1
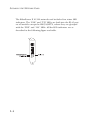
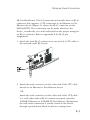
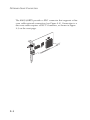
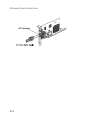
EtherPower II 10/100
10/100 Mbps Fast Ethernet
PCI Network Cards
u
u
u
u
u
High performance for instant access to network resources
Connection options of RJ-45, BNC and SC fiber
Auto-Negotiation for automatic selection of the highest
speed and operating mode
Support for remote LAN wakeup
Optional FLASH Boot ROM
User Guide
SMC9432TX
SMC9432BTX
SMC9432TX/MP
SMC9432FTX
User Guide
for
SMC’s
EtherPower II 10/100
PCI Network Cards
January 1999
Pub. # E0199-R01 150960-101
SMC
6 Hughes
Irvine, CA 92618
Information furnished by SMC Networks, Inc. (SMC) is believed to
be accurate and reliable. However, no responsibility is assumed
by SMC for its use, nor for any infringements of patents or other
rights of third parties which may result from its use. No license is
granted by implication or otherwise under any patent or patent
rights of SMC. SMC reserves the right to change specifications at
any time without notice.
Copyright © 1999 by
SMC Networks, Inc.
6 Hughes, Irvine, CA
All rights reserved. Printed in Taiwan
Trademarks:
SMC is a registered trademark; and EtherPower, SuperDisk, EZStart and EZdosodi are
trademarks of SMC Networks, Inc.. Other product and company names are trademarks or
registered trademarks of their respective holders.
Limited Warranty
HARDWARE: SMC Networks, Inc. (“SMC”) warrants its EtherPower II
10/100 Network Cards to be free from defects in workmanship and
materials, under normal use and service, for the following lengths of time
from the date of purchase from SMC or its Authorized Reseller:
EtherPower II 10/100 Network Cards ..................................... Limited Lifetime
Driver Software ......................................................................................... 90 days
If a product does not operate as warranted during the applicable warranty
period, SMC shall, at its option and expense, repair the defective product or
part, deliver to Customer an equivalent product or part to replace the
defective item, or refund the purchase price paid for the defective product.
All products that are replaced will become the property of SMC. Replacement products may be new or reconditioned. Any replaced or repaired
product or part has a ninety (90) day warranty or the remainder of the
initial warranty period, whichever is longer.
SMC shall not be responsible for any custom software or firmware, configuration information, or memory data of Customer contained in, stored on, or
integrated with any products returned to SMC pursuant to any warranty.
LIMITED LIFETIME: EtherPower 10/100 Network Cards have a standard
three-year warranty. If you wish to extend your three-year warranty on
these cards to a lifetime warranty, please complete and return the enclosed
product registration card within 90 days of purchase from SMC or its Authorized Reseller. Failure to complete and return this card does not affect the
standard three-year warranty. After registration, any defective EtherPower
10/100 Network Cards will be repaired or replaced at SMC’s option.
SOFTWARE: SMC warrants that the software programs licensed from it will
perform in substantial conformance to the program specifications for a period
of ninety (90) days from the date of purchase from SMC or its Authorized
Reseller. SMC warrants the magnetic media containing software against
failure during the warranty period. No updates are provided. SMC’s sole
obligation hereunder shall be (at SMC’s discretion) to refund the purchase
price paid by Customer for any defective software products or to replace
any defective media with software which substantially conform to SMC’s
applicable published specifications. Customer assumes responsibility for the
selection of the appropriate applications program and associated reference
materials. SMC makes no warranty that its software products will work in
combination with any hardware or applications software products provided
by third parties, that the operation of the software products will be
uninterrupted or error free, or that all defects in the software products will
be corrected. For any third party products listed in the SMC software
product documentation or specifications as being compatible, SMC will make
reasonable efforts to provide compatibility, except where the noncompatibility is caused by “bug” or defect in the third party’s product.
STANDARD WARRANTY SERVICE: Standard warranty service for hardware
products may be obtained by delivering the defective product, accompanied
LIMITED WARRANTY
by a copy of the dated proof of purchase, to SMC’s Service Center or to an
Authorized SMC Service Center during the applicable warranty period.
Standard warranty service for software products may be obtained by
telephoning SMC’s Service Center or an Authorized SMC Service Center.
Products returned to SMC’s Service Center must be pre-authorized by SMC
with a Return Material Authorization (RMA) number marked on the outside
of the package, and sent prepaid, insured, and packaged appropriately for
safe shipment. The repaired or replaced item will be shipped to Customer,
at SMC’s expense, not later than thirty (30) days after receipt by SMC.
WARRANTIES EXCLUSIVE: IF AN SMC PRODUCT DOES NOT OPERATE
AS WARRANTED ABOVE, CUSTOMER’S SOLE REMEDY SHALL BE REPAIR,
REPLACEMENT, OR REFUND OF THE PURCHASE PRICE PAID, AT SMC’S
OPTION. THE FOREGOING WARRANTIES AND REMEDIES ARE EXCLUSIVE
AND ARE IN LIEU OF ALL OTHER WARRANTIES, EXPRESSED OR IMPLIED,
EITHER IN FACT OR BY OPERATION OF LAW, STATUTORY OR
OTHERWISE, INCLUDING WARRANTIES OF MERCHANTABILITY AND
FITNESS FOR A PARTICULAR PURPOSE. SMC NEITHER ASSUMES NOR
AUTHORIZES ANY OTHER PERSON TO ASSUME FOR IT ANY OTHER
LIABILITY IN CONNECTION WITH THE SALE, INSTALLATION,
MAINTENANCE OR USE OF ITS PRODUCTS.
SMC SHALL NOT BE LIABLE UNDER THIS WARRANTY IF ITS TESTING
AND EXAMINATION DISCLOSE THAT THE ALLEGED DEFECT IN THE
PRODUCT DOES NOT EXIST OR WAS CAUSED BY CUSTOMER’S OR ANY
THIRD PERSON’S MISUSE, NEGLECT, IMPROPER INSTALLATION OR
TESTING, UNAUTHORIZED ATTEMPTS TO REPAIR, OR ANY OTHER
CAUSE BEYOND THE RANGE OF INTENDED USE, OR BY ACCIDENT,
FIRE, LIGHTNING, OR OTHER HAZARD.
LIMITATION OF LIABILITY: IN NO EVENT, WHETHER BASED IN
CONTRACT OR TORT (INCLUDING NEGLIGENCE) SHALL SMC BE LIABLE
FOR INCIDENTAL, CONSEQUENTIAL, INDIRECT, SPECIAL OR PUNITIVE
DAMAGES OF ANY KIND, OR FOR LOSS OF REVENUE, LOSS OF
BUSINESS, OR OTHER FINANCIAL LOSS ARISING OUT OF OR IN
CONNECTION WITH THE SALE, INSTALLATION, MAINTENANCE, USE,
PERFORMANCE, FAILURE, OR INTERRUPTION OF ITS PRODUCTS, EVEN
IF SMC OR ITS AUTHORIZED RESELLER HAS BEEN ADVISED OF THE
POSSIBILITY OF SUCH DAMAGES. NOTHING HEREIN SHALL HAVE THE
EFFECT OF LIMITING OR EXCLUDING SMC’S LIABILITY FOR DEATH OR
PERSONAL INJURY CAUSED BY NEGLIGENCE
Some states do not allow the exclusion of implied warranties or the
limitation of incidental or consequential damages for consumer products, so
the above limitations and exclusions may not apply to you. This warranty
gives you specific legal rights which may vary from state to state.
SMC Networks, Inc.
6 Hughes
Irvine, CA 92618
TABLE
1
OF
CONTENTS
Installing the Network Card ............................. 1-1
Introduction ................................................................................. 1-2
Package Contents ........................................................................ 1-5
SuperDisk Contents ..................................................................... 1-5
System Requirements .................................................................. 1-6
Installing a Flash ROM ................................................................. 1-6
Inserting the Network Card ......................................................... 1-7
PCI Configuration ......................................................................... 1-8
2
Network Cable Connection .............................. 2-1
Connection Guidelines ................................................................ 2-2
Connecting a UTP Cable ............................................................. 2-3
Connecting a Thin Coax Cable .................................................... 2-4
Connecting a Fiber Cable ............................................................ 2-5
3
Installing and Configuring Network Drivers .. 3-1
Windows 95/98 Installation ......................................................... 3-2
Windows NT 4.0 Installation ........................................................ 3-4
Windows 3.x Installation .............................................................. 3-7
Novell NetWare Installation ......................................................... 3-9
Other Installations ...................................................................... 3-15
Latest Drivers ............................................................................. 3-15
4
Testing the Network Card ................................. 4-1
Introduction ................................................................................. 4-2
Basic Adapter Test ....................................................................... 4-3
Two-Node Adapter Test .............................................................. 4-3
Network Card Diagnostic Utility .................................................. 4-6
i
TABLE OF CONTENTS
A
Troubleshooting ............................................... A-1
PCI Compatibility ........................................................................ A-2
Solutions for Common Problems ................................................ A-3
Memory-Management Utilities .................................................... A-5
B
Cables ................................................................. B-1
Cable Specifications .................................................................... B-2
Twisted-Pair Cable and Pin Assignments .................................... B-3
C
Specifications ..................................................... C-1
General Specifications ................................................................ C-2
SMC9432TX ................................................................................ C-3
SMC9432BTX .............................................................................. C-3
SMC9432TX/MP .......................................................................... C-4
SMC9432FTX .............................................................................. C-4
D
Using EZStart ...................................................... D-1
EZStart Navigational Keys .......................................................... D-2
Installing EZStart ......................................................................... D-3
Running EZStart .......................................................................... D-4
Copying Driver Files ................................................................... D-5
Printing Installation Documents .................................................. D-6
ii
COMPLIANCES
FCC - Class B
This equipment has been tested and found to comply with the limits
for a Class B digital device, pursuant to Part 15 of the FCC Rules.
These limits are designed to provide reasonable protection against
harmful interference in a residential installation. This equipment
generates, uses and can radiate radio frequency energy and, if not
installed and used in accordance with instructions, may cause
harmful interference to radio communications. However, there is no
guarantee that the interference will not occur in a particular installation. If this equipment does cause harmful interference to radio or
television reception, which can be determined by turning the equipment off and on, the user is encouraged to try to correct the interference by one or more of the following measures:
• Reorient the receiving antenna
• Increase the separation between the equipment and receiver
• Connect the equipment into an outlet on a circuit different from
that to which the receiver is connected
• Consult the dealer or an experienced radio/TV technician for help
Industry Canada - Class B
This digital apparatus does not exceed the Class B limits for radio
noise emissions from digital apparatus as set out in the interferencecausing equipment standard entitled “Digital Apparatus”, ICES-003 of
Industry Canada.
Cet appareil numérique respecte les limites de bruits radioélectriques
applicables aux appareils numériques de Classe B prescrites dans la
norme sur le matérial brouilleur: “Appareils Numériques”, NMB-003
édictée par l’Industrie.
EN55022 (CISPR-22) - Class B
This unit was tested and found to comply with the Class B limits of EN55022
(CISPR 22) and the immunity requirements of EN50082-1.
iii
COMPLIANCES
EC Conformance Declaration
This information technology product was found to comply with EC General
Directives 89/336/EEC and 73/23/EEC. An EC Declaration of Conformity
was issued for this product by:
SMC (Europe) Limited
1st Floor, Pyramid House, Easthampstead Road,
Bracknell, Berkshire RG12 1NS, United Kingdom
Japan VCCI Class B
Australia AS/NZS 3548 (1995) Class B
Australian Contact:
iv
SMC Communications Pty. Ltd.
LVL 10, 201 Miller Street,
North Sydney, NSW 2060
Phone: 61-2-9929-9159
Fax: 61-2-9929-9140
CHAPTER 1
INSTALLING
THE
NETWORK CARD
Introduction . . . . . . . . . . . . . . . . . . . . . . . . . . 1-2
Models . . . . . . . . . . . . . . . . . . . . . . . . . . . 1-2
LED Indicators . . . . . . . . . . . . . . . . . . . . . . 1-4
Package Contents . . . . . . . . . . . . . . . . . . . . . 1-5
SuperDisk Contents . . . . . . . . . . . . . . . . . . . . 1-5
System Requirements . . . . . . . . . . . . . . . . . . . 1-6
For Your Network Card . . . . . . . . . . . . . . . 1-6
For EZ Start . . . . . . . . . . . . . . . . . . . . . . . . 1-6
Installing a Flash ROM . . . . . . . . . . . . . . . . . . 1-6
Inserting the Network Card . . . . . . . . . . . . . . . 1-7
PCI Configuration . . . . . . . . . . . . . . . . . . . . . 1-8
1-1
INSTALLING THE NETWORK CARD
Introduction
The EtherPower™ II 10/100 network card is based on advanced
silicon to maximize throughput and increase the efficiency of your
network. It features dual-speeds and bus-master design, and
supports Auto-Negotiation and all common networking
environments.
Models
The EtherPower II 10/100 network card comes in four models:
u
u
u
u
SMC9432TX—which has an RJ-45 connector.
SMC9432BTX—which has RJ-45 and BNC connectors.
SMC9432TX/MP—which has an RJ-45 connector and a Wake-on
LAN Cable.
SMC9432FTX—which has RJ-45 and SC fiber connectors as well
as a Wake-on LAN Cable.
The RJ-45 connector supports Auto-Negotiation, so the port can
configure itself automatically to run at the highest possible
performance level—10 or 100 Mbps and half or full duplex—
providing the link partner also supports Auto-Negotiation.
The BNC connector enables the SMC9432BTX model to transmit at
10 Mbps over thin coax cable.
The SC fiber connector enables the SMC9432FTX model to
support 100 Mbps transmissions at full and half duplex over 62.5/
125 µm multimode fiber cable. A fiber cable link operating in fullduplex mode can extend to remote sites up to 2 km away.
1-2
INSTALLING THE NETWORK CARD
The Wake-on LAN (WOL) cable allows a WOL-enabled PC to be
managed remotely. Software can be loaded and updated,
configurations changed, data backed up, inventory checked,
viruses removed, device conflicts eliminated and system crashes
repaired from a remote central location. This decreases user
downtime and increases overall productivity.
1-3
INSTALLING THE NETWORK CARD
LED Indicators
The EtherPower II 10/100 network card includes four status LED
indicators. The “LNK” and “T/R” LEDs are built into the RJ-45 port
on all models except the SMC9432FTX, where they are grouped
with the “FDX” and “100” LEDs. All the LED indicators are as
described in the following figure and table.
1-4
INSTALLING THE NETWORK CARD
Package Contents
u EtherPower II 10/100 network card
u SuperDisk™ network drivers diskette
u Wake-on-LAN Cable (SMC9432TX/MP and SMC9432FTX
Models only)
u
u
EtherPower II 10/100 user guide (this manual)
SMC Warranty Registration Card
Make sure you have received all of these items. If any item is
missing or damaged, contact your place of purchase immediately.
Please complete the Warranty Registration Card and return it to
SMC or register on SMC’s Web site.
SuperDisk Contents
The SuperDisk contains drivers and other files to make network
card configuration, testing, and driver installation easy.
u
u
u
u
u
EZSTART.EXE — EZStart™ utility.
README.DOC — contains instructions for installing and using
EZStart, as well as SMC technical support hours and telephone
numbers.
SMCMnn.EXE — the compressed driver file contains drivers for
all major operating systems.
Driver-installation files — contain installation instructions for a
particular driver.
Driver-release files — contain history information for a particular
driver.
1-5
INSTALLING THE NETWORK CARD
System Requirements
For your network card
A PC (WOL-enabled for the SMC9432TX/MP and SMC9432FTX)
and BIOS that support the PCI Local Bus Specification (v2.0 or
later), a bus-mastering PCI slot, and the appropriate type of cable:
u
u
10 Mbps operation: UTP Category 3, 4, or 5 cable. For the
SMC9432BTX model only, thin coax cable can also be used.
100 Mbps operation: UTP Category 5 cable. For the
SMC9432FTX model only, 62.5/125 µm fiber cable can also be
used.
Refer to the tables in Appendix B.
For EZStart
u
MS-DOS, PC-DOS, or Windows operating system v3.11 or later.
Installing a Flash ROM
The EtherPower II 10/100 network card has an on-board socket for
an optional Flash ROM for remote booting. For information on
installing Flash ROMs, refer to the instructions that come with the
Flash ROM.
1-6
INSTALLING THE NETWORK CARD
Inserting the Network Card
1. Switch off all computer system components, unplug the computer, and remove the computer cover.
2. Work in a static-free area and touch the computer chassis often
to equalize static charges.
3. Install the network card into an available bus-mastering PCI slot.
4. Make sure the network card is completely seated so that no
“gold fingers” are exposed.
Figure 1-3. Inserting the Network Card
5.
For the SMC9432TX/MP and SMC9432FTX, connect one
end of the 3-pin WOL cable to J1 on the card, and the
other end to the “5V Standby” connector on the computer’s
motherboard, as shown in Figure 1-3. (Refer to your
computer’s installation manual to locate the 5V Standby
connector.)
1-7
INSTALLING THE NETWORK CARD
1-8
CHAPTER 2
NETWORK CABLE CONNECTION
Connection Guidelines . . . . . . . . . . . . . . . . . . 2-2
Connecting a UTP Cable . . . . . . . . . . . . . . . . 2-3
Connecting a Thin Coax Cable . . . . . . . . . . . . 2-4
Connecting a Fiber cable . . . . . . . . . . . . . . . . 2-5
2-1
NETWORK CABLE CONNECTION
All four EtherPower II 10/100 network card models have an RJ-45
connector for connection to an Ethernet or Fast Ethernet hub or
switch using an unshielded twisted-pair (UTP) cable. In addition,
the SMC9432BTX provides a BNC port for thin coax cable, while
the SMC9432FTX enables fiber cable connections. This chapter
describes all connection methods.
Connection Guidelines
u To connect to a 10BASE-T device, use the network card’s RJ-45
connector and Category 3, 4, or 5 UTP cable (2-wire pairs
required).
u
u
u
To connect to a 100BASE-TX device, use the network card’s
RJ-45 connector and Category 5 UTP cable (2-wire pairs
required).
To connect to a 10BASE2 device, use the BNC connector on
the SMC9432BTX network card and thin coax cable.
To connect to a 100BASE-FX device, use the SC connector on
the SMC9432FTX network card and 62.5/125 µm fiber optic
cable.
The attached device must be within the distance limitations
specified by the applicable IEEE specification.
Observe the following guidelines for 100BASE-TX/FX operation:
u
u
u
The maximum length of a twisted-pair segment is 100 meters.
The maximum length of a fiber segment is 412 meters in half
duplex and 2 km in full duplex.
For 100 Mbps operation, the EtherPower II 10/100 card must
be connected to a 100BASE-TX/100BASE-FX hub or switch.
For additional Fast Ethernet guidelines, refer to SMC’s World Wide
Web site at the URL shown on the back cover of this user guide.
2-2
NETWORK CABLE CONNECTION
Connecting a UTP Cable
All four EtherPower II 10/100 network card models have an RJ-45
connector that supports a UTP connection to an Ethernet or Fast
Ethernet device (Figure 2-1 shows the RJ-45 connector on the
SMC9432BTX). This connection can be made directly to the
device, or indirectly via a wall outlet that has the proper wiring for
an RJ-45 connector. Refer to Appendix B for RJ-45 pin
assignments.
1. Attach the male RJ-45 connector on one end of a UTP cable to
the network card's RJ-45 port.
Figure 2-1. RJ-45 Connector Port
2. Attach the male connector on the other end of the UTP cable
directly to an Ethernet or Fast Ethernet device.
OR
Attach the male connector on the other end of the UTP cable
to a wall outlet with an RJ-45 connector properly wired for
10BASE-T Ethernet or 100BASE-TX Fast Ethernet. Wiring from
the wall outlet connection is usually routed to the device
through a punch-down block located in a wiring closet.
2-3
NETWORK CABLE CONNECTION
Connecting a Thin Coax Cable
The SMC9432BTX provides a BNC connector that supports a thin
coax cable network connection (see Figure 2-2). Connection to a
thin coax cable requires a BNC T-Connector, as shown in Figure
2-3 on the next page.
2-4
NETWORK CABLE CONNECTION
2-5
NETWORK CABLE CONNECTION
Figure 2-4. Connecting Fiber Cable
2-6
CHAPTER 3
INSTALLING AND CONFIGURING
NETWORK DRIVERS
Windows 95/98 Installation . . . . . . . . . . . . . . 3-3
Optional Procedures to Modify Card
Settings and Add Network Protocols . . . . 3-4
Windows NT 4.0 Installation . . . . . . . . . . . . . . 3-5
First-Time Installation . . . . . . . . . . . . . . . . . 3-7
Secondary Installation . . . . . . . . . . . . . . . . .3-12
Windows 3.x Installation . . . . . . . . . . . . . . . .3-12
Windows for Workgroups v3.1 and v3.11 . .3-13
Novell Netware Installation . . . . . . . . . . . . . . .3-13
NetWare v4.x . . . . . . . . . . . . . . . . . . . . . . .3-14
NetWare v3.12 . . . . . . . . . . . . . . . . . . . . . .3-14
Other Installations . . . . . . . . . . . . . . . . . . . . . 3-15
Latest Drivers . . . . . . . . . . . . . . . . . . . . . . . . .3-15
3-1
INSTALLING AND CONFIGURING NETWORK DRIVERS
This chapter describes how to install and configure network
drivers for the EtherPower II 10/100 network card. The drivers for
this EtherPower II 10/100 network card are not compatible with
those on previous SuperDisks — even if the previous drivers
were designed for other SMC Fast Ethernet network cards (Models
SMC9332DST, SMC9332BDT, SMC9332BVT). Therefore, use only
the drivers on the SuperDisk supplied with this network card.
Windows 95/98 Installation
1. If Windows 95/98 is already installed on your computer,
proceed to Step 2. Otherwise, complete a first-time Windows
95/98 installation without the SMC network card installed.
2. Shut down your PC, install the SMC network card, and attach
network cable.
3. Restart Windows 95/98. Make sure you have your Windows
95/98 CD available (or you are aware of the path to those files
on your hard drive).
4. A “New Hardware Found” window appears and asks you to
select a driver to install. Select “Driver from disk provided by
manufacturer” and click on “OK”.
Note: The installation procedure for users of Windows 95 OEM
Service Release 2 and Windows 98 may be slightly
different than that described here. Refer to the Windows
95/98 driver installation document on the SMC SuperDisk
for more information.
5. The “Install From Disk” window appears. Insert the SMC
SuperDisk, specify the path to the root of the disk, and click on
“OK”.
3-2
INSTALLING AND CONFIGURING NETWORK DRIVERS
6. The message “The file netapi.dll on SMC SuperDisk could not
be found” appears. Specify the path to the Windows 95/98 CD
(or the Windows 95/98 path you have designated), and click
on “OK”.
6. You may be prompted for Windows 95/98 installation files. If
so, click on “OK” and then type the path to your Windows
95/98 CD, or change the path to those files on your hard drive,
and click “OK”.
7. Follow the remaining Windows 95/98 instructions to complete
the installation. After all the files have been copied, you are
prompted to reboot for the changes to take effect. Select “Yes”
when prompted to restart your computer, and remove the SMC
SuperDisk.
Optional procedures to modify card settings and add
network protocols
u
u
u
Double-click on the “My Computer”, “Control Panel”, and
“Network” icons. The “Network” dialog box appears. If the
correct network protocols are not installed in the “Primary
Network Logon” list box, select the primary network to which
you will be attaching. Click on “Add”. The “Select Network
Component Type” dialog box appears. Follow the on-screen
directions to select network protocols.
For peer-to-peer networks, you may wish to enable “File and
Print Sharing” in the “Network” dialog box.
To modify other network card properties, select the
appropriate tab or click on the “Properties” button from the
“Network” dialog box and modify properties as desired.
3-3
INSTALLING AND CONFIGURING NETWORK DRIVERS
Windows NT 4.0 Installation
First-time installation
If you've already installed a network card, configured Windows NT
Networking, or configured a network driver, refer to the procedure
titled “Secondary Installation.”
1. If Windows NT is already installed on your computer, proceed
to Step 2. Otherwise, complete a first-time Windows NT
installation without the SMC network card installed.
2. Shut down your PC, install the SMC network card, and attach
the network cable. Restart Windows NT.
3. Double-click on the “My Computer,” “Control Panel,” and
“Network” icons. The “Network Configuration” window
appears, prompting you to install Windows NT Networking.
Select “Yes.” Windows NT invokes the “Network Setup
Wizard.” Click on “Next.”
4. When prompted to “Search for a Network Adapter,” click on
“Select from List.”
5. When prompted to “Select a Network Adapter,” click on “Have
Disk.” Insert the SuperDisk when prompted and click on “OK.”
6. You are presented with the “Select OEM Option” window.
Highlight “EtherPower II 10/100” and click on “OK.”
7. When prompted to “Search for an Adapter,” click on “Next.”
8. Select network protocols when prompted and click “Next.”
Note: To complete a TCP/IP installation, you will need to know
your IP Address and Subnet Mask. For further information,
contact your network administrator or Internet service
provider.
3-4
INSTALLING AND CONFIGURING NETWORK DRIVERS
9. Click on “Next” and then “Next” again when prompted to
“Install Network Components.” When prompted for Windows
NT files, type the path to your Windows NT files on CD-ROM
(e.g., D:\WINNT), or change the path to those files on your
hard drive, and click on “OK.”
10.You are presented with the “Network Card Setup” window
where you can specify the network card data rate.
“AUTONEGOTIATE” is the recommended setting for the
EtherPower II 10/100 network card. Select “Continue” after
verifying network card settings.
11.Click on “Next” and then “Next” again when prompted to “Start
the Network.”
12.Enter the “Workgroup” or “Domain” names (optional) when
prompted and click on “Next.”
13.Select “Finish” when prompted and click on “Yes” when
prompted to reboot. Remove the SuperDisk.
For Further Customization
You can modify card settings via the “Network” applet. Install
additional protocols and network components by selecting the
appropriate folder (e.g., Customizing Protocols, Services,
Identification, or Bindings).
Secondary installation
Follow this procedure if you've already installed another network
card, configured Windows NT Networking, or loaded another
driver.
1. Install the SMC network card (if not already installed), attach the
network cable, and boot Windows NT.
3-5
INSTALLING AND CONFIGURING NETWORK DRIVERS
2. Double-click on the “My Computer,” “Control Panel,” and
“Network” icons. From the “Network” window, select the
Adapter tab.
3. Do not select any of the network cards listed. Select “Add.”
4. You are presented with the “Select Network Adapter” window.
Click on “Have Disk.”
5. You are presented with the “Insert Disk” window. Specify the
path to the root directory of the SuperDisk (e.g., A:\) and click
on “OK.”
6. You are presented with the “Select OEM Option” window.
Highlight “EtherPower II 10/100” and click on “OK.”
7. You are presented with the “Network Card Setup” window
where you can specify the network card data rate.
“AUTONEGOTIATE” is the recommended setting for the
EtherPower II 10/100 network card. Select “OK” after verifying
network card settings.
8. You are presented with the “Network” window where the SMC
network card is now listed as an installed adapter. At this point
you can select “Close” to exit the Network applet and follow
the prompts to restart Windows NT.
9. Select “Yes” when prompted to reboot for the changes to take
effect.
For Further Customization
You can modify card settings via the “Network” applet. Install
additional protocols and network components by selecting the
appropriate folder (e.g., Customizing Protocols, Services,
Identification, or Bindings).
3-6
INSTALLING AND CONFIGURING NETWORK DRIVERS
Windows 3.x Installation
Windows for Workgroups v3.1 and v3.11
The following section describes how to install Windows for
Workgroups v3.1 or v3.11 along with the SMC driver file. If you
already have Windows for Workgroups installed and only want to
install the SMC driver, proceed to “Installing the SMC Driver Only.”
Installing Windows for Workgroups and the SMC Driver
1. Insert the Windows for Workgroups Disk 1 Setup diskette in
your computer's disk drive.
2. Change to the drive where you inserted the disk in Step 1.
Then, at the DOS prompt, type: “SETUP.”
3. Press the “Enter” key to start the setup procedure. Typically,
this procedure takes from 10 to 15 minutes.
4. Follow the screen prompts until the “Network Setup” window
appears. Select “Networks” and “Install Microsoft Windows
Network.” Select “No additional network” or “Other,” as
necessary. Click on “OK.” Refer to your Windows for
Workgroups manual for information.
5. Select “Sharing” and specify whether you want other users to
be able to share your files and printer(s). Then select “OK.”
6. Click on the “Driver” button and then on the “Add Adapter”
button.
7. Select “Unlisted or Updated Network Adapter” followed by
“OK.”
8. When the “Install Driver” window appears, insert the SuperDisk
into your computer's disk drive. Type the path where the
driver resides (A:\WFW).
3-7
INSTALLING AND CONFIGURING NETWORK DRIVERS
9. Select “OK.” The “Unlisted or Updated Network Adapter”
window appears.
10.Select the “EtherPower II 10/100”network card followed by
“OK.”
11.Click on the “Close” button and then on “OK.” You will be
prompted to update the files. If you select “Yes,” Windows will
look for files from the Windows install disks and sometimes
may ask for the EtherPower II 10/100 driver again.
12.You will be notified via the “Windows Setup” screen that
certain *.INI files will be modified. Select “OK.” Select the
“Restart Computer” button to reboot your system and have the
changes take effect.
Installing the SMC Driver Only
The following procedure describes how to install the SMC driver
only and assumes that Windows for Workgroups v3.11 is already
installed.
1. Double click on the “Network Setup” icon in the “Network”
window.
2. When the “Network Setup” dialog box appears, refer to
“Installing Windows for Workgroups and the SMC Driver”
(Step 4).
The following procedure describes how to install the SMC driver
and assumes that Windows for Workgroups v3.1 is already installed.
1. Double click on the “Control Panel” icon and then on the
“Network” icon.
2. Select the “Adapters” option to add the SMC network card.
3. Refer to “Installing Windows for Workgroups and the SMC
Driver” (Step 6).
3-8
INSTALLING AND CONFIGURING NETWORK DRIVERS
Novell NetWare Installation
NetWare v4.x
Server Driver
Installing the LAN driver is part of the NetWare installation process.
Use the following instructions with those in the NetWare 386
installation manual to install the driver. You will need the
SuperDisk during this procedure.
1. Use EZStart to copy the SMC driver to your hard drive. Refer to
the EZStart instructions in Appendix C.
2. Refer to the “Load LAN driver module” section in the Novell
NetWare 386 v4.x installation manual for instructions on
installing NetWare.
3. Follow the instructions on starting NetWare and configuring the
server. Use the “Load” command to load the LAN driver. If the
LAN driver is not located in the default directory, specify the
path to the file on the command line. The Load command will
prompt you for configuration parameters if they are not
supplied on the command line.
The Load command line parameters may be saved in an
AUTOEXEC.NCF file, so they execute automatically every time
the server starts. Refer to the NetWare 386 installation manual
for information about how to create an AUTOEXEC.NCF file.
The following steps are specific to loading the SMCPWR2.LAN
driver. For examples, please refer to the NetWare v4.x server
driver installation document on the SMC SuperDisk.
4. To load the driver, type the following at the NetWare System
Console:
LOAD SMCPWR2
Press “Enter” when prompted for a slot number.
3-9
INSTALLING AND CONFIGURING NETWORK DRIVERS
5. At this point, a protocol must be bound to the driver. For
example:
BIND IPX TO SMCPWR2 NET=XX
where xx is the logical network address for the frame type
indicated in your load command.
Driver Command Line Parameters
Optional command line parameters are described in the NetWare
4.x server driver installation document on the SuperDisk.
Note that the network card is preprogrammed with Auto Negotiate
on the UTP port as the default configuration. The preprogrammed
configuration can be changed by running EZStart. Some command
line parameters are used to override the default configuration. In
the absence of such parameters, the default configuration will be
used by the NetWare driver.
DOS ODI VLM Client Driver
There are three different methods you can use to install the DOS
ODI driver and a VLM client:
One Step Installation with EZdosodi
In one simple step EZdosodi™ will attach your computer to the
nearest NetWare server. It will automatically detect your
network's frame type and configure your client files accordingly.
It will also modify your CONFIG.SYS file to add the
LASTDRIVE=Z statement and the AUTOEXEC.BAT file to call
STARTNET.BAT which calls the NetWare client files that attach
your workstation to the network server. If you do not wish to be
automatically connected to a network server at this time, use
one of the two installation procedures described on the following
pages. Otherwise, refer to the EZSTART.DOC document on the
SMC SuperDisk for information about how to use EZdosodi (Exit
to a DOS prompt, change to the SuperDisk target drive, type
“EZDOSODI,” and press “Enter”).
3-10
INSTALLING AND CONFIGURING NETWORK DRIVERS
Automatic Installation With EZStart
Use EZStart's “Automatic Novell DOS ODI” feature when you
require greater customization than offered by EZdosodi (for
example, if you wish to specify a server name or a specific
Ethernet frame type). You will have the choice of modifying your
CONFIG.SYS and AUTOEXEC.BAT files. If you choose this option,
the workstation will automatically attach to the server upon reboot.
Custom Installation With EZStart
For a basic NetWare Client installation which will copy the client
files and the SMC driver to your hard drive, use EZStart's “Custom
Setup” procedure.
1. Switch to the drive containing the SuperDisk, type “EZSTART,”
and press “Enter.” You will be presented with the main screen.
2. From the main screen, select “Custom.”
3. From the “Custom Installation” screen, select “Drivers/
Documents.”
4. From the “Driver Installation” screen, select “Automatic Novell
DOS ODI” (customization capability) or “Novell” (will not
modify AUTOEXEC.BAT or attach to a server upon reboot,
3-11
INSTALLING AND CONFIGURING NETWORK DRIVERS
If you installed the driver using EZStart and did not edit your
AUTOEXEC.BAT file to call STARTNET.BAT, see ”Using
STARTNET.BAT” below.
This completes the driver-loading procedure. Refer to the
Novell NetWare ODI Shell for DOS manual for further details
about running a DOS VLM client.
Using STARTNET.BAT
If you do not use EZdosodi or EZStart's “Automatic Novell DOS
ODI” installation procedure to automatically modify your
AUTOEXEC.BAT file to call STARTNET.BAT upon reboot, you can
modify it yourself, as shown below:
REM
REM
CD \NWCLIENT
REM
STARTNET
REM
REM
REM
Change directory to DOS ODI driver
files.
Load network software.
This batch file, STARTNET.BAT,loads
the DOS ODI driver and Novell
network shell program.
If you do not use the STARTNET.BAT file as described above, use
the following loading sequence to connect to a server:
LSL.COM
SMCPWR2.COM
IPXODI.COM
VLM.EXE
NET.CFG Keywords
NET.CFG keywords are described in the DOS ODI VLM Client
driver installation document on the SMC SuperDisk.
3-12
INSTALLING AND CONFIGURING NETWORK DRIVERS
NetWare v3.12
Server Driver
Installing the LAN driver is part of the NetWare installation process.
Use the following instructions with those in the NetWare 386
installation manual to install the driver. You will need the
SuperDisk during this procedure.
1. Use EZStart to copy the SMC driver to your hard drive. Refer to
the EZStart instructions in Appendix C.
2. Refer to the “Load LAN driver module” section in the Novell
NetWare 386 v3.12 installation manual for instructions on
installing NetWare.
3. Follow the instructions on starting NetWare and configuring the
server. Use the “Load” command to load the LAN driver. If the
LAN driver is not located in the default directory, specify the
path to the file on the command line. The Load command will
prompt you for configuration parameters if they are not
supplied on the command line.
The Load command line parameters may be saved in an
AUTOEXEC.NCF file, so they execute automatically every time
the server starts. Refer to the NetWare 386 installation manual
on how to create an AUTOEXEC.NCF file.
The following steps are specific to loading the SMCPWR2.LAN
driver. For examples, please refer to the INSTALL.DOC for
loading the NetWare v3.12 server driver on the SMC SuperDisk.
4. To load the driver, type the following at the NetWare System
Console:
LOAD SMCPWR2
Press “Enter” when prompted for a slot number.
3-13
INSTALLING AND CONFIGURING NETWORK DRIVERS
5. At this point, a protocol must be bound to the driver. For
example:
BIND IPX TO SMCPWR2 NET=XX
where xx is the logical network address for the frame type
indicated in your load command.
Driver Command Line Parameters
Optional command line parameters are described in the NetWare
v3.12 server driver installation document on the SMC SuperDisk.
Note that the EtherPower II 10/100 network card is
preprogrammed with Auto-Negotiate on the UTP port as the
default configuration. The preprogrammed configuration can be
changed by running EZStart. Some command line parameters are
used to override the default configuration. In the absence of such
parameters, the default configuration will be used by the NetWare
driver.
3-14
INSTALLING AND CONFIGURING NETWORK DRIVERS
Other Installations
Refer to the installation documents on SMC’s SuperDisk for
instructions on installing drivers for use with other operating
systems.
Please note that new releases of SMC drivers and operating
systems may result in procedures slightly different than those
described in this chapter. Run EZStart as described in Appendix D
to access installation documents, which may contain more up-todate information.
Latest Drivers
The SuperDisk contains the latest drivers available at shipping
time. If more recent versions of these drivers are available, you
can download them from SMC’s Web site. Refer to the back cover
of this user guide.
3-15
INSTALLING AND CONFIGURING NETWORK DRIVERS
3-16
CHAPTER 4
TESTING THE NETWORK CARD
Introduction . . . . . . . . . . . . . . . . . . . . . . . . . . 4-2
Basic Adapter Test . . . . . . . . . . . . . . . . . . . . . 4-3
Two-Node Adapter Test . . . . . . . . . . . . . . . . . 4-3
Setting Up a Responder . .
Setting Up an Initiator . . .
Running the Test . . . . . . .
What to Look For . . . . . .
Test Paramenters . . . . . . .
.
.
.
.
.
.
.
.
.
.
.
.
.
.
.
.
.
.
.
.
.
.
.
.
.
.
.
.
.
.
.
.
.
.
.
.
.
.
.
.
.
.
.
.
.
.
.
.
.
.
.
.
.
.
.
.
.
.
.
.
.
.
.
.
.
4-4
4-4
4-5
4-5
4-5
Network Card Diagnostic Utility . . . . . . . . . . . 4-6
4-1
TESTING THE NETWORK CARD
Introduction
EZStart is a multi-function Windows-like utility provided on the
SuperDisk. EZStart lets you install network drivers, test the
EtherPower II 10/100 network card, and display driver installation
instructions simply by pointing and clicking your mouse.
EZStart can perform the following tests on the network card to
verify its functionality:
u
u
u
4-2
Basic Adapter Test—verifies the operation of the network card's
basic functions. See page 4-3.
Two-Node Adapter Test—verifies the network card's ability to
communicate over the network with another card. At least one
other computer containing an SMC network card must be
connected to the network. As long as the cards are interfaced to
an Ethernet (or Fast Ethernet) hub that supports 10/100 Mbps
switching capability, the two-node test can be performed with a
mixture of 10 Mbps and 100 Mbps cards. See page 4-3.
Network Card Diagnostic Utility—a Windows-based network
card diagnostic utility that provides a quick, convenient way for
Windows 95/98 and Windows NT v4.0 and v3.51 users to test
the basic functions of their EtherPower II 10/100 network card.
See page 4-6.
TESTING THE NETWORK CARD
Basic Adapter Test
This test is actually a series of tests designed to check I/O Port
Accessibility, on-board RAM, Network Controller Registers,
Interrupt Generation, and Internal Loopback.
1. Run EZStart.
2. Select “Custom” from the EZStart main screen. The “Custom
Installation” screen appears. Select “Basic.” The “Basic Adapter
Test” screen appears and the test begins. When the test
completes, the result (either “Passed” or “Failed”) is listed
alongside each test.
Note: After running the test, you can select “Repeat” to run the
test continuously (such as overnight). To end a continuous
test, press any key. If your network card fails any of the
individual tests, click on “Help” for suggested remedies.
3. Select “Cancel” to return to the Custom Installation screen.
Two-Node Adapter Test
This test verifies that the network cable is connected correctly, so
that the network card can transmit and receive data.
The test requires at least two computers. One computer,
configured as the Initiator, generates and sends test messages.
One of the remaining computers, configured as a Responder,
receives messages and transmits them back to the Initiator.
Results can be viewed on both the initiating and responding
computers.
Note: Run the Basic Adapter Test before running the Two-Node
Adapter Test to ensure that the card's basic functions are
working properly.
4-3
TESTING THE NETWORK CARD
Setting Up a Responder
1. Run EZStart.
2. Select “Custom” from the EZStart main screen.
3. Select “Two Node.” The “Two-Node Selection” screen appears.
4. Select “Responder.” The “Respond To Test Messages” screen
appears.
The computer is ready to receive and retransmit messages. The
numbers in the “Frames Received” and “Frames Transmitted”
fields will be dynamically updated once the “Initiator” begins the
test.
Note: Repeat this procedure for all computers you wish to set up
as Responders.
Setting Up an Initiator
1. Run EZStart.
2. Select “Custom” from the EZStart main screen.
3. Select “Two Node.”
4. Select “Initiator.” The “Initiate Test Messages” screen appears.
Note: You can configure several Initiators, which can all send
frames to a single Responder.
Running the Test
1. From the “Initiate Test Messages” screen, use one of the
following procedures to select a Responder.
u
4-4
Select “Find Responder” to have EZStart choose the first
Responder it finds. (Skip ahead to Step 2.)
TESTING THE NETWORK CARD
u
Select “Parameters” if a computer has not yet been set up
as a Responder, or if you want to select a specific
Responder from several you have set up. The “Set
Parameters” screen appears. Enter the “Destination Address”
(Responder’s node address) and click “Ok.” You return to
the “Initiate Test Messages screen.”
2. Select “Start.” Two messages appear: “INITIATING TEST
MESSAGES” and “Press any key to stop Initiator.” The “Frames
Transmitted” and “Frames Received” fields are dynamically
updated during the test.
3. Press any key to stop the test.
4. Select “Statistics” to view test results. The “LAN Statistics”
screen appears, with Transmit statistics on the left and Receive
statistics on the right.
What to Look For
An acceptable level of error statistics is impossible to define. This
level varies depending on the size and configuration of your
network, and the applications being run. For example, collisions
naturally occur in Ethernet and Fast Ethernet networks. Acceptable
levels vary with the number of nodes on each segment and the
applications they are running. We recommend you consult your
network administrator when reviewing the LAN Statistics screen.
Test Parameters
To display and/or change Two-Node Adapter Test parameters:
1. Select “Parameters” from the “Initiate Test Messages” screen.
The “Set Parameters” screen appears.
2. Make any required changes.
3. Select “OK” to return to the “Initiate Test Messages screen.”
4-5
TESTING THE NETWORK CARD
Network Card Diagnostic Utility
The SMC SuperDisk contains a Windows-based diagnostic utility
that provides a quick, convenient way for Windows 95/98 and
Windows NT v4.0 and v3.51 users to test the basic functions of
their EtherPower II 10/100 network card. When you install an SMC
EtherPower II 10/100 network driver, this utility is automatically
created in a new program group on your Windows desktop.
After installing an SMC EtherPower II 10/100 network driver, use
the following procedure to run the network card diagnostic utility:
1. Windows 95/98 and Windows NT v4.0 users: From the
Start bar, click “Programs” and select “SMC” and then “Diag.”
The main window appears.
Windows NT v3.51 users: From DOS or a DOS window,
change to the WINNT\SYSTEM32 subdirectory. Then type
“DIAG” and press the Enter key. The main window appears
(see Figure 4-1).
Figure 4-1. Main Window
4-6
TESTING THE NETWORK CARD
2. If your computer has more than one SMC network card
installed, use the “Select Adapter” drop-down list at the top of
the window to select the card you want to test.
3. Click the “Basic tests” button. The basic adapter test consists of
individual tests that evaluate the loopback, send, and receive
capabilities of the selected SMC network card. When the test
starts:
A status bar to the right of the “Basic tests” button shows the
percentage of the test completed.
Status messages under “Test Results” show the current test in
progress. As each individual test completes, Test Results shows
whether the SMC network card passed or failed the test (see
Figure 4-2).
Figure 4-2. Testing Status
4-7
TESTING THE NETWORK CARD
Note: If the network card diagnostic utility encounters a problem
when initiating the test (such as an SMC network card is not
found), a message appears, along with “OK” and “Help”
buttons, and the test does not run. To identify and resolve
the problem, click the “Help” button. To remove the
message, click the “OK” button.
The test runs to completion, even if the network card fails one or
more of the individual tests. If your network card fails any of the
tests, click the “Help” button in the main window for suggested
causes and remedies.
4-8
APPENDIX A
TROUBLESHOOTING
PCI Compatibility . . . . . . . . . . . . . . . . . . . . . . A-2
Solutions for Common Problems . . . . . . . . . . . A-3
Basic Troubleshooting . . . . . . . . . . . . . . . .
EZStart . . . . . . . . . . . . . . . . . . . . . . . . . . .
Data Rate . . . . . . . . . . . . . . . . . . . . . . . . .
Full-Duplex Operation . . . . . . . . . . . . . . . .
Cannot Connect to a File Server . . . . . . . . .
SMC Driver-Related Error Messages . . . . . . .
Card Problems After Adding a Device
to Computer . . . . . . . . . . . . . . . . . . . . .
A-3
A-4
A-4
A-4
A-4
A-5
A-5
Memory-Management Utilities . . . . . . . . . . . . . A-5
EMM386 v4.48 or Earlier . . . . . . . . . . . . . . . A-5
EMM386 and HIGHSCAN Option . . . . . . . . A-5
A-1
TROUBLESHOOTING
PCI Compatibility
Early versions of PCI BIOS do not properly support the PCI
specification and may “hang” when a LAN driver tries to load. If
this occurs, make sure your BIOS correctly supports the PCI Local
Bus Specification (v2.0 or later).
Some PCI computers are not self-configuring and force you to
perform some or all of the following functions by motherboard
jumper changes and/or BIOS commands:
u
u
u
Verify that the slot is a bus-master and not a slave PCI slot. In
some instances, the PCI slot must be configured to support bus
mastering.
Configure the PCI slot to support INTA.
Assign INTA to a free IRQ (interrupt) number.
Consult your computer manual for information on changing
motherboard jumper settings and BIOS SETUP parameters for use
with PCI network cards. If you set a motherboard jumper and
modify the computer's BIOS, make sure the jumper and BIOS
settings match.
A-2
TROUBLESHOOTING
Solutions for Common Problems
Basic Troubleshooting
Network problems are often caused by cabling errors, conflicts
with other devices installed in the same computer, or software that
has been configured incorrectly. If you encounter a network
problem, use the following checklist to identify and correct the
problem.
u
u
u
u
u
u
Make sure the cable is within ANSI/IEEE 802.3 and ISO/
IEC8802-3 Ethernet, or ANSI/IEEE802.3u Fast Ethernet
standards for the type of network you are using. For 10BASE-T
and 100BASE-TX operation, the maximum UTP cable length is
100 meters. For 10BASE-T operation (SMC9432BTX model),
the maximum thin coax cable length is 185 meters.
Make sure the card is securely seated in the expansion slot.
Make sure the network cable is securely attached to the card's
connector.
Make sure the correct network operating system driver is
installed.
Make sure the computer is receiving power. If you suspect the
power outlet to be faulty, plug another device into it to verify
that it is working. Check to see whether the outlet is controlled
by a wall switch.
If you set your network card's speed manually, be sure the
speed selected for the hub and card (10 Mbps or 100 Mbps)
match.
A-3
TROUBLESHOOTING
EZStart
If you try to load a driver and DOS presents an error, the
destination files may have a size of 0 bytes. Increase the value of
the “FILES=” statement in your CONFIG.SYS file to at least 20.
Then use EZStart to copy the driver files to your computer's hard
disk again.
Data Rate
We strongly recommend using the AUTONEGOTIATE keyword
(the network card line speed default) when installing the driver. If
you must specify the network card line speed, then make sure the
speed you specify matches the speed of the attached hub.
Full-Duplex Operation
For your network card to auto-negotiate to full-duplex operation,
the network switch with which it communicates must comply with
the ANSI/IEEE 802.3u Fast Ethernet standard for Auto-Negotiation
(Clause 28). Otherwise, full-duplex operation must be forced at
the switch and EtherPower II 10/100 network card. Consult your
switch manual for directions about how to configure the switch to
operate in full-duplex mode. Refer to the driver installation
document for your particular environment on the SMC SuperDisk
to determine the appropriate method to force full-duplex
operation at the card.
Cannot Connect to a File Server
Verify that the network card is properly installed and that the
server is up and connected to the network. Then verify that the
frame type the driver is using (e.g., as specified in NET.CFG for
Novell environments) is the same as that used by the server. If
using multiple frame types, make sure the first one specified is the
same as that used by the server.
A-4
TROUBLESHOOTING
SMC Driver-Related Error Messages
Refer to the driver installation document on the SMC SuperDisk for
your driver. This document describes driver-related error messages.
Card Problems After Adding a Device to Computer
Make sure the SMC network card and the new device have not
been assigned identical addresses or interrupts. If necessary,
reconfigure one of the devices.
Memory-Management Utilities
EMM386 v4.48 or Earlier
If you use EMM386 v4.48 or earlier (provided with DOS v6.21 and
earlier), upgrade to EMM386 v4.49 by obtaining DOS v6.22 or
later, or change memory managers. Otherwise, incompatibilities in
EMM386 may cause your computer to “hang” when a LAN driver
tries to load.
To determine your DOS version, type “VER” and press Enter at
the DOS prompt.
EMM386 and HIGHSCAN Option
An incompatibility exists when using the HIGHSCAN option with
EMM386 and PCI network cards. This incompatibility may cause
your computer to hang or reboot. To resolve it, do not use
HIGHSCAN as an option parameter to EMM386 in the
CONFIG.SYS file.
Also, note that selecting Memmaker's (DOS v6.21 or v6.22)
Aggressive memory scanning option causes Memmaker to specify
HIGHSCAN as an option parameter to EMM386. To resolve this
problem, do not select the Aggressive memory scan option on
Memmaker.
A-5
TROUBLESHOOTING
A-6
APPENDIX B
CABLES
Cable Specifications . . . . . . . . . . . . . . . . . . . . B-2
Twisted-Pair Cable and Pin Assignments . . . . . B-3
10BASE-T/100BASE-TX Pin Assignments . . . B-4
Straight-Through Wiring . . . . . . . . . . . . . B-4
Crossover Wiring . . . . . . . . . . . . . . . . . . B-4
B-1
CABLES
Cable Specifications
Thin Coax (10BASE2) Cable
Cable Type
Connector
RG-58A/U or RG-58C/U
BNC
Twisted-Pair (10BASE-T) Cable
Cable Type
Category
100 Ohm UTP, 22 - 26 AWG
0.4 - 0.6 mm, 2 pairs
3, 4, 5
Connector
male, 8-pin RJ-45
Twisted-Pair (100BASE-TX) Cable
Cable Type
Category
100 Ohm UTP, 22 - 26 AWG
0.4 - 0.6 mm, 2 pairs
5
Connector
male, 8-pin RJ-45
Duplex Fiber (100BASE-FX) Cable
Cable Type
62.5/125 micron core
B-2
Connector
SC
CABLES
Twisted-Pair Cable and Pin Assignments
Caution: DO-NOT plug a phone jack connector into any RJ-45
port. Use only twisted-pair cables with RJ-45 connectors that conform with FCC standards.
For 10BASE-T/100BASE-TX connections, a twisted-pair cable must
have two pairs of wires. Each wire pair is identified by two
different colors. For example, one wire might be red and the
other, red with white stripes. Also, an RJ-45 connector must be
attached to both ends of the cable.
Caution: Each wire pair must be attached to the RJ-45 connectors
in a specific orientation.
Figure B-1 illustrates how the pins on the RJ-45 connector are
numbered. Be sure to hold the connectors in the same orientation
when attaching the wires to the pins.
Figure B-1. RJ-45 Connector Pin Numbers
B-3
CABLES
10BASE-T/100BASE-TX Pin Assignments
With 10BASE-T/100BASE-TX cable, pins 1 and 2 are used for
transmitting data, and pins 3 and 6 for receiving data. The “+” and
“-” signs in the tables below are used to represent the polarity of
the wires that make up each wire pair.
RJ-45 Pin Assignments
Pin Number
Assignment*
1
Tx+
2
Tx-
3
Rx+
6
Rx-
* The “+” and “-” signs are used to represent the polarity of the wires that
make up each wire pair.
Straight-Through Wiring
If the twisted-pair cable is to join two ports and only one of the
ports has an internal crossover, the two pairs of wires must be
straight-through.
Straight-Through RJ-45 Pin Assignments
B-4
End 1
End 2
1 (Tx+)
1 (Tx+)
2 (Tx-)
2 (Tx-)
3 (Rx+)
3 (Rx+)
6 (Rx-)
6 (Rx-)
CABLES
Crossover Wiring
If the twisted-pair cable is to join two ports and either both ports
are labeled with an “x” or neither port is labeled with an “x,” a
crossover must be implemented in the wiring.
Crossover RJ-45 Pin Assignments
End 1
End 2
1 (Tx+)
3 (Rx+)
2 (Tx-)
6 (Rx-)
3 (Rx+)
1 (Tx+)
6 (Rx-)
2 (Tx-)
B-5
CABLES
B-6
APPENDIX C
SPECIFICATIONS
General Specifications . . . . . . . . . . . . . . . . . . A-3
Model SMC9432TX . . . . . . . . . . . . . . . . . . . . . A-3
Model SMC9432BTX . . . . . . . . . . . . . . . . . . . A-3
Model SMC9432TX/MP . . . . . . . . . . . . . . . . . . A-4
Model SMC9432FTX . . . . . . . . . . . . . . . . . . . . A-4
C-1
SPECIFICATIONS
General Specifications
Bus Interface:
32-bit PCI Bus Master
PCI Interrupt Channel:
INTA
Temperature:
Operating: 32° to 131° F (0° to 55° C)
Storage: -4° to 158° F (-20° to 70° C)
C-2
Humidity:
Operating: 10% to 90%
Storage: 5% to 95%
Standards:
ANSI/IEEE 802.3 Ethernet
ANSI/IEEE 802.3u Fast Ethernet
ISO/IEC 8802-3 Ethernet
PCI v2.0 and v2.1
PC ’97
Mean Time Between
Failures (MTBF):
Over 250 years
Compliances:
CE Mark
Safety:
UL 1950
EN60950 (TÜV)
CSA 22.2 No. 950 (UL)
Emissions:
FCC Class B
Industry Canada Class B
EN55022 (CISPR 22) Class B
VCCI Class B
Warranty:
Limited lifetime
SPECIFICATIONS
SMC9432TX
Network Card Type:
10BASE-T/100BASE-TX
Connectors:
RJ-45 for 10BASE-T/100BASE-TX
Network Interface Cable:
10BASE-T: 2-wire pairs data grade UTP
cable; EIA/TIA Categories 3, 4, 5
100BASE-TX: 2-wire pairs data grade
UTP cable; EIA/TIA Category 5
Size (without bracket):
2.125 x 4.750 in. (5.4 x 12.0 cm)
Weight:
1.8 oz. (50 gm)
Operating Voltage:
+5 VDC @ 400 mA (typical),
500 mA (maximum)
+12 VDC @ 1.2 mA
SMC9432BTX
Network Card Type:
10BASE-T/100BASE-TX, 10BASE2
Connectors:
RJ-45 for 10BASE-T/100BASE-TX
BNC for 10BASE2
Network Interface Cable:
10BASE-T: 2-wire pairs data grade UTP
cable; EIA/TIA Categories 3, 4, 5
100BASE-TX: 2-wire pairs data grade
UTP cable; EIA/TIA Category 5
10BASE2: 50 Ohm coax, RG-58A/U or
RG-58C/U
Size (without bracket):
3.605 x 4.750 in. (9.1 x 12.0 cm)
Weight:
2.52 oz. (70 gm)
Operating Voltage:
+5 VDC @ 400 mA (typical),
500 mA (maximum)
+12 VDC @ 1.2 mA
C-3
SPECIFICATIONS
SMC9432TX/MP
Network Card Type:
10BASE-T/100BASE-TX
Connectors:
RJ-45 for 10BASE-T/100BASE-TX
3-pin Wake-on-LAN cable connector
Network Interface Cable:
10BASE-T: 2-wire pairs data grade UTP
cable; EIA/TIA Categories 3, 4, 5
100BASE-TX: 2-wire pairs data grade
UTP cable; EIA/TIA Category 5
Size (without bracket):
2.125 x 4.750 in. (5.4 x 12.0 cm)
Weight:
1.8 oz. (50 gm)
Operating Voltage:
+5 VDC @ 400 mA (typical),
500 mA (maximum)
+12 VDC @ 1.2 mA
SMC9432FTX
Network Card Type:
10BASE-T/100BASE-TX, 100BASE-FX
Connectors:
RJ-45 for 10BASE-T/100BASE-TX
SC connectors for 100BASE-FX
3-pin Wake-on-LAN cable connector
Network Interface Cable:
10BASE-T: 2-wire pairs data grade UTP
cable; EIA/TIA Categories 3, 4, 5
100BASE-TX: 2-wire pairs data grade
UTP cable; EIA/TIA Category 5
100BASE-FX: 62.5/125 µm multimode
fiber cable
C-4
Size (without bracket):
3.605 x 4.750 in. (9.1 x 12.0 cm)
Weight:
2.52 oz. (70 gm)
Operating Voltage:
RJ-45: +5 VDC @ 350 mA (typical)
Fiber: +5 VDC @ 1000 mA (typical)
+12 VDC @ 1.2 mA
APPENDIX D
USING EZSTART
EZStart Navigational Keys . . . . . . . . . . . . . . . D-2
Installing EZStart . . . . . . . . . . . . . . . . . . . . . . D-3
Windows 95/98, Windows NT, or
OS/2 Installation . . . . . . . . . . . . . . . . . . D-3
Hard Disk Installation in a DOS
Environment . . . . . . . . . . . . . . . . . . . . . D-3
Installation in a Windows 3.x Environment . D-3
Running EZStart . . . . . . . . . . . . . . . . . . . . . . . D-4
In a DOS Environment . . . . . . . . . . . . . . . . D-4
In a Windows 3.x Environment . . . . . . . . . . D-4
Copying Driver Files . . . . . . . . . . . . . . . . . . . D-5
Printing Installation Documents . . . . . . . . . . . D-5
D-1
USING EZSTART
EZStart is a Windows-like utility provided on the SuperDisk. This
multi-function utility takes the work out of driver installation and
lets you test the network card's basic functions.
EZStart Navigational Keys
EZStart provides a familiar Windows-like interface that can be
accessed with a mouse or the keys listed below.
u
u
u
u
u
u
Use Tab to move to the next field or button.
Use Shift+Tab to move to the previous field or button.
Use the Enter key or the Spacebar to select a highlighted
function.
Use the Up and Down arrows to move to selections in a list
box. Press F1 for help.
Use Alt+underscored character to select a function that is not
highlighted.
Use F3 or Alt+F4 to exit.
Note: When you see the “+” symbol between two keys, press
and hold the first key while pressing and releasing the
second. For example, for Shift+Tab, hold down the Shift
key while pressing and releasing the Tab key.
D-2
USING EZSTART
Installing EZStart
The EZStart utility can be run from the SuperDisk or the hard disk.
EZStart can also be installed and run using Microsoft Windows for
Workgroups 3.x by double-clicking on the EZStart icon.
Windows 95/98, Windows NT, or OS/2 Installation
Exit Windows NT or shut down Windows 95/98 and reboot your
computer to the DOS prompt (not a DOS window). Follow the
instructions for installing and running EZStart in a DOS
environment.
Hard Disk Installation in a DOS Environment
To run EZStart under DOS without using the SuperDisk, or to run
EZStart from your Windows desktop, use the following procedure
to load EZStart on your hard disk.
1. Insert the SuperDisk in a drive.
2. Using the DOS COPY command, copy all the files from the
SuperDisk to a single directory on the hard disk. For example:
C:\> COPY A:\*.* C:\SMC
<Enter>
Installation in a Windows 3.x Environment
1. Load EZStart on the hard disk as described above.
2. Start Microsoft Windows.
3. From the Program Manager, select “File,” “New,” and then
“Program Item.”
5. Select “OK.”
D-3
USING EZSTART
6. For the Command Line entry, type the complete path to the
SuperDisk files and then type “EZSTART.EXE.” For example:
C:\> SMC\EZSTART.EXE
Note: You can use the EZSTART.PIF file instead of EZSTART.EXE
for more control over the environment in which EZStart
loads. For more information on working with .PIF files, refer
to the Microsoft Windows documentation.
7. Select “Change Icon.”
8. Select “OK.”
9. Select “Browse” and then select the directory containing the
EZStart utility.
10.Select the “EZSTART.ICO” file to install the icon on your
Windows desktop.
11.Select “OK” with each window, until you return to your
Windows desktop.
Running EZStart
In a DOS Environment
1. To run EZStart from the SuperDisk, insert the SuperDisk in a
drive, select that drive, type “EZSTART,” and press the Enter
key. For example:
C:\> A: <Enter>
A:\> EZSTART <Enter>
2. To run EZStart from the hard disk, change to the directory on
the hard disk containing the SuperDisk files, type “EZSTART,”
and press Enter. For example:
C:\> CD SMC <Enter>
C:\SMC> EZSTART <Enter>
D-4
USING EZSTART
In a Windows 3.x Environment
From your Windows 3.x desktop, double-click the EZStart icon to
start EZStart. The EZStart main screen appears. This screen shows
the current configuration information for your network card.
Note: If multiple cards have been installed, a screen displays each
card with its configuration. Select an individual card by
double-clicking on it, or by highlighting it and either
choosing “Select” or pressing the Enter key. The EZStart
main screen will then appear.
Copying Driver Files
1 Run EZStart as previously described.
2. Select “Custom” from the EZStart main screen.
3. Select “Drivers/Documents” from the “Custom Installation
screen.”
4. There are two “Network Drivers and Documentation Selection”
screens. Select the appropriate vendor from the first screen.
The screen appears again. Select the appropriate driver that
you wish to install (make sure the selection you want is
highlighted). Then press the Enter key or select “OK.”
5. At the “Network Drivers and Documentation” screen, the
default destination directory and a list of files to be copied to
the default directory are displayed. To accept the default
destination directory, select “Copy Files.” Otherwise, enter a
destination directory at the prompt and select “Copy Files.”
6. Follow the prompts to continue the installation.
7. Select “Exit” to exit EZStart.
8. Remove the SuperDisk from the floppy disk drive.
D-5
USING EZSTART
Printing Installation Documents
1. Run EZStart.
2. Select “Documents” from the EZStart main screen.
3. Select your network operating system from the “Network
Drivers Documentation Selection” screen.
4. Select “Print” from the “Documentation” screen.
D-6
INDEX
A
Auto-Negotiation 1-2, 3-5, A-4
B
basic adapter test 4-3
BNC connector 2-4
C
cable
Category 3, 4, 5 1-6
Fast Ethernet 1-6
fiber 1-6, 2-5
guidelines 2-2
requirements 1-6
specifications B-2
UTP 2-3, B-3
Wake-on-LAN 1-2, 1-3, 1-7
Category 3, 4, 5 cable 1-6
compliances iii
configuration
NetWare v3.12 3-13
NetWare v4.x 3-9
PCI 1-8
Windows 3.x 3-7
Windows 95/98 3-2
Windows NT 4.0 3-4
connecting cable
fiber 2-5
thin coax 2-4
UTP 2-3
connection guidelines 2-2
connectors
BNC 2-4
RJ-45 2-3, B-3
SC 2-5
T-connector 2-4
contents
package 1-5
SuperDisk 1-5
crossover cable B-5
D
data speed A-4
diagnostic tests 4-2
DOS ODI installation 3-10
driver diskette 1-5
driver documents D-6
driver files 1-5, 3-2, 3-15, D-5
driver installation 3-2, D-5
E
EC conformance iv
emissions iii, C-2
EMM386 A-5
EZdosodi 3-10
EZStart
adapter tests 4-3
copying driver files D-5
custom installation 3-11, D-5
DOS ODI installation 3-11
installing D-3
navigational keys D-2
printing installation documents
D-6
using 3-9, 3-13, 3-15, 4-2, 4-3, D-2
F
Fast Ethernet cabling 1-6, 2-2, B-2
fiber cable 1-2, 1-6, 2-5
Flash ROM 1-6
full-duplex operation A-4
Index-1
INDEX
I
P
indicators 1-4
installation
DOS ODI 3-10
EZStart D-3
NetWare v3.12 3-13
NetWare v4.x 3-9
other 3-15
Windows 3.x 3-7
Windows 95/98 3-2
Windows NT 4.0 3-4
installation documents D-6
package contents 1-5
PCI configuration 1-8, A-2
pin assignments B-3
problems, common A-3
L
SC connectors 2-5
solutions for common problems A3
specifications
cable B-2
emissions C-2
environmental C-2
general C-2
STARTNET.BAT 3-10, 3-12
straight-through cable B-4
SuperDisk 1-5, 3-2
system requirements 1-6
LAN statistics 4-5
latest drivers 3-15
LEDs
100 Mbps 1-4
activity 1-4
full duplex 1-4
link 1-4
status 1-4
M
models 1-2
MTBF C-2
multimode fiber cable 1-2, 2-5
N
NetWare v3.12 installation 3-13
NetWare v4.x installation 3-9
network cable 2-2
network drivers 3-2, D-5
network protocols, adding 3-3
Index-2
R
regulatory information iii
RJ-45 connector 2-3
S
T
testing the network card 4-2
troubleshooting
basic A-3
error messages A-5
EZStart A-4
full-duplex operation A-4
memory-management utilities A-5
PCI compatibility A-2
twisted-pair cable B-3
two-node adapter test 4-3
INDEX
U
utility, diagnostic 4-2
UTP cable
connections 2-3
pin assigments B-3
W
Wake-on-LAN
attaching cable 1-8
cable 1-3
PC 1-3, 1-6
Windows 3.x installation 3-7
Windows 95/98 installation 3-2
Windows diagnostic utility 4-2, 4-6
Windows NT 4.0 installation 3-4
wiring
crossover B-5
straight-through B-4
Index-3
INDEX
Index-4
FOR TECHNICAL SUPPORT, CALL:
From U.S.A. and Canada (8:30 AM - 8:00 PM Pacific Time)
(800) SMC-4-YOU; (949) 707-2400; (949) 707-2460 (Fax)
From Europe (8:00 AM - 5:30 PM UK Greenwich Mean Time)
44 (0) 1344-420068; 44 (0) 1344-418835 (Fax)
INTERNET e-mail address: [email protected]
Driver updates available from the internet:
Host name info.smc.com (IP address: 170.129.51.1)
SMC Forum on CompuServe: at the prompt (!) type: GO SMC.
World Wide Web: http://www.smc.com/
FOR LITERATURE OR ADVERTISING RESPONSE CALL:
U.S.A. and Canada:
(800) SMC-4-YOU;
Fax
Europe:
44 (0) 1344 418800;
Fax
Northern Europe:
44 (0) 1344 418820;
Fax
Southern Europe:
33 (1) 41.38.32.32;
Fax
Central/Eastern Europe:
49 (0) 89 92861-0;
Fax
Nordic:
46 (8) 564 33145;
Fax
Middle East:
971-4818410;
Fax
South Africa:
27 (0) 11-3936491;
Fax
PRC:
86-10-6235-4958;
Fax
Taiwan:
886-2-2748-3945;
Fax
Asia Pacific:
(65) 336 1800;
Fax
Korea:
82-2-553-0860-1;
Fax
Japan:
81 (3) 57212271;
Fax
Australia:
61-2-9416-0495;
Fax
India:
91-22-8204437;
Fax
6 Hughes
Irvine, CA 92618
Phone: (949) 707-2400
(949) 707-2460
44 (0) 1344 418828
44 (0) 1344 418826
33 (1) 41.38.01.58
49 (0) 89 92861-230
46 (8) 87 62 62
971-4817993
27 (0) 11-3936491
86-10-6235-4962
886-2-2748-3942
(65) 339 6625
82-2-553-7202-3
81 (3) 57212270
61-2-9416-0474
91-22-8204443
Publication Number: E0199-R01 150960-10 1