1
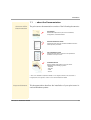
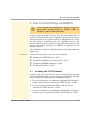
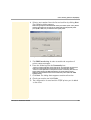
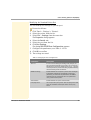
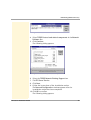
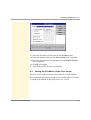
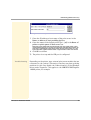
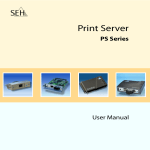
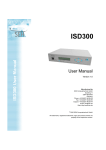
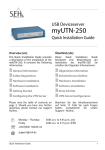
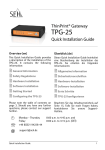
Print Server Installation in Windows Systems Installation Manual Manufactured by: SEH Computertechnik GmbH Suedring 11 33647 Bielefeld Germany Phone: +49 (0)521 94226-29 Fax: +49 (0)521 94226-99 Support: +49 (0)521 94226-44 Email: [email protected] Web: http://www.seh.de Document: Type: Installation Manual Title: Installation in Windows Systems Version: 1.1 Online Links to important Internet Resources: Free Guarantee Extention: http://www.seh-technology.com/guarantee Support Contacts and Informationen: http://www.seh-technology.com/support Sales Contact and Informationen: http://www.seh-technology.com/sales InterCon is a registered trademark of SEH Computertechnik GmbH. SEH Computertechnik GmbH has endeavoured to ensure that the information in all manuals is correct. If you detect any inaccuracies please inform us at the address indicated below. SEH Computertechnik GmbH will not accept any liability for any error or omission. The information in this manual is subject to change without notification. All rights are reserved. Copying, other reproduction or translation without the prior written consent from SEH Computertechnik GmbH is prohibited. © 2008 SEH Computertechnik GmbH All trademarks, registered trademarks, logos and product names are property of their respective owners. Table of Contents 1 Information. . . . . . . . . . . . . . . . . . . . . . . . . . . . . . . . . . . . . . . . . . . . . . 4 1.1 ... about the Documentation . . . . . . . . . . . . . . . . . . . . . . . . . . . . . . . . . . . . . . . 5 1.2 ... about Support and Current Services . . . . . . . . . . . . . . . . . . . . . . . . . . . . . . 7 1.3 ... about Your Safety. . . . . . . . . . . . . . . . . . . . . . . . . . . . . . . . . . . . . . . . . . . . . . . . 8 1.4 ... about the Printing Methods and Installation Procedures . . . . . . . . . . 9 1.5 ... about the Saving of the IP Address in the Print Server . . . . . . . . . . . . 11 2 Peer-to-Peer Printing via NetBIOS . . . . . . . . . . . . . . . . . . . . . . . . 13 2.1 Installing the TCP/IP Protocol . . . . . . . . . . . . . . . . . . . . . . . . . . . . . . . . . . . . . 13 2.2 Saving the IP Address in the Print Server. . . . . . . . . . . . . . . . . . . . . . . . . . . 14 2.3 Configuring NetBIOS Parameters . . . . . . . . . . . . . . . . . . . . . . . . . . . . . . . . . . 14 2.4 Setting up the Printer . . . . . . . . . . . . . . . . . . . . . . . . . . . . . . . . . . . . . . . . . . . . . 15 3 IPP Printing (Windows Vista/XP/2000). . . . . . . . . . . . . . . . . . . . 16 3.1 Saving the IP Address in the Print Server. . . . . . . . . . . . . . . . . . . . . . . . . . . 16 3.2 Setting up the Printer . . . . . . . . . . . . . . . . . . . . . . . . . . . . . . . . . . . . . . . . . . . . . 16 4 Socket Printing (Windows Me/98/95). . . . . . . . . . . . . . . . . . . . . 19 4.1 Installing the TCP/IP Protocol . . . . . . . . . . . . . . . . . . . . . . . . . . . . . . . . . . . . . 20 4.2 Saving the IP Address in the Print Server. . . . . . . . . . . . . . . . . . . . . . . . . . . 22 4.3 Setting up the Printer . . . . . . . . . . . . . . . . . . . . . . . . . . . . . . . . . . . . . . . . . . . . . 22 4.4 Configuring the Printer Port using the SEH Print Monitor . . . . . . . . . . . 23 5 LPD Printing (Windows NT 4.0) . . . . . . . . . . . . . . . . . . . . . . . . . . 32 5.1 Installing the TCP/IP Protocol . . . . . . . . . . . . . . . . . . . . . . . . . . . . . . . . . . . . . 33 5.2 Saving the IP Address in the Print Server. . . . . . . . . . . . . . . . . . . . . . . . . . . 35 5.3 Installing the Microsoft TCP/IP Print Services. . . . . . . . . . . . . . . . . . . . . . . 35 5.4 Setting Up the Printer and Configuring the LPR Port . . . . . . . . . . . . . . . 37 6 LPD Printing (Windows NT 3.51) . . . . . . . . . . . . . . . . . . . . . . . . . 40 6.1 Installing the TCP/IP and FTP Services . . . . . . . . . . . . . . . . . . . . . . . . . . . . . 41 6.2 Saving the IP Address in the Print Server. . . . . . . . . . . . . . . . . . . . . . . . . . . 43 6.3 Setting up the Printer and Configuring the LPR Port. . . . . . . . . . . . . . . . 44 7 Encrypted Printing (Windows 95/98/SE/NT4.0) . . . . . . . . . . . 46 8 List of Figures . . . . . . . . . . . . . . . . . . . . . . . . . . . . . . . . . . . . . . . . . . . 49 Print Server Installation Manual 3 Information 1 Information What information do you need? This chapter contains information concerning the documentation. You will get information on the available printing methods for the print server and on the described installation procedures. • ’... about the Documentation’ Ö5 • ’... about Support and Current Services’ Ö7 • ’... about Your Safety’ Ö8 • ’... about the Printing Methods and Installation Procedures’ Ö9 • ’... about the Saving of the IP Address in the Print Server’ Ö11 Print Server Installation Manual 4 Information 1.1 The print server documentation consists of the following documents: Hardware Installation Guide* Information about security, hardware installation and the initial operation procedure Quick Installation Guide Information about how to achieve a fast operational readiness of the print server. PD F Pr PD int F User Manual Detailed description of the print server installation, configuration, and administration Pr PD int F PD F Structure of the Documentation ... about the Documentation Installation Manual System-specific instructions for the print server installation in the following systems: - Windows - Mac OS - UNIX - Novell * There is no ’Hardware Installation Guide’ for the Japanese market. The document is integrated into the Japanese version of the ’Quick Installation Guide’. Scope and Content This documentation describes the installation of your print server in various Windows systems. Print Server Installation Manual 5 Information Symbols and Conventions A variety of symbols are used within this document. Their meaning is listed in the following table: Table 1: Symbols and conventions used in the documentation Symbol / Convention Description Warning A warning contains important information that must be heeded. Non-observance may lead to malfunctions. Note Proceed as follows: 1. Mark ... The ‘hand’ symbol marks the beginning of instructions. Individual instructions are set in italics. ª Confirmation The arrow confirms the consequence of an action. ; Requirements Hooks mark requirements that must be met before you can begin the action. Option A square marks procedures and options that you can choose. • Print Server Installation Manual A notice contains information that should be heeded. Eye-catchers mark lists. This sign indicates the summary of a chapter. Ö The arrow marks a reference to a page within this document. In the PDF file, you can jump to this page by clicking the symbol. Bold Established terms (of buttons or menu items, for example) are set in bold. Courier Command lines are set in Courier font. ’Proper names’ Proper names are put in inverted commas. 6 Information Document Features This documentation has been designed as an electronic document for screen use. Many programs (e.g. Adobe Reader) offer a bookmark navigation feature that allows you to view the entire document structure. This document contains hyperlinks to the associated information units. If you want to print this documentation, we recommend using the printer setting ’Duplex’ or ’Booklet’. 1.2 Support Current Services ... about Support and Current Services If questions remain, please contact our hotline. SEH Computertechnik offers extensive support and user training sessions. Monday through Thursday Friday ℡ +49 (0)521 94226-44 @ [email protected] from 8:00 a.m. to 5:45 p.m. and from 8:00 a.m. to 4:15 p.m. (CET) The following services can be found on the SEH website at www.seh.de. • current firmware • current tools • current documentation • current product information • product data sheet • FAQ • and much more Print Server Installation Manual 7 Information 1.3 ... about Your Safety Read and observe all safety regulations and warnings found in the documentation, on the device and on the packaging. This will avoid potential misuse and prevent damages to people and devices. SEH Computertechnik GmbH will not accept any liability for personal injuries, property damages and consequential damages resulting from the non-observance of the mentioned safety regulations and warnings. Non-observance will result in the warranty claims becoming void. Intended Use Print servers are network interfaces for printers. They are designed for the direct integration of printers into networks. The print server has been designed for use in office environments. Improper Use All uses of the device that do not comply with the print server functionalities described in the documentation are regarded as improper uses. It is not allowed to make modifications to the hardware and software or to try to repair the device. Safety Regulations Before starting the initial operation procedure of the print server, please note the safety regulations in the ’Hardware Installation Guide’. The Hardware Installation Guide is enclosed in the packaging. Warnings Read and observe all warnings mentioned in this document. Warnings are found before any instructions known to be dangerous. They are presented as follows: Warning! Print Server Installation Manual 8 Information 1.4 ... about the Printing Methods and Installation Procedures Depending on the selected printing method, the print server can be integrated into various Windows systems. There are many ways to install the print server in Windows systems, depending on the printing method. Overview of Printing Methods • The LPD protocol is used for printing in Windows NT 4.0 and NT 3.51 systems. The LPD protocol is a special protocol used for print data. During LPD printing the server sends the print data to the IP address of the print server by means of the LPR port. The print server receives the print data and routes it to the printer. • In peer-to-peer networks all clients have the same rights and can share their resources with other computers. The print server acts as network connection for a printer which is independent of a client. The print data is transferred from the individual client to the network. The print server receives the print data and routes it to the printer. Peer-to-Peer printing via NetBIOS is supported by all Windows systems. • The Internet Printing Protocol (IPP) provides printing services via a network. In a client/server system, such as Windows Vista/XP/2000, the client sends a query to the print server. After transmision of the print data, the data is printed. • During socket printing, the print server acts as network connection for a printer which is independent of a client. Printing is carried out by means of direct TCP/IP ports. The ports are installed with the aid of the SEH Print Monitor (see Ö23). The print data is transferred from the individual client to the network using the SEH Print Monitor. The print server receives the print data and routes it to the printer. Print Server Installation Manual 9 Information Overview of Installation Procedures The table shows you where to find information about the relevant installation procedures. Table 2: Installation Procedures Operating System What do you want to do? Socket Printing (via TCP/IP Ports) LPD Printing IPP Printing Peer-to-Peer (via NetBIOS) Windows Vista ** *** * * Windows XP ** *** * * Windows 2000 ** *** * * Windows NT 4.0 * * *** * Windows NT 3.51 *** * *** * Windows Me * *** *** * Windows 98 * *** *** * Windows 95 * *** *** * * Information about the installation procedure can be found in the Installation Manual ’Installation in Windows Systems’. (This document) ** Information about the installation procedure can be found in the print server documentation. The document is available at www.seh.de. *** Information about the installation procedure can be obtained from the SEH support team ’Peer-to-Peer Printing via NetBIOS’ Ö13 ’IPP Printing (Windows Vista/XP/2000)’ Ö16 ’Socket Printing (Windows Me/98/95)’ Ö19 ’LPD Printing (Windows NT 4.0)’ Ö32 ’LPD Printing (Windows NT 3.51)’ Ö40 Print Server Installation Manual 10 Information 1.5 ... about the Saving of the IP Address in the Print Server TCP/IP network protocols require the storing of the IP address in the print server so that the device can be addressed within the network. Why IP Addresses? An IP address is used to address network devices in an IP network. Depending on the network type the print server can also be addressed via alternative parameters such as the host name, the print server name, or the IPX address. How Does the Print Server Obtain IP Addresses? SEH print servers are shipped without an IP address. The print server is able to assign itself an IP address during the initial installation. Boot protocols are used to assign an IP address automatically to the print server. Upon delivery, the boot protocols ’BOOTP’, ’DHCP’, and ’ZeroConf’ are enabled. Once the print server is connected to the network, it checks whether an IP address can be obtained from the boot protocols BOOTP or DHCP. If this is not the case, the print server assigns itself an IP address via ZeroConf from the address range (169.254.0.0/16) which is reserved for ZeroConf. Once the print server has automatically received an IP address via a boot protocol, you can save a freely definable IP address in the print server. The print server supports many different methods for the assignment of the IP address. The following section describes the recommended method for saving the IP address via the IP Wizard of the InterCon-NetTool. Additional methods for the assignment of IP addresses are described in the print server user manual. Print Server Installation Manual 11 Information Saving the IP Address via the IP Wizard (InterCon-NetTool) The IP Wizard of the InterCon-NetTool helps you to configure the TCP/IP parameters, e.g. the IP address. You can easily enter the desired IP address and save it in the print server using the IP Wizard. Requirements ; The InterCon-NetTool is installed on the client, see: Print Server User Manual. ; By means of the InterCon-NetTool you can scan the network via Multicast, see: Print Server User Manual. ; The router in the network forwards multicast requests. Proceed as follows: 1. Start the InterCon-NetTool. 2. Select the print server from the print server list. The print server is displayed in the print server list under 'ZeroConf' with an IP address from the address range (169.254.0.0/16) which is reserved for ZeroConf. 3. Select Installation – IP Wizard from the menu bar. The IP Wizard is started. 4. Follow the instructions of the Wizard. ª The settings are saved. Abb. 1: InterCon-NetTool - IP Wizard Print Server Installation Manual 12 Peer-to-Peer Printing via NetBIOS 2 Peer-to-Peer Printing via NetBIOS In this chapter, the installation of the print server for peer-to-peer printing based on NetBIOS (SMB) in Windows systems will be described. In peer-to-peer networks all clients have the same rights and can share their resources with other computers. The print server acts as network connection for a printer which is independent of a client. The print data is transferred from the individual client to the network. The print server receives the print data and routes it to the printer. Peer-to-Peer printing via NetBIOS is supported by all Windows systems. The installation is similar for Windows systems. Individual steps may slightly vary. Procedure Follow the instructions to carry out the installation: ’Installing the TCP/IP Protocol’ Ö13 ’Saving the IP Address in the Print Server’ Ö14 ’Configuring NetBIOS Parameters’ Ö14 ’Setting up the Printer’ Ö15 2.1 Installing the TCP/IP Protocol In order to use your print server for peer-to-peer printing, you must install theTCP/IP protocol on every computer intended for printing. The procedure varies depending on the Windows system. • For more information on installation in Windows Me, 98 and 95, please read the section ’Installing the TCP/IP Protocol’ Ö20. • For the installation in Windows NT 4.0, read the section ’Installing the TCP/IP Protocol’ Ö33. • For more information on installation in Windows NT 3.51, please read the section ’Installing the TCP/IP and FTP Services’ Ö41 . Print Server Installation Manual 13 Peer-to-Peer Printing via NetBIOS • If TCP/IP has already been installed on your system, you may skip to the section ’Saving the IP Address in the Print Server’ Ö14. 2.2 Saving the IP Address in the Print Server The print server must be known to the network via its IP address. We recommend using the IP wizard of the InterCon-NetTool in order to assign an IP address to the print server, see: Ö12. 2.3 Configuring NetBIOS Parameters The NetBIOS parameters for the print server must be configured so that the print server can be seen in the network environment. For this purpose, various administration methods are available. The print server can only be configured in an existing workgroup or domain. If necessary, configure new workgroups or domains in advance. 1. 2. 3. 4. 5. ª Print Server Installation Manual Proceed as follows: Start the Print Server Homepage or start the InterCon-NetTool and double-click the print server in the print server list. Select Configuration – Microsoft Windows. Tick NetBIOS. Enter an existing workgroup or domain into the NetBIOS name box. Click Save or OK to confirm. The settings are saved. 14 Peer-to-Peer Printing via NetBIOS 2.4 Setting up the Printer A printer must be set up on the Windows system. For more information, please read the printer installation instructions in your Windows or printer user manual. 1. 2. 3. ª Troubleshooting Proceed as follows: Select the print server in the relevant workgroup or domain. Double-click the desired logical printer in Windows Me, 98 and 95. Right-click the desired logical printer in Windows NT. Follow the instructions of the installation routine. The printer will be installed. Depending on the printer type, external print server models that are connected to the printer's Centronics interface may have printing problems. In this case, disable the 'bidirectionality' of the Windows driver under 'Properties'. This applies to the MINOLTA QMS PagePro 1200W printer, for example. Print Server Installation Manual 15 IPP Printing (Windows Vista/XP/2000) 3 IPP Printing (Windows Vista/XP/2000) In this chapter the installation of your print server for IPP printing in Windows Vista, Windows XP, and Windows 2000 is described. The Internet Printing Protocol provides printing services via a network. In a client/server system, such as Windows Vista/XP/2000, the client sends a query to the print server. After transmision of the print data, the data is printed. The port 631 is used as socket for IPP printing. Requirements ; Make sure that Service Pack 1 or later has been installed when working with Windows XP. Procedure Follow the instructions to carry out the installation: ’Saving the IP Address in the Print Server’ Ö16 ’Setting up the Printer’ Ö16 3.1 Saving the IP Address in the Print Server The print server must be known to the network via its IP address. We recommend using the IP wizard of the InterCon-NetTool in order to assign an IP address to the print server, see: Ö12. 3.2 Setting up the Printer Your printer must be set up as a network printer in Windows. When IPP printing is used, Windows will automatically search for the printer at the entered IP address and set up the printer. Print Server Installation Manual 16 IPP Printing (Windows Vista/XP/2000) The following description refers to the configuration in Windows 2000. Depending on your Windows system, the menu navigation can vary. For more information, please read the printer installation instructions in your Windows or printer user manual. Proceed as follows: 1. Select Printers from the 'Start' menu. 2. Double-click Add Printer. The 'Add Printer Wizard' appears. 3. Click Next. The following dialog appears: Fig. 2: Add Printer Wizard: Network printer Do not select 'Local Printer' under any circumstances. As a result, your print server may no longer be properly installed. 4. Select Network printer. 5. Click Next. The following dialog appears: Print Server Installation Manual 17 IPP Printing (Windows Vista/XP/2000) Fig. 3: Add Printer Wizard: Locate Your Printer 6. Select Connect to a printer on the Internet or on your intranet. 7. Enter the IP address of the print server and the socket number for IPP printing: Syntax: http://<IP address of the print server>:631/ipp Example: http://192.168.0.123:631/ipp Enter the name of the logical printer (lp1- lp8), if necessary. Example: http://192.168.0.123:631/ipp/lp1 With print server models with several physical ports, the logical printer is also used to address the port. If no name or an incorrect name has been entered, the print data is automatically routed to the printer through logical printer no.1. For more information, please read the section ’Logical Printers’ in the user manual. 8. Click Next. 9. Follow the instructions of the installation routine to set up your printer. ª The printer is now installed. Troubleshooting Depending on the printer type, external print server models that are connected to the printer's Centronics interface may have printing problems. In this case, disable the 'bidirectionality' of the Windows driver under 'Properties'. This applies to the MINOLTA QMS PagePro 1200W printer, for example. Print Server Installation Manual 18 Socket Printing (Windows Me/98/95) 4 Socket Printing (Windows Me/98/95) Print Server Function In this chapter the installation of your print server in Windows Me, 98, and 95 is described. In peer-to-peer networks all clients have the same rights and can share their resources with other computers. In a peer-to-peer network, the print server acts as network connection for a printer which is independent of the client. The print data is transferred from the individual client to the network using the SEH Print Monitor. The print server receives the print data and routes it to the printer. Fig. 4: Peer-to-peer network with print server The installation is similar for all systems. The appearance of the dialogs can slightly vary. Procedure Follow the instructions to carry out the installation: ’Installing the TCP/IP Protocol’ Ö20 ’Saving the IP Address in the Print Server’ Ö22 ’Setting up the Printer’ Ö22 ’Configuring the Printer Port using the SEH Print Monitor’ Ö23 Print Server Installation Manual 19 Socket Printing (Windows Me/98/95) 4.1 Installing the TCP/IP Protocol In order to use your print server in Windows Me, 98 or 95, you must first install the TCP/IP protocol on the computer intended for printing. If TCP/IP has already been installed, you may skip to the section ’Saving the IP Address in the Print Server’ Ö22. Proceed as follows: 1. Select Control Panel from the 'Start' menu. 2. Double-click Network. 3. Select the Configuration tab. The following dialog appears: Fig. 5: Network - Configuration 4. Click Add. 5. Select Protocols. 6. Click Add. The following dialog appears: Print Server Installation Manual 20 Socket Printing (Windows Me/98/95) Fig. 6: Select Network Protocol 7. Select Microsoft from the Manufacturers box. 8. Select TCP/IP from the Network Protocols box. 9. Click OK to confirm. The Configuration tab appears. 10. Select TCP/IP from the box containing the list of installed network components. 11. Click Properties. The following dialog appears: Print Server Installation Manual 21 Socket Printing (Windows Me/98/95) Fig. 7: TCP/IP Properties - IP Address 12. Enter the IP address of your client. 13. Click OK to confirm. ª The TCP/IP protocol is installed. 4.2 Saving the IP Address in the Print Server The print server must be known to the network via its IP address. We recommend using the IP wizard of the InterCon-NetTool in order to assign an IP address to the print server, see: Ö12. 4.3 Setting up the Printer Set up your printer as a local printer under Windows Me, 98 or 95. Select LPT1 as the printer port. Do not print out a test page. Print Server Installation Manual 22 Socket Printing (Windows Me/98/95) For more information, please read the printer installation instructions in your Windows or printer user manual. Troubleshooting Depending on the printer type, external print server models that are connected to the printer's Centronics interface may have printing problems. In this case, disable the 'bidirectionality' of the Windows driver under 'Properties'. This applies to the MINOLTA QMS PagePro 1200W printer, for example. 4.4 Configuring the Printer Port using the SEH Print Monitor A printer port must be added to every client intended for printing. This section describes the installation and configuration of TCP/IP and HTTP ports on the client. The SEH Print Monitor is available for configuration purposes. What is the SEH Print Monitor? The SEH Print Monitor constitutes the connecting piece between the computer and the print server. It ensures the transfer of print data from the client to the print server by means of direct TCP/IP ports. The SEH Print Monitor can be installed on every client intended for printing. It is not possible to share the printer. Which Ports Are Available? Using the SEH Print Monitor you can adapt printing to your individual needs. You can define whether printing is done via a TCP/IP port or a HTTP port. The following features can be realized when printing via HTTP ports: • Encryption of print data • Identity check of the users and devices before they gain access to the print server (authentication) • Using a proxy server, print jobs can be sent to a print server via the Internet • Detailed and print server specific error messages Print Server Installation Manual 23 Socket Printing (Windows Me/98/95) Procedure In order to configure a printer port at the client, follow the instructions: ’Installing the SEH Print Monitor’ Ö24 ’Starting the SEH Print Monitor’ Ö24 ’Adding or Editing Printer Ports’ Ö25 Installing the SEH Print Monitor In order to install the SEH Print Monitor you must execute the ’sehmon-xxx.exe’ file. Proceed as follows: 1. Double-click the file 'sehmon-xxx.exe'. The file can be copied and started from www.seh.de or the Product CD. 2. Follow the installation routine. ª The SEH Print Monitor will be installed to your system. Starting the SEH Print Monitor The SEH Print Monitor is started by adding a new port to the print object. Requirements ; The SEH Print Monitor is installed on the client. ; The required printer drivers are installed on the client. The following description refers to the configuration in Windows 95. Depending on your Windows system, the menu navigation can vary. 1. 2. 3. 4. Print Server Installation Manual Proceed as follows: Click 'Start' > 'Settings' > 'Printers'. Select the printer from the list. Select File – Settings from the menu bar. The Properties dialog appears. Select the Details tab. 24 Socket Printing (Windows Me/98/95) 5. Click Add Port. The Add Port dialog appears. Fig. 8: Add Port 6. Tick Other. 7. Select SEH Print Monitor. 8. Click OK to confirm. ª The SEH Print Monitor is started and the dialog SEH TCP/IP Port Configuration appears. If the print server is protected by a password, the password will be demanded. Adding or Editing Printer Ports Add a printer port to the client by means of the SEH Print Monitor. What do you want to do? ’Adding a TCP/IP Printer Port’ Ö26 ’Adding a HTTP Printer Port’ Ö28 ’Modifying the Standard Printer Port’ Ö31 Print Server Installation Manual 25 Socket Printing (Windows Me/98/95) Adding a TCP/IP Printer Port Proceed as follows: 1. Start the SEH Print Monitor; see: Ö24. 2. Enter the IP address or the host name of the print server and click Next. The following dialog appears: Fig. 9: SEH Print Monitor – Selecting a Printing Method 3. Tick Standard TCP/IP printing and click Next. The following dialog appears: Fig. 10: SEH Print Monitor - Port Configuration-TCP/IP Print Server Installation Manual 26 Socket Printing (Windows Me/98/95) 4. Select a port number from the list and confirm by clicking Next. The following dialog appears: Different logical printers are addressed via the port number (9100 - 9107). Please note that the printer port of print server models with several physical printer ports (COM1, USB1, etc.) is defined via the logical printer. Fig. 11: SEH Print Monitor - SNMP 5. Tick SNMP monitoring in order to enable the reception of printer status messages. 6. Enter the following into the Community box: - If there is a write protection on the print server, you must enter the password. If there is no write protection on the print server, you must enter ’public’. - If there is a read protection on the print server, the 'Community' box does not appear. When starting the SEH Print Monitor you will be asked to enter a password. The password will be used as Community name within the SNMP communication. 7. Click Next. The dialog thats appears contains all entries. 8. Check your entries and click Finish. ª The configuration is saved and the TCP/IP printer port is added to the client. Print Server Installation Manual 27 Socket Printing (Windows Me/98/95) Adding a HTTP Printer Port Proceed as follows: 1. Start the SEH Print Monitor; see: Ö24. 2. Enter the IP address or the host name of the print server and click Next. The following dialog appears: Fig. 12: SEH Print Monitor – Selecting a Printing Method 3. Tick HTTP printing and click Next. The following dialog appears: Fig. 13: SEH Print Monitor - Port Configuration-HTTP Print Server Installation Manual 28 Socket Printing (Windows Me/98/95) 4. Select a logical printer (lp1 - lp8) from the list. Please note that the printer port of print server models with several physical printer ports (COM1, USB1, etc.) is defined via the logical printer. 5. Select Encrypted printing if you wish to encrypt the print data. Refer to the print server documentation for more information. 6. Select Authentication, if necessary. Refer to the print server documentation for more information. Fig. 14: SEH Print Monitor - SNMP 7. Tick SNMP monitoring in order to enable the reception of printer status messages. 8. Enter the following into the 'Community' box: - If there is a write protection on the print server, you must enter the password. If there is no write protection on the print server, you must enter ’public’. - If there is a read protection on the print server, the 'Community' box does not appear. When starting the SEH Print Monitor you will be asked to enter a password. The password will be used as Community name within the SNMP communication. 9. Click Next. The following dialog appears: Print Server Installation Manual 29 Socket Printing (Windows Me/98/95) Fig. 15: SEH Print Monitor - Proxy Server 10. You can print via a proxy server. If necessary, tick Use proxy server and enter the IP address and the port number of the proxy server. 11. Click Next. The dialog thats appears contains all entries. 12. Check your entries and click Finish. ª The configuration is saved and the HTTP printer port is added to the client. Print Server Installation Manual 30 Socket Printing (Windows Me/98/95) Modifying the Standard Printer Port You can modify the settings of a printer port. 1. 2. 3. 4. 5. 6. 7. 8. ª Proceed as follows: Click 'Start' > 'Settings' > 'Printers'. Select the printer from the list. Select File – Settings from the menu bar. The Properties dialog appears. Select the Details tab. Select the port from the list. Click Port Settings. The dialog SEH TCP/IP Port Configuration appears. Configure the parameters; see: Table 3 Ö31. Click OK to confirm. The settings are saved. Table 3: Changing the Port Configuration Print Server Installation Manual Parameters Description Time out If an error occurs during the sending of the print job, the print job will automatically be sent again. You can limit the duration of this process by defining a time out (1 - 120 min). This will prevent the process from being repeated endlessly and from blocking other connections. SNMP monitoring Enables/disables the reception of printer status messages. If parameter changes are controlled by a print server password, you must enter the password for the SNMP monitoring into the 'Community' box. If no password is used, you must enter 'public'. Authentication Enables/disables the option 'Authentication'. Use proxy server You can print via a proxy server. Tick 'Use proxy server' and enter the IP address and the port number of the proxy server. 31 LPD Printing (Windows NT 4.0) 5 LPD Printing (Windows NT 4.0) Print Server Function In this chapter the installation of your print server in Windows NT 4.0 is described. Windows NT 4.0 systems are so-called server-based networks. A server provides workstations located in the network with certain services. Services include, among other things, the administration of jointly used data sources and print services, all of which ensure the joint usage of printers in the network. While printing is being carried out in Windows NT 4.0, the print data is loaded into the network as an LPD protocol by means of the LPR port and sent to the IP address of the print server. The print server receives the print data and routes it to the printer. Fig. 16: Server-based network with print server In order to install the print server in Windows NT 4.0, you must first install the TCP/IP protocol and the TCP/IP print services. With the configuration of the LPR ports, the LPD protocol can automatically be used for printing. Requirements ; Make sure that Service Pack 5 or later has been installed on your Windows NT 4.0 system. Print Server Installation Manual 32 LPD Printing (Windows NT 4.0) Procedure Follow the instructions to carry out the installation: ’Installing the TCP/IP Protocol’ Ö33 ’Saving the IP Address in the Print Server’ Ö35 ’Installing the Microsoft TCP/IP Print Services’ Ö35 ’Setting Up the Printer and Configuring the LPR Port’ Ö37 5.1 Installing the TCP/IP Protocol In order to use your print server in a Windows NT 4.0 system, you must first install the TCP/IP protocol in the NT server. If the TCP/IP protocol has already been installed, you may skip to the section ’Saving the IP Address in the Print Server’ Ö35. Proceed as follows: 1. Select Control Panel from the 'Start' menu. 2. Double-click Network. 3. Select the Protocols tab. The following dialog appears: Fig. 17: Network - Protocols Print Server Installation Manual 33 LPD Printing (Windows NT 4.0) 4. Click Add. The following dialog appears: Fig. 18: Select Network Protocol 5. Select TCP/IP Protocol from the list. 6. Click OK to confirm. 7. Follow the instructions of the installation routine. The Protocols tab appears after the installation routine has been completed. 8. Click Close. The following dialog appears: Fig. 19: Microsoft TCP/IP Properties Print Server Installation Manual 34 LPD Printing (Windows NT 4.0) 9. Enter the IP address of the client in the IP Address box. 10. Enter the subnet mask into the Subnet Mask box, if required. 11. Enter the IP address of the gateway into the Default Gateway box, if required. 12. Click OK to confirm. ª The TCP/IP protocol is installed. 5.2 Saving the IP Address in the Print Server The print server must be known to the network via its IP address. We recommend using the IP wizard of the InterCon-NetTool in order to assign an IP address to the print server, see: Ö12. 5.3 Installing the Microsoft TCP/IP Print Services In order to print via TCP/IP, you must install the Microsoft TCP/IP print services. If the Microsoft TCP/IP print services have already been installed, you may skip to the section ’Setting Up the Printer and Configuring the LPR Port’ Ö37. Proceed as follows: 1. Select Control Panel from the 'Start' menu. 2. Double-click Network. 3. Select the Services tab. The following dialog appears: Print Server Installation Manual 35 LPD Printing (Windows NT 4.0) Fig. 20: Network - Services 4. Click Add. The following dialog appears: Fig. 21: Select Network Service 5. Select Microsoft TCP/IP Printing. 6. Click OK to confirm. Print Server Installation Manual 36 LPD Printing (Windows NT 4.0) 7. Follow the instructions of the installation routine. The Services tab appears after the installation routine has been completed. 8. Click Close. ª The Microsoft TCP/IP print services are installed. 5.4 Setting Up the Printer and Configuring the LPR Port In Windows NT 4.0, you must set up your printer as a printer managed by your computer under and not as a network printer server. Select the LPR port as the printer port. The different logical printers (lp1 - lp8) can be addressed by means of the LPR port. If you have already set up your printer, you must only configure the LPR port. Call the property sheet of the printer and select the 'Ports' tab. Continue with step 4 described in the following. Proceed as follows: 1. Select Printers from the 'Start' menu. 2. Double-click Add Printer. The following dialog appears: Fig. 22: Add Printer Wizard Print Server Installation Manual 37 LPD Printing (Windows NT 4.0) Do not select 'Network Printer Server' under any circumstances. As a result, your print server may no longer be properly installed. 3. Click Next. The following dialog appears: Fig. 23: Add Printer Wizard 4. Click Add. The following dialog appears: Fig. 24: Printer Ports 5. Select LPR Port. If the 'LPR Port' entry is invisible, install the TCP/IP print services first. For more information, please read the section ’Installing the Microsoft TCP/IP Print Services’ Ö35. Print Server Installation Manual 38 LPD Printing (Windows NT 4.0) 6. Click New Port. The following dialog appears: Fig. 25: Add LPR Compatible Printer 7. Enter the IP address or host name of the print server in the Name or address of host providing lpd box. 8. Enter the name of the logical printer (lp1 - lp8) in the Name of printer or print queue on that server box. With print server models with several physical ports, the logical printer is also used to address the port. If no name or an incorrect name has been entered, the print data is automatically routed to the printer through logical printer no.1. For more information, please read the section ’Logical Printers’ in the user manual. 9. Click OK to confirm. 10. Follow the instructions of the installation routine to set up your printer. ª The printer is set up and the LPR port is configured. Troubleshooting Depending on the printer type, external print server models that are connected to the printer's Centronics interface may have printing problems. In this case, disable the 'bidirectionality' of the Windows driver under 'Properties'. This applies to the MINOLTA QMS PagePro 1200W printer, for example. Print Server Installation Manual 39 LPD Printing (Windows NT 3.51) 6 LPD Printing (Windows NT 3.51) Print Server Function In this chapter the installation of your print server in Windows NT 3.51 is described. Windows NT 3.51 systems are so-called server-based networks. A server provides workstations located in the network with certain services. Services include, among other things, the administration of jointly used data sources and print services, all of which ensure the joint usage of printers in the network. While printing is being carried out in Windows NT 3.51, the print data is loaded into the network as an LPD protocol by means of the LPR port and sent to the IP address of the print server. The print server receives the print data and routes it to the printer. Fig. 26: Server-based network with print server In order to install the print server in Windows NT 3.51, you must first install the TCP/IP services. It is also useful to install FTP services. This allows you to open an FTP connection to transfer print data and change parameters. With the configuration of the LPR ports, the LPD protocol can automatically be used for printing. Print Server Installation Manual 40 LPD Printing (Windows NT 3.51) Procedure Follow the instructions to carry out the installation: ’Installing the TCP/IP and FTP Services’ Ö41 ’Saving the IP Address in the Print Server’ Ö43 ’Setting up the Printer and Configuring the LPR Port’ Ö44 6.1 Installing the TCP/IP and FTP Services In order to use your print server in a Windows NT 3.51 system, you must first install the TCP/IP and FTP services in the NT server. If the TCP/IP and FTP services have already been installed, you may skip to the section ’Saving the IP Address in the Print Server’ Ö43. Proceed as follows: 1. Select Control Panel from the main menu. 2. Double-click Network. The following dialog appears: Fig. 27: Network Settings 3. Click Software. The following dialog appears: Print Server Installation Manual 41 LPD Printing (Windows NT 3.51) Fig. 28: Add Network Software 4. Select TCP/IP Protocol and related components in the Network Software box. 5. Click Continue. The following dialog appears: Fig. 29: Windows NT TCP/IP Installation Options 6. 7. 8. 9. Select the TCP/IP Network Printing Support box. Tick FTP Server Service. Click Next. Follow the instructions of the installation routine. The Network Configuration window appears after the installation routine has been completed. 10. Click OK to confirm. The following dialog appears: Print Server Installation Manual 42 LPD Printing (Windows NT 3.51) Fig. 30: TCP/IP Configuration 11. Enter the IP address of the client in the IP Address box. 12. Enter the subnet mask into the Subnet Mask box, if required. 13. Enter the IP address of the gateway into the Default Gateway box, if required. 14. Click OK to confirm. ª The TCP/IP and FTP services are installed. 6.2 Saving the IP Address in the Print Server The print server must be known to the network via its IP address. We recommend using the IP wizard of the InterCon-NetTool in order to assign an IP address to the print server, see: Ö12. Print Server Installation Manual 43 LPD Printing (Windows NT 3.51) 6.3 Setting up the Printer and Configuring the LPR Port You must set up your printer as a local printer under Windows NT 3.51. Select the LPR port as the printer port. The different logical printers (lp1 - lp8) can be addressed by means of the LPR port. If you have already set up your printer, you must only configure the LPR port. Call the property sheet of the printer. Continue with step 4 described in the following. 1. 2. 3. 4. Proceed as follows: Select Print Manager from the main menu. Select Setup New Printer from the Printer menu. The Setup New Printer window appears. Enter a printer name, a driver, and a description. Select Other... in the Print to box. The following dialog appears: Fig. 31: Print Destinations 5. Select LPR Port. 6. Click OK to confirm. The following dialog appears: Print Server Installation Manual 44 LPD Printing (Windows NT 3.51) Fig. 32: Add LPR Compatible Printer 7. Enter the IP address or host name of the print server in the Name or address of host providing lpd box. 8. Enter the name of the logical printer (lp1 - lp8) in the Name of printer or print queue on that server box. With print server models with several physical ports, the logical printer is also used to address the port. If no name or an incorrect name has been entered, the print data is automatically routed to the printer through logical printer no.1. For more information, please read the section ’Logical Printers’ in the user manual. 9. Click OK to confirm. ª The printer is set up and the LPR port is configured. Troubleshooting Depending on the printer type, external print server models that are connected to the printer's Centronics interface may have printing problems. In this case, disable the 'bidirectionality' of the Windows driver under 'Properties'. This applies to the MINOLTA QMS PagePro 1200W printer, for example. Print Server Installation Manual 45 Encrypted Printing (Windows 95/98/SE/NT4.0) 7 Encrypted Printing (Windows 95/98/SE/NT4.0) This chapter describes the adjustment of Windows systems for encrypted printing with certificate validation. Further information about encrypted printing can be found in the Print Server User Manual. The SEH Print Monitor allows you to encrypt your print data in Windows systems. As of version 4.4, the SEH Print Monitor additionally supports certificate validation for encrypted printing. The SEH Print Monitor will need the following components: • Internet Explorer Version 5.01 • Directory Service Client (Dsclient.exe) These components are part of the standard installation of Windows ME/2000/XP/Vista. If you are using Windows NT4.0, see: ’Adding Components in Windows NT 4.0’ Ö46. If you are using Windows 95/98/SE, see: ’Adding Components in Windows 95/98/SE’ Ö47. Adding Components in Windows NT 4.0 The SEH Print Monitor (version 4.4 onwards) requires the following components for encrypted printing with certificate validation: • Internet Explorer Version 5.01 • Directory Service Client (Dsclient.exe) These components are not part of the standard installation of Windows NT4.0. Print Server Installation Manual 46 Encrypted Printing (Windows 95/98/SE/NT4.0) Install the missing components on your operating system for encrypted printing with certificate validation. Proceed as follows: 1. Install Service Pack 4 (or higher) for Windows NT 4.0. 2. Install the Internet Explorer (version 5.01 or higher). (We recommend installing the current version with the current patch). ª The components are installed. Encrypted printing with certificate validation will now be supported. Adding Components in Windows 95/98/SE The SEH Print Monitor (version 4.4 onwards) requires the following components for encrypted printing with certificate validation: • Internet Explorer Version 5.01 • Directory Service Client (Dsclient.exe) These components are not part of the standard installation of Windows 95/98/SE. Install the missing components on your operating system for encrypted printing with certificate validation. Warning: These instructions contain Registry modifications. Modifications to the Registry file can result in applications or parts of the operating system becoming inoperable. Modifications to this file should only be carried out by qualified technicians. To be able to access data from the old Registry file, you should save/rename a copy of the file before carrying out any modifications. The Registry Editor’s online help section provides further information. Proceed as follows: 1. Install the Internet Explorer (version 5.01 or higher). (We recommend installing the current version with the current patch). Print Server Installation Manual 47 Encrypted Printing (Windows 95/98/SE/NT4.0) 2. Install the Directory Service Client. The installation file Dsclient.exe can be downloaded from http://www.microsoft.com. It can also be found on the Microsoft Windows 2000 installation CD-ROM. 3. In your system, open the application regedit.exe (Registry Editor). 4. In the Registry Editor, open the folder 'HKEY_LOCAL_MACHINE\System\CurrentControlSet\Control\Sec urityProviders'. 5. Highlight the key SecurityProviders. 6. Select Modify from the Edit menu. The dialog box Edit String appears. 7. Add the value schannel.dll. 8. Click OK. ª The components are installed. Encrypted printing with certificate validation will now be supported. Fig. 33: Registry Editor - Edit String Print Server Installation Manual 48 List of Figures 8 List of Figures InterCon-NetTool - IP Wizard . . . . . . . . . . . . . . . . . . . . . . . . . . . . 12 Add Printer Wizard: Network printer . . . . . . . . . . . . . . . . . . . . . . 17 Add Printer Wizard: Locate Your Printer . . . . . . . . . . . . . . . . . . . 18 Peer-to-peer network with print server . . . . . . . . . . . . . . . . . . . 19 Network - Configuration . . . . . . . . . . . . . . . . . . . . . . . . . . . . . . . . 20 Select Network Protocol . . . . . . . . . . . . . . . . . . . . . . . . . . . . . . . . 21 TCP/IP Properties - IP Address . . . . . . . . . . . . . . . . . . . . . . . . . . . . 22 Add Port . . . . . . . . . . . . . . . . . . . . . . . . . . . . . . . . . . . . . . . . . . . . . 25 SEH Print Monitor – Selecting a Printing Method . . . . . . . . . . . 26 SEH Print Monitor - Port Configuration-TCP/IP . . . . . . . . . . . . . 26 SEH Print Monitor - SNMP . . . . . . . . . . . . . . . . . . . . . . . . . . . . . . 27 SEH Print Monitor – Selecting a Printing Method . . . . . . . . . . . 28 SEH Print Monitor - Port Configuration-HTTP . . . . . . . . . . . . . . 28 SEH Print Monitor - SNMP . . . . . . . . . . . . . . . . . . . . . . . . . . . . . . 29 SEH Print Monitor - Proxy Server . . . . . . . . . . . . . . . . . . . . . . . . . 30 Server-based network with print server . . . . . . . . . . . . . . . . . . . 32 Network - Protocols . . . . . . . . . . . . . . . . . . . . . . . . . . . . . . . . . . . . 33 Select Network Protocol . . . . . . . . . . . . . . . . . . . . . . . . . . . . . . . . 34 Microsoft TCP/IP Properties . . . . . . . . . . . . . . . . . . . . . . . . . . . . . 34 Network - Services . . . . . . . . . . . . . . . . . . . . . . . . . . . . . . . . . . . . . 36 Select Network Service . . . . . . . . . . . . . . . . . . . . . . . . . . . . . . . . . 36 Add Printer Wizard . . . . . . . . . . . . . . . . . . . . . . . . . . . . . . . . . . . . . 37 Add Printer Wizard . . . . . . . . . . . . . . . . . . . . . . . . . . . . . . . . . . . . . 38 Printer Ports . . . . . . . . . . . . . . . . . . . . . . . . . . . . . . . . . . . . . . . . . . 38 Add LPR Compatible Printer . . . . . . . . . . . . . . . . . . . . . . . . . . . . . 39 Server-based network with print server . . . . . . . . . . . . . . . . . . . 40 Network Settings . . . . . . . . . . . . . . . . . . . . . . . . . . . . . . . . . . . . . . 41 Add Network Software . . . . . . . . . . . . . . . . . . . . . . . . . . . . . . . . . 42 Windows NT TCP/IP Installation Options . . . . . . . . . . . . . . . . . . . 42 TCP/IP Configuration . . . . . . . . . . . . . . . . . . . . . . . . . . . . . . . . . . . 43 Print Destinations . . . . . . . . . . . . . . . . . . . . . . . . . . . . . . . . . . . . . . 44 Add LPR Compatible Printer . . . . . . . . . . . . . . . . . . . . . . . . . . . . . 45 Registry Editor - Edit String . . . . . . . . . . . . . . . . . . . . . . . . . . . . . 48 Print Server Installation Manual 49