1
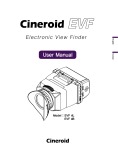
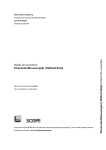
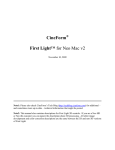
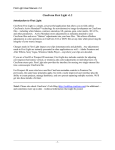
KineRAW-S35
- user manual -
KINERAW S35
DIGITAL CINEMA CAMERA
user manual
WWW.KINEFINITY.TV
INTRODUCING: KINERAW-S35
The KineRAW S35 digital cinema camera is a RAW digital cinema camera with a Super 35mm
sensor. This camera has been designed and developed by Beijing Zhuoyi Technology Co., Ltd. with
all intellectual property rights.
Key features
•
Super 35mm CMOS sensor; Recording format DCI 2K or full HD;
•
Dual RAW recording: uncompressed CinemaDNG or GoPro Cineform(tm) RAW; simultaneous
recording on 2.5” SSDs enabled;
•
Interchangeable lens-mount system;
•
Video output 1080p/720p using HDMI and 3G-SDI, compatible with all standardized broadcast
monitoring devices
•
Supports 3D-LUT and LOOK files for color management.
Safety instructions
•
Please read all points of the user manual carefully and pay attention to all warnings and notif ications;
•
Don't use the camera near water; avoid contact with any liquids;
•
Use dustless dry cloth to clean the camera body;
•
Don't cover the vent to avoid over-heating of the camera;
•
Don't film directly into the sun;
•
The recommended environmental temperature for using the KineRAW S35 is 0-40 degree Celsius;
•
Don't use the camera in dusty or humid conditions or during a thunderstorm.
•
Attention: the original KineMount is identical with a PL mount. However, for adaptability
reasons it is built very close to the sensor. Do not attempt to mount a lens directly onto the
KineMount. This will cause serious sensor damage. Always attach an adapter first.
•
Always press the F3 button before ejecting a SSD card before removing. On the camera display the
corresponding slot will be labeled with “vacancy” when the SSD is ready for removal.
•
The logo on the SSD must be on the upper side. Otherwise you will run danger to damage the pol.
•
Please don't boot the camera with an USB stick inserted. The system will reset and you'll loose your
customized setting and files.
WWW.KINEFINITY.TV
CONTENT
1. BASIC FEATURES
1.1 Product images and index
1.2 Quick start guide
1.3 Factory settings
1
4
5
2. LIVE VIEW
2.1 Interface and parameters
6
3. BASIC OPERATIONS
3.1 U1: zoom-in
3.2 U2: exposure
3.3 Histogram
3.4 Shooting parameters
3.5 F1: recording resolution
3.6 U3: zebra
3.7 U4: disable status information
3.8 EI / ISO settings
3.9 Footage information
3.10 SSD management
7
8
8
8
9
10
11
12
13
14
4. RECORDING
4.1 Image recording
4.2 Sound recording
4.3 Timecode
4.4 Functions during recording
16
17
17
17
5. PLAYBACK
5.1 Footage playback
5.2 Footage management
5.3 Other buttons
18
19
19
6. AUDIO
6.1 Beeper
20
7. FOOTAGE, WORKFLOW AND POST PRODUCTION
7.1 Footage and workflow
7.2 Introduction to file types
7.3 Cineform RAW
6.4 Cinema DNG
21
22
23
28
8. CONFIGURATIONS
8.1 Categories
8.2 Firmware updates
8.3 Upload customized LUTs
8.4 Core temperature and system
30
31
31
31
WWW.KINEFINITY.TV
9. TROUBLE SHOOTING
9.1 The camera does not boot
9.2 The camera does not record after pressing the REC button
9.3 Pixel appear in LIVE VIEW MODE or during recording
9.4 Pixel appear on the monitoring device
9.5 Pixel appear on Cineroid EVF4L electronic viewfinder
9.6 Updating firmware has been unsuccessful
9.7 Clips cannot be played back from the SSD card
10. TECHNICAL SPECIFICATIONS
WWW.KINEFINITY.TV
33
32
32
32
33
33
33
KineRAW-S35
- user manual -
1. BASIC FEATURES
1.1 Product images and index
Image 1: KineRAW-S35™, left side
1. PL mount fixing ring
9. ISO button – ISO and EI settings
20. WIFI receiver
2. KineMount fixing ring
10. LOOK – Look Up Table management
21. U3 button - enables/disables ZEBRA
3. LOCK button – locks interface
11. LCD display
22. U4 button - displays pure image output
4. LOCK signal light
12. PLAYBACK button – replay clips
23. REC button – starts / stops recording
5. / 19. ¼“- 20 thread
13. SLATE - footage Information
24. U1 button – zoom in
6. SHUTTER button – shutter settings
14. /15. /16. Shortcut Buttons (F1, F2, F3) 25. U2 button – exposure assistant
7. FPS – frame rate setting
17. CONF – configurations menu
8. TEMP – color temperature setting
18. Selection Wheel
WWW.KINEFINITY.TV
26. REC light, tally light
1
KineRAW-S35
- user manual -
Image 2: KineRAW-S35™, back
27. SSD card slot A
33. U6 – exposure assistant
41. 4-Pin XLR – power input
28. SSD card slot B
34. PWR – boot / shut down camera
42. / 43. 3-Pin XLR – audio input (LINE-IN)
29. REC light, tally light
35. TC – time code synchronization port
44. Vent
30. Status signal light
36. SYNC – 3D synchronization port
45. Vent
31. REC button – starts / stops recording
37. / 38. 3G-SDI output
46. Serial number, model information
32. U5 – Zoom in
39. / 40. USB slots (A. / B.)
WWW.KINEFINITY.TV
2
KineRAW-S35
- user manual -
Image 3: KineRAW-S35™, front
47. HDMI pol – video output
48. MISC pol – electronic iris control
49. VF pol – video output
50. Sensor
WWW.KINEFINITY.TV
3
KineRAW-S35
- user manual -
1.2 Quick start guide
1. To supply the camera with power connect a 14V power source to the power input (image 2, 41)
a) With a 12V outlet the camera can normally not be started.
b) Pay attention on the direction when inserting or ejecting the 4 pin XLR. When the camera is
factory new, the XLR and the outlet might be tight.
2. Mount a suitable adapter on the lens mount. Afterwards mount the lens.
a) Attention: the original KineMount is identical with a PL mount. However, for adaptability
reasons it is built very close to the sensor. Do not attempt to mount a lens directly on the
KineMOUNT. This will cause serious sensor damage. Always attach an adapter first.
b) Please ensure that the slot on the lens adapter and the aligning pin are well aligned. Afterwards
fix the KineMount locking ring to avoid instability.
3. Connect a monitoring device. Devices with SDI signal input must support 3G-SDI.
4. Hold the PWR button (Image 2. 34) for two seconds to power the camera. Hold it until the signal
light blinks (Image 2. 31 LED green signal light) or the KineRAW-S35 logo appears on the display.
5. After about 20 seconds your monitoring device will display a live view image (Image 4). The signal
light will flash every second.
6. Insert a KineMAG SSD into one of card slots (Image 2. 27 28).
a) Move the silver pin on the SSD slot to open it.
b) The logo of the SSD should face up.
c) The pol is delicate, please be careful when inserting or removing the SSD.
7. Push and release the REC button (Image 1. 23 or Image 2. 31), to start recording. The RECORD
MENU will be displayed. Push the REC button again and the recording will stop.
8. Press the PLAYBACK button (Image 1. 12) to open the PLAYBACK MENU (Image 10). By turning
the SELECTION WHEEL (Image 1. 18) you can select clips and play them back by pressing on the
wheel.
9. Press the F3 button to deactivate a SSD card. This is a mandatory step before ejecting the card.
Using a Firewire or SATA-USB cable you can transfer data to any APPLE MACINTOSH computer.
The KineMAG SSDs are pre-formatted for macintosh. To transfer files to a WINDOWS system it is
necessary to install an emulation software such as “HFSExplorer” or “Macdrive” (available as a
freeware).
10. You'll find your footage in the “SHOTS” folder on your SSD. You can set the file names in camera
before recording. Footage metadata is included in all files.
11. For shutting down the camera press the PWR button. Please wait until the shut-down dialog window
has disappeared before removing the power supply.
a) Attention: Press the PWR button twice and, the camera will shut down immediately.
b) If the camera doesn't react: Press the PWR button for 5 seconds, the camera will shut down
automatically.
WWW.KINEFINITY.TV
4
KineRAW-S35
- user manual -
1.3 Factory setting
•
EI/ISO setting: ISO Mode, ISO 800, Highlights: 4.3 stops
•
Resolution: 2K mode, 2048x1080
•
Frame Rate: 25fps
•
Shutter: 1/50s
•
Color temperature: 5600K daylight
•
LOOK: Kine709
•
Recording Format: Cineform RAW
•
Display resolution: 720p
•
Audio: Capture 15dB, Digital 0dB
WWW.KINEFINITY.TV
5
KineRAW-S35
- user manual -
2. LIVE VIEW
2.1 Interface and parameters
The LIVE VIEW interface appears immediately after booting. It offers support for compositing, framing and
exposure control.
Image 4: Live view interface parameters
1. Display mode - Live view/Playback
7. Current color temperature setting
13. Current clip name
2. Display proportion – 100% / 200% etc.
8. Exposure control mode - EI or ISO
14. Current recording format
3. Current recording resolution
9. Current EI/ISO setting
15. SSD status
4. Current frame rate
10. Highlight and headroom settings
16. Waveform monitor
5. Current shutter setting
11. VU Meter
17. Histogram
6. Current look-up-table
12. Timecode and timecode settings
WWW.KINEFINITY.TV
6
KineRAW-S35
- user manual -
3. BASIC OPERATIONS
It is highly recommended to use the SHORTCUT BUTTONS on the left side and on the back of the camera.
3.1 U1: zoom-in
(Image 1: 24, Image 2: 32)
Pressing the U1 button results in a change of the LIVE VIEW
1. 100% (Pixel to Pixel, 1:1) - The live view displays the exact same resolution as the recording
resolution.
2. 200% - The displayed image will be enlarged by the factor 2.
3. 800% - The displayed image will be enlarged by the factor 8.
PLEASE NOTE
When zoomed-in pixel and color strips will occur on the displayed image.
In ZOOM MODE a green frame will indicate the location on the displayed image. To navigate the displayed
area use the SELECTION WHEEL for horizontal and the F1/F2 buttons for vertical movement.
Image 5: The green frame
WWW.KINEFINITY.TV
7
KineRAW-S35
- user manual -
3.2 U2: exposure
(Image 1: 25, Image 2: 33)
Pressing the U2 Button swops between different tools of exposure control.
3.
RAW LUMA HISTOGRAM: displays the RAW exposure (the actual brightness the sensor catches).
4.
RAW RGB HISTOGRAM: displays the brightness of the red, green and blue color channel the
sensor catches.
5.
POST LUMA HISTOGRAM: displays the RAW exposure considering the selected LUT.
6.
POST RGB HISTOGRAM: displays the RGB exposure considering the selected LUT.
7.
No exposure control will be displayed
PLEASE NOTE
The waveform always displays information according to the selected histogram mode. When POST LUMA
HISTOGRAM is selected, the waveform will also display the RAW exposure information considering the
current LUT.
3.3 Histogram
(Image 4 / LIVE VIEW: 17)
The histogram displays two lines: grey and white.
3. Grey line: under current settings the histogram peak will appear on the grey line if an 18% grey card
is filmed.
4. White line: under current settings the histogram peak will appear on the white line if an 90% white
card is filmed.
WWW.KINEFINITY.TV
8
KineRAW-S35
- user manual -
3.4 Shooting parameters
In LIVE VIEW mode you can use the buttons on the left side to set various shooting parameters.
Image 6: Shortcuts and the selection wheel
Press the SHORTCUT BUTTONS on the left side of the camera and the respective options will
appear on the display. Turn the SELECTION WHEEL to toggle through the options. Press the
selection wheel to confirm your choice.
1)
SHUTTER: You can either set the shutter speed or the shutter angle in this menu. The default setting
is 1/50s and 180 degree for 25fps. Which parameter you can change depends on your settings in
LIVE VIEW > EXPOSURE.
2)
FPS: Set the desired frame rate. Depending on the recording resolution different frame rates will be
available.
3)
ISO: Change the ISO setting – considering your current LOOK and color temperature settings.
4)
TEMP: Set the color temperature from 2000K to 7000K in 50K steps. You may also customize your
white balance.
5)
LOOK: Choose a look up table. In our default setting the user can choose between: KineLOG,
Kine709 and KineCOLOR.
a)
KineLOG equals a LOG C algorithm. When choosing KineLOG you'll see the widest
movement range on the display. However, the video output of the KineRAW S35 is 8bit.
Thus, it is impossible to display a 12 bit movement range.
b)
KineCOLOR maintains more highlight and shadow details compared to KINE 709. It can be
used directly as a starting point for your color matching during post production.
c)
Kine709 corresponds with REC 709 and, thus, coincides with ITU broadcasting standards.
The color range of REC709 fits the output range of any HDTV.
PLEASE NOTE: When recording in CineformRAW. LOG C will always be employed, regardless of your
LOOK settings.
WWW.KINEFINITY.TV
9
KineRAW-S35
- user manual -
3.5 F1: recording resolution
a) Maximum resolution is 2K (2048 x 1152)
b) There are two options for 1280x720: “1280x720” and “1280x720C”.
a. When shooting in “1280x720” only 2/3 of the sensor are used. The image quality is identical
with recordings in 2K but you'll only record 2/3 of the image area. The maximum frame rate
in this mode is 50 fps.
b. When shooting in “1280x720C” you'll record the full frame but the image quality suffers
minimal (moiré might occur). Maximum frame rate in this mode is 100 fps.
3.6 U3: zebra
Pressing the U3 BUTTON will indicate overexposed areas or areas close to overexposure. ZEBRA
lines will appear on the display. By default the zebra threshold is set to 90% - zebra appears in all
areas with brightness equal or higher than 90%. The threshold is customizable in the “LIVE VIEW”
menu. Also the color of the ZEBRA indicator can be varied here.
PLEASE NOTE:
The zebra display always refers to RAW information – regardless of your LUT settings. When Zebra appears
with the default settings of 90% the exposure is close to clipping. No information will be recorded in clipped
areas.
WWW.KINEFINITY.TV
10
KineRAW-S35
- user manual -
3.7 U4: disable status information
Use U4 to enable or disable all status information on the LIVE VIEW display.
WWW.KINEFINITY.TV
11
KineRAW-S35
- user manual -
3.8 EI / ISO settings
In LIVE VIEW the current EI/ISO settings are displayed on the top-right above the main menu.
In nature light appears in all different wavelength and intensities. No camera chip can catch all
available light information. In the EI/ISO settings you can set the sensor's light sensitivity according
to your shooting environment. There are two different modes.
•
EI Mode
With the EI Mode you will solely utilize the camera's dynamic range without affecting the sensor
sensitivity. The ISO remains constant at the recommended level of 800 whereas the dynamic range
is shifted towards a lower or a higher exposure. That way the camera's light sensitivity can be
increased while keeping the noise level as low as possible. If you are familiar with other cinema
cameras you will recognize this feature and appreciate it in any controlled light situation.
•
ISO Mode:
The ISO mode is probably the most common way of in-camera exposure control. The higher the ISO
setting, the higher is the sensor's light sensitivity. In ambient light situations increasing the ISO will be
inevitable.
Default settings:
a) ISO: 800
b) Highlight: 4.3 stops (level between 18% grey and ADC Clip)
c) Headroom: 2 stops (level between 90% with and ADC Clip)
PLEASE NOTE:
As with every camera the noise level will raise and highlight details will vanish with higher ISO
settings.
•
Headroom and highlights in ISO mode
In the “CONFIGURATIONS>SHOOTING” menu you can manually set the headroom and highlights
when shooting in ISO mode.
a) Set the Highlights from 3.3 stops to 6.3 stops
b) Set Headroom from 1 stop to 4.3 stops
c) Your choice of highlight and headroom affects your possible ISO choice. When your
highlights are set to 4.3 the lowest available ISO setting is 320 ISO. The lowest available
ISO setting is indicated with an exclamation mark next to the number in the menu.
d) When increasing the headroom / highlight value with a constant ISO setting, the sensor's
sensitivity will decrease.
e) Set the highlights at >2 to maintain highlight details
WWW.KINEFINITY.TV
12
KineRAW-S35
- user manual -
3.9 Footage information
Press the SLATE-BUTTON to display the current footage information. To edit the information press
the F1/F2 button.
Image 7: Footage information
WWW.KINEFINITY.TV
13
KineRAW-S35
- user manual -
3.10 SSD management
In LIVE VIEW you'll see the current SSD status (See image 4, point 15).
1. GREEN: Active SSD slot. Footage will be saved here.
2. YELLOW: Inactive SSD slot. A card is inserted and the slot could be activated.
3. GREY: No SSD card is inserted.
4. The number at the bottom indicates the memory space availability on the active card. “4/60GB”
stands for 4GB available space on a card with 60GB capacity. When the available space is less
than 10% of the capacity, the status is indicated in red and the card should be replaced.
PLEASE NOTE:
When no card slot is selected, no footage will be recorded when pressing the REC button. The
camera won't give any notif ication in this case. When less than 1% of the SSD's capacity is available
recording will terminate automatically.
WWW.KINEFINITY.TV
14
KineRAW-S35
- user manual -
To manage SSDs press the F3 button.
Image 8: SSD Management
It shows the current condition and the capacity of the SSD. There are 3 operations for each SSD:
1)
Activate: When there is only one SSD inserted it will be actived automatically. Now the status
"in use" will be shown in the main menu.
2)
Deactivate: Deactivate the active SSD. There'll be a notif ication in the display when the
deactivation was successful. Please do not remove an SSD before this notif ication has been
displayed. Otherwise you will risk data loss or damage.
3)
Format: All files will be deleted and the file format will be reconstructed. You can only format a
deactivated SSD.
PLEASE NOTE
It is recommended to use Kinefinity KineMAG SSD Cards. Third-party SSD cards are not optimized
for working with the KineRAW S35. Performance and quality cannot be guaranteed.
WWW.KINEFINITY.TV
15
KineRAW-S35
- user manual -
4. RECORDING
4.1 Image recording
Before starting to record, please make sure to have a KineMAG SSD card inserted and activated.
Please read section 2.4 for more information on SSD management.
Press the red REC BUTTON to start recording. A SIGNAL NOISE (1KHz) will indicate the start of the
recording. Pressing the REC button a second time will terminate the recording. Again, a signal noise
will indicate the end (2KHz). Recording in process is also indicated by two red TALLY LIGHTS (see
image 1: point 26 or image 2: point 29).
WWW.KINEFINITY.TV
16
KineRAW-S35
- user manual -
4.2 Sound recording
The current volume of both audio channels can be supervised using the UV meter on the LIVE VIEW
display. Depending on the recording format audio is saved differently: Using Cineform RAW, audio is
encapsulated within the *.mov file. For CinemaDNG footage a separate *.wav file is saved for the left
and right audio channel.
•
Image 9: Record - “REC” flashes during recording
Timecode
The timecode is displayed in the bottom left corner of the LIVE VIEW display. Also, it is encapsulated
into the recorded footage. For CineformRAW recording a separate time code track can be found.
When recording CinemaDNG every frame includes timecode information as metadata.
•
Functions during recording
Several functions are available during recording. To avoid unintended changes pressing the LOCKBUTTON can disable the interface. In locked mode only the REC and the U1, U2, U3, U4 buttons
can be used.
WWW.KINEFINITY.TV
17
KineRAW-S35
- user manual -
5. PLAYBACK
Press the PLAYBACK BUTTON to enter the playback mode. Press the button again to return to LIVE
VIEW. Pressing the REC button will also result in a return to the LIVE VIEW mode.
Image 10: Playback Interface
PLEASE NOTE
Information displayed on top of the PLAYBACK MODE interface always refers to the current
recording settings – not to the settings of the recorded footage.
5.1 Footage playback
Clip number and amount of clips are displayed in the top left corner of the PLAYBACK MODE
window.
1) Turn the SELECTION WHEEL to toggle through the clips.
2) Press the wheel to replay the selected clip.
3) Press the wheel again to stop to the playback.
WWW.KINEFINITY.TV
18
KineRAW-S35
- user manual -
5.2 Footage management
Pressing F3 during the PLAYBACK MODE will display information about the selected clip.
Image 11: Footage management interface
You can undertake the following configurations:
1) Copy footage from one SSD to another SSD. All clips or the selected clip will copied on the
secondary SSD. For this operation a SSD card must be inserted in the deactivated card slot.
2) Delete: You can delete current or all footage; There will be a confirmation dialogue.
5.3 Other buttons
Most of the buttons have the same functions in PLAYBACK MODE as in LIVE VIEW.
WWW.KINEFINITY.TV
19
KineRAW-S35
- user manual -
6. AUDIO
KineRAW™ S35 supports LINE-IN audio input. MIC-IN is not supported. However, you can use all
audio equipment with LINE-OUT – for example the Zoom H4N external audio recorder.
6.1 Beeper
For better synchronizing audio and video the camera generates a 1KHz and 2KHz signal noise at the
end and start of every recording. The function can be disabled in the
CONFIGURATION>AUDIO>BEEPER menu.
WWW.KINEFINITY.TV
20
KineRAW-S35
- user manual -
7. FOOTAGE, WORKFLOW AND POST-PRODUCTION
Press the F3-Button to deactivate and eject an SSD card. KineMAG SSD cards are formatted for the
use with MACINTOSH computers. Emulation freeware such as “HFSExplorer” allows you to use
KineMAG SSDs with WINDOWS computers as well.
Please format the SSD cards in-camera rather than in MAC OS.
Please use these links to download the recommended emulation software:
B. MacDrive http://www.mediafour.com/products/macdrive
C. HFSExplorer http://www.catacombae.org/hfsx.html
7.1 Footage and workflow
The recorded footage is located directly in the root directory of your SSD card. The files-names can
be set in-camera beforehand.
The default file naming after formatting the SSD is the following:
“SSDSLOT” + “ROLL NUMBER”+”_”+”FIRST FOUR FIGURES OF THE SERIAL NUMBER”+”TWO
RANDOM FIGURES”
• Example: A002_6D09A6
Image12: SSD loaded in MAC
Image13: SSD loaded in Windows 7™
WWW.KINEFINITY.TV
21
KineRAW-S35
- user manual -
7.2 Introduction to file types
When opening the footage folder you'll encounter the following file types:
4.
*.bmp
Thumbnail of the clip
4.
*.mov
Main footage file when footage was recorded in CineformRAW
5.
*.look
Look-up-table information in “LOOK”-format (for Speedgrade DI, Cineform or Firstlight)
5.
*.cube
Look-up-table information in “CUBE”-format (for DaVinci Resolve or Speedgrade DI)
6.
curve.cube
Curve file for making LOG conversations. This file is only relevant when footage has been
recorded in CinemaDNG. It can be used to load LUT-files.
•
L01.wav and R01.wav
Left and right audio channel when footage has been recorded in CinemaDNG. When
CineformRAW has been chosen as a recording format, the audio is implemented in the
*.mov file.
•
*.dng
These files are the single frames of your CinemaDNG recording.
•
slate.txt
Text file including all footage information such as camera settings and timecode.
WWW.KINEFINITY.TV
22
KineRAW-S35
- user manual -
7.3 Cineform RAW
•
Compatibility
Cineform RAW is an open-source codec, which is well supported by all common editing and color
mixing softwares.
Find more information about compatibility on:
1) http://cineform.com/
•
Decoding
Cineform RAW is a RAW intermediate codec and has to be decoded before editing. Downloading the
Cineform RAW decoder is necessary.
2) http://cineform.com/gopro-cineform-decoder
The Cineform decoder works in the background and will be automatically utilized by your video
playback, editing or color mixing software to decode, debayer, load or unload LUTs or to playback
4:4:4 RGB video. Manual decoding is unnecessary. This process is very resource-economic and
will be supported by most modern consumer workstations and laptops. To improve results you can
change the debayer/demosic algorithm in the decoder settings.
•
LUTs
After editing you can use digital intermediate software to load LUTs specif ically designed for
KineRAW-S35 Cineform RAW footages such as the “Kine709” LUT. How to choose the right LUT;
please check the LUT/LOOK section of this manual.
PLEASE NOTE
The Cineform decoder is a freeware. In the windows version you'll find extended functions, such as
de-bayering. However, this function is subject to a charge in the mac version.
More information on the Cineform RAW workflow.
VIDEO: Grading with DaVinci Resolve 9
• www.vimeo.com/66651511
Additional information
• Cineform Workflow etc.: http://techblog.cineform.com/?page_id=1288
WWW.KINEFINITY.TV
23
KineRAW-S35
- user manual -
•
Playback with LUT in WINDOWS
By default your Cineform footage will be played back without a LUT applied. Using the Cineform
decoder any LUT can be selected quickly:
1. Double-click on the LUT file (*.cube or *.look) to select an LUT (or use the LookInstallerApp)
2. Right-click on the Cineform decoder icon (red “C” in your windows system bar) and choose
“Active Metadata” / “Looks (3D-LUTs)”
3. To disable the LUT, deselect “Looks (3D-LUTs)” again
•
Improve Cineform debayering results in WINDOWS
By default the de-bayering algorithm is set to “auto”. If the footage has been recorded in good
lightning conditions, you can increase the image quality by choosing “Advanced Details3”. However,
this process requires more hardware resources. To change the de-bayering algorithm:
6) Right-click on the Cineform decoder icon (red “C” in your windows system bar)
7) Choose “Decoder Settings” and after “Decoder Type”
WWW.KINEFINITY.TV
24
KineRAW-S35
- user manual -
•
Install Cineform RAW on MAC
The cineform decoder freeware for mac does not support LUT playback. However, using the trial
version of Cineform Studio Premium you'll still be able to install LUTs anytime.
a) Install Cineform Studio Premium trial version. Cineform Studio Premium includes “Firstlight”,
which you'll need to install your LUT.
b) Drag an Drop the LUT file on the Firstlight icon
c) The LUT will be installed automatically (ignore Firstlight in case it'll start opening)
d) After expiration of the trial version you can still install LUTs that way
•
Playback with LUTs on MAC
If you've already installed LUTs you might automatically load them by playing back a file. In any other
case you'll playback a flat image.
•
Install your LUT as described above. After you'll have two methods of manually selecting an
LUT for playback
◦
Click on the Cineform Icon in your status bar (located on top of your screen, next to
the small apple icon) and select or unselect “look”
◦
Open “System Preferences > Cineform” and select / unselect “Look”
WWW.KINEFINITY.TV
25
KineRAW-S35
- user manual -
•
Improve Cineform debayering on MAC
For changing the de-bayering algorithm on a MAC system you'll be required to purchase Cineform
Studio Premium.
•
Loading LUTs with DaVinci Resolve
Any LUT can be loaded with DaVinci Resolve by copying the LUT files (*.cube) into a designated
folder:
For Windows 7
• C:\ProgramData\Blackmagic Design\DaVinci Resolve\Support\LUT
For MAC:
• /Library/Application Support/Blackmagic Design/DaVinci Resolve/LUT
Afterwards open DaVinci and select “LUT File > KineRAW> Name of the LUT File” and restart the
program:
WWW.KINEFINITY.TV
26
KineRAW-S35
- user manual -
•
Loading LUTs in Adobe AfterEffects (CS5 or higher)
Loading LUTs in Adobe AfterEffects requires Version CS5 or higher.
•
Open Adobe After Effects and import your footage
•
Select “Effects > Utility > Apply Color LUT”
1. Select the desired LUT in the following dialogue
2. You can edit the LUT after loading it
Acknowledgment: Vital information were provided by the KineRAW S35 user Liu Qingqing 3721.
WWW.KINEFINITY.TV
27
KineRAW-S35
- user manual -
7.4 Cinema DNG
When recording CinemaDNG footage the LUT information will be already encapsulated in your files.
There are several ways for processing CinemaDNG files.
1. You can open them with several softwares by Adobe™, such as Lightroom or After Effects™.
2. You can open DNG files directly with Xnview™. We highly recommend this freeware.
3. DaVinci Resolve™ and Speedgrade™ can be used directly for color mixing.
PLEASE NOTE
For using 3d.look or 3d.cube in Speedgrade, you'll be required to utilize the “curve.cube” file at first.
1. Click on Global Grading for preferences
2. Click the Matrix&LUT at the bottom on the right
3. Select curve.cube in LUT before Matrix
4. Select 3d.cube in LUT after Matrix
Now you can use the same Look file as in Cineform.
WWW.KINEFINITY.TV
28
KineRAW-S35
- user manual -
8. CONFIGURATIONS
Press the CONF-BUTTON to enter the configuration menu:
Image 14: Configuration menu
The grey functions are currently disabled.
WWW.KINEFINITY.TV
29
KineRAW-S35
- user manual -
8.1 Categories
1)
RECORDING FORMAT: You can choose Cineform RAW, TRUE RAW (Cinema DNG) or
DUAL RAW (simultaneously recording of both formats on the selected SSD card).
2)
SHOOTING: All configurations related to shooting, such as ISO and highlight settings.
3)
GUIDELINE: Contains optional supports for framing (crosshair etc.), color temperature
setting and exposure (grey and white cards).LIVE VIEW: All configurations about live view,
such as zebra, anamorphic conversion and display resolution.
a)
Different factors of anamorphic conversion are available. When a factor of 1.5 is
selected the LIVE VIEW will display a 3k horizontal image. However, the actual
recording will remain at 2K horizontally.
b)
The KineRAW™ S35 supports two display resolutions for monitoring: 720p and
1080p. If monitoring problems (lagging) occur on 1080p please decrease the
resolution under “CONFIGURATION > LIVE VIEW > DISPLAY RESOLUTION”. The
default display resolution is 720p.
c)
ZEBRA stripes always refer to the RAW signal and will ignore the influence of LUTs
under all circumstances. If the zebras indicate overexposure no image information
are captured in the affected areas. Color and threshold of the zebra can be
customized.
4)
LUT: To load a customized LUT file please insert USB data source into the respective slot
before choosing this option. Make sure to insert the data source after booting the camera.
Otherwise a firmware update will be attempted and loss of all customized settings will result.
5)
AUDIO: Gain of Capture and Digital can be set. Under normal shooting conditions “Capture”
is advised
6)
SYNC: Setting of Signal Noise, Tally Light, Time Code and 3D;
7)
SYSTEM: Firmware Update, Factory Reset, Camera Configuration, Date/Time and
Language.
WWW.KINEFINITY.TV
30
KineRAW-S35
- user manual -
8.2 Firmware update
Information on the employed firmware version can be found below the last point of the
CONFIGURATIONS MENU.
a)
Download a firmware to an USB stick.
b)
Put this USB stick into the A- USB Pol of the camera.
c)
Enter the CONFIGURATIONS MENU and choose “SYSTEM>FIRMWARE
UPDATE>CONFIRMATION”, wait a few minutes until the displays shows a confirmation and,
after, reboot the system.
8.3 Upload customized LUTs
1. Insert an USB stick with your LUT files
2. Enter the CONFIGURATIONS MENU and choose “SYSTEM > LUT > LOAD CUSTOMIZED
LUT” and confirm.
3. Wait until the displays indicates “LUT file(s) loaded successfully”.
4. Restart the camera
PLEASE NOTE
The USB Stick needs to be FAT or FAT32 formatted to be recognized by the camera
8.4 Core temperature and system
The last point of the CONFIGURATIONS MENU provides information of the operation temperature
inside the housing. The critical point is at 85 °C. Please shut down the camera immediately as soon
as the temperature exceeds 85 °C.
WWW.KINEFINITY.TV
31
KineRAW-S35
- user manual -
9. TROUBLESHOOTING
All the conditions below are not necessarily a malfunction of the camera; they might result from wrong
operation.
9.1 The camera does not boot
Please make sure the camera is attached to an adequate power source.
a) KineRAW-S35™ has a 4-pin XLR power input. The input supports 14.4/14.8V
b) The AC adapter has an output of 12V/7.5A with XLR-4 pin and can supply the camera
directly.
c) When using a battery pinch make sure it supports the required power output. A 12V output
might not be enough to boot the camera.
9.2 The camera does not record after pressing the REC button
a) Double-check your SSD management. A card with sufficient vacant memory space must be
inserted and the slot must be activated.
PLEASE NOTE
Recording stops automatically when there is not enough memory space left.
9.3 Pixel appear in LIVE VIEW MODE or during recording
a) Press the PLAYBACK BUTTON to enter the PLAYBACK MODE. Press the button again to
return to LIVE VIEW MODE. The pixel should be gone.
b) Restart the camera in case the problem reoccurs.
c) Check the OPERATION TEMPERATURE and confirm that it is below 85 °C.
d) Please contact support if the temperature is below 85 °C and the problem does not
disappear.
9.4 Pixel appear on the monitoring device
a) Please make sure you are using and EVF or monitor approved by Kinefinity.
b) Double check if your monitoring device supports 1080p. If not try to set the LIVE VIEW
resolution to 720p.
WWW.KINEFINITY.TV
32
KineRAW-S35
- user manual -
9.5 Pixel appear on Cineroid EVF4L electronic viewfinder
a) The Cineroid EVF4L does not support 1080p. Set the LIVE VIEW resolution to 720p
9.6 Updating the firmware was unsuccessful
a) The USB stick needs to be FAT or FAT32 formatted
b) The firmware file must be located in the root directory
c) Only one firmware file must be located in the root directory
9.7 Clips cannot be played back from the SSD card after connecting to a
workstation
a) Double check if the cineform decoder software has been installed successfully.
b) Check the connection between the SSD and your workstation.
c) Check the thumbnail image file ( *.bmp). If it is not displayed the recording is very likely to be
defective.
WWW.KINEFINITY.TV
33
KineRAW-S35
- user manual -
10. TECHNICAL SPECIFICATIONS
PLEASE NOTE:
Firmware version 6031 enables recording with100 fps in 720p C.
WWW.KINEFINITY.TV
34