1
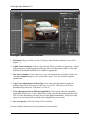
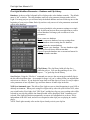
First Light User Manual v1.2 CineForm First Light v1.2 Introduction to First Light: CineForm First Light is a simple, yet powerful application that allows you to fully utilize CineForm's Active Metadata™ technology for non-destructive image development on CineForm files – including white balance, contrast, saturation, lift, gamma, gain, color matrix, 3D LUTs, and other parameters. Active Metadata stores adjustments as metadata attached to your CineForm files and never “flattens” adjustments into your base files. This allows effortless adjustments to color operations on CineForm AVI or MOV files at any time while preserving the integrity of your source images. Changes made in First Light impact your clips instantaneously and globally. Any adjustments made in First Light are instantly presented in other applications as well -- Adobe Premiere and After Effects, Sony Vegas, Windows Media Player -- anywhere your clips are decoded. If you are a Neo3D or Prospect3D customer, First Light also includes controls for adjusting convergence (horizontal, vertical, or rotation), plus color adjustments on individual eyes of a CineForm stereo pair. First Light also provides the interface for muxing two single-stream files into a stereoscopic CineForm file. For Prospect 4K users who have used the CineForm metadata controls in Premiere Pro previously, the same basic principles apply, but with a vastly improved user interface plus the ability to create projects, manage databases, and save presets spanning multiple sessions. We'll get into these details a bit later. Note1: Please also check CineForm’s Tech Blog (http://techblog.cineform.com) for additional – and sometimes more up-to-date – technical information that might be posted. -1- First Light User Manual v1.2 First Light - Quick Workflow Overview: 1. File Import: Drag your file(s) to the Clip Library from Windows Explorer (or use “FileImport…”) 2. Adjust Color Parameters: Select a clip in the bin. Hit Play or Pause as appropriate. Adjust color parameters, usually beginning at the top of the color adjustment window on the right. (Make sure the Enable checkboxes are enabled as appropriate). 3. Save Color Snapshot: If you want to save your color adjustments as a Profile for later use, click Save Snapshot and give your color profile a name. You can recall the Snapshot anytime later. 4. Copy Color Adjustments to Other Clips: If you want your adjustment(s) applied to multiple clips in the Library select “Edit-Copy” (or Ctrl+C). Then select one of more destination clips and select “Edit-Paste” (or Ctrl+V). 5. View Adjustments in Your Editorial Application: Click on your editorial or playback application (Premiere Pro, Vegas, WMP, etc) to bring it into the foreground; then hit “Play”. You’ll see the adjustments you made in First Light applied immediately. Keep First Light open so you can switch back and forth between applications as necessary. 6. Save your project (“File-Save Project”) for recall later. For more detailed discussion of various parameters, keep reading…. -2- First Light User Manual v1.2 First Light Workflow Discussion –Getting started: Before you begin, let's take a tour of the user interface. Left: The left side of the interface shows: The clip library Color database controls (above the clip bin) Right: The right side of the interface shows color adjustments including white balance, contrast, saturation, gain, gamma, lift, looks, and other parameters. Center: The center shows the preview window, timecode, and global controls to turn ON and OFF various Active Metadata parameters. -3- First Light User Manual v1.2 First Light Workflow Discussion – Database and Clip Library Database: At the top of the left panel in First Light are the color database controls. The default name is “db” as shown. The color database stores all color parameter changes made in First Light. For many projects you will need only the default database and can set this up once at the beginning of your project. Note: Each clip can have only one set of color parameters associated with it in the database. If you need multiple color parameter settings on a single clip for different projects then you might want to create a second database to manage your second set of color parameters. New: create new database Branch: create new database, but copy settings from current database when creating the new database. Delete: delete the current database Import: import a new database. The new database might have been moved from a different machine. Export: Export the database into a convenient format for moving to another machine. Clip Library: The clip library holds all clips for a particular project. You can drag-and drop or use “FileImport….” to grab clips for the library. Save Project: Using the “File-Save” command you can save the current project and all clips in the bin, and reload them later. An example for usage is if you’re editing a film you might define each scene as a Project. If you desire the same look on all the clips in a scene it is easy to adjust color parameters on one clip then Copy and Paste them to all other clips in the bin. NLE Sync/Automatic sync: This allows First Light to react to what's happening in your NLE or desktop environment. When you're using First Light side-by-side with your favorite NLE, when you switch back to First Light, click "NLE Sync" and the last clip you were working with will be selected in your clip bin, and the last frame decoded will be displayed. With "Automatic sync" selected, First Light will do this automatically as soon as it's brought back in to focus. This is independent of the NLE used, and will even respond to what clips you are playing in a media player. NOTE: First Light currently relies on the clip to already exist in your clip bin. -4- First Light User Manual v1.2 First Light Workflow Discussion – Preview Panel and Global Controls Clips in the First Light bin are displayed in the preview window. Timecode, if present, is displayed as well. If not, the clip will default to 00:00:00:00. Global Controls: White Balance, Primaries, Curves, Looks, and Framing are offered as Global Controls in the Preview Window. These controls define whether a specific parameter set is ON or OFF for any CineForm clip that is played, regardless of the calling application. Example usage: Using a LUT as an example, you’ll find that CPU usage increases when a LUT is applied. You might choose the proper LUT in First Light, but then turn the LUT OFF during editorial in Premiere Pro if you find that you need more CPU resources for editing tasks. You can always bring First Light back into focus and change the global parameter at any time. Histogram: With the power you have in First Light to radically alter the appearance of your clips, it's important to have a visual representation of your colors and levels. You can now enable a histogram overlay for all of your CineForm clips using the "Histogram" checkbox. Since this is a global control, make sure that this is turned OFF before you do any renders or exports, otherwise it will be baked in to your resulting files and previews. -5- First Light User Manual v1.2 First Light Workflow Discussion – Preview Panel and Global Controls Note that each color adjustment field has an Enable check box. If you disable any particular color control its effect will not be applied to the clip in the bin. Active Metadata tab: All color adjustments made in the Active Metadata tab are stored as metadata attached to your CineForm file in the database selected. Passive Metadata tab: Passive Metadata refers to information stored inside your CineForm clip which is not “active” in the sense of color information. We have many plans for expansion of passive metadata information, including logging information. Workspace Curves: The Encode Curve is an informational field allowing the user to define the curve applied to the data prior to CineForm encoding. Defining the encoder curve as part of the metadata fields provides information to the CineForm decoder engine such that it knows how to apply the inverse curve to restore to linear light. This is useful because it is preferred to apply color processing on linear data, not data to which a curve is applied. The Decode Curve is independent from the Encode Curve, and allows the user to specify the curve used for presentation. The default setting is to use the same curve as the encoder curve. Shown at left are other available options. The Primaries curve gives you two options as to how your color corrections are applied. You can choose linear space (like in previous First Light versions) or in the space of your output curve. This will modify how your corrections are interpreted, but it is your preference as to how you would rather work. White Balance: This feature allows you to adjust the white balance point of your images, either to correct or to artistically re-interpret. To specify a new white balance point, click the "Pick" button, then select a point in the image that is true white to automatically correct. If you select a blown-out point of the image, this feature will not work correctly. -6- First Light User Manual v1.2 Primary Corrections: Most of these controls (contrast, saturation) should be self-explanatory. Base Matrix specifies the base color matrix upon which to apply the corrections. Most sources will use "Neutral", but if your source has an existing matrix, like with the Silicon Imaging SI-2K, "Camera" should be used. If you have previously defined a custom color matrix using an older version of Prospect 4K, select "Custom" to preserve it. Gain, Gamma, and Lift can be regarded as Highlights, Midtones, and Shadows, respectively. First Light allows for independent adjustment of each color channel in each category. Look (3D LUT): Valid Look files match the Iridas .Look format and support up to 64x64x64 resolution. Look files can be created on any PC or Mac using Iridas Speedgrade OnSet and copied to your system with First Light installed. Double-clicking on a .Look file within Windows Explorer will register it for use on the system. The Window at left shows the Looks that are installed on this particular system. First Light ships with two Look files for your experimentation, but other Looks will have to be created and registered by the user. DeBayer Filter: DeBayer Filters are only applied to CineForm RAW files. BiLinear Demosaic is a simple, fast demosaic filter suitable for real-time playback but not suitable for final rendered output. During editorial it is best to use BiLinear Demosaic because it requires the least CPU resource. Think of the progression of Demosaic algorithms between BiLinear and CF Advanced Detail 3 as providing additional sharpening detail in your final output. Default: When set in Default mode the BiLinear Demosaic is always used for timeline playback during editorial. During high-precision render the CF Advanced Detail 1 demosaic is used. Suggestion: For your own experimentation, evaluate different demosaic modes during render to see what level of sharpening is best suited to your needs. Framing: This feature allows you to apply a mask to your clips to create a 2.35:1 aspect ratio. The offset slider allows you to move the frame up or down to better position the clip within the mask, allowing you to achieve the cinemascope look without complicating your NLE timeline. Snapshot Manager: At any time you can save the color adjustments applied to any clip as a “Snapshot”. You can name the snapshot for later recall using “Load to Snapshot” or “Load to Multiple”, which will apply the saved snapshot to any or all clips you select from the project bin. -7-