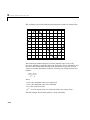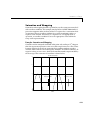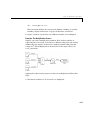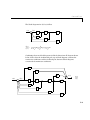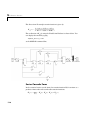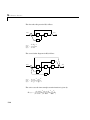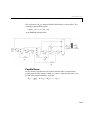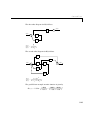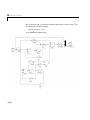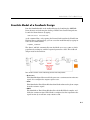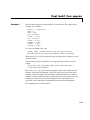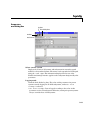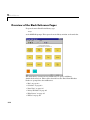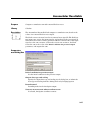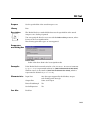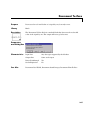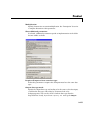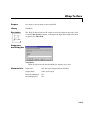
1
Fixed-Point Blockset ® For Use with Simulink Modeling Simulation Implementation User’s Guide Version 4 How to Contact The MathWorks: www.mathworks.com comp.soft-sys.matlab Web Newsgroup [email protected] Technical support Product enhancement suggestions Bug reports Documentation error reports Order status, license renewals, passcodes Sales, pricing, and general information 508-647-7000 Phone 508-647-7001 Fax The MathWorks, Inc. 3 Apple Hill Drive Natick, MA 01760-2098 Mail [email protected] [email protected] [email protected] [email protected] [email protected] For contact information about worldwide offices, see the MathWorks Web site. Fixed-Point Blockset User’s Guide COPYRIGHT 1995 - 2002 by The MathWorks, Inc. The software described in this document is furnished under a license agreement. The software may be used or copied only under the terms of the license agreement. No part of this manual may be photocopied or reproduced in any form without prior written consent from The MathWorks, Inc. FEDERAL ACQUISITION: This provision applies to all acquisitions of the Program and Documentation by or for the federal government of the United States. By accepting delivery of the Program, the government hereby agrees that this software qualifies as "commercial" computer software within the meaning of FAR Part 12.212, DFARS Part 227.7202-1, DFARS Part 227.7202-3, DFARS Part 252.227-7013, and DFARS Part 252.227-7014. The terms and conditions of The MathWorks, Inc. Software License Agreement shall pertain to the government’s use and disclosure of the Program and Documentation, and shall supersede any conflicting contractual terms or conditions. If this license fails to meet the government’s minimum needs or is inconsistent in any respect with federal procurement law, the government agrees to return the Program and Documentation, unused, to MathWorks. MATLAB, Simulink, Stateflow, Handle Graphics, and Real-Time Workshop are registered trademarks, and TargetBox is a trademark of The MathWorks, Inc. Other product or brand names are trademarks or registered trademarks of their respective holders. Printing History: March 1995 April 1997 January 1999 September 2000 June 2001 August 2001 July 2002 First printing Second printing Third printing Fourth printing Online only Fifth printing Online only Revised for MATLAB 5 Revised for MATLAB 5.3 (Release 11) New for Version 3 (Release 12) Revised for Version 3.1 (Release 12.1) Minor revisions for Version 3.1 Revised for Version 4 (Release 13) Contents Preface What Is the Fixed-Point Blockset? . . . . . . . . . . . . . . . . . . . . . . . . x Exploring the Blockset . . . . . . . . . . . . . . . . . . . . . . . . . . . . . . . . . . x How to Get Online Help . . . . . . . . . . . . . . . . . . . . . . . . . . . . . . . . xii System Requirements . . . . . . . . . . . . . . . . . . . . . . . . . . . . . . . . . xiii Licensing Information . . . . . . . . . . . . . . . . . . . . . . . . . . . . . . . . . xiii Related Products . . . . . . . . . . . . . . . . . . . . . . . . . . . . . . . . . . . . . . xv Using This Guide . . . . . . . . . . . . . . . . . . . . . . . . . . . . . . . . . . . . Expected Background . . . . . . . . . . . . . . . . . . . . . . . . . . . . . . . . If You Are a New User . . . . . . . . . . . . . . . . . . . . . . . . . . . . . . . If You Are an Experienced User . . . . . . . . . . . . . . . . . . . . . . . . How This Book Is Organized . . . . . . . . . . . . . . . . . . . . . . . . . . xvii xvii xvii xvii xviii Installation . . . . . . . . . . . . . . . . . . . . . . . . . . . . . . . . . . . . . . . . . . . xix Typographical Conventions . . . . . . . . . . . . . . . . . . . . . . . . . . . . xx Introduction 1 Overview . . . . . . . . . . . . . . . . . . . . . . . . . . . . . . . . . . . . . . . . . . . . Physical Quantities and Measurement Scales . . . . . . . . . . . . . Selecting a Measurement Scale . . . . . . . . . . . . . . . . . . . . . . . . . Example: Selecting a Measurement Scale . . . . . . . . . . . . . . . . . 1-2 1-2 1-3 1-4 Why Use Fixed-Point Hardware? . . . . . . . . . . . . . . . . . . . . . . 1-10 i Why Use the Fixed-Point Blockset? . . . . . . . . . . . . . . . . . . . . 1-12 The Development Cycle . . . . . . . . . . . . . . . . . . . . . . . . . . . . . . . 1-13 Compatibility with Simulink Blocks . . . . . . . . . . . . . . . . . . . Unified Simulink and Fixed-Point Blockset Blocks . . . . . . . . . Frame-Based Signals . . . . . . . . . . . . . . . . . . . . . . . . . . . . . . . . . Matrix Signals . . . . . . . . . . . . . . . . . . . . . . . . . . . . . . . . . . . . . . 1-15 1-15 1-17 1-18 Getting Started with the Blockset 2 Overview of Blockset Features . . . . . . . . . . . . . . . . . . . . . . . . . 2-2 Configuring Fixed-Point Blocks . . . . . . . . . . . . . . . . . . . . . . . . . 2-2 Additional Features and Capabilities . . . . . . . . . . . . . . . . . . . . . 2-8 Example: Converting from Doubles to Fixed-Point . . . . . . 2-10 Block Descriptions . . . . . . . . . . . . . . . . . . . . . . . . . . . . . . . . . . . 2-10 Simulation Results . . . . . . . . . . . . . . . . . . . . . . . . . . . . . . . . . . . 2-11 Demos . . . . . . . . . . . . . . . . . . . . . . . . . . . . . . . . . . . . . . . . . . . . . . 2-15 Basic Fixed-Point Blockset Demos . . . . . . . . . . . . . . . . . . . . . . 2-15 Advanced Fixed-Point Blockset Demos . . . . . . . . . . . . . . . . . . . 2-16 Data Types and Scaling 3 Overview . . . . . . . . . . . . . . . . . . . . . . . . . . . . . . . . . . . . . . . . . . . . . 3-2 Fixed-Point Numbers . . . . . . . . . . . . . . . . . . . . . . . . . . . . . . . . . . Signed Fixed-Point Numbers . . . . . . . . . . . . . . . . . . . . . . . . . . . Radix Point Interpretation . . . . . . . . . . . . . . . . . . . . . . . . . . . . . Scaling . . . . . . . . . . . . . . . . . . . . . . . . . . . . . . . . . . . . . . . . . . . . . Quantization . . . . . . . . . . . . . . . . . . . . . . . . . . . . . . . . . . . . . . . . . ii Contents 3-3 3-3 3-4 3-5 3-6 Range and Precision . . . . . . . . . . . . . . . . . . . . . . . . . . . . . . . . . . 3-8 Example: Fixed-Point Scaling . . . . . . . . . . . . . . . . . . . . . . . . . . 3-10 Example: Constant Scaling for Best Precision . . . . . . . . . . . . . 3-11 Floating-Point Numbers . . . . . . . . . . . . . . . . . . . . . . . . . . . . . . Scientific Notation . . . . . . . . . . . . . . . . . . . . . . . . . . . . . . . . . . . The IEEE Format . . . . . . . . . . . . . . . . . . . . . . . . . . . . . . . . . . . . Range and Precision . . . . . . . . . . . . . . . . . . . . . . . . . . . . . . . . . Exceptional Arithmetic . . . . . . . . . . . . . . . . . . . . . . . . . . . . . . . 3-15 3-15 3-17 3-19 3-21 Arithmetic Operations 4 Overview . . . . . . . . . . . . . . . . . . . . . . . . . . . . . . . . . . . . . . . . . . . . . 4-2 Limitations on Precision . . . . . . . . . . . . . . . . . . . . . . . . . . . . . . . 4-3 Rounding . . . . . . . . . . . . . . . . . . . . . . . . . . . . . . . . . . . . . . . . . . . 4-3 Padding with Trailing Zeros . . . . . . . . . . . . . . . . . . . . . . . . . . . . 4-9 Example: Limitations on Precision and Errors . . . . . . . . . . . . 4-10 Example: Maximizing Precision . . . . . . . . . . . . . . . . . . . . . . . . 4-10 Limitations on Range . . . . . . . . . . . . . . . . . . . . . . . . . . . . . . . . . Saturation and Wrapping . . . . . . . . . . . . . . . . . . . . . . . . . . . . . Guard Bits . . . . . . . . . . . . . . . . . . . . . . . . . . . . . . . . . . . . . . . . . Example: Limitations on Range . . . . . . . . . . . . . . . . . . . . . . . . 4-12 4-13 4-14 4-15 Recommendations for Arithmetic and Scaling . . . . . . . . . . Addition . . . . . . . . . . . . . . . . . . . . . . . . . . . . . . . . . . . . . . . . . . . Accumulation . . . . . . . . . . . . . . . . . . . . . . . . . . . . . . . . . . . . . . . Multiplication . . . . . . . . . . . . . . . . . . . . . . . . . . . . . . . . . . . . . . . Gain . . . . . . . . . . . . . . . . . . . . . . . . . . . . . . . . . . . . . . . . . . . . . . Division . . . . . . . . . . . . . . . . . . . . . . . . . . . . . . . . . . . . . . . . . . . . Summary . . . . . . . . . . . . . . . . . . . . . . . . . . . . . . . . . . . . . . . . . . 4-16 4-16 4-19 4-20 4-21 4-23 4-25 Parameter and Signal Conversions . . . . . . . . . . . . . . . . . . . . 4-26 Parameter Conversions . . . . . . . . . . . . . . . . . . . . . . . . . . . . . . . 4-27 Signal Conversions . . . . . . . . . . . . . . . . . . . . . . . . . . . . . . . . . . . 4-27 iii Rules for Arithmetic Operations . . . . . . . . . . . . . . . . . . . . . . . Computational Units . . . . . . . . . . . . . . . . . . . . . . . . . . . . . . . . . Addition and Subtraction . . . . . . . . . . . . . . . . . . . . . . . . . . . . . Multiplication . . . . . . . . . . . . . . . . . . . . . . . . . . . . . . . . . . . . . . Division . . . . . . . . . . . . . . . . . . . . . . . . . . . . . . . . . . . . . . . . . . . . Shifts . . . . . . . . . . . . . . . . . . . . . . . . . . . . . . . . . . . . . . . . . . . . . . 4-30 4-30 4-30 4-35 4-39 4-41 Example: Conversions and Arithmetic Operations . . . . . . 4-43 Realization Structures 5 Overview . . . . . . . . . . . . . . . . . . . . . . . . . . . . . . . . . . . . . . . . . . . . . 5-2 Realizations and Data Types . . . . . . . . . . . . . . . . . . . . . . . . . . . . 5-2 Targeting an Embedded Processor . . . . . . . . . . . . . . . . . . . . . Size Assumptions . . . . . . . . . . . . . . . . . . . . . . . . . . . . . . . . . . . . . Operation Assumptions . . . . . . . . . . . . . . . . . . . . . . . . . . . . . . . . Design Rules . . . . . . . . . . . . . . . . . . . . . . . . . . . . . . . . . . . . . . . . . 5-3 5-3 5-3 5-4 Canonical Forms . . . . . . . . . . . . . . . . . . . . . . . . . . . . . . . . . . . . . . 5-6 Direct Form II . . . . . . . . . . . . . . . . . . . . . . . . . . . . . . . . . . . . . . . 5-7 Series Cascade Form . . . . . . . . . . . . . . . . . . . . . . . . . . . . . . . . . 5-10 Parallel Form . . . . . . . . . . . . . . . . . . . . . . . . . . . . . . . . . . . . . . . 5-13 Tutorial: Feedback Controller Simulation 6 Overview . . . . . . . . . . . . . . . . . . . . . . . . . . . . . . . . . . . . . . . . . . . . . 6-2 Simulink Model of a Feedback Design . . . . . . . . . . . . . . . . . . 6-3 Simulation Setup . . . . . . . . . . . . . . . . . . . . . . . . . . . . . . . . . . . . . 6-4 Idealized Feedback Design . . . . . . . . . . . . . . . . . . . . . . . . . . . . . 6-6 iv Contents Digital Controller Realization . . . . . . . . . . . . . . . . . . . . . . . . . . 6-7 Direct Form Realization . . . . . . . . . . . . . . . . . . . . . . . . . . . . . . . 6-8 Simulation Results . . . . . . . . . . . . . . . . . . . . . . . . . . . . . . . . . . . 1. Initial Guess at Scaling . . . . . . . . . . . . . . . . . . . . . . . . . . . . . 2. Data Type Override . . . . . . . . . . . . . . . . . . . . . . . . . . . . . . . . 3. Automatic Scaling . . . . . . . . . . . . . . . . . . . . . . . . . . . . . . . . . 6-10 6-10 6-13 6-15 Tutorial: Producing Lookup Table Data 7 Overview . . . . . . . . . . . . . . . . . . . . . . . . . . . . . . . . . . . . . . . . . . . . . 7-2 Worst Case Error for a Lookup Table . . . . . . . . . . . . . . . . . . . 7-3 Example: Square Root Function . . . . . . . . . . . . . . . . . . . . . . . . . 7-3 Creating Lookup Tables for a Sine Function . . . . . . . . . . . . . 7-5 Parameters for fixpt_look1_func_approx . . . . . . . . . . . . . . . . . . 7-5 Setting Function Parameters for the Lookup Table . . . . . . . . . 7-6 Example 1: Using errmax with Unrestricted Spacing . . . . . . . . 7-7 Example 2: Using nptsmax with Unrestricted Spacing . . . . . . 7-10 Example 3: Using errmax with Even Spacing . . . . . . . . . . . . . 7-12 Example 4: Using nptsmax with Even Spacing . . . . . . . . . . . . 7-13 Example 5: Using errmax with Power of Two Spacing . . . . . . 7-14 Example 6: Using nptsmax with Power of Two Spacing . . . . . 7-16 Specifying Both errmax and nptsmax . . . . . . . . . . . . . . . . . . . . 7-17 Comparing the Examples . . . . . . . . . . . . . . . . . . . . . . . . . . . . . 7-18 Summary: Using the Lookup Table Functions . . . . . . . . . . 7-19 Effect of Spacing on Speed, Error, and Memory Usage . . . Data ROM Required . . . . . . . . . . . . . . . . . . . . . . . . . . . . . . . . . Determining Out-of-Range Inputs . . . . . . . . . . . . . . . . . . . . . . Determining Input Location . . . . . . . . . . . . . . . . . . . . . . . . . . . Interpolation . . . . . . . . . . . . . . . . . . . . . . . . . . . . . . . . . . . . . . . . Conclusion . . . . . . . . . . . . . . . . . . . . . . . . . . . . . . . . . . . . . . . . . 7-20 7-21 7-22 7-22 7-24 7-26 v Function Reference 8 Functions—By Category . . . . . . . . . . . . . . . . . . . . . . . . . . . . . . . Conversions . . . . . . . . . . . . . . . . . . . . . . . . . . . . . . . . . . . . . . . . . Fixed-Point Settings Interface . . . . . . . . . . . . . . . . . . . . . . . . . . Global Changes . . . . . . . . . . . . . . . . . . . . . . . . . . . . . . . . . . . . . . Lookup Tables . . . . . . . . . . . . . . . . . . . . . . . . . . . . . . . . . . . . . . . Data Type Structures . . . . . . . . . . . . . . . . . . . . . . . . . . . . . . . . . Tools . . . . . . . . . . . . . . . . . . . . . . . . . . . . . . . . . . . . . . . . . . . . . . . 8-2 8-3 8-3 8-3 8-3 8-4 8-4 Block Reference 9 Blocks—By Category . . . . . . . . . . . . . . . . . . . . . . . . . . . . . . . . . . 9-2 Bits . . . . . . . . . . . . . . . . . . . . . . . . . . . . . . . . . . . . . . . . . . . . . . . . 9-3 Calculus . . . . . . . . . . . . . . . . . . . . . . . . . . . . . . . . . . . . . . . . . . . . 9-3 Data Type . . . . . . . . . . . . . . . . . . . . . . . . . . . . . . . . . . . . . . . . . . . 9-5 Delays & Holds . . . . . . . . . . . . . . . . . . . . . . . . . . . . . . . . . . . . . . . 9-5 Edge Detect . . . . . . . . . . . . . . . . . . . . . . . . . . . . . . . . . . . . . . . . . 9-7 Filters . . . . . . . . . . . . . . . . . . . . . . . . . . . . . . . . . . . . . . . . . . . . . . 9-7 Logic & Comparison . . . . . . . . . . . . . . . . . . . . . . . . . . . . . . . . . . . 9-8 LookUp . . . . . . . . . . . . . . . . . . . . . . . . . . . . . . . . . . . . . . . . . . . . . 9-8 Math . . . . . . . . . . . . . . . . . . . . . . . . . . . . . . . . . . . . . . . . . . . . . . . 9-9 Nonlinear . . . . . . . . . . . . . . . . . . . . . . . . . . . . . . . . . . . . . . . . . . 9-10 Select . . . . . . . . . . . . . . . . . . . . . . . . . . . . . . . . . . . . . . . . . . . . . . 9-10 Sources . . . . . . . . . . . . . . . . . . . . . . . . . . . . . . . . . . . . . . . . . . . . 9-11 Overview of the Block Reference Pages . . . . . . . . . . . . . . . . 9-12 The Block Dialog Box . . . . . . . . . . . . . . . . . . . . . . . . . . . . . . . . . 9-15 Common Block Features . . . . . . . . . . . . . . . . . . . . . . . . . . . . . . Block Parameters . . . . . . . . . . . . . . . . . . . . . . . . . . . . . . . . . . . . Block Icon Labels . . . . . . . . . . . . . . . . . . . . . . . . . . . . . . . . . . . . Port Data Type Display . . . . . . . . . . . . . . . . . . . . . . . . . . . . . . . vi Contents 9-16 9-16 9-20 9-21 Code Generation A Overview . . . . . . . . . . . . . . . . . . . . . . . . . . . . . . . . . . . . . . . . . . . . . A-2 Code Generation Support . . . . . . . . . . . . . . . . . . . . . . . . . . . . . . Languages . . . . . . . . . . . . . . . . . . . . . . . . . . . . . . . . . . . . . . . . . . Storage Class of Variables . . . . . . . . . . . . . . . . . . . . . . . . . . . . . . Storage Class of Parameters . . . . . . . . . . . . . . . . . . . . . . . . . . . . Rounding Modes . . . . . . . . . . . . . . . . . . . . . . . . . . . . . . . . . . . . . . Overflow Handling . . . . . . . . . . . . . . . . . . . . . . . . . . . . . . . . . . . . Blocks . . . . . . . . . . . . . . . . . . . . . . . . . . . . . . . . . . . . . . . . . . . . . . Scaling . . . . . . . . . . . . . . . . . . . . . . . . . . . . . . . . . . . . . . . . . . . . . A-3 A-3 A-3 A-3 A-3 A-4 A-4 A-4 Generating Pure Integer Code . . . . . . . . . . . . . . . . . . . . . . . . . A-5 Example: Generating Pure Integer Code . . . . . . . . . . . . . . . . . . A-5 HTML Report . . . . . . . . . . . . . . . . . . . . . . . . . . . . . . . . . . . . . . . . A-9 Using the Simulink Accelerator . . . . . . . . . . . . . . . . . . . . . . . A-11 Using External Mode or rsim Target . . . . . . . . . . . . . . . . . . . A-12 External Mode . . . . . . . . . . . . . . . . . . . . . . . . . . . . . . . . . . . . . . A-12 Rapid Simulation Target . . . . . . . . . . . . . . . . . . . . . . . . . . . . . . A-12 Customizing Generated Code . . . . . . . . . . . . . . . . . . . . . . . . . A-13 Macros Versus Functions . . . . . . . . . . . . . . . . . . . . . . . . . . . . . A-13 Bit Sizes for Target C Compiler . . . . . . . . . . . . . . . . . . . . . . . . A-13 Selected Bibliography B vii viii Contents Preface What Is the Fixed-Point Blockset? (p. x) A brief overview of the features and capabilities of the Fixed-Point Blockset How to Get Online Help (p. xii) Tips on accessing Help online while using the Fixed-Point Blockset System Requirements (p. xiii) System requirements for the Fixed-Point Blockset Related Products (p. xv) MathWorks products related to the Fixed-Point Blockset Using This Guide (p. xvii) Tips on using this guide and an overview of its organization Installation (p. xix) Information on installing the Fixed-Point Blockset Typographical Conventions (p. xx) Typographical conventions used in this guide Preface What Is the Fixed-Point Blockset? The Fixed-Point Blockset includes a collection of blocks that extend the standard Simulink® block library. With these blocks, you can create discrete-time dynamic systems that use fixed-point arithmetic. As a result, Simulink can simulate effects commonly encountered in fixed-point systems for applications such as control systems and time-domain filtering. The Fixed-Point Blockset includes these major features: • Integer, fractional, and generalized fixed-point data types - Unsigned and two’s complement formats - Word sizes in simulation from 1 to 128 bits • Floating-point data types - IEEE-style singles and doubles - A nonstandard IEEE-style data type, where the fraction can range from 1 to 52 bits and the exponent can range from 1 to 11 bits • Methods for overflow handling, scaling, and rounding of fixed-point data types • Tools that facilitate - The collection of minimum and maximum simulation values - The optimization of scaling parameters - The display of input and output signals In addition, you can generate C code for execution on a fixed-point embedded processor with Real-Time Workshop®. The generated code uses only integer types and automatically includes all operations, such as shifts, needed to account for differences in fixed-point locations. Exploring the Blockset To open the main Fixed-Point Blockset library, type fixpt ® at the MATLAB command line, or right-click on the Fixed-Point Blockset listing in the Simulink Library Browser. The main library contains 12 sublibraries. Refer to “Blocks—By Category” on page 9-2. x What Is the Fixed-Point Blockset? You can double-click on any block icon in a library to see its parameter dialog box. Click the Help button to view the HTML-based help for that block. xi Preface How to Get Online Help The Fixed-Point Blockset provides several ways to get online help: • Block, System, and Filter Help Click the Help button in any block, system, or filter dialog box to view its HTML-based documentation. • Help Desk Type helpdesk or doc at the MATLAB command line to load the main MATLAB help page into the Help browser. • Release Information Type whatsnew fixpoint at the MATLAB command line to view information related to the version of the Fixed-Point Blockset that you’re using. xii System Requirements System Requirements The Fixed-Point Blockset is a multiplatform product that you install on a host computer running any of the operating systems supported by The MathWorks. The Fixed-Point Blockset requires • MATLAB 6.5 (Release 13) or later • Simulink 5.0 (Release 13) or later If you want to generate code from your fixed-point models, you must have Real-Time Workshop®. If you want to create an executable from the generated code, you must have the appropriate C compiler and linker. For the most up-to-date information about system requirements, see the system requirements section available in the support area of the MathWorks Web site (http://www.mathworks.com/support). Licensing Information Beginning with Release 13, the Fixed-Point Blockset is shipped and installed with every copy of Simulink. You can edit a model containing fixed-point blocks without a fixed-point license. However, you must have a fixed-point license to • Update a Simulink diagram (Ctrl+D) containing fixed-point data types • Run a model containing fixed-point data types • Generate code from a model containing fixed-point data types • Log the minimum and maximum values produced by a simulation • Handle overflows by saturating to the minimum or maximum possible value • Automatically scale the output of a model using the autoscaling tool The following products also depend on a fixed-point license to take full advantage of fixed-point features in R13: • DSP Blockset • Embedded Target for the TI TMS320C600™ DSP Platform • Real-Time Workshop • Real-Time Workshop Embedded Coder • Stateflow • Stateflow Coder xiii Preface • xPC Target To work with a model containing blocks from the Fixed-Point Blockset without a fixed-point license: 1 Access the Fixed-Point Settings interface from the model by selecting Tools -> Fixed-Point settings. 2 Set the Logging mode parameter to Force off model-wide. 3 Set the Data type override parameter to True doubles or True singles model-wide. xiv Related Products Related Products The MathWorks provides several products that are especially relevant to the kinds of tasks you can perform with the Fixed-Point Blockset. For more information about any of these products, see either • The online documentation for that product if it is installed or if you are reading the documentation from the CD • The products area of the MathWorks Web site (http://www.mathworks.com/products) Note The toolboxes listed below all include functions that extend the capabilities of MATLAB. The blocksets all include blocks that extend the capabilities of Simulink. Product Description DSP Blockset Design and simulate DSP systems Filter Design Toolbox Design and analyze advanced floating-point and fixed-point filters Real-Time Workshop Generate C code from Simulink models Simulink Design and simulate continuous- and discrete-time systems Simulink Performance Tools Manage and optimize the performance of large Simulink models Simulink Report Generator Automatically generate documentation for Simulink and Stateflow models Stateflow® Design and simulate event-driven systems xv Preface xvi Product Description Stateflow Coder Generate C code from Stateflow charts xPC Target Perform real-time rapid prototyping using PC hardware Using This Guide Using This Guide This guide describes how to use the Fixed-Point Blockset to emulate fixed-point arithmetic when modeling discrete-time dynamic systems in Simulink. It contains tutorial information that describes how to use the blockset features, as well as a reference entry for each block and function in the blockset. Expected Background This guide assumes you are familiar with both MATLAB and Simulink. If you are new to MATLAB, you should read the Getting Started with MATLAB documentation. If you are new to Simulink, you should read the Using Simulink documentation. You should also have a basic understanding of Boolean algebra and binary word representations. If You Are a New User Start with Chapter 1, “Introduction,” which describes how the Fixed-Point Blockset can help you bridge the gap between designing a dynamic system and implementing it on fixed-point digital hardware. Then read Chapter 2, “Getting Started with the Blockset,” which describes many Fixed-Point Blockset features and provides a simple example. After reading this chapter, you should be able to create simple fixed-point models. If you want detailed information about a specific block, refer to Chapter 9, “Block Reference.” If you want detailed information about a specific function, refer to Chapter 8, “Function Reference.” If You Are an Experienced User Start with Chapter 6, “Tutorial: Feedback Controller Simulation,” which describes how to simulate a fixed-point digital controller design. You should then read those parts of the guide that address the functionality that concerns you. If you want detailed information about a specific block, refer to Chapter 9, “Block Reference.” If you want detailed information about a specific function, refer to Chapter 8, “Function Reference.” xvii Preface How This Book Is Organized The organization of this guide is described below. xviii Chapter Name Description Introduction Describes how the Fixed-Point Blockset can help you bridge the gap between designing a dynamic system and implementing it on fixed-point digital hardware. Getting Started with the Blockset Shows you how to use many Fixed-Point Blockset features. After reading this chapter, you should be able to create simple fixed-point models. Data Types and Scaling Describes fixed-point data types, floating-point data types, and data type scaling. Arithmetic Operations Describes fixed-point arithmetic and its limitations. Realization Structures Describes how to create fixed-point realization structures. Tutorial: Feedback Controller Simulation Describes how to simulate a fixed-point digital controller design. Tutorial: Producing Lookup Table Data Describes how to create lookup table data using the lookup table approximation functions. Function Reference Describes MATLAB M-file scripts and functions provided with the blockset. Block Reference Describes each fixed-point block in detail. Code Generation Describes the simulation features that are available for code generation. Recommendations for producing efficient code are provided. Selected Bibliography Provides a selected list of references. Installation Installation To determine if the Fixed-Point Blockset is installed on your system, type ver at the MATLAB command line. When you enter this command, MATLAB displays information about the version of MATLAB you are running, including a list of installed add-on products and their version numbers. Check the list to see if the Fixed-Point Blockset appears. For information about installing the blockset, see your platform-specific MATLAB Installation guide. If you experience installation difficulties and have Web access, look for the installation and license information at the MathWorks Web site (http://www.mathworks.com/support). xix Preface Typographical Conventions This manual uses some or all of these conventions. Item Convention Example Example code Monospace font To assign the value 5 to A, enter A = 5 Function names, syntax, filenames, directory/folder names, and user input Monospace font The cos function finds the cosine of each array element. Syntax line example is MLGetVar ML_var_name Buttons and keys Boldface with book title caps Press the Enter key. Literal strings (in syntax descriptions in reference chapters) Monospace bold for literals f = freqspace(n,'whole') Mathematical expressions Italics for variables This vector represents the polynomial p = x2 + 2x + 3. MATLAB output Monospace font Standard text font for functions, operators, and constants MATLAB responds with A = 5 xx Menu and dialog box titles Boldface with book title caps Choose the File Options menu. New terms and for emphasis Italics An array is an ordered collection of information. Omitted input arguments (...) ellipsis denotes all of the input/output arguments from preceding syntaxes. [c,ia,ib] = union(...) String variables (from a finite list) Monospace italics sysc = d2c(sysd,'method') 1 Introduction Overview (p. 1-2) An overview of measurement scales and representing numbers Why Use Fixed-Point Hardware? (p. 1-10) A discussion of the limitations and benefits of fixed-point hardware Why Use the Fixed-Point Blockset? (p. 1-12) A description of key features and capabilities of the Fixed-Point Blockset The Development Cycle (p. 1-13) An overview of the development cycle for simulating dynamic systems Compatibility with Simulink Blocks (p. 1-15) A discussion of the compatibility of Fixed-Point Blockset blocks with Simulink blocks 1 Introduction Overview This chapter provides a rationale for using fixed-point hardware in general, and the Fixed-Point Blockset in particular. The decision to use fixed-point hardware is simply a choice to represent numbers in a particular form. This representation often offers advantages in terms of the power consumption, size, memory usage, speed, and cost of the final product. Physical Quantities and Measurement Scales A measurement of a physical quantity can take many numerical forms. For example, the boiling point of water is 100 degrees Celsius, 212 degrees Fahrenheit, 373 degrees Kelvin, or 671.4 degrees Rankine. No matter what number is given, the physical quantity is exactly the same. The numbers are different because four different scales are used. Well known standard scales like Celsius are very convenient for the exchange of information. However, there are situations where it makes sense to create and use unique nonstandard scales. These situations usually involve making the most of a limited resource. For example, nonstandard scales allow map makers to get the maximum detail on a fixed size sheet of paper. A typical road atlas of the USA will show each state on a two-page display. The scale of inches to miles will be unique for most states. By using a large ratio of miles to inches, all of Texas can fit on two pages. Using the same scale for Rhode Island would make poor use of the page. Using a much smaller ratio of miles to inches would allow Rhode Island to be shown with the maximum possible detail. Fitting measurements of a variable inside an embedded processor is similar to fitting a state map on a piece of paper. The map scale should allow all the boundaries of the state to fit on the page. Similarly, the binary scale for a measurement should allow the maximum and minimum possible values to “fit.” The map scale should also make the most of the paper in order to get maximum detail. Similarly, the binary scale for a measurement should make the most of the processor in order to get maximum precision. Use of standard scales for measurements has definite compatibility advantages. However, there are times when it is worthwhile to break convention and use a unique nonstandard scale. There are also occasions when a mix of uniqueness and compatibility makes sense. 1-2 Overview Selecting a Measurement Scale Suppose that you want to make measurements of the temperature of liquid water, and that you want to represent these measurements using 8-bit unsigned integers. Fortunately, the temperature range of liquid water is limited. No matter what scale you use, liquid water can only go from the freezing point to the boiling point. Therefore, this is range of temperatures the you must capture using just the 256 possible 8-bit values: 0,1,2,...,255. One approach to representing the temperatures is to use a standard scale. For example, the units for the integers could be Celsius. Hence, the integers 0 and 100 represent water at the freezing point and at the boiling point, respectively. On the upside, this scale gives a trivial conversion from the integers to degrees Celsius. On the downside, the numbers 101 to 255 are unused. By using this standard scale, more than 60% of the number range has been wasted. A second approach is to use a nonstandard scale. In this scale, the integers 0 and 255 represent water at the freezing point and at the boiling point, respectively. On the upside, this scale gives maximum precision since there are 254 values between freezing and boiling instead of just 99. On the downside, the units are roughly 0.3921568 degree Celsius per bit so the conversion to Celsius requires division by 2.55, which is a relatively expensive operation on most fixed-point processors. A third approach is to use a “semi-standard” scale. For example, the integers 0 and 200 could represent water at the freezing point and at the boiling point, respectively. The units for this scale are 0.5 degrees Celsius per bit. On the downside, this scale doesn’t use the numbers from 201 to 255, which represents a waste of more than 21%. On the upside, this scale permits relatively easy conversion to a standard scale. The conversion to Celsius involves division by 2, which is a very easy shift operation on most processors. Measurement Scales: Beyond Multiplication One of the key operations in converting from one scale to another is multiplication. The preceding case study gave three examples of conversions from a quantized integer value Q to a real-world Celsius value V that involved only multiplication: 1-3 1 Introduction 100°C -------------------- 100 bits- ⋅ Q 1 100°C V = ---------------------- ⋅ Q 2 255 bits 100°C ---------------------- ⋅ Q 3 200 bits Conversion 1 Conversion 2 Conversion 3 Graphically, the conversion is a line with slope S, which must pass through the origin. A line through the origin is called a purely linear conversion. Restricting yourself to a purely linear conversion can be very wasteful and it is often better to use the general equation of a line: V = SQ + B By adding a bias term B, you can obtain greater precision when quantizing to a limited number of bits. The general equation of a line gives a very useful conversion to a quantized scale. However, like all quantization methods, the precision is limited and errors can be introduced by the conversion. The general equation of a line with quantization error is given by V = SQ + B ± Error If the quantized value Q is rounded to the nearest representable number, then S S – ---- ≤ Error ≤ ---2 2 That is, the amount of quantization error is determined by both the number of bits and by the scale. This scenario represents the best case error. For other rounding schemes, the error can be twice as large. Example: Selecting a Measurement Scale On typical electronically controlled internal combustion engines, the flow of fuel is regulated to obtain the desired ratio of air to fuel in the cylinders just prior to combustion. Therefore, knowledge of the current air flow rate is required. Some manufacturers use sensors that directly measure air flow while other manufacturers calculate air flow from measurements of related signals. The relationship of these variables is derived from the ideal gas equation. The 1-4 Overview ideal gas equation involves division by air temperature. For proper results, an absolute temperature scale such as Kelvin or Rankine must be used in the equation. However, quantization directly to an absolute temperature scale would cause needlessly large quantization errors. The temperature of the air flowing into the engine has a limited range. On a typical engine, the radiator is designed to keep the block below the boiling point of the cooling fluid. Let's assume a maximum of 225o F (380o K). As the air flows through the intake manifold, it can be heated up to this maximum temperature. For a cold start in an extreme climate, the temperature can be as low as -60o F (222o K). Therefore, using the absolute Kelvin scale, the range of interest is 222o K to 380o K. The air temperature needs to be quantized for processing by the embedded control system. Assuming an unrealistic quantization to 3-bit unsigned numbers: 0,1,2,...,7, the purely linear conversion with maximum precision is 380°K V = ----------------- ⋅ Q 7.5 bit 1-5 1 Introduction The quantized conversion and range of interest are shown below. Visualization of Quantized Conversion o o Quantized Value, Q (50.6667 K/bit) with Bias = 0 K 8 7 V = 222oK 6 5 4 3 2 V = 380oK 1 0 −1 0 50 100 150 200 250 300 350 400 Real World Value, V (oK) Notice that there are 7.5 possible quantization values. This is because only half of the first bit corresponds to temperatures (real-world values) greater than zero. The quantization error is – 25.33 °K/bit ≤ Error ≤ 25.33°K/bit 1-6 Overview The range of interest of the quantized conversion and the absolute value of the quantized error are shown below. Visualization of Quantized Conversion Quantized Value, Q 400 350 300 250 200 240 260 280 300 320 340 360 380 340 360 380 40 o Quantization Error ( K/bit) Real World Value, V (oK) 30 20 10 0 240 260 280 300 320 Real World Value, V (oK) As an alternative to the purely linear conversion, consider the general linear conversion with maximum precision: 380°K – 222°K 380°K – 222°K V = ----------------------------------------- ⋅ Q + 222°K + 0.5 ⋅ ----------------------------------------- 8 8 1-7 1 Introduction The quantized conversion and range of interest are shown below. Visualization of Quantized Conversion 7 o V = 222 K 6 5 4 o o Quantized Value, Q (19.75 K/bit) with Bias = 231.875 K 8 3 2 V = 380oK 1 0 −1 0 50 100 150 200 250 300 350 400 Real World Value, V (oK) The quantization error is – 9.875 °K/bit ≤ Error ≤ 9.875°K/bit which is approximately 2.5 times smaller than the error associated with the purely linear conversion. 1-8 Overview The range of interest of the quantized conversion and the absolute value of the quantized error are shown below. Visualization of Quantized Conversion Quantized Value, Q 400 350 300 250 200 240 260 280 300 320 340 360 380 340 360 380 40 o Quantization Error ( K/bit) Real World Value, V (oK) 30 20 10 0 240 260 280 300 320 Real World Value, V (oK) Clearly, the general linear scale gives much better precision than the purely linear scale over the range of interest. 1-9 1 Introduction Why Use Fixed-Point Hardware? Digital hardware is becoming the primary means by which control systems and signal processing filters are implemented. Digital hardware can be classified as either off-the-shelf hardware (for example, microcontrollers, microprocessors, general purpose processors, and digital signal processors) or custom hardware. Within these two types of hardware, there are many architecture designs. These designs range from systems with a single instruction, single data stream processing unit to systems with multiple instruction, multiple data stream processing units. Within digital hardware, numbers are represented as either fixed-point or floating-point data types. For both these data types, word sizes are fixed at a set number of bits. However, the dynamic range of fixed-point values is much less than floating-point values with equivalent word sizes. Therefore, in order to avoid overflow or unreasonable quantization errors, fixed-point values must be scaled. Since floating-point processors can greatly simplify the real-time implementation of a control law or digital filter, and floating-point numbers can effectively approximate real-world numbers, then why use a microcontroller or processor with fixed-point hardware support? • Size and Power Consumption — The logic circuits of fixed-point hardware are much less complicated than those of floating-point hardware. This means that the fixed-point chip size is smaller with less power consumption when compared with floating-point hardware. For example, consider a portable telephone where one of the product design goals is to make it as portable (small and light) as possible. If one of today’s high-end floating-point, general-purpose processors is used, a large heat sink and battery would also be needed resulting in a costly, large, and heavy portable phone. • Memory Usage and Speed — In general fixed-point calculations require less memory and less processor time to perform. • Cost — Fixed-point hardware is more cost effective where price/cost is an important consideration. When using digital hardware in a product, especially mass-produced products, fixed-point hardware costs much less than floating-point hardware and can result in significant savings. After making the decision to use fixed-point hardware, the next step is to choose a method for implementing the dynamic system (for example, control system or digital filter). Floating-point software emulation libraries are 1-10 Why Use Fixed-Point Hardware? generally ruled out because of timing or memory size constraints. Therefore, you are left with fixed-point math where binary integer values are scaled. 1-11 1 Introduction Why Use the Fixed-Point Blockset? The Fixed-Point Blockset allows you to efficiently design control systems and digital filters that you will implement using fixed-point arithmetic. With the Fixed-Point Blockset, you can construct Simulink models that contain detailed fixed-point information about your systems. You can then perform bit-true simulations with the models to observe the effects of limited range and precision on your designs. You can configure the Fixed-Point Settings interface to automatically log the overflows, saturations, and signal extremes of your simulations. You can also use it to automate scaling decisions and to compare your fixed-point implementations against idealized, floating-point benchmarks. You can use the Fixed-Point Blockset with Real-Time Workshop to automatically generate efficient, integer-only C code representations of your designs. You can use this C code in a production target or for rapid prototyping. You can also use the Fixed-Point Blockset with Real-Time Workshop Embedded Coder to generate real-time C code for use on an integer production, embedded target. 1-12 The Development Cycle The Development Cycle The Fixed-Point Blockset provides tools that aid in the development and testing of fixed-point dynamic systems. You directly design dynamic system models in Simulink, which are ready for implementation on fixed-point hardware. The development cycle is illustrated below. Start Model plant or signal source Simulink Model fixed-point controller or filter Design requirements met? no yes Use the model as a specification for creating production code 1-13 1 Introduction Using MATLAB, Simulink, and the Fixed-Point Blockset, you follow these steps of the development cycle: 1 Model the system (plant or signal source) within Simulink using the built-in blocks and double precision numbers. Typically, the model will contain nonlinear elements. 2 Design and simulate a fixed-point dynamic system (for example, a control system or digital filter) with the Fixed-Point Blockset that meets the design, performance, and other constraints. 3 Analyze the results and go back to 1 if needed. When you have met the design requirements, you can use the model as a specification for creating production code using Real-Time Workshop®. The above steps interact strongly. In steps 1 and 2, there is a significant amount of freedom to select different solutions. Generally, you fine-tune the model based upon feedback from the results of the current implementation (step 3). There is no specific modeling approach. For example, you may obtain models from first principles such as equations of motion, or from a frequency response such as a sine sweep. There are many controllers that meet the same frequency-domain or time-domain specifications. Additionally, for each controller there are an infinite number of realizations. The Fixed-Point Blockset helps expedite the design cycle by allowing you to simulate the effects of various fixed-point controller and digital filter structures. 1-14 Compatibility with Simulink Blocks Compatibility with Simulink Blocks You can connect built-in Simulink blocks directly to Fixed-Point Blockset blocks provided the signals use built-in Simulink data types. The built-in data types include uint8, uint16, uint32, int8, int16, int32, single, double, and boolean. The Fixed-Point Blockset supports all built-in data types. However, a fixed-point signal consisting of 8-, 16-, or 32-bit integers is compatible with built-in Simulink blocks only when its scaling is given by a slope of 1 and a bias of 0. Some Simulink blocks impose restrictions on the data type of the signals they can handle. For example, some Simulink blocks only accept doubles. To incorporate these blocks into your fixed-point model, you must configure the driving block(s) to use doubles. Note If you want to connect Simulink blocks that only handle built-in data types to Fixed-Point Blockset blocks that output blockset-specific data types, then you must use the Gateway Out or Conversion block to convert to a built-in data type. Some Simulink blocks can accept signals of any data type. For these blocks, you can input any of the built-in data types or any of the blockset-specific data types. Examples of blockset-specific data types include 32-bit signed integers with a scaling of 2-8, and 18-bit unsigned integers with a scaling of 20. In some cases, fixed-point signals that are not built-in data types are converted to a real-world value as it enters the block. For example, the To Workspace block will output a 32-bit signed integer with a scaling of 2-8 as a double. Refer to the Simulink documentation for detailed information about the data types handled by each Simulink block. Unified Simulink and Fixed-Point Blockset Blocks Many core Simulink and Fixed-Point Blockset blocks with similar functions have been unified in Version 4.0 of the Fixed-Point Blockset. For example, the Sum block in the Simulink Math Operations library and the Sum block in the Fixed-Point Blockset Math library are now the same block. All the functionality from each original block has been maintained in unifying these 1-15 1 Introduction blocks. Compatibility with fixed-point data types and/or specific fixed-point features are now available with all of these blocks, whether they are used from the Simulink Blockset or from the Fixed-Point Blockset. You do not need to make any changes to your previously-existing models as a result of this improvement. You can now use any of the unified blocks with either built-in data types or fixed-point data types, which eliminates the need for you to replace blocks in your models when you want to use different data types. This change does not require all Simulink users to have a Fixed-Point Blockset license. Refer to “Licensing Information” on page -xiii for more information. Fixed-Point Blockset blocks that have been unified no longer have an “F” on their block icon. However, not all Fixed-Point Blockset blocks that have counterparts in Simulink libraries have been unified. You can still use the fixpt_convert function to replace nonunified Simulink blocks with their Fixed-Point Blockset counterparts in your models. Non-unified Fixed-Point Blockset blocks have an advantage over their Simulink counterparts in that they can handle more data types. However, you may still want to use the Simulink counterparts of non-unified Fixed-Point Blockset blocks in some cases, since they support faster simulation times for the data types they handle. The following table lists the unified blocks in this release, and the Simulink and Fixed-Point Blockset libraries in which they are found. 1-16 Block Simulink Library Fixed-Point Blockset Library Abs Math Operations Math Constant Sources Sources Data Store Memory Signal Routing N/A Data Store Read Signal Routing N/A Data Store Write Signal Routing N/A Gain Math Operations Math Inport Ports & Subsystems, Sources N/A Logical Operator Math Operations Logic & Comparison Compatibility with Simulink Blocks Block Simulink Library Fixed-Point Blockset Library Look-Up Table Look-Up Tables Look-Up Tables Look-Up Table (2-D) Look-Up Tables Look-Up Tables Manual Switch Signal Routing N/A Memory Discrete N/A Merge Signal Routing N/A Multiport Switch Signal Routing Select Outport Ports & Subsystems, Sinks N/A Product Math Operations Math Rate Transition Signal Attributes N/A Relational Operator Math Operations Logic & Comparison Relay Discontinuities Nonlinear Saturation Discontinuities Nonlinear Sign Math Operations Nonlinear Signal Specification Signal Attributes N/A Slider Gain Math Operations N/A Sum Math Operations Math Switch Signal Routing Select Unit Delay Discrete Delays & Holds Zero-Order Hold Discrete Delays & Holds Frame-Based Signals Most real-time systems optimize throughput rates by processing data in “batch” or “frame-based” mode, where each batch or frame is a collection of consecutive signal samples that have been buffered into a single unit. You can process signals in Simulink as frame-based signals. 1-17 1 Introduction Fixed-Point Blockset blocks accept frame-based signals for simulation and code generation, except for the Dot Product and FIR blocks. The DSP Blockset also supports frame-based processing, and can use blocks from the Fixed-Point Blockset in models that process frame-based signals. For further understanding of frame-based processing, refer to “Working with Signals” in the DSP Blockset documentation. Matrix Signals The Simulink documentation refers to two-dimensional (2-D) signals as matrices. Simulink blocks can output 2-D signals, which consist of streams of two-dimensional arrays emitted at a frequency of one 2-D array per sample time. Fixed-Point Blockset blocks support matrix-based signals for simulation and code generation, except for the Dot Product and FIR blocks. For further understanding of matrix-based processing, refer to “Working with Signals” in the Simulink documentation. 1-18 2 Getting Started with the Blockset Overview of Blockset Features (p. 2-2) An overview of specific features of the Fixed-Point Blockset, such as scaling and overflow handling Example: Converting from Doubles to Fixed-Point (p. 2-10) An example of using the Fixed-Point Blockset based on the fxpdemo_dbl2fix demo, which highlights converting between doubles and fixed-point data types Demos (p. 2-15) A list of the basic and advanced demos available with the Fixed-Point Blockset 2 Getting Started with the Blockset Overview of Blockset Features This section provides a brief overview of important Fixed-Point Blockset features. After reading this section and the example that follows, you should be able to configure simple fixed-point models that suit your own application needs. Configuring Fixed-Point Blocks You configure fixed-point blocks with a parameter dialog box. To configure blocks, you supply values for parameters via editable text fields, check boxes, and parameter lists. The dialog box for the Gateway In block is shown below. The following sections discuss parameters associated with this block. • “Real-World Values Versus Integer Values” on page 2-3 • “Selecting the Output Data Type” on page 2-3 • “Selecting the Output Scaling” on page 2-5 • “Rounding” on page 2-7 2-2 Overview of Blockset Features • “Overflow Handling” on page 2-7 • “Locking the Output Scaling” on page 2-8 For detailed information about each fixed-point block, refer to Chapter 9, “Block Reference.” Real-World Values Versus Integer Values You can configure the fixed-point gateway blocks to treat signals as real-world values or as stored integers with the Input and output to have equal parameter. The possible values are Real World Value and Stored Integer. In terms of the variables defined in “The General [Slope Bias] Encoding Scheme” on page 2-6, the real-world value is given by V and the stored integer value is given by Q. You may want to treat numbers as stored integer values if you are modeling hardware that produces integers as output. Selecting the Output Data Type For many fixed-point blocks, you have the option of specifying the output data type via the block dialog box, or inheriting the output data type from another block. You control how the output data type is selected with the Output data type and scaling or Output data type mode parameter list. Some possible values are Specify via dialog, Inherit via internal rule, Inherit via back propagation and Same as input. The Fixed-Point Blockset supports several fixed-point and floating-point data types. Fixed-point data types are characterized by their word size in bits and by their radix (binary) point. The radix point is the means by which fixed-point values are scaled. Additionally • Unsigned and two’s complement formats are supported. • The fixed-point word size can range from 1 to 128 bits in simulation. • The radix point is not required to be contiguous with the fixed-point word. Floating-point data types are characterized by their sign bit, fraction (mantissa) field, and exponent field. The Fixed-Point Blockset supports IEEE singles, IEEE doubles, and a nonstandard IEEE-style floating-point data type. 2-3 2 Getting Started with the Blockset Note You can create Fixed-Point Blockset data types directly in the MATLAB workspace and then pass the resulting structure to a fixed-point block, or you can specify the data type directly with the block dialog box. Integers. You specify unsigned and signed integers with the uint and sint functions, respectively. For example, to specify a 16-bit unsigned integer via the block dialog box, you configure the Output data type parameter as uint(16). To specify a 16-bit signed integer, you configure the Output data type parameter as sint(16). For integer data types, the default radix point is assumed to lie to the right of all bits. Fractional Numbers. You specify unsigned and signed fractional numbers with the ufrac and sfrac functions, respectively. For example, to configure the output as a 16-bit unsigned fractional number via the block dialog box, you specify the Output data type parameter to be ufrac(16). To configure a 16-bit signed fractional number, you specify Output data type to be sfrac(16). Fractional numbers are distinguished from integers by their default scaling. Whereas signed and unsigned integer data types have a default radix point to the right of all bits, unsigned fractional data types have a default radix point to the left of all bits, while signed fractional data types have a default radix point to the right of the sign bit. Both unsigned and signed fractional data types support guard bits, which act to “guard” against overflow. For example, sfrac(16,4) specifies a 16-bit signed fractional number with 4 guard bits. The guard bits lie to the left of the default radix point. Generalized Fixed-Point Numbers. You specify unsigned and signed generalized fixed-point numbers with the ufix and sfix functions. respectively. For example, to configure the output as a 16-bit unsigned generalized fixed-point number via the block dialog box, you specify the Output data type parameter to be ufix(16). To configure a 16-bit signed generalized fixed-point number, you specify Output data type to be sfix(16). 2-4 Overview of Blockset Features Generalized fixed-point numbers are distinguished from integers and fractionals by the absence of a default scaling. For these data types, you must explicitly specify the scaling with the Output scaling or Output scaling value parameter, or inherit the scaling from another block. Refer to “Selecting the Output Scaling” on page 2-5 for more information. Floating-Point Numbers. The Fixed-Point Blockset supports single-precision and double-precision floating-point numbers as defined by the IEEE Standard 754-1985 for Binary Floating-Point Arithmetic. You specify floating-point numbers with the float function. For example, to configure the output as a single-precision floating-point number via the block dialog box, you specify the Output data type parameter to be float('single'). To configure a double-precision floating-point number, you specify Output data type to be float('double'). You can also specify a nonstandard floating-point number that mimics the IEEE style. For this data type, the fraction (mantissa) can range from 1 to 52 bits and the exponent can range from 1 to 11 bits. For example, to configure a nonstandard floating-point number having 32 total bits and 9 exponents bits, you specify Output data type to be float(32,9). Note These numbers are normalized with a hidden leading 1 for all exponents except the smallest possible exponent. However, the largest possible exponent might not be treated as a flag for Infs or NaNs. Selecting the Output Scaling Most data types supported by the Fixed-Point Blockset have a default scaling that you cannot change. However, for generalized fixed-point data types, you have the option of specifying the output scaling via the block dialog box, or inheriting the output scaling from another block. You control how the output scaling is selected with the Output data type and scaling or Output data type mode parameter. The Fixed-Point Blockset supports two general scaling modes: radix point-only scaling and [Slope Bias] scaling. In addition to these general scaling modes, the blockset provides you with additional block-specific scaling choices for constant vectors and constant matrices. These scaling choices are based on radix 2-5 2 Getting Started with the Blockset point-only scaling and are designed to maximize precision. Refer to “Example: Constant Scaling for Best Precision” on page 3-11 for more information. To help you understand the supported scaling modes, the general [Slope Bias] encoding scheme is presented in the next section. The General [Slope Bias] Encoding Scheme. When representing an arbitrarily precise real-world value with a fixed-point number, it is often useful to define a general [Slope Bias] encoding scheme ˜ V ≈ V = SQ + B where • V is the real-world value. ˜ • V is the approximate real-world value. • Q is an integer that encodes V. • B is the bias. • S = F2E is the slope. The slope is partitioned into two components: • 2E specifies the radix point. E is the fixed power-of-two exponent. • F is the fractional slope. It is normalized such that 1 ≤ F < 2 . Radix Point-Only Scaling. This is “powers-of-two” scaling since it involves moving only the radix point. Radix point-only scaling does not require the radix point to be contiguous with the data word. The advantage of this scaling mode is the number of processor arithmetic operations is minimized. You specify radix point-only scaling with the syntax 2^ E where E is unrestricted. This creates a MATLAB structure with a bias B = 0 and a fractional slope F = 1.0. For example, if you specify the value 2^ 10 for the Output scaling or Output scaling value parameter, then the generalized fixed-point number has a power-of-two exponent E = -10. This value defines the radix point location to be 10 places to the left of the least significant bit. 2-6 Overview of Blockset Features [Slope Bias] Scaling. With this scaling mode, you can provide a slope and a bias. The advantage of [Slope Bias] scaling is that it typically provides more efficient use of a finite number of bits. You specify [Slope Bias] scaling with the syntax [slope bias], which creates a MATLAB structure with the given slope and bias. For example, if you specify the value [5/9 10] for the Output scaling or Output scaling value parameter, then the generalized fixed-point number has a slope of 5/9 and a bias of 10. The blockset would automatically store F as 1.1111 and E as -1 due to the normalization condition 1 ≤ F < 2 . Rounding You specify how fixed-point numbers are rounded with the Round toward or Round integer calculations toward parameter. These rounding modes are supported: • Zero – This mode rounds toward zero and is equivalent to the MATLAB fix function. • Nearest – This mode rounds toward the nearest representable number, with the exact midpoint rounded toward positive infinity. Rounding toward nearest is equivalent to the MATLAB round function. • Ceiling – This mode rounds toward positive infinity and is equivalent to the MATLAB ceil function. • Floor – This mode rounds toward negative infinity and is equivalent to the MATLAB floor function. Overflow Handling You control how overflow conditions are handled for fixed-point operations with the Saturate to max or min when overflows occur or Saturate on integer overflow checkbox. If this box is selected, then overflows saturate to either the maximum or minimum value represented by the data type. For example, an overflow associated with a signed 8-bit integer can saturate to -128 or 127. If this box is not selected, then overflows wrap to the appropriate value that is representable by the data type. For example, the number 130 does not fit in a signed 8-bit integer, and would wrap to -126. 2-7 2 Getting Started with the Blockset Locking the Output Scaling If the output data type is a generalized fixed-point number, then you have the option of locking its scaling by checking the Lock output scaling so autoscaling tool can’t change it or Lock output scaling against changes by the autoscaling tool checkbox. When locked, the automatic scaling script autofixexp will not change the output scaling. Otherwise, the autofixexp is free to adjust the scaling. Additional Features and Capabilities In addition to the features described in “Configuring Fixed-Point Blocks” on page 2-2, the Fixed-Point Blockset provides you with these features and capabilities: • An automatic scaling tool • Code generation capabilities Automatic Scaling You can use the autofixexp script to automatically change the scaling for each block that has generalized fixed-point output and does not have its scaling locked. The script uses the maximum and minimum values logged during the last simulation run. The scaling is changed such that the simulation range is covered and the precision is maximized. As an alternative to (and extension of) the automatic scaling script, you can use the Fixed-Point Settings interface. This tool allows you to easily control the parameters associated with automatic scaling and display the simulation results for a given model. To learn how to use the Fixed-Point Settings interface, refer to Chapter 6, “Tutorial: Feedback Controller Simulation.” Code Generation With Real-Time Workshop®, the Fixed-Point Blockset can generate C code. The code generated from fixed-point blocks uses only integer types and automatically includes all operations, such as shifts, needed to account for differences in fixed-point locations. You can use the generated code on embedded fixed-point processors or rapid prototyping systems even if they contain a floating-point processor. The code is structured so that key operations can be readily replaced by optimized 2-8 Overview of Blockset Features target-specific libraries that you supply. You can also use Target Language Compiler™ to customize the generated code. Refer to Appendix A, “Code Generation” for more information about code generation using fixed-point blocks. 2-9 2 Getting Started with the Blockset Example: Converting from Doubles to Fixed-Point The purpose of this example is to show you how to simulate a continuous realworld doubles signal using a generalized fixed-point data type. The model used is the simplest possible model and employs only two fixed-point blocks. Although simple in design, the model gives you the opportunity to explore many of the important features of the Fixed-Point Blockset including • Data types • Scaling • Rounding • Logging minimum and maximum simulation values to the workspace • Overflow handling The model used in this example is given by the fxpdemo_dbl2fix demo. You can launch this demo by typing its name at the MATLAB command line: fxpdemo_dbl2fix The model is shown below. Signal enerator Zero−Order Hold In Out Dbl To FixPt1 FixPt to Dbl1 Mux Mux Scope FixPt GUI Block Descriptions The Signal Generator block is configured to output a sine wave with an amplitude defined on the interval [-5 5]. It always outputs double-precision numbers. The Gateway In block (Dbl To FixPt1) is used as the interface between Simulink and the Fixed-Point Blockset. Its function is to convert the double-precision numbers from the Signal Generator block into one of the 2-10 Example: Converting from Doubles to Fixed-Point Fixed-Point Blockset data types. For simplicity, its output signal is limited to 5 bits in this example. The Gateway Out (FixPt to Dbl1) block is used as the interface between the Fixed-Point Blockset and Simulink. Its function is to convert one of the Fixed-Point Blockset data types into a Simulink data type. In this example, it outputs double-precision numbers. The GUI block launches the Fixed-Point Settings interface, fxptdlg. This tool provides convenient access to the global override and logging parameters, the logged minimum and maximum simulation data, the automatic scaling script, and the plot interface tool. It is not used in this example. If you have many fixed-point blocks whose scaling must be optimized, however, you should use this tool. Refer to Chapter 6, “Tutorial: Feedback Controller Simulation” for more information. Note As described in “Compatibility with Simulink Blocks” on page 1-15, you can eliminate the gateway blocks from your fixed-point model if all signals use built-in data types. Simulation Results The results of two simulation trials are given below. The first trial uses radix point-only scaling while the second trial uses [Slope Bias] scaling. Trial 1: Radix Point-Only Scaling When using radix point-only scaling, your goal is to find the optimal power-of-two exponent E, as defined in “Selecting the Output Scaling” on page 2-5. For this scaling mode, the fractional slope F is set to 1 and no bias is required. The Gateway In block is configured in this way: • Output data type The output data type is given by sfix(5). This creates a MATLAB structure that is a 5-bit, signed generalized fixed-point number. 2-11 2 Getting Started with the Blockset • Output scaling The output scaling is given by 2^ 2, which puts the radix point two places to the left of the rightmost bit. This gives a maximum value of 011.11 = 3.75, a minimum value of 100.00 = -4.00, and a precision of (1/2)2 = 0.25. • Rounding The rounding mode is given by Nearest. This rounds the fixed-point result to the nearest representable number, with the exact midpoint rounded towards positive infinity. • Overflows Fixed-point values that overflow will saturate to the maximum or minimum value represented by the word. The resulting real-world and fixed-point simulation results are shown below. 5 4 3 2 1 0 −1 −2 −3 −4 −5 0 0.1 0.2 0.3 0.4 0.5 0.6 0.7 0.8 0.9 1 The simulation clearly demonstrates the quantization effects of fixed-point arithmetic. The combination of using a 5-bit word with a precision of (1/2)2 = 0.25 produces a discretized output that does not span the full range of the input signal. 2-12 Example: Converting from Doubles to Fixed-Point If you want to span the complete range of the input signal with 5 bits using radix point-only scaling, then your only option is to sacrifice precision. Hence, the output scaling would be given by 2^ 1, which puts the radix point one place to the left of the rightmost bit. This scaling gives a maximum value of 0111.1 = 7.5, a minimum value of 1000.0 = -8.0, and a precision of (1/2)1 = 0.5. Trial 2: [Slope Bias] Scaling When using [Slope Bias] scaling, your goal is to find the optimal fractional slope F and fixed power-of-two exponent E, as defined in “Selecting the Output Scaling” on page 2-5. No bias is required for this example since the sine wave is defined on the interval [-5 5]. The Gateway In block configuration is the same as that of the previous trial except for the scaling. To arrive at a value for the slope, you can begin by assuming a fixed power-oftwo exponent of -2. In the previous trial, this value defined the radix point-only scaling and resulted in a precision of 0.25. To find the fractional slope, you divide the maximum value of the sine wave by the maximum value of the scaled 5-bit number. The result is 5.00/3.75 = 1.3333. The slope (and precision) is 1.3333.(0.25) = 0.3333. You specify this value as [0.3333] for the Output scaling parameter. Of course, you could have specified a fixed power-of-two exponent of -1 and a corresponding fractional slope of 0.6667. Naturally, the resulting slope is the same since E was reduced by one bit but F was increased by one bit. In this case, the blockset would automatically store F as 1.3332 and E as -2 due to the normalization condition of 1 ≤ F < 2 . 2-13 2 Getting Started with the Blockset The resulting real-world and fixed-point simulation results are shown below. 5 4 3 2 1 0 −1 −2 −3 −4 −5 0 0.1 0.2 0.3 0.4 0.5 0.6 0.7 0.8 0.9 1 This somewhat cumbersome process used to find the slope is not really necessary. All that is required is the range of the data you are simulating and the size of the fixed-point word used in the simulation. In general, you can achieve reasonable simulation results by selecting your scaling based on the formula ( max – min ) ----------------------------------ws 2 –1 where • max is the maximum value to be simulated. • min is the minimum value to be simulated. • ws is the word size in bits. • 2ws – 1 is the largest value of a word with whose size is given by ws. For this example, the formula produces a slope of 0.32258. 2-14 Demos Demos To help you learn the Fixed-Point Blockset, a collection of demos is provided. You can explore specific blockset features by changing block parameters and observing the effects of those changes. The demos are divided into two groups: basic demos that illustrate the basic functionality of the Fixed-Point Blockset, and advanced demos that illustrate the functionality of systems built with fixed-point blocks. All demos are located in the fxpdemos directory. You can access the demos through the MATLAB Demo browser. You launch the Demo browser by clicking the Demos block in the Fixed-Point Blockset library, or by typing demo blockset 'Fixed Point' at the command line. To open a demo, double-click the name of the demo in lower pane of the Demo browser. Basic Fixed-Point Blockset Demos The basic demos are listed below. Demo Name Description Double to Fixed-Point Conversion Convert a double precision value to a fixed-point value. Fixed-Point to Fixed-Point Conversion Convert a fixed-point value to another fixed-point value. Fixed-Point to Fixed-Point Inherited Conversion Convert a fixed-point value to an inherited fixed-point value. Fixed-Point Sine Add and multiply two fixed-point sine wave signals. Fixed-Point Filters Simulate implementations of a fixed-point filter. 2-15 2 Getting Started with the Blockset Demo Name Description Scaling a Fixed-Point Control Design Simulate a fixed-point feedback design. Generating Only Fixed-Point Code Generate pure integer code for a fixed-point digital controller. “Example: Converting from Doubles to Fixed-Point” on page 2-10 discusses the Double to Fixed-Point Conversion demo, while Chapter 6, “Tutorial: Feedback Controller Simulation” discusses the Scaling a Fixed-Point Control Design demo. Advanced Fixed-Point Blockset Demos The advanced demos are intended to show you how to build and test systems suited to your particular needs. The output of these demos is compared to the output of analogous built-in Simulink blocks with identical input. The advanced demos are listed below. 2-16 Demo Name Description Fixed-Point Integrators Compare output from the Integrator Trapezoidal, Integrator Backward, and Integrator Forward blocks to output from the Simulink Discrete Integrator block. Fixed-Point Derivatives Compare output from the Derivative and Derivative: Filtered realizations to output from the Simulink derivatives built using the Discrete Filter and Transfer Fcn blocks. Fixed-Point Lead and Lag Filters Compare output from the Lead and Lag Filter block to output from analogous Simulink filters built using the Discrete Filter block. Fixed-Point State Space Compare output from the State-Space Realization realization to output from the analogous built-in Simulink State-Space and Discrete State-Space blocks. Demos Demo Name Description Fixed-Point Data Type Propagation Illustrate data type propagation using the Data Type Propagation block, and the “Inherit via back propagation” setting. Fixed-Point Function Approximation Compare the fixed-point lookup approximation of a function with the ideal function. Additional fixed-point demos for direct form II, series cascade form, and parallel form realizations are discussed in Chapter 5, “Realization Structures.” 2-17 2 Getting Started with the Blockset 2-18 3 Data Types and Scaling Overview (p. 3-2) An overview of data types and scaling in digital hardware Fixed-Point Numbers (p. 3-3) A discussion of the representation and manipulation of fixed-point numbers, both in general and in the Fixed-Point Blockset Floating-Point Numbers (p. 3-15) A discussion of the representation and manipulation of floating-point numbers 3 Data Types and Scaling Overview In digital hardware, numbers are stored in binary words. A binary word is a fixed-length sequence of binary digits (1’s and 0’s). The way in which hardware components or software functions interpret this sequence of 1’s and 0’s is described by a data type. Binary numbers are represented as either fixed-point or floating-point data types. A fixed-point data type is characterized by the word size in bits, the radix (binary) point, and whether it is signed or unsigned. The radix point is the means by which fixed-point values are scaled. Within the Fixed-Point Blockset, fixed-point data types can be integers, fractionals, or generalized fixed-point numbers. The main difference between these data types is their default radix point. Floating-point data types are characterized by a sign bit, a fraction (or mantissa) field, and an exponent field. The blockset adheres to the IEEE Standard 754-1985 for Binary Floating-Point Arithmetic (referred to simply as the IEEE Standard 754 throughout this guide) and supports singles, doubles, and a nonstandard IEEE-style floating-point data type. When choosing a data type, you must consider these factors: • The numerical range of the result • The precision required of the result • The associated quantization error (i.e., the rounding mode) • The method for dealing with exceptional arithmetic conditions These choices depend on your specific application, the computer architecture used, and the cost of development, among others. With the Fixed-Point Blockset, you can explore the relationship between data types, range, precision, and quantization error in the modeling of dynamic digital systems. With Real-Time Workshop®, you can generate production code based on that model. 3-2 Fixed-Point Numbers Fixed-Point Numbers Fixed-point numbers are stored in data types that are characterized by their word size in bits, radix point, and whether they are signed or unsigned. The Fixed-Point Blockset supports integers, fractionals, and generalized fixed-point numbers. The main difference between these data types is their default radix point. Note Fixed-point word sizes up to 128 bits are supported. A common representation of a binary fixed-point number (either signed or unsigned) is shown below. b ws – 1 b ws – 2 … b5 b4 • b3 b2 b0 b1 LSB MSB radix point where • bi are the binary digits (bits). • The size of the word in bits is given by ws. • The most significant bit (MSB) is the leftmost bit, and is represented by location b ws – 1 . • The least significant bit (LSB) is the rightmost bit, and is represented by location b0. • The radix point is shown four places to the left of the LSB. Signed Fixed-Point Numbers Computer hardware typically represents the negation of a binary fixed-point number in three different ways: sign/magnitude, one’s complement, and two’s complement. Two’s complement is the preferred representation of signed fixed-point numbers and is supported by the Fixed-Point Blockset. 3-3 3 Data Types and Scaling Negation using two’s complement consists of a bit inversion (translation into one’s complement) followed by the addition of a one. For example, the two’s complement of 000101 is 111011. Whether a fixed-point value is signed or unsigned is usually not encoded explicitly within the binary word (i.e., there is no sign bit). Instead, the sign information is implicitly defined within the computer architecture. Radix Point Interpretation The radix point is the means by which fixed-point numbers are scaled. It is usually the software that determines the radix point. When performing basic math functions such as addition or subtraction, the hardware uses the same logic circuits regardless of the value of the scale factor. In essence, the logic circuits have no knowledge of a scale factor. They are performing signed or unsigned fixed-point binary algebra as if the radix point is to the right of b0. Within the Fixed-Point Blockset, the main difference between fixed-point data types is the default radix point. For integers and fractionals, the radix point is fixed at the default value. For generalized fixed-point data types, you must either explicitly specify the scaling by configuring dialog box parameters, or inherit the scaling from another block. The supported fixed-point data types are described below. Integers The default radix point for signed and unsigned integer data types is assumed to be just to the right of the LSB. You specify unsigned and signed integers with the uint and sint functions, respectively. Fractionals The default radix point for unsigned fractional data types is just to the left of the MSB, while for signed fractionals the radix point is just to the right of the MSB. If you specify guard bits, then they lie to the left of the radix point. You specify unsigned and signed fractional numbers with the ufrac and sfrac functions, respectively. Generalized Fixed-Point Numbers For signed and unsigned generalized fixed-point numbers, there is no default radix point. You specify unsigned and signed generalized fixed-point numbers with the ufix and sfix functions, respectively. 3-4 Fixed-Point Numbers Scaling The dynamic range of fixed-point numbers is much less than that of floating-point numbers with equivalent word sizes. To avoid overflow conditions and minimize quantization errors, fixed-point numbers must be scaled. With the Fixed-Point Blockset, you can select a fixed-point data type whose scaling is defined by its default radix point, or you can select a generalized fixed-point data type and choose an arbitrary linear scaling that suits your needs. This section presents the scaling choices available for generalized fixed-point data types. A fixed-point number can be represented by a general [Slope Bias] encoding scheme ˜ V ≈ V = SQ + B where • V is an arbitrarily precise real-world value. ˜ • V is the approximate real-world value. • Q is an integer that encodes V. • S = F.2E is the slope. • B is the bias. The slope is partitioned into two components: • 2E specifies the radix point. E is the fixed power-of-two exponent. • F is the fractional slope. It is normalized such that 1 ≤ F < 2 . Note S and B are constants and do not show up in the computer hardware directly – only the quantization value Q is stored in computer memory. The scaling modes available to you within this encoding scheme are described below. For detailed information about how the supported scaling modes effect fixed-point operations, refer to “Recommendations for Arithmetic and Scaling” on page 4-16. 3-5 3 Data Types and Scaling Radix Point-Only Scaling As the name implies, radix point-only (or “powers-of-two”) scaling involves moving only the radix point within the generalized fixed-point word. The advantage of this scaling mode is the number of processor arithmetic operations is minimized. With radix point-only scaling, the components of the general [Slope Bias] formula have these values: •F = 1 • S = 2E •B = 0 That is, the scaling of the quantized real-world number is defined only by the slope S, which is restricted to a power of two. In the Fixed-Point Blockset, you specify radix point-only scaling with the syntax 2^-E where E is unrestricted. This creates a MATLAB structure with a bias B = 0 and a fractional slope F = 1.0. For example, the syntax 2^-10 defines a scaling such that the radix point is at a location 10 places to the left of the least significant bit. [Slope Bias] Scaling When you scale by slope and bias, the slope S and bias B of the quantized real-world number can take on any value. You specify scaling by slope and bias with the syntax [slope bias], which creates a MATLAB structure with the given slope and bias. For example, a [Slope Bias] scaling specified by [5/9 10] defines a slope of 5/9 and a bias of 10. The slope must be a positive number. See “Example: Fixed-Point Scaling” on page 3-10 and “Example: Constant Scaling for Best Precision” on page 3-11 for more information. Quantization The quantization Q of a real-world value V is represented by a weighted sum of bits. Within the context of the general [Slope Bias] encoding scheme, the value of an unsigned fixed-point quantity is given by 3-6 Fixed-Point Numbers ws – 1 ˜ V = S⋅ ∑ bi 2i + B i=0 while the value of a signed fixed-point quantity is given by ws – 2 ˜ V = S ⋅ – b ws – 1 2 ws – 1 + ∑ bi 2 i + B i=0 where • bi are binary digits, with b i = 1, 0. • The word size in bits is given by ws, with ws = 1,2,3,...,128. • S is given by F2E, where the scaling is unrestricted since the radix point does not have to be contiguous with the word. bi are called bit multipliers and 2i are called the weights. Example: Fixed-Point Format The formats for 8-bit signed and unsigned fixed-point values are given below. 0 0 1 1 1 0 1 1 • • 0 1 0 1 Unsigned data type 0 1 0 1 Signed data type Note that you cannot discern whether these numbers are signed or unsigned data types merely by inspection since this information is not explicitly encoded within the word. The binary number 0011.0101 yields the same value for the unsigned and two’s complement representation since the MSB = 0. Setting B = 0 and using the appropriate weights, bit multipliers, and scaling, the value is 3-7 3 Data Types and Scaling ws – 1 ∑ E E ˜ V = ( F2 ) ⋅ Q = 2 ⋅ bi 2 i i=0 = 2 –4 7 6 5 4 3 2 1 0 ⋅ (0 ⋅ 2 + 0 ⋅ 2 + 1 ⋅ 2 + 1 ⋅ 2 + 0 ⋅ 2 + 1 ⋅ 2 + 0 ⋅ 2 + 1 ⋅ 2 ) = 3.3125 Conversely, the binary number 1011.0101 yields different values for the unsigned and two’s complement representation since the MSB = 1. Setting B = 0 and using the appropriate weights, bit multipliers, and scaling, the unsigned value is ws – 1 ∑ E E ˜ V = ( F2 ) ⋅ Q = 2 ⋅ bi 2 i i=0 = 2 –4 7 6 5 4 3 2 1 0 ⋅ (1 ⋅ 2 + 0 ⋅ 2 + 1 ⋅ 2 + 1 ⋅ 2 + 0 ⋅ 2 + 1 ⋅ 2 + 0 ⋅ 2 + 1 ⋅ 2 ) = 11.3125 while the two’s complement value is ws – 2 E E ˜ ws – 1 + V = ( F2 ) ⋅ Q = 2 ⋅ – b ws – 1 2 ∑ bi 2i i=0 = 2 –4 7 6 5 4 3 2 1 0 ⋅ ( –1 ⋅ 2 + 0 ⋅ 2 + 1 ⋅ 2 + 1 ⋅ 2 + 0 ⋅ 2 + 1 ⋅ 2 + 0 ⋅ 2 + 1 ⋅ 2 ) = – 4.6875 Range and Precision The range of a number gives the limits of the representation while the precision gives the distance between successive numbers in the representation. The range and precision of a fixed-point number depends on the length of the word and the scaling. 3-8 Fixed-Point Numbers Range The range of representable numbers for an unsigned and two’s complement fixed-point number of size ws, scaling S, and bias B is illustrated below. S.(2ws – 1) + B B positive numbers S.(–2ws – 1) + B 0 negative numbers S.(2ws – 1– 1) + B positive numbers For both the signed and unsigned fixed-point numbers of any data type, the number of different bit patterns is 2ws. For example, if the fixed-point data type is an integer with scaling defined as S = 1 and B = 0, then the maximum unsigned value is 2ws – 1 since zero must be represented. In two’s complement, negative numbers must be represented as well as zero so the maximum value is 2ws – 1– 1. Additionally, since there is only one representation for zero, there must be an unequal number of positive and negative numbers. This means there is a representation for –2ws – 1 but not for 2ws – 1. Precision The precision (scaling) of integer and fractional data types is specified by the default radix point. For generalized fixed-point data types, the scaling must be explicitly defined as either [Slope Bias] or radix point-only. In either case, the precision is given by the slope. Fixed-Point Data Type Parameters The low limit, high limit, and default radix point-only scaling for the supported fixed-point data types discussed in “Radix Point Interpretation” on page 3-4 3-9 3 Data Types and Scaling are given below. See “Limitations on Precision” and “Limitations on Range” in Chapter 4 for more information. Fixed-Point Data Type Range and Default Scaling Name Data Type Low Limit High Limit Default Scaling (~Precision) Integer uint 0 2ws – 1 1 sint –2ws – 1 2ws – 1 – 1 1 ufrac 0 1 – 2–ws 2–ws sfrac –1 1 – 2–(ws – 1) 2–(ws – 1) ufix N/A N/A N/A sfix N/A N/A N/A Fractional Generalized Fixed-Point Example: Fixed-Point Scaling Range of an 8-Bit Fixed-Point Data Type — Radix Point-Only Scaling The precision, range of signed values, and range of unsigned values for an 8-bit generalized fixed-point data type with radix point-only scaling follow. Note that the first scaling value (21) represents a radix point that is not contiguous with the word. Scaling 1 2 0 2 -1 2 -2 2 -3 2 -4 2 3-10 Precision Range of Signed Values (low, high) Range of Unsigned Values (low, high) 2.0 -256, 254 0, 510 1.0 -128, 127 0, 255 0.5 -64, 63.5 0, 127.5 0.25 -32, 31.75 0, 63.75 0.125 -16, 15.875 0, 31.875 0.0625 -8, 7.9375 0, 15.9375 Fixed-Point Numbers Scaling -5 2 -6 2 -7 2 -8 2 Precision Range of Signed Values (low, high) Range of Unsigned Values (low, high) 0.03125 -4, 3.96875 0, 7.96875 0.015625 -2, 1.984375 0, 3.984375 0.0078125 -1, 0.9921875 0, 1.9921875 0.00390625 -0.5, 0.49609375 0, 0.99609375 Range of an 8-Bit Fixed-Point Data Type – [Slope Bias] Scaling The precision and range of signed and unsigned values for an 8-bit fixed-point data type using [Slope Bias] scaling follow. The slope starts at a value of 1.25 and the bias is 1.0 for all slopes. Note that the slope is the same as the precision. Bias Slope/Precision Range of Signed Values (low, high) Range of Unsigned Values (low, high) 1 1.25 -159, 159.75 1, 319.75 1 0.625 -79, 80.375 1, 160.375 1 0.3125 -39, 40.6875 1, 80.6875 1 0.15625 -19, 20.84375 1, 40.84375 1 0.078125 -9, 10.921875 1, 20.921875 1 0.0390625 -4, 5.9609375 1, 10.9609375 1 0.01953125 -1.5, 3.48046875 1, 5.98046875 1 0.009765625 -0.25, 2.240234375 1, 3.490234375 1 0.0048828125 0.375, 1.6201171875 1, 2.2451171875 Example: Constant Scaling for Best Precision The Fixed-Point Blockset provides you with block-specific modes for scaling constant vectors and constant matrices. These scaling modes are based on radix point-only scaling and are described below: 3-11 3 Data Types and Scaling • Constant Vector Scaling Using this mode, you can scale a constant vector such that its precision is maximized element-by-element, or a common radix point is found based on the best precision for the largest value of the vector. • Constant Matrix Scaling Using this mode, you can scale a constant matrix such that its precision is maximized element-by-element, or a common radix point is found based on the best precision for the largest value of each row, each column, or the whole matrix. Constant matrix and constant vector scaling are available only for generalized fixed-point data types. All other fixed-point data types use their default scaling. The available constant matrix scaling modes are shown below for the Matrix Gain block. 3-12 Fixed-Point Numbers To understand how you might use these scaling modes, consider a 5- by- 4 matrix of doubles, M, defined as 3.3333e-005 3.3333e-004 3.3333e-003 3.3333e-002 3.3333e-001 3.3333e-006 3.3333e-005 3.3333e-004 3.3333e-003 3.3333e-002 3.3333e-007 3.3333e-006 3.3333e-005 3.3333e-004 3.3333e-003 3.3333e-008 3.3333e-007 3.3333e-006 3.3333e-005 3.3333e-004 Now suppose M is input into the Matrix Gain block, and you want to scale it using one of the constant matrix scaling modes. The results of using these modes are described below: • Use Specified Scaling Suppose the matrix elements are converted to a signed, 10-bit generalized fixed-point data type with radix point-only scaling of 2-7 (that is, the radix point is located seven places to the left of the rightmost bit). With this data format, M becomes 0 0 0 3.1250e-002 3.3594e-001 0 0 0 0 3.1250e-002 0 0 0 0 0 0 0 0 0 0 Note that many of the matrix elements are zero, and for the nonzero entries, the scaled values differ from the original values. This is because a double is converted to a binary word of fixed size and limited precision for each element. The larger and more precise the conversion data type, the more closely the scaled values match the original values. • Best Precision: Element-wise If M is scaled such that the precision is maximized for each matrix element, you obtain 3.3379e-005 3.3379e-004 3.3340e-003 3.3325e-002 3.3301e-001 3.3304e-006 3.3379e-005 3.3379e-004 3.3340e-003 3.3325e-002 3.3341e-007 3.3304e-006 3.3379e-005 3.3379e-004 3.3340e-003 3.3295e-008 3.3341e-007 3.3304e-006 3.3379e-005 3.3379e-004 • Best Precision: Row-wise If M is scaled based on the largest value for each row, you obtain 3-13 3 Data Types and Scaling 3.3379e-005 3.3379e-004 3.3340e-003 3.3325e-002 3.3301e-001 3.3379e-006 3.3379e-005 3.3569e-004 3.2959e-003 3.3203e-002 3.5763e-007 2.8610e-006 3.0518e-005 3.6621e-004 2.9297e-003 0 0 0 0 0 • Best Precision: Column-wise If M is scaled based on the largest value for each column, you obtain 0 0 2.9297e-003 3.3203e-002 3.3301e-001 0 0 3.6621e-004 3.2959e-003 3.3325e-002 0 0 3.0518e-005 3.3569e-004 3.3340e-003 0 0 2.8610e-006 3.3379e-005 3.3379e-004 • Best Precision: Matrix-wise If M is scaled based on its largest matrix value, you obtain 0 0 2.9297e-003 3.3203e-002 3.3301e-001 0 0 0 2.9297e-003 3.3203e-002 0 0 0 0 2.9297e-003 0 0 0 0 0 The disadvantage of scaling the matrix column-wise, row-wise, or matrix-wise is reduced precision resulting from the use of a common radix point. The advantage of using a common radix point is reduced code size and possibly increased processor speed. 3-14 Floating-Point Numbers Floating-Point Numbers Fixed-point numbers are limited in that they cannot simultaneously represent very large or very small numbers using a reasonable word size. This limitation can be overcome by using scientific notation. With scientific notation, you can dynamically place the radix point at a convenient location and use powers of the radix to keep track of that location. Thus, you can represent a range of very large and very small numbers with only a few digits. You can represent any binary floating-point number in scientific notation form ±e as ± f × 2 where f is the fraction (or mantissa); 2 is the radix or base (binary in this case); and e is the exponent of the radix. The radix is always a positive number while f and e can be positive or negative. When performing arithmetic operations, floating-point hardware must take into account that the sign, exponent, and fraction are all encoded within the same binary word. This results in complex logic circuits when compared with the circuits for binary fixed-point operations. The Fixed-Point Blockset supports single-precision and double-precision floating-point numbers as defined by the IEEE Standard 754. Additionally, a nonstandard IEEE-style number is supported. To link the world of fixed-point numbers with the world of floating-point numbers, the concepts behind scientific notation are reviewed below. Scientific Notation A direct analogy exists between scientific notation and radix point notation. For example, scientific notation using five decimal digits for the fraction would take the form p ± d.dddd × 10 = ± ddddd.0 × 10 p–4 = ± 0 .ddddd × 10 p+1 where p is an integer of unrestricted range. Radix point notation using five bits for the fraction is the same except for the number base q ± b.bbbb × 2 = ± bbbbb.0 × 2 q–4 = ± 0.bbbbb × 2 q+1 where q is an integer of unrestricted range. The previous equation is valid for both fixed- and floating-point numbers. For both these data types, the fraction can be changed at any time by the processor. However, for fixed- point numbers 3-15 3 Data Types and Scaling the exponent never changes, while for floating-point numbers the exponent can be changed any time by the processor. For fixed-point numbers, the exponent is fixed but there is no reason why the radix point must be contiguous with the fraction. For example, a word consisting of three unsigned bits is usually represented in scientific notation in one of these four ways. bbb. = bbb. × 2 0 bb.b = bbb. × 2 –1 b.bb = bbb. × 2 –2 .bbb = bbb. × 2 –3 If the exponent were greater than 0 or less than -3, then the representation would involve lots of zeros. bbb00000. = bbb. × 2 bbb00. = bbb. × 2 2 .00bbb = bbb. × 2 –5 .00000bbb = bbb. × 2 5 –8 These extra zeros never change to ones, however, so they don’t show up in the hardware. Furthermore, unlike floating-point exponents, a fixed-point exponent never shows up in the hardware, so fixed-point exponents are not limited by a finite number of bits. Note Restricting the radix point to being contiguous with the fraction is unnecessary; the Fixed-Point Blockset allows you to extend the radix point to any arbitrary location. 3-16 Floating-Point Numbers The IEEE Format The IEEE Standard 754 has been widely adopted, and is used with virtually all floating-point processors and arithmetic coprocessors — with the notable exception of many DSP floating-point processors. Among other things, this standard specifies four floating-point number formats of which singles and doubles are the most widely used. Each format contains three components: a sign bit, a fraction field, and an exponent field. These components, as well as the specific formats for singles and doubles, are discussed below. The Sign Bit While two’s complement is the preferred representation for signed fixed-point numbers, IEEE floating-point numbers use a sign/magnitude representation, where the sign bit is explicitly included in the word. Using this representation, a sign bit of 0 represents a positive number and a sign bit of 1 represents a negative number. The Fraction Field In general, floating-point numbers can be represented in many different ways by shifting the number to the left or right of the radix point and decreasing or increasing the exponent of the radix by a corresponding amount. To simplify operations on these numbers, they are normalized in the IEEE format. A normalized binary number has a fraction of the form 1.f where f has a fixed size for a given data type. Since the leftmost fraction bit is always a 1, it is unnecessary to store this bit and is therefore implicit (or hidden). Thus, an n-bit fraction stores an n+1-bit number. The IEEE format also supports denormalized numbers, which have a fraction of the form 0.f. Normalized and denormalized formats are discussed in more detail in next section. The Exponent Field In the IEEE format, exponent representations are biased. This means a fixed value (the bias) is subtracted from the field to get the true exponent value. For example, if the exponent field is 8 bits, then the numbers 0 through 255 are represented, and there is a bias of 127. Note that some values of the exponent are reserved for flagging Inf (infinity), NaN (not-a-number), and denormalized numbers, so the true exponent values range from -126 to 127. See the sections “Inf” and “NaN” on page 3-22. 3-17 3 Data Types and Scaling Single Precision Format The IEEE single-precision floating-point format is a 32-bit word divided into a 1-bit sign indicator s, an 8-bit biased exponent e, and a 23-bit fraction f. A representation of this format is given below. b31 b30 s b0 b22 e f The relationship between this format and the representation of real numbers is given by s e – 127 ( –1 ) ⋅ ( 2 ) ⋅ ( 1.f ) s e – 126 value = ( – 1 ) ⋅ ( 2 ) ⋅ ( 0.f ) exceptional value normalized, 0 < e < 255 denormalized, e = 0, f > 0 otherwise “Exceptional Arithmetic” on page 3-21 discusses denormalized values. Double Precision Format The IEEE double-precision floating-point format is a 64-bit word divided into a 1-bit sign indicator s, an 11-bit biased exponent e, and a 52-bit fraction f. A representation of this format is given below. b63 b62 s b51 b0 e f The relationship between this format and the representation of real numbers is given by s e – 1023 ( –1 ) ⋅ ( 2 ) ⋅ ( 1.f ) s e – 1022 value = ( – 1 ) ⋅ ( 2 ) ⋅ ( 0.f ) exceptional value normalized, 0 < e < 2047 denormalized, e = 0, f > 0 otherwise “Exceptional Arithmetic” on page 3-21 discusses denormalized values. 3-18 Floating-Point Numbers Nonstandard IEEE Format The Fixed-Point Blockset supports a nonstandard IEEE-style floating-point data type. This data type adheres to the definitions and formulas previously given for IEEE singles and doubles. You create nonstandard floating-point numbers with the float function: float(TotalBits,ExpBits) TotalBits is the total word size and ExpBits is the size of the exponent field. The size of the fraction field and the bias are calculated from these input arguments. You can specify any number of exponent bits up to 11, and any number of total bits such that the fraction field is no more than 53 bits. When specifying a nonstandard format, you should remember that the number of exponent bits largely determines the range of the result and the number of fraction bits largely determines the precision of the result. Note These numbers are normalized with a hidden leading one for all exponents except the smallest possible exponent. However, the largest possible exponent might not be treated as a flag for Inf or NaN. Range and Precision The range of a number gives the limits of the representation while the precision gives the distance between successive numbers in the representation. The range and precision of an IEEE floating-point number depend on the specific format. Range The range of representable numbers for an IEEE floating-point number with f bits allocated for the fraction, e bits allocated for the exponent, and the bias of e given by bias = 2e – 1– 1 is given below. negative overflow negative numbers negative underflow positive numbers positive underflow positive overflow 3-19 3 Data Types and Scaling where • Normalized positive numbers are defined within the range 21 – bias to (2 – 2–f).2bias. • Normalized negative numbers are defined within the range –21 – bias to –(2 – 2–f).2bias. • Positive numbers greater than (2 – 2–f).2bias, and negative numbers greater than –(2 – 2–f).2bias are overflows. • Positive numbers less than 21 – bias, and negative numbers less than –21 – bias are either underflows or denormalized numbers. • Zero is given by a special bit pattern, where e = 0 and f = 0. Overflows and underflows result from exceptional arithmetic conditions. Floating-point numbers outside the defined range are always mapped to ± Inf . Note You can use the MATLAB commands realmin and realmax to determine the dynamic range of double-precision floating-point values for your computer. Precision Due to a finite word size, a floating-point number is only an approximation of the “true” value. Therefore, it is important to have an understanding of the precision (or accuracy) of a floating-point result. In general, a value v with an accuracy q is specified by v ± q . For IEEE floating-point numbers, s v = ( – 1 ) ⋅ ( 2 e – bias ) ⋅ ( 1.f ) and q = 2 – f ⋅ 2 e – bias . Thus, the precision is associated with the number of bits in the fraction field. Note In MATLAB, floating-point relative accuracy is given by the command eps, which returns the distance from 1.0 to the next largest floating-point number. For a computer that supports the IEEE Standard 754, eps = 2-52 or 2.2204 510-16. 3-20 Floating-Point Numbers Floating-Point Data Type Parameters The high and low limits, exponent bias, and precision for the supported floating-point data types are given below. Data Type Low Limit High Limit Exponent Bias Precision Single 2 – 126 ≈ 10 – 38 2 128 ≈ 3 ⋅ 10 38 127 2 –23 ≈ 10 – 7 Double 2 – 1022 ≈ 2 ⋅ 10 – 308 2 1024 ≈ 2 ⋅ 10 308 1023 2 – 52 ≈ 10 – 16 Nonstandard 2 ( 1 – bias ) –f (2 – 2 ) ⋅ 2 bias 2 e–1 –1 2–f Due to the sign/magnitude representation of floating-point numbers, there are two representations of zero, one positive and one negative. For both representations e = 0 and 0.f = 0.0. Exceptional Arithmetic In addition to specifying a floating-point format, the IEEE Standard 754 specifies practices and procedures so that predictable results are produced independently of the hardware platform. Specifically, denormalized numbers, Inf, and NaN are defined to deal with exceptional arithmetic (underflow and overflow). If an underflow or overflow is handled as Inf or NaN, then significant processor overhead is required to deal with this exception. Although the IEEE Standard 754 specifies practices and procedures to deal with exceptional arithmetic conditions in a consistent manner, microprocessor manufacturers may handle these conditions in ways that depart from the standard. Some of the alternative approaches, such as saturation and wrapping, are discussed in Chapter 4, “Arithmetic Operations.” Denormalized Numbers Denormalized numbers are used to handle cases of exponent underflow. When the exponent of the result is too small (i.e., a negative exponent with too large a magnitude), the result is denormalized by right-shifting the fraction and leaving the exponent at its minimum value. The use of denormalized numbers is also referred to as gradual underflow. Without denormalized numbers, the gap between the smallest representable nonzero number and zero is much 3-21 3 Data Types and Scaling wider than the gap between the smallest representable nonzero number and the next larger number. Gradual underflow fills that gap and reduces the impact of exponent underflow to a level comparable with round off among the normalized numbers. Thus, denormalized numbers provide extended range for small numbers at the expense of precision. Inf Arithmetic involving Inf (infinity) is treated as the limiting case of real arithmetic, with infinite values defined as those outside the range of representable numbers, or – ∞ ≤ ( representable numbers ) < ∞ . With the exception of the special cases discussed below (NaN), any arithmetic operation involving Inf yields Inf. Inf is represented by the largest biased exponent allowed by the format and a fraction of zero. NaN A NaN (not-a-number) is a symbolic entity encoded in floating-point format. There are two types of NaN: signaling and quiet. A signaling NaN signals an invalid operation exception. A quiet NaN propagates through almost every arithmetic operation without signaling an exception. The following operations result in a NaN: ∞ – ∞ , – ∞ + ∞ , 0 × ∞ , 0 ⁄ 0 , and ∞ ⁄ ∞ . Both types of NaN are represented by the largest biased exponent allowed by the format and a fraction that is nonzero. The bit pattern for a quiet NaN is given by 0.f where the most significant number in f must be a one, while the bit pattern for a signaling NaN is given by 0.f where the most significant number in f must be zero and at least one of the remaining numbers must be nonzero. 3-22 4 Arithmetic Operations Overview (p. 4-2) An overview of issues that need to be considered when performing fixed-point arithmetic operations—overflow, quantization, computational noise, and limit cycles Limitations on Precision (p. 4-3) A discussion of the limits placed on the precision of fixed-point calculations, and how they are handled in the Fixed-Point Blockset Limitations on Range (p. 4-12) A discussion of the limits placed on the range of fixed-point calculations, and how they are handled in the Fixed-Point Blockset Recommendations for Arithmetic and Scaling (p. 4-16) Recommendations for scaling in your fixed-point design based on the limitations of fixed-point arithmetic Parameter and Signal Conversions (p. 4-26) A discussion of the way the data types of parameters and signals are converted in simulations using the Fixed-Point Blockset Rules for Arithmetic Operations (p. 4-30) A description of the way the Fixed-Point Blockset performs arithmetic operations on inputs and parameters Example: Conversions and Arithmetic Operations (p. 4-43) An example highlighting the way the Fixed-Point Blockset converts the data types of and performs arithmetic operations on inputs and parameters 4 Arithmetic Operations Overview When developing a dynamic system using floating-point arithmetic, you generally don’t have to worry about numerical limitations since floating-point data types have high precision and range. Conversely, when working with fixed-point arithmetic, you must consider these factors when developing dynamic systems: • Overflow Adding two sufficiently large negative or positive values can produce a result that does not fit into the representation. This will have an adverse effect on the control system. • Quantization Fixed-point values are rounded. Therefore, the output signal to the plant and the input signal to the control system do not have the same characteristics as the ideal discrete-time signal. • Computational noise The accumulated errors that result from the rounding of individual terms within the realization introduces noise into the control signal. • Limit cycles In the ideal system, the output of a stable transfer function (digital filter) approaches some constant for a constant input. With quantization, limit cycles occur where the output oscillates between two values in steady state. This chapter describes the limitations involved when arithmetic operations are performed using encoded fixed-point variables. It also provides recommendations for encoding fixed-point variables such that simulations and generated code are reasonably efficient. 4-2 Limitations on Precision Limitations on Precision Computer words consist of a finite numbers of bits. This means that the binary encoding of variables is only an approximation of an arbitrarily precise real-world value. Therefore, the limitations of the binary representation automatically introduce limitations on the precision of the value. For a general discussion of range and precision in the Fixed-Point Blockset, refer to “Range and Precision” in Chapter 3. The precision of a fixed-point word depends on the word size and radix point location. Extending the precision of a word can always be accomplished with more bits, but you face practical limitations with this approach. Instead, you must carefully select the data type, word size, and scaling such that numbers are accurately represented. Rounding and padding with trailing zeros are typical methods implemented on processors to deal with the precision of binary words. Rounding The result of any operation on a fixed-point number is typically stored in a register that is longer than the number’s original format. When the result is put back into the original format, the extra bits must be disposed of. That is, the result must be rounded. Rounding involves going from high precision to lower precision and produces quantization errors and computational noise. The blockset provides four rounding modes, which are shown in the expanded drop-down menu in the dialog below. 4-3 4 Arithmetic Operations The Fixed-Point Blockset rounding modes are discussed below. The data is generated using the Simulink Signal Generator block and doubles are converted to signed 8-bit numbers with radix point-only scaling of 2-2. Round Toward Zero The simplest rounding mode computationally is when all digits beyond the number required are dropped. This mode is referred to as rounding toward zero, and it results in a number whose magnitude is always less than or equal to the more precise original value. In MATLAB, you can round to zero using the fix function. Rounding toward zero introduces a cumulative downward bias in the result for positive numbers and a cumulative upward bias in the result for negative numbers. That is, all positive numbers are rounded to smaller positive numbers, while all negative numbers are rounded to smaller negative numbers. Rounding toward zero is shown below. 4-4 Limitations on Precision Round Toward Zero 1 0.5 Positive numbers are rounded to smaller positive numbers. 0 Negative numbers are rounded to smaller negative numbers. −0.5 −1 0 0.2 0.4 0.6 0.8 1 Time An example comparing rounding to zero and truncation for unsigned and two’s complement numbers appears in “Example: Rounding to Zero Versus Truncation” on page 4-8. Round Toward Nearest When you round toward nearest, the number is rounded to the nearest representable value. This mode has the smallest errors associated with it and these errors are symmetric. As a result, rounding toward nearest is the most useful approach for most applications. 4-5 4 Arithmetic Operations In MATLAB, you can round to nearest using the round function. Rounding toward nearest is shown below. Round Toward Nearest 1 0.5 All numbers are rounded to the nearest representable number. 0 −0.5 −1 0 0.2 0.4 0.6 0.8 Time Round Toward Ceiling When you round toward ceiling, both positive and negative numbers are rounded toward positive infinity. As a result, a positive cumulative bias is introduced in the number. 4-6 1 Limitations on Precision In MATLAB, you can round to ceiling using the ceil function. Rounding toward ceiling is shown below. Round Toward Ceiling 1 0.5 All numbers are rounded toward positive infinity. 0 −0.5 −1 0 0.2 0.4 0.6 0.8 1 Time Round Toward Floor When you round toward floor, both positive and negative numbers are rounded to negative infinity. As a result, a negative cumulative bias is introduced in the number. 4-7 4 Arithmetic Operations In MATLAB, you can round to floor using the floor function. Rounding toward floor is shown below. Round Toward Floor 1 0.5 All numbers are rounded toward negative infinity. 0 −0.5 −1 0 0.2 0.4 0.6 0.8 1 Time Rounding toward ceiling and rounding toward floor are sometimes useful for diagnostic purposes. For example, after a series of arithmetic operations, you may not know the exact answer because of word-size limitations, which introduce rounding. If every operation in the series is performed twice, once rounding to positive infinity and once rounding to negative infinity, you obtain an upper limit and a lower limit on the correct answer. You can then decide if the result is sufficiently accurate or if additional analysis is required. Example: Rounding to Zero Versus Truncation Rounding to zero and truncation or chopping are sometimes thought to mean the same thing. However, the results produced by rounding to zero and truncation are different for unsigned and two’s complement numbers. 4-8 Limitations on Precision To illustrate this point, consider rounding a 5-bit unsigned number to zero by dropping (truncating) the two least significant bits. For example, the unsigned number 100.01 = 4.25 is truncated to 100 = 4. Therefore, truncating an unsigned number is equivalent to rounding to zero or rounding to floor. Now consider rounding a 5-bit two’s complement number by dropping the two least significant bits. At first glance, you may think truncating a two’s complement number is the same as rounding to zero. For example, dropping the last two digits of -3.75 yields -3.00. However, digital hardware performing two’s complement arithmetic yields a different result. Specifically, the number 100.01 = -3.75 truncates to 100 = -4, which is rounding to floor. As you can see, rounding to zero for a two’s complement number is not the same as truncation when the original value is negative. For this reason, the ambiguous term “truncation” is not used in this guide, and four explicit rounding modes are used instead. Padding with Trailing Zeros Padding with trailing zeros involves extending the least significant bit (LSB) of a number with extra bits. This method involves going from low precision to higher precision. For example, suppose two numbers are subtracted from each other. First, the exponents must be aligned, which typically involves a right shift of the number with the smaller value. In performing this shift, significant digits can “fall off” to the right. However, when the appropriate number of extra bits is appended, the precision of the result is maximized. Consider two 8-bit fixed-point numbers that are close in value and subtracted from each other q 1.0000000 ⋅ 2 – 1.1111111 ⋅ 2 q–1 where q is an integer. To perform this operation, the exponents must be equal. 1.0000000 ⋅ 2 q q – 0.1111111 ⋅ 2 -------------------------------------------q 0.0000001 ⋅ 2 If the top number is padded by two zeros and the bottom number is padded with one zero, then the above equation becomes 4-9 4 Arithmetic Operations 1.000000000 ⋅ 2 q q – 0.111111110 ⋅ 2 --------------------------------------------------q 0.000000010 ⋅ 2 which produces a more precise result. An example of padding with trailing zeros using the Fixed-Point Blockset is illustrated in “Digital Controller Realization” on page 6-7. Example: Limitations on Precision and Errors Fixed-point variables have a limited precision because digital systems represent numbers with a finite number of bits. For example, suppose you must represent the real-world number 35.375 with a fixed-point number. Using the encoding scheme described in “Scaling” on page 3-5, the representation is –2 ˜ V = 2 Q + 32 The two closest approximations to the real-world value are Q = 13 and Q = 14. –2 ˜ V = 2 ( 13 ) + 32 = 35.25 –2 ˜ V = 2 ( 14 ) + 32 = 35.50 In either case, the absolute error is the same: E ˜ F2 V – V = 0.125 = ----------2 For fixed-point values within the limited range, this represents the worst-case error if round-to-nearest is used. If other rounding modes are used, the worst-case error can be twice as large: E ˜ V – V < F2 Example: Maximizing Precision Precision is limited by slope. To achieve maximum precision, you should make the slope as small as possible while keeping the range adequately large. The bias is adjusted in coordination with the slope. 4-10 Limitations on Precision Assume the maximum and minimum real-world value is given by max(V) and min(V), respectively. These limits may be known based on physical principles or engineering considerations. To maximize the precision, you must decide upon a rounding scheme and whether overflows saturate or wrap. To simplify matters, this example assumes the minimum real-world value corresponds to the minimum encoded value, and the maximum real-world value corresponds to the maximum encoded value. Using the encoding scheme described in “Scaling” on page 3-5, these values are given by E max ( V ) = F2 ( max ( Q ) ) + B E min ( V ) = F2 ( min ( Q ) ) + B Solving for the slope, you get F2 E max ( V ) – min ( V ) max ( V ) – min ( V ) = ------------------------------------------------- = ------------------------------------------------ws max ( Q ) – min ( Q ) 2 –1 This formula is independent of rounding and overflow issues, and depends only on the word size, ws. 4-11 4 Arithmetic Operations Limitations on Range Limitations on the range of a fixed-point word occur for the same reason as limitations on its precision. Namely, fixed-point words have limited size. For a general discussion of range and precision in the Fixed-Point Blockset, refer to “Range and Precision” in Chapter 3. In binary arithmetic, a processor may need to take an n-bit fixed-point number and store it in m bits, where m ≠ n . If m < n, the range of the number has been reduced and an operation can produce an overflow condition. Some processors identify this condition as Inf or NaN. For other processors, especially digital signal processors (DSPs), the value saturates or wraps. If m > n, the range of the number has been extended. Extending the range of a word requires the inclusion of guard bits, which act to “guard” against potential overflow. In both cases, the range depends on the word’s size and scaling. The Fixed-Point Blockset supports saturation and wrapping for all fixed-point data types, while guard bits are supported only for fractional data types. As shown below, you can select saturation or wrapping with the Saturate to max or min when overflows occur or Saturate on integer overflow checkbox, and you can specify guard bits with the Output data type parameter. 36-bit signed fractional data type with 4 guard bits. The total word size is 40 bits. Saturate overflows. 4-12 Limitations on Range Saturation and Wrapping Saturation and wrapping describe a particular way that some processors deal with overflow conditions. For example, Analog Device’s ADSP-2100 family of processors supports either of these modes. If a register has a saturation mode of operation, then an overflow condition is set to the maximum positive or negative value allowed. Conversely, if a register has a wrapping mode of operation, an overflow condition is set to the appropriate value within the range of the representation. Example: Saturation and Wrapping Consider an 8-bit unsigned word with radix point-only scaling of 2-5. Suppose this data type must represent a sine wave that ranges from -4 to 4. For values between 0 and 4, the word can represent these numbers without regard to overflow. This is not the case with negative numbers. If overflows saturate, all negative values are set to zero, which is the smallest number representable by the data type. The saturation of overflows is shown below. Overflows Saturate 8 6 4 Negative values saturate to zero Negative values saturate to zero 2 0 0 0.4 0.8 1.2 1.6 2 Time 4-13 4 Arithmetic Operations If overflows wrap, all negative values are set to the appropriate positive value. The wrapping of overflows is shown below. Overflows Wrap 8 6 4 2 Negative values wrap to positive values. Negative values wrap to positive values. 0 0 0.4 0.8 1.2 1.6 2 Time Note For most control applications, saturation is the safer way of dealing with fixed-point overflow. However, some processor architectures allow automatic saturation by hardware. If hardware saturation is not available, then extra software is required resulting in larger, slower programs. This cost is justified in some designs — perhaps for safety reasons. Other designs accept wrapping to obtain the smallest, fastest software. Guard Bits You can eliminate the possibility of overflow by appending the appropriate number of guard bits to a binary word. 4-14 Limitations on Range For a two’s complement signed value, the guard bits are filled with either 0’s or 1’s depending on the value of the most significant bit (MSB). This is called sign extension. For example, consider a 4-bit two’s complement number with value 1011. If this number is extended in range to 7 bits with sign extension, then the number becomes 1111101 and the value remains the same. Guard bits are supported only for fractional data types. For both signed and unsigned fractionals, the guard bits lie to the left of the default radix point. Example: Limitations on Range Fixed-point variables have a limited range for the same reason they have limited precision — because digital systems represent numbers with a finite number of bits. As a general example, consider the case where an integer is represented as a fixed-point word of size ws. The range for signed and unsigned words is given by max ( Q ) – min ( Q ) where 0 min ( Q ) = ws – 1 –2 ws 2 – 1 max ( Q ) = 2 ws – 1 – 1 unsigned signed unsigned signed Using the general [Slope Bias] encoding scheme described in “Scaling” on page 3-5, the approximate real-world value has the range ˜ ˜ max (V ) – min ( V ) where B ˜ min ( V ) = E ws – 1 )+B – F2 ( 2 E ws F2 ( 2 – 1 ) + B ˜ max ( V ) = F2 E ( 2 ws – 1 – 1 ) + B unsigned signed unsigned signed If the real-world value exceeds the limited range of the approximate value, then the accuracy of the representation can become significantly worse. 4-15 4 Arithmetic Operations Recommendations for Arithmetic and Scaling This section describes the relationship between arithmetic operations and fixed-point scaling, and some basic recommendations that may be appropriate for your fixed-point design. For each arithmetic operation: • The general [Slope Bias] encoding scheme described in “Scaling” on page 3-5 is used. • The scaling of the result is automatically selected based on the scaling of the two inputs. In other words, the scaling is inherited. • Scaling choices are based on - Minimizing the number of arithmetic operations of the result. - Maximizing the precision of the result. Additionally, radix point-only scaling is presented as a special case of the general encoding scheme. In embedded systems, the scaling of variables at the hardware interface (the ADC or DAC) is fixed. However for most other variables, the scaling is something you can choose to give the best design. When scaling fixed-point variables, it is important to remember that: • Your scaling choices depend on the particular design you are simulating. • There is no best scaling approach. All choices have associated advantages and disadvantages. It is the goal of this section to expose these advantages and disadvantages to you. Addition Consider the addition of two real-world values: V a = Vb + V c These values are represented by the general [Slope Bias] encoding scheme described in “Scaling” on page 3-5: Ei V i = Fi 2 Qi + Bi In a fixed-point system, the addition of values results in finding the variable Q a: 4-16 Recommendations for Arithmetic and Scaling Fb Eb – E a Fc Ec – Ea B b + B c – B a –E a Q a = ------ ⋅ 2 Q b + ------ ⋅ 2 Q c + --------------------------------- ⋅ 2 Fa Fa Fa This formula shows • In general, Qa is not computed through a simple addition of Qb and Qc. • In general, there are two multiplies of a constant and a variable, two additions, and some additional bit shifting. Inherited Scaling for Speed In the process of finding the scaling of the sum, one reasonable goal is to simplify the calculations. Simplifying the calculations should reduce the number of operations thereby increasing execution speed. The following choices can help to minimize the number of arithmetic operations: • Set Ba = Bb + Bc. This eliminates one addition. • Set Fa = Fb or Fa = Fc. Either choice eliminates one of the two constant times variable multiplies. The resulting formula is Qa = 2 Eb – Ea F c Ec – E a Q b + ------ ⋅ 2 Qc Fa or Fb Eb – E a Ec – E a Q a = ------ ⋅ 2 Qb + 2 Qc Fa These equations appear to be equivalent. However, your choice of rounding and precision may make one choice stand out over the other. To further simplify matters, you could choose Ea = Ec or Ea = Eb. This will eliminate some bit shifting. Inherited Scaling for Maximum Precision In the process of finding the scaling of the sum, one reasonable goal is maximum precision. You can determine the maximum precision scaling if the range of the variable is known. “Example: Maximizing Precision” on page 4-10 shows that you can determine the range of a fixed-point operation from ˜ max ( V a ) and min ( V a ) . For a summation, you can determine the range from 4-17 4 Arithmetic Operations ˜ ˜ ˜ min ( V a ) = min ( V b ) + min ( V c ) ˜ ˜ ˜ max ( V a ) = max ( V b ) + max ( V c ) You can now derive the maximum precision slope: Fa 2 Ea ˜ ˜ max ( V a ) – min ( V a ) = -----------------------------------------------------ws 2 a–1 Eb ws b Ec ws c – 1 ) + Fc 2 ( 2 – 1) Fb 2 ( 2 = ----------------------------------------------------------------------------------------ws a 2 –1 In most cases the input and output word sizes are much greater than one, and the slope becomes Fa 2 Ea ≈ Fb 2 E b + ws b – ws a + Fc 2 E c + ws c – ws a which depends only on the size of the input and output words. The corresponding bias is Ea ˜ B a = min ( V a ) – F a 2 ⋅ min ( Q a ) The value of the bias depends on whether the inputs and output are signed or unsigned numbers. If the inputs and output are all unsigned, then the minimum value for these variables are all zero and the bias reduces to a particularly simple form: B a = Bb + Bc If the inputs and the output are all signed, then the bias becomes Eb B a ≈ B b + Bc + Fb 2 ( – 2 ws b – 1 +2 ws b – 1 Ec ) + Fc 2 ( – 2 ws c – 1 +2 ws c – 1 ) Ba ≈ Bb + Bc Radix Point-Only Scaling For radix point-only scaling, finding Qa results in this simple expression: 4-18 Recommendations for Arithmetic and Scaling Qa = 2 Eb – E a Qb + 2 Ec – E a Qc This scaling choice results in only one addition and some bit shifting. The avoidance of any multiplications is a big advantage of radix point-only scaling. Note The subtraction of values produces results that are analogous to those produced by the addition of values. Accumulation The accumulation of values is closely associated with addition: V a_new = V a_old + V b Finding Qa_new involves one multiply of a constant and a variable, two additions, and some bit shifting: Fb E – E B b –E Q a_new = Q a_old + ------ ⋅ 2 b a Q b + ------- ⋅ 2 a Fa Fa The important difference for fixed-point implementations is that the scaling of the output is identical to the scaling of the first input. Radix Point-Only Scaling For radix point-only scaling, finding Qa_new results in this simple expression: Q a_new = Q a_old + 2 Eb – E a Qb This scaling option only involves one addition and some bit shifting. Note The negative accumulation of values produces results that are analogous to those produced by the accumulation of values. 4-19 4 Arithmetic Operations Multiplication Consider the multiplication of two real-world values: V a = Vb × V c These values are represented by the general [Slope Bias] encoding scheme described in “Scaling” on page 3-5: Ei V i = Fi 2 Qi + Bi In a fixed-point system, the multiplication of values results in finding the variable Qa: Fb Fc E + E – E Fb B c E – E Fc Bb E – E Q a = ------------- ⋅ 2 b c a Q b Q c + ------------- ⋅ 2 b a Q b + ------------- ⋅ 2 c a Q c Fa Fa Fa B b Bc – Ba –Ea + --------------------------- ⋅ 2 Fa This formula shows • In general, Qa is not computed through a simple multiplication of Qb and Qc. • In general, there is one multiply of a constant and two variables, two multiplies of a constant and a variable, three additions, and some additional bit shifting. Inherited Scaling for Speed The number of arithmetic operations can be reduced with these choices: • Set Ba = BbBc. This eliminates one addition operation. • Set Fa = FbFc. This simplifies the triple multiplication – certainly the most difficult part of the equation to implement. • Set Ea = Eb + Ec. This eliminates some of the bit-shifting. The resulting formula is Bc –Ec Bb –Eb Q a = Q b Q c + ------ ⋅ 2 Q b + ------- ⋅ 2 Q c Fc Fb 4-20 Recommendations for Arithmetic and Scaling Inherited Scaling for Maximum Precision You can determine the maximum precision scaling if the range of the variable is known. “Example: Maximizing Precision” on page 4-10 shows that you can ˜ ˜ ) and min ( V determine the range of a fixed-point operation from max ( V a a) . For multiplication, you can determine the range from ˜ min ( V a ) = min ( V LL, V LH, V HL, V HH ) ˜ max ( V a ) = max ( V LL, V LH, V HL, V HH ) where ˜ ˜ V LL = min ( V b ) ⋅ min ( V c ) ˜ ˜ V LH = min ( V b ) ⋅ max ( V c ) ˜ ˜ V HL = max ( V b ) ⋅ min ( V c ) ˜ ˜ V HH = max ( V b ) ⋅ max ( V c ) Radix Point-Only Scaling For radix point-only scaling, finding Qa results in this simple expression: Qa = 2 Eb + E c – E a QbQc Gain Consider the multiplication of a constant and a variable V a = K ⋅ Vb where K is a constant called the gain. Since Va results from the multiplication of a constant and a variable, finding Qa is a simplified version of the general fixed-point multiply formula: Qa KF 2 Eb KB b – B a b = -------------------- ⋅ Q b + ------------------------- Ea F 2Ea Fa 2 a 4-21 4 Arithmetic Operations Note that the terms in the parentheses can be calculated offline. Therefore, there is only one multiplication of a constant and a variable and one addition. To implement the above equation without changing it to a more complicated form, the constants need to be encoded using a radix point-only format. For each of these constants, the range is the trivial case of only one value. Despite the trivial range, the radix point formulas for maximum precision are still valid. The maximum precision representations are the most useful choices unless there is an overriding need to avoid any shifting. The encoding of the constants is KF 2 Eb b ------------------- = 2 EX Q X Ea Fa 2 KB b – B a E - = 2 Y Q Y -----------------------Ea F 2 a resulting in the formula Qa = 2 EX QX QB + 2 EY QY Inherited Scaling for Speed The number of arithmetic operations can be reduced with these choices: • Set Ba = KBb. This eliminates one constant term. • Set Fa = KFb and Ea = Eb. This sets the other constant term to unity. The resulting formula is simply Qa = Qb If the number of bits is different, then either handling potential overflows or performing sign extensions is the only possible operations involved. Inherited Scaling for Maximum Precision The scaling for maximum precision does not need to be different than the scaling for speed unless the output has fewer bits than the input. If this is the 4-22 Recommendations for Arithmetic and Scaling case, then saturation should be avoided by dividing the slope by 2 for each lost bit. This will prevent saturation but will cause rounding to occur. Division Division of values is an operation that should be avoided in fixed-point embedded systems, but it can occur in places. Therefore, consider the division of two real-world values: V a = V b /V c These values are represented by the general [Slope Bias] encoding scheme described in “Scaling” on page 3-5: Ei Vi = Fi 2 Qi + Bi In a fixed-point system, the division of values results in finding the variable Qa: E Qa b Ba –Ea Fb 2 Qb + Bb - – ------- ⋅ 2 = ------------------------------------------------------------------------Ec + Ea Ea F a FcFa 2 Qc + Bc Fa ⋅ 2 This formula shows • In general, Qa is not computed through a simple division of Qb by Qc. • In general, there are two multiplies of a constant and a variable, two additions, one division of a variable by a variable, one division of a constant by a variable, and some additional bit shifting. Inherited Scaling for Speed The number of arithmetic operations can be reduced with these choices: • Set Ba = 0. This eliminates one addition operation. • If Bc = 0, then set the fractional slope Fa = Fb/Fc. This eliminates one constant times variable multiplication. The resulting formula is Qb E – E – E ( Bb ⁄ Fb ) – E – E Q a = ------- ⋅ 2 b c a + ----------------------- ⋅ 2 c a Qc Qc 4-23 4 Arithmetic Operations If B c ≠ 0 , then no clear recommendation can be made. Inherited Scaling for Maximum Precision You can determine the maximum precision scaling if the range of the variable is known. “Example: Maximizing Precision” on page 4-10 shows that you can ˜ ˜ determine the range of a fixed-point operation from max ( V a ) and min ( V a ) . For division, you can determine the range from ˜ min ( V a ) = min ( V LL, V LH, V HL, V HH ) ˜ max ( V a ) = max ( V LL, V LH, V HL, V HH ) where for nonzero denominators ˜ ˜ V LL = min ( V b ) ⁄ min ( V c ) ˜ ˜ V LH = min ( V b ) ⁄ max ( V c ) ˜ ˜ V HL = max ( V b ) ⁄ min ( V c ) ˜ ˜ V HH = max ( V b ) ⁄ max ( Vc ) Radix Point-Only Scaling For radix point-only scaling, finding Qa results in this simple expression: Qb Eb – Ec – Ea Q a = ------- ⋅ 2 Qc Note For the last two formulas involving Qa, a divide by zero, and zero divided by zero are possible. In these cases, the hardware will give some default behavior but you must make sure that these default responses give meaningful results for the embedded system. 4-24 Recommendations for Arithmetic and Scaling Summary From the previous analysis of fixed-point variables scaled within the general [Slope Bias] encoding scheme, you can conclude • Addition, subtraction, multiplication, and division can be very involved unless certain choices are made for the biases and slopes. • Radix point-only scaling guarantees simpler math, but generally sacrifices some precision. Note that the previous formulas don’t show the following: • Constants and variables are represented with a finite number of bits. • Variables are either signed or unsigned. • Rounding and overflow handling schemes. You must make these decisions before an actual fixed-point realization is achieved. 4-25 4 Arithmetic Operations Parameter and Signal Conversions The previous sections of this chapter, together with Chapter 3, “Data Types and Scaling,” describe how data types, scaling, rounding, overflow handling, and arithmetic operations are incorporated into the Fixed-Point Blockset. With this knowledge, you can define the output of a fixed-point model by configuring fixed-point blocks to suit your particular application. However, to completely understand the results generated by the Fixed-Point Blockset, you must be aware of these three issues: • When numerical block parameters are converted from a double to a Fixed-Point Blockset data type • When input signals are converted from one Fixed-Point Blockset data type to another (if at all) • When arithmetic operations on input signals and parameters are performed For example, suppose a fixed-point block performs an arithmetic operation on its input signal and a parameter, and then generates output having characteristics that are specified by the block. The following diagram illustrates how these issues are related. Fixed-Point Block Parameter Value Input Operation Output Data Type Output Scaling Rounding Overflow Handling 4-26 Output Parameter and Signal Conversions The following sections discuss parameter conversions and signal conversions. “Rules for Arithmetic Operations” on page 4-30 discusses arithmetic operations. Parameter Conversions Parameters of fixed-point blocks that accept numerical values are always converted from a double to a Fixed-Point Blockset data type. Parameters can be converted to the input data type, the output data type, or to a data type explicitly specified by the block. For example, the FIR block converts the Initial condition parameter to the input data type, and converts the FIR coefficients parameter to a data type you explicitly specify via the block dialog box. Parameters are always converted before any arithmetic operations are performed. Additionally, parameters are always converted offline using round-to-nearest and saturation. Offline conversions are discussed below. For information about parameter conversions for a specific block, refer to Chapter 9, “Block Reference.” Offline Conversions An offline conversion is a conversion performed by your development platform (for example, the processor on your PC), and not by the fixed-point processor you are targeting. For example, suppose you are using a PC to develop a program to run on a fixed-point processor, and you need the fixed-point processor to compute ab y = ------- ⋅ u = C ⋅ u c over and over again. If a, b, and c are constant parameters, it is inefficient for the fixed-point processor to compute ab/c every time. Instead, the PC’s processor should compute ab/c offline one time, and the fixed-point processor computes only C ⋅ u . This eliminates two costly fixed-point arithmetic operations. Signal Conversions Consider the conversion of a real-world value from one Fixed-Point Blockset data type to another. Ideally, the values before and after the conversion are equal 4-27 4 Arithmetic Operations V a = Vb where Vb is the input value and Va is the output value. To see how the conversion is implemented, the two ideal values are replaced by the general [Slope Bias] encoding scheme described in “Scaling” on page 3-5: Ei V i = Fi 2 Qi + Bi Solving for the output data type’s stored integer value, Qa is obtained: F b E b – Ea B b – B a –Ea Q b + -------------------- 2 Q a = ------ 2 Fa Fa = Fs2 Eb – E a Q b + B net where Fs is the adjusted fractional slope and Bnet is the net bias. The offline conversions and online conversions and operations are discussed below. Offline Conversions Both Fs and Bnet are computed offline using round-to-nearest and saturation. Bnet is then stored using the output data type and Fs is stored using an automatically selected data type. Online Conversions and Operations The remaining conversions and operations are performed online by the fixed-point processor, and depend on the slopes and biases for the input and output data types. The conversions and operations are given by these steps: 1 The initial value for Qa is given by the net bias, Bnet: Q a = B net 2 The input integer value, Qb, is multiplied by the adjusted slope, Fs: Q RawProduct = F s Q b 3 The result of step 2 is converted to the modified output data type where the slope is one and bias is zero: 4-28 Parameter and Signal Conversions Q Temp = convert ( Q RawProduct ) This conversion includes any necessary bit shifting, rounding, or overflow handling. 4 The summation operation is performed: Q a = Q Temp + Q a This summation includes any necessary overflow handling. Streamlining Simulations and Generated Code Note that the maximum number of conversions and operations is performed when the slopes and biases of the input signal and output signal differ (are mismatched). If the scaling of these signals is identical (matched), the number of operations is reduced from the worst (most inefficient) case. For example, when an input has the same fractional slope and bias as the output, only step 3 is required: Q a = convert ( Q b ) Exclusive use of radix point-only scaling for both input signals and output signals is a common way to eliminate the occurrence of mismatched slopes and biases, and results in the most efficient simulations and generated code. 4-29 4 Arithmetic Operations Rules for Arithmetic Operations Fixed-point arithmetic refers to how signed or unsigned binary words are operated on. The simplicity of fixed-point arithmetic functions such as addition and subtraction allows for cost-effective hardware implementations. This section describes the blockset-specific rules that are followed when arithmetic operations are performed on inputs and parameters. These rules are organized into four groups based on the operations involved: addition and subtraction, multiplication, division, and shifts. For each of these four groups, the rules for performing the specified operation are presented with an example using the rules. Computational Units The core architecture of many processors contains several computational units including arithmetic logic units (ALUs), multiply and accumulate units (MACs), and shifters. These computational units process the binary data directly and provide support for arithmetic computations of varying precision. The ALU performs a standard set of arithmetic and logic operations as well as division. The MAC performs multiply, multiply/add, and multiply/subtract operations. The shifter performs logical and arithmetic shifts, normalization, denormalization, and other operations. Addition and Subtraction Addition is the most common arithmetic operation a processor performs. When two n-bit numbers are added together, it is always possible to produce a result with n + 1 nonzero digits due to a carry from the leftmost digit. For two’s complement addition of two numbers, there are three cases to consider: • If both numbers are positive and the result of their addition has a sign bit of 1, then overflow has occurred; otherwise the result is correct. • If both numbers are negative and the sign of the result is 0, then overflow has occurred; otherwise the result is correct. • If the numbers are of unlike sign, overflow cannot occur and the result is always correct. 4-30 Rules for Arithmetic Operations Fixed-Point Blockset Summation Process Consider the summation of two numbers. Ideally, the real-world values obey the equation Va = ±Vb ± Vc where Vb and Vc are the input values and Va is the output value. To see how the summation is actually implemented, the three ideal values should be replaced by the general [Slope Bias] encoding scheme described in “Scaling” on page 3-5: Ei Vi = Fi 2 Qi + Bi The equation in “Addition” on page 4-16 gives the solution of the resulting equation for the stored integer, Qa. Using shorthand notation, that equation becomes Q a = ± F sb 2 E b – Ea Q b ± F sc 2 Ec – E a Q c + B net where Fsb and Fsc are the adjusted fractional slopes and Bnet is the net bias. The offline conversions, and online conversions and operations are discussed below. Offline Conversions. Fsb, Fsc, and Bnet are computed offline using round-to-nearest and saturation. Furthermore, Bnet is stored using the output data type. Online Conversions and Operations. The remaining operations are performed online by the fixed-point processor, and depend on the slopes and biases for the input and output data types. The worst (most inefficient) case occurs when the slopes and biases are mismatched. The worst-case conversions and operations are given by these steps: 1 The initial value for Qa is given by the net bias, Bnet: Q a = B net 2 The first input integer value, Qb, is multiplied by the adjusted slope, Fsb: 4-31 4 Arithmetic Operations Q RawProduct = F sb Q b 3 The previous product is converted to the modified output data type where the slope is one and the bias is zero: Q Temp = convert ( Q RawProduct ) This conversion includes any necessary bit shifting, rounding, or overflow handling. 4 The summation operation is performed: Q a = ± Q a + Q Temp This summation includes any necessary overflow handling. 5 Steps 2 to 4 are repeated for every number to be summed. It is important to note that bit shifting, rounding, and overflow handling are applied to the intermediate steps (3 and 4) and not to the overall sum. Streamlining Simulations and Generated Code If the scaling of the input and output signals is matched, the number of summation operations is reduced from the worst (most inefficient) case. For example, when an input has the same fractional slope as the output, step 2 reduces to multiplication by one and can be eliminated. Trivial steps in the summation process are eliminated for both simulation and code generation. Exclusive use of radix point-only scaling for both input signals and output signals is a common way to eliminate the occurrence of mismatched slopes and biases, and results in the most efficient simulations and generated code. Example: The Summation Process Suppose you want to sum three numbers. Each of these numbers is represented by an 8-bit word, and each has a different radix point-only scaling. Additionally, the output is restricted to an 8-bit word with radix point-only scaling of 2-3. The summation is shown below for the input values 19.875, 5.4375, and 4.84375. 4-32 Rules for Arithmetic Operations Applying the rules from the previous section, the sum follows these steps: 1 Since the biases are matched, the initial value of Qa is trivial: Q a = 00000.000 2 The first number to be summed (19.875) has a fractional slope that matches the output fractional slope. Furthermore, the radix points and storage types are identical so the conversion is trivial: Q b = 10011.111 Q Temp = Q b 3 The summation operation is performed: Q a = Q a + Q Temp = 10011.111 4 The second number to be summed (5.4375) has a fractional slope that matches the output fractional slope, so a slope adjustment is not needed. The storage data types also match but the difference in radix points requires that both the bits and the radix point be shifted one place to the right: 4-33 4 Arithmetic Operations Q c = 0101.0111 Q Temp = convert ( Q c ) Q Temp = 00101.011 Note that a loss in precision of one bit occurs, with the resulting value of QTemp determined by the rounding mode. For this example, round-to-floor is used. Overflow cannot occur in this case since the bits and radix point are both shifted to the right. 5 The summation operation is performed: Q a = Q a + Q Temp 10011.111 + 00101.011 = -------------------------------------11001.010 = 25.250 Note that overflow did not occur, but it is possible for this operation. 6 The third number to be summed (4.84375) has a fractional slope that matches the output fractional slope, so a slope adjustment is not needed. The storage data types also match but the difference in radix points requires that both the bits and the radix point be shifted two places to the right: Q d = 100.11011 Q Temp = convert ( Q d ) Q Temp = 00100.110 Note that a loss in precision of two bit occurs, with the resulting value of QTemp determined by the rounding mode. For this example, round-to-floor is used. Overflow cannot occur in this case since the bits and radix point are both shifted to the right. 7 The summation operation is performed: 4-34 Rules for Arithmetic Operations Q a = Q a + Q Temp 11001.010 + 00100.110 = -------------------------------------11110.000 = 30.000 Note that overflow did not occur, but it is possible for this operation. As shown below, the result of step 7 differs from the ideal sum: 10011.111 0101.0111 + 100.11011 ------------------------------------------= 30.125 11110.001 Blocks that perform addition and subtraction include the Sum, Matrix Gain, and FIR blocks. Multiplication The multiplication of an n-bit binary number with an m-bit binary number results in a product that is up to m + n bits in length for both signed and unsigned words. Most processors perform n-bit by n-bit multiplication and produce a 2n-bit result (double bits) assuming there is no overflow condition. For example, the Texas Instruments TMS320C2x family of processors performs two’s complement 16-bit by 16-bit multiplication and produces a 32-bit (double bit) result. Fixed-Point Blockset Multiplication Process Consider the multiplication of two numbers. Ideally, the real-world values obey the equation Va = Vb × Vc where Vb and Vc are the input values and Va is the output value. To see how the multiplication is actually implemented, the three ideal values should be replaced by the general [Slope Bias] encoding scheme described in “Scaling” on page 3-5: 4-35 4 Arithmetic Operations Ei V i = Fi 2 Qi + Bi The solution of the resulting equation for the output stored integer, Qa, is given below: F b Fc Eb + E c – E a F b B c E b – Ea F c B b Ec – E a Q a = ------------- ⋅ 2 Q b Q c + ------------- ⋅ 2 Q b + ------------- ⋅ 2 Qc Fa Fa Fa B b B c – B a –E a + --------------------------- ⋅ 2 Fa The worst-case implementation of this equation occurs when the slopes and biases of the input and output signals are mismatched. This worst-case implementation is permitted in simulation but is not always permitted for code generation since it often requires more resources than is considered practical for an embedded system. For code generation and bit-true simulations, the biases must be zero and the fractional slopes must match for most blocks. When these requirements are met, the implementation reduces to Qa = 2 E b + E c – Ea Qb Qc The bit-true implementation of this equation is discussed below. Offline Conversions. As shown in the previous section, no offline conversions are performed. Online Conversions and Operations. The online conversions and operations for matched slopes and biases of zero are given by these steps: 1 The integer values, Qb and Qc, are multiplied together: Q RawProduct = Q b Q c To maintain the full precision of the product, the radix point of QRawProduct is given by the sum of the radix points of Qb and Qc. 2 The previous product is converted to the output data type: 4-36 Rules for Arithmetic Operations Q a = convert ( Q RawProduct ) This conversion includes any necessary bit shifting, rounding, or overflow handling. “Signal Conversions” on page 4-27 discusses conversions. 3 Steps 1 and 2 are repeated for each additional number to be multiplied. Example: The Multiplication Process Suppose you want to multiply three numbers. Each of these numbers is represented by a 5-bit word, and each has a different radix point-only scaling. Additionally, the output is restricted to a 10-bit word with radix point-only scaling of 2-4. The multiplication is shown below for the input values 5.75, 2.375, and 1.8125. Applying the rules from the previous section, the multiplication follows these steps: 1 The first two numbers (5.75 and 2.375) are multiplied: 4-37 4 Arithmetic Operations Q RawProduct = 101.11 × 10.011 ------------------------------------–3 101.11 ⋅ 2 101.11 ⋅ 2 –2 1 + 101.11 ⋅ 2 ------------------------------------01101.10101 = 13.65625 Note that the radix point of the product is given by the sum of the radix points of the multiplied numbers. 2 The result of step 1 is converted to the output data type: Q Temp = convert ( Q RawProduct ) = 001101.1010 = 13.6250 “Signal Conversions” on page 4-27 discusses conversions. Note that a loss in precision of one bit occurs, with the resulting value of QTemp determined by the rounding mode. For this example, round-to-floor is used. Furthermore, overflow did not occur but is possible for this operation. 3 The result of step 2 and the third number (1.8125) are multiplied: Q RawProduct = 01101.1010 × 1.1101 ---------------------------------------------------–4 1101.1010 ⋅ 2 1101.1010 ⋅ 2 –2 1101.1010 ⋅ 2 –1 0 + 1101.1010 ⋅ 2 ---------------------------------------------------0011000.10110010 = 24.6953125 Note that the radix point of the product is given by the sum of the radix points of the multiplied numbers. 4 The product is converted to the output data type: 4-38 Rules for Arithmetic Operations Q a = convert ( Q RawProduct ) = 011000.1011 = 24.6875 “Signal Conversions” on page 4-27 discusses conversions. Note that a loss in precision of 4 bits occurred, with the resulting value of QTemp determined by the rounding mode. For this example, round-to-floor is used. Furthermore, overflow did not occur but is possible for this operation. Blocks that perform multiplication include the Product, FIR, Gain, and Matrix Gain blocks. Division As with multiplication, division with mismatched scaling is complicated. Mismatched division is permitted for simulation only. For code generation and bit-true simulation, the signals must all have zero biases and matched fractional slopes. Fixed-Point Blockset Division Process Consider the division of two numbers. Ideally, the real-world values obey the equation V a = V b ⁄ Vc where Vb and Vc are the input values and Va is the output value. To see how the division is actually implemented, the three ideal values should be replaced by the general [Slope Bias] encoding scheme described in “Scaling” on page 3-5: Ei Vi = Fi 2 Qi + Bi For the case where the slopes are one and the biases are zero for all signals, the solution of the resulting equation for the output stored integer, Qa, is given below: Qa = 2 Eb – E c – E a ( Q b ⁄ Qc ) This equation involves an integer division and some bit shifts. If E a ≥ E b – E c, then any bit shifts are to the right and the implementation is simple. However, if E a < E b – E c , then the bit shifts are to the left and the implementation can 4-39 4 Arithmetic Operations be more complicated. The essential issue is the output has more precision than the integer division provides. To get full precision, a fractional division is needed. The C programming language provides access to integer division only for fixed-point data types. Depending on the size of the numerator, some of the fractional bits may be obtained by performing a shift prior to the integer division. In the worst case, it may be necessary to resort to repeated subtractions in software. In general, division of values is an operation that should be avoided in fixed-point embedded systems. Division where the output has more precision than the integer division (i.e., E a < E b – E c ) should be used with even greater reluctance. Division of signals with nonzero biases or mismatched slopes is not supported. Example: The Division Process Suppose you want to divide two numbers. Each of these numbers is represented by an 8-bit word, and each has a radix point-only scaling of 2-4. Additionally, the output is restricted to an 8-bit word with radix point-only scaling of 2-4. The division of 9.1875 by 1.5000 is shown below. For this example, Qa = 2 – 4 – ( –4 ) – ( –4 ) ( Qb ⁄ Qc ) 4 = 2 ( Qb ⁄ Qc ) Assuming a large data type was available, this could be implemented as 4-40 Rules for Arithmetic Operations 4 Qa ( 2 Qb ) = -----------------Qc where the numerator uses the larger date type. If a larger data type was not available, integer division combined with four repeated subtractions would be used. Both approaches produce the same result, with the former being more efficient. Shifts Nearly all microprocessors and digital signal processors support well-defined bit-shift (or simply shift) operations for integers. For example, consider the 8-bit unsigned integer 00110101. The results of a 2-bit shift to the left and a 2-bit shift to the right are shown below. Shift Operation Binary Value Decimal Value No shift (original number) 00110101 53 Shift left by 2 bits 11010100 212 Shift right by 2 bits 00001101 13 You can perform a shift with the Fixed-Point Blockset using the Shift Arithmetic block. Use this block to perform a bit shift, a radix point shift, or both. See Chapter 9, “Block Reference” for more information on performing bit and radix point shifts using the Shift Arithmetic block. Shifting Bits to the Right The special case of shifting bits to the right requires consideration of the treatment of the left-most bit, which may contain sign information. A shift to the right can be classified either as a logical shift right or an arithmetic shift right. For a logical shift right, a 0 is incorporated into the most significant bit for each bit shift. For an arithmetic shift right, the most significant bit is recycled for each bit shift. The Shift Arithmetic block performs an arithmetic shift right and, therefore, recycles the most significant bit for each bit shift right. For example, given the fixed-point number 11001.011 (-6.625), a bit shift two places to the right with 4-41 4 Arithmetic Operations the radix point unmoved yields the number 11110.010 (-1.75), as shown in the model below. Vy = Vu * 2^−2 Qy = Qu >> 2 Ey = Eu −6.625 sfix8_En3 Constant sfix8_En3 Shift Arithmetic Out −1.75 double Display Gateway Out To perform a logical shift right on a signed number using the Shift Arithmetic block, use the Conversion block to cast the number as an unsigned number of equivalent length and scaling, as shown below. The model shows that the fixed-point signed number 11001.001 (-6.625) becomes 00110.010 (6.25). −6.625 Constant 4-42 sfix8_En3 Convert ufix8_En3 Conversion Vy = Vu * 2^−2 Qy = Qu >> 2 Ey = Eu Shift Arithmetic ufix8_En3 Out double Gateway Out 6.25 Display Example: Conversions and Arithmetic Operations Example: Conversions and Arithmetic Operations This example uses the FIR block to illustrate when parameters are converted from a double to a fixed-point number, when the input data type is converted to the output data type, and when the rules for addition, subtraction, and multiplication are applied. For details about conversions and operations, refer to “Parameter and Signal Conversions” on page 4-26 and “Rules for Arithmetic Operations” on page 4-30. Note If a block can perform all four arithmetic operations, such as the FIR block, then the rules for multiplication and division are applied first. Suppose you configure the FIR block for two outputs (SIMO mode) where the first output is given by y 1 ( k ) = 13 ⋅ u ( k ) + 11 ⋅ u ( k – 1 ) – 7 ⋅ u ( k – 2 ) and the second output is given by y2 ( k ) = 6 ⋅ u ( k ) – 5 ⋅ u ( k – 1 ) Additionally, the initial values of u ( k – 1 ) and u ( k – 2 ) are given by 0.8 and 1.1, respectively and all inputs, parameters, and outputs have radix point-only scaling. To configure the FIR block for this situation, you must specify the FIR coefficients parameter as [13 11 -7; 6 -5 0] and the Initial condition parameter as [0.8 1.1] as shown below in the dialog box below. 4-43 4 Arithmetic Operations Parameter conversions and block operations are given below in the order in which they are carried out by the FIR block: 1 The FIR coefficients parameter is converted from doubles to the Parameter data type offline using round-to-nearest and saturation. The Initial condition parameter is converted from doubles to the input data type offline using round-to-nearest and saturation. 2 The coefficients and inputs are multiplied together for the initial time step for both outputs. For y1(0), the operations 13 ⋅ u ( 0 ) , 11 ⋅ 0.8 , and – 7 ⋅ 1.1 4-44 Example: Conversions and Arithmetic Operations are performed, while for y2(0), the operations 6 ⋅ u ( 0 ) and – 5 ⋅ 0.8 are performed. The results of these operations are then converted to the Output data type using the specified rounding and overflow modes. 3 The sum is carried out for y1(0) and y2(0). Note that the rules for addition and subtraction are satisfied since the coefficients and inputs are already converted to the Output data type. 4 Steps 2 and 3 are repeated for subsequent time steps. 4-45 4 Arithmetic Operations 4-46 5 Realization Structures Overview (p. 5-2) A brief overview of creating filters using the Fixed-Point Blockset Targeting an Embedded Processor (p. 5-3) A description of issues that arise when targeting a fixed-point design for use on an embedded processor Canonical Forms (p. 5-6) A discussion of some canonical forms that optimize filter implementation with respect to certain factors 5 Realization Structures Overview This chapter investigates how you can realize digital filters using the Fixed-Point Blockset. The Fixed-Point Blockset addresses the needs of the control system and signal processing fields, and other fields where algorithms are implemented on fixed-point hardware. In signal processing, a digital filter is a computational algorithm that converts a sequence of input numbers to a sequence of output numbers. The algorithm is designed such that the output signal meets frequency-domain or time-domain constraints (desirable frequency components are passed, undesirable components are rejected). In general terms, a discrete transfer function controller is a form of a digital filter. However, a digital controller may contain nonlinear functions such as look-up tables in addition to a discrete transfer function. This guide uses the term digital filter when referring to discrete transfer functions. Realizations and Data Types In an ideal world where numbers, calculations, and storage of states have infinite precision and range, there are virtually an infinite number of realizations for the same system. In theory, these realizations are all identical to each other. In the more realistic world of double-precision numbers, calculations, and storage of states, small nonlinearities are introduced due to the finite precision and range of floating-point data types. Therefore, each realization of a given system produces different results. In most cases however, these differences are small. In the world of fixed-point numbers where precision and range are limited, the differences in the realization results can be very large. Therefore, you must carefully select the data type, word size, and scaling for each realization element such that results are accurately represented. To assist you with this selection, design rules for modeling dynamic systems with fixed-point math are provided in “Targeting an Embedded Processor” on page 5-3. 5-2 Targeting an Embedded Processor Targeting an Embedded Processor This section describes issues that often arise when targeting a fixed-point design for use on an embedded processor, such as some general assumptions about integer sizes and operations available on embedded processors. These assumptions lead to design issues and design rules that may be useful for your specific fixed-point design. Size Assumptions Embedded processors are typically characterized by a particular bit size. For example, the terms “8-bit micro,” “32-bit micro,” or “16-bit DSP” are common. It is generally safe to assume that the processor is predominantly geared to processing integers of the specified bit size. Integers of the specified bit size are referred to as the base data type. Additionally, the processor typically provides some support for integers that are twice as wide as the base data type. Integers consisting of double bits are referred to as the accumulator data type. For example a 16-bit micro has a 16-bit base data type and a 32-bit accumulator data type. Although other data types may be supported by the embedded processor, this section describes only the base and accumulator data types. Operation Assumptions The embedded processor operations discussed in this section are limited to the needs of a basic simulation diagram. Basic simulations use multiplication, addition, subtraction, and delays. Fixed-point models also need shifts to do scaling conversions. For all these operations, the embedded processor should have native instructions that allow the base data type as inputs. For accumulator-type inputs, the processor typically supports addition, subtraction, and delay (storage/retrieval from memory), but not multiplication. Multiplication is typically not supported for accumulator-type inputs due to complexity and size issues. A difficulty with multiplication is that the output needs to be twice as big as the inputs for full precision. For example, multiplying two 16-bit numbers requires a 32-bit output for full precision. The need to handle the outputs from a multiply operation is one of the reasons embedded processors include accumulator-type support. However, if multiplication of accumulator-type inputs is also supported, then there is a need to support a data type that is twice as big as the accumulator type. To 5-3 5 Realization Structures restrict this additional complexity, multiplication is typically not supported for inputs of the accumulator type. Design Rules The important design rules that you should be aware of when modeling dynamic systems with fixed-point math follow. Design Rule 1: Only Multiply Base Data Types It is best to multiply only inputs of the base data type. Embedded processors typically provide an instruction for the multiplication of base-type inputs, but not for the multiplication of accumulator-type inputs. If necessary, you can combine several instructions to handle multiplication of accumulator-type inputs. However, this can lead to large, slow embedded code. You can insert blocks to convert inputs from the accumulator-type to the base-type prior to multiply or gain blocks, if necessary. Design Rule 2: Delays Should Use the Base Data Type There are two general reasons why a unit delay should use only base-type numbers: • The unit delay essentially stores a variable’s value to RAM, and one time step later, retrieves that value from RAM. Because the value must be in memory from one time step to the next, the RAM must be exclusively dedicated to the variable and can’t be shared or used for another purpose. Using accumulator-type numbers instead of the base data type doubles the RAM requirements, which can significantly increase the cost of the embedded system. • The unit delay typically feeds into a gain block. The multiplication design rule requires that the input (the unit delay signal) use the base data type. Design Rule 3: Temporary Variables Can Use the Accumulator Data Type Except for unit delay signals, most signals are not needed from one time step to the next. This means that the signal values can be temporarily stored in shared and reused memory. This shared and reused memory can be RAM or it can simply be registers in the CPU. In either case, storing the value as an accumulator data type is not much more costly than storing it as a base data type. 5-4 Targeting an Embedded Processor Design Rule 4: Summation Can Use the Accumulator Data Type Addition and subtraction can use the accumulator data type if there is justification. The typical justification is reducing the buildup of errors due to round-off or overflow. For example, a common filter operation is a weighted sum of several variables. Multiplying a variable by a weight naturally produces a product of the accumulator type. Before summing, each product can be converted back to the base data type. This approach introduces round-off error into each part of the sum. Alternatively, the products can be summed using the accumulator data type, and the final sum can be converted to the base data type. Round-off error is introduced in just one point and the precision is generally better. The cost of doing an addition or subtraction using accumulator-type numbers is slightly more expensive, but if there is justification, it is usually worth the cost. 5-5 5 Realization Structures Canonical Forms The Fixed-Point Blockset does not attempt to standardize on one particular fixed-point digital filter design method. For example, you can produce a design in continuous time and then obtain an “equivalent” discrete-time digital filter using one of many transformation methods. Alternatively, you can design digital filters directly in discrete time. After you obtain a digital filter, it can be realized for fixed-point hardware using any number of canonical forms. Typical canonical forms are the direct form, series form, and parallel form, all of which are outlined in this chapter. For a given digital filter, the canonical forms describe a set of fundamental operations for the processor. Since there are an infinite number of ways to realize a given digital filter, you must make the best realization on a per-system basis. The canonical forms presented in this chapter optimize the implementation with respect to some factor, such as minimum number of delay elements. In general, when choosing a realization method, you must take these factors into consideration: • Cost The cost of the realization might rely on minimal code and data size. • Timing constraints Real-time systems must complete their compute cycle within a fixed amount of time. Some realizations might yield faster execution speed on different processors. • Output signal quality The limited range and precision of the binary words used to represent real-world numbers will introduce errors. Some realizations are more sensitive to these errors than others. The Fixed-Point Blockset allows you to evaluate various digital filter realization methods in a simulation environment. Following the development cycle outlined in “The Development Cycle” in Chapter 1, you can fine-tune the realizations with the goal of reducing the cost (code and data size) or increasing signal quality. After you have achieved the desired performance, you can use the Real-Time Workshop to generate rapid prototyping C code and evaluate its performance with respect to your system’s real-time timing constraints. You 5-6 Canonical Forms can then modify the model based upon feedback from the rapid prototyping system. The presentation of the various realization structures takes into account that a summing junction is a fundamental operator; thus you may find that the structures presented here look different from those in the fixed-point filter design literature. For each realization form, an example is provided using the transfer function shown below: 1 + 2.2z –1 + 1.85z – 2 + 0.5z – 3 H ex ( z ) = ------------------------------------------------------------------------------1 – 0.5z – 1 + 0.84z – 2 + 0.09z – 3 ( 1 + 0.5z – 1 ) ( 1 + 1.7z – 1 + z – 2 ) = ------------------------------------------------------------------------------------( 1 + 0.1z – 1 ) ( 1 – 0.6z – 1 + 0.9z – 2 ) 3.4639 – 1.0916 + 3.0086z – 1 = 5.5556 – -------------------------- + -------------------------------------------------------1 + 0.1z – 1 1 – 0.6z – 1 + 0.9z – 2 Direct Form II In general, a direct form realization refers to a structure where the coefficients of the transfer function appear directly as gain blocks. The direct form II realization method is presented as using the minimal number of delay elements, which is equal to n, the order of the transfer function denominator. The canonical direct form II is presented as “Standard Programming” in Discrete-Time Control Systems by Ogata. It is known as the “Control Canonical Form” in Digital Control of Dynamic Systems by Franklin, Powell, and Workman. 5-7 5 Realization Structures You can derive the canonical direct form II realization by writing the discrete-time transfer function with input e(z) and output u(z) as u(z) h(z ) u(z) ----------- = ----------- ⋅ ----------h(z) e(z ) e(z) ( b 0 + b 1 z –1 + … + b m z – m ) 1 -------------------------------------------------------------------------------–1 –2 1 + a1 z + a2 z + … + an z –n = u( z) ----------h( z) h(z) ----------e(z) The block diagram for u(z)/h(z) follows: b0 b1 h(z) z -1 z -1 –1 –m u(z) ----------- = b 0 + b 1 z + ... + b m z h(z) 5-8 +z -1 bm + u(z) Canonical Forms The block diagrams for h(z)/e(z) follow. e(z) + h(z) z -1 z -1 z -1 -a1 -a2 -an h(z) 1 ----------- = ------------------------------------------------------------------------------–1 –2 –n e(z) 1 + a 1 z + a 2 z + ... + a n z Combining these two block diagrams yields the direct form II diagram shown below. Notice that the feedforward part (top of block diagram) contains the numerator coefficients and the feedback part (bottom of block diagram) contains the denominator coefficients. b0 b1 bm + e(z) + h(z) z -1 z -1 z -1 z u(z) u ( z )---------e(z) -1 -a1 -a2 -am -an 5-9 5 Realization Structures The direct form II example transfer function is given by 1 + 2.2z – 1 + 1.85z – 2 + 0.5z – 3 H ex ( z ) = ------------------------------------------------------------------------------1 – 0.5z – 1 + 0.84z – 2 + 0.09z –3 The realization of Hex(z) using the Fixed-Point Blockset is shown below. You can display this model by typing fxpdemo_direct_form2 at the MATLAB command line. Series Cascade Form In the canonical series cascade form, the transfer function H(z) is written as a product of first-order and second-order transfer functions: u(z) H i ( z ) = ----------- = H 1 ( z ) ⋅ H 2 ( z ) ⋅ H 3 ( z )…H p ( z ) e(z) 5-10 Canonical Forms This equation yields the canonical series cascade form. e(z) H1 (z) H 2 (z) H3 (z) Hp (z) u(z) Factoring H(z) into Hi(z) where i = 1,2,3,...,p can be done in a number of ways. Using the poles and zeros of H(z), you can obtain Hi(z) by grouping pairs of conjugate complex poles and pairs of conjugate complex zeros to produce second-order transfer functions, or by grouping real poles and real zeros to produce either first-order or second-order transfer functions. You could also group two real zeros with a pair of conjugate complex poles or vice versa. Since there are many ways to obtain Hi(z), you should compare the various groupings to see which produces the best results for the transfer function under consideration. For example, one factorization of H(z) might be H ( z ) = H 1 ( z )H 2 ( z )…H p ( z ) j = ∏ i=1 1 + bi z–1 ---------------------1 + ai z –1 p ∏ i = j+1 1 + ei z –1 + fi z–2 -----------------------------------------1 + c i z –1 + d i z – 2 You must also take into consideration that the ordering of the individual Hi(z)’s will lead to systems with different numerical characteristics. You may want to try various orderings for a given set of Hi(z)’s to determine which gives the best numerical characteristics. 5-11 5 Realization Structures The first order diagram for H(z) follows. x(z) + z -1 bi + y(z) -ai 1 + bi z –1 y(z) ---------- = ---------------------x(z) 1 + ai z –1 The second order diagram for H(z) follows. ei x(z) + z -1 z -1 fi + y(z) -ci -di 1 + e i z –1 + f i z – 2 y ( z ) = --------------------------------------------------x(z) 1 + ci z –1 + di z–2 The series cascade form example transfer function is given by ( 1 + 0.5z – 1 ) ( 1 + 1.7z – 1 + z – 2 ) H ex ( z ) = -------------------------------------------------------------------------------------( 1 + 0.1z –1 ) ( 1 – 0.6z – 1 + 0.9z –2 ) 5-12 Canonical Forms The realization of Hex(z) using the Fixed-Point Blockset is shown below. You can display this model by typing fxpdemo_series_cascade_form at the MATLAB command line. Parallel Form In the canonical parallel form, the transfer function H(z) is expanded into partial fractions. H(z) is then realized as a sum of a constant, first-order, and second-order transfer functions, as shown: u(z) H i ( z ) = ----------- = K + H 1 ( z ) + H 2 ( z ) + … + H p ( z ) e(z) 5-13 5 Realization Structures This expansion, where K is a constant and the H i ( z ) are the first and second-order transfer functions, follows. K H1(z) e(z) + H 2(z) u(z) H p(z) As in the series canonical form, there is no unique description for the first-order and second-order transfer function. Due to the nature of the Sum block, the ordering of the individual filters doesn’t matter. However, because of the constant K, you can choose the first-order and second-order transfer functions such that their forms are simpler than those for the series cascade form described in the preceding section. This is done by expanding H(z) as j H(z ) = K + ∑ Hi ( z ) + ∑ i=1 j = K+ bi Hi ( z ) i = j+1 p -+ ∑ ∑ 1---------------------+ a z –1 i=1 5-14 p i i =j+1 e i + fi z –1 -----------------------------------------1 + c i z – 1 + d i z –2 Canonical Forms The first order diagram for H(z) follows. bi x(z) + z + y(z) -1 -ai bi y ( z ) = ------------------------------x( z) 1 + a i z –1 The second order diagram for H(z) follows. ei fi x(z) + z -1 z -1 + y(z) -ci -di e i + fi z –1 y(z) ---------- = -----------------------------------------x(z) 1 + ci z –1 + di z–2 The parallel form example transfer function is given by – 1.0916 + 3.0086z – 1 3.4639 H ex ( z ) = 5.5556 – -------------------------- + -------------------------------------------------------– 1 1 – 0.6z – 1 + 0.9z – 2 1 + 0.1z 5-15 5 Realization Structures The realization of Hex(z) using the Fixed-Point Blockset is shown below. You can display this model by typing fxpdemo_parallel_form at the MATLAB command line. 5-16 6 Tutorial: Feedback Controller Simulation Overview (p. 6-2) An overview of the Fixed-Point Blockset features highlighted by the tutorial Simulink Model of a Feedback Design (p. 6-3) An introduction to the feedback design model used in the tutorial Idealized Feedback Design (p. 6-6) Presentation of the open-loop and plant-only Bode plots for the simulation Digital Controller Realization (p. 6-7) An introduction to the digital controller used in the tutorial Simulation Results (p. 6-10) A step-by-step tutorial based on the fxpdemo_feedback demo, which highlights use of the Fixed-Point Settings interface 6 Tutorial: Feedback Controller Simulation Overview The purpose of this tutorial is to show you how to simulate a fixed-point feedback design using the Fixed-Point Settings interface. In doing so, many of the essential features of the Fixed-Point Blockset are demonstrated. These include • Selecting output data type • Selecting output scaling • Logging maximum and minimum simulation results • Using the automatic scaling tool • Overriding the output data type for a system or subsystem 6-2 Simulink Model of a Feedback Design Simulink Model of a Feedback Design Run the Simulink model of the feedback design by launching the MATLAB Demo browser and selecting the Scaling a Fixed Point Control Design demo. Launch the Demo browser by typing demo blockset 'Fixed Point' at the command line, or by opening the Demos block found in the Fixed-Point Blockset library. Alternatively, you can access the model directly by typing its name at the command line: fxpdemo_feedback The demo’s .mdl file automatically runs the M-file preload_feedback, which populates the workspace with the required parameter values. The feedback design model is shown below. The model consists of the following blocks and subsystems: • Reference This Simulink Signal Generator block generates a continuous-time reference signal. It is configured to output a square wave. • Sum This Simulink or Fixed-Point Blockset Sum block subtracts the plant output from the reference signal. • ZOH The Simulink or Fixed-Point Blockset Zero-Order Hold block samples and holds the continuous signal. This block is configured so that it quantizes the signal in time by an amount tsamp = 0.01 second. 6-3 6 Tutorial: Feedback Controller Simulation • Analog to Digital Interface The analog to digital (A/D) interface consists of a Gateway In block that converts a Simulink double to a Fixed-Point Blockset data type. It represents any hardware that digitizes the amplitude of the analog input signal. In the real world, its characteristics are fixed. • Controller The digital controller is a subsystem that represents the software running on the hardware target. Refer to “Digital Controller Realization” on page 6-7. • Digital to Analog Interface The digital to analog (D/A) interface consists of a Gateway Out block that converts a Fixed-Point Blockset data type into a Simulink double. It represents any hardware that converts a digitized signal into an analog signal. In the real world, its characteristics are fixed. • Analog Plant The analog plant is described by a transfer function, and is controlled by the digital controller. In the real world, its characteristics are fixed. • FixPt GUI This block launches the Fixed-Point Settings interface. The model also includes three scopes, which display the reference, plant input, and plant output signals. Simulation Setup To set up this kind of fixed-point feedback controller simulation, you perform the following steps: 1 Identify all design components. In the real world, there are design components with fixed characteristics (the hardware) and design components with characteristics that you can change (the software). In this feedback design, the main hardware components are the A/D hardware, the D/A hardware, and the analog plant. The main software component is the digital controller. 6-4 Simulink Model of a Feedback Design 2 Develop a theoretical model of the plant and controller. For the feedback design used in this tutorial, the plant is characterized by a transfer function. The characteristics of the plant are unimportant for this tutorial, and are not discussed. The digital controller model used in this tutorial is described by a z-domain transfer function and is implemented using a direct-form realization. 3 Evaluate the behavior of the plant and controller. You evaluate the behavior of the plant and the controller with a Bode plot. This evaluation is idealized since all numbers, operations, and states are double-precision. 4 Simulate the system. You simulate the feedback controller design using Simulink and the Fixed-Point Blockset. Of course, in a simulation environment, you can treat all components (software and hardware) as though their characteristics are not fixed. 6-5 6 Tutorial: Feedback Controller Simulation Idealized Feedback Design Open loop (controller and plant) and plant-only Bode plots for the Scaling a Fixed-Point Control Design demo are shown below. The open loop Bode plot results from a digital controller described in the idealized world of continuous time, double-precision coefficients, storage of states, and math operations. The plant and controller design criteria are not important for the purposes of this tutorial. The Bode plots were created using the workspace variables produced by the preload_feedback M-file. Magnitude Bode Plots: Plant Only (dashed) and Open Loop (solid) 0 10 −5 10 −1 10 0 10 1 10 Freq (rad/sec) 2 10 3 10 0 Phase −100 −200 −300 −400 −1 10 6-6 0 10 1 10 Freq (rad/sec) 2 10 3 10 Digital Controller Realization Digital Controller Realization In this simulation, the digital controller is implemented using the fixed-point direct-form realization shown below. The hardware target is a 16-bit processor. Variables and coefficients are generally represented using 16 bits, especially if these quantities are stored in ROM or global RAM. Use of 32-bit numbers is limited to temporary variables that exist briefly in CPU registers or in a stack. The realization consists of these blocks: • Up Cast Up Cast is a Fixed-Point Blockset Conversion block that connects the A/D hardware with the digital controller. It pads the output word of the A/D hardware with trailing zeros to a 16-bit number (the base data type). • Numerator Terms and Denominator Terms Each of these Fixed-Point Blockset FIR blocks represents a weighted sum carried out in the CPU target. The word size and precision used in the calculations reflect those of the accumulator. Numerator Terms multiplies and accumulates the most recent inputs with the FIR numerator coefficients. Denominator Terms multiples and accumulates the most recent delayed outputs with the FIR denominator coefficients. The coefficients are stored in 6-7 6 Tutorial: Feedback Controller Simulation ROM using the base data type. The most recent inputs are stored in global RAM using the base data type. • Combine Terms Combine Terms is a Simulink or Fixed-Point Blockset Sum block that represents the accumulator in the CPU. Its word size and precision are twice that of the RAM (double bits). • Down Cast Down Cast is a Fixed-Point Blockset Conversion block that represents taking the number from the CPU and storing it in RAM. The word size and precision are reduced to half that of the accumulator when converted back to the base data type. • Prev Out Prev Out is a Simulink or Fixed-Point Blockset Unit Delay block that delays the feedback signal in memory by one sample period. The signals are stored in global RAM using the base data type. Direct Form Realization The controller directly implements this equation N y(k) = N ∑ bi u ( k – 1 ) – ∑ ai y ( k – 1 ) i=0 i=1 where • u(k – 1) represents the input from the previous time step. • y(k) represents the current output, and y(k – 1) represents the output from the previous time step. • bi represents the FIR numerator coefficients. • ai represents the FIR denominator coefficients. The first summation in y(k) represents multiplication and accumulation of the most recent inputs and numerator coefficients in the accumulator. The second summation in y(k) represents multiplication and accumulation of the most recent outputs and denominator coefficients in the accumulator. Since the FIR coefficients, inputs, and outputs are all represented by 16-bit numbers (the 6-8 Digital Controller Realization base data type), any multiplication involving these numbers produces a 32-bit output (the accumulator data type). 6-9 6 Tutorial: Feedback Controller Simulation Simulation Results Using Simulink and the Fixed-Point Blockset, you can easily transition from a digital controller described in the ideal world of double-precision numbers to one realized in the world of fixed-point numbers. The simulation approach used in this tutorial follows these steps: • “1. Initial Guess at Scaling” on page 6-10. For this tutorial, you run an initial “proof of concept” simulation using a reasonable guess at the fixed-point word size and scaling. This step is included only to illustrate how difficult it is to guess the best scaling. • “2. Data Type Override” on page 6-13. Perform a global override of the fixed-point data types and scaling using double-precision numbers. The maximum and minimum simulation values for each digital controller block are logged to the workspace. • “3. Automatic Scaling” on page 6-15. Use the automatic scaling procedure. This procedure uses the doubles simulation values previously logged to the MATLAB workspace, and changes the scaling for each block that does not have its scaling fixed. The feedback controller simulation is performed with the Fixed-Point Settings interface. You launch the interface by selecting the FixPt GUI block within the fxpdemo_feedback model, by selecting Fixed-Point settings from the Tools menu in the model window, by right-clicking in the model and selecting Fixed-Point settings from the menu that pops up, or by typing fxptdlg('fxpdemo_feedback') at the command line. The three steps of the simulation are described in the following sections. You determine the quality of the simulation results by examining the input and output of the analog plant. 1. Initial Guess at Scaling In the first step, initial guesses for the scaling of each block are already specified in each block mask in the model. This step is included to illustrate the difficulty of guessing at the best scaling. 6-10 Simulation Results 1 Run simulation f 2 Launch Plot System interface 1 After you launch the Fixed-Point Settings interface, click the Run button in the dialog to run the simulation. When the simulation is finished, the Simulation data logged for current system pane of the interface displays the block name, the minimum and maximum simulation results, the data type, and the scaling for each block. The display shows that the Up Cast block saturated 23 times, indicating a poor guess for the scaling. 2 Click the Plot button. This launches the Plot System interface, which is shown below. This interface displays all MATLAB variable names that contain Scope block data for the current model. 3 To plot the simulation results, select one or more variable names in the Plot System interface, and then select the appropriate plot button. This simulation plots the fixed-point signals for the plant input and the plant output. 6-11 6 Tutorial: Feedback Controller Simulation 3a Select both the plant input signal and the plant output signal 3b Plot selected signals The plant input and output signals are shown below. These signals reflect the initial guess at scaling. Fixed-point plant input signal Fixed-point plant output signal The Bode plot design sought to produce a well-behaved linear response for the closed-loop system. Clearly, the response is nonlinear. The nonlinear features 6-12 Simulation Results are due to significant quantization effects. An important part of fixed-point design is finding scaling that reduce quantization effects to acceptable levels. 2. Data Type Override You can obtain ideal simulation limits by using the automatic scaling tool. However, you must first perform a data type override with doubles of all blocks with fixed-point output, and you must log maximum and minimum simulation values for all blocks that are to be scaled. 1 Log mins, maxes, and overflows 2 Set data type override to true doubles 3 Run the simulation 4 Launch Plot System interface 1 Make sure the Logging Mode parameter is set to Min, max and overflow for the fxpdemo_feedback system. This overrides all local logging settings for the subsystems of the model. 2 Perform a data type override with doubles by setting the Data type override parameter in the interface to True Doubles. This overrides all local data type settings for the subsystems of the model. 6-13 6 Tutorial: Feedback Controller Simulation 3 Run the simulation by clicking the Run button. 4 Click the Plot button to launch the Plot System interface. 5 Compare the ideal (doubles) and fixed-point plant output signals using the Plot System interface. 5a Select the plant output signal 5b Plot both ideal (doubles) and fixed-point signal The ideal and fixed-point plant output signals are shown below. The ideal signal is produced by overriding the block output scaling with true doubles. 6-14 Simulation Results Ideal plant output signal Fixed-point plant output signal 3. Automatic Scaling Using the automatic scaling procedure, you can easily maximize the precision of the output data type while spanning the full simulation range. For a complex model, the absence of such a procedure can make achieving this goal tedious and time consuming. Perform automatic scaling for the Controller block. This block is a subsystem representing software running on the target, and requires optimization. 6-15 6 Tutorial: Feedback Controller Simulation 1 Set data type override to Use local settings 1 Turn off the data type override by setting Data type override in the Fixed-Point Settings interface to Use local settings. Each subsystem in the model now follows its own independent setting for this parameter. 6-16 Simulation Results 5 Run simulation 6 Launch Plot System interface 2 Select the Controller subsystem 3 Set the safety margin to 20 4 Run the autoscale script 2 Select the Controller subsystem in the Select current system parameter of the interface. 3 Set the Safety margin parameter in the interface to 20. This sets the scaling so that the largest simulation value seen is at least 20% smaller than the maximum value allowed. The Safety margin parameter value multiplies the “raw” simulation values by a factor of 1.2. Setting this parameter to a value greater than 1 decreases the likelihood that an overflow will occur when fixed-point data types are being used. Due to the nonlinear effects of quantization, a fixed-point simulation will produce results that are different from an idealized, doubles-based simulation. Signals in a fixed-point simulation may cover a larger or smaller range than in a doubles-based simulation. If the range increases enough, overflows or saturations could occur. A safety margin decreases the likelihood of this happening, but it may also decrease the precision of the simulation. 6-17 6 Tutorial: Feedback Controller Simulation 4 Run the autofixexp M-file script by clicking the Autoscale Blocks button. This script automatically changes the scaling on all fixed-point blocks that do not have their scaling locked, and that have their output data type specified as a generalized fixed-point number. This script uses the minimum and maximum data logged from the previous simulation to change each block’s scaling such that the precision is maximized while the full range of simulation values is spanned for each block. 5 Run the simulation by clicking the Run button. This simulation will use the new scaling set in Step 4. 6 Launch the Plot System interface and plot the plant output signal. The resulting plot is shown below. You can produce a close-up of a portion of the plot by clicking at the upper left of the region you want to expand, and dragging the pointer to the lower right while pressing the mouse button. When you then release the mouse button, you produce the plot below. 6-18 Simulation Results Limit cycles produced by the A2D block Note that a steady state has been achieved, but a small limit cycle is present in the steady state due to poor A/D design. 6-19 6 Tutorial: Feedback Controller Simulation 6-20 7 Tutorial: Producing Lookup Table Data Overview (p. 7-2) An overview of the topics covered by the tutorial Worst Case Error for a Lookup Table (p. 7-3) A description of worst case error for a lookup table, and how to find it using the fixpt_look1_func_plot function Creating Lookup Tables for a Sine Function (p. 7-5) A step-by-step tutorial on how to make lookup tables using the fixpt_look1_func_approx function Summary: Using the Lookup Table Functions (p. 7-19) A brief summary of conclusions from the tutorial on how to use fixpt_look1_func_plot and fixpt_look1_func_approx to create lookup tables Effect of Spacing on Speed, Error, and Memory Usage (p. 7-20) A comparison of lookup tables with differing spacing — uneven, even, and power of two 7 Tutorial: Producing Lookup Table Data Overview A function lookup table is a method by which you can approximate a function by a table with a finite number of points (X,Y). Function lookup tables are essential to many fixed-point applications. The function you want to approximate is called the ideal function. The X values of the lookup table are called the breakpoints. You approximate the value of the ideal function at a point by linearly interpolating between the two adjacent breakpoints closest to the point. In creating the points for a function lookup table, you generally want to achieve one or both of the following goals: • Minimize the worst case error for a specified maximum number of breakpoints • Minimize the number of breakpoints for a specified maximum allowed error This tutorial shows you how to create function lookup tables using the function fixpt_look1_func_approx. You can optimize the lookup table to minimize the number of data points, the error, or both. You can also restrict the spacing of the breakpoints to be even or even powers of two, in order to speed up computations using the table. This tutorial also explains how to use the function fixpt_look1_func_plot to find the worst case error of a lookup table and plot the errors at all points. 7-2 Worst Case Error for a Lookup Table Worst Case Error for a Lookup Table This section explains the worst case error of a lookup table, and how to find the worst case error using the function fixpt_look1_func_plot. It gives a simple example of the worst case error of a lookup table for the square root function. The error at any point of a function lookup table is the absolute value of the difference between the ideal function at the point and the corresponding Y value found by linearly interpolating between the adjacent breakpoints. The worst case error, or maximum absolute error, of a lookup table is the maximum absolute value of all errors in the interval containing the breakpoints. For example, if the ideal function is the square root, and the breakpoints of the lookup table are 0, .25 and 1, then in a perfect implementation of the lookup table, the worst case error is 1/8 = .125, which occurs at the point 1/16 = .0625. In practice, the error could be greater, depending on the fixed point quantization and other factors. Example: Square Root Function This example shows how to use the function fixpt_look1_func_plot to find the maximum absolute error for the simple lookup table whose breakpoints are 0, .25, and 1. The corresponding Y data points of the lookup table, which you find by taking the square roots of the breakpoints, are 0, .5 and 1. To use the function fixpt_look1_func_plot, you need to first define its parameters. To do so, type the following at the MATLAB prompt: funcstr='sqrt(x)'; %Define the square root function xdata=[0;.25;1]; %Set the breakpoints ydata=sqrt(xdata); %Find the square root of the breakpoints xmin = 0; %Set the minimum breakpoint xmax = 1; %Set the maximum breakpoint xdt = ufix(16); %Set the x data type xscale = 2^-16; %Set the x data scaling ydt = sfix(16); %Set the y data type yscale = 2^-14; %Set the y data scaling rndmeth = 'Floor'; %Set the rounding method Next, type errworst=fixpt_look1_func_plot(xdata,ydata,funcstr,... xmin,xmax,xdt,xscale,ydt,yscale,rndmeth) 7-3 7 Tutorial: Producing Lookup Table Data This returns the worst case error of the lookup table as the variable errworst: errworst = 0.1250 It also generates the plots shown below. The upper box (Outputs) displays a plot of the square root function, and a plot of the fixed-point lookup approximation underneath. The approximation is found by linear interpolation between the breakpoints. The lower box (Absolute Error) displays the errors at all points in the interval from 0 to 1. Notice that the maximum absolute error occurs at .0625. The error at the breakpoints is 0. 7-4 Creating Lookup Tables for a Sine Function Creating Lookup Tables for a Sine Function This section explains how to use the function fixpt_look1_func_approx to create lookup tables. It gives examples that show how to create lookup tables for the function sin(2 πx) on the interval from 0 to .25. The section covers • “Parameters for fixpt_look1_func_approx” on page 7-5 • “Setting Function Parameters for the Lookup Table” on page 7-6 • “Example 1: Using errmax with Unrestricted Spacing” on page 7-7 • “Example 2: Using nptsmax with Unrestricted Spacing” on page 7-10 • “Restricting the Spacing” on page 7-11 • “Example 3: Using errmax with Even Spacing” on page 7-12 • “Example 4: Using nptsmax with Even Spacing” on page 7-13 • “Example 5: Using errmax with Power of Two Spacing” on page 7-14 • “Example 6: Using nptsmax with Power of Two Spacing” on page 7-16 • “Specifying Both errmax and nptsmax” on page 7-17 • “Comparing the Examples” on page 7-18 Parameters for fixpt_look1_func_approx To use the function fixpt_look1_func_approx, you must first define its parameters. The required parameters for the function are • funcstr – The ideal function • xmin – The minimum input of interest • xmax – The maximum input of interest • xdt – The x data type • xscale – The x data scaling • ydt – The y data type • yscale – The y data scaling • rndmeth – The rounding method In addition there are three optional parameters: • errmax – The maximum allowed error of the lookup table • nptsmax – The maximum number of points of the lookup table 7-5 7 Tutorial: Producing Lookup Table Data • spacing – The allowed spacing between breakpoints You must use at least one of the parameters errmax and nptsmax. The next section “Setting Function Parameters for the Lookup Table” on page 7-6 gives typical settings for these parameters. Using Only errmax If you use only the errmax parameter, without nptsmax, the function creates a lookup table with the fewest points, for which the worst case error is at most errmax. See “Example 1: Using errmax with Unrestricted Spacing” on page 7-7. Using Only nptsmax If you use only the nptsmax parameter without errmax, the function creates a lookup table with at most nptsmax points, which has the smallest worse case error. See “Example 2: Using nptsmax with Unrestricted Spacing” on page 7-10. The section “Specifying Both errmax and nptsmax” on page 7-17 describes how the function behaves when you specify both errmax and nptsmax. Spacing You can use the optional spacing parameter to restrict the spacing between breakpoints of the lookup table. The options are • 'unrestricted' – The default. • 'even' – The distance between any two adjacent breakpoints is the same. • 'pow2' – The distance between any two adjacent breakpoints is the same and the distance is a power of two. The section “Restricting the Spacing” on page 7-11 and the examples that follow it explain how to use the spacing parameter. Setting Function Parameters for the Lookup Table To do the examples in this section, you must first set parameter values for the fixpt_look1_func_approx function. To do so, type the following at the MATLAB prompt: funcstr = 'sin(2*pi*x)'; %Define the sine function xmin = 0; %Set the minimum input of interest 7-6 Creating Lookup Tables for a Sine Function xmax = 0.25; %Set the maximum input of interest xdt = ufix(16); %Set the x data type xscale = 2^-16; %Set the x data scaling ydt = sfix(16); %Set the y data type yscale = 2^-14; %Set the y data scaling rndmeth = 'Floor'; %Set the rounding method errmax = 2^-10; %Set the maximum allowed error nptsmax = 21; %Specify the maximum number of points If you exit MATLAB after typing these commands, you must retype them before trying any of the other examples in this section. Example 1: Using errmax with Unrestricted Spacing The first example shows how to create a lookup table that has the fewest data points for a specified worst case error, with unrestricted spacing. Before trying the example, enter the same parameter values given in the section “Setting Function Parameters for the Lookup Table” on page 7-6, if you have not already done so in this MATLAB session. You specify the maximum allowed error by typing errmax = 2^-10; Creating the Lookup Table To create the lookup table, type [xdata,ydata,errworst]=fixpt_look1_func_approx(funcstr,... xmin,xmax,xdt,xscale,ydt,yscale,rndmeth,errmax); Note that the nptsmax and spacing parameters are not specified. The function returns three variables: • xdata, the vector of breakpoints of the lookup table • ydata, the vector found by applying ideal function, sin(2 πx), to xdata • errworst, which specifies the maximum possible error in the lookup table The value of errworst is less than or equal to the value of errmax. You can find the number of X data points by typing length(xdata) 7-7 7 Tutorial: Producing Lookup Table Data ans = 16 This means that 16 points are required to approximate sin(2 πx) to within the tolerance specified by errmax. You can display the maximum error by typing errworst. This returns errworst = 9.7656e-004 Plotting the Results You can plot the output of the function fixpt_look1_func_plot by typing fixpt_look1_func_plot(xdata,ydata,funcstr,xmin,xmax,xdt,... xscale,ydt,yscale,rndmeth); The resulting plots are shown below. 7-8 Creating Lookup Tables for a Sine Function The upper plot shows the ideal function, sin(2πx) and the fixed-point lookup approximation between the breakpoints. In this example, the ideal function and the approximation are so close together that the two graphs appear to coincide. The lower plot displays the errors. In this example, the Y data points, returned by the function fixpt_look1_func_approx as ydata, are equal to the ideal function applied to the points in xdata. However, you can define a different set of values for ydata after running fixpt_look1_func_plot. This can sometimes reduce the maximum error. You can also change the values of xmin and xmax in order to evaluate the lookup table on a subset of the original interval. To find the new maximum error after changing ydata, xmin or xmax, type errworst=fixpt_look1_func_plot(xdata,ydata,funcstr,xmin,xmax,... xdt,xscale,ydt,yscale,rndmeth) 7-9 7 Tutorial: Producing Lookup Table Data Example 2: Using nptsmax with Unrestricted Spacing The next example shows how to create a lookup table that minimizes the worst case error for a specified maximum number of data points, with unrestricted spacing. Before starting the example, enter the same parameter values given in the section “Setting Function Parameters for the Lookup Table” on page 7-6, if you have not already done so in this MATLAB session. Setting the Number of Breakpoints You specify the number of breakpoints in the lookup table by typing nptsmax = 21; Creating the Lookup Table Next, type [xdata,ydata,errworst]= fixpt_look1_func_approx(funcstr, xmin,xmax,xdt,xscale,ydt,yscale,rndmeth,[],nptsmax); The empty brackets, [], tell the function to ignore the parameter errmax, which is not used in this example. Omitting errmax causes the function fixpt_look1_func_approx to return a lookup table of size specified by nptsmax, with the smallest worst case error. The function returns a vector xdata, with 21 points. You can find the maximum error for this set of points is given by typing errworst at the MATLAB prompt. This returns errworst = 5.1139e-004 Plotting the Results To plot the lookup table along with the errors, type fixpt_look1_func_plot(funcstr,xdata,xdt,xscale,ydata,ydt,... yscale,rndmeth); The resulting plots are shown below. 7-10 Creating Lookup Tables for a Sine Function Restricting the Spacing In the previous two examples, the function fixpt_look1_func_approx creates lookup tables with unrestricted spacing between the breakpoints. You can restrict the spacing to improve the computational efficiency of the lookup table, using the spacing parameter. The options for spacing are: • 'unrestricted' – The default. • 'even' – The distance between any two adjacent breakpoints is the same. • 'pow2' – The distance between any two adjacent breakpoints is the same and is a power of two. Both power of two and even spacing increase the computational speed of the lookup table and use less command read-only memory (ROM). However, specifying either of the spacing restrictions along with errmax usually requires more data points in the lookup table than does unrestricted spacing, in order to achieve the same degree of accuracy. The section “Effect of Spacing on Speed, 7-11 7 Tutorial: Producing Lookup Table Data Error, and Memory Usage” on page 7-20 discusses the tradeoffs between different spacing options. Example 3: Using errmax with Even Spacing The next example shows how to create a lookup table that has evenly spaced breakpoints and a specified worst case error. To try the example, you must first enter the parameter values given in the section “Setting Function Parameters for the Lookup Table” on page 7-6, if you have not already done so in this MATLAB session. Next, at the MATLAB prompt type spacing = 'even'; [xdata ydata errworst]=fixpt_look1_func_approx(funcstr,... xmin,xmax,xdt,xscale,ydt,yscale,rndmeth,errmax,[],spacing); You can find the number of points in the lookup table by typing length(xdata). ans = 20 To plot the lookup table along with the errors, type fixpt_look1_func_plot(xdata,ydata,funcstr,xmin,xmax,xdt,... xscale,ydt,yscale,rndmeth); This produces the following plots. 7-12 Creating Lookup Tables for a Sine Function Example 4: Using nptsmax with Even Spacing The next example shows how to create a lookup table that has evenly space breakpoints and minimizes the worst case error for a specified maximum number of points. To try the example, you must first enter the parameter values given in the section “Setting Function Parameters for the Lookup Table” on page 7-6, if you have not already done so in this MATLAB session. Next, at the MATLAB prompt type spacing='even'; [xdata ydata errworst]= fixpt_look1_func_approx(funcstr,... xmin,xmax,xdt,xscale,ydt,yscale,rndmeth,[],nptsmax,spacing); The result requires 21 evenly spaced points to achieve a maximum absolute error of 2^-10.2209. To plot the lookup table along with the errors, type fixpt_look1_func_plot(xdata,ydata,funcstr,xmin,xmax,xdt,... 7-13 7 Tutorial: Producing Lookup Table Data xscale,ydt,yscale,rndmeth); Example 5: Using errmax with Power of Two Spacing The next example shows how to construct a lookup table that has power of two spacing and a specified worst case error. To try the example, you must first enter the parameter values given in the section “Setting Function Parameters for the Lookup Table” on page 7-6, if you have not already done so in this MATLAB session. Next, at the MATLAB prompt type spacing ='pow2'; [xdata ydata errworst]=fixpt_look1_func_approx(funcstr,xmin,xmax,xdt,... xscale,ydt,yscale,rndmeth,errmax,[],spacing); To find out how many points are in the lookup table, type 7-14 Creating Lookup Tables for a Sine Function length(xdata) ans = 33 This means that 33 points are required to achieve the worst case error specified by errmax. To verify that these points are evenly spaced, type widths=diff(xdata) This generates a vector whose entries are the differences between consecutive points in xdata. Every entry of widths is 2-7. To find the maximum error for the lookup table, type errworst errworst = 3.7209e-004 This is less than the value of errmax. To plot the lookup table data along with the errors, type fixpt_look1_func_plot(xdata,ydata,funcstr,xmin,xmax,xdt,... xscale,ydt,yscale,rndmeth); This displays the plots shown below. 7-15 7 Tutorial: Producing Lookup Table Data Example 6: Using nptsmax with Power of Two Spacing The next example shows how to create a lookup table that has power of two spacing and minimizes the worst case error for a specified maximum number of points. To try the example, you must first enter the parameter values given in the section “Setting Function Parameters for the Lookup Table” on page 7-6, if you have not already done so in this MATLAB session: spacing ='pow2'; [xdata, errworst]= fixpt_look1_func_approx(funcstr,... xmin,xmax,xdt,xscale,ydt,yscale,rndmeth,[],nptsmax,spacing); The result requires 17 points to achieve a maximum absolute error of 2^-9.6267. To plot the lookup table along with the errors, type 7-16 Creating Lookup Tables for a Sine Function fixpt_look1_func_plot(funcstr,xdata,xdt,xscale,ydt,yscale,rndmet h); This produces the plots shown below. Specifying Both errmax and nptsmax If you include both the errmax and the nptsmax parameters, the function fixpt_look1_func_approx tries to find a lookup table with at most nptsmax data points, whose worst case error is at most errmax. If it can find a lookup table meeting both conditions, it uses the following order of priority for spacing: 1 Power of two 2 Even 3 Unrestricted 7-17 7 Tutorial: Producing Lookup Table Data If the function cannot find any lookup table satisfying both conditions, it ignores nptsmax and returns a lookup table with unrestricted spacing, whose worst case error is at most errmax. In this case, the function behaves the same as if the nptsmax parameter were omitted. Using the parameters described the section “Setting Function Parameters for the Lookup Table” on page 7-6, the following examples illustrate the results of using different values for nptsmax when you enter [xdata ydata errworst]=fixpt_look1_func_approx(funcstr, xmin,xmax,xdt,xscale,ydt,yscale,rndmeth,errmax,numptsmax); The results for three different settings for nptsmax are as follows: • numptsmax=33 — The function creates the lookup table with 33 points having power of two spacing as in Example 3. • numptsmax=21 — Since the errmax and numptsmax conditions cannot be met with power of two spacing, the function creates the lookup table with 20 points having even spacing, as in Example 5. • numptsmax=16 — Since the errmax and numptsmax conditions cannot be met with either power of two or even spacing, the function creates the lookup table with 16 points having unrestricted spacing, as in Example 1. Comparing the Examples The following table summarizes the results for the examples. Note that when you specify errmax, even spacing requires more data points than unrestricted, and power of two spacing requires more points than even spacing. 7-18 Example Options Spacing Worst Case Error Number of Points in Table 1 errmax=2^-10 'unrestricted' 2^-10 16 2 nptsmax=21 'unrestricted' 2^-10.933 21 3 errmax=2^-10 'even' 2^-10.0844 20 4 nptsmax=21 'even' 2^-10.2209 21 5 errmax=2^-10 'pow2' 2^-11.3921 33 6 nptsmax=21 'pow2' 2^-9.627 17 Summary: Using the Lookup Table Functions Summary: Using the Lookup Table Functions The following summarizes how to use the lookup table approximation functions: 1 Define a The ideal function to be approximated b The range, xmin to xmax, over which to find X and Y data c The fixed-point implementation: data type, scaling, and rounding method d The maximum acceptable error, the maximum number of points, and the spacing 2 Run the fixpt_look1_func_approx function to generate X and Y data. 3 Use the fixpt_look1_func_plot function to plot the function and error between the ideal and approximated function using the selected X and Y data, and to calculate the error and the number of points used. 4 Vary input criteria, such as errmax, nptsmax and spacing, to produce sets of X and Y data that generate functions with varying worst-case error, number of points required, and spacing. 5 Compare results of the number of points required and maximum absolute error from various runs to choose the best set of X and Y data. 7-19 7 Tutorial: Producing Lookup Table Data Effect of Spacing on Speed, Error, and Memory Usage This section compares the implementations of lookup tables that use breakpoints whose spacing is uneven, even, and power of two. This comparison is only valid when the breakpoints are not tunable. If the breakpoints can be tuned in the generated code, then all three cases generate the same code. The comparison will focus on the amount of read-only memory (ROM) used for data, the amount of ROM used for commands, and the speed with which the commands are executed. As a specific example, this comparison uses the demo fxpdemo_approx_sin. There are three fixed-point lookup tables in this model. All three lookup tables approximate the function sin(2*pi*u) over the first quadrant. All three achieve a worst case error of less than 2^-8. However, they have different restrictions on their breakpoint spacing. You can use the model fxpdemo_approx, which this demo opens, to generate code with Real-Time Workshop. This section presents several segments of the generated code. These segments of code were edited and arranged for clarity and to emphasize key differences. This section covers the following topics: • “Data ROM Required” on page 7-21 • “Determining Out-of-Range Inputs” on page 7-22 • “Determining Input Location” on page 7-22 • “Interpolation” on page 7-24 • “Conclusion” on page 7-26 To open the demo, type at the MATLAB prompt fxpdemo_approx_sin This opens the model shown below. 7-20 Effect of Spacing on Speed, Error, and Memory Usage Data ROM Required This section looks at the data ROM required by each of the three spacing options. Uneven Case Uneven spacing requires both Y data points and breakpoints: int16_T yuneven[8]; uint16_T xuneven[8]; The total bytes used is 32. Even Case Even spacing requires only Y data points: int16_T yeven[10]; The total bytes used is 20. The breakpoints are not explicitly required. The code will use the spacing between the breakpoints, and may use the smallest and largest breakpoint. At most three values related to the breakpoints are needed. 7-21 7 Tutorial: Producing Lookup Table Data Power of Two Case Power of two spacing requires only Y data points: int16_T ypow2[17]; The total bytes used is 34. The breakpoints are not explicitly required. The code will use the spacing between the breakpoints, and may use the smallest and largest breakpoint. At most three values related to the breakpoints are needed. Determining Out-of-Range Inputs In all three cases you have to guard against the possibility that the input is less than the smallest breakpoint or greater than the biggest breakpoint. There may be differences in how occurrences of these possibilities are handled. However, the differences are generally minor and are normally not a key factor in deciding to use one spacing method over another. The subsequent sections assume that out-of-range inputs are impossible or have already been handled. Determining Input Location This section describes how the three fixed point lookup tables determine where the current input is relative to the breakpoints. Uneven Case Unevenly spaced breakpoints require a general-purpose algorithm such as a binary search to determine where the input lies in relation to the breakpoints. The following code provides an example: iLeft = 0; iRght = 7; /* number of breakpoints minus 1 */ while ( ( iRght - iLeft ) > 1 ) { i = ( iLeft + iRght ) >> 1; if ( uAngle < xuneven[i] ) { iRght = i; } else { 7-22 Effect of Spacing on Speed, Error, and Memory Usage iLeft = i; } } The while loop executes up to log2(N) times where N is number of breakpoints. Even Case Evenly spaced breakpoints require only one step to determine where the input lies in relation to the breakpoints: iLeft = uAngle / 455U; The divisor 455U represents the spacing between breakpoints. In general, the dividend would be (uAngle - SmallestBreakPoint). In this example, the smallest breakpoint was zero, so the subtraction was optimized out. Power of Two Case Power of two spaced breakpoints require only one step to determine where the input lies in relation to the breakpoints: iLeft = uAngle >> 8; The number of shifts is 8 because the breakpoints have spacing 2^8. The smallest breakpoint was zero, so uAngle replaced the general case of (uAngle - SmallestBreakPoint). Comparison To determine where the input is located with respect to the breakpoints, the unevenly spaced case clearly requires much more code than the other two cases. This code requires additional command ROM. This ROM penalty can be reduced if many lookup tables share the binary search algorithm as a function. Even if the code is shared, the number of clock cycles required to determine the location of the input is much higher for the unevenly spaced cases than the other two cases. If the code is shared, then function call overhead decreases the speed of execution a little more. In the evenly spaced case and the power of two spaced case, you can determine the location of the input with a single line of code. The evenly spaced cased uses a general integer division. The power of two case uses a shift instead of general division because the divisor is an exact power of two. Without knowing the 7-23 7 Tutorial: Producing Lookup Table Data specific processor to be used, you cannot be certain that a shift is better than division. Many processors can implement division with a single assembly language instruction, so the code will be small. However, this instruction often takes many clock cycles to complete. Quite a few processors do not provide a division instruction. Division on these processors is implemented via repeated subtractions. This is slow and requires a fair amount of machine code, but this code can be shared. Most processors provide a way to do logical and arithmetic shifts left and right. A distinguishing difference is whether the processor can do N shifts in one instruction (barrel shift) or requires N instructions that shift one bit at a time. The barrel shift will require less code. Whether or not the barrel shift also increases speed depends on the hardware that supports the operation. The compiler can also complicate the comparison. In the previous example, the command uAngle >> 8 essentially takes the upper 8 bits in a 16 bit word. The compiler may detect this and replace the bit shifts with an instruction that takes the bits directly. If the number of shifts is some other value, such as 7, this optimization would not occur. Interpolation In theory, you can calculate the interpolation with the following code: y = ( yData[iRght] - yData[iLeft] ) * ( u - xData[iLeft] ) / ( xData[iRght] - xData[iLeft] ) + yData[iLeft] The term (xData[iRght] - xData[iLeft]) is the spacing between neighboring breakpoints. If this value is constant, i.e., even spacing, some simplification is possible. If spacing is not just even but also a power of two, then very significant simplifications are possible for fixed-point implementations. Uneven Case For the uneven case, one possible implementation of the ideal interpolation in fixed point is as follows: xNum = uAngle - xuneven[iLeft]; xDen = xuneven[iRght] - xuneven[iLeft]; yDiff = yuneven[iRght] - yuneven[iLeft]; 7-24 Effect of Spacing on Speed, Error, and Memory Usage MUL_S32_S16_U16( bigProd, yDiff, xNum ); DIV_NZP_S16_S32_U16_FLOOR( yDiff, bigProd, xDen ); yUneven = yuneven[iLeft] + yDiff; The multiplication and division routines are not shown here. These can be somewhat involved and depend on the target processor. For example, these routines look quite different for a 16-bit processor than for a 32-bit processor. Even Case Evenly spaced breakpoints implement interpolation using just slightly different calculations than the uneven case. The key difference is that the calculations do not directly use the breakpoints. This means the breakpoints are not required in ROM, which can be a very significant savings: xNum = uAngle - ( iLeft * 455U ); yDiff = yeven[iLeft+1] - yeven[iLeft]; MUL_S32_S16_U16( bigProd, yDiff, xNum ); DIV_NZP_S16_S32_U16_FLOOR( yDiff, bigProd, 455U ); yEven = yeven[iLeft] + yDiff; Power of Two Case Power of two spaced breakpoints implement interpolation using very different calculations than the other two cases. Like the uneven case, breakpoints are not used in the generated code and therefore not required in ROM: lambda = uAngle & 0x00FFU; yPow2 = ypow2[iLeft)+1] - ypow2[iLeft]; MUL_S16_U16_S16_SR8(yPow2,lambda,yPow2); yPow2 += ypow2[iLeft]; 7-25 7 Tutorial: Producing Lookup Table Data This implementation has very significant advantages over the uneven and even implementations. The key difference is that a subtraction and a division are replaced by a bitwise-AND combined with a shift right at the end of the multiply. Another advantage is that the term (u - xData[iLeft] ) / ( xData[iRght] - xData[iLeft]) is computed with no loss of precision, because the spacing is a power of two. In contrast, the uneven and even cases usually introduce rounding error in this calculation. Conclusion The number of Y data points follows the expected pattern. For the same worst case error, unrestricted spacing (uneven) requires the fewest data points, and power of two spaced breakpoints requires the most. However, the implementation for the evenly spaced and the power of two cases does not need the breakpoints in the generated code. This reduces their data ROM requirements by a half. As a result, the evenly spaced case actually uses less data ROM than the unevenly spaced case. Also, the power of two case requires only slightly more ROM than the uneven case. Changing the worst case error can change these rankings. Nonetheless, when you compare data ROM usage, you should always take into account the fact that the evenly spaced and power of two spaced cases do not require their breakpoints in ROM. The effort of determining where the current input is relative to the breakpoints strongly favors the evenly spaced and power of two spaced cases. With uneven spacing, you use a binary search method that loops up to log2(N) times. With even and power of two spacing, you can determine the location with the execution of one line of C code. But you cannot decide the relative advantages of power of two versus evenly spaced without detailed knowledge of the hardware and the C compiler. The effort of calculating the interpolation favors the power of two case, which uses a bitwise AND operation and a shift to replace a subtraction and a division. The amount of advantage provided by this depends on the specific hardware, but you would expect an advantage in code size, speed, and also in accuracy. The evenly space case calculates the interpolation with a minor improvement in efficiency over the unevenly spaced case. 7-26 8 Function Reference Functions—By Category (p. 8-2) Tables of Fixed-Point Blockset functions by category 8 Function Reference Functions—By Category This chapter contains reference pages for the Fixed-Point Blockset M-file functions. In some cases, you will not call these functions from the MATLAB command line. Instead, they are automatically called when you specify certain parameter values via block dialog boxes or via the Fixed-Point Settings interface. “Conversions” on page 8-3 Functions for converting legacy models to fixed-point data types, converting floating-point to fixed-point numbers, and updating fixed-point models “Fixed-Point Settings Interface” on page 8-3 A function for calling the Fixed-Point Settings interface “Global Changes” on page 8-3 Functions for making global changes throughout a system or subsystem “Lookup Tables” on page 8-3 Functions for implementing and using lookup tables 8-2 “Data Type Structures” on page 8-4 Functions to create MATLAB structures “Tools” on page 8-4 Functions that yield more information about a simulation or value Functions—By Category Conversions fixpt_convert Convert Simulink models and subsystems to fixed-point equivalents fixpt_convert_prep Prepare a Simulink model for more complete conversion to fixed point fpupdate Update obsolete fixed-point blocks from previous Fixed-Point Blockset releases to current fixed-point blocks num2fixpt Quantize a value using a Fixed-Point Blockset representation Fixed-Point Settings Interface fxptdlg Invoke the Fixed-Point Settings interface Global Changes autofixexp Automatically change the scaling for each fixed-point block that does not have its scaling locked fixpt_restore_links Restore links for fixed-point blocks fixpt_set_all Set a property for every fixed-point block in a subsystem Lookup Tables fixpt_interp1 Implement a 1-D lookup table fixpt_look1_func_approx Optimize, for a fixed-point function, the x values that are generated for a lookup table fixpt_look1_func_plot Plot a function with x values generated by the fixpt_look1_func_approx function 8-3 8 Function Reference Data Type Structures float Create a MATLAB structure describing a floating-point data type sfix Create a MATLAB structure describing a signed generalized fixed-point data type sfrac Create a MATLAB structure describing a signed fractional data type sint Create a MATLAB structure describing a signed integer data type ufix Create a MATLAB structure describing an unsigned generalized fixed-point data type ufrac Create a MATLAB structure describing an unsigned fractional data type uint Create a MATLAB structure describing an unsigned integer data type Tools 8-4 fixptbestexp Determine the exponent that gives the best precision fixed-point representation of a value fixptbestprec Determine the maximum precision available for the fixed-point representation of a value showfixptsimerrors Display overflows from the last simulation showfixptsimranges Display the logged maximum and minimum values from the last simulation Alphabetical List of Functions Alphabetical List of Functions 8 The following pages contain the reference sheets for the Fixed-Point Blockset functions in alphabetical order. 8-5 autofixexp Purpose 8autofixexp Automatically change the scaling for each fixed-point block that does not have its scaling locked Syntax autofixexp Description The autofixexp script automatically changes the scaling for each block that does not have its scaling locked. This script uses the maximum and minimum data obtained from the last simulation run to log data to the workspace. The scaling is changed such that the simulation range is covered and the precision is maximized. The script follows these steps: 1 The global variable FixPtTempGlobal is created to “steal” parameters (such as data type) from variables not known in the base workspace. For example, assume the Sum block has its output data type specified as DerivedVar. DerivedVar is derived in the mask initialization based on mask parameters and the block is under a mask. The value of the parameter DerivedVar is retrieved by temporarily replacing DerivedVar with stealparameter(DerivedVar) in the block dialog. A model update is then forced. When stealparameter(DerivedVar) is evaluated, it returns the value of DerivedVar without modification and stores the value in FixPtTempGlobal. The stolen value is immediately used by this procedure and is not needed again. Therefore, the procedure can move from one block to the next using the same global variable. 2 The RangeFactor variable allows you to specify a range differing from that defined by the maximum and minimum values logged in FixPtSimRanges. For example, a RangeFactor value of 1.55 specifies that a range at least 55 percent larger is desired. A value of 0.85 specifies that a range up to 15 percent smaller is acceptable. You should be aware that the scaling is not exact for the radix point-only case since the range is given (approximately) by a power of two. The lower limit is exact, but the upper limit is always one bit below a power of two. For example, if the maximum logged value is 5 and the minimum logged value is -0.5, then any RangeFactor from 4/5 to slightly under 8/5 would produce the same radix point since these limits are less than a factor of two from each other. The radix point selected will produce a range from -8 to +8 (minus a bit). 8-6 autofixexp 3 The global variable FixPtSimRanges is retrieved from the workspace. This is the variable that holds the maximum and minimum simulation values. 4 The workspace is searched for the variables SlopeBits and BiasBits, which specify the number of bits to use in representing slopes and biases. If these variables are not found, then they are automatically created with default values of 7 and 8, respectively. 5 All blocks that logged maximum and minimum simulation data are processed. 6 All blocks that do not have their scaling locked are automatically scaled. If the data type class is FIX, then radix point-only scaling is performed. If the data type class is INT, then [Slope Bias] scaling is performed. To find out a data type’s class, refer to its reference page. See Also fxptdlg, showfixptsimranges 8-7 fixptbestexp Purpose 8fixptbestexp Determine the exponent that gives the best precision fixed-point representation of a value Syntax out = fixptbestexp(RealWorldValue,TotalBits,IsSigned) out = fixptbestexp(RealWorldValue,FixPtDataType) Description out = fixptbestexp(RealWorldValue,TotalBits,IsSigned) determines the exponent that gives the best precision for the fixed-point representation of the real-world value specified by RealWorldValue. You specify the number of bits for the fixed-point number with TotalBits, and you specify whether the fixed-point number is signed with IsSigned. If IsSigned is 1, the number is signed. If IsSigned is 0, the number is not signed. The exponent is returned to out. out = fixptbestexp(RealWorldValue,FixPtDataType) determines the exponent that gives the best precision based on the data type specified by FixPtDataType. Example The following command returns the exponent that gives the best precision for the real-world value 4/3 using a signed, 16-bit number: out = fixptbestexp(4/3,16,1) out = -14 Alternatively, you can specify the fixed-point data type: out = fixptbestexp(4/3,sfix(16)) out = -14 This value means that the maximum precision representation of 4/3 is obtained by placing 14 bits to the right of the radix point: 01.01010101010101 You would specify the precision of this representation in fixed-point blocks by setting the scaling to 2^-14 or 2^fixptbestexp(4/3,16,1). See Also 8-8 fixptbestprec, sfix, ufix fixptbestprec Purpose 8fixptbestprec Determine the maximum precision available for the fixed-point representation of a value Syntax out = fixptbestprec(RealWorldValue,TotalBits,IsSigned) out = fixptbestprec(RealWorldValue,FixPtDataType) Description out = fixptbestprec(RealWorldValue,TotalBits,IsSigned) determines the maximum precision for the fixed-point representation of the real-world value specified by RealWorldValue. You specify the number of bits for the fixedpoint number with TotalBits, and you specify whether the fixed-point number is signed with IsSigned. If IsSigned is 1, the number is signed. If IsSigned is 0, the number is not signed. The maximum precision is returned to out. out = fixptbestprec(RealWorldValue,FixPtDataType) determines the maximum precision based on the data type specified by FixPtDataType. Example The following command returns the maximum precision available for the real-world value 4/3 using a signed, 8-bit number: out = fixptbestprec(4/3,8,1) out = 0.015625 Alternatively, you can specify the fixed-point data type: out = fixptbestprec(4/3,sfix(8)) out = 0.015625 This value means that the maximum precision available for 4/3 is obtained by placing six bits to the right of the radix point since 2-6 equals 0.015625: 01.010101 You can use the maximum precision as the scaling parameter in fixed-point blocks. See Also fixptbestexp, sfix, ufix 8-9 fixpt_convert Purpose 8fixpt_convert Convert Simulink models and subsystems to fixed-point equivalents Syntax res res res res Description res is a structure that contains lists of blocks handled during conversion. res = fixpt_convert converts the Simulink model or subsystem specified by bdroot. The fields of this structure are given below. = = = = fixpt_convert fixpt_convert('SystemName') fixpt_convert('SystemName','Display') fixpt_convert('SystemName','Display','AutoSave') Output Field Description encapsulated Structure containing lists of blocks grouped by type that are encapsulated between fixed-point gateway blocks. The encapsulated versions are not truly fixed-point, but they will function within a fixed-point model. replaced Blocks that are replaced with fixed-point equivalents or with other blocks from a user-specified replacement list. skipped Blocks that are skipped because they are fixed-point compatible. Some of these blocks can cause errors if used in certain ways. For example, the Mux block can create lines that give different data types at downstream input ports. res = fixpt_convert('SystemName') converts the Simulink model or subsystem specified by SystemName. res = fixpt_convert('SystemName','Display') returns information associated with the conversion according to the method specified by Display. The Display methods are given below. 8-10 Display Method Description filename Write detailed block information to the specified file. off Do not display block information. fixpt_convert Display Method Description on Display detailed block information. on+filename Display detailed block information, and write detailed block information to the specified file. outline Display the conversion process outline. outline+filename Display the conversion process outline, and write detailed block information to the specified file. res = fixpt_convert('SystemName','Display','AutoSave') determines the state of the converted model or subsystem. If AutoSave is on, then the converted model or subsystem is saved and closed. If AutoSave is off, then the converted model or subsystem is unsaved and left open. Remarks If your Simulink model references blocks from a custom Simulink library, then these blocks are encapsulated upon conversion. A block is encapsulated when it cannot be converted to an equivalent fixed-point block. Encapsulation involves associating a Gateway In or a Gateway Out block with the Simulink block. To reduce the number of blocks that are encapsulated, you should convert the entire library by passing the library name to fixpt_convert, and then converting the model. To create a custom list of blocks to convert, you should use the fixpt_convert_userpairs script. To learn how to use this script, read the comments included in the M-file. The data types for fixed-point outputs taking Boolean values are specified by the variable LogicType. The data types of all other fixed-point outputs and parameters are specified by the variable BaseType. You can change these variables to any data type. For example, in the MATLAB workspace you can type BaseType = sfix(16) LogicType = uint(8) The converted model will not work if these variables are not defined. Best precision mode is used when available. Otherwise, the precision is set to 20, which means that the radix point is to the right of all bits. To automatically 8-11 fixpt_convert set the scaling, run a simulation with doubles override on and then invoke the automatic scaling script, autofixexp. You can run autofixexp directly, or in conjunction with the Fixed-Point Settings interface, fxptdlg. Example This example uses fixpoint_convert to convert a Simulink model of a direct form II realization to its fixed-point equivalent. “Direct Form II” on page 5-7 discusses this realization. The Simulink model shown below, fxpdemo_preconvet, is included as a demo with the blockset. b0 2.2 Gain b1 Input Zero−Order Hold 1.85 Gain1 b2 1 1 1 z Unit Delay z Unit Delay1 z Unit Delay2 0.5 Output Comparison Gain2 b3 0.5 Gain5 a1 −0.84 Gain4 a2 −0.09 Gain3 a3 The following command converts this model to its fixed-point equivalent, suppresses the display of detailed block information, and does not save the model after conversion: res = fixpt_convert('fxpdemo_preconvert','off','off') 8-12 fixpt_convert The built-in blocks that are replaced by fixed-point equivalent blocks are given by the replaced field: res.replaced ans = UnitDelay: ZeroOrderHold: Gain: Sum: {3x1 cell} {[1x40 char]} {6x1 cell} {2x1 cell} The built-in blocks that are skipped since they are compatible with the Fixed-Point Blockset are given by the skipped field: res.skipped ans = Mux: {'fxpdemo_preconvert_fixpt/Mux'} The built-in blocks that are encapsulated by fixed-point gateway blocks so that they are made compatible with the Fixed-Point Blockset are given by the encapsulated field: res.encapsulated ans = Scope: {[1x42 char]} SignalGenerator: {'fxpdemo_preconvert_fixpt/Input'} Note that the initial class of the base data type is double: BaseType = Class: 'DOUBLE' You can now run the simulation for the converted model: sim fxpdemo_preconvert_fixpt 8-13 fixpt_convert The output from the simulation is shown below. You should compare this output to the output produced by the fixed-point direct from II model, fxpdemo_direct_form2. 10 8 6 4 2 0 −2 −4 −6 −8 0 20 40 60 80 100 120 140 160 180 200 Next, define a fixed-point base data type: BaseType = sfix(16) Follow the automatic scaling procedure described in the autofixexp reference pages with 20% safety margin, and then run the simulation: sim fxpdemo_preconvert_fixpt The simulation now produces an error. This is because the vector signal leading into the scope is not homogeneous with regard to data type and scaling. In general, solving the problem of nonhomogeneous signals requires that you analyze how the signal is being used. If the distinct scaling and data type properties are important, then you must fully or partially unvectorize the relevant part of the model. Alternatively, you can force the signals to be homogenous using the Gateway Out block. Since this example plots real-world values in the Scope, inserting gateway blocks on the signals leading into the Scope is an adequate solution. See Also 8-14 autofixexp, fixpt_convert_prep, fxptdlg fixpt_convert_prep Purpose 8fixpt_convert_prep Prepare a Simulink model for more complete conversion to fixed-point data types Syntax fixpt_convert_prep('SystemName') Description fixpt_convert_prep('SystemName') prepares the Simulink model or subsystem specified by SystemName for more complete conversion (less encapsulation) to fixed-point data types using the fixpt_convert function. It does so by replacing this select set of blocks: • Old style Latch blocks Old style Latch blocks are replaced with a version contained in the fixpt_convert_lib library. The old style Latch block contains a Transport Delay block, which is a very inefficient implementation for both floating-point and fixed-point data types. • Function blocks acting like selectors Function blocks acting like selectors are replaced with the Selector block. Function blocks acting like selectors require that you specify the width of the input. To get this information, the model must be put into compile mode, which is inefficient. • A select set of additional function blocks You can replace function blocks that have replacements in the fixpt_convert_lib library. Alternatively, you can use fixpt_convert_prep as a prototype for creating a customized list of function blocks to be replaced. To do this, copy the function and the library to another directory, and then customize the library to include function blocks that you commonly encounter when converting models from floating point to fixed-point. Note This function is meant to be a starting point for customizing the Simulink to Fixed-Point Blockset conversion process. See Also fixpt_convert 8-15 fixpt_interp1 Purpose 8fixpt_interp1 Implement a 1-D lookup table Syntax y = fixpt_interp1(xdata,ydata,x,xdt,xscale,ydt,yscale,rndmeth) Description fixpt_interp1 implements a lookup table to find output(s) y for input(s) x. If x falls between two xdata values, then y is found by interpolating between the corresponding ydata pair. If x falls above the range given by xdata, y is given as the maximum ydata value. If x falls below the range given by xdata, y is given as the minimum ydata value. If either the input data type, xdt, or the output data type, ydt, is floating point, then floating-point calculation is used to perform the interpolation. Otherwise, integer-only calculation is used. This calculation handles the input scaling, xscale, and the output scaling, yscale, appropriately, and obeys the designated rounding method, rndmeth. Example Define xdata as a vector of 33 evenly spaced points between 0 and 8, and ydata as the sinc of xdata. xdata = linspace(0,8,33).'; ydata = sinc(xdata); Now define your input x as a vector of 201 evenly spaced points between -1 and 9. x = linspace(-1,9,201).'; Notice that x includes some values that are both lower and higher than the range of xdata. You can now use fixpt_interp1 to interpolate outputs for x. y = fixpt_interp1(xdata,ydata,x,sfix(8),2^-3,sfix(16),2^-14,... 'Floor') See Also 8-16 fixpt_look1_func_approx, fixpt_look1_func_plot, sfix fixpt_look1_func_approx Purpose Syntax 8fixpt_look1_func_approx Optimize for a fixed-point function, the x values, or breakpoints, that are generated for a lookup table [xdata,ydata,errworst]=fixpt_look1_func_approx('funcstr',... xmin,xmax,xdt,xscale,ydt,yscale,rndmeth,errmax) [xdata,ydata,errworst]=fixpt_look1_func_approx('funcstr',... xmin,xmax,xdt,xscale,ydt,yscale,rndmeth,[],nptsmax) [xdata,ydata,errworst]=fixpt_look1_func_approx('funcstr',... xmin,xmax,xdt,xscale,ydt,yscale,rndmeth,errmax,nptsmax) [xdata,ydata,errworst]=fixpt_look1_func_approx('funcstr',... xmin,xmax,xdt,xscale,ydt,yscale,rndmeth,errmax,nptsmax,spacing) Description fixpt_look1_func_approx('funcstr',xmin,xmax,xdt,xscale,ydt,yscale, rndmeth,errmax) optimizes the breakpoints of a lookup table over a specified range. The lookup table satisfies the maximum acceptable error, maximum number of points, and spacing requirements given by the optional parameters. The breakpoints refer to the x values of the lookup table. The command [xdata,ydata,errworst]=fixpt_look1_func_approx('funcstr',... xmin,xmax,xdt,xscale,ydt,yscale,rndmeth,errmax) returns the X and Y coordinates of the lookup table as vectors xdata and ydata, respectively. It also returns the maximum absolute error of the lookup table as a variable errworst. The fixed-point approximation is found by interpolating between the lookup table data points. The required input parameters are as follows. Input Value 'funcstr' Function of x funcstr is the function for which breakpoints are approximated. xmin Minimum value of x xmax Maximum value of x xdt Data type of x 8-17 fixpt_look1_func_approx Input Value xscale Scaling for the x values ydt Data type of y yscale Scaling for the y values rndmeth Rounding mode supported by the Fixed-Point Blockset: 'Toward Zero', 'Nearest', 'Floor' (default value), 'Ceiling' • xmin and xmax specify the range over which the breakpoints are approximated. • xdt, xscale, ydt, yscale, and rndmeth follow conventions used by the Fixed-Point Blockset. • rndmeth has a default value listed in the input table. In addition to the required parameters, there are three optional inputs, as follows. Input Value errmax Maximum acceptable error nptsmax Maximum number of points errworst Spacing: 'even', 'pow2' (even power of 2), 'unrestricted' (default value) Of these, you must use at least one of the parameters errmax and nptsmax. If you omit one of these, use brackets, [], in place of the omitted parameter. The function will then ignore that requirement for the lookup table. 8-18 fixpt_look1_func_approx The outputs of the function are as follows. Output Value xdata The breakpoints for the lookup table ydata The ideal function applied to the breakpoints errworst The worst case error, which is the maximum absolute error between the ideal function and the approximation given by the lookup table Criteria For Optimizing the Breakpoints: errmax, nptsmax, and spacing The approximation produced from the lookup table must satisfy the requirements for the maximum acceptable error, errmax, the maximum number of points, nptsmax, and the spacing, spacing. The requirements are • The maximum absolute error is less than errmax. • The number of points required is less than nptsmax. • The spacing is specified as unrestricted, even or even power of 2. Modes for errmax and nptsmax • If both errmax and nptsmax are specified The returned breakpoints will meet both criteria if possible. The errmax parameter is given priority, and nptsmax is ignored, if both criteria cannot be met with the specified spacing. • If only errmax is specified The breakpoints that meet the error criteria, and have the least number of points are returned. • If only nptsmax is specified The breakpoints that require nptsmax or fewer, and give the smallest worst case error are returned 8-19 fixpt_look1_func_approx Modes for Spacing If no spacing is specified, and more than one spacing method meets the requirements given by errmax and nptsmax, power of 2 spacing is chosen over even spacing, which in turn is chosen over uneven spacing. This case occurs when the errmax and nptsmax are both specified, but typically does not occur when only one is specified: • If unrestricted is entered, the function chooses the spacing that provides the best optimization. • If even is entered, the function chooses an evenly spaced set of points, including the pow2 spacing. • If pow2 spacing is entered, the function chooses an even power of 2 spaced set of points. Note The global optimum may not be found. The worst case error can depend on fixed-point calculations, which are highly nonlinear. Furthermore, the optimization approach is heuristic. The spacing you choose depends on the parameters you want to optimize: execution speed, function approximation error, ROM usage, and RAM usage: • The execution speed depends on the bisection search, and the interpolation method. • The error depends on how accurately the method approximates the nonuniform curvature of the function. • The ROM usage depends on the amount of data and command ROM used. • The RAM usage depends on how much global and stack RAM is used. When the lookup table has even power of two spacing, division is replaced by a bit shift. As a result, the execution speed is faster than for evenly spaced data. Using the Approximation Function 1 Choose a function and use the eval('funcstr'); command to view the function before creating the lookup table. 2 Define the remaining inputs. 8-20 fixpt_look1_func_approx 3 Run the fixpt_look1_func_approx function. 4 Use the fixpt_look1_func_plot function to plot the function from the selected breakpoints, and to calculate the error and the number of points used. 5 Vary the inputs to produce sets of breakpoints that generate functions with varying number of points required and worst case error. 6 Compare the number of points required and worst case error from various runs to choose the best set of breakpoints. Calculating the Output Function To calculate the function, use the returned breakpoints with • The eval function • A function lookup table. The x values are the breakpoints from the fixpt_look1_func_approx function, and the y values can be supplied using the eval function. See Chapter 7, “Tutorial: Producing Lookup Table Data” for a tutorial on using fixpt_look1_func_approx. 8-21 fixpt_look1_func_approx The following table summarizes the effect of spacing on the execution speed, error, and memory used. Table 8-1: Comparison of the Spacing Options Parameter Even Power of Two Spaced Data Evenly Spaced Data Unevenly Spaced Data Execution Speed The execution speed is the fastest. The position search and interpolation are the same as for evenly spaced data. However, to increase the speed more, the position search is replaced by a bit shift, and the interpolation is replaced with a bit mask. The execution speed is faster then that for unevenly spaced data because the position search is faster and the interpolation requires a simple division. The execution speed is the slowest of the different spacings because the position search is slower, and the interpolation requires more operations. Error The error can be larger than that for unevenly spaced data because approximating a function with nonuniform curvature requires more points to achieve the same accuracy. The error can be larger than that for unevenly spaced data because approximating a function with nonuniform curvature requires more points to achieve the same accuracy. The error can be smaller because approximating a function with nonuniform curvature requires fewer points to achieve the same accuracy. ROM Usage Uses less command ROM, but more data ROM. Uses less command ROM, but more data ROM. Uses more command ROM, and less data ROM. RAM Usage Not significant. Not significant. Not significant. 8-22 fixpt_look1_func_approx Examples This example produces a lookup table for a sine function. The inputs for the example are as follows: funcstr = 'sin(2*pi*x)'; xmin = 0; xmax = 0.25; xdt = ufix(16); xscale = 2^-16; ydt = sfix(16); yscale = 2^-14; rndmeth = 'Floor'; errmax = 2^-10; spacing = 'pow2'; To create the lookup table, type [xdata, ydata, errWorst]=fixpt_look1_func_approx(funcstr, xmin,xmax,xdt,xscale,ydt,yscale,rndmeth,errmax,[],spacing); The brackets [ ] are a place holder for the nptsmax parameter, which is not used in this example. You can then plot the ideal function, the approximation, and the errors by typing fixpt_look1_func_plot(xdata,ydata,funcstr,xmin,xmax,xdt,... xscale,ydt,yscale,rndmeth); The fixpt_look1_func_plot function produces a plot of the fixed-point sine function, using these breakpoints, and a plot of the error between the ideal function and the fixed-point function. The maximum absolute error and the number of points required are listed with the plot. The error drops to zero at a breakpoint, and increases between breakpoints due to the difference in curvature of the ideal function and the line drawn between breakpoints. The resulting plots are shown below. 8-23 fixpt_look1_func_approx The lookup table requires 33 points to achieve a maximum absolute error of 2^-11.3922. See Also 8-24 fixpt_look1_func_plot fixpt_look1_func_plot Purpose Syntax Description 8fixpt_look1_func_plot Plot a function with x values generated by the fixpt_look1_func_approx function errworst=fixpt_look1_func_plot(xdata,ydata,'funcstr',... xmin,xmax,xdt,xscale,ydt,yscale,rndmeth) fixpt_look1_func_plot(xdata,ydata,'funcstr',xmin,xmax,xdt,xscale, ydt,yscale,rndmeth) plots a lookup table approximation function and its error from the ideal function. You can use the fixpt_look1_func_approx function to generate xdata and ydata, the X and Y data points for the lookup table. The function returns the maximum absolute error as a variable errworst. The inputs are as follows. Input Value xdata x values for the lookup table ydata y values for the lookup table 'funcstr' Function of x xmin Minimum input of interest xmax Maximum input of interest xdt Data type of x xscale Scaling for the x values ydt Data type of y yscale Scaling for the y values rndmeth Rounding mode supported by the blockset: 'Toward Zero', 'Nearest', 'Floor', 'Ceiling' The fixpt_look1_func_approx function applies the ideal function to the points in xdata to produce ydata. While this is the easiest way to generate ydata, you are not required to use these values for ydata as input for the fixpt_look1_func_approx function. Choosing different values for ydata can, in some cases, produce a lookup table with a smaller maximum absolute error. 8-25 fixpt_look1_func_plot See Chapter 7, “Tutorial: Producing Lookup Table Data” for a tutorial on using the function fixpt_look1_func_plot. For an example of the function, see the reference page for the fixpt_look1_func_approx function. See Also 8-26 fixpt_look1_func_approx fixpt_restore_links Purpose 8fixpt_restore_links Restore links for fixed-point blocks Syntax res = fixpt_restore_links res = fixpt_restore_links('SystemName') res = fixpt_restore_links('SystemName','AutoSave') Description res = fixpt_restore_links restores broken links for the fixed-point blocks contained in the model or subsystem specified by bdroot. By default, the models and libraries containing restored block links are left open and unsaved. res contains the names of the blocks that had broken links restored. res = fixpt_restore_links('SystemName') restores links for the fixed-point blocks contained in the model or subsystem specified by SystemName. res = fixpt_restore_links('SystemName','AutoSave') determines the state of the models or subsystems containing restored block links. If AutoSave is on, the models or subsystems are saved and closed. If AutoSave is off, the models or subsystems are unsaved and left open. Remarks Breaking library links to fixed-point blocks will almost certainly produce an error when you attempt to run the model. If broken links exist, you will likely uncover them when upgrading to the latest release of the Fixed-Point Blockset. 8-27 fixpt_set_all Purpose 8fixpt_set_all Set a property for every fixed-point block in a subsystem Syntax fixpt_set_all(SystemName,fixptPropertyName,fixptPropertyValue) Description fixpt_set_all sets the property fixptPropertyName of every applicable block in the model or subsystem SystemName to the value fixptPropertyValue. Example To set every fixed-point block in a model called Filter_1 to round towards the floor and to saturate upon overflow, type fixpt_set_all('Filter_1','RndMeth','Floor') fixpt_set_all('Filter_1','DoSatur','on') 8-28 float Purpose 8float Create a MATLAB structure describing a floating-point data type Syntax a = float('single') a = float('double') a = float(TotalBits, ExpBits) Description float('single') returns a MATLAB structure that describes the data type of an IEEE single (32 total bits, 8 exponent bits). float('double') returns a MATLAB structure that describes the data type of an IEEE double (64 total bits, 11 exponent bits). float(TotalBits, ExpBits) returns a MATLAB structure that describes a nonstandard floating-point data type that mimics the IEEE style. That is, the numbers are normalized with a hidden leading one for all exponents except the smallest possible exponent. However, the largest possible exponent might not be treated as a flag for Infs and NaNs. float is automatically called when a floating-point number is specified in a block dialog box. Note Unlike fixed-point numbers, floating-point numbers are not subject to any specified scaling. Example Define a nonstandard, IEEE-style, floating-point data type with 31 total bits (excluding the hidden leading one) and 9 exponent bits: a = float(31,9) a = Class: 'FLOAT' MantBits: 21 ExpBits: 9 See Also sfix, sfrac, sint, ufix, ufrac, uint 8-29 fpupdate Purpose 8fpupdate Update obsolete fixed-point blocks from previous Fixed-Point Blockset releases to current fixed-point blocks Syntax fpupdate('model') fpupdate('model',blkprompt) fpupdate('model',blkprompt,varprompt) fpupdate('model',blkprompt,varprompt,muxprompt) fpupdate('model',blkprompt,varprompt,muxprompt,message) Description fpupdate('model') replaces all obsolete fixed-point blocks contained in model with current fixed-point blocks. The model must be opened prior to calling fpupdate. fpupdate('model',blkprompt) prompts you for replacement of obsolete blocks. If blkprompt is 0 (the default), you will not be prompted. If blkprompt is 1, you will have these three options: • y (default) replaces the block. • n does not replace the block. • a replaces all blocks without further prompting. fpupdate('model',blkprompt,varprompt) gives you the option of updating variables that appear in each block’s dialog box with their actual numerical values. Note that such an update is possible only if the variables can be evaluated in the MATLAB workspace. If varprompt is 1 (the default), you are prompted for each variable found in the block diagram. If varprompt is 0, all variables are automatically updated without prompting. fpupdate('model',blkprompt,varprompt, muxprompt) allows you to update the input size parameters of the Mux and Demux blocks found in model. The input sizes of these blocks may need to be updated to account for the mismatch between the old and new fixed-point data representations. In the old representation, each number had a width of 2. In the new representation, each number has a width of 1. To update Mux and Demux blocks that have only fixed-point inputs, the vector that specifies the input size should be divided by 2. If muxprompt is 1 (the default), each Mux and Demux block found in model is updated. If muxprompt is 0, the Mux and Demux blocks are automatically updated without prompting. 8-30 fpupdate fpupdate('model',blkprompt,varprompt,muxprompt,message) allows you to show or suppress any warning or update messages generated during the update process. If message is 1 (the default), all messages are displayed. If message is 0, all messages are suppressed. fpupdate calls addterms to terminate any unconnected input or output ports by attaching Ground or Terminator blocks, respectively. Example To see how fpupdate works, convert the obsolete model fixpoint/obsolete/fpex1.mdl: fpex1 fpupdate('fpex1') 8-31 fxptdlg Purpose 8fxptdlg Invokes the Fixed-Point Settings interface Syntax fxptdlg('model') Description fxptdlg('model') brings up the Fixed-Point Settings interface for the MDL-file model. You can also invoke this interface by • Selecting Fixed-Point settings in the Tools menu in the model window • Right-clicking in any subsystem and selecting Fixed-Point settings from the menu that pops up • Clicking on the Fixed-Point GUI block, which is included with all blockset demos The Fixed-Point Settings interface provides convenient access to global data type overrides and logging settings, the logged data, the automatic scaling script, and the Plot System interface. You can invoke the Fixed-Point Settings interface for any system or subsystem, and it controls the model specified by the Select current system parameter. For each block in the model that logs data, the Fixed-Point Settings interface displays its name, minimum simulation value, maximum simulation value, data type, and scaling in the Simulation data logged for current system pane. Additionally, if a signal saturates or overflows, a message is displayed for the associated block indicating how many times saturation or overflow occurred. You can display a block’s dialog box by double-clicking on the appropriate block entry in this pane. 8-32 fxptdlg Parameters and Dialog Box Stop button Show plot dialog button Run button Pause button Select current system Displays the names of all systems and subsystems in currently opened models in a hierarchical format. The menu can be expanded and collapsed using the + and - signs. The information displayed in the rest of the Fixed-Point Settings interface applies to the subsystem designated by this parameter. Logging mode Controls which blocks log data. The value of this parameter for parent systems controls logging for all child subsystems, unless Use local settings is selected. •Use local settings—Data is logged according to the value of this parameter set for each subsystem. Otherwise, settings for parent systems always override those of child systems. 8-33 fxptdlg •Min, max and overflow—Minimum value, maximum value, and overflow data is logged for all blocks in the current system or subsystem. •Overflow—Only overflow data is logged for all blocks in the current system or subsystem. •Force off—No data is logged for any block in the current system or subsystem. Use this selection to work with models containing fixed-point enabled blocks if you do not have a Fixed-Point Blockset license. Data type override Controls data type override. The value of this parameter for parent systems controls data type override for all child subsystems, unless Use local settings is selected. •Use local settings—Data types are overridden according to the value of this parameter set for each subsystem. Otherwise, settings for parent systems override those of child systems. •Scaled doubles—The output data type of all blocks in the current system or subsystem is overridden with doubles, however the scaling and bias specified in the mask of each block is maintained. •True doubles—The output data type of all blocks in the current system or subsystem is overridden with true doubles. The overridden values have no scaling or bias. •True singles—The output data type of all blocks in the current system or subsystem is overridden with true singles. The overridden values have no scaling or bias. •Force off—No data type override is performed on any block in the current system or subsystem. Set this parameter to True doubles or True singles to work with models containing fixed-point enabled blocks if you do not have a Fixed-Point Blockset license. Block Name Displays blocks that log data in the selected system or subsystem. The block path is described in terms of the blockset model name. The minimum value, maximum value, data type, and scaling are shown opposite each block name when the simulation is run. 8-34 fxptdlg Logging Type Controls the logging type. •Overwrite log—Information in the Simulation data logged for current system pane is completely cleared before new logging data is entered. •Merge log—New logging data is merged with any information previously appearing in the Simulation data logged for current system pane. Safety margin The Safety Margin parameter is used as part of the automatic scaling procedure. Before automatic scaling is performed, you must run the simulation to collect min/max data. To learn how to do this, refer to Chapter 6, “Tutorial: Feedback Controller Simulation.” Simulation values are multiplied by the factor designated by this parameter, allowing you to specify a range different from that defined by the maximum and minimum values logged to the workspace. For example, a value of 55 specifies that a range at least 55 percent larger is desired. A value of -15 specifies that a range up to 15 percent smaller is acceptable. The Fixed-Point Settings interface contains eight buttons: • Run runs the model and updates the display with the latest simulation information. • Pause pauses the simulation. • Stop stops the simulation from running. • Show plot dialog invokes the Plot System interface, which displays any To Workspace, Outport, or Scope blocks found in the model. • Open System invokes the Fixed-Point Settings interface for the system or subsystem displayed in the Select current system parameter. • Autoscale Blocks invokes the automatic scaling script autofixexp. • Close closes the interface. • Help displays the HTML-based help for the fxptdlg function. The Plot System interface is shown below. In this example it is displaying variable names that correspond to Scope block outputs from the fxpdemo_feedback demo. 8-35 fxptdlg To plot the simulation results, select one or more variable names, and then select the appropriate plot button: • Plot Signals plots the raw signal data for the selected variable(s). • Plot Doubles plots doubles data for the selected variable(s). Doubles are generated when the Data type override parameter is set to True doubles. • Plot Both plots both raw signal data and doubles data for the selected signal(s). Note that the doubles override does not overwrite the raw data. • Cancel allows you to exit the interface without plotting. Example To learn how to use the Fixed-Point Settings interface, refer to Chapter 6, “Tutorial: Feedback Controller Simulation.” See Also autofixexp, showfixptsimerrors, showfixptsimranges 8-36 num2fixpt Purpose 8num2fixpt Quantize a value using a Fixed-Point Blockset representation Syntax outValue = num2fixpt(OrigValue,FixPtDataType,FixPtScaling,... RndMeth, DoSatur) Description num2fixpt casts a real-world value represented in floating-point doubles, OrigValue, as a fixed-point number, outValue. OrigValue Identifies the real-world value to be cast to fixed-point. FixPtDataType Designates the desired fixed-point data type of outValue. Example FixPtScaling Indicates the scaling of the output in either Slope or [Slope Bias] format. RndMeth Specifies the rounding technique to be used on the output. If FixPtDataType is FLOAT, then RndMeth is ignored. DoSatur Indicates whether the output should be saturated to the minimum or maximum representable value upon underflow or overflow. If FixPtDataType is FLOAT, then DoSatur is ignored. The command num2fixpt(Pi,sfix(8),2^-5,'Nearest',on) returns Pi as a signed 8-bit fixed-point number with scaling of 2^-5. Rounding is towards the nearest representable value, and overflows saturate. See Also fixptbestexp, fixptbestprec, float, sfix 8-37 sfix Purpose 8sfix Create a MATLAB structure describing a signed generalized fixed-point data type Syntax a = sfix(TotalBits) Description sfix(TotalBits) returns a MATLAB structure that describes the data type of a signed generalized fixed-point number with a word size given by TotalBits. sfix is automatically called when a signed generalized fixed-point data type is specified in a block dialog box. Note A default radix point is not included in this data type description. Instead, the scaling must be explicitly defined in the block dialog box. Example Define a 16-bit signed generalized fixed-point data type: a = sfix(16) a = Class: 'FIX' IsSigned: 1 MantBits: 16 See Also 8-38 float, sfrac, sint, ufix, ufrac, uint sfrac Purpose 8sfrac Create a MATLAB structure describing a signed fractional data type Syntax a = sfrac(TotalBits) a = sfrac(TotalBits, GuardBits) Description sfrac(TotalBits) returns a MATLAB structure that describes the data type of a signed fractional number with a word size given by TotalBits. sfrac(TotalBits, GuardBits) returns a MATLAB structure that describes the data type of a signed fractional number. The total word size is given by TotalBits with GuardBits bits located to the left of the sign bit. sfrac is automatically called when a signed fractional data type is specified in a block dialog box. The default radix point for this data type is assumed to lie immediately to the right of the sign bit. If guard bits are specified, they lie to the left of the radix point in addition to the sign bit. Example Define an 8-bit signed fractional data type with 4 guard bits. Note that the range of this number is -24 = -16 to (1 – 2(1 - 8)).24 = 15.875: a = sfrac(8,4) a = Class: IsSigned: MantBits: GuardBits: See Also 'FRAC' 1 8 4 float, sfix, sint, ufix, ufrac, uint 8-39 showfixptsimerrors Purpose 8showfixptsimerrors Display overflows from the last simulation Syntax showfixptsimerrors Description The showfixptsimerrors script displays any overflows from the last fixed-point simulation. This information is also visible in the Fixed-Point Settings interface. See Also fxptdlg, showfixptsimranges 8-40 showfixptsimranges Purpose 8showfixptsimranges Display the logged maximum and minimum values from the last fixed-point simulation. Syntax showfixptsimranges Description The showfixptsimranges script displays the logged maximum and minimum values from the last fixed-point simulation. The logged data is stored in the FixPtSimRanges cell array, which can be accessed by the autofixexp automatic scaling script. See Also autofixexp, fxptdlg, showfixptsimerrors 8-41 sint Purpose 8sint Create a MATLAB structure describing a signed integer data type Syntax a = sint(TotalBits) Description sint(TotalBits) returns a MATLAB structure that describes the data type of a signed integer with a word size given by TotalBits. sint is automatically called when a signed integer is specified in a block dialog box. The default radix point for this data type is assumed to lie to the right of all bits. Example Define a 16-bit signed integer data type: a = sint(16) a = Class: 'INT' IsSigned: 1 MantBits: 16 See Also 8-42 float, sfix, sfrac, ufix, ufrac, uint ufix Purpose 8ufix Create a MATLAB structure describing an unsigned generalized fixed-point data type Syntax a = ufix(TotalBits) Description ufix(TotalBits) returns a MATLAB structure that describes the data type of an unsigned generalized fixed-point data type with a word size given by TotalBits. ufix is automatically called when an unsigned generalized fixed-point data type is specified in a block dialog box. Note The default radix point is not included in this data type description. Instead, the scaling must be explicitly defined in the block dialog box. Example Define a 16-bit unsigned generalized fixed-point data type: a = ufix(16) a = Class: 'FIX' IsSigned: 0 MantBits: 16 See Also float, sfix, sfrac, sint, ufrac, uint 8-43 ufrac Purpose 8ufrac Create a MATLAB structure describing an unsigned fractional data type Syntax a = ufrac(TotalBits) a = ufrac(TotalBits, GuardBits) Description ufrac(TotalBits) returns a MATLAB structure that describes the data type of an unsigned fractional number with a word size given by TotalBits. ufrac(TotalBits, GuardBits) returns a MATLAB structure that describes the data type of an unsigned fractional number. The total word size is given by TotalBits with GuardBits bits located to the left of the radix point. ufrac is automatically called when an unsigned fractional data type is specified in a block dialog box. The default radix point for this data type is assumed to lie immediately to the left of all bits. If guard bits are specified, then they lie to the left the default radix point. Example Define an 8-bit unsigned fractional data type with 4 guard bits. Note that the range of this number is from 0 to (1 – 2-8).24 = 15.9375: a = ufrac(8,4) a = Class: IsSigned: MantBits: GuardBits: See Also 8-44 'FRAC' 0 8 4 float, sfix, sfrac, sint, ufix, uint uint Purpose 8uint Create a MATLAB structure describing an unsigned integer data type Syntax a = uint(TotalBits) Description uint(TotalBits) returns a MATLAB structure that describes the data type of an unsigned integer with a word size given by TotalBits. uint is automatically called when an unsigned integer is specified in a block dialog box. The default radix point for this data type is assumed to lie to the right of all bits. Example Define a 16-bit unsigned integer: a = uint(16) a = Class: 'INT' IsSigned: 0 MantBits: 16 See Also float, sfix, sfrac, sint, ufix, ufrac 8-45 uint 8-46 9 Block Reference Blocks—By Category (p. 9-2) Tables of Fixed-Point Blockset blocks by category Overview of the Block Reference Pages (p. 9-12) An overview of the types of information presented in each Fixed-Point Blockset block’s reference page The Block Dialog Box (p. 9-15) An introduction to the types of information presented in each Fixed-Point Blockset block’s dialog box Common Block Features (p. 9-16) A discussion of the features and functionalities common to most or all Fixed-Point Blockset blocks 9 Block Reference Blocks—By Category The Fixed-Point Blockset blocks are divided into the following sublibraries: 9-2 “Bits” on page 9-3 Blocks that manipulate the bits of a signal “Calculus” on page 9-3 Blocks that perform calculus functions “Data Type” on page 9-5 Blocks that manipulate or convert the data type of a signal “Delays & Holds” on page 9-5 Blocks that delay or hold a signal “Edge Detect” on page 9-7 Blocks that detect a change in a signal or a signal edge “Filters” on page 9-7 Blocks that filter a signal “Logic & Comparison” on page 9-8 Blocks that perform logic and comparison functions “LookUp” on page 9-8 Blocks that implement lookup tables “Math” on page 9-9 Blocks that perform math functions “Nonlinear” on page 9-10 Blocks that limit or truncate a signal “Select” on page 9-10 Blocks that select which input or which part of an input gets passed on “Sources” on page 9-11 Blocks that create a signal Blocks—By Category Bits Bit Clear Set the specified bit of the stored integer to zero Bit Set Set the specified bit of the stored integer to one Bitwise Operator Perform the specified bitwise operation on the inputs Shift Arithmetic Arithmetically shift the bits and/or the radix point of a signal Calculus Accumulator Compute a cumulative sum Accumulator Resettable Compute a cumulative sum with external Boolean reset Accumulator Resettable Limited Compute a limited cumulative sum with external Boolean reset Derivative Compute a discrete time derivative Difference Calculate the change in a signal over one time step Integrator Backward Perform discrete-time integration of a signal using the backward method Integrator Backward Resettable Perform discrete-time integration of a signal using the backward method, with external Boolean reset Integrator Backward Resettable Limited Perform discrete-time limited integration of a signal using the backward method, with external Boolean reset Integrator Forward Perform discrete-time integration of a signal using the forward method Integrator Forward Resettable Perform discrete-time integration of a signal using the forward method, with external Boolean reset Integrator Forward Resettable Limited Perform discrete-time limited integration of a signal using the forward method, with external Boolean reset 9-3 9 Block Reference 9-4 Integrator Trapezoidal Perform discrete-time integration of a signal using the trapezoidal method Integrator Trapezoidal Resettable Perform discrete-time integration of a signal using the trapezoidal method, with external Boolean reset Integrator Trapezoidal Resettable Limited Perform discrete-time limited integration of a signal using the trapezoidal method, with external Boolean reset Sample Rate Probe Output weighted sample rate Sample Time Add Add the input signal to weighted sample time Sample Time Divide Divide the input signal by weighted sample time Sample Time Multiply Multiply the input signal by weighted sample time Sample Time Probe Output weighted sample time Sample Time Subtract Subtract weighted sample time from the input signal Blocks—By Category Data Type Conversion Convert from one Fixed-Point Blockset data type to another Conversion Inherited Convert from one Fixed-Point Blockset data type to another, and inherit the data type and scaling Data Type Duplicate Set all inputs to the same data type Data Type Propagation Configure the data type and scaling of the propagated signal based on information from the reference signals Gateway In Convert a Simulink data type to a Fixed-Point Blockset data type Gateway In Inherited Convert a Simulink data type to a Fixed-Point Blockset data type, and inherit the data type and scaling Gateway Out Convert a Fixed-Point Blockset data type to a Simulink data type Scaling Strip Remove scaling and map to a built in integer Delays & Holds Integer Delay Delay a signal N sample periods Tapped Delay Delay a scalar signal multiple sample periods and output all the delayed versions Unit Delay Delay a signal one sample period Unit Delay Enabled Delay a signal one sample period, if the external enable signal is on Unit Delay Enabled External IC Delay a signal one sample period, if the external enable signal is on, with an external initial condition Unit Delay Enabled Resettable Delay a signal one sample period, if the external enable signal is on, with an external Boolean reset 9-5 9 Block Reference Unit Delay Enabled Resettable External IC Delay a signal one sample period, if the external enable signal is on, with an external Boolean reset and initial condition Unit Delay External IC Delay a signal one sample period, with an external initial condition Unit Delay Resettable Delay a signal one sample period, with an external Boolean reset Unit Delay Resettable External IC Delay a signal one sample period, with an external Boolean reset and initial condition Unit Delay With Preview Output the signal and the signal delayed by one Enabled sample period, if the external enable signal is on Unit Delay With Preview Output the signal and the signal delayed by one Enabled Resettable sample period, if the external enable signal is on, with an external Boolean reset Unit Delay With Preview Output the signal and the signal delayed by one Enabled Resettable sample period, if the external enable signal is on, External RV with an external RV reset Unit Delay With Preview Output the signal and the signal delayed by one Resettable sample period, with an external Boolean reset Unit Delay With Preview Output the signal and the signal delayed by one Resettable External RV sample period, with an external RV reset Zero-Order Hold 9-6 Implement a zero-order hold of one sample period Blocks—By Category Edge Detect Detect Change Detect a change in a signal’s value Detect Decrease Detect a decrease in a signal’s value Detect Fall Negative Detect a falling edge when the signal’s value decreases to a strictly negative value, and its previous value was nonnegative Detect Fall Nonpositive Detect a falling edge when the signal’s value decreases to a nonpositive value, and its previous value was strictly positive Detect Increase Detect an increase in a signal’s value Detect Rise Nonnegative Detect a rising edge when a signal’s value increases to a nonnegative value, and its previous value was strictly negative Detect Rise Positive Detect a rising edge when a signal’s value increases to a strictly positive value, and its previous value was nonpositive Filters Filter Direct Form I Implement a Direct Form I realization of a filter Filter Direct Form I Time Implement a time varying Direct Form I Varying realization of a filter Filter Direct Form II Implement a Direct Form II realization of a filter Filter Direct Form II Time Varying Implement a time varying Direct Form II realization of a filter Filter First Order Implement a discrete-time first order filter Filter Lead or Lag Implement a discrete-time lead or lag filter Filter Real Zero Implement a discrete time filter that has a real zero and no pole 9-7 9 Block Reference FIR Implement a fixed-point finite impulse response (FIR) filter State-Space Implement discrete-time state space Logic & Comparison Compare to Constant Determine if a signal is equal to the specified constant Compare To Zero Determine if a signal is equal to zero Interval Test Determine if a signal is in a specified interval Interval Test Dynamic Determine if a signal is in a specified interval Logical Operator Perform the specified logical operation on the inputs Relational Operator Perform the specified relational operation on the inputs LookUp Cosine Implement a cosine function in fixed-point using a lookup table approach that exploits quarter wave symmetry Look-Up Table Approximate a one-dimensional function using a selected lookup method Look-Up Table Dynamic Provide a region of zero output 9-8 Look-Up Table (2-D) Approximate a two-dimensional function using a selected lookup method Sine Implement a sine function in fixed-point using a lookup table approach that exploits quarter wave symmetry Blocks—By Category Math Abs Output the absolute value of the input Add Add two inputs Decrement Real World Decrease the real world value of the signal by one Decrement Stored Integer Decrease the stored value of a signal by one Decrement Time To Zero Decrease the real world value of the signal by the sample time, but only to zero Decrement To Zero Decrease the real world value of a signal by one, but only to zero Divide Divide the first input by the second input Dot Product Generate the dot product of two input vectors Gain Multiply the input by a constant Increment Real World Increase the real world value of the signal by one Increment Stored Integer Increase the stored integer value of a signal by one Matrix Gain Multiply the input by a constant matrix MinMax Determine the minimum or maximum input value MinMax Running Resettable Determine the minimum or maximum of a signal over time Multiply Multiply two inputs Multiply Matrix Multiply two input matrices Product Multiply or divide inputs Product of Elements Collapse the input vector by multiplying all elements Product of Elements Inverted Collapse the input vector by dividing all elements Subtract Subtract the second input from the first input Sum Add or subtract inputs 9-9 9 Block Reference Sum of Elements Collapse the input vector by adding all elements Sum of Elements Negated Collapse the input vector by subtracting all elements Unary Minus Negate the input Nonlinear Dead Zone Provide a region of zero output Dead Zone Dynamic Set the input within the bounds to zero Rate Limiter Limit the rising and falling rates of the signal Rate Limiter Dynamic Limit the rising and falling rates of the signal Relay Switch output between two constants Saturation Bound the range of the input Saturation Dynamic Bound the range of the input Sign Indicate the sign of the input Wrap To Zero Set output to zero if input is above threshold Select 9-10 Index Vector Output the element of the input vector that corresponds to the value of the control input Multi-Port Switch Switch output between different inputs based on the value of the first input Switch Switch output between the first input and the third input based on the value of the second input Blocks—By Category Sources Constant Generate a constant value Counter Free Count up and overflow back to zero after the maximum value possible is reached for the specified number of bits Counter Limited Count up, and wrap back to zero after outputting the specified upper limit Repeating Sequence Interpolated Output a discrete-time sequence and repeat, interpolating between data points Repeating Sequence Stair Output a discrete time sequence and repeat 9-11 9 Block Reference Overview of the Block Reference Pages To open the main Fixed-Point library, type fixpt at the MATLAB prompt. This opens the main library window as shown below. The main library contains twelve sublibraries. To open a sublibrary, double-click on its icon. These tables describe how the Fixed-Point Blockset blocks are grouped into the sublibraries: • “Bits” on page 9-3 • “Calculus” on page 9-3 • “Data Type” on page 9-5 • “Delays & Holds” on page 9-5 • “Edge Detect” on page 9-7 • “Filters” on page 9-7 9-12 Overview of the Block Reference Pages • “Logic & Comparison” on page 9-8 • “LookUp” on page 9-8 • “Math” on page 9-9 • “Nonlinear” on page 9-10 • “Select” on page 9-10 • “Sources” on page 9-11 Fixed-Point Blockset block reference pages appear in alphabetical order and contain some or all of this information: • The block name and icon • The purpose of the block • A description of the block • Additional remarks about block usage • The data types and numeric type (complex or real) accepted and generated by the block • The block parameter dialog box, including a brief description of each parameter • The rules for some or all of these topics, as they apply to the block: - Converting block parameters from double precision numbers to Fixed-Point Blockset data types - Converting the input data type(s) to the output data type - Performing block operations between inputs and parameters • An example using the block • The block characteristics, including some or all of these, as they apply to the block: - Input Port(s)—the data type(s) accepted by the block and whether the inputs can be a scalar or vector - Output Port(s)—the data type(s) produced by the block and whether the outputs can be a scalar or vector - Dimensionalized—whether the block accepts and/or generates multidimensional signal arrays. For more information, see “Signal Basics” in the Using Simulink documentation. 9-13 9 Block Reference - Direct Feedthrough—whether the block or any of its ports has direct feedthrough - Sample Time—how the block’s sample time is determined, whether by the block itself or inherited from the block that drives it or is driven by it - Scalar Expansion—whether or not scalars are expanded to vectors - States—the number of discrete states - Vectorized—whether or not the block accepts and/or generates vector signals - Zero Crossing—whether the block detects zero-crossing events. For more information, see “Zero Crossing Detection” in the Using Simulink documentation. 9-14 The Block Dialog Box The Block Dialog Box You configure Fixed-Point Blockset blocks with a parameter dialog box. The parameter dialog box provides you with • The name and block type at the top of the dialog box • A brief description of the block’s behavior below the title • Zero or more editable parameter fields, check boxes, or parameter lists below the description. You specify the parameter values using valid MATLAB expressions. • A row of four buttons labeled OK, Cancel, Help, and Apply at the bottom of the dialog box. The OK button sets the current parameter values and closes the dialog box. The Cancel button reverts all the parameter values back to their values at the time the dialog box was opened, losing any changes you made. The Help button displays the HTML-based reference information for the block. The Apply button sets the current parameter values, but does not close the dialog box. Simulink stores the strings entered in these fields and passes them to MATLAB for evaluation when a simulation is started. If MATLAB variables are used, the simulation uses the values that exist in the workspace at the start of the simulation. These variables are not necessarily the same as when the variables are entered into the dialog box fields. If a simulation is running when a parameter is changed, MATLAB evaluates the parameter as soon as you click the OK or Apply button. 9-15 9 Block Reference Common Block Features For convenience, the following sections describe common block features: • “Block Parameters” on page 9-16 • “Block Icon Labels” on page 9-20 • “Port Data Type Display” on page 9-21 Block Parameters Many Fixed-Point Blockset blocks use the same parameters, which you configure through the block dialog box. Some common block parameters are associated with these blockset features: • Parameter and output data type selection • Parameter and output scaling selection • Autoscaling • Rounding • Overflow handling Block-specific parameters are described in the block reference pages. Selecting the Data Type and Scaling For many fixed-point blocks, you need to associate data type and scaling information with numerical parameters and output signals. Fixed-Point Blockset blocks often provide you with the option of inheriting information from an input signal, from the next block downstream, or by an internal rule. Alternatively, you can often specify the data type and scaling yourself in the dialog. You control this option with the Output data type mode and Parameter data type mode parameters. These drop-down lists often support one or more of the following four choices: • Specify via dialog—You explicitly specify the output data type and scaling with the Output data type and Output scaling value parameters, or the parameter data type and scaling with the Parameter data type and Parameter scaling value parameters. • Inherit via back propagation—Specified data type and scaling information is inherited by backpropagation from the next block downstream. In many cases, you will find that the Data Type Propagation 9-16 Common Block Features block provides you with the most flexibility when back propagating the data type. • Inherit via internal rule—The specified data type information is inherited from the input(s). The goal of the inheritance rule is to select the “natural” data type and scaling for the output. The specific rule that is used depends on the block operation. For example, if you are multiplying two signed 16-bit signals, the Product block produces the natural output of a signed 32-bit data type. An “unnatural” output is produced if the inputs have different signs and different sizes. In this case, some trial and error may be required to achieve satisfactory results. If you are adding signals, two natural choices for the output data type and scaling are possible: to preserve the precision or to prevent overflow. However, blocks only support one rule. For example, the Sum block preserves precision. If your goal is to prevent overflow, then you should manually configure the data type and scaling. • Same as input—The output data type and scaling are the same as the input signal. In addition, the Output data type mode and Parameter data type mode parameters often include built-in data types in their drop-down lists for easy selection. Built-in data types can also be entered into the Output data type or Parameter data type parameter if Specify via dialog is selected for the Output data type mode or Parameter data type mode parameter. The supported fixed-point data types that may be entered into the Output data type or Parameter data type parameter and their default scalings are shown below. Output Data Types and Default Scaling Data Type Description Default Scaling float Floating-point number None sfix Signed generalized fixed-point number None sfrac Signed fractional number Right of the sign bit 9-17 9 Block Reference Output Data Types and Default Scaling Data Type Description Default Scaling sint Signed integer Right of the least significant bit ufix Unsigned generalized fixed-point number None uint Unsigned integer Right of the least significant bit ufrac Unsigned fractional number Left of the most significant bit In the Fixed-Point Blockset, the word size in bits of fixed-point data types is given as an argument to the data type. For example, sfix(16) specifies a 16-bit signed generalized fixed-point number. Word sizes from 1 to 128 bits are supported in simulation. Floating-point data types are IEEE-style and are specified as float('single') for single-precision numbers and float('double') for double-precision numbers. Nonstandard IEEE-style numbers are specified as float(TotalBits,ExpBits) where TotalBits is the total number of physical bits and ExpBits is the number of exponent bits. For more information about supported fixed-point data types and their default scaling, refer to Chapter 3, “Data Types and Scaling.” If you select Specify via dialog for the Output data type mode or Parameter data type mode parameter, you must also explicitly specify the output or parameter scaling with the Output scaling value or Parameter scaling value parameter. The supported scaling modes for generalized 9-18 Common Block Features fixed-point data types are given below. Default scaling is used for all other fixed-point data types. Scaling Modes for Generalized Fixed-Point Data Types Scaling Mode Description Radix point-only Specify radix point-only (powers-of-two) scaling. For example, a scaling of 2^ 10 (or pow2( 10)) places the radix point at a location 10 places to the left of the least significant bit. [Slope Bias] Specify [Slope Bias] scaling. For example, a scaling of [5/9 10] specifies a slope of 5/9 and a bias of 10. When using this mode, you must specify a positive slope. Note that some blocks provide a form of radix point-only scaling for constant vectors and constant matrices. Refer to “Example: Constant Scaling for Best Precision” on page 3-11 for more information. Locking the Output Scaling If the Lock output scaling against changes by the autoscaling tool check box is selected, then the automatic scaling tool autofixexp will not change the Output scaling value parameter. Otherwise, the automatic scaling tool is free to adjust the scaling. You can run autofixexp directly from the command line, or through the Fixed-Point Settings interface, fxptdlg. 9-19 9 Block Reference Rounding You can choose the rounding mode for the block operation with the Round integer calculations toward parameter list. The available rounding modes are shown below. Rounding Modes Rounding Mode Description Zero Round the output towards zero. Nearest Round the output towards the nearest representable number, with the exact midpoint rounded towards positive infinity. Ceiling Round the output towards positive infinity. Floor Round the output towards negative infinity. Handling Overflows Overflow handling for fixed-point numbers is specified with the Saturate on integer overflow check box. If selected, fixed-point overflow results saturate. Otherwise, overflow results wrap. Whenever a result saturates, a warning is displayed. Block Icon Labels Many Fixed-Point Blockset icons look like those of built-in Simulink blocks. In fact, many Simulink blocks with fixed-point capabilities appear in the Fixed-Point Blockset libraries. For this reason, all blocks that belong only to the Fixed-Point Blockset have an “F” on their icons. The Gateway In, Gateway In Inherited, and Gateway Out blocks have additional labels, which reflect how the input and output signals are treated. If the block input or output is treated as a real-world value, then a “V” appears next to the relevant port on the block icon. If the block input or output is treated as a stored integer, then an “I” appears next to the relevant port on the block icon. 9-20 Common Block Features Port Data Type Display To display the data types of ports in your model, select Port data types from the Simulink Format menu. The port display for fixed-point signals consists of three parts: the data type, the number of bits, and the scaling. The data type and number of bits reflect the block’s Output data type parameter value or the data type that is inherited from the driving block or through backpropagation. The scaling reflects the block’s Output scaling value parameter value or the scaling that is inherited from the driving block or through backpropagation. For example, the model below displays its port data types: double Sine Wave 2 rad/s In sfix16_Sp2_B10 sfix16_En2 Out double summed signal In 1 Sum Out 1 Scope sfix16_En8 double Sine Wave1 1 rad/s In sfix16_En6 Product Out double multiplied signal Out 2 In 2 The data type display associated with the In 1 block in the model indicates that the output data type is sfix(16) (a signed, 16-bit, generalized fixed-point number) with [Slope Bias] scaling of [0.2 10]. Note that this scaling is not the block’s default scaling. The data type display associated with the In 2 block indicates that the output data type is sfix(16) with radix point-only scaling of 2^-6. The following table provides a key for various symbols that may appear in the port data type display for Fixed-Point Blockset blocks. Port Data Type Display Symbols Symbol Description uint unsigned integer fixed-point data type sint signed integer fixed-point data type 9-21 9 Block Reference Port Data Type Display Symbols Symbol Description ufrac unsigned fraction fixed-point data type sfrac signed fraction fixed-point data type ufix unsigned generalized fixed-point data type sfix signed generalized fixed-point data type fltu doubles-override of an unsigned fixed-point data type flts doubles-override of a signed fixed-point data type B bias E 2^ e 10^ F fractional slope n negative p decimal point S slope For more information on Fixed-Point Blockset data types, refer to “Fixed-Point Data Type Parameters” on page 3-9. For more information on [Slope Bias] and radix point-only scaling, refer to “Scaling” on page 3-5. 9-22 Alphabetical List of Blocks Alphabetical List of Blocks 9 The following pages contain the reference sheets for the Fixed-Point Blockset blocks in alphabetical order. 9-23 Abs Purpose 9Abs Library Simulink Math Operations and Fixed-Point Blockset Math Description The Abs block outputs the absolute value of the input. |u| Abs Output the absolute value of the input For signed data types, the absolute value of the most negative value is problematic since it is not representable by the data type. In this case, the behavior of the block is controlled by the Saturate on integer overflow check box. If selected, the absolute value of the data type saturates to the most positive value. If not selected, the absolute value of the most negative value represented by the data type has no effect. For example, suppose the block input is an 8-bit signed integer. The range of this data type is from -128 to 127, and the absolute value of -128 is not representable. If the Saturate on integer overflow check box is selected, then the absolute value of -128 is 127. If it is not selected, then the absolute value of -128 remains at -128. Data Type Support An Abs block accepts a real- or complex-valued input of any data type and outputs a real value of the same data type as the input. Parameters and Dialog Box Saturate on integer overflow When selected, the block maps signed integer input elements corresponding to the most negative value of that data type to the most positive value of that data type. • For 8-bit integers, -128 is mapped to 127. • For 16-bit integers, -32768 maps to 32767. 9-24 Abs • For 32-bit integers, -2147483648 maps to 2147483647. When not selected, the block does not act on signed integer input elements corresponding to the most negative value of that data type. • For 8-bit integers, -128 remains -128. • For 16-bit integers, -32768 remains -32768. • For 32-bit integers, -2147483648 remains -2147483648. Enable zero crossing detection Select to enable zero crossing detection. For more information, see “Zero Crossing Detection” in the Using Simulink documentation. Characteristics Dimensionalized Yes Direct Feedthrough Yes Sample Time Inherited from driving block Zero Crossing No, unless Enable zero crossing detection is selected 9-25 Accumulator Purpose 9Accumulator Library Calculus Description At time step n, the Accumulator block computes a cumulative sum of all input values u up to time n and outputs the sum. Compute a cumulative sum Parameters and Dialog Box Initial condition for previous output Set the initial condition for the previous output. Output data type and scaling Specify the output data type and scaling via the dialog box, or inherit the data type and scaling from the driving block or by backpropagation. Round toward Rounding mode for the fixed-point output. Saturate to max or min when overflows occur If selected, fixed-point overflows saturate. Characteristics 9-26 Input Port Any data type supported by the blockset Output Port Same data type as the input Direct Feedthrough Yes Scalar Expansion Of inputs and gain Accumulator Resettable Purpose 9Accumulator Resettable Library Calculus Description The Accumulator Resettable block computes a cumulative sum, based on the values of an external Boolean reset signal. Compute a cumulative sum with external Boolean reset The block can reset its state based on an external reset signal R. The block has two input ports, one for the input signal u, and another for the reset signal R. When the reset is false at time n, the block adds the current value of the input signal u to the sum at time n-1. When the reset is true at time n, the block resets the sum to the value of the Initial condition for previous output parameter, and outputs the sum. Parameters and Dialog Box Initial condition for previous output Set the initial condition for the previous output. Output data type and scaling Specify the output data type and scaling via the dialog box, or inherit the data type and scaling from the driving block or by backpropagation. Round toward Rounding mode for the fixed-point output. Saturate to max or min when overflows occur If selected, fixed-point overflows saturate. 9-27 Accumulator Resettable Characteristics See Also 9-28 Input Ports Any data type supported by the blockset Output Port Same data type as the input Direct Feedthrough Of the input and reset source ports Scalar Expansion Of inputs and gain Accumulator Accumulator Resettable Limited Purpose 9Accumulator Resettable Limited Library Calculus Description The Accumulator Resettable Limited block computes a cumulative sum, based on the values of an external Boolean reset signal. Compute a limited cumulative sum with external Boolean reset The block can reset its state based on an external reset signal R. When the cumulative sum reaches one of the limits given by the Upper limit and Lower limit parameters, the sum saturates to that limit. The block has two input ports, one for the input signal u, and another for the reset signal R. When the reset R is false at time n, the block adds the current value of the input signal u to the sum at time n-1. When the cumulative sum is outside the limits given by the Upper limit and Lower limit parameters, the sum saturates to one of the bounds. When the reset R is true at time n, the block resets the sum to the value of the Initial condition for previous output parameter, and outputs the sum. Parameters and Dialog Box Initial condition for previous output Set the initial condition for the previous output. Upper limit The upper limit for saturation of the cumulative sum. 9-29 Accumulator Resettable Limited Lower limit The lower limit for saturation of the cumulative sum. Output data type and scaling Specify the output data type and scaling via the dialog box, or inherit the data type and scaling from the driving block or by backpropagation. Round toward Rounding mode for the fixed-point output. Saturate to max or min when overflows occur If selected, fixed-point overflows saturate. Characteristics See Also 9-30 Input Ports Any data type supported by the blockset Output Port Same data type as the input Direct Feedthrough Of the input and reset source ports Scalar Expansion Of inputs and gain Accumulator Add Purpose 9Add Library Math Description The Add block is an implementation of the Sum block. See “Sum” on page 9-216 for more information. Add or subtract inputs Add 9-31 Bit Clear Purpose 9Bit Clear Library Bits Description The Bit Clear block is a masked block that sets the specified bit, given by its index, of the stored integer to zero. Scaling is ignored. Set the specified bit of the stored integer to zero You can specify the bit to be set to zero with the Index of bit parameter, where bit zero is the least significant bit. True floating-point data types are not supported. Parameters and Dialog Box Index of bit Index of bit where bit 0 is the least significant bit. Examples If the Bit Clear block is turned on for bit 2, bit 2 is set to 0. A vector of constants 2.^[0 1 2 3 4] is represented in binary as [00001 00010 00100 01000 10000]. With bit 2 set to 0, the result is [00001 00010 00000 01000 10000], which is represented in decimal as [1 2 0 8 16]. Characteristics Input Port Any data type supported by the blockset, except a true floating-point data type Output Port Same as the input Direct Feedthrough Yes Scalar Expansion Yes 9-32 Bit Set Purpose 9Bit Set Library Bits Description The Bit Set block is a masked block that sets the specified bit of the stored integer to one. Scaling is ignored. Set the specified bit of the stored integer to one You can specify the bit to be set to one with the Index of bit parameter, where bit zero is the least significant bit. True floating-point data types are not supported. Parameters and Dialog Box Index of bit Index of bit where bit 0 is the least significant bit. Examples If the Bit Set block is turned on for bit 2, bit 2 is set to 1. A vector of constants 2.^[0 1 2 3 4] is represented in binary as [00001 00010 00100 01000 10000]. With bit 2 set to 1, the result is [00101 00110 00100 01100 10100], which is represented in decimal as [5 6 4 12 20]. Characteristics Input Port Any data type supported by the blockset, except a true floating-point data type Output Port Same as the input Direct Feedthrough Yes Scalar Expansion Yes See Also Bit Clear 9-33 Bitwise Operator Purpose 9Bitwise Operator Library Bits Description The Bitwise Operator block is a masked S-function that performs the specified bitwise operation on its operands. Perform the specified bitwise operation on the inputs Unlike the logic operations performed by the Logical Operator block, bitwise operations treat the operands as a vector of bits rather than a single number. You select the bitwise Boolean operation with the Operator parameter list. The supported operations are given below. Operation Description AND TRUE if the corresponding bits are all TRUE OR TRUE if at least one of the corresponding bits is TRUE NAND TRUE if at least one of the corresponding bits is FALSE NOR TRUE if no corresponding bits are TRUE XOR TRUE if an odd number of corresponding bits are TRUE NOT TRUE if the input is FALSE (available only for single input) Unlike the Simulink Bitwise Logical Operator block, the Bitwise Operator block does not support shift operations. Refer to “Shifts” on page 4-41 to learn how to perform shift operations with the Fixed-Point Blockset. The size of the output depends on the number of inputs, their vector size, and the selected operator: • The NOT operator accepts only one input, which can be a scalar or a vector. If the input is a vector, the output is a vector of the same size containing the bitwise logical complements of the input vector elements. • For a single vector input, the block applies the operation (except the NOT operator) to all elements of the vector. If a bit mask is not specified, then the output is a scalar. If a bit mask is specified, then the output is a vector. 9-34 Bitwise Operator • For two or more inputs, the block performs the operation between all of the inputs. If the inputs are vectors, the operation is performed between corresponding elements of the vectors to produce a vector output. When configured as a multi-input XOR gate, this block performs an additionmodulo-two operation as mandated by the IEEE Standard for Logic Elements. If the Use bit mask check box is not selected, then the block can accept multiple inputs. You select the number of input ports with the Number of input ports parameter. The input data types must be identical. If the Use bit mask check box is selected, then a single input is associated with the bit mask you specify with the Bit Mask parameter. You specify the bit mask using any valid MATLAB expression. For example, you can specify the bit mask 00100101 as 2^5+2^2+2^0. Alternatively, you can use strings to specify a hexadecimal bit mask such as {'FE73','12AC'}. If the bit mask is larger than the input signal data type, then it is ignored. Note The output data type, which is inherited from the driving block, should represent zero exactly. Data types that satisfy this condition include signed and unsigned integers and any floating-point data type. The Treat mask as parameter list controls how the mask is treated. The possible values are Real World Value and Stored Integer. In terms of the general encoding scheme described in “Scaling” on page 3-5, Real World Value treats the mask as V = SQ + B where S is the slope and B is the bias. Stored Integer treats the mask as a stored integer, Q. For more information about this parameter list, refer to the Gateway In block. Remarks You can use the bit mask to perform a bit set or a bit clear on the input. To perform a bit set, you configure the Operator parameter list to OR and create a bit mask with a 1 for each corresponding input bit that you want to set to 1. To perform a bit clear, you configure the Operator parameter list to AND and create a bit mask with a 0 for each corresponding input bit that you want to set to 0. For example, suppose you want to perform a bit set on the fourth bit of an 8-bit input vector. The bit mask would be 00010000, which you can specify as 2^4 in 9-35 Bitwise Operator the Bit mask parameter. To perform a bit clear, the bit mask would be 11101111, which you can specify as 2^7+2^6+2^5+2^3+2^2+2^1+2^0 in the Bit mask parameter. Parameters and Dialog Box Operator The bitwise logical operator associated with the specified operands. Use bit mask Specify if the bit mask is used (single input only). Number of input ports The number of inputs. Bit Mask The bit mask to associate with a single input. Treat mask as Treat the mask as a real-world value or as an integer. Conversions 9-36 The Bit Mask parameter is converted from a double to the input data type offline using round-to-nearest and saturation. Refer to “Parameter Conversions” on page 4-27 for more information about parameter conversions. Bitwise Operator Examples To help you understand the Bitwise Operator block logic operations, consider the fixed-point model shown below. The Constant blocks are configured to output an 8-bit unsigned integer (uint(8)). The results for all logic operations are shown below. Characteristics Operation Binary Value Decimal Value AND 00101000 40 OR 11111101 253 NAND 11010111 215 NOR 00000010 2 XOR 11111000 248 NOT N/A N/A Input Port Any data type supported by the blockset Output Port Same as the input Direct Feedthrough No Scalar Expansion Of inputs 9-37 Compare To Constant Purpose 9Compare To Constant Library Logic & Comparison Description The Compare To Constant block is a masked block that determines if a signal is equal to the specified constant where: Determine if a signal is equal to the specified constant • The output is true (not 0) when the input signal is equal to the specified constant. • The output is false (equal to 0) when the input signal is not equal to the specified constant. You enter the constant with the Constant value parameter. Parameters and Dialog Box Operator Specify how the input is compared to the constant value. Constant value Specify the constant value that the input is compared with. Characteristics See Also 9-38 Input Port Any data type supported by the blockset Output Port An 8-bit unsigned integer Direct Feedthrough Yes Scalar Expansion Yes Compare to Zero Compare To Zero Purpose 9Compare To Zero Library Logic & Comparison Description The Compare To Zero block is a masked block that determines if a signal is equal to zero where: Determine if a signal is equal to zero • The output is true (not 0) when the input signal is equal to zero. • The output is false (equal to 0) when the input signal is not equal to zero. Parameters and Dialog Box Operator Specify how the input is compared to zero. Characteristics See Also Input Port Any data type supported by the blockset Output Port An 8-bit unsigned integer Direct Feedthrough Yes Compare To Constant 9-39 Constant Purpose 9Constant Library Simulink Sources and Fixed-Point Blockset Sources Description The Constant block generates a real or complex constant value. The block generates a scalar, vector, or matrix output, depending on the dimensionality of the Constant value parameter and the setting of the Interpret vector parameters as 1-D parameter. 1 Constant 0.0 Constant Data Type Support Generate a constant value The output of the block has the same dimensions and elements of the Constant value parameter. If you specify a vector for this parameter, and you want the block to interpret it as 1-D, select the Interpret vector parameters as 1-D parameter. When the Show additional parameters check box is selected, some of the parameters that become visible are common to many blocks. For a detailed description of these parameters, refer to “Block Parameters” on page 9-16. By default, a Constant block outputs a signal whose data type and complexity is the same as that of the block’s Constant value parameter. However, you can specify the output to be any supported data type. Parameters and Dialog Box Constant value Constant value output by the block. It can be a scalar, vector, or matrix. 9-40 Constant Interpret vector parameters as 1-D If selected, a vector specified for the Constant value parameter results in a 1-D signal. Show additional parameters If selected, additional parameters specific to implementation of the block become visible as shown. Output data type mode Specify how the data type of the output is designated. The data type can be inherited through backpropagation, or can be designated in the Constant value parameter; for example int8(29). You can also choose a built-in data type from the drop-down list. Lastly, if you choose Specify via dialog, the Output data type, Output Scaling Mode, and Output scaling value parameters become visible. Output data type Specify any data type, including fixed-point data types. This parameter is only visible if Specify via dialog is selected for the Output data type mode parameter. 9-41 Constant Output Scaling Mode Specify how the scaling of the output is designated. The output can be automatically scaled to maintain best vector-wise precision without overflow, or you can choose to specify the scaling in the dialog via the Output scaling value parameter. This parameter is only visible if Specify via dialog is selected for the Output data type mode parameter. Output scaling value Set the output scaling using radix point-only or [Slope Bias] scaling. This parameter is only visible if Specify via dialog is selected for the Output data type mode parameter, and if Use specified scaling is selected for the Output Scaling Mode parameter. Conversions The Constant value parameter is converted from its data type to the specified and Operations output data type offline using round-to-nearest and saturation. Refer to “Parameter Conversions” on page 4-27 for more information about parameter conversions. Characteristics 9-42 Dimensionalized Yes Direct Feedthrough No Sample Time Constant Scalar Expansion No Zero Crossing No Conversion Purpose 9Conversion Library Data Type Description The Conversion block is a masked S-function that converts from one Fixed-Point Blockset data type to another. Convert from one Fixed-Point Blockset data type to another This block requires that you specify the data type and scaling for the conversion. If you want to inherit this information from an input signal, you should use the Conversion Inherited block. For a detailed description of all block parameters, refer to “Block Parameters” on page 9-16. For more information about converting from one Fixed-Point Blockset data type to another, refer to “Signal Conversions” on page 4-27. Parameters and Dialog Box Input and Output to have equal Specify the type of value of the input and output that are to be equal. 9-43 Conversion Output data type and scaling Specify the output data type and scaling via the dialog box, or inherit the data type and scaling via backpropagation. Output data type Any data type supported by the Fixed-Point Blockset. Output scaling Set the output scaling using radix point-only or [Slope Bias] scaling. These scaling modes are available only for generalized fixed-point data types. Lock output scaling so autoscaling tool can’t change it If selected, Output scaling is locked. This feature is available only for generalized fixed-point output. Round toward Rounding mode for the fixed-point output. Saturate to max or min when overflows occur If selected, fixed-point overflows saturate. Characteristics See Also 9-44 Input Ports Any data type supported by the blockset Output Port Any data type supported by the blockset Direct Feedthrough Yes Conversion Inherited Conversion Inherited Purpose 9Conversion Inherited Library Data Type Description The Conversion Inherited block is a masked S-function that forces dissimilar data types to be the same. The first (top) input is used as the reference signal and the second (bottom) input is converted to the reference type by inheriting the data type and scaling information. Either input will be scalar expanded such that the output has the same width as the widest input. Convert from one Fixed-Point Blockset data type to another, and inherit the data type and scaling If you want to specify the data type and scaling when converting from one Fixed-Point Blockset data type to another, you should use the Conversion block. For a detailed description of all block parameters, refer to “Block Parameters” on page 9-16. For more information about converting from one Fixed-Point Blockset data type to another, refer to “Signal Conversions” on page 4-27. Remarks Inheriting the data type and scaling provides these advantages: • It makes reusing existing models easier. • It allows you to create new fixed-point models with less effort since you can avoid the detail of specifying the associated parameters. Parameters and Dialog Box 9-45 Conversion Inherited Input and Output to have equal Specify the type of value of the input and output that are to be equal. Round toward Rounding mode for the fixed-point output. Saturate to max or min when overflows occur If selected, fixed-point overflows saturate. Characteristics See Also 9-46 Input Ports Any data type supported by the blockset Output Port Any data type supported by the blockset Direct Feedthrough Yes Conversion Cosine Purpose 9Cosine Library LookUp Description The Cosine block implements a cosine function using a lookup table that exploits quarter wave symmetry. The output is normally a signed 16 bit number with 14 bits to the right of the radix point. Implement a cosine function in fixed-point using a lookup table approach that exploits quarter wave symmetry Parameters and Dialog Box Number of data points for lookup table The number of data points in the lookup table Characteristics Input Port Any data type supported by the blockset Output Port Same as the input Direct Feedthrough Yes 9-47 Counter Free Purpose 9Counter Free Library Sources Description The Counter Free block is a masked block that counts up until the maximum possible value, 2Nbits - 1, is reached, where Nbits is the number of bits. Then the counter overflows to zero, and restarts counting up. The counter is always initialized to zero. Count up and overflow back to zero after the maximum value possible is reached for the specified number of bits You can specify the number of bits with the Number of Bits parameter. You can specify the sample time with the Sample time parameter. The output is an unsigned integer. If the global doubles override is selected, the Counter Free does not wrap back to zero. Parameters and Dialog Box Number of Bits Specified number of bits. Sample time Sample time. Characteristics 9-48 Output Port Unscaled integer or a floating-point data type Scalar Expansion No Vectorized No Counter Limited Purpose 9Counter Limited Library Sources Description The Counter Limited block is a masked block that counts up until the specified upper limit is reached. Then the counter wraps back to zero, and restarts counting up. The counter is always initialized to zero. Count up and wrap back to zero after outputting the specified upper limit You can specify the upper limit with the Upper limit parameter. You can specify the sample time with the Sample time parameter. A Sample time of -1 means that the sample time is inherited. The output is an unsigned integer of 8, 16, or 32 bits, with the smallest number of bits needed to represent the upper limit. Parameters and Dialog Box Upper limit Upper limit. Sample time Sample time. Characteristics See Also Output Port Unscaled integer or a floating-point data type Scalar Expansion No Vectorized No Counter Free 9-49 Data Type Duplicate Purpose 9Data Type Duplicate Library Data Type Description The Data Type Duplicate block is a masked S-function that forces all inputs to have exactly the same data type. Other attributes of input signals, such as dimension, complexity, and sample time, are completely independent. Force all inputs to the same data type You can use the Data Type Duplicate block to check for consistency of data types among blocks. If all signals do not have the same data type, the block returns an error message. The Data Type Duplicate block is typically used such that one signal to the block controls the data type for all other blocks. The other blocks are set to inherit their data types via backpropagation. The block is also used in a user created library. These library blocks can be placed in any model, and the data type for all library blocks are configured according to the usage in the model. To create a library block with more complex data type rules than duplication, use the Data Type Propagation block. Parameters and Dialog Box Number of input ports Number of input ports. 9-50 Data Type Duplicate Characteristics Input Port Any data type supported by the blockset Scalar Expansion Yes States 0 Vectorized Yes 9-51 Data Type Propagation Purpose 9Data Type Propagation Library Data Type Description The Data Type Propagation block allows you to control the data type and scaling of signals in your model. You can use this block in conjunction with fixed-point blocks that have their Specify data type and scaling parameter configured to Inherit via back propagation. Set the data type and scaling of the propagated signal based on information from the reference signals The block has three inputs: Ref1 and Ref2 are the reference inputs, while the Prop input back propagates the data type and scaling information gathered from the reference inputs. This information is then passed on to other fixed-point blocks. The block provides you with many choices for propagating data type and scaling information. For example, you can: • Use the number of bits from the Ref1 reference signal, or use the number of bits from widest reference signal. • Use the range from the Ref2 reference signal, or use the range of the reference signal with the greatest range. • Use a bias of zero, regardless of the biases used by the reference signals. • Use the precision of the reference signal with the least precision. You specify how data type information is propagated with the Propagated data type parameter list. If the parameter list is configured as Specify via dialog, then you manually specify the data type via the Propagated data type edit field. Refer to “Selecting the Data Type and Scaling” on page 9-16 to learn how to specify the data type. If the parameter list is configured as Inherit via propagation rule, then you must use the parameters described in “Inheriting Data Type Information” on page 9-55. You specify how scaling information is propagated with the Propagated scaling parameter list. If the parameter list is configured as Specify via dialog, then you manually specify the scaling via the Propagated scaling edit field. Refer to “Selecting the Data Type and Scaling” on page 9-16 to learn how to specify the scaling. If the parameter list is configured as Inherit via propagation rule, then you must use the parameters described in “Inheriting Scaling Information” on page 9-57. 9-52 Data Type Propagation Remarks After you use the information from the reference signals, you can apply a second level of adjustments to the data type and scaling by using individual multiplicative and additive adjustments. This flexibility has a variety of uses. For example, if you are targeting a DSP, then you can configure the block so that the number of bits associated with a MAC (multiply and accumulate) operation is twice as wide as the input signal, and has a certain number of guard bits added to it. The Data Type Propagation block also provides a mechanism to force the computed number of bits to a useful value. For example, if you are targeting a 16-bit micro, then the target C compiler is likely to support sizes of only 8 bits, 16 bits, and 32 bits. The block will force these three choices to be used. For example, suppose the block computes a data type size of 24 bits. Since 24 bits is not directly usable by the target chip, the signal is forced up to 32 bits, which is natively supported. There is also a method for dealing with floating-point reference signals. This makes it easier to create designs that are easily retargeted from fixed-point chips to floating-point chips or visa versa. The Data Type Propagation block allows you to set up libraries of useful subsystems that will be properly configured based on the connected signals. Without this data type propagation process, a subsystem that you use from a library will almost certainly not work as desired with most integer or fixed-point signals, and manual intervention to configure the data type and scaling would be required. This block can eliminate the manual intervention in many situations. Precedence Rules The precedence of the dialog box parameters decreases from top to bottom. Additionally: • Double-precision reference inputs have precedence over all other data types. • Single-precision reference inputs have precedence over integer and fixed-point data types. • Multiplicative adjustments are carried out before additive adjustments. • The number of bits is determined before the precision or positive range is inherited from the reference inputs. 9-53 Data Type Propagation Parameters and Dialog Box 9-54 Data Type Propagation Propagated data type Use the parameter list to propagate the data type via the dialog box, or inherit the data type from the reference signals. Use the edit field to specify the data type via the dialog box. Propagated scaling Use the parameter list to propagate the scaling via the dialog box, or inherit the scaling from the reference signals. Use the edit field to specify the scaling via the dialog box. Inheriting Data Type Information If the Propagated data type parameter is Inherit via propagation rule, then these dialog box parameters are available to you. The If any reference input is single, output is parameter list can be single or double. This parameter makes it easier to create designs that are easily retargeted from fixed-point chips to floating-point chips or visa versa. The Is-Signed parameter list specifies the sign of Prop. The parameter values are described below. Parameter Value Description IsSigned1 Prop is a signed data type if Ref1 is a signed data type. IsSigned2 Prop is a signed data type if Ref2 is a signed data type. IsSigned1 or IsSigned2 Prop is a signed data type if either Ref1 or Ref2 are signed data types. 9-55 Data Type Propagation Parameter Value Description TRUE Ref1 and Ref2 are ignored, and Prop is always a signed data type. FALSE Ref1 and Ref2 are ignored, and Prop is always an unsigned data type. For example, if the Ref1 signal is ufix(16), the Ref2 signal is sfix(16), and the Is-Signed parameter is IsSigned1 or IsSigned2, then Prop is forced to be a signed data type. The Number-of-bits: base parameter list specifies the number of bits used by Prop for the base data type. The parameter values are described below. Parameter Value Description NumBits1 The number of bits for Prop is given by the number of bits for Ref1. NumBits2 The number of bits for Prop is given by the number of bits for Ref2. max([NumBits1 NumBits2]) The number of bits for Prop is given by the reference signal with largest number of bits. min([NumBits1 NumBits2]) The number of bits for Prop is given by the reference signal with smallest number of bits. NumBits1+NumBits2 The number of bits for Prop is given by the sum of the reference signal bits. Refer to “Targeting an Embedded Processor” on page 5-3 for more information about the base data type. The Number-of-bits: Multiplicative adjustment parameter allows you to adjust the number of bits used by Prop by including a multiplicative adjustment. For example, suppose you want to guarantee that the number of bits associated with a multiply and accumulate (MAC) operation is twice as wide as the input signal. To do this, you configure this parameter to the value 2. 9-56 Data Type Propagation The Number-of-bits: Additive adjustment parameter allows you to adjust the number of bits used by Prop by including an additive adjustment. For example, if you are performing multiple additions during a MAC operation, the result may overflow. To prevent overflow, you can associate guard bits with the propagated data type. To associate four guard bits, you specify the value 4. The Number-of-bits: Allowable final values parameter allows you to force the computed number of bits used by Prop to a useful value. For example, if you are targeting a processor that supports only 8, 16, and 32 bits, then you configure this parameter to [8,16,32]. The block always propagates the smallest specified value that fits. If you want to allow all fixed-point data types, you would specify the value 1:128. Inheriting Scaling Information If the Propagated scaling parameter is Inherit via propagation rule, then these dialog box parameters are available to you. The Slope: Base parameter list specifies the slope used by Prop for the base data type. The parameter values are described below. Parameter Value Description Slope1 The slope of Prop is given by the slope of Ref1. Slope2 The slope of Prop is given by the slope of Ref2. max([Slope1 Slope2]) The slope of Prop is given by the maximum slope of the reference signals. 9-57 Data Type Propagation Parameter Value Description min([Slope1 Slope2]) The slope of Prop is given by the minimum slope of the reference signals. Slope1*Slope2 The slope of Prop is given by the product of the reference signal slopes. Slope1/Slope2 The slope of Prop is given by the ratio of the Ref1 slope to the Ref2 slope. PosRange1 The range of Prop is given by the range of Ref1. PosRange2 The range of Prop is given by the range of Ref2. max([PosRange1 PosRange2]) The range of Prop is given by the maximum range of the reference signals. min([PosRange1 PosRange2]) The range of Prop is given by the minimum range of the reference signals. PosRange1*PosRange2 The range of Prop is given by the product of the reference signal ranges. PosRange1/PosRange2 The range of Prop is given by the ratio of the Ref1 range to the Ref2 range. You control the precision of Prop with Slope1 and Slope2, and you control the range of Prop with PosRange1 and PosRange2. Additionally, PosRange1 and PosRange2 are one bit higher than the maximum positive range of the associated reference signal. The Slope: Multiplicative adjustment parameter allows you to adjust the slope used by Prop by including a multiplicative adjustment. For example, if you want 3 bits of additional precision (with a corresponding decrease in range), the multiplicative adjustment is 2^-3. The Slope: Additive adjustment parameter allows you to adjust the slope used by Prop by including an additive adjustment. An additive slope adjustment is often not needed. The most likely use is to set the multiplicative adjustment to 0, and set the additive adjustment to force the final slope to a specified value. 9-58 Data Type Propagation The Bias: Base parameter list specifies the bias used by Prop for the base data type. The parameter values are described below. Parameter Value Description Bias1 The bias of Prop is given by the bias of Ref1. Bias2 The bias of Prop is given by the bias of Ref2. max([Bias1 Bias2]) The bias of Prop is given by the maximum bias of the reference signals. min([Bias1 Bias2]) The bias of Prop is given by the minimum bias of the reference signals. Bias1*Bias2 The bias of Prop is given by the product of the reference signal biases. Bias1/Bias2 The bias of Prop is given by the ratio of the Ref1 bias to the Ref2 bias. Bias1+Bias2 The bias of Prop is given by the sum of the reference biases. Bias1-Bias2 The bias of Prop is given by the difference of the reference biases. The Bias: Multiplicative adjustment parameter allows you to adjust the bias used by Prop by including a multiplicative adjustment. The Bias: Additive adjustment parameter allows you to adjust the bias used by Prop by including an additive adjustment. If you want to guarantee that the bias associated with Prop is zero, you should configure both the multiplicative adjustment and the additive adjustment to 0. 9-59 Data Type Propagation If the Propagated scaling parameter is Obtain via best precision, then the following dialog box parameters are available to you. You specify any values, such as the upper and lower limits on the propagated input, for the Values used to determine best precision scaling, which constrains the precision chosen to apply to those limits. Based on the data type, the scaling will automatically be selected such that these values can be represent with no overflow error and minimum quantization error. Characteristics 9-60 Input Ports Any data type supported by the blockset Direct Feedthrough Yes Scalar Expansion Yes Dead Zone Purpose 9Dead Zone Library Nonlinear Description The Dead Zone block is a masked S-function that generates zero output within a specified region, called its dead zone. The lower limit of the dead zone is specified with the Start of dead zone parameter, while the upper limit of the dead zone is specified with the End of dead zone parameter. The block output depends on the input and dead zone: Provide a region of zero output • If the input is within the dead zone (greater than the lower limit and less than the upper limit), the output is zero. • If the input is greater than or equal to the upper limit, the output is the input minus the upper limit. • If the input is less than or equal to the lower limit, the output is the input minus the lower limit. Parameters and Dialog Box Start of dead zone The lower limit of the dead zone. End of dead zone The upper limit of the dead zone. Saturate to max or min when overflows occur If selected, fixed-point overflows saturate. 9-61 Dead Zone Examples Consider the model shown below, which compares a fixed-point signal and the output generated by the Dead Zone block. The signal source is a sine wave with unit amplitude. The Start of dead zone parameter is configured to -0.5 and the End of dead zone parameter is configured to 0.5. The resulting output is shown below. 1 0.8 Original fixed-point signal 0.6 0.4 Dead Zone signal 0.2 0 −0.2 −0.4 −0.6 −0.8 −1 0 Characteristics 9-62 1 2 3 4 5 6 7 8 9 10 Input Ports Any data type supported by the blockset Output Port Any data type supported by the blockset Direct Feedthrough Yes Scalar Expansion Yes, of parameters Dead Zone Dynamic Purpose 9Dead Zone Dynamic Library Nonlinear Description The Dead Zone Dynamic block is a masked block that dynamically bounds the range of the input signal, providing a region of zero output. The bounds change according to the upper and lower limit input signals where Set inputs within the bounds to zero up u y • The input within the bounds is set to zero. lo Dead Zone Dynamic • The input below the lower limit is shifted down by the lower limit. • The input above the upper limit is shifted down by the upper limit. The input for the upper limit is the up port, and the input for the lower limit is the lo port. Parameters and Dialog Box Characteristics See Also Input Port Any data type supported by the blockset Output Port Same as the input Direct Feedthrough Yes Scalar Expansion Yes Dead Zone 9-63 Decrement Real World Purpose 9Decrement Real World Library Math Description The Decrement Real World block is a masked block that decreases the real world value of the signal by one. Overflows always wrap. Decrease the real world value of the signal by one Parameters and Dialog Box Characteristics See Also 9-64 Input Port Any data type supported by the blockset Output Port Same as the input Direct Feedthrough Yes Scalar Expansion No Decrement Stored Integer, Decrement Time To Zero, Decrement To Zero Decrement Stored Integer Purpose 9Decrement Stored Integer Library Math Description The Decrement Stored Integer block is a masked block that decreases the stored integer value of a signal by one. Decrease the stored integer value of a signal by one Floating-point signals are also decreased by one, and overflows always wrap. Parameters and Dialog Box Characteristics See Also Input Port Any data type supported by the blockset Output Port Same as the input Direct Feedthrough Yes Scalar Expansion No Decrement Real World, Decrement Time To Zero, Decrement To Zero 9-65 Decrement Time To Zero Purpose 9Decrement Time To Zero Library Math Description The Decrement Time To Zero block is a masked S-function that decreases the real-world value of the signal by the sample time, Ts. The output will never go below zero. This block only works with fixed sample rates. Decrease the real-world value of the signal by the sample time, but only to zero. Parameters and Dialog Box Characteristics See Also 9-66 Input Port Any data type supported by the blockset Output Port Same as the input Direct Feedthrough Yes Scalar Expansion No Decrement Real World, Decrement Stored Integer, Decrement To Zero Decrement To Zero Purpose 9Decrement To Zero Library Math Description The Decrement To Zero block is a masked block that decreases the real-world value of the signal by one. The output will never go below zero. Decreases the real-world value of a signal by one, but only to zero. Parameters and Dialog Box Characteristics See Also Input Port Any data type supported by the blockset Output Port Same as the input Direct Feedthrough Yes Scalar Expansion No Decrement Real World, Decrement Stored Integer, Decrement Time To Zero 9-67 Derivative Purpose 9Derivative Library Calculus Description The Derivative block computes a discrete time derivative, by subtracting the input value at the previous time step from the current value, and dividing by the sample time. Compute a discrete time derivative Parameters and Dialog Box Gain value Specify the weight by which the sample time is multiplied. Initial condition for previous weighted input K*u/Ts Set the initial condition for the previous scaled input. Output data type and scaling Specify the output data type and scaling via the dialog box, or inherit the data type and scaling from the driving block or by backpropagation. Round toward Rounding mode for the fixed-point output. Saturate to max or min when overflows occur If selected, fixed-point overflows saturate. 9-68 Derivative Characteristics Input Ports Any data type supported by the blockset Output Port Same as the input Direct Feedthrough Yes Scalar Expansion Of inputs and gain 9-69 Detect Change Purpose 9Detect Change Library Edge Detect Description The Detect Change block is a masked block that determines if an input does not equal its previous value where Detect a change in a signal’s value • The output is true (not 0), when the input signal does not equal its previous value. • The output is false (equal to 0), when the input signal equals its previous value. Parameters and Dialog Box Initial condition Set the initial condition for the previous input U/z. Characteristics See Also 9-70 Input Port Any data type supported by the blockset Output Port An 8-bit unsigned integer Direct Feedthrough Yes Scalar Expansion Yes Vectorized Yes Detect Decrease, Detect Fall Negative, Detect Fall Nonpositive, Detect Increase, Detect Rise Nonnegative, Detect Rise Positive Detect Decrease Purpose 9Detect Decrease Library Edge Detect Description The Detect Decrease block is a masked block that determines if an input is strictly less than its previous value where Detect a decrease in a signal’s value • The output is true (not 0), when the input signal is less than its previous value. • The output is false (equal to 0), when the input signal is greater than or equal to its previous value. Parameters and Dialog Box Initial condition Set the initial condition for the previous input U/z. Characteristics See Also Input Port Any data type supported by the blockset Output Port An 8-bit unsigned integer Direct Feedthrough Yes Scalar Expansion Yes Vectorized Yes Detect Change, Detect Fall Negative, Detect Fall Nonpositive, Detect Increase, Detect Rise Nonnegative, Detect Rise Positive 9-71 Detect Fall Negative Purpose Detect a falling edge when the signal’s value decreases to a strictly negative value, and its previous value was nonnegative Library Edge Detect Description The Detect Fall Negative block is a masked block that determines if the input is less than zero, and its previous value was greater than or equal to zero where 9Detect Fall Negative • The output is true (not 0), when the input signal is less than zero, and its previous value was greater than or equal to zero. • The output is false (equal to 0), when the input signal is greater than or equal to zero, or if the input signal is nonnegative, its previous value was positive or zero. Parameters and Dialog Box Initial condition Set the initial condition of the Boolean expression U/z < 0. Characteristics See Also 9-72 Input Port Any data type supported by the blockset Output Port An 8-bit unsigned integer Direct Feedthrough Yes Scalar Expansion Yes Vectorized Yes Detect Change, Detect Decrease, Detect Fall Nonpositive, Detect Increase, Detect Rise Nonnegative, Detect Rise Positive Detect Fall Nonpositive Purpose Detect a falling edge when the signal’s value decreases to a nonpositive value, and its previous value was strictly positive Library Edge Detect Description The Detect Fall Nonpositive block is a masked block that determines if the input is less than or equal to zero, and its previous value was positive where 9Detect Fall Nonpositive • The output is true (not 0), when the input signal is less than or equal to zero, and its previous value was greater than zero. • The output is false (equal to 0), when the input signal is greater than zero, or if it is nonpositive, its previous value was nonpositive. Parameters and Dialog Box Initial condition Set the initial condition of the boolean expression U/z <= 0. Characteristics See Also Input Port Any data type supported by the blockset Output Port An 8-bit unsigned integer Direct Feedthrough Yes Scalar Expansion Yes Vectorized Yes Detect Change, Detect Decrease, Detect Fall Negative, Detect Increase, Detect Rise Nonnegative, Detect Rise Positive 9-73 Detect Increase Purpose 9Detect Increase Library Edge Detect Description The Detect Increase block is a masked block that determines if an input is strictly greater than its previous value where Detect an increase in a signal’s value • The output is true (not 0), when the input signal is greater than its previous value. • The output is false (equal to 0), when the input signal is less than or equal to its previous value. Parameters and Dialog Box Initial condition Set the initial condition for the previous input U/z. Characteristics See Also 9-74 Input Port Any data type supported by the blockset Output Port An 8-bit unsigned integer Direct Feedthrough Yes Scalar Expansion Yes Vectorized Yes Detect Change, Detect Decrease, Detect Fall Negative, Detect Fall Nonpositive, Detect Rise Nonnegative, Detect Rise Positive Detect Rise Nonnegative Purpose 9Detect Rise Nonnegative Library Edge Detect Description The Detect Rise Nonnegative block is a masked block that determines if the input is greater than or equal to zero, and its previous value was less than zero where Detect a rising edge when a signal’s value increases to a nonnegative value, and its previous value was strictly negative • The output is true (not 0), when the input signal is greater than or equal to zero, and its previous value was less than zero. • The output is false (equal to 0), when the input signal is less than zero, or if nonnegative, its previous value was greater than or equal to zero. Parameters and Dialog Box Initial condition Set the initial condition of the Boolean expression U/z >= 0. Characteristics See Also Input Port Any data type supported by the blockset Output Port An 8-bit unsigned integer Direct Feedthrough Yes Scalar Expansion Yes Vectorized Yes Detect Change, Detect Decrease, Detect Fall Negative, Detect Fall Nonpositive, Detect Increase, Detect Rise Positive 9-75 Detect Rise Positive Purpose Detect a rising edge when a signal’s value increases to a strictly positive value, and its previous value was nonpositive Library Edge Detect Description The Detect Rise Positive block is a masked block that determines if the input is strictly positive, and its previous value was nonpositive where 9Detect Rise Positive • The output is true (not 0), when the input signal is greater than zero, and its previous value was less than zero. • The output is false (equal to 0), when the input is negative or zero, or if the input is positive, its previous value was also positive. Parameters and Dialog Box Initial condition Set the initial condition of the Boolean expression U/z > 0. Characteristics See Also 9-76 Input Port Any data type supported by the blockset Output Port An 8-bit unsigned integer Direct Feedthrough Yes Scalar Expansion Yes Vectorized Yes Detect Change, Detect Decrease, Detect Fall Negative, Detect Fall Nonpositive, Detect Increase, Detect Rise Nonnegative Difference Purpose 9Difference Library Calculus Description The Difference block outputs the current input value minus the previous input value. Calculate the change in a signal over one time step Parameters and Dialog Box Initial condition for previous output Set the initial condition for the previous output. Output data type and scaling Specify the output data type and scaling via the dialog box, or inherit the data type and scaling from the driving block or by backpropagation. Round toward Rounding mode for the fixed-point output. Saturate to max or min when overflows occur If selected, fixed-point overflows saturate. 9-77 Difference Characteristics 9-78 Input Ports Any data type supported by the blockset Output Port Any data type supported by the blockset Direct Feedthrough Yes Scalar Expansion Of inputs and gain Divide Purpose 9Divide Library Math Description The Divide block is an implementation of the Product block. See “Product” on page 9-173 for more information. Multiply or divide inputs Divide 9-79 Dot Product Purpose 9Dot Product Library Math Description The Dot Product block is a masked S-function that generates the dot product of its two input vectors. The scalar output, y, is equal to the MATLAB operation Generate the dot product y = sum(conj(u1).* u2) where u1 and u2 represent the inputs. If both inputs are vectors, they must be the same length. For a detailed description of all block parameters, refer to “Block Parameters” on page 9-16. For more information about converting from one Fixed-Point Blockset data type to another, refer to “Signal Conversions” on page 4-27. Parameters and Dialog Box Output data type and scaling Specify the output data type and scaling via the dialog box, or inherit the data type and scaling from the driving block or by backpropagation. Output data type Any data type supported by the Fixed-Point Blockset. 9-80 Dot Product Output scaling Set the output scaling using radix point-only or [Slope Bias] scaling. These scaling modes are available only for generalized fixed-point data types. Lock output scaling so autoscaling tool can’t change it If selected, Output scaling is locked. This feature is available only for generalized fixed-point output. Round toward Rounding mode for the fixed-point output. Saturate to max or min when overflows occur If selected, fixed-point overflows saturate. Characteristics Input Ports Any data type supported by the blockset Output Port Any data type supported by the blockset Direct Feedthrough Yes Scalar Expansion Yes 9-81 Filter Direct Form I Purpose 9Filter Direct Form I Library Filters Description The Filter Direct Form I block implements a Direct Form I realization of the filter specified by the Numerator coefficients and the Denominator coefficients excluding lead parameters. The block only supports single input-single output filters. Implement a Direct Form I realization of a filter The block automatically selects the data types and scalings of the output, the coefficients, and any temporary variables. Parameters and Dialog Box 9-82 Filter Direct Form I Numerator coefficients Coefficients for the numerator of the filter. Denominator coefficients excluding lead Coefficients for the denominator of the filter, excluding the leading coefficient, which must be 1.0. Initial condition for previous output Set the initial condition for the previous output. Initial condition for previous input Set the initial condition for the previous input. Round toward Rounding mode for the fixed-point output. Saturate to max or min when overflows occur If selected, fixed-point overflows saturate. Characteristics See Also Input Ports Any data type supported by the blockset—it must be a scalar Output Port Any data type supported by the blockset Direct Feedthrough Yes Scalar Expansion Of initial conditions Vectorized No Filter Direct Form I Time Varying, FIR 9-83 Filter Direct Form I Time Varying Purpose 9Filter Direct Form I Time Varying Library Filters Description The Filter Direct Form I Time Varying block implements a Direct Form I realization of the specified filter. The block only supports single input-single output filters. Implement a time varying Direct Form I realization of a filter The block automatically selects the data types and scalings of the output, the coefficients, and any temporary variables. Parameters and Dialog Box Initial condition for previous output Set the initial condition for the previous output. 9-84 Filter Direct Form I Time Varying Initial condition for previous input Set the initial condition for the previous input. Round toward Rounding mode for the fixed-point output. Saturate to max or min when overflows occur If selected, fixed-point overflows saturate. Characteristics See Also Input Port u Any data type supported by the blockset—it must be a scalar Input Port Num Any data type supported by the blockset—it must be a scalar Input Port Den No Lead Any data type supported by the blockset—it must be a scalar Output Port Any data type supported by the blockset Direct Feedthrough Yes Scalar Expansion Of initial conditions Vectorized No Filter Direct Form I, FIR 9-85 Filter Direct Form II Purpose 9Filter Direct Form II Library Filters Description The Filter Direct Form II block implements a Direct Form II realization of the filter specified by the Numerator coefficients and the Denominator coefficients excluding lead parameters. The block only supports single input-single output filters. Implement a Direct Form II realization of a filter The block automatically selects the data types and scalings of the output, the coefficients, and any temporary variables. Parameters and Dialog Box 9-86 Filter Direct Form II Numerator coefficients Coefficients for the numerator of the filter. Denominator coefficients excluding lead Coefficients for the denominator of the filter, excluding the leading coefficient, which must be 1.0. Initial condition Set the initial condition. Round toward Rounding mode for the fixed-point output. Saturate to max or min when overflows occur If selected, fixed-point overflows saturate. Characteristics See Also Input Ports Any data type supported by the blockset—it must be a scalar Output Port Any data type supported by the blockset Direct Feedthrough Yes Scalar Expansion Of initial conditions Vectorized No Filter Direct Form II Time Varying, FIR 9-87 Filter Direct Form II Time Varying Purpose 9Filter Direct Form II Time Varying Library Filters Description The Filter Direct Form II Time Varying block implements a Direct Form II realization of the specified filter. The block only supports single input-single output filters. Implement a time varying Direct Form II realization of a filter The block automatically selects the data types and scalings of the output, the coefficients, and any temporary variables. Parameters and Dialog Box Initial condition Set the initial condition. Round toward Rounding mode for the fixed-point output. 9-88 Filter Direct Form II Time Varying Saturate to max or min when overflows occur If selected, fixed-point overflows saturate. Characteristics See Also Input Port u Any data type supported by the blockset—it must be a scalar Input Port Num Any data type supported by the blockset—it must be a scalar Input Port Den No Lead Any data type supported by the blockset—it must be a scalar Output Port Any data type supported by the blockset Direct Feedthrough Yes Scalar Expansion Of initial conditions Vectorized No Filter Direct Form II, FIR 9-89 Filter First Order Purpose 9Filter First Order Library Filters Description The Filter First Order block implements a discrete-time first order filter of the input. The filter has a unity DC gain. Implement a discrete-time first order filter Parameters and Dialog Box Pole of filter (in Z plane) Set the pole of the filter. Initial condition for previous output Set the initial condition for the previous output. Round toward Rounding mode for the fixed-point output. Saturate to max or min when overflows occur If selected, fixed-point overflows saturate. 9-90 Filter First Order Characteristics See Also Input Ports Any data type supported by the blockset—it must be a scalar Output Port Any data type supported by the blockset Direct Feedthrough Yes Scalar Expansion Of initial conditions Vectorized No FIR 9-91 Filter Lead or Lag Purpose 9Filter Lead or Lag Library Filters Description The Filter Lead or Lag block implements a discrete-time lead or lag filter of the input. The instantaneous gain of the filter is one, and the DC gain is equal to (1-z)/(1-p), where z is the zero and p is the pole of the filter. Implement a discrete-time lead or lag filter The block implements a lead filter when 0 < z < p < 1, and implements a lag filter when 0 < p < z < 1. Parameters and Dialog Box Pole of filter (in Z plane) Set the pole of the filter. Zero of filter (in Z plane) Set the zero of the filter. Initial condition for previous output Set the initial condition for the previous output. Initial condition for previous input Set the initial condition for the previous input. 9-92 Filter Lead or Lag Round toward Rounding mode for the fixed-point output. Saturate to max or min when overflows occur If selected, fixed-point overflows saturate. Characteristics See Also Input Ports Any data type supported by the blockset—it must be a scalar Output Port Any data type supported by the blockset Direct Feedthrough Yes Scalar Expansion Of initial conditions Vectorized No FIR 9-93 Filter Real Zero Purpose 9Filter Real Zero Library Filters Description The Filter Real Zero block implements a discrete-time filter that has a real zero and effectively has no pole. Implement a discrete-time filter that has a real zero and no pole Parameters and Dialog Box Zero of filter (in Z plane) Set the zero of the filter. Initial condition for previous input Set the initial condition for the previous input. Round toward Rounding mode for the fixed-point output. Saturate to max or min when overflows occur If selected, fixed-point overflows saturate. 9-94 Filter Real Zero Characteristics See Also Input Ports Any data type supported by the blockset—it must be a scalar Output Port Any data type supported by the blockset Direct Feedthrough Yes Scalar Expansion Of initial conditions Vectorized No FIR 9-95 FIR Purpose 9FIR Library Filters Description The FIR block is a masked S-function that samples and holds the N most recent inputs, multiplies each input by a specified value (its FIR coefficient), and stacks them in a vector. This block supports both single-input/single-output (SISO) and single-input/multi-output (SIMO) modes. Implement a fixed-point finite impulse response (FIR) filter For the SISO mode, the FIR coefficients parameter is specified as a row vector. For the SIMO mode, the FIR coefficients are specified as a matrix where each row corresponds to a separate output. The Initial condition parameter provides the initial values for all times preceding the start time in the FIR realization. You specify the time interval between samples with the Sample time parameter. You can choose whether or not to specify the data type and scaling of the FIR coefficients in the dialog with the Gain data type and scaling parameter. If you select Specify via dialog for this parameter, the Parameter data type and Parameter scaling parameters become visible. You can specify the scaling for the FIR coefficients with the Parameter scaling parameter. Note that there are two dialog box parameters that control the FIR coefficient scaling: one associated with an edit field, and one associated with a parameter list. If Parameter data type is a generalized fixed-point number such as sfix(16), the Parameter scaling list provides you with these scaling modes: • Use Specified Scaling—This mode uses the [Slope Bias] or radix point-only scaling specified for the editable Parameter scaling parameter (for example, 2^-10). • Best Precision: Element-wise—This mode produces radix points such that the precision is maximized for each element of the FIR coefficients parameter. • Best Precision: Row-wise—This mode produces a common radix point for each element of the FIR coefficients row based on the best precision for the largest value of that row. 9-96 FIR • Best Precision: Column-wise—This mode produces a common radix point for each element of the FIR coefficients column based on the best precision for the largest value of that column. • Best Precision: Matrix-wise—This mode produces a common radix point for each element of the FIR coefficients matrix based on the best precision for the largest value of the matrix. If the FIR coefficients are specified as a row vector, then scaling element-wise and column-wise produce the same result, while scaling matrix-wise and row-wise produce the same result. For a detailed description of all other block parameters, refer to “Block Parameters” on page 9-16. Parameters and Dialog Box 9-97 FIR FIR coefficients FIR coefficients. One row per output. Initial condition Initial values for all times preceding the start time. Sample time Sample time. Gain data type and scaling Choose whether to specify the data type of the FIR coefficients via the dialog or via an internal rule. If Specify via dialog is selected, the Parameter data type and Parameter scaling parameters become visible. Parameter data type Any data type supported by the Fixed-Point Blockset. This parameter is only visible if Specify via dialog is selected for the Gain data type and scaling parameter. Parameter scaling Set the parameter scaling using radix point-only or [Slope Bias] scaling. Additionally, the FIR coefficients vector or matrix can be scaled using the constant vector or constant matrix scaling modes for maximizing precision. These scaling modes are available only for generalized fixed-point data types. This parameter is only visible if Specify via dialog is selected for the Gain data type and scaling parameter. Parameter scaling This drop-down list enables you to specify the parameter scaling in the dialog or by an inherited rule. This parameter is only visible if Specify via dialog is selected for the Gain data type and scaling parameter. Output data type and scaling Specify the output data type and scaling via the dialog box, or inherit the data type and scaling from the driving block or by backpropagation. Output data type Any data type supported by the Fixed-Point Blockset. 9-98 FIR Output scaling Set the output scaling using radix point-only or [Slope Bias] scaling. These scaling modes are available only for generalized fixed-point data types. Lock output scaling so autoscaling tool can’t change it If selected, Output scaling is locked. This feature is available only for generalized fixed-point output. Round toward Rounding mode for the fixed-point output. Saturate to max or min when overflows occur If selected, fixed-point overflows saturate. Conversions The FIR coefficients parameter is converted from doubles to the specified data and Operations type offline using round-to-nearest and saturation.The Initial condition parameter is converted from doubles to the input data type offline using round-to-nearest and saturation. Refer to “Parameter Conversions” on page 4-27 for more information about parameter conversions. The FIR block first multiplies its inputs by the FIR coefficients parameter, converts those results to the output data type using the specified rounding and overflow modes, and then carries out the summation. Refer to “Rules for Arithmetic Operations” on page 4-30 for more information about the rules this block adheres to when performing operations. Examples Suppose you want to configure this block for two outputs (SIMO mode) where the first output is given by y1 ( k ) = a1 ⋅ u ( k ) + b1 ⋅ u ( k – 1 ) + c1 ⋅ u ( k – 2 ) the second output is given by y2 ( k ) = a2 ⋅ u ( k ) + b2 ⋅ u ( k – 1 ) and the initial values of u(k – 1) and u(k – 2) are given by ic1 and ic2, respectively. To configure the FIR block for this situation, you must specify the FIR coefficient parameter as [a1 b1 c1; a2 b2 c2] where c2 = 0, and the Initial condition parameter as [ic1 ic2]. 9-99 FIR Characteristics 9-100 Input Ports Any data type supported by the blockset—it must be a scalar Output Port Any data type supported by the blockset Direct Feedthrough Yes Scalar Expansion Of initial conditions Vectorized No Gain Purpose 9Gain Library Simulink Math Operations and Fixed-Point Blockset Math Description The Gain block multiplies the input by a constant value (gain). The input and the gain can each be a scalar, vector, or matrix. 1 Gain 1.0 Gain Data Type Support Multiply the input by a constant You specify the value of the gain in the Gain parameter. The Multiplication parameter lets you specify element-wise or matrix multiplication. For matrix multiplication, this parameter also lets you indicate the order of the multiplicands. When the Show additional parameters check box is selected, some of the parameters that become visible are common to many blocks. For a detailed description of these parameters, refer to “Block Parameters” on page 9-16. The input and gain of the Gain block can be a real or complex scalar, vector, or matrix of any data type except boolean. If the input is real and the gain is complex, the output is complex. Parameters and Dialog Box Gain Specify the value by which to multiply the input. The gain may be a scalar, vector, or matrix. Multiplication Specify the multiplication mode: 9-101 Gain • Element-wise(K*u)—Each element of the input is multiplied by each element of the gain. The block performs expansions, if necessary, so that the input and gain have the same dimensions. • Matrix(K*u)—The input and gain are matrix multiplied with the input as the second operand. • Matrix(u*K)—The input and gain are matrix multiplied with the input as the first operand. • Matrix(K*u)(u vector)—The input and gain are matrix multiplied with the input as the second operand, and the input is a vector. The input and the output are required to be vectors and their lengths are determined by the dimensions of the gain. Show additional parameters If selected, additional parameters specific to implementation of the block become visible as shown. 9-102 Gain Parameter data type mode Set the data type and scaling of the gain to be the same as that of the input, or to be inherited via an internal rule. Alternatively, choose to specify the data type and scaling of the gain through the Parameter data type, Parameter scaling mode, and Parameter scaling parameters in the dialog. Parameter data type Set the gain data type. This parameter is only visible if Specify via dialog is selected for the Parameter data type mode parameter. Parameter scaling mode Set the mode to determine the scaling of the gain. • Use specified scaling—This mode allows you to set the scaling of the gain in the Parameter scaling parameter. 9-103 Gain • Best Precision: Element-wise—This mode sets radix points for the elements of the gain such that the precision of each element is maximized. • Best Precision: Row-wise—This mode sets a common radix point within each row of the gain such that the largest element of each row has the best possible precision. • Best Precision: Column-wise—This mode sets a common radix point within each column of the gain such that the largest element of each column has the best possible precision. • Best Precision: Matrix-wise—This mode sets a common radix point for all the elements of the gain such that the largest element has the best possible precision. This parameter is only visible if Specify via dialog is selected for the Parameter data type mode parameter. Parameter scaling Set the gain scaling using either radix point-only or [Slope Bias] scaling. This parameter is only visible if Specify via dialog is selected for the Parameter data type mode parameter, and if Use specified scaling is selected for the Parameter scaling mode parameter. Output data type mode Set the data type and scaling of the output to be the same as that of the input, or to be inherited via an internal rule or by backpropagation. Alternatively, choose to specify the data type and scaling of the output through the Output data type and Output scaling value parameters in the dialog. If you select Inherit via internal rule for this parameter, Simulink chooses a combination of output scaling and data type that requires the smallest amount of memory consistent with accommodating the output range and maintaining the output precision of the block. If the Production hardware characteristics parameter on the Advanced pane of the Simulation Parameters dialog is set to Unconstrained integer sizes, Simulink chooses the output data type without regard to hardware constraints. If the parameter is set to Microprocessor, Simulink chooses the smallest available hardware data type capable of meeting the range and precision constraints. For example, if the block multiplies an input of type int8 by a gain of int16 and Unconstrained integer sizes is 9-104 Gain specified, the output data type is sfix24. If Microprocessor is specified and the microprocessor supports 8-bit, 16-bit, and 32-bit words, the output data type is int32. If none of the word lengths provided by the target microprocessor can accommodate the output range, Simulink displays an error message in the Simulink Diagnostic Viewer. Output data type Set the output data type. This parameter is only visible if Specify via dialog is selected for the Output data type mode parameter. Output scaling value Set the output scaling using either radix point-only or [Slope Bias] scaling. This parameter is only visible if Specify via dialog is selected for the Output data type mode parameter. Lock output scaling against changes by the autoscaling tool If selected, scaling of outputs is locked. This parameter is only visible if Specify via dialog is selected for the Output data type mode parameter. Round integer calculations toward Select the rounding mode for fixed-point output. Saturate on integer overflow If selected, overflows saturate. Conversions The gain is converted from doubles to the specified data type offline using and Operations round-to-nearest and saturation. Refer to “Parameter Conversions” on page 4-27 for more information about parameter conversions. The input and gain are then multiplied, and the result is converted to the output data type using the specified rounding and overflow modes. Refer to “Rules for Arithmetic Operations” on page 4-30 for more information about the rules this block adheres to when performing operations. Characteristics Dimensionalized Yes Direct Feedthrough Yes Sample Time Inherited from driving block 9-105 Gain 9-106 Scalar Expansion Of input and Gain parameter for Element-wise multiplication Zero Crossing No Gateway In Purpose 9Gateway In Library Data Type Description The Gateway In block is a masked S-function that converts a built-in Simulink data type to a Fixed-Point Blockset data type. Convert a Simulink data type to a Fixed-Point Blockset data type The Input and Output to have equal parameter list controls how the input is processed. The possible values are Real World Value and Stored Integer. In terms of the general encoding scheme described in “Scaling” on page 3-5, Real World Value treats the input as V = SQ + B where S is the slope and B is the bias. V is used to produce Q = (V - B)/S, which is stored in the output. Stored Integer treats the input as a stored integer, Q. The value of Q is directly used to produce the output. In this mode, the input and output are identical except that the input is a raw integer lacking proper scaling information. In both modes, the output data type includes the scaling information needed to correctly interpret the signal as a real-world value. For a detailed description of all other block parameters, refer to “Block Parameters” on page 9-16. Parameters and Dialog Box 9-107 Gateway In Input and Output to have equal Specify the type of value that the input and output are to have equal. Output data type and scaling Specify the output data type and scaling via the dialog box, or inherit the data type and scaling by backpropagation. Output data type Any data type supported by the Fixed-Point Blockset. Output scaling Set the output scaling using radix point-only or [Slope Bias] scaling. These scaling modes are available only for generalized fixed-point data types. Lock output scaling so autoscaling tool can’t change it If selected, Output scaling is locked. This feature is available only for generalized fixed-point output. Round toward Rounding mode for fixed-point output. Saturate to max or min when overflows occur If selected, fixed-point overflows saturate. Examples 9-108 This example uses the Gateway In block to help you understand the difference between a real-world value and a stored integer. Consider the two fixed-point models shown below. Gateway In In the top model, the Gateway In block treats the input as a real-world value, and maps that value to an 8-bit signed generalized fixed-point data type with a scaling of 2-2. If the value is output from the Gateway Out block as a real-world value, then the scaling and data type information is retained and the output value is 001111.00, or 15. If the value is output from the Gateway Out block as a stored integer, then the scaling and data type information is not retained and the stored integer is interpreted as 00111100, or 60. In the bottom model, the Gateway In block treats the input as a stored integer, and the data type and scaling information is not applied. If the value is output from the Gateway Out block as a real-world value, then the scaling and data type information is applied to the stored integer, and the output value is 000011.11, or 3.75. If the value is output from the Gateway Out block as a stored integer, then you get back the original input value of 15. The model shown below illustrates how a summation operation applies to real-world values and stored integers, and how scaling information is dealt with in generated code. 9-109 Gateway In Note that the summation operation produces the correct result when the Gateway Out block outputs a real-world value. This is because the specified scaling information is applied to the stored integer value. However, when the Gateway Out block outputs a stored integer value, then the summation operation produces an unexpected result due to the absence of scaling information. If you generate code for the above model, then the code captures the appropriate scaling information. The code for the Sum block is shown below. The inputs to this block are tagged with the specified scaling information so that the necessary shifts are performed for the summation operation. /* Sum Block: <Root>/Sum * * y = u0 + u1 * * Input0 Data Type: Fixed Point * Input1 Data Type: Fixed Point * Output0 Data Type: Fixed Point * 9-110 S16 S16 S16 2^-2 2^-4 2^-5 Gateway In * Round Mode: Floor * Saturation Mode: Wrap * */ sum = ((in1) << 3); sum += ((in2) << 1); Characteristics See Also Input Port Any built-in Simulink data type Output Port Any data type supported by the blockset Direct Feedthrough Yes Scalar Expansion No Gateway In Inherited 9-111 Gateway In Inherited Purpose 9Gateway In Inherited Library Data Type Description The Gateway In Inherited block is a masked S-function that converts a built-in Simulink data type to a Fixed-Point Blockset data type. Convert a Simulink data type to a Fixed-Point Blockset data type, and inherit the data type and scaling The block requires two inputs. The first (top) input provides the data type and scaling information. The second (bottom) input passes through to the output, and inherits the data type and scaling of the first input. If you want to explicitly specify the output data type and scaling, use the Gateway In block. The Input and Output to have equal parameter list controls how the input is processed. The possible values are Real World Value and Stored Integer. In terms of the general encoding scheme described in “Scaling” on page 3-5, Real World Value treats the input as V = SQ + B where S is the slope and B is the bias. Stored Integer treats the input as a stored integer, Q. For more information about this parameter list, refer to the Gateway In block. For a detailed description of all other block parameters, refer to “Block Parameters” on page 9-16. Inheriting the data type and scaling provides these advantages: • It makes reusing existing models easier. • It allows you to create new fixed-point models with less effort since you can avoid the detail of specifying the associated parameters. 9-112 Gateway In Inherited Parameters and Dialog Box Input and Output to have equal Specify the type of value that the input and output are to have equal. Round toward Rounding mode for fixed-point output. Saturate to max or min when overflows occur If selected, fixed-point overflows saturate. Characteristics See Also Input Port Any built-in Simulink data type Output Port Any data type supported by the blockset Direct Feedthrough Yes Scalar Expansion No Gateway In 9-113 Gateway Out Purpose 9Gateway Out Library Data Type Description The Gateway Out block is a masked S-function that converts any data type supported by the Fixed-Point Blockset to a Simulink data type. Convert a Fixed-Point Blockset data type to a Simulink data type The Output and Input to have equal parameter list controls how the output is treated. The possible values are Real World Value and Stored Integer. In terms of the general encoding scheme described in “Scaling” on page 3-5, Real World Value treats the output as V = SQ + B where S is the slope and B is the bias. Stored Integer treats the output as a stored integer, Q. Selecting Stored Integer may be useful in these circumstances: • If you are generating code for a fixed-point processor, the resulting code only uses integers and does not use floating-point operations. • If you want to partition your model based on hardware characteristics. For example, part of your model may involve simulating hardware that produces integers as output. Note If the fixed-point signal is a true integer such as sint(8) or uint(16), then Real World Value and Stored Integer produce identical output values. For more information about this parameter list, refer to the Gateway In block description. The Output data type parameter list specifies the Simulink data type to use for the output. All built-in data types are supported as well as the boolean data type. auto indicates the Fixed-Point Blockset data type is converted to whatever data type Simulink back propagates. Remarks 9-114 The MATLAB built-in integer data types are limited to 32 bits. If you want to output fixed-point numbers that range between 33 and 53 bits without loss of precision or range, you should use the Gateway Out block to store the value inside a double. Gateway Out If you want to output fixed-point numbers with more than 53 bits without loss of precision or range, then you must break the number into pieces using the Gain block, and then output the pieces using the Gateway Out block. For example, suppose the original signal is an unsigned 128-bit value with default scaling. You can break this signal into four pieces using four parallel Gain blocks configured with the gain and output settings shown below. Piece Gain Output Data Type 1 2^0 uint(32) – Least significant 32 bits 2 2^-32 uint(32) 3 2^-64 uint(32) 4 2^-96 uint(32) – Most significant 32 bits For each Gain block, you must also configure the Round toward parameter to Floor, and the Saturate to max or min when overflows occur check box must be unselected. Parameters and Dialog Box 9-115 Gateway Out Output and Input to have equal Specify the type of value the input and output are to have equal. Output data type Any built-in data type supported by Simulink. Round toward Rounding mode for fixed-point output. Saturate to max or min when overflows occur If selected, fixed-point overflows saturate. Characteristics See Also 9-116 Input Ports Any data type supported by the blockset Output Port Any built-in Simulink data type Direct Feedthrough Yes Scalar Expansion N/A Gateway In Increment Real World Purpose 9Increment Real World Library Math Description The Increment Real World block is a masked block that increases the real world value of the signal by one. Overflows always wrap. Increase the real world value of the signal by one Parameters and Dialog Box Characteristics See Also Input Port Any data type supported by the blockset Output Port Same as the input Direct Feedthrough Yes Scalar Expansion No Increment Stored Integer 9-117 Increment Stored Integer Purpose 9Increment Stored Integer Library Math Description The Increment Stored Integer block is a masked block that increases the stored integer value of a signal by one. Increase the stored integer value of a signal by one Floating-point signals are also increased by one, and overflows always wrap. Parameters and Dialog Box Characteristics See Also 9-118 Input Port Any data type supported by the blockset Output Port Same as the input Direct Feedthrough Yes Scalar Expansion No Increment Real World Index Vector Purpose 9Index Vector Library Select Description The Index Vector block is an implementation of the Multi-Port Switch block. See “Multi-Port Switch” on page 9-170 for more information. Switch output between different inputs based on the value of the first input Index Vector 9-119 Integer Delay Purpose 9Integer Delay Library Delays & Holds Description The Integer Delay block delays its input by N sample periods. Delay a signal N sample periods The block accepts one input and generates one output, both of which can be scalar or vector. If the input is a vector, all elements of the vector are delayed by the same sample period. Parameters and Dialog Box Initial condition The initial output of the simulation. Sample time Sample time. Number of delays The number of periods to delay the input signal. Conversions The Initial condition parameter is converted from a double to the input data type offline using round-to-nearest and saturation. Characteristics Input Port Any data type supported by the blockset Output Port Same as the input Direct Feedthrough No Scalar Expansion Of input or initial conditions 9-120 Integrator Backward Purpose 9Integrator Backward Library Calculus Description The Integrator Backward block performs a discrete-time integration of a signal using the backward method. The block multiplies the input by the weighted sample time and adds the result to the cumulative sum since time zero. The block outputs the sum up to the nth time step at time n. Remarks The output of the Integrator Backward block differs from the output of the Integrator Forward block only by the first and last terms in the cumulative sum. Perform discrete-time integration of a signal using the backward method Parameters and Dialog Box Gain value Specify the weight by which the sample time is multiplied. Initial condition for previous output Set the initial condition for the previous output. Output data type and scaling The options are: - Specify via dialog - Inherit via internal rule 9-121 Integrator Backward - Inherit via back propagation When Specify via dialog is selected, you can specify the Output data type and Output scaling parameters. Round toward Rounding mode for the fixed-point output. Saturate to max or min when overflows occur If selected, fixed-point overflows saturate. Characteristics See Also 9-122 Input Port Any data type supported by the blockset Output Port Same as the input Direct Feedthrough Yes Scalar Expansion Of inputs and gain Integrator Backward Resettable, Integrator Backward Resettable Limited, Integrator Forward, Integrator Forward Resettable, Integrator Forward Resettable Limited, Integrator Trapezoidal, Integrator Trapezoidal Resettable, Integrator Trapezoidal Resettable Limited Integrator Backward Resettable Purpose 9Integrator Backward Resettable Library Calculus Description The Integrator Backward Resettable block performs a discrete-time integration of a signal using the backward method. Perform discrete-time integration of a signal using the backward method with external Boolean reset The block can reset its state based on an external reset signal R. When the reset signal R is false, the block multiplies the input by the weighted sample time and adds the result to the cumulative sum since time zero. When the reset signal R is true, the block outputs the Initial condition for previous output parameter. Remarks The output of the Integrator Backward Resettable block differs from the output of the Integrator Forward Resettable block only by the first and last terms in the cumulative sum. Parameters and Dialog Box Gain value Specify the weight by which the sample time is multiplied. Initial condition for previous output Set the initial condition for the previous output. 9-123 Integrator Backward Resettable Output data type and scaling The options are: - Specify via dialog - Inherit via internal rule - Inherit via back propagation When Specify via dialog is selected, you can specify the Output data type and Output scaling parameters. Round toward Rounding mode for the fixed-point output. Saturate to max or min when overflows occur If selected, fixed-point overflows saturate. Characteristics See Also 9-124 Input Ports Any data type supported by the blockset Output Port Same as the input Direct Feedthrough Yes, of the input and reset source ports Scalar Expansion Of inputs and gain Integrator Backward, Integrator Backward Resettable Limited, Integrator Forward, Integrator Forward Resettable, Integrator Forward Resettable Limited, Integrator Trapezoidal, Integrator Trapezoidal Resettable, Integrator Trapezoidal Resettable Limited Integrator Backward Resettable Limited Purpose 9Integrator Backward Resettable Limited Library Calculus Description The Integrator Backward Resettable Limited block performs a discrete-time integration of a signal using the backward method. Perform discrete-time limited integration of a signal using the backward method, with external Boolean reset The block can reset its state based on an external reset signal R. When the cumulative sum reaches one of the limits given by the Upper limit and Lower limit parameters, the sum saturates to that limit. When the reset signal R is false, the block multiplies the input by the weighted sample time and adds the result to the cumulative sum since time zero. When the reset signal R is true, the block outputs the Initial condition for previous output parameter. Remarks The output of the Integrator Backward Resettable Limited block differs from the output of the Integrator Forward Resettable Limited block only by the first and last terms in the cumulative sum. 9-125 Integrator Backward Resettable Limited Parameters and Dialog Box Gain value Specify the weight by which the sample time is multiplied. Initial condition for previous output Set the initial condition for the previous output. Upper limit The upper limit for saturation of the cumulative sum. Lower limit The lower limit for saturation of the cumulative sum. Output data type and scaling The options are: - Specify via dialog - Inherit via internal rule - Inherit via back propagation When Specify via dialog is selected, you can specify the Output data type and Output scaling parameters. 9-126 Integrator Backward Resettable Limited Round toward Rounding mode for the fixed-point output. Saturate to max or min when overflows occur If selected, fixed-point overflows saturate. Characteristics See Also Input Ports Any data type supported by the blockset Output Port Same as the input Direct Feedthrough Yes, of the input and reset source ports Scalar Expansion Of inputs and gain Integrator Backward, Integrator Backward Resettable, Integrator Forward, Integrator Forward Resettable, Integrator Forward Resettable Limited, Integrator Trapezoidal, Integrator Trapezoidal Resettable, Integrator Trapezoidal Resettable Limited 9-127 Integrator Forward Purpose 9Integrator Forward Library Calculus Description The Integrator Forward block performs a discrete-time integration of a signal using the forward method. The block multiplies the input by the weighted sample time and adds the result to the cumulative sum since time zero. The block outputs the sum up to the nth time step at time n+1. The first term of the sum is the Initial condition for previous output parameter. Remarks The output of the Integrator Forward block differs from the output of the Integrator Backward block only by the first and last terms in the cumulative sum. Perform discrete-time integration of a signal using the forward method Parameters and Dialog Box Gain value Specify the weight by which the sample time is multiplied. Initial condition for previous output Set the initial condition for the previous output. Output data type and scaling The options are: - Specify via dialog 9-128 Integrator Forward - Inherit via internal rule - Inherit via back propagation When Specify via dialog is selected, you can specify the Output data type and Output scaling parameters. Round toward Rounding mode for the fixed-point output. Saturate to max or min when overflows occur If selected, fixed-point overflows saturate. Characteristics See Also Input Port Any data type supported by the blockset Output Port Same as the input Direct Feedthrough Yes Scalar Expansion Of inputs and gain Integrator Backward, Integrator Backward Resettable, Integrator Backward Resettable Limited, Integrator Forward Resettable, Integrator Forward Resettable Limited, Integrator Trapezoidal, Integrator Trapezoidal Resettable, Integrator Trapezoidal Resettable Limited 9-129 Integrator Forward Resettable Purpose 9Integrator Forward Resettable Library Calculus Description The Integrator Forward Resettable block performs a discrete-time integration of a signal using the forward method. When the external reset signal R is false, the block multiplies the input by the weighted sample time and adds the result to the cumulative sum since time zero. Perform discrete-time integration of a signal using the forward method, with external Boolean reset When the external reset signal R is true, the block outputs the Initial condition for previous output parameter. Remarks The output of the Integrator Forward Resettable block differs from the output of the Integrator Backward Resettable block only by the first and last terms in the cumulative sum. Parameters and Dialog Box Gain value Specify the weight by which the sample time is multiplied. Initial condition for previous output Set the initial condition for the previous output. 9-130 Integrator Forward Resettable Output data type and scaling The options are: - Specify via dialog - Inherit via internal rule - Inherit via back propagation When Specify via dialog is selected, you can specify the Output data type and Output scaling parameters. Round toward Rounding mode for the fixed-point output. Saturate to max or min when overflows occur If selected, fixed-point overflows saturate. Characteristics See Also Input Ports Any data type supported by the blockset Output Port Same as the input Direct Feedthrough Yes Scalar Expansion Of inputs and gain Integrator Backward, Integrator Backward Resettable, Integrator Backward Resettable Limited, Integrator Forward, Integrator Forward Resettable Limited, Integrator Trapezoidal, Integrator Trapezoidal Resettable, Integrator Trapezoidal Resettable Limited 9-131 Integrator Forward Resettable Limited Purpose 9Integrator Forward Resettable Limited Library Calculus Description The Integrator Forward Resettable Limited block performs a discrete-time integration of a signal using the forward method. When the cumulative sum reaches one of the limits given by the Upper limit and Lower limit parameters, the sum saturates to that limit. Perform discrete-time limited integration of a signal using the forward method, with external Boolean reset When the external reset signal R is false, the block multiplies the input by the weighted sample time and adds the result to the cumulative sum since time zero. When the external reset signal R is true, the block outputs the Initial condition for previous output parameter. The first term of the sum is the product of the weighted sample time and the value of the Initial condition for previous input parameter. Remarks 9-132 The output of the Integrator Forward Resettable Limited block differs from the output of the Integrator Backward Resettable Limited block only by the first and last terms in the cumulative sum. Integrator Forward Resettable Limited Parameters and Dialog Box Gain value Specify the weight by which the sample time is multiplied. Initial condition for previous output Set the initial condition for the previous output. Upper limit The upper limit for saturation of the cumulative sum. Lower limit The lower limit for saturation of the cumulative sum. Output data type and scaling The options are: - Specify via dialog - Inherit via internal rule - Inherit via back propagation When Specify via dialog is selected, you can specify the Output data type and Output scaling parameters. 9-133 Integrator Forward Resettable Limited Round toward Rounding mode for the fixed-point output. Saturate to max or min when overflows occur If selected, fixed-point overflows saturate. Characteristics See Also 9-134 Input Ports Any data type supported by the blockset Output Port Same as the input Direct Feedthrough Yes Scalar Expansion Of inputs and gain Integrator Backward, Integrator Backward Resettable, Integrator Backward Resettable Limited, Integrator Forward, Integrator Forward Resettable, Integrator Trapezoidal, Integrator Trapezoidal Resettable, Integrator Trapezoidal Resettable Limited Integrator Trapezoidal Purpose 9Integrator Trapezoidal Library Calculus Description The Integrator Trapezoidal block performs a discrete-time integration of a signal using the trapezoidal method. At time step k, the block computes the average of the inputs at times k-1 and k, multiplies the average by the weighted sample time, and adds the result to the cumulative sum since time zero. The block outputs the sum up to the kth time step at time. Perform discrete-time integration of a signal using the trapezoidal method The block calculates the output at time k by the rule y( k ) = y(k – 1 ) + w( k) + w( k – 1) where u ( k ) is the input at time k and K ⋅ Ts w ( k ) = ---------------- ⋅ u ( k ) 2 At the first time step, y(0) is set to the value of Initial condition for previous output, and w(0) is set to the value of Initial condition for previous weighted input K*Ts*u/2. Parameters and Dialog Box 9-135 Integrator Trapezoidal Gain value Specify the weight by which the sample time is multiplied. Initial condition for previous output Set the initial condition for the previous output. Initial condition for previous weighted input K*Ts*u/2 Set the initial condition for the previous weighted input. Output data type and scaling The options are: - Specify via dialog - Inherit via internal rule - Inherit via back propagation When Specify via dialog is selected, you can specify the Output data type and Output scaling parameters. Round toward Rounding mode for the fixed-point output. Saturate to max or min when overflows occur If selected, fixed-point overflows saturate. Characteristics See Also 9-136 Input Port Any data type supported by the blockset Output Port Same as the input Direct Feedthrough Yes Scalar Expansion Of inputs and gain Integrator Backward, Integrator Backward Resettable, Integrator Backward Resettable Limited, Integrator Forward, Integrator Forward Resettable, Integrator Forward Resettable Limited, Integrator Trapezoidal Resettable, Integrator Trapezoidal Resettable Limited Integrator Trapezoidal Resettable Purpose 9Integrator Trapezoidal Resettable Library Calculus Description The Integrator Trapezoidal Resettable block performs a discrete-time integration of a signal using the trapezoidal method. Perform discrete-time integration of a signal using the trapezoidal method, with external Boolean reset The block can reset its state based on an external reset signal R. When the reset signal R is false at time k, the block calculates the output at time k by the rule y( k ) = y(k – 1 ) + w( k) + w( k – 1) where u ( k ) is the input at time k and K ⋅ Ts w ( k ) = ---------------- ⋅ u ( k ) 2 When the reset signal R is true at time k, the block resets the output y(k) to the value of the Initial condition for previous output parameter, and resets w(k) to the value of the Initial condition for previous weighted input K*Ts*u/2 parameter. Parameters and Dialog Box 9-137 Integrator Trapezoidal Resettable Gain value Specify the weight by which the sample time is multiplied. Initial condition for previous output Set the initial condition for the previous output. Initial condition for previous weighted input K*Ts*u/2 Set the initial condition for the previous weighted input. Output data type and scaling The options are: - Specify via dialog - Inherit via internal rule - Inherit via back propagation When Specify via dialog is selected, you can specify the Output data type and Output scaling parameters. Round toward Rounding mode for the fixed-point output. Saturate to max or min when overflows occur If selected, fixed-point overflows saturate. Characteristics See Also 9-138 Input Ports Any data type supported by the blockset Output Port Same as the input Direct Feedthrough Yes, of the input and reset source ports Scalar Expansion Of inputs and gain Integrator Backward, Integrator Backward Resettable, Integrator Backward Resettable Limited, Integrator Forward, Integrator Forward Resettable, Integrator Forward Resettable Limited, Integrator Trapezoidal, Integrator Trapezoidal Resettable Limited Integrator Trapezoidal Resettable Limited Purpose 9Integrator Trapezoidal Resettable Limited Library Calculus Description The Integrator Trapezoidal Resettable Limited block performs a discrete-time integration of a signal using the trapezoidal method. Perform discrete-time limited integration of a signal using the trapezoidal method, with external Boolean reset The block can reset its state based on an external reset signal R. When the cumulative sum reaches one of the limits given by the Upper limit and Lower limit parameters, the sum saturates to that limit. When the reset signal R is false at time step k, the block calculates the output at time k by the rule y( k ) = y(k – 1 ) + w( k) + w( k – 1) where u ( k ) is the input at time k and K ⋅ Ts w ( k ) = ---------------- ⋅ u ( k ) 2 When the reset signal R is true at time k, the block resets the output y(k) to the value of the Initial condition for previous output parameter. The block also resets w(k) to the value of the Initial condition for previous weighted input K*Ts*u/2 parameter. 9-139 Integrator Trapezoidal Resettable Limited Parameters and Dialog Box Gain value Specify the weight by which the sample time is multiplied. Initial condition for previous output Set the initial condition for the previous output. Initial condition for previous weighted input K*Ts*u/2 Set the initial condition for the previous weighted input. Upper limit The upper limit for saturation of the cumulative sum. Lower limit The lower limit for saturation of the cumulative sum. Output data type and scaling The options are: - Specify via dialog - Inherit via internal rule 9-140 Integrator Trapezoidal Resettable Limited - Inherit via back propagation When Specify via dialog is selected, you can specify the Output data type and Output scaling parameters. Round toward Rounding mode for the fixed-point output. Saturate to max or min when overflows occur If selected, fixed-point overflows saturate. Characteristics See Also Input Ports Any data type supported by the blockset Output Port Same as the input Direct Feedthrough Yes, of the input and reset source ports Scalar Expansion Of inputs and gain Integrator Backward, Integrator Backward Resettable, Integrator Backward Resettable Limited, Integrator Forward, Integrator Forward Resettable, Integrator Forward Resettable Limited, Integrator Trapezoidal, Integrator Trapezoidal Resettable 9-141 Interval Test Purpose 9Interval Test Library Logic & Comparison Description The Interval Test block outputs TRUE if the input is between the values specified by the Lower limit and Upper limit parameters. The block outputs FALSE if the input is outside those values. The output of the block when the input is equal to the Lower limit or the Upper limit is determined by whether the boxes next to Interval closed on left and Interval closed on right are selected in the dialog box. Determine if a signal is in a specified interval Parameters and Dialog Box Interval closed on right When the box is selected, the Upper limit is included in the interval for which the block outputs TRUE. Upper limit The upper limit of the interval for which the block outputs TRUE. Interval closed on left When the box is selected, the Lower limit is included in the interval for which the block outputs TRUE. Lower limit The lower limit of the interval for which the block outputs TRUE. 9-142 Interval Test Characteristics See Also Input Ports Any data type supported by the blockset Output Port Same data type as input Direct Feedthrough Yes Scalar Expansion Yes Interval Test Dynamic 9-143 Interval Test Dynamic Purpose 9Interval Test Dynamic Library Logic & Comparison Description The Interval Test Dynamic block outputs TRUE if the input is between the values of the external signals up and lo. The block outputs FALSE if the input is outside those values. The output of the block when the input is equal to the signal up or the signal lo is determined by whether the boxes next to Interval closed on left and Interval closed on right are selected in the dialog box. Determine if a signal is in a specified interval Parameters and Dialog Box Interval closed on right When the box is selected, the Upper limit is included in the interval for which the block outputs TRUE. Interval closed on left When the box is selected, the Lower limit is included in the interval for which the block outputs TRUE. Characteristics See Also 9-144 Input Ports Any data type supported by the blockset Output Port Same data type as output Direct Feedthrough Yes Scalar Expansion Yes Interval Test Logical Operator Purpose 9Logical Operator Library Simulink Math Operations and Fixed-Point Blockset Logic & Comparison Description The Logical Operator block performs the specified logical operation on its inputs. An input value is TRUE (1) if it is nonzero and FALSE (0) if it is zero. AND Logical Operator Perform the specified logical operation on the inputs You select the Boolean operation connecting the inputs with the Operator parameter list. The block icon updates to display the selected operator. The supported operations are given below. Operation Description AND TRUE if all inputs are TRUE OR TRUE if at least one input is TRUE NAND TRUE if at least one input is FALSE NOR TRUE when no inputs are TRUE XOR TRUE if an odd number of inputs are TRUE NOT TRUE if the input is FALSE The number of input ports is specified with the Number of input ports parameter. The output type is specified with the Output data type mode and/ or the Output data type parameters. An output value is 1 if TRUE and 0 if FALSE. Note The output data type should represent zero exactly. Data types that satisfy this condition include signed and unsigned integers, and any floating-point data type. The size of the output depends on input vector size and the selected operator: 9-145 Logical Operator • If the block has more than one input, any nonscalar inputs must have the same dimensions. For example, if any input is a 2-by-2 array, all other nonscalar inputs must also be 2-by-2 arrays. Scalar inputs are expanded to have the same dimensions as the nonscalar inputs. If the block has more than one input, the output has the same dimensions as the inputs (after scalar expansion) and each output element is the result of applying the specified logical operation to the corresponding input elements. For example, if the specified operation is AND and the inputs are 2-by-2 arrays, the output is a 2-by-2 array whose top left element is the result of applying AND to the top left elements of the inputs, etc. • For a single vector input, the block applies the operation (except the NOT operator) to all elements of the vector. The output is always a scalar. • The NOT operator accepts only one input, which can be a scalar or a vector. If the input is a vector, the output is a vector of the same size containing the logical complements of the input vector elements. When configured as a multi-input XOR gate, this block performs an additionmodulo-two operation as mandated by the IEEE Standard for Logic Elements. When the Show additional parameters check box is selected, some of the parameters that become visible are common to many blocks. For a detailed description of these parameters, refer to “Block Parameters” on page 9-16. Data Type Support 9-146 A Logical Operator block accepts real or complex signals of any data type. However, if the Output data type mode parameter is set to Logical, the input may only be boolean or double. Logical Operator Parameters and Dialog Box Operator The logical operator to be applied to the block inputs. Valid choices are the operators listed previously. Number of input ports The number of block inputs. The value must be appropriate for the selected operator. Show additional parameters If selected, additional parameters specific to implementation of the block become visible as shown. 9-147 Logical Operator Require all inputs and output to have same data type Select to require all inputs and the output to have the same data type. Output data type mode Set the output data type to Boolean, or choose to specify the data type through the Output data type parameter. Alternatively, you can select Logical to have the output data type determined by the Boolean Logic Signals parameter in the Advanced tab of the Simulation Parameters interface. If you select Logical and Boolean Logic Signals is on, then the output data type is always Boolean. If you select Logical and Boolean Logic Signals is off, then the output data type will match the input data type, which may be Boolean or double. Logical output data type Output data type. You should only use data types that represent zero exactly. Data types that satisfy this condition include signed and unsigned integers and any floating-point data type. This parameter is only visible if Specify via dialog is selected for the Output data type mode parameter. Characteristics 9-148 Dimensionalized Yes Direct Feedthrough Yes Sample Time Inherited from the driving block Scalar Expansion Of inputs Zero Crossing No Look-Up Table Purpose 9Look-Up Table Library Simulink Look-Up Tables and Fixed-Point Blockset LookUp Description The Look-Up Table block computes an approximation to some function y=f(x) given data vectors x and y. Approximate a one-dimensional function using the specified lookup method Note To map two inputs to an output, use the Look-Up Table (2-D) block. Look−Up Table The length of the x and y data vectors provided to this block must match. Also, the x data vector must be strictly monotonically increasing after conversion to the input’s fixed-point data type, except in the following case. If the input x and the output signal are both either single or double, and if the lookup method is Interpolation-Extrapolation, then x may be monotonically increasing rather than strictly monotonically increasing. Note that due to quantization, the x data vector may be strictly monotonic in doubles format, but not so after conversion to a fixed-point data type. You define the table by specifying the Vector of input values parameter as a 1-by-n vector and the Vector of output values parameter as a 1-by-n vector. The block generates output based on the input values using one of these methods selected from the Look-up method parameter list: • Interpolation-Extrapolation—This is the default method; it performs linear interpolation and extrapolation of the inputs. - If a value matches the block’s input, the output is the corresponding element in the output vector. - If no value matches the block’s input, then the block performs linear interpolation between the two appropriate elements of the table to determine an output value. If the block input is less than the first or greater than the last input vector element, then the block extrapolates using the first two or last two points. • Interpolation-Use End Values—This method performs linear interpolation as described above but does not extrapolate outside the end points of the input vector. Instead, the end-point values are used. 9-149 Look-Up Table • Use Input Nearest—This method does not interpolate or extrapolate. Instead, the element in x nearest the current input is found. The corresponding element in y is then used as the output. • Use Input Below—This method does not interpolate or extrapolate. Instead, the element in x nearest and below the current input is found. The corresponding element in y is then used as the output. If there is no element in x below the current input, then the nearest element is found. • Use Input Above—This method does not interpolate or extrapolate. Instead, the element in x nearest and above the current input is found. The corresponding element in y is then used as the output. If there is no element in x above the current input, then the nearest element is found. To create a table with step transitions, repeat an input value with different output values. For example, these input and output parameter values create the input/output relationship described by the plot that follows: Vector of input values: Vector of output values: [-2 -1 -1 0 0 0 1 1 2] [-1 -1 -2 -2 1 2 2 1 1] The output value This example has three step discontinuities: at u = -1, 0, and +1. When there are two points at a given input value, the block generates output according to these rules: • When the input signal u is less than zero, the output is the value connected with the point first encountered when moving away from the origin in a negative direction. In this example, when u is -1, y is -2, marked with a solid circle. 9-150 Look-Up Table • When u is greater than zero, the output is the value connected with the point first encountered when moving away from the origin in a positive direction. In this example, when u is 1, y is 2, marked with a solid circle. • When u is at the origin and there are two output values specified for zero input, the actual output is their average. In this example, if there were no point at u = 0 and y = 1, the output would be 0, the average of the two points at u = 0. If there are three points at zero, the block generates the output associated with the middle point. In this example, the output at the origin is 1. The Look-Up Table block icon displays a graph of the input vector versus the output vector. When a parameter is changed on the block’s dialog box, the graph is automatically redrawn when you click the Apply or Close button. When the Show additional parameters check box is selected, some of the parameters that become visible are common to many blocks. For a detailed description of these parameters, refer to “Block Parameters” on page 9-16. To avoid parameter saturation errors, the automatic scaling script autofixexp employs a special rule for the Look-Up Table block. autofixexp modifies the scaling by using the output look-up values in addition to the logged minimum and maximum simulation values. This prevents the data from being saturated to different values. The look-up values are given by the Vector of output values parameter (the YDataPoints variable). Parameters and Dialog Box 9-151 Look-Up Table Vector of input values Specify the vector of input values. The input values vector must be the same size as the output values vector. Also, the input values vector must be strictly monotonically increasing after conversion to the input’s fixed-point data type, except in the following case. If the input values vector and the output signal are both either single or double, and if the lookup method is Interpolation-Extrapolation, then the input values vector may be monotonically increasing rather than strictly monotonically increasing. Note that due to quantization, the input values vector may be strictly monotonic in doubles format, but not so after conversion to a fixed-point data type. Vector of output values Specify the vector of output values. The output values vector must be the same size as the input values vector. Show additional parameters If selected, additional parameters specific to implementation of the block become visible as shown. 9-152 Look-Up Table Look-up method Specify the lookup method. See “Description” on page 9-149 for a discussion of the options for this parameter. Output data type mode You can set the output signal to a built-in data type from this drop-down list, or you can choose the output data type and scaling to be the same as the input. Alternatively, you can choose to inherit the output data type and scaling by backpropagation. Lastly, if you choose Specify via dialog, the Output data type, Output scaling value, and Lock output scaling against changes by the autoscaling tool parameters become visible. Output data type Specify any data type, including fixed-point data types. This parameter is only visible if Specify via dialog is selected for the Output data type mode parameter. Output scaling value Set the output scaling using radix point-only or [Slope Bias] scaling. This parameter is only visible if Specify via dialog is selected for the Output data type mode parameter. Lock output scaling against changes by the autoscaling tool If selected, scaling of outputs is locked. This parameter is only visible if Specify via dialog is selected for the Output data type mode parameter. Round integer calculations toward Select the rounding mode for the fixed-point output. Saturate on integer overflow If selected, overflows saturate. Conversions The Vector of input values parameter is converted from doubles to the input data type. The Vector of output values parameter is converted from doubles and Operations to the output data type. Both conversion are performed offline using round-to-nearest and saturation. Refer to “Parameter Conversions” on page 4-27 for more information about parameter conversions. 9-153 Look-Up Table Examples Suppose the Look-Up Table block in the above model is configured to use a vector of input values given by [-5:5], and a vector of output values given by sinh([-5:5]). The following results are generated. Look-Up Method Input Output Comment InterpolationExtrapolation 1.4 2.153 N/A 5.2 83.59 N/A 1.4 2.153 N/A 5.2 74.2 The value for sinh(5.0) was used. 1.4 3.627 The value for sinh(2.0) was used. 5.2 74.2 The value for sinh(5.0) was used. 1.4 1.175 The value for sinh(1.0) was used. -5.2 -74.2 The value for sinh(-5.0) was used. 1.4 1.175 The value for sinh(1.0) was used. InterpolationUse End Values Use Input Above Use Input Below Use Input Nearest Characteristics Dimensionalized Yes Direct Feedthrough Yes See Also 9-154 Sample Time Inherited from driving block Scalar Expansion No Zero Crossing No Look-Up Table Dynamic, Look-Up Table (2-D) Look-Up Table Dynamic Purpose 9Look-Up Table Dynamic Library LookUp Description The Look-Up Table Dynamic block is a masked S-function that computes an approximation to some function y=f(x) given x, y data vectors. The look-up method can use interpolation, extrapolation, or the original values of the input. Approximate a one-dimensional function using a selected look-up method and a dynamically specified table The x data vector must be strictly monotonically increasing after conversion to the input’s fixed-point data type. Note that due to quantization, the x data vector may be strictly monotonic in doubles format, but not so after conversion to a fixed-point data type. Note Unlike the Look-Up Table block, the Look-Up Table Dynamic block allows you to change the table data without stopping the simulation. For example, you may want to automatically incorporate new table data if the physical system you are simulating changes. You define the look-up table by inputting the x and y table data to the block as 1-by-n vectors. To help reduce the ROM used by the code generated for this block, you can use different data types for the x table data and the y table data. However, these restrictions apply: • The y table data and the output vector must have the same sign, the same bias, and the same fractional slope. • The x table data and the x data vector must have the same sign, the same bias, and the same fractional slope. Additionally, the precision and range for the x data vector must greater than or equal to the precision and range for the x table data. The block generates output based on the input values using one of these methods selected from the Look-up method parameter list: • Interpolation-Extrapolation—This is the default method; it performs linear interpolation and extrapolation of the inputs. 9-155 Look-Up Table Dynamic - If a value matches the block’s input, the output is the corresponding element in the output vector. - If no value matches the block’s input, then the block performs linear interpolation between the two appropriate elements of the table to determine an output value. If the block input is less than the first or greater than the last input vector element, then the block extrapolates using the first two or last two points. • Interpolation-Use End Values—This method performs linear interpolation as described above but does not extrapolate outside the end points of the input vector. Instead, the end-point values are used. • Use Input Nearest—This method does not interpolate or extrapolate. Instead, the element in x nearest the current input is found. The corresponding element in y is then used as the output. • Use Input Below—This method does not interpolate or extrapolate. Instead, the element in x nearest and below the current input is found. The corresponding element in y is then used as the output. If there is no element in x below the current input, then the nearest element is found. • Use Input Above—This method does not interpolate or extrapolate. Instead, the element in x nearest and above the current input is found. The corresponding element in y is then used as the output. If there is no element in x above the current input, then the nearest element is found. For a detailed description of all other block parameters, refer to “Block Parameters” on page 9-16. 9-156 Look-Up Table Dynamic Parameters and Dialog Box Look-Up Method Look-up method. Output data type and scaling Specify the output data type and scaling via the dialog box, or inherit the data type and scaling by backpropagation. Output data type Any data type supported by the Fixed-Point Blockset. Output scaling Set the output scaling using radix point-only or [Slope Bias] scaling. These scaling modes are available only for generalized fixed-point data types. Lock output scaling so autoscaling tool can’t change it If selected, Output scaling is locked. This feature is available only for generalized fixed-point output. Round toward Rounding mode for the fixed-point output. Saturate to max or min when overflows occur If selected, fixed-point overflows saturate. 9-157 Look-Up Table Dynamic Conversions The table data is converted from doubles to the x data type. This conversion is performed offline using round-to-nearest and saturation. Refer to “Parameter Conversions” on page 4-27 for more information about parameter conversions. Examples For an example that illustrates the look-up methods supported by this block, see the example included in the Look-Up Table block reference pages. Characteristics Input Port(s) Any data type supported by the blockset Output Port Any data type supported by the blockset Direct Feedthrough Yes Scalar Expansion See Also 9-158 No Look-Up Table, Look-Up Table (2-D) Look-Up Table (2-D) Purpose 9Look-Up Table (2-D) Library Simulink Look-Up Tables and Fixed-Point Blockset LookUp Description The Look-Up Table (2-D) block computes an approximation to some function z=f(x,y) given x, y, z data points. 2−D Lookup Table The Row index input values parameter is a 1-by-m vector of x data points, the Column index input values parameter is a 1-by-n vector of y data points, and the Matrix of output values parameter is an m-by-n matrix of z data points. Both the row and column vectors must be monotonically increasing. These vectors must be strictly monotonically increasing in the following cases: Look−Up Table (2−D) Approximate a two-dimensional function using a selected look-up method • The input and output data types are both fixed-point. • The input and output data types are different. • The lookup method is not Interpolation-Extrapolation. • The matrix of output values is complex. • Minimum, maximum, and overflow logging is on. The block generates output based on the input values using one of these methods selected from the Look-up method parameter list: • Interpolation-Extrapolation—This is the default method; it performs linear interpolation and extrapolation of the inputs. - If the inputs match row and column parameter values, the output is the value at the intersection of the row and column. - If the inputs do not match row and column parameter values, then the block generates output by linearly interpolating between the appropriate row and column values. If either or both block inputs are less than the first or greater than the last row or column values, the block extrapolates using the first two or last two points. • Interpolation-Use End Values—This method performs linear interpolation as described above but does not extrapolate outside the end points of x and y. Instead, the end-point values are used. • Use Input Nearest—This method does not interpolate or extrapolate. Instead, the elements in x and y nearest the current inputs are found. The corresponding element in z is then used as the output. 9-159 Look-Up Table (2-D) • Use Input Below—This method does not interpolate or extrapolate. Instead, the elements in x and y nearest and below the current inputs are found. The corresponding element in z is then used as the output. If there are no elements in x or y below the current inputs, then the nearest elements are found. • Use Input Above—This method does not interpolate or extrapolate. Instead, the elements in x and y nearest and above the current inputs are found. The corresponding element in z is then used as the output. If there are no elements in x or y above the current inputs, then the nearest elements are found. To avoid parameter saturation errors, the automatic scaling script autofixexp employs a special rule for the Look-Up Table (2-D) block. autofixexp modifies the scaling by using the output look-up values in addition to the logged minimum and maximum simulation values. The output look-up values are converted to the specified output data type. This prevents the data from being saturated to different values. When the Show additional parameters check box is selected, some of the parameters that become visible are common to many blocks. For a detailed description of these parameters, refer to “Block Parameters” on page 9-16. Parameters and Dialog Box Row index input values The row values for the table, entered as a vector. The vector values must increase monotonically. 9-160 Look-Up Table (2-D) Column index input values The column values for the table, entered as a vector. The vector values must increase monotonically. Matrix of output values The table of output values. The matrix size must match the dimensions defined by the Row and Column parameters. Show additional parameters If selected, additional parameters specific to implementation of the block become visible as shown. Look-up method Specify the lookup method. See “Description” on page 9-159 for a discussion of the options for this parameter. 9-161 Look-Up Table (2-D) Require all inputs to have same data type Select to require all inputs to have the same data type. Output data type mode You can set the output signal to a built-in data type from this drop-down list, or you can choose the output data type and scaling to be the same as the input. Alternatively, you can choose to inherit the output data type and scaling by backpropagation. Lastly, if you choose Specify via dialog, the Output data type, Output scaling value, and Lock output scaling against changes by the autoscaling tool parameters become visible. Output data type Specify any data type, including fixed-point data types. This parameter is only visible if Specify via dialog is selected for the Output data type mode parameter. Output scaling value Set the output scaling using radix point-only or [Slope Bias] scaling. This parameter is only visible if Specify via dialog is selected for the Output data type mode parameter. Lock output scaling against changes by the autoscaling tool If selected, scaling of outputs is locked. This parameter is only visible if Specify via dialog is selected for the Output data type mode parameter. Round integer calculations toward Select the rounding mode for the fixed-point output. Saturate on integer overflow If selected, overflows saturate. Examples In this example, the block parameters are defined as Row: Column: Table: [1 2] [3 4] [10 20; 30 40] The first figure shows the block outputting a value at the intersection of block inputs that match row and column values. The first input is 1 and the second 9-162 Look-Up Table (2-D) input is 4. These values select the table value at the intersection of the first row (row parameter value 1) and second column (column parameter value 4). 3 4 1 10 20 2 30 40 In the second figure, the first input is 1.7 and the second is 3.4. These values cause the block to interpolate between row and column values, as shown in the table at the left. The value at the intersection (28) is the output value. 3 3.4 4 1 10 14 20 1.7 24 28 34 2 30 34 40 Characteristics See Also Dimensionalized Yes Direct Feedthrough Yes Sample Time Inherited from driving blocks Scalar Expansion Of one input if the other is a vector Zero Crossing No Look-Up Table, Look-Up Table Dynamic 9-163 Matrix Gain Purpose 9Matrix Gain Library Simulink Math Operations and Fixed-Point Blockset Math Description The Matrix Gain block is an implementation of the Gain block. See “Gain” on page 9-101 for more information. K*u Matrix Gain K*uvec Matrix Gain 9-164 Multiply input by a constant matrix MinMax Purpose 9MinMax Library Math Description The MinMax block is a masked S-function that outputs either the minimum or the maximum element of the inputs. You can choose which function to apply with the Function parameter list. Output the minimum or maximum input value You specify the number of input ports with the Number of input ports parameter. If the block has one input port, the input must be a scalar or a vector. The block outputs a scalar equal to the minimum or maximum element of the input vector. If the block has multiple input ports, the non-scalar inputs must all have the same dimensions. The block expands any scalar inputs to have the same dimensions as the non-scalar inputs. The block outputs a signal having the same dimensions as the input. Each output element equals the minimum or maximum of the corresponding input elements. For a detailed description of all other block parameters, refer to “Block Parameters” on page 9-16. Parameters and Dialog Box 9-165 MinMax Function The function to apply to the input. Number of input ports The number of inputs to the block. Output data type and scaling Specify the output data type and scaling via the dialog box, or inherit the data type and scaling from the driving block or by backpropagation. Output data type Any data type supported by the Fixed-Point Blockset. Output scaling Set the output scaling using radix point-only or [Slope Bias] scaling. These scaling modes are available only for generalized fixed-point data types. Lock output scaling so autoscaling tool can’t change it If selected, Output scaling is locked. This feature is available only for generalized fixed-point output. Round toward Rounding mode for the fixed-point output. Saturate to max or min when overflows occur If selected, fixed-point overflows saturate. Characteristics See Also 9-166 Input Ports Any data type supported by the blockset Output Port Any data type supported by the blockset Direct Feedthrough Yes Scalar Expansion Yes MinMax Running Resettable MinMax Running Resettable Purpose 9MinMax Running Resettable Library Math Description The MinMax Running Resettable block outputs the minimum or maximum of all past inputs u. You specify whether the block outputs the minimum or the maximum with the Function parameter. Determine the minimum or maximum of a signal over time The block can reset its state based on an external reset signal R. When the reset signal R is TRUE, the block resets the output to the value of the Initial condition parameter. Parameters and Dialog Box Function Specify whether the block outputs the minimum or the maximum. Initial condition Initial condition. Characteristics See Also Input Ports Any data type supported by the blockset Output Port Same data type as the input Direct Feedthrough Yes Scalar Expansion Yes MinMax 9-167 Multiply Purpose 9Multiply Library Math Description The Multiply block is an implementation of the Product block. See “Product” on page 9-173 for more information. Multiply 9-168 Multiply or divide inputs Multiply Matrix Purpose 9Multiply Matrix Library Math Description The Multiply Matrix block is an implementation of the Product block. See “Product” on page 9-173 for more information. Multiply or divide inputs Matrix Multiply Multiply Matrix 9-169 Multi-Port Switch Purpose 9Multi-Port Switch Library Simulink Signal Routing and Fixed-Point Blockset Select Description The Multi-Port Switch block chooses between a number of inputs. The first (top) input is called the control input, while the rest of the inputs are called data inputs. The value of the control input determines which data input is passed through to the output port. Multiport Switch Choose between multiple block inputs If the control input is an integer value, then the specified data input is passed through to the output. For example, suppose the Use zero-based indexing parameter is not selected. If the control input is 1, then the first data input is passed through to the output. If the control input is 2, then the second data input is passed through to the output, and so on. If the control input is not an integer value, the block first truncates the value to an integer by rounding to floor. If the truncated control input is less than 1 or greater than the number of input ports, an out-of-bounds error is returned. You specify the number of data inputs with the Number of input ports parameter. The data inputs can be scalar or vector. The block output is determined by these rules: • If you specify only one data input and that input is a vector, the block behaves as an “index selector,” and not as a multi-port switch. The block output is the vector element that corresponds to the value of the control input. • If you specify more than one data input, the block behaves like a multi-port switch. The block output is the data input that corresponds to the value of the control input. If at least one of the data inputs is a vector, the block output is a vector. Any scalar inputs are expanded to vectors. • If the inputs are scalar, the output is a scalar. When the Show additional parameters check box is selected, some of the parameters that become visible are common to many blocks. For a detailed description of these parameters, refer to “Block Parameters” on page 9-16. The Index Vector block, also in the Fixed-Point Blockset Select library, is another implementation of the Multi-Port Switch block that has different default parameter settings. 9-170 Multi-Port Switch Data type support The control input of a Multi-Port Switch block can be a real-valued signal of any data type, including fixed-point data types. The data inputs can of any complexity and data type, including fixed-point data types. Parameters and Dialog Box Number of input ports Specify the number of data inputs to the block. Show additional parameters If selected, additional parameters specific to implementation of the block become visible as shown. 9-171 Multi-Port Switch Use zero based indexing If selected, the block uses zero-based indexing. Otherwise, the block uses one-based indexing. Require all data port inputs to have same data type Select to require all data port inputs to have the same data type. Output data type mode You can choose to inherit the output data type and scaling by backpropagation or by an internal rule. The internal rule causes the output of the block to have the same data type and scaling as the input with the larger positive range. Round integer calculations toward Select the rounding mode for the fixed-point output. Saturate on integer overflow If selected, overflows saturate. Characteristics 9-172 Dimensionalized Yes Direct Feedthrough Yes Sample Time Inherited from driving blocks Scalar Expansion Yes Zero Crossing No Product Purpose 9Product Library Simulink Math Operations and Fixed-Point Blockset Math Description The Product block performs multiplication or division of its inputs. Product Product Multiply or divide inputs This block produces outputs using either element-wise or matrix multiplication, depending on the value of the Multiplication parameter. You specify the operations with the Number of inputs parameter. Multiply(*) and divide(/) characters indicate the operations to be performed on the inputs: • If there are two or more inputs, then the number of characters must equal the number of inputs. For example, “*/*” requires three inputs. For this example, if the Multiplication parameter is set to Element-wise, the block divides the elements of the first (top) input by the elements of the second (middle) input, and then multiplies by the elements of the third (bottom) input. In this case, all nonscalar inputs to this block must have the same dimensions. If, however, the Multiplication parameter is set to Matrix, the block output is the matrix product of the inputs marked “*” and the inverse of inputs marked “/”, with the order of operations following the entry in the Number of inputs parameter. The dimensions of the inputs must be such that the matrix product is defined. Note To perform a dot product on input vectors, use the Dot Product block. • If only multiplication of inputs is required, then a numeric parameter value equal to the number of inputs can be supplied instead of “*” characters. This may be used in conjunction with either element-wise or matrix multiplication. • If a single vector is input and the Multiplication parameter is set to Element-wise, then a single “*” will cause the block to output the scalar product of the vector elements. A single “/” will cause the block to output the inverse of the scalar product of the vector elements. • If a single matrix is input and the Multiplication parameter is set to Element-wise, then a single “*” or “/” will cause the block to error out. If, 9-173 Product however, the Multiplication parameter is set to Matrix, then a single “*” will cause the block to output the matrix unchanged, and a single “/” will cause the block to output the inverse of the matrix. When the Show additional parameters check box is selected, some of the parameters that become visible are common to many blocks. For a detailed description of these parameters, refer to “Block Parameters” on page 9-16. For your convenience, the Fixed-Point Blockset Math library contains the following implementations of the Product block, each with different default parameter settings: • Multiply • Divide • Product of Elements • Product of Elements Inverted • Multiply Matrix Data Type Support The Product block accepts signals of any complexity and data type, including fixed-point data types. All input signals must be of the same data type. Parameters and Dialog Box Number of inputs Enter the number of inputs or a combination of “*” and “/” symbols. See “Description” above for a complete discussion of this parameter. 9-174 Product Multiplication Specify element-wise or matrix multiplication. See “Description” above for a complete discussion of this parameter. Show additional parameters If selected, additional parameters specific to implementation of the block become visible as shown. Require all inputs to have same data type Select this parameter to require that all inputs must have the same data type. Output data type mode Specify the output data type and scaling to be the same as the first input, or inherit the data type and scaling by an internal rule or by backpropagation. You can also choose a built-in data type from the drop-down list. Lastly, if you choose Specify via dialog, the Output 9-175 Product data type, Output scaling value, and Lock output scaling against changes by the autoscaling tool parameters become visible. If you select Inherit via internal rule for this parameter, Simulink chooses a combination of output scaling and data type that requires the smallest amount of memory consistent with accommodating the output range and maintaining the output precision (and avoiding underflow in the case of division operations). If the Production hardware characteristics parameter on the Advanced pane of the Simulation Parameters dialog is set to Unconstrained integer sizes, Simulink chooses the data type without regard to hardware constraints. If the parameter is set to Microprocessor, Simulink chooses the smallest available hardware data type capable of meeting range, precision, and underflow constraints. For example, if the block multiplies inputs of type int8 and int16 and Unconstrained integer sizes is specified, the output data type is sfix24. If Microprocessor is specified and the microprocessor supports 8-bit, 16-bit, and 32-bit words, the output data type is int32. If none of the word lengths provided by the target microprocessor can accommodate the output range, Simulink displays an error message in the Simulink Diagnostic Viewer. Output data type Specify any data type, including fixed-point data types. This parameter is only visible if Specify via dialog is selected for the Output data type mode parameter. Output scaling value Set the output scaling using radix point-only or [Slope Bias] scaling. This parameter is only visible if Specify via dialog is selected for the Output data type mode parameter. Lock output scaling against changes by the autoscaling tool If selected, scaling of outputs is locked. This parameter is only visible if Specify via dialog is selected for the Output data type mode parameter. Round integer calculations toward Select the rounding mode for fixed-point output. Saturate on integer overflow 9-176 Product If selected, overflows saturate. Conversions The Product block first performs the specified multiply or divide operations on and Operations the inputs, and then converts the results to the output data type using the specified rounding and overflow modes. Refer to “Rules for Arithmetic Operations” on page 4-30 for more information about the rules that this block obeys when performing fixed-point operations. 9-177 Product Characteristics 9-178 Dimensionalized Yes Direct Feedthrough Yes Sample Time Inherited from driving block Scalar Expansion Yes Zero Crossing No Product of Elements Purpose 9Product of Elements Library Math Description The Product of Elements block is an implementation of the Product block. See “Product” on page 9-173 for more information. Multiply or divide inputs Product of Elements 9-179 Product of Elements Inverted Purpose 9Product of Elements Inverted Library Math Description The Product of Elements Inverted block is an implementation of the Product block. See “Product” on page 9-173 for more information. Product of Elements Inverted 9-180 Multiply or divide inputs Rate Limiter Purpose 9Rate Limiter Library Nonlinear Description The Rate Limiter block is a masked block that limits the rising and falling rates of the signal. Limit the rising and falling rates of the signal Use the Rising slew rate parameter to set the limit on the rising rate of the signal. Use the Falling slew rate parameter to set the limit on the falling rate of the signal. Parameters and Dialog Box Rising slew rate Limit on the rising rate of the signal. Falling slew rate Limit on the falling rate of the signal. Characteristics See Also Input Port Any data type supported by the blockset Output Port Same as the input Direct Feedthrough Yes Scalar Expansion Yes Rate Limiter Dynamic 9-181 Rate Limiter Dynamic Purpose 9Rate Limiter Dynamic Library Nonlinear Description The Rate Limiter Dynamic block is a masked block that limits the rising and falling rates of the signal. Limit the rising and falling rates of the signal The external signal up sets the upper limit on the rising rate of the signal. The external signal lo sets the lower limit on the falling rate of the signal. Parameters and Dialog Box Characteristics See Also 9-182 Input Ports Any data type supported by the blockset Output Port Same data type as input Direct Feedthrough Yes Scalar Expansion Yes Rate Limiter Relational Operator Purpose 9Relational Operator Library Simulink Math Operations and Fixed-Point Blockset Logic & Comparison Description The Relational Operator block performs the specified comparison of its two inputs. <= Relational Operator Perform the specified relational operation on the inputs The relational operator connecting the two inputs is selected with the Relational Operator parameter. The block icon updates to display the selected operator. The supported operations are given below. Operation Description == TRUE if the first input is equal to the second input ~= TRUE if the first input is not equal to the second input < TRUE if the first input is less than the second input <= TRUE if the first input is less than or equal to the second input >= TRUE if the first input is greater than or equal to the second input > TRUE if the first input is greater than the second input You can specify inputs as scalars, arrays, or a combination of a scalar and an array: • For scalar inputs, the output is a scalar. • For array inputs, the output is an array of the same dimensions, where each element is the result of an element-by-element comparison of the input arrays. • For mixed scalar/array inputs, the output is an array, where each element is the result of a comparison between the scalar and the corresponding array element. The output data type is specified with the Output data type mode and Output data type parameters. The output equals 1 for TRUE and 0 for FALSE. 9-183 Relational Operator Note The output data type selected should represent zero exactly. Data types that satisfy this condition include signed and unsigned integers and any floating-point data type. Data Type Support A Relational Operator block accepts real or complex signals of any data type. However, if the Output data type mode parameter is set to Logical, the input may only be boolean or double. One input can be real and the other complex if the operator is == or !=. Parameters and Dialog Box Relational Operator Designate the relational operator used to compare the two inputs. Show additional parameters If selected, additional parameters specific to implementation of the block become visible as shown. 9-184 Relational Operator Require all inputs to have same data type Select to require inputs to have the same data type. Output data type mode Set the output data type to boolean, or choose to specify the data type through the Output data type parameter. Alternatively, you can select Logical to have the output data type determined by the Boolean Logic Signals parameter in the Advanced tab of the Simulink Simulation Parameters interface. If you select Logical and Boolean Logic Signals is on, then the output data type is always boolean. If you select Logical and Boolean Logic Signals is off, then the output data type will match the input data type, which is always double. Output data type Specify the output data type. You should only use data types that represent zero exactly. Data types that satisfy this condition include signed and unsigned integers and any floating-point data type. This parameter is only visible if Specify via dialog is selected for the Output data type mode parameter. Enable zero crossing detection Select to enable zero crossing detection. For more information, see “Zero Crossing Detection” in the Using Simulink documentation. 9-185 Relational Operator Conversions The input with the smaller positive range is converted to the data type of the and Operations other input offline using round-to-nearest and saturation. This conversion is performed prior to comparison. Refer to “Parameter Conversions” on page 4-27 for more information about parameter conversions. Characteristics 9-186 Dimensionalized Yes Direct Feedthrough Yes Sample Time Inherited from driving block Scalar Expansion Of inputs Zero Crossing No, unless Enable zero crossing detection is selected. Relay Purpose 9Relay Library Simulink Discontinuities and Fixed-Point Blockset Nonlinear Description The Relay block allows its output to switch between two specified values. When the relay is on, it remains on until the input drops below the value of the Switch off point parameter. When the relay is off, it remains off until the input exceeds the value of the Switch on point parameter. The block accepts one input and generates one output. Relay Switch output between two constants The Switch on point value must be greater than or equal to the Switch off point. Specifying a Switch on point value greater than the Switch off point value models hysteresis, whereas specifying equal values models a switch with a threshold at that value. When the Show additional parameters check box is selected, some of the parameters that become visible are common to many blocks. For a detailed description of these parameters, refer to “Block Parameters” on page 9-16. Data Type Support This block supports any data type supported by the Fixed-Point Blockset. Parameters and Dialog Box 9-187 Relay Switch on point The “on” threshold for the relay. Switch off point The “off” threshold for the relay. Output when on The output when the relay is on. Output when off The output when the relay is off. Show additional parameters If selected, additional parameters specific to implementation of the block become visible as shown. 9-188 Relay Output data type mode Specify the output data type and scaling to be the same as the inputs, or inherit the data type and scaling by backpropagation. Lastly, if you choose Specify via dialog, the Output data type, Output scaling value, and Parameter Scaling parameters become visible. Output data type Specify any data type, including fixed-point data types. This parameter is only visible if Specify via dialog is selected for the Output data type mode parameter. Output scaling value Set the output scaling using radix point-only or [Slope Bias] scaling. This parameter is only visible if Specify via dialog is selected for the Output data type mode parameter, and is only enabled if Use specified scaling is selected for the Parameter Scaling parameter. Parameter Scaling • Use Specified Scaling—This mode allows you to specify the output scaling in the Output scaling value parameter • Best Precision: Vector-wise—This mode produces a common radix point for each element of the output vector based on the best precision for the largest value of the vector. This parameter is only visible if Specify via dialog is selected for the Output data type mode parameter. Enable zero crossing detection Select to enable zero crossing detection. For more information, see “Zero Crossing Detection” in the Using Simulink documentation. Conversions The Switch on point and Switch off point parameters are converted to the and Operations input data type offline using round-to-nearest and saturation. Characteristics Dimensionalized Yes Direct Feedthrough Yes Sample Time Inherited from driving block 9-189 Relay 9-190 Scalar Expansion Yes Zero Crossing No, unless Enable zero crossing detection is selected Repeating Sequence Interpolated Purpose 9Repeating Sequence Interpolated Library Sources Description The Repeating Sequence Interpolated block outputs a discrete-time sequence and then repeats it. Between data points, the block uses the method specified by the Look-Up Method parameter to determine the output. Output discrete-time sequence and repeat, interpolating between data points Parameters and Dialog Box Vector of output values Column vector containing output values of the discrete time sequence. Vector of time values Column vector containing time values. The time values must be a strictly increasing and the vector must have the same size as the vector of output values. Look-Up Method Specify the lookup method to determine the output between data points. 9-191 Repeating Sequence Interpolated Sample time Sample time. Output data type and scaling Specify the output data type and scaling via the dialog box, or by inheriting the data type and scaling by backpropagation. Output data type Any data type supported by the blockset. Output scaling Select the scaling method using the specified scaling or using the best precision. Lock output scaling so autoscaling tool can’t change it If the box is selected, output scaling is locked. Characteristics See Also 9-192 Output Port Any data type supported by the blockset Scalar Expansion Yes Repeating Sequence Stair Repeating Sequence Stair Purpose 9Repeating Sequence Stair Output and repeat the discrete time sequence Library Sources Description The Repeating Sequence Stair block is a masked block that outputs and repeats a discrete time sequence. You can specify the stair sequence with the Vector of output values parameter. For example, the vector can be specified as [3 1 2 4 1]', producing the stair sequence shown in the plot. You can specify the sample time with the Sample time parameter. You can select the output data type and scaling with the Output data type and scaling parameter, and set the output data type with the Output data type parameter. For fixed-point data types, you can set the output scaling with the Output scaling parameter, and, below that parameter, select the method for scaling the output with the Output scaling parameter. For a detailed description of all block parameters, refer to “Block Parameters” on page 9-4. For more information about converting from one Fixed-Point Blockset data type to another, refer to “Signal Conversions” on page 4-26. 9-193 Repeating Sequence Stair Parameters and Dialog Box Vector of output values Vector containing values of the repeating stair sequence. Sample time Sample time. Output data type and scaling Specify the output data type and scaling via the dialog box, or by inheriting the data type and scaling by backpropagation. Output data type Any data type supported by the blockset. Output scaling Slope or [Slope Bias] scaling. Lock output scaling so autoscaling tool can’t change it If the box is selected, output scaling is locked. Output scaling Select the scaling method using the specified scaling or using the best precision. 9-194 Repeating Sequence Stair Characteristics See Also Output Port Any data type supported by the blockset Scalar Expansion No Vectorized No Repeating Sequence Interpolated 9-195 Sample Rate Probe Purpose 9Sample Rate Probe Library Calculus Description The Sample Rate Probe block is an implementation of the Sample Time Multiply block. See “Sample Time Multiply” on page 9-199 for more information. 1/Ts Sample Rate Probe 9-196 Support calculations involving sample time Sample Time Add Purpose 9Sample Time Add Library Calculus Description The Sample Time Add block is an implementation of the Sample Time Multiply block. See “Sample Time Multiply” on page 9-199 for more information. Support calculations involving sample time u+Ts Sample Time Add 9-197 Sample Time Divide Purpose 9Sample Time Divide Library Calculus Description The Sample Time Divide block is an implementation of the Sample Time Multiply block. See “Sample Time Multiply” on page 9-199 for more information. u/Ts Sample Time Divide 9-198 Support calculations involving sample time Sample Time Multiply Purpose 9Sample Time Multiply Library Calculus Description The Sample Time Multiply block is a masked S-function that adds, subtracts, multiplies, or divides the input signal, u, by a weighted sample time Ts. Support calculations involving sample time You specify the math operation with the Operation parameter. Additionally, you can specify to use only the weight with either the sample time or its inverse. Enter the weighting factor with the Weight value. If the weight is 1, w is removed from the equation. For a detailed description of all block parameters, refer to “Block Parameters” on page 9-4. For more information about converting from one Fixed-Point Blockset data type to another, refer to “Signal Conversions” on page 4-26. The Calculus library contains the following implementations, which are all linked to the Sample Time Multiply block but have different parameter settings: • Sample Time Divide • Sample Time Add • Sample Time Subtract • Sample Time Probe • Sample Rate Probe 9-199 Sample Time Multiply Parameters and Dialog Box Operation Specify operation to use: +, -, *, /, Ts only, 1/Ts only. Weight value Enter weight of sample time. Implement using Specify online calculations or offline scaling adjustment. Output data type and scaling Specify whether the output data type and scaling are inherited by an internal rule or by backpropagation. Round toward Rounding mode for the fixed-point output. Saturate to max or min when overflows occur If selected, fixed-point overflows saturate. 9-200 Sample Time Multiply Characteristics Input Port Any data type supported by the blockset Output Port Same as the input Direct Feedthrough For all math operations options except Ts and 1/Ts Scalar Expansion No, the weight is always a scalar 9-201 Sample Time Probe Purpose 9Sample Time Probe Library Calculus Description The Sample Time Probe block is an implementation of the Sample Time Multiply block. See “Sample Time Multiply” on page 9-199 for more information. Ts Sample Time Probe 9-202 Support calculations involving sample time Sample Time Subtract Purpose 9Sample Time Subtract Library Calculus Description The Sample Time Subtract block is an implementation of the Sample Time Multiply block. See “Sample Time Multiply” on page 9-199 for more information. u−Ts Support calculations involving sample time Sample Time Subtract 9-203 Saturation Purpose 9Saturation Library Simulink Discontinuities and Fixed-Point Blockset Nonlinear Description The Saturation block imposes upper and lower bounds on a signal. When the input signal is within the range specified by the Lower limit and Upper limit parameters, the input signal passes through unchanged. When the input signal is outside these bounds, the signal is clipped to the upper or lower bound. Saturation Data Type Support Limit the range of a signal When the Lower limit and Upper limit parameters are set to the same value, the block outputs that value. A Saturation block accepts and outputs real signals of any data type, including fixed-point data types. The output data type is the same as the input data type. Parameters and Dialog Box Upper limit Specify the upper bound on the input signal. When the input signal to the Saturation block is above this value, the output of the block is clipped to this value. Lower limit Specify the lower bound on the input signal. When the input signal to the Saturation block is below this value, the output of the block is clipped to this value. 9-204 Saturation Treat as gain when linearizing Linearization commands in Simulink treat this block as a gain in state space. Select this parameter to cause linearization commands to treat the gain as 1; otherwise, the commands treat the gain as 0. Enable zero crossing detection Select to enable zero crossing detection. For more information, see “Zero Crossing Detection” in the Using Simulink documentation. Conversions Both the Upper limit and Lower limit parameters are converted to the input data type offline using round-to-nearest and saturation. and Operations Characteristics Dimensionalized Yes Direct Feedthrough Yes Sample Time Inherited from driving block Scalar Expansion Of parameters and input Zero Crossing No, unless Enable zero crossing detection is selected 9-205 Saturation Dynamic Purpose 9Saturation Dynamic Library Nonlinear Description The Saturation Dynamic block is a masked block that bounds the range of the input signal to upper and lower saturation values. The input signal outside of these limits saturates to one of the bounds where Bound the range of the input • The input below the lower limit is set to the lower limit. • The input above the upper limit is set to the upper limit. The input for the upper limit is the up port, and the input for the lower limit is the lo port. Parameters and Dialog Box Characteristics See Also 9-206 Input Port Any data type supported by the blockset Output Port Same as the input Direct Feedthrough Yes Scalar Expansion Yes Saturation Scaling Strip Purpose 9Scaling Strip Library Data Type Description The Scaling Strip block strips the scaling off a fixed point signal. It maps the input data type to the smallest built in data type that has enough data bits to hold the input. The stored integer value of the input is the value of the output. The output always has nominal scaling (slope = 1.0 and bias = 0.0), so the output does not make a distinction between real world value and stored integer value. Remove scaling and map to a built in integer Parameters and Dialog Box Characteristics Input Port Any data type supported by the blockset Output Port Same as the input Direct Feedthrough Yes Scalar Expansion Yes 9-207 Shift Arithmetic Purpose 9Shift Arithmetic Library Bits Description The Shift Arithmetic block can be used to shift the bits or the radix point of a signal, or both. Vy = Vu * 2^−8 Qy = Qu >> 8 Ey = Eu Shift Arithmetic Shift the bits and/or radix point of a signal For example, the effects of radix point shifts two places to the right and two places to the left on an input of data type sfix(8) are shown below. Shift Operation Binary Value Decimal Value No shift (original number) 11001.011 -6.625 Radix point shift right by 2 places 1100101.1 -26.5 Radix point shift left by 2 places 110.01011 -1.65625 This block performs arithmetic bit shifts on signed numbers. Therefore, the most significant bit is recycled for each bit shift. The effects of bit shifts two places to the right and two places to the left on an input of data type sfix(8) follow. 9-208 Shift Operation Binary Value Decimal Value No shift (original number) 11001.011 -6.625 Bit shift right by 2 places 11110.010 -1.75 Bit shift left by 2 places 00101.100 5.5 Shift Arithmetic Parameters and Dialog Box Shift bits right how many places (negative is shift left) The number of places the bits of the input signal is shifted. A positive value indicates a shift right, while a negative value indicates a shift left. Shift binary point right how many places (negative is shift left) The number of places the radix point of the input signal is shifted. A positive value indicates a shift right, while a negative value indicates a shift left. Characteristics Input Port Any data type supported by the blockset. Inputs may be scalar or vector. Output Port Any data type supported by the blockset. Output is scalar if the input is scalar, and vector if the input is vector. Direct Feedthrough Yes Sample Time Inherited Scalar Expansion No Vectorized Yes, accepts vector inputs 9-209 Sign Purpose 9Sign Library Simulink Math Operations and Fixed-Point Blockset Nonlinear Description The Sign block indicates the sign of the input: Indicate the sign of the input • The output is 1 when the input is greater than zero. • The output is 0 when the input is equal to zero. Sign Data Type Support • The output is -1 when the input is less than zero. The Sign block accepts signals of any data type including fixed-point data types. The output is a signed data type with the same number of bits as the input, and with nominal scaling (a slope of one and a bias of zero). Parameters and Dialog Box Enable zero crossing detection Select to enable zero crossing detection. For more information, see “Zero Crossing Detection” in the Using Simulink documentation. Characteristics 9-210 Dimensionalized Yes Direct Feedthrough Yes Sample Time Inherited from the driving block Scalar Expansion N/A Zero Crossing No, unless Enable zero crossing detection is selected Sine Purpose 9Sine Library Lookup Description The Sine block is a masked block that implements a sine wave in fixed-point using a lookup table method that exploits quarter wave symmetry. Implement a sine wave in fixed-point using a lookup table approach that exploits quarter wave symmetry You can set the number of data points to retrieve from the lookup table with the Number of data points for lookup table parameter. Parameters and Dialog Box Number of data points for lookup table Number of data points to retrieve from the lookup table. Characteristics Input Port Any data type supported by the blockset Output Port Same as the input Direct Feedthrough Yes Scalar Expansion N/A 9-211 State-Space Purpose 9State-Space Library Filters Description The State-Space block implements the system described by Implement discrete-time state space y(n) = Cx(n) + Du(n) x(n+1) = Ax(n) + Bu(n) where u is the input, x is the state, and y is the output. Both equations have the same data type. The matrices A, B, C and D have the following characteristics: • A must be an n-by-n matrix, where n is the number of states. • B must be an n-by-m matrix, where m is the number of inputs. • C must be an r-by-n matrix, where r is the number of outputs. • D must be an r-by-m matrix. In addition: • The state x must be a n-by-1 vector • The input u must be a m-by-1 vector • The output y must be a r-by-1 vector The block accepts one input and generates one output. The input vector width is determined by the number of columns in the B and D matrices. The output vector width is determined by the number of rows in the C and D matrices. 9-212 State-Space Parameters and Dialog Box State Matrix A Matrix of states. Input Matrix B Column vector of inputs. Output Matrix C Column vector of outputs. Direct Feedthrough Matrix D Matrix for direct feedthrough. Initial condition for state Initial condition for the state. Data type for internal calculations 9-213 State-Space Data type for internal calculations. Some examples are sfix(16), unit(8), and float('single'). Scaling for State Equation AX+BU Scaling for state equations. Scaling for Output Equation CX+DU Scaling for output equations. Lock output scaling so autoscaling tool can’t change it If the box is selected, the output scaling is locked. Round toward Rounding mode for the fixed-point output. Saturate to max or min when overflows occur If selected, fixed-point overflows saturate. Characteristics 9-214 Input Ports Any data type supported by the blockset—it must be a scalar Output Port Any data type supported by the blockset Direct Feedthrough Yes Scalar Expansion Of initial conditions Vectorized No Subtract Purpose 9Subtract Library Math Description The Subtract block is an implementation of the Sum block. See “Sum” on page 9-216 for more information. Add or subtract inputs Subtract 9-215 Sum Purpose 9Sum Library Simulink Math Operations and Fixed-Point Blockset Math Description The Sum block performs addition or subtraction on its inputs. This block can add or subtract scalar, vector, or matrix inputs. It can also collapse the elements of a single input vector. Add or subtract inputs You specify the operations of the block with the List of Signs parameter. Plus (+), minus (-), and spacer (|) characters indicate the operations to be performed on the inputs: Sum • If there are two or more inputs, then the number of characters must equal the number of inputs. For example, “+-+” requires three inputs and configures the block to subtract the second (middle) input from the first (top) input, and then add the third (bottom) input. All nonscalar inputs must have the same dimensions. Scalar inputs will be expanded to have the same dimensions as the other inputs. • A spacer character creates extra space between ports on the block’s icon. • If only addition of all inputs is required, then a numeric parameter value equal to the number of inputs can be supplied instead of “+” characters. • If only one vector is input, then a single “+” or “-” will collapse the vector using the specified operation. When the Show additional parameters check box is selected, some of the parameters that become visible are common to many blocks. For a detailed description of these parameters, refer to “Block Parameters” on page 9-16. For your convenience, the Fixed-Point Blockset Math library contains the following implementations of the Sum block, each with different default parameter settings: • Add • Subtract • Sum of Elements • Sum of Elements Negated 9-216 Sum Data Type Support The Sum block accepts signals of any complexity and data type, including fixed-point data types. The inputs may be of different data types unless the Require all inputs to have same data type parameter is selected. Parameters and Dialog Box Icon shape Designate the icon shape of the block. List of signs Enter as many plus (+) and minus (-) characters as there are inputs. Addition is the default operation, so if you only want to add the inputs, enter the number of input ports. For a single vector input, “+” or “-” will collapse the vector using the specified operation. You can manipulate the positions of the input ports on the block icon by inserting spacers (|) between the signs in the List of signs parameter. For example, “++|--” creates an extra space between the second and third input ports. Show additional parameters If selected, additional parameters specific to implementation of the block become visible as shown. 9-217 Sum Require all inputs to have same data type Select this parameter to require that all inputs must have the same data type. Output data type mode Specify the output data type and scaling to be the same as the first input, or inherit the data type and scaling from an internal rule or by backpropagation. You can also choose a built-in data type from the drop-down list. Lastly, if you choose Specify via dialog, the Output data type, Output scaling value, and Lock output scaling against changes by the autoscaling tool parameters become visible. Output data type Specify any data type, including fixed-point data types. This parameter is only visible if Specify via dialog is selected for the Output data type mode parameter. 9-218 Sum Output scaling value Set the output scaling using radix point-only or [Slope Bias] scaling. This parameter is only visible if Specify via dialog is selected for the Output data type mode parameter. Lock output scaling against changes by the autoscaling tool If selected, scaling of outputs is locked. This parameter is only visible if Specify via dialog is selected for the Output data type mode parameter. Round integer calculations toward Select the rounding mode for fixed-point output. Saturate on integer overflow If selected, overflows saturate. Conversions The Sum block first converts the input data type(s) to the output data type and Operations using the specified rounding and overflow modes, and then performs the specified operations. Refer to “Rules for Arithmetic Operations” on page 4-30 for more information about the rules that this block obeys when performing fixed-point operations. Characteristics Dimensionalized Yes Direct Feedthrough Yes Sample Time Inherited from driving blocks Scalar Expansion Yes States 0 Zero Crossing No 9-219 Sum of Elements Purpose 9Sum of Elements Library Math Description The Sum of Elements block is an implementation of the Sum block. See “Sum” on page 9-216 for more information. Sum of Elements 9-220 Add or subtract inputs Sum of Elements Negated Purpose 9Sum of Elements Negated Library Math Description The Sum of Elements Negated block is an implementation of the Sum block. See “Sum” on page 9-216 for more information. Add or subtract inputs Sum of Elements Negated 9-221 Switch Purpose 9Switch Library Simulink Signal Routing and Fixed-Point Blockset Select Description The Switch block passes through the first (top) input or the third (bottom) input based on the value of the second (middle) input. The first and third inputs are called data inputs. The second input is called the control input. Switch Switch output between the first input and the third input based on the value of the second input You select the conditions under which the first input is passed with the Criteria for passing first input parameter. You can make the block check whether the control input is greater than or equal to the threshold value, purely greater than the threshold value, or nonzero. If the control input meets the condition set in the Criteria for passing first input parameter, then the first input is passed. Otherwise, the third input is passed. When the Show additional parameters check box is selected, some of the parameters that become visible are common to many blocks. For a detailed description of these parameters, refer to “Block Parameters” on page 9-16. Data Type Support Parameters and Dialog Box 9-222 A Switch block accepts real- or complex-valued signals of any data type for data and control inputs. The data type of the threshold is double. Switch Criteria for passing first input Select the conditions under which the first input is passed. You can make the block check whether the control input is greater than or equal to the threshold value, purely greater than the threshold value, or nonzero. If the control input meets the condition set in this parameter, then the first input is passed. Otherwise, the third input is passed. Threshold Assign the switch threshold that determines which input is passed to the output. Show additional parameters If selected, additional parameters specific to implementation of the block become visible as shown. Require all data port inputs to have same data type Select to require all data inputs to have the same data type. Output data type mode Choose to inherit the output data type and scaling by backpropagation or by an internal rule. The internal rule causes the output of the block to have the same data type and scaling as the input with the larger positive range. 9-223 Switch Round integer calculations toward Select the rounding mode for fixed-point output. Saturate on integer overflow If selected, overflows saturate. Enable zero crossing detection Select to enable zero crossing detection. For more information, see “Zero Crossing Detection” in the Using Simulink documentation. Characteristics See Also 9-224 Dimensionalized Yes Direct Feedthrough Yes Sample Time Inherited from driving block Scalar Expansion Yes Zero Crossing No, unless Enable zero crossing detection is selected Multi-Port Switch Tapped Delay Purpose 9Tapped Delay Library Delays & Holds Description The Tapped Delay block delays its input by the specified number of sample periods, and outputs all the delayed versions. Delay a scalar signal multiple sample periods and output all the delayed versions This block provides a mechanism for discretizing a signal in time, or resampling the signal at a different rate. You specify the time between samples with the Sample time parameter. You specify the number of delays with the Number of delays parameter. A value of -1 instructs the block to inherit the number of delays by backpropagation. Each delay is equivalent to the z-1 discrete-time operator, which is represented by the Unit Delay block. The block accepts one scalar input and generates an output for each delay. The input must be a scalar. You specify the order of the output vector with the Order output vector starting with parameter list. Oldest orders the output vector starting with the oldest delay version and ending with the newest delay version. Newest orders the output vector starting with the newest delay version and ending with the oldest delay version. The block output for the first sampling period is specified by the Initial condition parameter. Careful selection of this parameter can minimize unwanted output behavior. Parameters and Dialog Box 9-225 Tapped Delay Initial condition The initial output of the simulation. Sample time Sample time. Number of delays The number of discrete-time operators. Order output vector starting with Specify whether the oldest delay version is output first, or the newest delay version is output first. Conversions The Initial condition parameter is converted from a double to the input data type offline using round-to-nearest and saturation. Characteristics Input Port Any data type supported by the blockset Output Port Same as the input Direct Feedthrough No Scalar Expansion Yes—of initial conditions 9-226 Unary Minus Purpose 9Unary Minus Library Math Description The Unary Minus block is a masked S-function that negates the input. The block accepts only signed data types. Negate the input For signed data types, you cannot accurately negate the most negative value since the result is not representable by the data type. In this case, the behavior of the block is controlled by the Saturate to max or min when overflows occur check box. If selected, the most negative value of the data type wraps to the most positive value. If not selected, the operation has no effect. If an overflow occurs, then a warning is returned to the MATLAB command line. For example, suppose the block input is an 8-bit signed integer. The range of this data type is from -128 to 127, and the negation of -128 is not representable. If the Saturate to max or min when overflows occur check box is selected, then the negation of -128 is 127. If it is not selected, then the negation of -128 remains at -128. Parameters and Dialog Box Saturate to max or min when overflows occur If selected, fixed-point overflows saturate. Characteristics Input Port Any data type supported by the blockset Output Port Same as the input (a nonzero bias is negated offline) Direct Feedthrough No Scalar Expansion Yes—of input or initial conditions 9-227 Unit Delay Purpose 9Unit Delay Library Simulink Discrete and Fixed-Point Blockset Delays & Holds Description The Unit Delay block delays its input by the specified sample period. This block is equivalent to the z-1 discrete-time operator. The block accepts one input and generates one output, which can be either both scalar or both vector. If the input is a vector, all elements of the vector are delayed by the same sample period. 1 z Unit Delay Delay a signal one sample period You specify the block output for the first sampling period with the Initial conditions parameter. Careful selection of this parameter can minimize unwanted output behavior. The time between samples is specified with the Sample time parameter. A setting of -1 means the sample time is inherited. The Unit Delay block provides a mechanism for discretizing one or more signals in time, or for resampling the signal at a different rate. If your model contains multirate transitions, then you must add Unit Delay blocks between the slow-to-fast transitions. The sample rate of the Unit Delay block must be set to that of the slower block. For fast-to-slow transitions, use the Zero Order Hold block. For more information about multirate transitions, refer to the Simulink or the Real-Time Workshop documentation. Note The Unit Delay block accepts continuous signals. When it has a continuous sample time, the block is equivalent to the Simulink Memory block. Data Type Support 9-228 The Unit Delay block accepts real or complex signals of any data type, including fixed-point data types. If the data type of the input signal is user-defined, the initial condition must be zero. Unit Delay Parameters and Dialog Box Initial conditions The output of the simulation for the first sampling period, during which the output of the Unit Delay block is otherwise undefined. Sample time The time interval between samples. To inherit the sample time, set this parameter to -1. Conversions The Initial conditions parameter is converted from a double to the input data type offline using round-to-nearest and saturation. and Operations Characteristics See Also Dimensionalized Yes Direct Feedthrough No Sample Time Discrete or continuous. When inheriting a continuous signal, this block acts as a Simulink Memory block. Scalar Expansion Of input or initial conditions States Yes—inherited from driving block for nonfixed-point data types. Zero Crossing No Unit Delay Enabled, Unit Delay Enabled External IC, Unit Delay Enabled Resettable, Unit Delay Enabled Resettable External IC, Unit Delay External IC, Unit Delay Resettable, Unit Delay Resettable External IC, Unit Delay With Preview Enabled, Unit Delay With Preview Enabled Resettable, Unit Delay 9-229 Unit Delay With Preview Enabled Resettable External RV, Unit Delay With Preview Resettable, Unit Delay With Preview Resettable External RV 9-230 Unit Delay Enabled Purpose 9Unit Delay Enabled Library Delays & Holds Description The Unit Delay Enabled block is a masked block that delays a signal by one sample period when the external enable signal E is on. While the enable is off, the block is disabled. It holds the current state at the same value and outputs that value. The enable signal is on when E is not 0, and off when E is 0. Delay a signal one sample period, if the external enable signal is on You specify the block output for the first sampling period with the value Initial condition parameter. The output data type is the same as the input u data type. The data type of the input u and the enable E can be any data type. You input the sample time with the Sample time parameter. A setting of -1 means the Sample time is inherited. Parameters and Dialog Box Initial condition Initial condition. Sample time Sample time. 9-231 Unit Delay Enabled Characteristics See Also 9-232 Input Port u Any data type supported by the blockset Input Port E Any data type supported by the blockset Output Port Same as the input u Direct Feedthrough No Scalar Expansion Yes Unit Delay, Unit Delay Enabled External IC, Unit Delay Enabled Resettable, Unit Delay Enabled Resettable External IC, Unit Delay External IC, Unit Delay Resettable, Unit Delay Resettable External IC, Unit Delay With Preview Enabled, Unit Delay With Preview Enabled Resettable, Unit Delay With Preview Enabled Resettable External RV, Unit Delay With Preview Resettable, Unit Delay With Preview Resettable External RV Unit Delay Enabled External IC Purpose 9Unit Delay Enabled External IC Library Delays & Holds Description The Unit Delay Enabled External IC block is a masked block that delays a signal by one sample period when the enable signal E is on. While the enable is off, the block holds the current state at the same value and outputs that value. The enable E is on when E is not 0, and off when E is 0. Delay a signal one sample period, if the external enable signal is on, with an external initial condition The initial condition of this block is given by the signal IC. The input u and IC data types must be the same, and are any data type. The output data type is the same as u and IC. The enable E is any data type. You specify the time between samples with the Sample time parameter. A setting of -1 means the Sample time is inherited. Parameters and Dialog Box Sample time Sample time. 9-233 Unit Delay Enabled External IC Characteristics See Also 9-234 Input Port u Any data type supported by the blockset Input Port E Any data type supported by the blockset Input Port IC Same as the input u Output Port Same as the input u Direct Feedthrough Yes, of the reset input port No, of the enable input port Yes, of the external IC port Scalar Expansion Yes Unit Delay, Unit Delay Enabled, Unit Delay Enabled Resettable, Unit Delay Enabled Resettable External IC, Unit Delay External IC, Unit Delay Resettable, Unit Delay Resettable External IC, Unit Delay With Preview Enabled, Unit Delay With Preview Enabled Resettable, Unit Delay With Preview Enabled Resettable External RV, Unit Delay With Preview Resettable, Unit Delay With Preview Resettable External RV Unit Delay Enabled Resettable Purpose 9Unit Delay Enabled Resettable Library Delays & Holds Description The Unit Delay Enabled Resettable block combines the features of the Unit Delay Enabled and Unit Delay Resettable blocks. Delay a signal one sample period, if the external enable signal is on, with an external Boolean reset The block can reset its state based on an external reset signal R. When the enable signal E is on and the reset signal R is false, the block outputs the input signal delayed by one sample period. When the enable signal E is on and the reset signal R is true, the block resets the current state to the initial condition, specified by the Initial condition parameter, and outputs that state delayed by one sample period. When the enable signal is off, the block is disabled, and the state and output do not change except for resets. The enable signal is on when E is not 0, and off when E is 0. You specify the time between samples with the Sample time parameter. A setting of -1 means the Sample time is inherited. Parameters and Dialog Box Initial condition The initial output of the simulation. 9-235 Unit Delay Enabled Resettable Sample time Sample time. Characteristics See Also 9-236 Input Port u Any data type supported by the blockset Input Port E Any data type supported by the blockset Input Port R Any data type supported by the blockset Output Port Same as the input u Direct Feedthrough No, of the input port No, of the enable port Yes, of the reset port Scalar Expansion Yes Unit Delay, Unit Delay Enabled, Unit Delay Enabled External IC, Unit Delay Enabled Resettable External IC, Unit Delay External IC, Unit Delay Resettable, Unit Delay Resettable External IC, Unit Delay With Preview Enabled, Unit Delay With Preview Enabled Resettable, Unit Delay With Preview Enabled Resettable External RV, Unit Delay With Preview Resettable, Unit Delay With Preview Resettable External RV Unit Delay Enabled Resettable External IC Purpose 9Unit Delay Enabled Resettable External IC Library Delays & Holds Description The Unit Delay Enabled Resettable External IC block combines the features of the Unit Delay Enabled, Unit Delay External IC, and Unit Delay Resettable blocks. Delay a signal one sample period, if the external enable signal is on, with an external Boolean reset and initial condition The block can reset its state based on an external reset signal R. When the enable signal E is on and the reset signal R is false, the block outputs the input signal delayed by one sample period. When the enable signal E is on and the reset signal R is true, the block resets the current state to the initial condition given by the signal IC, and outputs that state delayed by one sample period. When the enable signal is off, the block is disabled, and the state and output do not change except for resets. The enable signal is on when E is not 0, and off when E is 0. The output data type is the same as the input u and the initial condition IC data type, which can be any data type, but must be the same. The enable E and reset R can be any data type. You specify the time between samples with the Sample time parameter. A setting of -1 means the Sample time is inherited. Parameters and Dialog Box 9-237 Unit Delay Enabled Resettable External IC Sample time Sample time. Characteristics See Also 9-238 Input Port u Any data type supported by the blockset Input Port E Any data type supported by the blockset Input Port R Any data type supported by the blockset Input Port IC Same as the input u Output Port Same as the input u Direct Feedthrough No, of the input port No, of the enable port Yes, of the enable port Yes, of the external IC port Scalar Expansion Yes Unit Delay, Unit Delay Enabled, Unit Delay Enabled External IC, Unit Delay Enabled Resettable, Unit Delay External IC, Unit Delay Resettable, Unit Delay Resettable External IC, Unit Delay With Preview Enabled, Unit Delay With Preview Enabled Resettable, Unit Delay With Preview Enabled Resettable External RV, Unit Delay With Preview Resettable, Unit Delay With Preview Resettable External RV Unit Delay External IC Purpose 9Unit Delay External IC Library Delays & Holds Description The Unit Delay External IC block is a masked block that delays its input by one sample period. This block is equivalent to the z-1 discrete-time operator. The block accepts one input and generates one output, both of which can be scalar or vector. If the input is a vector, all elements of the vector are delayed by the same sample period. Delay a signal one sample period, with an external initial condition The block’s output for the first sample period is equal to the signal IC. The input u and initial condition IC data types must be the same, and are any data type. You specify the time between samples with the Sample time parameter. A setting of -1 means the Sample time is inherited. Parameters and Dialog Box Sample time Sample time. Characteristics Input Port u Any data type supported by the blockset Input Port IC Same as the input u Output Port Same as the input u Direct Feedthrough No, of the input port Yes, of the external IC port Scalar Expansion Yes 9-239 Unit Delay External IC See Also 9-240 Unit Delay, Unit Delay Enabled, Unit Delay Enabled External IC, Unit Delay Enabled Resettable, Unit Delay Enabled Resettable External IC, Unit Delay Resettable, Unit Delay Resettable External IC, Unit Delay With Preview Enabled, Unit Delay With Preview Enabled Resettable, Unit Delay With Preview Enabled Resettable External RV, Unit Delay With Preview Resettable, Unit Delay With Preview Resettable External RV Unit Delay Resettable Purpose 9Unit Delay Resettable Library Delays & Holds Description The Unit Delay Resettable block delays a signal one sample period. Delay a signal one sample period, with an external Boolean reset The block can reset its state based on an external reset signal R. The block has two input ports, one for the input signal u and the other for the external reset signal R. When the reset signal is false, the block outputs the input signal delayed by one time step. When the reset signal is true, the block resets the current state to the initial condition, specified by the Initial condition parameter, and outputs that state delayed by one time step. You specify the time between samples with the Sample time parameter. A setting of -1 means the Sample time is inherited. Parameters and Dialog Box Initial condition The initial output of the simulation. Sample time Sample time. 9-241 Unit Delay Resettable Characteristics See Also 9-242 Input Port u Any data type supported by the blockset Input Port R Any data type supported by the blockset Output Port Same as the input u Direct Feedthrough No, of the input port Yes, of the reset port Scalar Expansion Yes Unit Delay, Unit Delay Enabled, Unit Delay Enabled External IC, Unit Delay Enabled Resettable, Unit Delay Enabled Resettable External IC, Unit Delay External IC, Unit Delay Resettable External IC, Unit Delay With Preview Enabled, Unit Delay With Preview Enabled Resettable, Unit Delay With Preview Enabled Resettable External RV, Unit Delay With Preview Resettable, Unit Delay With Preview Resettable External RV Unit Delay Resettable External IC Purpose 9Unit Delay Resettable External IC Library Delays & Holds Description The Unit Delay Resettable External IC block delays a signal one sample period. Delay a signal one sample period, with an external Boolean reset and initial condition The block can reset its state based on an external reset signal R. The block has two input ports, one for the input signal u and the other for the reset signal R. When the reset signal is false, the block outputs the input signal delayed by one time step. When the reset signal is true, the block resets the current state to the initial condition given by the signal IC and outputs that state delayed by one time step. The input u and initial condition IC must be the same data type, but can be any data type. The output is the same data type as the inputs u and IC. The reset R can be any data type. You specify the time between samples with the Sample time parameter. A setting of -1 means the Sample time is inherited. Parameters and Dialog Box Sample time Sample time. 9-243 Unit Delay Resettable External IC Characteristics See Also 9-244 Input Port u Any data type supported by the blockset Input Port R Any data type supported by the blockset Input Port IC Same as the input u Output Port Same as the input u Direct Feedthrough No, of the input port Yes, of the reset port Yes, of the external IC port Sample Time Inherited Scalar Expansion Yes Unit Delay, Unit Delay Enabled, Unit Delay Enabled External IC, Unit Delay Enabled Resettable, Unit Delay Enabled Resettable External IC, Unit Delay External IC, Unit Delay Resettable, Unit Delay With Preview Enabled, Unit Delay With Preview Enabled Resettable, Unit Delay With Preview Enabled Resettable External RV, Unit Delay With Preview Resettable, Unit Delay With Preview Resettable External RV Unit Delay With Preview Enabled Purpose 9Unit Delay With Preview Enabled Library Delays & Holds Description The Unit Delay With Preview Enabled block supports calculations that have feedback and depend on the current input. Output the signal and the signal delayed by one sample period, if the external enable signal is on The block has two output ports. When the external enable signal E is on, the upper port outputs the signal and the lower port outputs the signal delayed by one sample period. The block has two input ports, one for the input signal u and the other for the enable signal E. When the enable signal E is off, the block is disabled, and the state and output values do not change, except for resets. The enable signal is on when E is not 0, and off when E is 0. The input u and initial condition IC must be the same data type, but can be any data type. The output is the same data type as the inputs u and IC. The reset R can be any data type. You specify the time between samples with the Sample time parameter. A setting of -1 means the Sample time is inherited. Parameters and Dialog Box 9-245 Unit Delay With Preview Enabled Initial condition Initial condition. Sample time Sample time. Characteristics See Also 9-246 Input Port u Any data type supported by the blockset Input Port E Any data type supported by the blockset Output Ports Same as the input u Direct Feedthrough Yes, to upper output port No, to lower output port Scalar Expansion Yes Unit Delay, Unit Delay Enabled, Unit Delay Enabled External IC, Unit Delay Enabled Resettable, Unit Delay Enabled Resettable External IC, Unit Delay External IC, Unit Delay Resettable, Unit Delay Resettable External IC, Unit Delay With Preview Enabled Resettable, Unit Delay With Preview Enabled Resettable External RV, Unit Delay With Preview Resettable, Unit Delay With Preview Resettable External RV Unit Delay With Preview Enabled Resettable Purpose 9Unit Delay With Preview Enabled Resettable Library Delays & Holds Description The Unit Delay With Preview Enabled Resettable block supports calculations that have feedback and depend on the current input. Output the signal and the signal delayed by one sample period, if the external enable signal is on, with an external Boolean reset The block can reset its state based on an external reset signal R. The block has two output ports. When the external enable signal E is on and the reset R is false, the upper port outputs the signal and the lower port outputs the signal delayed by one sample period. The block has two input ports, one for the input signal u and the other for the enable signal E. When the enable signal E is on and the reset R is true, the block resets the current state to the initial condition given by the Initial condition parameter. The block outputs that state delayed by one sample time through the lower output port, and outputs the state without a delay through the upper output port. When the Enable signal is off, the block is disabled, and the state and output values do not change, except for resets. The enable signal is on when E is not 0, and off when E is 0. The input u and initial condition IC must be the same data type, but can be any data type. The output is the same data type as the inputs u and IC. The reset R can be any data type. You specify the time between samples with the Sample time parameter. A setting of -1 means the Sample time is inherited. 9-247 Unit Delay With Preview Enabled Resettable Parameters and Dialog Box Initial condition Initial condition. Sample time Sample time. Characteristics See Also 9-248 Input Port u Any data type supported by the blockset Input Port E Any data type supported by the blockset Input Port R Any data type supported by the blockset Output Ports Same as the input u Direct Feedthrough Yes, to upper output port No, to lower output port Scalar Expansion Yes Unit Delay, Unit Delay Enabled, Unit Delay Enabled External IC, Unit Delay Enabled Resettable, Unit Delay Enabled Resettable External IC, Unit Delay Unit Delay With Preview Enabled Resettable External IC, Unit Delay Resettable, Unit Delay Resettable External IC, Unit Delay With Preview Enabled, Unit Delay With Preview Enabled Resettable External RV, Unit Delay With Preview Resettable, Unit Delay With Preview Resettable External RV 9-249 Unit Delay With Preview Enabled Resettable External RV Purpose 9Unit Delay With Preview Enabled Resettable External RV Library Delays & Holds Description The Unit Delay With Preview Enabled Resettable External RV block supports calculations that have feedback and depend on the current input. Output the signal and the signal delayed by one sample period, if the external enable signal is on, with an external RV reset The block can reset its state based on an external reset signal R. The block has two output ports. When the external enable signal E is on and the reset R is false, the upper port outputs the signal and the lower port outputs the signal delayed by one sample period. The block has two input ports, one for the input signal u and the other for the enable signal E. When the enable signal E is on and the reset R is true, the upper output signal is forced to equal the external reset signal RV. The lower output signal is not affected until one time step later, at which time it is equal to the external reset signal RV at the previous time step. The block uses the internal Initial condition only when the model starts or when a parent enabled subsystem is used. The internal Initial condition only affects the lower output signal. The first output is only affected through feedback. When the Enable signal is off, the block is disabled, and the state and output values do not change, except for resets. The enable signal is on when E is not 0, and off when E is 0. The input u and initial condition IC must be the same data type, but can be any data type. The output is the same data type as the inputs u and IC. The reset R can be any data type. You specify the time between samples with the Sample time parameter. A setting of -1 means the Sample time is inherited. 9-250 Unit Delay With Preview Enabled Resettable External RV Parameters and Dialog Box Initial condition Initial condition. Sample time Sample time. Characteristics Input Port u Any data type supported by the blockset Input Port E Any data type supported by the blockset Input Port R Any data type supported by the blockset Input Port RV Same as the input u Output Ports Same as the input u Direct Feedthrough Yes, to upper output port No, to lower output port Scalar Expansion Yes 9-251 Unit Delay With Preview Enabled Resettable External RV See Also 9-252 Unit Delay, Unit Delay Enabled, Unit Delay Enabled External IC, Unit Delay Enabled Resettable, Unit Delay Enabled Resettable External IC, Unit Delay External IC, Unit Delay Resettable, Unit Delay Resettable External IC, Unit Delay With Preview Enabled, Unit Delay With Preview Enabled Resettable, Unit Delay With Preview Resettable, Unit Delay With Preview Resettable External RV Unit Delay With Preview Resettable Purpose 9Unit Delay With Preview Resettable Library Delays & Holds Description The Unit Delay With Preview Resettable block supports calculations that have feedback and depend on the current input. Output the signal and the signal delayed by one sample period, with an external Boolean reset The block can reset its state based on an external reset signal R. The block has two output ports. When the reset R is false, the upper port outputs the signal and the lower port outputs the signal delayed by one sample period. When the reset R is true, the block resets the current state to the initial condition given by the Initial condition parameter. The block outputs that state delayed by one sample time through the lower output port, and outputs the state without a delay through the upper output port. The input u and initial condition IC must be the same data type, but can be any data type. The output is the same data type as the inputs u and IC. The reset R can be any data type. You specify the time between samples with the Sample time parameter. A setting of -1 means the Sample time is inherited. 9-253 Unit Delay With Preview Resettable Parameters and Dialog Box Initial condition Initial condition. Sample time Sample time. Characteristics See Also 9-254 Input Port u Any data type supported by the blockset Input Port R Any data type supported by the blockset Output Ports Same as the input u Direct Feedthrough Yes, to upper output port No, to lower output port Scalar Expansion Yes Unit Delay, Unit Delay Enabled, Unit Delay Enabled External IC, Unit Delay Enabled Resettable, Unit Delay Enabled Resettable External IC, Unit Delay External IC, Unit Delay Resettable, Unit Delay Resettable External IC, Unit Delay With Preview Enabled, Unit Delay With Preview Enabled Resettable, Unit Delay With Preview Resettable Unit Delay With Preview Enabled Resettable External RV, Unit Delay With Preview Resettable External RV 9-255 Unit Delay With Preview Resettable External RV Purpose 9Unit Delay With Preview Resettable External RV Library Delays & Holds Description The Unit Delay With Preview Resettable External RV block supports calculations that have feedback and depend on the current input. Output the signal and the signal delayed by one sample period, with an external RV reset The block can reset its state based on an external reset signal R. The block has two output ports. When the external reset R is false, the upper port outputs the signal and the lower port outputs the signal delayed by one sample period. When the external reset R is true, the upper output signal is forced to equal the external reset signal RV. The lower output signal is not affected until one time step later, at which time it is equal to the external reset signal RV at the previous time step. The block uses the internal Initial condition only when the model starts or when a parent enabled subsystem is used. The internal Initial condition only affects the lower output signal. The first output is only affected through feedback. The input u and initial condition IC must be the same data type, but can be any data type. The output is the same data type as the inputs u and IC. The reset R can be any data type. You specify the time between samples with the Sample time parameter. A setting of -1 means the Sample time is inherited. 9-256 Unit Delay With Preview Resettable External RV Parameters and Dialog Box Initial condition Initial condition. Sample time Sample time. Characteristics Input Port u Any data type supported by the blockset Input Port R Any data type supported by the blockset Input Port RV Same as the input u Output Ports Same as the input u Direct Feedthrough Yes, to upper output port No, to lower output port Scalar Expansion Yes 9-257 Unit Delay With Preview Resettable External RV See Also 9-258 Unit Delay, Unit Delay Enabled, Unit Delay Enabled External IC, Unit Delay Enabled Resettable, Unit Delay Enabled Resettable External IC, Unit Delay External IC, Unit Delay Resettable, Unit Delay Resettable External IC, Unit Delay With Preview Enabled, Unit Delay With Preview Enabled Resettable, Unit Delay With Preview Enabled Resettable External RV, Unit Delay With Preview Resettable Wrap To Zero Purpose 9Wrap To Zero Library Nonlinear Description The Wrap To Zero block sets the output to zero if the input is above the value set by the Threshold parameter, and outputs the input if the input is less than or equal to the Threshold. Set output to zero if input is above threshold Parameters and Dialog Box Threshold When the input exceeds the threshold, the output is set to zero. Characteristics Input Port Any data type supported by the blockset Output Ports Same as the input Direct Feedthrough Yes Scalar Expansion Yes 9-259 Zero-Order Hold Purpose 9Zero-Order Hold Library Simulink Discrete and Fixed-Point Blockset Delays & Holds Description The Zero-Order Hold block samples and holds its input for the specified sample period. The block accepts one input and generates one output, both of which can be scalar or vector. If the input is a vector, all elements of the vector are held for the same sample period. Zero−Order Hold Implement a zero-order hold of one sample period You specify the time between samples with the Sample time parameter. A setting of -1 means the Sample time is inherited. This block provides a mechanism for discretizing one or more signals in time, or resampling the signal at a different rate. If your model contains multirate transitions, you must add Zero-Order Hold blocks between the fast-to-slow transitions. The sample rate of the Zero-Order Hold must be set to that of the slower block. For slow-to-fast transitions, use the Unit Delay block. For more information about multirate transitions, refer to the Simulink or the Real-Time Workshop documentation. Data Type Support The Zero-Order Hold block accepts real or complex signals of any data type, including fixed-point data types. Parameters and Dialog Box Sample time Specify the time between samples. A value of -1 means the sample time is inherited. Characteristics 9-260 Dimensionalized Yes Direct Feedthrough Yes Zero-Order Hold Sample Time Discrete Scalar Expansion No Zero Crossing No 9-261 Zero-Order Hold 9-262 A Code Generation Overview (p. A-2) An overview of generating code from models using Fixed-Point Blockset blocks Code Generation Support (p. A-3) A discussion of the simulation features supported by code generation in the Fixed-Point Blockset Generating Pure Integer Code (p. A-5) Step-by-step instructions on generating pure integer code with the Fixed-Point Blockset Using the Simulink Accelerator (p. A-11) Information on using the Simulink accelerator to increase the speed of some Fixed-Point Blockset models Using External Mode or rsim Target (p. A-12) Information on errors that may occur when using the Real-Time Workshop external mode or rapid simulation target with Fixed-Point Blockset code generation Customizing Generated Code (p. A-13) A discussion on customizing code generated with the Fixed-Point Blockset by directly modifying the Target Language Compiler file A Code Generation Overview You can generate C code with the Fixed-Point Blockset using Real-Time Workshop. The code generated from fixed-point blocks uses only integer types and automatically includes all operations, such as shifts, needed to account for differences in fixed-point locations. You can use the generated code on embedded fixed-point processors or rapid prototyping systems even if they contain a floating-point processor. The code is structured so that key operations can be readily replaced by optimized target-specific libraries that you supply. You can also use Target Language Compiler to customize the generated code. For more information about code generation, refer to the Real-Time Workshop and the Target Language Compiler documentation. You can also generate code for testing on a rapid prototyping system such as xPC, the Real-Time Windows Target, or dSPACE. The target compiler and processor may support floating-point operations in software or in hardware. In any case, the fixed-point blocks generate pure integer code and do not use floating-point operations. This allows valid bit-true testing even on a floating-point processor. You can also generate code for nonreal-time testing. For example, you can generate code to run in nonreal-time on computers running any supported operating system. Even though the processors have floating-point hardware, the code generated by fixed-point blocks is pure integer code. The Generic Real-Time Target (GRT) and the Simulink Accelerator are examples of where nonreal-time code is generated and run. A-2 Code Generation Support Code Generation Support All fixed-point blocks support code generation, but not every simulation feature is supported. The code generation support is described below. Languages • C support only Storage Class of Variables • Fixed-Point Blockset code generation handles variables that do not match the target compiler sizes for char, short, int, or long data types. Code generation supports any variable having a width less than or equal to a long, either signed or unsigned. For example, the C40 compiler defines a long to be 32 bits. Therefore, the allowable sizes for variables range between 1 and 32 bits. This capability is particularly useful if you want to - Prototype on one target chip, but use a different target chip for production. - Provide bit-true simulation in a rapid prototyping environment for odd data type sizes used by FPGAs, ASICs, 24-bit DSPs, and so on. • The Fixed-Point Blockset supports floating-point types, except for custom floating-point types. Storage Class of Parameters • The Real-Time Workshop external mode support requires that parameters be 1 to 32 bits, either signed or unsigned. The parameter size must also be compatible with the target C compiler. • No floating-point support Rounding Modes • All four rounding modes are supported. • Rounding to floor generates the most efficient code for most cases. A-3 A Code Generation Overflow Handling • Saturation mode is supported. • Wrapping mode is supported and generates the most efficient code. • Automatic exclusion of saturation code when hardware saturation is available is currently not supported. Wrapping must be selected for Real-Time Workshop to exclude saturation code. Blocks All blocks generate code for all operations with a few exceptions: • The Look-Up Table, Look-Up Table (2D), and Dynamic Look-Up Table blocks generate code for all look-up methods except extrapolation. • A few combinations of scaling and operations lead to highly inefficient code. These few cases are described in the next section. Scaling • Radix point-only scaling is supported. • [Slope Bias] scaling is supported for all blocks except when it leads to highly inefficient code. All blocks except four support all cases of [Slope Bias] scaling. The Gain, Matrix Gain, and FIR blocks support matched [Slope Bias] scaling where the block input signals and output signals have the same slopes and biases, but not mismatched [Slope Bias] scaling. The Product block supports mismatched slope, but not mismatched bias. For more information about matched and mismatched [Slope Bias] scaling, refer to “Signal Conversions” on page 4-27. We generally recommend that signals with [Slope Bias] scaling (such as a sensor input) are immediately converted to radix point-only scaling. This typically produces more efficient code. A-4 Generating Pure Integer Code Generating Pure Integer Code All blocks generate pure integer code except for the Gateway In, Gateway In Inherited, and Gateway Out blocks. These blocks must generate floating-point code when handling floating-point input or output. However, if the input or output is an integer and the block is configured to treat the input or output as a stored integer, then these blocks will also generate pure integer code. Example: Generating Pure Integer Code This example outlines the steps you should take when generating pure integer code for your Fixed-Point Blockset model. The steps follow the description in the fxpdemo_code_only demo, which includes the model shown below. Note This example generates code using the Embedded C Real-Time Target (ERT), which is available with Real-Time Workshop Production Coder. If your version of Real-Time Workshop does not support ERT code generation, then you may want to select the Generic Real-Time Target (GRT). Using GRT, all Fixed-Point Blockset blocks (except the gateway blocks) will generate pure integer code. However, the code related to the GRT infrastructure is not generated to exclude floating-point operations. For example, GRT may decide when to execute blocks based on a floating-point counter. 1 Copy the fixed-point portion of your model to a new model. If your original model includes blocks that represent hardware, analog systems, and other blocks not related to embedded software, then you must A-5 A Code Generation create a new model. This new model contains only the fixed-point portion, which represents the software that will be running on the fixed-point processor. For example, the digital controller subsystem shown above contains the fixed-point blocks from the fxpdemo_feedback model used for code generation. 2 Add root-level Inport and Outport blocks. a Precede the blocks in your new model with root-level Inport blocks, and configure the Inport blocks to use the appropriate data type and scaling. For example, the Inport block shown above is configured to use the sfix(8) data type and to have an output scaling of 2^-4. b Follow the blocks in your new model with root-level Outport blocks. 3 Configure the simulation parameters. a Open the Simulink Simulation Parameters dialog box by selecting Simulation parameters under the Simulation menu. b In the Solver window, configure Solver options to Fixed-step and discrete (no continuous states), and configure Fixed step size to the required value. The Solver window for this configuration is shown below. c A-6 Select the Real-Time Workshop tab in the Simulation Parameters dialog box. Select the Browse button in the Configuration panel to open the System Target File Browser window. If it is available, select RTW Embedded Coder as the system target file as shown below, and click OK. Generating Pure Integer Code Note that you may not have ERT code generation capability. If this is the case, you should select the Generic Real-Time Target. The Real-Time Workshop pane now appears as shown below. d To configure the code generation parameters, select ERT code generation options (1) from the Category parameter drop-down menu. Select the Integer code only check box and any other options that A-7 A Code Generation you require. The ERT code generation options for this configuration are shown below. If you are using GRT, the dialog box choices are slightly different. A-8 e Select ERT code generation options (2) from the Category parameter drop-down menu. Select the Initialize floats and doubles to 0.0 check box and any other options that you require, as shown below. f Select General code generation options from the Category parameter drop-down menu. Select the Generate HTML report check box and any other options that you require, as shown below. Generating Pure Integer Code g Build the code by selecting the Generate code button. HTML Report When you select the Generate HTML report check box, Real-Time Workshop creates a report containing information about the generated code. The report, which is displayed in the Help browser, includes a table of the current code generation options. The color of the values in the right column indicates how the values affect code optimization. Values displayed in green are optimal for code generation, while values displayed in red are less than optimal. If you see a red value, change the corresponding setting in the Simulation Parameters dialog box. Then select the Real-Time Workshop tab and click Generate Code to generate new code. A screenshot of a report follows: A-9 A Code Generation The HTML report is contained in a subdirectory called HTML in your current working directory. A-10 Using the Simulink Accelerator Using the Simulink Accelerator You can use the Simulink Accelerator with your Fixed-Point Blockset model if the model meets the code generation restrictions. The Simulink Accelerator can drastically increase the speed of some fixed-point models. This is especially true for models that execute at a very large number of time steps. The time overhead to generate code for a fixed-point model will generally be larger than the time overhead to set up a model for simulation. As the number of time steps increases, the relative importance of this overhead decreases. Refer to the Simulink documentation for more information about the Simulink Accelerator. A-11 A Code Generation Using External Mode or rsim Target If you are using the Real-Time Workshop external mode or rapid simulation (rsim) target, there are situations where you may get unexpected errors when tuning block parameters. These errors can arise when you use blocks that support constant scaling for best precision and you use the Best precision scaling option. To avoid these errors, you should use the Use specified scaling parameter value. Refer to “Example: Constant Scaling for Best Precision” on page 3-11 for a description of the constant scaling feature. Refer to Chapter 9, “Block Reference” for a description of blocks that support this feature. For more information about external mode or rapid simulation target, refer to the Real-Time Workshop documentation. External Mode If you change a fixed-point block parameter by a sufficient amount (approximately a factor of two), the radix point changes. If you change a parameter such that the radix point moves during an external mode simulation (or during graphical editing) and you reconnect to the target, a checksum error occurs and you must rebuild the code. For example, suppose a block has a parameter value of -2. You then build the code and connect in external mode. While connected, you change the parameter to -4. If the simulation is stopped and then restarted, this parameter change causes a radix point change. In external mode, the radix point is kept fixed. If you keep the parameter value of -4 and disconnect from the target, then when you reconnect, a checksum error occurs and you must rebuild the code. Rapid Simulation Target If a parameter change is great enough, and you are using the best precision mode for constant scaling, then you cannot use the rapid simulation target. If you change a block parameter by a sufficient amount (approximately a factor of two), the best precision mode changes the radix point. Any change in the radix point requires the code to be rebuilt since the model checksum is changed. This means that if best precision parameters are changed over a great enough range, you cannot use the rapid simulation target and a checksum error message occurs when you initialize the rsim executable. A-12 Customizing Generated Code Customizing Generated Code You can customize generated code by directly modifying the Target Language Compiler file fixpttarget.tlc, which is located in the fixpoint directory. The two most important customizations are described below. Macros Versus Functions You can modify the TLC file to generate macros or C functions calls. With macros, you can avoid the overhead of a function call. With function calls, you can significantly reduce the overall code size for large routines. Additionally, many debuggers will not allow you to single-step through macros. This is not the case with function calls. The factory default setting is to generate macros. Bit Sizes for Target C Compiler You can modify the TLC file to accommodate custom target sizes by explicitly specifying the number of bits defined for char, short, int, or long data types. If you do not manually override these sizes, then the sizes for the MATLAB host computer are automatically selected. For example, if you are running MATLAB under the Windows operating system, then char, short, int, and long default to 8, 16, 32, and 32 bits, respectively. Most other supported operating systems use the same data type sizes. However DEC Alpha, for example, defines a long as 64 bits. A-13 A Code Generation A-14 B Selected Bibliography [1] Burrus, C. S., J.H. McClellan, A.V. Oppenheim, T.W. Parks, R.W. Schafer, and H.W. Schuessler, Computer-Based Exercises for Signal Processing Using MATLAB, Prentice Hall, Englewood Cliffs, New Jersey, 1994. [2] Franklin, G.F., J.D. Powell, and M.L. Workman, Digital Control of Dynamic Systems, Second Edition; Addison-Wesley Publishing Company, Reading, Massachusetts, 1990. [3] Handbook For Digital Signal Processing, edited by S.K. Mitra and J.F. Kaiser; John Wiley & Sons, Inc., New York, 1993. [4] Hanselmann, H., “Implementation of Digital Controllers — A Survey,” Automatica, vol. 23, no. 1, pp 7-32, 1987. [5] Jackson, L.B., Digital Filters and Signal Processing, Second Edition, Kluwer Academic Publishers, Seventh Printing, Norwell, Massachusetts, 1993. [6] Middleton, R. and G. Goodwin, Digital Control and Estimation – A Unified Approach, Prentice Hall, Englewood Clifs, New Jersey. 1990. [7] Moler, C., "Floating points: IEEE Standard unifies arithmetic model," Cleve's Corner, The MathWorks, Inc., 1996. You can find this article at http://www.mathworks.com/company/newsletter/clevescorner/cleve_toc .shtml [8] Ogata, K., Discrete-Time Control Systems, Second Edition, Prentice Hall, Englewood Cliffs, New Jersey, 1995. [9] Roberts, R.A. and C.T. Mullis, Digital Signal Processing, Addison-Wesley Publishing Company, Reading, Massachusetts, 1987.Burrus, C. S., J.H. McClellan, A.V. Oppenheim, T.W. Parks, R.W. Schafer, and H.W. Schuessler, Computer-Based Exercises for Signal Processing Using MATLAB, Prentice Hall, Englewood Cliffs, New Jersey, 1994. B Selected Bibliography [1] Franklin, G.F., J.D. Powell, and M.L. Workman, Digital Control of Dynamic Systems, Second Edition; Addison-Wesley Publishing Company, Reading, Massachusetts, 1990. [2] Handbook For Digital Signal Processing, edited by S.K. Mitra and J.F. Kaiser; John Wiley & Sons, Inc., New York, 1993. [3] Hanselmann, H., “Implementation of Digital Controllers — A Survey,” Automatica, vol. 23, no. 1, pp 7-32, 1987. [4] Jackson, L.B., Digital Filters and Signal Processing, Second Edition, Kluwer Academic Publishers, Seventh Printing, Norwell, Massachusetts, 1993. [5] Middleton, R. and G. Goodwin, Digital Control and Estimation – A Unified Approach, Prentice Hall, Englewood Clifs, New Jersey. 1990. [6] Moler, C., "Floating points: IEEE Standard unifies arithmetic model," Cleve's Corner, The MathWorks, Inc., 1996. You can find this article at http://www.mathworks.com/company/newsletter/clevescorner/cleve_toc .shtml [7] Ogata, K., Discrete-Time Control Systems, Second Edition, Prentice Hall, Englewood Cliffs, New Jersey, 1995. [8] Roberts, R.A. and C.T. Mullis, Digital Signal Processing, Addison-Wesley Publishing Company, Reading, Massachusetts, 1987. B-2 Index A Abs block 9-24 accumulations scaling recommendations 4-19 slope/bias encoding 4-19 Accumulator block 9-26 accumulator data types 5-3 feedback controller demo 6-9 Accumulator Resettable block 9-27 Accumulator Resettable Limited block 9-29 Add block 9-31 addition 9-216 blockset rules 4-30 scaling recommendations 4-17 slope/bias encoding 4-16 ALUs 4-30 arithmetic logic units (ALUs) 4-30 arithmetic shifts 4-41 autofixexp function 8-6 automatic scaling 8-32 autoscale safety margin 8-35 feedback controller demo 6-15 script 8-6 B base data type 5-3 feedback controller demo 6-9 binary point 3-3 Bit Clear block 9-32 Bit Set block 9-33 bits 3-3 clear 9-35 hidden 3-17 mask 9-35 multipliers 3-7 set 9-35 shifts 4-41 Bitwise Operator block 9-34 block configurations 2-2 selecting a data type 2-3 selecting a scaling 2-5 block icon labels 9-20 block parameters 9-16 blocks Abs 9-24 Accumulator 9-26 Accumulator Resettable 9-27 Accumulator Resettable Limited 9-29 Add 9-31 Bit Clear 9-32 Bit Set 9-33 Bitwise Operator 9-34 Compare To Constant 9-38 Compare To Zero 9-39 Constant 9-40 Conversion 9-43 Conversion Inherited 9-45 Cosine 9-47 Counter Free 9-48 Counter Limited 9-49 Data Type Duplicate 9-50 Data Type Propagation 9-52 Dead Zone 9-61 Dead Zone Dynamic 9-63 Decrement Real World 9-64 Decrement Stored Integer 9-65 Decrement Time To Zero 9-66 Decrement To Zero 9-67 Derivative 9-68 Detect Change 9-70 Detect Decrease 9-71 Detect Fall Negative 9-72 I-1 Index Detect Fall Nonpositive 9-73 Detect Increase 9-74 Detect Rise Nonnegative 9-75 Detect Rise Positive 9-76 Difference 9-77 Divide 9-79 Dot Product 9-80 Filter Direct Form I 9-82 Filter Direct Form I Time Varying 9-84 Filter Direct Form II 9-86 Filter Direct Form II Time Varying 9-88 Filter First Order 9-90 Filter Lead or Lag 9-92 Filter Real Zero 9-94 FIR 9-96 Free Counter 9-101 Gain 9-101 Gateway In 9-107 Gateway In Inherited 9-112 Gateway Out 9-114 Increment Real World 9-117 Increment Stored Integer 9-118 Index Vector 9-119 Integer Delay 9-120 Integrator Backward 9-121 Integrator Backward Resettable 9-123 Integrator Backward Resettable Limited 9-125 Integrator Forward 9-128 Integrator Forward Resettable 9-130 Integrator Forward Resettable Limited 9-132 Integrator Trapezoidal 9-135 Integrator Trapezoidal Resettable 9-137 Integrator Trapezoidal Resettable Limited 9-139 Interval Test 9-142 Interval Test Dynamic 9-144 I-2 Logical Operator 9-145 Look-Up Table 9-149 Look-Up Table (2-D) 9-159 Look-Up Table Dynamic 9-155 Matrix Gain 9-164 MinMax 9-165 Multiply 9-168 Multiply Matrix 9-169 Multiport Switch 9-170 Product 9-173 Product of Elements 9-179 Product of Elements Inverted 9-180 Rate Limiter 9-181 Rate Limiter Dynamic 9-182 Relational Operator 9-183 Relay 9-187 Repeating Sequence Interpolated 9-191 Repeating Sequence Stair 9-193 Sample Rate Probe 9-196 Sample Time Add 9-197 Sample Time Divide 9-198 Sample Time Multiply 9-199 Sample Time Probe 9-202 Sample Time Subtract 9-203 Saturation 9-204 Saturation Dynamic 9-206 Scaling Strip 9-207 Shift Arithmetic 9-208 Sign 9-210 Sine 9-211 State-Space 9-212 Subtract 9-215 Sum 9-216 Sum of Elements 9-220 Sum of Elements Negated 9-221 Switch 9-222 Tapped Delay 9-225 Index Unary Minus 9-227 Unit Delay Unit Delay block 9-228 Unit Delay Enabled 9-231 Unit Delay Enabled External IC 9-233 Unit Delay Enabled Resettable 9-235 Unit Delay Enabled Resettable External IC 9-237 Unit Delay External IC 9-239 Unit Delay Resettable 9-241 Unit Delay Resettable External IC 9-243 Unit Delay With Preview Enabled 9-245 Unit Delay With Preview Enabled Resettable 9-247 Unit Delay With Preview Enabled Resettable External RV 9-250 Unit Delay With Preview Resettable 9-253 Unit Delay With Preview Resettable External RV 9-256 Wrap To Zero 9-259 Zero-Order Hold 9-260 Bode plots 6-6 boolean operations 9-145 broken links restoring 8-27 built-in data types 1-15 summation 4-32 Compare to Constant block 9-38 Compare To Zero block 9-39 computational noise 4-2 rounding 4-3 computational units 4-30 Constant block 9-40 constant scaling for best precision 3-11 limitations for code generation A-12 contiguous bits 3-16 Conversion block 9-43 Conversion Inherited block 9-45 conversions parameter 4-27 signal 4-27 See also online conversion, offline conversion converting built-in data types to fixed-point 9-107 built-in models to fixed-point 8-10 fixed-point data types to built-in 9-114 old models 8-30 Cosine block 9-47 Counter Free block 9-48 Counter Limited block 9-49 D C ceil function 4-7 chopping 4-8 clearing bits 9-35 code generation A-2 multiplication 4-36 scaling 9-110 signal conversions 4-29 stored integer output 9-114 Data Type Duplicate block 9-50 Data Type Propagation block 9-52 data types 2-3 built-in 1-15 display 9-21 fractional numbers 2-4 generalized fixed-point numbers 2-4 IEEE numbers 2-5 inherited 9-16 integers 2-4 I-3 Index parameters 3-9 propagation 9-52 selecting 9-16 Dead Zone block 9-61 Dead Zone Dynamic block 9-63 Decrement Real World block 9-64 Decrement Stored Integer block 9-65 Decrement Time To Zero block 9-66 Decrement To Zero block 9-67 demos 2-15 denormalized numbers 3-21 Derivative block 9-68 Detect Change block 9-70 Detect Decrease block 9-71 Detect Fall Negative block 9-72 Detect Fall Nonpositive block 9-73 Detect Increase block 9-74 Detect Rise Nonnegative block 9-75 Detect Rise Positive block 9-76 development cycle 1-14 dialog box parameters 9-16 data type 9-16 lock output scaling 9-19 overflow handling 9-20 rounding 9-20 Difference block 9-77 digital controllers 6-7 digital filters 5-2 direct form realization 5-7 feedback controller demo 6-8 Divide block 9-79 division 9-173 blockset rules 4-39 scaling recommendations 4-23 slope/bias encoding 4-23 Dot Product block 9-80 double bits 4-35 I-4 double-precision formats 3-18 E encapsulation 8-11 encoding schemes 3-5 eps function 3-20 examples constant scaling for best precision 3-11 conversions and arithmetic operations 4-43 converting from doubles to fixed-point 2-10 division process 4-40 fixed-point format 3-7 fixed-point scaling 3-10 generating pure integer code A-5 limitations on precision and errors 4-10 limitations on range 4-15 maximizing precision 4-10 multiplication process 4-37 saturation and wrapping 4-13 selecting a measurement scale 1-4 summation process 4-32 exceptional arithmetic 3-21 exponents IEEE numbers 3-17 external mode A-12 F feedback designs 6-3 Filter Direct Form I block 9-82 Filter Direct Form I Time Varying block 9-84 Filter Direct Form II block 9-86 Filter Direct Form II Time Varying block 9-88 Filter First Order block 9-90 Filter Lead or Lag block 9-92 Filter Real Zero block 9-94 Index filters digital 5-2 FIR block 9-96 fix function 4-4 Fixed-Point Interface Tool 8-32 fixed-point numbers general format 3-3 scaling 3-5 Fixed-Point Settings interface feedback controller demo 6-10 fixpt_convert function 8-10 fixpt_convert_prep function 8-15 fixpt_interp1 function 8-16 fixpt_look1_func_approx function 8-17 fixpt_look1_func_plot function 8-25 fixpt_restore_links function 8-27 fixpt_set_all function 8-28 fixptbestexp function 8-8 fixptbestprec function 8-9 float function 8-29 floating-point numbers 3-17 floor function 4-8 fpupdate function 8-30 fraction IEEE numbers 3-17 fractional numbers 2-4 guard bits 4-15 fractional slope 3-5 frame-based signals 1-17 Free Counter block 9-101 functions autofixexp 8-6 fixpt_convert 8-10 fixpt_convert_prep 8-15 fixpt_interp1 8-16 fixpt_look1_func_approx 8-17 fixpt_look1_func_plot 8-25 fixpt_restore_links 8-27 fixpt_set_all 8-28 fixptbestexp 8-8 fixptbestprec 8-9 float 8-29 fpupdate 8-30 fxptdlg 8-32 num2fixpt 8-37 sfix 8-38 sfrac 8-39 showfixptsimerrors 8-40 showfixptsimranges 8-41 sint 8-42 ufix 8-43 ufrac 8-44 uint 8-45 fxptdlg function 8-32 G gain Matrix Gain block 9-164 scaling recommendations 4-22 using slope/bias encoding 4-21 Gain block 9-101 gateway built-in to fixed-point 9-107 built-in to fixed-point, inherited 9-112 fixed-point to built-in 9-114 Gateway In block 9-107 Gateway In Inherited block 9-112 Gateway Out block 9-114 generalized fixed-point numbers 2-4 Generic Real-Time Target A-5 global overrides with doubles 6-13 guard bits 4-14 GUI I-5 Index block 8-32 See also Fixed-Point Interface Tool H help xii hidden bits 3-17 I icon labels 9-20 IEEE floating-point numbers formats double precision 3-18 exponent 3-17 fraction 3-17 nonstandard 3-19 sign bit 3-17 single precision 3-18 precision 3-20 range 3-19 Increment Real World block 9-117 Increment Stored Integer block 9-118 Index Vector block 9-119 infinity 3-22 inherited built-in to fixed-point conversion 9-112 data types 9-16 by backpropagation 9-52 scaling by backpropagation 9-52 installation xix Integer Delay block 9-120 integers 2-4 code generation A-5 outputting large values 9-114 Integrator Backward Resettable block 9-123 I-6 Integrator Backward Resettable Limited block 9-125 Integrator Forward block 9-128 Integrator Forward Resettable block 9-130 Integrator Forward Resettable Limited block 9-132 Integrator Trapezoidal block 9-135 Integrator Trapezoidal Resettable block 9-137 Integrator Trapezoidal Resettable Limited block 9-139 Interval Test block 9-142 Interval Test Dynamic block 9-144 L least significant bit (LSB) 3-3 licensing xiii limit cycles 4-2 feedback controller demo 6-19 links restoring broken 8-27 locking output scaling 9-19 logging large integer values 9-114 logical operations 9-145 Logical Operator block 9-145 logical shifts 4-41 Look-Up Table (1-D) block 9-149 Look-Up Table (2-D) block 9-159 Look-Up Table Dynamic block 9-155 LSB (least significant bit) 3-3 M MACs 4-30 propagating data type information for 9-56 Index masking bits 9-35 Matrix Gain block 9-164 matrix signals 1-18 maximum values 9-165 measurement scales 1-2 minimum values 9-165 MinMax block 9-165 modeling the system 1-14 most significant bit (MSB) 3-3 MSB (most significant bit) 3-3 multiplication 9-173 blockset rules 4-35 scaling recommendations 4-20 slope/bias encoding 4-20 multiply and accumulate units 4-30 Multiply block 9-168 Multiply Matrix block 9-169 Multiport Switch block 9-170 N NaNs 3-22 nonstandard IEEE format 3-19 num2fixpt function 8-37 O offline conversions 4-27 addition and subtraction 4-31 multiplication 4-36 signals 4-28 online conversions addition and subtraction 4-31 multiplication 4-36 signals 4-28 online help xii overflows 4-2 code generation A-4 handling by fixed-point blocks 9-20 saturation 6-11 overrides with doubles global override 6-13 P padding with trailing zeros 4-9 feedback controller demo 6-7 parallel form realization 5-13 parameter conversions 4-27 See also conversions Plot System Interface 8-35 port data type display 9-21 precision best 8-8 fixed-point numbers 3-9 IEEE floating-point numbers 3-20 maximum 8-9 prerequisites xx Product block 9-173 Product of Elements block 9-179 Product of Elements Inverted block 9-180 propagation of data types 9-52 Q quantization 4-2 effects of fixed-point arithmetic 2-12 feedback controller demo 6-13 real-world value 3-6 rounding 4-3 R radix point 3-3 I-7 Index radix point-only scaling 3-6 range fixed-point numbers 3-9 IEEE floating-point numbers 3-19 rapid simulation (rsim) target A-12 Rate Limiter block 9-181 Rate Limiter Dynamic block 9-182 realizations design constraints 5-6 direct form 5-7 parallel form 5-13 series cascade form 5-10 Real-Time Workshop external mode A-12 GRT A-5 Production Coder A-5 rapid simulation (rsim) target A-12 Target Language Compiler A-13 real-world values 3-5 block input 9-107 relational operations 9-183 Relational Operator block 9-183 Relay block 9-187 release information xii Repeating Sequence Interpolated block 9-191 Repeating Sequence Stair block 9-193 round function 4-6 rounding modes 4-3 blocks 9-20 code generation A-3 toward ceiling 4-6 toward floor 4-7 toward nearest 4-5 toward zero 4-4 rsim target A-12 RTW Production Coder A-5 I-8 S Sample Rate Probe block 9-196 Sample Time Add block 9-197 Sample Time Divide block 9-198 Sample Time Multiply block 9-199 Sample Time Probe block 9-202 Sample Time Subtract block 9-203 saturation 4-13 Saturation block 9-204 Saturation Dynamic block 9-206 scaling accumulation 4-19 addition 4-16 code generation A-4 constant scaling for best precision 3-11 division 4-23 gain 4-21 locking 9-19 multiplication 4-20 output 2-5 radix point-only 3-6 slope/bias 3-6 Scaling Strip block 9-207 scientific notation 3-15 series cascade form realizations 5-10 setting bits 9-35 sfix function 8-38 sfrac function 8-39 Shift Arithmetic block 9-208 shifts 4-41 showfixptsimerrors function 8-40 showfixptsimranges function 8-41 sign extension 4-15 input signal 9-210 sign bit for IEEE numbers 3-17 Sign block 9-210 Index signal conversions 4-27 Simulink Accelerator A-11 Sine block 9-211 single-precision format 3-18 sint function 8-42 slope/bias scaling 3-6 State-Space block 9-212 stored integers 2-3 as block input 9-107 as block output 9-114 Subtract block 9-215 subtraction 9-216 See also addition Sum block 9-216 Sum of Elements block 9-220 Sum of Elements Negated block 9-221 Switch block 9-222 T Tapped Delay block 9-225 Target Language Compiler A-13 targeting an embedded processor design rules 5-4 operation assumptions 5-3 size assumptions 5-3 TLC file A-13 truncation 4-8 two’s complement 3-3 typographical conventions xx underflow 3-20 Unit Delay Enabled block 9-231 Unit Delay Enabled External IC block 9-233 Unit Delay Enabled Resettable block 9-235 Unit Delay Enabled Resettable External IC block 9-237 Unit Delay External IC block 9-239 Unit Delay Resettable block 9-241 Unit Delay Resettable External IC block 9-243 Unit Delay With Preview Enabled block 9-245 Unit Delay With Preview Enabled Resettable block 9-247 Unit Delay With Preview Enabled Resettable External RV block 9-250 Unit Delay With Preview Resettable block 9-253 Unit Delay With Preview Resettable External RV block 9-256 updating old models 8-30 W Wrap To Zero block 9-259 wrapping 4-13 Z Zero-Order Hold block 9-260 U ufix function 8-43 ufrac function 8-44 uint function 8-45 Unary Minus block 9-227 I-9 Index I-10