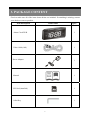
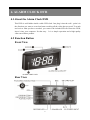
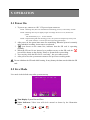
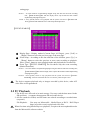
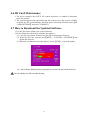
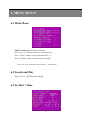
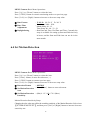
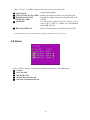
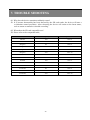
1
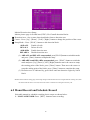
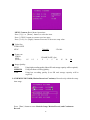
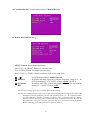
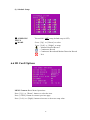
Model Number: RECLKSD-1
REVO AMERICA
700 FREEPORT PARKWAY SUITE 100 COPPELL
TX 75019 U.S.A TEL: 1-866-625-REVO (7386)
Alarm Clock Digital Video Recorder
USER MANUAL
VER.: 1.0, P/N: R040610C-REVODVR
Contents
1. SAFETY PRECAUTIONS .......................................................................................................... 1
2. FEATURES .................................................................................................................................. 2
3. PACKAGE CONTENT................................................................................................................ 3
4. ALARM CLOCK DVR................................................................................................................ 4
4.1 ABOUT THE ALARM CLOCK DVR .................................................................................. 4
4.2 FUNCTION BUTTON .......................................................................................................... 4
5. OPERATION................................................................................................................................ 6
5.1 POWER ON ........................................................................................................................... 6
5.2 LIVE MODE.......................................................................................................................... 6
5.3 RECORD MODE................................................................................................................... 7
5.4 PLAYBACK MODE.............................................................................................................. 8
5.5 PC PLAYBACK................................................................................................................... 10
5.6 SD CARD MAINTENANCE .............................................................................................. 11
5.7 HOW TO DOWNLOAD THE UPDATED SOFTWARE ................................................... 11
6. MENU SETUP........................................................................................................................... 12
6.1 MAIN MENU ...................................................................................................................... 12
6.2 SEARCH AND PLAY ......................................................................................................... 12
6.4 SET MOTION DETECTION .............................................................................................. 13
6.5 MANUL RECORD AND SCHEDULE RECORD ............................................................. 14
6.6 SD CARD OPTIONS........................................................................................................... 17
6.7 SYSTEM .............................................................................................................................. 18
6.8 STATUS ............................................................................................................................... 19
7. TROUBLE SHOOTING ............................................................................................................ 20
8. SPECIFICATION....................................................................................................................... 21
1. SAFETY PRECAUTIONS
CAUTION
RISK OF ELECTRIC SHOCK.
DO NOT OPEN!
CAUTION :
TO REDUCE THE RISK OF ELECTRICAL SHOCK,
DO NOT OPEN COVERS (OR BACK).
NO USER SERVICEABLE PARTS INSIDE.
REFER SERVICING TO QUALIFIED
SERVICE PERSONNEL.
It is advised to read the Safety Precaution Guide through carefully before operating the
product, to prevent any possible danger.
WARNING: This symbol is intended to alert the user to the presence of un-insulated “dangerous voltage”.
CAUTION: This symbol is intended to alert the user to presence of important operating and
maintenance (Servicing) instructions in the literature accompanying the appliance.
Disposal of Old Electrical & Electronic Equipment (Applicable in the European Union
and other European countries with separate collection systems).
This symbol on the product or on its packaging indicates that this product shall not be treated as household
waste. Instead it shall be handed over to the applicable collection point for the recycling of electrical and
electronic equipment. By ensuring this product is disposed of correctly, you will help prevent potential
negative consequences for the environment and human health, which could otherwise be caused by
inappropriate waste handling of this product. The recycling of materials will help to conserve natural
resources. For more detailed information about recycling of this product, please contact your local city office,
your household waste disposal service or the shop where you purchased the product.
Do not plug and unplug the power cord during operation, it may result product malfunction.
Do not install the product in an environment where the humidity is high.
Unless the product is waterproof or weatherproof, otherwise poor image quality may occur.
Do not drop the product or subject them to physical shocks.
Except for vandal-proof or shockproof product, otherwise malfunctions may occur.
Never keep the product to direct strong light.
It can damage the product.
Do not spill liquid of any kind on the product.
If it gets wet, wipe it dry immediately. Alcohol or beverage can contain minerals that corrode the
electronic components.
Do not install the product in extreme temperature conditions.
Use the product under conditions where temperatures are between 5∘
C(41∘
F) ~ 45∘
C.(113∘
F). Be especially
careful to provide ventilation when operating under high temperatures.
1
2. FEATURES
z The DVR is built-in with H.264 video. It supports video recording and playback
operation.
z Video data are recorded directly on the SD card with FAT32 file system and AVI file
format. Simple data backup method to a PC.
z You can view the data straight from your PC, and playback those AVI files with popular
media players.
z Supports up to 32GB SD card.
z The DVR supports: Manual, Schedule Event Detection, and Schedule Continuous Record
mode with independent video size, quality, and frame rate setup.
z Schedule Record can be setup to ON/ OFF and per hour.
z For motion detection, multiple detection blocks and appropriate motion trigger level
setup.
z Supports loop recording function, and the duration of the video files can be setup
according to personal preference.
z Use anywhere, the DVR supports either DC power adaptor.
2
3. PACKAGE CONTENT
Check to make sure all of the items shown below are included. If something is missing, contact
your dealer as soon as possible.
Item Description
Item Picture
QTY
Alarm Clock DVR
1
Video Cable(10ft)
1
Power Adaptor
1
Manual
1
SD Card (installed)
1
Allen Key
1
3
4. ALARM CLOCK DVR
4.1 About the Alarm Clock DVR
This DVR is well hidden inside a table LED clock. Just plug it into the wall... point it in
the direction you want to record and start recording all the video that you need. To watch
and review what you have recorded, you remove the included SD card from the DVR,
insert it into your computer. It's that easy. It is a simple operation and a high quality
video surveillance product.
4.2 Function Button
Front View
Rear View
4
Start the Device
z
After the Alarm Clock DVR has been connected to the power supply, please check the
time displayed. You will have to manually set the correct time and alarm.
z
Time is displayed in PM; A “PM” indicator will appear on the display for PM time
only and when PM is not displayed this indicates that the time is AM.
z
Alarm symbol ( ) appear on the display indicates that the alarm has been setup to
activate at the preset time.
Set the Clock
z
Slide the switch to the TIME (4) position.
z
Press and hold the HOUR button (1) to advance to the desired hour. A “PM” indicator
will appear on the display for PM time only.
z
Press and hold the MINUTE button (2) to advance to the desired minute.
z
Slide the mode switch to LOCK position (4) to complete the clock time setting.
Set the Alarm Time
z
Slide the switch to the ALARM (4) position.
z
Press and hold the HOUR button (1) to advance to the desired hour. A “PM” indicator
will appear on the display for PM time only.
z
Press and hold the MINUTE button (2) to advance to the desired minute.
z
Slide the mode switch to LOCK position (4) to complete the alarm time setting.
Set the Alarm ON/ OFF
z
z
Move the Alarm ON/OFF (3) switch to ON position. The alarm symbol ( ) will
appear on the display. The alarm will be activated at the preset time and sound for
8~9 minutes.
Move the Alarm ON/OFF (3) switch OFF position to shut off the alarm.
Snooze Operation
•
Press the SNOOZE (5) button to delay the Alarm for 8~9 minutes after the alarm
sounds.
Cleaning the Device
z
Do not use polish solvents or strong detergents to clean the unit. The cabinet can be
cleaned with a piece of soft cloth soaked with little water. The power plug should
ALWAYS be disconnected from the main power supply during the cleaning.
5
5. OPERATION
5.1 Power On
1. To power-up, connect to a DC 12V power input connector.
NOTE 1: Booting time (does not include SD card checking process) is about thirty seconds.
NOTE 2: Booting time may be slightly longer if an image file error occurs, because the
system
will automatically try to fix this situation.
NOTE 3: Implementing SD card checking process, the system will temporarily be busy and
may result in delays or a short-term frozen operating time display .
2. After power on, the system auto enters live monitoring. When the system is currently
under schedule recording, it auto enters record mode.
3. “ ” icon shown on the status line, indicates that the SD card is operating
normally.
4. When the SD card is not inserted or a problem occurs on the SD card, the “ ”
icon will be shown on the display. Please re-format before proceeding.
5. You can play while the SD card is “read only”, but you cannot record.
6. After power-loss the system auto returns to the previous recording mode.
Do not withdraw the SD card while booting. It may destroy the data stored within the SD
card.
5.2 Live Mode
Live mode is the default setup after system start-up.
① Time Display: System Date and Time.
② Video Indicator: Video icon will circle around as shown by the illustration
below.
Î
Î
Î
6
③ Video Status: :Manual Record
:Schedule Continuous Record
:Motion Detection Record
:Continuous Record+Motion Detection Record
④ Camera status: Indicates camera connection.
⑤ REC format (resolution)
:CIF resolution in NTSC system
:D1 resolution in NTSC system
⑥ REC format (quality)
:High quality
:Medium quality
:Low quality
⑦ SD Card Status:
:SD Card has not been inserted or malfunctioning.
:SD Card is functioning normally.
:Disk full.
:Overwrite prevention status.
SD Card is proceeding file testing.
⑧ SD Card loop function: Overwrites the earliest file if SD card has been full
while recoding.
When SD card is not inserted, record and playback function is inapplicable, but
monitoring is applicable.
5.3 Record Mode
1. Start Record: 3 types of recording mode.
(1) Manual Record: Suitable to record at anytime. Press《REC》button, to enter
manual recording status (start recording).
(2) Schedule Motion Detection Record: Suitable to record, when there are
severe image changes. Motion detection triggers schedule recording, but it
will only start recording when the variation exceeds the alarm limitation
value.
(3) Schedule Continuous Record: Suitable for few constant frame recording or
on long-term continuous recording.
2. Stop Record:
Manual Record
Schedule Record
Press《STOP》button, or stops manual recording when entering
playback mode.
Enter playback mode, all kinds of recordings (Motion
Detection/ Continuous) under schedule recording will be
stopped.
7
To continue recording, please follow the methods below to restart recording.
Repress《REC》button.
Manual Record
Schedule Record Stop playback and the system will auto re-check the record
schedule setup again.
3. System recording is determined according to the recording priority order (Record
Priority: Manual/ Motion Detection/ Continuous).
4. Different recording modes may have different kinds of setups. Basic setup: video
size, recording frames, and video quality When different recording modes are
triggered, the system starts recording according to the different setup. This kind of
design provides flexibility to ensure efficient recording time and quality. Example:
Work hour from 8:00am to 6:00pm, setup「Schedule Record」to low video quality
with less recording frames to extend the recording time. And off work hour, setup
「Motion Detection Record」 to enable high video quality with the highest
recording frames, when an event occurs.
5. When video input is interrupted, recording automatically stops.
6. Video may be recorded into the SD card
Do not withdraw the SD card while recording. It may destroy the data stored within the SD card.
Power loss during recording results incomplete videos or errors.
5.4 Playback Mode
Selectable Playback format: Normal Playback and Search and Playback.
(1) Normal Playback: Press《PLAY》button to first playback the final recorded data, and then
according to the SD card file recording order.
① Playback Status:
`
:Press《PLAY》button once to playback, press it again to pause.
:Press《Left》or《Right》button to Fast Rewind or Fast Forward
(Speed: x2/ x4/ x8/ x16/ x32). Press《PLAY》button to return to
normal speed playback.
:During playback, press《PLAY 》button to pause playback and press
again to return to playback status.
8
② Playback Speed
:Speed x2
:Speed x4
:Speed x8
:Speed x16
:Speed x32
③ Display Record Date and Time
Press《STOP》button to stop playback function and to return to live status.
(2) Search and Playback: Enter MENU and select item【SEARCH AND PLAY】.
【TIME SEARCH】
① The user may press《Up》or《Down》button to move the cursor up or down
and setup Year/ Date/ Time. After setup, press《Enter》button to enter next
setup page.
② Year/ Month Setup:Press《Left》or《Right》button to select the year or month,
press《Up》or《Down》button to adjust the year or month. When a date font
color is blue it indicates that the date contains recording file. Press《Enter》
button to enter and press《STOP》button return to exit the setting page.
③ Date Setup:Press《Left》or《Right》button to choose a date with recording file.
When a date font color is blue it indicates that the hour contains recording file. Press
《Enter》button to enter and press《STOP》button return to exit the setting page.
④ Hour Setup:Press《Up》or《Down》button to choose an hour with recording
file. Press《Enter》button to enter playback mode and playback starting from
the hour of the first recording file or press《STOP》button return to exit the
9
setting page.
NOTE
1:To avoid confusion of implementing daylight saving time after the end of the recording
time, 【TIME SEARCH】date and time display shows only the date and time without
implementing of daylight saving time.
NOTE 2:Press《STOP》button to stop playback and the system will return to【SEARCH and
PLAY】selection and enables the user to select the prefered input source.
【EVENT SEARCH】
①
Display Page:Display method (Current Page/ All Pages), press《Left》or
《Right》button to select the previous page or the next page.
② Event Setup:According to the date and time of the incident, press《Up》or
《Down》button to select the previous or next event recording to playback.
Press《Enter》button to enter playback mode and playback the recorded file.
③ Event Type:【EVENT SEARCH】The list shows only the event recording
(Motion Detection).
NOTE 1:To avoid confusion of implementing daylight saving time after the end of the recording time,
【TIME SEARCH】date and time display shows only the date and time without implementing
of daylight saving time.
NOTE
2:Press《STOP》button to stop playback and the system will return to【EVENT
SEARCH】selection and enables the user to select the prefered input source.
The device supports playback only to images recorded by this device, other AVI
video files are not guaranteed.
5.5 PC Playback
1. The device uses SD card as its main storage. User may read the data stored in the
SD card from a computer that supports SD card reader device.
2. All files (under dvr folder) and file names are ordered according to recorded times
(sequence).
File Playback:
User may use Microsoft®-Media Player or DivX-DivX Player
(http://www.divx.com/) to playback video files.
When first time using Media Player to playback, it requires the most updated decoder
from the Microsoft® software website.
10
5.6 SD Card Maintenance
1. The device supports only FAT32 file system; therefore it is unable to determine
other file systems.
2. The system supports only partial SD card file system repair. The system is unable
to detect any file system damage, therefore please format the SD card (enter【SD
CARD OPTIONS】and select “FORMAT”).
5.7 How to Download the Updated Software
1. Use the SD card to update your system firmware.
2. Please follow the steps below to update the software:
(1) Copy the new system firmware into the SD card Firmware directory.
(2) Insert the SD card; proceed item【MENU > SYSTEM > UPGRADE】and
update the software.
(3) When the confirmation message appears, select【YES】, to start the update.
(4) After software update has been completed, the system will auto reboot the device.
Do not withdraw the SD card while booting.
11
6. MENU SETUP
6.1 Main Menu
MENU Content: Basic Menu Operations.
Press《Up》or《Down》button, to select the item.
Press《Enter》button, to enter the sub menu (>).
Press《STOP》button to return to previous page.
NOTE: All words underlined and bold indicates「Default Value」.
6.2 Search and Play
Please refer to 【5.4 Playback Mode】.
6.3 Set Date / Time
12
MENU Content: Basic Menu Operations.
Press《Up》or《Down》button, to select the item.
Press《STOP》button to return to monitoring mode or to previous page.
Press《Left》or《Right》button to increase or decrease setup value.
① Date Format
② Date/ Time
Adjustment
③ Daylight Saving
:Y / M / D M / D / Y D / M / Y
:Year Setup: 2000 - 2030
Month Setup: 01 - 12
Time Setup: 00 : 00 - 23 : 59
:Start Date and Time, End Date and Time. Currently the
setup is available for setting up Start and End time only
in hours, and the Start and End time can not be in the
same month.
6.4 Set Motion Detection
MENU Content: Basic Menu Operations.
Press《Up》or《Down》button, to select the item.
Press《Enter》button, to enter the sub menu (>).
Press《STOP》button to return to previous page.
Press《Left》or《Right》button to increase or decrease setup value.
:MOTION
① Detection Format
② Set Motion Detection :Press《Enter》button to enter sub-menu.
Area
③ Set Motion Detection :(Min) 0 1 2 3 4 5 6 7 8 9 (Max.)
Sensitivity
Motion Detection Sensitivity Setup:
Changing the alert value may affect the recording sensitivity of the Motion Detection. Select item
【SET MD SENSITIVITY】, and then press《Left》or《Right》button to increase/ decrease
sensitivity rate.
13
Motion Detection Area Setup:
Motion picture page is divided into (NTSC) 22x15 small detection blocks.
① Detection Area:One or more detection blocks forms a detection area.
② Cursor:Press《Up》
《Down》
《Left》
《Right》button to change the position of the cursor.
③ Setup Mode:Press《PLAY》button to edit detection block.
Enable all cells
ADD ALL
Delete all cells
DEL ALL
ADD AREA Enable detection area
DEL AREA Disable detection area
(1) ADD ALL and DEL ALL setup method, press《PLAY》button to switch the mode
and press《Enter》button to complete the setup.
(2) ADD AREA and DEL AREA setup method, press《PLAY》button to switch the
mode and press《Up》
《Down》
《Left》
《Right》button to move the cursor to setup
the starting point of the block, press《Enter》button. Then move the cursor to
setup the ending point of the block, press《Enter》button to complete the setup.
(3) Detection area is indicated by green block and non-detection region by black
block.
NOTE: Detection block setting page, if the image changes within the detection area is higher than the warning value, then
the detection block turns to color red, and can be used as a reference for setting the sensitivity rate.
6.5 Manul Record and Schedule Record
Selectable manual or schedule recording, basic setups are shown below:
1. MANUAL RECORD: Press《REC》button to start recording.
14
MENU Content: Basic Menu Operations.
Press《Up》or《Down》button, to select the item.
Press《STOP》button to return to previous page.
Press《Left》or《Right》button to increase or decrease setup value.
① Video Size
VIDEO SIZE
NTSC
704x480
② Frame rate
VIDEO
SIZE
(NTSC):
1/5
1/3
1
352x240
FRAME RATE (fps)
2
3
5
10
15
20
30
③ Image Quality:
HIGH
MEDIUM
LOW
Using high recording quality (More SD card storage capacity will be required).
Using medium recording quality.
Using low recording quality (Less SD card storage capacity will be
required).
2. SCHEDULE RECORD (Motion Detection/ Continue): Records only within the setup
time range.
Press《Enter》button to enter Schedule Setup, Motion Record, and Continuous
Record.
15
(1) Continue Record:Setup method similar to Manual Record.
(2) Motion Detection Record:
MENU Content: Basic Menu Operations.
Press《Up》or《Down》button, to select the item.
Press《STOP》button to return to previous page.
Press《Left》or《Right》button to increase or decrease setup value.
① ~ ③
④ Duration
⑤ Pre-Alarm
REC
:Setup method similar to Manual Record.
:Recording duration triggered by Motion Detection. Setup to 5 ~ 60
SEC (increasing by every 5 SEC), Default 10 SEC (NOTE1).
:Recorded video files contain the length of time before the incident.
Setup to 0 ~ 10 SEC, Default: 5 SEC.
NOTE 1: Pre-recording applies only to [Motion Detection Recording].
NOTE 2: Pre-recording function is temporarily invalid, when proceeding [Motion Video] while other video
recordings are currently undergoing, and the video recording of item ① ~ ④ of [Motion Video]
are setup differently. (Example: Schedule recording is set to [Continuous Record + Motion
Detection Record] (hexagon), and [Continuous Record] and [Motion Detection Record] are
setup differently, during these moments when switching from [Continuous Record] to [Motion
Detection Record], pre-recording function is temporarily invalid.).
16
(3) Schedule Setup:
① SCHEDULE
SETUP
② MODE
:Record ON / OFF setup (default setup is OFF).
:Press《Up》or《Down》to select
Press《Left》or《Right》to setup
:Motion Detection Record
:Continuous Record
:Continuous Record and Motion Detection Record
:N/A
6.6 SD Card Options
MENU Content: Basic Menu Operations.
Press《Up》or《Down》button, to select the item.
Press《STOP》button to return to previous page.
Press《Left》or《Right》button to increase or decrease setup value.
17
① DISK TOTAL
② DISK REMAIN
③ CARD FULL
:SD card total capacity.
:SD card remaining capacity.
:LOOP (Continuous Record)/ STOP (Stop Record)
Stop Record – SD card stops recording when the
total capacity of the SD card is reached (Default).
④ MAX FILE SIZE
⑤ FORMAT
⑥ SD UNMOUNT
⑦ REMAIN TIME
Continuous Record -- SD card continues recording
and overwrites recording data from the beginning
when the total capacity of the SD card is reached
(NOTE 1 & NOTE 2).
:The maximum storage capacity of Manual Recording
and Continuous Recording of each file, file size that
is larger than the setting file is automatically stored.
Setup Value: 5/ 10/ 50/ 100/ 300 MB (NOTE 1).
:All recordings will be deleted and creates a dvr
directory under root directory (NOTE 3).
:Switch off the recording and perform the removal
process before withdrawing the SD card.
:Estimated manual recording period is according to
the current SD card remaining space and manual
recording format (NOTE 4).
NOTE 1: For continues recording, file is suggested to be setup as smaller size.
NOTE 2: Setting up continuous recording may overwrite old recording data, therefore, confirm beforehand.
NOTE 3: To format, make sure the confirmation message appears, and then select "YES", to format.
NOTE 4: Recordable time is due to the different size of SD card capacity, different recording modes, and degree
of video variation. Therefore, the estimated recording period is just rough estimation.
6.7 System
MENU Content: Basic Menu Operations.
Press《Up》or《Down》button, to select the item.
Press《STOP》button to return to previous page.
18
Press《Left》or《Right》button to increase or decrease setup value.
:Setup menu language.
① LANGUAGE
② COPY SETUP TO SD CARD :Backup all settings of the device to the SD card.
:Download settings of the device from the SD card
③ DOWNLOAD SETUP
(NOTE).
FROM SD CARD
:Use SD card to upgrade system software, please
④ UPGRADE
refer to【5.7 How to Update the Downloaded
Software】(NOTE).
:Return all settings back to default value (NOTE).
⑤ RECALL DEFAULT
NOTE: Please wait for the confirm message to appear and then select “YES” to proceed.
6.8 Status
Press《STOP》button, exit this screen display and returns to the Main Menu.
① Version
② SD Card Full
③ Manual Record
④ Motion Detection Record
⑤ Schedule Continuous Record
19
7. TROUBLE SHOOTING
Q1. Why does the device sometimes suddenly restart?
A1. It is because abnormality has been detected by the SD card reader, the device will start a
re-initiation control procedure. After rebooting the device will return to the latest status,
such as return to manual or schedule recording.
Q2. What about the SD card compatible test?
A2. Please refer to the compatible table,
Brand
Capacity
Specification
ADATA
16G
Class 6
ADATA
32G
Class 6
Kingston
4G
Class 4
Kingston
8G
Class 6
Kingston
16G
Class 6
Kingston
32G
Class 10
SanDisk
4G
Class 4
SanDisk
8G
Class 6
SanDisk
16G
Class 6
SanDisk
32G
Class 10
Transcend
4G
Class 4
Transcend
8G
Class 6
Transcend
16G
Class 6
Transcend
32G
Class 10
20
8. SPECIFICATION
STANDARD FUNCTION
Signal System
NTSC
Image Sensor
1/3“ High Resolution Sensor
Lens
Pinhole Lens,F2.0 / f =3.7mm
Video Compression
H.264 AVI file format
Max. Record Resolution
704x480@30fps
Record Quality
Low / Medium / High
Recording Mode
Manual / Schedule ( Motion Detection / Continue)
Recording Date/Time
Overlay with Video Images in AVI File
Motion Detection
Multiple Blocks and adjustable sensitivity
Playback Search
Time / Event Search
Playback Function
Play/Fast Forward/Fast Rewind/Pause
Playback Speed
x1/ x2/ x4/ x8/ x16/ x32
Storage Media
SD card (FAT 32),support up to 32GB
Video Output
1Vp-p / 75 Ohm
Video Port
BNC / RCA / RJ12
Power Supply
DC 12V ±10% / 500mA
Operating Environment
20%~80% RH, 5℃~ 45℃ (41℉ ~ 113℉)
Storage Environment
20%~80% RH, 0℃ ~ 50℃ (32℉ ~ 122℉)
Dimensions
205 mm (W) x 90 mm (H) x 55 mm (D)
Weight
300 g (Without memory card)
(Note: Design and Specifications are subject to change without notice.)
21