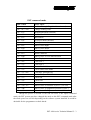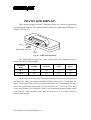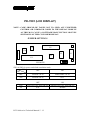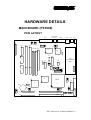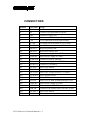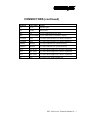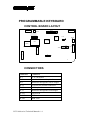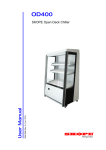
1
TM
PST-1000 SERIES
TECHNICAL MANUAL
Rev. : A
L3
L3
L2
L2
L1
L1
L0
L0
LP
LP
L4
L4
TM
SOME IMPORTANT NOTES
FCC NOTES
This equipment generates, uses, and can radiate radio frequency energy and, if not installed
and used in accordance with the instructions manual, may cause interference to radio communications.
It has been tested and found to comply with limits for a Class A digital device pursuant to subpart J of
Part 15 of FCC Rules, which are designed to provide reasonable protection against interference when
operated in a commercial environment. Operation of this equipment in a residential area is likely to
cause interference in which case the user at his own expense will be required to take whatever measures
to correct the interference.
WARRANTY LIMITS
Warranty will terminate automatically when the machine is opened by any person other than
the authorized technicians. The user should consult his/her dealer for the problem happened. Warranty
voids if the user does not follow the instructions in application of this merchandise. The manufacturer is
by no means responsible for any damage or hazard caused by improper application.
ABOUT THIS MANUAL
This manual assists the user especially the software programmer who provides the software
system for POS application to utilize the hardware of the PST1000 series that is a member of the
POSIFLEX integrated point-of-sale terminal product family. The PST1000 is a compact point-of-sale
system that gives the most user friendly upgrade transition from ECR and combines the performance
and affordability of personal computers with the elegance and reliability of business machine. The
PST1000 also provides the built-in networking capability for easy communication among multiple
terminals in addition to the data transfer and control through back office server.
The manufacturer of the PST1000 series heartily apologizes to the user for reserving the right
to change or to modify this manual without notice due to the rapid and constant progress and
improvement on science and technology. The user may always obtain the most up to date information
through our web site: http://www.mustekposiflex.com.tw or http://www.posiflex.com.tw
© Copyright Mustek Corp. 1998
All rights are strictly reserved. No part of this documentation may be reproduced, stored in a retrieval
system, or transmitted in any form or by any means, electronic, mechanical, photocopying, or otherwise,
without the prior written consent of Mustek Corp. the publisher of this documentation.
TRADE MARKS AND SERVICE MARKS
POSIFLEX is a registered trademark of Mustek Corp..
Other brand and product names are trademarks and registered trademarks and service marks of
their respective owners.
TM
TABLE OF CONTENTS
OVERVIEW. . . . . . . . . . . . . . . . . . . . . . . . . . . . . . . . . . . . . . . . . . . . . . 1 - 1
SCOPE . . . . . . . . . . . . . . . . . . . . . . . . . . . . . . . . . . . . . . . . . . . . . 1 - 1
FEATURES. . . . . . . . . . . . . . . . . . . . . . . . . . . . . . . . . . . . . . . . . . 1 - 1
MODEL NUMBERS . . . . . . . . . . . . . . . . . . . . . . . . . . . . . . . . . . . 1 - 2
GENERAL SPECIFICATIONS. . . . . . . . . . . . . . . . . . . . . . . . . . . . 2 - 1
SYSTEM . . . . . . . . . . . . . . . . . . . . . . . . . . . . . . . . . . . . . . . . . . . . 2
POWER SOURCE . . . . . . . . . . . . . . . . . . . . . . . . . . . . . . . . . . . . 2
SYSTEM POWER ON/OFF CONTROL. . . . . . . . . . . . . . . . . . . 2
OPERATOR DISPLAY. . . . . . . . . . . . . . . . . . . . . . . . . . . . . . . . . 2
LCD − OD-300 for PST 1000. . . . . . . . . . . . . . . . . . . . . . 2
CRT display (VGA interface)-for PST 1010 . . . . . . . . . . 2
UPS SUPPORT. . . . . . . . . . . . . . . . . . . . . . . . . . . . . . . . . . . . . . 2
PROGRAMMABLE KEYBOARD. . . . . . . . . . . . . . . . . . . . . . . . 2
INPUT / OUTPUT PORTS. . . . . . . . . . . . . . . . . . . . . . . . . . . . . . 2
SSD MEMORY WITH HDD EMULATION . . . . . . . . . . . . . . . . . 2
24VDC POWER SUPPLY TO POS PRINTER . . . . . . . . . . . . . 2
PRELOAD DOS . . . . . . . . . . . . . . . . . . . . . . . . . . . . . . . . . . . . . . 2
LED COLOR. . . . . . . . . . . . . . . . . . . . . . . . . . . . . . . . . . . . . . . . . 2
EXTERIOR . . . . . . . . . . . . . . . . . . . . . . . . . . . . . . . . . . . . . . . . . . 2
ENVIRONMENTAL . . . . . . . . . . . . . . . . . . . . . . . . . . . . . . . . . . . 2
ACCESSORIES . . . . . . . . . . . . . . . . . . . . . . . . . . . . . . . . . . . . . . 2
OPTIONS . . . . . . . . . . . . . . . . . . . . . . . . . . . . . . . . . . . . . . . . . . . 2
CUSTOMER DISPLAY. . . . . . . . . . . . . . . . . . . . . . . . . . . 2
MAGNETIC STRIPE READER . . . . . . . . . . . . . . . . . . . . 2
Reader application. . . . . . . . . . . . . . . . . . . . . . . . . . . . . 2
Card data format. . . . . . . . . . . . . . . . . . . . . . . . . . . . . . 2
TWO EXTRA COM PORTS FOR PST1000. . . . . . . . . . 2
-
1
1
1
2
2
2
3
3
4
4
4
4
5
5
5
6
6
6
7
7
7
7
i
TM
KEY TOP OPTION . . . . . . . . . . . . . . . . . . . . . . . . . . . . . .
UPS BATTERY . . . . . . . . . . . . . . . . . . . . . . . . . . . . . . . . .
PRINTER: PP-3000. . . . . . . . . . . . . . . . . . . . . . . . . . . . . .
INTERNAL MODEM CARD . . . . . . . . . . . . . . . . . . . . . . .
HDD . . . . . . . . . . . . . . . . . . . . . . . . . . . . . . . . . . . . . . . . . .
2
2
2
2
2
-
8
8
8
8
8
RELIABILITY SPECIFICATION . . . . . . . . . . . . . . . . . . . . . . . . . . 3 - 1
SYSTEM DEFINITIONS. . . . . . . . . . . . . . . . . . . . . . . . . . . . . . . . . . 4 - 1
BLOCK DIAGRAM. . . . . . . . . . . . . . . . . . . . . . . . . . . . . . . . . . . .
EXTERNAL KEYBOARD CONNECTOR . . . . . . . . . . . . . . . . .
LAN PORT . . . . . . . . . . . . . . . . . . . . . . . . . . . . . . . . . . . . . . . . . .
CRT DISPLAY PORT CONNECTOR. . . . . . . . . . . . . . . . . . . . .
SERIAL PORT COM1 . . . . . . . . . . . . . . . . . . . . . . . . . . . . . . . . .
SERIAL PORT COM2 . . . . . . . . . . . . . . . . . . . . . . . . . . . . . . . . .
SERIAL PORT COM3 . . . . . . . . . . . . . . . . . . . . . . . . . . . . . . . . .
SERIAL PORT COM4 . . . . . . . . . . . . . . . . . . . . . . . . . . . . . . . . .
CASH DRAWER CONTROLLER . . . . . . . . . . . . . . . . . . . . . . .
PARALLEL PORT LPT1 . . . . . . . . . . . . . . . . . . . . . . . . . . . . . .
CUSTOMER DISPLAY CONNECTOR . . . . . . . . . . . . . . . . . . .
24 VDC CONNECTOR . . . . . . . . . . . . . . . . . . . . . . . . . . . . . . . .
UPS BATTERY CONNECTOR. . . . . . . . . . . . . . . . . . . . . . . . . .
4
4
4
4
4
4
4
4
4
4
4
4
4
-
1
2
2
2
3
4
4
5
5
6
7
7
7
APPLICATION GUIDES. . . . . . . . . . . . . . . . . . . . . . . . . . . . . . . . . . 5 - 1
OPERATOR DISPLAY. . . . . . . . . . . . . . . . . . . . . . . . . . . . . . . . .
CRT MONITOR (PST1010) . . . . . . . . . . . . . . . . . . . . . . .
LCD DISPLAY (OD-300 FOR PST1000) . . . . . . . . . . . .
EPSON command mode (power on default). . . . . . . . . . . . .
PST command mode . . . . . . . . . . . . . . . . . . . . . . . . . . .
CUSTOMER DISPLAY . . . . . . . . . . . . . . . . . . . . . . . . . . . . . . . .
ii
5
5
5
5
5
5
-
1
1
1
2
3
4
TM
PD-101 (LED DISPLAY). . . . . . . . . . . . . . . . . . . . . . . . . .
PD-201 (LCD DISPLAY). . . . . . . . . . . . . . . . . . . . . . . . . .
EPSON command mode (power on default). . . . . . . . . . . . .
PST command mode . . . . . . . . . . . . . . . . . . . . . . . . . . .
PD-2101 (VFD DISPLAY). . . . . . . . . . . . . . . . . . . . . . . . .
Futaba emulation mode. . . . . . . . . . . . . . . . . . . . . . . . . .
Noritake emulation mode . . . . . . . . . . . . . . . . . . . . . . . .
Aedex emulation mode. . . . . . . . . . . . . . . . . . . . . . . . . .
Epson emulation mode (power on default). . . . . . . . . . . . . .
PD-7001 (LCD DISPLAY). . . . . . . . . . . . . . . . . . . . . . . . .
Jumper settings. . . . . . . . . . . . . . . . . . . . . . . . . . . . . . .
Epson mode − 2 lines x 20 characters. . . . . . . . . . . . . . . . .
Noritake mode − 2 lines x 20 characters. . . . . . . . . . . . . . .
Epson mode − 4 lines x 26 characters. . . . . . . . . . . . . . . . .
PROGRAMMABLE KEYBOARD. . . . . . . . . . . . . . . . . . . . . . . .
HOT KEY PROGRAMMING. . . . . . . . . . . . . . . . . . . . . . .
Preparation . . . . . . . . . . . . . . . . . . . . . . . . . . . . . . . . .
Enter “Hot key programming” mode . . . . . . . . . . . . . . . . .
Input the content to be programmed . . . . . . . . . . . . . . . . .
Exit “Hot key programming” mode. . . . . . . . . . . . . . . . . .
COMMON PROGRAMMING (KBM.EXE). . . . . . . . . . . .
Command listing in view mode . . . . . . . . . . . . . . . . . . . .
Command listing in ASCII-code editing mode. . . . . . . . . . .
Command listing in SCAN-code editing mode. . . . . . . . . . .
ANSWER BACK CODE . . . . . . . . . . . . . . . . . . . . . . . . . .
SHORTCUT UTILITY (RWM.EXE) . . . . . . . . . . . . . . . . .
HARDWARE LIMITATION. . . . . . . . . . . . . . . . . . . . . . . .
SSD MEMORY . . . . . . . . . . . . . . . . . . . . . . . . . . . . . . . . . . . . . . .
POWER ON/OFF CONTROL. . . . . . . . . . . . . . . . . . . . . . . . . . .
EXTERNAL POWER SWITCH . . . . . . . . . . . . . . . . . . . .
SOFTWARE SWITCH OFF. . . . . . . . . . . . . . . . . . . . . . .
CASH DRAWER. . . . . . . . . . . . . . . . . . . . . . . . . . . . . . . . . . . . . .
UPS BATTERY. . . . . . . . . . . . . . . . . . . . . . . . . . . . . . . . . . . . . . .
5
5
5
5
5
5
5
5
5
5
5
5
5
5
5
5
5
5
5
5
5
5
5
5
5
5
5
5
5
5
5
5
5
-
5
6
6
7
8
9
10
10
11
12
12
13
15
18
20
20
20
20
21
21
22
22
23
24
25
25
26
27
28
28
28
29
29
iii
TM
HARDWARE DETAILS. . . . . . . . . . . . . . . . . . . . . . . . . . . . . . . . . . . 6 - 1
MAIN BOARD (PST888). . . . . . . . . . . . . . . . . . . . . . . . . . . . . . .
PCB LAYOUT . . . . . . . . . . . . . . . . . . . . . . . . . . . . . . . . . .
CONNECTORS. . . . . . . . . . . . . . . . . . . . . . . . . . . . . . . . .
JUMPER SETTINGS. . . . . . . . . . . . . . . . . . . . . . . . . . . . .
CPU select. . . . . . . . . . . . . . . . . . . . . . . . . . . . . . . . . .
CPU voltage select. . . . . . . . . . . . . . . . . . . . . . . . . . . . .
CLOCK select . . . . . . . . . . . . . . . . . . . . . . . . . . . . . . .
RTC select. . . . . . . . . . . . . . . . . . . . . . . . . . . . . . . . . .
Customer display hardware handshake select. . . . . . . . . . . .
COM1 DC select. . . . . . . . . . . . . . . . . . . . . . . . . . . . . .
COM2 DC select. . . . . . . . . . . . . . . . . . . . . . . . . . . . . .
PROGRAMMABLE KEYBOARD. . . . . . . . . . . . . . . . . . . . . . . .
CONTROL BOARD LAYOUT. . . . . . . . . . . . . . . . . . . . . .
CONNECTORS. . . . . . . . . . . . . . . . . . . . . . . . . . . . . . . . .
JUMPER SETTINGS. . . . . . . . . . . . . . . . . . . . . . . . . . . . .
MODIFICATION FOR MSR . . . . . . . . . . . . . . . . . . . . . . .
Adding an ISO MSR . . . . . . . . . . . . . . . . . . . . . . . . . . .
VGA CARD (PST023) . . . . . . . . . . . . . . . . . . . . . . . . . . . . . . . . .
6
6
6
6
6
6
6
6
6
6
6
6
6
6
6
6
6
6
-
1
1
2
4
4
4
5
5
5
5
5
6
6
6
7
7
7
8
SERVICE AND SPARE PARTS . . . . . . . . . . . . . . . . . . . . . . . . . . 7 - 1
SERVICE GUIDE. . . . . . . . . . . . . . . . . . . . . . . . . . . . . . . . . . . . .
OPENING THE KEYBOARD . . . . . . . . . . . . . . . . . . . . . .
DETACHING THE REAR CABINET . . . . . . . . . . . . . . . .
SPARE DRAWING . . . . . . . . . . . . . . . . . . . . . . . . . . . . . . . . . . .
ASSEMBLY DRAWING. . . . . . . . . . . . . . . . . . . . . . . . . . . . . . . .
iv
7
7
7
7
7
-
1
1
5
8
11
TM
APPENDIX—Font Tables For Posiflex Customer Displays . . . . . Appendix- 1
CONTENTS . . . . . . . . . . . . . . . . . . . . . . . . . . . . . . . . . . . . . . . Appendix- 2
FONT FOR OD-300 . . . . . . . . . . . . . . . . . . . . . . . . . . . Appendix- 3
FONT FOR OD-300JPN . . . . . . . . . . . . . . . . . . . . . . . Appendix- 4
FONT FOR PD-201 . . . . . . . . . . . . . . . . . . . . . . . . . . . Appendix- 5
FONT FOR PD-201JPN. . . . . . . . . . . . . . . . . . . . . . . . Appendix- 6
FONT FOR PD-2101 PAGE 0. . . . . . . . . . . . . . . . . . . Appendix- 7
FONT FOR PD-2101 PAGE 1. . . . . . . . . . . . . . . . . . . Appendix- 8
FONT FOR PD-2101 EPSON PAGE 0. . . . . . . . . . . . Appendix- 9
FONT FOR PD-2101 EPSON PAGE 1. . . . . . . . . . . . Appendix-10
FONT FOR PD-7001 PAGE 0. . . . . . . . . . . . . . . . . . . Appendix-11
FONT FOR PD-7001 PAGE 1. . . . . . . . . . . . . . . . . . . Appendix-12
FONT FOR INTERNATIONAL CHARACTER SET. .Appendix-13
v
TM
vi
TM
OVERVIEW
SCOPE
The PST1000 series is a series of fully integrated PC based point-of-sale
terminals. This series provides the most user-friendly environment for ECR upgrade
with its powerful capability from PC. This series also provides a powerful
programmable keyboard with 112 key-sites of a comfortable size 18 x 22 mm in 8 x
14 matrix and a 6 position control key which is capable of sending answer back codes
according to the position of the key.
FEATURES
l
l
l
l
l
l
Highest security for business machine
Greatest User’s convenience and easiest software programming
Highest profitability for end users
Best compatibility and flexibility to any hardware / software application
Highest performance in most compact size point-of-sale system
Most cost effective with top quality, reliability and serviceability of pointof-sale system at reasonable price
l Powerful programming ability (hot key programming, programming under
Windows, multiple page, multiple level, whole range key content, time
delay, position sense answer back code covering most ECR functions, etc.)
l Built-in UPS function to support the system from intermittent power
failure
l Accidental power off protection – only power on or software controlled
power off function accessible from exterior of the system. This feature,
together with the UPS function, provides a data-loss-free environment.
PST-1000 series Technical Manual 1 - 1
TM
MODEL NUMBERS
Customer Display
Operator
(Cashier) Display
OPTIONAL CUSTOMER DISPLAY:
PD-101, PD-201 or PD-2101
or PD-7001 series
9” monochrome
CRT DISPLAY
PST1010
OD-300 -- 2 * 20
LCD DISPLAY
PST1000
PST-1000 series Technical Manual 1 - 2
TM
GENERAL SPECIFICATION
SYSTEM
l
l
l
l
l
CPU speed : 486DX4-100
4 MB DRAM (expandable to 32 MB max. option)
3.5” FDD 1.44 MB
Built-in IDE interface supports up to mode 4
Two half-length ISA expansion slots and one half-length PCI expansion
slot for the model without CRT display. One (ISA) slot will be occupied if
the CRT display is used.
l DCI Technology for best compatibility of input devices
Non-volatile Solid State memory 2MB with HDD emulation (expandable to 16
MB max. option)
POWER SOURCE
Item
Specification
High range of voltage input
180 ~ 264 Vac
Low range of voltage input
90 ~ 130 Vac
Input frequency
47 ~ 63 Hz
Power consumption of 9” mono CRT types: 43W nom., 52W max..
Power consumption of LCD types: 31W nom., 38W max..
Note on power consumption measurement: measured without printer.
SYSTEM POWER ON/OFF CONTROL
l One main power ON/OFF push switch hidden inside front door area for
direct drive on PSU
l One ON (controlled ON/OFF) switch at right end of front edge of the
system
l Position LP of the 6 position lock can be programmed as the software
shutdown control according to POSIFLEX standard
PST-1000 series Technical Manual 2 - 1
TM
OPERATOR DISPLAY
LCD (RS232 interface) – OD-300 for PST 1000
Display Type
monochrome STN – 2 * 20 LCD
View area
149 * 23 mm
Resolution
5*7 dot matrix
Character color
Dark blue
Back-light color
Yellow-green
View angle (V)
10° to 40° (for CR ≥ 2)
View angle (H)
-30° to 30° (for CR ≥ 2)
Swivel range
45°left, 30°right
Tilt angle
90°max
Power source
included in display connector
CRT display (VGA interface) – for PST 1010
Display Type
9” monochrome CRT
10” color CRT
Size
228 mm (9”) diag.
175 (6.9”) * 125 (4.9”)
mm
Resolution
800 * 600 max.
1024 * 768 max.
Position movable range
Back & forth: 48mm (1.890”) max.
Left to right: 30mm (1.181”) max.
Swivel range
90°left, 90°right
Tilt angle
20°max.
Power source
(UPS supported)
included in VGA
display connector
Video memory
AC input from output outlet
of system power
512 KB
Note: For 10” color monitor, the AC power is used instead of the UPS supported DC
power source in the VGA display connector. Hence, the 10”color monitor is not
supported by the UPS function while the 9” mono monitor is supported.
PST-1000 series Technical Manual 2 - 2
TM
UPS SUPPORT (battery not included)
l
Supports system operation for 5~10 min. depending on loading condition
of 24V printer and whether the UPS battery is fully charged
l STANDBY LED turned on when UPS stand-by at power on or AC power
present during system off
l STANDBY LED flashes and system beeps when UPS starts working and
discharging
PROGRAMMABLE KEYBOARD
l
l
l
l
l
l
l
l
l
l
l
l
l
l
l
l
Spill-proof construction
Extension keyboard wedge connector
Transparent key caps over key tops
6 position key switch control, with key extractable at L0 and L1
Security Key lock function locks up whole keyboard port
5 pages of programmable key definitions defined by 6 position key switch
112 sites max. of fully programmable keys for each page
255 bytes max. can be programmed for each key
Total memory for keys to be programmed: 8 KB
Programmable under DOS, Windows 3.1, or Windows95 without TSR or
DLL program
Multi-page programming
Multi - level programming
Time - delay programming
Hot key programming (teach & learn)
Answer back signal when position key changed or when enquired.
Standard layout includes one quad key, two double keys, 12 numeric keys
00 0~9 and 92 single keys
PST-1000 series Technical Manual 2 - 3
TM
INPUT / OUTPUT PORTS
l
l
l
l
l
l
l
l
1 X LAN port (Ethernet 10 base T)
For PST 1010, 4 X serial communication ports with COM1 capable of
supporting 5 V DC while each of the rest capable of supplying both DC
+5V and DC +12V at 1A. Default setting is +5 V DC for COM1 and no
DC output for all other ports.
For PST 1000, only one serial port (COM2) can be used freely, (COM1 is
used for both cashier and customer display and +5V DC output is default).
1 X parallel port
One independent control for a dedicated cash drawer
1 X VGA display port with UPS supported DC supply for cashier display
on PST 1010
1 X 24 VDC / 2 Amp. supply
UPS connector for 2.3AH/12V Lead Acid battery or above
SSD MEMORY WITH HDD EMULATION
l
l
l
l
2MB standard
Two memory sockets to support 2 memory modules
Each memory module can be 2MB,4MB,8MB
Max SSD memory up to 16MB
24VDC POWER SUPPLY TO POS PRINTER
l
l
l
l
UPS supported
24 +/- 1.2 VDC at 2 AMP load
Max. ripple + noise: 240 mV
Accessory: cable CCBLA-146
PRELOAD DOS
PST-1000 series Technical Manual 2 - 4
TM
LED COLOR
l
l
l
POWER LED: green
STANDBY INDICATOR: yellow
MSR INDICATOR: dual color (green for good reading, red for invalid
reading)
EXTERIOR
l
DIMENSIONS:
WIDTH: 408 mm (16.1”)
DEPTH: 465 mm (18.0”)
HEIGHT: 228 mm (9.0”) for LCD models (with OD300)
379 mm (14.9”) for CRT models (with 9” mono)
l
WEIGHT
12.5Kg for CRT models
8.0Kg for LCD models
ENVIRONMENTAL
l Temperature range:
Operating: 0°C ~ +40°C
Non-operating: -20°C ~ +70°C
l Humidity range:
Operating: 20%RH ~ 80%RH, non-condensing max. wet bulb 26°C
Non-operating: 10%RH ~ 80%RH, non-condensing max. wet bulb 28.9°C
PST-1000 series Technical Manual 2 - 5
TM
ACCESSORIES
l
l
l
l
l
l
l
l
l
USER’S MANUAL: 1 COPY
ELECTRONIC KEY FOR PROGRAMMABLE KEYBOARD : 4 PCS (1
SET)
MECHANICAL KEY FOR FRONT DOOR: 2 PCS
PST LEGEND SHEET IN 4 COLORS
CABLE FOR CASH DRAWER CONTROL (CCBLA-180 FOR CR-3100
/ CR3200)
DISKETTE FOR DRIVER UTILITY
COM 1 TERMINATOR FOR PST 1010
VFD TERMINATOR
POWER CORD
OPTIONS
CUSTOMER DISPLAY
MODEL Number
PD101
PD201
PD2101
PD7000 series
Display Media
LED
LCD
VFD
LCD
Number of rows
1
2
2
2 or 4
Characters per row
8
16
20
10 or 20 or 26
Character width (mm)
12.5
4.8
7.2
8.35 or 17.95
Character height (mm)
Character in dot matrix
format
14.2
7
segments
8.0
11.25
5X7
5X7
8.35 or 17.95
8 x 16, 16 x 16
or 6 x 8
Character color
Green
Dark blue
Green
505 nm
Dark blue
Horizontal slide (mm)
N.A.
N.A.
95
95
Horizontal rotation
360°
360°
360°
360°
60°/8
60°/8
14.5°and 30°
Inclined viewing angle
Display area
100.2 x
99 x 24
216 x 32
(mm x mm)
14.2
Remark : PD101 has 7 status indicator LED lamp
PST-1000 series Technical Manual 2 - 6
14.5°and 30°
196 x 42.4
TM
MAGNETIC STRIPE READER
Reader application
Applicable card type
ISO 7811
JIS X6302
Card feed method
Manual
Manual
Card feed direction
Bi-direction
Card feed speed
5 ~ 55 IPS
Uni-direction
100-1200mm/sec
Read / write function
Read only
Read only
Life of head
Approx. 300,000 passes
300,000 passes
Error rate
Less than 0.5%
Less than 0.1%
Available models
Tracks 1 & 2 or tracks 1, 2 & 3
JIS - II
Card data format
Card standard
IATA
ABA
THRIFT
JIS I
JIS - II
Track used
Recording method
Track 1
F2F
(FM)
Track 2
F2F
(FM)
Track 3
F2F
(FM)
Track 2
F2F
(FM)
Rear side
F2F
(FM)
Recording density
210 BPI
75 BPI
210 BPI
35 BPI
210 BPI
Recording capacity
(characters / bits)
79 / 7
40 / 5
107 / 5
40 / 5
72 / 7
TWO EXTRA COM PORTS FOR PST1000
l
l
COM3 & COM4 BOTH CAPABLE OF SUPPLYING +5 VDC
AND +12 VDC POWER WHILE DEFAULTED TO GIVE
NO DC OUTPUT
THIS OPTION COMES WITH A VGA PORT AS WHAT IS FOR
PST1010
PST-1000 series Technical Manual 2 - 7
TM
KEY TOP OPTION
l
l
l
l
QUAD KEY
DOUBLE KEY
SINGLE KEY
BLANK KEY
UPS BATTERY
l
2.3 AH/12V Lead Acid battery
PRINTER: PP-3000
l
l
l
l
l
l
DOT MATRIX 9 PIN
HIGH SPEED BI-DIRECTIONAL
FRICTION TYPE
40 COLUMNS FOR 15.4 CPI
ACCEPTS PAPER WIDTH 2.25/3/3.25 INCHES WITH
ADJUSTABLE PAPER GUIDE
PRINTS ON ORDINARY OR UP TO 3-FOLD CARBONLESS
COPY PAPER
INTERNAL MODEM CARD
l
AFM100 – CUSTOMIZED SIZE TO FIT INTO THE SYSTEM
HDD
l
850MB AND ABOVE
PST-1000 series Technical Manual 2 - 8
TM
RELIABILITY SPECIFICATION
l
POWER SUPPLY MTBF: 50,000 HRS
l
MONITOR MTBF: 30,000 HRS
l
FDD MTBF: 30,000 HRS
l
SSD MEMORY DATA HOLD TIME: 100 YRS
l
VFD LIFE EXPECTANCY: 30,000 HRS
l
LCD PANEL LIFE EXPECTANCY: 50,000 HRS
l
LCD BACK LIGHT LIFE EXPECTANCY: 20,000 HRS
l
MSR LIFE EXPECTANCY: 300,000 PASSES
l
KEY SWITCH LIFE EXPECTANCY: 10,000,000 STROKES
l
6 POSITION KEY LIFE EXPECTANCY: 25,000 TIMES
PST-1000 series Technical Manual 3 - 1
TM
PST-1000 series Technical Manual 3 - 2
TM
SYSTEM DEFINITIONS
BLOCK DIAGRAM
PARALLEL
PRINTER
SERIAL
PRINTER
(UPS BATTERY)
OD300
[PST1000]
UPS
MGMT.
24 VDC
PASS
THROUGH
(CUSTOMER DISPLAY:
PD-101, 201, 2101 or 7001)
CR3X00
COM 1
DEVICE
CR
COM2
(5 VDC,
12VDC)
(5 VDC)
NETWORK
ETHERNET
LAN
PSU
CR DECODER
HDD
LPT 1
FDD
CPU
DRAM
SSD
2 ~ 16 MB
PST023 CARD for PST1010 SYSTEM
PROGRAMMABLE
KEYBOARD MEMORY
(8KB)
VGA CONTROLLER
(5 VDC, 12 VDC)
(12 VDC)
(5VDC,
12VDC)
(MSR)
EXT. KB.
PORT
BARCODE SCANNER
KEYBOARD WEDGE
PC KB
COM 4
DEVICE
COM 3
DEVICE
VGA
CRT
PST-1000 series Technical Manual 4 - 1
TM
EXTERNAL KEYBOARD CONNECTOR
PIN ASSIGNMENT OF 5 PIN DIN FEMALE CONNECTOR:
PIN # DEFINITION
1
2
3
4
5
CLOCK
KEYBOARD DATA
NC
GROUND
+5 VDC
LAN PORT
PIN ASSIGNMENT OF 8 PIN TELEPHONE JACK:
PIN # DEFINITION
1
2
3
4
5
6
7
8
•
•
TD +
TD RD +
NC
NC
RD NC
NC
This port is defined as 10 base T LAN port.
IRQ 10 is applied for this port.
CRT DISPLAY PORT CONNECTOR
l
l
This port is available in PST1010 or as option to PST1000
DC +12 V is supplied to the monitor through specially designed
different pins.
« Short circuit will occur if any device other than the designated display
is connected to the display port.
« The DC supply in this connector is UPS supported.
PST-1000 series Technical Manual 4 - 2
TM
SERIAL PORT COM1
PIN ASSIGNMENT OF 9 PIN D SUB MALE CONNECTOR:
PIN # DEFINITION ALTERNATIVE DEFAULT SETTING
•
•
•
•
•
1 DCD
+12 VDC
DCD
2 RX
3 TX
4 DTR
5 GND
6 DSR
7 RTS
8 CTS
9 RI
+5 VDC
+5 VDC
IRQ 4 is applied for this port.
COM 1 terminator must be applied when there is no device connected
to COM1 port, otherwise the CR port and customer display will not
function.
It is definitely inadvisable to connect serial input devices to COM 1
port without thorough investigation. The reason is that some input
devices like serial mouse do not provide standard RS232 hardware
handshaking signals. In PST systems, both the customer display and
cash drawer controller share the COM 1 port. When the system issues
any command to cash drawer controller or the customer display, the
hardware handshaking signal will be in error status and could halt
this port if COM1 is not connected properly.
In PST1000, this connector is occupied by OD-300.
DC supply of this port is UPS supported.
PST-1000 series Technical Manual 4 - 3
TM
SERIAL PORT COM2
PIN ASSIGNMENT OF 9 PIN D SUB MALE CONNECTOR:
PIN # DEFINITION ALTERNATIVE DEFAULT SETTING
1 DCD
+12 VDC
DCD
2 RX
3 TX
4 DTR
5 GND
6 DSR
7 RTS
8 CTS
9 RI
+5 VDC
RI
• IRQ 3 is applied for this port.
• This port is suggested when a modem is to be connected.
• DC supply of this port is UPS supported.
SERIAL PORT COM3
PIN ASSIGNMENT OF 9 PIN D SUB MALE CONNECTOR:
PIN # DEFINITION ALTERNATIVE DEFAULT SETTING
1 DCD
+12 VDC
DCD
2 RX
3 TX
4 DTR
5 GND
6 DSR
7 RTS
8 CTS
9 RI
+5 VDC
RI
• This port is available in PST1010 or as option to PST1000
• IRQ applied: IRQ9
• DC supply of this port is UPS supported.
Jumper selection: please refer to Chapter 4 of this manual about PST023.
PST-1000 series Technical Manual 4 - 4
TM
SERIAL PORT COM4
PIN ASSIGNMENT OF 9 PIN D SUB MALE CONNECTOR:
PIN # DEFINITION ALTERNATIVE DEFAULT SETTING
1 DCD
+12 VDC
DCD
2 RX
3 TX
4 DTR
5 GND
6 DSR
7 RTS
8 CTS
9 RI
+5 VDC
RI
• This port is available in PST1010 or as option to PST1000
• IRQ applied: IRQ5
• DC supply of this port is UPS supported.
Jumper selection: please refer to Chapter 4 of this manual about PST023.
CASH DRAWER CONTROLLER
l The cash drawer solenoid input is a 200 msec. grounding signal.
l The power to cash drawer solenoid is DC 12 V nominal.
l The command to open cash drawers is decoded through COM 1.
l The drawer open indication can be detected by software through
status check on RI signal of COM 1.
PST-1000 series Technical Manual 4 - 5
TM
PARALLEL PORT LPT1
PIN ASSIGNMENT OF 25 PIN D SUB FEMALE CONNECTOR:
PIN # DEFINITION
1 - STROBE
2 D0
3 D1
4 D2
5 D3
6 D4
7 D5
8 D6
9 D7
10 - ACK
11 BUSY
12 PE
13 SLCT
14 - AUTO FEED
15 - ERROR
16 - INIT
17 - SLCT IN
18 GND
19 GND
20 GND
21 GND
22 GND
23 GND
24 GND
25 GND
• IRQ 7 is applied for this port.
PST-1000 series Technical Manual 4 - 6
TM
CUSTOMER DISPLAY CONNECTOR
l
l
l
This port uses COM 1 of the system and data can be passed through
to COM 1 connector when proper command is received.
The VFD terminator must be applied when there is no customer
display connected to this connector, otherwise the COM1 port and the
CR controller will not function properly.
DC supply to this device is UPS supported.
24 VDC CONNECTOR
DC supply of this connector is UPS supported.
PIN ASSIGNMENT OF 3.5φ DC JACK:
PIN
DEFINITION
-
CENTER
OUTER
+24 VDC
+24 VDC
GND
PIN ASSIGNMENT OF 3 PIN PLUG TO PRINTER:
PIN
DEFINITION
3
1
2
3
CASE
+24 V
GND
N.C.
CHASSIS GND
2
1
CASE
UPS BATTERY CONNECTOR
PIN ASSIGNMENT OF 4 PIN SOCKET:
PIN
DEFINITION
1
2
3
4
+12 V
+12 V
GND
GND
PIN 1
PST-1000 series Technical Manual 4 - 7
TM
PST-1000 series Technical Manual 4 - 8
TM
APPLICATION GUIDES
OPERATOR DISPLAY
CRT MONITOR (FOR PST1010)
The CRT monitor used in PST1010 or as option to PST1000 (together with
COM3 and COM4 whilst the monitor has to stand aside as the display platform is
occupied by the OD300 in PST1000) can be considered as ordinary PC VGA monitor
in application concern. However, the power to the 9” VGA monochrome monitor is
supplied through the VGA connector and is UPS supported. Yet, when the monitor
used is the 10” color monitor, the AC power is used and is not supported by the UPS
function.
LCD DISPLAY (OD-300 FOR PST1000)
The operator display OD-300 is a slim-lined LCD display for 2 rows by 20
alphanumeric characters. This device when in use is connected to the COM1
connector which is pass through connected from the customer display port. So, this
operator display can receive command / data from the host computer only when the
customer display port is in pass through mode or is plugged with the “VFD
terminator”. Please refer to the appendix of this manual for the fonts used in OD300
and OD300JPN when the OD300 receives data to display. The commands applicable
to OD300 are tabulated in the following pages. However, following command should
be issued to the system first to set the communication protocol for this display to 9600
bps, none parity, 8 data bits and 1 stop bit:
MODE COM1 96,n,8,1
(enter)
It is very important for the software programmer to take special care in
displaying the messages to the OD300, because there is no other display like a monitor
to indicate the system response in a standard PST1000.
PST-1000 series Technical Manual 5 - 1
TM
EPSON command mode (power on default)
COMMAND
NAME
HEX CODES
FUNCTION
BS
<08>
Move Cursor Left
HT
<09>
Move Cursor Right
LF
<0A>
Move Cursor Down
HOM
<0B>
Move Cursor To Home Position
CLR
<0C>
Clear Display Screen
CR
<0D>
Move Cursor To Left Most Position
CAN
<18>
Clear Cursor Line
ESC =
<1B><3D><n>
Select Peripheral Device
n=1 pass through (should not be used)
n=2 OD-300 selected
n=3 both OD-300/pass through selected
n=4 switch to PST command mode
ESC @
<1B><40>
Initialize Display
US MD1
<1F><01>
Specify Overwrite Mode
US MD2
<1F><02>
Specify Vertical Scroll Mode
US MD3
<1F><03>
Specify Horizontal Scroll Mode
US LF
<1F><0A>
Move Cursor Up
US CR
<1F><0D>
Move Cursor To Right Most Position
US $
<1F><24><n><m>
Move Cursor To Specified Position
n = 1 ~ 20
m = 1, 2
US @
<1F><40>
Show Version
US B
<1F><42>
Move Cursor To Bottom Position
US C
<1F><43><n>
Cursor On / Off
n = 0, 1
US E
<1F><45><n>
Blink Display Screen
n = 0 ~ 255
PST-1000 series Technical Manual 5 - 2
TM
PST command mode
HEX CODE
FUNCTION
<01>
Set Pass Through Flag (should not be used)
<06> <N1> <N2>
Change Leading Code
<14> <01>
Wraparound Mode (Default)
<14> <02>
Vertical Scroll Mode
<14> <03>
Insert Mode
<14> <04>
Overwrite Mode (Default)
<14> <08>
Back Space
<14> <09>
Move Cursor Right
<14> <0A>
Move Cursor Down
<14> <0B>
Move Cursor Left
<14> <0C>
Delete Character
<14> <0D>
Move Cursor To Left Most Position
<14> <0E>
Clear Display
<14> <10>
Clear Line 1
<14> <11>
Clear Line 2
<14> <12>
Cursor Block Mode
<14> <13>
Cursor Under Line Mode
<14> <15> <02>
Clear Pass Through Flag
<14> <16>
Switch To Epson Mode
<14> <17>
Cursor On
<14> <18>
Cursor Off
<14> <19>
Reset
<14> <1A> <P>
Move Cursor To Position P (P=0~13,14~27h)
<14> <1B>
Move Cursor To Rightmost Position Of Line 1
<14> <1C>
Move Cursor To Rightmost Position Of Line 2
Though the power on default of the OD-300 itself is the Epson command
mode, the PST system may have changed the mode to this PST command mode after
the whole power-on-self-test depending on the software system installed. It would be
advisable for the programmer to check ahead.
PST-1000 series Technical Manual 5 - 3
TM
CUSTOMER DISPLAY
In the following sections, it is assumed that before any command / data given
to the customer display, the PST system should have been previously prepared for
issuing command to the customer display unit through the command given under DOS
environment:
C:\> mode com1 96,n,8,1
(enter)
In other words, the protocols in RS-232C communication are listed below:
Baud Rate
9600 bps
Parity Check
none
Date Bits
8
Stop Bits
1
As for the data displayed, please refer to the appendix of this manual. The
PD101 can only display numbers and decimal points in 7-segment form, and is
therefor not exhibited. The charactors displayed in PD201 and its minor variation
PD201JPN are shown in two separate pages. The fonts used in PD-2101 page 0, PD2101 page 1, PD-2101 EPSON emulation page 0 and PD-2101 EPSON emulation
page 1 describe PD2101. The fonts used in PD-7001 page 0, PD-7001 page 1 and
international character sets describe PD7001.
The hardware handshaking signal of the customer display is defaulted to use
CTS signal. For PST1000 series of system version B introduced in 2nd quarter of 1998
onward, this handshaking signal is selectable between CTS and DSR through change
of jumper setting according to the description in hardware details.
PST-1000 series Technical Manual 5 - 4
TM
PD-101 (LED DISPLAY)
The customer display PD-101 in PST1000 is internally connected through the
cash drawer controller to the COM1 port of the host computer. The PD-101 enters
pass through mode automatically when power on. The PD-101 monitors all data
flowing from the COM1 port of the host computer for the clear pass through
command (the leading codes of this command can be modified).
HEX CODES
<01>
FUNCTION
Enter pass through mode
<06><N1><N2>
Change leading code for clear pass through command
<15><14><02>
Clear pass through mode
LED Status: Light up LED according to value X.
<15><01><X>
X
30
31
32
33
34
35
36
37
LED All Off S/TL TTL CASH CHNG DSCT QNTY U/P
<15><02><N1>
…<Nm><0D>
LED Data:
<N1> to <Nm> must be <2E> or <30> to <39>. 8 digits max.
PST-1000 series Technical Manual 5 - 5
TM
PD-201 (LCD DISPLAY)
EPSON command mode (power on default)
COMMAND
NAME
HEX CODES
BS
<08>
Move cursor left
HT
<09>
Move cursor right
LF
<0A>
Move cursor down
HOM
<0B>
Move cursor to home position
CLR
<0C>
Clear display screen
CR
<0D>
Move cursor to left-most position
CAN
<18>
ESC =
<1B><3D><n>
Clear cursor line
Select peripheral device
n=1 COM1 (pass through) selected
n=2 PD-201 selected
n=3 Both COM1/PD-201 selected
n=4 Switch to PST command mode
ESC @
<1B><40>
Initialize display
US MD1
<1F><01>
Specify overwrite mode
US MD2
<1F><02>
Specify vertical scroll mode
US MD3
<1F><03>
Specify horizontal scroll mode
US LF
<1F><0A>
Move cursor up
US CR
<1F><0D>
Move cursor to right-most position
US $
<1F><24><n><m>
Move cursor to specified position
n = 1 ~ 16
m=1~2
US @
<1F><40>
Show version
US B
<1F><42>
Move cursor to bottom position
US C
<1F><43><n>
US E
<1F><45>
PST-1000 series Technical Manual 5 - 6
FUNCTION
Set/cancel cursor display
n = 1, 2
Blink display screen
n = 0 ~ 255
TM
PST command mode
HEX COMMAND
CODES
FUNCTION
<01>
Set Pass-Through Flag
<06><N1><N2>
Change Leading Codes
<14><01>
Wraparound Mode (Default)
<14><02>
Vertical Scroll Mode
<14><03>
Insert Mode
<14><04>
Overwrite Mode (Default)
<14><08>
Back Space
<14><09>
Cursor Right
<14><0A>
Change Row
<14><0B>
Cursor Left
<14><0C>
Delete
<14><0D>
Carriage Return
<14><0E>
Clear Display
<14><10>
Clear Line 1 Cursor Home
<14><11>
Clear Line 2 Cursor Head
<14><12>
Cursor Block
<14><13>
Cursor Underline
<14><16>
Switch to EPSON Mode
<14><17>
Cursor On
<14><18>
Cursor Off
<14><19>
Reset
<14><1A><P>
Move Cursor to position P
<14> <1B>
Move Cursor To Rightmost Position Of Line 1
<14> <1C>
Move Cursor To Rightmost Position Of Line 2
<21><23><02>
Clear Pass-Through
transmission)
Flag
(no
compensation
PST-1000 series Technical Manual 5 - 7
TM
PD-2101 (VFD DISPLAY)
This customer display provides 4 emulation modes for software programming
in controlling the display. The emulation mode is defined by adjusting the DIP SW on
the back. See Fig. D-1.
SW1
Switch ON direction
SW2
Fig. D - 1 DIP switch position
The relationship between the switch position and the emulation mode is
summarized in the following table.
Emulation
Mode
Futaba
Noritake
Aedex
Epson
SW 1
on
off
on
off
SW 2
on
on
off
off
On the VFD, there are totally at most 40 characters in 2 rows to be displayed at
the same time, while each character displayed in the format of 5 by 7 rectangular dot
matrix. To the lower right corner of each dot matrix there are a round shaped dot and a
tail to form period and comma marks. For the characters in 2nd row of the VFD, there
is one more feature to be displayed, which is the downward pointing triangle under
each character. This triangular mark shall be referred to as the under mark for
identification later on.
PST-1000 series Technical Manual 5 - 8
TM
P15
P11
P75
P81
P71
P82
P83
As illustrated in the above drawing, each rectangular dot in the font format
shall be identified as P11, P12, …, P15, P21, P22, …, P25, P31, …, P35, …, P71, …,
P75, P81, P82, P83. Where “Pn1” means the leftmost dot in the nth row of the dot
matrix and “Pn5” stands for the rightmost dot in the nth row. P81 means the round dot
to the lower right corner, P82 notifies the tail to form a comma and P83 denotes the
under mark. These notations will be used in user defined fonts.
Futaba emulation mode
Command Name
Reset
Hex Codes
Command Name
Hex Codes
1F
Cursor on
13
Brightness control
04 bb
Cursor off
14
Change font page
1E 0p
(Horizontal tab.)
09
(Line feed)
0A
Moving sign
05 …… 0D
Change leading code
06 x1 x2
Set pass through flag
Clear pass through flag
Horizontal tab
11 09
01
Vertical scroll up
12 09
x1 x2 02
Cursor up/down
11 0A
Line feed
12 0A
Digit select
10 pp
Back space
08
Carriage return
0D
PST-1000 series Technical Manual 5 - 9
TM
Noritake emulation mode
Command Name
Hex Codes
Command Name
Hex Codes
Reset
1B 49
Cursor on
15
Clear
0E
Cursor off
16
05 …… 0D
Back space
08
(Horizontal tab)
09
(Line feed)
0A
Moving sign
Change leading code
06 x1 x2
Set pass through flag
01
Clear pass through flag
x1 x2 02
Horizontal tab
11 09
Change font page
1E 0p
Vertical scroll up
12 09
Brightness control
1B 4C bb
Cursor up/down
11 0A
Digit select
1B 48 pp
Line feed
12 0A
Cursor blinking Rate
1B 54 nn
Form feed
0C
User defined graphics / 1B 43 ad x1
Carriage return
fonts
~ x5
0D
Aedex emulation mode
Attention code + Function code + Data + Carriage return
Function Code
Command Name
Function Area
Data Length
1
Display top
Top row
Max. 20 characters
2
Display bottom
Bottom row
Max. 20 characters
4
On going scroll
Top row
Max. 60 characters
6
One time scroll
Top row
Max. 60 characters
7
Stop trapping
N.A.
No characters
8
Change attention code
N.A.
2 characters
9
Display whole area
Both rows
PST-1000 series Technical Manual 5 - 10
Max. 40 characters
TM
Epson emulation mode (power on default)
Command
Command Name
&
Hex Codes
Command Name
Command
&
Hex Codes
Move cursor left
BS
08
Clear display screen
CLR
0C
Move cursor right
HT
09
Clear cursor line
CAN
18
Move cursor down
LF
0A
Specify overwrite mode
US MD1
1F 01
US LF
1F 0A
Specify
mode
scroll
US MD2
1F 02
home
HOM
0B
Specify horizontal scroll
mode
US MD3
1F 03
Move cursor to bottom
position
US B
1F 42
Set/cancel display screen
blinking
US E
1F 45
Move cursor to leftmost
position
CR
0D
Brightness adjustment
US X
1F 58
Move cursor to rightmost
position
US CR
1F 0D
Set & display counter
(time)
US T
1F 54
Move cursor to specified
position
US $
1F 24
Display counter (time)
US U
1F 55
Move cursor up
Move
position
cursor
vertical
Set/cancel user
characters «
defined
ESC %
1B 25
Initialize display
Define
user
characters «
defined
ESC &
1B 26
Show firmware version
US @
1F 40
Delete
user
characters «
defined
ESC ?
1B 3F
Select peripheral device
ESC =
1B 3D
Select character code table
ESC @
1B 40
ESC t
1B 74
The commands with « mark may not be 100% compatible with original EPSON
commands.
PST-1000 series Technical Manual 5 - 11
TM
PD-7001 (LCD DISPLAY)
NOTE : CARE SHOULD BE TAKEN NOT TO SEND ANY UNDEFINED
CONTROL OR COMMAND CODES TO THE DISPLAY MODULE
AS THIS MAY CAUSE A SOFTWARE MALFUNCTION OR EVEN
SHUTDOWN OF THIS CUSTOMER DISPLAY.
JUMPER SETTINGS
JP2
U5
U4
U2A
U1
JP
1
J3
U6
U2
J4
PD700CPU
SW1 & SW2 for power on default emulation mode
SW2
OFF
SW1
1 2 3
ON
OFF
EPSON 2 X 20
NORITAKE 2 X 20
ON
EPSON 4 X 26
N.A.
OFF
ON
SW3
NO LOGO AT POWER-ON
SHOW LOGO AT POWER-ON
J4
N.A.
Default
PST-1000 series Technical Manual 5 - 12
TM
EPSON MODE -- 2 LINES X 20 CHARACTERS
Command
Name
Code
BS
Move cursor left
<08>h
HT
Move cursor right
<09>h
LF
Move cursor down
<0A>h
HOM
+ Move cursor to home position
<0B>h
CLR
+ Clear display screen
<0C>h
CR
Move cursor to left-most position
<0D>h
CAN
Clear cursor line
<18>h
ESC %
Set/cancel user-defined character set
<1B>h <25>h <n>
n = 1 : set
n = 0 : cancel
ESC &
Define user-defined character
(* Max. 3 characters
* multiple definition in 1 command
* every time new define command
will overlay old definition from the
first character) (ref. 4.4 for x1 to x16)
<1B>h <26>h <s> <n> <m>
[<a> <x1> <x2> … …
<x16> ]m-n+1
where: s = 2 , a = 8,
n = starting address,
m = ending address
ESC =
Select peripheral device:
n = 1 -> pass through selected
+ n = 2 -> display selected
n = 3 -> pass through / display both
selected
<1B>h <3D>h <n>h
Reset display mode:
n = 10-> Epson 2x20 mode
n = 20-> Noritake 2x20 mode
n = 40-> Epson 4x26 mode
n = 80-> (must not be used)
ESC ?
Delete user-defined character
<1B>h <3F>h <n>
ESC @
Initial display
<1B>h <40>h
PST-1000 series Technical Manual 5 - 13
TM
EPSON MODE -- 2 LINES X 20 CHARACTERS (CONTINUED)
Command Name
ESC C
Select cursor
ESC R
Select international character set
ESC t
Select character code table
US MD1
US MD2
US MD3
US LF
US CR
+ Specify overwrite mode
Specify vertical scroll mode
Specify horizontal scroll mode
Move cursor up
Move cursor to the right-most position
US $
Move cursor to the specified position
US :
US @
US B
US E
US ^
Code
<1B>h <43>h <n>
n = 0 : cursor invisible
+ n = 1 : cursor visible
<1B>h <52>h
<1B>h <74>h <n>
+ n = 0 : page 0 selected
n = 1 : page 1 selected
<1F>h <01>h
<1F>h <02>h
<1F>h <03>h
<1F>h <0A>h
<1F>h <0D>h
<1F>h <24>h <n> <m>
<n>th column <m>th line
Set start/ending position of macro
definition max. 60 byte commands (
Macro definition and user - defined <1F>h <3A>h
characters can not exist at the same time)
Execute self-test
(* show version,
* show overwrite, vertical/ horizontal
<1F>h <40>h
scroll modes,
* show all characters of current code
table)
Move cursor to bottom position
<1F>h <42>h
<1F>h <45>h <n>
n x 50 ms = on/off time
Blink display screen
n = 0, display keep on
n = 255, display keep off
<1F>h <5E>h <n> <m>
n x 20 ms = interval of bytes
Execute macro
m x 50 ms = interval of
macros
+ Display automatically default to these conditions after power-on or reset
PST-1000 series Technical Manual 5 - 14
TM
NORITAKE MODE -- 2 LINES X 20 CHARACTERS
COMMAND
DESCRIPTION (limitations)
Back Space:
<08>
This command moves the cursor to the left digit. If the
current position is the most significant digit (MSD) of the
2nd row, the cursor will move to the least significant digit
(LSD) of first row. If the current position is the MSD of the
first row, the cursor will not move.
Horizontal Tab:
<11> <09>
This command moves the cursor one digit to the right. If the
current position is the LSD of the 1st row, the cursor will
move to the MSD of the 2nd row. If the current position is
the LSD of the 2nd row, the cursor will move to MSD the
1st row.
Vertical Scroll Up:
<12> <09>
<11> <0A>
After writing as character to the LSD of the 2nd row, all 2nd
characters are transferred to the 1st row, leaving a blank line
on the 2nd row. The new cursor position is at the MSD of
the 2nd row. If the cursor is not at LSD of the 2nd row, this
command only moves the cursor to the next digit on the
right.
Cursor Up/Down:
Cursor moves up or down to another row.
Line Feed:
<12> <0A>
If the cursor is at the 2nd row, all characters in the 2nd row
will be transferred to the 1st row, and leave a blank 2nd row.
The cursor position is unchanged.
If the cursor is at the 1st row, it simply moves directly down
to the 2nd row. Characters are not effected.
PST-1000 series Technical Manual 5 - 15
TM
NORITAKE MODE
--
2
LINES
X
20
CHARACTERS
(CONTINUED 1)
COMMAND
DESCRIPTION (limitations)
<0D>
Carriage Return:
Cursor moves to the current row's MSD position.
<0C>
Form Feed:
Cursor moves to the MSD of the 1st row.
<1B> <48> <P>
Digit Select:
Move cursor to position P, where P is the digit position in
hex number. For example.
P=00 1st row MSD
P=01 1st row 2nd digit
P=13 1st row LSD
P=14 2nd row MSD
P=27 2nd row LSD
<15>
Cursor On:
Cursor On or lighted.
<16>
Cursor Off:
Cursor off.
<1B> <49>
Reset:
All characters erased and all settings returned to power-on
reset conditions.
<0E>
Clear:
All displayed characters are cleared. Cursor stays at the same
position.
<05>
Moving Sign
Enables a scrolling message to be sent to the display. The
string characters can be up to 45 characters long and
terminated by <0D>. The message will scroll on the first
row. It is disabled automatically when other information is
sent.
PST-1000 series Technical Manual 5 - 16
TM
NORITAKE MODE
--
2
LINES
X
20
CHARACTERS
(CONTINUED 2)
COMMAND
DESCRIPTION (limitations)
<1E><P>
Change font page
+ P = 0: page 0 selected
P = 1: page 1 selected
<01>
Set Pass-through Flag
Serial Pass-through and Parallel Pass-through pole displays
only. Enables the pass- function. All data following the
setting of this flag will pass-through the pole display and go
to another peripheral device.
<21> <23> <02>
Clear Pass-through flag
Serial Pass-through and Parallel Pass-through pole displays
only. Disables or clears the pass-through function. (Two
leading codes are programmable)
<06>
Change leading code
The two leading code followed the command will replace the
default leading code <21> and <23>.
<1B> <43>
<Addr> <x1>
<x2> … <x16>
User Defined Graphics/Fonts:
<Addr> specifies the address where the user defined
graphics/font to be stored. <x1>......<x16> are the 16 bytes
defining the dots of the 8 x 16 matrix to be turned on in the
user defined character (ref. 4.4). Recommended <Addr>= A0
through FF, and no more than 3 user defined graphics/fonts.
<1B> <3D> <n>
Reset display mode
n = 10-> Epson 2 x 20 mode
n = 20-> Noritake 2 x 20 mode
n = 40-> Epson 4 x 26 mode
n = 80-> (must not be used)
PST-1000 series Technical Manual 5 - 17
TM
EPSON MODE -- 4 LINES X 26 CHARACTERS
Command
BS
HT
LF
HOM
CLR
CR
CAN
ESC %
ESC &
ESC =
ESC ?
ESC @
Name
Move cursor left
Move cursor right
Move cursor down
+ Move cursor to home
position
+ Clear display screen
Move cursor to left-most
position
Clear cursor line
Set/cancel
character set
user-defined
Code
<08>h
<09>h
<0A>h
<0B>h
<0C>h
<0D>h
<18>h
<1B>h <25>h <n>
n = 1 : set
n = 0 : cancel
<1B>h <26>h <s> <n> <m>
[<a> <x1> <x2> … … <x8>
]m-n+1
s = 1 , a = 5,
n = starting character,
m = ending character
(ref. 4.4 for x1 to x8)
Define user-defined character
(* Max. 3 characters
* multiple characters can be
defined in 1 command sets
* every time new define
command execution will
overwrite the old definition
from the first character )
Select peripheral device
n = 1 -> pass through selected
+ n = 2 -> display selected
n = 3 -> pass through/display
both selected
<1B>h <3D>h <n>h
Reset display mode
n = 10-> Epson 2x20 mode
n = 20-> Noritake 2x20 mode
n = 40-> Epson 4x26 mode
n = 80-> (must not be used)
Delete user-defined character <1B>h <3F>h <n>h
Initial display
<1B>h <40>h
PST-1000 series Technical Manual 5 - 18
TM
EPSON MODE -- 4 LINES X 26 CHARACTERS (CONTINUED)
Command
Name
ESC C
Select cursor
ESC R
ESC t
US MD1
US MD2
US MD3
US LF
US CR
US $
US @
US B
US E
Code
<1B>h <43>h <n>
n = 0 : cursor invisible
+ n = 1 : cursor visible
Select international character
<1B>h <52>h
set
<1B>h <74>h <n>h
Select character code table
+ n = 0 : page 0 selected
n = 1 : page 1 selected
+ Specify overwrite mode
<1F>h <01>h
Specify vertical scroll mode
<1F>h <02>h
Specify horizontal scroll
<1F>h <03>h
mode
Move cursor up
<1F>h <0A>h
Move cursor to the right-most
<1F>h <0D>h
position
<1F>h <24>h <n> <m>
Move cursor to the specified
where:
position
<n>th column <m>th line
Execute self-test
(* show version
* show overwrite, vertical/
<1F>h <40>h
horizontal scroll modes
* show all characters of
current code table )
Move cursor to bottom
<1F>h <42>h
position
<1F>h <45>h <n>
n x 50 ms = on/off time
Blink display screen
n = 0, display keep on
n = 255, display keep off
+ Display automatically default to these conditions after power-on or reset
PST-1000 series Technical Manual 5 - 19
TM
PROGRAMMABLE KEYBOARD
HOT KEY PROGRAMMING
The POSIFLEX programmable keyboard supports the “Hot key programming”
method which is most useful in instant modification of a few keys in a
preprogrammed keyboard without entering the more sophisticated programming
utility. Of course, the user may also use this feature to program through out all 112
keys by 5 pages (LP and L1 to L4) at will. The whole process of “Hot key
programming” contains 4 steps for each key to be programmed and is illustrated as
following:
Preparation
Enter “hot key
programming”
mode
Input the
content to be
programmed
Exit “hot key
programming”
mode
PREPARATION
Please connect a standard PC or PS-2 keyboard to the external keyboard port
and settle the software and the rest hardware exactly the way application program
requires before entering “Hot key programming” mode. The user shall then decide
which key of which page is to be programmed and turn the 6 position control key to
the proper position before entering the “Hot key programming” mode. Please note that
the answer back codes of the position control key is not covered by the “Hot key
programming” feature.
ENTER “HOT KEY PROGRAMMING” MODE
To enter the “Hot key programming” mode, the user must input the “Hot key”
and identify the key on the programmable keyboard to be programmed. The so called
“Hot key” is a special combination of keys pressed on the standard PC or PS-2
keyboard. In PST programmable keyboard, the “Hot key” is defined as pressing and
holding the left “Alt” key while pressing the “PRT SC” (“Print Screen”) key on the
PC or PS-2 keyboard. And by doing so, the programmable keyboard will give 2 beeps
to notify that it is ready to receive the identification of which key to be programmed.
PST-1000 series Technical Manual 5 - 20
TM
Right after the “Hot key” is released, the user shall press the key to be programmed on
the programmable keyboard once to identify which key to be programmed. If the “Hot
key” is pressed for the second time or the “Esc” key is pressed prior to the press of the
key on the programmable keyboard, this mode will be aborted immediately. The user
should not enter the “Hot key programming” mode when the programmable keyboard
is already fully loaded (no more free memory for further programming) by the key
contents previously programmed.
INPUT THE CONTENT TO BE PROGRAMMED
Once the programmable keyboard enters the “Hot key programming” mode
with the key to be programmed identified, what the user types on the standard PC or
PS-2 keyboard will be taken for the content to be programmed into that key of the
programmable keyboard till the user exits the “Hot key programming” mode.
The legal input in this mode includes all alphabetical letters (including both
upper and lower cases), numerical digits (applicable only for keys at the area above
the alphabetical keys and excluding those on the numerical keypad), symbols (such as
`!”#$ and those keys excluding arithmetic signs in the numerical keypad) and the
“Enter” key. The “Shift” key, the “Caps lock” key and the “Back space” key are also
accepted in this mode to serve an editing purpose (for example, pressing “Back space”
will erase the last character of the input instead of being treated as a character for
input). Pressing the “Esc” key in this mode will abort the “Hot key programming”
mode immediately. All the rest keys (such as the “Ctrl”, “Alt”, “Home”, any function
key or arrow key or any key in the numerical keypad) on the standard PC or PS-2
keyboard are illegal inputs in this mode. The maximum number of key presses
acceptable to any key by “Hot key programming” is 32.
All the input from the standard PC or PS-2 keyboard in this mode will also be
sent to the host computer.
EXIT “HOT KEY PROGRAMMING” MODE
After the intended content of the key is completely entered, the user shall press
the “Hot key” again to notify the end of “Hot key programming”. The programmable
keyboard will give one beep to signify the normal exit of the “Hot key programming”
mode. Should there be any illegal entry in the content of the key or any other improper
PST-1000 series Technical Manual 5 - 21
TM
operation during the programming, the programmable keyboard will give three beeps
to signify the failure of “Hot key programming” and the key content is not changed. If
the user pressed the “Esc” key to abort “Hot key programming”, the programmable
keyboard will also give three beeps immediately as a response to signify the abort.
COMMON PROGRAMMING (KBM.EXE)
COMMAND LISTING IN VIEW MODE
ESC -- quit the keyboard programming program
F1 -- get help on command list
F3 -- enter the configuration screen
F5 -- enter ASCII-code editing mode
F8 -- enter scan-code editing mode
F10 -- quit the keyboard programming program
Ins -- toggle insert/overwrite status for editing (default = insert)
Del -- delete the content of the key where cursor stays
Home -- go to column A of same page same row
End -- go to column I of same page same row
PgUp -- go to one page less in cyclic manner
PgDn -- go to one page next in cyclic manner
Up arrow -- move cursor to one row up in cyclic manner
Down arrow -- move cursor to one row down in cyclic manner
Left arrow -- move cursor to one column left in cyclic manner
Right arrow -- move cursor to one column right in cyclic manner
ENTER -- enter ASCII-code editing mode, but if the last edit of the key was in scancode mode then this means enter scan-code editing mode.
Alt-A -- enter ASCII-code editing mode
Alt-C -- copy the key content of a key or contents of the keys in a page to buffer
Alt-E – erase the current page or all pages
Alt-G -- enter the configuration page
Alt-L -- load key definitions from a disk file
Alt-M -- enter multi-level shift marker
Alt-N -- enter scan-code editing mode
PST-1000 series Technical Manual 5 - 22
TM
Alt-O -- load key definitions from a disk file
Alt-P -- paste the buffer content to key definition
Alt-R -- read key definitions from the programmable keyboard
Alt-S -- save key definitions to a disk file
Alt-T – toggle key-content format between page-wise and column-wise
Alt-U -- recover key definition before last change
Alt-W -- write key definitions to the programmable keyboard
Alt-X -- quit the keyboard programming program
any other key stoke -- will be taken as an input in ASCII-code editing mode, and will
give no influence if the current key was last edited in scancode editing mode
COMMAND LISTING IN ASCII-CODE EDITING MODE
ESC -- enter view mode
F1 -- get help on command list of ASCII- code editing mode
F5 -- enter view mode
F8 -- enter view mode
F10 -- enter view mode
BkSp -- delete the character to the left of cursor
Ins -- toggle insert/overwrite status for editing (default = insert)
Del -- delete the character where cursor stays or the last character
Home -- go to first position within the key definition
End -- go to last position within the key definition
PgUp -- go to one page less in cyclic manner
PgDn -- go to one page next in cyclic manner
Up arrow -- move cursor to one row up in cyclic manner and enter view mode
Down arrow -- move cursor to one row down in cyclic manner and enter view mode
Left arrow -- move cursor to one character left within the key definition
Right arrow -- move cursor to one character right within the key definition
Alt-A -- enter view mode
Alt-C -- enter a “Caps Lock” into the key-content
Alt-D -- enter time delay mark into the key-content
Alt-N -- enter view mode
PST-1000 series Technical Manual 5 - 23
TM
Alt-S -- enter a multi-level separator between definitions of different levels.
Alt-X -- enter view mode
Alt-27 -- enter an “ESC” into the key-content
Alt-8 -- enter a “BkSp” into the key-content
Ctrl-C -- immediately terminates the programming utility.
any other key stoke -- will be taken as input in ASCII-code editing mode.
COMMAND LISTING IN SCAN-CODE EDITING MODE
ESC -- leading code to enter scan code of any key after it into key-content, except
“ESC” + “F” for utility version since 2.15.xx
ESC-F -- leading code of arbitrary release code for utility version since 2.15.xx.
Usually used to release “CTL”, “ALT” or “SHF”.
F1 -- get help on command list of ASCII- code editing mode
F5 -- enter view mode
F8 -- enter view mode
F10 -- enter view mode
BkSp -- delete the character to the left of cursor
Ins -- toggle insert/overwrite status for editing (default = insert)
Del -- delete the character where cursor stays or the last character
Home -- go to first position within the key definition
End -- go to last position within the key definition
PgUp -- go to one page less in cyclic manner
PgDn -- go to one page next in cyclic manner
Up arrow -- move cursor to one row up in cyclic manner and enter view mode
Down arrow -- move cursor to one row down in cyclic manner and enter view mode
Left arrow -- move cursor to one character left within the key definition
Right arrow -- move cursor to one character right within the key definition
Alt-A -- enter view mode
Alt-D -- enter time delay mark into the key-content
Alt-M -- enter a multi-level shift marker into the key-content
Alt-N -- enter view mode
Alt-S -- enter a multi-level separator between definitions of different levels.
Alt-X -- enter view mode
PST-1000 series Technical Manual 5 - 24
TM
Alt-27 -- work like “ESC” as the leading code for scan codes.
Alt-8 -- enter a “BkSp” into the key-content
Ctrl-C -- immediately terminates the programming utility.
any other displayable key stoke -- will be taken as input in scan-code format.
any other non-displayable key stroke -- will have no influence
ANSWER BACK CODE
Programming the answer back codes of the 6 position electronic key-lock is
also very easy as they are included in the keyboard programming with the locations
coded as “KLP”, “KL0”, “KL1”, “KL2”, “KL3” and “KL4” in the key-layout map of
page L1. These answer back codes will be issued by the programmable keyboard to
PC whenever the 6 position electronic key is switched to a new position (there will be
a time delay as determined in the configuration of the keyboard programming utility
and is adjustable by “r” and “t” key presses, this time delay is useful to give only the
answer back code of the last position of control key when it is turned across multiple
positions) or when the keyboard receives an “Enquiry” code (E7h) from the PC or the
PST system. Here are some examples of sending this “Enquiry” code to the
programmable keyboard in different languages:
Language
Syntax
C
outp (0x60, 0xE7)
BASIC
out &H60, &H0E7
DEBUG
o 60 E7
SHORTCUT UTILITY (RWM.EXE)
The feature of this RWM.EXE is designed mainly for the off-line
programming purpose and is very useful in quick reproduction of the preprogrammed
contents of the programmable keyboard. In such application, the user should have
either the preprogrammed keyboard or the preprogrammed file with “.tpl” extension
name that is the result of the keyboard programming. The user may use RWM.EXE to
directly transfer the programmed result of the programmable keyboard to a “.tpl” file
or directly transfer a prestored “.tpl” file to a programmable keyboard without entering
the utility “KBM.EXE” which may take more keystrokes. For instance, the user wants
PST-1000 series Technical Manual 5 - 25
TM
to transfer a file “XXX.tpl”, which was saved before, to the programmable keyboard,
he/she should type in following command in subdirectory “POSIFLEX.D”:
RWM XXX.tpl
(enter)
This operation is quite recommended to be performed on a daily basis to
ensure the system stability.
On the other hand, when the user wants to save the contents of a programmed
keyboard, e.g. when he/she newly receives a programmable keyboard, to a file named
“YYY.tpl”, he/she should type in following command in subdirectory
“POSIFLEX.D”:
RWM -r YYY.tpl
(enter)
HARDWARE LIMITATION
In the programmable keyboard, the detection of each key press is achieved
through the use of combination of “Logical columns” and “Logical rows”. For any key
pressed, the “Logical column” of that key is connected to the “Logical row” of the
same key by hardware, the CPU of the programmable keyboard detects such
connection and determines that which key has been pressed. However, in the case of
multiple simultaneous key-press, there are limitations on the position of the keys
selected. The basic rule of such limitations is:
No two keys in the combination are
allowed to be in the same “Logical row”.
The reason is that when any two keys of the same “Logical row” are pressed in
the same time, then there will be two “Logical columns” connected together through
that involved “Logical row”, causing some difficulties by its nature in identifying
which key is pressed. To overcome such problem, the output of the programmable
keyboard when the above rule is violated could be prohibited.
PST-1000 series Technical Manual 5 - 26
TM
SSD MEMORY
Considering the fact that the life of the SSD is limited and the speed of SSD is
inferior to DRAM just like a HDD is, the software programmer of PST1000 series is
hereby recommended to use some utility like RAMDRIVE. The software shall then
copy the data file from SSD to RAMDRIVE at the beginning of the program and
modify the data in RAMDRIVE according to the proceedings of the transaction. The
software shall then copy the data file in RAMDRIVE back to SSD only after a
transaction is completed and the system is waiting for the printer for a receipt or, if the
PST1000 system is equipped with the UPS battery, copy the data back to SSD once
every certain number of transactions or after certain period of time and when the
program is to be terminated. Through such application the system performance and
endurance will be better secured even in a very busy point of sale.
When the user installs more SSD than the original equipped, it is very
important to make the backup copy of the vital data before any attempt to initialize the
new SSD into effect because the initialization process will erase all information in
SSD out including the software itself. If there are two SSD units to be installed, unlike
the first SSD, the JP1 of the second SSD unit must be disconnected while the JP3
remains shorted for either module. Of course, all components involved in SSD
initialization operation must be well prepared. That means that the PST1000 system
itself and the SSD module(s) to be initialized for new SSD configuration must not be
improperly turned off before this initialization. If any of the above components was
turned off improperly either by the internal hardware ON/OFF switch or AC power
failure right before the SSD initialization, the initialization process could be ruined.
The initialization process is very simple. After proper backup and preparation
for reloading the software is done, the user has only to put the diskette marked as
“SSD initialization” into the floppy drive and restart the power on procedure. After a
while, the system may be re-initiated several times, when the system turns its own
power off, the SSD initialization is completed. The whole process is automatic. So,
insertion of this “SSD initialization” diskette must be handled with absolute care.
PST-1000 series Technical Manual 5 - 27
TM
POWER ON/OFF CONTROL
EXTERNAL POWER SWITCH
This switch is originally a software controlled power “ON/OFF” switch. It can
be programmed into a power “ON” only switch through software command. The so
called software controlled switch means that when the switch is pressed during system
working, the system will be turned off after all data in the SSD buffer are secured. The
SSD buffer mentioned here is an infrastructure of the system and is different from the
RAMDRIVE mentioned in the last section. To program this switch, the programmer
needs to issue the following mentioned commands in the application program to
COM1 under the protocol: 9600 bps, parity none, 8 data bits, 1 stop bit.
• Change to power on only switch -- the command string is <1B> <19> <01> in
hexadecimal format.
• Change to power on/off switch -- the command string is <1B> <19> <00> in
hexadecimal format (default status)
SOFTWARE SWITCH OFF
An even safer method to turn the system off is the software off switch. Usually
the position LP of the 6 position key switch (or any other key or key combination or
any other position of the 6 position key switch as may be preferred) is selected for this
purpose. The programmer has to program the answer back code of position LP of the
programmable keyboard to some command to close the application program (such as
“Alt+F4”). At the end of the closing operation, the application program should issue
the following mentioned software switch off command string to COM1 under the
protocol: 9600 bps, parity none, 8 data bits, 1 stop bit. Or, as an alternative, the
programmer may program the answer back code of position LP to contain:
The closing command of the application program;
A certain period of hold on time to allow a safe closing;
The command to call for a program which will send the
software switch off command string to COM1 as described.
The hexadecimal command string for software switch off function is :
<1B> <06> <16> <19> <0D>.
PST-1000 series Technical Manual 5 - 28
TM
In other words, the two approaches to utilize the software switch off function
are:
The recommended:
Keyboard gives closing command of Application Program
Application Program closes itself and gives switch off command
System secures all data and turns power off
The Alternative:
Keyboard gives closing command of Application Program and …
Application Program closes itself
Keyboard gives switch off command at a predefined time
System secures all data and turns power off
CASH DRAWER
The software command to open the cash drawer is a hexadecimal code of <07>
sent to COM1 port under the protocol of 9600bps, none parity, 8 data bits, 1 stop bit.
The drawer open status can be obtained through checking the communication
status of COM1 at signal RI. When there is no drawer open, the RI signal of COM1 is
always set. When there is any cash drawer opened, the RI signal of COM1 is reset.
The RI signal is obtained as the bit 6 (the second most significant bit) of the I/O
address 3Feh if the COM1 address is set to 3F8h~3FFh (conventional address for
COM1) in system configuration.
UPS BATTERY
The optional UPS battery is a maintenance-free lead-acid battery and is
targeted to support basically the data preservation and smooth running of the system
during intermittent power failure. This battery is not designed for prolonged power
support to the system against power shutdown. That means, when the AC power
outage is known to last for more than few minutes, it is advisable to turn off the
system instead of using the battery up while repeatedly using it up reduces the battery
life dramatically.
The battery will undergo self-discharging over time even when not in use. An
useful advice to preserve the battery at best condition is to regularly recharge the
battery if the battery or the PST system with the battery is put in storage for a period
PST-1000 series Technical Manual 5 - 29
TM
of time. It is recommended to turn on the system to recharge the battery for 1 ~ 2
hours every 3 months of storage if the storage temperature is lower than 30°C. The
battery should be recharged for 1 ~ 2 hours every month if the storage temperature
exceeds 30°C. However, the user shall avoid the situation with storage temperature
over 30°C to protect the life of the battery. Do not connect any other battery to this
UPS battery because mixed use of batteries of different capacity, history, or
manufacturers may cause damages. In case the user wants to have a longer battery
support time during AC power off, he/she should consult his/her dealer for application
of an external 12 V battery.
PST-1000 series Technical Manual 5 - 30
TM
HARDWARE DETAILS
MAIN BOARD (PST888)
PCB LAYOUT
JP8
J3
U24
SL1
1
2
3
J12
4
5
6
9
LPT
CUSTOMER
DISPLAY
COM1
LAN
P1
RJ2
P2
J5
J4
1
2
3
1
SL2
FLUSH PCI1
1
2
JP6
U16
U13
U10
1
2
3
U1
JP4
J7
X3
U35
UPS
MANAGEMENT
AREA
32P
SOCKET
/BIOS
X2
RJ1
24V
4
5
6
U21
X4
CR
U40
4
5
6
JP12
80C42
U36
JP1
1
2
JP9
JP2
1
10
J1
J15
J1
U2
CPU
J11
U4
X1
U1
BT1
1
2
3
J2
JP5
J8
4
5
6
JP3 1
J10
SIMM2
J9
SIMM1
7
-+
JPX
J6 J13 J14 JP11
PST-1000 series Technical Manual 6 - 1
TM
CONNECTORS
Position
Port Name
Usage
J1
SPKR
Connect to speaker
J2
KB
Connect to programmable keyboard
J3
FDD
Connect to floppy drive
J4
COM2
Connect to COM2 through cable (pin 10 open)
J5
LAN
To be connected to twisted pair in RJ45
J7
24 VDC
To supply power to printer in 5.5/2.5 plug
J8
STAND BY Connect to stand by control of SPS
J9
IDE (Pri.)
Reserved primary IDE
J10
IDE (Sec.)
Reserved secondary IDE
J11
PS
Main power supply from AT SPS
J12
COM2 DC
Select for DC supply to COM2
J14
STND LED
Connect to stand by indicator
J15
PS
Main power supply from ATX SPS
J16
UPS BATT. Connect to UPS battery
JP1
CPU SEL.
Select CPU models
JP2
CPU SEL-2
Select CPU models
JP3
CPU VOLT
Select CPU voltage between 3.3V and 5V
JP4
CLCK SEL. Select on board clock
JP5
RTC
Select RTC to normal operation or reset
JP6
VFD HS
Select CTS or DSR for hand shaking of VFD
JP8
COM1 DC
Select for DC supply to COM1
JP9
AMD DX2
Select only for AMD DX2-80
JP11
PWR SW
Connect to the internal power ON/OFF switch
JP12
CPU SEL-3
Select CPU models
JPX
ON SW
External power on switch
PST-1000 series Technical Manual 6 - 2
TM
CONNECTORS (continued)
Position
Port Name
Usage
P1
LPT1
Parallel port
P2
COM1
Serial port
RJ1
CR
To be connected to CR-3xxx
RJ2
CUST DISP To be connected to customer display
FLUSH1
SSD
To insert SSD memory for HDD emulation
FLUSH2
SSD
To insert SSD memory for HDD emulation
SIMM1
DRAM
To insert DRAM for system memory
SIMM2
DRAM
To insert DRAM for system memory
PCI1
PCI SLOT
To insert half length PCI card for expansion
SL1
ISA SLOT
To insert half length ISA card for expansion
SL2
ISA SLOT
To insert half length ISA card for expansion
U1
CPU
To insert CPU with cooling fan
PST-1000 series Technical Manual 6 - 3
TM
JUMPER SETTINGS (“«” marks the default setting)
CPU select
CPU models
Jumper settings
AMD 486DX2-80NV8T
JP1-3~JP2-2, JP1-6~JP2-5, JP9 short
AMD 486DX4-100NV8T
JP1-3~JP2-2 short
AMD 486DX4-100SV8B
JP1: 1-10, 2-11, 3-12, 4-13, 5-14, 6-15 short,
JP12: 1-2, 3-4 short
AMD 5K86
JP1: 2-11, 3-12, 4-13, 5-14, 6-15 short, JP12:
1-2, 3-4 short
AMD 5K86-133
JP1: 1-10, 2-11, 3-12, 4-13, 5-14, 6-15, 9-18
short, JP12: 1-2, 3-4 short
CYRIX 5X86
JP1: 2-11, 4-13, 5-14, 6-15 short, JP12: 1-2,
3-4 short
CYRIX 5X86-100GP
JP1: 2-11, 4-13, 5-14, 6-15 short, JP1-3~JP22 short, JP12: 1-2, 3-4 short
CYRIX 5X86-133
JP1: 2-11, 4-13, 5-14, 6-15, 9-18 short, JP13~JP2-2 short, JP12: 1-2, 3-4 short
INTEL 486DX4
JP1: 4-13, 5-14, 6-15, 8-17 short, JP1-3~JP22 short
TI 486DX2/DX4
JP1-2~JP2-1, JP1-3~JP2-2, JP1-4~JP2-3,
JP1-5~JP2-4, JP1-6~JP2-5 short, JP12: 5-6
short
ST 486DX4-100 (3.3V)
JP1: 2-11, 4-13, 5-14, 6-15 short, JP1-3~JP22 short, JP12: 1-2 short
CPU voltage select
CPU voltage
JP3 settings
3.3 V
5-6, 7-8 short
5V
1-2, 3-4 short
PST-1000 series Technical Manual 6 - 4
TM
CLOCK select
CLOCK rate
25 MHz
33.3 MHz
40 MHz
50 MHz
JP4 settings
1-4 short
1-4, 2-5, 3-6 short
1-4, 2-5 short
3-6 short
Applicable
CPU types
DX2-50
DX4-75
DX2-66
DX4-100
5X86-133
DX2-80
DX4-120
5X86-160
DX-50
DX4-150
RTC select
Function
JP5 settings
Normal operation
1-2, 4-5 short «
Reset RTC
2-3, 5-6 short
Customer display hardware handshake select
Handshaking through
JP6 settings
CTS of COM1
1-2, 4-5, 3-6 short «
DSR of COM1
2-3, 5-6, 1-4 short
This jumper is introduced on the main board bearing version number as
PST888G for system version B in 2nd quarter of year 1998. The hardware handshaking
signal for the customer display should be selected according to the application
program used. The default is to use CTS.
COM1 DC select
Function in COM1
JP8 settings
Pin9: +5VDC
1-2 short «
Pin9: RI
2-3 short
COM2 DC select
Function in COM2
J12 settings
Pin1: DCD
5-6 short «
Pin1: +12 VDC
4-5 short
Pin9: RI
2-3 short «
Pin9: +5 VDC
1-2 short
PST-1000 series Technical Manual 6 - 5
TM
PROGRAMMABLE KEYBOARD
CONTROL BOARD LAYOUT
JP12
JP6
JP15
JP181
J J J J J J
1 1 1 1 1 1
6 0 3 7 5 4
D19
U4
(JP1)
JP186
U15
(JP13)
1 2
J11
J6
J7
J12
J8
J9
JP3
2 1
JP185
JP5
CONNECTORS
Connector
Connect to
JP 1
PC AT keyboard
JP 3
6 position electronic key-lock
JP 6
Membrane through the narrow tongue
JP 12
I/O board for external connection
JP 13
PS/2 keyboard
JP 15
Membrane through the broad tongue
JP 181
Power LED
JP 185
MSR head
JP 186
MSR LED
PST-1000 series Technical Manual 6 - 6
JP184
JP183
TM
JUMPER SETTINGS
Jumper
Function
When shorted
When opened
J 13
Send code in
scan code
ASCII by Alt + Num «
J 14
ISO Track 1 of MSR
enabled
«
disabled
J 15
ISO Track 2 of MSR
enabled
disabled
J 16
ISO Track 3 of MSR
enabled
«
«
J 17
Leading/Stop sentinel
disabled
disabled
enabled
«
The « mark means the default setting for the above items.
The Alt + Num function is very important for some non-English language
application. The default setup of PST systems manufactured since 1997 is to enable
the Alt + Num function, while the default setup of PST systems manufactured in 1996
was to disable the Alt + Num function. For the English application, the user may
disable the Alt + Num function to improve the performance.
The start/end sentinel is defined by ISO7811: For track 1, start sentinel is “%”
and end sentinel is “?”. For tracks 2 and 3, start sentinel is “;” and end sentinel is “?”.
MODIFICATION FOR MSR
Adding an ISO MSR
•
•
•
Assemble the MSR head and connect it to JP 185.
Assemble the bi-color LED and connect it to JP 186.
Check the jumper settings of J17:
Short: Start/end sentinel OFF
Open: Start/end sentinel ON «
PST-1000 series Technical Manual 6 - 7
TM
VGA CARD (PST023)
2
1
10
9
COM 4
APD
AP16C552B
5 3 1
U13
U3
HMC
HM86314
U1
COM 3
JP5
U4
256K*16
HMC
HM8694
U2
JP4
6 4 2
HMC
HM86171
JP6
U16
P1
The PST023 is the adapter card that supports VGA display, COM3 and COM4
for the CRT type PST systems. This card can also be added to the LCD type of PST
systems as an option for obtaining 2 more serial ports and a monitoring VGA
connector. At the lowest part on this card the P1 connector is a 3 x 5 pin D type
female sub-miniature connector for the VGA display with +12V DC power supplied.
In case this port is to be connected to any display device other than the original one
supplied by the manufacturer, the possibility of short-circuiting due to this power
supply must be carefully considered.
The COM3 serial communication port is a 9 pin D type male sub-miniature
connector located above the VGA connector. The COM4 serial communication port is
another 9 pin D type male sub-miniature connector on an I/O plate connected to a 2 x
5 pin header on the PST023 card. Both COM ports support +5V DC and +12V DC
power individually.
PST-1000 series Technical Manual 6 - 8
TM
The selection of these jumper settings is listed as the following:
COM3
PIN 1
PIN 9
JP 4 :
JP 5 :
1 - 3 short
3 - 5 short
2 - 4 short
4 - 6 short
1 - 3 short
3 - 5 short
2 - 4 short
4 - 6 short
COM4
PIN 1
PIN 9
+ 5V DC
RI
+ 12V DC
DCD
+ 5V DC
RI
+ 12V DC
DCD
The default settings for JP 4 and JP 5 are both 3-5, 4-6 short.
IRQ 9 is used for COM3 and IRQ 5 is used for COM4.
PST-1000 series Technical Manual 6 - 9
TM
PST-1000 series Technical Manual 6 - 10
TM
SERVICE AND SPARE PARTS
SERVICE GUIDE
OPENING THE KEYBOARD
Whenever there comes to a need for service or maintenance or upgrading,
there may be the need for opening the PST system and having an access to the interior
of the cabinet. The method to access the interior of a PST system can be divided into
following steps: removing the exterior peripherals, opening the programmable
keyboard, detaching the rear cabinet and dissociating the required parts/module from
the chassis.
The possible exterior peripherals attached to the PST system may include
external KB wedge device, printer, CRT or LCD display, VFD customer display and
some devices connected to the I/O ports of PST system such as cash drawers, laser
scanning devices etc..
Before breaking or making any connection or opening any device or the PST
system, please always make certain that all the power for each and every device
involved are turned off and the power cords are removed.
Should there be any device connected to the area inside the front door such as
a KB wedge device or a PC keyboard, all these devices should be disconnected from
the PST system first. Use the mechanical key to open the front door (see DWG.-1). If
this key is lost somehow, the user should request for replacement of the same
mechanical lock. Unscrew two screws at the bottom side of PST near the front bottom
corners (see DWG.-2) and the user may now lift the programmable keyboard unit by
the front bottom edge of the keyboard unit as shown in the following drawing DWG.3 on page 7 - 3.
There are three cables to be disconnected from the keyboard unit before the
unit can be completely taken away from the major part of PST system. The user
should disconnect the cable coming from the external keyboard connector or through
an intermediate cable of the internally connected KB wedge device if assembled in
accordance with the instructions given in the User’s Manual; a four wire cable
PST-1000 series Technical Manual 7 - 1
TM
connecting to the KB CPU board from somewhere near the power supply unit; an
intermediate socket connecting to the LED on the programmable keyboard unit. Then
the keyboard unit can be taken away and put aside. However, to prevent a messy
situation for reinstallation later on, the two (or one if an internally connected KB
wedge device exists) cable stopper from both sides of the bottom chassis should be
taken out and kept well (see DWG.-4).
DWG. - 1 Unlocking front door
PST-1000 series Technical Manual 7 - 2
TM
DWG. - 2 Unscrewing the bottom
DWG. - 3 Lifting the keyboard unit
PST-1000 series Technical Manual 7 - 3
TM
DWG. - 4 Taking the cable stoppers out
PST-1000 series Technical Manual 7 - 4
TM
DETACHING THE REAR CABINET
Before detaching the rear cabinet of the PST system, all the external devices
should be removed. Disconnect all the connectors in the rear room within back cover.
Refer to the installation instructions in User’s Manual (take opposite operation in
reverse order) for detaching CRT or LCD display, printer, VFD and if installed, the
built-in battery.
Look into both sides of the PST chassis, with reference to the following
drawing, the user should find a “L” shaped steel wire at each side binding the rear
cabinet to the bottom chassis. Of course, only the short arm of the wire is visible from
the side that was covered by the side wall of the keyboard unit just removed. Turn the
short arms outward by 90 degrees (they were pointing upward) and pull the wires
toward the front till the long arms come out (see DWG.-5). Unscrew the two screws
and take out the washers on the printer platform to get ready to take the rear cabinet
off.
Now, the user would like it better to do the next operation with the PST system
up side down, though it is still possible for some skillful person to do it without
turning the PST. The drawing shows the bottom side of the PST system. The purpose
is to detach all the hooks from their notches. There are three notches on each side wall
of the bottom chassis and there are correspondingly three hooks at the inside of each
side wall of the rear cabinet. The key issue is to detach the hooks by pulling the side
walls of the rear cabinet a little bit outward yet still within the limit of the elasticity of
the cabinet (see DWG.-6). It is normal to have the rearmost pair of hooks more
difficult to get out than the others in this operation. Then the cabinet can be put aside
and the PST turned back to normal position.
Refer to the drawing for cable connections within the PST system and
disconnect those necessary for taking out the module that needs to be replaced (see
DWG.-7).
PST-1000 series Technical Manual 7 - 5
TM
Screws and
washers
“L”
shaped
steel wire
DWG. - 5 Turning the “L” shaped wire outward and pull out
Hooks inside rear cabinet
and notches on chassis
Pull the cabinet outward
DWG. - 6 Detaching hooks from notches
PST-1000 series Technical Manual 7 - 6
TM
DWG. - 7 Cable connections inside PST system
PST-1000 series Technical Manual 7 - 7
TM
SPARE PARTS/MODULE LIST
At the last page of this chapter, the assembly drawing of the PST1000 series
must have provided the reader of the Technical Manual an idea of the way to access
each parts or module for service or upgrading purposes as required in the previous
chapter(s). Every parts/module identifiable in the drawing are listed below, please note
that all available choices of each location are listed to cover the whole product range
of PST1000 series and parts at some location could be a subset of some module at
other location (e.g. item XXXX is contained in item YYYY).
Item
Part Number
Description
1010
PST9MVPWAU01N
9” DC monitor, northern hemisphere
1011
PST9MVPWAU01S
9” DC monitor, southern hemisphere
1012
AMT10C26TV02N
10” color monitor, northern hemisphere
1013
AMT10C26TV02S
10” color monitor, southern hemisphere
1020
PST9BASEMSM
Monitor swivel base mechanism
1030
OD300
OD300 display module with cable
1040
PSTCVRCRT
Rear cabinet, CRT type w/o pole base
1041
PSTCVRLCD
Rear cabinet, LCD type w/o pole base
1050
PD101
Customer display 8 x 7 segment + 7 LED
1051
PD201
Customer display 2 x 18 LCD
1052
PD2101
Customer display 2 x 20 VFD
1053
PD7001
Customer display graphic LCD (English)
1054
PD7011
Customer display graphic LCD (GB Chn)
1055
PD7021
Customer display graphic LCD (Big 5)
1060
PSTLCDBLCVR
LCD cable cover
1070
PSTCRTRODCVR
LCD cable cover, round shape
1071
PSTCRTLWROD
Pole base long type
1080
PSTLCDLWROD
Pole base short type
1081
PSTCRTCBLCVR
CRT cable cover
1090
PSTBTRYCVR
Battery cover
1100
PSTBKDRLH
Back door with latch
PST-1000 series Technical Manual 7 - 8
TM
(continued 1)
Items Part Number
Description
1110
CBT12VLA
12 V 2.3 AH UPS battery
1120
ASPOP200W TE006
ATX Power supply
1130
PSTBKCHASS
Back plastic chassis
1140
PST023
VGA card w/ COM3 & COM4
1150
A389-4
4MB SIMM module EDO DRAM
1151
A389-8
8MB SIMM module EDO DRAM
1160
PST100-2M
SSD module 2MB
1161
PST100-4M
SSD module 4MB
1162
PST100-8M
SSD module 8MB
1170
PST888G
486 system board module
1180
HCT-40TC-3
Cooling fan with heat sink
1190
CIC486DX4100-ST
CPU 486DX4-100 ST
1200
AHDD850MSEA
HDD 850 MB
1201
AHDD1.2GBSEAGT
HDD 1.2 GB
1202
AHDD2.1GQTM
HDD 2.1 GB
1210
CCBLA-148C
HDD cable
1220
CCBLA-149C
FDD cable
1230
PSTSPACRCVR
Left/Right cable stopper
1240
PSTSPACR-L
Left plastic bracket
1250
AFDD1.4MTEIV
FDD 1.44MB
1260
CCBLA-147A
External KB cable connector assembly to KB
controller
1270
PSTMAINCHASSY
Chassis kit
1280
PSTLCKROD
L-shape locking stick
1290
PSTSPACR-R
Right plastic bracket
1300
PSTSWLEVELA
Power switch level with adapter & knob
1310
PSTSWBRKT
Power switch level cover
1320
CCBLA-230
UPS battery cable
1330
PST054A1K
UPS battery connector board
1340
PSTSPKASSY
Speaker with bracket
PST-1000 series Technical Manual 7 - 9
TM
(continued 2)
Items Part Number
Description
1350
CCBLA-227A
I/O cable with plate (COM2)
1351
CCBLA-227B
I/O cable with plate (COM4, COM2)
1360
PSTCHASSISEMI
PST EMI kit (must be with item 1040 or 1041)
1370
CCBLA-152
MSR LED, (Dual color) with cable
1380
PSTKEYPAIR
Single key top & key cap pair
1381
PSTDBKEYPAIR
Double key top & key cap pair
1382
PSTQDKEYPAIR
Quad key top & key cap pair
1383
BK-2000
KB3100 blank key
1384
TK-2000
Ten key set
1390
CCBLA-167-2
Stand by LED, (Yellow) with cable
1400
PSTKB112
Stroke type keyboard w/o MSR
1401
PSTKB112MR2
Stroke type keyboard with 2 track MSR
1402
PSTKB112MR3
Stroke type keyboard with 3 track MSR
1403
PSTKB112MRJS2
Stroke type keyboard with JIS ΙΙ MSR
1410
PSTKB112EKEY
4 Keys set for 6 position key lock
1420
PSTKBELCK6PASY 6 Position key lock with wafer assembly
1430
CCBLA-151
Power LED, (Green) with cable
1440
PSTKBMECHKEY
Keyboard front door key
1450
PSTKBDR-1
Keyboard front door
1460
CCBLA-150C
Internal KB cable from system board to KB controller
1470
PSTKB112CPUMR
Keyboard controller
1480
CMSRCATRIGE-2
MSR module 2 tracks
1481
CMSRCATRIGE-3
MSR module 3 tracks
1482
CMSRCATRIGE-4A
MSR module JIS II
PST-1000 series Technical Manual 7 - 10
TM
ASSEMBLY DRAWING
1081
1070
1080
1100
1090
1050,1053
1051,1054 1040
1052,1055 1041 1030
1060
1020
1400
1401
1402
1403
1010
1011
1012
1013
1380
1381 1390
1382
1383
1384
1410
1420
1430
1440
1071
1110
1370
1120
1360
1450
1350
1351
1130
1140
1460
1340
1160 1150
1161 1151
1162
1330
1320
1310
1300
1170
1480
1481
1482
1470
1180
1290
1190
1200
1201
1202
1280
1270
(1380)
1210
1220 1230 1240 1250
1260
PST-1000 series Technical Manual 7 - 11