1
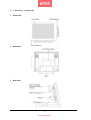
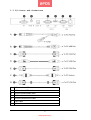
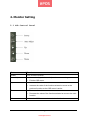
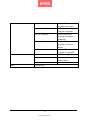
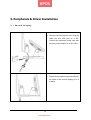
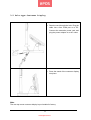
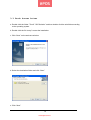
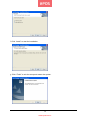
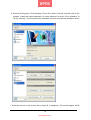
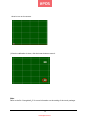
ePOS TOUCH VISION 1553
USER MANUAL
www.eposcom.ru
Contents
General Information .................................................................................................... i
ABOUT THIAS MANUAL........................................................................................ i
WARNING .............................................................................................................. i
WARRANTY LIMITS .............................................................................................. i
TRADE MARKS AND SERVICE MARKS ..............................................................ii
IMPORTANT SAFETY INFORMATION ..................................................................ii
1. Introduction ............................................................................................................ 2
1.1 Unpacking ....................................................................................................... 2
1.2 Product Overview ............................................................................................ 3
1.3 I/O Ports and Connectors ................................................................................ 5
1.4 Specifications .................................................................................................. 6
2. Monitor Setting ....................................................................................................... 7
2.1 OSD Control Panel.......................................................................................... 7
2.2 On-Screen Display .......................................................................................... 8
3. Peripherals & Driver Installation ......................................................................... 10
3.1 Second Display ............................................................................................. 10
3.2 Pole-type Customer Display ...........................................................................11
3.3 Touch Screen Driver ...................................................................................... 12
4. Peripherals Testing .............................................................................................. 16
4.1 Magnetic Stripe Card Reader ........................................................................ 16
4.2 Customer Display .......................................................................................... 17
1
www.eposcom.ru
1. Introduction
The PPD series offers high-quality, durable LCD touch screen that comes with a steady
aluminum die-casting base and standard 75mm VESA mounting holes. The PPD is designed
with the ability to integrate with any POS peripheral devices, such as speakers, rear top mount
or pole type customer display, magnetic card reader, and second monitor.
1.1 Unpacking
The contents may vary with different options. If there’s any physical damage or missing parts,
please contact your supplier immediately. Please keep all packing materials in case you need
to ship back the device for service.
POS Monitor 12.1”/15”/17” (For PPD-1210/1500/1700)
Touch Cable (USB or RS-232 Interface)
AC Power Cord (US, EU or UK)
Support CD
Options
Speakers (Pre-installed, Internal, 2W x 2)
Magnetic Stripe Card Reader (PS2, USB, or RS-232 Interface)
Second Monitor 10.4”/12.1”/15”
Customer Display (Pole-type or Rear Top Mount)
2
www.eposcom.ru
1.2 Product Overview
z
Front View
z
Rear View
z
Side View
3
www.eposcom.ru
Bottom View
4
www.eposcom.ru
1.3 I/O Ports and Connectors
A.
PS/2 interface MSR cable
B.
USB interface MSR cable
C.
RS-232 interface MSR cable
D.
USB interface touch cable
E.
RS-232 interface touch cable
F.
Audio cable
G.
VGA cable
5
www.eposcom.ru
1.4 Specifications
Display
PPD-1700
PPD-1500
PPD-1210
17”
15”
12.1”
Brightness
300 Nits
250 Nits
180 or 400 Nits
Resolution
1280 x 1024 Pixel
Model
TFT LCD
1024 x 768 Pixel
Touch Screen
5 Wire Resistive Type, 25-Point Calibration
Tilting Angle
15 ~ 80 Degrees
I/O Ports
Serial
RS-232 DB-9 x 2 (Optioned Touch x 1, MSR x1)
USB
USB2.0 x 1 for Touch Panel
RJ 45
PS2, or USB Optioned for MSR
VGA
1 x DB-15, Female, Support up to XGA / SXGA at 75Hz
Audio In
1 x Audio Jack with Internal Speaker 2W x 2
Others
Option
MSR, VFD, 2nd Display, Speaker
VESA
75mm
Power Input
Color
12VDC 48W
Black or Silver Optioned for Front Panel
FCC / CE / WEEE / RoHS
Compliance
Weight
Dimension (W x H x D:
12VDC 24W
6.4 Kg
5.4 Kg
5 Kg
416 x 370 x 330
356 x 340 x 305
305 x 320 x 305
5°C ~ 40°C
Operating Temperature
-20°C ~ 60°C
Storage Temperature
Storage Humidity
20% - 80% RH, Non-condensing
6
www.eposcom.ru
2. Monitor Setting
2.1 OSD Control Panel
Button
Function
Power
Turn on/off the monitor
Auto Adjust
a. Automatically optimize and adjust the screen settings.
b. Exit the OSD menu.
Up
a. Increase the volumn.
b. Increase the value of the function selected or move to the
previous function as the OSD menu is active.
Down
a. Decrease the volumn.
b. Decrease the value of the function selected or move to the next
function.
Menu
Activate the OSD menu and enter/select the function.
7
www.eposcom.ru
2.2 On-Screen Display
OSD Main Menu
Item
Description
Color
Contrast
Adjust the degree of
difference between
lightness and darkness.
Brightness
Adjust the balance
between lightness and
darkness.
Color Adjust
Set the value of red,
green, and blue.
Image Setting
Color Temp
Contain 5 color modes.
Back
Go back to menu.
Clock
Adjust the pixel clock
frequency.
Phase
Adjust the pixel clock
signal.
Sharpness
Adjust the clarity and
visibility of the edges.
Position
Back
Go back to menu.
H.Position
Adjust the horizontal
position of the screen
image.
V.Position
Adjust the vertical position
of the screen image.
OSD Menu
Back
Go back to menu.
OSD H.Pos
Adjust the horizontal
position of the OSD menu.
OSD V.Pos
Adjust the vertical position
of the OSD menu.
OSD Timer
Adjust the display time of
the OSD menu.
Language
Back
Go back to menu.
English
Set the OSD menu
language to English.
French
Set the OSD menu
language to French.
8
www.eposcom.ru
Germany
Set the OSD menu
language to Germany.
Spanish
Set the OSD menu
language to Spanish.
Chinese Traditional
Set the OSD menu
language to Chinese
Traditional.
Chinese Simple
Set the OSD menu
language to Chinese
Simple.
Japanese
Set the OSD menu
language to Japanese.
MISC.
Signal Source
D-SUB (analog) input only.
Reset
Reset all settings to the
default values.
Back
Exit
Go back to menu.
Exit the menu.
9
www.eposcom.ru
3. Peripherals & Driver Installation
3.1 Second Display
a. Pass the cord through the hole. Plug the
cable into the VGA port on a PC.
Connect the extension power cord and
plug the power adaptor to an AC outlet.
b. Tighten the bundled screws specified for
the stand of the second display to fix it
to place.
10
www.eposcom.ru
3.2 Pole-type Customer Display
a. Pass the cord through the hole. Plug the
cable into a free COM port on a PC.
Connect the extension power cord and
plug the power adaptor to an AC outlet.
b. Press the stand of the customer display
into place.
Note
The rear top mount customer display is pre-installed in factory.
11
www.eposcom.ru
3.3 Touch Screen Driver
a. Double click the folder “Touch” “5W Resistive” and then double click the subfolder according
to the operating system.
b. Double click the file “setup” to start the installation.
c. Click “Next” on the welcome window.
d. Select the destination folder and click “Next.”
e. Click “Next”.
12
www.eposcom.ru
f. Click “Install” to start the installation.
g. Click “Finish” to exit the setup and restart the system.
13
www.eposcom.ru
h. Execute All Programs \ Touch Package \ Touch Tool. Select “General” and then click “9 Pts.
Linearity” to start the 9-point-calibration. Or select “Advance” to select “4 Pts. calibration” or
“25 Pts. Linearity”. The more points are calibrated, the more accurate the calibration will be.
i. Press the red dot on the screen with a finger till it disappears. The dot will appear 4/9/25
14
www.eposcom.ru
times in turn on the screen.
j. After the calibration is done, click the lower button to save it.
Note
Refer to the file “Userguide2_8” for more information on the setting of the touch package.
15
www.eposcom.ru
4. Peripherals Testing
If the PPD is equipped with magnetic stripe card reader or customer display, follow the steps
below to test the function.
4.1 Magnetic Stripe Card Reader
a. Open the folder “Peripherals” “MSR” and double click the file “BREAKOUT.exe”.
b. After the testing window pops up, slide a magnetic stripe card and its information will show
on the window.
16
www.eposcom.ru
4.2 Customer Display
a. Open the folder “Peripherals” “Customer Display” and double click the file “BREAKOUT.exe”.
b. Enter any keys on the window and the typed words will appear on the customer display.
ePOS Components
17
www.eposcom.ru