1
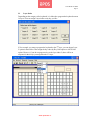
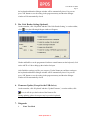
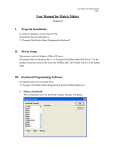
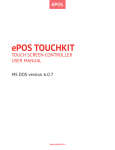
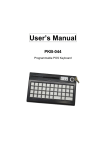
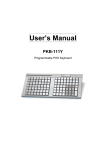
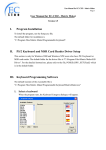
User Manual for PKB
Page 1
User Manual for PKB
Version 2.3
I.
Program Installation
To install the program, run the Setup.exe file.
The default folder for installation is
“C:\Program Files\PKB\Programmable Keyboard”.
II.
Driver Setup
This section is only for Windows 2000 or XP users.
The default folder for the driver files is “C:\Program Files\PKB\KB Driver”. For the detailed
instructions, please refer to the file, POSKB_DRV_SETUP.pdf, which is in the default folder.
III. Keyboard Programming Software
The default location of executable file is
“C:\Program Files\PKB\Programmable Keyboard\pkb.exe”
1. Select a keyboard
When the program runs, the Keyboard Category dialogue will appear.
www.eposcom.ru
User Manual for PKB
Page 2
Select the category of the keyboard you want to program, and then press OK button. The
following instructions are based on PKB-111 model, but they can also be applied for other
models.
2. Edit Key Map
(If a magnetic card reader is selected in the Keyboard Category dialogue, you can treat
Header, Separator, and Suffix as buttons in the keyboard and program them by ‘Key
Code’ and ‘ASCII code’ methods. For details, please refer to the Section 4.)
A button in the keyboard layout changing dark grey when the mouse cursor is on top of it
indicates that the button can be programmable.
Click the left mouse button on that programmable button, a popup menu appears. There
are totally two methods to assign the key map. One method is called ‘Key Code’ and
another is ‘ASCII Code’. After assigning codes for a button, you can choose ‘Clear’ in the
popup menu to clear the codes. Choose “Layer Index” to assign an index to a key.
Note:
This model does not have Key Lock, but others may have.
www.eposcom.ru
User Manual for PKB
Page 3
i.
Key Code
In this method, you can assign any scan codes to a key.
In the above dialogue window, most popular key codes (scan codes) are shown in the
“virtual keyboard” area, plus a few special codes which are listed in the “Special Codes”
area. Selecting a key from the “keyboard” area or double clicking an item in “Special
Codes” area will add that key’s code to the “Mapping Sequence” list. Up to 256 codes can
be mapped to a single key position.
Any key codes (scan codes) that are not selectable in this screen can be mapped by
directly entering the hexadecimal code for that key into the box next to “0x” and pressing
“Insert”.
Example
If you press “Shift”, “H”, “E”, “Shift”, “L”, “L”, and “O” buttons in the “virtual
keyboard”, the “Mapping Sequence” list will be shown as in the above dialogue window.
If you want to delete “O” in the above “Mapping Sequence” list, you can right click the
“O” item. A popup menu with two options will appear. Select “Delete” option will delete
the “O” item. But if you select “Clear All”, all items in the list will be deleted.
If you want to add “S” before “H” in the above “Mapping Sequence” list, click “H” item
in the list first, then press “S” in the “keyboard” picture. But remember to click any empty
www.eposcom.ru
User Manual for PKB
Page 4
items in the list if you want to append the codes at the end of the list.
After programming this key, if you type this button in Notepad, it will display “HEllo” if
the Caps Lock is off. However, it will display “heLLO” if the Caps Lock is on.
Caution:
1. If, for example, you want to assign Left Shift code (no any other codes), you just press
left Shift button once in the “keyboard” picture. But, in the “Mapping Sequence” list
of the above dialogue window, if you press left Shift button once (i.e. there will be no
Left Shift Up code in the “Mapping Sequence” list), when you press this button after
programming, it seems that the left Shift button is still pressing continuously. The
above situation is also applied for Right Shift code, Left Alt Code, Right Alt Code,
Left Ctrl Code, and Right Ctrl Code. Therefore, much attention is needed when
assigning these codes.
2. For PS2 interface, if <Pause> code is assigned, no other codes can be appended. On
the other hand, if other code is assigned, the <Pause> code cannot be appended.
3. For USB interface, the following codes cannot be assigned with other codes:
<Wake>, <Sleep>, <Power>, <Vol Up>, <Vol Down>, <Media Select>, <Mail>,
<Calculator>, <My Computer>, <WWW Search>. On the other hand, if other code is
assigned, the above codes cannot be appended.
Depending on the version of the software, you can change the virtual keyboard layout by
selecting the country you like.
www.eposcom.ru
User Manual for PKB
Page 5
ii.
ASCII Code
In this method, you can assign any printable ASCII Codes, i.e. A-Z, a-z, 0-9, +, - ,* , / ,
and punctuation symbols. Up to 255 ASCII codes can be assigned. Five special symbols
can also be assigned by using the following representations:
Symbol
Representation
Enter Character
\n or \N
Esc Character
\e or \E
Tab Character
\t or \T
\ Character
\\
Delay 0.5 second
\d or \D
For example, if you program a button with Hello\nWorld, as shown in the following
diagram,
After programming this button, if you type this button in Notepad, it will display,
Hello
World
Note:
1. By using this method, no matter you press Caps Lock or not, it will always display the
same character string.
2. The output of the character string is the same as what you enter if you choose a
correct Country Code in the Keyboard Setting dialogue (Refer to Section 3).
For example, if you enter “How are you?” in a Germany OS, but you choose USA for
the Country Code in the Keyboard Setting dialogue, the ouptut will become “How are
zou?”.
www.eposcom.ru
User Manual for PKB
Page 6
iii.
Layer Index
Depending on the category of the keyboard, it is allowed to program the keyboard at most
16 layers. You can assign a layer index to any key you like.
If, for example, you want to program the keyboard at the 2nd layer, you can choose Layer
2 option in the tool bar. Then assign the key codes by Key Code option or ASCII Code
option. However, if you do not program a key to the layer index 2, there will be no
response for those keys you assigned at the 2nd layer.
www.eposcom.ru
User Manual for PKB
Page 7
3. Keyboard Setting
(This setting will not be provided if a RS232 magnetic card reader is selected in the
Keyboard Category dialogue. If a PS2 or USB magnetic card reader is selected, only
“Country Code” setting is meaningful.)
On the menu bar, click ‘Keyboard’ and then ‘Keyboard Setting’, the following dialogue
window will appear,
If you want to have a beep sound when pressing a button on the keyboard, click ‘Beep
Enable’ option. Then you can choose either ‘All Keys’ or ‘Only Programmed Keys’
option.
If you allow the key to be displayed repeatedly when pressing the button continuously,
click ‘Repeat Enable’ option.
Depending on what type of keyboard chosen, you can assign a country code in the
keyboard setting. This country code will affect what the magstripe card reader reads and
the keys programmed by the ASCII code method.
After finish the settings you like, you can press ‘Update’ button to send these settings to
the keyboard and then the dialogue window will be automatically closed. Or you can
press ‘OK’ button to save the setting in the program memory and then the dialogue
window will be automatically closed.
Caution:
If you choose ‘Repeat Enable’ option and you assign non layer index for certain key lock
position, for example, assigning “Hello” for key lock L. When the key is switched on L
position, “Hello” will be generated repeatedly. If you choose ‘Beep Enable’ at the same
www.eposcom.ru
User Manual for PKB
Page 8
time, you will hear a continuous beep sound. Therefore, it is recommended the key lock
be assigned a layer index.
4. Magstrip Card Reader Setting (Optional)
On the menu bar, click ‘Keyboard’ and then ‘Magstrip Card Reader Setting’, or on the
toolbar, click
icon, the following dialogue window will appear,
Header, Separator, and Suffix can be programmed similar to normal buttons on the
keyboard, click on the ASCII or Code to bring up the window for input.
Note:
1. The code length for Header, Separator, and Suffix are limited to 16 only.
2. For a RS232 magnetic card reader, they can only be programmed by using ASCII
method.
According to the settings in the above dialogue window, after you sliding a magstrip card
along the reader, it will display as follows,
Header codes, Track 1 Start Sentinel, Track 1 Data, Track 1 End Sentinel, Separator codes,
Track 2 Start Sentinel, Track 2 Data, Track 2 End Sentinel, Separator codes, Track 3 Start
Sentinel, Track 3 Data, Track 3 End Sentinel, Suffix codes.
After finish the settings you like, you can press ‘Update’ button to send these settings to
www.eposcom.ru
User Manual for PKB
Page 9
the keyboard and then the dialogue window will be automatically closed. Or you can
press ‘OK’ button to save the setting in the program memory and then the dialogue
window will be automatically closed.
5. Bar Code Reader Setting (Optional)
On the menu bar, click ‘Keyboard’ and then ‘Bar Code Reader Setting’, or on the toolbar,
click
icon, the following dialogue window will appear,
Header and Suffixes can be programmed similar to normal buttons on the keyboard, click
on the ASCII or Code to bring up the window for input.
After finish the settings you like, you can press ‘Update’ button to send these settings to
the keyboard and then the dialogue window will be automatically closed. Or you can
press ‘OK’ button to save the setting in the program memory and then the dialogue
window will be automatically closed.
6. Firmware Update (Except for the USB device)
On the menu bar, click ‘Keyboard’ and then ‘Update Firmware’, or on the toolbar, click
icon, it will ask you the location of the firmware file.
During updating, please do not press any keys on the keyboard.
7. Diagnostic
i.
Enter Test Mode
www.eposcom.ru
User Manual for PKB
Page 10
The key pressed will show its key position. (For testing the keyboard only.) If your
keyboard has key lock and the repeat feature is turned on, the keyboard will
continuously send the key lock position. To stop this, you can press any other key.
ii.
Exit Test Mode
The key pressed will show the code programmed.
iii.
Reset
Reset the keyboard only. (For testing the keyboard only.)
iv.
Firmware Version
Get the current version of the firmware.
8. Update Key Mappings
After you assigning the codes for all or some of the buttons, you can start to program the
key mappings in the following manners.
On the menu bar, click ‘Keyboard’ and then ‘Update Key Mappings’, or on the toolbar,
click
icon.
During updating, please do not press any keys on the keyboard.
9. Update Whole Keyboard
After you assigning the codes for all or some of the buttons, configuring keyboard setting
magstrip card reader setting, and barcode reader setting, you can click ‘Keyboard’ on the
menu bar and then ‘Update Whole Keyboard’.
During updating, please do not press any keys on the keyboard.
10. Retrieve Keyboard
If you want to get the key code programmed in each key, keyboard setting or magstrip
card reader setting, you can click ‘Keyboard’ on the menu bar and then ‘Retrieve
Keyboard’ or click
icon on the toolbar.
During retrieving, please do not press any keys on the keyboard.
www.eposcom.ru
User Manual for PKB
Page 11
11. Clear All
If you want to clear all key mappings, the keyboard setting or the magstripe card reader
setting, click ‘Keyboard’ on the menu bar and then ‘Clear All’ or click
icon on the
toolbar.
This action only clears the program memory. It does not clear all settings in the actual
keyboard.
12. Save
If you want to save all key mappings, the keyboard setting or the magstripe card reader
setting into a file, click ‘File’ on the menu bar and then ‘Save’ or click
icon on the
toolbar.
13. Open
You can load the key mappings, keyboard setting or magstripe card reader setting from a
file, click ‘File’ on the menu bar and then ‘Open ….’ or click
icon on the toolbar.
An error will occur if you choose to load a wrong format keymap file.
IV. Batch Update
You can update the keymap or the firmware automatically by creating a batch file. After
updating, the program will be closed automatically.
1.
Keymap Update
The format of the batch file for updating keymap for a PS2 or USB device,
“Location_of_Executable_File” -1“Location_of_Keymap_File” -t“Category”
For example,
“C:\Program Files\PKB\Programmable Keyboard\PKB.exe” -1“C:\temp\pkb-111.dat”
-t“PKB-111”
The format of the batch file for updating keymap for a RS232 device,
“Location_of_Executable_File” -1“Location_of_Keymap_File” -t“Category”
-s“Port,Baud”
www.eposcom.ru
User Manual for PKB
Page 12
For example,
“C:\Program Files\PKB\Programmable Keyboard\PKB.exe” -1“C:\temp\C202AC.dat”
-t“C202AC” -s“1,57600”
2.
Firmware Update (Except for the USB device)
The format of the batch file for updating firmware for a PS2 device,
“Location_of_Executable_File” -2“Location_of_Firmware_File” -t“Category”
For example,
“C:\Program Files\PKB\Programmable Keyboard\PKB.exe” -2“C:\temp\poskb.bin”
-t“PKB-111”
The format of the batch file for updating firmware for a RS232 device,
“Location_of_Executable_File” -2“Location_of_Firmware_File” -t“Category”
-s“Port,Baud”
For example,
“C:\Program Files\PKB\Programmable Keyboard\PKB.exe” -2“C:\temp\poskb.bin”
-t“C202AC” -s“1,57600”
Note:
a. There is a space before -1, -2, -t, and -s but no space after -1, -2, -t and -s.
b. The double quotation mark is required.
www.eposcom.ru