1
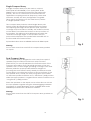
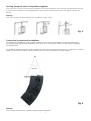
Compact Array
ORDERCODE D3710
Congratulations!
You have bought a great, innovative product from DAP Audio.
The DAP Audio Concert Series brings excitement to any venue. Whether you want simple plug-&-play
action or a sophisticated show, this product provides the effect you need.
You can rely on DAP Audio, for more excellent audio products.
We design and manufacture professional audio equipment for the entertainment industry.
New products are being launched regularly. We work hard to keep you, our customer, satisfied.
For more information: [email protected]
You can get some of the best quality, best priced products on the market from DAP Audio.
So next time, turn to DAP Audio for more great audio equipment.
Always get the best -- with DAP Audio!
Thank you!
DAP Audio
DAP Audio Compact Array™ Product Guide
Warning..…...................................................................................………………………………………….................
Safety-instructions………………………………………………………………………………………….…..............
Operating Determinations……………………………………………………………………………………............
2
2
3
Description..…..............................................................................……….…………………………………...............
Features………………………………………………………………………………….………………….…..............
Overview…………………………………………………………………………………………………..……............
4
4
4
Installation..............................................................................................................................................................
5
Set Up and Operation.....................................................................……..…………………………………..............
5
Connection Cables..............................….......................................………..………….…….………….…...............
9
Product Specifications.................................................................……………….…….……………….…................
10
1
WARNING
CAUTION!
Keep this system away from rain and moisture!
FOR YOUR OWN SAFETY, PLEASE READ THIS USER MANUAL CAREFULLY
BEFORE YOUR INITIAL START-UP!
SAFETY INSTRUCTIONS
Every person involved with the installation, operation and maintenance of this system have to:
be qualified
follow the instructions of this manual
CAUTION! Be careful with your operations.
With a dangerous voltage you can suffer
a dangerous electric shock when touching the wires!
Before you initial start-up, please make sure that there is no damage caused by transportation. Should
there be any, consult your dealer and do not use the system.
If you find items missing, they may have been shipped separately. Please allow several days for the rest of
your order to arrive before inquiring.
To maintain perfect condition and to ensure a safe operation, it is absolutely necessary for the user to
follow the safety instructions and warning notes written in this manual.
Please consider that damages caused by manual modifications to the system are not subject to
warranty.
This system contains no user-serviceable parts. Refer servicing to qualified technicians only.
IMPORTANT:
The manufacturer will not accept liability for any resulting damages caused by the nonobservance of this manual or any unauthorized modification to the system. Furthermore the
manufacturer is not responsible for the abuse of its product’s caused by avoiding compliance
with inspection and maintenance procedures or any other abuse.
Never let the power-cord come into contact with other cables! Handle the power-cord and all
connections with the mains with particular caution!
Never remove warning or informative labels from the unit.
Do not open the device and do not modify the device.
Never use anything to cover the ground contact.
Never leave any cables lying around.
Never use the device during thunderstorms, unplug the device immediately.
Do not insert objects into air vents.
Do not connect this system to a dimmer pack.
Do not switch the system on and off in short intervals, as this would reduce the system’s life.
Do not open this device. Risk: hazardous radiation exposure.
Do not shake the device. Avoid brute force when installing or operating the device.
Only use system indoor, avoid contact with water or other liquids.
Avoid flames and do not put close to flammable liquids or gases.
Always disconnect power from the mains, when system is not used. Only handle the power-cord
by the plug. Never pull out the plug by tugging the power-cord.
Make sure you don’t use the wrong kind of cables or defective cables.
Make sure that the signals into the mixer are balanced, otherwise hum could be created.
Make sure you use DI boxes to balance unbalanced signals; all incoming signals should be clear.
Make sure that there is sufficient room on all sides of the system for air circulation
2
Make sure that the available voltage is not higher than stated on the rear panel.
Make sure that the power-cord is never crimped or damaged. Check the system and the powercord from time to time.
The cable insert or the female part in the device must never be strained. There must always be
sufficient cable to the device. Otherwise, the cable may be damaged which may lead to deadly
electrical shocks
Always operate the unit with the AC ground wire connected to the electrical system ground.
Do not drive the inputs with a signal level bigger, than required to drive the equipment to full
output.
Please turn off the power switch, when changing the power cord or signal cable, or select the
input mode switch.
In typical use, Please set the volume to 0dB position.
Prevent distortion! Make sure that all components connected to the Sound mate have sufficient
power ratings. Otherwise distortion will be generated because the components are operated at
their limits.
Avoid ground loops! Always be sure to connect the power amps and the mixing console to the
same electrical circuit to ensure the same phase!
If system is dropped or struck, disconnect mains power supply immediately. Have a qualified
engineer inspect for safety before operating.
If the system has been exposed to drastic temperature fluctuation (e.g. after transportation), do
not switch it on immediately. The arising condensation water might damage your system. Leave
the system switched off until it has reached room temperature.
If your DAP Audio device fails to work properly, discontinue use immediately. Pack the unit
securely (preferably in the original packing material), and return it to your DAP Audio dealer for
service.
For replacement use fuses of same type and rating only.
The user is responsible for correct positioning and operating of the Concert Series. The
manufacturer will not accept liability for damages caused by the misuse or incorrect installation
of this device.
This device falls under protection class I. Therefore it is essential to connect the yellow/green
conductor to earth.
Repairs, servicing and electric connection must be carried out by a qualified technician.
SAVE YOUR INVOICE. It will be required for warranty service if needed in future.
WARRANTY: Till one year after date of purchase.
OPERATING DETERMINATIONS
If this system is operated in any other way, than the one described in this manual, the product may suffer
damages and the warranty becomes void.
Any other operation may lead to dangers like short-circuit, burns, electric shock, etc.
You endanger your own safety and the safety of others!
Improper installation can cause serious damage to people and property!
Rigging
Please follow the European and national guidelines concerning rigging, trussing and all other safety
issues.
Do not attempt the installation yourself!
Always let the installation be carried out by an authorized dealer!
Procedure:
If the projector is lowered from the ceiling or high joists, professional trussing systems have to be
used.
Use the DAP mounting frame (D3715) in combination with approved Safety slings to suspend the
Compact array from the trussing system.
3
The Compact array must never be fixed swinging freely in the room.
The installation must always be secured with a safety attachment, e.g. an appropriate safety net
or safety-cable.
When rigging, derigging or servicing the Compact Array, always make sure, that the area below
the installation place is blocked and staying in the area is forbidden.
Description of the device
Features
The Dap Audio Compact Array is a two-way, line-array loudspeaker system intended for use in arrays of
up to four enclosures. Array coverage may be adjusted by means of the Mid/ Long throw selector.
Backside
Fig. 1
1) Long/Mid -Throw switch.
This switch allows you to boost the highs with +3dB this is useful if several speakers are stacked.
We suggest switching the upper speaker in an array to “Long throw” + 3dB and switching all the lower
speakers to “Mid throw” (0dB).
2) Passive/ Bi-amp switch.
Passive mode: For use with one amplifier. Use one of the two input connectors (pin 1+ & pin 1-).
Bi-amp mode: For use with two amplifiers in combination with an external crossover. The internal
Crossover is bypassed. Use one of the two input connectors (low: pin 1+ & 1-, high: pin 2+ & 2-).
3) Parallel input connectors.
For connecting to your amplifier and linking through to other Compact Arrays.
4
Installation
Remove all packing materials from the Compact Array. Check that all foam and plastic padding is
removed.
Set Up and Operation
Signal Input
Both Speakon input sockets are wired in parallel. And can be used as either input or for linking through to
other Compact Arrays.
The DAP Audio Compact Array is a flexible speaker systems that can be deployed in ground supported
or suspended applications. The following information will help you set up your Compact Array system
safely and effectively.
Pole and Tripod safety warnings.
When using stands or poles, be sure to observe the following precautions:
Check the stand or pole specification to be certain that the device is designed to support the
weight of the speaker. Observe all safety precautions specified by the manufacturer.
Be certain that the surface on which the system is to be stacked is flat, stable and solid.
Route cables so that performers, production crew, and audience will not trip and topple the
speakers.
Inspect the stand (or pole and associated hardware) before each use and do not use equipment
with worn, damaged, or missing parts.
Do not attempt to place more than two Compact Array loudspeakers on a tripod.
When mounting two compact array speakers on a pole or tripod, internal rigging hardware must
be used to secure the speakers to each other.
Always be cautious when deploying the system outdoors. Unexpected winds may topple the
system. It may be necessary to place additional weight (i.e. sandbags) on the base of the stand
to improve stability. Avoid attaching banners or similar items to any part of a speaker system. Such
attachments could act as a sail and topple the system.
Unless you are confident that you can handle the weight of the speaker, ask another person to
help you get it onto the tripod stand or pole.
One or two Compact arrays may be mounted onto either a DAP D8409 Tripod stand or with the
DAP D8404 pole over its companion subwoofer the DAP D3701 LB-184 subwoofer.
5
Single Compact Array.
A single Compact Array may be used on a tripod
Stand (DAP Audio D8409B) or on a pole (DAP Audio
D8404) over its companion subwoofer (the DAP Audio
(D3701). The use of a subwoofer is recommended for
applications requiring more low-frequency power and
extension. Usually, the array configuration Long/MidThrow switch should be set to the "Mid Throw" position
if a single speaker is used.
The Compact Array includes a dual angle 36mm pole
Mount socket. By selecting the appropriate pole socket
and adjusting the height of the tripod or pole, optimum
coverage may be achieved. Ideally, the audience should
not be able to see either the bottom or the top surface of
the speaker. This will insure that all listeners are within the
“included coverage angle” of the speaker. The rear
pole-socket will position the speaker with the baffle 2.5º to
the floor while the forward socket.
System illustration shows availlable DAP Audio D8404 pole.
Fig. 2
Warning:
Do not stack more than one D3710 Compact Array speaker
on a pole.
Dual Compact Array
The Compact Array is designed in such a way that a pair of
speakers may be safely mounted onto a tripod stand
(DAP D3710). For most applications the forward socket of the
compact array will be used. This will tilt the lower of the two
speakers at a 15° down-angle (providing coverage of the near
listeners) while the upper speaker will face straight out
(covering the more distant areas). Ideally, the listeners should
not be able to see either the bottom or the top surfaces of the
two speaker array. Usually, the array Long/ Mid- throw switch
on the lower speaker should be set to “Mid Throw” (0dB) position
while the upper speaker’s Long/Mid Throw switch should be set to
“Long Throw” (+3dB) position.
Place the speakers on the tripod one at a time. Be sure to lock
the two speakers together using the internal rigging hardware
(see figure 3). System illustration shows availlable DAP Audio
D8409B Tripod and D3701 LB-184 bass cabinet.
Warning:
Do not stack more than two D3710 Compact Array speakers on
a tripod.
Fig. 3
6
Locking Compact Array loudspeakers together.
Any time two or more Compact Array speakers are locked together, they must be mechanically secured
to each other using the internal rigging frame and supplied quick release pins. See Figure 4 below for
details.
Warning:
Only use the correct quick release pins supplied by DAP Audio.
Fig. 4
Suspension in permanent installations.
For permanent installation a DAP Compact Array stack may be suspended by using the DAP D3715
Mounting Frame (separately available). In this way up to 4 Compact Arrays can be stacked together
and suspended.
For optimum performance we would suggest to set the upper speaker switch in the “Long Throw” position
(3dB). For the lower speakers the switch should be set in the “Mid Throw” position (0dB).
Max 60°
Fig. 5
Warning:
Do not stack more than 4 Compact Array speakers together.
7
Installing the Array frame.
1. The array frame is attached to the internal rigging of the Compact Array using the included quick
Release pins.
Warning:
Do not use any substitute for these pins. Place the entire frame on top of the Compact Array and
flip up the drop levers (B) found on both sides of the speaker to be received by the mounting
frame arms.
Fig. 6
2. Once the drop levers on the speaker are received by the array frame, use a pair of the provided
quick release pins (A) to attach the drop levers to the mounting frame.
8
Connection Cables
Take care of the connector cables, always holding them by the connectors and avoiding knots and
twists when coiling them: This gives the advantage of increasing their life and reliability, which is always to
your advantage.
Periodically check that your cables are in good condition, that they are correctly wired and that all their
contacts are perfectly efficient: a great number of problems (faulty contacts, ground hum, discharges,
etc.) are caused entirely by using unsuitable or faulty cables.
Functional Block Diagram
Fig. 7
9
Product Specifications
Woofer: 1X SA-1275NHL
High Driver: PA-44M
Nominal impedance: 12Ω
RMS Power Rating: 400W
Program Power Rating: 800W
Peak Power Rating: 1200W
Input connector: Speakon NL4 Style Connector
Full range: pin 1+ & 1Bi-amp: Low pin 1+ & 1-, High pin 2+ & 2Frequency response: 60 – 18.000Hz, -3dB
Crossover frequency Low: 1400 Hz ; 12dB Octave
Crossover frequency High: 2000 Hz ; 18dB Octave
Efficiency: 98dB/W/m Full space
Dimensions 590 x 425 x 395 mm (WXDXH)
Weight 30 Kg
Design and product specifications are subject to change without prior notice.
Website: www.Highlite.nl
Email: [email protected]
10
2007 Dap Audio.