1
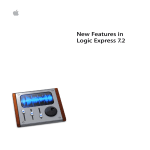
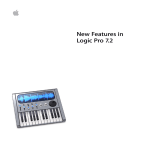
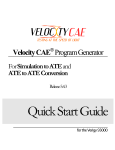
Logic Pro 7.1 – Apple Loops (2005-0905) 1 of 23 Logic Pro 7.1 Personal Manual by Edgar Rothermich [email protected] <http://homepage.mac.com/edgarrothermich> Apple Loops Apple Loops are “tagged aiff audio files” Tagged audio files Tagged Audio Files These are audio files (i.e. aiff, wav, mp3 etc) that have two data sections. You can actually “see” the data if you open an audio file with a text editor. • The majority of the data represents the digital audio data. Every Application that supports that audio file format (aiff, wav, mp3, etc), can read the file and playback the audio. • The additional data section of the audio file is called metadata or “tags”. Most of the tags are stored in the clear which means that you can spot them inside the “data mess” Audio data Different applications create their own metadata sets (tags). These metadata can only be used (understood) by the application that created them or by applications that support them. For example: • “ACIDized” wave files include metadata created by the application ACID or any application that utilizes the tags • “Apple Loops-formatted aiff files include metadata created by the Apple Loops Utility. The metadata should not interfere with the actual audio data or change the audio data itself. This ensures that “Tagged Audio Files” can be played back with any application that supports the audio file format (wave, aiff). If the metadata is not supported by the application then it just ignores the data or part of it. Metadata (tags) Tag Types: A plain audio file has only one function: It plays back the audio in same way it was recorded. Adding various tags however can extend the functionality of the audio file. Different applications use different sets of tags. Apple Loops uses the following types of tags • Additional File Information or File Description (Keywords) The most popular example is the mp3 file format that includes “ID3 tags”. These are description of the audio files like “Artist”, “Album”, “Comments”, etc “iTunes supports those tags and uses even more of their own. Logic has a build in “Loop Browser” that enables the search for audio files with those tags • Tempo Matching The most popular example is the ACID file. Using drums loops as audio files in your sequencer was always restricted by the tempo. The tempo of your song had to match the tempo of the recorded audio file in order to play in sync. The ACID file adds some metadata which enabled the sequencer to playback the audio file in the current tempo of your song without any pitch alteration. This process is called Tempo matching. • Key Matching Apple Loops took the idea of tempo matching and applied it to the pitch. If you are working on a song in your sequencer in the key C and want to use an audio file of a synth pattern that was recorded in D, then you have to do some DSP surgery to make them fit. Apple Loops provide metadata that enables the sequencer to match the Key of your song and playback the synth pattern in the key of C without any tempo alteration • MIDI Data and Instruments Data Apple Loops can tag even more metadata along the audio data. How about MIDI data. Instead of adding the audio file to an audio track, you can place it on a MIDI track and Logic will extract the MIDI data of that audio file and create a MIDI region, which you can play back with the synth module of your choice. Logic goes even that far that it can include the information of the audio instrument and all its used plugins. All those information must be embedded into the audio file first. See below for details. Logic Pro 7.1 – Apple Loops (2005-0905) 2 of 23 Apple Loop Concept A short History The Apple Loop technology was not a straightforward development for Logic. Original developed for the application “Soundtrack” which was meant as an audio postproduction tool or quick scoring tool for Final Cut Pro, it popped up in GarageBand and at the end in Logic. This explains the inconsistency in labeling and file management. 1) 2) 3) 4) 5) 6) 7) Apple creates “Soundtrack” that introduces “Apple Loops”. Utility “Soundtrack Loop Utility” comes with Soundtrack to create Apple Loops Apple acquires Logic from Emagic Apple takes some code from Logic and Soundtrack to create the consumer level sequencer “GarageBand” GarageBand is based on Apple Loops Logic 7 gets support for Apple Loops. It ships with “Apple Loops Utility”, which is the same as “Soundtrack Loop Utility” Logic 7.1 changes Apple Loop file management to conform with GarageBand Identifying Apple Loops You can’t identify an Apple Loop audio file just by looking at the file in the Finder. It looks like a regular aiff file with the “.aif” extension However, if you drag the audio files into Logic then there will be the channel indication • One circle: mono audio file or Apple Loop with the “File Type” tag set to “One-Shot” • Double circle: stereo audio file or Apple Loop with the “File Type” tag set to “One-Shot” • One ribbon: mono Apple Loop with the “File Type” tag set to “Loop” • Double ribbon: stereo Apple Loop with the “File Type” tag set to “Loop” Finder Arrange Window Window Audio Window Blue Apple Loops vs Green Apple Loops There are actually two kinds of Apple Loops: Blue and Green: (You can only see which one is which in the Loop Browser) The Blue Apple Loops are the “regular” ones. They include the audio data and the Apple Loop metadata, which enables the Time and Key matching when you place them onto an Audio Track in Logic The Green Apple Loops have two additional tags: • MIDI data • Channel Strip setting You can place them on three different Tracks: • Audio Track: they behave like blue Apple Loops with regular Time and Key matching • MIDI Track: Logic ignores the audio data and instead will create a MIDI Region with the MIDI data which is part of the Green Apple Loops metadata • Audio Instrument Track: Logic will again ignore the audio data and create a MIDI Region with the MIDI data from the embedded MIDI data. In addition, if the Audio Instrument Track doesn’t have any Instrument assigned yet, Logic will load the embedded Channel Strip setting, which includes the Audio Instrument and any assigned inserts for that track. NOTE: Once you placed them on one track type, it will become that region type (audio region or MIDI region) and you can’t move the Loop i.e. from the audio track to the MIDI track to retrieve the MIDI data. You have to drag the Loop again from the Loop Browser direct onto a MIDI track. Logic Pro 7.1 – Apple Loops (2005-0905) 3 of 23 Apple Loops “File Type” One of the important Apple Loop tags is called “File Type” and can be set to Loop or One-Shot • • Loop (Looping): if you drag a Apple Loop into Logic’s Arrange Window, then Tempo Matching and Key Matching will be applied to the Loop based on the current Song setting and the tags in the Apple Loop. Key Matching is a separate tag and can be disabled to avoid transposition of non-pitched loops (drums, percussion) One-Shot (Non-looping): Setting the File Type to One-Shot disables the Tempo AND Key Matching functionality for that loop and it plays back in its original tempo and key when dragged to Logic’s Arrange Window. One reason why you need that is when you convert a SFX Library into Apple Loop files and take advantage of the indexing and browse features of Logic’s Loop Browser. The SFX, when dragged into Logic, would play back like regular audio files without any tempo or key matching The current application for creating Apple Loops “Soundtrack Loop Utility” is renamed to “Apple Loops Utility”. Both using different labels for the File Type value File Type in Apple Loops Utility File Type in Soundtrack Loop Utility The Region Parameter Box in Logic’s Arrange Window provides different parameters for the two kind of audio files “non-looping” Apple Loops or regular audio file “looping” Apple Loops Fades No Fades No Transpose Transpose Be careful when you drag a “looped” Apple Loop into Logic. If Tempo and Key matching tags are set in the Apple Loop, then Logic will control the tempo and the key of the Loop. There is no ‘ignore” feature which lets you turn of tempo or key matching: • Tempo Matching will be controlled by Logic’s tempo, either one unique tempo set in the transport window or an elaborate tempo map set in the Global track or Tempo window • Key Matching: this is a more sneaky feature which could mess up your song if you don’t know the dynamics of “what gets transposed and how much”. The basic key is set in the Key Signature and any additional transposition will be set with the Chord or Transposition Track that are interconnected. The “Transpose” value in the Region Parameter box will add an additional transpose offset. As you can see, this could get really complex, but you need these kind of controls, i.e. if you dealing with loops that have already chord progression in it. Logic’s “Global Tracks” Logic Pro 7.1 – Apple Loops (2005-0905) 4 of 23 Loop Browser Tempo and Key matching are the most powerful feature of Apple Loops. Another feature, powerful in its own way, is search ability. Tagging – Indexing - Browsing Background Info Tagging: Once you imported audio files into iTunes, you can enter additional information (called tags or metadata) for each song like Artist, Album, Genre, etc. The metadata is added to the audio file, which means that once the information is added and you move the audio file to a different machine, the information will show up on that computers iTunes. • Indexing: The tagging of all your audio files is only the first step. ITunes wouldn’t be that powerful if it lets you only tag your audio file and not search for it. You need a search tool, called a “Browser” which lets you search for specific information in those audio files. If you tell iTunes to search for all audio files with the tag info “Classical”, and it starts to search for all audio files open them one after another to look for a metatags entry “Classical”, then you could imagine that it would be very inefficient and would take way too long. ITunes is using a little trick called “Indexing”. It creates an index file and every time you add an audio file into iTunes, it stores the location of the audio file together with any metadata that file has inside. Every time you add new metatdata to a song in iTunes, it also adds that information to the actual audio file AND updates the iTunes index file. The more songs you add to iTunes and the more metadata you add to the songs the bigger the iTunes index file gets and the more powerful it gets also. • Browsing: If you have 10,000 songs in iTunes and want to list only the “Classical” songs, iTunes just reads its index file and lists only the song with the Genre “Classical”. You can browse very quickly through all your songs to find the ones that meet specific search criteria. The new Spotlight feature in Tiger works in a similar way. It indexes as much as possible and if you search for something, Spotlight searches only its index file instead of scanning every single file on the hard drive(s) to come up with a fast result. • How does that relate to the Loop Browser: Tagging: To create tags in an Apple Loop, you need the “Apple Loop Utility”, which lets you add the information (Genre, Instruments, Moods, etc) to the audio file. Or you buy Apple Loops libraries, which are already tagged and ready to go. Indexing - Browsing Although Logic’s Project Manager has some powerful index and browse functionality build in, it won’t read the Apple Loop’s specific tags. You need a specific indexing and browsing tool for the Apple Loops: This is the Loop Bowser, which is build into Logic Loop Browser The Loop Browser suffers a little bit in the “Intuitive User Interface” department. As I mentioned before, this is partly based on the bumpy ride how Apple Loops were developed and integrated into the different applications (Soundtrack, GarageBand, Logic) Indexing: There are three ways how you can index your Apple Loops: • Install an Apple Loops Library (i,e, Jam Pack) and the indexing is taken care of by the installer • Drag your Apple Loops onto the Loop Browser window and it will index them • Create an Apple Loop from inside Logic which will index it automatically See the chapter “Apple Loops File Management” for details Browsing: The Loop Browser has basically two sections: • Upper section: Search Pane The various buttons, popup menus and entry boxes lets you create your search criteria. You can define your search by o Apple Loop name o Apple Loop folder o Genre o Instrument o Mood o Scale o Signature o Favorites • Lower Section: Result Pane The List displays all the found Apple Loops with additional information about each loops and playback controls for the volume and playback key. You can go through the list and preview the loops and drag them form the Loop Browser into the Arrange window or the Audio window. Logic Pro 7.1 – Apple Loops (2005-0905) 5 of 23 You open the Loop Bowser from Logic’s Main Menu: ”Audio > Loop Browser” or by Key Command Although the Loop Browser has not that many graphical elements, it can be confusing sometimes when you try to figure out the detailed functionality. Different search fields behave differently and the underlying database and the way the search works needs some fully understanding if you want complete control with your browsing experience: Search Pane The first button in the upper left corner of the Loop Browser switches between the two View Modes: Column View and Matrix View This changes how the Loop Browser displays the three search fields “Genre”, “Instruments”, “Mood Descriptor” Column View Matrix View As I mentioned before, the Loop Browser indexes all your Apple Loops and stores the information in the index file(s). You can think of all the index files together as a big Apple Loops database. The buttons, menus and entry boxes in the Search Pane lets you define your search criteria to search that database. To better understand the search concept, lets look at various databases: Background Info 1. 2. 3. Internet Search (Goggle, Yahoo), Spotlight Search You have one search field to enter your “search phrase” and the database looks in all database fields for a match iTunes, Mail You also have only one search filed to enter your “search phrase” but you can select a specific field of the database where you want to look for a match. i.e. you can search for a specific phrase in Mail only in the Subject field or the entire message or in the Recipient field. Database applications (FileMaker) You can shave multiple search fields and you you can enter the condition how to connect the search fields. i.e. o You can search for database records which have the word “Smith” in the “Last Name” field AND the word “Florida” in the “City field. The result would list all person records with the last name “Smith” who live in “Florida” o You can search for database records which have the word “Smith” in the “Last Name” field AND the word “Florida” in the “City field OR the word “Seattle” in the “City” filed. The result would list all person records with the last name “Smith” who live either in “Florida” or “Seattle” That kind of database can get very complex but they enable you to create precise search criteria. The Loop Browser works like a database application with 8 search fields: Five of the search fields are actual Apple Loops tags, stored in the Apple Loops file: 1) Scale 2) Signature 3) Genre 4) Instrument 5) Mood Description There are three additional search fields not part of the tags 6) Name of the Apple Loop 7) Folder location of the Apple Loop (“Jam Pack Management”) 8) Favorite Flag Here are the rules regarding the search: • • • • • • The search fields are combined with AND. i.e. selecting “Minor”, “4/4”, MyPattern” searches for Apple Loops with the name phrase “MyPattern” with the Scale tag “Minor” and the Signature tag “4/4”. Three search fields are always active: Scale, Signature, Folder location At least one search field has to be selected in order get a result. “Genre”, “Instrument”, “Mood” All search fields are interactive and online, which means: changing any field (change “Major” to “Minor”) will change the list of found Apple Loop right away, no need to hit an enter button to start the search. The exception is the Name entry box! The Name entry box requires to hit the <Enter> button after entering a name to start the search. The Name entry box will be cleared when you change any other search field (maybe bug?) Logic Pro 7.1 – Apple Loops (2005-0905) 6 of 23 Search Fields: 1 - Folder Location This is a new search filed added in Logic 7.1. First of all it is a great tool if you are working with a big Apple Loops library, but it needs a few enhancements. However, who came up with that stupid label “Jam Pack Management”? It is completely misleading. • • • • This is the first of the three default search fields, which is always part of your search. The Apple Loop s search will be restricted to that specific folder location, which you select from the popup menu. Selecting “Show All” searches all your indexed Apple Loop Libraries The popup menu is dynamic, which means that it lists only items that apply. o Show All: displays all Apple Loops on your system. (Default) o My Loops: displays all Apple Loops in “~/Library/Audio/Apple Loops/User Loops/Single Files”. These are single Apple Loops you added to the Loop Browser o Shared Loops on my Mac: display all Apple Loops in “/Library/Audio/Apple Loops” o GarageBand: display all Apple Loops installed with the GarageBand application. o Jam Pack x: display all Apple Loops from a specific Jam Pack installation o Vendor x: display all Apple Loops from a installation of a specific third-party vendor o Other: display all loops that you added to the loop library by dragging them onto the Loop Browser 2 - Scale • • • • • This is the second of the three default search fields which is always part of your search The Scale field is an Apple Loop tag and therefore stored in the Apple Loop file “Any” is the default, selected from the popup menu and means that the Scale tag can be “Major”, “Minor” or “Both” The entry “Neither” searches for Apple Loops with the Scale tag set to “Neither” which means no Key Matching The entry “Major”, “Minor” and “Good for Both” searches for Apple Loops with the Scale tag set exactly to that value 3 - Signature • • • This is the third of the three default search fields which is always part of your search The Signature field is an Apple Loop tag and therefore stored in the Apple Loop file “4/4” is the default, selected from the popup menu 4 - Apple Loops Name • • • • • • Entering a phrase into the name box will search the actual file name of the Apple Loop. The search phrase is not case-sensitive. You can search only one phrase. Boolean search (AND, OR) is not supported. The phrase is matched against any text string and down’t have to start with the word. The Apple Loop “Pattern One” will be found with the search “Patte” , “ern”I or “ rn oN”. This is the only search filed where you have to hit the <Enter> button to start the search Changing any other search field will clear the entry box (maybe bug?) Clicking on the magnifier symbol should popup a menu with previously entered phrases (doesn’t work, maybe bug?) Right Click on the entry box opens the a standard OSX popup menu with commands for Spelling, Spotlight, Dictionary, etc 5 - Genre – Instruments – Moods – Favorites • • • • These four search fields are combined in a special search area You can switch between the Column View display Matrix View with the View button “Genre”, “Instruments” and “Moods” are Apple Loop tags and stored in the actual Apple Loops file. Those fields have a predefined value list, which means that you have to choose from a list and if the Genre “Polka” is not available, then you have to select the one which describes the Genre the best. “Favorites” is not an Apple Loop tag. It is just a flag. That flag is stored in Logic’s preference file! o o o • All the Apple Loops which you mark (with the checkbox in the Result Pane), are stored with their actually path in the Logic plist file at “~/Library/Preferences/Logic/com.apple.logic.pro.plist”. If you trash that preference file during maintenance then you loose all your Favorite flags. This is a serious design flaw from Logic, because the preference files should contain only general settings, which you can rebuild. A long list of marked favorite Apple Loops, which you compiled over the course of a few months from thousands of Loops, is not reproducible!!! Another trap: New Favorites flags are stored in RAM until you quit Logic. The Favorites will then be stored to the plist file. If Logic crashes in between, then you loose the new Favorites. Columns View and Matrix view are not just different display option but they have also slightly different functionality regarding the search The search filed 1 – 2 – 3 are always included in the search. To complete the search criteria and have the matching Apple Loops displayed in the Result Pane, you have to add at least an entry in the search field 4 or one of the search fields 5 Logic Pro 7.1 – Apple Loops (2005-0905) 7 of 23 Column View • • • • Column View has three column Column 1: This is the main column called “Loops” which lists the four search fields “Genre”, “Instruments”, “Moods”, Favorites” and an additional field “All” The second and third columns list only keywords if they exist in any of your indexed Apple Loops. Column 2: This column lists the content of the selected field in the first Column: o Genre: lists all Genre values which exist in the indexed Apple Loops, max 10 o Instruments: lists all Instrument values that exist in your indexed Apple Loops, max 79 Instruments in 15 Instrument Categories. o Moods: lists all Mood values which exist in your indexed Apple Loops, max 18 Column 3: This column lists all valid Instruments and Moods that exist in your indexed Apple Loops, based on all search criteria you entered. The number in parenthesis displays how many Apple Loops with that tag exist. Selecting any tag value in column 3 displays all Apple Loops carrying that tag in the Results Pane The first 4 search fields (Scale, Signature, Name, Folder) are always active together with the selection in the Column. That means that what you see in Column 3 is the combined search. i.e. if you select the columns “By Instruments > Bass” then the result in column 3 includes also the search criteria “Minor”, “4/4” “Show All” if these are the values of the popup menus above. Refine search: You can change the entry in the Scale field and Name filed and it will affect the results in column 3 and the result list Reset column selection: If you change the Signature or the Folder popup menu however then the column selection will be reset! and not refined like with the Scale or Name field (maybe a bug?) Pro: Column View lets you see possible search hits (the number in parenthesis) before you select the value and display the result in the Result Pane, which lists only those Apple Loops with that particular Instrument or Mood. This is a good method if you want to make a small selection of possible good search hits. Con: You can’t make a combined search with multiple values like “Genre: Urban”, “Instrument Guitar”, “Mood: Clean AND Dry AND Melodic”. You can do his in the Matrix View Matrix View Button Modes: available – not available - selected Interface • • • • The Matrix View has 54 buttons (6x9) Each button can be freely assigned to any tag value from an existing value list o Right click on a button will popup a menu with the three search fields “Genre”, Instruments”, “Description” which is the same as “Mood” in the Column View (note to Apple, please clean up the GUI) o The three search fields have more submenus from where you select the tag value for the button o The “Reset” and “Favorites” button cannot be reassigned The default arrangement assigns the first three columns to Instruments, then one column for Genres and last two columns are setup for the 9 pairs of opposite moods (Relaxed-Intense, SingleEnsemble, etc) The buttons can have three modes which reflect the search criteria of the 4 search fields above (Scale, Signature, Name, Folder): o Available: there is at least one indexed Apple Loop that matches the search criteria of the first four search fields and this tag value o Not Available (Grayed out): there is no Apple Loop which matches the search criteria of the first four search fields with this tag value o Selected (Highlighted): The value tag is selected and part of the search criteria. The “Reset” button un-selects all selected buttons Search Rules At least one button has to be selected (highlighted) to complete a search (if no Name search was entered) and have the matching Apple Loops displayed in the Result Pane below The buttons are “self-eliminating”: Every time you change any of the search fields, the buttons changing the mode to display which tag value exists for the current search criteria. You can narrow your search by further selecting or un-selecting buttons If you change the selection of the first four search fields and which results in “No Match”, i.e. selecting the 7/8 Signature, then all the selected buttons are un-selected (Reset) Because the Loop Browser performs a “live” search, every change in the search fields or selection of the buttons will change the display of the Apple Loops in the Result Pane that match the search criteria. (Except the Name entry field) Popup menu Instruments Sub-categories Logic Pro 7.1 – Apple Loops (2005-0905) 8 of 23 Result Pane The Result Pane lists all the indexed Apple Loops that match the search criteria from the Search Pane Preview You can double click on an Apple Loop in the list to audition the loop. The icon changes to a speaker Use the up and down arrow on the keyboard to skip to the next or previous loop Double click again to stop the audition. The Transport command Stop or Play will also stop the Apple Loops audition The audio of the Apple Loop is routed to the highest available Audio Track in Logic’s Environment (it would be nice if you could select the monitor channel like in the Audio Window) • Make sure that the Audio Track is set to stereo and maybe set to Solo Safe mode to avoid an unwanted track mute situation. You could even previewing your Apple Loops with FX if you apply them to that Audio Track • You can set the preview volume with the volume slider • The “Play In” popup menu lets you select in what key you previewing the Apple Loops. The setting of course has no effect if the Apple Loop has Key matching disabled which is indicated with a hypen in the Key column • • • • Matched Items Displays the number of matched Apple Loops Results Lists The list that displays the matching Apple Loops has 7 columns. You can click on the column header to set the sort order like in the Finder window • • • • • • • Icon: The Icon indicates whether the Apple Loop is a Blue Apple Loop (Audio+standard tags) or a Green Apple Loop (Audio+standard tags+MIDI+Channel Strip Settings). The icon changes to a speaker when you double click on the Apple Loop to activate preview mode Name: The file name of the Apple Loop Match: the percentage indicates how close the Tempo and Key of your current Song matches the Tempo and Key of the Apple Loop Tempo: displays the original Tempo of the Apple Loop. The number 0 indicates that the tempo tag is disabled: no tempo matching will occur when dragged to the song Key: displays the original Key of the Apple Loop. A hyphen indicates that the key tag is disabled: no key matching will occur will occur when dragged to the song Beats: displays the length of the Apple Loops in beats Fav: the checkbox lets you set the Favorites flag Importing to your Song You can click on the Apple Loop in the list and drag it either to the Arrange window or the Audio window Missing Features: • • • A “Monitor Channel Select” similar to the Audio Window to choose the Audio Track for previewing the Apple Loops The “Display in Finder” command (com+R) like in iTUnes or in Project Manager. Right now you can see the Apple Loops but you don’t know from which Library the Apple Loops is coming from. There is no search command for displaying all Loops from a specific folder (Library). You can select the folder in the “JamPack Management” popup menu, but you have to select at least one search field in the Matrix or Column view to get a result in the Result Pane Logic Pro 7.1 – Apple Loops (2005-0905) 9 of 23 Indexing Apple Loops - File Management There are two ways how you can import Apple Loops into your Logic song: 1) Drag and Drop You have the Apple Loops on one of your mounted volumes (internal, external, network) and you drag the file direct into Logic, either into the Arrange Window or the Audio Window. This works if you know your Apple Loop files, but what if you have hundreds or thousands of Apple Loops. You need a Apple Loop file management tool: The Loop Browser, build directly into Logic 2) Loop Browser The previous chapter showed powerful search tools in the Loop Browser, but before you can search for Apple Loops, you have to tell the Loop Browser what files you have and where they are located. This process is called “Indexing” Indexing: Indexing Bikes and Apple Loops To understand the process of indexing, lets look at the following example You (the Loop Browser) work in a warehouse and your job is to keep track of your companies products, bicycles (Apple Loops) Inhouse Storage • A truck comes in and delivers a container named “Bike A (folder “Bike A”) with 500 bicycles (Apple Loops) • You take all the bicycles and put them into a container which you label “Bike A” (folder: Bike A) • You put the container into the Bike Building of your warehouse (folder “Apple Loops”) • Now you take a note pad (index file) and catalog all those bicycles: what color, what size, model number, etc. • You put the note pad into a Bike Drawer (folder: Apple Loops Index) • Over the next couple of weeks, you receive more container shipments and you do the same routine. • Now in your Bike Building (folder : Apple Loops), you have 10 containers (10 folders containing Apple Loops Libraries) and your Bike Drawer (folder: Apple Loops Index) has ten notepads (index files) • When your boss calls and want to check on a big red mountain bike (R&B drum loop), you don’t have to go to the Bike building and search in all the 10 containers – NO – You open the Bikes drawer (folder: Apple Loops Index) and scan through the 10 notepads (Index files) and find the location of that particular bike. Remote Storage: • One day a tuck with a new container comes in and you realize that you are running out of space in your warehouse. • You take a new note pad (index file) and still catalog all the bicycles and you put that notepad again into the Bike Drawer (folder (Apple Loops Index) • You take a new mini container (alias folder) label it the same way as if it would be a big container and put a note inside with the location of the actual container with the bikes (folder containing the Apple Loops) • You tell the truck driver to take the container back where it came from keep it there at its original location Single Bike delivery: • One day a the FedEx guy shows up and delivers a single bike. What I’m gonna to do with that? Waste a whole container for that? • You decide to take a regular container, put it also in the Bike Building and label it “single delivery” (folder: SingleFiles). From now on you put all the single bike deliveries together in that container. • You also take a new notepad (index file) and catalog all the single bikes that you put in that special container. Definitions: Apple Loop: individual file which you can drag into Logic Apple Loops Library: A collection (folder) of Apple Loops provided by Apple (Jam Pack), third party vendor or made by yourself Indexed Apple Loops Library: A portion (or all) of your Apple Loops Libraries that were indexed by Logic’s Loop Browser. All mounted volumes Loop Browser Arrange Window (Audio Window) Indexed Apple Loops Library Index Files Apple Loops Library Apple Loops Library alias Apple Loops Library Apple Loops Library Apple Loops LibraryApple Loops Library Apple Loops Library 1) Import Apple Loops through the Loop Browser: You have access only to the indexed Apple Loops but you can search in the Loop Browser and drag the found Apple Loops into the Arrange Window or Audio Window 2) Import Apple Loops from the Finder: You have access to all Apple Loops on your mounted volumes, but you have to know the files by name if you are searching for specific loops. The file can also be added to the Arrange Window or Audio Window Logic Pro 7.1 – Apple Loops (2005-0905) 10 of 23 Manually Indexing an Apple Loops folder Step 1 : • Open the Loop Browser in Logic and keep it visible • In the Finder, locate the folder with the Apple Loops and drag it over the Loop Browser Apple Loops are not on the boot drive Step 2: • Logic pops up a dialog window with three options: o Current Location: the Loop browser wont’ copy or move the Apple Loops, it will only create an alias of the folder and put it into the location: “~/Library/Audio/Apple Loops/User Loops/” An index file for that folder will be also created in the location “~/Library/Audio/Apple Loops Index/” o Copy to Loops Folder: copies the folder with the Apple Loops to “~/Library/Audio/Apple Loops/User Loops/” in your home directory if they are located on a volume different than the boot drive Apple Loops are on the boot drive An index file for that folder will be created in the location “~/Library/Audio/Apple Loops Index/” in your home directory o Move to Loops Folder: copies the folder with the Apple Loops to “~/Library/Audio/Apple Loops/User Loops/” in your home directory if they are located on the boot drive. An index file for that folder will be created in the location “~/Library/Audio/Apple Loops Index/” in your home directory o Cancel: forget the whole thing, don’t do anything Step 3: • This step shouldn’t be necessary (maybe a 7.1 bug?). You have to restart Logic in order to see the new Apple Loops folder in the popup menu (Jam Pack Management). You can however search for the file already. This is the procedure when you have a folder with Apple Loops already on your drive (internal, external, networked). This could be a … • … original CD of an Apple Loops Library • … folder of an Apple Loops Library copied to your drive • … folder with Apple Loops that you created yourself Be careful with long file names! There are some inconsistencies regarding the handling of long file names. OSX can handle them but not Logic, sort of. When you choose: • Current Location: The folder containing the Apple Loops and the Apple Loops themselves can have long file names. The Loop Browser doesn’t touch the original files, it indexes them and makes an alias to the folder location. The Loop Browser displays the long names in the “Jam Pack Management” popup menu and in the Results Pane • Copy/Move to Loops Folder: The Loop Browser copies/moves the folder into the Library Apple Loops directory, keeping its long name (because it’s a Finder action). The Apple Loops however with long names get truncated in the new location and the Loops will be displayed in the Loop Browser with the short name. This seems to be the 32-character limitation of Logic that kicks in. Other Indexing Procedures • • • • Install from a CD. Most commercial Apple Loops Libraries come on a CD or DVD and the indexing works just by dragging the folder onto the Loop Browser (manually indexing a folder). All the Jam Pack Libraries from Apple however have an installer, which you have to run. The installer copies the files into the Apple Loops Folder of the root Library (not the User Library!) and performs the indexing. Install through an application installation (GarageBand) Installing any of Apple’s audio applications (Logic, GarageBand, Soundtrack), will also install some Apple Loops. They also will be place in the Apple Loops folder of the root Library and not the user Library folder. Indexing a single Apple Loop manually The Loop Browser prompts you with the same dialog window as with the indexing folder procedure: copy or reference the file? This might be another 7.1 bug o Current Location: copies the Apple Loop to the Audio Loops Folder (7.1 Bug?) o Copy/Moves the Loop(s) to the Loops Folder The location of the single Apple Loop is “~/Library/Audio/Apple Loops/User Loops/SingleFIles” and the index file for that folder will be updated Indexing a single Apple Loop from Logic You can select any audio file region(s) or audio instrument region(s) from Logic, convert it to an Apple Loop and add it to the Loop Browser. The command is in the local Arrange window menu “Regions > Add to Apple Loops Library” Logic pops up a dialog window if you try to index a folder that was already indexed with three options: • • • Do not add this folder Add folder using a new name Replace original with new folder Logic Pro 7.1 – Apple Loops (2005-0905) 11 of 23 File Location The file • • • location for indexed Apple Loops has been straightened out in Logic 7.1 and makes much more sense than in earlier version: Apple Loops Library folders (or aliases) are stored in “Library/Audio/Apple Loops” folder Apple Loops index files are stored in “Library/Audio/Apple Loops Index” folder These two folders exist twice: one in the root Library directory and one in the use Library directory All the indexed Apple Loops from an installation disc or an application installation are stored in the root Library folder (root)/Library/Audio/ All the indexed Apple Loops (imported) by the user are stored in the user Library folder (user)/Library/Audio/ The “Apple Loops” folder has the following subfolders: o “User Loops”: contains all the Apple Loop Libraries dragged in by the user o “User Loops/SingleFiles”: subfolder, containing all the single Apple Loops added to the Loop Browser o “Apple”: contains all the Apple Loop Libraries installed by an Apple product (Jam Pack or Application) • The “Apple Loops Index” folder contains all the index files. Each single Library folder in the Apple Loops folder has its own index file • If the Apple Loops Index folder is empty (in root and user directory) then you get an error message “No Apple Loops found” Both folders “Apple Loops” and “Apple Loops Index” will automatically created when you (accidentally) delete them. The default (empty) folder structure is • What’s inside an index file: The Index files inside the “Apple Loops Index” folder are regular text files containing an entry for each Apple Loop with its meta data and the search path to the actual location of the Apple Loop audio file. How do index file work: The first step of course is the creation of the index file. As I mentioned above, for each indexed Apple Loops Library there will be a corresponding index file. The first line of the text file includes the path to the Apple Loops folder, which data it has indexed. When you launch Logic, the Loop Browser reads the first line and compiles the popup menu for the Loop Browsers “Jam Pack Management” When you make a search, Logic knows all the available index files and searches for the information based on the search criteria. Logic Pro 7.1 – Apple Loops (2005-0905) 12 of 23 File Access: Indexing: You have two Apple Loops Libraries, one is called “Apple Loops – Lib1” and the other is called “Apple Loops – Lib2”. You want to access those Loops though the Loops Browser inside Logic and therefore have to index them: • • You drag the folder with the Apple Loops Library onto the Loop Browser. The folder can be on any mounted drive: internal, external, network mounted or a CD/DVD drive The Loop browser opens a dialog window and gives you two options, how to treat the folder o Current Location: The Loop Browser leaves the “Apple Loops - Lib2 “folder in its original location and creates an alias in the “~/Library/Audio/Apple Loops/User Loops” o Copy to Loops Folder: The Loop Browser copies the “Apple Loops – Lib1” folder into the directory “~/Library/Audio/Apple Loops/User Loops” Loop Browser index index copy alias Apple Loops - Lib1 Apple Loops – Lib2 AMS index Properties Window index Index file - Lib1 Index file – Lib2 Apple Loops - Lib1 • Library/Audio/ Apple Loops – Lib2 The Loop Browser creates now an index file and stores all the index information for the “Apple Loops – Lib1” and “Apple Loops – Lib 2” folder in that file. The file is stored in the directory “`/Library/Audio/Apple Loops Index/” Browsing: When you use the Loop Browser to search for index Apple Loops, then the only files are used are the index files. They contain all the information needed for browsing Loop Browser play/ import browse When play the Loops in the Loop Browser or drag them into your song, then the Loop Browser accesses the audio files in their original location, which is stored in the index files. NOTE: the alias file of an Apple Loops library, stored outside the “~Library/Audio/Apple Loops/” directory is technically not needed. If you would delete the alias, the Loop Browser would still function, because it retrieves all its information from the index files Library/Audio/ Apple Loops - Lib1 Apple Loops – Lib2 AMS Properties Window Index file - Lib1 Index file – Lib2 Re-indexing: Apple Loops – Lib2 There is no direct command for re-indexing which you might use when • Remove some Libraries • Remove individual files from a Library • You Loop browser takes a long time to find files You have to use a trick to force the Loop Browser to reindex: • Remove an Apple Loop from its Library, search fro that specific file in the Loop Browser and try to preview it. • The Loop Browser displays the file (even if it is removed from its location), because it gets that information from the index file, which didn’t notice the removal (the index file is just a snapshot of the Apple Loops Library when it was indexed). • When you use the preview function however, the Loop Browser tries to access the actual file based on the information of the index file. • If Loop Browser can’t find the file in its supposed location then it will popup a “Can’t Find Loop” dialog window with the option to “Reindex Loops” Loop Browser reindex Library/Audio/ Apple Loops - Lib1 index Index file - Lib1 Apple Loops – Lib2 AMS Properties Window index Index file – Lib2 Apple Loops – Lib2 This is a complete Reindex, which means that • The Loop Browser looks in root and user “Library/Audio/Apple Loops/” Directory and creates an index file for each folder (Apple Loops Library) • Make sure that all aliases can be resolved (mount all volumes with the original Apple Loops Libraries). If the alias can’t be resolved then no index file will be created and that Library will not be visible in the Loop Browser Logic Pro 7.1 – Apple Loops (2005-0905) 13 of 23 Favorites Flag Location: Besides the actual Apple Loops in the Apple Loops folders and the index files, there is a third file with important information about your Apple Loops: The Logic property list file stored in the user directory: “~/Library/Preferences/com.apple.logic.pro.plist” That preference file stores your Favorites information about your Apple Loops. “Favorites” is not an Apple Loop tag. It is just a flag. • • • • All the Apple Loops which you mark (with the checkbox in the Result Pane), are stored with their actually path in the Logic plist file at “~/Library/Preferences/Logic/com.apple.logic.pro.plist”. If you trash that preference file during maintenance then you loose all your Favorite flags. This is a serious design flaw from Logic, because the preference files should contain only general settings which you can rebuild. A long list of marked favorite Apple Loops which you compiled over the course of a few month from thousands of Loops is not reproducible !!! Another trap: New Favorites flags are stored in RAM until you quit Logic. The Favorites will then be stored to the plist file. If Logic crashes in between, then you loose the new Favorites. The Favorites flag entry for an Apple Loop in the preference file can only be set or removed from the Loop Browser. If you open the “com.apple.logic.pro.plist” file with a text editor, then you can actually locate the section with the Favorite entries. Search for the header “Prefs_FavoritePaths” and you can see the names and paths of the Apple Loops which marked as Favorites in the Loop Browser. com.apple.logic.pro.plist NOTE: The Favorite flag entry for an Apple Loop in the preference file can only be set or removed from the Loop Browser. When you set that flag and then remove the Apple Loop from your library (reindexing) without un-checking that Favorite checkbox, then the entry will stay in the preference file (orphan) Logic Pro 7.1 – Apple Loops (2005-0905) Logic - GarageBand: Logic 7.1 and GarageBand v2 ( and Soundtrack Pro) share the same location for the indexed Apple Loops and the Index files: (root)/Library/Audio/Apple Loops (root)/Library/Audio/Apple Loops Index (user)/Library/Audio/Apple Loops (user)/Library/Audio/Apple Loops Index Logic 7.0 and GarageBand v1 stored them in different locations: /Library/Application Support/GarageBand/Apple Loops/ The code for handling Apple Loops seems to be the same now for both application. Most dialog windows are identical There is an exception that point to a bug in Logic: • Logic: When you add a single Apple Loop to the Loop Browser then Logic prompt the same dialog window when you drag a whole folder (keep location or copy folder). Even if you select “current location”, the Loop will be moved to the Loop Folder. • GarageBand: When you add a single Loop, GarageBand prompts a different window with the only option to “Move to Loops Folder” and that’s exactly what it does. The user interface is pretty similar in its functionality; just the graphics have their own identity The minor differences are: • GarageBand can’t search for the Signature tag • GarageBand doesn’t display the Match column in the Result Pane • GarageBand doesn’t have the “Play In” preview feature • The Favorite flags are independent for both applications because they are stored in the preference file of the individual application. So you won’t have access in GarageBand to the Favorites that you marked in Logic. The differences to the other Apple Loop supported application “Soundtrack Pro” are more significant, but I’m sure we will see a more unified Apple Loop integration in all three audio applications: Logic – Soundtrack - GarageBand 14 of 23 Logic Pro 7.1 – Apple Loops (2005-0905) 15 of 23 Create Apple Loops Apple provided two tools to create Apple Loops. One is a separate application called “Apple Loops Utility” and the second tool is build right into Logic which is a strip down version of the Apple Loops Utility that you access with the command “Add to Apple Loops Library” 1) Apple Loops Utility Apple Loops Utility can only save “Blue Apple Loops” that contain only the audio file but no MIDI or Channel Strip settings Open an audio file (aiff or wav) in Apple Loops Utility (aka Soundtrack Loops Utility) and edit the tags. There are three ways to get audio files into the Apple Loops Utility 1. Drag file onto Apple Loops Utility’s Asset drawer 2. Open audio file from Apple Loops Utility 3. Select an audio file in Logic’s Arrange Window and it directly in Loop Utility Apple Loops Utility Blue Apple Loop Logic: Arrange Window > Local Menu > Audio > Open in Apple Loops Utility.. 2) Logic’s “Add to Apple Loops Library” window Logic has a build-in “limited” Apple Loops Utility that can create blue and green Apple Loops: • Blue Apple Loop: select region(s) from audio track(s) • Green Apple Loops: select region(s) from audio instrument track(s) Logic’s “Add to Apple Loops Library” window Green Apple Loop Logic: Arrange Window > Local Menu > Region > Add to Apple Loops Library.. Logic Pro 7.1 – Apple Loops (2005-0905) 16 of 23 1) Apple Loops Utility (Detail) A few facts: • It was first released together with Soundtrack as a Final Cut Pro bundle in 2003 under the name “Soundtrack Loop Utility” • It is now also bundled with Logic still under the name “Soundtrack Loop Utility”. Version 1.2 ships with Logic • It is now called “Apple Loops Utility” with the new “Soundtrack Pro” application and has version number 1.3 • It is stored in the “/Applications/Utilities/ directory. • The old (Soundtrack Loop Utility) and the new (Apple Loops Utility) are identical except of the File Type label. The workflow of the Utility is fairly simple: • Open a wav or aiff file in the Utility • The transition marker, needed for the tempo matching is automatically created • The basic file info (bit depth, sample rate, channel) is displayed • You enter the available tags • You fine tune the transition marker (as needed) • You preview your loop • You save it as an Apple Loop (tagged aiff audio file) User Interface: The interface is also fairly simple. It has three main areas: • The main area has two tabs o Tags: for setting up the tags o Transients: for setting up the transient markers • The bottom area has the preview controls • The Asset button opens the sliding drawer with the list of all the loaded audio files Tag - View Asset Drawer Transient - View Preview Controls Apple Loop File icon You can open both aiff and wav files in Apple Loops Utility but after you add the tags and save it, it becomes an “Apple Loops tag formatted aiff file” The icon of the saved aiff file is different if you save it from “Apple Loops Utility” and “Soundtrack Loop Utility”, but the format is the same. Apple Loops Utility Soundtrack Loop Utility Logic Pro 7.1 – Apple Loops (2005-0905) 17 of 23 1) Tags Pane: The Tag Pane is divided into four sections: Property Tags – File Info – Search Tags - Descriptors a) File Info: This section should list just the info of the plain audio file and has nothing to do with the tags: Kind: AIFF or WAV Length: the length of the audio file Date Modified: Bit Depth: 8bit, 16bit, etc Sample Rate: 44.1kHz, 48kHz, etc Channel: Mono, Stereo File Location: Tempo: this item should be listed under the Property tag, because it is not a regular audio file value. The value depends on the setting of two tags: • N/A: If the File Type (under the Property Tags section) is set to “one-shot” (which is the same as “non-looped” then the audio file will not follow any tempo matching and therefore has no valid tempo value • xxx BPM: if the File Type is set to “Loop” then the Tempo value is based on the “Number of Beats” value and the “Time Signature” value b) Property Tags: These are the main tags, describing the behavior in regards to Tempo and Key matching: Number of Beats AUL analyses the added audio file and sets the Beat value automatically. It calculates the Tempo based on the beat value and the length of the audio file. You can double the Tempo or set it to half tempo by setting the beat value to double or half the value File Type: Selecting “Loop” will set the tempo matching tag. Selecting “One-Shot” (in Soundtrack Loop Utility) ore “non-looping” (in Apple Loops Utility) disables the tempo matching tag. AUL sets the tag automatically to “Loop” if the file is between 0.5s and 30s long when you add a new audio file. The label for the two options of File Type has changed in Apple Loops Utility: File Type in Soundtrack Loop Utility File Type in Apple Loops Utility Key: This tag sets the key matching tag. Select any of the keys from the popup menu that matches the root note of the audio file. Selecting the hyphen from the popup menu disables key matching. Scale Type: If you set that tag (i.e. Minor) then you can search later in the Loop browser only for loops in the minor key Time Signature: The popup menu is grouped into signature with the beat value /4 and the beat value /8. This will also affect the tempo value: double or half tempo. Author, Copyright, Comment: These fields can not be searched in the Loop Browser, unfortunately. At least having a comments field as a search able tag in the Loop Browser would add an enormous power to the Browser. c) Search Tags: To group the two tags under the section “Search Tags” doesn’t make much sense, because technically you have to include other tags here too, because they are also searchable tags. Genre: You can select one of the 10 Genre tags (or “Not Specified”) to search for you Apple Loop Instrument: Select one of the main 13 Instrument tags in the first column or if the instrument has submenu listed in the second column, you select the tag from there d) Descriptors: This is another of the bad name choices. First of all, the tags are called “Descriptors” but the Loop Browser calls them “Mood” and some times they are labeled “Mood Descriptors”. This is list of 9 pairs of opposite Moods. Select either the left or the right radio button. When you leave the radio button in the center then, no tag will be set. Logic Pro 7.1 – Apple Loops (2005-0905) 18 of 23 “Batch Tagging” 1 selected multiple selected You can tag multiple files at the same time: • Select multiple in files in the Assets drawer (sh+click or com+click) • The “Batch Checkbox” to the left of each tag becomes active: o A checked box means that all the selected files have the same tag value o A non-checked box means that the selected files have different tag values • Check an un-checked box will set the tag value for all selected files • The menu command “Tagging > Batch > All” checks all the checkboxes • The menu command “Tagging > Batch > None” unchecks all the checkboxes • Keep in mind that the tag setting stays in RAM until you save the files 2) Transients Pane: The transient markers enabling the loop to be played back in different tempi without changing its pitch or tonality, aka tempo matching. The position of the transient markers determines how good the tempo matching works. When you add an audio file to the Apple Loop Utility, it analyzes the audio content and sets the transient marker automatically. The Utility is pretty good at that and most of the time you don’t have to change marker. When you play back the loop in different tempi and you feel that the tempo matching is not perfectly working, then you can go into Transients view and optimize the transient markers. Automatic Marker Placement: The two controls above the marker area determines the automatic placement of the markers: Transient Division: Sets the markers according to the selected division value (default 1/16) Sensitivity: Adjusts the sensitivity how ALU detects the beats in the waveform. (default: least sensitive). In the left position it sets only the division markers. Moving to the right (more sensitive) adds sets the marker more precisely and adds more marker if needed. Manual Marker Placement: You can manually adjust the marker if you feel that the automatic placement is not accurate. NOTE: selecting any of the two automatic controls above will undo all the manual marker edits! Marker: Move: the marker by click-dragging them in the marker area Remove the marker by click-dragging them outside the marker area Add marker by clicking on the marker area Waveform “zoom-able” Scrollbar SPL Marker Area SPL & Scrollbar The little yellow triangle below the marker area indicating the play and the “zoom-able” Scrollbar lets you navigate through the waveform display. Marker • • • Guidelines: Marker should be places on the beginning and end of notes Have at least a marker every quarter note in sustained notes or chords Use the fewest number of transient to avoid distortion Bar Ruler Logic Pro 7.1 – Apple Loops (2005-0905) 19 of 23 3) Preview Controls: • • • • • • Assets: Show/Hide the Assets drawer Save: saves the selected file(s) Navigation Control o Return to zero o Play o Stop Key popup menu: plays the loop in the selected key so you can check how key matching affects the sound quality. Selecting the hyphen plays the loop in its original key Tempo slider: plays the loop in the selected tempo so you can check how the tempo matching affects the sound quality Playback volume slider 4) Asset Drawer: • • • • • • Any file (aiff or wav) you have opened will be listed in the Asset drawer You can show/hide the drawer with the “Assets” button The “plus” sign opens a file selector box to add more files The “minus” sign removes files from the list The dot in the Column “Changes” indicates that the file has been edited since its last save. You have three save options (the save applies only to changed (dot) files o Save: saves the selected file(s) in the list o Save as: saves the selected file with a new name o Save All: saves all files changed files in the list Open a file in the AUL: • • • • Using the “plus” sign” (you can select multiple audio files in the File Selector box to import more then one at the same time) Using the “File>Open” command Drag an aiff or wav file (or a folder) onto the Assets drawer Open an audio file from inside Logic direct in the AUL In Logic, select the audio file in the Arrange Window and choose the “Open in Apple Loops Utility…” command from the local Audio menu. If the audio region doesn’t match a bar or beat, then you get an dialog box to • Shorten the region for a better match • Use the Loop length, set in the entry box in bar or beats Apple Loops Utility <-> Loop Browser The illustration below shows the tag relationship between the Apple Loops Utility and the Loop Browser in Logic. Apple Loops Utility Loop Browser (Logic) Blue Arrows: searchable tags Green Arrows: displayed tags Logic Pro 7.1 – Apple Loops (2005-0905) 20 of 23 2) Logic’s “Add to Apple Loops Library” window (Detail) Besides using the Apple Loops Utility, there is a second tool to create Apple Loops and it is build right into Logic. It is a “limited” Apple Loops Utility that has one feature, not available in Apple Loops Utility: create green Apple Loops: There are basically 4 steps how you create the Apple Loop: 1. Select a Region in the Arrange Window: a. b. 2. Select the command “Add to Apple Loops Library…” from the Arrange windows local Region menu 3. Set the tags: The “Add Regions to Apple Loops Library” window has most of Apple Loops Utility’s tag set: • Name: enter the name for the Apple Loop you are about to create • Type: This is the “File Type” tag which determines the tempo matching: o Loop: activates the tempo matching tag o One-shot: no tempo matching will occur later • Scale: the window looks up the setting of your current Logic song. Whatever you have set in the Key setting of your song will be used as the default, but you can overwrite it by selecting a different option from the popup menu • Genre: popup menu with the same Genre as in the Apple Loops Utility • Instrument Descriptions: same two column Instrument keywords as in the Apple Loops Utility • Mood Descriptors: The 9 pairs of mood descriptors are the same as in the Apple Loops Utility. Instead of three radio buttons, you have “Linked Buttons”: Click a button to select, click a selected button to deselect, click the opposite button will select the clicked one and deselect the linked button. • Automatic Tags: Logic will add two more tags automatically which it looks up at start of your selected region o Tempo: o Signature 4. 1) Select a Region If you select a region from an Audio Track, then the Apple Loop will be a regular “Blue Apple Loop” If you select a Region from and Audio Instruments Track, then the Apple Loop will become a “Green Apple Loop” containing the MIDI data of the region and the channel strip setting of the track (including the audio instrument and plug-ins) 2) Select the command 3) Set the tags Create the Apple Loop Click the “Create” button to create the Apple Loop based on your settings. • The Apple Loop will be created in your user directory: “~/Library/Audio/Apple Loops/User Loops/Single Files” which is the same location where the Loop Browser puts single Apple Loops when you drag them onto the Loop Browser for indexing. • The index file for the “Single Files” folder will be updated in the ~/Library/Audio/Apple Loops Index” • You can open the Loop Browser in Logic and search for your brand new Apple Loop right away Note: • • • 4) Create the Loop You cannot check or modify the transient markers. For that you have to open the Apple Loop file later in Apple Loops Utility or use the “Open in Apple Loops Utility…” command from the local Audio menu If you have an audio file with a difficult to determine beat structure (i,e, atmospheric sound) or a region that doesn’t match a whole bar length, then Logic will grey out the File Type setting with “One-shot” selected. This means that Logic can’t figure out any transient marker and therefore sets the File Type to “One-shot” and also prevents you to overwrite that decision. You still can open that Apple Loop later in Apple Loops utility and change it. You can convert only one Region to an Apple Loop. If you select multiple regions in the Arrange window before selecting the command, then only the first region will be treated. Logic Pro 7.1 – Apple Loops (2005-0905) 21 of 23 Indexing non Apple Loops Importing standard audio files (aiff, wav) Regular audio files (aiff, wav) with no Apple Loop tags can also be indexed with the Loop Browser. This provides you with a search engine for regular audio files. You can use the following search fields: • Name: OF course you can search for the name of the indexed audio files • Folder: When you drag a whole with audio files onto the Loop Browser for indexing, then the name of the folder will be part of the “Jam Pack Management” popup menu. This enables you can restrict your search i.e. to a specific FX Library folder. • Keyword Tags: This is one of the undocumented features of the Loop Browser: The audio files of course have no keyword tags, which can be indexed. The Loop Browser however uses some intelligent algorithm to create some Keyword tags on fly, automatically when you index the audio files. The Loop Browser analyses each audio file an looks if any word in the file name or its folder name (and subfolder) matches any phrase of the “Genre”, “Instrument” or “Mood Descriptor” tag available for Apple Loops. All the matching keywords will be attached as tags to the indexed audio file. The tags are stored in the index file not the actual audio file. The audio file stays untouched. The “matching algorithm” goes even one step further: It has some intelligence build in which can interpolate keywords from similar words or phrases: o The file name “If you are happy” or “We wish you a merry Christmas” will be interpreted with the tag “cheerful” o The file name “Angry River” will be interpreted with the tag “Intense” Importing Acid Loops Acid Loops only include transition markers for tempo matching but no other metatags Acid Loops to Loop Browser • You can drag an Acid file (acidized wav file) direct onto Logic’s "Loop Browser”. This has much more advantages than the AUL procedure: • Logic uses the tempo matching info of the Acid file to create the transient marker • The key tag and the Signature tag will also be detected • The great feature is the automatic Keyword Tags creation. If the file name or the folder name (if you drag a folder) contains any of the keywords of the “Genre” “Instrument” or “Mood Descriptor” then it will index those tags on the fly. You can manipulate the tag creation before dragging them to the Loop Bowser by putting all the acid files in a folder naming it with all the keywords you want them to have and drag it over the Loop Browser • The original wav file stays untouched • All the added tags are stored in the index file not in the audio file! Acid Loops to Apple Loops Utility (ALU) ALU treats an Acidized wav file like a regular wave file when you open it: it detects the transition marker and key but no tags are set. You have to set them manually. When you enter a whole Acid Library then you can use the Batch function in ALU. After ‘tagging” the files, you save them as new “genuine” Apple Loops. What audio file format can the Loop Browser index and what metatags will be indexed Audio File Format Available Metatags Apple Loops All Metatags • Tempo Matching • Key Matching • MIDI Data • Channel Strip Setting • Keyword tags Acid Files (acidized wav) • • Tempo Matching Automatic Keyword tags (Algorithm) aiff, wav Audio Files • Automatic Keyword tags (Algorithm) ReCycle (Rex) No direct import possible, special conversion available in Logic Others (mp3, AAC, …) Drag them into Logic to convert them to aif files and then use the Apple Loop commands “Add to Apple Loops Library…” or “Open in Apple Loops Utility…” Logic Pro 7.1 – Apple Loops (2005-0905) 22 of 23 Importing ReCycle Files (Rex files) You can’t import a rex file into the ALU, but you can use Logic to convert any rex file into an Apple Loop. There are two methods: 1) Drag rex file to the Arrange window • • • • • • • • Dragging a rex file onto an Audio Track in Logic’s Arrange Window will open the “ReCycle file Import” window (Dragging a rex file onto any track different than an audio track will convert the rex file into an unusable audio file (white noise at max level.) Select from the “Fix Method” “Render into Apple Loops” Click ok will place the converted rex file as Apple Loop onto the audio track. The resulting Apple Loop contains only the transient marker (derived from the Rex files slice points) and the tag for tempo and signature. If you want to add more tags to it, open the file in the ALU Drag the file into the Loop Browser to add it to the Loops Library. 2) Use the Project Manager to (batch-) convert Rex files to Apple Loops • • • • • • Open the Project Manager and select Browse Mode Select Browse mode and navigate to the folder containing the rex file(s) If the folder wasn’t indexed yet, just drag it into the result pane of the Browser and it will be indexed right away. Select the rex file(s) and choose from the local “Functions” men u “Convert selected REX files to Apple Loop…” The following file selector box lets you select a location for the converted file Choose the checkboxes: o “Tempo for Apple Loop creation (bpm) xxx” or “Use original loop tempo” o “Add resulting file into audio window” • • • The resulting Apple Loop contains only the transient marker (derived from the Rex files slice points) and the tag for tempo and signature. If you want to add more tags to it, open the file in the ALU Drag the file into the Loop Browser to add it to the Loops Library. Logic Pro 7.1 – Apple Loops (2005-0905) 23 of 23 Summary There are a total of three related files when dealing with Apple Loops in the Loop Browser 1) 2) 3) The actual Apple Loop files The Apple Loops Index files (database for the Loop Browser) The Logic preference file, storing the Favorites flags General Note: • Long file names will be truncated when moved to Apple Loops folder during indexing • Re-indexing seems to speed up the search process • Deleting the Logic Preference file will delete ALL Favorites flags • Restart Logic after Indexing new Library to display the folder in “Jam Pack Management” • You can’t edit Apple Loops with the Sample Editor, no fade in and outs • Apple loops will be automatically sample rate converted to follow any SR changes in your song, adjusting the transient positions. Apple Loops tags Overview: Searchable in Loop Browser Display in Loop Browser Editable in Loop Utility Affects Playback of audio file Tags File Name File Info Kind Length Date Modified Bit Depth Sample Rate Channel Tempo File Location Property Tags Number of Beats File Type Key Scale Type Time Signature Author Copyright Comment Keyword Tags Genre Instrument Mood Descriptor Transient Marker Markers Green Loop Tags MIDI Data Channel Strip Setting Remarks X X Read-only Read-only Read-only Read-only Read-only Read-only Read-only. Tempo will change when the “Number of Beats” is changed. Tempo of “0” indicates “OneShot” Read-only X X X X X X X X X X X X X X X X X X X “Loop” activates Tempo and Key matching,”One-Shot” disables it, sets Tempo to “0” “None” disables Key Matching Can only be viewed in Apple Loop Utility. Can’t be searched for Can only be viewed in Apple Loop Utility. Can’t be searched for Can only be viewed in Apple Loop Utility. Can’t be searched for X X X X x x X Determines the accuracy of Tempo Matching Displays a “Green Apple Loop” icon in Loop Browser Displays a “Green Apple Loop” icon in Loop Browser