1
Table 4—Maximum Capacity of Pipe *
NOMINAL IRON
INTERNAL
PIPE SIZE (IN.) DIAMETER (IN.)
DO NOT INSTALL THE FURNACE ON ITS BACK OR
SIDES; safety control operation will be adversely affected.
Never connect return-air ducts to the sides or back of the
furnace. Failure to follow this warning could result in fire,
personal injury, or death.
1/2
3/4
1
1-1/4
1-1/2
Step 4—Filter Arrangement
0.622
0.824
1.049
1.380
1.610
LENGTH
10
20
175 120
360 250
680 465
1400 950
2100 1460
OF PIPE (FT)
30
40 50
97
82 73
200 170 151
375 320 285
770 660 580
1180 990 900
* Cubic ft of gas per hr for gas pressures of 0.5 psig (14-in. wc) or less, and a
pressure drop of 0.5-in. wc (based on a 0.60 specific gravity gas). Ref: Table
C-4 NFPA 54/ANSI Z223.1-1992.
Never operate unit without a filter or with filter access door
removed. Failure to follow this warning could result in fire,
personal injury, or death.
If a flexible connector is required or allowed by the authority
having jurisdiction, black iron pipe shall be installed at the
gas valve and extend a minimum of 2 in. outside the furnace
casing.
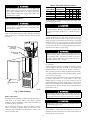
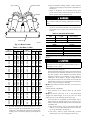
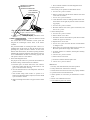
The 2 factory-supplied filters are shipped in the blower compartment. After the return-air duct has been connected to the furnace,
install the filters in a V-formation inside the return-air plenum.
(See Fig. 7.)
Piping should be pressure tested in accordance with local and
national plumbing and gas codes before the furnace has been
attached. If the pressure exceeds 0.5 psig (14-in. wc), the gas
supply pipe must be disconnected from the furnace and capped
before the pressure test. If the test pressure is equal to or less than
0.5 psig (14-in. wc), close the manual shut-off valve located on the
gas valve before the test. It is recommended that the ground joint
union be loosened before pressure testing.
AIRFLOW
INSTALLATION
POSITION
OF FILTERS
RETURN-AIR
PLENUM
Never purge a line into a combustion chamber. Never use
matches, candles, flame, or other sources of ignition to check
for gas leakage. Use a soap-and-water solution to check for
gas leaks. Failure to follow this warning could result in fire,
explosion, personal injury, or death.
After all connections have been made, purge the lines and check
for gas leakage.
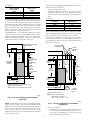
Install a sediment trap in the riser leading to the furnace. Connect
a capped nipple into the lower end of the tee. The capped nipple
should extend below the level of the gas controls. (See Fig. 8.)
Joint compounds (pipe dope) should be applied sparingly and only
to the male threads of the joints. This pipe dope must be resistant
to the action of propane gas.
Install an accessible manual shut-off valve upstream of the furnace
gas controls and within 72 in. of the furnace. A 1/8-in. NPT
plugged tapping, accessible for test gage connection, must be
installed immediately upstream of the gas supply connection to the
furnace and downstream of the manual shut-off valve. Place a
ground joint union between the gas control manifold and the
manual shut-off valve.
ACCESS DOOR
A88486
Fig. 7—Filter Positions
Use the proper length of pipes to avoid stress on the gas
control manifold. Failure to follow this warning could result
in a gas leak causing fire, explosion, personal injury, or death.
Step 5—Gas Piping
Gas piping must be installed in accordance with national and local
codes. Refer to the current edition of the NFGC. Canadian
installations must be installed in accordance with NSCNGPIC and
all authorities having jurisdiction.
Connect the gas pipe to the funace using a backup wrench to
avoid damaging gas controls.
The gas supply line should be a separate line directly from the
meter to the furnace, if possible. Refer to Table 4 for recommended gas pipe sizing. Risers should be used to connect to the
furnace and to the meter.
Step 6—Electrical Connections
115-V WIRING — Refer to the unit rating plate or Table 5 for
equipment electrical requirements. The control system requires an
earth ground for proper operation.
6