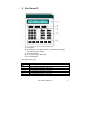
1
Fax Server IP
Manual
International
Headquarters
VIDICODE Datacommunicatie BV
USA
VIDICODE Datacommunications
Blauwroodlaan 140, 2718 SK Zoetermeer
The Netherlands
Tel. +31 79-3617181 Fax +31 79-3618092
[email protected] www.vidicode.nl
P.O. Box 3288
Wilmington, N.C. 28406
Tel. 910.452.5600 Fax 910.254.3525
[email protected] www.vidicode.com
2
Fax Server IP Manual
Contents
1
Introduction ............................................................. 7
1.1
1.2
1.3
1.4
2
Fax Server IP........................................................... 7
Send Fax ................................................................. 7
Fax Server IP Archiving System .............................. 8
Getting the Fax Server IP Fax System to work......... 8
Fax Server IP .......................................................... 9
2.1
2.2
2.3
2.4
2.5
Introduction to Fax Server IP ................................. 10
What's in the box ................................................... 10
Connecting the Fax Server IP ................................ 10
Setting up the Fax Server IP for operation ............. 11
System settings ..................................................... 11
2.5.1
2.5.2
2.5.3
2.5.4
2.5.5
2.6
Set the Clock ................................................................ 11
Protect the Fax Server with a Password ...................... 12
Remove Password protection ...................................... 13
Set the Language ......................................................... 13
Reset all values ............................................................ 13
Fax settings ........................................................... 14
2.6.1
2.6.2
2.6.3
2.6.4
2.6.5
2.6.6
2.6.7
2.6.8
2.6.9
2.6.10
2.6.11
2.6.12
2.6.13
2.6.14
2.6.15
2.6.16
2.6.17
2.7
2.7.1
Fax ID ........................................................................... 14
Top text......................................................................... 15
Maximum Fax speed .................................................... 15
Fax Send retries ........................................................... 16
Send Retry time............................................................ 16
Retry after voice ........................................................... 16
Speaker ........................................................................ 17
Speaker volume............................................................ 17
Beep after Rx/Tx........................................................... 17
Dial prefix .................................................................. 18
No Answer time-out................................................... 18
No Carrier time-out.................................................... 18
Caller ID .................................................................... 19
Rings to answer on.................................................... 19
Ring volume .............................................................. 20
Ring variation ............................................................ 20
Ring frequency .......................................................... 20
LAN settings .......................................................... 21
E-mail address.............................................................. 21
Fax Server IP Manual
3
2.7.2
2.7.3
2.7.4
2.7.5
2.7.6
2.7.7
2.7.8
2.7.9
2.7.10
2.7.11
2.7.12
2.7.13
2.7.14
2.8
2.9
2.10
2.11
2.12
2.13
3
Operation of the Fax Server IP .............................. 28
Rx, the received faxes ........................................... 29
Tx, the sent faxes .................................................. 30
Fax ID.................................................................... 31
Empty Send and Received queues ........................ 31
Disk info................................................................. 31
Send Fax............................................................... 33
3.1
3.2
3.3
3.4
3.5
3.6
3.7
3.8
3.9
3.10
4
Introduction to Send Fax........................................ 33
Installation ............................................................. 33
Setting up the Send Fax ........................................ 33
Send a Fax ............................................................ 35
Add a new contact ................................................. 35
Edit Address list ..................................................... 36
Fax Settings........................................................... 36
Send Fax Later ...................................................... 36
Import an address book ......................................... 37
Preview.................................................................. 37
Fax Server IP Archiving System ........................... 39
4.1
4.2
4.3
4.4
4.5
4.6
4
Reply address............................................................... 22
SMTP server IP address .............................................. 22
SMTP server port ......................................................... 23
Domain name ............................................................... 23
FTP user ....................................................................... 24
FTP password .............................................................. 24
FTP server port............................................................. 25
TelNet ........................................................................... 25
DHCP server ............................................................. 26
IP address ................................................................. 26
IP subnet mask.......................................................... 27
Gateway .................................................................... 27
IP name ..................................................................... 28
Introduction to Fax Server IP Archiving System ..... 39
Installation ............................................................. 39
Setting up a Fax Server IP connection................... 39
Viewing a Fax ........................................................ 40
Browsing the database, the viewer ........................ 40
Open an existing Archive ....................................... 41
Fax Server IP Manual
4.7
4.8
4.9
4.10
4.11
4.12
4.13
4.14
4.15
4.16
4.17
4.18
4.19
4.20
4.21
5
Create a new Archive............................................. 41
Update the Database ............................................. 42
Updating the database automatically ..................... 42
The Cache ............................................................. 42
Download faxes permanently................................. 43
Mark records for transfer to PC.............................. 43
Transfer records to PC........................................... 43
Deleting records from the Archive .......................... 44
Restore deleted records......................................... 44
Build a CD Archive................................................. 44
Complete Name fields............................................ 45
Perform queries on the main archive ..................... 46
Protect Archive with a password ............................ 46
History of Fax Server database updates ................ 46
Advanced Settings................................................. 47
Acknowledgements ............................................... 49
5.1
5.2
Guarantee.............................................................. 49
Liability .................................................................. 49
Fax Server IP Manual
5
6
Fax Server IP Manual
1 Introduction
The Fax Server IP is a stand-alone network fax machine. Together with the
Fax Server IP Archiving System and the Send Fax application it forms a
complete network faxing system. Faxes can be sent from every workstation
on the network with the Send Fax application. The Send Fax application
addresses the Fax Server IP, which stores the fax and takes care of the
actual fax transmission. All faxes received by the Fax Server IP are stored
on the internal hard disk and can be viewed from every workstation with the
Fax Server IP Archiving System. The Fax Server IP handles incoming and
outgoing fax transmission and stores all sent and received faxes. All stored
faxes are available through the network. The Fax Server has extensive Email capabilities. Incoming faxes can be selectively E-mailed to programmed
E-mail addresses. Fax transmission results are E-mailed to the Send Fax
User.
1.1 Fax Server IP
The Fax Server IP is the actual fax machine. The telephone line connection
enables the reception and sending of faxes. All sent and received faxes are
stored in a database on the internal hard disk.
Faxes can be sent from every workstation using the Send Fax application.
The Send Fax application addresses the Fax Server IP to send the fax. The
Fax Server IP takes care of the actual fax transmission and can E-mail the
User back with the result of the fax transmission.
The Fax Server IP holds a list of Users. This list can be managed from within
the Send Fax Options.
The fax database on the Fax Server IP can be accessed with the Fax Server
IP Archiving System through the network connection. All received and sent
faxes can be viewed from every workstation connected to the network.
E-mail is fully integrated in the Fax Server. Received faxes can be
selectively E-mailed to programmed E-mail addresses. In case several local
fax numbers are used the selection can take place according to local fax
number. Your PBX should support this function to enable this kind of
selection. Selection of faxes for distribution via E-mail can also take place
according to remote Fax ID. After fax transmission the Fax Server can Email the result of the fax transmission back to the User of the Send Fax.
1.2 Send Fax
The Send Fax application allows you to send a fax from virtually every PC
application with print option. With the installation of the Send Fax application
a printer is added to the computer's list of printers. Use the print-command
in your application to transfer the document to the Send Fax application,
which consequently starts up. In the Send Fax application one or more
Fax Server IP Manual
7
recipients can be chosen from an address book. New entries to the address
book can easily be made. The Send Fax has a preview function that allows
you to have a last look at the fax before sending it off. When Send Fax is
clicked the fax is uploaded to the Fax Server IP that will automatically take
care of the fax transmission. After fax transmission the Fax Server can report
the transmission result back to the User of the Send Fax through E-mail.
1.3 Fax Server IP Archiving System
The Fax Server IP Archiving System is a PC application that allows you to
access the Fax Server IP database over the network. The Fax Server IP
Archiving System shows a listing of the Fax Server IP's database in the Main
Archive. Each record in the Main Archive represents a fax. The Fax Server
IP Archiving System can keep the listing of the Main Archive up to date
automatically. The faxes belonging to the records in the list can be viewed
with the build in fax-viewer. The viewer allows you to browse through the
database of the Fax Server IP.
The Fax Server IP Archiving System supports the use of four Fax Servers.
1.4 Getting the Fax Server IP Fax System to work
For the Fax Server IP Fax System to work you need at least:
• A Fax Server IP connected to a telephone line and to the network.
• At least one workstation with the Fax Server IP Archiving System
application installed.
• At least one workstation with the Send Fax application installed.
The connection and setup of the Fax Server IP is described in Chapter 2.
The installation and operation of the Send Fax application is described in
Chapter 3. The installation and operation of the Fax Server IP Archiving
System is described in Chapter 4.
8
Fax Server IP Manual
2 Fax Server IP
1. The display.
2. The Softkeys. The softkeys function is determined by text right
above the key in the display.
3. The numerical keys.
4. The 8 function keys. See below.
5. The arrowed keys.
The eight function keys:
Received faxes queue and Received faxes info key. See § 2.9
Sent faxes queue and Send faxes info key. See § 2.10
Fax ID info key. See § 2.11
Empty queue function key. See § 2.12
Fax settings menu key. See § 2.6
Network settings menu key. See § 2.7
Disk info key. See § 2.13
System settings menu key. See § 2.5
Fax Server IP Manual
9
2.1 Introduction to Fax Server IP
The Fax Server IP is the actual fax machine. The telephone line connection
enables the reception and sending of faxes. All sent and received faxes are
stored in a database on the internal hard disk. E-mail is fully integrated in the
Fax Server. Received faxes can be selectively E-mailed to programmed Email addresses. In case several local fax numbers are used the selection
can take place according to local fax number. Your PBX should support this
function to enable this kind of selection. Selection of faxes for distribution via
E-mail can also take place according to remote Fax ID. After fax
transmission the Fax Server can E-mail the result of the fax transmission
back to the User of the Send Fax.
2.2 What's in the box
•
•
•
•
Fax Server IP
Mains supply adapter.
Telephone cable with RJ11 connectors.
CD-Rom with Send Fax and Fax Archive software.
2.3 Connecting the Fax Server IP
The Fax Servers back plate has the following connections.
The Fax Server IP back plate
A. The Power socket.
B. The Serial connection socket.
C. The Ethernet connection socket.
D. The telephone line and telephone connection sockets.
Connect the Fax Server IP as follows.
• Connect the Power supply to the power socket A.
• Connect the Ethernet plug to the Ethernet socket C.
10
Fax Server IP Manual
• Connect the telephone line to the Line socket D. The Phone socket in
D allows for the optional connection of a telephone.
The serial connection is used only in specific occasions not described in this
manual.
2.4 Setting up the Fax Server IP for operation
The setup of the Fax Server is done as follows. The following setting have to
be made.
• System settings deal with the general settings like clock, password
and language settings.
• Fax Settings relate to the actual fax transmission, like transmission
speed, top line and dial prefix settings.
• LAN Settings deal with the settings that have to do with the network
connection of the Fax Server like Ftp username and password, E-mail
address and IP Number settings.
Follow the instructions in the description of the System settings in 2.5 The
Fax settings can be found in 2.6 and LAN settings are described in 2.7.
2.5 System settings
Enter the System settings as follows.
• Press the
Sys button.
A sequence of System settings will need to be passed. Every item will have
at least three options:
• Press NEXT to move on to the next menu item.
• Press CHANGE to enter the value or property of the menu item.
• Press STOP to exit the menu.
Press NEXT repeatedly to scroll through the menu items. The following
sequence of menu items will appear:
2.5.1
Set the Clock
• Press the
Sys button.
Fax Server IP Manual
11
• Press CHANGE to change the setting of the clock.
Clock: ▓a
STORE
22-04-02
11:03
CANCEL
Setting the clock.
• Press key's 1-7 to change the day of the week.
The default date and time format is DD-MM-YY and HH:MM (when American
has been set as language the format is changed to MM-DD-YY). Use the
arrowed keys to move the blinking character left and right. Press softkey
STORE to store the changes. Press softkey CANCEL to return to previous
values.
2.5.2
Protect the Fax Server with a Password
The Fax Server can be protected with a password. When password
protection has been enabled all operations are blocked before the correct
password has been entered.
Sys button.
• Press the
• Press NEXT once.
Password active:
NEXT
CHANGE
No
STOP
Setting the Password.
• Press CHANGE to enter a password.
Password:
STORE
▓000
CANCEL
Enter a password.
• Press STORE to enable the entered password.
• Press STOP to exit the menu.
From this point on you will be prompted for the password before entering the
menus.
12
Fax Server IP Manual
2.5.3
Remove Password protection
• Press the
Sys button.
• Enter the password and press CONTINUE.
• Press NEXT once.
Password active:
NEXT
CHANGE
Yes
STOP
Disable the Password.
• Press CHANGE to disable the password.
• Press STOP to save and exit the menu.
The password protection has now been disabled.
2.5.4
Set the Language
• Press the
Sys button.
• Press NEXT twice.
Language:
English
NEXT
CHANGE
STOP
Setting the Language.
• Press CHANGE to select the preferred language.
• Press STOP to save and exit the menu.
2.5.5
Reset all values
Use Reset all values to reset all fax transmission and system values. LAN
settings are not affected by the Reset all values operation.
• Press the
Sys button.
• Press NEXT three times.
Reset all values:
CHANGE
No
STOP
Reset all values.
Fax Server IP Manual
13
• Press CHANGE to enable the Reset all values operation.
Reset all values:
CHANGE
Yes
STOP
Reset all values enabled.
• Press STOP to execute the Reset all values operation.
Attention: Reset all values operation will disable the password protection.
2.6 Fax settings
Enter the Fax settings as follows.
• Press the
Fax button.
A sequence of Fax settings will need to be passed. Every item will have at
least three options:
• Press NEXT to save and move on to the next menu item.
• Press CHANGE to enter or change the value or property of the menu
item.
• Press STOP to exit the menu.
Press NEXT repeatedly to scroll through the menu items. The following
sequence of menu items will appear:
2.6.1
Fax ID
The Fax ID is the actual identification of the fax machine. When a fax is
transmitted both fax machines negotiate their Fax ID's. It is by legal
obligation that the Fax ID should contain the entire local fax number
including country and area code. By international law it is not permitted to
have a fax machine without programmed Fax ID.
Fax-Id:
NEXT
CHANGE
STOP
Set the Fax ID.
• Press CHANGE to enter the Fax ID.
14
Fax Server IP Manual
Fax-Id: ▓
STORE
CANCEL
Enter the Fax ID.
• Press STORE to save the Fax ID.
• Press NEXT to move on to the next menu item.
2.6.2
Top text
The Top text is the text that is printed as the top line of the fax. The Top Text
is mandatory in the United States.
Top Text:
NEXT
CHANGE
STOP
Set the Top text.
• Press CHANGE to enter the Top text.
Top Text:
STORE
▓
CANCEL
Enter the Top text.
• Press STORE to save the Top text.
• Press NEXT to move on to the next menu item.
2.6.3
Maximum Fax speed
The fax transmission speed is negotiated between the two fax machines
before the actual transmission of the fax takes place and depends on the
quality of the telephone connection. The Maximum Fax speed is an upper
limit to the transmission speed.
Maximum Fax Speed: 14400
NEXT
CHANGE
STOP
Set the Maximum transmission speed.
• Press CHANGE to change the transmission speed.
Select 14400, 9600 or 4800 bps. The default 14400 bps setting is advised.
• Press NEXT to save and move on to the next menu item.
Fax Server IP Manual
15
2.6.4
Fax Send retries
The Fax Send Retries property determines the number of times the Fax
Server will try to send a fax in case of unsuccessful transmission.
Fax Send Retries:
NEXT
CHANGE
3x
STOP
Set the Fax Send Retries.
• Press CHANGE to change the number of retries.
Select a value between 0x and 15x.
• Press NEXT to save and move on to the next menu item.
2.6.5
Send Retry time
The Send retry time is the time the Fax Server will take to resend the fax.
Fax Send Retries:
NEXT
CHANGE
60s
STOP
Set the Fax Send Retries.
• Press CHANGE to change the Send retry time.
Select a value between 15 and 1800 seconds.
• Press NEXT to save and move on to the next menu item.
2.6.6
Retry after voice
Retry after voice determines whether the Fax Server should retry to send a
fax when the fax number was answered but no fax machine found on the
remote side. This property enabled allows for the recipient to put the call
through to the fax machine.
Retry after voice:
NEXT
CHANGE
Yes
STOP
Set retry after voice.
• Press CHANGE to enable or disable the retry after voice property.
• Press NEXT to save and move on to the next menu item.
16
Fax Server IP Manual
2.6.7
Speaker
Select the speaker mode.
Speaker:
NEXT
CHANGE
Dial only
STOP
Set the speaker mode.
• Press CHANGE to change speaker mode.
Choose between Dial only, Always on and Always off.
• Press NEXT to save and move on to the next menu item.
2.6.8
Speaker volume
Set the speaker volume.
Speaker:
NEXT
0
STOP
CHANGE
Set the speaker mode.
• Press CHANGE to change speaker mode.
Select a value between 0 and 7.
• Press NEXT to save and move on to the next menu item.
2.6.9
Beep after Rx/Tx
Beep after Rx/Tx lets the Fax Server sound a beep after a fax has been sent
or received.
Beep after Rx/Tx:
NEXT
CHANGE
Yes
STOP
Set Beep after Rx/Tx.
• Press CHANGE to enable or disable the Beep after Rx/Tx property.
• Press NEXT to save and move on to the next menu item.
Fax Server IP Manual
17
2.6.10 Dial prefix
Use the Dial prefix to have the Fax Server dial the Dial prefix before dialing
the fax number as supplied by the Send Fax application.
Dial prefix:
NEXT
CHANGE
STOP
Set the Dial prefix.
• Press CHANGE to enter the Dial prefix.
Dial prefix:
STORE
▓
CANCEL
Enter the Dial prefix.
• Press STORE to save the Dial prefix.
• Press NEXT to move on to the next menu item.
2.6.11 No Answer time-out
The No Answer timeout time determines the time the Fax Server will wait for
the remote fax machine to answer the call.
No Answer timeout:
NEXT
CHANGE
60s
STOP
Set the No Answer timeout.
• Press CHANGE to change the No Answer timeout.
Select a value between 20 and 180 seconds. It is advised to keep the default
60 second setting.
• Press NEXT to save and move on to the next menu item.
2.6.12 No Carrier time-out
The No Carrier timeout determines the time the Fax Server and the remote
fax machine have for negotiation.
18
Fax Server IP Manual
No Carrier timeout:
NEXT
CHANGE
60s
STOP
Set the No Carrier timeout.
• Press CHANGE to change the No Carrier timeout.
Select a value between 20 and 180 seconds. It is advised to keep the default
60 second setting.
• Press NEXT to save and move on to the next menu item.
2.6.13 Caller ID
The Fax Server supports four different kinds of Caller ID methods.
Caller ID:
DTMF-pola
NEXT
CHANGE
STOP
Set the Caller ID.
• Press CHANGE to change Caller ID method.
Choose between DTMF-pola, DTMF-ring, FSK-pola and FSK-ring. Caller
ID's are stored with the fax data and can be viewed in the Fax Archive.
• Press NEXT to save and move on to the next menu item.
2.6.14 Rings to answer on
Rings to answer on determines the number of times the telephone rings
before the Fax Server answers the telephone call.
Rings to answer on:
NEXT
CHANGE
1x
STOP
Set the Rings to answer on property.
• Press CHANGE to change the Rings to answer on value.
Select a value between 0x and 12x.
• Press NEXT to save and move on to the next menu item.
Fax Server IP Manual
19
2.6.15 Ring volume
The Ring volume determines the volume of the ringer of the Fax Server.
Ring volume:
NEXT
CHANGE
3
STOP
Set the Ring volume property.
• Press CHANGE to change the Ring volume property.
Select a value between 0 and 12.
• Press NEXT to save and move on to the next menu item.
2.6.16 Ring variation
Ring variation determines the variation in the sound of the ring.
Ring variation:
NEXT
CHANGE
2x5
STOP
Set the Ring variation property.
• Press CHANGE to change the Ring variation property.
Select a value between 1x3 and 3x12.
• Press NEXT to save and move on to the next menu item.
2.6.17 Ring frequency
Ring frequency determines the pitch of the ring.
Ring frequency:
CHANGE
2x5
STOP
Set the Ring frequency property.
• Press CHANGE to change the Ring frequency property.
Select a value between 400+50 and 3400+350.
• Press STOP to save and exit the menu.
20
Fax Server IP Manual
2.7 LAN settings
Enter the LAN settings as follows.
LAN button.
• Press the
A sequence of LAN settings will need to be passed. Every item will have at
least three options:
• Press NEXT to move on to the next menu item.
• Press CHANGE to enter or change the value or property of the menu
item.
• Press STOP to exit the menu.
Press NEXT repeatedly to scroll through the menu items. The following
sequence of menu items will appear:
2.7.1
E-mail address
The Fax Server extensive E-mail capabilities. All received faxes can easily
be forwarded to one E-mail address.
E-mail:
NEXT
CHANGE
STOP
Set the E-mail address.
• Press CHANGE to enter an E-mail address.
E-mail:
STORE
▓
CANCEL
Enter the E-mail address.
Use the numerical keys to enter the E-mail address.
• Press STORE to save the E-mail address.
• Press NEXT to move on to the next menu item.
There is an option to E-mail the received faxes to several E-mail addresses.
The Fax Server can be given a list of instructions how to distribute received
faxes by E-mail. In case several local fax numbers are used the selection
can take place according to local fax number. Your PBX should support this
function to enable this kind of selection. Selection of faxes for distribution via
Fax Server IP Manual
21
E-mail can also take place according to remote Fax ID. If required contact
your supplier for more details.
2.7.2
Reply address
Because the Fax Server cannot receive E-mail the E-mails sent by the Fax
Server require another reply address.
Reply:
NEXT
CHANGE
STOP
Set the E-mail reply address.
• Press CHANGE to enter the E-mail reply address.
Reply:
STORE
▓
CANCEL
Enter the E-mail reply address.
Use the numerical keys to enter the E-mail reply address.
• Press STORE to save the E-mail reply address.
• Press NEXT to move on to the next menu item.
2.7.3
SMTP server IP address
The Fax Server uses the IP address of the SMTP server to send E-mail. In
case a local SMTP server is used the IP number can be entered directly. In
case of an SMTP server outside the network both the Gateway and the
Subnet Mask need to be set later on.
SMTP srv: 0:0:0:0
NEXT
CHANGE
STOP
Set the IP address of the SMTP server.
• Press CHANGE to enter the IP address of the SMTP server.
SMTP-srv: ▓00:000:000:000
STORE
CANCEL
Enter the IP address of the SMTP
server.
22
Fax Server IP Manual
Use the numerical keys to enter the IP address of the SMTP server.
• Press STORE to save the IP address of the SMTP server.
• Press NEXT to move on to the next menu item.
2.7.4
SMTP server port
SMTP-server port is the port number through which the Fax Server
connection is to be made with the SMTP server. The SMTP-server port of
the Fax Server is default set to 25. Do not change the SMTP-server port
number when this value is not explicitly changed in the SMTP server.
SMTP-server port:
NEXT
CHANGE
25
STOP
Set the SMTP-server port number.
• Press CHANGE to change the SMTP-server port number.
SMTP-server port:
▓
CANCEL
Enter the SMTP-server port number.
Use the numerical keys to enter the SMTP-server port number.
• Press STORE to save the SMTP-server port number.
• Press NEXT to move on to the next menu item.
2.7.5
Domain name
The domain name of the SMTP server is required as domain name in the
Fax server. In case the SMTP server is on the network the network domain
is required. In case the SMTP server is outside the network the domain
name of the SMTP server is required. Contact your provider for more
information.
Domain:
NEXT
CHANGE
STOP
Set the domain of the SMTP server.
• Press CHANGE to enter the domain of the SMTP server.
Fax Server IP Manual
23
Domain: ▓
STORE
CANCEL
Enter the domain of the SMTP server.
Use the numerical keys to enter the domain of the SMTP server.
• Press STORE to save the domain of the SMTP server.
• Press NEXT to move on to the next menu item.
2.7.6
FTP user
The Ftp user is user name of the Fax Server. It is used by the Fax Archive
and Send Fax to log on to the Fax server.
FTP user: 0000
NEXT
CHANGE
STOP
Set the Ftp user name.
• Press CHANGE to change the Ftp user name.
FTP user:
▓
CANCEL
Enter the Ftp user name.
Use the numerical keys to enter the Ftp user name.
• Press STORE to save the Ftp user name.
• Press NEXT to move on to the next menu item.
2.7.7
FTP password
The Ftp password of the Fax Server is the password that goes with the FTP
user name of the Fax Server. It is used by the Fax Archive and Send Fax
applications to log on to the Fax server.
FTP pwd: 0000
NEXT
CHANGE
STOP
Set the Ftp password.
• Press CHANGE to change the Ftp password.
24
Fax Server IP Manual
FTP pwd:
▓
CANCEL
Enter the Ftp password.
Use the numerical keys to enter the Ftp password.
• Press STORE to save the Ftp password.
• Press NEXT to move on to the next menu item.
2.7.8
FTP server port
Ftp server port is the port number through which the Fax Archive and Send
Fax log on to the Fax server. The Ftp server port is default set to 21, as is
the setting of the port number in the Fax Archive and Send Fax. If there is no
direct reason to change the Ftp server port it is best left unchanged.
FTP server port:
NEXT
CHANGE
21
STOP
Set the Ftp -server port number.
• Press CHANGE to change the Ftp server port number.
FTP-server port:
▓
CANCEL
Enter the Ftp server port number.
Use the numerical keys to enter the Ftp server port number.
• Press STORE to save the Ftp server port number.
• Press NEXT to move on to the next menu item.
2.7.9
TelNet
TelNet can be used to log on to the Fax Server and configure the Fax Server
from your PC. If required contact your supplier for more details.
TelNet active:
NEXT
CHANGE
No
STOP
Enable TelNet.
• Press CHANGE to enable TelNet.
Fax Server IP Manual
25
TelNet active:
NEXT
CHANGE
Yes
STOP
TelNet enabled.
• Press NEXT to save and move on to the next menu item.
2.7.10 DHCP server
In case a DHCP server is used on the network the DHCP server must be
enabled. In case a DHCP server is not used on the network the DHCP
server must be disabled.
Use DHCP server:
NEXT
CHANGE
No
STOP
Enable DHCP server.
• Press CHANGE to enable DHCP server.
Use DHCP server:
NEXT
CHANGE
Yes
STOP
DHCP server enabled.
• Press NEXT to save and move on to the next menu item.
2.7.11 IP address
As part of the network the Fax Server needs an IP address. In case a DHCP
server is used (see previous item) the DHCP server will assign the Fax
Server an IP address. In case a DHCP server is not used a static IP address
must be given to the Fax Server.
IP addr: 0:0:0:0
NEXT
CHANGE
STOP
Set the IP address of the Fax server.
• Press CHANGE to enter the IP address of the Fax server.
IP addr: ▓00:000:000:000
STORE
CANCEL
Enter the IP address of the Fax server.
26
Fax Server IP Manual
Use the numerical keys to enter the IP address of the Fax server.
• Press STORE to save the IP address of the Fax server.
• Press NEXT to move on to the next menu item.
2.7.12 IP subnet mask
The IP subnet mask is used by the Fax server if access from outside the
network is required. In this case the Gateway will need to be entered as well.
In case the used SMTP server is not on the local network the IP mask and
gateway need to be entered.
IP mask: 255:255:255:000
NEXT
CHANGE
STOP
Set the IP subnet mask of the Fax
server.
• Press CHANGE to change the IP subnet mask of the Fax server.
IP mask: ▓55:255:255:000
STORE
CANCEL
Enter the IP subnet mask of the Fax
server.
Use the numerical keys to enter the IP subnet mask of the Fax server.
• Press STORE to save the IP subnet mask of the Fax server.
• Press NEXT to move on to the next menu item.
2.7.13 Gateway
The Gateway is used by the Fax server if access from outside the network is
required. If so the Gateway and the IP subnet mask will need to be entered.
For instance, if the used SMTP server is not on the local network the IP
mask and gateway are required.
Gateway: 0:0:0:0
NEXT
CHANGE
STOP
Set the Gateway of the Fax server.
• Press CHANGE to enter the Gateway of the Fax server.
Fax Server IP Manual
27
Gateway: ▓00:000:000:000
STORE
CANCEL
Enter the Gateway of the Fax server.
Use the numerical keys to enter the Gateway of the Fax server.
• Press STORE to save the Gateway of the Fax server.
• Press NEXT to move on to the next menu item.
2.7.14 IP name
Aside from the IP address the Fax Server can also be addressed by an IP
name if this function is supported by your DNS server.
IP name: IPFax0001
CHANGE
STOP
Set an IP name for the Fax server.
• Press CHANGE to enter an IP name for the Fax server.
IP name: ▓
CANCEL
Enter an IP name for the Fax server.
Use the numerical keys to enter an IP name for the Fax server.
• Press STORE to save an IP name for the Fax server.
The IP name is the last item in the LAN settings menu.
• Press STOP to exit the LAN menu.
2.8 Operation of the Fax Server IP
Under normal circumstances the Fax Server does not need much attention.
Operation is done through the Fax Archive and Send Fax applications. Once
the settings have been made the reception of faxes is done automatically.
Received faxes are E-mailed to the programmed E-mail address. Received
faxes can also be viewed over the network with the Fax Archive application.
Once the Send Fax application has been installed on a network workstation
and the settings have been made the sending of faxes is done with the Send
Fax application from the workstation over the network. The Fax Server is
28
Fax Server IP Manual
operated with the eight function keys, which allow for viewing basic info on
the status of the Fax Server and concise info of sent and received faxes. The
function of the function keys is described in the following paragraphs.
•
Rx gives information on the received. Both the archive and the queue
•
Tx gives information on the sent faxes. Both the archive and the
•
•
•
•
•
•
can be viewed. See 2.9.
queue can be viewed. See 2.10.
displays the Fax ID. See 2.11.
allows you to empty the Rx and Tx queues..
Fax opens the Fax settings menu. See 2.6.
LAN opens the Network settings menu. See 2.7.
displays the free disk space. See 2.13.
Sys opens the System settings menu. See 2.5.
2.9 Rx, the received faxes
The Rx key opens the received faxes menu.
• Press the Rx key to enter the received faxes menu.
Received Faxes
ARCHIVE
QUEUE
STOP
The Received faxes menu.
• Press STOP to exit the Received faxes menu.
• Press QUEUE to view the received faxes queue. The QUEUE contains
all the received faxes that still need to be E-mailed.
• Press ARCHIVE to enter the search the received faxes. The ARCHIVE
contains all the received faxes.
Search the received faxes archive on time, date or Fax ID.
Received on ▓4-04-02
SEARCH
TIME
STOP
Search the received faxes.
• Press the TIME key to select the kind of search.
Choose between Time, Date and Fax ID.
Fax Server IP Manual
29
• Enter a time, date or Fax ID to search for. Use wildcards (star key) to
expand your search criteria, e.g. enter **:**:02 to query all received
faxes of the year 2002.
• Press SEARCH to search for the entered search string.
Use the double arrowed keys to scroll through the found faxes and select a
fax. Use the single arrowed keys to scroll through the fax properties of the
selected fax.
2.10 Tx, the sent faxes
The Tx key opens the sent faxes menu.
• Press the Tx key to enter the sent faxes menu.
Sent Faxes
ARCHIVE
QUEUE
STOP
The Sent faxes menu.
• Press STOP to exit the Sent faxes menu.
• Press QUEUE to view the Send faxes queue. The QUEUE contains all
the Send faxes that still need to be sent.
• Press ARCHIVE to enter the search the sent faxes The ARCHIVE
contains all the sent faxes.
Search the sent faxes archive on time, date or Fax ID.
Sent on ▓4-04-02
SEARCH
TIME
STOP
Search the sent faxes.
• Press the TIME key to select the kind of search.
Choose between Time, Date and Fax ID.
• Enter a time, date or Fax ID to search for. Use wildcards (star key) to
expand your search criteria, e.g. enter **:**:02 to query all sent faxes
of the year 2002.
• Press SEARCH to search for the entered search string.
30
Fax Server IP Manual
Use the double arrowed keys to scroll through the found faxes and select a
fax. Use the single arrowed keys to scroll through the fax properties of the
selected fax.
2.11 Fax ID
Pressing the
display.
button shows the Fax ID of the Fax Server on the
Monday
24-04-02 10:26
Fax-Id: 31 0 70 3618092
The Fax ID.
Setting the Fax ID is done in the Fax settings menu. See 2.6.
2.12 Empty Send and Received queues
The
key opens the empty queue menu.
• Press the
key to enter the empty queue menu.
Empty Queue
RECEIVED
SENT
STOP
The empty queue key.
• Press RECEIVED to empty the received queue.
• Press SENT to empty the sent queue.
• Press STOP to exit the Empty queue menu.
2.13 Disk info
Pressing the
button shows the free disk space of the Fax Server's hard
disk on the display.
Monday
24-04-02 10:26
Free on disk: 9960 MB
The free disk space.
Fax Server IP Manual
31
32
Fax Server IP Manual
3 Send Fax
3.1 Introduction to Send Fax
The Send Fax application allows you to send a fax from virtually every PC
application with print option. With the installation of the Send Fax application
a printer is added to the computer's list of printers. Use the print-command
in your application to transfer the document to the Send Fax application,
which consequently starts up. In the Send Fax application one or more
recipients can be chosen from an address book. New entries to the address
book can easily be made. The Send Fax has a preview function that allows
you to have a last look at the fax before sending it off. When Send Fax is
clicked the fax is uploaded to the Fax Server IP that will automatically take
care of the fax transmission. After fax transmission the Fax Server can report
the transmission result back to the User of the Send Fax through E-mail. The
settings for the Send Fax application are located in the Send Fax Options.
The Send Fax Options can be entered from the Send Fax application or from
the windows START menu.
3.2 Installation
Placing the CD-ROM in your computer gives you a choice of installation of
Send Fax or Fax Archive software. Choose to install the Send Fax software.
If the installation is not started automatically, consult the readme file on the
CD to start installation manually. Follow the instructions on the screen.
3.3 Setting up the Send Fax
Setting up the Send Fax application presumes the presence of a Fax Server
on the network. Send Fax settings are made in the Send Fax Options. The
Send Fax Options can be entered from the Start menu.
• Start up the Send Fax Options by clicking Start, select Programs,
select Vidicode and select Send Fax Options.
The Send Fax Options dialog has four tab pages.
• Select the Network tab.
Enter the network properties of the Fax Server.
• Address IPFax is the IP number or name of the Fax Server that you
want to connect to.
Fax Server IP Manual
33
• Port is the Ftp server port through which the connection is to be made.
The Ftp server port of the Fax Server is default set to 21. Do not
change the Port # when this value is not explicitly changed in the Fax
Server.
• Ftp-user is the Ftp user of the Fax Server that you want to connect to.
• Ftp password is the Ftp password (Ftp pwd) as set in the Fax Server
that you want to connect to.
This concludes the network settings for the Send Fax. The Fax Server holds
a list of Users. For the Fax Server to send a fax it needs to know which User
to use. The Fax Server's list of Users is managed from the Send Fax
Options.
• Select the User Id's tab.
• Select Add New.
The Add new User dialog opens. Enter the desired User properties.
• User ID is a unique two character ID of the User.
• Name is the User name of the User.
• E-mail is the E-mail address of the User.
• Click OK to save the User to the local list of Users.
The local list of Users now differs from the list of Users in the Fax Server.
The list of Users in the Fax Server must be updated.
• Click Update.
The list of Users in the Fax Server will now be compared to the list of Users
in the Send Fax Options. If any differences between the lists are found a
dialog opens that displays the Users that exist in the Fax Server or on the
Send Fax Options side only. Use the arrow keys to move selected Users
from the Send Fax Options to the Fax Server and vice versa.
Attention: To execute the Update action the network properties of the Fax
Server need to be set.
• Select the User in the list of Users.
• Click Set Default User.
The selected User is now set as default User.
34
Fax Server IP Manual
3.4 Send a Fax
Faxes are sent from any PC application with a print option.
•
•
•
•
•
Open the PC application that you want to send a fax from.
Select and open the document you want to send as fax.
Select the Print command.
Select the IPFax printer from the list of printers.
Click OK.
The Send Fax application will now open. The opening of the Send Fax
initiates the conversion of the document to Fax format. The Status bar at the
bottom of the Send Fax application reads: Done: Converting to TIFF.
• Select the Quick FAX Number field.
Enter the fax number you want to send the fax to.
• Click Add.
The entered fax number is added to the Send list at the right of the Send Fax
dialog. Add as many Quick FAX Numbers as desired or double click a
contact from the address book on the left to add to the send list.
• Select file in the menu.
• Select Send fax.
The fax will now be uploaded to the Fax Server which will take care of the
actual transmission of the fax to the entered fax number. The User will
receive an E-mail from the Fax Server reporting on the result of the fax
transmission. Settings regarding the fax transmission in the Fax Server will
apply to the transmission of the fax.
3.5 Add a new contact
New entries can be made to the address list.
• Select file in the menu.
• Select New FAX contact.
The Add new FAX contact dialog opens. Enter the new fax contact's
properties, name, company and fax number.
• Click OK to add the new FAX contact to the address list.
Fax Server IP Manual
35
3.6 Edit Address list
The entries in the address list can be edited.
• Select Edit in the menu.
The following options appear:
• Search allows you to search the address list for name, company or fax
number.
• Search next searches for the next entry of the search term.
• Delete will remove the entry from the address list.
• Edit entry allows you to modify company name and fax number of the
selected entry.
3.7 Fax Settings
The fax transmission settings of the Fax Server can be overruled with the
Send Fax settings.
• Select Settings in the menu.
• Select Send Fax Options.
• Select the Sending tab.
Select the preferred Maximum transmission speed and Resolution. The
spooler options are described in 3.8. Check the following options.
• Transmit no Topline will withhold the topline from being sent.
• Disable Dial tone detect will disable dial tone detection of the Fax
Server
• Disable retries disables the retry setting of the Fax Server.
• Transmit no Fax ID will withhold the Fax ID from being sent.
Save the settings as follows.
• Select File in the menu.
• Select Save to save the settings.
3.8 Send Fax Later
The sending of faxes can be postponed to a later time.
• Select Settings in the menu.
• Select Send Fax Options.
36
Fax Server IP Manual
• Select the Sending tab.
Check Send Direct or Send on Command.
In case Send On Command is checked sending the fax will move the fax to
the fax spooler, which will consequently appear in your taskbar. The Sent fax
will have the paused status. Sending the fax is initiated as follows.
•
•
•
•
Double click the Fax Spooler icon in the taskbar.
Select the paused fax you want to send off.
Select Document in the menu.
Select Restart.
The paused fax will now be uploaded to the Fax Server, which in turn will
take care of the transmission of the fax.
3.9 Import an address book
The Send Fax allows for the import of another applications address book.
•
•
•
•
Select Settings in the menu.
Select Send Fax Options.
Select the Address book tab.
Click the CSV button.
A dialog opens that allows you to select a Comma Separated Value file.
• Press the button to browse to the location of the file.
• Click Open.
• Click Next.
Select the Name, Company and Fax number item of your choice.
• Click Finalize.
3.10 Preview
The Send Fax application has a Preview function to have a last look at the
fax before sending it off.
• Click the Preview toolbutton to open the preview.
Use the toolbuttons to rotate the fax image, zoom in and out and scroll
through the fax pages. Close the Preview as follows.
Fax Server IP Manual
37
• Select File from the menu.
• Select Exit.
38
Fax Server IP Manual
4 Fax Server IP Archiving System
4.1 Introduction to Fax Server IP Archiving System
The Fax Server IP Archiving System software comes with the Fax Server IP.
It is a PC application that allows you to access the Fax Server database over
the network. The main dialog of the Fax Server IP Archiving System shows a
listing of the Fax Server's database. Each record in the database represents
a fax. The Fax Server IP Archiving System can keep the listing of the
database up to date automatically. The faxes belonging to the records in the
list can be viewed with the build in fax-viewer. The viewer allows you to
browse through the database of the Fax Server. In the database searches
and selections can be made and queries performed.
4.2 Installation
Placing the CD-ROM in your computer gives you a choice of installation of
Send Fax or Fax Archive software. Choose to install the Fax Archive
software. If the installation is not started automatically, consult the readme
file on the CD to start installation manually. Follow the instructions on the
screen. Start up the Fax Server IP Archiving application by clicking Start,
select Programs, select Vidicode and select Fax Server IP Archiving
System.
4.3 Setting up a Fax Server IP connection
Setting up a connection with a Fax Server requires a few properties to be
entered.
• Start up the application.
• Click Options in the menu.
• Select the Ftp Profiles tab.
The properties of four different Fax Servers can be entered here. Enter the
properties of the Fax Server in the fields of Profile Fax Server 1.
• IP Name or IP Address is the IP Name or number of the Fax Server
that you want to connect to.
• Ftp User is the Ftp user of the Fax Server that you want to connect to.
• Ftp Password is the Ftp password (Ftp pwd) as set in the Fax Server
that you want to connect to.
• ID is the factory set ID of the Fax Server and cannot be changed. This
ID is automatically displayed after a connection with the Fax Server
has been established.
Fax Server IP Manual
39
• Port # is the Ftp server port through which the connection is to be
made. The Ftp server port of the Fax Server is default set to 21. Do
not change the Port # when this value is not explicitly changed in the
Fax Server.
• Allow access to Fax Server allows the application to access the Fax
Server database. Check if a connection is needed, uncheck if a
connection is not desired.
• Click Apply for the settings to take effect.
• Select Action in the menu.
• Click Update Database to retrieve a listing of the database of the Fax
Server.
The application will now connect to the Fax Server and retrieve a listing of
the database in the Fax Server.
4.4 Viewing a Fax
The main dialog of the application display's a list of records of the Fax
Server's database. Each record represents a fax. To view a fax:
• Select a record in the database and click the
tool button.
The application will now connect to the Fax Server and retrieve the fax
image. The fax will be displayed in the Fax Viewer, which consequently
opens. With the Fax Viewer you can scroll and browse through the Fax
Server's database. The Archiving application and the Fax Viewer can be
made to fit your screen together.
• Select View in the menu.
• Select Pane.
The record belonging to the viewed fax will be selected in the Archive
application.
4.5 Browsing the database, the viewer
The Fax Viewer allows you to browse through the database of the fax.
• The double arrowed buttons
the records of the database.
• The single arrowed buttons
pages of the fax.
40
and
and
Fax Server IP Manual
let you browse through
let you scroll through the
and
respectively fit the width and height of
• The buttons
the fax image to the size of the Fax Viewer.
• The printer button
allows you to print a fax.
• The rotation button
clockwise.
rotates the fax image a quarter turn
lets you save the fax image as bitmap.
• The save button
• The slider allows you to zoom in and out.
4.6 Open an existing Archive
The main dialog of the application displays the Main Archive. All the records
representing faxes are displayed in the Main Archive. Archives are
represented by a file called archive.MDB. Existing archives can be opened
as follows.
• Click File in the menu.
• Select Main Archive.
A dialog opens that allows you to open an Archive.
• Browse to the existing archive that you want to open by selecting the
file archive.MDB in the desired folder.
• Click Open.
Read Only archives, like archives stored on CD can be opened as follows.
• Click File in the menu.
• Select Archive on CD.
The same dialog opens again.
• Browse to the archive on CD that you want to open by selecting the file
archive.MDB in the desired folder.
• Click Open.
4.7 Create a new Archive
New Archives can be created.
• Click File in the menu.
• Select Main Archive.
Fax Server IP Manual
41
A dialog opens that allows you to open a new Archive.
• Browse to a location in your computer where you want to open a new
Archive.
• Click Open.
You are now prompted with the question whether you want to open a new
Archive in this folder. Confirm to open the new Archive.
4.8 Update the Database
To find out if new faxes have been received the database needs to be
updated.
button or choose Action in the menu and select
• Click the
Update database to update the database.
The application will connect to the Fax Server and request a listing of the
database. The application will add all the new records of the database to the
records in the archive.
4.9 Updating the database automatically
• Select Options in the menu.
• Select the Schedule and Viewer tab.
• Check Unattended download operation and select the appropriate
time interval.
Check Download listings only to have only the records updated.
Check Minimize on program...... to have the application start minimized in
the taskbar.
4.10 The Cache
During normal use of the Archive application the fax images are downloaded
for viewing only. After viewing the fax the data of the fax image is lost. The
next time the fax will be viewed the fax image is downloaded from the Fax
Server again. The described cycle can be repeated indefinitely. Images of
faxes that have been received less then thirty day's ago are stored in Cache
memory. After viewing a recently received fax the fax image remains
available from the Cache memory for viewing. At the start of the program the
application checks for redundant data in the Cache memory. If the reception
42
Fax Server IP Manual
of a fax took place more then thirty days ago the fax image will be removed
from the Cache and the application returns to the primarily described cycle.
4.11 Download faxes permanently
If it is necessary to download the images of viewed faxes permanently the
Cache routine as described above can be tuned off.
• Select Options in the menu.
• Select the Schedule and Viewer tab.
• Uncheck Keep viewed faxes on Server only.
Now if a fax is viewed the image of the fax is permanently downloaded to the
hard disk of the PC. Other ways to download fax images permanently are
described below.
4.12 Mark records for transfer to PC
Fax records can be marked for downloading of the fax image at a later time.
•
•
•
•
Select the records that need to be marked.
Select Action in the menu.
Select Select for transfer to PC.
Select Selection.
All the records in the archive can be marked for download by selecting All in
the last operation. Remove the marking of the marked records by choosing
Deselect All in the last operation.
Fax images of marked records can be downloaded as follows.
• Select Action in the menu.
• Select Transfer to PC.
• Select Marked Records, this operation is performed straight away with
the
toolbutton.
4.13 Transfer records to PC
Fax images can be downloaded directly
• Select the records of which the fax images need to be downloaded
• Select Action in the menu
• Select Transfer to PC
Fax Server IP Manual
43
• Select Selected Records, this operation is performed straight away
with the
toolbutton.
The fax images of all the records in the archive can be downloaded at once
by selection All Records in the last operation. this operation is performed
straight away with the
toolbutton.
4.14 Deleting records from the Archive
Records and faxes can be removed from the different archives.
• Select the records to be removed
• Select Action in the menu
• Click Delete Selection
Removed records are all moved to the Recycle Bin. The contents of the
Recycle Bin can be viewed as follows.
• Click File in the menu.
• Select Recycle Bin.
Return to the Main Archive by
• Click File in the menu.
• Select Main Archive.
4.15 Restore deleted records
Records and faxes in the Recycle Bin can be restored to the main archive as
follows.
• Select the records that you want to restore
• Select Action in the menu
• Click Restore Selection
4.16 Build a CD Archive
The Archiving application has a special feature that allows you to create
Archives that can be saved on CD. These archives are called CD Archive's.
Only downloaded faxes can be saved in the CD Archive.
• Select the faxes that you want to add to the CD Archive.
• Select Action in the menu.
44
Fax Server IP Manual
• Select Build CD Archive
• Click Add Selection to add the selection to the CD Archive.
The selected faxes are now added to the last CD Archive. A new CD Archive
is opened automatically when the size of the current CD Archive exceeds the
set maximum size. The maximum size for these CD Archives can be set as
follows.
• Select Options in the menu.
• Select the Security and CD's tab.
• Maximum bytes on CD sets the limit to the size of the CD Archives.
This value is default set to 650Mb.
Once you have saved the CD Archives on CD the CD Archives on your hard
disk can be removed.
• Click Erase All CD Archives in the Security and CD's tab to remove
all CD Archives.
The consecutive CD Archives are called CD0, CD1, CD2 etc.. The CD
Archives are stored in the folder C:/Program Files/Vidicode/Fax Archiver
IP/CD Build.
4.17 Complete Name fields
Each record in the archive can be given a name.
• Double click the field in the name of remote fax column of the record.
When the field turns yellow a name can be entered. The Fax Archive
associates the given name with the remote fax ID of the record. From that
point on the Fax Archive will automatically assign the same name to all fax
records with the same remote fax ID. To complete the name fields of
allready received faxes which remote fax ID were not associated with a
name act as follows.
• Select Action in the menu.
• Select Complete name fields.
All the records in the Archive which name can be associated with a remote
fax ID will be assigned the name associated with that remote fax ID.
Fax Server IP Manual
45
4.18 Perform queries on the main archive
Different queries can be performed on the records in the main archive.
Select Query in the menu to select the following options.
• Received Faxes will display received faxes only
• Sent Faxes will display the sent faxes only
• On Column data only will add a top row to the main archive. Double
click the field above the column and enter your search string. Click the
arrow to the right of the field and the query will be performed
• On Date Range opens a dialog to define the query. Select the begin
date of the query in the calendar and click Begin. Then select the end
date of the query and click End. Click Done to view the records that
fall within the date range. The End date should be the most recent
date
• All Failed to send Faxes will display the records of all the faxes which
transmission has failed
• Select All removes the query and returns to the main archive
4.19 Protect Archive with a password
The application can be protected with a password.
•
•
•
•
•
Select Options in the menu
Select the Security and CD's tab
Enter the desired password in the two fields
Check Ask to unlock to enable the password protection
Check Ask on start of program to have the program start locked
When the program is locked all the vital program functions are blocked. The
lock tool button is used to lock and unlock the program. When locked the
button is red. When unlocked the button is white.
4.20 History of Fax Server database updates
When the database is updated the new records are added to the open
archive. The Archiving application keeps a history of all the records that have
been downloaded from each separate Fax Server. The history of each Fax
Server can be cleared.
• Select Options in the menu.
• Select the Link to Fax Servers tab.
• Click the button of the Fax Server that you want to clear the history of.
46
Fax Server IP Manual
Once the history of a Fax Server is cleared the next Update Database will
retrieve the entire database of the Fax Server. This will cause double entries
in the database of your Fax Archive. Therefore use with care!
4.21 Advanced Settings
The language of the application can be adjusted.
• Select Options in the menu
• Select the Language tab
• Select the preferred language
The columns as displayed in the main archive can be made visible or
removed from the display. Column and row height can be adjusted.
• Select Options in the menu
• Select the Database tab
• Check or uncheck the various column checkboxes to display or
remove the column from the display
• Click Font to change the font settings of the main dialog.
• Check Can Change Column Order to enable dragging the columns to
a different location.
• Check Can Change Row height to enable adjusting the row height.
The Archive application can keep a record of the Ftp communication that
takes place with the Fax Servers in a log file. View the Ftp communication in
the main dialog as follows.
• Select Options in the menu.
• Select the Link to Fax Servers tab.
• Check the Show on main Form checkbox to display
Enable the log file saving of the Ftp communication as follows.
• Select Options in the menu.
• Select the Link to Fax Servers tab.
• Check the Log to File checkbox to save the Ftp communication to file
The file the Ftp communication is saved in is called Ftp.log and is saved in
the folder C:/Program Files/Vidicode/Fax Archiver IP
The Ftp Link Timeout is the time the Archive application will take to wait for
a connection to a Fax Server to take place before announcing an error. A
usual setting for a Fax Server connection over LAN might be 10 -15
Fax Server IP Manual
47
seconds. For an Internet connection the timeout could be set to
approximately 90 seconds. Change the Ftp Link Timeout as follows.
• Select the Link to Fax Servers tab
• Select the Time-out field and change the Timeout setting as desired
48
Fax Server IP Manual
5 Acknowledgements
5.1 Guarantee
Your Fax Server IP has a 12-month factory guarantee. The guarantee is
effective for normal use only. We would like to emphasize that the guarantee
is not valid under exceptional environmental conditions, such as extreme
temperatures or humidity levels, nor in the unlikely event of a lightning strike.
The guarantee is not valid if the machine has not been handled properly, for
example when it has been dropped, or bumped into. In order to qualify for
guarantee, you should contact your supplier, and show the receipt. If your
supplier cannot help you, you should contact the manufacturer. The
manufacturer reserves the right to determine the final date of the guarantee
period on the basis of the date of production. Costs of transport to and from
the supplier or the manufacturer are for the buyer’s account. Guarantee is for
parts only and does not cover any costs resulting from the breakdown of the
Fax Server IP. The Fax Server IP has various extra features that have not
been described in this manual. Additional information about this is given in a
technical information bulletin. Subjects discussed in this technical
documentation are further configuration options, remote configuring, and
how to update the firmware in the Fax Server IP. The further configuration
options concern all aspects of operation. In our experience most people are
interested in configurations related to user’s access.
5.2 Liability
Correct functioning of the Fax Server IP cannot be guaranteed under all
conditions and thus we do not accept any liability for loss of information or
other damages due to the use of the Fax Server IP.
Vidicode is not a source of official interpretation of laws of any country or
state and shall not be construed as a source for making decisions.
Fax Server IP Manual
49
50
Fax Server IP Manual
INDEX
language, 13
network settings, 21
no answer timeout, 18
No Carrier timeout, 18
Operation, 29
password protection, 12
received faxes, 29
reply address, 22
Reset all values, 13
retry after voice, 16
retry time, 16
ring volume, 20
rings to answer on, 19
search, 30
sent faxes, 30
SMTP server, 22
softkeys, 9
speaker, 17
system settings, 11
TelNet, 26
top line, 15
transmission speed, 15
volume, 17
wildcards, 30
A
Acknowledgements, 50
E
E-mail, 10. See also: Fax Server,
Send Fax and Fax Archive
F
Fax Archive, 40
archives, 42
browse Fax Server, 41
cache memory, 43
CD Archive, 46
delete records, 45
Fax Server history, 48
Ftp log, 48
language, 48
mark records, 44
network settings, 40
new archive, 42
password protection, 47
queries, 47
records names, 46
recycle bin, 45
transfer records, 44
update database, 43
viewer, 41
Fax Server, 10
adapter, 10
Caller ID, 19
clock, 12
connecting, 10
day, 12
DHCP server, 26
dial prefix, 18
disk info, 32
domain name, 23
E-mail address, 21
empty queue, 31
Fax ID setting, 14
fax retries, 16
fax settings, 14
Ftp password, 24
Ftp user, 24
Gateway, 28
IP address, 26
IP subnet mask, 27
G
guarantee, 50
I
Introduction, 7
L
liability, 50
S
Send Fax, 34
address list, 37
document, 36
E-mail, 36
fax contact, 37
fax number, 36
fax settings, 37
fax spooler, 38
import address book, 38
IP number, 35
list of Users, 35
network properties, 34
Fax Server IP Manual
51
preview, 39
Send Fax Options, 34
52
send on command, 38
Users, 35
Fax Server IP Manual