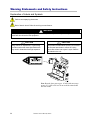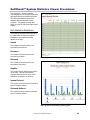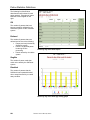
1
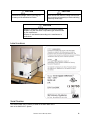
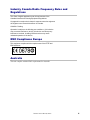
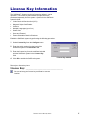
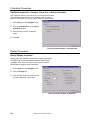
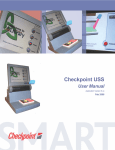
SelfCheck System Model 6210/7210 Staff Guide 3M Library Systems 3M Center, Building 225-4N-14 St. Paul, MN 55144–1000 1–800–328–0067 http://www.3M.com/library Copyright © 2003, 3M IPC. All rights reserved. 78-8123-7438-3 Rev. B, 060-A Software Version 3.0 This page is intentionally left blank. ii 78-8123-7438-3 Rev B, 060-A Table of Contents Safety and Standards......................................................... 1 Intended Use .............................................................................................1 SelfCheck System Operations ............................................................1 Automated Circulation System (ACS) Provisions .....................................1 Warning Statements and Safety Instructions ............................................2 Explanation of Labels and Symbols....................................................2 Label Locations...................................................................................3 Serial Number .....................................................................................3 EMC Compliance USA and Canada .........................................................4 FCC Intentional Radiator Certification.......................................................4 Industry Canada Radio Frequency Rules and Regulations ......................5 EMC Compliance Europe..........................................................................5 Australia.....................................................................................................5 License Key Information.................................................... 7 Quick Reference Guide ...................................................... 9 SelfCheck™ System Overview .................................................................9 Online Documentation and Training ...................................................9 Online Help .........................................................................................9 Preparing Your Library for Patron Self-service Check-out ......................10 Installation Checklists .......................................................................10 Staff Preparation and Training ..........................................................10 Preparing Library Patrons for the SelfCheck System .......................11 Site Planning.....................................................................................11 SelfCheck System Specifications .....................................................11 Components ............................................................................................12 Color Monitor ....................................................................................12 Bar Code Scanner ............................................................................12 Keypad ..............................................................................................12 Magnetic Card Reader......................................................................13 VCU (Video Checkout Unit) ..............................................................13 Receipt Printer ..................................................................................13 Multiple Book Detectors ....................................................................13 Desensitizer ......................................................................................14 Network Interface Card .....................................................................14 Digital Identification (Model 7210 only).............................................14 Communication........................................................................................15 Bar Codes................................................................................................15 Bad or Unreadable Bar Codes..........................................................15 Bar Code Formats.............................................................................15 Bar Code Placement.........................................................................15 Starting the SelfCheck™ System ............................................................16 Shutting down the SelfCheck System .....................................................16 Starting the SelfCheck™ Manager Software ..........................................16 SelfCheck™ Manager Procedures..........................................................17 Mode Procedures..............................................................................17 78-8123-7438-3 Rev B, 060-A iii Circulation Procedures......................................................................18 Display Procedures...........................................................................18 Message Procedures ........................................................................19 SelfCheck™ System Statistics Viewer Procedures ................................21 Item Statistics Definitions..................................................................21 Patron Statistics Definitions ..............................................................22 Viewing Patron and Item Data ..........................................................23 Searching for Data in Reports or Graphs .........................................24 Printing Reports and Graphs ............................................................25 Exporting Reports and Graphs .........................................................25 General Maintenance ..............................................................................27 Replace the Printer Paper.................................................................27 Clean the Proximity Sensor Cavities ................................................28 Clean the Housing ............................................................................28 Clean the Monitor..............................................................................28 Frequently Asked Questions and Troubleshooting .................................29 How do I increase or decrease the volume of happy/sad tones?.....29 SelfCheck System is not Responding...............................................29 Scanner Problems ............................................................................29 Message Issues ................................................................................29 Screen does not change after a book is removed from the cradle ...29 Patron Error Messages .....................................................................30 Printer Problems ...............................................................................30 Patron screen display information is inadequate ..............................30 Obtaining Service and Supplies ....................................... 31 Printer Paper and other Supplies ............................................................31 Contacting Support..................................................................................31 3M Library Systems Website...................................................................31 List of Machines and Serial Numbers......................................................32 iv 78-8123-7438-3 Rev B, 060-A Safety and Standards Please read and understand all safety information before operating this equipment. Intended Use The 3M™ SelfCheck™ System allows library patrons to check out and check in library items on their own. The library items must have bar codes attached that can be read by the scanner. The system performs check-in and checkout procedures through communication with the automated circulation system (ACS) interface module. This product has not been tested or proven safe for uses other than those stated above. SelfCheck System Operations The SelfCheck system is designed to process library items for checkin or checkout. The SelfCheck system allows you to perform the following tasks: Check-in and check-out (includes securing/unsecuring and sending item IDs) Offline Processing (when the automated circulation system (ACS) is not operational) Receipt Printing Please review this guide before you begin using your SelfCheck system. Automated Circulation System (ACS) Provisions Make certain that you have acquired an automated circulation system (ACS) server and a license for each SelfCheck system, and that the server is properly installed and configured prior to installation of the SelfCheck system. 78-8123-7438-3 Rev B, 060-A 1 Warning Statements and Safety Instructions Explanation of Labels and Symbols Refer to accompanying documents. Risk of electric shock. Refer all servicing to manufacturer. WARNING This equipment contains high voltage. Do not remove protective panels. Only 3M factory-trained technicians should service this equipment. CAUTION CAUTION Using controls or adjustments, or performing procedures other than those specified herein may result in hazardous laser light exposure. This product contains laser devices. Do not allow the scanner laser beam to reflect off a shiny, mirror-like surface into anyone’s eyes. Observe the labels on the unit. Note: Barcode laser power up to .95 mW with an average power of 3.9 µW at 630 to 670 nm could be emitted onto the book cradle 2 78-8123-7438-3 Rev B, 060-A CAUTION CAUTION Assembled unit weighs 125 lbs. [56,8 kg]. Do not attempt to lift assembled unit alone. Never lift unit from the front. Lifting from the front may cause the coil assembly to break and falling parts may cause injury. CAUTION Danger of explosion if internal battery is incorrectly replaced. Replace only with the same or equivalent type recommended by the manufacturer. Dispose of used batteries according to the manufacturer’s instructions. Label Locations Serial Number The serial number (S/N 7210XXX) is listed on the lower label on the back of the SelfCheck™ System. 78-8123-7438-3 Rev B, 060-A 3 EMC Compliance USA and Canada FCC Radio Frequency Rules and Regulations This equipment has been tested and found to comply with the limits for a Class A device, pursuant to Part 15 of the FCC Rules. These limits are designed to provide reasonable protection against harmful interference when the equipment is operated in a commercial environment. This equipment generates, uses, and can emit radiated radio frequency energy and, if not installed and used in accordance with the instruction manual, may cause harmful interference to radio communications. Operation of this equipment in a residential area is likely to cause harmful interference in which case the user will be required to correct the interference at their own expense. NO MODIFICATIONS. Modifications to this device shall not be made without the written consent of The 3M Company. Unauthorized modifications may void the authority granted under Federal Communications Commission Rules permitting the operation of this device. FCC Intentional Radiator Certification FCC ID: DGF-LSD7210 This equipment contains an intentional radiator approved by the FCC under the FCC ID number shown above. This device complies with Part 15 of the FCC Rules. Operation is subject to the following two conditions: (1) this device may not cause harmful interference, and (2) this device must accept any interference received, including interference that may cause undesired operation. NO MODIFICATIONS. Modifications to this device shall not be made without the written consent of The 3M Company. Unauthorized modifications may void the authority granted under Federal Communications Commission Rules permitting the operation of this device. 4 78-8123-7438-3 Rev B, 060-A Industry Canada Radio Frequency Rules and Regulations This Class A digital apparatus meets all requirements of the Canadian Interference-Causing Equipment Regulations. Cet appareil numerique de la classe A respecte toutes les exigences du Reglement sur lemateriel brouilleur du Canada. CANADA: Pending Operation is subject to the following two conditions: (1) this device may not cause interference, and (2) this device must accept any interference received, including interference that may cause undesired operation of the device. EMC Compliance Europe This equipment complies with the requirements of the RTTE and EMC directives. Australia This unit complies with the EMC requirements for Australia. 78-8123-7438-3 Rev B, 060-A 5 This page is intentionally left blank. 6 78-8123-7438-3 Rev B, 060-A License Key Information The SelfCheck™ System requires a license key before it can be operated. The license key also enables the options that are purchased separately from the system. Options for the SelfCheck system include: Video Check-in/Checkout Unit (VCU) Magnetic Stripe Card Reader Check-in Multiple Languages (up to four) Smart Card Store and Forward Patron Selectable Check-in/Checkout Enable the SelfCheck system by performing the following procedure: 1 Select License Key from the Configure menu. 2 Enter the serial number from the back of the SelfCheck system in the Serial No. field. 3 Enter the license key from the certificate included with the SelfCheck system in the License Key field. 4 Click OK to enable the SelfCheck system. License Key window Record your license key here: License Key: ____________________________ Be sure to keep your license key certificate in a secure location. 78-8123-7438-3 Rev B, 060-A 7 This page is intentionally left blank. 8 78-8123-7438-3 Rev B, 060-A Quick Reference Guide SelfCheck™ System Overview Welcome to the 3M SelfCheck System! Please take the time to read through this guide to help you understand how your SelfCheck system works. Keep it accessible when the system is in use. It will serve as a reference guide when questions arise. The SelfCheck system allows library patrons to check out books on their own. The system emulates the check-in and checkout procedures performed by a librarian. Also, the system can operate in Off-line mode, independent of the library's automated circulation system (ACS). The system can be configured with a barcode reader that identifies materials being checked out of the library and sends that information to the library's circulation database. A desensitizer unit then desensitizes the detection strip placed in or on the material. SelfCheck systems can read most bar code formats used by libraries throughout the world. The SelfCheck system bar code scanner can read up to eight different bar code formats. Codabar and Code 39 are the most common formats used in libraries. Online Documentation and Training The SelfCheck Manager CD has extensive online documentation and computer-based training. The information you need is factoryloaded onto the SelfCheck system's internal computer. Online Help The SelfCheck Manager CD contains extensive online assistance that covers procedures, troubleshooting, and reference material. 78-8123-7438-3 Rev B, 060-A 9 Preparing Your Library for Patron Self-service Check-out A number of requirements must be met for the installation and operation of the SelfCheck system. These requirements include adequate space and environmental conditions, electrical power connection, connection to the automated circulation system (ACS), and staff training. Installation Checklists Before installation can occur, personnel in your library will be asked to fill out the SelfCheck™ System Checklist. Use the following checklist to prepare for SelfCheck system installation: SelfCheck System Checklist – This document is used to provide information to 3M personnel about the specific needs of your library pertaining to the SelfCheck system. This document includes the general pre-installation requirements. You will also receive a System Administrator's Packet that is used to provide technical information needed to set up communication between your circulation system and the SelfCheck system. Staff Preparation and Training The introduction of patron self-service will fundamentally change how your library circulates items. Since patrons will be able to process their own routine checkouts, your staff will have more time to respond to patrons with more complicated checkout problems or information requests. Because the new system will affect the nature of their work, the entire library staff should be involved in the preparation for installation. The staff will help to identify the library functions that can be enriched with the added resources and time made available by the SelfCheck system. A key element of any media loss prevention effort is a successful staff training program. Your SelfCheck system will be much more effective with the active cooperation and participation of your entire library staff. We recommend that you use the operator guides provided with the system as texts for periodic formal security training. 10 78-8123-7438-3 Rev B, 060-A Preparing Library Patrons for the SelfCheck System To prepare library patrons for using the SelfCheck system, thoroughly review the SelfCheck system documentation. Then, consider scheduling patron orientation sessions to demonstrate the operation of the system. Demonstrate each different process for checking in and checking out items from your library. For example, using the Video Checkout Unit (VCU) to checkout videos. A librarian may need to monitor the new machines to offer assistance to patrons who are unfamiliar with the system for an extended period of time. Site Planning 1 Verify there is a table or cabinet with an adequate work surface for the SelfCheck™ System. The recommended size is: Height: approximately 39 in. [990 mm] Width: 30 in. [762 mm] Depth: 33 in. [838 mm] To prevent interference with the scanner laser light, never install the SelfCheck system in an area where ambient light brightness exceeds that of the laser, or where it could be exposed to direct sunlight. 2 Verify power is available within 3 ft [914 mm] of the SelfCheck system. SelfCheck System Specifications Physical Characteristics Height 32 inches [835 mm] Width 22 inches [635 mm] Depth 31.5 inches [815 mm] Weight 125 lbs. [56,8 kg] Shipping Weight 218 lbs. [99 kg] Operating Environment Temperature 50º to 104ºF [10º to 40ºC] Humidity 20 to 80% System Power Requirements Voltage 100-120/200-240 VAC Amperage 4.0/2.0 Amps Frequency 50/60 Hz Phase Single Power 200 Watts 78-8123-7438-3 Rev B, 060-A 11 Components The SelfCheck™ System consists of the following components: (1) Color Monitor (2) Bar Code Scanner (3) Keypad (4) Magnetic Card Reader (optional) (5) VCU (Video Checkout Unit)(optional) (6) Receipt Printer (built-in paper cutter optional) Multiple Book Detector (MBD) (internal) Desensitizer (internal) Network Interface Card (internal Digital Identification (internal) 1 2 4 3 5 6 The 3M SelfCheck System Color Monitor A color monitor mounted on top of the SelfCheck system displays graphic instructions, diagrams, and information to guide the patron through the operation of the SelfCheck system. Bar Code Scanner Your SelfCheck system may use one of two types of scanners, depending on the configuration of the SelfCheck system and the placement of bar codes on your library items. A visible single-line scanner reads perpendicular bar codes. The scan line should be visible whenever the system is on. An 8-line raster scanner with an approximately 1-inch wide read area reads parallel bar codes. A status LED is mounted on top of the scanner. The LED is visible through the observation hole in the scanner housing. When a good bar code reading occurs, the LED changes from orange to green. When a bad bar code reading occurs, the LED changes from orange to red. Keypad The keypad is a standard module that is used primarily to enter personal identification numbers (PINs). PINs can only contain numeric data (0 through 9). The keypad may also be used by the library staff to select certain administrative or diagnostic functions. It has 12 keys styled after the standard touch-tone telephone keypad (including * and # keys). 12 78-8123-7438-3 Rev B, 060-A Magnetic Card Reader The magnetic card reader can read magnetic stripes that conform to the ABA (American Banking Association) industry standard. It can read both numeric and alphanumeric data from the magnetic stripe if the data is recorded on track 1, track 2, or track 3. Typically, alphanumeric data is recorded on track 1, numeric data is recorded on track 2, and alphanumeric data is stored on track 3. The default selection for SelfCheck™ System operation is track 1. VCU (Video Checkout Unit) The Video Checkout Unit (VCU) is designed to allow patrons to check in and check out their videotapes. To be checked in or checked out successfully, videotapes must have a bar code applied near one end of the cassette. To be properly sensitized or desensitized, a 3M DVM-1 Security Strip must be applied to the spine of the cassette. Refer to the 3M™ DVM-1 Security Strip Installation Instructions for further information. As a videocassette is inserted into the slot, a sensor is blocked. A signal is sent to the processor and the patron screen changes. If the videocassette is fully inserted, a second sensor at the rear of the slot is blocked. If the tape is not fully inserted, an error message appears on the screen. When the videocassette is properly in place, the bar code is directly under the bar code scanner. The bar code number is sent to the processor and then to the circulation system. When the video has been checked in or checked out on the circulation system, the patron is instructed to remove the videocassette, sensitizing or desensitizing the strip. Receipt Printer The receipt printer, mounted inside the SelfCheck system, is a thermal printer that does not require toner or ribbons. Patrons may receive a receipt upon checking out library items. You may configure the information on receipts through the SelfCheck Manager software. As an additional cost option, the receipt printer can be equipped with a paper cutter that detaches receipts from the paper roll. Multiple Book Detectors Multiple book detectors (MBD) help prevent patrons from checking out and desensitizing materials without recording the transaction in the automated circulation system (ACS). The MBD sensors prevent patrons from desensitizing more than one item at a time. If more than one sensitized strip is detected, the system displays an error message, interrupting the loan process. 78-8123-7438-3 Rev B, 060-A 13 Desensitizer The desensitizer contains electronics housed beneath the book cradle on the SelfCheck system that desensitize and re-sensitize Security Strips. When a book is approved for checkout by the circulation system, the detection strip in the book is desensitized. The SelfCheck system is designed to prevent patrons from checking out more than one item on the same item bar code using the Multiple Book Detector (MBD). Network Interface Card The network interface card allows you to connect your SelfCheck system to the library's local area network (LAN). Your SelfCheck system may communicate with the library's circulation through the LAN. Digital Identification (Model 7210 only) The 3M™ SelfCheck™ System Model 7210 has digital identification capabilities that allow the SelfCheck system to recognize Digital ID™ tags through Radio Frequency Identification (RFID). Digital ID tags are placed within the library material. Each tag is encoded with item identification information using 3M™ Digital Identification equipment. The SelfCheck system uses the information contained on the Digital ID tag to properly check materials out to the patron. For more information about RFID technology and Digital ID tags, refer to www.3M.com/library. 14 78-8123-7438-3 Rev B, 060-A Communication This system sends and receives information from the automated circulation system (ACS). This information is exchanged in a manner consistent with 3M’s Standard Interface Protocol (SIP-1 or SIP-2). This system also communicates with patrons by identifying the patron's ID and leading them through the process of checking out materials. The SelfCheck™ System displays correction instructions to help the patron solve problems. If this fails, the system instructs the patron to ask for help at the circulation desk. Bar Codes Bad or Unreadable Bar Codes When the scanner tries to read a bar code that is not configured on the system, or if the bar code is unreadable (damaged or incomplete), an error screen appears and the patron is instructed to seek help at the front desk. Bar Code Formats The SelfCheck system identifies library cards and library materials by reading bar codes on the items. Several bar code formats have been developed. The SelfCheck system is pre-programmed to read the following bar code formats: Codabar Code 39 Plessey Telepin Alphanumeric Code 128 EAN-13 UPC-A If your library uses a bar code format not included by default with the SelfCheck software, you may specify a bar code format to replace one of the bar code formats listed above. Bar Code Placement Consistent bar code placement on library materials is necessary for easy and consistent patron use. If the bar code placement on library materials varies, the system must be set up in the center scanning configuration. 78-8123-7438-3 Rev B, 060-A 15 Starting the SelfCheck™ System 1 Turn ON the power switch on the back of the SelfCheck™ System. 2 Log in using your designated password if required. The system automatically starts the SelfCheck system program. Shutting down the SelfCheck System Press **316# on the keypad and wait for the screen message indicating it's safe to turn the system off, then turn OFF the power switch on the back of the system. To shut down the SelfCheck system while the SelfCheck program is NOT running, use the mouse to click Shut Down in the Windows™ Start menu. Starting the SelfCheck™ Manager Software Use the following steps to start the SelfCheck Manager software: If the keyboard is not plugged into the SelfCheck system, start at step 1. If the keyboard is already plugged in and the SelfCheck system is running, start at step 6. 1 Press **316# to shut down the SelfCheck system. 2 Turn OFF the power switch on the back of the SelfCheck system. 3 Open the right side panel on the SelfCheck system. 4 Plug the keyboard into the keyboard into the keyboard port. 5 Turn ON the power switch on the back of the SelfCheck system. The SelfCheck program starts. 6 Press the Esc key on the keyboard when the clock appears on the SelfCheck system screen. The Windows™ desktop appears on the screen. 7 Double-click the SelfCheck Manager icon on the Windows™ desktop. This starts the SelfCheck™ Manager software. SelfCheck™ Manager icon 16 78-8123-7438-3 Rev B, 060-A SelfCheck™ Manager Procedures This section contains common procedures for configuring and adjusting the SelfCheck Manager. Mode Procedures Use the following procedures to set the SelfCheck system in different modes of operation: Mode menu SelfCheck Mode Select SelfCheck from the Modes menu. This starts the SelfCheck program while leaving the SelfCheck Manager active. You can use this to observe changes to the SelfCheck program while adjusting the configuration. Pressing the escape key (Esc) on the keyboard will to return the system to the SelfCheck Manager. Out of Service Mode Select Out of Service from the Modes menu. This sets the SelfCheck system in the Out of service mode and shows the out of service graphic on the screen. When the Out of Service graphic is displayed, pressing the escape key (Esc) on the keyboard will to return the system to the SelfCheck Manager. Demonstration Mode Select Demonstration from the Modes menu. Putting the SelfCheck system in the Demonstration mode allows check out of items for training or demonstration purposes. While in the demonstration mode the SelfCheck system does not communicate with any other system. 78-8123-7438-3 Rev B, 060-A 17 Circulation Procedures SelfCheck System Use: Check-in, Check Out, or Patron Selectable The SelfCheck system is used to check-in or checkout library items. The SelfCheck system may be set to allow the patron to choose check-in or checkout, or it may be set for check-in or checkout only. 1 Click Policy from the Configure menu. 2 Click the Circulation tab on the Policy Properties window. 3 Click the button next to the desired mode. 4 Click OK. Policy Properties window - Circulation tab Display Procedures Setting Display Properties Display properties enable the presentation of patron information. Information can include automated circulation system (ACS) messages, fines, fees, item name and bar code, and patron identification and patron record information. 1 Click Policy from the Configure menu. 2 Click the Display tab. 3 Click to select the box for each item that should be displayed to the patron. Policy Properties window - Display tab 18 78-8123-7438-3 Rev B, 060-A Message Procedures Editing Message Screens This procedure details how to change the text on the screens the library patron sees. 1 Click Messages in the Configure menu. 2 Select a Screen and, if necessary, a Language from the drop-down menus. 3 Click Edit Messages…. The Edit Messages window appears. 4 Double-click the line of text you want to edit in the Edit Messages window. The line of text is then loaded into the Message Composition Tool. Message Screen Editor window Edit Messages window 78-8123-7438-3 Rev B, 060-A 19 Editing Text with the Message Composition Tool If your operating system version is English and the message text you are editing is English then you may use your keyboard to type a line of text. If the text of the message is in a language other than English, you can double-click characters, including spaces, in the character matrix to add to the message line below. You can also drag a character from the character matrix to the message field. Click the Clear button to delete the text in the message field at the bottom of the window. Click Undo Last to delete the final character of the line of text. Message Composition Tool window To move text from the Message Composition Tool to the Edit Messages window, drag the text while holding down the control key on your keyboard. Dragging Text Use the following steps to create and drag lines of text: 1 Move the Message Composition Tool window to the right to show the Edit Messages window. 2 Move the cursor over the text in the bottom field of the Message Composition Tool window that you want to drag. 3 Press and hold down the Ctrl key on your keyboard. 4 Press and hold down the left mouse button. 5 Move the cursor to the field in the Edit Messages window where you want the text to appear. The text is dragged along with the cursor. The fields in the Edit Messages window correspond to lines of text displayed to the patron. 6 Release the mouse button and the Ctrl key. This places the text in the field. Any text that appeared in the field before is overwritten. 7 Continue editing and dragging text using the procedures on this page until your message is complete. 8 Click OK in the Edit Messages window when complete. 9 Click Close in the Message Screen Editor window. 20 78-8123-7438-3 Rev B, 060-A SelfCheck™ System Statistics Viewer Procedures The SelfCheck™ System Statistics Viewer allows you to view patron and item data generated by the SelfCheck system. The data is automatically stored in a database that the Statistics Viewer accesses. The Statistics Viewer also allows you to print and export reports and graphs. Item Statistics Definitions The following list of definitions describes the valid values for each item statistic. Examples of item statistics screens appear on the right. Issued The number of items that have been successfully checked out. Renewed The number of items that have been successfully renewed. Items by hour of the day report Returned The number of items that have been successfully checked in. Illegible The number of item identifiers that could not be read. This can be caused by improper placement of the item, a bad barcode or no identifier on the item. Issued Refused The number of items refused for checkout by the circulation system. Returned Refused The number of items refused for renewal by the circulation system. Items by day of the week [by status] graph 78-8123-7438-3 Rev B, 060-A 21 Patron Statistics Definitions The following list of definitions describes the valid values for each patron statistic. Examples of patron statistics screens appear on the right. OK The number of patrons that have been successfully validated by the SelfCheck system via the circulation system. Refused The number of patrons that were refused service due to the following: Patron previously blocked by SelfCheck system. Patron is on blocked patron list during Off-line processing. Patron refused by circulation system. Patron by day of the week report Illegible The number of patron cards that could not be read by the SelfCheck system. Disabled The number of patrons that the SelfCheck has requested blocked due to suspicious activity or a walk away condition. Patron by day of the week [by status] graph 22 78-8123-7438-3 Rev B, 060-A Viewing Patron and Item Data Use the following steps to view patron and item data through the SelfCheck Statistics Viewer: 1 Click Start>Programs>3M SelfCheck SelfCheck Statistics> Statistics Viewer. The 3M SelfCheck™ Statistics window appears. 2 3 In the left pane of the 3M SelfCheck™ Statistics window, click the report or graph you wish to view. Click the + symbol in front of Items or Patrons to view their subfolders, and see the list of reports/graphs that are available. Click on the name of a report and their subfolders to view their contents. The report or graph appears in the right pane. 3M SelfCheck™ Statistics window Click the drop-down menu in the Range field to select the desired date range option from the list. The default selection is Today. Continued on next page… Range options 78-8123-7438-3 Rev B, 060-A 23 4 If you wish to specify a custom date range, use the following steps: a Click the drop-down menu in the Range field and choose Custom. b Click the drop-down menu in the From field and then click the desired start date on the calendar. c Click the drop-down menu in the To field and then click the desired end date on the calendar. Use the side arrows to change the month on the calendar. 5 Range Calendar drop-down menu Click the icon to the right of the To field. This updates the report or graph displayed below to the selected custom date range. Searching for Data in Reports or Graphs Use the search feature to search for text in a report or a graph. The search feature only searches one report or graph at a time. 1 Select the report or graph you wish to search in the left pane of the main window. 2 Click in the 3M SelfCheck Statistics window. The Search window appears. 3 Type the text you wish to find in the Find what field, and then click Find Next. If the text is found, it will be highlighted in the report or graph being searched. 4 Click Find Next to find the next occurrence of the text in the report or graph. 5 When you are finished searching, click Cancel in the Search window. 24 3M SelfCheck Statistics window Search window 78-8123-7438-3 Rev B, 060-A Printing Reports and Graphs Use the following steps to print a report or graph on a printer connected to the SelfCheck™ System, or connected to a computer with the SelfCheck™ Manager software installed: 6 7 Click the desired report or graph to be printed from the left side of the screen. Click 3M SelfCheck Statistics window – Steps 1 and 2 . The Printer Setup window appears. The Current Printer indicates where the report or graph is printed. 8 Click the drop-down menu in the Change Printer by Clicking Here field to select a printer if necessary. Check the printer to be sure that the printer you select is capable of printing using 8.5 inch x11 inch paper. 9 Click Print. The report or graph should print on the selected printer. Printer Setup window Exporting Reports and Graphs Use the following steps to export reports and graphs to an alternative file format: 1 Click the desired report or graph to be printed from the left side of the screen. 2 Click . The Export window appears. The Export window Continued on next page… 78-8123-7438-3 Rev B, 060-A 25 3 4 Click the drop-down menu in the Format field in the Export window and select from the following export file formats: Adobe Acrobat (.PDF) Character-separated values Comma-separated values Crystal Reports (.RPT) Data Interchange Format Excel HTML DHTML Lotus 1-2-3 ODBC Paginated Text Record Style Report Definition Rich Text (.RTF) Tab-separated text Tab-separated values Text Word for Windows XML Export Options window Click OK. The Export Options window displays. 5 Select the Page Range to be exported. You may choose to export All pages, or only subset of the pages in the graph or report. 6 Click OK. 7 Click the drop-down menu in the Save in field to select the destination directory for the exported file. 8 Type a name for the file in the File name field. You may wish to use the date range and data type for the file name. For example: Items by hour 0221_0228.pdf 9 Click Save. Choose export file window 10 Check the file in the directory you selected to ensure that the export was successful. 26 78-8123-7438-3 Rev B, 060-A General Maintenance Replace the Printer Paper When the printer paper runs out, use the following steps to replace it with a new roll of paper: To order printer paper rolls, refer to "Obtaining Service and Supplies" in this guide. 1 Shut down the SelfCheck™ System (refer to "Shutting down the SelfCheck System" in this guide). 2 Open the right side panel of the SelfCheck system. 3 Slide the printer assembly out of the model 6210 chassis. 4 Locate the print head lever and move the lever from the Engaged position to the Full Release position. 5 Lift the empty paper roll and roll pin out of the printer assembly. 6 Remove the paper roll from the roll pin. 7 Place a new paper roll on the roll pin. 8 Place the paper roll and roll pin on the printer assembly with the tag end of the paper coming off the bottom of the paper roll. 9 Feed the leading end of the paper roll into the printer assembly. Be sure the end of the paper roll is not ragged or it will not feed properly. 10 Press the line feed button on the side of the printer assembly until the paper feeds completely through the print head area of the printer. 11 Move the print head lever from the Full Release position to the Engaged position. 12 Tear off any excess paper. 13 Slide the printer assembly back into the 6210 chassis. 14 Close the side panel. 78-8123-7438-3 Rev B, 060-A 27 Clean the Proximity Sensor Cavities The SelfCheck™ System program uses proximity sensors installed in the book cradle to determine when a book has been placed on the cradle. If the proximity sensor cavities become blocked with dirt and debris, the proximity sensors may not work properly. Clean the proximity sensor cavities as needed. To clean these cavities: 1 Press **316# on the keyboard and wait for the screen message indicating it's safe to turn the system off, then turn OFF the power switch on the back of the system. To shut down the SelfCheck system while the SelfCheck program is NOT running, click Shut Down in the Windows™ Start menu. 2 Dampen a cloth with water or a mild cleaning solution. 3 Gently wipe the dirt and debris away from the proximity sensor cavities. Clean the Housing The exterior housing of the SelfCheck system will be dirty with normal use and may require cleaning. To clean the housing, dampen a soft cloth with water or mild cleaning solution and gently wipe away dirt from the affected areas. Clean the Monitor Press **316# on the keyboard and wait for the screen message indicating it's safe to turn the system off, then turn OFF the power switch on the back of the system. To shut down the SelfCheck system while the SelfCheck program is NOT running, click Shut Down in the Windows™ Start menu. Use care when cleaning the SelfCheck system monitor. Use pre-moistened towelettes that are sold specifically for monitor cleaning. If these are not available, you can use a non-solvent based cleaner to dampen a soft cloth but use it very sparingly. 28 78-8123-7438-3 Rev B, 060-A Frequently Asked Questions and Troubleshooting Use the following procedures to perform basic troubleshooting tasks on the SelfCheck™ System: How do I increase or decrease the volume of happy/sad tones? The volume control knob is located behind the door in the front center of the machine. Turn clockwise to increase the volume and counter-clockwise to decrease the volume. SelfCheck System is not Responding Possible cause Solutions No AC power. There is a computer problem with the system. 1 Make sure the outlet being used is not operated from a wall switch or other control device. 2 Check to see if any other machine or appliance using the same outlet is working or not. 3 If the outlet is dead, have a qualified technician check the circuit breaker or fuse box. In the U.S., call 3M Technical Support at 1-800-3280067. Outside the U.S., call your local 3M office. Refer to "Obtaining Service and Supplies" in this guide. Scanner Problems If the scanner is functioning properly, the bar code on the item being scanned may be faded or dirty. Try an item with a clean, good quality bar code. Message Issues When changing text in a receipt or in a screen, press and hold the Ctrl key on the keyboard, then press and hold the left mouse button to drag the text to the desired location. If a language other than English is selected, the text on the top part of the Message Screen Editor window may be incorrect. You may need to go to the drop-down menu and select the desired language. Screen does not change after a book is removed from the cradle Problem: The item sensors do not change states when the book is removed. Solution: Too much light may be shining on the SelfCheck system cradle. Reduce the light shining on the SelfCheck system cradle. 78-8123-7438-3 Rev B, 060-A 29 Patron Error Messages The messages below occasionally display to a patron using the SelfCheck™ System. “A system error has occurred - please advise library staff" “You cannot borrow this item. Please take it to the desk" “Please remove your card" “Please remove your card to continue" “Please take your card to the desk" “Please take this item to the desk" “You cannot renew this item. Please take it to the desk" “Please try again" “CARD HAS BEEN DISABLED Please take your card to the desk" “Item removed before loan complete" “Unknown bar code" “Unable to read card try again" (Bar Code Scanner) “Unable to read card try again" (Magnetic Card Reader) “Cannot proceed with this loan" “You took too long to enter your PIN" “Printer Problem - contact library staff" Printer Problems If the printer is not printing receipts, make sure that the printer's power switch is on, and that the printer paper is loaded and properly aligned. Patron screen display information is inadequate Make sure the desired patron information is selected on the Policy/Display setup screen. 30 78-8123-7438-3 Rev B, 060-A Obtaining Service and Supplies Printer Paper and other Supplies To order printer paper and other supplies in the U.S., call 1-800-3280067, option 2. Outside of the U.S., call your local 3M office. The following supplies are recommended: Thermal Printer Paper Part number 78-8121-0609-0 (Case of 16 rolls) Width 3 inches [76 mm] Diameter 6 inches [152 mm] Length 650 feet [198 m] If you order the part number 78-8121-0609-0, you will receive a case of 16 - 650 foot (198 m) rolls of printer paper. Contacting Support To contact 3M to request a service call, installation, software support, or to provide Service Agreement information, in the U.S. call 1-800-328-0067, option 1. Outside of the U.S., contact your local 3M office. 3M Library Systems Website The 3M Library Systems Web site – www.3M.com/library For additional information, refer to www.3m.com/library and select the link under "Product Literature and Related Information" at the bottom of the page. This directs you to a documentation links page containing a link for "SelfCheck Systems" where applicable documents are located. 78-8123-7438-3 Rev B, 060-A 31 List of Machines and Serial Numbers Machine Number (assigned by library) 32 Model Number Serial Number Troubleshooting Log 78-8123-7438-3 Rev B, 060-A