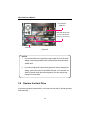
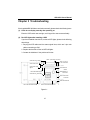
1
ARS-3020 Disk Box
User’s Manual
Version 1.0
Copyright © 2004 ACARD Technology Corp.
Release: September 2004
Copyright and Trademarks
The information in this manual is subject to change without prior notice and does not
represent a commitment on the part of the vendor, who assumes no liability or responsibility for any errors that may appear in this manual.
ACARD and SCSIDE are the trademarks of ACARD Technology Corp. IBM is the
trademark of International Business Machine Corporation. Microsoft and the Windows
Logo are the registered trademarks, and Windows is the trademark of Microsoft Corporation. All brands and trademarks are the properties of their respective owners.
This manual contains materials protected under International Copyright Conventions.
All rights reserved. No part of this manual may be reproduced in any form or by any
means, electronic or mechanical, including photocopying, without the written permission of the manufacturer and the author. All inquiries should be addressed to ACARD
Technology Corp.
Table of Contents
Chapter 1 Introduction ........................................ 4
1.1
1.2
1.3
1.4
1.5
1.6
1.7
Overview ................................................................ 4
Features ................................................................. 4
Specifications ....................................................... 4
Hardware Requirement ....................................... 5
HDD Compatibility ................................................ 5
Package ................................................................. 7
About SCSI ............................................................ 7
Chapter 2 Installation .......................................... 8
2.1
2.2
2.3
2.4
2.5
2.6
The Signal LEDs .................................................. 8
Set the SCSI ID ..................................................... 9
Set the Mode ....................................................... 10
Install the Hard Drives ....................................... 11
Connect the SCSI Port ...................................... 13
Replace the Hard Drive ..................................... 14
Chapter 3 Troubleshooting .............................. 15
Appendix Update the Firmware........................ 17
Technical Support Form .................................... 20
ARS-3020 User’s Manual
Chapter 1 Introduction
1.1
Overview
ARS-3020 is an external data storage equipment. It provides JBOD solution, and
meets the requirement of large data capacity in Digital Video Recording (DVR) / Digital
Audio Recording (DAR) / Media Streaming. Its capacity can reach 15TB by installing
250GB * 60 hard drives; that is, 15 sets. It uses ACARD’s leading SCSIDE technology,
that lets you enjoy the best SCSI performance by using inexpensive IDE hard drives.
And it offers 4 swappable trays for convenient replacing of hard drives.
1.2
Features
l
l
l
Capacity up to 1TB by connecting 250GB * 4 hard drives
Offers 4 swappable trays for convenient replacing of hard drives
High scalability up to 15 sets with 40MB/s of data transfer rate; maximum
capacity up to 15TB by connecting 250GB * 60 hard drives
High scalability up to 8 sets with 160MB/s of data transfer rate; maximum
capacity up to 8TB by connecting 250GB * 32 hard drives
Supports 48-bit LBA Big Drive Technology (hard drive over 137GB)
Built-in ACARD RISC microcontroller core for improving chip performance
On-board flash ROM for easy firmware update
l
l
l
l
l
Cost-effective and high-perfromance
1.3
Specifications
l
l
1U rack mount of 44(H) × 483(W) × 400(D) mm
Host interface
w Supports Ultra160 LVD SCSI feature with data transfer rate up to
160MB/s
w Selectable SCSI ID from 0 to 15
Device interface
w Supports UDMA mode with data transfer rate up to 133MB/s
l
4
ARS-3020 User’s Manual
l
l
l
l
1.4
w Supports Ultra ATA 133/100/66 HDD
w Two independent channels of IDE bus
JBOD / Normal mode set by DIP switch
Safety: FCC, CE
Temperature
w Operation: 0°C~50°C (not condensed)
w Non-operation: −20°C~70°C
Power
AC input voltage : 47 ~ 63 Hz
100 ~ 127V/3A ; 200 ~ 240V/1.5A
162W
Hardware Requirement
ARS-3020 needs a host system with SCSI LVD interface of Ultra2 Wide or higher
standard. ACARD AEC-67160 or AEC-67162 SCSI adapter is highly compatible with
ARS-3020. For the details please contact your distributor.
1.5
HDD Compatibility
ARS-3020 supports DMA 133/100/66 hard drives of the following brands.
MAXTOR
D740X-6L (80G; 40G; 20G) series
DiamondMax PLUS 8 series
IBM
IC35L180AVV207-1 (185.2GB)
IC35L120AVV207-1 (123.5GB)
IC35L060AVVA07-0 (61.4GB)
HITACHI
Deskstar 7K250 series
HDS722525VLAT80 (250GB)
Deskstar 180GXP series
HDS722520VLAT80 (200GB)
HDS722516VLAT80 (160GB)
HDS722516VLAT20 (160GB)
HDS722512VLAT80 (123.5GB)
5
ARS-3020 User’s Manual
HDS722512VLAT20 (123.5GB)
HDS722580VLAT20 (80GB)
HDS722540VLAT20 (40GB)
IC35L180AVV207 (185.2GB)
IC35L120AVV207 (123.5GB)
IC35L120AVVA07 (123.5GB)
IC35L100AVVA07 (102.93GB)
IC35L100AVVA07 (102.93GB)
IC35L080AVVA07 (82.3GB)
IC35L060AVVA07 (61.49GB)
IC35L060AVER07 (61.49GB)
IC35L040AVVA07 (41.17GB)
IC35L040AVER07 (41.17GB)
DTLA-307075 (76.86 GB)
DTLA-307060 (61.49GB)
DTLA-307045 (46.11GB)
SEAGATE
Barracuda IV series
Barracuda V series
Barracuda 7200.7 series
Barracuda 7200.7 ST3200822A (200GB)
Barracuda 7200.7 ST3200021A (200GB)
Barracuda 7200.7 ST3160021A (160GB)
Barracuda 7200.7 ST3160023A (160GB)
Barracuda 7200.7 ST3120026A (120GB)
Barracuda 7200.7 ST3120022A (120GB)
Barracuda 7200.7 ST380011A (80GB)
Barracuda 7200.7 ST380013A (80GB)
Barracuda 7200.7 ST340014A (40GB)
Barracuda 5400.1 ST340015A (40GB)
Barracuda 5400.1 ST340015ACE (40GB)
Barracuda V ST3120023A (120GB)
Barracuda V ST3120024A (120GB)
Barracuda V ST380023A (80GB)
Barracuda V ST360015A (60GB)
Barracuda V ST340017A (40GB)
Barracuda IV ST380021A (80GB)
Barracuda IV ST360021A (60GB)
Barracuda IV ST340016A (40GB)
6
ARS-3020 User’s Manual
1.6
Package
After opening the package, check the following items.
n
n
n
n
n
ARS-3020
n
n
CD containing Utility for F/W update and Ha! CD Burner
×1
External LVD cable (65cm)
Terminator
×1
Power cord
×1
User’s manual
×1
Pack of screws
×1
×1
×4
1.7 About SCSI
Be aware of the following issues before using SCSI devices.
(1). SCSI ID: Each device attached to the SCSI host adapter must be assigned a
unique SCSI ID, which distinctively identifies a SCSI device for its data transfer
and processing.
While connecting more than one SCSI devices, each device should have a different
ID number.
For Ultra2 Wide SCSI interface, the selectable SCSI ID is from 0 to 15. But 7 is
usually reserved for the SCSI adapter.
(2). Terminator: SCSI is featured with high scalability. In order to ensure reliable data
transmission on the SCSI bus, a terminator should be installed at the end of the
bus.
No matter how many SCSI devices (up to 15) are attached to the bus, a terminator
must be added to the last device.
7
ARS-3020 User’s Manual
Chapter 2 Installation
This chapter contains 6 parts: The Signal LEDs, Set the SCSI ID, Set the Mode,
Install the Hard Drives, Connect the SCSI port, and Replace the Hard Drive.
NOTICE
Make sure to power off the system during installation or
changing any configuration.
2.1
The Signal LEDs
The signal LEDs of ARS-3020 is as figure 2-2 shows. Besides the power singal LED,
there are 8 LEDs on the front panel of ARS-3020. Every 2 LEDs indicate the status of
a hard drive.
Power
Switch
Figure 2-1
1
2
3
4
5
6
7
8
9
Figure 2-2
8
ARS-3020 User’s Manual
No.
The LED
The Display Status
1
Power LED
Green light : Online
No light : Offline
2
Primary Master HDD's
Power Signal LED
Green light : Online
Red light : Offline
Blinking red light: Bad sector
3
Primary Master HDD's
Access Signal LED
Yellow light : Access
No light : No access
4
Primary Slave HDD's
Power Signal LED
Green light : Online
Red light : Offline
Blinking red light: Bad sector
5
Primary Slave HDD's
Access Signal LED
Yellow light: Access
No light : No access
6
Secondary Master HDD's
Power Signal LED
Green light : Online
Red light : Offline
Blinking red light : Bad sector
7
Secondary Master HDD's
Access Signal LED
Yellow light : Access
No light : No access
8
Secondary Slave HDD's
Power Signal LED
Green light : Online
Red light : Offline
Blinking red light : Bad sector
9
Secondary Slave HDD's
Access Signal LED
Yellow light : Access
No light : No access
Table 2-1
2.2 Set the SCSI ID
On the rear panel of ARS-3020 there is a SCSI ID switch as figure 2-3 shows. Set the
SCSI ID by adjusting the switch up or down. [Don’t set ID 7. It is for SCSI card.]
Setting SCSI ID & configuration mode: Be sure that each device has a unique ID number (see 1.7). No matter how many ARS-3020s (up to 15) are installed and connected,
the SCSI ID set on every switch cannot be the same. The selectable number for ARS3020 is from 0 to 15.
9
ARS-3020 User’s Manual
SCSI ID Switch
DIP Switch
SCSI Port
Figure 2-3
2.3
Set the Mode
On the rear panel of ARS-3020 there is a 4-pin DIP switch as figure 2-3 shows. By the
switch the configuration of ARS-3020 can be set. Refer to table 2-2 for setting the
mode. Defaults of all the 4 pins are OFF.
OFF (Defaults are all OFF)
ON
Pin #
Mode
JBOD
Normal
1 2 3 4
Transfer Rate
Pi n 1
Pi n 2
Pi n 3
Pi n 4
160MB/sec
OFF
OFF
OFF
ON
80MB/sec
OFF
OFF
OFF
OFF
40MB/sec
OFF
OFF
ON
OFF
160MB/sec
OFF
ON
OFF
ON
80MB/sec
OFF
ON
OFF
OFF
40MB/sec
OFF
ON
ON
OFF
Table 2-2
10
ARS-3020 User’s Manual
(1). Pin 1: Reserved
The default is OFF.
(2). Pin 2: JBOD Mode vs. Normal Mode
The default is JBOD. It combines 2 or more hard drives into a big one. The enlarged
capacity is convenient for mass data storage. In Normal mode the SCSI adapter
will detect the hard drives you have connected. You need to enable the SCSI
adapter’s LUN support. Take ACARD AEC-67160 as example. In the SCSI BIOS
screen, you need to set “Support LUN# 0 Upto Max LUN# As....” as 3 so that
the computer can detect all hard drives.
(3). Pin 3: SCSI Host Transfer Rate at 80MB/s vs. 40MB/s
The default is 80MB/s. If the SCSI adapter is not so capable or the signals become
unstable after connecting some ARS-3020s, lower the speed to 40MB/s.
However, if you have installed AEC-67160 SCSI adapter, the host PC will
automatically detect how many ARS-3020s you have connected, and adjust the
transfer rate.
(4). Pin 4: SCSI Host Transfer Rate at 160MB/s
The default is OFF. But if pin 4 is adjusted to ON, the highest transfer rate will
reach 160MB/s.
2.4
Install the Hard Drives
Follow the steps below to install hard drives into the trays of ARS-3020.
(1). Open the tray by pressing its handle.
Figure 2-4
11
ARS-3020 User’s Manual
(2). Pull the handle to let the tray out.
Figure 2-5
(3). Put a hard drive into the tray.
Figure 2-6
(4). Turn the tray, fasten with 4 screws, and put it back to ARS-3020.
Figure 2-7
(5). Install the other hard drives by repeating step 1 to 4.
Then, set the hard drives as Master or Slave in accordance with figure 2-8.Connect in
this way, otherwise the signal LEDs cannot display correctly.
12
ARS-3020 User’s Manual
HD1_PRI_MASTER
HD2_PRI_SLAVE
HD3_SEC_MASTER
HD4_SEC_SLAVE
Figure 2-8
2.5
Connect the SCSI Port
Connect one ARS-3020
Connect any one of the SCSI ports on the back of ARS-3020 to the external SCSI port
on the host PC with the enclosed SCSI LVD cable. Then, plug a terminator into another
SCSI port on the back of ARS-3020. If there is no SCSI port on the host PC, insert a
SCSI adapter like ACARD AEC-67160 or AEC-67162.
Daisy chain of ARS-3020s
Use SCSI LVD cables to connect two or more ARS-3020s, and add a terminator to the
last ARS-3020. See figure 2-9 and refer to 2.2 for installing more ARS-3020s.
13
ARS-3020 User’s Manual
Host External
SCSI Port
ARS-3020 SCSI ports
(2 port functions the
same for connection)
Terminator
Figure 2-9
NOTICE
1. It is recommended not to attach any single-ended device to the SCSI
adapter connecting with ARS-3020. It will drop down the performance
of ARS-3020.
2.
2.6
It is invalid to adjust DIP switch during operation. Before changing the
setting, power off the host PC and ARS-3020 first. You had better set
JBOD or Normal mode right in the beginning. The later change may
damage the stored data.
Replace the Hard Drive
It is the same as those mentioned in 2.4, but power off the host PC and all operating
ARS-3020s first.
14
ARS-3020 User’s Manual
Chapter 3 Troubleshooting
If the installed ARS-3020 does not function normally, please check the following items.
(1). LEDs do not display normally after powering on
Examine if DIP switch was set right, and if signal line was connected badly.
(2). Red LED lights after installing a HDD
If you have installed a hard drive, but the red LED lights, please do the following
three things.
1. Re-plug the IDE cables and the status signal lines, which are 3-pin color
cables connecting to CN6.
2. Replace the hard drive if the red LED still lights.
3. Contact the distributor if the problem still exists.
CN13: 4-pin Power Connector
CN8: IDE Port_Primary
CN11, 15, 22, 33:
Fan Connectors
CN5: Power LED
CN21: HDD Active
Signal
CN30: SCSI ID
Switch
CN6: HDD Status Signal
CN16: Switch for
ATX Power
CN9: IDE Port_Secondary
CN14: ATX Power
Connector
CN24: Mode Sense
CN3: LVD SCSI External Port
CN10: LVD SCSI External Port
Figure 3-1
15
ARS-3020 User’s Manual
CN21
PRIMARY_MASTER_POWER_LED
PRIMARY_SLAVE_POWER_LED
SECONDARY_MASTER_POWER_LED
SECONDARY_SLAVE_POWER_LED
CN5
SYSTEM_POWER_LED
red
PRIMARY_MASTER_HDD_GOOD_LED
PRIMARY_SLAVE_HDD_GOOD_LED
SECONDARY_MASTER_HDD_GOOD_LED
SECONDARY_SLAVE_HDD_GOOD_LED
green CN6
Figure 3-2
(3). The HDD’s power LED blinks red for 1 second and green for 9 seconds
The system has detected a bad track. Please get a good hard drive.
(4). The System doesn’t show all HDDs in normal mode
Inspect the BIOS screen while booting up the system. See if it displays LUN=3.
If not, follow the BIOS setup procedure stated in 2.3.
(5). The HDD’s capacity isn’t found in the system
Here let’s take Windows XP as an example.
1. Right-click “My Computer” and enter “Manage”.
2. Choose “Disk Management” under “Storage”, and a given hard drive ID will
appear on the right lower corner of the window.
3. If the newly installed hard drive has no ID, “Partition” and then “Format” it.
4. If the newly installed hard drive doesn’t appear on the screen, it might be
improperly installed or damaged. Try again.
16
ARS-3020 User’s Manual
Appendix Update the Firmware
Please follow the steps below to update the firmware of ARS-3020.
1. Put the support CD into CD-ROM, and find the program by the following path:
E:\Utility\Bridge_Smart_Uti\Setup.exe.
2. Click “Next” to install according to the instructions of wizard.
3. Execute the program from Start\Programs\SCSIDE Firmware Utility.
17
ARS-3020 User’s Manual
4. Click the icon of aec67160.
5. Click the icon of Hard Disk. Pay attention to the last 3 numbers and an alphabet of
the SCSIDE model like 150L. If the old version’s alphabet is L, you should choose
a new version with L, too.
18
ARS-3020 User’s Manual
6. Click “Update SCSIDE Firmware”, choose the new firmware, and click “Open”.
7. The system will ask if you want to update. Click “Yes”.
8. The successful update is as the following figure shows.
9. Boot again. Repeat step 3, 4, 5 to check if the update is correct.
19
ARS-3020 User’s Manual
Technical Support Form
Email: [email protected]
http://www.acard.com
Model: ARS-3020
*F/W Version:
System Configuration
Motherboard *
BIOS version
SCSI adapter *
Chipset
Memory
Display card
Other I/O card *
OS version *
Hard Disk
Brand *
Model *
Capacity *
Problem description * :
Required columns are marked with asterisks (*) .
20