1
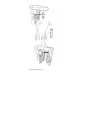
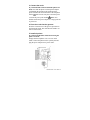
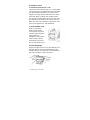
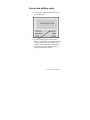
AltiTouch Plus
User Guide
Last Revised: June 18, 2002
AltiTouch Plus User Guide 2
Sayson Technologies Ltd. will not accept liability for any
damages, including long distance charges, which result from
unauthorized and/or unlawful use.
While every effort has been made to ensure accuracy, Sayson
Technologies Ltd. will not be liable for technical or editorial errors
or omissions contained within this documentation. The information
contained in this documentation is subject to change without
notice.
Sayson Technologies Ltd.
Tel. 604.730.1842
Fax. 604. 732.8726
www.sayson.com
[email protected]
Copyright 2002 Sayson Technologies Ltd.
All Rights Reserved. Printed in Canada
3 AltiTouch Plus User Guide
CONTENTS
Introduction ...................................................................................7
What’s New with Plus ...................................................................7
Installation and Setup.....................................................................8
Physical setup ..........................................................................8
Screen and softkey setup........................................................12
Getting Started .............................................................................15
Overview of Softkeys and Screen states.................................15
Time and Date..................................................................15
Idle State ..........................................................................16
Connected State................................................................17
Inbound Call State............................................................18
Handling Calls .............................................................................19
Placing a Call on Hold ...........................................................19
Parking Calls..........................................................................19
Retrieving calls with Syspark+ ..............................................20
Transferring Calls ..................................................................22
Consultation...........................................................................23
Conference Calls....................................................................24
Handling Multiple Calls.........................................................24
Single Call Waiting..........................................................25
Multiple Call Waiting ......................................................25
Making calls.................................................................................27
Predialing a number ...............................................................27
Using the Redial List..............................................................27
Redialing a number ..........................................................27
Deleting the Redial List....................................................28
Intercom and Set Paging ........................................................28
Using the Dial Menu Screen ..................................................29
ByName - Dial by Name..................................................29
LastNum – Last Number Redial.......................................29
LastClr – Dial Last Caller ................................................30
SySpeed – System Speed Dial..........................................30
DirSrv+ - Directory Services............................................30
ExtList – Extension List Directory .............................31
SySpeed – System Speed Dial Directory....................33
Paging ..............................................................................35
AudPage – Overhead Paging......................................35
TrkPage – Overhead Zone Paging..............................35
Retrieving and Answering calls ...................................................36
AnyRing – System Call Pickup..............................................36
ExtRing – Individual Call Pickup ..........................................36
SysPrk – System Call Park Pickup.........................................37
AltiTouch Plus User Guide 4
SysPrk+ - System Call Park Plus Pickup................................37
ExtPrk – Personal Call Park Pickup .......................................37
Managing Your Extension ...........................................................37
Vmail – Voicemail.................................................................37
Regular – AltiMail Service...............................................38
Vmail+ - Visual Voicemail ..............................................38
DND – Do Not Disturb ..........................................................42
ExtMgmt – Extension Management Options..........................42
CallFwd – Call Forwarding..............................................42
Greetng – Greeting Menu.................................................42
Logout – Station Logout ..................................................42
Login – Station Login ......................................................42
Status – Feature Status Check ..........................................43
Passwrd – Password Menu...............................................43
Workgroup Features...............................................................43
WGLogin – Workgroup Login.........................................43
WGLogout – Workgroup Logout .....................................43
Ready – Status Ready.......................................................43
Wait – Status Not Ready ..................................................44
Other Phone Features...................................................................44
Adjusting the Volume ............................................................44
Status lights............................................................................44
Speaker Light ...................................................................44
Telephone Light ...............................................................45
Timing a call ..........................................................................45
Additional AltiWare codes...........................................................45
Station Privilege Override......................................................45
Station Speed Dial..................................................................46
Feature Tips ...........................................................................46
Silent System Call Park..........................................................46
Operator Off-Line ..................................................................46
Outside Call Blocking............................................................47
Additional Phone Features ...........................................................47
Emergency Service Feature....................................................47
Using the directory.................................................................47
Adding a name and number to the Directory....................47
Entering Letters and Characters .......................................48
Finding entries in the Directory........................................49
Changing entries in the Directory.....................................49
Copying from the Callers List, the Redial List, or the
Display to the Directory ...................................................50
Dialing from the Directory...............................................50
Deleting an Entry from the Directory...............................51
Deleting all Entries in the Directory.................................51
Locking the Directory ......................................................51
5 AltiTouch Plus User Guide
Using the Callers List.............................................................52
Viewing the Callers List...................................................52
Calling an entry in the Callers List...................................52
Copying from the Callers List to the Directory ................53
Changing a number in the Callers List before dialing ......53
Deleting an entry in the Callers List .................................53
Deleting all entries in the Callers List ..............................54
FAQ .............................................................................................55
Limited Warranty.........................................................................60
Exclusions..............................................................................60
Warranty Repair Services ......................................................61
After Warranty Service ..........................................................61
Important Safety Instructions.......................................................62
Installation .............................................................................62
Use.........................................................................................63
US Regulations – Please Read Carefully .....................................65
Federal Communications Commission (FCC) Notice ............65
EMI/EMC (FCC Part 15).......................................................67
AltiTouch Plus User Guide 6
Introduction
This manual covers the use of the AltiTouch Plus
phone with the AltiGen phone system. The AltiTouch
provides an easy to use interface through its large
screen and 6 softkeys. By providing this interface, the
user no longer has to remember all the phone feature
codes to perform functions such as call handling, or
extension management.
This manual should therefore be used in place of the
AltiServ Telephone Functions portion of the AltiServ
Users Guide. Please continue to refer to your
AltiServ Users Guide for all other AltiServ features.
What’s New with Plus
The AltiTouch Plus phone adds Intercom ability as
well as powerful interactive screen features. The 3
interactive services are:
1. Visual Voicemail or Vmail+
2. Directory services or DirSrv+
3. Visual System Park Pickup or SysPrk+
7 AltiTouch Plus User Guide
Installation and Setup
Physical setup
Installation
If your AltiGen dealer has already setup your phone,
please skip to the next Chapter “Getting Started”.
This section will guide you through the physical
setup of your phone as well as making sure it has
been properly programmed for your AltiGen system.
1. Connect the handset cord
Turn the telephone over and locate the handset jack
marked
. Insert one end of handset cord into the
jack until it clicks into place. Then route the handset
cord through the groove as shown in the illustration
on the next page. Attach the handset to the other end
of the handset cord.
2. Attach the stand
If you plan to mount the phone on the wall, you do
not need to attach the stand; skip this step. If you
plan to use the phone on a desk, attach the stand by
inserting the tabs on the stand (marked with ) into
the slots on the bottom of the telephone. For a higher
viewing angle, use the slots marked
. For a lower
viewing angle, use the slots marked
. Then rotate
the stand towards the phone until it snaps into place.
AltiTouch Plus User Guide 8
9 AltiTouch Plus User Guide
3. Connect the cords
If you attached the stand to install the phone on a
desk, route both the phone cord and power adapter
cord through the opening in the stand. Insert the
phone cord into the slot on the back of the telephone
marked
until it clicks into place. Insert the power
cord into the power jack marked . Note: You
should connect the power adaptor to a surge protector
or power bar.
4. Press the cords into the grooves
Press the cords into two of the grooves provided on
the bottom the stand. This will allow the stand to sit
flat on a desk surface.
5. Install the phone
If you have installed the stand and are using the
phone on a desk:
Simply turn the telephone over so it rests on the
stand. Connect the phone cord to a phone jack and
plug the power adapter into a power outlet.
AltiTouch Plus User Guide 10
6. Install on a wall
To install the Model 390 on a wall:
Connect the cord to the wall jack (A). Coil the phone
cord into the space provided on the back of the phone
(B). Then align the telephone so the hooks on the
wall plate (C) align with the wall-mount slots on the
back of the phone, as shown here. Push the phone
onto the pegs, and then slide it down until it is secure
(D). Plug the power adaptor into a power outlet (E).
Note: You may wish to purchase a short phone cord
from a local supplier for a wall installation.
7. Insert number card
Write your telephone
number on the number
card, and place it into the
card slot on the telephone,
located under the
mouthpiece in the handset
cradle. Gently bend the
clear plastic lens into the
slot, over the number card.
8. Insert Faceplate
Snap the faceplate into the recess provided above the
dial pad. Slide the tab on the left-hand side of the
faceplate into the slot. Then press on the right-hand
side of the faceplate to snap it into place.
11 AltiTouch Plus User Guide
Screen and softkey setup
1.
After phone is plugged in and powered up,
Lift the Handset
2. If softkey labels appear on the screen as
shown, your phone set up is complete. If this
is the case, skip to the next chapter. (The
softkeys are the 6 buttons on either side of
the screen. The softkey labels are the text
that appears beside the buttons)
AltiTouch Plus User Guide 12
3.
4.
5.
If softkey labels do not appear on screen,
dial 1-866-732-8791 toll free to program
your phone.
At voice prompt press 2 to download
programming
At the prompt "Do you have a passcode?"
select "No"
13 AltiTouch Plus User Guide
6.
7.
The screen should now say “Accept
Download from AltiTouch Slot 1”
IMPORTANT! You must now select “YES”
within 5 seconds. If you don’t press the YES
before the beep, simply hang up and start
again at step 2. After 3 beeps, you will be
asked if you want to download the second
slot of programming. Please press “YES”
again.
If the screen displays "Phone ID not found",
please press the "Agent" softkey to connect
with an agent.
AltiTouch Plus User Guide 14
Getting Started
The AltiTouch Plus phone has pre-programmed
softkeys to make call handling and managing calls
easier. The AltiServ User Pocket Guide should be
used if you to not have an AltiTouch phone. Please
refer to this guide instead since you have an
AltiTouch Plus phone.
Overview of Softkeys and
Screen states
Time and Date
When you place the handset in the cradle or press the
Goodbye button when the handset is in the cradle you
will see the time and date. The AltiGen server sets
the time and date when you receive your first call. To
adjust time, please make sure the time and date are
correct on your AltiGen server, and then call your
15 AltiTouch Plus User Guide
extension from another phone. After the caller ID
appears on the screen, your time will be set.
The Time and Date will go away and the Idle State
Screen will appear if you do any of the following
things:
1. Wait 7 seconds
2. Pickup your handset
3. Press the Speaker button
.
4. Press the Services button and select the
AltiTouch Service.
Idle State
The Idle State is the screen you will see most often. It
allows you to make calls, pickup calls, check
voicemail and perform extension management. The
softkeys available from this screen are described in
detail in the sections Making Calls, Retrieving
Calls, and Managing Your Extension.
Note: When you place the handset in the cradle or
press the Goodbye button when the handset is in the
AltiTouch Plus User Guide 16
cradle the idle screen will go away for 7 seconds. If
you need the idle screen functions immediately, press
the speaker button or pickup the handset.
Connected State
The Connected State Screen will appear when you
are talking to someone on the phone. This screen is
used for all call handling functions such as
Transferring calls, Parking Calls, Conferencing Calls
and Placing Calls on Hold. These keys are described
in detail in the next chapter under the section
Handling Calls.
Tip: If you use the AltiGen keycodes to retrieve
parked calls (#41) or calls ringing at another
extension (#30), then the idle screen will be visible
for a few seconds instead of the connected state
screen when you are first connected to the caller. We
recommend using the idle state PICKUP softkey
instead of the AltiGen keycode so that the connected
state is immediately visible.
17 AltiTouch Plus User Guide
Tip: Only more advanced users that know the
AltiGen keycodes should use Flash key. Most users
will never use this key. For your ease of use, we
recommend using the Transfr, Hold and Conf
buttons to perform all your call handling functions.
Inbound Call State
When someone calls your extension, you will see the
Inbound Call Screen. To answer the call:
1. Press the Answer softkey for hands free
operation.
2. Press the Speaker button for hands free
operation.
3. Pickup the handset.
When you answer the call, the screen will change to
the connected state. If you ignore the call, it will go
to voicemail and the phone will return to the idle
state screen.
AltiTouch Plus User Guide 18
Handling Calls
When you are connected to a caller, you can use the
softkeys to transfer callers, place them on hold, park
them, or create a conference call.
Placing a Call on Hold
To place a call on hold, press the Hold or
Transfer key. Do not hang-up your phone at this
point. To retrieve the held call, press the Back key.
button at the top of the
Tip: Do not use the
phone to place callers on hold. This simply mutes the
call and they will not hear any on-hold music
connected to your AltiGen system.
Parking Calls
To place a call on hold so that it can be retrieved
from another extension, you must park the call. The
most common Park Method is the System Park.
While connected to a call
1. Press the Hold key
2. Press the Syspark key
3. Listen for the park number
4. Press the hangup key
To retrieve the parked call from another extension or
from this extension,
1. Press the Pickup key from the idle state
screen
2. Press the SysPrk key, enter the park
number and press Done
3. Or you can use the interactive System park
retrieval described in the next section.
19 AltiTouch Plus User Guide
Retrieving calls with Syspark+
Syspark+ allows you to see all the parked calls on
your system. If you have either forgotten the park
number of the call you wish to retrieve or if there are
several calls that are parked on your system and you
want to make sure you picked up the right one, then
use Syspark+.
1. Press Pickup
2. Press SysPark+
You will then see a screen that shows the calls
parked. It will look like this.
Note: It is normal to hear a beep and a short pause
before the screen appears. If you do not see this
screen, contact your system administrator to make
sure the AltiTouch Plus software has been installed
on your server.
To retrieve the call:
1. Use the
and
keys to move the
cursor ! to the call you want to
retrieve.
AltiTouch Plus User Guide 20
2.
Press the Pickup softkey to retrieve
the call.
If you want to see more information about the parked
button to see the next
calls, you can use the
screen that looks like this.
You can retrieve calls from this screen using the
same procedure as with the first screen. Use the
button to go back to the first screen.
Legend:
# - System Park Number
Caller ID – Phone number of parked caller
Time – Time when call was parked in 24 hr format
Name –Name of Parked Caller (if available through
caller ID service
Parked by – Extension and name of person that
originally parked the call
Pickup – Softkey retrieves the parked call
Refresh – Softkey updates the list of parked calls
Hangup – Exit Syspark+ feature and return phone to
idle state.
21 AltiTouch Plus User Guide
Transferring Calls
You can transfer calls to:
1. Another extension
2. Another outside number
3. Directly to a voice-mail box
4. Or to the AltiMail voicemail system
To transfer a call to another extension, while
connected to a call:
1. Press the Transfr key
2. Enter the extension
3. Press the Hangup key to complete the
transfer or
4. Wait for the third party to answer
5. Announce the transfer
6. Press the Hangup key to complete the
transfer
To transfer a call to an outside number, while
connected to a call:
1. Press the Transfr key
2. Dial the trunk access number (9) + outside
number that you wish to transfer to. If you
wish to do a Centrex transfer1 to an outside
number, use (*9) + outside number.
3. Press the Hangup key to complete the
transfer or
1
If you have a Centrex line, you can use this feature to transfer an
external call to an outside number without having to tie up two
trunk lines. Once the transfer is complete, the external caller’s line
connects directly to the outside number. Since there are no longer
any connections to internal users, internal trunk lines are then
dropped, freeing up system trunk line resources for other calls.
AltiTouch Plus User Guide 22
4.
5.
6.
Wait for the third party to answer
Announce the transfer
Press the Hangup key to complete the
transfer
To transfer a call to a voice-mail box, while
connected to a call:
1. Press the Transfr key
2. Press the ExtVM key
3. Enter the extension number and press Done
If someone wants to be transferred to the voicemail
system to check his or her voicemail, while
connected to the call:
1. Press the Transfr key
2. Press the VMSystem key
Consultation
If you wish to place a call on hold and consult with a
third party, you can use the transfer key as well.
While connected to a call
1. Press the Transfr key
2. Enter the extension or (9) + outside number
that you wish to transfer to.
3. Wait for the third party to answer
4. Consult with the 3rd party
5. Press the back key if you want to disconnect
from the 3rd party and go back to the original
caller
6. Or press the Hangup key to transfer the
caller to the 3rd party
23 AltiTouch Plus User Guide
Conference Calls
Conference calling is supported for up to six parties
with the AltiGen system. While connected to the first
party
1. Press the Conf key
2. Enter the extension or (9) + outside number
that you wish to add to the conference
3. Wait for the party to answer and press the
Conf.In key to create the conference or
4. Press the Back key to cancel the conference
and go back to the original caller
5. To add more members to the conference,
press the AddConf key
6. Enter the extension or (9) + outside number
that you wish to add to the conference
7. Wait for the party to answer and press the
Conf.In key
8. Repeat steps 5 to 7 until you have added all
the desired parties.
Handling Multiple Calls
To handle 2 callers at once, your extension needs to
be configured for single call waiting. To handle more
than 2 callers at once, your extension needs to be
configured for multiple call waiting. Please contact
your AltiGen administrator or dealer to find out how
your extension is configured.
Tip: The AltiServ is a powerful and intelligent phone
system. It relieves you from playing operator. For
this reason we recommend configuring your
extension for multiple call waiting – place callers in
queue for most cases because you no longer have to
interrupt your call, swap to the caller waiting and ask
AltiTouch Plus User Guide 24
them to hold. The AltiServ system intelligently gives
the caller waiting the option of holding for you,
leaving a voicemail, or transferring to the operator.
Single Call Waiting
If your extension is configured for single call
waiting, then during a call you may hear a tone
indicating that you have another call waiting. If you
wish to disconnect the current call, and answer the
second call, simply place the handset back in the
cradle2. Your phone will ring and it will be the
second caller. If you wish to put the current caller on
hold and answer the call waiting, then press the
FlashAns key after you hear the call waiting tone.
You can then use the FlashAns key to switch
between the first and second callers.
Important: If your extension is configured for single
call waiting and have a call waiting, you cannot use
the Transfr, Hold, or Conf keys while in this
state. You can only use those keys after one of the
callers has hung up. The only way to handle multiple
calls and still have the ability to Transfer, Park and
Conference calls with the AltiGen is to configure
your extension for multiple call waiting.
Multiple Call Waiting
If your extension is configured for multiple call
waiting, then during a call you may hear a tone
2
If you use the Hang-up key or Goodbye key when you hear the
call waiting tone, the idle state screen will be present for a few
seconds when you are connected to the second caller. It will switch
to the connected screen after a few seconds.
25 AltiTouch Plus User Guide
indicating that you have another call waiting. At this
point, you can
1. Ignore the call waiting and let the AltiGen
system handle the call
2. Hangup the current call and answer the
second call
3. Transfer the first caller then take the call
waiting
4. Park the current call and take the call
waiting
If you wish to disconnect the current call and answer
the second call, then simply place the handset back in
the cradle. Your phone will ring and it will be the
second caller.
If you wish to transfer the first caller to another
person, simply use the Transfr key as described in
the Transferring calls section. When you have hung
up your phone to complete the transfer, your phone
will ring and it will be the waiting caller.
If you wish to park the first caller and answer the call
waiting
1. Press the Hold key
2. press SysPark
3. Note the park location
4. Place the handset in the cradle
5. The phone will ring and it will be the call
waiting
When your extension is configured for multiple call
waiting, you can switch between more than 2 callers
by using the park and retrieve functions. Please also
read the section titled Answering and Retrieving
calls.
AltiTouch Plus User Guide 26
Making calls
Note: If you are unable to make calls within certain
area codes, check with your system administrator for
any toll restrictions placed on your extension that
restricts your access to long distance area codes and
dialing prefixes.
Predialing a number
Predialing lets you view a number before you dial.
Enter the number using the dial pad and before lifting
the handset. Use the Backspace softkey or
to
correct any errors. To dial the number, lift the
handset, press the Dial softkey, or press
.
Using the Redial List
The Redial List records the last 10 numbers you
dialed.
Redialing a number
1.
2.
3.
Press
to view the Redial List.
Use the
and
keys to move the
cursor to the number you want to dial.
Lift the handset to dial the number, or press
to dial the
the Dial softkey or
number using Handsfree.
27 AltiTouch Plus User Guide
Deleting the Redial List
1.
2.
3.
Press
to view the Redial List.
Press the DeleteList softkey.
Press the Delete softkey to confirm.
Intercom and Set Paging
You can intercom other AltiTouch Plus phones on
your AltiServ system.
1. Press the Intrcom softkey
2. Enter the Extension you wish to call
3. Press the Done softkey
4. After 2 rings, you will be connected to the
remote extension and can speak through its
speaker
5. When you are finished speaking, press the
Hangup softkey and your phone will hang
up. The remote extension will also hang up
automatically.
Note: If the remote phone doesn’t answer, please
contact your system administrator. If the remote
phone doesn’t hang up after you press the hang up
key, contact your administrator to configure the
remote extension correctly for intercom.
AltiTouch Plus User Guide 28
Using the Dial Menu Screen
From the Idle State screen, press the Dial softkey and
you will see the Dial Options Screen.
ByName - Dial by Name
When you press this key, you will be prompted to
enter letters of the name beginning with last name
followed by the first name and #. Use 1 for Q and Z.
The system will search until a unique name is found
and will call the extension associated with the name.
After calling the extension, the screen will switch to
the connected state.
LastNum – Last Number Redial
The AltiGen system saves and redials the last number
dialed.
29 AltiTouch Plus User Guide
LastClr – Dial Last Caller
Pressing this button will dial the last person that
called you.
SySpeed – System Speed Dial
Press this button and you will be prompted to enter a
2-digit System Speed Dial number. The system will
dial the preprogrammed number for you. The System
Speed Dial numbers are programmed and provided
by the System Administrator
DirSrv+ - Directory Services
The directory services present a graphical way of
looking up phone numbers. The current version of
AltiTouch Plus offers these directories:
1. ExtList – Full office Extension list
2. SySpeed – Listing of System speed dials
Press the DirSrv+ softkey and the following screen
will appear.
AltiTouch Plus User Guide 30
Note: It is normal to hear a beep and a short pause
before the directory services screen appears. If
nothing happens after you press the DirSrv+
softkey, please contact your system administrator.
This means the AltiTouch Plus software has not been
installed on the AltiWare server.
ExtList – Extension List Directory
To search the extension list, press the ExtList
softkey. The following softkeys will be presented:
LstName – Select an extension by last name.
1stName – Select an extension by first name.
ExtNum – Select an extension by number.
Back – Previous Menu
Press the LstName softkey and you will see an
index table of last names as in the following example.
and
keys to move the cursor to the
Use the
desired range of last names. You can also use the
PgUp and PgDn softkeys if the index table is more
than one page long. Press the Select softkey to view
31 AltiTouch Plus User Guide
the list of extensions in that range of last names. The
next screen will look like this:
The softkey definitions are as follows:
Dial – Dial the extension indicated by the cursor !.
Intrcom – Intercom3 or Set Page the extension
indicated by the cursor !.
Nxt - Displayed when at the first list of extensions.
Will load the next list of extensions.
Prv – Displayed when at the last list of extensions.
Will load the previous list of extensions
Prv/Nxt - Displayed for all other cases. Pressing
the Prv/Nxt softkey will take you to the previous
screen unless your cursor is positioned on the last
line. When the cursor is on the last line that reads
Prv/Nxt=Next List. The Prv/Nxt softkey
will take you to the next list of extensions.
Back – Return to Last Name Index table
PgUp/PgDn – Moves cursor 4 lines up or down.
3
Intercom calls can only be made to other AltiTouch
Plus phones. Contact your system administrator if
you’re not sure which extensions have this capability.
AltiTouch Plus User Guide 32
The 1stName and ExtNum softkeys work like this
example except the sort order of the extension list is
different.
SySpeed – System Speed Dial Directory
Shows a list of the system speed dials sorted by
name. You can dial directly from this list. To access
this list:
1.
2.
3.
Press the DirSrv+ softkey
Press the SySpeed softkey
The Speed Dial Index will appear
Use the
and
keys to move the cursor to the
desired range of names. You can also use the PgUp
and PgDn softkeys if the index table is more than one
page long. Press the Select softkey to view the list of
items in that range of names.
33 AltiTouch Plus User Guide
The next screen will look like this:
Use the
and
keys to move the cursor to the
desired item. You can also use the PgUp and PgDn
softkeys if the list is more than one page long. Press
the Dial softkey to call the selected item.
The Next and Prev softkeys will move to the next or
previous group of numbers on the index table. The
Back softkey will take you back to the index.
AltiTouch Plus User Guide 34
Paging
From the Idle Screen
1. Press the More softkey
2. Press the Paging softkey
Then you will see the Paging Options screen.
AudPage – Overhead Paging
You will be connected to the overhead broadcast
system. Speak into the handset and hang up when
finished. Note: An internal public address system
must be installed and connected to the AltiGen
system to use this feature.
TrkPage – Overhead Zone Paging
Press this key, then the 2 digit paging ID of the zone
you wish to page. Note: A zoned public address
system must be installed and connected to the
AltiGen system’s trunks to use this feature.
35 AltiTouch Plus User Guide
Retrieving and Answering
calls
Press the Pickup key and you will see Ringing and
Parked Call Pickup Screen. This screen allows you to
pickup calls ringing at other extensions, or to retrieve
parked calls.
AnyRing – System Call Pickup
Pressing this button will answer call ringing at any
other phone in the office. (Oldest call first)
ExtRing – Individual Call Pickup
You will be prompted to enter the Extension of the
ringing phone. Press the Done softkey and you will
be connected to the call ringing at that extension.
AltiTouch Plus User Guide 36
SysPrk – System Call Park
Pickup
A system parked call can be picked up at another
station by pressing this button. You will be prompted
to enter the 2 digit “location” number where the call
is parked and then press the Done softkey.
SysPrk+ - System Call Park Plus
Pickup
Displays a list of all calls parked on the system.
Scroll through the parked calls and retrieve them
easily. Please review the section titled Retrieving
Calls with Syspark+.
ExtPrk – Personal Call Park
Pickup
A personal-parked call can be picked up at any
station on the system by pressing this button. You
will be prompted for the extension where the call is
parked. Then press the Done softkey and you will be
connected to the parked call.
Managing Your Extension
Vmail – Voicemail
If you press the Vmail softkey on the Idle screen, you
will see following screen.
37 AltiTouch Plus User Guide
Regular – AltiMail Service
This softkey will access the AltiMail system. For
more information on how this service works, please
review the Voicemail section of the AltiServ User
Guide.
Vmail+ - Visual Voicemail
Visual Voicemail offers a graphical way of handling
your messages. It displays a list of your voicemails so
you can scroll through the list and listen to your
voicemail messages out of sequence.
Press the Vmail+ softkey and you will see a screen
asking for your AltiMail password. Enter it and press
the OK softkey.
Note: It is normal to hear a beep and a short pause
before the Voicemail password screen appears. If
nothing happens when you press the Vmail+
softkey, please contact your system administrator to
ensure the AltiTouch Plus software is installed and
AltiTouch Plus User Guide 38
running on the server. Your administrator can also
configure your extension so that you do not have to
enter your password when you press the Vmail+
softkey.
After you enter your password, you will see a list of
your voicemail messages like this.
The top line shown has the current page number and
the number of new messages. In this example, there
are 23 new messages and page one is shown. Below
this are the message headers. The cursor ! indicates
which is the active message. Each message header
has the caller ID information preceded by a tag mark.
The tag marks indicate:
!
Urgent Messages
n
New Messages
*
Retrieved Messages (as email)
h
Heard Messages
f
Forwarded Messages
You can move the cursor using the
and
keys. You can also see the second column of
. This will display the date
information using the
39 AltiTouch Plus User Guide
and time of the messages as in the following
example. To go back to the first screen use the
button.
To play messages:
1. Move the cursor ! to the message header
2. Press the Play softkey.
You can move to another message and press play
even while a message is playing and it will interrupt
the current message and play the new one. You can
also press the Stop softkey during playback to stop
the message.
If you have more than one page of messages, then
when you scroll down to the last line you will see the
text Play=Next Stop=Prev. When the cursor is
on this line, pressing the Play softkey will load the
next page of messages and pressing the Stop softkey
will load the previous page.
To Delete messages:
1. Move the cursor ! to the message header
AltiTouch Plus User Guide 40
2.
3.
Press the Delete softkey
Wait for the screen to refresh
To Save messages
1. Move the cursor ! to the message header
2. Press the SaveMsg softkey
3. Wait for the screen to refresh
4. To view saved messages, press the
SvdMsgs sofkey.
To call someone back that left you a voicemail, you
can press the Dial softkey and the following
softkeys will be displayed.
The following example illustrates how the keys work.
Original Caller ID:
6045551212
9+
95551212
91+
916045551212
10digit
96045551212
Dial
6045551212
41 AltiTouch Plus User Guide
DND – Do Not Disturb
Pressing this key will toggle the Do Not Disturb
feature on and off. While activated, all your calls will
be forwarded to voicemail.
ExtMgmt – Extension
Management Options
This key will take you to the Extension Management
Options screen with the following keys.
CallFwd – Call Forwarding
This button toggles Call Forwarding on and off.
When turning Call Forwarding on, you will be
prompted for your password and destination number.
Greetng – Greeting Menu
Allows you to change your greeting. You will be
prompted for your password.
Logout – Station Logout
Deactivates or shuts off your extension, forwarding
all calls to voice mail. This feature can be used to
move your extension from your phone set to another
phone set in the office.
Login – Station Login
Reactivates your extension at your original phone set
or another one. If using a different phone set, that set
must be deactivated for any prior extension. This can
also be used to hear the currently active extension
number for the phone set.
AltiTouch Plus User Guide 42
Status – Feature Status Check
Retrieves an announcement about currently activated
telephone features. In addition, the dial tone changes
when the following features are activated: Do Not
Disturb, Call Forwarding, Remote Call Forwarding,
Hands-Free Mode, Dial Tone Mute Mode, Outside
Call Blocking (Operator only) and Operator Off-line
(Operator only).
Passwrd – Password Menu
Follow the system prompts to change your password
Workgroup Features
Press the WorkGrp softkey from the second Idle
state screen and you will see the Workgroup options
menu with the following keys.
WGLogin – Workgroup Login
For workgroup members only: Logs in to a
workgroup.
WGLogout – Workgroup Logout
Log out and block workgroup calls but receive other
calls at your extension.
Ready – Status Ready
Tells the system your extension is ready to receive
workgroup calls. This can be used to end a call Wrap
Up Time delay.
43 AltiTouch Plus User Guide
Wait – Status Not Ready
Tells the system not to route workgroup calls to this
extension. Warning: if you press this button, you will
not get any workgroup calls until you press the
Ready softkey.
Other Phone Features
Adjusting the Volume
Pressing the volume button
adjusts the
receiver, speaker, and ringer volume.
• To adjust the ringer volume, leave the
handset in the cradle and press the volume
button
while there is no active
call. There are 8 settings for the ringer - the
display will temporarily indicate the current
ringer volume setting.
• To adjust the handset volume, lift the
handset and press the volume button while
you are on a call. The handset will return to
the default volume after you hang up.
• To adjust the speaker volume, press the
volume button while the speaker is activated
(activate the speaker by pressing
). The speaker will remain at this
volume until it is adjusted again.
Status lights
Speaker Light
•
Speaker light is on: a call is on Handsfree
(speaker).
AltiTouch Plus User Guide 44
•
Speaker light flashes and the display shows
Microphone muted: a call is muted.
to take the call off mute.
Press
Telephone Light
•
•
•
•
Light flashes and the display shows Call
is on hold: a call is on hold. Press
or lift the handset to take the call
off hold.
Light flashes and the display shows
Message Waiting: you have voicemail.
Light flashes quickly and the ringer sounds:
you have an incoming call.
Light is on and the display shows
Extension in use: an extension
telephone is using the line. The message also
appears when the telephone is not properly
connected to a phone line.
Timing a call
When you make or answer a call, the Timer shows
the elapsed time of the call.
Additional AltiWare codes
Station Privilege Override
Dial #35 to have your own calling privileges at that
phone set for the next call only. After the call, the
phone set returns to its original call restrictions.
45 AltiTouch Plus User Guide
Station Speed Dial
Dial #77 and the 2-digit speed dial number. These are
private speed dial numbers accessible from your
station only. To setup the speed dial numbers use
#25. Program a station speed dial phone number
assigned to a 2-digit dialing number between 00 and
19.The phone number can be up to 20 digits, and
must include all necessary digits such as outside line
access digit, 1 for out of area numbers and the area
code. When you have finished, press #. Hang up
when done, or you can continue to set up other speed
dial numbers by pressing # again.
Feature Tips
Dial #55 to hear helpful tips and reminders for
optimal use of AltiServ. There are eleven tips total
and a different one is played each time you access
Feature Tips. See “Feature Tips” on page 13 for more
information.
Silent System Call Park
Dialing #73 will disable the system from announcing
the “location” of a call when using the System Call
Park feature.
Operator Off-Line
When the Operator Off-line feature is activated, all
calls are directed to the Auto Attendant. When callers
dial 0 in the Auto Attendant, the system transfers the
call to the next extension in the workgroup if one is
configured. If there is no operator extension
available, the system informs the caller that the
AltiTouch Plus User Guide 46
Operator is not available and to leave a message in
the Operator’s mailbox.
To activate this feature, press #39. When it’s active,
you can deactivate it also by pressing #39.
Outside Call Blocking
You can block access to all outside lines by pressing
#38.Pressing#38 a second time restores the system to
its normal outside calling status.
Additional Phone Features
Emergency Service Feature
The AltiTouch will provide telephone service during
a power failure. However, only the dial pad, ringer
and handset will function. If you are on a handset call
during a power interruption, the Model 390 will keep
the call, although the display will not work while the
power is off. Handsfree calls will not be reestablished
during a power interruption.
Using the directory
The Directory can store up to 200 names and
numbers, which are displayed in alphabetical order.
Tip: Store all your Directory contacts the same way,
either first name first, or last name first. This will
make it easier to find names and numbers.
Adding a name and number to the
Directory
1. Press the Directory button
47 AltiTouch Plus User Guide
2. Press the AddNew softkey.
3. Enter the number using the dial pad. You
can enter up to 24 digits. Hyphens will be
automatically added. If you need to enter a
pause (between your voice mail number and
password, for example), press the Pause
softkey. The pause icon will appear. To
program a number that uses Flash, press the
Flash softkey where it is required in the
4.
5.
6.
number. The Flash icon will appear.
Press the Backspace softkey or
to
erase a number.
Press the Save softkey.
Enter a name using the letters on the dial
pad. See the following instructions
“Entering Letters and Characters” to enter
names using the dial pad. The name can
have up to 16 characters, including spaces.
Press the NextSpace softkey or
to
move to the next letter or add a space. Press
the Backspace softkey or to erase a
character.
Press the Save softkey. The new entry now
shows on the display.
Note: You can also copy an entry from the Callers
button,
List to the Directory using the
before or after you have changed it.
Entering Letters and Characters
You can enter characters using the telephone’s dial
pad. To enter a letter, press the key with that letter on
it. If the letter is the second one on that key, press the
AltiTouch Plus User Guide 48
key twice. For example, to enter ‘R’ press
three
times. The cursor will advance to the next space after
a delay of 2 seconds or if you press a different key.
To change the case of a letter, press the
Changecase softkey, and then enter the letter. By
default the first letter of a word or name will be
capitalized, and the letters following will be lower
case. Special characters are entered by pressing the
and the keys. Characters will appear in this
order:
: & , ( ) ` . _ - 1.
: # / \ @.
Finding entries in the Directory
1. Once in the Directory, press
2.
to scroll
to scroll up one listing at a
down and
time. Hold either key down to scroll
continuously.
Press a dial pad key to see listings that start
with that letter. For example,
takes you
to the first “J” listing,
takes you to
the first “K” listing.
Changing entries in the Directory
1. Find the entry you would like to change.
2. Press the Change softkey.
3. To change the number, use the Backspace
softkey or
to erase digits. Use the dial
pad to add digits. Use the Pause softkey to
4.
insert a 2 second pause. The pause icon
will appear.
Press Save to move to the name.
49 AltiTouch Plus User Guide
5. To change the name, use the Backspace
6.
softkey or
to erase letters. Use the dial
pad and the NextSpace softkey to add
letters. Press the ChangeCase softkey to
switch between upper and lower case.
Press Save to save changes.
Copying from the Callers List, the
Redial List, or the Display to the
Directory
1. Open the Callers List, Redial List, or answer
2.
3.
a call.
When the number is displayed on the screen,
press
. If the entry includes a name
and number, the display will show
Saved:Directory.
If the entry is a number only (such as in the
Redial List), you will be prompted to enter a
name. Once you’ve pressed the Save
softkey to save the name, the display will
show Saved: Directory.
Dialing from the Directory
1. Find the entry you would like to call in the
2.
Directory.
Lift the handset to dial the number, or press
to dial the
the Dial softkey or
number using Handsfree. Directory
unlocked.
AltiTouch Plus User Guide 50
Deleting an Entry from the
Directory
1. Find the entry you would like to delete.
2. Press the Delete softkey.
3. Press the Delete softkey again to confirm.
Deleting all Entries in the Directory
Once you have deleted the Directory, you cannot get
entries back. You can protect the Directory by
locking it.
To permanently delete all entries in the directory:
1. Press the Directory button to open the
Directory.
2. Press the Deletelist softkey
3. Press the Delete softkey to confirm.
Locking the Directory
You can lock the Directory so that entries cannot be
deleted or changed. You cannot add entries to a
locked directory.
1. Press
.
.
2. Press
3. Press
. The display shows Directory
locked
To unlock the Directory:
.
1. Press
.
2. Press
3. Press
. The display shows Directory
unlocked.
51 AltiTouch Plus User Guide
Using the Callers List
The Callers List records the last 100 callers in the
order which they called. The telephone display will
indicate when there are new callers. When the Callers
List is full, new callers are added to the list, and the
oldest callers are deleted. In the Callers List you will
see the message XX New caller(s),XX
Call(s)bumped on the display.
Viewing the Callers List
1.
2.
3.
Press the Callers button .
and
to move up and down in
Press
the Callers List. Hold either key down to
scroll continuously. You can also press the
Resume softkey to see the last caller you
viewed the last time you entered the Callers
List.
Press the Callers button , the Quit
at any time to leave
softkey, or
the Callers List.
Note:
on a call.
will also hang up a caller if you are
Calling an entry in the Callers List
1.
2.
Find the entry you would like to call in the
Callers List.
Lift the handset to dial the number, or press
the Dial softkey or
to dial the
number using Handsfree.
AltiTouch Plus User Guide 52
Copying from the Callers List to
the Directory
When the number is displayed in the Callers List,
press
. The display will show Saved:
Directory .
If the entry in the Callers List does not have a name
(i.e. if the name is listed as Unknown or Private),
you will be prompted to enter a name. You can edit a
number in the Callers List and then copy it to the
Directory.
Changing a number in the Callers
List before dialing
Tip: If you have to frequently remove area codes to
return local calls, you should use the Area Codes
option and add your local area code(s).
Note: The Callers List does not save changes. If you
plan to dial the number again, copy it to the Directory
and change it there.
1. Find the caller in the Callers List you wish
to dial.
2. To add digits, use the dial pad.
3. To delete digits, press the EditNum softkey
to begin editing. Use the dial pad to add
digits.
4. Lift the handset to dial the number, or press
the Dial softkey or
to dial the
number using Handsfree.
Deleting an entry in the Callers
List
1.
Find the entry you would like to delete in
the Callers List.
53 AltiTouch Plus User Guide
2.
3.
Press the Delete softkey.
Press the Delete softkey again to confirm.
The display shows Item is erased.
Deleting all entries in the Callers
List
1.
2.
3.
Press the Callers button .
Press the DeleteList softkey.
Press the Delete softkey to confirm. The
display shows Callers list is
empty.
AltiTouch Plus User Guide 54
FAQ
Why don’t numbers I return from the callers list
connect?
When returning a call from an outside caller, you
must add the trunk pre-dial string at the front of the
number. This is usually a “9”. You can add a “9”
easily by pressing the EditNum softkey
Incoming calls are recorded with the area code
attached, whether they are long distance or local
calls. You must remove the area code from local calls
in order to call from the Callers List, or use the Area
Code option in the options list to have local area
codes automatically removed.
Alternatively, you may need to add ‘1’ before long
distance numbers in order to dial long distance.
Why is my display blank?
Ensure that the power adaptor is fully plugged into
the electrical outlet, and that the outlet is supplying
power.
How do I set the time and date?
Ask your system administrator to make sure your
extension is configured for MDMF Caller ID format.
Then, the first incoming call will update the phone
with the time & date from the clock in the AltiServ
system. Otherwise, use the Time/Date option in the
options list to manually set the time and date.
55 AltiTouch Plus User Guide
Can I turn off the light on the screen?
No. You can only adjust the contrast of the display.
Why can’t I hear a caller or be heard?
Increase the receiver or speaker volume. Make sure
the handset cord is inserted securely into the jack. If
the speaker light is flashing, the call is muted; press
the
key to turn mute off; the light will be
steady and not flashing.
Why don’t I see any caller ID?
Ask your system administrator to make sure your
extension is configured for MDMF caller ID format.
What if I accidentally deleted the services on my
AltiTouch Plus phone?
If your phone is not loaded with any other Telco
services, you should be able to restore the AltiTouch
features.
Press the “services” button on the bottom right of the
phone. A restore soft key should be visible (the
top right soft key beside the screen); press the
restore softkey and your AltiTouch services
should be reloaded. If the restore key is not
visible, follow the instructions in the section titled
Screen and Softkey Setup.
AltiTouch Plus User Guide 56
How can I get the Softkeys back when they
disappear after I hang up the phone?
Pick up the handset or press the speaker button and
the softkeys will reappear. You can also press the
services key and select the service in the first slot.
Please review the section of the manual titled
Overview of Softkeys and Screen states.
How come the screen doesn’t show the Transfer
button right away when I’m connected to a caller?
Please do not use the pickup codes (#30, #29) to
pickup calls ringing at other extensions. Please use
the Pickup/AnyRing or Pickup/ExtRing
softkeys instead which will present you with the
connected state screen right away.
How come the transfer key disappears when I press
the flash key?
You do not need to use the flash key to transfer a call.
The transfer button performs a flash function already.
To perform call handling functions such as transfer,
hold, park or conference please use the Transfer, Park
and Conf softkeys. Review the section Handling
Calls.
Why doesn’t the caller hear the on-hold music when
I put them on hold?
Please make sure your administrator has connected a
music source to your AltiServ system. Do not use the
button at the top of the phone as that will
only place the caller on Hold at the set (similar to
57 AltiTouch Plus User Guide
mute). Use the Hold softkey to hold and the back to
retrieve. Review the section Handling Calls.
Why does the phone hang-up or drop calls
intermittently when I’m on speakerphone calls?
Please make sure the power adapter is secured
properly in the back of the phone. Also make sure
you have the cables connected to the phone through
the base as described in the section titled Physical
Setup.
Why does the telephone wobble on the desk?
Please make sure the cables routed through the base
are pushed into the grooves provided. Review the
section titled Physical Setup.
How come when I hear the call waiting tone, when I
press Flash, I don’t get the second caller, only dial
tone?
Please ask your administrator if your extension is
configured for single or multiple call waiting. If it is
configured for single call waiting, then use the
FlashAns softkey to switch between calls. Review the
section titled Handling Multiple Calls
Why does the Idle Screen switch to the Connected
screen when I pick up my handset or press the
speaker button?
Please make sure the dial tone is not disabled. You
can toggle the dial tones on and off using #81 and
#82 features. If your dial tone is disabled, then the
phone presents the connected state screen so that you
AltiTouch Plus User Guide 58
can answer incoming calls using the FlashAns
softkey.
How do I see view the time and date?
key on your phone and
Simply press the
the date and time will show for 7 seconds.
What should I do about discoloration on the
display?
Discoloration on the LCD display is normal when
you first take the phone out of the box. After you
plug the phone into a power source, the discoloration
on the screen should go away after a few minutes. If
it does not, please contact your AltiGen dealer.
Why does my phone not hang up automatically after
an intercom call?
Please have your AltiGen administrator configure
your extension for the proper disconnect signal. The
administrator’s guide will explain how to do this.
Why does my phone sometimes go off-hook when
someone calls my phone and hangs up after 1 ring?
Please contact your AltiGen dealer to obtain updated
programming for your AltiTouch Plus Phone.
How come nothing happens when I press the
DirSrv+, Vmail+ or SysPark+ keys?
AltiTouch Plus software has not been installed on
your server. Please contact your system
administrator.
59 AltiTouch Plus User Guide
Limited Warranty
Aastra Telecom warrants this product against defects
and malfunctions during a one (1) year period from
the date of original purchase. If there is a defect or
malfunction, Aastra Telecom shall, at its option, and
as the exclusive remedy, either repair or replace the
telephone set at no charge, if returned within the
warranty period. If replacement parts are used in
making repairs, these parts may be refurbished, or
may contain refurbished materials. If it is necessary
to replace the telephone set, it may be replaced with a
refurbished telephone of the same design and color. If
it should become necessary to repair or replace a
defective or malfunctioning telephone set under this
warranty, the provisions of this warranty shall apply
to the repaired or replaced telephone set until the
expiration of ninety (90) days from the date of pick
up, or the date of shipment to you, of the repaired or
replacement set, or until the end of the original
warranty period, whichever is later. Proof of the
original purchase date is to be provided with all
telephone sets returned for warranty repairs.
Exclusions
Aastra Telecom does not warrant its telephone sets to
be compatible with the equipment of any particular
telephone company. This warranty does not extend to
damage to products resulting from improper
installation or operation, alteration, accident, neglect,
abuse, misuse, fire or natural causes such as storms or
floods, after the telephone is in your possession.
Aastra Telecom shall not be liable for any incidental
or consequential damages, including, but not limited
to, loss, damage or expense directly or indirectly
AltiTouch Plus User Guide 60
arising from the customers use of or inability to use
this telephone, either separately or in combination
with other equipment. This paragraph, however, shall
not apply to consequential damages for injury to the
person in the case of telephones used or bought for
use primarily for personal, family or household
purposes.
This warranty sets forth the entire liability and
obligations of Aastra Telecom with respect to breach
of warranty, and the warranties set forth or limited
herein are the sole warranties and are in lieu of all
other warranties, expressed or implied, including
warranties or fitness for particular purpose and
merchant-ability.
Warranty Repair Services
Should the set fail during the warranty period, in
North America, please call contact your authorized
AltiGen dealer. Or for further information call
Sayson Technologies at (604) 730-1842. Outside
North America, contact your sales representative for
return instructions. You will be responsible for
shipping charges, if any. When you return this
telephone for warranty service, you must present
proof of purchase.
After Warranty Service
Aastra Telecom offers ongoing repair and support for
this product. This service provides repair or
replacement of your Aastra Telecom product, at
Aastra Telecom's option, for a fixed charge. You are
responsible for all shipping charges. For further
information and shipping instructions contact your
AltiGen dealer or In North America, call 1-800-5741611. Outside North America, contact your AltiGen
61 AltiTouch Plus User Guide
sales representative. Note: Repairs to this product
may be made only by the manufacturer and its
authorized agents, or by others who are legally
authorized. This restriction applies during and after
the warranty period. Unauthorized repair will void
the warranty.
Important Safety
Instructions
The following safety instructions cover the
installation and use of the Product. Read carefully
and retain for future reference.
Installation
WARNING: To avoid electrical shock hazard to
personnel or equipment damage, observe the
following precautions when installing telephone
equipment:
1. Never install telephone wiring during a lightning
storm.
2. Never install telephone jacks in wet locations
unless the jack is specifically designed for wet
locations.
3. Never touch uninsulated telephone wires or
terminals unless the telephone line has been
disconnected at the network interface.
4. Use caution when installing or modifying
telephone lines. The exclamation point within an
equilateral triangle is intended to alert the user to
the presence of important operating and
maintenance (servicing) instructions in the
literature accompanying the product.
AltiTouch Plus User Guide 62
This symbol on the product is used
to identify the following important
information: Use only with a CSA
or UL certified CLASS 2 level C
power supply, as specified in the
user guide.
Use
When using your telephone equipment, basic safety
precautions should always be followed to reduce risk
of fire, electric shock and injury to persons, including
the following:
1. Read and understand all instructions.
2. Follow the instructions marked on the product.
3. Unplug this product from the wall outlet before
cleaning. Do not use liquid cleaners or aerosol
cleaners. Use a damp cloth for cleaning.
4. Do not use this product near water, for example,
near a bath tub, wash bowl, kitchen sink or laundry
tub, in a wet basement or near a swimming pool.
5. Do not place this product on an unstable cart, stand
or table. The product may fall, causing serious
damage to the product.
6. This product should never be placed near or over a
radiator or heat register. This product should not be
placed in a built-in installation unless proper
ventilation is provided.
7. Do not allow anything to rest on the power cord.
Do not locate this product where the cord will be
abused by persons walking on it.
8. Do not overload wall outlets and extension cords
as this can result in the risk of fire or electric
shock.
9. Never spill liquid of any kind on the product.
63 AltiTouch Plus User Guide
10. To reduce the risk of electric shock do not
disassemble this product, but have it sent to a
qualified service person when some service or
repair work is required.
11. Unplug this product from the wall outlet and refer
servicing to qualified service personnel under the
following conditions:
a) When the power supply cord or plug is damaged
or frayed.
b) If the product has been exposed to rain, water, or
liquid has been spilled on the product, disconnect
and allow the product to dry out to see if it still
operates; but do not open up the product.
c) If the product housing has been damaged.
d.) If the product exhibits a distinct change in
performance.
12. Avoid using a telephone during an electrical
storm. There may be a remote risk of electric shock
from lightning.
13. Do not use the telephone to report a gas leak in
the vicinity of the leak.
14. CAUTION: To eliminate the possibility of
accidental damage to cords, plugs, jacks, and the
telephone, do not use sharp instruments during the
assembly procedures.
15. WARNING: Do not insert the plug at the free
end of the handset cord directly into a wall or baseboard jack. Such misuse can result in unsafe sound
levels or possible damage to the handset.
16. Save these instructions.
AltiTouch Plus User Guide 64
US Regulations – Please
Read Carefully
Federal Communications
Commission (FCC) Notice
FCC registration number: This telephone equipment
complies with Part 68, Rules and Regulations, of the
FCC for direct connection to the Public Switched
Telephone Network. (The FCC registration number
appears on a sticker affixed to the bottom of the
telephone.)
Your connection to the telephone line must comply
with these FCC rules:
• An FCC compliant telephone cord and modular
plug is provided with this equipment. This equipment
is designed to be connected to the telephone network
premises wiring using a compatible modular jack
which is Part 68 compliant. See installation
instructions for details.
• Use only an FCC Part 68-compliant Universal
Service Order Code (USOC) network interface jack,
as specified in the installation instructions, to connect
this telephone to the telephone line. (To connect the
phone, press the small plastic tab on the plug at the
end of the phone's line cord. Insert into a wall or
baseboard jack until it clicks. To disconnect, press
the tab and pull out.) See installation instructions for
details.
• If the terminal equipment causes harm to the
telephone network. The telephone company will
notify you in advance that temporary discontinuance
of the product may be required. But if advance notice
isn't practical, the telephone company will notify you
as soon as possible. You will also be advised of your
65 AltiTouch Plus User Guide
right to file a complaint with the FCC, if you believe
it is necessary.
• If a network interface jack is not already installed in
your location, you can order one from your telephone
company. Order the appropriate USOC Network
interface jack, as specified in the installation
instructions, for wall-mounted telephones or for desk/
table use. In some states, customers are permitted to
install their own jacks.
• Your telephone may not be connected to a party line
or coin telephone line. Connection to Party Line
Service is subject to state tariffs. (Contact the state
public utility commission, public service commission
or corporation commission for information.)
• It is no longer necessary to notify the Telephone
Company of your phone's Registration and REN
numbers. However, you must provide this
information to the telephone company if they request
it. The telephone company may make changes in its
facilities, equipment, operation or procedures that
could affect the operation of the equipment. If this
happens the telephone company will provide advance
notice in order for you to make necessary
modification to maintain uninterrupted service.
• Do not attempt to repair this equipment. If you
experience trouble, call 1-800-574-1611 for warranty
and repair information.
Ringer Equivalence Number: The FCC
Registration label (on bottom of phone), includes a
Ringer Equivalence Number (REN), which is used to
determine the number of devices you may connect to
your phone line. A high total REN may prevent
phones from ringing in response to an incoming call
and may make placing calls difficult. In most areas, a
total REN of 5 should permit normal phone
AltiTouch Plus User Guide 66
operation. To determine the total REN allowed on
your telephone line, consult your local telephone
company.
Hearing aids: This phone is compatible with hearing
aids equipped with an appropriate teleco options.
Programming Emergency Numbers:
When programming emergency numbers and/or
making test calls to emergency numbers:
1. Remain on the line and briefly explain to the
dispatcher the reason for calling before hanging
up.
2. Perform such activities in the off-peak hours,
such as early mornings or late evenings.
EMI/EMC (FCC Part 15)
Note: This equipment has been tested and found to
comply with the limits for a Class B digital device,
pursuant to Part 15 of the FCC Rules. These limits
are designed to provide reasonable protection against
harmful interference in a residential installation. This
equipment generates, uses and can radiate radio
frequency energy and, if not installed and used in
accordance with the instructions, may cause harmful
interference to radio communications. However,
there is no guarantee that interference will not occur
in a particular installation. If this equipment does
cause harmful interference to radio or television
reception, which can be determined by turning the
equipment off and on, the user is encouraged to try to
correct the interference by one or more of the
following measures:
• Reorient or relocate the receiving antenna.
• Increase the separation between the equipment and
receiver.
67 AltiTouch Plus User Guide
• Connect the equipment into an outlet on a circuit
different from that to which the receiver is connected.
• Consult the dealer or an experienced radio/TV
technician for help.
Changes or modifications not expressly approved by
the party responsible for compliance could void the
user’s authority to operate the equipment.
AltiTouch Plus User Guide 68