Transcript
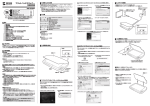
297 mm
A3F2400N
High Speed A3 Flatbed Scanner
1 Package Contents
Unpack the package and inspect the items closely to make
sure no item is damaged. The package should include:
1
2
3
4
5
1
Scanner
USB Cable
Power Adapter
Installation CD
Quick Start Guide
3
2
4
5
Quick
Start
Guide
2 Installing Driver
420 mm
Windows
NOTE: Please complete the software installation before
connecting the scanner. Do not connect USB cable to the
scanner or PC at this stage.
1. Insert the software Installation CD
into your CD- or DVD-ROM drive.
The CD will run automatically, and
then a main menu will pup-up on
the screen.
Note: If the Autorun does not work,
click on "AUTORUN.exe" file.
2. Select "Scanner Driver" from the
main menu.
Note: The Panel V2.0 will be
installed with the Scannr Driver.
3. Follow on screen instructions
to complete the installation
procedures.
4. InstallShield Wizard will remind you when the software
installation is complete.
Note: Return to the main menu to install other software to
your computer to enable certain features.
Mac
1. Insert the software Installation CD into
your CD- or DVD-ROM drive. Double
icon on the desktop.
click
2. Double click Image Acquire folder,
and then ImageAcquire
icon.
Follow on screen instructions to
complete the installation procedures.
3. Double click Scanner driver folder,
and then the scanner model
icon. Follow on screen
instructions to complete the installation procedures.
Note: Press and hold for 3
seconds to turn off.
Note: The scanner will turn
off after 15 minutes if no
operation.
The power
LED
POWER
6 Hardkey Settings (Windows only)
To use the scanner's buttons for a quick scanning you need
to set up the
Hardkey Settings as
following:
Press Start > All Programs > A3F2400N
Scanner > Hardkey Settings to bring up
the Hardkey Settings screen for setting
the Scan, and PDF buttons.
Scan - Press it to set up Scan Mode, Scan Setting PDF Setting
Resolution, File Path, File Type and etc.
PDF - Press it to set up Scan Mode,
Resolution, File Path, and Searchable
PDF.
Press Start > All Programs >
A3F2400N Scanner > Help > Hardware
file to find more details of the hardkey settings.
4 Placing an item for scanning
1.
8 Using the Scanner Buttons (Windows only)
1.
2.
3.
Connect one end of supplied power adapter to the
scanner’s DC IN jack, and the other end to a power socket.
With the computer being turned on, connect one end of
the USB cable to the USB port of your computer and the
other end to the scanner.
Note: Two pop-ups will appear at the right side of task bar
after the computer detects the new hardware being inserted.
The Windows Hardware Manager will detect the hardware
and remind you to start to install it. Follow on screen
instructions to complete installation. The pop-up message
will appear at the right side of task bar when the hardware
installation is complete.
Open the scanner
cover. Place the item
facing down on the
flatbed glass.
2. Position the paper as indicated
by the position arrow mark.
Close the scanner cover.
Note: The hinges of the scanner lid can
extend upwards to accommodate thick
items.
5 Turnning on the power
Press the POWER button to turn on the scanner. The power
LED lights up in blue.
Note: To convert to a searchable PDF, you must install the
ABBYY FineReader and the Adobe Acrobat Reader from the
installation CD.
3 PANEL button
Opens the Panel V2.0 to access additional features including
Edit, OCR, Settings and etc.
Note: To perform OCR text recognition on scanned documents,
you must install the ABBYY FineReader from the installation CD.
For more details about the Scanner Panel, press the Help
button on the Panel V2.0, or press Start > All Programs >
tA3F2400N Scanner > Help > Software file to find more details of
the functions.
Import PDF E-mail Setting Help
Scan
Edit Copy OCR
Exit
7 Scanning
Windows
You can scan in three ways with the Scanner, namely via the
scanner's SCAN button, on-screen Panel V2.0 or via the TWAIN
panel.
The easiest way to make a quick scan is via the scanner's
SCAN button:
Press the SCAN button on the scanner,
the status and progress bar will show
scanning progress. Upon completion,
the scanned image will be saved
in your computer and displayed
in the Panel V2.0 or the default
viewer program.
To scan with the Panel V2.0, do
following:
1. Press the PANEL button on
the scanner to launch the
Panel V2.0 software.
2. Press the
(Scan) button to start
scanning.
3. Press the
(Save) button to save
the scanned image.
To scan with TWAIN Dialog box, do
following:
1. Launch the TWAIN-compliant
program (e.g. Arcsoft Media
Impression, Photoshop)
2. Under the Import menu, select
the Acquire command and choose the A3F2400N Scanner.
3. Click Acquire. The TWAIN dialog box appears.
4. Click Preview to prescan. Set the scan area using the
marquee, then click Scan.
5. Click Save to save the scanned image.
Mac
1. Double click
icon from Mac's
'Applications' folder. Choose
the A3F2400N Scanner from the
Image Acquire window, then click
Acquire.
2. Click Preview to prescan. Set
the scan area using the marquee,
then click Scan.
3. Click Save to save the scanned
image.
3 Installing Hardware
Quick Start Guide
Note: These scanner buttons work only with the Windows
computers.
The scanner's buttons allow you to perform a quick scanning
in an easy way.
1 SCAN button
1 3
Scans directly to the default viewer
2
program, and the scanned image will
be saved in the computer.
2 PDF button
Scans and converts the scanned
image directly to a PDF file, and the
scanned image will be saved in the
computer.
Safety Information
1.
2.
3.
Keep away from water or moisture and dusty areas.
Never store in hot and very cold areas.
Only use attachments/accessories specified by the
manufacturer.
4. No objects filled with liquids, such as vases, shall be
placed on apparatus.
5. Avoid dust contamination when the scanner is not in use.
6. When left unused for a long period of time, the unit should
be disconnected from the power cable.
7. Avoid environments where the scanner would be exposed
to direct sunlight (or any other source of excessive heat)
for long periods of time.
8. Protect the scanner from potential liquid spills such as
soda, coffee, tea, and etc.
9. Be carefully to keep it without dropping it or strong
impact.
10. Operate the scanner on a level, well-grounded work
surface, free of excessive vibration.
11. Don’t open the scanner case alone without technical
support because there is danger of electrical shock.
12. Position the equipment near a power outlet where it can
be easily accessed when plugged in.
Specifications
Scanner Type
Flatbed
Scanning Element
Contact Image Sensor (CIS)
Light Source
Three-color (RGB) LEDs
Scanner Buttons
POWER, SCAN, PDF, PANEL
Scan Mode
Color: 48-bit, 24-bit
Gray: 16-bit, 8-bit
Line art: 1-bit
Scan Area (Max.)
297mm x 420mm (11.7” x 16.5”)
Resolution
Optical: 2400 dpi (H) x 2400 dpi (V)
Enhanced: 9600 dpi x 9600 dpi
Interface
Hi-Speed USB 2.0
Supported OS
Windows XP / Vista / 7 / 8
Mac OS X 10.7 - 10.9
Power
Consumption
12VDC, 2A, 24W
(Input: 100~120VAC or
200~240VAC, 50~60Hz)
Power Saving
Auto power off after 15min
Dimension (LxWxH)
555 mm x 383 mm x 88 mm
Weight
4.3 kgs
Software
Windows: Scanner driver (with the
Panel V2.0), ABBYY FineReader,
ArcSoft Media Impression, Adobe
Acrobat Reader
Mac: Scanner driver, ImageAcquire
* Images and screenshots shown in this guide are example only.
PN:82-370-00010