1
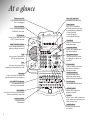
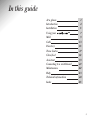
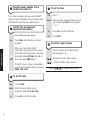
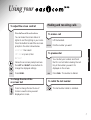
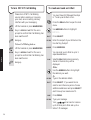
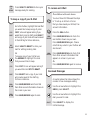
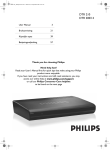
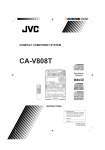
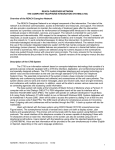
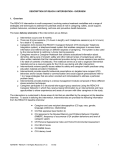
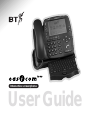
Interactive screenphone
User Guide
Please open this page for an ‘at a glance’
guide to your
.
Please open this page for a further
‘at a glance’guide to your
.
At a glance
Phone Line LED
New calls indicator
Lights when the phone
line is unplugged.
Visual alert for new calls.
Town Centre
Text size button
Press to choose between
3 different text sizes.
eas i com
BT Services
Press for fast and easy use
of BT’s Select Services.
Classified
Direct Dial national and
local advertisers.
Multi Function buttons
Use to choose between the
options offered on screen.
New Calls : 0
New Mails : 0
Mail
Navigation Arrows
0
M
6
Lets you move the cursor
or highlight an option for
selection.
W
X YZ
✱
V
RS
For use with E-Mail
directory and notepad.
Q
Full QWERTY Keyboard
TEL:
TU
8
D
3
NO
P
7
JK
5
L
4
C
G
HI
Directory
2
EF
AB
1
Calls
Lets you access 150 name and
numbers stored in the directory.
Assistant button
Use for the organiser and
calculator features.
Lets you send and receive
E-Mail and send faxes.
Lets you access incoming,
outgoing and reminder list calls.
10 0 0
Fully ADSI compatible
allowing interactive access
to participating companies;
- Home Banking
- Home Shopping
- Information Services
9
Enter button
Lets you make a selection.
Acts as the = button in
calculator mode.
Handsfree button
Use to dial and hold a
telephone conversation
without lifting the handset.
Recall button
For use with switchboards.
Volume button
Save button
Save up to 4 screens of information
when connected to a service.
Retrieve button
Displays saved
information.
Adjusts the ringer and
speaker volumes.
Secrecy
Allows you to talk to someone
in the same room, without your
caller hearing you.
Redial button
Redials the last number
you called.
1
Your
Screen
Telephone On/Off Hook
eas i com
10 0 0
AA
text size
Extension in use
Movement arrows
Receiving information
Password
Secrecy On/Off
New Calls : 0
New Mails : 0
Battery low
10:24am
Time
New Calls: 0
Number of new
calls received.
New Mails: 0
Number of new
mails received.
8 APR
Today’s date.
printer
Attach your
printer here
(available seperately)
Mains power cable with 3-pin adaptor
Attached telephone line cord
Key features
Send and receive E-Mail
The
enables you to
send and receive E-Mail messages
around the world without needing a computer.
You can also send faxes direct to any standard
fax machine.
Personal Directory
Easily store and quickly access up
to 150 names and numbers, as well
as E-Mail addresses and fax numbers in the
directory.
Caller Display
You can view information about calls
you have received, making it easy to
track and deal with callers.
2
Town Centre
Saves time by providing a fast track
route to interactive home shopping
and services direct to your home.
Classified
Dial Direct for a complete and up-todate list of entries in the UK Yellow
Pages. You can search for companies on a national
or local basis.
Pull-out QWERTY keyboard
Compact keyboard lets you type
E-Mails, faxes and directory entries.
With the A A button (next to the screen), you
also have a choice of three on-screen text sizes.
In this guide
At a glance
1
Introduction
4
Installation
5
Using your
7
Mail
9
Calls
13
Directory
15
Town Centre
17
Classified
18
Assistant
19
Connecting to a switchboard
21
Maintenance
22
Help
23
Technical information
24
Index
25
3
Introduction
Your
has been designed for ease of use and made to the
high standards set by BT.
You can expect your
to give you
many years of trouble-free service.
For your records
Please read the instructions carefully before use
and keep this User Guide for future reference.
Date of purchase:
Place of purchase:
Unpacking your
INSTALLATION
If anything is missing, please contact your place
of purchase immediately.
Serial number (on the base of the telephone):
Purchase price:
eas i com
AB
1
G
2
JK
5
L
TU
0
V
8
✱
DE
3
M
6
W
XYZ
RS
Q
P
7
NO
HI
4
TEL:
C
with
telephone line cord attached
F
●
9
10 0 0
For warranty purposes, proof of purchase is
required, so please keep your receipt.
Personal Emergency Numbers
● Mains adaptor
1
2
3
● 4 X AA size batteries
● User Guide
Interactive screenphone
User Guide
4
4
Installation
Follow these steps to set up your
ready for use.
Important
Plan the location of your
Make sure your
is within 2
metres of the phone and mains sockets.
If there is a power failure and you do not have
back-up batteries fitted, the telephone will still
work normally, but the caller display function
will not operate and your
’s screen
will go blank. Information stored in the memory
will be lost.
1 Insert back-up batteries
2
Turn your
upside down.
Plug the mains power adaptor into
to the
INSTALLATION
Use the end of a ballpoint pen (or similar) to
remove the battery compartment cover.
3 Connect the telephone line cord into
to the telephone line socket
Insert batteries as shown.
If you do not have modern phone sockets, call
Freefone 0800 800 150 and ask for a BT
engineer to come and fit the correct type. This
is a chargeable service.
5
4 Plug the power adaptor into a
socket and switch on
The screen comes on and asks you to dial BT
free to receive information into your phone that
will make BT Select Services easier to use.
To set the time
7
TIME
KEYPAD
Call BT free to download
5 important information
Press buttons in order shown
DIAL
Press DIAL and follow the on-screen
prompts.
OK
EXIT
INSTALLATION
6 To set the date
DATE
KEYPAD
OK
6
Press DATE.
Enter the correct date, e.g. for
6 January 1999, dial 06 01 1999.
Press OK to confirm the date.
Enter the time, using the 12-hour clock,
e.g. for 9.30, dial 0930. Press to select
AM or PM.
Press OK to confirm the time.
Press EXIT.
8 To set the ringer volume
When you have stored the BT
information, you can access the range
of BT Select Services quickly and easily
by pressing the BUTTON to the left of
the screen with
below it.
If the BT server is busy or unavailable
you can dial it manually later by phoning
0800 328 1949.
Press TIME.
Press the button on the front of the
phone marked – +.
+ Press for louder ringer volume.
– Press for softer ringer volume.
Your
is now ready for use.
Using your
To adjust the screen contrast
Press buttons in the order shown
You can make the screen darker or
lighter to suit the lighting in your room.
Press the buttons to select the on-screen
prompts in the order shown below:
Making and receiving calls
To make a call
Lift the handset.
KEYPAD
Dial the number you want.
ASSISTANT then select s
SETTINGS or press 6, then
To preview dial
You can dial your number and check
that it is correct before making the call.
Key in the number you want. It is
displayed on the screen.
Follow the on-screen prompts and use
the LEFT and RIGHT arrow buttons to
change the displayed settings.
DONE
Press DONE.
To change the size of the
on-screen text
Press to change the text to one of
3 sizes. Leave the size you want
displayed on screen.
USING
CONTRAST
DIAL
Press DIAL. The number is dialled.
To redial the last number
The last number called is redialled.
7
To make a handsfree call
Press buttons in order shown
You can make a call using the
loudspeaker, saving you from having to
pick up the handset.
Press the HANDSFREE button.
Dial the number.
To adjust the loudspeaker volume
During a handsfree call:
USING
+ Press to raise the volume
– Press to lower the volume
To use secrecy
You can stop a caller from hearing you,
so that you can have a private
conversation with someone else in the
room.
Press SECRECY. The screen shows
(SECRECY). Your caller cannot hear you.
Press SECRECY to speak to your caller
again. The (SECRECY) disappears.
8
Mail
Your
can send and receive a total
of 70 Internet E-Mail messages for up to 5
separate users.
You can also type and send faxes to any
standard fax machine. However, you
cannot receive faxes on the
.
To scroll through your messages, sending or
received, use the up and down arrows.
SELECT
USER DETAILS menu.
Use the ARROW buttons to highlight
your user number on the display.
SELECT
KEYPAD
Press buttons in the order shown
The first time you use your
to send an E-Mail or fax,
you need to enter your details in the
set-up menu. Up to 5 different users
can store their details in the memory.
KEYPAD
Enter the E-Mail ID Password and
Server numbers supplied with your
in order to register and
send/receive mail to your phone.
Type your name next to FAX NAME.
This appears on the headers of all
faxes you send.
DONE
Press DONE to confirm your settings.
EXIT
Press EXIT.
MAIL
To set up an E-Mail or fax
Press SELECT.
Press EDIT.
EDIT
IMPORTANT
Please remember that E-Mail messages are sent
and received via your telephone line. If you are
sending or receiving an E-Mail, you cannot use
your telephone at the same time.
Press SELECT. Display shows the
Please Note
When you enter your password a row
of asterisks (*) will appear to keep this
information private.
Press the MAIL button.
Use the ARROW buttons to highlight
SETTING.
9
To turn OFF BT Call Waiting
To create and send an E-Mail
Please turn off BT’s Call Waiting
service before sending or receiving
your mail, as an incoming call may
interfere with your messaging.
You must have first followed the steps
in ‘To set up an E-Mail or fax’.
Press the MAIL button to open the mail
menu.
Lift the handset or press HANDSFREE.
KEYPAD
Use ARROW buttons to highlight
COMPOSE.
Key in #43# and wait for the voice
prompt to confirm that Call Waiting has
been switched off.
SELECT
Press SELECT.
Hang up.
KEYPAD
Enter the subject of your E-Mail on the
line starting ‘Subject’.
ADDRESS
Press ADDRESS.
To turn Call Waiting back on
Lift the handset or press HANDSFREE.
MAIL
KEYPAD
Key in ✱43# and wait for the voice
prompt to confirm that Call Waiting has
been switched on.
You can send your E-Mail to up to 5
separate addresses.
E-Mail
Hang up.
KEYPAD
SELECT
DONE
KEYPAD
10
Select E-Mail. Addresses previously
stored in the directory will be
displayed.
Either
Use the ARROW buttons to highlight
the address you want.
Or
Type in the address details.
Press SELECT. If you would like to
send to more than one person choose
additional addresses and press SELECT
each time up to a maximum of 5.
Press DONE.
Type your message.
Your
can send or receive
up to 30 lines per E-Mail and up to a
total of 70 messages.
SEND
TO
OUTBOX
Press SEND TO OUTBOX to store your
message ready for sending.
To receive an E-Mail
Press buttons in the order shown
You must have first followed the steps
in ‘To set up an E-Mail or fax’ so
that you have saved your E-Mail/Fax
account information.
To keep a copy of your E-Mail
COPY
SELECT
SAVE
TO DRAFT
Go to the Outbox, highlight that mail that
you would like to keep a copy of, press
COPY, a box will appear asking if you
would like to copy to draft, press SELECT
and a copy of your mail will now be saved
in the draft log for future reference,.
Press SEND/RECEIVE and check the
user details shown are your own.
Press SEND/RECEIVE again. Please
note that any e-mail in your Outbox will
also be sent.
SEND/
RECEIVE
Press SEND/RECEIVE and check that
the E-Mail account information that
appears on screen is your own.
Or
Press SEND/RECEIVE again to receive.
MAIL
SEND/
RECEIVE
Select SAVE TO DRAFT to store your
mail for editing/sending later.
Or
To keep a copy of your E-Mail use
the ARROWS to highlight the mail
that you would like to keep.
COPY
Press the MAIL button.
Press COPY. A box will appear asking if
you would like to COPY TO DRAFT.
Received Messages
SELECT
Press SELECT and a copy of your mail
will now be saved in the draft log
for future reference.
A counter above the Inbox shows the
number of new messages waiting.
SEND/
RECEIVE
Press SEND/RECEIVE and check that
the E-Mail account information shown on
the screen is your own.
Use the arrow buttons to highlight the
INBOX, press SELECT.
SEND/
RECEIVE
Press SEND/RECEIVE again to send.
Use the arrow buttons to highlight the
mail you want to read.
SELECT
Press SELECT to display the
E-Mail message.
11
You can use the up and down ARROWS
or PAGE UP and PAGE DOWN on the
pull out keyboard to move through
your mail.
To send a fax
Press buttons in the order shown
KEYPAD
Type your fax message.
SEND
TO
OUTBOX
Press SEND TO OUTBOX to store your
fax ready for sending.
Or
If you want to save your message for
editing later, press SAVE TO DRAFT.
SAVE
TO
DRAFT
To keep a copy of your Fax
You must have first followed the steps
in ‘To set up an E-Mail or fax’ above so
that you have saved your E-Mail/Fax
account information.
Press MAIL.
MAIL
Use the ARROWS to highlight COMPOSE.
KEYPAD
Type the subject of your fax on the line
starting ‘Subject’.
ADDRESS
Press ADDRESS.
Use the ARROWS to highlight FAX.
If you have previously stored fax numbers
in the directory, they are shown.
SELECT
12
COPY
Press DONE to complete addressing
your fax.
Go to the Outbox, highlight the fax that
you would like to keep a copy of, press
copy, a box will appear asking if you
would like to copy to draft, press
SELECT and a copy of your fax will now
be saved in the draft log for future
reference. Use the ARROWS to
highlight the mail that you would like
to keep.
Press COPY. A box will appear asking if
you would like to COPY TO DRAFT.
SELECT
Press SELECT and a copy of your fax
will now be saved in the draft log
for future reference.
SEND
Press SEND. Check that the fax
account information that appears on
screen is correct.
SEND
Press SEND again to confirm and send.
Press SELECT again to choose the
highlighted name and number.
The fax details now appear at the top of
the screen.
DONE
SELECT
Press SELECT.
Use ARROWS to highlight names and
numbers from the fax directory.
SELECT
Press MAIL.
Calls
Your
works with BT Select
Services Caller Display and Caller Display with
Call Waiting. These are available on
subscription. For further information, call BT on
FREEfone 0800 800 150.
When you subscribe to Caller Display and Call
Waiting services, your
will display
the number of the person calling as well as the
number of a caller who is trying to contact you
even if you are already using the line.
Press the CALLS button. Display shows
a 50 Number Incoming Calls List,
a 10 Number Outgoing Calls List
and the Reminder List where you
can set up to 60 Reminder Alarms.
SELECT
To delete a single entry in a Calls List
Your
stores information on the
most recent incoming and outgoing calls giving
the time and date of each call. If you have stored
the name and phone number of the caller in the
directory, it will also display the name.
Press the CALLS button. The display
shows the Calls Lists.
Use the ARROW buttons to highlight
the Incoming Calls, Outgoing Calls or
Reminder Alarms list.
There is also a Reminder List which lets you set
up to 60 Reminder Alarms to your phone.
SELECT
Press SELECT to highlight the entry
you want to delete.
DELETE
Press DELETE. A dialogue box asks
you to confirm.
YES/NO
Choose YES or NO to delete or to cancel
the delete command.
New Calls light
Press buttons in the order shown
The red Calls light comes on to let you
know when you have received new calls.
Press SELECT to highlight the list
you want.
CALLS
Caller Display
To view the Calls List
13
To delete all entries in a calls list
Press buttons in the order shown
Press the CALLS button. Display shows
the Calls Lists.
Use the ARROW buttons to highlight
the Incoming Calls, Outgoing Calls or
Reminder Alarms list you want to delete.
CLEAR ALL
Press CLEAR ALL. A dialogue box asks
you to confirm.
YES/NO
Press YES to delete or NO to cancel.
Caller Display Text messages
CALLS
Your
can also display text
messages sent via the Caller Display service.
These messages provide extra information about
the type of call you have received.
INTERNATIONAL
Call received from outside the UK.
UNAVAILABLE
The caller’s network does not operate a caller
display service.
WITHHELD
The caller has stopped their number from
being sent.
OPERATOR
The call has come via the operator.
PAYPHONE
The caller is ringing from a payphone.
RINGBACK
The telephone number that you have set on
Ringback is now free to receive your call.
14
Call Waiting
Call Waiting lets you know if another caller is
trying to reach you when you are already on the
phone.
To answer a call waiting whilst on
a call
You hear a beep in the earpiece and
your
screen displays
SWITCH.
SWITCH
Press SWITCH to put your first call on
hold and talk to your second caller.
SWITCH
Press SWITCH again to talk to your
first caller again.
If one call hangs up, you are automatically
connected to the remaining caller.
Directory
Your
can store up to 150 names
and numbers, E-Mail addresses and fax
numbers in the directory.
To dial a director y entr y
Press the DIRECTORY button.
To add an entr y
ARROWS
Press buttons in the order shown
Press the DIRECTORY button.
KEYPAD
DIAL
Press DIAL.
DIAL
If you have more than one number
stored for the same name, a dialogue
box asks you to select the number you
want by highlighting it with the
ARROW buttons and then pressing
the DIAL button again.
Press NEW.
Enter the name you want.
Move the cursor to the next line down.
KEYPAD
Enter the number you want.
Use the pullout keyboard to enter the
persons details.
SAVE
D RECTORY
NEW
Press the ARROW buttons to scroll
through the list and highlight the name
you want.
To delete an entr y
Press SAVE.
Press the DIRECTORY button.
If you need to add a Pause to the number
you are storing, press the P button on
the pull-out keyboard where you want
to Pause to be placed in the number.
The Pause will be shown as P on the
display.
Press the ARROW buttons to scroll
through the list and highlight the name
you want to delete.
DELETE
Press DELETE. A dialogue box asks
you to confirm the delete.
Use the ARROW buttons to highlight
YES to delete or NO to cancel.
YES
Press YES to confirm deletion.
15
To set different ring tones for
director y entries ( works with BT’s
Caller Display Ser vice).
Press buttons in order shown
You can allocate up to 9 different ring
tones for entries in the
directory. For example, you could set
different tones for business or personal
numbers. You can set the ring tone for
new and existing entries.
Copying numbers into the
directory
Whenever you receive a number in the calls list,
you can copy it into your
’s directory.
To copy a phone number
When the Incoming or Outgoing Calls
List is displayed:
COPY
Press the DIRECTORY button.
Either
DIRECTORY
Press the ARROW buttons to scroll
through the list to find an existing name.
Or
ADD
16
Press ADD to start a new entry.
RING
SOUND
Press RING SOUND to hear a sample
of the current ringer. Return to the
standard ringer sound, by pressing the
RING SOUND button until there is no
number shown next to it on the display.
SAVE
Press SAVE to save your entry with the
ringer sound that is highlighted.
Press COPY and follow the on-screen
prompts to add the number to the
directory.
Town Centre
Within the Town Centre on the
are
stored the details and telephone numbers of
leading brands within the UK. You can browse
through the infromation and dial direct to the
shops listed here at the touch of a button.
As more and more services become available
direct from the
the choice
available to you through the Town Centre
will grow.
To restore a deleted street
If you delete a shopping or service
street and want to bring it back again,
just highligt it as described left and
RESTORE
Press RESTORE.
TOWN CENTRE
If you are interested in becoming a Service
Provider on
Town Centre please
contact us on 01565 872444.
The first time you dial from the
,
Town Centre information will be downloaded
into your phone to make it easier for you to
access services such as home banking and to
shop direct from home. This will only take
approximately 1 minute to complete.
To select a Town Centre Street
Press buttons in the order shown
Press the TOWN CENTRE button.
Use the ARROW buttons to highlight
the street you require.
DIAL
Press DIAL.
17
Classified
Your
has direct dial access to
Classified Advertising for your convenience.
Now you can find any listed company for the
whole of the UK.
To find a company nationally in
Classified Advertising
CLASSIFIED ADVERTISING
Press buttons in the order shown
Press the CLASSIFIED button to select
the company you want to call.
DIAL
18
Press DIAL. The number is dialled,
then you are guided step by step on
screen until you find the company
you are looking for.
Assistant
Assistant gives you quick access and help with
all the additional features of your
.
The pull-out keyboard makes it easy to use
these features, which are:
Calendar
Notepad
Country codes
To use the calculator
Once open, the calculator offers 4
modes of operation:
Calculator
World time
Settings
1 Simple calculator.
2 Tabulation.
3 Currency conversion.
To open an additional feature
Press buttons in the order shown
(By Linear measure, Square measure,
Capacity measure, Avdp. Weight or mass,
and Temperature equivalents.)
Press the ASSISTANT button. Use the
ARROW buttons to highlight the feature
you want.
For currency conversion.
Press the ENTER button to open the
feature you have selected.
Calendar
Once open, you can use the calendar to
set reminders for special events.
ASSISTANT
Enter
4 Unit conversion.
Use the ARROW buttons to highlight
each country.
KEYPAD
DONE
Enter the up-to-date currency rates
for each of the currencies you want to
calculate.
Press DONE.
KEYPAD
Choose the currency that you would
like to use by highlighting and pressing
CHANGE SELECTION.
KEYPAD
Type in the amount of that currency
you want to convert, e.g. £100.
Enter
Press the ENTER button.
The currency is converted and displayed.
19
To use the notepad
To adjust the settings of your
Press buttons in the order shown
Once the notepad is open:
KEYBOARD
SAVE
Use the keyboard to type notes.
Press SAVE. (The SAVE symbol appears
to remind you.)
World time
Once open, you can adjust the following settings
using the ARROW buttons to highlight the
setting you want to change.
Call Timer – select either ON to time each call
or OFF. The Call Timer will be displayed on the
phone’s Main Screen.
Time – select between the 12 or 24 hour clock.
Contrast – to lighten or darken your screen.
Once open, world time lets you
quickly find out time differences around
the world.
Password – set a password to protect your
personal information, stored in the memory.
ASSISTANT
Ring Sound – choose the ringer melody you
To use countr y codes
Once open, you can quickly find out
dialling codes from the UK to countries
around the world.
prefer; there are 9 options available.
Extn in Use – select ON if you wish to have the
in-use light come on when another extension on
the same line is in use.
Smart Redial – remembers the pauses between
Use the ARROW buttons to highlight
the country you want.
Enter
KEYPAD
20
Press the ENTER button. The country
code is automatically dialled.
Dial the rest of the number of the person
you are calling.
numbers you dial. This is useful for calling home
banking or chargecard automated services.
Connecting to a switchboard
Currently, Caller Display and BT Select Services
are not available when your
is
connected to a switchboard. However, it will
operate as a normal phone.
See your switchboard user guide for instructions
on using the Recall, Pause, # and ✱ buttons to
access the switchboard’s features.
SWITCHBOARD
21
Maintenance
General
Simply clean the
handset and base
with a soft cloth. Do not use a wet cloth.
Do not clean with abrasive materials or solvents
as these may damage the unit.
MAINTENANCE
Do not spray aerosol cleaner onto the base or
handset.
Warning
Your
may become warm. This is
normal and not dangerous. However, you should
avoid placing the unit on untreated antique
furniture.
Keep your
away from areas of high
humidity and out of direct sunlight.
Do not stand it on carpets or other surfaces which
generate fibres or place it in locations which
prevent the free flow of air over its surfaces.
This equipment is only designed to be used in
a normal office or domestic environment where
the relative humidity does not exceed 60%.
It should not be used in bathrooms or near water.
22
Service
Within guarantee
If you experience a problem with your
or handset, you should contact
the
Helpline on 08457 573464.
Lines are open 8.30am-5.30pm, Monday-Friday,
excluding bank holidays. Calls are charged at
local call rates. If the problem is not solved,
you will be advised to contact your original point
of purchase.
Some retailers offer extended warranty
schemes for cover outside the initial 12-month
period. Please ask them for details.
Outside warranty
If your
needs repair after the
warranty period has ended, call the
Helpline on 08457 573464 for information on
our recommended repair agents.
If you have to return your
Pack the cradle and handset securely, preferably
in the original packaging. All parts must be
returned including line cords, power supply unit
and original battery. We cannot take responsibility
for goods damaged in transit.
Help
Your
does not receive Caller
Display messages
To receive and display messages you must
subscribe to the Caller Display and Call Waiting
services on your line.
For further information, call BT free on
Freefone 0800 800 150 (residential customers)
or Freefone 0800 800 152 (business customers)
or your Service Provider.
Phone does not ring
Check that no other phones on the same line
have been left off the hook.
Do you have too many phones in your home?
(See ‘How many phones can you have?’ page 25.)
Screen does not work properly
Check that the mains power has been connected
correctly.
The battery cover must be fitted correctly in
order for your
to work.
I have not received any incoming E-Mail.
You must dial the server to collect any E-Mail
waiting there for you. Just press the MAIL
button, followed by SEND/RECEIVE.
Why do some of my E-Mails get returned to
me by the Postmaster?
This could be because an incorrect E-Mail
address has been used. Please double check
to make sure that you have addressed your
mail correctly.
HELP
Check that the ringer volume is not turned
down too low.
E-Mail Help
Why do some of E-Mails I receive have = in
between words?
This is because some of your mail has been
re-formatted as it has passed through the
internet. Please ignore the = symbols as
you read through your mail.
When I enter my password, only stars appear
on the screen?
Stars are used to display the password to keep
this information private.
I sometimes receive E-Mails with
attachments removed?
The
is for text messages only and
is unable to receive attachments or pictures.
23
Helpline
HELPLINE
If you are still experiencing difficulty, call the
Helpline on 08457 573464.
Lines are open 8.30am-5.30pm, Monday-Friday,
excluding bank holidays.
24
Technical information
Connection Information
Your
may be connected to public
networks in the UK. It may be connected to
switchboards that use tone signalling with time
break recall. If you are in doubt, contact your
switchboard supplier.
How many phones can you have?
Guarantee
If you own your
guarantee
– under
If a fault does occur in this product and you
bought the unit yourself, provided that you
return it to the place of purchase and produce
your receipt, it will be either repaired or
replaced free of charge.
TECHNIACAL INFORMATION
All items of telephone equipment have a Ringer
Equivalence Number (REN), which is used
to calculate the number of items that may be
connected to any one telephone line. Your
has a REN of 1. A total REN of 4 is
allowed. If the total REN of 4 is exceeded, the
telephones may not ring. With different telephone
types there is no guarantee of ringing, even when
the REN is less than 4.
•The equipment has not been tampered with or
repaired by anyone other than BT, its staff,
or agents.
The terms and conditions of this guarantee do
not affect your statutory rights.
If you own your
guarantee.
- outside
If your
needs repair after the
guarantee period has ended, it must be repaired
so as to comply with the approval requirements
for connection to the telephone network.
We recommend that you call BT on Freefone
0800 800 150 or visit your nearest BT shop,
and you will be informed of our recommended
repair agents.
BT guarantee the product for one year provided
that:
•The equipment has only been used for its
proper purpose and has not been subjected
to misuse or has been wilfully of accidentally
damaged.
25
Index
INDEX
Adjusting loudspeaker volume
8
Adjust settings
20
Assistant
19
At a glance
1
Battery, Installing
5
Calculator
19
Calendar
19
Caller Display
13
Caller Display, Text messages
14
Calls
13
Calls List
13
Calls, Making
7
Calls Timer
20
Call Waiting
10, 14
Classified
18
Contrast
7, 20
Country codes
20
Date
6
Directory
15
Add an entry
15
Copying numbers into
16
Delete an entry
15
Dial an entry
15
Set different ring tones to entries
16
Extn in use
20
Fax send
12
Guarantee
25
Handsfree calls
8
Helpline
24
Help
23
Loudspeaker
8
26
Mail
9
E-Mail Help
23
Create and send an E-Mail
10
Receive an E-Mail
11
Save Mail
10
Send a fax
12
Set up an E-Mail or fax
9
Maintenance
22
Making calls
7
Notepad
20
Open features
19
Password
20
Power
5
Preview dial
7
Redial last number
7
Ring sound
20
Secrecy
8
Select services
6, 10, 13, 14
Service
22
Smart redial
20
Switchboard
21
Technical information
25
Telephone line
5
Text size
7
Time
6, 20
Town Centre
17
Restore a deleted street
17
Select a street
17
Volume
6
Warning
22
World time
20
Offices in Europe, North America,
Japan and Asia Pacific.
The telecommunications services described in this publication
are subject to availability and may be modified from time to time.
Services and equipment are provided subject to British
Telecommunications plc’s respective standard conditions of contract.
Nothing in this publication forms any part of any contract.
Touchtone™ is a registered trade mark of
British Telecommunications plc in the UK.
© British Telecommunications plc 1998.
Registered Office: 81 Newgate Street, London EC1A 7AJ.
Registered in England No. 1800000.
Printed in XXXXX. easicom 1000 Issue 1 (10/98) 4.3
Designed by The Art & Design Partnership Limited.
CE compliant to 89/336/EEC
(EMC Directive) & 73/23/EEC
(Low Voltage Directive)
APPROVED for connection to
telecommunication systems specified
in the instructions for use subject to
the conditions set out in them