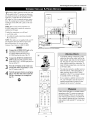
1
Your Television's
Directions for Use
55PP9352
60PP9352
Product
Highlights
• High-definition
displaym1080i/480p
• High-definition
component
and DB15 inputs
• Active Control
video/RGB+H/V
TM
• Eye Fidelity
• APAC (Automatic
Compensation)
TM
Phosphor
Aging
Features
• Multipoint
• Protective
digital convergence
screen filter
• Virtual Dolby _ Surround
• 3-D Y/C comb filter
• Two-tuner
picture-in-picture
• Slim, upscale styling
• Home-cinema
universal remote
3135 035 20532
O0
Once your PHILIPS purchase is registered, you're efigible to receive all the privileges of owning a
PHILIPS product. So complete and return the Warranty Registration Card enclosed with your purchase at once. And take advantage of these important benefits.
Congratulations on your purchase,
and welcome to the "family!"
Dear PHILIPS
product
PHILIPS
owner:
Thank you for your confidence in PHILIPS. You've selected one of the best-built,
ucts available today. And we'll do everything in our power to keep you happy with your purchase
for many years to come.
As a member of the PHILIPS ffamily," you're entitled to protection by one of the most comprehensive
warranties and outstanding service networks in the industry.
What's more, your purchase guarantees you'll receive all the information and special offers for which
you qualify, plus easy access to accessories from our convenient home shopping network.
And most importantly you can count on our uncompromising commitment to your total satisfaction.
All of this is our way of saying welcome-and thanks for investing in a PHILIPS product.
Sincerely,
Lawrence
President
J. Blanford
and Chief Executive
Know these
safetysymbols
ES.
Officer
_.
Remember, to get the most from your PHILIPS
product, you must return your
Warranty Registration Card within 10 days. So
please mail it to us right now!
This "bolt of lightning" indicates uninsulated
material within your unit may cause an electri-
cal shock. For the safety of everyone in your household, please do not remove product covering.
_LThe
"exclamation
point" calls attention to features for which you should read the enclosed
literature closely to prevent operating and maintenance problems.
WARNING: TO PREVENT FIRE OR SHOCK
TO RAIN OR MOISTURE.
HAZARD, DO NOT EXPOSE THIS EQUIPMENT
CAUTION: To prevent electric shock, match wide blade of plug to wide slot, and fully inserL
ATTENTION: Pour eviter les chocs electriques, introduire la lame la plus large de la fiche darts Ia
borne correspondante de la prise et pousser jusqu'au fond.
IMPORTANT SAFETY INSTRUCTIONS
Read before operating equipment
1.
2.
3.
4.
5.
6.
7.
8.
9.
10.
11,
12.
13.
14.
15.
Read these instructions.
Keep these instructions.
Heed all warnings,
Follow all instructions,
Do not use this apparatus near water.
Clean only with a dry cloth,
Do not block any of the ventilation openings. Install in
accordance with the manufacturers instructions,
Do not install near any heat sources such as radiators, heat
registers, stoves, or other apparatus (including amplifiers)
that produce heat,
Do not defeat the safety purpose of the polarized or grounding-type plug, A polarized plug has two blades with one
wider than the other, A grounding type plug has two blades
and third grounding prong. The wide blade or third prong
are provided for your safety, When the provided plug does
not fit into your outlet, consult an electrician for replacement
of the obsolete outlet.
Protect the power cord from being walked on or pinched
particularly at plugs, convenience receptacles, and the point
where they exit from the apparatus.
Only use attachments/accessories
specified by the manufacturer.
_
Use only with a cart, stand, tripod, bracket, or table
I specified by the manufacturer, or sold with the apparatus. When a cart is used, use caution when
moving the cart/apparatus combination to avoid
injury from tip-over,
Unplug this apparatus during lightning storms or when
unused for long periods of time.
Refer all servicing to qualified service personnel. Servicing
is required when the apparatus has been damaged in any
way, such as power*supply cord or plug is damaged, liquid
has been spilled or objects have fallen into apparatus, the
apparatus has been exposed to rain or moisture, does not
operate normally, or has been dropped.
This product may contain lead and mercury. Disposal of
these materials may be regulated due to environmental con*
siderations, For disposal or recycling information, please
contact your local authorities or the Electronic Industries
Alliance: www.eiae.org
16. Damage Requiring Service - The appliance should be
serviced by qualified service personnel when:
A, The power supply cord or the plug has been damaged;
or
B, Objects have fallen, or liquid has been spilled into the
appliance; or
C. The appliance has been exposed to rain; or
D, The appliance does not appear to operate normally or
exhibits a marked change in performance; or
E. The appliance has been dropped, or the enclosure
damaged.
17. Tilt/Stability - All televisions must comply with recommended international global safety standards for tilt and stability
properties of its cabinet design,
• Do not compromise these design standards by applying
excessive pull force to the front, or top, of the cabinet which
could ultimately overturn the product,
• Also, do not endanger yourself, or children, by placing
electronic equipment/toys on the top of the cabinet. Such
items could unsuspectingly fall from the top of the set and
cause product damage and/or personal injury.
18. Wall or Ceiling Mounting - The appliance should be
mounted to a wall or ceiling only as recommended by the
manufacturer,
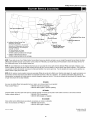
19. Power Lines -An outdoor antenna should be located away
from power lines.
20. Outdoor Antenna Grounding - If an outside antenna is
connected to the receiver, be sure the antenna system is
grounded so as to provide some protection against voltage
surges and built up static charges.
Section 810 of the National Electric Code, ANSI/NFPA No.
70-1984, provides information with respect to proper
grounding of the mast and supporting structure, grounding
of the lead-in wire to an antenna discharge unit, size of
grounding connectors, location of antenna-discharge unit,
connection to grounding electrodes, and requirements for
the grounding electrode. See Figure below.
21. Object and Liquid Entry - Care should be taken so that
objects do not fall and liquids are not spilled into the enclosure through openings.
Note to the CATVsysteminstaller: This reminder is provided to call the CATVsystem installer's attention to Article 820-40 of the ilEC that provides ]
guidelines for proper grounding and, in particular, specifies that the cable ground shall be connected to the grounding system of the building, as close
to the p0 nt of cab e entry as pract ca,
Exampleof AntennaGrounding
as per NEC- National ElectricCode
GROUNDCLAMP
ANTENNA LEAD IN WIRE
__
ANTENNA DISCHARGEUMT (NEC
SECTIO_
810-21)}
GROUNDING CONDUCTORS(_ECSECTION
818-211
GROUNDCLAMPS
J
T. _,.........._
ELECTRICSERVICEEQUIPMENT
3
POWER SERVICEGROUNDING ELECTRODESYSTEM (NEC
A£T2_e.PART
_)
Rev. 8/13/01
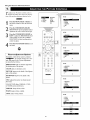
INTRODUCTION
Welcome/Registration of Your TV ....................
Safety/Precautions ..............................
Features ........................................
CONNECTING
ACCESSORY
FEATURES
The Timer
2
2 3
5
Setting
the Clock
Displaying
DEVICES
Setting
TO YOUR TV
the Time
the Timer's
Selecting
Panel Overviews:
Standard
inputs and Outputs
Panel Overviews:
High-definition
inputs
..........
6
...............
Connecting
a VCR
Connecting
a VCR and Cable Box ....................
................................
Connecting
and Using an Audio Hi-fi System
with Your TV .................................
DVD Player
8
Understanding
Setting
a Standard
Connecting
Capability
a DVD Player with Progressive-scan
....................................
12
Connecting
an S-Video
11
13
.....................
Connecting
an HD Receiver to the
HD INPUT-AV 4 Jacks ..........................
............................
40
Channel
Activate
Control
AutoLock
TM
up the AutoLock
TM
to Block Channels
...............
Using AutoLock
TM
to Block by Movie
Rating
Using AutoLock
TM
to Block by TV Rating
Turning the AutoLock TM Blocking
on or off ....................................
Using AutoLock
TM
16
Direct-entry Codes for A/V Accessory Devices
20
23
24
Using AutoSounO M ..............................
Using AutoPicture TM .............................
25
26
Using AutoSurP M ...............................
27
Using Program List and Alternate Channel (A/CH) ......
Using the Sleep Timer Control ......................
28
29
USING
THE
ONSCREEN
Setting
the Eye Fidelity
Setting
the Dynamic
_
SOUND
Adjusting
Balance
Control
Contrast
...............
Using the AVL (Audio Volume
Leveler)
Selecting
the Surround-sound
Modes
Selecting
the Stereo/Mono
Selecting
the SAP (Second Audio
......................
Feature
36
.....
58
.......
Service
Warranty
59
INFORMATION
...............................
60
..............................
Limited
57
Locations
61 62
.......................
63
64
......................
65 66
................................
68
•
_l)levision and remote-control operation
•
Onscreen menu controls
•
How to use the installation
ii
features.
III'l!l i!ll, I_l'l,_
Ill dIll't/iivl
As you unpack your TV, please note that this Directions /or Use
manual contains sat_ty-tlp inibrmation
and Factory Service
Center locations,
as well as a Warranty
Registration
Card_
remote control, and batteries tbr use with the remote control.
35
..............
Program)
C: Setting Color Space for the HD Inputs
I_
34
.................
Sound Mode
Using the Bass Boost Control
........
.........
...................
Ret_er to the simple Quick Use and Setup
Guide (supplied with your TV) for details on
the tMlowing:
• Basic TV connections
33
Control
56
[$,,llll!l'_[e:_l'i!lTll'l'-gi'lll [¢t167;T-J
32
the Treble, Bass, and
Controls ........................
53
Appendix
Factory
52
54-55
B: Model
Glossary of Television Terms
Index .........................................
31
................
........
.................
Specifications
50
51
Settings
Appendix
Troubleshooting
30
.....................
Control
...........................
Care and Cleaning
SUBMENUS
PICTURE
Adjusting the Picture Controls
.......
.................
Using Active Control
LILILI_I
GENERAL
21 22
Using the TV Remote with Accessory Devices .........
Using the AV and Source Select Buttons ..............
Control
Control
TM
48
That
APPENDIXES
Appendix A: Compatibility
Information
for the TV's High-definition
Inputs
19
......
TM
Using the Picture-format
18
Using the Code-entry Method to Program Your
TV Remote ...................................
Using the Search Method to Program Your
TV Remote ...................................
AutoLock
Captioning
47
...........
Broadcasts
15
Using the Closed
46
.........
49
to Block Unrated
Your Currrent
45
Control
Connecting
17
44
.............
Using AutoLock
Reviewing
USING THE the
REMOTE
CONTROL
Programming
TV Remote
to Work
with Accessory Devices .....................
43
.......................
Access Code
TM
14
Connecting
and Using Headphones
with Your TV .................................
42
................
Connecting
an HD Receiver to the
HD INPUT-AV 5 Jacks ..........................
..........................
41
.....................
Using AutoLock TM to Block Broadcasts
Have No Rating ...............................
a Camcorder
.........
AutoLock'_M
10
..................
the Timer's
39
Start Time and Stop Time
the Timer's
9
Connecting
Device
Setting
7
...............................
37
Please take a few minutes to complete your registration
serial number for the TV is on the rear of the set.
38
Refer to the back of this manual
and care of the TV.
4
for instructions
car&
in the cleaning
The
Active
ControP
Mcontinuously
measures
andcorrects
allincoming
signals
toprovide
thebest
picture
settings.
Thisfeature
provides
a
sharp
andvirtually
noise-fi-ee
picture
anytime,
from
anyNTSC
source.
NTSC
istheNational
Television
Standards
Committee
formatdevised
inthe1940s
forTVbroadcast
analog
videosi_aals
(525lines:
30Hz).
Alternate
Channel
(A/CH)button allows you to switch back and
forth between the currently
viewed channel.
Automatic
Phosphor
the set's Automatic
viewed
Aging
Format
channel
and the previously
Compensation
feature
(APAC)
to prevent
component
video inputs allow you to connect
signals to the TV (HD INPU'IZAV 4 only). The
result
color purity, crisp
is superb
Program
(SAP) bilingual
cable
enough
the TV. See pages 18 23.
Incredible
Surround
_M enhances
sound broader and fuller.
to blur image
retention.
APAC is like a screen
saver for
Audio/video
jacks
accessories
allow
for quality
direct
connections
TV picture
with VCRs
and sound
playback.
and other
Component
Audio
Volume
Leveler
(AVL) control
keeps
the TV's
converter
boxes,
satellite
may need to program
Onscreen
video input jacks are provided for high-fidelity
color and picture
resolution when using digital video source material, such as a
DVD.
as
those
broadcasts
when they are
universal remote control operates your TV set and
that work by infrared remote control, such as VCRs,
nonmoving
images. Periodically,
APAC automatically
shifts your
television picture in very small increments,
but in increments
large
your TV.
color
for YPbPr/RGB,
Hi-fi stereo system, including a built-in audio amplifier and a twin
speaker system. The system enables you to hear stereo sound or
Home-cinema
other devices
left by
color detail, and reduced
noise. Your set provides separate HD inputs
well as horizontal
and vertical sync.
Second Audio
available.
works with
screen burn
High-definition
High-definition
menu
controls
receivers,
the remote
shows
stereo
the TV controls
(can be viewed
and others.
Note:
to work with devices
programs
by making
and allows
in American
You
other than
the
you adjust
English,
French,
or set
or
Spanish).
sound at an
Program
List displays a list of your f_avorite channels at the press
of a button. You can scroll through the list, highlight a favorite
even level. Peaks and valleys that occur during program changes
or commercial
breaks are reduced, making for a more consistent,
comfortable
sound.
channel,
AutoChron
sets the right time of day and main-
accidents
through
watching.
The protective
screen filter is specifically
formulated
by
Philips for HD displays to protect your investment
while giving the
_M automatically
tains it with digital
precision
and even Daylight
Savings
AutoLock
rM protects
Time
and adjusts
has a Format
picture
to various
(games).
AutoSound
IM allows
controls
of programs,
Edit
of channels
from three
and Theatre
the particular
M allows
Channel
among
you to add or remove
the number
the TV
Closed Captioning
voice conversations
buttons
Surround
on your remote
(retYrred
dialog
to as DOLBY
uses two speakers
by a multichannel
"hanging
the PIP window
aren't
or cable
TV (CATV)
of
channel
for high-definition
(activated
when using the ttmer and
video.
the video with spatial and temporal filcross-color
and cross-luminance
inter-
video fields,
dots," and "barber
This filter uses extensive
significantly
reducing
pole artifacts"
mem"dot
on the image.
(PIP) allows you to monitor one
another. Access your favorite shows
with tuner one while
with tuner two. No VCR
scanning
other channels
is needed
in
for PIP tuning.
As an Energy Stal'_ Partner, Philips Consumer
Electronics
determined
this product meets the Energy Stal'_ guidelines
_
energy
it
Active
or
Control,
Surround
Copyright
in
the sur-
efficiency.
Energy
Star_
is a U.S.
registered
mark.
products
with the Energy Star:l_ label can save energy.
energy reduces air pollution
and lowers utilby bills.
control.
VIRTUAL
to simulate
when parents
into
from the list
Edit makes
Filter
Two-tuner
Picture-in-picture
video source while watching
that are available
allows you to read TV program
as onscreen text.
suhmenu)
produced
Channel
to the del-
or pets knows
capability
video resolution.
complete
on the main screen
only the channels
channels
of channels
to you when you press the CH +
round effect
you to tailor
Comb
improving
ory to analyze
crawl,"
especially
(VHF/UHF)
composite
inputs) processes
tering, virtually eliminating
you are watching.
to you. You can program up to 10 channels
M memory through the onscreen display.
allows
Dolby*
as well as advanced
to your own preferThe three factory-set
enable
stored in the TV's memory.
the onscreen
broadcast
t_actory-set controls
programming
you to easily switch
easy to limit or expand
Virtual
Standard
capability,
and
damage
turns the TV off after a set amount
control
movies,
accidental
with children
picture.
format
ference,
you to select
Anyone
in the home
Sleep Timer automatically
time of your choice.
and adapt your TV's
such as sports,
helps prevent
screen.
can happen
best possible
signal's
Also, your remote
you to push a button
Voice, Music,
that are of interest
the TV's AutoSurP
program-
you to select the picture
control that you set according
the onscreen Sound submenu.
sound to enhance
AutoSurP
the incoming
filter
3-D Y/C Digital
types
multimedia
and a personal
ences through
detects
that allows
you want to see.
AutoPicturO
M allows
failures,
from objectionable
it to fill the screen.
button
power
screen
icate front lenticular
adjustments.
young children
ming with V-chip technology.
Automatic
Format
automatically
format
brownouts,
and tune to the channel.
Protective
APAC,
are trademarks
2002 Philips
AutoPicture,
AutoSound,
of Pbilips Consumer
Consumer
Electronics.
AutoSurl,
Electronics
*Mmmfactured
under license fi'om Dolby Laboratories.
double-D
symbol are trademarks
of Dolby Laboratories.
has
for
Using
Saving
and Incredible
NolCb America.
' Dolby"
mid tbe
system.
Dynamic
Contrast
helps you sharpen the picture quality by making the contrast between the dark and bright picture areas more
noticeable
as the image on screen
Eye Fidelity
scanning
gives you a choice
techniques
changes.
between
progressive
two different
and interlaced.
picture-
Progressive
scan
doubles the number of visible picture lines per field by displaying
all picture frame lines at once, eliminating
line flicker. The interlaced mode
provides
for a double
vertical
display
(interlaced)
of
progressive
scan, which reduces annoying motion artifacts. The
Interlaced mode also helps smooth out jagged lines sometimes
seen on curved
and angled
surfaces.
Your new projection
television and its packaging contain materials
that can be recycled and reused. Specialized
companies
can recycle your product to increase the amount of reusable materials and
minimize the amounts that need to be properly disposed. The batteries used by your product should not be thrown away when
depleted but should be handed in and disposed of as small chemical waste. Please find out about the local regulations
concerning
how to dispose of your old television,
batteries,
materials whenever it is time to replace them.
and packaging
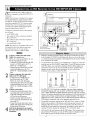
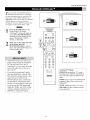
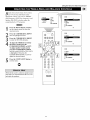
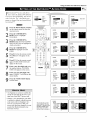
Connecting
Accessory
Devices
toYourTV
yoau
can connect a wide range of video and
udio devices to your TV, in various ways.
7his page and the next one provide an overview
of signal compatibilities
and the t2pes of
devices you can connect to the jacks.
Connection examples jbllow on subsequent
pages, Seepages
l and 2 _?fthe Quick Use and
Setup Guide that came with your setjbr examples of basic connections, You may also want to
refbr to the user instructions that came with
each particular device fi)r iqf!)rmation on con-
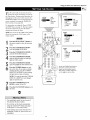
D
Rear of TV
Vlections,
WhatYou
Can Connect
to the
Standard
Panel Jacks
®°
ANTENNA IN 75_ jack--use to connect radio-frequency (RF) signals from
VHF/UHF antennas or a cable system,
These are 480i signals.
jacks)--compatible
YPbPr
(component with
video480i
input
signals
[CVI]
only. Use to connect accessories having
component video oulputs, such as DVD
players, laser-disc players, video-game
players, satellile receivers, or other
devices. Use the INPUT-AV 1 L(efi) and
R(ight) AUDIO jacks for sound connections. CVI cannot be displayed in the PIP
window.
3
4
5
6
S-VIDEO (super video) jacks--compatible with 480i signals only. Use to
connect accessories having Super VHS
(S-VHS) outputs, such as VCRs, DVD
players, laser-disc players, video-game
players, satellile receivers, or other
devices.
Summary
Compatible
from
Input
ANTENNA
jacks onTV
OUTPUT (VIDEO/AUDIO)--video
is
compatiNe with 480i signals only. Use to
connect to a VCR Io record programs
from the TV. Or use lhe AUDIO ouqguts
Io connect Io an audio hi-fi system,
headphones
,_, Headphone
for personal
jack--uselistening.
to connect
an
output
extetna[
signal
SOUrce
or device
IN 75_, INPUT AV-1,
INPUT AV-2, and side jack panel (AV3)
480i (480 lines, interlaced)
•
Side Jack Panel
VIDEO (composite) jacks (INPUT-AV 1,
INPUT-AV 2, and TV's side jack panel
[AV3l)--compatihle with 480i signals
only. Use m connect accessories having
composile video outputs, such as VCRs,
video-game players, or other devices.
AUDIO inputs (INPUT-AV 1,
INPUT-AV 2, and TV's ,sidejack panel
[AV3D--use io connect from the audio
output jacks on VCRs, DVDs, or olher
accessories,
of signal compatibilities
NOTE:The
TV recognizes
the side jack
panel as AV3.
Signals connected to the HD INPUT-AV 4
or HD INPUT-AV 5 inputs will provide
you with the best piclure, Examples of
sources for such signals are a progressivescan DVD player (480p) or an HD receiver
(1080i or 480p) with YPbPr or RGB oulputs. The 1080i signals will provide you
with the best picture possible, Devices with
RGB outputs may or may not have H and
V sync ouq_uts to connect io the HD
INPUT-AV 4 H and V SYNC inputs (see
page 57). Instructions for selecting lhe
HD INPUT-AV 4 and AV 5 color space
(YPbPr or RGB) are on page 59.
Among lhe 480J-compatible
inputs
(ANTENNA IN 75g2, INPUT AV-I,
INPUT AV-2, and the side jack panel), you
will get the best piclure from the component video inputs (labeled YPbPr), The
S-Video inputs will provide the nexl-best
level of picture qualily.
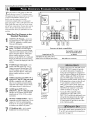
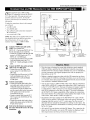
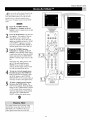
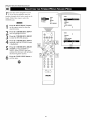
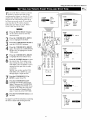
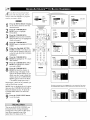
Connecting
HD INPUT-AV 4 and HD 1NPUT-AV 5
acks al!ow you to digital equipment with
1080i or 480p signal output.
Accessory
Devices
to Your TV
_jle
ANTENNAIN_S_
WhatYou Can Connect to the
High-definition Input Jacks
RearofTV
HD INPUT-AV 4_use to connect digital equipment with a 1080i or a 480p
signal output, such as HD receivers
(1080i or 480p) or DVD players with
progressive-scan capability (480p). You
can connect equipment with YPbPr
component video or RGB ouq_uts to the
HD INPUT-AV 4 jacks, H and V Sync
connections may or may not be required
for RGB connections, (See page 57,)
Dedicated audio input jacks are located
with the HD INPUT-AV 4 video jacks,
I-I®*®l,l®.®
Summary
of signal compatibilities
NOTE: The Picture-in-Picture (PIP) feature
does not function with AV 4,
2
HD IN PUT-AV _-use lo connect digital
equipment wilh a I080i or a 480p signal
output, such as HD receivers (I080i or
480p) or DVD players (480p). The
HD IN PUT-AV 5 jack accepts a DB15
connector, Dedicated audio input jacks
are located with lhe HD INPUT-AV 5
video jack.
NOTE: The Picture-in-Picture (PIP) feature
does not function with AV5,
¸:H ;
iiiiiiiiiiii IN ii i!
• The TV's default color-space setting for
HD INPUT-AV 4 is YPbPr, and for
HD INPUT-AV 5 it is RGB. If the picture
looks grossly incorrect, try changing the
color-space setting on either the digital
equipment or the TV, For more information on setting the color space on the digital equipment, see the equipment's directions-for-use manual, To set the TV's
color space, see page 59 in this manual.
• This television is designed to be compatible
with high-definition signal standards i080i
and 480p as specified by the Electronic
Industries Association standard EIA770.3,
Because output standards may vary by manufacturel; you may encounter some digital
equipment that will not pl'operly display pictures on the TV.
• The Picture-in-Picture (PIP) feature does
not function with the HD INPUT-AV 4 or
HD INPUT-AV 5 signal sources. AV4 and
AV5 cannot be displayed in the PIP window, nor can the PIP window be displayed when either AV4 or AV5 is being
viewed on the main screen.
from
Input jacks on TV
HD INPUT-AV
4 and HD INPUT-AV
an
external
SOUPce
or device
5
1080i (1080
Compatible
lines, interlaced)
output or
signal
480p (480 lines, progressive scan)
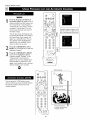
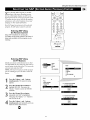
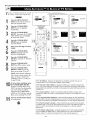
Connecting
Accessory
Devices
toYourTV
Tjhe
TV _ audio/video (A V) irlput jacks provide
r directpicture and sound connections
between the TV and accesso_ T devices such as
VCRs, D VD players, and others that have A V outputjack_.
Rear of TV
"lhis example, which uses the INPUT-AV l jacks,
shows you one wuy you can connect a VCR to
your TE
R_@r to the directionszfbr-use manual jbr your
VCR fiJr fi_rther iqfiJtwzation on connections.
7b make the connections show,n it1tbis example,
you will need:
• one coaxial cubic (75f2)
• one cablejbr a vMeo connection (standard
RCA connector)
• two cablesjbr audio connections (standard
RCA connectors) (only one cubic is needed /br
a nonstereo VCR).
NOTE: "Hw cables are not supplied with your TE
You should be able to buy them at most stores
that sell electronics. Or you cun call our
Customer Cure Center at 1-800-531-0039
®
Coaxial CaNe
Lead-in from
Cable TV Company
or VI-IF]UHF Antenn_
Rear of VCR*
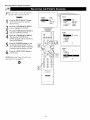
I I
* (Example: I_ilips VCR
mode[ VR674CAT)
r-a-war
Connect a cable TV or antenna signal to
the ANT IN jack on the rear of the VCR.
2
3
Connect from the OUT jack on the rear
of the VCR to the ANTENNA IN 75D-jack on the rear of the TVI
Connect the VIDEO OUT jack on the
rear of the VCR to the INPUT AV 1
VIDEO jack on the rear of the TVI
L(eft) jacks
Connect
theon
audio
the rear
output
of the
R(ight)
VCR and
to the
INPUT-AV 1AUDIO jacks on the rear of
the TVI
NOTE: if the VCP, is a mono (nonstereo)
unit, connect only the left audio cable,
which usually has a white connector.
trol asthe
Press
many
AV times
buttonasonnecessary
the remote
to select
conthe AV1 source.
[]
To simplify making connections, audio and
video cables often have color-code connectors. The jacks on your TV are likewise
color coded to match the connectors. The
coding is as follows:
• Yellow for video (composile)
• Red for the fight audio channel
• White for the left audio channel
NOTE: If your VCR is mono (nonstereo), you will connect only one audio
cable. You must ensure that the TV is set
to MONO for the signal source io which
you've connecled the VCR (INPUT-AV 1,
INPUT-AV2, or the side panel inputs
[AV3]). Otherwise, you will receive
sound from only one of the TV's speakers.
See page 36.
Turn athe
view
videotape
VCR ononand
the press
TV. PLAY to
You can display the AVI, AV2, orAV3 signal
sources in/he PIP window. See page 7 of the
Quick Use and Setup Guide for infom_alion on
using the Picture-in-Picture
(PIP) feature.
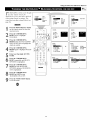
Connecting
Accessory
Devices
to Your TV
presented
here is a connection example
invoh4ng a VCR and cable box.
Rq/er to the VCR k directionsJbr-use
manual
/br jilrther #l/brmation
on connections.
7b make the connections
will need"
in this example,
you
• one, two-way signal splitter
• two coaxial cables (75_)
• one cablejbr
a video connection lstandard
RCA connecto 0
• two cablesjbr
audio connections
(standard
RCA connectors)
(only one cable is needed
jbr connection to a nonstereo VCR).
RearofTV
Rear ofVCR"
NOTE: ZTw cables are not supplied with your
TE You shouM be able to buy them at most
stores that sell electronics. Or you can call
our Customer Care Center at
1-800-53!-0039.
I
I
I I
/
Connect a cable TV signal to a twoway signal splitter,
Connect outputs
one of the
two-way
splitter
to the
INPUT signal
on the
cable box.
• _mple: Phlllps
(_CR model
VR674CA_
[]
Rear of Cable Box
S" nal
a_lt_r
splitter output
Connect
the other
to the
two-way
ANTENNA
signal IN
75_ on the rear of the TVI
jack to thefrom
Connect
ANTtheIN cable
jack on
boxtheOUTPUT
rear of
the VCR.
the
VCR the
to the
INPUT-AV
1 VIDEO
Connect
VIDEO
OUT jack
on
jack on the rear of the TV,
and
L(efl)jacks on the
VCRto
ConnecttheAUDIO
OUT
R(ight)
INPUT-AV 1AUDIOjacks on the rear
ofthe TV.
NOTE: if the VCR is a nonstereo unit,
connect only the left audio cable,
which usually has a white connector.
controltheasAV
Press
many
button
timesonasthenecessary
remote
to select the AVI source,
Turn the VCR on and push PLAY to
view a videotape,
To simplify making connedions, the connectors
on audio and video canes are often color
coded. The jacks on your TV are likewise color
coded to malch lhe conneclors,
The coding is as follows:
• Yellow for video (composite)
• Red for the righl audio channel
• White for the left audio channel
NOTE: if your VCR is mono (nons_ereo),
you will connect only one audio cable. You
musl ensure lhal the TV is set k3 MONO for
Ihe signal source to which you've connected
Ihe VCR (INPUT-AV l, INPUT-AV 2, or the
side panel inputs [AV3]). O_herwise, you will
receive sound from only one of the TV's
speakcrs. See page 36.
Connecting
Accessory
Devices
to Your TV
y_Jo u can use your TV_ AUDIO OUYPUY_ktcks
connect to an exterrlal audio kirfl system.
[_bllow tbe simple steps below.
"lb make these connections, you will need two
cables /br audio connections (stumlard RCA).
NOTE: 7"becables are not supplied with );our TI_
You shouhl be able to buy them at most stores
that sell electronics. Or you cun call our
Customer Cure Center at 1-800-531-0039.
RearofTV
Connect from the L(eft) and R(ight)
AUDIO OU'I PUT jacks on the rear of the
TV to the L(eft) and R(ight) AUX/TV
INPUT jacks on the lear of the hi-fi system.
2
See the section below on using the
AUDIO OUT control,
AJier
connecting the TV;_ AUDIO OU77_UT
lacks to the AUDiO INPUT jacks on an
external hiBf! system, set the AUDIO OUT
control in the SOUND submenu to either
VARIABLE or FIXED to determine whether
you ac_]ust the volume at the TV or at the
external hizf! system. 7b change the volume at
llw TV using the TV'_ remote control, you must
select VARIABL£
7b adjust the volume at the
stereo using the hizf!'s controls, you must select
FIXED. You can also use the SPEAKERS
control in the SOUND submenu to turn the
TV_Yspeakers
SOUND
• PICTURE
TREBLE
• FEATURES
• I_STALL
BASS
BALANCE
AVL
INCR'SURROU_D
I
,•
I_II_tI,
•
•
•
•
I
I
BASS
RALANCE
AVL
INCR.SURROUF_D
q[_'
SOUND
t
INCR-SURROUND
Press the MENU/SELECT
button
on the remote control to show the
onscreen
2
3
4
5
6
7
menu,
•
HEADPffOHE
•
STEREO
•
SAP
Press the CURSOR
RING DOWN
once to highlight SOUND.
Press the CURSOR
to enter the SOUND
RING RIGHT
submenu.
Press
RING
the CURSOR
repeatedly
lighted,
until AUDIO
l:|
DOWN
J]I] [010] h m
Ji,l!l
_]_L_il
SOUND
t
OUT is highHEADPHONE
• STEREO
• SAP
• AUDIOOUT
Press the CURSOR
RING LEFT or
RIGHT to set the AUDIO OUT to
either VARIABLE or FIXED,
If you want to turn the TV's internal
speakers off, press the CURSOR
RING DOWN repeatedly until
SPEAKERS is highlighted. Then press
the CURSOR RING LEFT or RIGHT
to turn the speakers off
®
Press the STATUS/EXIT button to
PHILIPS
11 UI!l[II
exit the menu.
10
tztt
The sound ouq_uts from the TV to an external hi-fi system are not afi'ec_ed or tailored
by the TREBLE, BASS, BALANCE,
AVL,
INCR. SURROUND,
and BASS BOOST
controls in the TV's SOUND submenu.
Connecting
Accessory
Devices
to Your TV
C:mponent
video inputs allow the highest posible color and picture resohttion in the playback of digital signals, such as those of DVD
players. 17re color dtfference signals (Pb, Pr) and
the luminance Or) signal are connected and
received separately. ITte result i_ better color
bandwidth inibrmation than is possible with composite video (lubeled VIDEO on your TV_juck
panel) or S-Video connections.
]b make the connections show,n in this example,
you w,ill need:
• three cablesf!)r video connections (stundurd
RCA connectors)
• two cablesjbr audio connections
RCA connectors).
(standard
NOTE: The cables are not supplied with your TI_
You should be able to buy them at most stores
that sell electronics. Or you cun call our
Customer Cure Center at 1-800-531-0039.
*(ExamNe:Philips
Connect the YPbPr (component)
VIDEO OUT jacks from the DVD player
to the INPUT-AV 1YPbPr (component
video) jacks on the rear of the TV.
NOTE: The INPUT-AV 1YPbPr jacks
will accept 480i (interlaced) output signals only. The connection exalnple on this
page assalnes the use ofa DVD player
with interlaced output. Some DVD players, howevel; have YPbPr outputs that can
be switched between interlaced and progessive scala.If you are attempting to use
a DVD player with progressive-scan
(480p output) capability to make the connection shown in this exalnple, you must
be sure to switch the DVD player to interlaced. If necessary, refer to the DVD player's directions-fol_use manual for help. if
you want to use the DVD player in pro_essive-scan mode, you must use the
HD INPUT-AV 4 jacks (see page 12).
DVD model DVD712)
[]
• To simplify making coanections, the connectors on audio and video cables are often color
coded. The jacks on your TV are likewise
color coded to match the connectors.
• The names for the COlnponentvideo jacks
may differ depending on the DVD player or
accessory digital soalve equipment used. For
exalnple, besides YPbPl; you may see
R-Y/B-Y/Y; or CrCbY Although abbreviations and terms may vaiN, the letters B and R
stand for the blue and led color componant
signal connectors, respectively, and Y indicates
the lalninance signal, ifnecessalT, refer to the
directions-for-use manual for yoar DVD or
digital accessory for more information.
• You can also connect a satellite receiver to the
TV in a manner similar to the exalnple shown
on this page. If you connect a satellite receiver
to the TV, you will need to use the receiver's
channeMnemorization
system to store channels in the receiver's memory.
®
R(ight) jacks
Connect
the AUDIO
from theOUT
DVDL(eft)
playerand
to the
INPUT-AV 1AUDIO jacks on the rear of
the TV:
•
If you experiance difficulties receiving soand
with a DVD disc, check the _)and settings
through the DVD disc's menu.
• The CVI source cannot be displayed in the
NP window. See page 7 in the Quick Use and
Setup GuMe for more on the PIP feature.
trol as the
Press
many
AV times
button asonnecessary
the remote
to select
conthe CVI (component video input) source
on the TV.
PLAYthe
Turn
to view
DVD the
player
DVDonprogram
and press
on
the TV.
To prevent aneven picture-tube aging, do not
leave nonmoving images or picture borders on
the screen for an extended period. See page 60.
11
Connecting
Accessory
Devices
to Your TV
Tche./bllowing
instructions explain how to
vnnect a DVD pluyer with plvgressive-scan
capability to the HD INPUT-A V 4 jacks on
your TE
RearofTV
"/b make the connection_, you will need:
• three cables.&r video connections (standurd
RCA connectors)
• two cables.ibr audio connections (standard
RCA connectors).
NOTE: Tbe cables art, not supplied with your TJ_
You should be able to buy them at most stores
that sell electronics. Or you cun call our
Ckstomer Cure Center at 1-800-531-0039.
Connect from the YPrPb jacks on
the rear of the DVD player to the
HD INPUT-AV 4 G/Y, IUPr, B/Pb jacks
on the rear of the TV.
Rear of DVD Player with Progressive Scan CapaNIity
2
3
Connect from the L(eft) and R(ight)
AUDIO OUT jacks on the rear of the
DVD player to the HD INPUT-AV 4
AUDIO L(efi) and R(ight)jacks on lhe rear
of the TV.
If after connecting your DVD player your
display is filled with wavy lines, it may be
that your DVD player is not set to progressive-scan mode. Some DVD players have an
I/P (interlaced/progressive
scan) switch
located on the back or front of the playel\s for
changing fi_)m interlaced to progressive-scan
mode. Other DVD players may allow the
mode to be changed by pressing a button on
the DVD player's remote control or by using
the DVD player's onscreen menu. If the
interlaced/progressive-scan
selection
option is provided only through the DVD
onscreen menu, you will need to connect
the DVD player to another AV input
source in addition to HD INPUT-AV 4 to
see the DVD menu. Select this additional
AV source on screen to see the DVD menu
and choose progressive-scan mode. You
will then be able to see the DVD picture
through the AV4 source.
Make sure the DVD player is in progressive-scan mode. You will not get a
viewable picture through the HD
IN PUT-AV 4 jacks if the DVD player is
in interlaced mode.
For more information on placing your
DVD player in progressive-scan mode,
see the DVD player's directions-for-use
manual. Also, see the Helpful Hints to
the right. The way in which progressive-scan mode is selected varies among
DVD players.
controltheasAV
Press
many
button
times
on as
your
necessary
TV remote
to
select the AV4 signal source.
Some DVD players have dedicated progressive-scan output jacks that are labeled as
such andrequire no switching to provide a
picture through the HD INPUT-AV 4 jacks.
See your DVD player's directions-fol_use
manual for infol_ation.
press
play DVD
to view
DVD aon
the and
TV.
Turn the
on, ainsert
disc,
®
@
If you experience difficulties receiving
sound with a DVD disc, check the sound
settings through the DVD disc's menu.
¸
To prevent uneven picture-tube aging, do not
leave nonmoving images or picture borders on
/he screen for an extended period. See page 60.
The default colol_space setting for the
HD INPUT-AV 4 jacks is YPbPr. RGB is
also an option. If the picture's color looks
grnssly incorrect, try changing either the
DVD player's or TV's color-space setting.
See the DVD player's directions-for-use
manual for information on setting its color
space. Or see page 59 in this manual to set
the TV's color space.
The Picture-in-Picture (PIP) feature does
not function with AV4 or AV5.
12
Connecting
The
S01per)-video connection on the rear (and
I side panel) qf the TV can give you better picture detail aM clar#y._br the pluyback qf S-VHS
VCR tapes or DVDs than the normal antenna
(RF signal) or Video (composite) picture connectiovl_. "lhe example given cnnnect_ a D VD/VCR
Cbmbi wlit to the 1NPUT_AV2jucks on the rear
qf the TE
Accessory
Devices
toYourTV
Rear of TV
I(O))_*
NOTE: The accessoo_ device must have an
S- V1DEO output jack to makz, the connection
explained on this page.
I
]b make the connections, you w,ill need:
• one S-_'deo cable
• two cablesjbr audio connections
RCA connectors).
(standard
I
Rear of Device with
m &
I
S-VIDEO Output 't
@
NOTE: The cables art, not supplied with your TE
You should be able to buy them at most stores
that sell electronics. Or you cun ca# our
C_stomer Cure Center at 1-800-531-0039.
*(Example:Pl/i[ips
DVDNCR
Combi model DV910VHS)
Connect the S-VIDEO OUT jack on the
rear of the accessory device with
S-VIDEO output to the INPUT-AV 2
S-VIDEO jack on the rear of the TV.
jacks on the
Connect
the rear
DVD/VCR
of the accessory
AUDIO device
OUT
to the INPUT-AV 2 AUDIO input jacks on
the rear of the TV.
trol asthe
Press
many
AV times
buttonasonnecessary
the remote
to select
conthe AV2 source on the TVI
play totheview
Turn
accessory
the video
device
source
on material
and press
(DVD or videotape, for example) on
the TV.
To simplify making conneclions, audio
cables are often color coded: red for the
righl channel, and while for the left channel, The jacks on your TV are likewise
color coded to match the connectors. To
make S-Video connections, you must use
an S-Video cable,
You can also connect a satellite receiver,
laser-disc player, video-game player, or
other accessory device with S-Video
capability to the TV in a manner similar
to example shown on this page.
if you connect a satellite receiver _o the
TV, you will need to use the receiver's
channel-memorization system m s_ore
channels in the receiver's memory,
¸
Video sources that show a constan_ nonmoving pattern on the TV screen can cause picture-robe damage, When you are not using
your video accessory devices, turn _hem oft2
Also, regularly alternate the use of accessory
video sources with normal TV viewing, See
page 60,
Connecting
Accessory
Devices
to Your TV
D;gital
equipment w,ith a 1080i or 480p outut, is compatible w,ith the HD INPUT-AV 4
video jacks.
NOTE: ]'b& television & desigmed to be compatible with high-definition sigmal standards 1080i
and 480p as spec!/ied by the Electronic Industries
Association standard E[A 770.3. Because output
standards may vao_ by mam(/itcture_; you may
encounter some digital equipment that w,ill not
properly display pictures on the TI_
]b make the connections show,n it1this example,
you will need:
• one S-VIDEO cable
• three cables/br video connections
RCA connectors)
• fimr cables/br audio connections
RCA connectors)
Coaxial
Cable
Lead in
from
Satellite
Dish Antenna
(standard
(standard
• one coaxial cable (75f_).
NOTE: 77w cables are not supplied with your TI_
You should be able to buy them at most stores
that sell electronics. Or you can call our
Customer Cure Center at 1-800-531-0039.
Connect S-VIDEO and audio cables.
NOTE: This example uses
INPUT-AV I. You can use INPUT-AV 2 or
the side inputjacks if you want.
• Connect an S-VIDEO cable fi'om the HI)
receiver's S-VIDEO jack to the TV's
INPUT-AV 1 S-VIDEO jack.
• Cormect from the HD receiver's AUDIO
L(eft) and R(ight)jacks to the TV's
INPUT-AV 1L(efi) and R(ight)AUDIO
jacks.
......... .....................................
Making a standard conneclion along with the HD conneclion as shown
in the example (S-ViDEO) on this page will allow you to see the receiver's onscreen menu and a picture (valid signal) from the receiver should
it be switohed to SD mode.
The HD INPUT-AV 4 jacks are for standard RCA connectors. Your HD
receiver may use RCA or BNC output jacks, if your HD receiver comes
with BNC jacks, you will need to purchase BNC-m-RCA adapters to
connect the receiver to the TV. You should be able to purchase these
adaptors at most stores that sell electronics. Or you can call our
Customer Care Centor at 1-800-531-0039.
cables to component
Connect
the TV's HDvideo
inputs.
and audio
• Connect from the YPRPB jacks on
the HD receiver to the TV's HI)
INPUT-AV4 G/Y, WPI, B/Pb jacks.
• Connect from the HD receiver's AUDIO
L(eft) and R(ight) jacks to the TV's HI)
INPUT-AV4 L(eft) and R(ight)AUDIO
jacks.
•Connect
Connectcoaxial
the coaxial
cable lead-in from
cables.
your cable outlet, cable converter box, or
VHF/UHF antemaato the IN FROM
ANT jack on the HI) receivel:
• Connect a coaxial cable fl'om the OUT
TO TV jack to the ANTENNA IN 75_Q
jack on the TV.
• Connect the coaxial cable lead-in from a
satellite dish antenna to the SATELLITE
iN jack on the HD receiver.
that came
Refer
to the
with
directions-for-use
the HD receivermanual
for setup
instructions.
OR
BNC-toRCA
Adapter
BNC
Connector
Adapter
Fitted to
Connection
RCA
Connector
The HD INPUT-AV 4 jacks are compatible with some digital equipment
having RGB oulptas with "sync on green" or RGB with "separate H and V
sync." Output standards for digital equipment, however, may vary by manuf:acturcr.No industry standards have been established for HD television RGB
signal systems, timing, synchronization, and signal strengths. If the digital
equipment you want to connect to your TV offers both component video and
RGB outputs, component video is the suggestad connection to use.
The default color-space setting for the HD INPUT-AV 4 jacks is YPbPr.
RGB is also an option. If the picture color looks grossly incorrect, try
changing either the receiver's or TV's color space. See the receiver's
direclions-for-use manual for information on setting its color space. Or
see page 59 in this manual for setting the TV's AV4 color space.
AV4 and AV5 do not function with the PIP feature. They cannot be displayed in the PIP window, nor can lhe PiP window be displayed when
those signal sources are being viewed on the main screen.
14
Connecting
Accessory
Devices
to Your TV
Digital
equipment with a 1080i or 480p
output, is compatible with the HD INPUTA V 5 vMeo inputjactc ]71is page presents one
possible connection scenario. See the HD
receiver _ directions-fbr-use
manual f!_r more
ir_fiwmation.
]b rnakz_the connections shown in this exw_q)le,
you will need:
• one DBI5 cable
• anS-VIDEO cuble
• /'bur cablesjbr audio connectiorls &tandard
RCA connectors)
• one couxial cable 175_2).
NOTE: "Hte cubles are not supplied with your 1_
You shouM be able to buy them at most stores
tbut sell electronics. Or you can call our
Customer Cure Center at 1-800-531-0039.
Connect S-VIDEO and audio cables.
NOTE: This example uses
INPUT-AV 1. You Call use INPUT-AV 2 or
the side input jacks if you would like.
• Connect all S-VIDEO cable from the HD
receiver's S-VIDEO jack to the TV's
INPUT-AV 1 S-VIDEO jack.
• Connect fi'Olnthe HI) receiver's AUDIO
L(efi) mid R(ight)jacks to the TV's
INPUT-AV l L(eft) and R(ight) AUDIO
jacks.
cables to the
Connect
the DBI5
TV's HD
videoinputs.
cable and audio
• Connect fi'Olnthe DB 15 jack on the
receiver to the TV's HD INPUT-AV 5
DB15 jack.
• Connect fi'Olnthe HI) receiver's AUDIO
L(efi) and R(ight)jacks to the TV's
HI) INPUT-AV 5 L(efl) and R(ight)
AUDIO jacks.
This lelevision is designed to accept high-definition
signal standards
1080i and 480p as specified by the Electronic Industries Association
standard EIA770,3, Because oulput standards may vary by manuPactuer,
you may encounler some digital equipment that will not properly display pictures on the TV.
•Connect
Connect coaxial
the coaxial
cable lead-in from
cables.
your cable ootlet, cable converter box, or
VHF/UHF antenna to the receiver's
ANTENNA A IN jack. If desired, connect the coaxial cable lead-in from another RF sigmal _urce to the receiver's
ANTENNA B IN jack.
• Connect a coaxial cable from the OUT
TO TVjack to the ANTENNA IN 75f2
jack on the TV.
• Connect the coaxial cable lead-in fl'om a
satellite dish antenna to the SATELLITE
IN jack on the receiver.
You can also connect a 1080i or 480p video source that has component
video, RGB, or RGB+H/V oulput jacks rather than a DB 15 output jack
to the TV's HD INPUT-AV5. This type of hookup will require a special_y cable that has a DBI5 connector on one end and standard (phono_ype) RCA connectors on the other. See page 57 for more information
on HD INPUT-AV5 input compatibilily. Afler making the connections,
also ensure that the TV's color-space setting ma_ches the ouq_ut of your
video source, either RGB or YPbPr (see page 59).
that came
Refer
to thewith
directions-fnr-use
the HD receivermanual
for setup
instructions.
Making a standard connection along with the HD connection as shown
in the example (S-VIDEO) on this page will allow you to see the receiver's onscreen menu and a picture (valid signal) from the receiver should
it be switched to standard-definition mode.
The default color-space selting for the HD INPUT-AV 5 jack is RGB,
YPbPr is also an option, if the picture color looks grossly incorrect, try
changing either the receiver's or TV's color space, See the receiver's
directions-for-use manual for information on setting its color space. See
page 59 in this manual for information on selecting a color-space setting
for the AV5 input.
AV4 and AV5 do not function with the PIP feature, They cannot be displayed in the PIP window, nor can the PIP window be displayed when
those signal sources are being viewed on the main screen.
15
Connecting
Accessory
Devices
toYourTV
Tjbhe side panel jacks provide a convenient w,ay
r you to connect a camcorder to your T_
]he side paneljucks are recognized by your TV
as AV&
Typical
Carncorder
You cun obtairl S-VIDE()quulity
with an S-VHS,
Hi-& or digital camcorder by connectiHg to the
S-VIDEO input insteud qf the V1DEO (composite)
iHput.
7b make the connections show,n in this example,
you will need."
• an S-VIDEO cable
• two cablesjbr audio connections
RCA connectorx).
(standard
NOTE: The cable_ art, not supplied with your T_
You should be able to buy them at most stores
that sell electronics. Or you cun ca# our
C_stomer Cure Center at 1-800-531-0039.
To simplify making conneclions,
the connectors on audio cables are often color
Connect from the S-VIDEO output on
the camcorder to the S-VIDEO input in
the TV's side panel.
coded: red for the right channel, and white
for the left channel. The jacks on your TV
are likewise color coded _o malch the connectars, To make S-Video connections,
you
must use an S-Video cable,
Connect
from the
AUDIO
outputs
on
the
camcorder
to the
side panel
AUDIO
L(eft) and R(ight) inputs.
trol as the
Press
many
AV times
button asonnecessary
the remote
to select
conthe AV3 source on the TV.
tape and
]'urn
the press
camcorder
PLAYon,
to view
insert the
a videotape
on the TV.
16
Connecting
Tphe
TV_ side panel has a headphonejuck
ersonal li.Ttening.
Accessory
Sidejack Panel
/br
©7
Insert the headphone plug into the headphone jack ,_, in the TV's side pmaeL
2
Devices
WLT
Turn down the TV's volume or press
the Mute button _ on the remote control to turn offthe TV's internal speakers.
See the section below for information on
adjusting headphone volume madbalance.
=@.
NOTE: The headphone impedance must
be between 8 mad4,000 ohms. The headphone jack is stereo and 3.5 mm in size.
T;e
HEADPHONE controls allow you to
djust the volume and balance of the
sound going to the headphones.
Press the MENU/SELECT button
on the female control io show the
onscreen menu.
2
3
4
B
Press the CURSOR
RING
once to highlight SOUND.
Press the CURSOR
to enter the SOUND
• PICTURE
TREBLE
• FEATURES
• iNSTALL
BASS
BALANCE
AVE
IRCR'SUBROURD
• BASS
• BALANCE
• AVE
• IRCR-SURROUND
I
T
DOWN
RING RIGHT
submenu.
Press the CURSOR RING DOWN
repeatedly until HEADPHONE is
highlighted, Then press the CURSOR
RING RIGHT to enter the
HEADPHONE submenu,
SOUND
®®®®
• TREBLE
VOLUNE
• BASS
• BALANCE
BALANCE
• INCR-SURROUND
[_!ffgff0llP, I
Press the CURSOR RING DOWN
or UP to highlight VOLUME or
BALANCE. Then press the CURSOR
RING LEFT or RIGHT to adjust the
control.
SOUND
HEADPHONE
•
a _I11Dltll
• BALANCE
exit
Pressthethemenu,
STATUS/EXIT button to
@@@
®®@
6@®
SOUND
HEADPHONE
• VOLUHE
:, ITN1NIff'I
headphones.
PHILIPS
17
•
to Your "IV
Using
the Remote
Control
Satellite Receiver
y;ur
TV remote is capable of working not
nly your TV but also other iq/?ared
remote (1R) controlled devices such as VCRs,
cable TV converter boxes, satellite receivers,
D VD players, and laser-disc players,
If you want to use your TV remote to operate a VCR or other accessory device, you
will need to perform this initial check
explained in this section. You may also need
to go W the sections on the "Code-entry
Method" and tile "Search Method" in tile
pages that fidlow.
Cable Converter
DVD Player
Press the VCR or ACC(essory)
mode button on the TV remote for
the desired accessory device category.
NOTE: Pressing the VCR mode button
allows access to product codes for
VCRs, Pressing the ACC(essory) mode
button allows access to the product
codes for cable TV converters, satellite
receivers, DVD players, and laser-disc
players,
VCR
Point theaccessory
desired
TV remote
device
toward
and the
press
the POWER button.
Does the remote
device on?
turn the accessory
If yes, [_] and try other function buttons on the TV remote. With a VCR,
for example, try the Play, Stop, and
Rewind butlons, for example. (See
page 23 for information
on how the
remote buttons correspond with accessory device functions.) If they also
work the accessory device, then the
remote is ready and no further steps
are needed.
1
If not, do the following:
Look up a four-digit remote code
number on pages 21 or 22 for your
brand of accessory device. Then go
through the simple steps for entering a
four-digit code as explained on
page 19.
®@@
@@@
®@@
6@®
if more than one four-digit code number is
listed, you may have to try more than the
first number given to locate your device's
correct code,
PHILIPS
18
Box
Using the Remote
Satellite Receiver
Nd
w that you have looked up the./ourigit remote-control
Direct-entJ T Code
/or your brand o/accessory
device, you are
read), to./ollow the simple steps shown below
to program your "l'Vremote.
Please read through all the steps befi)re
beginning.
Cable Converter
First, press and hold down the VCR
or ACC (for an accessory device
other than a VCR) mode button on
the TV remote, Then press and hold
down the MENU/SELECT button at
the same time for a brief moment,
Release the buttons, The TV remote
back light will switch on,
NOTE: For correct operation, you
must first press and hold the mode
button and then press and hold the
MEN U/SELECT button simultaneously.
2
DVD Player
VCR
Within 30 seconds of pressing the
VCR (or ACC) button and
MENU/SELECT button, enter a
four-digit code for the accessory
device (see pages 21 and 22),
if you make a mistake while atlempting to enter the four-digit code and
want to start again, press any button
other than one with a number, Then
return to step 1 to begin again.
Point theThen
device.
remote
press atthethePOWER
accessory
button
on the remote to turn the device on,
If you do not enter a complete code within
30 seconds, you will need to perform step
1 of the Code-entry
Method again.
®®®
®®®
®®®
@®®
If you enter more than four digits, the unit
will retain the first four digits entered.
If the procedure explained above does not
work the first time, repeat the steps using
the same remote code number.
• If after a second try the remote does not
operate your accessory device, and more
code numbers are listed for your brand,
use the next lisled code number.
PHILIP$
• If after repeated attempts the Entry-code
Method does not allow you to work your
accessory device with your TV remole, try
the Search Method explained on the next
page,
19
Box
Control
Using
the Remote
Control
y;ur
TV remote can be set to work various
ccessory devices (VCRs, cable com,erters, and satellite receivers, ./or example) 1)y
what is called the Search Method,
Satellite Receiver
NOTE: The Search Method works" only with
devices equipped with channel-display
indicators on the devices themseh,es or the ability to show channel numbers on the TV
screen, If the Code-entry Method (shown in
the previous section) did not enable your TV
remote to work your accessory device, then
fbllow the em T steps listed beloua Please
read the steps" once bejbre pe_jbrming
them,
Cable Converter
Box
r-wff rm
'lurn on the desired device. Press
and hold down the VCR or ACC
(for an accessory device other than
a VCR) mode button on the TV
remote, Then press and hold down the
SURF button as you hold down the
desired mode (VCR or ACC) button,
VCR
NOTE: For correct operation, you
must press and hold down the desired
mode (VCR or ACC) button first and
then press and hold down the SURF
butlon second.
While holding down the SURF and
the desired mode (VCR or ACC)
buttons simultaneously, point the
remote toward the accessory device
and continue holding the buttons
down.
2
Watch
the Channel
on
your accessory device. Channel numbers will scan up when the TV remote
has identified the correct code for
This may take
Your TV remote may locate the
accessory device's code quickly or
within several minutes,
Release the mode (VCR or ACC)
and SURF buttons as soon as channel numbers start to scan up. The
scanning means that your TV remole
has found the code for your accessory
device.
Don't let the accessory"device
scan up more than five channels
when the correct code is found
1heremote may pass up the right
code and have lo repeat lhe search
cycle,
your accessory device.
several minutes,
3
Indicator
The remote's back light will blink
as the remote moves through its
product code list. Alter the remole
identifies the product code for
your accessory device and you
release the remole buttons, the
back light will blink twice.
NOTE: If no channel change happens
after several minutes, repeat steps 1 and
2, Then if a channel change still does not
occur, the remole will not work wilh the
desired accessory device,
PHILIPS
2O
Using the Remote
Control
VCR
CODE
NUHBER
ADMIRAL ...............
ADVENTURA.............
AIKO ..................
A_WA .................
AKAI ..................
.....................
AMERICAACTION .........
AMERICANHIGH ..........
ASHA .................
0075, 0236
0027
0305
0334, 0495, 0027, 0064
0133, 0080, 0068, 0076,
0000, 0103, 0269
0305
0062
0267
AUDIOVOX
..............
0064
BEAUMARK
..............
BROKSON]C.............
.....................
CCE ..................
0267
0131
0148,0211, 0029, 0236,
0238, 0322, 0388, 0506
0099, 0305
CAUX
0064
BELL & HOWELL
..........
.................
CANON ................
JENSEN .................
0068
QUARTZ ....
KEC ..................
KLH ..................
KENWOOD .............
(_UASAR
LXI ...................
LLOYD'S................
LOGIK .................
MEI ..................
MGA ...............
MGNTECHNOLOGY.....
MTC ...............
0064,0305
0099
0068,0094,0411,0065
0062,0064
0064
0027,0235
0099
0062
0070,0008,0267
0267
0027,0267
MAGNASONIC
0305
KODAK
................
MAGNAVOX
...................
MAGNIN ...............
MARANTZ
............
DENON ................
DYNATECH..............
0194, 0062,
0047
0108
0305
0305,
0064
0099
0064, 0099,
0298
0062, 0068,
0078, 0267
0305, 0588,
0047
0069
0027
ELECTROHOME
0064
HETSUBISHI
..............
.....................
.....................
MOTOROLA.............
MULTITECH.............
HAD .................
NEC ..................
.....................
0064
NIKKO
0059
NIKON
CAPEHART
..............
CARVER
................
CINERAL
...............
CITIZEN
................
COLT
.................
CRAIG .................
.....................
CURTISMATHES..........
CYBERN
EX
DAEWOO
..............
...............
DA'_RON
..............
...........
ELECTROPHONtC
EMEREX
..........
................
EMERSON...............
.....................
.....................
.....................
.....................
.....................
FISHER.................
Fuji ...................
0129
..........
...........
MARTA
MATSUSHITA
0074, 0267,
0087, 0189
0047, 0072
0236, 0305,
0238, 0588,
0506, 0088,
0027, 0064,
0322, 0388,
Go VIDEO ..............
GOLDSTAR
0064,
0065,
.................
GE ...................
.....................
GARRARD
..............
..............
0045,
...........
MEMOREX............
...................
...................
...................
0211,0029,
0063, 0148,
0235, 0321,
0115, 0239,
0070, 0095,
0537
0074, 0131,
0060, 0062
0027
0062, 0087,
0229, 0267
0027
0306, 0459,
FUNAI
...............
0081,0093
MINOLTA
...............
.................
.....................
0498,
0507
GRADIENTE
.......
.,0035,0027,0435
GRUNDIG
.........
.,0222
.,0074
HI-Q ...........
HARLEY DAVIDSON
. ,
.,0027
HARMAN/KARDON
. ,
.,0065,0102,0108
HARWOOD
.......
.,0095,0099
.... 0073
HEADQUARTER
.....
HITACHI ..........
.... 0069,0193,0132,0092,
.....................
0027,0068,0109
HUGHES NETWORK
SYSTEMS ,0069
JVC ..................
0094,0035,0233,0234,
.....................
0060,0411
........
JVC ..................
KENWOOD .............
MAGNAVOX .............
......
P'.AN DEX
....
REAUSTIC
....
0062,0108,0137,0130,
0027, 0066, 0176
0267
0108,
0062
0064
0062,0189,0481
0131,0074,0506,0027,
0064,0075,0062,0073,
0267,0334,0066,0189,
0236,0481,0828,0829
0132,0069
0200,0088,0102,0241,
0269,0070,0075,0094,
0470
0062,0075
0027,0099
0085
0065,0067,0068,0077,
0094,0109,0131
RICOH
0064
SONY
......
RUNCO
.....
STS .......
SALORA
.....
SAMSUNG
SANKY
SANSUI
.....
SANYO
......
5COT_......
SEARS
......
SEMP.......
SHARP
......
SH[NTOM
PROTEC................
PULSAR
0066,0078
P£NNEY
................
.....................
PENTAX
................
PHtLCO ................
PH_LIPS .................
.....................
PILOT .................
PIONEER...............
POLKAUDIO ............
PORTLAND
..............
PROFITRONIC
............
PROSCAN
...............
................
QUARTER.............
.....
......
TEAC
.....................
.....................
.....................
....
SINGER
TATUNG
.............
SUNPAK
.....
SYLVANIA
TMK
.....
.......
TECHNICS
, , ,
TEKNIKA
....
THOMAS
....
TOSHIBA
....
.....................
TOTEVISION
.............
VECTOR
VIDEO
0267
0072
0065,0067
0067,0072,0088,0248
................
VECTOR
RESEARCH
CONCEPTS
VIDEOSONIC
........
.........
.............
0267
WANDS ................
.....................
.....................
WH[TEWESTINGHOUSE
XR-1000
YAMAHA
0073
0062,0189,0104,0481,
0828
0087,0176,0229,0069,
0132,0085,0062,0075,
0092,0104,0133,0267,
0304
0027
0064
0064
0027,0131,0074,0075,
0064,0062,0089,0073,
0093
0061,0280
0066
0069
0102
0072,0078,0080,0267
0066,0075
0068,0506,0027,0094,
0109,0236,0298
0074,0073,0131,0267
0211,0238,0148,0070,
0072,0237,0239
0081,0132,0064,0069,
0027,0062,0073,0074,
0093,0131
0072
0075,0089
0099
0078,0267
0099
0060,0061,0059,0280,
0027,0038,0062
0280
0062,0108,0027,0070,
0130,0137
0027
0063,0235,0267
0068
0027,0068
0062,0189,0273
0027,0062,0064,0079
0027
0072,0237,0239,0070,
0093,0393
0064,0267
UNITECH...............
.....
..............
...............
0062,0087,0089,0027,
0074,0239,0267,0069,
0075,0099,0108,0176
0099,0305,0236
0099,0027,0062
0065
ZENFH ................
.....................
0066,0027,0060,0061,
0236,0506
0862,0869
0073
PLAYER
............
0866
RCA
MITSUBISHI
............
0861
SAMSUNG
0860
SONY
0069
TECHNICS
00S9
THETA
0868
0865
0860
PHILIPS .................
0866,
PIONEER
...............
PROSCAN
...............
................
PANASONIC
, ,
......
MARANTZ
OPTIMUS
....
SYMPHONIC
CODE NUHBER
0859
0862
0871
0870
ONKYO
....
SHOGUN
0506,0029,0211,0236,
0322
0062,0189,0828,0481,
0253,0104,0405,0829,
0129,0252,0254,0273,
0827
0062,0267,0064,0069,
0065,0067,0081
0069,0092,0132
0062,0236,0506
0108,0062,0089,0137,
0830,0831
0064
0085, 0195, 0094
0108
0047
0267
0087,0229
0099
..............
................
....
......
0089
ORION
DVD
DENON ................
GE ...................
HARMAN/KARDON
HITACHI ................
SHACK
RADIX
OPTONtCA
.....................
0553, 0259
RADIO
NOBLEX ...............
OLYMPUS...............
OPTIMUS...............
.....................
.....................
PANASONIC
0075, 0092,
BcXII:II:I
0061,0280
0267
0062, 0253
0189, 0481,0827, 0828,
0075,0085,0829,0064,
0131,0459
................
.......
.......
.......
.......
.......
.......
.......
.......
.......
.......
.......
.......
.......
.......
.......
.......
.......
.......
.......
.......
.......
.......
.......
.......
.......
.......
.......
.......
.......
.......
.......
.......
.......
.......
.......
.......
.......
.......
.......
.......
.......
.......
.......
.......
.......
....
...............
.............
0860
..............
...........
0864
..........
DIGITAL
0859
.......
0869
TOSHIBA
...........
0860
0869, 0863
YAMAHA
...........
0862
ZENITH
0859,0867
0872,0860
............
SEE THE
21
0870
.............
NEXT
PAGE FOR HORE
CODES*
Using
the Remote
Control
LASER-DISC
CODE
ADS ..................
AIWA .................
0880
0855
CARVER
0853,
................
NUMBER
0850,
MARANTZ
..............
0853,
MITSUBBHI
..............
0849
0849
0879
0884
REALISTIC
....
SAMSUNG
....
SHARP
......
0849
SONY
......
0856
TECHNICS
NAD .................
NEC ..................
0858
PLAYER
DENON ................
DBCO V{SION........
0851,0849, 0875
0848
NIKKODO
FUNAI
0855
PANASONIC
0853
PHILIPS .................
0853,
0848
PIONEER...............
POLKAUDIO ............
QUASAR ...............
.............
HARMAN/KARDON
HITACHI
....
............
KENWOOD
.........
0877
MAGNAVOX
.........
0853,
..............
OPTIMUS
0857, 0875
...............
.............
CABLE
CODE
ABC ..................
.....................
.....................
NUHBER
HAMUN
ANTRONiX..............
APACHE................
ARCHER................
.....................
BBT ..................
BELCOR................
0030, 0028, 0034, 0035,
0038, 0040, 0041,0044,
0060
0180, 0342
0049, 0234
0797
0049, 0066, 0180, 0234,
0824
0294
0083
BELL & HOWELL
0041
ALLEGRO
CABLE
...............
STAR
CABLETENNA
CABLEVIEW
..........
.............
............
.............
0049
0180
0180, 0342
0052, 0058
COMBAND
0259
...............
..............
COHTRONES............
................
....
0047,0036,0286,0061,
0300
REGENCY
...............
REMBRANDT
0467
SIGNATURE
0060
0054
0027
0090,0183
0183,0090,0097
0797
0645
0046,0034
SPRUCER....
.................
.............
..............
..................
...............
STAR51GHT
0583
, , ,
STARCOM
....
STARGATE ....
STARQUEST,
, ,
SYLVANIA
....
TFC .......
TV86 ......
....
....
0234
VIEWSTAR
MECHANICS
......
...............
PULSAR................
QUASAR ...............
RCA ..................
RADIO
5HACK
REALISTIC
RECOTON
...........
...............
RECEIVER/DIGITAL
SATELLITE
TOSHIBA
TUSA
0237
0237
0070
JVC ..................
IANEIL .................
JERROLD................
LEGEND ................
MACOM ................
MAGNAVOX .............
MEMOREX ..............
NEXT LEVEL .............
0802
0179
0388,0654
0296
0088,0045
0749,0751
0296,0751
0896
......
UNITED
ARTISTS
, , ,
, ,
, , ,
ZENITH
.....
ZENTEK
.....
SYSTEH
NORSAT .....
.......
PANASONIC , ,
.......
PHILIPS......
.......
PICO .......
.......
PRIMESTAR , , ,
.......
RCA .......
.......
RADIO SHACK
.......
.......
RAMSEY .....
REALISTIC....
.......
STS .......
.......
SONY ......
.......
STAR CHOICE ,
.......
STARTRAK,,,
.......
.........
STRONG .....
TOSHIBA ....
.........
TOWN & COUNTRY .......
UNIDEN ................
.....................
.....................
ZENITH ................
I
22
UNIKA
VIEWMASTER
NUHBER
I
....
.......
UNIVERSAL
GE ...................
0593
GENERALINSTRUMENT ......
0388,0896,0574,0581,
.....................
0654
GOULD ................
0082
HNS ..................
0644
HTS ..................
0802
HITACHI ................
0846
HOMECABLE .............
0265
HUGHES NETWORK SYSTEMS.0776
HTrEK .................
0122
IQ ...................
IQPmSM ...............
INTERSAT ...............
,
TOCOM .....
0427
0300,0047,0286
..............
REGAL.................
......
TELEVIEVV ....
TELEVISION
.............
, , ,
TIMELESS
SATELLITE
MAGNAVOX
.....
TEXSCAN
POPULAR
CODE
0537
0042,0067
0038
0048
0569,0449
0030,0042
0067,0042,0797,0824
0042
0028
0337
0090
0285
0248
0067
0028
0445
0039,0040
0027
0042
0180,0234.0049
0034
0234,0049,0066,0083,
0180,0218
0847
0285,0054,0087,0090
0027,0552,0081
0427
SIGNAL
0027
0052,0058,0269,0317,
0054,0180
0171,0050,0560
0427
0797
0027
0027
0048
0042,0847,0342,0824
0042,0067
0565
0045, 0239
0080, 0236, 0243
0191
0031
0088, 0099
0068
0091,0272, 0045, 0176
0307, 0802, 0175, 0186,
0296
0802
0035.0044,0033.0504
.......
.......
.......
.......
.......
.......
.......
.......
.......
.......
.......
.......
.......
.......
.......
.......
.......
.......
.......
.......
.......
.......
.......
.......
.......
.......
.......
TELECAPTION
0824
0067,0171
SEAM .......
TANDY
...............
0067
.......
0048,0134,0027
0664
EMERSON
0027
SCIENTIFIC ATLANTA
0048
0029
0122
................
PANASONIC
.............
PANTHER ...............
PRELUDE
0881,0874
0855
0858
0848
0873
0854,0852,0878
0856
0853
0876
0857
0029
0038,0097
.............
LINSAY
OPTIMUS
.......
.......
.......
.......
.......
.......
.......
.......
.......
.......
BOX
...............
...............
ALPHASTAR ...........
AMPUCA ...............
AMWAY ................
ARUNTA ...............
ASTRO INDUSTRIES ........
BMC
.................
BSR ..................
CABLE INNOVATIONS .......
CAPETRONIC ............
CENTURY ...............
CHANNEL MASTER ........
CHAPARRAL .............
CITOH .................
CONIFER ...............
CURTIS MATHES ..........
DX ANTENNA ...........
DRAKE ................
ECHOSTAR ..............
.....................
EXPRESSVU..............
.....
YAMAHA
SAMSUNG
OAK
CODE NUHBER
0799
0099
0070, 0102
0548
0122
0114
0122
0581
VICTOR
0853
...............
NOVAPLEX
Focus .................
0427
GC ELECTRONICS
.........
0083, 0234
GE ...................
0259
GARRARD ..............
0180
GEM_NI................
0042, 0097, 0269, 0824
GENEP_LINSTRUMENT .... 0303, 0038, 0503, 0837
GOLDSTAR............
0067,0171
GOODMIND ...........
0797, 0824
0849, 0848
SL MARX
EASTERN
..............
DIGITAL
RUNCO
PARAGON..............
PHiLIPS.................
.....................
PIONEER...............
EVERQUEST
. . .
THETA
0850
0034
0042,0180,0342
0030,0039,0303,0041,
0503,0038,0051,0042,
0837
DIGI ..................
...............
.......
0038
0067, 0087
0046
0664
CONTEC
.......
HYTEX.................
IASCO .................
JERROLD
................
.....................
.....................
MEMOREX..............
MOVlETINE .............
NSC ..................
NEXUS ................
CITIZEN................
COLOURVOICE ..........
CENTURY
................
MAGNAVOX
0049
SEGA
CONVERTER
MACOM................
0083
RCA
0856
.....................
HITACHI
0850
0031
0179,0728
0227,0749,0751
0102
0654,0388
0593,0170,0882
0581,0896
0102
0079,0078
0237,0068
0666
0896
0207,0448,0574
0448
0109,0776,0817,0088
0574
0265,0079,0101,0397,
0581,0751,0103,0323,
0749
0091,0883,0088
Using the Remote
Chart below provides you with commonaccessory-device
junctions
associated with the buttons on your Philips TV remote
control, (Seepages
18 20jbr #!/brmation
on
programming
your TV remote to operate
accessol 3, device.s,.)
Control
Tile
-®.e@@-
0 07%°G V
NOTES:
• l='unctions can vary according to the manu/acturer ivspec(fications jbr each accessol 3,
device.
• l='irstpress
TV remote
ICURsORRING UP
LcuRsOR
R,NGLEFt
_RING
RING
OOWNI
• Firstpress
tbeACCmode
button to use the
TV remote to operate a DVD playet; laserdisc playeg cable converter box, or satellite receiver/digital
satellite system.
INUMBER Buttons
®
®®®®
@
RIGHT]
select
the VCR mode button to use the
to operate a VCR,
@
-------JFAST
FORWARD
I
(0-9)
®@@
-@@ @
@9@@)
IA/CH & TV/VCR
,CtlVE@
LIGHT]
-JBACK
iV Remote VCR
and Accessory Mode Buttons
Common
Cable
Box
Common
Button
on TV
Remote
Common
VCR
Function
DVD/LD
Player
or
Receiver/Digital
Function
System
Converter
Satellite
(DSS)
Satellite
Function
POWER
POWER
POWER
POWER
PAUSE
PAUSE
PAUSE
--
REWIND
REWIND
SEARCH REVERSE
--
STOP
STOP
STOP
--
PLAY
PLAY
PLAY
--
FAST FORWARD
FAST FORWARD
SEARCH FORWARD
--
CURSOR RING UP
CURSOR UP
CURSOR UP
CURSOR UP
CURSOR RING DOWN
CURSOR DOWN
CURSOR DOWN
CURSOR DOWN
CURSOR RING RIGHT
CURSOR RIGHT
CURSOR RIGHT
CURSOR RIGHT
CURSOR RING LEFT
CURSOR LEFT
CURSOR LEFT
CURSOR LEFT
MENU
OK Button
PROGRAM; MENU
MENU
(also, GUIDE for satellite receivers/DSS)
STATUS/EXIT
EXIT
EXIT
EXIT
MENU/SELECT
SELECT
SELECT
SELECT
CH +
CHANNEL
UP
NEXT
CHANNEL
UP
CH -
CHANNEL
DOWN
PREVIOUS
CHANNEL
DOWN
NUMBER Buttons (0-9)
A/CH _ and TV/VCR
NUMBER SELECTION (0-9)
TVNCR, A/CH _
RECORD
NUMBER SELECTION (0-9)
--
NUMBER SELECTION (0-9)
--
REC, SAP
BACK LIGHT H
(Press with PLAY Button)
BACK LIGHT **
-BACK LIGHT **
-BACK LIGHT **
*A/CH (Alternate Channel) allows you to switch between the currently viewed channel and the previously viewed channel
**Press the BACK LIGHT button to light the white buttons on the remote.
23
Using
the Remote
Control
Tshe
A V button on the remote control and
OURCE SIz'LECT button on the TV
allow you to access the TVI_ signal-source
inputs, With each press of the AV button you
can access a d!fferent signal-source
input.
The signal-source
input jacks are located on
the bach and side panels of your TE (See
pages 6 and Z)
[]
Selecting a Signal Source
Using the AV Button
on the Remote
Control
[]
Press the AV button on the remote control as
many times as necessary to select the signal
source you want to watch,
®®®®
o
Selecting a Signal Source
Using the Source Select
Button on the TV
Press the SOURCE
o
SELECT button on the TV
as many times as necessary to select the signal
source you want to watch.
®®®
®®®
®®®
24
mmmm
Using the Remote
can use the AutoSound TM options to
utomatically tailor the TV's sound /or
the t2pe of program you are watching, The
/actol T has set the VOICE, MUSIC', and
THEATRE options. 77wsettings /br the PERSONAL option are the ones you select
through the onscreen SOUND submenu. See
descriptions of the options below; right.
Control
y;u
Press the SOUND button on the
remote control. The current
AutoSound TM setting will appear on
screen, Press the SOUND button
repeatedly to cycle through the four
options: PERSONAL, VOICE,
MUSIC, or THEATRE,
2
When you see the option you want
on the screen, press the
STATUS/EXIT button to exit the
menu. The AutoSound TM option you
selecled is then active,
PERSONAL
BASS
TBEBLE_jI49
VOICE
49
TREBLE
BASS
®®®®
NUSIC
TREBLE
63
BASS
69
0®900
THEATRE
TREBLE
BASS
•
AuloSound TM works only with the programs coming through the ANTENNA
IN 75f2 jack on the rear of the TV,
Au{oSound TM will not control the sound
®®®
®®®
®®®
levels of the other jacks on the rear or
side of the TV,
•
AutoSound
If you select an AutoSound'_M option
other than PERSONAL,
then the TREBLE and BASS se_tings specific to that
option will also be written _o the
SOUND submenu i_ems. At that point,
the PERSONAL AuloSound TM option
se_tings will not be changed, Only when
you go into the SOUND submenu and
change the TREBLE and BASS se_tings
will those settings be reflected in the
PERSONAL AutoSound TM option.
PHILIPS
TM
Options
PERSONAL
presents the TV's sound
according to the TREBLE and BASS settings you make within the SOUND submenu,
VOICE brings xoices to the forefront and
emphasizes
them. Moxes music to the
background.
MUSIC emphasizes music over voices,
THEATRE provides a balance between
xoices and music,
25
Using
theRemote
Control
yOaU can use an AutoPicture TM option to
utomatically
tailor the TV _ picture./br
certain tapes o/input signals. 771e /bctol 3,
has set the MOVIES, SPORIS,
WEAK SIGNAL, and MULTIMEDIA
options. The settings jar the PERSONAL
option are the ones
you select through the onscreen PICTURE
suhmenu.
=22iiii i
PEESONAL
IIiI_IIEsIS
_
814148
46
Press the PICTURE button on the
remote control. The current
AuloPiclure TM selting will appear on
screen. Then Press the PICTURE bulion repeatedly to cycle through the
oplions: PERSONAL, MOVIES,
SPORTS, WEAK SIGNAL, and
MULTIMEDIA picture settings.
2
SPO_TS
When you see the option you want
on screen, press the STATUS/EXIT
button to turn oft'the onscreen display. The AutoPicture TM option you
selected is then active.
55
PICTURE
U_IGHINESS_
SHA_PHESS
60
50
70
WEAl( SIGNAL
C)
if you select an AutoPicture TM setting
option other than PERSONAL,
then the
BRIGHTNESS,
COLOR, PICTURE, and
SHARPNESS
settings specific to that
option will also be writlen to the PICTURE
submenu items. At that point, the PERSONAL AutoPicturc TM option settings will not
be changed. Only when you go into the
PICTURE submenu and change the seltings
will those settings be reflected in the PERSONAL AutoPicture TM oplion.
COLOR
_
®®®
®®®
®®®
HULTIHEDIA
PHILIPS
26
Using the Remote
After nal sources
you set up
a listSURF
q/'yourJbvorite
in the
list, ,,)ou can sigpress the SURF button to see the list and
quickly tune to a./bvoriW signal source,
Place up to 10 signal sources in the SURF
LISI_
[]
iiiiii!iiii!
Press the NUMBER buttons,
CH(annel) +/- buttons, or the AV
button to select a signal source to add
to the Surf list.
2
3
[]
Press the SURF button. The Surf list
box appears, The number of the current signal source is shown with
ADD? to the right. (if you have not
added any channels to the list, "SURF
LIST EMPTY" appears on screen.)
Press the CURSOR RING RIGHT to
add the signal source to the Surf list.
®®@®
®
[]
Press the NUMBER buttons,
CH(annel) +/- buttons, or the AV
button to select another signal source
to add to the Surf list, Press the SURF
button and then the CURSOR RING
RIGHT to add the signal source to the
list,
®®®
Repeat this step, filling the list with
up to 10 favorite signal sources.
NOTE: If you exceed 10 signal
sources, the first signal source on the
list will be deleted from the list,
4
B
@ =,,,@
[]
®®®
x
'lb tune to a favorite signal source
from the list, press the SURF button. The Surf list box appears. Press
the SURF button or the CURSOR
RING DOWN or UP as many times as
necessary to tune to the signal source.
2,4,
'lb delete a signal source from the
list, press the SURF button. The
Surf list box appears. Press the SURF
button or the CURSOR RING DOWN
or UP as many times as necessary to
select the signal source to be deleted.
Then press the CURSOR RING
RIGHT to delete the signal source.
27
Control
Using
the Remote
Control
®®®®
Press the Program List button on
the remote control to display a list of
channel numbers and their names (see
the "Tuner Mode" "Auto Program,"
"Channel Edit," and "Name" sections
on pages 4 6 in the Quick Use and
Setup Guide that came with your TV
For proper setup),
A padlock
image
right of a channel
that
You can also access the Program List
by pressing the button in the center of
the Cursor Ring, Each channel will
appear as a selectable item, The current channel will be highlighted by
default. Only five channels will be
shown in the list at one time.
®@@
@@@
®@@
Press the CURSOR RING UP or
DOWN to go through the list and and
highlight a channel.
Press the
to tune to
Channels
"Channel
CURSOR
RING RIGHT
the highlighted
channel,
marked "Skipped"
in the
Edit" control will not
is being
--
J
appear in the list. Any channel that is
being blocked by AutoLock TM will
appear with a padlock icon to indicate
that the channel is not viewable.
Watch
channel
[]
®®®®
You can press the A/CH button on your
remote control to go back and forth between
the current channel and one previously
watched channel.
Change
'Watch
channel
new
channel
(9@@
®®®
®®®
Press A/Ct4
to return
watched
28
button
to previously
channel
will appear
or signal
blocked
to the
source
by AutoLock
TM.
Using the Remote
HlVe
you ever.fallen asleep in /?ont o/'the
*V? You can program your TV to turn
oi]while you sleep, 77w Sleep 77mer.fL,ature
allows you to set your TV to turn q/]within a
certain amount of time: 15, 30, 45, 60, 90,
!20, 180, or 240 minutes',
_fflll[olil
Press the SLEEP button on the remote control. (The SLEEP Timer onscreen display
will appear on screen.) Then within five
seconds, press the SLEEP button again as
many times as necessary to select the
amount of time you want to pass before the
TV will turn itself off:
An onscreen countdown will appear during
the last minute before the TV turns off'. Ten
seconds before the Sleep Timer turns the TV
off; the onscreen display will show "Good
Bye."
[[!IIIN IN
The Sleep Timer options are 15, 30, 45,
60, 90,120,180,
or 240 minutes.
®®®®
• To see how many minutes remain before
the TV shuts itself off. press the
STATUS/EXiT button.
• Changing the channel or volume during
the last minute of a Sleep Timer will
cancel Sleep.
During the last minute of a Sleep Timer
setting, an onsereen countdown will be
displayed.
(9@@
(?)(9@
®®®
lffililllll
®o
During the last 10 seconds of a Sleep
Timer setting, "GOOD
displayed on screen.
i
PHIL|PS
29
BYE" will be
Control
Using the Onscreen
Submenus:
Picture
TOhadjust your TV picture controls, select a
annel and./bllow these steps. See descriptions q!'the picture-adjustment
options below.
Press the MENU/SELECT button on
the remote control to show the onscreen
• SOUND
• FEATURES
• INSTALL
BRIGHTNESS
COLOR
PICTURE
SHARPNESS
TINT
nlenu,
llitlll_llil--
li
• COLOR
• PICTURE
• SHARPNESS
• TINT
Press
the CURSORRING
RIGHT.and an
BRIGHTNESS
will be highlighted
adjusmlent bar will be shown to the right.
3
PICTURE
Press the CURSOR
PICTURE
RING RIGHT or
• BRIGHTNESS
LEFT to adjust the BRIGHTNESS level
of the picture. Or pl'eSS the CURSOR
RING DOWN to select another picture
control to adjust.
im
llllll
• PICTURE
• SHARPNESS
• TINT
the
menu.
Press
the STATUSIEXrI"button to exit
PICTURE
• BRIGHTNESS
• COLOR
lllllll
Picture-adjustment
Options
i
• SHARPNESS
• TINT
Remember, when the bar scale is centered
, the control settings are at normal, mid-range levels. Picture adjustments
are described as follows:
PICTURE
BRIGHTNESS adds or subtracts light from
the darkest part of lhe picture.
COLOR
adds or eliminates
@
color.
• BRIGHTNESS
• COLOR
• PICTURE
illl!lltlh
PICTURE imprm es lhe detail of the lightest
parts of lhe picture.
•
i
TINT
PHILIPS
SHARPNESS improves the detail in lhe
picture,
PICTURE
TINT adjusts the picture to obtain natural
skin tones,
COLOR TEMP offers NORMAL,
or WARM picture preferences.
• BRIGHTNESS
• COLOR
COOL,
• PICTURE
• SHARPNESS
i
NORMAL
WARM
keeps whites, while,
makes whites, reddish,
COOL makes whites, bluish.
PICTURE
t
COLOR
• PICTURE
• SHARPNESS
• TINT
lllll
Ill [ll'l_l-.
. illTIllll_l
[]
llllllnllllllii
i
,l,,,|:llll
[]
fill
3O
lll[lllll I_,_
,].m[I
Using the Onscreen
E)m,,e Fidelity gives you a choice between
o d!/.fi._rent scanning techniques_rogressive o1"interlaced,
Progressive scan doubles the number ojpicture lines, eliminating line/licker
and proriding a jitter:/?ee picture,
Submenus:
d !!iiiiiii
I
EHIGHTNESS
COLOR
PICTURE
• SOUND
• FEATURES
• INSTALL
SHAHPNESS
TINT
Interlaced improves the appearance
of
onscreen motion, It also helps smooth out
jagged lines that are sometimes seen on
curved and angled surjaces in the picture.
k.
• SNAHPNESS
• TINT
i
PICTURE
Press the MENU/SELECT
button
on the remote to show the onscreen
menu.
2
3
Press the CURSOR RING RIGHT
to enter the PICTURE submenu.
i
PICTURE
®®®®
®
@=-@ r,
ll_
Ilillhl'T!il$_t
i
[]
Press the CURSOR
RING DOWN
repeatedly until the EYE FIDELITY
control is highlighted,
turn
off,
ressthe
themenu
STATUS/EXIT
button to
• TINT
• COLOHTENP
ii F,llilllffilllltl
s
Illli'U
or
Press
LEFT
the until
CURSOR
you select
RING
theRIGHT
option
you want, either PROGRESSIVE or
INTERLACED,
B
• SHARPNESS
®®®
®®®
®®®
®®
!7!7!7!7!7!7!7!7!7!7!7!
';N I I I IIIIII!!!i!ii
I!Hil
• The Eye Fidelity control is not available
for use with AV4 and AV5,
PHILIPS
• You may want to use the interlaced
option to enhance programs containing a
lot of motion.
31
Illlllllll
_li
llili
Picture
Using the Onscreen
Submenus:
Picture
The
Dynamic Contrast contro! allows you
o sharpen the picture quality by making
dark portions o/the picture darker and light
portions of the picture more noticeable.
Normall); you will probably want to select
MED. In certain circumstances,
howevel;
• SOUND
• FEATURES
• INSTALL
8RIGHTNESS
COLOR
PICTURE
SHARPNESS
TINT
you may pre/er M1N or MAX.
• COLOR
• PICTURE
• SHARPNESS
• TINT
I
i
Press the MENU/SELECT
button
on the remote control to show the
onscreen
2
3
PICTURE
menu,
t
Press the CURSOR RING RIGHT
to enter the PICTURE submenu.
Press the CURSOR
®®®®
• SHARPNESS
• TINT
• COLORTEHP
• EYE FIDELITY
RING DOWN
[ lilillllllllili!_ll
_[tlff
E_ tllllllililllli!_lll
llllilli;
repeatedly until the DYN, CONTP.AST control is highlighted,
or
Press
LEFT
the until
CURSOR
you select
RINGtheRIGHT
option
you want: MIN, MED, or MAX,
[]
[]
exit
Pressthe
themetal.
STATUS/EXIT button to
Dlillllllfillili!_ll
®®®
®®®
®®®
sources,
PHILIPS
32
I_lllllll
Using the Onscreen Submenus: Sound
Besides
the normal volume level control,
your TV also has individual soundadjustment controls. You can use TREBLE
(high./?equenc_Z
BASS (low /?equenc_),
and
Speaker BALANCE to /ilrther adjust tlze
sound playback oj TV programs.
• PICTURE
TREBLE
• FEATURES
• INSIALL
BASS
BALANCE
AVL
INCR'SUNB0_ND
Press the MENU/SELECT
button
on the remote control to show the
onscreen
2
3
4
•
•
•
•
I
BASS
BALANCE
AVL
INCR'SUBNOUND
menu,
Press the CURSOR
once to highlight
SOUND
RING DOWN
SOUND.
• TREBLE
Press the CURSOR RING RIGHT
to enter the SOUND submenu.
®®®®
• AVL
• INCN-SUBNOUND
'lb adjust the TREBLE level of the
television's sound, press the
CURSOR RING RIGHT or LEF'I:
To adjust another sound control,
press the CURSOR RING DOWN
until the control (BASS or BALANCE)
is highlighted. Then press the
CURSOR RING RIGHT or LEFT to
adjust the selected control,
exit
Pressthethemenu.
STATUS/EXIT
button
to
When the bar scale is centered, speaker sound
BALANCE is centered between the TV's lef_
and right side speakers,
llll:l
• BALANCE
I
SOUND
• TREBLE
• BASS
nl_NlhlglPl
• AVL
• INCN'SUNBOUND
(9@@
®®®
®®®
PHILIPS
33
l
Using the Onscreen
Submenus:
Sound
ym
may have noticed the peaks and valeys of sound that occur between program changes or at commercial breaks, 77w
volume levels &'_en vary considerably:
By"
turning on the A VL (Audio Volume Levele 0
control, you can make your TVproduce
a
more consistent volume level £bl!ow these
steps to turn the AVL control
....??????x
{{{{{{{{{{{{{{{{{{{{{{{{{{{{{_????????????x
....
SOUND
• PICTURE
TBEBLE
• FEATURES
• iNSTALL
BASS
BALANCE
AVE
IRCR.SUBROURD
on,
• BASS
• BALANCE
• AVE
• IRCR'SURROUND
R
I
Press the MENU/SELECT
button
on the remote control to show the
onscreen
2
S
4
SOUND
menu,
• TREBLE
Press the CURSOR
once to highlight
RING DOWN
®®®®
SOUND.
131111ill
• INCR-SURBOUND
!
Press the CURSOR RING RIGHT
to enter the SOUND submenu.
I
[]
Press the CURSOR
RING DOWN
repeatedly until AVL is highlighted,
Then press the CURSOR RING
RIGHT or LEFT to turn AVL ON or
OFE
exit
Pressthe
themenu.
STATUS/EXFI' button to
• BASS
• BALANCE
IIIIA_II
&IIA_II
®®®
®®®
®®®
The AVL control does not function with the
Dolby* Virtual feature, so the option disappears from the SOUND suhmenu when you
select DOLBY VIRTUAL.
PHILIPS
*Man_lhctured under license fronl Dolby Laboratories.
"Dolby" and the double-D symbol are trademarks of
Dolby Laboratories.
34
nlrll/1
Using
Based
on the signal being received, you
select various surround-sound
modes:
can
MONO, SPA77AL, STEREO, INCR. SURROUND, or DOLBY* VIRTUAL (Virtual
Dolby Surlvund).
(See descriptions
options to the right.)
of the
Onscreen
Submenus:
Surround-sound
®®®
®®®
Modes
®®®
INCR. (Incredible) SURROUND
enhances stereo programs by making the
sound broader and fuller.
DOLBY VIRTUAL (with Virtual Dolby
Surround signals) creates a virtualized surround-sound experience from two speakers
using Dolby Pro Logic.* it retains all the
original multichannel audio information and
_rovides the listener with the sensation of
being surrounded by additional speakers,
lIH
IL/IliS
In nmno: select MONO
or SPATIAL.
SPATIAL enables you to add a surround
effect to mono programs,
Selecting a Surround-sound
Option
Using the TV Buttons
Shouhl your remote control become lost or o_erwise unavuiluble fiJr use, fiJlhm, tile steps Ix,low to
use the buttons on the fi'ont of the 7Y to access the
Oll.7CFegl7 melTII
allY
select
a SlllTOtnlY-sollttd
#######################################
...........
• PICTURE
TBEBLE
• FEATURES
BASS
BALANCE
moglL,.
c-a-ag_
• INSTALL
3
Press the Channel Down button
repeatedly until INCR. SURROUND is
highlighted. Then press lhe Volume + or
bulton until you select lhe surroundsound mode you want,
SOUND
AVE
INCR'SUENOUND
Press the Volume + and - buttons
simultaneously. The onsereen menu
appears.
highlight
Press
the SOUND,
Channel Then
Downpress
button
the to
Volume + button to enter the SOUND
submenu,
Sound
In stereo: select STEREO, INCR.
SURROUND, or DOLBY VIRTUAL.
Selecting a Surround-sound
Option
Using the
Remote
Control
While watching TV, you can select a surroundsound listening mode immediately by pressing the
DOLBY V button. Each press of the DOLB Y V
button selects a different mode based on the TV
signal being received.
the
• BASS
• BALANCE
• AVE
• INCN'SUNNOUND
SOUND
• TREBLE
• BASS
• BALANCE
• AVL
[]
I_llffllrllllli!_lllllIii
:lll[ll[lllllll{t[ttlllllillJlilll;
!
i
OI +,when
broadcast
Surround:
I_]lffllrlllllitr0111ll
signals are being
in Virtual
Dolby
E_ll[_lll_illllllIil
simultaneously
Press
the Volume
and+ repeatedly
and - buttons
until you
back out of lhe menu screens,
When
signals
cast in mono
I_]iIIllgtlrlNll!_ll
are being
(nonstereo):
_]lll[llllllll[tltlllllllNl[llll
[]
ill
!7!7!7!7!7!7!7!7!7!7!7!
';N I I I IIIIII!! I!Hil
!i!ii
The AVL (Audio Volume Leveler) control does
not function with the Dolby Virtual feature, so
the option di_ppears from the SOUND sub-
menu when you select DOLBY VIRTUAL.
*Manulhctured
under license [I'Olll Do|by Laboratories.
"Dolby',
'Pro Logic",
and the double-D
symbol are
trademm'ks
of Dolby Laboralories.
35
[l[ll'lll[l[{llllll
II [31117!1I1!
broad-
Using the Onscreen
ylu
Submenus:
Sound
can enjoy stereo programs on your
V. ii has both an amplifier and twin
speakers through which stereo sound can be
heard. Follow these steps to select the
STEREO mode,
SOUND
• PICTURE
TREBLE
• FEATURES
• INSTALL
UASS
BALANCE
AVE
INCR'SUHROUND
Press the MENU/SELECT button
on the remote control to show the
onscreen menu,
2
3
4
5
6
Press the CURSOR
• AVE
• IflCR-SUHROUND
SOUND
t
®®®®
RING DOWN
repeatedly until the STEREO
is highlighted,
iJill
I
Press the CURSOR
RING DOWN
once to highlight SOUND,
Press the CURSOR RING RIGHT
to enter the SOUND submenu.
|i_ll'tl
• UASS
• UALAflCE
t BALANCE
• AVL
• INCH'SURROUND
• HEADPHONE
control
[]
Press the CURSOR RING RIGHT
or LEFT to select STEREO or
MONO, When STEREO has been
selected, the television will reproduce
any stereo signal it receives,
Press the STATUS/EXIT button to
exit the menu.
|l
(9@@
®®®
®®®
PHILIPS
36
|I_li
li
ill|ill
Using the Onscreen
SAt P, or Second Audio Plvgram, is an addiional part q[ the stereo broadcast _system,
Sent as a third audio channel, an SAP can be
heard apartj?om the current TV program sound,
TV stations arej?ee to use SAPJbr aJO, number
oj))urposes, such as the broadcast q[a second
lan_mge or other audio #?ibrmation,
Submenus: Sound
®®®
®®®
If an SAP signal is not present with a selected
program, the SAP option cannot be selected,
Selecting SAP Using
the Remote
Control
Select SAP immediately by pressing the
SAP button on the remote control if the feature is
being made available with the program you _e
watching.
PHILIPS
Selecting SAP Using
the TV Buttons
Shouhl your remote control become lost or otherwise unavailuble.fiJr use, jbllow the steps" below to
use the buttons on the.fivnt qf the TV to access the
onscreen menu and select SAI_
• PICTURE
TREBLE
• FEATUBES
• INSTALL
BASS
BALANCE
AVL
2
3
4
Press the Channel Down button to
highlight SOUND, Then press the
Volume + bulton to enter the SOUND
submenu.
II;ll:
•
•
•
•
SOUND
]
i
.....
• IRCR'SUBROBRD
• HEADPHONE
IFA SECOND AUDIO PROGRAM
ISBEING BROADCAST:
• STEREO
]=.
ill
IT,T
!
!
[]
131
l;ll
Down button
repeatedly until SAP is highlighted.
Then press the Volume + or button to
turn SAP on or oft,,
Press the Volume
L&
BASS
BALANCE
AVL
IRCR-SUBROURD
I AVL
1,$_1
Press the Channel
.........
SOUND
INCR'SURBOUND
NOTE: SAP must be broadcast with the program
you are watching f!sr you to be able w select the
_eature,
Press the Volume + and - buttons
simultaneously. The onscreen menu
appears.
!iiiiiii
!ii!ii
!ii!ii!i
IFA SECOND AUDIO PROGRAM
IS NOT BEING BROADCAST:
|_1
simultaneously
and repeatedly
back out of the menu screens.
I ]1'[11 |:lI/!|
[]
+ and - buttons
until you
_'{.,a
37
l]l
[ [!|l_
Using the Onscreen
Submenus:
Sound
7_he BASS BOOST control allows you to
I increase the lowzf!'equenc T range of the
TV_ sound, 7his creates a deepe_ fuller
sound, f*o!low these steps to turn BASS
BOOST ON.
iiiiiiiiiiiiiiiiiiiiiiiiiii
iiiiiiiiiiiiiiiiiiiiiiiiiiiiiiiiiiiiiiiiiiiiiiiiiiiiiiiiiiiiiiiiii
...........
SOUND
• PICTURE
a
• FEATURES
• INSTALL
TREBLE
BASS
BALANCE
AVL
INCR.SUBEOURD
Press MENU/SELECT button on
the remote control to show the
onscreen menu,
2
3
4
=
i•
• BASS
• BALANCE
• AVL
• IRCR'SUBROURD
l
Press the CURSOR
RING DOWN
once to highlight SOUND.
Press the CURSOR RING RIGHT
to enter the SOUND submenu.
EII|N
SOUND
t
®®®®
Press the CURSOR
RING DOWN
repeatedly until BASS BOOST is
highlighted.
STEBEO
• SAP
• AUDIOOUT
• SPEAKEBS
:l g_II_*I*IU
:]]
[*m
:]]
[I]]I
[]
u Ii_lll[lII][il
or
LEFT
turn BASS
BOOST
ON
Press
the to
CURSOR
RING
RIGHT
or OFF.
exit
Pressthe
themenu.
STATUS/EXIT button to
®®®
®®®
®®®
PHILIPS
38
Using the Onscreen
yovur TV comes with an onscreen clock. You
ill treed to set the clock bejbre you can use
the 7hner./bature. Durirsg normal operation, the
time appeurs on the screen when you press the
STXTUS/EXIT button. You cun show the time on
screen constantly by turning tlre T/MER D1SPLAY control on (seepage 40).
• PICTURE
• SOUND
TIMER
AutoLock
• INSTALL
PIP
CLOSEDCAP
FORMAT
fbr instructimls on sett#lg the 7hner i_STXRT
aml S10P times, see page 4 l. 17ten go to pages
42 and 43 to learn how to select the 7hner i_
channel and activate the Timer.
NOTE: You can access the 77ME (clock) _eature
directly by pressing the Clock button on the
remote
co_#troL
Submenus:
• CLOSEDCAP
CHANNEL
• FORMAT
ACTIVATE
FEATUBES
TIMER
®®®®
• STARTTIME
• STOPTIME
• CHANNEL
• ACTIVATE
Press the MENU/SELECT button on
the remote control to show the onscreen
l
menu,
2
3
4
5
6
Press the CURSOR
RING DOWN
FEATUBES
TIMER
TIME
• STARTTIME
twice to highlight FEATURES.
Press the CURSOR RING RIGHT to
enter the FEATURES submenu.
Press the CURSOR RING RIGHT
again to shift the display left and highlight the TIME control.
Press the CURSOR RING RIGHT
again to highlight the time indicator area.
flliliitl
•
• STOPTIME
• CHANNEL
• ACTIVATE
(i)®®
®®®
Press the NUMBER buttons to enter
the correct time. If you make a mistake
entering the time. press the CURSOR
RING LEFT or RIGHT to move among
the input slots to make CO_Tections.
Access
the TiME
directly
button
by pressing the Clock
on the remote control.
After
doing
(Clock)
so, follow
feature
steps
on this page to set the clock.
NOTE: You cmaalso press the CURSOR
RING UP or DOWN to cycle through
digits to input the time.
7
•
ill:
Press the CURSOR RING UP or
DOWN to select AM or PM.
Press the STATUSIEXrI"button to exit
the menu.
• For single-digit entries, be sure to press 0
first and lhen the hour number,
• If you'd like, set the clock automatically
using lhe AutoChron TM feature (on page 5
in the Quick Use and Setup Guide),
• Clock settings may be lost when _he TV is
unplugged or when AC power to the set is
interrupted,
39
5_
Features
Using the Onscreen
Submenus:
Features
you have set the TVIv clock, you can
use your TV to keep up with the time on
screen, You can also set the timer to switch
/
A!_er
to another
the TV ojr
allows you
upper right
channel, and, !f you want, turn
77re 77mer ivDISPLAY control
to show the time constantly in the
corner of the screen,
• PICTURE
• SOUND
TIMER
AatoLocR
• INSTALL
PIP
CLOSEDCAP
FORMAT
i!iiiiiiiiiiiiiiii!!:ii:i
FEATURES
!i!ii!i!
ii:
i
_
• AutoLock
• PiP
TIME
STARTTIME
STOPTIME
• CLOSED
CAP
• FORMAT
CHANNEL
ACTIVATE
Press the MENU/SELECT
button
on the remote control to show the
onscreen
2
3
4
FEATURES
menu,
Press the CURSOR
twice to highlight
RING DOWN
FEATURES,
TIMER
I
®®®®
Press the CURSOR RING RIGHT
to enter the FEATURES submenu,
Press the CURSOR RING RIGHT
again, Then press lhe CURSOR RING
DOWN repealedly until the DISPLAY
control is highlighted,
o
_Q
8:06 PM
_'
STARTTIME
STOPTIME
CHANNEL
ACTIVATE
•
t
FEATURES
TIMER
1
-" STARTTIME
• STOPTIME
or
LEFT
turn the TIMER
DISPress
the to
CURSOR
RING RIGHT
PLAY ON or OFF.
exit
Pressthe
themenu.
STATUS/EXIT button to
•
•
•
•
• CHANNEL
• ACTIVATE
0®0
GO®
®0®
PHILIPS
4O
,J
:1 [llh_lil[2
,wl_
[]
:1 [llk_lil[2
,_ rl
Using the Onscreen
you
can set the ]liner to switch to a selected
'hannel at a specific time w,hile you are
watching another channel, or when the TV is in
stumlby mode. (Stamlby mode is w,hen the TV is
plugged irno the wall outlet but turned q/f) [/'
you want, you can also set the TV to turn off at
some time @er the TV switches channels.
Follow the steps below to set the 7_mer Zv
S])tRT TIME and STOP TIME.
a
• INSTALL
2
3
4
PiP
CLOSEDCAP
FORHAT
B
6
Press the CURSOR
i
TIME
• AuIoLock
• PIP
STARTTIHE
STOPTIHE
• CLOSEDCAP
• FOHHAT
CHANNEL
ACTIVATE
I
• STAHTTIHE
• STOPTIME
• CHANNEL
RING DOWN
FEATURES.
•_
8:06 PH
• ACTIVATE
Press the CURSOR RING RIGHT to
enter the FEATURES submenu.
•
Press the CURSOR RING RIGHT
again, Then press the CURSOR RING
DOWN once to highlight the START
TIME control,
Press the NUMBER buttons to enter
the correct time. if you make a mistake entering the time, use the CURSOR RING LEFT or RIGHT to move
among the time input slots to make
corrections,
TIHER
• TIHE
• CHANNEL
• ACTIVATE
(9@@
®@@
/®®®
YOU can also use the CUR-
Press the CURSOR
•
• STOPTIHE
•
l
FEATURES
TIHEH
• TIHE
• STAETTIHE
•
_r_ [',]Iffll[lll
• STOPTIHE
• CHANNEL
• ACTIVATE
SOR RING UP or DOWN to cycle
through digits to input the time,
Press the CURSOR RING UP or
DOWN to select AM or PM.
T
FEATURES
Press the CURSOR RING RIGHT
to highlight the time indicator area,
NOTE:
7
iii;!ii! _
FEATURES
TIHEH
menu,
twice to highlight
FEATUfiES
TIHER
AutoLock
Press the MENU/SELECT
button
on the remote control to show the
onscreen
"""
_,,,#;i_iiiiiiiiiii
• PICTURE
• SOUND
Submenus: Features
•
PHILIP'S
FEATURES
TIHEH
• TIHE
• STARTTIHE
RING LEFT
repeatedly until STAP,T TIME is highlighted. Then press the CURSOR RING
DOWN to highlight STOP TIME. if yon
wmat the TV to switch offat some time
after the changing of channels, follow
steps 5 7 above to set the STOP TIME.
•
• CHANNEL
• ACTIVATE
•
Press the STATUS/EXrI"button to exit
the menu.
See pages 42 mad43 for instructions on selecting
the Timer's channel and activating the timer.
FEATURES
TIHEE
• TIHE
• STAETTIHE
•
• STOPTIHE
• CHANNEL
•
• ACTIVATE
41
T
Using the Onscreen
F_llow
Submenus:
Features
these steps to select the channel
hich the Timer will switch the TE
to
t-fi-ffgr
Press the MENU/SELECT button
on the remote control to show the
onscreen menu,
2
3
4
Press the CURSOR
twice to highlight
• PICTURE
• SOUND
TIMER
AutoLock
• INSTATE
PIP
CEOSEDCAP
FORMAT
• PiP
• CLOSEDCAP
• FORMAT
RING DOWN
STOPTIME
CHANNEL
ACTIVATE
FEATURES,
Press the CURSOR RING RIGHT to
enter the FEATURES submenu.
Press the CURSOR RING RIGHT,
Then press the CURSOR RING
DOWN repeatedly until the CHANNEL
control is highlighted.
FEATURES
TIMER
/
®®®®
•
•_
• SIAM TIME
• STOPTIME
• CHANNEL
• ACIIVATE
the
Press
desired
the NUMBER
start-up channel.
buttonsOrtopress
enter
the CURSOR RING RIGHT repeatedly
to enter the start-up channel you want.
FEATURES
TIMER
• TIME
• STARTTIME
exit
Pressthethemenu.
STATUS/EXIT button to
•
• STOPTIME
[llhllll
NOTE: Before the Timer will work, you
must activate it, See page 43,
• ACTIVATE
®®®
®®®
f®®®
@®®
PHILIPS
42
•
T
8:06 PM
Using the Onscreen
AfiTiMer you have set the TIME, START
E, S?DP TIME, and CHANNEL,
you must activate tlle Timer !br it to opermc<
Your options are to set the Timer to work
ONCE or DAILY. Set A CTIVATE
you don't want to use tlle 7_mel:
• PICTURE
• SOUND
TIMER
AutoLock
• INSTALL
PIP
CLOSEDCAP
FORMAT
to OPT (]
Submenus:
FEATURES
• AutoLock
TIME
STAHTTIHE
• PIP
• CLOSEDCAP
STOPTIME
CHANNEL
• FORHAT
ACTIVATE
Press
MENU/SELECT
on
the the
remote
control to show button
the
onscreen
2
3
4
menu,
FEATURES
TIMER
/
Press the CURSOR RING DOWN
twice to h ....ghhght FEATURES,
R:06 PM
_'
• STARTTIME
• STOPTIME
• CHANNEL
Press the CURSOR RING RIGHT
to enter the FEATURES submenu,
• ACTIVATE
Press the CURSOR
RING RIGHT
again, Then press the CURSOR RING
DOWN repeatedly until the ACTIVATE control is highlighted,
•
l
FEATURES
TIMER
Press the C [ RSOR RING RIGH F
to cycle through the options and make
your selection, The options are
ONCE, DAILY, or OFF,
• TIME
• STARTTiME
• STOPTIME
• CHANNEL
:1 r:Illlllb,
exit
menu.
Pressthethe
STATUS/EXIT button to
@®®
®®®
®®®
[]
]l_lltV,I
• Changing the channel or adjusting the
voltmEe during the last minute of a Timer
setting will cancel the shutting off of the
TV.
PHILIPS
• Thirty seconds before the set changes To
the channel you set (see page 42), an
announcement appears on screen.
43
_
1- "
,,H
Features
Using the Onscreen
Submenus:
Features
T_te
AutoLockTM fi_ature can help parnts control what their children watch
on TV. AutoLockTM does this by using the
content advisories sent by broadcasters
or other program providers. After you
program AutoLock'_E it can respond to
the content advisories and block programs that contain content that you may
consider ol?iectionable
c?ffensive language, violence, or sexual situations. You
can also use AutoLock TM to block channels that you don't want your children to
watch.
In this section, you 71 learn how to block
channels and programming
that is not
rated, is unrated, or has no rating. You
will also find out how to turn these blocking./eatures on or ojf Following on this
page are brie/'explanations
_)]
AutoLock TM terms and program ratings.
'_rms
BLOCKING control---can be thought
of as the "master swituh" for
AutoLock TM, This control affects lhe seatings you have chosen for blocking programs according to movie ratings or TV
ratings, or for blocking programs that
have no rating or are unrated. When the
BLOCKING control is OFF, the blocking
or censoring of programs is disabled,
When the BLOCKING control is ON,
blocking will occur according m the settings you have chosen,
BLOCK UNRATED
control
if set to
ON, blocks all unrated programs.
Unrated programming consists of the
kind of shows that the MPAA (Motion
Picture Association of America) or the
TV broadcaslers have chosen not io rate.
NO RARING control
blocks all programming
advisory data,
if set io ON,
with no content
Programming that has No Rating is not
encoded with any rating information
from the MPAA or the Parental
Guidelines. Any programming
could fall
into lhis category.
BLOCK
CHANNEL
control---enables
you to block individual channels
don't want children m see.
that you
AutoLock
MOVIERATING
AutoLock
TVRATING
•
• PG
• PG-13
•R
• IIGI7
•
•
•
•
G (General Audience)_ll
ages
admitled, Most parents will find programs that are rated G m be suitable
for children of all ages. Such programs
have liltle or no violence, no strong
language, and liltle or no sexual dialog
or sexual situations.
PG (Parental Guidance
Suggested)_ontain
matarial that parents may find unsuitable for younger
children. Programs that are rated PG
have one or more of the following:
moderate violence, some sexual situations, infrequent coarse language, or
some suggestive dialog.
PG-13 (Parents Strongly
Cautioned)--contain
material that parents may find unsuitable for children
under/he age of 13, Programs that are
rated PG-13 have one or more of the
following: violence, sexual situations,
coarse language, or suggestive dialog.
R (Restricted)
specifically designed
for adults, Anyone under the age of 17
should view programs/hal
are ruled R
only with an accompmaying parent or
adult guardima, Such progrmns have one
or more of the following: intense violence; intense sexual situations; strong,
coarse language; or intensely suggestive
dialogue,
NC-17 (No one under the age of 17
will be admitted)
should be viewed
by adults only. Progrmns that are ratad
NC-17 have graphic violence; explicit
sex; or crude, indecent lmaguage,
X (Adults Only)
contain one or more
of/he following: very graphic violence,
very graphic mad explicit or indecent
sexual acts, or very coarse mad intensely
suggestive language.
44
•
_l'gl
TV-¥7
TV-G
TV-PG
TV-14
NTV-Ybe appropriate
(All Children}designed
for all children, to
especially ones ages 2-0, Progq'mns
luted TV-Y are not expected to frighten
yotuager children.
TV-Y7 (Directed to Older
Children}designed
for children
ages 7 and oldel_Programs rated
TV-Y7 may be more appropriate for children who have acquired the development
skills needed lo distinguish between
make-believe and reality. Such programs
may include mild fantasy and comic violence (FV).
_i_
TV-G (General Audience_most
parents will consider programs that
are rated TV-G to be statable for
children of all ages. Such pmgl'mns have
little or no violence, no strong language,
and little or no sexual dialogue or sexual
situations,
_
TV-PG (Parental Guidance
Suggested_-contain
material that
parents may find unsuitable for
younger children. This type of programming has one or more of the following:
moderate violence (V), snme sexual situations (S), infrequent coarse lmaguage
(L), or some suggestive dialogue (D).
_
TV-14 (Parents
Cautioned
contain
Strongly
material that
mmayparents will find tmsuitahle
for children under 14 years of age, Such
programs have one or more of the following: in/ense violence (V); in/ense sexual
situations (S); strong, coarse language
(L); or in/ensely suggeslive dialogue (D),
_
V-MA (Mature Audience Only_
.specifically designed to be viewed by
adults and therelbre may be uns@able for children under 17. Such progrmns
have one or more of the following: graphic
violence (V); explicit sexual situations (S);
or crude, indecent lmaguage (L),
Using the Onscreen Submenus: Features
yOyUrou AtoutoLock
TM access code allows
enter the
AutoLock TM submenus
to set up or turn offblocking.
Your access
code is also the "key" that unlocks programs or channels that are being blocked
by AutoLock TM.
FEATURES
• PICTURE
TIMER
• SODND
Aut0k0ck
• INFPAL[
PIP
CLOSEDCAP
FORMAT
Press the MENU/SELECT
button
on the remote control to show the
onscreen
FEATURES
• TIMER
• Autokock
TIME
STARTTIME
• PiP
SIOP TIME
•
• CLOSEDCAD
CItANREL
• CLOSEDCAP
• FORMAT
ACTIVATE
•
FRATORES
[_JillillDll<ll
PiP
FORMAT
FEATURES
menu,
DOWNthetwice
Press
CURSOR
to highlight
RING
FEATURES,
• TIMER
• TIMER
i_Auto_ck
• PiP
_Ruto[ock
• PiP
• RLOSED
RAP
• FORMAT
• CLOSED CAD
• FORMAT
RIGHT.
Press
the Then
CURSOR
press the
RING
CURSOR
RiNG DOWN once to highlight the
AutoLock control,
FEATURES
• TIMER
_Autoko&
• PIP
Press the toCURSOR
RIGHT
highlight
CODE.
INCORRECT
Press
0,7,1,1
screen.
ACCESS
RING
• CLOSED CAP
• FORMAT
FEATURES
• TIMER
_AutoLock
• PIP
• CLOSED
CAP
•FORMAI
onwilltheappear
remote oncontrol.
the
FEATURES
• TIMER
i_Ruto[ock
• PiP
• RLOSED
CAP
• FORMAT
Press 0,7,1,1 on the remote control
again. ENTER NEW CODE will
appear on the screen.
FEATURES
• TIMER
_bRutoLock
• PIP
• RLOSED
RAP
• FORMAT
the
number
Enter
a newbuttons.
four-digitCONFIRM
code using
CODE will appear on the screen.
FEATURES
Enter your new four-digit code
again, CORRECT will flash on the
screen briefly.
• TIMER
iPRuto[ock
• PIP
• RLOSED
RAP
• FORMAT
Press the STATUS/EXIT button
exit the menu.
FEATURES
•
• TIMER
_AutoLock
• PIP
• CLOSED
CAP
•FORMAI
FEATORES
• TIMER
i_Autoko&
• PIP
• CLOSED
CAP
•FORMAI
An X appears on screen to confirm the
receipt of each digit by the TV as you
input your AutoLock TM access code.
• Parents, it isn't possible for your child
to unblock a channel without knowing
your access code or changing it to a
new one. if you discover that your
access code has been changed, you can
assume that blocked channels may
have been viewed.
FEATURES
FEATURES
You can also set up a new
access code from the main
AutoLock TM Submenu using
the gETUP CODE option.
Simply enter and confirm
the new Code to activate it.
45
AutoLo(k
•
• BLOCKEOANREL
•
•
SETOPRODE
MOVIERATiRG
FEATORES
AutoLock
•
• BLOCKCHANNEL
• SETUPCODE
• MOVIERATING
• "IV RATING
o TV RATING
•
• BLOCKOPTIONS
BLOCKOPTIONS
ACCESS
CODE
After
you have set up your personal
access code (see page 45), you are
read), to select the channels or program
sources you want to block.
Jill¸
• PIRTURE
TIMER
• SOUND
AutoLock
a
• INSTALL
FEATURES
PiP
CLOSEDCAD
FORH_
Press the MENU/SELECT button
on the remote control to show the
onscreen menu,
Press the CURSOR RING
DOWN twice to highlight
FEATURES,
• PIP
hoP
• CLOSEDCAD
COANBCL
• CLOSEDCAD
• FORHAT
ACTIVATE
• FORHAT
[cl[_TrlTtllt_
N
• PIP
TIRE
• TIMER
• TIMER
_,AutoLock
• PIP
_,RutoEock
• PIP
• RLOSED
CAP
• FOUMkT
FEATUUEK
FEATURES
RutoEock
•
AutoLock
•
I
• ULORK CHANBEL
• SETUP CODE
2
• SETUPRODE
• HOKIE RATING
3
• MOVIE _IING
• IV D_TINO
4
• TKRATING
• BLOCKOPTIONS
K
• ULORK OPTIONS
m
tp
FEATURES
FEATORES
AutoLock
•
AutoLock
• ULORKRHkBHEL
•
BLOCKCHANNEL
• SETUPRODE
RING UP or
the channel
Press the CURSOR RING
RIGHT to block the channel, A
padlock image will appear to the
right of the channel number, if you
decide you don't want to block the
channel, press the CURSOR RING
RIGHT again to remove the block,
(The padlock image goes away.)
FEATURES
• FORHDI
Enter your fom'-digit ACCESS
CODE. CORRECT will flash very
briefly and the submenu will move
to the left with BLOCK CHANNEL
highlighted.
Press the CURSOR RING
RIGHT to highlight the TV's available channels,
ACCESSCODE
TIHE
STARTTIRE
• CLOKEOCAD
Press the CURSOR
RING
RIGHT again to highlight ACCESS
CODE.
Repeat steps 7 and 8 for any channels
want to block from xiewing,
• TIHCR
• AutoLock
FEATURES
Press the CURSOR RING
RIGH'E Then press the CURSOR
RING DOWN once to highlight the
AutoLock control,
Press the CURSOR
DOWN to highlight
you want to block.
FEATURES
• MOVIE fiATING
• SETOPCODE
• HOVIE UAIINO
• TVP_IINO
• 1_ RATING
• ULORKOPTIODK
• BLOCKOPTIONS
PHILLIS
FEATURES
AutoLock
•
• BLOCKRHkBHEL
• SETUPCODE
• HOVIEfiATING
• IV P_TINO
• ULORKOPTIODK
you
To block
NOTE: You can highlight the ALL option,
then press the CURSOR RING RIGHT to
block all channels at once. Or press the
CURSOR RING RIGHT to unlock all
channels,
the
all channels
CURSOR
RING
at once,
RIGHT
highlight
to block.
ALL
in the
Remove
the
channel
list.Then
blocks
the
FEATORES
AutoLock
Press the STATUS/EXIT button
to exit the menu.
•
• BLOCKCOANBCL
• SETUPCODE
• SETOPCODE
• HOVIEfiATING
• HOVIE UAIING
• IV P_TINO
• 1_ RATING
• ULORKOPTIODK _1
FEATURES
You can use the BLOCK CHANNEL control to prevent the viewing of programs
coming from a VCR, DVD, or other accessory device connected to any of the
audio/video (AV) inputs on the TV,
46
AutoLock
• BLOCKRHkBHEL
• BLOCKOPTIONS
•
same
press
way.
Using the Onscreen Submenus: Features
A_,r
you have set your personal access
code (see page 45), you can block
programs by .weciiic movie ratings,
Press the MENU/SELECT
button on the remote control to
show the onscreen menu.
T
• PICTURE
• SOUND
TIMER
AUTOLOU¢
a
• INSTALL
PIP
CLOSED
CAP
FORMAT
DOWNthetwice
Press
CURSOR
to highlight
RING
FEATURES,
•
•
•
•
AutoLo&
PIP
CLOSED
CAP
FORMAT
TiME
START
TiME
STOP
TiME
CHANNEL
ACTIVATE
RAtoLock
•
• SETUPCODE
3
• MOVIERATING
4
• TVRATING
5
• BLOCKOPTIONS
R
AutoEock
MOVIE RATING
DOWN repeatedly until MOVIE
RATING is highlighted,
PHILIPS
Press the CURSOR RING UP or
DOWN to highlight each rating you
want, Then press the CURSOR
RING RIGHT m turn the rating ON
or OFF. Turning the rating ON will
block such programs from being
seen,
Press the STATUS/EXIT button
to exit the menu.
When a rating is set to be turned on
(blocked), all higher ratings will also be
blocked automatically,
For example, if the
R rating is turned on, the NC-17 and X
ratings also will be lurned on.
47
ACCESSCODE
• PiP
• CLOSEDCAP
• FORMAT
• TIMEU
_RAtokock
• PIP
• CEOSED
CAP
• FOUMAT
[t
RING
• TIMER
FEATOATS
FEATURES
Enter your four-digit ACCESS
CODE. CORRECT
will flash very
briefly in red and the submenu will
move to the left with BLOCK
CHANNEL
highlighted,
RIGHT
Press
theand
CURSOR
the Rating
RING
submenu
will shift to the left with G highlighted,
FEATURES
• TIMER
_RAtoLock
• PIP
• CLOSED
O_P
• FORMAT
Press the again
RIGHT
CURSOR
to highlight
RING
ACCESS CODE.
Press the CURSOR
FEATURES
FEATURES
RIGHT.
Press
the Then
CURSOR
press the
RING
CURSOR
RING DOWN once to highlight the
AutoLock control,
5
............
FEATURES
AutoEock
• BEOCR
CHAMNEE G
• SETUP
CODE
PG
PG-I]
•TV_TIRG
R
• BEOCR
OPTIONS NC-I7
AutoLock
MOVIE RATING
L_
• PG
• PG
• PG-13
• PG-13
•R
tlc
• NC-I7
• RC-17
Using the Onscreen
y_u
Submenus:
Features
also can b!ock programs by specific
V ratings. Follow these simple steps,
Press the MENU/SELECT
button on the remote control to
show the onscreen menu.
FEATURES
• PICTOHE
TIMER
• SOURO
AutoLock
m
• INSIALL
PIP
CLOSED CAP
FORMAT
TIME
STARTTIME
• TIHER
• AutoLock
•
PiP
ACCESSCODE
STOPTIME
• PiP
• CLOSEDCAP
CHARNEL
• CLOSERCAP
• FORMAT
A_TIVATE
• FORMAT
DOWNthetwice
Press
CURSOR
to highlight
RING
FEATURES,
FEATURES
• TIHER
FEATURES
• TIMER
_,AutoLock
• PIP
• CLOSED
CAP
• FORHAT
RIGHT.
Press
the Then
CURSOR
press the
RING
CURSOR
RING DOWN once to highlight
the AutoLock control,
Press the again
RIGHT
CURSOR
to highlight
RING
ACCESS CODE.
_bAutoLock
• PIP
• CLOSEDCAP
• FORMAT
FEATURES
FEATURES
AutoLock
AutoLock
• DLOCRCHARNEL
IV-Y
• SETUPRODE
3
• SETUPCODE
• MOVIE RATING
4
• MOVIE RATIRG
TV-Y7
TV-G
• TVRATINO
E
• DLORK0PTIORS
A
I[ [_]Ifflli[NIDTIgI_Jr
CODE,
Enter your four-digit
ACCESS
Press the CURSOR
RING
DOWN repeatedly until TV
RATING is highlighted,
AutoLock
RIGHT
enter the TV
RATING
Press thetoCURSOR
RING
submenu,
Press the CURSOR
DOWN
IV-I4
AutoLock
TV RATING
IV RATIRG
• TV-T7
• IV-Y7
• TV-O
• KV-O
• TV-PO
• TV-PG
• TV-14
• TV-I4
ill
RING
or UP to select a rating.
Press the CURSOR RING
RIGHT or LEFT to turn the
IV-PG
• DLOCROPTIONS
PHILIP$
block on the rating ON or OFF.
NOTE: More-specific subratings
(for violence, sexual content, dialogue, or fantasy violence) are
available for TV-Y7, TV-PG, TV14, and TV-MA.
'lb access these subrafings, press
the CURSOR RING RIGHT.
Press the CURSOR RING UP or
DOWN to select the subrating that
you want to block or unblock,
Then press the CURSOR RING
RIGHT or LEFT button to turn the
block on the subrating
ON or OFF,
Press the STATUS/EXIT
to exit the menu,
button
TV;.Y (All Children)
designed to be appropriate for all children, especially
Programs rated TV-Y are not expected to frighten younger children.
TV;,Y7 (Directed
to Older Children)
designed
for children
r
ones ages
26.
ages 7 and older. Programs rated
TV-Y7 may be more appropriate for children who have acquired the development skills needed to
distinguish between make-believe and reality. Such programs may include mild fantasy and comic
violence (FV).
'1 V;,G (General Aud ence)
I kely to be co is dered su table for ch ldren of all ages. St ch
r
r
_
programs
have little or no violence, no strong _ language,
and little or no sexual dialogue or sexual
situations_
TV;,PG (Parental Guidance Suggested)
contain material that parents may find unsuitable for
younger children. This type of programming has one or more of the following: moderate violence
(V), some sexual situations (S), infrequent coarse language (L/, or some suggestive dialogue (D).
TV;,I4 (Parents Strongly Cautioned)
contain material that many parents will find unsuitable
for children under 14 yeal_ of age. Such programs have one or more of the following: intense violence (V); intense sexual situations (S); strong, coarse language (L); or intensely suggestive
dialogue (D).
TV;,MA (Mature Audience Only
specifically designed to be viewed by adults and therefore
may be unsuitable for children under 17. Such programs have one or more of the following:
graplfic violence (V); explicit sexual situations (S); or crude, indecent language (L).
48
Using the Onscreen Submenus: Features
Tohe
BLOCKING
control can be thought
/'as the "master switch "/'or
AutoLock TM, Use it to turn ON or OFF all
c?f the settings (based on ratings), 77Fis
control does" not qffect channel blocks (see
page 46),
FEATURES
• PICTURE
TIMER
• SOUND
AutoLock
a
• INSTALL
PiP
CLOSED CAP
FORHAI
Press the MENU/SELECT
button
on the remote control to show the
onscreen
FEATURES
TIME
STARTTIRE
• riMER
• PiP
STOPTIRE
• CLOSEDCAP
DHARMEL
• FORHAT
ACTIVATE
• PiP
• CLOSED
CAP
• FORHAT
L_
• AutoLock
FEATURES
ACCESSCODE
FEATURES
menu,
• TIMER
_AutoLock
• PIP
• DLOSED
CAP
• FORMAl
DOWNthetwice
Press
CURSOR
to highlight
RING
FEATURES,
RIGHT.
Press
the Then
CURSOR
press the
RING
CURSOR
RING DOWN once to highlight the
AutoLock controL.
• TINER
_RAtokock
• PIP
• CLOSED
CAP
• FORHAI
FEATURES
FEATURES
AutoLock
AutoLock
h
RIGHTthe again
Press
CURSOR
to highlight
RINGACCESS
CODE.
CODE,
Enter your four-digit
ACCESS
• BLODROPTIODS
6
• BLODRCHANNEL
BLOCRING
• SETUPCODE
BLOCR UNRATED
• MOVIE RATING
DO RATING
• IV RATING
AutoLock
AmoLock
BLOCROPTIODS
llfflllllll
DOWN
BLOCK
Press therepeatedly
CURSOR until
RING
OPTIONS is highlighted.
1
• BLODR UNRATED
• NO RATING
PHILIPS
will be highlighted,
Press the CURSOR RING
RIGHT or LEFT to turn
BLOCKING ON or OFF,
Press the STATUS/EXIT
to exit the menu.
3
R
@
@
@
RIGHT
enter the BLOCK
Press the toCURSOR
RING
OPTIONS submenu, BLOCKING
• SETUP
CODE
• MOVIERATING
• TVRATIRG
button
49
BLOCKOPTIONS
--.,
I_lllI|_l,
• BLOCKUNRATED
• NO RATING
IL
Using the Onscreen
Submenus:
Features
;addition
to blocking rated programs
r channels, you may also choose to
block all programming
that is unrated.
Unrated programming
consists g('shows
that the MPAA (Motion Picture
Association
of America) or the TV broadcasters have chosen not to rate.
3
i%ii%ii%ii%ii%ii%ii%ii%ii%ii%ii%ii_i_i_i_i?
FEATURES
• PICTULE
TIMER
• SOUND
AutoLock
PIP
• INSTALL
CLOSEDCLP
FONHAT
Press the MENU/SELECT
button on the remote control to show
the onscreen menu.
4
S
CODE,
Enter your four-digit
•
PIP
STOPTIME
•
CLOSEDCAP
CHANNEL
•
FONHAT
ACTILATE
AutoLock
FEATURES
K
4
• TKRATING
K
• BLOCKOPTIONS
A
•
• NO LATING
Press the CURSOR
RING
DOWN once to select BLOCK
UNRATED.
Press the CURSOR
RING
RIGHT or LEFT to turn
BLOCK UNRATED ON or OFF,
Press the STATUS/EXrI' button
to exit the menu.
Channel IK
Blocked by Amol_ck
Onraled
Aceesl Code
5O
• ULOCKCHANNEL
• SETUPLODE
• HOKIE RATING
• TKRATING
AutoLock
•
BLOCKING
I_tllI|lll_l_f_llgll
RIGHT
enter the BLOCK
Press the toCURSOR
RING
OPTIONS submenu,
AutobcL
•
LutoLock
Press the CURSOR
RING
DOWN repeatedly until BLOCK
OPTIONS is highlighted.
ACCESSCODE
• TIMEN
_wLutoLock
• PIP
• RLOSED
RAP
• FONMAI
• SETUPRODE
• HOKIE I_TING
BEOCLOPTIONS
• TNEN
_ffti_Ig'_m
• PIP
• CLOSED
CAP
• FORMAT
FEATNNES
FEATURES
ACCESS
When the BLOCK UNRATED control is
turned ON, allempts _o view unraled programs will bring to lhe screen a message
like the one shown lo the right. To walch
the program, enler your access code or go
into the BLOCK OPTIONS submenu and
turn the BLOCK UNRATED control OFF.
TIME
STARTTIME
• TIHEN
_AutoLock
• PIP
• CLOSED
CAP
• FONHAI
Press the CURSOR RING
RIGHT. Then press the
CURSOR RING DOWN once
to highlight the AutoLock control,
Press the CURSOR RING
RIGHT again to highlight
ACCESS CODE.
• AutoLock
FEATOKES
Press
CURSOR
RING
DOWNthetwice
to highlight
FEATURES,
3
FEATOKES
BLOCNOPTIONS
• BLOCKING
[Alll
HH|Ilg[llllltf_l|l_l
• NO MTINO
ULORKING
ULOCKUNI_TE
NO KATINU
Using the Onscreen
Some
programs contain no content adviories.fi'om the Motion Picture
Association
o/'America or the television
broadcasters
(seepage
44). To block programs with no rating,/hl!ow
these steps.
FEATURES
• PICTURE
TIMER
• SOUND
AutoLock
• INSTALL
PIP
CLOSEDCAP
FORNAT
•
•
•
•
Submenus:
Features
FEATURES
AutoLock
PIP
CLOSED
CAP
FORNAT
TiME
START
TIRE
STOP
TIRE
CHANNEL
ACTIVATE
• TIMER
ACCESS
CODE
[_/:Tff/ff_l
•
PiP
•
CLOSEDCAP
•
FORflRT
Press the MEN U/SELECT
button on the remote control to
show the onscreen menu,
FEATURES
Press thetwice
CURSOR
RING FEADOWN
to highlight
TURES,
3
Press the CURSOR RING
RIGHT. Then press the CURSOR RING DOWN once
to highlight the AutoLock
controL.
FEATOVES
• TIMER
• fiNER
_Auto_ck
• PiP
• C_SED CAP
• FORNAI
_RutoLock
• PIP
• CLOSED
CAP
• FORNAT
FEATURES
FEATURES
RmoLock
wr,, m n euL v
RIGHTthe again
Press
CURSOR
to highlight
RING the
ACCESS CODE input area,
CODE,
Enter your four-digit
RutoLock
h
•
RLORKCHRNREL
RLORKIRO
• SETUPCODE
3
•
SETUPCODE
RLORKUNEATED
•
V
•
NOBLEEATING
RO EAriNG
V
• TV EATING
HORIEEATINO
• IV EATING
•
RLORKOPTIONS
R
ACCESS
RutoLock
DOWN
BLOCK
Press therepeatedly
CURSOR until
RING
OPTIONS is highlighted.
PHILIPS
Press the CURSOR RING
DOWN twice to highlight NO
RATING.
Press the CURSOR
RING
RIGHT or LEFT to turn NO
RATING ON or OFF,
Press the STATUS/EXIT button
to exit the menu.
if the NO RATING control is turned on,
all programs having no content advisory
information will activate a screen like the
one shown to the right, To watch the
channel, enter your access code or turn
the NO RATING option OFE
RLORKOPTIORV
• RLOCBING
• BLOCBRNEATED
ll_lll
RIGHT
enter the BLOCK
Press the toCURSOR
RING
OPTIONS submenu,
AutoLock
BLOCKOPTIONS
Channel 12
Blocked by AatoLock
No ratm g
Access Code
51
_llu
¸,_
_l
•
BLOCKING
•
BLOCKRREATED
Using the Onscreen
Submenus:
Features
AaoLock'_M
provides a screen that sho_,'s
the settings you have selected. Here s
how to access the screen.
MOVIE RATINGl
Press the STNFUS/EXIT button on
the remote control twice. Your
AutoLock TM settings will appear on
the screen.
TV RATIN_
BLO0(
NOUNRAIED
RATING I
NOTE: if you have blocked specific
subratings, such as V for Violence in 1he
TV-PG category, Ihese blocked subratings will not appear in 1he review,
Nonetheless, the subralings are still
blocked according to your selections,
®®@®
leave the
After
a few
screen
seconds,
automatically,
the settingsorwill
you can press the STATUS/EXIT
button to exit the menu,
(9@@
®®®
®®®
® ®
MOVIE RATING--shows
all the movie ratings
that you have chosen to block within the MOVIE
RATING control. NOTE: If a lower rating is
blocked, higher ratings will also be blocked auto-
PHILIPS
matically. For example, if you block R-rated programs, those that are rated X will also be blocked.
TV RATING--shows
all the TV ratings that you
have chosen to block within the TV RATING conu-ol. NOTE: If a lower rating is blocked, higher
ratings will also be blocked automatically.
For
example, if you block TV-PG-rated
programs,
those rated TV-14 and TV-MA will also be
blocked. The TV rating controls also have suN-atings for Violence (V), Fantasy Violence (FV),
Sexual Situations (S), Coarse
Suggestive Language (D). if
rating but tmn on a suhrating
control, programs having the
Language (L), and
you turn off a main
of that main rating
subrating will be
blocke& however, the main rating will not appear
within the AutoLock review submenu because you
did not turn it ON.
BLOCK UNRAFED
shows whether
turned this control ON or OFF.
you have
BLOCK NO RAJ1NG
shows whether you
have turned this control ON or OFF.
BLOCKUNRATED
NO RATINGI
52
Using the Onscreen
Cltosed
Captioning (CC) allows you to read
he voice content &"television programs
on the TV screen. Designed to help the hearing impaired, this jeature uses onscreen text
boxes, to show dialogue and conversations
while the TV program is in progress,
Submenus: Features
.............
• PICTURE
TIMER
• SOUND
Autotock
a
• INSTALL
FEATURES
T,ME
;ii;!il _
PiP
CLOSEDCAP
FORMAT
• AuIoLock
• PIP
• CLOSEDCAP
STARTTIME
STOPTIME
CHANNEL
• FORMAT
ACTIVATE
Press the MENU/SELECT
button
on the remote control to show the
onscreen
2
3
4
5
menu,
Press the CURSOR
twice to highlight
RING DOWN
FEATURES
FEATURES,
• TIMEE
• AutoLock
Press the CURSOR
RING RIGHT
to enler the FEATURES submenu,
• PiP
Press the CURSOR
RING DOWN
repeatedly until the CLOSED CAP
control is highlighted,
• FORMAT
Press the CURSOR RING RIGHT,
The submenu will shift to the left and
CAPTION MODE will be highlighled,
Then press the CURSOR RING
RIGHT again to highlight the
CAPTION MODEs area,
FEATUEES
CLOSEDCAP
•
CAPTIONNODE
• CC DISPLAY
_]
(9@
®@
®@
6 @
DOWN
select a CAPTION
Press theto CURSOR
RING UPMODE.
or
NOTt_S:
• CCI mode is the usual setting, CC2,
CC3, and CC4 may not be supported
by broadcast stations.
Selecting the CC MUTE option
allows you to display Closed
Captioning by pressing the MUTE
button
on
the
remote
contl_oh
Note, however, that the program
you are watching must be providing
Closed Captioning.You must also
be sure CC DISPLAY is turned ON.
• The CC MUTE option turns lhe
CLosedCaptioning mode on whenever
the MUTE button on the remote
control is pushed. Select CC MUTE
in lhe onscreen submenu Io turn lhis
feature on,
PHILIPS
FEATURES
CLOSEDCAP
• CAPTIONMODE
[|illll
return
to the
CLOSEDRING
CAP LEFT
submenu.
Press the
CURSOR
to
Then press the CURSOR RING
DOWN to highlight CC DISPLAYI
Press the CURSOR RING RIGHT
to turn the onscreen display of Closed
Caplioning on or off. Closed
Caplioning will be shown only if the
TV station broadcasting on the channel
has the feature available,
Press the STATUS/EXIT button to
exit the mere|.
CAPTIONNODE
CCDISPLAY
Refer to your area's
TV program lislings
for the stations and
times of shows
being broadcast
with Closed
i1[t I ....
,=.,
[]
:, PBll_N10gl
rrlrIlll
TEXT
Caplioning.
Mode
Example
Broadcasters delermine lhe content of
caplions. Any
occurrences of misspellings, incorrect
grammar, or strange
characters are not
the result of TV
malfunction.
53
CAPTION
Example
Mode
Display
TheTV
Display
program
by theText
screen.
is blocked
Using the Onscreen
Submenus:
Features
ydur
TVIY wide screen (16:9 aspect ratio)
elivers a home-cinema _perience
not possible with a conventional
(4:3 aspect ratio) set.
High-deiinition
(HD) programs originating in
16:9./brmat aml other widescreenz/brmat
video
sources appear more l(/elik_, dramatic, and theatricaL Border bars are diminished or eliminated. Most anamolThic-D VD programs wil! fill
tlle wide screen without border bars.
Picturesappear more lifelike,
dramatic, and theatrical on your
TV+s wide screen.
The term aspect ratio refers It the relationship between the width and height of
a TV screen. Historically, TV screen
width has been 33 percent greater than its
heighh amounting It a 4:3 aspect ratio.
The width of your widescreen TV, however, is nearly 80 percent greater than its
heighh which means its aspect ratio is
16:9. This screen corresponds well with
the tendency of the eyes to feel more
comfortable with fields of view and
action planes that are horizontally oriented, The wide screen is also proportionally
truer to the formats in which movies are
filmed and presenled in thealers.
Use your HD set-top box or progressive-scancapable D VD player to control the picture jbrmats of video sources connected to the TV_Y HD
inputs.
For flexibility with video sources connected to
your TV's standard inputs ANTENNA, AVI,
CVI, A V2, or A V3 (side panel)_ccess
your TV's
picture7[brmat modes. View a video source in
standard (4:3)jormat or enlat;ge it to fill the
screen in various ways using EXPAND 4:3,
PANORAMA, WIDE SCREEN, or AUTO.
Selecting a Picture
Using the Remote
Format
Control
Use your TV's piclure-format modes with video
sources you connect It the ANTENNA, AV 1,
CVI, AV2, orAV3 (side panel) inputs on the
TV, While watching a video sourc_wilh
no
onscreen menu or display present
press the
CURSOR RING RIGHT or LEFT as many
limes as necessary It select the picture format
you desire, Or press the FORMAT button to
perform the same funclion,
Picture-format
Although the term widescreen can have
various meanings, it is most commonly
used to refer to a picture format or screen
that has a greater aspect ratio than the
conventional 4:3.
The picture-format modes are available for use only with video
sources connected to the ANTENNA, AV1, CVI,AV2, and AV3
(Side Panel) inputs on theTM Control the picture formats of
video sources connected to the HD inputs through the set-top
box (for HD programming) or pro-gressive-scan-capable DVD
player (for DVD programs)
4:3
Shows the convendonaI picture
in its original format Border bars
are displayed on the sides. See the
Warning on this page (below, left).
®
EXPAND
4:3
Zooms the picture
vertically and horizontally.
Modes
4:3 shows the conventional (4:3 aspect ratio)
picture in its original format, Border bars are
displayed on the sides, (See the warning above,)
EXPAND 4:3 expands, or zooms, lhe picture
bolh vertically and horizontally, eliminating or
reducing the size of border bars. Picture informalion is lost around the edges,
PANORAMA
Stretches the outer
parts of the
picture horizontally and causes
some
vertical
expansion.
WIDE
SCREEN
Expands the picture
horizontall)_ No vertical
expansion occurs.
PANORAMA slrelches the outer portions of
the picture horizontally and causes some vertical expansion.
WIDE SCREEN expands the picture horizontally, No vertical expansion occurs.
AUTO senses the presence of borders bars and
zooms the picture It reduce or eliminate the
bars, The amount of zoom varies based on the
original picture, but this option can provide
more expansion than EXPAND 4:3.
AUTO works best with video programs that
were originally "lettarboxed." FormaIIed It preserve the original lheatrieal aspect ratio, these
programs arc presented with border bars at lop
and bottom,
To prevent uneven
picture-tube aging,
do not leave border
bars or other stationary images on
screen for extended
periods of time, See
page 60.
54
AUTO
Senses the presence of picture borders and zooms the
picture to reduce or eliminate the borders.
Using the Onscreen
Submenus: Features
Selecting a picture Format
Using the _
Buttons
ShouM your remote comrol become lost or otherwi_e unavuiluble./br use, lbllow the steps below
to use the buttorss on the /hmt q!'the l_ to acees_
the onxcreen menu and select a pictureT/brmat
control
Press the Volume + and - buttons
simultaneously. The onscreen menu
appears,
2
S
Press the Channel Down button
repeatedly until FEATURES is highlighted. Then press 1he Volume + button to enter the FEATURES submcnu,
Press the Channel Down
repeatedly until FORMAT
ed. Then press 1he Volume
until you select Ihe picture
want,
• PICTURE
• SOUND
m
• INSTATL
TIMER
AutoLock
PIP
CLOSED
CAP
FORMAT
FEATURES
•
•
•
•
TIME
START
TIME
STOPTIME
COADNEL
ACTIVATE
AutoLock
PIP
CLOSED
CAP
FORMAT
FEATURES
• TIMER
• AutoLock
[]
• PIP
• CLOSED
CAP
lllll_lll
il
Iillllll
Jillli'_lll
III
[]
button
is highlight+ or bullon
formal you
[]
Illl]lt II
n=,/l Illllll
_tI_
[]
liil_lll
i:
.llJl
Press the Volumeand+ repeatedly
and - buttons
simultaneously
until
you back out of the menu screens,
The TV's Picture-format
options are available only with video sources connected lo
the ANTENNA,
AVI, CVI, AV2, AV3 (side
panel) inputs on the TV. The piclure formats
of video sources connected _o the HD inputs
are controlled through the HD sel-mp box
or progressive-scan-capable
DVD player
providing the video source,
7!7!7!7!7!7!7!7!7!7!7!7!7!7!7!7!i !i ii : ii ii ii ii ii ii ii ii ii ii ii ii ii ii ii ii ii ii ii ii ii ii ii ii
To prevent uneven picture-tube aging, do not
leave nonmoving images or black borders on
/he screen for an extended period. See page 60.
55
Using the Onscreen
Submenus:
Features
A'tive
Controf TM Measures and corrects
all incoming signals to provide the best
picture-quality
settings,
ACTIVECONTHOL ON
When you choose to turn Active Controf TM
on, picture sharpness and noise reduction
are controlled automatically,
Active
Controf TM adapts picture settings continuously and automaticall)4
NOTE: Active Controf TM is not available
signals connected to HD INPUT-A V 4
HD INPUT-AV5,
Turning
Active
Control
off Using the Remote
TM
SHARPNESS
NOISEREDUCTION
/br
A¢'l' _VE
C©N'_OI[
....
ACTIVECONTfiOL OFF
on or
Control
While watching TV, press the ACTIVE
CONTROL button on the remote control to
turn the feature on or off. When you turn
Active ControP Mon, the onscreen display
shows the up-to-the-moment picture Sharpness
and Noise Reduction settings,
TurningActive
Control
TM
on or
off Using the T_F Buttons
Shouhl your remote c'or_trol become lost or otherwise unavailuble /br use, jblh)w the steps
below to use the buttons on the./?ont of the TV
to access the onscreen menu and turn Active
Cbntrol
TM
• PICTURE
• SOUND
TIMEH
AutoLock
• INSTALL
PIP
CLOSEDCAP
FORMAT
on or qff,
simultaneously.
Press
the VolumeThe
+ and
onscreen
- buttons
menu
appears.
FEATURES
I
• Aat0L0ck
TINE
STARTTIME
• PIP
• CLOSEDCAP
• FORHAT
STOPTIME
CHANNEL
ACTIVATE
FEATUHES
t
I AutoLock
• PIP
• CLOSEDCAP
repeatedly
Press
the Channel
until FEATURES
Down button
is highlighted, Then press the Volume + button to enter the FEATURES submenu.
3
• FORNAT
Press the Channel Down button
repeatedly until ACTIVE CTRL is
highlighted. Then press 1he Volume +
or bu|ton to turn Active Control rM
on or off[
:1 [:IIll_l:
[1111.
:1 hill[Ill
[II[II
• J: ll_
[]
simultaneously
Press
the Volumeand+ repeatedly
and - buttons
until
you back out of the menu screens,
56
• I1 ElI
Appendix A
yHur
set _ HD inputs (HD INPUT-A V 4 and
D INPUT-AV 5) are designed to accept
high-definition signal standards 480p and 1080i
as spec(fied by the Electronic Industries
Association. Output standards may vary by manqfi_cturer. R_(br to the directionsz/br-use manual
fiJr the digital equipment bejbre connecting.
Yuur TV_ HD input jacks are compatible with
some digital equipment having RGB outputs with
"sync on green" or RGB w,ith "separate H and V
sync_ "As with HD component video signals, output standards may vary by manqfhcturer. Refbr m
the directionsz/br-use ntanual fiJr the receiver
before connecting.
!
• No industry standards have been established for HD television RGB signal systems, timing, synchronization,
and signal
s_reng_hs. The HD INPUT-AV 4 RGB
inputs on your Phi|ips TV will not be
compatible
with all digital equipment that
offers RGB ouq_uts, if the digital equipment you want to connect offers both
componen_ video and RGB, component
video is the suggested _ype of connection
to use.
HD INPUT-AV
When
4
the Inputs Are Used with
ComponentVideo
Signals
Y INPUT: 1.0 Vp-p (includes sync), 75 ohms
Pr INPUT: 700m Vp-p, 75 ohms
Pb INPUT: 700m Vp-p, 75 ohms
NOTES:
The Pb INPUT jack can also receive signals from outputs
The Pr INPUT jack can also receive signals from outputs
When
the Inputs Are Used with
RGB Video
labeled Cb or B-Y.
labeled Cr or R-Y.
Signals
G/Y: 1.0Vp-p, 75
R/Pr: 700 mVp-p,
B/Pb: 700 mVp-p,
H: 3Vp-p _+1.0V,
V: 3Vp-p _+1.0V,
ohms (compatible with sync on green)
75 ohms
75 ohms
1 kohm (when using separate H andV sync)
1 kohm (when using separate H andV sync).
HD INPUT-AV
S
GIY: 1.0Vp-p, 75
RIPr: 700 mVp-p,
BIPb: 700 mVp-p,
H: 3Vp-p _+1.0V,
V: 3Vp-p _+1.0V,
ohms (compatible with sync on green)
75 ohms
7S ohms
1 kohm (when using separate H andV sync)
I kohm.(when using separate H andV sync)
• Your TV's onscreen INSTALL submenu
provides the option of switching the AV4
and AV5 signal sources belween YPbPr
and RGB color-space settings. The option
is available only when have selecled the
either the AV4 or AV5 signal source
(using the AV button on the remole or the
Source Select button on the TV). The
default settings are YPbPr for AV4, and
RGB for AV5. See page 59,
57
Appendix
B
IN PUT-AV 2
VIDEO (composite): 1 Vp-p, 75 ohms
AUDIO: 500 mVrms, 30 kohm
Product Type
Rear-projection HDTV Monitor
Television System
HD INPUT-AV 4
ComponentVideoYPrPb/RGB (See page 57.)
AUDIO: 500 mVrms, 30 kohm
NTSC standard
Channel
Coverage
HD INPUT-AV 5
DB15 (See page 57.)
AUDIO: 500 mVrms, 30 kohm
VHF: 2-13
UHF: 14-69
Cable TV: Midband
Superband
Hyperband
Ultraband
VIDEO/AUDIO OUTPUT
VIDEO: 1Vpp, 75 ohms
AUDIO: Fixed: 500 mVrms into >10 kohm
Variable: 0-2Vrms into > 10 kohm
Power Source
Side Panel (AV3)
VIDEO (composite): 1 Vp-p, 75 ohms
AUDIO: 500 mVrms, 30 kohm
HEADPHONE: 1.5 Vrms, 16 ohm
AC 110 +10%,60 Hz
Power Consumption
255W (average),standby<1 W
Picture Visible Area
Audio Power
55PP9352:1397 mm
(55in.)
2 x 10W, 50 Hz-10 kHz at 5%THD (fiat response),
8-ohm load
60PP9352:1524 mm
(60 in.)
Speaker Type
4 x 6 oval, 15W
Video/Audio
Dimensions
Terminals
55PP9352:1337
mm (W) x 1449 mm (H) x 650 mm (D)
(52.6 in. x 57.0 in. x 25.6 in.)
IN PUT-AV 1
VIDEO (composite): 1 Vp-p, 75 ohms
AUDIO: 500 mVrms, 30 kohm
60PP9352:1439
mm (W) x 1508 mm (H) x 683 mm (D)
(56.7 in. x 59.4 in. x 26.9 in.)
COMPONENT VIDEO INPUTS (YPbPr)
Y INPUT: 1.0Vp-p (includes sync), 75 ohms
Pb INPUT: 700mVp-p, 75 ohms
Pr INPUT: 700mVp-p, 75 ohms
(The Pb INPUT jack can also receive signalsfrom outputs
labeled Cb or B-'LThe Pr INPUT jack can also receive signals from outputs labeled Cr or R-Y.)
Weight
(does not include
55PP9352:85.28
60PP9352:94.8
carton)
kg (t88 Ib)
kg (209 Ib)
Supplied Accessories
Remote control with two size "AA"
S-VIDEO INPUT (INPUT-AV 1, INPUT-AV2, side panel)
Y-INPUT: 1 Vp-p (includes sync), 75 ohms
C-INPUT: 300 mVp-p, 75 ohms
batteries.
Design and specifications are subject to change without notice.
58
Appendix C
1
Cd!Or
space re/_rs to how colors are
efined and appear on your T_ Your
TV's d@mlt colo_space
setting _r
HD lNPUT-AV 4 is YPbPI; and./br HD
INPUT-AV 5 it is RGB, [f the picture T_color
looks grossly incorrect, try changing the
color-space
setting on the TV, Or i[you 're
using an HD receive_ you may tl3, changing
its color-space
setting, See the receiver's
directionsz/br-use
manual /br more iq_brmation To set the TV:_ color space,/bllow
the
steps below,
Press the AV button on 1he remote
control as many" times as necessary" to
select the desired HD signal source
(AV4 or AV5),
2
3
4
LANGUAGE
TUNERNODE
• FEATURES
AUTOPROGRAM
a
CHANNELEDIT
AutoChron
For AV4:
®®®®
INSTALL
i
| AUTOPHOGRAH
• CHANNELEDiT
•
AutoChron
• NAHE
Press the MENU/SELECT button.
The onscreen menu appears,
l[4II
zlJ_]l
[]
Press the CURSOR RING DOWN
repeatedly until INSTALL is highlighted. Then press 1he CURSOR RING
LEFT or RIGHT to enter the
INSTALL submenu,
Press the CURSOR RING DOWN
repeatedly until 1he AV option (AV4 or
AV5) you desire is highlighted, The
current color-space setting is shown
(either YPbPr or RGB).
• PICTURE
• SOUND
For AVS:
®@@
@@@
®@®
INSTALL
%
| AUTOPHOGRAH
• CHANNELEDiT
• AatoChron
• NAHE
if you want to change the setting, press
the CURSOR RING LEFT or RIGHT.
exit
Pressthethemenu.
STATUS/EXIT
[]
button to
c I:S_A1
59
[_llgR_
General
WARNING
Concerning
the TV Screen:
Stationary
Images
PLACEMENT
on
TV
CLEANING
• To avoid possible shock hazard, be sure the TV is unplugged
from the electrical outlet before cleaning.
• Regularly dust the TV with a dry, nonscralching duster to
keep the TV clean.
When cleaning the TV, take care not to scratch or damage the
screen surPace. Avoid wearing jewelry or using anything
abrasive. Do not use household cleaners. Wipe the front
screen with a clean cloth dampened with water. Use even,
easy, vertical strokes when cleaning.
• Border bars--solid bars shown when viewing a standard
(4:3) picture and some widescreen movies on your
widescreen (16:9) TV
Specially designed screen-cleaning kits are also available.
These kits contain anti-static cleaners and cloths designed to
get into the ridges of the TV screen. Purchase the kits at
stores that sell electronics. Or call our Customer Care Cenler
of DVD disc content
images and scoreboards
at 1-800-531-0039,
• 'lMevision
station logos--present
a problem if they are
bright and stationary; moving or low-contrast
graphics are
less likely to cause uneven aging of the picture tube
• Stock-market tickers--presented
screen
and Cleaning
• Be sure io allow a free flow of air to and from the perforaled
back cover of the set.
Normal use of the TV should involve the showing of pictures
that contain constantly moving and changing images that fill the
screen. Be careful not to leave nonmoving images on screen for
extended periods of time, or to display the same images on
screen ioo frequently, because subtle ghost images can be left
on the picture tubes. Avoid showing pictures with border bars or
the same stationary images more than 15 percent of your total
viewing in any one week. Sources of stationary images may be
broadcast channels, cable channels, satellite channels, digital
television boxes, DVD discs, laser discs, video games, CD-i
discs, videotapes, and others, Here are some examples of stationary images (this is not an all-inclusive list; you may
encounter others in your viewing):
• Video-game
Care
• To avoid cabinet warping, cabinet color changes, and
increased chance of set failure, do not place the TV where
temperalures can become excessively hot; for example, in
direct sunlight or near a heating appliance.
Do not leave picture border bars or stationary
images on screen for extended
periods of time.
This can cause uneven picture-tube
aging.
• DVD menus--listings
OF THE
Information:
• Gently wipe the cabinet surfaces with a clean cloth or sponge
dampened in a solution of cool, clear water and a mild soap
or detergent. Use a clean, dry cloth to dry the wiped surfaces.
at the botlom of the TV
• Occasionally
vacuum
cover of the set.
• Shopping
channel logos and pricing displays--bright
and
shown constantly or repeatedly in the same location on the
TV screem
the ventilation
holes or slots in the back
• Never use thinners, insecticide sprays, or other chemicals on
or near the cabinet, as they might cause permanent marring of
the cabinet finish.
All picture tubes age with use, with their light output diminishing over time. But by maintaining
normal use
mixing television picture lypes
you will creale conditions for the tubes to
age at an even rate, The result will be a TV picture that is evenly bright over the entire screen.
6O
General
CheckThis
List of Symptoms
and Possible
You may be able to solve the problem
ered under your warranty.
yourself.
Charges
Solutions
Before
for TV installation
Requesting
and adjustment
Information:Troubleshooting
Service
of customer
controls
are not cov-
If you need to call a customer service representative, please know the model number and serial number of your product before you
call. This information is displayed on the back of the product. Also, please take a moment io identify the problem you are having,
and be prepared to explain this to the representative. If you believe the representative will need io help you with operations, please
stay near the product. Our representative will be happy io assist you. 'lb reach our Customer Care Center, call 1-800-531-0039.
Difficulties
and Possible Solutions
TheTV
remote
control
• Check
that the batteries
(*Q refers to the Quick Use and Setup Guide that came with yourTV.)
does not work
are installed
arc dead, replace
correctly.
Seepage
Q-2*.
•
if the batteries
•
Be no farther than 30 feet from the TV when using the remote control
the TV. See page *Q-2./or the location (_!'tlle remote-sensor
window.
• Clean the remote
control
them with two "AA" size heavy duly (zinc chloride)
and the remote-sensor
window
or alkaline
and point the remote
on the TV. Seepage
*Q-2/or
batteries,
toward
the location
Seepage
*Q-2.
the remote-sensor
of the remote-sensor
window
window.
• Check the TV power cord. Unplug the TV, wait 10 seconds, then reinsert the plug into the outlet and push the remote power
TV power/standby
bulton again. To locate the TV power/standby
button, see page *Q-2.
•
if you have your TV plugged
inlo an AC power
• Check
to see if the TV is on a wall swileh.
TheTV
has no power
strip, ensure
that the fuse on the power
on
or
strip is not blown.
• Check the TV's power cord. Unplug the TV, wait 10 seconds, then reinsert the plug into the outlet and push the remote-control
power or TV power/standby butlon again. The location (_!'the TV powerL_'tandby button is illustrated on page *Q-2.
• Check that the outlet is not on a wall switch,
• if you arc using an AC power strip, be sure the fuse on the power strip is not blown.
You cannot get a picture
• Be sure that you have made signal connections correctly and securely, Seepages
*Q-l, *Q-2, _9, and !l
!6.
• Check the Tuner Mode control for the correct tuner setting. See page *Q-4.
• Try running the Auto Program feature. Seepage
*Q-5.
• Ensurethaty_uhavese_ectedthec_rrectpicturesigna_s_urceusingtheAV(rem_te)_rS_urceSelect(TV)buit_ns.Seepage24_
• if you arc altempting io view a piclurc from a progressive-scan-capable
DVD player conneclcd to the HD inputs, ensure that you
have switched the DVD player to progressive-scan mode, See page 12, as well as the D VD player Zvdirections7/br-use manual.
• if you arc using an HD receiver, ensure that its oulput is set correctly (HD or SD) based on the connection to the TV you have
made. Seepages 14 and !5. Also, re/er to the directions7/br-use manual that came with the HD receive1:
Picture is fuzzy or out of focus
Check the set's convergence and adjust if necessary. See page *Q-8.
You cannot see a picture when you play aVCR tape
Press the AV butlon on the remote control or the Source Select button on the TV until you have selected the source to which you
connected the VCR. See page 24 (A V button) or page *Q-2 (Source Select button).
You cannot
tune
•
Use the number
•
if necessary,
to ensure
channel
on the remolc instead
of the CH +/
select the Tuner Mode and run Auto Program
You see scrolling
Check
to a particular
butlons
buuons.
Seepage
to store channels
*Q-3 (remote-control
io the set's memory.
images
that you have made connections
correctly.
Seepage.s"
*Q-!,
*Q-2, _9,
The list of difficulties and possible solutions continues on the next page.
61
and 11 16.
buttom).
See pages *Q-4 and *Q-5.
General
I n fo rmation:Trou
Difficulties
and
bleshooting
Possible
Solutions
(*Q
refers to the Quick
Use and Setup
Guide
that came with yourTV.)
The picture has no color or colors are not correct
• Check to ensure that you have made connections correctly, Seepages
*Q-l, *Q-2, _9, and !l 16.
• Ify_uhavec_nnecteddigita_equipmentt_theHDinputs_check/changethec_r-spacesetting_ntheequipraent_rTV.Seepage59.
• If the picture has red or blue fringes, you may need to adjust the convergence, Seepage
*Q-8.
You are not able to get sound
•
Check the Volume
•
Check the Mute button
•
Check the Audio
•
If you have connected auxiliary sound equipment,
check to ensure that you have made the audio connections correctly. See
page.s, _16. (.(/you have connected an external audio hi:/i system, see page !0 to ensure that you have made the connections
set the AUDIO OUT control correctl)_)
buttons on the remote
control
on the remote. Seepage
Out and Speaker
controls.
or on the TV, Seepage.s"
*Q-3jbr
Seepage
the location
*Q-2 (TVbutton.s)
and
*Q-3 (remote-contro!
button.s).
(_!'the Mute button.
10.
TV displays wrong channel or no channels above 13
• Try selecting the channel again,
• Add the desired channel numbers into the TV using the Channel Edit control, Seepage
• Check to ensure that the Tuner Mode is properly set and run Auto Program. Seepages
62
*Q-5.
*Q-4 and *Q-5.
and
General
Active Control rM • Proaclive video-control syslem for NTSC
(see definition below) sources. Active ControP Mcontinuously
measures and corrects the incoming signals io provide the best
picture possible.
Information:
Glossary
of Television
Terms
Interlaced • A piclure-scanning
lechnique lhat improves the appearance of onscreen molion, it also helps smooth jagged lines that are
sometimes seen on curved and angled surfaces in the picture.
Menu • An onscreen list of feature controls available for you to
adjust or set.
Alternate Channel • The feature that allows you to toggle
between the last two channels viewed by pressing lhe A/CH button
on the remote control,
NTSC • National
Television
Standards
devised in the 1940s for TV broadcast
(525 lines: 30 Hz).
ATSC • Advanced Television Syslems Committee, the U.S, committee (reporting to the FCC (Federal Commtmications
Commission]) lhat has specified a set of American digital TV standards. There are 18 voluntary ATSC video formats,
Commitlee
format
analog video signals
Onscreen Displays (OSD) • The wording or messages generated
by lhe television (or VCR) to help you with specific feature controis (color adjustment or programming, for example),
Audio/Video Inputs • Jacks (standard RCA), located on the rear of
lhe TV, used for the input of audio and video signals. These jacks
arc designed for use with VCRs (or other accessories) to receive
higher picture resolulion and offer sound-connection options.
Picture-in-Picture • The showing of two pictures on the TV
screen at the same time (one main screen picture and one small
picture, or PIP).
Progresfive Scan • A picture-scanning lechnique that douNes the
number of picture lines, eliminating the flicker and providing a
jitter-free picture.
Auto Program • The feature that, when activated, scans for all
available channels from regular antenna or cable signals and stores
only active broadcast stations in the TV's memory.
PTV • Projection Television. (Rear- and/or front-projeclion design
systems are available,)
Channel Edit • The feature that allows you to add or delele channels from the list of channels stored in the TV's memory. Channel
Edit makes it easy to limit or expand the number of channels thai
arc available to you when you press the CH +/ buttons on your
remote control,
Remote-control Sensor Window • The window or opening found
on lhe television control panel through which infrared remole-eontrol command signals are received.
RGB • Red, green, and blue signal. These are lhe primary colors of
light that are used to produce a picture in television, By mixing
levels or R, G, and B, all colors (chrominance and luminance) are
reproduced,
Closed Captioning • The broadcast standard feature that allows
you to read the voice content of tdevision programs on the TV
screen. Designed to help the hearing impaired, Closed Captioning
uses onscreen text boxes to show dialogue and conversations while
a TV program is in progress,
RF • Radio Frequency or modulaled signal design used as the carrier for lelevision broadcasts.
Coaxial Cable • A single solid wire normally matched with a
metal plug (F-type) end connector that screws (or pushes) directly
onto a 75-ohm input found on the lelevision or VCR.
Second Audio Program (SAP) • An additional audio channel provided for in lhe Multichannel Television Sound (MTS) broadcast
standard, A monaural soundtrack included within lhe recorded or
video signal (usually containing a second language translation for
the displayed programming).
Comb Filter • TV filter that removes distortion, resulling in a
sharper and purer color display. The comb filter addresses the
annoying cross-color distortion that may occur in TV broadcasts
when, for example, the presenter wears a slriped or checked jacket.
Status/Exit Button • Remole-control button lhat, when pressed,
shows the current channel number, name (if set), time (if set),
Sheep Timer setting, and sound selling (slereo, mono, SAP, or
mute). Pressing the button twice shows the current AutoLock TM
seltings. Pressing lhe button once when an onscreen display is
showing removes the onscreen display. You can use Status/Exit
rather than having to wait for the displays to "time out," or automatically disappear from lhe screen.
Component Video Inputs • inputs that allow lhe separale reception of blue, red, and luminance signals. These inputs provide lhe
highest possible color and picture resolution in the playback of digital signal-source malerial, such as the kind available from DVD
players. Component video inputs allow for improved bandwidth
information not possible lhrough composile video or S-Video conneclions.
S-Video Input • Signal input lhat allows direct connection of highresolution video sources, such as a salellite receiver, DVD player, S
(Super)-VHS videocassetm recorder, or video games. Provides
improved picture resolution, sharpness, and clarity.
Composite Video Input • An input in which all the components
required for displaying the onscreen image arc combined in one
signal,
Convergence • The technique used in color TV for bringing the
red, green, and blue color beams together so lhat they hit the same
part of the picture tube screen at lhe same time. This avoids color
fringes around images in the picture.
1080i • The highest verlical resolution defined for ATSC (see definition on this page). The format 1080i has 1920 x 1080 pixels.
Tint • TV function that allows you to change the general color balance between cool and warm. Adjust lint according to your personal preference.
High-definition Television (HDTV) • High-resolution digital television. HDTV is high-resolution digital lelevision, it has lifelike
pictures, and with it films retain their original widlh, enhancing the
home theater experience.
'lwin-lead Wire • The more commonly used name for the twostrand, 300-ohm antenna wire used with many indoor and outdoor
antenna systems. In many cases, this lype of antenna wire requires
an additional adapler (or balun) in order to connect to lhe 75-ohm
input lerminals designed into the more recent TVs and VCRs.
Incredible Surround TM • False acouslic management of the audio
signal lhat produces a dramatic expansion of the wall of sound that
surrotmds lhe listener and heightens overall viewing pleasure,
63
General
Information:
Index
A
S-Video device, 13
VCR, 8
VCR and cable box, 9
Convergence Controls
Red/blue, *Q-8
Restore factory, *Q-8
Multipoint red/blue, *Q-8
Save multipoint settings, *Q-8
Undo multipoint, *Q-8
Active ControP M,56, 63
Alternate Channel (A/CH), 28, 63
APAC TM, 5
Audio Out Control, 10
Audio/Video inputs (Definition), 63
AutoChron TM Control, *Q-5, *Q-6
AutoLock TM Control
Access code, 45
Blocking channels, 46
Movie ratings, 47
No rating broadcasts, 51
On/off control, 49
Settings review, 52
Setup Code, 45
TV ratings, 48
Understanding AutoLock TM, 44
Unrated broadcasts, 50
AutoPicture TM, 26
Auto Program, *Q-5, 63
AutoSound TM, 25
AutoSurP M,27
AV Button, 24
AVL Control, 34
D
Dolby _ Virtual Control, 35
Dynamic Contrast Control, 32
Eye Fidelity Control, 31
*Q refers to the Quick Use and Setup
T
Language Control
(See Menu Language Control)
Timer Control,
Activate, 43
Channel, 42
Clock, 39
Start time, 41
Stop time, 41
Time display, 40
Tint Control, 30, 63
Treble Control, 33
Troubleshooting, 61 62
Tuner Mode, *Q-4
Twin-lead Wire (Definition), 63
H
Headphone Control, 17
High-definition Television (Definition), 63
!
M
Cables/connectors, *Q-1
Channel Edit Control, *Q-5, 63
Cleaning (TV/Screen), 60
Clock (See Timer Control)
Closed Captioning Control, 53, 63
Coaxial Cable (Definition), 63
Color Control, 30
Color-space Control, 59
Color Temp Control, 30
Component Video Inputs (Definition), 63
Composite Video Input (Definition), 63
Connections
Antenna/cable, *Q-I
Cable converter box, *Q-2
Camcorder, 16
Compatibility, 6, 7, 57
DVD player, 11 12
HD receiver, 14-15
Headphone, 17
Hi-fi system, 10
Satellite receiver (standard), 6, 11, 13
S
L
Glossary, 63
C
Registration/Welcome, 2
Remote Control
Battery installation/caution, *Q-2
Button descriptions, *Q-3
Programming, 18 23
Sensor Window, *Q-2, 63
Usage, *Q-2, *Q-3
RF (Definition), 63
RGB Color Space Setting (See Color
Space Control)
Incredible Surround TM Control, 35, 63
Inputs (See Panel Jacks)
G
Balance Control, 33
Bass Boost Control, 38
Bass Control, 33
Brightness Control, 30
Buttons (TV), *Q-2
Buttons (Remote), *Q-3
R
Safety/Precautions, *Q-2, 2, 3
SAP, 37, 63
Sharpness Control, 30
Sleep Timer Control, 29
Source Select Button, *Q-2, 24
Specifications, 58
Stationary Images/Warning, 60
Status/Exit Button, *Q-3, 63
Stereo/Mono Control, 36
Surf Button (See AutoSurf rM)
Surround-sound Modes, 35
S-Video, *Q-l, 6, 13
Factory Service Locations, 65 66
B
Tint control, *Q-7
Tuning channels, *Q-7
Program List, *Q-3, 28
Menu, *Q-3, 63
Menu Language Control, *Q-4
Movie Ratings, 44, 47
MPAA, 44, 63
Mute Button, *Q-3, 17, 53
N
Name Control, *Q-6
NTSC, 63
V
O
Volume Control, *Q-2, *Q-3
Onscreen Displays (Definition), 63
P
W
Warranty, 68
Panel Jacks (Overviews), 6, 7
Picture Button (see AutoPicture TM)
Picture Control, 30
Picture-format Control, 54 55
PIP (Picture-in-Picture)
Definition, 62
Remote-control buttons, *Q-3, *Q-7
Guide that came with your TV,
64
Y
YPbPr Color Space Setting (See Color
Space Control)
Philips
Yr Indicates In-Home Service Only
Milwaukee: call Chicago
Cincinnati and Columbus: call Cleveland
Nashville and Chattanooga: call Knoxville
Washington/Baltimore:
carl Philadelphia
Charlotte: call Atlanta
Factory
Service
Locations
\
L Myers/SW Florida
Miami/SE Florida
Aft Florida locations: call Tampa
LOS Angeles: call San Francisco
Toll.free numbers provided
on the next page
•
Indicates In.Home!Carry.In
Service
Toll-free numbers provided on the next page
NOTE:If you reside in one of our Philips Factory Service Branch areas (see directory on back), you can contact the nearest Service Branch to obtain
efficient and expedient repair for your product, if your product is In-Warranty, you should have proof-of-purchase to ensure No Charge Service. For
Out-of-Warranty service, call the location nearest you.
NOT.&."
Si vous r_sidez darts une des r_gions desservies par une succursale de service apr_s vente du fabricant Philips (voir Iiste ci-dessous), vous
pourrez contacter la branche de service apr_s vente la plus pros de chez vous pour obtenir un service apr_s vente rapide et efficace. Si le produit est
sous garantie, il suffira de pr6senter une preuve d'achat pour b6n_ficier d'un service sans frais. Pour les produits non couverts par la garantie, contactez le centre le plus pros de chez vous.
NOT.&."
Si Ud. reside en una de nuestras zonas para sucursales Philips de servicio al de f_brica (ver directorio m_s abajo), Ud. puede comunicarse con
la sucursal de servicio m_s cercana para obtener una reparaci6n oportuna y eficaz de su producto. Si su producto est_ todavfa bajo garantia, Ud.
debe presentar comprobante de compra para no ocasionar ningunos cargos por servicio. Para servicio despu6s del vencimiento de la garantfa, Ilame
al lugar m_s cercano de los abajo indicados.
I_anada
How you can obtain efficient and expedient carry-in, mail-in, or in-home service for your product
Pleasecontact Philips at
1-800-661-6162 (French speaking)
1-800-531-0039 (English or Spanish speaking)
Au Canada
Comment obtenir le service apr_s-vente pour les produits apport_s ou envoy6s par la poste _ notre centre de service ou le service _ domicile
Veuillez contacter philips _:
1-800-661-6162 (Francophone)
1-800-531-0039 (Anglais ou Espagnol)
En la Canad_
C6mo recibir servicio efficiente para su producto, en persona, por correo o a domicillo
Favor de comunicarse con Philips al:
1-800-661-6162 (Franc_s)
1-800-531-0039 (Ingl6s o Espafiol)
EL4482-4 Rev. EE
3135 015 07541
Rev EE - 4/5/2002
65
PhilipsFactory
Service
Locations
QUALITY SERVICE IS AS CLOSEAS YOUR TELEPHONE!SIMPLY LOOK OVER THE LIST BELOW FOR THE NUMBER OF A FACTORY SERVICE CENTER
NEARYOU.
YOURPRODUCTWILL RECEIVEEFFICIENTAND EXPEDIENTCARRY-IN,
MAIL-IN_ OR IN'HOME SERVICE, AND YOU WILL RECEIVEPEACE
OF MIND, KNOWINGYOUR PRODUCTIS BEING GIVEN THE EXPERTA1TEHTIONOF PHELPS' FACTORY SERVICE.
COMMENT
OBTENIR
NOTRE
SERVICE
APRES
VENTERAPIDE
ETEFFICACE
SOITPARCOURRIER,
ADOMICILE,
OilENSEPRESENTANT
AUNCENTRE
DESERVICE
PHILIPSPLUSDE600CENTRES
DERECEPTION
DEPRODtiiTS
._REPARER
A TRAVERS
LEPAYS:
CONTACTER
LECENTRE
DESERVICE
ADXCONSOMMATEtiRS
LEPLtiSPROCHE
POURSAVOIR
L'EMPLACEMENT
DECESDI_P_TS
DANSDNRAYON
DE50._75 MILES(S0KM_ 120KM)DDCENTRE
DESERVICE
LOCAL.
C[)MO OBTENERtin SERVICIOOPORTtiNOY EFICiENTEPOR CORREO,EN CASAO EN PERSONAPARASD PRODtiCTOA TRAVESDE tin CENTROPHILIPS DE SERViCIO,MAS DE 600 SITiOS POR
TODD ELPAlS PARALA RECEPCIONDE PRODUCTOSNECESITAOOS
DE REPARACIONES:
COMtiNICARSECON ELCENTRODE SERVICIODE FASRICAMAS CERCANOPARAESTOSLUGARESDENTRO
DE UN RADIO DE S0 A 120 I(M (50 A 75 MILLAS) OEL CENTRODE SERVICIOLOCAL.
ATLANTA
Philips FactoryService
550 Franklin Road., Suite F
Marietta, GA 30067
800-273-1501
CLEVELAND
Philips FactoryService
950 Keynote Circle
Brooklyn Heights, OH44131
800-331-7037
CHICAGO
Philips FactoryService
1279 W. Hamilton Pkwy.
Itasca, IL 60143
800-531-2922
TAMPA
Philips FactoryService
1911 US Highway 301 North
Tampa,FL 33619
800-442-2027
DETROIT
Philips FactoryService
25173 Dequindre
Madison Heights, MI 48071
800-438-1398
KNOXVILLE
Philips FactoryService
6700 D Papermill Rd.
Knoxville,TN 37919
800-821-1767
SANFRANCISCO
Philips FactoryService
681 EastBrokaw Rd.
San Jose, CA 95112
800-300-9013
DALLAS-FORTWORTH
Philips FactoryService
415 N. Main Street,#107
Euless,TX 76040
800-952-3254
PHILADELPHIA
Philips FactoryService
352 Dunks Ferry Rd.
Bensalem,PA 19020
800-847-9320
HOUSTON
Philips FactoryService
1110 N. Post OakRd.,Suite 100
Houston, TX 77055
800-952-3254
4/5/2002
66
67
Limited
Warranty
PROJECTION
TELEVISION
One Year Free Labor
One Year Free Service on Parts
Two Years Free Service on Cathode Ray Tube Parts / 30 days Free Service on Projection TV Screen
This product can be repaired in-home.
MAKE
WHO
IS COVERED?
You must have proof of purchase to receive warranty service. A sales
receipt or other document showing that you purchased the product is
considered proof of purchase.
WHAT
IS COVERED?
Warranty coverage beginsthe day you buy your product, for one year
thereafter (30 daysfor the projection TV screen), all parts will be
repaired or replaced, and labor and transportation are free. From one to
two years from the day of purchase,you pay for the replacement or
repair of all parts except the cathode ray tube and the "Clear-Vu" lens,
and for all labor and transportation charges.After two years from the
day of purchase, you pay for the replacement or repair of all parts except
the "Clear-Vu" lens (which is guaranteed againstmanufacturer's defects
for the life of the product), and for all labor and transportation charges.
TO GET WARRANTY
SERVICE...
Repair must be performed by an authorized service center or a factory
service center If you do not live near a factory servicecenter, contact
your dealer. If your dealer is an authorized service center, he will
arrange repair. If your dealer is not an authorized service center, he
will direct you to the authorized service center engaged by him to
service the products he sells
(In U.S.A, Puerto Rico and U.S. Virgin Islands, all implied warranties,
including implied warranties of merchantability and fitness for a particular purpose, are limited in duration to the duration of this express
warranty. But, because some states do not allow limitationson how
long an implied warranty may last, this limitation may not apply to
you)
IS EXCLUDED?
Your warranty does not cover:
labor charges for installation or setup of the product, adjustment of
customer controls on the product, and installation or repair of
antenna systems outside of the product.
product repair and/or part replacement becauseof misuse, accident, unauthorized repair or other cause not within the control of
Philips Consumer Electronics Company.
reception problems caused by signal conditions or cable or antenna
systems outside the unic
a product that requires modification or adaptation to enable it to
operate in any country other than the country for which it was
designed, manufactured, approved and/or authorized, or repair of
products damaged by these modifications.
incidental or consequential damages resulting from the produce
(Some states do not allow the exclusion of incidental or consequential damages,so the above exclusion may not apply to you. This
includes, but is not limited to, prerecorded material, whether copyrighted or not copyrighte&)
a product used for commercial or institutional purposes
(In Canada,this warranty is given in lieu of all other warranties. No
other warranties are expressed or implied, including any implied warranties of merchantability or fitness for a particular purpose. Philips is
not liable under any circumstances for any direct, indirect, special, incidental or consequential damages, howsoever incurred, even if notified
of the possibility of such damages.)
IF YOU
HAVE
QUESTIONS...
Pleasecontact Philips at:
1-800-661-6162, if calling from Canada (French Speaking)
1-800-531-0039, if calling from Canada (English or Spanish Speaking)
1-800-531-0039, if calling from the USA (English or Spanish Speaking)
REMEMBER...
Pleaserecord the model andserial numbers found on the product
below. Also, pleasefill out and mail your warranty registration card
promptly. It will be easier for us to notify you if necessary.
WHERE
IS SERVICE
AVAILABLE?
Warranty service is available in all countries where the product is officially distributed by Philips Consumer Electronics Company. In countries where Philips Consumer Electronics Company does not distribute
the product, the local Philips service organization will attempt to provide service (although there may be a delay if the appropriate spare
parts and technical manual(s) are not readily available).
Philips Consumer
Electronics,
PO
KEEP...
BEFORE
REQUESTING
SERVICE...
Pleasecheck your owner's manual before requesting service.
Adjustments of the controls discussed there may save you a service
call.
All parts, including repaired and replaced parts, are covered only for
the original warranty period. When the warranty on the product
expires, the warranty on all replaced and repaired parts also expires
WHAT
SURE YOU
Pleasekeep your sales receipt or other document showing proof of
purchase. Attach it to this owner's manual and keep both nearby.
Also keep the original box and packing material in case you need to
return your product,
MODEL#
SERIAL#
Box 520890, Miami, FL 33152, (402) 536-4171
EL4945E005/ 2-02
68