1
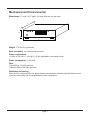
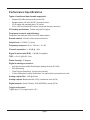
Important Safety Precautions and Explanation of Symbols
!
The exclamation point within an equilateral triangle is intended to alert the user to the
presence of important installation, operation, and service instructions in this manual.
The lightning flash with arrowhead symbol within an equilateral triangle is intended to alert
the user to the presence of uninsulated dangerous voltages within the enclosure that may
be of sufficient magnitude to constitute a risk of electrical shock to the user.
Please read this Installation and Operation Manual thoroughly before attempting to install,
configure, or operate the CD-1. After successful installation and configuration of the CD-1,
be sure to retain this manual in a safe place for future reference.
Safety is a key component to a long lasting and trouble free installation. Please read and
follow all instructions and heed all warnings on the CD-1 in this manual. The vast majority
of the subsequent safety precautions are common sense. If you are not comfortable with
the installation of audio/video entertainment equipment, you should seek the services of a
qualified installation professional or call us for help.
!
WARNING: To prevent the risk of fire or electric shock, do not use the CD-1 near
water or in wet locations and do not expose it to rain or moisture. Doing so may
result in damage to the CD-1 and the risk of electric shock, which may result in
bodily injury or death.
CAUTION: To reduce the risk of electric shock, do not remove the cover from the
CD-1. There are no user-serviceable parts inside the CD-1. Refer all service to
qualified service personnel.
Do not install the CD-1 near any heat sources such as radiators or heating vents. Avoid
installing the CD-1 directly above other heat-generating equipment unless sufficient
ventilation or forced-air cooling is provided.
Do not install the CD-1 in locations without proper ventilation. The CD-1 should not be
operated on a bed, sofa, rug, or similar surface that may block vents. The CD-1 should not
be installed in an enclosed location such as a bookcase, cabinet, or closed equipment rack
unless sufficient forced-air ventilation is provided.
Connect the CD-1 only to power sources of the correct voltage (as shown in this manual
and on the CD-1). Ensure that the Input Voltage selector switch on the rear of the CD-1 is
set to the appropriate voltage.
Protect power supply cables from being pinched, walked on, or otherwise damaged. Be
especially careful where the power cable enters the power outlet and CD-1 unit.
Only connect the CD-1 to an electrical outlet or extension cord of appropriate type and
rating. DO NOT defeat the safety purpose of a grounding or three-pronged plug by
removing ground pins or using unsafe adapters. If you replace the CD-1 power cord, only
use one of similar type and equal or greater current rating.
The power cable for the CD-1 should be unplugged from the outlet during severe electrical
storms, or when unused for a long period of time.
Only replace the fuse in the CD-1 with a fuse of proper value and voltage rating.
The CD-1 should only be cleaned as directed in the Installation and Operation Manual.
Avoid spraying liquids directly onto the CD-1 and NEVER spray liquids into the vents or
CD loading slot. Care should be taken so that small objects do not fall into the inside of the
CD-1.
!
You should seek service for your CD-1 by qualified service personnel if any of the following
occur:
1. The power-supply cord or the plug has been damaged
2. Objects or liquid have fallen or spilled into the vents or CD loading slot
3. The CD-1 has been exposed to rain
4. The CD-1 exhibits a marked change in performance
5. The CD-1 has been dropped or its enclosure or chassis is damaged.
FCC Interference Statement
Note: This equipment has been tested and found to comply with the limits for a Class
B digital device, pursuant to Part 15 of the FCC rules. These limits are designed to
provide reasonable protection against harmful interference in a residential installation.
This equipment generates, uses, and can radiate radio frequency energy, if not installed
and used in accordance with the instructions, the unit may cause harmful interference
to radio communications. However, there is no guarantee that the interference will not
occur in a particular installation. If this equipment does cause harmful interference to radio
or television reception, which can be determined by turning the equipment off and on,
the user is encouraged to try to correct the interference by one or more of the following
measures:
• Reorient or relocate the receiving antenna.
• Increase the separation between the equipment and receiver.
• Connect the equipment into an outlet on a circuit different from that of the receiver.
• Consult the dealer or an experienced radio/TV technician for help.
For questions regarding service, please contact:
Sherbourn Technologies, Inc.
131 SE Parkway Court
Franklin, Tennessee
37064
Tel (615) 791-4046
Fax (615) 791-6287
Web www.sherbourn.com
CD-1
Audiophile Compact Disc Player
Contents
Important Safety Precautions and Explanation of Symbols
Introduction..................................................................................................2
The Sherbourn CD-1...................................................................................2
About This Manual.......................................................................................2
Mechanical and Environmental...................................................................3
Inputs and Outputs......................................................................................4
Installation Tips............................................................................................5
Configuration...............................................................................................6
Performance Specifications.........................................................................7
Features......................................................................................................8
Operation.....................................................................................................9
Periodic Maintenance................................................................................11
Troubleshooting.........................................................................................12
Sherbourn Technologies, LLC Ten-Year Limited Warranty........................13
Important User Information........................................................................14
Notes.........................................................................................................15
Page 1
Introduction
Thank you for choosing the Sherbourn CD-1 Audiophile Compact Disc Player.
The Sherbourn CD-1 combines the superb sound quality and usability features necessary to satisfy
the most discerning audiophile with the flexibility and reliability demanded by professional installers.
The result is a CD player that is easy to install and configure, sounds great, and will continue to
deliver trouble-free performance for many years to come.
Sincerely,
The Sherbourn Team
The CD-1
The CD-1 Audiophile Compact Disc Player is a high-quality player for
standard (Red Book) audio CDs.
It CD-1 supports standard CD audio, HDCD encoded CD audio, and MP3 audio content on both CD
and CD-R media.
The CD-1 provides both balanced and unbalanced analog audio outputs, a full array of digital audio
outputs, and a trigger input and output.
The CD-1 includes a front panel VFD status display and an illuminated CD loading slot, and can be
operated by either front panel pushbutton controls, or the included machined aluminum IR remote
control.
About This Manual
This manual will provide you with all the information you need to install and configure the Sherbourn
CD-1 Audiophile Compact Disc Player to achieve its optimum performance. This manual also
includes a brief summary of the features offered by the CD-1, short description of how the controls
work, and how to perform common operations using both the front panel and remote control .
You may wish to record serial numbers or other purchase information on the Notes page at the back
of this manual.
Page 2
Mechanical and Environmental
Dimensions: 17” wide x 5.75” high x 14” deep (with feet, no rack ears)
14”
5.75”
17”
Weight: 17.5 lbs / 8 kg (unboxed)
Rack mountable: Yes, with optional rack ears
Power requirements:
115 VAC or 230 VAC +/- 10% @ 50 / 60 Hz (selectable by rear-panel switch)
Power consumption: <= 25 watts
Fuse:
T1AL 250V for 115 VAC operation
T500mAL 250V for 230 VAC operation
Ventilation and cooling:
While the CD-1 produces little heat, proper location and adequate ventilation should still be provided
to prevent overheating due to heat generated by other components.
Page 3
Inputs and Outputs
CD loading mechanism: Toshiba slot-load CD engine
Analog outputs: Balanced audio (XLR), unbalanced audio (RCA)
Output level (analog): 2 V RMS (7 V peak)
Digital outputs: Optical (Toslink), XLR (AES/EBU), coaxial (RCA)
Note: All audio outputs remain active at all times.
Trigger and control:
Trigger input (mono 1/8”), trigger output (mono 1/8”)
Remote control:
Solid machined aluminum remote control unit; command reception via internal front-panel IR
receiver
AC power input:
IEC standard detachable AC power cord
Page 4
Installation Tips
Inputs and outputs
Balanced (XLR) audio interconnects usually provide better noise immunity, and are preferable especially for long cable runs or in noisy environments.
Because of the audiophile-quality conversion and analog output circuitry in the CD-1, better audio
performance may be achieved by using the analog outputs from the CD-1 rather than by using the
digital outputs and allowing another component to perform the A-to-D conversion. This will depend
on the associated equipment the CD-1 is connected to.
Rack location
Because the CD-1 requires frequent user access, it should be located at a convenient height for disc
insertion and removal, and should not be located behind locked or securely latched doors. Some
users will also wish to read the information presented on the VFD during use.
Remote control
The CD-1 is controlled primarily via IR remote control, and should be placed in a location where
front panel visibility is good. If the CD-1 is installed in a location where front panel visibility is limited
or blocked, a wired IR receiver and emitter should be used to relay the remote control signal reliably
to the CD-1.
Ventilation and cooling
Avoid placing the CD-1 directly above components that generate large amounts of heat. If mounting
in a cabinet or enclosed rack, always ensure that adequate ventilation is provided to avoid
overheating components (either sufficient passive vents or active forced-air cooling). Overheating
adversely affects performance and shortens component life. We suggest locating components that
produce the most heat towards the top of your rack, and leaving at least 1U (1.75”) of rack space
between components. Space between components can be left open for ventilation, filled with a
spacer, or used to house a forced-air cooling solution.
The Sherbourn C-12 Flex Rack™ Cooling System uses whisper quiet, high capacity, variable speed
fans to provide over 100 CFM of forced-air cooling for rack installations. The C-12 offers a variety of
air-flow options (including external ducting), includes professional features like triggered operation
and thermostatic control, and takes up only 2U of rack space.
Page 5
Configuration
Verify that the CD-1 is configured for the correct operating voltage for your area.
(Voltage is set via the Input Voltage switch on the rear panel of the CD-1).
Page 6
Performance Specifications
Types of media and data formats supported:
•
•
•
•
Standard (Red Book) prerecorded audio CDs
Standard audio CDs with HDCD™ encoded content
CD-R media with standard audio CD content
CD or CD-R media with MP3 content (single flat directory structure)
CD loading mechanism: Toshiba slot-load CD engine
Front panel controls and indicators:
Pushbutton with indicator LEDs, blue VFD status display
Remote control: Infrared, solid machined aluminum
Output level: 2 V RMS (7 V peak)
Frequency response: 20 Hz - 20 kHz +/- 0.1 dB
Channel separation: >= 95 dB @ 1 kHz
Signal to noise ratio (S/N): > 100 dB (A weighted)
THD: <= 0.01% @ 0 dB, 1 kHz
Phase linearity: 30 degrees
Digital to analog conversion:
•
•
•
•
High-performance multibit Delta-Sigma (Analog Devices AD 1955)
8x oversampling
“Data Directed Scrambling” for high jitter immunity
“Perfect Differential Linearity Restoration” for reduced idle tones and lower noise
Analog output filter: -3 dB @ 80 kHz
Analog outputs: Balanced audio (XLR), unbalanced audio (RCA)
Digital outputs: Optical (Toslink), XLR (AES/EBU), coaxial (RCA)
Trigger and control:
Trigger input (1/8”), trigger output (1/8”)
Page 7
Features
The CD-1 combines the latest cutting edge technology with solid engineering and high quality
components to deliver superior audio performance and features. Some of the more important
features of the CD-1 include:
•
•
•
•
•
•
•
•
•
•
•
•
•
High reliability Toshiba slot load CD engine
Illuminated CD loading slot and VFD status display
Machined aluminum remote control
Front panel transport controls
Superior audio performance
High performance Analog Devices AD 1955 multibit Delta-Sigma DAC;
AD 1955 DAC features include an 8x oversampling digital filter, Data Directed Scrambling for
high jitter immunity, Perfect Differential Linearity Restoration for reduced idle tones and lower
noise, and differential current output for optimum audio performance
Fully differential signal path and discrete output stage
Premium quality OPA2134 op amps used throughout the audio signal path
Rear panel trigger input and output
Both balanced (XLR) and unbalanced (RCA) analog audio outputs
Unbalanced audio outputs feature gold-plated Tiffany style connectors
Full complement of digital audio outputs
[balanced AES/EBU (XLR), optical (Toslink), and coaxial (RCA)]
Rack-mountable
Page 8
Operation
Turning the CD-1 On
•
To turn On the CD-1, press the Standby/On button on the front panel of the unit or the Standby
button on the remote control. The display will read SHERBOURN for a few seconds at power
up. LOADING will then appear on the screen. The player will then say READY.
Loading and playing a disc
•
•
•
Make sure the CD-1 is on.
Insert a Compact Disc gently into the slot loader. Allow the slot loader to take the disc from
your hand; there will be a short delay. (If the CD-1 does not say READY at power up, a disc is
already in the player.
The disc will start playing automatically when it is loaded. If a disc is already loaded, it will start
playing at Power Up.
Note: Do not put anything except a Compact Disc into the disc loader; foreign objects may
damage the CD-1.
Note: Do not insert discs that are wet, have foreign materials stuck to them, or are warped.
Note: Do not force discs into the slot-loader.
Note: If the Compact Disc is too dirty or scratched the disc may not play.
Note: Never load more than one disc into the player at one time.
Stopping / pausing a disc
•
Press the Stop or Pause button on the front panel of the unit or the remote control. When the
disc is paused the display will read PAUSE. Play can be resumed by pressing the Play/Pause
button again.
Ejecting a disc
•
Press the Eject button on the front panel of the unit or the remote control.
Playing a specific track
•
•
•
Make sure that a disc is in the player.
Enter the number of the track you wish to play on the numeric keypad on the remote control.
Alternately, pressing the Next Track button on either the CD-1 or the remote control will move
the CD playback forward to the next track and pressing the Previous Track button on either the
CD-1 or the remote control will move the CD play backward to the previous track. Repeat as
necessary to find the desired track.
Page 9
Skipping to a particular point in a track
•
•
•
Make sure that the disc is playing the desired track.
Press the Reverse button on the remote control, the CD will then rewind within the track. Press
again and the disc will rewind faster. Press a third time and the disc rewinds even faster. Press
a fourth time and the disc will resume normal play or press Play to resume normal speed. The
button does not need to be held down during this function.
Press the Forward button on the remote control, the CD will then fast forward within the track.
Press again and the disc will fast forward faster. Press a third time and the disc fast forwards
even faster. Press a fourth time and the disc will return to normal play or press Play to resume
normal speed. The button does not need to be held down during this function.
Repeating one track or an entire disc
•
•
•
•
Make sure that the disc is playing.
Press the Repeat button on the remote control. REPEAT ONE will appear on the display. This
will cause the current track to repeat.
Press the Repeat button again and REPEAT ALL will appear on the display. This will cause the
disc currently in the CD-1 to repeat.
Press the Repeat button a third time and REPEAT OFF will appear on the display and the CD-1
returns to normal playback functions.
Changing what is shown on the display
•
Press the Display button on the remote control to change the information on the front panel
display.
Disc Handling
•
•
•
•
•
•
•
Replace the disc into its sleeve or jewel case when not in use.
Avoid touching the playing surface of the disc.
If the disc becomes dirty, wipe gently with a soft clean cloth. Wipe in a motion from the center to
the edge of the disc (do not wipe in a circle parallelling the audio tracks).
If necessary, a CD may be cleaned with water or a mild cleaning solution. If so, rinse the disc
carefully and dry it thoroughly after cleaning. Ensure that the disc is totally dry before inserting it
into the CD-1.
Do not leave the disc in bright sunlight for extended periods of time.
Do not write on either surface of the disc with a hard-tipped pen.
With CD-R’s, only write on the label side with soft-tip markers; NEVER use ballpoint pens or
pencils. Avoid dropping keys or hard objects onto the label side of CD-R discs. (CD-R’s are very
sensitive to damage on the label side even though prerecorded CDs are not).
Page 10
Periodic Maintenance
The Sherbourn CD-1 unit requires no periodic maintenance.
Cleaning the CD-1
•
•
If necessary, the CD-1 should be cleaned gently with a soft rag.
If something sticky gets on the front panel or case of the CD-1, it should be cleaned with a mild
cleaning solution applied to a soft rag, followed by wiping with a clean rag dampened with plain
water and drying with a soft dry rag or cloth.
Note: DO NOT spray water or cleaning solution directly onto the Sherbourn CD-1 or into the
vents or CD loading slot.
Changing the batteries in the remote control
Note: Sherbourn recommends using high quality AAA batteries in the CD-1 remote control.
Note: To change the remote control batteries you will need a flat tipped Phillips #2
screwdriver. DO NOT attempt to use a different size bit or damage will occur!
Note: Perform the following operation on a stable surface; use a cloth or paper towel to
protect the surface and the face of the remote control.
• Remove the six (6) Phillips head screws on the back of the remote and gently remove the back
panel.
• Remove the old batteries and discard according to battery maker’s instructions.
• Insert new batteries, making sure they are oriented correctly. (Use the diagrams in the battery
slots for reference).
• Replace the back panel back on the remote and reinstall the six (6) screws, turning clockwise
gently until a snug fit is achieved. Do not over tighten the screws as you may damage the screw
heads and/or screw holes in the back of the remote.
• Your remote is now ready to use.
Page 11
Troubleshooting
Problem: The CD-1 operates erratically or fails to operate
•
•
Verify that the CD-1 is plugged into an active electrical outlet of correct voltage
(if a switched outlet was used, verify that it is On)
Verify that the Input Voltage switch on the rear panel of the CD-1 is set to the correct voltage
Problem: The CD-1 does not load a disc when it is partially inserted
•
•
Verify that the CD-1 has power and is turned on
Verify that there isn’t already a disc in the CD-1
Problem: The CD-1 has loaded a disc but doesn’t play
•
•
•
•
Verify that the disc is a Red Book standard audio or MP3 CD or CD-R
Verify that the disc is not dirty, badly scratched, or warped
Verify that the disc is not upside down
If the disc is a CD-R, verify that it is not blank, and that it has been properly recorded
(CD-Rs with open sessions may play on a computer but not on an audio CD player)
Problem: The CD-1 appears to be playing a disc but there is no output
•
•
Verify that the correct input is selected on the pre/pro or preamp
Verify that the CD being played has output (some CDs contain long periods of silence)
Note: All analog and digital outputs on the CD-1 are active at all times
Problem: One particular CD either will not play, experiences drop-outs, or ticks while
playing, or plays part way through then stops
•
•
•
•
•
Verify that the disc is a Red Book CD standard audio, MP3 CD, or CD-R
Verify that the disc is not dirty, badly scratched, or warped
Verify that the disc is not upside down
If the disc is a CD-R, verify that it is not blank and that it has been properly recorded
(CD-Rs with open sessions may play correctly on a computer but not on an audio CD player)
If the disc is a pre-recorded “silver” CD, verify that it is not a defective pressing
(try it on another player)
Problem: The remote control does not operate
•
•
•
•
•
Verify that there are good batteries in the remote control
Verify that the remote sensor on the CD-1 has line-of-sight to the remote control
Verify that the LED window on the remote control and the window on the front panel of the CD-1
are clean
If a remote control receiver and emitter were used to relay the signal to the CD-1, verify that the
receiver has line-of-sight to the remote control, that the transmitter is properly positioned relative
to the CD-1, and that the transmitter has power and is active
Verify whether bright sunlight falls on the CD-1 remote control sensor (bright sunlight or light
from certain bulbs and/or TV screens may sometimes “blind” the sensor to signals from the
remote control)
Page 12
Sherbourn Technologies, LLC Ten-Year Limited Warranty
What does this warranty cover? Sherbourn Technologies, LLC (“Sherbourn”) warrants its products against defects in materials and workmanship. This warranty is subject to revision at any
time.
How long does this coverage last? This warranty commences on the date of retail purchase
by the original retail purchaser and runs for a period of ten (10) years thereafter, with the following
exceptions: (1) receivers (including the SR-8100, SR-8200, and SR-120), preamp/processors
(including the PT-7030, PT-7020C4, and PT-7020), preamplifiers (including the PRE-1), and the
CD-1 CD Player (with the exception of the slot load CD engine) are covered by this warranty for
five (5) years from the date of retail purchase by the original purchaser; and (2) electromechanical
components, including the slot load CD engine on the CD-1 CD Player, and all fans (including
the C-12 Cooling Unit), are covered by this warranty for three (3) years from the date of retail
purchase by the original retail purchaser. This warranty is transferrable, upon written notification
to Sherbourn, to any person that owns the warranted product, however, if ownership is transferred,
the Term shall be no longer than five (5) years from the date of purchase by the original purchaser.
Sherbourn warrants any replacement product or part furnished hereunder against defects in
materials and workmanship for the longer of the following: (i) the amount of time remaining under
the original warranty, or (ii) 120 days from your receipt of the repaired or replaced product. The
duration described in the previous 3 sentences is hereinafter referred to as the “Term”. TO THE
FULLEST EXTENT PERMITTED BY LAW, ALL IMPLIED WARRANTIES RELATED TO THE
ORIGINAL PRODUCT AND ANY REPLACEMENT PRODUCT OR PARTS (INCLUDING IMPLIED
WARRANTIES OF MERCHANTABILITY AND FITNESS FOR A PARTICULAR PURPOSE) ARE
EXPRESSLY LIMITED TO THE TERM OF THIS LIMITED WARRANTY. SOME STATES DO
NOT ALLOW LIMITATIONS ON HOW LONG AN IMPLIED WARRANTY LASTS, SO THE ABOVE
LIMITATION MAY NOT APPLY TO YOU. A claim under this warranty must be made by you within
the Term. A claim shall not be valid (and Sherbourn has no obligation related to the claim) if it is not
made within the Term and if it is not made in strict compliance with the requirements of the “How do
you get service?” section.
What will Sherbourn do? Sherbourn will, at its option, either: (i) repair the product, or (ii) replace
the product with a new consumer product which is identical or reasonably equivalent to the product.
Sherbourn may provide you with a refund of the actual purchase price of the product in the event
(i) Sherbourn is unable to provide replacement and repair is not commercially practicable or cannot
be timely made, or (ii) you agree to accept a refund in lieu of other remedies hereunder. When
a product or part is repaired or replaced, any replacement item becomes your property and the
replaced item becomes Sherbourn’s property. When a refund is given, the product for which the
refund is provided must be returned to Sherbourn and becomes Sherbourn’s property.
What is not covered by this warranty? This warranty does not apply: (i) to damage caused by
use with non-Sherbourn products, where the non-Sherbourn product is the cause of the damage;
(ii) to damage caused by service or maintenance performed by anyone who is not a representative
of Sherbourn; (iii) to damage caused by accident, abuse, misuse, flood, fire, earthquake or other
external causes; (iv) to a product or part that has been modified after its retail purchase, where
the modification caused or contributed to the damage; (v) to consumable parts, such as batteries;
(vi) normal wear tear; or (vii) if any Sherbourn serial number has been removed or defaced and
Sherbourn cannot otherwise confirm that you are the original retail purchaser or authorized transferee. SHERBOURN SHALL NOT BE LIABLE FOR ANY INCIDENTAL OR CONSEQUENTIAL
Page 13
DAMAGES ARISING FROM OR RELATED TO ANY DEFECTS IN OR DAMAGES TO ITS
PRODUCTS. SOME STATES DO NOT ALLOW THE EXCLUSION OR LIMITATION OF
INCIDENTAL OR CONSEQUENTIAL DAMAGES, SO THE ABOVE LIMITATION OR EXCLUSION
MAY NOT APPLY.
How do you get service? In order to make a claim under the warranty, you must:
1.
Call a customer service representative (“CSR”) of Sherbourn at (1-877-EMO-TECH /
1-877-366-8324). Provide the CSR with a description of your problem and the serial number of the
product for which the warranty claim is being made.
2.
The CSR will provide you with a returned material authorization number (“RMA”).
3.
Ship the product to Sherbourn at the following address, with the RMA written in large,
bold letters on the outside of the box, and with the letters “RMA” written before the number. Parcels
arriving without a RMA number on the outside of the box will be refused.
Sherbourn Technologies, LLC
Attn: Repair Department
135 Southeast Parkway Court
Franklin, TN 37064
How does state law apply? This warranty gives you specific legal rights, and you may also
have other rights which vary from state to state. CERTAIN STATES HAVE ENACTED LAWS
WHICH PRECLUDE THE WAIVER OF CONSEQUENTIAL AND INCIDENTAL DAMAGES AND/
OR PRECLUDE THE WAIVER/LIMITATION OF IMPLIED WARRANTIES. TO THE EXTENT
YOUR STATE HAS ENACTED A LAW WHICH PROHIBITS SUCH A WAIVER/LIMITATION, ALL
SUCH WAIVERS/LIMITATIONS CONTAINED IN THIS WARRANTY ARE INAPPLICABLE TO YOU.
CERTAIN STATES HAVE ENACTED LAWS WHICH REQUIRE THE DURATION OF A WARRANTY
TO BE EXTENDED (INCLUDING BUT NOT LIMITED TO DURING PERIODS OF REPAIR). TO
THE EXTENT YOUR STATE HAS ENACTED A LAW OF THIS NATURE, THEN THE DURATION
OF THIS WARRANTY WILL BE EXTENDED AS REQUIRED BY APPLICABLE LAW.
Important User Information
CAUTION: The use of controls, adjustments, or performance of procedures other
than those specified herein may result in hazardous radiation exposure.
CAUTION: No user-serviceable parts inside unit. The unit may not be opened or
modified by the customer. Exposure to harmful LASER radiation may result.
This product complies with FDA Class 1 Laser Certification during all modes of operation.
There is no scheduled maintenance necessary on this product.
Page 14
Internal Laser Radiation Emission Parameters:
Wavelength 790nm (+-15nm)
CW power for classification <290uW
Wavelength 650nm (+-10nm)
CW power for classification <311uW
No laser radiation above Class 1 levels accessible to user.
Label Data:
“Class 1 Laser Product” (explanatory label)
location: Rear Panel
Manufacturer’s ID & Certification Statement
location: Bottom
Complies with FDA performance standards for laser products, except
for deviations pursuant to Laser Notice No. 50, dated June 24, 2007
EN/IEC 60825-1:2007
Notes
Page 15