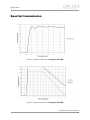
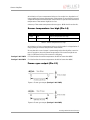
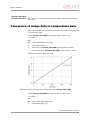
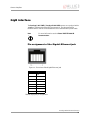
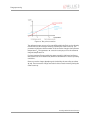
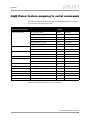
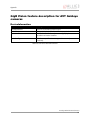
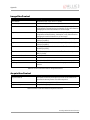
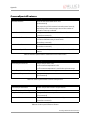
1
AVT Pearleye Technical Manual LWIR cameras with GigE interface V2.0.0 03 November 2011 Allied Vision Technologies GmbH Taschenweg 2a D-07646 Stadtroda / Germany Legal notice Life support applications These products are not designed for use in life support appliances, devices, or systems where malfunction of these products can reasonably be expected to result in personal injury. Allied Vision Technologies customers using or selling these products for use in such applications do so at their own risk and agree to fully indemnify Allied for any damages resulting from such improper use or sale. Trademarks Unless stated otherwise, all trademarks appearing in this document of Allied Vision Technologies are brands protected by law. Warranty The information provided by Allied Vision Technologies is supplied without any guarantees or warranty whatsoever, be it specific or implicit. Also excluded are all implicit warranties concerning the negotiability, the suitability for specific applications or the non-breaking of laws and patents. Even if we assume that the information supplied to us is accurate, errors and inaccuracy may still occur. Copyright All texts, pictures and graphics are protected by copyright and other laws protecting intellectual property. It is not permitted to copy or modify them for trade use or transfer, nor may they be used on web sites. Allied Vision Technologies GmbH 11/2011 All rights reserved. Managing Director: Mr. Frank Grube Tax ID: DE 184383113 Headquarters: Taschenweg 2A D-07646 Stadtroda, Germany Tel.: +49 (0)36428 6770 Fax: +49 (0)36428 677-28 e-mail: [email protected] Pearleye Technical Manual V2.0.0 2 Contents Contacting Allied Vision Technologies ................................................... 5 Introduction ............................................................................................................ 6 Document history............................................................................................................ 6 Manual overview ............................................................................................................. 6 Conventions used in this manual ........................................................................................ 7 Styles ....................................................................................................................... 7 Symbols .................................................................................................................... 8 Before operation............................................................................................................. 9 Safety warnings .............................................................................................................. 9 Conformity ..............................................................................................................11 CE .......................................................................................................................... 11 Specifications .......................................................................................................12 Pearleye P-007 LWIR / P-007 LWIR High Temp ..................................................................... 12 Pearleye P-030 LWIR ...................................................................................................... 14 Spectral transmission .................................................................................................... 16 Camera dimensions ..........................................................................................17 Pearleye P-007 LWIR / Pearleye P-030 LWIR........................................................................ 17 Start up .....................................................................................................................19 Camera control commands .............................................................................................. 19 Adjust the image processing............................................................................................ 21 Camera interfaces .............................................................................................22 Control connector ......................................................................................................... 23 Camera I/O connector pin assignment (15-pin D-Sub jack)................................................ 23 Power supply (Pin 1-4)............................................................................................... 24 Serial interface (Pin 7, 8) ........................................................................................... 24 Trigger input (Reset) (Pin 10, 11)................................................................................. 24 Sensor temperature too low (Pin 12, 13) ....................................................................... 25 Sensor temperature too high (Pin 14) ........................................................................... 26 Frame-sync output (Pin 15)......................................................................................... 26 Conversion of image data to temperature data .................................................................... 27 Consideration of the emission ratio................................................................................... 28 GigE interface............................................................................................................... 30 Pin assignment of the Gigabit Ethernet jack.................................................................... 30 Image processing ...............................................................................................31 Image processing chain .................................................................................................. 31 Two-point correction ................................................................................................. 32 Pearleye Technical Manual V2.0.0 3 Background correction............................................................................................... 32 Bad pixel correction .................................................................................................. 32 Drift compensation ................................................................................................... 32 Look-up table (LUT) .................................................................................................. 32 Correction data ........................................................................................................ 33 Correction sets ......................................................................................................... 33 File system................................................................................................................... 33 Short introduction: Two-point correction (A, B, E, J, K, N) ............................................................................................................ 34 Basic parameters and commands ............................................................36 Select a correction data set (S) ........................................................................................ 36 Automatic calibration (k)................................................................................................ 37 Electromechanical shutter (I) .......................................................................................... 40 Temperature warning (T) ................................................................................................ 40 Software version and correction data information (V) ........................................................... 41 Current parameter settings (Y) ......................................................................................... 42 Show help text (?) ......................................................................................................... 42 Advanced parameters and commands ..................................................43 Two-point correction (A, B, E, J, K, N) ............................................................................... 43 Background correction (U, M) .......................................................................................... 47 Bad pixel correction (C, F)............................................................................................... 50 Temperature drift compensation (m, n, o, p)....................................................................... 51 Look-up table (LUT) (D, G) .............................................................................................. 52 Integrator and image store (H) ........................................................................................ 53 Baud rate (s) ................................................................................................................ 55 Save parameters in flash (X) ............................................................................................ 57 Upload a file to flash (Q)................................................................................................. 57 Appendix ..................................................................................................................60 Command reference ....................................................................................................... 60 GigE Vision feature mapping to serial commands ................................................................. 72 GigE Vision feature description for AVT Goldeye cameras ....................................................... 73 DeviceInformation .................................................................................................... 73 ImageSizeControl ..................................................................................................... 74 AcquisitionControl .................................................................................................... 74 CameraSpecialFeatures .............................................................................................. 75 CameraSpecialFeatures\TwoPointCorrection................................................................... 76 CameraSpecialFeatures\BackgroundCorrection............................................................... 76 CameraSpecialFeatures\LUT........................................................................................ 76 CameraSpecialFeatures\IntegratorAndImageStore .......................................................... 77 CameraSpecialFeatures\BadPixelCorrection ................................................................... 77 Index...........................................................................................................................78 Pearleye Technical Manual V2.0.0 4 Contacting Allied Vision Technologies Contacting Allied Vision Technologies Info • Technical information: http://www.alliedvisiontec.com • Support: [email protected] Allied Vision Technologies GmbH (Headquarters) Taschenweg 2a 07646 Stadtroda, Germany Tel.: +49 36428-677-0 Fax.: +49 36428-677-28 e-mail: [email protected] Allied Vision Technologies Canada Inc. 101-3750 North Fraser Way Burnaby, BC, V5J 5E9, Canada Tel: +1 604-875-8855 Fax: +1 604-875-8856 e-mail: [email protected] Allied Vision Technologies Inc. 38 Washington Street Newburyport, MA 01950, USA Tel.: +1 978-225-2030 Fax: +1 978-225-2029 e-mail: [email protected] Allied Vision Technologies Asia Pte. Ltd. 82 Playfair Road #07-02 D’Lithium Singapore 368001 Tel: +65 6634-9027 Fax: +65 6634-902 e-mail: [email protected] Pearleye Technical Manual V2.0.0 5 Introduction Introduction This Pearleye Technical Manual describes in depth the technical specifications, dimensions, all pixel formats, image processing, basic and advanced parameters and related subjects. Note Please read through this manual carefully. We assume that you have read already the How to install a GigE camera (Bigeye/Pearleye/Goldeye) and that you have installed the hardware and software on your PC or laptop (GigE interface card, cables etc.). http://www.alliedvisiontec.com/emea/support/downloads/ product-literature Document history Version Date Description V2.0.0 03.11.11 New Pearleye Technical Manual Table 1: Document history Manual overview This manual overview outlines the contents of each chapter of this manual. • Chapter Contacting Allied Vision Technologies on page 5 lists AVT contact data (phone numbers and URLs) for both: – Technical information / ordering – Commercial information • Chapter Introduction on page 6 (this chapter) gives you the document history, a manual overview (short description of each chapter) and conventions used in this manual (styles and symbols). Furthermore you learn how to get more information on how to install hardware, available AVT software (incl. documentation) and where to get it. • Chapter Conformity on page 11 gives you information about conformity of AVT cameras (CE, FCC, RoHS). • Chapter Specifications on page 12 lists camera details and measured spectral transmission diagrams for each camera type. Pearleye Technical Manual V2.0.0 6 Introduction • • • • • • • • • Chapter Camera dimensions on page 17 provides CAD drawings of standard housing models (2D drawings), tripod adapter and cross sections of the mounts. Chapter Camera interfaces on page 22 describes in general the inputs/ outputs of the cameras (incl. trigger features). Chapter Start up on page 19 describes the first steps to get the camera into operation: camera control signals and camera controls as well as adjusting the image process. Chapter Camera interfaces on page 22 describes the control junction (I/O pin assignment), inputs / outputs and trigger features. Chapter Image processing on page 31 describes the function of the Pearleye P-007 LWIR / Pearleye P-030 LWIR firmware. It is related to the individual modules of image processing and shows in what way the user can control these modules via the serial interface. Chapter Basic parameters and commands on page 36 describes the basic configuration options and general commands available for the user, being important for the operation of an ex factory preconfigured camera. Most probably the information stated here will be sufficient for most of the users. Chapter Advanced parameters and commands on page 43 describes the advanced configuration of the Pearleye P-007 LWIR / Pearleye P-030 LWIR models. For the control of an ex-factory set up camera the intervention within the parameters stated here or rather the use of the mentioned commands is only necessary in exceptional cases. The appendix: Chapter Command reference on page 60 describes the general command reference of the Pearleye P-007 LWIR / Pearleye P-030 LWIR firmware. Chapter Index on page 78 gives you quick access to all relevant data in this manual. Conventions used in this manual To give this manual an easily understood layout and to emphasize important information, the following typographical styles and symbols are used: Styles Style Function Example Bold Programs, inputs or highlighting bold important things Courier Code listings etc. Input Table 2: Styles Pearleye Technical Manual V2.0.0 7 Introduction Style Function Example Upper case Register REGISTER Italics Modes, fields Mode Parentheses and/or blue Links (Link) Table 2: Styles Symbols Note This symbol highlights important information. Caution www This symbol highlights important instructions. You have to follow these instructions to avoid malfunctions. This symbol highlights URLs for further information. The URL itself is shown in blue. Example: http://www.alliedvisiontec.com Pearleye Technical Manual V2.0.0 8 Introduction Before operation We place the highest demands for quality on our cameras. Target group Getting started This Technical Manual is the guide to detailed technical information of the camera and is written for experts. For a quick guide how to get started read: How to install a GigE camera (Bigeye/Pearleye/Goldeye). Note Caution Please read through this manual carefully before operating the camera. Before operating any AVT camera read safety instructions and ESD warnings. Safety warnings Caution Electrostatic discharge The camera contains sensible electronic components which can be destroyed by means of electrostatic discharge. Use sufficient grounding to minimize the risk of damage. Pearleye Technical Manual V2.0.0 9 Introduction Caution Environmental conditions Operate the camera in dry and dust free environment. The working temperature range (temperature of the camera housing) depends on the model version: • • Pearleye P-007 LWIR: 25°C ... 45°C Pearleye P-030 LWIR: 15 °C ... 35 °C Outside this temperature range the image quality can be worse. Also saturation of some regions or saturation of the whole image is possible outside the working temperature range. Regarding the signal quality of the camera it is an advantage to operate the camera under constant ambient air temperature. This can e.g. be facilitated by assembling the camera on a bigger metal corpus or by an additional active temperature regulation. The red LED at the backside of the camera (L3) or the value of the register T serves for examination. If L3 permanently lights up or rather the lowest bit of T is set, the camera housing has a temperature which is outside of the optimum. In this case provide an additional heating or cooling. Note Warm-up period Depending on the prevailing environmental conditions, some time might pass after the camera start, until the image quality reaches its optimum. In case of simple view applications with low demands, the data are already suitable following an operating period of some minutes. If time stability of the temperature data is required a longer warm up period of at least 20 minutes is recommended. Pearleye Technical Manual V2.0.0 10 Conformity Conformity Allied Vision Technologies declares under its sole responsibility that all standard cameras of the Pearleye family to which this declaration relates are in conformity with the following standard(s) or other normative document(s): • CE, following the provisions of 2004/108/EG directive • RoHS (2002/95/EC) CE We declare, under our sole responsibility, that the previously described Pearleye cameras conform to the directives of the CE. Pearleye Technical Manual V2.0.0 11 Specifications Specifications Note The warranty becomes void in case of unauthorized tampering or any manipulations not approved by the manufacturer. Pearleye P-007 LWIR / P-007 LWIR High Temp Feature Specification Image device Amorphous silicon uncooled microbolometer focal plane array (FPA) ULIS UL 03 08 1; built-in electromechanical shutter Effective chip size 11.2 mm (H) x 8.4 mm (V) Cell size 35 μm x 35 μm Image size (max.) 320 (H) x 240 (V) Lens mount M65 x 0.5 Field of view (FOV) With 18 mm lens: 35° x 26° Spectral response 8 ... 14 μm (LWIR) Pixel format Mono8, Mono12 Frame rate up to 40 fps Measurement temperature range -20 °C ... +80 °C (standard version) Sensitivity (NETD) typical 80 mK @ 303 K @ f/1.0 Temperature stabilization Peltier stabilized ADC 14 bit Digital output Internal 14 bit, output only 12 bit, GigE Sensor time constant approx. 7 ms Pixel clock 5.25 MHz 0 °C ... +200 °C (High Temp version) Table 3: Specification Pearleye P-007 LWIR / P-007 LWIR High Temp Pearleye Technical Manual V2.0.0 12 Specifications Feature Specification Smart features Built-in correction data sets, bad pixel correction, background (FPN) correction, gain/offset correction (NUC/non-uniformity correction) for each pixel, drift compensation, temperature linearization (LUT), continuous mode (image acquisition with maximum frame rate) With AVT‘s AcquireControl: pseudo color LUT with several color profiles, auto contrast, auto brightness, temperature measurement, analyze multiple regions (rectangular, circle) within image, real-time statistics and histogram, background (FPN) correction Digital interface IEEE 802.3 1000BASE-T (GigE Vision V1.2) Power requirements + 12 V, -0% / +5%, max. 1.5 A Dimensions With 18 mm f/1.0 lens: 133.7 mm x 90 mm x 86 mm (L x W x H); incl. connectors Mass 830 g (with 18 mm f/1.0 lens) Housing material Aluminium alloy (AlMgSi1) Operating temperature (Reference to the internal temperature sensor) +15 °C ... +50 °C Optimal working range (Reference to the internal temperature sensor) +25 °C ... +45 °C Ambient temperature during storage -30 °C ... +70 °C Relative humidity (operating and storage) 10 % ... 95 % without condensation Shock 25 g Vibration 2g Regulations CE, RoHS (2002/95/EC) Options Suitable lenses for LWIR with various focal lengths: 12 mm lens, f/0.85 35 mm lens, f/1.0 Different temperature ranges Table 3: Specification Pearleye P-007 LWIR / P-007 LWIR High Temp Note The design and specifications for the products described above may change without notice. Pearleye Technical Manual V2.0.0 13 Specifications Note • • The right polarization of the 12 V supply voltage must be assured. The warranty becomes void in case of unauthorized tampering or any manipulations not approved by the manufacturer. Pearleye P-030 LWIR Feature Specification Image device Amorphous silicon uncooled microbolometer focal plane array (FPA) ULIS UL 03 08 1; built-in electromechanical shutter Effective chip size 16 mm (H) x 12 mm (V) Cell size 25 μm x 25 μm Image size (max.) 640 (H) x 480 (V) Lens mount M65 x 0.5 Field of view (FOV) With 18 mm lens: 47.9° x 36.9° Focus range 0.5 m to infinity (manually adjustable) Spectral response 8 ... 14 μm (LWIR) Pixel format Mono8, Mono10, Mono12, Mono14 Frame rate up to 24 fps Measurement temperature range -20 °C ... +80 °C (standard version) Sensitivity (NETD) typical 120 mK @ 303 K @ f/1.0 Temperature stabilization Peltier stabilized ADC 14 bit Digital output 14 bit, GigE Sensor time constant approx. 7 ms Smart features Built-in correction data sets, bad pixel correction, background (FPN) correction, gain/offset correction (NUC/non-uniformity correction) for each pixel, drift compensation, temperature linearization (LUT), continuous mode (image acquisition with maximum frame rate) With AVT‘s AcquireControl: pseudo color LUT with several color profiles, auto contrast, auto brightness, temperature measurement, analyze multiple regions (rectangular, circle) within image, real-time statistics and histogram, background (FPN) correction Digital interface IEEE 802.3 1000BASE-T (GigE Vision V1.2) Table 4: Specification Pearleye P-030 LWIR Pearleye Technical Manual V2.0.0 14 Specifications Feature Specification Power requirements + 12 V, -0% / +5%, max. 1.5 A Dimensions With 18 mm f/1.0 lens: 133.7 mm x 90 mm x 86 mm (L x W x H); incl. connectors Mass 760 g (with 18 mm f/1.0 lens) Housing material Aluminium alloy (AlMgSi1) Operating temperature (Reference to the internal temperature sensor) +10 °C ... +40 °C Optimal working range (Reference to the internal temperature sensor) +15 °C ... +35 °C Ambient temperature during storage -30 °C ... +70 °C Relative humidity (operating and storage) 10 % ... 95 % without condensation Shock 25 g Vibration 2g Regulations CE, RoHS (2002/95/EC) Options Suitable lenses for LWIR with various focal lengths Different temperature ranges Table 4: Specification Pearleye P-030 LWIR Note The design and specifications for the products described above may change without notice. Note • • The right polarization of the 12 V supply voltage must be assured. The warranty becomes void in case of unauthorized tampering or any manipulations not approved by the manufacturer. Pearleye Technical Manual V2.0.0 15 Specifications Spectral transmission Figure 1: Spectral transmission of Pearleye P-007 LWIR Figure 2: Spectral transmission of Pearleye P-030 LWIR Pearleye Technical Manual V2.0.0 16 Camera dimensions Camera dimensions Pearleye P-007 LWIR / Pearleye P-030 LWIR max.32.7 101 max.28.9 94 15.27 71 Ø38.1 Ø 1 1/8" Ø45.7 GIP-1000 86 Camera 86 71 Ø90 62 Lens 18mm f/1 UNC 1/4" UNC 1/4" M4 max. screw depth 4.5mm 4.5mm 3mm 13 31 44 Gigabit Ethernet connection L2 L3 Power L4 L5 Ø90 Power / Control connection UNC1/4" (2x) and M4 mounting holes are in the center of main body Figure 3: Camera dimensions: Pearleye P-007 LWIR / Pearleye P-030 LWIR (front/side/back) Pearleye Technical Manual V2.0.0 17 Camera dimensions LED Color Description Power Green Power indicator L2 Red Camera is operational L3 Red Temperature state Off means: temperature is ok L4 Red Trigger (reset) input activity L5 Red Frame output activity Table 5: Description of LEDs: Pearleye P-007 LWIR / Pearleye P-030 LWIR Pearleye Technical Manual V2.0.0 18 Start up Start up A Gigabit Ethernet port (1000Base-T) on the receiving computer is necessary. 1. Connect the camera with the appropriate data cable to the computer. 2. Plug the 15-pin connector of the power supply to the camera and switch on the power supply. Camera control commands To configure the internal image processing a serial command interface is provided. By default this command interface is internally routed to the Gigabit Ethernet port, but the RS232 signals at the 15 pin D-SUB jack may also be used. To access it, a serial terminal program employing the PC’s RS-232 COM port is required. For Gigabit Ethernet the camera functions are controlled via GigE Vision features. This GigE Vision features are internally mapped to direct camera control signals or the serial commands accordingly. Note Refer to the corresponding control and command chapters throughout this manual to learn more about the GigE Vision feature mapping. If the serial interface is routed over the 15 pin D-SUB jack, then e.g. HyperTerminal, being part of Microsoft® Windows® deliveries, might be the choice to manually control the camera. AVT provides the software AcquireControl: this can operate the camera’s serial port inband via the Gigabit Ethernet interface or externally via PC standard COM ports. Type <CTRL>+Y to get a camera control terminal window there. By default the serial interface uses the following parameters: • 115200 Baud • 8 data bits • 1 stop bit • No parity • No handshake The baud rate is factory-adjusted to 115200 but can also be configured to other values (see Chapter Advanced parameters and commands on page 43). Each command consists of a command letter, followed by an equality sign and a parameter value in hexadecimal number representation. The command letter is case sensitive. Hexadecimal values are always upper case and are 1 to 4 digits long. The command is activated by a carriage return ([CR], ASCII character number 0x0D). Pearleye Technical Manual V2.0.0 19 Start up Serial communication operates in echo mode by default. This means that each character received by the module is echoed back to the sender. In all command examples the characters sent to the camera are represented in Bold Courier Font and the camera’s answer in Plain Courier Font. Recapitulatory the serial commands have the following fixed scheme: >B=wxyz[CR] Sign Description B Command or parameter letter (upper and lower case letter have different meaning) = Sign of equality (0x3D) wxyz 1-4 digits long value in hexadecimal number representation (capital letters) [CR] Carriage Return (0x0D) [LF] Line Feed (0x0A) Table 6: Scheme of serial commands Example (activate correction data set number 0): 1. The user sends the four characters S=0[CR] 2. The camera answers with seven characters S=0[CR][CR][LF]> 3. A terminal program without local echo displays S=0 > After successful execution of the command, the command input character > is output. If any error occurred, somewhere previous to the prompt a question mark character ? is displayed. To query a parameter value, send the corresponding command letter followed by the equality sign and a question mark character: >s=?[CR] If the intended action does not need any parameter, it is also sufficient in most cases - as a shortcut - to send the command letter only, directly followed by [CR]. At the beginning of a command sequence it is good practice to check the serial communication by sending just a [CR] to the camera and verify that the command prompt > is returned. There is an input buffer holding a few characters Pearleye Technical Manual V2.0.0 20 Start up but no hardware handshake. Thus a sequence of commands should not be send to the camera without awaiting the intermediate input prompts. Otherwise the camera’s serial input buffer may overflow. Adjust the image processing Subsequently the important commands for quick starting the image correction of the Pearleye P-007 LWIR / Pearleye P-030 LWIR are mentioned. All further parameters and a description of the correction modules can be found in Chapter Image processing on page 31. The camera is configured ex-factory with parameter settings which ensure a basic image correction. In the case that the Pearleye P-007 LWIR / Pearleye P-030 LWIR is equipped with multiple correction data sets for different operation conditions, the image quality can be improved by activating another correction data set if the conditions of the camera have changed. In addition the Pearleye P-007 LWIR / Pearleye P-030 LWIR models feature an electromechanical shutter that can further enhance the quality of the corrected image. The selection of a good data set can be done automatically by use of the serial command k=0. This command also controls the shutter. Note For more information: see Chapter Automatic calibration (k) on page 37. Pearleye Technical Manual V2.0.0 21 Camera interfaces Camera interfaces This chapter gives you information on the control junction, inputs and outputs and trigger features. www For accessories like cables see: http://www.alliedvisiontec.com/emea/products/ accessories/gige-accessories.html Pearleye Technical Manual V2.0.0 22 Camera interfaces Control connector Camera I/O connector pin assignment (15-pin D-Sub jack) This jack is intended for the power supply as well as for controlling the camera via its serial RS232 interface over a COM port. Furthermore some output signals are available, showing the camera state. Pearleye P-007 LWIR / Pearleye P-030 LWIR Pin Signal 1 2 3 4 Direction Level External Power Description +12 V DC (-0% / +5%) Power supply max. 1.5 A External GND 5 --- Reserved (do not connect) 6 --- Reserved (do not connect) 7 RxD In RS232 Camera control 8 TxD Out RS232 Camera control 9 --- 10 Trigger (Reset) 11 input Reserved (do not connect) + 12 Sensor tempera- 13 ture too low + optocoupler input optocoupler output 14 Sensor tempera- Out ture too high Active low 15 Frame-sync output Active low Out Figure 4: Camera I/O connector pin assignment (Pearleye P-007 LWIR / Pearleye P-030 LWIR) Pearleye Technical Manual V2.0.0 23 Camera interfaces Power supply (Pin 1-4) The camera requires 12 V +5% DC and maximum 1.5 A. The voltage should not fall below 12.0 V and should not exceed 12.6 V. It is recommended to use respectively both pins (1+2, 3+4) for power supply. Serial interface (Pin 7, 8) By use of the serial interface at pin 7 and 8 the camera can be controlled externally via a RS232 COM Port. A simple terminal program (e.g. HyperTerminal) is sufficient for manually controlling the camera. Note Operating this serial interface and the second available port (indirect via GigE Vision features) concurrently may lead to unexpected results. Both interfaces share the same receive buffer and thus the characters of simultaneously sent commands may be randomly mixed up. See Chapter Baud rate (s) on page 55 for more information about serial interface configuration options. Trigger input (Reset) (Pin 10, 11) Due to a rising edge at the trigger input the image readout is reset and the camera immediately starts to output the first line of the new image. In this way a synchronization of several cameras is possible. Note A reset event can render up to two output images invalid. The first image may have fewer lines because its output was aborted by the reset event. Additionally, the intensity of the second image may be inaccurate because the microbolometer pixels’ minimal integration time was not reached. Avoid reset events during integration of correction data or execution of the automatic calibration function (k). Pearleye Technical Manual V2.0.0 24 Camera interfaces Figure 5: Trigger input diagram The current (1) which flows through the optocoupler and the integrated dropping resistor should be > 5 mA and should not exceed 20 mA. Pearleye P-007 LWIR For continuous periodical trigger the pulse must be at least 100μs in length and the periodic time exact 24.96ms ±10μs. Pearleye P-030 LWIR For continuous periodical trigger the pulse must be at least 82μs in length and the periodic time exact 41.608ms ±20μs. Sensor temperature too low (Pin 12, 13) Figure 6: Sensor temperature too low Caution Pearleye P-007 LWIR / Pearleye P-030 LWIR: The current which flows through the optocoupler should not exceed 20 mA (at 12 V Rv 600 ). As long as the sensor operating temperature is too low, the sensor control output at pin 12/13 remains active (transistor switched on). Following the warm up phase of the camera this output becomes inactive. Pearleye Technical Manual V2.0.0 25 Camera interfaces An indication of sensor temperature being too low results in a degradation of image quality and inexact temperature measurement. In case that this control output will not become inactive after some minutes of operation the ambient air temperature of the camera might be too low. A heat up of the camera temperature above approx. 15°C should resolve this. Sensor temperature too high (Pin 14) Voltage Logical Level Description ≤ 0.8 V low Sensor temperature too high > 4.0 V high Normal operation Table 7: Sensor temperature too high An indication of sensor temperature being too high results in a degradation of image quality and inexact temperature measurement. In case that this control output is permanently active already after some minutes of operation, the environment temperature of the camera might be too high. A sufficient cooling of the camera is obligatory. Pearleye P-007 LWIR For ideal results the camera temperature should be lower than 45°C. Pearleye P-030 LWIR For ideal results the camera temperature should be lower than 35°C. Frame-sync output (Pin 15) Figure 7: Frame-sync output (Pearleye P-007 LWIR) Figure 8: Frame-sync output (Pearleye P-030 LWIR) Pearleye Technical Manual V2.0.0 26 Camera interfaces Pearleye P-007 LWIR Pearleye P-030 LWIR The frame-sync output (active low) supplies approx. 900 mV at a termination with 75 . Conversion of image data to temperature data Due to the internal LUT, the pixel information can be converted to a corresponding temperature value. For the Pearleye P-007 LWIR the following relation can be used: T = r x DN + o with: DN: 12-bit digital value (pixel data) T: Temperature value [°C] r: Resolution (for Pearleye P-007 LWIR standard version: 0.03°C) o: offset for DN=0 (for Pearleye P-007 LWIR standard version: -30°C) The following diagram shows the result: Figure 9: Conversion of image data to temperature data: Pearleye P-007 LWIR For the Pearleye P-030 LWIR the following relation can be used: T = r x DN + o with: DN: 14-bit digital value (pixel data) T: Temperature value [°C] Pearleye Technical Manual V2.0.0 27 Camera interfaces r: Resolution (for Pearleye P-030 LWIR standard version: 0.0075°C) o: offset for DN=0 (for Pearleye P-030 LWIR standard version: -30°C) The following diagram shows the result: Figure 10: Conversion of image data to temperature data: Pearleye P-030 LWIR Consideration of the emission ratio Every material has its own emissivity value for IR, so the measured value is not equal to the real temperature. The best result can be reached with materials that have emissivity ratio near to 1.0 (100%). The following formula allows correcting the temperature value, when the emissivity ratio is known: 4 4 4 T m – 1 – Tb T t K = ---------------------------------------------4 Formula 1: Pearleye P-007 LWIR: emissivity with: Tt[K]: Corrected value in Kelvin Tm: Measured value in Kelvin T b: Background temperature in Kelvin : Emission ratio Pearleye Technical Manual V2.0.0 28 Camera interfaces Note • • Normally the background temperature can be assumed to be equal to the environmental temperature. The emission grades of many different materials can be found on various internet sources. Pearleye Technical Manual V2.0.0 29 Camera interfaces GigE interface The Pearleye P-007 LWIR / Pearleye P-030 LWIR cameras are equipped with a 1000Base-T Ethernet interface (RJ-45 connector). The data connection between camera and PC can be established via a standard CAT5e patch cable. Note For more information see the Pleora iPORT PT1000-VB Documentation. Pin assignment of the Gigabit Ethernet jack Figure 11: Front view of the Gigabit Ethernet jack Pin Signal 1 D1+ 2 D1– 3 D2+ 4 D3+ 5 D3- 6 D2- 7 D4+ 8 D4– Table 8: GigE jack: pin assignment Pearleye Technical Manual V2.0.0 30 Image processing Image processing This chapter explains the function of the Pearleye P-007 LWIR / Pearleye P-030 LWIR firmware. It is related to the individual modules of image processing and shows in what way the user can control these modules via the serial interface. Image processing chain Due to the fact that the uncorrected sensor image from the microbolometer sensor is very inhomogeneous and that each sensor element has its own characteristic curve, an individual adjustment of each pixel is necessary. The standard firmware of the Pearleye P-007 LWIR / Pearleye P-030 LWIR contains a chain of correction modules which undertake these tasks in real time. Figure 12: Image processing chain: Pearleye P-007 LWIR / Pearleye P-030 LWIR Each module can have various parameters which control the operation mode. In the drawing above and as well within the text of this manual, these parameters are always marked by Courier bold font in order to highlight them to be parameters (or commands) adjustable via the serial Interface. For fast access all available correction data (e.g. reference images for the twopoint correction and bad pixel correction control data) are copied from the nonvolatile flash memory into a correction data memory (SDRAM) when starting the camera. From this point the correction data is available for real-time image correction. The image data from the camera head is shifted through the correction modules and the corresponding correction data is applied. Some modules may also write new data back to the correction memory: but currently only to the SDRAM and not to the non-volatile Flash memory. Pearleye Technical Manual V2.0.0 31 Image processing The main correction modules are in detail: • Two-point correction • Background correction • Bad pixel correction • Drift compensation • Look-up table (LUT) Two-point correction With help of the two-point correction (likewise gain offset correction) the normally distinctive underground structure of the microbolometer sensor can be equalized. The gain and the offset for each pixel of the input image can be adapted to the set values on the basis of two reference images so that in the optimum case no image structure is discernible. Background correction The Pearleye P-007 LWIR / Pearleye P-030 LWIR models feature an electromechanical shutter. In conjunction with the second correction module in the chain – the background correction – the image quality can additionally be enhanced. The shutter is closed to acquire a temporary background correction image. This image is subtracted from the two-point corrected image data to reduce the remaining fixed pattern noise. Bad pixel correction The bad pixel correction uses up to six non-false neighbour pixels to determine an interpolated value from the neighbour pixels that replaces the bad pixel. In this way the image appears without disturbing hot or cold pixels. Drift compensation As the temperature of the camera itself directly influences the output data, for stable measurements it is necessary to compensate this drift. Therefore the correction module drift compensation can be used. It directly incorporates an internally measured temperature into a drift correction function. Look-up table (LUT) The temperature characteristic curve of the microbolometer sensor usually is not linear. With help of the look-up table (LUT) there is the possibility to linearize the data at the end of the processing chain, so that more precise temperature values are resulting. Pearleye Technical Manual V2.0.0 32 Image processing Correction data Ex factory camera specific correction data for each correction module are determined and stored in the camera so that an optimum image quality is available at the Gigabit Ethernet interface. A PC with a Gigabit Ethernet interface can transmit the temperature data directly to the main memory or rather to the display. To reach more exact temperature measurements only an emission factor correction depending on the surface and material of the object as well as of the environment temperature within the object scene is necessary at the receiving end. Correction sets In case of high quality requirements with regard to exactness and image quality it is recommended to determinate ex factory more than one correction data set by means of which some influence caused by changing operating conditions of the camera are mostly compensated. Several different correction sets for the two-point correction are stored inside the camera. By transmitting commands over the serial interface the user is able to activate (manually or automatically) the correction set which is most suitable for the actual environment conditions of the camera. File system The Pearleye P-007 LWIR / Pearleye P-030 LWIR camera models are equipped with a non-volatile data memory (64 MByte flash) which records configuration and correction data. Due to resource reasons the data is managed in a minimalist file system. Due to the file system there are the following restrictions: • Files are identified via one byte. Regarding to its function this file number is somewhat comparable to the file name (including extension) from the PC world. Valid file numbers are between 1 (0x01) and 254 (0xFE). • The file type can be defined via a further byte. It is an optional clustering feature for files, but it has no relevance for the file identification. • There is no directory structure. All files are on one single hierarchy level within the main directory. This results in a maximum possible number of 254 simultaneously stored files, because each file number can only be allocated once. Ex factory the camera is usually already equipped with several files, containing system and correction data. The Pearleye P-007 LWIR / Pearleye P-030 LWIR don’t use the whole 64 MByte, so that a customer can also use this memory for own data. Pearleye Technical Manual V2.0.0 33 Image processing Note For more information see Chapter Upload a file to flash (Q) on page 57. Short introduction: Two-point correction (A, B, E, J, K, N) The two-point correction is the most elaborate correction module of the Pearleye P-007 LWIR / Pearleye P-030 LWIR camera models. For this reason initially a general survey of the two-point correction functioning shall be given. Note For more information see Chapter Basic parameters and commands on page 36. This will probably be sufficient for most users, due to the fact that the determining and adjustment of nearly all parameters is already executed ex factory and normally, no user intervention is necessary at all. For more extensive details of the current parameters see Chapter Advanced parameters and commands on page 43. By means of the two-point correction (also called gain offset correction) usually, the distinctive underground structure of the microbolometer sensor can be equalized. The target is to transmit the individual characteristic curve of each pixel to a set characteristic curve, being valid for all pixels. In order to achieve this result, initially the effective characteristic curve of each single pixel is determined by taking up data samples. A linear characteristic curve is supposed so that two data samples are sufficient for a definite determination. By means of recording two reference images at the scene temperatures TA and TB the data samples can be determined for all pixels. Furthermore the digital set values J and K each belonging to the temperatures TA and TB are determined. Owing to the four parameters mentioned above, the two-point correction is now able to modify the gain and the offset of each pixel characteristic curve in a way that it is congruent with the set characteristic curve. Therefore, in an optimum case, an image structure, caused by the sensor, does no longer occur. The below mentioned diagram tries to exemplary explain the facts on the basis of one single pixel characteristic curve: Pearleye Technical Manual V2.0.0 34 Image processing Figure 13: Two-point correction The reference images are stored in several files within the flash and are directly transferred into the correction memory following the camera start-up. The parameter A indicates the file number of the correction image at low reference temperature TA. The parameter B serves the same purpose for the reference image at temperature TB. For improvement of image quality the camera usually is delivered ex-factory with several sets of correction data, which are determined for diverse operating conditions. Diverse correction images (A, B) may exist including the according set values (J, K). These correction images are loaded o the correction memory during the camera start-up. Pearleye Technical Manual V2.0.0 35 Basic parameters and commands Basic parameters and commands This chapter illustrates the basic configuration options and general commands available for the user, being important for the operation of an ex factory preconfigured camera. Most probably the information stated here will be sufficient for most of the users. Note For more information see Chapter Advanced parameters and commands on page 43. Select a correction data set (S) In the case that the Pearleye P-007 LWIR / Pearleye P-030 LWIR is equipped with multiple correction data sets for different operation conditions the image quality can be improved by activating another correction data set if the environmental conditions have changed. For quick access to the (optionally available) different correction data sets, the correction data memory is subdivided into 32 single pages. Each of these pages can store a complete set of correction data (parameters A and B). At all times only one page can be active simultaneously and all eventual modification of the correction data takes place within this page. For each correction memory page a further pair of registers for the parameters J and K is available. In order to enable an access on the values J and K of each correction data set, the page address also serves as access address to the register pairs. The memory pages are filled with data starting at the address 0. The highest valid address depends on the number of correction data sets stored in the camera, however it can not exceed 31 (0x1F). If e.g. 27 correction data sets are available this would result in a maximum valid page address of 0x1A. Both parameters, A and B together affect the choice and the number of data sets to be loaded. By means of the parameter S the address of the active page can be adjusted: Example Activate the eleventh correction data set (address 10 = 0xA) >S=A[CR] Pearleye Technical Manual V2.0.0 36 Basic parameters and commands GigE feature name (CameraSpecialFeatures) Feature Visibility Description CorrectionDataSet Beginner Number of the correction data set to activate. (S=<value> command) Table 9: GigE feature: CorrectionDataSet Automatic calibration (k) Beside the manual selection of data sets with parameter S also an automatic calibration (one-time or timer controlled repeating) can be carried out. The automatic process tries to determine the best data set S (if several available) and activates it. The Pearleye P-007 LWIR / Pearleye P-030 LWIR variants additional employ the electromechanical shutter to acquire a temporary background correction image. Criterion for the data set selection is a statistics value which is correlating with the fixed pattern noise, being visible within the image. For the determination of this statistics value an image is recorded and stored by means of the first Integrator / Image Memory module in the chain. This acquired image is tested in succession with each correction set being available in the memory by determining the statistics value of the corrected data. Finally that memory page S becomes activated, which is showing the best results for the statistics value. Depending on the number of available data sets the automatic data set selection can take some seconds. During the data set selection the image output is stopped by suppression of the FVAL signal. According to each image content, at the same conditions diverse correction sets can be chosen in case they are quite similar to each other. But generally the data set which is optimum for the actual image content becomes activated. Avoid triggering the camera while the calibration is in progress. Depending on the camera model and current j parameter configuration, the actions accomplished by the k command and its output at the serial interface may vary. Note For more information on the corresponding commands see Chapter Command reference on page 60. Example Start an automatic calibration process (Pearleye P-007 LWIR / Pearleye P-030 LWIR models with shutter, j=FB). >k=0[CR] Pearleye Technical Manual V2.0.0 37 Basic parameters and commands S=0A M=87C8 > GigE feature name (CameraSpecialFeatures) Feature Visibility Description AutoCalibrateOnce Beginner Start the automatic calibration once. (k=0 command) The processing of this command can take several seconds, depending on the current image rate and the number of correction data sets available. Table 10: GigE feature: AutoCalibrateOnce The following Pearleye P-007 LWIR table shows an overview of the consumed time by the command k=0: Description Max. Time Typical time for a Pearleye P-007 LWIR Close shutter (optional) 4 * T 100 ms 0 ms Save one image 75 ms 75 ms Open shutter (optional) 0 * T 0 ms 0 ms Choose data set N1 * 2 * T 1600 ms 800 ms (N1=16) Close shutter 5*T 125 ms 125 ms Integrate images (N2 + 1) * T 1625 ms 1625 ms Open shutter 0*T 0 ms 0 ms Calculate statistics 2*T 50 ms 50 ms 3.58s 2.68s At all Time 3*T Table 11: Pearleye P-007 LWIR: consumed time with command k=0 T = Time for one frame-out (Pearleye P-007 LWIR: 25ms) N1 = number of data sets (max. 32) N2 = number of integrated images (max. 64) Pearleye Technical Manual V2.0.0 38 Basic parameters and commands The following Pearleye P-030 LWIR table shows an overview of the consumed time by the command k=0: Description Time Max. Time Typical time for a Pearleye P-030 LWIR Close shutter (optional) 4 * T 166 ms 0 ms Save one image 125 ms 125 ms Open shutter (optional) 0 * T 0 ms 0 ms Choose data set N1 * 2 * T 2662 ms 1331 ms (N1=16) Close shutter 5*T 208 ms 208 ms Integrate images (N2 + 1) * T 2704 ms 2704 ms Open shutter 0*T 0 ms 0 ms Calculate statistics 2*T 83 ms 83 ms 5.95s 4.45 s 3*T At all Table 12: Pearleye P-030 LWIR: consumed time with command k=0 T = Time for one frame-out (Pearleye P-030 LWIR: 41.6 ms) N1 = number of data sets (max. 32) N2 = number of integrated images (max. 64) In case that the camera is exposed to unsteady operating conditions it might be an advantage that the automatic data set selection regularly starts on its own. If k is not set to 0 the automatic search starts at approx. each k * 256 images. At a frame rate of e.g. 40 images per second the chronological resolution of the k value is approx. 6.4 seconds. Example The automatic correction data selection shall always be started approx. every 1200 seconds (20 minutes): 1200 sec. / 6.4 sec. per count ≈ 188 = 0xBC. >k=BC [CR] Caution The electromechanical shutter is not designed to be held closed permanently. Reopen it soon after closing. Pearleye Technical Manual V2.0.0 39 Basic parameters and commands GigE feature name (CameraSpecialFeatures) Feature Visibility Description AutoCalibrationInterval Expert Setup the automatic calibration interval. 0=Calibrate one-time, 1...65535=Calibrate every k*256 frames. (k=<value> command) Table 13: GigE feature: AutoCalibrationInterval Electromechanical shutter (I) The Pearleye P-007 LWIR / Pearleye P-030 LWIR models are equipped with an electromechanical shutter that can be controlled with the command I. Use I=1 to close and I=0 to open the shutter. Note The shutter is open by default (power off). GigE feature name (CameraSpecialFeatures) Feature Visibility Description MechanicalShutter Beginner Set the electromechanical shutter state manually. (I=<value> command) Table 14: GigE feature: Electromechanical shutter Temperature warning (T) The command T=1 displays the content of the temperature warning register. The lowest order bit has the same function as LED L3 placed at the backside of the camera housing. In case the value 1 is output, the temperature of the microbolometer sensor is outside the optimum range. After switching-on the cold camera this may take place for a time because the stabilization of the sensor temperature takes some minutes until the set value becomes achieved. In case that the temperature warning remains active for a longer period, the environment temperature of the camera should be checked. Pearleye Technical Manual V2.0.0 40 Basic parameters and commands Note For information about the starting procedure see Warm-up period on page 10. The camera is equipped with an internal temperature sensor. The temperature can be displayed using the command T=2. The temperature is output as 16 bits value. The 4 most significant bits contain information about the temperature sensing state. The remaining 12 bits contain two’s complement of 1/16 degrees Celsius. GigE feature name (CameraSpecialFeatures) Feature Visibility Description SensorTemperatureState Expert Camera sensor temperature state. 0 = The sensor temperature is OK. 1 = The sensor temperature is outside the optimum range. QuerySensorTemperatureState Expert Query camera sensor temperature state. (T = 1 command) ShutterTemperatureValue Beginner Shutter temperature value in degree Celsius. QueryShutterTemperatureValue Beginner Query camera shutter temperature state. (T = 2 command) Table 15: GigE feature: Sensor temperature state Software version and correction data information (V) By means of the command V=1 information about the correction data installed in the non-volatile memory is displayed. The current firmware version and also the serial number of the camera are output. Note This function is not available as GigE Vision feature. Pearleye Technical Manual V2.0.0 41 Basic parameters and commands Current parameter settings (Y) The command Y=1 shows the actual set parameter values. Note This function is not available as GigE Vision feature. Show help text (?) The command ?=1 shows a command reference text at the serial terminal. It lists a short description for each command available in the firmware. Note This function is not available as GigE Vision feature. Note Not every command is useful with the Pearleye P-007 LWIR / Pearleye P-030 LWIR cameras. Pearleye Technical Manual V2.0.0 42 Advanced parameters and commands Advanced parameters and commands This chapter is to illuminate the advanced configuration of the Pearleye P-007 LWIR / Pearleye P-030 LWIR models. For the control of an ex-factory set up camera the intervention within the parameters stated here or rather the use of the mentioned commands is only necessary in exceptional cases. Two-point correction (A, B, E, J, K, N) The configuration of the two-point correction comprises the following parameters: Parameter Description A File number of the first correction image recorded at cold reference temperature. B File number of the first correction image recorded at warm reference temperature. E Two-point correction operating mode J Set value of the correction image of the actually chosen correction data set recorded at cold reference temperature. K Set value of the correction image of the actually chosen correction data set recorded at warm reference temperature. N File number for the set values of all correction data sets. Table 16: Advanced parameters: two-point correction The parameter E controls the operation mode of the two-point correction. The following value assignments are valid: Value Description 0 Deactivated Data is passed through transparently. 1 Activated Correction data A and B with the set values J and K of the actual correction memory page S is used. 2 Deactivated Test mode: Correction data A are output as image data. (*) Table 17: Parameter E: values Pearleye Technical Manual V2.0.0 43 Advanced parameters and commands Value Description 3 Deactivated Test mode: Correction data B are output as image data. (*) 4 One-point correction: Simple subtraction of the correction data A from the input data. In addition the set value J is added as offset to each pixel value. 5 One point correction: Simple subtraction of the correction data B from the input data. In addition the set value K is added as offset to each pixel value. Table 17: Parameter E: values Note (*) Operating modes 2 and 3 exist for test purposes. In case of activating one of these modes it has to be taken into consideration that the module does not transmit any incoming image data anymore. It becomes a data source itself instead. Example Activate the two-point correction >E=1[CR] The parameters A and B define both files out of which the reference images for the two-point correction data are loaded. In case that various correction data sets are available the reference images in the file system are stored each in a closed sequence of file numbers. The loading process following the camera start begins at the first cold reference image A. Then it is continued with the accompanying warm reference image B. In the following step it is attempted to load the file numbers A+1, then B+1 and so on. This process is continued as long as one file within the sequence is missing in the flash or the maximum number of correction sets (actually 32) had been achieved. In case during operation the value of A or B is new adjusted, this change causes the immediate data load out of this file. Different to the automatic loading procedure following the switch-on of the camera, the data are exclusively copied within the memory page S (see Chapter Select a correction data set (S) on page 36) actually being activated. Following the storage (X=1) and a restart of the camera all file numbers following A and B are loaded into the correction data memory as mentioned above. For an optimum image quality one should take into consideration that the parameters A and B shall always specify a pair of two mating reference images, even though these parameters are alterable separately. Pearleye Technical Manual V2.0.0 44 Advanced parameters and commands Note For more information of command X=1 see Chapter Save parameters in flash (X) on page 57. Example Loading of correction data at low reference temperature into the active correction memory page of file number 0x20. >A=20[CR] The set values for both reference images A and B are adjusted with the parameters J and K. For each correction data set two registers are available which include the corresponding set value. One always refers to both set values of the actual correction data set S. In case that various correction sets are obtainable, the set values are factorybunched in one file, the number of which is indicated by the parameter N. If N is not zero, the values for all correction sets from this file are loaded, when switching-on the camera and stored back with X=1. In case that only one correction data set is on hand, N can remain on the value zero, because J and K (only the values of the actual memory page) are stored together with all other parameters of one system file apart from the file N. Note Changes to J and K can not be stored to file N. Example All set values of the two-point correction have to be loaded from the file 0x60. >N=60[CR] Generally no changes at the set values have to be executed. The factory-determined value J (or rather K) for a determined correction image, as well as the definition of the conversion of temperatures in digital values, can be gathered from an optional calibration report. From the registers J and K actually only the higher 12 (Pearleye P-007 LWIR) or 14 (Pearleye P-030 LWIR) bits are used. The lower bits are reserved for prospective extensions and should always be set to zero: Pearleye Technical Manual V2.0.0 45 Advanced parameters and commands Bit position Value (12-bit) Value (14-bit) 15 14 13 12 11 10 9 8 7 6 5 4 3 2 1 0 211 210 29 28 27 26 25 24 23 22 21 20 - - - - - - a 213 212 211 210 29 28 0 27 26 25 24 23 22 21 20 a 0 Table 18: J and K: bit usage GigE Vision feature name Feature Visibility Description TPC_OperationMode Expert Operation mode of the two-point correction (E=<value> command) TPC_CorrectionData_FileNumber Expert File number of the flash file containing the set values for the two-point correction. (N=<value> command) TPC_SetValue_LowRef Expert Define the set value for the low reference image of the two-point correction. (J=<value> command) TPC_SetValue_HighRef Expert Define the set value for the high reference image of the two-point correction. (K=<value> command) TPC_FirstImage_LowRef Expert File number of the first low reference image of the two-point correction. (A=<value> command) TPC_FirstImage_HighRef Expert File number of the first high reference image of the two-point correction. (B=<value> command) Table 19: GigE feature: TwoPointCorrection (TPC) Pearleye Technical Manual V2.0.0 46 Advanced parameters and commands Background correction (U, M) The module background correction is closely related to the module integrator / image store at the beginning of the processing chain (H). It also comprehends an image integration function. But additionally it can subtract its current correction data image (H/U) from the incoming image and add the offset M. Thus a fixed pattern noise reduction or difference image calculation is possible. Note This module uses the same memory buffer as the integrator and image store (H). It is not useful to activate U and H at the same time. The bits of the parameter value are divided into three different sized bit groups a, b and c. Each bit group has a special function, being independent of the other ones: • a: Controls the output of background correction module. Beside the normal background correction mode also the actual memory content (H/U) of the integrator can be output. In this case the correction module becomes an image source itself. It provides a simple image store function. Note This bit group is split into two separate areas. • • b: Defines the number of images to be integrated and starts the integration process as soon as a new value was set. c: Indicates whether the at last started integration is still running. This bit can only be read out; during write access to U it is ignored. The table below illustrates the possible values for the individual bit groups: Pearleye Technical Manual V2.0.0 47 Advanced parameters and commands U 0 Operation Mode Background Correction F E D C B A 9 8 7 6 5 4 3 2 1 0 - - - - - - - - c - - a b b b a ro Bit group Value (hex) a b c rw rw rw rw rw Explanation 0 Output: deactivated. Data is passed through transparently. 1 Output: activated. Apply the current correction image (H/U) and offset value M. 2 Output: activated. Output of current correction image (H/U). 0 Integration: deactivated. The image store content is not changed. 1 Integration: 1 image. The following image is copied into the image store. 4 Integration: 8 images. The following 8 images are integrated and the result is copied into the image store. 5 Integration: 16 images. The following 16 images are integrated and the result is copied into the image store. 6 Integration: 32 images. The following 32 images are integrated and the result is copied into the image store. 7 Integration: 64 images. The following 64 images are integrated and the result is copied into the image store. 0 Integration completed. (This value can only be read out.) 1 Integration still running. (This value can only be read out.) Note: The Integration is activated by change of the bit group b of U. In case that e.g. directly following the integration of 64 images a further integration of 64 images is subject to be started another value has to be written into the register first. Example: U=E, U=0, U=E. Table 20: Parameter U: values Example Integration of 32 images simultaneously to the output of the actual integration image (a=2, b=6) => abbba = 11100 [binary] = 0x1A. After that, reactivate the background correction. Command sequence >U=1A[CR] Pearleye P-007 LWIR ...wait for at least 34 image cycles (32 + 2 frames jitter buffer, 0.85 seconds at 40 images / second) or poll the state of bit group c with U[CR]... Pearleye P-030 LWIR ...wait for at least 34 image cycles (32 + 2 frames jitter buffer, 1.41 seconds at 24 images / second) or poll the state of bit group c with U[CR]... >U=1[CR] Pearleye Technical Manual V2.0.0 48 Advanced parameters and commands The parameter M defines the offset value that is added to every pixel if the background correction is activated. By default, M is automatically set to the mean value of the background image, provided that the background image acquisition is done with the automatic calibration function (k). In this way it is possible to preserve the constant component of the image irrespective of the background correction’s activation state. Integrating a new background correction image with the command U does not modify M. Only the 12 (14) high significant bits of this 16 bits value are relevant. The following table reveals the bit order: Bit position Value (12-bit) Value (14-bit) 15 14 13 12 11 10 9 8 7 6 5 4 3 2 1 0 211 210 29 28 27 26 25 24 23 22 21 20 - - - - - - a 213 212 211 210 29 28 0 27 26 25 24 23 22 21 20 a 0 Table 21: U and M: bit usage Example Set the background correction offset to 291 = 0x123 >M=1230[CR] GigE Vision feature name Description BGC_OperationMode Operation mode of the background correction. (U=<value> command) While reading this feature the MSB shows the state of the integration process. (0=Idle, 1=Busy) BGC_OffsetValue Offset value for the background correction. (M=<value> command) Table 22: Camera special feature: BackgroundCorrection Pearleye Technical Manual V2.0.0 49 Advanced parameters and commands Bad pixel correction (C, F) The configuration of the bad pixel correction is executed ex factory, like this normally no access on behalf of the user becomes necessary. The bad pixel correction applies up to six non false neighbour pixels, in order to determine an interpolated value from the neighbour ship. At the position of the defective pixel an interpolated value in exchange of the bad pixel value is output. The parameter F controls the operation mode of the bad pixel correction. The following value assignment is applied: Value Description 0 Bad pixel correction deactivated; output of the uncorrected data. 1 Bad pixel correction is applied. 2 Testing mode, output of correction data. (*) Table 23: Parameter F: values Note (*) Operation mode 2 exists for test purposes. In case of activating this mode the module does not transmit any incoming image data anymore. It becomes a data source itself instead. Example Activate the bad pixel correction. >F=1[CR] By means of parameter C the file number of the required correction data is indicated. Ex-factory the defective pixels are determined one time and the corresponding correction data is stored in a special data format in the camera. As generally only one file with correction data exists in the camera, it is not necessary to change this parameter. Example Initialization of the correction data for the bad pixel correction from the file 0x70. >C=70[CR] Pearleye Technical Manual V2.0.0 50 Advanced parameters and commands GigE Vision feature name Description BPC_OperationMode Operation mode of the bad pixel correction. (F=<value> command) BPC_CorrectionData_FileNumber File number of the correction data for the bad pixel correction. (C=<value> command) Table 24: Camera special feature: BadPixelCorrection Temperature drift compensation (m, n, o, p) The output data of a microbolometer system is highly affected by the temperature of the camera. Therefore digital drift compensation can be activated in the post processing chain. An internal temperature sensor (Dallas DS18B20) is used for calculating an offset that will be added to every pixel. The parameters for this compensation are normally preset by factory with measured values for every camera. However, the user can modify these parameters, specially the additional offset parameter p=<p16>. With m=<p8> the drift compensation can be activated/deactivated and a filter for the temperature values can be switched on/off. m 0 Operation Mode Drift compensation Bit group f m 7 6 5 4 3 2 1 0 - - - f - - - m rw rw Value (hex) Description 0 Filter is enabled 1 Filter is bypassed 0 Drift compensation deactivated 1 Drift compensation activated Table 25: Temperature drift compensation: values The parameter n=<p16> specifies the slope of the linear drift compensation term n*T+o. The value specifies the slope in counts per °C and is represented in 10.6 bit fixed point two’s complement notation. With o=<p16> the offset is specified. The value is represented in 16 bits fixed point two’s complement notation. An additional offset (user offset) can be specified by p=<p16>. This parameter is represented in 16 bits fixed point two’s complement notation. Pearleye Technical Manual V2.0.0 51 Advanced parameters and commands Note This function is currently not available as GigE Vision feature. Look-up table (LUT) (D, G) The temperature data of the microbolometer sensor is generally non- linear. By means of the LUT there is the opportunity to linearize the data that have already been pre-corrected by two-point, background and bad pixel correction, resulting in more exact temperature values. The LUT is implemented as 12-bit LUT. The operation mode of the LUT is controlled with parameter G. The following value assignment is applied: Value Description 0 Deactivated. Data are passed through transparently. 1 Activated 2 Deactivated Test mode: LUT data are output sequentially. (*) Table 26: Look-up table: values Note (*) Operation mode 2 exists only for test purposes. In case of activating this mode the module does not transmit any incoming image data anymore. It becomes a data source itself instead. Example Activate the LUT for linearization. >G=1[CR] The file containing the LUT data is set with parameter D. Ex factory the LUT is determined one time and stored into the flash. As generally only one LUT exists in the camera, it is not necessary to change this parameter. Example Initialisation of the LUT with data from file number 0x80. >D=80[CR] Pearleye Technical Manual V2.0.0 52 Advanced parameters and commands GigE Vision feature name Description LUT_OperationMode Operation mode of the LUT. (G=<value> command) LUT_CorrectionData_FileNumber File number of the data for the LUT. (D=<value> command) Table 27: Camera special feature: LUT Integrator and image store (H) The integrator / image store (integrator) module is internally applied for the automatic selection of the correction set (k=) and the recording of new temporary reference image data (A=FF, B=FF). Furthermore this module may also be controlled manually. Due to the fact that the data are stored in the volatile SDRAM memory it will get lost after the camera is switched off. Note This module uses the same memory buffer as the Background Correction (U). It is not useful to activate H and U at the same time. The bits of the parameter value are divided into four different sized bit groups a, b, c and d. Each bit group has a special function, being independent of the other ones: • a: Controls the output of integrator module. Either the incoming data are subject to be passed through transparently or the actual memory content of the integrator is output. In the latter case the integrator becomes an image source itself. In this way this module has available a simple image store function. • b: Defines the number of images to be integrated and starts the integration process as soon as a new value was set. • c: Controls the data copy mode. The image store content of the integrator is subject to be copied into the correction data store as cold or warm reference image of the two point correction (parameter A or B in the active memory page S) at any time. The data copy mode should stay active for a minimum period of two complete image cycles in order to guarantee a save data transmission into the target area. • d: Indicates whether the at last started integration is still running. This bit can only be read out; during write access to H it is ignored. Pearleye Technical Manual V2.0.0 53 Advanced parameters and commands The table below illustrates the possible values for the individual bit groups: H 0 Operation Mode Integrator/Image Store Bit group a b E D C B A 9 8 7 6 5 4 3 2 1 0 - - - - - - - - d - c c b b b a ro Value (hex) rw rw rw rw rw rw Description 0 Output: deactivated. Data are passed through transparently. 1 Output: activated. Output of actual image store content. 0 Integration: deactivated. The image store content is not changed. 1 Integration: 1 image. The following image is copied into the image store. 4 Integration: 8 images. The following 8 images are integrated and the result is copied into the image store. 5 Integration: 16 images. The following 16 images are integrated and the result is copied into the image store. 6 Integration: 32 images. The following 32 images are integrated and the result is copied into the image store. 7 Integration: 64 images. The following 64 images are integrated and the result is copied into the image store. 0 Copy: deactivated. 1 Copy: Target A. The image store content of the integrator is subject to be copied into the correction data store as cold reference image of the two point correction 2 Copy: Target B. The image store content of the integrator is subject to be copied into the correction data store as warm reference image of the two point correction 0 Integration completed. (This value can only be read out.) 1 Integration still running. (This value can only be read out.) c d F Note: The Integration is activated by change of the register content of H. In case that e.g. directly following the integration of 64 images a further integration of 64 images is subject to be started another value has to be written into the register first. Example: H=E, H=0, H=E. Table 28: Integrator and image store: values Example Integration of 32 images simultaneously to the output of the actual integration image and copy as a reference image A into the correction data memory (a=1, b=6, c=1) => yyxxxw = 011101 binary = 0x1D. As soon as the integration is terminated, one still has to wait for at least two image cycles, before the copy procedure is ended. >H=1D[CR] Pearleye Technical Manual V2.0.0 54 Advanced parameters and commands Pearleye P-007 LWIR ...wait for at least 36 image cycles (34 + 2 frames jitter buffer, 0.9 seconds at 40 images / sec.) or poll the state of bit group d with H[CR]... Pearleye P-030 LWIR ...wait for at least 36 image cycles (34 + 2 frames jitter buffer, 1.50 seconds at 24 images / sec.) or poll the state of bit group d with H[CR]... >H=0[CR] GigE Vision feature name Description IIS_OperationMode Operation mode of the integrator and image store. (H=<value> command) While reading this feature the MSB shows the state of the integration process. (0=Idle, 1=Busy) Table 29: Camera special feature: IntegratorAndImageStore Baud rate (s) The baud rate of the RS232 interface is determined by use of register s: The bits of the parameter value are divided into three different sized bit groups a, e and x. Each bit group has a special function, being independent of the other ones: • a: Controls the configuration of the serial port. • e: Controls the echo mode. • x: Controls the baud rate of the serial port. Pearleye Technical Manual V2.0.0 55 Advanced parameters and commands s 0 Operation Mode Integrator / Image Store Bit group x a e F E D C B A 9 8 7 6 5 4 3 2 1 0 - - - - - - - - e a a - x x x x rw rw rw Value (hex) rw rw rw rw Description O 110 Baud 1 300 Baud 2 600 Baud 3 1200 Baud 4 2400 Baud 5 4800 Baud 6 9600 Baud 7 19200 Baud 8 38400 Baud 9 57600 Baud A 115200 Baud 00 RS232 via 15 pin SUB-D only. 01 Additionally activate second channel via Pleora device port serial 0. 10 Additionally activate second channel vis Pleora device port bulk 0 (MODE:UART). 11 Reserved. 0 Each character received from the host is echoed back to it. 1 No Echo. Table 30: Baud rates: values Example Set the factory default (115200 Baud and activate serial interface via Gigabit Ethernet). >s=2A[CR] Note This function is not available as GigE Vision feature. Caution Do not change the baud rate, if the camera is to be controlled via GigE Vision features. Pearleye Technical Manual V2.0.0 56 Advanced parameters and commands Save parameters in flash (X) By means of the command X=1 all parameter values are stored into a system file within the flash memory. After a re-start they are automatically restored. However, neither new recorded correction images, nor modified set values (J and K for all valid S) are stored and will therefore be lost after the camera is switched off. GigE Vision feature name Description SaveParameterToCameraFlash Saves the parameters into internal camera flash memory. (X=<value> command) 1 = All parameter values are stored into a system file within the flash memory of the camera. Table 31: Camera special feature: SaveParameterToCameraFlash Upload a file to flash (Q) The data in the flash memory are managed in a minimalist file system. Files are identified via one byte. Valid file numbers are between 1 (0x01) and 254 (0xFE). A further byte can be used to define the file type. There is no directory structure. This results in a maximum possible number of 254 simultaneously stored files. A lot of file numbers are already reserved by factory. For the correction data of the Pearleye P-007 LWIR / Pearleye P-030 LWIR the file numbers 1, 32-96, 112-113, 128 are used. File numbers greater than or equal to 240 are reserved for the system itself and will be not visible to the user. For user data we recommend the file numbers between 16 (0x10) and 31 (0x1F). The file system is administrated by serial commands (via RS232 or inband via Gigabit Ethernet). There are different commands to control the file system: Command Description l=1 List actually stored file numbers. d=<p8> Delete the file with the specified file number. v=<p8> View file. Dumps all bytes of the specified file to the serial interface. Q=<p8> Upload a file and store it in the Flash memory. Table 32: File system commands Pearleye Technical Manual V2.0.0 57 Advanced parameters and commands Caution Note The commands d=<p8> and Q=<p8> do not need additional confirmation. Files below ID 0xF0 are not write-protected and thus are modified or deleted without warning. For more details see Chapter Command reference on page 60. Note The upload via the inband Device Port Serial 0 can take a lot of time (only some thousand bytes/minute). For bigger files we recommend to use the external RS232 port or the inband Device Port Bulk 0. For details on how to configure the port see Chapter Baud rate (s) on page 55. The command Q=<p8> is used to transmit files to the module. <p8> is an 8 bits wide parameter value in ASCII hexadecimal notation. It specifies the number for the file to be created or overwritten. After confirmation of the command by sending a carriage return character [CR] additional parameters will be expected; e.g. the type of the file, its size and also the data itself. Below you will see an example of a character sequence. It creates a file under the number 16 (0x10) with file type 66 (0x42) containing the text “Testtext” as data: Example >Q=10[CR] N00000007S4200[PAUSE]D5465737474657874 > As from confirmation of the command Q with [CR] the following characters are not echoed back as usual. That means that the control character sequence N00… has to be send blind. The character sequence is divided into the following parts: Part Description Nnnnnnnnn n = file size in bytes – 1. Creating a file of size 0 is not specified. Sttmm t = file type (any between „01“ and „FE“) m = transmit mode (always „00“) Table 33: The Q=<p8> command: parts Pearleye Technical Manual V2.0.0 58 Advanced parameters and commands Part Description [PAUSE] To prevent an overflow of the input buffer a pause of at least one second has to be maintained at this point. The file system needs time to open the file and delete the data of an eventually existing file. Ddddddd… n+1 data bytes in ASCII hexadecimal representation (two characters 0…9,A…F per byte) Table 33: The Q=<p8> command: parts If an error occurs during transmission, the operation will instantly be aborted. The camera module sends a ? character as error mark. Already transmitted data bytes will stay stored in the file, meaning that the first part of the file may still exist after abort. The sender should regularly check for reception of the ? while transmitting large files to efficiently recognize the error situation. This allows the sender to stop the transmission. As soon as the module outputs its command prompt the sender may retry the transmission. If the transmission fails several times, the flash chip may be full or there is an error in the hardware. Caution Do not switch off the camera during file writing operation (e.g. command d=<p8> or Q=<p8>) until the host received the command prompt character >. Switching off the camera during file writing operation will very likely corrupt the file system. In this case return the camera to AVT for system recovery. Retrieve a file: v=<p8> command To retrieve (view) a file, the command v=<p8> may be used. This command directly outputs the data bytes of the specified file to the serial interface (not in ASCII hexadecimal notation as with Q=<p8>). The above mentioned example would produce following output: >v=10 Testtext > Because this example uses an ASCII text file, the data can be displayed correctly in a terminal window. For binary data this is not the case. Note • • • Large files may take a while for output. For an easy access to the file system AVT also offers an Windows application (File manager) that can be used to upload files. This is also included in the AcquireControl application and can be started by command [CTRL+F]. All file operations are not available via GigE Vision features. Pearleye Technical Manual V2.0.0 59 Appendix Appendix Command reference This chapter describes the general command reference of the Pearleye P-007 LWIR / Pearleye P-030 LWIR firmware. It can be output to the camera’s serial interface by sending the command ?=1. Note This firmware is used in other camera models as well. Thus not all commands and parameters mentioned in this reference are useful in conjunction with the Pearleye P-007 LWIR / Pearleye P-030 LWIR. IRC-300CL/GE, IRC-320CL/GE, IRC-340CL/GE, IRC-600CL/GE, IRC-640CL/GE, NIR-300(F)(P)CL/GE, NIR-600PCL/PGE, NIR-610PCL/PGE; Pearleye P-007 LWIR, Pearleye P-030 LWIR, Goldeye (CL/P)-008 NIR (Cool) and Goldeye (CL/P)-032 NIR Cool Series Command Help =============================================================================== Version...............: Vxx / xx.xx.20xx / AVT GmbH Referenced Firmware...: Vxx / Vxxxx General Information ------------------Each command consists of a command letter, optionally followed by an equality sign and a parameter value in hexadecimal number representation. The command letter is case sensitive. Hexadecimal values are always upper case and are 1 to 4 digits long. The command is activated by sending a carriage return character ([CR], ASCII character number 0x0D). Serial communication operates in echo mode by default. This means that each character received by the module is echoed back to the sender. Example (set Baudrate to 115200 Baud, RS-232 only): s=A[CR] After successful execution of the command, the command input character ">" is output. If any error occurred, somewhere previous to the prompt a question mark character "?" is displayed. To query a parameter value, send the corresponding command letter followed by the equality sign and a question mark character: s=?[CR] If the intended action does not need any parameter, it is also sufficient in most cases - as a shortcut - to send the command letter only, directly followed by [CR]. Pearleye Technical Manual V2.0.0 60 Appendix At the beginning of a command sequence it is good practice to check the serial communication by sending just a [CR] to the camera and verify that the command prompt ">" is returned. There is an input buffer holding a few characters but no hardware handshake. Thus a sequence of commands should not be send to the camera without awaiting the intermediate input prompts. Otherwise the camera’s serial input buffer may overflow. How to use Help --------------To see this help text type the following command: ?=1[CR] Conventions ----------<p8> : 8 bits long parameter value (1 to 2 Hex characters) <p16> : 16 bits long parameter value (1 to 4 Hex characters) <aa00_*bbb> : 8 bits long parameter (resulting in two hex chars) consisting of bit fields. The function of each bit field is described, like this: "aa" : Lower case letters label the bits of interest. "00" : These bits have to be zero. "_" : Separation character for readability. "*" : Marks a don´t care bit, should be written as "0". "bbb" : Bit fields may have any length. (*) : Some commands are only accessible in a special password protected administrator mode. Command Overview (Lower Case Commands, Mainly for Administration purposes) ----------------------------------------------------------------------------a=<p16> : Set the serial number A and save it to flash. (*) b=<p16> : Set the serial number B and save it to flash. (*) c=<p8> : Configure the FPGA with data from the specified file number. (*) d=<p8> : Delete the file with the specified file number. e=<p8> : Erase the flash. (*) e=0 : Erase used blocks only. e=FF : Erase all blocks. f=<p16> : Write a data byte to a FPGA register. (*) High Byte : Data value to write. Low Byte : Address of the register. g=<p8> : Read a data byte from a FPGA register at specified address. (*) Pearleye Technical Manual V2.0.0 61 Appendix h=<p16> : Internal mode and control register. (*) <**kk_jjih_gfed_cbaa> \| \||| |||| ||\| | ||| |||| || +-a: Camera Link output mode. | ||| |||| || 00 -> 12 data bits per pixel. | ||| |||| || 01 -> 14 data bits per pixel. | ||| |||| || 10 -> 16 data bits per pixel. | ||| |||| || 11 -> 10 data bits per pixel. | ||| |||| |+---b: Destination of external trigger | ||| |||| | signal (GE interface only). See | ||| |||| | W=<p8> for details. | ||| |||| +----c: Current shutter state. Use I=<p8> to | ||| |||| control the shutter (IRC-320/IRC-600, | ||| |||| Pearleye P-007/P-030 only). | ||| |||+------d: NIR-300F/NIR-600 and Goldeye CL-008/ | ||| ||| P-008/P-032 support. | ||| ||| 0 -> Normal mode (e.g. for | ||| ||| IRC-300/320/600, NIR-300, | ||| ||| Pearleye P-007/030). | ||| ||| 1 -> NIR-300F/NIR-600, Goldeye | ||| ||| CL-008/P-008/P-032 mode. | ||| ||+-------e: Destination for bad pixel correction | ||| || data loading from flash (NIR-300F, | ||| || Goldeye CL-008/P-008). | ||| || 0 -> Buffer used during normal mode | ||| || (CC2=high). | ||| || 1 -> Buffer used during fast AOI mode | ||| || (CC2=low). | ||| |+--------f: The shutter's normal (inactive) state | ||| | (IRC-320/600, Pearleye P-007/030 only). | ||| | 0 -> Shutter normally open. | ||| | 1 -> Shutter normally closed. | ||| +---------g: Global frame output enable. | ||| 0 -> FVAL always low. | ||| 1 -> FVAL toggles. | ||+-----------h: Compatibility mode (CL interface | || only). | || 0 -> Rev. 2. | || 1 -> Rev. 1. | |+------------i: Continuous internal temperature | | measurement (affects T=2 command, | | only available on IRC-320/600, | | Pearleye P-007/030). | | 0 -> continuous temperature | | measurement disabled. | | 1 -> continuous temperature | | measurement enabled. | +-------------j: IRC-340 support. | 00 -> Normal mode. | 11 -> IRC-340 mode. | Other values are reserved. +----------------k: Data multiplexing mode of the camera head. 00 -> 12 bits slow, first word (e.g. IRC-300/320, NIR-300, Pearleye P-007). 01 -> 12 bits slow, second word (for testing purposes). Pearleye Technical Manual V2.0.0 62 Appendix 10 -> 12 bits fast (e.g. NIR-300F, NIR-600; Goldeye CL-008, P-008 or P-032). 11 -> 14 bits multiplex (e.g. IRC-600, Pearleye P-030). i=<p16> : Fast AOI mode offset for Two Point Correction. This offset controls the starting point of correction data from memory, if NIR-300F/NIR-600 and Goldeye CL-008/P-008/P-032 mode is activated (see h=<p16>) and the CC2 signal from the grabber is low. This parameter is specified in number of pixels divided by 8. (*) j=<p16> : Mode of the automatic calibration function (k=<p16>). <0000_000g_fffe_dcba> | \_|| |||| | || |||+-a: 0 -> Do not select a new correction | || ||| data set. | || ||| 1 -> Try to find a good correction | || ||| data set and activate it | || ||| (S=<p8>). | || ||+--b: 0 -> Do not take a new background | || || correction image. | || || 1 -> Integrate frames to a new | || || background correction image, | || || activate the correction if | || || deactivated (U=1) and eventually | || || (see bit field "e") set offset | || || to mean value of the new | || || correction image (M=<p16>). Bit | || || field "f" specifies the number | || || of frames to integrate. See bit | || || field "b" of parameter U=<p8> | || || for description. | || |+---c: 0 -> (IRC-320/600, Pearleye P-007/030 | || | only:) Leave the mechanical | || | shutter open for automatic | || | correction data set selection. | || | 1 -> (IRC-320/600, Pearleye P-007/030 | || | only:) Close the mechanical | || | shutter for automatic correction | || | data set selection. | || +----d: 0 -> (IRC-320/600, Pearleye P-007/030 | || only:) Leave the mechanical | || shutter open for background | || correction image integration. | || 1 -> (IRC-320/600, Pearleye P-007/030 | || only:) Close the mechanical | || shutter for background correction | || image integration. | |+------e: Activation of the offset calculation | | for the background correction. | | 0 -> Do not calculate new mean value. | | M=<p16> keeps its current data. | | 1 -> Calculate a new value and set | | it as offset for the background | | correction (M=<p16>). Bit field | | "g" controls the calculation Pearleye Technical Manual V2.0.0 63 Appendix | | | +-------f: | | +-----------g: method. Operation mode during image integration. See bit field "b" of parameter U=<p8> for description. Offset calculation method for the background correction (M=<p16>). 0 -> Set M=<p16> to the mean value of the newly captured background correction image. 1 -> (IRC-320/600, Pearleye P-007/030 only:) Set M=<p16> to a linear interpolated value depending om the current camera temperature. See parameter q=<p8> for correction data file. k=<p16> : Start the automatic calibration function. Depending on the value of j different correction mechanisms are applied to improve image quality. The parameter U may be affected, too. k=0 : Calibrate one-time. k=<1..FFFF> : Start the calibration every k*256 frames. l=1 : List contents of the flash file directory. m=<p8> : (IRC-320/600, Pearleye P-007/030 only:) Operation mode of the temperature drift compensation. A linear compensation term n*T + o + p is added to the pixel data to correct a drift depending on the temperature T. The temperature T is measured internally. Slope and offset of the linear term are controlled by n=<p16> and o=<p16>. Changing this parameters may void ex factory calibration. <000f_000m> | | | +---m : Operation mode. | 0 -> Deactivated. | 1 -> Drift compensation activated using | the temperature measured internally. | Please note: not all camera models | are equipped with a temperature | sensing feature. +--------f : Bypass the filtering of internally measured temperature. 0 -> Filter is enabled. 1 -> Filter is bypassed. n=<p16> : (IRC-320/600, Pearleye P-007/030 only:) Slope n of the linear drift compensation term n*T + o. The value specifies the slope in counts per °C and is represented in 10.6 bits fixed point two's complement notation. See parameter m=<p8> for more details about drift compensation. Changing this parameter may void ex factory calibration. o=<p16> : (IRC-320/600, Pearleye P-007/030 only:) Offset o of the linear drift compensation term n*T + o. The value specifies an offset in counts and is Pearleye Technical Manual V2.0.0 64 Appendix represented in 16 bits fixed point two's complement notation. See parameter m=<p8> for more details about drift compensation. Changing this parameter may void ex factory calibration. p=<p16> : (IRC-320/600, Pearleye P-007/030 only:) User specified parameter for the temperature drift compensation. This is a value represented in 16 bits fixed point two's complement notation. The value is an additional offset value to fine adjust the camera. See parameter m=<p8> for more details about drift compensation. q=<p8> : (IRC-320/600, Pearleye P-007/030 only:) File number of the binary table data for the temperature dependant mean value correction (see parameter j=<p16>). The file consists of sampling points given as binary value pairs (temperature, M). The correction interpolates linearly between two sampling points and extrapolates beyond the edges of the covered temperature range. Correction data is recorded during the factory calibration process. Changing this parameter or the specified file contents may void ex factory calibration. s=<p8> : Configure the UART(s) for main serial communications. Changes are activated immediately. <eaa*_bbbb> |\| \__| | | +---b: Baud rate of the main UART and (if | | availiable) the second channel UART. The | | second channel UART supports 9600 to 115200 | | Baud only. | | 0 -> 110 Baud. | | 1 -> 300 Baud. | | 2 -> 600 Baud. | | 3 -> 1200 Baud. | | 4 -> 2400 Baud. | | 5 -> 4800 Baud. | | 6 -> 9600 Baud. | | 7 -> 19200 Baud. | | 8 -> 38400 Baud. | | 9 -> 57600 Baud. | | A -> 115200 Baud. | +---------a: Second channel UART configuration. This | channel is equivalent to the main UART | concerning the use as command interface. | But it is not intended to use both UARTs at | the same time, because they share the same | receive buffer. Output characters are always | sent to both channels. | 00 -> Second channel UART off. The active | serial communication port is selected | by hardware jumper settings. | 01 -> Activate second channel via the frame | grabber's serial port. This is either | Camera Link TG/TC or Pleora device | port serial 0. | 10 -> Activate second channel via Pleora | device port bulk 0 (MODE:UART, Pearleye Technical Manual V2.0.0 65 Appendix | GigE interface only). | 11 -> Reserved. +-----------e: Echo suppression. 0 -> Each character received from the host is echoed back to it. 1 -> No echo. v=<p8> : View file. Dumps all bytes of the specified file to the serial interface. Raw data is output. If the file contains binary data it may disturb a connected terminal program. Please consider the available baud rate: large files may take several minutes to transfer. x=1 : Dump the complete processor RAM contents in hexadecimal format. (*) Command Overview (Upper Case Commands, Mainly for User Configuration) --------------------------------------------------------------------A=<p8> : File number of the first cold (low) reference image of the two point correction (Gain Offset Correction). Changing this parameter or the contents of the specified files may void ex factory calibration. 0 : No loading of any correction image. The memory content remains uninitialized at startup. 01..EF : The correction data is loaded from the indicated file. In case that the following number also exists within the flash, it is loaded into the second page of the correction memory. This sequential loading procedure is continued as long as one file number in the sequence is missing or the maximum number (currently 32) is achieved. FF : 64 frames are integrated and the result is loaded into the active page of the correction memory as a new correction image. B=<p8> : File number of the first warm (high) reference image of the two point correction (Gain Offset Correction). Changing this parameter or the contents of the specified files may void ex factory calibration. 0 : No loading of any correction image. The memory content remains uninitialized at startup. 01..EF : The correction data is loaded from the indicated file. In case that the following number also exists within the flash, it is loaded into the second page of the correction memory. This sequential loading procedure is continued as long as one file number in the sequence is missing or the maximum number (currently 32) is achieved. FF : 64 frames are integrated and the result is loaded into the active page of the correction memory as a new correction image. C=<p8> : File number of the correction data for the bad pixel Pearleye Technical Manual V2.0.0 66 Appendix correction. Changing this parameter or the contents of the specified files may void ex factory calibration. 0 : No loading of any correction image. The memory content remains uninitialized at startup. 01..EF : The correction data is loaded from the indicated file. In case that the following number also exists within the flash, it is loaded into a second page of the correction memory. The actually data page for correction is selected depending on the grabber's CC2 signal state. D=<p8> : File number of the data for the 12-bits-LUT. Changing this parameter or the contents of the specified files may void ex factory calibration. 0 : No LUT data is loaded. The memory content remains uninitialized at startup. 01..EF : The correction data is loaded from the indicated file. E=<p8> : Operation mode of the two point correction (Gain Offset Correction). Changing this parameter may void ex factory calibration. 0 : Deactivated. Image data is passed through transparently. 1 : Two point correction activated. Correction data A and B with set values J and K of the actual correction memory page S are employed. 2 : Two point correction deactivated. Test mode: Correction data A is output as image data. 3 : Two point correction deactivated. Test mode: Correction data B is output as image data. 4 : One point correction: Simple subtraction of the correction data A from the input data. In addition the set value J is added as offset to each pixel value. 5 : One point correction: Simple subtraction of the correction data B from the input data. In addition the set value K is added as offset to each pixel value. F=<p8> : Operation mode of the bad pixel correction. 0 : Deactivated. Image data is passed through transparently. 1 : Activated. Correction data C is employed. 2 : Deactivated. Test mode: Data output controlled by L=<p8>(*). G=<p8> : Operation mode of the LUT. Changing this parameter may void ex factory calibration. 0 : Deactivated. Image data is passed through transparently. 1 : Activated. 2 : Deactivated. Test mode: LUT data is output sequentially. H=<p8> : Operation mode of the integrator / image store. This module Pearleye Technical Manual V2.0.0 67 Appendix shares its memory with the background correction (U=<p8>). This means that a new captured image with the command H=<p8> overwrites the current image of the background correction. The difference between H=<p8> and U=<p8> is the position in the image processing chain: H integrates and outputs data always at the beginning of the chain, which is uncorrected camera raw data. U operates behind the two point correction and thus integrates the data output of the two point correction (see E=<p8>). <d*cc_bbba> | \| \_|| | | |+--a : Output mode. | | | 0 -> Pass image data through unchanged. | | | 1 -> Actual image memory content is output. | | +---b : Control of integration process. Assigning a | | new (not equal) value to this bit field | | starts the corresponding action. Please | | ensure that at least N+2 frames are output | | from the camera head and let this amount of | | time pass until a new value is assigned. | | 000 -> No integration operation. | | 001 -> Store the next image. | | 100 -> Integrate 8 images and divide by 8. | | 101 -> Integrate 16 images and divide by 16. | | 110 -> Integrate 32 images and divide by 32. | | 111 -> Integrate 64 images and divide by 64. | | (Other values undefined.) | +-------c : Control of the data copy process (usually | done after a new image has been integrated). | Let pass through at least one complete frame | (to be sure: wait two frames) from the camera | to completely copy the data. Set this field | back to 00 after copying. Notice that the | set values J and K are not affected. | 00 -> No action. | 01 -> Copy to Target A. The image store | content of the integrator is subject | to be copied into the correction | data store as cold (low) reference | image of the two point correction. | 10 -> Copy to Target B. The image store | content of the integrator is subject | to be copied into the correction | data store as warm (high) reference | image of the two point correction. +----------d : State of the integration process (read only). 0 -> Integration has finished. 1 -> Integration is still in progress. I=<p8> : Set the mechanical shutter state manually (IRC-320/600, Pearleye P-007/030 only). 0 : Shutter open. 1 : Shutter closed. J=<p16> : Define the set value for the cold (low) reference image of the two point correction. It is a 16 bits value of which the 12 (or 14) most significant bits currently are used. For each correction data set S=<p8> an own set value is stored. Pearleye Technical Manual V2.0.0 68 Appendix All set values are loaded together from the flash file N=<p8>. Changing this parameter may void ex factory calibration. K=<p16> : Define the set value for the warm (high) reference image of the two point correction. It is a 16 bits value of which the 12 (or 14) most significant bits currently are used. For each correction data set S=<p8> an own set value is stored. All set values are loaded together from the flash file N=<p8>. Changing this parameter may void ex factory calibration. M=<p16> : Offset value for the background correction. This value is added to every pixel value of the input image. It is a 16 bits value of which the 12 (or 14) most significant bits currently are used. If the automatic calibration function with background correction image integration is used (see k and j), this parameter is automatically set to the mean value of the background correction image. N=<p8> : File number of the flash file containing the set values for the two point correction (J,K). Changing this parameter or the contents of the specified files may void ex factory calibration. 0 : No set values are loaded. The memory content remains uninitialized at startup. 01..EF : The correction data is loaded from the indicated file. O=<p8> : File number of the file containing the FPGA configuration data. (*) P=1 : Upload a new FPGA configuration file via the serial interface and store it in the flash memory. After issuing [CR] a special transfer protocol is processed. A currently existing file will be overwritten. (*) Q=<p8> : Upload a general file via the serial interface and store it in the flash memory using the specified file number. After issuing [CR] a special transfer protocol is processed. A currently existing file will be overwritten. WARNING: Do not power down the device until the command prompt ">" has returned! Otherwise file system corruption may occur, which can leave the device inoperable. S=<p8> : Number of the correction data set to activate. The range of valid values depends on the number of factory prepared and currently loaded data sets. Please note that a change of S affects the correction data for the gain-offset correction. Pearleye Technical Manual V2.0.0 69 Appendix T=1 : Show sensor temperature warning state. <***b_***a> | | | +--a : Sensor temperature warning state (this bit | is only valid for cameras with peltier | temperature stabilization like e.g. IRC-300, | IRC-320, IRC-600, NIR-300P, NIR-600P; | Pearleye P-007/030, Goldeye (CL/P)-008 NIR | Cool, Goldeye (CL/P)-032 NIR Cool). | 0 -> The sensor temperature is OK. | 1 -> The sensor temperature is outside the | optimum range. This can result in a | negative influence on the image | quality. Please ensure that the | temperature of the camera housing is | inside the specified range. +-------b : PLL state. 0 -> PLL is locked. 1 -> PLL is not locked. This should never occur under normal circumstances. T=2 : Query camera's internal temperature value (IRC-320/600, Pearleye P-007/030 only). <dcb*_aaaa_aaaa_aaaa> ||| \____________| ||| +--a : Temperature in 1 / 16 °C (two's ||| complement). ||+------------------b : Result of LAST temperature || measurement attempt. || 0 -> Unsuccessful (if "c" is 1, the || value "a" is valid anyway, || but contains old data from the || last successful conversion). || 1 -> Successful. |+-------------------c : 0 -> The content of "a" is invalid. | 1 -> The content of "a" is valid. +--------------------d : Continuous temperature measurement is enabled (mirrors bit "i" in parameter h). Pearleye Technical Manual V2.0.0 70 Appendix U=<p8> : Operation mode of the background correction module. May automaticly be set to 1 by the command k, depending on the setting of parameter j. <c**a_bbba> | | \_|| | +---~+--a : Output mode of the background correction | | module. Attention: split bit field! | | 00 -> Pass image data through unchanged. | | 01 -> Background correction activated. The | | current background correction image is | | subtracted from the input image and | | the offset (M=<p16>) is added. A new | | background correction image can be | | taken by use of the command k=<p16> or | | use of the bits "b". | | 10 -> Output the current correction image. | | This mode changes the background | | correction into a fixed image source, | | no live image data from the camera is | | output. | +---b : Control of integration of new background | correction image. Assigning a new | (not equal) value to this bit field | starts the corresponding action. | 000 -> No integration operation. | 001 -> Store the next image. | 100 -> Integrate 8 images and divide by 8. | 101 -> Integrate 16 images and divide by 16. | 110 -> Integrate 32 images and divide by 32. | 111 -> Integrate 64 images and divide by 64. | (Other values undefined.) +----------c : State of the integration process (read only). 0 -> Integration has finished. 1 -> Integration is still in progress. V=1 : Show firmware version and calibration data information. W=<p8> : Switch the destination of the opto coupler trigger input at pins 10/11 of the 15-pin D-SUB connector (GigE interface variants only). 0 : Route directly to camera head (OR-ed with CC1 from frame grabber). 1 : Route to TTL_IN[0] of PT1000-VB board. X=1 : Store the current parameter configuration to the flash. Y=1 : Show the current parameter configuration. Z=1 : Activates the factory default parameter configuration. The saved configuration is only affected if you store the new parameter values with X=1 afterwards. WARNING: The factory default configuration of the firmware usually is not identical to the camera specific ex-factory configuration. Especially individual calibration information may be lost by applying Z=1 followed by X=1! ?=1 : Show this help text. Pearleye Technical Manual V2.0.0 71 Appendix GigE Vision feature mapping to serial commands The following table shows the assignment of the available GigE Vision features to the corresponding serial commands. GigE category (CameraSpecialFeatures) GigE feature name Feature visibility Serial command TwoPointCorrection TPC_OperationMode Expert E=<value> TPC_CorrectionData_FileNumber Expert N=<value> TPC_SetValue_LowRef Expert J=<value> TPC_SetValue_HighRef Expert K=<value> TPC_FirstImage_LowRef Expert A=<value> TPC_FirstImage_HighRef Expert B=<value> BGC_OperationMode Expert U=<value> BGC_OffsetValue Expert M=<value> LUT_OperationMode Expert G=<value> LUT_CorrectionData_FileNumber Expert D=<value> IntegratorAndImageStore IIS_OperationMode Expert H=<value> BadPixelCorrection BPC_OperationMode Expert F=<value> BPC_CorrectionData_FileNumber Expert C=<value> AutoCalibrateOnce Beginner k=0 AutoCalibrationMode Expert j=<value> AutoCalibrationInterval Expert k=<value> CorrectionDataSet Beginner S=<value> LoadParameterFromCameraFlash Expert Z=<value> SaveParameterToCameraFlash Expert X=<value> ParameterDump Guru Y=<value> BackgroundCorrection LUT Table 34: GigE feature mapping to serial commands Pearleye Technical Manual V2.0.0 72 Appendix GigE Vision feature description for AVT Goldeye cameras DeviceInformation Feature Description DeviceModeName Name of the attached camera model. DeviceID Unique 32 bit device ID of the AVT camera model. DeviceUserID User ID field. This field can be accessed (R/W) by the user to store an additional device identifier. DeviceScanType This feature specifies the scan type of the sensor (Areascan or Linescan). Table 35: Standard: DeviceInformation Pearleye Technical Manual V2.0.0 73 Appendix ImageSizeControl Feature Description SensorWidth Maximum width of the sensor in pixels. SensorHeight Maximum height of the sensor in pixels. WidthMax This feature represents the maximum width (in pixels) of the image after horizontal binning, decimation or any other function changing the horizontal dimensions of the image. HeightMax This feature represents the maximum height (in pixels) of the image after vertical binning, decimation or any other function changing the vertical dimensions of the image. Width This feature represents the actual image width expelled by the camera (in pixels). Height This feature represents the actual image height expelled by the camera (in pixels). OffsetX This feature represents the horizontal offset from the origin to the AOI (in pixels). OffsetY This feature represents the vertical offset from the origin to the AOI (in pixels). DecimationHorizontal Unused. DecimationVertical Unused. PixelFormat List with all available pixel formats of the camera, e.g. MONO12. TestImageSelector Enables or disables the internal test image generator of the camera. Table 36: Camera standard feature: ImageSizeControl AcquisitionControl Feature Description AcquisitionMode This feature controls the acquisition mode of the software. It describes how many frames should be acquired. AcquisitionStart Starts the image acquisition of the camera. AcquisitionStop Stops the image acquisition of the camera. Table 37: Camera standard feature: AcquisitionControl Pearleye Technical Manual V2.0.0 74 Appendix CameraSpecialFeatures Feature Description AutoCalibrateOnce Start the automatic calibration once. (k=0 command) The processing of this command can take several seconds, depending on the current image rate and the number of correction data sets available. AutoCalibrationMode Configure mode of the automatic calibration function. (j=<value> command) AutoCalibrationInterval Setup the automatic calibration interval. 0 = Calibrate one-time, 1..65535 = Calibrate every k*256 frames. (k=<value> command) CorrectionDataSet Number of the correction data set to activate. (S=<value> command) ReloadCameraSpecialFeatures Force a reload of all parameters from the CameraSpecialFeatures section. Table 38: Camera special feature: Calibration and correction data Feature Description CameraTemperatureState Camera temperature state. 0 = The camera temperature is OK. 1 = The camera temperature is outside the optimum range. CameraTemperatureStateReg Camera temperature state register. QueryCameraTemperatureState Query camera temperature state. (T=1 command) Table 39: Camera special feature: Camera temperature Feature Description ShutterTemperatureValue Shutter temperature value in degree Celsius. ShutterTemperatureValueReg Shutter temperature value register. QueryShutterTemperatureValue Query camera shutter temperature state. (T=2 command) MechanicalShutter Set the mechanical shutter state manually. (I=<value> command) Table 40: Camera special feature: Shutter Pearleye Technical Manual V2.0.0 75 Appendix CameraSpecialFeatures\TwoPointCorrection Feature Description TPC_OperationMode Operation mode of the two-point correction. (E=<value> command) TPC_CorrectionData_FileNumber File number of the flash file containing the set values for the two-point correction. (N=<value> command) TPC_SetValue_LowRef Define the set value for the low reference image of the two-point correction. (J=<value> command) TPC_SetValue_HighRef Define the set value for the high reference image of the twopoint correction. (K=<value> command) TPC_FirstImage_LowRef File number of the first low reference image of the two-point correction. (A=<value> command). TPC_FirstImage_HighRef File number of the first high reference image of the two-point correction. (B=<value> command). Table 41: Camera special feature: TwoPointCorrection CameraSpecialFeatures\BackgroundCorrection Feature Description BGC_OperationMode Operation mode of the background correction. (U=<value> command) While reading this feature the MSB shows the state of the integration process. (0=Idle, 1=Busy) BGC_OffsetValue Offset value for the background correction. (M=<value> command) Table 42: Camera special feature: BackgroundCorrection CameraSpecialFeatures\LUT Feature Description LUT_OperationMode Operation mode of the LUT. (G=<value> command) LUT_CorrectionData_FileNumber File number of the data for the LUT. (D=<value> command) Table 43: Camera special feature: LUT Pearleye Technical Manual V2.0.0 76 Appendix CameraSpecialFeatures\IntegratorAndImageStore Feature Description IIS_OperationMode Operation mode of the integrator and image store. (H=<value> command) While reading this feature the MSB shows the state of the integration process. (0=Idle, 1=Busy) Table 44: Camera special feature: IntegratorAndImageStore CameraSpecialFeatures\BadPixelCorrection Feature Description BPC_OperationMode Operation mode of the bad pixel correction. (F=<value> command) BPC_CorrectionData_FileNumber File number of the correction data for the bad pixel correction. (C=<value> command) Table 45: Camera special feature: BadPixelCorrection Pearleye Technical Manual V2.0.0 77 Index Index Numbers E 15-pin D-Sub jack ..................................... 23 electromechanical shutter (I) ..................... 40 emission ratio.......................................... 28 emissivity ............................................... 28 External GND ........................................... 23 External Power......................................... 23 A automatic calibration (k) ................................................... 37 B background correction............................... 32 (U, M)............................................... 47 background correction (U) ......................... 53 Background temperature ........................... 28 bad pixel correction .................................. 32 (C, F) ................................................ 50 basic commands ....................................... 36 basic parameters ...................................... 36 baud rate (s) ........................................... 55 baud rates values............................................... 56 F FCC Class B .............................................. 11 file system .............................................. 33 file system commands ............................... 57 Frame-sync output............................... 23, 26 G Gigabit Ethernet jack................................. 30 GigE interface .......................................... 30 GigE jack pin assignment............................ 30 H C HyperTerminal ......................................... 24 camera dimensions ................................... 17 camera interfaces ..................................... 22 CE.......................................................... 11 command k=0 ..................................... 38, 39 Conformity .............................................. 11 consumed time ........................................ 38 Contacting ................................................ 5 Control connector..................................... 23 correction data ........................................ 33 correction sets ......................................... 33 current parameter settings (Y) ................................................... 42 I D LED........................................................ 18 Legal notice .............................................. 2 Look-up table (LUT) (D, G) ............................................... 52 look-up table (LUT)................................... 32 declaration of conformity ........................... 11 dimensions ............................................. 17 document history ....................................... 6 drift compensation ................................... 32 image processing ................................ 21, 31 Image processing chain ............................. 31 Integrator and image store values............................................... 54 integrator and image store (H)................................................... 47 integrator and image store (H).................... 53 interfaces ............................................... 22 I/O connector .......................................... 23 L Pearleye Technical Manual V2.0.0 78 Index O optocoupler input..................................... 23 optocoupler output................................... 23 P parameter E values............................................... 43 Parameter F values............................................... 50 parameter U values............................................... 48 Pearleye P-007 LWIR spectral transmission........................... 16 Pearleye P-030 LWIR spectral transmission........................... 16 Power supply ...................................... 23, 24 Q Q= command parts ................................................ 58 R RJ-45 ..................................................... 30 RoHS (2002/95/EC) .................................. 11 RS232 .................................................... 19 RS232 COM Port........................................ 24 RxD (RS232) ............................................ 23 specifications .......................................... 12 Spectral transmission Pearleye P-007 LWIR............................ 16 Pearleye P-030 LWIR............................ 16 start up .................................................. 19 styles ....................................................... 7 Support .................................................... 5 symbols.................................................7, 8 T Technical information ................................. 5 temperature data ..................................... 27 temperature drift compensation (m, n, o, p) ........................................ 51 temperature warning (T) ............................ 40 terminal program ..................................... 24 Trigger input ........................................... 24 Trigger (Reset) input................................. 23 two-point correction ................................. 32 short introduction............................... 34 (A, B, E, J, K, N).................................. 43 TxD (RS232) ............................................ 23 U U and M bit usage ........................................... 49 upload a file to flash (Q)................................................... 57 S save parameters in flash (X) ................................................... 57 select a correction data set (S) ................................................... 36 sensor temperature too high ....................................... 23, 26 too low ........................................ 23, 25 serial commands ...................................... 20 Serial interface ........................................ 24 show help text (?) ................................................... 42 software version and correction data information (V) ................................................... 41 Specifications Pearleye P-007 LWIR............................ 12 Pearleye P-030 LWIR............................ 14 Pearleye Technical Manual V2.0.0 79