1
Cisco SCE 8000 CLI Command Reference
Release 4.2.x
August 26, 2014
Cisco Systems, Inc.
www.cisco.com
Cisco has more than 200 offices worldwide.
Addresses, phone numbers, and fax numbers
are listed on the Cisco website at
www.cisco.com/go/offices.
THE SPECIFICATIONS AND INFORMATION REGARDING THE PRODUCTS IN THIS MANUAL ARE SUBJECT TO CHANGE WITHOUT NOTICE. ALL
STATEMENTS, INFORMATION, AND RECOMMENDATIONS IN THIS MANUAL ARE BELIEVED TO BE ACCURATE BUT ARE PRESENTED WITHOUT
WARRANTY OF ANY KIND, EXPRESS OR IMPLIED. USERS MUST TAKE FULL RESPONSIBILITY FOR THEIR APPLICATION OF ANY PRODUCTS.
THE SOFTWARE LICENSE AND LIMITED WARRANTY FOR THE ACCOMPANYING PRODUCT ARE SET FORTH IN THE INFORMATION PACKET THAT
SHIPPED WITH THE PRODUCT AND ARE INCORPORATED HEREIN BY THIS REFERENCE. IF YOU ARE UNABLE TO LOCATE THE SOFTWARE LICENSE
OR LIMITED WARRANTY, CONTACT YOUR CISCO REPRESENTATIVE FOR A COPY.
The Cisco implementation of TCP header compression is an adaptation of a program developed by the University of California, Berkeley (UCB) as part of UCB’s public
domain version of the UNIX operating system. All rights reserved. Copyright © 1981, Regents of the University of California.
NOTWITHSTANDING ANY OTHER WARRANTY HEREIN, ALL DOCUMENT FILES AND SOFTWARE OF THESE SUPPLIERS ARE PROVIDED “AS IS” WITH
ALL FAULTS. CISCO AND THE ABOVE-NAMED SUPPLIERS DISCLAIM ALL WARRANTIES, EXPRESSED OR IMPLIED, INCLUDING, WITHOUT
LIMITATION, THOSE OF MERCHANTABILITY, FITNESS FOR A PARTICULAR PURPOSE AND NONINFRINGEMENT OR ARISING FROM A COURSE OF
DEALING, USAGE, OR TRADE PRACTICE.
IN NO EVENT SHALL CISCO OR ITS SUPPLIERS BE LIABLE FOR ANY INDIRECT, SPECIAL, CONSEQUENTIAL, OR INCIDENTAL DAMAGES, INCLUDING,
WITHOUT LIMITATION, LOST PROFITS OR LOSS OR DAMAGE TO DATA ARISING OUT OF THE USE OR INABILITY TO USE THIS MANUAL, EVEN IF CISCO
OR ITS SUPPLIERS HAVE BEEN ADVISED OF THE POSSIBILITY OF SUCH DAMAGES.
Cisco and the Cisco logo are trademarks or registered trademarks of Cisco and/or its affiliates in the U.S. and other countries. To view a list of Cisco trademarks, go to this
URL: www.cisco.com/go/trademarks. Third-party trademarks mentioned are the property of their respective owners. The use of the word partner does not imply a partnership
relationship between Cisco and any other company. (1110R)
Any Internet Protocol (IP) addresses used in this document are not intended to be actual addresses. Any examples, command display output, and figures included in the
document are shown for illustrative purposes only. Any use of actual IP addresses in illustrative content is unintentional and coincidental.
Cisco SCE 8000 CLI Command Reference
© 2014 Cisco Systems, Inc. All rights reserved.
CONTENTS
About This Guide
Introduction
Audience
1
1
1
Document Revision History
Organization
2
Related Publications
Conventions
2
2
3
Obtaining Documentation and Submitting a Service Request
CHAPTER
1
Command-Line Interface
Introduction
4
1-1
1-1
Authorization and Command Mode Levels (Hierarchy) 1-2
CLI Authorization Levels 1-2
CLI Command Mode Hierarchy 1-3
Prompt Indications 1-6
Navigating Between Authorization Levels and Command Modes 1-7
The do Command: Executing Commands Without Exiting 1-9
CLI Help Features 1-9
Partial Help 1-9
Argument Help 1-10
Navigational and Shortcut Features 1-12
Command History 1-12
Keyboard Shortcuts 1-12
Auto-Completion 1-13
FTP User Name and Password 1-14
Managing Command Output 1-15
Scrolling the Screen Display 1-15
Filtering Command Output 1-15
Redirecting Command Output to a File
Creating a CLI Script
CHAPTER
2
CLI Command Reference
Introduction
1-16
1-17
2-1
2-1
Cisco SCE 8000 CLI Command Reference
iii
Contents
?
2-2
aaa accounting commands
2-3
aaa authentication attempts
2-5
aaa authentication commands default
aaa authentication enable default
aaa authentication login default
accelerate-packet-drops
access-class
2-6
2-8
2-10
2-12
2-14
access-list
2-16
active-port
2-18
application slot replace force completion
asymmetric-l2-support
attack-detector
2-20
2-22
attack-detector default
2-23
attack-detector number
2-25
attack-detector tcp-port-list | udp-port-list
attack-filter
2-32
attack-filter subscriber-notification ports
auto-fail-over
2-36
auto-negotiate
bandwidth
blink
2-37
2-39
2-40
2-41
boot system
2-42
bursty-traffic-convergence
calendar set
cd
2-46
2-48
cdp enable
2-49
cdp holdtime
cdp mode
cdp run
cdp timer
2-51
2-53
2-55
2-57
clear arp-cache
2-59
clear cdp counters
Cisco SCE 8000 CLI Command Reference
iv
2-28
2-30
attack-filter dont-filter | force-filter
banner
2-19
2-60
2-44
2-35
Contents
clear cdp table
2-61
clear diameter counters
2-62
clear diameter Gx counters
2-63
clear diameter Gy counters
2-64
clear interface linecard counters
2-65
clear interface linecard flow-filter
2-66
clear interface linecard mac-resolver arp-cache
2-67
clear interface linecard subscriber anonymous all
clear interface linecard subscriber db counters
clear interface linecard TpReportCounters
clear interface linecard traffic-counter
2-68
2-69
2-70
2-71
clear interface linecard vas-traffic-forwarding vas counters health-check
clear interface linecard vpn
clear interface range
clear logger
2-73
2-74
2-76
clear management-agent notifications counters
clear rdr-formatter
clock read-calendar
clock timezone
2-81
2-83
2-87
clock update-calendar
2-88
2-89
connection-mode
copy
2-80
2-82
clock summertime
configure
2-78
2-79
clear scmp name counters
clock set
2-72
2-90
2-92
copy ftp://
2-93
copy-passive
2-95
copy running-config-application startup-config-application
copy running-config-party-db startup-config-party-db
copy running-config startup-config
copy source-file ftp://
2-97
2-99
2-101
2-102
copy source-file startup-config
2-103
copy startup-config destination-file
2-104
copy startup-config-party-db backupfile
2-105
Cisco SCE 8000 CLI Command Reference
v
Contents
cpa-client destination
cpa-client retries
2-107
2-108
debug const-db name CcConstDb.Party.maxNum128bitIps
default subscriber template all
delete
2-110
2-111
diameter
2-112
diameter Gx
2-113
diameter Gx failure-grace-time
diameter Gx login-rate
2-114
2-115
diameter Gx MIP Support
2-117
diameter Gx PCRF-connection-failure-grace-time
diameter Gx peer-proxyagent
diameter Gx send-attributes
diameter Gx tx-timer
2-119
2-120
2-121
diameter Gx virtual-gi multi-mapping
diameter gx virtual-gi vlan-id
2-124
diameter Gy peer-proxyagent
2-126
2-122
diameter Gy subscriber-attribute-mapping
diameter Gy tx-timer
diameter host
2-128
2-129
diameter origin-realm
diameter peer
2-131
diameter port
2-133
diameter realm
2-130
2-134
diameter realm forwarding-mode
diameter tx-timer
dir
2-139
disable
do
2-140
2-142
duplex
2-143
enable
2-144
enable password
end
2-138
2-146
2-148
erase startup-config-all
exit
2-151
Cisco SCE 8000 CLI Command Reference
vi
2-150
2-136
2-127
2-118
2-109
Contents
external-bypass
2-153
failure-recovery operation-mode
flow-capture
2-154
2-155
flow-capture controllers
flow-filter set-ff rule
2-161
2-163
flow-filter set-ff rule ipv6
2-164
flow-filter set-table rule ipv6 any-ip-prefix-port1-port2-tos protocol
2-165
2-166
force failure-condition
help
2-167
2-168
history
2-170
history size
hostname
2-171
2-172
hw-bypass mode
2-173
interface gigabitethernet
interface linecard
interface mng
2-175
2-178
2-179
interface range gigabitethernet (SCE 8000 GBE only)
interface range tengigabitethernet
interface tengigabitethernet
ip access-class
ip address
2-185
2-187
2-190
ip default-gateway
ip domain-lookup
2-192
2-193
ip domain-name
2-195
ip ftp password
2-197
ip ftp username
2-198
2-199
ip name-server
2-200
ip radius-client retry limit
ip route
2-183
2-188
ip advertising
ip host
2-181
2-201
2-202
ip rpc-adapter
2-204
ip rpc-adapter port
2-205
ip rpc-adapter security-level
2-206
Cisco SCE 8000 CLI Command Reference
vii
Contents
ip ssh
2-207
ip ssh access-class
ip ssh key
2-209
2-211
ip ssh mng-vlan
ip-tunnel 6to4
2-213
2-215
ip-tunnel DS-Lite
2-217
ip-tunnel DS-Lite Extention-Header-Support
ip-tunnel DS-Lite Extend-IANA
ip-tunnel gre skip
ip-tunnel ipinip skip
ip-tunnel l2tp skip
2-225
2-227
2-229
2-231
l2tp identify-by
line vty
2-221
2-223
ip-tunnel dscp-marking-skip
Ipv6-IANA
2-233
2-235
link failure-reflection
link mode
2-236
2-238
link port-enhanced-recovery
logger add-user-message
logger device
2-239
2-240
2-241
logger device user-file-log max-file-size
logger get support-file
logging facility
logging host
logging on
2-242
2-243
logger get user-log file-name
2-244
2-245
2-247
2-249
logging message-counter
logging rate-limit
logging trap
logout
2-219
2-251
2-252
2-254
2-256
mac-resolver arp
2-257
management-agent sce-api ignore-cascade-violation
management-agent sce-api logging
2-261
management-agent sce-api timeout
2-262
management-agent system
Cisco SCE 8000 CLI Command Reference
viii
2-263
2-259
Contents
mkdir
2-265
mng-vlan
more
2-266
2-268
more running-config-all
2-270
more running-config-application
more running-config-party-db
more startup-config-all
2-274
2-276
2-278
more startup-config-application
more startup-config-party-db
more user-log
mpls
2-282
2-284
2-286
2-287
no subscriber
2-289
no subscriber mappings included-in
os-fingerprinting
2-291
2-292
os-fingerprinting gx-report
2-294
os-fingerprinting NAT-detection-window
os-fingerprinting os-flush-time
2-297
os-fingerprinting sampling
2-299
os-fingerprinting scan-port
2-300
os-fingerprinting signature-file
party default-type
2-302
2-303
party mapping ip-address name
party mapping ip-range
party name
2-304
2-306
2-308
party name hw-bypass
party template index
2-310
2-312
periodic-records aggregate-by-cpu
ping
pqi install file
2-316
2-317
pqi rollback file
2-318
pqi uninstall file
2-319
pqi upgrade file
2-320
queue
2-313
2-315
pir-deviation-percentage
pwd
2-295
2-321
2-322
Cisco SCE 8000 CLI Command Reference
ix
Contents
rdr-formatter category number buffer-size
rdr-formatter category number name
rdr-formatter destination
2-324
2-326
2-328
rdr-formatter destination protocol netflowv9 template data timeout
rdr-formatter forwarding-mode
rdr-formatter history-size
rdr-formatter protocol
2-333
2-334
2-335
rdr-formatter protocol netflowv9 dscp
rdr-formatter rdr-mapping
reload
rename
salt
2-337
2-339
reload shutdown
rmdir
2-340
2-341
2-342
2-343
sce-url-database add-entry
sce-url-database import
2-344
2-346
sce-url-database protection
2-349
sce-url-database remove-all
2-352
scmp
2-336
2-353
scmp keepalive-interval
2-355
scmp loss-of-sync-timeout
scmp name
2-356
2-357
scmp reconnect-interval
2-359
scmp subscriber force-single-sce
scmp subscriber id append-to-guid
scmp subscriber send-session-start
script capture
script print
script run
script stop
2-360
2-361
2-363
2-364
2-365
2-366
2-368
service-bandwidth-prioritization-mode
service password-encryption
service rdr-formatter
service telnetd
2-373
service timestamps
Cisco SCE 8000 CLI Command Reference
x
2-372
2-374
2-370
2-369
2-331
Contents
show access-lists
2-376
show applications slot lookup Double-Wildcard
show applications slot tunable
show blink
2-381
2-382
show cdp entry
2-383
show cdp neighbors
show cdp traffic
show clock
2-378
2-380
show calendar
show cdp
2-386
2-389
2-391
show diameter
2-392
show diameter forwarding-mode
show diameter Gx
2-394
2-395
show diameter Gx send-attributes
2-397
show diameter Gx MIP-support
2-398
show diameter gx virtual-gi
2-399
show diameter Gx virtual-gi multi-mapping
show diameter Gx login-rate
show diameter Gy
2-402
2-406
show diameter peer-table
show diameter realm
2-407
2-408
show diameter routing table
show environment all
2-409
2-410
show environment cooling
show environment power
2-412
2-414
show environment temperature
show environment voltage
2-415
2-416
show failure-recovery operation-mode
show hostname
2-401
2-404
show diameter peer
show hosts
2-377
2-417
2-418
2-419
show hw-bypass mode
2-420
show interface gigabitethernet
show interface linecard
2-421
2-422
show interface linecard accelerate-packet-drops
2-423
Cisco SCE 8000 CLI Command Reference
xi
Contents
show interface linecard application
2-424
show interface linecard asymmetric-l2-support
2-425
show interface linecard asymmetric-routing-topology
show interface linecard attack-detector
show interface linecard attack-filter
2-426
2-428
2-431
show interface linecard cascade connection-status
2-433
show interface linecard cascade peer-sce-information
show interface linecard cascade redundancy-status
show interface linecard connection-mode
show interface linecard counters
2-436
2-440
show interface linecard duplicate-packets-mode
show interface linecard external-bypass
show interface linecard flow-capture
2-445
2-448
show interface linecard ip-tunnel DS-Lite
show interface linecard ip-tunnel ipinip
show interface linecard l2tp
2-452
2-446
2-447
show interface linecard ip-tunnel 6to4
2-451
show interface linecard link mode
2-449
2-450
2-453
show interface linecard link-to-port-mapping
show interface linecard mac-mapping
2-454
2-456
show interface linecard mac-resolver arp
show interface linecard mpls
2-442
2-443
show interface linecard flow-open-mode
show interface linecard ipv6
2-435
2-438
show interface linecard cpa-client
show interface linecard ip-tunnel
2-434
2-457
2-458
show interface linecard periodic-records aggregation
show interface linecard physically-connected-links
show interface linecard sce-url-database
2-459
2-460
2-461
show interface linecard sce-url-database protection
2-462
show interface linecard service-bandwidth-prioritization-mode
show interface linecard shutdown
show interface linecard silent
2-464
2-465
show interface linecard subscriber
2-466
show interface linecard subscriber aging
Cisco SCE 8000 CLI Command Reference
xii
2-468
2-463
Contents
show interface linecard subscriber anonymous
2-469
show interface linecard subscriber anonymous-group
show interface linecard subscriber crypto-params
show interface linecard subscriber db counters
2-470
2-472
2-474
show interface linecard subscriber Gx-pull-request-disable
show interface linecard subscriber mapping
2-476
2-477
show interface linecard subscriber max-subscribers
show interface linecard subscriber name
2-479
2-480
show interface linecard subscriber name breach-state
2-483
show interface linecard subscriber name bucket-state
2-484
show interface linecard subscriber name bucket-state id
show interface linecard subscriber properties
2-487
show interface linecard subscriber sm-connection-failure
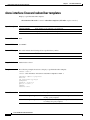
show interface linecard subscriber templates
2-486
2-488
2-490
show interface linecard subscriber TP-IP-range
2-491
show interface linecard subscriber mapping included in TP-IP-range
show interface linecard subscriber virtual-gi-mode
show interface linecard tos-marking
show interface linecard traffic-counter
2-497
2-499
2-500
show interface linecard vas-traffic-forwarding
show interface linecard virtual-links
show interface linecard vlan
show interface linecard vpn
show interface linecard wap
show interface mng
show ip advertising
2-507
2-509
2-510
2-511
2-517
2-518
show ip default-gateway
2-519
2-520
show ip radius-client
show ip route
2-504
2-513
show ip access-class
show ip filter
2-501
2-506
show interface tengigabitethernet
show inventory
2-495
2-496
show interface linecard TpReportCounters
show interface linecard traffic-rule
2-493
2-522
2-523
Cisco SCE 8000 CLI Command Reference
xiii
Contents
show ip rpc-adapter
show ip ssh
2-524
2-525
show ip ssh mng-vlan
show line vty
show log
2-526
2-527
2-528
show logger device
show logging
2-529
2-531
show logging counters
2-532
show management-agent
2-533
show management-agent sce-api quota
show mng-vlan
2-534
2-535
show mng-vlan service-bind
show mng-vlan statistics
2-537
2-538
show os-fingerprinting config
2-539
show os-fingerprinting subscriber-name
show os-fingerprinting signature-file
show party all
2-541
2-542
2-544
show party name
2-546
show party name hw-bypass
show party name mappings
show party mapping
2-548
2-549
2-551
show party num-parties-with-active-flows
show party num-parties-with-open-flows
show pqi file
2-554
2-555
show pqi last-installed
show processes cpu
show rdr-formatter
2-556
2-557
2-559
show rdr-formatter buffer-size
2-561
show rdr-formatter connection-status
show rdr-formatter counters
show rdr-formatter enabled
2-563
2-565
show rdr-formatter destination
2-567
2-569
show rdr-formatter forwarding-mode
show rdr-formatter history-size
2-570
2-572
show rdr-formatter protocol netflowv9 dscp
Cisco SCE 8000 CLI Command Reference
xiv
2-553
2-573
Contents
show rdr-formatter rdr-mapping
show rdr-formatter statistics
show running-config
2-574
2-576
2-578
show running-config-all
2-580
show running-config-application
show running-config-party-db
show scmp
2-588
show snmp
2-590
show snmp accelerate-query
show snmp community
2-594
show snmp enabled
2-595
2-597
show snmp host
2-599
show snmp location
2-600
2-601
show snmp traps
2-604
show snmp user
2-605
show snmp view
2-607
show sntp
2-592
2-596
show snmp group
show snmp mib
2-586
2-593
show snmp contact
show snmp engine-id
2-584
2-608
show startup-config
2-609
show startup-config-all
2-611
show startup-config-application
show startup-config-party-db
show system operation-status
show system-uptime
show tacacs
2-619
2-621
show telnet status
show timezone
show version
2-617
2-620
show telnet sessions
show users
2-615
2-623
2-624
2-625
2-626
2-627
show version all
2-632
show version software
2-635
Cisco SCE 8000 CLI Command Reference
xv
Contents
show vty mng-vlan
silent
2-636
2-637
snmp-server accelerate-query
snmp-server
2-640
snmp-server community
snmp-server contact
2-641
2-643
snmp-server enable traps
snmp-server group
2-648
snmp-server interface
2-650
snmp-server location
2-651
snmp-server mng-vlan
snmp-server user
2-654
snmp-server view
2-656
sntp broadcast client
2-652
2-658
2-659
sntp update-interval
speed
2-644
2-646
snmp-server host
sntp server
2-638
2-660
2-661
subscriber aging
2-662
subscriber anonymous-group export csv-file
2-663
subscriber anonymous-group import csv-file
2-664
subscriber anonymous-group name ip-range
2-665
subscriber capacity-options
2-668
subscriber downstream-split-flow-pull
subscriber export csv-file
2-671
subscriber Gx-pull-request-disable
subscriber ip-linger-stats
2-674
subscriber ip-linger-time
2-675
subscriber import csv-file
2-673
2-676
subscriber load property-file
2-677
subscriber max-subscribers
2-678
subscriber name property name
2-680
subscriber sm-connection-failure
2-682
subscriber template export csv-file
2-684
subscriber template import csv-file
2-685
Cisco SCE 8000 CLI Command Reference
xvi
2-670
subscriber TP-IP-range
2-686
subscriber TP-IP-range export csv-file
2-688
subscriber TP-IP-range import csv-file
2-689
subscriber virtual-gi-mode
tacacs-server host
tacacs-server key
2-691
2-693
tacacs-server timeout
telnet
2-695
2-696
timeout
tracert
2-690
2-697
2-698
traffic-counter
2-699
traffic-rule ip addresses
traffic-rule ipv6
2-701
2-705
traffic-side (SCE 8000 10G platform only)
tunable value
unzip
2-708
2-710
2-712
username
2-713
username privilege
2-715
vas-traffic-forwarding
2-716
vas-traffic-forwarding traffic-link
2-718
vas-traffic-forwarding vas server-id health-check
vas-traffic-forwarding vas server-id vlan
vas-traffic-forwarding vas server-group
2-723
2-725
vas-traffic-forwarding vas server-group failure
vas-traffic-forwarding vas server-id
virtual-links index direction
vlan
2-735
vty mng-vlan
wap
2-739
2-737
2-731
2-720
2-729
2-727
Contents
Cisco SCE 8000 CLI Command Reference
xviii
About This Guide
Revised: August 26, 2014
Introduction
This guide contains Command-Line Interface (CLI) commands to maintain the Cisco SCE platform.
This guide assumes a basic familiarity with telecommunications equipment and installation procedures.
This reference provides a list of all commands at the admin authorization level or below, with examples
of performing typical Cisco SCE platform management functions.
Audience
This guide is intended for the networking or computer technician responsible for configuring and
maintaining the Cisco SCE platform on-site. It is also intended for the operator who manages the Cisco
SCE platforms. This guide does not describe high-level technical support procedures available to root
administrators and Cisco technical support personnel.
Cisco SCE 8000 CLI Command Reference
1
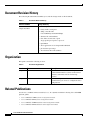
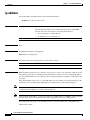
Document Revision History
The following Document Revision History records the changes made to this document.
Table 1
Document Revision History
Release and Date
Change Summary
Release 4.2.x
August 26, 2014
The following new commands were added:
•
bursty-traffic-convergence
•
debug const-db name
CcConstDb.Party.maxNum128bitIps
•
diameter Gx send-attributes
•
flow-filter set-table rule 1 ipv6
any-ip-prefix-port1-port2-tos protocol
•
Ipv6-IANA
•
show applications slot lookup Double-Wildcard
•
pir-deviation-percentage
•
show diameter Gx send-attributes
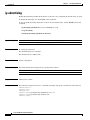
Organization
This guide contains the following sections.
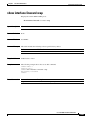
Table 2
Document Organization
Section
Title
Description
Chapter 1
Command-Line Interface
Describes how to use the Cisco SCE platform
Command-Line Interface (CLI), its hierarchical
structure, authorization levels and its help
features.
Chapter 2
CLI Command Reference
Provides an alphabetical list of the available CLI
commands that you can use to configure the Cisco
SCE platform.
Related Publications
Use the Cisco SCE8000 CLI Command Reference in conjunction with the following Cisco SCE 8000
platform guides:
•
Cisco SCE8000 10GBE Software Configuration Guide
•
Cisco SCE8000 GBE Software Configuration Guide
•
Cisco SCE8000 10GBE Installation and Configuration Guide
•
Cisco SCE8000 GBE Installation and Configuration Guide
Cisco SCE 8000 CLI Command Reference
2
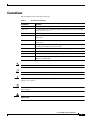
Conventions
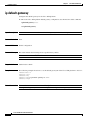
This document uses the following conventions.
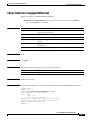
Table 3
Document Conventions
Convention
Indication
bold font
Commands and keywords and user-entered text appear in bold font.
italic font
Document titles, new or emphasized terms, and arguments for which you supply
values are in italic font.
[ ]
Elements in square brackets are optional.
{x | y | z }
Required alternative keywords are grouped in braces and separated by
vertical bars.
[x | y | z]
Optional alternative keywords are grouped in brackets and separated by
vertical bars.
string
A nonquoted set of characters. Do not use quotation marks around the string or
the string will include the quotation marks.
courier
font
Terminal sessions and information the system displays appear in courier font.
< >
Nonprinting characters such as passwords are in angle brackets.
[ ]
Default responses to system prompts are in square brackets.
!, #
An exclamation point (!) or a pound sign (#) at the beginning of a line of code
indicates a comment line.
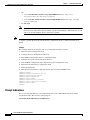
Note
Means reader take note.
Tip
Means the following information will help you solve a problem.
Caution
Timesaver
Warning
Means reader be careful. In this situation, you might perform an action that could result in equipment
damage or loss of data.
Means the described action saves time. You can save time by performing the action described in
the paragraph.
Means reader be warned. In this situation, you might perform an action that could result in
bodily injury.
Cisco SCE 8000 CLI Command Reference
3
Obtaining Documentation and Submitting a Service Request
For information on obtaining documentation, submitting a service request, and gathering additional
information, see the monthly What’s New in Cisco Product Documentation, which also lists all new and
revised Cisco technical documentation, at:
http://www.cisco.com/en/US/docs/general/whatsnew/whatsnew.html
Subscribe to the What’s New in Cisco Product Documentation as an RSS feed and set content to be
delivered directly to your desktop using a reader application. The RSS feeds are a free service. Cisco currently
supports RSS Version 2.0.
Cisco SCE 8000 CLI Command Reference
4
CH A P T E R
1
Command-Line Interface
Revised: August 26, 2014
Introduction
This chapter describes how to use the Cisco SCE platform Command-Line Interface (CLI), its
hierarchical structure, authorization levels and its help features. The Command-Line Interface is one of
the Cisco SCE platform management interfaces.
The CLI is accessed through a Telnet session or directly via the console port on the front panel of the
Cisco SCE platform. When you enter a Telnet session, you enter as the simplest level of user, in the User
Exec mode.
the Cisco SCE platform supports up to eleven concurrent CLI sessions; five sessions initiated by Telnet
connection, five sessions via SSH connection, and one session on the console port.
•
Authorization and Command Mode Levels (Hierarchy), page 1-2
•
CLI Help Features, page 1-9
•
Navigational and Shortcut Features, page 1-12
•
Managing Command Output, page 1-15
•
Creating a CLI Script, page 1-17
Cisco SCE 8000 CLI Command Reference
1-1
Chapter 1
Command-Line Interface
Authorization and Command Mode Levels (Hierarchy)
Authorization and Command Mode Levels (Hierarchy)
When using the CLI there are two important concepts that you must understand to navigate:
•
Authorization Level — Indicates the level of commands you can execute. A user with a simple
authorization level can only view some information in the system, while a higher level administrator
can actually make changes to configuration.
This manual documents commands up to and including the admin authorization level.
•
Command Hierarchy Level — Provides you with a context for initiating commands. Commands are
broken down into categories and you can only execute each command within the context of its
category. For example, to configure parameters related to the Line Card, you need to be within the
Linecard Interface Configuration Mode. (See “CLI Command Mode Hierarchy” section on
page 1-3.)
The following sections describe the available Authorization and Command Hierarchy Levels and how to
maneuver within them.
The on-screen prompt indicates both your authorization level and your command hierarchy level, as well
as the assigned hostname.
Note
Throughout the manual, Cisco SCE is used as the sample host name.
CLI Authorization Levels
The Cisco SCE platform has four authorization levels, which represent the user access permissions.
When you initially connect to the Cisco SCE platform, you automatically have the most basic
authorization level, that is User, which allows minimum functionality.
To monitor the system, you must have Viewer authorization, while to perform administrative functions
on the Cisco SCE platform, you must have Admin or Root authorization. A higher level of authorization
is accessed by logging in with appropriate password, as described in the procedures below.
In each authorization level, all the commands of the lower authorization layers are available in addition
to commands that are authorized only to the current level.
The following CLI commands are related to authorization levels:
•
enable
•
disable
Each authorization level has a value (number) corresponding to it. When using the CLI commands, use
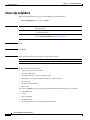
the values, not the name of the level, as shown in Table 1-1.
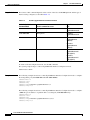
Table 1-1
Authorization Levels
Level
Description
Value
Prompt
User
Password required. This level enables basic operational
functionality.
0
>
Viewer
5
Password required. This level enables monitoring
functionality. All show commands are available to the
Viewer authorization level, with the exception of those that
display password information.
>
Cisco SCE 8000 CLI Command Reference
1-2
Chapter 1
Command-Line Interface
Authorization and Command Mode Levels (Hierarchy)
Table 1-1
Authorization Levels (continued)
Level
Description
Value
Admin
Password required. For use by general administrators, the 10
Admin authorization level enables configuration and
management of the Cisco SCE platform.
Root
Password required. For use by technical field engineers,
the Root authorization level enables configuration of all
advanced settings, such as debug and disaster recovery.
The Root level is used by technical engineers only.
15
Prompt
#
#>
CLI Command Mode Hierarchy
The set of all CLI commands is grouped in hierarchical order, according to the type of the commands.
The first two levels in the hierarchy are the User Exec and Privileged Exec modes. These are
non-configuration modes in which the set of available commands enables the monitoring of the Cisco
SCE platform, file system operations, and other operations that cannot alter the configuration of the
Cisco SCE platform.
The next levels in the hierarchy are the Global and Interface configuration modes, which hold a set of
commands that control the global configuration of the Cisco SCE platform and its interfaces. Any of the
parameters set by the commands in these modes should be saved in the startup configuration, such that
in the case of a reboot, the Cisco SCE platform restores the saved configuration.
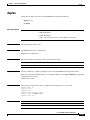
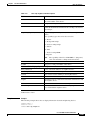
Table 1-2 shows the available CLI modes.
Table 1-2
CLI Modes
Mode
Description
User Exec
Initial mode. Also allows monitoring of the system User/Viewer SCE8000>
(show commands).
Privileged Exec
General administration; file system manipulations
and control of basic parameters that do not change
the configuration of the Cisco SCE platform.
•
Admin
•
SCE8000#
•
Root
•
SCE8000#>
Configuration of general system parameters, such
as DNS, host name, and time zone.
•
Admin
•
SCE8000(config)#
•
Root
•
SCE8000(config)#>
Management Interface Configuration of management interface parameters,
Configuration
such as the Ethernet interface properties and
selection of the active port.
•
Admin
•
SCE8000(config if)#
•
Root
•
SCE8000(config if)#>
Interface
Configuration
•
Admin
•
SCE8000(config if)#
•
Root
•
SCE8000(config if)#>
Global Configuration
Configuration of specific system interface
parameters, for the following interface modes.
•
linecard interface
•
specific traffic interface
Level
Prompt indication
Cisco SCE 8000 CLI Command Reference
1-3
Chapter 1
Command-Line Interface
Authorization and Command Mode Levels (Hierarchy)
Table 1-2
CLI Modes (continued)
Mode
Description
Interface Range
Configuration
Configuration of a range of traffic interfaces.
Line Configuration
Level
Configuration of Telnet lines, such as an access-list.
Prompt indication
•
SCE8000(config if
range)#
•
SCE8000(config if
range)#>
Admin
•
SCE8000(config-line)#
Root
•
SCE8000(config-line)#>
•
Admin
•
Root
•
•
When you login to the system, you have the User authorization level and enter User Exec mode.
Changing the authorization level to Viewer does not change the mode. Changing the authorization level
to Admin automatically moves you to Privileged Exec mode. To move to any of the configuration modes,
you must enter command specific to that mode.
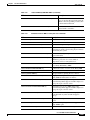
The list of available commands in each mode can be viewed using the question mark ‘?’ at the end of the
prompt.
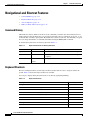
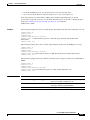
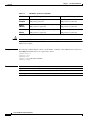
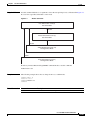
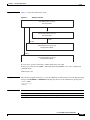
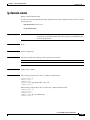
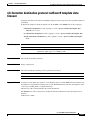
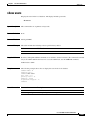
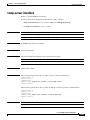
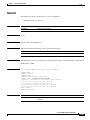
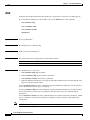
The figure below illustrates the hierarchical structure of the CLI modes, and the CLI commands used to
enter and exit a mode.
Figure 1-1
CLI Command Modes
User Exec Mode
Enable
Disable
Privileged Exec Mode
Configure
Exit
Global Configuration Mode
Exit
E2
Line Card
Interface
Configuration
Mode
Exit
Interface
Configuration
Mode
(Management)
E3
Exit
Interface
Configuration
Mode
(Traffic)
E4
Exit
Interface
Range
Configuration
Mode
E5
Exit
Line
Configuration
Mode
Interface Configuration Mode
The following commands are used to enter the various specific configuration modes from the global
configuration mode:
Cisco SCE 8000 CLI Command Reference
1-4
274489
E1
Chapter 1
Command-Line Interface
Authorization and Command Mode Levels (Hierarchy)
•
E1: interface Linecard 0
•
E2: interface Mng 0/1, 0/2 OR interface GigabitEthernet 1/1, 1/2 (management ports, both
platforms)
•
E3: (traffic ports)
– Cisco SCE 8000 GBE: interface GigabitEthernet 3/0/0-3/0/7, 3/1/0-3/1/7
– Cisco SCE 8000 10GBE: interface TenGigabitEthernet 3/0/0, 3/1/0, 3/2/0, or 3/3/0
Cisco SCE 8000 CLI Command Reference
1-5
Chapter 1
Command-Line Interface
Authorization and Command Mode Levels (Hierarchy)
•
E4:
– Cisco SCE 8000 GBE: interface range GigabitEthernet 3/<bay-range (0 | 1 |
0-1)>/<port-range (any range between 0 and 7)>
– Cisco SCE 8000 10GBE: interface range TenGigabitEthernet 3/<bay-range (any range
between 0 and 3)>/0
•
Note
Note
E5: line vty 0
Although the system supports up to five concurrent Telnet connections, you cannot configure
them separately. This means that any number you enter in the line vty command (0, 1, 2, 3 or 4)
will act as a 0 and configure all five connections together.
In order for the auto-completion feature to work, when you move from one interface configuration mode
to another, you must first exit the current interface configuration mode (as illustrated in the above
figure).
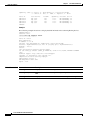
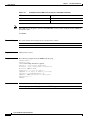
Example:
This example illustrates moving into and out of configuration modes as follows:
1.
Enter the global configuration mode.
2.
Configure the Cisco SCE platform time zone.
3.
Enter MNG (management) interface configuration mode.
4.
Configure the speed of the management interface.
5.
Exit the MNG configuration mode and enter the global configuration mode.
6.
Enter the Linecard interface configuration mode.
7.
Define the link mode.
8.
Exit the Linecard interface configuration mode and enter the user EXEC mode.
SCE8000#configure
SCE8000(config)#clock timezone PST -10
SCE8000(config)#interface mng 0/1
SCE8000(config if)#speed 100
SCE8000(config if)#exit
SCE8000(config)#interface Linecard 0
SCE8000(config if)#link mode forwarding
SCE8000(config if)#end
SCE8000>
Prompt Indications
The on-screen prompt indicates your authorization level, your command hierarchy level, and the
assigned host name. The structure of the prompt is:
<hostname (mode-indication) level-indication>
Cisco SCE 8000 CLI Command Reference
1-6
Chapter 1
Command-Line Interface
Authorization and Command Mode Levels (Hierarchy)
Authorization levels are indicated as listed in Table 1-3.
Table 1-3
Prompt Indications: Authorization Levels
This prompt...
Indicates this...
>
User and Viewer levels
#
Admin level
#>
Root level
Command hierarchy levels are indicated as listed in Table 1-4.
Table 1-4
Prompt Indications: Command Hierarchy Levels
This command hierarchy...
Is Indicated as...
User Exec
SCE8000>
Privileged Exec
SCE8000#
Global Configuration
SCE
(config)#
Interface Configuration
SCE
(config if)#
Interface Range Configuration
SCE
(config if range)#
Line Configuration
SCE
(config-line)#
Example:
The prompt SCE1(config if)# indicates:
•
The name of the Cisco SCE platform is SCE1
•
The current CLI mode is Interface configuration mode
•
The user has Admin authorization level
Navigating Between Authorization Levels and Command Modes
The authorization levels and command modes function together in one hierarchy. The User and Viewer
authorization levels have only a single command mode. When you enter either the Admin or Root
authorization level (which function in parallel), you enter the Privileged Exec command mode. From
this command mode you can access the other command modes.
•
User EXEC authorization level
•
Viewer authorization level
•
Privileged EXEC command mode (you are now in either Admin or Root authorization level)
Cisco SCE 8000 CLI Command Reference
1-7
Chapter 1
Command-Line Interface
Authorization and Command Mode Levels (Hierarchy)
•
Global Configuration command mode
From this command mode, the following Interface Command Modes can be accessed:
– MNG Interface Configuration (management interface)
– Linecard Interface Configuration
– TenGigabitEthernet Interface Configuration (Cisco SCE 8000 10GBE traffic interfaces)
– GigabitEthernet Interface Configuration (Cisco SCE 8000 GBE traffic interfaces)
– Interface Range Configuration (range of traffic interfaces)
– Line Configuration
Table 1-5 summarizes how to navigate the CLI command hierarchy.
Table 1-5
CLI Command Navigation Hierarchy
Authorization Level or
Command Mode
Use This Command to Access
Use This Command to
Exit
User Exec
Not applicable
logout or exit (Exits the
current CLI session)
Viewer
enable 5
disable
Privileged Exec
enable 10 or enable 15 (accesses root level)
disable
Global configuration
configure
exit (Exits to Privileged
Exec)
end (Exits to User
Exec)
MNG interface
configuration
(management)
interface mng (0/1 | 0/2)
Or
interface gigabitethernet (1/1 | 1/2)
Linecard interface
configuration
interface linecard 0
exit (Exits to Global
Configuration)
end (Exits to User
Exec)
exit (Exits to Global
Configuration)
end (Exits to User
Exec)
TenGigabitEthernet
interface configuration
(Cisco SCE 8000 10GBE
traffic)
interface tengigabitethernet 3/<bay-number
(0-3)>/0
exit (Exits to Global
Configuration)
Or
end (Exits to User
Exec)
interface range tengigabitethernet
3/<bay-range (any range between 0 and 3)>/0
Cisco SCE 8000 CLI Command Reference
1-8
Chapter 1
Command-Line Interface
CLI Help Features
Table 1-5
CLI Command Navigation Hierarchy (continued)
Authorization Level or
Command Mode
Use This Command to
Exit
Use This Command to Access
GigabitEthernet Interface interface gigabitethernet 3/<bay-number
Configuration (Cisco SCE (0|1)>/<port-number (0-7)>
8000 GBE traffic)
Or
interface range gigabitethernet 3/<bay-range
(0 | 1 | 0-1)>/<port-range (any range between 0
and 7)>
Line Configuration
line vty 0
exit (Exits to Global
Configuration)
end (Exits to User
Exec)
exit (Exits to Global
Configuration)
end (Exits to User
Exec)
The do Command: Executing Commands Without Exiting
When you are in either the global configuration mode or any of the interface configuration modes, it is
possible to execute an EXEC mode command (such as a show command) or a privileged EXEC (such as
show running-config) without exiting to the relevant command mode. Use the do command for this
purpose.
How to execute an exec mode command from a configuration command mode
At the Cisco SCE8000(config)# (or SCE8000(config if)# or SCE8000(config-line)#) prompt, type do
<command> and press Enter.
The specified command executes without exiting to the appropriate exec command mode.
The following example shows how to display the running configuration while in interface configuration
mode:
SCE8000(config if#) do show running-config
CLI Help Features
CLI provides context sensitive help. Two types of context sensitive help are supported:
•
Partial Help, page 1-9
•
Argument Help, page 1-10
Partial Help
To obtain a list of commands that begin with a particular character string, enter the abbreviated command
entry immediately followed by a question mark (?). This form of help is called partial help, because it
lists only the keywords or arguments that begin with the abbreviation you entered.
Example:
The following example illustrates how typing c? displays all available arguments that start with the letter
c.
Cisco SCE 8000 CLI Command Reference
1-9
Chapter 1
Command-Line Interface
CLI Help Features
SCE8000(config)#snmp-server c?
Communitycontact
SCE8000(config)#snmp-server c
Argument Help
To obtain a list of keywords or parameters associated with a command, type a question mark (?) in place
of a keyword or parameter on the command line.
Note that if <Enter> is acceptable input, the symbol <cr> represents the Enter key.
Example:
The following example illustrates how to get a list of all arguments or keywords expected after the
command snmp-server.
SCE8000(config)#snmp-server?
community Define community string
contact Set system contact
enable Enable the SNMP agent
host Set traps destination
interface Set interface parameters
SCE8000(config)# snmp-server
When asking for help on particular parameter, the system informs you of the type of data that is an
accepted legal value. The types of parameters supported are:
STRING
When a String is expected, you can enter any set of characters or digits. If the string has
a space as one of its characters, use double-quote (“) marks to enclose the string.
DECIMAL Any decimal number. Positive number is assumed, for negative numbers use the “–”
symbol.
HEX
A hexadecimal number; must start with either 0x or 0X.
Cisco SCE 8000 CLI Command Reference
1-10
Chapter 1
Command-Line Interface
CLI Help Features
Example:
The following example illustrates the use of ? to get help on commands syntax. In this example, you can
enter either the word running-config, or any name of a file, after the word copy.
SCE8000#copy?
running-config Copy running configuration file
startup-config Backup the startup-config to a specified destination
STRING Source file
SCE8000#copy
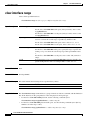
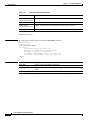
Table 1-6 summarizes the CLI help features.
Table 1-6
Getting Help
Command
Purpose
?
List all commands available for a particular
command mode
<abbreviated-command-entry>?
Obtain a list of commands that begin with a
particular character string.
Example:
(Do not leave a space between the command and
question mark.)
c?
calendar cd clear
copy copy-passive
clock
configure
<abbreviated-command-entry><Tab>
Complete a partial command name.
Example:
en <Tab>
enable
<command>?
List the keywords associated with the specified
command.
<command keyword> ?
List the arguments associated with the specified
keyword.
Example:
Leave a space between the keyword and question
mark
show ?
access-lists
Show all access-lists
Cisco SCE 8000 CLI Command Reference
1-11
Chapter 1
Command-Line Interface
Navigational and Shortcut Features
Navigational and Shortcut Features
•
Command History, page 1-12
•
Keyboard Shortcuts, page 1-12
•
Auto-Completion, page 1-13
•
FTP User Name and Password, page 1-14
Command History
CLI maintains a history buffer of the most recent commands you used in the current CLI session for
quick retrieval. Using the keyboard, you can navigate through your last commands, one by one, or all
commands that start with a given prefix. By default, the system saves the last 30 commands you typed.
You can change the number of commands remembered using the history size command.
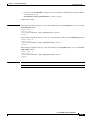
To use the history functions, use the keys shown in Table 1-7.
Table 1-7
Keyboard Shortcuts for History Functions
Arrow
Shortcut
Description
Up arrow
Ctrl-P
Move cursor to the previous command with the same prefix.
Down arrow
Ctrl-N
Moves the cursor to the next command with the same prefix
as original.
Ctrl-L
Re-display the current command line.
Ctrl-R
Keyboard Shortcuts
The Cisco SCE platform has several keyboard shortcuts that make it easier to navigate and use the
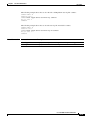
system. Table 1-8 shows the keyboard shortcuts available.
You can get a display the keyboard shortcuts at any time by typing help bindings.
Table 1-8
Keyboard Shortcuts
Description
Shortcut key
Navigational shortcuts
Move cursor one character to the right.
CTRL-F /->
Move cursor one character to the left.
CTRL-B /<-
Move cursor one word to the right (forward).
ESC-F
Move cursor one word to the left (backward).
ESC-B
Move cursor to the start of the line.
CTRL-A
Move cursor to the end of the line.
CTRL-E
Editing shortcuts
Delete the character where the cursor is located.
Cisco SCE 8000 CLI Command Reference
1-12
CTRL-D
Chapter 1
Command-Line Interface
Navigational and Shortcut Features
Table 1-8
Keyboard Shortcuts (continued)
Description
Shortcut key
Delete from the cursor position to the end of the word.
ESC-d
Delete the character before the current location of the cursor.
Backspace
Delete the character before the current location of the cursor.
CTRL-H
Deletes from the cursor position to the end of the line
CTRL-K
Deletes all characters from the cursor to the beginning of the line
CTRL-U
Delete the word to the left of the cursor.
CTRL-W
Recall the last item deleted.
CTRL-Y
Completes the word when there is only one possible completion.
<Tab>
Completes the word when there is only one possible completion. (Same
functionality as <Tab>.)
CTRL-I
Auto-Completion
The CLI interface features tab completion. When you type in the first letters of a command and press
<Tab>, the system automatically fills in the rest of the command or keyword. This feature works only
when there is one command that could be possible using the starting letters.
Example:
The letters snm followed by <Tab> will be completed to the command snmp-server.
SCE8000(config)#snm <Tab>
SCE8000(config)#snmp-server
If you press <Enter> instead of <Tab>, and there is no ambiguity, the system actually carries out the
command that is the result of the auto-completion.
Example: 1
The following example displays how the system completes a partial (unique) command for the enable
command. The system carries out the command using the default authorization level (10) when you press
Enter.
SCE8000>en <Enter>
Password:
SCE8000#
Example: 2
The following example illustrates how to use the completion feature with a non-default value for the
argument. In this example, the enable command is completed using the specified value (15) for the
authorization level.
SCE8000>en 15 <Enter>
Password:
SCE8000#
Cisco SCE 8000 CLI Command Reference
1-13
Chapter 1
Command-Line Interface
Navigational and Shortcut Features
FTP User Name and Password
CLI enables saving FTP user name and password to be used in FTP operations—download and upload,
per session.
These settings are effective during the current CLI session.
The following example illustrates how to set FTP password and user name and the use in these settings
for getting a file named config.tmp from a remote station using FTP protocol.
SCE8000#ip FTP password pw123
SCE8000#ip FTP username user1
SCE8000#copy ftp://@10.10.10.10/h:/config.tmp myconf.txt connecting 10.10.10.10 (user name
user1 password pw123) to retrieve config.tmp
SCE8000#
Cisco SCE 8000 CLI Command Reference
1-14
Chapter 1
Command-Line Interface
Managing Command Output
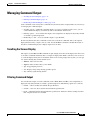
Managing Command Output
•
Scrolling the Screen Display, page 1-15
•
Filtering Command Output, page 1-15
•
Redirecting Command Output to a File, page 1-16
Some commands, such as many show commands, may have many lines of output. There are several ways
of managing the command output:
•
Scrolling options — When the command output is too large to be displayed all at once, you can
control whether the display scrolls line by line or refreshes the entire screen.
•
Filtering options — You can filter the output so that output lines are displayed only if they include
or exclude a specified expression.
•
Redirecting to a file — You can send the output to a specified file.
Note that by default, the show commands act the same as the more commands; that is, the output is
displayed interactively a single screen at a time. Use the no more command to disable this feature so
that show commands display the complete output all at one time.
Scrolling the Screen Display
The output of some show and dir commands is quite lengthy and cannot all be displayed on the screen
at one time. Commands with many lines of output are displayed in chunks of 24 lines. You can choose
to scroll the display line by line or refresh the entire screen. At the prompt after any line, you can type
one of the following keys for the desired action:
•
<Enter>- Show one more line
•
<Space>- Show 24 more lines (a new chunk)
•
<g>- Stop prompting for more
•
<?>- Display a help string showing possible options
•
Any other key- Quit showing the file
Filtering Command Output
You can filter the output of certain commands, such as show, more, and dir, so that output lines are
displayed only if they include or exclude a specified expression. The filtering options are as follows:
•
include — Shows all lines that include the specified text.
•
exclude — Does not show any lines that include the specified text.
•
begin — Finds the first line that includes the specified text, and shows all lines starting from that
line. All previous lines are excluded.
Cisco SCE 8000 CLI Command Reference
1-15
Chapter 1
Command-Line Interface
Managing Command Output
The syntax of filtered commands is as follows:
•
<command>| include <expression>
•
<command>| exclude <expression>
•
<command>| begin <expression>
Following is an example of how to filter the show version command to display only the last part of the
output, beginning with the version information.
SCE8000# show version | begin revision
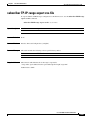
Redirecting Command Output to a File
You can redirect the output of commands, such as show, more, and dir, to a file. When writing the output
of these commands to a file, you can specify either of the following options:
•
redirect — The new output of the command will overwrite the existing contents of the file.
•
append — The new output of the command will be appended to the existing contents of the file.
The syntax of redirection commands is as follows:
•
<command>| redirect <file-name>
•
<command>| append <file-name>
Following is an example of how to do the following:
•
Filter the more command to display from a csv subscriber file only the gold package subscribers.
•
Redirect that output to a file named current_gold_subscribers. The output should not overwrite
existing entries in the file, but should be appended to the end of the file.
SCE8000# more subscribers_10.10.2008 include gold | append current_gold_subscribers
Cisco SCE 8000 CLI Command Reference
1-16
Chapter 1
Command-Line Interface
Creating a CLI Script
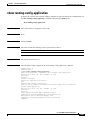
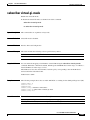
Creating a CLI Script
The CLI scripts feature allows you to record several CLI commands together as a script and play it back.
This is useful for saving repeatable sequence of commands, such as software upgrade. For example, if
you are configuring a group of Cisco SCE platforms and you want to run the same configuration
commands on each platform, you could create a script on one platform and run it on all the other Cisco
SCE platforms. The available script commands are:
•
script capture
•
script stop
•
script print
•
script run
Step 1
At the SCE8000# prompt, type script capture filename.scr where filename.scr is the name of the script,
with a scr file extension.
Step 2
Perform the actions you want to be included in the script.
Step 3
Type script stop.
The system saves the script.
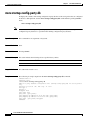
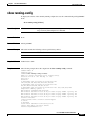
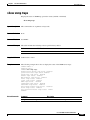
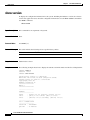
The following is an example of recording a script for upgrading software.
SCE8000#script capture upgrade.scr
SCE8000#configure
SCE8000(config)#boot system new.pkg Verifying package file...
Package file verified OK.
SCE8000(config)#exit
SCE8000#copy running-config startup-config
Writing general configuration file to temporary location...
Extracting files from ‘//apps/data/scos/images/new.pkg’...
Verifying package file...
Package file verified OK.
Device ‘//apps/data/scos/’ has 81154048 bytes free, 21447973 bytes are needed for
extraction, all is well.
Extracting files to temp locations...
Renaming temp files...
Extracted OK.
Backing-up general configuration file...
Copy temporary file to final location...
SCE8000#script stop
SCE8000#
Cisco SCE 8000 CLI Command Reference
1-17
Chapter 1
Creating a CLI Script
Cisco SCE 8000 CLI Command Reference
1-18
Command-Line Interface
CH A P T E R
2
CLI Command Reference
Revised: August 26, 2014
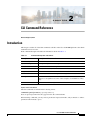
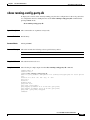
Introduction
This chapter contains all of the CLI commands available on the Cisco SCE 8000 platform at the admin
authorization level or lower.
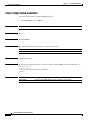
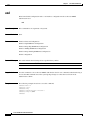
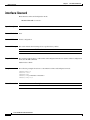
Each command description includes the information shown in Table 2-1.
Table 2-1
Command Description Subsections
Description
Description of the command
Command Syntax
General format.
Syntax Description
Description of parameters and options for the command.
Default
If relevant, the default setting for the command.
Mode
Mode (command line) from which the command can be invoked.
Usage Guidelines
Information about when to invoke the command and additional details.
Authorization
Level of user authorization required for using the command.
Example
An illustration of how the command looks when invoked. Because the
interface is straightforward, some of the examples are included for clarity
only.
Related Commands
Other commands that might be used with the command.
Syntax and Conventions
The CLI commands are written in the following format:
command required-parameter [optional-parameter]
no is an optional parameter that may appear before the command name.
When entering commands, you may enclose parameters in quotation marks, and you must do so when a
parameter name includes a space.
Cisco SCE 8000 CLI Command Reference
2-1
Chapter 2
CLI Command Reference
?
?
Lists all of the commands available for the current command mode. You can also use the ? command to
obtain specific information about a keyword or argument.
To display a list of commands that begin with a particular character string, enter the abbreviated
command entry immediately followed by a question mark (?). This form of help is called partial help,
because it lists only the commands that begin with the abbreviation you entered.
?
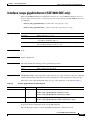
Syntax Description
This command has no arguments or keywords.
Command Default
None
Command Modes
All
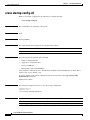
Command History
This table includes the following release-specific history entries:
Release
Modification
2.5.7
This command was introduced.
Usage Guidelines
To list a command’s associated keywords or arguments, enter a question mark (?) in place of a keyword
or argument on the command line. This form of help is called argument help because it lists the keywords
or arguments that apply based on the command, keywords, and arguments you have already entered.
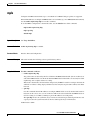
Examples
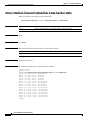
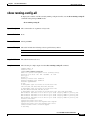
The following example shows how to request help using the ? wildcard:
SCE8000(config)#ip
default-gateway
domain-lookup
domain-name
host
name-server
?
Sets the default gateway
Enables the IP DNS-based host name-to-address translation
Define a default domain name
Add a host to the host table
Specify the address of one or more name servers to use for name and
address resolution
route
Add IP routing entry
SCE8000(config)#ip d?
default-gateway domain-lookup domain-name
SCE8000(config)#ip de?
default-gateway
SCE8000(config)#ip de
Cisco SCE 8000 CLI Command Reference
2-2
Chapter 2
CLI Command Reference
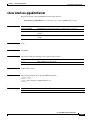
aaa accounting commands
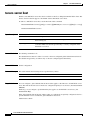
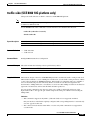
aaa accounting commands
Enables TACACS+ accounting.
To disable TACACS+ accounting, use the no form of this command.
aaa accounting commands level default stop-start group tacacs+
no aaa accounting commands level default
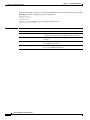
Syntax Description
level
stop-start
Privilege level for which to enable TACACS+ accounting. Choose one of
the following levels:
•
0 (user)
•
5 (viewer)
•
10 (admin)
•
15 (root).
Sends the accounting message before and after the CLI command is
executed.
Command Default
TACACS+ accounting is disabled.
Command Modes
Global configuration
Command History
This table includes the following release-specific history entries:
Usage Guidelines
Release
Modification
3.0.3
This command was introduced.
If TACACS+ accounting is enabled, the Cisco SCE platform sends an accounting message to the
TACACS+ server after every command execution. The accounting message is logged in the TACACS+
server for use by the network administrator.
The start-stop keyword (required) indicates that the accounting message is sent at the beginning and the
end (if the command was successfully executed) of the execution of a CLI command.
Authorization: admin
Examples
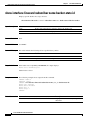
The following example shows how to enable TACACS+ accounting for the admin privilege level (10):
SCE8000>enable 10
Password:<cisco>
SCE8000#config
SCE8000(config)# aaa accounting commands 10 default stop-start group tacacs+
SCE8000(config)#
Cisco SCE 8000 CLI Command Reference
2-3
Chapter 2
CLI Command Reference
aaa accounting commands
Related Commands
Command
Description
aaa authentication attempts
Sets the maximum number of login attempts that will be
permitted before a Telnet session is terminated.
aaa authentication command default Specifies which command authentication methods are to be
used, and in what order of preference.
aaa authentication enable default
Specifies which privilege level authentication methods are to
be used, and in what order of preference.
aaa authentication login default
Specifies which login authentication methods are to be used,
and in what order of preference.
tacacs-server host
Defines a new TACACS+ server host that is available to the
Cisco SCE platform TACACS+ client.
tacacs-server key
Defines the global default encryption key for the TACACS+
server hosts.
Cisco SCE 8000 CLI Command Reference
2-4
Chapter 2
CLI Command Reference
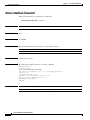
aaa authentication attempts
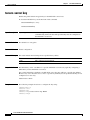
aaa authentication attempts
Specifies the number of login attempts allowed before a Telnet session is terminated.
aaa authentication attempts login [number-of-attempts]
Syntax Description
login number-ofattempts
Command Default
The default number of authentication attempts is 3.
Command Modes
Global configuration
Command History
This table includes the following release-specific history entries:
Usage Guidelines
Maximum number of login attempts that will be permitted before the Telnet
session is terminated.
Release
Modification
3.0.0
This command was introduced.
The maximum number of login attempts is relevant only for Telnet sessions. From the local console, the
number of retries is unlimited.
Authorization: admin
Examples
The following example shows how to set the maximum number of login attempts to 5:
SCE8000>enable 10
Password:<cisco>
SCE8000#config
SCE8000(config)# aaa authentication attempts login 5
SCE8000(config)#
Related Commands
Command
Description
aaa authentication accounting commands
Enables TACACS+ accounting.
aaa authentication commands default
Specifies which command level authentication methods
are to be used, and in what order of preference.
aaa authentication enable default
Specifies which privilege level authentication methods
are to be used, and in what order of preference.
aaa authentication login default
Specifies which login authentication methods are to be
used, and in what order of preference.
Cisco SCE 8000 CLI Command Reference
2-5
Chapter 2
CLI Command Reference
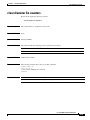
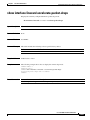
aaa authentication commands default
aaa authentication commands default
Specifies which command level authentication methods are to be used, and in what order of preference.
To delete the command level authentication list, use the no form of this command.
aaa authentication command level default method1 [method2]
no aaa authentication command level default
Syntax Description
level
method1 [method2]
Privilege level for which to enable TACACS+ command authorization.
Choose one of the following levels:
•
0 (user)
•
5 (viewer),
•
10 (admin)
•
15 (root)
Command level authentication methods to be used. You may specify up to
two different methods, in the order in which they are to be used. See Usage
Guidelines for more information.
Command Default
The default command level authentication method is enable.
Command Modes
Global configuration
Command History
This table includes the following release-specific history entries:
Usage Guidelines
Release
Modification
3.0.3
This command was introduced.
Use this command to configure “backup” command level authentication methods to be used if the
primary command level authentication method fails. The following methods are available:
•
group tacacs+—Use TACACS+ authentication.
•
none—Use no authentication.
If the command level authentication methods list is deleted, the default command level authentication
method only (enable) is used. TACACS+ authentication is not used.
Authorization: admin
Cisco SCE 8000 CLI Command Reference
2-6
Chapter 2
CLI Command Reference
aaa authentication commands default
Examples
The following example shows how to configure command level authentication methods:
SCE8000>enable 10
Password:<cisco>
SCE8000#config
SCE8000(config)# aaa authentication command 15 default group tacacs+ none
SCE8000(config)#
Related Commands
Command
Description
aaa authentication enable default Specifies which privilege level authentication methods are to be
used, and in what order of preference.
aaa authentication login default
Specifies which login authentication methods are to be used, and
in what order of preference.
aaa accounting commands
Enables TACACS+ accounting.
aaa authentication attempts
Sets the maximum number of login attempts that will be
permitted before a Telnet session is terminated.
show tacacs
Displays statistics for the TACACS+ servers.
Cisco SCE 8000 CLI Command Reference
2-7
Chapter 2
CLI Command Reference
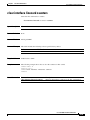
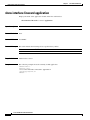
aaa authentication enable default
aaa authentication enable default
Specifies which privilege level authentication methods are to be used, and in what order of preference.
To delete the privilege level authentication methods list, use the no form of this command.
aaa authentication enable default method1 [method2...]
no aaa authentication enable default
Syntax Description
method1...
Command Default
The default privilege level authentication method is enable.
Command Modes
Global configuration
Command History
This table includes the following release-specific history entries:
Usage Guidelines
Privilege level authentication methods to be used. You may specify up to
four different methods, in the order in which they are to be used. See Usage
Guidelines for more information.
Release
Modification
3.0.0
This command was introduced.
Use this command to configure “backup” privilege level authentication methods to be used if the primary
privilege level authentication method fails. The following methods are available:
•
group tacacs+—Use TACACS+ authentication.
•
local—Use the local username database for authentication.
•
enable (default)—Use the enable password for authentication.
•
none—Use no authentication.
If the privilege level authentication methods list is deleted, the default privilege level authentication
method only (enable password) is used. TACACS+ authentication is not used.
Authorization: admin
Examples
The following example shows how to configure privilege level authentication methods:
SCE8000>enable 10
Password:<cisco>
SCE8000#config
SCE8000(config)# aaa authentication enable default group tacacs+ enable none
SCE8000(config)#
Cisco SCE 8000 CLI Command Reference
2-8
Chapter 2
CLI Command Reference
aaa authentication enable default
Related Commands
Command
Description
aaa authentication command default
Specifies which command authentication methods are to be
used, and in what order of preference.
aaa authentication commands default Specifies which command level authentication methods are
to be used, and in what order of preference.
aaa authentication login default
Specifies which login authentication methods are to be used,
and in what order of preference.
aaa accounting commands
Enables TACACS+ accounting.
aaa authentication attempts
Sets the maximum number of login attempts that will be
permitted before a Telnet session is terminated.
show tacacs
Displays statistics for the TACACS+ servers.
Cisco SCE 8000 CLI Command Reference
2-9
Chapter 2
CLI Command Reference
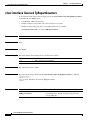
aaa authentication login default
aaa authentication login default
Specifies which login authentication methods are to be used, and in what order of preference.
To delete the login authentication methods list, use the no form of this command.
aaa authentication login default method1 [method2...]
no aaa authentication login default
Syntax Description
method1...
Command Default
The default login authentication method is enable.
Command Modes
Global configuration
Command History
This table includes the following release-specific history entries:
Login authentication methods to be used. You may specify up to four
different methods, in the order in which they are to be used. See Usage
Guidelines for more information.
Release
Modification
3.0.0
This command was introduced.
Use this command to configure “backup” login authentication methods to be used if the primary login
authentication method fails. The following methods are available:
•
group tacacs+—Use TACACS+ authentication.
•
local—Use the local username database for authentication.
•
enable (default)—Use the enable password for authentication.
•
none—Use no authentication.
If the login authentication methods list is deleted, the default login authentication method only (enable
password) is used. TACACS+ authentication is not used.
Authorization: admin
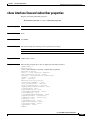
Examples
The following example shows how to configure login authentication methods:
SCE8000>enable 10
Password:<cisco>
SCE8000#config
SCE8000(config)# aaa authentication login default group tacacs+ enable none
SCE8000(config)#
Cisco SCE 8000 CLI Command Reference
2-10
Chapter 2
CLI Command Reference
aaa authentication login default
Related Commands
Command
Description
aaa authentication command default
Specifies which command authentication methods are to be
used, and in what order of preference.
aaa authentication commands default Specifies which command level authentication methods are
to be used, and in what order of preference.
aaa authentication enable default
Specifies which privilege level authentication methods are to
be used, and in what order of preference.
aaa accounting commands
Enables TACACS+ accounting.
aaa authentication attempts
Sets the maximum number of login attempts that will be
permitted before a Telnet session is terminated.
show tacacs
Displays statistics for the TACACS+ servers.
Cisco SCE 8000 CLI Command Reference
2-11
Chapter 2
CLI Command Reference
accelerate-packet-drops
accelerate-packet-drops
Enables drop-wred-packets-by-hardware mode. This mode improves performance, but prevents the
application from being able to count all dropped packets.
To disable drop-wred-packets-by-hardware mode, enabling the software to count all dropped packets (at
the expense of some loss of performance), use the no form of this command.
accelerate-packet-drops
no accelerate-packet-drops
Syntax Description
This command has no arguments or keywords.
Command Default
This command (drop-wred-packets-by-hardware mode) is enabled.
Command Modes
Interface Linecard Configuration
Command History
This table includes the following release-specific history entries:
Usage Guidelines
Release
Modification
3.0.0
This command was introduced.
By default, the Cisco SCE platform hardware drops WRED packets (packets that are marked to be
dropped due to bandwidth-control criteria). However, dropping these packets might be a problem if you
need to know the number of dropped packets per service.
You can disable drop-wred-packets-by-hardware mode. The application can then retrieve the number of
dropped packets for every flow and provide better visibility into the exact number of dropped packets
and their distribution.
Note that counting all dropped packets impacts system performance and therefore, by default,
drop-wred-packets-by-hardware mode is enabled.
Note
The MIB object tpTotalNumWredDiscardedPackets counts dropped packets. The value in this counter is
absolute only in no accelerate-packet-drops mode. When in accelerate-packet-drops mode (the
default mode), this MIB counter provides only a relative value indicating the trend of the number of
packet drops, with a factor of approximately 1:6.
Authorization: admin
Cisco SCE 8000 CLI Command Reference
2-12
Chapter 2
CLI Command Reference
accelerate-packet-drops
Examples
The following example shows how to disable drop-wred-packets-by-hardware mode so that the
application can count all dropped packets:
SCE8000>enable 10
password:<cisco>
SCE8000#>config
SCE8000(config)#interface linecard 0
SCE8000(config if)#no accelerate-packet-drops
SCE8000(config if)#
Related Commands
Command
Description
show interface linecard accelerate-packet-drops Displays the currently configured hardware
packet drop mode.
Cisco SCE 8000 CLI Command Reference
2-13
Chapter 2
CLI Command Reference
access-class
access-class
Restricts Telnet server access to those addresses listed in the specified ACL.
Use the no form of this command to either remove a specified ACL or to set the Telnet server to accept
access from any IP address.
access-class acl-number in
no access-class [acl-number] in
Syntax Description
acl-number
Command Default
By default, no ACL is configured (Telnet access is available from any IP address).
Command Modes
Line Configuration Mode
Command History
This table includes the following release-specific history entries:
Usage Guidelines
An access-list number (1–99).
Release
Modification
2.5.7
This command was introduced.
You must configure the ACL before you can assign it to a service. (See access-list.)
Authorization: admin
Examples
The following are examples of the access-class command:
EXAMPLE 1
The following example configures an access class for all Telnet lines.
SCE8000>enable 10
Password:<cisco>
SCE8000#config
SCE8000(config)#line vty 0
SCE8000(config-line)#access-class 1 in
SCE8000(config-line)#
EXAMPLE 2
The following example removes an access class for Telnet lines.
SCE8000>enable 10
Password:<cisco>
SCE8000#config
SCE8000(config)#line vty 0
SCE8000(config-line)#no access-class 1 in
SCE8000(config-line)#
Cisco SCE 8000 CLI Command Reference
2-14
Chapter 2
CLI Command Reference
access-class
Related Commands
Command
Description
access-list
Creates or updates a specified ACL
show access-lists
Displays all currently configured ACLs.
Cisco SCE 8000 CLI Command Reference
2-15
Chapter 2
CLI Command Reference
access-list
access-list
Adds an entry to the bottom of the specified access list.
To remove an entry from the specified access list, use the no form of this command.
access-list number permission address
no access-list number
Syntax Description
number
Number of an access list (1 to 99).
permission
Indicates whether the IP address should be allowed or denied access permission, as
described in Table 2-2 in Usage Guidelines.
address
Addresses to be matched by this entry, as described in Table 2-2 in Usage
Guidelines.
Command Default
None
Command Modes
Global configuration
Command History
This table includes the following release-specific history entries:
Usage Guidelines
Release
Modification
2.5.7
This command was introduced.
The Cisco SCE platform can be configured with access control lists (ACLs), which are used to permit
or deny incoming connections on any of the management interfaces. An access control list is an ordered
list of entries, each consisting of the following elements:
•
Permit/deny field
•
IP address
•
Optional wildcard “mask” defining an IP address range
The order of the entries in the list is important. The default action of the first entry that matches the
connection is used. If no entry in the access list matches the connection, or if the access list is empty, the
default action is deny. Table 2-2 lists valid permission values.
Table 2-2
Valid Permission Values
deny
Denies access to list member.
permit
Permits access to list member.
Cisco SCE 8000 CLI Command Reference
2-16
Chapter 2
CLI Command Reference
access-list
Table 2-2
Valid Permission Values (continued)
any
All IP addresses are matched by this entry. This value is equivalent to specifying the
address 0.0.0.0 255.255.255.255.
address
IP address or range of IP addresses, matched by this entry. This value can be one address
in the format x.x.x.x or a range of addresses in the format x.x.x.x y.y.y.y, where x.x.x.x
specifies the prefix bits common to all IP addresses in the range, and y.y.y.y is a mask
that specifies the bits that are ignored. In this notation, 1 means bits to ignore.
For example, the address 0.0.0.0 255.255.255.255 means any IP address. The address
10.0.0.0 0.1.255.255 means IP addresses from 10.0.0.0 to 10.1.255.255. The address
1.2.3.4 0.0.0.255 means IP addresses from 1.2.3.0 to 1.2.3.255 (a more natural way of
expressing the same range is 1.2.3.0 0.0.0.255).
Authorization: admin
Examples
The following example adds entries to the bottom of access-list 1. The first entry permits access to
10.1.1.0 to 10.1.1.255. The second entry denies access to any address. Together, this list allows access
only to addresses 10.1.1.*.
SCE8000>enable 10
Password:<cisco>
SCE8000#config
SCE8000(config)#access-list 1 permit 10.1.1.0 0.0.0.255
SCE8000(config)#access-list 1 deny any
SCE8000(config)#
The following example defines access-list 2, a list that denies access to all IP addresses in the range
10.1.2.0 to 10.1.2.255, permits access to all other addresses in the range 10.1.0.0 to 10.1.15.255, and
denies access to all other IP addresses. Note that, because the first range is contained within the second
range, the order of entries is important. If they had been entered in the opposite order, the deny entry
would not have any effect.
SCE8000>enable 10
Password:<cisco>
SCE8000#config
SCE (config)#access-list 2 deny 10.1.2.0 0.0.0.255
SCE (config)#access-list 2 permit 10.1.0.0 0.0.15.255
SCE8000(config)#
Related Commands
Command
Description
ip access-class
Specifies which access control list (ACL) controls global access to the Cisco
SCE platform.
show access-lists
Displays all access lists or a specific access list.
Cisco SCE 8000 CLI Command Reference
2-17
Chapter 2
CLI Command Reference
active-port
active-port
Specifies which management port is currently active.
active-port
Syntax Description
This command has no arguments or keywords.
Command Default
Default Mng port is 0/1.
Command Modes
Mng Interface Configuration
Command History
This table includes the following release-specific history entries:
Usage Guidelines
Release
Modification
3.0.0
This command was introduced.
The command must be executed from the Mng interface that is to be defined as the active port, as
follows:
•
Use the interface mng command, specifying the desired port number (0/1 or 0/2), to enter the proper
command mode.
•
Execute the active-port command.
The use of this command varies slightly depending on whether the management interface is configured
as a redundant interface (auto fail-over disabled)
•
auto fail-over enabled (automatic mode): the specified port becomes the currently active port, in
effect forcing a fail-over action even if a failure has not occurred.
•
auto fail-over disabled (manual mode): the specified port should correspond to the cabled Mng port,
which is the only functional port and therefore must be and remain the active management port
Authorization: admin
Examples
The following example shows how to use this command to configure Mng port 2 as the currently active
management port.
SCE8000>enable 10
Password:<cisco>
SCE8000#config
SCE8000(config)#interface mng 0/2
SCE8000(config if)#active-port
SCE8000(config if)#
Cisco SCE 8000 CLI Command Reference
2-18
Chapter 2
CLI Command Reference
application slot replace force completion
application slot replace force completion
Forces the current application replace process to complete and immediately start finalization (killing all
old flows).
application slot slot-number replace force completion
Syntax Description
slot-number
Command Default
None
Command Modes
Privileged EXEC
Command History
This table includes the following release-specific history entries:
Number of the identified slot. Enter a value of 0.
Release
Modification
3.0.3
This command was introduced.
Usage Guidelines
Authorization: admin
Examples
The following example shows how to force the application replace operation to complete immediately:
SCE8000>enable 10
Password:<cisco>
SCE8000#application slot 0 replace force completion
SCE8000#
Cisco SCE 8000 CLI Command Reference
2-19
Chapter 2
CLI Command Reference
asymmetric-l2-support
asymmetric-l2-support
Configures the system to treat flows as having asymmetric Layer 2 characteristics (including Ethernet,
VLAN, and L2TP), for the purpose of packet injection.
To disable asymmetric L2 support, use the no form of this command.
asymmetric-l2-support
no asymmetric-l2-support
Syntax Description
This command has no arguments or keywords.
Command Default
Asymmetric Layer 2 support is disabled.
Command Modes
Interface Linecard Configuration
Command History
This table includes the following release-specific history entries:
Usage Guidelines
Note
Release
Modification
3.1.6
This command was introduced.
You should enable asymmetric Layer 2 support when the following conditions apply for any flows:
•
Each direction of the flow has a different pair of MAC addresses.
•
The routers do not accept packets with the MAC address of the other link.
“Asymmetric routing topology” support and “asymmetric tunneling support” are two separate features.
Asymmetric routing topology refers to topologies where the Cisco SCE platform might see some flows
only in one direction (upstream or downstream).
Asymmetric tunneling support (asymmetric L2 support) refers to the ability to support topologies where
the Cisco SCE platform sees both directions of all flows, but some of the flows may have different Layer
2 characteristics (such as MAC addresses, VLAN tags, and L2TP headers), which the Cisco SCE
platform must specifically take into account when injecting packets into the traffic (such as in block and
redirect operations).
Note as well that, to support asymmetric Layer 2, the Cisco SCE platform switches to asymmetric flow
open mode, which impacts performance. This limitation is not the case for asymmetric routing topology.
Authorization: admin
Cisco SCE 8000 CLI Command Reference
2-20
Chapter 2
CLI Command Reference
asymmetric-l2-support
Examples
The following example shows how to use this command:
SCE8000>enable 10
Password:<cisco>
SCE8000#configure
SCE8000(config)#interface linecard 0
SCE8000(config if)# asymmetric-L2-support
Related Commands
Command
Description
show interface linecard
Displays information for a specific line card interface.
Cisco SCE 8000 CLI Command Reference
2-21
Chapter 2
CLI Command Reference
attack-detector
attack-detector
Enables the specified attack detector and assigns an access control list (ACL) to it.
attack-detector number access-list access-list
Syntax Description
number
Number of the attack detector.
access-list
Number of the ACL containing the IP addresses selected by this detector.
Command Default
None
Command Modes
Interface Linecard Configuration
Command History
This table includes the following release-specific history entries:
Usage Guidelines
Release
Modification
2.5.7
This command was introduced.
Use the following commands to define the attack detector and the ACL:
•
attack-detector
•
access-list
Authorization: admin
The following example shows how to enable attack detector number 2 and assign ACL 8:
SCE8000>enable 10
Password:<cisco>
SCE8000#config
SCE8000(config)#interface LineCard 0
SCE8000(config if)#attack-detector 2 access-list 8
SCE8000(config if)#
Related Commands
Command
Description
access-list
Adds an entry to the bottom of the specified access list.
attack-detector number
Configures a specific attack detector for a particular attack
type with the assigned number.
show interface linecard attack-detector
Displays the configuration of the specified attack detector.
show access-lists
Displays all access lists or a specific access list.
Cisco SCE 8000 CLI Command Reference
2-22
Chapter 2
CLI Command Reference
attack-detector default
attack-detector default
Defines default thresholds and attack handling action. If a specific attack detector is defined for a
particular situation (protocol, attack direction, or side), the detector overrides the defaults.
To delete the user-defined defaults, use the no form of this command. The system defaults are used
instead.
attack-detector default protocol protocol attack-direction attack-direction side side [action
action] [open-flows open-flows] [ddos-suspected-flows ddos-suspected-flows]
[suspected-flows-ratio suspected-flows-ratio] [notify-subscriber | dont-notify-subscriber]
[alarm |noalarm]
no attack-detector default protocol protocol attack-direction attack-direction side side [action
action] [open-flows open-flows] [ddos-suspected-flows ddos-suspected-flows]
[suspected-flows- ratio suspected-flows-ratio]
Syntax Description
Command Default
protocol
For protocol, choose TCP, UDP, IMCP, or other.
attack-direction
For attack-direction, choose attack-source, attack-destination, or both.
side
For size, choose subscriber, network, or both.
action
For action, choose report or block.
open-flows
Threshold for concurrently open flows (new open flows per second).
ddos-suspected-flows
Threshold for DDoS-suspected flows (new suspected flows per second).
suspected-flows-ratio
Threshold for ratio of suspected flow rate to open flow rate.
notify-subscriber,
dont-notify-subscriber
Enables or disables subscriber notification.
alarm, noalarm
Enables or disables sending of SNMP traps.
The default attack detector uses the following default values:
•
Action—report
•
Thresholds—varies according to the attack type
•
Subscriber notification—disabled
•
Sending an SNMP trap—disabled
Command Modes
Interface Linecard Configuration
Command History
This table includes the following release-specific history entries:
Release
Modification
2.5.7
This command was introduced.
Cisco SCE 8000 CLI Command Reference
2-23
Chapter 2
CLI Command Reference
attack-detector default
Usage Guidelines
Use the attack-detector number command to configure a specific attack detector.
Authorization: admin
Examples
The following example shows how to configure a default attack detector for TCP flows from the attack
source:
SCE8000>enable 10
Password:<cisco>
SCE8000#config
SCE8000(config)#interface LineCard 0
SCE8000(config if)#attack-detector default protocol TCP attack-direction attack-source
side both action report open-flows 500 ddos-suspected-flows 75 suspected-flows-ratio 50
SCE8000(config if)#
The following example shows how to enable subscriber notification for the specified default attack
detector:
SCE8000>enable 10
Password:<cisco>
SCE8000#config
SCE8000(config)#interface LineCard 0
SCE8000(config if)#attack-detector default protocol TCP attack-direction attack-source
side both notify-subscriber
SCE8000(config if)#
Related Commands
Command
Description
attack-detector number
Configures a specific attack detector for a particular
attack type with the assigned number.
attack-filter subscriber-notification ports
Specifies a port as a subscriber notification port.
show interface linecard attack-detector
Displays the configuration of the specified attack
detector.
Cisco SCE 8000 CLI Command Reference
2-24
Chapter 2
CLI Command Reference
attack-detector number
attack-detector number
Configures a specific attack detector for a particular attack type (protocol, attack direction, or side) with
the assigned number.
To configure the default attack detector for the specified attack type, use the default form of this
command.
To delete the specified attack detector, use the no form of this command.
attack-detector number protocol {TCP | UDP | ICMP | other | all} [destination-port
destination-port] attack-direction attack-direction side side [action action] [open-flows
open-flows] [ddos-suspected-flows ddos-suspected-flows] [suspected-flows-ratio
suspected-flows-ratio] [notify-subscriber | dont-notify-subscriber] [alarm | no-alarm]
no attack-detector number
attack-detector default protocol {TCP | UDP | ICMP | other | all} [destination-port
destination-port] attack-direction attack-direction side side [action action] [open-flows
open-flows] [ddos-suspected-flows ddos-suspected-flows] [suspected-flows-ratio
suspected-flows-ratio] [notify-subscriber | dont-notify-subscriber] [alarm | no-alarm]
no attack-detector default protocol {TCP | UDP | ICMP | other | all} [destination-port
destination-port] attack-direction attack-direction side side
default attack-detector {all | all-numbered}
default attack-detector number protocol {all | IMCP | other | TCP | UDP} [destination-port
destination-port] attack-direction attack-direction side side
Syntax Description
number
Assigned number for the attack detector.
protocol
For protocol, choose TCP, UDP, IMCP, or other.
destination port
(TCP and UDP protocols only) Defines whether the default attack detector
applies to specific (port-based) or not-specific (port-less) detections.
For destination-port, choose specific, not-specific, or both.
attack-direction
For attack-direction, choose single-side-destination, single-side-both,
dual-sided, or all.
side
For side, choose subscriber, network, or both.
action
For action, choose report or block.
open-flows-rate
Threshold for rate of open flows (new open flows per second).
suspected-flows-rate
Threshold for rate of suspected DDoS flows (new suspected flows per
second).
suspected-flows-ratio
Threshold for ratio of suspected flow rate to open flow rate.
notify-subscriber,
Enables or disables subscriber notification.
dont-notify-subscriber
alarm, noalarm
Enables or disables sending of SNMP traps.
Cisco SCE 8000 CLI Command Reference
2-25
Chapter 2
CLI Command Reference
attack-detector number
Command Default
The default attack detector uses the following default values:
•
Action—report
•
Thresholds—varies according to the attack type
•
Subscriber notification—disabled
•
Sending an SNMP trap—disabled
Command Modes
Interface Linecard Configuration
Command History
This table includes the following release-specific history entries:
Usage Guidelines
Release
Modification
2.5.7
This command was introduced.
If a specific attack detector is defined for a particular attack type, this detector overrides the configured
default attack detector.
If the selected protocol is either TCP or UDP, specify whether destination ports are specific, not specific,
or both. If the destination ports are specific, configure the ports using the attack-detector number,
page 2-25 command.
To enable a configured attack detector, use the attack-detector number, page 2-25 command.
To configure a default attack detector, use the attack-detector default, page 2-23 command.
Authorization: admin
Examples
The following example shows how to configure attack detector number 2:
SCE8000>enable 10
Password:<cisco>
SCE8000#config
SCE8000(config)#interface LineCard 0
SCE8000(config if)# attack-detector 2 protocol UDP dest-port not-specific attack-direction
single-side-destination side both action block open-flows-rate 500 suspected-flows-rate
500 suspected-flows-ratio 50 notify-subscriber alarm
SCE8000(config if)#
The following example shows how to delete attack detector number 2:
SCE8000>enable 10
Password:<cisco>
SCE8000#config
SCE8000(config)#interface LineCard 0
SCE8000(config if)#no attack-detector 2
SCE8000(config if)#
The following example shows how to disable subscriber notification for attack detector number 2:
SCE8000>enable 10
Password:<cisco>
SCE8000#config
SCE8000(config)#interface LineCard 0
Cisco SCE 8000 CLI Command Reference
2-26
Chapter 2
CLI Command Reference
attack-detector number
SCE8000(config if)#attack-detector 2 protocol UDP dest-port not-specific attack-direction
single-side-destination side both dont-notify-subscriber
SCE8000(config if)#
Related Commands
Command
Description
attack-detector
Enables the specified attack detector and assigns an
access control list (ACL) to it.
attack-detector tcp-port-list | udp-port-list Defines the list of destination ports for specific port
detections for TCP or UDP protocols.
attack-filter subscriber-notification ports
Specifies a port as a subscriber notification port.
attack-detector default
Defines default thresholds and attack handling action.
show interface linecard attack-detector
Displays the configuration of the specified attack
detector.
Cisco SCE 8000 CLI Command Reference
2-27
Chapter 2
CLI Command Reference
attack-detector tcp-port-list | udp-port-list
attack-detector tcp-port-list | udp-port-list
Defines the list of destination ports for specific port detections for TCP or UDP protocols.
attack-detector number {tcp-port-list | udp-port-list} {all | port1 [port2...]}
Syntax Description
number
Number of the attack detector for which this list of specific ports is relevant.
port1 ...
List of up to 15 specific port numbers.
all
Includes all ports in the list.
Command Default
None
Command Modes
Interface Linecard Configuration
Command History
This table includes the following release-specific history entries:
Usage Guidelines
Release
Modification
3.0.0
This command was introduced.
TCP and UDP protocols may be configured for specified ports only (port-based). Use this command to
configure the list of specified destination ports for each protocol. Up to 15 different TCP port numbers
and 15 different UDP port numbers can be specified.
Configuring a TCP or UDP port list for an attack detector affects only those attack types that have the
same protocol (TCP or UDP) and are port-based (that is, detect a specific destination port). Settings for
other attack types are not affected by the configured port list.
Authorization: admin
Examples
The following example shows how to configure the destination port list for the TCP protocol for attack
detector 10:
SCE8000>enable 10
Password:<cisco>
SCE8000#config
SCE8000(config)#interface LineCard 0
SCE8000(config if)#attack-detector 10 tcp-port-list 100 101 102 103
SCE8000(config if)#
Cisco SCE 8000 CLI Command Reference
2-28
Chapter 2
CLI Command Reference
attack-detector tcp-port-list | udp-port-list
Related Commands
Command
Description
attack-detector number
Configures a specific attack detector for a particular attack type
with the assigned number.
attack-filter
(Interface Linecard Configuration)
Enables specific attack detection for a specified protocol and
attack direction.
Cisco SCE 8000 CLI Command Reference
2-29
Chapter 2
CLI Command Reference
attack-filter
attack-filter
Enables specific attack detection for a specified protocol and attack direction.
To disable attack detection, use the no form of this command.
attack-filter protocol {TCP | UDP | ICMP | other | all} [dest-port destination-port]
attack-direction attack-direction
no attack-filter protocol {TCP | UDP | ICMP | other | all} [dest-port destination-port]
attack-direction attack-direction
Syntax Description
protocol
Choose TCP, UDP, IMCP, other, or all.
destination-port
(TCP and UDP protocols only) Defines whether the default attack detector
applies to specific (port-based) or not-specific (port-less) detections.
Choose specific, not-specific, or both.
attack-direction
Command Default
Choose single-side-destination, single-side-source, single-side-both,
dual-sided, or all.
This command is enabled.
The default for protocol is all (no protocol specified).
The default for destination-port is both (port-based and port-less).
The default for attack-direction is all (all directions).
Command Modes
Interface Linecard Configuration
Command History
This table includes the following release-specific history entries:
Usage Guidelines
Release
Modification
2.5.7
This command was introduced.
Specific attack filtering is configured in two steps:
1.
Enabling specific IP filtering for the particular attack type (using this command).
2.
Configuring an attack detector for the relevant attack type (using the attack-detector number,
page 2-25command). Each attack detector specifies the thresholds that define an attack and the
action to be taken when an attack is detected.
In addition, you can manually override the configured attack detectors to either force or prevent attack
filtering in a particular situation (using the attack filter force filter | dont-filter command).
By default, specific IP detection is enabled for all attack types. You can configure specific IP detection
to be enabled or disabled for a specific defined situation only, depending on the following options:
•
For a selected protocol only
Cisco SCE 8000 CLI Command Reference
2-30
Chapter 2
CLI Command Reference
attack-filter
•
For TCP and UDP protocols, for only port-based or only port-less detections
•
For a selected attack direction, either for all protocols or for a selected protocol
If the selected protocol is either TCP or UDP, specify whether the destination port is specific
(port-based), not specific (port-less), or both. If the destination ports are specific, configure the ports
using the attack-detector tcp-port-list | udp-port-list, page 2-28command.
Authorization: admin
Examples
The following example shows how to enable specific, dual-sided attack detection for TCP protocol only:
SCE8000>enable 10
Password:<cisco>
SCE8000#config
SCE8000(config)#interface LineCard 0
SCE8000(config if)#attack-filter protocol TCP dest-port specific attack-direction
dual-sided
SCE8000(config if)#
The following example shows how to enable single-sided attack detection for ICMP protocol only:
SCE8000>enable 10
Password:<cisco>
SCE8000#config
SCE8000(config)#interface LineCard 0
SCE8000(config if)# attack-filter protocol ICMP attack-direction single-side-source
SCE8000(config if)#
The following example shows how to disable attack detection for all protocols that are not TCP, UDP, or
ICMP:
SCE8000>enable 10
Password:<cisco>
SCE8000#config
SCE8000(config)#interface LineCard 0
SCE8000(config if)#no attack-filter protocol other attack-direction all
SCE8000(config if)#
Related Commands
Command
Description
attack-detector tcp-port-list | udp-port-list
Defines the list of destination ports for specific port
detections for TCP or UDP protocols.
attack-detector number
Configures a specific attack detector for a particular
attack type with the assigned number.
show interface linecard attack-filter
Displays the attack-filtering configuration.
Cisco SCE 8000 CLI Command Reference
2-31
Chapter 2
CLI Command Reference
attack-filter dont-filter | force-filter
attack-filter dont-filter | force-filter
Prevents attack filtering for a specified IP address or protocol. If filtering is already in process, it will be
stopped. When attack filtering has been stopped, it remains stopped until explicitly restored by another
CLI command (either specific or general). To restore attack filtering, use the no form of this command.
The force-filter option forces attack filtering for a specified IP address or protocol. When attack filtering
has been forced, it continues until explicitly stopped by another CLI command (either specific or
general). To stop attack filtering, use the no form of this command.
attack-filter force-filter [action {block | report}] protocol {TCP | UDP | ICMP | other}
[destination-port {port-number | not-specific}] attack-direction {single-side-source |
single-side-destination | single-side-both | dual-sided} {ip ip-address | dual-sided source-ip
ip-address destination-ip ip-address | dual-sided source-ipv6 ipv6-address destination-ipv6
ipv6-address} side {both | network | subscribe}
attack-filter dont-filter protocol {TCP | UDP | ICMP | other} attack-direction
{single-side-source | single-side-destination | single-side-both | dual-sided} {ip ip-address |
dual-sided source-ip ip-address destination-ip ip-address | dual-sided source-ipv6
ipv6-address destination-ipv6 ipv6-address} side {both | network | subscribe}
no attack-filter dont-filter protocol {TCP | UDP | ICMP | other} attack-direction
{single-side-source | single-side-destination | single-side-both| dual-sided} {ip ip-address |
dual-sided source-ip ip-address destination-ip ip-address | dual-sided source-ipv6
ipv6-address destination-ipv6 ipv6-address} side {both | network | subscribe}
no attack-filter force-filter protocol {TCP | UDP | ICMP | other} [destination-port
{port-number | not-specific}] attack-direction {single-side-source | single-side-destination |
single-side-both | dual-sided) {ip ip-address | dual-sided source-ip ip-address destination-ip
ip-address | dual-sided source-ipv6 ipv6-address destination-ipv6 ipv6-address} side {both |
network | subscribe}
no attack-filter force-filter all
no attack-filter dont-filter all
Syntax Description
action (force-filter
option only)
Specifies the action the force-filter option should perform. Choose either
block or report.
protocol
Choose TCP, UDP, ICMP, or other.
destination port
(TCP and UDP protocols only) Defines whether specific IP detection is
forced or prevented for the specified port number or is port-less (not
specific).
Choose port-number or not-specific.
attack direction
Cisco SCE 8000 CLI Command Reference
2-32
Defines whether specific IP detection is forced or prevented for single-sided
or dual-sided attacks:
•
Single-sided—Specify the direction (single-side-source,
single-side-destination, single-side-both) and the IP address.
•
Dual-sided—Specify dual-sided and both the source IP address and the
destination IP address.
Chapter 2
CLI Command Reference
attack-filter dont-filter | force-filter
ip-address
IP address from which traffic will not be filtered:
•
For single-sided filtering, specify only one IP address.
•
For dual-sided filtering, specify both a source IP address and a
destination IP address.
side
For side, choose subscriber, network, or both.
all
Restores or stops all filtering.
Command Default
None
Command Modes
Interface Linecard Configuration
Command History
This table includes the following release-specific history entries:
Usage Guidelines
Release
Modification
3.1.0
This command was introduced.
After configuring the attack detectors, the Cisco SCE platform automatically detects attacks and handles
them according to the configuration. However, to manually intervene (either for debugging purposes or
because reconfiguring the Cisco SCE attack detectors properly would be difficult), you can use the CLI
attack- filtering commands to:
•
Prevent or stop filtering of an attack related to a protocol, direction, and specified IP address
•
Force filtering of an attack related to a protocol, direction, and specified IP address
Attack filtering can be prevented for a specified IP address or protocol by executing a dont-filter CLI
command. If filtering is already in process, it will be stopped. When attack filtering has been stopped, it
remains stopped until explicitly restored by another CLI command (either force-filter or no dont-filter).
Authorization: admin
Examples
The following example shows how to prevent attack filtering for the specified conditions:
SCE8000>enable 10
Password:<cisco>
SCE8000#config
SCE8000(config)#interface linecard 0
SCE8000(config if)#attack-filter dont-filter protocol other attack-direction
single-side-source ip 10.10.10.10 side both
SCE8000(config if)#
The following example shows how to restore all attack filtering:
SCE8000>enable 10
SCE8000#config
SCE8000(config)#interface linecard 0
SCE8000(config if)#no attack-filter dont-filter all
SCE8000(config if)#
Password:<cisco>
Cisco SCE 8000 CLI Command Reference
2-33
Chapter 2
CLI Command Reference
attack-filter dont-filter | force-filter
The following example shows how to force attack filtering:
SCE8000>enable 10
Password:<cisco>
SCE8000#config
SCE8000(config)#interface linecard 0
SCE8000(config if)#attack-filter force-filter protocol TCP dest-port not-specific
attack-direction dual-sided source-ip 10.10.10.10 destination-ip 20.20.20.20 side both
SCE8000(config if)#
The following example shows how to stop all forced attack filtering:
SCE8000>enable 10
Password:<cisco>
SCE8000#config
SCE8000(config)#interface linecard 0
SCE8000(config if)#no attack-filter force-filter all
SCE8000#
Related Commands
Command
Description
attack-filter
Enables specific attack detection for a specified protocol and attack
direction.
Cisco SCE 8000 CLI Command Reference
2-34
Chapter 2
CLI Command Reference
attack-filter subscriber-notification ports
attack-filter subscriber-notification ports
Specifies a port as a subscriber notification port. TCP traffic from the subscriber side to this port will
never be blocked by the attack filter, leaving it always available for subscriber notification.
To remove the port from the subscriber notification port list, use the no form of this command.
attack-filter subscriber-notification ports port
no attack-filter subscriber-notification ports port
Syntax Description
port
Command Default
None
Command Modes
Interface Linecard Configuration
Command History
This table includes the following release-specific history entries:
Usage Guidelines
Port number. One port can be specified as the subscriber notification port.
Release
Modification
2.5.7
This command was introduced.
This command configures the port to be used for subscriber notification as configured using the
attack-filter and attack-detector number commands.
Authorization: admin
Examples
The following example shows how to specify port 100 as the subscriber notification port:
SCE8000>enable 10
Password:<cisco>
SCE8000#config
SCE8000(config)#interface linecard 0
SCE8000(config if)#attack-filter subscriber-notification ports 100
SCE8000(config if)#
Related Commands
Command
Description
attack-detector default
Defines default thresholds and attack-handling action.
attack-detector number
Configures a specific attack detector for a particular attack
type with the assigned number.
show interface linecard attack-filter
Displays the attack-filtering configuration.
Cisco SCE 8000 CLI Command Reference
2-35
Chapter 2
CLI Command Reference
auto-fail-over
auto-fail-over
Enables automatic fail-over on the Mng ports. Use the no form of the command to disable automatic
fail-over on the Mng ports.
auto-fail-over
no auto-fail-over
Syntax Description
This command has no arguments or keywords.
Command Default
By default, the auto fail-over mode is enabled.
Command Modes
Interface Management Configuration
Command History
This table includes the following release-specific history entries:
Usage Guidelines
Release
Modification
3.0.0
This command was introduced.
This parameter can be configured for either management port, and is applied to both ports with one
command.
The automatic mode must be enabled to support management interface redundancy. This mode
automatically switches to the backup management link when a failure is detected in the currently active
management link.
When the automatic fail-over mode is disabled, by default Mng port 1 is the active port. If Mng port 2
will be the active port, it must be explicitly configured as such (see active-port ).
Authorization: admin
Examples
This example shows how to disable the auto fail-over mode.
SCE8000>enable 10
Password:<cisco>
SCE8000#config
SCE8000(config)#interface Mng 0/1
SCE8000(config if)#no auto-fail-over
SCE8000(config if)#
Related Commands
Command
Description
active-port
Specifies which management port is currently active.
Cisco SCE 8000 CLI Command Reference
2-36
Chapter 2
CLI Command Reference
auto-negotiate
auto-negotiate
Configures GigabitEthernet interface auto-negotiation mode. Use this command to either enable or
disable auto-negotiation.
To always have auto-negotiation disabled, regardless of the connection mode, use the no form of this
command.
auto-negotiate
no auto-negotiate
default auto-negotiate
Syntax Description
This command has no arguments or keywords.
Command Default
Auto-negotiation is:
•
On for inline connection mode
•
Off for receive-only connection mode
Command Modes
GigabitEthernet Interface Configuration
Command History
This table includes the following release-specific history entries:
Usage Guidelines
Release
Modification
2.5.7
This command was introduced.
Auto-negotiation does not work when the Cisco SCE platform is connected through an optical splitter
(receive-only connection mode).
In the Cisco SCE 8000 10GBE platform, auto-negotiation is supported by the GBE management
interface only (1/1). The connection mode is not relevant to the management interface.
Authorization: admin
Examples
The following example shows how to configure all the GigabitEthernet line interfaces on the specified
SPA to perform no auto-negotiation:
SCE_GBE>enable 10
Password:<cisco>
SCE_GBE#config
SCE_GBE(config)#interface range GigabitEthernet 3/0/0-7
SCE_GBE(config range if)#no auto-negotiate
SCE_GBE(config range if)#
Cisco SCE 8000 CLI Command Reference
2-37
Chapter 2
CLI Command Reference
auto-negotiate
Related Commands
Command
Description
show interface gigabitethernet
Displays the details of the GigabitEthernet management interface.
Cisco SCE 8000 CLI Command Reference
2-38
Chapter 2
CLI Command Reference
bandwidth
bandwidth
Sets Ethernet shaping for the TenGigabitEthernet line interfaces.
bandwidth bandwidth burst-size burstsize
Syntax Description
Command Default
bandwidth
Bandwidth measured in kbps.
burstsize
Burst size in bytes.
The default bandwidth is 100000K (100 Mbps).
The default burst size is 5000 (5K bytes).
Command Modes
TenGigabitEthernet Interface Configuration
Command History
This table includes the following release-specific history entries:
Usage Guidelines
Release
Modification
2.5.7
This command was introduced.
This command is valid for a specified TenGigabitEthernet line interface only. It must be executed
explicitly for each interface.
Authorization: admin
Examples
The following example shows how to set the bandwidth and burst size for the TenGigabitEthernet line
interface 3/2/0:
SCE8000#config
SCE8000(config)#interface TenGigabitEthernet 3/2/0
SCE8000(config if)#bandwidth 100000 burstsize 5000
SCE8000(config if)#
Related Commands
Command
Description
interface tengigabitethernet
Displays the details of a TenGigabitEthernet interface.
queue
Sets the queue shaping.
Cisco SCE 8000 CLI Command Reference
2-39
Chapter 2
CLI Command Reference
banner
banner
Enables the display of the warning banner every time a user connects to the Cisco SCE platform through
either the console connection or Telnet.
Use the no form of the command to disable the display of the warning banner.
banner login banner-text
no banner login
Syntax Description
banner-text
Command Default
By default, the banner is disabled.
Command Modes
Global configuration
Command History
This table includes the following release-specific history entries:
Usage Guidelines
Text of the warning banner message, enclosed in delimiting characters
(such as quotation marks).
Release
Modification
3.7.x
This command was introduced.
The warning banner serves as a security warning for unauthorized users trying to connect to Cisco SCE
platform. It can also provide device details, as well as information about the service and application.
You do not have to shutdown the Cisco SCE platform in order to enable or disable the banner.
Authorization: admin
Examples
The following example shows how to enable the login banner:
SCE8000>enable 10
Password:<cisco>
SCE8000#config
SCE8000(config)#banner login “Welcome to the Cisco SCE8000”
SCE8000(config)#
Cisco SCE 8000 CLI Command Reference
2-40
Chapter 2
CLI Command Reference
blink
blink
Blinks a slot LED for visual identification.
To stop slot blinking, use the no form of this command.
blink slot slot-number
no blink slot slot-number
Syntax Description
slot-number
Command Default
Not blinking
Command Modes
Privileged EXEC
Command History
This table includes the following release-specific history entries:
Number of the identified slot. Enter a value of 0.
Release
Modification
2.5.7
This command was introduced.
Usage Guidelines
Authorization: admin
Examples
The following example shows how to configure the Cisco SCE platform to stop blinking:
SCE8000>enable 10
Password:<cisco>
SCE8000#no blink slot 0
SCE8000#
Related Commands
Command
Description
show blink
Displays the blinking status of a slot.
Cisco SCE 8000 CLI Command Reference
2-41
Chapter 2
CLI Command Reference
boot system
boot system
Specifies a new package file to install. The Cisco SCE platform extracts the actual image files from the
specified package file only during the copy running-config startup-config command.
boot system pkg-file
no boot system
Syntax Description
pkg-file
Command Default
None.
Command Modes
Global configuration
Command History
This table includes the following release-specific history entries:
Usage Guidelines
The package file that contains the new firmware. The filename should end
with the .pkg file type.
Release
Modification
2.5.7
This command was introduced.
Use this command to upgrade the Cisco SCE platform embedded firmware. The package file is verified
for the system and checked that it is not corrupted. The actual upgrade takes place only after you run the
copy running-config startup-config command, and reboot the Cisco SCE device.
If you are transferring the pkg file to the device manually, after the pkg file is transferred to the device,
move it to the /apps/data/scos directory (The default SCOS directory) before saving the running
configuration. The Cisco SCE device expects the pkg file in the /apps/data/scos directory. The upgrade
fails if the pkg file is not placed in this directory.
Authorization: admin
Examples
The following example shows how to upgrade the system:
SCE8000> enable 10
Password: <cisco>
SCE8000#
SCE8000# copy ftp://user:[email protected]/downloads/SENum.pkg pkg-file.pkg
SCE8000#config
SCE8000(config)#boot system pkg-file.pkg
Verifying package file…
Package file verified OK.
SCE8000(config)# do copy running-config startup-config
Backing –up configuration file…
Writing configuration file…
Extracting new system image…
Extracted OK.
Cisco SCE 8000 CLI Command Reference
2-42
Chapter 2
CLI Command Reference
boot system
Related Commands
Command
Description
copy running-config startup-config Builds a configuration file with general configuration
commands called config.txt, which is used in successive boots.
Cisco SCE 8000 CLI Command Reference
2-43
Chapter 2
CLI Command Reference
bursty-traffic-convergence
bursty-traffic-convergence
Enables or configures bursty traffic convergence algorithm for specific agc in aggregative global
controllers mode.
Use the no form of the command to disable bursty traffic convergence for specific agc in aggregative
global controllers mode.
aggregative-global-controller {network | subscriber} agc-index bursty-traffic-convergence
no aggregative-global-controller {network | subscriber} agc-index bursty-traffic-convergence
Syntax Description
agc-index
ID of the aggregative global controller. The range is from 1 to 5.
The agc-index is already created through Cisco SCABB and verified if the
created agc-index is reflected in running-config after the AGC policy
application. The agc-index which is already created through Cisco SCABB,
is used in the bursty-traffic-convergence CLI. The
bursty-traffic-convergence CLI will not work for AGC that is created
manually through CLI.
Command Default
By default, bursty traffic convergence is disabled.
Command Modes
Linecard Interface Configuration
Command History
This table includes the following release-specific history entries:
Usage Guidelines
Release
Modification
4.2.0
This command was introduced.
Authorization: root
Use the show interface Linecard slot aggregative-global-controller {network | subscriber} agc-index
bursty-traffic-convergence command to display the bursty traffic convergence algorithm for a specific
agc index in aggregative global controllers mode.
Examples
The following example shows how to enable bursty traffic convergence algorithm for a specific agc in
aggregative global controllers mode:
SCE8000> enable 15
Password:<cisco>
SCE8000#> configure
SCE8000(config)#> interface linecard 0
SCE8000(config if)#> aggregative-global-controller network 2 bursty-traffic-convergence
Cisco SCE 8000 CLI Command Reference
2-44
Chapter 2
CLI Command Reference
bursty-traffic-convergence
Note
Cisco recommends that the agc index that you choose is a dedicated agc for only one service traffic such
as P2P, which is uncontrolled by legacy bandwidth algorithm at a configured PIR limit.
Cisco SCE 8000 CLI Command Reference
2-45
Chapter 2
CLI Command Reference
calendar set
calendar set
Sets the system calendar. The calendar is a system clock that continues functioning even when the system
shuts down.
calendar set hh:mm:ss day month year
Syntax Description
hh:mm:ss
Current local time in hours in 24-hour format, minutes, and seconds
(hh:mm:ss).
day
Current day (date) in the month.
month
Current month (by 3-letter abbreviated name).
year
Current year using a 4-digit number.
Command Default
None
Command Modes
Privileged EXEC
Command History
This table includes the following release-specific history entries:
Usage Guidelines
Release
Modification
2.5.7
This command was introduced.
Always coordinate between the calendar and clock by using the clock read-calendar command after
setting the calendar.
Authorization: admin
Examples
The following example shows how to set the calendar to 20 minutes past 10 a.m., January 13, 2006,
synchronize the real-time clock to the calendar time, and display the result:
SCE8000>enable 10
Password:<cisco>
SCE8000#calendar set 10:20:00 13 jan 2006
SCE8000#clock read-calendar
SCE8000#show calendar
10:20:03 UTC THU January 13 2006
SCE8000#show clock
10:20:05 UTC THU January 13 2006
SCE8000#
Cisco SCE 8000 CLI Command Reference
2-46
Chapter 2
CLI Command Reference
calendar set
Related Commands
Command
Description
clock read-calendar
Synchronizes clocks by setting the system clock from the calendar.
clock set
Manually sets the system clock.
clock update-calendar Synchronizes clocks by setting the calendar from the system clock.
Cisco SCE 8000 CLI Command Reference
2-47
Chapter 2
CLI Command Reference
cd
cd
Changes the path of the current working directory.
cd new-path
Syntax Description
new-path
Command Default
None
Command Modes
Privileged EXEC
Command History
This table includes the following release-specific history entries:
Usage Guidelines
Path name of the new directory. This name can be either a full path or a
relative path.
Release
Modification
2.5.7
This command was introduced.
The new path should already have been created in the local flash file system.
Authorization: admin
Examples
The following example shows how to display the current directory (root directory) and then change the
directory to the log directory located under the root directory:
SCE8000>enable 10
Password:<cisco>
SCE8000>enable 10
SCE8000#pwd
system
SCE8000#cd log
SCE8000#pwd
system:log
SCE8000#
Related Commands
Command
Description
pwd
Displays the current working directory.
mkdir
Creates a new directory.
Cisco SCE 8000 CLI Command Reference
2-48
Chapter 2
CLI Command Reference
cdp enable
cdp enable
Enables Cisco Discovery Protocol (CDP) on a specific traffic interface. Use the no form of the command
to disable CDP on a specific interface.
CDP is not supported on management interfaces.
cdp enable
no cdp enable
Syntax Description
This command has no arguments or keywords.
Command Default
By default, CDP is enabled on all traffic interfaces.
Command Modes
Cisco SCE 8000 GBE: GigabitEthernet Interface Configuration (traffic interfaces only)
Cisco SCE 8000 10G: TenGigabitEthernet Interface Configuration
Command History
Usage Guidelines
Tip
This table includes the following release-specific history entries:
Release
Modification
3.6.x
This command was introduced.
By default, CDP is enabled on all traffic interfaces. CDP must be enabled globally on the Cisco SCE
8000 platform (cdp run command) in order to enable a specific interface.
For consistent CDP operation, it is recommended that both ports of any one traffic link be either enabled
or disabled.
Authorization: admin
Examples
The following example illustrates how to disable CDP on both 10 Gigabit Ethernet traffic interfaces of
the first traffic link on a Cisco SCE 8000 10G platform.
SCE8000>enable 10
Password:<cisco>
SCE8000#config
SCE8000(config)#interface range TenGigabitEthernet 3/0-1/0
SCE8000(config if range)#no cdp enable
Cisco SCE 8000 CLI Command Reference
2-49
Chapter 2
cdp enable
Related Commands
Command
Description
cdp mode
Sets the CDP mode.
cdp run
Enables Cisco Discovery Protocol (CDP) globally.
show cdp
Displays the current CDP configuration.
Cisco SCE 8000 CLI Command Reference
2-50
CLI Command Reference
Chapter 2
CLI Command Reference
cdp holdtime
cdp holdtime
Specifies the amount of time the receiving device should hold a Cisco Discovery Protocol (CDP) packet
from the Cisco SCE 8000 before discarding it.
Use either the no or the default form of the command to restore the holdtime to the default value (180
seconds).
cdp holdtime seconds
no cdp holdtime
default cdp holdtime
Syntax Description
seconds
Command Default
180 seconds
Command Modes
Global configuration
Command History
This table includes the following release-specific history entries:
Usage Guidelines
Hold time value to be sent in the CDP update packets in seconds.
Release
Modification
3.6.x
This command was introduced.
CDP packets are sent with a time to live, or hold time, value. The receiving device will discard the CDP
information in the CDP packet after the hold time has elapsed.
You can set the hold time lower than the default setting of 180 seconds if you want the receiving devices
to update their CDP information more rapidly.
The specified CDP hold time must be greater than the time between CDP transmissions, which is set
using the cdp timer command.
Authorization: admin
Examples
The following example sets the CDP hold time to 60 seconds.
SCE8000>enable 10
Password:<cisco>
SCE8000#config
SCE8000(config)#cdp holdtime 60
SCE8000(config)#
Cisco SCE 8000 CLI Command Reference
2-51
Chapter 2
CLI Command Reference
cdp holdtime
Related Commands
Command
Description
cdp run
Enables Cisco Discovery Protocol (CDP) globally.
cdp enable
Enables Cisco Discovery Protocol (CDP) on a specific traffic interface.
cdp timer
Specifies how often the Cisco SCE 8000 platform sends CDP updates.
show cdp
Displays the current CDP configuration.
Cisco SCE 8000 CLI Command Reference
2-52
Chapter 2
CLI Command Reference
cdp mode
cdp mode
Sets the Cisco Discovery Protocol (CDP) mode on the Cisco SCE 8000 platform.
To reset the CDP mode to the default mode (bypass) use the default form of the command.
cdp mode (standard | monitor | bypass)
default cdp mode
Syntax Description
standard
Standard CDP operation. CDP packets are received and processed, as well
as generated.
In this mode CDP functions as it does on a typical Cisco device. This mode
should be used in most cases, even though it is not the default mode.
bypass (default)
CDP packets are received and transmitted unchanged on the corresponding
interface. Received packets are not processed. No packets are generated.
In this mode, ‘bump-in-the-wire’ behavior is applied to CDP packets. This
is the backward compatible mode, equivalent to not having CDP support.
monitor
CDP packets are received, processed, and transmitted unchanged. CDP
packets are analyzed and CDP neighbor information is available. No
packets are generated.
In this mode 'bump-in-the-wire’ behavior is applied to CDP packets. This
mode may be confusing to operators and network management tools, since
it is contrary to the concept of CDP as a physical link protocol.
Command Default
Bypass
Command Modes
Global configuration
Command History
This table includes the following release-specific history entries:
Usage Guidelines
Note
Release
Modification
3.6.x
This command was introduced.
The Cisco SCE 8000 is usually installed as a bump-in-the-wire device, and therefore forwards packets
(including CDP packets) from one interface to the corresponding interface, whereas a typical Cisco
device never forwards CDP packets from one interface to another interface. Therefore, the Cisco SCE
8000 extends the enabled state with three different CDP modes, allowing it to either function as a typical
CDP device, or to only monitor the CDP packets, or to bypass them altogether.
When CDP is either not running or disabled at the interface level, CDP packets are discarded and CDP
packets are not generated, regardless of the CDP mode.
Cisco SCE 8000 CLI Command Reference
2-53
Chapter 2
CLI Command Reference
cdp mode
Table 2-3
CDP Modes in the Cisco SCE 8000
CDP Mode
"cdp run" AND "cdp enable"
"no cdp run" OR "no cdp enable"
Received CDP packets processed
Received CDP packets discarded
Standard
CDP packets generated
CDP packets not generated
Bypass
(Default)
Received CDP packets bypassed (not processed) Received CDP packets discarded
Monitor
Caution
CDP packets not generated
CDP packets not generated
Received CDP packets processed and bypassed
Received CDP packets discarded
CDP packets not generated
CDP packets not generated
In cascade topologies, both SCE 8000 platforms must be configured to the same CDP mode.
Authorization: admin
Examples
The following example illustrates how to set the CDP to “standard” so that CDP functions on the Cisco
SCE 8000 platform like it does on a typical Cisco device.
SCE8000>enable 10
Password:<cisco>
SCE8000#config
SCE8000(config)#cdp mode standard
SCE8000(config)#
Related Commands
Command
Description
cdp run
Enables Cisco Discovery Protocol (CDP) globally.
cdp enable
Enables Cisco Discovery Protocol (CDP) on a specific traffic interface.
show cdp
Displays the current CDP configuration.
Cisco SCE 8000 CLI Command Reference
2-54
Chapter 2
CLI Command Reference
cdp run
cdp run
Enables Cisco Discovery Protocol (CDP) globally on the Cisco SCE 8000 platform. Use the no form of
the command to disable CDP.
cdp run
no cdp run
Syntax Description
This command has no arguments or keywords.
Command Default
By default, CDP is enabled.
Command Modes
Global configuration
Command History
This table includes the following release-specific history entries:
Usage Guidelines
Release
Modification
3.6.x
This command was introduced.
By default, CDP is enabled on the Cisco SCE 8000. If you prefer not to use the CDP device discovery
capability, use the no cdp run command to disable it.
By default, when CDP is enabled, it is enabled on all traffic interfaces. To disable CDP on a specific
interface, use the no cdp enable command in interface configuration mode.
Note
By default, when you enable CDP, it is set to bypass mode. To change the mode, use the cdp mode
command.
Authorization: admin
Examples
The following example illustrates how to disable CDP.
SCE8000>enable 10
Password:<cisco>
SCE8000#config
SCE8000(config)#no cdp run
SCE8000(config)#
Cisco SCE 8000 CLI Command Reference
2-55
Chapter 2
CLI Command Reference
cdp run
Related Commands
Command
Description
cdp mode
Sets the CDP mode.
cdp enable
Enables Cisco Discovery Protocol (CDP) on a specific traffic interface.
show cdp
Displays the current CDP configuration.
Cisco SCE 8000 CLI Command Reference
2-56
Chapter 2
CLI Command Reference
cdp timer
cdp timer
Specifies how often the Cisco SCE 8000 platform sends Cisco Discovery Protocol (CDP) updates.
Use either the no or the default form of the command to restore the timer to the default value (60
seconds).
cdp timer
no cdp timer
default cdp timer
Syntax Description
seconds
Command Default
60 seconds
Command Modes
Global configuration
Command History
This table includes the following release-specific history entries:
Usage Guidelines
How often the Cisco SCE 8000 platform sends CDP updates, in seconds.
Release
Modification
3.6.x
This command was introduced.
Adjust the value to balance the advantage of more up-to-date CDP information with the increased
bandwidth required for more frequent transmissions.
The specified CDP timer value must be less than the hold time value sent in the CDP updated packets,
which is set using the cdp holdtime command.
Authorization: admin
Examples
The following example sets the timer value to 80 seconds.
SCE8000>enable 10
Password:<cisco>
SCE8000#config
SCE8000(config)#cdp timer 80
SCE8000(config)#
Cisco SCE 8000 CLI Command Reference
2-57
Chapter 2
CLI Command Reference
cdp timer
Related Commands
Command
Description
cdp run
Enables Cisco Discovery Protocol (CDP) globally.
cdp enable
Enables Cisco Discovery Protocol (CDP) on a specific traffic interface.
cdp holdtime
Specifies the amount of time the receiving device should hold a CDP packet
from the Cisco SCE 8000 before discarding it.
show cdp
Displays the current CDP configuration.
Cisco SCE 8000 CLI Command Reference
2-58
Chapter 2
CLI Command Reference
clear arp-cache
clear arp-cache
Deletes all dynamic entries from the ARP cache. The Address Resolution Protocol (ARP) is a TCP/IP
protocol that converts IP addresses to physical addresses. Dynamic entries are automatically added to
and deleted from the cache during normal use. Entries that are not reused age and expire within a short
period of time. Entries that are reused have a longer cache life.
clear arp-cache
Syntax Description
This command has no arguments or keywords.
Command Default
None
Command Modes
Privileged EXEC
Command History
This table includes the following release-specific history entries:
Release
Modification
2.5.7
This command was introduced.
Usage Guidelines
Authorization: admin
Examples
The following example shows how to clear the ARP cache:
SCE8000>enable 10
Password:<cisco>
SCE8000#clear arp-cache
SCE8000#
Related Commands
Command
Description
clear interface linecard mac-resolver arp-cache Clears all the MAC addresses in the MAC
resolver database.
Cisco SCE 8000 CLI Command Reference
2-59
Chapter 2
CLI Command Reference
clear cdp counters
clear cdp counters
Resets the Cisco Discovery Protocol (CDP) traffic counters to zero.
clear cdp counters
Syntax Description
This command has no arguments or keywords.
Command Default
None
Command Modes
Privileged EXEC
Command History
This table includes the following release-specific history entries:
Release
Modification
3.6.x
This command was introduced.
Usage Guidelines
Authorization: admin
Examples
The following example illustrates how to use this command. The show cdp traffic output shows that all
of the traffic counters have been reset to zero.
SCE8000>enable 10
Password:<cisco>
SCE8000#clear cdp counters
SCE8000#show cdp traffic
CDP counters:
Total packets output: 0, Input: 0
Hdr syntax: 0, Chksum error: 0, Encaps failed: 0
No memory: 0, Invalid packet: 0, Fragmented: 0
CDP version 1 advertisements output: 0, Input: 0
CDP version 2 advertisements output: 0, Input: 0
SCE8000#
Related Commands
Command
Description
clear cdp table
Clears the table that contains CDP information about neighbors.
show cdp traffic
Displays the CDP traffic counters.
Cisco SCE 8000 CLI Command Reference
2-60
Chapter 2
CLI Command Reference
clear cdp table
clear cdp table
Clears the table that contains Cisco Discovery Protocol (CDP) information about neighbors.
clear cdp table
Syntax Description
This command has no arguments or keywords.
Command Default
None
Command Modes
Privileged EXEC
Command History
This table includes the following release-specific history entries:
Release
Modification
3.6.x
This command was introduced.
Usage Guidelines
Authorization: admin
Examples
The following example illustrates how to use this command. The output of the show cdp neighbors
command shows that all information has been deleted from the table.
SCE8000>enable 10
Password:<cisco>
SCE8000#clear cdp table
SCE8000#show cdp neighbors
Capability Codes: R - Router, T - Trans Bridge, B - Source Route Bridge
S - Switch, H - Host, I - IGMP
Device ID
Local Intrfce
Holdtme
Capability Platform Port I
SCE8000#
Related Commands
Command
Description
clear cdp counters
Resets the CDP traffic counters to zero.
show cdp neighbors
Displays the table that contains CDP information about neighbors.
Cisco SCE 8000 CLI Command Reference
2-61
Chapter 2
clear diameter counters
clear diameter counters
Resets all diameter stack message statistics.
clear diameter counters
Syntax Description
This command has no arguments or keywords.
Command Default
None
Command Modes
Privileged EXEC
Command History
This table includes the following release-specific history entries:
Release
Modification
3.6.x
This command was introduced.
Usage Guidelines
Authorization: admin
Examples
The following example shows how to use this command.
SCE8000> enable 10
Password: <cisco>
SCE8000# clear diameter counters
SCE8000#
Related Commands
Command
Description
show diameter counters
Displays stack message statistics.
Cisco SCE 8000 CLI Command Reference
2-62
CLI Command Reference
Chapter 2
CLI Command Reference
clear diameter Gx counters
clear diameter Gx counters
Resets all Gx application message statistics.
clear diameter Gx counters
Syntax Description
This command has no arguments or keywords.
Command Default
None
Command Modes
Privileged EXEC
Command History
This table includes the following release-specific history entries:
Release
Modification
3.6.x
This command was introduced.
Usage Guidelines
Authorization: admin
Examples
The following example shows how to use this command.
SCE8000>enable 10
Password:<cisco>
SCE8000#clear diameter Gx counters
SCE8000#
Related Commands
Command
Description
show diameter Gx counters Displays Gx message statistics.
Cisco SCE 8000 CLI Command Reference
2-63
Chapter 2
clear diameter Gy counters
clear diameter Gy counters
Resets Gy application counters.
clear diameter Gy counters
Syntax Description
This command has no arguments or keywords.
Command Default
None
Command Modes
Privileged EXEC
Command History
This table includes the following release-specific history entries:
Release
Modification
3.6.x
This command was introduced.
Usage Guidelines
Authorization: admin
Examples
The following example shows how to use this command.
SCE8000>enable 10
Password:<cisco>
SCE8000#clear diameter Gy counters
SCE8000#
Related Commands
Command
Description
show diameter Gy counters
Displays Gy counters.
Cisco SCE 8000 CLI Command Reference
2-64
CLI Command Reference
Chapter 2
CLI Command Reference
clear interface linecard counters
clear interface linecard counters
Clears the line card interface counters.
clear interface linecard slot-number counters
Syntax Description
slot-number
Command Default
None
Command Modes
Privileged EXEC
Command History
This table includes the following release-specific history entries:
Number of the identified slot. Enter a value of 0.
Release
Modification
3.1.5
This command was introduced.
Usage Guidelines
Authorization: admin
Examples
The following example shows how to clear the counters for line card 0:
SCE8000>enable 10
Password:<cisco>
SCE8000#clear interface linecard 0 counters
SCE8000#
Related Commands
Command
Description
show interface linecard counters
Displays the hardware counters for the line card interface.
Cisco SCE 8000 CLI Command Reference
2-65
Chapter 2
CLI Command Reference
clear interface linecard flow-filter
clear interface linecard flow-filter
Clears all flow filter rules for the specified partition.
clear interface linecard slot-number flow-filter partition name name
Syntax Description
slot-number
Number of the identified slot. Enter a value of 0.
name
Name of the partition for which to clear the flow filter rules.
Command Default
None
Command Modes
Privileged EXEC
Command History
This table includes the following release-specific history entries:
Release
Modification
3.1.6
This command was introduced.
Usage Guidelines
Authorization: admin
Examples
The following example shows how to use this command:
SCE8000>enable 15
Password:<cisco>
SCE8000#>clear interface linecard 0 flow-filter partition name partition_1
SCE8000#>
Related Commands
Command
Description
show interface linecard flow-filter
Displays data relating to flow filtering.
Cisco SCE 8000 CLI Command Reference
2-66
Chapter 2
CLI Command Reference
clear interface linecard mac-resolver arp-cache
clear interface linecard mac-resolver arp-cache
Clears all the MAC addresses in the MAC resolver database.
clear interface linecard slot-number mac-resolver arp-cache
Syntax Description
slot-number
Command Default
None
Command Modes
Privileged EXEC
Command History
This table includes the following release-specific history entries:
Number of the identified slot. Enter a value of 0.
Release
Modification
3.1.6
This command was introduced.
Usage Guidelines
Authorization: admin
Examples
The following example shows how to use this command:
SCE8000>enable 10
Password:<cisco>
SCE8000#clear interface linecard 0 mac-resolver arp-cache
SCE8000#
Related Commands
Command
Description
clear arp-cache
Deletes all dynamic entries from the ARP cache.
mac-resolver arp
Adds a static IP entry to the MAC resolver database.
show interface linecard mac-resolver arp Displays a listing of all IP addresses and corresponding
MAC addresses currently registered in the MAC resolver
database.
Cisco SCE 8000 CLI Command Reference
2-67
Chapter 2
CLI Command Reference
clear interface linecard subscriber anonymous all
clear interface linecard subscriber anonymous all
Clears all anonymous subscribers in the system.
clear interface linecard slot-number subscriber anonymous all
Syntax Description
slot-number
Command Default
None
Command Modes
Privileged EXEC
Command History
This table includes the following release-specific history entries:
Usage Guidelines
Caution
Examples
Number of the identified slot. Enter a value of 0.
Release
Modification
2.5.7
This command was introduced.
3.8.0
Updated to include IPv6 anonymous subscribers.
Authorization: admin
Because the clear interface linecard subscriber anonymous all command clears all the anonymous
subscribers in the system, do not use the command in a production environment. Using this command in
a production environment impacts anonymous subscribers’ accountability. Use the command only when
the linecard interface is shut down.
The following example shows how to clear all anonymous subscribers:
SCE8000>enable 10
Password: <cisco>
SCE8000# clear interface linecard 0 subscriber anonymous all
SCE8000#
Related Commands
Command
Description
no subscriber
Removes a specified subscriber from the system.
no subscriber anonymous-group
Deletes the anonymous group or removes it from
the specified SCMP destination.
show interface linecard subscriber anonymous
Displays the subscribers in a specified
anonymous subscriber group.
Cisco SCE 8000 CLI Command Reference
2-68
Chapter 2
CLI Command Reference
clear interface linecard subscriber db counters
clear interface linecard subscriber db counters
Clears the “total” and “maximum” subscriber database counters.
clear interface linecard slot-number subscriber db counters
Syntax Description
slot-number
Command Default
None
Command Modes
Privileged EXEC
Command History
This table includes the following release-specific history entries:
Usage Guidelines
Examples
Number of the identified slot. Enter a value of 0.
Release
Modification
2.5.7
This command was introduced.
Authorization: admin
The following example shows how to clear all anonymous subscribers:
SCE8000>enable 10
Password:<cisco>
SCE8000#clear interface linecard 0 subscriber db counters
SCE8000#
Related Commands
Command
Description
show interface linecard subscriber db counters Displays the subscriber database counters.
Cisco SCE 8000 CLI Command Reference
2-69
Chapter 2
CLI Command Reference
clear interface linecard TpReportCounters
clear interface linecard TpReportCounters
To clear the following reports that are displayed, use the clear interface linecard TpReportCounters
command in the user EXEC mode:
•
Total Number of Reports generated
•
Number of Reports successfully sent to the Control Processor(CP)
•
Number of Reports dropped at the corresponding Traffic Processor(TP)
clear interface lineCard slot-number TpReportCounters
Syntax Description
slot-number
Command Default
None
Command Modes
User EXEC
Command History
This table includes the following release-specific history entries:
Number of the identified slot. Enter a value of 0.
Release
Modification
3.7.x
This command was introduced.
Usage Guidelines
The authorization used is admin.
Examples
The following is sample output from the clear interface linecard TpReportCounters command:
SCE8000>enable 15
Password:<cisco>
SCE8000>clear interface linecard 0 TpReportCounters
SCE8000>
Related Commands
Command
Description
show interface lineCard slot-number
TpReportCounters
Displays the total number of RDR reports generated, reports
successfully sent to the CP and reports dropped at the
corresponding TP.
Cisco SCE 8000 CLI Command Reference
2-70
Chapter 2
CLI Command Reference
clear interface linecard traffic-counter
clear interface linecard traffic-counter
Clears the specified traffic counter.
clear interface linecard slot-number traffic-counter {name | all}
Syntax Description
slot-number
Number of the identified slot. Enter a value of 0.
name
Name of the traffic counter to be cleared.
all
Clears all traffic counters.
Command Default
None
Command Modes
Privileged EXEC
Command History
This table includes the following release-specific history entries:
Release
Modification
2.5.7
This command was introduced.
Usage Guidelines
Authorization: admin
Examples
The following example shows how to clear the traffic counter named counter1:
SCE8000>enable 10
Password:<cisco>
SCE8000#clear interface linecard 0 traffic-counter name counter1
SCE8000#
Related Commands
Command
Description
show interface linecard traffic-counter Displays information of a specified traffic counter.
traffic-counter
Defines a new traffic counter
Cisco SCE 8000 CLI Command Reference
2-71
Chapter 2
CLI Command Reference
clear interface linecard vas-traffic-forwarding vas counters health-check
clear interface linecard vas-traffic-forwarding vas counters
health-check
Clears the VAS health check counters. Use the all keyword to clear counters for all VAS servers.
clear interface linecard slot-number vas-traffic-forwarding vas server-id number counters
health-check
clear interface linecard slot-number vas-traffic-forwarding vas all counters health-check
Syntax Description
slot-number
The number of the identified slot. Enter a value of 0.
number
ID number of the specified VAS server for which to clear the counters.
Command Default
This command has no default settings.
Command Modes
Privilege Exec
Command History
This table includes the following release-specific history entries:
Usage Guidelines
Release
Modification
3.0.0
This command was introduced.
Use the all keyword to clear counters for all VAS servers.
Authorization: admin
Examples
This example illustrates how to clear the health check counters for all VAS servers.
SCE8000>enable 10
Password:<cisco>
SCE8000#clear interface linecard 0 vas-traffic-forwarding vas all counters health-check
SCE8000#
Related Commands
Command
Description
vas-traffic-forwarding vas server-id health-check
Enables or disables the VAS health check, and
defines the ports it should use.
show interface linecard vas-traffic-forwarding
Displays information regarding VAS
configuration and operational status summary.
Cisco SCE 8000 CLI Command Reference
2-72
Chapter 2
CLI Command Reference
clear interface linecard vpn
clear interface linecard vpn
Removes VLAN VPNs that were created automatically by the Cisco SCE platform.
clear interface linecard slot-number vpn automatic
Syntax Description
slot-number
Command Default
This command has no default settings.
Command Modes
Privileged EXEC
Command History
This table includes the following release-specific history entries:
Usage Guidelines
Examples
The number of the identified slot. Enter a value of 0.
Release
Modification
3.5.0
This command was introduced.
Authorization: admin
The following example illustrates the use of this command.
SCE8000>enable 10
Password:<cisco>
SCE8000#clear interface linecard 0 vpn automatic
SCE8000#
Cisco SCE 8000 CLI Command Reference
2-73
Chapter 2
CLI Command Reference
clear interface range
clear interface range
Clears all the specified interfaces.
clear interface range interface-type [sce-id/]bay-range/interface-range
Syntax Description
interface-type
For the Cisco SCE 8000 10GBE, enter a value of tengigabitethernet.
For the Cisco SCE 8000 GBE traffic ports (in bays 0 and 1), enter a value
of gigabitethernet.
For the Cisco SCE 8000 GBE cascade ports (in bays 2 and 3), enter a value
of tengigabitethernet.
bay-range
For the Cisco SCE 8000 10GBE, specify the range of bays in the format
bay1-bay2, where the overall range of possible bay numbers is 0-3.
For the Cisco SCE 8000 GBE traffic ports, enter a value of 0, 1, or 0-1.
For the Cisco SCE 8000 GBE cascade ports, enter a value of 2, 3, or 2-3.
interface-range
For the Cisco SCE 8000 10GBE, enter a value of 0 (cannot be a range).
For the Cisco SCE 8000 GBE traffic ports, specify the range of ports in the
format port1-port2, where the overall range of possible port numbers is 0 to
7.
For the Cisco SCE 8000 GBE cascade ports, enter a value of 0 (cannot be a
range).
sce-id
In an installation of two cascaded SCE 8000 GBE platforms, identifies the
specific SCE platform of the cascaded pair. Enter a value of 0 or 1.
Command Default
None
Command Modes
Privileged EXEC
Command History
This table includes the following release-specific history entries:
Usage Guidelines
Release
Modification
3.5.5
This command was introduced.
The clear interface range command clears a group of interfaces with one command, with the limitation
that all the interfaces in the group must be of the same physical and logical type.
•
For the Cisco SCE 8000 10GBE platform, use the following command syntax:
clear interface range tengigabitethernet sce-id/bay-range/0
•
For the Cisco SCE 8000 GBE platform traffic ports, use the following command syntax (the bay
numbers are in the range of 0-1):
clear interface range gigabitethernet sce-id/bay-range/interface-range
Cisco SCE 8000 CLI Command Reference
2-74
Chapter 2
CLI Command Reference
clear interface range
•
For the Cisco SCE 8000 GBE cascade ports, use the following command syntax (the bay numbers
are in the range of 2-3):
clear interface range tengigabitethernet sce-id/bay-range/0
Authorization: admin
Examples
The following example shows how to clear all the traffic interfaces in SCE 8000 platform 1 of a cascaded
SCE 8000 GBE system:
SCE8000>enable 10
Password:<cisco>
SCE8000#clear interface range gigabitethernet 1/0-1/0-7
SCE8000#
The following example shows how to clear the cascade interfaces in the same SCE 8000 GBE platform:
SCE8000>enable 10
Password:<cisco>
SCE8000#clear interface range tengigabitethernet 1/2-3/0
SCE8000#
The following example shows how to clear all the interfaces in SCE 8000 platform 1 of a cascaded SCE
8000 10GBE system:
SCE8000>enable 10
Password:<cisco>
SCE8000#clear interface range tengigabitethernet 1/0-3/0
SCE8000#
Related Commands
Command
Description
show interface linecard counters
Displays the hardware counters for the line card interface.
Cisco SCE 8000 CLI Command Reference
2-75
Chapter 2
CLI Command Reference
clear logger
clear logger
Clears the Cisco SCE platform logger (user log files). This operation erases the information stored in the
user log files.
clear logger device {user-file-log | line-attack-file-log} [counters | nv-counters]
Syntax Description
device
Device name to be cleared. Choose user-file-log or line-attack-file-log.
counters
Clears the couters of the Cisco SCE platform logger.
nv-counters
Clears the nonvolatile counters for the entire log or for only the specified
SCE platform.
Command Default
None
Command Modes
Privileged EXEC
Command History
This table includes the following release-specific history entries:
Usage Guidelines
Release
Modification
2.5.7
This command was introduced.
The user log files have a size limit, with new entries overwriting the oldest entries, so you do not need
to regularly clear the log files. Use this operation when you are certain that the information contained in
the logs is irrelevant and might be confusing (for example, when reinstalling the system at a new site
whose administrators do not need old information).
•
The counters keyword clears the counters of the Cisco SCE platform logger (user log files). These
counters keep track of the number of info, warning, error, and fatal messages.
•
The nv-counters keyword clears the nonvolatile counters for the entire log or for only the specified
SCE platform. These counters are not cleared during bootup, and must be cleared explicitly by using
this command.
Authorization: admin
Examples
The following example shows how to clear the Cisco SCE platform user log file:
SCE8000>enable 10
Password:<cisco>
SCE8000#clear logger device user-file-log
Are you sure? Y
SCE8000#
Cisco SCE 8000 CLI Command Reference
2-76
Chapter 2
CLI Command Reference
clear logger
The following example shows how to clear the Cisco SCE platform user log file counters:
SCE8000>enable 10
Password:<cisco>
SCE8000#clear logger device user-file-log counters
Are you sure? Y
SCE8000#
The following example shows how to clear the user log file nonvolatile counters:
SCE8000>enable 10
Password:<cisco>
SCE8000#clear logger device user-file-log nv-counters
Are you sure? Y
SCE8000#
Related Commands
Command
Description
show logger device
Displays the configuration of the specified SCE platform logger file.
show log
Displays the contents of the user log file.
Cisco SCE 8000 CLI Command Reference
2-77
Chapter 2
CLI Command Reference
clear management-agent notifications counters
clear management-agent notifications counters
Clears the counters for the number of notifications sent to the management agent
clear management-agent notifications counters
Syntax Description
This command has no arguments or keywords.
Command Default
None
Command Modes
Privileged EXEC
Command History
This table includes the following release-specific history entries:
Release
Modification
3.0.3
This command was introduced.
Usage Guidelines
Authorization: admin
Examples
The following example shows how to clear the management agent notifications counters:
SCE8000>enable 10
Password:<cisco>
SCE8000#clear management-agent notifications counters
SCE8000#
Cisco SCE 8000 CLI Command Reference
2-78
Chapter 2
CLI Command Reference
clear rdr-formatter
clear rdr-formatter
Clears the RDR formatter counters and statistics.
clear rdr-formatter
Syntax Description
This command has no arguments or keywords.
Command Default
None
Command Modes
Privileged EXEC
Command History
This table includes the following release-specific history entries:
Release
Modification
2.5.7
This command was introduced.
Usage Guidelines
Authorization: admin
Examples
The following example shows how to clear the RDR formatter counters:
SCE8000>enable 10
Password:<cisco>
SCE8000#clear rdr-formatter
SCE8000#
Related Commands
Command
Description
show rdr-formatter counters
Displays the RDR formatter counters.
Cisco SCE 8000 CLI Command Reference
2-79
Chapter 2
CLI Command Reference
clear scmp name counters
clear scmp name counters
Clears the counters for the specified SCMP peer device.
clear scmp name name counters
Syntax Description
name
Command Default
None
Command Modes
Privileged EXEC
Command History
This table includes the following release-specific history entries:
Name of the SCMP peer device.
Release
Modification
3.0.5
This command was introduced.
Usage Guidelines
Authorization: admin
Examples
The following example shows how to clear the counters for the SCMP peer device named device_1:
SCE8000>enable 10
Password:<cisco>
SCE8000#clear scmp name device_1 counters
SCE8000#
Related Commands
Command
Description
show scmp
Displays the SCMP (ISG) general configuration and status.
Cisco SCE 8000 CLI Command Reference
2-80
Chapter 2
CLI Command Reference
clock read-calendar
clock read-calendar
Synchronizes clocks by setting the system clock from the calendar.
clock read-calendar
Syntax Description
This command has no arguments or keywords.
Command Default
None
Command Modes
Privileged EXEC
Command History
This table includes the following release-specific history entries:
Release
Modification
2.5.7
This command was introduced.
Usage Guidelines
Authorization: admin
Examples
The following example shows how to update the system clock from the calendar:
SCE8000>enable 10
Password:<cisco>
SCE8000#clock read-calendar
SCE8000#
Related Commands
Command
Description
calendar set
Sets the system calendar.
clock update-calendar Synchronizes clocks by setting the calendar from the system clock.
show calendar
Displays the time maintained by the real-time system calendar clock.
Cisco SCE 8000 CLI Command Reference
2-81
Chapter 2
CLI Command Reference
clock set
clock set
Manually sets the system clock.
clock set hh:mm:ss day month year
Syntax Description
hh:mm:ss
Current local time in hours in 24-hour format, minutes, and seconds
(hh:mm:ss).
day
Current day (date) in the month.
month
Current month (by 3-letter abbreviated name).
year
Current year using a 4-digit number.
Command Default
None
Command Modes
Privileged EXEC
Command History
This table includes the following release-specific history entries:
Usage Guidelines
Release
Modification
2.5.7
This command was introduced.
Always coordinate between the calendar and clock by using the clock update-calendar command after
setting the clock.
Authorization: admin
Examples
The following example shows how to set the clock to 20 minutes past 10 p.m. on January 13, 2006:
SCE8000>enable 10
Password:<cisco>
SCE8000#clock set 22:20:00 13 jan 2006
SCE8000#clock update-calendar
SCE8000#show clock
22:21:10 UTC THU January 13 2006
SCE8000#show calendar
22:21:18 UTC THU January 13 2006
SCE8000#
Related Commands
Command
Description
clock update-calendar Synchronizes clocks by setting the calendar from the system clock.
show calendar
Displays the time maintained by the real-time system calendar clock.
show clock
Displays the time maintained by the system clock.
Cisco SCE 8000 CLI Command Reference
2-82
Chapter 2
CLI Command Reference
clock summertime
clock summertime
Configures the Cisco SCE platform to automatically switch to daylight saving time on a specified date,
and also to switch back to standard time. In addition, the time-zone code can be configured to vary with
daylight saving time if required. (For example, in the eastern United States, standard time is designated
as EST, and daylight saving time is designated as EDT).
To cancel the daylight saving time transitions configuration, use the no form of this command.
clock summertime
no clock summertime
Syntax Description
zone
Code for the time zone for daylight saving time.
week1/week2
Week of the month on which daylight saving time begins (week1) and ends
(week2). A day of the week, such as Monday, must also be specified. The
week/day of the week is defined for a recurring configuration only.
Default: Not used
day1/day2
Day of the week on which daylight saving time begins (day1) and ends
(day2).
For recurring configurations, day is a day of the week, such as Sunday.
(Use the first and last keywords to specify the occurrence of a day of the
week in a specified month. For example, last Sunday March.)
For nonrecurring configurations, day is a date in the month, such as 28.
Defaults: day1 is second Sunday, day2 is first Sunday
month1/month2
Month in which daylight saving time begins (month1) and ends (month2).
year1/year2
Year in which daylight saving time begins (year1) and ends (year2).
Defaults: month1 is March, month2 is November
For nonrecurring configurations only.
Default: Not used
time1/time2
Time of day (24-hour clock) at which daylight saving time begins (time1)
and ends (time2).
Required for all configurations.
Default: time1 and time2 is 2:00
offset
Difference in minutes between standard time and daylight saving time.
Default: 60
Command Default
For recurring configurations, offset is 60 minutes.
The following recurrent time changes are configured:
•
Daylight saving time begins at 2:00 (a.m.) on the second Sunday of March.
•
Daylight saving time ends at 2:00 (a.m.) on the first Sunday of November.
Cisco SCE 8000 CLI Command Reference
2-83
Chapter 2
CLI Command Reference
clock summertime
Command Modes
Global configuration
Command History
This table includes the following release-specific history entries:
Usage Guidelines
Release
Modification
2.5.7
This command was introduced.
The format of the command varies somewhat, depending on how the dates for the beginning and end of
daylight saving time are determined for the particular location:
•
If daylight saving time always begins and ends on the same day every year (recurring, as in the
United States):
– Use the clock summertime recurring command.
– Do not specify the year keyword.
•
If the start and end of daylight saving time is different every year (not recurring, as in Israel):
– Use the clock summertime command.
– Specify the year keyword.
Authorization: admin
General Guidelines
The following guidelines apply to configuring daylight saving time transitions:
•
Specify the time-zone code for daylight saving time.
•
For recurring configurations, specify a day of the month (week number/first|last/day of the
week/month).
•
For nonrecurring configurations, specify a date (month/day of the month/year).
•
Define two days:
– day1 is the beginning of daylight saving time.
– day2 is the end of daylight saving time.
•
In the Southern hemisphere, month2 must be earlier than month1, because daylight saving time
begins in the fall and ends in the spring.
•
Specify the exact time that the transition should occur (24-hour clock):
– Time of transition into daylight saving time, according to local standard time
– Time of transition out of daylight saving time, according to local daylight saving time
Recurring Configurations
For the clock summertime recurring command, the default values are the United States transition rules:
•
Daylight saving time begins at 2:00 (a.m.) on the second Sunday of March.
•
Daylight saving time ends at 2:00 (a.m.) on the first Sunday of November.
Use the recurring keyword if daylight saving time always begins and ends on the same day every year.
Cisco SCE 8000 CLI Command Reference
2-84
Chapter 2
CLI Command Reference
clock summertime
Specifying Explicit Days
To specify the occurrence of a day of the week in a specified month, use the first and last keywords. For
example, last Sunday March.
For a nonrecurring configuration, use a specific date, including the year. For example, March 29, 2004.
For a recurring configuration, use week/day of the week/month (no year):
Examples
•
Use the first or last occurrence of a day of the week in a specified month. For example, last Sunday
March (the last Sunday in March).
•
Use the day of the week in a specific week in a specified month. For example, 4 Sunday March (the
fourth Sunday in March). This day is different from the last Sunday of a month that has five Sundays.
The following examples show how to use this command.
Example 1
The following example shows how to configure recurring daylight saving time for a time zone designated
as DST:
•
Daylight saving time begins at 0:00 on the last Sunday of March.
•
Daylight savings time ends at 23:59 on the Saturday of the fourth week of November.
•
Offset is 1 hour (default).
SCE8000>enable 10
Password:<cisco>
SCE8000#config
SCE8000(config)#clock summertime DST
recurring last Sunday March 00:00 4 Saturday November 23:59
SCE8000(config)#
Example 2
The following example shows how to configure nonrecurring daylight saving time for a time zone
designated as DST:
•
Daylight savings time begins at 0:00 on April 16, 2007.
•
Daylight savings time ends at 23:59 October 23, 2007.
•
Offset is 1 hour (default).
SCE8000>enable 10
Password:<cisco>
SCE8000#config
SCE8000(config)#clock summertime DST April 16 2005 00:00 October 23 2005 23:59
SCE8000(config)#
Example 3
The following example shows how to cancel the daylight saving time configuration:
SCE8000>enable 10
Password:<cisco>
SCE8000#config
SCE8000(config)#no clock summertime
SCE8000(config)#
Cisco SCE 8000 CLI Command Reference
2-85
Chapter 2
CLI Command Reference
clock summertime
Related Commands
Command
Description
clock set
Manually sets the system clock.
calendar set
Sets the system calendar.
show calendar
Displays the time maintained by the real-time system calendar clock.
show clock
Displays the time maintained by the system clock.
Cisco SCE 8000 CLI Command Reference
2-86
Chapter 2
CLI Command Reference
clock timezone
clock timezone
Sets the time zone so that the system can correctly interpret time-stamp data coming from systems
located in other time zones.
To remove current time zone settings, use the no form of this command.
clock timezone zone hours [minutes]
no clock timezone
Syntax Description
zone
Name of the time zone to be displayed.
hours
Hours offset from UTC. This number must be an integer ranging from –23
to 23.
minutes
Minutes offset from UTC. This number must be an integer ranging from 0
to 59. Use this argument to specify an additional offset in minutes when the
offset is not measured in whole hours.
Command Default
UTC (hours = 0)
Command Modes
Global configuration
Command History
This table includes the following release-specific history entries:
Release
Modification
2.5.7
This command was introduced.
Usage Guidelines
Authorization: admin
Examples
The following example shows how to set the time zone to Pacific Standard Time with an offset of 10
hours behind UTC:
SCE8000>enable 10
Password:<cisco>
SCE8000#config
SCE8000(config)#clock timezone PST –10
SCE8000(config)#
Related Commands
Command
Description
calendar set
Sets the system calendar.
clock set
Manually sets the system clock.
show calendar
Displays the time maintained by the real-time system calendar clock.
Cisco SCE 8000 CLI Command Reference
2-87
Chapter 2
CLI Command Reference
clock update-calendar
clock update-calendar
Synchronizes clocks by setting the calendar from the system clock.
clock update-calendar
Syntax Description
This command has no arguments or keywords.
Command Default
None
Command Modes
Privileged EXEC
Command History
This table includes the following release-specific history entries:
Release
Modification
2.5.7
This command was introduced.
Usage Guidelines
Authorization: admin
Examples
The following example shows how to update the calendar according to the clock:
SCE8000>enable 10
Password:<cisco>
SCE8000#clock update-calendar
SCE8000#
Related Commands
Command
Description
clock set
Manually sets the system clock.
calendar set
Sets the system calendar.
clock read-calendar
Synchronizes clocks by setting the system clock from the calendar.
Cisco SCE 8000 CLI Command Reference
2-88
Chapter 2
CLI Command Reference
configure
configure
Enables the user to move from Privileged EXEC mode to Global Configuration mode.
configure
Syntax Description
This command has no arguments or keywords.
Command Default
None
Command Modes
Privileged EXEC
Command History
This table includes the following release-specific history entries:
Usage Guidelines
Release
Modification
2.5.7
This command was introduced.
After you enter the configure command, the system prompt changes from <hostname># to
<hostname>(config)#, indicating that the system is in Global Configuration mode. To leave Global
Configuration mode and return to the Privileged EXEC mode prompt, use the exit command.
Authorization: admin
Examples
The following example shows how to enter Global Configuration mode:
SCE8000>enable 10
Password:<cisco>
SCE8000#configure
SCE8000(config)#
Related Commands
Command
Description
exit
Exits from the current mode to the next “lower” mode.
Cisco SCE 8000 CLI Command Reference
2-89
Chapter 2
CLI Command Reference
connection-mode
connection-mode
Sets the connection mode parameters.
connection-mode connection-mode sce-id sce-id priority priority on-failure on-failure
Syntax Description
connection-mode
sce-id
Establishes the connection:
•
inline—Single SCE platform inline
•
receive-only—Single SCE platform receive-only
•
inline-cascade—(Cascaded SCE platform topology only) Two SCE
platforms inline
•
receive-only-cascade—(Cascaded SCE platform topology only) Two SCE
platforms receive-only
(Cascaded SCE platform topology only) Number that identifies the Cisco SCE
platform in a cascaded pair. Choose 0 or 1.
In a pair of cascaded SCE 8000 GBE platforms, this number allows the system
to identify the traffic links, with links 0 to 7 connected through one SCE
platform and links 8 to 15 on the other. These link numbers are used in the SCA
BB Reporter reports as well as in the Global Control configuration menu in the
SCA BB console.
Command Default
priority
(Cascaded SCE platform topology only) Defines the primary SCE platform.
Choose primary or secondary.
on-failure
(Inline topologies only) Determines system behavior on failure of the Cisco SCE
platform. Choose bypass, cutoff, or external-bypass.
The default for connection-mode is inline.
The default for sce-id is 0.
The default for priority is primary.
The defaults for on-failure are:
– external-bypass for inline mode.
– bypass for inline-cascade mode.
Command Modes
Interface Linecard Configuration
Command History
This table includes the following release-specific history entries:
Release
Modification
2.5.7
This command was introduced.
Cisco SCE 8000 CLI Command Reference
2-90
Chapter 2
CLI Command Reference
connection-mode
Usage Guidelines
Caution
Note
This command can be used only if the line card is in either no-application or shutdown mode.
The sce-id argument, which identifies the Cisco SCE platform, replaces the physically-connected-link
argument, which identified the link. This change was required with the introduction of the Cisco SCE
8000 GBE platform, which supports multiple links. However, for backward compatibility, the
physically-connected-link argument is still recognized and the number of the link assigned to that
argument (0 or 1) is defined as the Cisco SCE ID.
Authorization: admin
Examples
The following example shows how to configure the primary SCE 8000 platform in a two-SCE platform
inline topology. This device is designated as SCE platform 0, and the behavior of the Cisco SCE platform
if a failure occurs is bypass (default).
SCE8000>enable 10
Password: <cisco>
SCE8000#config
SCE8000(config)#interface linecard 0
SCE8000(config if)#connection-mode inline-cascade sce-id 0 priority primary on-failure
bypass
SCE8000(config if)#
Related Commands
Command
Description
show interface linecard connection-mode
Displays the current configuration of the
Cisco SCE platform traffic-link connection.
show interface linecard physically-connected- links
Displays the link mapping for the line card
interface.
show interface linecard cascade connection-status
Displays information about the connection
between two cascaded SCE 8000 platforms,
using the cascade interfaces.
show interface linecard cascade peer-sce-information Displays information about the peer SCE
platform.
Cisco SCE 8000 CLI Command Reference
2-91
Chapter 2
CLI Command Reference
copy
copy
Copies any file from a source directory to a destination directory on the local flash file system.
copy source-file destination-file
Syntax Description
source-file
Name of the original file.
destination-file
Name of the new destination file.
Command Default
None
Command Modes
Privileged EXEC
Command History
This table includes the following release-specific history entries:
Usage Guidelines
Release
Modification
2.5.7
This command was introduced.
Both filenames should be in 8.3 format, that is, the names have a maximum of eight characters before
the period and three characters after it.
Authorization: admin
Examples
The following example shows how to copy the local analysis.sli file located in the root directory to the
applications directory:
SCE8000>enable 10
Password:<cisco>
SCE8000#copy analysis.sli applications/analysis.sli
SCE8000#
Related Commands
Command
Description
copy ftp://
Uploads or downloads a file system using FTP.
copy-passive
Uploads or downloads a file using passive FTP.
Cisco SCE 8000 CLI Command Reference
2-92
Chapter 2
CLI Command Reference
copy ftp://
copy ftp://
Uploads or downloads a file system using FTP.
copy ftp://username[:password]@server-address[:port]/path/source-file destination-file
copy source-file ftp://username[:password]@server-address[:port]/path/destination-file
Syntax Description
username
Username known by the FTP server.
password
Password of the given username.
server-address
Dotted decimal IP address of the FTP server.
port
(Optional) Port number on the FTP server.
source-file
Name of the source file.
When downloading a file, this source must be an FTP location.
destination-file
Name of the destination file.
When uploading a file, this destination must be an FTP location.
When downloading a file to the local flash file system, this filename should
be in 8.3 format.
Command Default
None
Command Modes
Privileged EXEC
Command History
This table includes the following release-specific history entries:
Usage Guidelines
Release
Modification
2.5.7
This command was introduced.
Use the following syntax for remote upload or download using FTP:
ftp://username[:password]@server-address[:port]/path/file
You can configure keyword shortcuts for the copy command using the following commands:
•
ip ftp password to configure a password shortcut
•
ip ftp username to configure a username shortcut
Authorization: admin
Cisco SCE 8000 CLI Command Reference
2-93
Chapter 2
CLI Command Reference
copy ftp://
Examples
The following example shows how to download the ftp.sli file from the host 10.10.10.10 with the
username user and the password a1234:
SCE8000>enable 10
Password:<cisco>
SCE8000#copy ftp://user:[email protected]/p:/applications/ftp.sli appl/analysis.sli
SCE8000#
Related Commands
Command
Description
copy-passive
Uploads or downloads a file using passive FTP.
ip ftp password
Specifies the password to be used for FTP connections for the current
session.
ip ftp username
Configures the username for FTP connections for the current session.
Cisco SCE 8000 CLI Command Reference
2-94
Chapter 2
CLI Command Reference
copy-passive
copy-passive
Uploads or downloads a file using passive FTP.
copy-passive source-file ftp://username[:password]@server-address[:port]/path/destination-file
[overwrite]
copy-passive ftp://username[:password]@server-address[:port]/path/source-file destination-file
Syntax Description
source-file
Name of the source file.
When downloading a file, this source must be an FTP location.
username
Username known by the FTP server.
password
Password of the given username.
server-address
Dotted decimal IP address.
port
(Optional) Port number on the FTP server.
destination-file
Name of the destination file.
When uploading a file, this destination must be an FTP location.
overwrite
Allows the command to overwrite an existing file.
Command Default
None
Command Modes
Privileged EXEC
Command History
This table includes the following release-specific history entries:
Usage Guidelines
Release
Modification
2.5.7
This command was introduced.
Use the following syntax for remote upload or download using FTP:
ftp://username[:password]@serveraddress[:port]/path/file
You can configure keyword shortcuts for the copy command using the following commands:
•
ip ftp password to configure a password shortcut
•
ip ftp username to configure a username shortcut
Authorization: admin
Cisco SCE 8000 CLI Command Reference
2-95
Chapter 2
CLI Command Reference
copy-passive
Examples
The following example shows how to download the analysis.sli file from the host 10.10.10.10 with the
username user and the password a1234:
SCE8000>enable 10
Password:<cisco>0
SCE8000#copy-passive ftp://user:[email protected]/p:/applications/analysis.sli
appl/analysis.sli
SCE8000#
Related Commands
Command
Description
copy ftp://
Uploads or downloads a file system using FTP.
ip ftp password
Specifies the password to be used for FTP connections for the current
session.
ip ftp username
Configures the username for FTP connections for the current session.
Cisco SCE 8000 CLI Command Reference
2-96
Chapter 2
CLI Command Reference
copy running-config-application startup-config-application
copy running-config-application startup-config-application
To enable the task of copying the currently running configuration application to the startup configuration
application in the Cisco SCE platform, use the copy running-config-application
startup-config-application command in the privileged EXEC mode.
copy running-config-application startup-config-application
Syntax Description
This command has no arguments or keywords.
Command Default
None
Command Modes
Privileged EXEC
Command History
This table includes the following release-specific history entries:
Release
Modification
3.7.x
This command was introduced.
Usage Guidelines
The authorization used is root.
Examples
The following is sample output from the copy running-config-application startup-config-application
command:
SCE8000>enable 15
Password:<cisco>
SCE8000#>copy running-config-application startup-config-application
Writing application configuration file to temporary location...
Removing old application configuration file...
Renaming temporary application configuration file with the final file's name...
SCE8000#>
Cisco SCE 8000 CLI Command Reference
2-97
Chapter 2
CLI Command Reference
copy running-config-application startup-config-application
Related Commands
Command
Description
more
running-config-all
Displays the contents of all the currently running configuration files.
more
running-config-applic
ation
DisplayS the contents of the currently running configuration application in
the Cisco SCE platform.
more
startup-config-all
Displays the contents of all the startup configuration files.
more
DisplayS the contents of the startup configuration application files in the
startup-config-applica Cisco SCE platform
tion
show
running-config-all
Displays the contents of all the running configuration files.
show
running-config-applic
ation
Displays the contents of the currently running configuration application in
the Cisco SCE platform.
show
startup-config-all
Displays the contents of all the startup configuration files.
Displays the contents of the startup configuration application files in the
show
startup-config-applica Cisco SCE platform.
tion
Cisco SCE 8000 CLI Command Reference
2-98
Chapter 2
CLI Command Reference
copy running-config-party-db startup-config-party-db
copy running-config-party-db startup-config-party-db
To enable the task of copying the currently running configuration party database to the startup
configuration party database of the static parties that are configured on the Cisco SCE platform, use the
copy running-config-party-db startup-config-party-db command in the privileged EXEC mode.
copy running-config-party-db startup-config-party-db
Syntax Description
This command has no arguments or keywords.
Command Default
None
Command Modes
Privileged EXEC
Command History
This table includes the following release-specific history entries:
Release
Modification
3.7.x
This command was introduced.
Usage Guidelines
The authorization used is root.
Examples
The following is sample output from the copy running-config-party-db startup-config-party-db
command:
SCE8000>enable 15
Password:<cisco>
SCE8000#>copy running-config-party-db startup-config-party-db
SCE8000#>show startup-config-party-db
#This is a party database configuration file (running-config-party-db) for static parties
only.
#Created on 13:34:53 UTC TUE July 12 2011
#cli-type 1
#version 1
hw-bypass mode
party name "N/A"
party name "[party-name]"
party mapping ip-address 24.11.52.128 name [party-name]
party mapping ip-address 110.10.10.10 name [party-name]
party name [party-name] hw-bypass
SCE8000#>
Cisco SCE 8000 CLI Command Reference
2-99
Chapter 2
CLI Command Reference
copy running-config-party-db startup-config-party-db
Related Commands
Command
Description
show
running-config-all
Displays the contents of all the running configuration files.
show
running-config-partydb
Displays the contents of the currently running party database configuration
for the static parties that are configured on the Cisco SCE platform.
show
startup-config-all
Displays the contents of all the startup configuration files.
show
Displays the startup party database configuration of the static parties that
startup-config-party-d are configured on the Cisco SCE platform.
b
Cisco SCE 8000 CLI Command Reference
2-100
Chapter 2
CLI Command Reference
copy running-config startup-config
copy running-config startup-config
Builds a configuration file called config.txt that contains general configuration commands. This file is
used in successive boots.
copy running-config startup-config
Syntax Description
This command has no arguments or keywords.
Command Default
None
Command Modes
Privileged EXEC
Command History
This table includes the following release-specific history entries:
Usage Guidelines
Release
Modification
2.5.7
This command was introduced.
This command must be entered to save newly configured parameters so that they will be effective after
a reboot. To view the running configuration before saving it, use the more running-config command.
The old configuration file is automatically saved in the /system/prevconf directory.
Authorization: admin
Examples
The following example shows how to save the current configuration for successive boots:
SCE8000>enable 10
Password:<cisco>
SCE8000#copy running-config startup-config
Backing-up configuration file...
Writing configuration file...
SCE8000#
Related Commands
Command
Description
more
Displays the contents of a file.
show running-config
Displays the current configuration.
Cisco SCE 8000 CLI Command Reference
2-101
Chapter 2
CLI Command Reference
copy source-file ftp://
copy source-file ftp://
Uploads a file to a remote station using FTP.
copy source-file ftp://username[:password]@server-address[:port]/path/destination-file
Syntax Description
source-file
Name of the source file located in the local flash file system.
username
Username known by the FTP server.
password
Password of the given username.
server-address
Dotted decimal IP address.
port
(Optional) Port number on the FTP server.
destination-file
Name of the file to be created in the FTP server.
Command Default
None
Command Modes
Privileged EXEC
Command History
This table includes the following release-specific history entries:
Usage Guidelines
Release
Modification
2.5.7
This command was introduced.
Use the following syntax for remote upload or download using FTP:
ftp://username[:password]@serveraddress[:port]/path/file
You can configure keyword shortcuts for the copy command using the following commands:
•
ip ftp password to configure a password shortcut
•
ip ftp username to configure a username shortcut
Authorization: admin
Examples
The following example shows how to upload the analysis.sli file located on the local flash file system to
the host 10.1.1.105:
SCE8000>enable 10
Password:<cisco>
SCE8000#copy /appl/analysis.sli ftp://myname:[email protected]/p:/applications/analysis.sli
SCE8000#
Related Commands
Command
Description
copy ftp://
Uploads or downloads a file system using FTP.
Cisco SCE 8000 CLI Command Reference
2-102
Chapter 2
CLI Command Reference
copy source-file startup-config
copy source-file startup-config
Copies the specified source file to the startup-config file.
The command uploads a backup configuration file created using the copy startup-config
destination-file command. In a cascaded solution, you can copy the configuration from one SCE
platform to the other.
copy source-file startup-config
Syntax Description
source-file
Name of the backup configuration file. Choose either:
•
ftp://user:pass@host/drive:/dir/bckupcfg.txt
•
/system/preconf
Command Default
None
Command Modes
Privileged EXEC
Command History
This table includes the following release-specific history entries:
Usage Guidelines
Release
Modification
3.0.0
This command was introduced.
The source filename should be in 8.3 format, that is, the names have a maximum of eight characters
before the period and three characters after it.
Authorization: admin
Examples
The following example shows how to upload a backup configuration file:
SCE8000>enable 10
Password:<cisco>
SCE8000#copy ftp://user:pass@host/drive:/dir/bakupcfg.txt startup-config
SCE8000#
Related Commands
Command
Description
copy startup-config destination-file
Copies the startup-config file to the specified destination file.
Cisco SCE 8000 CLI Command Reference
2-103
Chapter 2
CLI Command Reference
copy startup-config destination-file
copy startup-config destination-file
Copies the startup-config file to the specified destination file.
The command creates a backup configuration file. In a cascaded solution, you can copy the configuration
from one SCE platform to the other. The file created by this command can be uploaded to the second
SCE platform using the copy source-file startup-config command.
copy startup-config destination-file
Syntax Description
destination-file
Name of the file to which the configuration is copied. Choose either:
•
ftp://user:pass@host/drive:/dir/bckupcfg.txt
•
/system/prevconf
Command Default
None
Command Modes
Privileged EXEC
Command History
This table includes the following release-specific history entries:
Usage Guidelines
Release
Modification
3.0.0
This command was introduced.
The destination filename should be in 8.3 format, that is, the names have a maximum of eight characters
before the period and three characters after it.
Authorization: admin
Examples
The following example shows how to create a backup configuration file:
SCE8000>enable 10
Password:<cisco>
SCE8000#copy startup-config ftp://user:pass@host/drive:/dir/bckupcfg.txt
SCE8000#
Related Commands
Command
Description
copy source-file startup-config
Copies the specified source file to the startup-config file.
Cisco SCE 8000 CLI Command Reference
2-104
Chapter 2
CLI Command Reference
copy startup-config-party-db backupfile
copy startup-config-party-db backupfile
To enable the task of copying the startup configuration party database and create a backup file of the
configured static parties in the Cisco SCE platform, use the copy startup-config-party-db backup-file
command in the privileged EXEC mode.
copy startup-config-party-db backup-file name
Syntax Description
backup-file name
Command Default
None
Command Modes
Privileged EXEC
Command History
This table includes the following release-specific history entries:
Name of the backup file to which the startup configuration party database
is copied.
Release
Modification
3.7.x
This command was introduced.
Usage Guidelines
The authorization used is root.
Examples
The following is sample output from the copy startup-config-party-db backupfile command:
SCE8000>enable 15
Password:<cisco>
SCE8000#>copy startup-config-party-db partydbcfgbackup.txt
SCE8000#>more partydbcfgbackup.txt
#This is a party database configuration file (running-config-party-db) for static parties
only.
#Created on 13:34:02 UTC TUE July 12 2011
#cli-type 1
#version 1
hw-bypass mode
party name "N/A"
party name "[party-name]"
party mapping ip-address 24.11.52.128 name [party-name]
party mapping ip-address 110.10.10.10 name [party-name]
party name [party-name] hw-bypass
SCE8000#>
Cisco SCE 8000 CLI Command Reference
2-105
Chapter 2
CLI Command Reference
copy startup-config-party-db backupfile
Related Commands
Command
Description
more
running-config-all
Displays the contents of all the currently running configuration files.
more
startup-config-all
Displays the contents of all the startup configuration files.
show
running-config-all
Displays the contents of all the currently running configuration files.
show
running-config-partydb
Displays the contents of the currently running party database configuration
for the static parties that are configured on the Cisco SCE platform.
show
startup-config-all
Displays the contents of all the startup configuration files.
Displays the contents of the startup configuration party database of the
show
startup-config-party-d static parties that are configured in the Cisco SCE platform.
b
Cisco SCE 8000 CLI Command Reference
2-106
Chapter 2
CLI Command Reference
cpa-client destination
cpa-client destination
Configures the destination CPA server.
cpa-client destination ip-address port port#
no cpa-client destination
Syntax Description
ip-address
IP address of the destination CPA server.
port#
Port number of the CPA server.
Command Default
None
Command ModesI
Interface Linecard Configuration
Command History
This table includes the following release-specific history entries:
Release
Modification
3.7.x
This command was introduced.
Usage Guidelines
Authorization: admin
Examples
The following example shows how configure the destination of the CPA client.
SCE8000>enable 10
password:<cisco>
SCE8000#>config
SCE8000(config)#interface linecard 0
SCE8000(config if)#cpa-client destination 10.10.10.20 port 135
SCE8000(config if)#
Related Commands
Command
Description
show interface linecard cpa-client
Displays the current configuration of the CPA client.
Cisco SCE 8000 CLI Command Reference
2-107
Chapter 2
CLI Command Reference
cpa-client retries
cpa-client retries
Configures the number of retries to make if a request to the CPA server times out.
cpa-client retries number
no cpa-client retries
Syntax Description
number
Command Default
None
Command Modes
Interface Linecard Configuration
Command History
This table includes the following release-specific history entries:
Number of retries to allow for the CPA server.
Release
Modification
3.7.x
This command was introduced.
Usage Guidelines
Authorization: admin
Examples
The following example shows how configure the number of retries for the CPA client.
SCE8000>enable 10
password:<cisco>
SCE8000#>config
SCE8000(config)#interface linecard 0
SCE8000(config if)#cpa-client retries 5
SCE8000(config if)#
Related Commands
Command
Description
show interface linecard cpa-client
Displays the current configuration of the CPA client.
Cisco SCE 8000 CLI Command Reference
2-108
Chapter 2
CLI Command Reference
debug const-db name CcConstDb.Party.maxNum128bitIps
debug const-db name CcConstDb.Party.maxNum128bitIps
Increases the DS-Lite table buffer size when the system is configured in 128-bit mode.
debug const-db name CcConstDb.Party.maxNum128bitIps value {decimal}
Syntax Description
decimal
Command Default
By default, value is 0.
Command Modes
Global Configuration
Command History
This table includes the following release-specific history entries:
Usage Guidelines
Specifies the DS-Lite table buffer size. Suggested buffer size is 1000.
Release
Modification
4.2.0
This command was introduced.
Authorization: root
If DS-Lite and IANA traffic has more than 100 K flows, configure the DSLite constdb to increase
DS-Lite table size.
debug const-db name CcConstDb.Party.maxNum128bitIps value 1000
Examples
The following example shows how to increase the buffer table size:
SCE8000>enable 10
password:<cisco>
SCE8000#>config
SCE8000(config)#debug const-db name CcConstDb.Party.maxNum128bitIps value 1000
Cisco SCE 8000 CLI Command Reference
2-109
Chapter 2
CLI Command Reference
default subscriber template all
default subscriber template all
Removes all user-defined subscriber templates from the system. Only the default template remains.
default subscriber template all
Syntax Description
This command has no arguments or keywords.
Command Default
None
Command Modes
Interface Linecard Configuration
Command History
This table includes the following release-specific history entries:
Release
Modification
2.5.7
This command was introduced.
Usage Guidelines
Authorization: admin
Examples
The following example shows how to remove all user-defined subscriber templates:
SCE8000>enable 10
Password:<cisco>
SCE8000#config
SCE8000(config)#interface linecard 0
SCE8000(config if)# default subscriber template all
SCE8000(config if)#
Related Commands
Command
Description
subscriber template import csv-file
Imports a subscriber template from the specified
CSV file, according to the party template.
show interface linecard subscriber templates Displays a specified subscriber template.
Cisco SCE 8000 CLI Command Reference
2-110
Chapter 2
CLI Command Reference
delete
delete
Deletes a file from the local flash file system.
delete filename [/recursive]
Syntax Description
filename
Name of the file or directory to be deleted.
/recursive
Deletes a complete directory and its contents. When used with this switch,
the filename argument specifies a directory rather than a file.
Command Default
None
Command Modes
Privileged EXEC
Command History
This table includes the following release-specific history entries:
Release
Modification
2.5.7
This command was introduced.
Usage Guidelines
Authorization: admin
Examples
The following example shows how to delete the file oldlog.txt:
SCE8000>enable 10
Password:<cisco>
SCE8000#delete oldlog.txt
SCE8000#
The following example shows how to delete the directory oldlogs:
SCE8000>enable 10
Password:<cisco>
SCE8000#delete oldlogs /recursive
3 files and 1 directories will be deleted.
Are you sure? y
3 files and 1 directories have been deleted.
SCE8000#
Related Commands
Command
Description
dir
Displays the files in the current directory.
rmdir
Removes an empty directory.
Cisco SCE 8000 CLI Command Reference
2-111
Chapter 2
CLI Command Reference
diameter
diameter
Starts the diameter stack.
To stop the stack, use the no form of this command.
To reset the stack to the default state (stopped), use the default form of this command.
diameter
no diameter
default diameter
Syntax Description
This command has no arguments or keywords.
Command Default
Diameter stack is stopped.
Command Modes
Global configuration
Command History
This table includes the following release-specific history entries:
Usage Guidelines
Release
Modification
3.6.x
This command was introduced.
Stopping the stack using this command is a brute force shutdown. All messages and states may be lost.
Authorization: admin
Examples
The following example shows how to stop the stack.
SCE8000>enable 10
Password:<cisco>
SCE8000# configure
SCE8000(config)#no diameter
SCE8000(config)#
Related Commands
Command
Description
show diameter
Displays the current diameter stack state.
Cisco SCE 8000 CLI Command Reference
2-112
Chapter 2
CLI Command Reference
diameter Gx
diameter Gx
Starts the Gx application.
To stop the Gx application, use the no form of this command.
diameter Gx
no diameter Gx
Syntax Description
This command has no arguments or keywords.
Command Default
Gx application is stopped.
Command Modes
Global configuration
Command History
This table includes the following release-specific history entries:
Release
Modification
3.6.x
This command was introduced.
Usage Guidelines
Authorization: admin
Examples
The following example shows how to stop the Gx application.
SCE8000>enable 10
Password:<cisco>
SCE8000# configure
SCE8000(config)#no diameter Gx
SCE8000(config)#
Related Commands
Command
Description
show diameter Gx
Displays the current Gx application state.
Cisco SCE 8000 CLI Command Reference
2-113
Chapter 2
CLI Command Reference
diameter Gx failure-grace-time
diameter Gx failure-grace-time
Configures Gx detection time out. If no connection to any server is detected for the configured length of
time, all diameter sessions are closed and a new connection must be established. The sessions will be
reopened once a connection is reestablished.
To reset the grace period to the default, use the default form of this command.
diameter Gx failure-grace-time time
default Gx failure-grace-time
Syntax Description
time
Command Default
300 seconds
Command Modes
Global configuration
Command History
This table includes the following release-specific history entries:
Detection grace period in seconds.
Release
Modification
3.6.x
This command was introduced.
Usage Guidelines
Authorization: admin
Examples
The following example shows how to use this command.
SCE8000>enable 10
Password:<cisco>
SCE8000# configure
SCE8000(config)#diameter Gx failure-grace-time 360
SCE8000(config)#
Related Commands
Command
Description
show diameter Gx
Displays the current Gx application configuration.
Cisco SCE 8000 CLI Command Reference
2-114
Chapter 2
CLI Command Reference
diameter Gx login-rate
diameter Gx login-rate
Configures the maximum Gx login rate when only Gx is enabled.
To reset login-rate to the default value, use the default form of this command.
diameter Gx login-rate login-rate
default Gx login-rate
Syntax Description
login-rate
Maximum Gx login rate.
Possible value range is from 360 to 456.
The default value varies based on the Gx and Gy configuration. When Gy is
enabled, the default value is 200 and when only Gx is enabled, the default
value is 360.
We recommend that you set a value more than 360 only for Gx integration.
Revert to the default values for Subscriber Manager integration.
You cannot configure the Gx login-rate if Gy is enabled. The default value
changes to 200 when Gy is enabled on the device.
Command Default
This command is disabled.
Command Modes
Global configuration
Command History
This table includes the following release-specific history entries:
Usage Guidelines
Release
Modification
4.0.0
This command was introduced.
Authorization: admin
This command is applicable when only Gx is enabled.
Examples
The following example shows how to use this command.
SCE8000> enable 10
Password: <cisco>
SCE8000# configure
SCE8000(config)# diameter Gx login-rate 400
SCE8000(config)#
Cisco SCE 8000 CLI Command Reference
2-115
Chapter 2
diameter Gx login-rate
Related Commands
Command
Description
show diameter Gx
Displays the current Gx application configuration.
Cisco SCE 8000 CLI Command Reference
2-116
CLI Command Reference
Chapter 2
CLI Command Reference
diameter Gx MIP Support
diameter Gx MIP Support
Enables multiple IP mapping for a Gx subscriber.
To disable the multiple IP mapping, use the no form of the command.
diameter Gx MIP-support
no diameter Gx MIP-support
Syntax Description
This command has no arguments or keywords.
Command Default
Diameter Gx MIP support is disabled.
Command Modes
Global configuration
Command History
This table includes the following release-specific history entries:
Usage Guidelines
Release
Modification
4.1.0
This command was introduced.
If MIP-support is enabled, a subscriber can have multiple IP mappings. When a subscriber with an IP
mapping is logged in with an existing subscriber ID in Gx, the new IP mapping flow is logged out
implicitly and the IP mapping is mapped to the existing subscriber ID.
If MIP-support is disabled, a subscriber can have only one mapping. When a new subscriber is logged
in with an existing subscriber ID in Gx, the existing subscriber IP mapping is logged out and the
subscriber is logged in with a new IP mapping.
Authorization: admin
Examples
The following example shows how to use this command.
SCE8000#> enable 10
Password: <cisco>
SCE8000#> configure
diameter Gx MIP-support
SCE8000(config)#> diameter Gx MIP-support
SCE8000(config)#> end
SCE8000#> show diameter Gx MIP-support
MIP SUPPORT IS ENABLED
SCE8000#
Cisco SCE 8000 CLI Command Reference
2-117
Chapter 2
CLI Command Reference
diameter Gx PCRF-connection-failure-grace-time
diameter Gx PCRF-connection-failure-grace-time
Configures the diameter Gx connection failure grace period.
To reset the grace period to the default, use the default form of this command.
diameter Gx pcrf-connection-failure-grace-time time
default diameter Gx pcrf-connection-failure-grace-time
Syntax Description
time
Command Default
150 seconds
Command Modes
Global configuration
Command History
This table includes the following release-specific history entries:
Usage Guidelines
Grace period in seconds.
Release
Modification
3.6.x
This command was introduced.
Failover functions as follows:
•
If a connection fails and is reestablished within the failover grace period, no failover action is taken
•
If a connection fails and is not reestablished within the failover grace period, failover action is taken.
•
If a server fails, all its sessions remain open for the failover grace period. After that period has
expired, all the server sessions are closed and reopened on secondary server.
•
If a server fails on a system using session-sharing, no failover action is taken.
Authorization: admin
Examples
The following example shows how to use this command.
SCE8000>enable 10
Password:<cisco>
SCE8000# configure
SCE8000(config)#diameter Gx pcrf-connection-failure-grace-time 120
SCE8000(config)#
Related Commands
Command
Description
show diameter Gx
Displays the current Gx application configuration.
Cisco SCE 8000 CLI Command Reference
2-118
Chapter 2
CLI Command Reference
diameter Gx peer-proxyagent
diameter Gx peer-proxyagent
To enable the peer proxy agent in CCR messages for Gx, use the diameter Gx peer-proxyagent
command.
Use the no form of the command to disable the peer proxy agent in CCR messages.
diameter Gx peer-proxyagent
no diameter Gx peer-proxyagent
Syntax Description
This command has no syntax or keywords.
Command Default
None.
Command Modes
CONFIG (#)
Command History
This table includes the following release-specific history entries:
Release
Modification
3.8.0
This command was introduced.
Usage Guidelines
Authorization: admin
Examples
Example 1
The following example shows how to enable peer proxy agent in CCR messages for Gx:
SCE8000> enable 10
Password:<cisco>
SCE8000# configure
SCE8000(config)# diameter Gx peer-proxyagent
Example 2
The following example shows how to disable peer proxy agent in CCR messages for Gx:
SCE8000> enable 10
Password:<cisco>
SCE8000# configure
SCE8000(config)# no diameter Gx peer-proxyagent
Cisco SCE 8000 CLI Command Reference
2-119
Chapter 2
diameter Gx send-attributes
diameter Gx send-attributes
Configures the diameter Gx VSA attributes send mode.
Use the no form of command to change the mode to DONT_SEND.
diameter Gx send-attributes {always | on-change | on-initial}
Syntax Description
always
Sends the subscriber VSA attributes always.
on-change
Sends the subscriber VSA attributes on change.
on-initial
Sends the subscriber VSA attributes on initial.
Command Default
By default, the mode is DONT_SEND
Command Modes
Global configuration
Command History
This table includes the following release-specific history entries:
Release
Modification
4.2.0
This command was introduced.
Usage Guidelines
Authorization: admin
Examples
The following example shows how to use this command:
SCE8000#enable 10
password: <cisco>
SCE8000#configure
SCE8000(config)#diameter gx send-attributes on-initial
Examples
The following example shows how to use this command:
SCE8000#enable 10
password: <cisco>
SCE8000#configure
SCE8000(config)#no diameter gx send-attributes
Related Commands
Command
Description
show diameter Gx
Displays the current Gx application configuration.
Cisco SCE 8000 CLI Command Reference
2-120
CLI Command Reference
Chapter 2
CLI Command Reference
diameter Gx tx-timer
diameter Gx tx-timer
Configures the transmit timeout value for messages.
To reset the tx timeout to the default value, use the default form of this command.
diameter Gx tx-timer time
default diameter Gx tx-timer
Syntax Description
time
Command Default
5 seconds
Command Modes
Global configuration
Command History
This table includes the following release-specific history entries:
Usage Guidelines
Timeout interval in seconds.
Release
Modification
3.6.x
This command was introduced.
If the PCRF does not respond to a Gx message in the configured tx-timer seconds, the message is
considered timed out. The message is dumped if it arrives after tx-timer expires.
Authorization: admin
Examples
The following example shows how to use this command.
SCE8000>enable 10
Password:<cisco>
SCE8000# configure
SCE8000(config)# diameter Gx tx-timeout 20
SCE8000(config)#
Related Commands
Command
Description
show diameter Gx
Displays the current Gx application configuration.
Cisco SCE 8000 CLI Command Reference
2-121
Chapter 2
CLI Command Reference
diameter Gx virtual-gi multi-mapping
diameter Gx virtual-gi multi-mapping
Configures multiple VLAN ID to a virtual Gi ID mapping.
diameter Gx virtual-gi multi-mapping {enable| disable| disable force}
Syntax Description
enable
Enables multiple VLAN ID to a virtual Gi ID mapping. Cisco SCE adds the
new VLAN ID mapping to an existing VGi ID without overwriting the
VLAN ID.
disable
Disables multiple VLAN ID to a virtual Gi ID mapping if no two or more
VLAN IDs are configured to a VGi ID.
disable force
Disables multi-mapping configurations on the device and removes all
multi-mapping configurations.
Command Default
None
Command Modes
Global configuration
Command History
This table includes the following release-specific history entries:
Usage Guidelines
Release
Modification
4.1.0
This command was introduced.
Authorization: admin
When configuring a VLAN ID mapping to an already mapped virtual Gi ID, by default, the previous
VLAN ID is overwritten because only one VLAN ID can be mapped to a virtual Gi ID.
Examples
The following example shows how to enable TACACS+ accounting for the admin privilege level (10):
Enable and configure multi-mapping:
SCE8000#>
SCE8000#> configure
SCE8000(config)#> diameter gx virtual-gi multi-mapping enable
SCE8000(config)#> end
SCE8000#> show diameter gx virtual-gi multi-mapping
Multiple VLAN ID to single
SCE8000#>
SCE8000#> configure
SCE8000(config)#> diameter
SCE8000(config)#> diameter
SCE8000(config)#> diameter
SCE8000#>
Cisco SCE 8000 CLI Command Reference
2-122
VGi ID mapping supported
gx virtual-gi vlan-id 1 mapping 100
gx virtual-gi vlan-id 2 mapping 100
gx virtual-gi vlan-id 3 mapping 100
Chapter 2
CLI Command Reference
diameter Gx virtual-gi multi-mapping
SCE8000#> show diameter gx virtual-gi all
Virtual Gi Mapping Table:
--------------------| VLAN | Mapping |
--------------------| 1 | 100 |
| 2 | 100 |
| 3 | 100 |
---------------------
Disable multi-mapping:
SCE8000(config)#> diameter Gx virtual-gi multi-mapping disable
SCE8000(config)#> do show diameter gx virtual-gi multi-mapping
Multiple VLAN ID to single VGi ID mapping NOT supported
SCE8000(config)#>
Disable fails when multi-mapping is configured:
SCE8000(config)#> do show diameter gx virtual-gi all
Virtual Gi Mapping Table:
--------------------| VLAN | Mapping |
--------------------| 1 | 100 |
| 2 | 100 |
| 3 | 100 |
| 4 | 101 |
--------------------SCE8000(config)#> diameter gx virtual-gi multi-mapping disable
Error - Cannot disable Multi Mapping option as multiple mappings existing; Use 'force'
option to remove all the multiple mappings and disable
Disable multi-mapping and remove all multi-mapping configurations:
SCE8000(config)#> do show diameter gx virtual-gi all
Virtual Gi Mapping Table:
--------------------| VLAN | Mapping |
--------------------| 1 | 100 |
| 2 | 100 |
| 3 | 100 |
| 4 | 101 |
--------------------SCE8000(config)#> diameter gx virtual-gi multi-mapping disable force
SCE8000(config)#> do show diameter gx virtual-gi all
Virtual Gi Mapping Table:
diameter Gx virtual-gi multi-mapping
--------------------| VLAN | Mapping |
--------------------| 4 | 101 |
--------------------SCE8000(config)#>
SCE8000(config)#> do show diameter gx virtual-gi multi-mapping
Multiple VLAN ID to single VGi ID mapping NOT supported
SCE8000(config)#>
Cisco SCE 8000 CLI Command Reference
2-123
Chapter 2
CLI Command Reference
diameter gx virtual-gi vlan-id
diameter gx virtual-gi vlan-id
Configures the mapping of VLAN ID to virtual Gi ID.
To disable the configuration or to remove the mapping, use the no form of this command.
diameter gx virtual-gi vlan-id vlan-id mapping value
no diameter gx virtual-gi mapping vlanid vlan-id
no diameter gx virtual-gi mapping vgi-id vgi-id
no diameter gx virtual-gi mapping all
Syntax Description
vlan-id
VLAN tag (1-4094) to be mapped to virtual Gi ID.
value
Virtual Gi ID (1-255) mapped to a VLAN ID.
vgi-id
Specifies to remove Virtual Gi ID.
vgi-id
Virtual Gi ID (1-255) to be removed.
all
Removes all configured mappings.
Command Default
None
Command Modes
Global configuration
Command History
This table includes the following release-specific history entries:
Usage Guidelines
Release
Modification
3.6.x
This command was introduced.
3.7.x
This command was modified.
4.1.0
This command was modified to add new VLAN ID mapping to an existing
VGi ID when multiple VLAN-ID to VGi ID mapping is enabled.
The VLAN ID (1-4094) retrieved by SCE 8000 from the subscriber traffic is mapped to a static virtual
Gi ID (1-255).
By default, when configuring a VLAN ID mapping to an already mapped virtual Gi ID, the previous
VLAN ID is overwritten, because only one VLAN ID can be mapped to a virtual Gi ID.
If multiple VLAN ID to a Virtual Gi ID is enabled using the diameter Gx virtual-gi multiple-mapping
enable command, Cisco SCE adds the new VLAN ID ID mapping to an existing VGi ID without
overwriting the VLAN ID.
Authorization: admin
Cisco SCE 8000 CLI Command Reference
2-124
Chapter 2
CLI Command Reference
diameter gx virtual-gi vlan-id
Examples
The following example shows how to enable TACACS+ accounting for the admin privilege level (10):
SCE8000>enable 10
Password:<cisco>
SCE8000#config
SCE8000(config)# diameter Gx virtual-gi vlan-id 2 mapping 3
SCE8000(config)#
Related Commands
Command
Description
subscriber virtual-gi-mode
Enables virtual Gi mode.
VLAN symmetric classify
Specifies the VLAN tag as subscriber.
Cisco SCE 8000 CLI Command Reference
2-125
Chapter 2
CLI Command Reference
diameter Gy peer-proxyagent
diameter Gy peer-proxyagent
To enable the peer proxy agent in CCR messages for Gy, use the diameter Gy peer-proxyagent
command.
Use the no form of the command to disable the peer proxy agent in CCR messages.
diameter Gy peer-proxyagent
no diameter Gy peer-proxyagent
Syntax Description
This command has no syntax or keywords.
Command Default
None.
Command Modes
CONFIG (#)
Command History
This table includes the following release-specific history entries:
Release
Modification
3.8.0
This command was introduced.
Usage Guidelines
Authorization: admin
Examples
Example 1
The following example shows how to enable peer proxy agent in CCR messages for Gy:
SCE8000>enable 10
Password:<cisco>
SCE8000# configure
SCE8000(config)#diameter Gy peer-proxyagent
Example 2
The following example shows how to disable peer proxy agent in CCR messages for Gy:
SCE8000>enable 10
Password:<cisco>
SCE8000# configure
SCE8000(config)#no diameter Gy peer-proxyagent
Cisco SCE 8000 CLI Command Reference
2-126
Chapter 2
CLI Command Reference
diameter Gy subscriber-attribute-mapping
diameter Gy subscriber-attribute-mapping
Maps the specified PS Information AVP (3GPP-charging-characteristics) into the specified realm.
diameter Gy subscriber-attribute-mapping attribute-name 3GPP-charging-characteristics
attribute-value attribute-value realm-id realm-id
Syntax Description
attribute-value
The PS Information AVP to be mapped to the realm.
realm-id
Name of the realm.
Note
The specified realm must be configured in the realm table. If no
such realm was configured (or configuration was removed), the first
realm in the table is used as default.
Command Default
As configured for peer.
Command Modes
Global configuration
Command History
This table includes the following release-specific history entries:
Release
Modification
3.6.x
This command was introduced.
Usage Guidelines
Authorization: admin
Examples
The following example shows how to use this command. This example maps all subscriber s that logged
in with VSA attribute 3GPP-charging-characteristics value = 0800 to the realm called
‘PrePaidSubsRealm’.
Note
If the specified realm is not found in the realm table, the first realm in the table is used as default.
SCE8000>enable 10
Password:<cisco>
SCE8000# configure
SCE8000(config)#diameter
Gy subscriber-attribute-mapping attribute-name
3GPP-charging-characteristics attribute-value 0800 realm-id PrePaidSubsRealm
SCE8000(config)#
Cisco SCE 8000 CLI Command Reference
2-127
Chapter 2
CLI Command Reference
diameter Gy tx-timer
diameter Gy tx-timer
Configures the transmit timeout value for messages.
To reset the tx timeout to the default value, use the default form of this command.
diameter Gy tx-timer time
default diameter Gy tx-timer
Syntax Description
time
Command Default
5 seconds
Command Modes
Global configuration
Command History
This table includes the following release-specific history entries:
Usage Guidelines
Timeout interval in seconds.
Release
Modification
3.6.x
This command was introduced.
If the PCRF does not respond to a Gy message in the configured tx-timer seconds, the message is
considered timed out. The message is dumped if it arrives after tx-timer expires.
Authorization: admin
Examples
The following example shows how to use this command.
SCE8000>enable 10
Password:<cisco>
SCE8000# configure
SCE8000(config)#diameter Gy tx-timeout 20
SCE8000(config)#
Related Commands
Command
Description
show diameter Gy
Displays the current Gy application configuration.
Cisco SCE 8000 CLI Command Reference
2-128
Chapter 2
CLI Command Reference
diameter host
diameter host
Configures the diameter host IP address.
To return to the default diameter host IP address, use the no form of this command.
diameter host ip-address
no diameter host
Syntax Description
ip-address
Command Default
ip-address = Management interface IP address
Command Modes
Global configuration
Command History
This table includes the following release-specific history entries:
Usage Guidelines
Caution
IP address of the host.
Release
Modification
3.7.x
This command was introduced.
By default, the IP address the diameter stack uses is the IP address that is configured for the management
interface. Use this command to configure a different IP address for the diameter stack.
Run this command only when the stack is stopped. Use the no diameter command to stop the stack.
Authorization: admin
Examples
The following example shows how to use this command.
SCE8000>enable 10
Password:<cisco>
SCE8000# configure
SCE8000(config)#no diameter
SCE8000(config)#diameter host 1.1.1.1
Note
Related Commands
The IP address configured in the above CLI 'diameter host 1.1.1.1' should be present either physically
or logically in the Cisco SCE box. Otherwise, the diameter stack will fail to start.
Command
Description
show diameter
Displays the current diameter stack state.
Cisco SCE 8000 CLI Command Reference
2-129
Chapter 2
CLI Command Reference
diameter origin-realm
diameter origin-realm
Configures the name of the stack realm.
To reset the stack realm to the default, use the default form of this command.
diameter origin-realm realm
default diameter origin-realm
Syntax Description
realm
Command Default
sce.cisco.com
Command Modes
Global configuration
Command History
This table includes the following release-specific history entries:
Name of the realm.
Release
Modification
3.6.x
This command was introduced.
Usage Guidelines
Caution
Run this command only when the stack is stopped. Use the no diameter command to stop the stack.
Authorization: admin
Examples
The following example shows how to use this command.
SCE8000>enable 10
Password:<cisco>
SCE8000# configure
SCE8000(config)#no diameter
SCE8000(config)#diameter origin-realm realm1
Related Commands
Command
Description
no diameter
Stops the diameter stack.
Cisco SCE 8000 CLI Command Reference
2-130
Chapter 2
CLI Command Reference
diameter peer
diameter peer
Adds an entry to the peer table.
To remove an entry from the peer table, use the no form of this command.
To clear the peer table, removing all the entries, use the no diameter peer all command.
diameter peer name peer-host ip-address [port port#]
no diameter peer name
no diameter peer all
Syntax Description
name
Name to be assigned to the entry in the peer table
ip-address
IP address of the host
Note
port#
A peer is defined by an URI. This means that the same IP can not be
used on different ports to distinguish between two servers except
when a DNS is used.
Port number used.
Command Default
None
Command Modes
Global configuration
Command History
This table includes the following release-specific history entries:
Usage Guidelines
Note
Release
Modification
3.6.x
This command was introduced.
The peer table holds a list of all the peers with which the Cisco SCE has a direct connection. The
information for each entry includes:
•
Peer host – The host IP
•
Peer port
•
State – Up, Down, or N/A (stack is not currently activated). This information is non-configurable.
•
Peer name – Name assigned by this command
Removing a peer from the peer table removes all the peer related configuration information from the
Routing table and from the forwarding scheme.
Cisco SCE 8000 CLI Command Reference
2-131
Chapter 2
CLI Command Reference
diameter peer
General Guidelines
•
Do not assign the same IP address to two peers, even if the port numbers are different, unless they
are in different domains.
•
To remove one entry from the peer table, use the no diameter peer name command.
•
To clear the peer table, use the use the no diameter peer all command.
Authorization: admin
Examples
Example 1
The following example shows how to add an entry to the peer table for a peer named “test_peer”.
SCE8000>enable 10
Password:<cisco>
SCE8000# configure
SCE8000(config)#diameter peer test_peer peer-host 1.1.1.1
Example 2
The following example shows how to clear the peer table.
SCE8000>enable 10
Password:<cisco>
SCE8000# configure
SCE8000(config)#no diameter peer all
Related Commands
Command
Description
show diameter peer
Displays the specified peer table entry.
show diameter peer-table Displays the peer table.
Cisco SCE 8000 CLI Command Reference
2-132
Chapter 2
CLI Command Reference
diameter port
diameter port
Configures the stack host.
To reset the stack port to the default, use the default form of this command.
diameter port port
default diameter port
Syntax Description
port
Command Default
3868
Command Modes
Global configuration
Command History
This table includes the following release-specific history entries:
Port number to be used by the stack.
Release
Modification
3.6.x
This command was introduced.
Usage Guidelines
Caution
Run this command only when the stack is stopped. Use the no diameter command to stop the stack.
Authorization: admin
Examples
The following example shows how to use this command.
SCE8000>enable 10
Password:<cisco>
SCE8000# configure
SCE8000(config)#no diameter
SCE8000(config)#diameter port 3333
Related Commands
Command
Description
no diameter
Stops the diameter stack.
Cisco SCE 8000 CLI Command Reference
2-133
Chapter 2
CLI Command Reference
diameter realm
diameter realm
Adds an entry to the routing table.
To remove an entry from the routing table, use the no form of this command.
To clear the routing table, removing all the entries, use the no diameter realm all command.
diameter realm realm-name (Gx|Gy) peer peer-name priority priority
no diameter realm realm-name [Gx|Gy] peer peer-name
no diameter realm all
Syntax Description
realm-name
Name of the realm.
Gx or Gy
Indicate whether the application is Gx or Gy.
•
Required when adding a peer.
•
Optional when removing a peer entry, depending on whether you are
removing only the entry for a specific application or removing entires
for both applications.
peer-name
Name of the peer. (See the diameter peer command)
priority
Priority assigned to the peer within the forwarding scheme. (0-99)
Priority is optional for the first peer entry for a realm, but required for all
subsequent peer entries.
Command Default
None
Command Modes
Global configuration
Command History
This table includes the following release-specific history entries:
Usage Guidelines
Release
Modification
3.6.x
This command was introduced.
The routing table contains the peer application support and the forwarding scheme priority information.
The information for each entry includes:
•
peer name
•
supported application (Gx or Gy)
•
realm
•
priority
Cisco SCE 8000 CLI Command Reference
2-134
Chapter 2
CLI Command Reference
diameter realm
General Guidelines
•
Priority is required except for the first peer entry assigned to a realm. If a priority is not assigned to
the first peer entry for a realm, a priority of 100 is assigned automatically.
•
In the Gx application there is one realm with many peers supporting that realm.
•
In the Gy application there can be several realms, each with multiple peers.
•
Peers can support more than one application.
•
To remove the entry for a peer only for a specific application, specify Gx or Gy in the no form of
the command. If you do not specify the application, if two peer entries exist, they will both be
removed.
•
To clear the routing table use the no diameter realm all command.
Authorization: admin
Examples
Example 1
The following example shows how to add a route.
SCE8000>enable 10
Password:<cisco>
SCE8000# configure
SCE8000(config)#diameter realm test_realm.cisco.com Gy peer test_peer
Example 2
The following example shows how delete one entry from the routing table.
SCE8000>enable 10
Password:<cisco>
SCE8000# configure
SCE8000(config)#no diameter realm test_realm.cisco.com Gy peer test_peer
Example 3
The following example is similar to Example 2, but it removes both entries for the specified peer from
the routing table.
SCE8000>enable 10
Password:<cisco>
SCE8000# configure
SCE8000(config)#no diameter realm test_realm.cisco.com peer test_peer
Related Commands
Command
Description
show diameter realm
Displays all routing table entries for the specified realm
show diameter routing table
Displays the routing table.
Cisco SCE 8000 CLI Command Reference
2-135
Chapter 2
CLI Command Reference
diameter realm forwarding-mode
diameter realm forwarding-mode
Configures the forwarding mode for the specified realm and application.
diameter realm realm-name(Gx |Gy) forwarding-mode (load-balancing| high-availability
[shared-session-on [stickness-on |stickness-off]| shared-session-off])
Syntax Description
realm-name
Name of the realm.
Gx or Gy
Indicate whether the forwarding mode applies to Gx or Gy applications.
Command Default
Load-Balancing
Command Modes
Global configuration
Command History
This table includes the following release-specific history entries:
Usage Guidelines
Release
Modification
3.6.x
This command was introduced.
Load Balancing
Load balancing is completed by round robin using the available servers. The available servers are round
robin cycled per session and not per message, meaning the messages for a specific session are all sent to
the same server.
When a server fails, it is removed from the round robin.
High Availability (Failover)
When the high availably scheme is used, there is no load balancing between servers. The high
availability scheme is strictly an active and standby scheme.
Each server is assigned a priority. Only the server with the highest priority handles the session. When
the active server fails, all new sessions will be started on the next server in the priority list order.
High availability mode has additional options:
•
shared-session-on: Sessions are common to all servers, and therefore sessions on a failed server do
not need to be reopened on a different server if the server fails.
– stickiness-on: Sessions move back to the original server when it restarts.
– stickiness-off: Sessions do not move back to the original server when it restarts.
•
shared-session-off: Sessions are not common to all servers, and therefore sessions on a failed server
must be reopened on a different server if the server fails.
Authorization: admin
Cisco SCE 8000 CLI Command Reference
2-136
Chapter 2
CLI Command Reference
diameter realm forwarding-mode
Examples
The following example shows how to configure high-availability forwarding mode where the sessions
will be common to all servers and will not return to the original server after failure when that server
restarts.
SCE8000>enable 10
Password:<cisco>
SCE8000#configure
SCE8000(config)#diameter realm test_realm.cisco.com Gy forwarding-mode high-availability
shared-session-on stickiness-off
SCE8000(config)#
Related Commands
Command
Description
show diameter forwarding-mode
Displays the forwarding mode table.
Cisco SCE 8000 CLI Command Reference
2-137
Chapter 2
diameter tx-timer
diameter tx-timer
Configures the diameter transmit timeout value for messages.
To reset the timeout to the default, use the default form of this command.
diameter tx-timer time
default diameter tx-timer
Syntax Description
time
Command Default
30 seconds
Command Modes
Global configuration
Command History
This table includes the following release-specific history entries:
Timeout interval in seconds. Range is 5-6000.
Release
Modification
3.6.x
This command was introduced.
Usage Guidelines
Authorization: admin
Examples
The following example shows how to use this command.
SCE8000>enable 10
Password:<cisco>
SCE8000# configure
SCE8000(config)#diameter tx-timeout 20
SCE8000(config)#
Related Commands
Command
Description
show diameter
Displays the current diameter stack state.
Cisco SCE 8000 CLI Command Reference
2-138
CLI Command Reference
Chapter 2
CLI Command Reference
dir
dir
Displays the files in the current directory.
dir [applications] [-r]
Syntax Description
applications
Filters the list of files to display only the application files in the current
directory.
-r
Includes all files in the subdirectories of the current directory, as well as the
files in the current directory.
Command Default
None
Command Modes
Privileged EXEC
Command History
This table includes the following release-specific history entries:
Release
Modification
2.5.7
This command was introduced.
Usage Guidelines
Authorization: admin
Examples
The following example shows how to display the files in the current directory (root):
SCE8000>enable 10
Password:<cisco>
SCE8000#dir
File list for /system/
512TUE JAN 01 00:00:00 1980LOGDBG DIR
512TUE JAN 01 00:00:00 1980LOG DIR
7653 TUE JAN 01 00:00:00 1980FTP.SLI
29 TUE JAN 01 00:00:00 1980SCRIPT.TXT
512 TUE JAN 01 00:00:00 1980SYSTEM DIR
SCE8000#
Related Commands
Command
Description
pwd
Displays the current working directory.
cd
Changes the path of the current working directory.
Cisco SCE 8000 CLI Command Reference
2-139
Chapter 2
CLI Command Reference
disable
disable
Moves the user from a higher level of authorization to a lower user level.
disable level
Syntax Description
level
Command Default
None
Command Modes
Privileged EXEC and Viewer
Command History
This table includes the following release-specific history entries:
Release
Modification
2.5.7
This command was introduced.
Cisco SCE 8000 CLI Command Reference
2-140
User authorization level (0, 5, 10, 15) as specified in CLI Authorization
Levels.
Chapter 2
CLI Command Reference
disable
Usage Guidelines
Use this command with the level argument to lower the user privilege level, as illustrated in Figure 2-1.
If a level is not specified, it defaults to User mode.
Figure 2-1
Disable Command
User Authorization Level (0)
User Exec Mode
Disable
Viewer Authorization Level (5)
User Exec Mode
Disable
Disable
Admin Authorization Level (10)
Privileged Exec Mode
Disable
157243
Root Authorization Level (15)
Privileged Exec Mode
Note that you must exit to Privileged EXEC command mode to use this command.
Authorization: user
Examples
The following example shows how to change from root to admin mode:
SCE8000>enable 15
Password:<cisco>
SCE8000#>disable 10
SCE8000#
Related Commands
Command
Description
enable
Allows the user to access a higher authorization level.
Cisco SCE 8000 CLI Command Reference
2-141
Chapter 2
CLI Command Reference
do
do
Executes an EXEC mode command (such as a show command) or a privileged EXEC command (such
as show running-config) without exiting to the relevant command mode.
do command
Syntax Description
command
Command Default
None
Command Modes
All configuration modes
Command History
This table includes the following release-specific history entries:
Usage Guidelines
Command to be executed.
Release
Modification
3.0.0
This command was introduced.
Use this command when in any configuration command mode (global configuration, linecard
configuration, or any interface configuration) to execute a User EXEC or Privileged EXEC command.
Enter the entire command with all parameters as you would if you were in the relevant command mode.
Authorization: admin
Examples
The following example assumes that the on-failure action of the Cisco SCE platform has been changed
to bypass. The connection mode configuration is then displayed to verify that the parameter was
changed. The do command is used to avoid having to exit to User EXEC mode.
SCE8000>enable 10
Password:<cisco>
SCE8000#config
SCE8000(config)#interface linecard 0
SCE8000(config if)#connection-mode on-failure bypass
SCE8000(config if)#do show interface linecard 0 connection-mode
slot 0 connection mode
Connection mode is inline
slot failure mode is bypass
Redundancy status is standalone
SCE8000(config if)#
Cisco SCE 8000 CLI Command Reference
2-142
Chapter 2
CLI Command Reference
duplex
duplex
Configures the duplex operation of the GigabitEthernet management interface.
duplex [mode]
no duplex
Syntax Description
mode
Sets duplex operation to one of the following modes:
•
full—Full duplex
•
half—Half duplex
•
auto—Auto-negotiation (do not force duplex on the link)
Command Default
The default duplex mode is auto.
Command Modes
GigabitEthernet Interface Configuration
Mng Interface Configuration
Command History
Usage Guidelines
This table includes the following release-specific history entries:
Release
Modification
2.5.7
This command was introduced.
Use this command to configure the duplex mode of the GigabitEthernet management interface.
If the speed of the management interface is configured to auto (see the speed command), changing this
configuration has no effect.
Authorization: admin
Examples
The following example shows how to configure the management port to auto mode.
SCE8000>enable 10
Password:<cisco>
SCE8000#config
SCE8000(config)#interface mng 0/1
SCE8000(config if)#duplex auto
SCE8000(config if)#
Related CommandsE
Command
Description
speed
Configures the speed of the management interface.
show interface mng
Displays the details of the GigabitEthernet management interface.
Cisco SCE 8000 CLI Command Reference
2-143
Chapter 2
CLI Command Reference
enable
enable
Enables the user to access a higher authorization level.
enable [level]
Syntax Description
level
Command Default
The default authorization level is admin (10).
Command Modes
User EXEC
Command History
This table includes the following release-specific history entries:
Release
Modification
2.5.7
This command was introduced.
Cisco SCE 8000 CLI Command Reference
2-144
User authorization level (0, 5, 10, 15) as specified in CLI Authorization
Levels, page 1-2.
Chapter 2
CLI Command Reference
enable
Usage Guidelines
Figure 2-2 shows the authorization levels.
Figure 2-2
Enable Command
User Authorization Level (0)
User Exec Mode
Enable
Viewer Authorization Level (5)
User Exec Mode
Enable
Enable
Admin Authorization Level (10)
Privileged Exec Mode
Enable
157244
Root Authorization Level (15)
Privileged Exec Mode
If a level is not specified, it defaults to admin authorization (level 10).
Note that you cannot use the enable command from Privileged EXEC or any of the configuration
command modes.
Authorization: user
Examples
The following example shows how to access the administrator authorization level. Note that the prompt
changes from SCE8000> to SCE8000#, indicating that the level is the administrator privilege level.
SCE8000>enable
Password:<cisco>
SCE8000#
Related Commands
Command
Description
disable
Moves the user from a higher level of authorization to a lower user level.
enable password
Configures a password for the specified authorization level.
Cisco SCE 8000 CLI Command Reference
2-145
Chapter 2
CLI Command Reference
enable password
enable password
Configures a password for the specified authorization level, which prevents unauthorized users from
accessing the Cisco SCE platform.
To disable the password for the specified authorization level, use the no form of this command.
enable password [level level] [encryption-type ] [password]
no enable password [level level]
Syntax Description
Command Default
level
User authorization level (0, 5, 10, 15) as specified in CLI Authorization
Levels. If no level is specified, the default is admin (10).
encryption-type
If you want to enter the encrypted version of the password, set the
encryption type to 5, which specifies the algorithm used to encrypt the
password.
password
Sets a regular or encrypted password for the access level. If you specify
encryption-type, you must supply an encrypted password.
The default authorization level is admin (10).
The default password is cisco.
Command Modes
Global configuration
Command History
This table includes the following release-specific history entries:
Usage Guidelines
Release
Modification
2.5.7
This command was introduced.
After the command is entered, any user executing the enable command must supply the specified
password. The following conditions apply to passwords:
•
Must be at least 4 and no more than 100 characters long
•
Can contain any printable characters
•
Must begin with a letter
•
Cannot contain spaces
•
Are case-sensitive
Authorization: admin
Cisco SCE 8000 CLI Command Reference
2-146
Chapter 2
CLI Command Reference
enable password
Examples
The following example shows how to set a level 10 password:
SCE8000>enable 10
Password:<cisco>
SCE8000#config
SCE8000(config)#enable password level 10 a123*man
SCE8000(config)#
Related Commands
Command
Description
enable
Allows the user to access a higher authorization level.
service password-encryption
Enables password encryption.
Cisco SCE 8000 CLI Command Reference
2-147
Chapter 2
CLI Command Reference
end
end
Exits from Global Configuration mode or an interface configuration mode to the User EXEC
authorization level.
end
Syntax Description
This command has no arguments or keywords.
Command Default
None
Command Modes
Interface Linecard Configuration
Interface GigabitEthernet Configuration
Interface Range GigabitEthernet Configuration
Interface TenGigabitEthernet Configuration
Interface Range TenGigabitEthernet Configuration
Global configuration
Command History
Usage Guidelines
This table includes the following release-specific history entries:
Release
Modification
3.5.5
This command was introduced.
Use this command to exit to the User EXEC authorization level in one command, rather than having to
execute the exit command twice. The system prompt changes to reflect the lower-level mode.
Authorization: admin
Examples
The following example shows how to use this command:
SCE8000>enable 10
Password:<cisco>
SCE8000#config
SCE8000(config)#interface linecard 0
SCE8000(config if)#end
SCE8000#
Cisco SCE 8000 CLI Command Reference
2-148
Chapter 2
CLI Command Reference
end
Related Commands
Command
Description
configure
Enables the user to move from Privileged EXEC mode to
Configuration mode.
interface gigabitethernet
Enters GigabitEthernet Interface Configuration mode.
interface range gigabitethernet
Enters a GigabitEthernet Interface Configuration mode for two
or more GBE line interfaces.
interface tengigabitethernet
Enters TenGigabitEthernet Interface Configuration mode for
the 10GBE line interfaces.
interface range tengigabitethernet
Enters TenGigabitEthernet Interface Configuration mode for
two or more 10GBE line interfaces.
interface linecard
Enters Interface Linecard Configuration mode.
line vty
Enters Line Configuration mode for Telent lines, which
configures all Telnet lines.
Cisco SCE 8000 CLI Command Reference
2-149
Chapter 2
CLI Command Reference
erase startup-config-all
erase startup-config-all
Removes all current configurations by removing all configuration files.
erase startup-config-all
Syntax Description
This command has no arguments or keywords.
Command Default
None
Command Modes
Privileged EXEC
Command History
This table includes the following release-specific history entries:
Usage Guidelines
Release
Modification
3.0.0
This command was introduced.
The following data is deleted by this command:
•
General configuration files
•
Application configuration files
•
Static party DB files
•
Management agent installed MBeans
After using this command, the Cisco SCE platform should be reloaded immediately to ensure that it
returns to the “factory default” state.
To create a backup of the current configuration before it is deleted, use the copy startup-config
destination-file command.
Authorization: admin
Examples
The following example shows how to erase the startup configuration:
SCE8000>enable 10
Password:<cisco>
SCE8000#erase startup-config-all
Related Commands
Command
Description
reload
Reboots the Cisco SCE platform.
copy startup-config destination-file
Copies the startup-config file to the specified destination file.
Cisco SCE 8000 CLI Command Reference
2-150
Chapter 2
CLI Command Reference
exit
exit
Exits from the current mode to the next “lower” mode. When executed from Privileged EXEC or User
EXEC mode, the command logs out of the CLI session.
exit
Syntax Description
This command has no arguments or keywords.
Command Default
None
Command Modes
All
Command History
This table includes the following release-specific history entries:
Usage Guidelines
Tip
Release
Modification
2.5.7
This command was introduced.
Use this command each time you want to exit a mode. The system prompt changes to reflect the
lower-level mode.
Use the end command to exit to the User EXEC authorization level.
Authorization: admin
Examples
The following example shows how to exit from Interface Linecard Configuration mode to Global
Configuration mode and then to Privileged EXEC mode and then log out:
SCE8000>enable 10
Password:<cisco>
SCE8000#config
SCE8000(config)#interface linecard 0
SCE8000(config if)#exit
SCE8000(config)#exit
SCE8000#exit
Connection closed by foreign host.
Cisco SCE 8000 CLI Command Reference
2-151
Chapter 2
CLI Command Reference
exit
Related Commands
Command
Description
configure
Enables the user to move from Privileged EXEC mode to
Configuration mode.
interface gigabitethernet
Enters GigabitEthernet Interface Configuration mode.
interface range gigabitethernet
Enters a GigabitEthernet Interface Configuration mode for two
or more GBE line interfaces.
interface tengigabitethernet
Enters TenGigabitEthernet Interface Configuration mode for
the 10GBE line interfaces.
interface range tengigabitethernet Enters TenGigabitEthernet Interface Configuration mode for
two or more 10GBE line interfaces.
interface linecard
Enters Interface Linecard Configuration mode.
line vty
Enters Line Configuration mode for Telent lines, which
configures all Telnet lines.
Cisco SCE 8000 CLI Command Reference
2-152
Chapter 2
CLI Command Reference
external-bypass
external-bypass
Manually activates the external bypass modules.
To deactivate the external bypass modules, use the no form of this command.
To return the external bypass module to the default state (deactivated), use the default form of this
command.
external-bypass
no external-bypass
default external-bypass
Syntax Description
This command has no arguments or keywords.
Command Default
The external bypass module is deactivated.
Command Modes
Interface Linecard Configuration
Command History
This table includes the following release-specific history entries:
Release
Modification
3.1.6
This command was introduced.
Usage Guidelines
Authorization: admin
Examples
The following example shows how to use this command:
SCE8000>enable 10
Password:<cisco>
SCE8000#config
SCE8000(config)#interface linecard 0
SCE8000(config if)#external-bypass
SCE8000(config if)#
Related Commands
Command
Description
show interface linecard external-bypass
Displays the state of the external bypass module.
Cisco SCE 8000 CLI Command Reference
2-153
Chapter 2
CLI Command Reference
failure-recovery operation-mode
failure-recovery operation-mode
Specifies the operation mode to be applied when the system reboots after a failure.
If you use the default form of the command, you do not have to specify the mode.
failure-recovery operation-mode mode
default failure-recovery operation-mode
Syntax Description
mode
Command Default
The default mode is operational.
Command Modes
Global configuration
Command History
This table includes the following release-specific history entries:
Indicates whether or not the system boots as operational following a failure.
Choose operational or non-operational.
Release
Modification
2.5.7
This command was introduced.
Usage Guidelines
Authorization: admin
Examples
The following example shows how to set the system to boot as operational after a failure:
SCE8000>enable 10
Password:<cisco>
SCE8000#config
SCE8000(config)#failure-recovery operation-mode operational
SCE8000(config)#
Related Commands
Command
Description
show failure-recovery operation-mode Displays the operation mode to apply after booting resulted
from a failure.
Cisco SCE 8000 CLI Command Reference
2-154
Chapter 2
CLI Command Reference
flow-capture
flow-capture
Executes flow-capture operations.
flow-capture {start format cap file-name-prefix filename | stop}
Syntax Description
filename
Destination (FTP site path) where the cap file should be created, in the
format: ftp://username:password@ip_address/path/filename. (Do not
include the ".cap" file extension; it is appended automatically.)
In a system with two SCE 8000-SCM modules, which creates two capture
files, an indicator is appended to this prefix to indicate which SCE
8000-SCM module created the file. For example, if you assign the filename
“myCapFile”, the system creates myCapFile1.cap and myCapFile2.cap.
stop
Stops recording.
Command Default
None
Command Modes
Privileged EXEC
Command History
This table includes the following release-specific history entries:
Usage Guidelines
Release
Modification
3.5.0
This command was introduced.
Flow capturing is a useful debugging capability that captures packets from the traffic stream in real time
and stores them for later analysis using a standard cap format. The classification of the traffic portion to
be captured is based on L4 attributes. The captured information is sent to a specified FTP destination. In
a system with two SCE 8000-SCM modules installed, a separate cap file is created by each SCE
8000-SCM module.
The following flow-capture operations are available:
•
start—Starts recording.
•
stop—Stops recording.
Note that traffic can be captured only when an application is loaded.
To perform a flow capture, follow these steps:
1.
(Optional) Configure limits to the flow-capture operation using the flow-capture controllers
command. Limits prevent a negative impact on traffic processing.
You may skip this step and use the default controller values.
2.
Configure an appropriate recording rule using the traffic-rule command. Assign the flow-capture
action to the rule (see traffic-rule).
Cisco SCE 8000 CLI Command Reference
2-155
Chapter 2
CLI Command Reference
flow-capture
Tip
You must use the traffic-rule command to define the recording rule. You cannot use the
flow-filter command.
3.
Start the actual capture. The capture will not start if a valid recording rule has not been defined.
Use the flow-capture start command.
4.
(Optional) Stop the capture.
Use the flow-capture stop command.
If you do not stop the flow capture, it will stop when the maximum duration or capacity has been
reached.
At any point, you can use the show interface linecard flow-capture command to display the flowcapture status, including whether flow capture is currently recording or is stopped, the capacity already
used, and the number of packets recorded.
Authorization: admin
Examples
The following examples show how to use this command. All examples show output for an SCE 8000
with two SCE 8000-SCM modules installed.
Example 1
The following example shows how to perform all the steps in a flow capture:
1.
Define the limits (flow-capture controllers max-l4-payload-length and flow-capture controllers
time).
2.
Define a counter to be assigned to the traffic rule. (Optional)
3.
Define the recording traffic rule (traffic-rule with action flow-capture option).
4.
Start the capture (flow-capture start).
(The show command shows that recording is in progress.)
5.
Stop the capture (flow-capture stop).
SCE8000>enable 10
Password:<cisco>
SCE8000#configure
SCE8000(config)#interface linecard 0
SCE8000(config if)#flow-capture controllers max-l4-payload-length 200
SCE8000(config if)#flow-capture controllers time 45
SCE8000(config if)#traffic-counter name counter2 count-packets
SCE8000(config if)#traffic-rule name FlowCaptureRule IP-addresses subscriber-side all
network-side all protocol 250 direction both traffic-counter name counter2 action
flow-capture
SCE8000(config if)#end
SCE8000#flow-capture start format cap file-name-prefix
ftp://myUser:[email protected]/./myCap
SCE8000#show interface linecard 0 flow-capture
Flow Capture Status (module #1):
-------------------------------Flow capture status:
RECORDING
Capturing type:
ONLINE
Target file name:
ftp://myUser:[email protected]/./myCap1.cap
Target file size (bytes):
26580
Time limit (sec):
45
Max L4 payload length (bytes): 200
Cisco SCE 8000 CLI Command Reference
2-156
Chapter 2
CLI Command Reference
flow-capture
Number of recorded packets:
152
Number of lost packets:
0
Flow Capture Status (module #2):
-------------------------------Flow capture status:
RECORDING
Capturing type:
ONLINE
Target file name:
ftp://myUser:[email protected]/./myCap2.cap
Target file size (bytes):
28944
Time limit (sec):
45
Max L4 payload length (bytes): 200
Number of recorded packets:
167
Number of lost packets:
0
SCE8000#flow-capture stop
SCE8000#show interface linecard 0 flow-capture
Flow Capture Status (module #1):
-------------------------------Flow capture status:
NOT RECORDING
Capturing type:
ONLINE
Last stop cause:
User Request
Target file name:
ftp://myUser:[email protected]/./myCap1.cap
Target file size (bytes):
99392
Time limit (sec):
45
Max L4 payload length (bytes): 200
Number of recorded packets:
573
Number of lost packets:
0
Flow Capture Status (module #2):
-------------------------------Flow capture status:
NOT RECORDING
Capturing type:
ONLINE
Last stop cause:
User Request
Target file name:
ftp://myUser:[email protected]/./myCap2.cap
Target file size (bytes):
159344
Time limit (sec):
45
Max L4 payload length (bytes): 200
SCE8000#
Example 2
The following example is identical to the previous one, except that instead of using the stop command,
the capturing process continues until the defined time limit is reached.
1.
Define the limits (flow-capture controllers max-l4-payload-length and flow-capture controllers
time).
2.
Define a counter to be assigned to the traffic rule. (Optional)
3.
Define the recording traffic rule (traffic-rule with action flow-capture option).
4.
Start the capture (flow-capture start).
(The show command shows that recording is in progress.)
5.
Capture concludes automatically after 45 seconds.
SCE8000>enable 10
Password:<cisco>
SCE8000#configure
SCE8000(config)#interface linecard 0
SCE8000(config if)#flow-capture controllers max-l4-payload-length 200
SCE8000(config if)#flow-capture controllers time 45
SCE8000(config if)#traffic-counter name counter2 count-packets
SCE8000(config if)#traffic-rule name FlowCaptureRule IP-addresses subscriber-side all
network-side all protocol 250 direction both traffic-counter name counter2 action
flow-capture
SCE8000(config if)#end
SCE8000#flow-capture start format cap file-name-prefix
Cisco SCE 8000 CLI Command Reference
2-157
Chapter 2
CLI Command Reference
flow-capture
ftp://myUser:[email protected]/./myCap
SCE8000#show interface linecard 0 flow-capture
Flow Capture Status (module #1):
-------------------------------Flow capture status:
RECORDING
Capturing type:
ONLINE
Target file name:
ftp://myUser:[email protected]/./myCap1.cap
Target file size (bytes):
26580
Time limit (sec):
45
Max L4 payload length (bytes): 200
Number of recorded packets:
152
Number of lost packets:
0
Flow Capture Status (module #2):
-------------------------------Flow capture status:
RECORDING
Capturing type:
ONLINE
Target file name:
ftp://myUser:[email protected]/./myCap2.cap
Target file size (bytes):
28944
Time limit (sec):
45
Max L4 payload length (bytes): 200
Number of recorded packets:
167
Number of lost packets:
0
after 45 seconds...
SCE8000>show interface linecard 0 flow-capture
Flow Capture Status (module #1):
-------------------------------Flow capture status:
NOT RECORDING
Capturing type:
ONLINE
Last stop cause:
Time Limit
Target file name:
ftp://myUser:[email protected]/./myCap1.cap
Target file size (bytes):
558716
Time limit (sec):
45
Max L4 payload length (bytes): 200
Number of recorded packets:
2696
Number of lost packets:
0
Flow Capture Status (module #2):
-------------------------------Flow capture status:
NOT RECORDING
Capturing type:
ONLINE
Last stop cause:
Time Limit
Target file name:
ftp://myUser:[email protected]/./myCap2.cap
Target file size (bytes):
673840
Time limit (sec):
45
Max L4 payload length (bytes): 200
Number of recorded packets:
3335
Number of lost packets:
0
SCE8000#
Example 3
In this example, instead of using the stop command, the capturing process continues until the defined
file-size limit (64 MB for each SCE 8000-SCM) is reached on the first SCE 8000-SCM. The other
module is stopped using the flow-capture stop command
1.
Set the limits back to the defaults (default flow-capture controllers max-l4-payload-length and
default flow-capture controllers time).
2.
Define a counter to be assigned to the traffic rule. (Optional)
3.
Define the recording traffic rule (traffic-rule with action flow-capture option).
4.
Start the capture (flow-capture start).
Cisco SCE 8000 CLI Command Reference
2-158
Chapter 2
CLI Command Reference
flow-capture
(The show command shows that recording is in progress.)
5.
Capture on the first SCE 8000-SCM concludes automatically when the file size reaches the limit.
6.
Stop the capture on the second SCE 8000-SCM (flow-capture stop).
SCE8000>enable 10
Password:<cisco>
SCE8000#configure
SCE8000(config)#interface linecard 0
SCE8000(config if)#default flow-capture controllers max-l4-payload-length
SCE8000(config if)#default flow-capture controllers time
SCE8000(config if)#traffic-counter name counter2 count-packets
SCE8000(config if)#traffic-rule name FlowCaptureRule IP-addresses subscriber-side all
network-side all protocol 250 direction both traffic-counter name counter2 action
flow-capture
SCE8000(config if)#end
SCE8000#flow-capture start format cap file-name-prefix
ftp://myUser:[email protected]/./myCap
SCE8000#show interface linecard 0 flow-capture
Flow Capture Status (module #1):
-------------------------------Flow capture status:
RECORDING
Capturing type:
ONLINE
Target file name:
ftp://myUser:[email protected]/./myCap1.cap
Target file size (bytes):
11141528
Time limit (sec):
3600
Max L4 payload length (bytes): Unlimited
Number of recorded packets:
20687
Number of lost packets:
0
Flow Capture Status (module #2):
-------------------------------Flow capture status:
RECORDING
Capturing type:
ONLINE
Target file name:
ftp://myUser:[email protected]/./myCap2.cap
Target file size (bytes):
4150456
Time limit (sec):
3600
Max L4 payload length (bytes): Unlimited
Number of recorded packets:
8365
Number of lost packets:
0
after 32 minutes...
SCE8000#show interface linecard 0 flow-capture
Flow Capture Status (module #1):
-------------------------------Flow capture status:
NOT RECORDING
Capturing type:
ONLINE
Last stop cause:
Cannot Write To File or Max Allowed File Size Exceeded
Target file name:
ftp://myUser:[email protected]/./myCap1.cap
Target file size (bytes):
67108164
Time limit (sec):
3600
Max L4 payload length (bytes): Unlimited
Number of recorded packets:
124916
Number of lost packets:
0
Flow Capture Status (module #2):
-------------------------------Flow capture status:
RECORDING
Capturing type:
ONLINE
Target file name:
ftp://myUser:[email protected]/./myCap2.cap
Target file size (bytes):
27551456
Time limit (sec):
3600
Max L4 payload length (bytes): Unlimited
Number of recorded packets:
55140
Number of lost packets:
0
Cisco SCE 8000 CLI Command Reference
2-159
Chapter 2
CLI Command Reference
flow-capture
after 5 more minutes...
SCE8000#flow-capture stop
SCE8000#show interface linecard 0 flow-capture
Flow Capture Status (module #1):
-------------------------------Flow capture status:
NOT RECORDING
Capturing type:
ONLINE
Last stop cause:
Cannot Write To File or Max Allowed File Size Exceeded
Target file name:
ftp://myUser:[email protected]/./myCap1.cap
Target file size (bytes):
67108164
Time limit (sec):
3600
Max L4 payload length (bytes): Unlimited
Number of recorded packets:
124916
Number of lost packets:
0
Flow Capture Status (module #2):
-------------------------------Flow capture status:
NOT RECORDING
Capturing type:
ONLINE
Last stop cause:
User Request
Target file name:
ftp://myUser:[email protected]/./myCap2.cap
Target file size (bytes):
31647736
Time limit (sec):
3600
Max L4 payload length (bytes): Unlimited
Number of recorded packets:
63463
Number of lost packets:
0
SCE8000(config if)#
Related Commands
Command
Description
flow-capture controllers
Configures limitations on the flow capture feature.
traffic-rule
Defines a new traffic rule.
show interface linecard flow-capture Displays the flow capture status.
Cisco SCE 8000 CLI Command Reference
2-160
Chapter 2
CLI Command Reference
flow-capture controllers
flow-capture controllers
Configures limitations on the flow-capture feature.
To reset all options to the default values, use the default form of this command.
flow-capture controllers time {duration | unlimited}
flow-capture controllers max-l4-payload-length {length | unlimited}
default flow-capture controllers {time | max-l4-payload-length}
Syntax Description
duration
Maximum duration for the flow-capture recording time, in seconds.
To specify unlimited duration, use the unlimited keyword.
length
Specifies the number of payload bytes per packet.
To specify unlimited payload bytes per packet, use the unlimited keyword.
Command Default
The default for duration is 3600 seconds.
The default for length is unlimited.
Command Modes
Interface Linecard Configuration
Command History
This table includes the following release-specific history entries:
Usage Guidelines
Release
Modification
3.5.0
This command was introduced.
Flow capturing is a useful debugging capability that captures packets from the traffic stream in real time
and stores them for later analysis. The classification of the traffic portion to be captured is based on L4
attributes.
The portion of traffic that is captured does not receive service (is not processed by the application).
Therefore, it is important to control the capturing scenario so that service is not negatively affected. You
can limit certain aspects of the flow capture using the following options:
•
time (flow-capture recording time)—The duration of the flow capture may be limited to the
specified time limit, or it may be unlimited, so that the flow capture is stopped only by executing an
explicit stop command or when the maximum file size is reached (128 MB on the Cisco SCE 8000
platform).
•
max-l4-payload-length (payload size)—The maximum number of L4 bytes captured from each
packet may be specified. This keyword relates to each packet in the traffic stream rather than to
overall flow-capture capacity. Using this keyword, the flow-capture throughput (in terms of captured
packets) can be increased.
Authorization: admin
Cisco SCE 8000 CLI Command Reference
2-161
Chapter 2
flow-capture controllers
Examples
The following example shows how to configure limitations to the flow capture:
SCE8000>enable 10
Password:<cisco>
SCE8000#>configure
SCE8000(config)#interface linecard 0
SCE8000(config if)#flow-capture controllers time 120
SCE8000(config if)#flow-capture controllers max-l4-payload-length 200
SCE8000(config if)#
Related Commands
Command
Description
traffic-rule
Defines a new traffic rule.
flow-capture
Executes flow capture operations.
show interface linecard flow-capture
Displays the flow capture status.
Cisco SCE 8000 CLI Command Reference
2-162
CLI Command Reference
Chapter 2
CLI Command Reference
flow-filter set-ff rule
flow-filter set-ff rule
To configure flow-filter rules, use the flow-filter set-ff rule command in the interface linecard
configuration mode.
flow-filter set-ff rule rule number [any-ip1-ip2-port1-port2-tos | clear | ip1-min | ipv6]
flow-filter set-ff rule rule number clear
Syntax Description
rule number
Enter a number for the rule.
any-ip1-ip2-port1-por
t2-tos
Specifies ip1, ip2, port1, port2, tos matches any value.
clear
Clears all the rule fields.
ip1-min
Specifies the minimum value for IP1.
ipv6
IPv6 flow-filter rule configuration.
Command Default
None
Command Modes
Interface linecard configuration (config-if)
Command History
This table includes the following release-specific history entries:
Release
Modification
3.7.5
This command was introduced.
Usage Guidelines
Authorization: admin
Examples
The following example shows how to configure limitations to a flow capture:
SCE8000> enable 10
Password: <cisco>
SCE8000#> configure
SCE8000(config)# interface linecard 0
SCE8000(config if)# flow-filter set-ff rule 2 ip1-min
SCE8000(config if)#
Related Commands
Command
Description
flow-filter set-ff rule ipv6
Configures a flow-filter rule for IPv6.
Cisco SCE 8000 CLI Command Reference
2-163
Chapter 2
CLI Command Reference
flow-filter set-ff rule ipv6
flow-filter set-ff rule ipv6
To configures flow-filter rules for IPv6 traffic use the flow-filter set-ff rule command in the interface
linecard configuration mode.
flow-filter set-ff rule rule number ipv6 any-ip1-ip2-port1-port2-tos
flow-filter set-ff rule rule number clear
Syntax Description
rule number
Enter a number for the rule.
any-ip1-ip2-port1-port2-tos
Specifies IP 1, IP 2, Port 1 and Port2, Tos matches any value.
clear
Clears all the rule fields.
Command Default
None
Command Modes
Interface linecard configuration (config-if)
Command History
This table includes the following release-specific history entries:
Release
Modification
3.7.5
This command was introduced.
Usage Guidelines
Authorization: admin
Examples
The following example shows how to configure limitations to flow capture:
SCE8000> enable 10
Password: <cisco>
SCE8000#> configure
SCE8000(config)# interface linecard 0
SCE8000(config if)# flow-filter set-ff rule 2 ipv6 any-ip-prefix-port1-port2-tos
SCE8000(config if)#
Related Commands
Command
Description
flow-filter set-ff rule
Configures a flow-filter rule.
Cisco SCE 8000 CLI Command Reference
2-164
Chapter 2
CLI Command Reference
flow-filter set-table rule ipv6 any-ip-prefix-port1-port2-tos protocol
flow-filter set-table rule ipv6 any-ip-prefix-port1-port2-tos
protocol
To configures flow-filter rules for IPv6 traffic, use the flow-filter set-table rule 1 ipv6
any-ip-prefix-port1-port2-tos protocol command in the interface linecard configuration mode.
flow-filter set-table rule rule number ipv6 any-ip1-ip2-port1-port2-tos protocol {ALL | EIGRP
| ICMP | IGRP | IS-IS | OSPF | TCP | UDP | decimal}
Syntax Description
rule number
Enter a number for the rule.
any-ip1-ip2-port1-port2-tos
Specifies IP 1, IP 2, Port 1 and Port2, Tos matches any value.
protocol
Configures flow-filter rules for the traffic using specific protocol.
ALL
Specifies any protocol value.
EIGRP
Specifies EIGRP protocol only.
ICMP
Specifies ICMP protocol only.
IGRP
Specifies IGRP protocol only.
IS-IS
Specifies IS-IS protocol only.
OSPF
Specifies OSPF protocol only.
TCP
Specifies TCP protocol only.
UDP
Specifies UDP protocol only.
decimal
Specifie a protocol in the range 0 to 255.
Command Default
None
Command Modes
Interface linecard configuration (config-if)
Command History
This table includes the following release-specific history entries:
Release
Modification
4.2.0
This command was introduced.
Usage Guidelines
Authorization: root
Examples
The following example shows how to configure flow-filter rules for IPv6 traffic using any protocol:
SCE8000#>enable 15
password : <cisco>
SCE8000#>configure
SCE8000(config)#>interface LineCard 0
SCE8000(config)#>flow-filter set-table rule 1 ipv6 any-ip-prefix-port1-port2-tos protocol
all
Cisco SCE 8000 CLI Command Reference
2-165
Chapter 2
Command
Description
flow-filter set-ff rule
Configures a flow-filter rule.
Cisco SCE 8000 CLI Command Reference
2-166
CLI Command Reference
Chapter 2
CLI Command Reference
force failure-condition
force failure-condition
Forces a virtual failure condition, and exits from the failure condition, when performing an application
upgrade.
To disable forcing a virtual failure condition, use the no form of this command.
force failure-condition
no force failure-condition
Syntax Description
This command has no arguments or keywords.
Command Default
None
Command Modes
Interface Linecard Configuration
Command History
This table includes the following release-specific history entries:
Usage Guidelines
Release
Modification
2.5.7
This command was introduced.
When upgrading the application in a cascaded system, use this command to force failure in the active
SCE 8000 platform (see System Upgrades in the Cisco SCE8000 10GBE Software Configuration Guide
or System Upgrades in the Cisco SCE8000 GBE Software Configuration Guide).
Authorization: admin
Examples
The following example shows how to force a virtual failure condition.
At the displayed “n,” type Y and press Enter to confirm the forced failure.
SCE8000>enable 10
Password:<cisco>
SCE8000#config
SCE8000(config)#interface linecard 0
SCE8000(config if)#force failure-condition
Forcing failure will cause a failover - do you want to continue? n
SCE8000(config if)#
Related Commands
Command
Description
pqi upgrade file
Upgrades the application using the specified pqi file and any specified
upgrade options.
Cisco SCE 8000 CLI Command Reference
2-167
Chapter 2
CLI Command Reference
help
help
Displays information relating to all available CLI commands.
help {bindings | tree}
Syntax Description
bindings
Prints a list of keyboard bindings (shortcut commands).
tree
Displays the entire tree of all available CLI commands.
Command Default
None
Command Modes
EXEC
Command History
This table includes the following release-specific history entries:
Release
Modification
2.5.7
This command was introduced.
Usage Guidelines
Authorization: user
Examples
The following example shows partial output from the help bindings command:
SCE8000>help bindings
Line Cursor Movements
--------------------Ctrl-F /->Moves cursor one character to the right.
Ctrl-B /<-Moves cursor one character to the left.
Esc-FMoves cursor one word to the right.
Esc-BMoves cursor one word to the left.
Ctrl-AMoves cursor to the start of the line.
Ctrl-EMoves cursor to the end of the line.
Esc F Moves cursor forward one word.
Esc BMoves cursor backward one word.
Editing
------Ctrl-DDeletes the character where the cursor is located.
Esc-DDeletes from the cursor position to the end of the word.
BackspaceDeletes the character before the current location of the cursor.
Ctrl-H Deletes the character before the current location of the cursor.
Ctrl-KDeletes from the cursor position to the end of the line.
Ctrl-UDeletes all characters from the cursor to the beginning of the line.
Ctrl-XDeletes all characters from the cursor to the beginning of the line.
Ctrl-WDeletes the word to the left of the cursor.
Ctrl-YRecall the last item deleted.
Help and Operation Features
---------------------------? Argument help.
<Tab>Toggles between possible endings for the typed prefix.
Cisco SCE 8000 CLI Command Reference
2-168
Chapter 2
CLI Command Reference
help
<Esc><Tab>Displays all the possible arguments backwards.
Ctrl-I <TAB>
SCE8000>
Cisco SCE 8000 CLI Command Reference
2-169
Chapter 2
CLI Command Reference
history
history
Enables the history feature,which is a record of the last command lines that executed.
To disable the history feature, use the no form of this command.
history
no history
Syntax Description
This command has no arguments or keywords.
Command Default
History is enabled.
Command Modes
Privileged EXEC
Command History
This table includes the following release-specific history entries:
Release
Modification
2.5.7
This command was introduced.
Usage Guidelines
Authorization: admin
Examples
The following example shows how to enable the history feature:
SCE8000>enable 10
Password:<cisco>
SCE8000#history
SCE8000#
The following example shows how to disable the history feature:
SCE8000>enable 10
Password:<cisco>
SCE8000#no history
SCE8000#
Related Commands
Command
Description
history size
Sets the number of command lines that the system records in history.
Cisco SCE 8000 CLI Command Reference
2-170
Chapter 2
CLI Command Reference
history size
history size
Sets the number of command lines that the system records in the history.
To restore the default size, use the no form of this command.
history size [size]
no history size
Syntax Description
size
Command Default
The default buffer size is 10 lines.
Command Modes
Privileged EXEC
Command History
This table includes the following release-specific history entries:
Usage Guidelines
Number of command lines stored in the history of commands for quick
recall.
Release
Modification
2.5.7
This command was introduced.
The size of the history buffer can be any number from 0 to 50. Use the no form of this command to
restore the default size.
Authorization: admin
Examples
The following example shows how to set the history buffer size to 50 command lines:
SCE8000>enable 10
Password:<cisco>
SCE8000#history size 50
SCE8000#
Related Commands
Command
Description
history
Enables the history feature, which is a record of the last command lines that
were executed.
Cisco SCE 8000 CLI Command Reference
2-171
Chapter 2
CLI Command Reference
hostname
hostname
Modifies the name of the Cisco SCE platform. The hostname is part of the displayed prompt.
hostname [hostname]
Syntax Description
hostname
Command Default
The default hostname is SCE.
Command Modes
Global configuration
Command History
This table includes the following release-specific history entries:
Usage Guidelines
Examples
New hostname. Maximum length is 20 characters.
Release
Modification
2.5.7
This command was introduced.
Authorization: admin
The following example shows how to change the hostname to MyHost:
SCE8000>enable 10
Password:<cisco>
SCE8000#config
SCE8000(config)#>hostname MyHost
MyHost(config)#>
Related Commands
Command
Description
show hostname
Displays the currently configured hostname.
Cisco SCE 8000 CLI Command Reference
2-172
Chapter 2
CLI Command Reference
hw-bypass mode
hw-bypass mode
To enable the hardware bypass mode of the Cisco SCE platform and to set or reset the hardware bypass
state for the specified static parties when configured in this mode, use the hw-bypass mode in the global
configuration mode. To disable the hardware bypass mode, use the no form of this command.
hw-bypass mode
no hw-bypass mode
Note
The hardware bypass action can be performed only for the static parties created in the hardware bypass
mode.
Syntax Description
This command has no arguments or keywords.
Command Default
None
Command Modes
Global configuration
Command History
This table includes the following release-specific history entries:
Usage Guidelines
Release
Modification
3.7.x
This command was introduced.
When no hw-bypass mode command is executed, the existing static parties with hardware bypass state
will be reset. Secondly, the hardware bypass mode of the Cisco SCE platform will be disabled
successfully.
The authorization used is root.
Examples
The following example shows how to enable the hw-bypass mode:
SCE8000>enable 15
Password:<cisco>
SCE8000#config
SCE8000(config)#>hw-bypass mode
SCE8000(config)#
The following is the sample output from the no hw-bypass mode command:
SCE8000>enable 15
Password:<cisco>
SCE8000#config
SCE8000(config)#>no hw-bypass mode
hw-bypass for party party-name is reset
Cisco SCE 8000 CLI Command Reference
2-173
Chapter 2
CLI Command Reference
hw-bypass mode
hw-bypass for party party-1 is reset
hw-bypass for party party-2 is reset .
hw-bypass for party party-N is reset
SCE8000(config)#>exit
SCE8000#>show hw-bypass mode
hw-bypass mode is disabled
Related Commands
Command
Description
show hw-bypass mode Displays the hardware bypass mode status of the Cisco SCE platform to the
EXEC authorization level.
Cisco SCE 8000 CLI Command Reference
2-174
Chapter 2
CLI Command Reference
interface gigabitethernet
interface gigabitethernet
Enters GigabitEthernet Interface Configuration mode.
In the Cisco SCE 8000 10GBE platform, only the management interfaces in slot 1 are Gigabit Ethernet
interfaces. (To configure the 10 Gigabit Ethernet line interfaces, use the interface tengigabitethernet
command.)
In the Cisco SCE 8000 GBE platform, both the management interfaces in slot 1 and the line interfaces
in slot 3 are Gigabit Ethernet interfaces.
Note
To configure two or more GBE line interfaces with a single command, use the interface range
gigabitethernet command.
Tip
To configure the management interfaces, you can also use the interface mng command.
interface gigabitethernet slot-number/interface-number
interface gigabitethernet slot-number/bay-number/interface-number
interface gigabitethernet sce-id /slot-number/bay-number/interface-number
Syntax Description
slot-number
For a management interface, enter a value of 1.
(SCE 8000 GBE only) For a GBE line interface, enter a value of 3.
bay-number
(SCE 8000 GBE only) Enter a value of 0 or 1.
Note that slots 2 and 3 are used only for cascade interfaces, which are
10GBE interfaces and are not explicitly configured.
interface-number
For a management interface, enter a value of 1.
(SCE 8000 GBE only) For a GBE line interface, enter a value in the range
of 0 to 7.
sce-id
(SCE 8000 GBE only) In a cascade installation, identifies the specific
Cisco SCE 8000 platform of the cascaded pair. Enter a value of 0 or 1.
Command Default
None
Command Modes
Global configuration
Command History
This table includes the following release-specific history entries:
Release
Modification
2.5.7
This command was introduced.
Cisco SCE 8000 CLI Command Reference
2-175
Chapter 2
CLI Command Reference
interface gigabitethernet
Usage Guidelines
The format of this command depends on the version of the Cisco SCE 8000 platform and the type of
interface being configured, as described Table 2-4.
Table 2-4
Interface gigabitethernet Command Formats
Authorization Level or
Command Mode
Use this command to access
Use this command to
exit
SCE 8000 10GBE
Management
interface
gigabitethernet 1/1
SCE 8000 GBE
Management
interface
gigabitethernet 1/1
SCE 8000 GBE
GBE line
interface
gigabitethernet
3/0/(0-7)
interface
gigabitethernet
3/1/(0-7)
Cascaded SCE 8000 GBE GBE line
interface
gigabitethernet 0/
3/(0-1)/(0-7)
interface
gigabitethernet 1/
3/(0-1)/(0-7)
To return to Global configuration mode, use the exit command.
The system prompt changes to reflect GigabitEthernet Interface Configuration mode.
Authorization: admin
Examples
The following example shows how to enter GigabitEthernet Interface Configuration mode to configure
the management port (SCE 8000 GBE and SCE 8000 10GBE):
SCE8000>enable 10
Password:<cisco>
SCE8000#config
SCE8000(config)#interface gigabitethernet 1/1
SCE8000(config if)#
The following example shows how to enter GigabitEthernet Interface Configuration mode to configure
a GBE line port in subslot 1 of platform 0 in a cascaded pair (SCE 8000 GBE only):
SCE8000>enable 10
Password:<cisco>
SCE8000#config
SCE8000(config)#interface gigabitethernet 0/3/1/5
SCE8000(config if)#
Cisco SCE 8000 CLI Command Reference
2-176
Chapter 2
CLI Command Reference
interface gigabitethernet
Related Commands
Command
Description
exit
Exits from the current mode to the next “lower” level.
show interface gigabitethernet
Displays the details of the GigabitEthernet management interface.
interface range gigabitethernet
Enters a GigabitEthernet Interface Configuration mode for two or
more GBE line interfaces.
interface mng
Enters Management Interface Configuration mode.
Cisco SCE 8000 CLI Command Reference
2-177
Chapter 2
CLI Command Reference
interface linecard
interface linecard
Enters Interface Linecard Configuration mode.
interface linecard slot-number
Syntax Description
slot-number
Command Default
None
Command Modes
Global configuration
Command History
This table includes the following release-specific history entries:
Usage Guidelines
Number of the identified slot. Enter a value of 0.
Release
Modification
2.5.7
This command was introduced.
The system prompt changes to reflect Linecard Configuration mode. To return to Global configuration
mode, use the exit command.
Authorization: admin
Examples
The following example shows how to enter Interface Linecard Configuration mode:
SCE8000>enable 10
Password:<cisco>
SCE8000#config
SCE8000(config)#interface linecard 0
SCE8000(config if)#
Related Commands
Command
Description
exit
Exits from the current mode to the next “lower” level.
Cisco SCE 8000 CLI Command Reference
2-178
Chapter 2
CLI Command Reference
interface mng
interface mng
Enters Management Interface Configuration mode.
interface mng slot-number/interface-number
Syntax Description
slot-number
The number of the identified slot. Enter a value of 0.
interface-number
The Management interface number. Enter a value of 1 or 2 to configure the
desired Management port.
Command Default
This command has no default settings.
Command Modes
Global configuration
Command History
This table includes the following release-specific history entries:
Usage Guidelines
Release
Modification
3.0.0
This command was introduced.
Use this command to configure the management ports for the Cisco SCE platforms.
The system prompt is changed to reflect the Management Interface Interface Configuration mode.
•
To return to the Global configuration Mode, use the exit command.
•
To return to the Use Exec authorization level, use the end command.
Authorization: admin
Examples
The following example enters into Management Interface Configure Interface Mode.
SCE8000>enable 10
Password:<cisco>
SCE8000#config
SCE8000(config)#interface mng 0/1
SCE8000(config if)#
Cisco SCE 8000 CLI Command Reference
2-179
Chapter 2
CLI Command Reference
interface mng
Related Commands
Command
Description
exit
Exits from the current mode to the next “lower” level
end
Exits from Global configuration mode or an interface configuration mode
to the User EXEC authorization level.
show interface mng
Displays information regarding the specified management interface.
duplex
Configures the duplex operation of the GigabitEthernet management
interface.
speed
Configures the speed of the management interface.
active-port
Specifies which management port is currently active.
Cisco SCE 8000 CLI Command Reference
2-180
Chapter 2
CLI Command Reference
interface range gigabitethernet (SCE 8000 GBE only)
interface range gigabitethernet (SCE 8000 GBE only)
Enters GigabitEthernet Interface Configuration mode for two or more GBE line interfaces. You can
specify a range of bays as well as a range of ports. You can also specify both SCE 8000 platforms of a
cascaded pair.
interface range gigabitethernet slot-number/bay-range/interface-range
interface range gigabitethernet sce-id/slot-number/bay-range/interface-range
Syntax Description
slot-number
Enter a value of 3.
bay-range
Enter a value of 0, 1, or 0-1.
interface-range
Specify the range of ports in the format port1-port2, where the overall range
of possible port numbers is 0 to 7.
sce-id
In a cascade installation, identifies the specific Cisco SCE 8000 platform of
the cascaded pair. Enter a value of 0 or 1.
Command Default
None
Command Modes
Global configuration
Command History
This table includes the following release-specific history entries:
Usage Guidelines
Release
Modification
3.0.3
This command was introduced.
The interface range command performs a CLI operation on a group of interfaces with one command,
with the limitation that all the interfaces in the group must be of the same physical and logical type.
The format of this command depends on the topology of the installation, as described in Table 2-5.
Table 2-5
interface gigabitethernet Command Format
Version
Interface
Command Format
Single SCE 8000 GBE
GBE line
interface range gigabitethernet 3/0/interface-range
interface range gigabitethernet 3/1/interface-range
interface range gigabitethernet 3/0-1/interface-range
Cascaded SCE 8000 GBE
GBE line
interface range gigabitethernet 0/3/bay-range/interface-range
interface range gigabitethernet 1/3/bay-range/interface-range
To return to Global configuration mode, use the exit command.
The system prompt changes to reflect GigabitEthernet Interface Configuration mode.
Cisco SCE 8000 CLI Command Reference
2-181
Chapter 2
CLI Command Reference
interface range gigabitethernet (SCE 8000 GBE only)
The following commands are executed on all interfaces specified in the interface range gigabitethernet
command as long as you remain in GigabitEthernet Interface Configuration mode:
•
auto-negotiate (for a cascaded system, supported for the GBE traffic ports only, not for the 10GBE
cascade ports)
•
global-controller bandwidth
•
global-controller name
Authorization: admin
Examples
The following example shows how to enter GigabitEthernet Interface Configuration mode to configure
interfaces 3 to 6 of both 8-port SPA modules:
SCE8000>enable 10
Password:<cisco>
SCE8000#config
SCE8000(config)#interface range gigabitethernet 3/0-1/3-6
SCE8000(config if range)#
The following example shows how to enter GigabitEthernet Interface Configuration mode to configure
interfaces 3 to 6 of both 8-port SPA modules on SCE 8000 platform 0 of a cascaded pair:
SCE8000>enable 10
Password:<cisco>
SCE8000#config
SCE8000(config)#interface range gigabitethernet 0/3/0-1/3-6
SCE8000(config if range)#
Related Commands
Command
Description
exit
Exits from the current mode to the next “lower” level.
end
Exits from Global configuration mode or an interface
configuration mode to the User EXEC authorization level.
show interface gigabitethernet
Displays the details of the GigabitEthernet management
interface.
interface gigabitethernet
Enters GigabitEthernet Interface Configuration mode.
interface range tengigabitethernet
Enters TenGigabitEthernet Interface Configuration mode for
two or more 10GBE line interfaces.
Cisco SCE 8000 CLI Command Reference
2-182
Chapter 2
CLI Command Reference
interface range tengigabitethernet
interface range tengigabitethernet
Enters TenGigabitEthernet Interface Configuration mode for two or more 10GBE line interfaces. You
can specify a range of bays.
Note that in the Cisco SCE 8000 GBE platform, only the cascade ports in bays 2 and 3 support 10GBE
interfaces.
interface range tengigabitethernet 3/bay-range/0
Syntax Description
bay-range
For the Cisco SCE 8000 10GBE, specify the range of bays in the format
bay1-bay2, where the overall range of possible bay numbers is 0 to 3.
For the Cisco SCE 8000 GBE, enter a value of 2, 3, or 2-3.
Command Default
None
Command Modes
Global configuration
Command History
This table includes the following release-specific history entries:
Usage Guidelines
Release
Modification
3.5.5
This command was introduced.
The interface range command performs a CLI operation on a group of interfaces with one command,
with the limitation that all the interfaces in the group must be of the same physical and logical type.
Because each SPA has only one interface (numbered 0), the only argument that has a possible range is
the number of the bay or subslot.
To return to Global configuration mode, use the exit command.
The system prompt changes to reflect the interface range configuration mode.
Authorization: admin
Examples
The following example shows how to enter TenGigabitEthernet Interface Configuration mode on an SCE
8000 10GBE platform to configure all the interfaces:
SCE8000>enable 10
Password:<cisco>
SCE8000#config
SCE8000(config)#interface range tengigabitethernet 3/0-3/0
SCE8000(config if range)#
Cisco SCE 8000 CLI Command Reference
2-183
Chapter 2
CLI Command Reference
interface range tengigabitethernet
The following example shows how to enter TenGigabitEthernet Interface Configuration mode on an SCE
8000 GBE platform to configure both the cascade interfaces:
SCE8000>enable 10
Password:<cisco>
SCE8000#config
SCE8000(config)#interface range tengigabitethernet 3/2-3/0
SCE8000(config if range)#
Related CommandsE
Command
Description
exit
Exits from the current mode to the next “lower” level.
end
Exits from Global configuration mode or an interface
configuration mode to the User EXEC authorization level.
show interface tengigabitethernet
Displays the details of the TenGigabitEthernet management
interface.
interface tengigabitethernet
Enters TenGigabitEthernet Interface Configuration mode for
the 10GBE line interfaces.
interface range gigabitethernet
Enters a GigabitEthernet Interface Configuration mode for
two or more GBE line interfaces.
Cisco SCE 8000 CLI Command Reference
2-184
Chapter 2
CLI Command Reference
interface tengigabitethernet
interface tengigabitethernet
Enters TenGigabitEthernet Interface Configuration mode for the 10GBE line interfaces.
Note that in the Cisco SCE 8000 GBE platform, only the cascade ports in bays 2 and 3 support 10GBE
interfaces.
interface tengigabitethernet 3/bay-number/0
Syntax Description
bay-number
For the Cisco SCE 8000 10GBE, possible bay numbers are 0 to 3.
For the Cisco SCE 8000 GBE, possible bay numbers are 2 or 3.
Command Default
None
Command Modes
Global configuration
Command History
This table includes the following release-specific history entries:
Usage Guidelines
Release
Modification
3.5.5
This command was introduced.
To return to Global configuration mode, use the exit command.
The system prompt changes to reflect the interface configuration mode.
Authorization: admin
Examples
The following example shows how to enter TenGigabitEthernet Interface Configuration mode on an SCE
8000 10GBE platform to configure the interface in bay 1:
SCE8000>enable 10
Password:<cisco>
SCE8000#config
SCE8000(config)#interface tengigabitethernet 3/1/0
SCE8000(config if range)#
Cisco SCE 8000 CLI Command Reference
2-185
Chapter 2
CLI Command Reference
interface tengigabitethernet
Related CommandsE
Command
Description
exit
Exits from the current mode to the next “lower” level.
end
Exits from Global configuration mode or an interface
configuration mode to the User EXEC authorization level.
show interface tengigabitethernet
Displays the details of a TenGigabitEthernet management
interface.
interface range tengigabitethernet
Enters TenGigabitEthernet Interface Configuration mode for
two or more 10GBE line interfaces.
interface gigabitethernet
Enters GigabitEthernet Interface Configuration mode.
Cisco SCE 8000 CLI Command Reference
2-186
Chapter 2
CLI Command Reference
ip access-class
ip access-class
Specifies which access control list (ACL) controls global access to the Cisco SCE platform.
To permit global access to the Cisco SCE platform from any IP address, use the no form of this
command.
ip access-class number
no ip access-class
Syntax Description
number
Command Default
None (all IP addresses can access the system).
Command Modes
Global configuration
Command History
This table includes the following release-specific history entries:
Usage Guidelines
Number of the access list (1 to 99) to use to allow global access to the Cisco
SCE platform.
Release
Modification
2.5.7
This command was introduced.
The ACL specified in this command contains the definitions for all IP addresses with permission to
access the Cisco SCE platform. IP addresses not permitted in this access list cannot access or detect the
Cisco SCE platform; even a ping command does not receive a response if it is not from a permitted IP
address.
Authorization: admin
Examples
The following example shows how to set access list 1 as the global ACL:
SCE8000>enable 10
Password:<cisco>
SCE8000#config
SCE8000(config)#ip access-class 1
SCE8000(config)#
Related Commands
Command
Description
access-list
Adds an entry to the bottom of the specified access list.
show access-lists
Displays all access lists or a specific access list.
Cisco SCE 8000 CLI Command Reference
2-187
Chapter 2
CLI Command Reference
ip address
ip address
Sets the IP address and subnet mask of the management interface.
ip address new-address subnet-mask
Syntax Description
new-address
New IP address of the management interface.
The following IP addresses are used internally by the Cisco SCE 8000
platform and cannot be assigned to the management interface:
subnet-mask
•
192.168.207.241 to 192.168.207.255
•
92.168.207.145 to 192.168.207.159
Network mask for the associated IP network.
Command Default
None
Command Modes
GigabitEthernet Interface Configuration
MNG Interface Configuration
Command History
Usage Guidelines
This table includes the following release-specific history entries:
Release
Modification
2.5.7
This command was introduced.
When both management ports are connected, only one port is active at any given time, while the second
management port provides a redundant management interface. In this case, the configured IP address
acts as a virtual IP address for the currently active management interface, regardless of which port is the
active port.
Since this IP address always acts as a virtual IP address for the currently active management port, this
command can be executed from the Mng Interface Configuration for either management port.
Note
Changing the IP address of the management interface using Telnet results in the loss of the Telnet
connection and the inability to reconnect with the interface.
Note
After changing the IP address, you must reload the Cisco SCE platform (see reload) so that the change
will take effect properly in all internal and external components of the Cisco SCE platform.
If a routing table entry maps to the old address, but not to the new address, the command may fail.
Authorization: admin
Cisco SCE 8000 CLI Command Reference
2-188
Chapter 2
CLI Command Reference
ip address
Examples
The following example shows how to set the IP address of the Cisco SCE platform to 10.1.1.1 and the
subnet mask to 255.255.0.0:
SCE8000>enable 10
Password:<cisco>
SCE8000#config
SCE8000(config)#interface mng 0/1
SCE8000(config if)#ip address 10.1.1.1 255.255.0.0
SCE8000(config if)#
Related Commands
Command
Description
gigabitethernet interface
Enters GigabitEthernet Interface Configuration mode.
interface mng
Enters Management Interface Configuration mode.
Cisco SCE 8000 CLI Command Reference
2-189
Chapter 2
CLI Command Reference
ip advertising
ip advertising
Enables IP advertising. If either the destination or interval is not configured, the default values are used.
To disable IP advertising, use the no form of this command.
To restore the IP advertising destination or interval to the default values, use the default form of this
command.
ip advertising [destination destination | interval interval]
no ip advertising
default ip advertising [destination | interval]
Syntax Description
Command Default
destination
IP address of the destination for the ping requests
interval
Frequency of the ping requests, in seconds
IP advertising is disabled.
The default destination is 127.0.0.1.
The default interval is 300 seconds.
Command Modes
Global configuration
Command History
This table includes the following release-specific history entries:
Release
Modification
2.5.7
This command was introduced.
Usage Guidelines
Authorization: admin
Examples
The following example shows how to enable IP advertising and specify a destination and an interval:
SCE8000>enable 10
Password:<cisco>
SCE8000#config
SCE8000(config)#ip advertising destination 10.1.1.1
SCE8000(config)#ip advertising interval 240
SCE8000(config)#
Cisco SCE 8000 CLI Command Reference
2-190
Chapter 2
CLI Command Reference
ip advertising
The following example shows how to restore the IP advertising destination to the default value:
SCE8000>enable 10
Password:<cisco>
SCE8000#config
SCE8000(config)#default ip advertising destination
SCE8000(config)#
Related Commands
Command
Description
show ip advertising
Displays the status of IP advertising, the configured destination, and the
configured interval.
Cisco SCE 8000 CLI Command Reference
2-191
Chapter 2
CLI Command Reference
ip default-gateway
ip default-gateway
Configures the default gateway for the Cisco SCE platform.
To remove the Cisco SCE platform default gateway configuration, use the no form of this command.
ip default-gateway x.x.x.x
no ip default-gateway
Syntax Description
x.x.x.x
Command Default
None
Command Modes
Global configuration
Command History
This table includes the following release-specific history entries:
IP address of the default gateway for the Cisco SCE platform.
Release
Modification
2.5.7
This command was introduced.
Usage Guidelines
Authorization: admin
Examples
The following example shows how to set the default gateway IP of the Cisco SCE platform to 10.1.1.1:
SCE8000>enable 10
Password:<cisco>
SCE8000#config
SCE8000(config)#ip default-gateway 10.1.1.1
SCE8000(config)#
Related Commands
Command
Description
show ip default-gateway
Displays the configured default gateway.
Cisco SCE 8000 CLI Command Reference
2-192
Chapter 2
CLI Command Reference
ip domain-lookup
ip domain-lookup
Enables or disables the domain name lookups.
To disable domain name lookup, use the no form of this command.
ip domain-lookup
no ip domain-lookup
Syntax Description
This command has no arguments or keywords.
Command Default
Domain name lookup is enabled.
Command Modes
Global configuration
Command History
This table includes the following release-specific history entries:
Release
Modification
2.5.7
This command was introduced.
Usage Guidelines
Authorization: admin
Examples
The following example shows how to enable domain lookup:
SCE8000>enable 10
Password:<cisco>
SCE8000#config
SCE8000(config)#ip domain-lookup
SCE8000(config)#
The following example shows how to disable domain lookup:
SCE8000>enable 10
Password:<cisco>
SCE8000#config
SCE8000(config)#no ip domain-lookup
SCE8000(config)#
Cisco SCE 8000 CLI Command Reference
2-193
Chapter 2
CLI Command Reference
ip domain-lookup
Related Commands
Command
Description
ip domain-name
Defines a default domain name.
ip name-server
Specifies the address of one or more servers to use for name and address
resolution.
show hosts
Displays the default domain name, the address of the name server, and the
contents of the host table.
Cisco SCE 8000 CLI Command Reference
2-194
Chapter 2
CLI Command Reference
ip domain-name
ip domain-name
Defines a default domain name.
To remove the current default domain name, use the no form of this command. You do not have to specify
the domain name.
ip domain-name domain-name
no ip domain-name
Syntax Description
domain-name
Command Default
None
Command Modes
Global configuration
Command History
This table includes the following release-specific history entries:
Default domain name used to complete hostnames that do not specify a
domain. Do not include the initial period that separates an unqualified name
from the domain name.
Release
Modification
2.5.7
This command was introduced.
Usage Guidelines
Authorization: admin
Examples
The following example shows how to configure a domain name:
SCE8000>enable 10
Password:<cisco>
SCE8000#config
SCE8000(config)#ip domain-name cisco.com
SCE8000(config)#
The following example shows how to remove the configured domain name:
SCE8000>enable 10
Password:<cisco>
SCE8000#config
SCE8000(config)#no ip domain-name
SCE8000(config)#
Cisco SCE 8000 CLI Command Reference
2-195
Chapter 2
CLI Command Reference
ip domain-name
Related Commands
Command
Description
ip domain-lookup
Enables or disables domain name lookups.
ip name-server
Specifies the address of one or more servers to use for name and address
resolution.
show hosts
Displays the default domain name, the address of the name server, and the
contents of the host table.
Cisco SCE 8000 CLI Command Reference
2-196
Chapter 2
CLI Command Reference
ip ftp password
ip ftp password
Specifies the password to be used for FTP connections for the current session. The system uses this
password if no password is specified with the copy ftp command.
ip ftp password [password]
Syntax Description
password
Command Default
The default password is admin.
Command Modes
Privileged EXEC
Command History
This table includes the following release-specific history entries:
Usage Guidelines
Examples
Password for FTP connections.
Release
Modification
2.5.7
This command was introduced.
Authorization: admin
The following example shows how to set the password to be used in the FTP connection to mypw:
SCE8000>enable 10
Password:<cisco>
SCE8000#ip ftp password mypw
SCE8000#
Related Commands
Command
Description
copy ftp://
Uploads or downloads a file system using FTP.
copy-passive
Uploads or downloads a file using passive FTP.
ip ftp username
Configures the username for FTP connections for the current session.
Cisco SCE 8000 CLI Command Reference
2-197
Chapter 2
CLI Command Reference
ip ftp username
ip ftp username
Configures the username for FTP connections for the current session. This username is used if no
username is specified with the copy ftp command.
ip ftp username [username]
Syntax Description
username
Command Default
The default username is anonymous.
Command Modes
Privileged EXEC
Command History
This table includes the following release-specific history entries:
Username for FTP connections.
Release
Modification
2.5.7
This command was introduced.
Usage Guidelines
Authorization: admin
Examples
The following example shows how to set myname as the username for FTP connections:
SCE8000>enable 10
Password:<cisco>
SCE8000#ip ftp username myname
SCE8000#
Related Commands
Command
Description
copy ftp://
Uploads or downloads a file system using FTP.
copy-passive
Uploads or downloads a file using passive FTP.
ip ftp password
Specifies the password to be used for FTP connections for the current
session.
Cisco SCE 8000 CLI Command Reference
2-198
Chapter 2
CLI Command Reference
ip host
ip host
Adds a hostname and address to the host table.
To remove a hostname and address from the host table, use the no form of this command.
ip host hostname ip-address
no ip host hostname [ip-address]
Syntax Description
hostname
Hostname to be added or removed.
ip-address
Host IP address in x.x.x.x format.
Command Default
None
Command Modes
Global configuration
Command History
This table includes the following release-specific history entries:
Release
Modification
2.5.7
This command was introduced.
Usage Guidelines
Authorization: admin
Examples
The following example shows how to add a host to the host table:
SCE8000>enable 10
Password:<cisco>
SCE8000#config
SCE8000(config)#ip host PC85 10.1.1.1
SCE8000(config)#
Related Commands
Command
Description
show hosts
Displays the default domain name, the address of the name server, and the
contents of the host table.
Cisco SCE 8000 CLI Command Reference
2-199
Chapter 2
CLI Command Reference
ip name-server
ip name-server
Specifies the address of one or more servers to use for name and address resolution. The system
maintains a list of up to three name servers. If the current list is not empty, the command adds the
specified servers to the list.
To remove specified servers from the current list, use the no form of this command.
ip name-server server-address1 [server-address2] [server-address3]
no ip name-server
Syntax Description
server-address1
IP address of the name server.
server-address2
IP address of an additional name server.
server-address3
IP address of an additional name server.
Command Default
None
Command Modes
Global configuration
Command History
This table includes the following release-specific history entries:
Release
Modification
2.5.7
This command was introduced.
Usage Guidelines
Authorization: admin
Examples
The following example shows how to add the DNS 10.1.1.1 and 10.1.1.2 to the list of configured servers:
SCE8000>enable 10
Password:<cisco>
SCE8000#config
SCE8000(config)#ip name-server 10.1.1.1 10.1.1.2
SCE8000(config)#
Related Commands
Command
Description
ip domain-lookup
Enables or disables domain name lookups.
show hosts
Displays the default domain name, the address of the name server, and the
contents of the host table.
Cisco SCE 8000 CLI Command Reference
2-200
Chapter 2
CLI Command Reference
ip radius-client retry limit
ip radius-client retry limit
Configures the parameters for retransmitting unacknowledged RADIUS client messages.
ip radius-client retry limit [times] [timeout timeout]
Syntax Description
Command Default
times
Maximum number of times the RADIUS client can try unsuccessfully to
send a message.
timeout
Timeout interval for retransmitting a message, in seconds
The default for times is 3.
The default for timeout is 5 seconds.
Command Modes
Global configuration
Command History
This table includes the following release-specific history entries:
Usage Guidelines
Release
Modification
3.0.3
This command was introduced.
Because of the unreliable nature of UDP, the RADIUS client retransmits requests to the SCMP peer
device if they were not acknowledged within the configured number of seconds. Messages that were not
acknowledged can be retransmitted up to the configured maximum number of retries.
The optional timeout keyword limits the time interval for retransmitting a message.
Authorization: admin
Examples
The following example shows how to configure the retransmission parameters:
SCE8000>enable 10
Password:<cisco>
SCE8000#config
SCE8000(config)# ip radius-client retry limit 5 timeout 5
SCE8000(config)#
Related Commands
Command
Description
scmp name
Adds an SCMP peer device.
show ip radius-client
Displays the RADIUS client general configuration.
Cisco SCE 8000 CLI Command Reference
2-201
Chapter 2
CLI Command Reference
ip route
ip route
Adds an IP routing entry to the routing table.
To remove an IP routing entry from the routing table, use the no form of this command.
ip route ip-address mask [next-hop]
no ip route prefix mask [next-hop]
no ip route all
Syntax Description
ip-address
IP address of the new entry.
mask
Relevant subnet mask.
next-hop
Next hop in the route.
all
Used with the no form of the command, removes all IP routing entries from
the routing table.
Command Default
None
Command Modes
Global configuration
Command History
This table includes the following release-specific history entries:
Usage Guidelines
Release
Modification
2.5.7
This command was introduced.
All addresses must be in dotted notation.
The next-hop address must be within the Management Interface subnet.
A maximum of 100 subnets can be configured.
Authorization: admin
Examples
The following example shows how to set the next-hop address for IP addresses in the specified range:
SCE8000>enable 10
Password:<cisco>
SCE8000#config
SCE8000(config)#ip route 10.10.10.0 255.255.255.0 20.2.2.2
SCE8000(config)#
Cisco SCE 8000 CLI Command Reference
2-202
Chapter 2
CLI Command Reference
ip route
The following example shows how to remove the entry added in the previous example:
SCE8000>enable 10
Password:<cisco>
SCE8000#config
SCE8000(config)#no ip route 10.10.10.0 255.255.255.0
SCE8000(config)#
Related Commands
Command
Description
show ip route
Displays the entire routing table and the destination of last resort (default
gateway).
Cisco SCE 8000 CLI Command Reference
2-203
Chapter 2
CLI Command Reference
ip rpc-adapter
ip rpc-adapter
Enables the RPC adapter.
To disable the RPC adapter, use the no form of this command.
ip rpc-adapter
no ip rpc-adapter
Syntax Description
This command has no arguments or keywords.
Command Default
None
Command Modes
Global configuration
Command History
This table includes the following release-specific history entries:
Release
Modification
2.5.7
This command was introduced.
Usage Guidelines
Authorization: admin
Examples
The following example shows how to enable the RPC adapter:
SCE8000>enable 10
Password:<cisco>
SCE8000#config
SCE8000(config)#ip rpc-adapter
SCE8000(config)#
The following example shows how to disable the RPC adapter:
SCE8000>enable 10
Password:<cisco>
SCE8000#config
SCE8000(config)#no ip rpc-adapter
SCE8000(config)#
Related Commands
Command
Description
ip rpc-adapter port
Defines the RPC adapter port.
show ip rpc-adapter
Displays the status of the RPC adapter and the configured port.
ip rpc-adaptor security-level
Sets the PRPC server security level.
Cisco SCE 8000 CLI Command Reference
2-204
Chapter 2
CLI Command Reference
ip rpc-adapter port
ip rpc-adapter port
Defines the RPC adapter port.
To reset the RPC adapter port assignment to the default port of 14374, use the default form of this
command.
ip rpc-adapter port [port-number]
default ip rpc-adapter port
Syntax Description
port-number
Command Default
The default port number is 14374.
Command Modes
Global configuration
Command History
This table includes the following release-specific history entries:
Number of the port assigned to the RPC adapter.
Release
Modification
2.5.7
This command was introduced.
Usage Guidelines
Authorization: admin
Examples
The following example shows how to configure the RPC interface, specifying 1444 as the RPC adapter
port:
SCE8000>enable 10
Password:<cisco>
SCE8000#config
SCE8000(config)#ip rpc-adapter
SCE8000(config)#ip rpc-adapter port 1444
The following example shows how reset the RPC adapter port:
SCE8000>enable 10
Password:<cisco>
SCE8000#config
SCE8000(config)#default ip rpc-adapter port
Related Commands
Command
Description
ip rpc-adapter
Enables the RPC adapter.
show ip rpc-adapter
Displays the status of the RPC adapter and the configured port.
Cisco SCE 8000 CLI Command Reference
2-205
Chapter 2
CLI Command Reference
ip rpc-adapter security-level
ip rpc-adapter security-level
Sets the PRPC server security level.
ip rpc-adapter security-level [level]
Syntax Description
level
Command Default
The default security level is semi.
Command Modes
Global configuration
Command History
This table includes the following release-specific history entries:
Usage Guidelines
Security level for the PRPC server. Choose full, semi, or None. See Usage
Guidelines for more information.
Release
Modification
3.0.3
This command was introduced.
Specify the PRPC server security level as follows:
•
full—All PRPC connections require authentication.
•
semi—PRPC connections that supply a username and password during connection establishment are
authenticated. Connections that do not supply a username and password are accepted with no
authentication.
•
none—No authentication is performed.
Authorization: admin
Examples
The following example shows how to set the PRPC server security level:
SCE8000>enable 10
Password:<cisco>
SCE8000#configure
SCE8000(config)#ip rpc-adapter security-level full
SCE8000>
Related Commands
Command
Description
ip rpc-adapter
Enables the RPC adapter.
show ip rpc-adapter
Displays the status of the RPC adapter and the configured port.
Cisco SCE 8000 CLI Command Reference
2-206
Chapter 2
CLI Command Reference
ip ssh
ip ssh
Enables the SSH server.
SSH allows you to login only when the user password and AAA authentication are configured.
1.
Configure at least one user name and password.
SCE8000(config)# username <username> password <password>
2.
Configure AAA authentication for login.
SCE8000(config)# aaa authentication login default none
To disable the SSH server, use the no form of this command.
ip ssh [sshv1]
no ip ssh [sshv1]
Syntax Description
sshv1
Command Default
None
Command Modes
Global configuration
Command History
This table includes the following release-specific history entries:
Usage Guidelines
Enables SSHv1.
Release
Modification
2.5.7
This command was introduced.
If the sshv1 keyword is not specified, both SSHv1 and SSHv2 are enabled. If you want to enable only
SSHv2, use the no form of this command to disable SSHv1. Use the ip ssh sshv1 command to reenable
SSHv1.
When using an SSH server, you should also generate an SSH key set (ip ssh key command). A set of
keys must be generated at least once before enabling the SSH server.
Authorization: admin
Examples
The following example shows how to enable the SSH server. Both SSHV1 and SSHv2 are enabled.
SCE8000>enable 10
Password:<cisco>
SCE8000#config
SCE8000(config)#ip ssh
SCE8000(config)#
Cisco SCE 8000 CLI Command Reference
2-207
Chapter 2
CLI Command Reference
ip ssh
The following example shows how to disable the SSH server:
SCE8000>enable 10
Password:<cisco>
SCE8000#config
SCE8000(config)#no ip ssh
SCE8000(config)#
The following example shows how to disable SSHv1 so that only SSHv2 is enabled:
SCE8000>enable 10
Password:<cisco>
SCE8000#config
SCE8000(config)#ip ssh
SCE8000(config)#no ip ssh sshv1
SCE8000(config)#
Related Commands
Command
Description
ip ssh key
Generates or removes the SSH key set.
show ip ssh
Displays the status of the SSH server, including current SSH sessions.
Cisco SCE 8000 CLI Command Reference
2-208
Chapter 2
CLI Command Reference
ip ssh access-class
ip ssh access-class
Assigns an access class list (ACL) to the SSH server, so that access to the SSH server is limited to the
IP addresses defined in the ACL.
Use the no option to remove the ACL assignment from the SSH server.
ip ssh access-class acl-number
no ip ssh access-class
Syntax Description
acl-number
Command Default
By default, no ACL is configured (SSH access is available from any IP address).
Command Modes
Global configuration
Command History
This table includes the following release-specific history entries:
Usage Guidelines
The access list number of an ACL
Release
Modification
2.5.7
This command was introduced.
You must configure the ACL before you can assign it to a service. (See access-list.)
Authorization: admin
Examples
The following examples illustrate how to use this command.
EXAMPLE 1:
The following example assigns an existing ACL to the SSH server.
SCE8000>enable 10
Password:<cisco>
SCE8000#config
SCE8000(config)#ip ssh access-class 4
SCE8000(config)#
EXAMPLE 2:
The following example removes the ACL assignment from the SSH server.
SCE8000>enable 10
Password:<cisco>
SCE8000#config
SCE8000(config)#no ip ssh access-class
SCE8000(config)#
Cisco SCE 8000 CLI Command Reference
2-209
Chapter 2
ip ssh access-class
Related Commands
Command
Description
access-list
Creates or updates a specified ACL
ip ssh
Enables the SSH server.
show ip ssh
Displays the current SSH service configuration.
Cisco SCE 8000 CLI Command Reference
2-210
CLI Command Reference
Chapter 2
CLI Command Reference
ip ssh key
ip ssh key
Generates or removes the SSH key set. A set of keys must be generated at least once before enabling the
SSH server.
ip ssh key [generate | remove]
Syntax Description
generate
Generates a new SSH key set and saves it to nonvolatile memory. Key size
is always 2048 bits.
remove
Removes the existing key set.
Command Default
None
Command Modes
Global configuration
Command History
This table includes the following release-specific history entries:
Usage Guidelines
Release
Modification
2.5.7
This command was introduced.
Each SSH server should define a set of keys (DSA2, RSA2, and RSA1) to be used when communicating
with various clients. The key sets are pairs of public and private keys. The server publishes the public
key, while keeping the private key in nonvolatile memory. The private key is never transmitted to SSH
clients.
Note that the keys are kept on the /system/ file, which means that a person with knowledge of the enable
password can access both the private and public keys. The SSH server implementation provides
protection against eavesdroppers who can monitor the management communication channels of the
Cisco SCE platform, but it does not provide protection against a user with knowledge of the enable
password.
When using an SSH server, you should also enable the SSH server (ip ssh command).
Authorization: admin
Examples
The following example shows how to generate a new SSH key set:
SCE8000>enable 10
Password:<cisco>
SCE8000#config
SCE8000(config)#ip ssh key generate
SCE8000(config)#
Cisco SCE 8000 CLI Command Reference
2-211
Chapter 2
CLI Command Reference
ip ssh key
The following example shows how to remove the SSH key set:
SCE8000>enable 10
Password:<cisco>
SCE8000#config
SCE8000(config)#ip ssh key remove
SCE8000(config)#
Related Commands
Command
Description
ip ssh
Enables the SSH server.
ip ssh access-class
Assigns an access control list to the SSH service.
show ip ssh
Displays the status of the SSH server, including current SSH sessions.
Cisco SCE 8000 CLI Command Reference
2-212
Chapter 2
CLI Command Reference
ip ssh mng-vlan
ip ssh mng-vlan
Assigns the specified VLAN to SSH services.
Use the no form of the command to remove the VLAN configuration for SSH services.
ip ssh mng-vlan vlan-id
no ip ssh mng-vlan
Syntax Description
vlan-id
Command Default
None
Command Modes
Global configuration
Command History
This table includes the following release-specific history entries:
Usage Guidelines
VLAN tag to be assigned to SSH services (1-4094).
Release
Modification
3.7.x
This command was introduced.
You can create separate VLAN interfaces on the management interface in order to differentiate between
various management and control services. There are two steps in this process:
1.
Create the VLAN and assign the IP address (mng-vlan command).
2.
Assign the VLAN to a management service.
Authorization: admin
Examples
The following example shows how to configure a VLAN for SSH services.
SCE8000>enable 10
Password:<cisco>
SCE8000#config
SCE8000(config)#mng-vlan 100 address 10.10.10.20 mask 255.255.255.0
SCE8000(config)#ip ssh mng-vlan 100
SCE8000(config)#
The following example shows how to remove the VLAN for SSH services.
SCE8000>enable 10
Password:<cisco>
SCE8000#config
SCE8000(config)#no ip ssh mng-vlan
SCE8000(config)#
Cisco SCE 8000 CLI Command Reference
2-213
Chapter 2
CLI Command Reference
ip ssh mng-vlan
Related Commands
Command
Description
show ip ssh mng-vlan
Displays the VLAN configured for SSH services, if configured.
show ip ssh
Displays the VLAN configuration of SSH services, if configured, in
addition to other SSH properties.
Cisco SCE 8000 CLI Command Reference
2-214
Chapter 2
CLI Command Reference
ip-tunnel 6to4
ip-tunnel 6to4
To enable the IPv6-to-IPv4 tunneling in an IP tunnel, use the ip-tunnel 6to4 command in inteface
linecard configuartion mode.
To disable IPv6-to-IPv4 tunneling, use the no form of this command.
ip-tunnel 6to4
no ip-tunnel 6to4
Syntax Description
This command has no arguments or keywords.
Command Default
IP tunnel recognition is disabled.
Command Modes
Interface linecard configuration (config-if)
Command History
This table includes the following release-specific history entries:
Usage Guidelines
Caution
Release
Modification
3.7.5
This command was introduced.
The 6to4 protocol is an IPv6-based tunneling protocol. The IPv6 environment and the 6to4 environment
should be configured before you can use this command.
6to4 tunneling can be enabled or disabled only when no applications are loaded or the line card is shut
down.
If 6to4 is configured, depending on the configuration, the internal or the external IP header is considered
as the subscriber traffic. In the 6to4 IPv6 mode, the internal IP header is considered as the subscriber
traffic and in the 6to4-IPv4 mode as the external header.
If 6to4 is not configured, the Cisco SCE device considers the external IP header as the subscriber traffic.
All the flows in the tunnel are considered as a single flow.
The corresponding subscriber IP address gets mapped to the traffic processors that are configured to
handle IPv4 and IPv6, based on the 6to4 hash configuration in the 6to4-IPv6 mode.
Authorization: admin
Cisco SCE 8000 CLI Command Reference
2-215
Chapter 2
CLI Command Reference
ip-tunnel 6to4
Examples
The following example shows how to use this command. Note that you must have root level access to
shut down the line card, even though an admin level access is sufficient to run the 6to4 command.
SCE8000> enable 15
Password: <cisco>
SCE8000#> configure
SCE8000(config)#> interface linecard 0
SCE8000(config if)#> shutdown
SCE8000(config if)#> ip-tunnel 6to4
SCE8000(config if)#> no shutdown
Related Commands
Command
Description
show interface linecard ip-tunnel
Displays the current IP tunnel configuration.
Cisco SCE 8000 CLI Command Reference
2-216
Chapter 2
CLI Command Reference
ip-tunnel DS-Lite
ip-tunnel DS-Lite
To enable the DS-Lite tunnel in the IP tunnel, use the ip-tunnel DS-Lite command in interface linecard
configuration mode.
To disable the DS-Lite tunnelling use the no form of this command.
ip-tunnel DS-Lite
no ip-tunnel DS-Lite
Syntax Description
This command has no arguments or keywords.
Command Default
IP tunnel recognition is disabled.
Command Modes
Interface linecard configuration (config-if)
Command History
This table includes the following release-specific history entries:
Usage Guidelines
Caution
Release
Modification
3.7.5
This command was introduced.
The IPv6 environment should be configured before you use this command.
DS-Lite tunneling can be enabled or disabled only when no applications are loaded or the line card is
shut down.
When DS-Lite is enabled, IPv6 traffic is handled by the traffic processor configured for IPv6, as TCP or
UDP. If DS-Lite is disabled, IPv6 traffic is bypassed on the traffic processor configured for IPv6.
Authorization: admin
Examples
The following example shows how to use this command. Note that you must have root level access to
shut down the line card, even though an admin level access is sufficient to run the DS-Lite command.
SCE8000> enable 15
Password: <cisco>
SCE8000#> configure
SCE8000(config)#> interface linecard 0
SCE8000(config if)#> shutdown
SCE8000(config if)#> ip-tunnel DS-Lite
SCE8000(config if)#> no shutdown
Cisco SCE 8000 CLI Command Reference
2-217
Chapter 2
CLI Command Reference
ip-tunnel DS-Lite
Related Commands
Command
Description
show interface linecard ip-tunnel
Displays the current IP tunnel configuration.
Cisco SCE 8000 CLI Command Reference
2-218
Chapter 2
CLI Command Reference
ip-tunnel DS-Lite Extention-Header-Support
ip-tunnel DS-Lite Extention-Header-Support
To enable DS-Lite extension header support in the IP tunnel, use the ip-tunnel DS-Lite
Extention-Header-Support command in interface linecard configuration mode.
To disable DS-Lite Extention-Header-Support in the IP tunnel, use the no form of this command.
ip-tunnel DS-Lite Extention-Header-Support
no ip-tunnel DS-Lite Extention-Header-Support
Syntax Description
This command has no arguments or keywords.
Command Default
IP tunnel recognition is disabled.
Command Modes
Interface linecard configuration (config-if)
Command History
This table includes the following release-specific history entries:
Usage Guidelines
Caution
Release
Modification
3.7.5
This command was introduced.
The IPv6 environment should be configured before you can use this command. DS-Lite extension header
support is significant only if the DS-Lite mode is enabled.
DS-Lite extension header support can be enabled or disabled only when no applications are loaded or
the line card is shut down.
When DS-Lite is enabled, IPv6 traffic is handled by the traffic processor configured for IPv6, as TCP or
UDP. If DS-Lite is disabled, IPv6 traffic is bypassed on the traffic processor configured for IPv6.
Authorization: admin
Examples
The following example shows how to use this command. Note that you must have root level access to
shut down the line card, even though an admin level access is sufficient to run the DS-Lite command.
SCE8000> enable 15
Password: <cisco>
SCE8000#> configure
SCE8000(config)#> interface linecard 0
SCE8000(config if)#> shutdown
SCE8000(config if)#> ip-tunnel DS-Lite
SCE8000(config if)#> ip-tunnel DS-Lite Extention-Header-Support
DS-Lite Extension header support will be significant only if DS-Lite mode gets enabled.
SCE8000(config if)#> no shutdown
Cisco SCE 8000 CLI Command Reference
2-219
Chapter 2
CLI Command Reference
ip-tunnel DS-Lite Extention-Header-Support
Related Commands
Command
Description
show interface linecard ip-tunnel
Displays the current IP tunnel configuration.
Cisco SCE 8000 CLI Command Reference
2-220
Chapter 2
CLI Command Reference
ip-tunnel DS-Lite Extend-IANA
ip-tunnel DS-Lite Extend-IANA
To enable 128 bit hashing for DS-Lite flows, use the ip-tunnel DS-Lite Extend-IANA command in
interface linecard configuration mode.
To disable 128 bit hashing for DS-Lite flows, use the no form of this command.
ip-tunnel DS-Lite Extend-IANA
no ip-tunnel DS-Lite Extend-IANA
Syntax Description
This command has no arguments or keywords.
Command Default
128-bit hashing is disabled.
Command Modes
Interface linecard configuration (config-if)
Command History
This table includes the following release-specific history entries:
Usage Guidelines
Caution
Release
Modification
4.0.0
This command was introduced.
The IPv6 environment should be configured before you can use this command. 128-bit hashing of
DS-LIte flows is significant only if the DS-Lite mode is enabled.
128-bit hashing of DS-Lite flows can be enabled or disabled only when no applications are loaded or the
line card is shut down.
When DS-Lite is enabled, IPv6 traffic is handled by the traffic processor configured for IPv6, as TCP or
UDP. If DS-Lite is disabled, IPv6 traffic is bypassed on the traffic processor configured for IPv6.
Authorization: admin
Examples
The following example shows how to use this command. Note that you must have root level access to
shut down the line card, even though an admin level access is sufficient to run the DS-Lite command.
SCE8000> enable 15
Password: <cisco>
SCE8000#> configure
SCE8000(config)#> interface linecard 0
SCE8000(config if)#> shutdown
SCE8000(config if)#> ip-tunnel DS-Lite
SCE8000(config if)#> ip-tunnel DS-Lite Extend-IANA
SCE8000(config if)#> no shutdown
Cisco SCE 8000 CLI Command Reference
2-221
Chapter 2
CLI Command Reference
ip-tunnel DS-Lite Extend-IANA
Related Commands
Command
Description
show interface linecard ip-tunnel
Displays the current IP tunnel configuration.
Cisco SCE 8000 CLI Command Reference
2-222
Chapter 2
CLI Command Reference
ip-tunnel gre skip
ip-tunnel gre skip
Enables the recognition of GRE tunnels and skipping into the internal IP packet.
To disable tunnel recognition and classify traffic by the external IP address, use the no form of this
command.
ip-tunnel gre skip
no ip-tunnel gre skip
Syntax Description
This command has no arguments or keywords.
Command Default
IP tunnel recognition is disabled.
Command Modes
Interface Linecard Configuration
Command History
This table includes the following release-specific history entries:
Usage Guidelines
Release
Modification
3.6.x
This command was introduced.
GRE is an IP-based tunneling protocol. If GRE tunnel recognition is not configured, the system treats
the external IP header as the subscriber traffic. All of the flows in the tunnel are seen as a single flow.
IP tunnel mode is mutually exclusive with other VLAN-based classifications.
Caution
GRE tunneling can be enabled or disabled only when no applications are loaded or the line card is shut
down.
Authorization: admin
Examples
The following example shows how to use this command. Note that you must access the root level to shut
down the line card, even though the DSCP marking command is at the admin level.
SCE8000>enable 15
Password:<cisco>
SCE8000#> configure
SCE8000(config)#>interface linecard 0
SCE8000(config if)#>shutdown
SCE8000(config if)#>ip-tunnel gre skip
SCE8000(config if)#>no shutdown
Cisco SCE 8000 CLI Command Reference
2-223
Chapter 2
CLI Command Reference
ip-tunnel gre skip
Related Commands
Command
Description
show interface linecard ip-tunnel
Displays the current IP tunnel configuration.
Cisco SCE 8000 CLI Command Reference
2-224
Chapter 2
CLI Command Reference
ip-tunnel dscp-marking-skip
ip-tunnel dscp-marking-skip
Configures the Cisco SCE platform to perform DSCP marking on the internal IP header of IPinIP or GRE
traffic.
To perform DSCP marking on the external IP header, use the no form of this command.
ip-tunnel (gre | ipinip) dscp-marking-skip
no ip-tunnel (gre | ipinip) dscp-marking-skip
Syntax Description
This command has no arguments or keywords.
Command Default
DSCP marking is performed on the external IP header (no form of the command).
Command Modes
Interface Linecard Configuration
Command History
This table includes the following release-specific history entries:
Usage Guidelines
Release
Modification
3.1.6
This command was introduced.
DSCP marking modifies the DSCP bits of the IPv4 header. IPinIP and GRE tunnels have at least two IP
headers. By default, DSCP marking is performed only on the external IP header. Use this command to
mark the DSCP bits of the internal IP header.
This command takes effect only when ipinip skip or gre skip is enabled (see the ip-tunnel ipinip skip
command or the ip-tunnel gre skip command).
Note
Caution
DSCP marking should be enabled and configured through the SCA BB console. Refer to the section
“How to Manage DSCP Marker Values” in the Cisco Service Control Application for Broadband User
Guide for more information.
DSCP marking can be configured only when no applications are loaded or the line card is shut down.
Authorization: admin
Examples
The following example shows how to configure the Cisco SCE platform to perform DSCP marking on
the internal IP header of an IPinIP flow.
Note that you must access the root level to shut down the line card, even though the DSCP marking
command is at the admin level.
Cisco SCE 8000 CLI Command Reference
2-225
Chapter 2
CLI Command Reference
ip-tunnel dscp-marking-skip
SCE8000>enable 15
Password:<cisco>
SCE8000#> configure
SCE8000(config)#>interface linecard 0
SCE8000(config if)#>shutdown
SCE8000(config if)#>ip-tunnel ipinip dscp-marking-skip
SCE8000(config if)#>no shutdown
Related Commands
Command
Description
ip-tunnel gre skip
Enables the recognition of G RE tunnels and skipping into the internal IP
packet.
ip-tunnel ipinip skip
Enables the recognition of IPinIP tunnels and skipping into the internal IP
packet.
Cisco SCE 8000 CLI Command Reference
2-226
Chapter 2
CLI Command Reference
ip-tunnel ipinip skip
ip-tunnel ipinip skip
Enables the recognition of IPinIP tunnels and skipping into the internal IP packet.
To disable IPinIP skip, use the no form of this command.
ip-tunnel ipinip skip
no ip-tunnel ipinip skip
Syntax Description
This command has no arguments or keywords.
Command Default
IPinIP skip is disabled.
Command Modes
Interface Linecard Configuration
Command History
This table includes the following release-specific history entries:
Usage Guidelines
Release
Modification
3.1.6
This command was introduced.
Use this command as follows:
•
IPinIP and other tunnels—IPinIP is supported simultaneously with plain IP traffic and any other
tunneling protocol supported by the Cisco SCE platform.
•
Overlapping IP addresses—Overlapping IP addresses within different IPinIP tunnels are not
supported.
•
IPinIP can be enabled or disabled only when no applications are loaded or the line card is shut down.
•
DSCP marking—For IPinIP traffic, DSCP marking can be done on either the external or the internal
IP header exclusively.
See the ip-tunnel dscp-marking-skip command for more information.
Authorization: admin
Examples
The following example shows how to use this command.
Note that you must access the root level to shut down the line card, even though the ipinip command is
at the admin level.
SCE8000>enable 15
Password:<cisco>
SCE8000#> configure
SCE8000(config)#>interface linecard 0
SCE8000(config if)#>shutdown
SCE8000(config if)#>ip-tunnel ipinip skip
SCE8000(config if)#>no shutdown
Cisco SCE 8000 CLI Command Reference
2-227
Chapter 2
CLI Command Reference
ip-tunnel ipinip skip
Related Commands
Command
Description
ip-tunnel ipinip dscp-marking-skip
Configures the Cisco SCE platform to perform DSCP
marking on the internal IP header of IPinIP traffic.
show interface linecard ip-tunnel ipinip Displays the current IPinIP configuration.
Cisco SCE 8000 CLI Command Reference
2-228
Chapter 2
CLI Command Reference
ip-tunnel l2tp skip
ip-tunnel l2tp skip
Configures the recognition of L2TP tunnels and skipping into the internal IPv4 or IPv6 packet.
To disable tunnel recognition and classify traffic by the external IP address, use the no form of this
command.
ip-tunnel l2tp skip
no ip-tunnel
Syntax Description
This command has no arguments or keywords.
Command Default
IP tunnel recognition is disabled.
Command Modes
Interface Linecard Configuration
Command History
This table includes the following release-specific history entries:
Usage Guidelines
Release
Modification
3.0.0
This command was introduced.
4.1.0
Updated for IPv6.
L2TP is an IP-based tunneling protocol. The system must be specifically configured to recognize the
L2TP flows, based on the UDP port used for L2TP. The Cisco SCE platform can then skip the external
IP, UDP, and L2TP headers and reach the internal IP, which is the actual subscriber traffic.
If L2TP is not configured, the system treats the external IP header as the subscriber traffic. All of the
flows in the tunnel are seen as a single flow.
On Cisco SCE 8000, L2TP skip mode supports only L2TP IPv6 over IPv4 and L2TP IPv4 over IPv4.
L2TP IPv6 over IPv6 and L2TP IPv4 over IPv6 flows are treated as native IPv6 flows.
IP tunnel mode is mutually exclusive with other MPLS or VLAN-based classifications.
To configure the port number that the LNS and LAC use for L2TP tunnels, use the l2tp identify-by
command.
Caution
L2TP tunneling can be enabled or disabled only when no applications are loaded or the line card is shut
down.
Authorization: admin
Examples
The following example shows how to enable recognition of L2TP tunnels.
Cisco SCE 8000 CLI Command Reference
2-229
Chapter 2
CLI Command Reference
ip-tunnel l2tp skip
Note that you must access the root level to shut down the line card, even though the DSCP marking
command is at the admin level.
SCE8000> enable 15
Password:<cisco>
SCE8000#> configure
SCE8000(config)#> interface linecard 0
SCE8000(config if)#> shutdown
SCE8000(config if)#> ip-tunnel l2tp skip
SCE8000(config if)#> no shutdown
Related Commands
Command
Description
show interface linecard ip-tunnel
Displays the current IP tunnel configuration.
l2tp identify-by
Configures the port number that the LNS and LAC use for
L2TP tunnels.
mpls
Configures the MPLS environment.
vlan
Configures the VLAN environment.
Cisco SCE 8000 CLI Command Reference
2-230
Chapter 2
CLI Command Reference
Ipv6-IANA
Ipv6-IANA
Configures the system to 128-bit mode for 128-IANA support in linecard interface configuration mode.
Ipv6-IANA mode decimal
Syntax Description
decimal
Specify the mode.
Use 0 to configure the system to 64-bit mode and 1 to configure the system
to 128-bit mode.
Command Default
By default, system mode is 64-bit mode.
Command Modes
Interface Linecard Configuration
Command History
This table includes the following release-specific history entries:
Usage Guidelines
Release
Modification
4.2.0
This command was introduced.
Authorization: root
To configure the system to 64/128 bit-mode, use the application shutdown mode command.
When you change one mode to another (64 to 128 bit mode or 128 to 64 bit mode) you must clear
anonymous, if any, present in system.
Note
When Ipv6 IANA mode is enabled, you need to clear all the anonymous subscribers:
SCE8000#>clear interface LineCard 0 subscriber anonymous all
Note
Examples
IPv6 IANA mode is not supported for cascade setup.
The following example shows how to enable the IPv6 IANA in 64-bit mode:
SCE8000> enable 15
Password:<cisco>
SCE8000#> configure
SCE8000(config)#> interface linecard 0
SCE8000(config if)#> Ipv6-IANA mode 0
Cisco SCE 8000 CLI Command Reference
2-231
Chapter 2
Ipv6-IANA
Examples
The following example shows how to enable the IPv6 IANA in 128-bit mode:
SCE8000> enable 15
Password:<cisco>
SCE8000#> configure
SCE8000(config)#> interface linecard 0
SCE8000(config if)#> Ipv6-IANA mode 1
Cisco SCE 8000 CLI Command Reference
2-232
CLI Command Reference
Chapter 2
CLI Command Reference
l2tp identify-by
l2tp identify-by
Configures the port number that the LNS and LAC use for L2TP tunnels.
l2tp identify-by port-number [port-number]
l2tp identify-by default port
Syntax Description
port-number
Port number to be configured for L2TP tunnels.
default port
Replaces the user-configured port number with the default port number
(1701).
Command Default
The default port number is 1701.
Command Modes
Interface Linecard Configuration
Command History
This table includes the following release-specific history entries:
Usage Guidelines
Release
Modification
2.5.7
This command was introduced.
If external fragmentation exists in the L2TP environment, you must configure a quick-forwarding-ignore
traffic rule that bypasses all IP traffic targeted to either the LNS or LAC IP address. (See "Configuring
Traffic Rules and Counters” in the Cisco SCE8000 10GBE Software Configuration Guide or
“Configuring Traffic Rules and Counters” in the Cisco SCE8000 GBE Software Configuration Guide.)
This rule ensures that any packets not having the L2TP port indication (that is, non-first fragments) will
not require handling by the traffic processors.
In addition, to prevent reordering of L2TP tunneled fragments, you should define a quick-forwarding
traffic rule for all the L2TP traffic. This rule can be based on the IP ranges in use by the internal IPs in
the tunnel (as allocated by the LNS) or for all of the traffic passing through the Cisco SCE platform.
Note that flow redirection and flow blocking cannot be performed on the quick-forwarded traffic.
Authorization: admin
Examples
The following example shows how to configure port 1000 as the L2TP port:
SCE8000>enable 10
Password:<cisco>
SCE8000#config
SCE8000(config)#interface linecard 0
SCE8000(config if)#l2tp identify-by port-number 1000
SCE8000(config if)#
Cisco SCE 8000 CLI Command Reference
2-233
Chapter 2
CLI Command Reference
l2tp identify-by
Related Commands
Command
Description
show interface linecard l2tp
Displays the currently configured L2TP support parameters.
ip-tunnel l2tp skip
Configures the recognition of L2TP tunnels and skipping into the
internal IP packet.
Cisco SCE 8000 CLI Command Reference
2-234
Chapter 2
CLI Command Reference
line vty
line vty
Enters Line Configuration mode for Telnet lines, which configures all Telnet lines.
line vty start-number [end-number]
Syntax Description
start-number
Starting number ranging from 0 to 4. The actual number supplied does not
matter. All Telnet lines are configured by this command.
end-number
Ending number ranging from 0 to 4. The actual number supplied does not
matter. All Telnet lines are configured by this command.
Command Default
None
Command Modes
Global configuration
Command History
This table includes the following release-specific history entries:
Usage Guidelines
Release
Modification
2.5.7
This command was introduced.
The system prompt changes to reflect Line Configuration mode. To return to Global configuration mode,
use the exit command.
Authorization: admin
Examples
The following example shows how to enter Line Configuration mode for all lines:
SCE8000>enable 10
Password:<cisco>
SCE8000#config
SCE8000(config)#line vty 0
SCE8000(config-line)#
Related Commands
Command
Description
show line vty
Displays the Telnet configuration.
exit
Exits from the current mode to the next “lower” level.
Cisco SCE 8000 CLI Command Reference
2-235
Chapter 2
CLI Command Reference
link failure-reflection
link failure-reflection
Enables link failure reflection.
To disable link failure reflection, use the no form of this command.
link failure-reflection [on-all-ports] [linecard-aware]
no link failure-reflection [linecard-aware]
Syntax Description
on-all-ports
(SCE 8000 10GBE platforms only) Enables reflection of a link failure to all
ports.
linecard-aware
(SCE 8000 10GBE platforms only) Prevents link failure reflection if the
failure might be in the line card.
Command Default
Link failure reflection is disabled.
Command Modes
Interface Linecard Configuration
Command History
This table includes the following release-specific history entries:
Usage Guidelines
Release
Modification
2.5.7
This command was introduced.
Use the linecard-aware keyword when each link of the Cisco SCE 8000 10GBE platform
(subscriber-side interface and the corresponding network-side interface) is connected to a different line
card.
This mode reflects a failure of one port to the other three ports of the Cisco SCE 8000 10GBE platform
differently, depending on whether the failure appears to be in the Cisco SCE platform itself or not:
•
One interface of the Cisco SCE 8000 10GBE platform is down, indicating a problem with the Cisco
SCE platform—Link failure is reflected to the other three SCE platform ports.
•
Two reciprocal ports of the Cisco SCE 8000 10GBE platform are down, indicating a problem in the
line card to which the Cisco SCE platform is connected and not in the interface—No action is taken.
This response allows the second link in the Cisco SCE platform to continue functioning without
interruption.
Use the no form of this command with the linecard-aware keyword to disable linecard-aware mode
without disabling link failure reflection itself.
None of the keywords can be used with the Cisco SCE 8000 GBE platform.
Authorization: admin
Cisco SCE 8000 CLI Command Reference
2-236
Chapter 2
CLI Command Reference
link failure-reflection
Examples
The following example shows how to enable the reflection of a link failure to all ports (SCE 8000 10GBE
platform only):
SCE8000>enable 10
Password:<cisco>
SCE8000#config
SCE8000(config)#interface linecard 0
SCE8000(config if)#link failure-reflection on-all-ports
SCE8000(config if)#
The following example shows how to enable the reflection of a link failure. This form of the command
is the only one that can be used on the Cisco SCE 8000 GBE platform (but it can also be used on the
Cisco SCE 8000 10GBE platform).
SCE8000>enable 10
Password:<cisco>
SCE8000#config
SCE8000(config)#interface linecard 0
SCE8000(config if)#link failure-reflection
SCE8000(config if)#
Related Commands
Command
Description
link port-enhanced-recovery Enables link port enhanced recovery.
Cisco SCE 8000 CLI Command Reference
2-237
Chapter 2
CLI Command Reference
link mode
link mode
Configures the link mode. The link mode allows you to force the specified behavior on the link, which
may be useful during installation and for debugging the network.
link mode {all-links mode}
Syntax Description
all-links
Sets the link mode for all links. (The link mode cannot be set separately for
individual links.)
mode
Establishes the link mode. Choose forwarding, bypass, or cutoff.
Command Default
None
Command Modes
Interface Linecard Configuration
Command History
This table includes the following release-specific history entries:
Release
Modification
2.5.7
This command was introduced.
Usage Guidelines
Authorization: admin
Examples
The following example shows how to use this command:
SCE8000>enable 10
Password:<cisco>
SCE8000#config
SCE8000(config)#interface linecard 0
SCE8000(config if)#link mode all-links bypass
Related Commands
Command
Description
show interface linecard link mode
Displays the configured Linecard Interface link mode.
Cisco SCE 8000 CLI Command Reference
2-238
Chapter 2
CLI Command Reference
link port-enhanced-recovery
link port-enhanced-recovery
Enables link port enhanced recovery.
To disable link port enhanced recovery, use the no form of this command.
link port-enhanced-recovery
no port-enhanced-recovery
Syntax Description
This command has no arguments or keywords.
Command Default
Link port enhanced recovery is disabled.
Command Modes
Interface Linecard Configuration
Command History
This table includes the following release-specific history entries:
Usage Guidelines
Release
Modification
3.6.x
This command was introduced.
Link port-enhanced-recovery tries to recover the link before link failure is declared. When enabled, it
tries five times to recover the link at 200msec intervals before the link is declared down
If link failure-reflection is also configured, it comes into effect after one second.
Authorization: admin
Examples
The following example shows how to enable link port enhanced recovery.
SCE8000>enable 10
Password:<cisco>
SCE8000#config
SCE8000(config)#interface linecard 0
SCE8000(config if)#link port-enhanced-recovery
SCE8000(config if)#
Related Commands
Command
Description
link failure-reflection
Enables link failure reflection.
Cisco SCE 8000 CLI Command Reference
2-239
Chapter 2
CLI Command Reference
logger add-user-message
logger add-user-message
Adds a message string to the user log files.
logger add-user-message message-text
Syntax Description
message-text
Command Default
None
Command Modes
Privileged EXEC
Command History
This table includes the following release-specific history entries:
Message string you want to add.
Release
Modification
2.5.7
This command was introduced.
Usage Guidelines
Authorization: admin
Examples
The following example show how to add “testing 123” as the message to the user log files:
SCE8000>enable 10
Password:<cisco>
SCE8000#logger add-user-message testing 123
SCE8000#
Cisco SCE 8000 CLI Command Reference
2-240
Chapter 2
CLI Command Reference
logger device
logger device
Disables or enables the specified logger device.
logger device {line-attack-file-log | statistics-file-log | user-file-log} [status]
Syntax Description
logger device
Available logger devices are Line-Attack-File-Log (line-attack-file-log),
SCE-agent-Statistics-Log (statistics-file-log), or User-File-Log (user-filelog).
status
Indicates whether to turn logging on or off. Choose enabled or disabled.
Command Default
Log devices are enabled.
Command Modes
Global configuration
Command History
This table includes the following release-specific history entries:
Usage Guidelines
Release
Modification
2.5.7
This command was introduced.
System messages generated by the Cisco SCE platform are available from the following sources:
•
SCE user logs (managed using logger commands)
•
SNMP traps (displayed using the show snmp mib command)
•
syslog server (managed using logging commands)
Authorization: admin
Examples
The following example shows how to disable the User-File-Log device:
SCE8000>enable 10
Password:<cisco>
SCE8000#config
SCE8000(config)#logger device user-file-log disabled
SCE8000(config)#
Related Commands
Command
Description
logger device user-file-log max-file-size
Sets the maximum size of the log file.
logger get user-log file-name
Outputs the current user log to a target file.
clear logger
Clears the Cisco SCE platform logger (user log files).
Cisco SCE 8000 CLI Command Reference
2-241
Chapter 2
CLI Command Reference
logger device user-file-log max-file-size
logger device user-file-log max-file-size
Sets the maximum size of the log file.
logger device user-file-log max-file-size [size]
Syntax Description
size
Command Default
The default log size is 1,000,000 bytes.
Command Modes
Global configuration
Command History
This table includes the following release-specific history entries:
Maximum size for the user log (in bytes).
Release
Modification
2.5.7
This command was introduced.
Usage Guidelines
Authorization: admin
Examples
The following example shows how to configure the maximum size of the user-file-log device to
65000 bytes:
SCE8000>enable 10
Password:<cisco>
SCE8000#config
SCE8000(config)#logger device user-file-log max-file-size 65000
SCE8000(config)#
Related Commands
Command
Description
logger device
Disables or enables the specified logger device.
show logger device
Displays the configuration of the specified SCE platform logger file.
Cisco SCE 8000 CLI Command Reference
2-242
Chapter 2
CLI Command Reference
logger get support-file
logger get support-file
Generates a log file for technical support through FTP. Note that this operation may take some time.
logger get support-file filename
Syntax Description
filename
Command Default
None
Command Modes
Privileged EXEC
Command History
This table includes the following release-specific history entries:
Name of the generated log file. The specified file must be located on an FTP
site, not on the local file system.
Release
Modification
2.5.7
This command was introduced.
Usage Guidelines
Authorization: admin
Examples
The following example shows how to generate a technical support log file (via FTP) named support.zip:
SCE8000>enable 10
Password:<cisco>
SCE8000#logger get support-file ftp://user:[email protected]/c:/support.zip
SCE8000#
Cisco SCE 8000 CLI Command Reference
2-243
Chapter 2
CLI Command Reference
logger get user-log file-name
logger get user-log file-name
Outputs the current user log to a target file.
logger get user-log file-name target-file
Syntax Description
target-file
Command Default
None
Command Modes
Privileged EXEC
Command History
This table includes the following release-specific history entries:
Name of the output file to which the system will write the log file
information. This file can be a local path, full path, or full FTP path
filename.
Release
Modification
2.5.7
This command was introduced.
Usage Guidelines
Authorization: admin
Examples
The following example shows how to retrieve the current user log files:
SCE8000>enable 10
Password:<cisco>
SCE8000#logger get user-log file-name ftp://myname:[email protected]/d:/log.txt
SCE8000#
Related Commands
Command
Description
logger get support-file Generates a log file for technical support through FTP.
Cisco SCE 8000 CLI Command Reference
2-244
Chapter 2
CLI Command Reference
logging facility
logging facility
Assigns the syslog messages to the specified facility.
To reset the facility to the default (local7), use the no form of this command.
logging facility facility-type
Syntax Description
facility-type
Command Default
local7
Command Modes
Global configuration
Command History
This table includes the following release-specific history entries:
Usage Guidelines
Syslog facility. See the "Usage Guidelines" section of this command entry
for descriptions of acceptable keywords.
Release
Modification
3.6.x
This command was introduced.
Table 2-6 describes the acceptable keywords for the facility-type argument.
Table 2-6
logging facility facility-type Argument
Facility-type keyword
Description
auth
Authorization system
cron
Cron facility
daemon
System daemon
kern
Kernel
local0-local7
Reserved for locally defined messages
lpr
Line printer system
mail
Mail system
news
USENET news
sys9
System use
sys10
System use
sys11
System use
sys12
System use
sys13
System use
sys14
System use
syslog
System log
Cisco SCE 8000 CLI Command Reference
2-245
Chapter 2
logging facility
Table 2-6
logging facility facility-type Argument
Facility-type keyword
Description
user
User process
uucp
UNIX-to-UNIX copy system
Authorization: admin
Examples
The following example shows how to configure a the logging facility to syslog.
SCE8000>enable 10
Password:<cisco>
SCE8000#config
SCE8000(config)#logging facility syslog
SCE8000(config)#
Related Commands
Command
Description
logging on
Enables logging to a syslog server.
show logging
Displays the syslog server configuration.
Cisco SCE 8000 CLI Command Reference
2-246
CLI Command Reference
Chapter 2
CLI Command Reference
logging host
logging host
Configures a remote host to receive syslog messages.
To remove a specified logging host from the configuration, use the no form of this command.
logging host (hostname | ip-address) [transport udp [port port-number]]
no logging host (hostname | ip-address)
Syntax Description
hostname
Logical name of the host that will receive the syslog messages
ip-address
IP address of the host that will receive the syslog messages.
transport udp
(Optional) Method of transport to be used. Since only UDP is supported,
this option is only used when you want to configure a port number.
port-number
(Optional) Integer from 1 through 65535 that defines the port.
If a port number is not specified, the standard Cisco default port number for
UDP is 514.
Command Default
port number = 514
Command Modes
Global configuration
Command History
This table includes the following release-specific history entries:
Usage Guidelines
Release
Modification
3.6.x
This command was introduced.
Standard system logging to syslog is disabled by default. If logging to syslog is not enabled on your
system, you must enter the logging on command to enable logging before you can use the logging host
command.
The logging host command identifies a remote host (a device serving as a syslog server) to receive
logging messages. By issuing this command more than once, you can build a list of hosts that receive
logging messages.
To specify the severity level for logging to all hosts, use the logging trap command.
Authorization: admin
Examples
The following example shows how to configure a remote logging host.
SCE8000>enable 10
Password:<cisco>
SCE8000#config
SCE8000(config)#logging host 10.10.10.30 transport udp port 100
SCE8000(config)#
Cisco SCE 8000 CLI Command Reference
2-247
Chapter 2
logging host
Related Commands
Command
Description
logging on
Enables logging to a syslog server.
logging trap
Configures the severity level of the messages to log.
show logging
Displays the syslog server configuration.
Cisco SCE 8000 CLI Command Reference
2-248
CLI Command Reference
Chapter 2
CLI Command Reference
logging on
logging on
Sends SCE platform user log messages to the syslog server.
To disable sending log messages to the syslog server, use the no form of this command.
logging on
no logging on
Syntax Description
This command has no arguments or keywords.
Command Default
Logging to syslog is disabled by default.
Command Modes
Global configuration
Command History
This table includes the following release-specific history entries:
Usage Guidelines
Release
Modification
3.6.x
This command was introduced.
System messages generated by the Cisco SCE platform are available from the following sources:
•
SCE user logs (managed using logger commands)
•
SNMP traps (displayed using the show snmp mib command)
•
syslog server (managed using logging commands)
If logging to the syslog server is disabled, system messages are available only from the Cisco SCE
platform user logs or through SNMP.
Authorization: admin
Examples
The following example shows how enable sending log messages to the syslog server.
SCE8000>enable 10
Password:<cisco>
SCE8000#config
SCE8000(config)#logging on
SCE8000(config)#
Cisco SCE 8000 CLI Command Reference
2-249
Chapter 2
logging on
Related Commands
Command
Description
logging host
Configures the syslog host.
logging trap
Configures the severity level of the messages to log.
logging facility
Configures the facility types to log.
logging rate-limit
Configures the logging rate limit
service timestamps log Configures the timestamp format for syslog messages.
show logging
Cisco SCE 8000 CLI Command Reference
2-250
Displays the syslog server configuration.
CLI Command Reference
Chapter 2
CLI Command Reference
logging message-counter
logging message-counter
Enables message counter in the syslog message.
To disable the message counter, use the no form of this command. When the message counter is disabled,
no line count appears in the syslog messages.
logging message-counter
no logging message-counter
Syntax Description
This command has no arguments or keywords.
Command Default
By default, the syslog message counter is enabled.
Command Modes
Global configuration
Command History
This table includes the following release-specific history entries:
Release
Modification
3.6.x
This command was introduced.
Usage Guidelines
Authorization: admin
Examples
The following example shows how to disable the syslog message counter.
SCE8000>enable 10
Password:<cisco>
SCE8000#config
SCE8000(config)#no logging message-counter
SCE8000(config)#
Related Commands
Command
Description
logging on
Enables logging to a syslog server.
Cisco SCE 8000 CLI Command Reference
2-251
Chapter 2
CLI Command Reference
logging rate-limit
logging rate-limit
Configures the maximum number of messages logged per second.
To reset the rate limit to the default level (10), use the no form of this command.
logging rate-limit rate [except severity-level]
no logging rate-limit
Syntax Description
rate
Number of messages to be logged per second. Valid values are 1 to 10000.
The default is 10.
except severity-level
(Optional) Excludes messages of this severity level and higher. Valid levels
are :
•
fatal
•
error
•
warning
•
info
Command Default
10 messages logged per second
Command Modes
Global configuration
Command History
This table includes the following release-specific history entries:
Release
Modification
3.6.x
This command was introduced.
Usage Guidelines
Authorization: admin
Examples
The following example shows how to configure the logging rate limit. In this example, fatal error
messages have no rate limit.
SCE8000>enable 10
Password:<cisco>
SCE8000#config
SCE8000(config)#logging rate-limit 15 except fatal
SCE8000(config)#
Cisco SCE 8000 CLI Command Reference
2-252
Chapter 2
CLI Command Reference
logging rate-limit
Related Commands
Command
Description
logging on
Enables logging to a syslog server.
logging trap
Configures the severity level of the messages to log.
show logging
Displays the syslog server configuration.
Cisco SCE 8000 CLI Command Reference
2-253
Chapter 2
CLI Command Reference
logging trap
logging trap
Specifies the minimum severity level of the messages to be logged to the syslog server. Any messages
at the specified security level or above will be sent to the syslog server.
To reset the minimum severity level to be logged to the default level (info), use the no form of this
command.
logging trap severity-level
no logging trap
Syntax Description
severity-level
The name of the minimum severity level at which messages should be
logged. Error messages of lesser severity will not be logged to syslog.
Severity levels supported by the Cisco SCE platform are as follows:
•
fatal
•
error
•
warning
•
info
Command Default
info
Command Modes
Global configuration
Command History
This table includes the following release-specific history entries:
Usage Guidelines
Release
Modification
3.6.x
This command was introduced.
A trap is an unsolicited message sent to a remote network management host. Logging traps should not
be confused with SNMP traps (SNMP logging traps require the use of the CISCO -SYSLOG-MIB and
are sent using the Simple Network Management Protocol.)
Table 2-7 lists syslog severity levels and the corresponding SCOS severity levels. Not all syslog severity
levels are supported on the Cisco SCE platform.
Use the logging host and logging trap commands to send messages to a remote syslog server.
Table 2-7
Syslog and SCOS Severity Levels
Syslog Severity Level
SCOS Severity
SCOS Definition
emergency
0
Not defined
SEVERITY_EMERGENCY_LEVEL
alert
1
Not defined
SEVERITY_ALERT_LEVEL
Cisco SCE 8000 CLI Command Reference
2-254
Chapter 2
CLI Command Reference
logging trap
Table 2-7
Syslog and SCOS Severity Levels
Syslog Severity Level
SCOS Severity
SCOS Definition
critical
2
Fatal
SEVERITY_FATAL_LEVEL
error
3
Error
SEVERITY_ERROR_LEVEL
warning
4
Warning
SEVERITY_WARNING_LEVEL
notice
5
Not defined
SEVERITY_NOTICE_LEVEL
informational
6
Info
SEVERITY_INFORMATIONAL_LEVEL
debug
7
Not defined
SEVERITY_DEBUG_LEVEL
Authorization: admin
Examples
The following example shows how to configure the logging severity level to warning.
SCE8000>enable 10
Password:<cisco>
SCE8000#config
SCE8000(config)#logging trap warning
SCE8000(config)#
Related Commands
Command
Description
logging on
Enables logging to a syslog server.
logging host
Configures a remote logging host.
show logging
Displays the syslog server configuration.
Cisco SCE 8000 CLI Command Reference
2-255
Chapter 2
logout
logout
Logs out of the command-line interface of the Cisco SCE platform.
logout
Syntax Description
This command has no arguments or keywords.
Command Default
None
Command Modes
EXEC
Command History
This table includes the following release-specific history entries:
Release
Modification
2.5.7
This command was introduced.
Usage Guidelines
Authorization: user
Examples
The following example shows how to log out:
SCE8000>enable 10
Password:<cisco>
SCE8000#config
SCE8000(config)#exit
SCE8000>logout
Connection closed by foreign host.
Cisco SCE 8000 CLI Command Reference
2-256
CLI Command Reference
Chapter 2
CLI Command Reference
mac-resolver arp
mac-resolver arp
Adds a static IP entry to the MAC resolver database.
To remove the static IP entry from the database, use the no form of this command.
mac-resolver arp ip-address [vlan vlan-tag] mac-address
no mac-resolver arp ip-address [vlan vlan-tag] mac-address
Syntax Description
ip-address
IP address entry to be added to the database.
vlan-tag
VLAN tag that identifies the VLAN that carries this IP address (if
applicable).
mac-address
MAC address assigned to the IP address, in xxxx.xxxx.xxxx format.
Command Default
None
Command Modes
Interface Linecard Configuration
Command History
This table includes the following release-specific history entries:
Usage Guidelines
Release
Modification
3.0.3
This command was introduced.
When adding or removing a static IP entry:
•
Adding an entry
If a client has previously registered a dynamic entry with the same IP address and VLAN tag, the
entry receives the MAC address specified in the CLI command, and the entry is changed to static.
•
Removing an entry
If an entry has been added both as a dynamic entry and a static entry, it exists in the database as a
static entry only (as explained in the previous paragraph). Removing the static configuration
changes the entry from a static entry to a dynamic entry and deletes the corresponding
user-configured MAC address.
Authorization: admin
Examples
The following example shows how to assign the MAC address 1111.2222.3333 to the IP address
10.20.30.40:
SCE8000>enable 10
Password:<cisco>
SCE8000#config
Cisco SCE 8000 CLI Command Reference
2-257
Chapter 2
CLI Command Reference
mac-resolver arp
SCE8000(config)#interface linecard 0
SCE8000(config mac-resolver arp 10.20.30.40 1111.2222.3333
SCE8000(config if)#
Related Commands
Command
Description
show interface linecard mac-resolver arp Displays a listing of all IP addresses and corresponding
MAC addresses currently registered in the MAC resolver
database.
Cisco SCE 8000 CLI Command Reference
2-258
Chapter 2
CLI Command Reference
management-agent sce-api ignore-cascade-violation
management-agent sce-api ignore-cascade-violation
Configures the agent to ignore the errors issued when login operations are performed on a standby SCE
platform.
To configure the agent to issue an error when a login operation is performed on a standby SCE platform,
use the no form of this command.
To set the value to the default, use the default form of this command. (The default behavior is to issue
an error when a login operation is performed on a standby SCE platform.)
management-agent sce-api ignore-cascade-violation
no management-agent sce-api ignore-cascade-violation
default management-agent sce-api ignore-cascade-violation
Syntax Description
This command has no arguments or keywords.
Command Default
An error is issued when a login operation is performed on a standby SCE platform (no form of the
command).
Command Modes
Global configuration
Command History
This table includes the following release-specific history entries:
Usage Guidelines
Release
Modification
3.1.5
This command was introduced.
Starting in release 3.1.0, the Cisco SCE platform issues an error message when a login operation is
performed on the standby SCE platform in a cascaded system. This behavior is not backward compatible
for previous versions of the Cisco SCE subscriber API.
Use this command with SCOS release 3.1.0 to provide backward-compatible behavior to earlier releases
in which such errors were not issued.
Authorization: admin
Examples
The following example shows how to use this command:
SCE8000>enable 10
Password:<cisco>
SCE8000#config
SCE8000(config)# management-agent sce-api ignore-cascade-violation
SCE8000(config)#
Cisco SCE 8000 CLI Command Reference
2-259
Chapter 2
CLI Command Reference
management-agent sce-api ignore-cascade-violation
Related Commands
Command
Description
management-agent sce-api logging
Enables SCE subscriber API troubleshooting logging
management-agent sce-api timeout
Defines the timeout interval for disconnection of an SCE
subscriber API client.
Cisco SCE 8000 CLI Command Reference
2-260
Chapter 2
CLI Command Reference
management-agent sce-api logging
management-agent sce-api logging
Enables SCE subscriber API troubleshooting logging. This information is written to the user log.
To disable SCE subscriber API troubleshooting logging, use the no form of this command.
management-agent sce-api logging
no management-agent sce-api logging
Syntax Description
This command has no arguments or keywords.
Command Default
SCE subscriber API troubleshooting logging is disabled.
Command Modes
Global configuration
Command History
This table includes the following release-specific history entries:
Release
Modification
3.0.0
This command was introduced.
Usage Guidelines
Authorization: admin
Examples
The following example shows how to enable SCE subscriber API troubleshooting logging:
SCE8000>enable 10
Password:<cisco>
SCE8000#config
SCE8000(config)# management-agent sce-api logging
SCE8000(config)#
Related Commands
Command
Description
management-agent sce-api ignore-cascade-violation
Configures the agent to ignore the errors
issued when login operations are performed
on a standby SCE platform.
management-agent sce-api timeout
Defines the timeout interval for
disconnection of an SCE subscriber API
client.
Cisco SCE 8000 CLI Command Reference
2-261
Chapter 2
CLI Command Reference
management-agent sce-api timeout
management-agent sce-api timeout
Defines the timeout interval for disconnection of an SCE subscriber API client. After the interval is
reached, the resources allocated for this client are released.
management-agent sce-api timeout [timeout-interval]
Syntax Description
timeout-interval
Command Default
The default interval is 300 seconds.
Command Modes
Global configuration
Command History
This table includes the following release-specific history entries:
Usage Guidelines
Examples
Time in seconds that the client waits before timing out.
Release
Modification
3.0.0
This command was introduced.
Authorization: admin
The following example shows how to configure a timeout interval of 10 seconds:
SCE8000>enable 10
Password:<cisco>
SCE8000#config
SCE8000(config)# management-agent sce-api timeout 10
Related Commands
Command
Description
management-agent sce-api ignore-cascade-violation
Configures the agent to ignore the errors
issued when login operations are performed
on a standby SCE platform.
management-agent sce-api logging
Enables SCE subscriber API
troubleshooting logging.
Cisco SCE 8000 CLI Command Reference
2-262
Chapter 2
CLI Command Reference
management-agent system
management-agent system
Specifies a new package file to install for the management agent. The Cisco SCE platform extracts the
actual image files from the specified package file only during the copy running-config startup-config
command.
When using the no form of this command, you do not have to specify the package filename.
management-agent system package-filename
no management-agent system
Syntax Description
package-filename
Command Default
None
Command Modes
Global configuration
Command History
This table includes the following release-specific history entries:
Usage Guidelines
Name of a package file that contains the new management agent software.
The name should end with the .pkg file type.
Release
Modification
2.5.7
This command was introduced.
Use this command to upgrade the Cisco SCE platform management agent. The package file is verified
for the system and checked that it is not corrupted. The actual upgrade takes place only after executing
the copy running-config startup-config command and rebooting the Cisco SCE platform.
Authorization: admin
Examples
The following example shows how to upgrade the system with the mng45.pkg package:
SCE8000>enable 10
Password:<cisco>
SCE8000#config
SCE8000(config)#management-agent system mng45.pkg
Verifying package file…
Package file verified OK.
SCE8000(config)#do copy running-config startup-config
Backing –up configuration file…
Writing configuration file…
Extracting new management agent…
Extracted OK.
Cisco SCE 8000 CLI Command Reference
2-263
Chapter 2
CLI Command Reference
management-agent system
Related Commands
Command
Description
copy running-config startup-config
Builds a configuration file with general configuration
commands called config.txt, which is used in successive boots.
Cisco SCE 8000 CLI Command Reference
2-264
Chapter 2
CLI Command Reference
mkdir
mkdir
Creates a new directory.
mkdir directory-name
Syntax Description
directory-name
Command Default
None
Command Modes
Privileged EXEC
Command History
This table includes the following release-specific history entries:
Name of the directory to be created.
Release
Modification
2.5.7
This command was introduced.
Usage Guidelines
Authorization: admin
Examples
The following example shows how to create a new directory named mydir:
SCE8000>enable 10
Password:<cisco>
SCE8000#mkdir mydir
CE#
Related Commands
Command
Description
dir
Displays the files in the current directory.
Cisco SCE 8000 CLI Command Reference
2-265
Chapter 2
CLI Command Reference
mng-vlan
mng-vlan
Creates a new management service VLAN interface and assigns the specified IP address to that VLAN.
Use the no form of the command to remove the specified VLAN interface.
Use the no form of the command with the all keyword to remove the all configured management service
VLANs.
mng-vlan vlan-id address ip-address mask mask
no mng-vlan vlan-id
no mng-vlan all
Syntax Description
vlan-id
VLAN tag to be assigned to the interface (1-4094).
ip-address
IP address to assign to the VLAN interface.
mask
IP subnet mask.
Command Default
None
Command Modes
Global configuration
Command History
This table includes the following release-specific history entries:
Usage Guidelines
Release
Modification
3.7.x
This command was introduced.
You can create separate VLAN interfaces on the management interface in order to differentiate between
various management services. There are two steps in this process:
1.
Create the VLAN and assign the IP address (mng-vlan command).
2.
Assign the VLAN to a management service. Use one of the following commands:
– ip ssh mng-vlan
– vty mng-vlan
– snmp-server mng-vlan
Authorization: admin
Cisco SCE 8000 CLI Command Reference
2-266
Chapter 2
CLI Command Reference
mng-vlan
Examples
The following example shows how to create a management VLAN.
SCE8000>enable 10
Password:<cisco>
SCE8000#config
SCE8000(config)#mng-vlan 100 address 10.10.10.20 mask 255.255.255.0
SCE8000(config)#
The following example shows how to delete a management VLAN.
SCE8000>enable 10
Password:<cisco>
SCE8000#config
SCE8000(config)#no mng-vlan 100
SCE8000(config)#
The following example shows how to delete all existing management VLANs.
SCE8000>enable 10
Password:<cisco>
SCE8000#config
SCE8000(config)#no mng-vlan all
SCE8000(config)#
Related Commands
Command
Description
ip ssh mng-vlan
Assigns the specified management VLAN to the SSH service.
vty mng-vlan
Assigns the specified management VLAN to the telnet service.
snmp-server mng-vlan Assigns the specified management VLAN to the SNMP service.
Cisco SCE 8000 CLI Command Reference
2-267
Chapter 2
CLI Command Reference
more
more
Displays the contents of a file.
more {filename | running-config [all-data] | startup-config}
Syntax Description
filename
Name of the file to be displayed.
running-config
Displays the running configuration file.
all-data
Displays default and nondefault settings (running-config keyword only).
startup-config
Displays the startup configuration file.
Command Default
None
Command Modes
Privileged EXEC
Command History
This table includes the following release-specific history entries:
Usage Guidelines
Release
Modification
2.5.7
This command was introduced.
You can use the all-data keyword with the running-config keyword to see sample usage for many CLI
configuration commands.
Authorization: admin
Examples
The following sample output displays the contents of the running configuration file:
SCE8000>enable 10
Password:<cisco>
SCE8000#more running-config
#This is a general configuration file (running-config).
#Created on 16:48:11 UTC WED June 13 2001
cli-type 1
#version 1
service logger
no service password-encryption
enable password level 10 0 “cisco”
enable password level 15 0 “cisco”
service RDR-formatter
no RDR-formatter destination all
RDR-formatter history-size 0
clock timezone UTC 0
ip domain-lookup
no ip domain-name
no ip name-server
service telnetd
Cisco SCE 8000 CLI Command Reference
2-268
Chapter 2
CLI Command Reference
more
FastEthernet 0/0
ip address 10.1.5.120 255.255.0.0
auto
duplex auto
exit
ip default-gateway 10.1.1.1
no ip route all
line vty 0 4
no access-class in
timeout 30
exit
SCE8000#
Related Commands
Command
Description
show running-config
Displays the current configuration.
show startup-config
Displays the startup configuration file.
Cisco SCE 8000 CLI Command Reference
2-269
Chapter 2
CLI Command Reference
more running-config-all
more running-config-all
To display the contents of all the currently running configuration files, use the more running-config-all
command in the privileged EXEC mode.
more running-config-all
Syntax Description
This command has no arguments or keywords.
Command Default
None
Command Modes
Privileged EXEC
Command History
This table includes the following release-specific history entries:
Release
Modification
3.7.x
This command was introduced.
Usage Guidelines
The authorization used is root.
Examples
The following is sample output from the more running-config-all command:
SCE8000>enable 15
Password:<cisco>
SCE8000#more running-config-all
#This is a general configuration file (running-config).
#Created on 16:19:09 UTC FRI November 18 2011
#cli-type 1
#version 1
watchdog software-reset disabled
watchdog hardware-reset disabled
hostname "pqemb154SAV"
ip ssh
no management-agent notifications notification-list
1417,1418,804,815,1404,1405,1406,1407,1408,400
no management-agent notifications notification-list
402,421,440,441,444,445,446,450,437,457
no management-agent notifications notification-list 3593,3594,3595,10040
RDR-formatter destination 10.78.242.172 port 33000 category number 1 priority
RDR-formatter destination 10.78.242.172 port 33000 category number 2 priority
RDR-formatter destination 10.78.242.172 port 33000 category number 3 priority
RDR-formatter destination 10.78.242.172 port 33000 category number 4 priority
interface LineCard 0
aggregative-global-controllers
aggregative-global-controller-dynamic mode suspend
aggregative-global-controller-dynamic mode active
connection-mode inline on-failure bypass
no watchdog
Cisco SCE 8000 CLI Command Reference
2-270
100
100
100
100
Chapter 2
CLI Command Reference
more running-config-all
no silent
no shutdown
flow-open-mode enhanced UDP min-packets 2
statistics-logging frequency 5
service-bandwidth-prioritization-mode global
no protocol-pack version
no VAS-traffic-forwarding VAS server-id 0 health-check
no VAS-traffic-forwarding VAS server-id 1 health-check
no VAS-traffic-forwarding VAS server-id 2 health-check
no VAS-traffic-forwarding VAS server-id 3 health-check
no VAS-traffic-forwarding VAS server-id 4 health-check
no VAS-traffic-forwarding VAS server-id 5 health-check
no VAS-traffic-forwarding VAS server-id 6 health-check
no VAS-traffic-forwarding VAS server-id 7 health-check
no VAS-traffic-forwarding VAS server-id 8 health-check
no VAS-traffic-forwarding VAS server-id 9 health-check
no VAS-traffic-forwarding VAS server-id 10 health-check
no VAS-traffic-forwarding VAS server-id 11 health-check
no VAS-traffic-forwarding VAS server-id 12 health-check
no VAS-traffic-forwarding VAS server-id 13 health-check
no VAS-traffic-forwarding VAS server-id 14 health-check
no VAS-traffic-forwarding VAS server-id 15 health-check
no VAS-traffic-forwarding VAS server-id 16 health-check
no VAS-traffic-forwarding VAS server-id 17 health-check
no VAS-traffic-forwarding VAS server-id 18 health-check
no VAS-traffic-forwarding VAS server-id 19 health-check
no VAS-traffic-forwarding VAS server-id 20 health-check
no VAS-traffic-forwarding VAS server-id 21 health-check
no VAS-traffic-forwarding VAS server-id 22 health-check
no VAS-traffic-forwarding VAS server-id 23 health-check
no VAS-traffic-forwarding VAS server-id 24 health-check
no VAS-traffic-forwarding VAS server-id 25 health-check
no VAS-traffic-forwarding VAS server-id 26 health-check
no VAS-traffic-forwarding VAS server-id 27 health-check
no VAS-traffic-forwarding VAS server-id 28 health-check
no VAS-traffic-forwarding VAS server-id 29 health-check
no VAS-traffic-forwarding VAS server-id 30 health-check
no VAS-traffic-forwarding VAS server-id 31 health-check
no VAS-traffic-forwarding VAS server-id 32 health-check
no VAS-traffic-forwarding VAS server-id 33 health-check
no VAS-traffic-forwarding VAS server-id 34 health-check
no VAS-traffic-forwarding VAS server-id 35 health-check
no VAS-traffic-forwarding VAS server-id 36 health-check
no VAS-traffic-forwarding VAS server-id 37 health-check
no VAS-traffic-forwarding VAS server-id 38 health-check
no VAS-traffic-forwarding VAS server-id 39 health-check
no VAS-traffic-forwarding VAS server-id 40 health-check
no VAS-traffic-forwarding VAS server-id 41 health-check
no VAS-traffic-forwarding VAS server-id 42 health-check
no VAS-traffic-forwarding VAS server-id 43 health-check
no VAS-traffic-forwarding VAS server-id 44 health-check
no VAS-traffic-forwarding VAS server-id 45 health-check
no VAS-traffic-forwarding VAS server-id 46 health-check
no VAS-traffic-forwarding VAS server-id 47 health-check
no VAS-traffic-forwarding VAS server-id 48 health-check
no VAS-traffic-forwarding VAS server-id 49 health-check
no VAS-traffic-forwarding VAS server-id 50 health-check
no VAS-traffic-forwarding VAS server-id 51 health-check
no VAS-traffic-forwarding VAS server-id 52 health-check
no VAS-traffic-forwarding VAS server-id 53 health-check
no VAS-traffic-forwarding VAS server-id 54 health-check
no VAS-traffic-forwarding VAS server-id 55 health-check
no VAS-traffic-forwarding VAS server-id 56 health-check
no VAS-traffic-forwarding VAS server-id 57 health-check
Cisco SCE 8000 CLI Command Reference
2-271
Chapter 2
CLI Command Reference
more running-config-all
no VAS-traffic-forwarding VAS server-id 58 health-check
no VAS-traffic-forwarding VAS server-id 59 health-check
no VAS-traffic-forwarding VAS server-id 60 health-check
no VAS-traffic-forwarding VAS server-id 61 health-check
no VAS-traffic-forwarding VAS server-id 62 health-check
no VAS-traffic-forwarding VAS server-id 63 health-check
no sanity-checks test-packets
no sanity-checks attack-filter
no sanity-checks event-counters Flow-ID-Allocations-Failed
no l7-filter
no attack-filter protocol TCP
no attack-filter protocol UDP
no attack-filter protocol ICMP attack-direction single-side-both
no attack-filter protocol other attack-direction single-side-both
attack-filter subscriber-notification ports 80
replace spare-memory code bytes 3145728
interface GigabitEthernet 1/1
ip address 10.78.242.173 255.255.255.0
interface GigabitEthernet 1/2
ip address 10.78.242.173 255.255.255.0
interface GigabitEthernet 3/0/0
auto-negotiate
interface GigabitEthernet 3/1/0
auto-negotiate
interface GigabitEthernet 3/2/0
auto-negotiate
interface GigabitEthernet 3/3/0
auto-negotiate
exit
ip default-gateway 10.78.242.129
line vty 0 4
no timeout
exit
interface Mng 0/1
no auto-fail-over
exit
interface Mng 0/2
active-port
exit
sub-attribute add-attribute Called-Station-ID
sub-attribute add-attribute 3GPP-Charging-Characteristics
sub-attribute add-attribute 3GPP-GPRS-Negotiated-QoS-Profile
sub-attribute add-attribute 3GPP-RAT-Type
sub-attribute add-attribute 3GPP-SGSN-Address-Code-6
sub-attribute add-attribute 3GPP-SGSN-Address
sub-attribute add-attribute 3GPP-SGSN-MCC-MNC
cdp mode bypass
service debug-shell
service debug-telnet
service debug-ssh
debug const-db name lcConstDb.rucSched.shutWaitBeforeShuttingRucs value 1000
debug const-db name lcConstDb.rucSched.shutWaitAfterShuttingRucs value 1000
debug const-db name lcConstDb.traverser.maxClsFcIds value 3312
debug const-db name lcConstDb.traverser.clsFcIdsThreshold value 3248
debug const-db name lcConstDb.sanityChecks.enableTestPackets value false
debug const-db name lcConstDb.sanityChecks.enableDelayPacketsEF value false
debug const-db name lcConstDb.sanityChecks.enableDelayPacketsBE value false
debug const-db name lcConstDb.attackFilter.maxTotalPacketsIncrease value 1e+10
debug const-db name commonConstDb.sli.minSupportedObjectFormat value 13
diameter
no subscriber LEG dhcp-lease-query
subscriber LEG dhcp-lease-query servers 127.0.0.1
logger device SCE-agent-Statistics-Log max-file-size 204800
Cisco SCE 8000 CLI Command Reference
2-272
Chapter 2
CLI Command Reference
more running-config-all
management-agent property "com.pcube.management.framework.install.activation.operation"
"Install"
management-agent property "com.pcube.management.framework.install.activated.package" "SCA
BB"
management-agent property "com.pcube.management.framework.install.activated.version"
"3.7.0 build 514"
management-agent property "com.pcube.management.framework.install.activation.date" "Wed
Nov 16 11:57:15 UTC 2011"
ip ftp-server
ip http-tech-if
#This is an application configuration file (running-config-application).
#Created on 16:19:28 UTC FRI November 18 2011
#cli-type 1
#version 1
interface LineCard 0
application /apps/data/scos/temp.sli
exit
# Dynamic RDR category configuration
#This is a party templates configuration(included in application configuration
running-config-application).
#Created on 16:19:28 UTC FRI November 18 2011
#cli-type 1
#version 1
logger application-stats import-application-stats
/apps/data/scos/system/p3hidden/um//config//appstats.csv
RDR-formatter protocol NetflowV9 mapping file
/apps/data/scos/system/p3hidden/um//config//netflow.xml
#This is a party database configuration file (running-config-party-db) for static parties
only.
#Created on 16:19:29 UTC FRI November 18 2011
#cli-type 1
#version 1
hw-bypass mode
party name "N/A"
party name "party-name"
party mapping ip-address 1.2.3.4 name party-name
party name party-name hw-bypass
SCE8000#
Related Commands
Command
Description
show running-config
Displays the contents of the currently running configuration.
show
running-config-all
Displays the contents of all the currently running configuration files.
show
running-config-applic
ation
Displays the contents of the currently running configuration application on
the Cisco SCE platform.
show
running-config-partydb
Displays the contents of the currently running party database configuration
for the static parties that are configured on the Cisco SCE platform.
Cisco SCE 8000 CLI Command Reference
2-273
Chapter 2
CLI Command Reference
more running-config-application
more running-config-application
To display the contents of the currently running configuration application on the Cisco SCE platform,
use the more running-config-application in the privileged EXEC mode.
more running-config-application
Syntax Description
This command has no arguments or keywords.
Command Default
None
Command Modes
Privileged EXEC
Command History
This table includes the following release-specific history entries:
Release
Modification
3.7.x
This command was introduced.
Usage Guidelines
The authorization used is root.
Examples
The following is sample output from the the more running-config-application command:
SCE8000>enable 15
Password:<cisco>
SCE8000#>more running-config-application
#This is an application configuration file (running-config-application).
#Created on 16:19:28 UTC FRI November 18 2011
#cli-type 1
#version 1
interface LineCard 0
application /apps/data/scos/temp.sli
exit
# Dynamic RDR category configuration
#This is a party templates configuration(included in application configuration
running-config-application).
#Created on 16:19:28 UTC FRI November 18 2011
#cli-type 1
#version 1
logger application-stats import-application-stats
/apps/data/scos/system/p3hidden/um//config//appstats.csv
RDR-formatter protocol NetflowV9 mapping file
/apps/data/scos/system/p3hidden/um//config//netflow.xml
SCE8000#>
Cisco SCE 8000 CLI Command Reference
2-274
Chapter 2
CLI Command Reference
more running-config-application
Related Commands
Command
Description
show
running-config-applic
ation
Displays the contents of the currently running configuration application in
the Cisco SCE platform.
Cisco SCE 8000 CLI Command Reference
2-275
Chapter 2
CLI Command Reference
more running-config-party-db
more running-config-party-db
To display the contents of the currently running party database configuration for the static parties that
are configured in the Cisco SCE platform, use the more running-config-party-db command in the
privileged EXEC mode.
more running-config-party-db
Syntax Description
This command has no arguments or keywords.
Command Default
Default Party
Command Modes
Privileged EXEC
Command History
This table includes the following release-specific history entries:
Release
Modification
3.7.x
This command was introduced.
Usage Guidelines
The authorization used is root.
Examples
The following is sample output from the more running-config-party-db command:
SCE8000>enable 15
Password:<cisco>
SCE8000#>more running-config-party-db
#This is a party database configuration file (running-config-party-db) for static parties
only.
#Created on 13:34:02 UTC TUE July 12 2011
#cli-type 1
#version 1
hw-bypass mode
party name "N/A"
party name "[party-name]"
party mapping ip-address 24.11.52.128 name [party-name]
party mapping ip-address 110.10.10.10 name [party-name]
party name [party-name] hw-bypass
SCE8000#>
Cisco SCE 8000 CLI Command Reference
2-276
Chapter 2
CLI Command Reference
more running-config-party-db
Related Commands
Command
Description
party name party-name Sets the hardware bypass state for the specified static party in the hardware
hw-bypass
bypass mode of the Cisco SCE platform.
show party name
party-name
Displays the contents of the specified static party in the Cisco SCE
platform.
show party name
party-name hw-bypass
To display the hardware bypass status of a specified static party in the
hardware bypass mode of the Cisco SCE platform, use the show party
name hw-bypass command in the privileged EXEC mode.
show
running-config-all
Displays the contents of all the currently running configuration files.
show
running-config-partydb
Displays the contents of the currently running party database configuration
for the static parties that are configured in the Cisco SCE platform.
Cisco SCE 8000 CLI Command Reference
2-277
Chapter 2
CLI Command Reference
more startup-config-all
more startup-config-all
To display the contents of all the startup configuration files, use the more startup-config-all command
in the privileged EXEC mode.
more startup-config-all
Note
The configuration file contents will be displayed only if all the startup configuration files are copied
from the running configuration.
Syntax Description
This command has no arguments or keywords.
Command Default
None
Command Modes
Privileged EXEC
Command History
This table includes the following release-specific history entries:
Release
Modification
3.7.x
This command was introduced.
Usage Guidelines
The authorization used is root.
Examples
The following is sample output from the more startup-config-all command:
SCE8000>enable 15
Password:<cisco>
SCE8000#more startup-config-all
#This is a general configuration file (running-config).
#Created on 16:19:09 UTC FRI November 18 2011
#cli-type 1
#version 1
watchdog software-reset disabled
watchdog hardware-reset disabled
hostname "pqemb154SAV"
ip ssh
no management-agent notifications notification-list
1417,1418,804,815,1404,1405,1406,1407,1408,400
no management-agent notifications notification-list
402,421,440,441,444,445,446,450,437,457
no management-agent notifications notification-list 3593,3594,3595,10040
RDR-formatter destination 10.78.242.172 port 33000 category number 1 priority
RDR-formatter destination 10.78.242.172 port 33000 category number 2 priority
RDR-formatter destination 10.78.242.172 port 33000 category number 3 priority
RDR-formatter destination 10.78.242.172 port 33000 category number 4 priority
interface LineCard 0
Cisco SCE 8000 CLI Command Reference
2-278
100
100
100
100
Chapter 2
CLI Command Reference
more startup-config-all
aggregative-global-controllers
aggregative-global-controller-dynamic mode suspend
aggregative-global-controller-dynamic mode active
connection-mode inline on-failure bypass
no watchdog
no silent
no shutdown
flow-open-mode enhanced UDP min-packets 2
statistics-logging frequency 5
service-bandwidth-prioritization-mode global
no protocol-pack version
no VAS-traffic-forwarding VAS server-id 0 health-check
no VAS-traffic-forwarding VAS server-id 1 health-check
no VAS-traffic-forwarding VAS server-id 2 health-check
no VAS-traffic-forwarding VAS server-id 3 health-check
no VAS-traffic-forwarding VAS server-id 4 health-check
no VAS-traffic-forwarding VAS server-id 5 health-check
no VAS-traffic-forwarding VAS server-id 6 health-check
no VAS-traffic-forwarding VAS server-id 7 health-check
no VAS-traffic-forwarding VAS server-id 8 health-check
no VAS-traffic-forwarding VAS server-id 9 health-check
no VAS-traffic-forwarding VAS server-id 10 health-check
no VAS-traffic-forwarding VAS server-id 11 health-check
no VAS-traffic-forwarding VAS server-id 12 health-check
no VAS-traffic-forwarding VAS server-id 13 health-check
no VAS-traffic-forwarding VAS server-id 14 health-check
no VAS-traffic-forwarding VAS server-id 15 health-check
no VAS-traffic-forwarding VAS server-id 16 health-check
no VAS-traffic-forwarding VAS server-id 17 health-check
no VAS-traffic-forwarding VAS server-id 18 health-check
no VAS-traffic-forwarding VAS server-id 19 health-check
no VAS-traffic-forwarding VAS server-id 20 health-check
no VAS-traffic-forwarding VAS server-id 21 health-check
no VAS-traffic-forwarding VAS server-id 22 health-check
no VAS-traffic-forwarding VAS server-id 23 health-check
no VAS-traffic-forwarding VAS server-id 24 health-check
no VAS-traffic-forwarding VAS server-id 25 health-check
no VAS-traffic-forwarding VAS server-id 26 health-check
no VAS-traffic-forwarding VAS server-id 27 health-check
no VAS-traffic-forwarding VAS server-id 28 health-check
no VAS-traffic-forwarding VAS server-id 29 health-check
no VAS-traffic-forwarding VAS server-id 30 health-check
no VAS-traffic-forwarding VAS server-id 31 health-check
no VAS-traffic-forwarding VAS server-id 32 health-check
no VAS-traffic-forwarding VAS server-id 33 health-check
no VAS-traffic-forwarding VAS server-id 34 health-check
no VAS-traffic-forwarding VAS server-id 35 health-check
no VAS-traffic-forwarding VAS server-id 36 health-check
no VAS-traffic-forwarding VAS server-id 37 health-check
no VAS-traffic-forwarding VAS server-id 38 health-check
no VAS-traffic-forwarding VAS server-id 39 health-check
no VAS-traffic-forwarding VAS server-id 40 health-check
no VAS-traffic-forwarding VAS server-id 41 health-check
no VAS-traffic-forwarding VAS server-id 42 health-check
no VAS-traffic-forwarding VAS server-id 43 health-check
no VAS-traffic-forwarding VAS server-id 44 health-check
no VAS-traffic-forwarding VAS server-id 45 health-check
no VAS-traffic-forwarding VAS server-id 46 health-check
no VAS-traffic-forwarding VAS server-id 47 health-check
no VAS-traffic-forwarding VAS server-id 48 health-check
no VAS-traffic-forwarding VAS server-id 49 health-check
no VAS-traffic-forwarding VAS server-id 50 health-check
no VAS-traffic-forwarding VAS server-id 51 health-check
no VAS-traffic-forwarding VAS server-id 52 health-check
Cisco SCE 8000 CLI Command Reference
2-279
Chapter 2
CLI Command Reference
more startup-config-all
no VAS-traffic-forwarding VAS server-id 53 health-check
no VAS-traffic-forwarding VAS server-id 54 health-check
no VAS-traffic-forwarding VAS server-id 55 health-check
no VAS-traffic-forwarding VAS server-id 56 health-check
no VAS-traffic-forwarding VAS server-id 57 health-check
no VAS-traffic-forwarding VAS server-id 58 health-check
no VAS-traffic-forwarding VAS server-id 59 health-check
no VAS-traffic-forwarding VAS server-id 60 health-check
no VAS-traffic-forwarding VAS server-id 61 health-check
no VAS-traffic-forwarding VAS server-id 62 health-check
no VAS-traffic-forwarding VAS server-id 63 health-check
no sanity-checks test-packets
no sanity-checks attack-filter
no sanity-checks event-counters Flow-ID-Allocations-Failed
no l7-filter
no attack-filter protocol TCP
no attack-filter protocol UDP
no attack-filter protocol ICMP attack-direction single-side-both
no attack-filter protocol other attack-direction single-side-both
attack-filter subscriber-notification ports 80
replace spare-memory code bytes 3145728
interface GigabitEthernet 1/1
ip address 10.78.242.173 255.255.255.0
interface GigabitEthernet 1/2
ip address 10.78.242.173 255.255.255.0
interface GigabitEthernet 3/0/0
auto-negotiate
interface GigabitEthernet 3/1/0
auto-negotiate
interface GigabitEthernet 3/2/0
auto-negotiate
interface GigabitEthernet 3/3/0
auto-negotiate
exit
ip default-gateway 10.78.242.129
line vty 0 4
no timeout
exit
interface Mng 0/1
no auto-fail-over
exit
interface Mng 0/2
active-port
exit
sub-attribute add-attribute Called-Station-ID
sub-attribute add-attribute 3GPP-Charging-Characteristics
sub-attribute add-attribute 3GPP-GPRS-Negotiated-QoS-Profile
sub-attribute add-attribute 3GPP-RAT-Type
sub-attribute add-attribute 3GPP-SGSN-Address-Code-6
sub-attribute add-attribute 3GPP-SGSN-Address
sub-attribute add-attribute 3GPP-SGSN-MCC-MNC
cdp mode bypass
service debug-shell
service debug-telnet
service debug-ssh
debug const-db name lcConstDb.rucSched.shutWaitBeforeShuttingRucs value 1000
debug const-db name lcConstDb.rucSched.shutWaitAfterShuttingRucs value 1000
debug const-db name lcConstDb.traverser.maxClsFcIds value 3312
debug const-db name lcConstDb.traverser.clsFcIdsThreshold value 3248
debug const-db name lcConstDb.sanityChecks.enableTestPackets value false
debug const-db name lcConstDb.sanityChecks.enableDelayPacketsEF value false
debug const-db name lcConstDb.sanityChecks.enableDelayPacketsBE value false
debug const-db name lcConstDb.attackFilter.maxTotalPacketsIncrease value 1e+10
debug const-db name commonConstDb.sli.minSupportedObjectFormat value 13
Cisco SCE 8000 CLI Command Reference
2-280
Chapter 2
CLI Command Reference
more startup-config-all
diameter
no subscriber LEG dhcp-lease-query
subscriber LEG dhcp-lease-query servers 127.0.0.1
logger device SCE-agent-Statistics-Log max-file-size 204800
management-agent property "com.pcube.management.framework.install.activation.operation"
"Install"
management-agent property "com.pcube.management.framework.install.activated.package" "SCA
BB"
management-agent property "com.pcube.management.framework.install.activated.version"
"3.7.0 build 514"
management-agent property "com.pcube.management.framework.install.activation.date" "Wed
Nov 16 11:57:15 UTC 2011"
ip ftp-server
ip http-tech-if
#This is an application configuration file (running-config-application).
#Created on 16:19:28 UTC FRI November 18 2011
#cli-type 1
#version 1
interface LineCard 0
application /apps/data/scos/temp.sli
exit
# Dynamic RDR category configuration
#This is a party templates configuration(included in application configuration
running-config-application).
#Created on 16:19:28 UTC FRI November 18 2011
#cli-type 1
#version 1
logger application-stats import-application-stats
/apps/data/scos/system/p3hidden/um//config//appstats.csv
RDR-formatter protocol NetflowV9 mapping file
/apps/data/scos/system/p3hidden/um//config//netflow.xml
#This is a party database configuration file (running-config-party-db) for static parties
only.
#Created on 16:19:29 UTC FRI November 18 2011
#cli-type 1
#version 1
hw-bypass mode
party name "N/A"
party name "party-name"
party mapping ip-address 1.2.3.4 name party-name
party name party-name hw-bypass
SCE8000#
Related Commands
Command
Description
more
startup-config-all
Displays all the contents of the startup configuration files.
show
startup-config-all
Displays all the contents of the startup configuration files.
show
Displays the contents of the startup configuration application files in the
startup-config-applica Cisco SCE platform.
tion
show
Displays the contents of the startup configuration party database of the
startup-config-party-d static parties that are configured in the Cisco SCE platform.
b
Cisco SCE 8000 CLI Command Reference
2-281
Chapter 2
CLI Command Reference
more startup-config-application
more startup-config-application
To display the contents of the startup configuration application files in the Cisco SCE platform, use the
more startup-config-application command in the Privileged EXEC mode.
more startup-config-application
Note
The configuration file contents will be displayed only if the corresponding startup configuration
application is copied from the running configuration application.
Syntax Description
This command has no arguments or keywords.
Command Default
None
Command Modes
Privileged EXEC
Command History
This table includes the following release-specific history entries:
Release
Modification
3.7.x
This command was introduced.
Usage Guidelines
The authorization used is root.
Examples
The following is sample output from the more startup-config-application command:
SCE8000>enable 15
Password:<cisco>
SCE8000#>more startup-config-application
#This is an application configuration file (running-config-application).
#Created on 16:19:28 UTC FRI November 18 2011
#cli-type 1
#version 1
interface LineCard 0
application /apps/data/scos/temp.sli
exit
# Dynamic RDR category configuration
#This is a party templates configuration(included in application configuration
running-config-application).
#Created on 16:19:28 UTC FRI November 18 2011
#cli-type 1
#version 1
logger application-stats import-application-stats
/apps/data/scos/system/p3hidden/um//config//appstats.csv
RDR-formatter protocol NetflowV9 mapping file
/apps/data/scos/system/p3hidden/um//config//netflow.xml
SCE8000#>
Cisco SCE 8000 CLI Command Reference
2-282
Chapter 2
CLI Command Reference
more startup-config-application
Related Commands
Command
Description
show
startup-config-all
Displays the contents of all the startup configuration files.
show
Displays the contents of all the startup configuration application files in the
startup-config-applica Cisco SCE platform.
tion
Cisco SCE 8000 CLI Command Reference
2-283
Chapter 2
CLI Command Reference
more startup-config-party-db
more startup-config-party-db
To display the contents of the startup configuration party database of the static parties that are configured
in the Cisco SCE platform, use the more startup-config-party-db command in the privileged EXEC
mode.
more startup-config-party-db
Note
The contents of the startup configuration party database will be displayed only if the startup
configuration party database is copied from the running configuration party database.
Syntax Description
This command has no arguments or keywords.
Command Default
None
Command Modes
Privileged EXEC
Command History
This table includes the following release-specific history entries:
Release
Modification
3.7.x
This command was introduced.
Usage Guidelines
The authorization used is root.
Examples
The following is sample output from the more startup-config-party-db command:
SCE8000>enable 15
Password:<cisco>
SCE8000#>more startup-config-party-db
#This is a party database configuration file (running-config-party-db) for static parties
only.
#Created on 13:34:02 UTC TUE July 12 2011
#cli-type 1
#version 1
hw-bypass mode
party name "N/A"
party name "[party-name]"
party mapping ip-address 24.11.52.128 name [party-name]
party mapping ip-address 110.10.10.10 name [party-name]
party name [party-name] hw-bypass
SCE8000#>
Cisco SCE 8000 CLI Command Reference
2-284
Chapter 2
CLI Command Reference
more startup-config-party-db
Related Commands
Command
Description
copy
Enables the task of copying the startup configuration party database and
startup-config-party-d create a backup file of the configured static parties in the Cisco SCE
b backupfile
platform.
more
running-config-all
Displays the contents of all the currently running configuration files.
more
running-config-partydb
Displays the contents of the currently running party database configuration
for the static parties that are configured in the Cisco SCE platform.
more
startup-config-all
Displays the contents of all the startup configuration files.
show
startup-config-all
Displays the contents of all the startup configuration files.
show
Displays the contents of the startup configuration party database of the
startup-config-party-d static parties that are configured in the Cisco SCE platform.
b
Cisco SCE 8000 CLI Command Reference
2-285
Chapter 2
CLI Command Reference
more user-log
more user-log
Displays the user log on the CLI console screen.
more user-log
Syntax Description
This command has no arguments or keywords.
Command Default
None
Command Modes
Privileged EXEC
Command History
This table includes the following release-specific history entries:
Release
Modification
2.5.7
This command was introduced.
Usage Guidelines
Authorization: admin
Examples
The following example shows how to display the user log on the CLI console screen:
SCE8000>enable 10
Password:<cisco>
SCE8000#more user-log
<INFO>| 01/28/97 22:29:22 | CPU #000 | Logger: Task Initialized successfully
Related Commands
Command
Description
logger get user-log file-name
Outputs the current user log to a target file.
show log
Displays the contents of the user log file.
Cisco SCE 8000 CLI Command Reference
2-286
Chapter 2
CLI Command Reference
mpls
mpls
Configures the MPLS environment. Up to a maximum of 15 MPLS labels per packet are supported.
When all IP addresses are unique and MPLS labels are not mandatory (a non-MPLS/VPN environment),
use the traffic-engineering skip form of this command.
To set the MPLS configuration to the default value, use the default form of this command.
mpls traffic-engineering skip
mpls vpn skip
default mpls
Syntax Description
See Usage Guidelines.
Command Default
traffic-engineering skip is enabled.
Command Modes
Interface Linecard Configuration
Command History
This table includes the following release-specific history entries:
Usage Guidelines
Release
Modification
2.5.7
This command was introduced.
Use this command as follows:
•
traffic-engineering skip
Any packets that are injected by the Cisco SCE into the MPLS labeled traffic (block or redirect) are
sent with no MPLS labels. Use this mode when the MPLS labels in the traffic are used only for traffic
engineering, such as QOS, and not for routing.
This mode is the default, and it should be changed only if MPLS is used for routing in the network
and block or redirect is being employed. However, first verify that no private IP conflicts exist in the
network.
•
vpn skip
Use this command when all IP addresses are unique, MPLS labels are used, and the labels used for
injection are the correct ones, as seen on the flow. This mode can be used when the MPLS labels are
used for routing or for VPNs (assuming no private IP addresses are being used).
The vpn skip mode is an asymmetric Layer 2 mode. You should expect reduced performance and
capacity, because the system must follow the flow and keep the Layer 2 information.
Authorization: admin
Cisco SCE 8000 CLI Command Reference
2-287
Chapter 2
CLI Command Reference
mpls
Examples
The following example shows the use of this command in a non-MPLS/VPN environment:
SCE8000>enable 10
Password:<cisco>
SCE8000#config
SCE8000(config)#interface linecard 0
SCE8000(config if)#mpls traffic-engineering skip
SCE8000(config if)#
Related Commands
Command
Description
show interface linecard mpls
Displays the current MPLS configuration.
Cisco SCE 8000 CLI Command Reference
2-288
Chapter 2
CLI Command Reference
no subscriber
no subscriber
To remove a specificsubscriber from the system, use the no subscriber command in interface linecard
configuration mode.
no subscriber name subscriber-name
no subscriber scmp name scmp-name all
no subscriber sm all
no subscriber all [with-vpn-mappings]
Syntax Description
subscriber-name
Specific subscriber name to be removed from the system.
scmp name all
Removes all subscribers managed by the specified SCMP peer device.
scmp-name
Name of an SCMP peer device.
sm all
Removes all subscribers managed by the SM.
all
Removes all introduced subscribers.
with-vpn-mappings
Removes all VPN-based subscribers. This option allows you to switch out
of VPN mode when the SM is down
Command Default
None
Command Modes
Interface linecard configuration (config-if)
Command History
This table includes the following release-specific history entries:
Usage Guidelines
Caution
Release
Modification
2.5.7
This command was introduced.
This command may affect the performance of the party db because the command triggers sequential
processes that affect the flows and may result in removing the party context. We recommend that you do
not run this command in an active network which contains large number of subscribers.
Use the with-vpn-mappings option only when the Cisco SCE platform is disconnected from the
Subscriber Manager.
Authorization: admin
Examples
The following example shows how to remove all subscribers:
Cisco SCE 8000 CLI Command Reference
2-289
Chapter 2
CLI Command Reference
no subscriber
SCE8000>enable 10
Password:<cisco>
SCE8000#config
SCE8000(config)#interface linecard 0
SCE8000(config if)# no subscriber all
SCE8000(config if)#
Related Commands
Command
Description
show interface linecard subscriber
Displays subscribers that meet specified criteria.
Cisco SCE 8000 CLI Command Reference
2-290
Chapter 2
CLI Command Reference
no subscriber mappings included-in
no subscriber mappings included-in
Removes all existing subscriber mappings from a specified IP range.
no subscriber mappings included-in ip-range ip-range
Syntax Description
ip-range
Removes all existing subscriber mappings from the specified IP range.
ip-range
IP address and mask length defining the IP range.
Command Default
None
Command Modes
Interface Linecard Configuration
Command History
This table includes the following release-specific history entries:
Release
Modification
2.5.7
This command was introduced.
Usage Guidelines
Authorization: admin
Examples
The following example shows how to remove any existing subscriber mappings from the specified IP
range:
SCE8000>enable 10
Password:<cisco>
SCE8000#config
SCE8000(config)#interface linecard 0
SCE8000(config if)# no subscriber mappings included-in ip-range 10.10.10.10/0
Related Commands
Command
Description
show interface linecard subscriber mapping
Displays subscribers whose mapping meets the
specified criteria.
Cisco SCE 8000 CLI Command Reference
2-291
Chapter 2
CLI Command Reference
os-fingerprinting
os-fingerprinting
Enables OS fingerprinting and loads the default.fp signature file.
To disable OS fingerprinting, use the no form of this command.
os-fingerprinting
no os-fingerprinting
Syntax Description
This command has no arguments or keywords.
Command Default
By default, OS fingerprinting is disabled.
Command Modes
Interface Linecard Configuration
Command History
This table includes the following release-specific history entries:
Usage Guidelines
Release
Modification
3.7.x
This command was introduced.
When OS fingerprinting is enabled, you can also configure the following OS fingerprinting parameters:
•
Sampling window—How long flows from a subscriber are fingerprinted
•
Interval—Interval between OS fingerprinting sampling periods
•
NAT detection window—Time period within which detecting multiple operating systems for the
same subscriber or IP address triggers NAT identification
•
OS flush time–Time interval after which OS information is flushed from the system
•
Signature file—Name of OS fingerprint signature file
•
Scan port—Port used for opening OS fingerprinting flows.
•
GX reporting—Enable sending subscriber OS information in Gx messages
Authorization: admin
Examples
The following example shows how to enable OS fingerprinting.
SCE8000>enable 10
Password:<cisco>
SCE8000#configure
SCE8000#config)# interface linecard 0
SCE8000(config if)# os-fingerprinting
OsFingerPrint enable success
SCE8000(config if)#
Cisco SCE 8000 CLI Command Reference
2-292
Chapter 2
CLI Command Reference
os-fingerprinting
Related Commands
Command
Description
os-fingerprinting sampling
Configures the OS fingerprinting sampling period and
interval.
os-fingerprinting NAT-detection-window
Configures the OS fingerprinting NAT detection
window.
os-fingerprinting os-flush-time
Configures the OS fingerprinting OS flush time.
os-fingerprinting scan-port
Configures the port used for opening OS fingerprinting
flows.
os-fingerprinting signature-file
Specifies the OS fingerprinting file.
os-fingerprinting gx-report
Enables sending subscriber OS information in Gx
messages.
show os-fingerprinting config
Displays the current OS fingerprinting configuration.
Cisco SCE 8000 CLI Command Reference
2-293
Chapter 2
CLI Command Reference
os-fingerprinting gx-report
os-fingerprinting gx-report
Enables sending subscriber OS information in Gx messages.
To disable sending subscriber OS information in Gx messages, use the no form of this command.
os-fingerprinting gx-report
no os-fingerprinting gx-report
Syntax Description
This command has no arguments or keywords.
Command Default
Disabled
Command Modes
Interface Linecard Configuration
Command History
This table includes the following release-specific history entries:
Usage Guidelines
Release
Modification
3.7.x
This command was introduced.
If sending subscriber OS information in Gx messages is enabled, the OS information will be included in
the following Gx messages:
•
OS type will be sent as a VSA in CCR-U each time a new OS type is detected for that subscriber.
Authorization: admin
Examples
The following example shows how to enable sending subscriber OS information in Gx messages.
SCE8000>enable 10
Password:<cisco>
SCE8000#configure
SCE8000#configure
SCE8000#config)# interface linecard 0
SCE8000(config if)#os-fingerprinting
OsFingerPrint enable success
SCE8000(config if)# os-fingerprinting gx-report
SCE8000(config)#
Related Commands
Command
Description
os-fingerprinting
Enables OS fingerprinting and loads the default.fp signature
file.
Cisco SCE 8000 CLI Command Reference
2-294
Chapter 2
CLI Command Reference
os-fingerprinting NAT-detection-window
os-fingerprinting NAT-detection-window
Enables NAT detection and configures the time period within which detecting multiple operating
systems for one subscriber will trigger NAT identification.
To disable NAT detection, use the no form of this command.
os-fingerprinting NAT-detection-window time
no os-fingerprinting NAT-detection-window
Syntax Description
time
Command Default
By default, NAT detection is disabled.
Time period within which detecting multiple operating systems will trigger
NAT identification, in seconds (10-300)
Time = 10 second
Command Modes
Interface Linecard Configuration
Command History
This table includes the following release-specific history entries:
Usage Guidelines
Release
Modification
3.7.x
This command was introduced.
If multiple operating systems are detected for the same subscriber or IP address within the configured
time period, they will be identified as part of NAT environment. Multiple operating systems detected for
the same IP address over a longer time period will not be identified as part of NAT.
You must first enable OS fingerprinting (see os-fingerprinting).
Authorization: admin
Examples
The following example shows how to enable NAT detection and set the NAT detection window to 200
seconds.
SCE8000>enable 10
Password:<cisco>
SCE8000#configure
SCE8000#config)# interface linecard 0
SCE8000(config if)# os-fingerprinting
OsFingerPrint enable success
SCE8000(config if)# os-fingerprinting NAT-detection-window 200
SCE8000(config if)#
Cisco SCE 8000 CLI Command Reference
2-295
Chapter 2
CLI Command Reference
os-fingerprinting NAT-detection-window
Related Commands
Command
Description
os-fingerprinting
Enables OS fingerprinting and loads the default.fp signature
file.
show os-fingerprinting config
Displays the current OS fingerprinting configuration.
Cisco SCE 8000 CLI Command Reference
2-296
Chapter 2
CLI Command Reference
os-fingerprinting os-flush-time
os-fingerprinting os-flush-time
Enables flushing OS fingerprinting information and configures the time interval after which OS
fingerprinting information is flushed from the system.
To disable OS flush, use the no form of this command.
os-fingerprinting os-flush-time time
no os-fingerprinting os-flush-time
Syntax Description
time
Command Default
By default, flushing OS fingerprinting information is disabled.
Time period, in days (1-5)
Time = 1 day
Command Modes
Interface Linecard Configuration
Command History
This table includes the following release-specific history entries:
Usage Guidelines
Release
Modification
3.7.x
This command was introduced.
If the OS fingerprinting information for a subscriber is not updated for the configured time interval, the
OS information for the subscriber is flushed from the system. So, for example, if the OS flush time is set
to one day, the OS information for a subscriber that has not been updated is flushed after one day when
new traffic is detected for the subscriber.
You must first enable OS fingerprinting (see os-fingerprinting).
Authorization: admin
Examples
The following example shows how to enable flushing the OS fingerprinting information and set the OS
flush time to three days.
SCE8000>enable 10
Password:<cisco>
SCE8000#configure
SCE8000#config)# interface linecard 0
SCE8000(config if)# os-fingerprinting
OsFingerPrint enable success
SCE8000(config if)# os-fingerprinting os-flush-time 3
SCE8000(config if)#
Cisco SCE 8000 CLI Command Reference
2-297
Chapter 2
CLI Command Reference
os-fingerprinting os-flush-time
Related Commands
Command
Description
os-fingerprinting
Enables OS fingerprinting and loads the default.fp signature
file.
show os-fingerprinting config
Displays the current OS fingerprinting configuration.
Cisco SCE 8000 CLI Command Reference
2-298
Chapter 2
CLI Command Reference
os-fingerprinting sampling
os-fingerprinting sampling
Configures the sampling window and the sampling interval for OS fingerprinting.
To reset the OS fingerprinting sampling window and interval to their default values, use the no form of
this command.
os-fingerprinting sampling
no os-fingerprinting sampling
Syntax Description
Command Default
window
How long flows from a subscriber are fingerprinted, in seconds (10-300)
interval
Interval between fingerprinting periods, in minutes (10-1440)
Window = 10 seconds
Interval = 10 minutes
Command Modes
Interface Linecard Configuration
Command History
This table includes the following release-specific history entries:
Usage Guidelines
Release
Modification
3.7.x
This command was introduced.
You must first enable OS fingerprinting (see os-fingerprinting).
Authorization: admin
Examples
The following example shows how to sample OS fingerprinting for 50 seconds (window) every 60
minutes (interval).
SCE8000>enable 10
Password:<cisco>
SCE8000#configure
SCE8000#config)# interface linecard 0
SCE8000(config if)# os-fingerprinting
OsFingerPrint enable success
Related Commands
Command
Description
os-fingerprinting
Enables OS fingerprinting and loads the default.fp signature
file.
show os-fingerprinting config
Displays the current OS fingerprinting configuration.
Cisco SCE 8000 CLI Command Reference
2-299
Chapter 2
CLI Command Reference
os-fingerprinting scan-port
os-fingerprinting scan-port
Configures the port used for opening OS fingerprinting flows.
To reset the OS scan port to the default value, use the no form of this command.
os-fingerprinting scan-port port#
no os-fingerprinting scan-port
Syntax Description
port#
Command Default
port# = 80
Command Modes
Interface Linecard Configuration
Command History
This table includes the following release-specific history entries:
Usage Guidelines
Number of the port to be used for OS fingerprinting.
Release
Modification
3.7.x
This command was introduced.
The port numbers can be in the range of 0 - 65535. However, the following ports are blocked:
20 FTP—data transfer
21 FTP—control (command)
554 Real Time Streaming Protocol (RTSP)
651 IEEE-MMS
654 Media Management System (MMS) Media Management Protocol (MMP)[23
1755 Microsoft Media Services (MMS, ms-streaming)
2948 WAP-push Multimedia Messaging Service (MMS)
2949 WAP-pushsecure Multimedia Messaging Service (MMS)
194 Internet Relay Chat (IRC)
4374 PSI Push-to-Talk Protocol
1720 H.323 Call signalling
2000 Cisco SCCP (Skinny)
5060 Session Initiation Protocol (SIP)
5061 Session Initiation Protocol (SIP) over TLS
Authorization: admin
Cisco SCE 8000 CLI Command Reference
2-300
Chapter 2
CLI Command Reference
os-fingerprinting scan-port
Examples
The following example shows how to set the OS fingerprinting to use port 100.
SCE8000>enable 10
Password:<cisco>
SCE8000#configure
SCE8000#config)# interface linecard 0
SCE8000(config if)# os-fingerprinting
OsFingerPrint enable success
SCE8000(config if)# os-fingerprinting scan-port 100
SCE8000(config if)#
Related Commands
Command
Description
os-fingerprinting
Enables OS fingerprinting and loads the default.fp signature
file.
show os-fingerprinting config
Displays the current OS fingerprinting configuration.
Cisco SCE 8000 CLI Command Reference
2-301
Chapter 2
CLI Command Reference
os-fingerprinting signature-file
os-fingerprinting signature-file
Specifies the signature file used for OS fingerprinting.
os-fingerprinting signature-file filename
Syntax Description
filename
Command Default
Filename = default.f0p (signature file packaged with the SCOS release)
Command Modes
Interface Linecard Configuration
Command History
This table includes the following release-specific history entries:
Usage Guidelines
Name of the signature file used for OS fingerprinting.
Release
Modification
3.7.x
This command was introduced.
An encrypted signature file for OS fingerprinting is packaged with each SCOS release; this file is the
default signature file. Use this command to change the signature file used for OS fingerprinting. The
signature file to be updated must be placed in the path /apps/data/scos in order for the signature file
update to be successful.
Authorization: admin
Examples
The following example shows how to change the OS fingerprinting signature file.
SCE8000>enable 10
Password:<cisco>
SCE8000#configure
SCE8000#config)# interface linecard 0
SCE8000(config if)# os-fingerprinting
OsFingerPrint enable success
SCE8000(config if)# os-fingerprinting signature-file os-signs.fp
SCE8000(config if)#
Related Commands
Command
Description
show os-fingerprinting signature-file filename
Displays the unencrypted contents of the specified
signature file.
Cisco SCE 8000 CLI Command Reference
2-302
Chapter 2
CLI Command Reference
party default-type
party default-type
To configure the default subscription ID type to be sent in the CCR messages to PCRF, use the party
default-type command.
party default-type {nai | imsi | e164 | sip-uri | private }
Syntax Description
nai
Sets the default subscription ID type as END_USER_NAI.
imsi
Sets the default subscription ID type as END_USER_IMSI.
e164
Sets the default subscription ID type as END_USER_E164.
sip-uri
Sets the default subscription ID type as END_USER_SIP-URI.
private
Sets the default subscription ID type as END_USER_PRIVATE
Command Default
None.
Command Modes
Privileged EXEC (#)
Command History
This table includes the following release-specific history entries:
Usage Guidelines
Release
Modification
3.8.0
This command was introduced.
Authorization: admin
Valid subscription ID types are:
Examples
•
END_USER_E164
•
END_USER_IMSI
•
END_USER_NAI
•
END_USER_SIP-URI
•
END_USER_PRIVATE
The following example shows how to set the party default type for END_USER_IMSI subscription ID
type:
SCE8000> enable 10
Password: <cisco>
SCE8000# configure
SCE8000#config)# party default-type imsi
Cisco SCE 8000 CLI Command Reference
2-303
Chapter 2
CLI Command Reference
party mapping ip-address name
party mapping ip-address name
To set the IP address for a specified static party in the Cisco SCE platform, use the party mapping
ip-address name command in the global configuration mode.
Use the no form of the command to remove the mapping of an IP address.
party mapping {ip-address ip-address | ipv6-address ipv6-address} name party-name
no party mapping {ip-address ip-address | ipv6-address ipv6-address} name party-name
Syntax Description
ip-address
Sets the IPv4 address of the static party.
ip-address
IP address of the static party that is created.
ipv6-address
Sets the IPv6 address of the static party.
ipv6-address
IPv6 address of the static party that is created.
party-name
Name of the configured static party.
Command Default
None
Command Modes
Global configuration
Command History
This table includes the following release-specific history entries:
Release
Modification
3.7.x
This command was introduced.
3.8.0
Support for IPv6 addresses added.
Usage Guidelines
The authorization used is root.
Examples
The following example shows how to set the IPv6 address for the specified static party test:
SCE8000> enable 15
Password: <cisco>
SCE8000# config
SCE8000(config)#> mapping ipv6-address 24:11:52:128::0 name test
SCE8000(config)# exit
The following example shows how to set the IPv4 address for the specified static party test:
SCE8000> enable 15
Password:<cisco>
SCE8000#config
SCE8000(config)#>party mapping ip-address 24.11.52.128 name test
SCE8000(config)#exit
Cisco SCE 8000 CLI Command Reference
2-304
Chapter 2
CLI Command Reference
party mapping ip-address name
Related Commands
Command
Description
party mapping
ip-range
ip-address/mask-value
name party-name
Sets the IP range for a specified static party in the Cisco SCE platform.
party name party-name Allows the creation of a specified static party in the Cisco SCE platform.
show party name
party-name
Displays the contents of a specified static party in the Cisco SCE platform.
Cisco SCE 8000 CLI Command Reference
2-305
Chapter 2
CLI Command Reference
party mapping ip-range
party mapping ip-range
To set the IP range for a specified static party in the Cisco SCE platform, use the party mapping
ip-range command in the global configuration mode.
Use the no form of the command to remove the mapping of an IPv6 range.
party mapping ip-range {ip-address/mask-value | ipv6-address/prefix-length} name party-name
no party mapping ip-range {ip-address/mask-value | ipv6-address/prefix-length} name
party-name
Note
Syntax Description
If the mask value is not provided for the corresponding IP address, the complete mask value of 32 is
considered for the specified IP address.
ip-address
IP address of the static party which is created.
mask-value
Mask value that is to be set for the specified IP address.
ipv6-address
IPv6 address of the static party which is created.
prefix-length
Prefix length that is to be set for the specified IP address.
party-name
Name of the configured static party.
Command Default
None
Command Modes
Global configuration
Command History
This table includes the following release-specific history entries:
Release
Modification
3.7.x
This command was introduced.
3.8.0
IPv6 address support was added.
Usage Guidelines
The authorization used is root.
Examples
The following example shows how to set the IP range for the specified static party test:
SCE8000> enable 15
Password: <cisco>
SCE8000# configure
SCE8000(config)#> party mapping IPv6-range 1:2:3:4::0/64 name test
SCE8000(config)# exit
The following example shows how to set the IP range for the specified static party test:
Cisco SCE 8000 CLI Command Reference
2-306
Chapter 2
CLI Command Reference
party mapping ip-range
SCE8000> enable 15
Password:<cisco>
SCE8000# configure
SCE8000(config)#> party mapping ip-range 1.2.3.0/31 name [party-name]
SCE8000(config)# exit
Related Commands
Command
Description
party mapping
ip-address ip-address
name party-name
Sets the IP address for a specified static party in the Cisco SCE platform.
party name party-name Allows the creation of a specified static party in the Cisco SCE platform.
show party name
party-name
Displays the contents of a specified static party in the Cisco SCE platform.
Cisco SCE 8000 CLI Command Reference
2-307
Chapter 2
CLI Command Reference
party name
party name
To enable the task of creating a static party in the Cisco SCE platform, use the party name command in
the global configuration mode. To delete the static party that is created, use the no form of this
command.
party name party-name
no party name party-name
party-name
Name of the static party that is to be created.
Command Default
None
Command Modes
Global configuration
Command History
This table includes the following release-specific history entries:
Release
Modification
3.7.x
This command was introduced.
Usage Guidelines
The authorization used is root.
Examples
The following example shows how to create a static party:
SCE8000>enable 15
Password:<cisco>
SCE8000#config
SCE8000(config)#> party name [party-name]
SCE8000(config)#
Cisco SCE 8000 CLI Command Reference
2-308
Chapter 2
CLI Command Reference
party name
Related Commands
Command
Description
party name party-name Sets the hardware bypass state for a specified static party in the hardware
hw-bypass
bypass mode of the Cisco SCE platform.
party mapping
ip-address ip-address
name party-name
Sets the IP address for a specified static party in the Cisco SCE platform.
party mapping
ip-range
ip-range/mask-value
name party-name
Sets the IP range for a specified static party in the Cisco SCE platform.
show party name
party-name
Displays the contents of a specified static party in the Cisco SCE platform.
show party name
party-name hw-bypass
To display the hardware bypass status of a specified static party in the
hardware bypass mode of the Cisco SCE platform.
Cisco SCE 8000 CLI Command Reference
2-309
Chapter 2
CLI Command Reference
party name hw-bypass
party name hw-bypass
To set the hardware bypass state for a specified static party in the hardware bypass mode of the Cisco
SCE platform, use the party name hw-bypass command in the global configuration mode. To reset the
hardware bypass state for the static party in the hardware bypass mode, use the no form of this
command.
party name party-name hw-bypass
no party name party-name hw-bypass
Note
The static parties created only in hw-bypass mode are hardware bypassed.
Syntax Description
party-name
Command Default
None
Command Modes
Global configuration
Command History
This table includes the following release-specific history entries:
Usage Guidelines
Note
Examples
Name of the static party for which to set or reset the hardware bypass state.
Release
Modification
3.7.x
This command was introduced.
The authorization used is root.
This command is not applicable to IPv6 static subscribers.
The following example shows how to set the hardware bypass state for a static party:
SCE8000> enable 15
Password:<cisco>
SCE8000#config
SCE8000(config)#> party name [party-name] hw-bypass
SCE8000(config)#exit
The following example shows how to reset the hardware bypass state for a static party:
SCE8000> enable 15
Password:<cisco>
SCE8000#config
SCE8000(config)#> no party name [party-name] hw-bypass
SCE8000(config)#exit
Cisco SCE 8000 CLI Command Reference
2-310
Chapter 2
CLI Command Reference
party name hw-bypass
Related Commands
Command
Description
show party name
party-name
Displays the contents of a specified static party in the Cisco SCE platform.
show party name
party-name hw-bypass
Displays the hardware bypass status of a specified static party in the
hardware bypass mode of the Cisco SCE platform.
Cisco SCE 8000 CLI Command Reference
2-311
Chapter 2
CLI Command Reference
party template index
party template index
To configure the values of tunables, such as Package ID and Monitor, for a particular subscriber (with
the template index) in the Cisco SCE platform, use the party template index command in the global
configuration mode.
party template index <template-value> tunables name <tunable> PackageId value
template-value
The decimal value that is associated iwth the anonymous subscriber.
tunable
The name of the party tunable.
Command Default
None.
Command Modes
Global configuration (config)
Command History
This table includes the following release-specific history entries:
Release
Modification
3.6.x
This command was introduced.
Usage Guidelines
The authorization used is root.
Examples
The following example shows how to set the tunables (packageId ) value for the template index 1:
SCE8000> enable 15
Password: <cisco>
SCE8000# config
SCE8000(config)# party template index 1 tunables name packageId value 5
The following example shows the output of the show party template command after configuring the
Cisco SCE device using the party template index:
SCE8000#> show party template index 5
Template 1
Template 1 has 5 tunables:
downVlinkId=0
monitor=0
new_classification_policy=0
packageId=5
upVlinkId=0
Template 5 has no meters
Cisco SCE 8000 CLI Command Reference
2-312
Chapter 2
CLI Command Reference
periodic-records aggregate-by-cpu
periodic-records aggregate-by-cpu
Enables RDR aggregation for the specified RDRs. By default, RDR aggregation is enabled.
Use the no form of the command to disable record aggregation.
The Cisco SCE platform aggregates certain RDRs, thus reducing the load on the CM without affecting
the usability of the information provided. The RDR aggregation feature is relevant only to global
records. More specifically, only periodic records are aggregated, because other records relate to events
like a single transaction or flow, and cannot be aggregated across processors – if they are aggregated,
they loose the required granularity.
Currently the following RDRs are aggregated:
•
Virtual Link Usage RDRs (VLURs )
•
Link Usage RDRs (LURs)
•
Package Usage RDRs (PURs)
periodic-records aggregate-by-cpu [all | LUR | PUR | VLUR]
no periodic-records aggregate-by-cpu [all | LUR | PUR | VLUR]
Syntax Description
all
Enables or disables aggregation of all relevant types of RDRs.
LUR | PUR | VLUR
Enables or disables aggregation of the specified type of RDR only.
Command Default
By default, all record types are aggregated.
Command Modes
Interface Linecard Configuration
Command History
This table includes the following release-specific history entries:
Release
Modification
3.6.x
This command was introduced.
Usage Guidelines
Authorization: admin
Examples
The following example illustrates how to disable RDR aggregation for PURs.
SCE8000>enable 10
Password:<cisco>
SCE8000#config
SCE8000(config)#interface linecard 0
SCE8000(config if)#no periodic-records
SCE8000(config if)#
aggregate-by-cpu PUR
Cisco SCE 8000 CLI Command Reference
2-313
Chapter 2
CLI Command Reference
periodic-records aggregate-by-cpu
Related Commands
Command
Description
show interface linecard periodic-records aggregation
Displays the current RDR aggregation
configuration.
Cisco SCE 8000 CLI Command Reference
2-314
Chapter 2
CLI Command Reference
ping
ping
Pings a host to test for connectivity. The ping program sends a test message (packet) to an address and
then awaits a reply. Ping output can help you evaluate path-to-host reliability, delays over the path, and
whether the host can be reached or is functioning.
ping hostname
Syntax Description
hostname
Command Default
None
Command Modes
Privileged EXEC
Command History
This table includes the following release-specific history entries:
Hostname or IP address of a remote station to ping.
Release
Modification
2.5.7
This command was introduced.
Usage Guidelines
Authorization: admin
Examples
The following example shows how to ping host 10.1.1.201:
SCE8000>enable 10
Password:<cisco>
SCE8000#ping 10.1.1.201
pinging 10.1.1.201...
PING 10.1.1.201: 56 data bytes
64 bytes from host (10.1.1.201): icmp_seq=0. time=0.
64 bytes from host (10.1.1.201): icmp_seq=1. time=0.
64 bytes from host (10.1.1.201): icmp_seq=2. time=0.
64 bytes from host (10.1.1.201): icmp_seq=3. time=0.
----10.1.1.201 PING Statistics---4 packets transmitted, 4 packets received, 0% packet
round-trip (ms) min/avg/max = 0/0/0
SCE8000#
ms
ms
ms
ms
loss
Cisco SCE 8000 CLI Command Reference
2-315
Chapter 2
CLI Command Reference
pir-deviation-percentage
pir-deviation-percentage
Configures the accepted deviation in percentage of the current bandwidth in comparison to the
configured PIR.
pir-deviation-percentage percentage
Syntax Description
percentage
Command Default
By default, the PIR deviation percentage is 5.
Command Modes
Global configuration (config)
Command History
This table includes the following release-specific history entries:
Usage Guidelines
Percentage value for PIR crossed count to report in VLUR RDR. The range
is from 1 to 100.
Release
Modification
4.2.0
This command was introduced.
Authorization: admin
This command controls the PIR crossed count in VLUR RDR.
The value should be within the range 1 to 100 percentage.
PIR_CROSSED_COUNT will start to be accounted when the current bandwidth crosses the sum of
VLINK PIR and the pir-deviation-percentage of VLINK PIR.
Examples
The following example shows how to configure the accepted percentage deviation of the current
bandwidth in comparison to the configured PIR:
SCE8000#>configure
SCE8000(config)#>?
pir-deviation-percentage Accepted deviation in percentage of the current BW in comparison
to the configured PIR
SCE8000(config)#>pir-deviation-percentage ?
DECIMAL Percentage (value 1 to 100) for PIR crossed count, to report in VLUR RDR
SCE8000(config)#>pir-deviation-percentage 10
SCE8000(config)#>pir-deviation-percentage 0
Error - Percentage above PIR is 0, which is not in Rage 1 to 100
SCE8000(config)#>pir-deviation-percentage 101
Error - Percentage above PIR is 101, which is not in Rage 1 to 100
SCE8000(config)#>
Cisco SCE 8000 CLI Command Reference
2-316
Chapter 2
CLI Command Reference
pqi install file
pqi install file
Installs the specified pqi file using the installation options specified (if any). This procedure may take
up to 5 minutes.
pqi install file filename [options options]
Syntax Description
filename
Filename of the pqi application file to be installed.
options
Installation options. Use the show pqi file command to display the available
options.
Command Default
None
Command Modes
Interface Linecard Configuration
Command History
This table includes the following release-specific history entries:
Usage Guidelines
Release
Modification
2.5.7
This command was introduced.
Always run the pqi uninstall file command before installing a new pqi file to prevent the accumulation
of old files on the disk.
Authorization: admin
Examples
The following example shows how to install the Subscriber Manager anr10015.pqi file. No options are
specified.
SCE8000>enable 10
Password:<cisco>
SCE8000#config
SCE8000(config)#interface linecard 0
SCE8000(config if)#pqi install file anr10015.pqi
SCE8000(config if)#
Related Commands
Command
Description
show pqi file
Displays information about the specified application file.
pqi uninstall file
Uninstalls the specified pqi file.
Cisco SCE 8000 CLI Command Reference
2-317
Chapter 2
CLI Command Reference
pqi rollback file
pqi rollback file
Reverses an upgrade of the specified pqi file. This procedure may take up to 5 minutes.
pqi rollback file filename
Syntax Description
filename
Command Default
None
Command Modes
Interface Linecard Configuration
Command History
This table includes the following release-specific history entries:
Usage Guidelines
Filename of the pqi application file to be rolled back. The file must be the
pqi file that was last upgraded.
Release
Modification
2.5.7
This command was introduced.
Always specify the last pqi file that was upgraded. To find the name of this file, use the show pqi
last-installed command.
Authorization: admin
Examples
The following example shows how to reverse the upgrade for the Subscriber Manager using the
anr100155.pqi file:
SCE8000>enable 10
Password:<cisco>
SCE8000#config
SCE8000(config)#interface linecard 0
SCE8000(config if)#pqi rollback file anr100155.pqi
SCE8000(config if)#
Related Commands
Command
Description
show pqi last-installed Displays the name of the last pqi file that was installed.
Cisco SCE 8000 CLI Command Reference
2-318
Chapter 2
CLI Command Reference
pqi uninstall file
pqi uninstall file
Uninstalls the specified pqi file. This procedure may take up to 5 minutes.
pqi uninstall file filename
Syntax Description
filename
Command Default
None
Command Modes
Interface Linecard Configuration
Command History
This table includes the following release-specific history entries:
Usage Guidelines
Filename of the pqi application file to be uninstalled. The file must be the
pqi file that was installed last.
Release
Modification
2.5.7
This command was introduced.
Always specify the last pqi file that was installed. To find the name of this file, use the show pqi
last-installed command.
Always run the pqi uninstall command before installing a new pqi file to prevent the accumulation of
old files on the disk.
Authorization: admin
Examples
The following example shows how to uninstall the Subscriber Manager anr10015.pqi file:
SCE8000>enable 10
Password:<cisco>
SCE8000#config
SCE8000(config)#interface linecard 0
SCE8000(config if)#pqi uninstall file anr10015.pqi
SCE8000(config if)#
Related Commands
Command
Description
show pqi last-installed Displays the name of the last pqi file that was installed.
pqi install file
Installs the specified pqi file using any specified installation options.
Cisco SCE 8000 CLI Command Reference
2-319
Chapter 2
CLI Command Reference
pqi upgrade file
pqi upgrade file
Upgrades the application using the specified pqi file and any specified upgrade options. This procedure
may take up to 5 minutes.
pqi upgrade file filename [options options]
Syntax Description
filename
Filename of the pqi application file to be used for the upgrade.
options
Upgrade options. Use the show pqi file command to display the available
options.
Command Default
None
Command Modes
Interface Linecard Configuration
Command History
This table includes the following release-specific history entries:
Usage Guidelines
Release
Modification
2.5.7
This command was introduced.
A pqi upgrade file is suitable for upgrading only from specific previously installed pqi files. The upgrade
procedure checks that an upgrade is possible from the currently installed pqi file. The upgrade procedure
will be stopped with an error message if the upgrade is not possible.
When upgrading the application in a cascaded system, use the force failure-condition command to force
failure in the active SCE 8000 platform. (See System Upgrades in the Cisco SCE8000 10GBE Software
Configuration Guide or System Upgrades in the Cisco SCE8000 GBE Software Configuration Guide.)
Authorization: admin
Examples
The following example shows how to upgrade using the anr100155.pqi file. No options are specified.
SCE8000>enable 10
Password:<cisco>
SCE8000#config
SCE8000(config)#interface linecard 0
SCE8000(config if)#pqi upgrade file anr100155.pqi
SCE8000(config if)#
Related Commands
Command
Description
show pqi file
Displays information about the specified application file.
force failure-condition Forces a virtual failure condition, and exits from the failure condition, when
performing an application upgrade.
Cisco SCE 8000 CLI Command Reference
2-320
Chapter 2
CLI Command Reference
pwd
pwd
Displays the current working directory.
pwd
Syntax Description
This command has no arguments or keywords.
Command Default
None
Command Modes
Privileged EXEC
Command History
This table includes the following release-specific history entries:
Release
Modification
2.5.7
This command was introduced.
Usage Guidelines
Authorization: admin
Examples
The following example shows how to display the current working directory (system):
SCE8000>enable 10
Password:<cisco>
SCE8000#pwd
system:
SCE8000#
Related Commands
Command
Description
cd
Changes the path of the current working directory.
Cisco SCE 8000 CLI Command Reference
2-321
Chapter 2
CLI Command Reference
queue
queue
Sets the queue shaping.
queue queue-number bandwidth bandwidth burst-size burstsize
Syntax Description
queue-number
bandwidth
Queue number from 1 to 4, where 4 is the highest priority (fastest).
•
1—BE. The best effort queue, that is, the lowest priority.
•
2, 3—AF. The assured forwarding queues are middle priority, with 3
being a higher priority queue. That is, packets from queue 3 are
transferred faster than those in queue 2.
•
4—EF. The expedited forwarding queue, that is, the highest priority
forwarding.
Bandwidth measured in kbps. The maximum bandwidth is determined by
the line rate.
0 disables packet transmission from the queue.
Bandwidth is set in resolutions of approximately140 kbps, that is, rounded
to the nearest multiple of 140 kbps.
burstsize
Command Default
Burst size in bytes, ranging from 0 to 16000000.
The default bandwidth is 100000K (100 Mbps).
The default burst size is 8000 (8K bytes).
Command Modes
TenGigabitEthernet Interface Configuration
Command History
This table includes the following release-specific history entries:
Usage Guidelines
Release
Modification
2.5.7
This command was introduced.
This command is valid for a specified TenGigabitEthernet line interface only. It must be executed
explicitly for each interface.
Use the interface tengigabitethernet command to access the configuration mode for the desired
interface.
Authorization: admin
Cisco SCE 8000 CLI Command Reference
2-322
Chapter 2
CLI Command Reference
queue
Examples
The following example shows how to configure queue shaping for queue 1 for the 10GBE interface in
bay 3:
SCE8000>enable 10
Password:<cisco>
SCE8000#config
SCE8000(config)#interface TenGigabitEthernet 3/3/0
SCE8000(config if)#queue 1 bandwidth 20000 burstsize 1000
Related CommandsE
Command
Description
bandwidth
Sets Ethernet shaping for the TenGigabitEthernet line interfaces.
interface tengigabitethernet
Enters TenGigabitEthernet Interface Configuration mode to the
10GBE line interfaces.
Cisco SCE 8000 CLI Command Reference
2-323
Chapter 2
CLI Command Reference
rdr-formatter category number buffer-size
rdr-formatter category number buffer-size
Sets the buffer size for the specified RDR category.
rdr-formatter category number number buffer-size size
default rdr-formatter category number number buffer-size
default rdr-formatter buffer-size all
Syntax Description
number
Number of the category. Range is from1 to 4.
size
Size of the buffer allocated to the specified category in bytes.
Command Default
Default buffer size varies by category (see Usage Guidelines).
Command Modes
Global configuration
Command History
This table includes the following release-specific history entries:
Usage Guidelines
Release
Modification
3.5.5
This command was introduced.
The buffer size can be configured only when the RDR-formatter service is disabled. (Use the no service
rdr-formatter command.)
Use the default option to set the buffer size for the specified category to the default value.
Use the all keyword with the default option to set the buffer size for the all categories to the default
value.
Total memory assigned to all RDR categories is 80 MB.
The total memory available for the RDR formatter cannot be changed. This command specifies how
much of the total available memory is allocated to each RDR category.
Default memory allocations to each RDR category, assuming the following standard categories:
•
Category 1—40 MB
•
Category 2—24 MB
•
Category 3—8 MB
•
Category 4—8 MB
Authorization: admin
Cisco SCE 8000 CLI Command Reference
2-324
Chapter 2
CLI Command Reference
rdr-formatter category number buffer-size
Examples
The following example shows how to configure the buffer size for Category 1. The RDR formatter must
be disabled before the command is executed and the re-enabled.
SCE8000> enable 10
Password: <cisco>
SCE8000# configure
SCE8000(config)# no service rdr-formatter
SCE8000(config)# rdr-formatter category number 1 buffer-size 50000000
SCE8000(config)# service rdr-formatter
SCE8000(config)#
Related Commands
Command
Description
rdr-formatter history-size
Configures the size of the history buffer.
service rdr-formatter
Enables or disables the RDR formatter.
show rdr-formatter
Displays the RDR formatter configuration.
Cisco SCE 8000 CLI Command Reference
2-325
Chapter 2
CLI Command Reference
rdr-formatter category number name
rdr-formatter category number name
Assigns a meaningful name to a category. This category name can then be used in any rdr-formatter
command in place of the category number.
To disassociate the name from the category, use the no form of this command. The name will not be
recognized by any CLI commands.
rdr-formatter category number number name category-name
no rdr-formatter category number number name category-name
Syntax Description
number
Number of the category. Can be 1 to 4.
category-name
User-defined name to be assigned to the category.
Command Default
None
Command Modes
Global configuration
Command History
This table includes the following release-specific history entries:
Usage Guidelines
Release
Modification
3.5.5
This command was introduced.
The following four categories are predefined in the system:
•
Category 1—Usage RDRs to the Collection Manager or mediation system
•
Category 2—Quota RDRs to Pre-Paid Server or Subscriber Controller OSS
•
Category 3—External events RDR or RT Signaling to various systems, such as a packet cable
multi-media policy server
•
Category 4—URL Query RDR to URL Filtering database (for example, surfControl)
Authorization: admin
Examples
The following example shows how to assign a name (prepaid) to Category 1:
SCE8000>enable 10
Password:<cisco>
SCE8000#config
SCE8000(config)#rdr-formatter category number 1 name prepaid
SCE8000(config)#
Cisco SCE 8000 CLI Command Reference
2-326
Chapter 2
CLI Command Reference
rdr-formatter category number name
Related Commands
Command
Description
show rdr-formatter
Displays the RDR formatter configuration.
service rdr-formatter
Enables or disables the RDR formatter.
rdr-formatter history-size
Configures the size of the history buffer.
Cisco SCE 8000 CLI Command Reference
2-327
Chapter 2
CLI Command Reference
rdr-formatter destination
rdr-formatter destination
Configures an RDRv1 or NetFlow destination. The RDR formatter sends the records (RDRs or export
packets) it produces to this destination.
To remove the mappings of a destination to categories, use the no form of this command. When all
categories for a destination are removed, the entire destination is removed.
rdr-formatter destination ip-address port port-number [category {name category-name}|
{number number}] [priority priority-value ] [category …] protocol {rrdrv1 | netflowv9}
[transport {udp | tcp}]
no rdr-formatter destination ip-address port port-number [category {name category-name }|
{number number}]
no rdr-formatter destination all
Syntax Description
ip-address
Destination IP address.
port-number
Destination port number.
category
(Optional) Assigns a priority to a particular category for this destination.
category-name
(Optional) User-defined name that identifies the category.
number
(Optional) Identifies the category by number (1 to 4).
priority-value
(Optional) Priority of the destination. The priority value may be any number
from 1 (lowest) to 100 (highest).
protocol
Protocol configured for this destination. Choose rdrv1 or netflowv9.
transport
(Optional) Transport type configured for this destination. Choose:
•
UDP when the protocol is NetFlow.
•
TCP when the protocol is RDRv1.
Command Default
The default protocol is RDRv1.
Command Modes
Global configuration
Command History
This table includes the following release-specific history entries:
Usage Guidelines
Release
Modification
2.5.7
This command was introduced.
Up to eight destinations can be configured. Multiple destinations over the same category must have
distinct priorities. In redundancy mode, the entry with the highest priority is used by the RDR formatter;
in multicast mode or load-balancing mode, priorities have no meaning.
Cisco SCE 8000 CLI Command Reference
2-328
Chapter 2
CLI Command Reference
rdr-formatter destination
In its simplest form, this command specifies only the IP address and port number of the destination and
the protocol being used. In addition, a global priority may be assigned to the destination. Or, a specific
priority may be assigned to any or all of the four categories for the specified destination. If a global
priority is not explicitly configured, the highest priority is assigned automatically.
Categories may be identified by either name or number.
A specific destination may be configured to one or more categories at the same time. A maximum of
three destinations may be assigned to a specific category.
Note
RDRv1 may be configured only with the transport type of TCP. NetFlowV9 may be configured only with
the transport type of UDP.
Priorities
The following guidelines apply to configuring priorities for report destinations:
•
In redundancy mode, the entry with the highest priority is used by the RDR formatter, provided that
a connection with this destination can be established.
•
Priority configuration is not relevant in multicast mode, because all reports are sent to all
destinations.
•
Priority configuration is not relevant in load-balancing mode, because all destinations are used for
load balancing.
•
For the first destination defined, if no priority is set, the highest priority is automatically assigned.
•
For all subsequently defined destinations, the priority must be explicitly defined; otherwise, it will
collide with the first destination priority.
•
You can also assign a different priority to each category for each destination. If no category is
specified, the same priority is assigned to all categories for that destination.
•
The same priority cannot be assigned to the same category for two different destinations.
Authorization: admin
Examples
The following example shows how to configure a NetFlow destination with the default priority (highest)
to be used by all categories:
SCE8000>enable 10
Password:<cisco>
SCE8000#config
SCE8000(config)#rdr-formatter destination 10.1.1.205 port 33000 protocol netflowv9
transport udp
SCE8000(config)#
The following example shows how to configure an RDR formatter destination for two categories with a
different priority for each category. This configuration sends RDRs from category 2 to this destination,
but usually not RDRs from category 1.
SCE8000>enable 10
Password:<cisco>
SCE8000#config
SCE8000(config)#rdr-formatter destination 10.1.1.206 port 34000 category number 1 priority
10 category number 2 priority 90 protocol rrdrv1
SCE8000(config)#
Cisco SCE 8000 CLI Command Reference
2-329
Chapter 2
CLI Command Reference
rdr-formatter destination
Related Commands
Command
Description
show rdr-formatter destination
Displays the RDR formatter destinations,
including protocol and transport type.
service rdr-formatter
Enables or disables the RDR formatter.
rdr-formatter protocol netflowv9 dscp
Defines the DSCP value to be assigned to
the NetFlow packets.
rdr-formatter destination protocol netflowv9 template Configures the interval after which all Net
data timeout
Flow templates must be exported to the
specified destination (refreshed).
Cisco SCE 8000 CLI Command Reference
2-330
Chapter 2
CLI Command Reference
rdr-formatter destination protocol netflowv9 template data timeout
rdr-formatter destination protocol netflowv9 template data
timeout
Configures the interval after which all NetFlow templates must be exported to the specified destination
(refreshed).
To disable the template refresh mechanism, use the no form or the default form of this command.
rdr-formatter destination ip-address port port-number protocol netflowv9 template data
timeout timeout-value
no rdr-formatter destination ip-address port port-number protocol netflowv9 template data
default rdr-formatter destination ip-address port port-number protocol netflowv9 template
data
Syntax Description
ip-address
Destination IP address.
port-number
Destination port number.
timeout-value
Time interval between exporting the NetFlow templates to the specified
destination. Valid range is 1 to 86400 seconds.
Command Default
The refresh mechanism is disabled.
Command Modes
Global configuration
Command History
This table includes the following release-specific history entries:
Usage Guidelines
Release
Modification
3.1.0
This command was introduced.
A template record defines the structure of each NetFlow data record. The RDR formatter transmits only
the templates along with their matching data records. The RDR formatter refreshes the templates on the
collector by resending them at configured intervals.
The no form of the command disables the refresh mechanism.
The default form of the command also disables the refresh mechanism, because the default state is
disabled.
Authorization: admin
Cisco SCE 8000 CLI Command Reference
2-331
Chapter 2
CLI Command Reference
rdr-formatter destination protocol netflowv9 template data timeout
Examples
The following example shows how to use this command:
SCE8000>enable 10
Password:<cisco>
SCE8000#config
SCE8000(config)#rdr-formatter destination 10.1.1.205 port 33000 protocol netflowv9
template data timeout 240
SCE8000(config)#
Related Commands
Command
Description
show rdr-formatter destination
Displays the RDR formatter destinations, including
protocol and transport type.
rdr-formatter destination
Configures an RDRv1 or NetFlow destination.
Cisco SCE 8000 CLI Command Reference
2-332
Chapter 2
CLI Command Reference
rdr-formatter forwarding-mode
rdr-formatter forwarding-mode
Defines the mode in which the RDR formatter sends RDRs to the destinations.
rdr-formatter forwarding-mode [mode]
Syntax Description
mode
Command Default
The default mode is redundancy.
Command Modes
Global configuration
Command History
This table includes the following release-specific history entries:
Usage Guidelines
Choose redundancy, multicast, or simple-load-balancing, as described in
Table 2-5 in Usage Guidelines.
Release
Modification
2.5.7
This command was introduced.
Table 2-8 lists the valid mode settings.
Table 2-8
Valid Mode Settings
redundancy
All RDRs are sent only to the primary (active) connection.
multicast
All RDRs are sent to all destinations.
simple-load-balancing
Each successive record is sent to a different destination, one
destination after the other, in a round robin manner.
Authorization: admin
Examples
The following example shows how to set the RDR formatter mode to redundancy:
SCE8000>enable 10
Password:<cisco>
SCE8000#config
SCE8000(config)#rdr-formatter forwarding-mode redundancy
SCE8000(config)#
Related Commands
Command
Description
show rdr-formatter forwarding-mode Displays the configured RDR formatter forwarding mode.
Cisco SCE 8000 CLI Command Reference
2-333
Chapter 2
CLI Command Reference
rdr-formatter history-size
rdr-formatter history-size
Configures the size of the history buffer.
rdr-formatter history-size [size]
Syntax Description
size
Command Default
The default size is 0.
Command Modes
Global configuration
Command History
This table includes the following release-specific history entries:
Usage Guidelines
Size of the history buffer in bytes. Maximum size is 64 KB.
Release
Modification
3.0.0
This command was introduced.
When a connection fails, a certain amount of data is considered 'sent' by the RDR formatter (since it was
passed to the TCP stack), but is not received at the collector. This ‘missing’ data can be stored in the
history buffer. Then, when the RDR formatter switches to a secondary destination, or reconnects with
the original collector, the RDRs from the history buffer are sent before any new RDRs are sent.
The amount of ‘missing’ data is limited by the size of the TCP buffers in the RDR formatter and the
collector platform, and the TCP window size of the connection. The history buffer should be configured
to a size larger than the sum of the these TCP buffer and window sizes.
Authorization: admin
Examples
The following example shows how to configure the history buffer size:
SCE8000> enable 10
Password: <cisco>
SCE8000# configure
SCE8000(config)# rdr-formatter history-size 25000
SCE8000(config)#
Related Commands
Command
Description
show rdr-formatter history-size
Displays the configured size of the RDR formatter history buffer.
Cisco SCE 8000 CLI Command Reference
2-334
Chapter 2
CLI Command Reference
rdr-formatter protocol
rdr-formatter protocol
Configures the RDR formatter protocol.
rdr-formatter protocol rdrv1 | NetflowV9
Syntax Description
rdrv1 | NetflowV9
Command Default
The default is rdrv1.
Command Modes
Global configuration
Command History
This table includes the following release-specific history entries:
Usage Guidelines
Name of the RDR formatter protocol.
Release
Modification
3.0.0
This command was introduced.
The RDR formatter protocol can be configured only when the RDR-formatter service is disabled (Use
the no service rdr-formatter command ).
This command configures the protocol to be used globally by the RDR formatter. A protocol can also be
assigned specifically to each RDR formatter destination (see the rdr-formatter destination command).
Authorization: admin
Examples
The following example illustrates how to reset the RDR formatter.
SCE8000> enable 15
Password: <cisco>
SCE8000#> configure
SCE8000(config)# no service rdr-formatter
SCE8000(config)# rdr-formatter protocol rdrv1
SCE8000(config)# service rdr-formatter
SCE8000(config)#>
Related Commands
Command
Description
show rdr-formatter protocol
Displays the RDR-formatter protocol used.
Cisco SCE 8000 CLI Command Reference
2-335
Chapter 2
CLI Command Reference
rdr-formatter protocol netflowv9 dscp
rdr-formatter protocol netflowv9 dscp
Defines the DSCP value to be assigned to the NetFlow packets.
rdr-formatter protocol netflowv9 dscp dscp-value
Syntax Description
dscp-value
Command Default
The default DSCP value is 0.
Command Modes
Global configuration
Command History
This table includes the following release-specific history entries:
Usage Guidelines
DSCP value to be assigned to the NetFlow packets, in hexadecimal format.
Valid range is 0 to 63.
Release
Modification
3.1.0
This command was introduced.
You can assign a DSCP value to specify the diffserv value of the NetFlow traffic exported from your SCE
platform.
Authorization: admin
Examples
The following example shows how to use this command:
SCE8000>enable 10
Password:<cisco>
SCE8000#config
SCE8000(config)#rdr-formatter protocol netflowv9 dscp 0x20
SCE8000(config)#
Related Commands
Command
Description
show rdr-formatter protocol netflowv9 dscp Displays the DSCP value assigned by NetFlowV9.
Cisco SCE 8000 CLI Command Reference
2-336
Chapter 2
CLI Command Reference
rdr-formatter rdr-mapping
rdr-formatter rdr-mapping
Adds a dynamic RDR mapping to a category or removes one from a category.
To remove an existing mapping, use the no form of this command.
rdr-formatter rdr-mapping [tag-id tag-number category-number category-number]
no rdr-formatter rdr-mapping [tag-id tag-number category-number category-number]
Syntax Description
tag-number
Complete 32-bit value given as an hexadecimal number. The RDR tag must
be already configured in the formatter by the application.
category-number
Number of the category (1 to 4) to which to map the RDR tag.
Command Default
None
Command Modes
Global configuration
Command History
This table includes the following release-specific history entries:
Usage Guidelines
Release
Modification
3.0.0
This command was introduced.
The configuration of categories to RDR tags is done by adding and removing mappings. You can add a
mapping of RDR tag to a category and remove a mapping, including the default mapping. If the table
already contains a mapping with the same tag and category number, an error is issued and nothing is
done.
If all categories are removed from a tag, the tag is ignored and is not formatted and sent. This process is
‘ignore mapping'.
Authorization: admin
Examples
The following example shows how to add a mapping to a category:
SCE8000>enable 10
Password:<cisco>
SCE8000#config
SCE8000(config)#rdr-formatter rdr-mapping tag-id 0xf0f0f000 category-number 1
SCE8000(config)#
Cisco SCE 8000 CLI Command Reference
2-337
Chapter 2
CLI Command Reference
rdr-formatter rdr-mapping
The following example shows how to restore the default mapping for a specified RDR tag:
SCE8000>enable 10
Password:<cisco>
SCE8000#config
SCE8000(config)#default rdr-formatter rdr-mapping tag-id 0xf0f0f000
SCE8000(config)#
Related Commands
Command
Description
show rdr-formatter rdr-mapping Displays the RDR formatter category that a specified RDR tag is
mapped to.
Cisco SCE 8000 CLI Command Reference
2-338
Chapter 2
CLI Command Reference
reload
reload
Note
To not lose the current configuration, use the copy running-config-all startup-config-all command
before using the reload command.
Reboots the Cisco SCE platform.
reload
Syntax Description
This command has no arguments or keywords.
Command Default
None
Command Modes
Privileged EXEC
Command History
This table includes the following release-specific history entries:
Release
Modification
2.5.7
This command was introduced.
Usage Guidelines
Authorization: admin
Examples
The following example shows how to back up the configuration and perform a system reboot:
SCE8000>enable 10
Password:<cisco>
SCE8000#copy running-config-all startup-config-all
SCE8000#reload
Are you sure? Y
The system is about to reboot, this will end your CLI session
Related Commands
Command
Description
copy running-config startup-config
Builds a configuration file with general configuration
commands called config.txt, which is used in successive boots.
reload shutdown
Shuts down the Cisco SCE platform, preparing it to be turned
off.
Cisco SCE 8000 CLI Command Reference
2-339
Chapter 2
CLI Command Reference
reload shutdown
reload shutdown
Shuts down the Cisco SCE platform, preparing it to be turned off.
reload shutdown
Syntax Description
This command has no arguments or keywords.
Command Default
None
Command Modes
Privileged EXEC
Command History
This table includes the following release-specific history entries:
Usage Guidelines
Release
Modification
2.5.7
This command was introduced.
Use this command to shut down the Cisco SCE platform in an orderly manner before turning it off. After
issuing this command, the only way to revive the Cisco SCE platform from its power-down state is to
turn it off, then back on.
This command can only be issued from the serial CLI console port. When issued during a Telnet CLI
session, an error message is returned and the command is ignored. This response prevents the possibility
of shutting the platform down from a remote location, from which it is not possible to power back up.
Authorization: admin
Examples
The following example shows how to shut down the Cisco SCE platform:
SCE8000>enable 10
Password:<cisco>
SCE8000#reload shutdown
You are about to shut down the system.
The only way to resume system operation after this
is to cycle the power off, and then back on.
Continue? Y
IT IS NOW SAFE TO TURN THE POWER OFF.
Related Commands
Command
Description
reload
Reboots the Cisco SCE platform.
Cisco SCE 8000 CLI Command Reference
2-340
Chapter 2
CLI Command Reference
rename
rename
Changes the filename to the specified name.
rename existing-filename new-filename
Syntax Description
existing-filename
Original name of the file.
new-filename
New name of the file.
Command Default
None
Command Modes
Privileged EXEC
Command History
This table includes the following release-specific history entries:
Release
Modification
2.5.7
This command was introduced.
Usage Guidelines
Authorization: admin
Examples
The following example shows how to change the name of file test1.pkg to test3.pkg:
SCE8000>enable 10
Password:<cisco>
SCE8000#rename test1.pkg test3.pkg
SCE8000#
Cisco SCE 8000 CLI Command Reference
2-341
Chapter 2
CLI Command Reference
rmdir
rmdir
Removes an empty directory.
To remove a directory that is not empty, use the delete command with the /recursive switch.
rmdir directory-name
Syntax Description
directory-name
Command Default
None
Command Modes
Privileged EXEC
Command History
This table includes the following release-specific history entries:
Usage Guidelines
Name of the directory to be removed.
Release
Modification
2.5.7
This command was introduced.
You can only remove an empty directory. Use the dir command to verify that no files are listed in this
directory.
Authorization: admin
Examples
The following example shows how to delete the directory named code:
SCE8000>enable 10
Password:<cisco>
SCE8000#rmdir code
SCE8000#
Related Commands
Command
Description
dir
Displays the files in the current directory.
delete
Deletes a file from the local flash file system.
Cisco SCE 8000 CLI Command Reference
2-342
Chapter 2
CLI Command Reference
salt
salt
Configures the value of the salt to be applied to the Personally Identifying Field of Extended Transaction
Usage RDRs before hashing it.
To reset the salt to the default value, use the default form of this command.
salt salt-value1 salt-value2 salt-value3 salt-value4
default salt
Syntax Description
salt-value1 ... salt-value4
Command Default
The default salt value is 0x12345678 0x12345678 0x12345678 0x12345678.
Command Modes
Interface Linecard Configuration
Command History
This table includes the following release-specific history entries:
Usage Guidelines
Four 4-byte salt values in hexadecimal format.
Release
Modification
3.5.0
This command was introduced.
When generating Extended Transaction Usage RDRs for analyzing subscriber browsing patterns, you
must hash the Personally Identifying Field to protect the identity of the subscriber. This command
configures the salt to be applied to the field before hashing.
Always save the running configuration using the copy running-config startup-config command.
Authorization: admin
Examples
The following example shows how to use this command:
SCE8000>enable 10
Password:<cisco>
SCE8000#configure
SCE8000(config)#interface linecard 0
SCE8000(config if)#salt 0xfafafafa 0xfafafafa 0xfafafafa 0xfafafafa
SCE8000(config if)#
Cisco SCE 8000 CLI Command Reference
2-343
Chapter 2
CLI Command Reference
sce-url-database add-entry
sce-url-database add-entry
Adds a single entry to the protected URL database.
sce-url-database add-entry url-wildcard url-wildcard-format flavor-id flavor-id
Syntax Description
url-wildcard-format
(* | [*] [host-suffix] | [*] [host-suffix] / [url-prefix [*]] [url-suffix]
[? params-prefix])
See Table 2-9 for examples of how to define the URL.
flavor-id
ID of the flavor to be applied to the entry. The specified flavor must be the
one that was designated for the blacklist in the pqb file that was applied;
otherwise, the operation will fail.
Command Default
None
Command Modes
Interface Linecard Configuration
Command History
This table includes the following release-specific history entries:
Usage Guidelines
Release
Modification
3.5.0
This command was introduced.
Use this command to add only a few new entries to the database. Add a large number of new URLs by
importing an updated protected URL database file.
Table 2-6 includes URL examples.
Table 2-9
Examples for Defining URLs
URL Input
LUT Key Output
Result
*
*:*:*:*
Blocks all URLs.
*.com
*.com:*:*:*
Blocks all URLs in which the host ends with .com.
*/media
*:/media:*:*
Blocks all URLs in which the path contains only media.
*/media*mp3
*:/media*:*mp3:*
Blocks all URLs in which the path starts with media and
ends with mp3.
*/*?key
*:/*:*:key*
Blocks all URLs in which the parameters start with key.
*.com/media*mp4?download
*.com:/media*:*mp4:download*
Blocks all URLs in which:
Cisco SCE 8000 CLI Command Reference
2-344
•
The host ends with .com.
•
The path starts with media and ends with mp4.
•
The parameters start with download.
Chapter 2
CLI Command Reference
sce-url-database add-entry
The user executing the command must have write permission for the protected URL database.
Authorization: admin
Examples
The following example shows how to add an entry to the database. Because the flavor ID is included in
the command, it is not present in the import file.
SCE8000>enable 10
Password:<cisco>
SCE8000#>configure
SCE8000(config)#interface linecard 0
SCE8000(config if)#sce-url-database add-entry url-wildcard *.com/media*mp4?download
flavor-id 50
SCE8000(config if)#
Related Commands
Command
Description
sce-url-database protection
Configures user authorization for the protected URL
database.
sce-url-database import
Imports entries from an encrypted or clear-text file into
the protected URL database.
show interface linecard sce-url-database
Displays the contents of the protected URL database.
Cisco SCE 8000 CLI Command Reference
2-345
Chapter 2
CLI Command Reference
sce-url-database import
sce-url-database import
Imports entries from an encrypted or clear-text file into the protected URL database.
sce-url-database import {cleartext-file | encrypted-file filename} [flavor-id flavor-id]
Syntax Description
x-file
Specifies the type of file from which entries are being imported. Choose either
cleartext-file or encrypted-file.
filename
Path and filename of the protected URL database import file.
flavor-id
ID of the flavor to be applied to all entries in the file. The specified flavor must be the
one that was designated for the blacklist in the pqb file that was applied; otherwise, the
operation will fail.
•
If the import file does not contain the flavor for the entries, you must specify the
flavor with this command.
•
If the import file does contain the flavor for the entries, you may not specify the
flavor with this command.
Command Default
None
Command Modes
Interface Linecard Configuration
Command History
This table includes the following release-specific history entries:
Usage Guidelines
Release
Modification
3.5.0
This command was introduced.
An encrypted file can be imported only if a matching encryption key has been configured. (See
sce-url-database protection.)
Guidelines for Managing the Protected URL Database
•
The user executing the command must have write permission for the protected URL database.
•
When a new file is imported, the existing database is cleared before the import. Incremental updating
is not supported, so the import file must contain all the relevant URLs, not just new ones to be added
to the database.
•
Add a large number of new URLs by importing an updated protected URL database file. Typically,
if the database is protected, this process is done with an encrypted file.
•
Add a few new URLs by adding them with the sce-url-database add-entry command.
Protected URL Database Import File
A maximum of 500,000 entries is permitted in the import file.
Cisco SCE 8000 CLI Command Reference
2-346
Chapter 2
CLI Command Reference
sce-url-database import
The database import file may either contain clear text or be encrypted. If the file is encrypted, the
matching encryption key must be configured by the database owner.
If the file is encrypted, it must be prefixed with a clear-text header. The encrypted file header format
must be exactly as follows:
Encrypted file version: 0x01
Block cipher index: 0x01
Mode of operation index: 0x02
Padder index: 0x02
IV length: 0x10
IV: <16 unformatted bytes that form the 128 bits IV of the encrypted data>
After the header, the following data should appear in AES 128, CFB mode, encrypted format:
A random number (in the range 16 to 31) of random bytes, followed by the word "Signed" and then
another 32 random bytes
Each subsequent line represents a single URL.
Protected URL Database Import File Format
[flavor Tab] url
where:
•
flavor—The flavor ID must either be included for every line in the file or for none of the lines. The
flavor must be separated from the URL by a tab.
•
url—(* | [*] [host-suffix] | [*] [host-suffix] / [url-prefix [*]] [url-suffix] [? params-prefix])
See Table 2-9 for examples of how to define the URL.
Results
•
The Cisco SCE URL database is first cleared.
•
The entries from the file are written to the database.
•
Duplicate keys in the file are overwritten with no warning.
•
In case of a failure, writing continues to the next entry.
The total number of failures and a listing of the failed file line numbers are reported when the import
is finished.
Authorization: admin
Examples
The following example shows how to import the protected URL database from an encrypted file.
Because the flavor ID is included in the command, it is not present in the import file.
SCE8000>enable 10
Password:<cisco>
SCE8000#>configure
SCE8000(config)#interface linecard 0
SCE8000(config if)#sce-url-database import encrypted-file blacklist-file flavor-id 50
SCE8000(config if)#
Cisco SCE 8000 CLI Command Reference
2-347
Chapter 2
CLI Command Reference
sce-url-database import
Related Commands
Command
Description
sce-url-database protection
Configures user authorization for the protected URL
database.
sce-url-database add-entry
Adds a single entry to the protected URL database.
show interface linecard sce-url-database Displays the contents of the protected URL database.
Cisco SCE 8000 CLI Command Reference
2-348
Chapter 2
CLI Command Reference
sce-url-database protection
sce-url-database protection
Configures user authorization for the protected URL database.
To remove either all protection settings or only the encryption key, use the no form of this command.
sce-url-database protection owner {myself | name username}
sce-url-database protection allow-write {all-users | owner-only}
sce-url-database protection allow-lookup {owner-only | no-user}
sce-url-database protection encryption-key encryption-key
no sce-url-database protection
no sce-url-database protection encryption-key
Syntax Description
owner
Owner of the protected URL database. Choose either myself or username.
username
Owner of the database.
This name cannot be the default username.
Command Default
allow-write,
allow-lookup
Configures an allowed action for the database.
all-users
All users can perform the specified action.
owner-only
Only the owner of the protected URL database can perform the specified
action.
no-user
No user can perform the specified action.
encryption-key
AES encryption key that is either 128, 192, or 256 bits long. The key is
supplied in hexadecimal format and is 32, 48, or 64 hexadecimal digits,
respectively.
•
The database does not have a designated owner.
•
Read permission—no-user. This setting is not configurable.
•
Write permission:
– If no owner has been assigned, the default is all-users.
– If an owner has been assigned, the default is owner-only.
•
Lookup permission:
– If no owner has been assigned, the default is all-users.
– If an owner has been assigned, the default is no-user.
•
Command Modes
Encryption key—No key.
Interface Linecard Configuration
Cisco SCE 8000 CLI Command Reference
2-349
Chapter 2
CLI Command Reference
sce-url-database protection
Command History
Usage Guidelines
This table includes the following release-specific history entries:
Release
Modification
3.5.0
This command was introduced.
When the protected URL database is protected, one user is designated as the owner of the database and
only that user can execute the protection CLI commands on the database. The database manipulation
commands are restricted according to the owner configuration. This restriction requires defining the
AAA authorization method (either based on local users or based on a TACACS+ server, and so on) and
defining at least one user who should be assigned as the owner of the database.
If the database is defined to be protected, none of the database information (including the owner, the
database entries, and the authorization information itself) is accessible to any users, including the
relevant saved configuration in the log files and in the relevant SCA BB reports. The database-owner
user may change the authorizations using the CLI; however, when any of the protections are relaxed (or
all of the protections are relaxed by removing the protections entirely) the database is reset.
To ensure the secrecy of the database information, the database entries may be imported to the Cisco
SCE (using the CLI) in an encrypted form using 128-, 192-, or 256-bit key length AES. The key may be
set or updated using the appropriate CLI command; typically, this command should be run over a secure
Telnet session.
User Authorization Guidelines
•
The default user cannot be the owner.
•
When no owner is designated, the Cisco SCE URL database is unprotected, and the contents can be
read and modified by any user.
•
Only the owner can configure the protection settings. If no owner is designated, the database is
unprotected, and any user has read and write permissions. A user may be configured to be the owner
of the database only while no owner user is designated for the database.
•
When any protection setting is relaxed, the database is reset. Protection is relaxed in the following
cases:
– Protection is removed completely using the no sce-url-database protection command.
– Write permission is changed from owner-only to all-users.
– Lookup permission is changed from no-user to owner-only.
•
The Cisco SCE URL database configuration information is not accessible as part of the running
config and startup config files.
– Protected information is not displayed when a show or more command is executed on the config
files.
– Protected information is included when a copy command is executed on the config files.
Authorization: admin
Examples
The following example shows how to configure protected URL database protection:
SCE8000>enable 10
Password:<cisco>
SCE8000#>configure
SCE8000(config)#interface linecard 0
SCE8000(config if)#sce-url-database protection owner myself
Cisco SCE 8000 CLI Command Reference
2-350
Chapter 2
CLI Command Reference
sce-url-database protection
SCE8000(config if)#sce-url-database protection allow-write all-users
SCE8000(config if)#sce-url-database protection allow-lookup no-user
SCE8000(config if)#sce-url-database protection encryption-key
AABBCCDDEEFF11223344556677889900
SCE8000(config if)#
Related Commands
Command
Description
sce-url-database import
Imports entries from an encrypted or clear-text file into the protected
URL database.
show interface linecard
sce-url-database protection
Displays the current protected URL database protection settings.
sce-url-database remove-all
Clears the protected URL database.
sce-url-database add-entry
Adds a single entry to the protected URL database.
Cisco SCE 8000 CLI Command Reference
2-351
Chapter 2
CLI Command Reference
sce-url-database remove-all
sce-url-database remove-all
Clears the protected URL database.
sce-url-database remove-all
Syntax Description
This command has no arguments or keywords.
Command Default
None
Command Modes
Interface Linecard Configuration
Command History
This table includes the following release-specific history entries:
Usage Guidelines
Release
Modification
3.5.0
This command was introduced.
To execute this command, you must have write permission for the protected URL database.
Authorization: admin
Examples
The following example shows how to use this command:
SCE8000>enable 10
Password:<cisco>
SCE8000#>configure
SCE8000(config)#interface linecard 0
SCE8000(config if)#sce-url-database remove-all
SCE8000(config if)#
Related Commands
Command
Description
sce-url-database protection
Configures user authorization for the protected URL
database.
sce-url-database import
Imports entries from an encrypted or clear-text file into
the protected URL database.
show interface linecard sce-url-database Displays the contents of the protected URL database.
Cisco SCE 8000 CLI Command Reference
2-352
Chapter 2
CLI Command Reference
scmp
scmp
Enables the Service Control Management Protocol functionality.
To disable SCMP, use the no form of this command.
scmp
no scmp
Syntax Description
This command has no arguments or keywords.
Command Default
SCMP is disabled.
Command Modes
Global configuration
Command History
This table includes the following release-specific history entries:
Usage Guidelines
Release
Modification
3.0.3
This command was introduced.
SCMP is a protocol by which an SCE platform communicates with peers such as Cisco routers running
ISG to manage subscriber sessions.
SCMP performs the following functions:
•
Manages the connection status to all SCMP peer devices
•
Encodes and decodes the SCMP messages
•
Orders northbound messages for each subscriber
When the SCMP is disabled, all subscribers provisioned through this interface are removed.
Authorization: admin
Examples
The following example shows how to disable SCMP:
SCE8000>enable 10
Password:<cisco>
SCE8000#config
SCE8000(config)#no scmp
SCE8000(config)#
Cisco SCE 8000 CLI Command Reference
2-353
Chapter 2
CLI Command Reference
scmp
Related Commands
Command
Description
scmp keepalive-interval
Defines the interval between keepalive messages to the SCMP
peer device.
scmp loss-of-sync-timeout
Defines the loss of sync timeout interval.
scmp name
Adds an SCMP peer device.
scmp reconnect-interval
Defines the SCMP reconnect interval.
scmp subscriber force-single-sce
Configures SCMP to make the SCMP peer device verify that
each subscriber is provisioned for only one SCE platform.
scmp subscriber id append-to-guid Defines the subscriber ID structure for subscribers provisioned
through the SCMP interface.
scmp subscriber send-session-start Configures SCMP to make the SCMP peer device push sessions
to the Cisco SCE platform immediately when the session is
created on the peer device.
no subscriber
Removes a specified subscriber from the system.
show scmp
Displays the SCMP (ISG) general configuration and status.
Cisco SCE 8000 CLI Command Reference
2-354
Chapter 2
CLI Command Reference
scmp keepalive-interval
scmp keepalive-interval
Defines the interval between keepalive messages to the SCMP peer device.
scmp keepalive-interval [interval]
Syntax Description
interval
Command Default
The default interval is 5 seconds.
Command Modes
Global configuration
Command History
This table includes the following release-specific history entries:
Usage Guidelines
Interval between keepalive messages from the Cisco SCE platform to the
SCMP peer device.
Release
Modification
3.0.3
This command was introduced.
The Cisco SCE platform sends keepalive messages to all connected SCMP peer devices at the defined
interval.
•
If a response is received within the defined interval, the keepalive time stamp is updated.
•
If a response is not received within the defined interval, the connection is assumed to be down. The
connection state is changed to not-connected, and the SCMP begins attempts to reconnect.
Authorization: admin
Examples
The following example shows how to define the SCMP keepalive message interval:
SCE8000>enable 10
Password:<cisco>
SCE8000#configure
SCE8000(config)#scmp keepalive-interval 10
SCE8000(config)#
Related Commands
Command
Description
show scmp
Displays the SCMP (ISG) general configuration and status.
Cisco SCE 8000 CLI Command Reference
2-355
Chapter 2
CLI Command Reference
scmp loss-of-sync-timeout
scmp loss-of-sync-timeout
Defines the loss-of-sync timeout interval, which is the amount of time between loss of connection
between the Cisco SCE platform and an SCMP peer device and the loss-of-sync event.
scmp loss-of-sync-timeout [interval]
Syntax Description
interval
Command Default
The default interval is 90 seconds.
Command Modes
Global configuration
Command History
This table includes the following release-specific history entries:
Usage Guidelines
Loss-of-sync timeout interval in seconds.
Release
Modification
3.0.3
This command was introduced.
If the connection between an SCE platform and an SCMP peer device fails, a timer starts. If the
connection exceeds the configured loss-of-sync timeout interval, the connection is assumed to be
not-in-sync. In this case, a loss-of-sync event occurs, and the system performs the following actions:
•
Sets the connection status to not-in-sync
•
Removes all messages from the SCMP buffers
•
Removes all subscribers associated with the SCMP peer device
Authorization: admin
Examples
The following example shows how to define the loss-of-sync timeout interval:
SCE8000>enable 10
Password:<cisco>
SCE8000#config
SCE8000(config)# scmp loss-of-sync-timeout 120
SCE8000(config)#
Related Commands
Command
Description
show scmp
Displays the SCMP (ISG) general configuration and status.
scmp reconnect-interval
Defines the SCMP reconnect interval.
Cisco SCE 8000 CLI Command Reference
2-356
Chapter 2
CLI Command Reference
scmp name
scmp name
Adds an SCMP peer device.
To delete the specified SCMP peer device, use the no form of this command.
scmp name name radius hostname secret secret [auth-port [auth-port]] [acct-port [acct-port] ]
no scmp name name
Syntax Description
Command Default
name
Name of the SCMP peer device.
hostname
IP address or name of the RADIUS host.
secret
RADIUS shared secret.
auth-port
Authentication port number.
acct-port
Accounting port number.
The default port configuration is as specified in RFC 2865 and RFC 2866.
The default authentication port is 1812.
The default accounting port is 1813.
Command Modes
Global configuration
Command History
This table includes the following release-specific history entries:
Usage Guidelines
Release
Modification
3.0.3
This command was introduced.
After defining an SCMP peer device, you must associate it with one or more unmapped anonymous
groups (see subscriber anonymous-group name scmp name). This association provides the ability to
query the SCMP peer regarding unmapped IP addresses if the Cisco SCE platform is not updated when
the subscriber session has started (see scmp subscriber send-session-start) or in recovery scenarios.
You cannot delete an SCMP device that has anonymous groups assigned to it. Use the no subscriber
anonymous-group name scmp name command to remove all associated anonymous groups before
deleting the device.
Authorization: admin
Examples
The following example shows how to define an SCMP peer device:
SCE8000>enable 10
Password:<cisco>
SCE8000#config
SCE8000(config)# scmp name peer_device1 radius radius1 secret abcdef
SCE8000(config)#
Cisco SCE 8000 CLI Command Reference
2-357
Chapter 2
CLI Command Reference
scmp name
Related Commands
Command
Description
subscriber anonymous-group name ip-range scmp name Assigns an anonymous group to a
specified range of IP addresses and to an
SCMP device.
no subscriber
Removes a specified subscriber from the
system.
ip radius-client retry limit
Configures the parameters for
retransmitting unacknowledged
RADIUS client messages.
show scmp
Displays the SCMP (ISG) general
configuration and status.
Cisco SCE 8000 CLI Command Reference
2-358
Chapter 2
CLI Command Reference
scmp reconnect-interval
scmp reconnect-interval
Defines the SCMP reconnect interval, which is the amount of time between attempts by the Cisco SCE
platform to reconnect with an SCMP peer.
scmp reconnect-interval [interval]
Syntax Description
interval
Command Default
The default interval is 30 seconds.
Command Modes
Global configuration
Command History
This table includes the following release-specific history entries:
Usage Guidelines
Interval between attempts by the Cisco SCE platform to reconnect with an
SCMP peer, in seconds.
Release
Modification
3.0.3
This command was introduced.
The Cisco SCE platform attempts to reconnect to the SCMP peer device at the defined intervals by
sending an establish-peering-request message. If a valid reply is received, the SCMP connection state
for the SCMP peer is changed, and the SCMP performs the required reconnection operations. These
operations include:
•
Requerying the peer regarding all subscribers provisioned by this device
•
Querying the peer regarding all anonymous subscribers created using the anonymous group assigned
to this peer
Authorization: admin
Examples
The following example shows how to define the SCMP reconnect interval:
SCE8000>enable 10
Password:<cisco>
SCE8000#configure
SCE8000(config)#scmp reconnect-interval 60
SCE8000(config)#>
Related Commands
Command
Description
show scmp
Displays the SCMP (ISG) general configuration and status.
scmp loss-of-sync-timeout
Defines the loss of sync timeout interval.
Cisco SCE 8000 CLI Command Reference
2-359
Chapter 2
CLI Command Reference
scmp subscriber force-single-sce
scmp subscriber force-single-sce
Configures SCMP to make the SCMP peer device verify that each subscriber is provisioned for only one
SCE platform. This configuration must be enabled in MGSCP deployments.
To disable verifying that each subscriber is provisioned for only one SCE platform, use the no form of
this command.
scmp subscriber force-single-sce
no scmp subscriber force-single-sce
Syntax Description
This command has no arguments or keywords.
Command Default
Subscriber verification is disabled.
Command Modes
Global configuration
Command History
This table includes the following release-specific history entries:
Usage Guidelines
Release
Modification
3.0.3
This command was introduced.
This command takes effect only if it is set before the connection with the SCMP peers is established. If
active connections exist, use the no scmp and scmp commands to stop and then restart SCMP.
Authorization: admin
Examples
The following example shows how to use this command:
SCE8000>enable 10
Password:<cisco>
SCE8000#config
SCE8000(config)#scmp subscriber force-single-sce
SCE8000(config)#
Related Commands
Command
Description
show scmp
Displays the SCMP (ISG) general configuration and status.
scmp
Enables the Service Control Management Protocol functionality.
Cisco SCE 8000 CLI Command Reference
2-360
Chapter 2
CLI Command Reference
scmp subscriber id append-to-guid
scmp subscriber id append-to-guid
Defines the subscriber ID structure for subscribers provisioned through the SCMP interface.
To clear the subscriber ID structure setting, use the no form of this command.
scmp subscriber id append-to-guid radius-attributes {calling-station-id | nas-port-id |
user-name} [calling-station-id | nas-port-id | user-name] [calling-station-id | nas-port-id |
user-name]
no scmp subscriber id append-to-guid
Syntax Description
radius-attributes
Command Default
All settings are cleared.
Command Modes
Global configuration
Command History
This table includes the following release-specific history entries:
Usage Guidelines
Sets the subscriber ID structure. Choose one or more of the following
options: calling-station-id, nas-port-id, or user-name.
Release
Modification
3.0.3
This command was introduced.
The GUID is a global unique ID assigned to each subscriber session by the SCMP peer device.
You can define the structure of the subscriber ID with this command by specifying which of the
following RADIUS attributes to include and in which order:
•
Calling station ID
•
NAS port
•
Username
The GUID is always appended at the end of the subscriber ID as defined by this command.
The no form of the command clears the subscriber ID structure setting, resulting in no other elements
being used with the GUID to form the subscriber ID.
You must disable the SCMP interface before executing this command. (Use the no scmp command.)
Authorization: admin
Examples
The following example shows how to use this command:
SCE8000>enable 10
Password:<cisco>
SCE8000#config
SCE8000(config)#no scmp
Cisco SCE 8000 CLI Command Reference
2-361
Chapter 2
CLI Command Reference
scmp subscriber id append-to-guid
SCE8000(config)#scmp subscriber id append-to-guid radius-attributes user-name
calling-station-id nas-port-id
SCE8000(config)#scmp
SCE8000(config)#
Related Commands
Command
Description
show scmp
Displays the SCMP (ISG) general configuration and status.
scmp
Enables the Service Control Management Protocol functionality.
Cisco SCE 8000 CLI Command Reference
2-362
Chapter 2
CLI Command Reference
scmp subscriber send-session-start
scmp subscriber send-session-start
Configures SCMP to make the SCMP peer device push sessions to the Cisco SCE platform immediately
when the session is created on the peer device. This feature must be disabled in MGSCP deployments.
To disable pushing of sessions from the SCMP peer device to the Cisco SCE platform, use the no form
of this command.
scmp subscriber send-session-start
no scmp subscriber send-session-start
Syntax Description
This command has no arguments or keywords.
Command Default
Session pushing is disabled.
Command Modes
Global configuration
Command History
This table includes the following release-specific history entries:
Usage Guidelines
Release
Modification
3.0.3
This command was introduced.
This command takes effect only if it is set before the connection with the SCMP peers is established. If
active connections exist, use the no scmp and scmp commands to stop and then restart SCMP.
Authorization: admin
Examples
The following example shows how to use this command:
SCE8000>enable 10
Password:<cisco>
SCE8000#config
SCE8000(config)#scmp subscriber send-session-start
SCE8000(config)#
Related Commands
Command
Description
show scmp
Displays the SCMP (ISG) general configuration and status.
Cisco SCE 8000 CLI Command Reference
2-363
Chapter 2
CLI Command Reference
script capture
script capture
Begins the recording of a script. The command tracks all commands entered until the script stop
command is used.
script capture script-filename
Syntax Description
script-filename
Command Default
None
Command Modes
Privileged EXEC
Command History
This table includes the following release-specific history entries:
Usage Guidelines
Name of the output file where the script is stored.
Release
Modification
2.5.7
This command was introduced.
Use this command to capture a sequence of repeated commands into a file for the purpose of executing
the commands again.
Use the script stop command to stop capturing the script.
Authorization: admin
Examples
The following example shows the script capture for script1.txt:
SCE8000>enable 10
Password:<cisco>
SCE8000#script capture script1.txt
SCE8000#cd log
SCE8000#cd..
SCE8000#pwd
SCE8000#script stop
Related Commands
Command
Description
script stop
Stops script capture.
Cisco SCE 8000 CLI Command Reference
2-364
Chapter 2
CLI Command Reference
script print
script print
Displays a script file.
script print script-filename
Syntax Description
script-filename
Command Default
None
Command Modes
Privileged EXEC
Command History
This table includes the following release-specific history entries:
Usage Guidelines
Examples
Name of the file containing the script.
Release
Modification
2.5.7
This command was introduced.
Authorization: admin
The following example shows how to print the commands captured in script1.txt:
SCE8000>enable 10
Password:<cisco>
SCE8000#script print script1.txt cd log
cd..
pwd
script stop
SCE8000#
Related Commands
Command
Description
script capture
Begins the recording of a script.
script run
Runs a script.
Cisco SCE 8000 CLI Command Reference
2-365
Chapter 2
CLI Command Reference
script run
script run
Runs a script. The script may be created using the script capture command or it may be created as a text
file containing the appropriate commands.
script run script-filename [halt]
Syntax Description
script-filename
Name of the file containing the script.
halt
Breaks the script on errors.
Command Default
None
Command Modes
Privileged EXEC
Command History
This table includes the following release-specific history entries:
Usage Guidelines
Release
Modification
2.5.7
This command was introduced.
Use this command to run a script that you have previously created using the script capture command.
Authorization: admin
Examples
The following example shows how to run the script named monitor.txt, which contains commands to
enable the generation of the real-time subscriber usage RDRs for the specified subscribers.
The file contains the following command lines:
configure
interface linecard 0
subscriber name Leonardo property name monitor value 1
subscriber name Raphael property name monitor value 1
subscriber name Donatello property name monitor value 1
subscriber name Michelangelo property name monitor value 1
The following example shows how to run the script:
SCE8000>enable 10
Password:<cisco>
SCE8000#script run monitor.txt
SCE8000#configure
SCE8000(config)#interface linecard
SCE8000(config if)#subscriber name
SCE8000(config if)#subscriber name
SCE8000(config if)#subscriber name
SCE8000(config if)#subscriber name
SCE8000(config if)#
Cisco SCE 8000 CLI Command Reference
2-366
0
Leonardo property name monitor value 1
Raphael property name monitor value 1
Donatello property name monitor value 1
Michelangelo property name monitor value 1
Chapter 2
CLI Command Reference
script run
Related Commands
Command
Description
script capture
Begins the recording of a script.
script print
Displays a script file.
Cisco SCE 8000 CLI Command Reference
2-367
Chapter 2
CLI Command Reference
script stop
script stop
Stops script capture. Used with the script capture command, it marks the end of a script being recorded.
script stop
Syntax Description
This command has no arguments or keywords.
Command Default
None
Command Modes
Privileged EXEC
Command History
This table includes the following release-specific history entries:
Release
Modification
2.5.7
This command was introduced.
Usage Guidelines
Authorization: admin
Examples
The following example shows how to stop capturing a script:
SCE8000>enable 10
Password:<cisco>
SCE8000#script capture script1.txt
SCE8000#cd log
SCE8000#cd..
SCE8000#pwd
SCE8000#script stop
SCE8000#
Related Commands
Command
Description
script capture
Begins the recording of a script.
Cisco SCE 8000 CLI Command Reference
2-368
Chapter 2
CLI Command Reference
service-bandwidth-prioritization-mode
service-bandwidth-prioritization-mode
Defines the service bandwidth prioritization mode.
service-bandwidth-prioritization-mode [mode]
Syntax Description
mode
Command Default
The default mode is subscriber-internal.
Command Modes
Interface Linecard Configuration
Command History
This table includes the following release-specific history entries:
Usage Guidelines
Choose global or subscriber-internal. See Usage Guidelines for more
information.
Release
Modification
3.0.5
This command was introduced.
This command configures how bandwidth controllers compete for bandwidth by specifying which
assurance level (AL) value is used when allocating bandwidth between bandwidth controllers. The
global controller AL can be taken from either of the following modes:
•
global prioritization mode—Taken from current bandwidth controller Assurance Level.
•
subscriber-internal prioritization mode—For each bandwidth controller, taken from the Primary
BWC Relative Priority (the party or “total” bandwidth-controller Relative-Priority value).
Authorization: admin
Examples
The following example shows how to use this command:
SCE8000>enable 10
Password:<cisco>
SCE8000#configure
SCE8000(config)#interface linecard 0
SCE8000(config if)#service-bandwidth-prioritization-mode global
SCE8000(config if)#
Related Commands
Command
Description
show interface linecard service-bandwidth-prioritization-mode
Displays the currently
configured service bandwidth
prioritzation mode.
Cisco SCE 8000 CLI Command Reference
2-369
Chapter 2
CLI Command Reference
service password-encryption
service password-encryption
Enables password encryption so that the password remains secret when the configuration file is
displayed.
To disable password encryption, use the no form of this command.
service password-encryption
no service password-encryption
Syntax Description
This command has no arguments or keywords.
Command Default
Password encryption is disabled.
Command Modes
Global configuration
Command History
This table includes the following release-specific history entries:
Usage Guidelines
Release
Modification
2.5.7
This command was introduced.
Passwords that were configured in an encrypted format are not deciphered when password encryption is
disabled.
Authorization: admin
Examples
The following example shows the effect of enabling password encryption:
SCE8000>enable 10
Password:<cisco>
SCE8000#config
SCE8000(config)#enable password abcd
SCE8000(config)#do more running-config
#This is a general configuration file (running-config).
#Created on 10:20:57 ISR TUE July 3 2001
…
enable password level 10 0 “abcd”
…
SCE8000(config)#service password-encryption
SCE8000(config)#do more running-config
#This is a general configuration file (running-config).
#Created on 10:21:12 ISR TUE July 3 2001
…
service password-encryption
enable password level 10 0 “e2fc714c4727ee9395f324cd2e7f331f”
…
SCE8000(config)#
Cisco SCE 8000 CLI Command Reference
2-370
Chapter 2
CLI Command Reference
service password-encryption
Related Commands
Command
Description
enable password
Configures a password for the specified authorization level.
Cisco SCE 8000 CLI Command Reference
2-371
Chapter 2
CLI Command Reference
service rdr-formatter
service rdr-formatter
Enables or disables the RDR formatter. The RDR formatter is the element that formats the event reports
produced by the line card and sends them to an external data collector.
To disable the RDR formatter, use the no form of this command.
service rdr-formatter
no service rdr-formatter
Syntax Description
This command has no arguments or keywords.
Command Default
The RDR formatter is enabled.
Command Modes
Global configuration
Command History
This table includes the following release-specific history entries:
Release
Modification
2.5.7
This command was introduced.
Usage Guidelines
Authorization: admin
Examples
The following example shows how to enable the RDR formatter:
SCE8000>enable 10
Password:<cisco>
SCE8000#config
SCE8000(config)#service rdr-formatter
SCE8000(config)#
The following example shows how to disable the RDR formatter:
SCE8000>enable 10
Password:<cisco>
SCE8000#config
SCE8000(config)#no service rdr-formatter
SCE8000(config)#
Related Commands
Command
Description
show rdr-formatter enabled
Displays the RDR formatter status (enabled or disabled).
rdr-formatter category-number
Assigns a meaningful name to a category.
rdr-formatter destination
Configures an RDRv1 or NetFlow destination.
Cisco SCE 8000 CLI Command Reference
2-372
Chapter 2
CLI Command Reference
service telnetd
service telnetd
Enables the Telnet daemon.
To disable the daemon, which prevents new users from accessing the Cisco SCE platform through Telnet,
use the no form of this command.
service telnetd
no service telnetd
Syntax Description
This command has no arguments or keywords.
Command Default
The Telnet daemon is enabled.
Command Modes
Global configuration
Command History
This table includes the following release-specific history entries:
Release
Modification
2.5.7
This command was introduced.
Usage Guidelines
Authorization: admin
Examples
The following example shows how to enable the Telnet daemon:
SCE8000>enable 10
Password:<cisco>
SCE8000#config
SCE8000(config)#service telnetd
SCE8000(config)#
The following example shows how to disable the Telnet daemon:
SCE8000>enable 10
Password:<cisco>
SCE8000#config
SCE8000(config)#no service telnetd
SCE8000(config)#
Related Commands
Command
Description
show telnet status
Displays the status of the Telnet server domain.
telnet
Starts a Telnet session.
Cisco SCE 8000 CLI Command Reference
2-373
Chapter 2
CLI Command Reference
service timestamps
service timestamps
Configures the time stamp on the messages on the syslog server.
To reset the timestamp format to the default (uptime), use the no form of this command.
service timestamps log (uptime | (datetime [msec] [localtime] [show-timezone] [year]))
no service timestamps log
Syntax Description
uptime
Time stamp shows the time since the system was last rebooted. For example
"4w6d" (time since last reboot is 4 weeks and 6 days).
This is the default time-stamp format.
The format for uptime varies depending on how much time has elapsed:
datetime
•
HHHH:MM:SS (HHHH hours: MM minutes: SS seconds) for the first
24 hours.
•
DdHHh (D days HH hours) after the first day.
•
WwDd (W weeks D days) after the first week.
Time stamp shows the date and time.
•
The time-stamp format for datetime is MMM DD HH:MM:SS, where
MMM is the month, DD is the date, HH is the hour (in 24-hour
notation), MM is the minute, and SS is the second.
•
If the datetime keyword is specified, you can optionally add the msec,
localtime, show-timezone, or year keywords.
Note
The optional msec, localtime, show-timezone, and year keywords,
if present, must be in the order shown in the command syntax. All
keywords up to the last specified keyword must be present.
– Incorrect: service timestamps log datetime msec year
– Correct: service timestamps log datetime msec localtime
show-timezone year
•
msec
(Optional) Include milliseconds in the date-time format, in the format
HH:DD:MM:SS.mmm, where .mmm is milliseconds
localtime
(Optional) Time stamp relative to the local time zone.
Note
Command Default
If the localtime keyword option is not used (or if the local time zone
has not been configured), time will be displayed in Coordinated
Universal Time (UTC).
show-timezone
(Optional) Include the time zone name in the date-time format.
year
(Optional) Include the year in the date-time format.
Default time stamp format is uptime.
Cisco SCE 8000 CLI Command Reference
2-374
If the service timestamps datetime command is used without
additional keywords, time stamps will be shown using UTC, without
the year, without milliseconds, and without a time zone name.
Chapter 2
CLI Command Reference
service timestamps
Command Modes
Global configuration
Command History
This table includes the following release-specific history entries:
Usage Guidelines
Release
Modification
3.6.x
This command was introduced.
If the service timestamps command is specified with no arguments or keywords, the default is service
timestamps log uptime.
•
The uptime form of the command adds time stamps (such as "2w3d") that indicate the time since
the system was rebooted.
•
The datetime form of the command adds time stamps (such as "Sep 5 2002 07:28:20") that indicate
the date and time according to the system clock.
•
The year and the timezone can be displayed only for the localtime option.
The time stamp will be preceded by an asterisk or period if the time is potentially inaccurate.
Authorization: admin
Examples
The following example shows how to configure datetime time stamps with msec and the year.
SCE8000>enable 10
Password:<cisco>
SCE8000#config
SCE8000(config)#service
SCE8000(config)#
Related Commands
timestamps log datetime msec localtime show-timezone year
Command
Description
logging on
Configures the syslog host.
Cisco SCE 8000 CLI Command Reference
2-375
Chapter 2
show access-lists
show access-lists
Displays all access lists or a specific access list.
show access-lists [number]
Syntax Description
number
Command Default
The default access list number is 1.
Command Modes
Privileged EXEC
Command History
This table includes the following release-specific history entries:
Number of the access list to show
Release
Modification
2.5.7
This command was introduced.
Usage Guidelines
Authorization: admin
Examples
The following example shows how to display the configuration of access list 5:
SCE8000>enable 5
Password:<cisco>
SCE8000#show access-lists 5
Standard IP access list 5
Permit 10.1.1.0, wildcard bits 0.0.0.255
deny any
SCE8000#
Related Commands
Command
Description
access-list
Adds an entry to the bottom of the specified access list.
Cisco SCE 8000 CLI Command Reference
2-376
CLI Command Reference
Chapter 2
CLI Command Reference
show applications slot lookup Double-Wildcard
show applications slot lookup Double-Wildcard
To display the all double star entry in the LUT, use the show applications slot lookup Double-Wildcard
command in global configuration mode.
show applications slot slot-number lookup lookup-name Double-Wildcard
Syntax Description
slot-number
Number of the identified slot. Enter a value of 0.
lookup-name
Defines the name of the lookup.
Double-Wildcard
Displays the all Double star entry in the LUT.
Command Default
None
Command Modes
Global configuration
Command History
This table includes the following release-specific history entries:
Release
Modification
4.2.0
This command was introduced.
Usage Guidelines
Authorization:
Examples
The following example shows how to display the status of all the configured tunables:
SCE8000#>show applications slot 0 lookup GT_LUT_HTTP_URLs Double-Wildcard
Table keys and values:
key = *.rapidshare.*:/cgi-bin/upload*:*:*
value = 2
key = *facebook.*:*:*:*
value = 24
key = *.rapidshare.com:*files:*:*
value = 2
key = *.divshare.com:*cgi-bin/upload.cgi:*:sid=*
value = 57
MaxKeyLength
= 42
AvgKeyLength
= 28
Number of Keys = 3
Cisco SCE 8000 CLI Command Reference
2-377
Chapter 2
CLI Command Reference
show applications slot tunable
show applications slot tunable
To display the status of a tunable in the Cisco SCE platform, use the show applications slot tunable
command in global configuration mode.
show applications slot slot-number {tunable tunable-name | all-tunables}
Syntax Description
slot-number
Number of the identified slot. Enter a value of 0.
tunable-name
Defines the name of the tunable.
all-tunables
Displays the status of all the tunables.
Command Default
None
Command Modes
Global configuration
Command History
This table includes the following release-specific history entries:
Release
Modification
3.7.x
This command was introduced.
Usage Guidelines
The authorization used is root.
Examples
The following example shows how to display the status of all the configured tunables:
SCE8000>enable 15
Password:<cisco>
SCE8000#>show applications slot 0 all-tunables
GT_COOKIE_EMPTY_VALUE=""
GT_HTTP_FLAVOR_COOKIE_PRESENTED=FALSE
GT_Redirect_enablePackageID=TRUE
GT_MAX_COOKIE_LENGTH=100
SCE8000#>
The following example shows how to display the status of a specific tunable:
SCE8000>enable 15
Password:<cisco>
SCE8000#>show applications
tunable-name=TRUE
SCE8000#>
Cisco SCE 8000 CLI Command Reference
2-378
slot 0 tunable tunable-name
Chapter 2
CLI Command Reference
show applications slot tunable
Related Commands
Command
Description
tunable tunable-name
value value
To enable and disable a tunable and set a value for a tunable in the Cisco
SCE platform.
Cisco SCE 8000 CLI Command Reference
2-379
Chapter 2
CLI Command Reference
show blink
show blink
Displays the blinking status of a slot. A slot blinks after it receives a blink command.
show blink slot slot-number
Syntax Description
slot-number
Command Default
None
Command Modes
User EXEC
Command History
This table includes the following release-specific history entries:
Usage Guidelines
Examples
Number of the identified slot. Enter a value of 0.
Release
Modification
2.5.7
This command was introduced.
Authorization: viewer
The following example shows the blink status of slot 0:
SCE8000>enable 5
Password:<cisco>
SCE8000>show blink slot 0
Slot 0 blink status: off
SCE8000>
Related Commands
Command
Description
blink
Blinks a slot LED for visual identification.
Cisco SCE 8000 CLI Command Reference
2-380
Chapter 2
CLI Command Reference
show calendar
show calendar
Displays the time maintained by the real-time system calendar clock.
show calendar
Syntax Description
This command has no arguments or keywords.
Command Default
None
Command Modes
User EXEC
Command History
This table includes the following release-specific history entries:
Release
Modification
2.5.7
This command was introduced.
Usage Guidelines
Authorization: viewer
Examples
The following example shows how to display the current system calendar:
SCE8000>enable 5
Password:<cisco>
SCE8000>show calendar
12:50:03 GMT MON November 13 2005
SCE8000>
Related Commands
Command
Description
calendar set
Sets the system calendar.
Cisco SCE 8000 CLI Command Reference
2-381
Chapter 2
CLI Command Reference
show cdp
show cdp
Displays the following Cisco Discovery Protocol (CDP) information:
•
interval between transmissions of CDP advertisements (transmission timer)
•
the number of seconds the CDP advertisement is valid for a given port (hold time)
•
the version of the advertisement
•
CDP mode
show cdp
Syntax Description
This command has no arguments or keywords.
Command Default
None
Command Modes
User EXEC
Command History
This table includes the following release-specific history entries:
Release
Modification
3.6.x
This command was introduced.
Usage Guidelines
Authorization: viewer
Examples
The following example illustrates sample output from this command.
SCE8000>enable 5
Password:<cisco>
SCE8000>show cdp
Global CDP information:
Sending CDP packets every 60 seconds
Sending a holdtime value of 180 seconds
Sending CDPv2 advertisements is enabled
standard mode - CDP packets are received and processed. CDP packets are generated.
SCE8000>
Related Commands
Command
Description
show cdp entry
Displays information about a specific neighboring device discovered using
CDP.
show cdp neighbors
Displays information that was discovered regarding the neighboring devices.
show cdp traffic
Displays information about traffic between devices gathered using CDP
Cisco SCE 8000 CLI Command Reference
2-382
Chapter 2
CLI Command Reference
show cdp entry
show cdp entry
Displays information about a specific neighboring device discovered using Cisco Discovery Protocol
(CDP).
show cdp entry {* | device-name[*] [protocol | version]}
Syntax Description
*
Displays all of the CDP neighbors.
device-name
Name of the neighbor about which you want information.
device-name*
You can enter an asterisk (*) at the end of an device-name as a wildcard. For
example, entering show cdp entry dev* will match all entries which begin
with dev.
protocol
(Optional) Limits the display to information about the protocols enabled on
a router.
version
(Optional) Limits the display to information about the version of software
running on the router.
Command Default
None
Command Modes
User EXEC
Command History
This table includes the following release-specific history entries:
Release
Modification
3.6.x
This command was introduced.
Usage Guidelines
Table 2-10
show cdp entry Field Description
Field
Definition
Device ID
The name of the neighbor device and either the MAC address or
the serial number of this device.
Entry address(es)
A list of network addresses of neighbor devices.
[Network protocol] address
The IP v4 address of the neighbor device.
Platform
The product number of the device.
Cisco SCE 8000 CLI Command Reference
2-383
Chapter 2
CLI Command Reference
show cdp entry
Table 2-10
show cdp entry Field Description
Field
Definition
Capability (Capability Codes)
Capability (type of routing device) of the neighboring device.
Note
The capability of the Cisco
SCE 8000 is ‘r’ (Repeater),
since it is installed as a
bump-in-the-wire device.
The capability types that can be discovered are:
R—Router
T—Transparent bridge
B—Source-routing bridge
S—Switch
H—Host
I— Device is using IGMP
r—Repeater
Interface
The protocol being used by the connectivity media.
Port ID
The protocol and port number of the device.
Holdtime
The remaining amount of time (in seconds) the current device
will hold the CDP advertisement from a sending router before
discarding it.
Version
The software version running on the neighbor device.
Authorization: viewer
Examples
The following examples illustrate how to use this command.
Example 1
The following is sample output from the show cdp entry command with no limits. Information about
the neighbor device.cisco.com is displayed, including device ID, address and protocol, platform,
interface, hold time, and version.
SCE8000> enable 5
Password:<cisco>
SCE8000> show cdp entry device.cisco.com
------------------------Device ID: device.cisco.com
Entry address(es):
IP address: 192.168.68.18
Platform: cisco 4500, Capabilities: Router
Interface: Ethernet0/1, Port ID (outgoing port): Ethernet0
Holdtime : 125 sec
Version :
Cisco IOS Software
Cisco IOS (tm) 4500 Software (C4500-J-M), Version 12.1(2)
Copyright (c) 1986-2000 by cisco Systems, Inc.
Compiled Mon 07-Apr-00 19:51 by joeuser
Example 2
The following is sample output from the show cdp entry protocol command. Only information about
the protocols enabled on device.cisco.com is displayed.
Cisco SCE 8000 CLI Command Reference
2-384
Chapter 2
CLI Command Reference
show cdp entry
SCE8000>enable 5
Password:<cisco>
SCE8000>show cdp entry device.cisco.com protocol
Protocol information for device.cisco.com:
IP address: 192.168.68.18
Example 3
The following is sample output from the show cdp entry version command. Only information about the
version of software running on device.cisco.com is displayed.
SCE8000>enable 5
Password:<cisco>
SCE8000>show cdp entry device.cisco.com version
Version information for device.cisco.com:
Cisco IOS Software
Cisco IOS (tm) 4500 Software (C4500-J-M), Version 12.1(2)
Copyright (c) 1986-2000 by cisco Systems, Inc.
Compiled Mon 07-Apr-00 19:51 by joeuser
Related Commands
Command
Description
show cdp
Displays the current CDP configuration.
show cdp neighbors
Displays information that was discovered regarding the neighboring devices.
show cdp traffic
Displays information about traffic between devices gathered using CDP
Cisco SCE 8000 CLI Command Reference
2-385
Chapter 2
CLI Command Reference
show cdp neighbors
show cdp neighbors
Displays information that was discovered regarding the neighboring devices.
show cdp neighbors [type number] [detail]
Syntax Description
type
(Optional) Type of the interface connected to the neighbors about which you
want information.
number
(Optional) Number of the interface connected to the neighbors about which
you want information.
detail
(Optional) Displays detailed information about a neighbor (or neighbors).
See the Additional Fields described in Table 2-11.
Command Default
None
Command Modes
User EXEC
Command History
This table includes the following release-specific history entries:
Usage Guidelines
Release
Modification
3.6.x
This command was introduced.
Displays the following information:
•
type of device that was discovered
•
the name of the device
•
the number and type of the local interface (port)
•
the number of seconds the CDP advertisement is valid for the port
•
the device type
•
the device product number
•
the port ID
If you use the detail keyword, the following additional information is displayed for each device:
•
entry address(es)
•
version
•
native VLAN ID
•
the duplex mode
•
the VTP domain name associated with neighbor devices.
Cisco SCE 8000 CLI Command Reference
2-386
Chapter 2
CLI Command Reference
show cdp neighbors
Table 2-11
show cdp neighbors Field Description
Field
Definition
Device ID
The name of the neighbor device and either the MAC address or
the serial number of this device.
Local Intrfce
The protocol being used by the connectivity media.
Holdtme
The remaining amount of time (in seconds) the current device
will hold the CDP advertisement from a sending router before
discarding it.
Capability (Capability Codes)
Capability (type of routing device) of the listed neighboring
device.
The capability types that can be discovered are:
R—Router
T—Transparent bridge
B—Source-routing bridge
S—Switch
H—Host
I— device is using IGMP
r—Repeater
Note
The capability of the Cisco SCE 8000 is ‘r’ (Repeater),
since it is installed as a bump-in-the-wire device.
Platform
The product number of the device.
Port ID
The protocol and port number of the device.
Additional Fields Displayed by the Detail Option
Entry address(es)
A list of network addresses of neighbor devices.
[Network protocol] address
The IP v4 address of the neighbor device.
Version
The software version running on the neighbor device.
Advertisement version
The version of CDP being used for CDP advertisements.
Duplex
The duplex state of connection between the current device and
the neighbor device
Native VLAN
The ID number of the VLAN on the neighbor device
VTP Management Domain
A string that is the name of the collective group of VLANs
associated with the neighbor device.
Authorization: viewer
Examples
Example 1
The following example shows how to display information about the neighboring devices.
SCE8000>enable 5
Password:<cisco>
SCE8000>show cdp neighbors
Cisco SCE 8000 CLI Command Reference
2-387
Chapter 2
CLI Command Reference
show cdp neighbors
Capability Codes: R - Router, T - Trans Bridge, B - Source Route Bridge
S - Switch, H - Host, I - IGMP, r - Repeater, P - Phone
Device ID
Lab-Router
Lab-Router
Lab-Router
Lab-Router
SCE8000>
Local Intrfce
Gig 3/0/0
Gig 3/0/1
Gig 3/0/2
Gig 3/0/3
Holdtme
169
169
169
169
Capability
R S I
R S I
R S I
R S I
Platform Port ID
ME-C6524GSGig 1/5
ME-C6524GSGig 1/6
ME-C6524GSGig 1/7
ME-C6524GSGig 1/8
Example 2
The following example shows how to display detailed information about the neighboring devices.
SCE8000>enable 5
Password:<cisco>
SCE8000>show cdp neighbors detail
------------------------Device ID: Router
Entry address(es):
IP address: 1.1.1.10
Platform: cisco ME-C6524GS-8S, Capabilities: Router Switch IGMP
Interface: GigabitEthernet3/0/0, Port ID (outgoing port): GigabitEthernet1/5
Holdtime : 178 sec
Version :
Cisco Internetwork Operating System Software
IOS (tm) s6523_rp Software (s6523_rp-IPBASE-M), Version 12.2(18)ZU2, RELEASE SOFTWARE
(fc2)
Technical Support: http://www.cisco.com/techsupport
Copyright (c) 1986-2007 by cisco Systems, Inc.
Compiled Tue 30-Jan-07 03:59 by alnguyen
advertisement version: 2
VTP Management Domain: demo
Duplex : full
Related Commands
Command
Description
show cdp
Displays the current CDP configuration.
show cdp entry
Displays information about a specific neighboring device discovered using
CDP.
show cdp traffic
Displays information about traffic between devices gathered using CDP.
Cisco SCE 8000 CLI Command Reference
2-388
Chapter 2
CLI Command Reference
show cdp traffic
show cdp traffic
Displays information about traffic between devices gathered using Cisco Discovery Protocol (CDP).
show cdp traffic
Syntax Description
This command has no arguments or keywords.
Command Default
None
Command Modes
User EXEC
Command History
This table includes the following release-specific history entries:
Release
Modification
2.5.7
This command was introduced.
Usage Guidelines
Table 2-12
show cdp traffic Field Description
Field
Description
Total packets output
Number of CDP advertisements sent by the local device. Note that this value
is the sum of the CDP Version 1 advertisements output and CDP Version 2
advertisements output fields.
Input
Number of CDP advertisements received by the local device. This value is the
sum of the CDP Version 1 advertisements input and CDP Version 2
advertisements input fields.
Hdr syntax
Number of CDP advertisements with bad headers received by the local device.
Chksum error
Number of times the checksum (verifying) operation failed on incoming CDP
advertisements.
Encaps failed
Number of times CDP failed to send advertisements on an interface due to a
failure caused by the bridge port of the local device.
No memory
Number of times the local device did not have enough memory to store the
CDP advertisements in the advertisement cache table when the device was
attempting to assemble advertisement packets for transmission and parse
them when receiving them.
Invalid
Number of invalid CDP advertisements received and sent by the local device.
Fragmented
Number of times fragments or portions of a single CDP advertisement were
received by the local device instead of the complete advertisement.
Cisco SCE 8000 CLI Command Reference
2-389
Chapter 2
CLI Command Reference
show cdp traffic
Table 2-12
show cdp traffic Field Description
Field
Description
CDP version 1
advertisements output
Number of CDP Version 1 advertisements sent by the local device.
Input
Number of CDP Version 1 advertisements received by the local device.
CDP version 2
advertisements output
Number of CDP Version 2 advertisements sent by the local device.
Input
Number of CDP Version 2 advertisements received by the local device.
Authorization: viewer
Examples
The following is sample output from the show cdp traffic command.
SCE8000>enable 5
Password:<cisco>
SCE8000>show cdp traffic
CDP counters:
Total packets output: 543, Input: 333
Hdr syntax: 0, Chksum error: 0, Encaps failed: 0
No memory: 0, Invalid: 0, Fragmented: 0
CDP version 1 advertisements output: 191, Input: 187
CDP version 2 advertisements output: 352, Input: 146
SCE8000>
Related Commands
Command
Description
show cdp
Displays the current CDP configuration.
show cdp entry
Displays information about a specific neighboring device discovered using
CDP.
show cdp neighbors
Displays information that was discovered regarding the neighboring devices.
Cisco SCE 8000 CLI Command Reference
2-390
Chapter 2
CLI Command Reference
show clock
show clock
Displays the time maintained by the system clock.
show clock
Syntax Description
This command has no arguments or keywords.
Command Default
None
Command Modes
User EXEC
Command History
This table includes the following release-specific history entries:
Release
Modification
2.5.7
This command was introduced.
Usage Guidelines
Authorization: viewer
Examples
The following example shows how to display the current system clock:
SCE8000>enable 5
Password:<cisco>
SCE8000>show clock
12:50:03 GMT MON November 13 2005
SCE8000>
Related Commands
Command
Description
clock set
Manually sets the system clock.
Cisco SCE 8000 CLI Command Reference
2-391
Chapter 2
CLI Command Reference
show diameter
show diameter
Displays the current diameter stack state. Use the counters option to display message statistics.
show diameter [counters]
Syntax Description
counters
Command Default
None
Command Modes
User EXEC
Command History
This table includes the following release-specific history entries:
Displays stack message statistics.
Release
Modification
3.6.x
This command was introduced.
Usage Guidelines
Authorization: viewer
Examples
Example 1
The following example shows output from this command.
SCE8000>enable 5
Password:<cisco>
SCE8000>show diameter
Stack State : Down
Host
: 10.10.10.10
Realm
: sce.cisco.com
Tx-Timer : 30
Log Level : OFF
SCE8000>
Example 2
The following example shows output from this command with the counters option.
SCE8000> enable 5
Password: <cisco>
SCE8000> show diameter counters
WDR
WDR
WDA
WDA
CER
CER
CEA
CEA
Sent
Received
Sent
Received
Sent
Received
Sent
Received
:
:
:
:
:
:
:
:
150
182
182
150
3
0
0
3
Cisco SCE 8000 CLI Command Reference
2-392
Chapter 2
CLI Command Reference
show diameter
DPR Sent
DPA Sent
SCE8000>
Related Commands
: 0
: 1
Command
Description
diameter
Starts and stops the diameter stack.
Cisco SCE 8000 CLI Command Reference
2-393
Chapter 2
CLI Command Reference
show diameter forwarding-mode
show diameter forwarding-mode
Displays the forwarding mode table.
show diameter forwarding-mode
Syntax Description
This command has no arguments or keywords.
Command Default
None
Command Modes
User EXEC
Command History
This table includes the following release-specific history entries:
Release
Modification
3.6.x
This command was introduced.
Usage Guidelines
Authorization: viewer
Examples
The following example shows output from this command.
SCE8000>enable 5
Password:<cisco>
SCE8000>show diameter forwarding-mode
---------------------------------------------| Realm
| Application | Scheme
|
-----------------------------------------------| scos.com
| Gx
| Load-Balancing |
---------------------------------------------SCE8000>
Related Commands
Command
Description
show diameter realm
Displays all routing table entries for the specified realm.
Cisco SCE 8000 CLI Command Reference
2-394
Chapter 2
CLI Command Reference
show diameter Gx
show diameter Gx
Displays the current Gx application state and connected peers. Use the counters option to display
message statistics.
show diameter Gx [counters]
Syntax Description
counters
Command Default
None
Command Modes
User EXEC
Command History
This table includes the following release-specific history entries:
Displays Gx message statistics.
Release
Modification
3.6.x
This command was introduced.
4.0.0
Command output updated with new fields.
Usage Guidelines
Authorization: viewer
Examples
Example 1
The following example shows output from this command.
SCE8000> enable 5
Password: <cisco>
SCE8000> show diameter Gx
Gx Application Status
Gx Realm
Gx tx-timer
Gx PCRF-connection-failure-grace-time
Gx fatal-grace-time
Connected
SCE8000>
:
:
:
:
:
Up
scos.com
5
150
300
Example 2
The following example shows output from this command with the counters option.
SCE8000>enable 5
Password:<cisco>
SCE8000> show diameter Gx counters
CCR
CCR
CCR
CCR
CCR
Initial Messages
Initial Messages Sent Failed
Initial Messages Timed Out
Update Messages
Update Messages Timed Out
:
:
:
:
:
8294
0
0
0
0
Cisco SCE 8000 CLI Command Reference
2-395
Chapter 2
show diameter Gx
CCR Update Messages Sent Failed
CCR Terminate Messages
CCR Terminate Messages Timed Out
CCR Terminate Messages Sent Failed
CCA Initial Messages
CCA Initial Messages Error
CCA Update Messages
CCA Terminate Messages
CCA Terminate Messages Error
RAR Received Messages
RAA Sent Messages
RAA Sent Messages Timed Out
RAA Sent Messages Sent Failed
ASR Received Messages
ASA Sent Messages(SUCCESS)
ASA Sent Messages(UNKOWN_SESSIOM_ID)
ASA Sent Messages(UNABLE_TO_COMPLY)
ASA Sent Messages Timed Out
ASA Sent Messages Sent Failed
Login Failed (Pull Response tunable)
Login Failed (Pull Response Failed)
Tunable Update Failed (No Party Name)
Tunable Update Failed (Update Failed)
Radius VSA Update Failed (No Owner)
Radius VSA Update Failed (No Party Info)
Radius VSA Update Failed (Update Failed)
Pull retry ignored
(Wait for CCA)
Last Send Error Code:
Usage Reporting Dumped
Usage Reporting Config error
Usage Reporting Non Existing Sub
Usage Reporting Failed PCIDs
Bad Event-Trigger AVP
Bad Monitoring-Key AVP value
Event-Trigger AVP value not supported
Bad Granted-Service-Unit AVP
Usage-Monitoring-Level AVP value not supported
Handler call failed
Pull Response Rate
Spawn Login Rate
Spawn Logout Rate
CCR Rate
CCA Rate
ASR Rate
ASA Rate
MSG Rate
Total Opened Sessions
Total Closed Sessions
Currently Active Sessions
Sessions Waiting for Retry
SCE8000>
Related Commands
0
0
0
0
8293
0
0
0
0
0
0
0
0
0
0
0
0
0
0
0
0
0
0
0
0
0
0
0
0
0
0
0
0
0
0
0
0
0
246.3
246.4
0.0
246.4
246.3
0.0
0.0
493.2
9642
0
9642
0
Command
Description
diameter Gx
Starts and stops the Gx application.
Cisco SCE 8000 CLI Command Reference
2-396
:
:
:
:
:
:
:
:
:
:
:
:
:
:
:
:
:
:
:
:
:
:
:
:
:
:
:
:
:
:
:
:
:
:
:
:
:
:
:
:
:
:
:
:
:
:
:
:
:
:
CLI Command Reference
Chapter 2
CLI Command Reference
show diameter Gx send-attributes
show diameter Gx send-attributes
Displays the current Gx VSA attributes in send mode.
show diameter Gx send-attributes
Syntax Description
This command has no arguments or keywords.
Command Default
None.
Command Modes
User EXEC.
Usage Guidelines
Authorization: Admin
Command History
This table includes the following release-specific history entries:
Examples
Release
Modification
4.2.0
This command was introduced.
The following example shows output from this command:
SCE8000#enable 10
password: <cisco>
SCE8000#show diameter gx send-attributes
Diameter Gx send attributes: DONT_SEND
Cisco SCE 8000 CLI Command Reference
2-397
Chapter 2
show diameter Gx MIP-support
show diameter Gx MIP-support
Shows the status of multiple IP mappings configuration for a Gx subscriber.
show diameter Gx MIP-support
Syntax Description
This command has no arguments or keywords.
Command Default
None.
Command Modes
User EXEC.
Command History
This table includes the following release-specific history entries:
Examples
Release
Modification
4.1.0
This command was introduced.
SCE8000> enable 10
Password: <cisco>
SCE8000# configure
SCE8000(config)#> diameter Gx MIP-support
SCE8000(config)#> end
SCE8000#> show diameter Gx MIP-support
MIP SUPPORT IS ENABLED
SCE8000#>
Cisco SCE 8000 CLI Command Reference
2-398
CLI Command Reference
Chapter 2
CLI Command Reference
show diameter gx virtual-gi
show diameter gx virtual-gi
Displays the specified VLAN ID to virtual Gi ID mapping.
show diameter gx virtual-gi {vlan-id value | all}
Syntax Description
vlan-id value
VLAN ID to be displayed.
all
Displays all the configured VLAN ID to virtual Gi ID mappings.
Command Default
None
Command Modes
User EXEC
Command History
This table includes the following release-specific history entries:
Release
Modification
3.6.x
This command was introduced.
Usage Guidelines
Authorization: viewer
Examples
The following example shows how to display information for all the existing VLAN ID to virtual Gi ID
mappings:
SCE8000>enable 5
Password:<cisco>
SCE8000>show diameter gx virtual-gi all
Virtual Gi Mapping Table:
--------------------| VLAN
| Mapping |
--------------------|
2
| 3
|
|
5
| 6
|
--------------------SCE8000>
The following example shows how to display information of VLAN ID 2 mapping to virtual Gi ID:
SCE8000>enable 5
Password:<cisco>
SCE8000>show diameter gx virtual-gi vlan-id 2
virtual Gi Mapping for vlanId 2
SCE8000>
=
3
Cisco SCE 8000 CLI Command Reference
2-399
Chapter 2
CLI Command Reference
show diameter gx virtual-gi
Related Commands
Command
Description
subscriber virtual-gi-mode
Enables the virtual Gi mode.
diameter gx virtual-gi vlan-id
Configures the maping of VLAN ID and virtual Gi ID.
Cisco SCE 8000 CLI Command Reference
2-400
Chapter 2
CLI Command Reference
show diameter Gx virtual-gi multi-mapping
show diameter Gx virtual-gi multi-mapping
Shows whether the virtual Gi multi-mapping is enabled on the device.
show diameter Gx virtual-gi multi-mapping
Syntax Description
This command has no arguments or keywords.
Command Default
None.
Command Modes
Global configuration
Command History
This table includes the following release-specific history entries:
Release
Modification
4.1.0
This command was introduced.
Usage Guidelines
Authorization: viewer
Examples
SCE8000# configure
SCE8000(config)#> diameter gx virtual-gi multi-mapping enable
SCE8000(config)#> end
SCE8000#> show diameter gx virtual-gi multi-mapping
Multiple VLAN ID to single VGi ID mapping supported
SCE8000#> configure
SCE8000(config)#> diameter Gx virtual-gi multi-mapping disable
SCE8000(config)#> end
SCE8000#> show diameter gx virtual-gi multi-mapping
Multiple VLAN ID to single VGi ID mapping NOT supported
SCE8000(config)#>
Cisco SCE 8000 CLI Command Reference
2-401
Chapter 2
show diameter Gx login-rate
show diameter Gx login-rate
Displays the maximum Gx login-rate.
show diameter Gx login-rate
Syntax Description
This command has no arguments or keywords.
Command Default
None
Command Modes
User EXEC
Command History
This table includes the following release-specific history entries:
Release
Modification
4.0.x
This command was introduced.
Usage Guidelines
Authorization: viewer
Examples
Example 1
The following example shows output from this command.
SCE8000> enable 5
Password: <cisco>
SCE8000> show diameter Gx login-rate
Gx Max Login Rate : 400
SCE8000>
Example 2
The following example shows output from this command when the Gy is enabled.
SCE8000> enable 5
Password: <cisco>
SCE8000> show diameter Gy
Gy Client Status : Enabled
Gy tx-timer : 5
SCE8000> show diameter Gx login-rate
Gx Max Login Rate(Gy Enabled) : 200
SCE8000> SCE8000(config)#> diameter Gx login-rate 450
Error - Can't set Gx max login rate when Gy is UP
SCE8000>
Cisco SCE 8000 CLI Command Reference
2-402
CLI Command Reference
Chapter 2
CLI Command Reference
show diameter Gx login-rate
Related Commands
Command
Description
diameter Gx login-rate Sets the maximum Gx login rate when only Gx is configured.
Cisco SCE 8000 CLI Command Reference
2-403
Chapter 2
CLI Command Reference
show diameter Gy
show diameter Gy
Displays the current Gy application state and connected peers.
•
Use the counters option to display message statistics.
show diameter Gy [counters]
Syntax Description
counters
Command Default
None
Command Modes
User EXEC
Command History
This table includes the following release-specific history entries:
Displays Gy message statistics.
Release
Modification
3.6.x
This command was introduced.
4.0.0
Command output updated with CCR-I,CCR-T, CCA-I, and CCA-T fields.
Usage Guidelines
Authorization: viewer
Examples
Example 1
The following example shows output from this command.
SCE8000> enable 5
Password: <cisco>
SCE8000> show diameter Gy
Gy Client Status
Gy tx-timer
SCE8000>
: Enabled
: 5
Example 2
The following example shows output from this command with the counters option.
SCE8000> enable 5
Password: <cisco>
SCE8000> show diameter Gy counters
Gy Client Counters:
------------------CCR Initial Sent Messages
CCR Update Sent Messages
CCR Terminate Sent Messages
CCR Intial Messages (Package Switch)
CCR Terminate Messages (Package Switch)
Cisco SCE 8000 CLI Command Reference
2-404
:
:
:
:
:
11497
0
0
0
0
Chapter 2
CLI Command Reference
show diameter Gy
CCR
CCR
CCR
CCR
CCR
CCR
CCR
CCR
CCR
CCR
CCR
CCR
CCR
CCR
CCR
CCR
CCR
CCR
Related Commands
Messages Timed Out
:
Initial Messages Timed Out
:
Update Messages Timed Out
:
Terminate Messages Timed Out
:
Retransmitted Messages
:
Initial Retransmitted Messages
:
Update Retransmitted Messages
:
Terminate Retransmitted Messages
:
Aborted Retransmission Messages
:
Messages Sent To Alt Server
:
Initial Messages Sent To Alt Server :
Update Messages Sent To Alt Server
:
Terminate Messages Sent To Alt Server:
Message Failed on Creation
:
Message Failed on Send
:
Initial Message Failed on Send
:
Update Message Failed on Send
:
Terminate Message Failed on Send
:
0
0
0
0
0
0
0
0
0
0
0
0
0
0
0
0
0
0
CCA Messages Received
CCA Messages Received on Initial
CCA Messages Received on Update
CCA Messages Received on Terminate
CCA Messages No MSCC Handled
Error CCA Messages Received
Error CCA Messages Received on Initial
Error CCA Messages Received on Update
Error CCA Messages Received on Terminate
:
:
:
:
:
:
:
:
:
12704
12704
0
0
0
0
0
0
0
RAR Messages Received
RAA Sent Messages
RAA Messages Failed on Send
: 0
: 0
: 0
Gy Failure Messages
Severe Failures
: 0
: 0
CCR Rate
CCR-I Rate
CCR-T Rate
CCA Rate
CCA-I Rate
CCA-T Rate
:244.8
:244.8
:0.0
:244.6
:245.2
:0.0
Current Opened Sessions
Max Opened Sessions
Number of Active->Standby events
SCE8000>
: 13355
: 13355
: 0
Command
Description
diameter Gy
Starts and stops the Gy application.
Cisco SCE 8000 CLI Command Reference
2-405
Chapter 2
show diameter peer
show diameter peer
Displays the specified peer table entry.
show diameter peer name
Syntax Description
name
Command Default
None
Command Modes
User EXEC
Command History
This table includes the following release-specific history entries:
Name of peer to display.
Release
Modification
3.6.x
This command was introduced.
Usage Guidelines
Authorization: viewer
Examples
The following example shows output from this command.
SCE8000>enable 5
Password:<cisco>
SCE8000>show diameter peer A
Peer Table:
----------------------------------------------------------------------| Name
| Host
| Port
| State |
----------------------------------------------------------------------| A
| 64.103.125.22
| 3868
| Down |
SCE8000>
Related Commands
Command
Description
diameter peer
Adds an entry to the peer table.
show diameter peer-table
Displays the peer table.
Cisco SCE 8000 CLI Command Reference
2-406
CLI Command Reference
Chapter 2
CLI Command Reference
show diameter peer-table
show diameter peer-table
Displays the peer table.
show diameter peer-table
Syntax Description
This command has no arguments or keywords.
Command Default
None
Command Modes
User EXEC
Command History
This table includes the following release-specific history entries:
Release
Modification
3.6.x
This command was introduced.
Usage Guidelines
Authorization: viewer
Examples
The following example shows output from this command.
SCE8000>enable 5
Password:<cisco>
SCE8000>show diameter peer-table
Peer Table:
------------------------------------------------------------| Name
| Host
| Port
| State |
------------------------------------------------------------| SER_GX
| 10.121.64.38
| 3869
| Up
|
| SER_GY
| 10.121.64.46
| 3870
| Up
|
------------------------------------------------------------SCE8000>
Related Commands
Command
Description
show diameter peer
Displays the specified peer table entry.
Cisco SCE 8000 CLI Command Reference
2-407
Chapter 2
show diameter realm
show diameter realm
Displays all routing table entries for the specified realm.
show diameter realm name
Syntax Description
name
Command Default
None
Command Modes
User EXEC
Command History
This table includes the following release-specific history entries:
Name of the realm to display.
Release
Modification
3.6.x
This command was introduced.
Usage Guidelines
Authorization: viewer
Examples
The following example shows output from this command.
SCE8000>enable 5
Password:<cisco>
SCE8000>show diameter realm scos.com
Realm: scos.com
Application: Gx
Servers:
A
B
Scheme Type : Load Balancing
---------------------------Session Sharing: Off
Stickiness
: Off
Server: A
Status : Not Connected
Server: B
SCE8000>
Related Commands
Command
Description
diameter realm
Adds an entry to the routing table.
show diameter routing table
Displays the routing table.
Cisco SCE 8000 CLI Command Reference
2-408
Status : Not Connected
CLI Command Reference
Chapter 2
CLI Command Reference
show diameter routing table
show diameter routing table
Displays the routing table.
show diameter routing table
Syntax Description
This command has no arguments or keywords.
Command Default
None
Command Modes
User EXEC
Command History
This table includes the following release-specific history entries:
Release
Modification
3.6.x
This command was introduced.
Usage Guidelines
Authorization: viewer
Examples
The following example shows output from this command.
SCE8000>enable 5
Password:<cisco>
SCE8000>show diameter routing table
--------------------------------------------------------| Name
| Realm
| Application | Priority |
--------------------------------------------------------| SER_GY
| cisco.com
| Gy
| 0
|
| SER_GX
| cisco.com
| Gx
| 0
|
--------------------------------------------------------SCE8000>
Related Commands
Command
Description
show diameter realm
Displays all routing table entries for the specified realm.
Cisco SCE 8000 CLI Command Reference
2-409
Chapter 2
CLI Command Reference
show environment all
show environment all
Displays information about the Cisco SCE platform environment. The information includes cooling,
power supply units, temperature, and voltage.
show environment all
Syntax Description
This command has no arguments or keywords.
Command Default
None
Command Modes
User EXEC
Command History
This table includes the following release-specific history entries:
Release
Modification
3.5.0
This command was introduced.
Usage Guidelines
Authorization: viewer
Examples
The following example shows how to use this command:
SCE8000>enable 5
Password:<cisco>
SCE8000>show environment all
Environment information:
--------------------Slot 1: SCE8000-SCM-E
--------------------scm[0].smc[0].max1668[0] - temperature device
.
.
TEMPERATURE status:
==========================================================================================
=======================================================
PCB_Upper
local1
29C 29
29.0
29
0.0
-18
-8
60
75
OK
0000:00:00:54 ----------- ----:--:--:-- 0
.
.
.
VOLTAGE status:
.
.
.
FAN status:
CurrStatus : OK fan tray is in non-manual mode (0000:00:00:50)
Cisco SCE 8000 CLI Command Reference
2-410
Chapter 2
CLI Command Reference
show environment all
PrevStatus : <none> (----:--:--:--)
Sts#
: 0 (access=2, fail=0)
.
.
.
PSU status:
CurrStatus : OK (0000:00:00:50)
PrevStatus : <none> (----:--:--:--)
Sts#
: 0 (access=1, fail=0)
.
.
.
Message summary:
INTERNAL status is: {OK}
VOLTAGE status is: {OK, <DISABLED>}
TEMPERATURE status is: {OK}
FAN status is: {OK}
PSU status is: {OK}
SCE8000>
Cisco SCE 8000 CLI Command Reference
2-411
Chapter 2
show environment cooling
show environment cooling
Displays information about the Cisco SCE platform cooling.
show environment cooling
Syntax Description
This command has no arguments or keywords.
Command Default
None
Command Modes
User EXEC
Command History
This table includes the following release-specific history entries:
Release
Modification
3.5.0
This command was introduced.
Usage Guidelines
Authorization: viewer
Examples
The following example shows how to use this command:
SCE8000>enable 5
Password:<cisco>
SCE8000>show environment cooling
Environment Cooling information:
----------SCE8000-FAN
----------fan-tray[0] - cooling device
INTERNAL status:
CurrStatus : OK (0000:00:01:43)
PrevStatus : <none> (----:--:--:--)
Sts#
: 0 (access=7, fail=0)
FAN status:
CurrStatus : OK fan tray is in non-manual mode (0000:00:01:43)
PrevStatus : <none> (----:--:--:--)
Sts#
: 0 (access=4, fail=0)
Status Register
: 0xa4
Control Mode
: HP (High Power)
Test Enable State : Disabled
Led Status
: Green
Fan Status
: OK
Thermistor Status : OK
Speed Level (1-4) : 1
Thermistor Value : 24 Celsius
Sw Version
: 0x10000
Cisco SCE 8000 CLI Command Reference
2-412
CLI Command Reference
Chapter 2
CLI Command Reference
show environment cooling
Message summary:
INTERNAL status is: {OK}
VOLTAGE status is: {OK, <DISABLED>}
TEMPERATURE status is: {OK}
FAN status is: {OK}
PSU status is: {OK}
SCE8000>
Cisco SCE 8000 CLI Command Reference
2-413
Chapter 2
show environment power
show environment power
Displays information about the Cisco SCE platform PSUs (power supply units).
show environment power
Syntax Description
This command has no arguments or keywords.
Command Default
None
Command Modes
User EXEC
Command History
This table includes the following release-specific history entries:
Release
Modification
3.5.0
This command was introduced.
Usage Guidelines
Authorization: viewer
Examples
The following example shows how to use this command:
SCE8000>enable 5
Password:<cisco>
SCE8000>show environment power
Environment Power information:
------------PWR-2700-AC/4
------------psu[0] - power supply device
INTERNAL status:
CurrStatus : OK (0000:00:01:59)
PrevStatus : <none> (----:--:--:--)
Sts#
: 0 (access=4, fail=0)
PSU status:
CurrStatus : OK (0000:00:01:59)
PrevStatus : <none> (----:--:--:--)
Sts#
: 0 (access=4, fail=0)
Message summary:
INTERNAL status is: {OK}
VOLTAGE status is: {OK, <DISABLED>}
TEMPERATURE status is: {OK}
FAN status is: {OK}
PSU status is: {OK}
SCE8000>
Cisco SCE 8000 CLI Command Reference
2-414
CLI Command Reference
Chapter 2
CLI Command Reference
show environment temperature
show environment temperature
Displays information about the temperature of the Cisco SCE platform.
show environment temperature
Syntax Description
This command has no arguments or keywords.
Command Default
None
Command Modes
User EXEC
Command History
This table includes the following release-specific history entries:
Release
Modification
3.5.0
This command was introduced.
Usage Guidelines
Authorization: viewer
Examples
The following example shows how to use this command:
SCE8000>enable 5
Password:<cisco>
SCE8000>show environment temperature
Environment Temperature information:
--------------------Slot 1: SCE8000-SCM-E
--------------------scm[0].smc[0].max1668[0] - temperature device
INTERNAL status:
CurrStatus : OK (0000:00:02:15)
PrevStatus : <none> (----:--:--:--)
Sts#
: 0 (access=35, fail=0)
TEMPERATURE status:
Name
General CurrVal MinVal AvgVal MaxVal DevVal ErrL
WrnL
WrnH
ErrH
CurrStatus dddd:hh:mm:ss PrevStatus dddd:hh:mm:ss Sts#
==========================================================================================
=======================================================
PCB_Upper
local1
29C 29
29.0
29
0.0
-18
-8
60
75
OK
0000:00:02:15 ----------- ----:--:--:-- 0
DPT
sd_1
39C 38
38.7
39
0.5
-8
2
74
89
OK
0000:00:02:15 ----------- ----:--:--:-- 0
CLS
sd_2
33C 32
32.8
33
0.4
-8
2
63
78
OK
0000:00:02:15 ----------- ----:--:--:-- 0
SCE8000>
Cisco SCE 8000 CLI Command Reference
2-415
Chapter 2
CLI Command Reference
show environment voltage
show environment voltage
Displays information about the Cisco SCE platform voltage.
show environment voltage
Syntax Description
This command has no arguments or keywords.
Command Default
None
Command Modes
User EXEC
Command History
This table includes the following release-specific history entries:
Release
Modification
3.5.0
This command was introduced.
Usage Guidelines
Authorization: viewer
Examples
The following example shows how to use this command:
SCE8000>enable 5
Password:<cisco>
SCE8000>show environment voltage
Environment Voltage information:
--------------------Slot 1: SCE8000-SCM-E
--------------------scm[0].smc[0].summit766[0] - voltage device
INTERNAL status:
CurrStatus : OK (0000:00:01:28)
PrevStatus : <none> (----:--:--:--)
Sts#
: 0 (access=23, fail=0)
VOLTAGE status:
Name
General CurrVal MinVal AvgVal MaxVal DevVal
CurrStatus dddd:hh:mm:ss PrevStatus dddd:hh:mm:ss Sts#
ErrL
WrnL
WrnH
ErrH
==========================================================================================
=======================================================
Main_3_3
CH_A
3286mV 3286
3286.0 3286
0.0
3168
3234
3366
3432
OK
0000:00:01:28 ----------- ----:--:--:-- 0
Main_2_5
CH_B
2490mV 2490
2490.0 2490
0.0
2400
2450
2550
2600
OK
0000:00:01:28 ----------- ----:--:--:-- 0
SCE8000>
Cisco SCE 8000 CLI Command Reference
2-416
Chapter 2
CLI Command Reference
show failure-recovery operation-mode
show failure-recovery operation-mode
Displays the operation mode to apply after booting resulted from a failure.
show failure-recovery operation-mode
Syntax Description
This command has no arguments or keywords.
Command Default
None
Command Modes
User EXEC
Command History
This table includes the following release-specific history entries:
Release
Modification
2.5.7
This command was introduced.
Usage Guidelines
Authorization: viewer
Examples
The following example shows how to display the failure recovery operation mode:
SCE8000>enable 5
Password:<cisco>
SCE8000>show failure-recovery operation-mode
System Operation mode on failure recovery is: operational
SCE8000>
Related Commands
Command
Description
failure-recovery operation-mode
Specifies the operation mode to be applied when the system
reboots after a system failure.
Cisco SCE 8000 CLI Command Reference
2-417
Chapter 2
show hostname
show hostname
Displays the currently configured hostname.
show hostname
Syntax Description
This command has no arguments or keywords.
Command Default
None
Command Modes
User EXEC
Command History
This table includes the following release-specific history entries:
Release
Modification
2.5.7
This command was introduced.
Usage Guidelines
Authorization: viewer
Examples
The following example shows how to display the current hostname:
SCE8000>enable 5
Password:<cisco>
SCE8000>show hostname
SCE8000
SCE8000>
Related Commands
Command
Description
hostname
Modifies the name of the Cisco SCE platform.
Cisco SCE 8000 CLI Command Reference
2-418
CLI Command Reference
Chapter 2
CLI Command Reference
show hosts
show hosts
Displays the default domain name, the address of the name server, and the contents of the host table.
show hosts
Syntax Description
This command has no arguments or keywords.
Command Default
None
Command Modes
User EXEC
Command History
This table includes the following release-specific history entries:
Release
Modification
2.5.7
This command was introduced.
Usage Guidelines
Authorization: viewer
Examples
The following example shows how to display the configured domain and hosts:
SCE8000>enable 5
Password:<cisco>
SCE8000>show hosts
Default domain is cisco.com
Name/address lookup uses domain service
Name servers are 10.1.1.60, 10.1.1.61
Host
Address
---------PC85
10.1.1.61
SCE8000>
Related Commands
Command
Description
hostname
Modifies the name of the Cisco SCE platform.
ip domain-name
Defines a default domain name.
ip name-server
Specifies the address of one or more servers to use for name and address
resolution.
Cisco SCE 8000 CLI Command Reference
2-419
Chapter 2
CLI Command Reference
show hw-bypass mode
show hw-bypass mode
To displays the harware bypass mode status of the Cisco SCE platform, use the show hw-bypass mode
command in the privileged EXEC mode.
show hw-bypass mode
Syntax Description
This command has no arguments or keywords.
Command Default
None
Command Modes
Privileged EXEC
Command History
This table includes the following release-specific history entries:
Release
Modification
3.7.x
This command was introduced.
Usage Guidelines
The authorization used is root.
Examples
The following is the sample output for the show hw-bypass mode command:
SCE8000>enable 15
Password:<cisco>
SCE8000#>show hw-bypass mode
hw-bypass mode is enabled
SCE8000(config)#>
Related Commands
Command
Description
hw-bypass mode
Enables the hardware bypass mode of the Cisco SCE platform. It also
allows you to set the hardware bypass state for the specified static parties
when configured in this mode.
Cisco SCE 8000 CLI Command Reference
2-420
Chapter 2
CLI Command Reference
show interface gigabitethernet
show interface gigabitethernet
Displays the details of the GigabitEthernet management interface.
show interface gigabitethernet slot-number/interface-number [counters [direction]]
Syntax Description
slot-number
Number of the identified slot. Enter a value of 1.
interface-number
GigabitEthernet management interface number. Enter a value of 1.
counters
Displays the values of counters of the GigabitEthernet management
interface.
direction
(Optional) Displays only those counters of a specific direction. Choose in
or out.
Command Default
None
Command Modes
User EXEC
Command History
This table includes the following release-specific history entries:
Release
Modification
2.5.7
This command was introduced.
Usage Guidelines
Authorization: viewer
Examples
The following example shows the GigabitEthernet details:
SCE8000>enable 5
Password:<cisco>
SCE8000>show interface gigabitethernet 1/1
SCE8000>
Related Commands
Command
Description
interface gigabitethernet
Enters GigabitEthernet Interface Configuration mode.
Cisco SCE 8000 CLI Command Reference
2-421
Chapter 2
show interface linecard
show interface linecard
Displays information for a specific line card interface.
show interface linecard slot-number
Syntax Description
slot-number
Command Default
None
Command Modes
User EXEC
Command History
This table includes the following release-specific history entries:
Usage Guidelines
Examples
Number of the identified slot. Enter a value of 0.
Release
Modification
2.5.7
This command was introduced.
Authorization: viewer
The following example shows how to use this command:
SCE8000>enable 5
Password:<cisco>
SCE8000>show interface linecard 0
The application assigned to slot 0 is /system/app/eng30102.sli
Silent is off
Configured shutdown is off
Shutdown due to sm-connection-failure is off
Resulting current shutdown state is off
WAP handling is disabled
SCE8000>
Related Commands
Command
Description
interface linecard
Enters Interface Linecard Configuration mode.
Cisco SCE 8000 CLI Command Reference
2-422
CLI Command Reference
Chapter 2
CLI Command Reference
show interface linecard accelerate-packet-drops
show interface linecard accelerate-packet-drops
Displays the currently configured hardware packet drop mode.
show interface linecard slot-number accelerate-packet-drops
Syntax Description
slot-number
Command Default
None
Command Modes
User EXEC
Command History
This table includes the following release-specific history entries:
Number of the identified slot. Enter a value of 0.
Release
Modification
3.0.3
This command was introduced.
Usage Guidelines
Authorization: viewer
Examples
The following example shows how to display the current drop mode:
SCE8000>enable 5
Password:<cisco>
SCE8000>show interface linecard 0 accelerate-packet-drops
Accelerated packet drops mode is enabled
SCE8000>
Related Commands
Command
Description
accelerate-packet-drops
Enables drop-wred-packets-by-hardware mode.
Cisco SCE 8000 CLI Command Reference
2-423
Chapter 2
show interface linecard application
show interface linecard application
Displays the name of the application loaded on the line card interface.
show interface linecard slot-number application
Syntax Description
slot-number
Command Default
None
Command Modes
User EXEC
Command History
This table includes the following release-specific history entries:
Number of the identified slot. Enter a value of 0.
Release
Modification
2.5.7
This command was introduced.
Usage Guidelines
Authorization: viewer
Examples
The following example shows the currently loaded application:
SCE8000>enable 5
Password:<cisco>
SCE8000>show interface linecard 0 application
/system/app/eng30102.sli
SCE8000>
Cisco SCE 8000 CLI Command Reference
2-424
CLI Command Reference
Chapter 2
CLI Command Reference
show interface linecard asymmetric-l2-support
show interface linecard asymmetric-l2-support
Displays the current asymmetric Layer 2 support configuration.
show interface linecard slot-number asymmetric-l2-support
Syntax Description
slot-number
Command Default
None
Command Modes
User EXEC
Command History
This table includes the following release-specific history entries:
Number of the identified slot. Enter a value of 0.
Release
Modification
3.1.6
This command was introduced.
Usage Guidelines
Authorization: viewer
Examples
The following example shows how to use this command:
SCE8000>enable 5
Password:<cisco>
SCE8000>show interface linecard 0 asymmetric-l2-support
Asymmetric layer 2 support is disabled
SCE8000>
Related Commands
Command
Description
asymmetric-l2-support
Configures the system to treat flows as having asymmetric Layer 2
characteristics for the purpose of packet injection.
Cisco SCE 8000 CLI Command Reference
2-425
Chapter 2
CLI Command Reference
show interface linecard asymmetric-routing-topology
show interface linecard asymmetric-routing-topology
Displays information relating to asymmetric routing topology.
show interface linecard slot-number asymmetric-routing-topology
Syntax Description
slot-number
Command Default
None
Command Modes
User EXEC
Command History
This table includes the following release-specific history entries:
Usage Guidelines
Number of the identified slot. Enter a value of 0.
Release
Modification
3.1.0
This command was introduced.
This command displays the following information:
•
Current asymmetric routing topology status.
•
The ratio of TCP unidirectional flows to total TCP flows per traffic processor (TCP unidirectional
flows ratio).
The unidirectional flow ratio is displayed only for TCP flows, and reflects the way the flows were
opened. It is calculated over the period of time since the Cisco SCE platform was last reloaded or
since the counters were last reset.
To reset the asymmetric routing mode counters, use the clear interface linecard
asymmetric-routing-topology counters command.
Note
The Cisco SCE platform identifies unidirectional flows by default and regardless of the asymmetric
routing mode.
Authorization: viewer
Examples
The following example shows how to use this command:
SCE8000>enable 5
Password:<cisco>
SCE8000>show interface linecard 0 asymmetric-routing-topology
Asymmetric Routing Topology mode is disabled
TCP Unidirectional flows ratio statistics:
==========================================
Traffic Processor 1
:
0%
Traffic Processor 2
:
0%
Cisco SCE 8000 CLI Command Reference
2-426
Chapter 2
CLI Command Reference
show interface linecard asymmetric-routing-topology
Traffic
Traffic
Traffic
Traffic
Traffic
Traffic
Traffic
Traffic
Traffic
Traffic
Processor
Processor
Processor
Processor
Processor
Processor
Processor
Processor
Processor
Processor
3
4
5
6
7
8
9
10
11
12
:
:
:
:
:
:
:
:
:
:
0%
0%
0%
0%
0%
0%
0%
0%
0%
0%
Note that the statistics are updated only if the system is configured to work in Enhanced
Open Flow (i.e. following settings are disabled:
Classical Open Flow mode, VAS, TCP no bypass est, etc.).
The statistics are updated once every two minutes
SCE8000>
Cisco SCE 8000 CLI Command Reference
2-427
Chapter 2
CLI Command Reference
show interface linecard attack-detector
show interface linecard attack-detector
Displays the configuration of the specified attack detector.
show interface linecard slot-number attack-detector [default | all]
show interface linecard slot-number attack-detector attack-detector
Syntax Description
slot-number
Number of the identified slot. Enter a value of 0.
default
Displays the default attack detector configuration.
all
Displays the configuration of all existing attack detectors.
attack-detector
Number of the specific attack detector to be displayed.
Command Default
None
Command Modes
User EXEC
Command History
This table includes the following release-specific history entries:
Usage Guidelines
Release
Modification
2.5.7
This command was introduced.
When you specify the all or default keyword, the following information is displayed:
•
Protocol side—Whether the attack detector applies to attacks originating at the subscriber or
network side.
•
Direction—Whether the attack detector applies to single-sided or dual-sided attacks.
•
Action to take if an attack is detected.
•
Thresholds:
– open-flows-rate—Default threshold for the rate of open flows (new open flows per second).
– suspected-flows-rate—Default threshold for the rate of suspected DDoS flows (new suspected
flows per second).
– suspected-flows-ratio—Default threshold for the ratio of suspected flow rate to open flow rate.
•
Subscriber notification—Enabled or disabled.
•
Alarm—Sending an SNMP trap is enabled or disabled.
Authorization: viewer
Cisco SCE 8000 CLI Command Reference
2-428
Chapter 2
CLI Command Reference
show interface linecard attack-detector
Examples
The following examples show the use of the show interface linecard attack-detector command.
Example 1
The following example shows how to display the configuration of attack detector number 3:
SCE8000>enable 5
Password:<cisco>
SCE8000>show interface linecard 0 attack-detector 3
Detector #3:
Comment: 'Sample'
Access-list: 1
Effective only for TCP port(s) 21,23,80
Effective for all UDP ports
Protocol|Side|Direction ||Action| Thresholds |Sub- |Alarm
| | || |Open flows|Ddos-Suspected flows|notif|
| | || |rate |rate |ratio | |
--------|----|-----------||------|----------|------------|-------|-----|----TCP |net.|source-only|| | | | | |
TCP |net.|dest-only || | | | | |
TCP |sub.|source-only|| | | | | |
TCP |sub.|dest-only || | | | | |
TCP |net.|source+dest|| | | | | |
TCP |sub.|source+dest|| | | | | |
TCP+port|net.|source-only||Block | | | | |Yes
TCP+port|net.|dest-only || | | | | |
TCP+port|sub.|source-only||Block | | | | |Yes
TCP+port|sub.|dest-only || | | | | |
TCP+port|net.|source+dest|| | | | | |
TCP+port|sub.|source+dest|| | | | | |
UDP |net.|source-only|| | | | | |
UDP |net.|dest-only || | | | | |
UDP |sub.|source-only|| | | | | |
UDP |sub.|dest-only || | | | | |
UDP |net.|source+dest|| | | | | |
UDP |sub.|source+dest|| | | | | |
UDP+port|net.|source-only|| | | | | |
UDP+port|net.|dest-only || | | | | |
UDP+port|sub.|source-only|| | | | | |
UDP+port|sub.|dest-only || | | | | |
UDP+port|net.|source+dest|| | | | | |
UDP+port|sub.|source+dest|| | | | | |
ICMP |net.|source-only|| | | | | |
ICMP |net.|dest-only || | | | | |
ICMP |sub.|source-only|| | | | |Yes |
ICMP |sub.|dest-only || | | | | |
other |net.|source-only|| | | | | |
other |net.|dest-only || | | | | |
other |sub.|source-only|| | | | | |
other |sub.|dest-only || | | | | |
Empty fields indicate that no value is set and configuration from
the default attack detector is used.
SCE8000>
Example 2
The following example shows how to display the configuration of the default attack detector:
SCE8000>enable 5
Password:<cisco>
SCE8000>show interface linecard 0 attack-detector default
Protocol|Side|Direction ||Action| Thresholds |Sub- |Alarm
| | || |Open flows|Ddos-Suspected Flows|notif|
| | || |rate |rate |ratio | |
Cisco SCE 8000 CLI Command Reference
2-429
Chapter 2
CLI Command Reference
show interface linecard attack-detector
--------|----|-----------||------|----------|------------|-------|-----|----TCP |net.|source-only||Report| 1000| 500|50 |No |No
TCP |net.|dest.-only ||Report| 1000| 500|50 |No |No
TCP |sub.|source-only||Report| 1000| 500|50 |No |No
TCP |sub.|dest.-only ||Report| 1000| 500|50 |No |No
TCP |net.|source+dest||Report| 100| 50|50 |No |No
TCP |sub.|source+dest||Report| 100| 50|50 |No |No
TCP+port|net.|source-only||Report| 1000| 500|50 |No |No
TCP+port|net.|dest.-only ||Report| 1000| 500|50 |No |No
TCP+port|sub.|source-only||Report| 1000| 500|50 |No |No
TCP+port|sub.|dest.-only ||Report| 1000| 500|50 |No |No
TCP+port|net.|source+dest||Report| 100| 50|50 |No |No
TCP+port|sub.|source+dest||Report| 100| 50|50 |No |No
UDP |net.|source-only||Report| 1000| 500|50 |No |No
UDP |net.|dest.-only ||Report| 1000| 500|50 |No |No
UDP |sub.|source-only||Report| 1000| 500|50 |No |No
UDP |sub.|dest.-only ||Report| 1000| 500|50 |No |No
UDP |net.|source+dest||Report| 100| 50|50 |No |No
UDP |sub.|source+dest||Report| 100| 50|50 |No |No
UDP+port|net.|source-only||Report| 1000| 500|50 |No |No
UDP+port|net.|dest.-only ||Report| 1000| 500|50 |No |No
UDP+port|sub.|source-only||Report| 1000| 500|50 |No |No
UDP+port|sub.|dest.-only ||Report| 1000| 500|50 |No |No
UDP+port|net.|source+dest||Report| 100| 50|50 |No |No
UDP+port|sub.|source+dest||Report| 100| 50|50 |No |No
ICMP |net.|source-only||Report| 500| 250|50 |No |No
ICMP |net.|dest.-only ||Report| 500| 250|50 |No |No
ICMP |sub.|source-only||Report| 500| 250|50 |No |No
ICMP |sub.|dest.-only ||Report| 500| 250|50 |No |No
other |net.|source-only||Report| 500| 250|50 |No |No
other |net.|dest.-only ||Report| 500| 250|50 |No |No
other |sub.|source-only||Report| 500| 250|50 |No |No
other |sub.|dest.-only ||Report| 500| 250|50 |No |No
SCE8000>
Related Commands
Command
Description
attack-detector
Enables the specified attack detector and assigns an ACL to it.
attack-detector default
Defines default thresholds and attack-handling action.
attack-detector number
Configures a specifc attack detector for a particular attack type with the
assigned number.
Cisco SCE 8000 CLI Command Reference
2-430
Chapter 2
CLI Command Reference
show interface linecard attack-filter
show interface linecard attack-filter
Displays the attack-filtering configuration.
show interface linecard slot-number attack-filter [option]
Syntax Description
slot-number
Number of the identified slot. Enter a value of 0.
option
See Usage Guidelines for the list of options.
Command Default
None
Command Modes
User EXEC
Command History
This table includes the following release-specific history entries:
Usage Guidelines
Release
Modification
2.5.7
This command was introduced.
The following options may be displayed:
•
query IP configured—Displays the configured threshold values and action as follows:
– query single-sided IP ip-address configured—Displays the configured threshold values and
action for attack detection for a specified IP address (single-sided detection).
– query single-sided-v6 ip-address configured—Displays the configured threshold values and
action for v6 attack detection for a specified IP address (single-sided detection).
– query dual-sided source-IP ip-address1 dest ip-address2 configured—Displays the
configured threshold values and action for attack detection between two specified IP addresses
(dual-sided detection).
– query dual-sided-v6 source-IP ip-address1 dest ip-address2 configured—Displays the
configured threshold values and action for v6 attack detection between two specified IP
addresses (dual-sided detection).
– dest-port port-number—Displays the configured threshold values and action for the specified
port. You can include this argument with both single-sided and dual-sided queries.
•
query IP current—Displays the current counters for a specified attack detector for all protocols and
attack directions as follows:
– query single-sided IP ip-address current—Displays the current counters for attack detection
for a specified IP address (single-sided detection).
– query single-sided IP-v6 ip-address current—Displays the current counters for v6 attack
detection for a specified IP address (single-sided detection).
– query dual-sided source-IP ip-address1 dest ip-address2 current—Displays the current
counters for attack detection between two specified IP addresses (dual-sided detection).
Cisco SCE 8000 CLI Command Reference
2-431
Chapter 2
CLI Command Reference
show interface linecard attack-filter
– query dual-sided-v6 source-IP ip-address1 dest ip-address2 current—Displays the current
counters for v6 attack detection between two specified IP addresses (dual-sided detection).
– dest-port port-number—Displays the configured threshold values and action for the specified
port. You can include this argument with both single-sided and dual-sided queries.
•
current-attacks—Displays all currently handled attacks.
•
current-attacks-ipv6—Displays all currently handled attacks for ipv6.
•
counters—Displays all attack detection counters.
•
dont-filter—Displays all existing stopped attack filters.
•
dont-filter-ipv6—Displays all existing stopped attack filters for ipv6.
•
force-filter—Displays all existing forced attack filters.
•
force-filter-ipv6—Displays all existing forced attack filters for ipv6.
•
subscriber-notification ports—Displays the list of subscriber-notification ports.
•
subscriber-notification redirect—Displays the configuration of subscriber-notification
redirection, such as the configured destination and dismissal URLs, and allowed hosts.
Authorization: viewer
Examples
The following example shows how to display the configuration of attack detection between two specified
IP addresses (dual-sided) for destination port 101:
SCE8000>enable 5
Password:<cisco>
SCE8000>show interface linecard 0 attack-filter
query dual-sided source-IP 10.10.10.10 dest 10.10.10.145 dest-port 101 configured
SCE8000>
The following example shows how to display all existing forced attack filters:
SCE8000>enable 5
Password:<cisco>
SCE8000>show interface linecard 0 attack-filter
force-filter No force-filter commands are set for slot 0
SCE8000>
The following example shows how to display the subscriber notification ports:
SCE8000>enable 5
Password:<cisco>
SCE8000>show interface linecard 0 attack-filter
subscriber-notification ports
Configured Subscriber notification ports: 100
SCE8000>
Related Commands
Command
Description
attack-filter
Enables specific attack detection for a specified protocol and
attack direction.
attack-filter dont-filter | force-filter
Prevents attack filtering for a specified IP address or protocol.
Cisco SCE 8000 CLI Command Reference
2-432
Chapter 2
CLI Command Reference
show interface linecard cascade connection-status
show interface linecard cascade connection-status
Displays information about the connection between two cascaded SCE 8000 platforms. This information
can help assist in the installation of a cascaded system and to prevent incorrect cabling.
show interface linecard slot-number cascade connection-status
Syntax Description
slot-number
Command Default
None
Command Modes
User EXEC
Command History
This table includes the following release-specific history entries:
Number of the identified slot. Enter a value of 0.
Release
Modification
3.6.x
This command was introduced.
Usage Guidelines
Authorization: viewer
Examples
The following example shows the output from this command when the cascade interfaces of two
cascaded Cisco SCE 8000 10GBE platforms have not been connected correctly:
SCE8000>enable 5
Password:<cisco>
SCE8000>show interface linecard 0 cascade connection-status
SCE is improperly connected to peer
Please verify that each cascade port is connected to the correct port of the peer SCE.
Note that in the current topology, the SCE must be connected to its peer as follows:
Port 3/2/0 must be connected to port 3/2/0 at peer
Port 3/3/0 must be connected to port 3/3/0 at peer
SCE8000>
The following example shows the output from this command when the cascade interfaces of two
cascaded Cisco SCE platforms have been connected correctly:
SCE8000>enable 5
Password:<cisco>
SCE8000>show interface linecard 0 cascade connection-status
SCE is connected to peer
SCE8000>
Related Commands
Command
Description
connection-mode
Sets the connection mode parameters.
Cisco SCE 8000 CLI Command Reference
2-433
Chapter 2
CLI Command Reference
show interface linecard cascade peer-sce-information
show interface linecard cascade peer-sce-information
Displays information about the peer SCE platform. The data is available even when the two platforms
are no longer in cascade connection mode.
show interface linecard slot-number cascade peer-sce-information
Syntax Description
slot-number
Command Default
None
Command Modes
User EXEC
Command History
This table includes the following release-specific history entries:
Number of the identified slot. Enter a value of 0.
Release
Modification
3.6.x
This command was introduced.
Usage Guidelines
Authorization: viewer
Examples
The following example shows typical output from this command when the two SCE platforms are
connected correctly:
SCE8000>enable 5
Password:<cisco>
SCE8000>show interface linecard 0 cascade peer-sce-information
Peer SCE's IP address is 10.10.10.10
SCE8000>
The following example shows typical output from this command when the two SCE platforms are not
connected correctly:
SCE8000>enable 5
Password:<cisco>
SCE8000>show interface linecard 0 cascade peer-sce-information
SCE is improperly connected to peer.
For further information, please consult cli show "cascade connection-status" command
Last known peer SCE's IP address was 10.10.10.10
Related Commands
Command
Description
connection-mode
Sets the connection mode parameters.
Cisco SCE 8000 CLI Command Reference
2-434
Chapter 2
CLI Command Reference
show interface linecard cascade redundancy-status
show interface linecard cascade redundancy-status
Displays the current redundancy status of the Cisco SCE platform.
show interface linecard slot-number cascade redundancy-status
Syntax Description
slot-number
Command Default
None
Command Modes
User EXEC
Command History
This table includes the following release-specific history entries:
Number of the identified slot. Enter a value of 0.
Release
Modification
3.6.x
This command was introduced.
Usage Guidelines
Authorization: viewer
Examples
The following example shows typical output from this command:
SCE8000>enable 5
Password:<cisco>
SCE8000>show interface linecard 0 cascade redundancy-status
Redundancy status is active
SCE8000>
Related Commands
Command
Description
connection-mode
Sets the connection mode parameters.
Cisco SCE 8000 CLI Command Reference
2-435
Chapter 2
CLI Command Reference
show interface linecard connection-mode
show interface linecard connection-mode
Displays the current configuration of the Cisco SCE platform traffic link connection.
show interface linecard slot-number connection-mode
Syntax Description
slot-number
Command Default
None
Command Modes
User EXEC
Command History
This table includes the following release-specific history entries:
Number of the identified slot. Enter a value of 0.
Release
Modification
2.5.7
This command was introduced.
Usage Guidelines
Authorization: viewer
Examples
The following example shows typical output from this command for a single SCE 8000 platform:
SCE8000>enable 5
Password:<cisco>
SCE8000>show interface linecard 0 connection-mode
slot 0 connection mode
Connection mode is inline
slot failure mode is external-bypass
Redundancy status is active
SCE8000>
The following example shows typical output from this command for a cascaded SCE 8000 platform:
SCE8000>enable 5
Password:<cisco>
SCE8000>show interface linecard 0 connection-mode
slot 0 connection mode
Connection mode is inline-cascade
slot 0 sce-id is 1
slot 0 is secondary
slot 0 is connected to peer
slot failure mode is bypass
Redundancy status is standalone
SCE8000>
Cisco SCE 8000 CLI Command Reference
2-436
Chapter 2
CLI Command Reference
show interface linecard connection-mode
Related Commands
Command
Description
connection-mode
Sets the connection mode parameters.
Cisco SCE 8000 CLI Command Reference
2-437
Chapter 2
CLI Command Reference
show interface linecard counters
show interface linecard counters
Displays the hardware counters for the line card interface.
show interface linecard slot-number counters [bandwidth] [cpu-utilization]
Syntax Description
slot-number
Number of the identified slot. Enter a value of 0.
bandwidth
Displays only the bandwidth counters.
cpu-utilization
Displays only the CPU-utilization counters.
Command Default
None
Command Modes
User EXEC
Command History
This table includes the following release-specific history entries:
Release
Modification
2.5.7
This command was introduced.
Usage Guidelines
Authorization: viewer
Examples
The following example shows how to display the hardware counters for the line card interface:
SCE8000>enable 5
Password:<cisco>
SCE8000>show interface linecard 0 counters
DP packets in: 340
DP packets out: 340
DP IP packets in: 340
DP Non-IP packets: 0
DP IP packets checksum err: 0
DP IP packets length err: 0
DP IP broadcast packets: 0
DP IP fragmented packets: 0
DP IP packets with TTL=0 err: 0
DP Non TCP/UDP packets: 0
DP TCP/UDP packets checksum err: 0
DP ARP packets: 0
DP PPP compressed packets: 0
DP packets dropped: 0
DP tuples to FF: 340
DP tuples from CLS: 340
DP L7 Filter congested packets: 0
DP VLAN packets: 0
DP MPLS packets: 0
DP parse errors: 0
DP IPinIP skipped packets: 0
Cisco SCE 8000 CLI Command Reference
2-438
Chapter 2
CLI Command Reference
show interface linecard counters
DP
DP
DP
DP
DP
no payload packets: 53
self-IP packets: 0
tunneled packets: 0
L2TP control packets: 0
L2TP packets with offset: 0
traffic-counters information:
----------------------------Counter 'myCounter' value: 0 L3 bytes. Rules using it: None.
1 counters listed out of 36 available
...
SCE8000>
Related Commands
Command
Description
clear interface linecard counters
Clears the counters for the line card interface.
Cisco SCE 8000 CLI Command Reference
2-439
Chapter 2
CLI Command Reference
show interface linecard cpa-client
show interface linecard cpa-client
Displays configuration and statistics for the CPA client.
show interface linecard slot-number cpa-client
Syntax Description
slot-number
Command Default
This command has no default settings.
Command Modes
User Exec
Command History
This table includes the following release-specific history entries:
The number of the identified slot. Enter a value of 0.
Release
Modification
3.7.x
This command was introduced.
Usage Guidelines
Authorization: viewer
Examples
This example shows how to display configuration and statistics for the CPA client.
SCE8000>enable 5
Password:<cisco>
SCE8000#show interface linecard 0 cpa-client
CPA client: Enabled
CPA Server Address: none
Number of categorization retries to make: 3
CPA Socket timeout(in millisec): 10
-------------------------------CPA client status: Ok
Last error:
Successful queries: 0
Failed queries: 0
Pending queries: 0
Current rate (query/sec): 0.0
Last successful query round trip time (millisec): 0
-------------------------------CPA client started at: Wed, 15 Sep 2010, 11:04:12.731
Last query at:
Last response at:
SCE8000#
Cisco SCE 8000 CLI Command Reference
2-440
Chapter 2
CLI Command Reference
show interface linecard cpa-client
Related Commands
Command
Description
cpa-client destination
Configures the destination CPA server.
cpa-client retries
Configures the number of retries to make if a request to the CPA server
times out.
Cisco SCE 8000 CLI Command Reference
2-441
Chapter 2
CLI Command Reference
show interface linecard duplicate-packets-mode
show interface linecard duplicate-packets-mode
Displays the currently configured duplicate packets mode.
show interface linecard slot-number duplicate-packets-mode
Syntax Description
slot-number
Command Default
None
Command Modes
User EXEC
Command History
This table includes the following release-specific history entries:
Usage Guidelines
Examples
Number of the identified slot. Enter a value of 0.
Release
Modification
3.0.3
This command was introduced.
Authorization: viewer
The following example shows how to use this command:
SCE8000>enable 5
Password:<cisco>
SCE8000>show interface linecard 0 duplicate-packets-mode
Packet duplication of flows due to Delay Sensitive <bundles>is enabled
Packet duplication of flows due to No-Online-Control <set-flow>is enabled
Packet duplication of flows due to No-Online-Control <set-flow>ratio percent is 70
Packet duplication in case of shortage is enabled
SCE8000>
Cisco SCE 8000 CLI Command Reference
2-442
Chapter 2
CLI Command Reference
show interface linecard external-bypass
show interface linecard external-bypass
Displays the state of the external bypass module.
show interface linecard slot-number external-bypass
Syntax Description
slot-number
Command Default
None
Command Modes
User EXEC
Command History
This table includes the following release-specific history entries:
Number of the identified slot. Enter a value of 0.
Release
Modification
3.5.0
This command was introduced.
Usage Guidelines
Authorization: viewer
Examples
The following example shows the output from this command when both external bypass modules are
functioning properly:
SCE8000>enable 5
Password:<cisco>
SCE8000>show interface linecard 0 external-bypass
External bypass current state is ‘not activated’.
External bypass failure state is ‘activated’.
Amount of expected external bypass devices: 2
(automatically configured)
SCE8000>
The following example shows the output from this command when one external bypass module is not
detected:
SCE8000>enable 5
Password:<cisco>
SCE8000>show interface linecard 0 external-bypass
External bypass current state is ‘not activated’.
External bypass failure state is ‘activated’.
Amount of expected external bypass devices: 2
(automatically configured)
Warning: External bypass device expected but not detected on link #1
SCE8000>
Cisco SCE 8000 CLI Command Reference
2-443
Chapter 2
show interface linecard external-bypass
Related Commands
Command
Description
external-bypass
Manually activates the external bypass modules.
Cisco SCE 8000 CLI Command Reference
2-444
CLI Command Reference
Chapter 2
CLI Command Reference
show interface linecard flow-capture
show interface linecard flow-capture
Displays the flow capture status.
show interface linecard slot-number flow-capture
Syntax Description
slot-number
Command Default
This command has no default settings.
Command Modes
User EXEC
Command History
This table includes the following release-specific history entries:
The number of the identified slot. Enter a value of 0.
Release
Modification
3.6.x
This command was introduced.
Usage Guidelines
Authorization: viewer
Examples
The following example shows how to use this command.
SCE8000>enable 5
Password:<cisco>
SCE8000>show interface linecard 0 flow-capture
Flow Capture Status (module #1):
-------------------------------Flow capture status:
RECORDING
Capturing type:
ONLINE
Target file name:
ftp://myUser:[email protected]/./myCap1.cap
Target file size (bytes):
11141528
Time limit (sec):
3600
Max L4 payload length (bytes): Unlimited
Number of recorded packets:
20687
Number of lost packets:
0
SCE8000>
Related Commands
Command
Description
flow-capture controllers
Configures limitations on the flow-capture feature.
traffic-rule ip-addresses
Defines a new traffic rule.
traffic-rule ipv6
Defines a new traffic rule containing IPv6 IP addresses.
Cisco SCE 8000 CLI Command Reference
2-445
Chapter 2
CLI Command Reference
show interface linecard flow-open-mode
show interface linecard flow-open-mode
Displays the currently configured flow open mode.
show interface linecard slot-number flow-open-mode
Syntax Description
slot-number
Command Default
None
Command Modes
User EXEC
Command History
This table includes the following release-specific history entries:
Number of the identified slot. Enter a value of 0.
Release
Modification
3.0.3
This command was introduced.
Usage Guidelines
Authorization: viewer
Examples
The following example shows how to use this command:
SCE8000>enable 5
Password:<cisco>
SCE8000>show interface linecard 0 flow-open-mode
Enhanced flow open mode is disabled
Asymmetric layer 2 support is disabled
Note that other settings may override all/part of the Enhanced Flow Open mode, e.g. VAS,
TCP no bypass est, etc.(in which cases will behave as in the classical mode)
SCE8000>
Cisco SCE 8000 CLI Command Reference
2-446
Chapter 2
CLI Command Reference
show interface linecard ip-tunnel
show interface linecard ip-tunnel
Displays the current IP tunnel configuration.
show interface linecard slot-number ip-tunnel
Syntax Description
slot-number
Command Default
None
Command Modes
User EXEC
Command History
This table includes the following release-specific history entries:
Number of the identified slot. Enter a value of 0.
Release
Modification
3.0.3
This command was introduced.
Usage Guidelines
Authorization: viewer
Examples
The following example shows how to use this command:
SCE8000>enable 5
Password:<cisco>
SCE8000>show interface linecard 0 ip-tunnel
no IP tunnel
SCE8000>
Cisco SCE 8000 CLI Command Reference
2-447
Chapter 2
CLI Command Reference
show interface linecard ip-tunnel 6to4
show interface linecard ip-tunnel 6to4
To display the status of the 6to4 configuration, use the show interface linecard ip-tunnel 6to4
command in user EXEC mode.
show interface linecard slot-number ip-tunnel 6to4
Syntax Description
slot-number
Command Default
None
Command Modes
User EXEC (>)
Command History
This table includes the following release-specific history entries:
Number of the identified slot.
Release
Modification
3.7.5
This command was introduced.
Usage Guidelines
Authorization: viewer
Examples
The following example shows how to use this command:
SCE8000> enable 5
Password: <cisco>
SCE8000> show interface linecard 0 ip-tunnel 6to4
6to4 mode is enabled
SCE8000>
Related Commands
Command
Description
ip-tunnel 6to4
Enables 6to4 tunneling when the IPv6 environment is
configured on the Cisco SCE device.
Cisco SCE 8000 CLI Command Reference
2-448
Chapter 2
CLI Command Reference
show interface linecard ip-tunnel DS-Lite
show interface linecard ip-tunnel DS-Lite
To display the status of the DS-Lite configuration, use the show interface linecard ip-tunnel DS-Lite
command in user EXEC mode.
show interface linecard slot-number ip-tunnel DS-Lite
Syntax Description
slot-number
Command Default
None
Command Modes
User EXEC (>)
Command History
This table includes the following release-specific history entries:
Usage Guidelines
Examples
Number of the identified slot.
Release
Modification
3.7.5
This command was introduced.
Authorization: viewer
The following example shows how to use this command:
SCE8000> enable 5
Password: <cisco>
SCE8000> show interface linecard 0 ip-tunnel DS-Lite
DS-Lite mode is enabled
DS-Lite Extention-Header-Support is enabled
SCE8000>
Related Commands
Command
Description
ip-tunnel DS-Lite
Enables DS-Lite tunneling when the IPv6 environment is
configured on the Cisco SCE devices.
Cisco SCE 8000 CLI Command Reference
2-449
Chapter 2
CLI Command Reference
show interface linecard ip-tunnel ipinip
show interface linecard ip-tunnel ipinip
Displays the current IPinIP configuration.
show interface linecard slot-number ip-tunnel ipinip
Syntax Description
slot-number
Command Default
None
Command Modes
User EXEC
Command History
This table includes the following release-specific history entries:
Usage Guidelines
Examples
Number of the identified slot. Enter a value of 0.
Release
Modification
3.1.6
This command was introduced.
Authorization: viewer
The following example shows how to use this command:
SCE8000>enable 5
Password:<cisco>
SCE8000>show interface linecard 0 ip-tunnel ipinip
IPinIP skip mode is enabled
IPinIP DSCP skip mode is disabled
SCE8000>
Related Commands
Command
Description
ip-tunnel ipinip skip
Enables the recognition of IPinIP tunnels and skipping into
the internal IP packet.
ip-tunnel ipinip dscp-marking-skip
Configures the Cisco SCE platform to perform DSCP
marking on the internal IP header of IPinIp traffic.
Cisco SCE 8000 CLI Command Reference
2-450
Chapter 2
CLI Command Reference
show interface linecard ipv6
show interface linecard ipv6
Displays the current IPv6 state.
show interface linecard slot-number ipv6
Syntax Description
slot-number
Command Default
None
Command Modes
User EXEC
Command History
This table includes the following release-specific history entries:
Number of the identified slot. Enter a value of 0.
Release
Modification
3.5.5
This command was introduced.
Usage Guidelines
Authorization: viewer
Examples
The following example shows typical output from this command:
SCE8000>enable 5
Password:<cisco>
SCE8000>show interface linecard 0 ipv6
IPv6 counting mode is enabled
SCE8000>
Cisco SCE 8000 CLI Command Reference
2-451
Chapter 2
CLI Command Reference
show interface linecard l2tp
show interface linecard l2tp
Displays the currently configured L2TP support parameters.
show interface linecard slot-number l2tp
Syntax Description
slot-number
Command Default
None
Command Modes
User EXEC
Command History
This table includes the following release-specific history entries:
Number of the identified slot. Enter a value of 0.
Release
Modification
3.0.3
This command was introduced.
Usage Guidelines
Authorization: viewer
Examples
The following example shows how to use the show interface linecard l2tp command:
SCE8000>enable 5
Password:<cisco>
SCE8000>show interface linecard 0 l2tp
L2TP identify-by port-number 1701
SCE8000>
Related Commands
Command
Description
l2tp identify-by
Configures the port number that the LNS and LAC use for L2TP tunnels.
Cisco SCE 8000 CLI Command Reference
2-452
Chapter 2
CLI Command Reference
show interface linecard link mode
show interface linecard link mode
Displays the configured Linecard Interface link mode.
show interface linecard slot-number link mode
Syntax Description
slot-number
Command Default
None
Command Modes
User EXEC
Command History
This table includes the following release-specific history entries:
Number of the identified slot. Enter a value of 0.
Release
Modification
2.5.7
This command was introduced.
Usage Guidelines
Authorization: viewer
Examples
The following example shows the configured link mode for the line card interface:
SCE8000>enable 5
Password:<cisco>
SCE8000>show interface linecard 0 link mode
Link mode on port1-port2
Current link mode is :forwarding
Actual link mode on active is :forwarding
Actual link mode on failure is :monopath-bypass
SCE8000>
Related Commands
Command
Description
link mode
Configures the link mode.
Cisco SCE 8000 CLI Command Reference
2-453
Chapter 2
CLI Command Reference
show interface linecard link-to-port-mapping
show interface linecard link-to-port-mapping
Displays the mapping of links and ports resulting from the connection-mode command.
show interface linecard slot-number link-to-port-mapping
Syntax Description
slot-number
Command Default
None
Command Modes
User EXEC
Command History
This table includes the following release-specific history entries:
Number of the identified slot. Enter a value of 0.
Release
Modification
3.0.3
This command was introduced.
Usage Guidelines
Authorization: viewer
Examples
The following example shows the link-to-port mapping:
SCE8000>enable 5
Password:<cisco>
SCE8000>show interface linecard 0 link-to-port-mapping
Link Id
|
Upstream Port (Subscribers) | Downstream Port (Network)
--------------------------------------------------------------------------0
|
0/3/0/0
|
0/3/0/1
1
|
0/3/0/2
|
0/3/0/3
2
|
0/3/0/4
|
0/3/0/5
3
|
0/3/0/6
|
0/3/0/7
4
|
0/3/1/0
|
0/3/1/1
5
|
0/3/1/2
|
0/3/1/3
6
|
0/3/1/4
|
0/3/1/5
7
|
0/3/1/6
|
0/3/1/7
8 (cascade) |
1/3/0/0
|
1/3/0/1
9 (cascade) |
1/3/0/2
|
1/3/0/3
10 (cascade) |
1/3/0/4
|
1/3/0/5
11 (cascade) |
1/3/0/6
|
1/3/0/7
12 (cascade) |
1/3/1/0
|
1/3/1/1
13 (cascade) |
1/3/1/2
|
1/3/1/3
14 (cascade) |
1/3/1/4
|
1/3/1/5
15 (cascade) |
1/3/1/6
|
1/3/1/7
SCE8000>
Cisco SCE 8000 CLI Command Reference
2-454
Chapter 2
CLI Command Reference
show interface linecard link-to-port-mapping
Related Commands
Command
Description
connection-mode
Sets the connection mode parameters.
Cisco SCE 8000 CLI Command Reference
2-455
Chapter 2
CLI Command Reference
show interface linecard mac-mapping
show interface linecard mac-mapping
Displays the line card MAC mapping information.
show interface linecard slot-number mac-mapping
Syntax Description
slot-number
Command Default
None
Command Modes
User EXEC
Command History
This table includes the following release-specific history entries:
Number of the identified slot. Enter a value of 0.
Release
Modification
3.0.3
This command was introduced.
Usage Guidelines
Authorization: viewer
Examples
The following example shows the MAC mapping information:
SCE8000>enable 5
Password:<cisco>
SCE8000>show interface linecard 0 mac-mapping
MAC mapping status is: disabled
MAC mapping default mapping is: none set
MAC mapping dynamic insertion to table is enabled
SCE8000>
Related Commands
Command
Description
show interface linecard mac-resolver arp
Displays a listing of all IP addresses and corresponding
MAC addresses currently registered in the MAC
resolver database.
mac-resolver arp
Adds a static IP entry to the MAC resolver database.
Cisco SCE 8000 CLI Command Reference
2-456
Chapter 2
CLI Command Reference
show interface linecard mac-resolver arp
show interface linecard mac-resolver arp
Displays a listing of all IP addresses and corresponding MAC addresses currently registered in the MAC
resolver database.
show interface linecard slot-number mac-resolver arp
Syntax Description
slot-number
Command Default
None
Command Modes
User EXEC
Command History
This table includes the following release-specific history entries:
Number of the identified slot. Enter a value of 0.
Release
Modification
3.0.3
This command was introduced.
Usage Guidelines
Authorization: viewer
Examples
The following example shows how to display the entries in the MAC resolver ARP database:
SCE8000>enable 5
Password:<cisco>
SCE8000>show interface linecard 0 mac-resolver arp
There are no entries in the mac-resolver arp database
SCE8000>
Related Commands
Command
Description
mac-resolver arp
Adds a static IP entry to the MAC resolver database.
Cisco SCE 8000 CLI Command Reference
2-457
Chapter 2
show interface linecard mpls
show interface linecard mpls
Displays the current MPLS tunnelling configuration.
show interface linecard slot-number mpls
Syntax Description
slot-number
Command Default
This command has no default settings.
Command Modes
User Exec
Command History
This table includes the following release-specific history entries:
The number of the identified slot. Enter a value of 0.
Release
Modification
3.1.5
This command was introduced.
Usage Guidelines
Authorization: viewer
Examples
The following example illustrates the use of this command:
SCE8000>enable 5
Password:<cisco>
SCE8000>show interface linecard 0 mpls
MPLS Traffic-Engineering skip
SCE8000>
Related Commands
Command
Description
mpls
Configures the MPLS environment.
Cisco SCE 8000 CLI Command Reference
2-458
CLI Command Reference
Chapter 2
CLI Command Reference
show interface linecard periodic-records aggregation
show interface linecard periodic-records aggregation
Displays the current RDR aggregation configuration.
show interface linecard slot-number periodic-records aggregation
Syntax Description
slot-number
Command Default
None
Command Modes
User EXEC
Command History
This table includes the following release-specific history entries:
Number of the identified slot. Enter a value of 0.
Release
Modification
3.6.x
This command was introduced.
Usage Guidelines
Authorization: viewer
Examples
The following shows sample output from this command.
SCE8000>enable 5
Password:<cisco>
SCE8000>show interface
VLUR : enabled
LUR : enabled
PUR : enabled
CSCE8000>
Related Commands
linecard 0 periodic-records aggregation
Command
Description
periodic-records aggregate-by-cpu
Enables RDR aggregation for the specified RDRs.
Cisco SCE 8000 CLI Command Reference
2-459
Chapter 2
show interface linecard physically-connected-links
show interface linecard physically-connected-links
Displays the link mapping for the line card interface.
show interface linecard slot-number physically-connected-links
Syntax Description
slot-number
Command Default
None
Command Modes
User EXEC
Command History
This table includes the following release-specific history entries:
Number of the identified slot. Enter a value of 0.
Release
Modification
2.5.7
This command was introduced.
Usage Guidelines
Authorization: viewer
Examples
The following example shows the link mapping for the line card interface:
SCE8000>enable 5
Password:<cisco>
SCE8000>show interface linecard 0 physically-connected-links
slot 0 is connected to link-0 and link-1
SCE8000>
Related Commands
Command
Description
connection-mode
Sets the connection mode parameters.
Cisco SCE 8000 CLI Command Reference
2-460
CLI Command Reference
Chapter 2
CLI Command Reference
show interface linecard sce-url-database
show interface linecard sce-url-database
Displays the contents of the protected URL database.
You can also use this command to look for a specific URL and display the related flavor ID.
show interface linecard slot-number sce-url-database
show interface linecard slot-number sce-url-database url url
Syntax Description
slot-number
Number of the identified slot. Enter a value of 0.
url
Specific URL to look up in the Cisco SCE URL database.
Command Default
None
Command Modes
Privileged EXEC
Command History
This table includes the following release-specific history entries:
Usage Guidelines
Release
Modification
3.5.0
This command was introduced.
To display the contents of the protected URL database, it must have all protection removed and no
assigned owner. If the database has an assigned owner, it is protected and cannot be displayed.
To display the flavor ID of a specific URL, the user executing the command must have lookup permission
for the protected URL database.
Authorization: admin
Examples
The following example shows how to use this command:
SCE8000>enable 10
Password:<cisco>
SCE8000#show interface linecard 0 sce-url-database
SCE8000#
Related Commands
Command
Description
sce-url-database protection
Configures user authorization for the protected URL database.
Cisco SCE 8000 CLI Command Reference
2-461
Chapter 2
CLI Command Reference
show interface linecard sce-url-database protection
show interface linecard sce-url-database protection
Displays the current protected URL database protection settings, including owner username, current
protection settings, and whether a key is configured.
show interface linecard slot-number sce-url-database protection
Syntax Description
slot-number
Command Default
None
Command Modes
User EXEC
Command History
This table includes the following release-specific history entries:
Usage Guidelines
Examples
Number of the identified slot. Enter a value of 0.
Release
Modification
3.5.0
This command was introduced.
Authorization: viewer
The following example shows how to use this command:
SCE8000>enable 5
Password:<cisco>
SCE8000>show interface linecard 0 sce-url-database protection
Protection Domain BLACK_LIST_DOMAIN Status:
Domain owner:black
Read is allowed to no user
Write is allowed to user black only
Lookup is allowed to no user
Encryption key is not set
SCE8000>
Related Commands
Command
Description
show interface linecard sce-url-database
Displays the contents of the protected URL database.
Cisco SCE 8000 CLI Command Reference
2-462
Chapter 2
CLI Command Reference
show interface linecard service-bandwidth-prioritization-mode
show interface linecard service-bandwidth-prioritization-mode
Displays the currently configured service bandwidth prioritization mode.
show interface linecard slot-number service-bandwidth-prioritization-mode
Syntax Description
slot-number
Command Default
None
Command Modes
User EXEC
Usage Guidelines
Authorization: viewer
Command History
This table includes the following release-specific history entries:
Examples
Number of the identified slot. Enter a value of 0.
Release
Modification
3.0.3
This command was introduced.
The following example shows how to use this command:
SCE8000>enable 5
Password:<cisco>
SCE8000>show interface linecard 0 service-bandwidth-prioritization-mode
Service bandwidth prioritization mode is: Subscriber Internal
SCE8000>
Related Commands
Command
Description
service-bandwidth- prioritization-mode Defines the service bandwidth prioritization mode.
Cisco SCE 8000 CLI Command Reference
2-463
Chapter 2
show interface linecard shutdown
show interface linecard shutdown
Displays the current shutdown state.
show interface linecard slot-number shutdown
Syntax Description
slot-number
Command Default
None
Command Modes
User EXEC
Command History
This table includes the following release-specific history entries:
Number of the identified slot. Enter a value of 0.
Release
Modification
3.0.5
This command was introduced.
Usage Guidelines
Authorization: viewer
Examples
The following example shows how to display the linecard shutdown state:
SCE8000>enable 5
Password:<cisco>
SCE8000>show interface linecard 0 shutdown
off
SCE8000>
Cisco SCE 8000 CLI Command Reference
2-464
CLI Command Reference
Chapter 2
CLI Command Reference
show interface linecard silent
show interface linecard silent
Displays the current Linecard Interface silent state. When the silent state is OFF, the line card events
reporting function is enabled.
show interface linecard slot-number silent
Syntax Description
slot-number
Command Default
None
Command Modes
User EXEC
Command History
This table includes the following release-specific history entries:
Usage Guidelines
Examples
Number of the identified slot. Enter a value of 0.
Release
Modification
2.5.7
This command was introduced.
Authorization: viewer
The following example shows how to display the Linecard Interface silent state:
SCE8000>enable 5
Password:<cisco>
SCE8000>show interface linecard 0 silent
off
SCE8000>
Related Commands
Command
Description
silent
Disables the line card from reporting events.
Cisco SCE 8000 CLI Command Reference
2-465
Chapter 2
CLI Command Reference
show interface linecard subscriber
show interface linecard subscriber
Displays subscribers that meet specified criteria.
show interface linecard slot-number subscriber [amount] [prefix prefix] [suffix suffix]
[property property-name equals | bigger-than | less-than property-val] [all-names]
show interface linecard slot-number subscriber name subscriber-name
show interface linecard slot-number subscriber all-names
show interface linecard slot-number subscriber [amount] {prefix prefix | suffix suffix}
show interface linecard slot-number subscriber [amount] property property-name
{equals | bigger-than | less-than property-val}
Syntax Description
amount
Displays the number of subscribers meeting the criteria rather than listing
actual subscriber names.
slot-number
Number of the identified slot. Enter a value of 0.
prefix
Subscriber name prefix to match.
suffix
Subscriber name suffix to match.
property-name
Name of the subscriber property to match.
property-val
Value of the specified subscriber property. Specify whether to search for
values equal to, greater than, or less than this value.
all-names
Displays the names of all subscribers currently in the Cisco SCE platform
subscriber database.
Command Default
None
Command Modes
User EXEC
Command History
This table includes the following release-specific history entries:
Usage Guidelines
Release
Modification
2.5.7
This command was introduced.
3.8.0
IPv6 support added.
Use this command to display names of subscribers or the number of subscribers meeting one of the
following specified criteria:
•
Having a value of a subscriber property that is equal to, larger than, or smaller than a specified value
•
Having a subscriber name that matches a specific prefix
•
Having a subscriber name that matches a specific suffix
Cisco SCE 8000 CLI Command Reference
2-466
Chapter 2
CLI Command Reference
show interface linecard subscriber
Authorization: viewer
Examples
The following example lists the number of subscribers with the prefix “gold” in the subscriber name:
SCE8000>enable 5
Password:<cisco>
SCE8000>show interface linecard 0 subscriber amount prefix gold
There are 40 subscribers with name prefix 'gold'.
SCE8000>
The following example lists all subscribers currently in the Cisco SCE platform subscribers database:
SCE8000> enable 5
Password:<cisco>
SCE8000> show interface linecard 0 subscriber all-names
There are 8 subscribers in the database.
john_doe
mary_smith
david_jones
betty_peters
bill_jackson
jane_doe
bob_white
andy_black
SCE8000>
Related Commands
Command
Description
subscriber name property name
Assigns a value to the specified property of the specified
subscriber.
Cisco SCE 8000 CLI Command Reference
2-467
Chapter 2
CLI Command Reference
show interface linecard subscriber aging
show interface linecard subscriber aging
Displays the subscriber aging configuration for the specified type of subscriber (anonymous or
introduced).
show interface linecard slot-number subscriber aging {anonymous | introduced}
Syntax Description
slot-number
Number of the identified slot. Enter a value of 0.
anonymous
Displays the subscriber aging configuration for anonymous subscribers.
introduced
Displays the subscriber aging configuration for introduced subscribers.
Command Default
None
Command Modes
User EXEC
Usage Guidelines
Authorization: viewer
Command History
This table includes the following release-specific history entries:
Examples
Release
Modification
2.5.7
This command was introduced.
The following example shows how to display the aging of introduced subscribers:
SCE8000>enable 5
Password:<cisco>
SCE8000>show interface linecard 0 subscriber aging introduced
Introduced subscriber aging is enabled.
Introduced subscriber aging time is 30 minutes.
SCE8000>
Related Commands
Command
Description
subscriber aging
Enables of disables subscriber aging for the specified type of subscribers.
Cisco SCE 8000 CLI Command Reference
2-468
Chapter 2
CLI Command Reference
show interface linecard subscriber anonymous
show interface linecard subscriber anonymous
Displays the subscribers in a specified anonymous subscriber group.
show interface linecard slot-number subscriber anonymous
Syntax Description
slot-number
Command Default
None
Command Modes
User EXEC
Command History
This table includes the following release-specific history entries:
Number of the identified slot. Enter a value of 0.
Release
Modification
2.5.7
This command was introduced.
3.8.0
IPv6 support added.
Usage Guidelines
Authorization: viewer
Examples
The following example lists the anonymous subscribers currently in the Cisco SCE platform
subscribers database:
SCE8000> enable 5
Password: <cisco>
SCE8000> show interface linecard 0 subscriber anonymous
Anonymous subscribers:
1080:a2b1::0@ipv6a
ff00::0@ipv6a
Total 2 subscribers listed.
The following example lists the anonymous subscribers currently in the Cisco SCE platform
subscribers database:
SCE8000> enable 15
Password: <cisco>
SCE8000> show interface linecard 0 subscriber anonymous-group name ABC
subscriber anonymous-group name "ABC" IP-range 0.0.0.0:0x00000000
Related Commands
Command
Description
clear interface linecard subscriber
Clears all anonymous subscribers in the system.
Cisco SCE 8000 CLI Command Reference
2-469
Chapter 2
CLI Command Reference
show interface linecard subscriber anonymous-group
show interface linecard subscriber anonymous-group
Displays the configuration of the specified IPv4 or IPv6 anonymous subscriber group.
show interface linecard slot-number subscriber anonymous-group {name group-name | all}
Syntax Description
slot-number
Number of the identified slot. Enter a value of 0.
group-name
Anonymous subscriber group.
all
Displays all existing anonymous subscriber groups.
Command Default
None
Command Modes
User EXEC
Command History
This table includes the following release-specific history entries:
Release
Modification
2.5.7
This command was introduced.
3.8.0
IPv6 support added.
Usage Guidelines
Authorization: viewer
Examples
The following example shows how to display the anonymous subscriber groups for IPv4 subscribers:
SCE8000> enable 5
Password: <cisco>
SCE8000> show interface linecard 0 subscriber anonymous-group all
name
IP range Template #
----------- ---------Group1 10.10.10.10/99 0
1 anonymous groups are configured
SCE8000>
The following example shows how to display the anonymous subscriber groups for IPv6 subscribers:
SCE8000> enable 5
Password: <cisco>
SCE8000> show interface linecard 0 subscriber anonymous-group all
name
IP range
Template
-----------------antest
fd49:13f5:bef:b2ba::/64
0
Total 1 anonymous groups listed.
Cisco SCE 8000 CLI Command Reference
2-470
Manager #
-------SM
Chapter 2
CLI Command Reference
show interface linecard subscriber anonymous-group
Related Commands
Command
Description
subscriber anonymous-group name
Assigns the anonymous group to the specified range of IP
addresses and optional template or to an SCMP device.
Cisco SCE 8000 CLI Command Reference
2-471
Chapter 2
CLI Command Reference
show interface linecard subscriber crypto-params
show interface linecard subscriber crypto-params
Displays the encryption parameters of the subscriber ID encryption in redirect URLs.
show interface linecard slot-number subscriber crypto-params
Syntax Description
slot-number
Command Default
None
Command Modes
User EXEC
Command History
This table includes the following release-specific history entries:
Number of the identified slot. Enter a value of 0.
Release
Modification
4.0.0
This command was introduced.
Usage Guidelines
Authorization: viewer
Examples
The following example shows the output from this command:
SCE8000> enable 5
Password: <cisco>
SCE8000> show interface linecard 0 subscriber crypto-params
Algorithm used
: AES 128 block cipher algorithm
Mode of operation
: Cipher Feedback (CFB) mode
Initialization
Vector (IV)
: 000102030405060708090A0B0C0D0E0F
Padding
: No padding
Encrypted subscriber ID in redirect URL
: Encoded as hex string
Keys in redirection sets
:
Redirect Set 0
key : 2B7E151628AED2A6ABF7158809CF4F3C
Redirect Set 1
key : 3B7E151628AED2A6ABF7158809CF4F3C
Redirect Set 2
key : 4B7E151628AED2A6ABF7158809CF4F3C
The following example shows the output from this command if no application is assigned to slot 0:
SCE8000#> show interface linecard 0
No application is assigned to slot 0
Silent is off
Configured shutdown is off
Shutdown due to sm-connection-failure is off
Resulting current shutdown state is off
WAP handling is disabled
SCE8000#> show interface linecard 0 crypto-params
Cisco SCE 8000 CLI Command Reference
2-472
Chapter 2
CLI Command Reference
show interface linecard subscriber crypto-params
Algorithm used
Mode of operation
Initialization
Vector (IV)
Padding
Encrypted subscriber ID in redirect URL
:
:
:
:
:
Keys in redirection sets
:
AES 128 block cipher algorithm
Cipher Feedback (CFB) mode
000102030405060708090A0B0C0D0E0F
No padding
Encoded as hex string
Redirect Set 0
key : Error - No global variables are defined, probabl
y no application is loaded.
Error -
Related Commands
Command
Description
show interface linecard 0
Displays the interface linecard details.
Cisco SCE 8000 CLI Command Reference
2-473
Chapter 2
CLI Command Reference
show interface linecard subscriber db counters
show interface linecard subscriber db counters
Displays the subscriber database counters.
show interface linecard slot-number subscriber db counters
Syntax Description
slot-number
Command Default
None
Command Modes
User EXEC
Command History
This table includes the following release-specific history entries:
Usage Guidelines
Number of the identified slot. Enter a value of 0.
Release
Modification
2.5.7
This command was introduced.
Authorization: viewer
Counter Definitions
The following sections present definitions of the counters displayed in the output of this command.
Current values:
Subscribers: Number of currently existing subscribers (excluding subscribers waiting to be removed).
Introduced subscribers: Number of introduced subscribers.
Anonymous subscribers: Number of anonymous subscribers.
Subscribers with mappings: Number of subscribers with mappings.
Single non-VPN IP mappings: Number of mappings to single IP addresses.
Non-VPN IP Range mappings: Number of mappings to ranges of IP addresses.
VLAN based subscribers (appears only if VLAN-based subscribers are enabled): Number of VLAN
based VPNs with subscribers.
Subscribers with open sessions: Number of subscribers with open flows (sessions).
Sessions mapped to the default subscriber: Number of open flows (sessions) related to the default party.
Peak values:
Peak number of subscribers with mappings:
Peak number occurred at:
Peak number cleared at:
Cisco SCE 8000 CLI Command Reference
2-474
Chapter 2
CLI Command Reference
show interface linecard subscriber db counters
Event counters:
Subscriber introduced: Number of login calls resulting in adding a subscriber.
Subscriber pulled: Number of pullResponse calls.
Subscriber aged: Number of aged subscribers.
Pull-request notifications sent: Number of pull-request notifications sent.
State notifications sent: Number of state change notifications sent to peers.
Logout notifications sent: Number of logout events.
Examples
The following example shows the output from this command:
SCE8000>enable 5
Password:<cisco>
SCE8000>show interface linecard 0 subscriber db counters
Current values:
===============
Subscribers: 3 used out of 9999 max.
Introduced/Pulled subscribers: 3.
Anonymous subscribers: 0.
Subscribers with mappings: 3 used out of 9999 max.
Single non-VPN IP mappings: 1.
non-VPN IP Range mappings: 1.
Subscribers with open sessions: 0.
Sessions mapped to the default subscriber: 0.
Related Commands
Command
Description
clear interface linecard subscriber db counters
Clears the “total” and “maximum” subscribers
database counters.
Cisco SCE 8000 CLI Command Reference
2-475
Chapter 2
CLI Command Reference
show interface linecard subscriber Gx-pull-request-disable
show interface linecard subscriber Gx-pull-request-disable
Displays the status of the Gx pull request.
show interface lineCard subscriber Gx-pull-request-disable
Syntax Description
This command does not have any argument.
Command Default
None
Command Modes
User EXEC
Command History
This table includes the following release-specific history entries:
Release
Modification
3.7.x
This command was introduced.
Usage Guidelines
Authorization: viewer
Examples
The following example shows the output of the command:
SCE8000>enable 5
Password:<cisco>
SCE8000>show interface linecard subscriber Gx-pull-request-disable
Gx-pull-request is disabled
Related Commands
None
Cisco SCE 8000 CLI Command Reference
2-476
Chapter 2
CLI Command Reference
show interface linecard subscriber mapping
show interface linecard subscriber mapping
Displays subscribers whose mapping meets the specified criteria.
show interface linecard slot-number subscriber mapping [IP ip-address/range | IPv6
ipv6-address/prefix-length] [included-in [IP ip-range | IPv6 ipv6-address/prefix-length] [VPN
vpn-name | any-vpn]] [VLAN-id vlan-id ] [none]
Syntax Description
slot-number
Number of the identified slot. Enter a value of 0.
ip-range
Specified range of IP addresses.
ipv6-address/prefix-len
gth
Specified IPv6 address and prefix length.
VPN
Specifies the VPN name. This keyword is not available for IPv6 address.
vpn-name
Name of VPN in which to search for the IP address. Displays a subscriber
with a private IP mapping.
any-vpn
You can use this keyword instead of specifying a VPN name to match all the
mappings within the specified IP ranges, regardless of their VPN, including
non-VPN mappings
VLAN-id
The VLAN-id keyword is not available for IPv4 and IPv6.
vlan-id
Specified VLAN tag.
Command Default
None
Command Modes
User EXEC
Command History
This table includes the following release-specific history entries:
Usage Guidelines
Release
Modification
2.5.7
This command was introduced.
3.8.0
IPv6 supported added.
Use this command to display subscribers whose mapping meets one of the following specified criteria:
•
Matches a specified IP address or range of IP addresses (exact match of the specified range)
•
Intersects a specified IP range (not necessarily an exact match of the specified range, but with IP
addresses that are within the specified range)
•
Matches a specified VLAN tag (This option is provided for backwards compatibility and has certain
restrictions. See Note below)
•
Matches a specified VPN mapping (This option is provided for backwards compatibility and has
certain restrictions. See Note below)
•
Has no mapping
Cisco SCE 8000 CLI Command Reference
2-477
Chapter 2
CLI Command Reference
show interface linecard subscriber mapping
The any-vpn keyword is a wildcard that matches all the mappings within the IP ranges, regardless of
their VPN, including non-VPN mappings.
Note the specific results of the following options:
Note
•
VLAN—if the VLAN tag is configured as a single subscriber (mapped to 0.0.0.0/0 on the VPN that
is mapped to the specified VLAN tag) this option displays that subscriber.
•
included-in IP (no VPN specified)—matches non-VPN mappings only
•
included-in IP VPN—matches private-IP mappings
•
IP and VPN- the mapping must match the exact VPN as well as the IP range
The VLAN option is provided for backward compatibility. The options require that the entire VLAN or
VPN be defined as a single subscriber with an IP address of 0.0.0.0/0@vpn, which corresponds to the
VPN and VLAN subscriber definition of pre-3.1.5 versions.
Authorization: viewer
Examples
The following example shows how to list the number of subscribers with no mapping:
SCE8000>enable 5
Password:<cisco>
SCE8000> show interface linecard 0 subscriber mapping none
Subscribers with no mappings:
N/A
Total 1 subscribers listed.
SCE8000>
The following example shows how to list the number of subscribers with IPv6 mapping:
SCE8000>enable 5
Password:<cisco>
SCE8000> show interface linecard 0 subscriber mapping IPv6 1080:a2b1::1e:0 test
Card 0 subscriber mapping included-in IPv6 1080:a2b1::1e:0
Subscribers with IPv6 mappings included in IPv6 range '1080:a2b1::/64':
Subscriber 'test', mapping '1080:a2b1::/64
Total 1 subscribers found, with 1 matching mappings.
The following example shows how to list the number of subscribers included-in IPv6 mapping:
SCE8000>enable 5
Password:<cisco>
SCE8000> show interface LineCard 0 subscriber mapping included-in IPv6 1080:a2b1::1e:0
There are 1 subscribers with 1 IPv6 mappings included in IPv6 range '1080:a2b1::/64'.
Cisco SCE 8000 CLI Command Reference
2-478
Chapter 2
CLI Command Reference
show interface linecard subscriber max-subscribers
show interface linecard subscriber max-subscribers
Displays the maximum number of subscribers. The command also indicates whether the capacity options
have been disabled.
show interface linecard slot-number subscriber max-subscribers
Syntax Description
slot-number
Command Default
None
Command Modes
User EXEC
Command History
This table includes the following release-specific history entries:
Number of the identified slot. Enter a value of 0.
Release
Modification
3.5.5
This command was introduced.
Usage Guidelines
Authorization: viewer
Examples
The following example shows how to display the maximum number of subscribers when the capacity
options have not been disabled. (In which case the capacity options determine the maximum number of
subscribers.)
SCE8000>enable 5
Password:<cisco>
SCE8000>show interface linecard 0 subscriber max-subscribers
Configured actual maximum number of subscribers: 80000.
Note, however, that Subscriber Capacity Options are enabled, and they determine the actual
maximum number of subscribers.
SCE8000>
Related Commands
Command
Description
subscriber max-subscribers
Specifies the maximum number of subscribers.
subscriber capacity-options
Overrides the capacity option when loading the SCA BB application.
Cisco SCE 8000 CLI Command Reference
2-479
Chapter 2
CLI Command Reference
show interface linecard subscriber name
show interface linecard subscriber name
Displays information about a specified subscriber.
show interface linecard slot-number subscriber name name [mappings] [counters] [properties]
[VAS-servers] [os-info]
Syntax Description
slot-number
Number of the identified slot. Enter a value of 0.
name
Subscriber name.
mappings
Displays subscriber mappings.
counters
Displays OS counters.
properties
Displays values of all subscriber properties.
vas-servers
Display the VAS servers used by the specified subscriber
os-info
Displays the OS detected for the specified subscriber. If the subscriber has
multiple IP addresses, OS information is displayed for each IP address.
Command Default
None
Command Modes
User EXEC
Command History
This table includes the following release-specific history entries:
Usage Guidelines
Release
Modification
2.5.7
This command was introduced.
3.8.0
This command was updated to support IPv6 subscribers.
The following information can be displayed:
•
Mappings
•
OS counters (bandwidth and current number of flows)
•
All values of subscriber properties
•
VAS servers used per VAS server group
•
OS detected for the subscriber
•
All of the above
If no category is specified, a complete listing of property values, mappings, and counters is displayed.
Authorization: viewer
Cisco SCE 8000 CLI Command Reference
2-480
Chapter 2
CLI Command Reference
show interface linecard subscriber name
Examples
Example 1
The following example shows how to display subscriber information for the specified subscriber:
SCE8000> enable 5
Password: <cisco>
SCE8000> show interface linecard 0 subscriber name gold123
Subscriber 'gold123' manager: CLI
Subscriber 'gold123' properties:
downVlinkId=0
monitor=0
new_classification_policy=0
packageId=0
upVlinkId=0
Subscriber 'gold123' read-only properties:
concurrentAttacksNumber=0
PV_internalPackage=0
PV_REP_nonReportedSessionsInTUR=0
P_aggPeriodType=8
P_blockReportCounter=0
P_firstTimeParty=TRUE
P_internalDownVLink=0
P_internalUpVLink=0
P_MibSubCounters16[0..31][0..1]=0*64
P_MibSubCounters32[0..31][0..1]=0*64
P_newParty=TRUE
p_numOfRedirections=0
P_packageCounterIndex=0
P_partyCurrentDownVLink=0
P_partyCurrentPackage=0
P_partyCurrentUpVLink=0
P_serviceReportedBitMap=0
P_spamCounter=0
Subscriber 'gold123' attributes:
Subscriber 'gold123' mappings:
IP 10.0.0.0 - Expiration (sec): Unlimited
IP 20.0.0.0 - Expiration (sec): Unlimited
IP 30.0.0.0 - Expiration (sec): Unlimited
IP 40.0.0.0 - Expiration (sec): Unlimited
IP 50.0.0.0 - Expiration (sec): Unlimited
IP 60.0.0.0 - Expiration (sec): Unlimited
Subscriber 'gold123' has 0 active sessions.
Aging disabled
Subscriber 'gold123' OS-Info:
IP Address:10.0.0.0
OS-INFO:
1. INDEX: 2
OS Name: Linux
2. INDEX: 55
OS Name: SymbianOS
3. INDEX: 65
OS Name: iOS
NAT DETECTED
SCE8000>
Example 2
The following example shows how to list the mappings for the specified IPv4 subscriber:
SCE8000>enable 5
Password:<cisco>
SCE8000>show interface linecard 0 subscriber name gold123 mappings
Subscriber 'gold123' mappings:
IP 10.0.0.0 - Expiration (sec): Unlimited
SCE8000>
Cisco SCE 8000 CLI Command Reference
2-481
Chapter 2
CLI Command Reference
show interface linecard subscriber name
Example 3
The following example shows how to list the mappings for the specified IPv6 subscriber:
SCE8000> enable 5
Password: <cisco>
SCE8000> show interface linecard 0 subscriber name test mappings
Subscriber 'test' mappings:
IPv6 1080:a2b1::/64 - Expiration (sec): Unlimited
Example 4
The following example shows how to list OS detected for the specified subscriber.
SCE8000> enable 5
Password: <cisco>
SCE8000> show interface linecard 0 subscriber name gold123 os-info
Subscriber 'gold123' OS-Info:
IP Address:10.0.0.10
OS-INFO:
1. INDEX: 2
OS Name: Linux
2. INDEX: 55
OS Name: SymbianOS
3. INDEX: 65
OS Name: iOS
NAT DETECTED
SCE8000>
Related Commands
Command
Description
subscriber name property name
Assigns a value to the specified property of the specified
subscriber.
show os-finger-printing
subscriber-name
Displays the OS detected for the specified subscriber. If the
subscriber has multiple IP addresses, OS information is displayed
for each IP address
Cisco SCE 8000 CLI Command Reference
2-482
Chapter 2
CLI Command Reference
show interface linecard subscriber name breach-state
show interface linecard subscriber name breach-state
Displays all breached buckets for the specified subscriber.
show interface linecard slot-number subscriber name name breach-state
Syntax Description
slot-number
Number of the identified slot. Enter a value of 0.
name
Name of the subscriber for which to display the breach-state
Command Default
None
Command Modes
User EXEC
Command History
This table includes the following release-specific history entries:
Release
Modification
3.6.x
This command was introduced.
Usage Guidelines
Authorization: viewer
Examples
The following examples show output from this command.
Example 1
SCE8000>enable 5
Password:<cisco>
SCE8000>show interface
No BREACHED buckets
SCE8000>
linecard 0 subscriber name john_doe breach-state
Example 2
SCE8000>enable 5
Password:<cisco>
SCE8000>show interface
Bucket 2 is breached.
Bucket 3 is breached.
Bucket 4 is breached.
Bucket 5 is breached
Related Commands
linecard 0 subscriber name jane_smith breach-state
Command
Description
show interface linecard subscriber name bucket-state
Displays all buckets used by the specified
subscriber
Cisco SCE 8000 CLI Command Reference
2-483
Chapter 2
CLI Command Reference
show interface linecard subscriber name bucket-state
show interface linecard subscriber name bucket-state
Displays all buckets used by the specified subscriber.
show interface linecard slot-number subscriber name name bucket-state
Syntax Description
slot-number
Number of the identified slot. Enter a value of 0.
name
Name of the subscriber for which to display the breach-state
Command Default
None
Command Modes
User EXEC
Command History
This table includes the following release-specific history entries:
Release
Modification
3.6.x
This command was introduced.
Usage Guidelines
Authorization: viewer
Examples
The following example shows output from this command.
SCE8000>enable 5
Password:<cisco>
SCE8000>show interface linecard 0 subscriber
Bucket 1 is used. Status - Not Breached.
Bucket 2 is used. Status - Breached.
Bucket 3 is used. Status - Breached.
Bucket 4 is used. Status - Breached.
Bucket 5 is used. Status - Breached.
Bucket 6 is used. Status - Not Breached.
Bucket 7 is used. Status - Not Breached.
Bucket 8 is used. Status - Not Breached.
Bucket 9 is used. Status - Not Breached.
Bucket 10 is used. Status - Not Breached.
Bucket 11 is used. Status - Not Breached.
Bucket 12 is used. Status - Not Breached.
Bucket 13 is used. Status - Not Breached.
Bucket 14 is used. Status - Not Breached.
Bucket 15 is used. Status - Not Breached.
Bucket 16 is used. Status - Not Breached.
SCE8000>
Cisco SCE 8000 CLI Command Reference
2-484
name john_doe bucket-state
Chapter 2
CLI Command Reference
show interface linecard subscriber name bucket-state
Related Commands
Command
Description
show interface linecard subscriber name breach-state
Displays all breached buckets for the
specified subscriber.
show interface linecard subscriber name bucket-state id
Displays specific bucket size, usage and
state.
Cisco SCE 8000 CLI Command Reference
2-485
Chapter 2
CLI Command Reference
show interface linecard subscriber name bucket-state id
show interface linecard subscriber name bucket-state id
Displays specific bucket size, usage and state.
show interface linecard slot-number subscriber name name bucket-state id bucket-number
Syntax Description
slot-number
Number of the identified slot. Enter a value of 0.
name
Name of the subscriber for which to display the bucket-state
bucket-number
Number of the bucket to display.
Command Default
None
Command Modes
User EXEC
Command History
This table includes the following release-specific history entries:
Usage Guidelines
Release
Modification
3.6.x
This command was introduced.
4.1.0
Updated the Bucket State output field.
If the bucket state is QUOTA_UNLIMITED, the output displays:
Bucket state: Unlimited Quota
Authorization: viewer
Examples
The following example shows output from this command.
SCE8000> enable 5
Password: <cisco>
SCE8000> show interface
Bucket type: Sessions
Bucket state: Breached
Bucket size: 2
Bucket usage: 2
SCE8000>
Related Commands
Command
linecard 0 subscriber name john_doe bucket-state id 3
Description
show interface linecard subscriber name bucket-state Displays all buckets used by the specified
subscriber.
Cisco SCE 8000 CLI Command Reference
2-486
Chapter 2
CLI Command Reference
show interface linecard subscriber properties
show interface linecard subscriber properties
Displays all existing subscriber properties.
show interface linecard slot-number subscriber properties
Syntax Description
slot-number
Command Default
None
Command Modes
User EXEC
Command History
This table includes the following release-specific history entries:
Number of the identified slot. Enter a value of 0.
Release
Modification
2.5.7
This command was introduced.
Usage Guidelines
Authorization: viewer
Examples
The following example shows how to display the subscriber properties:
SCE8000>enable 5
Password:<cisco>
SCE8000>show interface linecard 0 subscriber properties
Subscriber properties:
"monitor" : int16, minValue=0, maxValue=1.
"new_classification_policy" : Uint16.
"packageId : Uint16, minValue=0, maxValue=4999.
"QpLimit" : int32[18].
"QpSet" : Uint8[18].
Subscriber read-only properties:
"concurrentAttacksNumber" : Uint8.
"PU_QP_QuotaSetCounter" : Uint8[18].
"PU_QP_QuotaUsageCounter" : int32[18].
"PU_REP_nonReportedSessionsInTUR" : int32.
"P_aggPeriodType" :Uint8.
"P_blockReportCounter : int32
"P_endOfAggPeriodTimestamp : Uint32.
"P_firstTimeParty" : bool.
"P_localEndOfAggPeriodTimestamp : Uint32.
"P_mibSubCounters16" : Uint16[36][2].
"P_mibSubCounters32" : Uint32[36][2].
"P_newParty" : bool.
"P_numOfRedirections : Uint8.
"P_partyCurrentPackage : Uint16
"P_partyGoOnlineTime : Uint32
"P_partyMonth : Uint16
SCE8000>
Cisco SCE 8000 CLI Command Reference
2-487
Chapter 2
CLI Command Reference
show interface linecard subscriber sm-connection-failure
show interface linecard subscriber sm-connection-failure
Displays the current state of the SM-SCE platform connection, as well as the configured action to take
if that connection fails.
show interface linecard slot-number subscriber sm-connection-failure [timeout]
Syntax Description
slot-number
Number of the identified slot. Enter a value of 0.
timeout
Displays the configured SM-SCE platform link failure timeout value.
Command Default
None
Command Modes
User EXEC
Command History
This table includes the following release-specific history entries:
Release
Modification
3.0.3
This command was introduced.
Usage Guidelines
Authorization: viewer
Examples
The following example shows how to display the state of the SM-SCE platform connection:
SCE8000>enable 5
Password:<cisco>
SCE8000>show interface linecard 0 subscriber subscriber sm-connection-failure
Current SM link state: down.
Please note that this refers to the logical connection,
which means the synchronization with the SM i.e.
There might be cases where the connection at the SM will be up
and down at the SE since synchronization hasn't been completed yet.
Configured action to take when SM link is down: No action
SCE8000>
The following example shows how to display the configured timeout value for the SM-SCE platform
connection:
SCE8000> enable 5
Password: <cisco>
SCE8000> show interface linecard 0 subscriber subscriber sm-connection-failure timeout
SM SCE link failure timeout is: 90
SCE8000>
Cisco SCE 8000 CLI Command Reference
2-488
Chapter 2
CLI Command Reference
show interface linecard subscriber sm-connection-failure
Related Commands
Command
Description
subscriber sm-connection-failure Configures the behavior of the system if communication fails
between the SM and the Cisco SCE platform.
Cisco SCE 8000 CLI Command Reference
2-489
Chapter 2
CLI Command Reference
show interface linecard subscriber templates
show interface linecard subscriber templates
Displays a specified subscriber template.
show interface linecard slot-number subscriber templates {all | index template-number}
Syntax Description
slot-number
Number of the identified slot. Enter a value of 0.
template-number
Index number of the template to be displayed.
all
Displays all existing subscriber templates.
Command Default
None
Command Modes
User EXEC
Command History
This table includes the following release-specific history entries:
Release
Modification
3.0.3
This command was introduced.
Usage Guidelines
Authorization: viewer
Examples
The following example shows how to display a specified subscriber template:
SCE8000> enable 5
SCE8000> show interface linecard 0 subscriber templates index 3
Subscriber template 3 properties
monitor=0
new_classification_policy=0
packageId=0
QpLimit[0..17]=0*17,8
QpSet[0..17]=0*17,1
SCE8000>
Password:<cisco>
Related Commands
Command
Description
subscriber template import csv-file Imports a subscriber template from the specified CSV file,
creating a party template.
subscriber template export csv-file
Cisco SCE 8000 CLI Command Reference
2-490
Exports a subscriber template to the specified CSV file,
according to the party template.
Chapter 2
CLI Command Reference
show interface linecard subscriber TP-IP-range
show interface linecard subscriber TP-IP-range
To view the details of the IPv4 and IPv6 traffic processor IP range configuration, use the show interface
linecard TP-IP-range command in privileged EXEC mode.
show interface LineCard slot subscriber {TP-IP-range [name range-name | all]}
Syntax Description
slot
The slot number of the Linecard. Enter 0.
TP-IP-range
Traffic Processor IP range.
range-name
Name of the IP range for which to view the subscriber mapping details.
Command Default
None.
Command Modes
Privileged EXEC (#)
Command History
This table includes the following release-specific history entries:
Release
Modification
3.8.0
This command was introduced.
Usage Guidelines
Authorization: admin
Examples
The following example shows how to display the subscriber details in a TP-IP range:
SCE8000> enable 5
Password: <cisco>
SCE8000> show interface LineCard 0 subscriber TP-IP-range name test
TP IP range test - IPv6 Range: 1080:a2b1::/48, Target TP: 3.
Number of Subscribers with mappings in the range: 0.
The following example shows how to display the subscriber details in all TP-IP ranges:
SCE8000> enable 5
Password: <cisco>
SCE8000> show interface LineCard 0 subscriber TP-IP-range all
Number of TP IP ranges currently configured: 4
TP IP range p2
IP Range: 0x98144248, Mask: 0x98144258, Target TP: 8.
Number of Subscribers with mappings in the range: 0.
Total number of Mappings found in the range: 0.
TP IP range p3
IP Range: 0x98144248, Mask: 0x98144258, Target TP: 7.
Number of Subscribers with mappings in the range: 0.
Total number of Mappings found in the range: 0.
Cisco SCE 8000 CLI Command Reference
2-491
Chapter 2
CLI Command Reference
show interface linecard subscriber TP-IP-range
TP IP range p4
IPv6 Range: 1080:a2b1::0, Mask: ffff:ffff:ffff::0, Target TP: 3.
Number of Subscribers with mappings in the range: 0.
Total number of Mappings found in the range: 0.
TP IP range p1
IPv6 Range: 1111:a2b1::0, Mask: ffff:ffff:ffff::0, Target TP: 3.
Number of Subscribers with mappings in the range: 0.
Total number of Mappings found in the range: 0.
Total number of Subscribers with mappings in all TP IP ranges: 0.
Total number of Mappings in all TP IP ranges: 0.
Related Commands
Command
Description
subscriber {TP-IP-range [name
range-name | all]}
Provides the details of the TP-IP ranges configured.
Cisco SCE 8000 CLI Command Reference
2-492
Chapter 2
CLI Command Reference
show interface linecard subscriber mapping included in TP-IP-range
show interface linecard subscriber mapping included in
TP-IP-range
To view the subscriber mapping details pertaining to a specific IPv4 and IPv6 traffic processor IP range,
use the show interface linecard subscriber mapping included in TP-IP-range command.
show interface LineCard slot subscriber {mapping included-in TP-IP-range name range-name
| amount mapping included-in TP-IP-range name range-name}
Syntax Description
mapping included-in
TP-IP-range
Shows all subscribers with mappings related to a specific IPv4 or IPv6
traffic processor IP range name.
range-name
Name of the IP range for which to view the subscriber mapping details.
amount mapping
included-in
TP-IP-range
Shows the number of subscribers with mappings related to a specific IPv4
or IPv6 traffic processor IP range name.
Command Default
None.
Command Modes
Privileged EXEC (#)
Command History
This table includes the following release-specific history entries:
Release
Modification
3.8.0
This command was introduced.
Usage Guidelines
Authorization: admin
Examples
The following example illustrates how to view the subscriber mapping details pertaining to a specific IP
range:
SCE8000> enable 15
SCE8000> show interface LineCard 0 subscriber mapping included-in TP-IP-range subu
Subscribers with IP mappings included in TP IP range 'subu' (abcd::/56):
Subscriber 'siva', mapping 'abcd::/56'.
Total 1 subscribers found, with 1 matching mappings.
The following example illustrates how to view the subscriber mapping details pertaining to a specific
subscriber:
SCE8000> enable 15
SCE8000> show interface LineCard 0 subscriber amount mapping included-in TP-IP-range name
siva
Subscriber 'siva', mapping 'abcd::/56'.
Total 1 subscribers found, with 1 matching mappings.
Cisco SCE 8000 CLI Command Reference
2-493
Chapter 2
show interface linecard subscriber mapping included in TP-IP-range
Cisco SCE 8000 CLI Command Reference
2-494
CLI Command Reference
Chapter 2
CLI Command Reference
show interface linecard subscriber virtual-gi-mode
show interface linecard subscriber virtual-gi-mode
To display the currently configured status of the virtual Gi mode, use the show interface linecard
subscriber virtual-gi-mode command in the user EXEC mode.
show interface linecard slot-number subscriber virtual-gi-mode
Syntax Description
slot-number
Command Default
None
Command Modes
User EXEC
Command History
This table includes the following release-specific history entries:
Number of the identified slot. Enter a value of 0.
Release
Modification
3.7.0
This command was introduced.
3.7.2
This command was modified.
Usage Guidelines
Authorization: viewer
Examples
The following is the sample output from the show interface linecard subscriber virtual-gi-mode
command:
SCE8000>enable 5
Password:<cisco>
SCE8000>show interface lineCard 0 subscriber virtual-gi-mode
Virtual Gi Mode is enabled
SCE8000>
Related Commands
Command
Description
diameter gx virtual-gi vlan-id
Configures the mapping of VLAN ID and virtual Gi ID.
subscriber virtual-gi-mode
Enables the virtual Gi mode.
Cisco SCE 8000 CLI Command Reference
2-495
Chapter 2
CLI Command Reference
show interface linecard tos-marking
show interface linecard tos-marking
Displays the current TOS marking state.
show interface linecard slot-number tos-marking
Syntax Description
slot-number
Command Default
None
Command Modes
User EXEC
Command History
This table includes the following release-specific history entries:
Usage Guidelines
Number of the identified slot. Enter a value of 0.
Release
Modification
3.1.5
This command was introduced.
Use this command to display the current TOS marking state, including the translation table and the
marking mode for each interface (enable or disable).
Authorization: viewer
Examples
The following example shows a sample of the output from this command:
SCE8000>enable 5
Password:<cisco>
SCE8000>show interface linecard 0 tos-marking
ToS Translation Table
=====================
| tos-id | tos-value (DSCP) |
|--------|------------------|
| 1 | 00 (0x00) |
| 2 | 00 (0x00) |
| 3 | 00 (0x00) |
| 4 | 00 (0x00) |
| 5 | 00 (0x00) |
| 6 | 00 (0x00) |
| 7 | 00 (0x00) |
ToS Marking state by egress interface
=====================================
| Interface | State |
|------------|----------|
| 1 | Disabled |
| 2 | Disabled |
| 3 | Disabled |
| 4 | Disabled |
SCE8000>
Cisco SCE 8000 CLI Command Reference
2-496
Chapter 2
CLI Command Reference
show interface linecard TpReportCounters
show interface linecard TpReportCounters
To display the following reports, use the show interface linecard TpReportCounters command in the
user EXEC mode:
•
Total Number of Reports generated
•
Number of Reports successfully sent to the Control Processor(CP)
•
Number of Reports dropped at the corresponding Traffic Processor(TP)
show interface linecard slot-number TpReportCounters
Syntax Description
slot-number
Command Default
None
Command Modes
User EXEC
Command History
This table includes the following release-specific history entries:
Number of the identified slot. Enter a value of 0.
Release
Modification
3.7.x
This command was introduced.
Usage Guidelines
The authorization used is admin.
Examples
The following is sample output from the show interface linecard TpReportCounters command:
SCE8000>enable 15
Password:<cisco>
SCE8000>show interface linecard 0 TpReportCounters
--- PPC 0 ----------------------------------------------------------Total Reports Formed: 0
Reports sent to Control: 0
Reports dropped to Control: 0
--- PPC 1 ----------------------------------------------------------Total Reports Formed: 424486
Reports sent to Control: 355311
Reports dropped to Control: 69175
--- PPC 2 ----------------------------------------------------------Total Reports Formed: 477317
Reports sent to Control: 355208
Reports dropped to Control: 122109
--- PPC 3 ----------------------------------------------------------Total Reports Formed: 371456
Reports sent to Control: 355230
Reports dropped to Control: 16226
--- PPC 4 ----------------------------------------------------------Total Reports Formed: 424412
Cisco SCE 8000 CLI Command Reference
2-497
Chapter 2
CLI Command Reference
show interface linecard TpReportCounters
Reports sent to Control: 355235
Reports dropped to Control: 69177
SCE8000>
Related Commands
Command
Description
clear interface linecard slot-number
TpReportCounters
Clears the display of total number of RDR reports
generated, reports successfully sent to the CP and reports
dropped at the corresponding TP.
Cisco SCE 8000 CLI Command Reference
2-498
Chapter 2
CLI Command Reference
show interface linecard traffic-counter
show interface linecard traffic-counter
Displays the specified traffic counter.
show interface linecard slot-number traffic-counter {name | all}
Syntax Description
slot-number
Number of the identified slot. Enter a value of 0.
name
Name of the traffic counter to be displayed.
all
Displays all traffic counters.
Command Default
None
Command Modes
User EXEC
Command History
This table includes the following release-specific history entries:
Release
Modification
2.5.7
This command was introduced.
Usage Guidelines
Authorization: viewer
Examples
The following example shows how to display information for all existing traffic counters:
SCE8000>enable 5
Password:<cisco>
SCE8000>show interface linecard 0 traffic-counter all
Counter 'cnt' value: 0 packets. Rules using it: None.
Counter 'cnt2' value: 1284 packets. Rules using it: Rule2.
2 counters listed out of 32 available.
SCE8000>
Related Commands
Command
Description
traffic-counter
Defines a new traffic counter.
clear interface linecard traffic-counter Clears the specified traffic counter.
Cisco SCE 8000 CLI Command Reference
2-499
Chapter 2
CLI Command Reference
show interface linecard traffic-rule
show interface linecard traffic-rule
To display the specified traffic rule configuration, use the show interface linecard traffic-rule in the user
EXEC mode.
show interface linecard slot-number traffic-rule {name name | tunnel-id-mode | all}
Syntax Description
slot-number
Number of the identified slot. Enter a value of 0.
name
Name of the traffic rule to be displayed.
tunnel-id-mode
Displays all traffic counter rules.
all
Displays all rules defined in tunnel-ID mode.
Command Default
None
Command Modes
User EXEC (>)
Command History
This table includes the following release-specific history entries:
Release
Modification
2.5.7
This command was introduced.
Usage Guidelines
Authorization: viewer
Examples
The following example shows how to display traffic rule information:
SCE8000> enable 5
Password: <cisco>
SCE8000> show interface linecard 0 traffic-rule name Rule1
0 rules listed out of 127 available.
SCE8000>
Related Commands
Command
Description
traffic-rule ip-addresses
Defines a new traffic rule.
traffic-rule ipv6
Defines a new traffic rule containing IPv6 IP addresses.
Cisco SCE 8000 CLI Command Reference
2-500
Chapter 2
CLI Command Reference
show interface linecard vas-traffic-forwarding
show interface linecard vas-traffic-forwarding
Displays information regarding VAS configuration and operational status summary.
show interface linecard slot-number vas-traffic-forwarding
show interface linecard slot-number vas-traffic-forwarding health-check
show interface linecard slot-number vas-traffic-forwarding vas server-group number
show interface linecard slot-number vas-traffic-forwarding vas server-group all
show interface linecard slot-number vas-traffic-forwarding vas server-id number
show interface linecard slot-number vas-traffic-forwarding vas server-id all
show interface linecard slot-number vas-traffic-forwarding vas server-id number counters
health-check
show interface linecard slot-number vas-traffic-forwarding vas server-id all counters
health-check
Syntax Description
slot-number
The number of the identified slot. Enter a value of 0.
number
ID number of either the specified VAS server or VAS server group for which
to display information
Command Default
This command has no default settings.
Command Modes
User Exec
Command History
This table includes the following release-specific history entries:
Usage Guidelines
Release
Modification
3.0.0
This command was introduced.
Use this command to display the following for VAS traffic-forwarding information:
•
Global VAS status summary — VAS mode, the traffic link used
•
VAS server groups information summary — operational status, number of configured servers,
number of current active servers.
This information may be displayed for a specific server group or all server groups:
•
VAS servers information summary — operational status, Health Check operational status, number
of subscribers mapped to this server.
This information may be displayed for a specific server or all servers:
Cisco SCE 8000 CLI Command Reference
2-501
Chapter 2
CLI Command Reference
show interface linecard vas-traffic-forwarding
•
VAS health check counters
Use the basic command with no parameters to display global VAS traffic forwarding information.
Use the VAS server-group parameter to display information relating to VAS server groups.
Use the VAS server-id parameter to display information relating to individual VAS servers.
Use the counters health-check parameter with the VAS server-id parameter to display information
relating to VAS health check.
Use the all keyword with the VAS server-group parameter or the VAS server-id parameter to display
information for all servers or server groups.
Authorization: viewer
Examples
The following examples illustrate how to display VAS traffic forwarding information and provide sample
outputs.
EXAMPLE 1
This example shows how to display global VAS status and configuration.
SCE8000>enable 5
Password:<cisco>
SCE8000>show interface linecard 0 vas-traffic-forwarding
VAS traffic forwarding is enabled
VAS traffic link configured: Link-1 actual: Link-1
SCE8000>
EXAMPLE 2
This example shows how to display operational and configuration information for a specific VAS Server
Group.
SCE8000>enable 5
Password:<cisco>
SCE8000>show interface linecard 0 vas-traffic-forwarding VAS server-group 0
VAS server group 0:
State: Failure configured servers: 0 active servers: 0
minimum active servers required for Active state: 1 failure action: Pass
SCE8000>
EXAMPLE 3
This example shows how to display operational and configuration information for a specific VAS server.
SCE8000>enable 5
Password:<cisco>
SCE8000>show interface linecard 0 vas-traffic-forwarding VAS server-id 0
VAS server 0:
configured mode: enable actual mode: enable VLAN: 520 server group: 3
State: UP
Health Check configured mode: enable status: running
Health Check source port: 63140 destination port: 63141
Number of subscribers: 0
SCE8000>
EXAMPLE 4
This example shows how to display health check counters for a specific server. (To clear these counters,
see clear interface linecard vas-traffic-forwarding vas counters health-check.)
Cisco SCE 8000 CLI Command Reference
2-502
Chapter 2
CLI Command Reference
show interface linecard vas-traffic-forwarding
SCE8000>enable 5
Password:<cisco>
SCE8000>show interface linecard 0 vas-traffic-forwarding VAS server-id 0 counters
health-check Health Checks statistics for VAS server '0' Upstream Downstream
----------------------------------------------------------------------Flow Index '0'
----------------Total packets sent
: 31028 : 31027 :
Total packets received
: 31028 : 31027 :
Good packets received
: 31028 : 31027 :
Error packets received
: 0 : 0 :
Not handled packets
: 0 : 0 :
Average roundtrip (in millisecond) : 0 : 0 :
Error packets details
--------------------------Reordered packets
: 0 : 0 :
Bad Length packets
: 0 : 0 :
IP Checksum error packets
: 0 : 0 :
L4 Checksum error packets
: 0 : 0 :
L7 Checksum error packets
: 0 : 0 :
Bad VLAN tag packets
: 0 : 0 :
Bad Device ID packets
: 0 : 0 :
Bad Server ID packets
: 0 : 0 :
SCE8000>
Related Commands
Command
Description
vas-traffic-forwarding
Enables VAS traffic forwarding.
clear interface linecard vas-traffic-forwarding vas counters Clears the VAS health check
health-check
counters.
Cisco SCE 8000 CLI Command Reference
2-503
Chapter 2
CLI Command Reference
show interface linecard virtual-links
show interface linecard virtual-links
Displays the currently configured virtual links.
show interface linecard slot-number virtual-links all
show interface linecard slot-number virtual-links changed
Syntax Description
slot-number
Number of the identified slot. Enter a value of 0.
all
Displays all the currently configured virtual links, with their ID number and
direction.
changed
Displays virtual links that have global controllers (GCs) for which the PIR is
now different from the values configured for the template GCs through the
console.
Command Default
None
Command Modes
User EXEC
Command History
This table includes the following release-specific history entries:
Usage Guidelines
Release
Modification
3.5.0
This command was introduced.
You can also use this command to see which virtual links have global controllers whose values have been
changed from the original SCA BB configuration.
Authorization: viewer
Examples
The following example shows how to display all existing virtual links:
SCE8000>enable 5
password<cisco>
SCE8000>show interface linecard 0 virtual-links all
Virtual Link enabled
Virtual link index 1 direction upstream
Virtual link index 2 direction upstream
Virtual link index 3 direction upstream
Virtual link index 4 direction upstream
Virtual link index 12 direction upstream
Virtual link index 13 direction upstream
Virtual link index 14 direction upstream
Virtual link index 15 direction upstream
The following example shows how to display the virtual links that have GCs with values that are different
from the original configuration:
Cisco SCE 8000 CLI Command Reference
2-504
Chapter 2
CLI Command Reference
show interface linecard virtual-links
SCE8000>enable 5
password<cisco>
SCE8000>show interface linecard 0 virtual-links changed
Virtual Link enabled
Virtual link index 3 direction upstream
Global Controller index 0 timebased values = 300,300,300,300
Global Controller index 1 timebased values = 500,500,500,500
Virtual link index 12 direction upstream
Global Controller index 0 timebased values = 700,700,700,700
Virtual link index 14 direction upstream
Global Controller index 0 timebased values = 5500,5500,5500,5500
Global Controller index 1 timebased values = 1500,1500,1500,1500
Related Commands
Command
Description
virtual-links index direction
Adds a new virtual link.
Cisco SCE 8000 CLI Command Reference
2-505
Chapter 2
show interface linecard vlan
show interface linecard vlan
Displays the VLAN tunnel configuration.
show interface linecard slot-number vlan
Syntax Description
slot-number
Command Default
None
Command Modes
User EXEC
Command History
This table includes the following release-specific history entries:
Number of the identified slot. Enter a value of 0.
Release
Modification
3.0.3
This command was introduced.
Usage Guidelines
Authorization: viewer
Examples
The following example shows how to display the VLAN configuration:
SCE8000>enable 5
Password:<cisco>
SCE8000>show interface linecard 0 vlan
VLAN symmetric skip
SCE8000>
Related Commands
Command
Description
vlan
Configures the VLAN environment.
Cisco SCE 8000 CLI Command Reference
2-506
CLI Command Reference
Chapter 2
CLI Command Reference
show interface linecard vpn
show interface linecard vpn
Displays information regarding currently logged-in VPNs.
show interface linecard slot-number VPN {name vpn-name | all-names [automatic]}
Syntax Description
slot-number
The number of the identified slot. Enter a value of 0.
vpn-name
The name of the VPN in which to search for the IP mapping.
Command Default
This command has no default settings.
Command Modes
User Exec
Command History
This table includes the following release-specific history entries:
Usage Guidelines
Release
Modification
3.1.5
This command was introduced.
Use the name option to specify a specific currently logged-in VPN for which to display the details.
Use the all-names keyword to display he names of all VPNs that are currently logged into the system.
Use the automatic keyword with the all-names option to display the names of all VPNs that were
created automatically by the Cisco SCE platform.
Authorization: viewer
Examples
The following examples illustrate how to use this command.
EXAMPLE 1
The following example displays names of all currently logged in VPNs.
SCE8000>enable 5
Password:<cisco>
SCE8000>show interface linecard 0 VPN all-names
There are 2 VPNs in the data-base:
VPN1
VPN2
EXAMPLE 2
The following example illustrates the output of this command for an empty VPN:
SCE8000>enable 5
Password:<cisco>
SCE8000>show interface linecard 0 VPN name Vpn2
VPN name: Vpn2
Cisco SCE 8000 CLI Command Reference
2-507
Chapter 2
CLI Command Reference
show interface linecard vpn
VPN has no mappings
Number of subscriber mappings: 0
SCE8000>
EXAMPLE 3
The following example illustrates the output of this command for a VLAN-based VPN:
SCE8000>enable 5
Password:<cisco>
SCE8000>show interface linecard 0 VPN name Vpn3
VPN name: Vpn3
VLAN: 2
Number of subscriber mappings: 0
SCE8000>
EXAMPLE 4
The following example illustrates the output of this command for an automatically created VLAN VPN:
SCE8000>enable 5
Password:<cisco>
SCE8000>show interface linecard 0 VPN name Vpn2
VPN name: Vpn2
VLAN: 2
Number of subscriber mappings: 1
Automatically created VPN
SCE8000>
Cisco SCE 8000 CLI Command Reference
2-508
Chapter 2
CLI Command Reference
show interface linecard wap
show interface linecard wap
Displays the current WAP handling state.
show interface linecard slot-number wap
Syntax Description
slot-number
Command Default
None
Command Modes
User EXEC
Command History
This table includes the following release-specific history entries:
Number of the identified slot. Enter a value of 0.
Release
Modification
3.0.3
This command was introduced.
Usage Guidelines
Authorization: viewer
Examples
The following example shows how to use this command:
SCE8000>enable 5
Password:<cisco>
SCE8000>show interface linecard 0 wap
WAP handling is disabled
SCE8000>
Related Commands
Command
Description
wap
Enables or disables operating in a WAP environment.
Cisco SCE 8000 CLI Command Reference
2-509
Chapter 2
CLI Command Reference
show interface mng
show interface mng
Displays information regarding the specified management interface.
show interface mng {0/1 | 0/2} [auto-fail-over|duplex|ip address|speed]
Syntax Description
This command has no arguments.
Command Default
This command has no default settings.
Command Modes
User Exec
Command History
This table includes the following release-specific history entries:
Usage Guidelines
Release
Modification
3.0.3
This command was introduced.
Use this command to display the following information for the specified management interface:
•
speed
•
duplex
•
IP address
•
auto-fail-over
If no keyword is specified, all information is displayed.
Speed and duplex parameters are specific to the selected interface (port), while other parameters apply
to both ports and are displayed by a command to either interface.
Authorization: viewer
Examples
This example shows how to display all information for Management port 1.
SCE8000>enable 5
Password:<cisco>
SCE8000>show interface mng 0/1
ip address: 10.1.6.145
subnet mask: 255.255.0.0
Configured speed: auto, configured duplex: auto
AutoNegotiation is On, link is Up, actual speed: 100, actual duplex: half
SCE8000>
Related Commands
Command
Description
interface mng
Enters interface management configuration mode.
Cisco SCE 8000 CLI Command Reference
2-510
Chapter 2
CLI Command Reference
show interface tengigabitethernet
show interface tengigabitethernet
Displays the details of a TenGigabitEthernet Interface.
show interface tengigabitethernet slot-number/bay-number/interface-number [counters
[direction] | queue queue-number]
Syntax Description
slot-number
Number of the identified slot. Enter a value of 3.
bay-number
Number of the SPA bay or subslot in the Cisco SCE 8000-SIP module. Enter
a value ranging from 0 to 3.
interface-number
TenGigabitEthernet interface number. Enter a value of 0.
counters
Displays the values of counters of a TenGigabitEthernet line interface.
direction
(Optional) Displays only those counters of a specific direction. Choose in
or out.
queue
Displays the bandwidth and burst size of a queue in a TenGigabitEthernet
line interface.
queue-number
Number of the queue, ranging from 0 to 3.
Command Default
None
Command Modes
User EXEC
Command History
This table includes the following release-specific history entries:
Release
Modification
3.1.6
This command was introduced.
Usage Guidelines
Authorization: viewer
Examples
The following example shows how to display information about the TenGigabitEthernet interface:
SCE8000>enable 5
Password:<cisco>
SCE8000>show interface TenGigabitEthernet 3/2/0
Auto negotiation configured: Disabled
Actual status:
Link is: ON
Auto negotiation: Disabled
Bandwidth (L1): 10000000 Kbps, Burst-size: 500000 bytes
Traffic side is "subscriber" (default configuration)
Pseudo IP Address: Not Configured
SCE8000>
Cisco SCE 8000 CLI Command Reference
2-511
Chapter 2
CLI Command Reference
show interface tengigabitethernet
Related Commands
Command
Description
interface TenGigabitEthernet
Enters interface ten gigabit Ethernet configuration mode.
Cisco SCE 8000 CLI Command Reference
2-512
Chapter 2
CLI Command Reference
show inventory
show inventory
Displays UDI information for the Cisco SCE platform.
show inventory [raw]
Syntax Description
raw
Displays the complete inventory of the Cisco SCE platform.
When this keyword is not used, only field replaceable units (FRUs) are
displayed.
Command Default
None
Command Modes
User EXEC
Command History
This table includes the following release-specific history entries:
Usage Guidelines
Release
Modification
3.0.3
This command was introduced.
Use this command to display the following UDI information for the Cisco SCE platform:
•
Device name
•
Description
•
Product identifier
•
Version identifier
•
Serial number
Authorization: viewer
Examples
The following examples show output from this command.
Example 1
The following example shows how to display the UDI information for the Cisco SCE platform:
SCE8000>enable 5
Password:<cisco>
SCE8000>show inventory
NAME: "Chassis", DESCR: "Cisco SCE 2020 Service Control Engine, Multi Mode, 4-port GE"
PID: SCE2020-4XGBE-MM , VID: V01, SN: CAT093604K3
SCE8000>
Example 2
The following example shows how to display the inventory (UDIs) for the FRUs only:
Cisco SCE 8000 CLI Command Reference
2-513
Chapter 2
CLI Command Reference
show inventory
SCE8000>enable 5
Password:<cisco>
SCE8000>show inventory
NAME: "SCE8000 Chassis", DESCR: "CISCO7604"
PID: CISCO7604
, VID: V0 , SN: FOX105108X5
NAME: "SCE8000 Service Control Module (SCM) in slot 1", DESCR: "SCE8000-SCM-E"
PID: SCE8000-SCM-E
, VID: V0 , SN: CAT1122584N
NAME: "SCE8000 SPA Interface Processor (SIP) in slot 3", DESCR: "SCE8000-SIP"
PID: SCE8000-SIP
, VID: V0 , SN: CAT1150G07F
NAME: "SPA-1X10GE-L-V2", DESCR: "SPA-1X10GE-L-V2"
PID: SPA-1X10GE-L-V2
, VID: V02, SN: JAE11517RMR
NAME: "SPA-1X10GE-L-V2", DESCR: "SPA-1X10GE-L-V2"
PID: SPA-1X10GE-L-V2
, VID: V02, SN: JAE11496E1P
NAME: "SPA-1X10GE-L-V2", DESCR: "SPA-1X10GE-L-V2"
PID: SPA-1X10GE-L-V2
, VID: V02, SN: JAE11517RIO
NAME: "SPA-1X10GE-L-V2", DESCR: "SPA-1X10GE-L-V2"
PID: SPA-1X10GE-L-V2
, VID: V02, SN: JAE115295HH
NAME: "SCE8000 FAN 1", DESCR: "FAN-MOD-4HS"
PID: FAN-MOD-4HS
, VID: V0 , SN: DCH11013744
NAME: "SCE8000 AC or DC power supply 0", DESCR: "PWR-2700-AC/4"
PID: PWR-2700-AC/4
, VID: V0 , SN: APQ105000MV
NAME: "SCE8000 AC or DC power supply 1", DESCR: "PWR-2700-DC/4"
PID: PWR-2700-AC/4
, VID: V0 , SN: APQ105000MV
NAME: "XFP-10GLR-OC192SR ", DESCR: "XFP-10GLR-OC192SR "
PID: XFP-10GLR-OC192SR , VID: V02, SN: AGA1142N4B7
NAME: "XFP-10GLR-OC192SR ", DESCR: "XFP-10GLR-OC192SR "
PID: XFP-10GLR-OC192SR , VID: V02, SN: AGA1142N4AL
NAME: "XFP-10GLR-OC192SR ", DESCR: "XFP-10GLR-OC192SR "
PID: XFP-10GLR-OC192SR , VID: V02, SN: AGA1141N43R
NAME: "XFP-10GLR-OC192SR ", DESCR: "XFP-10GLR-OC192SR "
PID: XFP-10GLR-OC192SR , VID: V02, SN: AGA1143N4JN
Example 3
The following example shows how to display the complete inventory (UDIs) of the Cisco SCE platform:
SCE8000>enable 5
Password:<cisco>
SCE8000>show inventory raw
PID: CISCO7604
, VID: V0
NAME: "SCE8000 Physical Slot 1",
slot"
PID: ""
, VID: ""
NAME: "SCE8000 Physical Slot 2",
slot"
PID: ""
, VID: ""
, SN: FOX105108XB
DESCR: "Container SCE8000 Service Control Module (SCM)
, SN: ""
DESCR: "Container SCE8000 Service Control Module (SCM)
, SN: ""
NAME: "SCE8000 Physical Slot 3", DESCR: "Container SCE8000 SPA Interface Processor (SIP)
slot"
PID: ""
, VID: "" , SN: ""
NAME: "SCE8000 Physical Slot 4", DESCR: "Container SCE8000 Optical Bypass slot"
PID: ""
, VID: "" , SN: ""
Cisco SCE 8000 CLI Command Reference
2-514
Chapter 2
CLI Command Reference
show inventory
NAME: "SCE8000 Fan Module", DESCR: "Container SCE8000 Fan Module"
PID: ""
, VID: "" , SN: ""
NAME: "SCE8000 AC or DC power supply", DESCR: "Container SCE8000 AC or DC power supply"
PID: ""
, VID: "" , SN: ""
NAME: "SCE8000 Link", DESCR: "Container SCE8000 Link"
PID: ""
, VID: "" , SN: ""
NAME: "SCE8000 Backplane", DESCR: "Container SCE8000 Backplane "
PID: ""
, VID: "" , SN: ""
NAME: "SCE8000 Service Control Module (SCM) in slot 1", DESCR: "SCE8000-SCM-E"
PID: SCE8000-SCM-E
, VID: V0 , SN: CAT1151G00Z
NAME: "SCE8000 SPA Interface Processor (SIP) in slot 3", DESCR: "SCE8000-SIP"
PID: SCE8000-SIP
, VID: V0 , SN: CAT1204G020
NAME: "SCE8000 Link 0", DESCR: "SCE8000 Link"
PID: ""
, VID: "" , SN: ""
NAME: "SCE8000 Link 1", DESCR: "SCE8000 Link"
PID: ""
, VID: "" , SN: ""
NAME: "SCE8000 SIP bay 3/0", DESCR: "SCE8000 SIP bay"
PID: ""
, VID: "" , SN: ""
NAME: "SCE8000 SIP bay 3/1", DESCR: "SCE8000 SIP bay"
PID: ""
, VID: "" , SN: ""
NAME: "SCE8000 SIP bay 3/2", DESCR: "SCE8000 SIP bay"
PID: ""
, VID: "" , SN: ""
NAME: "SCE8000 SIP bay 3/3", DESCR: "SCE8000 SIP bay"
PID: ""
, VID: "" , SN: ""
NAME: "SPA-1X10GE-L-V2", DESCR: "SPA-1X10GE-L-V2"
PID: SPA-1X10GE-L-V2
, VID: V02, SN: JAE11485LPJ
NAME: "SPA-1X10GE-L-V2", DESCR: "SPA-1X10GE-L-V2"
PID: SPA-1X10GE-L-V2
, VID: V02, SN: JAE11485L4C
NAME: "SPA-1X10GE-L-V2", DESCR: "SPA-1X10GE-L-V2"
PID: SPA-1X10GE-L-V2
, VID: V02, SN: JAE11485L9V
NAME: "SPA-1X10GE-L-V2", DESCR: "SPA-1X10GE-L-V2"
PID: SPA-1X10GE-L-V2
, VID: V02, SN: JAE11485LAP
NAME: "TenGigabitEthernet3/0/0", DESCR: "SCE8000 SPA port"
PID: ""
, VID: "" , SN: ""
NAME: "TenGigabitEthernet3/1/0", DESCR: "SCE8000 SPA port"
PID: ""
, VID: "" , SN: ""
NAME: "TenGigabitEthernet3/2/0", DESCR: "SCE8000 SPA port"
PID: ""
, VID: "" , SN: ""
NAME: "TenGigabitEthernet3/3/0", DESCR: "SCE8000 SPA port"
PID: ""
, VID: "" , SN: ""
NAME: "SCE8000 FAN 1", DESCR: "FAN-MOD-4HS"
PID: FAN-MOD-4HS
, VID: V0 , SN: DCH10511402
Cisco SCE 8000 CLI Command Reference
2-515
Chapter 2
CLI Command Reference
show inventory
NAME: "SCE8000 AC or DC power supply 0", DESCR: "PWR-2700-AC/4"
PID: PWR-2700-AC/4
, VID: V0 , SN: APQ105100F8
NAME: "SCE8000 AC or DC power supply 1", DESCR: "PWR-2700-AC/4"
PID: PWR-2700-AC/4
, VID: V0 , SN: APQ105100F8
NAME: "XFP-10GZR-OC192LR ", DESCR: "XFP-10GZR-OC192LR "
PID: XFP-10GZR-OC192LR , VID: V01, SN: FNS11061SBB
NAME: "XFP-10GZR-OC192LR ", DESCR: "XFP-10GZR-OC192LR "
PID: XFP-10GZR-OC192LR , VID: V01, SN: FNS11021359
NAME: "XFP-10G-MM-SR
PID: XFP-10G-MM-SR
", DESCR: "XFP-10G-MM-SR
, VID: V01, SN: FNS12130MLQ
"
NAME: "XFP-10G-MM-SR
PID: XFP-10G-MM-SR
", DESCR: "XFP-10G-MM-SR
, VID: V01, SN: FNS12130MHF
"
NAME: "SCE8000 traffic processor 1", DESCR: "SCE8000 traffic processor"
PID: ""
, VID: "" , SN: ""
NAME: "SCE8000 traffic processor 2", DESCR: "SCE8000 traffic processor"
PID: ""
, VID: "" , SN: ""
NAME: "SCE8000 traffic processor 3", DESCR: "SCE8000 traffic processor"
PID: ""
, VID: "" , SN: ""
NAME: "SCE8000 traffic processor 4", DESCR: "SCE8000 traffic processor"
PID: ""
, VID: "" , SN: ""
NAME: "SCE8000 traffic processor 5", DESCR: "SCE8000 traffic processor"
PID: ""
, VID: "" , SN: ""
NAME: "SCE8000 traffic processor 6", DESCR: "SCE8000 traffic processor"
PID: ""
, VID: "" , SN: ""
NAME: "SCE8000 traffic processor 7", DESCR: "SCE8000 traffic processor"
PID: ""
, VID: "" , SN: ""
NAME: "SCE8000 traffic processor 8", DESCR: "SCE8000 traffic processor"
PID: ""
, VID: "" , SN: ""
NAME: "SCE8000 traffic processor 9", DESCR: "SCE8000 traffic processor"
PID: ""
, VID: "" , SN: ""
NAME: "SCE8000 traffic processor 10", DESCR: "SCE8000 traffic processor"
PID: ""
, VID: "" , SN: ""
NAME: "SCE8000 traffic processor 11", DESCR: "SCE8000 traffic processor"
PID: ""
, VID: "" , SN: ""
NAME: "SCE8000 traffic processor 12", DESCR: "SCE8000 traffic processor"
PID: ""
, VID: "" , SN: ""
SCE8000>
Cisco SCE 8000 CLI Command Reference
2-516
Chapter 2
CLI Command Reference
show ip access-class
show ip access-class
Displays the access list defined for global IP access to the Cisco SCE platform. Only IP addresses
permitted access according to this access list are allowed access to the system.
show ip access-class
Syntax Description
This command has no arguments or keywords.
Command Default
None
Command Modes
User EXEC
Command History
This table includes the following release-specific history entries:
Release
Modification
2.5.7
This command was introduced.
Usage Guidelines
Authorization: viewer
Examples
The following example shows how to display the IP access class mapping:
SCE8000>enable 5
Password:<cisco>
SCE8000>show ip access-class
IP layer is using access-list # 1.
SCE8000>
Related Commands
Command
Description
ip access-class
Specifies which access control list (ACL) controls global access to the
Cisco SCE platform.
Cisco SCE 8000 CLI Command Reference
2-517
Chapter 2
CLI Command Reference
show ip advertising
show ip advertising
Displays the status of IP advertising, the configured destination, and the configured interval.
show ip advertising [destination | interval]
Syntax Description
destination
Displays the IP advertising destination.
interval
Displays the interval between ping commands.
Command Default
None
Command Modes
User EXEC
Command History
This table includes the following release-specific history entries:
Release
Modification
2.5.7
This command was introduced.
Usage Guidelines
Authorization: viewer
Examples
The following example shows how to display the IP advertising status and configuration:
SCE8000>enable 5
Password:<cisco>
SCE8000>show ip advertising
IP advertising is disabled
IP advertising destination is 10.10.10.10
IP advertising interval is 853 seconds
SCE8000>
Related Commands
Command
Description
ip advertising
Enables IP advertising.
Cisco SCE 8000 CLI Command Reference
2-518
Chapter 2
CLI Command Reference
show ip default-gateway
show ip default-gateway
Displays the configured default gateway.
show ip default-gateway
Syntax Description
This command has no arguments or keywords.
Command Default
None
Command Modes
User EXEC
Command History
This table includes the following release-specific history entries:
Release
Modification
2.5.7
This command was introduced.
Usage Guidelines
Authorization: viewer
Examples
The following example shows how to display the default gateway:
SCE8000>enable 5
Password:<cisco>
SCE8000>show ip default-gateway
Default gateway: 10.1.1.1
SCE8000>
Related Commands
Command
Description
ip default-gateway
Configures the default gateway for the Cisco SCE platform.
Cisco SCE 8000 CLI Command Reference
2-519
Chapter 2
CLI Command Reference
show ip filter
show ip filter
Displays information about the management interface IP filtering.
show ip filter
Syntax Description
This command has no arguments or keywords.
Command Default
None
Command Modes
User EXEC
Command History
This table includes the following release-specific history entries:
Usage Guidelines
Release
Modification
3.0.0
This command was introduced.
Use this command to display the following information for management interface IP filtering.
•
IP fragment filter enabled or disabled
•
Configured attack threshold (permitted and not-permitted IP addresses)
•
Configured end-of-attack threshold (permitted and not-permitted IP addresses)
•
Burst size in seconds (permitted and not-permitted IP addresses)
Authorization: viewer
Examples
The following example shows how to display information about management interface IP filtering:
SCE8000>enable 5
Password:<cisco>
SCE8000>show ip filter
is fragment filtered : 0
Input Bandwidth : 0 Kb/sec
Input packets rate : 2 Pkt/sec
Input bandwidth policer : CIR: 20000.00 Kb/sec BTime: 200 msec LP: 100 %
Input packet rate policer : CIR: 5000.00 Pkt/sec BTime: 200 msec LP: 100 %
Permit monitor :state : no_attack BW: 0
High : CIR: 20000.00 Kb/sec BTime: 10000 msec LP: 100 %
Low : CIR: 20000.00 Kb/sec BTime: 10000 msec LP: 100 %
Denied monitor :state : no_attack BW: 0
High : CIR: 20000.00 Kb/sec BTime: 10000 msec LP: 100 %
Low : CIR: 20000.00 Kb/sec BTime: 10000 msec LP: 100 %
in_bytes : 85115466
in_pkt : 371598
in_pkt_accept : 371598
in_pkt_denied : 0
drop_fragment_cnt : 0
Cisco SCE 8000 CLI Command Reference
2-520
Chapter 2
CLI Command Reference
show ip filter
action_delay_due_bw : 0
action_delay_due_pkt : 0
PERMIT events
meStartAttack : 0
meStopAttack : 0
DENIED events
meStartAttack : 0
SCE8000>
Cisco SCE 8000 CLI Command Reference
2-521
Chapter 2
CLI Command Reference
show ip radius-client
show ip radius-client
Displays the RADIUS client general configuration.
show ip radius-client
Syntax Description
This command has no arguments or keywords.
Command Default
None
Command Modes
Privileged EXEC
Command History
This table includes the following release-specific history entries:
Release
Modification
3.0.5
This command was introduced.
Usage Guidelines
Authorization: admin
Examples
The following example shows how to use this command:
SCE8000>enable 10
Password:<cisco>
SCE8000#show ip radius-client
SCE8000>
Related Commands
Command
Description
ip radius-client retry limit
Configures the parameters for retransmitting unacknowledged
RADIUS client messages.
Cisco SCE 8000 CLI Command Reference
2-522
Chapter 2
CLI Command Reference
show ip route
show ip route
Displays the entire routing table and the destination of last resort (default gateway). When you use the
prefix and mask arguments, the command displays the routing entries from the subnet specified by the
prefix and mask pair.
show ip route [prefix mask ]
Syntax Description
prefix
Prefix of the routing entries to be included.
mask
Limits the search of routing entries.
Command Default
None
Command Modes
User EXEC
Command History
This table includes the following release-specific history entries:
Release
Modification
2.5.7
This command was introduced.
Usage Guidelines
Authorization: viewer
Examples
The following example shows the default gateway:
SCE8000>enable 5
Password:<cisco>
SCE8000>show ip route gateway of last resort is 10.1.1.1
SCE8000>
The following example shows how to retrieve the IP route:
SCE8000>enable 5
Password:<cisco>
SCE8000>show ip route 10.1.60.0 255.255.255.0
| prefix
| mask
| next hop
|
|--------------|--------------|--------------|
| 10.1.60.0
| 255.255.255.0 | 10.1.1.5
|
SCE8000>
Related Commands
Command
Description
ip route
Adds an IP routing entry to the routing table.
Cisco SCE 8000 CLI Command Reference
2-523
Chapter 2
CLI Command Reference
show ip rpc-adapter
show ip rpc-adapter
Displays the status of the RPC adapter (enabled or disabled) and the configured port.
show ip rpc-adapter [sessions]
Syntax Description
sessions
Command Default
None
Command Modes
User EXEC
Command History
This table includes the following release-specific history entries:
Usage Guidelines
Examples
Displays information about RPC adapter sessions.
Release
Modification
2.5.7
This command was introduced.
Authorization: viewer
The following example shows how to display the configuration of the RPC adapter:
SCE8000>enable 5
Password:<cisco>
SCE8000>show ip rpc-adapter
RPC Server is OFFLINE
RPC Server port is 14374
SCE8000>
Related Commands
Command
Description
ip rpc-adapter
Enables the RPC adapter.
ip rpc-adapter port
Defines the RPC adapter port.
Cisco SCE 8000 CLI Command Reference
2-524
Chapter 2
CLI Command Reference
show ip ssh
show ip ssh
Displays the status of the SSH server, including current SSH sessions.
show ip ssh
Syntax Description
This command has no arguments or keywords.
Command Default
None
Command Modes
User EXEC
Command History
This table includes the following release-specific history entries:
Release
Modification
2.5.7
This command was introduced.
Usage Guidelines
Authorization: viewer
Examples
The following example shows how to retrieve the current SSH status:
SCE8000>enable 5
Password:<cisco>
SCE8000>show ip ssh
SSH server is enabled.
SSHv1 support is enabled
SSH server does not use any access-list.
There are no active SSH sessions.
Management vlan 3 configured for ssh service
SCE8000>
Related Commands
Command
Description
ip ssh
Enables the SSH server.
Cisco SCE 8000 CLI Command Reference
2-525
Chapter 2
show ip ssh mng-vlan
show ip ssh mng-vlan
Displays the management interface VLAN configured for SSH services.
show ip ssh mng-vlan
Syntax Description
This command has no arguments or keywords.
Command Default
This command has no default settings.
Command Modes
User Exec
Command History
This table includes the following release-specific history entries:
Release
Modification
3.7.x
This command was introduced.
Usage Guidelines
Authorization: viewer
Examples
This example shows how to display the VLAN configured for SSH services.
SCE8000>enable 5
Password:<cisco>
SCE8000#show ip ssh mng-vlan
Management vlan 3 assigned to ssh service
SCE8000#
Related Commands
Command
Description
ip ssh mng-vlan
Assigns the specified VLAN to SSH services.
Cisco SCE 8000 CLI Command Reference
2-526
CLI Command Reference
Chapter 2
CLI Command Reference
show line vty
show line vty
Displays the Telnet configuration.
show line vty {timeout | access-class in}
Syntax Description
timeout
Displays the timeout configured to the Telnet sessions.
access-class in
Displays the access list configured to the Telnet server that contains the list
of addresses that have access to the system.
Command Default
None
Command Modes
User EXEC
Command History
This table includes the following release-specific history entries:
Release
Modification
2.5.7
This command was introduced.
Usage Guidelines
Authorization: viewer
Examples
The following example shows the access list configured for Telnet lines:
SCE8000>enable 5
Password:<cisco>
SCE8000>show line vty access-class in
Telnet server is using access-list # 1.
SCE8000>
Related Commands
Command
Description
line vty
Enters Line Configuration mode for Telnet lines, which configures all
Telnet lines.
Cisco SCE 8000 CLI Command Reference
2-527
Chapter 2
CLI Command Reference
show log
show log
Displays the contents of the user log file.
show log
Syntax Description
This command has no arguments or keywords.
Command Default
None
Command Modes
User EXEC
Command History
This table includes the following release-specific history entries:
Release
Modification
3.0.3
This command was introduced.
Usage Guidelines
Authorization: viewer
Examples
The following example shows how to use this command:
SCE8000>enable 5
Password:<cisco>
SCE8000>show log
2006-01-25 00:14:46
files were opened
2006-01-25 00:23:07
2006-01-25 00:49:41
2006-01-25 01:02:41
2006-01-25 01:06:33
2006-01-25 01:08:07
2006-01-25 01:23:07
2006-01-25 01:56:44
- file size 1200
2006-01-25 05:34:45
SCE8000>
Related Commands
|
|
|
|
|
|
|
INFO
INFO
INFO
INFO
INFO
INFO
INFO
|
|
|
|
|
|
|
CPU
CPU
CPU
CPU
CPU
CPU
CPU
#000
#000
#000
#000
#000
#000
#000
|
|
|
|
|
|
|
A new password was set for level 10
System hostname changed to :ecco"
Time zone set to GMT
A new password was set for level 15
A new password was set for level 5
IP address of slot 0, port 0 set to 10.10.10
Configuration file '/system/config.txt' was saved
| INFO | CPU #000 | A Telnet session from 20.20.20.20 was established
Command
Description
clear logger
Clears the Cisco SCE platform logger (user log files).
logger get user-log file-name
Outputs the current user log to a target file.
more user-log
Displays the user log on the CLI console screen.
Cisco SCE 8000 CLI Command Reference
2-528
| INFO | CPU #000 | User message files were successfully cleared, new
Chapter 2
CLI Command Reference
show logger device
show logger device
Displays the configuration of the specified SCE platform logger file. The command also displays the
current user log counters.
show logger device {line-attack-file-log | user-file-log [counters | max-file-size | status |
nv-counters]}
Syntax Description
logger device
Choose either:
•
line-attack-file-log—Displays status and maximum file size.
•
user-file-log—Displays status and maximum file size.
If you specify user-file-log, you can also specify one of the following
keywords: counters, max-file-size, nv-counters, or status.
counters
Displays the user-file-log counters.
max-file-size
Displays the currently configured maximum file size for the user-file-log.
status
Displays the current status of the user-file-log.
nv-counters
Displays the user-file-log nonvolatile counters.
Command Default
None
Command Modes
User EXEC
Command History
This table includes the following release-specific history entries:
Release
Modification
3.0.3
This command was introduced.
Usage Guidelines
Authorization: viewer
Examples
The following example shows the Cisco SCE platform line-attack-file-log status and configuration:
SCE8000>enable 5
Password:<cisco>
SCE8000>show logger device Line-Attack-File-Log
Line-Attack-File-Log status: Enabled
Line-Attack-File-Log file size: 1000000
SCE8000>
The following example shows the Cisco SCE platform user-file-log counters:
SCE8000>enable 5
Password:<cisco>
SCE8000>show logger device line-attack-file-log counters
Cisco SCE 8000 CLI Command Reference
2-529
Chapter 2
CLI Command Reference
show logger device
device User-File-Log counters
Total info messages: 62
Total warning messages: 4
Total error messages: 0
Total fatal messages: 0
Last time these counters were cleared: 02:23:27 GMT TUES January 17 2006
SCE8000>
Related Commands
Command
Description
logger device
Disables or enables the specified logger device.
clear logger
Clears the Cisco SCE platform logger (user log files).
Cisco SCE 8000 CLI Command Reference
2-530
Chapter 2
CLI Command Reference
show logging
show logging
Displays the current configuration of system logging (syslog).
show logging
Syntax Description
This command has no arguments.
Command Default
This command has no default settings.
Command Modes
Privileged Exec
Command History
This table includes the following release-specific history entries:
Release
Modification
3.6.x
This command was introduced.
Usage Guidelines
Authorization: admin
Examples
This example shows how to display the syslog configuration.
SCE8000>enable 10
Password:<cisco>
SCE8000#show logging
Syslog logging: enabled (0 messages rate limited)
logging trap severity: level informational
logging rate-limit severity: level warning
logging rate-limit messages: 10 per sec
logging facility: LOCAL7
logging to 10.78.242.134 with port 514
timestamps is uptime
SCE8000#
Related Commands
Command
Description
logging on
Enables logging to the syslog server.
logging host
Configures the syslog host.
logging trap
Configures the severity level of the messages to log.
logging facility
Configures the facility types to log.
logging rate-limit
Configures the logging rate limit
show logging counters Displays the syslog server counters.
Cisco SCE 8000 CLI Command Reference
2-531
Chapter 2
show logging counters
show logging counters
Displays the current syslog counters.
show logging counters
Syntax Description
This command has no arguments.
Command Default
This command has no default settings.
Command Modes
Privileged Exec
Command History
This table includes the following release-specific history entries:
Release
Modification
3.6.x
This command was introduced.
Usage Guidelines
.Authorization: admin
Examples
This example shows how to display the syslog counters.
SCE8000>enable 10
Password:<cisco>
SCE8000#show logging counters
Logger counters:
Total messages read: 108634
Total messages written: 108634
Total written info messages: 108634
Total written warning messages: 0
Total written error messages: 0
Total written fatal messages: 0
SCE8000#
Related Commands
Command
Description
show logging
Displays the syslog server configuration.
Cisco SCE 8000 CLI Command Reference
2-532
CLI Command Reference
Chapter 2
CLI Command Reference
show management-agent
show management-agent
Displays information about the management agent.
show management-agent
Syntax Description
This command has no arguments or keywords.
Command Default
None
Command Modes
User EXEC
Command History
This table includes the following release-specific history entries:
Usage Guidelines
Release
Modification
2.5.7
This command was introduced.
Use this command to display the following information for the management agent:
•
Status (enabled or disabled)
•
Access control list number assigned
Authorization: viewer
Examples
The following example shows how to display the information about the management agent:
SCE8000>enable 5
Password:<cisco>
SCE8000>show management-agent
management agent is enabled.
management agent is active, version: SCE Agent 3.0.3 Build 15
management agent does not use any access-list.
SCE8000>
Related Commands
Command
Description
management-agent access-class
Assigns an access class list (ACL) to the
management agent, so that access to the
management agent is limited to the IP
addresses defined in the ACL.
service management-agent
Enables the management agent service.
Cisco SCE 8000 CLI Command Reference
2-533
Chapter 2
CLI Command Reference
show management-agent sce-api quota
show management-agent sce-api quota
Displays information about the quota message buffer.
show management-agent sce-api quota
Syntax Description
This command has no arguments or keywords.
Command Default
None
Command Modes
User EXEC
Command History
This table includes the following release-specific history entries:
Usage Guidelines
Release
Modification
3.1.6
This command was introduced.
Use this command to display the following information about the quota message buffer:
•
Quota rate control
•
Maximum size of the buffer
•
Number of messages currently in the buffer that are waiting to be sent to the QM
Authorization: viewer
Examples
The following example shows how to display the information about the quota message buffer:
SCE8000>enable 5
Password:<cisco>
SCE8000>show management-agent sce-api quota
Quota rate control : 125
Quota max buffer size : 1000
Quota msg in buffer : 0
SCE8000>
Related Commands
Command
Description
management-agent
sce-api
quota-buffer-size
Configures the Cisco SCE to define the size of the message queue that
displays the Quota Manager (QM) indication when the QM is down.
Cisco SCE 8000 CLI Command Reference
2-534
Chapter 2
CLI Command Reference
show mng-vlan
show mng-vlan
Displays the IP configuration and configured management service for the specified management VLAN.
Use the all keyword to display the IP configuration for all existing management VLANs
show mng-vlan [vlan-id | all]
Syntax Description
vlan-id
VLAN tag for which to display the IP address configuration (1-4094).
all
Displays configuration for all existing management VLANs.
Command Default
This command has no default settings.
Command Modes
User Exec
Command History
This table includes the following release-specific history entries:
Release
Modification
3.7.x
This command was introduced.
Usage Guidelines
Authorization: viewer
Examples
This example shows how to display the IP address configuration for the specified management VLAN.
SCE8000>enable 5
Password:<cisco>
SCE8000#show mng-vlan 4
Vlan: 4,
Address: 5.6.7.8,
Mask: 255.255.255.0
services binded: TELNET | SSH | SNMPSCE8000#
SCE8000#
This example shows how to display the IP address configuration for all existing management VLANs.
SCE8000>enable 5
Password:<cisco>
SCE8000#show mng-vlan all
Number of management vlan interfaces configured: 2
Management VLAN Table:
-----------------------------------------------------------------------| VLAN
| Address
| Mask
| Services
|
-----------------------------------------------------------------------|
4
| 5.6.7.8
| 255.255.255.0
| TELNET,SSH,SNMP
|
|
5
| 6.6.7.8
| 255.255.255.0
| |
-----------------------------------------------------------------------SCE8000#
Cisco SCE 8000 CLI Command Reference
2-535
Chapter 2
CLI Command Reference
show mng-vlan
Related Commands
Command
Description
mng-vlan
Creates a management VLAN and assigns an IP address.
Cisco SCE 8000 CLI Command Reference
2-536
Chapter 2
CLI Command Reference
show mng-vlan service-bind
show mng-vlan service-bind
Displays the management service assigned to the specified management VLAN.
show mng-vlan vlan-id service-bind
Syntax Description
vlan-id
Command Default
This command has no default settings.
Command Modes
User Exec
Command History
This table includes the following release-specific history entries:
VLAN tag for which to display the service (1-4094).
Release
Modification
3.7.x
This command was introduced.
Usage Guidelines
Authorization: admin
Examples
This example shows how to display the service that the specified management interface VLAN is
assigned to.
SCE8000>enable 5
Password:<cisco>
SCE8000#show mng-vlan 100 service-bind
Vlan: 100,
services binded: TELNET
SCE8000#
Related Commandss
Command
Description
show mng-vlan
Displays the IP configuration for the specified management interface
VLAN.
Cisco SCE 8000 CLI Command Reference
2-537
Chapter 2
CLI Command Reference
show mng-vlan statistics
show mng-vlan statistics
Displays the traffic statistics for the specified VLAN.
show mng-vlan vlan-id statistics
Syntax Description
vlan-id
Command Default
This command has no default settings.
Command Modes
User Exec
Command History
This table includes the following release-specific history entries:
VLAN tag for which to display the statistics (1-4094).
Release
Modification
3.7.x
This command was introduced.
Usage Guidelines
Authorization: admin
Examples
This example shows how to display the traffic statistics for the specified management interface VLAN.
SCE8000>enable 5
Password:<cisco>
SCE8000#show mng-vlan 4 statistics
VLAN Statistics
--------------VLAN ID 4 :
total frames received
total bytes received
Broadcast/Multicast Rcvd
total frames transmitted
total bytes transmitted
total headroom inc
total encap on xmit
SCE8000#
Related Commandss
Command
Description
show mng-vlan
Displays the IP configuration for the specified management interface
VLAN.
Cisco SCE 8000 CLI Command Reference
2-538
0
0
0
0
0
0
0
Chapter 2
CLI Command Reference
show os-fingerprinting config
show os-fingerprinting config
Displays the current OS fingerprinting configuration.
show os-fingerprinting config
Syntax Description
This command has no arguments or keywords.
Command Default
This command has no default settings.
Command Modes
User Admin
Command History
This table includes the following release-specific history entries:
Usage Guidelines
Release
Modification
3.7.x
This command was introduced.
The following information is displayed:
•
State of OS fingerprinting (enabled or disabled)
•
Sampling period
•
Sampling interval
•
NAT detection window
•
OS flush time
•
Signature file
•
OS fingerprinting port
•
Gx reporting status
Authorization: viewer
Examples
This example shows how to display the current OS fingerprinting configuration.
SCE8000>enable 10
Password:<cisco>
SCE8000#show os-fingerprinting config
OS Fingerprinting Status: Enabled
Sampling Window: 200 Sec
Interval: 20 mins
NAT Detection Window Status: Disable
OS Flush Time Status: Enable (2 day)
Scan Port Number: 80
Gx Report Status: Disable
Current Signature File: default.fp
SCE8000#
Cisco SCE 8000 CLI Command Reference
2-539
Chapter 2
CLI Command Reference
show os-fingerprinting config
Related Commands
Command
Description
os-fingerprinting
Enables OS fingerprinting and loads the default.fp signature
file.
Cisco SCE 8000 CLI Command Reference
2-540
Chapter 2
CLI Command Reference
show os-fingerprinting subscriber-name
show os-fingerprinting subscriber-name
Displays the detected operating system for the specified subscriber. If the subscriber includes multiple
IP addresses, the operating systems are displayed for all IP addresses.
show os-fingerprinting subscriber-name subscriber-name
Syntax Description
subscriber-name
Command Default
This command has no default settings.
Command Modes
User Admin
Command History
This table includes the following release-specific history entries:
Name of the subscriber for which to display OS information.
Release
Modification
3.7.x
This command was introduced.
Usage Guidelines
Authorization: viewer
Examples
This example shows how to display OS information for a specified subscriber.
SCE8000>enable 10
Password:<cisco>
SCE8000#show os-fingerprinting subscriber-name subscriber1
Subscriber 10.0.0.1@test OS-Info:
IP Address:10.0.0.1
OSINFO - INDEX: 2 OS Name: Linux
OSINFO - INDEX: 65 OS Name: iOS
NAT DETECTED
SCE8000#
Related Commands
Command
Description
show interface linecard slot-number
subscriber name name os-info
Displays the OS detected for the specified subscriber. If
the subscriber has multiple IP addresses, OS information
is displayed for each IP address.
Cisco SCE 8000 CLI Command Reference
2-541
Chapter 2
CLI Command Reference
show os-fingerprinting signature-file
show os-fingerprinting signature-file
Displays the unencrypted contents of the configured signature file.
show os-fingerprinting signature-file
Syntax Description
This command has no arguments or keywords.
Command Default
This command has no default settings.
Command Modes
User Admin
Command History
This table includes the following release-specific history entries:
Release
Modification
3.7.x
This command was introduced.
Usage Guidelines
Authorization: viewer
Examples
This example shows how to display the unencrypted contents of the specified signature file. (Only partial
output is displayed.)
SCE8000>enable 10
Password:<cisco>
SCE8000#show os-fingerprinting signature-file
OS Fingerprinting Signature File Template
----------------------------------------Index: 1 OS Name: AIX
Index: 2 OS Name: Linux
Index: 3 OS Name: FreeBSD
Index: 4 OS Name: NetBSD
Index: 5 OS Name: OpenBSD
Index: 6 OS Name: Solaris
Index: 7 OS Name: SunOS
Index: 8 OS Name: IRIX
Index: 9 OS Name: OpenVMS
Index: 10 OS Name: Tru64
Index: 11 OS Name: MacOS
Index: 12 OS Name: Windows98
SCE8000#
Related Commands
Command
Description
os-fingerprinting signature-file
Specifies the OS fingerprinting file.
Cisco SCE 8000 CLI Command Reference
2-542
Chapter 2
CLI Command Reference
show party all
show party all
To display the contents of static parties in the Cisco SCE platform, use the show party command in the
privileged EXEC mode.
show party {all | all-names}
Syntax Description
all
Shows all parties in the data-base.
all-names
Shows all names of all parties in the database.
Command Default
None.
Command Modes
Privileged EXEC (#)
Command History
This table includes the following release-specific history entries:
Release
Modification
3.8.x
This command was introduced.
Usage Guidelines
Authorization: admin
Examples
The following is the sample output from the show party all-names command:
SCE8000> enable 15
Password: <cisco>
SCE8000#> show party all-names
There are 2 parties in the data-base:
N/A
10.1.5.145@ABC
The following is the sample output from the show party all command:
SCE8000> enable 15
Password: <cisco>
SCE8000#> show party all
There are 2 parties in the data-base:
Party "N/A" is static
Party "N/A" has 0 mappings:
Party "N/A" is managed by N/A
Party "N/A" IP-range-mappings:
No records found.
Party "N/A" IPv6-range-mappings:
No records found.
Party "N/A" has 5 tunables:
downVlinkId=0
monitor=0
Cisco SCE 8000 CLI Command Reference
2-543
Chapter 2
show party all
new_classification_policy=0
packageId=0
upVlinkId=0
Party "N/A" has no meters
Aging disabled
Party "test" is static
Party "test" has 1 mappings:
Party "test" is managed by CLI
Party "test" IP-range-mappings:
No records found.
Party "test" IPv6-range-mappings:
1080:a2b1::/64 - Expiration (sec): Unlimited
Party "test" has 5 tunables:
downVlinkId=0
monitor=0
new_classification_policy=0
packageId=0
upVlinkId=0
Party "test" has no meters
Aging disabled
Cisco SCE 8000 CLI Command Reference
2-544
CLI Command Reference
Chapter 2
CLI Command Reference
show party name
show party name
To display the contents of a specified static party in the Cisco SCE platform, use the show party name
command in the privileged EXEC mode.
show party name party-name
Syntax Description
party-name
Command Default
None
Command Modes
Privileged EXEC
Command History
This table includes the following release-specific history entries:
Name of the static party for which contents are to be displayed.
Release
Modification
3.7.x
This command was introduced.
3.8.0
IPv6 support added.
Usage Guidelines
The authorization used is root.
Examples
The following is the sample output from the show party name command for IPv4 party:
SCE8000>e nable 15
Password: <cisco>
SCE8000#> show party name [party-name]
Party "[party-name]" is static
Party "[party-name]" has 1 mappings:
Party "[party-name]" is managed by CLI
Party "[party-name]" IP-range-mappings:
1.2.3.4:0xffffffff - Expiration (sec): Unlimited
Party has no context, no variable data shown.
Party has no context, no meter data shown.
Aging disabled
hw-bypass for party "[party-name]" is enabled
SCE8000#>
The following is the sample output from the show party name command for IPv6 party:
SCE8000> enable 15
Password: <cisco>
SCE8000#> show party name test
Party "test" is static
Party "test" has 1 mappings:
Party "test" is managed by CLI
Party "test" IP-range-mappings:
No records found.
Party "test" IPv6-range-mappings:
Cisco SCE 8000 CLI Command Reference
2-545
Chapter 2
CLI Command Reference
show party name
ff00::/64 - Expiration (sec): Unlimited
Party "test" has 25 variables:
concurrentAttacksNumber=0
downVlinkId=0
monitor=0
new_classification_policy=0
packageId=0
PV_internalPackage=0
PV_REP_nonReportedSessionsInTUR=0
P_aggPeriodType=8
P_blockReportCounter=0
P_firstTimeParty=TRUE
P_internalDownVLink=0
P_internalUpVLink=0
P_MibSubCounters16[0..31][0..1]=0*64
P_MibSubCounters32[0..31][0..1]=0*64
P_newParty=TRUE
p_numOfRedirections=0
P_packageCounterIndex=0
P_partyCurrentDownVLink=0
P_partyCurrentPackage=0
P_partyCurrentUpVLink=0
P_serviceReportedBitMap=0
P_spamActivity=0
P_spamCounter=0
P_spamMessageCounter=0
upVlinkId=0
Party "test" has no meters
Aging disabled
Related Commands
Command
Description
party name party-name Allows the creation of a specified static party in the Cisco SCE platform.
show party name
party-name hw-bypass
Cisco SCE 8000 CLI Command Reference
2-546
To display the hardware bypass status of a specified static party in the
hardware bypass mode of the Cisco SCE platform, use the show party
name hw-bypass command in the privileged EXEC mode.
Chapter 2
CLI Command Reference
show party name hw-bypass
show party name hw-bypass
To display the hardware bypass status of a specified static party in the hardware bypass mode of the
Cisco SCE platform, use the show party name hw-bypass command in the privileged EXEC mode.
show party name party-name hw-bypass
Note
The hardware bypass action can be performed only on the static parties created in the hardware bypass
mode.
Syntax Description
party-name
Command Default
None
Command Modes
Privileged EXEC
Command History
This table includes the following release-specific history entries:
Name of the static party for which to display the hardware bypass status.
Release
Modification
3.7.x
This command was introduced.
Usage Guidelines
The authorization used is root.
Examples
The following is the sample output from the show party name hw-bypass command:
SCE8000> enable 15
Password: <cisco>
SCE8000#> show party name [party-name] hw-bypass
SCE8000#> hw-bypass for party "[party-name]" is disabled
Related Commands
Command
Description
party name party-name Sets the hardware bypass state for a specified static party in the hardware
hw-bypass
bypass mode of the Cisco SCE platform.
Cisco SCE 8000 CLI Command Reference
2-547
Chapter 2
CLI Command Reference
show party name mappings
show party name mappings
To view the details of all IPv4 and IPv6 mappings of a party, use the show party name comamnd.
show party name name mappings { all | ipranges | ipv6-ranges}
Syntax Description
all
Shows all IPv4 and IPv6 mappings.
ip-ranges
Shows the IPv4 range mappings.
ipv6-ranges
Shows IPv6 range mappings.
Command Default
None.
Command Modes
Privileged EXEC (#)
Command History
This table includes the following release-specific history entries:
Release
Modification
3.8.0
This command was introduced.
Usage Guidelines
Authorization: admin
Examples
The following is the sample output from the show party name mappings IPv6 command:
SCE8000> enable 15
Password: <cisco>
SCE8000#> show party name 1080:a2b1::0@ipv6a mappings IPv6-ranges
Party "1080:a2b1::0@ipv6a" IPv6-range-mappings:
1080:a2b1::/64 - Expiration (sec): Unlimited
The following is the sample output from the show party name mappings IPv6 command:
SCE8000> enable 15
Password: <cisco>
SCE8000#> show party name test mappings all
Party "test" has 1 mappings:
Party "test" IP-range-mappings:
10.1.4.145:0xffffffff - Expiration (sec): Unlimited
Party "test" IPv6-range-mappings:
No records found.
The following is the sample output from the show party name mappings IPv6 command:
SCE8000> enable 15
Password: <cisco>
SCE8000#> show party name test mappings ipv6-addresses
Cisco SCE 8000 CLI Command Reference
2-548
Chapter 2
CLI Command Reference
show party name mappings
Party "test" is static
Party "test" has 1 mappings:
Party "test" is managed by CLI
Party "test" IP-range-mappings:
No records found.
Party "test" IPv6-range-mappings:
ff00::/64 - Expiration (sec): Unlimited
Party "test" has 25 variables:
concurrentAttacksNumber=0
downVlinkId=0
monitor=0
new_classification_policy=0
packageId=0
PV_internalPackage=0
PV_REP_nonReportedSessionsInTUR=0
P_aggPeriodType=8
P_blockReportCounter=0
P_firstTimeParty=TRUE
P_internalDownVLink=0
P_internalUpVLink=0
P_MibSubCounters16[0..31][0..1]=0*64
P_MibSubCounters32[0..31][0..1]=0*64
P_newParty=TRUE
p_numOfRedirections=0
P_packageCounterIndex=0
P_partyCurrentDownVLink=0
P_partyCurrentPackage=0
P_partyCurrentUpVLink=0
P_serviceReportedBitMap=0
P_spamActivity=0
P_spamCounter=0
P_spamMessageCounter=0
upVlinkId=0
Party "test" has no meters
Aging disabled
Cisco SCE 8000 CLI Command Reference
2-549
Chapter 2
CLI Command Reference
show party mapping
show party mapping
To show the details of the party to which an IP address is mapped to, use the show party mapping
command.
show party mapping {IPv6-address ipv6-address | IPv6-address number | IPv6-range
ipv6-address/prefix-length | IPv6-range number}|{IP-address ipv4-address | IP-range}
Syntax Description
IPv6-address
Specifies that IPv6 address.
ipv6-address
IPv6 address for which the party mapping is sought.
IPv6-address number
Specifies the IPv6 address number to get the party mapping.
IPv6-range
Specifies the IPv6 range to get the party mapping.
ipv6-address/prefix-len
gth
The IPv6 address range to get the party mapping.
IPv6-range number
Specifies the IPv6 range number to get the party mapping.
IP-address
Specifies that party mapping is for IPv4 address.
ipv4-address
IPv4 address for which the party mapping is sought.
IP-range
pecifies the IPv4 range to get the party mapping.
Command Default
None.
Command Modes
Privileged EXEC (#)
Command History
This table includes the following release-specific history entries:
Release
Modification
3.8.0
This command was introduced.
Usage Guidelines
Authorization: admin
Examples
The following is the sample output from the show party mappings IPv6 command:
SCE8000> enable 15
Password: <cisco>
SCE8000#> show party mapping IPv6-address abcd::0
IPv6 address abcd::0 is mapped to party "siva"
The following is the sample output from the show party mappings IPv6 command:
SCE8000> enable 15
Password: <cisco>
SCE8000#> show party mapping IPv6-address number
Cisco SCE 8000 CLI Command Reference
2-550
Chapter 2
CLI Command Reference
show party mapping
There are 1 ipv6-address mappings in the data-base.
The following is the sample output from the show party mappings IPv6 command:
SCE8000> enable 15
Password: <cisco>
SCE8000#> show party mapping IPv6-range bcd::/63
IPv6 range bcd::/63 is not mapped to a party.
The following is the sample output from the show party mappings IPv6 command:
sSCE8000> enable 15
Password: <cisco>
SCE8000#> show party mapping IPv6-range number
There are 1 ipv6-range mappings in the data-base.
Cisco SCE 8000 CLI Command Reference
2-551
Chapter 2
CLI Command Reference
show party num-parties-with-active-flows
show party num-parties-with-active-flows
To show the number of subscribers having only bidirectional flows, use the show party
num-parties-with-active-flows command in the priviliged EXEC mode.
show party num-parties-with-active-flows
Syntax Description
This command has no arguments or keywords.
Command Modes
Privileged EXEC (#)
Command History
This table includes the following release-specific history entries:
Examples
Release
Modification
3.8.5
This command was introduced.
The following example is a sample output of the show party num-parties-with-active-flows command:
SCE8000# show party num-parties-with-active-flows
There are 1 parties with active flows
Cisco SCE 8000 CLI Command Reference
2-552
Chapter 2
CLI Command Reference
show party num-parties-with-open-flows
show party num-parties-with-open-flows
To show the number of subscribers having unidirectional, bidirectional, and inconclusive flows, use the
show party num-parties-with-open-flows command in the priviliged EXEC mode.
show party num-parties-with-open-flows
Syntax Description
This command has no arguments or keywords.
Command Modes
Privileged EXEC (#)
Command History
This table includes the following release-specific history entries:
Examples
Release
Modification
3.5.5
This command was introduced.
The following is a sample output of the show party num-parties-with-open-flows command:
SCE8000# show party num-parties-with-open-flows
There are 2 parties with open flows
Cisco SCE 8000 CLI Command Reference
2-553
Chapter 2
CLI Command Reference
show pqi file
show pqi file
Displays information, such as installation options, about the specified application file.
show pqi file filename info
Syntax Description
filename
Command Default
None
Command Modes
User EXEC
Command History
This table includes the following release-specific history entries:
Usage Guidelines
Examples
Filename of the application file.
Release
Modification
2.5.7
This command was introduced.
Authorization: viewer
The following example shows how to display application file information:
SCE8000>enable 5
Password:<cisco>
SCE8000>show pqi file myfile.pqi info
application: sm
description: SCE 8000 sm
target SCE : SCE 8000
module names: sm20001.pm0
SCE8000>
Related Commands
Command
Description
pqi install file
Installs the specified pqi file using any specified installation options.
Cisco SCE 8000 CLI Command Reference
2-554
Chapter 2
CLI Command Reference
show pqi last-installed
show pqi last-installed
Displays the name of the last pqi file that was installed.
show pqi last-installed
Syntax Description
This command has no arguments or keywords.
Command Default
None
Command Modes
User EXEC
Command History
This table includes the following release-specific history entries:
Release
Modification
2.5.7
This command was introduced.
Usage Guidelines
Authorization: viewer
Examples
The following example shows how to find out which pqi file is installed:
SCE8000>enable 5
Password:<cisco>
SCE8000>show pqi last-installed
package name: SACS BB
package version 3.0.1. build 02
package date: Tue Jun 10 17:27:55 GMT+00:00 2006
operation: Upgrade
SCE8000>
Related Commands
Command
Description
pqi rollback file
Reverses an upgrade of the specified pqi file.
pqi uninstall file
Uninstalls the specified pqi file.
Cisco SCE 8000 CLI Command Reference
2-555
Chapter 2
CLI Command Reference
show processes cpu
show processes cpu
Displays detailed CPU utilization statistics (CPU use per process).
show processes cpu [sorted]
Syntax Description
sorted
Command Default
This command has no default settings.
Command Modes
User EXEC
Command History
This table includes the following release-specific history entries:
Usage Guidelines
Examples
(Optional) Displays CPU history sorted by percentage of utilization.
Release
Modification
3.6.x
This command was introduced.
Authorization: viewer
The following example illustrates the use of this command:
SCE8000>enable 5
Password:<cisco>
SCE8000>show processes cpu
CORE_0 CPU utilization for five seconds: 100%/
PID
Runtime(ms)
Invoked
uSecs
5Sec
1
78790
6374
0 0.00%
2
10
1
0 0.00%
3
5010
501
0 0.00%
4
90
9
0 0.00%
5
63130
6313
0 0.00%
6
4940
494
0 0.00%
7
0
0
0 0.00%
8
10530
1053
0 0.00%
9
2606490
207337
0 0.00%
10
1246730
123793
0 0.00%
11
0
0
0 0.00%
12
177810
17781
0 0.00%
13
8010
801
0 0.00%
16
0
0
0 0.00%
17
0
0
0 0.00%
18
0
0
0 0.00%
19
0
0
0 0.00%
20
0
0
0 0.00%
21
1198570
119326
0 0.00%
22
7413850
741207
0 0.00%
23
556170
49614
0 0.00%
24
527310
52718
0 0.00%
Cisco SCE 8000 CLI Command Reference
2-556
0%; one minute:
1Min
5Min TTY
0.00% 0.00%
0
0.00% 0.00%
0
0.00% 0.00%
0
0.00% 0.00%
0
0.00% 0.00%
0
0.00% 0.00%
0
0.00% 0.00%
0
0.00% 0.00%
0
0.02% 0.03%
0
0.02% 0.02%
0
0.00% 0.00%
0
0.00% 0.00%
0
0.00% 0.00%
0
0.00% 0.00%
0
0.00% 0.00%
0
0.00% 0.00%
0
0.00% 0.00%
0
0.00% 0.00%
0
0.02% 0.02%
0
0.11% 0.10%
0
0.02% 0.01%
0
0.00% 0.01%
0
81%; five minutes:
Process
(init)
(kthreadd)
(migration/0)
(ksoftirqd/0)
(watchdog/0)
(migration/1)
(ksoftirqd/1)
(watchdog/1)
(events/0)
(events/1)
(khelper)
(kblockd/0)
(kblockd/1)
(kswapd0)
(aio/0)
(aio/1)
(nfsiod)
(mtdblockd)
(skynet)
(hw-mon-regs)
(scos-dump)
(wdog-kernel)
38%
Chapter 2
CLI Command Reference
show processes cpu
SCE8000>
Cisco SCE 8000 CLI Command Reference
2-557
Chapter 2
CLI Command Reference
show rdr-formatter
show rdr-formatter
Displays the RDR formatter configuration.
show rdr-formatter
Syntax Description
This command has no arguments or keywords.
Command Default
None
Command Modes
User EXEC
Command History
This table includes the following release-specific history entries:
Release
Modification
2.5.7
This command was introduced.
Usage Guidelines
Authorization: viewer
Examples
The following example shows how to display the configuration of the RDR formatter:
SCE8000>enable 5
Password:<cisco>
SCE8000>show rdr-formatter
Status: enabled
Connection is: down
Forwarding mode: redundancy
Connection table:
---------------------------------------------------------Collector | Port | Status | Priority per Category: |
IP Address / | | |--------------------------|
Host-Name | | | Category1 | Category2 |
---------------------------------------------------------10.1.1.205 |33000 | Down | 100 | 100 |
10.1.1.206 |33000 | Down | 60 | 60 |
10.12.12.12 |33000 | Down | 40 | 40 |
---------------------------------------------------------RDR:
queued: 0, sent:4460807, thrown: 0, format-mismatch:0
UM:
queued: 0, sent: 0,
thrown: 0
Logger: queued: 0, sent: 39,
thrown: 0
Errors: thrown: 0
Last time these counters were cleared: 20:23:05 IST WED March 14 2007
SCE8000>
Cisco SCE 8000 CLI Command Reference
2-558
Chapter 2
CLI Command Reference
show rdr-formatter
Related Commands
Command
Description
rdr-formatter destination
Configures an RDRv1 or NetFlow destination.
service rdr-formatter
Enables or disables the RDR formatter.
Cisco SCE 8000 CLI Command Reference
2-559
Chapter 2
show rdr-formatter buffer-size
show rdr-formatter buffer-size
Displays the size of the buffer for each RDR formatter category.
show rdr-formatter buffer-size all
Syntax Description
This command has no arguments or keywords.
Command Default
This command has no default settings.
Command Modes
User exec
Command History
This table includes the following release-specific history entries:
Release
Modification
3.7.x
This command was introduced.
Usage Guidelines
Authorization: viewer
Examples
The following example illustrates the use of this command.
SCE8000>enable 10
Password:<cisco>
SCE8000#show rdr-formatter buffer-size all
Category #1: 3000000 bytes.
Category #2: 1800000 bytes.
Category #3: 600000 bytes.
Category #4: 600000 bytes.
Total 6000000 bytes used out of 6000128 available (100%).
SCE8000#
Cisco SCE 8000 CLI Command Reference
2-560
CLI Command Reference
Chapter 2
CLI Command Reference
show rdr-formatter buffer-size
Related Commands
Command
Description
show rdr-formatter
Displays the RDR formatter configuration.
show rdr-formatter connection-status
Displays information about the RDR formatter
connections.
show rdr-formatter counters
Displays the RDR formatter counters.
show rdr-formatter destination
Displays the RDR formatter destinations, including
protocol and transport type.
show rdr-formatter enabled
Displays the RDR formatter status.
show rdr-formatter forwarding-mode
Displays the configured RDR formatter forwarding mode
show rdr-formatter rdr-mapping
Displays to which RDR formatter category a specified
RDR tag is mapped.
show rdr-formatter statistics
Displays RDR formatter statistics.
Cisco SCE 8000 CLI Command Reference
2-561
Chapter 2
CLI Command Reference
show rdr-formatter connection-status
show rdr-formatter connection-status
Displays information about the RDR formatter connections.
show rdr-formatter connection-status
Syntax Description
This command has no arguments or keywords.
Command Default
None
Command Modes
User EXEC
Command History
This table includes the following release-specific history entries:
Usage Guidelines
Release
Modification
2.5.7
This command was introduced.
Use this command to display the following information about the RDR formatter connections:
•
Main connection
•
Status—Status and forwarding mode connection table with the following information for each
destination:
– Port
– Status
– Priority
Authorization: viewer
Examples
The following example shows how to display the RDR formatter connection status:
SCE8000>enable 5
Password:<cisco>
SCE8000>show rdr-formatter connection-status
Connection is: up
Forwarding mode: redundancy
Connection table:
---------------------------------------------------------Collector | Port | Status | Priority per Category: |
IP Address / | | |--------------------------|
Host-Name | | | Category1 | Category2 |
---------------------------------------------------------10.1.1.205 |33000 | Up | 100 primary | 100 primary|
10.1.1.206 |33000 | Down | 60 | 60 |
10.12.12.12 |33000 | Up | 40 | 40 |
---------------------------------------------------------SCE8000>
Cisco SCE 8000 CLI Command Reference
2-562
Chapter 2
CLI Command Reference
show rdr-formatter connection-status
Related Commands
Command
Description
show rdr-formatter
Displays the RDR formatter configuration.
show rdr-formatter counters
Displays the RDR formatter counters.
show rdr-formatter destination
Displays the RDR formatter destinations, including
protocol and transport type.
show rdr-formatter enabled
Displays the RDR formatter status.
show rdr-formatter forwarding-mode
Displays the configured RDR formatter forwarding
mode.
show rdr-formatter history-size
Displays the configured size of the RDR formatter
history buffer.
show rdr-formatter protocol netflowv9 dscp Displays the DSCP value assigned by NetFlowV9.
show rdr-formatter rdr-mapping
Displays to which RDR formatter category a
specified RDR tag is mapped.
show rdr-formatter statistics
Displays RDR formatter statistics.
Cisco SCE 8000 CLI Command Reference
2-563
Chapter 2
show rdr-formatter counters
show rdr-formatter counters
Displays the RDR formatter counters.
show rdr-formatter counters
Syntax Description
This command has no arguments or keywords.
Command Default
None
Command Modes
User EXEC
Command History
This table includes the following release-specific history entries:
Release
Modification
2.5.7
This command was introduced.
Usage Guidelines
Authorization: viewer
Examples
The following example shows how to display the RDR formatter counters:
SCE8000>enable 5
Password:<cisco>
SCE8000>show rdr-formatter counters
RDR: queued: 0, sent:4460807, thrown: 0, format-mismatch:0
UM: queued: 0, sent: 0, thrown: 0
Logger: queued: 0, sent: 39, thrown: 0
Last time these counters were cleared: 20:23:05 IST WED March 14 2007
SCE8000>
Cisco SCE 8000 CLI Command Reference
2-564
CLI Command Reference
Chapter 2
CLI Command Reference
show rdr-formatter counters
Related Commands
Command
Description
show rdr-formatter
Displays the RDR formatter configuration.
show rdr-formatter connection-status
Displays information about the RDR formatter
connections.
show rdr-formatter destination
Displays the RDR formatter destinations, including
protocol and transport type.
show rdr-formatter enabled
Displays the RDR formatter status.
show rdr-formatter forwarding-mode
Displays the configured RDR formatter forwarding
mode.
show rdr-formatter history-size
Displays the configured size of the RDR formatter
history buffer.
show rdr-formatter protocol netflowv9 dscp Displays the DSCP value assigned by NetFlowV9.
show rdr-formatter rdr-mapping
Displays to which RDR formatter category a
specified RDR tag is mapped.
show rdr-formatter statistics
Displays RDR formatter statistics.
Cisco SCE 8000 CLI Command Reference
2-565
Chapter 2
CLI Command Reference
show rdr-formatter destination
show rdr-formatter destination
Displays the RDR formatter destinations, including protocol and transport type.
show rdr-formatter destination
Syntax Description
This command has no arguments or keywords.
Command Default
None
Command Modes
User EXEC
Command History
This table includes the following release-specific history entries:
Release
Modification
2.5.7
This command was introduced.
Usage Guidelines
Authorization: viewer
Examples
The following example shows how to display the configured RDRv1 formatter destinations:
SCE8000>enable 5
Password:<cisco>
SCE8000>show rdr-formatter destination
Destination: 10.56.201.50
Port: 33000
Protocol: RDRv1
Destination: 10.56.204.7
Port: 33000
Protocol: NetflowV9
Destination: 10.56.204.10
Port: 33000
Protocol: RDRv1
SCE8000>
Cisco SCE 8000 CLI Command Reference
2-566
Chapter 2
CLI Command Reference
show rdr-formatter destination
Related Commands
Command
Description
show rdr-formatter
Displays the RDR formatter configuration.
show rdr-formatter connection-status
Displays information about the RDR formatter
connections.
show rdr-formatter counters
Displays the RDR formatter counters.
show rdr-formatter enabled
Displays the RDR formatter status.
show rdr-formatter forwarding-mode
Displays the configured RDR formatter forwarding
mode.
show rdr-formatter history-size
Displays the configured size of the RDR formatter
history buffer.
show rdr-formatter protocol netflowv9 dscp
Displays the DSCP value assigned by NetFlowV9.
show rdr-formatter rdr-mapping
Displays to which RDR formatter category a
specified RDR tag is mapped.
show rdr-formatter statistics
Displays RDR formatter statistics.
Cisco SCE 8000 CLI Command Reference
2-567
Chapter 2
CLI Command Reference
show rdr-formatter enabled
show rdr-formatter enabled
Displays the RDR formatter status (enabled or disabled).
show rdr-formatter enabled
Syntax Description
This command has no arguments or keywords.
Command Default
None
Command Modes
User EXEC
Command History
This table includes the following release-specific history entries:
Release
Modification
2.5.7
This command was introduced.
Usage Guidelines
Authorization: viewer
Examples
The following example shows how to display the status of the RDR formatter (enabled):
SCE8000>enable 5
Password:<cisco>
SCE8000>show rdr-formatter enabled
Status: enabled
SCE8000>
Related Commands
Command
Description
service rdr-formatter
Enables or disables the RDR formatter.
show rdr-formatter
Displays the RDR formatter configuration.
show rdr-formatter connection-status
Displays information about the RDR formatter
connections.
show rdr-formatter counters
Displays the RDR formatter counters.
show rdr-formatter destination
Displays the RDR formatter destinations, including
protocol and transport type.
show rdr-formatter forwarding-mode
Displays the configured RDR formatter forwarding mode.
show rdr-formatter history-size
Displays the configured size of the RDR formatter history
buffer.
show rdr-formatter rdr-mapping
Displays to which RDR formatter category a specified
RDR tag is mapped.
show rdr-formatter statistics
Displays RDR formatter statistics.
Cisco SCE 8000 CLI Command Reference
2-568
Chapter 2
CLI Command Reference
show rdr-formatter forwarding-mode
show rdr-formatter forwarding-mode
Displays the configured RDR formatter forwarding mode (redundancy, multicast, or simple load
balancing).
show rdr-formatter forwarding-mode
Syntax Description
This command has no arguments or keywords.
Command Default
None
Command Modes
User EXEC
Command History
This table includes the following release-specific history entries:
Release
Modification
2.5.7
This command was introduced.
Usage Guidelines
Authorization: viewer
Examples
The following example shows how to display the RDR formatter forwarding mode:
SCE8000>enable 5
Password:<cisco>
SCE8000>show rdr-formatter forwarding-mode
Forwarding mode: redundancy
SCE8000>
Cisco SCE 8000 CLI Command Reference
2-569
Chapter 2
CLI Command Reference
show rdr-formatter forwarding-mode
Related Commands
Command
Description
rdr-formatter forwarding-mode
Defines the mode in which the RDR formatter will send the
RDRs to the destinations.
show rdr-formatter
Displays the RDR formatter configuration.
show rdr-formatter connection-status Displays information about the RDR formatter connections.
show rdr-formatter counters
Displays the RDR formatter counters.
show rdr-formatter destination
Displays the RDR formatter destinations, including protocol
and transport type.
show rdr-formatter enabled
Displays the RDR formatter status.
show rdr-formatter history-size
Displays the configured size of the RDR formatter history
buffer.
show rdr-formatter rdr-mapping
Displays to which RDR formatter category a specified RDR
tag is mapped.
show rdr-formatter statistics
Displays RDR formatter statistics.
Cisco SCE 8000 CLI Command Reference
2-570
Chapter 2
CLI Command Reference
show rdr-formatter history-size
show rdr-formatter history-size
Displays the configured size of the RDR formatter history buffer.
show rdr-formatter history-size
Syntax Description
This command has no arguments or keywords.
Command Default
None
Command Modes
User EXEC
Command History
This table includes the following release-specific history entries:
Release
Modification
3.0.3
This command was introduced.
Usage Guidelines
Authorization: viewer
Examples
The following example shows how to display the size of the RDR formatter history buffer:
SCE8000>enable 5
Password:<cisco>
SCE8000>show rdr-formatter history-size
History buffer size: 16000 bytes
SCE8000>
Related Commands
Command
Description
rdr-formatter history-size
Configures the size of the history buffer (command not
supported).
show rdr-formatter
Displays the RDR formatter configuration.
show rdr-formatter connection-status
Displays information about the RDR formatter
connections.
show rdr-formatter counters
Displays the RDR formatter counters.
show rdr-formatter destination
Displays the RDR formatter destinations, including
protocol and transport type.
show rdr-formatter enabled
Displays the RDR formatter status.
show rdr-formatter forwarding-mode
Displays the configured RDR formatter forwarding mode.
show rdr-formatter rdr-mapping
Displays to which RDR formatter category a specified RDR
tag is mapped.
show rdr-formatter statistics
Displays RDR formatter statistics.
Cisco SCE 8000 CLI Command Reference
2-571
Chapter 2
CLI Command Reference
show rdr-formatter protocol netflowv9 dscp
show rdr-formatter protocol netflowv9 dscp
Displays the DSCP value assigned by NetFlowv9.
show rdr-formatter protocol netflowv9 dscp
Syntax Description
This command has no arguments or keywords.
Command Default
None
Command Modes
User EXEC
Command History
This table includes the following release-specific history entries:
Release
Modification
3.1.5
This command was introduced.
Usage Guidelines
Authorization: viewer
Examples
The following example shows how to use this command:
SCE8000>enable 5
Password:<cisco>
SCE8000>show rdr-formatter protocol netflowv9 dscp
Configured DSCP for Netflow traffic: 0
SCE8000>
Related Commands
Command
Description
rdr-formatter protocol netflowv9 dscp
Defines the DSCP value to be assigned to the NetFlow
packets.
show rdr-formatter
Displays the RDR formatter configuration.
show rdr-formatter connection-status
Displays information about the RDR formatter
connections.
show rdr-formatter counters
Displays the RDR formatter counters.
show rdr-formatter destination
Displays the RDR formatter destinations, including
protocol and transport type.
show rdr-formatter statistics
Displays RDR formatter statistics.
Cisco SCE 8000 CLI Command Reference
2-572
Chapter 2
CLI Command Reference
show rdr-formatter rdr-mapping
show rdr-formatter rdr-mapping
Displays to which RDR formatter category a specified RDR tag is mapped.
show rdr-formatter rdr-mapping {all | tag-id}
Syntax Description
all
Displays all current RDR category mappings.
tag-id
RDR tag.
Command Default
None
Command Modes
User EXEC
Command History
This table includes the following release-specific history entries:
Release
Modification
3.0.3
This command was introduced.
Usage Guidelines
Authorization: viewer
Examples
The following example shows how to use this command and includes partial output:
SCE8000>enable 5
Password:<cisco>
SCE8000>show rdr-formatter rdr-mapping all
Tag Categories
--- ---------0xb2d05e01 1
0xb2d05e02 1
0xb2d05e04 1
0xb2d05e05 1
0xf0f0f000 1
0xf0f0f002 1
0xf0f0f004 1
0xf0f0f005 1
0xf0f0f010 1
0xf0f0f016 1
0xf0f0f017 1
0xf0f0f018 1
---More--SCE8000>
Cisco SCE 8000 CLI Command Reference
2-573
Chapter 2
CLI Command Reference
show rdr-formatter rdr-mapping
Related Commands
Command
Description
rdr-formatter rdr-mapping
Adds a dynamic RDR mapping to a category or removes
one from a category.
show rdr-formatter
Displays the RDR formatter configuration.
show rdr-formatter counters
Displays the RDR formatter counters.
show rdr-formatter destination
Displays the RDR formatter destinations, including
protocol and transport type.
show rdr-formatter enabled
Displays the RDR formatter status.
show rdr-formatter forwarding-mode
Displays the configured RDR formatter forwarding mode.
show rdr-formatter history-size
Displays the configured size of the RDR formatter history
buffer.
show rdr-formatter statistics
Displays RDR formatter statistics.
Cisco SCE 8000 CLI Command Reference
2-574
Chapter 2
CLI Command Reference
show rdr-formatter statistics
show rdr-formatter statistics
Displays RDR formatter statistics.
show rdr-formatter statistics
Syntax Description
This command has no arguments or keywords.
Command Default
None
Command Modes
User EXEC
Command History
This table includes the following release-specific history entries:
Usage Guidelines
Release
Modification
2.5.7
This command was introduced.
Use this command to display the following RDR formatter statistics:
•
Rates and counters for each connection
•
Protocol and transport attributes for each connection
•
For NetFlow destinations only:
– Number of templates sent
– Number of records sent
Authorization: viewer
Examples
The following example shows how to display the current RDR statistics:
SCE8000>enable 5
Password:<cisco>
SCE8000>show rdr-formatter statistics
RDR-formatter statistics:
=========================
Category 1:
sent: 1794517
in-queue: 0
thrown: 0
format-mismatch: 0
unsupported-tags: 1701243
rate: 2 RDRs per second
max-rate: 64 RDRs per second
Category 2:
sent: 12040436
in-queue: 0
thrown: 0
Cisco SCE 8000 CLI Command Reference
2-575
Chapter 2
CLI Command Reference
show rdr-formatter statistics
format-mismatch: 0
unsupported-tags: 0
rate: 12 RDRs per second
max-rate: 453 RDRs per second
Category 3:
sent: 0
in-queue: 0
thrown: 0
format-mismatch: 0
unsupported-tags: 0
rate: 0 RDRs per second
max-rate: 0 RDRs per second
Category 4:
sent: 0
in-queue: 0
thrown: 0
format-mismatch: 0
unsupported-tags: 0
rate: 0 RDRs per second
max-rate: 0 RDRs per second
Destination: 10.56.201.50 Port: 33000 Status: up
Sent: 13835366
Rate: 211 Max: 679
Last connection establishment: 17 hours, 5 minutes, 14 seconds
Destination: 10.56.204.7 Port: 33000 Status: up
Sent: 12134054
Rate: 183 Max: 595
Sent Templates: 13732
Sent Data Records: 12134054
Refresh Timeout (Sec): 5
Last connection establishment: 17 hours, 5 minutes, 15 seconds
SCE8000>
Related Commands
Command
Description
show rdr-formatter
Displays the RDR formatter configuration.
show rdr-formatter connection-status
Displays information about the RDR formatter
connections.
show rdr-formatter counters
Displays the RDR formatter counters.
show rdr-formatter destination
Displays the RDR formatter destinations, including
protocol and transport type.
show rdr-formatter enabled
Displays the RDR formatter status.
show rdr-formatter forwarding-mode
Displays the configured RDR formatter forwarding
mode.
show rdr-formatter history-size
Displays the configured size of the RDR formatter
history buffer.
show rdr-formatter protocol netflowv9 dscp
Displays the DSCP value assigned by NetFlowV9.
show rdr-formatter rdr-mapping
Displays to which RDR formatter category a
specified RDR tag is mapped.
Cisco SCE 8000 CLI Command Reference
2-576
Chapter 2
CLI Command Reference
show running-config
show running-config
To display the contents of the currently running configuration, use the command in the privileged EXEC
mode.
show running-config [all-data]
Syntax Description
all-data
Command Default
None
Command Modes
Privileged EXEC
Command History
This table includes the following release-specific history entries:
Usage Guidelines
Examples
Displays default and nondefault settings. Use this keyword to see sample
usage for many CLI configuration commands.
Release
Modification
2.5.7
This command was introduced.
Authorization: admin
The following example shows the output from the show running-config command:
SCE8000>enable 10
Password:<cisco>
SCE8000#>show running-config all-data
#This is a general configuration file (running-config).
#Created on 12:06:13 UTC MON May 11 2009
#cli-type 1
#version 1
no management-agent notifications notification-list
1417,1418,804,815,1404,1405,1406,1407,1408,400
no management-agent notifications notification-list
402,421,440,441,444,445,446,450,437,457
no management-agent notifications notification-list 3593,3594,3595,10040
snmp-server community "public" ro
RDR-formatter forwarding-mode multicast
RDR-formatter destination 10.56.96.26 port 33000 category number 1 priority
RDR-formatter destination 10.56.96.26 port 33000 category number 2 priority
RDR-formatter destination 10.56.96.26 port 33000 category number 3 priority
RDR-formatter destination 10.56.96.26 port 33000 category number 4 priority
interface LineCard 0
connection-mode inline on-failure external-bypass
no silent
no shutdown
attack-filter subscriber-notification ports 80
replace spare-memory code bytes 3145728
interface GigabitEthernet 1/1
100
100
100
100
Cisco SCE 8000 CLI Command Reference
2-577
Chapter 2
CLI Command Reference
show running-config
ip address 10.56.96.46 255.255.252.0
interface TenGigabitEthernet 3/0/0
bandwidth 10000000 burst-size 50000
global-controller 0 name "Default Global
interface TenGigabitEthernet 3/1/0
bandwidth 10000000 burst-size 50000
global-controller 0 name "Default Global
interface TenGigabitEthernet 3/2/0
bandwidth 10000000 burst-size 50000
global-controller 0 name "Default Global
interface TenGigabitEthernet 3/3/0
bandwidth 10000000 burst-size 50000
global-controller 0 name "Default Global
Controller"
Controller"
Controller"
Controller"
exit
ip default-gateway 10.56.96.1
line vty 0 4
exit
management-agent property "com.pcube.management.framework.install.activation.operation"
"Install"
management-agent property "com.pcube.management.framework.install.activated.package" "SCA
BB"
management-agent property "com.pcube.management.framework.install.activated.version"
"3.1.6 build 79"
management-agent property "com.pcube.management.framework.install.activation.date" "Sun
May 11 08:44:04 GMT+00:00 2008"
flow-filter partition name "ignore_filter" first-rule 4 num-rules 32
flow-filter partition name "udpPortsToOpenBySw" first-rule 40 num-rules 21
SCE8000#
Related Commands
Command
Description
more
Displays the contents of a file.
Cisco SCE 8000 CLI Command Reference
2-578
Chapter 2
CLI Command Reference
show running-config-all
show running-config-all
To display the contents of all the currently running configuration files, use the show running-config-all
command in the privileged EXEC mode.
show running-config-all
Syntax Description
This command has no arguments or keywords.
Command Default
None
Command Modes
Privileged EXEC
Command History
This table includes the following release-specific history entries:
Release
Modification
3.7.x
This command was introduced.
Usage Guidelines
The authorization used is root.
Examples
The following is sample output from the show running-config-all command:
SCE8000>enable 15
Password:<cisco>
SCE8000#show running-config-all
#This is a general configuration file (running-config).
#Created on 16:19:09 UTC FRI November 18 2011
#cli-type 1
#version 1
watchdog software-reset disabled
watchdog hardware-reset disabled
hostname "pqemb154SAV"
ip ssh
no management-agent notifications notification-list
1417,1418,804,815,1404,1405,1406,1407,1408,400
no management-agent notifications notification-list
402,421,440,441,444,445,446,450,437,457
no management-agent notifications notification-list 3593,3594,3595,10040
RDR-formatter destination 10.78.242.172 port 33000 category number 1 priority
RDR-formatter destination 10.78.242.172 port 33000 category number 2 priority
RDR-formatter destination 10.78.242.172 port 33000 category number 3 priority
RDR-formatter destination 10.78.242.172 port 33000 category number 4 priority
interface LineCard 0
aggregative-global-controllers
aggregative-global-controller-dynamic mode suspend
aggregative-global-controller-dynamic mode active
connection-mode inline on-failure bypass
no watchdog
100
100
100
100
Cisco SCE 8000 CLI Command Reference
2-579
Chapter 2
show running-config-all
no silent
no shutdown
flow-open-mode enhanced UDP min-packets 2
statistics-logging frequency 5
service-bandwidth-prioritization-mode global
no protocol-pack version
no VAS-traffic-forwarding VAS server-id 0 health-check
no VAS-traffic-forwarding VAS server-id 1 health-check
no VAS-traffic-forwarding VAS server-id 2 health-check
no VAS-traffic-forwarding VAS server-id 3 health-check
no VAS-traffic-forwarding VAS server-id 4 health-check
no VAS-traffic-forwarding VAS server-id 5 health-check
no VAS-traffic-forwarding VAS server-id 6 health-check
no VAS-traffic-forwarding VAS server-id 7 health-check
no VAS-traffic-forwarding VAS server-id 8 health-check
no VAS-traffic-forwarding VAS server-id 9 health-check
no VAS-traffic-forwarding VAS server-id 10 health-check
no VAS-traffic-forwarding VAS server-id 11 health-check
no VAS-traffic-forwarding VAS server-id 12 health-check
no VAS-traffic-forwarding VAS server-id 13 health-check
no VAS-traffic-forwarding VAS server-id 14 health-check
no VAS-traffic-forwarding VAS server-id 15 health-check
no VAS-traffic-forwarding VAS server-id 16 health-check
no VAS-traffic-forwarding VAS server-id 17 health-check
no VAS-traffic-forwarding VAS server-id 18 health-check
no VAS-traffic-forwarding VAS server-id 19 health-check
no VAS-traffic-forwarding VAS server-id 20 health-check
no VAS-traffic-forwarding VAS server-id 21 health-check
no VAS-traffic-forwarding VAS server-id 22 health-check
no VAS-traffic-forwarding VAS server-id 23 health-check
no VAS-traffic-forwarding VAS server-id 24 health-check
no VAS-traffic-forwarding VAS server-id 25 health-check
no VAS-traffic-forwarding VAS server-id 26 health-check
no VAS-traffic-forwarding VAS server-id 27 health-check
no VAS-traffic-forwarding VAS server-id 28 health-check
no VAS-traffic-forwarding VAS server-id 29 health-check
no VAS-traffic-forwarding VAS server-id 30 health-check
no VAS-traffic-forwarding VAS server-id 31 health-check
no VAS-traffic-forwarding VAS server-id 32 health-check
no VAS-traffic-forwarding VAS server-id 33 health-check
no VAS-traffic-forwarding VAS server-id 34 health-check
no VAS-traffic-forwarding VAS server-id 35 health-check
no VAS-traffic-forwarding VAS server-id 36 health-check
no VAS-traffic-forwarding VAS server-id 37 health-check
no VAS-traffic-forwarding VAS server-id 38 health-check
no VAS-traffic-forwarding VAS server-id 39 health-check
no VAS-traffic-forwarding VAS server-id 40 health-check
no VAS-traffic-forwarding VAS server-id 41 health-check
no VAS-traffic-forwarding VAS server-id 42 health-check
no VAS-traffic-forwarding VAS server-id 43 health-check
no VAS-traffic-forwarding VAS server-id 44 health-check
no VAS-traffic-forwarding VAS server-id 45 health-check
no VAS-traffic-forwarding VAS server-id 46 health-check
no VAS-traffic-forwarding VAS server-id 47 health-check
no VAS-traffic-forwarding VAS server-id 48 health-check
no VAS-traffic-forwarding VAS server-id 49 health-check
no VAS-traffic-forwarding VAS server-id 50 health-check
no VAS-traffic-forwarding VAS server-id 51 health-check
no VAS-traffic-forwarding VAS server-id 52 health-check
no VAS-traffic-forwarding VAS server-id 53 health-check
no VAS-traffic-forwarding VAS server-id 54 health-check
no VAS-traffic-forwarding VAS server-id 55 health-check
no VAS-traffic-forwarding VAS server-id 56 health-check
no VAS-traffic-forwarding VAS server-id 57 health-check
Cisco SCE 8000 CLI Command Reference
2-580
CLI Command Reference
Chapter 2
CLI Command Reference
show running-config-all
no VAS-traffic-forwarding VAS server-id 58 health-check
no VAS-traffic-forwarding VAS server-id 59 health-check
no VAS-traffic-forwarding VAS server-id 60 health-check
no VAS-traffic-forwarding VAS server-id 61 health-check
no VAS-traffic-forwarding VAS server-id 62 health-check
no VAS-traffic-forwarding VAS server-id 63 health-check
no sanity-checks test-packets
no sanity-checks attack-filter
no sanity-checks event-counters Flow-ID-Allocations-Failed
no l7-filter
no attack-filter protocol TCP
no attack-filter protocol UDP
no attack-filter protocol ICMP attack-direction single-side-both
no attack-filter protocol other attack-direction single-side-both
attack-filter subscriber-notification ports 80
replace spare-memory code bytes 3145728
interface GigabitEthernet 1/1
ip address 10.78.242.173 255.255.255.0
interface GigabitEthernet 1/2
ip address 10.78.242.173 255.255.255.0
interface GigabitEthernet 3/0/0
auto-negotiate
interface GigabitEthernet 3/1/0
auto-negotiate
interface GigabitEthernet 3/2/0
auto-negotiate
interface GigabitEthernet 3/3/0
auto-negotiate
exit
ip default-gateway 10.78.242.129
line vty 0 4
no timeout
exit
interface Mng 0/1
no auto-fail-over
exit
interface Mng 0/2
active-port
exit
sub-attribute add-attribute Called-Station-ID
sub-attribute add-attribute 3GPP-Charging-Characteristics
sub-attribute add-attribute 3GPP-GPRS-Negotiated-QoS-Profile
sub-attribute add-attribute 3GPP-RAT-Type
sub-attribute add-attribute 3GPP-SGSN-Address-Code-6
sub-attribute add-attribute 3GPP-SGSN-Address
sub-attribute add-attribute 3GPP-SGSN-MCC-MNC
cdp mode bypass
service debug-shell
service debug-telnet
service debug-ssh
debug const-db name lcConstDb.rucSched.shutWaitBeforeShuttingRucs value 1000
debug const-db name lcConstDb.rucSched.shutWaitAfterShuttingRucs value 1000
debug const-db name lcConstDb.traverser.maxClsFcIds value 3312
debug const-db name lcConstDb.traverser.clsFcIdsThreshold value 3248
debug const-db name lcConstDb.sanityChecks.enableTestPackets value false
debug const-db name lcConstDb.sanityChecks.enableDelayPacketsEF value false
debug const-db name lcConstDb.sanityChecks.enableDelayPacketsBE value false
debug const-db name lcConstDb.attackFilter.maxTotalPacketsIncrease value 1e+10
debug const-db name commonConstDb.sli.minSupportedObjectFormat value 13
diameter
no subscriber LEG dhcp-lease-query
subscriber LEG dhcp-lease-query servers 127.0.0.1
logger device SCE-agent-Statistics-Log max-file-size 204800
Cisco SCE 8000 CLI Command Reference
2-581
Chapter 2
CLI Command Reference
show running-config-all
management-agent property "com.pcube.management.framework.install.activation.operation"
"Install"
management-agent property "com.pcube.management.framework.install.activated.package" "SCA
BB"
management-agent property "com.pcube.management.framework.install.activated.version"
"3.7.0 build 514"
management-agent property "com.pcube.management.framework.install.activation.date" "Wed
Nov 16 11:57:15 UTC 2011"
ip ftp-server
ip http-tech-if
#This is an application configuration file (running-config-application).
#Created on 16:19:28 UTC FRI November 18 2011
#cli-type 1
#version 1
interface LineCard 0
application /apps/data/scos/temp.sli
exit
# Dynamic RDR category configuration
#This is a party templates configuration(included in application configuration
running-config-application).
#Created on 16:19:28 UTC FRI November 18 2011
#cli-type 1
#version 1
logger application-stats import-application-stats
/apps/data/scos/system/p3hidden/um//config//appstats.csv
RDR-formatter protocol NetflowV9 mapping file
/apps/data/scos/system/p3hidden/um//config//netflow.xml
#This is a party database configuration file (running-config-party-db) for static parties
only.
#Created on 16:19:29 UTC FRI November 18 2011
#cli-type 1
#version 1
hw-bypass mode
party name "N/A"
party name "party-name"
party mapping ip-address 1.2.3.4 name party-name
party name party-name hw-bypass
SCE8000#
Related Commands
Command
Description
more
running-config-all
Displays the contents of all the currently running configuration files.
show running-config
Displays the contents of the currently running configuration.
show
running-config-applic
ation
Displays the contents of the currently running configuration application in
the Cisco SCE platform.
show
running-config-partydb
Displays the contents of the currently running party database configuration
for the static parties that are configured in the Cisco SCE platform.
Cisco SCE 8000 CLI Command Reference
2-582
Chapter 2
CLI Command Reference
show running-config-application
show running-config-application
To display the contents of the currently running configuration application in the Cisco SCE platform, use
the show running-config-application command in the privileged EXEC mode.
show running-config-application
Syntax Description
This command has no arguments or keywords.
Command Default
None
Command Modes
Privileged EXEC
Command History
This table includes the following release-specific history entries:
Release
Modification
3.7.x
This command was introduced.
Usage Guidelines
The authorization used is root.
Examples
The followingis sample output from the show running-config-application command:
SCE8000>enable 15
Password:<cisco>
SCE8000#>show running-config-application
#This is an application configuration file (running-config-application).
#Created on 16:19:28 UTC FRI November 18 2011
#cli-type 1
#version 1
interface LineCard 0
application /apps/data/scos/temp.sli
exit
# Dynamic RDR category configuration
#This is a party templates configuration(included in application configuration
running-config-application).
#Created on 16:19:28 UTC FRI November 18 2011
#cli-type 1
#version 1
logger application-stats import-application-stats
/apps/data/scos/system/p3hidden/um//config//appstats.csv
RDR-formatter protocol NetflowV9 mapping file
/apps/data/scos/system/p3hidden/um//config//netflow.xml
SCE8000#>
Cisco SCE 8000 CLI Command Reference
2-583
Chapter 2
CLI Command Reference
show running-config-application
Related Commands
Command
Description
more
running-config-applic
ation
Displays the contents of the currently running configuration application in
the Cisco SCE platform.
show
running-config-all
Displays the contents of all the currently running configuration files.
Cisco SCE 8000 CLI Command Reference
2-584
Chapter 2
CLI Command Reference
show running-config-party-db
show running-config-party-db
To display the contents of the currently running party database configuration for the static parties that
are configured in the Cisco SCE platform, use the show running-config-party-db command in the
privileged EXEC mode.
show running-config-party-db
Syntax Description
This command has no arguments or keywords.
Command Default
Default Party.
Command Modes
Privileged EXEC
Command History
This table includes the following release-specific history entries:
Release
Modification
3.7.x
This command was introduced.
Usage Guidelines
The authorization used is root.
Examples
The following is sample output from the show running-config-party-db command:
SCE8000>enable 15
Password:<cisco>
SCE8000#>show running-config-party-db
#This is a party database configuration file (running-config-party-db) for static parties
only.
#Created on 13:34:02 UTC TUE July 12 2011
#cli-type 1
#version 1
hw-bypass mode
party name "N/A"
party name "[party-name]"
party mapping ip-address 24.11.52.128 name [party-name]
party mapping ip-address 110.10.10.10 name [party-name]
party name [party-name] hw-bypass
SCE8000#>
Cisco SCE 8000 CLI Command Reference
2-585
Chapter 2
CLI Command Reference
show running-config-party-db
Related Commands
Command
Description
more
running-config-partydb
Displays the contents of the currently running party database configuration
for the static parties that are configured in the Cisco SCE platform.
more
running-config-all
Displays the contents of all the currently running configuration files.
party name party-name Sets the hardware bypass state for a specified static party in the hardware
hw-bypass
bypass mode of the Cisco SCE platform.
show party name
party-name
Displays the contents of a specified static party in the Cisco SCE platform.
show party name
party-name hw-bypass
Displays the hardware bypass status of a specified static party in the
hardware bypass mode of the Cisco SCE platform.
show
running-config-all
Displays the contents of all the currently running configuration files.
Cisco SCE 8000 CLI Command Reference
2-586
Chapter 2
CLI Command Reference
show scmp
show scmp
Displays the SCMP (ISG) general configuration and status.
show scmp {all | name name} [counters]
Syntax Description
all
Displays the configuration for all destinations.
name
Displays the configuration or counters for the specified destination (SCMP
peer device).
counters
Displays the statistics for each destination. You must specify either the
destination, using the name keyword, or all.
Command Default
None
Command Modes
Privileged EXEC
Command History
This table includes the following release-specific history entries:
Release
Modification
3.0.5
This command was introduced.
Usage Guidelines
Authorization: admin
Examples
The following example shows how to display the SCMP counters for a specified destination:
SCE8000>enable 10
Password:<cisco>
SCE8000#show scmp name scmp_peer1 counters
SCMP Connection 'scmp_peer1' counters:
Total messages sent: 72
Total messages received: 72
Establish requests sent: 1
Establish replies received: 1
Accounting requests sent: 20
Accounting replies received: 20
Subscriber queries sent: 0
Subscriber query response recv: 0
Request retry exceeded: 0
Requests replied with errors: 0
Subscriber requests received: 50
Subscriber responses sent: 50
Failed Requests: 0
Keep-alive sent: 1
Keep-alive received: 1
SCE8000>
Cisco SCE 8000 CLI Command Reference
2-587
Chapter 2
CLI Command Reference
show scmp
Related Commands
Command
Description
clear scmp name counters
Clears the counters for the specified SCMP peer device.
scmp
Enables the Service Control Management Protocol functionality.
Cisco SCE 8000 CLI Command Reference
2-588
Chapter 2
CLI Command Reference
show snmp
show snmp
Displays the SNMP configuration and counters.
show snmp
Syntax Description
This command has no arguments or keywords.
Command Default
None
Command Modes
User EXEC
Command History
This table includes the following release-specific history entries:
Release
Modification
2.5.7
This command was introduced.
Usage Guidelines
Authorization: viewer
Examples
The following example shows how to display the SNMP server configuration and statistics:
SCE8000>enable 5
Password:<cisco>
SCE8000>show snmp
SNMP server status: Enabled
Location: London_Office Room301
Contact: [email protected]
Authentication Trap Status: Enabled
Management vlan 4 assigned to snmp service
Communities:
-----------Community: public, Access Authorization: RO, Access List Index: 1
Trap managers:
-----------Trap host: 10.1.1.205, community: public, version: SNMPv2c
SNMP stats:
29 SNMP packets input
0 Bad SNMP version errors
29 Unknown community name
0 Illegal operation for community name supplied
0 Encoding errors
0 Number of requested variables
0 Number of altered variables
0 Get-request PDUs
0 Get-next PDUs
0 Set-request PDUs
29 SNMP packets output
0 Too big errors
0 No such name errors
Cisco SCE 8000 CLI Command Reference
2-589
Chapter 2
CLI Command Reference
show snmp
0 Bad values errors
0 General errors
0 Response PDUs
29 Trap PDUs
SCE8000>
Related Commands
Command
Description
show snmp community
Displays configured SNMP communities.
show snmp contact
Displays the configured MIB-II variable sysContact.
show snmp enabled
Displays the SNMP agent status.
show snmp host
Displays the destination hosts for SNMP traps.
show snmp location
Displays the configured MIB-II variable sysLocation.
Cisco SCE 8000 CLI Command Reference
2-590
Chapter 2
CLI Command Reference
show snmp accelerate-query
show snmp accelerate-query
To view the linksServiceUsage queries configured for SNMP walk acceleration, use the show snmp
accelerate-query command.
show snmp accelerate-query
Syntax Description
This command does not contain syntax or keywords.
Command Default
None.
Command Modes
EXEC (#)
Command History
This table includes the following release-specific history entries:
Release
Modification
3.8.0
This command was introduced.
Usage Guidelines
Authorization: Viewer
Examples
The following example shows the accelerated SNMP link Usage Queries. Only linkUsageUpVolume is
accelerated in this case.
SCE8000#> show snmp accelerate-query
acceleration for linkServiceUsageUpVolume query is enabled
SCE8000#>
Related Commands
Command
Description
snmp-server accelerate-query
Enables or disables the SNMP walk acceleration for
linkServiceUsage queries.
Cisco SCE 8000 CLI Command Reference
2-591
Chapter 2
show snmp community
show snmp community
Displays configured communities.
show snmp community
Syntax Description
This command has no arguments or keywords.
Command Default
None
Command Modes
User EXEC
Command History
This table includes the following release-specific history entries:
Release
Modification
2.5.7
This command was introduced.
Usage Guidelines
Authorization: viewer
Examples
The following example shows how to display the SNMP manager communities:
SCE8000>enable 5
Password:<cisco>
SCE8000>show snmp community
Community: public, Access Authorization: RO,
Access List Index: 1
SCE8000>
Related Commands
Command
Description
snmp-server community
Sets a community string.
show snmp
Displays the SNMP configuration and counters.
Cisco SCE 8000 CLI Command Reference
2-592
CLI Command Reference
Chapter 2
CLI Command Reference
show snmp contact
show snmp contact
Displays the configured MIB-II variable sysContact.
show snmp contact
Syntax Description
This command has no arguments or keywords.
Command Default
None
Command Modes
User EXEC
Command History
This table includes the following release-specific history entries:
Release
Modification
2.5.7
This command was introduced.
Usage Guidelines
Authorization: viewer
Examples
The following example shows how to display the system contact:
SCE8000>enable 5
Password:<cisco>
SCE8000>show snmp contact
Contact: [email protected]
SCE8000>
Related Commands
Command
Description
snmp-server contact
Sets the MIB-II variable system contact.
show snmp
Displays the SNMP configuration and counters.
Cisco SCE 8000 CLI Command Reference
2-593
Chapter 2
CLI Command Reference
show snmp enabled
show snmp enabled
Displays the SNMP agent status (enabled or disabled).
show snmp enabled
Syntax Description
This command has no arguments or keywords.
Command Default
None
Command Modes
User EXEC
Command History
This table includes the following release-specific history entries:
Release
Modification
2.5.7
This command was introduced.
Usage Guidelines
Authorization: viewer
Examples
The following example shows how to display the current status of the SNMP server (enabled):
SCE8000>enable 5
Password:<cisco>
SCE8000>show snmp enabled
SNMP server status: Enabled
SCE8000>
Related Commands
Command
Description
snmp-server
Enables the SNMP agent.
show snmp
Displays the SNMP configuration and counters.
Cisco SCE 8000 CLI Command Reference
2-594
Chapter 2
CLI Command Reference
show snmp engine-id
show snmp engine-id
Displays the engine ID of the SNMP agent or device.
show snmp engine-id
Syntax Description
This command has no arguments or keywords.
Command Default
None.
Command Modes
User EXEC.
Command History
This table includes the following release-specific history entries:
Usage Guidelines
Release
Modification
4.1.0
This command was introduced.
The engine ID may be used to configure the users on the SNMP manager for receiving the traps.
Authorization: viewer
Examples
SCE8000> enable 5
Password: <cisco>
SCE8000> show snmp engine-id
SCE8000(config)#>
Cisco SCE 8000 CLI Command Reference
2-595
Chapter 2
CLI Command Reference
show snmp group
show snmp group
Displays information on the SNMP groups configured on a device; including the users configured in that
group.
show snmp group {all-groups | group-name group name}
Syntax Description
all-groups
Shows all SNMP groups configured on a device.
group-name
Shows the details of a specific SNMP group.
group name
Name of the group.
Command Default
None.
Command Modes
Global configuration
Command History
This table includes the following release-specific history entries:
Release
Modification
4.1.0
This command was introduced.
Usage Guidelines
Authorization: user
Examples
SCE8000#> show snmp group all-Groups
List of configured Groups:Group Name: ipGroup :
Security Level: authNoPriv
read view: IPView
write view: none-view
Group Name: ifGroup :
Security Level: authPriv
read view: IfView
write view: IfView
Group Name: ifGroupReadOnly :
Security Level: noAuthNoPriv
read view: IfView
write view: none-view
SCE8000#> show snmp group group-name ifGroup
Group Name: ifGroup :
Security Level: authPriv
read view: IfView
write view: IfView
Cisco SCE 8000 CLI Command Reference
2-596
Chapter 2
CLI Command Reference
show snmp group
Users belonging to this group:
ifUserRW
Cisco SCE 8000 CLI Command Reference
2-597
Chapter 2
CLI Command Reference
show snmp host
show snmp host
Displays the destination hosts for SNMP traps.
show snmp host
Syntax Description
This command has no arguments or keywords.
Command Default
None
Command Modes
User EXEC
Command History
This table includes the following release-specific history entries:
Release
Modification
2.5.7
This command was introduced.
Usage Guidelines
Authorization: viewer
Examples
The following example shows how to display the destination hosts for SNMP traps:
SCE8000>enable 5
Password:<cisco>
SCE8000>show snmp host
Trap host: 10.1.1.205, community: public, version: SNMPv2c
SCE8000>
Related Commands
Command
Description
snmp-server host
Sets destination hosts for SNMP traps.
show snmp
Displays the SNMP configuration and counters.
Cisco SCE 8000 CLI Command Reference
2-598
Chapter 2
CLI Command Reference
show snmp location
show snmp location
Displays the configured MIB-II variable sysLocation.
show snmp location
Syntax Description
This command has no arguments or keywords.
Command Default
None
Command Modes
User EXEC
Command History
This table includes the following release-specific history entries:
Release
Modification
2.5.7
This command was introduced.
Usage Guidelines
Authorization: viewer
Examples
The following example shows how to display the system location:
SCE8000>enable 5
Password:<cisco>
SCE8000>show snmp location
Location: London_Office
SCE8000>
Related Commands
Command
Description
snmp-server location
Assigns a name to the Cisco SCE platform location and sets the MIB-II
variable sysLocation.
show snmp
Displays the SNMP configuration and counters.
Cisco SCE 8000 CLI Command Reference
2-599
Chapter 2
CLI Command Reference
show snmp mib
show snmp mib
Displays MIB variables.
show snmp mib mib variables
Syntax Description
mib
Name of the MIB to display.
variables
Name of the specific MIB group or object to display.
Command Default
None
Command Modes
SCE 8000 uses MIBs from three sources:
•
Cisco Service Control MIBs
•
standard MIBs
•
general Cisco MIBs
Table 2-13 and Table 2-14 describe these MIB files.
Note
All Cisco MIBs and some of the common standard MIBs can be obtained at the following URL:
http://tools.cisco.com/Support/SNMP/do/BrowseMIB.do?local=en&step=2
Note
For information about the differences between the MIBs used by the Cisco SCE 8000, see the Cisco
Service Control MIBs appendix in the Cisco SCE8000 Software Configuration Guide.
Table 2-13
CISCO-SERVICE_CONTROL MIBS
MIB
Description
CISCO-SERVICE-CONTROL-LINK-MIB.my
Provides information about the status and
configuration of links used by service
control entities.
CISCO-SERVICE-CONTROL-RDR-MIB.my
Defines objects describing statistics and
configuration relating to the Raw Data
Record Formatter running on a service
control entity.
CISCO-SERVICE-CONTROL-SUBSCRIBERS-MIB.my
Provides global and specific information
on subscribers managed by a service
control entity
CISCO-SERVICE-CONTROL-TP-STATS-MIB.my
Provides information and statistics on the
traffic processor(s) of a service control
entity.
Cisco SCE 8000 CLI Command Reference
2-600
Chapter 2
CLI Command Reference
show snmp mib
Table 2-13
CISCO-SERVICE_CONTROL MIBS (continued)
MIB
Description
CISCO-SERVICE-CONTROL-ATTACK-MIB.my
Provides information related to different
types of attacks detected on the network
entities and corresponding actions taken
in the monitored network
CISCO-SERVICE-CONTROLLER-MIB.my
Provides information about service
control traffic controllers.
Table 2-14
Standard and Cisco MIBs used tby the Cisco SCE 8000
MIBs
Description
CISCO-SMI.my
Defines Cisco enterprise tree structure
CISCO-TC.my
Contains Textual Conventions needed in some MIBs
CISCO-CONFIG-COPY-MIB.my
Facilitates writing of configuration files
CISCO-ENTITY-ALARM-MIB.my
Defines the managed objects that support the
monitoring of alarms generated by physical entities
contained by the system
CISCO-ENTITY-FRU-CONTROL-MIB.my
Monitor s and configures operational status of Field
Replaceable Units
CISCO-ENTITY-REDUNDANCY-MIB.my
Supports configuration, control and monitoring of
redundancy protection for various kinds of
components on Cisco managed devices.
CISCO-ENTITY-REDUNDANCY-TC-MIB.my Defines the textual conventions used within
Cisco Entity Redundancy MIBs
CISCO-ENTITY-SENSOR-MIB.my
Monitors the values of sensors in the Entity-MIB
CISCO-PROCESS-MIB.my
Provides overall information about the CPU load.
CISCO-QUEUE-MIB.my
Manages interface queuing in Cisco devices.
CISCO-SECURE-SHELL-MIB.my
Displays and configures accounting and Secure
Shell (SSH) related features in a device.
CISCO-SYSLOG-EXT-MIB.my
Extends the Cisco Syslog MIB and provides
network management support to handle and process
Syslog messages as device events
CISCO-SYSLOG-EVENT-EXT-MIB.my
Extends the Cisco Syslog.MIB and provides
network management support to handle and process
Syslog messages as device events
CISCO-SYSLOG-MIB.my
Describes and stores the system messages generated
by the IOS and any other OS which supports
syslogs.
CISCO-TELNET-SERVER-MIB.my
Displays and configures Telnet related features in a
device.
ENTITY-MIB.my
Represents multiple logical entities supported by a
single SNMP agent
ENTITY-STATE-MIB.my
Defines a state extension to the Entity MIB
Cisco SCE 8000 CLI Command Reference
2-601
Chapter 2
CLI Command Reference
show snmp mib
Table 2-14
Note
Standard and Cisco MIBs used tby the Cisco SCE 8000 (continued)
MIBs
Description
ENTITY-STATE-TC-MIB.my
Defines state textual conventions.
HOST-RESOURCES-MIB.my
Manages host systems.
Only OIDs that are mapped to former pcube MIB OIDs are in use in the standard and Cisco MIBs as
listed in this table.
User EXEC
Command History
This table includes the following release-specific history entries:
Release
Modification
2.5.7
This command was introduced.
Usage Guidelines
Authorization: viewer
Examples
The following example shows the MIB-II system group:
SCE8000>enable 5
Password:<cisco>
SCE8000>show snmp mib mib-ii system
sysDescr.0 = CiSco Service Engineering,
SW version: Control Card Version 1.30 build 29,
HW version: SCE GE “RevE”
sysObjectID.0 = 1.3.6.1.4.1.5655.1.2
sysUpTime.0 = 14 hours, 25 minutes, 59 seconds
sysContact.0 = [email protected]
sysName.0 = SCE sysLocation.0 = London_Office
sysServices.0 = 2
SCE8000>
Related Commands
Command
Description
show snmp traps
Displays the status of SNMP trap generation status (enabled or disabled).
Cisco SCE 8000 CLI Command Reference
2-602
Chapter 2
CLI Command Reference
show snmp traps
show snmp traps
Displays the status of SNMP trap generation status (enabled or disabled).
show snmp traps
Syntax Description
This command has no arguments or keywords.
Command Default
None
Command Modes
User EXEC
Command History
This table includes the following release-specific history entries:
Release
Modification
2.5.7
This command was introduced.
Usage Guidelines
Authorization: viewer
Examples
The following example shows how to display the status of the SNMP server traps:
SCE8000>enable 5
Password:<cisco>
SCE8000>show snmp traps
Authentication-failure trap status: Disabled
operational-status traps status: Enabled
system-reset trap status: Enabled
chassis traps status: Enabled
RDR-formatter traps status: Enabled
Telnet traps status: Enabled
logger traps status: Enabled
SNTP traps status:
Enabled
link-bypass traps status: Enabled
subscriber traps status: Enabled
pull-request-failure traps status: Disabled
attack traps status: Enabled
port-operational-status traps status: Enable
SCE8000>
Related Commands
Command
Description
snmp-server enable traps
Enables or disables SNMP traps.
Cisco SCE 8000 CLI Command Reference
2-603
Chapter 2
show snmp user
show snmp user
Shows SNMP users on a device.
show snmp user {all-users | user-name user name}
Syntax Description
all-users
Shows all SNMP users configured on a device.
user-name
Shows the details of a specific SNMP user.
user name
Name of the user.
Command Default
None.
Command Modes
Global configuration
Command History
This table includes the following release-specific history entries:
Release
Modification
4.1.0
This command was introduced.
Usage Guidelines
Authorization: user
Examples
SCE8000#> show snmp user all-Users
User: ipUser :
Group Name: ipGroup
Authentication Protocol: MD5
Privacy protocol: NONE
User: ipUser01 :
Group Name: ipGroup
Authentication Protocol: SHA
Privacy protocol: NONE
User: ifUserNoAuth :
Group Name: ifGroupReadOnly
Authentication Protocol: NONE
Privacy protocol: NONE
User: ifUserRW :
Group Name: ifGroup
Authentication Protocol: SHA
Privacy protocol: AES
SCE8000#> show snmp user user-name ipUser
User: ipUser :
Group Name: ipGroup
Cisco SCE 8000 CLI Command Reference
2-604
CLI Command Reference
Chapter 2
CLI Command Reference
show snmp user
Authentication Protocol: MD5
Privacy protocol: NONE
Cisco SCE 8000 CLI Command Reference
2-605
Chapter 2
show snmp view
show snmp view
Shows details of SNMP views configured on a device.
show snmp view {all-views | view-name view name}
Syntax Description
all-views
Shows all SNMP views configured on a device.
view-name
Shows the details of a specific SNMP view.
view name
Name of the view.
Command Default
None.
Command Modes
Global configuration
Command History
This table includes the following release-specific history entries:
Release
Modification
4.1.0
This command was introduced.
Usage Guidelines
Authorization: viewer
Examples
SCE8000#> show snmp view all-Views
List of configured Views:View: full-view - include OID: 1
View: none-view - exclude OID: 1
View: IPView - include OID: 1.3.6.1.2.1.4
View: IfView - include OID: 1.3.6.1.2.1.2.2
SCE8000#> show snmp view view-name IPView
View: IPView include OID: 1.3.6.1.2.1.4
Cisco SCE 8000 CLI Command Reference
2-606
CLI Command Reference
Chapter 2
CLI Command Reference
show sntp
show sntp
Displays the SNTP configuration and update statistics.
show sntp
Syntax Description
This command has no arguments or keywords.
Command Default
None
Command Modes
User EXEC
Command History
This table includes the following release-specific history entries:
Release
Modification
2.5.7
This command was introduced.
Usage Guidelines
Authorization: viewer
Examples
The following example shows how to display statistics from the SNTP clients:
SCE8000>enable 5
Password:<cisco>
SCE8000>show sntp
SNTP broadcast client: disabled
last update time: not available
SNTP uni-cast client: enabled
there is one server:
1: 128.182.58.100
last update time: June 10 2009, 14:06:41
update interval: 100 seconds
SCE8000>
Related Commands
Command
Description
sntp server
Enables the SNTP unicast client to query the specified SNTP server.
sntp broadcast client
Enables the SNTP multicast client to accept SNTP broadcasts from any
SNTP server.
sntp update-interval
Defines the interval between SNTP unicast update queries.
Cisco SCE 8000 CLI Command Reference
2-607
Chapter 2
CLI Command Reference
show startup-config
show startup-config
Display the contents of the startup configuration file.
show startup-config
Syntax Description
This command has no arguments or keywords.
Command Default
None
Command Modes
Privileged EXEC
Command History
This table includes the following release-specific history entries:
Usage Guidelines
Release
Modification
2.5.7
This command was introduced.
Use this command to compare the configuration used by the Cisco SCE platform at boot time with the
current configuration to make sure that you approve of all the differences before you save the
configuration with the copy running-config startup-config command.
Authorization: admin
Examples
The following example shows sample output from this command:
SCE8000>enable 10
Password:<cisco>
SCE8000#show startup-config
#Created on 12:06:13 UTC SUN May 11 2008
#cli-type 1
#version 1
no management-agent notifications notification-list
1417,1418,804,815,1404,1405,1406,1407,1408,400
no management-agent notifications notification-list
402,421,440,441,444,445,446,450,437,457
no management-agent notifications notification-list 3593,3594,3595,10040
snmp-server community "public" ro
RDR-formatter forwarding-mode multicast
RDR-formatter destination 10.56.96.26 port 33000 category number 1 priority
RDR-formatter destination 10.56.96.26 port 33000 category number 2 priority
RDR-formatter destination 10.56.96.26 port 33000 category number 3 priority
RDR-formatter destination 10.56.96.26 port 33000 category number 4 priority
interface LineCard 0
connection-mode inline on-failure external-bypass
no silent
no shutdown
attack-filter subscriber-notification ports 80
replace spare-memory code bytes 3145728
interface GigabitEthernet 1/1
Cisco SCE 8000 CLI Command Reference
2-608
100
100
100
100
Chapter 2
CLI Command Reference
show startup-config
ip address 10.56.96.46 255.255.252.0
interface TenGigabitEthernet 3/0/0
bandwidth 10000000 burst-size 50000
global-controller 0 name "Default Global
interface TenGigabitEthernet 3/1/0
bandwidth 10000000 burst-size 50000
global-controller 0 name "Default Global
interface TenGigabitEthernet 3/2/0
bandwidth 10000000 burst-size 50000
global-controller 0 name "Default Global
interface TenGigabitEthernet 3/3/0
bandwidth 10000000 burst-size 50000
global-controller 0 name "Default Global
Controller"
Controller"
Controller"
Controller"
exit
ip default-gateway 10.56.96.1
line vty 0 4
exit
management-agent property "com.pcube.management.framework.install.activation.operation"
"Install"
management-agent property "com.pcube.management.framework.install.activated.package" "SCA
BB"
management-agent property "com.pcube.management.framework.install.activated.version"
"3.1.6 build 79"
management-agent property "com.pcube.management.framework.install.activation.date" "Sun
May 11 08:44:04 GMT+00:00 2008"
flow-filter partition name "ignore_filter" first-rule 4 num-rules 32
flow-filter partition name "udpPortsToOpenBySw" first-rule 40 num-rules 21
SCE8000#
Related Commands
Command
Description
more
Displays the contents of a file.
Cisco SCE 8000 CLI Command Reference
2-609
Chapter 2
CLI Command Reference
show startup-config-all
show startup-config-all
To display the contents of all the startup configuration files, use the show startup-config-all command
in the privileged EXEC mode.
show startup-config-all
Note
The configuration file contents will be displayed only if the corresponding startup configuration files are
copied from the running configuration.
Syntax Description
This command has no arguments or keywords.
Command Default
None
Command Modes
Privileged EXEC
Command History
This table includes the following release-specific history entries:
Release
Modification
3.7.x
This command was introduced.
Usage Guidelines
The authorization used is root.
Examples
The followingis sample output from the show startup-config-all command:
SCE8000>enable 15
Password:<cisco>
SCE8000#show startup-config-all
#This is a general configuration file (running-config).
#Created on 16:19:09 UTC FRI November 18 2011
#cli-type 1
#version 1
watchdog software-reset disabled
watchdog hardware-reset disabled
hostname "pqemb154SAV"
ip ssh
no management-agent notifications notification-list
1417,1418,804,815,1404,1405,1406,1407,1408,400
no management-agent notifications notification-list
402,421,440,441,444,445,446,450,437,457
no management-agent notifications notification-list 3593,3594,3595,10040
RDR-formatter destination 10.78.242.172 port 33000 category number 1 priority
RDR-formatter destination 10.78.242.172 port 33000 category number 2 priority
RDR-formatter destination 10.78.242.172 port 33000 category number 3 priority
RDR-formatter destination 10.78.242.172 port 33000 category number 4 priority
interface LineCard 0
Cisco SCE 8000 CLI Command Reference
2-610
100
100
100
100
Chapter 2
CLI Command Reference
show startup-config-all
aggregative-global-controllers
aggregative-global-controller-dynamic mode suspend
aggregative-global-controller-dynamic mode active
connection-mode inline on-failure bypass
no watchdog
no silent
no shutdown
flow-open-mode enhanced UDP min-packets 2
statistics-logging frequency 5
service-bandwidth-prioritization-mode global
no protocol-pack version
no VAS-traffic-forwarding VAS server-id 0 health-check
no VAS-traffic-forwarding VAS server-id 1 health-check
no VAS-traffic-forwarding VAS server-id 2 health-check
no VAS-traffic-forwarding VAS server-id 3 health-check
no VAS-traffic-forwarding VAS server-id 4 health-check
no VAS-traffic-forwarding VAS server-id 5 health-check
no VAS-traffic-forwarding VAS server-id 6 health-check
no VAS-traffic-forwarding VAS server-id 7 health-check
no VAS-traffic-forwarding VAS server-id 8 health-check
no VAS-traffic-forwarding VAS server-id 9 health-check
no VAS-traffic-forwarding VAS server-id 10 health-check
no VAS-traffic-forwarding VAS server-id 11 health-check
no VAS-traffic-forwarding VAS server-id 12 health-check
no VAS-traffic-forwarding VAS server-id 13 health-check
no VAS-traffic-forwarding VAS server-id 14 health-check
no VAS-traffic-forwarding VAS server-id 15 health-check
no VAS-traffic-forwarding VAS server-id 16 health-check
no VAS-traffic-forwarding VAS server-id 17 health-check
no VAS-traffic-forwarding VAS server-id 18 health-check
no VAS-traffic-forwarding VAS server-id 19 health-check
no VAS-traffic-forwarding VAS server-id 20 health-check
no VAS-traffic-forwarding VAS server-id 21 health-check
no VAS-traffic-forwarding VAS server-id 22 health-check
no VAS-traffic-forwarding VAS server-id 23 health-check
no VAS-traffic-forwarding VAS server-id 24 health-check
no VAS-traffic-forwarding VAS server-id 25 health-check
no VAS-traffic-forwarding VAS server-id 26 health-check
no VAS-traffic-forwarding VAS server-id 27 health-check
no VAS-traffic-forwarding VAS server-id 28 health-check
no VAS-traffic-forwarding VAS server-id 29 health-check
no VAS-traffic-forwarding VAS server-id 30 health-check
no VAS-traffic-forwarding VAS server-id 31 health-check
no VAS-traffic-forwarding VAS server-id 32 health-check
no VAS-traffic-forwarding VAS server-id 33 health-check
no VAS-traffic-forwarding VAS server-id 34 health-check
no VAS-traffic-forwarding VAS server-id 35 health-check
no VAS-traffic-forwarding VAS server-id 36 health-check
no VAS-traffic-forwarding VAS server-id 37 health-check
no VAS-traffic-forwarding VAS server-id 38 health-check
no VAS-traffic-forwarding VAS server-id 39 health-check
no VAS-traffic-forwarding VAS server-id 40 health-check
no VAS-traffic-forwarding VAS server-id 41 health-check
no VAS-traffic-forwarding VAS server-id 42 health-check
no VAS-traffic-forwarding VAS server-id 43 health-check
no VAS-traffic-forwarding VAS server-id 44 health-check
no VAS-traffic-forwarding VAS server-id 45 health-check
no VAS-traffic-forwarding VAS server-id 46 health-check
no VAS-traffic-forwarding VAS server-id 47 health-check
no VAS-traffic-forwarding VAS server-id 48 health-check
no VAS-traffic-forwarding VAS server-id 49 health-check
no VAS-traffic-forwarding VAS server-id 50 health-check
no VAS-traffic-forwarding VAS server-id 51 health-check
no VAS-traffic-forwarding VAS server-id 52 health-check
Cisco SCE 8000 CLI Command Reference
2-611
Chapter 2
CLI Command Reference
show startup-config-all
no VAS-traffic-forwarding VAS server-id 53 health-check
no VAS-traffic-forwarding VAS server-id 54 health-check
no VAS-traffic-forwarding VAS server-id 55 health-check
no VAS-traffic-forwarding VAS server-id 56 health-check
no VAS-traffic-forwarding VAS server-id 57 health-check
no VAS-traffic-forwarding VAS server-id 58 health-check
no VAS-traffic-forwarding VAS server-id 59 health-check
no VAS-traffic-forwarding VAS server-id 60 health-check
no VAS-traffic-forwarding VAS server-id 61 health-check
no VAS-traffic-forwarding VAS server-id 62 health-check
no VAS-traffic-forwarding VAS server-id 63 health-check
no sanity-checks test-packets
no sanity-checks attack-filter
no sanity-checks event-counters Flow-ID-Allocations-Failed
no l7-filter
no attack-filter protocol TCP
no attack-filter protocol UDP
no attack-filter protocol ICMP attack-direction single-side-both
no attack-filter protocol other attack-direction single-side-both
attack-filter subscriber-notification ports 80
replace spare-memory code bytes 3145728
interface GigabitEthernet 1/1
ip address 10.78.242.173 255.255.255.0
interface GigabitEthernet 1/2
ip address 10.78.242.173 255.255.255.0
interface GigabitEthernet 3/0/0
auto-negotiate
interface GigabitEthernet 3/1/0
auto-negotiate
interface GigabitEthernet 3/2/0
auto-negotiate
interface GigabitEthernet 3/3/0
auto-negotiate
exit
ip default-gateway 10.78.242.129
line vty 0 4
no timeout
exit
interface Mng 0/1
no auto-fail-over
exit
interface Mng 0/2
active-port
exit
sub-attribute add-attribute Called-Station-ID
sub-attribute add-attribute 3GPP-Charging-Characteristics
sub-attribute add-attribute 3GPP-GPRS-Negotiated-QoS-Profile
sub-attribute add-attribute 3GPP-RAT-Type
sub-attribute add-attribute 3GPP-SGSN-Address-Code-6
sub-attribute add-attribute 3GPP-SGSN-Address
sub-attribute add-attribute 3GPP-SGSN-MCC-MNC
cdp mode bypass
service debug-shell
service debug-telnet
service debug-ssh
debug const-db name lcConstDb.rucSched.shutWaitBeforeShuttingRucs value 1000
debug const-db name lcConstDb.rucSched.shutWaitAfterShuttingRucs value 1000
debug const-db name lcConstDb.traverser.maxClsFcIds value 3312
debug const-db name lcConstDb.traverser.clsFcIdsThreshold value 3248
debug const-db name lcConstDb.sanityChecks.enableTestPackets value false
debug const-db name lcConstDb.sanityChecks.enableDelayPacketsEF value false
debug const-db name lcConstDb.sanityChecks.enableDelayPacketsBE value false
debug const-db name lcConstDb.attackFilter.maxTotalPacketsIncrease value 1e+10
debug const-db name commonConstDb.sli.minSupportedObjectFormat value 13
Cisco SCE 8000 CLI Command Reference
2-612
Chapter 2
CLI Command Reference
show startup-config-all
diameter
no subscriber LEG dhcp-lease-query
subscriber LEG dhcp-lease-query servers 127.0.0.1
logger device SCE-agent-Statistics-Log max-file-size 204800
management-agent property "com.pcube.management.framework.install.activation.operation"
"Install"
management-agent property "com.pcube.management.framework.install.activated.package" "SCA
BB"
management-agent property "com.pcube.management.framework.install.activated.version"
"3.7.0 build 514"
management-agent property "com.pcube.management.framework.install.activation.date" "Wed
Nov 16 11:57:15 UTC 2011"
ip ftp-server
ip http-tech-if
#This is an application configuration file (running-config-application).
#Created on 16:19:28 UTC FRI November 18 2011
#cli-type 1
#version 1
interface LineCard 0
application /apps/data/scos/temp.sli
exit
# Dynamic RDR category configuration
#This is a party templates configuration(included in application configuration
running-config-application).
#Created on 16:19:28 UTC FRI November 18 2011
#cli-type 1
#version 1
logger application-stats import-application-stats
/apps/data/scos/system/p3hidden/um//config//appstats.csv
RDR-formatter protocol NetflowV9 mapping file
/apps/data/scos/system/p3hidden/um//config//netflow.xml
#This is a party database configuration file (running-config-party-db) for static parties
only.
#Created on 16:19:29 UTC FRI November 18 2011
#cli-type 1
#version 1
hw-bypass mode
party name "N/A"
party name "party-name"
party mapping ip-address 1.2.3.4 name party-name
party name party-name hw-bypass
SCE8000#
Related Commands
Command
Description
more
startup-config-all
Displays the contents of all the startup configuration files.
show startup-config
Displays the contents of a startup configuration file.
show
Displays the contents of the startup configuration application files in the
startup-config-applica Cisco SCE platform.
tion
Displays the contents of the startup configuration party database of the
show
startup-config-party-d static parties that are configured in the Cisco SCE platform.
b
Cisco SCE 8000 CLI Command Reference
2-613
Chapter 2
CLI Command Reference
show startup-config-application
show startup-config-application
To display the contents of a startup configuration application file in the Cisco SCE platform, use the
show startup-config-application command in the privileged EXEC mode.
show startup-config-application
Note
The configuration file contents will be displayed only if the corresponding startup configuration
application is copied from the running configuration application.
Syntax Description
This command has no arguments or keywords.
Command Default
None
Command Modes
Privileged EXEC
Command History
This table includes the following release-specific history entries:
Release
Modification
3.7.x
This command was introduced.
Usage Guidelines
The authorization used is root.
Examples
The following is sample output from the show startup-config-application command:
SCE8000>enable 15
Password:<cisco>
SCE8000#>show startup-config-application
#This is an application configuration file (running-config-application).
#Created on 16:19:28 UTC FRI November 18 2011
#cli-type 1
#version 1
interface LineCard 0
application /apps/data/scos/temp.sli
exit
# Dynamic RDR category configuration
#This is a party templates configuration(included in application configuration
running-config-application).
#Created on 16:19:28 UTC FRI November 18 2011
#cli-type 1
#version 1
logger application-stats import-application-stats
/apps/data/scos/system/p3hidden/um//config//appstats.csv
RDR-formatter protocol NetflowV9 mapping file
/apps/data/scos/system/p3hidden/um//config//netflow.xml
SCE8000#>
Cisco SCE 8000 CLI Command Reference
2-614
Chapter 2
CLI Command Reference
show startup-config-application
Related Commands
Command
Description
more
Displays the contents of all the startup configuration application files in the
startup-config-applica Cisco SCE platform.
tion
show
startup-config-all
Displays the contents of all the startup configuration files.
Cisco SCE 8000 CLI Command Reference
2-615
Chapter 2
CLI Command Reference
show startup-config-party-db
show startup-config-party-db
To display the contents of the startup configuration party database of the static parties that are configured
in the Cisco SCE platform, use the show startup-config-party-db command in the privileged EXEC
mode.
show startup-config-party-db
Note
The configuration file contents will be displayed only if the corresponding startup configuration party
database is copied from the running configuration party database.
Syntax Description
This command has no arguments or keywords.
Command Default
None
Command Modes
Privileged EXEC
Command History
This table includes the following release-specific history entries:
Release
Modification
3.7.x
This command was introduced.
Usage Guidelines
The authorization used is root.
Examples
The following is sample output from the show startup-config-party-db command:
SCE8000>enable 15
Password:<cisco>
SCE8000#>show startup-config-party-db
#This is a party database configuration file (running-config-party-db) for static parties
only.
#Created on 13:34:02 UTC TUE July 12 2011
#cli-type 1
#version 1
hw-bypass mode
party name "N/A"
party name "[party-name]"
party mapping ip-address 24.11.52.128 name [party-name]
party mapping ip-address 110.10.10.10 name [party-name]
party name [party-name] hw-bypass
SCE8000#>
Cisco SCE 8000 CLI Command Reference
2-616
Chapter 2
CLI Command Reference
show startup-config-party-db
Related Commands
Command
Description
copy
Allows the task of copying the startup configuration party database and
startup-config-party-d creating a backup file of the configured static parties in the Cisco SCE
b backupfile
platform.
more
running-config-all
Displays the contents of all the currently running configuration files.
more
startup-config-all
Displays the contents of all the startup configuration files.
more
Displays the contents of the startup configuration party database of the
startup-config-party-d static parties that are configured in the Cisco SCE platform.
b
show
startup-config-all
Displays the contents of all the startup configuration files.
show
running-config-all
Displays the contents of all the currently running configuration files.
Cisco SCE 8000 CLI Command Reference
2-617
Chapter 2
show system operation-status
show system operation-status
Displays the operating status of the system.
show system operation-status
Syntax Description
This command has no arguments or keywords.
Command Default
None
Command Modes
User EXEC
Command History
This table includes the following release-specific history entries:
Release
Modification
2.5.7
This command was introduced.
Usage Guidelines
Authorization: viewer
Examples
The following example shows how to display the system operating status:
SCE8000>enable 5
Password:<cisco>
SCE8000>show system operation-status
System Operation status is Operational
SCE8000>
Cisco SCE 8000 CLI Command Reference
2-618
CLI Command Reference
Chapter 2
CLI Command Reference
show system-uptime
show system-uptime
Displays the length of time the system has been running since the last reboot.
show system-uptime
Syntax Description
This command has no arguments or keywords.
Command Default
None
Command Modes
User EXEC
Command History
This table includes the following release-specific history entries:
Release
Modification
2.5.7
This command was introduced.
Usage Guidelines
Authorization: viewer
Examples
The following example shows how to display the system uptime for the Cisco SCE platform:
SCE8000>enable 5
Password:<cisco>
SCE8000>show system-uptime
SCE uptime is 4 days, 13 hours, 21 minutes, 37 seconds
SCE8000>
Cisco SCE 8000 CLI Command Reference
2-619
Chapter 2
CLI Command Reference
show tacacs
show tacacs
Displays statistics for the TACACS+ servers.
show tacacs [all]
Syntax Description
all
Command Default
None
Command Modes
User EXEC
Displays keys, timeouts, and other statistics.
The all keyword is available only at the Privileged EXEC level.
Command History
Usage Guidelines
This table includes the following release-specific history entries:
Release
Modification
3.0.0
This command was introduced.
Note that, although most show commands are accessible to viewer-level users, the all keyword is
available only at the admin authorization level. Use the enable 10 command to access the admin level.
Authorization: viewer
Examples
The following example shows how to display statistics for all TACACS+ servers:
SCE8000>enable 5
Password:<cisco>
SCE8000>show tacacs
Server: 100.10.10.10./49: opens=0 closes=0 error=0
messages in=0 messages out=0
SCE8000>
The following example shows how to display statistics, including keys and timeouts, for all TACACS+
servers:
SCE8000>enable 10
Password:<cisco>
SCE8000# show tacacs all
Server: 100.10.10.10./49: opens=0 closes=0 error=0
messages in=0 messages out=0
timeout=20
uses default timeout= yes
key= a
uses default key= no
SCE8000#
Cisco SCE 8000 CLI Command Reference
2-620
Chapter 2
CLI Command Reference
show tacacs
Related Commands
Command
Description
tacacs-server host
Defines a new TACACS+ server host that is available to the Cisco SCE
platform TACACS+ client.
tacacs-server key
Defines the global default encryption key for the TACACS+ server hosts.
tacacs-server timeout
Defines the global default timeout interval for the TACACS+ server hosts.
Cisco SCE 8000 CLI Command Reference
2-621
Chapter 2
CLI Command Reference
show telnet sessions
show telnet sessions
Displays the active Telnet sessions.
show telnet sessions
Syntax Description
This command has no arguments or keywords.
Command Default
None
Command Modes
User EXEC
Command History
This table includes the following release-specific history entries:
Usage Guidelines
Release
Modification
2.5.7
This command was introduced.
Authorization: viewer
The Index number in the command output does not indicate the number of telnet sessions; but provides
a unique number for each session. The Index numbers are filled in increasing order. When four telnet
sessions are active, the corresponding index numbers are 0, 1, 2, and 3. If the session with index number
1 logs off, then there will be 3 active sessions with index numbers 0, 2, and 3. If a fourth session is
opened, the index numbers will again be 0, 1, 2, and 3.
Examples
The following example shows how to display the currently active Telnet sessions:
SCE8000> enable 5
Password: <cisco>
SCE8000> show telnet sessions
There are 3 active telnet sessions:
Index | Source
================
0 | 10.1.1.201
1 | 10.1.1.202
2 | 10.1.1.202
SCE8000>
Related Commands
Command
Description
telnet
Starts a Telnet session.
show telnet status
Displays the status of the Telnet server daemon.
Cisco SCE 8000 CLI Command Reference
2-622
Chapter 2
CLI Command Reference
show telnet status
show telnet status
Displays the status of the Telnet server daemon.
show telnet status
Syntax Description
This command has no arguments or keywords.
Command Default
None
Command Modes
User EXEC
Command History
This table includes the following release-specific history entries:
Release
Modification
2.5.7
This command was introduced.
Usage Guidelines
Authorization: viewer
Examples
The following example shows how to display the current status of the Telnet daemon (enabled):
SCE8000> enable 5
Password: <cisco>
SCE8000> show telnet status
Telnet daemon is enabled.
SCE8000>
Related Commands
Command
Description
service telnetd
Enables the Telnet daemon.
show telnet sessions
Displays any active Telnet sessions.
Cisco SCE 8000 CLI Command Reference
2-623
Chapter 2
CLI Command Reference
show timezone
show timezone
Displays the current time zone and daylight saving time configuration as configured by the user.
show timezone
Syntax Description
This command has no arguments or keywords.
Command Default
None
Command Modes
User EXEC
Command History
This table includes the following release-specific history entries:
Release
Modification
2.5.7
This command was introduced.
Usage Guidelines
Authorization: viewer
Examples
The following example shows how to display the time zone configured by the user:
SCE8000>enable 5
Password:<cisco>
SCE8000>show timezone
Time zone: ISR minutes offset from UTC: 120
SCE8000>
Related Commands
Command
Description
clock timezone
Sets the time zone.
Cisco SCE 8000 CLI Command Reference
2-624
Chapter 2
CLI Command Reference
show users
show users
Displays the users in the local database. The display includes passwords.
show users
Syntax Description
This command has no arguments or keywords.
Command Default
None
Command Modes
Privileged EXEC
Command History
This table includes the following release-specific history entries:
Usage Guidelines
Release
Modification
3.0.0
This command was introduced.
Note that, although most show commands are accessible to viewer-level users, this command is available
only at the admin authorization level. To access the admin level, use the enable 10 command.
Authorization: admin
Examples
The following example shows how to display the users in the local database:
SCE8000>enable 10
Password:<cisco>
SCE8000# show users
User: name = Joe
privilege level = 10
password = jasper
is password encrypted = no
SCE8000#
Related Commands
Command
Description
username
Adds a new user to the local database.
username privilege
Sets the privilege level for the specified user.
Cisco SCE 8000 CLI Command Reference
2-625
Chapter 2
CLI Command Reference
show version
show version
To display the configuration information for the system, including the hardware version, the software
version, the application used, and other configuration information, use the show version command in
user EXEC command.
show version
Syntax Description
This command has no arguments or keywords.
Command Default
None
Command Modes
User EXEC (>)
Command History
This table includes the following release-specific history entries:
Release
Modification
2.5.7
This command was introduced.
Usage Guidelines
Authorization: viewer
Examples
The following example shows how to display the current version information of the Cisco SCE platform:
SCE8000> enable 5
Password: <cisco>
SCE8000> show version
System version: Version 3.7.5 Build 345
Build time: Feb 29 2012, 20:35:04 (Change-list 697063)
Software version is: Version 3.7.5 Build 345
Cryptography class: K9
Hardware information is:
=====================
Module 1
=====================
--------------------Firmware
--------------------kernel
: [kernel] 2.4.0/3 (inactive: [kernel] 2.4.0/3)
u-boot
: [uboot] 2.1.0/1 (field: [uboot] 0.8.1/18)
select
: [ubs-cf1] 2.4.0/3 (secondary: [ubs-cf1] 2.4.0/3)
--------------------Slot 1: SCE8000-SCM-E
--------------------serial-num : CAT1326G027
part-num
: 73-10598-03
Cisco SCE 8000 CLI Command Reference
2-626
Chapter 2
CLI Command Reference
show version
cpld
: 0x8274
vtpld
: 0xc004
summit-0
: 0xf2c1001
summit-1
: 0xf2c1101
dpt/tx
: 0x491f
cls/ff
: 0x2113
cls cam
: 0x454120
cls flow cap: 33554432
ssa
: 0x90
--------------------TVR
--------------------#cpus
: 1
cpu SVR
: 0x80900121
cpu PVR
: 0x80040202
cpu freq
: 1000MHz
cpu (eeprom): 2.1, 1000MHz
cpld
: 0xa1bc
cpld-ufm
: 0xa803
summit
: 0xf2c1701
cf
: Model=SMART CF, S/N=2008021302C418071807, FwRev=0x20060811, Size=4062240KB
phy-0
: 0xcc2
phy-1
: 0xcc2
phy-2
: 0xcc2
--------------------CFC-0
--------------------board type : P2
#cpus
: 3
cpu-0 SVR
: 0x80900121
cpu-0 PVR
: 0x80040202
cpu-0 freq : 1500MHz
cpu-1 SVR
: 0x80900121
cpu-1 PVR
: 0x80040202
cpu-1 freq : 1500MHz
cpu-2 SVR
: 0x80900121
cpu-2 PVR
: 0x80040202
cpu-2 freq : 1500MHz
cpu (eeprom): 2.1, 1500MHz
cpld-0
: 0xb219
cpld-1
: 0xb219
cpld-2
: 0xb219
cpld-0-ufm : 0xb803
cpld-1-ufm : 0xb803
cpld-2-ufm : 0xb803
summit-0
: 0xf2c1301
summit-1
: 0xf2c1401
fc
: 0x130e
--------------------CFC-1
--------------------board type : P2
#cpus
: 3
cpu-0 SVR
: 0x80900121
cpu-0 PVR
: 0x80040202
cpu-0 freq : 1500MHz
cpu-1 SVR
: 0x80900121
cpu-1 PVR
: 0x80040202
cpu-1 freq : 1500MHz
cpu-2 SVR
: 0x80900121
cpu-2 PVR
: 0x80040202
Cisco SCE 8000 CLI Command Reference
2-627
Chapter 2
show version
cpu-2 freq :
cpu (eeprom):
cpld-0
:
cpld-1
:
cpld-2
:
cpld-0-ufm :
cpld-1-ufm :
cpld-2-ufm :
summit-0
:
summit-1
:
fc
:
1500MHz
2.1, 1500MHz
0xb219
0xb219
0xb219
0xb803
0xb803
0xb803
0xf2c1301
0xf2c1401
0x130e
--------------------Slot 3: SCE8000-SIP
--------------------serial-num : CAT1342G00V
part-num
: 73-10947-02
cpld
: 0x9274
summit-0
: 0xf2c1501
summit-1
: 0xf2c1601
dpt-0
: 0x3245
dpt-1
: 0x3245
ssa-0
: 0x90
ssa-1
: 0x90
CIO RLDRAM : OK
spa[0]
: SPA-8X1GE
spa[1]
: no SPA
spa[2]
: no SPA
spa[3]
: no SPA
--------------------SCE8000 Chassis
--------------------product-num : SCE8000
serial-num : FOX1338HAA5
part-num
: 73-11293-02
part-rev
: A0
vid
: V02
=====================
Module 2
=====================
--------------------Firmware
--------------------kernel
: [kernel] 2.4.0/3 (inactive: [kernel] 2.4.0/3)
u-boot
: [uboot] 2.1.0/1 (field: [uboot] 0.8.1/18)
select
: [ubs-cf0] 2.4.0/3 (secondary: [ubs-cf0] 2.4.0/3)
--------------------Slot 2: SCE8000-SCM-E
--------------------serial-num : CAT1230G001
part-num
: 73-10598-01
cpld
: 0x8274
vtpld
: 0xc003
summit-0
: 0xf2c1001
summit-1
: 0xf2c1101
dpt/tx
: 0x491f
cls/ff
: 0x2113
cls cam
: 0x454120
cls flow cap: 33554432
Cisco SCE 8000 CLI Command Reference
2-628
CLI Command Reference
Chapter 2
CLI Command Reference
show version
ssa
: 0x90
--------------------TVR
--------------------#cpus
: 1
cpu SVR
: 0x80900121
cpu PVR
: 0x80040202
cpu freq
: 1000MHz
cpu (eeprom): 2.1, 1000MHz
cpld
: 0xa1bb
cpld-ufm
: 0xa803
summit
: 0xf2c1701
cf
: Model=SILICONSYSTEMS INC 4GB-3213, S/N=B828318HCJY10916300C,
FwRev=0x242-0230, Size=4125744KB
phy-0
: 0xcc2
phy-1
: 0xcc2
phy-2
: 0xcc2
--------------------CFC-0
--------------------board type : P2
#cpus
: 3
cpu-0 SVR
: 0x80900121
cpu-0 PVR
: 0x80040202
cpu-0 freq : 1500MHz
cpu-1 SVR
: 0x80900121
cpu-1 PVR
: 0x80040202
cpu-1 freq : 1500MHz
cpu-2 SVR
: 0x80900121
cpu-2 PVR
: 0x80040202
cpu-2 freq : 1500MHz
cpu (eeprom): 2.1, 1500MHz
cpld-0
: 0xb217
cpld-1
: 0xb217
cpld-2
: 0xb217
cpld-0-ufm : 0xb803
cpld-1-ufm : 0xb803
cpld-2-ufm : 0xb803
summit-0
: 0xf2c1301
summit-1
: 0xf2c1401
fc
: 0x130e
--------------------CFC-1
--------------------board type : P2
#cpus
: 3
cpu-0 SVR
: 0x80900121
cpu-0 PVR
: 0x80040202
cpu-0 freq : 1500MHz
cpu-1 SVR
: 0x80900121
cpu-1 PVR
: 0x80040202
cpu-1 freq : 1500MHz
cpu-2 SVR
: 0x80900121
cpu-2 PVR
: 0x80040202
cpu-2 freq : 1500MHz
cpu (eeprom): 2.1, 1500MHz
cpld-0
: 0xb217
cpld-1
: 0xb217
cpld-2
: 0xb217
cpld-0-ufm : 0xb803
cpld-1-ufm : 0xb803
Cisco SCE 8000 CLI Command Reference
2-629
Chapter 2
CLI Command Reference
show version
cpld-2-ufm
summit-0
summit-1
fc
:
:
:
:
0xb803
0xf2c1301
0xf2c1401
0x130e
Part number
Revision
Software revision
LineCard S/N
Power Supply type
:
:
:
:
:
73-10598-03
1
1
CAT1326G027
AC
SML Application information is:
No application is configured.
Logger status: Enabled
Platform: SCE8000
Management agent interface version: SCE Agent 3.7.5 Build 300
Software package file: ftp://ftpserver/simba_03750345_K9.pkg
SCE8000
uptime is 1 weeks, 4 days, 17 hours, 28 minutes, 0 seconds
SCE8000#>
Related Commands
Command
Description
show version all
Displays complete version information as well as the information on the
running configuration for all the components.
show version software
Displays version information about the current software that is being used.
Cisco SCE 8000 CLI Command Reference
2-630
Chapter 2
CLI Command Reference
show version all
show version all
Displays complete version information as well as the running configuration for all components.
show version all
Syntax Description
This command has no arguments or keywords.
Command Default
None
Command Modes
User EXEC
Command History
This table includes the following release-specific history entries:
Release
Modification
2.5.7
This command was introduced.
Usage Guidelines
Authorization: viewer
Examples
The following example shows how to display version and configuration information for all system
components:
SCE8000>enable 5
Password:<cisco>
SCE8000>show version all
System version: Version 3.1.6S Build 279
Build time: Jun 10 2008, 19:27:47 (Change-list 335658)
Software version is: Version 3.1.6S Build 279
Hardware information is:
---------------Firmware
---------------kernel : [kernel] 1.0.0/5 (inactive: [kernel] 1.0.0/5)
u-boot : [uboot] 1.0.0/6 (field: [uboot] 0.8.1/13)
select : [ubs-cf1] 1.0.0/5 (secondary: [ubs-cf1] 1.0.0/5)
---------------Slot 1: SCM-8000
---------------serial-num : CAT1202G07D
part-num : 73-10598-01 38
cpld : 0x8162
vtpld : 0xc001
summit-0 : 0x10008
summit-1 : 0x10008
dpt/tx : 0x4837
cls/ff : 0x2047
cls flow cap: 33554432
Cisco SCE 8000 CLI Command Reference
2-631
Chapter 2
show version all
---------------TVR
---------------#cpus : 1
cpu SVR : 0x80900120
cpu PVR : 0x80040202
cpu freq : 1000MHz
cpu (eeprom): 2.1, 1000MHz
cpld : 0xa1b7
cpld-ufm : 0xa803
summit : 0x10007
cf : Model=SMART CF, FwRev=0x20060811, Size=4062240KB
---------------CFC-0
---------------board type : P2
#cpus : 3
cpu-0 SVR : 0x80900121
cpu-0 PVR : 0x80040202
cpu-0 freq : 1500MHz
cpu-1 SVR : 0x80900121
cpu-1 PVR : 0x80040202
cpu-1 freq : 1500MHz
cpu-2 SVR : 0x80900121
cpu-2 PVR : 0x80040202
cpu-2 freq : 1500MHz
cpu (eeprom): 2.1, 1500MHz
cpld-0 : 0xb20e
cpld-1 : 0xb20e
cpld-2 : 0xb20e
cpld-0-ufm : 0xb803
cpld-1-ufm : 0xb803
cpld-2-ufm : 0xb803
summit-0 : 0x1000a
summit-1 : 0x1000a
fc : 0x1044
---------------CFC-1
---------------board type : P2
#cpus : 3
cpu-0 SVR : 0x80900121
cpu-0 PVR : 0x80040202
cpu-0 freq : 1500MHz
cpu-1 SVR : 0x80900121
cpu-1 PVR : 0x80040202
cpu-1 freq : 1500MHz
cpu-2 SVR : 0x80900121
cpu-2 PVR : 0x80040202
cpu-2 freq : 1500MHz
cpu (eeprom): 2.1, 1500MHz
cpld-0 : 0xb20e
cpld-1 : 0xb20e
cpld-2 : 0xb20e
cpld-0-ufm : 0xb803
cpld-1-ufm : 0xb803
cpld-2-ufm : 0xb803
summit-0 : 0x1000a
summit-1 : 0x1000a
fc : 0x1044
---------------Slot 3: SIP-8000
---------------serial-num : CAT1204G01H
Cisco SCE 8000 CLI Command Reference
2-632
CLI Command Reference
Chapter 2
CLI Command Reference
show version all
part-num : 73-10947-01
cpld : 0x9162
summit-0 : 0x10006
summit-1 : 0x10006
dpt-0 : 0x3033
dpt-1 : 0x3033
spa[0] : SPA-1X10GE-L-V2
spa[1] : SPA-1XTENGE-XFP
spa[2] : SPA-1X10GE-L-V2
spa[3] : SPA-1XTENGE-XFP
---------------SCE8000 Chassis
---------------product-num : CISCO7604
serial-num : FOX10420BKZ
part-num : 73-9789-02
part-rev : A0
vid : V01
Part number: 73-10598-01 38
Revision:
Software revision:
LineCard S/N : CAT1202G07D
Power Supply type: AC
SML Application information is:
No application is configured.
Logger status: Enabled
Platform: SCE8000 - 4x10GBE
Management agent interface version: SCE Agent 3.1.6 Build 134
Software package file: ftp://ftpserver/simba.pkg
SCE8000 uptime is 9 minutes, 54 seconds
======================
#This is a general configuration file (running-config).
#Created on 10:14:59 UTC TUE November 12 2006
.
interface LineCard 0
connection-mode active
no silent
.
.
Software package file: Not available
Unified management package file: /system/images/um13012.pkg
SCE8000>
Related Commands
Command
Description
show version
Displays the configuration information for the system.
show version software
Displays version information for the current software.
Cisco SCE 8000 CLI Command Reference
2-633
Chapter 2
CLI Command Reference
show version software
show version software
Displays version information for the current software.
show version software
Syntax Description
This command has no arguments or keywords.
Command Default
None
Command Modes
User EXEC
Command History
This table includes the following release-specific history entries:
Release
Modification
2.5.7
This command was introduced.
Usage Guidelines
Authorization: viewer
Examples
The following example shows how to display the current software version:
SCE8000>enable 5
Password:<cisco>
SCE8000>show version software
Software version is: Version 3.0.5 Build 240
SCE8000>
Related Commands
Command
Description
show version
Displays the configuration information for the system.
show version all
Displays complete version information as well as the running configuration
for all components.
Cisco SCE 8000 CLI Command Reference
2-634
Chapter 2
CLI Command Reference
show vty mng-vlan
show vty mng-vlan
Displays the management interface VLAN configured for Telnet services.
show vty mng-vlan
Syntax Description
This command has no arguments or keywords.
Command Default
This command has no default settings.
Command Modes
User Exec
Command History
This table includes the following release-specific history entries:
Release
Modification
3.7.x
This command was introduced.
Usage Guidelines
Authorization: viewer
Examples
This example shows how to display the VLAN configured for Telnet services.
SCE8000>enable 5
Password:<cisco>
SCE8000#show vty mng-vlan
Management vlan 2 assigned to telnet service
SCE8000#
Related Commands
Command
Description
vty mng-vlan
Assigns the specified VLAN to Telnet services.
Cisco SCE 8000 CLI Command Reference
2-635
Chapter 2
silent
silent
Disables the line card from reporting events.
To enable the line card to send reports, use the no form of this command.
silent
no silent
Syntax Description
This command has no arguments or keywords.
Command Default
Reporting events is disabled.
Command Modes
Interface Linecard Configuration
Command History
This table includes the following release-specific history entries:
Release
Modification
2.5.7
This command was introduced.
Usage Guidelines
Authorization: admin
Examples
The following example shows how to change the line card state to silent:
SCE8000>enable 10
Password:<cisco>
SCE8000#config
SCE8000(config)#interface linecard 0
SCE8000(config if)#silent
SCE8000(config if)#
Related Commands
Command
Description
show interface linecard silent
Displays the current silent state.
Cisco SCE 8000 CLI Command Reference
2-636
CLI Command Reference
Chapter 2
CLI Command Reference
snmp-server accelerate-query
snmp-server accelerate-query
To enable the SNMP walk acceleration for linksServiceUsage queries, use the snmp-server
accelerate-query command.
Use the no form of the command to disable the SNMP walk acceleration.
snmp-server accelerate-query <linkServiceUsage query>
no snmp-server accelerate-query <linkServiceUsage query>
Syntax Description
linkServiceUsage query Any one of the following linkServiceUsage queries:
•
linkServiceUsageActiveSubs
•
linkServiceUsageConcSessions
•
linkServiceUsageDownVolume
•
linkServiceUsageDuration
•
linkServiceUsageNumSessions
•
linkServiceUsageUpVolume
Command Default
None.
Command Modes
CONFIG (#)>
Command History
This table includes the following release-specific history entries:
Release
Modification
3.8.0
This command was introduced.
Usage Guidelines
Authorization: admin
Examples
The following example shows the how to enable SNMP linkServiceUsageUpVolume query.
SCE8000> enable 10
Password: <cisco>
SCE8000# config
SCE8000(config)#> snmp-server accelerate-query linkServiceUsageUpVolume
SCE8000(config)#>
The following example shows the how to disable SNMP linkServiceUsageUpVolume query
SCE8000>enable 10
Password:<cisco>
SCE8000# config
SCE8000(config)#> snmp-server accelerate-query linkServiceUsageUpVolume
Cisco SCE 8000 CLI Command Reference
2-637
Chapter 2
CLI Command Reference
snmp-server accelerate-query
SCE8000(config)#>
Related Commands
Command
Description
show snmp accelerate-query
Displays the linkServiceUsage queries enabled on the Cisco
SCE.
Cisco SCE 8000 CLI Command Reference
2-638
Chapter 2
CLI Command Reference
snmp-server
snmp-server
Enables the SNMP agent. You can also use any of the other snmp-server commands to enable the SNMP
agent.
To disable the SNMP agent from responding to SNMP managers, use the no form of this command. All
SNMP settings are saved and then restored when the SNMP agent is re-enabled.
snmp-server enable
no snmp-server
Syntax Description
enable
Command Default
The SNMP agent is disabled.
Command Modes
Global configuration
Command History
This table includes the following release-specific history entries:
Usage Guidelines
Enables the SNMP agent.
Release
Modification
2.5.7
This command was introduced.
To allow SNMP access, you must define at least one community string.
Authorization: admin
Examples
The following example shows how to disable the SNMP server:
SCE8000>enable 10
Password:<cisco>
SCE8000#config
SCE8000(config)#no snmp-server
SCE8000(config)#
Related Commands
Command
Description
snmp-server community
Sets a community string.
show snmp
Displays the SNMP configuration and counters.
Cisco SCE 8000 CLI Command Reference
2-639
Chapter 2
CLI Command Reference
snmp-server community
snmp-server community
Sets a community string.
To remove a community string, use the no form of this command.
snmp-server community community-string [ro | rw] [acl-number]
no snmp-server community community-string [ro | rw] [acl-number]
no snmp-server community all
Syntax Description
community-string
SNMPv1 and SNMPv2c security string that identifies a community of
managers that can access the SNMP server. It functions much like a
password, permitting access to SNMP.
The community string is 1 to 32 alphanumeric characters. Blank spaces are
not permitted.
Note
The @ symbol is used for delimiting the context information. Avoid
using the @ symbol as part of the SNMP community string when
configuring this command.
ro
(Optional) Specifies read-only access. Authorized management stations can
only retrieve MIB objects.
rw
(Optional) Specifies read-write access. Authorized management stations
can both retrieve and modify MIB objects.
acl-number
(Optional) Integer from 1 to 99 that specifies a standard access list of IP
addresses allowed access to the SNMP agent. This ACL is assigned globally
to the SNMP agent, not just to the specified community string.
all
(Optional) Used with the no form of the command. Removes all configured
communities.
Command Default
No SNMP access.
Command Modes
Global configuration
Command History
This table includes the following release-specific history entries:
Release
Modification
2.5.7
This command was introduced.
Cisco SCE 8000 CLI Command Reference
2-640
Chapter 2
CLI Command Reference
snmp-server community
Usage Guidelines
Note
Assigning different ACLs to different community strings is not supported. If you specify an ACL in this
command, it is assigned to the SNMP server globally, not just to the specified community string. For
example, if you configure two community strings and assign a different ACL to each, access to the
SNMP agent for both communities is controlled by both ACLs.
Authorization: admin
Examples
The following example shows how to configure two SNMP manager communities with read-only access.
Access by both communities is controlled by ACLs 1 and 2 in conjunction.
SCE8000>enable 10
Password:<cisco>
SCE8000#config
SCE8000(config)#snmp-server community community1 ro 1
SCE8000(config)#snmp-server community community2 ro 2
SCE8000(config)#
The following example shows how to remove one of the configured community strings. The assigned
ACL address is also removed, so that access to the SNMP agent is now controlled be ACL 2 only.
SCE8000>enable 10
Password:<cisco>
SCE8000#config
SCE8000(config)#no snmp-server community community1 ro 1
SCE8000(config)#
Related Commands
Command
Description
access-list
Creates or updates a specified ACL
show snmp community Displays the current SNMP community configuration.
Cisco SCE 8000 CLI Command Reference
2-641
Chapter 2
snmp-server contact
snmp-server contact
Sets the system contact (sysContact) string.
To remove the contact setting, use the no form of this command.
snmp-server contact contact
no snmp-server contact
Syntax Description
contact
Command Default
None
Command Modes
Global configuration
Command History
This table includes the following release-specific history entries:
Sring that identifies the system contact.
Release
Modification
2.5.7
This command was introduced.
Usage Guidelines
Authorization: admin
Examples
The following example shows how to configure the system contact:
SCE8000>enable 10
Password:<cisco>
SCE8000#config
SCE8000(config)#snmp-server contact [email protected]
SCE8000(config)#
Related Commands
Command
Description
show snmp contact
Displays the configured system contact string.
Cisco SCE 8000 CLI Command Reference
2-642
CLI Command Reference
Chapter 2
CLI Command Reference
snmp-server enable traps
snmp-server enable traps
Enables or disables sending the specified SNMP traps. (Only authentication-failure traps and enterprise
traps can be controlled using this command.)
To reset SNMP traps to the default status, use the default form of this command.
snmp-server enable traps [snmp [snmp-trap-name]] [enterprise [enterprise-trap-name]]
no snmp-server enable traps [snmp [snmp-trap-name]] [enterprise [enterprise-trap-name]]
default snmp-server enable traps [snmp [snmp-trap-name]] [enterprise [enterprise-trap-name]]
Syntax Description
snmp-trap-name
(Optional) Controls a specific SNMP trap. The only valid trap is
Authentication.
enterprise-trap-name
(Optional) Controls a specific enterprise trap.
Choose attack, chassis, link-bypass, logger, operational-status,
port-operational-status, pull-request-failure, RDR-formatter, session,
SNTP, subscriber, system-reset, telnet, vas-traffic-forwarding
Command Default
SNMP traps are disabled.
Enterprise traps are enabled.
Command Modes
Global configuration
Command History
This table includes the following release-specific history entries:
Usage Guidelines
Release
Modification
2.5.7
This command was introduced.
The following classes of SNMP traps are controlled by this command:
•
SNMP traps
•
Enterprise traps
The snmp and enterprise keywords specify the class of traps that are to be enabled or disabled by this
command. Each class, or type, is composed of specific traps. Use these keywords as follows:
•
To enable or disable all traps of one type—Specify only snmp or enterprise.
•
To enable or disable only one specific trap—Specify snmp or enterprise with the trap-name
argument naming the trap.
•
To enable or disable all traps—Do not specify either snmp or enterprise.
Because currently only the SNMP type of trap is the authentication trap, the snmp and authentication
keywords are redundant.
Cisco SCE 8000 CLI Command Reference
2-643
Chapter 2
CLI Command Reference
snmp-server enable traps
The snmp-server enable traps command is used in conjunction with the snmp-server host command.
Use the snmp-server host command to specify which host or hosts receive SNMP notifications. To send
notifications, you must configure at least one snmp-server host command.
Authorization: admin
Examples
The following example shows how to configure the SNMP server to send traps:
SCE8000>enable 10
Password:<cisco>
SCE8000#config
SCE8000(config)#snmp-server enable traps
SCE8000(config)#
Related Commands
Command
Description
show snmp traps
Displays the status of SNMP trap generation.
snmp-server host
Configures a destination for SNMP traps.
Cisco SCE 8000 CLI Command Reference
2-644
Chapter 2
CLI Command Reference
snmp-server group
snmp-server group
Configures an SNMP server group. To remove all server groups or a specific server group use the no
form of the command.
snmp server group group name 3 {noAuthNoPriv | authNoPriv | authPriv } [read-view view
name] [write-view view name]
no snmp server group group name
no snmp server group all
Syntax Description
group name
Name of the SNMP server group.
3
Indicates the SNMP version 3.
noAuthNoPriv
Sets the security level to no authentication and no privacy. Group does not
require any authentication or encryption security levels for access.
authNoPriv
Sets the security level with authentication and no privacy. The users of this
group has to authenticate themselves to get access.
authPriv
Sets the security level with authentication and privacy. The users of this
group requires both authentication and encryption security levels for access.
read-view
(Optional)Specifies that the view is a read-view. This is the view used for
SNMPGET/GET-NEXT/WALK.
write-view
(Optional)Specifies that the view is a write-view. This is the view used for
SNMPSET.
view name
Enter the view name for the group.
Command Default
None.
Command Modes
Global configuration
Command History
This table includes the following release-specific history entries:
Usage Guidelines
Release
Modification
4.1.0
This command was introduced.
If configured, SNMP server group details are included in the running configuration. SNMPv3 group
configurations are not persistent across restarts. You must copy the running-configuration to the
startup-configuration to make the groups persistent.
Notify-view is not supported for group configuration.
By default an SNMP group is read-only.
You can remove a group only if there are no users configured in the group.
Cisco SCE 8000 CLI Command Reference
2-645
Chapter 2
CLI Command Reference
snmp-server group
Authorization: admin.
Examples
SCE8000> enable 10
Password: <cisco>
SCE8000# configure
SCE8000(config)#> snmp-server
SCE8000(config)#> snmp-server
SCE8000(config)#> snmp-server
SCE8000(config)#> snmp-server
SCE8000(config)#> snmp-server
Cisco SCE 8000 CLI Command Reference
2-646
view IPView OID 1.3.6.1.2.1.4 operation include
view IfView OID 1.3.6.1.2.1.2.2 operation include
group ipGroup 3 authNoPriv read-view IPView
group ifGroup 3 authPriv read-view IfView write-view IfView
group ifGroupReadOnly 3 noAuthNoPriv read-view IfView
Chapter 2
CLI Command Reference
snmp-server host
snmp-server host
Configures a destination for SNMP traps.
To remove configured hosts, use the no form of the command.
snmp-server host { hostname| ip-address } [traps] [ version version ] {community-string | {
noAuthNoPriv | authNoPriv | authPriv }} user user-name
no snmp-server host { hostname| ip-address } [traps]
no snmp-server host all
Syntax Description
host
Specifies the details of the SNMP host. The SNMP notification host is
typically a network management station (NMS) or SNMP manager. This
host is the recipient of the SNMP traps.
hostname
Name of the host.
ip-address
IP address of the SNMP notification host.
traps
Optional switch, does not influence command functionality.
version
SNMP version running in the system.
version
SNMP version. Can be set to 1. 2c, or 3.
community-string
(Only for SNMP v1 and v2c) The SNMPv1 and SNMPv2c security string
that identifies a community of managers that are able to access the SNMP
server.
noAuthNoPriv
(Only for SNMP v3) Specifies to configure the traps for the host with no
authentication and no privacy.
authNoPriv
(Only for SNMP v3) Specifies to configure the traps for the host with
authentication; but no privacy.
authPriv
(Only for SNMP v3) Specifies to configure the traps for the host with both
authentication and privacy.
user-name
(Only for SNMP v3) Name of the user.
all
(Optional) Used with the no form of the command, removes all configured
hosts.
Command Default
SNMP traps do not have destination hosts.
Command Modes
Global configuration
Command History
This table includes the following release-specific history entries:
Release
Modification
2.5.7
This command was introduced.
4.1.0
This command was updated for SNMP version 3.
Cisco SCE 8000 CLI Command Reference
2-647
Chapter 2
CLI Command Reference
snmp-server host
Usage Guidelines
For SNMP version 1 and version 2c, If the given community is not configured earlier, then the
community is automatically configured with read only permissions as if the snmp-server community
community-string ro command was given along with the snmp-server host command.
For SNMP version 3, you must configure the user-name for the user before configuring the trap host
using the user-name.
Notifications are not sent unless you enter at least one snmp-server host command. To configure the
Cisco SCE platform to send SNMP notifications, you must enter at least one snmp-server host
command. To enable multiple hosts, issue separate snmp-server host command for each host.
The snmp-server host command is used in conjunction with the snmp-server enable traps command.
Use the snmp-server enable traps command to specify which SNMP notifications are to be sent.
Use the all keyword with the no form of the command to remove all configured hosts. This will result in
no notifications being sent.
Authorization: admin
Examples
The following example shows how to add a host destination for SNMPv2c traps:
SCE8000>enable 10
Password:<cisco>
SCE8000#config
SCE8000(config)#snmp-server host 10.1.1.205 2c public
SCE8000(config)#
Adding a host destination for SNMPv3 traps:
SCE8000> enable 10
Password: <cisco>
SCE8000# configure
SCE8000(config)# snmp-server host host 10.1.1.205 version 3 authPriv user user1
SCE8000(config)#
Related Commands
Command
Description
show snmp host
Displays the destination hosts for SNMP traps.
snmp-server enable traps
Specifies which notifications to send.
Cisco SCE 8000 CLI Command Reference
2-648
Chapter 2
CLI Command Reference
snmp-server interface
snmp-server interface
Defines a specific SNMP server interface.
To remove the interface definition, use the no form of this command.
snmp-server interface interface-number {alias alias | link-up-down-trap}
no snmp-server interface interface-number
Syntax Description
interface-number
Number of the SNMP server interface.
alias
Logical name assigned to the interface.
link-up-down-trap
Enables the link up or down trap for the specified interface.
Command Default
No SNMP server interface is defined.
Command Modes
Global configuration
Command History
This table includes the following release-specific history entries:
Release
Modification
3.1.6
This command was introduced.
Usage Guidelines
Authorization: admin
Examples
The following example shows how to define an alias for the specified interface:
SCE8000>enable 10
Password:<cisco>
SCE8000#config
SCE8000(config)#snmp-server interface 4 alias snmp-server1
SCE8000(config)#
The following example shows how to enable the link up or down trap for the specified interface:
SCE8000>enable 10
Password:<cisco>
SCE8000#config
SCE8000(config)#snmp-server interface 4 link-up-down-trap
SCE8000(config)#
Related Commands
Command
Description
snmp-server
Enables the SNMP server.
Cisco SCE 8000 CLI Command Reference
2-649
Chapter 2
snmp-server location
snmp-server location
Assigns a name to the Cisco SCE platform location (sysLocation).
To remove the location setting, use the no form of this command.
snmp-server location location
no snmp-server location
Syntax Description
location
Command Default
No location is defined.
Command Modes
Global configuration
Command History
This table includes the following release-specific history entries:
String that specifies the system location.
Release
Modification
2.5.7
This command was introduced.
Usage Guidelines
Authorization: admin
Examples
The following example shows how to configure the system location:
SCE8000>enable 10
Password:<cisco>
SCE8000#config
SCE8000(config)#snmp-server location London Office Room 300
SCE8000(config)#
Related Commands
Command
Description
show snmp location
Displays the configured MIB-II variable sysLocation.
Cisco SCE 8000 CLI Command Reference
2-650
CLI Command Reference
Chapter 2
CLI Command Reference
snmp-server mng-vlan
snmp-server mng-vlan
Assigns the specified VLAN to SNMP services.
Use the no form of the command to the VLAN configuration for SNMP services.
snmp-server mng-vlan vlan-id
no snmp-server mng-vlan
Syntax Description
vlan-id
Command Default
None
Command Modes
Global configuration
Command History
This table includes the following release-specific history entries:
Usage Guidelines
VLAN tag to be assigned to SNMP services (1-4094).
Release
Modification
3.7.x
This command was introduced.
You can create separate VLAN interfaces on the management interface in order to differentiate between
various management services. There are two steps in this process:
1.
Create the VLAN and assign the IP address (mng-vlan command).
2.
Assign the VLAN to a management service.
Note
This command, in either the positive or negative form, restarts the SNMP process in order for
the changes to take effect. This generates a cold-start trap.
Authorization: admin
Examples
The following example shows how to configure a VLAN for SNMP services.
SCE8000>enable 10
Password:<cisco>
SCE8000#config
SCE8000(config)#mng-vlan 100 address 10.10.10.20 mask 255.255.255.0
SCE8000(config)#snmp-server mng-vlan 100
SCE8000(config)#
The following example shows how to remove the VLAN for SNMP services.
Cisco SCE 8000 CLI Command Reference
2-651
Chapter 2
CLI Command Reference
snmp-server mng-vlan
SCE8000>enable 10
Password:<cisco>
SCE8000#config
SCE8000(config)#no snmp-server mng-vlan
SCE8000(config)#
Related Commands
Command
Description
show snmp
Displays the VLAN configuration of SNMP service, if configured, in
addition to other SNMP properties.
Cisco SCE 8000 CLI Command Reference
2-652
Chapter 2
CLI Command Reference
snmp-server user
snmp-server user
Configures SNMPv3 users on a Cisco SCE device.
To remove a specific SNMP user or all SNMP users on a device, use the no form of the command.
snmp-server user user-name group group-name [ auth { MD5-auth | SHA-auth }
auth-pass-phrase authPassPhrase ] [ priv { AES-priv | DES-priv } priv-pass-phrase
privPassPhrase ]
no snmp server user user name
no snmp server user all
Syntax Description
user
Specifies the SNMP user name.
user-name
SNMP user name to be added to a group.
group
Specifies the group to add the user.
group-name
Name of the group to add the user.
auth
Specifies the type of authentication.
MD5-auth
Specifies to use MD5 authentication.
SHA-auth
Specifies to use SHA authentication.
auth-pass-phrase
Specifies the authentication pass phrase.
authPassPhrase
Authentication pass phrase to be used for the specific user.
priv
Specifies the type of privacy to be used.
AES-priv
Specifies to use AES privacy.
DES-priv
Specifies to use DES privacy.
priv-pass-phrase
Specifies to use the pass phrase for the privacy type.
privPassPhrase
Pass phrase to be used for the privacy.
all
Removes all SNMP users from a device.
Command Default
None.
Command Modes
Global configuration
Command History
This table includes the following release-specific history entries:
Usage Guidelines
Release
Modification
4.1.0
This command was introduced.
If you are configuring large number of SNMPv3 users, disable SNMP agent before configuring the users.
Enable the SNMP agent after configuring all users.
Cisco SCE 8000 CLI Command Reference
2-653
Chapter 2
CLI Command Reference
snmp-server user
If you are configuring less number of SNMPv3 user or few ad hoc configurations, you need not disable
the SNMP agent. You may notice a delay of few seconds for the configuration to take effect.
SNMPv3 users are not shown in the running-configuration. To see a list of configured users, use the show
snmp user command. The SNMPv3 user configurations are persistent across restarts of the Cisco SCE.
To remove any or all users, you must explicitly remove them using no snmp-server user command.
If you configure a group and configure few users for that group. You must copy the
running-configuration to startup-configuration to preserve the group configurations across restarts of the
Cisco SCE. If you do not copy the running-configuration to startup-configuration, the user configuration
is preserved and group configuration is deleted. To make the groups and users usable again, you need to
configure the groups again.
Authorization: admin
Examples
SCE8000> enable 10
Password: <cisco>
SCE8000# configure
SCE8000(config)#> no snmp-server
SCE8000(config)#> snmp-server user ipUser group ipGroup auth MD5-auth auth-pass-phrase
password
Note: Do not forget to enable the SNMP agent after all the user configuration, to make
them active.
SCE8000(config)#> snmp-server user ipUser01 group ipGroup auth SHA-auth auth-pass-phrase
passwordsha
Note: Do not forget to enable the SNMP agent after all the user configuration, to make
them active.
SCE8000(config)#> snmp-server user ifUserNoAuth group ifGroupReadOnly
Note: Do not forget to enable the SNMP agent after all the user configuration, to make
them active.
SCE8000(config)#> snmp-server user ifUserRW group ifGroup auth SHA-auth auth-pass-phras
passwordsha priv AES-priv priv-pass-phrase passwordaes
Note: Do not forget to enable the SNMP agent after all the user configuration, to make
them snmp-server user active.
SCE8000(config)#> snmp-server enable
SCE8000(config)#> end
SCE8000#>
Cisco SCE 8000 CLI Command Reference
2-654
Chapter 2
CLI Command Reference
snmp-server view
snmp-server view
Creates a view entry. To remove an SNMP view entry, use the no form of the command.
Note
Enter a valid SNMP Object ID to be included or excluded. Cisco SCE does not validate the OID.
snmp server view view-name OID OID or MIB Name Operation {Included | Excluded}
no snmp server view view-name OID OID or MIB Name Operation {Included | Excluded}
no snmp server view all
Syntax Description
view-name
Name for the viewyou are creating.
OID
Specifies to use theMIB Object ID.
OID or MIB Name
SNMP MIB Object ID or the MIB name.
Operation
Specifies the type of the entry for view.
Included
Specifies to include all entries from the MIB/OID name to the view.
Excluded
Specifies to exclude the MIB/OID name from the view.
all
Specifies to remove all view entries.
Command Default
None.
Command Modes
Global configuration
Command History
This table includes the following release-specific history entries:
Usage Guidelines
Release
Modification
4.1.0
This command was introduced.
If configured, SNMP server view details are included in the running configuration.
By default, two views are defined. A full-view that indicates that the user can see all objects and a
none-view that indicates that the user cannot view any objects. You can not modify or remove these
views.
While removing a view, both the OID and the operation should match. You can not remove a view if it
is being used in a group.
Authorization: admin
Examples
SCE8000> enable 10
Password: <cisco>
SCE8000# configure
Cisco SCE 8000 CLI Command Reference
2-655
Chapter 2
CLI Command Reference
snmp-server view
SCE8000(config)#> snmp-server view IPView OID 1.3.6.1.2.1.4 operation include
SCE8000(config)#> snmp-server view IfView OID 1.3.6.1.2.1.2.2 operation include
SCE8000#>
Cisco SCE 8000 CLI Command Reference
2-656
Chapter 2
CLI Command Reference
sntp broadcast client
sntp broadcast client
Enables the SNTP multicast client to accept SNTP broadcasts from any SNTP server.
To disable the SNTP multicast client, use the no form of this command.
sntp broadcast client
no sntp broadcast client
Syntax Description
This command has no arguments or keywords.
Command Default
The SNTP multicast client is disabled.
Command Modes
Global configuration
Command History
This table includes the following release-specific history entries:
Release
Modification
2.5.7
This command was introduced.
Usage Guidelines
Authorization: admin
Examples
The following example shows how to enable the SNTP multicast client:
SCE8000>enable 10
Password:<cisco>
SCE8000#config
SCE8000(config)#sntp broadcast client
SCE8000(config)#
Related Commands
Command
Description
show sntp
Displays the SNTP configuration and update statistics.
sntp server
Enables the SNTP unicast client to query the specified SNTP server.
sntp update-interval
Defines the interval between SNTP unicast update queries.
Cisco SCE 8000 CLI Command Reference
2-657
Chapter 2
CLI Command Reference
sntp server
sntp server
Enables the SNTP unicast client to query the specified SNTP server.
To disable the SNTP unicast server, use the no form of this command.
sntp server {address | hostname}
no sntp server hostname
no sntp server all
Syntax Description
address
IP address of the SNTP server.
hostname
Hostname of the SNTP server.
all
Used with the no form of this command, disables all SNTP unicast servers.
Command Default
The SNTP unicast server is disabled.
Command Modes
Global configuration
Command History
This table includes the following release-specific history entries:
Release
Modification
2.5.7
This command was introduced.
Usage Guidelines
Authorization: admin
Examples
The following example shows how to enable an SNTP server at a specified IP address:
SCE8000>enable 10
Password:<cisco>
SCE8000#config
SCE8000(config)#sntp server 128.182.58.100
SCE8000(config)#
Related Commands
Command
Description
show sntp
Displays the SNTP configuration and update statistics.
sntp broadcast client
Enables the SNTP multicast client to accept SNTP broadcasts from any
SNTP server.
sntp update-interval
Defines the interval between SNTP unicast update queries.
Cisco SCE 8000 CLI Command Reference
2-658
Chapter 2
CLI Command Reference
sntp update-interval
sntp update-interval
Defines the interval (in seconds) between SNTP unicast update queries.
sntp update-interval [interval]
Syntax Description
interval
Command Default
The default interval is 64 seconds.
Command Modes
Global configuration
Command History
This table includes the following release-specific history entries:
Length of the interval, in seconds.
Release
Modification
2.5.7
This command was introduced.
Usage Guidelines
Authorization: admin
Examples
The following example shows how to set the SNTP update interval to 100 seconds:
SCE8000>enable 10
Password:<cisco>
SCE8000#config
SCE8000(config)#sntp update-interval 100
SCE8000(config)#
Related Commands
Command
Description
show sntp
Displays the SNTP configuration and update statistics.
sntp server
Enables the SNTP unicast client to query the specified SNTP server.
sntp broadcast client
Enables the SNTP multicast client to accept SNTP broadcasts from any
SNTP server.
Cisco SCE 8000 CLI Command Reference
2-659
Chapter 2
CLI Command Reference
speed
speed
Configures the speed of the management interface to either 10 Mbps, 100 Mbps, or 1000 Mbps. The auto
option specifies auto-negotiation (do not force speed on the link).
speed [speed]
no speed
Syntax Description
speed
Command Default
The default speed is auto.
Command Modes
GigabitEthernet Interface Configuration
Speed in Mbps or auto-negotiation. Can be set to 10, 100, 1000, or auto.
Mng Interface Configuration
Command History
Usage Guidelines
This table includes the following release-specific history entries:
Release
Modification
2.5.7
This command was introduced.
Use this command to configure the speed of the GigabitEthernet management interface.
If the duplex mode of the interface is configured to auto (see the duplex command), changing this
configuration has no effect.
Authorization: admin
Examples
The following example shows how to configure the speed of the management port to auto.
SCE2000>enable 10
Password:<cisco>
SCE8000#config
SCE8000(config)#interface GigabitEthernet 1/2
SCE8000(config if)#speed auto
SCE2(config if)#
Related Commands
Command
Description
duplex
Configures the duplex operation of the GigabitEthernet management
interface.
show interface mng
Displays the details of the GigabitEthernet management interface.
Cisco SCE 8000 CLI Command Reference
2-660
Chapter 2
CLI Command Reference
subscriber aging
subscriber aging
Enables or disables subscriber aging for the specified type of subscribers (anonymous or introduced).
The aging period may also be defined when aging is enabled.
subscriber aging {anonymous | introduced} [timeout aging-time]
no subscriber aging {anonymous | introduced}
Syntax Description
aging-time
Length of the aging period, in minutes (2-14400).
anonymous
Anonymous subscribers.
introduced
Introduced subscribers.
Command Default
By default, subscriber aging is disabled.
Command Modes
Interface Linecard Configuration
Command History
This table includes the following release-specific history entries:
Usage Guidelines
Release
Modification
2.5.7
This command was introduced.
The most common usage for aging is for anonymous subscribers. Aging ensures that anonymous
subscribers who have logged out of the network are removed from the Cisco SCE platform and are no
longer occupying resources.
The aging time can be configured individually for introduced subscribers and for anonymous
subscribers.
Authorization: admin
Examples
The following example shows how to enable subscriber aging for anonymous subscribers with a timeout
period of 10 minutes:
SCE8000>enable 10
Password:<cisco>
SCE8000#config
SCE8000(config)#interface linecard 0
SCE8000(config if)#subscriber aging anonymous timeout 10
SCE8000(config if)#
Related Commands
Command
Description
show interface linecard subscriber aging Displays the subscriber aging configuration for the
specified type of subscriber.
Cisco SCE 8000 CLI Command Reference
2-661
Chapter 2
CLI Command Reference
subscriber anonymous-group export csv-file
subscriber anonymous-group export csv-file
Exports anonymous groups to the specified CSV file.
subscriber anonymous-group export csv-file filename
Syntax Description
filename
Command Default
None
Command Modes
Interface Linecard Configuration
Command History
This table includes the following release-specific history entries:
Usage Guidelines
Note
Examples
Name of the CSV file to which the anonymous group information is to be
exported.
Release
Modification
2.5.7
This command was introduced.
Authorization: admin
This command is not applicable to IPv6 subscribers.
The following example shows how to export anonymous group information to the specified file:
SCE8000>enable 10
Password:<cisco>
SCE8000#config
SCE8000(config)#interface linecard 0
SCE8000(config if)# subscriber anonymous-group export csv-file s_g_0507.csv
SCE8000(config if)#
Related Commands
Command
Description
subscriber anonymous-group import csv-file
Creates anonymous groups by importing anonymous
subscribers from the specifed CSV file.
Cisco SCE 8000 CLI Command Reference
2-662
Chapter 2
CLI Command Reference
subscriber anonymous-group import csv-file
subscriber anonymous-group import csv-file
Creates anonymous groups by importing anonymous subscribers from the specified CSV file.
subscriber anonymous-group import csv-file filename
Syntax Description
filename
Command Default
None
Command Modes
Interface Linecard Configuration
Command History
This table includes the following release-specific history entries:
Usage Guidelines
Name of the CSV file containing the anonymous group information.
Release
Modification
2.5.7
This command was introduced.
Anonymous Group CSV files have a fixed format. All lines have the following structure:
Anonymous-group-name, IP-range or IPv6-range [, subscriber-template-number].
If no subscriber template number is specified, then the anonymous subscribers of that group will use the
default template (0), which cannot be changed by template import operations.
The following example shows an anonymous group CSV file:
group1, 10.1.0.0/16, 2
group2, 176.23.34.0/24, 3
group3, 10.2.0.0/16
Authorization: admin
Note
Examples
This command is not applicable to IPv6 subscribers.
The following example shows how to import subscribers from the file subscribers_groups.csv:
SCE8000>enable 10
Password:<cisco>
SCE8000#config
SCE8000(config)#interface linecard 0
SCE8000(config if)# subscriber anonymous-group import csv-file subscribers_groups.csv
SCE8000(config if)#
Related Commands
Command
Description
subscriber anonymous-group export csv-file
Exports anonymous groups to the specifed CSV file.
Cisco SCE 8000 CLI Command Reference
2-663
Chapter 2
CLI Command Reference
subscriber anonymous-group name ip-range
subscriber anonymous-group name ip-range
Assigns the anonymous group to the specified range of IP addresses and optional template, to an SCMP
device, to a Gx, or to a Cisco SCE.
To delete the anonymous group or remove it from the specified SCMP destination, use the no form of
this command.
subscriber anonymous-group name group-name {ip-range range | ipv6-range range} [template
template] [None]
subscriber anonymous-group name group-name {ip-range range | ipv6-range range} {Gx | None
| scmp name [scmp-name]}
no subscriber anonymous-group {name group-name [scmp] | all}
Syntax Description
group-name
Name of the anonymous group.
range
IP range of the anonymous group.
ipv6 range
IPv6 range of the anonymous group.
template
(optional) Group template for the anonymous group .
scmp-name
(optional) Name of the SCMP peer device. SCMP option is not available for
IPv6.
Gx
Assigns the anonymous group to the Gx, so as to enable the Gx to introduce
subscribers.
None
Assigns the anonymous group to the Cisco SCE. The subscribers assigned
to the Cisco SCE remains anonymous always.
all
Specifies all anonymous subscriber group definitions.
Command Default
None
Command Modes
Interface Linecard Configuration
Command History
This table includes the following release-specific history entries:
Usage Guidelines
Release
Modification
3.1.6
This command was introduced.
3.6.0
Gx and None options were introduced.
3.8.0
IPv6 range was introduced.
An anonymous subscriber group is a specified IP range, where each IP address in the given range is treated
as a separate subscriber. You can assign a subscriber template to the group so that all subscribers in the
group have properties as defined by that template.
Cisco SCE 8000 CLI Command Reference
2-664
Chapter 2
CLI Command Reference
subscriber anonymous-group name ip-range
This command defines the IP range of the specified anonymous group and optionally defines a subscriber
template to be assigned to all subscribers within that IP range.
Anonymous groups can have overlapping IP ranges. When the Cisco SCE platform detects traffic for an
IP address which is contained in more than one anonymous group, the group with the longest prefix is
used to create the anonymous subscriber for that IP address.
Use the scmp option to assign the anonymous group to the specified SCMP destination. In this case, the
specified anonymous group is the IP range managed by the SCMP peer device and subscribers for this
anonymous group are generated when subscriber traffic from the SCMP peer device is detected. If a
subscriber template has been assigned to the group, the anonymous subscribers generated have
properties as defined by that template. If no subscriber template has been assigned, the default template
is used.
If Gx or None option is not configured, the Cisco SCE sends the anonymous group to the Subscriber
Manager.
You must define the specified SCMP peer device before assigning the anonymous group (see scmp
name).
The no form of the command has three options:
•
Delete the specified anonymous subscriber group definition: no subscriber anonymous-group
name group-name
•
Remove the specified anonymous subscriber group from the specified SCMP destination: no
subscriber anonymous-group name group-name scmp
•
Delete all anonymous subscriber group definitions: no subscriber anonymous-group all
Authorization: admin
Examples
The following example shows how to assign an anonymous group to an IPv6 range and also assign a
template:
SCE8000> enable 10
Password:<cisco>
SCE8000# configure
SCE8000(config)# interface linecard 0
SCE8000(config if)# subscriber anonymous-group name anon_group IPv6-range
10:10:10:10::0/64 template 2
SCE8000(config if)#
The following example shows how to assign an anonymous group to an IPv4 range and also assign a
template:
SCE8000> enable 10
Password:<cisco>
SCE8000# configure
SCE8000(config)# interface linecard 0
SCE8000(config if)#subscriber anonymous-group name anon_group IP-range 10.10.10.0/8
template 2
SCE8000(config if)#
The following example shows how to assign an anonymous group to an SCMP device:
SCE8000> enable 10
Password: <cisco>
SCE8000# configure
SCE8000(config)#scmp name peer_device1 radius radius1 secret abcdef
Cisco SCE 8000 CLI Command Reference
2-665
Chapter 2
CLI Command Reference
subscriber anonymous-group name ip-range
SCE8000(config)# interface linecard 0
SCE8000(config if)#subscriber anonymous-group name anon_group IP-range 10.10.10.0/8 scmp
name peer_device1
SCE8000(config if)#
The following example shows how to remove an anonymous group from an SCMP device:
SCE8000> enable 10
Password: <cisco>
SCE8000# config
SCE8000(config)# interface linecard 0
SCE8000(config if)#no subscriber anonymous-group name anon_group scmp
SCE8000(config if)#
The following example shows how to assign an anonymous group to a Gx:
SCE8000#> enable 10
Password: <cisco>
SCE8000# configure
SCE8000(config)# interface LineCard 0
SCE8000(config if)# subscriber anonymous-group name test IP-range 10.10.10.0/24 Gx
SCE8000(config if)#
The following example shows how to assign an anonymous group to an SCE:
SCE8000#> enable 10
Password: <cisco>
SCE8000# configure
SCE8000(config)# interface LineCard 0
SCE8000(config if)# subscriber anonymous-group name test IP-range 10.10.10.0/24 None
SCE8000(config if)#
The following example shows how to remove all currently defined anonymous groups:
SCE8000> enable 10
Password: <cisco>
SCE8000# configure
SCE8000(config)# interface linecard 0
SCE8000(config if)# no subscriber anonymous-group all
SCE8000(config if)#
Cisco SCE 8000 CLI Command Reference
2-666
Chapter 2
CLI Command Reference
subscriber capacity-options
subscriber capacity-options
To override the capacity option when loading the SCA BB application, use the disable form of this
command.
To reenable the capacity option, use the enable form of this command.
subscriber capacity-options {enable | disable}
Syntax Description
This command has no arguments or keywords.
Command Default
The capacity option is enabled.
Command Modes
Interface Linecard Configuration
Command History
This table includes the following release-specific history entries:
Usage Guidelines
Release
Modification
3.5.0
This command was introduced.
You must first define the maximum number of subscribers using the subscriber max-subscribers
command.
You must override the capacity option before installing the pqi file.
If you have disabled the capacity option but want to use it the next time you load a new application, you
must reenable the option before you load the application file.
Caution
If you have applied a policy configuration (PQB file) to the Cisco SCE platform, you must retrieve it and
save it before loading an application file. Then reapply it after the executing the command and loading
the PQI file. (PQB files are managed from the SCA BB console.)
Authorization: admin
Examples
The following example shows how to use this command:
SCE8000>enable 10
Password:<cisco>
SCE8000#config
SCE8000(config)#interface linecard 0
SCE8000(config if)#subscriber max-subscribers 500K
SCE8000(config if)#subscriber capacity-options disable
SCE8000(config if)#pqi install file mov2008.pqi
Cisco SCE 8000 CLI Command Reference
2-667
Chapter 2
CLI Command Reference
subscriber capacity-options
Related Commands
Command
Description
subscriber max-subscribers
Specifies the maximum number of
subscribers.
show interface linecard subscriber max-subscribers Displays the maximum number of
subscribers.
Cisco SCE 8000 CLI Command Reference
2-668
Chapter 2
CLI Command Reference
subscriber downstream-split-flow-pull
subscriber downstream-split-flow-pull
To enable downstream split-flow pull request, use the subscriber downstream-split-flow-pull command
in linecard interface configuration mode. Use the no form of this command to disable downstream
split-flow pull request.
subscriber downstream-split-flow-pull
no subscriber downstream-split-flow-pull
Syntax Description
downstream-split-flow Enables downstream split-flow pull request.
-pull
Command Default
Downstream split-flow pull request is enabled by default.
Command Modes
Linecard Interface Configuration.
Command History
This table includes the following release-specific history entries:
Release
Modification
3.7.x
This command was introduced.
Usage Guidelines
Authorization: admin
Examples
The following example shows how to disable downstream split-flow pull request:
SCE8000#>
SCE8000#>config
SCE8000(config)#>interface linecard 0
SCE8000(config if)#>no subscriber downstream-split-flow-pull
SCE8000(config if)#>end
Cisco SCE 8000 CLI Command Reference
2-669
Chapter 2
CLI Command Reference
subscriber export csv-file
subscriber export csv-file
To export subscribers to a specified CSV file, use the subscriber export csv-file command in the
interface linecard configuration mode. Use the keyword all to export all the subscribers that are
introduced statically and dynamically.
subscriber export csv-file filename [all]
subscriber export csv-file filename
Note
Syntax Description
Exports only the static subscribers when the keyword all is not used.
filename
Name of the CSV file to which the subscriber information is to be exported.
all
Exports both the static and dynamic subscribers to the specified file.
Command Default
None
Command Modes
Interface linecard configuration
Command History
This table includes the following release-specific history entries:
Usage Guidelines
Release
Modification
2.5.7
This command was introduced.
3.7.x
This command was modified.
3.8.5
This command was modified to support IPv6 subscribers.
Subscriber CSV files are application-specific. Refer to the relevant application documentation for the
definition of the file format.
•
Subscribers introduced statically and dynamically by the Subscriber Manager (SM), Service Control
Engine(SCE) subscriber API, or Service Control Management Protocol(SCMP) integration are
exported.
•
Subscribers imported using the subscriber import CLI command are exported.
To export the subscribers managed by the SM, the SM GUI, or Command-Line Utilities (CLU) should
be used. (For more information about exporting the subscribers managed by SM, the SM GUI or CLU,
See the Cisco Service Control Management Suite Subscriber Manager User Guide.)
The authorization used is admin.
Note
This command is not applicable to IPv6 subscribers.
Cisco SCE 8000 CLI Command Reference
2-670
Chapter 2
CLI Command Reference
subscriber export csv-file
Examples
The following example shows how to export all the subscribers to a specified file:
SCE8000>enable 10
Password:<cisco>
SCE8000#config
SCE8000(config)#interface linecard 0
SCE8000(config if)# subscriber export csv-file gold_subscribers_04072003.csv all
SCE8000(config if)#
The following example shows how to export only the static subscribers to a specified file:
SCE8000>enable 10
Password:<cisco>
SCE8000#config
SCE8000(config)#interface linecard 0
SCE8000(config if)# subscriber export csv-file gold_subscribers_04072003.csv
SCE8000(config if)#
Related Commands
Command
Description
subscriber import csv-file
Imports subscribers from the specified CSV file.
Cisco SCE 8000 CLI Command Reference
2-671
Chapter 2
subscriber Gx-pull-request-disable
subscriber Gx-pull-request-disable
Disables the Gx pull request.
subscriber Gx-pull-request disable
no subscriber Gx-pull-request-disable
Syntax Description
This command does not have any argument.
Command Default
None
Command Modes
Interface Linecard Configuration
Command History
This table includes the following release-specific history entries:
Release
Modification
3.7.x
This command was introduced.
Usage Guidelines
Authorization: admin
Examples
The following example shows how to use the command:
SCE8000>enable 10
Password:<cisco>
SCE8000#config
SCE8000(config)#interface linecard 0
SCE8000(config if)# subscriber gx-pull-request-disable
SCE8000(config if)#
Related Commands
None
Cisco SCE 8000 CLI Command Reference
2-672
CLI Command Reference
Chapter 2
CLI Command Reference
subscriber ip-linger-stats
subscriber ip-linger-stats
To view the configured linger time and flow details, use the subscriber ip-linger-stats command in the
linecard interface configuration mode.
subscriber ip-linger-stats
Syntax Description
This command has no arguments or keywords.
Command Modes
Linecard interface configuration (configure-if)
Command History
This table includes the following release-specific history entries:
Release
Modification
3.7.0
This command was introduced.
Usage Guidelines
Use the subscriber ip-linger-stats command to view the configured linger time if the subscriber
lingering option is enabled.
Examples
The following example shows how to view the configured linger time and flow details:
SCE8000(configure)# interface linecard 0
SCE8000(configure if)# subscriber ip-linger-stats
IP lingering option is enabled
Configured linger time is 240 seconds
Linger time flows:
====================
Traffic Processor 1
Traffic Processor 2
Traffic Processor 3
:
:
:
0
2
5
Cisco SCE 8000 CLI Command Reference
2-673
Chapter 2
CLI Command Reference
subscriber ip-linger-time
subscriber ip-linger-time
To configure the linger time for subscribers, use the subscriber ip-linger-time command in the linecard
interface configuration mode.
subscriber ip-linger-time linger-time
Syntax Description
linger-time
Command Default
By default, the subscriber lingering option is disabled.
Command Modes
Linecard interface configuration (configure-if)
Command History
This table includes the following release-specific history entries:
Usage Guidelines
Linger time, in seconds.
Release
Modification
3.7.x
This command was introduced.
If this option is enabled, configuring 0 seconds disables this option. The maximum linger time that is
allowed is 86400 seconds (1 day).
Authorization: admin
Examples
The following example shows how to configure linger time:
SCE8000#
SCE8000# configure
SCE8000(configure)# interface linecard 0
SCE8000(configure if)# no subscriber ip-linger-time 10
SCE8000(configure if)# end
Cisco SCE 8000 CLI Command Reference
2-674
Chapter 2
CLI Command Reference
subscriber import csv-file
subscriber import csv-file
To import subscribers from the specified CSV file, use the subscriber import csv-file command in the
linecard interface configuration mode.
subscriber import csv-file filename [additivemapping]
Syntax Description
filename
Name of the CSV file containing the subscriber information.
additivemapping
Imports the subscriber information from the specified file and appends the
new subscriber mapings with the existing ones.
Command Default
None
Command Modes
Linecard interface configuration (configure-if)
Command History
This table includes the following release-specific history entries:
Usage Guidelines
Release
Modification
2.5.7
This command was introduced.
3.8.5
The command was modified. Support for IPv6 and the additivemapping
syntax were added.
Subscriber CSV files are application-specific. Refer to the relevant application documentation for the
definition of the file format.
A maximum of 80,000 static subscribers can be imported for each import operation. To import more than
this limit, divide the subscribers into several CSV files and import each file separately.
Authorization: admin
Examples
The following example shows how to import subscribers from the gold_subscribers.csv file:
SCE8000> enable 10
Password: <cisco>
SCE8000# configure
SCE8000(configure)# interface linecard 0
SCE8000(configure if)# subscriber import csv-file gold_subscribers.csv
SCE8000(configure if)#
Related Commands
Command
Description
subscriber export csv-file
Exports the subscribers to the specified CSV file.
Cisco SCE 8000 CLI Command Reference
2-675
Chapter 2
CLI Command Reference
subscriber load property-file
subscriber load property-file
To load the subaware.pro file, use the subscriber load property-file command in the linecard interface
configuration mode.
subscriber load property-file
Syntax Description
This command has no argument.
Command Default
By default, the subaware.pro file contains only the IPv4 subscribers and loading this file using the
subscriber load property-file command without modifying file only imports the IPv4 subscribers.
Command Modes
Linecard interface configuration (configure if)
Command History
This table includes the following release-specific history entries:
Release
Modification
3.8.5
This command was introduced.
Usage Guidelines
From Cisco SCE Release 3.8.5, you can import and export IPv6 subscribers. Before importing or
exporting IPv6 subscribers, modify the subaware.pro file located at
/apps/data/scos/system/p3hidden/um/ssu/.
Examples
The following example shows how to load the subaware.pro file:
SCE8000> enable 10
Password: <cisco>
SCE8000# configure
SCE8000(configure)# interface linecard 0
SCE8000(configure if)# subscriber load property-file
Subaware.pro property file loaded successfully.
Cisco SCE 8000 CLI Command Reference
2-676
Chapter 2
CLI Command Reference
subscriber max-subscribers
subscriber max-subscribers
Specifies the maximum number of subscribers.
subscriber max-subscribers [subscriber-number]
Syntax Description
subscriber-number
Command Default
The default number of subscribers is 250,000 (250K).
Command Modes
Interface Linecard Configuration
Command History
This table includes the following release-specific history entries:
Usage Guidelines
Caution
Maximum number of subscribers. Choose either 100K, 250K, 500K, or
1M.
Release
Modification
3.5.0
This command was introduced.
For this maximum number to take effect, you must also:
1.
Disable the capacity option (see subscriber capacity-options).
2.
Load a new application (see pqi install).
If you have applied a policy configuration (PQB file) to the Cisco SCE platform, you must retrieve it and
save it before loading an application file. Then reapply it after the executing the command and loading
the PQI file. (PQB files are managed from the SCA BB console.)
Authorization: admin
Examples
The following example shows how to use this command:
SCE8000>enable 10
Password:<cisco>
SCE8000#config
SCE8000(config)#interface linecard 0
SCE8000(config if)#subscriber max-subscribers 500K
SCE8000(config if)#subscriber capacity-options disable
SCE8000(config if)#pqi install file mov2008.pqi
Cisco SCE 8000 CLI Command Reference
2-677
Chapter 2
CLI Command Reference
subscriber max-subscribers
Related Commands
Command
Description
subscriber capacity-options
Overrides the capacity option when loading
the SCA BB application.
show interface linecard subscriber max-subscribers
Displays the maximum number of
subscribers.
Cisco SCE 8000 CLI Command Reference
2-678
Chapter 2
CLI Command Reference
subscriber name property name
subscriber name property name
Assigns a value to the specified property of the specified subscriber.
subscriber name subs-name property name property-name value property-val
Syntax Description
subs-name
Name of the subscriber.
property-name
Subscriber property for which the value is to be assigned.
property-val
Value to be assigned.
Command Default
None
Command Modes
Interface Linecard Configuration
Command History
This table includes the following release-specific history entries:
Usage Guidelines
Release
Modification
3.0.3
This command was introduced.
This command can be used to enable or disable the generation of the real-time subscriber usage RDRs
(see the example).
•
To enable RDR generation, set property-name to monitor and property-val to 1.
•
To disable RDR generation, set property-name to monitor and property-val to 0.
•
To enable subscriber monitoring for a group of subscribers, create a text file containing the sequence
of CLI commands, including the commands to access the appropriate CLI mode. The file might look
like this:
configure
interface linecard 0
subscriber name Jerry property name monitor value 1
subscriber name George property name monitor value 1
subscriber name Elaine property name monitor value 1
subscriber name Kramer property name monitor value 1
subscriber name Newman property name monitor value 1
Use the script run command to run the script.
Authorization: admin
Cisco SCE 8000 CLI Command Reference
2-679
Chapter 2
CLI Command Reference
subscriber name property name
Examples
The following example shows how to disable the generation of the real-time subscriber usage RDRs for
subscriber jane_smith:
SCE8000>enable 10
Password:<cisco>
SCE8000#config
SCE8000(config)#interface linecard 0
SCE8000(config if)#subscriber name jane_smith property name monitor value 0
SCE8000(config if)#
Related Commands
Command
Description
show interface linecard subscriber name
Displays information about a specified subscriber.
Cisco SCE 8000 CLI Command Reference
2-680
Chapter 2
CLI Command Reference
subscriber sm-connection-failure
subscriber sm-connection-failure
Configures the behavior of the system if communication fails between the SM and the Cisco SCE
platform.
subscriber sm-connection-failure {warning | action {force-failure | none | remove-mappings |
shut}}
subscriber sm-connection-failure timeout timeout
default subscriber sm-connection-failure
Syntax Description
timeout
Timeout interval, in seconds, after which a failure condition is detected that
the specified action is taken by the system.
warning
Sets the system operational status to “warning” when the link is down.
action
Requests the system to respond in a certain way depending on which of the
options is specified (force-failure, none, remove-mappings, or shut).
force-failure
Forces failure of the Cisco SCE platform in the event of any loss of
connection with the SM.
the Cisco SCE platform then acts according to the behavior configured for
the failure state.
none
No action needs to be taken in the event of any loss of connection between
the Cisco SCE platform and the SM.
remove-mappings
Removes all current subscriber mappings in the event of any loss of
connection between the Cisco SCE platform and the SM.
shut
SCE platform shuts down and quits providing service.
Command Default
None
Command Modes
Interface Linecard Configuration
Command History
This table includes the following release-specific history entries:
Usage Guidelines
Release
Modification
3.0.3
This command was introduced.
If SM functionality is not critical to the operation of the system, no action needs to be configured.
If SM functionality is critical to the operation of the system, configure forced failure of the Cisco SCE
platform in the event of any loss of connection with the SM.
If no action is required, you may want to configure the system operational status to be set to “warning”
when communication is lost. Use the warning keyword for this option.
Authorization: admin
Cisco SCE 8000 CLI Command Reference
2-681
Chapter 2
CLI Command Reference
subscriber sm-connection-failure
Examples
The following example shows how to configure forced failure of the Cisco SCE platform if the SM fails:
SCE8000>enable 10
Password:<cisco>
SCE8000#config
SCE8000(config)#interface linecard 0
SCE (config if)#subscriber sm-connection-failure action force-failure
SCE (config if)#
The following example shows how to set the timeout interval to 2 minutes (120 seconds):
SCE8000>enable 10
Password:<cisco>
SCE8000#config
SCE8000(config)#interface linecard 0
SCE (config if)#subscriber sm-connection-failure timeout 120
SCE (config if)#
Related Commands
Command
Description
show interface linecard subscriber sm-connection-failure Displays the current state of the
SM-SCE platform connection, as well
as the configured action to take if that
connection fails.
Cisco SCE 8000 CLI Command Reference
2-682
Chapter 2
CLI Command Reference
subscriber template export csv-file
subscriber template export csv-file
Exports a subscriber template to the specified CSV file, according to the party template.
subscriber template export csv-file filename
Syntax Description
filename
Command Default
None
Command Modes
Interface Linecard Configuration
Command History
This table includes the following release-specific history entries:
Name of the CSV file to which the subscriber template is to be exported.
Release
Modification
2.5.7
This command was introduced.
Usage Guidelines
Authorization: admin
Examples
The following example shows how to export the subscriber template to the specified file:
SCE8000> enable 10
Password: <cisco>
SCE8000# config
SCE8000(config)#interface linecard 0
SCE8000(config if)# subscriber template export csv-file gold0507.csv
SCE8000(config if)#
Related Commands
Command
Description
subscriber template import csv-file
Imports a subscriber template from the specified CSV
file, creating a party template.
Cisco SCE 8000 CLI Command Reference
2-683
Chapter 2
CLI Command Reference
subscriber template import csv-file
subscriber template import csv-file
Imports a subscriber template from the specified CSV file. Importing the template creates a party
template.
subscriber template import csv-file filename
Syntax Description
filename
Command Default
None
Command Modes
Interface Linecard Configuration
Command History
This table includes the following release-specific history entries:
Name of the CSV file containing the subscriber template.
Release
Modification
2.5.7
This command was introduced.
Usage Guidelines
Authorization: admin
Examples
The following example shows how to import the subscriber template from the file gold0507.csv:
SCE8000> enable 10
Password: <cisco>
SCE8000# config
SCE8000(config)#interface linecard 0
SCE8000(config if)# subscriber template import csv-file gold0507.csv
SCE8000(config if)#
Related Commands
Command
Description
subscriber template export csv-file
Exports a subscriber template to the specified CSV file,
according to the party template.
Cisco SCE 8000 CLI Command Reference
2-684
Chapter 2
CLI Command Reference
subscriber TP-IP-range
subscriber TP-IP-range
To add or update an IP range for a traffic processor, use the subscriber TP-IP range command.
Use the no forms of the command to remove subscriber mappings in the IPv4 and IPv6 range, or to not
allow removing the range if any matching subscriber mapping exist in the range.
subscriber TP-IP-range name range-name IPv6-range ipv6-address/mask-length target-TP
TP-num [remove-subscriber-mappings]
no subscriber TP-IP-range name range-name [remove-subscriber-mappings]
no subscriber mapping included-in TP-IP-range name range-name
no subscriber mapping included-in IP-range ipv6-address/prefix-length
Syntax Description
range-name
The name of the IP range.
ipv6-address/mask-leng IPv6 address and length of the mask.
th
target-TP
Specifies the target traffic processor.
TP-num
The number corresponding the traffic processor.
remove-subscriber-ma Specifies to remove the subsriber mappings if any matching subscriber
ppings
mapping exists in the range.
Command Default
None.
Command Modes
Interface Line Configuration (configif #)
Command History
This table includes the following release-specific history entries:
Usage Guidelines
Release
Modification
3.8.0
This command was introduced.
While adding or updating an IP range for a Traffic Processor, if the new IPv6 range clashes with an
existing TP IP range, the Cisco SCE rejects the new IP range. Optionally, you can remove the subscriber
mappings in the IP range. You can also configure the Cisco SCE to reject the new IPv6 range if there is
a matching subscriber mappings exist.
Authorization: admin
Examples
The following example illustrates how to add or update an IP range for a Traffic Processor:
Cisco SCE 8000 CLI Command Reference
2-685
Chapter 2
CLI Command Reference
subscriber TP-IP-range
SCE8000> enable 10
Password: <cisco>
SCE8000# subscriber TP-IP-range name 'range-name' IPv6-range 'ipv6-address/mask-length'
target-TP ‘TP-num’ [remove-subscriber-mappings]
Number of Subscribers that had mappings in the TP IP range(s): 1.
Related Commands
Command
Description
show interface LineCard slot
subscriber {mapping included-in
TP-IP-range name range-name |
amount mapping included-in
TP-IP-range name range-name}
To view the subscriber mapping details pertaining to a
specific IPv4 and IPv6 traffic processor IP range
Cisco SCE 8000 CLI Command Reference
2-686
Chapter 2
CLI Command Reference
subscriber TP-IP-range export csv-file
subscriber TP-IP-range export csv-file
To export all IPv4 and IPv6 ranges configured for a Traffic Processor, use the subscriber TP-IP-range
export csv-file command.
subscriber TP-IP-range export csv-file csv-file-name
Syntax Description
csv-file
Specifies the name of the csv file.
csv-file-name
The name of the csv file.
Command Default
None.
Command Modes
Interface Linecard Configuration (configif#)
Command History
This table includes the following release-specific history entries:
Usage Guidelines
Release
Modification
3.8.0
This command was introduced.
The format in which the details of the range is exported is:
"'range-name','ipv4-address/mask or ipv6-address/prefix-length','target-TP'"
Authorization: admin
Cisco SCE 8000 CLI Command Reference
2-687
Chapter 2
CLI Command Reference
subscriber TP-IP-range import csv-file
subscriber TP-IP-range import csv-file
To import IPv4 and IPv6 ranges for a Traffic Processor or to remove subscriber mappings in IPv4 or IPv6
ranges, use the subscriber TP-IP-range import csv-file command.
subscriber TP-IP-range import csv-file csv-file-name [remove-subscriber-mappings]
Syntax Description
csv-file-name
Name of the csv file.
remove-subscriber-ma Specifies to remove the existing subscriber mappings.
ppings
Command Default
None.
Command Modes
Interface Linecard Configuration (configif #)
Command History
This table includes the following release-specific history entries:
Usage Guidelines
Release
Modification
3.8.0
This command was introduced.
The range details are imported incrementally in relationg to already existing IPv4 and IPv6 ranges. You
can use the command to remove the subscriber mappings in any of IPv4 or IPv6 ranges. You can also
use this command to prevent adding or updating of any of the IPv4 or IPv6 ranges that have any matching
subscriber mappings.
Authorization: admin
Cisco SCE 8000 CLI Command Reference
2-688
Chapter 2
CLI Command Reference
subscriber virtual-gi-mode
subscriber virtual-gi-mode
Enables the virtual Gi mode.
To disable the virtual Gi mode, use the no form of this command.
subscriber virtual-gi-mode
no subscriber virtual-gi-mode
Syntax Description
This command has no arguments or keywords.
Command Default
Virtual Gi mode is disabled.
Command Modes
Interface Linecard Configuration
Command History
This table includes the following release-specific history entries:
Usage Guidelines
Release
Modification
3.7.x
This command was introduced.
You can enable the mapping of VLAN ID to virtual Gi ID using the subscriber virtual-gi-mode
command. When this command is enabled, SCE maps the VLAN ID that is in the range of 1-4094 to a
virtual Gi ID that is in the range of 1-255.
The PCRF server uses the virtual Gi ID to fetch the policy corresponding to the VLAN ID that is
retrieved from the subscriber traffic.
Authorization: admin
Examples
The following example shows how to enable TACACS+ accounting for the admin privilege level (10):
SCE8000>enable 10
Password:<cisco>
SCE8000#config
SCE8000(config)# interface Linecard 0
SCE8000(config-if)#subscriber virtual-gi-mode
SCE8000(config-if)#
Related Commands
Command
Description
diameter gx virtual-gi vlan-id
Configures the mapping of VLAN ID and virtual Gi ID.
VLAN symmetric classify
Specifies the VLAN tag as subscriber.
Cisco SCE 8000 CLI Command Reference
2-689
Chapter 2
CLI Command Reference
tacacs-server host
tacacs-server host
Defines a new TACACS+ server host that is available to the Cisco SCE platform TACACS+ client. The
Service Control solution supports a maximum of three TACACS+ server hosts.
To remove a TACACS+ server host, use the no form of this command.
tacacs-server host hostname [port [port-number]] [timeout [timeout-interval]] [key [key-string]]
no tacacs-server host hostname
Syntax Description
Command Default
hostname
Name of the server.
port-number
TACACS+ port number.
timeout-interval
Time, in seconds, that the server waits for a reply from the server host
before timing out.
key-string
Encryption key that the server and client will use when communicating with
each other. Make sure that the specified key is actually configured on the
TACACS+ server host.
The default port number is 49.
The default timeout interval is either 5 seconds or the user-configured global default timeout interval.
The default encryption key is either no key or the user-configured global default key.
Command Modes
Global configuration
Command History
This table includes the following release-specific history entries:
Usage Guidelines
Release
Modification
3.0.0
This command was introduced.
You can configure a global default timeout interval that applies as the timeout to all TACACS+ server
hosts. The timeout interval does not need to be configured explicitly for each server. (See tacacs-server
timeout.)
Similarly, you can configure a global default key that applies to all TACACS+ server hosts. (See
tacacs-server key.)
If the global default timeout interval and key string are configured, an explicitly configured value for a
specific TACAS+ server overrides the global default for that server.
Authorization: admin
Cisco SCE 8000 CLI Command Reference
2-690
Chapter 2
CLI Command Reference
tacacs-server host
Examples
The following example shows how to configure a TACACS+ server host using the default port and no
key:
SCE8000>enable 10
Password:<cisco>
SCE8000#config
SCE8000(config)#tacacs-server host server1 timeout 8
SCE8000(config)#
Related Commands
Command
Description
tacacs-server key
Defines the global default encryption key for the TACACS+ server hosts.
tacacs-server timeout
Defines the global default timeout interval for the TACACS+ server hosts.
show tacacs
Displays statistics for the TACACS+ servers.
Cisco SCE 8000 CLI Command Reference
2-691
Chapter 2
CLI Command Reference
tacacs-server key
tacacs-server key
Defines the global default encryption key for the TACACS+ server hosts.
To clear the TACACS+ key, use the no form of this command.
tacacs-server key key-string
no tacacs-server key
Syntax Description
key-string
Command Default
The default is no encryption.
Command Modes
Global configuration
Command History
This table includes the following release-specific history entries:
Usage Guidelines
Default encryption key that all TACACS servers and clients will use when
communicating with each other. The specified key must be configured on
the TACACS+ server hosts.
Release
Modification
3.0.0
This command was introduced.
This default key can be overridden for a specific TACACS+ server host by explicitly configuring a
different key for that TACACS+ server host.
If no global default key is defined, each TACACS+ server host may still have a specific key defined.
However, any server host that does not have a specific key defined (uses the global default key) is now
configured to not use a key.
Authorization: admin
Examples
The following example shows how to configure the key string:
SCE8000>enable 10
Password:<cisco>
SCE8000#config
SCE8000(config)#tacacs-server key ABCDE
SCE8000(config)#
Cisco SCE 8000 CLI Command Reference
2-692
Chapter 2
CLI Command Reference
tacacs-server key
Related Commands
Command
Description
tacacs-server host
Defines a new TACACS+ server host that is available to the Cisco SCE
platform TACACS+ client.
tacacs-server timeout
Defines the global default timeout interval for the TACACS+ server hosts.
show tacacs
Displays statistics for the TACACS+ servers.
Cisco SCE 8000 CLI Command Reference
2-693
Chapter 2
CLI Command Reference
tacacs-server timeout
tacacs-server timeout
Defines the global default timeout interval for the TACACS+ server hosts.
To clear the global default timeout interval, use the no form of this command.
tacacs-server timeout [interval]
no tacacs-server timeout
Syntax Description
interval
Command Default
The default interval is 5 seconds.
Command Modes
Global configuration
Command History
This table includes the following release-specific history entries:
Usage Guidelines
Default time, in seconds, that the server waits for a reply from the server
host before timing out.
Release
Modification
3.0.0
This command was introduced.
This default timeout interval can be overridden for a specific TACACS+ server host by explicitly
configuring a different timeout interval for that TACACS+ server host.
If no global default timeout interval is defined, each TACACS+ server host may still have a specific
timeout interval defined. However, any server host that does not have a timeout interval explicitly
defined (uses the global default timeout interval) is now configured to a 5-second timeout interval.
Authorization: admin
Examples
The following example shows how to configure a default timeout interval of 10 seconds:
SCE8000>enable 10
Password:<cisco>
SCE8000#config
SCE8000>(config)#tacacs-server timeout 10
SCE8000(config)#
Related Commands
Command
Description
tacacs-server host
Defines a new TACACS+ server host that is available to the Cisco SCE
platform TACACS+ client.
tacacs-server key
Defines the global default encryption key for the TACACS+ server hosts.
show tacacs
Displays statistics for the TACACS+ servers.
Cisco SCE 8000 CLI Command Reference
2-694
Chapter 2
CLI Command Reference
telnet
telnet
Starts a Telnet session.
telnet address [port-number]
Syntax Description
address
Telnet access address.
port-number
Optional port number.
Command Default
The default port number is 23.
Command Modes
Privileged EXEC
Command History
This table includes the following release-specific history entries:
Release
Modification
2.5.7
This command was introduced.
Usage Guidelines
Authorization: admin
Examples
The following example shows how to start a Telnet session:
SCE8000>enable 10
Password:<cisco>
SCE8000#telnet 10.1.5.120
connecting to 10.1.5.120:23...
Related Commands
Command
Description
show telnet sessions
Displays any active Telnet sessions.
service telnetd
Enables the Telnet daemon.
Cisco SCE 8000 CLI Command Reference
2-695
Chapter 2
CLI Command Reference
timeout
timeout
Configures the timeout for the Telnet session when the Telnet session is idle. After this time, the Telnet
session is disconnected.
To configure the Telnet server to work without a timeout, use the no form of this command. The system
will not automatically disconnect the Telnet session, regardless of how long the session has been
inactive.
timeout [time]
no timeout
Syntax Description
time
Command Default
The default timeout is 30 minutes.
Command Modes
Line Configuration
Command History
This table includes the following release-specific history entries:
Timeout length, in minutes.
Release
Modification
2.5.7
This command was introduced.
Usage Guidelines
Authorization: admin
Examples
The following example shows how to set the timeout to 45 minutes:
SCE8000>enable 10
Password:<cisco>
SCE8000#config
SCE8000(config)#line vty 0
SCE8000(config-line)#timeout 45
SCE8000(config-line)#
Related Commands
Command
Description
telnet
Starts a Telnet session.
Cisco SCE 8000 CLI Command Reference
2-696
Chapter 2
CLI Command Reference
tracert
tracert
Determines the route that packets take to reach a specified host.
tracert {hostname | ip-address}
Syntax Description
hostname
Destination hostname.
ip-address
Destination IP address.
Command Default
None
Command Modes
Interface Linecard Configuration
Command History
This table includes the following release-specific history entries:
Usage Guidelines
Release
Modification
3.0.0
This command was introduced.
The destination of the traceroute function can be specified as either a known hostname or an IP address.
Authorization: admin
Examples
The following example shows output from this command:
SCE8000>enable 10
Password:<cisco>
SCE8000#config
SCE8000(config)#interface linecard 0
SCE8000(config if)#tracert 64.103.125.118
traceroute to 10.56.217.103, 30 hops max,
1 10.56.217.1 ( 10.56.217.1) 0 ms 1 ms 0
2 10.56.223.9 ( 10.56.223.9) 1 ms 0 ms 1
3 64.103.115.209 ( 64.103.115.209) 0 ms 1
4 64.103.125.118 ( 64.103.125.118) 0 ms 0
Trace complete.
SCE8000(config if)#
Related Commands
40 byte packets
ms
ms
ms 0 ms
ms 0 ms
Command
Description
show ip route
Displays the entire routing table and the destination of last resort (default
gateway).
Cisco SCE 8000 CLI Command Reference
2-697
Chapter 2
CLI Command Reference
traffic-counter
traffic-counter
Defines a new traffic counter.
To delete an existing traffic counter, use the no form of this command.
traffic-counter name name {count-bytes | count-packets}
no traffic-counter {name name | all}
Syntax Description
name
Name to be assigned to this traffic counter.
count-bytes
Enables counting the bytes in each packet. The counter increments by the
number of bytes in each packet.
count-packets
Enables counting whole packets. The counter increments by one for each
packet.
all
Used with the no form of the command, deletes all existing traffic counters.
Command Default
None
Command Modes
Interface Linecard Configuration
Command History
This table includes the following release-specific history entries:
Release
Modification
2.5.7
This command was introduced.
Usage Guidelines
Authorization: admin
Examples
The following example shows how to create a traffic counter that counts bytes:
SCE8000>enable 10
Password:<cisco>
SCE8000#config
SCE8000(config)#interface linecard 0
SCE8000(config if)#traffic-counter name counter1 count-bytes
SCE8000(config if)#
The following example shows how to delete all traffic counters:
SCE8000>enable 10
Password:<cisco>
SCE8000#config
SCE8000(config)#interface linecard 0
SCE8000(config if)#no traffic-counter all
SCE8000(config if)#
Cisco SCE 8000 CLI Command Reference
2-698
Chapter 2
CLI Command Reference
traffic-counter
Related Commands
Command
Description
show interface linecard traffic-counter
Displays the specified traffic counter.
clear interface linecard traffic-counter
Clears the specified traffic counter.
Cisco SCE 8000 CLI Command Reference
2-699
Chapter 2
CLI Command Reference
traffic-rule ip addresses
traffic-rule ip addresses
Defines a new traffic rule.
To delete an existing traffic rule, use the no form of this command. To delete all existing traffic rules,
use the all keyword with the no form of the command.
traffic-rule name name IP-addresses ip-addresses protocol protocol [port port-id] [tunnel-id
tunnel-id] direction direction traffic-counter name traffic-counter action action
traffic-rule tunnel-id-mode
no traffic-rule {name name | all | tunnel-id-mode}
no traffic-rule capture
Syntax Description
name
Name to be assigned to this traffic rule.
ip-addresses
Subscriber-side and network-side IP specification. (See Usage Guidelines.)
protocol
One of the following protocols: TCP, UDP, ICMP, IGRP, EIGRP, IS-IS,
OSPF, or all.
port-id
(TCP or UDP only) Defines a port or range of ports for each side (subscriber
and network). (See Usage Guidelines.)
tunnel-id
ID of the tunnel. (See Usage Guidelines.)
direction
Choose upstream, downstream, or both.
traffic-counter
Name of the traffic counter or none.
action
Action to be performed on flows that meet the rule criteria. (See Usage
Guidelines.)
Command Default
None
Command Modes
Interface Linecard Configuration
Command History
This table includes the following release-specific history entries:
Usage Guidelines
Release
Modification
2.5.7
This command was introduced.
The following usage guidelines apply to the traffic-rule command.
IP specification
all | ([all-but] (ip-address | ip-range))
•
ip-address is a single IP address in dotted-decimal notation (such as 10.1.2.3).
Cisco SCE 8000 CLI Command Reference
2-700
Chapter 2
CLI Command Reference
traffic-rule ip addresses
•
ip-range is an IP subnet range, in dotted-decimal notation followed by the number of significant bits
(such as 10.1.2.0/24).
Port specification
all | ([all-but] [port-number] [port-range])
•
Specify the port or port range for both the subscriber side and the network side.
•
Specify a range of ports using the format minport:maxport.
•
Specify ports only if the protocol is either TCP or UDP.
Tunnel ID specification
all | ([all-but] tunnel-id) '
•
tunnel-id is a hexadecimal tunnel-ID range, in the format '(HEX)tunnel-id' or
'(HEX)min-tunnel-id:(HEX)max-tunnel-id
To enable or disable defining the traffic rule according to the tunnel ID, use the tunnel-id-mode
keyword.
Traffic counter name
Specify either:
•
Name of an existing traffic counter—Packets meeting the criteria of the rule are to be counted in
the specified counter.
If a counter name is defined, the “count” action is also defined implicitly.
•
none—An action must be explicitly defined with the action keyword.
Action
Specify one of the following options:
•
block—Blocks the specified traffic.
•
ignore—Bypasses the specified traffic. The traffic receives no service.
•
quick-forwarding—Quick forwards (duplicates) delay-sensitive packets with service.
•
quick-forwarding-ignore—Quick forwards (duplicates) delay-sensitive packets with no service.
•
Flow-capture—Captures the flow matching the configured rule. This flow receives no service.
Use the no traffic-rule capture command to delete all current flow-capture rules.
Authorization: admin
Examples
The following examples show how to use this command.
Example 1
The following example shows how to create a traffic rule called rule2:
•
Name = rule2
•
IP addresses: subscriber side = all IP addresses, network side = all IP addresses except the subnet
address 10.10.10.0/24
•
Protocol = TCP
•
subscriber-side port = 100
Cisco SCE 8000 CLI Command Reference
2-701
Chapter 2
CLI Command Reference
traffic-rule ip addresses
•
network-side ports = all-but 200
•
Direction = downstream
•
Traffic counter = counter2
•
Action = block
The actions performed will be counting and blocking.
SCE8000>enable 10
Password:<cisco>
SCE8000#config
SCE8000(config)#interface linecard 0
SCE8000(config if)# traffic-rule name rule2 ip-addresses subscriber-side all network-side
all-but 10.10.10.0/24 protocol tcp ports subscriber-side 100 network-side all-but 200
direction downstream traffic-counter name counter2 action block
SCE8000(config if)
Example 2
The following example shows how to create a traffic rule called rule3:
•
Name = rule3
•
IP addresses: all
•
Protocol = IS-IS
•
Direction = upstream
•
Traffic counter = none
•
Action = ignore (required because traffic-counter = none)
The only action performed will be ignore.
SCE8000>enable 10
Password:<cisco>
SCE8000#config
SCE8000(config)#interface linecard 0
SCE8000(config if)# traffic-rule name rule3 ip-addresses all protocol is-is direction
upstream traffic-counter name none action ignore
SCE8000(config if)
Example 3
The following example shows how to delete all traffic rules:
SCE8000>enable 10
Password:<cisco>
SCE8000#config
SCE8000(config)#interface linecard 0
SCE8000(config if)# no traffic-rule all
SCE8000(config if)
Example 4
The following example shows how to configure a traffic rule that will be used as a recording rule using
the flow-capture option. All flows that match this rule will be recorded when the flow-capture process
is in operation.
•
Name = FlowCaptureRule
•
IP addresses: subscriber side = all IP addresses, network side = all IP addresses
•
Direction = both
•
Protocol = 250
Cisco SCE 8000 CLI Command Reference
2-702
Chapter 2
CLI Command Reference
traffic-rule ip addresses
•
Traffic counter name = counter2
•
Action = flow-capture
The actions performed will be counting and flow capture.
SCE8000>enable 10
Password:<cisco>
SCE8000#configure
SCE8000(config)#interface linecard 0
SCE8000(config if)#traffic-rule name FlowCaptureRule ip-addresses subscriber-side all
network-side all protocol 250 direction both traffic-counter name counter2 action
flow-capture
SCE8000(config if)#
Related Commands
Command
Description
show interface linecard traffic-rule
Displays the specified traffic rule configuration.
Cisco SCE 8000 CLI Command Reference
2-703
Chapter 2
CLI Command Reference
traffic-rule ipv6
traffic-rule ipv6
To define a new traffic rule with IPv6 IP address, use the traffic-rule ipv6 command in interface linecard
configuration mode.
To delete an existing traffic rule, use the no form of this command. To delete all the existing traffic rules,
use the all keyword with the no form of this command.
traffic-rule name name ipv6 IP-addresses ip-addresses protocol protocol [port port-id]
[tunnel-id tunnel-id] direction direction traffic-counter name traffic-counter action action
traffic-rule tunnel-id-mode
no traffic-rule {name name | all | tunnel-id-mode}
no traffic-rule capture
Syntax Description
name
Name to be assigned to a traffic rule.
ip-addresses
Subscriber-side and network-side IP specifications. (For more information
about this, see the Usage Guidelines.)
port-id
TCP or UDP. Defines a port for each side. (For more information about this,
see the Usage Guidelines.)
tunnel-id
ID of a tunnel.
direction
upstream, downstream, or both.
traffic-counter
Name of a traffic counter or none.
action
Action to be performed on the flows that meet the rule criteria. (For more
information about this, see the Usage Guidelines.)
Command Default
None
Command Modes
Interface linecard configuration (config-if)
Command History
This table includes the following release-specific history entries:
Usage Guidelines
Release
Modification
3.7.5
This command was introduced.
The following usage guidelines apply to the traffic-rule command:
IP Specification
all | (ip-address | ip-prefix)
•
ip-address is a single IP address in the Classless Inter-Domain Routing (CIDR) notation in the
format A:B:C:D:E:F:G:H/I
Cisco SCE 8000 CLI Command Reference
2-704
Chapter 2
CLI Command Reference
traffic-rule ipv6
•
ip-range is an IP subnet range in the CIDR notation followed by the number of significant bits (such
as 2001:DB8:0:1:FFFF:1234::5).
Protocol
Any one of the following:
•
TCP
•
UDP
•
all
Port Specification
port
•
Specify a port only if the protocol is either TCP or UDP.
•
Specify a port for both the subscriber side and the network side.
•
Create multiple rules if you plan to use multiple ports.
Direction
Any of the following:
•
Upstream
•
Downstream
•
both
Traffic Counter Name
Specify either:
•
name of an existing traffic counter—Packets that meet the criteria of the rule are to be counted in
the specified counter.
If a counter name is defined, the count action is also defined implicitly.
•
none—An action must be explicitly defined with the action keyword.
Action
Specify one of the following options:
•
block—Blocks the specified traffic.
•
classical-open-flow-mode—Use the classical open flow mode for the specified flow.
•
ignore—Bypasses the specified traffic. The traffic receives no service.
Authorization: admin
Examples
The following examples show how to use this command.
Example 1
The following example shows how to create a traffic rule called rule2:
•
Name — rule2
•
IP addresses — subscriber side — all, network side — all
•
Protocol — TCP
Cisco SCE 8000 CLI Command Reference
2-705
Chapter 2
CLI Command Reference
traffic-rule ipv6
•
subscriber-side port — 100
•
network-side port — 200
•
Direction — downstream
•
Traffic counter — counter2
•
Action — block
The actions that will be performed by this command are counting and blocking.
SCE8000> enable 10
Password: <cisco>
SCE8000# config
SCE8000(config)# interface linecard 0
SCE8000(config if)# traffic-rule name rule2 ipv6 subscriber-side all network-side all
protocol tcp ports subscriber-side 100 network-side 200 direction downstream
traffic-counter name counter2 action block
SCE8000(config if)
Example 2
The following example shows how to delete all the traffic rules:
SCE8000> enable 10
Password: <cisco>
SCE8000# config
SCE8000(config)# interface linecard 0
SCE8000(config if)# no traffic-rule all
SCE8000(config if)
Related Commands
Command
Description
show interface linecard traffic-rule
Displays the specified traffic rule configuration.
Cisco SCE 8000 CLI Command Reference
2-706
Chapter 2
CLI Command Reference
traffic-side (SCE 8000 10G platform only)
traffic-side (SCE 8000 10G platform only)
Changes the traffic direction on Link 1 of the Cisco SCE 8000 10G platform.
Note
This command is supported only on10 Gigabit Ethernet line interfaces 3/2/0 and 3/3/0. It is not supported
on interfaces 3/0/0 and 3/1/0.
Use the default form of the command to reset the interface to the default traffic direction.
traffic-side (subscriber | network)
default traffic-side
Syntax Description
Command Default
subscriber
Configure the interface to process subscriber traffic.
network
Configure the interface to process network traffic.
•
3/2/0: subscriber
•
3/3/0: network
Command Modes
TenGigabitEthernet Interface Configuration
Command History
This table includes the following release-specific history entries:
Usage Guidelines
Release
Modification
3.6.x
This command was introduced.
The hardware design of the Cisco SCE 8000 10G platform is such that the traffic coming in and out of
SPAs 0 and 2 is limited to a total of 16Gbps in each direction, as is the traffic coming in and out of SPAs
1 and 3. Since by default, in 10GBE installations, SPAs 0 and 2 are subscriber-side ports, and SPAs 1
and 3 are network-side ports, this effectively limits total traffic in each direction (upstream and
downstream) to 16Gbps. Therefore, a site that has a total of more than 16Gbps of traffic in one direction
(upstream or downstream), will exceed this limit and suffer packet loss.
You can use this command to swap the roles of the ports on link 1, which will switch part of the
high-volume traffic to the opposite pair of SPAs and prevent either pair of SPAs from exceeding the
16Gbps limit.
Limitations
•
This command is supported only Link 1 (3/2/0 and 3/3/0). It is not supported on Link 0.
Only one interface on the link is explicitly configured. The corresponding interface is automatically
set to the opposite traffic side.
•
The connection mode must be either inline or receive-only. This command is not supported for
cascade modes.
Cisco SCE 8000 CLI Command Reference
2-707
Chapter 2
CLI Command Reference
traffic-side (SCE 8000 10G platform only)
•
This command can only be executed when no application is loaded, or in shutdown mode.
Authorization: admin
Examples
Example 1
The following example illustrates how to reverse the traffic direction on link 1 on the Cisco SCE 8000
10G platform.
SCE8000>enable 10
Password:<cisco>
SCE8000#config
SCE8000(config)#interface TenGigabitEthernet 3/2/0
SCE8000(config if)#traffic-side network
SCE8000(config if)#
Example 2
The following example illustrates how to reset the traffic direction to the default.
SCE8000>enable 10
Password:<cisco>
SCE8000#config
SCE8000(config)#interface TenGigabitEthernet 3/2/0
SCE8000(config if)#default traffic-side
SCE8000(config if)#
Related Commands
Command
Description
show interface TenGigabitEthernet
Displays the current configuration for the specified interface.
Cisco SCE 8000 CLI Command Reference
2-708
Chapter 2
CLI Command Reference
tunable value
tunable value
To enable and disable a tunable and set a value for a tunable in the Cisco SCE platform, use the tunable
value command in the global configuration mode.
tunable tunable-name value value
Syntax Description
tunable -name
Defines the name of the tunable.
value
The tunable value can either be a boolean or an integer. The value range is
from 0 to 65535 in case of integers.
Command Default
The default value differs based upon the tunables.
Command Modes
Global configuration
Command History
This table includes the following release-specific history entries:
Usage Guidelines
Release
Modification
3.7.x
This command was introduced.
A tunable is disabled only if the value is set to false. If not, the tunable will continue to be enabled.
The authorization used is root.
Examples
The following example shows how to enable a tunable from the interface linecard configuration mode:
SCE8000>enable 15
Password:<cisco>
SCE8000#>configure ter
SCE8000(config)#>interface linecard 0
SCE8000(config if)#>tunable tunable-name value true
SCE8000(config if)#>
The following example shows how to enter a value for a tunable from th e interface linecard
configuration mode:
SCE8000>enable 15
Password:<cisco>
SCE8000#>configure ter
SCE8000(config)#>interface linecard 0
SCE8000(config if)#>tunable tunable-name value 255
Cisco SCE 8000 CLI Command Reference
2-709
Chapter 2
CLI Command Reference
tunable value
Related Commands
Command
Description
show applications slot
slot-number {tunable
tunable-name |
all-tunables}
Displays the status of a tunable in the Cisco SCE platform.
Cisco SCE 8000 CLI Command Reference
2-710
Chapter 2
CLI Command Reference
unzip
unzip
Extracts a zip file to the current directory.
unzip filename
Syntax Description
filename
Command Default
None
Command Modes
Privileged EXEC
Command History
This table includes the following release-specific history entries:
Usage Guidelines
Examples
Zip file to be extracted.
Release
Modification
2.5.7
This command was introduced.
Authorization: admin
The following example shows how to extract the file zipfile.zip:
SCE8000>enable 10
Password:cisco>
SCE8000#unzip zipfile.zip
Unzipping '/system/zipfile.zip'...
Zip file has 3 entries:
1.sli, 13429 bytes extracted
preflut.sli, 12558 bytes extracted
temp/SLI/x/IpraeLut.sli, 12929 bytes extracted
Finished, Extracted 3 files.
Cisco SCE 8000 CLI Command Reference
2-711
Chapter 2
CLI Command Reference
username
username
Adds a new user to the local database.
To remove a user from the database, use the no form of this command.
username name {password password | nopassword | secret {0 password | 5 password }}
no username name
Syntax Description
name
Name of the user to be added.
password
Clear-text password.
nopassword
No password is associated with this user.
secret
Saves the password in MD5 encrypted form.
The keywords 0 and 5 indicate the format of the password as entered in the
command. See Usage Guidelines.
Command Default
None
Command Modes
Global configuration
Command History
This table includes the following release-specific history entries:
Usage Guidelines
Release
Modification
3.0.0
This command was introduced.
Up to 100 users may be defined.
The password is defined with the username. You can use the following password options:
•
No password—Use the nopassword keyword.
•
Password—Password is saved in clear-text format in the local list. Use the password keyword.
•
Encrypted password—Password is saved in encrypted (MD5) form in the local list. Use the secret
keyword and either of the following options:
– Specify a clear-text password (0), which is saved in MD5 encrypted form.
– Specify an MD5 encryption string (5), which is saved as the user MD5-encrypted secret
password.
The following keywords are available:
•
nopassword—No password is associated with this user.
•
secret—The password is saved in MD5 encrypted form. Use with either of the following keywords
to indicate the format of the password as entered in the command:
– 0 specifies a clear-text password that will be saved in MD5 encrypted form.
Cisco SCE 8000 CLI Command Reference
2-712
Chapter 2
CLI Command Reference
username
– 5 specifies an MD5 encryption string that will be saved as the user MD5-encrypted secret
password.
Authorization: admin
Examples
The following example shows how to add a new user to the local database with a clear-text password:
SCE8000>enable 10
Password:<cisco>
SCE8000#config
SCE8000(config)#username johndoe password mypassword
SCE8000(config)#
The following example shows how to add a new user to the local database with no password:
SCE8000>enable 10
Password:<cisco>
SCE8000#config
SCE8000(config)#username johndoe nopassword
SCE8000(config)#
The following example shows how to add a new user to the local database with an MD5 encrypted
password entered in clear text:
SCE8000>enable 10
Password:<cisco>
SCE8000#config
SCE8000(config)#username johndoe secret 0 mypassword
SCE8000(config)#
Related Commands
Command
Description
show users
Displays the users in the local database.
username privilege
Sets the privilege level for the specified user.
Cisco SCE 8000 CLI Command Reference
2-713
Chapter 2
CLI Command Reference
username privilege
username privilege
Sets the privilege level for the specified user.
username name privilege [level]
Syntax Description
name
Name of the user whose privilege level is set.
level
Privilege level permitted to the specified user. These levels correspond to
the CLI authorization levels, which are entered with the enable command.
Choose one of the following levels: 0 (user), 5 (viewer), 10 (admin), or 15
(root).
Command Default
The default level is 15.
Command Modes
Global configuration
Command History
This table includes the following release-specific history entries:
Usage Guidelines
Release
Modification
3.0.0
This command was introduced.
When you request an authorization for a specified privilege level with the enable command, the Cisco
SCE platform sends an authentication request to the TACACS+ server. The Cisco SCE platform grants
the requested privilege level only after the TACACS+ server authenticates the enable command
password and verifies that you have sufficient privileges to enter the requested privilege level.
Authorization: admin
Examples
The following example shows how to set the privilege level for the user to viewer:
SCE8000>enable 10
Password:<cisco>
SCE8000#config
SCE8000(config)#username johndoe privilege 5
SCE8000(config)#
Related Commands
Command
Description
show users
Displays the users in the local database.
username
Adds a new user to the local database.
Cisco SCE 8000 CLI Command Reference
2-714
Chapter 2
CLI Command Reference
vas-traffic-forwarding
vas-traffic-forwarding
Enables VAS traffic forwarding. Use the no form of the command to disable VAS traffic forwarding.
Refer to the example below for complete instructions on how to disable VAS traffic.
vas-traffic-forwarding
no vas-traffic-forwarding
Syntax Description
This command has no arguments or keywords.
Command Default
By default, VAS traffic forwarding is disabled.
Command Modes
Interface Linecard Configuration
Command History
This table includes the following release-specific history entries:
Usage Guidelines
Release
Modification
3.0.0
This command was introduced.
There are certain other SCE platform features that are incompatible with VAS traffic forwarding. Before
enabling VAS traffic forwarding, it is the responsibility of the user to make sure that no incompatible
features or modes are configured.
The features and modes listed below cannot coexist with VAS mode:
•
Line-card connection modes: receive-only, receive-only-cascade, inline-cascade
•
Link mode other than forwarding
•
All link encapsulation protocols, including VLAN, MPLS, L2TP
Authorization: admin
Examples
This example shows how to disable VAS traffic forwarding. You must first shutdown the linecard before
disabling VAS forwarding, since there may still be some open flows that have already been forwarded
to the VAS servers. If the VAS feature is stopped while there are still such flows open, their packets
coming back from the VAS servers may be routed to their original destination with the VLAN tag of the
VAS server on it.
Note that, although this command is an admin level command, you must enter the ROOT authorization
level (15) to shutdown the linecard.
SCE8000>enable 15
Password:<cisco>
SCE8000#>config
SCE8000(config if)#>interface linecard 0
SCE8000(config if)#>shutdown
Cisco SCE 8000 CLI Command Reference
2-715
Chapter 2
CLI Command Reference
vas-traffic-forwarding
SCE8000(config if)#>no vas-traffic-forwarding
SCE8000(config if)#>no shutdown
SCE8000(config if)#>
Related Commands
Command
Description
vas-traffic-forwarding vas server-id
Enables or disables a VAS server.
vas-traffic-forwarding vas traffic-link
Configures the link to which the VAS servers are
connected.
vas-traffic-forwarding vas server-id
health-check
Enables or disables the VAS health check, and
defines the ports it should use.
vas-traffic-forwarding vas server-group
Adds servers to and removes them from a
specified VAS server group.
vas-traffic-forwarding vas server-group failure
Configures the failure parameters for the
specified VAS server group.
show interface linecard vas-traffic-forwarding
Displays information regarding VAS
configuration and operational status summary.
Cisco SCE 8000 CLI Command Reference
2-716
Chapter 2
CLI Command Reference
vas-traffic-forwarding traffic-link
vas-traffic-forwarding traffic-link
Configures the link on which to transmit VAS traffic (the link to which the VAS servers are connected).
Use the no form of the command to remove the VAS link configuration and revert to the VAS link
defaults.
vas-traffic-forwarding traffic-link {link-0|link-1}
no vas-traffic-forwarding traffic-link
Syntax Description
Enter the link number on which to transmit VAS traffic
•
Link-0
•
Link-1
Command Default
Default traffic link = Link-1
Command Modes
Interface Linecard Configuration
Command History
This table includes the following release-specific history entries:
Release
Modification
3.0.0
This command was introduced.
Usage Guidelines
Note
The VAS traffic link should be in Forwarding mode.
Authorization: admin
Examples
This example shows how to configure link 0 for VAS traffic.
SCE8000>enable 10
Password:<cisco>
SCE8000#config
SCE8000(config)#interface linecard 0
SCE8000(config if)#vas-traffic-forwarding traffic-link link-0
SCE8000(config if)#
Cisco SCE 8000 CLI Command Reference
2-717
Chapter 2
CLI Command Reference
vas-traffic-forwarding traffic-link
Related Commands
Command
Description
vas-traffic-forwarding
Enables VAS traffic forwarding.
vas-traffic-forwarding vas server-id
Enables or disables a VAS server.
vas-traffic-forwarding vas server-group
Adds servers to and removes them from a
specified VAS server group.
vas-traffic-forwarding vas server-group failure
Configures the failure parameters for the
specified VAS server group.
show interface linecard vas-traffic-forwarding
Displays information regarding VAS
configuration and operational status summary.
Cisco SCE 8000 CLI Command Reference
2-718
Chapter 2
CLI Command Reference
vas-traffic-forwarding vas server-id health-check
vas-traffic-forwarding vas server-id health-check
Enables or disables the VAS health check, and defines the ports it should use. Use the UDP ports
keyword to define source and destination UDP ports to be used by the health check packets. Use the no
form of this command to disable the health check. Use either the no or default form of this command
with the UDP ports keyword to remove the UDP port configuration.
vas-traffic-forwarding vas server-id number health-check
vas-traffic-forwarding vas server-id number health-check udp ports source port-number
destination port-number
no vas-traffic-forwarding vas server-id number health-check
no vas-traffic-forwarding vas server-id number health-check udp ports
default vas-traffic-forwarding vas server-id number health-check udp ports
Syntax Description
Command Default
number
ID number of the VAS server for which to enable or disable the health check
port-number
source or destination port number (use with the source and destination
options)
By default, the health check is enabled.
Default port numbers = two port numbers for each server, starting with ports 63140 and 63141.
Command Modes
Interface Linecard Configuration
Command History
This table includes the following release-specific history entries:
Usage Guidelines
Release
Modification
3.0.0
This command was introduced.
Use the UDP ports keyword to define source and destination UDP ports to be used by the health check
packets.
Note that the health check is activated only if all the following conditions are true. If the health check is
enabled but one or more of the following conditions are not met, the server state will be Down :
•
VAS Traffic Forwarding mode is enabled
•
Pseudo IPs are configured for the Cisco SCE platform GBE ports on the VAS traffic link
•
VAS server is enabled
•
Server has a VLAN tag
•
Health check for the server is enabled
Cisco SCE 8000 CLI Command Reference
2-719
Chapter 2
CLI Command Reference
vas-traffic-forwarding vas server-id health-check
If the health check of the server is disabled, its operational status depends on the following (requirements
for Up state are in parentheses):
•
admin status (enable)
•
VLAN tag configuration (VLAN tag defined)
•
group mapping (assigned to group)
Authorization: admin
Examples
The following examples illustrate how to disable the health check, and how to define the UDP ports.
Example 1
This example shows how to disable the health check for VAS server 5.
SCE8000>enable 10
Password:<cisco>
SCE8000#config
SCE8000(config)#interface linecard 0
SCE8000(config if)#no vas-traffic-forwarding vas server-id 5 health-check
SCE8000(config if)#
Example 2
This example shows how to define the source and destination ports for VAS server 5 and enable the
health check.
SCE8000>enable 10
Password:<cisco>
SCE8000#config
SCE8000(config)#interface linecard 0
SCE8000(config if)#vas-traffic-forwarding vas server-id 5 health-check udp ports source
63150
destination 63151
SCE8000(config if)#vas-traffic-forwarding vas server-id 5 health-check
SCE8000(config if)#
Example 3
This example shows how to remove the UDP port configuration using the no keyword.
SCE8000>enable 10
Password:<cisco>
SCE8000#config
SCE8000(config)#interface linecard 0
SCE8000(config if)#no vas-traffic-forwarding vas server-id 5 health-check udp ports
SCE8000(config if)#
Example 4
This example shows how to remove the UDP port configuration using the default keyword.
SCE8000>enable 10
Password:<cisco>
SCE8000#config
SCE8000(config)#interface linecard 0
SCE8000(config if)#default vas-traffic-forwarding vas server-id 5 health-check udp ports
SCE8000(config if)#
Cisco SCE 8000 CLI Command Reference
2-720
Chapter 2
CLI Command Reference
vas-traffic-forwarding vas server-id health-check
Related Commands
Command
Description
vas-traffic-forwarding
Enables VAS traffic forwarding.
vas-traffic-forwarding vas server-id
Enables or disables a VAS server.
vas-traffic-forwarding vas traffic-link
Configures the link to which the VAS servers are
connected.
vas-traffic-forwarding vas server-group
Adds servers to and removes them from a
specified VAS server group.
vas-traffic-forwarding vas server-group failure
Configures the failure parameters for the
specified VAS server group.
show interface linecard vas-traffic-forwarding
Displays information regarding VAS
configuration and operational status summary.
Cisco SCE 8000 CLI Command Reference
2-721
Chapter 2
CLI Command Reference
vas-traffic-forwarding vas server-id vlan
vas-traffic-forwarding vas server-id vlan
Assigns the VLAN ID to a specified VAS server. Use the no form or the default form of this command
to delete the VLAN tag assignment from a specified VAS server.
vas-traffic-forwarding vas server-id number vlan vlan-number
no vas-traffic-forwarding vas server-id number vlan
default vas-traffic-forwarding vas server-id number vlan
Syntax Description
number
The ID number of the VAS server
vlan-number
The VLAN tag to use for the specified VAS server
Command Default
Default vlan-number = No VLAN
Command Modes
Interface Linecard Configuration
Command History
This table includes the following release-specific history entries:
Usage Guidelines
Release
Modification
3.0.0
This command was introduced.
Note the following important points:
•
The VAS server is not operational until the VLAN tag is defined.
•
Disabling the server does not remove the VLAN tag number configured to the server.
•
The no form of the command (same as the default form of the command), removes the previously
configured VLAN tag (no VLAN is the default configuration).
Authorization: admin
Examples
The following example assigns the vlan id = 10 to server ID number = 4.
SCE8000>enable 10
Password:<cisco>
SCE8000#config
SCE8000(config)#interface linecard 0
SCE8000(config if)#vas-traffic-forwarding vas server-id 4 vlan 10
SCE8000(config if)#
Cisco SCE 8000 CLI Command Reference
2-722
Chapter 2
CLI Command Reference
vas-traffic-forwarding vas server-id vlan
Related Commands
Command
Description
vas-traffic-forwarding
Enables VAS traffic forwarding.
vas-traffic-forwarding vas server-id
Enables or disables a VAS server.
vas-traffic-forwarding vas server-group
Adds servers to and removes them from a
specified VAS server group.
vas-traffic-forwarding vas server-group failure
Configures the failure parameters for the
specified VAS server group.
vas-traffic-forwarding vas traffic-link
Configures the link to which the VAS servers are
connected.
show interface linecard vas-traffic-forwarding
Displays information regarding VAS
configuration and operational status summary.
Cisco SCE 8000 CLI Command Reference
2-723
Chapter 2
CLI Command Reference
vas-traffic-forwarding vas server-group
vas-traffic-forwarding vas server-group
Adds servers to and removes them from a specified VAS server group. Use the no form of this command
to remove a specified server from the VAS server group.
vas-traffic-forwarding vas server-group group-number server-id server-number
no vas-traffic-forwarding vas server-group group-number server-id server-number
Syntax Description
group-number
The ID number of the VAS server group. (0-7)
server-number
The ID number of the VAS server.
•
SCE 8000: 0-63
Command Default
This command has no default settings.
Command Modes
Interface Linecard Configuration
Command History
This table includes the following release-specific history entries:
Usage Guidelines
Release
Modification
3.0.0
This command was introduced.
The user may define up to eight VAS server groups. Each VAS server group has the following
parameters:
•
Server Group ID
•
A list of VAS servers attached to this group.
•
Failure detection — minimum number of active servers required for this group so it will be
considered to be Active. If the number of active servers goes below this minimum, the group will be
in Failure state.
•
Failure action — action performed on all new data flows that should be mapped to this Server Group
while it is in Failure state.
If no VAS server ID is specified in the no form of the command, all servers are removed from the server
group and all group parameters (failure detection and action) are set to the default values (see
VAS-traffic-forwarding VAS server-group failure ).
Authorization: admin
Examples
The following examples illustrate how to add servers to and remove servers from a specified VAS server
group.
Cisco SCE 8000 CLI Command Reference
2-724
Chapter 2
CLI Command Reference
vas-traffic-forwarding vas server-group
Example 1
This example shows how to add VAS server 5 to VAS server group 1.
SCE8000>enable 10
Password:<cisco>
SCE8000#config
SCE8000(config)#interface linecard 0
SCE8000(config if)#vas-traffic-forwarding vas server-group 1 vas server-id 5
SCE8000(config if)#
Example 2
This example shows how to remove VAS server 5 from VAS server group 1.
SCE8000>enable 10
Password:<cisco>
SCE8000#config
SCE8000(config)#interface linecard 0
SCE8000(config if)#no vas-traffic-forwarding vas server-group 1 vas server-id 5
SCE8000(config if)#
Example 3
This example shows how to remove all VAS servers from VAS server group 1 and set all group
parameters (failure detection and action) to the default values.
SCE8000>enable 10
Password:<cisco>
SCE8000#config
SCE8000(config)#interface linecard 0
SCE8000(config if)#no vas-traffic-forwarding vas server-group 1
SCE8000(config if)#
Related Commands
Command
Description
vas-traffic-forwarding
Enables VAS traffic forwarding.
vas-traffic-forwarding vas server-id
Enables or disables a VAS server.
vas-traffic-forwarding vas traffic-link
Configures the link to which the VAS servers
are connected.
vas-traffic-forwarding vas server-id health-check
Enables or disables the VAS health check, and
defines the ports it should use.
vas-traffic-forwarding vas server-group failure
Configures the failure parameters for the
specified VAS server group.
show interface linecard vas-traffic-forwarding
Displays information regarding VAS
configuration and operational status summary.
Cisco SCE 8000 CLI Command Reference
2-725
Chapter 2
CLI Command Reference
vas-traffic-forwarding vas server-group failure
vas-traffic-forwarding vas server-group failure
Configures the failure parameters for the specified VAS server group. Use either the no form or the
default form of the command to set the specified failure parameter to the default value.
vas-traffic-forwarding vas server-group group-number failure minimum-active-servers
min-number
vas-traffic-forwarding vas server-group group-number failure action {block | pass}
default vas-traffic-forwarding vas server-group group-number failure
minimum-active-servers
no vas-traffic-forwarding vas server-group group-number failure minimum-active-servers
default vas-traffic-forwarding vas server-group group-number failure action
no vas-traffic-forwarding vas server-group group-number failure action
Syntax Description
Command Default
group-number
The ID number of the VAS server group (0-7)
min-number
The minimum number of active servers required for the specified server
group.
failure action
The action to be applied to all new flows mapped to this server group while
it is in Failure state
•
block — all new flows assigned to the failed VAS server group will be
blocked by the Cisco SCE platform
•
pass — all new flows assigned to the failed VAS server group will be
considered as regular non-VAS flows, and will be processed without
VAS service.
Default failure minimum-active-servers min-number = 1
Default failure action = pass
Command Modes
Interface Linecard Configuration
Command History
This table includes the following release-specific history entries:
Usage Guidelines
Release
Modification
3.0.0
This command was introduced.
To set both group parameters (failure detection and action) to the default values, use the no form of the
command without specifying any parameter (see VAS-traffic-forwarding VAS server-group.)
Authorization: admin
Cisco SCE 8000 CLI Command Reference
2-726
Chapter 2
CLI Command Reference
vas-traffic-forwarding vas server-group failure
Examples
The following examples illustrate how to set the failure parameters to specified values or to the default
value.
Example 1
The following example shows how to configure the minimum number of active servers for VAS server
group 5.
SCE8000>enable 10
Password:<cisco>
SCE8000#config
SCE8000(config)#interface linecard 0
SCE8000(config if)#vas-traffic-forwarding vas server-group 5 failure
minimum-active-servers 3
SCE8000(config if)#
Example 2
The following example shows how to reset the minimum number of active servers for VAS server group
5 to the default value.
SCE8000>enable 10
Password:<cisco>
SCE8000#config
SCE8000(config)#interface linecard 0
SCE8000(config if)#default vas-traffic-forwarding vas server-group 5 failure
minimum-active-servers
SCE8000(config if)#
Related Commands
Command
Description
vas-traffic-forwarding
Enables VAS traffic forwarding.
vas-traffic-forwarding vas server-id
Enables or disables a VAS server.
vas-traffic-forwarding vas traffic-link
Configures the link to which the VAS
servers are connected.
vas-traffic-forwarding vas server-id health-check
Enables or disables the VAS health check,
and defines the ports it should use.
vas-traffic-forwarding vas server-group
Adds servers to and removes them from a
specified VAS server group.
show interface linecard vas-traffic-forwarding
Displays information regarding VAS
configuration and operational status
summary.
Cisco SCE 8000 CLI Command Reference
2-727
Chapter 2
CLI Command Reference
vas-traffic-forwarding vas server-id
vas-traffic-forwarding vas server-id
Enables or disables a VAS server. Use the enable keyword to enable a new or existing VAS server. Use
the disable keyword to disable an existing VAS server (server properties are not deleted). Use the no
form or the default form of this command to delete all server properties from a specified VAS server.
vas-traffic-forwarding vas server-id number enable
vas-traffic-forwarding vas server-id number disable
no vas-traffic-forwarding vas server-id number
default vas-traffic-forwarding vas server-id number
Syntax Description
number
The ID number of the VAS server
•
SCE 8000: 0-63
•
SCE 2000:0-7
Command Default
By default, a defined VAS server is enabled.
Command Modes
Interface Linecard Configuration
Command History
This table includes the following release-specific history entries:
Usage Guidelines
Release
Modification
3.0.0
This command was introduced.
The VAS server is not operational until the VLAN tag is defined (vas-traffic-forwarding server-id vlan).
Authorization: admin
Examples
The following examples illustrate how to create, enable, and disable a VAS server.
Example 1
The following example defines a VAS server, server ID number = 4, that is not yet operational.
SCE8000>enable 10
Password:<cisco>
SCE8000#config
SCE8000(config)#interface linecard 0
SCE8000(config if)# vas-traffic-forwarding vas server-id 4 enable
SCE8000(config if)#
Cisco SCE 8000 CLI Command Reference
2-728
Chapter 2
CLI Command Reference
vas-traffic-forwarding vas server-id
Example 2
The following example disables the VAS server, but does not delete the server definition or the associated
VLAN tag.
SCE8000>enable 10
Password:<cisco>
SCE8000#config
SCE8000(config)#interface linecard 0
SCE8000(config if)# vas-traffic-forwarding vas server-id 4 disable
SCE8000(config if)#
Related Commands
Command
Description
vas-traffic-forwarding
Enables VAS traffic forwarding.
vas-traffic-forwarding server-id vlan
Defines the VLAN tag for the VAS servwe.
vas-traffic-forwarding vas traffic-link
Configures the link to which the VAS servers
are connected.
vas-traffic-forwarding vas server-id health-check Enables or disables the VAS health check, and
defines the ports it should use.
vas-traffic-forwarding vas server-group
Adds servers to and removes them from a
specified VAS server group.
vas-traffic-forwarding vas server-group failure
Configures the failure parameters for the
specified VAS server group.
show interface linecard vas-traffic-forwarding
Displays information regarding VAS
configuration and operational status summary.
Cisco SCE 8000 CLI Command Reference
2-729
Chapter 2
CLI Command Reference
virtual-links index direction
virtual-links index direction
Adds a new virtual link. The command also optionally changes the PIR values for a specified Global
Controller configured in the SCA BB application.
To remove a specified virtual link, use the no form of this command.
virtual-links index vl-index direction [upstream | downstream]
virtual-links index vl-index direction [upstream | downstream] gc relative-gc-index set-pir value
[‘]pir-value[, pir-value2, pir-value3, pir-value4]’
virtual-links index vl-index direction [upstream | downstream] gc relative-gc-index reset-pir
no virtual-links index vl-index direction [upstream | downstream]
Syntax Description
vl-index
Index number assigned to the virtual link.
relative-gc-index
Index number of the Global Controller (GC) whose PIR values you want to
change. This index must be the number of the desired GC template for the
specified direction (upstream or downstream).
pir-value
PIR value to be assigned to the specified GC.
You can specify either one PIR value, which will be used for all timeframes,
or four PIR values, one for each timeframe.
If you specify four values, separate the values with commas and enclose the
entire string in single quotation marks. For example: ‘w,x,y,z’
direction
Specifies the direction for this virtual link (upstream or downstream).
Command Default
None
Command Modes
Interface Linecard Configuration
Command History
This table includes the following release-specific history entries:
Usage Guidelines
Release
Modification
3.5.0
This command was introduced.
You can configure virtual links when the physical link that the Cisco SCE platform monitors is actually
composed of multiple smaller links that you want to monitor and control separately. With virtual links,
instead of creating hundreds or even thousands of separate packages with the specific bandwidth
configuration for each small link, you can create a policy with a limited number of basic packages, each
with a standard bandwidth configuration. Any specific bandwidth configuration can be adjusted for each
virtual link by reconfiguring the relevant Global Controller.
Configuring virtual links consists of three steps in three different components of the Cisco Service
Control application:
Cisco SCE 8000 CLI Command Reference
2-730
Chapter 2
CLI Command Reference
virtual-links index direction
•
Create and apply a virtual links policy with the Global Controllers template.
The policy is managed and applied through the GUI or API.
•
Create the virtual links and optionally set any specific bandwidth configuration in the Global
Controllers.
Virtual links are created and managed in the Cisco SCE through a set of CLI commands.
•
Set the virtual link names in the CM.
The virtual link names are set using a command line utility (CLU) in the CM. These names are used
in the Virtual Links Reports.
Direction
Virtual links are directional. In the CLI commands, a virtual link is always identified by both the index
number assigned to the virtual link and the direction (upstream or downstream).
Always use the direction keyword and specify upstream or downstream.
Global Controller (GC) Templates
The virtual links policy created in the SCA BB console specifies Global Controllers that will be used as
bandwidth templates for the virtual links. When a new virtual link is created, it receives a set of the
directional template VL Global Controllers with their PIR values as configured in the SCA BB console.
In some cases, you may want to modify the PIR values of a particular GC template for use with a
particular virtual link:
•
Use the set-pir keyword with the desired PIR value to change the PIR value of a specified GC
associated with a specified virtual link.
•
Use the reset-pir keyword with no PIR values to reset the PIR values of a specified GC to the
original values, as configured through the console.
Global Controllers–Relative Index
To specify the GC, use the gc keyword and then indicate the relative GC index. This number is the
relevant GC as found in the GC configuration for the specified direction.
GC numbering starts at 0 for the default BWC in each direction, so the third user-configured GC, for
example, is number 3. In the GC configuration illustrated in Figure 2-3, the relative index for the P2P
GC is 2 for upstream and 3 for downstream.
Note
Each GC also has an absolute index. In Figure 2-3, six GCs are configured and each one is identified
internally by a unique index. This absolute index is not needed to identify a particular GC in these
commands.
Cisco SCE 8000 CLI Command Reference
2-731
Chapter 2
CLI Command Reference
virtual-links index direction
Figure 2-3
Sample Configuration
PIR Values
Either one or four PIR values are configured for each template GC. By default, the SCA BB calendar
function contains four timeframes. You can configure a different PIR for each timeframe or only one PIR
that will be applied to all timeframes.
Examples
The following example shows how to create a new virtual link for the downstream direction:
SCE8000>enable
password<cisco>
SCE8000#configure
SCE8000(config)#interface linecard 0
SCE8000(config if)#virtual-links index 10 direction downstream
The following example shows how to change the PIR values for the template GC (the third one, which
is number 2) for the specified virtual link. Be sure to use the proper index number from the correct
direction for the GC.
Note that the four PIR values are separated by commas and enclosed in single quotation marks.
SCE8000>enable
password<cisco>
SCE8000#configure
SCE8000(config)#interface linecard 0
SCE8000(config if)#virtual-links index 10 direction downstream gc 2 set-pir value
‘10000,50000,50000,10000’
The following example shows how to remove a virtual link. Be sure to specify the direction.
SCE8000>enable
password<cisco>
SCE8000#configure
SCE8000(config)#interface linecard 0
SCE8000(config if)#no virtual-links index 10 direction downstream
Cisco SCE 8000 CLI Command Reference
2-732
Chapter 2
CLI Command Reference
virtual-links index direction
Related CommandsE
Command
Description
show interface
linecard virtual-links
Displays the currently configured virtual links.
Cisco SCE 8000 CLI Command Reference
2-733
Chapter 2
CLI Command Reference
vlan
vlan
Configures the VLAN environment. One VLAN tag is supported for each packet (no QinQ support).
To set the VLAN configuration to the default value, use the default form of this command.
vlan symmetric skip
vlan a-symmetric skip
vlan symmetric classify
default vlan
Syntax Description
See Usage Guidelines.
Command Default
The default mode is symmetric skip.
Command Modes
Interface Linecard Configuration
Command History
This table includes the following release-specific history entries:
Usage Guidelines
Release
Modification
2.5.7
This command was introduced.
The VLAN modes act as follows:
•
vlan symmetric skip—Ignores tunnel.
•
vlan a-symmetric skip—Ignores tunnel, asymmetric.
•
vlan symmetric classify—VLAN tag as subscriber.
•
When the tunneling information is ignored, the subscriber identification is the subscriber IP of the
IP packet carried inside the tunnel.
Use the symmetric skip form of the command to skip the VLAN header when flow classification does
not use the VLAN tag. VLAN tags are symmetric.
Use the a-symmetric skip form of the command to skip the VLAN header when flow classification does
not use the VLAN tag. VLAN tags are asymmetric. Note that this form of the command impacts
performance.
Use the symmetric classify form of the command when flow classification uses the VLAN tag. VLAN
tags are symmetric. Using VLAN classification is mutually exclusive with any other tunnel-based
classification.
Note
The Cisco SCE 8000 supports a maximum of 4096 VLAN tags.
Cisco SCE 8000 CLI Command Reference
2-734
Chapter 2
CLI Command Reference
vlan
Symmetric and Asymmetric Environments
In a symmetric environment, the same VLAN tags are used for carrying a transaction in the upstream
and downstream directions.
In an asymmetric environment, the upstream and downstream VLAN tags of the same flow might not be
the same.
The Cisco SCE platform is configured by default to work in symmetric environments. The a-symmetric
skip command is needed to allow correct operation of the Cisco SCE platform in an asymmetric
environment. The command instructs the platform to take into consideration that the upstream and
downstream of each flow has potentially different VLAN tags.
Examples
The following example shows how to enable VLAN-based classification:
SCE8000>enable 10
Password:<cisco>
SCE8000#config
SCE8000(config)#interface linecard 0
SCE8000(config if)#vlan symmetric classify
SCE8000(config if)#
Related Commands
Command
Description
show interface
linecard vlan
Displays the VLAN tunnel configuration.
Cisco SCE 8000 CLI Command Reference
2-735
Chapter 2
CLI Command Reference
vty mng-vlan
vty mng-vlan
Assigns the specified VLAN to Telnet services.
Use the no form of the command to the VLAN configuration for Telnet services.
vty mng-vlan vlan-id
no vty mng-vlan
Syntax Description
vlan-id
Command Default
None
Command Modes
Global configuration
Command History
This table includes the following release-specific history entries:
Usage Guidelines
VLAN tag to be assigned to Telnet services (1-4094).
Release
Modification
3.7.x
This command was introduced.
You can create separate VLAN interfaces on the management interface in order to differentiate between
various management services. There are two steps in this process:
1.
Create the VLAN and assign the IP address (mng-vlan command).
2.
Assign the VLAN to a management service.
Authorization: admin
Examples
The following example shows how to configure a VLAN for Telnet services.
SCE8000>enable 10
Password:<cisco>
SCE8000#config
SCE8000(config)#mng-vlan 100 address 10.10.10.20 mask 255.255.255.0
SCE8000(config)#vty mng-vlan 100
SCE8000(config)#
The following example shows how to remove the VLAN for Telnet services.
SCE8000>enable 10
Password:<cisco>
SCE8000#config
SCE8000(config)#no vty mng-vlan
SCE8000(config)#
Cisco SCE 8000 CLI Command Reference
2-736
Chapter 2
CLI Command Reference
vty mng-vlan
Related Commands
Command
Description
show vty mng-vlan
Displays the VLAN configured for Telnet services, if configured.
Cisco SCE 8000 CLI Command Reference
2-737
Chapter 2
CLI Command Reference
wap
wap
Enables or disables operating in a WAP-based environment.
To disable operating in a WAP-based environment, use the no form of this command.
wap
no wap
Syntax Description
vlan-id
VLAN tag to be assigned to Telnet services (1-4094).
This command has no arguments or keywords.
Command Default
Operating in a WAP environment is disabled.
Command Modes
Interface Linecard Configuration
Command History
This table includes the following release-specific history entries:
Usage Guidelines
Examples
Release
Modification
3.0.0
This command was introduced.
Authorization: admin
The following example shows how to enable operating in a WAP-based environment:
SCE8000>enable 10
Password:<cisco>
SCE8000#config
SCE8000(config)#interface linecard 0
SCE8000(config if)#wap
SCE8000(config if)#
Related Commands
Command
Description
show interface linecard wap
Displays the current WAP handling state.
Cisco SCE 8000 CLI Command Reference
2-738