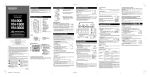
1
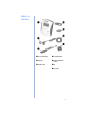
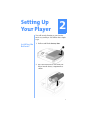
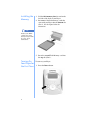
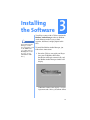
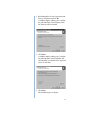
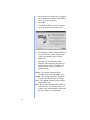
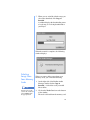
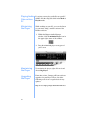
Notice
© 2000 Compaq Computer Corporation
COMPAQ and the Compaq logo registered in U.S.
Patent and Trademark Office.
iPAQ is a trademark of Compaq Information
Technologies Group, L.P.
Microsoft and Windows are trademarks of Microsoft
Corporation.
All other product names mentioned herein may be
trademarks or registered trademarks of their respective
companies.
Compaq shall not be liable for technical or editorial
errors or omissions contained herein. The information
in this document is subject to change without notice.
The information in this publication is subject to change
without notice and is provided “AS IS” WITHOUT
WARRANTY OF ANY KIND. THE ENTIRE RISK
ARISING OUT OF THE USE OF THIS
INFORMATION REMAINS WITH RECIPIENT. IN
NO EVENT SHALL COMPAQ BE LIABLE FOR
ANY DIRECT, CONSEQUENTIAL, INCIDENTAL,
SPECIAL, PUNITIVE, OR OTHER DAMAGES
WHATSOEVER (INCLUDING WITHOUT
LIMITATION, DAMAGES FOR LOSS OF
BUSINESS PROFITS, BUSINESS INTERRUPTION,
OR LOSS OF BUSINESS INFORMATION), EVEN IF
COMPAQ HAS BEEN ADVISED OF THE
POSSIBILITY OF SUCH DAMAGES. THE
FOREGOING SHALL APPLY REGARDLESS OF
THE NEGLIGENCE OR OTHER FAULT OF EITHER
PARTY AND REGARDLESS OF WHETHER SUCH
LIABILITY SOUNDS IN CONTRACT,
NEGLIGENCE, TORT, OR ANY OTHER THEORY
OF LEGAL LIABILITY, AND
NOTWITHSTANDING ANY FAILURE OF
ESSENTIAL PURPOSE OF ANY LIMITED
REMEDY.
The limited warranties for Compaq products are
exclusively set forth in the documentation
accompanying such products. Nothing herein should be
construed as constituting a further or additional
warranty.
Compaq
iPAQ Personal Audio Player PA-1
First Edition (July 2000)
Part Number 175380-001
Welcome
1
Thanks for buying an iPAQ Personal Audio
Player PA-1, and welcome to the world of
digital audio—one of the hottest topics in the
world today.
What is
Digital Audio?
Why Digital
Audio?
Digital audio is a way of compressing recorded
sound so that it takes up much less storage
space. A song is reduced to about 1/10 its size,
enabling fast downloads from the Internet to
your Player. There are many types of digital
audio formats, but MP3 and WMA are two of
the most popular.
Digital audio players provide many benefits:
➜ Solid state (no skipping)
➜ CD quality sound
➜ Portability (small and lightweight)
➜ Compatibility with the Internet
➜ The ability to take your favorite music with
you anywhere!
3
Is Your PC
Ready for
Digital Audio?
If you have a multimedia PC with a sound card
and speakers, you are probably ready for
digital audio. However, to get optimal
performance, we recommend the requirements
shown here. You may be able to download
audio files with a less sophisticated PC, but
you will be happier if your PC meets or
exceeds these requirements:
➜ 233 MHz Processor
➜ Microsoft Windows 98
➜ 100 MB free hard drive space
➜ 1 available USB port
➜ 24x CD-ROM drive (32x preferred)
➜ 64 MB RAM
How to
Get Help
If you have any trouble setting up your Player
or would just like more information, visit
Compaq’s web site:
http://www.compaq.com/products/internetdevices
Register Your
PA-1
Please register your Player to receive a more
personalized support experience. You may
register at Compaq’s web site:
http://www.compaq.com/go/register
Warranty
4
Your Player has a One-Year Limited
Warranty. Please see the Warranty Card that
came in the package for further details.
What’s in
the Box?
1 Personal Audio Player
4 Two AAA batteries
2 Earphones
5 64 MB of MMC flash
memory
3 USB data cable
6 CD
7 This guide
5
6
Setting Up
Your Player
2
You will soon be listening to your favorite
music on your Player. Just follow these simple
steps:
Installing the
Batteries
1. Pull out and lift the battery door.
2. Place the batteries that came with your
Player into the battery compartment as
shown.
7
Installing the
Memory
3. Lift the flash memory door located on the
left side of the back of your Player.
4. Insert one of the flash memory cards that
came with your Player into the bottom slot
(Slot 1). See the figure below for
orientation.
Tip
Format your MMC
cards before using
them for the first time.
See page 27 for
instructions.
5. Insert the second Flash Memory card into
the top slot (Slot 2).
Turning On
Your Player for
the First Time
8
To turn on your Player:
1. Press the Power button.
When you turn on your Player, the LCD
screen briefly displays all icons, then
Compaq iPAQ, and then, assuming the
memory cards are installed, the following:
1:32M 2:32M
This indicates that each 32 MB memory
card is installed correctly.
You will then see a No songs message,
since the memory cards do not contain any
songs yet.
2. Press and hold the Power button for 2
seconds to turn off the Player. The display
will show OFF (HOLD).
Installing the
Belt Clip
Your Player comes with an optional Belt Clip.
1. Place the belt clip into the hole in the back
of the Player.
2. Tighten the screw.
Tip
When installing new
batteries, loosen the
screw and rotate the
belt clip clockwise, or
remove the belt clip
completely.
9
Features of
Your Player
Your Player has many outstanding features:
Front
Features
1Display Screen - Area
where song and playback
information is displayed.
2Volume Decrease Press to lower volume.
5Volume Increase Press to raise volume
level.
6Play/Pause - Press to
play a song. Press
again to pause play.
3Power - Press to turn the 7Menu - Press to see
Player On. Hold for 2
seconds to turn the
Player off. The display
will show OFF (HOLD).
4Rewind/Previous
Track - Press and hold to
rewind within a song.
Press once to skip back
to the previous track.
10
menu options.
8Fast Forward/Next
Track - Press and hold
to fast forward within a
song. Press once to
skip ahead to the next
song.
Top Features
Tip
You must set the
Norm/Hold switch to
the Normal position
to turn on the Player.
Hold Mode is
displayed on the
screen if the switch is
in the Hold position
when you press the
Power button.
1 Earphone Connection
2 Norm/Hold Switch -The Norm/Hold switch should
Display
Screen
be in the Norm position for typical usage. When the
switch is in the Hold position, the front panel
buttons are disabled. You can carry your Player in a
pocket or purse and not worry about accidentally
pushing the buttons.
Volume level indicator - Each )
represents 2 steps in volume with a
maximum volume of 5 )s.
Music indicator - Flashes when the
Player is in PAUSE mode. The
indicator is solid when songs are
playing.
11
Battery charge indicator -The number of
bars visible indicates the amount of
charge remaining in your Player’s
batteries. Replace batteries when the three
bars have disappeared.
DISPLAY AREA - Displays track number,
track length, artist, and song name. The
song title format is set using the RioPort
Audio Manager software.
w USB indicator - Displays only when the
USB cable is connected to the computer
and to the Player.
HOLD - Displays when the Norm/Hold
switch is in the Hold position.
N Repeat indicator - N displays when the
current song is set to repeat. NALL
displays when all songs are set to repeat.
SHUFFLE - Indicates that songs will be
played in a non-sequential order.
Menu
Options
12
Your Player has many features available
through Menu options. To access the Menu
options:
1. Press the Menu button to see the first
option.
2. Press the Menu button repeatedly to move
through the options.
3. Press the Play/Pause button to make a
selection.
To exit the Menu, scroll through the options
until you are returned to your songs OR, if no
buttons are pressed for 5 seconds, you will be
returned to your songs.
The following options are available through
the Menu:
Shuffle
Off - Songs play in the order of your playlist.
On - Songs do not play in the order of your
playlist.
Repeat
Tip
In REPEAT ALL or
REPEAT ONE mode,
songs will play
continuously until you
stop play or the
batteries run out of
power.
Repeat All - Continuously plays all the songs
in your playlist.
Repeat One - The current song plays again
and again.
Repeat Off - All songs in your playlist play
once, then the Player will automatically shut
off if no buttons are pressed for 10 minutes.
Equalizer
Rock - Choose this setting to hear rock music
at its best.
Jazz - Choose this setting to hear Jazz music at
its best.
Classical - Choose this setting to hear
Classical music at its best.
Custom - (Default) Use this setting to
manually adjust the Bass and Treble. With this
mode, you can boost the amount of bass and
treble.
Self Test
Self Test tests the display, memory cards, and
the audio to each of the earphones. It also
displays the Player’s software version.
13
Installing
the Software
Tip
If the RioPort Audio
Manager window
does not display, click
on the Start menu,
select Run, and type
X:setup (where X is
the letter of your
CD-ROM or DVD
drive.)
3
Your Player comes with a CD that contains the
RioPort Audio Manager software. RioPort
Audio Manager makes it easy to find,
organize, download, and play digital audio
files.
To install the RioPort Audio Manager, just
follow these instructions:
1. Insert the CD that came with your Player
into your CD-ROM or DVD drive.
Installation will begin automatically, and
the RioPort Audio Manager window will
display.
Additional windows that display a License
Agreement and a Privacy Statement follow.
14
2. Read through the License Agreement and
Privacy Statement and click Yes.
A window displays asking you to confirm
the path and name of the folder in which
the software will be installed.
3. Click Next.
A window displays asking you to confirm
the path and name of the folder that will
store the music you download or copy from
your CD collection.
4. Click Next.
The installation process begins.
15
A message window displays asking if you
would like to make the Audio Manager
your default player.
5. Click Yes.
When you see the following window, the
installation is complete.
6. Click Finish to restart your computer now,
or you may choose to restart it later.
After your computer restarts, look for the
RioPort Audio Manager icon on your
desktop.
16
RioPort Audio
Manager
4
What is the
RioPort Audio
Manager?
The RioPort Audio Manager makes it easy to
find, organize, download, and play digital
audio files. It compresses content from CDs
and neatly organizes the content while
retrieving the names of artists, albums, and
song titles from an online CD database
(CDDB). Assuming you have an Internet
connection, the long process of typing titles
and creating specific folders for albums and
artists is eliminated. RioPort Audio Manager
automatically performs this function.
Finding Music
on the Web
1. Double click the RioPort Audio Manager
icon on your desktop to activate the
software.
18
The RioPort Audio Manager window
displays.
To get audio files from the Internet to your
Player, you must first download them to your
PC. Make sure your PC is connected to the
Internet. Then complete the following:
What is
iCAST?
2. Click the internet button.
The iCAST home page displays.
Tip
You may search for
songs on the iCAST
web site or you can
type a different web
site URL on the
address line.
19
Take control of your entertainment
experience with iCAST. Plunge into
thousands of music downloads, radio
stations, artist bios, news, and exclusive
interviews. Discover the excitement in
online entertainment with hours of audio
and video content, chat, instant messaging,
and other tools that connect you with the
entertainment you love. Be sure to take
advantage of iCAST’s free registration.
Once registered, you can showcase and
promote yourself for an audience or be the
ultimate fan. Create a flash profile or a
home page devoted to your own music or
to your favorite band. You will also gain
access to iCAST chat and forums.
3. When you locate an audio file on the
Internet that you want to download to your
Player, you will see Download near the
selection. It may be underlined and a
different color. Click Download.
A File Download window displays giving
you the option of opening the file or saving
it to disk.
20
4. Make sure Save this file to disk is checked
and click OK.
A Save As window displays for you to
verify or change the name of the file you
are downloading and where it will be
stored on your computer.
5. Make sure that C:\\My Music is the
selected folder and give the file a name (or
use the default) and click Save. To access
this folder, you may need to click the up
arrow button shown in the graphic above
and then select the C drive. The file is
downloaded to your PC.
Congratulations!
You have downloaded an audio file to your
PC. You can play the file on your PC now, or
you can create a playlist and download it to
your Player. For more information on playlists,
see page 24.
21
Copying CDs
The RioPort Audio Manager software enables
you to copy audio files from your personal CD
collection. You should not, however, use this
software to distribute songs to your friends. It
is illegal to distribute audio files without
permission from the copyright holder.
This product and software are designed to help
you reproduce materials for which you own the
copyright or have obtained copy permission
from the owner. If you purchase a CD, you do
have the right to make copies of the songs to
use on your PC or on your Player.
Unauthorized reproduction of copyrighted
materials may be a violation of copyright law
and could result in the imposition of fines and
other penalties. Please use your Player
responsibly.
Insert an audio CD into your CD-ROM drive.
1. Make sure you are connected to the
Internet.
2. Within the RioPort Audio Manager, click
read a CD.
A message asks if you would like to get the
track titles and additional song information
from the Internet*. This only takes a
moment, but you must be connected to the
Internet. The software then connects with
the Compact Disc Database (CDDB). If
CDDB does not provide the titles to your
CD, then the CD is probably too new.
*If you do not get the track titles prior to
copying the songs, you can add them later,
but the titles cannot be retrieved from the
Internet. You must enter the titles
manually.
22
3. Select the files you want to copy by
clicking the box to the left of the song or
by double clicking on the song title.
4. Click Start Reading. This procedure
converts the songs to a digital format that
is stored on the hard drive of your PC.
A message will display to let you know
that your system and CD drive are being
checked to ensure that each is optimized
for the copying process.
5. When copying is complete, a message
displays stating that the recording is
successfully completed and the track or
tracks are added to your collection.
Once these songs have been grouped into a
playlist, you can transfer them to your
Player.
23
What is a
Playlist?
A playlist is a list of audio files grouped
together in any way you like. You might want
to group music by a category such as classical,
rock and roll, reggae, or alternative music. Or,
you might want to group songs together by
artist. It’s up to you.
Creating and
Managing
Playlists
Creating playlists using your RioPort Audio
Manager takes only a few quick steps.
Tip
To search for songs
already on your hard
drive, click the File
menu item from the
tool bar at the top,
then choose the
Search Hard Disks
for Tracks option. All
the songs on your
hard drive are
displayed.
24
1. Click the make a playlist button at the top
left of the RioPort Audio Manager.
2. Click Clear List at the bottom left to
simplify the setup of your playlist.
3. Click Select Tracks from Database. A
Select Tracks from Database window
displays.
Tip
Each time you create
a new playlist, be sure
to clear the current
playlist first. If you do
not, the playlists will
be listed together
sequentially.
Tip
4. Select the tracks that you want grouped
together by clicking the V box.
5. When you have finished making your
selections, click OK.
You are returned to the Playlist window.
6. Click Save Tracks as Playlist.
The Add Playlist window displays. Name
the playlist and give it a description.
To find this playlist
again, click the Select
Playlists from
Database button.
7. Click Close when you are finished.
Your Player is now ready to receive a playlist.
Before you begin downloading songs to your
Player, there are a few additional setup steps.
25
Connecting
the USB Cable
Tip
The USB cable does
not need to be
connected to the
Player until you are
ready to download
music.
Connecting
the Earphones
Tip
You may use your
favorite earphones or
headphones.
Permanent hearing
loss may occur if
earphones or
headphones are used
at high volume.
26
1. Connect the USB cable to your computer.
The location of USB ports varies on
different computers. See your computer’s
feature guide if you are unable to locate
your computer’s USB port.
2. Press the Power button to turn on the
Player.
3. Connect the small square USB cable end
to your Player.
The USB symbol w displays on the
LCD.
Downloading
Audio Files to
Your Player
When you are ready to download audio files to
your Player,
1. Connect the USB cable to the Player and to
your computer. Then turn on your Player.
2. Click the copy to devices button at the top
of the RioPort Audio Manager window.
Tip
Make sure the USB
cable is connected to
the port on your
computer and to your
Player before
downloading files to
the Player.
Tip
The feature that turns
off the Player after 10
minutes of inactivity is
disabled when the
USB cable is
connected to allow for
long downloads.
Disconnect the USB
cable after download
is complete to
preserve battery life.
IMPORTANT: Before using an MMC card
for the first time, you must format it. The cards
can be formatted (one at a time) by following
the steps below. A message displays within the
Audio Manager saying you are about to erase
all selections even if there is no content on the
MMC card. Click OK to continue.
• Click on copy to devices.
• Choose Card 1.
• Click on Format Media at the bottom of the
•
screen.
Follow the same procedure for Card 2.
You may also use Format Media to quickly
erase all data on an MMC card.
3. Choose Select Tracks from Database or
Select Playlists from Database for songs
to download.
27
4. Select the tracks or playlist that you would
like to download by clicking in the V box
next to each song or playlist.
5. Click OK.
You will be notified if you have selected
too many songs for the memory card.
6. Click Close to continue with the download,
but you will have to delete enough songs
so that the remaining songs fit on the
MMC card.
The right side of the RioPort Audio
Manager window displays the amount of
memory being used by each MMC card
and the amount of space available for
additional songs.
Green - The amount of memory that is
currently being used by the MMC card.
Yellow - The amount of memory that will be
needed to download the selected songs.
Grey - The amount of memory still available
on the MMC card.
Red - The amount of memory that will not fit
on the memory card. You must delete one
or more songs from the MMC card or from
the list of songs to be downloaded.
28
7. When you are satisfied with the songs you
selected to download, click Copy to
Portable.
A window displays the downloading status
of each song as it is being downloaded to
your Player.
When the transfer is complete, the following
window displays.
Deleting
Songs from
Your Memory
Cards
Tip
You may also rightclick on the track and
choose Delete from
the pop-up menu.
When you want to delete songs from your
memory cards, you can do the following:
1. On the right side of the RioPort Audio
Manager window (below Copy to
Portable), c1ick on the track you would
like to delete.
2. Click on the Trash Can icon at the bottom
of the window.
The track is deleted from the memory card.
29
Playing Audio
Files on Your
PC
If you just want to play audio files on your PC,
double click the song title while in the Make a
Playlist mode.
Minimizing
the Player
While working on your PC, you can also listen
to your music using a smaller version of the
RioPort software.
1. Within the Rioport Audio Manager
window, click the minimize Player icon in
the upper right corner of the window.
2. Drag the minimized player to any part of
your screen.
Maximizing
the Player
To maximize the player, right-click on it and
choose Big Player.
Upgrading
the Player
From time to time, Compaq will issue software
upgrades for your Player. Please check the
following web site on a regular basis for any
updates:
http://www.compaq.com/products/internetdevices
30
Having
Trouble?
If you ever have trouble with your Player or
with downloading audio files, visit our web
site at:
http://www.compaq.com/products/internetdevices
For additional support, you can e-mail your
questions directly to a Technical Support
Engineer at:
[email protected]
Be sure to include PA-1 in the subject line of
any e-mails sent to Compaq’s technical
support.
Or, you can review the next few pages to see if
you can solve the problem.
31
Troubleshooting
5
Display Troubleshooting
Symptom
Nothing shows on the display when
the Power button is pressed.
What to do
• Install fresh batteries.
• Make sure the batteries are installed
with the proper orientation. Battery
orientation is indicated in the bottom
of the battery compartment.
The songs listed do not match the
content on a newly inserted MMC
card.
Press the Play/Pause button to cause the
Player to read the MMC card.
The LCD backlight does not
illuminate when a button is pressed.
• Install fresh batteries.
• The backlight may not be visible in
bright light. Check in a dark
environment.
NO MEMORY is displayed on the
LCD.
• There are no MMC cards in the unit.
• Make sure the MMC cards are
•
oriented properly and fully inserted
into the connector. When looking at
the back of the Player, the label of the
MMC card should be facing up and
the notch on the MMC card should be
on the right (matching the icon on the
MMC access door).
Make sure the MMC card is formatted
using the RioPort Audio Manager. See
page 27 for format instructions.
32
Audio Troubleshooting
Symptom
What to do
NO SONGS is displayed on the LCD.
The Player cannot read any songs on the
MMC cards. Make sure that the MMC
cards are formatted, and that songs are
listed on the right side of the COPY TO
DEVICES screen. See page 27 for
format instructions.
HOLD MODE is displayed on the
LCD.
Displays when attempting to turn on the
Player when the Norm/Hold switch on
top of the Player is in the Hold position.
Slide this switch to the Norm position
before turning on the Player.
Song audio quality is less than desired
on songs copied from a CD.
Start the RioPort Audio Manager and
press the F10 key on the keyboard.
Select the READ CD tab. MP3 format
encoding at 128kBit/s or WMA format
encoding at 80kBit/s should give
excellent sound quality. 160kBit/s
WMA content is not recommended for
downloading to the Player.
No sound
• Make sure the Play/Pause icon on the
•
•
•
No sound in one earphone
• Make sure the earphone connector is
•
33
LCD is solid. A flashing icon
indicates Pause mode. Press the Play/
Pause button.
Increase the volume level by pressing
the + button.
Make sure the MMC cards have songs
on them.
Look for a song title on the LCD
display.
fully inserted into the connector on the
Player.
Try a different set of earphones.
Operation Troubleshooting
Symptom
Able to transfer only a few songs to
the Player.
What to do
• Make sure the MMC cards do not
•
•
have other data on them. Reformat
the MMC cards and then transfer
songs to the cards.
Make sure your Player has fresh
batteries.
Restart your PC and reattach the
USB cable to the PC and to your
Player.
The Fast Forward and Rewind
functions do not work on some songs.
Occasionally, the way a song file was
created does not include the necessary
information to support the Fast
Forward or Rewind functions. This is
not a problem with your Player.
The BASS and TREBLE adjustments
are not available.
The BASS and TREBLE adjustments
become available when the Equalizer
Mode is set to CUSTOM. These
adjustments are not available in the
ROCK, JAZZ, or CLASSICAL
settings.
The USB icon w is not shown on
the LCD display when the USB cable
is connected to both the PC and the
Player.
• Make sure your Player is turned on.
• Make sure the USB cable is
•
•
properly connected to the PC and to
your Player.
Make sure the PC is operating
normally. Restart the PC and then
reattach the cable.
Make sure the Player is plugged
directly into the PC and not into a
USB hub. The Player may not
operate properly with some USB
hubs.
34
Operation Troubleshooting (continued)
Symptom
The RioPort Audio Manager does not
recognize the Player.
What to do
• Make sure the USB icon w is
•
•
The Player is slow to respond with a
new MMC card.
shown on the LCD display. See
previous item.
Make sure the Compaq PA-1 is the
selected device on the Player tab in
the RioPort Options.
Make sure that the MMC cards are
inserted and recognized by the
Player. If not, see MMC Memory
troubleshooting.
• Be patient. It could take 30 seconds
•
or more for the RioPort Audio
Manager to recognize the MMC
card.
Make sure the MMC card is
formatted. See page 27 for format
instructions.
Self Test
If your Player is not performing as expected, follow these steps to help
identify the problem.
1. Remove the memory cards.
2. Install fresh batteries, or if the batteries are fresh, take them out and
reinstall them.
3. Press the Power button (Make sure the Normal/Hold switch on top of
the Player is in the NORM position). The LCD should display the
startup sequence, and NO MEMORY should appear on the display as
well as the volume and battery icons. The battery icon should indicate
a full charge.
4. Attach the earphones to the Player and put them on with the left
earphone in your left ear and the right earphone in your right ear.
5. Press the Menu button until SELF TEST appears on the LCD and
then press the Play/Pause button.
35
First, run the test without memory cards:
Test N am e
LCD
M E M O RY
A U D IO
V E R SIO N
Test D escrip tion
A ll icons and
blocks in the text
area of the L C D are
turned on
m om entarily.
T his test looks for
the M M C m em ory
cards.
W h at to L ook F or
W h at to D o For P rob lem s
T he display should look G o to the D isp lay
like the figure on page
Trou b lesh ootin g section.
11.
“N O C A R D 1” and then C heck the C om paq support
“N O C A R D 2” w ill be w eb site h ttp ://
displayed.
w w w.com aq .com /p rod u cts/
in tern etd evices.
T his test determ ines L E FT E A R displays and G o the A u d io
if audio is going to a voice says “this is your Trou b lesh ootin g section.
left channel,” then
each of the
“R IG H T E A R ” displays
earphones.
and a voice says “this is
your right channel.”
T he last item listed “V 1.03” or sim ilar
W rite dow n this version
is the P layer’s
displays on the L C D
num ber and go to the
softw are revision. screen.
U p grad in g the P layer
section.
If the tests above do not reveal the problem, install the MMC cards and
run the following tests:
Test N am e
LCD
M E M O RY
A U D IO
V E R S IO N
36
Test D escription
A ll icons and
blocks in the text
area of the L C D are
turned on
m om entarily.
M akes sure that the
P layer can
com m unicate w ith
the M M C cards.
T his test determ ines
if audio is going to
each of the
earphones.
W h at to L ook F or
W h at to D o For P rob lem s
T he display should
G o to the D isp lay
look like the figure on Trou b lesh ootin g section.
page 11.
“M em ory 1 O K ” and
then “M em ory 2 O K ”
is displayed.
G o to the D isp lay
Trou b lesh ootin g section.
L E FT E A R displays
and a voice says “this
is your left channel,”
then “R IG H T E A R ”
displays and a voice
says “this is your right
channel.”
T he last item listed “V 1.03” or sim ilar
displays on the L C D
is the P layer’s
softw are revision. screen.
G o the A ud io
Trou b lesh ootin g section.
W rite dow n this version
num ber and go to the
U pgrad in g th e P layer
section.
Helpful
Information
Content Per
Memory Card
6
Based on the following transfer rates—stated
in terms of kilobits per second (kbps)—you
can expect to use the following amounts of
MMC memory when transferring a CD’s
worth of content to your Player.
Memory Needed to
Store 1 CD
WMA Format @ ___kbps
Sampling
28 MB
64 kbps
42 MB
96 kbps
56 MB
128 kbps
MultiMediaCard • Do not remove any MMC cards while operating
the Player.
(MMC)
Usage and Care • Data on the MMC cards may be lost
1. If the USB cable is disconnected while
downloading
2. If the cards are exposed to static
electricity
• Keep the MMC cards out of the reach of
•
children. If a card is accidentally swallowed,
please call your physician immediately.
Do not touch the gold, metallic contact points at
the end of each MMC card.
Do not bend or drop the MMC cards.
•
• Do not try to disassemble the MMC cards.
• Do not expose the MMC cards to water.
• You cannot share your MMC cards with others
who do not have an iPAQ Personal Audio Player,
but you may exchange your cards with another
iPAQ Personal Audio Player owner.
37
Maintenance
Use only a soft, dry cloth to clean the Player,
MMC cards, and headphone jack.
Precautions
• Do not remove the batteries while operating
the unit.
• Do not expose the unit to a significant
amount of moisture.
• Do not store the unit in a place in which the
temperature will exceed 50 degrees C or will
be less than -10 degrees C (120°F to 15°F).
ACC Patent
Information
FCC
Compliance
THIS PRODUCT IS COVERED BY THE FOLLOWING
U.S. PATENTS:. 5,848,391; 5,291,557; 5,451,954; 5 400
433; 5,222,189; 5,357,594; 5 752 225; 5,394,473;
5,583,962; 5,274,740; 5,633,981; 5,297,236; 4,914,701;
5,235,671; 07/640,550; 5,579,430; 08/678,666; 98/
03037; 97/02875; 97/02874; 98/03036; 5,227,788;
5,285,498; 5,481,614; 5,592,584; 5,781,888; 08/039,478;
08/211,547; 5,703,999; 08/557,046; 08/894,844;
5,299,238; 5,299,239; 5,299,240; 5,197,087; 5,490,170;
5,264,846; 5,268,685; 5,375,189; 5,581,654; 5,548,574;
5,717,821. Other U.S. and foreign patents may apply.
This device complies with Part 15 of the FCC
Rules. Operation is subject to the following
conditions:
1. This device may not cause harmful
interference, and
2. This device must accept any interference
received, including interference that may
cause undesired operation.
CAUTION: Changes or modifications not
expressly approved by Compaq may void the user’s
authority to operate this equipment.
NOTE: This equipment has been tested and found
to comply with the limits for a Class B digital
device, pursuant to Part 15 of the FCC Rules. These
limits are designed to provide reasonable protection
against harmful interference in a residential
installation. This equipment generates, uses, and
38
can radiate radio frequency energy, and if not
installed and used in accordance with the
instructions, may cause harmful interference to
radio communications. However, there is no
guarantee that interference will not occur in a
particular installation. If this equipment does cause
harmful interference to radio or television reception
(which can be determined by turning the equipment
off and on) the user is encouraged to try to correct
the interference by one or more of the following
measures:
• Reorient or relocate the receiving antenna.
• Increase the separation between the equipment
•
•
Specifications
and receiver.
Connect the equipment into an outlet on a circuit
different from that to which the receiver is
connected.
Consult the dealer or an experienced radio/TV
technician for help.
Memory: 64 MB MultiMediaCard flash
memory
Casing: Aluminum front and high-impact
plastic back
Dimensions: 2.7” x 2.2” x 0.8”
Weight: 3 ounces with batteries
Display: LCD with backlight
Power Source: 2 AAA batteries
Signal to noise ratio: >85dB
Frequency Response: 20 Hz to 20 kHz
Operation Temperature: –10 degrees C to 50
degrees C (15°F to 120°F)
Output Power: 7.5 mW per channel
Harmonic Distortion: 0.1%
Format Support: MP3, WMA, AAC
Software: RioPort Audio Manager
PC Interface: USB
Upgradeability: Software upgrades via the
Internet
39
GLOSSARY
Advanced Audio
Coding. An audio
compression format
based on MPEG-2,
audio layer 3.
AAC
To transfer a
file from one medium to
another (for example,
from the Internet to
your PC).
Download
A type
of memory that retains
its information even
when the memory card
has no power.
Flash Memory
An audio
compression format
based on MPEG-1,
audio layer 3.
MP3
MPEG Moving Pictures
Expert Group. A
committee that sets
standards for digital
40
video. Their standards
are known as MPEG-1,
MPEG-2, etc.
MMC
MultiMediaCard. A
type of Flash Memory
that is extremely
compact.
Universal Serial
Bus. Connects a PC to
an external device like
the Player. The symbol
for USB is w.
USB
Windows Media
Audio. An audio
compression format
created by Microsoft. It
incorporates Windows
Media Digital Rights
Management.
WMA