1
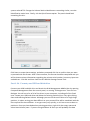
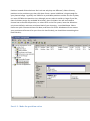
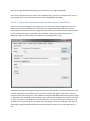
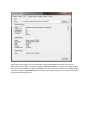
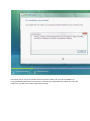
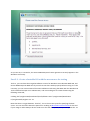
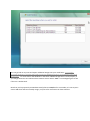
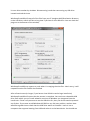
Creating a multiboot USB drive
Introduction
1
Part one: prepare the USB drive
2
Part two: prepare the Windows Vista/2008 installation images
6
Part three: using WinSetupFromUSB to create the bootable USB drive
14
Part four: adding boot options & modify Grub4DOS menu
19
Introduction
One of the more frustrating downsides to the recent rise in popularity of netbooks is the
difficulty in installing an operating system without an optical drive. The traditional way
around this issue was to do a network install, using something like Microsoft's Remote
Installation Services or Windows Deployment Services, which is fine if you have the
infrastructure already in place, but overkill for the average user - having to set up a domain
and then create images is a lengthy process if all you want to do is install Windows on your
new computer. One of the most popular solutions for this increasingly common issue is to
install from a USB flash memory drive. There are applications readily available on the
Internet that will take your standard USB flash memory drive and turn it into a bootable
drive from which you can install Windows.
This got me thinking; wouldn't it be great to have a USB drive with all the versions of
Windows that you install regularly? A quick search on google yielded some helpful but
incomplete instructions on how to achieve this, but fortunately after many days of
tweaking, I have been able to create a USB drive with the following operating systems;
Windows XP Professional x86 with SP3
Windows XP Professional x64 with SP2
Windows Vista Starter, Home Basic, Home Premium, Business, Ultimate and Enterprise x86
with SP1
Windows Vista Home Basic, Home Premium, Business, Ultimate and Enterprise x64 with SP1
Windows Server 2008 Standard, Enterprise, Datacenter full and Server Core x86 and x64
Which, by my count, is 13 client and 12 server operating systems, all installable from a single
8GB USB flash drive. With some further research and modification of the method, I was also
able to create a bootable USB hard disk drive with the above, as well as a number of
additional utilities including;
Acronis True Image Server
memtest
GParted
WinPE,
Ultimate Boot CD
BartPE
This is an extremely powerful tool, especially to the IT professional who has to work on a
range of systems that may not have working optical drives, or simply doesn't want to carry
10+ discs around with them at all times.
Over the next few posts, I will give instructions on how to create these bootable USB drives.
The majority of these instructions come from various sources on the Internet, mainly the
forums at msfn.org. I will list the sources I used as I go along, although I apologise in
advance if I do not credit somebody for their work - I do not recall where I got all of the
information from. So, that's the preamble and scenario dealt with; onto the guide!
Part one: prepare the USB drive
Essential items & software for this step:
A USB drive (either flash memory or external hard drive - either will work) large enough to
hold your OS installers and/or tools. In this example, I am going to use a 4GB flash drive.
The HP USB Disk Storage Format Tool - available from here and various other sources on the
Internet.
Time - at least 15 minutes for this step
There are certain things you must do to prepare your USB drive for booting. The first is to
format it correctly, and the method to do this varies depending on the type of drive you are
using. If you are using a flash memory drive the easiest way to do format it is to use the HP
USB Disk Storage Format Tool. If you are using an external hard disk drive, you can format it
using Disk Management in the Computer Management MMC.
Obviously, formatting your drive will destroy any data currently stored on it, so if you want
to keep that data make sure you transfer it somewhere before you proceed. I do not want
to be blamed for any loss of important data, no matter how obvious this should be!
Part 1.1a - Format your USB flash drive
Connect your USB drive and then launch the HP USB Disk Storage Format Tool. You should
see a list of all of the removable drives on your computer. Unless you have more than one
USB drive connected, or a card reader, you should see that your USB drive is the only device
in the Device list and is already selected. If not, select the correct drive now. Under File
system select NTFS. Change the Volume label to Multiboot or something similar, to make
identification easier later. Finally, tick the Quick Format option. The panel should look
something like this:
Click Start to accept these settings, and when prompted click Yes to confirm that you want
to proceed with the format. After a few moments, the format should be completed and you
will be shown various information regarding the volume serial number, how many bytes are
available etc.. Click OK and then close the HP USB Disk Storage Format Tool.
Part 1.1b - Format your USB hard disk drive
Connect your USB hard disk drive and launch the Disk Management MMC either by opening
Computer Management from the control panel, or running "diskmgmt.msc" from the run
dialogue. You will see a list of all of the drives in your computer, including all of the fixed
ones. Locate your USB hard drive and delete the existing partition(s) on it by right clicking
them and selecting Delete Volume. Although you can use the entire drive as a single large
partition, it makes sorting your data difficult as your personal files will be combined with the
files required for the multiboot - it can get messy very quickly, so it's best to use at least to
partitions. Once you have deleted any existing partitions, right click the empty space and
select New Volume (note - if you are using Windows XP then you will probably see New
Partition instead of New Volume. Don't ask me why they are different!). Select Primary
partition as the partition type, then click Next. Enter a space in MB that is large enough for
your planned usage. I typically use 32GB for my multiboot partition and the rest for my data,
so I enter 32768 as the partition size, although you can make it smaller or larger if you like,
then click Next. Assign any available drive letter, then click Next. You will now need to
choose how to format the partition, so select NTFS as the File system, leave the Allocation
unit size as default, and enter a Volume label of your choosing - I used Multiboot. Select
Perform a quick format and then click Next, and then click Finish. Windows will now create
your partition and format it for you. Once this has finished, you should have something that
looks like this;
Part 1.2 - Make the partition active
Now that your drive has been correctly formatted, you will need to make the new partition
active. This is done via a Microsoft command line tool called DiskPart. Open the command
prompt either from the Start -> All Programs -> Accessories menu, or by typing CMD into
the run dialogue. Start DiskPart by typing diskpart and pressing return. You will now need to
identify the disk number assigned to your USB drive, so type list disk to view a list of all of
the drives in your computer. In this example, the USB drive is disk 1. Select the disk by
entering select disk # where # is the disk number. Select partition 1 by entering select
partition 1, and mark it active by with active. DiskPart will confirm that this has been
successful, as demonstrated below;
The partition is now marked as active. You can now exit DiskPart or close the command
prompt.
Your USB drive is now properly prepared for being made bootable. In the next step, I will
explain how to use some third party tools to streamline the process.
Part two: prepare the Windows Vista/2008 installation images
Essential items & software for this part:
Windows Automated Installation Kit (WAIK)
Windows Vista and/or Server 2008 and or Windows 7 installation media for whichever editions you
wish to install
GImageX - GUI for ImageX, not essential but highly recommended
Special thanks to chon_ from the msfn.org forum for the original instructions from which I derived
this part of the guide.
Now that you have your USB drive ready for use, it's time to prepare your Windows installation
source. This is done via the ImageX tool, which is part of the Windows Automated Installation Kit, or
WAIK. ImageX can export individual images from the install.wim found on the standard Windows
Vista and Server 2008 media. If you do not wish to change the images in your install.wim then you
can simply extract your installation media to a folder on your hard disk, and move on to the next
part.
Part 2.1 - Extract the images from each install media
Firstly, decide which images you want to incorporate into your multi install media. Keep in mind that
the more images you want to include, the larger the source will become. To give you some idea of
how large, every edition of Longhorn (that is, Server 2008 and Vista) comes to 5.5GB, and if you
want to include Windows 7 that goes up to 8.5GB - too big too burn to a dual layer DVD but still
useful if you have a 16GB+ drive. In this example, I will use Windows Vista Ultimate x86 & x64 and
Server 2008 Enterprise x86 & x64 - probably the most commonly used versions.
Create a working folder with a structure similar to this;
Extract the contents of your Windows Vista x86 disc to the E:\LonghornAIO\Distribution folder
(Substitute "E:\LonghornAIO\" for wherever you create your working folder. ) Note: you can use the
x86 disc for Server 2008 too if you are building a Server 2008 only image. Avoid using the x64
versions as they will not work on any machine that lacks x64 support - any machine with an x64
capable processor will be able to use the x86 version so it's best to stick to that.
Move E:\LonghornAIO\Distribution\Sources\install.wim to E:\LonghornAIO\Vx86
Extract the install.wim files from each of the installation discs you wish to incorporate into source.
For example, extract the install.wim from the Server 2008 x86 disk into Sx86.
Part 2.2 - Export the installation sources into a master install.wim
Now it's time to start merging in the images into your install.wim. Open GImageX and select the
Export tab. Click the top Browse button and select E:\LonghornAIO\Vx64\install.wim. Click the
bottom Browse button and select E:\LonghornAIO\Distribution\sources\install.wim. Click the Select
button, and choose image 4 - Windows Vista ULTIMATE. Change the Compression option to
Maximum. When you are finished, you should see something similar to this;
Click Export to begin extracting the image into the new install.wim file. This will probably take a few
minutes, depending on the speed of your processor and hard disk. When the process is finished,
close the window and change the source WIM to E:\LonghornAIO\Vx86\install.wim and select image
4 - Windows Vista ULTIMATE, then click Export again. The process should be much quicker this time
as many of the files in the image are the same as the first one you extracted. Once the process has
finished for the second time, you can check that both images are there by clicking the Info tab and
selecting E:\LonghornAIO\Distribution\sources\install.wim and you will see something similar to
this;
Repeat this process again, this time selecting E:\LonghornAIO\Sx64\install.wim as the Source
WIM and selecting image 2 - Windows Longhorn SERVERENTERPRISE, and Export the image. Repeat
this a final time selecting E:\LonghornAIO\Sx86\install.wim as the Source WIM and selecting image 2
- Windows Longhorn SERVERENTERPRISE, and Export the image. When you are finished, the Info tab
should look something like this;
You may repeat this process as many times as you want, including as many images as you need to,
but be careful not to accidentally export the same image twice. If you do accidentally merge the
same image twice, you may use the Delete tab to remove the errant image from the install.wim.
Now that you have your super-sized install.wim with all the images you want, you will need to merge
the license agreements from the Vista and Server 2008 discs. If you do not do this, you will
receive this error message when you try to select an image for which the license agreement does not
exist (for example: if you used the Vista x86 disc as the base and try to install Server 2008 Enterprise
Edition but didn't copy the license agreement from the Server 2008 disc);
Fortunately, this is easy to do. Extract the sources\license folder from your Server 2008 disc to
E:\LonghornAIO\Distribution\sources\license, overwriting any duplicated files. When you select the
image now, you will see the license agreement instead;
As you can see, it now works; the Server 2008 Enterprise license agreement correctly appears in the
Windows Vista setup.
Part 2.3 - Create a bootable ISO with the new source for testing
That's it, you now have the merged installation sources for Windows Vista Ultimate x86 & x64, and
Server 2008 Enterprise x86 & x64. If you wish to test that it works properly before moving on to the
next step, you can create an ISO of the new installation media using the WAIK. Run the Windows PE
Tools Command Prompt as an Administrator, and use oscdimg.exe to create the ISO using the
following command;
oscdimg -bE:\LonghornAIO\Distribution\boot\etfsboot.com E:\LonghornAIO\Distribution
E:\LonghornAIO\Longhorn.iso -u2
Note that there is no gap between -b and E:\ - this is the correct syntax for specifying the boot
sector. You can read more about the options for oscdimg at Microsoft's Technet article for the tool.
If your image is under 4GB you do not need to use the UDF file system, and you can replace the -u2
with -n.
After a couple of minutes oscdimg should finish creating your ISO file and you can now test it by
either burning it to DVD or using your favourite virtualisation software. If everything has gone
according to plan, you should see four images available for installation;
You can go back at any time and export additional images into your install.wim. For example, I
extracted Windows 7 Ultimate x64 & x86 and Server 2008 R2 Enterprise and merged in the license
agreements; - for some reason the Windows 7 and Server 2008 R2 images won't install properly if
you merge them into an install.wim that contains Vista or Server 2008. I am investigating this to see
if there is a workaround.
Now that you've prepared your Windows Vista/7/Server 2008/R2 all-in-one media, it's time to put it
onto a USB drive and start actually using it; see part 3 for instructions on how to do this.
Part three: using WinSetupFromUSB to create the bootable USB drive
Essential items & software for this part:
WinSetupFromUSB - download mirror here
Windows Vista/Server 2008/7/2008 R2 distribution folder from part two
Grub4DOS
Grub4DOS Toolbox
This is the part where we pull together the previous two parts and actually create a
bootable USB drive, using WinSetupFromUSB to do most of the work for us.
Part 3.1 - Use WinSetupFromUSB to copy the Windows installation to the
USB drive and make it bootable
Connect your USB drive to the computer and launch WinSetupFromUSB. If you haven't
prepared your USB drive properly, you will see the error "No USB disks dectected or not
properly formatted" in the USB Disk Selection field - go back to part one and follow the
instructions there. If you see your USB disk in this field, then it has been correctly prepared.
Select the checkbox next to Vista/7 setup/PE/Recovery ISO, and then enter
E:\LonghornAIO\Distribution (or wherever you created your working folder in the previous
step) into the box. You will be warned if the source is too large to fit on your USB drive, and
will not be able to proceed, so make sure your install.wim is small enough to fit on the drive.
WinSetupFromUSB should now look like this;
Notice the number in the bottom left corner? That's how much space the entire distribution
folder and the required support files will take on your USB drive. I am using my Windows
Vista Ultimate x64 & x86 and Server 2008 Enterprise x64 & x86 install.wim that I created in
the previous step. Click GO to begin the process. If your USB drive is disk 10 or above, you
may receive the following error;
It appears that the grubinst.exe that WinSetupFromUSB uses can only access the first 10
drives in your computer. In my case, I have a USB card reader with lots of slots, each given
it's own drive number by windows. Disconnecting it and then connecting my USB drive
instead resolved the issue.
WinSetupFromUSB will copy all of the files from your E:\LonghornAIO\Distribution directory
to the USB drive, which can take a long time if you have a slow USB drive. You can check the
progress at the bottom of the window;
WinSetupFromUSB may appear to crash when it is copying the wim files - don't worry, it will
respond once the file transfer has finished.
After a few minutes (or longer, if you have a slow USB drive and a large install.wim)
WinSetupFromUSB will report that the process is complete. You now have a bootable USB
drive from which you can install whatever versions of Windows you integrated into the
install.wim. If that is all you want to use the USB drive for, then you do not need to proceed
any further. If you want to add Windows XP/2003 or any 3rd party utilities, read on. Now
would be a good time to check that the USB drive works as intended - insert it into a
computer that supports booting from USB and select it as the boot device. You should see
the "Windows is loading files..." message, and eventually be taken to Windows Setup.
Part 3.2 - Install Grub4DOS onto the USB drive
In order to be able to select different options for boot, we need to install a boot loader and
Grub4DOS is one of the most popular ones. Download Grub4DOS and the Grub4DOS
Toolbox, and extract them into a directory on your hard disk, E:\Tools for example. Make
sure that you put both in the same directory, otherwise the Grub4DOS Toolbox will be
unable to find Grub4DOS.
Connect your USB drive and launch the Grub4DOS Toolbox. From the Tasks menu, select
Add Grub4DOS to bootmgr boot menu (Vista/2008 above), then select the bootmgr file on
your USB drive - if you are running Vista/2k8/7 you will also see C:\bootmgr as an option,
however make sure you do not select it. Leave the name of the Grub4DOS mbr file and title
entry as default, and select the Boot by default option. You can select whatever timeout
suits you; I have selected 5 seconds. Once you've set these options, you should see
something similar to this;
Click Do It! to begin the process. Grub4DOS Toolbox will report that the operation was a
success. Click Exit to close Grub4DOS Toolbox. Now browse to the directory you extracted
Grub4DOS to and copy gldr.mbr to the root of your USB drive. When you boot from the USB
drive, you should see the following menu;
If you select Windows Setup the Windows Setup will run, and you will be able to install your
Windows Vista/2k8/7 images as before, however if you select Grub4DOS you will see the
default Grub4DOS menu. Now we have a bootable USB drive with the correct boot loader,
it's time to start adding our additional boot options to the USB drive. I'll explain how to do
so in part four.
Part four: adding boot options & modify Grub4DOS menu
Essential items & software for this part:
Text editor - I recommend Notepad++
3rd party CD images - WinPE/BartPE, UBCD, GParted etc.
The final part of this guide will help you add extra options to your Grub4DOS menu to build
your multiboot USB drive. Although you can use the text editor included with Windows (i.e.
notepad) it's much easier if you use a more powerful editor such as Notepad++.
Part 4.1 - Modifying the Grub4DOS menu
Locate menu.lst on the root of your USB drive and open it in your text editor. You will see
the default Grub4DOS menu, which includes a lot of options that have been commented out
- feel free to delete everything prefixed with a # as we'll be adding our own entries. To give
you an example of how to do this, I will add an Ultimate Boot CD image and add it to the
menu. Copy the UBCD ISO file to the root of your USB drive and add the following lines to
your menu.lst file;
title Ultimate Boot CD 4.11 ISO\nLoad the UBDC
find --set-root /ubcd411.iso
map /ubcd411.iso (0xff) || map --mem /ubcd411.iso (0xff)
map --hook
chainloader (0xff)
savedefault --wait=2
Make sure the filename matches the one referenced in the menu.lst file - ubcd411.iso in this
example. Save and close the menu.lst file and boot from your USB drive, and you will see a
new option in your Grub4DOS menu. You can add as many images as you like, you are
limited only by the space on your USB drive.
Unfortunately it's not quite as straightforward as simply copying the ISO file to the drive and
referencing it in the menu.lst for everything - certain things like WinPE and BartPE will fail to
boot this way unless you load them into RAM first (an extremely helpful guide on how to do
this can be found here). Some Linux LiveCDs will also fail using this method, but can instead
be launched by chainloading their bootloader. There are various guides on the Internet that
explain how to do this. If your image does not work, I recommend that you read the
Grub4DOS manual, which is available on the project website and provides a great deal of
useful information that will help you get your more troublesome CD images to load.
While it is beyond my ability to list everything you may want to boot from your USB drive, I
have tried a number of utilities. Here is have been able to get the following to launch from
Grub4DOS without issue;
Utility
Grub4DOS menu entry
Acronis True Image
title Acronis True Image Server 8.0 ISO\nLoad the old version of
Acronis True Image Server
find --set-root /Acronis.iso
map /Acronis.iso (0xff) || map --mem /Acronis.iso (0xff)
map --hook
chainloader (0xff)
FreeDOS
title FreeDOS\nLaunch the FreeDOS operating system
map --mem (hd0,0)/DOSUBCD.IGZ (fd0)
map --hook
chainloader (fd0)+1
rootnoverify (fd0)
MemTest86+
title MemTest86+\nStart MemTest86+
kernel /memtest.bin
Ultimate Boot CD 2.4 title Ultimate Boot CD 2.4 ISO\nLoad the old version of UBDC
ISO
find --set-root /ubcd24.iso
map /ubcd24.iso (0xff) || map --mem /ubcd24.iso (0xff)
map --hook
chainloader (0xff)
WinPE x86
find --set-root /WinPE_x86.iso
map /WinPE_x86.iso (0xff) || map --mem /WinPE_x86.iso (0xff)
map --hook
chainloader (0xff)
I hope that you have found this guide to be informative, and that the information proves
useful to you in creating your USB multiboot drive. If you have any questions or issues
please feel free to leave a comment. If you believe I have referenced your work without
giving you credit, please let me know so I can amend the guide. Thank you for reading!