1
Installation
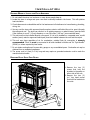
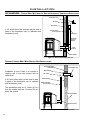
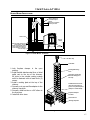
Inside Vertical Installations:
1. Place the unit on the hearth pad if a hearth pad is to be used (or on solid material if installed on a
carpeted surface) and space the unit in a manner so when the pellet vent is installed vertically, it will
meet the minimum clearance from a combustible wall stated by the vent manufacturer.
2. Install the tee with clean out.
3. Install the pellet vent upward from tee. When you reach the ceiling, make sure that the vent goes
through a ceiling fire stop. Keep attic insulation away from the vent pipe & maintain an effective vapor
barrier. All joints in the exhaust venting system must be fastened with at least three (3) screws. Refer
to vent manufacturer for distance to combustibles & follow the vent manufacturer’s instructions on
sealing.
4. Finally, extend the pellet vent to go through the roof flashing.
5. Ensure that the rain cap is approximately 24” (61 cm) above the roof.
6. Install the fresh air system.
Rain Cap (ensure
cap is at least 3ft
(91cm) above the
roof at the lowest
2 ft
(61 cm)
Roof Flashing
Roof Rafter
Fire Stop with
Support Collar
Ceiling Joist
Vertical Vent Pipe
Clean Out Tee
with Pipe Adapter
NOTE: All vent sections must
maintain the clearances to
combustibles set out by the
vent manufacturer.
Figure 16: Inside Vertical Installation.
16












![User's Manual AH-480 Series [Machine / Software]](http://vs1.manualzilla.com/store/data/006867875_1-b2cd01726e15f409a063f19433f9385d-150x150.png)