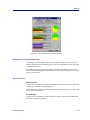
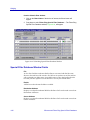
1
Title Page CSX200 and CSX400 User’s Guide Notice Cabletron Systems reserves the right to make changes in speciÞcations and other information contained in this document without prior notice. The reader should in all cases consult Cabletron Systems to determine whether any such changes have been made. The hardware, Þrmware, or software described in this manual is subject to change without notice. IN NO EVENT SHALL CABLETRON SYSTEMS BE LIABLE FOR ANY INCIDENTAL, INDIRECT, SPECIAL, OR CONSEQUENTIAL DAMAGES WHATSOEVER (INCLUDING BUT NOT LIMITED TO LOST PROFITS) ARISING OUT OF OR RELATED TO THIS MANUAL OR THE INFORMATION CONTAINED IN IT, EVEN IF CABLETRON SYSTEMS HAS BEEN ADVISED OF, KNOWN, OR SHOULD HAVE KNOWN, THE POSSIBILITY OF SUCH DAMAGES. Virus Disclaimer Cabletron has tested its software with current virus checking technologies. However, because no antivirus system is 100% reliable, we strongly caution you to write protect and then verify that the Licensed Software, prior to installing it, is virus-free with an anti-virus system in which you have conÞdence. Cabletron Systems makes no representations or warranties to the effect that the Licensed Software is virus-free. Copyright 1998 by Cabletron Systems, Inc. All rights reserved. Printed in the United States of America. Order Number: 9032723 July 1998 Cabletron Systems, Inc. P.O. Box 5005 Rochester, NH 03866-5005 Cabletron Systems, SPECTRUM, BRIM, DNI, FNB, INA, Integrated Network Architecture, LANVIEW, LANVIEW Secure, Multi Media Access Center, MiniMMAC, and TRMM are registered trademarks, and Bridge/Router Interface Modules, BRIM-A100, CRBRIM-W/E, CRXMIM, CXRMIM, Desktop Network Interface, Distributed LAN Monitoring, Distributed Network Server, DLM, DNSMIM, E1000, E2000, E3000, EFDMIM, EMM-E6, EMME, EPIM, EPIM-3PS, EPIM-A, EPIM-C, EPIM-F1, EPIM-F2, EPIM-F3, EPIM-T, EPIM-T1, EPIM-X, ESXMIM, ETSMIM, ETWMIM, FDCMIM-04, FDCMIM-08, FDMMIM, FDMMIM-04, Flexible Network Bus, FOMIM, FORMIM, HubSTACK, IRBM, IRM, IRM-2, IRM-3, Media Interface Module, MicroMMAC, MIM, MMAC, MMAC-3, MMAC-3FNB, MMAC-5, MMAC-5FNB, MMAC-8, MMAC-8FNB, MMAC-M8FNB, MMAC-Plus, MRX, MRXI, MRXI-24, MultiChannel, NB20E, NB25E, NB30, NB35, NBR-220/420/620, RMIM, SecureFast Switch, SecureFast Packet Switching, SFS, SFPS, SPECTRUM Element Manager, SPECTRUM for Open Systems, SPIM-A, SPIM-C, SPIM-F1, SPIM-F2, SPIM-T, SPIM-T1, TPMIM, TPMIM-22, TPMIM-T1, TPRMIM, TPRMIM-36, TPT-T, TRBMIM, TRMM-2, TRMMIM, and TRXI are trademarks of Cabletron Systems, Inc. i AppleTalk, Apple, Macintosh, and TokenTalk are registered trademarks; and Apple Remote Access and EtherTalk are trademarks of Apple Computer, Inc. SmartBoost is a trademark of American Power Conversion ST is a registered trademark and C++ is a trademark of AT&T Banyan and VINES are registered trademarks of Banyan Systems, Inc. cisco, ciscoSystems, and AGS+ are registered trademarks; and cBus, cisco Router, CRM, IGS, and MGS are trademarks of cisco Systems, Inc. GatorBox is a registered trademark; and GatorMail, GatorMIM, GatorPrint, GatorShare, GatorStar, GatorStar GX-M, and XGator are trademarks of Cayman Systems, Inc. CompuServe is a registered trademark of CompuServe Incorporated X Window System is a trademark of Consortium, Inc. CTERM, DECnet, and ULTRIX are registered trademarks; and DEC, DEC C++, DECnet-DOS, DECstation, VAX DOCUMENT, VMA, and VT are trademarks of Digital Equipment Corporation Fore Systems, ForeRunner, and ForeRunner ASX-100 are trademarks of Fore Systems, Inc. PC/TCP is a registered trademark of FTP Software, Inc. HP OpenView is a registered trademark of Hewlett-Packard, Inc. AIX, IBM, OS/2, NetView, and PS/2 are registered trademarks; and AT, Micro Channel, PC, PC-DOS, PC/XT, Personal Computer AT, Operating System/2, Personal System/2, RISC System/6000, and Workplace Shell are trademarks of International Business Machines Corporation i960 microprocessor is a registered trademark; and Intel and Multichannel are trademarks of Intel Corporation Microsoft, MS-DOS, and Windows are registered trademarks of Microsoft Corporation Chameleon, ChameleonNFS, Chameleon 32, IPX/link, and NEWT are trademarks of NETMANAGE, Inc. NetWare and Novell are registered trademarks; and Internetwork Packet Exchange (IPX), IPX, and Network File System (NFS) are trademarks of Novell, Inc. Motif and MS are registered trademarks; and Open Software Foundation, OSF, OSF/1, and OSF/Motif are trademarks of The Open Software Foundation, Inc. Silicon Graphics and IRIS are registered trademarks; and Indigo and IRIX are trademarks of Silicon Graphics, Inc. NFS, PC-NFS, SPARC, Sun Microsystems, and Sun Workstation are registered trademarks; and OpenWindows, SPARCstation, SPARCstation IPC, SPARCstation IPX, Sun, Sun-2, Sun-3, Sun-4, Sun386i, SunNet, SunOS, SunSPARC, and SunView are trademarks of Sun Microsystems, Inc. OPEN LOOK and UNIX are registered trademarks of Unix System Laboratories, Inc. Ethernet, NS, Xerox Network Systems and XNS are trademarks of Xerox Corporation ii ANNEX, ANNEX-II, ANNEX-IIe, ANNEX-3, ANNEX-802.5, MICRO-ANNEX-XL, and MICROANNEX-ELS are trademarks of Xylogics, Inc. MAXserver and Xyplex are trademarks of Xyplex, Inc. Restricted Rights Notice (Applicable to licenses to the United States Government only.) 1. Use, duplication, or disclosure by the Government is subject to restrictions as set forth in subparagraph (c) (1) (ii) of the Rights in Technical Data and Computer Software clause at DFARS 252.227-7013. Cabletron Systems, Inc., 35 Industrial Way, Rochester, New Hampshire 03867-0505. 2. (a) This computer software is submitted with restricted rights. It may not be used, reproduced, or disclosed by the Government except as provided in paragraph (b) of this Notice or as otherwise expressly stated in the contract. (b) This computer software may be: (1) Used or copied for use in or with the computer or computers for which it was acquired, including use at any Government installation to which such computer or computers may be transferred; (2) Used or copied for use in a backup computer if any computer for which it was acquired is inoperative; (3) Reproduced for safekeeping (archives) or backup purposes; (4) Modified, adapted, or combined with other computer software, provided that the modified, combined, or adapted portions of the derivative software incorporating restricted computer software are made subject to the same restricted rights; (5) Disclosed to and reproduced for use by support service contractors in accordance with subparagraphs (b) (1) through (4) of this clause, provided the Government makes such disclosure or reproduction subject to these restricted rights; and (6) Used or copied for use in or transferred to a replacement computer. (c) Notwithstanding the foregoing, if this computer software is published copyrighted computer software, it is licensed to the Government, without disclosure prohibitions, with the minimum rights set forth in paragraph (b) of this clause. (d) Any other rights or limitations regarding the use, duplication, or disclosure of this computer software are to be expressly stated in, or incorporated in, the contract. (e) This Notice shall be marked on any reproduction of this computer software, in whole or in part. iii iv Contents Chapter 1 Introduction HSIM-W6 and HSIM-W84 ........................................................................................... 1-2 Using the CSX 200 and CSX400 UserÕs Guide .......................................................... 1-2 Related Manuals............................................................................................................ 1-3 Software Conventions .................................................................................................. 1-4 Common Window Fields...................................................................................... 1-4 Using the Mouse .................................................................................................... 1-5 Using Window Buttons......................................................................................... 1-6 Getting Help .................................................................................................................. 1-7 Using On-line Help................................................................................................ 1-7 Getting Help from the Cabletron Systems Global Call Center ....................... 1-7 CSX200 and CSX400 Firmware ................................................................................... 1-8 Chapter 2 CSX200 and 400 Chassis View Viewing Chassis Information ...................................................................................... 2-2 Front Panel Information........................................................................................ 2-3 Menu Structure....................................................................................................... 2-4 The CSX200/400 Port Status Displays................................................................ 2-7 Selecting a Port Status View.......................................................................... 2-7 Port Status Color Codes................................................................................. 2-9 The Chassis Manager Window ............................................................................ 2-9 Viewing Hardware Types ................................................................................... 2-10 Device Type ................................................................................................... 2-10 Viewing the Port Description...................................................................... 2-11 Managing the Device.................................................................................................. 2-11 Using the Find Source Address Feature ........................................................... 2-12 Viewing I/F Summary Information.................................................................. 2-12 Interface Performance Statistics/Bar Graphs ........................................... 2-14 Viewing Interface Detail .............................................................................. 2-16 Making Sense of Detail Statistics......................................................... 2-18 Enabling and Disabling Ports ............................................................................ 2-18 Chapter 3 CSX200 and CSX400 WAN Configuration About the CSX200 Series.............................................................................................. 3-1 About the CSX400 ......................................................................................................... 3-2 WAN Redundancy................................................................................................. 3-2 CSX WPIMs.................................................................................................................... 3-3 WAN Logical View ....................................................................................................... 3-5 v Contents WAN Logical View Window Fields..................................................................... 3-6 Changing WAN Logical Settings ......................................................................... 3-6 Chapter 4 Bridging Bridging Basics .............................................................................................................. 4-1 About Transparent Bridging................................................................................. 4-2 About Source Route Bridging .............................................................................. 4-2 About Source Route-Transparent Bridges .......................................................... 4-4 About Source Route-Translational Bridges ........................................................ 4-4 Viewing and Managing Bridging Interfaces ............................................................. 4-6 The Bridge Status Window .......................................................................................... 4-8 Bridge Status Window Information Fields......................................................... 4-8 Accessing Other Options from the Bridge Status Window ........................... 4-10 Enabling and Disabling Bridging ............................................................................. 4-14 Enabling and Disabling Individual Interfaces ................................................. 4-14 Enabling and Disabling All Installed Interfaces .............................................. 4-15 Bridge Statistics ........................................................................................................... 4-15 Performance Graphs............................................................................................ 4-15 Bridge Performance Graph Window Fields.............................................. 4-17 ConÞguring the Bridge Performance Graphs........................................... 4-18 The Bridge Detail Breakdown Window..................................................... 4-18 The Bridge Port Detail Breakdown Window ............................................ 4-20 The Interface Statistics Window......................................................................... 4-21 Statistics Window Fields .............................................................................. 4-22 The CSMACD Statistics Window ...................................................................... 4-23 Receive Errors................................................................................................ 4-24 Transmission Errors...................................................................................... 4-25 Collision Errors ............................................................................................. 4-26 The PPP Link Statistics Window........................................................................ 4-26 Errors .............................................................................................................. 4-27 Statistics.......................................................................................................... 4-28 The Dot5 Errors Statistics Window.................................................................... 4-29 Source Route Statistics......................................................................................... 4-32 Bridge Source Routing Window Fields...................................................... 4-33 Received Frames ........................................................................................... 4-33 Transmitted Frames ...................................................................................... 4-34 Discards .......................................................................................................... 4-34 Bridge Spanning Tree.................................................................................................. 4-35 ConÞguring the Bridge Spanning Tree Window ............................................. 4-36 Bridge Level Fields .............................................................................................. 4-36 Bridge Port Level Fields ...................................................................................... 4-38 Changing Bridge Spanning Tree Parameters ................................................... 4-40 Changing Bridge Priority ............................................................................ 4-40 Changing the Spanning Tree Algorithm Protocol Type .......................... 4-40 Changing Hello Time ................................................................................... 4-41 Changing Max Age Time ............................................................................. 4-41 Changing Forwarding Delay Time............................................................. 4-41 Changing Port Priority................................................................................. 4-42 vi Contents Changing Path Cost...................................................................................... 4-42 Filtering Database ....................................................................................................... 4-42 Filtering Database Window Fields .................................................................... 4-45 ConÞguring the Filtering Database................................................................... 4-46 Altering the Aging Time .............................................................................. 4-47 Changing the Type of Entry ........................................................................ 4-47 Changing the Receive Port .......................................................................... 4-48 Changing the Port Filtering Action............................................................ 4-48 Adding or Deleting Individual Entries ..................................................... 4-48 Clearing All Permanent, Static, or Dynamic Entries ............................... 4-49 Ethernet and Token Ring Special Filter Databases................................................. 4-49 Ethernet Special Filter Database Window........................................................ 4-50 Token Ring Special Filter Database Window................................................... 4-51 Special Filter Database Window Fields ............................................................ 4-52 DeÞning and Editing Filters in the Special Database ..................................... 4-53 Changing the Receive Ports................................................................................ 4-55 Changing the Port Filtering Action ................................................................... 4-55 Setting the Port Filtering Action ................................................................. 4-55 Clearing the Port Filtering Action .............................................................. 4-56 Enabling and Disabling a Filter ......................................................................... 4-56 Saving a Set of Filters to a File ........................................................................... 4-56 Source Route ConÞguration ...................................................................................... 4-57 Information on Source Routing ......................................................................... 4-58 The Source Route ConÞguration Window ....................................................... 4-59 Source Route ConÞguration Fields ............................................................ 4-59 Making and Setting Changes ............................................................................. 4-63 Using the Find Source Address Feature .................................................................. 4-63 The Port Source Addresses Window ........................................................................ 4-64 Setting the Aging Time........................................................................................ 4-65 Duplex Modes ............................................................................................................. 4-66 The Duplex Modes Window .............................................................................. 4-67 Duplex Modes Window Fields ................................................................... 4-67 Setting the Duplex Mode............................................................................. 4-68 Ethernet Port ConÞguration Window............................................................... 4-69 Fast Ethernet Port ConÞguration.............................................................................. 4-70 Setting the Desired Operational Mode for the FE-100TX .............................. 4-73 Setting the Desired Operational Mode for the FE-100FX............................... 4-73 SONET Port ConÞguration........................................................................................ 4-74 SONET/SDH ConÞguration .............................................................................. 4-74 SONET/SDH Statistics Window ....................................................................... 4-76 Errors .............................................................................................................. 4-78 Statistics.......................................................................................................... 4-80 ConÞguring Broadcast Suppression......................................................................... 4-82 Token Ring Bridge Mode ........................................................................................... 4-83 DeÞning the Bridge Modes ................................................................................ 4-84 Setting The Token Ring Bridge Mode ............................................................... 4-84 Using the Physical View Windows........................................................................... 4-85 ETWMIM Ethernet Port Physical View ............................................................ 4-85 Ethernet Port Physical Status Fields .......................................................... 4-85 ETWMIM Token Ring Port Physical View ....................................................... 4-86 vii Contents Token Ring Physical Status Fields .............................................................. 4-87 Using the Interface ConÞguration Window ............................................................ 4-89 DeÞning the Bridge Method............................................................................... 4-90 Setting the Bridge Method.................................................................................. 4-91 DeÞning the Protocol Transmission .................................................................. 4-91 Using the Bridge and Port ConÞguration Windows.............................................. 4-92 ConÞguring SmartTrunking ...................................................................................... 4-96 Index viii Chapter 1 Introduction How to use this guide; related guides; software conventions; getting help; CSX200 and CSX400 firmware versions Welcome to the Cabletron SystemsÕ SPECTRUM Element Manager for the CSX200 and CSX400 UserÕs Guide. We have designed this guide to serve as a simple reference for using SPECTRUM Element Manager for the CSX200 and CSX400. SPECTRUM Element Manager provides management support for both the CyberSWITCH CSX200 and CyberSWITCH CSX400 stand-alone LAN-to-WAN access devices. Both the CSX200 series and the CSX400 device support PPP and Frame Relay WAN protocols, as well as multiprotocol bridging and IP/IPX routing. The CSX200 series (CSX 201, 202, and 203) is designed for smaller branch ofÞces who need up to twelve Ethernet ports connected to a corporate WAN or ISP. Each CSX200 device has twelve RJ-45 ports and one WAN interface. Before shipping, the proper Wide Area Port Interface Module (WPIM) is installed in your device, depending on the technology you need. WPIM connections currently supported by SPEL include T1 and synchronous. In the future E1, DDS, DI (Drop-andInsert), and HDSL will also be supported by SPECTRUM Element Manager. All of these WPIM options are discussed in Chapter 3, CSX200 and CSX400 WAN ConÞguration. The CSX200 also supports Point to Point Protocol (PPP), leased lines, and Frame Relay (RFC1490), providing up to four Permanent Virtual Connections (PVCs) to corporate ofÞces or the Internet. The CSX400 is ideal for corporate ofÞces or larger branch sites that require two individual Ethernet LAN segments with single or dual WAN connectivity. The two Ethernet ports can be conÞgured with any available EPIM media, while the two WAN ports can be occupied by any swappable combination of Cabletron WPIMs. Currently SPECTRUM Element Manager can only manage a T1 or synchronous connection, but in the future WPIM options will also include DDS, DI, E1, and HDSL connectivity. Each WPIM can act independently, allowing 1-1 Introduction simultaneous communication, or the pair can be conÞgured to provide redundant channels if desired. Connectivity is available for Point to Point Protocol (PPP), as well as Frame Relay and leased lines. NOTES It is also important to note a Windows 95- and NT-based utility called QuickSET was shipped with your CyberSwitch. This program is designed for point-and-click installation and set-up of CSX200 and CSX400 devices. QuickSET can also be used to conÞgure WPIM settings and routing-bridging protocols, including those WPIMs not currently supported by SPECTRUM Element Manager. The CSX400 can support an ISDN connection with the WPIM-S/T. However, this connection is designed for WAN redundancy only. A primary ISDN WAN connection is not an option on the CSX400 at this time. See your CSX400 UserÕs Guide or your QuickSET documentation for more information. If you launch Chassis Manager for a CyberSwitch device and have QuickSET installed, your Utilities menu will display a menu pick for launching QuickSET. See your QuickSET documentation for more information. HSIM-W6 and HSIM-W84 The HSIM-W6 and HSIM-W84 are Wide Area Networking HSIMs (High Speed Interface Modules), which are functionally identical to the CSX200 and CSX400 in that they provide LAN to WAN switching. They can be installed in SmartSwitch 2000, 6000, and 9000 modules to uplink to WANs. These HSIMs are intelligent modules with their own IP addresses, and are managed separately through SPECTRUM Element Manager. Therefore, users of the HSIM-W6 and HSIM-W84 should also use this manual. The HSIM-W6 supports IP and IPX bridging or routing services, including IP RIP. Multiple WAN connectivity is similar to that of the CSX400, with the use of two conÞgurable WAN WPIMs. WPIM options are discussed in Chapter 2, Device ConÞguration. Each WPIM on the HSIM-W6 can act independently, allowing simultaneous communication, or the pair can be conÞgured to provide redundant channels if desired. The HSIM-W84 provides a Þxed conÞguration of four RJ45 ports for four active T1 interfaces. Using the CSX 200 and CSX400 User’s Guide This guide describes a number of different applications, each of which provides a portion of the overall management functionality for the CSX200 and CSX400 Cyberswitch devices. This guide contains information about software functions which are accessed directly from the device icon; for information about management functions which are accessed via the SPECTRUM Element Manager 1-2 HSIM-W6 and HSIM-W84 Introduction primary window menus, consult the SPECTRUM Element Manager UserÕs Guide and the SPECTRUM Element Manager Tools Guide. Following is a description of the applications covered in this guide. While we provide as much background information as we can, we do assume that youÕre familiar with Ethernet, Frame Relay, and WAN networks, and with general network management concepts: NOTE ¥ Chapter 1, Introduction, provides a list of related documentation, describes certain software conventions, and shows you how to contact the Cabletron Systems Global Call Center. ¥ Chapter 2, CSX200 and CSX400 Chassis Views, describes the visual displays of the CSX200 and CSX400 devices and how to use the mouse with the Chassis Views. Also described are some basic functions available only from within the Chassis Views (changing the port display, opening menus and windows, enabling and disabling ports, checking device and port status, and so on). ¥ Chapter 3, CSX200 and CSX400 WAN ConÞguration, describes the physical conÞguration of the CSX200 and CSX400 devices, including WPIM options, and explains the WAN Logical View window. ¥ Chapter 4, Bridging, discusses the Bridge Status window, instructs you on conÞguring bridge parameters, and discusses the Bridge Filtering and Special Databases. In places where information applies to both the CSX200 and CSX400 devices, this manual may make reference to the ÒCSX200/400,Ó or simply the ÒCSX.Ó Related Manuals The CSX200 and CSX400 UserÕs Guide is only part of a complete document set designed to provide comprehensive information about the features available to you through SPECTRUM Element Manager. Other guides which supply important information related to managing the CSX200 and CSX400 include: Cabletron SystemsÕ SPECTRUM Element Manager UserÕs Guide Cabletron SystemsÕ SPECTRUM Element Manager Tools Guide Cabletron SystemsÕ SPECTRUM Element Manager Remote Administration Tools UserÕs Guide Cabletron SystemsÕ SPECTRUM Element Manager Remote Monitoring (RMON) UserÕs Guide Cabletron SystemsÕ Network Troubleshooting Guide Microsoft CorporationÕs Microsoft Windows UserÕs Guide Related Manuals 1-3 Introduction For more information about the capabilities of the CSX200 and CSX400 management modules, consult the appropriate hardware documentation. Software Conventions SPECTRUM Element ManagerÕs device user interface contains a number of elements which are common to most windows and which operate the same regardless of which window they appear in. A brief description of some of the most common elements appears below; note that the information provided here is not repeated in the descriptions of speciÞc windows and/or functions. Common Window Fields Similar descriptive information is displayed in boxes at the top of most device-speciÞc windows in SPECTRUM Element Manager, as illustrated in Figure 1-1. Device Name IP Address Location MAC Address Figure 1-1. Sample Window Showing Group Boxes Device Name Displays the user-deÞned name of the device. The device name can be changed via the System Group window; see the Generic SNMP UserÕs Guide for details. 1-4 Software Conventions Introduction IP Address Displays the deviceÕs IP (Internet Protocol) Address; this will be the IP address used to deÞne the device icon. The IP address is assigned via Local Management to the CSXÕs internal Host interface; it cannot be changed via SPECTRUM Element Manager. Location Displays the user-deÞned location of the device. The location is entered through the System Group window; see the Generic SNMP UserÕs Guide for details. MAC Address Displays the manufacturer-set MAC address associated with the IP address used to deÞne the device icon; this will be the MAC address assigned to the CSXÕs internal Host interface. Note that each physical interface in the CSX has its own MAC address; these addresses are factory-set and cannot be altered. Using the Mouse This document assumes you are using a Windows-compatible mouse with two buttons; if you are using a three button mouse, you should ignore the operation of the middle button when following procedures in this document. Procedures within the SPECTRUM Element Manager document set refer to these buttons as follows: Left Mouse Button Right Mouse Button Figure 1-2. Mouse Buttons For many mouse operations, this document assumes that the left (primary) mouse button is to be used, and references to activating a menu or button will not include instructions about which mouse button to use. However, in instances in which right (secondary) mouse button functionality is available, instructions will explicitly refer to right mouse button usage. Also, in situations where you may be switching between mouse buttons in the same area or window, instructions may also explicitly refer to both left and right mouse buttons. Software Conventions 1-5 Introduction Instructions to perform a mouse operation include the following terms: ¥ Pointing means to position the mouse cursor over an area without pressing either mouse button. ¥ Clicking means to position the mouse pointer over the indicated target, then press and release the appropriate mouse button. This is most commonly used to select or activate objects, such as menus or buttons. ¥ Double-clicking means to position the mouse pointer over the indicated target, then press and release the mouse button two times in rapid succession. This is commonly used to activate an objectÕs default operation, such as opening a window from an icon. Note that there is a distinction made between Òclick twiceÓ and Òdouble-click,Ó since Òclick twiceÓ implies a slower motion. ¥ Pressing means to position the mouse pointer over the indicated target, then press and hold the mouse button until the described action is completed. It is often a pre-cursor to Drag operations. ¥ Dragging means to move the mouse pointer across the screen while holding the mouse button down. It is often used for drag-and-drop operations to copy information from one window of the screen into another, and to highlight editable text. Using Window Buttons The button that appears at the bottom of most windows allows you to exit a window and terminate any unsaved changes you have made. You may also have to use this button to close a window after you have made any necessary changes and set them by clicking on an , , or button. An , , or button appears in windows that have conÞgurable values; it allows you to conÞrm and SET changes you have made to those values. In some windows, you may have to use this button to conÞrm each individual set; in other windows, you can set several values at once and conÞrm the sets with one click on the button. The button brings up a Help text box with information speciÞc to the current window. For more information concerning Help buttons, see Getting Help, page 1-7. The command buttons, for example , call up a menu listing the windows, screens, or commands available for that topic. Any menu topic followed by ... (three dots) Ñ for example Statistics... Ñ calls up a window or screen associated with that topic. 1-6 Software Conventions Introduction Getting Help This section describes two different methods of getting help for questions or concerns you may have while using SPECTRUM Element Manager. Using On-line Help You can use the buttons to obtain information speciÞc to a particular window. When you click on a Help button, a window will appear which contains context-sensitive on-screen documentation that will assist you in the use of the windows and their associated command and menu options. Note that if a Help button is grayed out, on-line help has not yet been implemented for the associated window. From the Help menu accessed from the Chassis View window menu bar, you can access on-line Help speciÞc to the Chassis View window, as well as bring up the Chassis Manager window for reference. Refer to Chapter 2 for information on the Chassis View and Chassis Manager windows. NOTE All of the online help windows use the standard Microsoft Windows help facility. If you are unfamiliar with this feature of Windows, you can select Help from the menu, or Help Ñ>How to Use Help from the primary SPECTRUM Element Manager window, or consult your Microsoft Windows product UserÕs Guide. Getting Help from the Cabletron Systems Global Call Center If you need technical support related to SPECTRUM Element Manager, or if you have any questions, comments, or suggestions related to this manual or any of our products, please feel free to contact the Cabletron Systems Global Call Center via one of the following methods: By phone: (603) 332-9400 24 hours a day, 365 days a year By mail: Cabletron Systems, Inc. PO Box 5005 Rochester, NH 03866-5005 By Internet mail: [email protected] FTP: ftp.ctron.com (134.141.197.25) Login Password By BBS: Modem Setting Getting Help anonymous your email address (603) 335-3358 8N1: 8 data bits, 1 stop bit, No parity 1-7 Introduction For additional information about Cabletron Systems products, visit our World Wide Web site: http://www.cabletron.com/. For technical support, select Service and Support. CSX200 and CSX400 Firmware SPECTRUM Element Manager support for the CSX200 has been tested against Þrmware version 1.02.06. The CSX400 has been tested against Þrmware version 2.00.11. If you have an earlier version of Þrmware and experience problems, contact Cabletron Systems Global Call Center for upgrade information. NOTE 1-8 As a general rule, Þrmware versions for new products are liable to change rapidly; contact Cabletron Systems Global Call Center for upgrade information for the latest customer release of Þrmware. CSX200 and CSX400 Firmware Chapter 2 CSX200 and 400 Chassis View Information displayed in the Chassis View window; the Chassis Manager window; Hub management functions The CSX200/400 Chassis View window is the main screen that immediately informs you of the current condition of individual ports on your switch via a graphical display. The Chassis View window also serves as a single point of access to all other CSX windows and screens, which are discussed throughout this manual. NOTE It is important to note a Windows 95- and NT-based utility called QuickSET was shipped with your device. This program is designed for point-and-click installation and set-up of CSX200/400 devices. If you launch Chassis Manager for a CyberSWITCH device and have QuickSET installed, your Utilities menu will display a menu pick for launching QuickSET. See your QuickSET documentation for more information. To access the CSX Chassis View window, use one of the following options: 1. In any map, list, or tree view, double-click on the CSX200 or CSX400 you wish to manage. or 1. In any map, list, or tree view, click the left mouse button once to select the CSX you wish to manage. 2. Select Manage—>Node from the primary window menu bar, or select the Manage Node toolbar button. or 1. In any map, list, or tree view, click the right mouse button once to select the CSX200/400 you wish to manage. 2. On the resulting menu, click to select Manage. 2-1 CSX200 and 400 Chassis View Viewing Chassis Information The desired CSX200/400 Chassis View window (Figure 2-1) provides a graphical representation of the device, including a color-coded port display which immediately informs you of the current conÞguration and status of the switch and its ports. Figure 2-1. CSX200 and CSX400 Chassis View Windows NOTES At the time of this release, the Chassis View windows will only display the bridge ports on a CSX device. See your QuickSET documentation for information on managing your Ethernet ports. Bridging capabilities are discussed in Chapter 4 of this manual. By clicking in designated areas of the chassis graphical display (as detailed later in this chapter), or by using the menu bar at the top of the Chassis View window, you can access all of the menus that lead to more detailed device- and port-level windows. TIP 2-2 When you move the mouse cursor over a management Òhot spotÓ the cursor icon will change into a ÒhandÓ to indicate that clicking in the current location will bring up a management option. Viewing Chassis Information CSX200 and 400 Chassis View Front Panel Information The areas surrounding the main chassis area provide the following device information: IP The Internet Protocol address assigned to the CSX appears in the title bar of the Chassis View window. IP addresses are assigned via Local Management. Connection Status This color-coded area indicates the current state of communication between SPECTRUM Element Manager and the CSX200/400. ¥ Green indicates the CSX200/400 is responding to device polls (valid connection). ¥ Magenta indicates that the CSX200/400 is in a temporary stand-by mode while it responds to a physical change in the switch; note that board and port menus are inactive during this stand-by state. ¥ Blue indicates an unknown contact status Ñ polling has not yet been established with the CSX200/400. ¥ Red indicates the CSX200/400 is not responding to device polls (device is off line, or device polling has failed across the network for some other reason). UpTime The amount of time, in a X day(s) hh:mm:ss format, that the CSX200/400 has been running since the last start-up. Port Status If management for your device supports a variable port display (detailed in The CSX200/400 Port Status Displays later in this chapter), this Þeld will show the display currently in effect. If only a single port display is available Ñ or if the default view is in effect Ñ this Þeld will state Default. MAC Displays the physical layer address assigned to the interface associated with the IP Address used to deÞne the device icon when it was added to SPECTRUM Element Manager. MAC addresses are hard-coded in the device, and are not conÞgurable. Boot Prom The revision of BOOT PROM installed in the CSX200/400. Firmware The revision of device Þrmware stored in the CSX200/400Õs FLASH PROMs. Viewing Chassis Information 2-3 CSX200 and 400 Chassis View Time The current time, in a 24-hour hh:mm:ss format, set in the CSX200/400Õs internal clock. Date The current date, in an mm/dd/yy format, set in the CSX200/400Õs internal clock. NOTE In accordance with Year 2000 compliance requirements, SPECTRUM Element Manager now displays and allows you to set all dates with four-digit year values. Menu Structure By clicking on various areas of the CSX200/400 Chassis View display, you can access menus with device- and port-level options, as well as utility applications which apply to the device. The following illustration displays the menu structure and indicates how to use the mouse to access the various menus: If QuickSET is installed on your workstation, it will also appear in the Utilities menu. Clicking the on the module index will bring up the Bridge menu, described in Chapter 4. Figure 2-2. CSX200/400 Chassis View Menu Structure 2-4 Viewing Chassis Information CSX200 and 400 Chassis View The Device Menu From the Device Menu at the Chassis View window menu bar, you can access the following selections: ¥ Device Type..., which displays a window containing a description of the device being modeled: CSX200/400 - CyberSWITCH. ¥ Edit Device Time/Edit Device Date..., which allows you set the deviceÕs internal clock. ¥ System Group..., which allows you to manage the CSX200/400 via SNMP MIB II. Refer to the Generic SNMP Guide for further information. ¥ I/F Summary, which allows you to view statistics (displayed both graphically and numerically) for the trafÞc processed by each network interface on your CSX200/400. See Viewing I/F Summary Information on page 2-12 for more information. ¥ Bridge Status..., which opens a window that provides an overview of bridging information for each interface, and allows you to access all other bridgerelated options. Refer to Chapter 4 of this manual for more information. ¥ Find Source Address...,which opens a window that allows you to search the 802.1d Filtering Database of the CSX200/400 to determine which bridging interface a speciÞed source MAC address is communicating through. If the MAC address is detected as communicating through the switch, the port display will ßash to indicate the bridge interface of interest. Refer to Using the Find Source Address Feature on page 2-12 for more information. ¥ WAN Status..., which accesses the WAN Logical View window of your device. See Chapter 3 for more information. ¥ Exit, which closes the CSX200/400 Chassis View window. The Port Status Menu The Port Status Menu allows you to select the status information that will be displayed in the port text boxes in the Chassis View window: ¥ Status allows you to select one of four status type displays: Bridge, Bridge Mapping, Admin, or Operator. ¥ Load will display the portion of network load processed per polling interval by each interface as a percentage of the theoretical maximum load (10 or 100 Mbits/sec). ¥ Errors allows you to display the number of errors detected per polling interval by each interface as a percentage of the total number of valid packets processed by the interface. ¥ I/F Mapping will display the interface (if) index associated with each port on your CSX200/400 switch. Viewing Chassis Information 2-5 CSX200 and 400 Chassis View ¥ I/F Speed will display the speed (10 or 100 Mbits/sec) of the network segment attached to each port. The speed of the network management port will be displayed in Kbits/sec. ¥ I/F Type will display the interface type of each port in the CSX200/400 Ñ i.e., Eth (ethernet-csmacd) for the bridging interfaces, and PPP for the network management port. For more information on the port display options available via this menu, see The CSX200/400 Port Status Displays, later in this chapter. The Utilities Menu From the Utilities menu you can select: NOTE ¥ MIB Tools, a utility provided by SPECTRUM Element Manager for use with the CSX200/400. The MIB Tools utility provides direct access to the CSX200/400Õs MIB information. This selection is also available from the Tools menu at the top of SPECTRUM Element ManagerÕs main window. Refer to your SPECTRUM Element Manager Tools Guide for more information on the MIB Tools utility. ¥ Router ConÞg, for launching the Basic Router application. Basic routing is described in its own UserÕs Guide, and can also be launched from the Tools menu. ¥ RMON, for launching the Remote Network Monitoring application. RMON is described in its own UserÕs Guide. Like MIB Tools and Basic Router, RMON can also be launched from the Tools menu at the top of SPECTRUM Element ManagerÕs main window. RMON is supported by the CSX400 only. You will be able to launch the QuickSET application from the Utilities menu, provided it is installed on your machine. See your QuickSET documentation for more information. The Help Menu The Help Menu has three selections: ¥ MIBs Supported, which brings up the Chassis Manager window, described later in this chapter. ¥ Chassis Manager Help, which brings up a help window with information speciÞcally related to using the Chassis Manager and Chassis View windows. ¥ About Chassis Manager..., which brings up a version window for the Chassis Manager application in use. The Port Menus The menu for bridging ports offers the following selections: 2-6 Viewing Chassis Information CSX200 and 400 Chassis View ¥ Connection Type... opens a window displaying a description of the connection type of the selected bridge interface. This description is comprised of text based on the ctIfConnectionType MIB. ¥ Description..., which brings up a window describing the selected port; see Viewing the Port Description, later in this chapter. ¥ Performance Graph..., which allows you to view the trafÞc going through a selected bridge. This information is displayed both numerically and graphically, as described in Chapter 4, Bridging. ¥ Source Addressing..., which displays a list of MAC Addresses that communicate through the selected bridge port. ¥ I/F Statistics..., which allows you to view color-coded statistical information about the selected bridge port; see Viewing Interface Detail later in this chapter. ¥ Alarm ConÞguration..., which opens the Basic Alarm ConÞguration window. See Basic Alarm ConÞguration in Chapter 4, RMON Alarms and Events, in your RMON UserÕs Guide for more information. RMON is only supported by the CSX400. A CSX200 device will allow you to open this window, but alarm conÞguration will not be possible. ¥ Statistics... see I/F Statistics, above. ¥ Enable/Disable, which administratively turns the selected bridging port on or off; see Enabling and Disabling Ports on page 2-18 for more information. The CSX200/400 Port Status Displays When you open the Chassis View window, each port on the CSX200/400 will display its Admin status (deÞned below). To change this status display, select one of the options on the Port Status menu, as described in the following sections. Selecting a Port Status View To change the status of your ports: 1. Click on Port Status on the menu bar at the top of the Chassis View window; a menu will appear. 2. Drag down (and to the right, if necessary) to select the status information you want to display. The port text boxes will display the appropriate status information. Port status view options are: Status You can view four port Status categories, as follows: Viewing Chassis Information 2-7 CSX200 and 400 Chassis View ¥ ¥ ¥ ¥ Bridge Ñ FWD, DIS, LRN, LIS, BLK, BRK, or UNK Bridge Mapping Ñ bridge interface index numbers Admin Ñ ON or OFF Operator Ñ ON or OFF If you have selected the Bridge status mode, a port is considered: ¥ FWD (Forwarding) if the port is on-line and forwarding packets across the CSX200/400 from one network segment to another. ¥ DIS (Disabled) if bridging at the port has been disabled by management; no trafÞc can be received or forwarded on this port, including conÞguration information for the bridged topology. ¥ LRN (Learning) if the Forwarding database is being created, or the Spanning Tree Algorithm is being executed because of a network topology change. The port is monitoring network trafÞc, and learning network addresses. ¥ LIS (Listening) if the port is not adding information to the Þltering database. It is monitoring Bridge Protocol Data Unit (BPDU) trafÞc while preparing to move to the forwarding state. ¥ BLK (Blocking) if the port is on-line, but Þltering trafÞc from going across the CSX200/400 from one network segment to another. Bridge topology information will be forwarded by the port. ¥ BRK (Broken) if the physical interface has malfunctioned. ¥ UNK (Unknown) if the interfaceÕs status cannot be determined. If you have selected Bridge Mapping, the port status boxes will display the bridge interface index numbers assigned to each interface (which may or may not match the ifIndex values displayed via the I/F Mapping option described below). If you have selected the Admin status mode, a port is considered: ¥ ON if the port is enabled by management and has a valid link. ¥ OFF if it has not been enabled or if it has been disabled through management action. If you have selected the Operator status mode, a port is considered: ¥ ON if the port is currently forwarding packets. ¥ OFF if the port is not currently forwarding packets. Load If you choose Load, the interface text boxes will display the percentage of network load processed by each port during the last polling interval. This percentage reßects the network load generated per polling interval by devices 2-8 Viewing Chassis Information CSX200 and 400 Chassis View connected to the port compared to the theoretical maximum load (10 or 100 Mbits/sec) of an Ethernet network. Errors If you choose the Errors mode, the interface boxes will display the percentage of the total number of valid packets processed by each port during the last polling interval that were error packets. This percentage reßects the number of errors generated during the last polling interval by devices connected to that port compared to the total number of valid packets processed by the port. NOTE In SPECTRUM Element Manager, the polling interval is set via the Tools Ñ> Options...Ñ>Polling option from the main windowÕs menu bar. Refer to the Installing and Using SPECTRUM Element Manager guide for full information on setting device polling intervals. I/F Mapping If you choose the I/F Mapping mode, the interface boxes will display the interface number (IfIndex) associated with each port on the CSX200/400. I/F Speed If you choose the I/F Speed mode, the port text boxes will display the speed of the network segment connected to each port. The speed of the network management port will be displayed in Kbits/sec. I/F Type If you choose the I/F Type mode, the interface boxes will display the interface type of each port on the CSX200/400 (e.g., Eth, PPP, other). Port Status Color Codes The Port Status display options Ñ Bridge, Admin, and Operator Ñ incorporate color coding schemes. For the Admin and Operator Status display options, green = ON, red = OFF, and blue = N/A (not available). For the Bridge Status display option, green = forwarding, blue = disabled, magenta = learning and listening, orange = blocking, red = broken, and gray = unknown. For all other Port Status selections Ñ Load, Errors, I/F Port Mapping, Speed, and Type Ñ color codes will continue to reßect the most recently selected mode which incorporates its own color coding scheme. The Chassis Manager Window Like most networking devices, the CSX200/400 draws its functionality from a collection of proprietary MIBs and IETF RFCs. In addition, the CSX200/400 organizes its MIB data into a series of Òcomponents.Ó A MIB component is a logical grouping of MIB data, and each group controls a deÞned set of objects. For Viewing Chassis Information 2-9 CSX200 and 400 Chassis View example, CSX200/400 bridging information is organized into its own component. Note, too, that there is no one-to-one correspondence between MIBs and MIB components. A single MIB component might contain objects from several different proprietary MIBs and RFCs. The Chassis Manager window, Figure 2-3, is a read-only window that displays the MIBs and the MIB components Ñ and, therefore, the functionality Ñ supported by the currently monitored device. To view the Chassis Manager window: 1. Click on Help on the menu bar at the top of the Chassis View window. 2. Drag down to MIBs Supported, and release. The MIBs which provide the CSX200/400’s functionality — both proprietary MIBs and IETF RFCs — are listed here. MIB Components are listed here. Remember, there’s no one-to-one correspondence between MIBs and MIB Components. Figure 2-3. Chassis Manager Window Viewing Hardware Types In addition to the graphical displays described above, menu options available at several levels provide speciÞc information about the physical characteristics of the CSX200/400 and its ports. Device Type Choosing the Device Type... option on the Device menu brings up a window that describes the management device being modeled: 2-10 Viewing Chassis Information CSX200 and 400 Chassis View Figure 2-4. Device Type Windows Viewing the Port Description Choosing the Description... option on the individual port interface menus brings up a window that describes the interface you have selected. This description is based on a value returned by the ifDescr MIB. Two possibilities for a CSX interface description are shown in Figure 2-5. Figure 2-5. Interface Description Windows Managing the Device The Chassis View provides you with the basic tools available to conÞgure your device and keep it operating properly. NOTE Until future releases of SPECTRUM Element Manager provide more comprehensive support of the CSX200 and CSX400 CyberSWITCHes, Cabletron recommends that anything beyond the basic conÞguration options described in this section be handled with the QuickSET utility. See your QuickSET documentation for more information. Managing the Device 2-11 CSX200 and 400 Chassis View Management for the CSX200/400 through SPELÕs Chassis View is comprised of source address location, viewing interface statistics, and enabling and disabling ports. Using the Find Source Address Feature You can select the Find Source Address option to discover which bridging interface a speciÞed source MAC address is communicating through. When you select the Find Source Address option, a search is made of the 802.1d Bridge Filtering Database to discover the bridge interface associated with the address that you specify. If the search is successful, the corresponding interface will ßash in the Chassis View window. For more information on the Filtering Database and bridging in general, refer to the bridging chapter in your SPECTRUM Element Manager Tools Guide. Use the Find Source Address feature as follows: 1. Click to display the Device pull-down menu. 2. Drag to Find Source Address.... The following window will appear. Figure 2-6. Find Source Address Window 3. In the text field in the middle of the window, enter a valid MAC address in Hex format and then click OK. If the address is found in the 802.1d Bridge Filtering Database, the port through which the address is communicating will ßash in the front panel Chassis View display. If the address is not found in the Filtering Database, a separate window will appear with a ÒCanÕt Find Source AddressÓ message. Viewing I/F Summary Information The I/F Summary menu option available from the Device menu lets you view statistics for the trafÞc processed by each network interface on your device. The 2-12 Managing the Device CSX200 and 400 Chassis View window also provides access to a detailed statistics window that breaks down Transmit and Receive trafÞc for each interface. To access the I/F Summary window: 1. From the Module View, click on the Device option from the menu bar. 2. Click again to select I/F Summary, and release. The I/F Summary window, Figure 2-7, will appear. Figure 2-7. I/F Summary Window When you open the I/F Summary window, you will see Þelds which describe each interface on your device, as well as a bar graph and statistics which display each interfaceÕs performance. The following descriptive information is provided for each interface: UpTime The UpTime Þeld lists the amount of time, in a days, hh:mm:ss format, that the device has been running since the last start-up. Index The index value assigned to each interface on the device. Type The type of the interface, distinguished by the physical/link protocol(s) running immediately below the network layer. Description A text description of the interface. Managing the Device 2-13 CSX200 and 400 Chassis View Physical Status Displays the current physical status Ñ or operational state Ñ of the interface: Online or Ofßine. Logical Status Displays the current logical status Ñ or administrative state Ñ of the interface: Up or Down. Interface Performance Statistics/Bar Graphs The statistical values (and, where available, the accompanying bar graphs) in the far-right columns of the I/F Summary window provide a quick summary of interface performance. You can select the statistical value you want to display and the units in which you want those values displayed by using the two menu Þelds directly above the interface display area, as follows: 1. In the right-most menu field, click on the down arrow and select the unit in which you wish to display the selected statistic: Load, Raw Counts, or Rate. NOTE Bar graphs are only available when Load is the selected base unit; if you select Raw Counts or Rate, the Bar Graph column will be removed from the interface display. 2. Once you have selected the base unit, click on the down arrow in the left-most field to specify the statistic you’d like to display. Note that the options available from this menu will vary depending on the base unit you have selected. After you select a new display mode, the statistics (and graphs, where applicable) will refresh to reßect the current choice, as described below. Raw Counts The total count of network trafÞc received or transmitted on the indicated interface since device counters were last reset. Raw counts are provided for the following parameters: 2-14 In Octets Octets received on the interface, including framing characters. In Packets Packets (both unicast and non-unicast) received by the device interface and delivered to a higher-layer protocol. In Discards Packets received by the device interface that were discarded even though no errors prevented them from being delivered to a higher layer protocol (e.g., to free up buffer space in the device). Managing the Device CSX200 and 400 Chassis View In Errors Packets received by the device interface that contained errors that prevented them from being delivered to a higher-layer protocol. In Unknown Packets received by the device interface that were discarded because of an unknown or unsupported protocol. Out Octets Octets transmitted by the interface, including framing characters. Out Packets Packets transmitted, at the request of a higher level protocol, by the device interface to a subnetwork address (both unicast and non-unicast). Out Discards Outbound packets that were discarded by the device interface even though no errors were detected that would prevent them from being transmitted. A possible reason for discard would be to free up buffer space in the device. Out Errors Outbound packets that could not be transmitted by the device interface because they contained errors. Load The number of bytes processed by the indicated interface during the last poll interval in comparison to the theoretical maximum load for that interface type (10 Mbps for standard Ethernet; 100 Mbps for Fast Ethernet). Load is further deÞned by the following parameters: In Octets The number of bytes received by this interface, expressed as a percentage of the theoretical maximum load. Out Octets The number of bytes transmitted by this interface, expressed as a percentage of the theoretical maximum load. When you select this option, a Bar Graph Þeld will be added to the interface display area; this Þeld is only available when Load is the selected base unit. Rate The count for the selected statistic during the last poll interval. The available parameters are the same as those provided for Raw Counts. Refer to the Raw Counts section, above, for a complete description of each parameter. Managing the Device 2-15 CSX200 and 400 Chassis View Viewing Interface Detail The Interface Statistics window (Figure 2-8) provides detailed MIB-II interface statistical information Ñ including counts for both transmit and receive packets, and error and buffering information Ñ for each individual port interface. Colorcoded pie charts also let you graphically view statistics for both received and transmitted Unicast, Multicast, Discarded, and Error packets. To open the Interface Statistics window: 1. In the I/F Summary window, click to select the interface for which you’d like to view more detailed statistics. 2. Click on Detail. The appropriate I/F Statistics window, Figure 2-8, will appear. Figure 2-8. Detail Interface Statistics TIP You can also access this information via the I/F Statistics option available on the individual port menus. Three informational Þelds appear in the upper portion of the window: Description Displays the interface description for the currently selected interface: Ethernet, Host, SMB 1, SMB 10, or INB. 2-16 Managing the Device CSX200 and 400 Chassis View Address Displays the MAC (physical) address of the selected interface. Type Displays the interface type of the selected port: ethernet-csmacd, sdlc, or other. The lower portion of the window provides the following transmit and receive statistics (the Þrst four statistics are also graphically displayed in the pie charts). Unicast Displays the number of packets transmitted to or received from this interface that had a single, unique destination address. These statistics are displayed in the pie chart, color-coded green. Non-Unicast Displays the number of packets transmitted to or received from this interface that had a destination address that is recognized by more than one device on the network segment. The multicast Þeld includes a count of broadcast packets Ñ those that are recognized by all devices on a segment. These statistics are displayed in the pie chart, color-coded dark blue. Discarded Displays the number of packets which were discarded even though they contained no errors that would prevent transmission. Good packets are typically discarded to free up buffer space when the network becomes very busy; if this is occurring routinely, it usually means that network trafÞc is overwhelming the device. To solve this problem, you may need to re-conÞgure your bridging parameters, or perhaps re-conÞgure your network to add additional bridges or switches. Consult the Cabletron Systems Network Troubleshooting Guide for more information. These statistics are displayed in the pie chart, color-coded magenta. Error Displays the number of packets received or transmitted that contained errors. These statistics are displayed in the pie chart, color-coded red. Unknown Protocol (Received only) Displays the number of packets received which were discarded because they were created under an unknown or unsupported protocol. Packets Received (Received only) Displays the number of packets received by the selected interface. Transmit Queue Size (Transmit only) Displays the number of packets currently queued for transmission from this interface. The amount of device memory devoted to buffer space, and the trafÞc level on the target network, determine how large the output packet queue can grow before the device will begin to discard packets. Managing the Device 2-17 CSX200 and 400 Chassis View Packets Transmitted (Transmit only) Displays the number of packets transmitted by this interface. Making Sense of Detail Statistics The statistics available in this window can give you an idea of how an interface is performing; by using the statistics in a few simple calculations, itÕs also possible to get a sense of an interfaceÕs activity level: To calculate the percentage of input errors: Received Errors /Packets Received To calculate the percentage of output errors: Transmitted Errors /Packets Transmitted To calculate the total number of inbound and outbound discards: Received Discards + Transmitted Discards To calculate the percentage of inbound packets that were discarded: Received Discards /Packets Received To calculate the percentage of outbound packets that were discarded: Transmit Discards /Packets Transmitted NOTE Unlike the Interface Detail window, which this window replaces, the Interface Statistics window does not offer Disable or Test options. These options are available in the Interface Group window, which can be accessed via the System Group window (select System Group... from the Device menu). Refer to your Generic SNMP UserÕs Guide for further information on the System Group and Interface Group windows. Enabling and Disabling Ports From the Port menus on the CSX200/400 Chassis View window, you can administratively enable and disable the ports. When you administratively disable a bridge port, you disconnect that portÕs network from the bridge entirely. The port does not forward any packets, nor does it participate in Spanning Tree operations. Nodes connected to the network can still communicate with each other, but they canÕt communicate with the bridge or with other networks connected to the bridge. When you enable a port, the port moves from the Disabled state, through the Learning and Listening states, to the Forwarding state; bridge port state color codes will change accordingly. To enable or disable a bridge port: 2-18 Managing the Device CSX200 and 400 Chassis View 1. Click on the desired Port index. The Port menu will appear. 2. Click on Enable to enable the port, or Disable to disable the port. Your port will now be enabled or disabled as desired. NOTE For more information about bridging functions and how to determine the current state of each bridge port, see Chapter 4 of this manual. Managing the Device 2-19 CSX200 and 400 Chassis View 2-20 Managing the Device Chapter 3 CSX200 and CSX400 WAN Configuration Physical CSX device information; CSX WPIMs; the WAN Logical View window The CSX200 devices have one WAN interface, a Cabletron Wide Area Port Interface Module (WPIM) installed at the factory. The CSX400 has two swappable WAN interfaces, which can currently consist of any combination of CabletronÕs T1/E1/DI, HDSL, DDS, or synchronous WPIMs. NOTE ItÕs important to note that a Windows 95- and NT-based utility called QuickSET was shipped with your CyberSWITCH. This program is designed for point-and-click installation and set-up of CSX200/400 devices. Currently, QuickSET should be used to conÞgure all WPIM settings and routing/bridging protocols, including those WPIMs not currently supported by Spectrum Element Manager. See your QuickSET documentation for more information. Future releases of SPECTRUM Element Manager will support the CSX200/400 more comprehensively. The CSX200 series (201, 202, and 203) and the CSX 400 come with a variety of Ethernet LAN and WAN connectivity options. The WPIMs which provide the WAN connection(s) are discussed in this chapter, along with EPIM possibilities for the CSX400. WAN Logical View on page 3-5 discusses how to access the WAN Logical View window through SPECTRUM Element ManagerÕs Chassis View. There, you can view your WAN interface settings. About the CSX200 Series There are three devices in the CSX200 family: the CSX201, CSX202, and CSX203. Each has twelve RJ-45 Ethernet ports for LAN connection via 10BaseT twisted 3-1 CSX200 and CSX400 WAN Configuration pair cable, along with a WPIM slot to provide one WAN interface. The model number depends on the type of Wide Area Networking interface installed: NOTE CSX201 Provides a T1/E1 Wide Area uplink CSX202 Provides a Serial interface (V.35, X.21, RS449, RS232. or RS530) CSX203 Provides a DDS WAN uplink At the time of this release, SPECTRUM Element Manager does not support a DDS interface on a CSX device. This applies to both the CSX203 and a WPIM-DDS installed on a CSX400. In addition, the WPIM-DI, WPIM-E1, and WPIM-HDSL are also not currently supported by SPECTRUM Element Manager but will be in the future. The Windows 95- and NT-based utility QuickSET, which was shipped with your CSX200/400 device, can be used to conÞgure these WPIMs. See your QuickSET documentation for more information. See CSX WPIMs on page 3-3 for a description of the WPIM modules that are available for your CSX200. About the CSX400 The CSX400 supports multiple LAN options through two Ethernet ports. These ports can be conÞgured with any combination of the following Cabletron EPIM connections: EPIM-A Female AUI interface with DB-15 connector EPIM-C 10Base-2 coaxial port, BNC connectors EPIM-T 10Base-T twisted pair port with RJ45 connector EPIM-F1 10BaseFL multi-mode Þber port with SMA connectors EPIM-F2 10Base-FL multi-mode Þber port with ST connectors EPIM-F3 802.3 single-mode Þber port with ST connectors For more information on these EPIMs, consult your hardware documentation. The CSX400 also consists of two WAN interfaces, which can currently be conÞgured with any combination of Cabletron WPIMs, which are described in CSX WPIMs on page 3-3. WAN Redundancy For a redundant wide-area connection, one of the WAN interfaces on your CSX400 can be conÞgured as a primary link, with the other interface designated 3-2 About the CSX400 CSX200 and CSX400 WAN Configuration as the backup. If the primary link should fail for some reason, the other WAN interface will take over as the wide area link until the primary is restored. When a WPIM-S/T is installed as the backup interface, that connection will activate and provide an ISDN connection to the wide area network, if the primary WAN link fails. The ISDN WPIM can also provide backup for single or multiple Data Link Connection Interfaces (DLCIs). If a leased line loses a DLCI or a remote ofÞce, for example, the WPIM-S/T will restore a 64K connection for that site while the rest of the connections remain on the leased line. For more information on WAN redundancy and the WPIM-S/T, consult your QuickSET documentation or your hardware documentation. NOTE The WPIM-S/T is designed for WAN ISDN redundancy only and is not intended to be used for a primary WAN connection at this time. CSX WPIMs The following Cabletron WPIMs provide WAN connectivity for the CSX400, HSIM-W84, and the CSX200 series. Currently Cabletron recommends that all WPIM conÞguration be done through the QuickSET application that was shipped with your device. Consult your QuickSET documentation for more details. If there is a speciÞc device from the CSX200 series that supports the WPIM, it is noted below. Otherwise, the WPIM can be special-ordered and installed in a general CSX200 (contact the Cabletron Systems Global Call Center for more information). CSX WPIMs WPIM-DDS DDS is Digital Data Services, a digital network that supports data rates of 56Kbps or 64Kbps. The DDS service provides users with dedicated, two-way simultaneous transmission capabilities operating at transfer rates up to 64 Kbps. This WPIM comes with a built-in CSX/DSU. (CSX203) WPIM-DI The DI (Drop-and-Insert) WPIM provides a T1 interface through a front-panel RJ45 port and includes a built-in CSU/DSU for direct connection to a T1 line. The WPIMDI provides Full T1 or Fractional T1 using 56 or 64 Kbps Time Slots. It also provides a second Drop-and-Insert interface that allows more than one device, such as a PBX, to share a single T1 connection. (CSX201) WPIM-E1 This WPIM provides an E1 interface through a frontpanel RJ-45 port and includes a built-in CSU/DSU for direct connection to an E1 line. This WPIM provides Full E1 or Fractional E1 using 56 or 64 Kbps Time Slots with a total throughput of up to 2 Mbps. Time Division 3-3 CSX200 and CSX400 WAN Configuration Multiplexing (TDM) allows for the channelization of up to 31 links of a single physical interface. (CSX201) WPIM-HDSL This WPIM is designed for campus environments and provides a connection for sending LAN trafÞc over existing telephone lines at rates up to 1.544Mbps. It can communicate reliably up to a distance of 12,000 feet over Unshielded Twisted Pair (UTP) cabling. WPIM-S/T For the CSX400 only. This WPIM provides an ISDN 128 Kbps Basic Rate Interface (BRI) and is designed for an ISDN back-up link for a frame relay or leased line. In the United States and Canada, Network Terminator equipment (NT1) is required to provide an interface between the WPIM-S/T and the ISDN line. WPIM-SY Provides a synchronous serial connection of up to 2.048 Mbps to external communications equipment (an external CSU/DSU is required). For the CSX202. The following electrical interfaces are supported. An external CSU/DSU is required (consult your hardware documentation for cable pinout information): EIA-RS449 V.35 EIA-RS232D X.21 EIA-RS530 EIA-530A RS530 ALT A RS530A ALT A 3-4 WPIM-T1 Provides a T1 interface through a front-panel RJ45 port and includes a built-in CSU/DSU for direct connection to a T1 line. The WPIM-T1 provides both Full T1 or Fractional T1 using 56 or 64 Kbps Time Slots, with a total throughput of up to 1.544 Mbps. Time Division Multiplexing (TDM) allows for channelization of up to 24 links over a single physical T1/FT1 interface. CSX201 WPIM-T1/DDS This WPIM provides both a T1 and DDS interface that allows you to easily switch between the two interfaces by changing the physical cabling and reconÞguring the desired interface with QuickSET or SPEL. Currently, however, SPECTRUM Element Manager does not support a DDS interface on a CSX device. CSX WPIMs CSX200 and CSX400 WAN Configuration For more information on these WPIMs, consult the appropriate hardware documentation or your QuickSET documentation. WAN Logical View The WAN Logical View window displays information about the interfaces that are part of your physical port. The windows are identical for the T1 and the Synchronous ports. The number of entries is dependent on the type of port. The T1 port, for example, will have 24 entries. To open this window: 1. Click on Device on the Chassis View menu bar; the device menu will appear. 2. Drag down to the WAN Status..., then right to Logical View... and release. The WAN Logical View window, Figure 3-1, will appear. Figure 3-1. WAN Logical View Window NOTE WAN Logical View The information in this window is static; use the Refresh button to view updated logical settings and statistics. 3-5 CSX200 and CSX400 WAN Configuration WAN Logical View Window Fields IF Displays the interface index; a unique value for each interface that this device connects to. Protocol Displays the active Link Layer protocol. This Þeld displays PPP (Point to Point), Frame Relay, or Other. Compression Indicates whether data compression is activated or de-activated. NOTE Data compression is not supported by the CSX at this time; therefore, compression will always be de-activated or ÒOffÓ. MTU Displays the MTU (Maximum Transfer Unit) for this interface. The MTU is the largest packet size that can be transmitted on the selected interface. Line Coding Displays the line coding set for this interface. The Þeld displays INV-HDLC, JBZS, or None. None (the default value) is displayed when the line coding being used on the interface is B8ZS. CRC Length The length of the CRC (Cyclical Redundancy Check) for this interface. Changing WAN Logical Settings You can change the protocol setting, from your WAN Logical View window. To do so: 1. Click anywhere on the line of the interface of interest, and the WAN Logical Settings window (Figure 3-2) will appear. 3-6 WAN Logical View CSX200 and CSX400 WAN Configuration Figure 3-2. WAN Logical Settings Window 2. Click on the Protocol button to select PPP, Frame Relay, or None. LEX (LAN Extender) may also appear in the Protocol menu, but it is not applicable to a CSX device. 3. After making your changes, click on OK to exit the window and save the changes, or Cancel to exit the window without saving the changes. Note that this window also displays the state of compression on the interface. After exiting the Logical Settings window, the WAN Logical View window will update with the changes you made. NOTE WAN Logical View If you do make any conÞguration changes through the WAN Logical Settings window, make sure they donÕt conßict with other conÞgurations made through the QuickSET application. 3-7 CSX200 and CSX400 WAN Configuration 3-8 WAN Logical View Chapter 4 Bridging A brief explanation of bridging methods; viewing and managing bridging interfaces; using the Bridge Status window; enabling and disabling bridging; viewing bridge statistics; using Spanning Tree; using the Filtering Database; using the Source Route Configuration window; using the Find Source Address feature; using the Port Source Addresses window; configuring duplex modes; using SONET port configuration options; configuring broadcast suppression; using the Token Ring Bridge Mode window; using the Physical View windows; using the Interface Configuration window; using the Bridge Configuration and Port Configuration windows; and configuring SmartTrunking Bridging Basics Bridges are used in local area networks to connect two or more network segments and to control the ßow of packets between the segments. Ideally, bridges forward packets to another network segment only when necessary. Bridges are also used to increase the fault tolerance in a local area network by creating redundant bridge paths between network segments. In the event of a bridge or bridge segment failure, an alternate bridge path will be available to network trafÞc, without signiÞcant interruption to its ßow. The method a bridge uses to forward packets, choose a bridge path, and ensure that a sending stationÕs messages take only one bridge path depends on the bridgeÕs type: Transparent (generally used in Ethernet or FDDI environments) or Source Routing (generally used in Token Ring environments), source routing-transparent, or source route-transparentÑthe two latter being combinations that are found in a mixed network environment. NOTE Not all of the sections in this chapter Ñ Source Routing and Token Ring information, for example Ñ are applicable to your CSX200/400 device. 4-1 Bridging About Transparent Bridging Transparent bridges are most common in Ethernet networks. Individual Transparent bridges monitor packet trafÞc on attached network segments to learn where end stations reside in relation to each segment by mapping the Source Address of each received frame to the port (and segment) it was detected on. This information gets stored in the bridgeÕs Filtering Database. When in the Forwarding state, the bridge compares a packetÕs destination address to the information in the Filtering Database to determine if the packet should be forwarded to another network segment or Þltered (i.e., not forwarded). A bridge Þlters a packet if it determines that the packetÕs destination address exists on the same side of the bridge as the source address. If two or more bridges are connected to the same Ethernet LAN segmentÑplaced in parallelÑonly a single bridge must be allowed to forward data frames onto that segment. If two or more bridges were forwarding data frames onto the same Ethernet segment, the network would soon be ßooded. With a data loop in the topology, bridges would erroneously associate a single source address with multiple bridge ports, and keep proliferating data by forwarding packets in response to the ever-changing (but incorrect) information stored in their Filtering Database. To avoid such data storms, Transparent bridges communicate with one another on the network by exchanging Bridge Protocol Data Units (BPDUs) to determine the network topology and collectively implement a Spanning Tree Algorithm (STA) that selects a controlling bridge for each LAN segment; this ensures that only a single data route exists between any two end stations and that topology information remains current. About Source Route Bridging Source Routing is typically used to connect two or more Token Ring network segments. Source Route bridges differ from Transparent bridges in that they do not build and then use a physical address database to make forwarding decisions. Instead, the source end station transmits packets with a header that contains routing information (added by bridges in the network topology during a route discovery process between end stations); once a route has been determined, a Source Route bridge simply reads the header of a source routed packet to determine whether it is a participant in routing the packet. In Source Routing, sending and receiving devices employ broadcast packetsÑknown as explorer packetsÑto determine the most efÞcient route for a message to travel. Generally, before a station sends a message, it will Þrst send a test packet to all stations on the same ring; if the sending station receives a response to this packet, it assumes that the destination station is on the same ring and therefore it will not include routing information in frames sent to that station in the future. Any further packets issued between stations will appear to be transparent-style frames without embedded routing information. 4-2 Bridging Basics Bridging If the sending station does not receive a response to the test packet, it will send explorer packets to the destination; the explorer packets will be propagated by the networkÕs bridges as either All Paths Explorer (APE) packets or as Spanning Tree Explorer (STE) packets. The task of both packet types is to get the destination station to return speciÞc route information to the sending station (by including an identiÞer for each ring the explorer packet traversed and for each bridge between any rings). Since the data ßow on a Source Routed network is determined by end stations (unlike a Transparently bridged network), a looped bridge topology is not an issue for data ßow. APE packets are sent from the source station over every possible bridge path to the end station. The original APE frame contains no routing information (e.g., bridge numbers and ring numbers). As the frame is propagated along all available paths to the destination station, each bridge along the way adds its own bridge and ring numbers to the packetÕs RIF before forwarding it, thereby providing route information. In response to each received APE packet, the destination station directs a reply to the sending station. On receiving the replies, the sending station ideally assumes that the Þrst returned reply contains the most efÞcient route. The sending station then stores the route information and uses it to send subsequent transmissions to the same station. Because APE frames do increase network trafÞc, some sites may use STE explorer frames as an alternate method of route discovery. With STE exploration, a Spanning Tree Algorithm (either conÞgured automatically via BPDUs or manually via management) is maintained for the sole purpose of determining how to direct an explorer frame during route discovery. During the discovery process, a source station will send out STE explorer frames into a bridged topology. If a bridge is in a forwarding state according to Spanning Tree, it will forward an explorer frame onto its attached LAN segment (appending the Bridge and LAN Segment IdentiÞers in the appropriate area of the RIF); if the bridge is Þltering, it will discard the explorer frames. In this fashion, only a single explorer frame will reach each individual LAN segment. Ultimately, the destination station will receive only a single STE packet, and will respond with APE packets (that return to the sending station on all possible bridge paths) or an STE packet (that returns to the sending station via in the reverse route of the STE explorer packet). Although the Spanning Tree Algorithm determines the bridge path an STE takes to the destination station, during future communication between the stations, bridges along the route will use Source Routing to forward the packet (i.e., the bridges will read the Routing Information Field in the header of speciÞcally routed frames to decide whether to forward them). Bridging Basics 4-3 Bridging About Source Route-Transparent Bridges Because network topologies have developed in which bridges must be able to handle network trafÞc from end stations which support source routing and others which do not, a hybrid type of bridgeÑSource Route-Transparent (SRT)Ñcombines elements of both bridging methods. An end stationÕs network drivers can be conÞgured in software to use a bit setting in the source address portion of a data frame to indicate whether the station is to operate in a Source Route or Transparently bridged network environment. The Routing Information Indicator (RII) bit of the source address is set to 1 if the station is to use Source Routing; if the station is to operate in a Transparently bridged environment, the RII bit is left unchanged (i.e., at 0). Not all end stations in a Token Ring environment have network drivers which support Source RoutingÑwhether the drivers are improperly conÞgured via management or they simply are not source-route capable. In a network with a mix of Source Route and Transparent end stations, data frames from both station types must be bridged correctly. An SRT bridge inspects the RII bit setting of incoming frames to determine whether they should be Transparently bridged (if the RII bit was at 0) or Source Routed (if the RII bit was set to 1) to their destination and will use the appropriate bridge method to forward the frame. NOTE Cabletron has extended the functionality of Ethernet ports on translational bridges, so the ports can be set to Source Route mode. When an Ethernet port is in Source Route mode, on receipt of an SR packet from a Token Ring port, it will save the Source Routing information and send out the packet transparently. When the response comes back, the source routing information will be restored and sent to the Token Ring port. About Source Route-Translational Bridges Because SmartSwitch 2000, 6000 and 9000 modules have the ability to combine mixed network topologies, yet another hybrid bridge methodÑcalled a Source Route Translational bridge (SR-TB)Ñis used by a number of these SmartSwitch modules. An SR-TB bridge supports both Source Routing and Transparent bridging capabilities, with the added requirement of maintaining Source Route information across an FDDI interfaceÑeither the SmartSwitch 9000 FNB backplane, or an installed FDDI High Speed Interface Module (HSIM). An SR-TB bridge does this by ÒtranslatingÓ the Token Ring physical frame format (by stripping out routing information, if necessary) so that the frameÕs source address can be recognized on an FDDI, Ethernet, or ATM segment; and then, when data is returned to the source, restoring the necessary route information to forward it along a bridged Token Ring environment. 4-4 Bridging Basics Bridging For data that is restricted to the Token Ring networks available from the SR-TB bridgeÕs front panel, the bridging method used is user-conÞgurable via local management to be Source Route-only (bridged packets must include RIF information and will be source routed; no transparent bridging is enabled), Source Route-Transparent (bridging method will be determined by whether the RII bit is set), or Transparent only (no source routed packets will be bridged). Remote management of these interfaces is based upon their current mode (as set through local management). For data that will ultimately be sent across an FDDI interface to an ATM, Ethernet, FDDI, or another Token Ring segment, the Routing Information Field will be stripped from the packet so the packet can be transparently bridged onto Ethernet or FDDI media; however, the RIF information as well as the source address of the packet is stored in a RIF cache of the SR-TB bridge. When data is returned to that source address, the SR-TB bridge can look up the address information in its RIF cache, append the proper Routing Information onto the packet, and then forward the data to the Token Ring segment. The RIF cache is a software table that can store up to 8192 entries. An SR-TB bridge updates its RIF cache much like a Transparent bridge dynamically updates its Filtering Database: it learns new address information by listening to incoming packets on each port, saves that information to an Address Database, andÑif the address was learned to be Source-Route capableÑupdates routing information for that source address in the RIF cache. Every time a packet arrives from an FDDI interface for a MAC address that is communicating through the SR-TB bridgeÕs front panel, the RIF cache table is searched for an address/RIF match. There are conÞguration issues when a Token Ring module receives a packet from an FDDI interface for a destination address that is unknown, and not in its Address Database or RIF cache. You must conÞgure your SR-TB bridge to treat incoming packets with an unknown destination address as either a Source Route or Transparently bridged packet (since Token Ring end stations attached to the module may or may not support Source Routing). If the bridge is conÞgured to treat an incoming packet with unknown addresses as a Source Routed frame, it will forward it using either STE or ARE frames. If the bridge is conÞgured to treat an incoming packet with an unknown destination as a Transparently bridged frame, it simply forwards the frame. After a packet with a previously unknown destination has been bridged successfully, and communication begins between the two end nodes, the RIF cache will be updated and packets will be translated as described previously. Bridging Basics 4-5 Bridging Viewing and Managing Bridging Interfaces With SPECTRUM Element Manager, you can view and manage each bridging interface supported by your device, including any installed interface modules, such as BRIMs (Bridge/Router Interface Modules) and HSIMs (High Speed Interface Modules). You can manage your bridge by using the following windows: 4-6 ¥ The Bridge Status window provide you with basic information about the current status of the deviceÕs bridging interfaces, and allow you to enable or disable bridging at each interface of the bridge. The Bridge Status window also lets you access further windows to conÞgure bridging at the device (see The Bridge Status Window, page 4-8). ¥ Bridge statisticsÑincluding the Performance Graph, Interface Statistics, CSMACD Statistics, PPP Link Statistics, Dot5 Error Statistics, and Source Route Statistics windowsÑgraphically display the trafÞc passing between your bridged networks, and let you compare and contrast trafÞc and errors processed by each interface (see Bridge Statistics, page 4-15). ¥ The Spanning Tree window shows bridge port information and protocol parameters relating to the Spanning Tree AlgorithmÑthe method of determining the controlling bridge when a series of bridges are placed in parallel (see Bridge Spanning Tree, page 4-35). ¥ With the Filtering Database window, you can see the contents of the Static and Learned databasesÑthe two address databases which construct the IEEE 802.1 Source Address Table. The bridge uses the contents of these databases to make its packet Þltering and forwarding decisions. You can conÞgure entries in these databases to increase bridging efÞciency across your network (see Filtering Database, page 4-42). ¥ The Ethernet Special Filter Database and Token Ring Special Filter Database windows let you conÞgure a special Þltering scheme at your bridge. With this scheme, you can enter Þlter parameters for a frame based on the contents of its source or destination address Þeld, type Þeld, or data Þeld (with offset)Ñthen specify the bridging action to take place at each port when a frame matching your speciÞcations is encountered (see Ethernet and Token Ring Special Filter Databases, page 4-49). ¥ The Duplex Modes window lists each interface on your device and whether or not it is using Full Duplex mode. The window allows you to switch full duplex mode on and off for each interface on the device. Full Duplex Switched Ethernet (FDSE) mode allows the interface to transmit and receive information simultaneously, effectively doubling the available bandwidth (see Duplex Modes, page 4-66). ¥ The Broadcast Suppression window enables you to monitor the number of broadcast packets received by each interface of a selected device, and conÞgure the maximum number of broadcast packets that will be forwarded to other interfaces (see ConÞguring Broadcast Suppression, page 4-82). Viewing and Managing Bridging Interfaces Bridging NOTE ¥ The SmartTrunk option invokes the SmartTrunk ConÞguration and Status window, which enables you to group interfaces logically to achieve greater bandwidth between devices, if both devices support the SmartTrunk feature. There is no limit to the number of ports that can be included in a single Òtrunk,Ó nor is there a limit to the number of trunked ÒinstancesÓ that can be supported (see ConÞguring SmartTrunking, page 4-96). ¥ The Token Ring Bridge Mode window lets you select which type of bridging that will be used by the Token Ring bridging deviceÑTransparent, Source Routing, or Source Route Transparent (see Token Ring Bridge Mode, page 4-83). ¥ The Bridge ConÞguration option opens a window that allows you to set address and routing information for all interfaces on a Token Ring bridging device, including the Bridge Number and the Virtual Ring Number. It also allows you to set source route bridging parameters at the device level (see Using the Bridge and Port ConÞguration Windows, page 4-92). ¥ The Port ConÞguration option opens a window that allows you to view the address and routing information for an individual Token Ring bridging interface. This window displays information that is set at the device level via the Bridge ConÞguration window, such as the Bridge Number and the Virtual Ring Number. It also allows you to set source route bridging parameters for that port (see Using the Bridge and Port ConÞguration Windows, page 4-92). ¥ The I/F ConÞguration port-level menu option invokes the Interface ConÞguration window, which allows you to select a bridging method for a Token Ring bridging interface. This window also allows you to select one of three transmission methods that should be used when unknown addresses are received from end stations attached to the selected bridge port (see Using the Interface ConÞguration Window, page 4-89). ¥ The Source Route ConÞguration option enables you to conÞgure source routed trafÞc passing between bridge ports (see Source Route ConÞguration, page 4-57). The menu options that are available will vary depending on the type of device you are monitoring, and on the type of bridge interfaces supported by the device. The following sections detail how to use each of the bridge management windows. Viewing and Managing Bridging Interfaces 4-7 Bridging The Bridge Status Window The Bridge Status window provides you with basic information about the current status of bridging across your device. Color-coding of each port display allows you to quickly ascertain the status of each interface. The Bridge Status window also lets you access further windows to control bridging at your device. To access the Bridge Status window from the Chassis View window: 1. Click on the Device selection in the menu bar. A pull-down menu will appear. 2. Click on Bridge Status…. The Bridge Status window, Figure 4-1, will appear. Bridge Status Window Information Fields The following information is provided by the Bridge Status window for the monitored device as a whole and for each individual bridging interface. Since the Bridge Status window can only display four interfaces simultaneously, the and buttons are activated when a device supports over four bridge interfaces, so that you can scroll the display to show all interfaces. NOTE 4-8 When you Þrst open the Bridge Status window the Prev and Next buttons will be grayed out, and a message will appear stating that the application is initializing and processing each interface. You will not be able to scroll the display until after all the bridging interfaces have been processed. The Bridge Status Window Bridging Figure 4-1. The Bridge Status Window Up Time At the top of the Bridge Status window, you can see the time period (in a days, hours, minutes, seconds format) that has elapsed since the device was last reset or initialized. Bridge State on Interface Indicates the state of bridging over the port interface. Possible bridge states and their corresponding colors are: ¥ Forwarding (green)ÑThe port is on-line and forwarding packets across the bridge from one network segment to another. ¥ Disabled (blue)ÑBridging at the port has been disabled by management; no trafÞc can be received or forwarded on this port, including conÞguration information for the bridged topology. ¥ Listening (magenta)ÑThe port is not adding information to the Þltering database. It is monitoring Bridge Protocol Data Unit (BPDU) trafÞc while preparing to move to the forwarding state. ¥ Learning (magenta)ÑThe Forwarding database is being created, or the Spanning Tree Algorithm is being executed because of a network topology change. The port is monitoring network trafÞc, and learning network addresses. The Bridge Status Window 4-9 Bridging ¥ Blocking (orange)ÑThe port is on-line, but Þltering trafÞc from going across the bridge from one network segment to another. Bridge topology information will be forwarded by the port. Interface Type Indicates the interface type which applies to each device bridging port interface (e.g., ethernet). The interface type (ifType) is a mandatory object type from the SNMP MIB II Interface (if) Group. Bridge Address Indicates the physical address of the bridge interface. Speed Indicates the speed of the interface in Mb/s or Gb/s. Accessing Other Options from the Bridge Status Window At the top of the Bridge Status window, you can click to access a menu that provides other bridge management options. Depending on which device you are monitoring via SPECTRUM Element Manager, the following bridge management options will be available: 4-10 ¥ The Module TypeÉ window displays a description of the device that is currently being monitored. ¥ The Find Source AddressÉ window allows you to discover the bridge interface through which a particular MAC address is communicating (see Using the Find Source Address Feature, page 4-63). ¥ The Performance GraphÉ window displays statistics for trafÞc across the entire bridge (see Performance Graphs, page 4-15). ¥ The Spanning TreeÉ window allows you to set the Spanning Tree Algorithm parameters for bridging on your device (see Bridge Spanning Tree, page 4-35). ¥ The SmartTrunkÉ option invokes the SmartTrunk ConÞguration and Status window, which enables you to group interfaces logically to achieve greater bandwidth between devices, if both devices support the SmartTrunk feature. There is no limit to the number of ports that can be included in a single Òtrunk,Ó nor is there a limit to the number of trunked ÒinstancesÓ that can be supported (see ConÞguring SmartTrunking, page 4-96). ¥ The Filtering DatabaseÉ window lets you see the contents of the Static and Learned databasesÑthe two address databases which construct the IEEE 802.1 Source Address Table. The bridge uses the contents of these databases to make its packet Þltering and forwarding decisions. You can conÞgure the bridgeÕs acquired and permanent Þltering databases to Þlter or forward trafÞc across the device (see Filtering Database, page 4-42). The Bridge Status Window Bridging ¥ The Ethernet Special Filter DatabaseÉ window lets you conÞgure a special Þltering scheme at your bridge. With this scheme, you can enter Þlter parameters for a frame based on the contents of its source or destination address Þeld, type Þeld, or data Þeld (with offset)Ñthen specify the bridging action to take place at each port when a frame matching your speciÞcations is encountered (see Ethernet and Token Ring Special Filter Databases, page 4-49). ¥ The Token Ring Special Filter DatabaseÉ window enables you to deÞne complex Þlters for transparently bridged Token Ring frames based upon receive port, source or destination MAC address, Token Ring data type, or data Þeld information (up to 64 bytes) (see Ethernet and Token Ring Special Filter Databases, page 4-49). ¥ The Token Ring Bridge ModeÉ window lets you select which type of bridging that will be used by the Token Ring bridging deviceÑTransparent, Source Routing, or Source Route Transparent (see Token Ring Bridge Mode, page 4-83). ¥ The Duplex ModesÉ window allows you to conÞgure duplex mode (on or off) for supporting interfaces on the device (see Duplex Modes, page 4-66). ¥ Enable Bridge and Disable Bridge options allow you to administratively activate or deactivate bridging at the device level see (Enabling and Disabling Bridging, page 4-14). ¥ The Bridge ConÞgurationÉ option opens a window that allows you to set address and routing information for all interfaces on a Token Ring bridging device, including the Bridge Number and the Virtual Ring Number. It also allows you to set source route bridging parameters at the device level (see Using the Bridge and Port ConÞguration Windows, page 4-92). The individual bridge port index ( ) menu that you can access from the Bridge Status window will provide the following options, depending on which device you are monitoring through SPECTRUM Element Manager: ¥ The Connection TypeÉ window displays a text description of the connection type of the selected bridge interface. ¥ The DescriptionÉ option displays a text description of a bridge interface from the ifDescr value of the ifIndex related to the selected port. ¥ The Performance GraphÉ window graphically displays the trafÞc passing between your bridged networks, and lets you compare and contrast trafÞc processed by each interface (see Performance Graphs, page 4-15). ¥ The Source AddressingÉ window displays the contents of the deviceÕs Filtering Database with respect to a selected port. This will display the source MAC addresses that have been detected by the port as it forwards data across the network. The window also lets you set the aging timer that controls how long an inactive MAC address will continue to be stored in the Source Address Database before being aged out (see Source Route ConÞguration, page 4-63). The Bridge Status Window 4-11 Bridging 4-12 ¥ The PPP Link StatusÉoption invokes the PPP Link Statistics Window, which enables you to view color-coded statistics related to the PPP (Point-to-Point Protocol) link at the selected interface (see The PPP Link Statistics Window, page 4-26). ¥ The Source Route StatisticsÉ option opens a window that allows you to view statistics for source routed trafÞc passing between bridging ports. The window enables you to view the frames that were received, transmitted, and discarded by the bridge (see Source Route Statistics, page 4-32). ¥ The I/F ConÞguration port-level menu option invokes the Interface ConÞguration window, which allows you to select a bridging method for a Token Ring bridging interface. This window also allows you to select one of three transmission methods that should be used when unknown addresses are received from end stations attached to the selected bridge port (see Using the Interface ConÞguration Window, page 4-89). ¥ The Source Route ConÞgurationÉ option opens a window that enables you to conÞgure source routed trafÞc passing between bridging ports (see Source Route ConÞguration, page 4-57). ¥ The Port ConÞgurationÉ option opens a window that allows you to view the address and routing information for an individual Token Ring bridging interface. This window displays information that is set at the device level via the Bridge ConÞguration window, such as the Bridge Number and the Virtual Ring Number. It also allows you to set source route bridging parameters for that port (see Using the Bridge and Port ConÞguration Windows, page 4-92). ¥ The Dot5 ErrorsÉ invokes a window that enables you to view 802.5 statistics for the selected bridging interface on a Token Ring bridging device (see The Dot5 Errors Statistics Window, page 4-29). ¥ The RMON MAC LayerÉ option opens the Token Ring Statistics window for Token Ring devices that support RMON, which enables you to view a statistical breakdown of trafÞc on the monitored Token Ring interface (network segment). Note that if the RMON default MIB component is disabled, the RMON MAC Layer menu option will launch the Interface Statistics window. Refer to the SPECTRUM Element Manager Remote Monitoring (RMON) UserÕs Guide for more information on how to enable and disable RMON MIB components. For more information about this menu option, refer to the Statistics chapter in the SPECTRUM Element Manager Remote Monitoring (RMON) UserÕs Guide, and/or the appropriate device-speciÞc UserÕs Guide. ¥ The RMON Promiscuous StatsÉ option opens the Token Ring Promiscuous Statistics window, which allows you to view statistical information on those packets that carry the normal data ßow across a bridging interface (network segment). Note that if the RMON default MIB component is disabled, the RMON Promiscuous Stats menu option will launch the Interface Statistics window. Refer to the SPECTRUM Element Manager Remote Monitoring (RMON) UserÕs Guide for more information on how to enable and disable RMON MIB components. For more information about this menu option, refer The Bridge Status Window Bridging to the Statistics chapter in the SPECTRUM Element Manager Remote Monitoring (RMON) UserÕs Guide, and/or the appropriate device-speciÞc UserÕs Guide. ¥ The RMON Alarm ConÞgurationÉ invokes the Basic Alarm ConÞguration window that enables you to create alarms or actions at a speciÞc bridge interface based on rising and falling thresholds for Kilobits, Broadcast/Multicast packets, or Total Errors. Note that if the RMON default MIB component is disabled, the RMON Alarm ConÞguration menu option will still appear and the window will still display; however, you will not have the ability to set anything. Refer to the SPECTRUM Element Manager Remote Monitoring (RMON) UserÕs Guide for more information on how to enable and disable RMON MIB components. For more information about this menu option, refer to the RMON Alarms and Events chapter in the SPECTRUM Element Manager Remote Monitoring (RMON) UserÕs Guide, and/or the appropriate device-speciÞc UserÕs Guide. ¥ The I/F StatisticsÉ option activates the Interface Statistics Port window, which allows you to view color-coded statistical information about each individual bridge port on the currently monitored device (see The Interface Statistics Window, page 4-21). ¥ The ConÞgurationÉ option opens a window that enables you to conÞgure the selected bridge interface for either full duplex or standard mode (see Ethernet Port ConÞguration Window, page 4-69). ¥ The Alarm ConÞgurationÉ option appears as a menu choice for Ethernet devices which support RMON, and invokes the RMON Basic Alarm ConÞguration window that enables you to create alarms or actions at a speciÞc bridge interface based on rising and falling thresholds for Kilobits, Broadcast/Multicast packets, or Total Errors. Note that if the RMON default MIB component is disabled, the Alarm ConÞguration menu option will still appear and the window will still display; however, you will not have the ability to set anything. Refer to the SPECTRUM Element Manager Remote Monitoring (RMON) UserÕs Guide for more information on how to enable and disable RMON MIB components. For more information about this window, refer to the RMON Alarms and Events chapter in the SPECTRUM Element Manager Remote Monitoring (RMON) UserÕs Guide, and/or the appropriate device-speciÞc UserÕs Guide. ¥ The StatisticsÉ option appears as a menu choice for Ethernet devices which support RMON, and it opens the Ethernet Statistics window, which enables you to view a statistical breakdown of trafÞc at the monitored Ethernet network segment. Note that if the RMON default MIB component is disabled, the Statistics menu option will launch the Interface Statistics window. Refer to the SPECTRUM Element Manager Remote Monitoring (RMON) UserÕs Guide for more information on how to enable and disable RMON MIB components. For more information about this menu option, refer to the Statistics chapter in the SPECTRUM Element Manager Remote Monitoring (RMON) UserÕs Guide, and/or the appropriate device-speciÞc UserÕs Guide. The Bridge Status Window 4-13 Bridging ¥ The Sonet/SDH ConÞgurationÉ window enables you to determine whether any installed FE-100Sx Fast Ethernet Port Interface Modules or APIM-2x ATM Port Interface Modules, both of which provide direct access to SONET (Synchronous Optical Network) networks, will operate according to SONET or SDH (Synchronous Digital Hierarchy) standards (see SONET/SDH ConÞguration, page 4-74). ¥ The Sonet StatisticsÉ option opens a window that will let you view some of the statistical information related to any installed FE100-Sx Fast Ethernet Port Interface Modules or APIM-2x ATM Port Interface Modules (see SONET/SDH Statistics Window, page 4-76). ¥ The Physical ViewÉ option allows you to view the physical state of the Ethernet bridge port through the ETW EtherPhysStatus window and the Token Ring bridge port through the Token Ring Phys Status window when you are monitoring an ETWMIM via SPECTRUM Element Manager (see Using the Physical View Windows, page 4-85). ¥ The CSMACD StatsÉ option opens a window that enables you to view color-coded statistical information for some Ethernet bridging interfaces, including receive errors, transmission errors, and collision errors (see The CSMACD Statistics Window, page 4-23). ¥ Enable and Disable options allow you to administratively enable or disable bridging at the selected interface (see Enabling and Disabling Bridging, page 4-14). Enabling and Disabling Bridging When you disable a bridge port, you disconnect that portÕs network from the bridge entirely. The port does not forward any packets, nor does it participate in Spanning Tree operations. Nodes connected to the network can still communicate with each other, but they canÕt communicate with the bridge and other networks connected to the bridge. When you enable a port, the port moves from the Disabled state through the Learning and Listening states to the Forwarding or Blocking state (as determined by Spanning Tree). Enabling and Disabling Individual Interfaces There are two ways to disable an individual port interface: from the Bridge Status window: 1. Click on the desired Port button ( ) to display the port menu. 2. Drag down to Enable to restart bridging on the selected interface, or Disable to halt bridging across the selected interface. 4-14 Enabling and Disabling Bridging Bridging from the Chassis View window: 1. Click on the appropriate port index to access the Port menu. 2. Drag down to Enable to restart bridging on the selected interface, or Disable to halt bridging across the selected interface. Enabling and Disabling All Installed Interfaces Similarly, there are two ways to disable bridging across all interfaces installed in a device: from the Bridge Status window: 1. Click on to display the Bridge menu. 2. Drag down to Enable Bridge to enable bridging across all installed interfaces, or to Disable Bridge to disable bridging across all installed interfaces. from the Chassis View window: 1. Click on the Board Index of the device of interest; the Board menu will appear. 2. Drag down to Enable Bridge to enable bridging across all installed interfaces, or to Disable Bridge to disable bridging across all installed interfaces. Bridge Statistics The following sections describe Statistics windows that are available for the bridge that is being monitored via SPECTRUM Element Manager, both at the device and port levels. Performance Graphs You use Bridge Performance Graphs to view a color-coded strip chart that shows you the trafÞc being bridged through all networks or an individual network supported by your device. You can conÞgure the display to show frames Þltered, forwarded, or transmitted across the device or its individual bridging interfaces, as well as the number of errors experienced at both levels. The graph has an X axis that indicates the 60-second interval over which charting occurs continuously, while its Y axis measures the number of packets or errors that are processed by the device or its bridging interfaces. You can select the type of errors you wish to monitor by using the available menu buttons. When you click on the error type you wish to view, the name of that error will appear in the button, and the Performance Graph will refresh. The graph will now generate a strip chart based on the newly deÞned parameters. Bridge Statistics 4-15 Bridging At the device level, a Detail button on the window allows you to compare the packets forwarded, Þltered, or transmitted on all networks supported by the device, as well as errors on all networks. For a selected bridged network, the Detail button allows you to view the number of packets forwarded to, or received from, each other network supported by the device. To access the device-level Bridge Performance Graph window from the Bridge Status window: 1. Click on to display the Bridge menu. 2. Drag down to select Performance Graph…. The device Bridge Performance Graph window, Figure 4-2, will appear. (The individual port Bridge Performance Graph windows are similar, except that they display a graph applicable to the selected interface.) from the Chassis View window: 1. Click on the Board Index of the device of interest; the Board menu will appear. 2. Drag down to select Performance Graph…. The device Bridge Performance Graph window, Figure 4-2, will appear. To access the port-level Bridge Performance Graph window from the Bridge Status window: 1. Click on the desired Port button ( ) to display the port menu. 2. Drag down to select Performance Graph…. The port Bridge Performance Graph window, Figure 4-2, will appear. from the Chassis View window: 1. Click on the appropriate port index to access the Port menu. 2. Drag down to select Performance Graph…. The port Bridge Performance Graph window, Figure 4-2, will appear. NOTE 4-16 The displayed graphic in Figure 2-2 is a device-level window; the window that is displayed at the port level is virtually identical to the one at the device level. Bridge Statistics Bridging Figure 4-2. Bridge Performance Graph Bridge Performance Graph Window Fields You can select the following statistics to display in the Bridge Performance Graph or Bridge Port Performance Graph. Statistics are provided numerically (as an average or peak value) and graphically. The device is polled for the graphed information every 2 seconds, and numeric values are updated based on this poll. The graph updates at the Þxed two second interval. For the Þrst 60 seconds of graphing, you will note the graph lines extending as each intervalÕs data is added to the graph. Once the Þrst 60 seconds has passed, the newest data is added at the right edge of the graph, and the oldest data is scrolled off to the left. Peak statistics are based on the peak level of activity returned from a single poll since the Performance Graph window was invoked. A date and time is provided for peak levels. The Average statistics are updated every two seconds as averaged over the previous four poll intervals (i.e., averaged over a sliding eight second time window). Frames Forwarded (Green) Forwarded The number of frames forwarded by the deviceÕs bridge, at the device or port level. Nothing Filtered (Magenta) Filtered Nothing Bridge Statistics The Frames Forwarded function is currently not measuring any statistics. The total number of frames Þltered by the deviceÕs bridge, at the device or port level. The Filtered scale is not currently measuring the number of packets Þltered by the bridge at the device or port level. 4-17 Bridging Errors (Red) Total Errors Nothing Xmitted (Blue) Xmitted Nothing The total number of errors that all bridging interfaces on the device, or an individual bridge interface, has experienced during bridging. The Errors scale is currently not measuring any type of error packets coming through the device or port. The total number of frames transmitted by the selected bridge interface, or all bridge interfaces. The Xmitted scale is not currently measuring the number of packets Þltered by the bridge or the individual interface. Configuring the Bridge Performance Graphs To conÞgure the Bridge Performance Graph: 1. Using the mouse, click on (with green statistics to the right). The Forwarded menu will appear. Click on the desired mode. 2. Click on (with magenta statistics to the right). The Filtered menu will appear. Click on the desired mode. 3. Click on (with red statistics to the right). The Errors menu will appear. Click on the desired mode. 4. Click on (with blue statistics to the right). The Xmitted menu will appear. Click on the desired mode. Once you have selected a new mode, it will appear in its respective button, and after the next poll the Performance Graph will refresh and begin to measure using the new mode. The Bridge Detail Breakdown Window The Bridge Detail Breakdown window allows you to compare the number of frames forwarded, Þltered, and transmitted on the network segments connected to each interface of your device bridge, as well as the number of errors experienced on each interface. NOTE 4-18 The Bridge Detail Breakdown window will not be available if your device has more than 13 bridge ports. Bridge Statistics Bridging To access this window from the Bridge performance graph, click on Bridge Detail Breakdown window, Figure 4-3, will appear. . The Figure 4-3. The Bridge Detail Breakdown Window The following information is available for the network segments connected to each of the bridge ports on the device, and any installed BRIM or HSIM port. The information is expressed both numerically and in pie charts. Each portÕs network segment has a corresponding color for its statistics or pie chart segments. Depending on your particular bridge and its conÞguration, the segments are color-coded as follows: light red = LAN 1, light green = LAN 2, yellow = LAN 3, light gray = LAN 4, light cyan = LAN 5, light blue = LAN 6, green = LAN 7, red = LAN 8, hot pink = LAN 9, light magenta = LAN 10, blue = LAN 11, cyan = LAN 12, black = LAN 13. The values given in these Þelds are cumulative totals. Frames Forwarded The total number of frames forwarded on each portÕs network segment, as read from the device after each poll interval. Filtered The total number of frames Þltered on each portÕs network segment, as read from the device after each poll interval. Errors The total number of frames (either inbound or outbound) containing errors which prevented them from being processed by each bridge interface, as reported from the device during the last poll interval. Bridge Statistics 4-19 Bridging Xmitted The total number of frames transmitted over each portÕs network segment, as read from the device after each poll interval. The Bridge Port Detail Breakdown Window For the selected bridge interface, the Bridge Port Detail Breakdown window allows you to view the number of packets forwarded to or received from each of the other interfaces on your device. To access the Bridge Port Detail Breakdown window from the port Bridge performance graph, click . The Bridge Port Detail Breakdown window, Figure 4-4, will appear. Figure 4-4. The Bridge Port Detail Breakdown Window The following information is available for each bridge interface on the device. The information is expressed both numerically and in pie charts. The colors corresponding to the forwarding interfaces will vary, depending on which interface is selected. Forwarded to The number of frames forwarded by the selected bridge interface to each other interface on the bridge, as read from the device after each poll interval. Forwarded from The total number of frames received by the selected bridge interface from each of the other bridge interfaces, as read from the device after each poll interval. 4-20 Bridge Statistics Bridging The Interface Statistics Window You can use the interface Statistics window to view color-coded statistical information for each individual bridge port on your device. Statistics are provided for both transmit and receive packets at each port, as well as error and buffering information. Color-coded pie charts in the middle of the window lets you graphically view statistics for Unicast, Non-Unicast, Discarded and Error packets. To access the Statistics window from the Bridge Status window: 1. Click on the desired Port button ( ) to display the port menu. 2. Drag down to select I/F Statistics…. The device port I/F Statistics window, Figure 4-5, will appear. from the Chassis View window: 1. Click on the appropriate port index to access the Port menu. 2. Drag down to select I/F Statistics…. The device port I/F Statistics window, Figure 4-5, will appear. Figure 4-5. I/F Statistics Window Bridge Statistics 4-21 Bridging Statistics Window Fields The following informational and statistics Þelds appear in the interface Statistics window. Three informational Þelds appear in the upper portion of the window: Description Describes the interface description for the currently selected port. Address Displays the MAC (physical) address of the selected port. Type Displays the interface type of the selected port. The following transmit and receive statistics Þelds are displayed in the lower portion of the window. The Þrst four statistics are also graphically displayed in a pie chart. The statistics are read directly from the device, and are updated with each poll from SPECTRUM Element Manager to the device. Unicast Displays the number of packets transmitted to, or received from, this interface that had a single, unique source or destination address. These statistics are displayed in the pie chart (color-coded green). Non-Unicast Displays the number of packets transmitted to, or received from, this interface that had a source or destination address that is recognized by more than one device on the network segment. The non-unicast Þeld includes a count of broadcast packetsÑthose that are recognized by all devices on a segment. These statistics are displayed in the pie chart (color-coded dark blue). Discarded Displays the number of packets which were discarded even though no errors were detected to prevent transmission. One possible reason for discarding such a packet could be to free up buffer space. Discarding good packets indicates a very busy network. If a device routinely discards packets, it usually means that network trafÞc is overwhelming the device, perhaps because the device is performing poorly. These statistics are displayed in the pie chart (color-coded hot pink). Error Displays the number of packets received or transmitted that contained errors. These statistics are displayed in the pie chart (color-coded red). 4-22 Bridge Statistics Bridging Unknown Protocol Displays the number of packets received which were discarded because of an unknown or unsupported protocol. The device bridge interface will discard the packet and increment this counter if it canÕt recognize the packet. Packets Received Displays the number of packets received by this interface. Transmit Queue Size The number of packets currently queued by the device for transmission from this interface. The amount of device memory devoted to buffer space, and the trafÞc level on the target network, determine how large the output packet queue can grow before the device begins to discard packets. Packets Transmitted Displays the number of packets transmitted by this interface. The CSMACD Statistics Window The CSCMACD Statistics Windows display statistics for some Ethernet bridging interfaces. Receive errors, transmission errors, and collision errors are displayed in this window. Three color-coded pie charts allow you to graphically view the breakdowns of each statistics group. To access the CSMACD Statistics window from the Bridge Status window: 1. Click on the desired Port button ( ) to display the port menu. 2. Drag down to select CSMACD Stats…. The device port CSMACD Statistics window, Figure 4-6, will appear. from the Chassis View window: 1. Click on the appropriate port index to access the Port menu. 2. Drag down to select CSMACD Stats…. The device port CSMACD Statistics window, Figure 4-6, will appear. Bridge Statistics 4-23 Bridging Figure 4-6. CSMACD Statistics Window Each of the receive, transmission, and collision errors are described in detail below. Receive Errors Alignment The number of frames received on a particular interface that contain a nonintegral number of bytes (color-coded green). Misaligned packets can result from a MAC layer packet formation problem, or from a cabling problem that is corrupting or losing data. FCS The number of frames received on a particular interface that are an integral number of bytes in length, but do not pass the FCS (Frame Check Sequence) check. FCS, or Frame Check Sequence, errors occur when packets are somehow damaged on transit. When each packet is transmitted, the transmitting interface computes a frame check sequence (FCS) value based on the contents of the packet, and appends that value to the packet. The receiving interface performs the same computation; if the FCS values differ, the packet is assumed to have been corrupted and is counted as an FCS error. 4-24 Bridge Statistics Bridging SQE Test Displays the number of times that the SQE Test Error message is generated by the PLS sublayer on the selected interface. The SQE (Signal Quality Error) Test tests the collision detect circuitry after each transmission. If the SQE Test fails, a SQE Test Error is sent to the interface to indicate that the collision detect circuitry is malfunctioning. Carrier Sense Displays the number of times that the carrier sense condition was lost or never asserted when attempting to transmit a frame on a particular interface. Carrier sense describes the action an interface desiring to transmit will take to listen to the communication channel to see if any other interface is transmitting. If a Òcarrier is sensed,Ó the sensing interface will wait a random length of time, and then attempt to transmit. Frame Too Long Displays the amount of frames received on this interface that exceed the maximum permitted frame size. Internal MAC The number of frames that failed to be received by the interface due to an internal MAC sublayer receive error. These errors are only counted if a Frame Too Long, Alignment, or FCS Error did not occur along with the internal MAC error. Receive Errors Displays the total number of receive errors of all types that were detected by the selected interface while it was receiving a transmission. Transmission Errors Deferred Displays the number of frames for which the Þrst transmission attempt on this interface is delayed because the medium is busy. Internal MAC The number of frames for which transmission fails due to an internal MAC sublayer transmit error. This error is only counted in this window if there have not been corresponding Late Collisions, Excessive Collisions, or Carrier Sense Errors. Transmit Errors The total of transmission errors of all types that occurred while the selected interface was attempting to transmit frames. Bridge Statistics 4-25 Bridging Collision Errors Single Displays the number of successfully transmitted frames on the selected interface for which transmission was prevented by one collision. Multiple Displays the number of successfully transmitted frames on the selected interface for which transmission was prevented by more than one collision. Late Displays the number of times that a collision has been detected on this interface later than 51.2 microseconds into the transmission of the packet on a 10 Mbit/s system or later than 5.12 microseconds on a 100 Mbit/s system. Excessive Displays the number of frames from this interface for which transmission was not complete due to excessive collisions. Collision Errors Displays the total number of collision errors of all types that occurred during transmission from this interface. The PPP Link Statistics Window The PPP Link Status menu option opens the PPP Link Statistics window, which enables you to view color-coded statistics related to the PPP (Point-to-Point Protocol) link at the selected interface. The Point-to-Point Protocol is a standard method of transporting multiprotocol datagrams over point-to-point links. A PPP Link provides full-duplex communication between the endpoints, allowing a simultaneous bidirectional operation that should maintain the order in which data packets are transmitted. To access the PPP Link Statistics window from the Bridge Status window: 1. Click on the desired Port button ( ) to display the port menu. 2. Drag down to select PPP Link Status…. The device port PPP Link Statistics window, Figure 4-7, will appear. from the Chassis View window: 1. Click on the appropriate port index to access the Port menu. 2. Drag down to select PPP Link Status…. The device port PPP Link Statistics window, Figure 4-7, will appear. 4-26 Bridge Statistics Bridging Figure 4-7. PPP Link Statistics Window Each of the errors and statistics related to the PPP Link at the selected bridging interface is described in detail below. Errors Bad Addresses The Bad Addresses Þeld displays the number of packets received with an incorrect Address Þeld. Bad Controls The Bad Controls Þeld displays the number of packets received on the selected interface that have an incorrect Control Þeld. Packets Too Long The Packets Too Long Þeld displays the number of received packets that were discarded because their length exceeded the MRU (Maximum Receive Unit). Note that packets that are longer than the MRU and that are successfully received and processed are not included in the count. Bridge Statistics 4-27 Bridging Bad FCSs The Bad FCSs Þeld displays the number of received packets that were discarded due to having an incorrect FCS (Frame Check Sequence) value. Total Errors The Total Errors Þeld displays the total number of errors of all types: Bad Addresses, Bad Controls, Packets Too Long, and Bad FCSs. Statistics Local MRU The Local MRU Þeld displays the current value of the MRU (Maximum Receive Unit) for the local PPP entity. This value is the MRU that the remote entity uses when sending packets to the local PPP entity. The MRU is the maximum length of data information (included ÒpaddedÓ data octets, but excluding the Protocol Þeld which identiÞes the datagramÕs protocol type) that can be received by this interface. The default MRU size is 1500 octets. The auto-negotiation process may establish another value for MRU if consent is given at both ends of the PPP link (if either the local or remote PPP entity informs the other that larger packets can be sent, or requests that smaller packets be sent). Remote MRU The Remote MRU Þeld displays the current value of the MRU (Maximum Receive Unit) established for the remote interface at the other end of the PPP Link. This value is the MRU that the local entity uses when sending packets to the remote PPP entity. Local to Peer ACC Map The Local to Peer ACC Map Þeld displays the current value of the Asynchronous Control Character (ACC) Map used for sending packets from the local PPP entity to the remote PPP entity. In effect, this is the ACC Map that is required in order to ensure that all characters can be successfully transmitted through the local modem. The actual ACC Map used on the transmit side of the link will be a combination of the local nodeÕs pppLinkConÞgTransmitACCMap and the remote nodeÕs pppLinkConÞgReceiveACCMap. Peer to Local ACC Map The Peer to Local ACC Map Þeld displays the Asynchronous Control Character (ACC) Map used by the remote PPP entity when transmitting packets to the local PPP entity. In effect, this is the ACC Map that is required in order to ensure that the local modem will successfully receive all characters. The actual ACC Map used on the receive side of the link will be a combination of the local nodeÕs pppLinkConÞgReceiveACCMap and the remote nodeÕs pppLinkConÞgTransmitACCMap. 4-28 Bridge Statistics Bridging Local to Remote Protocol Compression The Local to Remote Protocol Compression Þeld determines whether or not the local PPP entity uses Protocol Compression when transmitting packets to the remote PPP entity. Remote to Local Protocol Compression The Remote to Local Protocol Compression Þeld determines whether or not the remote PPP entity uses Protocol Compression when transmitting packets to the local PPP entity. Local to Remote AC Compression The Local to Remote AC Compression Þeld determines whether or not the local PPP entity uses Address and Control (AC) Compression when transmitting packets to the remote PPP entity. Remote to Local AC Compression The Remote to Local AC Compression Þeld determines whether or not the remote PPP entity uses Address and Control (AC) Compression when transmitting packets to the local PPP entity. Transmit FCS Size The Transmit FCS Size Þeld displays the size of the Frame Check Sequence (FCS), in bits, that the local node generates when sending packets to the remote node. Currently, only a 16 bit FCS is supported. Receive FCS Size The Receive FCS Size Þeld displays the size of the Frame Check Sequence (FCS), in bits, that the remote node generates when sending packets to the local node. Currently, only a 16 bit FCS is supported. The Dot5 Errors Statistics Window The Dot5 Errors menu option invokes the Dot5 Errors Statistics window, which enables you to view IEEE 802.5 error statistics reported for a Token Ring bridge interface. To access the Dot5 Errors Statistics window from the Bridge Status window: 1. Click on the desired Port button ( ) to display the port menu. 2. Drag down to select Dot5 Errors…. The device port Dot5 Errors Statistics window, Figure 4-8, will appear. Bridge Statistics 4-29 Bridging from the Chassis View window: 1. Click on the appropriate port index to access the Port menu. 2. Drag down to select Dot5 Errors…. The device port Dot5 Errors Statistics window, Figure 4-8, will appear. Figure 4-8. Dot5 Errors Statistics Window Each type of IETF 802.5 error detected by the selected station port is described in detail below. Line Errors The Line Errors Þeld displays the number of the line errors detected by the selected port. This error indicates a nondata bit between the starting and ending delimiters of data or a frame check sequence (FCS) error. Burst Errors The Burst Errors Þeld displays the number of burst errors detected by the selected port. This error indicates a bit information encoding error when there are no transitions between 0 and 1 over Þve half-bit times. 4-30 Bridge Statistics Bridging A. C. Errors The A. C. Errors Þeld displays the number of A. C. errors detected by the selected port. These errors count protocol data units (PDUs) that contain errors in the A or C bits. Abort Sequences The Abort Sequences Þeld displays the number of abort sequences transmitted by the selected port. Internal Errors The Internal Errors Þeld displays the number of recoverable internal errors detected by the selected port. Lost Frames The Lost Frames Þeld displays the number of lost frames transmitted by the selected port that have not returned because the Timer Return to Repeat (TRR) expired. Congestion Errors The Congestion Errors Þeld displays the number of times the selected port has not been able to copy a protocol data unit (PDU) addressed to it because of a lack of internal buffering. F. C. Errors The F. C. Errors Þeld displays the number of protocol data units (PDUs) addressed to the selected station with the A bits already set to 1. This error indicates that a possible electrical line disturbance or a duplicate address has occurred on the ring. Token Errors The Token Errors Þeld displays the number of times that the selected station, acting as the active monitor, detected an error condition that needed a token transmitted. Soft Errors The Soft Errors Þeld displays the number of soft errors detected by the selected port. Hard Errors The Hard Errors Þeld displays the number of immediately recoverable fatal errors detected by the selected port. Signal Loss The Signal Loss Þeld displays the number of times that the selected port has detected the loss of a signal condition from the ring. Bridge Statistics 4-31 Bridging Transmit Beacons The Transmit Beacons Þeld displays the number of beacon frames transmitted by the selected station. Recoveries The Recoveries Þeld displays the number of frames the ring has been purged and recovered into a normal operating state. Lobe Wires The Lobe Wires Þeld displays the number of open or short circuits detected in the lobe data path. Removes The Removes Þeld displays the number of Remove Ring Station MAC frame requests detected by the selected port. Singles The Singles Þeld displays the number of times the selected station has detected that it is the only station on the ring. This error may indicate that the station is the Þrst on the ring or that there is a hardware problem. Frequency Errors The Frequency Errors Þeld displays the number of times that the selected station detected a larger-than-allowed difference between the incoming frequency and the expected frequency. Source Route Statistics The Source Route Statistics menu option invokes the Bridge Source Routing window, which allows you to compare the statistics on frames received, transmitted, and discarded at the Token Ring interfaces of devices that are bridging from a source routing network to a transparent network. To access the Bridge Source Routing window from the Bridge Status window: 1. Click on the desired Port button ( ) to display the port menu. 2. Drag down to select Source Route Statistics…. The Bridge Source Routing window, Figure 4-9, will appear. from the Chassis View window: 1. Click on the appropriate port index to access the Port menu. 2. Drag down to select Source Route Statistics…. The Bridge Source Routing window, Figure 4-9, will appear. 4-32 Bridge Statistics Bridging Figure 4-9. The Bridge Source Routing Window Bridge Source Routing Window Fields The Bridge Source Routing window provides basic statistics for source routed trafÞc passing between the bridging ports. Pie charts graphically break down the statistical information. The following frame types are provided for frames transmitted, received, and discarded by the bridge ports. All statistics are calculated since the device was last reset or powered up. Received Frames Specif. Routed Displays the total number of SpeciÞcally Routed Explorer frames received by the indicated port from its attached segment. These frames have data and routing information and are following a known route from source to destination. All Paths Expl. Displays the total number of All Path Explorer frames received by the indicated port from its attached segment. Bridge Statistics 4-33 Bridging When a sending station needs to determine the best route to an intended destination, it transmits an All Paths Explorer (APE) frame. The APE frame contains no routing information; it is propagated along all available paths to the destination station, which then directs a reply back to the source. The Þrst reply received by the original sending station is considered the most efÞcient route and is used in subsequent transmissions. Span. Tree Expl. Displays the total number of Spanning Tree Explorer (STE) frames received by the indicated port from its attached segment. STE frames, also known as Single Route Broadcast frames, follow the topology established by the Spanning Tree Algorithm. Transmitted Frames Specif. Routed Displays the total number of SpeciÞcally Routed Frames transmitted by the indicated port onto its attached segment. All Paths Expl. Displays the total number of All Path Explorer frames transmitted by the indicated port onto its attached segment. Span Tree Expl. Displays the total number of Spanning Tree Explorer (STE) frames transmitted by the indicated port onto its attached segment. Discards Segment Mismatch Displays the number of explorer frames discarded because their routing descriptor Þeld contained an invalid value for a segment attached to the port. The routing information Þeld of a SpeciÞcally Routed frame contains LAN Segment In (Ring In)ÐBridge NumberÐLAN Segment Out (Ring Out) information. If the bridgeÕs LAN Segment Out value does not match the LAN Segment Out speciÞed in the frameÕs Routing Information Field, the bridge logs a Segment Mismatch and discards the frame. Duplicate Segment Displays the number of frames discarded because the frameÕs Routing Information Field identiÞes a particular segment more than once. 4-34 Bridge Statistics Bridging Hop Cnt. Exceeded Displays the number of All Paths Explorer frames discarded at the speciÞed port because they exceeded the number of routing descriptors (bridge hops) speciÞed by the Hop Count Limit. Bridge Spanning Tree The Bridge Spanning Tree window allows you to display and modify the deviceÕs bridge port information and protocol parameters relating to the Spanning Tree Algorithm. In a network design with multiple bridges placed in parallel (i.e, attached to the same LAN), data loops must be prevented. The Spanning Tree Algorithm (STA) is the method that bridges use to communicate with each other to ensure that only a single data route exists between any two end stations. On a LAN interconnected by multiple bridges, Spanning Tree selects a controlling Root Bridge and Port for the entire bridged LAN, and a Designated Bridge and Port for each individual LAN segment. A Designated Port/Bridge for a LAN segment forwards frames from that LAN towards the Root Bridge, or from the Root Bridge onto the LAN. All other bridge ports attached to that LAN are conÞgured to Þlter (block) frames. When data passes from one end station to another across a bridged LAN, it is forwarded through the Designated Bridge/Port for each LAN segment towards the Root Bridge, which in turn forwards frames towards Designated Bridges/Ports on its opposite side. During the Root Bridge Selection process, all bridges on the network communicate STA information via Bridge Protocol Data Units (BPDUs). With BPDUs, all network bridges collectively determine the current network topology and communicate with each other to ensure that the topology information is kept current. To access the Bridge Spanning Tree window from the Bridge Status window: 1. Click on to display the Bridge menu. 2. Drag down to select Spanning Tree…. The Bridge Spanning Tree window, Figure 4-10, will appear. from the Chassis View window: 1. Click on the Board Index of the device of interest; the Board menu will appear. 2. Drag down to select Spanning Tree…. The Bridge Spanning Tree window, Figure 4-10, will appear. Bridge Spanning Tree 4-35 Bridging Figure 4-10. Bridge Spanning Tree Window Configuring the Bridge Spanning Tree Window The Bridge Spanning Tree window displays STA parameters and allows you to alter parameters for the device bridge as a whole, and for each individual bridging interface. The currently selected bridging interface is highlighted in the lower right quadrant of the window. To alter the parameters of another interface, click on the appropriate Port X name listed in the quadrant. Bridge Level Fields Bridge Priority This Þeld displays the ÒpriorityÓ component of the deviceÕs unique bridge identiÞer. The Spanning Tree Algorithm assigns each bridge a unique identiÞer, which is derived from the bridgeÕs MAC address and the Priority. The bridge with the lowest value of bridge identiÞer is selected as the Root. A lower priority number indicates a higher priority; a higher priority enhances a bridgeÕs chance of being selected as the Root. You can edit this text box to change network topology, if needed. The default value is 8000; the range is 0ÑFFFF hexadecimal. 4-36 Bridge Spanning Tree Bridging TIP Part of a bridgeÕs IdentiÞer is based on its MAC address. In most network installations, performance differences between bridges may be negligible. You may, however, Þnd your data bottle-necked in installations where both a low-performance bridge and a high-performance bridge are attached to the same LAN segment and the two (or more) bridges have the same Priority component set (e.g., at the default 8000 Hex). In such a scenario you may want to alter the Priority component of the higher performance bridge to ensure that it becomes root for the segment (or overall root). Remember, if Priority components are equal, the bridge on the segment with the lowest MAC address would have a better chance of being selected as the root bridgeÑas it would have a lower Bridge IdentiÞer. If your bridges come from multiple vendors, they will have different MAC address values (e.g., Cabletron devices have a lower MAC address than 3Com devices); if they come from the same vendor, the bridge with the earlier manufacture date will have the lower MAC address value. Root Bridge Displays the MAC address of the bridge that is currently functioning as the Root Bridge. Root Cost Indicates the cost of the data path from this bridge to the Root Bridge. Each port on each bridge adds a ÒcostÓ to a particular path that a frame must travel. For example, if each port in a particular path has a Path Cost of 1, the Root Cost would be a count of the number of bridges along the path. (You can edit the Path Cost of bridge ports as described later.) The Root BridgeÕs Root Cost is 0. Root Port This Þeld displays the identiÞer (the physical index number) of the device bridge port that has the lowest cost path to the Root Bridge on the network. If the device is currently the Root Bridge, this Þeld will read 0. Protocol Displays the Spanning Tree Algorithm Protocol type the device is currently using. The choices are: ¥ ¥ ¥ 802.1 DEC (DEC Lanbridge 100) None The following four Þelds display values used for various Spanning Tree timers that are set at the Root Bridge and this bridge. In Spanning Tree operations, the value used for the tree is the one set at the Root Bridge (with the exception of Hold Time, which is a Þxed value); but you can change the value for each bridge on your network in the event that it becomes Root. Bridge Spanning Tree 4-37 Bridging Hello Time This parameter indicates, in seconds, the length of time the Root Bridge (or bridge attempting to become the Root) waits before resending ConÞguration BPDUs. The range for this Þeld is 1 to 10 seconds, with a default value of 2 seconds. The Root Bridge sets the Hello Time. Max Age This parameter displays the bridgeÕs BPDU aging timer. This controls the maximum time a BPDU can be retained by the bridge before it is discarded. During normal operation, each bridge in the network receives a new ConÞguration BPDU before the timer expires. If the timer expires before a ConÞguration BPDU is received, it indicates that the former Root is no longer active. The remaining bridges begin Spanning Tree operation to select a new Root. The current Root Bridge on the network sets the Max Age time. The range for this Þeld is 6 to 40 seconds, with a default value of 20 seconds. Forwarding Delay This parameter displays the time period which elapses between states while the bridge is moving to the Forwarding state. For example, while moving from a Blocking to a Forwarding state, the port Þrst moves from Blocking to Listening to BPDU activity on the network, remains there for the Forward Delay period, then moves to the Learning State (and remains in it for the Forward Delay period), and Þnally moves into a Forwarding state. This timer is set by the Root Bridge. During a topology change, the Forward Delay is also used as the Filtering Database Aging Time, which ensures that the Filtering Database maintains current topology information. Hold Time This parameter displays, in seconds, the minimum time that can elapse between the transmission of ConÞguration BPDUs through a bridge port. The Hold Time ensures that ConÞguration BPDUs are not transmitted too frequently through any bridge port. Receiving a BPDU starts the Hold Timer. After the Hold Timer expires, the port transmits its ConÞguration BPDU to send conÞguration information to the Root. The Hold Time is a Þxed value, as speciÞed by the IEEE 802.1d speciÞcation. Bridge Port Level Fields The following Þelds are applicable to each bridge port on the device. Priority If two or more ports on the same bridge are connected to the same LAN segment, they will receive the same Root ID/Root Cost/Bridge ID information in ConÞguration BPDUs received at each port. In this case, the BPDUÕs Port ID informationÑthe transmitting portÕs identiÞer and its manageable Priority componentÑis used to determine which is the Designated Port for that segment. 4-38 Bridge Spanning Tree Bridging A lower assigned value gives the port a higher Priority when BPDUs are compared. The allowable range is 0ÑFF hexadecimal (0Ñ255 decimal); the default is 80 hexadecimal. Path Cost Displays the cost that this port will contribute to the calculation of the overall Root path cost in a ConÞguration BPDU transmitted by this bridge port. You can lower a portÕs Path Cost to make the port more competitive in the selection of the Designated PortÑfor example, you may want to assign a lower path cost to a port on a higher performance bridge. The allowable range is 1 to 65,535. Designated Cost Displays the cost of the path to the Root Bridge of the Designated Port on the LAN to which this port is attached. This cost is added to the Path Cost to test the value of the Root Path Cost parameter received in ConÞguration BPDUs. Designated Root Displays the unique bridge identiÞer of the bridge that is assumed to be the Root Bridge. Designated Bridge Displays the network address portion of the Bridge ID (MAC address/priority component) for the bridge that is believed to be the Designated Bridge for the LAN associated with this port. The Designated Bridge ID, along with the Designated Port and Port IdentiÞer parameters for the port, is used to determine whether this port should be the Designated Port for the LAN to which it is attached. The Designated Bridge ID is also used to test the value of the Bridge IdentiÞer parameter in received BPDUs. Designated Port Displays the network address portion of the Port ID (which includes a manageable priority component) of the port believed to be the Designated Port for the LAN associated with this port. The Designated Port ID, along with the Designated Bridge and Port IdentiÞer parameters for the port, is used to determine whether this port should be the Designated Port for the LAN to which it is attached. Management also uses it to determine the Bridged LAN topology. Topology This indicates how many times the bridgeÕs Topology Change ßag has been changed since the device was last powered up or initialized. It also indicates the time elapsed since the topology last changed. The Topology Change ßag increments each time a bridge enters or leaves the network, or when the Root Bridge ID changes. Bridge Spanning Tree 4-39 Bridging Changing Bridge Spanning Tree Parameters The Bridge Spanning Tree window allows you to update the following parameters for your device bridge. When you have Þnished making changes to the following individual parameters, you must click on at the bottom of the Spanning Tree window to write the changes to the device. NOTE Any values you set at the bridge will cause a Topology Change ßag to be issued in the next ConÞguration BPDUs it transmits. This will cause the bridged network to immediately recalculate Spanning Tree and change topology accordingly. Changing Bridge Priority To change the part of the bridge address that contains the identiÞer used in the Spanning Tree Algorithm for priority comparisons: 1. Highlight the Bridge Priority field. 2. Enter the new identifier, in hexadecimal format; the allowed range is 0-FFFF hexadecimal. 3. Click on . The selected Bridge Priority will be applied to the bridge (a lower number indicates a higher priority in the root selection process). Changing the Spanning Tree Algorithm Protocol Type To change the type of protocol used in Spanning Tree: 1. Click the mouse on the appropriate option button: 802.1, DEC, or None. 2. Click on . The selected Spanning Tree Algorithm protocol type will be applied to the bridge. If you selected None, the Spanning Tree Algorithm will be disabled (if it already was enabled). If STA Protocol Type was changed from None to IEEE 802.1 or DEC, you must restart the bridge for the newly selected STA protocol to be applied. ! All bridges in a network must use the same Spanning Tree version. Mixing Spanning Tree Algorithm protocols will cause an unstable network. CAUTION 4-40 Bridge Spanning Tree Bridging Changing Hello Time If the bridge is the Root Bridge, or is attempting to become the Root, and you want to change the length of time the bridge waits between sending conÞguration BPDUs: 1. Highlight the Hello Time field, and type in a new value. 2. Click on . The IEEE 802.1d speciÞcation recommends that Hello Time = 2 seconds, with an allowable range of 1 to 10 seconds. Changing Max Age Time If the device is the Root Bridge or attempting to become the Root, and you want to change the maximum time that bridge protocol information will be kept before it is discarded: 1. Highlight the Max Age field, and type in a new value. 2. Click on . The IEEE 802.1d speciÞcation recommends that Max Age = 20 seconds, with an allowable range of 6 to 40 seconds. Changing Forwarding Delay Time If the device is the Root Bridge or attempting to become the Root, and you want to change the time period the bridge will spend in the Listening state (e.g. either listening to BPDU activity on the network while moving from the Blocking to the Learning state or in the Learning state while the bridge is moving from the Listening to the Forwarding state): 1. Highlight the Forwarding Delay field, and type in a new value. 2. Click on . The IEEE 802.1d speciÞcation recommends that Forward Delay = 15 seconds, with an allowable range of 4 to 30 seconds. NOTE To ensure proper operation of the Spanning Tree Algorithm, the IEEE 802.1d speciÞcation recommends that you always observe the following relationship between Forwarding Delay, Max Age, and Hello Time: 2 x (Forwarding Delay - 1.0) > Max Age > 2 x (Hello Time +1.0) Bridge Spanning Tree 4-41 Bridging Changing Port Priority To change the part of the Port Priority used in priority comparisons: 1. If necessary, select the desired port by clicking the mouse to highlight the port in the lower right quadrant of the window. The lower left quadrant of the window will now allow you to edit parameters for the selected port. 2. Highlight the port Priority field, and enter the new priority identifier. Only valid hexadecimal numbers (0 to FF) are allowed in this field. The default is 80 hexadecimal. 3. Click on . The new port priority will be saved. Changing Path Cost To change the Path Cost: 1. If necessary, select the desired port by clicking the mouse to highlight the port in the lower right quadrant of the window. The lower left quadrant of the window will now allow you to edit parameters for the selected port. 2. Highlight the Path Cost field, and type in a new value from 1 to 65535 decimal (default is 100 decimal). 3. Click on . The new path cost will be applied to the port. Filtering Database The Filtering Database, which makes up the IEEE 802.1 Source Address Table, is used to determine which frames will be forwarded or Þltered across the deviceÕs bridging ports. During initialization, the bridge copies the contents of its Permanent Database to the Filtering Database. Next, the bridge learns network addresses by entering the source address and port association of each received packet into the Filtering Database. When in the Forwarding state, the bridge examines each received packet, checks it against the Special Database (refer to Ethernet and Token Ring Special Filter Databases, page 4-49), and then (if no special Þltering applies) compares the destination address to the contents of the Filtering Database. If the destination address is located on the network from which the packet was received, the bridge Þlters (does not forward) the packet. If the destination address is located on a different network, the bridge forwards the packet to the appropriate network. If the destination address is not found in the Filtering Database, the bridge forwards the packet to all networks. To keep Filtering Database entries current, older entries are purged after a period of time, which is called the Dynamic Aging Time. 4-42 Filtering Database Bridging The Filtering Database consists of two separate databases: the Static and the Learned Databases. The Static Database contains addresses that are entered by a network administrator. You add these addresses directly to the database while the bridge is powered up, or to the deviceÕs battery-backed RAM so that they are stored on shutdown until the next power-up. The Learned Database consists of addresses that accumulate as part of the bridgeÕs learning process as it is up and running. These do not remain in the Source Address Table when the system is shut down. The Learned Database also contains the addresses that are in the Static Database upon start-up of the bridge. Entries to the Source Address Table are one of four types: Permanent, Static, Dynamic, or Learned. ¥ Permanent entries are addresses that you add to the Static Database (via the Filtering Database window) that are stored in the deviceÕs battery-backed RAM. Since they remain in the device on shutdown or restart, they are considered ÒPermanent.Ó ¥ Static entries are addresses that you add to the Static Database (via the Filtering Database window). These entries remain in the device until it is shut down. ¥ Dynamic entries are addresses that you add to the Static Database (via the Filtering Database window). With the Aging Time feature, you set the time period that these addresses are saved in the Source Address Table. Addresses that have not transmitted a packet during one complete cycle of the aging timer are deleted from the database. ¥ Learned entries are addresses that are added to the Learned Database through the bridgeÕs learning process. With the Aging Time feature, you set the time period that these addresses are saved in the Source Address Table. Addresses which are inactive within a cycle of the aging timer are dropped from the database. Learned address entries are divided into two types, Learned and Self. Address entries classiÞed as Learned have transmitted frames destined for a device attached to a device portÕs connected segment. Address entries classiÞed as Self are those that have sent a frame with a destination address of one of the deviceÕs bridging ports. At the Filtering Database window (Figure 4-11, page 4-45), you can view the number of entries of each type: Permanent, Static, Dynamic, or Learned. NOTE Filtering Database Even though new entries into the Filtering Database are added as Static entries by default, note that some devices, including the FN100, do not support Static entries. For these devices, once you add an entry into the Filtering Database, it must be changed to a Permanent type before clicking on OK to apply the change. If the entry is not changed to a Permanent type before clicking on OK, you will receive a Set Failed message. 4-43 Bridging A scrollable Address Entry panel allows you to: ¥ View the address entries in the Filtering Database. ¥ Alter an entryÕs type (e.g., from Learned to Permanent, Dynamic, or Static). ¥ View and conÞgure the bridging action taking place on the packets entering each of the bridging ports. In addition, you can use buttons to add individual addresses to, or delete them from, these databases, or clear all Permanent, Static, or Dynamic entries in the database. To access the Filtering Database window from the Bridge Status window: 1. Click on to display the Bridge menu. 2. Drag down to select Filtering Database…. The Filtering Database window, Figure 4-11, will appear. from the Chassis View window: 1. Click on the Board Index of the device of interest; the Board menu will appear. 2. Drag down to Filtering Database…. The Filtering Database window, Figure 4-11, will appear. 4-44 Filtering Database Bridging Figure 4-11. The Filtering Database Window Filtering Database Window Fields The following Þelds are listed in the top portion of the Filtering Database window. List The List checkboxes indicate whether the associated entry type (Permanent, Static, Dynamic, or Learned) will be displayed in the scrollable table of address entries. A check next to the entry type indicates that it will be displayed. Type Indicates the type of entry in the database. Number Displays the current number of Permanent, Static, Dynamic, and Learned Address entries. Capacity Indicates the total capacity of each entry type in the Static and Learned databases. Filtering Database 4-45 Bridging Aging Time Indicates the length of time, in seconds, that Dynamic and Learned Addresses in the Source Address Table are allowed to remain inactive before they are dropped from the database. The allowable time range for these entries is 10 to 1,000,000 seconds. Aging time is not applicable to Static or Permanent entries. You can conÞgure this Þeld, as described in the next section. The following Þelds are applicable to the scrollable Address Entry panel of Filtering Database entries. Address Lists the addresses for which the bridgeÕs Filtering Database has forwarding and/or Þltering information. Type Indicates the type of an entry in the database. The possible types are Static, Dynamic, Learned, Self, or Permanent. You can alter the entry type, as described in the next section. Source Port Indicates the port number on which the address entry was Þrst detected. A question mark (?) indicates that the address entry was not a learned entry, but Port Filtering information applies to it (i.e., the entry is a created Permanent, Dynamic, or Static entry and has corresponding Þltering information). Receive Port Indicates the number of the port on which a frame must be received in order for the entryÕs Port Filtering information to apply. An asterisk (*) indicates that the receive port is promiscuous, and applies to all ports of the bridge (assuming no conßicting entry applies). You can change the receive port, as described in the following section. Port Filtering Indicates the action that will take place at each bridge port when it receives frames from the selected address entry. A green arrow indicates that the frames received from the address will be forwarded to the portÕs associated segment ( ). A red circle indicates that frames will be Þltered (blocked) from the portÕs associated segment ( ). You can change the Port Filtering action, as described in the next section. (Note that port Þltering is scrollable among all the potential ports; however, only two consecutive ports can be viewed simultaneously.) Configuring the Filtering Database You can conÞgure the Filtering Database by: 4-46 ¥ Altering the Aging Time for Dynamic and Learned entries. ¥ Changing the type of entry with the Type buttons. Filtering Database Bridging ¥ Changing the Receive port for the Þlter. ¥ Changing the Port Filtering action at each bridge port. ¥ Adding or deleting individual Filtering Database entries. ¥ Clearing all Permanent, Static, or Dynamic entries from the Filtering Database. Note that although conÞguration changes will appear in the window, no action actually takes place in the bridgeÕs Filtering Database until you click on the OK button in the bottom right of the window. This saves the new conÞguration. NOTE When you reconÞgure the Filtering Database and click OK, the screen will clear temporarily and a message will appear to indicate that the information is being updated. When the changes have been successfully set and the Filtering Database has updated, the screen information will be refreshed. If you change the window without clicking on OK, then attempt to exit the window by clicking on Cancel, a text box will appear stating ÒChanges have been made. Cancel them?Ó. Click on Yes to exit the window without changing the Filtering Database, or select No to return to the window. Altering the Aging Time To alter the Aging Time for Dynamic and Learned entries: 1. Highlight the Aging Time field with the cursor. 2. Type in the new Aging Time (allowable range is 10 to 1,000,000 seconds). NOTE Note that the Filtering Database Aging Time is the same as the Aging Time displayed (and conÞgured) via the Port X Source Addresses window. Setting the Aging Time in the Filtering Database window also changes the time in the Source Addresses window, and vice versa. Changing the Type of Entry You can change any entry type from its current type (Learned, Self, Permanent, Static, or Dynamic) to either a Permanent, Static, or Dynamic entry. To do so: 1. Click on the shadowed Type button. A menu will appear with the three types to which the entry can be changed. 2. Highlight the desired type. Filtering Database 4-47 Bridging Changing the Receive Port You can change the Receive port of an address entry in the scrollable panel, so that a frame must be received at the speciÞed port for the Þltering action to apply. To do so, click on the Receive port in the panel. With each click, the Receive port will cycle to the next port (e.g., from * (promiscuous), to 1, to 2, to 3, to 4, to 5, up to 32, back to *). Changing the Port Filtering Action You can change the Port Filtering action at each bridge port from its current action to the opposing action. 1. Maneuver the scroll bar until the desired port is in the Port Filtering panel. 2. Click on the port to alter its filtering action from forwarding frames from the associated address ( ), to filtering frames ( ) (or vice versa). Adding or Deleting Individual Entries You can add or delete entries individually from the Filtering Database. To add an address: 1. Click on the New button in the lower left of the window. A window (Figure 4-12) will appear. Figure 4-12. Filter DatabaseÑNew Filter Window 2. In the Filter Address field, type in the address (Hex format) for which you desire bridging. Be sure to add “-” as a separator between each byte in the address. 3. In the Receive Port field, type in the port at which the address must be detected for bridging to take place. If you enter a value of 0 in this field, the Receive Port is considered promiscuous (i.e., any port), and will be designated by an “*” in the Address Entry panel. 4. Click on . 5. Specify the Port Filtering action on the address entry as described in the previous section. 4-48 Filtering Database Bridging To delete an address: 1. Click to highlight the address entry in the Address Entry panel that you wish to delete from the filtering database. 2. Click on . Clearing All Permanent, Static, or Dynamic Entries To erase all Permanent, Static, or Dynamic entries from the Filtering Database, click on the associated button in the upper portion of the window. Ethernet and Token Ring Special Filter Databases While the Filtering Database deÞnes Þlters for all packets from a particular source address, the Ethernet Special Filter Database and the Token Ring Special Filtering Databases allow you to Þlter packets through an Ethernet or a Token Ring bridge, respectively, using a special Þltering scheme. When a packet is received at an Ethernet bridging interface, it is Þrst checked against the Ethernet Special Filter Database to see if any Þltering action applies to it. Because of this, an entry in the Ethernet Special Filter Database takes precedence over a Þlter entry in the Filtering Database that would otherwise apply to the packet. The Ethernet Special Filter Database allows you to: ¥ DeÞne and save a Þlter based on a combination of Source Address, Destination Address, Ethernet Data Type and Data (including the offset). ¥ Specify the receive ports at which the Þlter will take effect. ¥ Specify the forwarding/Þltering action at each bridging port of the device. When checking for Transparent Þltering information, the bridge Þrst checks the Token Ring Special Filter Database to see if any Þltering action applies to it. Because of this, a Þlter entry in the Token Ring Special Filter Database takes precedence over a Þlter entry in the Filtering Database that would otherwise apply to the packet. Looking at each enabled Þlter, starting with the lowest numbered Þlter, the bridge compares the following Þelds to the corresponding Þelds in the received packet: ¥ ¥ ¥ ¥ Destination address Source address Ethernet or Token Ring data type Up to 16 hex integers (64 bytes) of the data Þeld In addition, a Þlter can also specify at which port or ports the packet must be received for the Þlter to be applicable. If a received packet matches all the contents of an enabled Þlter, the bridge forwards the packet to the deÞned set of ports. Ethernet and Token Ring Special Filter Databases 4-49 Bridging Filters provide broad conÞguration ßexibility. For example, you can deÞne multiple scenarios for a single Þlter by specifying different combinations of receive port/destination port. You can use wildcard characters in Þlter Þelds to force a match with particular bits of the received packetÕs destination address, source address, type, or data. You can specify an offset for the data Þeld, to specify the starting point in the data where the bridge looks for the match. For entries that donÕt match any of the enabled Þlters, you can conÞgure the bridge to Þlter or forward the entry or pass the Þlter/forward decision to the Filtering Database. Ethernet Special Filter Database Window At the Ethernet Special Filter Database window, Figure 4-13, you can view a list of the special Þlters for the selected bridge. There are 19 available Þlters in the Special Filter Database. You can not add any additional Þlters. You can view Þve of these Þlters at a time in the Special Filter Database window. Use the scroll bars to view the other fourteen Þlters. When you Þrst open the window, all Þlters will be undeÞned. (See Figure 4-13, on the following page; Þlters 2 through 5 are undeÞned.) For each Þeld, bytes will be initialized with Òmatch-anyÓ characters (xx) for each digit. Any hexadecimal byte will be accepted as valid for the corresponding wildcard (xx) characters. For example, a Source Address Þlter deÞned as Òxx-xx-xx-xx-bf-coÓ will pass the Þrst four bytes of a frameÕs source address unconditionally, but the last two bytes must match the Òbf-coÓ Þlter. To access the Ethernet Special Filter Database window from the Bridge Status window: 1. Click on to display the Bridge menu. 2. Drag down to select Ethernet Special Filter Database…. The Ethernet Special Filter Database window, Figure 4-13, will appear. from the Chassis View window: 1. Click on the Board Index of the device of interest; the Board menu will appear. 2. Drag down to select Ethernet Special Filter Database…. The Ethernet Special Filter Database window, Figure 4-13, will appear. 4-50 Ethernet and Token Ring Special Filter Databases Bridging Figure 4-13. Ethernet Special Filter Database Window Token Ring Special Filter Database Window At the Token Ring Special Filter Database window, Figure 4-14, you can view a list of the special Þlters for the selected bridge. There are 19 available Þlters in the Token Ring Special Filter Database. You can not add any additional Þlters. You can view Þve of these Þlters at a time in the Token Ring Special Filter Database window. Use the scroll bars to view the other fourteen Þlters. When you Þrst open the window, all Þlters will be undeÞned. For each Þeld, bytes will be initialized with match any characters (xx) for each digit. Any hexadecimal byte will be accepted as valid for the corresponding wildcard (xx) characters. For example, a Source Address Þlter deÞned as Òxx-xx-xx-xx-bf-coÓ will pass the Þrst four bytes of a frameÕs source address unconditionally, but the last two bytes must match the Òbf-coÓ Þlter. To access the Token Ring Special Filter Database window from the Bridge Status window: 1. Click on to display the Bridge menu. 2. Drag down to select Token Ring Special Filter Database…. The Token Ring Special Filter Database window, Figure 4-14, will appear. Ethernet and Token Ring Special Filter Databases 4-51 Bridging from the Chassis View window: 1. Click on the Board Index of the device of interest; the Board menu will appear. 2. Drag down to select Token Ring Special Filter Database…. The Token Ring Special Filter Database window, Figure 4-14, will appear. Figure 4-14. Token Ring Special Filter Database Window Special Filter Database Window Fields File An X in this checkbox indicates that the Þlter is associated with the Þle name shown in the title bar of the window. If a Þle has not yet been saved, the title bar will not display any Þlter name. A saved Þle name is only displayed in the title bar after you have opened a saved Þlter Þle or saved your current Þlters. Enable A Þlled-in circle indicates the Þlter is enabled. Destination Address Displays a six-byte hexadecimal Þeld for the Þlter which can be used to mask out Destination Addresses. Source Address Displays a six-byte hexadecimal Þeld for the Þlter which can be used to mask out Source Addresses. 4-52 Ethernet and Token Ring Special Filter Databases Bridging Data Type Displays the hexadecimal two-byte Þeld for the Þlter which can be used to mask out a speciÞed protocol type Þeld. Examples of protocol type are: ¥ ¥ ¥ ¥ 0800 = IP 8137 = Novell 0bad = Banyan 80f3 = AppletalkARP Data Offset Indicates the offset (in bytes, from the beginning of the data in the packet) where the Data Mask will be applied. The default for this Þeld is 0000 (no data offset). An example of a valid offset to enter into this Þeld is 0016 (16 bytes). Data Mask Displays the 64-byte overlay used to Þlter packets. The Data Mask is applied to the packet after the Þxed part of the packet, which includes Source Address, Destination Address, and Type Þelds. The Þlter applies the mask directly at the start of the data portion of the packet unless there is a Data Offset. If a Data Offset has been deÞned, the mask will apply to the data that comes after the speciÞed offset in the packet. Receive Port(s) Indicates the ports at which the packet must be received for Þltering information to be applied. Note that you can only immediately see one receive port per Þlter, even though you can set more than one receive port for the Þltering action to apply. The receive port Þeld can display each device bridge port, BRIM port, or Ò*Ó. The Ò*Ó indicates that a packet can be received at any port for the Þlter to apply (i.e., the port is promiscuous). Port Filtering forwarding blocking Indicates the forwarding/blocking information for the Þlter at each port on the device. Note that you can only view two ports at a time. Use the scroll bar at the top of the column to view the hidden ports. Selected Filter This Þeld, visible at the bottom of the window, displays the number of the Þlter that is currently highlighted. The possible range is from 01-19. Defining and Editing Filters in the Special Database You can edit an existing Þlter or deÞne a new Þlter using the following steps: 1. Click to select the filter you wish to edit. (The filter is selected when it is highlighted. When the bridge uses the Special Database, it starts with the lowest numbered enabled filter.) Ethernet and Token Ring Special Filter Databases 4-53 Bridging 2. Click . The Special Database Filter window, Figure 4-15, will appear with the following fields: • Destination Address (six-byte hexadecimal field) • Source Address (six-byte hexadecimal field) • Type (two-byte hexadecimal field) • Data Offset (decimal field) • Data Mask (64-byte hexadecimal data mask) Figure 4-15. The Special Database Filter Window 3. If you are editing an existing filter, the fields will reflect the current configuration. A filter that has not yet been defined will have wildcards in every field. If you want to completely reconfigure an existing filter, click on will revert all the fields to all xx’s. . This 4. Highlight the field which you want to define, and enter the appropriate information. 5. When you have finished defining the filter, click on . This will save the filter you created and return you to the Special Filter Database window, where the configured filter will be displayed. NOTE 4-54 If you do not wish to save what you have entered in the Special Database Filter Window, click on the Cancel button. This will cancel what you have entered into this window and return you to the Ethernet Special Filter Database window. Ethernet and Token Ring Special Filter Databases Bridging 6. Click on to save the changes you have made and exit the Special Database Filter window. Changing the Receive Ports You can set the receive ports in the Special Filter Database window either before or after you deÞne a Þlter. These are the ports at which the frame must be received for the Þltering parameters to apply. The default selection is Port 1. To designate a receive port, click on the receive port icon ( ) for the Þlter. As you click on the icon, it will cycle though the ports (e.g., 1, 2, 3, 4, etc. until the end of the interface table, and Ò*Ó). When you have selected a port, you can set the port Þltering action that will apply when the packet is received at that particular port (refer to the following section for further information). In this fashion, you can specify all receive ports at which the packet must be received and the designated Þltering action which will apply when the packet is received at each port. Selecting Ò*Ó (promiscuous or any port) will apply the Þlter and its speciÞed Þltering action to all ports on the device. Remember that you can only view a single receive port and its Þltering action. To check all receive ports for a single Þlter, you must click on the receive port icon to cycle through the series of ports. Changing the Port Filtering Action Use the port icons under the Port Filtering section of the Special Filter Database window to determine the port Þltering action associated with the Þlter when it is received at a speciÞed receive port. You can select the port Þltering action either before or after deÞning the Þlter. By default, the Þltering action is initially not set at any port. You must click on a port to invoke the Þltering action symbols. After the Þrst port is set (either to Þltering or blocking), the remaining ports in the Þlter are set to blocking until you specify otherwise. Setting the Port Filtering Action When you set the port Þltering action for a Þlter, you determine whether the port will block or forward packets which match the ÞlterÕs speciÞcations. To set port Þltering action, click on the desired port icon (e.g., 1, 2, 3, 4, 5, 6, up to 32) to toggle from blocking ( ) to forwarding ( ) or vice versa. You can set the port Þltering action for the bridging port on each port of the device, as well any BRIM ports. Ethernet and Token Ring Special Filter Databases 4-55 Bridging Clearing the Port Filtering Action When you clear the port Þltering action of a Þlter, all ports that were conÞgured to forwarding or blocking will be reset to no action. Note that when you clear port Þltering for a Þlter, the Þltering or blocking action will be simultaneously cleared at all of its receive ports. In order to clear the port Þltering action, use the following steps. 1. Click to select the filter whose port filtering action you would like to disable. 2. Click on . This will clear the port filtering action for the selected filter at all of its receive ports. The port filtering symbols will appear in cleared mode. Enabling and Disabling a Filter To determine if a Þlter is enabled, check the Enable radio button. To enable a Þlter: 1. Click on the empty Enable radio button. When the radio button is filled ( the filter is enabled. ), To disable a Þlter: 1. Click on the filled Enable radio button. When the radio button is empty ( the filter is disabled. ), Saving a Set of Filters to a File When you have deÞned a set of Þlters, you can save that set to a Þle. This allows you to conveniently recall a series of Þlters when the need arises. To save a set of Þlters: 1. Make sure that all filters that you want contained in the set have the File checkbox checked. 2. Click on . A menu will appear. 3. Click on Save As…. A standard Microsoft Windows Save File window will appear. 4. In the File name field, specify the file name and file path in which you want to save the filter series. 5. Click on OK. The file will be saved as indicated. To update the file while it is still open, click on the Save selection from the Filters pull-down menu. 4-56 Ethernet and Token Ring Special Filter Databases Bridging To open an existing Þle containing a Þlter set: 1. Click on . A menu will appear. 2. Click on Open…. A standard Microsoft Windows Open File window will appear. 3. To specify the file: • In the File name field, specify the file to open by path and name, or • Use the Look in drop-down list box and associated file list to select the desired file, and click to highlight it. 4. Click on Open. The Þlters will appear in the Special Filter Database window, with all parameters (File, Enable, Source and Destination Address, Data Type and Offset, Data Mask, Receive Port, and Port Filtering Action) displayed as they were conÞgured at the last Þle save. Source Route Configuration With the Source Route ConÞguration window, you can view address and routing information, and set source route bridging parameters for bridging interfaces. To access the Source Route ConÞguration window from the Bridge Status window: 1. Click on the desired Port button ( ) to display the port menu. 2. Drag down to select Source Route Configuration…. The Source Route Configuration window, Figure 4-16, will appear. from the Chassis View window: 1. Click on the appropriate port index to access the Port menu. 2. Drag down to select Source Route Configuration…. The Source Route Configuration window, Figure 4-16, will appear. Source Route Configuration 4-57 Bridging Figure 4-16. Source Route ConÞguration Window Information on Source Routing Source Routing is a bridging technique developed by IBM and the 802.5 standards committee in which a bridge routes frames based on the contents of their media access control frame header, rather than by maintaining a Þltering database to determine whether a packet should be forwarded or Þltered. Source Routing functions as follows: ¥ An end point station transmits discovery (explorer) frames to a particular destination address in order to seek the best route through a bridged topology to that node. These frames are broadcast over the entire network. In a network topology with parallel bridges, multiple paths may be available to the same destination. In this case, the explorer frame may be further deÞned as: 4-58 - All Routes Explorer, so that all possible routes to the destination are recorded, and multiple explorer frames can reach the same segment. - Spanning Tree Explorer (also known as Single Route Broadcast), so that only one path is possible to a segment (i.e., through a designated bridge in a Spanning Tree topology), and only one explorer frame will be forwarded onto each segment. The Spanning Tree can be conÞgured either automatically (i.e., by algorithm) or manually. Source Route Configuration Bridging ¥ When a source routing bridge processes the explorer frame, it adds a unique identiÞer to the frame in a reserved portion of the frame. This identiÞes the segment the frame was received from, followed by the speciÞc bridge, and Þnally the segment it was forwarded onto. ¥ When the discovery frame (or frames if more than one route is possible) reaches its destination, it contains a complete record of bridge hops on its route. ¥ The destination address then returns All Routes Explorer (using speciÞcally routed frames) and Single Route (spanning tree) Explorer frames (using All Routes Broadcast frames), to the source address. ¥ The source station selects one path from the returned explorer frames, and includes that path speciÞcation (with bridge and segment identiÞers) in subsequent transmissions to that particular destination. All bridges in the topology then examine the routing information Þeld of a speciÞcally source routed frame and either forward it if there is a match in the routing informationÑor if it is an All Routes explorer frameÑor discard it. The Source Route Configuration Window The Source Route ConÞguration window allows you to view IP address and routing information, and to view and set source route bridging parameters for any bridging device which supports this menu option. NOTE It is recommended that the device be restarted when changes are made that affect source route bridging in order to clear the buffers, but you do not need to restart for the changes to take effect. Source Route Configuration Fields IP Address This Þeld displays the Internet Protocol (IP) address, which acts as a logical identiÞer on the network, currently assigned to each port on the device. This is needed for SNMP network management capability. The IP address is expressed in dotted decimal notation (four decimal values between 0 and 255, separated by a period, e.g., 255.255.255.255). This Þeld can only be edited (with the correct security access) via Local Management for the device (or the MIBTools utility). Refer to the appropriate device-speciÞc UserÕs Guide for more information. Source Route Configuration 4-59 Bridging Subnet Mask A subnet mask is used by a device to determine whether a destination address exists within its own subnetwork (logical division of the network by router or gateway) and can be reached directly, or whether it is unknown and therefore must be delivered to a router (as speciÞed by the deviceÕs IP routing table or default gateway address). A subnet mask should be set at the device if it will issue SNMP traps in a routed environment, so that the trap messages it generates will be routed correctly. A subnet mask acts as a Þlter for destination IP addresses. It is a 32-bit quantity in which all bits that correspond to the network portion (both site and subnet identifying bits) of the deviceÕs IP address are set to 1, and all bits that correspond to the host portion are set to 0. The device will logically AND a destination trap IP address with the subnet mask to determine which portion of the address identiÞes the network/subnetwork. The device then compares the result on a bit-to-bit basis with the network identifying bits in its own IP address. If the network portions match, the bridging device transmits the trap onto its subnetwork. If they do not match, the device transmits the trap through a router or gateway. This Þeld can only be edited (with the correct security access) via Local Management for the device (or the MIBTools utility). Refer to the appropriate device-speciÞc UserÕs Guide for more information. MAC Address This Þeld displays the Media Access Control (MAC) layer address which identiÞes the ports/interfaces of the bridging device on a network. This six-byte address is set at the factory and is unique to each interface. Each byte is identiÞed in bit order starting with the most signiÞcant bit. You cannot conÞgure this Þeld. The following Þelds apply to the Source Route ConÞguration window: Local Segment This Þeld displays the unique segment number that identiÞes the segment attached to the selected interface (either of the Token Ring or FDDI interfaces). The bridge adds the Local Segment number to the routing information Þeld of source route discovery frames. Valid values range from 0 to 4095. Target Segment This Þeld displays the unique segment number of the target segment that the source routed frame will be forwarded to. Valid values range from 0 to 4095. Hop Count Limit The maximum number of routing descriptors (i.e., bridge hops) allowed for an All Routes Explorer or a Spanning Tree Explorer frame received by the device. This will reduce the unnecessary propagation of explorer frames through the network. 4-60 Source Route Configuration Bridging You can use the Set button at the bottom of the window to change the Hop Count for the port, as explained in the section Making and Setting Changes, page 4-63. The permissible value for this Þeld is 0 to 28. Spanning Tree Expl. This read-only Þeld displays the action currently being applied to Spanning Tree Explorer frames received by the indicated port. This Þeld will appear in one of two ways: ¥ If the Spanning Tree Mode for the bridge is set to Auto (as explained in the following section), this Þeld will display the Spanning Tree Port State for the indicated port. If set to Auto, the device is subject to the Spanning Tree Algorithm. Each port will treat incoming frames according to its current Spanning Tree bridging state (i.e., Forwarding, Disabled, Listening, Learning, Blocking, or Broken). ¥ If the Spanning Tree Mode is set to Manual (as explained in the following section) this Þeld will display either Enabled or Disabled as the Spanning Tree Port Enable State for the indicated port. Bridge Number The Bridge Number uniquely identiÞes a bridge port when more than one bridge is used to span the same two segments. The Bridge Number should be in the range of 0 to 15. You can use the Set button at the bottom of the window to change the bridge number of the port, as explained in the section Making and Setting Changes, page 4-63. Current source routing protocols allow a range of 0 to 15 (0ÐF hexadecimal) for the bridge number identiÞer. If no bridge number is assigned to the device, a default value of 1 will appear in this Þeld. Source Route Configuration 4-61 Bridging Spanning Tree Mode Indicates how a port on the device will behave with an incoming single-route broadcast (Spanning Tree ExplorerÑSTE) frame. You can conÞgure this Þeld with the radio buttons and checkboxes, or via the MIBTools utility or local management. This Þeld allows you to conÞgure a Spanning Tree for your network. You can set the Spanning Tree Mode to Auto or Manual using the radio buttons. We recommend that all bridges in your network topology have the same setting for Spanning Tree Mode (i.e., all set to Auto or all set to Manual). Auto If the Spanning Tree Mode is set to Auto, a port that implements the Spanning Tree Algorithm (STA), and is enabled and in the forwarding state, will accept and relay STE frames onto its attached segment. Using STA, a bridge port will only forward frames if it is the designated port for its attached segment. A port is ÒdesignatedÓ for its segment if it has the lowest Root Path Cost of all bridge ports attached to that segment. The Root Path Cost is the lowest total path cost calculated by adding the costs of each port along the path of a frame that traverses the bridge topology from the root to that port (including its own path cost). If two ports on a segment have equal Root Path Costs, the port on the bridge with the highest priority bridge identiÞer (for convenience sake, that have the lowest numerical value) will be chosen as the root port. You can affect Spanning Tree topology by changing the deviceÕs bridge priority (Bridge Label) and path cost for its port pair (path cost increment) via the Spanning Tree window (discussed in earlier in this chapter). Manual If the Spanning Tree Mode is set to Manual, you can manually conÞgure the bridge to forward STE frames (i.e., manually establish a Spanning Tree for STE frames by determining which bridge in a parallel series of bridges will forward these frames). If you set the Spanning Tree Mode to Manual, you can use the Enable or Disable checkboxes to set a portÕs Spanning Tree Enable State to: 4-62 - Enabled (participating in frame relay). - Disabled (not participating in the bridging process or in operation of the Spanning Tree Algorithm and protocol). If the Spanning Tree Mode is set to Disabled, the bridge port will not send or accept any STE frames. Any STE frame received will be discarded. The Spanning Tree Expl Þeld at the ConÞguration window, and the STE Frames Þeld at the Status window will both read ÒDisabled.Ó Source Route Configuration Bridging Making and Setting Changes The Source Route ConÞguration window allows you to affect changes for the following Source Route Bridging parameters: Bridge Number, Local Segment, Target Segment, Hop Count Limit, and the deviceÕs Spanning Tree Mode. To make a change to Bridge Number, Local Segment, Target Segment, or Hop Count Limit, use the mouse to highlight the existing value in the desired Þeld, and type in a new value. To set the Spanning Tree Mode to Auto or Manual, click on the radio button next to the appropriate selection. If set to Auto, a Spanning Tree Algorithm will calculate the deviceÕs priority in a series of parallel bridges to determine a root bridge on the network. If set to Manual, you conÞgure a Spanning Tree by administratively enabling or disabling each bridging port on the network. When the deviceÕs Spanning Tree Mode is set to Manual, you can change how a bridge port will treat a Spanning Tree Explorer frame. Use the Enable checkbox to allow STE frame forwarding at the port, or use the Disabled checkbox to prevent STE frame forwarding at the port. Click on the Enabled or Disabled checkbox to make your selection. When you make changes in the Source Route ConÞguration window, they are not implemented at the device until you click on the Set button. This will cause the device to reboot. Since rebooting the device will bring it down for several minutes, a ÒReset with new parameters?Ó pop-up dialog box will appear to ensure that you are ready. Click on OK to accept the changes, or Cancel to return to the Source Route ConÞguration window. Using the Find Source Address Feature You can select the Find Source Address option to discover which bridging interface a speciÞed source MAC address is communicating through. When you select the Find Source Address option, a search is made of the 802.1d Bridge Filtering Database to discover the bridge interface associated with the address that you specify. If the search is successful, the corresponding interface will ßash in the Chassis View window. For more information on the Filtering Database, refer to Filtering Database on page 4-42. Use the Find Source Address feature as follows: 1. Click to display the Device menu. 2. Drag to Find Source Address…. The following window will appear. Using the Find Source Address Feature 4-63 Bridging Figure 4-17. Find Source Address Window 3. In the text field in the middle of the window, enter a valid MAC address in hexadecimal format and then click OK. If the address is found in the 802.1d Bridge Filtering Database, the port through which the address is communicating will ßash in the front panel Chassis View display. If the address is not found in the Filtering Database, a separate window will appear with a ÒCanÕt Find Source AddressÓ message. The Port Source Addresses Window You can use the port-level Source Addresses window to view all the MAC addresses that are communicating through a selected bridge interface. To open the Source Addresses window from the Bridge Status window: 1. Click on the desired Port button ( ) to display the port menu. 2. Drag down to select Source Addressing…. The following window, Figure 4-18, will appear. from the Chassis View window: 1. Click on the appropriate port index to access the Port menu. 2. Drag down to select Source Addressing…. The following window, Figure 4-18, will appear. 4-64 The Port Source Addresses Window Bridging Figure 4-18. Port Source Addresses Window The Port Source Addresses window displays the MAC addresses of all devices that have transmitted packets that have been forwarded through the selected bridging interface during the last cycle of the Filtering DatabaseÕs deÞned aging timer (learned addresses that have not transmitted a packet during one complete cycle of the aging timer are purged from the Source Address Table). For more information on the Filtering Database, see Filtering Database on page 4-42. NOTE The aging time displayed in the Port Source Addresses window is the same as the aging time displayed in the Filtering Database window. The aging time can be set from either window, and any changes to its value will be reßected in both locations. Setting the Aging Time The Filtering Database Aging Time is user-conÞgurable through the Device Aging Time window. To alter the Aging Time for Dynamic and Learned entries: 1. Click the I-bar cursor ( ) next to the Device Aging Time field. The Device Aging Time window, Figure 4-19, will appear. The Port Source Addresses Window 4-65 Bridging Figure 4-19. Device Aging Time Window 2. Type in the new Aging Time, in seconds, then click on . The allowable range is 10 to 1000000 seconds; the default is 300 seconds. Duplex Modes Some of the bridge interfaces on a device will support Full Duplex Switched Ethernet (FDSE) mode. Enabling full duplex mode on an interface allows the interface to receive and transmit packets at the same time, effectively doubling the available bandwidth. On an Ethernet connection that is not using full duplex mode, the interface can either transmit or receive packets. The interface has to wait for one activity to be completed before switching to the next activity (receive or transmit). Using the full duplex mode allows for faster transmission of packets over Ethernet connections because the bridging interface can transmit and receive packets; the interface does not have to wait for one activity to be completed before switching to the next one. WARNING Full Duplex should only be enabled on an interface that has a connection to a single destination address at the other end of the connection (i.e., it is not a segment with an attached repeater cascading the connection to multiple destination addresses). Full Duplex mode disables the collision detection circuitry at the interface, so that both Transmit and Receive wires can be used simultaneously. With a single destination address at the other end of the connection (for example, if the connection was to a full duplex interface on another switching module, or if a single Þle server was connected to the full duplex switch port), this essentially doubles the available bandwidth from 10 Mbit/sec to 20 Mbit/sec. Note that the interface at the other end of the connection must also have Full Duplex enabled at the attached interface. Full Duplex mode must be disabled if the interface is communicating with multiple destinations simultaneously (i.e., if a repeater is cascaded from the interface), since Ethernet relies on Collision Sense for proper operation. 4-66 Duplex Modes Bridging The Duplex Modes Window The bridge-level Duplex Modes window allows you to enable and disable full duplex mode capability for each bridging interface on your device. The window lists each interface on the device and whether full duplex is ÒONÓ or ÒOFFÓ for each interface. To access the Duplex Modes window from the Bridge Status window: 1. Click on to display the Bridge menu. 2. Drag down to select Duplex Modes…. The Duplex Modes window, Figure 4-20, will appear. from the Chassis View window: 1. Click on the Board Index of the device of interest; the Board menu will appear. 2. Drag down to select Duplex Modes…. The Duplex Modes window, Figure 4-20, will appear. Figure 4-20. Duplex Modes Window Duplex Modes Window Fields The following information is displayed in the Duplex Modes window: Interface: Lists the bridging interfaces available on the device (Interface 1, Interface 2, and so on). Duplex Modes 4-67 Bridging Full Duplex Displays the current state of full duplex on each interface. Possible values for this Þeld are as follows: Connect A Indicates that the interface is connected to MMAC Channel A and does not support full duplex mode (Interface 1 only). You will not be able to change the value of this Þeld from this window. ON Indicates that full duplex mode is being used on this interface. OFF Indicates that full duplex mode is not being used on this interface. N/A Indicates that full duplex mode is not available on this interface. Setting the Duplex Mode You set an interface to use or not use Full Duplex Switched Ethernet by turning the full duplex capability ON or OFF from this window. To turn the full duplex mode ON or OFF: 1. In the Duplex Modes window, highlight the interface you want to change. 2. Double-click on the highlighted interface. The interface list will be briefly grayed-out as the set is being made to the device. If the set is successful, the interface list will reactivate and the Full Duplex: indicator will switch from ON to OFF or OFF to ON. If you attempt to set an interface to full duplex mode that does not support this feature, you will receive a “Set Failed” error message. Click on Cancel to close the window. NOTE 4-68 Because full duplex conÞguration takes place as you set each change individually, any changes that have been completed up to the point of clicking on Cancel will have been set at the device. Make sure that you have undone any unwanted changes before exiting the window. Duplex Modes Bridging Ethernet Port Configuration Window You can also conÞgure duplex modes from the Port ConÞguration window. To access the Port ConÞguration window: from the Bridge Status window: 1. Click on the desired Port button ( ) to display the port menu. 2. Drag down to select Configuration…. The Port Configuration window for the selected Ethernet interface, Figure 4-21, will appear. from the Chassis View window: 1. Click on the appropriate port index to access the Port menu. 2. Drag down to select Configuration…. The Port Configuration window for the selected Ethernet interface, Figure 4-21, will appear. Figure 4-21. Port ConÞguration Window This window will indicate which mode is being used on the interface, standard mode or full duplex mode. Standard Mode Standard mode is being used on this interface. In standard mode, the interface can transmit or receive packets. The interface has to wait for one activity to be completed before switching to the next activity (receive or transmit). Full Duplex Full duplex mode is being used on this interface. In full duplex mode, the interface receives and transmits packets at the same time. Duplex Modes 4-69 Bridging You set an interface to use standard or full duplex by selecting the appropriate mode from this window. When you open the Port ConÞguration window the currently used mode appears selected. To change the mode from standard to full duplex mode or from full duplex to standard mode, click in the radio button of the appropriate option and then click on Apply. To cancel the action without applying any changes, click on Cancel. Fast Ethernet Port Configuration You can use the port-level Fast Ethernet ConÞguration window to manually conÞgure 100Base-TX Fast Ethernet ports and FE100-TX Fast Ethernet Interface Modules (FEPIMs) for 10Base-T and 100Base-TX full or half duplex operation. You can also conÞgure them to auto-negotiate with the device at the other end of the connection, based upon each deviceÕs Advertised and Remote Capabilities. If you are monitoring a device with 100Base-FX Fast Ethernet ports, you can use the Fast Ethernet ConÞguration window to manually conÞgure them to full or half duplex operation. No auto-negotiation is available for the 100Base-FX ports, and by extension, no Advertised or Remote capabilities. From this window you can manually set the operational mode of the port, determining the speed of the port (10 Mbps or 100 Mbps), and whether it uses full duplex or standard mode bridging. You can also set a 100Base-TX port to auto-negotiation so that the appropriate operational mode can be determined automatically (using the Advertised Abilities of the local interface that you determine, and the Remote Capabilities of the Remote Link). The mode you set will determine the speed of the port and whether it uses full duplex or standard mode bridging. To access the Fast Ethernet ConÞguration window from the Bridge Status window: 1. Click on the desired Port button ( ) to display the port menu. 2. Drag down to select Configuration…. The Fast Ethernet Configuration Port X window (where X represents the port number of the selected interface), Figure 4-22, will appear. from the Chassis View window: 1. Click on the appropriate port index to access the Port menu. 2. Drag down to select Configuration…. The Fast Ethernet Configuration Port X window (where X represents the port number of the selected interface), Figure 4-22, will appear. 4-70 Fast Ethernet Port Configuration Bridging Figure 4-22. Fast Ethernet ConÞguration Port X Window From this window you can manually set the operational mode of the port, orÑfor 100Base-TX interfacesÑset the port to auto-negotiation so that the appropriate operational mode can be determined automatically. The mode you set will determine the speed of the port and whether it uses full duplex or standard mode bridging. The following information about the selected Fast Ethernet port is displayed: Port Type Displays the type of Fast Ethernet port: FE-100TX or FE-100FX. Link State Displays the connection status of the selected port: Link or No Link. Current Operational Mode Displays the mode that the port is operating in at the present time. Possible operational modes include 10Base-T, 10Base-T Full Duplex, 100Base-TX, 100Base-TX Full Duplex, 100Base-FX or 100Base-FX Full Duplex. If no current operational mode is returned, it indicates the port is operating under auto-negotiation. Fast Ethernet Port Configuration 4-71 Bridging Desired Operational Mode Displays the operational mode that you want to conÞgure for this port. The following operational modes are available for each port: FE-100TX Auto-Negotiation, 10Base-T, 10Base-T Full Duplex, 100Base-TX, and 100Base-TX Full Duplex. FE-100FX 100Base-FX and 100Base-FX Full Duplex See Setting the Desired Operational Mode for the FE-100TX and Setting the Desired Operational Mode for the FE-100FX, following, for more information. Advertised Abilities This Þeld works in conjunction with auto-negotiation on FE-100TX ports. During auto-negotiation, the local hardware will advertise all selected modes in descending bandwidth order: 100Base-TX Full Duplex, 100Base-TX, 10Base-T Full Duplex, and 10Base-T. Of the selected abilities, the highest mode available on the port on the other side of the connection will automatically be used. The Advertised Abilities will only be used when auto-negotiation is enabled. Remote Capabilities This Þeld displays the advertised abilities of the remote hardware at the other end of the link from the FE-100TX port. Again, possible advertised abilities by the remote partner include 10Base-T, 10Base-T Full Duplex, 100Base-TX, or 100Base-TX Full Duplex. If auto-negotiation is not enabled or supported at either the local or remote interface, or if there is no active link, all entries in this Þeld will be grayed out. NOTE Auto-negotiation is not available on the FE-100FX; therefore, the Advertised Abilities and Remote Capabilities section of the Fast Ethernet ConÞguration window will be grayed out when you are viewing the port conÞguration of an FE-100FX. ! If you choose to select a speciÞc mode of operation (rather than auto-negotiation), you should be sure that the link partner supports the same mode. Otherwise, no link will be achieved. CAUTION If you select a full duplex mode and the link partner supports the same wire speed but not full duplex, a link will be achieved, but it will be unstable and will behave erratically. If you select auto-negotiation, the local node will try to match the mode of the link partner, even if the link partner is not set to auto-negotiate, and even if the local node must use a mode which it is not currently advertising. 4-72 Fast Ethernet Port Configuration Bridging Setting the Desired Operational Mode for the FE-100TX You can manually set the FE-100TX to use any one of four operational modes. You can also set the port to auto-negotiation, which allows the port to determine for itself the best operational mode using the Advertised Abilities and Remote Capabilities of the local and remote interface, respectively. If you want to manually conÞgure the mode: 1. Click on the Desired Operational Mode list-box, and select one of the following modes: • 10Base-T—10 Mbps connection, Standard Mode • 10Base-T Full Duplex—10 Mbps connection, Duplex Mode • 100Base-TX—100 Mbps connection, Standard Mode • 100Base-TX Full Duplex—100 Mbps connection, Duplex Mode 2. Click on . The mode that you have chosen will be set at the port. If you want the port to use auto-negotiation: 1. Click on the Desired Operational Mode list-box and select Auto Negotiation. 2. Click in the Advertised Abilities check boxes to select either 10Base-T, 10Base-T Full Duplex, 100Base-TX, or 100Base-TX Full Duplex. 3. Click on . When an active link is established, the operational mode will be dynamically set based on the modes selected in the Advertised Abilities field and the speeds and modes supported by the attached device; see the definition for Advertised Abilities on page 4-72. Setting the Desired Operational Mode for the FE-100FX You can manually set the FE-100FX to use either of two operational modes: 1. Click on the Desired Operational Mode list-box, and select one of the following modes: • 100Base-FX—100 Mbps connection, Standard Mode • 100Base-FX Full Duplex—100 Mbps connection, Duplex Mode 2. Click on Fast Ethernet Port Configuration . The mode that you have chosen will be set at the port. 4-73 Bridging SONET Port Configuration The FE100-Sx series of Fast Ethernet Port Interface Modules and the APIM-2x series of ATM Port Interface Modules provide SONET (Synchronous Optical Network) access for some of CabletronÕs devices. The FE100-Sx Port Interface Modules and the APIM-2x Port Interface Modules link high-speed local or metropolitan area networks by using an OC-3 connection (leased from your local telco or Internet service provider) to a SONET ring. If your device is equipped with an FE100-Sx or an APIM-2x port interface module, you can use the SONET/SDH ConÞguration window to set its operating parameters, and the SONET/SDH Statistics window to view performance information for the interface (which can tell you if your telco/service provider is meeting any guarantees regarding network reliability). SONET/SDH Configuration The SONET/SDH ConÞguration window lets you determine whether your FE-100Sx or APIM-2x port interface module will operate according to SONET or SDH (Synchronous Digital Hierarchy) standards. SONET is the ANSI (American National Standards Institute) standard for the optical transport of data according to the transmission standards in effect in North America (United States/Canada), Korea, Taiwan, and Hong Kong. ANSI sets industry standards in the U.S. for the telecommunications industry, among other industries. The basic SONET building block signal (transmitted at 51.84 Mbps) is referred to as STS-1 (Synchronous Transport Signal Level 1). SONET can multiplex (or combine) STS-1 signals into STS-N signals, where N is some integer multiple of STS-1 signals. The ITU, or International Telecommunications Union (formerly known as the CCITTÑthe Consultative Committee on International Telegraph and Telephone) incorporated the SONET standard into its Synchronous Digital Hierarchy (SDH) recommendations, which address differences between the European and North American transmission standards. The ITU sets standards for international communications (except for nations adhering to ANSI standards). SDH is a world standard, and as such, the SONET standard is considered a subset within it. The SDH transmission hierarchy uses the STM-1 (Synchronous Transfer Module Level 1) as its basic building block signal (transmitted at 155.52 Mbps). Again, there are STM-N signals, which are STM-1 signals that have been multiplexed into a higher signaling rate. 4-74 SONET Port Configuration Bridging Table 4-1. SONET/SDH Transmission Hierarchies SONET Bit Rate SDH STS-1/OC-1 51.84 Mbps Ñ STS-3/OC-3 (supports FE-100Sx and APIM-2x in SONET operational mode) 155.52 Mbps STM-1 (supports FE-100Sx and APIM-2x in SDH operational mode) STS-12/OC-12 622.08 Mbps STM-4 STS-24/OC-24 1244.16 Mbps Ñ STS-48/OC-48 2588.32 Mbps STM-16 STS-192/OC-192 9953.28 Mbps STM-64 You should be sure that the operational mode for both the local and remote ends of the SONET connection is set appropriately for your region. Setting the wrong operational mode may cause errors to be generated during transmission, since there are slight differences in framing SONET and SDH signals. To access the SONET/SDH ConÞguration window from the Bridge Status window: 1. Click on the desired Port button ( ) to display the port menu. 2. Drag down to select SONET/SDH Configuration…. The SONET/SDH Configuration: Port X window, Figure 4-23, will appear. from the Chassis View window: 1. Click on the appropriate port index to access the Port menu. 2. Drag down to select SONET/SDH Configuration…. The SONET/SDH Configuration: Port X window, Figure 4-23, will appear. Figure 4-23. SONET/SDH ConÞguration Window SONET Port Configuration 4-75 Bridging To set the operational mode of the SONET port via the SONET/SDH ConÞguration window: 1. Click in the radio box adjacent to the appropriate selection, SONET or SDH, to choose the data transmission standard to be used by the interface. 2. Click on Apply to set your change at the interface, or Cancel to exit the SONET/SDH Configuration window without applying any changes. SONET/SDH Statistics Window SONET/SDH statistics are available for each FE100-Sx or APIM-2x port interface module installed in your device. The same statistics apply whether you have conÞgured the interface to operate according to SONET or SDH transmission standards. The FE100-Sx and the APIM-2x port interface modules are SONET path-terminating equipment (PTE). They act as an endpoint of an end-to-end connection between themselves and another similar port interface module. As endpoints, they are capable of generating and receiving the Path Overhead information contained within the SPE (Synchronous Payload Envelope) of the base-level SONET or SDH signals. Simply put, overhead is the extra bits in the digital stream that relay information besides trafÞc signals. The Path Overhead provides for end-to-end performance monitoring of the link, the signal label (the content of the SPE, including status of mapped payloads), the pathÕs current status, and path trace capabilities. The SONET/SDH Statistics window enables you to view some of the error information contained within the Path Overhead that your FE100-Sx or APIM-2x is receiving from the remote endpoint. The window will inform you whether there have been speciÞc defects experienced on the SONET link, and if the network has experienced any signiÞcant unavailability time as a result. With a SONET link, there are three levels of error conditionsÑanomalies, defects, and failures. 4-76 ¥ Anomalies are small discrepancies between a desired and actual characteristic of an item, which when occurring singly will not interrupt the ability of the SONET network elements to perform their required functions. ¥ Defects indicate that anomalies have reached a level where the ability of the SONET network elements to perform their required functions has been interrupted. Defects are used in performance monitoring and in determining the faultÕs cause, and have impact on consequent actions on the network. ¥ Failures indicate that a network element has been unable to perform its required functions beyond a maximum time allocated to a given error condition. SONET Port Configuration Bridging These errors can occur in any of the four optical layers of a SONET network, which are (in order from lowest to highest layer in the hierarchy) the physical Medium, Section, Line, and Path layers. ¥ The Medium layer is the Photonic layer that physically converts electrical signals to optical signals. ¥ The Section layer deals with the transport of frames across the optical medium, including framing and scrambling data for transmission, the error monitoring and maintenance between section-layer elements (such as signal regenerators/repeaters), and orderwire (provisioning channels). ¥ The Line layer is responsible for reliably transporting the higher-level Path layer payload and overhead across the physical medium. It is responsible for synchronizing (clocking) the data transmission, multiplexing signals into a single channel, error monitoring and maintenance between line-layer elements (such as Add/Drop Multiplexers), and switching to secondary data paths should the primary path experience failure. ¥ The Path layer transports services between path-terminating equipment. It maps signals into a format required by the line layer, and reads, interprets, and modiÞes path overhead for performance monitoring and automatic protection switching. Error reporting occurs at the Section, Line, and Path layers, and is carried within the corresponding SONET overhead. In terms of the SONET protocol stack, the three layers with overhead are mapped to the SONET link as shown in the following diagram. The statistics and errors indicators provided in the SONET/SDH statistics window are taken from both the end-to-end Path layer, and from the Section layer between the FE100-Sx or APIM-2x and the Add/Drop Multiplexer to which it is connected. They reßect errors that may be occurring on your customer premises equipment, as well as errors that may be occurring at the Line or Section layers within the SONET MAN/WAN ring itself. LinePathTerminating Terminating OC-3c Equipment— Equipment— link Telco/SP ADM (FE100-Sx (Add/Drop or APIM-2x) Multiplexer) Regenerators Section LinePathTerminating Equipment— OC-3c Terminating Equipment— link Telco/SP ADM (FE100-Sx (Add/Drop or APIM-2x) Multiplexer) Line Path SONET Port Configuration 4-77 Bridging To access the SONET/SDH Statistics window from the Bridge Status window: 1. Click on the desired Port button ( ) to display the port menu. 2. Drag down to select SONET/SDH Statistics…. The SONET/SDH Statistics window for that interface, Figure 4-24, will appear. from the Chassis View window: 1. Click on the appropriate port index to access the Port menu. 2. Drag down to select SONET/SDH Statistics…. The SONET/SDH Statistics window for that interface, Figure 4-24, will appear. Figure 4-24. The SONET/SDH Statistics Window Errors The Errors indicators at the bottom of the SONET/SDH Statistics window show the status of the SONET link as reported by the monitored interface, by indicating whether the link has experienced Loss of Pointer, Loss of Signal, or Loss of Frame defects or failures during the current 15-minute interval. Note that Loss of Pointer is detected at the Path level on the SONET link, meaning that the error occurred anywhere on the end-to-end link between the connected FE100-Sx or APIM-2x devices that are customer premises equipment (CPE), and Loss of Signal and Loss of Frame are detected at the Section level, meaning that the error occurred on the SONET section between the monitored CPE device and the ADM node (line-terminating equipmentÑLTE) to which it is connected. 4-78 SONET Port Configuration Bridging Note also that these indicators simply show which error conditions have been detected during the last 15-minute interval; they do not alter the display of the statistics above. Loss of Pointer SONET uses ÒpointersÓ to compensate for frequency and phase variations as data is being transmitted across the optical network, so that data is not delayed or lost on the network. Basically, a pointer is a data offset value that indicates where in the frame that the ÒpayloadÓ (user data and path overhead) begins, so that it can be differentiated from the Òtransport overheadÓ (the information in the frame used for transporting it across the SONET network). A Loss of Pointer (LOP) defect occurs when either a valid pointer is not detected in eight consecutive SONET STS-N frames, or when eight consecutive frames are detected with the New Data Flag (NDF) set without being validly combined into an STS-N(c)Ña concatenated STS-N signalÑto carry a larger payload. An LOP defect is cleared when three consecutive frames are detected with either a valid pointer and a normal NDF, or a valid concatenation indicator. Note that incoming Alarm Indicator Signals (which are alarm messages generated by the line and section layers that are propagated along the path to indicate a loss of signal condition on upstream network elements) cannot contribute to an LOP defect. A Loss of Pointer failure is declared when a defect condition persists for a period of 2 to 3 seconds; the LOP failure is cleared when there is no defect condition detected for 9.5 to 10.5 seconds Loss of Signal Incoming SONET signals are monitored for Loss of Signal (LOS) errors, which indicate a loss of physical signal failure (either optical or electrical) at the source (e.g., a laser failure) or in the transmission facility (e.g., a Þber cut). Loss of signal is detected in the data (before scrambling) by an Òall zerosÓ pattern, which indicates that there are no light pulses for OC-N optical interfaces (on the line-terminating equipment or a regenerator), or no voltage transitions for STS-1 or STS-3 electrical interfaces (on path-terminating equipment, such as the FE100-Sx or APIM-2x). A state of no transitions that lasts 2.3 µs (microseconds) or less is insigniÞcant. A state of no transitions that lasts between 2.3 µs and 100 µs is declared an LOS defect. The LOS defect is cleared after a 125 µs interval (the time required to transmit one frame on a SONET network) during which no LOS defect is detected. If the LOS defect persists for a period of 2 to 3 seconds, an LOS failure will be declared, an alarm indicator will be set, and an alarm message will be sent to an Operations Systems application (responsible for overseeing the entire network). The LOS failure is cleared when the LOS defect is absent for a period of 9.5 to 10.5 seconds. SONET Port Configuration 4-79 Bridging A Loss of Signal may also be detected if the received signal level (e.g., the incoming optical power) falls below a Bit Error Rate (BER) threshold of 1 in 103. A BER is the number of coding violations detected in an interval of time (usually one second). A predicted BER of 1 in 103 means that during each second, there is an error ratio of 1 errored bit per 1,000 bits sent. This state clears when two consecutive framing patterns are received, and no Òall zerosÓ LOS conditions are detected in the intervening time (one frame). Note that for path- or line-terminating SONET network elements, LOS failure detection is also linked to the declaration or clearing of Loss of Frame (LOF) failures (described below). If there was a previously existing LOF failure at the time an LOS failure is declared, the LOF failure will be cleared; if an existing LOS failure is cleared, but LOF failure conditions still exist, an LOF failure will be immediately declared on clearing the LOS failure. Loss of Frame SONET frames uses A1 and A2 framing bytes in the section overhead to indicate the beginning of the frame. An Out of Frame (OOF) alignment defect (also known as a Severely Errored FrameÑSEFÑdefect) occurs when four consecutive SONET frames are received with invalid patterns in these framing bytes. This defect is cleared when two consecutive SONET frames are received with valid framing patterns. A Loss of Frame (LOF) defect occurs when this OOF/SEF defect persists for a period of 3 milliseconds. This defect is cleared when the incoming signal remains continuously in-frame for a period of 1 to 3 milliseconds. An LOF failure is declared when an LOF defect persists for a period of 2 to 3 seconds (except when a Loss of Signal defect or failure is present, as described above). An LOF failure is cleared if an LOS failure is declared, or when the LOF defect is absent for 9.5 to 10.5 seconds. Statistics Statistics are given for both the Near-End and Far-End of the SONET/SDH path. Far-end statistics are taken from the far-end block error code (FEBE)Ñused to indicate that the remote entity at the far-end of the path has detected errored data Ñwithin the Path Overhead of SONET frames. You can view statistics for the current 15-minute interval, or accumulated over the last one-, eight-, or 24-hour period by clicking on the appropriate selection button. Errored Seconds The counter associated with the number of Errored Seconds, or Far-End Errored Seconds, encountered by a SONET/SDH Path in the speciÞed interval. An Errored Second (ES) is a second with one or more coding violations (bit parity errors) at the associated layer reported at the Section, Line, or Path layer of the SONET link, or a second during which at least one or more incoming defects (e.g., Loss of Signal, Loss of Pointer, or Loss of Frame) has occurred at that layer. 4-80 SONET Port Configuration Bridging Coding Violations are Bit Interleaved Parity (BIP) errors that are detected in the incoming signal (as described below). Severely Errored Seconds The number of Severely Errored Seconds, or Far-End Severely Errored Seconds, encountered by a SONET/SDH Path in the speciÞed interval. A Severely Errored Second (SES) is a second with X or more coding violations (bit parity errors) reported at the Section, Line, or Path layer of the SONET link, or a second during which at least one or more incoming defects (e.g., Loss of Signal, Loss of Pointer, or Loss of Frame) has occurred at that layer. The statistic provided in this Þeld is provided by the STS-Path level of the link. Values of X at each layer depend on the linkÕs line rate and the Bit Error Rate. For the STS-Path layer, with a line rate of 51.84 Mbps (STS-1) and a BER of 1.5 x 10⁻⁷, X is 9; with a line rate of 155.52 Mbps (STS-3) and a BER of 1 x 10⁻⁷, X is 16. If the FE100-Sx or APIM-2x is experiencing consecutive Severely Errored Seconds, it may indicate an impending period of network unavailability (which begins at the onset of 10 consecutive SESs). Periods of unavailability can severely impact service (e.g., the disconnection of switched services). Availability is restored at the onset of 10 consecutive error-free seconds. Severely Errored Framing Seconds The counter associated with the number of Severely Errored Framing Seconds encountered by a SONET/SDH Section in the speciÞed interval. A Severely Errored Framing Second (SEFS) is a second containing one or more SEF events. This counter is only counted at the Section Layer, and is not available as a Far-End counter. Code Violations The number of Coding Violations (CVs) encountered by a SONET/SDH Path interface, or the number of Far-End Coding Violations reported via the far-end block error count to the monitored SONET/SDH Path interface, in the speciÞed interval. Coding Violations are Bit Interleaved Parity (BIP) transmission errors that are detected in the incoming signal. Bit Interleaved Parity is a check at the receiving interface that groups all bits in a block into a unit (e.g., a byte), then veriÞes the block for parity for each bit position in the group by making sure that the number of bits set to the value Ô1Õ is either even or odd, as reported by the transmitting entity. SONET Port Configuration 4-81 Bridging Configuring Broadcast Suppression Excessive broadcasts to all ports, or broadcast storms, can result in severe network performance problems, and possibly cause the network to crash. Devices which support the broadcast suppression feature provide automatic protection against broadcast/multicast storms. In many ways, broadcast suppression is similar to Þltering. To protect against storms, an acceptable rate for broadcast trafÞc across a port is deÞned. Ports which reach this user-deÞned threshold will be throttled, and an SNMP trap message will be sent to the network management station. To access the Broadcast Suppression window: 1. Click on the Device menu from the Chassis View window of the selected device. 2. Drag down to select Broadcast Suppression…. The Broadcast Suppression window, Figure 4-25, will appear. Figure 4-25. The Broadcast Suppression Window In the Broadcast Suppression Window, each interface of the device that is being monitored can be individually conÞgured for automatic broadcast/multicast storm protection. You can also deÞne what level of broadcasts the device will recognize as a broadcast storm by specifying the number of broadcast packets that can be transmitted within a given time period. 4-82 Configuring Broadcast Suppression Bridging To conÞgure a port for broadcast storm protection: 1. Click to highlight the entry for the port you wish to configure for automatic broadcast storm protection. 2. In the Time on Selected Ports field, enter the desired time period in seconds. Note that a value of 0 will disable the threshold alarm. 3. In the Transmit (Frames Per Second) Threshold on Selected Ports field, enter the number of broadcast packets that will be the threshold for the time period set in Step 2. 4. Click Apply and your settings will be added to the window. Click Cancel to close the window. Token Ring Bridge Mode The Token Ring Bridge Mode window allows you to choose between three different modes of bridging on a deviceÕs Token Ring bridge port: Source Route Transparent, Transparent, or Source Routing. The default setting is Source Route Transparent. To access the Token Ring Bridge Mode window from the Bridge Status window: 1. Click on to display the Bridge menu. 2. Drag down to select Token Ring Bridge Mode…. The Token Ring Bridge Mode window, Figure 4-26, will appear. from the Chassis View window: 1. Click on the Board Index of the device of interest; the Board menu will appear. 2. Drag down to select Token Ring Bridge Mode…. The Token Ring Bridge Mode window, Figure 4-26, will appear. Token Ring Bridge Mode 4-83 Bridging Figure 4-26. Token Ring Bridge Mode Window Defining the Bridge Modes Transparent When the bridge is set to Transparent mode, the bridge will only transmit transparent frames from the Token Ring connection. If a source route frame is received by the bridge, the Source Route information in the frame will be dropped from the packet. (A transparent frame is the same as a source route frame without a RIFÑRouting Information Field.) Source Routing When the bridge is set to Source Routing mode, the bridge will only transmit source route frames from the Token Ring connection.You should set the bridging mode to Source Route when you are bridging from Ethernet to Token Ring. The source route information (as conÞgured at the Ethernet portÕs Source Route ConÞguration window) will be appended to the RIF for frames transmitted on the Token Ring. Source Route Transparent When the bridge is set to Source Route Transparent, the bridge will transmit both transparent and source route frames. The frames received which have source route information will be transmitted as source route, while frames received that are transparent will be transmitted as transparent. Setting The Token Ring Bridge Mode 1. Click on the radio button next to the bridging mode you would like your Token Ring bridge port to use: Transparent Bridge, Source Routing, or Source Route Transparent. 2. Click on OK to close the window and set the bridge to the desired mode. 4-84 Token Ring Bridge Mode Bridging Using the Physical View Windows ETWMIM Ethernet Port Physical View The Physical View allows you to view the physical state of the Ethernet port when you are monitoring an ETWMIM via SPECTRUM Element Manager. To use the Physical View option from the Bridge Status window: 1. Click on the Ethernet bridge port (Port 1). The Ethernet bridge port pull-down menu will appear. 2. Drag down to select Physical View…. The ETWMIM EtherPhysStatus (Ethernet Physical Status) window, Figure 4-27, will appear. from the Chassis View window: 1. Click on the Ethernet bridge interface (Port 1). The Ethernet bridge port pull-down menu will appear. 2. Drag down to select Physical View…. The ETWMIM EtherPhysStatus (Ethernet Physical Status) window, Figure 4-27, will appear. Figure 4-27. Ethernet Port Physical View Ethernet Port Physical Status Fields Active Port This Þeld will have an enabled check box next to the active port conÞguration option you have selected for your ETWMIM Ethernet port. ¥ If you have conÞgured the ETWMIM for use with the Ethernet backplane connection, the X will appear in the BackPlane checkbox. Using the Physical View Windows 4-85 Bridging ¥ If you have opted to use a front panel EPIM for your Ethernet connection, the X will appear in the EPIM checkbox. You cannot change your active port conÞguration from the window. It must be changed physically on the ETWMIM itself. Epim Type This Þeld will show the type of EPIM you have installed via the front panel of your ETWMIM, if applicable. The types of EPIMs are listed below, along with the type of segment each will be connected to. ¥ ¥ ¥ ¥ ¥ ¥ ¥ ¥ EPIM-TÑ10BASE-T Twisted Pair Segment EPIM-F1/F2ÑFiber Optic Link Segment EPIM-F3ÑSingle Mode Fiber Optic Link Segment EPIM-CÑThin-net segment EPIM-AÑAUI cable segment EPIM-XÑAUI cable segment EPIM UnknownÑSPECTRUM Element Manager cannot determine the EPIM Type. N/AÑThe backplane connection is being used. Link State This Þeld will display the link state of the EPIM Ethernet port. The possible states are: ¥ LinkedÑindicates a link has been established on the EPIM. ¥ UnlinkedÑindicates a link has not been established on the EPIM. ¥ UnknownÑindicates the status of the EPIM link is unknown, or not valid for the type of EPIM installed. ¥ N/AÑindicates that the backplane connection is being used. ETWMIM Token Ring Port Physical View The Physical View option allows you to view and conÞgure the physical set up of the Token Ring port when you are monitoring an ETWMIM via SPECTRUM Element Manager. To use the Physical View option from the Bridge Status window: 1. Click on the Token Ring bridge port (Port 2). The Token Ring bridge port pull-down menu will appear. 2. Drag down to select Physical View…. The ETWMIM Token Ring Phys(ical) Status window, Figure 4-28, will appear. 4-86 Using the Physical View Windows Bridging from the Chassis View window: 1. Click on the Token Ring bridge port (Port 2). The Token Ring bridge port pull-down menu will appear. 2. Drag down to select Physical View…. The ETWMIM Token Ring Phys(ical) Status window, Figure 4-28, will appear. Figure 4-28. Token Ring Port Physical View Token Ring Physical Status Fields Ring Speed Displays the current ring speed conÞgured for your Token Ring port. You can change the ring speed from this window by clicking on the radio button next to the desired ring speed: 4 Megabits/second or 16 Megabits/second. When you reconÞgure the ring speed, the new speed will appear in the text box in this Þeld. Ring State Displays the state of the ETWMIMÕs Token Ring MAU with respect to the ring. When the ring is Òopen,Ó the Token Ring MAU is participating in the ring poll process and is receiving and transmitting data onto the ring. When the ring is Òclosed,Ó the MAU is removed from the ring, and data is not being transmitted or received on the ring. You can change the ring state from this window by clicking on the radio button next to the desired option: Open or Close. If you successfully reconÞgure the ring state, the new state will appear in the text box in this Þeld. Using the Physical View Windows 4-87 Bridging FNB State The FNB State section displays, and lets you conÞgure, the state of the backplane FNB connectors on the ETWMIM. The right-hand side of the window displays the current connection conÞguration for the FNB connectors on the ETWMIM, and lets you alter those options by using the appropriate radio button selections: ¥ Connect Left indicates that the ETWMIM is/will be connected on the FNB to the Þrst board to its left in the MMAC chassis with a valid right FNB connection. ¥ Disconnect Left indicates that the ETWMIM is/will be disconnected on the FNB from any boards to its left in the MMAC chassis. ¥ Connect Right indicates that the ETWMIM is/will be connected on the FNB to the Þrst board to its right in the MMAC chassis with a valid left FNB connection. ¥ Disconnect Right indicates that the ETWMIM is/will be disconnected on the FNB from any boards to its right in the MMAC chassis. ¥ Enable Bypass indicates that the ETWMIM is/will be in bypass state. It will not be connected to any boards on its left or right. In a shunting chassis, the FNB will bypass the board to maintain the integrity of the ring across the chassis. ¥ Disable Bypass indicates that the ETWMIM is/will be inserted into the FNB, according to the established FNB connection options above. The left-hand side of the window indicates the results of the current FNB conÞguration, with an X next to the appropriate state of the FNB connection: Connected Left, Connected Right, Bypassed, Right Connection Fault, or Left Connection Fault. For example, if you choose Connect Right and Disconnect Left, the Connected Right and Left Connect Fault Þelds will appear with an X next to them. Active Monitor This Þeld allows you to conÞgure whether or not the ETWMIMÕs onboard management station will engage in the active monitor contention process, which occurs as part of the recovery procedures initiated after certain ring error situations. If you select Enable, the station will contend in the process used to establish a ring station as an Active Monitor. If you select Disable, the station will not contend, even if the contention process is activated for the ring. Note that if the ETWMIM is currently serving as the active monitor, it will continue in that role until the next contention. The box to the left of the choices will reßect your actions by displaying On when the Active Monitor has been enabled, and Off when the Active Monitor has been disabled. 4-88 Using the Physical View Windows Bridging Using the Interface Configuration Window The I/F ConÞguration port-level menu option invokes the Interface ConÞguration window, which allows you to select a bridging method for a Token Ring bridging interface. You can also make this selection via the Token Ring Bridge Mode window; see Token Ring Bridge Mode, page 4-83, for more information. This window also allows you to select one of three transmission methods that should be used when unknown addresses are received from end stations attached to the selected bridge port. To access the Interface ConÞguration window from the Bridge Status window: 1. Click on the desired Port button ( ) to display the port menu. 2. Drag down to select I/F Configuration…. The Interface Configuration window, Figure 4-29, will appear. from the Chassis View window: 1. Click on the appropriate port index to access the Port menu. 2. Drag down to select I/F Configuration…. The Interface Configuration window, Figure 4-29, will appear. Using the Interface Configuration Window 4-89 Bridging Figure 4-29. Interface ConÞguration Window Defining the Bridge Method Transparent When the bridge is set to Transparent mode, the bridge will only transmit transparent frames from the Token Ring connection. If a source route frame is received by the bridge, the Source Route information in the frame will be dropped from the packet. (A transparent frame is the same as a source route frame without a RIFÑRouting Information Field.) Source Routing When the bridge is set to Source Routing mode, the bridge will only transmit source route frames from the Token Ring connection.You should set the bridging mode to Source Route when you are bridging from Ethernet to Token Ring. The source route information (as conÞgured at the Ethernet portÕs Source Route ConÞguration window) will be appended to the RIF for frames transmitted on the Token Ring. 4-90 Using the Interface Configuration Window Bridging Source Route Transparent When the bridge is set to Source Route Transparent, the bridge will transmit both transparent and source route frames. The frames received which have source route information will be transmitted as source route, while frames received that are transparent will be transmitted as transparent. Setting the Bridge Method 1. Click on the radio button next to the bridging mode you would like your Token Ring bridge port to use: Transparent Bridge, Source Routing, or Source Route Transparent. 2. Click on Set to apply the desired mode. Defining the Protocol Transmission The choices in the Protocol Transmission for Unknown Address Þeld are deÞned as follows: TCP/IP Determines whether IP frames received at the interface should be forwarded as a transparent frame, source route frame, or both. IPX Determines whether IPX frames received at the interface should be forwarded as a transparent frame, source route frame, or both. NetBIOS Determines whether NetBIOS frames received at the interface should be forwarded as a transparent frame, source route frame, or both. SNA Determines whether SNA frames received at the interface should be forwarded as a transparent frame, source route frame, or both. Other Determines whether frames of all other protocols not mentioned above (IP, IPX, NetBIOS, and SNA) that are received at the interface should be forwarded as a transparent frame, source route frame, or both. If Transparent is selected, the frame is forwarded out of the bridge interface as a transparent frame. If Source Route is selected, the frame is forwarded out of the bridge interface as a source route frame. If Auto is selected, the frame is forwarded out of the bridge interface as both a transparent frame and as a source route frame. Using the Interface Configuration Window 4-91 Bridging To select Transparent as the transmission method for TCP/IP, IPX, SNA, NetBIOS or Other protocols: 1. Click on the radio button next to the transmission method you would like your Token Ring bridge port to use: Transparent, Source Route, or Auto. 2. Click on Set to apply the desired mode. Using the Bridge and Port Configuration Windows The Bridge ConÞguration and the Port ConÞguration windows look similar and are used for similar purposes, with the only exception being that the former window is set at the device level, while the latter is set at the interface level. The Bridge ConÞguration window provides a global capability to conÞgure all of the Token Ring bridging interfaces on a device simultaneously as well as set the bridge number and virtual ring number (target ring). The Port ConÞguration window provides the capability to conÞgure individual Token Ring bridging interfaces on a device. This window displays the information that is set at the device level via the Bridge ConÞguration window, such as the Bridge Number and the Virtual Ring NumberÑboth of which are read-only Þelds in the Port ConÞguration window. The Ring Number Þeld is the only Þeld that is not common to both windows, because this value cannot be set globally on a device. It appears in the Port ConÞguration window only, since the value assigned to this Þeld must be unique to each interface. To access the Bridge ConÞguration window from the Bridge Status window: 1. Click on to display the Bridge menu. 2. Drag down to select Bridge Configuration…. The Bridge Configuration window, Figure 4-30, will appear. from the Chassis View window: 1. Click on the Board Index of the device of interest; the Board menu will appear. 2. Drag down to select Bridge Configuration…. The Bridge Configuration window, Figure 4-30, will appear. 4-92 Using the Bridge and Port Configuration Windows Bridging Figure 4-30. Bridge ConÞguration Window To access the Port ConÞguration window from the Bridge Status window: 1. Click on the desired Port button ( ) to display the port menu. 2. Drag down to select Port Configuration…. The Port Configuration window, Figure 4-31, will appear. from the Chassis View window: 1. Click on the appropriate port index to access the Port menu. 2. Drag down to select Port Configuration…. The Port Configuration window, Figure 4-31, will appear. Using the Bridge and Port Configuration Windows 4-93 Bridging Figure 4-31. Port ConÞguration Window The Bridge ConÞguration and Port ConÞguration window Þelds are deÞned as follows: Bridge Number Displays the number of the Token Ring bridge. This value is limited to the range of 0 through 15; a value of 65535 signiÞes there is no bridge number assigned. This Þeld is settable in the Bridge ConÞguration window and read-only in the Port ConÞguration window. Virtual Ring Number Displays the segment number that corresponds to the target segment the selected port is connected to by the bridge. This value is limited to the range of 0 through 4095; a value of 65535 signiÞes there is no virtual ring number assigned. This Þeld is settable in the Bridge ConÞguration window and read-only in the Port ConÞguration window. Ring Number Displays the segment number that uniquely identiÞes the segment to which this port is connected. This value is limited to the range of 0 through 4095; a value of 65535 signiÞes there is no ring number assigned. (This Þeld appears in the Port ConÞguration window only.) 4-94 Using the Bridge and Port Configuration Windows Bridging Port Mode Displays the two port mode options that are available, Lobe or Station. Novell Translation Displays the three bit-order options that are availableÑEnable LLC (Logical Link Control Translation), Enable DLC (Data Link Layer Translation), and Disable (No translation will take place) at the bridge or bridge interface. Ring Speed Displays the selected ring speed, 4 Mb/s or 16 Mb/s. Bridge Mode/Explorer Type Displays the available bridging modes/explorer frame typesÑSource Route Transparent/Transparent, Source Route Transparent/ARE, Source Route Transparent/STE, Source Route/ARE, Source Route/STE, and Transparent/Transparent. The default selection is Transparent/Transparent. To set the Bridge Number or the Virtual Ring Number in the Bridge ConÞguration window: 1. Click in the Bridge Number or the Virtual Ring Number field in the upper portion of the Bridge Configuration window. Enter a hexadecimal value between 0 and F in the Bridge Number field, or a hexadecimal value between 001 and FFF in the Virtual Ring Number field. 2. Click on Set to apply the change, or click on Cancel to exit the window without applying the change. To set the Ring Number in the Port ConÞguration window: 1. Click in the Ring Number field in the upper portion of the Port Configuration window. Enter a hexadecimal value between 001 and FFF. 2. Click on Set to apply the change, or click on Cancel to exit the window without applying the change. To set the Port Mode globally for all bridge interfaces on a device in the Bridge ConÞguration window or for an individual interface in the Port ConÞguration window: 1. Click on the empty radio button adjacent to either choice in the Port Mode field, Lobe(DTR) or Station. When the radio button is filled ( ), the selected choice will be enabled. 2. Click on Set to apply the change, or click on Cancel to exit the window without applying the change. Using the Bridge and Port Configuration Windows 4-95 Bridging To set the Novell Translation method globally for all bridge interfaces on a device in the Bridge ConÞguration window or for an individual interface in the Port ConÞguration window: 1. Click on the empty radio button adjacent to one of the three choices in the Novell Translation field, Enable LLC, Enable DLC, or Disable. When the radio button is filled ( ), the selected choice will be enabled. 2. Click on Set to apply the change, or click on Cancel to exit the window without applying the change. To set the Ring Speed globally for all bridge interfaces on a device in the Bridge ConÞguration window or for an individual interface in the Port ConÞguration window: 1. Click on the empty radio button adjacent to one of the two choices in the Ring Speed field, 4 Mb/s or 16 Mb/s. When the radio button is filled ( ), the selected choice will be enabled. 2. Click on Set to apply the change, or click on Cancel to exit the window without applying the change. To select the Bridge Mode/Explorer Type globally for all bridge interfaces on a device in the Bridge ConÞguration window or for an individual interface in the Port ConÞguration window: 1. Click in the Bridge Mode/Explorer Type pull-down list box. Pull down with the left mouse button to select one of the available choices: Source Route Transparent/Transparent, Source Route Transparent/ARE, Source Route Transparent/STE, Source Route/ARE, Source Route/STE, and Transparent/Transparent. (The default selection is Transparent/Transparent.) 2. Click on Set to apply the change, or click on Cancel to exit the window without applying the change. Configuring SmartTrunking The SmartTrunk menu option invokes the SmartTrunk ConÞguration and Status window, which allows you to group interfaces logically to achieve greater bandwidth between devices (both devices must support the SmartTrunk feature). There is no limit to the number of ports that can be included in a single Òtrunk.Ó NOTE 4-96 SmartTrunking is designed to work in the traditional bridging mode only, and is not available if a switch is in the Securefast VLAN mode. The Securefast VLAN architecture supports a fully-meshed topology, which has beneÞts similar to SmartTrunking. Configuring SmartTrunking Bridging To access the SmartTrunk ConÞguration and Status window from the Bridge Status window: 1. Click on to display the Bridge menu. 2. Drag down to select SmartTrunk…. The SmartTrunk Configuration and Status window, Figure 4-32, will appear. from the Chassis View window: 1. Click on the Board Index of the device of interest; the Board menu will appear. 2. Drag down to select SmartTrunk…. The SmartTrunk Configuration and Status window, Figure 4-32, will appear. Figure 4-32. The SmartTrunk ConÞguration and Status Window The SmartTrunk ConÞguration and Status window displays all of the ports on the selected device. The following information is given for each port: Port Displays each port on the selected module. If the number of listed ports is more than what can be seen in the list box, you can scroll down to view the additional ports. Name Displays the name assigned to each listed port. Configuring SmartTrunking 4-97 Bridging Mode Displays the connection type for each port, either User or Network. User connections do not participate in SmartTrunking; Network connections do. At least two ports (from two separate chassis) must be designated as Network connections to participate in SmartTrunking. All FNB interfaces must be designated as User connections. SmartTrunk State Displays the current operating state of each listed port. The possible states include: ¥ NoneÑThe port is operating as a normal switch port. ¥ BlockingÑThe port is load sharing, but in the blocked mode. While the module performs the function of determining if there is a network loop, data is temporarily blocked on new SmartTrunk ports and on any port that becomes newly linked. ¥ SmartTrunkingÑThe port is load sharing with other Network-designated ports of the same instance. Instance Displays the ports associated with each redundant loop. A module can have multiple instances. # SmartTrunks Displays the total number of load-sharing ports in the redundant loop. The only conÞgurable Þelds in the SmartTrunk ConÞguration and Status window are the two Þelds with radio buttons, each with two possible settings: SmartTrunk (with the options of Enable and Disable) and Enable and Disable Port # X (with the options of LoadSharing and Disable). NOTE When you Þrst open the SmartTrunk ConÞguration and Status Screen, the Enable and Disable Port # X Þeld will be labeled SmartTrunk State Port #. After you click on a port number in the list box, the Þeld title will change to Enable and Disable Port # X. To enable or disable SmartTrunking on an individual interface: 1. Click to select the interface number under the Port column in the list box for which you wish to enable or disable SmartTrunking. 2. Click on the empty radio button adjacent to one of the two choices in the SmartTrunk field: Enable or Disable. When the radio button is filled ( ), the selected choice will be enabled. 3. Click on Set to apply your selection, or Cancel to exit the window without applying the change. 4-98 Configuring SmartTrunking Bridging To enable or disable Load Sharing on an individual bridge port: 1. Click to select the interface number under the Port column in the list box. The interface number will then be listed as “X” in the Enable/Disable Port # X field. 2. Click on the empty radio button adjacent to one of the two choices in the field: LoadSharing or Disable. When the radio button is filled ( ), the selected choice will be enabled. 3. Click on Set to apply your selection, or Cancel to exit the window without applying the change. NOTE When you Þrst open the SmartTrunk ConÞguration and Status Screen, the Enable and Disable Port # X Þeld will be labeled SmartTrunk State Port #. After you click on a port number in the list box, the Þeld title will change to Enable and Disable Port # X. Configuring SmartTrunking 4-99 Bridging 4-100 Configuring SmartTrunking Index A Accessing Other Management Options Duplex Modes window 4-11 Ethernet Special Filter Database window 4-11 Filtering Database window 4-10 Module Type window 4-10 Performance Graph 4-10 Spanning Tree window 4-10 Active Monitor 4-88 Active Port 4-85 Address 4-22, 4-46 Admin 2-8 Admin/Link 2-8 Ageing Time 4-46 Altering 4-47 Alarm ConÞguration window 4-13 All Paths Explorer (APE) packet 4-3 APIM-2x 4-74 B Bit Interleaved Parity 4-81 Boot Prom, revision 2-3 Bridge 2-8 Bridge Address 4-10 Bridge ConÞguration window 4-7, 4-11, 4-92 Bridge Detail Breakdown window 4-18 Bridge Level Fields 4-36 Bridge Mapping 2-8 Bridge Performance Graph Configuring 4-18 Bridge Performance Graph window 4-16 Bridge Performance Graph window Þelds 4-17 Bridge Port Detail Breakdown window 4-20 Bridge Port Level Fields 4-38 Bridge Priority 4-36 Changing 4-40 Bridge Protocol Data Units (BPDUs) 4-2 Bridge Spanning Tree window 4-35, 4-36 Changing parameters 4-40 Bridge State on Interface 4-9 Bridge status mode 2-8 Bridge Status Window Information Fields 4-9 Bridge Status window 4-6, 4-8 Accessing Other Management Options 4-10 Bridge Translation Setting 4-66 broadcast packet 4-2 Broadcast Suppression window 4-6, 4-82 buffer space 2-17 C Cabletron Systems Global Call Center 1-7 Cancel button 1-6 Capacity 4-45 Coding Violations 4-81 color codes 2-9 color-coded port display 2-2 command buttons 1-6 Compression 3-6 ConÞguration window 4-13 Connect A 4-68 Connection Status 2-3 Connection Type window 4-11 CRC Length 3-6 CSMACD Statistics window 4-6 CSMACD Stats window 4-14 CSX200 family and CSX400, descriptions 1-1 CSX400, description 1-1 D Data Mask 4-53, 4-54 Data Offset 4-53, 4-54 Data Type 4-53, 4-54 Description 4-22 Description window 4-11 Designated Bridge 4-39 Designated Cost 4-39 Designated Port 4-39 Designated Root 4-39 Index-1 Index Destination Address 4-52, 4-54 Device Menu 2-5 Device Name 1-4 Device Type 2-10 disable a bridge port 4-14 Discarded 4-22 Discarded packets 2-17 Dot5 Error Statistics window 4-6 Dot5 Errors window 4-12 Duplex Mode Setting 4-68 Duplex Modes 4-66 Duplex Modes window 4-6, 4-67 Duplex Modes Window Fields 4-67 Dynamic entries 4-43 E edit 4-53 Edit button 4-53 Enable 4-52 Entries Clearing All 4-49 Epim Type 4-86 Error 4-22 Errored Seconds 4-80 Errors 4-18, 4-19 Ethernet Port Physical View 4-85 Ethernet Special Filtering Database window 4-6 explorer packet 4-2 F far-end block error 4-80 FE100-Sx 4-74, 4-76 File 4-52 Filter Enabling and Disabling 4-56 Filter Address 4-48 Filter Database New Filter Window 4-48 Filtered 4-17, 4-19 Filtering Database 4-2, 4-42 Configuring 4-46 Filtering Database window 4-6, 4-44 Filtering Database Window Fields 4-45 Filters Saving a Set 4-56 Filters button 4-56 Firmware, revision 2-3 Index-2 FNB State 4-88 Forwarded from 4-20 Forwarded to 4-20 Forwarding Delay 4-38 Forwarding Delay Time Changing 4-41 Frames Forwarded 4-17, 4-19 Full Duplex 4-68 G Getting Help 1-7 Global Call Center 1-7 H Hello Time 4-38 Changing 4-41 Help button 1-6, 1-7 Help Menu 2-6 Hold Time 4-38 HSIM-W6, description 1-2 HSIM-W84 1-2 HSIM-W84, WPIMs 3-3 I I/F ConÞguration window 4-7, 4-12 I/F Statistics window 4-13 I/F Summary interface performance statistics 2-14 I/F Summary window 2-13 IF 3-6 Individual Entries Adding or Deleting 4-48 Instance 4-98 Interface 4-67 Interface Detail window 2-16 Interface Statistics window 2-16, 4-6, 4-21 Interface Statistics Window Fields 4-22 Interface Type 4-10 IP address 1-5, 2-3 L Learned Database 4-43 Learned entries 4-43 Line Coding 3-6 Link State 4-86 List 4-45 Load 2-15 Location 1-5 Index Logical Settings 3-7 Logical Status 2-14 Logical View 3-5 Loss of Frame 4-80 Loss of Pointer 4-79 Loss of Signal 4-79 M MAC address 1-5, 2-3 Max Age 4-38 Max Age Time Changing 4-41 menu structure 2-4 MIB components 2-9 Mode 4-98 mouse usage 1-5 MTU 3-6 Multicast (Non-Unicast) 2-17 N N/A 4-68 Name 4-97 Network design 4-35 New button 4-48 New Filter Window 4-48 Non-Unicast 4-22 Non-Unicast (Multicast) 2-17 Number 4-45 O OFF 2-8, 4-68 OK button 1-6 ON 2-8, 4-68 P Packets Received 2-17, 4-23 Packets Transmitted 2-18, 4-23 Path Cost 4-39 Changing 4-42 Performance Graph window 4-6, 4-11 Permanent entries 4-43 Physical Status 2-14 Physical View 4-85, 4-86, 4-87 Physical View window 4-14 Port # 4-97 Port ConÞguration window 4-7, 4-12, 4-92 port display, color codes 2-2 Port Filtering 4-46, 4-53 Port Filtering Action Changing 4-48, 4-55 Clearing 4-56 Setting 4-55 Port Menus 2-6 Port Priority Changing 4-42 Port Status 2-3 port status color codes 2-9 PPP Link Statistics window 4-6 PPP Link Status window 4-12 Priority 4-38 Protocol 3-6, 4-37 Q QuickSET 1-2 WAN configuration with 3-1 R Rate 2-15 Raw Counts 2-14 Receive Port 4-46, 4-48 Changing 4-48 Receive Port Icon 4-55 Receive Ports 4-53 Changing 4-55 Redundancy 3-2 Remote Capabilities 4-72 Ring Speed 4-87 Ring State 4-87 RMON Alarm ConÞguration window 4-13 RMON MAC Layer window 4-12 RMON Promiscuous Stats window 4-12 Root Bridge 4-37 Root Bridge Selection process 4-35 Root Cost 4-37 Root Port 4-37 S SDH 4-74 Selected Filter 4-53 Set button 1-6 setting full duplex mode 4-68 Severely Errored Framing Second 4-81 Severely Errored Seconds 4-81 SmartTrunk ConÞguration and Status Screen 4-7 Index-3 Index SmartTrunk ConÞguration and Status window 4-96 SmartTrunk State 4-98 SmartTrunks 4-98 SONET 4-74 Sonet Statistics window 4-14 SONET/SDH 4-74 Coding Violations 4-81 configuration 4-74 Errored Second 4-80 errors 4-76 Errors indicators 4-78 Loss of Frame 4-80 Loss of Pointer 4-79 Loss of Signal 4-79 optical layers 4-77 Severely Errored Framing Second 4-81 Severely Errored Second 4-81 Statistics 4-76, 4-80 Statistics window 4-78 SONET/SDH conÞguration 4-74 Sonet/SDH ConÞguration window 4-14 SONET/SDH transmission hierarchy 4-75 Source 4-54 Source Address 4-52, 4-54 Source Address Table 4-6, 4-42 Source Addressing window 4-11 Source Port 4-46 Source Route ConÞguration window 4-7, 4-12 Source Route Statistics window 4-6, 4-12 Source Route Transparent mode 4-84, 4-91 Source Routing 4-2 Source Routing mode 4-84, 4-90 Spanning Tree Algorithm (STA) 4-2 Spanning Tree Algorithm Protocol Type Changing 4-40 Spanning Tree Explorer (STE) packet 4-3 Spanning Tree window 4-6 Special Filter Database Defining and Editing Filters 4-53 Special Filter Database window 4-50 Special Filter Database Window Fields 4-52 Static Database 4-43 Static entries 4-43 Statistics window 4-13 Subnet Mask 4-60 T technical support 1-7 Index-4 the SmartTrunk ConÞguration and Status Screen 4-97 Token Ring Bridge Mode 4-83 Token Ring Bridge Mode Window 4-84 Token Ring Bridge Mode window 4-7, 4-11 Token Ring Port Physical View 4-87 Token Ring Special Filter Database window 4-11 Token Ring Special Filtering Database window 4-6 Topology 4-39 Total Bridge Detail Breakdown window Color-code 4-19 Transmit Queue Size 2-17, 4-23 Transparent mode 4-84, 4-90 Troubleshooting 2-17 Type 4-22, 4-45, 4-46 Type of Entry Changing 4-47 U Unicast 2-17, 4-22 UNK 2-8 Unknown Protocol 2-17, 4-23 Up Time 2-3, 2-13, 4-9 Utilities Menu 2-6 launching QuickSET from 1-2 W WAN Logical View 3-5 WAN Redundancy 3-2 WPIM-DDS 3-3 WPIM-DI 3-3 WPIM-E1 3-3 WPIM-HDSL 3-4 WPIM-S/T 3-4 redundancy with 3-3 WPIM-SY 3-4 WPIM-T1 3-4 WPIM-T1/DDS 3-4 X Xmitted 4-18, 4-20