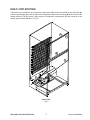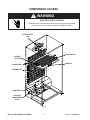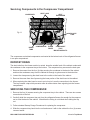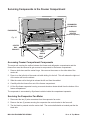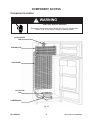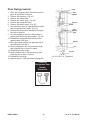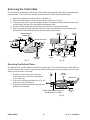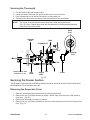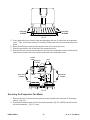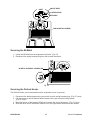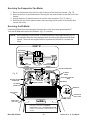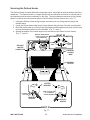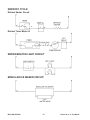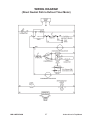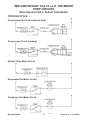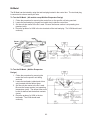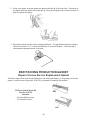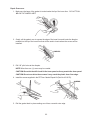
1
ORPORATION CONSUMER SERVICES TECHNICAL EDUCATION GROUP PRESENTS AM-4 APARTMENT MAINTENANCE SERIES TOP-MOUNT REFRIGERATOR/FREEZERS “OLD DESIGN” 14 cu. ft. “MULLION EVAPORATOR DESIGN” 12 cu. ft. “NEW DESIGN” 14 cu. ft. “MID-LINE DESIGN” 16 thru 22 cu. ft. Job Aid Part No. 4322309 I INTRODUCTION This Job Aid, “APARTMENT MAINTENANCE SERIES: Servicing Refrigerators,” (Part Number LIT 4322309) has been compiled to provide the most recent information on design, features, operation, troubleshooting and repair procedures of 12 through 22 cu. ft. top-mount refrigerator/freezers. Four distinct series of top-mount refrigerator/freezers will be covered. See Page V for more details: 1) 12 cu. ft. “Mullion Evaporator Design” - These units are available as Roper Brand only and have the evaporator located in the mullion divider between the freezer and refrigerator sections. There are louvers located at the front of the freezer floor. 1) 14 cu. ft. “Old Design” - These units were manufactured through the early part of 1997 and are equipped with electric mullion heaters. There is an escutcheon box at the upper rear of the freezer section with louvers across the top of the box. 2) 14 cu. ft. “New Design” - These units were manufactured from 1993 to the present and are currently designated Model “F” and are equipped with heat loops and a stack condenser. There is an air tower located on the back wall of the freezer with horizontal louvers on the sides of the tower. 3) 16, thru 22 cu. ft. “Mid-Line Design” - These units were manufactured from 1994 to the present and are equipped with heat loops and forced air condensers. There is an air tower located on the back wall of the freezer with a curved face and vertical louvers. This Job Aid is not intended to replace or substitute for the Service Manuals, Use and Care Guides or Tech Sheets associated with any of the models covered. Particular attention should be given to the Tech Sheets provided with each individual unit for the latest engineering design changes. GOALS AND OBJECTIVES The goal of this Job aid is to provide detailed information that will enable the service technician to properly diagnose malfunctions and repair 12 through 22 cu. ft. top-mount refrigerator/freezers. The objectives of this Job Aid are: The service technician will -• • • • Understand proper safety precautions. Successfully troubleshoot and diagnose malfunctions. Successfully perform necessary repairs. Successfully return the unit to proper operational status. TO THE INSTRUCTOR/INDEPENDENT STUDENT At the end of certain sections of this Job Aid you will find a “Confirmation of Learning Exercise.” You will need a pencil or pen and in some cases two “Hi-Light” markers to complete these exercises. Certain exercises may require that service procedures be performed, if an appropriate appliance is available. CORPORATION WHIRLPOOL CORPORATION ASSUMES NO RESPONSIBILITY FOR ANY REPAIRS MADE ON OUR PRODUCTS BY ANYONE OTHER THAN AUTHORIZED SERVICE TECHNICIANS. © 1998 Whirlpool Corporation, Benton Harbor, MI 49022 II TABLE OF CONTENTS INTRODUCTION ............................................................................................. II GOALS AND OBJECTIVES ........................................................................... II TO THE INSTRUCTOR/INDEPENDENT STUDENT ...................................... II TABLE OF CONTENTS................................................................................. III SAFETY ........................................................................................................ IV PRODUCT IDENTIFICATION ........................................................................ V SECTION ONE - Mullion Evaporator Design 12 cu. ft. Top-Mount INSTALLATION CONSIDERATIONS ....................................................... 1 THEORY OF OPERATION........................................................................ 4 COMPONENT ACCESS ............................................................................ 6 WIRING DIAGRAMS and STRIP CIRCUITS .......................................... 10 SECTION TWO - Old Design 14 cu. ft. Top-Mount INSTALLATION CONSIDERATIONS ..................................................... 13 THEORY OF OPERATION...................................................................... 17 COMPONENT ACCESS .......................................................................... 19 WIRING DIAGRAMS and STRIP CIRCUITS .......................................... 24 SECTION THREE - New Design 14 cu. ft. Top-Mount INSTALLATION CONSIDERATIONS ..................................................... 33 THEORY OF OPERATION...................................................................... 37 COMPONENT ACCESS .......................................................................... 39 WIRING DIAGRAMS and STRIP CIRCUITS .......................................... 46 SECTION FOUR - Mid-Line Design 16 & 22 cu. ft. Top-Mount INSTALLATION CONSIDERATIONS ..................................................... 49 THEORY OF OPERATION...................................................................... 53 COMPONENT ACCESS .......................................................................... 55 WIRING DIAGRAMS and STRIP CIRCUITS .......................................... 64 SECTION FIVE - TROUBLESHOOTING AND DIAGNOSIS GENERAL ............................................................................................... 71 SEALED SYSTEM DIAGNOSIS ............................................................. 72 TROUBLESHOOTING CHART ............................................................... 73 TYPICAL TESTING PROCEDURES ....................................................... 80 SECTION SIX - TECH TIPS REPLACING ELECTROMECHANICAL TIMERS ................................... 89 DOOR GASKET REPLACEMENT .......................................................... 90 SERVICING THE ADAPTIVE DEFROST CONTROL ............................. 94 SERIAL AND MODEL NUMBER DESIGNATORS ................................. 95 III SAFETY ! WARNING To avoid the risk of electrical shock, property damage, personal injury or death: • The power cord must be plugged into a 3-prong grounding-type wall receptacle, grounded in accordance with the National Electrical Code, ANSI/NFPA 70 - latest edition, and local codes and ordinances. • It is the personal responsibility of the consumer to have a proper 3-prong wall receptacle installed by a qualified electrician. • DO NOT, UNDER ANY CIRCUMSTANCES, REMOVE THE POWER CORD GROUNDING PRONG. • A separate adequately fused and grounded circuit should be available for this appliance. Grounding • Do not remove any grounding wires from individual components while servicing, unless the component is to be removed and replaced. It is extremely important to replace all grounding wires when components are replaced. Type Wall Receptacle Power Supply Cord with 3-Prong Grounding Plug ! WARNING ELECTRIC SHOCK HAZARD Disconnect the electrical power before servicing any components . Failure to do so can result in death or electrical shock. IV PRODUCT IDENTIFICATION Four distinct series of top-mount refrigerator/freezers will be covered in the Job Aid. Each series can be identified by a number of distinguishing features: A) B) C) D) Air circulation in the freezer compartment Type of condenser Location of the Evaporator Method of outside condensation control Louvers at Front of Freezer Floor 12 cu. ft. “Mullion Evaporator Design” Distinguishing Characteristics: • Air return louvers located at the front of the freezer floor. • A stack condenser on the back of the unit. • Has heat loop mullion and stile heat. • Evaporator located in the divider between the freezer and refrigerator sections. • Roper brand only Component Access - Section One, page 6. Wiring Diagram - Section One, page 10. Louvers Across Top Rear 12 & 14 cu. ft. “Old Design” Distinguishing Characteristics: • Air discharge louvers located at the top rear of the freezer section. • A stack condenser on the back of the unit. • Has electric mullion and stile heaters. • Evaporator vertically mounted behind rear panel of freezer compartment. • May be equipped with Adaptive Defrost Control. Component Access - Section Two, page 19. Wiring Diagram - Section Two, page 24. Adaptive Defrost Control - Section Six, page 92. Air Tower with Horizontal Louvers 14 cu. ft. “New Design” Distinguishing Characteristics: • Air tower at the rear of the freezer section with horizontal louvers. • Has heat loop mullion and stile heat. • A stack condenser on the back of the unit. • Model “F” designation • Manufactured from 1993 to present Component Access - Section Three, page 36. Wiring Diagram - Section Three, page 46. Air Tower with Vertical Louvers 16, thru 22 cu. ft. “Mid-Line Design” Distinguishing Characteristics: • Air tower at the rear of the freezer section with vertical louvers. • Has heat loop mullion and stile heat. • A forced air condenser at the bottom of the unit. • Manufactured from 1994 to present. Component Access - Section Four, page 55. Wiring Diagram - Section Four, page 64. V -- NOTES -- VI Section One Mullion Evaporator Design 12 cu. ft. Top-Mount INSTALLATION CONSIDERATIONS Minimum Clearance Measure the opening at the location in which the refrigerator/freezer is to be installed and make sure the following minimum clearance dimensions are followed. Top: At least 3” (7.5cm) clearance between the overhead cabinet and the refrigerator/ freezer top. (Dimension A) (Fig. 1) Sides: At least 1” (2.5cm) clearance on each side of the refrigerator/freezer. (Dimension B) (Fig. 1) A Back: At least ½” (1.25cm) clearance between the condenser (“Old Design” 14 cu. ft. Top-Mount) and the wall. B B Fig 1 Leveling the Refrigerator/Freezer It is critical that the refrigerator/freezer be properly leveled. Both the back and front of the unit should be carefully leveled before it is turned on. 1. 2. 3. 4. Place a board across the rear of the installed position and set a level on the board. (Fig. 2) Place shims where the rear rollers will sit to level the board. Remove the board and leave the shims in place. Place the unit in its installed position. Level Board Fig. 2 MULLION EVAPORATOR DESIGN 1 12 cu. ft. Top-Mount Once the unit is located in the final installed location and the rear of the unit is level, proceed to level the front. NOTE: Using a spirit level, the front of the unit should be ½ bubble higher than the back. 1. Use a flat blade screwdriver to rotate the front roller leveling screws in the appropriate direction to level the unit side to side. (Fig. 3 & 4)) 2. Use a level and check to make sure the rollers are set so the unit is level side to side and ½ bubble higher in front. VIEW OF ROLLER WITH NO HINGE VIEW OF ROLLER WITH HINGE IN PLACE Fig. 3 Fig. 4 LOWER RAISE Leveling Screw Leveling Screw Electrical Requirements A 115 V, 60 Hz, 15 TO 20 Amp fused circuit utilizing a 3-wire grounding receptacle meeting all national and local electrical codes is required. It is recommended that a separate circuit serving only this appliance be provided. ! WARNING To avoid the risk of electrical shock, property damage, personal injury or death: • The power cord must be plugged into a 3-prong grounding-type wall receptacle, grounded in accordance with the National Electrical Code, ANSI/NFPA 70 - latest edition, and local codes and ordinances. • It is the personal responsibility of the consumer to have a proper 3-prong wall receptacle installed by a qualified electrician. • DO NOT, UNDER ANY CIRCUMSTANCES, REMOVE THE POWER CORD GROUNDING PRONG. • Do not remove any grounding wires from individual components while servicing, unless the component is to be removed and replaced. It is extremely important to replace all grounding wires when components are replaced. MULLION EVAPORATOR DESIGN 2 Grounding Type Receptacle 3-Prong Grounding Plug 12 cu. ft. Top-Mount DOOR SWING REVERSAL 1. Open the refrigerator door and remove the toe panel at the bottom of the unit. 2. Remove the top hinge. (Fig. 5) 3. Remove the freezer door. 4. Remove the center hinge. (Fig. 5) 5. Remove the refrigerator door. 6. Remove the bottom hinge. (Fig. 5) 7. Lay the freezer door on a flat protected surface and remove the door handle. (Fig. 5) 8. Reinstall the freezer door handle on the opposite side of the door. 9. Lay the refrigerator door on a flat protected surface and remove the door handle. (Fig. 5) 10. Reinstall the refrigerator door handle on the opposite side of the door. 11. Move the bottom hinge to the opposite side of the cabinet and reinstall it. 12. Set the refrigerator door on the bottom hinge and close the door to keep it in place. 13. Reinstall the center hinge. 14. Set the freezer door in the center hinge and close the door to keep it in place. 15. Reinstall the top hinge. 16. To align the refrigerator door: a) DO NOT ADJUST THE BOTTOM HINGE. Use the bottom hinge as an establishing point. b) Loosen the center hinge (Figs. 5) and align the refrigerator door with the cabinet edge. c) Tighten the center hinge. 17. To align the freezer door: a) If the refrigerator door is properly aligned, DO NOT ADJUST THE CENTER HINGE. b) Loosen the top hinge (Fig. 5) and align the top of the freezer door with the top of the cabinet. c) Tighten the top hinge. Cover Top Hinge Shim Hinge Hole Plug Hinge Bushing Plug Plastic Washer Center Hinge Handle Door Stop Fiber Washer Handle Insert Handle Hole Plug Fiber Washer Door Stop Bottom Hinge Fig. 5 MULLION EVAPORATOR DESIGN 3 12 cu. ft. Top-Mount THEORY OF OPERATION TEMPERATURE CONTROL Temperature control is provided by an adjustable thermostat located behind the control panel escutcheon in the refrigerator compartment. (Fig. 6) This thermostat influences the temperatures in both the freezer section and the refrigerator section. There is no damper to adjust air flow between the two sections. Fig. 6 DEFROST HEATER The defrost heat is provided by a quartz tube radiant heater (Fig. 7) lying underneath the evaporator coils in the divider mullion. (Fig. 8) A coiled wire element is encased in a quartz tube. Special care must be taken when handling this heater element to insure that the quartz tube does not come in contact with any contaminants such as skin oil, perspiration or lubricants. Always wear a pair of clean gloves when handling the defrost heater assembly. Contaminating the surface of the quartz tube will cause premature failure. Fig. 7 Fig. 8 MULLION EVAPORATOR DESIGN 4 12 cu. ft. Top-Mount HEAT LOOP ROUTING The heat loop is routed from the condenser outlet up the right side of the cabinet to the right stile (A). It then loops through the mullion between the refrigerator and freezer sections (B) and up around the freezer section (C & D), where it then returns to component compartment (E) and connects to the sealed system at the filter-drier. (Fig. 9) D C B A E HEAT LOOP Fig. 9 MULLION EVAPORATOR DESIGN 5 12 cu. ft. Top-Mount COMPONENT ACCESS ! WARNING ELECTRIC SHOCK HAZARD Disconnect the electrical power before servicing any components. Failure to do so can result in death or electrical shock. EVAPORATOR FAN EVAPORATOR DEFROST HEATER BI-METAL CONDENSER THERMOSTAT COMPRESSOR DRIP PAN/ COMPRESSOR BASE Fig. 10 MULLION EVAPORATOR DESIGN 6 12 cu. ft. Top-Mount Servicing Components in the Compressor Compartment CONDENSER HEAT LOOP HEAT EXCHANGER Fig. 11 CAPILLARY TUBE DRAIN TUBE COMPRESSOR FILTER DRIER COMPONENT TRAY MOUNTING BOLTS The compressor and related components are located at the bottom back of the refrigerator/freezer in an open compartment. DEFROST DRAIN The drain tube from the freezer section is routed down the outside back of the cabinet underneath the condenser to the component tray at the bottom. The component tray serves as the drain pan. 1. Remove the screws from the four (4) clips securing the condenser to the back of the cabinet and lean the condenser away from the cabinet far enough to gain access to the drain tube. 2. Loosen the clamp securing the drain hose to the outlet on the back of the cabinet. 3. Remove the screw from the clip securing the lower portion of the drain hose to the cabinet. 4. When replacing the drain hose be sure to put a loop in it near the connection to the freezer. The loop creates a trap which prevents warm air and moisture from migrating into the freezer compartment. SERVICING THE COMPRESSOR 1. Remove the four (4) screws securing the component tray to the cabinet. There are two screws on each side of the unit. 2. Carefully slide the component tray out from the refrigerator/freezer far enough for the compressor to clear the back of the cabinet. Watch that the tubing is not kinked when sliding the tray out. 3. Follow standard Sweep Charge Procedures for replacing the compressor. 4. Slide the component tray back into the unit and secure it with to the cabinet the four (4) screws removed earlier. MULLION EVAPORATOR DESIGN 7 12 cu. ft. Top-Mount Servicing Components in the Freezer Compartment EVAPORATOR FAN MOTOR EVAPORATOR DEFROST HEATER (Under Evaporator) Fig. 12 CENTER RAIL BRACKET HEAT SHIELD HEAT LOOP Accessing Freezer Compartment Components The center rail covering the mullion between the freezer and refrigerator compartments and the freezer floor must be removed to gain access to components in the freezer compartment. 1. Remove both doors and the center hinge. Also remove the screws on the other side of the center rail. 2. Press in on the left side of the center rail while sliding it to the left. This will release the right end of the center rail from the cabinet. 3. Slide the center rail to the right to release the left end from the cabinet. 4. Carefully slide the freezer floor out of the freezer compartment. 5. Lift the Styrofoam evaporator housing cover and aluminum heater shield from the bottom of the freezer compartment. The evaporator is surrounded by Styrofoam insulation inside the compartment separator. Servicing the Evaporator Fan Motor 1. Disconnect the two (2) wire connectors from the evaporator fan motor. 2. Remove the two (2) screws securing the evaporator fan motor bracket to the fan scroll. 3. The fan blade is pressed onto the motor shaft. The motor shaft should not extend past the fan blade hub. MULLION EVAPORATOR DESIGN 8 12 cu. ft. Top-Mount DEFROST HEATER DRIP COVER WIRE CONNECTOR Fig. 13 BRACKET TABS DEFROST HEATER Servicing the Defrost Heater 1. Disconnect the wire connectors from both ends of the defrost heater. 2. Carefully lift up on the evaporator far enough to expose the defrost heater and drip cover. 3. Carefully bend the tabs on the defrost heater mounting brackets up to release the defrost heater drip cover and remove the drip cover. 4. Remove the defrost heater from the mounting brackets. 5. Place the new defrost heater in the mounting brackets. NOTE: Do not touch the glass tube of the defrost heater with bare hands. Body oils and other contaminants will cause the glass tube to break when it gets hot. Wear a pair of clean soft gloves. 6. Reinstall the defrost heater drip cover and secure it in place by bending the mounting bracket tabs down. MULLION EVAPORATOR DESIGN 9 12 cu. ft. Top-Mount WIRING DIAGRAM STRIP CIRCUITS COOLING CYCLE Compressor Circuit (at instant of start) MULLION EVAPORATOR DESIGN 10 12 cu. ft. Top-Mount Compressor Circuit (running) Defrost Timer Motor Circuit Evaporator Fan Motor Circuit DEFROST CYCLE Defrost Timer and Defrost Heater Circuit REFRIGERATOR LIGHT Refrigerator Light Circuit MULLION EVAPORATOR DESIGN 11 12 cu. ft. Top-Mount -- NOTES -- MULLION EVAPORATOR DESIGN 12 12 cu. ft. Top-Mount Section Two Old Design 12 & 14 cu. ft. Top-Mount INSTALLATION CONSIDERATIONS Minimum Clearance Measure the opening at the location in which the refrigerator/freezer is to be installed and make sure the following minimum clearance dimensions are followed. Top: At least 3” (7.5cm) clearance between the overhead cabinet and the refrigerator/ freezer top. (Dimension A) (Fig. 14) Sides: At least 1” (2.5cm) clearance on each side of the refrigerator/freezer. (Dimension B) (Fig. 14) A Back: At least ½” (1.25cm) clearance between the condenser (“Old Design” 14 cu. ft. Top-Mount) and the wall. B B Fig. 14 Leveling the Refrigerator/Freezer It is critical that the refrigerator/freezer be properly leveled. Both the back and front of the unit should be carefully leveled before it is turned on. 1. 2. 3. 4. Place a board across the rear of the installed position and set a level on the board. (Fig. 15) Place shims where the rear rollers will sit to level the board. Remove the board and leave the shims in place. Place the unit in its installed position. Level Board Fig. 15 OLD DESIGN 13 12 & 14 cu. ft. Top-Mount Once the unit is located in the final installed location and the rear of the unit is level, proceed to level the front. NOTE: When leveling the front of the unit, the front should be ½ bubble higher than the back. 1. Use a flat blade screwdriver to rotate the front roller leveling screws in the appropriate direction to level the unit side to side. (Fig. 16 & 17) 2. Use a level and check to make sure the rollers are set so the unit is level side to side and ½ bubble higher in front. VIEW OF ROLLER WITH NO HINGE VIEW OF ROLLER WITH HINGE IN PLACE Fig. 16 Fig. 17 LOWER RAISE Leveling Screw Leveling Screw Electrical Requirements A 115 V, 60 Hz, 15 TO 20 Amp fused circuit utilizing a 3-wire grounding receptacle meeting all national and local electrical codes is required. It is recommended that a separate circuit serving only this appliance be provided. ! WARNING To avoid the risk of electrical shock, property damage, personal injury or death: OLD DESIGN • The power cord must be plugged into a 3-prong grounding-type wall receptacle, grounded in accordance with the National Electrical Code, ANSI/NFPA 70 - latest edition, and local codes and ordinances. • It is the personal responsibility of the consumer to have a proper 3-prong wall receptacle installed by a qualified electrician. • DO NOT, UNDER ANY CIRCUMSTANCES, REMOVE THE POWER CORD GROUNDING PRONG. • Do not remove any grounding wires from individual components while servicing, unless the component is to be removed and replaced. It is extremely important to replace all grounding wires when components are replaced. 14 Grounding Type Receptacle 3-Prong Grounding Plug 12 & 14 cu. ft. Top-Mount Door Alignment Occasionally, the refrigerator or freezer doors may need to be realigned. Evidence of improperly aligned doors includes a generally poor appearance of the unit and/or sweating/frosting on both the inside and outside of the cabinet due to poor gasket seal. Fig. 18 1. Check for proper door gasket seal by placing an American dime between the inside of the door and the cabinet. The gap should not be less than, or greater, than then diameter of the dime (11/16”). (Fig. 18) TOP HINGE Cover 2. Before making any attempt to realign the doors by adjusting the hinges, make sure the unit is solidly supported and level. (See page 13 in this section on procedures to level the unit.) Top Hinge Shim Spacer 3. To align the refrigerator door: a) DO NOT ADJUST THE BOTTOM HINGE. Use the bottom hinge as an establishing point. b) Loosen the center hinge (Figs. 19) and align the refrigerator door with the cabinet edge. c) Tighten the center hinge. Sealing Screws CENTER HINGE Door Stop Shim Spacer 4. To align the freezer door: a) If the refrigerator door is properly aligned, DO NOT ADJUST THE CENTER HINGE. b) Loosen the top hinge (Fig. 19) and align the top of the freezer door with the top of the cabinet. c) Tighten the top hinge. Center Hinge Spacer Sealing Screws BOTTOM HINGE 5. Check the door gasket gap on the hinged side of the door. The gap should be straight and even and the proper width (11/16” or the diameter of an American dime) from the top hinge to the bottom hinge. a) If the gap is uneven or too narrow or if the doors hit each other when opened together, add shims at the center hinge to even out the gap. b) If the gap is uneven or too wide, or the space between the refrigerator and freezer door widens when opened together, remove shims at the center hinge to even out the gap. OLD DESIGN Door Stop Spacer Shim Bottom Hinge Tap Plate (in cabinet) Moveable Hinge Pin (left hole for left swing) Fig. 19 15 12 & 14 cu. ft. Top-Mount Door Swing Reversal Cap 1. Open the refrigerator door and remove the toe panel at the bottom of the unit. 2. Remove the top hinge. (Fig. 20) 3. Remove the freezer door. 4. Remove the center hinge. (Fig. 20) 5. Remove the refrigerator door. 6. Remove the bottom hinge. (Fig. 20) 7. Lay the freezer door on a flat protected surface and remove the door handle. (Fig. 20) 8. Reinstall the freezer door handle on the opposite side of the door. 9. Lay the refrigerator door on a flat protected surface and remove the door handle. (Fig. 20) 10. Reinstall the refrigerator door handle on the opposite side of the door. 11. Move the bottom hinge to the opposite side of the cabinet and reinstall it. 12. Set the refrigerator door on the bottom hinge and close the door to keep it in place. 13. Reinstall the center hinge. 14. Set the freezer door in the center hinge and close the door to keep it in place. 15. Reinstall the top hinge. 16. Align the doors. (See procedures on page 15.) Cap Spacer Spacer Screw Cap Spacer Cap Spacer Cap Screw Fig. 11 14, 16 & 18 cu. ft. Top-Mount Cover for Refrigerator Door Handle Cover OLD DESIGN Fig. 9 16 12 & 14 cu. ft. Top-Mount THEORY OF OPERATION MULLION AND STILE HEATERS All refrigerators have a tendency to sweat around the door openings due to the differences between the ambient room temperature and the cold compartments of the refrigerator. On “Old Design” units low-wattage resistance heaters are installed to the front flange area of the cabinet to help prevent sweating. Stile Heaters Stile heaters are foil-wrapped resistance-type heating elements in the 5 - 30 watt range. These heating elements fit on the inside of the cabinet flange across the top of the freezer and about 1/3 of the way down both sides. (Fig. 22) Stile heaters are on 100% of the time the refrigerator is plugged in, except during the defrost cycle, or on models with power saver switches. See the wiring diagrams for units with stile heaters at the end of this section. Mullion Heaters Mullion heaters are foil-wrapped resistancetype heating elements in the 8 - 12 watt range. These heating elements fit on the inside of the rail that separates the refrigerator and freezer sections. (Fig. 23) CABINET HEATER ELEMENT FOIL The mullion heater element is normally wired in parallel with the stile heater element. It is on 100% of the time the refrigerator is plugged in, except during the defrost cycle or on models with power saver switches. CABINET Fig. 22 Fig. 23 MULLION HEATER ELEMENT FOIL OLD DESIGN 17 12 & 14 cu. ft. Top-Mount AIR CIRCULATION The evaporator fan circulates air inside the refrigerator and freezer sections. (Fig. 24) Most of the air circulates inside the freezer compartment, and returns to the evaporator from slots in the front and rear of the freezer floor. The return air travels between the floor and the liner, where it joins other return air at the back, flowing beneath the evaporator cover and up through the evaporator coil. 8 6 7 12 11 Cold air is also sent to the refrigerator section through the air duct at the rear of the freezer section. The cold air enters the refrigerator section through a diffuser. Part of the air is forced forward where is passes through the front part of the compartment and the shelves in the door. Part of the cold air is directed down the back of the compartment to cool the lower portion of the refrigerator section. The warmed air is then returned to the freezer section through two air return ducts. Figure 24 Key: 1 - Evaporator 2 - Evaporator Cover 3 - Evaporator Fan 4 - Fan Scroll 5 - Cold Air Discharge 6 - Return Air Louvers OLD DESIGN 7 - Separator 8 - Air Duct 9 - Diffuser 10 - Cold Air Discharge 11 - Cold Air Discharge 12 - Air Return (2) 18 9 10 Fig. 24 12 & 14 cu. ft. Top-Mount COMPONENT ACCESS Component Location ! WARNING ELECTRIC SHOCK HAZARD Disconnect the electrical power before servicing any components. Failure to do so can result in death or electrical shock. EVAPORATOR FAN EVAPORATOR CONDENSER COLLECTOR PAN COMPRESSOR Fig. 25 OLD DESIGN 19 12 & 14 cu. ft. Top-Mount Servicing the Defrost Timer and Thermostat Removing the Control Box The Control box is attached to the bottom of the divider wall separating the freezer and refrigerator compartments. The control box contains the defrost timer and the operating thermostat. 1. Remove the two (2) mounting screws securing the front of the control box to the bottom of the separator. (Fig. 26) 2. Pull the control box forward to release the two (2) tabs securing the back of the control box to the bottom of the separator. 3. The control box can now be dropped down to allow access to the defrost timer and the thermostat. COVER MOUNTING SCREW DEFROST TIMER MOUNTING SCREWS DEFROST TIMER MOUNTING SCREWS TAB TAB AT AT REAR OF REAR OF CONTROL BOX CONTROL BOX Fig. 26 Servicing the Defrost Timer There are two different types of defrost timers, depending on the model being serviced. Figure 27 shows an Electronic Defrost Control. Figure 28 shows a typical Electromechanical Defrost Timer. Both types of defrost timers are secured in the control box with the same mounting screws as shown in Figure 28. Fig. 27 Fig. 28 NOTE: Units with Adaptive Defrost Control will have the ADC printed circuit board mounted in the same location as the Electromechanical Defrost Timer pictured above. Two additional wires (Brown and White) are provided and connect to terminals 5 and 6 of the ADC. OLD DESIGN 20 12 & 14 cu. ft. Top-Mount Servicing the Thermostat SENSOR TUBE The thermostat is mounted in the cross rail area by two (2) mounting screws. When removing the thermostat the sensing tube will also have to be removed. The sensing tube is routed back to the deffuser. To access the sensing tube, remove the two (2) screws securing the deffuser cover. (Fig. 29) THERMOSTAT Fig. 29 Servicing the Evaporator Fan Access to the Evaporator Fan is possible once the Evaporator Cover has been removed. 1. Remove the evaporator mounting screws and remove the evaporator cover. (Fig. 30) MOUNTING SCREWS SHELF STUDS MOUNTING SCREWS Fig. 30 2. Remove the four (4) screws securing the fan shroud to the back wall of the freezer section and lift the shroud off. (Fig. 31) 3. Remove the two (2) screws securing the fan motor mounting bracket to the back wall of the freezer section and lift the fan motor assembly from its location. (Fig. 31) 4. Disconnect the wiring harness connector from the fan motor terminals. SHROUD MOUNTING SCREW SHROUD MOUNTING SCREW FAN MOUNTING SCREW FAN MOUNTING SCREW SHROUD MOUNTING SCREW SHROUD MOUNTING SCREW Fig. 31 Servicing the Bi-Metal The Bi-Metal (Fig. 32) is attached to the heat shield on the back wall of the freezer section. 1. Gently pry the bi-metal retaining clip up and slide the bi-metal out from under the clip. 2. Disconnect the bi-metal wire connector from the wiring harness plug. OLD DESIGN 21 BIMETAL Fig. 32 12 & 14 cu. ft. Top-Mount Servicing the Defrost Heater The defrost heater is located on the left side and bottom of the evaporator and is held in place by two slotted retainers at the bottom of the evaporator. 1. Release the evaporator from its position by first pulling the two plastic retaining clips from the bosses that secure the evaporator to the heat shield. 2. Gently pull the left end of the evaporator away from the heat shield. Be careful not to kink the evaporator outlet tubing. (Fig. 33) PLASTIC RETAINING CLIPS Fig. 33 3. Gently slide the defrost heater by pulling it to the left and out of the retaining slots on the evaporator. (Fig. 34) 4. Disconnect the defrost heater wire connector from the wiring harness plug. DEFROST HEATER Fig. 34 OLD DESIGN 22 12 & 14 cu. ft. Top-Mount Servicing the Mullion Heater The electrical mullion rail heater can be replaced and can be accessed by removing the mullion rail cover. 1. Remove the doors following the procedures described in earlier in this section. 2. Remove the two screws on the opposite side of the mullion from the hinges. 3. Slide one end of the mullion rail cover to the left or right under the cabinet flange enough to free the other end of the cover. 4. Slide the mullion in the opposite direction and remove it from the mullion rail. (Fig. 35) 5. Disconnect the mullion heater wire connector from the wiring harness plug. INSULATION MULLION RAIL COVER MULLION HEATER ELEMENT Fig. 35 OLD DESIGN 23 12 & 14 cu. ft. Top-Mount WIRING DIAGRAM (Early Mullion & Stile Heater Design) STRIP CIRCUITS (Early Mullion & Stile Heater Design) COOLING CYCLE Compressor Circuit (at instant of start) Compressor Circuit (running) OLD DESIGN 24 12 & 14 cu. ft. Top-Mount Defrost Timer Motor Circuit Evaporator Fan Motor Circuit DEFROST CYCLE Defrost Heater Circuit Defrost Timer Motor Circuit OLD DESIGN 25 12 & 14 cu. ft. Top-Mount REFRIGERATOR LIGHT CIRCUIT MULLION HEATER CIRCUIT OLD DESIGN 26 12 & 14 cu. ft. Top-Mount “OLD DESIGN” 14 cu. ft. TOP-MOUNT WIRING DIAGRAM (Recent Mullion & Stile Heater Design) OLD DESIGN 27 12 & 14 cu. ft. Top-Mount “OLD DESIGN” 14 cu. ft. TOP-MOUNT STRIP CIRCUITS (Recent Mullion & Stile Heater Design) COOLING CYCLE Compressor Circuit (at instant of start) Compressor Circuit (running) Defrost Timer Motor Circuit Evaporator Fan Motor Circuit OLD DESIGN 28 12 & 14 cu. ft. Top-Mount DEFROST CYCLE Defrost Heater Circuit BR Defrost Timer Motor Circuit Mullion and Stile Heater Circuit REFRIGERATOR LIGHT CIRCUIT MODULAR ICE MAKER CIRCUIT OLD DESIGN 29 12 & 14 cu. ft. Top-Mount “OLD DESIGN” 14 cu. ft. TOP-MOUNT WIRING DIAGRAM (Adaptive Defrost Control with Current Mullion & Stile Heater Design) COOLING CYCLE Energizing Electronic Defrost Control OLD DESIGN 30 12 & 14 cu. ft. Top-Mount Compressor Circuit (at instant of start) ELECTRONIC DEFROST CONTROL Compressor Circuit (at instant of start) ELECTRONIC DEFROST CONTROL Monitoring Compressor Run-Time ELECTRONIC DEFROST CONTROL DEFROST CYCLE Defrost Heater Circuit ELECTRONIC DEFROST CONTROL Monitoring Defrost Heater Run-Time ELECTRONIC DEFROST CONTROL OLD DESIGN 31 12 & 14 cu. ft. Top-Mount MULLION AND STILE HEATER CIRCUIT ELECTRONIC DEFROST CONTROL EVAPORATOR FAN MOTOR CIRCUIT ELECTRONIC DEFROST CONTROL REFRIGERATOR LIGHT CIRCUIT MODULAR ICE MAKER OLD DESIGN 32 12 & 14 cu. ft. Top-Mount Section Three New Design 14 cu. ft. Top-Mount INSTALLATION CONSIDERATIONS Minimum Clearance Measure the opening at the location in which the refrigerator/freezer is to be installed and make sure the following minimum clearance dimensions are followed. Top: At least 3” (7.5cm) clearance between the overhead cabinet and the refrigerator/ freezer top. (Dimension A) (Fig. 36) Sides: At least 1” (2.5cm) clearance on each side of the refrigerator/freezer. (Dimension B) (Fig. 36) A Back: At least ½” (1.25cm) clearance between the condenser (“Old Design” 14 cu. ft. Top-Mount) and the wall. B B Fig. 36 Leveling the Refrigerator/Freezer It is critical that the refrigerator/freezer be properly leveled. Both the back and front of the unit should be carefully leveled before it is turned on. 1. 2. 3. 4. Place a board across the rear of the installed position and set a level on the board. (Fig. 37) Place shims where the rear rollers will sit to level the board. Remove the board and leave the shims in place. Place the unit in its installed position. Level Board Fig. 37 NEW DESIGN 33 14 cu. ft. Top-Mount Once the unit is located in the final installed location and the rear of the unit is level, proceed to level the front. NOTE: When leveling the front of the unit, the front should be ½ bubble higher than the back. 1. Use a flat blade screwdriver to rotate the front roller leveling screws in the appropriate direction to level the unit side to side. (Fig. 38 & 39) 2. Use a level and check to make sure the rollers are set so the unit is level side to side and ½ bubble higher in front. VIEW OF ROLLER WITH NO HINGE VIEW OF ROLLER WITH HINGE IN PLACE Fig. 38 Fig. 39 LOWER RAISE Leveling Screw Leveling Screw Electrical Requirements A 115 V, 60 Hz, 15 TO 20 Amp fused circuit utilizing a 3-wire grounding receptacle meeting all national and local electrical codes is required. It is recommended that a separate circuit serving only this appliance be provided. ! WARNING To avoid the risk of electrical shock, property damage, personal injury or death: NEW DESIGN • The power cord must be plugged into a 3-prong grounding-type wall receptacle, grounded in accordance with the National Electrical Code, ANSI/NFPA 70 - latest edition, and local codes and ordinances. • It is the personal responsibility of the consumer to have a proper 3-prong wall receptacle installed by a qualified electrician. • DO NOT, UNDER ANY CIRCUMSTANCES, REMOVE THE POWER CORD GROUNDING PRONG. • Do not remove any grounding wires from individual components while servicing, unless the component is to be removed and replaced. It is extremely important to replace all grounding wires when components are replaced. 34 Grounding Type Receptacle 3-Prong Grounding Plug 14 cu. ft. Top-Mount Door Alignment Occasionally, the refrigerator or freezer doors may need to be realigned. Evidence of improperly aligned doors includes a generally poor appearance of the unit and/or sweating/frosting on both the inside and outside of the cabinet due to poor gasket seal. 1. Check for proper door gasket seal by placing an American dime between the inside of the door and the cabinet. The gap should not be less than, or greater, than then diameter of the dime (11/16”). (Fig. 40) Fig. 40 TOP HINGE Cover 2. Before making any attempt to realign the doors by adjusting the hinges, make sure the unit is solidly supported and level. (See page 33 on procedures to level the unit.) Top Hinge 3. To align the refrigerator door: a) DO NOT ADJUST THE BOTTOM HINGE. Use the bottom hinge as an establishing point. b) Loosen the center hinge (Fig. 41) and align the refrigerator door with the cabinet edge. c) Tighten the center hinge. Shim Spacer Sealing Screws CENTER HINGE Door Stop 4. To align the freezer door: a) If the refrigerator door is properly aligned, DO NOT ADJUST THE CENTER HINGE. b) Loosen the top hinge (Fig. 41) and align the top of the freezer door with the top of the cabinet. c) Tighten the top hinge. Spacer Shim Hinge Pin Screws 5. Check the door gasket gap on the hinged side of the door. The gap should be straight and even and the proper width (11/16” or the diameter of an American dime) from the top hinge to the bottom hinge. a) If the gap is uneven or too narrow or if the doors hit each other when opened together, add shims at the center hinge to even out the gap. b) If the gap is uneven or too wide, or the space between the refrigerator and freezer door widens when opened together, remove shims at the center hinge to even out the gap. BOTTOM HINGE Door Stop Spacer Shim Bottom Hinge Tap Plate (in cabinet) Moveable Hinge Pin (left hole for left swing) Fig. 41 NEW DESIGN 35 14 cu. ft. Top-Mount Door Swing reversal Cap 1. Open the refrigerator door and remove the toe panel at the bottom of the unit. 2. Remove the top hinge. (Fig. 42) 3. Remove the freezer door. 4. Remove the center hinge. (Fig. 42) 5. Remove the refrigerator door. 6. Remove the bottom hinge. (Fig. 42) 7. Lay the freezer door on a flat protected surface and remove the door handle. (Fig. 42) 8. Reinstall the freezer door handle on the opposite side of the door. 9. Lay the refrigerator door on a flat protected surface and remove the door handle. (Fig. 42) 10. Reinstall the refrigerator door handle on the opposite side of the door. 11. Move the bottom hinge to the opposite side of the cabinet and reinstall it. 12. Set the refrigerator door on the bottom hinge and close the door to keep it in place. 13. Reinstall the center hinge. 14. Set the freezer door in the center hinge and close the door to keep it in place. 15. Reinstall the top hinge. 16. Align the doors. (See procedures on page 33.) Cap Spacer Spacer Screw Cap Spacer Cap Spacer Cap Screw Fig. 42 14, 16 & 18 cu. ft. Top-Mount Cover for Refrigerator Door Handle Screw Hole Fig. 43 NEW DESIGN 36 14 cu. ft. Top-Mount THEORY OF OPERATION Heat Loop Routing The heat loop enters the cabinet through a grommet at the bottom and bends to the left side (1). It then angles up to the front of the cabinet (2). At the separator between the refrigerator and freezer compartments, the loop turns right and travels across the mullion (3); then up the right stile (4); across the top mullion (5) and down the left stile (6). The loop then angles back toward the left rear corner of the cabinet (7). Finally, it turns in (8) and down through a grommet. (Fig. 44) Fig. 44 NEW DESIGN 37 14 cu. ft. Top-Mount Air Circulation The evaporator fan circulates air inside of the refrigerator and freezer section. (Fig. 45) Most of the air circulates in the freezer compartment, where it travels to the front and passes through the series of slots in the inner floor. The air then travels toward the back of the freezer between the inner floor and the liner, where it passes under the evaporator cover, across the evaporator coils and back into the freezer through a series of slots in the air tower. Some of the air in the air tower travels down the chimney into the refrigerator compartment, and is discharged through the front (narrow slot) and back (wide slot) of the diffuser. (Fig. 45, INSET) The fan draws circulating air from the refrigerator through two return air ducts at the back of the separator. From there the air travels up behind the evaporator cover and across the evaporator coils. The fan again forces the air into the freezer and refrigerator compartments, to complete the cycle. AIR TOWER EVAPORATOR FAN RETURN AIR DUCT EVAPORATOR COVER INNER FLOOR EVAPORATOR RETURN AIR DUCT SEPARATOR INSET AIR FLOW TOWARDS BACK NARROW SLOT AIR FLOW TOWARDS FRONT WIDE SLOT DIFFUSER Fig. 45 NEW DESIGN 38 14 cu. ft. Top-Mount COMPONENT ACCESS Component Location ! WARNING ELECTRIC SHOCK HAZARD Disconnect the electrical power before servicing any components. Failure to do so can result in death or electrical shock. AIR TOWER EVAPORATOR FAN EVAPORATOR CONDENSER COLLECTOR PAN COMPRESSOR Fig. 46 NEW DESIGN 39 14 cu. ft. Top-Mount Removing the Control Box The Control box is attached to the bottom of the divider wall separating the freezer and refrigerator compartments. The control box contains the defrost timer and the operating thermostat. 1. Open the refrigerator door and slide the top shelf out. 2. Remove the hex-head screw for the front of the control box. (Fig. 47) 3. Lower the front of the control box slightly and pull it forward to release the slots in back from the two tabs in the top of the refrigerator compartment liner. 4. Carefully lift the thermostat sensor tube from the hooks in the warm air return. 5. Slide a screwdriver blade under the front skirt of the top connector to unlock the tab and disconnect the control box plug from the wiring harness connector. LIGHT SOCKET WIRING HARNESS CONNECTOR PLUG LIGHT SWITCH PINS CONTROL BOX PLUG SENSOR TUBE CLIP CONTROL BOX SENSOR TUBE HEX-HEAD SCREW DEFROST TIMER THERMOSTAT CONTROL BOX KNOB Fig. 48 Fig. 47 Servicing the Defrost Timer The defrost timer is held inside the control box by three clips. The thermostat sensor tube rests in a slot at the back of the control box and must be removed from the slot and positioned out of the way when the defrost timer is removed. 1. Unclip the sensor tube from the groove at the back of the control box and position it out of the way. 2. Press out on the two indicated clips (Fig. 49) and remove the defrost timer. 3. Disconnect the wiring harness plug from the defrost timer terminals. PRESS OUT THIS CLIP CONNECTOR UNSNAP SENSOR TUBE FROM SLOT AND MOVE OUT OF THE WAY PRESS OUT THIS CLIP Fig. 49 NEW DESIGN 40 14 cu. ft. Top-Mount Servicing the Thermostat 1. 2. 3. 4. Pull the knob off the thermostat control. Unclip the sensor tube from the groove at the back of the control box. Lift the thermostat out of the tabs securing it to the control box. Disconnect the three wire connectors from the terminals of the thermostat. NOTE: The inside of the thermostat control knob has a wide and a narrow slot (Fig. 50, Inset). Match these slots with the tabs next to the thermostat shaft and press the knob over the tabs. WIDE SLOT ORANGE WIRE TABS THERMOSTAT TAB NARROW SLOT TAB UNSNAP SENSOR TUBE FROM BACK OF UNIT RED WIRE GREEN TAB WIRE KNOB Fig. 50 Servicing the Freezer Section The Bi-Metal, Evaporator Fan and Defrost Heater can all be accessed in the Freezer Section after the Evaporator Cover has been removed. Removing the Evaporator Cover 1. Open the freezer door and remove the ice cube trays and shelf. 2. Remove the two (2) Phillips screws (or plastic “canoe” clips) from the front of the freezer’s inner floor. (Fig. 51) 3. Remove the automatic ice maker, if present. 4. Remove the two (2) Phillips screws from the rear of the freezer’s inner floor and remove the floor. (Fig. 51) NEW DESIGN 41 14 cu. ft. Top-Mount PHILLIPS SCREWS PHILLIPS SCREWS Fig. 51 5. Press against the top of the air tower and disengage the two (2) clips from the evaporator cover. Then, lift the tower and pull it forward to release the four (4) hooks and remove the tower. 6. Remove the Phillips screw from the access cover and remove the cover. 7. Slide the ground wire clip off the tab of the evaporator cover. 8. Remove the two (2) hex-head screws from the top of the evaporator cover and the two hehead screws from the fan motor bracket and remove the evaporator cover. ACCESS PANEL MOUNTING SCREWS MOUNTING SCREWS TABS FAN GROUND SCREW WIRE MOUNTING SCREWS SLOTS Fig. 52 Servicing the Evaporator Fan Motor 1. Remove the two (2) screws securing the fan motor bracket to the rear wall of the freezer section. (Fig. 52) 2. Disconnect the three wires from the fan motor terminals (Fig. 53, INSET) and remove the fan motor assembly. (Fig. 53, Inset) NEW DESIGN 42 14 cu. ft. Top-Mount WHITE WIRE INSET GREEN WIRE RED WIRE FAN MOUNTING SCREW Fig. 53 Servicing the Bi-Metal 1. Unclip the Bi-Metal from the evaporator inlet tube. (Fig. 54) 2. Disconnect the wiring harness plug from the bi-metal connector. BI-METAL HARNESS CONNECTOR INSET Fig. 54 Servicing the Defrost Heater The Defrost Heater can be accessed once the evaporator cover is removed. 1. Disconnect the defrost heater wiring connector from the wiring harness plug. (Fig. 55, Inset) 2. Cut the bottom of the left defrost heater bracket with a pair of metal-cutting shears. (Fig. 55, Inset) 3. Bend the bottom of the bracket DOWN and remove the end of the heater. (Fig. 55, Inset) 4. Slide the other end of the heater element out of the right bracket and remove the heater. NEW DESIGN 43 14 cu. ft. Top-Mount EVAPORATOR DEFROST HEATER PLUG DEFROST HEATER ELEMENT DISCONNECT HARNESS PLUG EVAPORATOR HEATER BRACKET SLIDE DEFROST HEATER OUT CUT HERE & BEND DOWN DEFROST HEATER DEFROST HEATER INSET Fig. 55 Adjusting the Air Tower The air tower has three temperature slots that allow an increase or decrease in the cold air flow to vary the temperature inside the freezer. If the freezer is too warm or too cold, adjusting the slots in the tower will help correct the problem. To change the air tower settings, the air tower must be removed from the evaporator cover at the back of the freezer section. (See Figure 56, page 45.) 1. Open the freezer door and remove all the contents. 2. Remove the two (2) Phillips-head screws (or plastic “canoe” clips) securing the front of the freezer’s inner floor. 3. Remove the two (2) Phillips-head screws securing the rear of the freezer inner floor. Remove the inner floor. 4. Press against the top of the air tower to disengage the two (2) clips from the evaporator cover. Then, lift the tower and pull it forward to release the four (4) hooks from the evaporator cover. Remove the air tower from the freezer. NEW DESIGN 44 14 cu. ft. Top-Mount For A Colder Setting See Figure 56 for the following. Carefully raise the top of the rear panel of the air tower just far enough to lift the side tab out of the slot marked “MID,” then slide the panel so that the slot marked “COLDER” is lined up with the tab. Press firmly against the slot in the panel until the tab breaks through the plastic web. For A Warmer Setting See figure 56 for the following. Carefully raise the top of the rear panel of the air tower just far enough to slide the tab out of the slot marked “MID,” then slide the panel so that the slot marked “WARMER” is lined up with the tab. Press firmly against the slot in the panel until the tab breaks through the plastic web. Fig. 56 REAR PANEL RAISE FRONT OF REAR PANEL AND SLIDE IN EITHER DIRECTION TO POSITION TAB OVER DESIRED SLOT COLDER SETTING INCREASES FREEZER AIR CIRCULATION COLDER MOVING BAFFLE MOVING BAFFLE MOVING BAFFLE A WARMER SETTING DECREASES FREEZER AIR CIRCULATION NORMAL AIR CIRCULATION B NORMAL C WARMER CENTER AIR DIFFUSER AIR TO REFRIGERATOR ENTERS THROUGH CENTER AIR DIFFUSER NEW DESIGN 45 14 cu. ft. Top-Mount WIRING DIAGRAM STRIP CIRCUITS COOLING CYCLE Compressor Circuit (at instant of start) NEW DESIGN 46 14 cu. ft. Top-Mount Compressor Circuit (running) Defrost Timer Motor Circuit Evaporator Fan Motor Circuit DEFROST CYCLE Defrost Heater Circuit PK NEW DESIGN 47 14 cu. ft. Top-Mount Defrost Timer Motor Circuit REFRIGERATOR LIGHT CIRCUIT MODULAR ICE MAKER CIRCUIT NEW DESIGN 48 14 cu. ft. Top-Mount Section Four Mid-Line Design 16 thru 22 cu. ft. Top-Mount INSTALLATION CONSIDERATIONS Minimum Clearance Measure the opening at the location in which the refrigerator/freezer is to be installed and make sure the following minimum clearance dimensions are followed. Top: At least 3” (7.5cm) clearance between the overhead cabinet and the refrigerator/ freezer top. (Dimension A) (Fig. 57) Sides: At least 1” (2.5cm) clearance on each side of the refrigerator/freezer. (Dimension B) (Fig. 57) A B B Fig. 57 Leveling the Refrigerator/Freezer It is critical that the refrigerator/freezer be properly leveled. Both the back and front of the unit should be carefully leveled before it is turned on. 1. 2. 3. 4. Place a board across the rear of the installed position and set a level on the board. (Fig. 58) Place shims where the rear rollers will sit to level the board. Remove the board and leave the shims in place. Place the unit in its installed position. Level Board Fig. 58 MID-LINE DESIGN 49 16 thru 22 cu. ft. Top-Mount Once the unit is located in the final installed location and the rear of the unit is level, proceed to level the front. NOTE: When leveling the front of the unit, the front should be ½ bubble higher than the back. 1. Use a flat blade screwdriver to rotate the front roller leveling screws in the appropriate direction to level the unit side to side. (Fig. 59 & 60) 2. Use a level and check to make sure the rollers are set so the unit is level side to side and ½ bubble higher in front. VIEW OF ROLLER WITH NO HINGE VIEW OF ROLLER WITH HINGE IN PLACE Fig. 59 Fig. 60 LOWER RAISE Leveling Screw Leveling Screw Electrical Requirements A 115 V, 60 Hz, 15 TO 20 Amp fused circuit utilizing a 3-wire grounding receptacle meeting all national and local electrical codes is required. It is recommended that a separate circuit serving only this appliance be provided. ! WARNING To avoid the risk of electrical shock, property damage, personal injury or death: MID-LINE DESIGN • The power cord must be plugged into a 3-prong grounding-type wall receptacle, grounded in accordance with the National Electrical Code, ANSI/NFPA 70 - latest edition, and local codes and ordinances. • It is the personal responsibility of the consumer to have a proper 3-prong wall receptacle installed by a qualified electrician. • DO NOT, UNDER ANY CIRCUMSTANCES, REMOVE THE POWER CORD GROUNDING PRONG. • Do not remove any grounding wires from individual components while servicing, unless the component is to be removed and replaced. It is extremely important to replace all grounding wires when components are replaced. 50 Grounding Type Receptacle 3-Prong Grounding Plug 16 thru 22 cu. ft. Top-Mount Door Alignment TOP HINGE Occasionally, the refrigerator or freezer doors may need to be realigned. Evidence of improperly aligned doors includes a generally poor appearance of the unit and/or sweating/frosting on both the inside and outside of the cabinet due to poor gasket seal. Cover Top Shim Spacer 1. Check for proper door gasket seal by placing an American dime between the inside of the door and the cabinet. The gap should not be less than, or greater, than then diameter of the dime (11/16”). (Fig. 61) Sealing Screws CENTER HINGE -Style 1 2. Before making any attempt to realign the doors by adjusting the hinges, make sure the unit is solidly supported and level. (See page 49 on procedures to level the unit.) Door Stop Spacer 3. To align the refrigerator door: a) DO NOT ADJUST THE BOTTOM HINGE. Use the bottom hinge as an establishing point. b) Loosen the center hinge (Fig. 61) and align the refrigerator door with the cabinet edge. c) Tighten the center hinge. Shim Hinge Pin Screws Hinge Bracket CENTER HINGE -Style 2 4. To align the freezer door: a) If the refrigerator door is properly aligned, DO NOT ADJUST THE CENTER HINGE. b) Loosen the top hinge (Fig. 61) and align the top of the freezer door with the top of the cabinet. c) Tighten the top hinge. Door Stop Spacer Shim Hinge Pin Screws 5. Check the door gasket gap on the hinged side of the door. The gap should be straight and even and the proper width (11/16” or the diameter of an American dime) from the top hinge to the bottom hinge. a) If the gap is uneven or too narrow or if the doors hit each other when opened together, add shims at the center hinge to even out the gap. b) If the gap is uneven or too wide, or the space between the refrigerator and freezer door widens when opened together, remove shims at the center hinge to even out the gap. BOTTOM HINGE Door Stop Spacer Hinge Pin Screws Fig. 61 MID-LINE DESIGN 51 16 thru 22 cu. ft. Top-Mount Door Swing reversal Cap 1. Open the refrigerator door and remove the toe panel at the bottom of the unit. 2. Remove the top hinge. (Fig. 62) 3. Remove the freezer door. 4. Remove the center hinge. (Fig. 62) 5. Remove the refrigerator door. 6. Remove the bottom hinge. (Fig. 62) 7. Lay the freezer door on a flat protected surface and remove the door handle. (Fig. 62) 8. Reinstall the freezer door handle on the opposite side of the door. 9. Lay the refrigerator door on a flat protected surface and remove the door handle. (Fig. 62) 10. Reinstall the refrigerator door handle on the opposite side of the door. 11. Move the bottom hinge to the opposite side of the cabinet and reinstall it. 12. Set the refrigerator door on the bottom hinge and close the door to keep it in place. 13. Reinstall the center hinge. 14. Set the freezer door in the center hinge and close the door to keep it in place. 15. Reinstall the top hinge. 16. Align the doors. (See procedures on page 51.) Cap Spacer Spacer Screw Cap Spacer Cap Spacer Cap Screw Fig. 62 14, 16 & 18 cu. ft. Top-Mount Cover for Refrigerator Door Handle Screw Hole Fig. 63 MID-LINE DESIGN 52 16 thru 22 cu. ft. Top-Mount THEORY OF OPERATION Heat Loop Routing The heat loop enters the cabinet through a grommet at the bottom and bends to the left side (1). It then angles up to the front of the cabinet (2). At the separator between the refrigerator and freezer compartments, the loop turns straight up, traveling behind the left front flange (3); then across the top front flange (4); down the right front flange (5) and across the separator mullion (6). The loop then angles back toward the left rear corner of the cabinet (7). Finally, it turns in (8) and down through a grommet. (Fig. 64) 4 5 3 6 2 7 HEAT LOOP INLET HEAT EXCHANGER HEAT LOOP OUTLET 8 1 Fig. 64 MID-LINE DESIGN 53 16 thru 22 cu. ft. Top-Mount Air Circulation The evaporator fan circulates air inside of the refrigerator and freezer sections. (Fig. 65) Most of the air circulates inside the freezer compartment, and returns to the evaporator from two directions. The first route is through a series of slots between the evaporator cover and the rear edge of the freezer floor, where it passes under the evaporator cover, and up through the evaporator coil. The second direction is through slots in the front of the freezer floor. The return air travels between the floor and the liner, where it joins other return air at the back, flowing beneath the evaporator cover and up through the evaporator coil. Some of the air from the evaporator fan travels down the air tower into the refrigerator compartment, and is discharged through the diffuser. The amount of air entering the refrigerator compartment through the diffuser is determined by the position of the air damper. As the freezer control knob is turned, it moves the damper over the opening of the diffuser, thus varying its size, and controlling the amount of air into the refrigerator compartment. The fan draws circulating air from the refrigerator through return air ducts at the back of the refrigerator-freezer partition. From there, the air travels up behind the evaporator cover, and up through the evaporator coils. The fan again forces the air into the freezer and refrigerator compartments, to complete the cycle. AIR TOWER EVAPORATOR FAN EVAPORATOR COVER EVAPORATOR RETURN AIR FREEZER FLOOR RETURN AIR FREEZER COMPARTMENT RETURN AIR REFRIGERATOR COMPARTMENT PHANTOM VIEW SIDE VIEW Fig. 65 MID-LINE DESIGN 54 16 thru 22 cu. ft. Top-Mount COMPONENT ACCESS Component Location ! WARNING ELECTRIC SHOCK HAZARD Disconnect the electrical power before servicing any components. Failure to do so can result in death or electrical shock. AIR TOWER EVAPORATOR CONTROL BOX DEFROST TIMER THERMOSTAT AIR DAMPER COLLECTOR PAN CONDENSER FAN COMPRESSOR CONDENSER Fig. 66 MID-LINE DESIGN 55 16 thru 22 cu. ft. Top-Mount Servicing the Defrost Timer and Thermostat Removing the Control Box The control box is attached to the bottom of the divider wall separating the freezer and refrigerator compartments. The control box contains the defrost timer and the operating thermostat. 1. Open the refrigerator door and remove the top shelf. 2. Unclip the air diffuser assembly using a small flat-bladed screwdriver and remove the assembly from the refrigerator. 3. Remove the two (2) hex-head screws securing the control box to the top of the refrigerator section. Lower the front of the control box slightly. 4. Disconnect the light connector from the wiring harness plug. 5. Disconnect the main wiring harness plug from the receptacle mounting in the top of the refrigerator section. 6. Pull the control box forward to release the two (2) tabs securing the back of the control box to the tabs in the refrigerator liner. Remove the control box from the refrigerator. BLACK MAIN HARNESS PLUG MAIN HARNESS RECEPTACLE YELLOW LIGHT CONNECTORS CONTROL BOX TAB CLIPS SLOT SLOT HEX-HEAD SCREW AIR DAMPER HEX-HEAD SCREW Fig. 67 AIR DIFFUSER ASSEMBLY AIR DAMPER SENSOR TUBE DEFROST TIMER LIGHT FIXTURE LIGHT FIXTURE Fig. 68 THERMOSTAT MID-LINE DESIGN 56 16 thru 22 cu. ft. Top-Mount Servicing the Defrost Timer Early Production Models: 1. Press out on the locking arm and slide the defrost timer out from under the holding tabs. 2. Disconnect the wiring harness plug from the terminals of the defrost timer and remove the defrost timer from the control box. PUSH ON LOCKING ARM TO REMOVE DEFROST TIMER HOLDING TABS DEFROST TIMER CONNECTOR Fig. 69 Current Production Models: 1. Remove the two (2) clips from the pins securing the defrost timer to the control box. In some cases it may be neces sary to clip off the tops of each pin. (Fig. 70, Inset) Lift the defrost timer out of the control box. 2. Disconnect the wiring harness plug from the terminals of the defrost timer. IF NECESSARY CLIP OFF TOPS OF PINS DEFROST TIMER CONNECTOR NOTE: When reinstalling a new defrost timer, place the timer over the pins as far as it will go. Even if the pins have been clipped short, the defrost timer will remain in position when the control box is reinstalled in the refrigerator. PIN CLIP DEFROST TIMER INSET Fig. 70 Servicing the Thermostat 1. Disconnect the Red, Orange and Green wires from the thermostat terminals. (Fig. 71) 2. Unclip the right end of the thermostat bracket from the control box. Then slide the left end of the bracket from the slot in the control box. 3. Position the air damper out of the way, and carefully peel off and set aside the adhesive foam cover from the thermal weight sensor tube access hole in the rear of the control box. (Fig. 71, Inset) 4. Pull the thermal weight and sensor tube out of the mounting slots. 5. Unclip the thermostat from the bracket and remove it. 6. Remove the knob. NOTE: When installing a new thermostat and sensor tube, be sure to form a 1½” diameter loop in the sensor tube. Be careful not to kink the sensor tube. MID-LINE DESIGN 57 16 thru 22 cu. ft. Top-Mount FORM LOOP HERE AIR DAMPER RED WIRE UNCLIP TO REMOVE PULL BRACKET OUT OF SLOT THERMOSTAT INSET ADHESIVE FOAM COVER THERMAL WEIGHT THERMAL WEIGHT ACCESS SLOT ORANGE WIRE SLOT SENSOR TUBE FITS INTO SLOT HERE UNCLIP BRACKET GREEN WIRE Fig. 71 Servicing the Freezer Section Removing the Freezer Light Assembly Early Production Models Some early Production Models of Mid-Line Refrigerators were equipped with a magnetically operated electronic light switching system. If the unit being serviced does NOT have a rocker switch on the freezer light assembly, follow these instructions. Door Magnet - The door magnet may be attached to the door with only an adhesive or it may have a mounting screw. Replacement door magnets are supplied with a pre-drilled hole and a selftapping screw . 1. If the door magnet does not have a mounting screws, pull the magnet away from the door until the adhesive tape is free of the door liner. (Fig. 72) 2. If the door magnet has a mounting screw, remove it and then pull the door magnet from the door liner as instructed above. DOOR MAGNET MOUNTING SCREW DOOR LINER Fig. 72 MID-LINE DESIGN 58 16 thru 22 cu. ft. Top-Mount Door Switch Assembly 1. Slide the cover forward on the front of the freezer light assembly and remove it. 2. Remove the screw from the front of the freezer light assembly. Drop the assembly down to work on the components inside the assembly. The wiring harness will remain attached at this point. 3. Slide the electrical shield from the back of the assembly. 4. Both the electronic light switch board and the light socket can be unsnapped from the back of the assembly. Disconnect the wiring connectors from the terminals on the electronic light switch circuit board or light socket. FREEZER LIGHT SOCKET FREEZER LIGHT ASSEMBLY MOUNTING SCREW COVER ELECTRONIC LIGHT SWITCH CIRCUIT BOARD ELECTRICAL SHIELD LIGHT SWITCH ASSEMBLY WIRING HARNESS CONNECTOR (Behind Evaporator Cover) Fig. 73 MID-LINE DESIGN 59 16 thru 22 cu. ft. Top-Mount Current Production Models: Current Production Models of Mid-Line Refrigerators are equipped with a rocker switch located at the front of the light switch assembly. 1. Remove the screw from the bottom of the freezer light assembly. (Fig. 74) Drop the assembly down to work on the components inside the assembly. The wiring harness will remain attached at this point. 2. Slide the electrical shield from the back of the assembly. 3. The rocker switch and light socket can now be unsnapped from the freezer light assembly and the wiring harness connectors can be removed from the switch and socket terminals. SHOWN ROTATED 90° FREEZER LIGHT SOCKET & WIRING FREEZER LIGHT ASSEMBLY ROCKER SWITCH & WIRING ORANGE & BLACK WIRES ELECTRICAL SHIELD FREEZER LIGHT ASSEMBLY WIRING HARNESS CONNECTOR (Behind Evaporator Cover) MOUNTING SCREW Fig. 74 MID-LINE DESIGN 60 16 thru 22 cu. ft. Top-Mount Removing the Freezer Floor and Evaporator Cover Access to the component behind the evaporator cover and removing the air tower can be accomplished by removing the freezer floor and evaporator cover. Removing the Freezer Floor 1. Remove the ice cube tray, bin and shelf (if present) or remove the automatic ice maker. 2. Remove the two (2) Phillips screws securing the front of the freezer floor to the freezer liner and slide the floor out of the freezer. Removing the Evaporator Cover 1. Remove the Phillips screw securing the Ice Maker Wiring Access Cover to the Evaporator Cover and remove the Access Cover. 2. Remove the two (2) Phillips screws from the top of the Evaporator Cover on both sides of the Air Tower. 3. Pull the top of the Evaporator cover forward and carefully lift the base of the Air Tower out of the freezer liner cutout and remove the Evaporator Cover. Removing the Air Return Covers Each Air Return Cover consists of two (2) sections. When lifting the Air Return Covers out of the freezer liner, hold the sections together so that the front section does not fall into the air return chute. (Fig. 75, Inset 1) Removing the Air Tower Remove the hex-head screws from the back of the Evaporator Cover, and release the two (2) tabs at the top of the Air Tower, and remove the Air Tower from the Evaporator Cover. (Fig. 75, Inset 2) INSET #2 SLOTS TAB TAB PHILLIPS-HEAD SCREW PHILLIPS-HEAD SCREW HEX-HEAD SCREW PHILLIPS-HEAD SCREW AIR TOWER AIR RETURN COVERS INSET #1 Fig. 75 MID-LINE DESIGN 61 16 thru 22 cu. ft. Top-Mount Servicing the Evaporator Fan Motor 1. Remove the harness wires from the clips at the top of the fan motor bracket. (Fig. 76) 2. Remove the four (4) hex-head screws securing the fan motor bracket to the rear liner of the freezer. 3. Unplug the three (3) harness wires from the fan motor terminals. (Fig. 76, Inset 1) 4. Remove the two (2) hex washer-head screws securing the fan motor to the bracket and remove the motor. Servicing the Bi-Metal Unclip the Bi-Metal from the evaporator inlet tube and cut the wire leads approximately 2” from the Bi-Metal and remove the Bi-Metal. (Fig. 76, Inset #2) NOTE: When installing a new Bi-Metal, it will be necessary to strip approximately 3/8” of the insulation from the wiring harness leads, as well as the replacement Bi-Metal pigtails. Wire nuts are supplied with the replacement Bi-Metal to complete this repair. INSET #1 WHITE WIRE GREEN WIRE RED WIRE HEX WASHER-HEAD SCREW HEX WASHER-HEAD SCREW HEATER/BI-METAL WIRE CLIPS FAN MOTOR BRACKET Fig. 76 DEFROST HEATER CONNECTOR BI-METAL WIRES DEFROST HEATER WIRE HEX-HEAD SCREWS BI-METAL ICE MAKER CONNECTOR BI-METAL GROUNDING CLIP COATING ON INLET TUBE INSET #2 HEAT SHIELD DRIP TRAY NOTE: This illustration shows the Bi-Metal & Heat Exchanger configuration for CURRENT PRODUCTION models. EARLIER PRODUCTION models have the Bi-Metal & Heat Exchanger on the left side. MID-LINE DESIGN 62 16 thru 22 cu. ft. Top-Mount Servicing the Defrost Heater The Defrost Heater is located behind the evaporator cover, and wraps around the bottom half of the evaporator. The Defrost Heater is a single element with one electrical connection on the left side of the evaporator and the other connection on the right. The wiring harness connector for the Defrost heater is located next to the terminal block on the left side of the rear freezer liner. (Fig. 77) 1. Unplug the Defrost Heater wiring harness connector from the wiring harness plug at the terminal block. 2. Unclip the Defrost heater lead from the clips that are along the top of the fan motor bracket. 3. Bend the bottom tabs up on the left and right defrost heater brackets with a pair of pliers and remove the heater element from the brackets. (Fig. 77, Inset 1) 4. Spread the bottom of the center support clip and remove the heater from the freezer. (Fig. 77, Inset 2) REMOVE HEATER WIRE FROM CLIPS ON FAN MOTOR BRACKET INSET #2 EVAPORATOR TUBING SQUEEZE HERE DEFROST HEATER CONNECTOR SQUEEZE HERE DEFROST HEATER DEFROST HEATER WIRE DEFROST HEATER HEATER BRACKET LOCKING TAB IN PLACE BEND LOCKING TAB UP TO REMOVE HEATER ELEMENT DEFROST HEATER DEFROST HEATER INSET #1 Fig. 77 MID-LINE DESIGN 63 16 thru 22 cu. ft. Top-Mount WIRING DIAGRAM (Neutral Path To Defrost Timer Motor through Defrost Heater and Compressor Run Winding) STRIP CIRCUITS COOLING CYCLE Compressor Circuit (at instant of start) MID-LINE DESIGN 64 16 thru 22 cu. ft. Top-Mount Compressor Circuit (running) Defrost Timer Motor Circuit Evaporator Fan Motor Circuit Condenser Fan Motor Circuit MID-LINE DESIGN 65 16 thru 22 cu. ft. Top-Mount DEFROST CYCLE Defrost Heater Circuit PK Defrost Timer Motor Circuit REFRIGERATOR LIGHT CIRCUIT MODULAR ICE MAKER CIRCUIT MID-LINE DESIGN 66 16 thru 22 cu. ft. Top-Mount WIRING DIAGRAM (Direct Neutral Path to Defrost Timer Motor) MID-LINE DESIGN 67 16 thru 22 cu. ft. Top-Mount “MID-LINE DESIGN” 16 & 18 cu. ft. TOP-MOUNT STRIP CIRCUITS (Direct Neutral Path to Defrost Timer Motor) COOLING CYCLE Compressor Circuit (at instant of start) Compressor Circuit (running) Defrost Timer Motor Circuit Evaporator Fan Motor Circuit Condenser Fan Motor Circuit MID-LINE DESIGN 68 16 thru 22 cu. ft. Top-Mount DEFROST CYCLE Defrost Timer and Defrost Heater Circuit REFRIGERATOR LIGHT CIRCUIT MODULAR ICE MAKER MID-LINE DESIGN 69 16 thru 22 cu. ft. Top-Mount --NOTES -- MID-LINE DESIGN 70 16 thru 22 cu. ft. Top-Mount Section Five TROUBLESHOOTING AND DIAGNOSIS GENERAL HEAVY WARM LOAD WARM ROOM The amount of warm food placed in the refrigerator affects running time and power consumption. Ordinarily, when a supply of food is placed in a refrigerator, it will operate continuously until the food is down to the desired storage temperature. This continuous operation is normal. In high ambient room temperatures, an excessive warm load may cause overload cycles. 1. A warm room or other large source of heat (such as a range, heater, hot air duct, sunny window) can affect the performance of the refrigerator. If the room ambient temperature exceeds 100°F, running time will approach 100%. EXCESSIVE DOOR OPENING 3. In general, the warmer the room, the greater the running time and power consumption. 2. At temperatures approaching 120°F, the refrigerator may cycle on the overload. The length of time the door is left open and the number of times the door is opened should be held to a minimum. Excessive door opening will greatly increase running time, power consumption and frost buildup. EXTERIOR SWEATING Refrigerators are designed to prevent “runoff” moisture at ambient room temperatures of 90°F and relative humidity of 90%. There may be a thin film of moisture on some areas at a lower temperature and relative humidity. This is within design specifications and is not a fault of construction. IMPROPER PACKAGING Uncovered foods and improper packaging materials and methods cause food to dry out. This reduces the flavor of foods and results in an excessive frost buildup. Refer the customer to the Owner’s guide that came with the refrigerator. Relocating the refrigerator in a less humid and better ventilated area will normally eliminate most moisture problems. ! WARNING ELECTRIC SHOCK HAZARD Disconnect the electrical power before performing any diagnostic test, continuity test or attempting any servicing of any components. Failure to do so can result in death or electrical shock. 71 SEALED SYSTEM DIAGNOSIS REVIEW Entering and properly processing the sealed refrigeration system requires special equipment and should only be accomplished by a qualified service technician. Before suspecting that the sealed refrigeration system has failed, be sure to check out all other possibilities as described in the following Troubleshooting Chart on pages 73-79. There are four conditions that make entering the sealed system necessary. 1. 2. 3. 4. Incorrect amount of refrigerant Restriction of refrigerant flow Refrigerant leak Compressor not operating correctly Current U. S. Environmental Protection Agency regulations require specific procedures and equipment for the collection and disposal of any refrigerant used in the sealed system of a domestic refrigerator, freezer, ice machine or air conditioner. As a result, if it is determined that the sealed system must be repaired, contact a qualified and certified service technician to perform the repairs. 72 TROUBLESHOOTING CHART PROBLEM CAUSE PROCEDURE Compressor will not start 1.Service cord unplugged 1.Plug in electrical outlet (Parts of this diagnosis and service procedure must be performed by a qualified refrigeration system service technician.) 2.No power at outlet 2.Check to confirm 120VAC, 60 Hz at outlet. 3.Thermostat: a.Turned off b.Points not closed 3. 4.Relay or overload 4.Using a start cord, check compressor directly, if compressor starts, check relay and overload separately with ohmmeter and replace defective part. If compressor does not start, call for a qualified service technician. 5.Loose connections 5.Check circuit from power source to compressor. 6.Capacitor 6.Check capacitor and replace if defective. 7.Motor windings open, shorted or grounded. 7.Check winding with ohmmeter. See wiring diagram for resistance values. Replace compressor if motor is defective. 8.Timer 8.a.Timer may be in defrost cycle. Turn clockwise past 2 o’clock. b. Wired wrong c. Check timer and replace if defective. 9.Compressor stuck 9.Try starting with starting cord. If compressor won’t start, call for a qualified service technician. 1.Air circulation on high-side: a.Condenser or grille blocked by lint. b.Condenser fan not running or too slow. c.Unit compartment rear cover not in place. d.Air obstruction in back or above cabinet. 1. Compressor runs, but no refrigeration or insufficient refrigeration. 73 a.Turn knob clockwise b.Place jumper between terminals. If compressor starts, thermostat is defective and should be replaced. a.Clean condenser and air passage with vacuum cleaner. b.Check for continuity in fan motor, re place if defective. c. Put unit compartment rear cover in place. d. Clean condenser or back of cabinet and make sure there is three inches or more of free air space above the cabinet. PROBLEM Compressor runs, but no refrigeration or insufficient refrigeration. (con’t.) (This diagnosis and service procedure must be performed by a qualified refrigeration system service technician.) Compressor stops on overload (Parts of this diagnosis and service procedure must be performed by a qualified refrigeration system service technician.) Freezer compartment too warm (Parts of this diagnosis and service procedure must be performed by a qualified refrigeration system service technician.) CAUSE PROCEDURE 2.Moisture Restriction 2.Call for a qualified service technician. 3.Permanent Restriction 3.Call for a qualified service technician. 4.Low Charge or No Charge 4.Call for a qualified service technician. 5.No Capacity or LowCapacity Compressor 5.Call for a qualified service technician. 1.High ambient and/or abnormal usage 1. On initial pull-down in high ambient, compressor may cut off on overload, instruct customer. 2.Low or high voltage 2.Check to confirm 120VAC, 60 Hz at outlet. If not correct, a qualified electrician must make repairs. 3.Capacitor 3.Check capacitor, replace if defective. 4.Air circulation on high-side: a.Condenser or grille blocked by lint. b.Condenser fan not running or too slow. c.Unit compartment rear cover not in place. d.Air obstruction in back or above cabinet. 4. 5.Relay and/or Overload 5.Check each component and replace defective part. 6.Motor winding shorted 6.Check motor winding with ohmmeter. Replace compressor if motor is defective. Call for a qualified service technician. 7.Overcharge 7.Call for a qualified service technician. 8.Compressor stuck 8.Call for a qualified service technician. 1.Thermostat a.Set too warm b.Sensing tube not properly located c.Out of calibration or not functioning 1. 74 a.Clean condenser and air passage with vacuum cleaner. b.Check for continuity in fan motor, replace if defective. c. Put unit compartment rear cover in place. d. Clean condenser or back of cabinet and make sure there is three inches or more of free air space above the cabinet. a.Turn knob to higher setting. b.See that sensing tube in covered with barrier and properly located. c.Check thermostat for cutin and cutout temperatures, recalibrate or replace. PROBLEM Freezer compartment too warm (con’t.) Refrigerator compartment too warm (Parts of this diagnosis and service procedure must be performed by a qualified refrigeration system service technician.) CAUSE PROCEDURE 5.Interior air circulation a.Evaporator Fan not running b.Restriction in air ducts c.Air control open too wide 5. 6.Abnormal use 6.Instruct customer 7.Bad door seal or door not closing 7.a.Adjust door to obtain proper door seal. b.Instruct customer to make sure door closes completely. 8.High ambient temperature 8.Locate in area out of direct sunlight and away from air vents and other source of heat. 9.Cabinet light(s) 9.Check to make sure door switch is closed, replace or adjust switch. 10. Excessive frost on evaporator unit: a.Compressor won’t run b.Compressor runs continuously 10. Check items under “Incomplete Defrosting” a.See “Compressor Won’t Run” b.See “Compressor runs, but no refrigeration or insufficient refrigeration.” Call for a qualified service technician. 1.Thermostat a.Set too warm b.Sensing tube not properly located 1. c.Out of calibration or not functioning a.Check evaporator fan motor winding, replace if defective. b.Remove obstruction in ducts. c. Adjust rear panel on air tower. a.Turn knob to higher setting. b.See that sensing tube is properly positioned and pressed into retainer clips. c.Check thermostat for cutin and cutout temperatures, recalibrate or replace. 2.Air control closed 2.Adjust rear panel on air tower. 3.Abnormal use 3.Instruct customer. 4.Bad door seal or door not closing 4.a.Adjust door to obtain proper door seal. b.Instruct customer to make sure door closes completely. 5.High ambient temperature 5.Locate in area out of direct sunlight and away from air vents and other source of heat. 6.Cabinet light(s) 6.Check to make sure door switch is closed, replace or adjust switch. 7.Excessive frost on evaporator unit: a.Compressor won’t run b.Compressor runs continuously 7.Check items under “Incomplete Defrosting”. a.See “Compressor Won’t Run”. b.See “Compressor runs, but no refrigeration or insufficient refrigeration.” Call for a qualified service technician. 75 PROBLEM Freezer compartment too cold Refrigerator compartment too cold CAUSE PROCEDURE 1.Thermostat a.Set too cold b.Sensing tube not properly positioned c.Out of calibration or not functioning a.Turn knob to lower number. b. See that sensing tube is covered by barrier and properly located. c. Check thermostat for cut-in and cu-tout temperatures, recalibrate or replace. 2.Air control closed 2.Adjust rear panel of air tower. 1.Thermostat a.Set too cold b.Sensing tube not properly positioned 1. a.Turn knob to lower setting. b.See that sensing tube is properly positioned and pressed into retainer clips. c.Check thermostat for cut-in and cutout temperatures, recalibrate or replace. c.Out of calibration or not functioning External sweating Internal sweating 1.Door seal 1.Adjust door for proper door seal. 2.Void in insulation 2.Voids are not likely to occur within cabinet walls. If in accessible area, fill with fiberglass. 1.Abnormal Use 1.Instruct customer to cover foods and liquids. 2.Door seal 2.Check door seal and adjust door. Instruct customer to be sure door closes completely. 3.Insufficient air circulation 3. a.Make sure return air flow is not restricted. b.Increase cold air flow by operating refrigerator compartment as cold as possible without freezing food. Incomplete defrosting, or high cabinet temperatures during defrost 1.Bi-metal 1.Check bi-metal defrost control. If bimetal opens too soon, defrost will be incomplete and frost will accumulate. If bi-metal is stuck closed or opens too late, high cabinet temperatures will result. A loose bi-metal may cause the defrost heater to stay on too long. Change bi-metal is defective. 2.Timer 2.Check timer for proper operation. Timer should initiate 21-minute defrost cycle every 12 hours. Replace timer if defective. 3.Defrost heater 3.Check defrost heater with ohmmeter. Replace if open or shorted. 4.Drain clogged 4.Clogged drain may result in ice buildup in evaporator. Clean drain system. 76 DIAGNOSTIC TESTS PROBLEM COMPRESSOR TIMER NOTE: The production timer (Paragon) has a 10 hour cumulative run time with a 21minute defrost duration. The service replacement timer has an 8 hour cumulative run time with a 21-minute defrost duration. PROCEDURE READINGS 1.Touch probes of ohmmeter to M and C terminals 1.Meter should read 1Ω to 5Ω 2.Touch probes of ohmmeter to S and C terminals 2.Meter should read 3Ω to 11Ω 3. Ground Test: Touch one probe to the chassis and the other probe to the M, S and C terminals 3.Infinity for each check. Any resistance indicates a short. To test the timer, perform the following steps: 1.Use a screwdriver and manually turn the timer clockwise until you hear it “click.” This will place the timer in the “defrost” position. If the refrigerator was running, the compressor and fan(s) will turn off. 2.Unplug the unit. 3.Disconnect the 4-wire connector from the timer. 4.Set the ohmmeter to the Rx10K scale. 5.Zero the meter. CHECKING THE MOTOR 1. Paragon Timer: The motor windings have a capacitor connected in series. Use the same test procedure that you would use for checking a capacitor. Momentarily touch the probes to terminals PK and R; then reverse the probes and touch the terminals again. Paragon Timer - whenever you first touch the terminals, the meter should momentarily deflect and show continuity. 2. Mallory Timer: Touch the meter probes to timer terminals PK and R. Mallory Timer - the meter should read 6KΩ to 9KΩ. 77 PROBLEM PROCEDURE TIMER (continued) DEFROST MODE NOTE: The production timer (Paragon) has a 10 hour cumulative run time with a 21minute defrost duration. 1.Set the ohmmeter to the Rx1 scale and zero the meter. The service replacement timer has an 8 hour cumulative tun time with a 21-minute defrost duration. READINGS 2.Touch the meter probes to timer terminals PK and BK. The meter should read “zero” resistance (contacts closed). If it reads anything else, replace the timer. 3.Touch the meter probes to timer terminals PK and OR. The meter should read “infinity” (contacts open). If it reads anything else, replace the timer. COOLING MODE 1.Use the screwdriver and manually advance the timer ¼-turn. 2.Touch the meter probes to timer terminals BK and OR. The meter should read “zero” resistance (contacts closed). If it reads anything else, replace the timer. 3.Touch the meter probes to timer terminals PK and BK. The meter should read “infinity” (contacts open). If it reads anything else, replace the timer. OVERLOAD PROTECTOR Touch the meter probes to the overload terminals. The normally closed switch should show continuity (0Ω). PTC RELAY The PTC relay cannot be tested. To determine its reliability, unplug it and use the following procedure to check it: 1.Check the R and W wires at the compressor for 120 VAC. 2.Check the overload relay to make sure there is continuity through it. 3.Test the capacitor. 4.Use a test cord and start the compressor. If it starts, and the components are operating, the PTC relay is defective. RUN CAPACITOR Unplug the capacitor from the relay, discharge it and touch the probes to the terminals. 78 The meter should peak and then drop. Reverse the test probes on the terminals and the same results should occur. PROBLEM DEFROST HEATER PROCEDURE Locate the test terminals inside the control box. (Brown and Pink wires) Touch the meter probes to the ends of Brown wire and the Neutral side of the plug wires (any White wire terminal.) Meter should read 19Ω to 35Ω nominal resistance. Ground Test: Touch one meter probe to the barrel of the heater and the other to the Brown and White wires. The meter should read “infinity”. Any resistance beyond nominal reading indicates a short circuit. 12 cu. ft. “Mullion Heater Design”: With the Defrost Timer in the Cooling Mode - Touch a probe to the Blue terminal of the Test Plug and the other probe to any White terminal. BI-METAL READINGS Make sure that the freezer is cold enough to close the bimetal contacts. (32°F closed, 55°F open). Place the probes on the Brown and Pink leads in the control box. Meter should read 19Ω to 35Ω nominal resistance. Meter should read 0Ω. 12 cu. ft. “Mullion Heater Design”: Timer in the Defroat Mode, Thermostat closed - Touch one probe the the Blue terminal of the Test Plug and the other probe to any White terminal. EVAPORATOR FAN MOTOR Disconnect the wire connectors from the evaporator fan motor and touch the meter probes to the motor terminals. Ground Test: Touch one meter probe to the chassis and the other to each terminal on the motor. CONDENSER FAN MOTOR Disconnect the wire connectors from the condenser fan motor and touch the probes to the terminals on the motor. Ground Test: Touch one meter probe to the chassis and the other to each terminal on the motor. 79 Meter should read 30Ω to 70Ω. The meter should read “infinity” for each check. Any resistance indicates a short circuit. Meter should read 30Ω to 70Ω. The meter should read “infinity” for each check. Any resistance indicates a short circuit. TYPICAL TESTING PROCEDURES Electromechanical Defrost Timer The Defrost Timer Motor and Switch can be tested in Electromechanical Defrost Timers. To Test the Timer Switch: 1. 2. 3. 4. 5. Disconnect the wiring harness plug from the defrost timer. Rotate the timer cam until you hear a click. (This puts it in the defrost cycle.) Set a volt-ohm meter on Rx1 scale. Place the probes of a VOM on the terminals 1 and 2. The VOM should read continuity. Rotate the timer cam until it clicks a second time. (Just a few degrees back to the cooling cycle.) 6. Place the probes of a VOM on the 1 and 4 terminals. The VOM should read continuity. To Test the Timer Motor: 1. Set volt-ohm meter on Rx10K scale. 2. Place the probes of a VOM on the 2 and 3 terminals. a) On Mallory timers, the VOM should read between 6K and 9K ohms. b) (Set volt-ohm meter to highest setting) On Paragon timers, the VOM should momentarily deflect and then show infinity. NOTE: Paragon timers have a capacitor in series with the timer motor. These must be checked like a capacitor. Testing Timer Motor and Switch 1 4 2 3 80 Thermostat The Thermostat can be tested with an Ohmmeter. To Test the Thermostat: 1. 2. 3. 4. 5. 6. Disconnect the wire connectors from the thermostat terminals. Set it to the ON position. Set the volt-ohm meter to the Rx1 scale. Place the probes of a VOM on the two terminals. The VOM should read continuity. Set it to the OFF position. Place the probes of a VOM on the two terminals. The VOM should read infinity (open circuit). NOTE: This check only varifies continuity through the thermostat switch, not the accuracy of the temperature sensing mechanism. Testing Thermostat Switch 81 Evaporator Fan Motor The Evaporator fan motor can be tested with an ohmmeter set on the Rx1K scale. To test the Evaporator Fan Motor: 1. Disconnect the wire connectors from the fan motor terminals. 2. Place the probes on the two outer terminals of the fan motor. 4. The VOM should read approximately 1,100 ohms. 5. Set the VOM to the highest scale to check for shorted windings. Place one probe on one of the outer terminals and the other probe on the motor housing. Then touch the probe to the other outside terminal. In both cases the meter should show an open circuit. 82 Bi-Metal The Bi-Metal can be tested by using the test lead plug located in the control box. The test lead plug is connected to a brown and a pink wire. To Test the Bi-Metal: (All models except Mullion Evaporator Design) 1. Follow the procedure for removing the control box on the specific unit being serviced. 2. Locate the test lead plug (a brown and a pink wire) inside the control box. 3. Set the volt-ohm meter to the Rx1 scale. Be sure the freezer section is at operating temperature (cold). 4. Place the probes of a VOM in the two terminals of the test lead plug. The VOM should read continuity. Brown Wire Pink Wire Bi-Metal To Test the Bi-Metal: (Mullion Evaporator Design) 1. Follow the procedure for removing the control box on the specific unit being serviced. 2. Locate the test leads (a black and a blue wire) located with the defrost timer. 3. Set the volt-ohm meter to the Rx1 scale. Be sure the freezer section is at operating temperature (cold). The defrost timer must be set for defrost and the defrost contacts closed. 4. Place the probes of a VOM to the two test leads. The VOM should read continuity. 83 Defrost Heater (All models except Mullion Evaporator Design) The Defrost heater can be tested with an ohmmeter set on the Rx1K scale. To Test the Defrost Heater: 1. 2. 3. 4. Follow the procedure for removing the control box on the specific unit being serviced. Locate the test lead plug inside the control box. Set the volt-ohm meter to the Rx1 scale. Place one probe of a VOM in the brown wire terminal of the test lead plug. Place the other probe on any white wire connector. The VOM should show continuity. NOTE: In Mullion Evaporator Models the test lead wire color is blue. Brown Wire Any White Wire Connector Compressor The Compressor can be tested with an Ohmmeter. To Test the Compressor: 1. Remove the PTC Start Relay and Overload Protector from the terminals of the compressor. 2. Place the probes of a VOM (Rx1 scale) on terminals “C” and “S”. The VOM should read between 6 and 22 ohms. 3. Place the probes of a VOM on terminals “C” and “M”. The VOM should read between1.5 and 6 ohms. 4. Place the one probe of a VOM (highest scale) on terminal “C” and scratch through the paint on the compressor body so the probe contacts bare metal. The VOM should read infinity (open circuit). NOTE: Main motor winding may be designated as M or R. 84 Testing Start Winding Testing Run Winding Compressor Terminal Configurations S C M(R) M(R) C C Testing for Short to Ground S M 85 S M(R) Overload The Overload can be tested with an ohmmeter set on the Rx1 scale. To Test the Overload: 1. Locate the overload mounted to the compressor and remove it. Disconnect all wire leads. 2. Set the volt-ohm meter to the Rx1 scale. 4. Place the probes of a VOM on the two wire leads or wire terminals of the overload. The VOM should show continuity at room temperature. Start Relay The Start Relay can be tested with an ohmmeter set on the Rx1 scale. To Test the Current Draw Type Start Relay: 1. Locate the start relay connected to the terminals of the compressor. Pull the relay from the compressor terminals and disconnect all wires. 2. Set the volt-ohm meter to the Rx1 scale. 3. Place the probes of a VOM on the red wire lead or terminal 1. Place the other probe in the start pin receptacle (left side). a. In the upright position the VOM should show infinity (open circuit). b. In the inverted position the VOM should show continuity. Open Contacts Position Closed Contacts Position 86 To Test the PTC Type Start Relay: (Test the compressor and overload before performing this test.) 1. Locate the start relay connected to the terminals of the compressor. Pull the relay from the compressor terminals and disconnect all wires. 2. Set the volt-ohm meter to the Rx1K scale. 3. Place the probes of a VOM on terminals numbered 2 and 3. The VOM should show continuity at room temperature. If VOM shows infinity (open circuit) the PTC Start Relay is defective. 4. If the compressor, overload and PTC relay pass these tests and the unit still will not start, call an authorized Whirlpool Service Technician. PTC Relay Run Capacitor The Run Capacitor can be tested with an ohmmeter set on the Rx10K scale. To Test the Capacitor: 1. Locate the capacitor in the compressor compartment. 2. Discharged the capacitor by shorting across the terminals with a screwdriver with an insulated handle. Disconnect the wiring harness connectors from the capacitor terminals. 3. Set the volt-ohm meter to the Rx10K scale. 4. Place the probes of a VOM on the two terminals of the capacitor. The VOM should deflect momentarily and then show infinity (open circuit). If the meter does not deflect or the meter shows continuity the capacitor is defective. 87 CONFIRMATION OF LEARNING EXERCISE Place an X in the blank next to the correct answer(s) to the following servicing situations. 5. If you are testing the start winding of the compressor, what should the meter reading be? 1. The customer complains that the compressor will not start. Which of the following could be the cause of the problem? ____ A. Air obstruction in the back or above the cabinet. ____ A. 1Ω to 5Ω ____ B. 7Ω to 20Ω ____ B. Motor windings open, shorted or grounded. ____ C. 22Ω to 30Ω ____ D. 50Ω to 75Ω ____ C. Condenser fan not running or too slow. 6. When testing the timer, what scale should be used on the ohmmeter? ____ D. Air control closed. ____ A. Rx1 2. The customer complains that the freezer compartment is too warm. Which of the following could be the cause of the problem? ____ B. Rx1K ____ C. Rx10K ____ D. Rx1M ____ A. Excessive frost on the evaporator coils. 7. Is the overload protector normally closed? ____ B. Air control closed. ____ A. Yes ____ C. Insufficient air circulation. ____ B. No ____ D. Motor winding shorted. ____ C. Doesn’t matter 3. The customer complains of external sweat ing. Which of the following could be the cause of the problem? 8. At what temperature is the freezer cold enough to close the Bi-metal contacts? ____ A. 32°F ____ A. Defective Bi-Metal ____ B. 55°F ____ B. Condensate drain clogged. ____ C. 100°F ____ C. Thermostat set too cold. ____ D. None of the above. ____ D. Void in insulation. 9. When testing the timer motor, on which terminals should you place the ohmmeter probes? 4. If you are testing the main winding of the compressor, what should the meter reading be? ____ A. 2 and 3 ____ A. 1Ω to 5Ω ____ B. 1 and 2 ____ B. 7Ω to 10Ω ____ C. 1 and 4 ____ C. 12Ω to 14Ω ____ D. 2 and 4 ____ D. 50Ω to 75 Ω 88 Section Six TECH TIPS REPLACING ELECTROMECHANICAL TIMERS The current universal defrost timer kit (Part No. 482493) will work as a service replacement in units where the timer motor circuit is routed through the run winding of the compressor to neutral and in units where the timer motor circuit is routed directly to neutral. This universal defrost timer kit will replace all 8, 10, 12 and 24-hour timers. The timer in this kit has a black jumper wire lead that must be connected to a terminal on the timer prior to installing it in the unit. The replacement timer terminals are numbered. ALWAYS CONNECT THE CABINET LEADS TO THE SAME NUMBERED TERMINALS AS THE DEFECTIVE TIMER. Check the wiring diagram label on the back of the cabinet, or on the Tech Sheet, located in the unit compartment. • If the wiring schematic looks like the one below, the timer motor circuit is routed directly to neutral. • The black jumper wire on the timer should be pressed onto Terminal 1. COMMON WIRE CONFIGURATION Jumper Wire • If the wiring schematic looks like the one below, the timer motor circuit is routed through the compressor motor to neutral. • The black jumper wire on the timer should be pressed onto Terminal 2. NEUTRAL PATH THROUGH DEFROST HEATER CONFIGURATION Jumper Wire 89 DOOR GASKET REPLACEMENT Beginning in 1993 all Mid-Line Top-Mount Refrigerator/Freezers are equipped with Foamed-In-Place (FIP) doors. FIP refers to the manufacturing process of first assembling the door’s outer panel, inner liner and gasket, and then injecting foam between the outer panel and the inner liner. The gasket is held in place by the lip of the inner liner and the adhesion of the foam. Since no screws are used in the assembly of these doors, gasket replacement procedures are quite different than doors assembled with screws. Follow these instructions carefully. Before Starting: 1. Check to make sure the correct size gasket is on hand. 2. Remove the door from the refrigerator/freezer and place it outer panel down on a protected surface. Removing the Old Gasket: 1. Start from the middle of one of the longer sides and carefully lift the edge of the gasket. 2. While lifting the edge of the gasket, cut the exposed portion of the gasket with a pair of diagonal wire cutters. 3. Pull the gasket out and cut the remaining part of the gasket. DO NOT PULL UP ON THE GASKET. 90 4. DO NOT PULL ON THE GASKET. This action will pull the interior door liner away from the exterior door panel. To remove the gasket, pull away from the door. 5. With the gasket removed, use a putty knife to clean any debris from between the lip of the inner liner and outer panel. Do not insert the putty knife more than ½”. INSERT KNIFE ½” TO CLEAN OUT DEBRIS Installing a New Gasket: 1. To install the service replacement gasket, place the hard lower section of the gasket under the lip of the inner liner at one corner. Then repeat the process at an opposite corner. (Use corners 1 & 2 or 3 & 4.) 2 3 4 1 LIP FLANGE 91 2. Using your fingers, snap the gasket into place under the lip of the inner liner. If a section of the gasket does not readily tuck under the lip, use a small edged roller or blunt flat object to push the gasket into place. 3. Reinstall and level the door on the refrigerator/freezer. The gap between the door and the cabinet should be 11/16”, or about the diameter of an American dime. Check the gap in several places along each side of the door. REATTACHING PRODUCTION GASKET Repair of Loose Service Replacement Gasket Should the edge of the inner liner pull away from the outer panel flange, or not properly secure the gasket, a service screw kit (part No. 4318172) is available for repairing this problem. FIP Door Gasket Repair Kit Part No. 4318172 Contents: GAP • (6) sheet Metal Screws • (1) Instruction Sheet GAP 92 Repair Procecure: 1. Make sure the base of the gasket is tucked under the lip of the inner liner. DO NOT PULL UP ON THE INNER LINER. 2. Gently roll the gasket over to expose the edge of the inner liner and locate the dimples molded into the lip of the inner liner that will be used to locate where the screws will be installed. DIMPLES 3. Drill 1/8” pilot holes at the dimples. NOTE: More than one (1) screw may be needed. CAUTION:Do not let the drill chuck hit the inner panel as it may scratch the inner panel. CAUTION:Do not over drive the screw as it may crack the plastic inner liner edge. 4. Install the screws supplied in the FIP Door Gasket Repair Kit (Part No. 4318172). SCREWS 5. Roll the gasket back in place making sure it has a smooth outer edge. 93 SERVICING THE ADAPTIVE DEFROST CONTROL ! CAUTION STATIC ELECTRICITY DISCHARGE MAY CAUSE DAMAGE • • • TO THIS ELECTRONIC BOARD. Use an anti-static wrist strap. Connect wrist strap to green ground connection point or unpainted metal in the appliance. Touch your finger repeatedly to a green ground connection point or unpainted metal in the appliance. Before removing the part from its package, touch the anti-static bag to a green ground connection point or unpainted metal in the appliance. ADC Test Mode The refrigerator/freezer defrost system can be checked by manually initiating a defrost cycle. There are two methods of initiating the ADC Test Mode. First Test Method: 1. 2. 3. 4. 5. 6. 7. Turn the thermostat off for 15 seconds. Turn the thermostat on for 5 seconds. Turn the thermostat off for 15 seconds. Turn the thermostat on for 5 seconds. Turn the thermostat off for 15 seconds. Turn the thermostat on for 5 seconds. Turn the thermostat off. In 3 to 8 seconds the ADC should turn on the defrost heater (with the bimetal closed). NOTE: The test mode will terminate when the bimetal opens. If the refrigerator/freezer is already in defrost, Test Mode can be terminated by unplugging the refrigerator/freezer from the wall outlet and waiting 30 seconds before plugging it back in. The refrigerator/freezer should immediately go into cooling mode if the thermostat is closed. If this first test procedure fails to make the ADC initiate a defrost cycle, try the following procedure to make the ADC begin the Test Mode. Second Test Method: 1. Disconnect the refrigerator/freezer from the wall outlet for at least 30 seconds. 2. Turn the thermostat off. 3. Reconnect power to the refrigerator/freezer. Within 3 to 8 seconds the ADC should turn on the defrost heater (with the bimetal closed). If the unit fails to go into the defrost mode during this test, the problem may not be with the ADC. A defective bimetal may be the cause of the failure. The ADC will only go into a test mode if the bimetal is closed. If the ADC senses an open bimetal it will return to the cooling mode within 3 to 8 seconds. HELPFUL HINT: Upon entering the Test Mode, the relay mounted on the ADC board should turn off the compressor and turn on the defrost heater. Listen for the relay to click. •If the relay clicks one time when entering the Test Mode, check for continuity in the defrost heater. •If the relay clicks two times, check for an open bimetal. 94 The Service Replacement Adaptive Defrost Control may need to be modified when installed in certain refrigerator/freezers. This modification should only be made when replacing Adaptive Defrost Controls with the following Original Part Numbers: • 2154958 • 2169267 • 2169269 Do not follow these instructions for any other Adaptive Defrost Controls with Original Part Numbers other than those listed above. 1. When replacing original part number 2154958, 2169267 or 2169269 the following step must be made: 2. Remove the resistor marked R17 by cutting in two places with wire cutters as shown below. CUT AND REMOVE THIS SECTION SERIAL and MODEL NUMBER DESIGNATORS WHIRLPOOL SERIAL NUMBERS SERIAL NUMBER E E 03 10003 MANUFACTURER/LOCATION E = Evansville EW = W.C. Wood VS = Vitro-Supermatic I = Inglis, Ltd. YEAR OF MANUFACTURE WEEK OF MANUFACTURE PRODUCT SEQUENCE NUMBER YEAR CODE 0= 1= 2= 3= 4= 5= 6= 7= 8= 9= X= A= B= C= D= 1980/2010 1981/2011 1982/2012 1983/2013 1984/2014 1985/2015 1986/2016 1987/2017 1988/2018 1989/2019 1990/2020 1991/2021 1992/2022 1993/2023 1994/2024 E= F= G= H= J= K= L= M= P= R= S= T= U= W= Y= 95 1995/2025 1996/2026 1997/2027 1998/2028 1999/2029 2000/2030 2001/2031 2002/2032 2003/2033 2004/2034 2005/2035 2006/2036 2007/2037 2008/2038 2009/2039 WHIRLPOOL MODEL NUMBERS Refrigerators (1982 - 1986) E MODEL NUMBER T 14 N MARKET CHANNEL (If Present) PRODUCT GROUP E = Refrigeration PRODUCT IDENTIFICATION T = 2 Door, Top-Mount Freezer CAPACITY 14 = 14 cu. ft. MODEL TYPE OR DEFROST METHOD A = Princess Series E = Estate J = No Frost M = Mark (No Frost) N = Deluxe (No Frost) O = Promotion Special P = 24” Wide S = Promotional (No Frost) T = Promotional V = Variation (No Frost) X = Variation Z = Variation (Promo) FEATURE CODE C = Conventional Ice Tray K = Ice Maker Optional ENERGY/POWER DESIGNATOR (Numeric) X = Original 1 = One, etc. YEAR OF INTRODUCTION K= L= M= P= R= S= T= 1982/2001 1983/2002 1984/2003 1985/2004 1986/2005 1987/2006 1988/2007 V = 1989/2008 W = 1990/2009 X = 1991/2010 Y = 1992/2011 A = 1993/2012 B = 1994/2013 C = Constant D = 1995/2014 E = 1996/2015 F = 1997/2016 G = 1998/2017 H = 1999/2018 J = 2000/2019 COLOR CODE W = White N = Almond DOOR SWING ENGINEERING CHANGE (Numeric) 96 K X M W R 0 WHIRLPOOL MODEL NUMBERS Refrigerators (1987 to Present) E MODEL NUMBER T 14 N MARKET CHANNEL (If Present) PRODUCT GROUP E = Refrigeration PRODUCT IDENTIFICATION T = Top-Mount Freezer CAPACITY 14 = 14 cu. ft. MODEL TYPE OR DEFROST METHOD A = Princess-Wire Powder C = Custom Wire Zinc E = Estate H = Variation II - Wire Powder J = Custom - No Frost N = Special - wire O = Promotional Special S = Starter Series - WZ X = Variation I - Wire Powder Y = Promo Spec. FIP Door FEATURE CODE C = Conventional Ice Tray K = Ice Maker Adaptable M = Factory Installed Ice Maker F = FIP Door DOOR SWING YEAR OF INTRODUCTION K= L= M= P= R= S= T= 1982/2001 1983/2002 1984/2003 1985/2004 1986/2005 1987/2006 1988/2007 V = 1989/2008 W = 1990/2009 X = 1991/2010 Y = 1992/2011 A = 1993/2012 B = 1994/2013 C = Constant D = 1995/2014 E = 1996/2015 F = 1997/2016 G = 1998/2017 H = 1999/2018 J = 2000/2019 COLOR CODE W = White N = Almond ENERGY/POWER DESIGNATOR (Numeric) 0 = Original 1 = One, etc. ENGINEERING CHANGE (Numeric) 97 K X E W 0 0 ROPER SERIAL NUMBERS SERIAL NUMBER E E YEAR CODE 03 0= 1= 2= 3= 4= 5= 6= 7= 8= 9= X= A= B= C= D= 10003 MANUFACTURER/LOCATION E = Evansville EW = W.C. Wood VS = Vitro-Supermatic YEAR OF MANUFACTURE WEEK OF MANUFACTURE PRODUCT SEQUENCE NUMBER ROPER MODEL NUMBERS Refrigerators (1989 to Present) R MODEL NUMBER T 14 C MARKET CHANNEL (If Present) PRODUCT GROUP R = Refrigeration PRODUCT IDENTIFICATION T = 2 Door, Top-Mount Freezer CAPACITY 14 = 14 cu. ft. FEATURE LEVEL B = Cantilevered Wire shelves C = Adjustable Powder Coat Shelves D = Adjustable Zink shelves E = Non-Adj. Zink O = Filler FEATURE CODE C = Conventional Ice Tray K = Ice Maker Optional M = Factory Installed Ice Maker O = Filler DOOR SWING YEAR OF INTRODUCTION 7 = 1987 8 = 1988 V = 1989 W = 1990 X = 1991 Y = 1992 A = 1993 B = 1994 J = 2000 C = Constant D = 1995 E = 1996 F = 1997 G = 1998 H = 1999 COLOR CODE W = White N = Almond ENERGY/POWER DESIGNATOR (Numeric) 0 = Original 1 = One, etc. ENGINEERING CHANGE (Numeric) 98 K D V 1980/2010 1981/2011 1982/2012 1983/2013 1984/2014 1985/2015 1986/2016 1987/2017 1988/2018 1989/2019 1990/2020 1991/2021 1992/2022 1993/2023 1994/2024 W 0 E= F= G= H= J= K= L= M= P= R= S= T= U= W= Y= 1995/2025 1996/2026 1997/2027 1998/2028 1999/2029 2000/2030 2001/2031 2002/2032 2003/2033 2004/2034 2005/2035 2006/2036 2007/2037 2008/2038 2009/2039 0 YEAR CODE ESTATE/HOLIDAY SERIAL NUMBERS SERIAL NUMBER E E 03 10003 0= 1= 2= 3= 4= 5= 6= 7= 8= 9= X= A= B= C= D= MANUFACTURER/LOCATION E = Evansville EW = W.C. Wood VS = Vitro-Supermatic YEAR OF MANUFACTURE WEEK OF MANUFACTURE PRODUCT SEQUENCE NUMBER ESTATE/HOLIDAY MODEL NUMBERS Refrigerators MODEL NUMBER T T 14 C MARKET CHANNEL (If Present) PRODUCT GROUP R = Refrigeration PRODUCT IDENTIFICATION T = 2 Door, Top-Mount Freezer CAPACITY 14 = 14 cu. ft. FEATURE LEVEL B = Cantilevered Wire shelves C = Adjustable Powder Coat Shelves D = Adjustable Zink shelves FEATURE CODE K = Ice Maker Adaptable M = Factory Installed Ice Maker DOOR SWING YEAR OF INTRODUCTION W = 1990 X = 1991 Y = 1992 A = 1993 B = 1994 C = Constant D = 1995 E = 1996 F = 1997 G = 1998 H = 1999 J = 2000 COLOR CODE W = White N = Almond ENERGY/POWER DESIGNATOR (Numeric) 0 = Original 1 = One, etc. ENGINEERING CHANGE (Numeric) 99 K R D 1980/2010 1981/2011 1982/2012 1983/2013 1984/2014 1985/2015 1986/2016 1987/2017 1988/2018 1989/2019 1990/2020 1991/2021 1992/2022 1993/2023 1994/2024 W 0 E= F= G= H= J= K= L= M= P= R= S= T= U= W= Y= 1995/2025 1996/2026 1997/2027 1998/2028 1999/2029 2000/2030 2001/2031 2002/2032 2003/2033 2004/2034 2005/2035 2006/2036 2007/2037 2008/2038 2009/2039 0 ANSWERS TO CONFIRMATION OF LEARNING EXERCISE Section Five TROUBLESHOOTING AND DIAGNOSIS 1. The customer complains that the compressor will not start. Which of the following could be the cause of the problem? 5. If you are testing the start winding of the compressor, what should the meter reading be? ____ A. Air obstruction in the back or above the cabinet. ____ A. 1Ω to 5Ω _X__ B. 7Ω to 10Ω _X__ B. Motor windings open, shorted or grounded. ____ C. Condenser fan not running or too slow. ____ D. Air control closed. ____ C. 22Ω to 30Ω ____ D. 50Ω to 70 Ω 6. When testing the timer, what scale should be used on the ohmmeter? ____ A. Rx1 2. The customer complains that the freezer compartment is too warm. Which of the following could be the cause of the problem? _X__ A. Excessive frost on the evaporator coils. ____ B. Rx1K _X__ C. Rx10K ____ D. Rx1M 7. Is the overload protector normally closed? ____ B. Air control closed. _X__ A. Yes _X__ C. Insufficient air circulation. ____ B. No ____ D. Motor winding shorted. ____ C. Doesn’t matter 3. The customer complains of external sweat ing. Which of the following could be the cause of the problem? 8. At what temperature is the freezer cold enough to close the Bi-metal contacts? _X__ A. 32°F ____ A. Defective Bi-Metal ____ B. 55°F ____ B. Condensate drain clogged. ____ C. 100°F ____ C. Thermostat set too cold. _X__ D. Void in insulation. 4. If you are testing the main winding of the compressor, what should the meter reading be? ____ D. None of the above. 9. When testing the timer motor, on which terminals should you place the ohmmeter probes? _X__ A. 2 and 3 _X__ A. 1Ω to 5Ω ____ B. 1 and 2 ____ B. 7Ω to 10Ω ____ C. 1 and 4 ____ C. 12Ω to 14Ω ____ D. 2 and 4 ____ D. 50Ω to 75 Ω 100 VII CORPORATION VIII