1
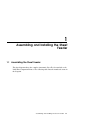
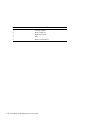
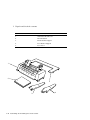
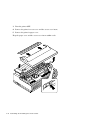
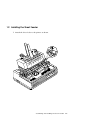
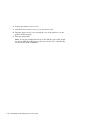
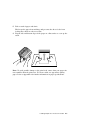
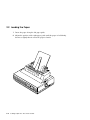
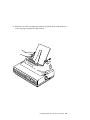
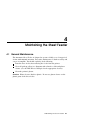
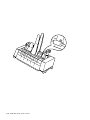
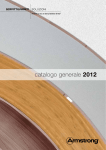
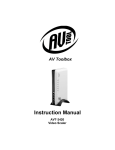
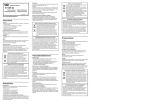
LA75 Plus Companion Printer
Sheet Feeder Guide
digital equipment corporation
First Printing, July 1991
The information in this document is subject to change without notice and should
not be construed as a commitment by Digital Equipment Corporation. Digital
Equipment Corporation assumes no responsibility for any errors that may appear
in this document.
The software described in this document is furnished under a license and may be used
or copied only in accordance with the terms of such license.
No responsibility is assumed for the use or reliability of software on equipment that is
not supplied by Digital Equipment Corporation or its affiliated companies.
Restricted Rights: Use, duplication, or disclosure by the U.S. Government is subject to
restrictions as set forth in subparagraph (c)(1) (ii) of the Rights in Technical Data and
Computer Software clause at DFARS 252.227-7013.
© by Digital Equipment Corporation 1991.
All Rights Reserved.
Printed in U.S.A.
The postpaid READER’S COMMENTS form on the last page of this document requests the user’s
critical evaluation to assist in preparing future documentation.
All Rights Reserved.
Printed in Germany
The following are trademarks of Digital Equipment Corporation:
DEC
DIBOL
RSX
DEC/CMS
EduSystem
UNIBUS
DEC/EDI
IAS
VAX
DECnet
MASSBUS
VAXcluster
DECsystem-10
Message Router
VMS
DECSYSTEM-20
PDP
VT
DECUS
PDT
DECwriter
RSTS
IBM is a registered trademark, and IBM Proprinter is a trademark of International
Business Machines Corporation.
This document was prepared using VAX DOCUMENT, Version 1.2.
Contents
Preface . . . . . . . . . . . . . . . . . . . . . . . . . . . . . . . . . . . . . . . . . . . . . . . . . . . . .
v
1 Assembling and Installing the Sheet Feeder
1.1
1.2
Assembling the Sheet Feeder . . . . . . . . . . . . . . . . . . . . . . . . . . . . .
Installing the Sheet Feeder . . . . . . . . . . . . . . . . . . . . . . . . . . . . . .
1–1
1–7
2 Loading Paper into the Sheet Feeder
2.1
2.2
Preparing to Load the Paper . . . . . . . . . . . . . . . . . . . . . . . . . . . . .
Loading the Paper . . . . . . . . . . . . . . . . . . . . . . . . . . . . . . . . . . . . .
2–1
2–4
3 Operating and Removing the Sheet Feeder
3.1
3.2
3.3
Operating the Printer . . . . . . . . . . . . . . . . . . . . . . . . . . . . . . . . . .
Using the Sheet Feeder . . . . . . . . . . . . . . . . . . . . . . . . . . . . . . . . .
Removing the Sheet Feeder . . . . . . . . . . . . . . . . . . . . . . . . . . . . . .
3–1
3–2
3–2
4 Maintaining the Sheet Feeder
4.1
4.2
General Maintenance . . . . . . . . . . . . . . . . . . . . . . . . . . . . . . . . . . .
Correcting Simple Problems . . . . . . . . . . . . . . . . . . . . . . . . . . . . . .
4–1
4–3
iii
A Paper Specifications and Technical Data
A.1
Paper Specifications . . . . . . . . . . . . . . . . . . . . . . . . . . . . . . . . . . . .
A–1
Technical Data . . . . . . . . . . . . . . . . . . . . . . . . . . . . . . . . . . . . . . . .
A–3
Tables
A–1
iv
Preface
About This Guide
The LA75 Plus Companion Printer Sheet Feeder Guide explains how to install
and operate the Automatic Sheet Feeder. This guide is intended for someone
with little or no computer experience.
The guide contains four chapters and one appendix.
Chapter 1 shows how to assemble and install the Automatic Sheet Feeder.
Chapter 2 explains how to load paper into the Automatic Sheet Feeder.
Chapter 3 shows how to operate and remove the Automatic Sheet Feeder.
Chapter 4 shows how to maintain the Automatic Sheet Feeder, and suggests
how you can identify and solve simple problems.
Appendix A indicates what sort of paper you should use and how you should
store the paper. The appendix also provides technical data about the sheet
feeder.
v
Conventions Used in This Guide
Cautions and Notes
The cautions and notes in this guide have the following specific purposes:
CAUTION
Contains information about preventing damage to equipment.
NOTE
Contains general information of which you should be aware.
Associated Documentation
The LA75 Plus Companion Printer Installation and User Guide contains
information on installing and using the LA75 Plus Companion Printer.
About the Automatic Sheet Feeder
The optional Automatic Sheet Feeder is designed to give you easy and efficient
handling of single-sheet paper on the LA75 Plus Companion Printer. You can
stack up to 80 sheets of standard bond paper in the sheet feeder at one time,
and a new sheet is automatically loaded whenever required.
vi
1
Assembling and Installing the Sheet
Feeder
1.1 Assembling the Sheet Feeder
The first diagram shows the complete Automatic Sheet Feeder attached to the
LA75 Plus Companion Printer. The following table lists the numbered items in
the diagram.
Assembling and Installing the Sheet Feeder 1–1
Item Number
Item Name
1.
Left Paper Guide
2.
Stacker Supports
3.
Right Paper Guide
4.
Tabs
5.
Printer Control Panel
1–2 Assembling and Installing the Sheet Feeder
1
2
3
4
4
LA7
5 Plu
s Co
mpa
nion
Prin
ter
5
Assembling and Installing the Sheet Feeder 1–3
1
Unpack and check the contents.
Item Number
Item Name
1.
Automatic Sheet Feeder
2.
Documentation
3.
Front Stacker Support
4.
Rear Stacker Support
5.
Rear Cover
1
2
5
3
1–4 Assembling and Installing the Sheet Feeder
4
2
Attach the front and rear stacker supports to the sheet feeder.
Assembling and Installing the Sheet Feeder 1–5
3
Turn the printer OFF.
4
Remove the printer’s access cover and the access cover insert.
5
Remove the printer’s paper cover.
Keep the paper cover and the access cover insert within reach.
5
LA7
r
rinte
nP
anio
omp
C
Plus
1–6 Assembling and Installing the Sheet Feeder
1.2 Installing the Sheet Feeder
1
Attach the sheet feeder to the printer as shown.
lus
5P
LA7
r
rinte
nP
anio
p
Com
Assembling and Installing the Sheet Feeder 1–7
2
Replace the printer’s access cover.
3
Attach the sheet feeder’s rear cover to the sheet feeder.
4
Push the paper release lever towards the rear of the printer to set the
printer in friction mode.
5
Turn the printer ON
Note: If you have installed the sheet feeder with the power ON, switch
the power OFF, then ON again, for the sheet feeder to be automatically
selected by the printer’s firmware.
1–8 Assembling and Installing the Sheet Feeder
2
Loading Paper into the Sheet Feeder
2.1 Preparing to Load the Paper
1
Pull the right and left rear tabs towards the front of the printer, until the
paper bin locks open to allow for paper loading.
Loading Paper into the Sheet Feeder 2–1
2
Slide the left paper guide all the way to the left.
3
Slide the right paper guide so that it roughly matches the width of your
paper.
4
Center the front stacker support between the two paper guides.
LA7
5 Plu
s Co
mpa
nion
Prin
ter
2–2 Loading Paper into the Sheet Feeder
5
Take a stack of paper and fan it.
This keeps the paper from sticking, and prevents the sheet feeder from
feeding more than one sheet at a time.
6
Tap the side and bottom edges of the paper on a flat surface to even up the
stack.
Note: To avoid possible damage to the print head, ensure that your paper size
is not smaller than the print area. For best results, use typewriter-quality
paper. Refer to Appendix A for further information on paper specifications.
Loading Paper into the Sheet Feeder 2–3
2.2 Loading the Paper
1
Insert the paper along the left paper guide.
2
Adjust the position of the right paper guide until the paper is held firmly,
but not so tightly that it causes the paper to bunch.
LA7
5 Plu
s Co
mpa
nion
Prin
ter
2–4 Loading Paper into the Sheet Feeder
3
Push the rear tabs on both paper guides towards the back of the printer to
secure the paper against the guide rollers.
LA7
5 Plu
s Co
mpa
nion
Prin
ter
Loading Paper into the Sheet Feeder 2–5
3
Operating and Removing the Sheet
Feeder
3.1 Operating the Printer
Testing the Printer
To ensure that you have installed the sheet feeder correctly, you can run the
printer’s self-test. See the LA75 Plus Companion Printer Installation and User
Guide (Installation chapter) for more information.
Selecting Page (Form) Length
For information on selecting page length, (the number of printable lines)
see the Configuration and Reference Information chapters in the LA75 Plus
Companion Printer Installation and User Guide.
Solving Problems
Again, consult the LA75 Plus Companion Printer Installation and User Guide
(Maintenance chapter) for advice on solving simple problems.
Software Operation
When you switch between using continuous paper and the sheet feeder,
you usually need to change the settings of your software program. To work
properly, your program needs to know how many printable lines are available
on the page. In addition to the number of printable lines (referred to as page
length or form length, mentioned above), you may also need to set the top
margin, bottom margin, and the actual number of lines to be printed on the
page. Not all software is the same, so some experimentation may be needed
before you find the best settings to use.
Operating and Removing the Sheet Feeder 3–1
Many programs give you two ways to change these settings:
You can change the settings in each individual file you print.
You can change the program’s default settings so that every time you use
the program, these new settings are in effect.
3.2 Using the Sheet Feeder
After stacking paper in the sheet feeder, make sure that the Ready indicator
(RDY) on the printer’s control panel is lit up, indicating that the printer is
on-line and ready to print. When the printer is on-line, and receives print
data from the computer, the first sheet is loaded automatically. Subsequent
sheets are then loaded as necessary. When the paper bin is empty, the printer
automatically goes off line, and the Ready indicator (RDY) begins to blink. To
resume printing, stack more paper in the sheet feeder, press the Ready switch,
and then the Form Feed (FF) switch.
Caution: If you turn off the printer when the printer detects a paper out or
paper jam condition, any data remaining in the printer’s buffer is lost.
Note: If you have installed the sheet feeder with the power ON, switch the
power OFF, then ON again, for the sheet feeder to be automatically selected by
the printer’s firmware.
3.3 Removing the Sheet Feeder
To remove the Automatic Sheet Feeder, carry out the following steps:
1
Feed through any paper that may be wrapped around the platen (black
roller) by pressing the FF switch.
2
Turn the printer OFF.
3
Remove the sheet feeder’s rear cover.
4
Remove the printer’s access cover.
5
Detach the sheet feeder from the printer.
6
Replace the sheet feeder’s rear cover.
7
Replace the printer’s paper cover.
8
Replace the insert to the printer’s access cover.
9
Replace the printer’s access cover.
10 Turn the printer ON.
3–2 Operating and Removing the Sheet Feeder
4
Maintaining the Sheet Feeder
4.1 General Maintenance
The Automatic Sheet Feeder is designed to operate reliably over a long period
of time with minimal attention. Preventive maintenance is both necessary and
easy to accomplish. You should regularly do the following:
Dust the sheet feeder, first removing the feeder from the printer.
Clean all pick-up rollers (see diagram) with a lint-free cloth and platen
cleaner. (See the DEC Direct Catalogue for the appropriate cleaner).
Clean the printer’s platen.
Caution: Platen cleaner dissolves plastic. Do not use platen cleaner on the
plastic parts of the sheet feeder.
Maintaining the Sheet Feeder 4–1
4–2 Maintaining the Sheet Feeder
4.2 Correcting Simple Problems
This section lists possible fault symptoms and suggests tests and actions to
help you clear those symptoms.
Refer also to the Maintenance chapter in the LA75 Plus Companion Printer
Installation and User Guide.
The feeder does not operate.
i
It is possible that you have installed the sheet feeder with the power
ON.
Switch the printer OFF, then ON, for the sheet feeder to be
automatically selected by the printer’s firmware.
ii
Check that the paper stack is in the correct operating position.
If it is not, push the rear tabs into the correct operating position.
iii
Check whether the platen motion is transferring to the sheet feeder.
If it is not, follow the installation procedure as described in Chapter 1
in this guide.
iv
Check that the paper release lever is in friction mode. If it is not, set
the lever in the correct position by pushing it towards the back of the
printer.
There is no paper feed.
i
ii
If the sheet feeder is out of paper, reload the paper bin.
If there is a paper jam, remove the jammed paper.
More than one sheet feeds at a time.
i
Check that the paper is sufficiently fanned.
If it is not, fan, then reload the paper stack.
ii
Check that the paper conforms to the required specifications, or that it
is not damaged.
If it does not conform, or is damaged, replace with new paper that does
conform to the specifications.
iii
If the paper bin is misaligned, readjust, then reload the bin.
Maintaining the Sheet Feeder 4–3
There is a paper skew.
i
ii
iii
If the paper is damaged, replace with new paper.
If the paper bin is not properly adjusted, readjust, then reload the bin.
The feeder pick-up rollers may not be gripping the paper properly.
Check the paper surface for defects. Clean the pick-up rollers.
Note: If the feeder inserts paper correctly on to the printer platen
but the paper then skews, there is a printer fault. In such a case,
refer to the Maintenance chapter in the LA75 Plus Companion
Printer Installation and User Guide EK-LA75S-UG-001.
There is a paper eject malfunction.
i
ii
iii
Check the state of the output stacker. If it is full, empty it.
If the printhead has been incorrectly adjusted for paper thickness,
readjust the printhead adjustment lever. (See Section 3.3 in the LA75
Plus Companion Printer Installation and User Guide.)
Check that the paper conforms to the required specifications.
If it does not conform, replace with new paper that does conform to the
specifications.
4–4 Maintaining the Sheet Feeder
A
Paper Specifications and Technical Data
This appendix describes what paper you should use and how you should store
it. The appendix also provides technical data about the sheet feeder including
the following:
Physical dimensions of the sheet feeder
Paper hopper capacity
Paper dimensions
Environmental conditions
A.1 Paper Specifications
To ensure that the sheet feeder works properly, use paper that conforms to the
following specifications. If this is not possible, test a sample of the paper in the
sheet feeder first.
Most paper is sensitive to temperature and humidity conditions. Extremes in
these conditions may affect the performance of the paper in the feeder and
printer.
Paper Type and Quality
Plain bond, typewriter quality paper with a light wood pulp content should be
used for optimum performance. The maximum allowable cotton or rag content
is 25%. Papers which should be operationally tested before regular use are
those with a textured, embossed or glossy surface, or a "hammered" type paper.
Paper must be well cut and in pristine condition with no creases or surface
or edge damage. The paper must be flat, not curled or curved. An existing
curl may not exceed +-0.12" (+- 3.1 mm), that is, face and back curl. The
paper should be noted with the natural curl going the same way for all sheets.
Inspect and "fan" the paper prior to loading it into the paper hopper.
Paper Specifications and Technical Data A–1
Paper Surface Smoothness
A single sheet of paper must have a surface within a smoothness range of 18 to
30 Bekk or 180 to 140 Sheffield.
The under side of the last page in a multi-form set must have a smoothness
range of 18 to 30 Bekk or 180 to 140 Sheffield.
Tolerance
Since variable length paper may be used in the sheet feeder, only width is
specified. The paper width tolerance in the same stack is 0.020" (0.51 mm).
Paper must be cut at an angle of 90 degrees and the deviation must not be
greater than 3 angular minutes.
Paper Weight
Single sheets 16-24 lbs (64 - 96g/m²).
Paper Storage Recommendation
64°F - 75°F
18°C - 24°C
40% - 60% relative humidity
Multi-part Forms
Multi-part forms are more complex than single sheets and adherence to
tolerances and environmental conditions is more critical. You should use
snap-out or top-glued form sets. You should test them before use.
Top-glued Forms The top edge of top-glued forms must be flat, smooth, and
free of glue vestiges. Form sets should be cut against the grain. On each side
of the form there should be an unglued 0.7" (20mm) wide.
Snap-out Forms The snap-out perforation ratio hole to paper must be 7:0.8
(first sheet and copies) and 3:0.8 (last sheet). An alternative can be microperforation for the first and last sheet. (Recommended 72 dots/inch).
A–2 Paper Specifications and Technical Data
Paper Weight
Multi-part forms with carbon (max. 2 copies)
First/last sheet 17.50-20.00 lbs (70-80g/²)
Copies 8.75-10.00lbs (35-40g/²)
Carbon approx. 6.25 lbs (25g/²)
Note The uncoated surface of the carbon paper has to be rough.
Pressure-sensitive multi-part forms (max. 2 copies)
First/last sheet 17.50-20.00 lbs (70-80g/²)
Copies 10.00-15.00 lbs (40-60g/²)
Table A–1
Technical Data
Physical Dimensions:
Height: 7.48" (190mm)
Depth: 11.50" (292mm)
Width: 12.75" (324mm)
Weight: 1.76lbs (0.8kgs)
Paper Bin Capacity:
A maximum of 80 sheets of 20lbs (80g/m²) paper weight
Output Stacker Capacity:
A maximum of 80 sheets of 20lbs (80g/m²) paper weight
Paper Dimensions:
Length: max. 14" (355mm);
min. 8" (203mm)
Width: 4" to 9" (100mm to
229mm)
Weight: 16lbs-24lbs (64-96
g/m²)
Operating Temperature
Range:
50°F to 104°F
Relative Humidity:
40% to 80%
Temperature Variation:
max. 15°F (8°C) per hour
Storage Temperature
Range:
-22°F to 158°F
Relative Humidity:
max. 95% non-condensing
Paper Specifications and Technical Data A–3