1
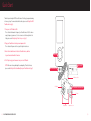
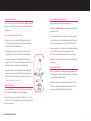
TransDock micro
™
™
D I G I TA L L I F E S T Y L E O U T F I T T E R S
Contents
Quick Start
4
Using Your DLO TransDock micro
6
About TransDock micro FM Transmitter
6
Setting Up Your TransDock micro
6
Finding Empty Radio Frequencies
8
Tuning Your TransDock micro
8
Setting Preset Stations on Your TransDock micro
9
Getting the Best Sound Quality
9
Using TransDock micro with a Cassette Adapter or an Auxiliary Input
10
Using Other MP3 Players or Devices with TransDock micro
10
Tips + Troubleshooting
11
Tech Specs
14
Service + Support
15
Warranty
16
FCC Statement
17
© 2007 DIGITAL LIFESTYLE OUTFITTERS
The DLO logo, Digital Lifestyle Outfitters and TransDock
micro are trademarks of Digital Lifestyle Outfitters.
SanDisk and Sansa are trademarks of SanDisk
Corporation. All Rights Reserved
Printed in China
M52120-061031-D
2 | DLO TRANSDOCK MICRO USER GUIDE
| 3
Quick Start
Thanks for purchasing the DLO TransDock micro. We will get you up and running
in four easy steps. For more detailed instructions, please read Using Your DLO
TransDock micro [pg 6].
1. Tune your car’s FM radio to 88.5.
This is the default broadcast frequency for TransDock micro. If 88.5 is not an
empty frequency in your area (i.e. there is music or talk already on that station), please read Finding Empty Radio Frequencies [pg 8].
2. Plug your TransDock micro into your auto power outlet.
This is labeled 12v power outlet or cigarette lighter in older cars.
3. Attach the included Connector Cable to TransDock micro, and then
to your Sansa’s bottom Dock Connector.
Click PLAY
4
4. Click Play to enjoy your Sansa music over your car’s FM radio.
NOTE: For more info on optimizing the sound quality of TransDock micro,
please read Getting the Best Sound Quality on your TransDock micro [pg 9].
1
Attach Connector Cable
Tune to 88.5 FM
3
USB Connector Dock
LCD Display
2
Plug TransDock micro into Power Outlet
Fit Collar
Tuning Buttons
4 | DLO TRANSDOCK MICRO USER GUIDE
Adjustment Screw
| 5
Using Your DLO TransDock micro
About TransDock micro FM Transmitter
TransDock micro is basically a mini radio station that broadcasts your Sansa
music to the FM radio in your car, while charging the battery in your Sansa at
the same time. TransDock micro has two Tuning Buttons on either side, so you
can tune to any frequency from 88.1 to 107.9. It comes with four preset stations, so you can set it to the frequencies you use most.
6. Match the FM frequency on your TransDock micro with the empty FM station on your radio using the Tuning Buttons on TransDock micro (Right
Button for tuning up, Left Button for tuning down). Most of the static will
go away. Now your radio has found TransDock micro’s signal.
7. To control the overall volume of your music while using TransDock micro,
use the car radio’s volume control, not the Sansa volume.
Setting Up Your TransDock micro
1. Turn on your car radio and set it to FM radio mode.
2. Slip the Fit Collar onto your TransDock micro to ensure a secure fit in your
car’s cigarette lighter or 12v power outlet.
3. If you want to change the angle of your TransDock micro for the easiest
access, loosen the Adjustment Screws and adjust TransDock micro to the
best position.
NOTE: It may help to remove TransDock micro when you do this. Unplug
TransDock micro, adjust and plug back in.
4. Plug the Connector Cable into TransDock micro’s USB Connector Dock.
Plug the other end of the Connector Cable into your Sansa.
5. Find an FM frequency with no signal or radio station. For more help with
this, please read Finding Empty Radio Frequencies [pg 8].
6 | DLO TRANSDOCK MICRO USER GUIDE
| 7
Finding Empty Radio Frequencies
Setting Preset Stations on Your TransDock micro
If you live in a big city with a lot of FM radio stations, finding an empty FM
frequency can be tricky. Visit www.dlo.com/openfm to find the best frequencies in your area.
To set your own preset stations, follow these simple steps:
1. Using the Left and Right Tuning Buttons, tune TransDock micro to the station you’d like to set.
Here are some tips for finding an empty station:
2. Press and hold both Tuning Buttons simultaneously for three seconds to
save that station as a preset station. The display on TransDock micro will
flash the preset station you just set, e.g., CHO1, CH02, CH03 or CH04.
• Be sure to search the entire spectrum of FM frequencies, from 88.1 to
107.9. Don’t just look to the low end of the dial. There are often empty
FM stations in the 100’s that will work great.
3. To add a second preset, cycle to another preset station by briefly pressing
both Tuning Buttons at the same time and repeat steps 1 and 2.
NOTE: Your new preset will override whatever preset was last saved.
• When using scan/seek on your car’s radio, if your tuner stops on 101
and then jumps to 103, look in the 102 frequencies for empty stations.
• Try tuning to a strong station, then backing down two frequencies - for
example 103.5 to 103.1. You can often find empty frequencies this way. If
that frequency is taken, scan to the next station and try again.
• Save a station as a preset on your radio when you find a frequency that
works well in your area, and also set that frequency as a preset on your
TransDock micro. To learn how to set a preset, please read Setting Preset
Stations on your TransDock micro [pg. 9].
Tuning Your TransDock micro
To tune your TransDock micro, use the Tuning Buttons on either side of the
unit – Right Button for tuning up, Left Button for tuning down.
4. Repeat steps 1 and 2 for preset station 3 and 4 to set all four TransDock
micro presets.
Getting the Best Sound Quality
T R A N S D O C K MICRO
• Make sure the frequency you’ve tuned to is empty and not near a strong
station. A good place to start is channel 88.5, which is the default frequency on TransDock micro and often empty.
• TransDock micro will tune to any radio frequency, from 88.1 to 107.9, so
try the entire spectrum until you find an unoccupied channel. To learn
more, please read Finding Empty Radio Frequencies [pg 8].
TransDock micro has four preset stations. The default presets are 88.1, 94.9,
100.9, and 107.9. To cycle through these presets, briefly press both Tuning
Buttons at the same time.
8 | DLO TRANSDOCK MICRO USER GUIDE
| 9
Tips + Troubleshooting
Using TransDock micro with a Cassette Adapter or an Auxiliary Input
I’m having trouble finding an empty FM frequency in my area.
TransDock micro can be connected to your car’s radio with a cassette adapter
or a mini cable for cars with Aux-In jacks.
Be sure to look in the 100’s, not just in the 80’s or 90’s. Try scanning to a
The output for these applications is located on the bottom of TransDock micro.
Simply, plug your cassette adapter or mini cable into the Line-Out jack on the
bottom of TransDock micro and connect your cassette adapter or mini cable
directly into your car as you normally would.
For more tips and information see Finding Empty Radio Frequencies [pg. 8],
strong station, then back down two frequencies - for example 103.5 to 103.1.
If that frequency is taken, try scanning to the next strong station and repeat.
Using Other MP3 Players or Devices with TransDock micro
TransDock micro will transmit the audio from other devices like MP3 players,
portable DVD players, gaming systems, etc. To do this, plug your device into
TransDock micro’s Aux-In jack using a standard male-to-male mini cable
(available separately). TransDock micro will use its high-quality FM transmitter to broadcast the device’s audio.
To get the best sound quality from your TransDock micro when using the AuxIn Jack carefully, adjust the volume level of your device until there is no distortion. Then control the overall volume of your music with your car radio’s volume and not the device.
TransDock micro will also charge many USB chargeable devices with the correct USB cable (available separately).
IMPORTANT: When using TransDock micro with an audio device plugged into
the Aux-In jack, be sure to unplug TransDock micro’s Connector Cable.
10 | DLO TRANSDOCK MICRO USER GUIDE
or visit www.dlo.com/openfm to search for the best frequencies in your area.
My music is playing, but there seems to be a lot of static.
First, unplug TransDock micro to see if there might be a radio station interfering. If so, try another frequency. If you are still having trouble, see Finding
Empty Radio Frequencies [pg. 8], or visit www.dlo.com/openfm to search for
the best frequencies in your area.
My radio will only scan/seek to occupied FM stations.
Many car radios default to scan/seek mode for tuning, so they automatically
tune to a radio station. Most of these radios can be switched to manual tuning
(consult your car or radio manual on how to do this).
You can also “find” your TransDock micro by tuning it to your selected frequency. Your scan/seek function will typically find TransDock micro automatically.
My music sounds overdriven and distorted.
Be sure that the FM station you’re using is still unoccupied as you drive
through different areas. FM signals can intrude on an unused frequency.
My Sansa is not working with TransDock micro. What can I do?
Be sure that your Sansa contains the most recent firmware. Visit www.sandisk.com/Retail/Default.aspx?CatID=1376 to download the latest Sansa
firmware for your player.
| 11
If I leave TransDock micro plugged into my car’s power outlet, will it drain my
car battery?
Probably not. But it’s always a good idea to unplug anything when leaving
your car for a long period of time.
NOTE: Your TransDock micro will continue to draw power from your car’s
battery as long as a device is attached.
Can I use TransDock micro with other devices?
Yes, TransDock micro will broadcast MP3 players, portable DVD players, laptops, CD players or any other audio device with a standard output jack. See
Using Other MP3 Players or Devices with TransDock micro [pg.10]
Will TransDock micro charge my other USB devices, like my cell phone?
Yes, it will. TransDock micro will charge any USB chargeable device like MP3
players, cell phones, portable DVD players, laptops & others. Simply use the
USB charger cable for your device and connect it to TransDock micro.
12 | DLO TRANSDOCK MICRO USER GUIDE
| 13
Tech Specs
FM TRANSMITTER
Service + Support
For more information and tips, please visit our website at www.dlo.com and
click Support.
Modulation: FM Stereo
RF Output Frequency Range: 88.1 - 107.9 MHz
Default Preset Frequencies (MHz): 88.1, 94.9, 100.9, and 107.9
Frequency Adjustment: 0.1 MHz per step
Frequency Response: 50Hz ~ 18KHz
Transmitter Range: Up to 27 feet (8.2M)
Tuning: Digitally controlled crystal oscillator
International frequency compatible
DOCK CONNECTOR
USB to Sansa Dock Connector Cable: Length 48”
Aux Input Jack: 3.5mm Stereo Mini jack
Direct Output: 3.5mm Stereo Mini jack
POWER
USB Output: 500mA @ 5VDC (for charging external devices)
Input Voltage: 12 – 16 VDC
Input Current: <300mA @ DC12V~16V
CONNECTORS
Auxiliary Input Jack: 3.5mm Stereo mini jack
Direct Output: 3.5mm Stereo mini jack
TEMPERATURE
Storage Temperature: -10° to 120° F (-23° to 49° C)
Operating Temperature: -4° to 113° F (-20° to 45° C)
14 | DLO TRANSDOCK MICRO USER GUIDE
| 15
Warranty
FCC Statement
Digital Lifestyle Outfitters Limited Manufacturer’s Warranty
Federal Communications Commission Interference Statement
What This Warranty Covers. DLO (Digital Lifestyle Outfitters) warrants this product against defects in materials and workmanship. This limited warranty applies only to products manufactured by or for DLO.
This device complies with Part 15 of the FCC rules. Operation is subject to the following two conditions:
(1) This device may not cause harmful interference, and (2) this device must accept any interference received,
including interference that may cause undesired operation.
What This Warranty Does Not Cover. This warranty does not apply to damage caused by: (a) accident, abuse,
misuse, misapplication, ordinary wear, improper maintenance, failure to follow instructions, or products not
manufactured by or for DLO; and (b) aftermarket services (including upgrades and expansions).
CAUTION: Changes or modifications not expressly approved by the party responsible for compliance could
void the user’s authority to operate the equipment.
How Long This Warranty Lasts. This warranty lasts for a period of ninety (90) days from the date of original
retail purchase.
What DLO Will Do. If a defect exists, DLO will exchange the product, at its option, with a product that is new
or has been manufactured from new or serviceable used parts and that is at least functionally equivalent to
the original product. DLO will warrant a replacement product against defects in materials and workmanship
for a period of ninety (90) days from the date of replacement.
How To Get Service. In order to be eligible for this warranty, you MUST register your purchase at
www.dlo.com/register within thirty (30) days of purchasing this product. If you believe that this product is
defective in materials or workmanship, please e-mail [email protected] with a brief description of the
problem, for further instructions.
No Change To Warranty. No DLO reseller, agent or employee is authorized to make any modification, extension, or addition to this warranty.
How State Law Applies. This warranty gives you specific legal rights, and you also may have other rights that
vary from state to state, or country.
Restrictions On Implied Warranties. All implied warranties, including, without limitation, warranties of merchantability and fitness for a particular purpose, are limited in duration to the duration of this warranty. Some
states do not allow limitations on how long an implied warranty lasts, so the above limitation may not apply to
you.
Restrictions On Damages. DLO is not responsible for direct, special, incidental or consequential damages
resulting from any breach of warranty or condition or under any other legal theory (including, without limitation, lost profits; downtime; goodwill; damage to or replacement of equipment and property; failure to maintain the confidentiality of data stored on the product; and any costs of recovering, reprogramming or reproducing any program or data stored in or used with products manufactured by or for DLO). Some states and
countries do not allow the exclusion or limitation of incidental or consequential damages, so the above limitation or exclusion may not apply to you.
W1000-050803-B
16 | DLO TRANSDOCK MICRO USER GUIDE
| 17
18 | DLO TRANSDOCK MICRO USER GUIDE
| 19
Thanks for purchasing TransDock micro
Enjoy the Ride
DIGITAL LIFESTYLE OUTFITTERS • VISIT US AT WWW.DLO.COM • ©2007 DIGITAL LIFESTYLE OUTFITTERS