1
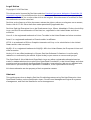
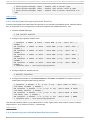
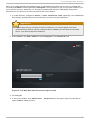
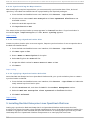
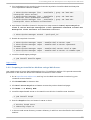
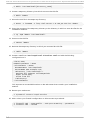
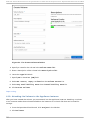
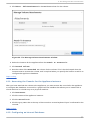
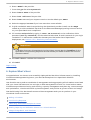
Red Hat Cloud Infrastructure 5 Quick Start for Red Hat Enterprise Linux OpenStack Platform and Red Hat CloudForms with Smart Management Installing Red Hat Cloud Infrastructure Red Hat Cloud Infrastructure Documentation Team Red Hat Cloud Infrastructure 5 Quick Start for Red Hat Enterprise Linux OpenStack Platform and Red Hat CloudForms with Smart Management Installing Red Hat Cloud Infrastructure Red Hat Clo ud Infrastructure Do cumentatio n Team Red Hat Custo mer Co ntent Services rhci-do [email protected] m Legal Notice Co pyright © 20 15 Red Hat. This do cument is licensed by Red Hat under the Creative Co mmo ns Attributio n-ShareAlike 3.0 Unpo rted License. If yo u distribute this do cument, o r a mo dified versio n o f it, yo u must pro vide attributio n to Red Hat, Inc. and pro vide a link to the o riginal. If the do cument is mo dified, all Red Hat trademarks must be remo ved. Red Hat, as the licenso r o f this do cument, waives the right to enfo rce, and agrees no t to assert, Sectio n 4 d o f CC-BY-SA to the fullest extent permitted by applicable law. Red Hat, Red Hat Enterprise Linux, the Shado wman lo go , JBo ss, MetaMatrix, Fedo ra, the Infinity Lo go , and RHCE are trademarks o f Red Hat, Inc., registered in the United States and o ther co untries. Linux ® is the registered trademark o f Linus To rvalds in the United States and o ther co untries. Java ® is a registered trademark o f Oracle and/o r its affiliates. XFS ® is a trademark o f Silico n Graphics Internatio nal Co rp. o r its subsidiaries in the United States and/o r o ther co untries. MySQL ® is a registered trademark o f MySQL AB in the United States, the Euro pean Unio n and o ther co untries. No de.js ® is an o fficial trademark o f Jo yent. Red Hat So ftware Co llectio ns is no t fo rmally related to o r endo rsed by the o fficial Jo yent No de.js o pen so urce o r co mmercial pro ject. The OpenStack ® Wo rd Mark and OpenStack Lo go are either registered trademarks/service marks o r trademarks/service marks o f the OpenStack Fo undatio n, in the United States and o ther co untries and are used with the OpenStack Fo undatio n's permissio n. We are no t affiliated with, endo rsed o r spo nso red by the OpenStack Fo undatio n, o r the OpenStack co mmunity. All o ther trademarks are the pro perty o f their respective o wners. Abstract This guide co vers ho w to deplo y Red Hat Clo ud Infrastructure using Red Hat Enterprise Linux OpenStack Platfo rm as the virtualizatio n layer, Clo udFo rms Management Engine fo r systems management, and Red Hat Satellite fo r smart management. T able of Cont ent s T able of Contents . .. .O. verview 1 . . . . . . . . . . . . . . . . . . . . . . . . . . . . . . . . . . . . . . . . . . . . . . . . . . . . . . . . . . . . . . . . . . . . . . . . . . . . . . . . . 2. . . . . . . . . . 1.1. Key Step s 2 . .. .Inst 2 . . . alling . . . . . Red . . . . Hat . . . . Sat . . . ellit ...e . . . . . . . . . . . . . . . . . . . . . . . . . . . . . . . . . . . . . . . . . . . . . . . . . . . . . . . . . . . . 4. . . . . . . . . . 2 .1. Req uirements fo r Red Hat Satellite 4 2 .2. Firewall Rules 4 2 .3. Red Hat Satellite Ins tallatio n and Initial Co nfig uratio n 5 2 .4. Po p ulating Red Hat Satellite with Co ntent 8 . . .Inst 3 . . .alling . . . . . Red . . . . Hat . . . .Ent . . . erprise . . . . . . .Linux . . . . .O. penSt . . . . . .ack . . . Plat . . . .form . . . . . . . . . . . . . . . . . . . . . . . . . . . . . . . . . . . .1. 0. . . . . . . . . . 3 .1. Req uirements fo r Red Hat Enterp ris e Linux O p enStac k Platfo rm 11 3 .2. Firewall Rules 12 3 .3. Ins talling the Red Hat Enterp ris e Linux O p enStac k Platfo rm Ins taller Us er Interfac e 12 3 .4. Ad d ing Ho s ts 20 3 .5. Pro vis io ning Red Hat Enterp ris e Linux O p enStac k Platfo rm 21 . .. .Inst 4 . . . alling . . . . . Red . . . . Hat . . . . CloudForms . . . . . . . . . . . . . . . . . . . . . . . . . . . . . . . . . . . . . . . . . . . . . . . . . . . . . . . . . . . . . . . . .2. 9. . . . . . . . . . 4 .1. Req uirements fo r Red Hat Clo ud Fo rms 30 4 .2. O b taining the Clo ud Fo rms Manag ement Eng ine Ap p lianc e 30 4 .3. Lo g g ing in to the Das hb o ard fo r the Firs t Time 30 4 .4. Up lo ad ing the Ap p lianc e o n Red Hat Enterp ris e Linux O p enStac k Platfo rm 31 4 .5. Ad d ing a Rule to a Sec urity G ro up 32 4 .6 . Creating a Cus to m Flavo r fo r Clo ud Fo rms Manag ement Eng ine 33 4 .7. Launc hing the Clo ud Fo rms Manag ement Eng ine Ins tanc e 34 4 .8 . Ad d ing a Flo ating IP Ad d res s 34 4 .9 . Creating a Vo lume 35 4 .10 . Attac hing the Vo lume to the Ap p lianc e Ins tanc e 36 4 .11. Ac c es s ing the Co ns o le fo r the Ap p lianc e Ins tanc e 37 4 .12. Co nfig uring an Internal Datab as e 37 . . .Adding 5 . . . . . . Red . . . . Hat . . . .Ent . . . erprise . . . . . . .Linux . . . . .O. penSt . . . . . .ack . . . Providers . . . . . . . . .t.o. Red . . . . Hat . . . . CloudForms . . . . . . . . . . . . . . . . . . . . . . . 38 ........... 5 .1. Ad d ing a Red Hat Enterp ris e Linux O p enStac k Platfo rm Pro vid er 38 . .. .Explore 6 . . . . . . .What . . . . 's . . Next . . . . . . . . . . . . . . . . . . . . . . . . . . . . . . . . . . . . . . . . . . . . . . . . . . . . . . . . . . . . . . . . . . . . 39 ........... . .. .Revision A . . . . . . . .Hist . . . ory . . . . . . . . . . . . . . . . . . . . . . . . . . . . . . . . . . . . . . . . . . . . . . . . . . . . . . . . . . . . . . . . . . . . . .4. 1. . . . . . . . . . 1 Red Hat Cloud Infrast ruct ure 5 Q uick St art for Red Hat Ent erprise Linux O penSt ack Plat form and Red Hat Clo 1. Overview The goal of the RHEL OpenStack Platform and Red Hat CloudForms installation process described in this guide is to create a solid RHEL OpenStack Platform infrastructure that is managed by Red Hat CloudForms. Before you begin the actual RHEL OpenStack Platform and Red Hat CloudForms installation process, you need to have some of the following in place: C o mp u t ers The RHEL OpenStack Platform installer can be installed on a physical host or as a virtual machine on a KVM host. Likewise, controller nodes can be on physical or virtual systems. Hypervisors are generally installed directly on bare metal. N et wo rk In t erf aces The network connecting your RHEL OpenStack Platform installer, controller, and compute nodes should be a private network. That is because the installer runs infrastructure services (such as D HCP and D NS) that only apply to the RHEL OpenStack Platform systems. An external network is required by the installer to at least gain access to Red Hat software repositories (although that service could be provided by a Red Hat Satellite server attached to your local network). Network traffic for virtual machines within the RHEL OpenStack Platform configuration itself are directed to external networks through the controller node. D epending on workload, you might also have a separate tenant network that can handle traffic between compute nodes, such as virtual machine migration. St o rag e D isk storage is needed by RHEL OpenStack Platform to provide back-end block storage for virtual machines (provided by the Cinder service) and operating system images (provided by the Glance service). Configuration of both of these services is available through the RHEL OpenStack Platform installer. Report a bug 1.1. Key St eps Installation of a RHEL OpenStack Platform setup consists of the following basic steps: 1. Install Red Hat Satellite: Red Hat Satellite is a source for installing software on client systems. (#1 in the accompnaying diagram) 2. Install Red Hat Enterprise Linux: You need to install Red Hat Enterprise Linux as a prerequisite to installing the RHEL OpenStack Platform installer software. (#2 in the accompanying figure) 3. Install the RHEL OpenStack installer: Install the RHEL OpenStack Platform installer software on the Red Hat Enterprise Linux system you just set up. The installer is used to deploy a controller node and a compute node in your RHEL OpenStack Platform configuration. (#3 in the accompanying figure) 4. Provision RHEL OpenStack Platform: Each computer in your RHEL OpenStack Platform configuration must boot from its network interface card to allow the installer to discover it. Once discovered, each computer is assigned as a compute node or a controller node. After configuring the compute and controller services, each of those nodes is installed and configured from bare metal. D uring configuration of your controller nodes, you also identify the location of Glance and Cinder storage. (#4, A and B in the accompanying figure) 2 1 . O verview 5. Install Red Hat CloudForms: A Red Hat CloudForms appliance can be installed as a virtual machine on a host in the RHEL OpenStack Platform environment. (#5 in the accompanying figure) 6. Configure Red Hat CloudForms: After Red Hat CloudForms is up and running as a virtual machine on a compute node, it can then be configured to manage the assets of the RHEL OpenStack Platform environment. (#6 in the accompanying figure) Fig u re 1. R ed H at En t erp rise Lin u x O p en St ack Plat f o rm an d C lo u d Fo rms In st allat io n wit h Smart Man ag emen t 3 Red Hat Cloud Infrast ruct ure 5 Q uick St art for Red Hat Ent erprise Linux O penSt ack Plat form and Red Hat Clo With Red Hat CloudForms in place and communicating with the controller node, you can start using Red Hat CloudForms to manage the resources within your RHEL OpenStack Platform environment. See Section 6, “ Explore What's Next” for ways to start using your new RHEL OpenStack Platform and Red Hat CloudForms configuration. Report a bug 2. Inst alling Red Hat Sat ellit e Setting up a production Red Hat Satellite Server that can act as a source for installing software on client systems involves three key steps: installing the Red Hat Satellite Server on a machine running Red Hat Enterprise Linux, creating a subscription manifest that describes the software repositories the Red Hat Satellite Server provides, and synchronizing the packages in those software repositories available to the Red Hat Satellite server with those available to the Content D elivery Network. This section guides you through these steps, and results in a working Red Hat Satellite server with which to register client machines and download the packages required to install Red Hat Enterprise Linux OpenStack Platform. Note This section outlines only the basic options for setting up a Red Hat Satellite Server, such as providing software using the default organization entry. For more information on advanced configuration options, see the Red Hat Satellite 6.0 Installation Guide. 2.1. Requirement s for Red Hat Sat ellit e The following are the requirements for installing a basic Red Hat Satellite Server: One physical machine on which Red Hat Enterprise Linux 6.5 or above is installed. This guide outlines how to install Red Hat Satellite Server on this machine. This machine requires the following: 64-bit architecture A minimum of 2 CPU cores; 4 cores are recommended. A minimum of 8 GB memory; 12 GB is recommended. Use 4 GB of swap space where possible. A minimum of 6 GB storage for installing the base Red Hat Enterprise Linux operating system. A minimum of 400 MB storage for the Red Hat Satellite 6 software installation A minimum of 120 GB storage for all Red Hat Enterprise Linux OpenStack Platform repositories. The details of a Customer Portal account for subscribing the machine, including the user name and password. A fully qualified domain name that can be resolved using forward and reverse D NS lookups. Report a bug 2.2. Firewall Rules 4 2 . Inst alling Red Hat Sat ellit e The following table outlines the firewall rules that you must manually configure before installing Red Hat Satellite Server. Satellite Server uses these ports to communicate with and control other machines in the environment. Configuration of these firewall rules is outlined in the procedure for installing Satellite Server. T ab le 1. R ed H at Sat ellit e Server Firewall R u les Po rt s Pro t o co ls Service Pu rp o se 80, 443 TCP 5671 TCP HTTP, HTTPS SSL 8080 8140 TCP TCP Tomcat6 Puppet 9090 TCP Foreman Smart Proxy The Apache web server for hosting the user interface for the Red Hat Satellite Server. Secure communication with systems that the Red Hat Satellite Server manages. Java connections. Communication between Puppet clients and the Puppet master. Foreman Smart Proxy connections with systems that the Red Hat Satellite server manages. Report a bug 2.3. Red Hat Sat ellit e Inst allat ion and Init ial Configurat ion Installing Red Hat Satellite Server involves four key steps: registering the system on which to install Satellite Server with the Content D elivery Network, configuring the required firewall rules, downloading the required packages, and installing and configuring Satellite Server. 2 .3.1 . Subscribing t o t he Re quire d Channe ls Using Subscript io n Manage r To install Red Hat Satellite Server, you must register the system where you are installing the Red Hat Satellite Server with Red Hat Subscription Manager, and subscribe to the required channels. 1. Register your system with the Content D elivery Network, entering your Customer Portal user name and password when prompted: # subscription-manager register 2. Find entitlement pools containing the channels required to install the Red Hat Satellite Server: # subscription-manager list --available | grep -A8 "Red Hat Enterprise Linux Server" # subscription-manager list --available | grep -A8 "Red Hat Enterprise Linux Software Collections" # subscription-manager list --available | grep -A8 "Red Hat Satellite" 3. Use the pool identifiers located in the previous step to attach the R ed Hat Enterpri se Li nux Server, R ed Hat Enterpri se Li nux So ftware C o l l ecti o ns, and R ed Hat Satel l i te entitlements to the system: # subscription-manager attach --pool=pool_id 4. Enable the required channels: 5 Red Hat Cloud Infrast ruct ure 5 Q uick St art for Red Hat Ent erprise Linux O penSt ack Plat form and Red Hat Clo # subscription-manager repos --enable rhel-6-server-rpms # subscription-manager repos --enable rhel-server-rhscl-6-rpms # subscription-manager repos --enable rhel-6-server-satellite-6.0rpms Report a bug 2 .3.2 . Inst alling and Co nfiguring Re d Hat Sat e llit e Install the packages and dependencies required to run the Red Hat Satellite Server. Satellite Server has an automatic initial configuration script that prepares the Satellite Server for use. 1. Install the katello package: # yum install katello 2. Configure the required firewall rules: # iptables -I INPUT -m state --state NEW -p tcp --dport 443 -j ACCEPT \ & & iptables -I INPUT -m state --state NEW -p tcp --dport 5671 -j ACCEPT \ & & iptables -I INPUT -m state --state NEW -p tcp --dport 80 -j ACCEPT \ & & iptables -I INPUT -m state --state NEW -p tcp --dport 8140 -j ACCEPT \ & & iptables -I INPUT -m state --state NEW -p tcp --dport 9090 -j ACCEPT \ & & iptables -I INPUT -m state --state NEW -p tcp --dport 8080 -j ACCEPT \ # iptables-save > /etc/sysconfig/iptables 3. Configure Red Hat Satellite Server: # katello-installer 4. Configure the firewall to limit elast icsearch to fo reman and katel l o system users and make these rules persistent during reboots: # iptables -A OUTPUT -o lo -p tcp -m tcp --dport 9200 -m owner -uid-owner foreman -j ACCEPT \ & & iptables -A OUTPUT -o lo -p tcp -m tcp --dport 9200 -m owner -uid-owner katello -j ACCEPT \ & & iptables -A OUTPUT -o lo -p tcp -m tcp --dport 9200 -m owner -uid-owner root -j ACCEPT \ & & iptables -A OUTPUT -o lo -p tcp -m tcp --dport 9200 -j DROP # iptables-save > /etc/sysconfig/iptables The Red Hat Satellite Server is populated with an initial organization and location named " D efault Organization" and " D efault Location" , respectively. Report a bug 2 .3.3. Co nne ct ing t o t he Re d Hat Sat e llit e Use r Int e rface 6 2 . Inst alling Red Hat Sat ellit e When you install the Red Hat Satellite Server, a default administrative user account is created with the username ad mi n and the password chang eme. The first time you log in to the user interface, you must use this account. Moreover, it is strongly recommended that you immediately change the password for this account to secure access to the user interface. 1. In a web browser, navigate to https: //your-satellite-fqdn, replacing your-satellite-fqdn with the fully qualified domain name that you provided during installation. Important The first time that you connect to the user interface, you are prompted to trust the certificate being used to secure communications between your browser and the web server. You must accept this certificate. 2. Enter ad mi n in the User Name field and chang eme in the P asswo rd field. Fig u re 2. T h e R ed H at Sat ellit e Server lo g in screen 3. Click Lo g i n. 4. In the user interface, click Ad min U ser → My acco u n t in the upper right of the title bar to open the Ed i t User window. 7 Red Hat Cloud Infrast ruct ure 5 Q uick St art for Red Hat Ent erprise Linux O penSt ack Plat form and Red Hat Clo Fig u re 3. Accessin g acco u n t set t in g s 5. Enter a new password in the P asswo rd text field and again in the Veri fy text field. 6. Click Submi t. Report a bug 2.4 . Populat ing Red Hat Sat ellit e wit h Cont ent Red Hat Satellite Server provides software updates to subscribed client systems. In order for Red Hat Satellite Server to provide software updates to client systems, it requires setting up a manifest from the Red Hat content provider, enabling the necessary Red Hat repositories, and synchronizing the content to the Satellite Server. 2 .4 .1 . Se t t ing up a Manife st Obtain a subscription manifest and upload it to your organization. 1. Go to https://access.redhat.com, and log in to the Red Hat Customer Portal using your customer account details. 2. Click Su b scrip t io n s → Su b scrip t io n Man ag emen t → Su b scrip t io n Man ag emen t Ap p licat io n s, and then click Sat ellit e. 3. On the upper right corner of the Subscriptions Management Applications page, click R eg i ster a Satel l i te. 4. Create a name for your Red Hat Satellite Server. 5. Select Sat ellit e 6 .0 from the Satel l i te versi o n list. 6. Click R eg i ster. 7. Click Attach a subscri pti o n, and add the subscriptions required for Red Hat Satellite Server: a. Red Hat Enterprise Linux 6 Server x86_64 b. Red Hat OpenStack for Red Hat Enterprise Linux 6 Server x86_64 c. Red Hat Software Collections for Red Hat Enterprise Linux 6 Server x86_64 d. Red Hat Common x86_64 for Red Hat Enterprise Linux 6 Server x86_64 e. Red Hat Satellite Server 6 x86_64 8. Click At t ach Select ed . 8 2 . Inst alling Red Hat Sat ellit e 9. Click D o wn lo ad man if est to generate an archive in .zip format that contains the manifest for Red Hat Satellite Server. 10. Log in to the Red Hat Satellite Server. 11. Click An y C o n t ext → An y O rg an iz at io n , and select the default organization. 12. Click C o n t en t → R ed H at Su b scrip t io n s, and then click Manag e Mani fest on the upper right corner of the page. 13. In the Subscri pti o n Mani fest section, click Acti o ns, and under the Upl o ad New Mani fest subsection, click Bro wse. 14. Select the manifest file to upload, and then click Upl o ad . Report a bug 2 .4 .2 . Enabling t he Re quire d Re po sit o rie s In the Red Hat Satellite Server, enable the repositories required to install Red Hat Enterprise Linux OpenStack Platform, and prepare them for synchronization.. 1. From the Red Hat Satellite Server user interface, click C o n t en t → R ed H at R ep o sit o ries. 2. Click the R P Ms tab. 3. Click the arrow next to R ed Hat Enterpri se Li nux O penStack P l atfo rm to expand the list of available repository sets. 4. Choose the following repository sets to automatically enable them: a. Red Hat Enterprise Linux 6 Server x86_64 b. Red Hat OpenStack for Red Hat Enterprise Linux 6 Server x86_64 c. Red Hat Software Collections for Red Hat Enterprise Linux 6 Server x86_64 d. Red Hat Common x86_64 for Red Hat Enterprise Linux 6 Server x86_64 e. Red Hat Satellite Server 6 x86_64 Report a bug 2 .4 .3. Synchro nizing Co nt e nt fro m So urce Re po sit o rie s t o Re d Hat Sat e llit e Synchronization is the act of coordinating updates between the Red Hat Satellite Server repositories and the source repositories being used. It is a required step after enabling repositories to populate the Satellite Server with content from the source repositories. Constant, scheduled synchronization provides the following benefits: D ata integrity between packages Updated packages, security fixes, and errata Satellite Server's synchronization management capabilities allow organization administrators to create synchronization plans to configure how often a host should look for and install updates. Synchronization plans are then paired with the product repositories to come up with a synchronization schedule that will allow products to be updated at specific intervals that are convenient for the organization's network. 9 Red Hat Cloud Infrast ruct ure 5 Q uick St art for Red Hat Ent erprise Linux O penSt ack Plat form and Red Hat Clo 2.4 .3.1. Syn ch ro n iz in g t h e R ep o sit o ries After enabling the required repositories, you must manually synchronize them. Then, the local repository in the Red Hat Satellite Server is populated by the required packages. 1. From the Red Hat Satellite Server user interface, click C o n t en t → Syn c St at u s. 2. Click the arrow next to R ed Hat Enterpri se Li nux O penStack P l atfo rm to see available content. 3. Select the enabled repositories. 4. Click Synchro ni ze No w. The status of the synchronization process appears in the R esul t column. If synchronization is successful, Sync co mpl ete appears; if it fails, Erro r synci ng appears. Report a bug 2.4 .3.2. C reat in g a Syn ch ro n iz at io n Plan Create a synchronization plan to ensure regular, frequent synchronization of source repositories to the Red Hat Satellite Server. 1. From the Red Hat Satellite Server user interface, click C o n t en t → Syn c Plan s. 2. Click New Sync P l an. 3. Enter a Name and D escri pti o n for the plan. 4. Select d ai l y from the Interval list. 5. Accept the default values for Start D ate and Start T i me. 6. Click Save. Report a bug 2.4 .3.3. Ap p lyin g a Syn ch ro n iz at io n Sch ed u le Associate Red Hat Enterprise Linux OpenStack Platform with your synchronization plan to create a synchronization schedule. 1. From the Red Hat Satellite Server user interface, click C o n t en t → Syn c Plan s and select the newly created synchronization plan. 2. Click the P ro d ucts tab, and then click Ad d in the P ro d uct Manag ement section. 3. Select the R ed Hat Enterpri se Li nux O penStack P l atfo rm check box. 4. Click Ad d Sel ected . Report a bug 3. Inst alling Red Hat Ent erprise Linux OpenSt ack Plat form Setting up a production Red Hat Enterprise Linux OpenStack Platform environment involves provisioning that environment using the Red Hat Enterprise Linux OpenStack Platform installer. The installer is a graphical user interface that provides functions for managing the provisioning of Red Hat Enterprise Linux OpenStack Platform components on a set of physical machines. 10 3 . Inst alling Red Hat Ent erprise Linux O penSt ack Plat form There are three key steps to the provisioning process: installing the user interface for the Red Hat Enterprise Linux OpenStack Platform installer, adding hosts to the user interface onto which to provision the environment, and then provisioning the environment. This section guides you through these steps, and results in a basic working environment with one controller node, which provides the core services for administering the environment, and one compute node, which acts as a hypervisor that provides the processing capabilities for running the environment. Note This section outlines only the basic options for provisioning Red Hat Enterprise Linux OpenStack Platform, such as using LVM as the volume driver for block storage, no high availability, and a networking service integrated into the compute node itself known as Nova networking. For more information on advanced configuration options, see D eploying OpenStack: Enterprise Environments (Red Hat Enterprise Linux OpenStack Platform Installer) 3.1. Requirement s for Red Hat Ent erprise Linux OpenSt ack Plat form The following are the requirements for provisioning a basic RHEL OpenStack Platform environment using the installer: A private network accessible by physical machines on which RHEL OpenStack Platform components can be provisioned. Services such as D HCP, D NS, and PXE must be disabled on this network because these services can interfere with the installer. One physical machine running Red Hat Enterprise Linux 6.6 on which to set up the installer. For this machine, 6 GB of memory is recommended; a minimum of 4 GB memory is required. Important The machine on which you set up the installer must have a fully qualified domain name that satisfies the following requirements: Matches the domain of the network to be provisioned. D oes not conflict with any existing domains (to prevent resource conflicts). A machine that is a member of the private network and that also has access to external networks that can act as a router or gateway. The machine on which the user interface is installed can perform this function if required. Two physical machines to act as nodes in the environment. These machines must be members of the private network, but no other prior configuration is required. A Red Hat Enterprise Linux 7.0 installation medium. An installation medium is a source of files that the installer can use to install the base operating system on a machine when you provision RHEL OpenStack Platform. The installation medium must be in the format of an operating system installation tree that is accessible to the machine on which to set up the installer via a web server or an NFS share. The details of a Customer Portal account for subscribing the machine on which to set up the user interface for the installer, and for registering the hosts in your RHEL OpenStack Platform environment, including the user name, password, the ID of an entitlement pool to attach, the names of channels to enable, and the details of a HTTP proxy, if any. 11 Red Hat Cloud Infrast ruct ure 5 Q uick St art for Red Hat Ent erprise Linux O penSt ack Plat form and Red Hat Clo Report a bug 3.2. Firewall Rules The following table outlines the firewall rules that the rhel -o sp-i nstal l er command configures when you install the user interface. The installer uses these ports to communicate with and control other machines in the environment. This table is provided for your information; no further configuration is necessary beyond that provided by rhel -o sp-i nstal l er. T ab le 2. R ed H at En t erp rise Lin u x O p en St ack Plat f o rm In st aller Firewall R u les Po rt s Pro t o co ls Service Pu rp o se 22 TCP SSH 53 TCP, UD P D NS 67 TCP D HCP 69 TCP TFTP 80, 443 TCP 8140 TCP HTTP, HTTPS Puppet Connecting to other machines on the private network that the installer defines. Resolving the host names and addresses of machines on the private network that the installer defines. Assigning IP addresses to machines on the private network that the installer defines. Enabling the PXE booting of machines on the private network that the installer defines. The Apache web server for hosting the user interface for the installer. Communication between Puppet clients and the Puppet master. Report a bug 3.3. Inst alling t he Red Hat Ent erprise Linux OpenSt ack Plat form Inst aller User Int erface Installing the user interface involves four key steps: registering the system on which to install the user interface with the Content D elivery Network, preparing an initial installation medium for provisioning your RHEL OpenStack Platform environment, downloading the required packages for the user interface, and installing and configuring the user interface. 3.3.1 . Subscribing t o t he Re quire d Channe ls Using Subscript io n Manage r To install the RHEL OpenStack Platform installer user interface, you must register the system where the user interface will be installed with your Red Hat Satellite server and subscribe to the required channels. You must also install the Katello agent to allow your Red Hat Satellite server to provide information about errata that are applicable for the system. 1. D ownload and install a copy of the CA Certificate for your Red Hat Satellite server: yum -y --nogpgcheck install http://[hostname]/pub/katello-caconsumer-[hostname]-1.0-1.noarch.rpm 2. Register your system with your Red Hat Satellite server, entering your Customer Portal user name and password when prompted: # subscription-manager register --org=Default_Organization -environment=Library 12 3 . Inst alling Red Hat Ent erprise Linux O penSt ack Plat form 3. Find entitlement pools containing the channels required to install the Red Hat Enterprise Linux OpenStack Platform Installer: # subscription-manager list --available | grep -A8 "Red Hat Enterprise Linux Server" # subscription-manager list --available | grep -A8 "Red Hat Enterprise Linux OpenStack Platform" # subscription-manager list --available | grep -A8 "Red Hat Enterprise Linux Software Collections" 4. Use the pool identifiers located in the previous step to attach the R ed Hat Enterpri se Li nux 6 Server, R ed Hat Enterpri se Li nux O penStack P l atfo rm, and R ed Hat Enterpri se Li nux So ftware C o l l ecti o ns entitlements: # subscription-manager attach --pool=pool_id 5. Enable the required channels: # subscription-manager # subscription-manager foreman-rpms # subscription-manager # subscription-manager repos --enable=rhel-6-server-rpms repos --enable=rhel-6-server-openstackrepos --enable=rhel-server-rhscl-6-rpms repos --enable=rhel-6-server-rh-common-rpms 6. Install the katello-agent package: # yum install katello-agent Report a bug 3.3.2 . Pre paring an Inst allat io n Me dium using a We b Se rve r Use a web server to host a Red Hat Enterprise Linux 7 installation medium. This procedure must be performed on the machine where the installation medium is to be hosted. 1. Go to https://access.redhat.com, and log in to the Red Hat Customer Portal using your customer account details. 2. Click D o wn lo ad s in the menu bar. 3. Click R ed Hat Enterpri se Li nux to access the product download page. 4. Click R HEL 7. 0 Bi nary D VD . 5. Install the Apache web server on the machine on which to install the user interface: # yum install httpd 6. Start the httpd service, and ensure it starts on boot: # service httpd start # chkconfig httpd on 7. In the root web server directory, create a directory in which to store the files for the installation medium: 13 Red Hat Cloud Infrast ruct ure 5 Q uick St art for Red Hat Ent erprise Linux O penSt ack Plat form and Red Hat Clo # mkdir /var/www/html/[directory_name] 8. Create a temporary directory into which to mount the ISO file: # mkdir /RHEL7 9. Mount the ISO file in the temporary directory: # mount -t iso9660 -o loop rhel-server-7.0-x86_64-dvd.iso /RHEL7 10. Copy the contents of the temporary directory to the directory in which to store the files for the installation medium: # cp -dpR /RHEL7 /var/www/html/. 11. Unmount the ISO file: # umount /RHEL7 12. Remove the temporary directory in which you mounted the ISO file: # rmdir /RHEL7 13. Create a new file at /etc/httpd /co nf. d /med i um. co nf and add the following configuration to it: Listen 8118 NameVirtualHost *:8118 <VirtualHost *:8118> DocumentRoot /var/www/html/ ServerName www.example.com <Directory "/var/www/html/"> Options All Indexes FollowSymLinks Order allow,deny Allow from all </Directory> </VirtualHost> This exposes an accessible location on the web server that contains your installation medium. 14. Restart your web server: # systemctl restart httpd.service 15. Add a rule to your firewall configuration to allow access to port 8118: # firewall-cmd --zone=public --add-port=8118/tcp --permanent # firewall-cmd --reload 14 3 . Inst alling Red Hat Ent erprise Linux O penSt ack Plat form The installation medium is now available for the Red Hat Enterprise Linux OpenStack Platform Installer to access. Test access to the installation medium by navigating to http: //www. exampl e. co m: 8118/R HEL7/, which displays a listing of Red Hat Enterprise Linux 7 files and folders. Report a bug 3.3.3. Inst alling t he Use r Int e rface Run the rhel -o sp-i nstal l er command to install the user interface and configure the core parameters that the installer uses to provision RHEL OpenStack Platform. Note The rhel -o sp-i nstal l er command automatically configures the required SELinux permissions and adds the required firewall rules to ip t ab les while preserving any existing firewall rules. 1. Install the rhel-osp-installer package: # yum install rhel-osp-installer 2. Start the installation: # rhel-osp-installer 3. Enter the number for the network interface that the installer will use to provision RHEL OpenStack Platform, and press Enter: Please select NIC on which you want Foreman provisioning enabled: 1. eth1 2. eth0 ? 4. Configure networking options: a. Enter the number for the configuration option to change, and press Enter. b. Enter a new value, and press Enter. c. When you have specified the preferred value for each configuration option, enter 1, and press Enter. Networking setup: Network interface: IP address: Network mask: Network address: Host Gateway: DHCP range start: DHCP range end: DHCP Gateway: DNS forwarder: 'eth1' 'XX.XX.XX.XX' 'XX.XX.XX.XX' 'XX.XX.XX.XX' 'XX.XX.XX.XX' 'XX.XX.XX.XX' 'XX.XX.XX.XX' 'XX.XX.XX.XX' 'XX.XX.XX.XX' 15 Red Hat Cloud Infrast ruct ure 5 Q uick St art for Red Hat Ent erprise Linux O penSt ack Plat form and Red Hat Clo Domain: 'mydomain.example.com' Foreman URL: 'https://host.mydomain.example.com' NTP sync host: '0.rhel.pool.ntp.org' Timezone: 'America/New_York' Configure networking on this machine: ✓ Configure firewall on this machine: ✓ The installer can configure the networking and firewall rules on this machine with the above configuration. Default values are populated from the this machine's existing networking configuration. If you DO NOT want to configure networking please set 'Configure networking on this machine' to No before proceeding. Do this by selecting option 'Do not configure networking' from the list below. How would you like to proceed?: 1. Proceed with the above values 2. Change Network interface 3. Change IP address 4. Change Network mask 5. Change Network address 6. Change Host Gateway 7. Change DHCP range start 8. Change DHCP range end 9. Change DHCP Gateway 10. Change DNS forwarder 11. Change Domain 12. Change Foreman URL 13. Change NTP sync host 14. Change Timezone 15. Do not configure networking 16. Do not configure firewall 17. Cancel Installation Important The name of the domain must match that of the fully qualified domain name of the machine on which the user interface is being installed. Important By default, the address of the machine on which the user interface is being installed is specified as the D HCP gateway, which is the gateway the installer configures on hosts it provisions. You must edit this value and specify the address of a machine that can perform this function. 5. Configure client authentication: a. Enter the number for the configuration option to change, and press Enter. b. Enter a new value, and press Enter. 16 3 . Inst alling Red Hat Ent erprise Linux O penSt ack Plat form c. When you have specified either a SSH public key or a root password, enter 1, and press Enter. Configure client authentication SSH public key: '' Root password: '*********' Please set a default If you choose not to The password must be public ssh key which machines. root password for newly provisioned machines. set a password, it will be generated randomly. a minimum of 8 characters. You can also set a will be deployed to newly provisioned How would you like to proceed?: 1. Proceed with the above values 2. Change SSH public key 3. Change Root password 4. Toggle Root password visibility 6. Specify the details of an installation medium: a. Enter 1, and press Enter. b. Enter the address of the installation medium, and press Enter. c. Enter 2, and press Enter. Now you should configure installation media which will be used for provisioning. Note that if you don't configure it properly, host provisioning won't work until you configure installation media manually. Enter RHEL repo path: 1. Set RHEL repo path (http or https URL): http:// 2. Proceed with configuration 3. Skip this step (provisioning won't work) Note The path you specify must be a full path that ends in the root directory containing the files and sub-directories for the installation medium. For example, http: //exampl e. co m/rhel 7/ where rhel 7 is a directory that contains subdirectories such as i so l i nux and Li veO S, and exampl e. co m is the name of the machine where the installation medium is hosted. 7. Specify the details of a Subscription Manager account: a. Enter the number for the configuration option to change, and press Enter. b. Enter a new value, and press Enter. c. When you have specified the preferred value for each configuration key, enter 9 , and press Enter. 17 Red Hat Cloud Infrast ruct ure 5 Q uick St art for Red Hat Ent erprise Linux O penSt ack Plat form and Red Hat Clo Enter your subscription manager credentials: 1. Subscription manager username: 2. Subscription manager password: 3. Comma separated repositories: rhel-7-server-openstack5.0-rpms 4. Subscription manager pool (recommended): 5. Subscription manager proxy hostname: 6. Subscription manager proxy port: 7. Subscription manager proxy username: 8. Subscription manager proxy password: 9. Proceed with configuration 10. Skip this step (provisioning won't subscribe your machines) Note The value for the Subscription Manager pool must be in the format of a Subscription Manager entitlement pool ID . Moreover, you can only specify a single entitlement pool ID . If you leave the value for this configuration item blank, the installer attempts to auto-attach the required entitlements on systems it provisions. The user interface is installed, and the entries in the user interface required to provision RHEL OpenStack Platform are automatically generated based on the details you provided. After the installation is complete, the user name of and a randomly generated password for the default administrative user account are displayed. The address for accessing the user interface is also displayed. Report a bug 3.3.4 . Lo gging in t o t he Use r Int e rface fo r t he First T im e When you install the user interface, a default administrative user account is created with the username ad mi n and a randomly generated password. The first time you log in to the user interface, you must use this account. Moreover, it is strongly recommended that you immediately change the password for this account to secure access to the user interface. Note If you do not have a copy of the randomly generated password, you can retrieve it by running the following command: # grep admin_password /etc/foreman/rhel-osp-installer.answers.yaml 1. In a web browser, navigate to the URL provided once installation of the user interface is complete. By default, this URL is the fully qualified domain name of the machine on which the user interface is installed. For example, https: //myhost.example.com/. 18 3 . Inst alling Red Hat Ent erprise Linux O penSt ack Plat form Important The first time that you connect to user interface, you are prompted to trust the certificate being used to secure communications between your browser and the web server. You must accept this certificate. 2. Enter ad mi n in the Username field and the randomly generated password in the P asswo rd field. Fig u re 4 . T h e R ed H at En t erp rise Lin u x O p en St ack Plat f o rm in st aller lo g in screen 3. Click Lo g i n. 4. In the user interface, click Ad min U ser → My acco u n t in the upper right of the title bar to open the Ed i t User window. Fig u re 5. Accessin g acco u n t set t in g s 5. Enter a new password in the P asswo rd field and again in the Veri fy field. 6. Click Submi t. Report a bug 19 Red Hat Cloud Infrast ruct ure 5 Q uick St art for Red Hat Ent erprise Linux O penSt ack Plat form and Red Hat Clo 3.4 . Adding Host s A host is a physical machine that acts as a node in a RHEL OpenStack Platform environment. To provision a basic RHEL OpenStack Platform environment, you must add two hosts to the user interface: one to act as a controller, and one to act as a Compute node. 3.4 .1 . Adding a Ho st via Disco ve ry Add a host to the user interface via the discovery function. This procedure assumes that the host is connected to the private network on which the installer provides the D HCP service. 1. Start the host, and select the network as the boot device to start the host using the PXE service that the installer provides. 2. Select d i sco very from the PXE boot options menu. The host starts into the Fo reman D i sco very screen and is automatically registered in the user interface. Fig u re 6 . T h e Fo reman D isco very Screen 3. Log in to the user interface, and confirm that the host has been registered: a. Click H o st s → D isco vered h o st s to open the D i sco vered ho sts page. b. Click the name of the newly registered host to open the details page for the host, and review the details. 20 3 . Inst alling Red Hat Ent erprise Linux O penSt ack Plat form Fig u re 7. T h e D isco vered H o st D et ails Pag e Report a bug 3.5. Provisioning Red Hat Ent erprise Linux OpenSt ack Plat form The installer provisions Red Hat Enterprise Linux OpenStack Platform using deployments. A deployment is a collection of settings that defines the hosts on which services are to be provisioned, options such as whether to use Neutron networking or Nova networking as the networking back end, and key parameters for several of the services to be provisioned. Note This guide currently outlines only how to use Nova networking as the networking back end. Nova networking is a service integrated into the Compute node itself that manages both private and public networking access for virtual machines in the environment. A key consideration when you create a new deployment is the volume driver for the Block Storage (Cinder) service: Vo lu me D rivers A volume driver is the storage back end that the Block Storage service uses to provide block storage to Compute nodes in a RHEL OpenStack Platform environment. The default implementation is to use LVM, but you can also choose from NFS storage, Ceph storage, or EqualLogic storage. For more information on each of the volume drivers and how to configure the options available to each volume driver, see " Volume D rivers" in the Configuration Reference Guide. 3.5 .1 . Cre at ing a De plo ym e nt Create a deployment for provisioning a RHEL OpenStack Platform environment. 1. Click O p en St ack In st aller → N ew d ep lo ymen t . 21 Red Hat Cloud Infrast ruct ure 5 Q uick St art for Red Hat Ent erprise Linux O penSt ack Plat form and Red Hat Clo 2. Configure deployment settings: Fig u re 8. T h e D ep lo ymen t Set t in g s st ep a. Enter a name for the deployment in the Name field. b. Enter a description in the D escri pti o n field. c. Select C o ntro l l er / C o mpute in the Hi g h Avai l abi l i ty section. d. Select No va Netwo rk in the Netwo rki ng section. e. Select R abbi tMQ as the message broker in the Messag i ng P ro vi d er section. Note As of Red Hat Enterprise Linux OpenStack Platform 5, RabbitMQ replaces QPid as the default (and recommended) message broker. f. Ensure R ed Hat Enterpri se Li nux O penStack P l atfo rm 5 wi th R HEL 7 is selected in the P l atfo rm section. 22 3 . Inst alling Red Hat Ent erprise Linux O penSt ack Plat form g. Select G enerate rand o m passwo rd fo r each servi ce in the Servi ce P asswo rd section to generate a random password for each service. h. Leave the C usto m repo s text area blank. i. Click Next. 3. Configure network traffic: Fig u re 9 . T h e N et wo rk C o n f ig u rat io n st ep a. D rag and drop the available network traffic types into the section for a subnet. b. Create new subnets if you require a new subnet to which to assign a network traffic type: a. Click New Subnet. b. Enter a name to represent the subnet in the user interface in the Name field. c. Select External D HC P or No exi sti ng D HC P from the D HC P server list. If you select No Exi sti ng D HC P and the subnet is to carry the P ubl i c AP I network traffic type, you must enter the address of a machine that can act as a gateway in the G ateway field. If you select No exi sti ng D HC P , you can also specify the IP R ang e Start and the IP R ang e End . 23 Red Hat Cloud Infrast ruct ure 5 Q uick St art for Red Hat Ent erprise Linux O penSt ack Plat form and Red Hat Clo d. Enter the network address in the Netwo rk Ad d ress field. This address must be in CID R notation. For example, XX. XX. XX. 0 /24 . e. Optionally, enter a VLAN ID for the subnet in the VLAN field. f. Click C reate Subnet. c. Click Next. Note By default, all network traffic types except External is assigned to the default subnet. Because the External network traffic type is required and cannot be assigned to the same subnet as other network traffic types, you must create a dedicated subnet for this network traffic type. You you can then drag and drop network traffic types to subnets as required, or to the Avai l abl e Netwo rk T raffi c T ypes section to disable optional network traffic types. 4. In the Servi ces O vervi ew step, review the list of services to be provisioned, and click Next. Fig u re 10. T h e Services C o n f ig u rat io n st ep 24 3 . Inst alling Red Hat Ent erprise Linux O penSt ack Plat form 5. Configure service options: Fig u re 11. T h e Services C o n f ig u rat io n st ep a. N o va T enant Netwo rk T ype: Select the type of network used for tenant networks. You can choose from Fl at wi th D HC P , or VLAN. If you choose VLAN, you must also specify the tenant VLAN range. Fl o ati ng IP rang e fo r external netwo rk: Enter the range of IP addresses to be used for external networks. Ranges must be entered using CID R notation. For example, XX. XX. XX. 0 /24 . Fi xed IP rang e fo r tenant netwo rks: Enter the range of IP addresses to be used for tenant networks. Ranges must be entered using CID R notation. For example, XX. XX. XX. 0 /24 . b. G lan ce C ho o se D ri ver Backend : Select the driver to use for back-end storage of images. Select Lo cal Fi l e for the local file system. c. C in d er 25 Red Hat Cloud Infrast ruct ure 5 Q uick St art for Red Hat Ent erprise Linux O penSt ack Plat form and Red Hat Clo C ho o se D ri ver Backend : Select LVM for the volume driver to use for back-end storage. 6. Click Next. Report a bug 3.5 .2 . Assigning a Ho st t o a De plo ym e nt Ro le After you have created the deployment, you must assign the hosts you added to the user interface to roles in that deployment. You must assign one host to the C o ntro l l er (No va) role, and one host to the C o mpute (No va) role. 1. Click O p en St ack In st aller → D ep lo ymen t s. 2. Click the name of the deployment to which to assign hosts. Fig u re 12. T h e d ep lo ymen t d et ails p ag e 3. In the D epl o yment R o l es section, click + for a deployment role. 4. Select the check box for a host in the Free Ho sts section. 5. Click Assi g n Ho sts. Report a bug 3.5 .3. Co nfiguring Ho st Ne t wo rking 26 3 . Inst alling Red Hat Ent erprise Linux O penSt ack Plat form After you have assigned hosts to a deployment, you must configure the subnets assigned to the network interfaces on the hosts before you can provision the RHEL OpenStack Platform environment. The following procedure must be performed on each host in your deployment. 1. From the deployment details page, click the Ho sts tab. 2. Click the Assi g ned sub-tab. 3. Select the check box for a host and click C o nfi g ure Netwo rks. 4. D rag and drop subnets between the sections for network interfaces to change the network traffic carried by those interfaces. Fig u re 13. T h e C o n f ig u re N et wo rks Screen 5. Click D o ne. Report a bug 3.5 .4 . Pro visio ning Re d Hat Ent e rprise Linux Ope nSt ack Plat fo rm Use a deployment to provision RHEL OpenStack Platform on one or more hosts. 1. Click O p en St ack In st aller → D ep lo ymen t s. 2. Click the name of the deployment to provision. 27 Red Hat Cloud Infrast ruct ure 5 Q uick St art for Red Hat Ent erprise Linux O penSt ack Plat form and Red Hat Clo Fig u re 14 . T h e d ep lo ymen t d et ails p ag e 3. Click D epl o y to open the deployment confirmation screen. Fig u re 15. T h e d ep lo ymen t co n f irmat io n screen 4. Click D epl o y. Report a bug 3.5 .5 . Re t rie ving Se rvice De t ails 28 4 . Inst alling Red Hat CloudForms After you have provisioned your RHEL OpenStack Platform environment, you must retrieve the password for the messaging broker and the location and credentials of the D ashboard service for your RHEL OpenStack Platform environment. These details are required when you later log in to the D ashboard and when you add the environment to the Red Hat CloudForms Management Engine. 1. Click O p en St ack In st aller → D ep lo ymen t s. 2. Click the name of a deployment you have provisioned. 3. Retrieve the details of the D ashboard service: a. Note the value of the Ho ri zo n UR L field and Username field. b. Click the disclosure button next to the row of asterisks in the P asswo rd field, and note the password. Fig u re 16 . T h e service d et ails p ag e 4. Retrieve the password for the messaging broker: a. Click the Access al l d etai l s button. b. Note the value of the Amq p field. Report a bug 4 . Inst alling Red Hat CloudForms Red Hat CloudForms provides a centralized management console for large and distributed virtualized deployments. It extends Red Hat Enterprise Virtualization and Red Hat Enterprise Linux OpenStack Platform management capabilities by adding performance monitoring, discovery, selfservice provisioning, policy-based compliance, charge-back, and greater automation capability. Red Hat CloudForms is comprised of a single component, the CloudForms Management Engine 29 Red Hat Cloud Infrast ruct ure 5 Q uick St art for Red Hat Ent erprise Linux O penSt ack Plat form and Red Hat Clo appliance. After downloading the appliance as a virtual machine image template from the Red Hat Customer Portal, upload the appliance to a RHEL OpenStack Platform environment. After a few appliance configuration steps, you are ready to manage your hybrid cloud environment using the CloudForms web interface. 4 .1. Requirement s for Red Hat CloudForms To use CloudForms Management Engine, the following requirements must be met: One of the following web browsers: Mozilla Firefox for versions supported under Mozilla's Extended Support Release (ESR) [1] Internet Explorer 8 or higher Google Chrome for Business A monitor with minimum resolution of 1280x1024. Adobe Flash Player 9 or above. At the time of publication, you can access it at http://www.adobe.com/products/flashplayer/. Report a bug 4 .2. Obt aining t he CloudForms Management Engine Appliance 1. Go to https://access.redhat.com, and log in to the Red Hat Customer Portal using your customer account details. 2. Click D o wn lo ad s in the menu bar. 3. Click A-Z to sort the product downloads alphabetically. 4. Click R ed Hat C l o ud Fo rms to access the product download page. 5. Click the C FME O penStack Vi rtual Appl i ance download link. Report a bug 4 .3. Logging in t o t he Dashboard for t he First T ime After you have obtained the appliance image, you must log in to the D ashboard for your RHEL OpenStack Platform environment for the first time to upload the appliance and continue the installation process. Important To log in to the D ashboard, you require the IP address and credentials you retrieved earlier before provisioning the RHEL OpenStack Platform environment. 1. In a web browser, navigate to the address of the D ashboard. By default, this URL is the IP address of the machine on which the D ashboard is installed followed by /d ashbo ard . For example, http: //XX.XX.XX.XX/dashboard. 30 4 . Inst alling Red Hat CloudForms 2. Enter ad mi n in the User Name text field and the password for the default administrative user in the P asswo rd text field. Fig u re 17. T h e D ash b o ard lo g in screen 3. Click Si g n In. Report a bug 4 .4 . Uploading t he Appliance on Red Hat Ent erprise Linux OpenSt ack Plat form 1. From the OpenStack D ashboard, in the P ro ject tab, click Imag es under the C o mp u t e menu. 2. Click C reate Imag e. 3. Enter a name for the image. 4. Include the location URL of the image in the Imag e Lo cati o n field, or save the image file to your machine and browse to this location in the Imag e Fi l e field. For example, the image file name is in the format cfme-rho s-5. 3-26 . x86 _6 4 . q co w2 5. Select the correct type from the Fo rmat list (for example, Q C O W2). 6. In the Archi tecture field, specify the architecture. For example, i386 for a 32-bit architecture or x86-64 for a 64-bit architecture. 7. Enter 4 5 in the Mi ni mum D i sk (G B) and 6 14 4 in the Mi ni mum R AM (MB) fields. 31 Red Hat Cloud Infrast ruct ure 5 Q uick St art for Red Hat Ent erprise Linux O penSt ack Plat form and Red Hat Clo 8. Select P ubl i c to make the appliance available to all users. 9. Select P ro tected to protect the image from being accidentally deleted. 10. Click C reate Imag e to place the appliance image in the queue to be uploaded. After the appliance image is available, the Status of the appliance image changes from Q ueued to Acti ve. Report a bug 4 .5. Adding a Rule t o a Securit y Group Security groups specify what IP traffic is allowed to reach an instance on its public IP address. Security group rules are processed before network traffic reaches firewall rules defined within the guest itself. Note In the default configuration, the default security group accepts all connections from the default source; all instances within the default group can talk to each other on any port. 1. From the OpenStack D ashboard, in the P ro ject tab, click Access & Secu rit y under the C o mp u t e menu. 2. In Securi ty G ro ups, click Manag e R ul es on the row for the d efaul t security group. Fig u re 18. Ed it Secu rit y G ro u p R u les: d ef au lt D ialo g 3. Click Ad d R ul e. 32 4 . Inst alling Red Hat CloudForms Fig u re 19 . Ad d R u le D ialo g 4. Configure the rule. a. Select C usto m T C P R ul e from the R ul e list. b. Select Ing ress from the D i recti o n list. c. Select P o rt from the O pen P o rt list. d. Specify 4 4 3 in the P o rt field. e. Select C ID R from the R emo te list. f. Specify 0 . 0 . 0 . 0 /0 in the C ID R field. 5. Click Ad d . Report a bug 4 .6. Creat ing a Cust om Flavor for CloudForms Management Engine A flavor is a resource allocation profile that specifies, for example, how many virtual CPUs and how much RAM can be allocated to an instance. You can, for example, run CloudForms Management Engine on a RHEL OpenStack Platform m1.large flavor, which specifies a virtual machine with 4 cores, 8GB RAM, and 80GB disk space. This procedure explains how to create a custom flavor to suit the specific requirements of the CloudForms Management Engine appliance. 33 Red Hat Cloud Infrast ruct ure 5 Q uick St art for Red Hat Ent erprise Linux O penSt ack Plat form and Red Hat Clo 1. From the OpenStack D ashboard, in the Ad mi n tab, click Fl avo rs under the System P anel menu. 2. Click C reate Fl avo r. 3. Configure the settings to define a flavor that meets CloudForms Management Engine system requirements: a. Enter a name for the flavor. b. Enter the following settings: VC P Us: 4 R AM MB: 6 14 4 R o o t D i sk G B: 4 5 Ephemeral D i sk G B: 0 Swap D i sk MB: 0 4. Click C reate Fl avo r. Report a bug 4 .7. Launching t he CloudForms Management Engine Inst ance 1. From the OpenStack D ashboard, in the P ro ject tab, click In st an ces under the C o mp u t e menu. 2. Click Launch Instance. 3. Enter a name for the instance. 4. Select the custom flavor for your instance. The flavor selection determines the computing resources available to your instance. The resources used by the flavor are displayed in the Flavo r D et ails pane. 5. Enter 1 in the Instance C o unt field. 6. Select the Bo o t fro m i mag e boot option from the Instance Bo o t So urce list. A new field for Imag e Name will be displayed. Select the image from the drop-down list. 7. Click Netwo rki ng then select a network for the instance by clicking the + (plus) button for the network from Avai l abl e Netwo rks. 8. Click Launch. Report a bug 4 .8. Adding a Float ing IP Address When you create an instance, Red Hat Enterprise Linux OpenStack Platform automatically assigns it a fixed IP address in the network to which the instance belongs. This IP address is permanently associated with the instance until the instance is terminated. In addition to the fixed address, you can also assign a floating IP address to an instance. Unlike fixed IP addresses, you can modify floating IP addresses associations at any time, regardless of the state of the instances involved. 34 4 . Inst alling Red Hat CloudForms 1. At the command-line on your RHEL OpenStack Platform host, create a pool of floating IP addresses using the no va-manag e fl o ati ng create command. Replace IP_BLOCK with the desired block of IP addresses expressed in CID R (Classless Inter-D omain Routing) notation (for example 192.168.0.0/16). $ nova-manage floating create IP_BLOCK 2. In the OpenStack D ashboard, under the P ro ject tab, click Access & Secu rit y under the C o mp u t e menu. 3. In the Fl o ati ng IP s tab, click Al l o cate IP to P ro ject. The allocated IP address appears in the Fl o ati ng IP s table. 4. Locate the newly allocated IP address in the Fl o ati ng IP s table. On the same row, click Asso ci ate to assign the IP address to a specific instance. Fig u re 20. Man ag e Flo at in g IP Ad d resses D ialo g 5. Select an instance with which to associate the floating IP Ad d ress. 6. Click Asso ci ate to associate the IP address with the selected instance. Report a bug 4 .9. Creat ing a Volume Create a volume on which to host the database for the appliance. 1. From the OpenStack D ashboard, click P ro ject in the title bar. 2. Click Vo l umes. 3. Click C reate Vo l ume. 35 Red Hat Cloud Infrast ruct ure 5 Q uick St art for Red Hat Ent erprise Linux O penSt ack Plat form and Red Hat Clo Fig u re 21. T h e C reat e Vo lu me win d o w 4. Specify a name for the volume in the Vo l ume Name field. 5. Enter a description of the volume in the D escri pti o n field. 6. Leave the T ype field blank. 7. Specify 20 in the Si ze (G B) field. 8. Select No so urce, empty vo l ume from the Vo l ume So urce list. 9. Select Any Avai l abi l i ty Zo ne from the Avai l abi l i ty Zo ne list. 10. Click C reate Vo l ume. Report a bug 4 .10. At t aching t he Volume t o t he Appliance Inst ance After you have created the volume, you must attach it to the appliance instance. Attaching a volume to an instance makes that volume available to the instance as a virtual disk that can be used for storage. 1. From the OpenStack D ashboard, click P ro ject in the title bar. 2. Click Vo l umes. 36 4 . Inst alling Red Hat CloudForms 3. Click Mo re → Ed it At t ach men t s in the Acti o ns column for the volume. Fig u re 22. T h e Man ag e Vo lu me At t ach men t s win d o w 4. Select the instance for the appliance from the Attach to Instance list. 5. Click Attach Vo l ume. 6. Note the value of the Attached T o column for the volume. This is the device path that the instance uses to access the volume, and is required when you specify the location at which to configure the appliance database. Report a bug 4 .11. Accessing t he Console for t he Appliance Inst ance After you have attached the volume to the appliance, you must access the console for the appliance to configure the database. A console is a graphical user interface that allows you to interact with a virtual machine in a similar way as a physical machine. 1. Click Instances. 2. Click the name of the appliance instance. 3. Click the C o nso l e tab. 4. Click the gray status bar at the top of the console to ensure keyboard input is redirected to the console. Report a bug 4 .12. Configuring an Int ernal Dat abase 37 Red Hat Cloud Infrast ruct ure 5 Q uick St art for Red Hat Ent erprise Linux O penSt ack Plat form and Red Hat Clo CloudForms Management Engine uses a database to store information about the cloud environment it manages. You must configure a database for the appliance before you can use it to administer your cloud infrastructure. 1. Log in to the appliance using the user name ad mi n and the password smartvm. 2. Press Enter to change to the configuration menu. 3. Select 8) C o nfi g ure D atabase from the menu. 4. Choose 1) C reate key to create an encryption key. 5. Choose 1) Internal for the database location. 6. Choose a disk for the database. For example: 1) /dev/vdb: 20480 Choose disk: Enter 1 to choose /d ev/vd b for the database location. 7. When prompted, enter a three digit region ID to create a region. As your deployment grows, you can add more regions in the future to manage multiple appliances. Warning Creating a new region destroys any existing data on the selected disk. 8. Confirm the configuration when prompted. Report a bug 5. Adding Red Hat Ent erprise Linux OpenSt ack Providers t o Red Hat CloudForms Adding a Red Hat Enterprise Linux OpenStack Platform provider to Red Hat CloudForms establishes a connection between the two environments, enabling the appliance to manage the hybrid cloud environment. 5.1. Adding a Red Hat Ent erprise Linux OpenSt ack Plat form Provider 1. In a web browser, navigate to the URL of the CloudForms Management Engine console. By default, this URL is the IP address of the machine on which the appliance is installed. The web console may take several minutes to become available after installation of the appliance. 2. Enter ad mi n in the Username text field, and smartvm in the P asswo rd text field. 3. Click Lo g In. 4. Navigate to C lo u d s → Pro vid ers. 5. Click 38 C o nfi g urati o n, then click Ad d a New C l o ud P ro vi d er. 6 . Explore What 's Next 6. Enter a Name for the provider. 7. From the T ype list select O penStack. 8. Enter the Ho st Name of the provider. 9. Enter the IP Ad d ress of the provider. 10. Enter the AP I P o rt of your Keystone service. Use the default port, 50 0 0 . 11. Select the appropriate Zo ne if you have more than one available. 12. If QPID credentials were changed during the OpenStack provider install, use the AMQ P subtab to provide credentials required for the Advanced Message Queuing Protocol service on your OpenStack Nova component. 13. Fill out the C red enti al s by typing in a User ID , P asswo rd , and a verification of this password (Veri fy P asswo rd ). Use the administrative User ID and Password for your login credentials. To retrieve the credentials that were provided at the time of OpenStack deployment, see, Section 3.5.5, “ Retrieving Service D etails” Important To enable discovery of OpenStack cloud providers, ensure that the i ptabl es for the OpenStack host providing Keystone services allows port 5000 access to all hosts on the same network. 14. Click Val i d ate to validate the credentials. 15. Click Ad d . Report a bug 6. Explore What 's Next Congratulations! You have now successfully deployed Red Hat Cloud Infrastructure by installing CloudForms Management Engine on your Red Hat Enterprise Linux OpenStack Platform environment. Use CloudForms to perform a multitude of management tasks aggregating all information associated with your virtual infrastructure into a single, unified management console. For virtual environments, CloudForms provides monitoring and tracking, capacity management and planning, resource usage and optimization, virtual machine life cycle management, and policies to govern access and usage. See the following links that describe some of the management tasks you can perform in your virtualized cloud environment: Adding a Provider Provisioning Requests Performing SmartState Analysis On Hosts Viewing Capacity and Utilization Charts For a Virtual Machine Usage, Chargeback, and Timelines 39 Red Hat Cloud Infrast ruct ure 5 Q uick St art for Red Hat Ent erprise Linux O penSt ack Plat form and Red Hat Clo Report a bug 40 A. Revision Hist ory A. Revision Hist ory R evisio n 5.0- 11 Fri Jan 23 2015 BZ #1180001 - Updated the key steps required for installation. Z ac D o ver R evisio n 5.0- 10 T h u D ec 18 2014 An d rew D ah ms Removed introductory sections that have now been formed into a standalone reference. R evisio n 5.0- 9 T u e N o v 11 2014 An d rew D ah ms BZ #1161973 - Updated instructions for obtaining a Red Hat Enterprise Linux 7.0 ISO file. R evisio n 5.0- 8 T u e N o v 11 2014 B rian Mo ss BZ #1161972 - Updated instructions for obtaining the CloudForms Management Engine appliance. R evisio n 5.0- 7 Fri N o v 7 2014 BZ #1161426 - Updated the firewall rules for elasticsearch. At h en e C h an R evisio n 5.0- 6 T h u N o v 6 2014 An d rew D ah ms BZ #1160895 - Updated the minimum operating system requirements for the installer. BZ #1160894 - Updated the procedure for retrieving service details. BZ #1160893 - Added a procedure outlining how to configure host networking. BZ #1160892 - Updated the procedure for creating a deployment. R evisio n 5.0- 5 Fri O ct 31 2014 Final revision for publication. An d rew D ah ms R evisio n 5.0- 4 T h u O ct 30 2014 At h en e C h an BZ #1156049 - Added a procedure on synchronizing content in Red Hat Satellite Server. BZ #1156040 - Added a procedure on populating Red Hat Satellite Server with content. BZ #1156027 - Added a procedure on accessing the Red Hat Satellite Server user interface. R evisio n 5.0- 3 T h u O ct 30 2014 Lu cy B o p f BZ #1156254 - Updated the section on synchronizing repositories, creating a synchronization plan, and applying a synchronization schedule for Red Hat Satellite. BZ #1156246 - Updated the section on enabling the required repositories for Red Hat Satellite. BZ #1156244 - Updated the section on setting up and uploading a manifest for Red Hat Satellite. BZ #1155836 - Updated the section on installing and configuring Red Hat Satellite. BZ #1155835 - Updated the section on subscribing to the required channels for Red Hat Satellite using subscription manager. R evisio n 5.0- 2 Wed O ct 29 2014 An d rew D ah ms BZ #1154897 - Added an overview of Red Hat Satellite. BZ #1155832 - Added information on requirements for Red Hat Satellite. BZ #1156258 - Revised the content on subscribing to the required channels. R evisio n 5.0- 1 T u e O ct 21 2014 B rian Mo ss BZ #1153026 - Updated the procedure for configuring an internal database. R evisio n 5.0- 0 Wed O ct 15 2014 Initial creation for Red Hat Cloud Infrastructure 5.0. An d rew D ah ms 41 Red Hat Cloud Infrast ruct ure 5 Q uick St art for Red Hat Ent erprise Linux O penSt ack Plat form and Red Hat Clo [1] http ://www.mo z illa.o rg /en-US/firefo x/o rg aniz atio ns /faq / 42