1
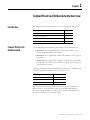
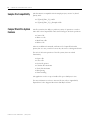
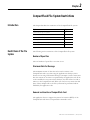
CompactFlash File
System on
Logix5000
Controllers
1756-L61, 1756-L62, 1756-L63,
1756-L64, 1756-L60M03SE
Application Solution
Important User Information
Solid state equipment has operational characteristics differing from those of
electromechanical equipment. Safety Guidelines for the Application, Installation and
Maintenance of Solid State Controls (Publication SGI-1.1 available from your local
Rockwell Automation sales office or online at http://www.ab.com/manuals/gi)
describes some important differences between solid state equipment and hard-wired
electromechanical devices. Because of this difference, and also because of the wide
variety of uses for solid state equipment, all persons responsible for applying this
equipment must satisfy themselves that each intended application of this equipment is
acceptable.
In no event will Rockwell Automation, Inc. be responsible or liable for indirect or
consequential damages resulting from the use or application of this equipment.
The examples and diagrams in this manual are included solely for illustrative purposes.
Because of the many variables and requirements associated with any particular
installation, Rockwell Automation, Inc. cannot assume responsibility or liability for
actual use based on the examples and diagrams.
No patent liability is assumed by Rockwell Automation, Inc. with respect to use of
information, circuits, equipment, or software described in this manual.
Reproduction of the contents of this manual, in whole or in part, without written
permission of Rockwell Automation, Inc. is prohibited.
Throughout this manual, when necessary we use notes to make you aware of safety
considerations.
WARNING
IMPORTANT
ATTENTION
Identifies information about practices or circumstances that can
cause an explosion in a hazardous environment, which may lead
to personal injury or death, property damage, or economic loss.
Identifies information that is critical for successful application
and understanding of the product.
Identifies information about practices or circumstances that can
lead to personal injury or death, property damage, or economic
loss. Attentions help you:
• identify a hazard
• avoid a hazard
• recognize the consequence
SHOCK HAZARD
Labels may be on or inside the equipment (e.g., drive or motor) to
alert people that dangerous voltage may be present.
BURN HAZARD
Labels may be on or inside the equipment (e.g., drive or motor) to
alert people that surfaces may reach dangerous temperatures.
CompactFlash, Logix5000, Allen-Bradley, Rockwell Automation, TechConnect, PowerFlex, CompactLogix, ControlLogix, and RSLogix 5000
are trademarks of Rockwell Automation, Inc.
Trademarks not belonging to Rockwell Automation are property of their respective companies.
Table of Contents
Important User Information . . . . . . . . . . . . . . . . . . . . . . . . . . . . . . . . . . 2
Preface
Purpose of This Manual. . . . . . . . . . . . . . . . . . . . . . . . . . . . . . . . . . . . . . 5
Who Should Use This Manual. . . . . . . . . . . . . . . . . . . . . . . . . . . . . . . . . 5
Additional Resources . . . . . . . . . . . . . . . . . . . . . . . . . . . . . . . . . . . . . . . . 5
Chapter 1
CompactFlash Card
Enhancements Overview
Introduction . . . . . . . . . . . . . . . . . . . . . . . . . . . . . . . . . . . . . . . . . . . . . . . 7
CompactFlash Card Enhancements . . . . . . . . . . . . . . . . . . . . . . . . . . . . 7
Sample File Compatibility . . . . . . . . . . . . . . . . . . . . . . . . . . . . . . . . . . . . 8
CompactFlash File System Features . . . . . . . . . . . . . . . . . . . . . . . . . . . . 8
Possible Applications of the CompactFlash File System . . . . . . . . . . . . 9
Chapter 2
CompactFlash File System
Restrictions
Introduction . . . . . . . . . . . . . . . . . . . . . . . . . . . . . . . . . . . . . . . . . . . . . . 11
Restrictions of the File System . . . . . . . . . . . . . . . . . . . . . . . . . . . . . . . 11
Number of Open Files . . . . . . . . . . . . . . . . . . . . . . . . . . . . . . . . . . 11
Maximum Data Per Message. . . . . . . . . . . . . . . . . . . . . . . . . . . . . . 11
Removal and Insertion of CompactFlash Card . . . . . . . . . . . . . . . 11
Minimum File Size/Resolution . . . . . . . . . . . . . . . . . . . . . . . . . . . . 12
Memory Resources and Performance. . . . . . . . . . . . . . . . . . . . . . . 12
Controllers Supported . . . . . . . . . . . . . . . . . . . . . . . . . . . . . . . . . . . 12
Limited Life . . . . . . . . . . . . . . . . . . . . . . . . . . . . . . . . . . . . . . . . . . . 12
Read or Write Portions of a File . . . . . . . . . . . . . . . . . . . . . . . . . . . 12
Number of Files that Can Be Created . . . . . . . . . . . . . . . . . . . . . . 12
Chapter 3
CompactFlash Commands
Introduction . . . . . . . . . . . . . . . . . . . . . . . . . . . . . . . . . . . . . . . . . . . . . . 13
CF_Data_Working Tag . . . . . . . . . . . . . . . . . . . . . . . . . . . . . . . . . . . . . 14
Create Command . . . . . . . . . . . . . . . . . . . . . . . . . . . . . . . . . . . . . . . . . . 15
Set Up the Create Command . . . . . . . . . . . . . . . . . . . . . . . . . . . . . 16
Write Command. . . . . . . . . . . . . . . . . . . . . . . . . . . . . . . . . . . . . . . . . . . 16
Set Up the Write Command . . . . . . . . . . . . . . . . . . . . . . . . . . . . . . 17
Read Command . . . . . . . . . . . . . . . . . . . . . . . . . . . . . . . . . . . . . . . . . . . 18
Set Up the Read Command. . . . . . . . . . . . . . . . . . . . . . . . . . . . . . . 18
Delete Command . . . . . . . . . . . . . . . . . . . . . . . . . . . . . . . . . . . . . . . . . . 19
Set Up the Delete Command . . . . . . . . . . . . . . . . . . . . . . . . . . . . . 19
Determine the Number of Bytes to Read or Write . . . . . . . . . . . . . . . 19
Chapter 4
Example Application
3
Introduction . . . . . . . . . . . . . . . . . . . . . . . . . . . . . . . . . . . . . . . . . . . . . . 21
Requirements . . . . . . . . . . . . . . . . . . . . . . . . . . . . . . . . . . . . . . . . . . . . . 21
Configure Message Instructions . . . . . . . . . . . . . . . . . . . . . . . . . . . . . . 21
Set the Controller Slot Number . . . . . . . . . . . . . . . . . . . . . . . . . . . 21
Create a File on the CompactFlash Card . . . . . . . . . . . . . . . . . . . . . . . 23
Publication LOGIX-AP007B-EN-P - January 2007
4
Table of Contents
Write Data to the CompactFlash Card . . . . . . . . . . . . . . . . . . . . . . . . . 26
Read Data from the CompactFlash Card . . . . . . . . . . . . . . . . . . . . . . . 28
Delete a File on the CompactFlash Card . . . . . . . . . . . . . . . . . . . . . . . 29
Build an Example . . . . . . . . . . . . . . . . . . . . . . . . . . . . . . . . . . . . . . . . . . 30
Set Up Recipe Data . . . . . . . . . . . . . . . . . . . . . . . . . . . . . . . . . . . . . 31
Create the File . . . . . . . . . . . . . . . . . . . . . . . . . . . . . . . . . . . . . . . . . 33
Write the Recipe. . . . . . . . . . . . . . . . . . . . . . . . . . . . . . . . . . . . . . . . 34
Read the Recipe . . . . . . . . . . . . . . . . . . . . . . . . . . . . . . . . . . . . . . . . 34
Delete the Recipe . . . . . . . . . . . . . . . . . . . . . . . . . . . . . . . . . . . . . . . 34
Appendix A
Format a CompactFlash Card
Introduction . . . . . . . . . . . . . . . . . . . . . . . . . . . . . . . . . . . . . . . . . . . . . . 35
Requirements . . . . . . . . . . . . . . . . . . . . . . . . . . . . . . . . . . . . . . . . . . . . . 35
Format with a Personal Computer and a CompactFlash Card Reader 35
Format RSLogix 5000 Software and a Logix5000 Controller with
CompactFlash Support . . . . . . . . . . . . . . . . . . . . . . . . . . . . . . . . . . . . . 37
Appendix B
Performance Data
Introduction . . . . . . . . . . . . . . . . . . . . . . . . . . . . . . . . . . . . . . . . . . . . . . 43
Performance Data Tables . . . . . . . . . . . . . . . . . . . . . . . . . . . . . . . . . . . 43
Access 450 Bytes . . . . . . . . . . . . . . . . . . . . . . . . . . . . . . . . . . . . . . . 43
Access 4500 Bytes . . . . . . . . . . . . . . . . . . . . . . . . . . . . . . . . . . . . . . 44
Access 4500 Bytes with an HMI Load . . . . . . . . . . . . . . . . . . . . . . 44
Access 4500 Bytes with 16 Message Instructions. . . . . . . . . . . . . . 44
Access 4500 Bytes and Periodic Tasks . . . . . . . . . . . . . . . . . . . . . . 44
Appendix C
Troubleshoot the CompactFlash
File System
Introduction . . . . . . . . . . . . . . . . . . . . . . . . . . . . . . . . . . . . . . . . . . . . . . 45
Status User-defined Data Type . . . . . . . . . . . . . . . . . . . . . . . . . . . . . . . 45
Tag Layout . . . . . . . . . . . . . . . . . . . . . . . . . . . . . . . . . . . . . . . . . . . . 46
Message Error Codes . . . . . . . . . . . . . . . . . . . . . . . . . . . . . . . . . . . . . . . 47
Appendix D
Expand the Code to Support More Introduction . . . . . . . . . . . . . . . . . . . . . . . . . . . . . . . . . . . . . . . . . . . . . . 49
Modify the Application to Access More Data . . . . . . . . . . . . . . . . . . . 49
than 4500 Bytes of Data
Access 10,000 Bytes Example . . . . . . . . . . . . . . . . . . . . . . . . . . . . . 50
Modify the Arrays . . . . . . . . . . . . . . . . . . . . . . . . . . . . . . . . . . . . . . 51
Modify the Data Element . . . . . . . . . . . . . . . . . . . . . . . . . . . . . . . . 51
Rockwell Automation Support . . . . . . . . . . . . . . . . . . . . . . . . . . . . . . . 57
Installation Assistance . . . . . . . . . . . . . . . . . . . . . . . . . . . . . . . . . . . 57
New Product Satisfaction Return . . . . . . . . . . . . . . . . . . . . . . . . . . 57
Publication LOGIX-AP007B-EN-P - January 2007
Preface
Purpose of This Manual
This manual describes how you can use the CompactFlash file system on
Logix5000 controllers.
Who Should Use
This Manual
You should use this manual if you program applications that use
CompactFlash card and RSLogix 5000 programming software with the
following Logix5000 controllers:
• ControlLogix controller
Additional Resources
This table lists Logix products and documentation that may be valuable as you
program your application.
Related Documentation
Catalog
Number
Title
Publication
Number
1756-L61,
1756-L62,
1756-L63,
1756-L64,
1756-L60M03SE
Logix5000 Controllers Common Procedures
Programming Manual
1756-PM001
1756-L61,
1756-L62,
1756-L63,
1756-L64,
1756-L60M03SE
Logix5000 General Instruction Set Reference
1756-RM041
To view or download these publications, go to:
http://www.literature.rockwellautomation.com.
To obtain a hard copy, contact your Rockwell Automation distributor or sales
representative.
5
Publication LOGIX-AP007B-EN-P - January 2007
6
Notes:
Publication LOGIX-AP007B-EN-P - January 2007
Chapter
1
CompactFlash Card Enhancements Overview
Introduction
CompactFlash Card
Enhancements
This chapter reviews the enhancements for the CompactFlash file system.
Topic
Page
CompactFlash Card Enhancements
7
Sample File Compatibility
8
CompactFlash File System Features
8
Possible Applications of the CompactFlash File System
9
The CompactFlash file system has gone through several enhancements.
• Version 11: The CompactFlash card could only be used for saving
project image files with the NVS feature.
• Version 12: The CompactFlash card stored firmware as well as project
image files.
• Version 16: The CompactFlash card functionality has been extended to
include a file system that can be used for storing tag values, recipes, log
data, and other user data.
The CompactFlash file system as described in this document is available on the
following Logix5000 controllers, with version 16.x or later.
ControlLogix Controller
Version
1756-L6X/A
16.x
1756-L6X/B
16.x
1756-L60M03SE
16.x
This document explains each feature and provides you with examples that
illustrate how to use those features. After you read and understand this
document and the examples, you will be able to add the CompactFlash file
system functionality to any of your programs.
7
Publication LOGIX-AP007B-EN-P - January 2007
8
CompactFlash Card Enhancements Overview
Sample File Compatibility
This document is compatible with the sample projects, version 3.2, dated
January 2007.
• CF_Read_Write_V3_2.ACD
• CF_Read_Write_V3_2_Example.ACD
CompactFlash File System
Features
The file system has the ability to perform a variety of operations to read or
write data to the CompactFlash card. The following are the basic operations:
•
•
•
•
Create a file
Write to a file
Read from a file
Delete a file
There is an additional command, verification if a CompactFlash card is
present, but as a user you will not access this, this runs as a background check.
For each of the basic operations of the file system, there are related
functionality.
•
•
•
•
•
•
•
Open a file
Close a file
Set the file pointer
Calculate file checksums
Verify file checksums
Data parsing
Error handling
The application code is set up to handle a file up to 4500 bytes in size.
For more information on how to increase file size, refer to Appendix D,
Expand the Code to Support More than 4500 Bytes of Data.
Publication LOGIX-AP007B-EN-P - January 2007
CompactFlash Card Enhancements Overview
Possible Applications of
the CompactFlash File
System
9
Using RSLogix 5000 software, version 16 or later, and using the application
provided in this publication, you can read and write data to the CompactFlash
card. This could include tag values, recipes, or data log information, just to
name a few.
A possible application would be to store a collection of recipes on the
CompactFlash card. Whenever a recipe needs data, it can be read from a file
on the CompactFlash card. Then if changes were made to the recipe the data
could then be written back to the CompactFlash card for later use.
CompactFlash cards can also be read and written to with a personal computer,
using a CompactFlash card reader. However, using the methods described in
this document, tag values will be written out as binary data to the
CompactFlash card.
Attempting to open the file in a text editor will work, but the contents
displayed will be the ASCII equivalent of the binary data. The application will
not allow for files to be created on a personal computer and then read into the
controller, because checksums are embedded into the data. If you create a file
on the personal computer, it will not have the checksums embedded. When
the data is read it will fail the checksum test.
There are numerous possibilities with this feature, but there are some clear
restrictions that are explained in Chapter 2, CompactFlash File System
Restrictions.
Publication LOGIX-AP007B-EN-P - January 2007
10
CompactFlash Card Enhancements Overview
Notes:
Publication LOGIX-AP007B-EN-P - January 2007
Chapter
2
CompactFlash File System Restrictions
Introduction
Restrictions of the File
System
This chapter describes the restrictions of the CompactFlash file system.
Topic
Page
Restrictions of the File System
11
Number of Open Files
11
Maximum Data Per Message
11
Memory Resources and Performance
12
Limited Life
12
Read or Write Portions of a File
12
The following are the restrictions of the CompactFlash file system.
Number of Open Files
The total number of open files at one time is one.
Maximum Data Per Message
The maximum amount of data that can be read or written to the
CompactFlash card at one time using the application is 450 bytes, this is
because we are using CIP Generic Messages. Attempts to read or write more
than this amount at one time is not permitted by the application code. If the
code is modified to access more than 450 bytes, the data will not be read or
written to the CompactFlash card. When you need to access more than 450
bytes of data, multiple calls to the file system must be performed and are
handled by the application code.
Removal and Insertion of CompactFlash Card
The application does not support the removal or insertion (RIUP) of the
CompactFlash card when a CompactFlash command is active.
11
Publication LOGIX-AP007B-EN-P - January 2007
12
CompactFlash File System Restrictions
Minimum File Size/Resolution
The minimum file size supported is 450 bytes. If you create a file and write 4
bytes to the file the application will actually write 450 bytes. The same
concepts applies for reads and writes. If you read or write 500 bytes, 900 bytes
will be read or written.
Memory Resources and Performance
The subroutines described in this document depend on messaging to perform
the required operations to the CompactFlash card. These operations use the
same memory resources that might be needed to perform other messaging.
The performance of the CompactFlash card operations will be affected by:
• the communications system overhead time slice and amount of other
messaging or HMI communications that are occurring in the controller.
You can configure the System Overhead Time Slice from the Controller
Properties dialog.
• the task structure of the program. Motion, periodic tasks, or event tasks
slow performance when accessing the CompactFlash card.
Refer to Appendix B, Performance Data for more information.
Controllers Supported
Only the Logix series of controllers support read/write access to the
CompactFlash card using this feature.
Limited Life
Due to the limited life of any CompactFlash card, write to the card only when
necessary. Do not write to the CompactFlash card every program scan. Write
to the card only at predetermined intervals, such as a shift change.
Read or Write Portions of a File
The application code does not support reading or writing to portions of a file
that already exists. Only the entire file can be read or written. If a part of the
file needs to be modified, read the entire file from the CompactFlash card,
make changes, and then write the file back to the card.
Number of Files that Can Be Created
Currently, the application only supports creating files on the root directory.
Because the FAT16 format is used on the CompactFlash card you are limited
to 250 files. This is a Microsoft product limitation.
Publication LOGIX-AP007B-EN-P - January 2007
Chapter
3
CompactFlash Commands
Introduction
This chapter describes four of the CompactFlash commands, the ControlFlash
Data Working Tag, and how to determine the number of bytes to read or write.
Topic
Page
CF_Data_Working Tag
14
Create Command
15
Write Command
16
Read Command
18
Delete Command
19
Determine the Number of Bytes to Read or Write
19
The file system has the ability to perform a variety of operations to read or
write data to the CompactFlash card. There are four basic commands that you
can access:
•
•
•
•
Create a file
Write to a file
Read from a file
Delete a file
There is an additional command, verification if a CompactFlash card is
present, but as a user you will not access this, this runs as a background check.
13
Publication LOGIX-AP007B-EN-P - January 2007
14
CompactFlash Commands
CF_Data_Working Tag
Before explaining the four commands, you need to understand the layout of a
key tag in the application. The CF_Data_Working tag, a user-defined data type
tag (UDT), is at the program scope.
This is an example of a user-defined data type tag or UDT.
When a command is executed, the routines use this tag to get all the
information needed to perform the command, such as file name, data, or
number of bytes to read or write. The table below is a layout of the UDT in the
file structure area.
Publication LOGIX-AP007B-EN-P - January 2007
CompactFlash Commands
15
The UDT tag's type is called CF_File_Structure. This will be important if you
create a Recipe_Manager. The only 3 tags you will need to manipulate in the
UDT are:
• File_Name
The name of the file that will be on the CompactFlash card. This name
can be up to 140 characters in length. The file name must include a file
extension. The .xxx is included in the 140 characters. For example,
testfile1.dat would be an 11-character file name. The format of the
filename follows standard Microsoft file naming conventions.
• Bytes_to_RW
The number of bytes that you want to read or write to a file.
• Data
The SINT array is where you place the data that you want to write or
where data read will be put. The baseline application supports up to
4500 bytes of data, but can easily be expanded.
Refer to Appendix D, Expand the Code to Support More than 4500
Bytes of Data, for more information.
Do not manipulate the other tags. They are used by the routines as they
execute; manipulating them could cause unexpected changes to the file
currently opened.
Create Command
Use the Create command when a file does not exist on the CompactFlash card
and you want to create one. A file must exist on the CompactFlash card before
you can use the other three commands.
The Create command is broken down into four commands:
• Sets the file attribute parameters.
You do not need to manipulate the file attribute parameters.
• Creates the file.
When a Create command is performed, the file is created and then
opened.
• Closes the file.
• Error handling is performed, if needed.
Publication LOGIX-AP007B-EN-P - January 2007
16
CompactFlash Commands
Set Up the Create Command
To set up the Create command, define the filename including the file
extension, for example, testfile1.dat. To execute the Create command, set the
execute_CF_Create_File bit. The application code resets this bit.
Refer to Chapter 4, Example Application for complete instructions.
Write Command
Use the Write command to write data to the CompactFlash card. A file must
exist on the CompactFlash card before executing this command.
The Write command is broken into 11 commands:
• Data parsing
Only 450 bytes can be written at one time to the file. Therefore, writing
to the file is broken down into 450 byte chunks.
This moves the data into the data_to_write array from the data array in
the CF_Data_Working UDT, putting in the place holders for the
checksums. It also verifies that all arrays used are large enough to handle
the data.
• checksum calculations
This calculates the checksum for each 450 byte chunk of data and places
it into the place holders created in Data parsing.
•
•
•
•
•
•
The file is open.
The file pointer is set.
The data is written.
The file is closed.
The file is opened.
The file is read.
Only 450 bytes can be read at one time from the file. Therefore, reading
from the file is broken down into 450 byte chunks. This moves the data
into the data_read array.
Publication LOGIX-AP007B-EN-P - January 2007
CompactFlash Commands
17
• The checksums are verified and the data in data_to_write and data_read
are compared to make sure they are equal.
TIP
If the checksums are not calculated, compared, and
parsed, the file is closed and the write sequence is
restarted from the beginning.
The application will attempt to write a file four times.
After the fourth failure, a checksum error is set.
• The file is closed.
• Error handling is performed, if needed.
Set Up the Write Command
To set up the write command, you need to set the bit execute_CF_Write_Data.
The application code handles resetting this bit.
1. Define a file name including a file extension, for example, testfile1.dat.
2. Enter the number of bytes you want to write to the file.
3. Move the data to be written in the CF_Data_Working UDT into the
Data array.
We recommended that you clear the data array before moving the data
into the array. This will clear out any data from previous read or write
commands.
Refer to Chapter 4, Example Application for complete instructions.
Publication LOGIX-AP007B-EN-P - January 2007
18
CompactFlash Commands
Read Command
The Read command is used when you want to read data from the
CompactFlash card. A file must exist on the CompactFlash card before
executing this command.
The read command is broken into six commands:
• The file is open.
• The file pointer is set.
• The file is read.
Only 450 bytes can be read at one time from the file. Therefore, reading
from the file is broken down into 450 byte chunks. This moves the data
into the data_read array.
• The checksums are calculated and compared to those in the file. The
data is then parsed into the Data array in the CF_Data_Working UDT.
TIP
If the checksums are not calculated, compared, and parsed,
the file closes and the read sequence is restarted from the
beginning.
The application will attempt to read the file four times.
After the fourth failure a checksum error is set.
• The file is closed.
• Error handling is performed, if needed.
Set Up the Read Command
To set up the read command, you need to set the bit execute_CF_Read_Data.
The application code handles resetting this bit.
1. Define a file name including a file extension, for example, testfile1.dat.
2. Enter the number of bytes you want to read from the file.
3. Move the data from the data array in the CF_Data_Working UDT when
the read is completed.
Only 450 bytes can be read at one time from the file. Therefore, reading
from the file is broken down into 450 byte chunks. This moves the data
into the data_read array.
We recommended that you clear the data array before moving the data
into the array. This will clear out any data from previous read or write
commands.
Refer to Chapter 4, Example Application for complete instructions.
Publication LOGIX-AP007B-EN-P - January 2007
CompactFlash Commands
Delete Command
19
Use the Delete command when a file needs to be deleted from the
CompactFlash card. A file must exist on the CompactFlash card before you
can use the Delete command.
The delete command consists of two commands:
• Delete the file.
• Error Handling is performed, if needed.
Set Up the Delete Command
To set up the Delete command:
• define a filename including a file extension, for example, testfile1.dat.
• set the bit execute_CF_Delete_File. The application code handles
resetting this bit.
Refer to Chapter 4, Example Application for complete instructions.
Determine the Number of
Bytes to Read or Write
Tags of any data type, including arrays, user-defined types (UDT), and arrays
of UDT tags can be read and written to the CompactFlash card.
When reading and writing data to the CompactFlash card, you need to know
how many bytes are actually being read or written. The following chart
indicates the type and size of the atomic data types. The minimum memory
allocation for a tag is 4 bytes. When you create a tag that stores data that
requires less than four bytes, the controller allocates four bytes, but the data
only fills the part it needs.
Data Type Bits
31
16 15
8 7
1
0
BOOL
Not used
0 or 1
SINT
Not used
-128…+127
INT
Not used
-32,768…+32767
DINT
-2,147,483,648…+2,147,483,647
REAL
-3.40282347E38…-1.17549435E-38 (negative values)
0
1.17549435E-38…3.40282347E38 (positive values)
For example, if one DINT type tag value is being written to the CompactFlash
card, 4 bytes is the amount of data that will be written. If an array of DINT
tags is being written, the number of bytes being written will be 4 times the size
of the array.
Publication LOGIX-AP007B-EN-P - January 2007
20
CompactFlash Commands
For example, the tag MYDINTS[100] will be 4 times 100 elements, or 400
bytes of data. Similarly, if a UDT is used, 1 instance of that UDT will be the
sum of the sizes of all the data types within the structure.
TIP
When reading or writing to the CompactFlash card, it is
best to use UDT tags. This lets you mix different data types
together and lets you know the number of bytes that will
need to be transferred to and from the card.
The following is a UDT that is the recipe for making waffles.
As you can see, the total size of the recipe is 72 bytes. This means that you
would want to read or write 72 bytes of data to the CompactFlash card. This
would be entered into the Bytes_to_RW element of the CF_File_Structure
UDT.
Publication LOGIX-AP007B-EN-P - January 2007
Chapter
4
Example Application
Introduction
Requirements
You should now have a good understanding of the basics using the
CompactFlash file system. This example application brings all the concepts
together.
Topic
Page
Requirements
21
Configure Message Instructions
21
Create a File on the CompactFlash Card
23
Write Data to the CompactFlash Card
26
Read Data from the CompactFlash Card
28
Delete a File on the CompactFlash Card
29
Build an Example
30
You must have:
• the RSLogix 5000 software, version 16.00 or later, installed and open.
• a CompactFlash card installed. The application detects if one is present.
Configure Message
Instructions
The majority of this configuration has already been performed for you in the
ACD file. The only configuration you need to do is set the controller slot
number.
Set the Controller Slot Number
1. Open the project CF_Read_Write_V3_2.ACD
21
Publication LOGIX-AP007B-EN-P - January 2007
22
Example Application
2. Open the MainPrograms tags.
3. Expand the MainPrograms tags.
4. Double-click Program Tags.
Make sure the Monitor Tags tab is selected in the tag editor.
5. Sort the tags by Name.
6. Find the tag Controller_Slot_Number.
Publication LOGIX-AP007B-EN-P - January 2007
Example Application
23
7. Enter the slot number where the controller will be located in the value
column.
When the application enters Run mode, the D_CF_Intialization routine
executes. The paths for all the message instructions will be modified to
contain the slot number you just entered. You can add a new rung zero
to the D_CF_Intialization routine to move the slot number into the tag
Controller_Slot_Number.
8. Download the project to the controller and go online.
9. Put the controller into Run mode.
Create a File on the
CompactFlash Card
Before you can perform any read or write commands to a file, you must create
the file on the CompactFlash card first.
1. Open the MainPrograms tags.
Make sure the Monitor Tags tab is selected in the tag editor.
2. Sort the tags by Name.
3. Find the tag CF_Data_Working.
This is a user-defined data type (UDT).
4. Click the + next to the tag to expand the CF_Data_Working tag.
The FileName element of the UDT CF_Data_Working needs to be
modified.
FileName, as it implies, is the name of the file you want to perform an
operation on, in this case create. The file name can be up to 140
characters in length. You must include a file extension.
5. Click in the value field.
The Browse button appears.
Publication LOGIX-AP007B-EN-P - January 2007
24
Example Application
6. Click Browse
and the string browser window displays.
7. Enter testfile1.dat and click OK.
8. Switch the Scope to CF_Read_Write in the tag monitor to view the
Controller Scoped tags.
Publication LOGIX-AP007B-EN-P - January 2007
Example Application
25
9. Sort the tags by name.
10. Find the tag execute_CF_Create_File.
11. Enter a 1 in the value field and press Enter.
The tag goes back to a 0. This indicates that the application has
attempted to create your file.
12. Find the tag CF_Create_Seq_Status.
13. Click + to expand the tag.
This is a user-defined data type (UDT). As the tag name indicates, this
will give you status on the create file sequence. There is an element of
the UDT called Overall_Status. At this point, it should be equal to 1.
This means that the file was created successfully.
If another value is present, refer to AppendixC, Troubleshoot the
CompactFlash File System.
Publication LOGIX-AP007B-EN-P - January 2007
26
Example Application
Write Data to the
CompactFlash Card
Set up how the program is going to write the data to the CompactFlash card.
1. Switch to the MainPrograms tags.
Make sure the Monitor Tags tab is selected in the tag editor.
2. Sort the tags by Name.
3. Find the tag CF_Data_Working.
This is a user-defined data type (UDT).
4. Click + to expand the tag.
Leave the filename the same as the previous section, testfile1.dat. There
is an element in the UDT called CF_Data_Working.Bytes_to_RW. This
tells the application how many bytes in this case will be written to the
file.
5. Find CF_Data_Working.Bytes_to_RW and enter a value of 450.
This means that 450 bytes will be written to the file testfile1.dat.
6. Expand the data element in the UDT, (CF_Data_Working.Data).
This array holds the data to be written to the file.
Publication LOGIX-AP007B-EN-P - January 2007
Example Application
27
7. Enter a value of 100 in the first element of the Data array.
8. Switch the Scope to CF_Read_Write in the tag monitor to view the
Controller Scoped tags.
9. Sort the tags by name.
10. Find the tag execute_CF_Write_Data.
11. Enter a 1 in the value field and press Enter.
The tag will go back to a 0. This indicates that the application has
attempted to write to your file.
12. Find the tag CF_Write_Seq_Status and click + to expand the tag.
This is a user-defined data type (UDT). As the tag name indicates, this
will give you status on the write file sequence. There is an element of the
UDT called Overall_Status. At this point, it should be equal to 1. This
means that the file was written successfully.
If another value is present, refer to AppendixC, Troubleshoot the
CompactFlash File System.
Publication LOGIX-AP007B-EN-P - January 2007
28
Example Application
Read Data from the
CompactFlash Card
Determine how the program is going to read the data from the CompactFlash
card.
1. Switch to the MainPrograms tags.
Make sure the Monitor Tags tab is selected in the tag editor.
2. Sort the tags by Name.
3. Find the tag CF_Data_Working.
This is a user-defined data type (UDT).
4. Click + to expand the tag.
5. Use the file name from the previous section, testfile1.dat.
The UDT element Bytes_to_RW remains set at 450. The UDT element
called Bytes_to_RW tells the application how many bytes in this case
will be read from the file.
6. Enter a value of 127 in the first element of the data array,
(CF_Data_Working.Data).
7. Switch to view Controller Scoped tags in the tag monitor.
8. Sort the tags by name.
9. Find the tag execute_CF_Read_Data.
Publication LOGIX-AP007B-EN-P - January 2007
Example Application
29
10. Enter a 1 in the value field and press Enter.
The tag will go back to a 0. This indicates that the application has
attempted to read from your file.
11. Find the tag CF_Read_Seq_Status and click + to expand the tag.
This is a user-defined data type (UDT). As the tag name indicates, this
will give you status on the read file sequence. There is an element of the
UDT called Overall_Status. At this point, it should be equal to 1. This
means that the file was created successfully.
If another value is present, refer to AppendixC, Troubleshoot the
CompactFlash File System.
12. Switch to view MainProgram Scoped tags in the tag monitor.
13. Find the tag CF_Data_Working.
This is a user-defined data type (UDT).
14. Click + to expand the tag.
15. Expand the SINT array Data in the UDT.
Earlier in this section, you entered a value of 127. The value is now 100.
This is what you wrote to the file testfile1.dat in the last section and was
read back.
Delete a File on the
CompactFlash Card
Determine how the program is going to delete a file from the CompactFlash
card.
1. Open the MainPrograms tags.
Make sure the Monitor Tags tab is selected in the tag editor.
2. Sort the tags by Name.
3. Find the tag CF_Data_Working.
This is a user-defined data type (UDT). Expand this by clicking in the +
next to the tag. There are no elements of the UDT CF_Data_Working
that need to be modified. The file name testfile1.dat is already entered.
You want to delete this file.
4. Switch to view Controller Scoped tags in the tag monitor.
5. Sort the tags by name.
Publication LOGIX-AP007B-EN-P - January 2007
30
Example Application
6. Find the tag execute_CF_Delete_File.
7. Enter a 1 in the value field and press Enter.
The tag will go back to a 0. This indicates that the application has
attempted to delete your file.
8. Find the tag CF_Delete_Seq_Status and click + to expand the tag.
This is a user-defined data type (UDT). As the tag name indicates, this
will give you status on the file sequence. There is an element of the UDT
called Status. It should be equal to 1. This means that the file was
deleted successfully.
If another value is present, refer to AppendixC, Troubleshoot the
CompactFlash File System.
Build an Example
You will build an example application with the waffle recipe from the last
chapter.
1. Open the file CF_Read_Write_V3_2_Example.ACD.
This code will handle four recipes.
In the controller organizer under the MainProgram, you will see a
routine called Recipe_Manager. This routine shows a basic recipe
manager and how to interface into the baseline CompactFlash
application.
Rung zero is used to make sure that you do not try and access two
recipes at the same time or change a CompactFlash command when one
is currently executing. All you would need to do is enter a value of 1, 2,
3, or 4 in Recipe_Number and a value of 1 to 4, depending on the
CompactFlash command you want into Recipe_Command.
1 = create
2 = write
3 = read
4 = delete
There are four rungs remaining; each rung is for a different recipe. In
this example, you are only going to look at one of them.
Publication LOGIX-AP007B-EN-P - January 2007
Example Application
31
2. Open the Recipe_Manager routine.
3. Look at the next rung (rung 1).
The first conditions determine that this recipe and a command have
been selected. After this there are 5 branches.
Branch
Description
1
Handles the command to write data to the CompactFlash
card.
2
Handles creating the file on the CompactFlash card.
3
Handles the reading of data from the CompactFlash card
and placing it into the Recipe.
4
Handles deleting the file on the CompactFlash card.
5
Handles clearing the Recipe_Manager for the next recipe
and command.
Set Up Recipe Data
The next item to do is to set the application to perform commands to the
CompactFlash Card. First you need to set up recipe data to store to the card.
1. Open the Controller Tags from the controller organizer.
2. Click Monitor Tags.
Publication LOGIX-AP007B-EN-P - January 2007
32
Example Application
3. Scroll down until you find the tag Recipe1.
This is the UDT (Recipe Data) we discussed in the previous chapter.
4. Expand the tag and enter some data.
Earlier we discussed a program scope tag called CF_Working_Data.
When a command is executed, the routines use this tag to get all
information, such as file name, data, number of bytes to read or write.
In the CompactFlash Commands chapter, we manipulated data directly
in this tag, but since we are now interested in handling multiple files, we
will not. We will create new tags that have this type for each recipe. The
Recipe_Manager code will handle the copying of this data.
5. Find the tag Recipe_1_CF in the controller organizer.
6. Expand the tag.
The first element to manipulate will be the File_Name.
7. Enter recipe1.dat.
Remember to use a file extension.
Publication LOGIX-AP007B-EN-P - January 2007
Example Application
33
8. Define how many bytes you want to read/write to the file.
From the previous section, a waffle recipe was 72 bytes in size.
9. Enter 72 in the tag Bytes_to_RW.
The last piece of data to manipulate is the Data. You will copy the data
from the waffle Recipe1 into this array. This is done in the
Recipe_Manager code.
TIP
Remember to set the tag controller_slot_number and to
make sure a CompactFlash card is installed in the
controller.
10. Save the project and download it to the controller.
11. Go online with the controller.
You are now ready to read and write your recipe data to the
CompactFlash card.
12. Open the Controller tags and go to the Monitor tab.
13. Look for the tags Recipe_Commmand and Recipe_Number.
You will use the first recipe as an example.
Create the File
Tell the Recipe_Manager routine to create a file.
1. Enter a value of 1 in the Recipe_Number tag.
This tells the Recipe_Manager to work with Recipe1.
2. Enter a value of 1 in the Recipe_Command tag.
This tells the Recipe Manager to create the file.
Once the command has completed the tags Recipe_Number and
Recipe_Commmand will be set to zero.
Publication LOGIX-AP007B-EN-P - January 2007
34
Example Application
Write the Recipe
Write the recipe data to the CompactFlash card. You entered data into Recipe1
before you download to the controller.
1. Enter a value of 1 in the Recipe_Number tag.
This tells the Recipe_Manager routine to work with Recipe1.
2. Enter a value of 2 in the Recipe_Command tag.
This tells the Recipe_Manager to write to the file. Once the command
has completed, the tags Recipe_Number and Recipe_Commmand will
be set to zero.
Read the Recipe
Before you read the recipe from the CompactFlash card, you need to clear out
the values you entered earlier.
1. Go to the tag Recipe1 and clear out the values you entered earlier.
2. Enter a value of 1 in the Recipe_Number tag.
This tells the Recipe_Manager to work with Recipe1.
3. Enter a value of 3 in the Recipe_Command tag.
This tells the Recipe_Manager to read from the file.
Once the command has completed, the tags Recipe_Number and
Recipe_Commmand will be set to zero.
Now look back in the tag Recipe1 the values have been read from the
CompactFlash card and the values have been restored.
Delete the Recipe
Tell the Recipe_Manager routine to delete the file.
1. Enter a value of 1 in the Recipe_Number tag.
This tells the Recipe_Manager to work with Recipe1.
2. Enter a value of 4 in the Recipe_Command tag.
This tells the Recipe_Manager to delete a file. Once the command has
completed, the tags Recipe_Number and Recipe_Commmand will be
set to zero.
Publication LOGIX-AP007B-EN-P - January 2007
Appendix
A
Format a CompactFlash Card
Introduction
This appendix reviews how to format a CompactFlash card with a
CompactFlash Card Reader or using RSLogix5000 software.
Topic
Page
Requirements
35
Format with a Personal Computer and a CompactFlash
Card Reader
35
Format RSLogix 5000 Software and a Logix5000
Controller with CompactFlash Support
37
Requirements
To use the information described in this document, it is necessary to have the
CompactFlash card formatted to a FAT16 file system. Allen-Bradley
CompactFlash cards (1784-CF64) are pre-formatted to a FAT16 file system
and are ready to use. If the CompactFlash card needs to be formatted, it can be
done two ways: by using a personal computer with a CompactFlash card reader
or by using RSLogix 5000 software and a Logix5000 controller with
CompactFlash support.
Format with a Personal
Computer and a
CompactFlash Card Reader
The card can be formatted using a Windows-based operating system on a
personal computer with a CompactFlash card reader. The following steps
illustrate how to do this using Windows XP Professional. If another version of
Windows is being used, the steps should be similar. Detailed steps can be
found in Windows online help or in the instruction manual.
1. Insert the CompactFlash card into the CompactFlash reader.
2. Go to My Computer using the icon on the desktop.
3. Right-click the drive corresponding to the CompactFlash reader and
select Format.
35
Publication LOGIX-AP007B-EN-P - January 2007
36
Format a CompactFlash Card
The following screen appears.
4. Choose FAT from the File system pull-down menu.
5. Enter a volume label, if desired.
6. Click Start.
The card will now be formatted and, once complete, the card is ready
for use.
The second method formats the card only if it is unformatted or
incorrectly formatted. In both cases, if the card is formatted, all data on
the card will be lost.
Publication LOGIX-AP007B-EN-P - January 2007
Format a CompactFlash Card
Format RSLogix 5000
Software and a Logix5000
Controller with
CompactFlash Support
37
The card can also be formatted using RSLogix 5000 software and a Logix5000
controller with CompactFlash Support.
1. Open RSLogix 5000 software, click Start > Programs > Rockwell
Software > RSLogix 5000 Enterprise Series > RSLogix 5000.
The following screen appears.
2. Select File -> Open.
3. Navigate to the location of CF_Read_Write_V3_2 or any other file that
is version 16 or later.
Publication LOGIX-AP007B-EN-P - January 2007
38
Format a CompactFlash Card
4. Double-click the file to open it.
The following window appears.
Be sure that the controller is Online. Instructions for bringing a
controller online can be found in the RSLogix 5000 software help files.
5. Right-click the Controller folder in the Controller Organizer and select
Properties.
Publication LOGIX-AP007B-EN-P - January 2007
Format a CompactFlash Card
39
The following screen appears.
6. Click the Nonvolatile Memory tab.
Publication LOGIX-AP007B-EN-P - January 2007
40
Format a CompactFlash Card
The computer screen should look similar to the following.
7. Click Load/Store.
8. Make sure that the controller is in Program mode.
9. Click Store.
Publication LOGIX-AP007B-EN-P - January 2007
Format a CompactFlash Card
41
The following message box appears.
10. Click Yes.
11. Click OK in any dialogs that my appear.
The CompactFlash card formats to a FAT16 file system and the current
project image file is stored on the CompactFlash card. The card is now
ready for use.
Publication LOGIX-AP007B-EN-P - January 2007
42
Format a CompactFlash Card
Notes:
Publication LOGIX-AP007B-EN-P - January 2007
Appendix
B
Performance Data
This appendix describes performance data of the CompactFlash card. All tests
were done with Rockwell Automation 1784-CF64 Revision BO1 cards.
Performance with third party CompactFlash cards will vary.
Introduction
Topic
Page
Performance Data Tables
43
Access 450 Bytes
43
Access 4500 Bytes
44
Access 4500 Bytes with an HMI Load
44
Access 4500 Bytes with 16 Message Instructions
44
Access 4500 Bytes and Periodic Tasks
44
TIP
The application described in this document depends on
messaging to perform operations, such as open, read, or
write, on the CompactFlash card.
Therefore, data transfer rates will be affected by the
communications time slice and amount of other messaging
and HMI communications that is occurring in the
controller, as well as program structures, for example,
motion, periodic tasks, and event tasks.
Performance Data Tables
The following tables show the performance of the CompactFlash card in
varying instances.
Access 450 Bytes
This table shows the baseline performance of the CompactFlash card. The
application code as it is shipped was used to access 450 bytes. All data shown is
in ms. Each command was performed 32,000 times and the highest value is
shown.
L6X Controllers
43
Create Command
Write Command
Read Command
Delete Command
67
187
52
82
Publication LOGIX-AP007B-EN-P - January 2007
44
Performance Data
Access 4500 Bytes
This table shows the baseline performance of the CompactFlash card. The
application code as it is shipped was used to access 4500 bytes. All data shown
is in ms. Each command was performed 32,000 times and the highest value is
shown.
L6X Controllers
Create Command
Write Command
Read Command
Delete Command
68
572
178
83
Access 4500 Bytes with an HMI Load
This table shows the baseline performance of the CompactFlash card. The
application code as it is shipped was used to access 4500 bytes. Also, a
simulated HMI load was added accessing 1500 tags every 500 ms. All data
shown is in ms. Each command was performed 32,000 times and the highest
value is shown.
L6X Controllers
Create Command
Write Command
Read Command
Delete Command
74
580
177
84
Access 4500 Bytes with 16 Message Instructions
This table shows the baseline performance of the CompactFlash card. The
application code as it is shipped was used to access 4500 bytes. Also, 16
message instructions were added into the application code, each accessing 100
DINT tags from a remote controller. All data shown is in ms. Each command
was performed 32,000 times and the highest value is shown.
L6X Controllers
Create Command
Write Command
Read Command
Delete Command
110
1093
483
103
Access 4500 Bytes and Periodic Tasks
This table shows the baseline performance of the CompactFlash card. The
application code as it is shipped was used to access 4500 bytes. The task that
contains the CompactFlash code was made into a periodic task that executes
every second. All data shown is in ms. Each command was performed 32,000
times and the highest value is shown.
L6X Controllers
Publication LOGIX-AP007B-EN-P - January 2007
Create Command
Write Command
Read Command
Delete Command
4001
33000
29000
1001
Appendix
C
Troubleshoot the CompactFlash File System
Introduction
Status User-defined Data
Type
This appendix describes possible troubleshooting topics you might encounter
while using the CompactFlash file system.
Topic
Page
Status User-defined Data Type
45
Tag Layout
46
Message Error Codes
47
For each command that the application supports there is a status user-defined
data type created. These are found in the Controller Scoped tags.
Command
Controller Scoped Tag
Create a file
CF_Create_Seq_Status
Write to a file
CF_Write_Seq_Status
Read from a file
CF_Read_Seq_Status
Delete a file
CF_Delete_Seq_Status
The formats of these are generally the same, it depends on the number of
steps in each command. This example describes the CF_Write_Seq_Status tag.
45
Publication LOGIX-AP007B-EN-P - January 2007
46
Troubleshoot the CompactFlash File System
Tag Layout
In the write sequence, there are seven major steps and one overall status. The
CF_Write_Seq_Status.Parse_Data status has been expanded to show its
format. After a command has been executed, you will want to check the overall
status.
The following table lists the codes that will appear in the overall status.
Code
Description
0
The command has not been run or is currently running.
1
The command executed without errors.
2
The command ran with errors and you will need to expand each
individual sequence and check its Status element.
3
A checksum error has been found. This will only occur for the read and
write commands. This means that a read or write was attempted four
times and failed the checksum verification.
8
No CompactFlash card was present when a command was executed.
The command will not be attempted.
Codes that will appear in the individual sequence status when a 2 appears in the
overall status:
Publication LOGIX-AP007B-EN-P - January 2007
4
A file size mismatch occurred. If it is a read command than the tag
data_read is too small. If it is a write command than data_to_write is
too small. Increase the size of the array.
5
The number of Bytes_to_RW was set to zero.
6
A message instruction involved in this sequence errored. Look at the
Message_Error and Message_Error_Extended elements.
7
No file name was entered.
Troubleshoot the CompactFlash File System
Message Error Codes
47
The following table lists the error codes that you might see when working with
the CompactFlash file system. All error codes are in hex.
Error / Extended
Extended Error Description
0C/0
File does not exist. Invalid handle (State conflict).
05/00
Card removed while command was active.
02/0
Media does not have the free space to create the new file.
0D/0
File already exists.
0C/0
File does not exist (Delete command).
10/0
Device State Conflict: the flash card is not formatted.
13/0
Insufficient command data: the command packet does not contain
enough data.
FF/2100
Privilege failure.
For other error codes refer to Logix5000 Controllers General Instructions,
publication 1756-RM003.
Publication LOGIX-AP007B-EN-P - January 2007
48
Troubleshoot the CompactFlash File System
Notes:
Publication LOGIX-AP007B-EN-P - January 2007
Appendix
D
Expand the Code to Support More than 4500
Bytes of Data
Introduction
Modify the Application to
Access More Data
This appendix describes how to expand the code to support more than 4500
bytes of data.
Topic
Page
Modify the Application to Access More Data
49
Access 10,000 Bytes Example
50
Modify the Arrays
51
Modify the Data Element
51
The baseline application supports reading or writing 4500 bytes of data to
CompactFlash card. If you need to access more data, modify the baseline
application.
For example, you might have three groups of data that you want to write to the
CompactFlash card. One group will be 250 bytes, one will be 3000 bytes, and
the last will be 10,000 bytes. The first two will not warrant any changes to the
baseline application, but the last will. You will need to expand three tag’s array
sizes.
Before writing to the CompactFlash card, calculate how big to make those
three arrays. Do not increase them to 10,000 bytes. Be sure to take into
consideration that of the 450 bytes, 8 bytes are checksum information, leaving
442 bytes for user data.
Step 1:
Actual_Bytes_to_RW = Bytes_to_RW + (TRN (Bytes_to_RW/442) * 8) + (If
the MOD (Bytes_to_RW/442) > 0 then 8 else 0)
Step 2:
450 [TRN(Actual_Bytes_to_RW/450) +(if the MOD (Actual_Bytes_to_RW)
> 0 then 1 else 0]
49
Publication LOGIX-AP007B-EN-P - January 2007
50
Expand the Code to Support More than 4500 Bytes of Data
Access 10,000 Bytes Example
For example, if you want to access 10,000 bytes:
Step 1:
Actual_Bytes_to_RW = 10,000 + (TRN (10,000/442) * 8) + (If the MOD
(10,000/442) > 0 then 8 else 0)
= 10,000 + 22(8) + 8
= 10,184
Step 2:
450[(TRN(10,184/450)) + (If the MOD (10,148/450) > 0 then 1 else 0)]
= 450 [22+1]
= 450(23)
= 10350 bytes
You need to increase the arrays to a minimum of 10,350 elements. Do not
place this value in the Actual_Bytes_to_RW. This value is calculated when a
file command is executed.
Publication LOGIX-AP007B-EN-P - January 2007
Expand the Code to Support More than 4500 Bytes of Data
51
Modify the Arrays
The arrays that will need modification are in the program scope:
• data_read
• data_to_write
• UDT CF_File_Structure
The third change to make is the definition of the UDT CF_File_Structure,
shown below.
Data Element
Modify the Data Element
You will need to modify the Data element. This will modify all usage of this
data type throughout the application.
Publication LOGIX-AP007B-EN-P - January 2007
52
Expand the Code to Support More than 4500 Bytes of Data
Notes:
Publication LOGIX-AP007B-EN-P - January 2007
How Are We Doing?
Your comments on our technical publications will help us serve you better in the future.
Thank you for taking the time to provide us feedback.
You can complete this form and mail (or fax) it back to us or email us at
[email protected]
Pub. Title/Type CompactFlash File System on Logix5000 Controllers
Cat. No.
1756-L61, 1756-L62,
1756-L63, 1756-L64,
1756-L60M03SE
Pub. No.
LOGIX-AP007B-EN-P
Pub. Date January 2007
Part No.
953014-88
Please complete the sections below. Where applicable, rank the feature (1=needs improvement, 2=satisfactory, and 3=outstanding).
Overall Usefulness
1
2
3
Completeness
Technical Accuracy
(all provided information
is correct)
How can we make this publication more useful for you?
Can we add more information to help you?
1
Clarity
1
(all provided information is
easy to understand)
2
3
procedure/step
illustration
feature
example
guideline
other
explanation
definition
Can we be more accurate?
text
2
Other Comments
3
illustration
How can we make things clearer?
You can add additional comments on the back of this form.
Your Name
Your Title/Function
Location/Phone
Would you like us to contact you regarding your comments?
___No, there is no need to contact me
___Yes, please call me
___Yes, please email me at _______________________
___Yes, please contact me via _____________________
Return this form to:
Rockwell Automation Technical Communications, 1 Allen-Bradley Dr., Mayfield Hts., OH 44124-9705
Fax: 440-646-3525
Publication CIG-CO521C-EN-P- May 2003
Email: [email protected]
PN953014-88957782-91
PLEASE FASTEN HERE (DO NOT STAPLE)
PLEASE FOLD HERE
NO POSTAGE
NECESSARY
IF MAILED
IN THE
UNITED STATES
BUSINESS REPLY MAIL
FIRST-CLASS MAIL PERMIT NO. 18235 CLEVELAND OH
POSTAGE WILL BE PAID BY THE ADDRESSEE
1 ALLEN-BRADLEY DR
MAYFIELD HEIGHTS OH 44124-9705
PLEASE REMOVE
Other Comments
Rockwell Automation
Support
Rockwell Automation provides technical information on the Web to assist you in using
its products. At http://support.rockwellautomation.com, you can find technical
manuals, a knowledge base of FAQs, technical and application notes, sample code and
links to software service packs, and a MySupport feature that you can customize to
make the best use of these tools.
For an additional level of technical phone support for installation, configuration, and
troubleshooting, we offer TechConnect Support programs. For more information,
contact your local distributor or Rockwell Automation representative, or visit
http://support.rockwellautomation.com.
Installation Assistance
If you experience a problem with a hardware module within the first 24 hours of
installation, please review the information that's contained in this manual. You can also
contact a special Customer Support number for initial help in getting your module up
and running.
United States
1.440.646.3223
Monday – Friday, 8am – 5pm EST
Outside United
States
Please contact your local Rockwell Automation representative for any
technical support issues.
New Product Satisfaction Return
Rockwell tests all of its products to ensure that they are fully operational when shipped
from the manufacturing facility. However, if your product is not functioning, it may
need to be returned.
Publication LOGIX-AP007B-EN-P - January 2007 57
Supersedes Publication LOGIX-AP007A-EN-P - March 2006
United States
Contact your distributor. You must provide a Customer Support case
number (see phone number above to obtain one) to your distributor in
order to complete the return process.
Outside United
States
Please contact your local Rockwell Automation representative for
return procedure.
PN 953014-88
Copyright © 2007 Rockwell Automation, Inc. All rights reserved. Printed in the U.S.A.