1
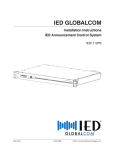
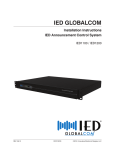
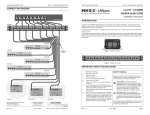
Last Edit: 07/10/02 12:49 pm
INSTALLATION INSTRUCTIONS
MODEL 500DHD DUAL HARD DRIVE CARD
MODEL 500DHD
DUAL HARD DRIVE CARD
The IED Model 500DHD Dual Hard Drive Card is a component of the IED 500ACS Announcement Control System. It is used for non-volatile storage of programs and data
such as the operating system, the control program, the configuration files, and permanent message takes.
The 500DHD features RAID 1 technology to provide a continuous backup of all information stored on the hard drive in order to safeguard against accidental loss of data and to
assure uninterrupted operation.
500DHD DRIVE REPLACEMENT PROCEDURE
NOTE: The drive replacement procedure requires that the ACS be offline for as much as
1 hour, depending in part on drive capacity.
In the event of a drive failure, the following procedure describes the recommended
method for replacement of the failed drive:
1. Shut down the power to the ACS mainframe.
2. Remove the faulted hard drive from the 500DHD. To accomplish this, first,
remove the 500DHD from the mainframe. Next, disconnect the data ribbon and
power supply cables from the faulted hard drive. Finally, remove the four screws
that attach the hard drive to the PCB.
3. Attach the new hard drive to the 500DHD. Make sure that the new hard drive is
of the same brand and model (Samsung SpinPoint™ V40 Series) and of equal or
greater capacity than the one it is replacing. Furthermore, it is recommended that
the new hard drive have the same number of read/write heads as the hard drive it
will be mirroring.
Attach the new hard drive securely to the PCB using the four screws you removed
in step one. Next, attach the power supply cable and the data ribbon cable to the
new hard drive.
4. Return the 500DHD to the mainframe. Re-attach the data ribbon cable between
the 500-CPU to the 500DHD.
5. Apply power to the mainframe. Once the mainframe is powered on, wait until the
blue boot menu appears and select option two (2. DOS) and press <enter>.
Once the computer has come to rest at the DOS prompt ( c:\> ), type “dupli” and
press <enter> to run the DupliDisk setup utility.
6. Initialize the replacement hard drive. Once the DupliDisk Setup Utility is
running, press <enter> and a message prompting you to initialize the
replacement hard drive will appear. If you replaced the primary drive, you should
select “Initialize drives using the mirror drive initialization” and press <Enter>.
Otherwise, if you replaced the mirrored drive, select “Initialize using the primary
drive initialization” and press <Enter>. You should then be prompted by the
DupliDisk Setup Utility to press <Enter> to reboot the 500DHD. If not prompted,
simply continue with step 7, “Synchronize the replacement hard drive”.
500 SERIES AUDIO CONTROL SYSTEM
AUG 2002
SECTION 3 GROUP 58 SUB B PAGE 1
MODEL 500DHD DUAL HARD DRIVE CARD
INSTALLATION INSTRUCTIONS
If you are not prompted to initialize the drives as described in the preceding
paragraph, then you will be prompted to rebuild the replacement drive. Use the
arrow keys to select the appropriate rebuild option and pre
ss <Enter>. Otherwise, if you replaced the mirror drive, select “Rebuild drive on
the mirror channel” and press <Enter>. This will initiate the synchronization
process. If you were prompted to “rebuild” the replacement drive instead of
“initialize” the replacement drive, continue with steps 8A through 8G.
7. Synchronize the replacement hard drive. IF after initializing the replacement
hard drive in step 6., you were prompted by the DupliDisk Setup Utility to reboot,
select boot option two (2. DOS) and press <Enter> . When the computer has
come to rest at the DOS prompt (C:\), type “dupli” and press <Enter> to run the
500DHD setup utility. Once the DupliDisk Setup Utility is running, press <Enter>
and a message asking if you would like to synchronize the drives will appear.
Choose “Yes” and press <Enter> to bring up a menu of synchronization options.
Otherwise, if after initializing the replacement hard drive in step 6, you were not
prompted to reboot the computer, use the right arrow key to highlight the dupli
menu item “Copy” to display a menu of synchronization options.
In the menu of synchronization options you should only be concerned with two
options:
1. Primary Master to Mirror Master
2. Mirror Master to Primary Master
NOTE: The “Primary” drive is always the upper drive when the 500DHD is
installed in an ACS mainframe.
The drives are labeled “Primary” and “Mirrored” on the printed circuit board
directly in front of the data ribbon cable connectors. If you replaced the Primary
Master drive, then select the second option, Mirror Master to Primary Master, then
press <Enter>. This will copy the entire contents of the Mirror Master to the newly
replaced Primary Master. Otherwise, if you replaced the Mirror Master drive, then
select the first option, copy from Primary Master to Mirror Master, and press
<Enter>. This will copy the entire contents of the Primary Master drive to the
newly replaced Mirror Master drive.
After you select the correct synchronization option and press <Enter>, the
DupliDisk Setup Utility will ask you to confirm the action. Simply type “Y” for
“Yes”and press <Enter> to commence the synchronization process.
WARNING: Failure to select the correct synchronization option could result in
a loss of all data.
Copy/Synch times vary depending on drive size. A 20GB drive takes about 45
minutes to copy.
8. Mirror the drives. If after synchronizing the replacement hard drive instep 7. You
are prompted to reboot the computer, select option two (2. DOS) and press
<Enter>. When the computer has come to rest at a DOS prompt (C:\>), type
“dupli” and press <Enter> to run the 500DHD setup utility. Once the 500DHD
setup utility is running, press <Enter> to clear the “Initialization Status” screen,
Now, continue with steps 8A through 8G.
Otherwise, if after synchronizing the replacement hard drive in step 7, you were
not prompted to reboot the computer, simply continue with steps 8A through 8G.
A. Under the “Configure” menu, highlight “Operation Mode” and press
<enter>, then highlight “Mirror Mode” and press <enter>.
B. Highlight “Read Schedule” and press <enter>, then highlight “Primary
Only” and press <enter>.
C. Highlight “Startup Options” and press <enter>, this will bring up a new
“Startup Options” menu. Within the “Startup Options” menu, highlight “Beep
Innovative Electronic Designs, Inc.h9701 Taylorsville Road hLouisville, Kentucky 40299 hUSA
Phone: (502) 267-7436 hFax: (502) 267-9070 h Internet: http://www.iedaudio.com
SECTION 3 GROUP 58 SUB B PAGE 2
AUG 2002
500 SERIES AUDIO CONTROL SYSTEM
INSTALLATION INSTRUCTIONS
MODEL 500DHD DUAL HARD DRIVE CARD
on drive failure” and press <enter>, select “Continuously” and press
<enter>.
D. Highlight “Beep after cold boot if drive failure is detected” and press
<enter>, select “Enable” and press <enter>.
E. Highlight “Beep after a cold boot if running in single mode” and press
<enter>, select “Enable” and press <enter>.
F. Highlight “Turn buzzer off after cold boot” and press <enter>, select
“Disable” and press <enter>.
G. Highlight “Idle Mode Support” and press <enter>, select “Within 8 Secs.”
and press <enter>.
Press the escape (ESC) to exit the “Startup Options” menu and use the right
arrow key to highlight the “Exit” option in the menu bar.
Once the “Exit Program” option is highlighted, press the <enter> key to exit the
program. You will be asked if you are sure that you wish to exit. Select “Y” and
press <Enter>.
Upon exiting you will be prompted to re-boot the computer. This time, allow the
500DHD to run through its default boot cycle and start up the ACS software. At
this point, the 3 status LED’s on the front of the 500DHD should all be solid green
denoting that the 500DHD is running in “Mirror Mode” and both drives ( Primary
Master and Mirror Master ) are identical.
500 SERIES AUDIO CONTROL SYSTEM
AUG 2002
SECTION 3 GROUP 58 SUB B PAGE 3
MODEL 500DHD DUAL HARD DRIVE CARD
INSTALLATION INSTRUCTIONS
POWER
CABLE
CONNECTORS
BUZZER
OFF SWITCH
PRIMARY DRIVE'
STATUS LED
PRIMARY DRIVE
CARD RESET
SWITCH
DATA
CABLE
CONNECTORS
CARD RESET LED
CARD STATUS LED
CONNECTOR FOR
RIBBON CABLE
TO 500CPU
POWER
CABLE
CONNECTORS
MIRRORED DRIVE
SERIAL PORT
MIRRORED DRIVE
STATUS LED
DATA
CABLE
CONNECTORS
Figure 1 - 500DHD Component Layout
Showing location of all components
Innovative Electronic Designs, Inc.h9701 Taylorsville Road hLouisville, Kentucky 40299 hUSA
Phone: (502) 267-7436 hFax: (502) 267-9070 h Internet: http://www.iedaudio.com
SECTION 3 GROUP 58 SUB B PAGE 4
AUG 2002
500 SERIES AUDIO CONTROL SYSTEM
INSTALLATION INSTRUCTIONS
MODEL 500DHD DUAL HARD DRIVE CARD
MOUNTING SCREWS
PRIMARY DRIVE
MOUNTING SCREWS
MIRRORED DRIVE
500 SERIES AUDIO CONTROL SYSTEM
AUG 2002
SECTION 3 GROUP 58 SUB B PAGE 5
MODEL 500DHD DUAL HARD DRIVE CARD
INSTALLATION INSTRUCTIONS
This page left blank intentionally
Innovative Electronic Designs, Inc.h9701 Taylorsville Road hLouisville, Kentucky 40299 hUSA
Phone: (502) 267-7436 hFax: (502) 267-9070 h Internet: http://www.iedaudio.com
SECTION 3 GROUP 58 SUB B PAGE 6
AUG 2002
500 SERIES AUDIO CONTROL SYSTEM