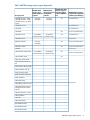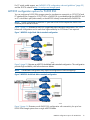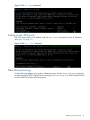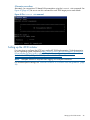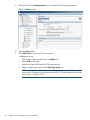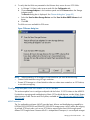
1
HP MPX200 Multifunction Router User Guide
Abstract
This document describes the MPX200 Multifunction Router, which supports HP 3PAR StoreServ, P6000 EVA, and P9000/XP
families of Fibre Channel storage systems for integrated iSCSI connectivity, FCIP, FCoE, and data migration (see the Data
Migration Services User's Guide).
This document is intended for system administrators with knowledge of HP 3PAR StoreServ 10400/10800, 7200/7400,
F200/F400, T400/T800, P65x0/P63x0, EVA4x00/6x00/8x00, and P9000/XP storage systems, HP Fibre Channel SANs,
Ethernet, TCP/IP networking, iSCSI, FCIP, and FCoE.
HP Part Number: 5697-2511
Published: April 2013
Edition: 13
© Copyright 2009–2013 Hewlett-Packard Development Company, L.P.
Warranty
The information contained herein is subject to change without notice. The only warranties for HP products and services are set forth in the express
warranty statements accompanying such products and services. Nothing herein should be construed as constituting an additional warranty. HP shall
not be liable for technical or editorial errors or omissions contained herein.
Acknowledgments
Microsoft® and Windows® are U.S. registered trademarks of Microsoft Corporation.
Oracle® is a registered trademark of Oracle and/or its affiliates.
UNIX® is a registered trademark of The Open Group.
Contents
1 MPX200 Multifunction Router overview........................................................10
MPX200
MPX200
MPX200
MPX200
features....................................................................................................................10
storage system support ..............................................................................................10
configuration options for P6000 EVA...........................................................................15
configurations for XP24000/20000............................................................................17
2 Planning the MPX200 installation...............................................................20
Installation recommendations...................................................................................................20
iSCSI/FCoE operation.............................................................................................................21
Total number of initiators.....................................................................................................21
Number of paths required per initiator..................................................................................21
Use of iSNS......................................................................................................................21
Use of iSCSI ports..............................................................................................................21
Balancing the load.............................................................................................................21
10-GbE initiators................................................................................................................22
MPX200 storage and IP network best practices...........................................................................22
Prerequisites......................................................................................................................22
Planning your storage configuration.....................................................................................22
General IP-SAN.................................................................................................................23
Recommended switch infrastructure for an IP-SAN...................................................................23
Network latency................................................................................................................25
3 Installing the MPX200...............................................................................26
MPX200 components..............................................................................................................26
Rack mounting the MPX200.....................................................................................................27
4 Managing MPX200 iSCSI using HP P6000 Command View..........................31
Setting up the MPX200 management port..................................................................................31
Fibre Channel zoning..............................................................................................................31
Open zoning....................................................................................................................31
Fibre Channel switch-based zoning......................................................................................32
HP P6000 Command View discovery........................................................................................32
Setting up the iSCSI IP ports.....................................................................................................34
Setting the date and time on the MPX200..................................................................................35
Code load.............................................................................................................................36
Shutting down and restarting the MPX200 ................................................................................37
Saving or restoring the MPX200 configuration............................................................................37
Locating the MPX200..............................................................................................................38
Removing an iSCSI controller....................................................................................................39
5 Managing MPX200 iSCSI for 3PAR StoreServ Storage..................................40
Setting up the MPX200 management port..................................................................................40
Setting up the iSCSI ports........................................................................................................41
Fibre Channel zoning..............................................................................................................41
LUN provisioning....................................................................................................................42
Setting up the iSCSI initiator.....................................................................................................45
6 Managing MPX200 iSCSI for XP24000/20000..........................................46
Setting up the MPX200 management port..................................................................................46
Setting up the iSCSI ports........................................................................................................47
Fibre Channel zoning..............................................................................................................47
LUN management...................................................................................................................48
Contents
3
7 MPX200 iSCSI configuration rules and guidelines.........................................52
iSCSI rules and supported maximums .......................................................................................52
P6000 EVA storage system rules and guidelines.........................................................................52
HP P6000 Command View management rules and guidelines......................................................53
P6000 EVA storage system software..........................................................................................53
Features supported for iSCSI hosts........................................................................................53
Features not supported for iSCSI hosts...................................................................................54
3PAR StoreServ Storage system rules and guidelines....................................................................54
XP storage system rules and guidelines......................................................................................54
Fibre Channel switch and fabric support....................................................................................55
Operating system and multipath software support.......................................................................55
iSCSI initiator rules and guidelines............................................................................................56
Apple Mac OS X iSCSI initiator rules and guidelines..............................................................56
Microsoft Windows iSCSI initiator rules and guidelines...........................................................56
Linux iSCSI initiator rules and guidelines ..............................................................................57
Solaris iSCSI initiator rules and guidelines ............................................................................57
VMware iSCSI initiator rules and guidelines..........................................................................57
Supported IP network adapters ................................................................................................58
IP network requirements ..........................................................................................................58
Setting up the iSCSI initiator.....................................................................................................58
Windows Server iSCSI initiator ...........................................................................................59
Multipathing.....................................................................................................................65
Installing the MPIO feature for Windows Server 2012, 2008...................................................66
Installing the MPIO feature for Windows Server 2003............................................................68
Microsoft Windows Server 2003 Scalable Networking Pack....................................................69
Setting up SNP for the HP NC3xxx Multifunction Gigabit server adapter..............................69
iSCSI initiator setup for Apple Mac OS X (single-path)............................................................69
Setting up the iSCSI initiator for Apple Mac OS X.............................................................70
Setting up storage for Apple Mac OS X...........................................................................74
iSCSI initiator setup for Linux...............................................................................................74
Installing and configuring the SUSE Linux Enterprise 10 iSCSI driver.....................................74
Installing and configuring the iSCSI driver for Red Hat 5................................................77
Installing and configuring the iSCSI driver for Red Hat 4 and SUSE 9..............................77
Installing the iSCSI initiator for Red Hat 3 and SUSE 8..................................................77
Assigning device names.................................................................................................78
Target bindings.............................................................................................................78
Mounting file systems.....................................................................................................79
Unmounting file systems.................................................................................................79
Presenting P6000 EVA storage for Linux...........................................................................79
iSCSI Initiator setup for VMware..........................................................................................80
Configuring multipath with the Solaris 10 iSCSI initiator..........................................................83
MPxIO overview...........................................................................................................83
Preparing the host system..........................................................................................84
Enabling MPxIO for an HP P6000 EVA storage array...................................................84
Enable iSCSI target discovery.....................................................................................86
Modifying the target parameter MaxRecvDataSegLen...................................................87
Monitoring the multipath devices................................................................................88
Configuring Microsoft MPIO iSCSI devices............................................................................89
Microsoft MPIO for iSCSI load-balancing policies...................................................................90
Microsoft MPIO with QLogic iSCSI HBA................................................................................90
Installing the QLogic iSCSI HBA......................................................................................91
Installing the Microsoft iSCSI initiator services and MPIO....................................................91
Configuring the QLogic iSCSI HBA..................................................................................91
Adding targets to the QLogic iSCSI initiator......................................................................93
4
Contents
Presenting LUNs to the QLogic iSCSI initiator....................................................................94
Installing the HP MPIO Full Featured DSM for P6000 EVA..................................................94
Microsoft Windows Cluster support......................................................................................95
Microsoft Cluster Server for Windows 2003.....................................................................95
Microsoft Cluster Server for Windows 2008.....................................................................96
Setting up authentication ........................................................................................................97
General CHAP restrictions ..................................................................................................97
Microsoft initiator CHAP secret restrictions ............................................................................98
Linux CHAP restrictions ......................................................................................................98
ATTO Macintosh CHAP restrictions ......................................................................................98
Recommended CHAP policies .............................................................................................98
iSCSI session types ............................................................................................................98
MPX200 CHAP modes ......................................................................................................98
Enabling single-direction CHAP during discovery session and normal session............................99
Enabling CHAP for the MPX200-discovered iSCSI initiator entry ............................................100
Enabling CHAP for the Microsoft iSCSI initiator....................................................................100
Enabling CHAP for the open-iscsi iSCSI initiator ..................................................................101
Enabling single-direction CHAP during discovery session and bidirectional CHAP during normal
session ..........................................................................................................................102
Enabling bidirectional CHAP during discovery session and single-direction CHAP during normal
session...........................................................................................................................104
Enabling bidirectional CHAP during discovery session and bidirectional CHAP during normal
session...........................................................................................................................105
8 MPX200 FCIP........................................................................................108
MPX200 FCIP product description...........................................................................................108
Redundant FCIP network structure example...............................................................................108
Using FCIP to encapsulate FC packets.....................................................................................109
FCIP Impact on existing iSCSI configurations............................................................................109
FCIP and iSCSI performance..................................................................................................110
MPX200 iSCSI/FCIP configurations.........................................................................................111
HP Continuous Access 3-site configurations.........................................................................115
3-site configuration with four MPX200 routers.................................................................116
3-site configuration with six MPX200 routers...................................................................116
3-site configuration with eight MPX200 routers................................................................117
3-site configuration with six MPX200 routers and full inter-site connectivity..........................118
FCIP configuration rules and guidelines...............................................................................119
General FCIP configuration rules...................................................................................119
Operating system and multipath support........................................................................119
Storage system rules and guidelines...............................................................................120
Fibre Channel switch and firmware support.....................................................................120
FC switch requirements............................................................................................121
IP network requirements...........................................................................................121
IP performance tuning...........................................................................................................121
Distance.........................................................................................................................122
Bandwidth per route.........................................................................................................122
Latency...........................................................................................................................122
MTU/Jumbo frames..........................................................................................................122
Compression...................................................................................................................123
TCP window size/scaling performance tuning......................................................................123
Modifying the window size and scaling factor.....................................................................123
TCP window size and scaling factor recommendations..........................................................124
FCIP link diagnostics.............................................................................................................126
Configuring an FCIP route......................................................................................................127
Step 1. Verify your system requirements...............................................................................127
Contents
5
Step 2. Pre-installation checklist..........................................................................................127
Step 3. Rack-mount the MPX200........................................................................................128
Step 4. Install the SFPs......................................................................................................128
Step 5. Set the MPX200 management port parameters.........................................................128
Step 6. Configure the MPX200 FCIP Route parameters..........................................................129
Install FCIP license.......................................................................................................129
Critical FCIP Performance settings..................................................................................130
Configure the FCIP routes using the CLI..........................................................................130
Step 7. Configure FC switch settings for the MPX200............................................................131
Step 8. Cable the MPX200 FC, GE, and management ports..................................................131
Step 9. Verify FCIP links and firmware version......................................................................132
9 MPX200 FCoE feature description............................................................133
FCoE configurations..............................................................................................................133
Setting up for FCoE connectivity to HP P6000 EVAs..................................................................134
Setting up FCoE connectivity to 3PAR arrays.............................................................................138
10 Diagnostics and troubleshooting.............................................................141
MPX200 chassis diagnostics..................................................................................................141
Input Power LED is extinguished.........................................................................................141
System Fault LED is illuminated...........................................................................................141
Fibre Channel Port LEDs....................................................................................................142
POST diagnostics.............................................................................................................142
Heartbeat LED blink patterns........................................................................................142
Normal blink pattern...............................................................................................142
System error blink pattern........................................................................................142
Management port IP address conflict blink pattern......................................................142
Over-temperature blink pattern.................................................................................143
Locating the MPX200 blade..............................................................................................144
MPX200 log data............................................................................................................144
MPX200 statistics.............................................................................................................144
MPX200 ping command...................................................................................................144
FCIP Route Link Failure – Event Log Entries...........................................................................145
WANLink diagnostic........................................................................................................145
Troubleshooting using HP P6000 Command View................................................................146
Issues and solutions...............................................................................................................147
HP P6000 Command View does not discover MPX200.........................................................147
Initiator cannot log in to MPX200 iSCSI target.....................................................................147
Initiator logs in to MPX200 iSCSI target, but P6000 EVA-assigned LUNs do not appear on
initiator..........................................................................................................................148
P6000 EVA-presented virtual disk not seen by initiator..........................................................148
Windows initiators may display Reconnecting if NIC MTU changes after connection has logged
in..................................................................................................................................149
Communication between HP P6000 Command View and MPX200 is down............................149
HP P6000 Command View issues and solutions........................................................................149
Virtual disk operation troubleshooting.................................................................................150
11 Support and other resources...................................................................151
Intended audience................................................................................................................151
Related documentation..........................................................................................................151
Contacting HP......................................................................................................................151
HP technical support........................................................................................................151
Subscription service..........................................................................................................152
Product feedback.............................................................................................................152
Related information...............................................................................................................152
HP websites....................................................................................................................152
6
Contents
Typographical conventions.....................................................................................................152
Rack stability........................................................................................................................153
Product warranties................................................................................................................153
12 Documentation feedback.......................................................................154
A Command reference...............................................................................155
Command syntax..................................................................................................................155
Command line completion................................................................................................155
Authority requirements......................................................................................................155
Commands..........................................................................................................................155
Admin............................................................................................................................156
Beacon...........................................................................................................................157
Blade.............................................................................................................................157
Clear.............................................................................................................................157
Date..............................................................................................................................157
Exit................................................................................................................................158
Fciproute........................................................................................................................158
FRU................................................................................................................................160
Help..............................................................................................................................161
History...........................................................................................................................162
Image............................................................................................................................162
Initiator...........................................................................................................................163
Logout............................................................................................................................164
Lunmask.........................................................................................................................164
Passwd...........................................................................................................................166
Ping...............................................................................................................................166
Quit...............................................................................................................................166
Reboot...........................................................................................................................167
Reset..............................................................................................................................167
Save..............................................................................................................................167
Set.................................................................................................................................168
Set alias.........................................................................................................................169
Set CHAP.......................................................................................................................169
Set chassis......................................................................................................................170
Set FC............................................................................................................................170
Set features.....................................................................................................................172
Set iSCSI........................................................................................................................172
Set iSNS.........................................................................................................................172
Set Mgmt........................................................................................................................173
Set NTP..........................................................................................................................173
Set properties..................................................................................................................174
Set SNMP.......................................................................................................................174
Set system.......................................................................................................................175
Set VPGroups..................................................................................................................175
Show.............................................................................................................................176
Show CHAP....................................................................................................................178
Show chassis...................................................................................................................178
Show FC........................................................................................................................179
Show fciproutes...............................................................................................................179
Show features..................................................................................................................180
Show initiators.................................................................................................................180
Show initiators LUNmask..................................................................................................180
Show iSCSI.....................................................................................................................181
Show iSNS.....................................................................................................................181
Show logs.......................................................................................................................182
Contents
7
Show LUNinfo.................................................................................................................182
Show LUNs.....................................................................................................................183
Show LUNmask...............................................................................................................183
Show memory.................................................................................................................184
Show mgmt.....................................................................................................................184
Show NTP......................................................................................................................184
Show perf.......................................................................................................................185
Show presented targets.....................................................................................................186
Show properties..............................................................................................................187
Show SNMP...................................................................................................................187
Show stats......................................................................................................................187
Show system...................................................................................................................190
Show targets...................................................................................................................190
Show VPGroups...............................................................................................................191
Shutdown.......................................................................................................................191
Target............................................................................................................................192
Traceroute.......................................................................................................................192
Wanlinktest.....................................................................................................................192
B Command Line Interface usage.................................................................195
Logging on to an MPX200.....................................................................................................195
Understanding the guest account............................................................................................195
Working with MPX200 router configurations............................................................................196
Modifying a configuration.................................................................................................196
Saving and restoring router configurations...........................................................................197
Restoring router configuration and persistent data.................................................................198
C Simple Network Management Protocol setup.............................................199
SNMP parameters................................................................................................................199
SNMP trap configuration parameters.......................................................................................200
Management Information Base ..............................................................................................200
Network port table...........................................................................................................200
FC port table...................................................................................................................202
Initiator object table.........................................................................................................204
LUN table.......................................................................................................................205
VP group table................................................................................................................207
Sensor table....................................................................................................................209
Notifications........................................................................................................................210
System information objects................................................................................................210
Notification objects..........................................................................................................211
Agent startup notification..................................................................................................212
Agent shutdown notification..............................................................................................212
Network port down notification..........................................................................................212
FC port down notification..................................................................................................212
Target device discovery....................................................................................................212
Target presentation (mapping)...........................................................................................213
VP group notification........................................................................................................213
Sensor notification...........................................................................................................213
Generic notification..........................................................................................................214
D Log messages........................................................................................216
E HP mpx100/mpx100b to MPX200 upgrade..............................................238
To upgrade from mpx100/mpx100b to the MPX200 Multifunction Router:....................................238
F Regulatory compliance and safety.............................................................240
Regulatory compliance notices...............................................................................................240
8
Contents
Federal Communications Commission notice for Class A equipment........................................240
Modifications.............................................................................................................240
Cables.......................................................................................................................240
Regulatory compliance identification numbers......................................................................240
Laser device....................................................................................................................240
Laser safety warning....................................................................................................240
Certification and classification information......................................................................240
Laser product label......................................................................................................241
International notices and statements........................................................................................241
Canadian notice (avis Canadien).......................................................................................241
Class A equipment......................................................................................................241
BSMI notice....................................................................................................................241
Japanese notice...............................................................................................................242
Korean notices.................................................................................................................242
Safety notices.......................................................................................................................242
Battery replacement notice................................................................................................242
Taiwan battery recycling notice..........................................................................................243
Power cords....................................................................................................................243
Japanese power cord statement.........................................................................................244
Chinese warning messages...............................................................................................244
Altitude warning message............................................................................................244
Non-tropical warning message.....................................................................................244
Waste Electrical and Electronic Equipment directive...................................................................244
English notice..................................................................................................................244
Dutch notice....................................................................................................................244
Czechoslovakian notice....................................................................................................245
Estonian notice................................................................................................................245
Finnish notice..................................................................................................................245
French notice...................................................................................................................245
German notice................................................................................................................245
Greek notice...................................................................................................................246
Hungarian notice.............................................................................................................246
Italian notice...................................................................................................................246
Latvian notice..................................................................................................................247
Lithuanian notice..............................................................................................................247
Polish notice....................................................................................................................247
Portuguese notice.............................................................................................................247
Slovakian notice..............................................................................................................248
Slovenian notice..............................................................................................................248
Spanish notice.................................................................................................................248
Swedish notice................................................................................................................248
G Saving and restoring the MPX200 configuration........................................249
Saving the configuration using MPX200 CLI.............................................................................249
Restoring the configuration using MPX200 CLI..........................................................................249
Glossary..................................................................................................251
Index.......................................................................................................255
Contents
9
1 MPX200 Multifunction Router overview
This user guide provides information to help you do the following:
•
Understand the MPX200 options and configurations
•
Plan the installation of the MPX200
•
Install the MPX200– For high availability, install an additional MPX200 blade option
•
Configure the MPX200 – For iSCSI, FCoE, and FCIP
•
Manage the MPX200 using HP P6000 Command View or mpx Manager
•
Troubleshoot the MPX200
•
Use the CLI
•
Interpret error messages
MPX200 features
The HP P6000/EVA, HP 3PAR StoreServ 10000/7000, 3PAR T-Class/F-Class, and XP families
of Fibre Channel storage systems are supported for integrated iSCSI connectivity using the MPX200.
The MPX200 hardware is integrated with up to four P6000 EVA, HP 3PAR StoreServ 10000/7000,
3PAR T-Class/F-Class, or XP24000/20000 storage systems for iSCSI connectivity, to deliver
multi-protocol capabilities. This provides iSCSI and FC attached servers access to block storage
through an FC network and an Ethernet IP network simultaneously.
The MPX200 supports multiple functions including iSCSI, FCoE (10-GbE models), FCIP, and online
or offline data migration. FCIP and data migration are license-enabled features. See Table 2 (page
13).
The MPX200 functions are supported separately or simultaneously in the following configurations:
•
iSCSI and/or FCoE
•
FCIP (license required)
•
Data migration (license required)
•
iSCSI/FCoE and FCIP (license required)
•
iSCSI/FCoE and data migration (license required)
For more information about MPX200 simultaneous operation, see “Planning the MPX200 installation”
(page 20). For more information on data migration, see the Data Migration Services User's Guide.
MPX200 storage system support
The MPX200 storage system support may be different based on the protocol. Not all storage system
models are supported on all the MPX200 supported protocols. The storage system support for each
MPX200 protocol is described in Table 1 (page 11).
10
MPX200 Multifunction Router overview
Table 1 MPX200 storage system support by protocol
Storage system
HP 3PAR StoreServ 7000;
HP 3PAR StoreServ 10000,
HP 3PAR T-Class, HP 3PAR
F-Class
MPX200 iSCSI
Target support
and management
software
MPX200 FCoE
Target support and
management
software
Yes (mpx
Manager)
Yes (mpx
Manager)
MPX200 FCIP SAN
extension support
and management
software (MPX200
CLI)
Yes
MPX200 data migration
support and management
software (mpx Manager)
Yes (destination)
HP P2000 G3 FC
Yes (destination)
HP P4000
Yes (destination)
HP P9500
HP P65x0/63x0
Yes (P6000
Command View)
Yes (P6000
Command View)
Yes
Yes (source/destination)
Yes
Yes (destination)
HP 3PAR S-Class
XP24000/20000
Yes (source)
Yes (mpx
Manager)
XP12000/10000
Yes
Yes (source/destination)
Yes
Yes (source/destination)
HP SVSP
HP EVA4x00/6x00/8x00
HP EVA3000/5000
Yes (source)
Yes (P6000
Command View)
Yes (P6000
Command View)
Yes
Yes (source/destination)
Yes
MSA1500/1000/2012f
Dell Compellent Series 30,
40
Dell EquaLogic family (iSCSI)
EMC CLARiiON CX, AX
EMC Symmetrix DMX
EMC Symmetrix VMAX SE
EMC VNX5500
HDS AMS family
HDS Lightning 99xx V series
Yes (source)
HDS TagmaStore Network
Storage Controller model
NSC55
HDS Thunder 95xx V series
HDS USP family
HDS VSP
HDS WMS family
IBM DS3000 family
IBM DS4000 family
IBM DS5000 family
MPX200 storage system support
11
Table 1 MPX200 storage system support by protocol (continued)
Storage system
MPX200 iSCSI
Target support
and management
software
MPX200 FCoE
Target support and
management
software
MPX200 FCIP SAN
extension support
and management
software (MPX200
CLI)
MPX200 data migration
support and management
software (mpx Manager)
IBM DS6000 family
IBM DS8000 family
IBM nlStorwize V7000
Unified disk system
IBM XIV Storage System
family
NetApp FAS2000 Series
NetApp FAS270
NetApp FAS3100 Series
NetApp FAS6000 Series
Xiotech Enterprise 5000
MRC 1, MRC 2
Xiotech Mag3D 4000
For the latest information about MPX200 support, see the HP SPOCK website at http://
www.hp.com/storage/spock. You must sign up for an HP Passport to enable access.
For more information on data migration, see the Data Migration Services User's Guide.
The MPX200 is available from HP factory-integrated with a P6000 EVA or XP24000/20000
storage system or as a field upgrade to an existing storage system. iSCSI connectivity to the storage
system is provided for servers through a standard 1-GbE or 10-GbE NIC.
Management software
Management software for MPX200 iSCSI, FCoE, and data migration is available for download
at the following HP websites:
•
For
1.
2.
3.
•
For
1.
2.
3.
HP P6000 Command View:
Go to http://www.hp.com/go/hpsc.
Under Support Options/DOWNLOAD OPTIONS, click Drivers, Software, & Firmware.
Enter HP P6000 Command View Software in the Find an HP product by search box and
click GO.
4. Select HP P6000 Command View Software.
5. Select Cross operating system.
6. Under Downloads, click Download for the desired software.
4.
5.
6.
7.
12
mpx Manager:
Go to http://www.hp.com/go/hpsc.
Under Support Options/DOWNLOAD OPTIONS, click Drivers, Software, & Firmware.
Enter MPX 10-1GbE Base Multifunction Router in the Find an HP product by search box
and then click GO.
Select HP MPX 10-1GbE Base Multifunction Router.
Select the driver language.
Select the operating system.
Under Downloads, click Download for the desired software.
MPX200 Multifunction Router overview
NOTE: The HP Storage mpx Manager software is available as a separate download or as
part of the HP Storage Data Migration Utilities kit which includes additional data migration
tools.
The MPX200 chassis contains one or two router blades, two PCMs, and a mid-plane. There are
two types of router blades: a 4-port 1-GbE blade and a 2-port 10-GbE/2-port 1-GbE blade. Both
blade options include two 8-Gb/s FC ports. MPX200 dual-blade configurations provide for high
availability with failover between blades.
NOTE: Each PCM has three variable-speed fans that provide power and cooling. You can remove
and replace a PCM at any time. To ensure that the MPX200 chassis remains operational, there
must be at least one functioning PCM. Each PCM is capable of powering two blades. The PCM
cools the corresponding blade; therefore, when you remove a PCM, you must replace it within 7
minutes or the blade will shut down due to an over-temperature condition.
Table 2 (page 13) lists the MPX200 options.
Table 2 MPX200 options
Option
Option includes
Order with
HP MPX200 1GbE Base
Chassis
• One chassis
Up to four P6000 EVA, 3PAR StoreServ
10000/7000, 3PAR T-Class/F-Class, or
XP24000/20000 storage systems, or order
separately to upgrade existing storage systems
• One 1-GbE blade with four
1-GbE iSCSI ports and two
8-Gb/s FC ports
• Rail kit
• Accessory kit
• Documentation
• Redundant power supplies
HP MPX200 1 GbE
Upgrade Blade
• One 1-GbE blade with four
1-GbE iSCSI ports and two
8-Gb/s FC ports
• Accessory kit
• Documentation
HP MPX200 10-1GbE Base
Chassis
An MPX200 base chassis and up to four P6000
EVA, 3PAR StoreServ 10000/7000, 3PAR
T-Class/F-Class, or XP24000/20000 storage
systems, or to upgrade existing storage systems to
provide high-availability multipath connectivity
• One chassis
Up to four P6000 EVA, 3PAR StoreServ
10000/7000, 3PAR T-Class/F-Class, or
• One 10-GbE/1-GbE blade with XP24000/20000 storage systems, or order
two 10-GbE and two 1-GbE
separately to upgrade existing storage systems
iSCSI ports, and two 8-Gb/s FC
ports
• Rail kit
• Accessory kit
• Documentation
• Redundant power supplies
HP MPX200 10-1GbE
Upgrade Blade
• One 10-GbE/1-GbE blade with
two 10-GbE and two 1-GbE
iSCSI ports, and two 8-Gb/s FC
ports.
• Accessory kit
An MPX200 base chassis and P6000 EVA, 3PAR
StoreServ 10000/7000, 3PAR T-Class/F-Class, or
XP24000/20000 storage systems, or to upgrade
up to four existing storage systems to provide
high-availability multipath connectivity
• Documentation
HP MPX200 Half Chassis
FCIP License
Includes the license to enable FCIP
functionality in one out of two bays
(slots) in an MPX200 chassis.
MPX200 storage system support
13
Table 2 MPX200 options (continued)
HP MPX200 Full Chassis
FCIP License
Includes the license to enable FCIP
functionality for both bays (slots) in
an MPX200 Chassis. For multipath
(redundant blade for high
availability), order the full chassis
license TA767A.
HP MPX200 1TB Full
Chassis Data Migration
License
Includes the license to migrate 1 TB
of data using an MPX200 Chassis.
HP MPX200 5TB Full
Chassis Data Migration
License
Includes the license to migrate 5 TB
of data using a MPX200 Chassis.
HP MPX200 Full Chassis 1
Array Data Migration
License
Includes the license to migrate data
from or to a single array using a
MPX200 Chassis.
NOTE: When configured for iSCSI bridging, HP recommends use of the same blade option type
(1 GbE or 10GbE-1GbE) in a common chassis to ensure balanced performance in a redundant
configuration.
The following additional equipment is required to configure the MPX200:
14
•
B-series, C-series, or H-series FC switch (iSCSI fabric-attached, data migration, or FCIP)
•
Optical SFP trancievers
◦
FC ports, 8 Gb/s short-range SFP (AJ718A)
◦
FC ports, 4 Gb/s short-range SFP (A744B)
◦
10-GbE ports, short-range SFP+ (455883–B21)
•
Optical FC cables, copper FC cables (direct-connect only)
•
Cat5e or Cat6 GbE network cables
•
Supported Direct Attach Copper 10GbE SFP+ Ethernet cables:
◦
HP ProCurve 10-GbE SFP+ 1m Direct Attach Cable (J9281B)
◦
HP ProCurve 10-GbE SFP+ 3m Direct Attach Cable (J9283B)
◦
HP ProCurve 10-GbE SFP+ 7m Direct Attach Cable (J9285B)
◦
HP ISS 10-GbE SFP+ 0.5m Direct Attach Cable (487649-B21)
◦
HP ISS 10-GbE SFP+ 1m Direct Attach Cable (487652-B21)
◦
HP ISS 10-GbE SFP+ 3m Direct Attach Cable (487655-B21)
◦
HP ISS 10-GbE SFP+ 7m Direct Attach Cable (487658-B21)
◦
Cisco 10-GbE SFP+ 3m Direct Attach Cable SFP-H10GB-CU3M (AP784A)
◦
Cisco 10-GbE SFP+ 5m Direct Attach Cable SFP-H10GB-CU5M (AP785A)
◦
Brocade 10-GbE SFP+ 1m Direct Attach Cable XBR-TWX-0101 (AP818A)
◦
Brocade 10-GbE SFP+ 3m Direct Attach Cable XBR-TWX-0301 (AP819A)
◦
Brocade 10-GbE SFP+ 5m Direct Attach Cable XBR-TWX-0501 (AP820A)
MPX200 Multifunction Router overview
For FC switch model support, see “MPX200 iSCSI configuration rules and guidelines” (page 52)
and the SPOCK website at http://www.hp.com/storage/spock.
MPX200 configuration options for P6000 EVA
You can configure a P6000 EVA storage system for simultaneous connectivity to iSCSI/FCoE and
FC attached hosts. Support for iSCSI/FCoE to a P6000 EVA is provided through the MPX200 and
an FC switch fabric port (fabric attach) or the MPX200 directly connected to the P6000 EVA.
NOTE: Directly connecting an MPX200 FC port and a P6000 EVA requires the P6000 EVA
controller port to be set to Direct.
Figure 1 (page 15) illustrates an MPX200 single-blade fabric-attached configuration. This is the
lowest-cost configuration and is used when high availability for iSCSI hosts is not required.
Figure 1 MPX200 single-blade fabric-attached configuration
Figure 2 (page 15) illustrates an MPX200 dual-blade fabric-attached configuration. This configuration
provides high availability with failover between blades.
NOTE:
A dual-blade configuration may require reconfiguration of device mappings.
Figure 2 MPX200 dual-blade fabric-attached configuration
Figure 3 (page 16) illustrates a multi-P6000 EVA configuration with connectivity for up to four
P6000 EVA storage systems from a single MPX200 blade.
MPX200 configuration options for P6000 EVA
15
Figure 3 MPX200 single-blade multi-P6000 EVA configuration
Figure 4 (page 16) illustrates a multi-P6000 EVA configuration with connectivity for up to four
P6000 EVA storage systems from dual MPX200 blades. This configuration provides high availability
with failover between blades.
Figure 4 MPX200 dual-blade multi-P6000 EVA configuration
Figure 5 (page 17), Figure 6 (page 17), and Figure 7 (page 17) illustrate P6000 EVA direct
connect configurations.
16
MPX200 Multifunction Router overview
Figure 5 MPX200 dual-blade direct connect to one P6000 EVA configuration
MPX200 blade 1
MGMT
HP StorageWorks
MPX200
GE4
IOIOI
MGMT
GE3
FC1
HP StorageWorks
MPX200
FC2
GE1
FC1
MPX200 blade 2
MGMT
1 GbE Blade
MPX200 Multifunction Router
FC2
GE2
IP network
management
(WAN/LAN)
GE4
IOIOI
MGMT
GE3
1 GbE Blade
MPX200 Multifunction Router
FC1
FC2
FC1
GE1
GE1
FC2
GE2
iSCSI
GE1
IP network
iSCSI data
(LAN/VLAN)
NIC
P6000/EVA storage system
FP1
FP2
FP1
FP2
A
B
26639a
Figure 6 MPX200 single-blade direct connect to one P6000 EVA configuration
IP network
management
(WAN/LAN)
MPX200
MGMT
HP StorageWorks
MPX200
GE4
IOIOI
MGMT
GE3
1 GbE Blade
MPX200 Multifunction Router
FC1
FC2
FC1
GE1
FC2
GE2
iSCSI
GE1
IP network
iSCSI data
(LAN/VLAN)
NIC
P6000/EVA
storage system
FP1
FP2
FP1
FP2
A
B
26640a
Figure 7 MPX200 dual-blade direct connect to two P6000 EVAs configuration
MPX200 blade 1
MGMT
HP StorageWorks
MPX200
MGMT
GE4
IOIOI
GE3
FC1
FC2
FC1
HP StorageWorks
MPX200
GE1
FC2
MPX200 blade 2
MGMT
1 GbE Blade
MPX200 Multifunction Router
GE2
IP network
management
(WAN/LAN)
MGMT
GE4
IOIOI
GE3
FC1
GE1
1 GbE Blade
MPX200 Multifunction Router
FC2
FC1
GE1
FC2
GE2
IP network
iSCSI data
(LAN/VLAN)
FP1
P6000/EVA
storage system
FP2
A
iSCSI
GE1
FP1
FP2
FP1
FP2
NIC
A
B
B
FP1
FP2
26641a
MPX200 configurations for XP24000/20000
An XP storage system can be configured for simultaneous connectivity to iSCSI and FC attached
hosts. Support for iSCSI to an XP storage system is provided through the MPX200 and an existing
FC switch fabric port (fabric-attached).
Figure 8 (page 18) shows an MPX200-XP single-blade fabric-attached configuration. This is the
lowest-cost configuration and is used when high availability for iSCSI hosts is not required.
MPX200 configurations for XP24000/20000
17
Figure 8 MPX200-XP single-blade fabric-attached configuration
Figure 9 (page 18) shows an MPX200-XP dual-blade fabric-attached configuration. This configuration
provides high availability with failover between blades.
Figure 9 MPX200-XP dual-blade fabric-attached configuration
Figure 10 (page 19) shows a multi-XP configuration with connectivity for up to four XP storage
systems from a single MPX200 blade.
18
MPX200 Multifunction Router overview
Figure 10 MPX200-XP multi-XP fabric-attached configuration
MPX200 configurations for XP24000/20000
19
2 Planning the MPX200 installation
Prior to installation, it is important to define the requirements for server connectivity and MPX200
multifunction usage. You should consider present and future needs as they relate to MPX200
configuration attributes and installation recommendations.
Installation recommendations
Before installing the HP MPX200 Multifunction Router, HP recommends that you:
•
Develop an installation and configuration plan for your FC-SAN and Ethernet IP-SAN
environments.
•
Review all documentation.
•
Determine if the IP-SAN is lossy or lossless (Enhanced Ethernet) and if iSCSI or FCoE is
deployed.
The MPX200 supports the following functions: iSCSI-FCoE, FCIP, Data Migration. For simultaneous
operation, you can configure the MPX200 chassis with a single blade or dual blades to run up to
two functions per blade in the combinations shown in Table 3 (page 20).
Table 3 MPX200 blade configurations
Single blade chassis (blade1/empty)
Dual-blade chassis (blade1/blade2)
iSCSI-FCoE/empty
iSCSI-FCoE/iSCSI-FCoE
iSCSI-FCoE-FCIP/empty
iSCSI-FCoE-FCIP/iSCSI-FCoE-FCIP
iSCSI-FCoE-DMS/empty
iSCSI-FCoE-DMS/iSCSI-FCoE-DMS
FCIP/empty
FCIP/FCIP
DMS/empty
DMS/DMS
iSCSI-FCoE-DMS/iSCSI-FCoE-FCIP
iSCSI-FCoE-FCIP/iSCSI-FCoE-DMS
•
Simultaneous iSCSI and FCoE are considered one function. FCoE is only supported with
10-GbE models.
•
When configuring for blade redundancy, you must configure both blades. To add a redundant
blade, you must un-present/re-present existing LUN presentations to gain access through the
second blade.
NOTE: When configured for iSCSI bridging, HP recommends use of the same blade option
type (1 GbE or 10GbE-1GbE) in a common chassis to ensure balanced performance in a
redundant configuration.
•
Dual-blade iSCSI-FCoE configurations are always configured for high availability.
•
Dual-blade FCIP configurations can be configured for separate operation or high availability.
•
A license is required for FCIP, half-chassis or full chassis.
•
A license is required for data migration, 1TB, 5TB, or 1 Array. FCIP is not required for remote
data migration.
NOTE:
For more information on data migration, see the Data Migration Services User's Guide.
Table 4 (page 21) describes the MPX200 supported configuration maximums for ports, blades,
and chassis.
20
Planning the MPX200 installation
Table 4 MPX200 supported configuration maximums
Configuration parameter
Per port
Per blade
Per chassis (2 blades1)
iSCSI connections, 1-GbE model
256
1,024
2,048
iSCSI-FCoE connections, 10-GbE model
2,0482
2,048
4,096
Initiators, 1-GbE model
N/A
300
300
FCoE Initiators, 10-GbE model
N/A
600
600
LUNs, 1-GbE model
N/A
4,096
4,096
FCoE LUNs, 10-GbE model
N/A
4,096
4,096
Targets
N/A
Up to four 3PAR, Up to four 3PAR StoreServ
EVA, or XP
10000/7000, 3PAR
storage systems3 T-Class/F-Class, P6000 EVA, or
XP storage systems3
1
2
3
For mixed-blade chassis configurations that include one 1-GbE blade and one 10-GbE blade, the supported maximums
are the 1-GbE values.
10-GbE ports only.
For iSCSI connectivity, a total of 4 storage systems supported (any mix of 3PAR StoreServ 10000/7000, 3PAR
T-Class/F-Class, P6000 EVA, or XP24000/20000 arrays).
iSCSI/FCoE operation
You can configure the MPX200 with a single blade or with two (redundant) blades.
Total number of initiators
With two blades, the initiator is registered in both blades for consistency, whether or not you intend
to access both blades.
Number of paths required per initiator
After establishing the number of initiators, determine how many paths are required by each. The
number of connections per blade is finite, and every initiator login constitutes a connection to the
MPX200. In a multipath environment, HP recommends a minimum of one connection per blade;
high-performance applications may require up to four connections per blade (a total of eight).
Use of iSNS
The MPX200 presents one iSCSI target for each VPG (a total of four). Each initiator, therefore,
discovers four times the number of FC targets. HP recommends that you use iSNS to present to the
initiator only the required iSCSI targets.
Use of iSCSI ports
When configuring the MPX200 for iSCSI, there are four available iSCSI ports per blade. For high
performance and maximum initiator connectivity, HP recommends that you use all available ports.
Balancing the load
HP recommends that you use all iSCSI ports for both 1-GbE and 10-GbE blades. If multiple 1-GbE
initiators are required, ensure that logins are spread across all 1-GbE ports. For 10-GbE blades,
you can place a higher number of initiators on the 10-GbE ports than on the 1-GbE ports.
Because iSCSI and data migration traffic can share the same FC ports, it is prudent to understand
how each function effects the other during I/O operation. The use of bandwidth throttling for data
migration or MPIO for iSCSI provides a mechanism to allocate FC bandwidth to each function.
iSCSI/FCoE operation
21
10-GbE initiators
HP recommends that you map servers with 10-GbE NICs for login to the 10-GbE ports on the
MPX200.
MPX200 storage and IP network best practices
The following sections list requirements and recommendations for optimal results.
Prerequisites
Prerequisites for using this product include:
•
A Fibre Channel switch installed in your environment for MPX200 fabric-attached configurations
•
Equipment cabinet suitable for 2U-sized enclosures
•
A 1 GbE or 10-GbE switch to connect to the MPX200 1GbE iSCSI ports or to the MPX200
10GbE iSCSI/FCoE ports as iSCSI targets
•
Converged network switch, if planning to configure the MPX200 as an iSCSI/FCoE target,
and separately configured iSCSI and FCoE VLANs
•
Cat5e or Cat6 cabling to the MPX200 1 GbE iSCSI data ports
•
HP-recommended 10-GbE SFP+ optical transceivers or 10-GbE SFP+ copper cabling to the
10-GbE iSCSI/FCoE data ports (see the MPX200 QuickSpec for part numbers)
•
For 10-GbE connectivity, HP recommends OM3 or HP PremierFlex LC-LC (OM3+, OM4) type
cabling
Planning your storage configuration
Proper planning of the storage subsystem and its subsequent performance is critical to a successful
deployment of the MPX200 and connected storage systems. Improper planning or implementation
can result in wasted storage space, degraded performance, or inability to expand the system to
meet growing storage needs. Planning considerations include:
•
System and performance expectations
•
Striping methods
•
RAID levels
•
Hard drive sizes and types
•
Spare drives
•
Number of storage systems (up to 4) and sizing (capacity)
•
Number of Fibre Channel presented virtual LUNs
•
Number of iSCSI and FCoE initiators
– 1 GbE iSCSI per chassis (1 or 2 blades): 300 initiators or logins maximum– 10 GbE
iSCSI/FCoE per chassis (1 or 2 blades): 600 initiators or logins maximum
•
Number of virtual LUNs to be presented to the iSCSI and FCoE initiators
– 1 GbE iSCSI per chassis (1 or 2 blades): 4096 LUNs maximum
– 10 GbE iSCSI/FCoE per chassis (1 or 2 blades): 4096 combined iSCSI and FCoE LUNs
maximum
•
FCoE requires a converged network switch that implements DCB standards for lossless Ethernet.
You can build a high-performance, highly available IP-SAN in a variety of ways. Consider an
enterprise-class switch infrastructure as detailed in Table 1 (page 11) to minimize packet discard,
packet loss, and unpredictable performance. Consider implementing the 10-GbE IP-SAN on a
22
Planning the MPX200 installation
lossless Ethernet network, utilizing DCB switches. Within a 10-GbE based data center, consider
implementing the FCoE protocol.
General IP-SAN
For best results, follow these IP-SAN recommendations:
•
For Microsoft Windows Server environments, implement MPIO along with the HP DSM for
NIC fault tolerance and superior performance.
•
For other operating systems, where supported, implement NIC bonding in the host software
for NIC fault tolerance and performance.
•
Implement a separate subnet or VLAN for the IP storage network for dedicated bandwidth.
•
Implement separate FCoE and iSCSI VLANs.
•
Implement a fault-tolerant switch environment as a separate VLAN through a core switch
infrastructure or multiple redundant switches.
•
Set the individual 1- and 10-Gb ports connected to the storage nodes and servers at auto
negotiate full duplex at both the switch and host/node port level.
•
Implement switches with full-duplex non-blocking mesh backplanes with sufficient port buffer
cache (at least 512 KB per port).
•
Implement Flow Control on the storage network switch infrastructure. Flow control can have
a dramatic impact on performance in a 10 GbE environment, especially in a mixed 1 GbE
and 10 GbE environment. When a network port becomes saturated, excess frames can be
dropped because the port cannot physically handle the amount of traffic it is receiving. Packets
are then resent, resulting in a performance decrease. An example of this is a 10 GbE link
sending data at 10 Gb/s to a single 1 GbE link. Flow control eliminates the problem by
controlling the speed at which data is sent to the port. For this reason, best practices dictate
that you always enable flow control. You must enable flow control on both the switches and
NICs/iSCSI initiators for it to function properly. If flow control is not enabled globally, the
network defaults to the lowest common denominator, which would be to have flow control
disabled.
•
(Optional) Implement Jumbo Frames support on the switch, 1 GbE iSCSI blade, and 10-GbE
iSCSI/FCoE blade when iSCSI is configured, and all servers are connected to the IP-SAN.
Consider using 4–K Jumbo Frames instead of 9–K Jumbo Frames for better streaming
performance.
NOTE: FCoE requires Jumbo Frames and is the default configuration of a CNA, converged
network switch, and the 10-GbE iSCSI/FCoE blade when FCoE is configured.
Recommended switch infrastructure for an IP-SAN
HP recommends using HPN ProCurve Ethernet switches, which typically include minimum capabilities
for building a high performance fault-tolerant storage network in a relatively easy and cost effective
way. Any Enterprise-class managed switch typically has the necessary capabilities that most IP-SAN
customers require. Table 5 (page 24) describes minimum recommended Ethernet switch capabilities
for an MPX200 based IP-SAN.
For more information about FCoE, see the converged network switches and the HP SAN Design
Reference Guide at http://h18006.www1.hp.com/storage/networking/index.html .
MPX200 storage and IP network best practices
23
Table 5 MPX200 switch capability
Switch capability
Description
1 and 10 Gigabit
Ethernet support
The 1 GbE iSCSI blade of the MPX200 comes with four copper GbE ports (802.3ab). To
take advantage of full duplex gigabit capabilities, you need infrastructure of Cat5e or Cat6
cabling. The 10-GbE iSCSI/FCoE blade of the MPX200 comes with two SFP+ 10 Gb ports.
You can configure either SFP+ optical or SFP+ copper connectivity. Server connections and
switch interconnects can be done via SFP+ fiber cabling, in addition to Cat5e or Cat6
cabling, depending on IP switch capabilities.
Fully subscribed
non-blocking
backplanesor Adequate
per-port buffer cache
For optimal switch performance, HP recommends that the switch have at least 512 KB of
buffer cache per port. Consult your switch manufacturer specifications for the total buffer
cache. For example, if the switch has 48 Gb ports. You should have at least 24 MB of
buffer cache dedicated to those ports. If the switch aggregates cache among a group of
ports (that is, 1MB of cache per 8 ports) space your utilized ports appropriately to avoid
cache oversubscription.
Flow Control support
IP storage networks are unique in the amount of sustained bandwidth that is required to
maintain adequate performance levels under heavy workloads. You should enable Gigabit
Ethernet Flow Control (802.3x) technology on the switch to eliminate receive and/or transmit
buffer cache pressure. Note: Some switch manufacturers do not recommend configuring
Flow Control when using Jumbo Frames, or vice versa. Consult the switch manufacturer
documentation. HP recommends implementing Flow Control over Jumbo Frames for optimal
performance. Flow control is required when using the HP DSM and MPIO.
Individual port speed and All ports on the switch, servers, and storage nodes should be configured to auto-negotiate
duplex setting
duplex and speed settings. Although most switches and NICs will auto negotiate the optimal
performance setting, if a single port on the IP storage network negotiates a suboptimal
(100 megabit or less and/or half-duplex) setting, the entire SAN performance can be
impacted negatively. Check each switch and NIC port to make sure that the auto-negotiation
is resolved to be 1000Mb/s or 10Gb/s with full-duplex.
24
Link
Aggregation/Trunking
support
It is important to enable Link Aggregation and/or Trunking support when building a high
performance fault-tolerant IP storage network. HP recommends implementing Link
Aggregation and/or Trunking technology when doing Switch to Switch Trunking, Server
NIC Load Balancing and Server NIC Link Aggregation (802.3ad).
VLAN support
Implementing a separate subnet or VLAN for the IP storage network is a best IP-SAN practice.
If implementing VLAN technology within the switch infrastructure, typically you need to
enable VLAN Tagging (802.1q) and/or VLAN Trunking (802.1q or InterSwitch Link [ISL]
from Cisco). Consult your switch manufacturer configuration guidelines when enabling
VLAN support.
Spanning Tree/Rapid
Spanning Tree
In order to build a fault-tolerant IP storage network, you need to connect multiple switches
into a single Layer 2 (OSI Model) broadcast domain using multiple interconnects. In order
to avoid Layer 2 loops, you must implement the Spanning Tree protocol (802.1D) or Rapid
Spanning Tree protocol (802.1w) in the switch infrastructure. Failing to do so can cause
numerous issues on the IP storage networks including performance degradation or even
traffic storms. HP recommends implementing Rapid Spanning Tree if the switch infrastructure
supports it for faster Spanning Tree convergence. If the switch is capable, consider disabling
spanning tree on the server switch ports so that they do not participate in the spanning tree
convergence protocol timings. Note: You should configure FCoE with spanning-tree disabled
at the first level server edge switch.
Jumbo Frames support
Sequential read and write, or streaming workloads can benefit from a maximum frame
size larger than 1514 bytes. The 1 GbE iSCSI and 10 GbE iSCSI/FCoE ports are capable
of frame sizes up to 9K bytes. Better performance is realized when the NICs and iSCSI
initiators are configured for 4K byte (maximum frame size of 4088 bytes) jumbo frames.
You must enable Jumbo frames on the switch, the 1 GbE iSCSI and 10 GbE iSCSI/FCoE
modules, and all servers connected to the IP-SAN. Typically, you enable Jumbo Frames
globally on the switch or per VLAN and on a per port basis on the server. Note: Some
switch manufacturers do not recommend configuring Jumbo Frames when using Flow
Control, or vice versa. Consult the switch manufacturer documentation. HP recommends
implementing Flow Control over Jumbo Frames for optimal performance.
Planning the MPX200 installation
For optimal availability and performance, consider the following:
•
Switch Infrastructure: Dual Redundant 1 or 10 Gigabit switches trunked together for bandwidth
and fault-tolerance.
•
1 GbE iSCSI blade and 10 GbE iSCSI blade connectivity: at least one port from each blade
connected to each switch.
•
1 GbE iSCSI blade connectivity: When using 2 GE ports, utilize GE port 1 and GE port 3 or
GE port 2 and GE port 4 for improved performance balancing.
•
Host Server connectivity: Dual NICs connected to the IP storage network with a single port
connected to each switch. For Windows 2003/2008, use the HP DSM for MPIO for multiple
NIC support.
Network latency
High network latency can be the primary cause of slow I/O performance, or worse, iSCSI drive
disconnects. It is important to keep network latency (for example, ping response time measurement)
on your IP-SAN subnet below 2 milliseconds. Many factors can contribute to increasing network
latency, such as congestion, distance, and router hops. Configuring the IP-SAN on a single IP
subnet with layer-2 switching helps to lower the network latency.
Network bandwidth
Network bandwidth required for an IP-SAN depends on the server applications, maintenance
utilities, and backup/recovery processes. Most I/O intensive applications, like Microsoft Exchange
and SQL Server,do will not consume much network bandwidth and are more sensitive to network
latency issues. Bandwidth becomes much more important when you are performing maintenance
operations, like backup/recovery. Any sequential read/write stream could consume significant
bandwidth.
NOTE: Storage data transfer rates are typically measured in bytes while network data transfer
rates are measured in bits. A 1 Gb/sec network connection can transfer a maximum of 120–130
MB/sec. Microsoft Windows provides performance monitor counters that can help to determine
the data-path bandwidth requirements. Disk Bytes/sec is the rate bytes are transferred to or from
the disk during write or read operations.
MPX200 storage and IP network best practices
25
3 Installing the MPX200
This chapter describes how to rack mount the MPX200.
WARNING!
•
Mount the MPX200 in the rack so that the weight is evenly distributed. An unevenly loaded
rack can become unstable, possibly resulting in equipment damage or personal injury.
•
This product is supplied with a 3 wire cable and plug for the user's safety. Use this power
cable in conjunction with a properly grounded outlet to avoid electrical shock. An electrical
outlet that is not correctly wired could place hazardous voltage on metal parts of the switch
chassis. It is the responsibility of the customer to ensure the outlet is correctly wired and
grounded to prevent electrical shock.
•
If the chassis is installed in a closed or multi-rack assembly, the operating temperature of the
rack environment may be greater than the ambient temperature. Be sure to install the chassis
in an environment that is compatible with the maximum ambient rated temperature.
MPX200 components
Figure 11 (page 26) shows the MPX200 components.
Figure 11 MPX200 components
1. Rack rail, inner (2)
2. Rack rail, outer (2)
3. Chassis rail (2)
4. Screw, flathead, 6–32 x 1/4 in. (8)
5. Screw, flathead, 10–32 x 1/4 in. (6)
6. Screw, panhead, 10–32 x 3/8 in. (10)
7. Washer, centering (10); for use on racks with
square holes only
26
Installing the MPX200
Rack mounting the MPX200
NOTE:
Use a crosshead screwdriver to perform the rack mount procedure.
To rack mount the MPX200:
1. Attach the two chassis rails to the MPX200 chassis using three 10-32 x 1/4 in. screws for
each rail. Make sure that the end with the flange is facing the rear of the chassis
(Figure 12 (page 27)).
The MPX200 has multiple mounting holes to allow for adjustable setback. Secure the chassis
rails in the desired position if additional room is needed.
Figure 12 Chassis rails
1
1. Chassis rail
2.
2
26592b
2. Screws, flathead, 10-32 x 1/4 in.
Assemble the front and rear rack rails; secure them loosely using four 6-32 x 1/4 in. screws
(Figure 13 (page 27)).
Figure 13 Rack rails
1. Rear rack rail
2. Front rack rail
3. Screw, flathead, 6-32 x 1/4 in.
Rack mounting the MPX200
27
3.
Install the rails in the rack.
There are two inner rails and two outer rails. Slide each inner rail into the corresponding outer
rail to create a complete rack rail.
a. Extend the rack rails to fit the inner dimensions of the rack. The rail flanges on both ends
fit inside the rack.
b. Make sure the inner rail is toward the front of the rack.
c. Fasten the rail flanges to the rack on both ends using two 10-32 x 3/8 in. screws in the
upper and lower holes (Figure 14 (page 28)).
Figure 14 Inner rack view
1. Screw, flathead, 6-32 x 1/4 in.
2. Screw, panhead, 10-32 x 3/8 in.
3. Washer
4.
Install the chassis in the rack:
a. Starting from the back of the rack, slide the MPX200 chassis and rail assembly into the
rack rails.
b. Fasten the chassis to the rack using two 10-32 x 3/8 in. screws in the middle hole on
each rail flange (Figure 15 (page 28)).
Figure 15 Rear view
1
1
26588b
1. Screws, panhead, 10-32 x 3/8 in.
28
Installing the MPX200
5.
Route the power cord:
a. Starting from the front of the rack, connect the power cord to the MPX200.
b. For the left blade, route the cord by following the gap between the chassis and the chassis
rail (see Figure 16 (page 29)).
c. Repeat for the right blade.
NOTE: The right blade requires the power cord to extend approximately 30 cm (12
inches) beyond the front edge, due to the positioning of the socket on the PCM.
Figure 16 Power cord
1
26591b
1. Power cord
Rack mounting the MPX200
29
6.
Install the HP MPX200 bezel:
a. Remove the four 10-32 x 3/8 in. screws that secure the rack rails to the front of the rack.
b. Position the bezel support plate in front of the MPX200 chassis, with the arrows pointing
up.
c. Replace the four 10-32 x 3/8 in. screws, two on each side of the bezel support plate.
d. Install the bezel by pushing it through the white pop-in tabs on the bezel support plate
(Figure 17 (page 30)).
Figure 17 Bezel view
30
1. Screw, panhead, 10-32 x 3/8 in.
2. Bezel mount bracket
3. Bracket arrows
4. Bezel
Installing the MPX200
4 Managing MPX200 iSCSI using HP P6000 Command
View
This chapter provides instructions for setting up the MPX200 management port, Fibre Channel
zoning, HP P6000 Command View discovery, setting up the iSCSI IP ports, and setting the date
and time.
NOTE: FCIP functionality is not configured using HP P6000 Command View. For configuration
requirements, see “MPX200 FCIP” (page 108).
Setting up the MPX200 management port
Most management functions have been built into HP P6000 Command View. In some cases, access
to the MPX200 CLI is required.
You connect to the CLI through one of the following:
•
RS-232 serial port (115200/8/n/1)
•
Telnet
•
SSH
By default, the management port obtains a DHCP address. If the management port cannot obtain
a DHCP address, you must set a static IP address.
Fibre Channel zoning
Because the MPX200 can be a fabric-connected device, it is important to understand the zoning
requirements.
Open zoning
When using an open zone configuration, each FC port on each MPX200 must be connected to a
separate fabric (see “Open zone configuration” (page 31)).
Figure 18 Open zone configuration
CAUTION:
initiators.
HP recommends that you use zoning if the MPX is in a mixed environment with FC
Setting up the MPX200 management port
31
Fibre Channel switch-based zoning
Each FC port on the MPX200 uses NPIV to create a total of four unique, virtual WWNNs per
physical FC port. To create proper zoning, you must understand the use of VPGs. A VPG consists
of a WWNN from each of the four physical FC ports. This allows presentation for up to 1,024
LUNs from a single P6000 EVA or XP array.
Place an array target port in the same zone as one of the VPG ports (see “EVA Fibre Channel
zone configuration” (page 32)). This ensures a single path to the FC port on the router blade and
gives you more control of load balancing through the router.
Figure 19 EVA Fibre Channel zone configuration
HP P6000 Command View discovery
When the management port IP address is set and the router FC ports are visible to the P6000 EVA,
you can perform the MPX200 discovery. You discover the MPX200 iSCSI controllers using the
Discover iSCSI Devices button or the Add iSCSI Device button (see Figure 20 (page 33)).
32
Managing MPX200 iSCSI using HP P6000 Command View
Figure 20 iSCSI devices folder properties
NOTE: HP recommends that you set a static IP address on the management port to ensure
connectivity.
After the discovery is complete, the MPX200s appear in the iSCSI Devices folder as iSCSI Controller
01 and iSCSI Controller 02. The four iSCSI MPX200 hosts appear in the Hosts folder (see
Figure 21 (page 33)). The ports associated with each host consist of the VPGs from each blade.
Figure 21 Host properties
Figure 22 (page 34) shows the iSCSI Controller Properties Mgmt Port tab on the iSCSI Controller
Properties page.
HP P6000 Command View discovery
33
In the IPv4 or IPv6 box, select Static and set the management port IP address.
Figure 22 iSCSI controller properties: Mgmt Port tab
Setting up the iSCSI IP ports
Each iSCSI IP port must have an IP address—IPv4, IPv6, or both. Set the IP address on the IP Ports
tab on the iSCSI Controller Properties page (see Figure 23 (page 35)).
NOTE:
34
A target portal is created for each IP address that you set.
Managing MPX200 iSCSI using HP P6000 Command View
Figure 23 iSCSI controller properties: IP Ports tab
Setting the date and time on the MPX200
Setting the date and time on the MPX200 ensures the synchronization of events and assists in
troubleshooting. You have three options for setting the date and time (see Figure 24 (page 36)).
NOTE: HP recommends using the NTP settings, if available on your network. This provides
redundancy through multiple time servers.
Setting the date and time on the MPX200
35
Figure 24 Set iSCSI controller time
Code load
NOTE: HP recommends that you load the latest MPX200 firmware. See http://www.hp.com/
go/hpsc for updates.
You load the firmware from the P6000 Command View Code Load page for the iSCSI controller.
Firmware is loaded for the selected controller only; for a dual-blade configuration, you must perform
this procedure for each blade.
1. Select the desired iSCSI controller.
2. Click Code Load.
3. Browse to the firmware file.
4. Click Next Step.
5. Click Finish.
6. In the dialog box, enter yes, and then click Update.
The MPX200 reboots upon successful load of the firmware.
36
Managing MPX200 iSCSI using HP P6000 Command View
Figure 25 Code Load page for the iSCSI controller
Shutting down and restarting the MPX200
If you need to restart the MPX200, select the General tab, and then click Restart. If you need to
shut down the MPX200, click Shut down. See Figure 26 (page 37).
Figure 26 iSCSI controller shutdown options
Saving or restoring the MPX200 configuration
After initial setup of the MPX200, it is a good practice to save the configuration. The FRU Save
function allows you to save the configuration to a file that can be used later as a restoration point.
The FRU Restore function allows you to restore the configuration to the point when the configuration
was last saved, which is especially important for single-blade configurations.
NOTE:
A Restore action reboots the blade.
In a dual-blade configuration, a copy of the configuration for each router is kept on the peer. If
you add a new blade, the configuration of the peer blade is copied to the new blade and is ready
for use immediately; no reconfiguration is required.
To save or restore the MPX200 configuration:
1. Select the desired blade.
Shutting down and restarting the MPX200
37
2.
3.
4.
Click Set Options.
Click Save Configuration.
Select a configuration method, and then click Select (see Figure 27 (page 38)).
Figure 27 iSCSI controller configuration selection
Locating the MPX200
A flashing blue LED in the center of the blade indicates that the locating beacon is on.
NOTE:
The beacon turns off after 15 minutes.
Figure 28 Blue LED locating beacon
1. Input fault LED
2. System power LED
3. Heartbeat LED
4. 1-GbE or 10-GbE iSCSI ports
5. 1–GbE iSCSI ports
6. Maintenance button
7. 8–Gb/s FC ports
8. UID beacon (blue LED)
9. RS-232 port
10. Management port 10/100/1000 Ethernet
To enable or disable the locating beacon:
1. Select the iSCSI controller.
2. Click Locate.
3. Click Locate ON or Locate OFF, and then click OK (Figure 29 (page 39)).
38
Managing MPX200 iSCSI using HP P6000 Command View
Figure 29 Locate hardware device
Removing an iSCSI controller
Before you remove an iSCSI controller permanently, ensure that all virtual disk presentations have
been removed.
To remove an iSCSI controller:
1. Select the iSCSI controller.
2. Click Set Options.
3. Select Remove controller, and then click OK. (see Figure 30 (page 39)).
Figure 30 iSCSI controller options: Remove controller
Removing an iSCSI controller
39
5 Managing MPX200 iSCSI for 3PAR StoreServ Storage
This chapter describes management procedures for configuring and managing MPX200 iSCSI
with 3PAR StoreServ 10000/7000, 3PAR T-Class/F-Class Storage. For more information, see
“MPX200 iSCSI configuration rules and guidelines” (page 52).
Setting up the MPX200 management port
Access to the MPX200 CLI is required for initial setup. Connect to the CLI through one of the
following:
•
RS-232 serial port (115200/8/n/1)
•
Telnet
•
SSH
When connected, select the blade to manage by using the blade <1 | 2> command.
By default, the management port obtains a DHCP address. If the management port cannot obtain
a DHCP address, you must set a static IP address. HP highly recommends using static IP addresses
to retain connectivity. See Figure 31 (page 40).
Figure 31 The blade # command
Enter the admin start command to change settings. See Figure 32 (page 40).
Figure 32 The admin start command
Enter the set mgmt command to setup the management port IP address. See Figure 33 (page
41).
40
Managing MPX200 iSCSI for 3PAR StoreServ Storage
Figure 33 The set mgmt command.
Setting up the iSCSI ports
The iSCSI ports require an IP address. Enter the set iscsi command to set the IP addresses.
See Figure 34 (page 41).
Figure 34 The set iscsi command
Fibre Channel zoning
Use the following diagram as a guide to implement zones. Use the show vpgroups command
to determine the MPX200 WWNs used in zoning (see Figure 35 (page 42)). Zones include WWNs
from the MPX200 and the 3PAR array ports.
Setting up the iSCSI ports
41
Figure 35 3PAR zoning
NOTE: Arrays can connect to each fabric multiple ways. HP recommends a connection to each
fabric from different controller nodes at minimum.
LUN provisioning
LUN masking for MPX200 connectivity to a 3PAR array is accomplished by executing the following
procedure in which the MPX200 is treated as if it were a Windows FC host to the 3PAR array.
NOTE: To properly set up LUN masking, you must create a host that includes the WWNs from
a single VPG.
42
Managing MPX200 iSCSI for 3PAR StoreServ Storage
1.
Run the show vpgroups command and observe the fourth bit in the output to identify the
WWNs belonging to a VPG. See Figure 36 (page 43).
Figure 36 The show vpgroups command
2.
Using the InForm Management Console, create a host and add only WWNs that belong to
the same VPG.
There can be up to four hosts that represent the MPX200.
NOTE: Figure 37 (page 43) shows an example with eight connections from the MPX200 to
the array. Each of the four FC ports detects two array ports.
Figure 37 Host properties
LUN provisioning
43
3.
4.
Perform a Discovery of an iSCSI port on each MPX200 blade from the initiator to register the
initiator IQN.
Download, install, and run the mpx Manager.
NOTE: Although you can accomplish LUN masking using either the mpx Manager GUI or
the command line, the mpx Manager is the preferred method.
5.
6.
Connect to the management port of one of the blades.
Select the blade, and then select Wizards→LUN Presentation Wizard to start LUN Presentation
Wizard. This must be done for each blade. See Figure 38 (page 44).
Figure 38 mpx Manager LUN Presentation Wizard
7.
Select the initiator, and then click Next.
The selected array appears in a LUN Selection window.
8.
Expand the tree, select the LUN that you want to present, and then click Next. See
Figure 39 (page 44).
Figure 39 LUN Selection window
9. Click Finish to complete the LUN presentation for the selected blade.
10. Repeat Step 6 through Step 9 for each blade.
44
Managing MPX200 iSCSI for 3PAR StoreServ Storage
Alternate procedure
Alternately, you can perform CLI based LUN presentation using the lunmask add command. See
Figure 40 (page 45). Be sure to run this command for each 3PAR target port on each blade.
Figure 40 The lunmask add command
Setting up the iSCSI initiator
For instructions to configure the iSCSI host, see the HP 3PAR Implementation Guide that pertains
to your operating system, available at http://h20000.www2.hp.com/bizsupport/TechSupport/
DocumentIndex.jsp?lang=en&cc=us&prodClassId=-1&contentType=SupportManual&
docIndexId=64255&prodTypeId=18964&prodSeriesId=5044394.
NOTE:
Multipath software is required when logging in to multiple connections.
For Windows-specific settings, see “Microsoft Windows iSCSI initiator rules and guidelines” (page
56).
Setting up the iSCSI initiator
45
6 Managing MPX200 iSCSI for XP24000/20000
This chapter describes management procedures for configuring and managing MPX200 iSCSI
with XP24000/20000 storage systems. For more information, see “MPX200 iSCSI configuration
rules and guidelines” (page 52).
Setting up the MPX200 management port
Access to the MPX200 CLI is required for initial setup. Connect to the CLI through one of the
following:
•
RS-232 serial port (115200/8/n/1)
•
Telnet
•
SSH
By default, the management port obtains a DHCP address. If the management port cannot obtain
a DHCP address, you must set a static IP address. HP highly recommends using static IP addresses
to retain connectivity.
When connected, select the blade to manage by using the blade <1 | 2> command (see
Figure 41 (page 46)).
Figure 41 The blade # command
Use the admin start command to change settings (see Figure 42 (page 46)).
Figure 42 The admin start command
Use the set mgmt command to setup the management port IP address (see Figure 43 (page 47)).
46
Managing MPX200 iSCSI for XP24000/20000
Figure 43 The set mgmt command.
Setting up the iSCSI ports
The iSCSI ports require an IP address. Use the set iscsi command (see Figure 44 (page 47)).
Figure 44 The set iscsi command
Fibre Channel zoning
See “Fibre Channel zoning” (page 31) and “Fibre Channel switch-based zoning” (page 32) for
zoning information.
WWNs used in zoning can be found in the MPX200 using the show vpgroups command (see
Figure 45 (page 48)).
Setting up the iSCSI ports
47
Figure 45 The show vpgroup command
LUN management
LUN masking for MPX200 connectivity to XP is accomplished by executing the following procedure.
The MPX200 is treated as if it were a Windows FC host to the XP.
48
Managing MPX200 iSCSI for XP24000/20000
1.
To properly setup LUN masking, create a group that includes the WWNs from a single VPG.
To identify which WWNs belong to a VPG see the fourth bit (circled in Figure 46 (page 49)).
You can create up to four groups, each containing WWNs from each VPG from each MPX200
blade. LUNs can be created and assigned to the groups at this time.
Figure 46 LUN management window
2.
Install the Microsoft iSCSI Initiator software. For Windows Server 2008, the iSCSI initiator is
included with the operating system.
For Windows Server 2003, you must install the iSCSI initiator. For Windows Server 2003,
the Microsoft iSCSI initiator installation presents an option for installing MPIO using the
Microsoft generic DSM (Microsoft MPIO Multipathing Support for iSCSI check box). For
Windows Server 2008, MPIO is installed separately as a feature.
3.
4.
5.
See “Setting up the iSCSI initiator” (page 58) to set up the Windows host and register the
IQN name.
Install and run the mpx Manager.
Start the Presentation Wizard by selecting Wizards from the menu.
The LUN Presentation Wizard will display the XP target ports (see Figure 47 (page 50)).
LUN management
49
Figure 47 LUN Selection window
6.
Expand the desired ports and select the same LUN from each (see Figure 48 (page 50)).
Figure 48 Expanded ports
7.
50
Select the initiator and finish (see Figure 49 (page 51)).
Managing MPX200 iSCSI for XP24000/20000
Figure 49 Select the Initiators
8.
Follow the steps beginning with Step 5 to log in to the target.
LUN management
51
7 MPX200 iSCSI configuration rules and guidelines
This chapter describes the iSCSI configuration rules and guidelines for the MPX200.
iSCSI rules and supported maximums
The MPX200 chassis can be configured with one or two blades. Dual-blade configurations provide
for high availability with failover between blades, and are supported as redundant pairs only.
iSCSI-connected servers can be configured for access to one or both blades.
NOTE: In the event of a failover between blades, servers with single-blade connectivity to a failed
blade will no longer have connectivity to the MPX200.
Table 6 (page 52) lists the supported maximums.
Table 6 Supported MPX200 iSCSI maximums
Maximum per MPX200 solution1
Description
Hardware
3PAR StoreServ 10000/7000, 3PAR T-Class/F-Class, P6000
EVA and/or XP24000/20000 storage systems
4 total (any combination)
MPX200
One chassis with up to 2 blades
MPX200 iSCSI port connections
See “MPX200 supported configuration maximums”
(page 21).
Configuration parameter
Total number of iSCSI initiators
300 per chassis for 1-GbE (1 or 2 blades)
600 per chassis for 10-GbE (1 or 2 blades)
Total number of iSCSI LUNs
4,096 per chassis, 1,024 per P6000 EVA or XP
iSCSI connections, 1-GbE
1,024 per blade, 2,048 per chassis
iSCSI connections, 10 GbE
2,048 per blade, 4,096 per chassis
1
For mixed-blade chassis configurations that include one 1-GbE blade and one 10-GbE blade, the maximums supported
are the 1-GbE blade values.
P6000 EVA storage system rules and guidelines
The MPX200 is supported for iSCSI with the following P6000 EVA storage systems:
•
EVA4400/4400 with embedded switch
•
EVA4000/4100/6000/6100/8000/8100
•
EVA6400/8400
•
P63x0/P65x0
All MPX200 configurations must follow these P6000 EVA connectivity rules:
52
•
All MPX200 Fibre Channel connections are supported for fabric–connect or direct-connect
configurations.
•
Each P6000 EVA storage system can connect to a maximum of one MPX200 chassis (two
blades).
•
Each P6000 EVA controller host port can connect to a maximum of two MPX200 Fibre Channel
ports.
MPX200 iSCSI configuration rules and guidelines
•
A maximum of one MPX200 chassis (two blades) can be zoned with up to four P6000 EVA
storage systems.
•
A P6000 EVA storage system can present LUNs to iSCSI initiators and Fibre Channel hosts
concurrently.
HP P6000 Command View management rules and guidelines
The HP P6000 Command View implementation for the MPX200 supports management of up to
four P6000 EVA storage systems concurrently, and provides the equivalent functionality for both
iSCSI and Fibre Channel connected servers. All MPX200 management functions are integrated in
HP P6000 Command View.
IMPORTANT: The MPX200 requires a specific controlled release of HP P6000 Command View.
For more information and to receive the supported HP P6000 Command View version, contact
your HP service representative.
The HP P6000 Command View management rules and guidelines follow:
•
Requires HP P6000 Command View 9.2 or later for array-based and server-based
management. FCoE requires Command View EVA 9.3 or later, P6300/P6500 requires 9.4
or later.
•
A maximum of one MPX200 chassis (two blades) can be discovered by a P6000 EVA storage
system.
•
HP P6000 Command View manages the MPX200 out of band (IP) through the MPX200
management IP port. The HP P6000 Command View application server must be on the same
IP network as the MPX200 management IP port.
•
The MPX200 iSCSI initiator and iSCSI LUN masking information resides in the MPX200, not
in the HP P6000 Command View database.
•
The default iSCSI initiator P6000 EVA host-mode setting is Microsoft Windows. The iSCSI
initiator host-mode setting for Apple Mac OS X, Linux, Oracle Solaris, VMware, and Windows
2008 is configured with HP P6000 Command View.
•
iSCSI host mode setting for Windows 2012 is configured with MPX200 CLI only.
NOTE: Communication between HP P6000 Command View and the MPX200 is not secured by
the communication protocol. If unsecured communication is a concern, HP recommends using a
confined or secured IP network in the data center.
P6000 EVA storage system software
P6000 EVA storage system software supported for Fibre Channel hosts, such as HP P6000
Continuous Access, HP P6000 Business Copy, HP SSSU, and HP Replication Solutions Manager,
are supported with the MPX200 for P6000 EVA LUNs that have been presented to iSCSI initiators.
This section describes restrictions for iSCSI hosts using the MPX200.
Features supported for iSCSI hosts
The following Business Copy features are supported for iSCSI hosts:
•
LUN snapshots presented to iSCSI hosts
•
LUN snapclones (normal or 3-phase) presented to iSCSI hosts
•
Instant restore from a snapclone to the original source
•
Ability of iSCSI hosts to access and write to P6000 EVA snapshots and snapclones
HP P6000 Command View management rules and guidelines
53
•
Use of HP P6000 Command View, SSSU, or RSM to create snapshots manually or automatically
on a schedule
•
CLI support to enter replication commands from iSCSI hosts
Features not supported for iSCSI hosts
LUNs that are presented to iSCSI hosts through the MPX200, and that require a host agent on the
iSCSI initiator, do not support advanced replication features because there are no iSCSI replication
host agents available. The following features are not supported for iSCSI hosts:
•
Mounting and unmounting LUNs through a host agent, which must be performed manually
•
Accessing the host view of storage (for example, viewing an F drive from a host)
•
Deploying host agents to allow users to launch a script on the iSCSI host
Table 7 (page 54) describes support for P6000 EVA storage system software when using the
MPX200 for iSCSI.
Table 7 Support for P6000 EVA storage system software with MPX200 iSCSI
HP storage product
MPX200 iSCSI support
HP P6000 Business Copy
iSCSI and Fibre Channel hosts are supported.
HP Replication Solutions Manager
HP SSSU
HP P6000 Continuous Access
HP P6000 Continuous Access with HP-supported FCIP
gateways
iSCSI and Fibre Channel hosts and LUN remote replication
are supported.
3PAR StoreServ Storage system rules and guidelines
The MPX200 is supported for iSCSI with the following 3PAR storage systems:
•
3PAR StoreServ 10000/7000
•
3PAR F-Class, T-Class
All MPX200 configurations must follow these connectivity rules:
•
When using the MPX200 for iSCSI, MPX200 FC connections can be fabric-attached through
an FC switch or direct-connect to a 3PAR FC port.
•
Multiple MPX200 chassis can be connected to a single 3PAR array. However, HP recommends
that array FC ports are not shared between different chassis.
•
HP recommends a maximum of eight 3PAR array ports be connected to a single MPX200
chassis.
•
A maximum of one MPX200 chassis (two blades) can be zoned with up to four 3PAR storage
systems.
•
3PAR, XP and P6000 EVA storage systems can connect to the same MPX200. The total
allowable number of storage systems is four per MPX200 chassis.
•
A 3PAR storage system can present LUNs to iSCSI initiators and FC hosts concurrently.
XP storage system rules and guidelines
The MPX200 is supported for iSCSI with the following XP storage systems:
54
•
XP24000
•
XP20000
MPX200 iSCSI configuration rules and guidelines
All MPX200 configurations must follow these connectivity rules:
•
When using the MPX200 for iSCSI, MPX200 FC connections must be fabric-attached through
an FC switch.
•
Each XP storage system can connect to a maximum of one MPX200 chassis (two blades).
•
A maximum of one MPX200 chassis (two blades) can be zoned with up to four XP storage
systems.
•
XP and P6000 EVA storage systems can connect to the same MPX200, The total allowable
number of storage systems is four per MPX200 chassis.
•
An XP storage system can present LUNs to iSCSI initiators and FC hosts concurrently.
Fibre Channel switch and fabric support
The MPX200 is supported with HP B-series and C-series switch models.
For the latest information on Fibre Channel switch model and firmware support, see the HP SPOCK
website at http://www.hp.com/storage/spock. You must sign up for an HP Passport to enable
access.
Operating system and multipath software support
This section describes the MPX200 iSCSI operating system, multipath software, and cluster support.
For the latest information on operating system and multipath software support, see SPOCK at
http://www.hp.com/storage/spock. You must sign up for an HP Passport to enable access
Table 8 (page 55) describes P6000 EVA operating system and multipath software support.
Table 8 P6000 EVA operating system and multipath software support
Operating system
Multipath software
Clusters
P6000 EVA storage system
Apple Mac OS X
None
None
EVA4400/4400 with embedded switch
Microsoft Windows
Server 2008, 2003,
Hyper-V
MPIO with HP DSM
MSCS
EVA4000/4100/6000/6100/8000/8100
Microsoft windows 2012
MPIO with HPDSM,
MSDSM
EVA6400/8400
MPIO with Microsoft DSM
P6300/P6500
None
Red Hat Linux, SUSE Linux Device Mapper
None
Solaris
Solaris MPxIO
None
VMware
VMware MPxIO
None
Table 9 (page 55) lists XP24000/20000 operating system and multipath software support.
Table 9 MPX200-XP operating system and multipath support
Operating system
Multipath software
XP storage system
Microsoft Windows Server 2008, 2003
MPIO with Microsoft DSM
XP24000/20000
Microsoft Windows 2012
MPIO with HPDSM, MSDSM
P95000
Fibre Channel switch and fabric support
55
Table 10 (page 56) lists 3PAR StoreServ 10000/7000, 3PAR T-Class/F-Class operating system
and multipath software support.
Table 10 HP 3PAR StoreServ Storage operating system and multipath software support
Operating system
Multipath software
Clusters
3PAR storage system
Windows Server 2003
MPIO with HP DSM1
MSCS
Windows Server 2008
MPIO with MS DSM1
MSCS
3PAR StoreServ
10000/7000, 3PAR
F-Class, T-Class
Windows Server 2012
MPIO with MS DSM
None
VMware
1
VMware MPxIO
N/A
Red Hat, SUSE, Oracle Linux Device Mapper1
N/A
1
See the HP 3PAR Implementation Guide that pertains to your operating system.
iSCSI initiator rules and guidelines
This section describes the iSCSI initiator rules and guidelines for Apple Mac OS, Microsoft Windows,
Linux, Solaris, and VMware. General iSCSI initiator rules and guidelines follow:
•
iSCSI initiators and MPX200 iSCSI ports can be in different IP subnets. This requires setting
the MPX200 iSCSI gateway feature. For more information, see “MPX200 configuration options
for P6000 EVA” (page 15) and “Command Line Interface usage” (page 195).
•
Both single-path and multipath initiators are supported on the same MPX200.
•
Fibre Channel LUNs and iSCSI LUNs are not supported on the same server.
Apple Mac OS X iSCSI initiator rules and guidelines
The Apple Mac OS X iSCSI initiator supports the following:
•
Power PC and Intel Power Mac G5, Xserve, Mac Pro
•
ATTO Technology Mac driver
•
iSNS
•
CHAP
iSCSI initiator operating system considerations follow:
•
Host-mode setting—Apple Mac OS X
•
Multipathing—Not supported
Microsoft Windows iSCSI initiator rules and guidelines
The Microsoft Windows iSCSI initiator supports the following:
•
Microsoft iSCSI initiator versions 2.08 and 2.07
•
Microsoft iSCSI Initiator for Windows 2012, 2008, Vista, and Windows 7
•
Multipath on MPX200 single-blade or dual-blade configurations
iSCSI initiator operating system considerations:
•
Host-mode setting—Microsoft Windows 2012, 2008, or Windows 2003
Windows iSCSI Initiator Settings:
56
MPX200 iSCSI configuration rules and guidelines
NOTE: These parameters are not required if Windows is running in a virtualized environment
where the host is providing storage to the guest.
•
TCPIP parameter—Tcp1323Opts must be entered in the registry with a value of DWord=2
under the registry setting
HKEY_LOCAL_MACHINE\SYSTEM\CurrentControlSet\Services\Tcpip\Parameters.
HKEY_LOCAL_MACHINE\SYSTEM\CurrentControlSet\Services\Tcpip\ParametersTcp1323Opts=2
•
TimeOutValue parameter—Enter this parameter in the registry with a value of DWord=120
under the registry setting HKEY_LOCAL_MACHINE\SYSTEM\CurrentControlSet\Services\Disk.
HKEY_LOCAL_MACHINE\SYSTEM\CurrentControlSet\Services\DiskTimeOutValue=120
CAUTION: Using the Registry Editor incorrectly can cause serious problems that may require
reinstallation of the operating system. Use Registry Editor at your own risk. Back up the registry
before you make any changes.
NOTE: The registry parameters are set automatically by the HP StorageWorks MPX200 for
Enterprise Virtual Array Windows software kit, which is available at http://h18006.www1.hp.com/
products/storageworks/evaiscsiconnect/index.html .
Linux iSCSI initiator rules and guidelines
The Linux iSCSI initiator supports the following:
•
Red Hat Linux and SUSE Linux
•
Multipath using HP Device Mapper
iSCSI initiator operating system considerations:
•
Host-mode setting—Linux
•
NIC bonding—Not supported
Solaris iSCSI initiator rules and guidelines
The Solaris iSCSI initiator supports the following:
•
Solaris iSCSI initiator only
•
Multipath using MPxIO
•
MPxIO Symmetric option only
•
MPxIO round-robin
•
MPxIO auto-failback
iSCSI initiator operating system considerations:
•
Host-mode setting–Solaris
•
TOE NICs or iSCSI HBA—Not supported
•
LUN 0—Not supported
VMware iSCSI initiator rules and guidelines
The VMware iSCSI initiator supports the following:
•
Native iSCSI initiator in VMware ESX 4.0/3.5
•
Guest OS SCSI controller, LSI Logic and/or Bus Logic (Bus Logic with SUSE Linux only)
•
ESX server native multipath solution, based on NIC teaming on the server
iSCSI initiator rules and guidelines
57
•
Guest OS boot from an MPX200 iSCSI device
•
VMFS data stores and raw device mapping for guest OS virtual machines
•
Multi-initiator access to the same LUN via VMFS
•
VMware ESX server 4.0/3.5 native multipath solution based on NIC teaming
iSCSI initiator operating system considerations:
•
Host-mode setting—VMware
•
Hardware iSCSI initiator (iSCSI HBA)—Not supported
Supported IP network adapters
For the latest information on IP network adapter support, see the product release notes or SPOCK
at http://www.hp.com/storage/spock. You must sign up for an HP Passport to enable access.
Table 11 (page 58) lists the IP network adapters supported by the MPX200.
Table 11 Supported IP network adapters
Operating system
Network interconnect
Apple Mac OS X
All standard GbE NICs/ASICs supported by Apple
Microsoft Windows Server 2012,
2008, 2003, Hyper-V
All standard 1 Gbe or 10 GbE NICs/ASICs and TOE NICs supported by HP
for Windows 2012, 2008 and 2003
QLogic iSCSI HBAs
Red Hat Linux, SUSE Linux
All standard 1 Gbe or 10 GbE NICs/ASICs supported by HP for Linux
QLogic iSCSI HBAs
Solaris
All standard GbE NICs/ASICs supported by Sun
VMware
All standard 1 Gbe or 10 GbE NICs/ASICs supported by HP for VMware
QLogic iSCSI HBAs
IP network requirements
HP requires the following:
•
Network protocol: TCP/IP IPv6 or IPv4, Ethernet 1,000 Mb/s or 10 GbE
NOTE: If you configure IPv6 on any MPX200 iSCSI port, you must also configure IPv6 on
the HP Command View management server.
•
IP data—LAN/VLAN supported with less than 10 ms latency; maximum of two VLANs per
port, one VLAN per protocol
•
IP management—LAN/WAN supported
•
Dedicated IP network for iSCSI data
HP recommends the following:
•
Jumbo frames
Setting up the iSCSI initiator
This section explains how to set up the iSCSI initiator.
58
MPX200 iSCSI configuration rules and guidelines
Windows Server iSCSI initiator
For Windows Server 2012, 2008, the iSCSI initiator is included with the operating system. For
Windows Server 2003, you must download and install the iSCSI initiator (version 2.08
recommended).
1. Install the HP StorageWorks MPX200 iSCSI kit.
a. Start the installer by running Launch.exe. (If you are using a CD-ROM, the installer
should start automatically.)
b. Click Install iSCSI software package. See Figure 50 (page 59).
Figure 50 Installing the Windows Server kit
2.
Install the Windows Server 2003 Initiator.
For Windows Server 2003, the Microsoft iSCSI initiator installation presents an option for
installing MPIO using the Microsoft generic DSM (Microsoft MPIO Multipathing Support for
iSCSI check box). For Windows Server 2008, MPIO is installed separately. See
Figure 51 (page 60).
Setting up the iSCSI initiator
59
Figure 51 Installation Wizard
3.
Setup the Microsoft iSCSI Initiator.
a. Click the Microsoft iSCSI Initiator icon to open the Control Panel applet.
The iSCSI Initiator Properties window opens.
b.
Select the Discovery tab. See Figure 52 (page 60) or Figure 53 (page 61).
Figure 52 iSCSI initiator properties: Discovery tab (Windows 2003)
60
MPX200 iSCSI configuration rules and guidelines
Figure 53 iSCSI initiator properties: Discovery tab (Windows 2012, 2008)
c.
In the Target Portals section, click Add (Windows 2003) or Discover Portal (Windows
2012, 2008).
A dialog box opens.
d.
e.
Enter the iSCSI port IP address.
Click OK.
The discovery is complete.
4.
In HP P6000 Command View, set up the iSCSI host and virtual disks.
Setting up the iSCSI initiator
61
a.
Click the P6000 EVA Storage Systems icon to start the iSCSI storage presentation.
Figure 54 Adding a host
b.
c.
Select the Hosts folder.
Click Add a Host to create an iSCSI initiator host.
A dialog box opens.
•
Enter a name for the initiator host in the Name box.
•
Select iSCSI as the Type.
•
Select the initiator IQN from the iSCSI node name list.
•
Select an operating system from the Operating System list.
NOTE: For Windows 2012, select the default operating system “Windows” as the
host mode in Command View, then go to the MPX200 CLI and change the host mode
of this host to “Windows 2012”.
62
MPX200 iSCSI configuration rules and guidelines
d.
Create a virtual disk and present it to the host you created in Step 4.c. Note the circled
number in the target IQN; it is referenced during initiator login. See Figure 55 (page 63)
and Figure 56 (page 63).
Figure 55 Virtual disk properties
Figure 56 Host details
Setting up the iSCSI initiator
63
5.
Set up the iSCSI disk on the iSCSI initiator.
a. Open the iSCSI initiator Control Panel applet.
b. Select the Targets tab and then click the Refresh button to see the available targets. See
Figure 57 (page 64) or Figure 58 (page 65). The status should be Inactive.
Figure 57 Targets tab (Windows 2003)
64
MPX200 iSCSI configuration rules and guidelines
Figure 58 Targets tab (Windows 2012, 2008)
c.
Select the target IQN noted in Step 4d, and then click Log On.
A dialog box opens.
d.
Configure the target IQN.
•
Select the Automatically check box to restore this connection when the system boots.
•
Select the Multipathing check box to enable MPIO. The target status is Connected
when logged in.
NOTE: HP recommends using the Advanced button to choose the Local Adapter, Source
IP, and Target Portal. The Target Portal IP Address is the iSCSI port that this initiator
connection is defined.
e.
f.
g.
h.
Depending on the operating system, open Server Manager or Computer Management.
Select Disk Management.
Select Action→Rescan Disks. Verify that the newly assigned disk is listed; if not, you may
need to reboot.
Format and partition the disk to prepare it for use.
Multipathing
Microsoft MPIO includes support for redundant paths to send I/O from the initiator to the target.
For Windows Server 2008, MPIO is a separate feature that must be installed separately. Microsoft
iSCSI Software Initiator 2.x includes MPIO and must be selected for installation. Setting up redundant
paths properly ensures high availability of the target disk. Ideally, the paths would use separate
Setting up the iSCSI initiator
65
NICs and a separate network infrastructure (cables, switches, and MPX200 blades). HP recommends
using separate target ports.
Microsoft MPIO allows the initiator to log in to multiple sessions to the same target and aggregate
the duplicate devices into a single device exposed to Windows. Each session to the target can be
established using different NICs, network infrastructure, and target ports. If one session fails, another
session can continue processing I/O without interrupting the application. The iSCSI target must
support multiple sessions to the same target. The Microsoft iSCSI MPIO DSM supports a set of
load-balance policies that determine how I/O is allocated among sessions. With Microsoft MPIO,
the load-balance policies apply to each LUN individually.
The Microsoft iSCSI DSM 2.x assumes that all targets are active/active and can handle I/O on
any path at any time. There is no mechanism in the iSCSI protocol to determine whether a target
is active/active or active/passive; therefore, the MPX200 supports only multipath configurations
with the P6000 EVA with active/active support. For more information, see the following:
http://www.microsoft.com/WindowsServer2003/technologies/storage/mpio/default.mspx
http://www.microsoft.com/WindowsServer2003/technologies/storage/mpio/faq.mspx
http://download.microsoft.com/download/3/0/4/304083f1-11e7-44d9-92b9-2f3cdbf01048/
mpio.doc
Table 12 (page 66) details the differences between Windows Server 2008 and Windows Server
2003.
Table 12 Differences between Windows Server 2012/2008 and Windows Server 2003
Windows Server 2012, 2008
Windows Server 2003
iSCSI initiator
Included with operating system
Must be installed separately
MPIO
Must be installed separately
Included with iSCSI initiator
Table 13 (page 66) lists the supported MPIO options for the MPX200.
Table 13 MPIO options for the MPX200
Multipath support
Windows Server 2012, 2008
Windows Server 2003
HP MPIO Full Featured
DSM for P6000 EVA
(preferred)
Supported
Supported
Microsoft generic DSM
Supported
Supported
Installing the MPIO feature for Windows Server 2012, 2008
NOTE: Microsoft Windows 2012, 2008 includes an MPIO feature that must be installed
separately. It also includes the iSCSI initiator, which does not require download or installation.
To install the MPIO feature for Windows Server 2012, 2008:
66
MPX200 iSCSI configuration rules and guidelines
1.
Select the Multipath I/O check box on the Select Features page (Figure 59 (page 67)).
Figure 59 Select Features page
2.
3.
Click Next, and then click Install.
After the server reboots, add support for iSCSI devices using the MPIO applet (Figure 60 (page
67) and Figure 61 (page 68)).
NOTE: You must present a virtual disk to the initiator to enable the Add support for iSCSI
devices check box (see Figure 60 (page 67)).
Figure 60 MPIO Properties page before reboot
Setting up the iSCSI initiator
67
Figure 61 MPIO Properties page after reboot
4.
Reboot the system to MPIO the devices.
Installing the MPIO feature for Windows Server 2003
For Windows Server 2003, if you are installing the initiator for the first time, select all of the
installation option check boxes, and then click Next (Figure 62 (page 68)).
Figure 62 Software update installation wizard
To add or remove Microsoft iSCSI initiator components after the initial installation, run the setup
package executable and select the Microsoft MPIO Multipathing Support for iSCSI check box. The
application automatically selects the check boxes for components that are already installed. For
example, if you want to add the Microsoft MPIO component, leave the other check boxes blank;
select only the Microsoft MPIO check box.
NOTE:
68
After the installation is complete, you must reboot the system.
MPX200 iSCSI configuration rules and guidelines
IMPORTANT:
Windows XP Professional does not support Microsoft MPIO.
Microsoft Windows Server 2003 Scalable Networking Pack
The Microsoft Windows Server 2003 SNP includes the TCP Chimney feature, which allows TCP
network processing to be off-loaded to hardware. SNP also includes the Receive Side Scaling
feature, which allows receive packet processing to scale across multiple CPUs.
The HP NC3xxx Multifunction Gigabit server adapters use SNP to support TCP off-load functionality.
For support details, see the latest HP adapter information at http://h18004.www1.hp.com/
products/servers/networking/index.html.
To download the SNP package and for more details, see http://support.microsoft.com/kb/912222.
NOTE:
Windows Server 2003 SP2 includes SNP functionality.
Setting up SNP for the HP NC3xxx Multifunction Gigabit server adapter
SNP works in conjunction with the HP NC3xxx Multifunction Gigabit server adapters for Windows
2003 only.
To set up SNP on a Windows 2003 server:
1. Following the manufacturer's installation instructions, install the hardware and software for
the NC3xxx Multifunction Gigabit server adapter.
2. Download the SNP package from the Microsoft website: http://support.microsoft.com/kb/
912222.
•
To start the installation immediately, click Run.
•
To copy the download to your computer for installation at a later time, click Save.
A reboot is required after successful installation.
3.
After the reboot, verify the TCP off-load settings by opening a command prompt window and
entering the following command:
C:\>netsh interface ip show offload
The following is displayed:
Offload Options for interface "33-IP Storage Subnet" with index:
10003:
TCP Transmit Checksum
IP Transmit Checksum
TCP Receive Checksum
IP Receive Checksum
TCP Large Send TCP Chimney Offload.
4.
To enable or disable the TOE Chimney feature, enter one of the following commands:
C:\>netsh int ip set chimney enabled
C:\>netsh int ip set chimney disabled
For more information, see http://support.microsoft.com/kb/912222.
iSCSI initiator setup for Apple Mac OS X (single-path)
The EVA4400 and P6000 EVA connectivity option supports ATTO Technology's Xtend SAN iSCSI
Initiator for Mac OS X . For details, see http://www.attotech.com.
Setting up the iSCSI initiator
69
Setting up the iSCSI initiator for Apple Mac OS X
1.
2.
Install the Xtend SAN iSCSI Initiator 3.10.
Run the Xtend SAN iSCSI application to discover and configure the P6000 EVA iSCSI targets.
The Xtend SAN iSCSI Initiator can discover targets either by static address or iSNS.
For static address discovery:
a. Click Discover Targets, and then click Discover by DNS/IP (Figure 63 (page 70)).
Figure 63 Discover targets
b.
Enter the static IP address of the mpx iSCSI port in the Address box, and then click Finish
(Figure 64 (page 70)).
Figure 64 Add static IP address
70
MPX200 iSCSI configuration rules and guidelines
c.
Select a target from the Discovered Targets list and then click Add (Figure 65 (page 71)).
Figure 65 Discovered Targets list
NOTE: The mpx iSCSI port may present several iSCSI targets to the Xtend SAN iSCSI
Initiator. Select only one target from the list.
d.
For ISNS discovery
Select Initiator and then enter the iSNS name or IP address in the box (Figure 66 (page
71)).
Figure 66 iSNS discovery and verification
Setting up the iSCSI initiator
71
e.
Test the connection from the initiator to the iSNS server by clicking Verify iSNS. If
successful, click Save.
If necessary, from the iSNS server, make the appropriate edits to add the Xtend SAN
iSCSI Initiator to any iSNS discovery domains that include MPX iSCSI targets.
f.
Click Discover Targets, and then click Discover by iSNS.
A list of MPX targets appears under Discovered Targets (Figure 67 (page 72)).
Figure 67 Discovered Targets
NOTE: The MPX iSCSI port may present several iSCSI targets to the Xtend SAN iSCSI
Initiator. Select only one target from the list.
g.
h.
i.
72
Select the newly added target under Host name in the left pane.
Select the Visible check box to allow the initiator to display the target status
(Figure 68 (page 73)).
Select the Auto Login check box to configure the initiator to automatically log in to the
iSCSI target at system startup.
MPX200 iSCSI configuration rules and guidelines
j.
Click Save.
Figure 68 Selecting the newly added target
k.
Click Status, select the network node, and then click Login to connect to the MPX target
(Figure 69 (page 73)).
The target status is Connected and the target status light turns green.
Figure 69 Select status
Setting up the iSCSI initiator
73
Setting up storage for Apple Mac OS X
1.
2.
In HP P6000 Command View, present the LUNs.
Verify that the P6000 EVA LUNs are presented to the Xtend SAN iSCSI Initiator:
a. Open the Xtend SAN iSCSI application.
b. Select the MPX200 target entry under the host name.
c. Click LUNs.
A list of presented P6000 EVA LUNs is displayed (Figure 70 (page 74)).
Figure 70 Presented P6000 EVA LUNs
NOTE: If no LUNs are displayed, log out and then log in again to the target, or reboot
the system.
3.
Set up the iSCSI drive on the Xtend SAN iSCSI Initiator:
a. Open Disk Utilities from the Apple Mac OS X Finder Applications list.
b. Format and partition the P6000 EVA LUN, as needed.
iSCSI initiator setup for Linux
Installing and configuring the SUSE Linux Enterprise 10 iSCSI driver
Configure the initiator using the built-in GUI-based tool or the open-iscsi administration utility
using the iscsiadm command. For detailed command information, see the iscsiadm (8) man
pages.
1. Modify the initiator name:
# vi /etc/<initiatorname>.iscsi
2.
74
To configure the initiator and targets, start the iSCSI initiator applet (located in the YaST Control
Center under Network Services), and then set the initiator to start at boot time (Figure 71 (page
75)).
MPX200 iSCSI configuration rules and guidelines
Figure 71 Configure the iSCSI initiator and targets
3.
Select the Discovered Targets tab and enter the iSCSI target IP address (Figure 72 (page 75)).
Figure 72 Discovered Targets tab
4.
Log in to the target (Figure 73 (page 76)).
Setting up the iSCSI initiator
75
Figure 73 Log in to the target
5.
Select the Connected Targets tab, and then click the Toggle Start-Up button for each target
listed so the targets start automatically (Figure 74 (page 76)).
Figure 74 Connected Targets tab
76
MPX200 iSCSI configuration rules and guidelines
Installing and configuring the iSCSI driver for Red Hat 5
NOTE: The iSCSI driver package is included but is not installed by default. Install the package
iscsi—initiator—utils during or after operating system installation.
To install and configure the iSCSI driver for Red Hat 5:
1. Use the iscsiadm command to control discovery and connectivity:
# iscsiadm –m discovery –t st –p 10.6.0.33:3260
2.
Edit the initiator name:
# vi /etc/iscsi/initiatorname.iscsi
3.
Start the iSCSI service:
# service iscsi start
4.
Verify that the iSCSI service starts automatically:
#chkconfig iscsi on
NOTE:
For details, see the man pages for the iscsiadm open-iscsi administration utility.
Installing and configuring the iSCSI driver for Red Hat 4 and SUSE 9
NOTE: The iSCSI driver is included with the Red Hat 4 and SUSE 9 distributions and is installed
by default. Configuration is the same for Red Hat 3 and 4 and SUSE 8 and 9.
To install and configure the iSCSI driver for Red Hat 4 and SUSE 9:
1. Update the /etc/iscsi.conf file to include the IP address of the iSCSI target.
The configuration file might include entries like this:
DiscoveryAddress=33.33.33.101
For a detailed description of the configuration file format, enter the following command:
man iscsi.conf
2.
Manually start iSCSI services to test your configuration:
/etc/init.d/iscsi start
3.
Modify the /etc/<initiatorname>.iscsi file to assign a meaningful name to the initiator.
For example:
InitiatorName=iqn.1987–05.com.cisco:servername.yourcompany.com
NOTE:
In most cases, you only modify the text following the colon.
If there is a problem starting the iscsi daemon, it is usually due to an incorrect IP address or an
incorrectly formatted initiator name.
Installing the iSCSI initiator for Red Hat 3 and SUSE 8
If you are upgrading from a previous version of an iSCSI driver, HP recommends that you remove
the /etc/<initiatorname>.iscsi file before installing the new driver. For the latest version
of the Linux driver for P6000 EVA iSCSI connectivity, see:
http://sourceforge.net/projects/linux-iscsi
NOTE: The Linux driver supports both Red Hat 3 and SUSE 8. For information on how to configure
the Linux iSCSI initiator, see the Readme file in the tar ball.
Setting up the iSCSI initiator
77
Assigning device names
Linux assigns SCSI device nodes dynamically when it detects a SCSI logical unit; therefore, the
mapping from device nodes (such as /dev/sda and /dev/sdb) to iSCSI targets and logical units
may vary.
Variations in process scheduling and network delay can result in iSCSI targets being mapped to
different SCSI device nodes each time the driver is started. Therefore, configuring applications or
operating system utilities to use the standard SCSI device nodes to access iSCSI devices can result
in SCSI commands being sent to the wrong target or logical unit.
To ensure consistent naming, the iSCSI driver scans the system to determine the mapping from
SCSI device nodes to iSCSI targets. The iSCSI driver creates a tree of directories and symbolic
links under /dev/iscsi to facilitate access to a logical unit of an iSCSI target.
The directory tree under /dev/iscsi contains subdirectories for each iSCSI bus number, each
target ID number on the bus, and each LUN for each target. For example, the disk device for bus
0, target ID 0, and LUN 0 would be /dev/iscsi/bus0/target0/LUN0/disk.
Each logical unit directory contains a symbolic link for each SCSI device node that can connect
to that logical unit. The symbolic links are named using the Linux devfs naming convention.
•
The symbolic link disk maps to the whole-disk SCSI device node (for example, /dev/sda
or /dev/sdb).
•
The symbolic links, part1 through part15, map to each partition of the SCSI disk. For
example, a symbolic link can map to partitions /dev/sda1 and dev/sda15, or to as many
partitions as necessary.
NOTE: The symbolic links exist regardless of the number of disk partitions. Accessing a
partition name results in an error if the partition does not exist on the disk.
•
The symbolic link mt maps to the auto-rewind SCSI tape device node for the LUN (for example,
/dev/st0). Additional links for mtl, mtm, and mta map to the other auto-rewind devices
(for example,/dev/st0l, /dev/st0m, /dev/st0a), regardless of whether those device
nodes exist or can be opened.
•
The symbolic link mtn maps to the no-rewind SCSI tape device node, if any. (For example,
this LUN maps to /dev/nst0.) Additional links (formtln, mtmn, and mtan) map to the
other no-rewind devices (for example, /dev/nst0l, /dev/nst0m, /dev/nst0a),
regardless of whether those device nodes exist or can be opened.
•
The symbolic link cd maps to the SCSI CD-ROM device node, if any, for the LUN (for example,
/dev/scd0).
•
The symbolic link generic maps to the SCSI generic device node, if any, for the LUN (for
example, /dev/sg0).
The symlink creation process must open all SCSI device nodes in /dev to determine which nodes
map to iSCSI devices. Therefore, several modprobe messages may be logged to syslog indicating
that modprobe could not find a driver for a particular combination of major and minor numbers.
You can ignore these messages, which occur when Linux is unable to find a driver to associate
with a SCSI device node that the iSCSI daemon is opening as part of the symlink creation
process. To prevent these messages from occurring, remove the SCSI device nodes that do not
contain an associated high-level SCSI driver.
Target bindings
The iSCSI driver automatically maintains a bindings file, /var/iscsi/bindings. This file
contains persistent bindings to ensure that the same iSCSI bus and target ID number are used for
every iSCSI session with a particular iSCSI TargetName, even if the driver is restarted repeatedly.
78
MPX200 iSCSI configuration rules and guidelines
The bindings file ensures that the SCSI number in the symlinks device (described in “Assigning
device names” (page 78)) always maps to the same iSCSI target.
NOTE: Linux dynamically allocates SCSI device nodes as SCSI devices are found; therefore, the
driver cannot ensure that a SCSI device node (for example, /dev/sda) always maps to the same
iSCSI target name. The symlinks described in “Assigning device names” (page 78) provide
application and fstab file persistent device mapping; use these symlinks instead of direct
references to SCSI device nodes.
If the bindings file grows too large, you can edit the file and remove the lines for targets that no
longer exist. This should not be necessary because the driver can maintain up to 65,535 bindings.
Mounting file systems
The Linux boot process typically mounts the file systems listed in /etc/fstab before the network
is configured; therefore, adding mount entries in iSCSI devices to /etc/fstab does not work.
The iscsi-mountall script manages the checking and mounting of devices listed in
/etc/fstab.iscsi, which has the same format as /etc/fstab. This script is invoked
automatically by the iSCSI startup script.
NOTE: If iSCSI sessions are unable to log in immediately due to network or authentication
problems, the iscsi-mountall script may time out and fail to mount the file systems.
Mapping inconsistencies can occur between SCSI device nodes and iSCSI targets (for example,
the wrong device is mounted because of device name changes resulting from iSCSI target
configuration changes or network delays). Instead of directly mounting SCSI devices, HP recommends
that you do one of the following:
•
Mount the /dev/iscsi symlink tree.
•
Mount the file system UUIDs or labels (see the man pages for mke2fs, mount, and fstab).
•
Use the Linux Logical Volume Manager.
Unmounting file systems
You must unmount all file systems on iSCSI devices before the iSCSI driver stops. If the iSCSI driver
stops while iSCSI devices are mounted, buffered writes may not be committed to disk, and file
system corruption may occur.
Linux does not unmount file systems that are being used by a process; therefore, any process using
those devices must be stopped (see the man page for fuser(1)) before iSCSI devices can be
unmounted.
To prevent file system corruption, the iSCSI shutdown script automatically stops all processes using
devices in /etc/fstab.iscsi. The script sends a SIGTERM signal to stop the processes, followed
by a SIGKILL signal to stop any remaining processes. It then unmounts all iSCSI file systems and
stops the iSCSI daemon, terminating all connections to iSCSI devices.
CAUTION:
File systems not listed in /etc/fstab.iscsi cannot be unmounted automatically.
Presenting P6000 EVA storage for Linux
To present P6000 EVA storage for Linux:
1. Set up the LUNs by using HP P6000 Command View, as described in Step 4.
Setting up the iSCSI initiator
79
2.
Set up the iSCSI drive on the iSCSI initiator.
a. Restart the iSCSI services:
/etc/rc.d/initd/iscsi restart
b.
Verify that the iSCSI LUNs are presented to the operating system:
fdisk -l
iSCSI Initiator setup for VMware
The software iSCSI Initiator is built into the ESX server VMkernel and uses standard 10GigE/GigE
NICs to connect to the MPX200.
To set up software-based iSCSI storage connectivity:
1. Install the appropriate license from VMware to enable iSCSI software driver using the VMware
instructions.
2. Configure the VMKernel TCP/IP networking stack for iSCSI support. Configure the VMkernel
service console with dedicated virtual switch with a dedicated NIC for iSCSI data traffic.
Follow the instructions from VMware. “Configuration tab” (page 80) shows an example of a
configuration.
Figure 75 Configuration tab
3.
Open a firewall port by enabling the iSCSI software client service:
a. Using the VMware VI client, select the server.
b. Click the Configuration tab, and then click Security Profile.
c. Click the Properties link.
The Firewall Properties dialog box is displayed. See “Firewall Properties dialog box”
(page 81).
d.
e.
80
Select the check box for Software iSCSI to enable iSCSI traffic.
Click OK.
MPX200 iSCSI configuration rules and guidelines
Figure 76 Firewall Properties dialog box
4.
Enable the iSCSI software initiators:
a. In the VMware VI client, select the server from the inventory panel.
b. Click the Configuration tab, and then click Storage Adapters under Hardware.
c. Under iSCSI Software Adapter, choose the available software initiator.
d. Click the Properties link of the software adapter.
The iSCSI Initiator Properties dialog box is displayed.
e.
Click Configure.
The General Properties dialog box is displayed. See “General Properties dialog box”
(page 81).
f.
g.
Select the Enabled check box.
Click OK.
Figure 77 General Properties dialog box
Setting up the iSCSI initiator
81
5.
Set
a.
b.
c.
up Discovery Addressing for the software initiator:
Repeat Step 4 to open the iSCSI initiator Properties dialog box.
Click the Dynamic Discovery tab.
Click Add to add a new iSCSI target.
The Add Send Target Server dialog box is displayed. See “Add Send Target Server dialog
box” (page 82).
d.
e.
Enter the iSCSI IP address of the MPX200.
Click OK.
Figure 78 Add Send Target Server dialog box
82
MPX200 iSCSI configuration rules and guidelines
6.
To verify that the LUNs are presented to the VMware host, rescan for new iSCSI LUNs:
a. In VMware’s VI client, select a server and click the Configuration tab.
b. Choose Storage Adapters in the hardware panel and click Rescan above the Storage
Adapters panel.
The Rescan dialog box is displayed. See “Rescan dialog box” (page 83).
c.
d.
Select the Scan for New Storage Devices and the Scan for New VMFS Volumes check
boxes.
Click OK.
The LUNs are now available for ESX server.
Figure 79 Rescan dialog box
NOTE:
When presenting iSCSI storage to Virtual Machines you must do the following:
•
Create Virtual Machines using LSI Logic emulation.
•
Present iSCSI storage to a Virtual Machine either as a data store created on an iSCSI device,
or raw device mapping.
Configuring multipath with the Solaris 10 iSCSI initiator
This section explains how to configure multipath with the Solaris 10 iSCSI initiator to the MPX200.
For details on managing and troubleshooting Solaris iSCSI multipath devices, see the Solaris System
Administration Guide: Devices and File Systems, available at http://dlc.sun.com/pdf/817-5093/
817-5093.pdf.
MPxIO overview
The Sun multipathing software (MPxIO) provides basic failover and load-balancing capability to
HP EVA4000/6000/8000 and EVA4100/6100/8100 storage arrays. MPxIO allows the merging
of multiple SCSI layer paths, such as an iSCSI device exposing the same LUN through several
different iSCSI target names. Because MPxIO is independent of transport, it can multipath a target
Setting up the iSCSI initiator
83
that is visible on both iSCSI and FC ports. This section describes only the iSCSI implementation of
MPxIO with the MPX200.
For more information about MPxIO, see the Solaris Fibre Channel and Storage Multipathing
Administration Guide, available at http://docs.sun.com/source/819-0139.
Preparing the host system
To verify that MPxIO is enabled:
1. Enter the following command:
cat kernel/drv/iscsi.conf
2.
Verify the MPxIO setting:
mpxio-disable=”no”
If the setting is yes, change it to no, and then reboot:
Reboot -- -r
Example: MPxIO on all iSCSI port settings in /kernel/dev/iscsi.conf
# Copyright 2006 Sun Microsystems, Inc. All rights reserved.
# Use is subject to license terms.
#
#ident "@(#)iscsi.conf 1.2 06/06/12 SMI"
name="iscsi" parent="/" instance=0;
ddi-forceattach=1;
#
# I/O multipathing feature (MPxIO) can be enabled or disabled using
# mpxio-disable property. Setting mpxio-disable="no" will activate
# I/O multipathing; setting mpxio-disable="yes" disables the feature.
#
# Global mpxio-disable property:
#
# To globally enable MPxIO on all iscsi ports set:
# mpxio-disable="no";#
# To globally disable MPxIO on all iscsi ports set:
# mpxio-disable="yes";
#
mpxio-disable="no";
#
Enabling MPxIO for an HP P6000 EVA storage array
This section explains how to configure a Solaris server to recognize an HP storage array in an
iSCSI multipath environment with the MPX200.
Editing the scsi_vhci.conf file
HP storage arrays are supported with MPxIO:
•
As symmetric devices only
•
With no load balancing
•
With no failback
To configure MPxIO for HP storage arrays, you must add information to the /kernel/drv/
scsi_vhci.conf file:
1. Use a text editor to modify the configuration file. For example:
# vi /kernel/drv/scsi_vhci.conf
2.
Change load balancing to none:
load-balance="none";
84
MPX200 iSCSI configuration rules and guidelines
3.
Change auto-failback to disable:
auto-failback="disable";
4.
Add the following lines for the EVA4x00/6x00/8x00 storage arrays:
device-type-scsi-options-list =
“HP
HSV“, “symmetric-option“;
symmetric-option = 0x1000000;
NOTE:
You must enter six spaces between HP and HSV.
Example: HP storage array settings in /kernel/drv/scsi_vhci.conf
#
# Copyright 2004 Sun Microsystems, Inc. All rights reserved.
# Use is subject to license terms.
#
#pragma ident
"@(#)scsi_vhci.conf
1.9
04/08/26 SMI"
#
name="scsi_vhci" class="root";
#
# Load balancing global configuration: setting load-balance="none" will cause
# all I/O to a given device (which supports multipath I/O) to occur via one
# path. Setting load-balance="round-robin" will cause each path to the device
# to be used in turn.
#
load-balance="none";
#
# Automatic failback configuration
# possible values are auto-failback="enable" or auto-failback="disable"
auto-failback="disable";
#
# For enabling MPxIO support for 3rd party symmetric device need an
# entry similar to following in this file. Just replace the "SUN
SENA"
# part with the Vendor ID/Product ID for the device, exactly as reported by
# Inquiry cmd.
#
# device-type-scsi-options-list =
# "SUN
SENA", "symmetric-option";
#
# symmetric-option = 0x1000000;
#
device-type-scsi-options-list =
"HP
HSV","symmetric-option";
symmetric-option = 0x1000000;
5.
Reboot to activate the changes:
# reboot -- -r
Editing the sgen.conf file
To ensure that the HP storage arrays are recognized by Solaris as SCSI controllers, you must add
information to the /kernel/drv/sgen.conf file:
1. Use a text editor to modify the configuration file. For example:
# vi /kernel/drv/sgen.conf
2.
Add array_ctrl to device-type-config-list:
device-type-config-list="array_ctrl";
3.
Uncomment all target/LUN pair entries.
Example: HP storage array settings in /kernel/drv/sgen.conf
.
.
.
# devices on your system.
Please refer to sgen(7d) for details.
Setting up the iSCSI initiator
85
#
# sgen may be configured to bind to SCSI devices exporting a particular device
# type, using the device-type-config-list, which is a ',' delimited list of
# strings.
#
device-type-config-list="array_ctrl";
.
.
.
# After configuring the device-type-config-list and/or the inquiry-config-list,
# the administrator must uncomment those target/lun pairs at which there are
# devices for sgen to control. If it is expected that devices controlled by
# sgen will be hotplugged or added into the system later, it is recommended
# that all of the following lines be uncommented.
name="sgen"
name="sgen"
name="sgen"
name="sgen"
name="sgen"
name="sgen"
name="sgen"
name="sgen"
name="sgen"
name="sgen"
name="sgen"
name="sgen"
name="sgen"
name="sgen"
name="sgen"
name="sgen"
class="scsi"
class="scsi"
class="scsi"
class="scsi"
class="scsi"
class="scsi"
class="scsi"
class="scsi"
class="scsi"
class="scsi"
class="scsi"
class="scsi"
class="scsi"
class="scsi"
class="scsi"
class="scsi"
target=0 lun=0;
target=1 lun=0;
target=2 lun=0;
target=3 lun=0;
target=4 lun=0;
target=5 lun=0;
target=6 lun=0;
target=7 lun=0;
target=8 lun=0;
target=9 lun=0;
target=10 lun=0;
target=11 lun=0;
target=12 lun=0;
target=13 lun=0;
target=14 lun=0;
target=15 lun=0;
Creating an sgen driver alias
The HP storage array is a self-identifying SCSI device and must be bound to the sgen driver using
an alias. Execute the following procedure to create an sgen driver alias:
1. Update the sgen driver:
# update_drv –a –I “scsiclass,0c” sgen
NOTE:
2.
Lowercase c is mandatory.
Verify the sgen alias setting:
#egrep sgen /etc/driver_aliases
Example:
# rep sgen /etc/driver_aliases
sgen "scsa,08.bfcp"
sgen "scsa,08.bvhci"
sgen "scsiclass,0c"
Enable iSCSI target discovery
Solaris supports three iSCSI target discovery methods:
•
SendTargets
•
Static
•
iSNS
This section describes SendTargets discovery only. For information on static and iSNS discovery,
see http://docs.sun.com/app/docs/doc/817-5093/fqnlk?l=en&=view.
To enable iSCSI target discovery:
1. Enter the following command:
# iscsiadm modify discovery –t enable
86
MPX200 iSCSI configuration rules and guidelines
2.
Verify that SendTargets is enabled:
# iscsiadm list discovery
3.
The MPX200 has multiple iSCSI ports available to the Solaris iSCSI initiator. To discover the
targets available, enter the following command for each iSCSI port IP address that the iSCSI
initiator accesses:
#iscsiadm add discovery-address ‘iscsi port IP address’
4.
Verify the discovery address entries:
#iscsiadm list discovery-address
5.
After discovery addresses are entered, the Solaris iSCSI initiator polls each address for all
targets available. To list the targets available to the initiator, enter the following command:
#iscsiadm list target
Example:
#iscsiadm list target
Target: iqn.1986-03.com.hp:fcgw.mpx200.0834e00028.b2.01.50014380025c4179
Alias: TPGT: 0
ISID: 4000002a0000
Connections: 1
Target: iqn.1986-03.com.hp:fcgw.mpx200.0834e00028.b1.01.50014380025c417d
Alias: TPGT: 0
ISID: 4000002a0000
Connections: 1
NOTE: The iSCSI initiator must discover all targets presented by each MPX200 iSCSI port
that will be used in a multipath configuration.
6.
Create the iSCSI device links for the local system:
# devfsadm -i iscsi
Modifying the target parameter MaxRecvDataSegLen
Sun recommends that you set the MaxRecvDataSegLen parameter to 65,536 bytes for each
iSCSI discovered target. For more information, see http://wikis.sun.com/display/StorageDev/
iSCSI+Features+Related+to+RFC+3720+Parameters.
To modify the target parameter MaxRecvDataSegLen:
1. List all iSCSI targets:
#iscsiadm list target-param
2.
Change the value of MaxRecvDataSegLen to 65536 for each target:
#iscsiadm modify target-param -p maxrecvdataseglen=65536 ‘target
iqn’
Setting up the iSCSI initiator
87
3.
Use the following example to verify the target setting:
# iscsiadm list target-param
Target: iqn.1986-03.com.hp:fcgw.mpx200.0834e00028.b1.01.50014380025c417d
#iscsiadm modify target-param –p maxrecvdataseglen=65536 iqn.1986-03.com.hp:fcgw.mpx200.
0834e00028.b1.01.50014380025c417d
# iscsiadm list target-param -v iqn.1986-03.com.hp:fcgw.mpx200.0834e00028.b1.01.
50014380025c417d
Target: iqn.1986-03.com.hp:fcgw.mpx200.0834e00028.b1.01.50014380025c417d
Alias: Bi-directional Authentication: disabled
Authentication Type: NONE
Login Parameters (Default/Configured):
Data Sequence In Order: yes/Data PDU In Order: yes/Default Time To Retain: 20/Default Time To Wait: 2/Error Recovery Level: 0/First Burst Length: 65536/Immediate Data: yes/Initial Ready To Transfer (R2T): yes/Max Burst Length: 262144/Max Outstanding R2T: 1/Max Receive Data Segment Length: 8192/65536
Max Connections: 1/Header Digest: NONE/Data Digest: NONE/Configured Sessions: 1
Monitoring the multipath devices
After HP P6000 Command View has presented the virtual disks to the Solaris host, enter the
following commands to monitor the configuration:
1. iscsiadm list target -S
This command lists targets with their presented LUNs. In a multipath environment, the same
LUN should appear under different P6000 EVA port targets from the same controller.
Example:
iscsiadm list target -S
Target: iqn.1986-03.com.hp:fcgw.mpx200.0834e00028.b2.01.50014380025c4179
Alias: TPGT: 0
ISID: 4000002a0000
Connections: 1
LUN: 120
Vendor: HP
Product: HSV300
OS Device Name: /dev/rdsk/c5t600508B4000B15A200005000038E0000d0s2
Target: iqn.1986-03.com.hp:fcgw.mpx200.0834e00028.b1.01.50014380025c417d
Alias: TPGT: 0
ISID: 4000002a0000
Connections: 1
LUN: 120
Vendor: HP
Product: HSV300
OS Device Name: /dev/rdsk/c5t600508B4000B15A200005000038E0000d0s2
2.
mpathadm list lu
This command displays the total and operational path count for each logical unit. It displays
both the controller and device path counts.
Example:
#mpathadm list lu
/scsi_vhci/array-controller@g50014380025c4170
Total Path Count: 2
Operational Path Count: 2
88
MPX200 iSCSI configuration rules and guidelines
/dev/rdsk/c5t600508B4000B15A200005000038E0000d0s2
Total Path Count: 2
3.
mpathadm show lu logical-unit
This command displays details about a logical unit. Use this command to verify symmetric
mode, load balancing, and auto-failback settings, as well as path and target port information.
Example:
#mpathadm show lu /dev/rdsk/c5t600508B4000B15A200005000038E0000d0s2
Logical Unit: /dev/rdsk/c5t600508B4000B15A200005000038E0000d0s2
mpath-support: libmpscsi_vhci.so
Vendor: HP
Product: HSV300
Revision: 0005
Name Type: unknown type
Name: 600508b4000b15a200005000038e0000
Asymmetric: no
Current Load Balance: none
Logical Unit Group ID: NA
Auto Failback: off
Auto Probing: NA
Paths:
Initiator Port Name: iqn.1986-03.com.sun:01:sansun-s04,4000002a00ff
Target Port Name: 4000002a0000,iqn.1986-03.com.hp:fcgw.mpx200.0834e00028.
b2.01.50014380025c4179
Override Path: NA
Path State: OK
Disabled: no
Initiator Port Name: iqn.1986-03.com.sun:01:sansun-s04,4000002a00ff
Target Port Name: 4000002a0000,iqn.1986-03.com.hp:fcgw.mpx200.0834e00028.
b1.01.50014380025c417d
Override Path: NA
Path State: OK
Disabled: no
Target Ports:
Name: 4000002a0000,iqn.1986-03.com.hp:fcgw.mpx200.0834e00028.
b2.01.50014380025c4179
Relative ID: 0
Name: 4000002a0000,iqn.1986-03.com.hp:fcgw.mpx200.0834e00028.
b1.01.50014380025c417d
Relative ID: 0
Configuring Microsoft MPIO iSCSI devices
For Microsoft MPIO, the load-balance policies apply to each LUN individually. To display and
modify the LUN load-balance policy (Figure 80 (page 90)):
1. Start the Microsoft iSCSI Control Panel applet.
2. Select the Target tab.
3. Click Details.
4. Click Devices.
5. Highlight a LUN device name, and then click Advanced.
6. Select the MPIO check box.
Setting up the iSCSI initiator
89
7.
Select the desired options on the Load Balance Policy menu.
Figure 80 iSCSI Initiator MPIO properties
Microsoft MPIO for iSCSI load-balancing policies
The Microsoft MPIO for iSCSI load-balancing policies are as follows:
•
Failover Only. No load balancing is performed. There is a single active path; the remaining
paths are standby paths. The active path sends all I/O. If the active path fails, a standby path
is used. When the formerly active path is reconnected, it becomes active and the activated
standby path returns to standby.
•
Round-robin. All paths are active paths and are used to send I/O in a round-robin fashion.
•
Round-robin with a subset of paths. One set of paths is configured as active and another set
of paths is configured as standby. I/O is sent in a round-robin fashion over the active paths.
If all active paths fail, a standby path is used. When a formerly active path is reconnected, it
becomes active and the activated standby path returns to standby.
•
Weighted Path. Each path is assigned a weight and I/O is sent on the path with the lowest
weight. If the path with the lowest weight fails, the path with the next lowest weight is used.
•
Least Queue Depth. This is not supported by MPIO.
NOTE: For raw disk access, the MPIO load-balancing policy must be Failover Only. For file
system disk access, all MPIO load-balancing policies are supported. Failover policies are set on
a LUN-by-LUN basis. MPIO does not support global failover settings.
Microsoft MPIO with QLogic iSCSI HBA
The QLogic iSCSI HBA is supported in a multipath Windows configuration that is used in conjunction
with Microsoft iSCSI initiator services and Microsoft MPIO. Because the iSCSI driver resides on
the QLogic iSCSI HBA, it is not necessary to install the Microsoft iSCSI initiator.
90
MPX200 iSCSI configuration rules and guidelines
Installing the QLogic iSCSI HBA
Install the QLogic iSCSI HBA hardware and software following the instructions in the QLogic
installation manual. The QLogic iSCSI HBA is managed by the QLogic SANsurfer Management
Suite (SMS).
NOTE: After installing the QLogic iSCSI HBA, you must configure the QLogic iSCSI initiator
through SMS. The QLogic iSCSI HBA does not appear in the Microsoft Network Connection device
list.
Installing the Microsoft iSCSI initiator services and MPIO
To install the Microsoft iSCSI initiator:
1. Access the Microsoft iSCSI Initiator Installation page of the Software Update Installation Wizard
(Figure 81 (page 91)).
Figure 81 Microsoft iSCSI Initiator Installation page
IMPORTANT: Do not select the Software Initiator check box. The QLogic initiator resides on
the iSCSI HBA.
2.
Reboot the system.
Configuring the QLogic iSCSI HBA
To configure the QLogic iSCSI HBA:
1. Launch the QLogic SMS from the desktop icon or through Start > Programs, and connect to
the local host (Figure 82 (page 92)).
Setting up the iSCSI initiator
91
2.
Click Yes to launch the general configuration wizard (Figure 83 (page 92)). Use the wizard
to:
•
Select iSCSI HBA port to configure the QLogic iSCSI HBA.
•
Configure the HBA Port network settings.
•
Configure the HBA Port DNS settings (optional).
•
Configure the SLP Target Discovery settings (optional).
•
Configure the iSNS Target Discovery settings (optional).
Figure 82 Connect to Host window
Figure 83 Start general configuration wizard
92
MPX200 iSCSI configuration rules and guidelines
Adding targets to the QLogic iSCSI initiator
To add HBA port targets:
1. Click the green plus sign (Figure 84 (page 93)).
2. Enter the first iSCSI target port IP address.
Figure 84 HBA Port Target Configuration window
3.
4.
5.
6.
Repeat steps 1 and 2 for each MPX200 you want to add.
Click Next.
To activate the changes, enter the SMS password: config.
Select the Target Settings tab. Verify that the HBA state is Ready, Link Up and that each target
entry state is Session Active (Figure 85 (page 93)).
Figure 85 Target Settings tab
Setting up the iSCSI initiator
93
Presenting LUNs to the QLogic iSCSI initiator
To present LUNs to the QLogic iSCSI initiator:
1. Follow the procedure in Step 4 to:
2.
•
Create an iSCSI host.
•
Present LUNs to the iSCSI host.
On the iSCSI HBA tab (Figure 86 (page 94)), verify that the QLogic iSCSI HBA is connected
to the iSCSI LUNs in SMS under the HBA iSCSI port.
Figure 86 iSCSI HBA port connections
Use the Microsoft iSCSI initiator services to manage the iSCSI target login and LUN
load-balancing policies.
Installing the HP MPIO Full Featured DSM for P6000 EVA
Follow the procedure in the Installation and Reference Guide, available at http://
h20000.www2.hp.com/bizsupport/TechSupport/DocumentIndex.jsp?contentType=SupportManual&
lang=en&cc=us&docIndexId=64179&taskId=101&prodTypeId=18964&prodSeriesId=421492.
After installing the HP MPIO Full Featured DSM for P6000 EVA, open Computer Management to
view and control the iSCSI LUNs (Figure 87 (page 95)).
94
MPX200 iSCSI configuration rules and guidelines
Figure 87 HP MPIO DSM Manager with iSCSI devices
Microsoft Windows Cluster support
Microsoft Cluster Server for Windows 2003
iSCSI Failover clustering is supported on the HP StorageWorks MPX200 Multifunction Router. For
more information, see http://www.microsoft.com/windowsserver2003/technologies/storage/
iscsi/iscsicluster.mspx.
Requirements
•
Operating system: Windows Server 2003 Enterprise, SP2, R2, x86/x64
•
Firmware: Minimum version—3.1.0.0, released November 2009
•
Initiator:
◦
Persistent Reservation registry key—for Microsoft Generic DSM
◦
Multiple NIC/iSCSI HBA ports—four recommended:
◦
–
one public
–
one private
–
two storage, for higher availability and performance
MPIO—use HP DSM or the Microsoft Generic DSM
–
•
HP recommends using the latest available DSM
Connectivity: Dual blade configuration for redundancy
Setting the Persistent Reservation registry key
The iSCSI Persistent Reservation Setup utility assists you in creating the proper registry settings for
use with the Microsoft Generic DSM and Microsoft Cluster Server. This must be run on every node
of the cluster.
1. Run PRset.hta to start the application.
This automatically adds the registry key and values seen.
2.
Click Modify to make changes. See “iSCSI Persistent Reservation Setup” (page 96).
Setting up the iSCSI initiator
95
3.
Click Done to finish.
Figure 88 iSCSI Persistent Reservation Setup
Each cluster is required to have its own value, and each node of a single cluster must have its own
value. For example, Cluster A could have the default setting of AABBCCCCBBAA. Table 14 (page
96) shows possible node settings.
Table 14 Node settings
Node
Value
Node 1
1
Node 2
2
Node 3
3
Node 4
4
When the HP Full Featured DSM for P6000 EVA is installed, Persistent Reservation is set in the
registry by default. For more information on the HP DSM, see http://h20000.www2.hp.com/
bizsupport/TechSupport/DocumentIndex.jsp?contentType=SupportManual&lang=en&cc=us&
docIndexId=64179&taskId=101&prodTypeId=18964&prodSeriesId=421492
Microsoft Cluster Server for Windows 2008
iSCSI Failover clustering is supported on the HP MPX200 Multifunction Router. For more information,
see http://technet.microsoft.com/en-us/library/cc754482.aspx.
Requirements
96
•
Operating system: Windows Server 2008 Enterprise, SP2, R2, x86/x64
•
Firmware: Minimum version—3.1.0.0, released November 2009
MPX200 iSCSI configuration rules and guidelines
•
Initiator:
◦
◦
Multiple NIC/iSCSI HBA ports—four recommended
–
one public
–
one private
–
two storage, for higher availability and performance
MPIO - use HP DSM or the Microsoft Generic DSM
–
•
HP recommends using the latest available
Connectivity: Dual blade configuration for redundancy
Setting up authentication
Challenge Handshake Authentication Protocol (CHAP) is an authentication protocol used for secure
login between the iSCSI initiator and iSCSI target. CHAP uses a challenge-response security
mechanism to verify the identity of an initiator without revealing the secret password shared by
the two entities. It is also referred to as a three-way handshake. With CHAP, the initiator must
prove to the target that it knows the shared secret without actually revealing the secret. You can
configure CHAP on the MPX200.
NOTE: Setting up authentication for your iSCSI devices is optional. If you require authentication,
HP recommends that you configure it after you have properly verified installation and operation
of the iSCSI implementation without authentication.
In a secure environment, authentication may not be required—access to targets is limited to trusted
initiators. In a less secure environment, the target cannot determine if a connection request is from
a certain host. In this case, the target can use CHAP to authenticate an initiator.
When an initiator contacts a target that uses CHAP, the target (called the authenticator) responds
by sending the initiator a challenge. The challenge consists of information that is unique to the
authentication session. The initiator encrypts this information using a previously issued password
that is shared by both the initiator and the target. The encrypted information is then returned to the
target. The target has the same password and uses it as a key to encrypt the information that it
originally sent to the initiator. The target compares its results with the encrypted results sent by the
initiator; if they are the same, the initiator is considered authentic. These steps are repeated
throughout the authentication session to verify that the correct initiator is still connected.
These schemes are called proof-of-possession protocols. The challenge requires that an entity prove
possession of a shared key or one of the key pairs in a public-key scheme.
See the following RFCs for detailed information about CHAP:
•
RFC 1994 (PPP Challenge Handshake Authentication Protocol, August 1996)
•
RFC 2433 (Microsoft PPP CHAP Extensions, October 1998)
•
RFC 2759 (Microsoft PPP CHAP Extensions version 2, January 2000)
General CHAP restrictions
The CHAP restrictions are:
•
Maximum length of 100 characters
•
Minimum length of 1 character
•
Entering an IQN using the HP P6000 Command View add host tab requires the iSCSI initiator
to have been registered in the iSCSI or iSCSI/FCoE module's initiator database.
Setting up authentication
97
Microsoft initiator CHAP secret restrictions
The Microsoft initiator CHAP secret restrictions are:
•
Maximum length of 16 characters
•
Minimum length of 12 characters
•
When an initiator uses iSNS for target discovery, only normal session CHAP applies
NOTE:
There is no restriction on the type of characters that can be entered.
Linux CHAP restrictions
The Linux CHAP restrictions are:
•
CHAP is supported with the Linux open-iscsi initiator and MPX200.
•
CHAP setup with Linux iSCSI initiator is not supported with the MPX200.
ATTO Macintosh CHAP restrictions
The ATTO Macintosh iSCSI initiator does not support CHAP at this time.
Recommended CHAP policies
The following CHAP policies are recommended:
•
The same CHAP secret should not be configured for authentication of multiple initiators or
targets.
•
Any CHAP secret used for initiator authentication must not be configured for authentication
of any target. Any CHAP secret used for target authentication must not be configured for
authentication of any initiator.
•
CHAP should be configured after the initial iSCSI initiator/target login to validate initiator/target
connectivity. The first initiator/target login creates a discovered iSCSI initiator entry on the
MPX200 that is used in the CHAP setup.
iSCSI session types
iSCSI defines two types of sessions:
•
Discovery—SCSI discovery enables an initiator to find the targets to which it has access.
•
Normal—A normal session is unrestricted.
CHAP is enforced on both discovery and normal sessions.
MPX200 CHAP modes
The MPX200 supports two CHAP modes. Once CHAP is enabled, it is enforced for both discovery
sessions and normal sessions. You can choose only the CHAP mode:
98
•
Single-direction—The target authenticates the identity of the initiator with the user-provided
CHAP secret. To enable single-direction CHAP, you must enable CHAP for a specific initiator
record on the MPX200 and enter a corresponding CHAP secret from the iSCSI host.
•
Bidirectional—The initiator and target authenticate each other's identity by using the
user-provided CHAP secrets. To enable bidirectional CHAP for a discovery session, you must
provide a CHAP secret for the initiator and for the iSCSI port for which you are performing
discovery. To enable bidirectional CHAP for a normal session, you must provide a CHAP
secret for the initiator and for the iSCSI-presented target that you want to log in to.
•
Single-direction CHAP during discovery session and during normal session
•
Single-direction CHAP during discovery session and bidirectional CHAP during normal session
MPX200 iSCSI configuration rules and guidelines
•
Bidirectional CHAP during discovery session and single-direction CHAP during normal session
•
Bidirectional CHAP during discovery session and during normal session
Enabling single-direction CHAP during discovery session and normal session
Table 15 (page 99) lists the settings you use to enable single-direction CHAP during a discovery
session and normal session.
Table 15 CHAP single-direction settings
MPX200 secret settings1
Source
Microsoft initiator secret settings1
Setting (example)
Action
Setting (example)
iSCSI Port
N/A
General Tab Secret
N/A
Discovered iSCSI Initiator
CHAPsecret01
Add Target Portal
CHAPsecret01
iSCSI Presented Target
N/A
Log on to Target
CHAPsecret01
1
These are examples of secret settings. Configure CHAP using settings that apply to your network environment.
To enable CHAP for the MPX200-discovered iSCSI initiator entry:
•
If the iSCSI initiator is not listed when you execute the set chap command, do one of the
following:
◦
From HP P6000 Command View, select Hosts, and then select the Add Host tab. Enter
the IQN string.
◦
From the CLI, use the add command to add the iSCSI initiator that will perform the
discovery.
•
If the iSCSI initiator is listed when you execute the set chap command, then enable the
CHAP secret (for example, CHAPsecret01):
1. Select the index of the iSCSI initiator.
2. Enable CHAP by selecting 0 and then entering the CHAP secret.
•
1.
To enable CHAP for the Microsoft iSCSI initiator:
Click Discovery
•
To discover iSCSI target portals manually:
a.
b.
c.
d.
e.
Click Add under Target Portals.
Enter the IP address of the MPX200 iSCSI port.
Click Advanced.
Select the CHAP Login Information check box.
Enter the CHAP secret for the MPX200-discovered iSCSI initiator in the Target Secret box
(for example, CHAPsecret01).
Click OK.
f.
The initiator completes target discovery.
•
a.
b.
c.
2.
3.
4.
5.
To discover iSCSI target portals using iSNS:
Click Add under iSNS Servers.
Enter the IP address of the iSNS server.
Click OK.
Click Targets, and then select the appropriate target for login.
Click Log On.
Click Advanced.
Select the CHAP Login Information check box.
Setting up authentication
99
6.
7.
8.
Enter the CHAP secret for the MPX200-discovered iSCSI initiator in the Target Secret box.
Click OK.
Click OK again.
The initiator completes normal login.
Enabling CHAP for the MPX200-discovered iSCSI initiator entry
You must use the CLI to enable CHAP for the MPX200-discovered iSCSI initiator entry:
•
•
If the iSCSI initiator is not listed when you execute the set chap command, do one of the
following:
◦
From HP P6000 Command View, select Hosts, and then select the Add Host tab. Enter
the IQN string.
◦
From the CLI, use the add command to add the iSCSI initiator that performs the discovery.
If the iSCSI initiator is listed when you execute the set chap command, then enable the
CHAP secret (for example, CHAPsecret01):
1. Select the index of the iSCSI initiator.
2. Enable CHAP by selecting 0 and then entering the CHAP secret.
Enabling CHAP for the Microsoft iSCSI initiator
To enable CHAP for the Microsoft iSCSI initiator:
1. Click Discovery. To manually discover iSCSI target portals:
a. Click Add under Target Portals.
b. Enter the IP address of the iSCSI port of the MPX200.
c. Click Advanced.
d. Select the CHAP Login Information check box.
e. Enter the CHAP secret for the MPX200-discovered iSCSI initiator in the Target Secret box
(for example, CHAPsecret01).
f. Click OK and the initiator completes Target discovery. Using iSNS for target discovery:
2.
3.
4.
5.
6.
7.
•
Click Add under iSNS Servers.
•
Enter the IP address of the iSNS server.
•
Click OK.
Click Targets and select the appropriate target for login.
Click Log On and then click Advanced.
Select the CHAP Login Information check box.
Enter the CHAP secret for the MPX200-discovered iSCSI initiator in the Target Secret box.
Click OK.
Click OK again.
100 MPX200 iSCSI configuration rules and guidelines
Enabling CHAP for the open-iscsi iSCSI initiator
To enable CHAP for the open-iscsi iSCSI initiator:
1. Edit the /etc/iscsi/iscsid.conf file:
a. Enable CHAP for both discovery and normal sessions:
discovery.sendtargets.auth.authmethod=CHAP
node.session.auth.authmethod=CHAP
b.
Set up the user name and password for the initiator for a normal session. For example:
# To set a CHAP username and password for initiator
# authentication by the target(s), uncomment the following lines:
#node.session.auth.username = username
#node.session.auth.password = password
node.session.auth.username = iqn.1994-05.com.redhat:fc813cac13.
sanergy33
node.session.auth.password = CHAPSecret01
c.
Set up the user name and password for the initiator for a discovery session. For example:
# To set a discovery session CHAP username and password for the initiator
# authentication by the target(s), uncomment the following lines:
#discovery.sendtargets.auth.username = username
#discovery.sendtargets.auth.password = password
discovery.sendtargets.auth.username = iqn.1994-05.com.redhat:fc813cac13.
sanergy33
discovery.sendtargets.auth.password = CHAPSecret01
2.
Save the /etc/iscsi/iscsid.conf file and start or restart iSCSI:
[root@sanergy33 iscsi]# /etc/init.d/iscsi start or /etc/init.d/iscsi
restart
3.
Use the iscsiadm command to perform a discovery. For example:
[root@sanergy33 iscsi]# iscsiadm -m discovery -t sendtargets -p
10.10.1.23
4.
Use the iscsiadm command to log in to the iSCSI target. For example:
[root@sanergy33 iscsi]# iscsiadm --mode node --targetname
iqn.1986-03.com.hp:fcgw.mpx200.0840e00002.
b1.01.50001fe15006ac39 --login
The following is a sample iscsid.conf file for CHAP:
# *************
# CHAP Settings
# *************
# To enable CHAP authentication set node.session.auth.authmethod
# to CHAP. The default is None.
#node.session.auth.authmethod = CHAP
node.session.auth.authmethod = CHAP
# To set a CHAP username and password for initiator
# authentication by the target(s), uncomment the following lines:
#node.session.auth.username = username
node.session.auth.username = iqn.1994-05.com.redhat:fc813cac13.sanergy33
#node.session.auth.password = password
node.session.auth.password = CHAPSecret01
# To set a CHAP username and password for target(s)
# authentication by the initiator, uncomment the following lines:
#node.session.auth.username_in = username_in
#node.session.auth.password_in = password_in
# To enable CHAP authentication for a discovery session to the target
# set discovery.sendtargets.auth.authmethod to CHAP. The default is None.
#discovery.sendtargets.auth.authmethod = CHAP
node.session.auth.authmethod = CHAP
Setting up authentication
101
# To set a discovery session CHAP username and password for the initiator
# authentication by the target(s), uncomment the following lines:
#discovery.sendtargets.auth.username = username
discovery.sendtargets.auth.username = iqn.1994-05.com.redhat:fc813cac13.sanergy3
3
#discovery.sendtargets.auth.password = password
discovery.sendtargets.auth.password = CHAPSecret01
# To set a discovery session CHAP username and password for target(s)
# authentication by the initiator, uncomment the following lines:
#discovery.sendtargets.auth.username_in = username_in
#discovery.sendtargets.auth.password_in = password_in
Enabling single-direction CHAP during discovery session and bidirectional CHAP
during normal session
Table 16 (page 102) lists the settings you use to enable single-direction CHAP during a discovery
session and bidirectional CHAP during a normal session.
Table 16 CHAP single-direction settings
MPX200 secret settings
Source
Microsoft initiator secret settings
Setting (example)
Action
Setting (example)
iSCSI Port
N/A
General Tab Secret
hpstorageworks
Discovered iSCSI
Initiator
CHAPsecret01
Add Target Portal
CHAPsecret0
iSCSI Presented
Target
hpstorageworks
Log on to Target
CHAPsecret01
NOTE:
1.
Enable CHAP for the MPX200 discovered iSCSI initiator entry (CHAP can be enabled via CLI
only).
a. If the iSCSI initiator is not listed under the set chap command, do one of the following:
b.
2.
These are examples of secret settings. Configure CHAP using settings that apply to your network environment.
•
From HP P6000 Command View, select Hosts, and then select the Add Host tab.
Enter the IQN name string.
•
From the CLI, use the add command to add the iSCSI initiator that will perform the
discovery.
If the iSCSI initiator is listed when you execute the set chap command, then enable
CHAP secret (for example: CHAPsecret01).
•
Select the index of the iSCSI initiator.
•
Enable CHAP by selecting 0, and then entering the CHAP secret.
Enable CHAP for the MPX200 iSCSI presented target:
a. Enter the set chap command.
b. Select the Presented Target the initiator will log in to.
c. Enable CHAP and enter a CHAP secret. For example: hpstorageworks
102 MPX200 iSCSI configuration rules and guidelines
3.
Enable CHAP for the Microsoft iSCSI initiator.
a. Select the General tab.
b. Click Secret in the middle of the screen.
c. Click Reset.
d. Enter the MPX200 iSCSI Presented Target CHAP secret (for example: hpstorageworks).
e. Click Discovery.
•
To discover iSCSI target portals manually:
a. Click Add under Target Portals.
b. Enter the IP address of the iSCSI port of the MPX200.
c. Click Advanced.
d. Select the CHAP Login Information check box.
e. Enter the CHAP secret for the MPX200 discovered iSCSI initiator in the Target
Secret box (for example: CHAPsecret01).
f. Click OK.
The initiator completes target discovery.
•
Using iSNS for target discovery:
a. Click Add under iSNS Servers.
b. Enter the IP address of the iSNS server.
c. Click OK.
f.
g.
h.
i.
j.
k.
Click Targets.
Select the appropriate target for login.
Click Log On.
Click Advanced.
Select the CHAP Login Information check box.
Enter the CHAP secret for the MPX200 discovered iSCSI initiator in the Target Secret box
(for example: CHAPsecret01).
l. Select the Mutual Authentication check box.
m. Click OK.
n. Click OK and the initiator completes normal login.
Setting up authentication 103
Enabling bidirectional CHAP during discovery session and single-direction CHAP
during normal session
Table 17 (page 104) lists the settings you use to enable bidirectional CHAP during a discovery
session and single-direction CHAP during a normal session.
Table 17 CHAP bidirectional settings
MPX200 secret settings
Source
Microsoft initiator secret settings
Setting (example)
Action
Setting (example)
iSCSI Port
hpstorageworks
General Tab Secret
hpstorageworks
Discovered iSCSI
Initiator
CHAPsecret01
Add Target Portal
CHAPsecret0
iSCSI Presented
Target
N/A
Log on to Target
CHAPsecret01
NOTE:
1.
Enable CHAP for the MPX200 discovered iSCSI initiator entry (CHAP can be enabled via CLI
only).
a. If the iSCSI initiator is not listed when you execute the set chap command, do one of
the following:
b.
2.
These are examples of secret settings. Configure CHAP using settings that apply to your network environment.
•
From HP P6000 Command View, select Hosts, and then select the Add Host tab.
Enter the IQN name string.
•
From the CLI, enter the initiator add command and add the iSCSI initiator that
performs the discovery.
If the iSCSI initiator is listed under the set chap command, then enable CHAP secret
(for example: CHAPsecret01).
•
Select the index of the iSCSI initiator.
•
To Enable CHAP, select 0, and then enter the CHAP secret.
Enable CHAP for the MPX200 iSCSI port:
a. To enable CHAP for the MPX200 iSCSI port using HP Command View:
b.
•
Select the appropriate iSCSI Controller, then select the IP Ports tab, and then select
the appropriate IP Port.
•
Under Security, select Enabled in CHAP Status, and then enter the CHAP Secret (for
example, hpstorageworks).
•
Select the Save Changes tab to save the changes.
To enable CHAP for the MPX200 iSCSI port using the MPX200 CLI:
•
Enter the set chap command.
•
Select the appropriate Portal iqn name index that the initiator logs in to.
•
Select 0 to enable CHAP.
•
Enter a CHAP secret. For example: hpstorageworks.
104 MPX200 iSCSI configuration rules and guidelines
3.
Enable CHAP for the Microsoft iSCSI initiator.
a. Select the General tab.
b. Click Secret in the middle of the screen.
c. Click Reset.
d. Enter the MPX200 iSCSI Presented Target CHAP secret (for example: hpstorageworks).
e. Click OK.
f. Click Discovery.
•
To discover iSCSI target portals manually:
a. Click Add under Target Portals.
b. Enter the IP address of the iSCSI port of the MPX200.
c. Click Advanced.
d. Select the CHAP Login Information check box.
e. Enter the CHAP secret for the MPX200 discovered iSCSI initiator in the Target
Secret box (for example, CHAPsecret01).
f. Select the Mutual Authentication check box.
g. Click OK.
h. Click OK.
The initiator completes Target discovery
•
Using iSNS for Target discovery:
a. Click Add under iSNS Servers.
b. Enter the IP address of the iSNS server.
c. Click OK.
g.
h.
i.
j.
k.
l.
Click Targets.
Select the appropriate target for login.
Click Log On.
Click Advanced.
Select the CHAP Login Information check box.
Enter the CHAP secret for the MPX200 discovered iSCSI initiator in the Target Secret box
(for example, CHAPsecret01).
m. Select the Mutual Authentication check box.
n. Click OK.
o. Click OK again and the initiator completes normal login.
Enabling bidirectional CHAP during discovery session and bidirectional CHAP during
normal session
Table 18 (page 105) lists the settings you use to enable bidirectional CHAP during a discovery
session and bidirectional CHAP during a normal session.
Table 18 CHAP bidirectional settings
MPX200 secret settings
Source
Setting (example)
Microsoft initiator secret settings
Action
Setting (example)
iSCSI Port
hpstorageworks
General Tab Secret
hpstorageworks
Discovered iSCSI
initiator
CHAPsecret01
Add Target Portal
CHAPsecret0
Setting up authentication 105
Table 18 CHAP bidirectional settings (continued)
iSCSI Presented
Target
NOTE:
1.
CHAPsecret01
These are examples of secret settings. Configure CHAP using settings that apply to your network environment.
•
From HP P6000 Command View, select Hosts and then select the Add Host tab.
Enter the IQN name string.
•
From the CLI, enter the initiator add command and add the iSCSI initiator that
performs the discovery.
If the iSCSI initiator is listed under the set chap command, enable CHAP secret (for
example: CHAPsecret01).
a. Select the index of the iSCSI initiator.
b. To Enable CHAP, select 0, then enter the CHAP secret.
Enable CHAP for the MPX200 iSCSI port:
a. To enable CHAP for the MPX200 iSCSI port using HP Command View:
b.
3.
Log on to Target
Enable CHAP for the MPX200 discovered iSCSI initiator entry (CHAP can be enabled via CLI
only):
a. If the iSCSI initiator is not listed when you execute the set chap command, do one of
the following:
b.
2.
hpstorageworks
•
Select the appropriate iSCSI Controller, then select the IP Ports tab, and then select
the appropriate IP Port.
•
Under Security, select Enabled in CHAP Status, and then enter the CHAP Secret (for
example: hpstorageworks).
•
Select the Save Changes tab to save the changes.
Enable CHAP for the MPX200 iSCSI port using the MPX200 CLI:
•
Enter the set chap command.
•
Select the appropriate Portal iqn name index that the initiator logs in to.
•
Select 0 to enable CHAP.
•
Enter a CHAP secret (for example: hpstorageworks).
Enable CHAP for the MPX200 iSCSI presented target using the CLI:
a. Enter the set CHAP command.
b. Select the Presented Target the initiator logs in to.
c. Enable CHAP and enter a CHAP secret (for example, hpstorageworks).
106 MPX200 iSCSI configuration rules and guidelines
4.
Enable CHAP for the Microsoft iSCSI initiator.
a. Select the General tab.
b. Click Secret in the middle of the screen.
c. Click Reset.
d. Enter the MPX200 iSCSI Presented Target CHAP secret (for example: hpstorageworks).
e. Click OK.
f. Click Discovery.
•
For
a.
b.
c.
d.
e.
•
Using iSNS for target discovery:
a. Click Add under iSNS Servers.
b. Enter the IP address of the iSNS server.
c. Click OK.
manually discovering iSCSI target portals:
Click Add under Target Portals.
Enter the IP address of the iSCSI port of the MPX200.
Click Advanced.
Select the CHAP Login Information check box.
Enter the CHAP secret for the MPX200 discovered iSCSI initiator in the Target
Secret box (for example: CHAPsecret01).
f. Select the Mutual Authentication check box.
g. Click OK.
h. Click OK again and the initiator completes target discovery.
g.
h.
i.
j.
k.
l.
Click Targets.
Select the appropriate target for login.
Click Log On.
Click Advanced.
Select the CHAP Login Information check box.
Enter the CHAP secret for the MPX200 discovered iSCSI initiator in the Target Secret box
(for example: CHAPsecret01).
m. Select the Mutual Authentication check box.
n. Click OK.
o. Click OK again and the initiator completes normal login.
Setting up authentication 107
8 MPX200 FCIP
MPX200 FCIP product description
The HP MPX200 Multifunction Router with an FCIP license provides FC SAN extension over an IP
network. Used in conjunction with 3PAR StoreServ 10000/7000, 3PAR T-Class/F-Class,
P6000/EVA, and XP storage system families and Remote Copy and HP Continuous Access software,
the MPX200 enables long-distance remote replication for disaster tolerance. A base FCIP
configuration consists of a minimum of two MPX200 blades, one for the local site and one for the
remote site.
The MPX200 FCIP feature can be configured as a standalone function or for use simultaneously
with iSCSI. A license is required to enable the FCIP feature. All licenses are half-chassis based,
allowing FCIP to be configured on one or both bays (slots) in a dual-blade chassis configuration.
The following licenses are available for FCIP:
•
HP Storage Works MPX200 Half Chassis FCIP License — Includes the license to enable FCIP
functionality in one out of two bays (slots) in an MPX200 Chassis.
•
HP Storage Works MPX200 Full Chassis FCIP License — Includes the license to enable FCIP
functionality for both bays (slots) in an MPX200 Chassis.
NOTE: If you install a single blade and a half-chassis license initially, and then install a second
blade, a second half-chassis license is required.
A base configuration can be either a single HP MPX200 Multifunction Router 1-GbE Base Chassis
(MPX200), or an HP MPX200 Multifunction Router 10–1 GbE Base Chassis (MPX200). Note that
FCIP is currently supported only on MPX200 1 GbE ports per site, which is required. See
Figure 89 (page 108).
Figure 89 MPX200 basic FCIP configuration
Redundant FCIP network structure example
In a high-availability FCIP configuration, pairs of MPX200 routers and two independent IP networks
provide full redundancy. Loss of connectivity through one of the IP networks does not result in a
loss of connectivity between the fabrics.
The redundant configuration can be either a single HP MPX200 Multifunction Router 1-GbE Base
Chassis with an HP MPX200 Router 1-GbE Upgrade Blade, or an HP MPX200 Multifunction Router
10–1 GbE Base Chassis with an HP MPX200 Router 10–1 GbE Upgrade Blade. Note that FCIP
is currently supported only on MPX200 1 GbE ports. See Figure 90 (page 109).
108 MPX200 FCIP
Figure 90 MPX200 high-availability configuration with fully-redundant long-distance links
Using FCIP to encapsulate FC packets
With FCIP, gateways transport FC frames over an IP network. From the perspective of the local
and remote fabrics, the FC devices accessed through the gateways appear to be part of one unified
fabric. This is possible because FC traffic is carried over the IP network in such a way that the FC
fabric and all FC devices on the fabric are unaware of the presence of the IP network. Once
configured, FCIP instances on each gateway become active and establish their connectivity through
the IP network. The FC devices in the local fabric access the FC devices in the remote fabric using
FC frames. The FC frames are encapsulated in IP packets by the local gateway and then transmitted
to the remote gateway. The remote gateway strips the IP packet data and passes only the FC frames
to the remote FC devices. The gateways deployed for FCIP are configured to use TCP, which uses
standard TCP flow control and error recovery algorithms.
FCIP Impact on existing iSCSI configurations
This guide includes samples of FCIP and iSCSI configurations to illustrate some of the many possible
configurations available. Despite the number of permutations, there are really only two basic FCIP
configurations: a dedicated FCIP blade and a shared iSCSI/FCIP blade.
A dedicated MPX200 blade running only FCIP does not have any impact on a dedicated MPX200
blade running iSCSI. There is, however, an impact and possibly changes required for existing
MPX200 iSCSI configurations when FCIP is added to the same blade. Also consider this possibility
when planning a new iSCSI/FCIP mixed blade configuration.
Configuring an FCIP route and specifying an FC and GE port pair take precedence over any
previous configuration for the port pair (FC/GE). This means that for an existing or new iSCSI
configuration, once an FCIP Route is configured, one FC port and one GE port are no longer
available for iSCSI or DM use.
For existing iSCSI configurations, there are two configuration cases to consider: one with a single
FC fabric (see Figure 91 (page 110)) connected to an MPX200 blade and one with dual FC fabrics
(see Figure 92 (page 110)) connected to an MPX200 blade. In the single FC fabric case (see
Figure 91 (page 110)), the impact is minimal and can be resolved by rezoning any targets that
were zoned only with the FCIP FC port to the remaining iSCSI FC port of that blade. Once the
targets are rezoned, the impact to iSCSI is the loss of one 1 GbE port.
Using FCIP to encapsulate FC packets 109
Figure 91 FCIP impact on existing iSCSI configurations – single fabric per blade
Figure 92 FCIP impact on existing iSCSI configurations — dual fabrics per blade
In the dual FC fabric case, the impact is higher because after adding an FCIP Route there is only
one remaining FC port available for iSCSI. Therefore, only the targets from one fabric or the other
will be available to iSCSI initiators connected to that MPX200 blade; access to targets on the other
fabric are through another MPX200 blade.
FCIP and iSCSI performance
In most use cases, mixing iSCSI and FCIP on the same blade provides adequate performance.
However, high availability/performance goals may dictate a dedicated MPX200 for each function
or protocol. For example, if your performance needs are for more that 8 Gb/s of FC access for
iSCSI alone, configuring FCIP on the same blade would limit FC access to only 8 Gb/s and would
not meet the performance requirements for that situation.
110
MPX200 FCIP
MPX200 iSCSI/FCIP configurations
The MPX200 router supports the following configurations:
•
Figure 93 (page 111) MPX200 basic FCIP configuration with one or two long-distance links
•
Figure 94 (page 112) MPX200 FCIP with B-series Integrated Routing
•
Figure 95 (page 112) MPX200 FCIP with C-series IVR
•
Figure 96 (page 112) MPX200 high-availability configuration with one or two long-distance
links
•
Figure 97 (page 113) MPX200 high-availability configuration with fully-redundant long-distance
links
•
Figure 98 (page 113) MPX200 configuration with remote IP distance gateway (mpx110)
•
Figure 99 (page 113) MPX200 highly-redundant configuration with one or two long-distance
links
•
Figure 100 (page 114) MPX200 highly redundant pairs of gateways with fully-redundant
long-distance links
•
Figure 101 (page 114) MPX200 simultaneous iSCSI and FCIP with remote dedicated FCIP
blade
•
Figure 102 (page 115) MPX200 simultaneous iSCSI and FCIP, both local and remote
•
Figure 103 (page 115) MPX200 iSCSI and FCIP dedicated blades, both local and remote
•
Figure 104 (page 116) HP Continuous Access 3-site configuration with four MPX200 routers
•
Figure 105 (page 117) HP Continuous Access 3-site configuration with six MPX200 routers
•
Figure 106 (page 118) HP Continuous Access 3-site configuration with eight MPX200 routers
•
Figure 107 (page 119) HP Continuous Access 3-site configuration with six MPX200 router full
peer-to-peer connectivity
Figure 93 MPX200 basic FCIP configuration with one or two long-distance links
Figure 94 (page 112) shows a configuration using MPX200 with FCIP and B-series switches with
Integrated Routing. This provides fabric isolation between the local and remote fabrics, allowing
device access without merging the fabrics. This can be implemented in all supported MPX200 FCIP
configurations using B-series Fibre Channel switches with Integrated Routing or B-series routers
configured for Fibre Channel routing.
MPX200 iSCSI/FCIP configurations
111
Figure 94 MPX200 FCIP with B-series Integrated Routing
LAN
WAN
LAN
FCIP
Local
FC servers
GbE
Fabric A1
GbE
GbE
GbE
Remote
FC servers
E
EX
HP
HP
Fabric A2
StorageW
StorageW
orks
MPX200
orks
MPX200
GE4
GE4
GE3
MGMT
GE3
MGMT
IOIOI
IOIOI
MPX200
MPX200
1 GbE
Multifunction
Blade
Router
1 GbE
Multifunction
Blade
Router
FC1
FC1
FC2
FC2
GE1
GE1
GE2
GE2
Fabric B1
EX
MPX200
MPX200
Local
storage system
E
Fabric B2
Remote
storage system
26625a
Figure 95 (page 112) shows a configuration using the MPX200 with FCIP and C-series switches
with IVR. This provides fabric isolation between the local and remote fabrics, allowing device
access without merging the fabrics. This can be implemented in all supported MPX200 FCIP
configurations using C-series Fibre Channel switches with IVR.
Figure 95 MPX200 FCIP with C-series IVR
Figure 96 MPX200 high-availability configuration with one or two long-distance links
112
MPX200 FCIP
Figure 97 MPX200 high-availability configuration with fully-redundant long-distance links
Figure 98 MPX200 configuration with remote IP Distance gateway (mpx110)
Figure 99 MPX200 highly-redundant configuration with one or two long-distance lists
MPX200 iSCSI/FCIP configurations
113
Figure 100 MPX200 highly redundant pairs of gateways with fully-redundant long-distance links
Figure 101 MPX200 simultaneous iSCSI and FCIP with remote dedicated FCIP blade
114
MPX200 FCIP
Figure 102 MPX200 simultaneous iSCSI and FCIP, both local and remote
Figure 103 MPX200 iSCSI and FCIP dedicated blades, both local and remote
HP Continuous Access 3-site configurations
This section describes the following HP Continuous Access 3-site configurations:
•
HP Continuous Access 3-site configuration with four MPX200 routers
•
HP Continuous Access 3-site configuration with six MPX200 routers
•
HP Continuous Access 3-site configuration with eight MPX200 routers
•
3-site configuration with six gateways and full inter-site connectivity
The first three configurations provide a fan-in or fan-out relationship between the sites. The fourth
configuration provides a peer-to-peer relationship between all sites.
Figure 104 (page 116) shows connectivity for three sites using four MPX200 routers, which implement
the minimum-level and lowest-cost connectivity for a 3-site configuration. Figure 105 (page 117)
MPX200 iSCSI/FCIP configurations
115
shows additional connectivity and redundancy using six MPX200 routers. Figure 106 (page 118)
shows the highest level of 3-site connectivity using eight MPX200 routers.
Figure 107 (page 119) is similar to Figure 105 (page 117), with additional connectivity to allow for
replication between Site 2 and Site 3.
The following configuration rules apply to Figure 104 (page 116) through Figure 106 (page 118)
(fan-in/fan-out relationships):
•
For Site 1, Site 2 or Site 3 can function as the remote site.
•
For Site 2 or Site 3, Site 1 can function as the remote site.
•
Replication between Site 2 and Site 3 is not supported.
The following configuration rules apply to Figure 107 (page 119) (peer-to-peer relationship):
•
For Site 1, Site 2 or Site 3 can function as the remote site.
•
For Site 2, Site 1 or Site 3 can function as the remote site.
•
For Site 3, Site 1 or Site 2 can function as the remote site.
3-site configuration with four MPX200 routers
The configuration in Figure 104 (page 116) provides long-distance link redundancy between all
three sites.
Figure 104 HP Continuous Access 3-site configuration with four MPX200 routers
3-site configuration with six MPX200 routers
The configuration in Figure 105 (page 117) provides the same long-distance link redundancy as
the configuration in Figure 104 (page 116), with the addition of redundant MPX200 routers at sites
2 and 3.
116
MPX200 FCIP
Figure 105 HP Continuous Access 3-site configuration with six MPX200 routers
3-site configuration with eight MPX200 routers
The configuration in Figure 106 (page 118) provides the highest 3-site redundancy, with a dedicated
MPX200 pair for all long-distance links to all three sites.
MPX200 iSCSI/FCIP configurations
117
Figure 106 HP Continuous Access 3-site configuration with eight MPX200 routers
3-site configuration with six MPX200 routers and full inter-site connectivity
Figure 107 (page 119) provides long-distance link redundancy and full connectivity between all
three sites.
118
MPX200 FCIP
Figure 107 HP Continuous Access 3-site configuration with six MPX200 router full peer-to-peer
connectivity
FCIP configuration rules and guidelines
This section defines the FCIP configuration rules for using the MPX200 Multifunction Router.
General FCIP configuration rules
The following general configuration rules apply:
•
All MPX200 FCIP configurations require a minimum of two gateways. These can be two
MPX200s or one MPX200 and one IP Distance Gateway (mpx110), one local and one remote,
connected through an IP network. HP does not support FCIP connectivity between other gateway
models.
•
FCIP is supported on GbE ports only. For the MPX200 1 GbE blade, ports GE1, GE2, GE3,
and GE4 are GbE. For the MPX200 10 GbE blade, ports GE1 and GE2 are GbE.
•
The MPX200 Multifunction Router is supported for FCIP extension with HP 3PAR Remote Copy,
HP Continuous Access and XP Continuous Access (see “Storage system rules and guidelines”
(page 120)).
NOTE: For current support, see SPOCK at http://www.hp.com/storage/spock. You must sign
up for an HP Passport to enable access.
Operating system and multipath support
The MPX200 Multifunction Router is supported using FCIP with all operating systems and multipath
software supported by HP for Continuous Access EVA and XP Continuous Access. For more
information, see the HP SAN Design Reference Guide, available at http://www.hp.com/go/
SDGManuals.
MPX200 iSCSI/FCIP configurations
119
Storage system rules and guidelines
•
The MPX200 Multifunction Router configured for FCIP is supported for use with the following
HP Continuous Access storage systems:
◦
EVA4400/4400 with embedded switch
◦
EVA4000/4100/6000/6100/8000/8100
◦
EVA6400/8400
◦
P6300/P6350/P6500/P6550
◦
EVA3000/5000
◦
P9500
◦
3PAR StoreServ 10000/7000
◦
3PAR T-Class/F-Class
◦
XP24000/20000
◦
XP12000/10000
•
The MPX200 Multifunction Router is supported for use in all HP-supported HP Continuous
Access configurations, including the standard two-fabric, five-fabric, and six-fabric
configurations.
•
HP Continuous Access supports RCS and non-RCS LUNs with FCIP extension.
•
HP MPX200 Multifunction Router supports the minimum IP bandwidth/maximum DR groups.
•
The minimum bandwidth required for XP Continuous Access is 16 Mb/s per path.
•
The MPX200 Multifunction Router is supported with current P6000 EVA storage software
applications such as HP Continuous Access, P6000 Command View, Business Copy, SSSU,
and Replication Solutions Manager.
Table 19 (page 120) specifies the minimum IP bandwidth and maximum DR groups for EVA XCS
and VCS.
Table 19 Minimum IP bandwidth and maximum EVA DR groups
Gateway pair
Minimum IP bandwidth and maximum DR groups1
Dual fabric latency (0 and 100 ms
one-way)
MPX200 Multifunction Router
(MPX200)
1
Single or shared IP link latency (0 to 100
ms one-way)
Minimum: At least 2 Mb/s for 1 DR
Minimum: At least 4 Mb/s for 1 DR
group Recommended: At least 5 Mb/s group Recommended: At least 10 Mb/s
for 1 to 5 DR groups
for 1 to 5 DR groups
Gb/s IP bandwidth can have up to 128 DR groups with VCS 4.x, and up to 256 DR groups with XCS.
Fibre Channel switch and firmware support
The MPX200 is compatible with the following Fibre Channel switches:
•
B-series 8 Gb/s, 4 Gb/s, and 2 Gb/s Fibre Channel switches
•
C-series 8 Gb/s, 4 Gb/s, and 2 Gb/s Fibre Channel switches
•
H-series 8 Gb/s Fibre Channel switches
NOTE: For current support, see SPOCK at http://www.hp.com/storage/spock. You must sign
up for an HP Passport to enable access.
120 MPX200 FCIP
FC switch requirements
For additional B-series, C-series, and H-series FC switches, local and remote MPX200 Multifunction
Router pairs must be connected to the same Fibre Channel switch product line series.
NOTE:
The MPX200 Fibre Channel ports operate at 2, 4, and 8 Gb/s.
IP network requirements
HP requires that the following standards be met for the IP network:
•
Supported network protocols are TCP/IP IPv4 and IPv6 Ethernet 1,000 Mb/s.
For minimum IP bandwidth requirements, see “Storage system rules and guidelines” (page 120).
•
For MPX200 IP data—Local and remote pairs are supported for up to 100 ms of IP network
delay one-way, or 200 ms round-trip for HP Continuous Access. HP requires dedicated IP
bandwidth (see Table 20 (page 121)).
•
For MPX200 IP management—LAN and WAN are supported.
•
For XP Continuous Access network requirements, see the SAN Extension chapter in the HP
StorageWorks SAN Design Reference Guide.
Table 20 Network requirements for the MPX200 with XCS and VCS
Specification
1
Description
Bandwidth
Must be dedicated to the HP Continuous Access storage replication
Bandwidth function. There is no support for dynamic pacing of the
gateway.
Maximum number of DR groups
See Table 19 (page 120) for minimum supported bandwidth based on
the average maximum number of DR groups packet-loss ratio and
one-way intersite latencies.
MTU of the IP network
1,500 bytes
Maximum latency1
EVA: 100 ms one-way or 200 ms round-trip
Average packet-loss ratio2
Low-loss network: 0.0012% average over 24 hours
High-loss network: 0.2% average over 24 hours; must not exceed 0.5%
for more than 5 minutes in a 2-hour window
Latency jitter3
Must not exceed 10 ms over 24 hours.
1
Pre-existing restriction
2
A high packet-loss ratio indicates the need to retransmit data across the intersite link. Each retransmission delays
transmissions queued behind the current packet, thus increasing the time to complete pending transactions.
Latency jitter is the difference between the minimum and maximum values, and indicates how stable or predictable the
network delay. The greater the jitter, the greater the variance in the delay, which lowers the performance predictability.
3
IP performance tuning
The MPX200 supports Fibre Channel service at transmission rates of 2 Gb/s, 4 Gb/s or 8 Gb/s
with a maximum frame size of 2,148 bytes. It supports Ethernet service at transmission rates of
1,000 or 100 Mb/s with an MTU size between 1,000 and 9,000 bytes (jumbo frames). Related
performance characteristics include the following:
•
Distance
•
Bandwidth per route
•
Latency
•
MTU/Jumbo frames
•
Compression
IP performance tuning
121
•
TCP window size/ scaling performance tuning
•
Modifying the window size and scaling factor
•
TCP window size and scaling factor recommendations
Distance
Consider the physical distance between the MPX200 Multifunction Routers. This is usually measured
in RTT. The RTT can be anywhere from less than 1 millisecond to as great as 200 milliseconds.
Bandwidth per route
Bandwidth is a measure of the volume of data that can be transmitted at a given transmission rate.
WAN data rates typically range from 1.5 Mb/s (T1) to 1 Gb/s. The proper MPX200 bandwidth
setting is determined based on the bandwidth that is available for each FCIP route, irrespective of
the total bandwidth and physical speed of the link.
To determine the proper MPX200 bandwidth setting, start with the total bandwidth of the WAN
link. Adjust this number based on the guaranteed allocated FCIP bandwidth and further adjust this
number if the number of FCIP routes configured is greater than one. For example, if the WAN link
is 45 Mb/s and 15 Mb/s is allocated to network traffic, the remaining 30 Mb/s is available for
FCIP. If in this example the MPX200 is configured for two routes, based on the 30 Mb/s total
bandwidth available for FCIP, you would set the MPX200 bandwidth parameter to 15, the available
bandwidth for each FCIP route.
HP Continuous Access replication solution requires dedicated bandwidth for the intersite link. If
other applications share the intersite link, some method of QOS must be used to ensure that the
replication application has uncontested access to the allocated bandwidth.
NOTE: Setting the bandwidth per route setting higher than the actual bandwidth available for
each route results in a decrease in performance; the optimal setting matches the bandwidth per
route setting to the actual bandwidth available for each route.
Latency
Latency is the amount of time a packet takes to traverse the network from source to destination.
MTU/Jumbo frames
122
•
For MTU size there are 3 choices, normal (1500 bytes), Jumbo (9000 bytes) and other, where
you are then prompted for a value between 1000 and 9000.
•
Typically MTU should be set to the default of 1500; rarely do WAN networks support MTU
sizes greater than 1500. An MTU setting that is too high can result in a high number of
dropped packets and retransmissions, significantly impacting performance. An MTU that is
too low (less than 1200) causes a single Fibre Channel frame to be spread across more than
two Ethernet frames, also impacting performance. Using an MTU size of 1500 to 1200 ensures
a single Fibre Channel frame (2112 bytes) fits within two Ethernet frames, resulting in optimal
performance.
•
Encryption products on the WAN link often add some number of additional bytes to each
packet, so it may be necessary to decrease the MPX200 MTU size setting to between 1450
and 1200. This reduction accommodates the additional bytes, while maintaining a total MTU
size of 1500 or less.
•
Jumbo frames can enhance the IP performance of the MPX200. Before enabling Jumbo frames
however, you must ensure that the entire network is enabled for Jumbo frames. If any
MPX200 FCIP
connections utilized through the network are not set to Jumbo, performance can degrade
significantly.
•
In addition to support for Jumbo frames, you can select other and configure the MTU size
between 1000 and 9000 bytes.
NOTE:
Jumbo frames are not supported for use with HP Continuous Access.
Compression
The MPX200 integrates a software compression option. This option can be set to disable,
enable, or auto. When set to auto, the MPX200 continually assesses data compressibility and
automatically enables or disables compression based on data compressibility. The default setting
for software compression is disable for new installations. If upgrading from an version of firmware
earlier than v3.2.0.1, the existing setting is maintained (either enable or disable).
NOTE: The auto compression mode setting is available with MPX200 firmware version 3.2.0.1
or later.
•
Use the disable setting if you know that the data being transferred over FCIP is not
compressible.
•
Use the disable setting when using a high speed WAN link (622 Mb/s OC-12 up to 1
Gb/s) in a configuration with simultaneous FCIP and iSCSI functions operating on the same
MPX200 blade.
•
Use the enable setting if you know that the data being transferred over FCIP is compressible.
•
Use the auto setting if you are unsure of data compressibility.
NOTE: All mode settings require the proper setting of the MPX200 bandwidth per route
parameter, matched to the guaranteed available bandwidth (QoS) of the WAN link, based
on the number of routes. See “Bandwidth per route” (page 122). HP does not recommend that
you use the auto setting if the available bandwidth per route is inconsistent or unpredictable.
TCP window size/scaling performance tuning
The MPX200 FCIP performance is maximized when properly configured. Knowing the RTT (distance)
between MPX200 Multifunction Routers and the WAN dedicated or guaranteed bandwidth allows
the gateways to be tuned for optimal performance. See “Modifying the window size and scaling
factor” (page 123).
Modifying the window size and scaling factor
The MPX200 window size can be set to a maximum of 32 KB. The scaling factor is used as a
multiplier to increase the window size above 32 KB. Modify the window size and scaling factor
in the MPX200 Multifunction Router pairs based on the WAN RTT and link speed. To determine
the appropriate window size setting and scaling factor, use the pre-populated tables or the following
formula. In version 3.4.0.0 and above the TCP Window size and Window scaling factor were
combined into a single parameter that reflects the true TCP Window size versus the three parameters
used in previous versions.
NOTE: Use the MPX200 CLI command ping to determine the RTT and select only the default
(~56) packet size for this test. For troubleshooting link issues, always use the maximum packet
size.
If the recommended TCP window size and scale factor for a given RTT and WAN link speed is
not shown in Table 22 (page 124) through Table 28 (page 126), use the formula: (RTT (ms) x
link rate (Kb/s) x (1 byte/8 bits)) = minimum window size (MWS).
IP performance tuning
123
Then, convert the MWS to a recommended scale factor by dividing it by the default window size
(32,768 bytes). Use Table 21 (page 124) to determine the scale factor.
Table 21 TCP window size scale factors
MWS scale result
Scale factor / TCP Window size
0 to 2
0 / 32KB
2 to 4
1 / 64KB
4 to 8
2 / 128KB
8 to 16
3 / 256KB
16 to 32
4 / 512KB
32 to 64
5 / 1MB
64 to 128
6 / 2MB
128 to 256
7 / 4MB
256 to 512
8 / 8MB
512 or greater
9 / 16MB
TCP window size and scaling factor recommendations
Table 22 (page 124) through Table 28 (page 126) provide TCP window size and scaling factor
settings for specific WAN environments. These tables are organized by typical link speed.
NOTE: The TCP window size recommendations listed in Table 22 (page 124) through
Table 28 (page 126) are based on low-loss networks (0.0012% average packet-loss ratio over 24
hours). For higher-loss, longer-latency networks, you should reduce the recommended window size
and scaling factor by one setting to compensate for the increased number of packet retransmissions.
Table 22 T1/DS-1 1.554 Mb/sec (bandwidth = 1 Mb)
Round trip time (RTT) in ms
Window size (bytes)
Scaling factor (2n)
250
64K
1
100
32K
0
50
32K
0
25
32K
0
20
32K
0
15
32K
0
10
32K
0
5
32K
0
2.5
32K
0
1 or less
32K
0
Table 23 T3/DS-3 45 Mb/sec (bandwidth = 43 Mb)
124
Round trip time (RTT) in ms
Window size (bytes)
Scaling factor (2n)
250
1M
5
100
512K
4
50
256K
3
MPX200 FCIP
Table 23 T3/DS-3 45 Mb/sec (bandwidth = 43 Mb) (continued)
25
128K
2
20
128K
2
15
128K
2
10
64K
1
5
32K
0
2.5
32K
0
1 or less
32K
0
Table 24 OC-1 50 Mb/sec (bandwidth = 50 Mb)
Round trip time (RTT) in ms
Window size (bytes)
Scaling factor (2n)
250
2M
6
100
512K
4
50
256K
3
25
128K
2
20
128K
2
15
128K
2
10
64K
1
5
32K
0
2.5
32K
0
1 or less
32K
0
Table 25 OC-3 150 Mb/sec (bandwidth = 148 Mb)
Round trip time (RTT) in ms
Window size (bytes)
Scaling factor (2n)
250
16M
9
100
4M
7
50
2M
6
25
1M
5
20
1M
5
15
1M
5
10
512K
4
5
256K
3
2.5
128K
2
1 or less
64K
1
Table 26 DS-5 400 Mb/sec (bandwidth = 384 Mb)
Round trip time (RTT) in ms
Window size (bytes)
Scaling factor (2n)
250
4M
7
100
2M
6
50
1M
5
IP performance tuning
125
Table 26 DS-5 400 Mb/sec (bandwidth = 384 Mb) (continued)
25
512K
4
20
512K
4
15
256K
3
10
256K
3
5
128K
2
2.5
64K
1
1 or less
32K
0
Table 27 OC-12 621 Mb/sec (bandwidth = 699 Mb)
Round trip time (RTT) in ms
Window size (bytes)
Scaling factor (2n)
250
16M
9
100
8M
8
50
4M
7
25
2M
6
20
1M
5
15
1M
5
10
1M
5
5
512K
4
2.5
256K
3
1 or less
64K
1
Table 28 OC-24 and above 1.244 Gb/sec (bandwidth = 1000 Mb)
Round trip time (RTT) in ms
Window size (bytes)
Scaling factor (2n)
250
16M
9
100
16M
9
50
8M
8
25
4M
7
20
4M
7
15
2M
6
10
2M
6
5
1M
5
2.5
512K
4
1 or less
128K
2
FCIP link diagnostics
For information on FCIP diagnostics, see “WANLink diagnostic” (page 145).
126
MPX200 FCIP
Configuring an FCIP route
Step 1. Verify your system requirements
Verify that you have the following for both the local site and the remote site (see “MPX200 basic
FCIP configuration” (page 108)):
•
HP MPX200 Multifunction Router 1-GbE Base Chassis or HP MPX200 Multifunction Router
10-1 GbE Base Chassis. Note that FCIP is currently supported only on MPX200 1 GbE ports.
•
HP MPX200 Half Chassis FCIP License
•
Continuous Access EVA
•
EVA3000/5000, EVA4x00/6x00/8x00, P63x0/P65x0, XP24000/20000/12000/10000,
or P9500 storage systems
•
3PAR StoreServ 10000/7000, 3PAR T-Class/F-Class
•
FC fabrics consisting of B-series C-series, or H-series switches
•
Cat 5e network cable, three per site (mgmt, (2) FCIP)
•
Optical SFP transceiver and FC cable, two per site
•
MPX200 serial console cable adapter, Cat 5e network cable
Additional equipment for the local site and remote site (see “MPX200 high-availability configuration
with one or two long-distance links” (page 112) and “MPX200 configuration with remote IP Distance
gateway (mpx110)” (page 113)) is as follows:
•
HP MPX200 Multifunction Router 1-GbE Upgrade Blade (MPX200 blade for redundancy)
◦
HP MPX200 Multifunction Router 10–1 GbE Upgrade Blade. Note that FCIP is currently
supported only on MPX200 1 GbE ports.
Or
◦
HP Storage Works MPX200 Full Chassis FCIP License
NOTE: For the Full Chassis FCIP License, you need to install a license for only one of
the two blade serial numbers in the chassis. When the Full Chassis FCIP License is applied
to the blade it enables both slots. Replacement blades can work in either slot with no
need for another FCIP license.
NOTE: For the latest information about operating system and multipath software support, see
SPOCK at the website http://www.hp.com/storage/spock. You must sign up for an HP Passport
to enable access.
Step 2. Pre-installation checklist
Before you begin the configuration process, contact your system administrator for the following
information for both sites:
•
IP address, subnet mask and gateway for the MPX200 management port (if not using DHCP)
•
IP address, subnet mask and gateway for the first available GE port
•
IP address of the remote MPX200 that connects to the first available GE port
•
IP address, subnet mask and gateway for the second available GE port
•
IP address of the remote MPX200 that connects to the second available GE port
•
FCIP Link Parameters, Guaranteed Bandwidth, Round-Trip-Time, Quality Of Service,
VLAN/Priority
Configuring an FCIP route
127
Step 3. Rack-mount the MPX200
See “MPX200 components” (page 26).
Step 4. Install the SFPs
To install the SFPs:
NOTE:
1.
2.
3.
An SFP transceiver is required for each FC port that connects to an FC switch.
Align the SFP transceiver so that the key is oriented correctly to the port. Transceivers are
keyed so that they can be inserted only one way.
Insert the transceiver into the port.
Press gently until the transceiver snaps into place.
Step 5. Set the MPX200 management port parameters
Use the following steps to set initial MPX200 configuration parameters or, if already configured,
go to step 6.
NOTE: If you are using Telnet to configure the MPX200 for the first time, your workstation IP
address must be "10.0.0.x," where x is a number other than 1 and the subnet mask is 255.0.0.0.
1.
2.
3.
Connect the MPX200 management port or serial console port to a workstation to set the initial
MPX200 configuration parameters. You can connect the MPX200 management port to an IP
switch, a hub, or directly to the workstation using an Ethernet crossover cable. If you are using
the MPX200 serial port, the settings are 115,200 baud, 8 bit, 1 stop bit, no parity, and no
flow control.
Attach both AC power cords to the PCM located at the front of the MPX200, and a power
distribution unit or AC power outlet. Verify that the MPX200 system power LED is lit. The
MPX200 runs a self-test and enters operating mode.
Verify that the heartbeat LED is blinking (once per second) and that the System fault LED does
not light. “MPX200 chassis diagnostic LEDs” (page 141) shows the location of the ports and
LEDs on the MPX200.
NOTE: For a description of the LED fault indicators, see the “MPX200 chassis diagnostics”
(page 141).
4.
Connect to the MPX200 from your management workstation as follows (Figure 108 (page
129)).
a. Enter guest at the Login prompt.
b. Enter password at the Password prompt.
NOTE:
5.
6.
7.
Enter Blade n at the mpx200#> prompt, where n is the number of the blade in the chassis
being configured.
Enter admin start at the mpx200 <n> prompt, where n is the number of the blade currently
selected in the chassis.
Enter the default password config.
NOTE:
128
HP recommends that you change the MPX200 guest password after logging in.
MPX200 FCIP
HP recommends that you change the MPX200 config password after logging in.
8.
Enter the command set mgmt to set the initial parameters.
Follow the on-screen prompts to configure the management port (or press Enter to accept the
default settings, as shown in Figure 108 (page 129)):
Figure 108 Setting IP addresses
The management port is now configured with the appropriate IP address and network
parameters.
IMPORTANT: If you are using Telnet to configure the MPX200, the Telnet session is terminated.
To restart the Telnet session, use the IP address you just assigned to the management port.
Step 6. Configure the MPX200 FCIP Route parameters
Install FCIP license
For each MPX200 chassis, select the blade with the serial number used to obtain either the Full or
Half Chassis License and add the FCIP license as shown in Figure 109 (page 129). A Full Chassis
License enables both slots, while a Half Chassis License only enables one slot.
Figure 109 FCIP License Add
Configuring an FCIP route
129
Critical FCIP Performance settings
The following four parameters are critical to ensure optimal performance of the MPX200. Configuring
the FCIP Route to match the actual link characteristics is the only way to ensure the best utilization
of the available bandwidth.
•
Bandwidth per route: do not set the bandwidth setting above the guaranteed bandwidth of
the link for each FCIP route.
•
TCP Window size/scaling factor: Use the recommended setting documented in this guide for
the actual bandwidth and RTT of the link.
•
For recommendations on setting compression see “IP performance tuning” (page 121).
NOTE: HP recommends that you accept the default settings for TCP Port and GE Port Speed. If
you need to change the port speed, select Full Duplex mode; Half Duplex mode is not supported.
The Ethernet switch port settings must be set to match the MPX GE port settings.
Configure the FCIP routes using the CLI
For each MPX200, configure the FCIP route information as follows:
MPX200 <1> (admin) #> fciproute add
A list of attributes with formatting and current values will follow.
Enter a new value or simply press the ENTER key to accept the current value.
If you wish to terminate this process before reaching the end of the list
press 'q' or 'Q' and the ENTER key to do so.
WARNING:
The following command might cause a loss of connections to both GE ports.
Configuring FCIP Route:
----------------------FCIP Interfaces FC & GE (0=Enable, 1=Disable) [Enabled
FC Port (1=FC1 2=FC2)
[
GE Port (1=FC1 2=GE2 3=10GE1 4=10GE2)
[
IP Address (IPv4 or IPv6; 0=IPv6 Link Local) [0.0.0.0
Subnet Mask
[0.0.0.0
Gateway IP Address
[0.0.0.0
Remote IP Address
[0.0.0.0
MTU Size (0=Normal, 1=Jumbo, 2=Other)
[Normal
TCP Window Size (0=32KB, 1=64KB, 2=128KB,
3=256KB, 4=512KB, 5=1MB,
6=2MB, 7=4MB, 8=8MB, 9=16MB) [4MB
TCP Port No. (Min=1024, Max=65535)
[3225
GE Port Speed (0=Auto, 1=100Mb, 2=1Gb)
[Auto
Bandwidth, Mbit/sec (Min=1, Max=1000)
[1000
VLAN (0=Enable, 1=Disable)
[Disabled
FCIP SW Compression(0=Enable,1=Disable,2=Auto)[Disabled
]
]
]
]
]
]
]
]
1
1
66.66.1.94
255.255.255.0
66.66.1.124
] 5
]
]
] 150
]
] 2
All attribute values for FCIP Route 1 will now be saved.
MPX200 <1> (admin) #>
NOTE: After an FCIP route is configured, the MPX200 CLI command show iSCSI output is
invalid for the GE port associated with the FCIP route. The command show fciproutes has
multiple lines of output, two of which are GE Link Statusand FCIP Link Status. AGE
Link Status of UP indicates only that the GE port is connected to an Ethernet switch. FCIP
Link Status displays the status of the FCIP connection between the FC switches.
130 MPX200 FCIP
Step 7. Configure FC switch settings for the MPX200
Execute the following commands for all B-series FC switches that will use the FCIP link:
•
B-Switch# switchdisable
•
B-Switch# iodset
•
B-Switch#aptpolicy [1 or 3]
•
B-Switch#portcfgislmode [slot/ port], 1 (Must be set for all MPX200 FCIP FC ports
regardless of storage types)
•
B-Switch# portcfggport [slot/ port] ,1 (set for all MPX200 FCIP FC ports)
•
B-Switch# switchenable
For C-series FC switches, execute the following commands for each VSAN that uses the FCIP link.
Enter one command per line.
•
C-Switch# config
•
C-Switch(config)# in-order-guarantee VSAN n (where n stands for all VSANs
that use the FCIP link)
•
C-Switch(config)# vsan database
•
C-Switch(config-vsan-db)# vsan n loadbalancing [src-dst-id or
src-dst-ox-id]
•
C-Switch(config-vsan-db)# exit
•
C-Switch(config)# exit
•
C-Switch# copy run start
NOTE:
•
For B-series, specify 1 for port-based routing (all XCS versions) or 3 for exchange-based routing
(XCS 09534000 or later).
•
For C-series, specify src-dst-id for port-based routing (all XCS versions) or src-dst-ox-id
for exchange-based routing (XCS 09534000 or later).
•
For port-based routing, set the Continuous Access EVA data replication protocol to HP FC
Data Replication Protocol.
•
For exchange-based routing, use HP SCSI FC Compliant Data Replication Protocol.
Step 8. Cable the MPX200 FC, GE, and management ports
To cable the MPX200:
1. Connect the management port cable to your Ethernet network, which is accessible from the
management server.
2. Connect the cables to the GE1, GE2, FC1, and FC2 ports as shown in the suggested
configurations in Figure 89 (page 108), “MPX200 high-availability configuration with one or
two long-distance links” (page 112), “MPX200 configuration with remote IP Distance gateway
(mpx110)” (page 113), or “MPX200 high-availability configuration with fully-redundant
long-distance links” (page 113).
NOTE: Use a standard Cat 5e straight network cable to connect MPX200 GE ports to an IP
switch port. Use a Cat 5e crossover network cable to directly connect two MPX200s through their
respective GE ports without an IP switch.
Configuring an FCIP route
131
Step 9. Verify FCIP links and firmware version
1.
2.
To determine whether a firmware upgrade is necessary, go to the SPOCK website at http://
www.hp.com/storage/spock. You must sign up for an HP Passport to enable access. Upgrade
accordingly.
Use the CLI ping command to verify FCIP link connectivity.
NOTE: When troubleshooting/testing the FCIP route with the MPX200 CLI command ping,
always use the largest supported packet size size. Utilizing the default packet size (~56) does
not sufficiently stress the link. Also if ping does not work, the FCIP route cannot come online.
3.
4.
Use the wanlinktest command to verify the WAN link. See “wanlinktest
command” (page 192).
Verify that the FC switches have established an ISL over the FCIP link.
NOTE: After the ISL is established, use the FCPING command to test the ISL connection. Each
FC Switch has unique switches to the FCPING command, but generally always test with the maximum
frame size allowed and run for an extended period of time to verify a stable connection.
132
MPX200 FCIP
9 MPX200 FCoE feature description
The HP MPX200 Multifunction Router provides FCoE target functionality. Used with the HP arrays,
the MPX200 enables FCoE connectivity over a 10-GbE link at no additional cost. FCoE features
include:
•
10-GbE model only
•
Support enabled with firmware version 3.2.2.0 (minimum) by default, no license required
•
FCoE host connectivity to HP P6000 EVA and 3PAR storage
•
Management by HP P6000 Command View (P6000 EVA)
•
MPX200 simultaneously servicing Fibre Channel, FCoE, and iSCSI hosts
•
Simultaneous support with iSCSI/FCoE and one additional function, either data migration or
FCIP
•
Support for simultaneous iSCSI and FCoE on the same blade or the same 10 GbE port
FCoE configurations
Figure 110 (page 133) shows an FCoE end-to-end direct-connect storage configuration using an
MPX200 Multifunction Router and HP storage systems (either P6000 EVA or 3PAR). This
configuration provides 10-GbE FCoE and, as an option, iSCSI connectivity for up to two storage
systems without the need for any Fibre Channel switches.
Figure 110 FCoE end-to-end direct-connect storage configuration
Servers with CNAs
Servers with NICs
FCoE/IP
/iSCSI
Converged
network
iSCSI/IP
FCoE/iSCSI
MPX200
FCoE/iSCSI
target
HP
X-series CN
switches
StorageWorks
MPX200
10GbE4
10GbE3
MGMT
IOIOI
MPX200
10 1 GbE
Multifunction
Blade
Router
FC1
FC2
HP
StorageWorks
MPX200
GE1
GE2
10GbE4
10GbE3
MGMT
IOIOI
MPX200
10 1 GbE
Multifunction
Blade
Router
FC1
FC2
GE1
GE2
IP
Ethernet
network
Storage systems
10-GbE/FCoE A/FCoE B connection
iSCSI/IP connection
10-GbE connection
10-GbE FCoE/iSCSI connection
Fabric A Fibre Channel connection
Fabric B Fibre Channel connection
26652d
Figure 111 (page 134) shows additional connectivity, allowing up to four storage systems (either
P6000 EVA or 3PAR) using a fabric connection between the MPX200 and storage systems. This
configuration provides the highest level of multi-protocol support with FCoE, iSCSI, and Fibre
Channel connectivity for up to four storage systems. In addition to FCoE and iSCSI, Fibre Channel
connected servers can access the same storage systems through the Fibre Channel fabric.
FCoE configurations
133
Figure 111 FCoE end-to-end fabric-connect storage configuration
Servers with NICs
Servers with CNAs
FCoE/IP
/iSCSI
iSCSI/IP
Converged
network
X-series CN switches
IP
FCoE/iSCSI
MPX200
FCoE/iSCSI
target
HP StorageWorks
MPX200
MGMT
10GbE4
IOIOI
FC1
10GbE3
HP StorageWorks
MPX200
10 - 1 GbE Blade
MPX200 Multifunction Router
FC2
GE1
GE2
MGMT
10GbE4
IOIOI
10GbE3
FC1
Ethernet
network
10 - 1 GbE Blade
MPX200 Multifunction Router
FC2
GE1
GE2
Fibre
Channel
Fabric B
Fabric A
Storage systems
10-GbE/FCoE A/FCoE B connection
iSCSI/IP connection
10-GbE connection
10-GbE FCoE/iSCSI connection
Fabric A Fibre Channel connection
Fabric B Fibre Channel connection
26653d
Setting up for FCoE connectivity to HP P6000 EVAs
Before executing the following procedure, ensure that MPX200 discovery has been completed as
described in “Managing MPX200 iSCSI using HP P6000 Command View” (page 31).
To set up for FCoE:
1. Configure the FCoE enabled converged network switch. Depending on the switch vendor,
configure the ports for FCoE use.
For information regarding switch setup, see the Fibre Channel Over Ethernet chapter of the
HP SAN Design Reference Guide, available at:
http://www.hp.com/go/sdgmanuals
The MPX200 10-GbE ports must be connected to the FCoE switch, as described in the section
“FCoE configurations” (page 133).
2.
Set up the CNA. For more information regarding CNA configuration, see the HP Emulex
Converged Network Adapter Installation Guide at:
http://bizsupport1.austin.hp.com/bc/docs/support/SupportManual/c02018539/
c02018539.pdf
a. Install the driver for the CNA.
b. Depending on the CNA vendor, use the management tool to determine the
WWNN/WWPN for each port on the CNA.
134
MPX200 FCoE feature description
3.
Create an FCoE zone. Zone the WWNN from the MPX200 FCoE port from each blade and
the host CNA. If multiple fabrics exist, create zones where redundancy requires it. There are
two ways to identify the FCoE ports on the MPX200:
•
In HP P6000 Command View, click the FC Ports tab of the iSCSI Controller 0X in the
Hardware folder (see Figure 112 (page 135)).
•
In the CLI, issue the show fc command (see Figure 113 (page 136)).
Figure 112 HP Command View FCoE ports
Setting up for FCoE connectivity to HP P6000 EVAs
135
Figure 113 FCoE show fc command
4.
136
Create the FCoE host:
a. Use the Add a Host function to create the FCoE host entry.
b. Name the host.
c. In the Type field, select FCoE.
d. Select the WWNN that belongs to the host.
e. Select the appropriate operating system.
f. Click Add Host (see Figure 114 (page 137)).
MPX200 FCoE feature description
Figure 114 Host type
5.
Create a virtual disk and assign it to the FCoE host.
Note that the host has its own icon. Each host entry has only one WWPN associated with it,
so any host with multiple port CNAs must have an entry for each (see Figure 115 (page 137)).
Figure 115 Host properties
Setting up for FCoE connectivity to HP P6000 EVAs
137
6.
Add FCoE targets to the FCoE zone.
After the first virtual disk/LUN is presented, the FCoE targets are dynamically created and
mapped. In Figure 116 (page 138), if move your cursor over the More icon, a Host Details
pop-up appears, showing the FCoE targets and how they map to the P6000 EVA ports. These
FCoE WWNNs must be added to the FCoE zone created in Step 3.
NOTE: This step is not required for subsequent Vdisk/LUN assignments for the same or
additional hosts.
Figure 116 Host Details display
Setting up FCoE connectivity to 3PAR arrays
Before executing the following procedure, ensure that MPX200 host has been created in the InForm
Management Console as described in “Managing MPX200 iSCSI for 3PAR StoreServ Storage”
(page 40).
To set up for FCoE:
1. Configure the FCoE-enabled converged network switch. Depending on the switch vendor, you
might need to configure the ports for FCoE use.
For information about switch setup, see the Fibre Channel Over Ethernet chapter of the HP
SAN Design Reference Guide, available at: http://www.hp.com/go/sdgmanuals.
2.
3.
Verify that the MPX200 10-GbE ports are connected to the FCoE switch as described in “FCoE
configurations” (page 133).
Set up the CNA:
a. Install the CNA driver kit.
b. Depending on the CNA vendor, use the available management tool to determine the
WWNN/WWPN for each port on the CNA.
For more information about CNA configurations, see the HP Emulex Converged Network
Adapter Installation Guide, available at http://bizsupport1.austin.hp.com/bc/docs/support/
SupportManual/c02018539/.
4.
Create a zone with the MPX200 FCoE ports and the CNA on each fabric.
This registers the CNA worldwide name in the MPX200.
138
MPX200 FCoE feature description
NOTE: Because the same array port worldwide names can be exposed through both MPX200
blades to the fabric, you must create a new target alias.
5.
Using the mpx Manager, start the Target Map Wizard:
a. On the Select a Target page, expand an array port, and then select a VPGROUP (the
same VPG as when the MPX200 host was created in Step 2, “LUN provisioning” (page
42)) and then click Next.
b. On the Select a Portal page, select an FCoE port, and then click Finish.
c. To view the target mappings:
•
Click the Refresh icon.
•
Under the selected blade, expand the FC Presented Targets and then select a target.
Details appear in the right pane. See Figure 117 (page 139).
Figure 117 Target mapping
6.
Rerun the Target Map Wizard for as many available array ports on each blade.
NOTE:
You can cross map ports for redundancy.
Setting up FCoE connectivity to 3PAR arrays
139
7.
After all target maps have been created, the newly created WWNs can be added to the zone
that you created in Step 4.
Figure 118 3PAR MPX zoning — FCoE
8.
9.
Use the InForm Management Console to provision LUNs to the MPX200 host.
You can now use the mpx Manager LUN Presentation Wizard for LUN presentation to the
initiator.
140 MPX200 FCoE feature description
10 Diagnostics and troubleshooting
This chapter describes MPX200 chassis diagnostics and provides information to help you
troubleshoot problems. Diagnostic information is also available through diagnostics, HP P6000
Command View, and the CLI event logs and error messages.
MPX200 chassis diagnostics
Chassis diagnostics are indicated by the chassis LEDs (see Figure 119 (page 141)).
NOTE:
The USB port is unmarked and is not supported.
Figure 119 MPX200 chassis diagnostic LEDs
1. Input fault LED
2. System power LED
3. Heartbeat LED
4. 1-GbE or 10-GbE iSCSI ports
5. 1-GbE iSCSI ports
6. Maintenance button
7. 8-Gb/s FC ports
8. UID beacon (blue LED)
9. RS-232 port
10. Management port 10/100/1000 Ethernet
Input Power LED is extinguished
The Input Power LED is illuminated when the MPX200 logic circuitry is receiving the proper voltage.
If the Input Power LED is not illuminated:
1. Inspect the power cord and connectors on the back of the chassis (Figure 119 (page 141)). Is
the cord unplugged? Is the cord or connector damaged?
2.
3.
•
If yes, make the necessary corrections or repairs. If the problem persists, proceed to the
next step.
•
If not, proceed to the next step.
Inspect the AC power source. Is the power source delivering the proper voltage?
•
If yes, proceed to the next step.
•
If not, make the necessary repairs. If the problem persists, proceed to the next step.
Replace the MPX200 blade.
System Fault LED is illuminated
The System Fault LED is illuminated when a fault exists in the MPX200 firmware or hardware. If
the System Fault LED is illuminated, check the Heartbeat LED for an error blink pattern and take
the necessary actions. For more information, see “Heartbeat LED blink patterns” (page 142).
MPX200 chassis diagnostics
141
Fibre Channel Port LEDs
•
The top LED (2 Gb/s) indicates activity (data) is passing through the port at 2 Gb/s speed.
•
The middle LED (4 Gb/s) indicates activity (data) is passing through the port at 4 Gb/s speed.
•
The bottom LED (8 Gb/s) indicates activity (data) is passing through the port at 8 Gb/s speed.
•
When all three LEDs are blinking, the port is not operational.
POST diagnostics
The MPX200 performs a series of tests as part of its power-on procedure. The POST diagnostic
program performs the following tests:
•
Memory
•
Flash validation
•
PCI device discovery
•
Management Ethernet port
Heartbeat LED blink patterns
The Heartbeat LED indicates the operational status of the MPX200. When the POST completes
with no errors, the Heartbeat LED blinks at a steady rate of once per second. When the MPX200
is in maintenance mode, the Heartbeat LED blinks continuously. The blink patterns that indicate
critical errors are described in the following sections. In addition to producing a Heartbeat LED
blink pattern, a critical error also illuminates the System Fault LED. The Heartbeat LED shows a
blink pattern for the following conditions:
•
1 blink—Normal operation
•
2 blinks—Not used
•
3 blinks—System error
•
4 blinks—Management port IP address conflict
•
5 blinks—Over temperature
Normal blink pattern
A blink pattern of one second ON followed by one second OFF indicates that the MPX200 is
operating normally (Figure 120 (page 142)).
Figure 120 Normal blink pattern
System error blink pattern
A system error is indicated by a three-blink pattern (Figure 121 (page 142)).
Figure 121 System error blink pattern
Management port IP address conflict blink pattern
An IP address conflict on the management port is indicated by a four-blink pattern (Figure 122 (page
143)).
142
Diagnostics and troubleshooting
Figure 122 Management port IP address conflict blink pattern
Using the CLI or GUI, the IP address conflict blink pattern may be cleared using the Beacon OFF
function.
Over-temperature blink pattern
An over-temperature condition is indicated by a five-blink pattern followed by a two-second pause.
The five-blink pattern indicates that the air temperature inside the MPX200 has exceeded the failure
temperature threshold of 70 °C (Figure 123 (page 143)).
Figure 123 Over-temperature blink pattern
If the Heartbeat LED shows the over-temperature blink pattern, do the following:
1. Inspect the chassis air vents. Are the intake and exhaust vents clear?
2.
3.
•
If yes, proceed to the next step.
•
If not, remove any debris from the fan intake and exhaust. If the condition persists, proceed
to the next step.
Consider the ambient air temperature near the MPX200 and the clearance around the MPX200.
Make the necessary corrections.
If the condition persists, power down the MPX200. Contact your authorized maintenance
provider.
MPX200 chassis diagnostics
143
Locating the MPX200 blade
A flashing blue LED indicates that the MPX200 blade beacon is ON. There are two ways to identify
the location of an MPX200 blade:
•
Enter the CLI command beacon on (Figure 124 (page 144)).
Figure 124 Using the beacon on command to locate an MPX200 blade
•
In HP P6000 Command View, select the General tab, and then click the Locate button. Use
the Locate ON and Locate OFF buttons to control the blue LED (Figure 125 (page 144)).
Figure 125 Using HP P6000 Command View to locate a hardware device
MPX200 log data
The MPX200 maintains a log that can be displayed through the CLI. The log is persistent through
reboots or power cycles. To view the log, use the CLI command show logs.
For log data descriptions, see “MPX200 log messages” (page 216), “DM log messages” (page 232).
MPX200 statistics
Statistics for the iSCSI and Fibre Channel ports are available through the CLI. To view statistics,
use the CLI command show stats.
MPX200 ping command
The ping command is the most basic network troubleshooting tool that is available to troubleshoot
FCIP route problems. This command runs a diagnostic in which a message is sent to a destination,
144 Diagnostics and troubleshooting
the destination echoes a reply, and the command returns the amount of time it took to reach the
destination and back.
To troubleshoot an intermittent FCIP link, run the ping command for an extended period of time,
recording the output. The output should be evaluated looking for large deviations in the ping-time
or lost-packets. Also use the maximum packet-size for the ping test; using the 56-byte default
packet size is not a typical packet size for FCIP. Figure 126 (page 145) illustrates the ping command.
Figure 126 FCIP route ping command
FCIP Route Link Failure – Event Log Entries
Table 29 (page 145) provides an example of four event log entries that are typical for a simple link
failure. The following two terms used in the event log entries are defined here for clarity:
•
A jiffy is a time increment; in this error log entry, there are 100 jiffies in a second.
•
A TCP fast retransmission is one where TCP retries the transmission but does not bring down
the connection between the end nodes. In simple terms, it is a lost or duplicate ACK.
Table 29 Event log messages
Sample event log entries
Explanation
Tue Feb 05 23:54:39 EST 2013 FCIP FcipRoute#0: Did not get Did not receive the keep-alive
the keepalive msg from remote peer. Jiffies last 111822002 message from the remote peer in
2525 jiffies or 25.3 seconds.
curr 111824527
Tue Feb 05 23:54:39 EST 2013 FCIP FcipRoute#0: TCP Link
Down TCP Stats: Timer Expired=1 Fast Retransmissions=59
A 10-second summary of the LINK
TCP stats; 1 TCP transmission failed
after 59 retries.
Tue Feb 05 23:54:39 EST 2013 FCIP FcipRoute#0: TCP Link
Down MAC Stats: Tx Dropped Count=0 Rx Dropped Count=0 Tx
Pause Count=0 Rx Pause Count=0
Similar 10-second summary of the
LINK MAC stats; No MAC layer
frames were dropped and no pause
frames were sent or received.
Tue Feb 05 23:54:39 EST 2013 FCIP FcipRoute#0: In last 10 A summary of the event and the
number of outstanding FC Frames.
secs TCP Timer Expired=1 Fast Retransmissions=59
OutStanding Completions=0 FC Frames
WANLink diagnostic
NOTE:
This command is only supported for use with MPX200 1 GbE ports.
MPX200 chassis diagnostics
145
Beginning with version 3.4.0.0, a wanlinktest CLI command was added to the MPX200 to
facilitate the testing of the WAN link between two MPX200 Multifunction Routers. This diagnostic
does not require any data replication software, storage arrays, or even a Fibre Channel connection
to test the WAN link. The primary purpose of the diagnostic is to determine the available bandwidth
and RTT on the WAN link. These two values are used as look up in tables or to calculate the correct
settings to configure the FCIP route that will use the WAN link. For more information, see “TCP
window size/scaling performance tuning” (page 123).
The diagnostic output reports two bandwidth numbers: one using TCP protocol and the other using
UDP protocol. The UDP bandwidth is the better indicator of the actual size in bandwidth of the
WAN link and therefore is used in determining the TCP Windows size/scaling factor. The TCP
bandwidth will always be slightly lower than the UDP bandwidth because TCP has more overhead
than UDP, but does guarantee delivery. A large difference between the UDP and TCP bandwidth
could indicate that there is congestion or excessive packet loss on the WAN link.
NOTE: The resulting UDP bandwidth determined by the diagnostic may not be the bandwidth
setting used when configuring the FCIP Route(s). For example, if when testing the WAN link the
diagnostic determines there is a 100 Mbps of UDP bandwidth and this link is shared with two
pairs of MPX200 routers, then each pair of MPX200 routers would be configured for 50 Mbps or
one-half the total bandwidth.
The diagnostic is implemented as a client/server model and only one route can be tested at a time.
All normal functions of the GE port under test are disabled while the diagnostic is running. To run
the test first on one MPX200, the wanlinktest setup command is used to configure the server
side of the WAN link. For more information on these commands see “wanlinktest
command” (page 192).
Once the server-side MPX200 is configured, the wanlinktest start command is used on the
other MPX200 to configure/start the client-side of the diagnostic. Once the test is started, the
wanlinktest show command can be used on the client side to display a summary result every
five minutes while the test is running, or after the test is completed the command will provide a
summary report. The wanlinktest show command also creates a file named
wan_link_test_results.stats in the ftp directory that contains a one line summary of the
last 1024 runs of the diagnostic. When the diagnostic testing is complete, the wanlinktest
stop command must be executed on the server-side to restore the MPX200 back to normal operating
mode.
The minimum time to run the diagnostic is five minutes, but the longer the diagnostic is run the more
accurate the results will be. For example, running the diagnostic overnight may identify other traffic
congestion periods for backups or other WAN applications sharing the link that might be missed
in a shorter test.
Troubleshooting using HP P6000 Command View
You can use HP Command View EVA to display the properties for each iSCSI controller. At a
glance, you can check the controller’s serial number and temperature and power/cooling status
(Figure 127 (page 147)).
146
Diagnostics and troubleshooting
Figure 127 iSCSI controller properties
Issues and solutions
HP P6000 Command View does not discover MPX200
Solution 1: Ensure that a DHCP server is available.
Solution 2: Use the CLI to set a static IP address on each MPX200 blade.
Solution 3: Ensure that the HP P6000 Command View station is on the same subnet as the
management ports.
Solution 4: Enter the known IP address of the management port of the iSCSI controller in the HP
P6000 Command View discovery screen.
Initiator cannot log in to MPX200 iSCSI target
Solution 1: Ensure that you are using the correct iSCSI port IP address.
Solution 2: In HP P6000 Command View, for each controller, click the IP ports tab, and verify the
IP Address settings (Figure 128 (page 148)).
Issues and solutions
147
Figure 128 iSCSI controller properties: IP Ports tab
Initiator logs in to MPX200 iSCSI target, but P6000 EVA-assigned LUNs do not
appear on initiator
Solution 1: The initiator must log in to the target to which the P6000 EVA LUN was assigned.
Solution 2: The P6000 EVA LUN was assigned to a different iSCSI host than was expected.
P6000 EVA-presented virtual disk not seen by initiator
Solution: The initiator must log in to the appropriate iSCSI target. Match the virtual disk presentation
properties to the initiator’s target login. See Figure 129 (page 148) and Figure 130 (page 149).
Figure 129 Virtual disk properties: Host details
148
Diagnostics and troubleshooting
Figure 130 iSCSI initiator properties: Targets tab
Windows initiators may display Reconnecting if NIC MTU changes after connection
has logged in
Solution. Log out of the sessions and log in again to re-establish the Connected state.
Communication between HP P6000 Command View and MPX200 is down
When communication between HP P6000 Command View and the MPX200 is down, use the
following options:
•
Option 1: Refresh using the iSCSI Controller button.
•
Option 2:
◦
If the IPv4 management port IP address is set:
1. Discover the controller. This option is exposed through iSCSI controller→Set
options→Discover controller.
2. Enter a valid IPv4 management IP address under Mgmt Port, and then click Save
changes.
◦
If only the IPv6 management port IP address is set, enter a valid IPv6 management IP
address under Mgmt Port, and then click Save changes.
NOTE: If you configure IPv6 on any MPX200 iSCSI port, you must also configure IPv6 on the HP
P6000 Command View management server.
HP P6000 Command View issues and solutions
Issue
Solution
Discovered iSCSI controller was not found with selected
P6000 EVA.
Click the Refresh button on the iSCSI Controller Properties
page.
Check the management port connection.
Check all FC connections.
HP P6000 Command View issues and solutions
149
Not a supported configuration. Discovery of the MPX200
controller with Direct Connect Fibre Channel attachment
mode is not allowed.
Ensure that the MPX200 is connected to a fabric.
Not a supported configuration. Both MPX200 controllers
should be in the same chassis/enclosure.
Only MPX200 blades that are in the same chassis are
supported for connectivity. Blades in different chassis are
not allowed.
Not a supported configuration. The MPX200 cannot be
discovered with this P6000 EVA.
Check FC zoning and connectivity to the P6000 EVA.
Not a supported configuration. The specified MPX200
controller host port does not exist.
A P6000 EVAFC host exists of which the MPX200 FC port
is a member. Locate the FC host and remove the port.
Virtual disk operation has failed. Ensure that the FC target Check all MPX200 FC connections to the P6000 EVA (see
connections are online.
“Virtual disk operation troubleshooting” (page 150)).
Cannot change iSCSI controller IP port attributes.
Enable the iSCSI controller IP port.
Command not supported with this version of the iSCSI
controller.
Check the firmware version and update if necessary.
Unable to process the command at this time. iSCSI
controller FC ports are unavailable.
Check all FC connections and zoning.
Invalid iSCSI controller configuration file extension.
Ensure that the correct file is being used to restore the
configuration.
Operation failed. iSCSI controller code load file cannot
open/read.
The firmware file may be invalid or corrupt. Obtain another
copy of the file.
The iSCSI controller code load process has failed.
The code load process may have been interrupted; try
again.
Invalid iSCSI controller code load file extension.
Ensure that the correct file is being used.
Virtual disk operation troubleshooting
To view P6000 EVA host ports and Fiber Channel connectivity status, use the procedures below.
To ensure that all P6000 EVA host ports are operational:
1. Open HP P6000 Command View.
2. In the Hardware folder, select a P6000 EVA controller.
3. On the Host Ports tab, view the connection state of the port.
4. Repeat for each P6000 EVA controller.
To check Fiber Channel connections using the CLI:
1. Log into the MPX200 CLI and select blade 1.
2. Type the show fc command.
3. Use the show targets command to view the state of all targets (all should be online).
4. Confirm that all targets are the intended ports connected from the P6000 EVA controllers. If
any target appears that does not belong, you must:Remove the target by adjusting FC zoning;
when it is offline, use the target rm command to remove it.
NOTE: For firmware 3.3.0.1 or lower, you may have to reboot to clear any offline LUN
information.
5.
150
Repeat this procedure for blade 2.
Diagnostics and troubleshooting
11 Support and other resources
Intended audience
This guide is intended for system administrators with knowledge of:
•
HP EVA4x00/6x00/8x00 storage systems
•
Configuring LUNs using HP P6000 Command View
•
HP Fibre Channel SANs
•
Ethernet
•
TCP/IP networking
•
iSCSI
Related documentation
The following sources provide related information:
•
HP MPX200 Multifunction Router EVA iSCSI Connectivity Quick Start Instructions for Microsoft
Windows
•
HP MPX200 Multifunction Router Release Notes
•
HP P6000 Command View Software Suite User Guide
•
HP online help for HP P6000 Command View
•
HP Enterprise Virtual Array user guide for your array
•
HP SAN Design Reference Guide
•
HP 9500 and XP storage system user guides
You can find the documents referenced in this guide on the Manuals page of the HP Business
Support Center website:
http://www.hp.com/support/manuals
•
For P6000 EVA documents, under Storage, select Disk Storage Systems, and then under EVA
P6000 Storage, select HP EVA P6000 Storage.
•
For MPX200 documents, under Storage, select Storage Networking, and then under
Routers/Gateways/Multiplexers, select HP MPX200 Multifunction Router.
•
For XP documents, under Storage, select Disk Storage Systems, and then under XP P9000
Stprage, select your product.
The SAN Design Reference Guide, is available at http://www.hp.com/go/sdgmanuals.
Contacting HP
HP technical support
For worldwide technical support information, see the HP support website:
http://www.hp.com/support
Before contacting HP, collect the following information:
•
Product model names and numbers
•
Technical support registration number (if applicable)
•
Product serial numbers
•
Error messages
Intended audience
151
•
Operating system type and revision level
•
Detailed questions
Subscription service
HP recommends that you register your product at the Subscriber's choice for business website:
http://www.hp.com/go/e-updates
After registering, you will receive email notification of product enhancements, new driver versions,
firmware updates, and other product resources.
Product feedback
To make comments and suggestions about HP P6000 Command View, send a message to:
[email protected].
Related information
HP websites
For additional information, see the following HP websites:
•
HP:
http://www.hp.com
•
HP Storage:
http://www.hp.com/go/storage
•
HP Partner Locator:
http://www.hp.com/service_locator
•
HP Software Downloads:
http://www.hp.com/go/hpsc
•
HP Software Depot:
http://h20293.www2.hp.com
•
HP Single Point of Connectivity Knowledge (SPOCK)
http://www.software.hp.com
•
HP SAN manuals:
http://www.hp.com/go/sdgmanuals
Typographical conventions
Table 30 Document conventions
Convention
Element
Blue text: Table 30 (page 152)
Cross-reference links and email addresses
Blue, underlined text: http://www.hp.com
Website addresses
Bold text
• Keys that are pressed
• Text entered into a GUI element, such as a box
• GUI elements that are clicked or selected, such as menu and
list items, buttons, tabs, and check boxes
Italic text
152
Support and other resources
Text emphasis
Table 30 Document conventions (continued)
Convention
Element
Monospace text
• File and directory names
• System output
• Code
• Commands, their arguments, and argument values
Monospace, italic text
• Code variables
• Command variables
Monospace, bold text
Emphasized monospace text
.
.
.
Indication that example continues
WARNING!
CAUTION:
IMPORTANT:
NOTE:
TIP:
Indicates that failure to follow directions could result in bodily harm or death.
Indicates that failure to follow directions could result in damage to equipment or data.
Provides clarifying information or specific instructions.
Provides additional information.
Provides helpful hints and shortcuts.
Rack stability
To reduce the risk of personal injury or damage to equipment:
•
Extend leveling jacks to the floor.
•
Ensure that the full weight of the rack rests on the leveling jacks.
•
Instal stabilizing feet on the rack.
•
In multiple-rack installations, fasten racks together securely.
•
Extend only one rack component at a time. Racks can become unstable if more than one
component is extended.
Product warranties
For information about HP product warranties, see the warranty information website:
http://www.hp.com/go/storagewarranty
Rack stability
153
12 Documentation feedback
HP is committed to providing documentation that meets your needs. To help us improve the
documentation, send any errors, suggestions, or comments to Documentation Feedback
([email protected]). Include the document title and part number, version number, or the URL
when submitting your feedback.
154 Documentation feedback
A Command reference
This chapter lists and describes the MPX200 CLI commands in alphabetical order.
Command syntax
The MPX200 CLI command syntax uses the following format:
command
keyword
keyword [value]
keyword [value1] [value2]
The command is followed by one or more keywords. Consider the following rules and conventions:
•
Commands and keywords are not case sensitive.
•
Required keyword values appear in standard font within brackets: [value].
•
Optional keyword values appear in italics within brackets: [value].
•
In command prompts, <1> or <2> indicate which blade is being managed.
Command line completion
The command line completion feature makes entering and repeating commands easier.
Table 31 (page 155) describes the command line completion keystrokes.
Table 31 Command line completion keystrokes
Keystroke
Description
Tab
Completes the command line. Enter at least one character and press the Tab key to complete
the command line. If there is more than one possibility, press Tab again to display all
possibilities.
Up arrow
Scrolls backward through the list of previously entered commands.
Down arrow
Scrolls forward through the list of previously entered commands.
Ctrl+A
Moves the cursor to the beginning of the command line.
Ctrl+B
Moves the cursor to the end of the command line.
Authority requirements
You must be in an administrator (Admin) session to perform various set commands. Note that:
•
Commands for monitoring tasks are available to all accounts.
•
Commands for configuration tasks are available only in an Admin session. An account must
have admin authority to execute the admin start command, which opens an Admin session
(see admin command).
Commands
This section lists and describes the MPX200 CLI commands in alphabetical order.
Command syntax
155
Admin
Opens or closes an administrator (Admin) session. You must be in an Admin session to execute
commands that change the router configuration. An inactive Admin session times out after 15
minutes.
Authority
Admin session
Syntax
admin
start (or begin)end (or stop)cancel
Keywords
start (or
begin)
Opens the Admin session.
end (or
stop)
Closes the Admin session. The logout, shutdown, and reset
commands also end an Admin session.
cancel
Terminates an Admin session opened by another user. Use this
keyword with care because it terminates the Admin session without
warning the other user and without saving pending changes.
NOTE: Closing a Telnet window during an Admin session does not release the session. When
using Telnet, you must either wait for the Admin session to time out, or use the admin cancel
command.
Example: The following example shows how to open and close an Admin session:
MPX200 <1>
Password :
MPX200 <1>
.
.
.
MPX200 <1>
MPX200 <1>
156
Command reference
#> admin start
******
(admin) #>
(admin) #> admin end
#>
Beacon
Enables or disables the flashing of the blue beacon LED.
Authority
None
Syntax
beacon
on
off
Keywords
on
Turns on the flashing beacon.
off
Turns off the flashing beacon.
Example: The following example shows how to turn the flashing beacon on:
MPX200 <1>#> beacon on
Blade
Allows you to select the blade to be managed. This command is valid only at the chassis CLI
prompt. The chassis CLI prompt does not include the blade number (for example, MPX200 #>),
whereas the blade CLI prompt includes the blade number (for example, MPX200 <1> #>).
Authority
None
Syntax
blade
[1 or 2]
Example: The following example shows blade 2 being selected at the chassis prompt, followed
by the quit command at the blade prompt, which returns control to the chassis prompt:
MPX200 #> blade 2
MPX200 <2> #> quit
MPX200 #>
Clear
Removes all entries (events) from the router log file or resets the FC and iSCSI statistics counters.
Authority
Admin session
Syntax
clear
logs
stats
Keywords
logs
Clears all entries from the router’s log file.
stats
Resets the statistics counters.
Examples: The following examples show the clear commands:
MPX200 <1>(admin) #> clear logs
MPX200 <1>(admin) #> clear stats
Date
Displays or sets the date and time. To set the date and time, enter the information in the format
MMDDhhmmCCYY (numeric representation of month-date-hour-minute-century-year). The new date
Commands
157
and time take effect immediately. This ensures that event log entries are dated correctly. You must
set the date and time before applying any feature keys or licenses.
Authority
Admin session is required to set the date and time. No authority is required to
display the current date and time.
Syntax
date
Keywords
[MMDDhhmmCCYY] Specifies the date, which requires an Admin session. If you
omit [MMDDhhmmCCYY], the command displays the current
date, which does not require an Admin session.
[MMDDhhmmCCYY]
NOTE: Always set the time using Greenwich Mean Time and Universal Transverse Mercator.
You must disable NTP before using the date command to set the time.
Example: The following example shows how to set and display the date and time:
MPX200 <1>(admin) #> date 010214282009
Fri Jan 2 14:28:00 2009
MPX200 <1>(admin) #> date
Fri Jan 2 14:28:14 2009
Exit
Exits the CLI and returns you to the login prompt (same as the quit command).
Authority
None
Syntax
exit
Example 1: The exit command behaves differently depending on whether you are at the chassis
management level or blade management level. At the chassis management level, exit returns
you to the login prompt. The following example shows the exit command for the chassis:
MPX200 #> exit
(none) login:
Example 2: At the blade management level, exit returns you to the chassis management level.
The following example shows the exit command for the blade:
MPX200 <1> (admin) #> exit
HP StorageWorks MPX200 #>
Fciproute
Configures a new FCIP route or modifies or deletes an existing FCIP route. Each FCIP route requires
a dedicated FC and GbE port. Configuring an FCIP route and specifying an FC and GE port pair
take precedence over any previous configuration for the port pair (FC/GE).
Authority
Admin session
Syntax
fciproute [add | mod | rm]
Keywords
add
Configure a new FCIP route
mod
Modify an existing FCIP route
rm
Remove an existing FCIP route
Example 1:
MPX200 <1> (admin) #> fciproute add
A list of attributes with formatting and current values will follow.
158
Command reference
Enter a new value or simply press the ENTER key to accept the current value.
If you wish to terminate this process before reaching the end of the list
press 'q' or 'Q' and the ENTER key to do so.
WARNING:
The following command might cause a loss of connections to both GE ports.
Configuring FCIP Route:
----------------------FCIP Interfaces FC & GE (0=Enable, 1=Disable) [Enabled
FC Port (1=FC1 2=FC2)
[
GE Port (1=FC1 2=GE2 3=10GE1 4=10GE2)
[
IP Address (IPv4 or IPv6; 0=IPv6 Link Local) [0.0.0.0
Subnet Mask
[0.0.0.0
Gateway IP Address
[0.0.0.0
Remote IP Address
[0.0.0.0
MTU Size (0=Normal, 1=Jumbo, 2=Other)
[Normal
TCP Window Size (0=32KB, 1=64KB, 2=128KB,
3=256KB, 4=512KB, 5=1MB,
6=2MB, 7=4MB, 8=8MB, 9=16MB) [4MB
TCP Port No. (Min=1024, Max=65535)
[3225
GE Port Speed (0=Auto, 1=100Mb, 2=1Gb)
[Auto
Bandwidth, Mbit/sec (Min=1, Max=1000)
[1000
VLAN (0=Enable, 1=Disable)
[Disabled
FCIP SW Compression(0=Enable,1=Disable,2=Auto)[Disabled
]
]
]
]
]
]
]
]
1
1
66.66.1.94
255.255.255.0
66.66.1.124
] 5
]
]
] 150
]
] 2
All attribute values for FCIP Route 1 will now be saved.
MPX200 <1> (admin) #>
Example 2:
MPX200 <1> (admin) #> fciproute mod
A list of attributes with formatting and current values will follow.
Enter a new value or simply press the ENTER key to accept the current value.
If you wish to terminate this process before reaching the end of the list
press 'q' or 'Q' and the ENTER key to do so.
WARNING:
The following command might cause a loss of connections to both GE ports.
Route
----1
2
FC Port ID
---------FC1
FC2
GE Port ID
---------GE1
GE2
Please select a FCIP route from the list above ('q' to quit): 1
Configuring FCIP Route:
----------------------FCIP Interfaces FC & GE (0=Enable, 1=Disable)
IP Address (IPv4 or IPv6; 0=IPv6 Link Local)
Subnet Mask
Gateway IP Address
Remote IP Address
MTU Size (0=Normal, 1=Jumbo, 2=Other)
TCP Window Size (0=32KB, 1=64KB, 2=128KB,
3=256KB, 4=512KB, 5=1MB,
6=2MB, 7=4MB, 8=8MB, 9=16MB)
TCP Port No. (Min=1024, Max=65535)
GE Port Speed (0=Auto, 1=100Mb, 2=1Gb)
Bandwidth, Mbit/sec (Min=1, Max=1000)
VLAN (0=Enable, 1=Disable)
FCIP SW Compression(0=Enable,1=Disable,2=Auto)
Do you want to save/discard changes? (0=Save, 1=Discard)
[Enabled
[66.66.1.94
[255.255.255.0
[0.0.0.0
[66.66.1.124
[Normal
]
]
]
]
]
]
[1MB
[3225
[Auto
[150
[Disabled
[Auto
[Save
] 4
]
]
] 100
]
]
]
All attribute values for FCIP Route 1 will now be saved.
Commands
159
MPX200 <1> (admin) #>
Example 3:
MPX200 <2> (admin) #> fciproute rm
A list of attributes with formatting and current values will follow.
Enter a new value or simply press the ENTER key to accept the current value.
If you wish to terminate this process before reaching the end of the list
press 'q' or 'Q' and the ENTER key to do so.
WARNING:
The following command might cause a loss of connections to both GE ports.
Route
----1
2
FC Port ID
---------FC1
FC2
GE Port ID
---------GE1
GE2
Please select a FCIP route from the list above ('q' to quit): 1
FCIP Route 1 has been removed from the system.
MPX200 <2> (admin) #>
FRU
Saves and restores the router configuration.
Authority
Admin session to restore
Syntax
FRU
restore
save
Keywords
restore
The fru restore command requires that you first FTP the tar
file containing the configuration to the router. When you issue this
command, the system prompts you to enter the restore level. You
can fully restore the router’s configuration (all configuration
parameters and LUN mappings) or restore only the LUN mappings.
The restored configuration does not take effect until the router is
rebooted.
save
Creates a tar file containing the blade’s persistent data,
configuration, and LUN mappings. The file is stored in the router’s
/var/ftp directory. You must then FTP the tar file from the
router.
Example 1: The following is an example of the fru restore command:
MPX200 <1>(admin) #> fru restore
A list of attributes with formatting and current values will
follow. Enter a new value or simply press the ENTER key to accept
the current value. If you wish to terminate this process before
reaching the end of the list press 'q' or 'Q' and the ENTER key to
do so.
Type of restore (0=full, 1=mappings only) [full]
FRU restore completed.
Please reboot the system for configuration to take affect.
Example 2: The following is an example of the fru save command:
MPX200 <1>(admin) #> fru save
FRU save completed. Configuration File is QLogic_Router_FRU.bin
Please use FTP to extract the file out from the System.
160 Command reference
Help
Displays a list of the commands and their syntax.
Authority
None
Syntax
help
Example 1: The help command differs for the chassis and the blade. The following example shows
the help command for the chassis:
MPX200 #> help
admin [begin | end | start | stop | cancel]
blade [1 | 2]
exit
help
history
logout
quit
reset [factory | mappings]
show [chassis]
Example 2: The following example shows the help command for the blade:
MPX200 <1> #> help
admin [begin | end | start | stop | cancel]
beacon [ on | off ]
date [MMDDhhmmCCYY]
clear [logs | stats]
exit
fru [restore | save]
help
history
image [cleanup | list | unpack]
image cleanup
image list
image unpack [<filename>]
initiator [add | mod | run]
logout
lunmask [add | rm]
passwd
ping
quit
reboot
reset [factory | mappings]
save [capture | logs | traces]
set [alias | chap | chassis | fc | features | iscsi | isns | mgmt |
ntp | properties | snmp | system | vpgroups]
set alias
set chap
set chassis
set fc [<PORT_NUM>]
set features
set iscsi [<PORT_NUM>]
set isns
set mgmt
set ntp
set properties
set snmp [trap_destinations [<DEST_NUM>]]
set system
set vpgroups [vpgroup index]
show [chap | chassis | fc | features | initiators |
initiators_lunmask | iscsi | isns | logs | luninfo |
luns | lunmask | memory | mgmt | ntp | perf |
presented targets | properties | snmp | stats |
system | targets | vpgroups]
Commands
161
show chap
show chassis
show fc [<PORT_NUM>]
show features
show initiators [fc | iscsi]
show initiators_lunmask
show iscsi [<PORT_NUM>]
show isns
show logs [<ENTRIES>]
show luninfo
show luns
show lunmask
show memory
show mgmt
show ntp
show perf [byte | init_rbyte | init_wbyte |tgt_rbyte | rgt_wbyte]
show presented_targets [fc|iscsi]
show properties]
show snmp
show stats
show system
show targets [fc | iscsi]
show vpgroups [vpgroup index]
shutdown
target [add | rm]
traceroute
History
Displays a numbered list of the previously entered commands.
Authority
None
Syntax
history
Example:
MPX200 <1> (admin) #> history
1: admin start
2: help
3: history
MPX200 <1> (admin) #>
Image
Updates the router’s firmware image and cleans up (removes) the image files in the router’s /var/
ftp directory.
162
Authority
Admin session
Syntax
image
cleanup
list [file]
unpack [file]
Keywords
cleanup
Removes all firmware image files in the router’s /var/ftp
directory. These are files transferred by the user when updating
the router’s firmware image.
list
[file]
Displays a list of the firmware image files in the router’s /var/
ftp directory.
unpack
[file]
Unpacks the firmware image file specified in the [file]
parameter, and then installs the firmware image on the router.
Before using this command, you must use FTP to transfer the
Command reference
firmware image file to the router’s /var/ftp directory. To activate
the new firmware, you must reboot the router.
Example 1:
MPX200 <1> (admin) #> image cleanup
Example 2:
MPX200 <1> (admin) #> image list
Image Location Image File
-------------- ---------Blade 1 (local) isr-6200-3_0_0_5.bin
Example 3:
MPX200 <1> (admin) #> image unpack HP_StorageWorks_MPX200-2_0_0_1.bin
Unpack Completed. Please reboot the system for FW to take effect.
MPX200 <1> (admin) #> reboot
Are you sure you want to reboot the System (y/n): y
System will now be rebooted...
Initiator
Adds, modifies, or removes an initiator in the router’s database.
Authority
Admin session
Syntax
initiator add
mod
remove
Keywords
add
Adds an initiator to the router’s database.
mod
Modifies the settings of an initiator.
remove
Removes a logged-out initiator. You cannot remove an initiator
that is currently logged in.
Example 1:
MPX200 <1> (admin) #> initiator add
A list of attributes with formatting and current values will follow. Enter a
new value or simply press the ENTER key to accept the current value. If you
wish to terminate this process before reaching the end of the list press 'q' or
'Q' and the ENTER key to do so.
Only valid iSCSI name characters will be accepted. Valid characters include
lower-case alphabetical (a-z), numerical (0-9), colon, hyphen, and period.
iSCSI Initiator Name (Max = 223 characters) [ ]
iqn.1991-05.com.microsoft:server1
OS Type (0=MS Windows, 1=Linux, 2=Other) [MS Windows ]
All attribute values that have been changed will now be saved.
Example 2:
MPX200 <1> (admin) #> initiator mod
Index (WWNN,WWPN/iSCSI Name)
----- ---------------------0 iqn.1991-05.com.microsoft:server1
Please select an Initiator from the list above ('q' to quit): 0
A list of attributes with formatting and current values will follow. Enter a
new value or simply press the ENTER key to accept the current value. If you
wish to terminate this process before reaching the end of the list press 'q' or
'Q' and the ENTER key to do so.
OS Type (0=MS Windows, 1=Linux, 2=Other) [MS Windows ]
All attribute values that have been changed will now be saved.
Example 3:
MPX200 <1> (admin) #> initiator remove
Index Status (WWNN,WWPN/iSCSI Name)
----- ------ ---------------------Commands 163
0 LoggedOut test
1 LoggedOut iqn.1991-05.com.microsoft:server1
Please select a 'LoggedOut' Initiator from the list above ('q' to quit): 0
All attribute values that have been changed will now be saved.
Logout
Exits the CLI and returns you to the login prompt.
Authority
None
Syntax
logout
Example:
MPX200 <1> (admin) #> logout
(none) login:
Lunmask
Maps a target LUN to an initiator, and removes mappings. The CLI prompts you to select from a
list of VPGs, targets, LUNs, and initiators.
Authority
Admin session
Syntax
lunmask
add
remove
Keywords
add
Maps a LUN to an initiator. After you enter the command, the CLI
displays a series of prompts from which you choose the initiator,
target, and LUN.
rm
Removes the mapping of a LUN from an initiator. After you enter
the command, the CLI displays a series of prompts from which
you choose the initiator, target, and LUN.
Example 1: The following example shows the lunmask add command:
MPX200 <1> (admin) #> lunmask add
Index (WWNN/iSCSI Name)
----- ----------------0 iqn.1991-05.com.microsoft:server1
Please select an Initiator from the list above ('q' to quit): 0
Index (WWNN,WWPN/iSCSI Name)
----- ---------------------0 20:00:00:20:37:fd:8b:ab,22:00:00:20:37:fd:8b:ab
1 20:00:00:20:37:fd:8a:b0,22:00:00:20:37:fd:8a:b0
2 20:00:00:20:37:fd:9c:f7,22:00:00:20:37:fd:9c:f7
3 20:00:00:20:37:fd:8d:00,22:00:00:20:37:fd:8d:00
Please select a Target from the list above ('q' to quit): 0
LUN WWULN Vendor
---- ---------- -------0 20:00:00:20:37:fd:8b:ab:00:00:00:00:fc:b7:3f:fa SEAGATE
Please select a LUN to present to the initiator ('q' to quit): 0
All attribute values that have been changed will now be saved.
Example 2: The following example shows the lunmask add command with VPGs:
MPX200 <1> (admin) #> lunmask add
Index Mapped (WWNN,WWPN/iSCSI Name)
----- ------ ---------------------0 Yes iqn.1991-05.com.microsoft:server1
Please select an Initiator from the list above ('q' to quit): 0
Index (VpGroup Name)
----- -------------164 Command reference
1 VPGROUP_1
2 VPGROUP_2
3 VPGROUP_3
4 VPGROUP_4
Multiple VpGroups are currently 'ENABLED'.
Please select a VpGroup from the list above ('q' to quit): 1
Index (WWNN,WWPN/iSCSI Name)
----- ---------------------0 50:06:01:60:c1:e0:0d:a2,50:06:01:60:41:e0:0d:a2
1 50:06:01:60:c1:e0:0d:a2,50:06:01:68:41:e0:0d:a2
Please select a Target from the list above ('q' to quit): 0
Index (LUN/VpGroup) Vendor
----- ------------- -----1 1/VPGROUP_1 DGC
2 2/VPGROUP_1 DGC
3 3/VPGROUP_1 DGC
Please select a LUN to present to the initiator ('q' to quit): 1
All attribute values that have been changed will now be saved.
Example 3: The following example shows the lunmask rm command:
MPX200 <1> (admin) #> lunmask rm
Index (WWNN,WWPN/iSCSI Name)
----- ---------------------0 20:00:00:20:37:fd:8b:ab,22:00:00:20:37:fd:8b:ab
1 20:00:00:20:37:fd:8a:b0,22:00:00:20:37:fd:8a:b0
2 20:00:00:20:37:fd:9c:f7,22:00:00:20:37:fd:9c:f7
3 20:00:00:20:37:fd:8d:00,22:00:00:20:37:fd:8d:00
Please select a Target from the list above ('q' to quit): 0
LUN WWULN Vendor
---- ---------- -------0 20:00:00:20:37:fd:8b:ab:00:00:00:00:fc:b6:1f:fa SEAGATE
Please select a LUN from the list above ('q' to quit): 0
Index Initiator
----- ----------------0 iqn.1991-05.com.microsoft:server1
Please select an Initiator to remove ('a' to remove all, 'q' to quit): 0
All attribute values that have been changed will now be saved.
Example 4: The following example shows the lunmask rm command with VPGs:
MPX200 <1> (admin) #> lunmask remove
Index (WWNN,WWPN/iSCSI Name)
----- ---------------------0 50:06:01:60:c1:e0:0d:a2,50:06:01:60:41:e0:0d:a2
1 50:06:01:60:c1:e0:0d:a2,50:06:01:68:41:e0:0d:a2
Please select a Target from the list above ('q' to quit): 0
Index (LUN/VpGroup) Vendor
----- ------------- -----0 0/VPGROUP_1 DGC
1 1/VPGROUP_1 DGC
2 2/VPGROUP_1 DGC
3 3/VPGROUP_1 DGC
4 0/VPGROUP_2 DGC
Please select a LUN from the list above ('q' to quit): 0
Index Initiator
----- ----------------0 iqn.1991-05.com.microsoft:server1
Please select an Initiator to remove ('a' to remove all, 'q' to quit): 0
All attribute values that have been changed will now be saved.
MPX200 <1> (admin) #>
Commands
165
Passwd
Changes the guest and administrator passwords.
Authority
Admin session
Syntax
passwd
Example:
MPX200 <1>(admin) #> passwd
Press 'q' and the ENTER key to abort this command.
Select password to change (0=guest, 1=admin) : 1
account OLD password : ******
account NEW password (6-128 chars) : ******
please confirm account NEW password : ******
Password has been changed.
Ping
Verifies the connectivity of management and GE ports. This command works with both IPv4 and
IPv6.
Authority
Admin session
Syntax
ping
Example:
MPX200 <1> (admin) #> ping
A list of attributes with formatting and current values will follow. Enter a
new value or simply press the ENTER key to accept the current value. If you
wish to terminate this process before reaching the end of the list press 'q' or
'Q' and the ENTER key to do so.
IP Address (IPv4 or IPv6) [0.0.0.0] fe80::217:a4ff:fe99:c279
Iteration Count (0=Continuously) [0 ] 10
Outbound Port (0=Mgmt, 1=GE1, 2=GE2, ...) [Mgmt ]
Size Of Packet (Min=1, Max=65486 Bytes) [56 ]
Pinging fe80::217:a4ff:fe99:c279 with 56 bytes of data:
Request timed out.
Reply from fe80::217:a4ff:fe99:c279: bytes=64 time=0.4ms
Reply from fe80::217:a4ff:fe99:c279: bytes=64 time=0.3ms
Reply from fe80::217:a4ff:fe99:c279: bytes=64 time=0.3ms
Reply from fe80::217:a4ff:fe99:c279: bytes=64 time=0.2ms
Reply from fe80::217:a4ff:fe99:c279: bytes=64 time=0.3ms
Reply from fe80::217:a4ff:fe99:c279: bytes=64 time=0.3ms
Reply from fe80::217:a4ff:fe99:c279: bytes=64 time=0.7ms
Reply from fe80::217:a4ff:fe99:c279: bytes=64 time=0.2ms
Reply from fe80::217:a4ff:fe99:c279: bytes=64 time=0.2ms
Ping Statistics for fe80::217:a4ff:fe99:c279:
Packets: Sent = 10, Received = 9, Lost = 1
Approximate round trip times in milli-seconds:
Minimum = 0.2ms, Maximum = 0.7ms, Average = 0.3ms
Quit
Exits the CLI and returns you to the login prompt (same as the exit command).
Authority
None
Syntax
quit
Example 1: The quit command behaves differently depending on whether you are at the chassis
management level or blade management level. At the chassis management level, quit returns
you to the login prompt. The following example shows the quit command for the chassis:
166 Command reference
MPX200 <1>(admin) #> quit
(none) login:
At the blade management level, quit returns you to the chassis management level. The following
example shows the quit command for the blade:
MPX200 <1>(admin) #> quit
HP StorageWorks MPX200 #>
Reboot
Restarts the blade firmware.
Authority
Admin session
Syntax
reboot
Example:
MPX200 <1>(admin) #> reboot
Are you sure you want to reboot the System (y/n): y
System will now be rebooted...
Reset
Restores the router configuration parameters to the factory default values. The reset factory
command deletes all LUN mappings, as well as all persistent data for targets, LUNs, initiators,
VPG settings, log files, iSCSI and management IP addresses, FC and Ethernet port statistics, and
passwords. This command also restores the factory default IP addresses. The reset mappings
command clears only the LUN mappings.
Authority
Admin session
Syntax
reset
factory
mappings
Keywords
factory
Deletes all LUN mappings, as well as all persistent data for targets,
LUNs, initiators, VPG settings, log files, iSCSI and management
IP addresses, FC and Ethernet port statistics, and passwords.
mappings Clears only the LUN mappings
Example 1:
MPX200 <1>(admin) #> reset factory
Are you sure you want to restore to factory default settings (y/n): y
Please reboot the System for the settings to take effect
Example 2:
MPX200 <1>(admin) #> reset mappings
Are you sure you want to reset the mappings in the system (y/n): y
Please reboot the System for the settings to take effect.
Save
Saves logs and traces.
Authority
Admin session
Syntax
save
capture
logs
traces
Keywords
capture
The save capture command creates a debug file that captures
all debug dump data. When the command has finished executing,
you must FTP the debug capture file from the blade.
Commands
167
logs
The save logs command creates a tar file that contains the
router’s log data, storing the file in the router’s /var/ftp
directory. When the command has finished executing, you must
FTP the log’s tar file from the blade.
traces
The save traces command creates a tar file that contains the
router’s dump data, storing the file in the router’s /var/ftp
directory. When the command has finished executing, you must
FTP the trace’s tar file from the blade. The system notifies you if
the router does not have any dump data. Each time it generates
dump data, the system adds an event log entry.
Example 1:
MPX200 <1>(admin) #> save capture
Debug capture completed. Package is System_Capture.tar.gz
Please use FTP to extract the file out from the System.
Example 2:
MPX200 <1>(admin) #> save logs
Save Event Logs completed. Package is Router_Evl.tar.gz
Please use FTP to extract the file out from the System.
Example 3:
MPX200 <1>(admin) #> save traces
Save ASIC Traces completed. Package is Router_Asic_Trace.tar.gz
Please use FTP to extract the file out from the System.
Set
Configures general router parameters, as well as parameters for the FC, iSCSI, and management
ports.
Authority
Admin session
Syntax
set
alias
chap
chassis
fc [<PORT_NUM>]
features
iscsi [<PORT_NUM>]
isns
mgmt
ntp
properties
snmp [trap_destinations [<DEST_NUM>]]
system
vpgroups [vpgroup index]
Keywords
alias
Assigns an alias name to a presented iSCSI target. See
“set alias command” (page 169).
chap
Sets the CHAP secrets. See “set CHAP
command” (page 169).
chassis
Sets the chassis name. See “set chassis
command” (page 170).
fc [<PORT_NUM>]
Sets the FC port parameters. See “set FC
command” (page 170).
features
Applies license keys to the router. See “set features
command” (page 172).
iscsi [<PORT_NUM>]
Sets the iSCSI port parameters. See “set iSCSI
command” (page 172).
168 Command reference
isns
Sets the Internet Simple Name Service (iSNS)
parameters. See “set iSNS command” (page 172).
mgmt
Sets the management port parameters. See “set mgmt
command” (page 173).
ntp
Sets the NTP parameters. See “set NTP
command” (page 173).
properties
Configures CLI properties for the blade. See “set
properties command” (page 174).
snmp
Sets the Simple Network Management Protocol (SNMP)
parameters, such as the symbolic name and log level.
See “set SNMP command” (page 174).
system
Sets system parameters, such as the symbolic name
and log level. See “set system command” (page 175).
vpgroups [vpgroup index]
Sets VPGs on the blade. See “set VPGroups
command” (page 175).
Set alias
Assigns an alias name to a presented iSCSI target.
Authority
Admin session
Syntax
set alias
Example:
MPX200 <2> (admin) #> set alias
A list of attributes with formatting and current values will follow.
Enter a new value or simply press the ENTER key to accept the current value.
If you wish to terminate this process before reaching the end of the list
press 'q' or 'Q' and the ENTER key to do so.
Index (WWNN,WWPN/iSCSI Name)
----- ---------------------0
iqn.1986-03.com.hp:fcgw.mpx200.0834e00025.b1.01.50001fe150070ce9
1
iqn.1986-03.com.hp:fcgw.mpx200.0834e00025.b1.02.50001fe150070ce9
2
iqn.1986-03.com.hp:fcgw.mpx200.0834e00025.b1.03.50001fe150070ce9
3
iqn.1986-03.com.hp:fcgw.mpx200.0834e00025.b1.04.50001fe150070ce9
4
iqn.1986-03.com.hp:fcgw.mpx200.0834e00025.b1.01.50001fe150070cec
5
iqn.1986-03.com.hp:fcgw.mpx200.0834e00025.b1.02.50001fe150070cec
6
iqn.1986-03.com.hp:fcgw.mpx200.0834e00025.b1.03.50001fe150070cec
7
iqn.1986-03.com.hp:fcgw.mpx200.0834e00025.b1.04.50001fe150070cec
Please select a iSCSI node from the list above ('q' to quit): 0
A list of attributes with formatting and current values will follow.
Enter a new value or simply press the ENTER key to accept the current value.
If you wish to terminate this process before reaching the end of the list
press 'q' or 'Q' and the ENTER key to do so.
Set CHAP
Configures the CHAP parameters.
Authority
Admin session
Syntax
set chap
Example:
MPX200 <1>(admin) #> set chap
A list of attributes with formatting and current values will follow. Enter a
new value or simply press the ENTER key to accept the current value. If you
Commands
169
wish to terminate this process before reaching the end of the list press 'q' or
'Q' and the ENTER key to do so.
Index iSCSI Name
----- ---------0
iqn.1986-03.com.hp:fcgw.mpx200.0834e00025.b1.0
1
iqn.1986-03.com.hp:fcgw.mpx200.0834e00025.b1.1
2
iqn.1986-03.com.hp:fcgw.mpx200.0834e00025.b1.01.50001fe150070ce9
3
iqn.1986-03.com.hp:fcgw.mpx200.0834e00025.b1.02.50001fe150070ce9
4
iqn.1986-03.com.hp:fcgw.mpx200.0834e00025.b1.03.50001fe150070ce9
5
iqn.1986-03.com.hp:fcgw.mpx200.0834e00025.b1.04.50001fe150070ce9
6
iqn.1986-03.com.hp:fcgw.mpx200.0834e00025.b1.01.50001fe150070cec
7
iqn.1986-03.com.hp:fcgw.mpx200.0834e00025.b1.02.50001fe150070cec
8
iqn.1986-03.com.hp:fcgw.mpx200.0834e00025.b1.03.50001fe150070cec
9
iqn.1986-03.com.hp:fcgw.mpx200.0834e00025.b1.04.50001fe150070cec
Please select a presented target from the list above ('q' to quit): 2
A list of attributes with formatting and current values will follow.
Enter a new value or simply press the ENTER key to accept the current value. If
you wish to terminate this process before reaching the end of the list press
'q' or 'Q' and the ENTER key to do so.
CHAP (0=Enable, 1=Disable) [Disabled] 0
CHAP Secret (Max = 100 characters) [ ] ****
All attribute values that have been changed will now be saved.
Set chassis
Sets the chassis name.
Authority
Admin session
Syntax
set chassis
Example:
MPX200 <1>(admin) #> set chassis
A list of attributes with formatting and current values will follow.
Enter a new value or simply press the ENTER key to accept the current value.
If you wish to terminate this process before reaching the end of the list
press 'q' or 'Q' and the ENTER key to do so.
Chassis Name (Max = 64 characters) [ ] rack 14
All attribute values that have been changed will now be saved.
Set FC
Configures an FC port.
Authority
Admin session
Syntax
set fc
Keywords
[<PORT_NUM>] The number of the FC port to be configured.
[<PORT_NUM>]
Example:
MPX200 <1>(admin) #> set fc
A list of attributes with formatting and current values will
follow.
Enter a new value or simply press the ENTER key to accept the
current value. If you wish to terminate this process before
reaching the end of the list press 'q' or 'Q' and the ENTER key to
do so.
WARNING:
The following command might cause a loss of connections to both
ports.
Configuring FC Port: 1
------------------------Link Rate (0=Auto, 1=1Gb, 2=2Gb) [Auto ]
Frame Size (0=512B, 1=1024B, 2=2048B) [2048 ]
170
Command reference
Execution Throttle (Min=16, Max=256) [64 ]
Programmed Connection Option:
(0=Loop Only, 1=P2P Only, 2=Loop Pref) [Loop Pref ]
All attribute values for Port 1 that have been changed will now be
saved.
Configuring FC Port: 2
------------------------Link Rate (0=Auto, 1=1Gb, 2=2Gb) [Auto ]
Frame Size (0=512B, 1=1024B, 2=2048B) [2048 ]
Execution Throttle (Min=16, Max=256) [64 ]
Programmed Connection Option:
(0=Loop Only, 1=P2P Only, 2=Loop Pref) [Loop Pref ]
All attribute values for Port 2 that have been changed will now be
saved.
Commands
171
Set features
Applies license keys to the router. The date and time must be set on the router before applying a
new key.
Authority
Admin session
Syntax
set features
Set iSCSI
Configures an iSCSI port.
Authority
Admin session
Syntax
set
iscsi
Keywords
[<PORT_NUM>] The number of the iSCSI port to be configured.
[<PORT_NUM>]
Example:
MPX200 <1>(admin) #> set iscsi 1
A list of attributes with formatting and current values will follow.
Enter a new value or simply press the ENTER key to accept the current value.
If you wish to terminate this process before reaching the end of the list
press 'q' or 'Q' and the ENTER key to do so.
WARNING:
The following command might cause a loss of connections to both ports.
Configuring iSCSI Port: 1
--------------------------Port Status (0=Enable, 1=Disable) [Enabled ]
Port Speed (0=Auto, 1=100Mb, 2=1Gb) [Auto ]
MTU Size (0=Normal, 1=Jumbo, 2=Other) [Normal ]
Window Size (Min=8124B, Max=1048576B) [65536 ]
IPv4 Address [10.3.5.205 ]
IPv4 Subnet Mask [255.255.255.0 ]
IPv4 Gateway Address [0.0.0.0 ]
IPv4 TCP Port No. (Min=1024, Max=65535) [3260 ]
IPv4 VLAN (0=Enable, 1=Disable) [Disabled ]
IPv6 Address 1 [:: ]
IPv6 Address 2 [:: ]
IPv6 Default Router [:: ]
IPv6 TCP Port No. (Min=1024, Max=65535) [3260 ]
IPv6 VLAN (0=Enable, 1=Disable) [Disabled ]
iSCSI Header Digests (0=Enable, 1=Disable) [Disabled ]
iSCSI Data Digests (0=Enable, 1=Disable) [Disabled ]
All attribute values for Port 1 that have been changed will now be saved.
Set iSNS
Configures the blade iSNS parameters.
Authority
Admin session
Syntax
set isns
Example:
MPX200 <2>(admin) #> set isns
A list of attributes with formatting and current values will follow.
Enter a new value or simply press the ENTER key to accept the current value.
If you wish to terminate this process before reaching the end of the list
press 'q' or 'Q' and the ENTER key to do so.
172
Command reference
iSNS (0=Enable, 1=Disable) [Disabled ] 0
iSNS Address (IPv4 or IPv6) [0.0.0.0 ] 10.3.6.33
TCP Port No. [3205 ]
All attribute values that have been changed will now be saved.
Set Mgmt
Configures the blade management port (10/100).
Authority
Admin session
Syntax
set mgmt
Example 1:
MPX200 <1>(admin) #> set mgmt
A list of attributes with formatting and current values will
follow. Enter a new value or simply press the ENTER key to accept
the current value. If you wish to terminate this process before
reaching the end of the list press 'q' or 'Q' and the ENTER key to
do so.
WARNING:
The following command might cause a loss of connections to the MGMT
port.
IPv4 Interface (0=Enable, 1=Disable) [Enabled]
IPv4 Mode (0=Static, 1=DHCP, 2=Bootp, 3=Rarp) [Dhcp ]
IPv6 Interface (0=Enable, 1=Disable) [Enabled]
IPv6 Mode (0=Manual, 1=AutoConfigure) [Manual ] 1
All attribute values that have been changed will now be saved.
Example 2: The following example shows how to use the set mgmt command to set a static
address:
MPX200 <1>(admin) #> set mgmt
A list of attributes with formatting and current values will follow.
Enter a new value or simply press the ENTER key to accept the current value.
If you wish to terminate this process before reaching the end of the list
press 'q' or 'Q' and the ENTER key to do so.
WARNING:
The following command might cause a loss of connections to the MGMT port.
IPv4 Interface (0=Enable, 1=Disable) [Enabled ]
IPv4 Mode (0=Static, 1=DHCP, 2=Bootp, 3=Rarp) [Static ]
IPv4 Address [172.17.136.86 ]
IPv4 Subnet Mask [255.255.255.0 ]
IPv4 Gateway [172.17.136.1 ]
IPv6 Interface (0=Enable, 1=Disable) [Disabled ]
All attribute values that have been changed will now be saved.
Set NTP
Configures the NTP parameters.
Authority
Admin session
Syntax
set ntp
Example:
MPX200 <1>(admin) #> set ntp
A list of attributes with formatting and current values will follow.
Enter a new value or simply press the ENTER key to accept the current value.
If you wish to terminate this process before reaching the end of the list
press 'q' or 'Q' and the ENTER key to do so.
NTP (0=Enable, 1=Disable) [Disabled ] 0
TimeZone Offset from GMT (Min=-12:00,Max=12:00) [00:00 ] -8:0
IP Address [1] (IPv4 or IPv6) [0.0.0.0 ] 207.126.97.57
Commands
173
IP Address [2] (IPv4 or IPv6) [0.0.0.0 ]
IP Address [3] (IPv4 or IPv6) [0.0.0.0 ]
All attribute values that have been changed will now be saved.
Set properties
Configures blade CLI properties.
Authority
Admin session
Syntax
set properties
Example:
MPX200 <1>(admin) #> set properties
A list of attributes with formatting and current values will follow.
Enter a new value or simply press the ENTER key to accept the current value.
If you wish to terminate this process before reaching the end of the list
press 'q' or 'Q' and the ENTER key to do so.
CLI Inactivity Timer (0=Disable, 1=15min, 2=60min) [15min ]
CLI Prompt (Max=32 Characters) [HP StorageWorks MPX200 ]
All attribute values that have been changed will now be saved.
Set SNMP
Configures general SNMP) properties and eight trap destinations.
Authority
Admin session
Syntax
set snmp [trap_destinations]<DEST_NUM>]]
Example 1: The following example shows the set snmp command for setting general properties:
MPX200 <1>(admin) #> set snmp
A list of attributes with formatting and current values will follow.
Enter a new value or simply press the ENTER key to accept the current value.
If you wish to terminate this process before reaching the end of the list
press 'q' or 'Q' and the ENTER key to do so.
Configuring SNMP :
----------------Read Community [ ] Public
Trap Community [ ] Private
System Location [ ]
System Contact [ ]
Authentication Traps (0=Enable, 1=Disable) [Disabled ]
All attribute values that have been changed will now be saved.
Example 2: The following example shows the set snmp command for configuring an SNMP trap
destination:
MPX200 <1>(admin) #> set snmp trap_destinations
A list of attributes with formatting and current values will follow.
Enter a new value or simply press the ENTER key to accept the current value.
If you wish to terminate this process before reaching the end of the list
press 'q' or 'Q' and the ENTER key to do so.
Configuring SNMP Trap Destination 1 :
------------------------------------Destination enabled (0=Enable, 1=Disable) [Disabled ] 0
IP Address [0.0.0.0 ] 10.0.0.5
Destination Port [0 ] 1024
Trap Version [0 ] 2
Configuring SNMP Trap Destination 2 :
------------------------------------Destination enabled (0=Enable, 1=Disable) [Disabled ]
Configuring SNMP Trap Destination 3 :
------------------------------------174
Command reference
Destination enabled (0=Enable, 1=Disable) [Disabled ]
Configuring SNMP Trap Destination 4 :
------------------------------------Destination enabled (0=Enable, 1=Disable) [Disabled ]
Configuring SNMP Trap Destination 5 :
------------------------------------Destination enabled (0=Enable, 1=Disable) [Disabled ]
Configuring SNMP Trap Destination 6 :
------------------------------------Destination enabled (0=Enable, 1=Disable) [Disabled ]
Configuring SNMP Trap Destination 7 :
------------------------------------Destination enabled (0=Enable, 1=Disable) [Disabled ]
Configuring SNMP Trap Destination 8 :
------------------------------------Destination enabled (0=Enable, 1=Disable) [Disabled ]
All attribute values that have been changed will now be saved.
Set system
Configures the blade's system-wide parameters.
Authority
Admin session
Syntax
set system
Example:
MPX200 <1>(admin) #> set system
A list of attributes with formatting and current values will follow.
Enter a new value or simply press the ENTER key to accept the current value.
If you wish to terminate this process before reaching the end of the list
press 'q' or 'Q' and the ENTER key to do so.
WARNING:
If enabled by operator, the Symbolic Name can be embedded as part of the
iSCSI Name. Changes to the iSCSI name will be effective after a reboot.
Only valid iSCSI name characters will be accepted. Valid characters include
alphabetical (a-z, A-Z), numerical (0-9), colon, hyphen, and period.
Changes to the Settings below will be effective after a reboot.
System Symbolic Name (Max = 64 characters) [Blade-1 ]
Embed Symbolic Name (0=Enable, 1=Disable) [Disabled ]
Mode (0=iSCSI Server Connectivity),
1=SAN over WAN,
2=iSCSI Server Connectivity/SAN over WAN,
3=Data Migration) [iSCSI Connectivity]
Target Presentation Mode (0=Auto, 1=Manual) [Auto ]
Lun Mapping (0=Enable, 1=Disable) [Disabled ]
Controller Lun AutoMap (0=Enable, 1=Disable) [Enabled ]
Target Access Control (0=Enable, 1=Disable) [Disabled ]
All attribute values that have been changed will now be saved.
Set VPGroups
Sets VPGs on the blade. Allows you to enable or disable VPGs, and modify the VPG name.
Authority
Admin session
Syntax
set vpgroups [vpgroup index]
Example: The following example shows how to enable VPGs 2 and 3:
MPX200 <1>(admin) #> set vpgroups
The following wizard will query for attributes before persisting
and activating the updated mapping in the system configuration.
If you wish to terminate this wizard before reaching the end of the list
Commands
175
press 'q' or 'Q' and the ENTER key to do so.
Configuring VpGroup: 1
------------------------Status (0=Enable, 1=Disable) [Enabled ]
VpGroup Name (Max = 64 characters) [VPGROUP_1 ]
All attribute values for VpGroup 1 that have been
Configuring VpGroup: 2
------------------------Status (0=Enable, 1=Disable) [Disabled ] 0
VpGroup Name (Max = 64 characters) [VPGROUP_2 ]
All attribute values for VpGroup 2 that have been
Configuring VpGroup: 3
------------------------Status (0=Enable, 1=Disable) [Disabled ] 0
VpGroup Name (Max = 64 characters) [VPGROUP_3 ]
All attribute values for VpGroup 3 that have been
Configuring VpGroup: 4
------------------------Status (0=Enable, 1=Disable) [Disabled ]
All attribute values for VpGroup 4 that have been
changed will now be saved.
changed will now be saved.
changed will now be saved.
changed will now be saved.
Show
Displays operational information for the blade.
176
Authority
None
Syntax
show
chap
chassis
fc [port_num]
features
initiators [fc or iscsi]
initiators_lunmask
iscsi [port_num]
isns [port_num]
logs [last_x_entries]
luninfo
lunmask
luns
memory
mgmt
ntp
perf [ byte | init_rbyte
| init_wbyte
| tgt_rbyte
| tgt_wbyte ]
presented_targets [fc or iscsi]
properties
snmp
stats
system
targets [fc or iscsi]
vpgroups [vpgroup index]
Keywords
chap
Displays configured CHAP iSCSI nodes. See “show
CHAP command” (page 178).
chassis
Displays chassis information and status. See “show
chassis command” (page 178).
fc [port_num]
Displays FC port information. See “show FC
command” (page 179).
fciproutes [<link_id>]
Displays the current settings for a particular FCIP route
or for all FCIP routes. See “show fciproutes
command” (page 179).
Command reference
features
Displays licensed features. See “show features
command” (page 180).
initiators [fc or iscsi]
Displays initiator information for iSCSI or FC. See “show
initiators command” (page 180).
initiators_lunmask
Displays initiators and the LUNs to which they are
mapped. See “show initiators LUN mask
command” (page 180).
iscsi [port_num]
Displays iSCSI port and configuration information. See
“show iSCSI command” (page 181).
isns [port_num]
Displays the router’s iSCSI name server (iSNS)
configuration. See “show iSNS command” (page 181).
logs [last_x_entries]
Displays the router’s logging information. See “show
logs command” (page 182).
luninfo
Displays detailed LUN information for a specified target
and LUN. See “show LUNinfo command” (page 182).
lunmask
Displays LUN mappings. See “show lunmask
command” (page 183).
luns
Displays information about LUNs and their targets. See
“show LUNs command” (page 183).
memory
Displays memory usage. See “show memory
command” (page 184).
mgmt
Displays the router’s management port (10/100)
configuration. See “show mgmt command” (page 184).
ntp
Displays the router’s NTP configuration. See “show NTP
command” (page 184).
perf [ byte | init_rbyte |
Displays information about the router performance. See
init_wbyte | tgt_rbyte | tgt_wbyte “show perf command” (page 185).
]
presented_targets [fc or iscsi]
Displays the targets presented by the router: FC, iSCSI,
or both. See “show presented targets
command” (page 186).
properties
Displays the router properties. See “show properties
command” (page 187).
snmp
Displays the router’s SNMP properties and trap
configurations. See “show SNMP command” (page 187).
stats
Displays the router FC and iSCSI statistics. See “show
stats command” (page 187).
system
Displays router product information, including the serial
number, software version, hardware version,
configuration, and temperature. See “show system
command” (page 190).
targets [fc or iscsi]
Displays the targets discovered by the router: FC, iSCSI,
or both. See “show targets command” (page 190).
vpgroups [vpgroup index]
Displays the VPGs. See “show VPGroups
command” (page 191).
Commands 177
Show CHAP
Displays the CHAP configuration for iSCSI nodes.
Authority
None
Syntax
show chap
Example:
MPX200 <1>(admin) #> show chap
The following is a list of iSCSI nodes that have been configured
with CHAP 'ENABLED':
Type iSCSI Node
-------- -----------Init iqn.1991-05.com.microsoft:server1
Show chassis
Displays the chassis information and status. You can execute this command from the chassis
management level or blade management level.
Authority
None
Syntax
show chassis
Example:
MPX200 #>show chassis
Chassis Information
--------------------Product Name HP StorageWorks MPX200
Chassis Name Router Chassis Name Here
Serial Number 0834E00019
HW Version 20697-03 A
Fan Speed Normal
Blade 1 Information (Left Slot)
------------------------------Status Online
Product Name HP StorageWorks MPX200
Symbolic Name Blade-1
Serial Number 0834E00008
HW Version 20694-03 A
SW Version 3.0.1.2
Temp (Front/Rear/CPU1/CPU2) 48C/36C/37C/41C
Power Cooling Module 1
---------------------Status Installed
Power Source Connected
Fan1/Fan2/Fan3 Healthy/Healthy/Healthy
Blade 2 Information (Right Slot)
-------------------------------Status Online
Product Name HP StorageWorks MPX200
Symbolic Name Blade-2
Serial Number 0836E00018
HW Version 20694-03 A
SW Version 3.0.1.2
Temp (Front/Rear/CPU1/CPU2) 46C/34C/38C/38C
Power Cooling Module 2
---------------------Status Installed
Power Source Not Connected
Fan1/Fan2/Fan3 Healthy/Healthy/Healthy
178
Command reference
Show FC
Displays FC port information for the specified port. If you do not specify a port, the command
displays all ports.
Authority
None
Syntax
show fc
Keywords
[port_num] Identifies the number of the FC port.
[port_num]
Example:
MPX200 <1>#> show fc 2
FC Port Information
--------------------FC Port 2
Link Status Up
Current Link Rate 2Gb
Programmed Link Rate Auto
WWNN 20:00:00:c0:dd:0c:8b:ef
WWPN 21:00:00:c0:dd:0c:8b:ef
Port ID 00-00-ef
Firmware Revision No. 3.03.07
Frame Size 2048
Execution Throttle 64
Connection Mode Loop
Programmed Connection Option Loop Preferred
Show fciproutes
Displays the current settings for a particular FCIP route or for all FCIP routes.
Authority
None
Syntax
show fciproutes [link_id]
Keywords
[link_id]
Route number to display
Example:
MPX200 <2> (admin) #> show fciproutes
FCIP Route Information
-----------------------FCIP Route
FCIP Interfaces Status
FCIP Link Status
FC Port
GE Port
GE Link Status
Local IP Address
Remote IP Address
Subnet Mask
Gateway IP Address
MTU Size
TCP Window Size
Window Scaling
Window Scaling Factor
TCP Port No
Current GE Port Speed
Programmed GE Port Speed
Bandwidth, Mbit/sec
VLAN
FCIP SW Compression
1
Enabled
Up
FC1
GE1
Up
44.44.1.124
44.44.1.158
255.255.0.0
0.0.0.0
Normal
32768
Enabled
2
3225
100Mb/FDX
Auto
1000
Disabled
Disabled
Commands
179
MPX200 <2> (admin) #>
Show features
Displays any licensed features.
Authority
None
Syntax
show features
Example:
MPX200 <1>#> show features
No Feature Keys exist in the system.
Show initiators
Displays SCSI initiator information for iSCSI.
Authority
None
Syntax
iscsi
show
features
Keywords
fc
Displays FC initiator information.
iscsi
Displays iSCSI initiator information.
Example:
MPX200 <1>#> show initiators
Initiator Information
----------------------Initiator Name iqn.1991-05.com.microsoft:server1
Alias
IP Address 0.0.0.0
Status Logged Out
OS Type MS Windows
Show initiators LUNmask
Displays all LUNs mapped to the specified initiator.
Authority
None
Syntax
show initiators_lunmask
Example:
MPX200 <1>#> show initiators_lunmask
Index (WWNN,WWPN/iSCSI Name)
----- ---------------------0 iqn.1991-05.com.microsoft:server1
Please select an Initiator from the list above ('q' to quit): 0
Target(WWPN) (LUN/VpGroup) VendorId
------------ ------------- -------21:00:00:11:c6:17:12:22 0/VPGROUP_1 SEAGATE
50:06:01:60:3a:60:0a:63 0/VPGROUP_2
50:06:01:60:3a:60:0a:63 1/VPGROUP_2
50:06:01:60:3a:60:0a:63 2/VPGROUP_2
50:06:01:60:3a:60:0a:63 3/VPGROUP_2
50:06:01:60:3a:60:0a:63 4/VPGROUP_2
50:06:01:60:3a:60:0a:63 5/VPGROUP_2
50:06:01:60:3a:60:0a:63 6/VPGROUP_2
180 Command reference
50:06:01:60:3a:60:0a:63 7/VPGROUP_2
50:06:01:60:3a:60:0a:63 8/VPGROUP_2
Show iSCSI
Displays iSCSI information for the specified port. If you do not specify a port, the command displays
all ports.
Authority
None
Syntax
show
iscsi
Keywords
[port_num] The number of the iSCSI port.
[port_num]
Example:
MPX200 <1>(admin) #> show iscsi
iSCSI Port Information
-----------------------iSCSI Port
GE1
Port Status
Enabled
Link Status
Up
iSCSI Name
iqn.1986-03.com.hp:fcgw.mpx200.0834e00025.b1.0
Firmware Revision
3.00.01.57
Current Port Speed
1Gb/FDX
Programmed Port Speed
Auto
MTU Size
Jumbo
Window Size
32768
MAC Address
00-c0-dd-13-16-44
IPv4 Address
33.33.50.96
IPv4 Subnet Mask
255.255.0.0
IPv4 Gateway Address
0.0.0.0
IPv4 Target TCP Port No.
3260
IPv4 VLAN
Disabled
IPv6 Address 1
2000:33::37:96:1
IPv6 Address 2
::
IPv6 Link Local
fe80::2c0:ddff:fe13:1644
IPv6 Default Router
::
IPv6 Target TCP Port No.
0
IPv6 VLAN
Disabled
iSCSI Max First Burst
65536
iSCSI Max Burst
262144
iSCSI Header Digests
Disabled
iSCSI Data Digests
Disabled
Show iSNS
Displays iSNS configuration information for the specified iSCSI port. If you do not specify a port,
the command displays iSNS configuration information for all iSCSI ports.
Authority
None
Syntax
show
isns
Keywords
[port_num] The number of the iSCSI port.
[port_num]
Example:
MPX200 <2>(admin) #> show isns
iSNS Information
---------------iSNS Disabled
Commands
181
IP Address 0.0.0.0
TCP Port No. 3205
Show logs
Displays either all or a portion of the router event log.
Authority
None
Syntax
show logs
Keywords
[last_x_entries] Shows only the last x entries in the router event log. For
example, show logs 10 displays the last 10 entries in the
router event log. The show logs command (without a number)
displays the entire router event log.
[last_x_entries]
Example:
MPX200 <1>#> show logs
01/01/2008 00:00:13 System
01/01/2008 00:00:21 QL4022
01/01/2008 00:00:13 System
01/01/2008 00:00:22 QL4022
3
3
3
3
Tuesday 01 January 12:13 AM
#0: QLIsrDecodeMailbox: Link up
Tuesday 01 January 12:13 AM
#0: QLIsrDecodeMailbox: Link up
Show LUNinfo
Displays detailed information for a specified LUN and target.
Authority
None
Syntax
show luninfo
Example:
MPX200 <1>(admin) #> show luninfo
0
50:00:1f:e1:50:07:0c:e0,50:00:1f:e1:50:07:0c:e9
1
50:00:1f:e1:50:07:0c:e0,50:00:1f:e1:50:07:0c:ec
Please select a Target from the list above ('q' to quit):
Index
----0
1
(LUN/VpGroup)
-----0/VPGROUP_1
1/VPGROUP_1
Please select a LUN from the list above ('q' to quit):
LUN Information
----------------WWULN
LUN Number
VendorId
ProductId
ProdRevLevel
Portal
Lun Size
Lun State
182
Command reference
50:00:1f:e1:50:07:0c:e0
0
HP
HSV210
5000
1
0 MB
Online
1
0
Show LUNs
Displays LUN information for each target.
Authority
None
Syntax
show luns
Example:
MPX200 <1>#> show luns
Target(WWPN)
============
50:00:1f:e1:50:07:0c:e9
50:00:1f:e1:50:07:0c:ec
VpGroup
=======
VPGROUP_1
VPGROUP_1
VPGROUP_1
VPGROUP_1
VPGROUP_1
VPGROUP_2
VPGROUP_2
VPGROUP_2
VPGROUP_2
VPGROUP_2
LUN
===
0
0
1
2
3
0
0
1
2
3
Show LUNmask
Displays all initiators mapped to the specified LUN.
Authority
None
Syntax
show lunmask
Example:
MPX200 <1>#> show lunmask
Index
----0
1
(WWNN,WWPN/iSCSI Name)
---------------------50:00:1f:e1:50:07:0c:e0,50:00:1f:e1:50:07:0c:e9
50:00:1f:e1:50:07:0c:e0,50:00:1f:e1:50:07:0c:ec
Please select a Target from the list above ('q' to quit):
Index
----0
1
2
3
4
5
6
7
8
9
10
11
12
0
(LUN/VpGroup)
-----0/VPGROUP_1
0/VPGROUP_2
1/VPGROUP_2
2/VPGROUP_2
3/VPGROUP_2
4/VPGROUP_2
5/VPGROUP_2
6/VPGROUP_2
7/VPGROUP_2
8/VPGROUP_2
9/VPGROUP_2
0/VPGROUP_3
0/VPGROUP_4
Please select a LUN from the list above ('q' to quit):
2
Target 50:00:1f:e1:50:07:0c:e0,50:00:1f:e1:50:07:0c:e9
LUN
Initiator
------------------1 iqn.1991-05.com.microsoft:server1
Commands 183
Show memory
Displays free and total physical system memory and GE port connections. It does not display
information about free space in the /var/ftp/directory.
Authority
None
Syntax
show memory
Example:
MPX200 <1>#> show memory
Memory Units Free/Total
-------------- ---------Physical 415MB/1002MB
Buffer Pool 6866/8960
Nic Buffer Pool 0/0
Process Blocks 8192/8192
Request Blocks 8192/8192
Event Blocks 2048/2048
Control Blocks 2048/2048
Sessions 2048/2048
Connections:
GE1 256/256
GE2 256/256
GE3 256/256
GE4 256/256
Show mgmt
Displays the blade management port (10/100) configuration.
Authority
None
Syntax
show mgmt
Example:
MPX200 <1>(admin) #> show mgmt
Management Port Information
----------------------------IPv4 Interface Enabled
IPv4 Mode Dhcp
IPv4 IP Address 172.17.137.129
IPv4 Subnet Mask 255.255.254.0
IPv4 Gateway 172.17.136.1
IPv6 Interface Disabled
Link Status Up
MAC Address 00-c0-dd-0c-8b-e1
Show NTP
Displays the blade NTP configuration.
Authority
None
Syntax
show ntp
Example:
MPX200 <1>#> show ntp
NTP Information
----------------Mode Disabled
184 Command reference
Status Offline
TimeZone Offset (Hours) 0
Show perf
Displays the port, read, write, initiator, or target performance, in bytes per second (b/s).
Authority
None
Syntax
show
perf
[byte | init_rbyte | init_wbyte | tgt_rbyte |
tgt_wbyte ]
Keywords
byte
Displays performance data for all ports.
init_rbyte Displays initiator mode read performance.
init_wbyte Displays initiator mode write performance.
tgt_rbyte Displays target mode read performance.
tgt_wbyte Displays target mode write performance.
Example 1:
MPX200 <1>#> show perf
WARNING: Valid data is only displayed for port(s) that are not
associated with any configured FCIP routes.
Port
Number
-----GE1
GE2
FC1
FC2
Bytes/s
(init_r)
-------0
0
0
0
Bytes/s
(init_w)
-------0
0
0
0
Bytes/s
(tgt_r)
-------0
0
0
0
Bytes/s
(tgt_w)
-------0
0
0
0
Bytes/s
(total)
-------0
0
0
0
Example 2:
MPX200 <1>#> show perf byte
WARNING: Valid data is only displayed for port(s) that are not
associated with any configured FCIP routes.
Displaying bytes/sec (total)... (Press any key to stop display)
GE1
GE2
FC1
FC2
-------------------------------0
0
0
0
0
0
0
0
0
0
0
0
Example 3:
MPX200 <1>#> show perf init_rbyte
WARNING: Valid data is only displayed for port(s) that are not
associated with any configured FCIP routes.
Displaying bytes/sec (initiator mode read)... (Press any key to
stop display)
GE1 GE2 GE3 GE4 FC1 FC2
-----------------------------------------------0
0
0
0
0
0
0
0
0
0
0
0
Example 4:
MPX200 <1>#> show perf tgt_wbyte
WARNING: Valid data is only displayed for port(s) that are not
associated with any configured FCIP routes.
Displaying bytes/sec (target mode write)... (Press any key to
Commands 185
stop display)
GE1
GE2
FC1
FC2
-------------------------------0
0
0
0
0
0
0
0
0
0
0
0
0
0
0
0
Show presented targets
Displays the targets presented by the FC router, iSCSI router, or both.
Authority
None
Syntax
fc
show
presented_targets iscsi
Keywords
fc
Displays FC presented targets.
iscsi
Displays iSCSI presented targets.
Example 1:
MPX200 <1>#> show presented_targets fc
No Presented Targets found.
Example 2:
MPX200 <1>#> show presented_targets iscsi
Presented Target Information
iSCSI Presented Targets
====================
Name iqn.1986–03.com.hp:fcgw.mpx200.0834e00025.b1.01.50001fe150070ce9
Alias
<MAPS TO>
WWNN 50:00:1f:e1:50:07:0c:e0
WWPN 50:00:1f:e1:50:07:0c:e9
Name iqn.1986–03.com.hp:fcgw.mpx200.0834e00025.b1.02.50001fe150070ce9
Alias
<MAPS TO>
WWNN 50:00:1f:e1:50:07:0c:e0
WWPN 50:00:1f:e1:50:07:0c:e9
Name iqn.1986–03.com.hp:fcgw.mpx200.0834e00025.b1.03.50001fe150070ce9
Alias
<MAPS to>
WWNN 50:00:1f:e1:50:07:0c:e0
WWPN 50:00:1f:e1:50:07:0c:e9
Name iqn.1986–03.com.hp:fcgw.mpx200.0834e00025.b1.04.50001fe150070ce9
Alias
<MAPS TO>
WWNN 50:00:1f:e1:50:07:0c:e0
WWPN 50:00:1f:e1:50:07:0c:e9
Name iqn.1986–03.com.hp:fcgw.mpx200.0834e00025.b1.01.50001fe150070cec
Alias
<MAPS TO>
WWNN 50:00:1f:e1:50:07:0c:e0
WWPN 50:00:1f:e1:50:07:0c:ec
Name iqn.1986–03.com.hp:fcgw.mpx200.0834e00025.b1.02.50001fe150070cec
Alias
<MAPS TO>
186 Command reference
WWNN
WWPN
50:00:1f:e1:50:07:0c:e0
50:00:1f:e1:50:07:0c:ec
Name iqn.1986–03.com.hp:fcgw.mpx200.0834e00025.b1.03.50001fe150070cec
Alias
<MAPS TO>
WWNN 50:00:1f:e1:50:07:0c:e0
WWPN 50:00:1f:e1:50:07:0c:ec
Name iqn.1986–03.com.hp:fcgw.mpx200.0834e00025.b1.04.50001fe150070cec
Alias
<MAPS TO>
WWNN 50:00:1f:e1:50:07:0c:e0
WWPN 50:00:1f:e1:50:07:0c:ec
Show properties
Displays the router CLI properties.
Authority
None
Syntax
show properties
Example:
MPX200 <1>#> show properties
CLI Properties
---------------Inactivity Timer 15 minutes
Prompt String MPX200
Show SNMP
Displays the router’s SNMP configuration and any configured traps.
Authority
None
Syntax
show snmp
Example:
MPX200 <1>(admin) #> show snmp
SNMP Configuration
-----------------Read Community Public
Trap Community Private
System Location
System Contact
Authentication traps Disabled
System OID 1.3.6.1.4.1.3873.1.5
System Description HP StorageWorks MPX200
Trap Destination 1
-----------------IP Address 10.0.0.5
Trap Port 1024
Trap Version 2
Show stats
Displays the blade statistics for FC and iSCSI.
Authority
None
Syntax
show stats
Commands
187
Example:
MPX200 <1>#> show stats
FC Port Statistics
-------------------FC Port 1
Interrupt Count 23
Target Command Count 0
Initiator Command Count 0
FC Port 2
Interrupt Count 1717443350
Target Command Count 0
Initiator Command Count 1815115822
iSCSI Port Statistics
----------------------iSCSI Port 1
Interrupt Count 3108358287
Target Command Count 1815115673
Initiator Command Count 0
MAC Xmit Frames 54392137663
MAC Xmit Byte Count 61199467593726
MAC Xmit Multicast Frames 0
MAC Xmit Broadcast Frames 0
MAC Xmit Pause Frames 0
MAC Xmit Control Frames 0
MAC Xmit Deferrals 0
MAC Xmit Late Collisions 0
MAC Xmit Aborted 0
MAC Xmit Single Collisions 0
MAC Xmit Multiple Collisions 0
MAC Xmit Collisions 0
MAC Xmit Dropped Frames 0
MAC Xmit Jumbo Frames 0
MAC Rcvd Frames 42061498217
MAC Rcvd Byte Count 60362392962831
MAC Rcvd Unknown Control Frames 0
MAC Rcvd Pause Frames 0
MAC Rcvd Control Frames 0
MAC Rcvd Dribbles 0
MAC Rcvd Frame Length Errors 0
MAC Rcvd Jabbers 0
MAC Rcvd Carrier Sense Errors 0
MAC Rcvd Dropped Frames 0
MAC Rcvd CRC Errors 0
MAC Rcvd Encoding Errors 0
MAC Rcvd Length Errors Large 1
MAC Rcvd Small Errors Small 0
MAC Rcvd Multicast Frames 34394
MAC Rcvd Broadcast Frames 33144
iSCSI Port 2
Interrupt Count 51604
Target Command Count 0
Initiator Command Count 0
MAC Xmit Frames 0
MAC Xmit Byte Count 0
MAC Xmit Multicast Frames 0
MAC Xmit Broadcast Frames 0
MAC Xmit Pause Frames 0
MAC Xmit Control Frames 0
MAC Xmit Deferrals 0
MAC Xmit Late Collisions 0
MAC Xmit Aborted 0
MAC Xmit Single Collisions 0
MAC Xmit Multiple Collisions 0
MAC Xmit Collisions 0
188 Command reference
MAC Xmit Dropped Frames 0
MAC Xmit Jumbo Frames 0
MAC Rcvd Frames 186
MAC Rcvd Byte Count 39260
MAC Rcvd Unknown Control Frames 0
MAC Rcvd Pause Frames 0
MAC Rcvd Control Frames 0
MAC Rcvd Dribbles 0
MAC Rcvd Frame Length Errors 0
MAC Rcvd Jabbers 0
MAC Rcvd Carrier Sense Errors 0
MAC Rcvd Dropped Frames 0
MAC Rcvd CRC Errors 0
MAC Rcvd Encoding Errors 0
MAC Rcvd Length Errors Large 0
MAC Rcvd Small Errors Small 0
MAC Rcvd Multicast Frames 94
MAC Rcvd Broadcast Frames 91
iSCSI Shared Statistics
----------------------PDUs Xmited 2729500577
Data Bytes Xmited 55036896842234
PDUs Rcvd 2655246170
Data Bytes Rcvd 0
I/O Completed 1815115669
Unexpected I/O Rcvd 0
iSCSI Format Errors 0
Header Digest Errors 0
Data Digest Errors 0
Sequence Errors 0
PDU Xmit Count 2729500577
PDU Xmit Count 2729500577
PDU Xmit Count 2729500577
IP Xmit Packets 54392134283
IP Xmit Byte Count 59132566295008
IP Xmit Fragments 0
IP Rcvd Packets 42061430681
IP Rcvd Byte Count 58764046068744
IP Rcvd Fragments 0
IP Datagram Reassembly Count 0
IP Error Packets 0
IP Fragment Rcvd Overlap 0
IP Fragment Rcvd Out of Order 0
IP Datagram Reassembly Timeouts 0
TCP Xmit Segment Count 54392134284
TCP Xmit Byte Count 57389353022514
TCP Rcvd Segment Count 42061430681
TCP Rcvd Byte Count 57418079800284
TCP Persist Timer Expirations 0
TCP Rxmit Timer Expired 116
TCP Rcvd Duplicate Acks 986657165
TCP Rcvd Pure Acks 816265831
TCP Xmit Delayed Acks 3584507
TCP Rcvd Pure Acks 177811024
TCP Rcvd Segment Errors 0
TCP Rcvd Segment Out of Order 1
TCP Rcvd Window Probes 0
TCP Rcvd Window Updates 18500272TCP ECC Error Corrections 0
Commands 189
Show system
Displays blade product information, including the serial number, hardware and software versions,
number of ports, and temperature.
Authority
None
Syntax
show system
Example:
MPX200 <1>#> show system
System Information
-------------------Product Name
Symbolic Name
System Mode
Controller Lun AutoMap
Target Access Control
Serial Number
HW Version
SW Version
Boot Loader Version
No. of FC Ports
No. of iSCSI Ports
Telnet
SSH
Temp (Front/Rear/CPU1/CPU2)
HP StorageWorks MPX200
Blade-1
iSCSI Server Connectivity
Enabled
Disabled
0851E0014
20694-03
3.0.1.2
0.97.0.4
2
2
Enabled
Enabled
42C/31C/34C/34C
Show targets
Displays the targets discovered by the FC router, iSCSI router, or both.
Authority
None
Syntax
show targets fc
iscsi
Keywords
fc
Displays FC targets.
iscsi
Displays iSCSI targets.
Example 1:
MPX200 <1>#> show targets fc
Target Information
-------------------WWNN
50:00:1f:e1:50:07:0c:e0
WWPN
50:00:1f:e1:50:07:0c:e9
Port ID
02-f7-01
State
Online
WWNN
WWPN
Port ID
State
50:00:1f:e1:50:07:0c:e0
50:00:1f:e1:50:07:0c:ec
8b-ad-f2
Online
Example 2:
MPX200 <1>#> show targets iscsi
No Targets found.
190 Command reference
Show VPGroups
Displays information about the blade configured VPGs.
Authority
None
Syntax
show
vpgroups
[vp index]
Keywords
vp index
The number (1–4) of the VPG to be displayed.
Example 1: The following example shows the show vpgroups command for a specific VPG:
MPX200 <1>#> show vpgroups 2
VpGroup Information
--------------------Index
VpGroup Name
Status
WWPNs
2
VPGROUP_2
Enabled
21:01:00:c0:dd:13:16:44
21:01:00:c0:dd:13:16:45
Example 2: The following example shows the show vpgroups command for all VPGs:
MPX200 <1>#> show vpgroups
VpGroup Information
--------------------Index
1
VpGroup Name
VPGROUP_1
Status
Enabled
WWPNs
21:00:00:c0:dd:13:16:44
21:00:00:c0:dd:13:16:45
Index
VpGroup Name
Status
WWPNs
Index
VpGroup Name
Status
WWPNs
Index
VpGroup Name
Status
WWPNs
2
VPGROUP_2
Enabled
21:01:00:c0:dd:13:16:44
21:01:00:c0:dd:13:16:45
3
VPGROUP_3
Enabled
21:02:00:c0:dd:13:16:44
21:02:00:c0:dd:13:16:45
4
VPGROUP_4
Enabled
21:03:00:c0:dd:13:16:44
21:03:00:c0:dd:13:16:45
Shutdown
Shuts down the blade.
Authority
Admin session
Syntax
shutdown
Example:
MPX200 <1>(admin) #> shutdown
Are you sure you want to shutdown the System (y/n): n
Command aborted.
Commands
191
Target
Removes an offline target from the blade database. Typically, you use this command to remove
targets that are no longer connected to the router.
Authority
Admin session
Syntax
target
rm
Keywords
rm
Removes a target from the router’s target database.
Example:
MPX200 <1>(admin) #> target rm
Index State (WWNN,WWPN/iSCSI Name)
----- ----- ---------------------0 Offline 20:00:00:14:c3:3d:d2:bf,22:00:00:14:c3:3d:d2:bf
1 Online 20:00:00:14:c3:44:9b:86,22:00:00:14:c3:44:9b:86
2 Online 20:00:00:14:c3:44:9b:9d,22:00:00:14:c3:44:9b:9d
3 Online 20:00:00:14:c3:44:9a:fa,22:00:00:14:c3:44:9a:fa
Please select an OFFLINE Target from the list above ('q' to
quit): 0
All attribute values for that have been changed will now be
saved.
Traceroute
Displays the route that a network packet takes to reach the specified destination.
Authority
Admin session
Syntax
traceroute
Example:
MPX200 <1>(admin) #> traceroute
A list of attributes with formatting and current values will follow.
Enter a new value or simply press the ENTER key to accept the current value.
If you wish to terminate this process before reaching the end of the list
press 'q' or 'Q' and the ENTER key to do so.
IP Address (IPv4 or IPv6) [0.0.0.0] 172.35.14.17
Outbound Port (0=Mgmt, 1=GE1, 2=GE2, ...) [Mgmt ] 0
Tracing route to 172.35.14.17 over a maximum of 30 hops:
1 172.17.136.2 0.4ms 0.3ms 0.5ms
2 10.7.9.5 1.1ms 1.1ms 1.1ms
3 172.21.130.233 2.7ms 2.7ms 2.6ms
4 172.21.4.245 291.4ms 291.4ms 291.4ms
5 172.21.4.246 413.6ms 417.1ms 439.2ms
6 10.35.9.1 459.1ms 465.6ms 480.0ms
7 172.35.14.17 495.3ms 483.0ms 505.9ms
Traceroute completed in 7 hops.
Wanlinktest
Collects data for the WAN link.
Authority
Admin session
Syntax
wanlinktest
192 Command reference
Authority
Admin session
Syntax
wanlinktest
setup
start
show
stop
Keywords
setup
Configures the WAN link test parameters on the server side
of the WAN link.
start
Begins running the WAN link test on the client side of the
WAN link.
show
Displays the outcome of the WAN link test on the client or
the status and port number of the server if running.
stop
Terminates running the WAN link test.
NOTE: When setting up or starting the test, ensure that the Gige Port parameter specifies the
same port number as the WAN link test server and the client.
Example 1:
The following example illustrates the use of the wanlinktest setup command.
MPX200 <2>(admin) #> wanlinktest setup
A list of attributes with formatting and current values will follow.
Enter a new value or simply press the ENTER key to accept the current value.
If you wish to terminate this process before reaching the end of the list
press 'q' or 'Q' and the ENTER key to do so.
Gige Port (0=Mgmt, 1=GE1, 2=GE2, ...)
[Mgmt
]
Is Local IP already configured (y=yes, n=no)
[y
]
Local IP Address (IPv4 or IPv6)
[0.0.0.0 ]
Subnet Mask
[0.0.0.0 ]
Gateway
[0.0.0.0 ]
MTU (Min=582, Max=9000)
[1500
]
VLAN (0=Enable, 1=Disable)
[1=Disable]
Server Port to listen On (3225 FCIP/3260 iSCSI)[
]
1
N
1.1.1.1
255.255.255.0
3260
Started iperf Server on port 1 (socket 3260) sucessfully..!
Example 2:
The following example illustrates the use of the wanlinktest start command.
MPX200 <1>(admin) #> wanlinktest start
A list of attributes with formatting and current values will follow.
Enter a new value or simply press the ENTER key to accept the current value.
If you wish to terminate this process before reaching the end of the list
press 'q' or 'Q' and the ENTER key to do so.
Gige Port (0=Mgmt, 1=GE1, 2=GE2, ...)
[Mgmt
]
Is Local IP already configured (y=yes, n=no)
[y
]
Local IP Address (IPv4 or IPv6)
[0.0.0.0 ]
Subnet Mask
[0.0.0.0 ]
Gateway
[0.0.0.0 ]
MTU (Min=582, Max=9000)
[1500
]
VLAN (0=Enable, 1=Disable)
[1=Disable]
Test Duration in Minutes (multiples of 5)
[10
]
Server Port to connect to 3225 FCIP/3260 iSCSI)[
]
1
N
1.1.1.2
255.255.255.0
3260
Checking whether resources are available to start WAN LINK TEST
Commands
193
........
Wan link test initialization completed successfully
Example 3:
The following example illustrates the use of the wanlinktest show command.
MPX200 <1>(admin) #> wanlinktest show
Not completed single iteration yet
Wan link test started for the duration of 10 Minutes at
LocalIP: 66.66.1.120 RemoteIP: 66.66.1.90
on GigePort 1
Active Iterations.... Press Control+C to quit command
StartTime
EndTime
RTT
TCP BW
UDP BW
Jitter
PktDrop%
---------
---------
---
-----
-----
------
--------
<0.1ms
<0.1ms
948Mb
952Mb
949Mb
951Mb
<0.1ms
<0.1ms
0.000%
0.000%
14:29-Jun/04/2012
14:34-Jun/04/2012
14:34-Jun/04/2012
14:39-Jun/04/2012
Done With WAN Link Test
Wan link test started for the duration of 10 Minutes at 14:28-Jun/04/2012 on GigePort 1
LocalIP: 66.66.1.120 RemoteIP: 66.66.1.90
Average So Far
StartTime
---------
EndTime
RTT
TCP BW
UDP BW
Jitter
PktDrop%
---------
---
-----
-----
------
--------
14:28-Jun/04/2012
14:39-Jun/04/2012
<0.1ms
950Mb
950Mb
<0.1ms
You can ftp wan_link_test_results.stats file to get overall statistics information
0.000%
Done With WAN Link Test
MPX200 <1> (admin) #>
Example 4:
The following example illustrates the use of the wanlinktest show command on a WAN link
test server.
MPX200 <1>(admin) #> wanlinktest show
Wanlinktest server is listening on interface 1.1.1.1 socket port 3260
Example 5:
The following example illustrates the use of the wanlinktest stop command.
MPX200 <1>(admin) #> wanlinktest stop
Stopping the test
Wan Link Test stopped successfully
194
Command reference
B Command Line Interface usage
The CLI enables you to perform a variety of MPX200 management tasks through an Ethernet or
serial port connection.
Logging on to an MPX200
You can use either Telnet or SSH to log on to a router, or you can log on to the switch through the
serial port.
To log on to a router using Telnet:
1. On the workstation, open a command line window.
2. Enter the Telnet command followed by the router IP address:
# telnet <ip address>
A Telnet window opens and prompts you to log in.
3. Enter an account name and password.
To log on to a router using SSH:
NOTE: SSH works in a way similar to Telnet, except it uses ROSA to encode transmissions to
and from your workstation and the MPX200 blade.
1.
2.
On the workstation, open a command line window.
Enter the ssh command followed by the router IP address:
# ssh <ip address>
An SSH window opens and prompts you to log in.
3. Enter an account name and password.
To log on to a switch through the serial port:
1. Configure the workstation port with the following settings:
2.
•
115,200 baud
•
8-bit character
•
1 stop bit
•
No parity
When prompted, enter an account name and password.
Understanding the guest account
Routers come from the factory with the guest account already defined. This guest account provides
access to the router and its configuration. After planning your router management needs, consider
changing the password for this account. For information about changing passwords, see the
“passwd command” (page 166). The guest account is automatically closed after 15 minutes of
inactivity. The initial login opens at the chassis level. From the chassis level, select the blade to be
managed. For example:
login as: guest
[email protected]'s password: *********
******************************************************
*
*
*
HP StorageWorks MPX200
*
*
*
******************************************************
MPX200 #>help
blade [ 1 | 2 ]
exit
help
Logging on to an MPX200 195
history
logout
quit
show [ chassis ]
Account name: guest
Password: password
MPX200 #> show chassis
Chassis Information
--------------------Product Name HP StorageWorks MPX200
Chassis Name Router Chassis Name
Serial Number 0834E00019
HW Version 20697-03 A
Fan Speed Normal
Blade 1 Information (Left Slot)
------------------------------Status Online
Product Name HP StorageWorks MPX200
Symbolic Name Blade-1
Serial Number 0834E00008
HW Version 20694-03 A
SW Version 3.0.1.0rc2a
Temp (Front/Rear/CPU1/CPU2) 44C/33C/34C/38C
Power Cooling Module 1
---------------------Status Installed
Power Source Connected
Fan1/Fan2/Fan3 Healthy/Healthy/Healthy
Blade 2 Information (Right Slot)
-------------------------------Status Offline
Power Cooling Module 2
---------------------Status Installed
Power Source Connected
Fan1/Fan2/Fan3 Healthy/Healthy/Healthy
MPX200 #>blade 1
MPX200 <1>#>
Working with MPX200 router configurations
Successfully managing routers with the CLI depends on effective router configurations. Key router
management tasks include modifying configurations, backing up configurations, and restoring
configurations.
Modifying a configuration
The router has the following major areas of configuration:
•
•
196
Management port configuration requires the use of the following commands:
◦
The “set mgmt command” (page 173)
◦
The “show mgmt command” (page 184)
iSCSI port configuration requires using the following commands:
◦
The “set iSCSI command” (page 172)
◦
The “show iSCSI command” (page 181)
Command Line Interface usage
•
•
VPG configuration requires the following commands:
◦
The “set VPGroups command” (page 175)
◦
The “show VPGroups command” (page 191)
LUN mapping requires the use of the “show lunmask command” (page 183).
Saving and restoring router configurations
Saving and restoring a configuration helps protect your work. You can also use a saved
configuration as a template for configuring other routers.
Persistent data consists of system settings, VPG settings, LUN mappings, discovered FC targets,
and discovered iSCSI initiators. To save a blade configuration and persistent data:
1. Generate a file (HP_StorageWorks_MPX200_FRU.bin) containing the saved data by
entering the fru save CLI command.
This command stores the file locally on the router in an FTP directory.
2.
Transfer the saved data from the router to a workstation by executing an FTP utility on a
workstation.
The following example shows an FTP transfer to get the saved router configuration data:
c:\> ftp 172.17.137.102
Connected to 172.17.137.102.
220 (none) FTP server (GNU inetutils 1.4.2) ready.
User (172.17.137.102:(none)): ftp
331 Guest login ok, type your name as password.
Password: ftp
230 Guest login ok, access restrictions apply.
ftp> bin
200 Type set to I.
ftp> get HP_StorageWorks_MPX200_FRU.bin
200 PORT command successful.
150 Opening BINARY mode data connection for 'HP_StorageWorks_MPX200_FRU.bin'
(6168 bytes).
226 Transfer complete.
ftp: 6168 bytes received in 0.00Seconds 6168000.00Kbytes/sec.
ftp> quit
221 Goodbye.
Working with MPX200 router configurations
197
Restoring router configuration and persistent data
1.
Transfer the saved data from a workstation to the router by executing an FTP utility on the
workstation.
The following example shows an FTP transfer to put previously saved router configuration data
on the router:
c:\> ftp 172.17.137.102
Connected to 172.17.137.102.
220 (none) FTP server (GNU inetutils 1.4.2) ready.
User (172.17.137.102:(none)): ftp
331 Guest login ok, type your name as password.
Password: ftp
230 Guest login ok, access restrictions apply.
ftp> bin
NOTE: Dual-blade MPX200s perform an automatic FRU restore on a new blade any time it
is detected in the chassis.
200 Type set to I.
ftp> put HP StorageWorks MPX200_FRU.bin
200 PORT command successful.
150 Opening BINARY mode data connection for 'HP StorageWorks MPX200_FRU.bin'.
226 Transfer complete.
ftp: 6168 bytes sent in 0.00Seconds 6168000.00Kbytes/sec.
ftp> quit
221 Goodbye.
2.
Update a blade with the saved configuration data by executing the fru restore CLI
command. The fru restore command has the following two options:
•
Full restore restores all router configuration parameters, including IP addresses, subnet
masks, gateways, VPG settings, LUN mappings, and all other persistent data.
•
Partial restore restores only the LUN mappings and persistent data, such as discovered
FC targets and iSCSI initiators.
198 Command Line Interface usage
C Simple Network Management Protocol setup
SNMP provides monitoring and trap functions for managing the router through third-party
applications that support SNMP. The router firmware supports SNMP versions 1 and 2 and a
QLogic Management Information Base (MIB) (see “Management Information Base ” (page 200)).
You may format traps using SNMP version 1 or 2.
SNMP parameters
You can set the SNMP parameters using the CLI. For command details, see the “set SNMP
command” (page 174).
Table 32 (page 199) describes the SNMP parameters.
Table 32 SNMP parameters
Parameter
Description
Read community
A password that authorizes an SNMP management server to read information from the
router. This is a write-only field. The value on the router and the SNMP management server
must be the same. The read community password can be up to 32 characters, excluding
the number sign (#), semicolon (;), and comma (,). The default password is private.
Trap community
A password that authorizes an SNMP management server to receive traps. This is a write-only
field. The value on the router and the SNMP management server must be the same. The trap
community password can be up to 32 characters, excluding the number sign (#), semicolon
(;), and comma (,). The default password is private.
System location
Specifies the name of the router location. The name can be up to 64 characters, excluding
the number sign (#), semicolon (;), and comma (,). The default is undefined.
System contact
Specifies the name of the person to be contacted to respond to trap events. The name can
be up to 64 characters, excluding the number sign (#), semicolon (;), and comma (,). The
default is undefined.
Authentication
traps
Enables or disables the generation of authentication traps in response to authentication
failures. The default is disabled.
SNMP parameters 199
SNMP trap configuration parameters
SNMP trap configuration lets you set up to eight trap destinations. Choose from Trap 1 through
Trap 8 to configure each trap. Table 33 (page 200) describes the parameters for configuring an
SNMP trap.
Table 33 SNMP trap configuration parameters
Parameter
Description
Trap n enabled1
Enables or disables trap n. If disabled, the trap is not configured.
Trap address
Specifies the IP address to which the SNMP traps are sent. A maximum of eight trap addresses
are supported. The default address for traps is 0.0.0.0.
Trap port1
Port number on which the trap is sent. The default is 162. If the trap destination is not enabled,
this value is 0 (zero). Most SNMP managers and management software listen on this port
for SNMP traps.
Trap version
Specifies the SNMP version (1 or 2) with which to format traps.
1
Trap address (other than 0.0.0.0.) and trap port combinations must be unique. For example, if trap 1 and trap 2 have
the same address, they must have different port values. Similarly, if trap 1 and trap 2 have the same port value, they
must have different addresses.
Management Information Base
This section describes the QLogic MIB.
Network port table
The network port table contains a list of network ports that are operational on the router. The entries
in this table include the management port (labeled MGMT) and the GbE ports (labeled GE1 and
GE2).
qsrNwPortTable
Syntax
SEQUENCE OF QsrNwPortEntry
Access
Not accessible
Description
Entries in this table include the management port, and the iSCSI ports on the router.
qsrNwPortEntry
Syntax
QsrNwPortEntry
Access
Not accessible
Description
Each entry (row) contains information about a specific network port.
A network port entry consists of the following sequence of objects:
qsrNwPortRole
QsrPortRole
qsrNwPortIndex
unsigned32
qsrNwPortAddressMode
INTEGER
qsrIPAddressType
InetAddressType
qsrIPAddress
InetAddress
qsrNetMask
InetAddress
qsrGateway
InetAddress
qsrMacAddress
MacAddress
200 Simple Network Management Protocol setup
qsrNwLinkStatus
QsrLinkStatus
qsrNwLinkRate
QsrLinkRate
qsrNwPortRole
Syntax
QsrPortRole
Access
Not accessible
Description
Operational role of this port: management port or iSCSI port.
qsrNwPortIndex
Syntax
Unsigned32
Access
Not accessible
Description
A positive integer indexing each network port in a given role.
qsrNwPortAddressMode
Syntax
INTEGER
1 = Static
2 = DHCP
3 = Bootp
4 = RARP
Access
Read-only
Description
Method by which the port gets its IP address.
qsrIPAddressType
Syntax
InetAddressType
Access
Read-only
Description
IP address type: ipv4 or ipv6.
qsrIPAddress
Syntax
InetAddress
Access
Read-only
Description
IP address of the port.
qsrNetMask
Syntax
InetAddress
Access
Read-only
Description
Subnet mask for this port.
qsrGateway
Syntax
InetAddress
Access
Read-only
Description
Gateway for this port.
Management Information Base 201
qsrMacAddress
Syntax
IMacAddress
Access
Read-only
Description
MAC address for this port.
qstNwLinkStatus
Syntax
QsrLinkStatus
Access
Read-only
Description
Operational link status for this port.
qsrNwLinkRate
Syntax
QsrLinkRate
Access
Read-only
Description
Operational link rate for this port.
FC port table
This table contains a list of the FC ports on the router. There are as many entries in this table as
there are FC ports on the router.
qsrFcPortTable
Syntax
SEQUENCE OF QsrFcPortEntry
Access
Not accessible
Description
A list of the FC ports on the router. The table contains as many entries as
there are FC ports on the router.
qsrFcPortEntry
Syntax
QsrFcPortEntry
Access
Not accessible
Description
Each entry (row) contains information about a specific FC port.
An FC port entry consists of the following sequence of objects:
qsrFcPortRole
QsrPortRole
qsrFcPortIndex
unsigned32
qsrFcPortNodeWwn
PhysAddress
qsrFcPortWwn
PhysAddress
qsrFcPortId
PhysAddress
qsrFcPortType
Unsigned32
202 Simple Network Management Protocol setup
qsrFcLinkStatus
QsrLinkStatus
qsrFcLinkRate
QsrLinkRate
qsrFcPortRole
Syntax
QsrPortRole
Access
Not accessible
Description
Operational role of this port: FCP mode or frame shuttle mode.
qsrFcPortIndex
Syntax
Unsigned32
Access
Not accessible
Description
A positive integer indexing each FC port in a given role.
qsrFcPortNodeWwn
Syntax
PhysAddress
Access
Read-only
Description
World Wide Name of the node that contains this port.
qsrFcPortWwn
Syntax
PhysAddress
Access
Read-only
Description
World Wide Name for this port.
qsrFcPortId
Syntax
PhysAddress
Access
Read-only
Description
Interface's 24-bit FC address identifier.
qsrFcPortType
Syntax
Unsigned32
Access
Read-only
Description
Type of FC port, as indicated by the use of the appropriate value assigned
by IANA. The IANA-maintained registry for FC port types is located here:
www.iana.org/assignments/fc-port-types
qsrFcLinkStatus
Syntax
QsrLinkStatus
Access
Read-only
Description
Current link status for this port.
Management Information Base 203
qsrFcLinkRate
Syntax
QsrLinkRate
Access
Read-only
Description
Current link rate for this port.
Initiator object table
The initiator object table is a list of the iSCSI initiators that have been discovered by the router.
There are as many entries in this table as there are iSCSI initiators on the router.
qsrIsInitTable
Syntax
SEQUENCE OF QsrIsInitEntry
Access
Not accessible
Description
Entries in this table contain Information about initiators.
qsrIsInitEntry
Syntax
QsrIsInitEntry
Access
Not accessible
Description
Each entry (row) contains information about a specific iSCSI initiator.
An iSCSI initiator information entry consists of the following sequence of the objects:
qsrIsInitIndex
Unsigned32
qsrIsInitName
SnmpAdminString
qsrIsInitAlias
SnmpAdminString
qsrIsInitAddressType
InetAddressType
qsrIsInitAddress
InetAddress
qsrIsInitStatus
INTEGER
qsrIsInitOsType
SnmpAdminString
qsrIsInitChapEnabled
INTEGER
qsrIsInitIndex
Syntax
Unsigned32
Access
Not accessible
Description
An arbitrary positive integer denoting each iSCSI initiator discovered by the
router.
qsrIsInitName
Syntax
SnmpAdminString
Access
Not accessible
Description
iSCSI name of the initiator.
204 Simple Network Management Protocol setup
qsrIsInitAlias
Syntax
SnmpAdminString
Access
Read-only
Description
Alias for the iSCSI initiator.
qsrIsInitAddressType
Syntax
InetAddressType
Access
Read-only
Description
Type of iSCSI initiator’s IP address (IPv4 or IPv6).
qsrIsInitAddress
Syntax
InetAddress
Access
Read-only
Description
IP address of the iSCSI initiator.
qsrIsInitStatus
Syntax
Integer:
1 = unknown,
2 = loggedIn,
3 = loggedOut,
4 = recovery
Access
Read-only
Description
Status of the iSCSI initiator, that is, whether or not it is logged in to the router.
qsrIsInitOsType
Syntax
SnmpAdminString
Access
Read-only
Description
The type of the iSCSI initiator's operating system.
qsrIsInitChapEnabled
Syntax
Integer: 0 = enabled; 2 = disabled
Access
Read-only
Description
A value indicating whether CHAP is enabled or not for this iSCSI initiator.
LUN table
These tables contain information about the LUN list.
qsrLunTable
Syntax
SEQUENCE OF QsrLunEntry
Management Information Base 205
Access
Not accessible
Description
A list of the LUNs on the FC targets discovered by the router. There are as
many entries in this table as there are FC targets on the router.
qsrLunEntry
Syntax
QsrLunEntry
Access
Not accessible
Description
Each entry (row) contains information about a specific LUN. This table extends
scsiDscLunTable in QLOGIC-SCSI-MIB. The entries in this table show
other attributes of the LUN.
A LUN entry contains of following sequence of objects.
qsrLunWwuln
PhysAddress
qsrLunVendorId
SnmpAdminString
qsrLunProductId
SnmpAdminString
qsrLunProdRevLevel
SnmpAdminString
qsrLunSize
Unsigned32
qsrLunState
INTEGER
qsrLunVPGroupid
INTEGER
qsrLunVPGroupname
SnmpAdminString
qsrLunWwuln
Syntax
PhysAddress
Access
Read-only
Description
The WWULN for the LUN.
qsrLunVendorId
Syntax
SnmpAdminString
Access
Read-only
Description
Vendor ID for the LUN.
qsrLunProductId
Syntax
SnmpAdminString
Access
Read-only
Description
Product ID for the LUN
qsrLunProdRevLevel
Syntax
SnmpAdminString
Access
Read-only
Description
Product revision level for the LUN
206 Simple Network Management Protocol setup
qsrLunSize
Syntax
Unsigned32
Access
Read-only
Description
Size of the LUN (in megabytes)
qsrLunState
Syntax
Integer
1 = online,
2 = offline,
3 = reserved
Access
Read-only
Description
State of the LUN (online or offline)
qsrLunVPGroupid
Syntax
Integer
Access
Read-only
Description
ID of the VP group to which this LUN belongs
qsrLunVPGroupname
Syntax
SnmpAdminString
Access
Read-only
Description
VP group name to which this LUN belongs
VP group table
This table contains a list of VPGs. There are four entries in this table at any point of time.
qsrVPGroupTable
Syntax
SEQUENCE OF QsrVPGroupEntry
Access
Not accessible
Description
Table for the VP group
qsrVPGroupEntry
Syntax
QsrVPGroupEntry
Access
Not accessible
Description
Each entry in the VP group table
Index
{ qsrVPGroupIndex } ::= { qsrVPGroupTable 1 }
The QsrVPGroupEntry contains the following sequence of objects:
qsrVPGroupIndex
Unsigned32
qsrVPGroupId
INTEGER
qsrVPGroupName
SnmpAdminString
Management Information Base 207
qsrVPGroupWWNN
VpGroupWwnnAndWwpn
qsrVPGroupWWPN
VpGroupWwnnAndWwpn
qsrVPGroupStatus
INTEGER
qsrVPGroupIndex
Syntax
Unsigned32
Access
Read-only
Description
VP group index.
qsrVPGroupId
Syntax
Integer
Access
Read-only
Description
VP group ID.
qsrVPGroupName
Syntax
SnmpAdminString
Access
Read-only
Description
VP group name or host group name.
qsrVPGroupWWNN
Syntax
VpGroupWwnnAndWwpn
Access
Read-only
Description
WWPN
qsrVPGroupStatus
Syntax
Integer: 0 = enabled; 1 = disabled
Access
Read-only
Description
Maintain the status of the VP group (enabled/disabled)
208 Simple Network Management Protocol setup
Sensor table
The sensor table lists all the sensors on the router. Each table row specifies a single sensor.
qsrSensorTable
Syntax
SEQUENCE OF QsrSensorEntry
Access
Not accessible
Description
List of all the sensors on the router. The table contains as many entries (rows)
as there are sensors.
qsrSensorEntry
Syntax
QsrSensorEntry
Access
Not accessible
Description
Each entry (row) corresponds to a single sensor.
A sensor entry consists of the following sequence of objects:
qsrSensorType
INTEGER
qsrSensorIndex
Unsigned32
qsrSensorUnits
INTEGER
qsrSensorValue
Integer32
qsrUpperThreshold
Integer32
qsrLowerThreshold
Integer32
qsrSensorState
INTEGER
qsrSensorType
Syntax
INTEGER
Temperature = 1
Access
Not accessible
Description
Type of data being measured by this sensor.
qsrSensorIndex
Syntax
Unsigned32
Access
Not accessible
Description
A positive integer identifying each sensor of a given type.
qsrSensorUnits
Syntax
INTEGER
Celsius = 1
Access
Read-only
Description
Unit of measurement for the sensor.
Management Information Base 209
qsrSensorValue
Syntax
Integer32
Access
Read-only
Description
Current value of the sensor.
qsrUpperThreshold
Syntax
Integer32
Access
Read-only
Description
Upper-level threshold for this sensor.
qsrLowerThreshold
Syntax
Integer32
Access
Read-only
Description
Lower-level threshold for this sensor.
qsrSensorState
Syntax
INTEGER
Access
Read-only
Description
State of this sensor, indicating the health of the system: Unknown = The sensor
value/thresholds cannot be determined. Normal = The sensor value is within
normal operational limits. Warning = The sensor value is approaching a
threshold. Critical = The sensor value has crossed a threshold.
Notifications
This section describes the MPX200 notification types.
NOTE: Every notification uses qsrBladeSlot as one of the objects. This determines the originator
blade for the same notification.
System information objects
System information objects provide the system serial number, version numbers
(hardware/software/agent), and number of ports (FC/GE).
qsrSerialNumber
Syntax
SnmpAdminString
Access
Read-only
Description
System serial number.
qsrHwVersion
210
Syntax
SnmpAdminString
Access
Read-only
Description
System hardware version number.
Simple Network Management Protocol setup
qsrSwVersion
Syntax
SnmpAdminString
Access
Read-only
Description
System software (firmware) version number.
qsrNoOfFcPorts
Syntax
Unsigned32
Access
Read-only
Description
Quantity of FC ports on the system.
qsrNoOfGbEPorts
Syntax
Unsigned32
Access
Read-only
Description
Quantity of gigabit Ethernet ports on the system.
qsrAgentVersion
Syntax
SnmpAdminString
Access
Read-only
Description
Version number of the agent software on the system.
Notification objects
This section defines the objects used in notifications.
qsrEventSeverity
Syntax
INTEGER
Access
Accessible for notify
Description
Indicates the severity of the event. The value clear specifies that a condition
that caused an earlier trap is no longer present.
qsrEventDescription
Syntax
SnmpAdminString
Access
Accessible for notify
Description
A textual description of the event that occurred.
qsrEventTimeStamp
Syntax
DateAndTime
Access
Accessible for notify
Description
Indicates when the event occurred.
Notifications
211
Agent startup notification
The agent startup notification indicates that the agent on the router has started running.
qsrAgentStartup uses the qsrEventTimeStamp object.
Agent shutdown notification
The agent shutdown notification indicates that the agent on the router is shutting down.
qsrAgentShutdown uses the qsrEventTimeStamp object.
Network port down notification
The network port down notification indicates that the specified network port is down. The next time
the port comes up, this event is sent with the qsrEventSeverity object set to clear.
qsrNwPortDown uses the following objects:
•
qsrNwLinkStatus
•
qsrEventTimeStamp
•
qsrEventSeverity
Network notifications are sent for the following events:
•
Management port: down or up
•
iSCSI port: down or up
•
Port number (1–4)
FC port down notification
The FC port down notification indicates that the specified FC port is down. The next time the port
comes up, this event is sent with the qsrEventSeverity object set to clear.
qsrFcPortDown uses the following objects:
•
qsrFcLinkStatus
•
qsrEventTimeStamp
•
qsrEventSeverity
FC notifications are sent for the following events:
•
Fibre Channel port: down or up
•
Port number (1–4)
Target device discovery
The Fibre Channel target device discovery notification indicates that the specified Fibre Channel
target is online or offline.
qsrDscTgtStatusChanged uses the following objects:
212
•
qsrBladeSlot
•
qsrEventTimeStamp
•
qsrFcTgtState
•
qsrEventSeverity
Simple Network Management Protocol setup
FC target device discovery notifications are sent for the following event:
•
FC Target
◦
State: Discovered, went offline, or went online
◦
Target WWPN
◦
Blade number (1 or 2)
Target presentation (mapping)
The target presentation notification indicates that the specified target has been presented (mapped)
or unpresented (unmapped).
qsrPresTgtMapped uses the following objects:
•
qsrBladeSlot
•
qsrEventTimeStamp
•
qsrPresTgtMapped
•
qsrPresTgtUnmapped
•
qsrEventSeverity
Target presentation notifications are sent for the following event:
•
Target Presentation
◦
State: Presented (mapped) or unpresented (unmapped)
◦
Target name
◦
Blade number (1 or 2)
VP group notification
The VP group notification indicates that the specified VP group is enabled or disabled. It also
represents change in the name of the VP group.
qsrVPGroupStatusChanged uses the following objects:
•
qsrBladeSlot
•
qsrVPGroupIndex
•
qsrVPGroupStatus
•
qsrEventTimeStamp
•
qsrEventSeverity
VP group notifications are sent for the following events:
•
Change in name of a VP group
•
Enabling and disabling a VP group
Sensor notification
The sensor notification indicates that the state for the specified sensor is not normal. When the
sensor returns to the normal state, this event is sent with the qsrEventSeverity object set to
clear.
qsrSensorNotification uses the following objects:
•
qsrSensorValue
•
qsrSensorState
Notifications
213
•
qsrEventTimeStamp
•
qsrEventSeverity
Sensor notifications are sent for the following events:
•
•
•
Over Temperature
◦
Blade number (1 or 2)
◦
Sensor number (1 of 3)
Temperature returned to normal
◦
Blade number (1 or 2)
◦
Sensor number (1 of 3)
Fans at high speed
◦
•
Fans returned to normal speed
◦
•
•
PCM number (1 or 2)
PCM un-powered (AC power removed)
◦
•
PCM number (1 or 2)
PCM powered (AC power connected)
◦
•
PCM number (1 or 2)
PCM removed
◦
•
PCM number (1 or 2)
PCM installed
◦
•
PCM number (1 or 2)
PCM number (1 or 2)
Fan failed
◦
PCM number (1 or 2)
◦
Fan number (1 of 3)
Fan returned to operational state
◦
PCM number (1 or 2)
◦
Fan number (1 of 3)
Generic notification
The generic notification reports events other than the defined event types. It provides a description
object that identifies the event in clear text.
qsrGenericEvent uses the following objects:
214
•
qsrEventTimeStamp
•
qsrEventSeverity
•
qsrEventDescription
Simple Network Management Protocol setup
Generic notifications are sent for the following events:
•
•
•
FC port configuration change
◦
Blade number (1 or 2)
◦
Port number (1 of 4)
iSCSI port configuration change
◦
Blade number (1 or 2)
◦
Port number (1 of 4)
iSNS configuration change
◦
•
NTP configuration change
◦
•
Blade number (1 or 2)
Firmware upgrade complete
◦
•
Blade number (1 or 2)
Management port configuration change
◦
•
Blade number (1 or 2)
Router configuration change
◦
•
Blade number (1 or 2)
Blade number (1 or 2)
Reboot blade
◦
Blade number (1 or 2)
Notifications
215
D Log messages
This appendix provides details about messages logged to a file. The message logs are persistent
because they are maintained across router power cycles and reboots. Information in the following
tables is organized as follows:
•
The ID column specifies the message identification numbers in ascending order.
•
The Log Message column indicates the message text displayed in the MPX200 CLI. Note that:
•
•
•
◦
Log messages for the iSCSI driver module are common to both iSCSI ports. Log messages
beginning with #0 denote iSCSI port 1 (GE1) and log messages beginning with #1 denote
iSCSI port 2 (GE2).
◦
Log messages for the FC driver module are common to both FC ports. Log messages
beginning with #0 denote FC port 1 (FC1) and log messages beginning with #1 denote
FC port 2 (FC2).
The Module Type column specifies the message reporting module, where:
◦
App = Application module (iSCSI, FCIP, or DMS)
◦
FC = FC driver
◦
FCIP = FCIP driver
◦
iSCSI = iSCSI driver
◦
NIC = NIC module
◦
System = System module
◦
User = User module (iSCSI, FCIP, DMS, or WD)
The Msg. Type column specifies the log message type, where:
◦
Error = Error log message
◦
Fatal = Fatal log message
◦
Info = Informational log message
The Description column provides additional information about the log message.
Table 34 MPX200 log messages
216
ID
Log message
Module
type
Msg type
Description
40967
QLBA_NullDoorbell: driver
unloaded, port disabled
App
Error
NULL doorbell routine for unloaded
drivers. When a driver is unloaded,
the doorbell routine is redirected to
this NULL routine.
40996
QLBA_ProcessTrb: Processing
App
unsupported ordered tag command
Error
Processing unsupported ordered tag
task management command.
41004
QLBA_ProcessTrb: Processing
unsupported head of queue tag
command
App
Error
Processing unsupported head-of-queue
task management command.
41058
QLBA_CreateTargetDeviceObject: App
Too many devices
Error
Unable to create an object for the
target device; exceeded the maximum
number of target devices.
Log messages
Table 34 MPX200 log messages (continued)
41060
QLBA_CreateTargetNodeObject:
Too many devices
App
Error
Unable to create an object for the
target node; exceeded the maximum
number of target devices.
41067
QLBA_CreateLunObject: LunObject App
memory unavailable
Error
Memory unavailable for LUN object.
41077
QLBA_CreateInitiatorObject: Too App
many initiators
Error
Unable to create an object for initiator
object; exceeded the maximum
number of initiators.
41096
QLBA_DisplayTargetOperationStatus: App
PCI Error, Status 0x%.2x
Error
Process control block status indicates
that a PCI error occurred during a
target operation.
41106
QLBA_DisplayInitiatorOperationStatus: App
DMA Error, Status 0x%.2x
Error
Process control block status indicates
that a DMA error occurred during an
initiator operation.
41107
QLBA_DisplayInitiatorOperationStatus: App
Transport Error, Status 0x%.2x
Error
Process control block status indicates
that a transport error (protocol)
occurred during an initiator operation.
41111
QLBA_DisplayInitiatorOperationStatus: App
Data Overrun, Status 0x%.2x
Error
Process control block status indicates
that a data overrun error occurred
during an initiator operation.
41234
QLIS_LoginPduContinue:
Operation failed. Initiator
0x%x, TPB status 0x%x
App
Error
iSCSI login failed between receipt of
PDU and request for the data segment.
41238
QLKV_ValidateLoginTransitCsgNsgVersion App
failed (status 0x%x)
Error
iSCSI login failed due to unsupported
version number in received login PDU.
41257
QLIS_LoginPduContinue: Invalid App
initiator name. Initiator:
Error
iSCSI login PDU contains invalid
initiator name. The format and
character set used to form the initiator
name is invalid.
41265
QLIS_LoginPduContinue: Target
not configured for Portal
App
Error
iSCSI target login was attempted to a
portal (iSCSI1 or iSCSI2) on which the
target is not presented.
41267
QLIS_LoginPduContinue: Target
not found. Target name:
App
Error
iSCSI login PDU received for a target
with a target name unknown to the
router.
41268
QLIS_LoginPduContinue: Missing App
target name
Error
iSCSI login PDU received without a
target name for a normal session.
41270
QLIS_LoginPduContinue: TSIH is App
0 but InitiatorName key/value
not provided
Error
iSCSI login PDU received without an
initiator name key/value.
41272
QLIS_LoginPduContinue:
CONN_STATE_IN_LOGIN, Unknown
InitTaskTag
App
Error
iSCSI login PDU received with an
incorrect initiator task tag for a session
which is partially logged in. This
would occur if a login PDU other than
the initial login PDU used an initiator
task tag which was different than the
initiator task tag provided in the initial
login PDU.
41283
QLIS_LoginPduContinue: TSIH
0x%x out of range
App
Error
iSCSI login PDU was received with a
TSIH out of range. This would occur if
the iSCSI initiator attempting the login
failed to used the TSIH value provided
in the Target Login Response PDU
217
Table 34 MPX200 log messages (continued)
(router is target) in subsequent login
PDUs.
218
41284
QLIS_LoginPduContinue: Session App
does not exist, invalid TSIH
0x%x
Error
iSCSI login PDU was received with an
invalid TSIH value. The TSIH is invalid
because there is no session with that
TSIH value. This would occur if the
iSCSI initiator attempting the login
failed to used the TSIH value provided
in the target login response PDU
(router is target) in subsequent login
PDUs.
41353
QLIS_LoginPduContinue: Session App
does not exist, invalid TSIH
0x%x
Error
iSCSI login rejected due to a CHAP
authentication error.
41354
QLIS_LoginPduContinue:
Unexpected CHAP key detected
App
Error
iSCSI login rejected due to a CHAP
key error.
41508
QLBI_SetPortInfo:
QLUT_AllocatePortalObject
failed (PortType 0x%x, PortId
0x%x)
App
Error
Failed to allocate an object for Set Port
Info IOCTL processing: PortType: 0 =
FC, 1 = iSCSIPortId: 0 = FC1 or
iSCSI1(GE1), 1 = FC2 or iSCSI2
(GE2)
41626
QLBI_GetLunInfo: INQUIRY
failed, TPB status 0x%x
App
Error
Inquiry command failed. The Inquiry
command was issued by the router as
part of its discovery process.
41629
QLBI_GetLunInfo: INQUIRY
failed, TPB status 0x%x
App
Error
Pass-Through command for Inquiry
command for page 83 failed. The
Inquiry command was issued by the
router as part of its discovery process.
41635
QLBI_Passthru: Invalid data
length %d bytes
App
Error
Pass-Through command for Read
Capacity command failed. The Read
Capacity command was issued by the
router as part of its discovery process.
41636
QLBI_GetLunInfo: INQUIRY
failed, TPB status 0x%x
App
Error
Read Capacity command failed. The
Read Capacity command was issued
by the router as part of its discovery
process.
41696
QLBI_GetLunInfo: INQUIRY
failed, TPB status 0x%x
App
Error
Pass-Through command issued by
management application (such as GUI)
was aborted.
41700
QLBI_Passthru: Invalid CDB
length %d bytes
App
Error
Pass-Through command issued by
management application (such as GUI)
failed due to invalid CDB length.
41701
QLBI_Passthru: Invalid data
length %d bytes
App
Error
Pass-Through command issued by
management application (such as GUI)
failed due to invalid data length.
41717
QLBI_Passthru: Invalid data
length %d bytes
App
Error
Pass-Through command issued by
management application (such as GUI)
was interrupted or timed out.
41750
QLBI_Ioctl: ERROR: Operation
(0x%x) not supported in this
mode
App
Error
IOCTL operation unsupported.
Operation code provided in log
message.
41768
QLBI_GetLunList: REPORT LUNS
command failed
App
Error
Report LUNs command failed. The
Report LUNs command was issued by
Log messages
Table 34 MPX200 log messages (continued)
the router as part of its discovery
process.
41769
QLBI_GetLunList: REPORT LUNS
command failed with CHECK
CONDITION, SCSI STATUS 0x%02X
App
Error
Report LUNs command failed with
check condition status. The Report
LUNs command was issued by the
router as part of its discovery process.
41771
QLBI_GetLunList: Lun allocation App
failed for LunId %d
Error
Failed to allocate LUN object; out of
resources.
41994
QLFC_Login: VpIndex (%d) out of App
range
Error
Login attempted using FC VP index
that is out-of-range (range = 0–31).
Index reported in log message.
41995
QLFC_Login: VP Index 0x%x not
configured
App
Error
Login attempted using FC VP index
that has not been configured.
Operation attempted on an
unconfigured VP.
42002
QLFC_Login: Can't open
connection
App
Error
Attempting login but FC connection
cannot be opened.
42024
QLFC_Logout: No active path to App
device. WWPN:
%.2X%.2X%.2X%.2X%.2X%.2X%.2X%.2X
Error
Attempting logout of device for which
there is no active path (WWPN not
found).
42027
QLFC_Logout: VP Index 0x%x not App
configured
Error
Logout attempted using FC VP index
that has not been configured.
Operation attempted on an
unconfigured VP.
42068
QLFC_HandleTeb: System Error
App
Error
Event notification; FC processor
encountered a system error
(unrecoverable firmware error).
42069
QLFC_HandleTeb: Driver Fatal
Error
App
Error
Event notification; FC driver
encountered a fatal error.
42072
QLFC_HandleTeb: Driver Fatal
Error
App
Error
Event notification; FC port logged out.
42242
QLIS_AllocateSessionObject: Out App
of session resources
Error
Failed to allocate object for iSCSI
session; out of session resources.
42252
QLIS_EnqueueiScsiPdu: Duplicate App
PDU, CmdSN %d (0x%x), dropping
it
Error
Received iSCSI PDU with duplicate
command sequence number (CmdSN).
Command PDU will be dropped.
42258
QLIS_InstantiateSession: Can't App
add Initiator to the database
Error
Unable to allocate iSCSI initiator
object while instantiating session.
42259
QLIS_InstantiateSession:
App
Maximum number (%d) of allowed
hosts already logged in
Error
iSCSI session login rejected because
the maximum number of allowed hosts
are already logged in.
42404
QLIS_InstantiateSession:
App
Maximum number (%d) of allowed
hosts already logged in
Error
Failed to execute iSCSI Command
PDU because its CmdSN is
out-of-range. Log message contains
the incorrect CmdSN, the valid CmdSN
range, the first byte of the CDB, and
the data length.
42648
QLIS_HandleTeb: Driver Fatal
Error
App
Error
Event notification; iSCSI driver
encountered a fatal error.
42649
QLIS_HandleTeb: Unload Driver
App
Error
Event notification; an IOCTL request
was received to unload the iSCSI
driver.
219
Table 34 MPX200 log messages (continued)
42654
QLIS_HandleTeb: iSNS Connection App
Failed
Error
Event notification; attempt to connect
to the iSNS server failed.
43265
QLUT_AllocateTpbExtension: TPB App
allocation failed
Error
Failed to allocate memory for TPB
extension.
43267
QLUT_AllocateTpbExtension:
App
Alloc of DSD failed for buffer
len %d
Error
Failed to allocate DSD (buffer length
%d).
43268
QLUT_AllocateTpbExtension: Data App
buffer allocation failed
(length %d)
Error
Failed to allocate data buffer (length
%d).
53254
System Booting Up.
App
Info
Router is booting up.
53357
QLBA_ProcessTpb: De-compression App
failed. Disabling compression
temporarily
Info
Decompression failed. Disabling
compression temporarily.
53584
QLIS_LoginPduContinue: [0x%x]
SES_STATE_LOGGED_IN NORMAL
App
Info
iSCSI session full feature login.
53585
QLIS_LoginPduContinue: [0x%x]
SES_STATE_LOGGED_IN DISCOVERY
App
Info
iSCSI session discovery login.
53586
QLIS_LoginPduContinue:
Initiator: %s
App
Info
iSCSI login of Initiator: %s.
53587
QLIS_LoginPduContinue: Target: App
%s
Info
iSCSI login of Target: %s.
54274
QLFC_Login: Origin 0x%x, VP
Index 0x%x, Id 0x%x
App
Info
FC login occurred, origin xx (1 =
adapter, 2 = target, 3 = initiator), VP
(virtual port) xx, ID (loop ID) xx.
54275
QLFC_Login: Port ID
%.2x%.2x%.2x
App
Info
FC login occurred with port ID
xx.xx.xx.
54276
QLFC_Login: Node Name
App
%.2x%.2x%.2x%.2x%.2x%.2x%.2x%.2x
Info
FC login occurred with WWNN
xx.xx.xx.xx.xx.xx.xx.xx.
54277
QLFC_Login: Port Name
App
%.2x%.2x%.2x%.2x%.2x%.2x%.2x%.2x
Info
FC login occurred with WWPN
xx.xx.xx.xx.xx.xx.xx.xx.
54306
QLFC_Logout: Origin 0x%x, VP
Index 0x%x, Id 0x%x
App
Info
QLFC_Logout: Origin 0x%x, VP Index
0x%x, Id 0x%x.
54307
QLFC_Logout: Port ID
%.2x%.2x%.2x
App
Info
FC Logout: Port ID %.2x%.2x%.2x.
54308
QLFC_Logout: Node Name
App
%.2x%.2x%.2x%.2x%.2x%.2x%.2x%.2x
Info
FC Logout: Node Name xx xx xx xx
xx xx xx xx.
54309
QLFC_Logout: Port Name
App
%.2x%.2x%.2x%.2x%.2x%.2x%.2x%.2x
Info
FC Logout: Port Name xx xx xx xx xx
xx xx xx.
54359
QLFC_Logout: Port Name
App
%.2x%.2x%.2x%.2x%.2x%.2x%.2x%.2x
Info
FC login event notification, VPxx.
54683
QLIS_OpenConnectionNotification: App
Target connection opened (Port
%d, DDB %d)
Info
iSCSI target connection opened for
port %d, DDB %d.
54938
QLIS_OpenConnectionNotification: App
Target connection opened (Port
%d, DDB %d)
Info
Event notification; iSCSI open
connection request.
220 Log messages
Table 34 MPX200 log messages (continued)
54939
QLIS_HandleTeb:
UTM_EC_CLOSE_CONNECTION or
UTM_EC_CONNECTION_CLOSED
App
Info
Event notification; iSCSI close
connection request or connection
closed.
54940
QLIS_HandleTeb:
UTM_EC_CLOSE_CONNECTION or
UTM_EC_CONNECTION_CLOSED
App
Info
Event notification; iSCSI connection
closed.
54941
QLIS_HandleTeb:iSNS Server Open App
Connection succeeded
Info
Event notification; connection opened
with iSNS server.
54943
QLIS_HandleTeb: UTM_EC_ISNS_SCN App
Info
Event notification; iSNS RSCN
received.
54945
QLIS_HandleTeb:
UTM_EC_ISNS_CLIENT_DISCOVERED
App
Info
Event notification; iSNS client
discovered.
69652
#%d: qlutm_init: Diagnostic
failed, invalid SRAM
iSCSI
Fatal
iSCSI processor SRAM test failed.
69653
#%d: qlutm_init: Diagnostic
failed, fail reboot
iSCSI
Fatal
iSCSI processor failed diagnostic
reboot.
69654
#%d: qlutm_init: Diagnostic
failed, invalid NVRAM
iSCSI
Fatal
iSCSI processor failed NVRAM
diagnostic.
69655
#%d: qlutm_init: Diagnostic
failed, invalid DRAM
iSCSI
Fatal
iSCSI processor failed DRAM
diagnostic.
69656
#%d: qlutm_init: Failed to
return diagnostic result to
Bridge
iSCSI
Fatal
iSCSI processor failed to return
diagnostic results.
69941
#%d: QLUtmProcessResponseQueue: iSCSI
Invalid handle %x EntryType %x
Fatal
Response queue entry contains an
invalid handle.
69951
#%d: QLSetNvram: QLRebootTimer iSCSI
failed AF %x RS %x Time %d
Fatal
Set NVRAM reboot timer failed.
69964
#%d: QLDisable: QLRebootTimer
failed AF %x RS %x Time %d
iSCSI
Fatal
Port disable reboot timer failed.
69966
#%d: QLEnable: QLRebootTimer
failed AF %x RS %x Time %d
iSCSI
Fatal
Port enable reboot timer failed.
70224
#%d: QLProcSrblessiSNSResponse: iSCSI
Invalid handle %x
Fatal
iSNS response contains an invalid
handle.
70400
#%d: QLInitializeDevice:
QLStartAdapter failed
iSCSI
Fatal
Start iSCSI processor failed.
70417
#%d: QLInitializeAdapter:
QLInitializeFW failed
iSCSI
Fatal
iSCSI processor firmware initialization
failed.
70432
#%d:
QLDoInterruptServiceRoutine:
PortFatal interrupt.
PortFatalErrorStatus %08x CSR
%08x AS %x AF %x
iSCSI
Fatal
iSCSI processor port fatal error.
70448
#%d: QLStartAdapter:
QLRebootTimer failed AF %x RS
%x Time %d
iSCSI
Fatal
Start iSCSI processor reboot timer
failed.
70489
#%d: QLIsrDecodeMailbox: System iSCSI
Error 8002 MB[1-7] %04x %04x
%04x %04x %04x %04x %04x
Fatal
iSCSI processor fatal system error.
221
Table 34 MPX200 log messages (continued)
70499
#%d: QLProcessResponseQueue:
Invalid handle for
ET_PASSTHROUGH_STATUS
iSCSI
Fatal
Response queue invalid handle for ET
pass-through.
70501
#%d: QLProcessResponseQueue:
iSCSI
Invalid entry type in response
queue %x
Fatal
Response queue invalid entry type.
70502
#%d: QLProcessResponseQueue:
iSCSI
Invalid handle %x EntryType %x
Fatal
Response queue invalid handle for
specified entry type.
70524
#%d: QLProcessAen: Invalid
event %x
iSCSI
Fatal
Asynchronous event for unknown event
type.
70544
#%d: QLRebootTimer: Reboot
failed!
iSCSI
Fatal
Reboot timer failed.
70563
#%d: QLRebootTimer: Reboot
failed!
iSCSI
Fatal
iSCSI driver missed iSCSI processor
heartbeat. iSCSI processor rebooted.
70564
#%d: QLRebootTimer: Reboot
failed!
iSCSI
Fatal
iSCSI processor failed to complete
operation before timeout.
70609
#%d: QLRebootTimer: Reboot
failed!
iSCSI
Fatal
iSCSI processor system error restart.
70610
#%d: QLProcessSystemError:
RebootHba failed
iSCSI
Fatal
iSCSI processor reboot failed.
70784
#%d: QLConfigChip: invalid
NVRAM
iSCSI
Fatal
iSCSI processor NVRAM invalid
(checksum error).
70835
#%d: QLStartFw:
MBOX_CMD_SET_FLASH failed %x
iSCSI
Fatal
iSCSI controller Set Flash command
failed.
70836
#%d: QLStartFw: Invalid Fw
loader state 0x%x
iSCSI
Fatal
iSCSI controller failed to load
firmware.
70837
#%d: QLStartFw: Load Fw loader iSCSI
timeout
Fatal
iSCSI controller firmware load
operation timed out.
70938
#%d: ql_adapter_up: Failed to
initialize adapter
iSCSI
Fatal
iSCSI controller failed to initialize.
72351
#%d: QLProcSrblessiSNSResponse: iSCSI
Invalid handle %x
Fatal
iSCSI controller reported that an SNS
response had an invalid handle.
73990
#%d: QLUtmIoctlEnable:
Initialize FW failed
iSCSI
Error
iSCSI processor failed firmware
initialization.
74056
#%d: QLRunDiag: MBOX Diag test iSCSI
internal loopback failed %x %x
Error
iSCSI processor failed the internal
loopback test.
74057
#%d: QLRunDiag: MBOX Diag test iSCSI
external loopback failed %x %x
Error
iSCSI processor failed the external
loopback test.
74068
#%d: QLUtmReceiveScsiCmd:
iSCSI
Invalid ATIO Continuation type
%x
Error
iSCSI processor reported an invalid
ATIO Continuation type x.
74069
#%d: QLUtmProcessResponseQueue: iSCSI
Immediate data addr %08x:%08x
in unsupported PduType
Error
iSCSI processor reported an
Immediate data address
(xxxxxxxx:xxxxxxxx) in an
unsupported PDU type.
74241
#%d: QLiSNSEnableCallback: iSNS iSCSI
Server TCP Connect failed
Error
iSCSI processor could not connect with
the iSNS.
222 Log messages
Table 34 MPX200 log messages (continued)
74577
#%d: QLIsrDecodeMailbox: NVRAM iSCSI
invalid
Error
iSCSI processor reported that the iSCSI
port NVRAM contains invalid data
(checksum error).
74580
#%d: QLIsrDecodeMailbox: AEN
%04x, Duplicate IP address
detected, MB[1-5] %04x %04x
%04x %04x %04x
iSCSI
Error
iSCSI processor reported a duplicate
IP address was detected (address xxxx
xxxx xxxx xxxx xxxx).
74587
#%d: QLIsrDecodeMailbox: Link
down
iSCSI
Error
iSCSI processor reported a link down
condition.
74656
#%d: QLReadyTimer: Adapter
missed heartbeat for %d
seconds. Time left %d
iSCSI
Error
Driver failed to receive a heartbeat
from the iSCSI processor for the
specified number of seconds.
74659
#%d: QLReadyTimer: Adapter
missed heartbeat for 0x%x
seconds
iSCSI
Error
iSCSI processor (adapter) failed to
provide a heartbeat for x seconds.
74660
#%d: QLReadyTimer: Abort
pTpb=%p failed, DrvCount 0x%x
iSCSI
Error
iSCSI processor failed to complete an
abort request.
74661
#%d: QLTimer: Abort pTpb=%p,
iSCSI
Type %x, Timeout 0x%x DrvCount
0x%x, DdbIndex 0x%x
Error
Driver timed out an iSCSI processor
operation and is aborting the
operation.
74663
#%d: QLReadyTimer: MBOX_CMD
%04x %04x %04x %04x %04x %04x
%04x %04x timed out
iSCSI
Error
Driver timed out an iSCSI processor
mailbox command.
74665
#%d: QLReadyTimer:
QLiSNSReenable failed.
iSCSI
Error
Driver timed out while attempting to
reconnect with the iSNS.
74705
#%d: QLProcessSystemError:
Restart RISC
iSCSI
Error
iSCSI processor was restarted.
74746
#%d: QLInitializeFW:
iSCSI
MBOX_CMD_INITIALIZE_FIRMWARE
failed %04x %04x %04x %04x %04x
%04x
Error
iSCSI processor rejected the firmware
initialize command.
74784
#%d: QLUpdateInitiatorData: No iSCSI
more room in Initiator
Database.
Error
Driver’s initiator database is full. The
driver is capable of storing 1024
iSCSI initiators in its database. Use
the CLI or GUI to remove
unwanted/unused iSCSI initiators.
74800
#%d: QLSetTargetData: No more
room in Target Database.
iSCSI
Error
Driver’s target database is full. Use the
CLI or GUI to remove
unwanted/unused iSCSI targets.
75008
#%d: ql_process_error:
OB_TCP_IOCB_RSP_W returned
DdbInx 0x%x pTpb %p
iSCSI
Error
TCP retry for a frame failed on the
connection ddbIndex. Tpb contains
the frame memory address.
86347
#%d: QLDisable: Restart RISC
iSCSI
Info
Restart iSCSI processor (RISC).
86349
#%d: QLEnable: Restart RISC to iSCSI
update EEPROM
Info
EEPROM updated, restart iSCSI
processor (RISC).
86874
#%d: QLIsrDecodeMailbox: Link
up
iSCSI
Info
Link up reported by iSCSI processor
for GE1 or GE 2.
87346
#%d: QLGetFwStateCallback: link iSCSI
100Mb FDX
Info
iSCSI controller reported a link
speed/configuration of 100 Mb
full-duplex (FDX).
223
Table 34 MPX200 log messages (continued)
87348
#%d: QLGetFwStateCallback: link iSCSI
1000Mb FDX
Info
iSCSI controller reported a link
speed/configuration of 1000 Mb FDX.
87350
#%d: QLGetFwStateCallback:
Invalid link speed 0x%x
iSCSI
Info
iSCSI controller reported an invalid
link speed.
102419
#%d: qlutm_init: Diagnostic
failed, port 1 invalid SRAM
FC
Fatal
FC1 processor SRAM test failed.
102420
#%d: qlutm_init: Diagnostic
failed, port 1 POST failed
FC
Fatal
FC1 processor POST failed.
102421
#%d: qlutm_init: Diagnostic
failed, port 2 invalid SRAM
FC
Fatal
FC2 processor SRAM test failed.
102422
#%d: qlutm_init: Diagnostic
failed, port 2 POST failed
FC
Fatal
FC2 processor POST failed.
102423
#%d: qlutm_init: Failed to
return diagnostic result to
Bridge
FC
Fatal
FC processor failed to return
diagnostic results.
102656
#%d: QLInitializeAdapter: Reset FC
ISP failed
Fatal
FC processor failed reset.
102657
#%d: QLInitializeAdapter: Load FC
RISC code failed
Fatal
FC processor firmware load failed.
102658
#%d: QLInitializeAdapter: Load FC
ISP2322 receive sequencer code
failed
Fatal
FC processor receive sequencer code
load failed.
102659
#%d: QLInitializeAdapter: Load FC
ISP2322 transmit sequencer code
failed
Fatal
FC processor transmit sequencer code
load failed.
102662
#%d: QLInitializeAdapter:
FC
Verify Checksum command failed
(%x)
Fatal
FC processor firmware checksum
failed.
102680
#%d: QLInitializeFW: FAILED
FC
Fatal
FC processor firmware initialization
failed.
102688
#%d: QLInterruptServiceRoutine: FC
Risc pause %x with parity error
hccr %x, Disable adapter
Fatal
FC processor paused due to internal
parity error.
102689
#%d: QLInterruptServiceRoutine: FC
Invalid interrupt status: %x
Fatal
FC processor returned an invalid
interrupt status.
102716
#%d: QLIsrEventHandler: System FC
error event (%x), MB1=%x,
MB2=%x, MB3=%x, MB4=%x, MB5=%x,
MB6=%x, MB7=%x
Fatal
FC processor system error.
102746
#%d: QLProcessResponseQueue:
Invalid handle %x, type %x
FC
Fatal
Response queue entry contains an
invalid handle.
102752
#%d: QLTimer: Ext Ram parity
error exceed limit cnt 0x%x,
limit 0x%x, Disabled adapter
FC
Fatal
FC processor external SRAM parity
error count exceeded limit; FC port
disabled.
102755
#%d: QLTimer: Heartbeat failed FC
Fatal
FC processor heartbeat failed.
102800
#%d: QLRestartRisc: restart
RISC
FC
Fatal
FC processor being restarted.`
106583
#%d: QLUtmReceiveIo: Path
FC
invalid/FW No resource count %x
Error
FC processor received a SCSI
command for an unknown target path
224 Log messages
Table 34 MPX200 log messages (continued)
or has run out of resources to execute
additional commands.
106589
#%d: QLIoctlEnable: Adapter
disabled
FC
Error
FC processor was disabled by an
IOCTL request to the driver.
106590
#%d: QLIoctlEnable: Initialize FC
FW error
Error
FC processor firmware failed
initialization. The request to initialize
was received by the driver in an
IOCTL request.
106592
#%d: QLIoctlRunDiag: Diagnostic FC
loopback command failed %x % %x
%x
Error
FC processor failed the external
loopback test.
106593
#%d: QLIoctlDisable:
Re-initialize adapter failed
FC
Error
FC processor failed to re-initialize in
response to an IOCTL disable request.
106803
#%d: QLIsrEventHandler: Link
down (%x)
FC
Error
FC processor reported a link down
condition.
106813
#%d: QLIsrEventHandler:
FC
Unexpected async event (%x),
MB1=%x, MB2=%x, MB3=%x, MB4=%x,
MB5=%x, MB6=%x, MB7=%x
Error
FC processor reported an unexpected
asynchronous event. The mailbox
registers provide status, event code,
and data related to the event.
106847
#%d: QLProcessResponseQueue:
FC
Invalid EntryStatus %x, type %x
Error
FC controller reported an invalid Entry
Status %x, type %x.
106851
#%d: QLTimer: Heartbeat failed FC
Error
FC controller failed to provide a
heartbeat.
106853
#%d: QLTimer: Link error count FC
(0x%x) exceeded, link down
Error
Driver has determined that the FC link
is unreliable and unusable due to the
number of errors encountered. The link
has been taken down.
106912
#%d: QLReserveLoopId: out of
loop Ids
FC
Error
FC processor was unable to obtain the
number of loop IDs required. This
failure occurs only when the FC
processor is running multi-ID firmware.
106928
#%d: QLMarkDeviceOffline:
Device Id: %x marked offline,
cLinkDownTimeout = %x,
cPortDownRetryCount=%x
FC
Error
Driver was unable to re-establish
connection to the target within the
timeout and retry counts, and is
therefore marking it offline.
106948
#%d: QLSnsGetAllNext: Name
server login FAILED %x
FC
Error
FC processor is unable to log into the
FC fabric name server.
107029
#%d: QLUpdateDeviceData: out of FC
slots in host database
Error
Driver host (initiator) database is full.
107030
#%d: QLUpdateDeviceData: out of FC
slots in target database
Error
Driver target database is full.
107041
#%d: QLUpdateDeviceDatabase
0x%x: GET_ID failed %x
FC
Error
Driver host (initiator) database is full.
Maximum hosts is 64.
107056
#%d: QLUpdateDeviceDatabase 0x%x: out FC
of slots in host database
Error
Drivers host (initiator) database is full.
107078
#%d: QLUpdatePort 0x%x: out of FC
slots in host database
Error
Driver was unable to re-establish
connection to the target within the
timeout and retry counts, and is
therefore marking it offline.
107984
#%d: QLWriteFlashDword: Write
fails at addr 0x%x data 0x%x
FC
Error
FC controller failed a Flash write
(address x data x).
225
Table 34 MPX200 log messages (continued)
108032
#%d: QLGetVpDatabase:
FC
MBOX_CMD_GET_VP_DATABASE for VP
%d fatal error
Error
FC controller failed the Get VP
Database command (for virtual port
%d).
108033
#%d: QLGetVpDatabase:
FC
MBOX_CMD_GET_VP_DATABASE for VP
%d failed %x
Error
FC controller failed the Get VP
Database command (for virtual port
%d) with status x.
108049
#%d: QLVerifyMenloFw:
FC
EXECUTE_COMMAND_IOCB failed MB0
%x MB1 %x
Error
FC controller reported failure status for
an Execute IOCB (input/output control
block) command.
108050
#%d: QLVerifyMenloFw:
EXECUTE_COMMAND_IOCB fatal
error
FC
Error
FC controller reported a fatal error
while processing an Execute IOCB
command.
108064
#%d: QLGetFwState: Get Firmware FC
State failed 0-3 %x %x %x %x
Error
FC controller reported failure status for
a Get Firmware State command.
118882
#%d: QLIoctlDisable: Reset
adapter
FC
Info
Request to reset the FC processor
(adapter) received from IOCTL
interface.
119088
#%d: QLIsrEventHandler: LIP
occurred (%x): mailbox1 = %x
FC
Info
FC loop initialization process (LIP)
occurred. The LIP type is reported, as
is the contents of the FC processor’s
mailbox 1 register.
119089
#%d: QLIsrEventHandler: LIP
reset occurred (%x): mailbox1
= %x
FC
Info
FC LIP reset occurred. The LIP reset
type is reported, as is the contents of
the FC processor’s mailbox 1 register.
119090
#%d: QLIsrEventHandler: Link up FC
(%x) mailbox1 = %x
Info
FC link up occurred. Event status is
reported, as is the contents of the FC
processor’s mailbox 1 register.
119092
#%d: QLIsrEventHandler: Link
mode up (%x): RunTimeMode=%x
FC
Info
FC link up occurred. Event status is
reported, as is the RunTimeMode (0 =
loop, 1 = point-to-point).
119093
#%d: QLIsrEventHandler: RSCN
update (%x) rscnInfo: %x
FC
Info
An RSCN was received. Event status
is reported, as is the RSCN
information.
119097
#%d: QLIsrEventHandler: Port
update (%x) mb1-3 %x %x %x
FC
Info
FC port update. Event status is
reported, as is the contents of the FC
processor’s mailbox 1, 2, and 3
registers.
119144
#%d: QLTimer: VP %d discover a FC
reject device PID %02x%02x%02x
Info
A virtual port logged into a device,
but the device rejected the login.
120278
#%d: QLFlashGetNvram: Invalid
Serial Link Control 0x%x for
port %d
FC
Info
Update NVRAM for the invalid serial
link control for the mezzanine
platform.
120373
#%d: QLIsrEventHandler: DCBX
Completed (%x)
FC
Info
For FCoE protocol, the data center
bridging exchange protocol (DCBX)
is complete.
120374
#%d: QLIsrEventHandler: IDC
FC
Completion (%x) %x, %x, %x, %x,
%x, %x, %x
Info
For FCoE protocol, the inter-driver
communication (IDC) is complete.
120375
#%d: QLIsrEventHandler: IDC
FC
Notification (%x), %x, %x, %x,
%x, %x, %x, %x
Info
For FCoE protocol, the IDC notification
came from another driver.
226 Log messages
Table 34 MPX200 log messages (continued)
120376
#%d: QLIsrEventHandler: IDC
FC
Time Extended (%x), %x, %x, %x,
%x, %x, %x, %x
Info
For FCoE protocol, the IDC time
extended notification is received.
120377
#%d: QLIsrEventHandler: DCBX
Started (%x)
FC
Info
For FCoE protocol, the DCBX protocol
has started.
120378
#%d: QLIsrEventHandler: FCF
Config Error (%x), MB1=%x
FC
Info
For FCoE protocol, the FCF
configuration error occurred.
120379
#%d: QLIsrEventHandler: DCBX
Parameter Changed (%x)
FC
Info
For FCoE protocol, the DCBX
parameters are changed.
139265
QBRPC_Initialize: Entered
User
Error
RPC (remote procedure call) server
initialization entry point.
139266
QBRPC_Initialize:GetBridge Mem User
Allocation error
Error
Get System API memory allocation
failed.
139267
QBRPC_Initialize:GetBridgeAdv
Mem Allocation error
User
Error
Get System Advanced API memory
allocation failed.
139268
QBRPC_Initialize:GetMgmt Mem
Allocation error
User
Error
Get Management API memory
allocation failed.
139269
QBRPC_Initialize:GetIscsi Mem
Allocation error
User
Error
Get iSCSI API memory allocation
failed.
139270
QBRPC_Initialize:GetIscsiAdv
Mem Allocation error
User
Error
Get iSCSI advanced API memory
allocation failed.
139271
QBRPC_Initialize:GetIsns Mem
Allocation error
User
Error
Get iSNS API memory allocation
failed.
139272
QBRPC_Initialize:GetFcIntfc Mem User
Allocation error
Error
Get FC Interface API memory
allocation failed.
139273
QBRPC_Initialize:GetFcAdv Mem
Allocation error
User
Error
Get FC Advanced API memory
allocation failed.
139280
QBRPC_Initialize:GetFcSfp Mem
Allocation error
User
Error
Failed memory allocation for Get FC
SFP API.
139281
QBRPC_Initialize:GetLog Mem
Allocation error
User
Error
Failed memory allocation for Get Log
API.
139282
QBRPC_Initialize:GetStats Mem
Allocation error
User
Error
Failed memory allocation for Get
Statistics API.
139283
QBRPC_Initialize:InitListMem
Allocation error
User
Error
Failed memory allocation for Get
Initiator List API.
139284
QBRPC_Initialize:TargetList Mem User
Allocation error
Error
Failed memory allocation for Get
Target List API.
139285
QBRPC_Initialize:LunList
MemAllocation error
User
Error
Failed memory allocation for Get LUN
List API.
139286
QBRPC_Initialize:PresTarget Mem User
Allocation error
Error
Failed memory allocation for Get
Presented Targets List API.
139287
QBRPC_Initialize:LunMask Mem
Allocation error
User
Error
Failed memory allocation for Get LUN
Mask API.
139288
QBRPC_Initialize:Init Mem
Allocation error
User
Error
Failed memory allocation for Initiator
API.
139289
QBRPC_Initialize:TgtDevice Mem User
Allocation error
Error
Failed memory allocation for Target
Device API.
227
Table 34 MPX200 log messages (continued)
139296
QBRPC_Initialize:FcTgt Mem
Allocation error
User
Error
Failed memory allocation for FC
Target API.
139297
QBRPC_Initialize:BridgeStatus
Mem Allocation error
User
Error
Failed memory allocation for System
Status API.
139298
QBRPC_Initialize:Diag Mem
Allocation error
User
Error
Failed memory allocation for
Diagnostic API.
139299
QBRPC_Initialize:DiagLog Mem
Allocation error
User
Error
Failed memory allocation for
Diagnostic Log API.
139300
QBRPC_Initialize:FruImage Mem
Allocation error
User
Error
Failed memory allocation for FRU
Image API.
139301
QBRPC_Initialize:OemMfg Mem
Allocation error
User
Error
Failed memory allocation for OEM
Manufacturing API.
139302
QBRPC_Initialize:Status Mem
Allocation error
User
Error
Failed memory allocation for Status
API.
139303
QBRPC_Initialize:TcpIpStats Mem User
Allocation error
Error
Failed memory allocation for TCP/IP
Statistics API.
139304
QBRPC_Initialize:NtpStats Mem
Allocation error
User
Error
Failed memory allocation for NTP
Status API.
139305
QBRPC_Initialize:LunList
MemAlloc error
User
Error
Failed memory allocation for LUN List
API.
139315
QBRPC_FreeResources:Entered
User
Error
RPC free resources entry point.
139553
checkDuplicateIp: Detected
Error %08x %08x%04x
User
Error
Detected duplicate IP address for
management port.
139930
FcipRoute#%d Failed with Memory App
Allocation Error
Error
FCIP route add/mod failed because
of lack of memory.
139931
FcipRoute#%d Failed with
Invalid Arg Error
App
Error
FCIP route add/mod failed because
the arguments supplied were incorrect.
139932
FcipRoute#%d Failed with
Unknown Device Error
App
Error
FCIP route add/mod failed because
of incorrect configuration.
139933
FcipRoute#%d Failed with Kernel App
Error
Error
FCIP route add/mod failed because
of configuration error.
139934
FcipRoute#%d Failed with
Network Configuration Error
App
Error
FCIP route add/mod failed because
of the Ethernet network configuration.
139935
FcipRoute#%d Failed with
Persistence Read Failure
App
Error
FCIP route add/mod failed because
of an error in reading the saved
configuration from persistence.
139936
FcipRoute#%d Failed with
Persistence Write Failure
App
Error
FCIP route add/mod failed because
of an error in writing the route
configuration to persistence.
139937
FcipRoute#%d Failed with IP
Address Reuse Error
App
Error
FCIP route add/mod failed because
an IP address supplied is already
under use.
139938
FcipRoute#%d Add Failed because App
relevant FCIP Licence not
available
Error
FCIP route add/mod failed because
FCIP license is not present.
151842
FW Upgrade performed: new
version is: %d.%d.%d.%d
Info
A firmware upgrade was performed,
the new version is: d.d.d.d.
228 Log messages
User
Table 34 MPX200 log messages (continued)
151843
REBOOT/SHUTDOWN Command from
user. Code=%d
User
Info
User issued a REBOOT or SHUTDOWN
command.
151889
#%d:
User
qapisetfcinterfaceparams_1_svc:
FC port configuration changed
Info
FC port configuration has changed.
151890
#%d:
User
qapisetiscsiinterfaceparams_1_svc:
iSCSI port configuration
changed
Info
iSCSI port configuration has changed.
151891
#%d: qapisetisns_1_svc:iSNS
configuration changed
User
Info
iSNS configuration has changed.
151892
qapisetntpparams_1_svc: NTP
configuration changed
User
Info
NTP configuration has changed.
151893
#%d: qapisetvlanparams_1_svc:
VLAN configuration changed
User
Info
VLAN configuration has changed.
151894
qapisetlunmask_1_svc: Lunmask
added for LUN %d
User
Info
LUN mask was added for LUN %d.
151895
qapisetlunmask_1_svc: Lunmask
removed for LUN %d
User
Info
LUN mask was removed for LUN %d.
151896
qapisetmgmintfcparams_1_svc:Management User
port configuration changed
Info
Management port configuration has
changed.
151897
qapisetbridgebasicinfo_1_svc:Bridge User
configuration changed
Info
Router configuration has changed.
151908
GE%d: Port status changed by
user to ENABLED.
User
Info
GE port %d was enabled user.
151909
GE%d: Port status changed by
user to DISABLED.
User
Info
GE port %d was disabled by user.
151910
FC%d: Port status changed by
user to ENABLED.
User
Info
FC port %d was enabled by user.
151911
FC%d: Port status changed by
user to DISABLED.
User
Info
FC port %d was disabled by user.
151912
qapimaptargetdevice_1_svc:
User
Target WWPN:
%.2x%.2x%.2x%.2x%.2x%.2x%.2x%.2x
mapped to iSCSI portal %d.
Info
Target at WWPN:
xx.xx.xx.xx.xx.xx.xx.xx has been
mapped to iSCSI portal %d.
151913
qapimaptargetdevice_1_svc:
User
Target WWPN:
%.2x%.2x%.2x%.2x%.2x%.2x%.2x%.2x
unmapped from iSCSI portal %d.
Info
Target at WWPN:
xx.xx.xx.xx.xx.xx.xx.xx has been
unmapped from iSCSI portal %d.
152069
FcipRoute#%d Added
App
Info
FCIP route #n has been successfully
added.
152070
FcipRoute#%d Modified
App
Info
FCIP route #n has been successfully
modified.
152071
FcipRoute#%d Removed
App
Info
FCIP route #n has been successfully
removed.
152082
qapiaddmodifyinitiator_1_svc : User
Initiator Configuration Changed
Info
Initiators configuration has changed.
152083
qapiremoveinitiator_1_svc :
Initiator Removed
User
Info
Initiator has been removed.
229
Table 34 MPX200 log messages (continued)
152129
sysTempMon: Left PCM Installed User
Info
Left power and cooling module (PCM)
is or has been installed.
152130
sysTempMon: Left PCM
Un-installed
User
Info
Left PCM is or has been uninstalled.
152131
sysTempMon: Right PCM Installed User
Info
Right PCM is or has been installed.
152132
sysTempMon: Right PCM
Un-installed
User
Info
Right PCM is or has been uninstalled.
152133
sysTempMon: Power for Left PCM User
Plugged-in
Info
Left PCM is connected AC power.
152134
sysTempMon: Power for Left PCM User
Un-plugged
Info
Left PCM is not connected to AC
power (unplugged).
152135
sysTempMon: Power for Right PCM User
Plugged-in
Info
Right PCM is connected AC power.
152136
sysTempMon: Power for Right PCM User
Un-plugged
Info
Right PCM is not connected to AC
power (unplugged).
152137
sysTempMon: Slot 1 (R1) PCM
Fan%d faulty
User
Info
Left PCM (#1) is reporting a faulty fan.
152138
sysTempMon: Slot 2 (R2) PCM
Fan%d faulty
User
Info
Left PCM (#1) is reporting a healthy
fan.
152139
sysTempMon: Slot 1 (R1) PCM
Fan%d healthy
User
Info
Right PCM (#2) is reporting a faulty
fan.
152140
sysTempMon: Slot 2 (R2) PCM
Fan%d healthy
User
Info
Right PCM (#2) is reporting a healthy
fan.
152141
sysTempMon: Over Temperature
User
Front: %dC Rear: %dC CPU1: %dC
CPU2: %dC
Info
Router has detected an over
temperature, Front: %dC Rear: %dC
CPU1: %dC CPU2: %dC.
152142
sysTempMon: Setting the fan
speed to high
User
Info
Fan(s) speed has been set to high.
152143
sysTempMon: Setting the fan
speed to normal
User
Info
Fan(s) speed has been set to normal.
152144
sysTempMon: Temperature back to User
safe value. Front: %dC Rear:
%dC CPU1: %dC CPU2: %dC
Info
Router temperature has returned to
normal operating range, Front: %dC
Rear: %dC CPU1: %dC CPU2: %dC.
152145
sysTempMon: Critical
User
Temperature, Shutting Down
Front: %dC Rear: %dC CPU1: %dC
CPU2: %dC
Info
Router has reached a critical
temperature ad is shutting down,
Front: %dC Rear: %dC CPU1: %dC
CPU2: %dC.
172040
FcipRoute#%d: Cleaning FCIP
Instance
FCIP
Error
This is an informative message, not an
error. It indicates that an FCIP was
removed or modified.
172231
FcipRoute#%d: Did not get the
FCIP
keepalive msg form remote peer
Error
FCIP route #n has not been able to
communicate with the remote peer for
10 seconds.
172238
FcipRoute#%d: Synchronization
Error on Receive
FCIP
Error
FCIP route #n local node is out of sync
with the remote peer.
172239
FcipRoute#%d: Decompression
Error on Receive
FCIP
Error
FCIP route #n detected an error in
de-compression.
230 Log messages
Table 34 MPX200 log messages (continued)
172240
FcipRoute#%d: De-encapsulation FCIP
Error on Receive
Error
FCIP route #n local node is out of sync
with the remote peer.
172245
FcipRoute#%d: Transmit Failure FCIP
Error
FCIP route #n not able to transmit
data.
172246
FcipRoute#%d: Remote Peer
Disconnected
FCIP
Error
FCIP route #n remote peer closed
connection.
172247
FcipRoute#%d: Failed to send FC FCIP
Up/Down
Error
Not able to bring the Fibre Channel
port up or down.
172249
FcipRoute#%d: FCIP Link Down
FCIP
Error
FCIP link is down for FCIP route #n.
172250
FcipRoute#%d: TCP Link Down
FCIP
Error
TCP link for FCIP route #n has been
established.
172253
FcipRoute#%d: Remote Peer IP
FCIP
Address Validation Failed.
Expected IP Address:
%d.%d.%d.%d, Actual IP Address:
%d.%d.%d.%d
Error
FCIP route #n: Received connection
from unauthorized remote peer.
172272
FcipRoute#%d: Tcp Client's
connect attempt failed
FCIP
Error
FCIP route #n is not able to establish
the TCP connection with remote peer.
172273
FcipRoute#%d: Tcp Server's
Listen attempt failed
FCIP
Error
FCIP route #n TCP server is not able
to accept an incoming TCP
connection. The TCP server will start
listening for new TCP connections.
172300
FcipRoute#%d:
FCIP
tcpi_total_retrans %d,
tcpi_reordering %d, tcpi_probes
%d
Error
Displays FCIP route #n's WAN
characteristics, including TCP total
retranmission for entire connection
(tcpi_total_retrans), packet reordering
metric (tcpi_reordering), and
unanswered zero window probe
(tcpi_probes).
172301
cipRoute#%d: Did not get the
FCIP
keepalive msg form remote peer
last %lu, curr %lu
Error
The FCIP route #n has not been able
to communicate with its remote peer
for 10 seconds resulting in a link drop
due to a keepalive time-out.
172302
FcipRoute#%d: TCP Link Down,
FCIP
TCP Stats: SACKed=%d TCP Total
ReTransmitted=%d
Error
The TCP link for FCIP route #n has
disconnected. The TCP statistics for the
connection include total SACKs
(selective acknowledgements) and total
retransmission for the connection.
172303
FcipRoute#%d: TCP Link Down,
FCIP
MAC Stats: Tx Dropped Count=%ld
Rx Dropped Count=%ld Tx Pause
Count=%ld Rx Pause Count=%ld
Error
The TCP link for FCIP route #n has
disconnected. The MAC or Ethernet
statistics include total packet dropped
during transmit (TxDropped), total
packet dropped during receive
(RxDropped), total Ethernet pause
frames transmitted (TxPause), and total
Ethernet pause frames received
(RxPause).
172304
FcipRoute#%d: Tcp
FCIP
Retranmissions in last 10 Sec
%d, OutStanding Completions %d
FC Frames
Error
The total number of TCP
retransmissions that happened in the
last 10 seconds before the link was
brought down due to a keepalive
time-out. It also displays the total
number of outstanding transmissions
that were pending to be transmitted
through the GbE port.
231
Table 34 MPX200 log messages (continued)
172322
FcipRoute#%d: FC link on the
remote peer went down
FCIP
Error
The FCIP route #n went down because
the Fibre Channel port on the remote
peer went down.
184515
FcipRoute#%d: TCP Link Up
FCIP
Info
TCP link for FCIP route #n has been
established.
184536
FcipRoute#%d: FCIP Link Up
FCIP
Info
FCIP link is up for FCIP route #n.
184542
FcipRoute#%d: VLAN Info
Unavailable
FCIP
Error
FCIP route #n: Incorrect VLAN
configuration.
205571
QL3xxx:%s: Auto Negotiation
error detected
NIC
Error
Ethernet port was not able to negotiate
the configured speed.
205572
QL3xxx:eth%d: Unsupported speed NIC
portConfig 0x%x
Error
Ethernet port speed is not supported.
206080 QL3xxx:ql3xxx_probe: cannot
allocate ethernet device %s
NIC
Error
Ethernet device could not be
configured.
206089 QL3xxx:ql3xxx_probe: cannot
register network device %s
NIC
Error
The Ethernet port was not able to
register as a network device, resulting
in a port initialization error for the
specified network device.
206114
QL3xxx:eth%d: TCP/IP checksum
NIC
error - TotalChecksumErrorCount
= %lu
Error
The total number of TCP checksum
errors detected on the Ethernet link
belonging to the eth#%d port.
217856
QL3xxx:%s: PHY Downshift
occurred
NIC
Info
Ethernet port is operating at 100Mbps
speed.
217857
QL3xxx:%s: Link Up
NIC
Info
Ethernet link is up.
217858
QL3xxx:%s: Link Down
NIC
Info
Ethernet link is down.
218389
QL3xxx:%s Adapter Down
NIC
Info
Ethernet port is down.
218401
QL3xxx:%s Adapter Up
NIC
Info
Ethernet port is up.
233473
"memory monitor: Detected
System
Uncorrectable Ecc %08lx system
is rebooting in 5 secs\n"
Fatal
Uncorrectable memory error detected
at address provided in log message.
233474
"Failed to register interrupt
handler!\n"
System
Fatal
Attempt to register the interrupt
handler failed.
233475
"%s class_simple_create
failed\n"
System
Fatal
Failed class_simple_create
system call from memory monitor
initialization routine.
237572
"Failed to kill sys killer
%d\n"
System
Error
Failed to kill system task.
237573
Temperature over high threshold System
%d
Error
Router temperature has exceeded the
high temperature threshold.
249862
Temperature is back to normal
range %d
Info
Router temperature has returned to the
normal operating range.
System
Table 35 DM log messages
ID
Log Message
44549
QLDM_HandleMigError: Migration App
Job %d stopped for Src Lun %hd
Dest Lun %hd Error %x
232 Log messages
Module type
Msg type
Description
Error
An error occurred on an I/O that
was issued for a migration job.
The description provides the job
Table 35 DM log messages (continued)
id, source and destination lun ids,
as well as the error.
AdditionalErrorStatus %x at
line %d
56321
QLMP_Logout: Virtual Target
Logged out
App
Info
An array went offline because all
the target ports of the array went
offline.
56322
QLMP_Logout: Node Name
App
%.2x%.2x%.2x%.2x%.2x%.2x%.2x%.2x
Info
WWNN of the Array that went
offline. This is tied with 56321.
56323
QLMP_Logout: Port Name
App
%.2x%.2x%.2x%.2x%.2x%.2x%.2x%.2x
Info
WWPN of the Array that went
offline. This is tied with 56321.
56346
QLMP_CombineMPDevice: Virtual
Target Online
App
Info
An array came online.
56347
QLMP_CombineMPDevice: Node Name App
%.2x%.2x%.2x%.2x%.2x%.2x%.2x%.2x
Info
WWNN of the Array that came
online. This is tied with 56346.
56348
QLMP_CombineMPDevice: Port Name App
%.2x%.2x%.2x%.2x%.2x%.2x%.2x%.2x
Info
WWPN of the Array that came
online. This is tied with 56346.
56842
QLDM_ResumeMigration: Failed to App
resume job: %d, job's current
state: 0x%x, error: %d
Info
Failed to resume a paused job.
56865
QLDM_DelayedStart:%d Failed to App
start job : Job ID: %d
Info
Failed to start a delayed schedule
job.
56866
Lun is already used for of some App
other migration job
Info
Migration add failed because
LUN is part of another migration
job.
56867
Selected Lun is a Controller
Lun
App
Info
Migration being added with a
LUN that is a controller LUN.
Data LUNs are required for
configuring migration jobs.
56868
Selected Lun is Masked, It cant App
be used for Offline Migration
Info
Migration job being added for a
LUN that is masked to an Initiator
on the router. Mapped LUNs
cannot be used for offline
migration jobs.
56869
Read Capacity is not available App
for the Lun
Info
Migration job being added for a
LUN for which no Read Capacity
Information is available.
Migration add will fail.
56870
QLDM_CreateMigrationObject:
Failed to create Source Lun
Object
App
Info
Failed to allocate memory for the
source LUN of a Migration job.
56871
QLDM_CreateMigrationObject:
Failed to create Destination
Lun Object
App
Info
Failed to allocate memory for the
destination LUN of a Migration
job.
56872
QLDM_CreateMigrationObject:
MigrationObject memory
unavailable
App
Info
Failed to allocate memory for the
Migration job.
56880
Start time got from user %lu
Cur Time: %lu Diff: %d
App
Info
The log displays the configured
start time and current time for a
delayed migration job.
56881
Failed to stop migration job id App
%u
Info
Failed to stop a migration job.
233
Table 35 DM log messages (continued)
56884
QLDM_DeleteMigrationJobByLun:
App
Could not find migration object
Info
Did not find a Migration job for
the associated LUN object.
152096
qapisetmigrfctargets_1_svc:
Configuration Changed for
migration target
User
Info
A set array was performed on
one of the arrays.
152099
LogMigration: Error in Writting User
log file
Info
Encountered an error while
updating the migration log entry.
Some migration log entries might
be missing.
152100
qapiaddgroup_1_svc: Added Group User
with id %d
Info
Group with ID specified in the log
got added.
152101
qapiremovegroup_1_svc: Removed User
Group with id %d
Info
Group with ID specified in the log
got removed.
152102
qapiupdategroup_1_svc: Updated User
Group with id %d
Info
Group with ID specified in the log
got updated.
152103
qapisetserialjobs_1_svc: Serial User
Time %lu
Info
Serial schedule jobs are
scheduled to start at time
specified in the log.
152104
qapireadjustpriority_1_svc:
Readjust Priority Failed on
line %d with error %d
User
Info
Readjust Priority command
completed with an error. Error
code 2 indicates no scheduled
jobs were found. Error code 16
indicates that a job with priority
1 is configured.
152105
qapireadjustpriority_1_svc:
Readjust Priority Done
User
Info
Completed readjusting the serial
schedule priority of Migration
jobs.
152106
qapiupdatemigration_1_svc:
User
Update Migration returned with
error %d
Info
An update migration action
[Start/Stop/Pause/Resume]
has failed.
152107
RemoveMigration:%d with Job Id User
%d and error = %d
Info
Failed to remove a Migration Job
with ID specified in the log.
152108
ValidateSerialSchedule:
User
Previous time %ld New time %ld
Info
Reset the serial schedule delayed
time to invalid if the last serial
schedule job was removed.
152109
addMigration: Creating
User
migration Job Failed with error
%d
Info
Failed to Create a Migration Job.
234 Log messages
Table 36 WD log messages
ID
Log Message
Module type
Msg
type
Description
WD: port GE1 mode changed from iSCSI User
to GE
Info
Ports mode changed from iSCSI to
Ethernet.
WD: port GE1 mode restored from GE to User
iSCSI
Info
Ports mode changed from Ethernet to
iSCSI.
WD: port GE1 mode restored from GE to User
FCIP
Info
Ports mode changed from FCIP to
Ethernet.
WD: port GE1mode changed from FCIP
to GE
User
Info
Ports mode changed from Ethernet to
FCIP.
WD: wanlinktest setup completed on GE1 User
ip 1.1.1.2 socket 3260
Info
Wanlink Test Server is started on IP
1.1.1.2 & it is listening on port 3260.
WD: wanlinktest is stopped successfully.
User
Info
Wanlink test is stopped. Same message
is used for client & server.
WD: wanlink Iteration Count:XX
User
Info
Wanlink Test is executed repeatedly;
the iteration count lists the repeated
number.
WD: wanlink GetRTTAndJitter done
User
Info
RTT & Jitter calucation is completed.
WD: wanlink PMTU Found:1600
User
Info
Path MTU is discovered.
WD: wanlink UDP B/W Calc Started
User
Info
UDP Bandwidth calculation is started.
WD: wanlink UDP B/W Found:xxx
User
Info
UDP Bandwidth is calculated.
WD: wanlink Packetdrop Calc Started
User
Info
Packet Drop calcuation started.
WD: wanlink Packetdrop Calc Done
User
Info
Packet Drop calcuation is completed.
WD: wanlink TCP B/W Calc Started
User
Info
TCP Bandwidth calculation is started.
WD: wanlink TCP B/W Found:xxx
User
Info
TCP Bandwidth calculation is
completed, with result.
WD: wanlinktest src 1.1.1.2 dest
1.1.1.1:3260 success
User
Info
Wanlink Test Client started.
WD: wanlinktest setup on {GE2 ip
2.2.2.2 socket 6000} failed
User
Error
Unable to start Wanlink Test server.
WD:mtu set on interface failed
User
Error
MTU setting failed.
WD: Unable to restore GE2 to iSCSI
mode,error xx
User
Error
Unable to restore mode of port after
Wanlink Test.
WD: Unable to confiure port speed for
interface GE2
User
Error
Error while setting port speed.
WD: Path MTU detection failed defaulting to 1500 MTU
User
Error
Path MTU detection failed; default
PMTU is now assumed to be 1500
WD: Wrong IscsiPort LinkRate for
interface GE2
User
Error
Invalid link rate.
WD: Unable to reset IPv4 configuration
of GE2
User
Error
Unable to change IPv4 setting.
WD: Unable to reset IPv6 configuration
of GE2
User
Error
Unable to change IPv6 setting.
WD: Unable to restore GE2 to FCIP mode, User
error xx
Error
Unable to restore mode of port after
Wanlink Test.
152323
140034
235
Table 36 WD log messages (continued)
236 Log messages
WD: Unable to resotre GE2 Network IPV4 User
params
Error
Unable to change IPV4 setting back to
original.
WD: Unable to resotre GE2 Network IPV6 User
params
Error
Unable to change IPV6 setting back to
original.
WD: Unable to set FCIP parameters on
GE2
User
Error
Error occurred while changing FCIP port
property.
WD: Error Unable to do interface GE2
down
User
Error
Error while shutting down interface.
WD: Error Unable to do
WanLinkTestConfigureIP:xx
User
Error
Error while configuring IP address for
Wanlink Testing.
WD: Unable to get iSCSI parameters GE2 User
xx
Error
Unable to fetch iSCSI parameters.
WD: Unable to set iSCSI parameters on
GE2
User
Error
Unable to store iSCSI parameters.
WD: Unable to set properies of PMTU
request connection
User
Error
Path MTU client is not able to set
required property of the socket.
WD: unable to configure (err 2) PMTU
Thread
User
Error
Path MTU Server configuration failure.
WD: Unable to bind PMTU server socket
User
Error
Path MTU server failed to bind to the
socket.
WD: PMTU Listen Failed
User
Error
Path MTU server failed to start listing
socket.
WD: Unable to perform PMTU calculation, User
error code xx
Error
Path MTU calculation failed; insufficient
resources.
WD: Unable to perform PMTU calculation, User
no memory
Error
Path MTU calculation failed, insufficient
resources.
WD: client to pmtu server Connect
failed:xx
User
Error
Unable to connect to PMTU server
running on Wanlink Test Sever.
WD: unable to begin Wan Link Test
Calcuation procedure
User
Error
Wanlink Test Calculation has not
started.
WD: wanlink Time expired
User
Error
Wanlink Calcuation did not finish
within expected time.
WD: Error getting RTT and Jitter
User
Error
Error occurred while fetching the RTT &
Jitter calculation result.
WD: Error getting UDP MTU & Bandwidth User
Error
Error occurred while fetching the UDP
Bandwidth & MTU calculation result.
WD: Error getting Packet Drop
User
Error
Error occurred while fetching the Packet
Drop calculation result.
WD: Error getting TCP Bandwidth
User
Error
Error occurred while fetching the TCP
Bandwidth calculation result.
WD: Destination IP address and Port not
reachable.
User
Error
Ping test failed.
WD: Error opening offline stats file
User
Error
Unable to report Wanlink test results.
WD: wanlinktest setup failed, Invalid
parameter received.
User
Error
User provided invalid parameter.
Table 36 WD log messages (continued)
WD: wanlinktest setup GetportInfo Failed. User
Error
Wanlink Test failed because error
occurred while reading port
information.
WD: Unable to start PMTU thread due to User
insufficient system resources
Error
Path MTU calculation process not
started due to insufficient resources.
WD: wanlinktest setup on {GE2 ip
1.1.1.1 socket xxxx} failed.
User
Error
Wanlink Test not started on server side.
WD: wanlinktest start GetportInfo Failed. User
xx
Error
Wanlink Test failed because error
occurred while reading port
information.
WD: Unable to perform The Client
Calculation due insufficient system
resources
User
Error
Wanlink Test Calcluation cannot
proceed due to low memory.
WD: Unable to stop Wan Link Test
Calculation, rc = xx
User
Error
Error occurred while stopping Wanlink
Test.
WD: Unable to stop PMTU Server, rc =
xx
User
Error
Error occurred while stopping PMTU
discovery process.
WD: error getting RTT Ping returned -1
s:1.1.1.1 d:1.1.1.2
User
Error
Ping test failed.
WD: 1.1.1.2 Not reachable:42485
User
Error
Ping test failed.
WD: wanlinktest src 1.1.1.1 dest
1.1.1.2:3260 failed
User
Error
Wanlink Testing failed.
237
E HP mpx100/mpx100b to MPX200 upgrade
The purpose of this appendix is to provide the steps required to replace an existing installation of
the EVA iSCSI Connectivity Kit (mpx100/mpx100b) with the MPX200 Multifunction Router. This
appendix assumes that the user is familiar with HP EVA, HP Command View EVA, SSSU, EVA
iSCSI Connectivity Kit (mpx100/mpx100b), and the MPX200 Multifunction Router. You must plan
for downtime, since this upgrade procedure requires production interruption.
To upgrade from mpx100/mpx100b to the MPX200 Multifunction Router:
1.
2.
3.
4.
5.
Using the CLI or mpx Manager, capture the mpx100 configuration backup by performing a
Save FRU on each router. This is only for backup.
Capture the P6000 EVA configuration via SSSU for backup.
Before shutting down all servers, shut down all applications that access the iSCSI storage.
a. For Windows, remove all targets from the Favorite Target tab in the iSCSI applet. Remove
all IP addresses in the Discovery tab.
b. For Linux, delete everything in the Send Targets and Nodes folders to clean up all target
information.
Shut down all servers attached to the mpx100.
Use the HP P6000 Command View GUI or run SSSU to unpresent LUNs.
Example 1 SSSU:
delete iscsi_lun iscsi_host="\Hosts\mpx100\BL6\BL6-02"
vdisk="\Virtual Disks\mpx100\mpx100-D002"
6.
7.
Use the HP P6000 Command View GUI or run SSSU to delete iSCSI hosts.
Remove the iSCSI Controllers in HP P6000 Command View. This succeeds after all LUNs have
been unpresented.
8. Physically disconnect and remove the mpx100/mpx100b.
9. Connect MPX200 to SAN Switches or directly to P6000 EVA ports as shown in “MPX200
configuration options for P6000 EVA” (page 15).
10. Install/upgrade to HP P6000 Command View 9.2 or the latest version available.
11. For physical installation instructions, cable Ethernet and Fibre Channel connections, depending
on your configuration, see “Installing the MPX200” (page 26).
NOTE:
Zoning may be required at this point for fabric attached configurations.
12. To configure the MPX200 (see “Managing MPX200 iSCSI using HP P6000 Command View”
(page 31) to configure the MPX200):
a. Set the management port.
b. Perform iSCSI MPX controller discovery.
c. Set iSCSI IP Addresses.
NOTE:
Ensure that the latest firmware is installed.
13. Boot all Hosts. Configure each iSCSI initiator to perform a discovery of the MPX200 target
portals.
14. Create an iSCSI host entry for each initiator using HP P6000 Command View or SSSU.
15. Represent LUNs with the HP P6000 Command View GUI or SSSU to MPX200 iSCSI Hosts.
Example 2
ADD ISCSI_LUN VDISK=MPX200-D002 ISCSI_HOST="\Hosts\MPX200\BL6\BL6-02"
238 HP mpx100/mpx100b to MPX200 upgrade
16. Boot Hosts.
a. Linux:
i. Restart iSCSI service.
ii. Configure MPIO – multipath –v3 & multipath –ll to verify.
iii. Mount drives.
b. Windows:
i. On the Targets tab of the iSCSI Initiator applet, click Refresh.
ii. Log in to proper targets.
iii. Rescan devices and use Disk Management to mount disks.
To upgrade from mpx100/mpx100b to the MPX200 Multifunction Router: 239
F Regulatory compliance and safety
Regulatory compliance notices
Federal Communications Commission notice for Class A equipment
This equipment has been tested and found to comply with the limits for a Class A digital device,
pursuant to Part 15 of the FCC Rules. These limits are designed to provide reasonable protection
against harmful interference when the equipment is operated in a commercial environment. This
equipment generates, uses and can radiate radio frequency energy and, if not installed and used
in accordance with the instruction manual, may cause harmful interference to radio communications.
Operation of this equipment in a residential area is likely to cause harmful interference, in which
case the user will be required to correct the interference at his own expense. The end user of this
product should be aware that any changes or modifications made to this equipment without the
approval of Hewlett-Packard could result in the product not meeting the Class A limits, in which
case the FCC could void the user's authority to operate the equipment.
Modifications
The FCC requires the user to be notified that any changes or modifications made to this device
that are not expressly approved by Hewlett-Packard Company may void the user's authority to
operate the equipment.
Cables
Connections to this device must be made with shielded cables with metallic RFI/EMI connector
hoods in order to maintain compliance with FCC Rules and Regulations.
Regulatory compliance identification numbers
For the purpose of regulatory compliance certifications and identification, your product has been
assigned a unique Regulatory Model Number. The RMN can be found on the product nameplate
label, along with all required approval markings and information. When requesting compliance
information for this product, always refer to this RMN. The Regulatory Model Number should not
be confused with the marketing name or model number of the product.
Laser device
All HP systems equipped with a laser device comply with safety standards, including International
Electrotechnical Commission (IEC) 825. With specific regard to the laser, the equipment complies
with laser product performance standards set by government agencies as a Class 1 laser product.
The product does not emit hazardous light.
Laser safety warning
WARNING!
To reduce the risk of exposure to hazardous radiation:
•
Do not try to open the laser device enclosure. There are no user-serviceable components inside.
•
Do not operate controls, make adjustments, or perform procedures to the laser device other
than those specified herein.
•
Allow only HP authorized service technicians to repair the laser device.
Certification and classification information
This product contains a laser internal to the fiber optic (FO) transceiver for connection to the Fibre
Channel communications port.
In the US, the FO transceiver is certified as a Class 1 laser product conforming to the requirements
contained in the Department of Health and Human Services (DHHS) regulation 21 CFR, Subchapter
J. A label on the plastic FO transceiver housing indicates the certification.
240 Regulatory compliance and safety
Outside the US, the FO transceiver is certified as a Class 1 laser product conforming to the
requirements contained in IEC 825–1:1993 and EN 60825–1:1994, including Amendment
11:1996 and Amendment 2:2001.
Laser product label
The optional label in Figure 131 (page 241) or equivalent may be located on the surface of the HP
supplied laser device.
Figure 131 Class 1 laser product label
This optional label indicates that the product is classified as a CLASS 1 LASER PRODUCT. This
label may appear on the laser device installed in your product.
International notices and statements
Canadian notice (avis Canadien)
Class A equipment
This Class A Digital apparatus meets all requirements of the Canadian Interference-Causing
Equipment Regulations.
Cet appareil numérique de la classe A respecte toutes les exigences du Règlement sur le matériel
brouilleur du Canada.
BSMI notice
International notices and statements
241
Japanese notice
Korean notices
Safety notices
Battery replacement notice
Your switch is equipped with a lithium manganese dioxide, a vanadium pentoxide, or an alkaline
internal battery or battery pack. There is a danger of explosion and risk of personal injury if the
battery is incorrectly replaced or mistreated. Replacement is to be done by an HP authorized
242 Regulatory compliance and safety
service provider using the HP spare part designated for this product. For more information about
battery replacement or proper disposal, contact an HP authorized service provider.
WARNING! Your switch contains an internal lithium manganese dioxide, a vanadium pentoxide,
or an alkaline battery pack. There is risk of fire and burns if the battery pack is not properly handled.
To reduce the risk of personal injury:
•
Do not attempt to recharge the battery.
•
Do not expose to temperatures higher than 60 °C.
•
Do not disassemble, crush, puncture, short external contacts, or dispose of in fire or water.
•
Replace only with the HP spare part designated for this product.
Batteries, battery packs, and accumulators should not be disposed of together with the general
household waste. To forward them to recycling or proper disposal, use the public collection system
or return them to HP, an authorized HP Partner, or their agents.
For more information about battery replacement or proper disposal, contact an HP authorized
reseller or service provider.
Taiwan battery recycling notice
The Taiwan EPA requires dry battery manufacturing or importing firms in accordance with Article
15 of the Waste Disposal Act to indicate the recovery marks on the batteries used in sales,
give-away, or promotion. Contact a qualified Taiwanese recycler for proper battery disposal.
Power cords
The power cord set must meet the requirements for use in the country where the product was
purchased. If the product is to be used in another country, purchase a power cord that is approved
for use in that country.
The power cord must be rated for the product and for the voltage and current marked on the
product electrical ratings label. The voltage and current rating of the cord should be greater than
the voltage and current rating marked on the product. In addition, the diameter of the wire must
be a minimum of 1.00 mm2 or 18 AWG, and the length of the cord must be between 1.8 m, (6
ft) and 3.6 m (12 ft). If you have questions about the type of power cord to use, contact an HP
authorized service provider.
NOTE: Route power cords so that they will not be walked on and cannot be pinched by items
placed upon or against them. Pay particular attention to the plug, electrical outlet, and the point
where the cords exit from the product.
Safety notices 243
Japanese power cord statement
Chinese warning messages
Altitude warning message
May be used safely only in areas where the attitude is less than 2000m.
Non-tropical warning message
May be used safely only in non-tropical climates.
Waste Electrical and Electronic Equipment directive
English notice
Disposal of waste equipment by users in private households in the European Union
This symbol on the product or on its packaging indicates that this product must not be disposed
of with your other household waste. Instead, it is your responsibility to dispose of your waste
equipment by handing it over to a designated collection point for recycling of waste electrical and
electronic equipment. The separate collection and recycling of your waste equipment at the time
of disposal will help to conserve natural resources and ensure that it is recycled in a manner that
protects human health and the environment. For more information about where you can drop off
your waste equipment for recycling, contact your local city office, your household waste disposal
service, or the shop where you purchased the product.
Dutch notice
Verwijdering van afgedankte apparatuur door privé-gebruikers in de Europese Unie
Dit symbool op het product of de verpakking geeft aan dat dit product niet mag worden
gedeponeerd bij het normale huishoudelijke afval. U bent zelf verantwoordelijk voor het inleveren
van uw afgedankte apparatuur bij een inzamelingspunt voor het recyclen van oude elektrische en
elektronische apparatuur. Door uw oude apparatuur apart aan te bieden en te recyclen, kunnen
244 Regulatory compliance and safety
natuurlijke bronnen worden behouden en kan het materiaal worden hergebruikt op een manier
waarmee de volksgezondheid en het milieu worden beschermd. Neem contact op met uw gemeente,
het afvalinzamelingsbedrijf of de winkel waar u het product hebt gekocht voor meer informatie
over inzamelingspunten waar u oude apparatuur kunt aanbieden voor recycling.
Czechoslovakian notice
Estonian notice
Seadmete jäätmete kõrvaldamine eramajapidamistes Euroopa Liidus
See tootel või selle pakendil olev sümbol näitab, et kõnealust toodet ei tohi koos teiste
majapidamisjäätmetega kõrvaldada. Teie kohus on oma seadmete jäätmed kõrvaldada, viies
need elektri- ja elektroonikaseadmete jäätmete ringlussevõtmiseks selleks ettenähtud kogumispunkti.
Seadmete jäätmete eraldi kogumine ja ringlussevõtmine kõrvaldamise ajal aitab kaitsta
loodusvarasid ning tagada, et ringlussevõtmine toimub viisil, mis kaitseb inimeste tervist ning
keskkonda. Lisateabe saamiseks selle kohta, kuhu oma seadmete jäätmed ringlussevõtmiseks viia,
võtke palun ühendust oma kohaliku linnakantselei, majapidamisjäätmete kõrvaldamise teenistuse
või kauplusega, kust Te toote ostsite.
Finnish notice
Laitteiden hävittäminen kotitalouksissa Euroopan unionin alueella
Jos tuotteessa tai sen pakkauksessa on tämä merkki, tuotetta ei saa hävittää kotitalousjätteiden
mukana. Tällöin hävitettävä laite on toimitettava sähkölaitteiden ja elektronisten laitteiden
kierrätyspisteeseen. Hävitettävien laitteiden erillinen käsittely ja kierrätys auttavat säästämään
luonnonvaroja ja varmistamaan, että laite kierrätetään tavalla, joka estää terveyshaitat ja suojelee
luontoa. Lisätietoja paikoista, joihin hävitettävät laitteet voi toimittaa kierrätettäväksi, saa ottamalla
yhteyttä jätehuoltoon tai liikkeeseen, josta tuote on ostettu.
French notice
Élimination des appareils mis au rebut par les ménages dans l'Union européenne
Le symbole apposé sur ce produit ou sur son emballage indique que ce produit ne doit pas être
jeté avec les déchets ménagers ordinaires. Il est de votre responsabilité de mettre au rebut vos
appareils en les déposant dans les centres de collecte publique désignés pour le recyclage des
équipements électriques et électroniques. La collecte et le recyclage de vos appareils mis au rebut
indépendamment du reste des déchets contribue à la préservation des ressources naturelles et
garantit que ces appareils seront recyclés dans le respect de la santé humaine et de l'environnement.
Pour obtenir plus d'informations sur les centres de collecte et de recyclage des appareils mis au
rebut, veuillez contacter les autorités locales de votre région, les services de collecte des ordures
ménagères ou le magasin dans lequel vous avez acheté ce produit.
German notice
Entsorgung von Altgeräten aus privaten Haushalten in der EU
Waste Electrical and Electronic Equipment directive 245
Das Symbol auf dem Produkt oder seiner Verpackung weist darauf hin, dass das Produkt nicht
über den normalen Hausmüll entsorgt werden darf. Benutzer sind verpflichtet, die Altgeräte an
einer Rücknahmestelle für Elektro- und Elektronik-Altgeräte abzugeben. Die getrennte Sammlung
und ordnungsgemäße Entsorgung Ihrer Altgeräte trägt zur Erhaltung der natürlichen Ressourcen
bei und garantiert eine Wiederverwertung, die die Gesundheit des Menschen und die Umwelt
schützt. Informationen dazu, wo Sie Rücknahmestellen für Ihre Altgeräte finden, erhalten Sie bei
Ihrer Stadtverwaltung, den örtlichen Müllentsorgungsbetrieben oder im Geschäft, in dem Sie das
Gerät erworben haben.
Greek notice
Hungarian notice
Italian notice
Smaltimento delle apparecchiature da parte di privati nel territorio dell’Unione Europea
Questo simbolo presente sul prodotto o sulla sua confezione indica che il prodotto non può
essere smaltito insieme ai rifiuti domestici. È responsabilità dell'utente smaltire le apparecchiature
consegnandole presso un punto di raccolta designato al riciclo e allo smaltimento di apparecchiature
elettriche ed elettroniche. La raccolta differenziata e il corretto riciclo delle apparecchiature da
smaltire permette di proteggere la salute degli individui e l'ecosistema. Per ulteriori informazioni
relative ai punti di raccolta delle apparecchiature, contattare l'ente locale per lo smaltimento dei
rifiuti, oppure il negozio presso il quale è stato acquistato il prodotto.
246 Regulatory compliance and safety
Latvian notice
Lithuanian notice
Polish notice
Portuguese notice
Descarte de Lixo Elétrico N/A Comunidade Européia
Este símbolo encontrado no produto ou N/A embalagem indica que o produto não deve ser
descartado no lixo doméstico comum. É responsabilidade do cliente descartar o material usado
(lixo elétrico), encaminhando-o para um ponto de coleta para reciclagem. A coleta e a reciclagem
seletivas desse tipo de lixo ajudarão a conservar as reservas naturais; sendo assim, a reciclagem
será feita de uma forma segura, protegendo o ambiente e a saúde das pessoas. Para obter mais
informações sobre locais que reciclam esse tipo de material, entre em contato com o escritório
da HP em sua cidade, com o serviço de coleta de lixo ou com a loja em que o produto foi
adquirido.
Waste Electrical and Electronic Equipment directive 247
Slovakian notice
Slovenian notice
Spanish notice
Eliminación de residuos de equipos eléctricos y electrónicos por parte de usuarios particulares en
la Unión Europea
Este símbolo en el producto o en su envase indica que no debe eliminarse junto con los
desperdicios generales de la casa. Es responsabilidad del usuario eliminar los residuos de este
tipo depositándolos en un "punto limpio" para el reciclado de residuos eléctricos y electrónicos.
La recogida y el reciclado selectivos de los residuos de aparatos eléctricos en el momento de su
eliminación contribuirá a conservar los recursos naturales y a garantizar el reciclado de estos
residuos de forma que se proteja el medio ambiente y la salud. Para obtener más información
sobre los puntos de recogida de residuos eléctricos y electrónicos para reciclado, póngase en
contacto con su ayuntamiento, con el servicio de eliminación de residuos domésticos o con el
establecimiento en el que adquirió el producto.
Swedish notice
Bortskaffande av avfallsprodukter från användare i privathushåll inom Europeiska Unionen
Om den här symbolen visas på produkten eller förpackningen betyder det att produkten inte får
slängas på samma ställe som hushållssopor. I stället är det ditt ansvar att bortskaffa avfallet genom
att överlämna det till ett uppsamlingsställe avsett för återvinning av avfall från elektriska och
elektroniska produkter. Separat insamling och återvinning av avfallet hjälper till att spara på våra
naturresurser och gör att avfallet återvinns på ett sätt som skyddar människors hälsa och miljön.
Kontakta ditt lokala kommunkontor, din närmsta återvinningsstation för hushållsavfall eller affären
där du köpte produkten för att få mer information om var du kan lämna ditt avfall för återvinning.
248 Regulatory compliance and safety
G Saving and restoring the MPX200 configuration
The MPX200 configuration information is saved as a .bin or .tgz file, depending on the method
used to restore the MPX200 persistent data. The MPX200 configuration information is saved and
restored using the MPX200 CLI commands or HP Command View EVA (see “ Saving or restoring
the MPX200 configuration” (page 37)).
NOTE: As with any important database, the MPX200 persistent data should be saved periodically
to avoid data loss from hardware or software errors. It is also important to save the configuration
information before replacing the MPX200.
Saving the configuration using MPX200 CLI
Using the MPX200 CLI to save the configuration information places the file in the MPX200’s FTP
directory. You must then move the file using FTP from the MPX200 (an FTP client accesses the file
and moves it to any desired location).
To save the configuration using the MPX200 CLI:
1. Log in to the MPX200 using a Telnet session to the management port or the console port:
Username: guest
Password: password
2.
Enter the following command:
MPX200> admin start
3.
4.
Enter config as the password.
Enter the following command:
MPX200 (admin) #> fru save
FRU save completed. Configuration File is HP_StorageWorks_MPX200_FRU.bin. Please use FTP to extract the file out from the
System.
MPX200 (admin) #>
NOTE: The FRU save creates a bin file containing the router persistent data, configuration,
and LUN mappings. The file is stored in the router directory /var/ftp. You must then FTP
the tar file from the router.
5.
Establish an FTP connection to the MPX200 management port and log in:
Username: ftp
Password: ftp
6.
Enter the following command to set the FTP transfer type to Binary:
ftp> bin
7.
Enter the following command to access the HP_StorageWorks_MPX200_FRU.bin file:
ftp> get HP_StorageWorks_MPX200_FRU.bin
Restoring the configuration using MPX200 CLI
There are two options for restoring configurations on the MPX200:
•
Full Configuration Restore, which fully restores the router’s configuration (all configuration
parameters and LUN mappings)
•
Partial Restore (Mappings), which restores only the LUN mappings
The restored configuration takes effect after the router is rebooted.
To restore the configuration using MPX200 CLI:
1. Establish an FTP connection to the MPX200 management port and log in:
Username: ftp
Password: ftp
Saving the configuration using MPX200 CLI 249
2.
Enter the following command to set the FTP transfer type to binary:
ftp> bin
3.
Enter the following command to put the HP_StorageWorks_MPX200_FRU.bin file:
ftp> put HP_StorageWorks_MPX200_FRU.bin
4.
Log in to the MPX200 using a Telnet session to the management port or console port:
Username: guest
Password: password
5.
Enter the following command:
MPX200> admin start
6.
7.
Enter config as the password.
Enter the following command:
MPX200 (admin) #> fru restore
A list of attributes with formatting and current values will follow.
Enter a new value or simply press the Enter key to accept the current
value. If you wish to terminate this process before reaching the end
of the list press 'q' or 'Q' and the Enter key to do so. Type of restore
(0=full, 1=mappings only) [full]
FRU restore completed.
8.
Reboot the system for the configuration to take effect.
250 Saving and restoring the MPX200 configuration
Glossary
A
array
A storage system that contains multiple disk or tape drives. A disk array, for example, is
differentiated from a disk enclosure, in that the array has cache memory and advanced
functionality, like RAID and virtualization. Components of a typical disk array include disk array
controllers, cache memories, disk enclosures, and power supplies.
B
bandwidth
A measure of the volume of data that can be transmitted at a specified transmission rate. A
1-Gbps/2-Gbps Fibre Channel port can transmit or receive at nominal rates of 1- or 2-Gbps,
depending on the device to which it is connected. This corresponds to actual bandwidth values
of 106 MB and 212 MB, respectively.
blade
A server computer with a modular design optimized to minimize the use of physical space and
energy.
C
CHAP
Challenge Handshake Authentication Protocol. A protocol that defines a methodology for
authenticating initiators and targets.
CLI
Command Line Interface.
CNA
Converged network adapter.
D
data migration
The process of transferring data between storage types, formats, or computer systems. Data
migration is usually performed programmatically to achieve an automated migration, freeing up
human resources from tedious tasks. Migration is a necessary action for retaining the integrity of
the data and for allowing users to search, retrieve, and make use of data in the face of constantly
changing technology.
DCB
Data center bridging,
DHCP
Dynamic Host Configuration Protocol.
DMS
Data migration service. A technology that simplifies data migration jobs with minimum downtime
while providing protection against common user errors.
DSM
Device Specific Module.
E
EVA
Enterprise Virtual Array. The EVA Cluster aggregates multiple EVA subsystems into a single system
image and a single point of management. It allows for the pooling and sharing of storage resources
to improve efficiency, simplify operations, and improve availability over individual storage
subsystems.
F
fabric
A fabric consists of cross-connected Fibre Channel devices and switches.
fan-in
The number of inputs of an electronic logic gate.
fan-out
The number of logic inputs that a given logic output drives.
FC
Fibre Channel. High-speed serial interface technology that supports other higher layer protocols
such as SCSI and IP, and is primarily used in SANs. Standardized under ANSI in 1994.
FC-SAN
Fibre Channel SAN.
FCIP
Fibre Channel over Internet Protocol. An Internet Protocol-level storage networking technology.
FCIP mechanisms enable the transmission of Fibre Channel information by tunneling data between
251
SAN facilities over IP networks. This facilitates data sharing over a geographically distributed
enterprise.
FCoE
Fibre Channel over Ethernet. An encapsulation of Fibre Channel frames over Ethernet networks.
This allows Fibre Channel to use 10 Gigabit Ethernet networks while preserving the Fibre Channel
protocol. For more information, visit www.fcoe.com.
Fibre Channel
See FC.
Fibre Channel over
Ethernet
See FCoE.
G
GbE
Gigabit Ethernet.
H
heartbeat
A periodic synchronization signal issued by cluster software or hardware to indicate that a node
is an active member of the cluster. The MPX200 heartbeat LED blinks at a rate of once per second
during normal operation.
I
initiator
A media (host) server that runs the backup/restore application that passes commands and data
between the network and the VLS.
IP-SAN
Internet Protocol SAN.
IQN
iSCSI qualified name.
iSCSI
Internet small computer system interface. Transmits native SCSI over the TCP/IP stack. In a system
supporting iSCSI, a user or software application issues a command to store or retrieve data on
a SCSI storage device. The request is processed by the operating system and is converted to one
or more SCSI commands that are then passed to software or to a card. The command and data
are encapsulated by representing them as a serial string of bytes proceeded by iSCSI headers.
The encapsulated data is then passed to a TCP/IP layer that breaks it into packets suitable for
transfer over the network. If required, the encapsulated data can also be encrypted for transfer
over an insecure network.
ISL
Interswitch link.
iSNS
Internet Storage Name Service.
J
jumbo frame
In an iSCSI network, a frame that can contain 9000 bytes for large data transfers. A normal
frame can contain 1500 bytes.
K
keyword
An identifier that has a particular meaning to the command.
L
lossless
A class of data compression algorithms that allows the exact original data to be reconstructed
from compressed data.
lossy
A class of data compression algorithms that allows an approximation of original data to be
reconstructed from compressed data.
LUN
Logical unit number. Representation of a logical address on a peripheral device or array of
devices.
LVM
Logical Volume Manager.
252 Glossary
M
MPIO
Microsoft Multipathing I/O software.
MTU
Maximum Transmission Unit.
multipath routing
The routing technique of leveraging multiple alternative paths through a network, which can yield
a variety of benefits such as fault tolerance, increased bandwidth, or improved security.
MWS
Maximum window size.
N
NIC
Network interface controller.
NPIV
N_Port ID Virtualization.
NTP
Network Time Protocol.
O
OSI
Open Systems Interconnection. A joint ISO and ITU-T standard for computer networks and
communication protocols.
OSI Model
A layered description for communications and computer network protocol design.
P
path
A path to a device is a combination of an adapter port instance and a target port as distinct from
internal paths in the fabric network. A fabric network appears to the operating system as an
opaque network between the adapter (initiator) and the target.
Because a path is a combination of an adapter and a target port, it is distinct from another path
if it is accessed through a different adapter or it is accessing a different target port. Consequently,
when switching from one path to another, the driver might be selecting a different adapter
(initiator), a different target port, or both.
This is important to the driver when selecting the proper method of failover notification. It can
make a difference to the target device, which might have to take different actions when receiving
retries of the request from another initiator or on a different port.
PCM
Power cooling module.
peer-to-peer
A distributed application architecture that partitions tasks or workloads among peers.
POST
Power-On Self Test.
Q
QoS
Quality of service.
R
Replication
Solutions Manager
See RSM
router
A device that forwards data packets between computer networks.
RSM
Replication Solutions Manager.
RTT
Round trip time.
S
SAN
Storage Area Network. A network of storage devices and the initiators that store and retrieve
information on those devices, including the communication infrastructure.
secure shell
See SSH.
SFP
Small form-factor pluggable transceiver.
SMS
SANsurfer Management Suite. QLogic HBA management software.
253
SNP
Microsoft Scalable Networking Pack.
Spanning tree
A network design that includes redundant links to provide automatic backup paths if an active
link fails.
SPOCK
Single Point of Connectivity Knowledge website. SPOCK is the primary portal used to obtain
detailed information about supported HP storage product configurations.
SSH
Secure shell. Protocol that secures connections to the switch for the command line interface.
SSSU
Storage System Scripting Utility. An HP command line interface that allows you to configure and
control EVAs. Used to script and run repetitious and complex configuration tasks.
Storage System
Scripting Utility
See SSSU.
T
target
The storage-device endpoint of a SCSI session. Initiators request data from targets (usually disk
drives, tape drives, or other media devices). Typically, a SCSI peripheral device is the target but
an adapter may, in some cases, be a target. A target can contain many LUNs. A target is a
device that responds to a request by an initiator (the host system). Peripherals are targets, but for
some commands (for example, a SCSI COPY command), the peripheral may act as an initiator.
TCP
Transmission Control Protocol.
Telnet
Software that implements the client part of the protocol. Telnet clients are available for nearly all
computer platforms. Because of security issues with Telnet, its use has declined in favor of SSH
for remote access.
V
VLAN
Virtual LAN.
VMFS
Virtual Machine File System.
VPG
Virtual port group.
W
world wide node
name
See WWNN.
world wide port
name
See WWPN.
world wide unique
LUN name
See WWULN.
WWNN
World wide node name. Unique 64-bit address assigned to a device.
WWPN
World wide port name. Unique 64-bit address assigned to each port on a device. One WWNN
may contain multiple WWPN addresses.
WWULN
World wide unique LUN name. WWULN identifiers for SCSI devices are read from page 80
and page 83 of your SCSI block device as based on the SCSI standard.
Z
zoning
254 Glossary
Configuring a set of Fibre Channel device ports to communicate across the fabric. Through
switches, traffic within a zone can be physically isolated from traffic outside the zone.
Index
Symbols
3PAR
LUN provisioning, 42
setting up the iSCSI ports, 41
setting up the MPX200 management port, 40
3PAR storage, 40
FCoE connectivity, 138
MPX zoning, 140
A
additional equipment, required, 14
admin command, 156
agent shutdown notification, 212
agent startup notification, 212
Apple Mac
iSCSI initiator, 69
storage setup, 74
Apple Mac OS X
iSCSI initiator, 56
array, 251
authority requirements, 155
B
bandwidth, 251
battery replacement notice, 242
beacon command, 157
blade command, 157
C
CHAP, 251
chassis diagnostics, 141
clear command, 157
CLI usage, 195
cluster support, Windows, 95
command reference, 155
command syntax, 155
commands
admin, 156
beacon, 157
blade, 157
clear, 157
date, 157
exit, 158
fciproute, 158
fru, 160
help, 161
history, 162
image, 162
initiator, 163
logout, 164
lunmask, 164
ping, 166
quit, 166
reboot, 167
reset, 167
save, 167
set, 168
set alias, 169
set chap, 169
set chassis, 170
set fc, 170
set features, 172
set iscsi, 172
set isns, 172
set mgmt, 173
set ntp, 173
set properties, 174
set snmp, 174
set system, 175
set vpgroups, 175
show, 176
show chap, 178
show chassis, 178
show fc, 179
show fciproutes, 179
show features, 180
show initiators, 180
show initiators_lunmask, 180
show iscsi, 181
show isns, 181
show logs, 182
show luninfo, 182
show lunmask, 183
show luns, 183
show memory, 184
show mgmt, 184
show ntp, 184
show perf, 185
show presented_targets, 186
show properties, 187
show snmp, 187
show stats, 187
show system, 190
show targets, 190
show vpgroups, 191
shutdown, 191
target, 192
traceroute, 192
wanlinktest, 192
configuration
blades, 20
dual-blade fabric-attached, 15
dual-blade multi-P6000 EVA, 16
maximums, 20
modifying, 196
single-blade fabric-attached, 15
single-blade multi-P6000 EVA, 15
configuration options, 15
configuring
restoring, 198
saving and restoring, 197
255
Connected Targets tab, 76
D
data migration, 251
date command, 157
device names
Linux initiator, 78
device names, assigning, 78
diagnostic, WANLinktest , 145
diagnostics
chassis, 141
POST, 142
Discovered Targets tab, 75
discovery
target device, 212
DMS, 251
document
related documentation, 151
documentation
HP website, 151
providing feedback on, 154
E
EVA, 251
exit command, 158
F
fabric, 251
FC port down notification, 212
FC port table, 202
FCC notice, 240
FCIP, 251
fciproute command, 158
FCoE, 252
3PAR MPX zoning, 140
configurations, 133
connectivity to 3PAR storage systems, 138
connectivity to HP P6000 EVAs, 134
feature description, 133
feedback
product, 152
Fibre Channel, 251
Fibre Channel zoning, 41
file systems
mounting, 79
unmounting, 79
fru command, 160
G
generic notification, 214
guest account, understanding, 195
H
hardware device, locating, 144
help command, 161
history command, 162
host system, preparing, 84
HP P6000 Command View
troubleshooting, 146
256 Index
I
image command, 162
initiator command, 163
initiator object table, 204
initiator setup
Linux, 74
VMware, 80
initiators
10-GbE, 22
number of, 21
number of paths required, 21
Input Power LED, 141
Installation
planning, 20
IP network adapters, 58
iSCSI, 252
Apple Mac initiator, 69
Apple Mac OS X initiator, 56
configuration, 52
configuring MPIO devices, 89
enable target discovery, 86
initiator rules and guidelines, 56
initiator setup for Linux, 74
initiator setup for VMware, 80
Linux initiator, 57
load-balancing MPIO features, 90
Microsoft Windows initiator, 56
Solaris initiator, 57
supported maximums, 52
use of the ports, 21
VMware initiator, 57
Windows Server 2003 initiator, 59
iSCSI ports
setting up, 41
iSNS
use of, 21
L
LEDs
heartbeat, 142
Input Power, 141
System Alert, 141
Linux
installing Red Hat, 77
iSCSI initiator, 57
iSCSI initiator setup for, 74
presenting P6000 EVA storage for, 79
Linux initiator
device names, 78
target bindings, 78
load balancing, 21
log data, 144
log messages, 216
logging on, 195
logout command, 164
LUN, 252
LUN provisioning, 42
LUN table, 205
lunmask command, 164
M
management port
setting up, 40
Microsoft Windows
iSCSI initiator, 56
mid-plane, 13
MPIO, 65
installing, 66
installing for Windows Server 2003, 68
options, 66
Properties page, 67
with QLogic iSCSI HBA, 90
MPX200 blade, locating, 144
MPX200 features, 10
MPxIO
enabling for HP P6000 EVA storage array, 84
multipath devices, monitoring, 88
multipath routing, 253
multipathing, 65
N
network port down notification, 212
network port table, 200
notices
battery replacement, 242
Japanese power cord, 244
Taiwan battery recycling, 243
notifications
agent shutdown, 212
agent startup, 212
FC port down, 212
generic, 214
network port down, 212
sensor, 213
VP group, 213
O
options, 13
P
P6000 EVA
FCoE connectivity, 134
P6000 EVA storage systems, 52
pages
MPIO Properties, 67
Select Features, 67
path, 253
ping command, 144, 166
power control module, 13
product
providing feedback, 152
Q
QLogic
configuring iSCSI HBA, 91
QLogic iSCSI HBA
installing, 91
QLogic iSCSI initiator
adding targets to, 93
presenting LUNs to, 94
quit command, 166
R
rack mounting, 26
rack stability, 153
reboot command, 167
Red Hat Linux
installing and configuring, 77
related documentation, 151
reset command, 167
router blade, 13
RSM, 253
S
SAN, 253
save command, 167
secure shell, 254
security
CHAP, 97
Select Features page, 67
sensor notification, 213
sensor table, 209
set alias command, 169
set chap command, 169
set chassis command, 170
set command, 168
set fc command, 170
set features command, 172
set iscsi command, 172
set isns command, 172
set mgmt command, 173
set ntp command, 173
set properties command, 174
set snmp command, 174
set system command, 175
set vpgroups command, 175
show chap command, 178
show chassis command, 178
show command, 176
show fc command, 179
show fciproutes command, 179
show features command, 180
show initiators command, 180
show initiators_lunmask, 180
show iscsi command, 181
show isns command, 181
show logs command, 182
show luninfo command, 182
show lunmask command, 183
show luns command, 183
show memory command, 184
show mgmt command, 184
show ntp command, 184
show perf command, 185
show presented_targets command, 186
show properties command, 187
show snmp command, 187
show stats command, 187
257
show system command, 190
show targets command, 190
show vpgroups command, 191
shutdown command, 191
SNMP
parameters, 199
trap configuration parameters, 200
SNP
setup, 69
Windows Server 2003, 69
software
storage system, 53
Solaris
iSCSI initiator, 57
SPOCK, 15, 55, 58, 119, 120, 127, 132, 152
SSH, 254
SSSU, 254
statistics, 144
storage
presenting for Linux, 79
storage system software, 53
Subscriber's choice, HP, 152
support
fabric, 55
Fibre Channel switch, 55
multipath software, 55
operating system, 55
supported maximums, 52
SUSE Linux
installing and configuring, 74
switches
recommended types, 23
System Alert LED, 141
system information objects, 210
T
tabs
Connected Targets, 76
Discovered Targets, 75
Target Settings, 93
Taiwan battery recycling notice, 243
target, 254
login, 76
target bindings, 78
target command, 192
target device discovery, 212
target parameter, modify, 87
target presentation, 213
Target Settings tab, 93
Telnet, 254
traceroute command, 192
V
VMware
iSCSI initiator, 57
iSCSI initiator setup for, 80
VP group notification, 213
VP group table, 207
258 Index
W
wanlinktest command, 192
WANLinktest diagnostic, 145
websites
HP Subscriber's choice for business, 152
product manuals, 151
Windows Cluster support, 95
Windows Server 2003
iSCSI initiator, 59
Scalable Networking Pack, 69
WWNN, 254
WWPN, 254
WWULN, 254
Z
zoning, 41, 254