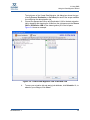
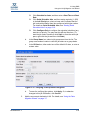
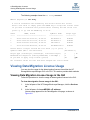
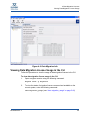
1
Data Migration Service
for HP StorageWorks MPX200
User’s Guide
ISR654606-00 A
Data Migration Service for HP StorageWorks MPX200
User’s Guide
Information furnished in this manual is believed to be accurate and reliable. However, QLogic Corporation assumes no
responsibility for its use, nor for any infringements of patents or other rights of third parties which may result from its
use. QLogic Corporation reserves the right to change product specifications at any time without notice. Applications
described in this document for any of these products are for illustrative purposes only. QLogic Corporation makes no
representation nor warranty that such applications are suitable for the specified use without further testing or
modification. QLogic Corporation assumes no responsibility for any errors that may appear in this document.
Document Revision History
Revision A, November 16, 2009
Changes
Initial release of new user’s guide.
ii
Sections Affected
All
ISR654606-00 A
Table of Contents
Preface
Intended Audience . . . . . . . . . . . . . . . . . . . . . . . . . . . . . . . . . . . . . . . . . . . .
What’s in This Guide . . . . . . . . . . . . . . . . . . . . . . . . . . . . . . . . . . . . . . . . . .
Related Materials . . . . . . . . . . . . . . . . . . . . . . . . . . . . . . . . . . . . . . . . . . . . .
Documentation Conventions . . . . . . . . . . . . . . . . . . . . . . . . . . . . . . . . . . . .
License Agreements. . . . . . . . . . . . . . . . . . . . . . . . . . . . . . . . . . . . . . . . . . .
Technical Support . . . . . . . . . . . . . . . . . . . . . . . . . . . . . . . . . . . . . . . . . . . .
Availability . . . . . . . . . . . . . . . . . . . . . . . . . . . . . . . . . . . . . . . . . . . . . .
Training . . . . . . . . . . . . . . . . . . . . . . . . . . . . . . . . . . . . . . . . . . . . . . . .
Contact Information . . . . . . . . . . . . . . . . . . . . . . . . . . . . . . . . . . . . . . .
Knowledge Database . . . . . . . . . . . . . . . . . . . . . . . . . . . . . . . . . . . . .
1
ix
ix
x
x
xi
xi
xi
xi
xii
xii
Introduction
Features Overview . . . . . . . . . . . . . . . . . . . . . . . . . . . . . . . . . . . . . . . . . . . .
Feature Details . . . . . . . . . . . . . . . . . . . . . . . . . . . . . . . . . . . . . . . . . . . . . . .
Job Scheduling . . . . . . . . . . . . . . . . . . . . . . . . . . . . . . . . . . . . . . . . . .
Immediate Schedule . . . . . . . . . . . . . . . . . . . . . . . . . . . . . . . . . .
Delayed Schedule . . . . . . . . . . . . . . . . . . . . . . . . . . . . . . . . . . .
Configure Only . . . . . . . . . . . . . . . . . . . . . . . . . . . . . . . . . . . . . .
Serial Schedule . . . . . . . . . . . . . . . . . . . . . . . . . . . . . . . . . . . . .
Data Migration Job Groups . . . . . . . . . . . . . . . . . . . . . . . . . . . . . . . . .
Array Properties. . . . . . . . . . . . . . . . . . . . . . . . . . . . . . . . . . . . . . . . . .
Protection . . . . . . . . . . . . . . . . . . . . . . . . . . . . . . . . . . . . . . . . . . . . . .
Data Migration Jobs. . . . . . . . . . . . . . . . . . . . . . . . . . . . . . . . . . . . . . .
Data Migration Job Attributes . . . . . . . . . . . . . . . . . . . . . . . . . . .
Data Migration Job States . . . . . . . . . . . . . . . . . . . . . . . . . . . . .
Data Migration Job CLI Commands . . . . . . . . . . . . . . . . . . . . . .
Logs. . . . . . . . . . . . . . . . . . . . . . . . . . . . . . . . . . . . . . . . . . . . . . . . . . .
Users . . . . . . . . . . . . . . . . . . . . . . . . . . . . . . . . . . . . . . . . . . . . . . . . . .
ISR654606-00 A
1-1
1-2
1-3
1-3
1-3
1-3
1-3
1-4
1-4
1-6
1-6
1-6
1-7
1-7
1-8
1-8
iii
Data Migration Service for HP StorageWorks MPX200
User’s Guide
2
Getting Started
Supported Configurations. . . . . . . . . . . . . . . . . . . . . . . . . . . . . . . . . . . . . . .
Supported Topologies . . . . . . . . . . . . . . . . . . . . . . . . . . . . . . . . . . . . .
Direct Attach Configuration. . . . . . . . . . . . . . . . . . . . . . . . . . . . .
Fabric Configuration . . . . . . . . . . . . . . . . . . . . . . . . . . . . . . . . . .
Supported Fibre Channel Fabrics . . . . . . . . . . . . . . . . . . . . . . . . . . . .
Supported Storage Arrays . . . . . . . . . . . . . . . . . . . . . . . . . . . . . . . . . .
Best Practices . . . . . . . . . . . . . . . . . . . . . . . . . . . . . . . . . . . . . . . . . . . . . . .
High Availability and Redundant Configurations . . . . . . . . . . . . . . . . .
Choosing the Right DMS Options . . . . . . . . . . . . . . . . . . . . . . . . . . . .
General Precautions . . . . . . . . . . . . . . . . . . . . . . . . . . . . . . . . . . . . . .
Hardware and Software Setup . . . . . . . . . . . . . . . . . . . . . . . . . . . . . . . . . . .
Hardware Setup. . . . . . . . . . . . . . . . . . . . . . . . . . . . . . . . . . . . . . . . . .
Software Setup . . . . . . . . . . . . . . . . . . . . . . . . . . . . . . . . . . . . . . . . . .
3
Using DMS
General Steps for Data Migration. . . . . . . . . . . . . . . . . . . . . . . . . . . . . . . . .
Setting Array Properties . . . . . . . . . . . . . . . . . . . . . . . . . . . . . . . . . . . . . . . .
Setting Array Properties in the GUI . . . . . . . . . . . . . . . . . . . . . . . . . . .
Setting the Array Bandwidth . . . . . . . . . . . . . . . . . . . . . . . . . . . .
Setting Array Properties in the CLI . . . . . . . . . . . . . . . . . . . . . . . . . . .
Creating a Data Migration Job Group. . . . . . . . . . . . . . . . . . . . . . . . . . . . . .
Creating a Data Migration Job Group in the GUI. . . . . . . . . . . . . . . . .
Creating a Data Migration Job Group in the CLI . . . . . . . . . . . . . . . . .
Using the Data Migration Wizard . . . . . . . . . . . . . . . . . . . . . . . . . . . . . . . . .
Starting the Data Migration Wizard . . . . . . . . . . . . . . . . . . . . . . . . . . .
Scheduling an Individual Data Migration Job in the GUI . . . . . . . . . . .
Scheduling an Individual Data Migration Job in the CLI . . . . . . . . . . .
Scheduling Data Migration Jobs in Batch Mode . . . . . . . . . . . . . . . . .
Starting Serial Scheduled Jobs . . . . . . . . . . . . . . . . . . . . . . . . . . . . . . . . . .
Viewing the Status of Data Migration Jobs. . . . . . . . . . . . . . . . . . . . . . . . . .
Viewing Data Job Migration Jobs Status in the GUI . . . . . . . . . . . . . .
Viewing Data Job Migration Jobs Status in the CLI. . . . . . . . . . . . . . .
Rescanning Targets . . . . . . . . . . . . . . . . . . . . . . . . . . . . . . . . . . . . . . . . . . .
Viewing Job Details and Controlling Job Actions . . . . . . . . . . . . . . . . . . . . .
Viewing Job Details and Controlling Job Actions in the GUI . . . . . . . .
Viewing Job Details and Controlling Job Actions in the CLI . . . . . . . .
Viewing System and Data Migration Job Logs. . . . . . . . . . . . . . . . . . . . . . .
Viewing Logs in the GUI . . . . . . . . . . . . . . . . . . . . . . . . . . . . . . . . . . .
Viewing Logs in the CLI. . . . . . . . . . . . . . . . . . . . . . . . . . . . . . . . . . . .
iv
2-1
2-1
2-1
2-2
2-3
2-3
2-4
2-4
2-5
2-5
2-6
2-6
2-7
3-1
3-2
3-2
3-3
3-5
3-6
3-6
3-7
3-7
3-7
3-8
3-11
3-15
3-18
3-19
3-19
3-20
3-22
3-23
3-23
3-25
3-27
3-27
3-30
ISR654606-00 A
Data Migration Service for HP StorageWorks MPX200
User’s Guide
Using the Verify Migration Job Wizard . . . . . . . . . . . . . . . . . . . . . . . . . . . . .
Starting the Verify Migration Job Wizard . . . . . . . . . . . . . . . . . . . . . . .
Scheduling Verification of Job Options . . . . . . . . . . . . . . . . . . . . . . . .
Acknowledging a Data Migration Job . . . . . . . . . . . . . . . . . . . . . . . . . . . . . .
Removing an Offline Array . . . . . . . . . . . . . . . . . . . . . . . . . . . . . . . . . . . . . .
4
Data Migration Licenses
Types of Data Migration Licenses . . . . . . . . . . . . . . . . . . . . . . . . . . . . . . . .
Capacity-based Licenses . . . . . . . . . . . . . . . . . . . . . . . . . . . . . . . . . .
Array-based Licenses . . . . . . . . . . . . . . . . . . . . . . . . . . . . . . . . . . . . .
Installing a Data Migration License Key . . . . . . . . . . . . . . . . . . . . . . . . . . . .
Installing a Data Migration License Key in the GUI . . . . . . . . . . . . . . .
Installing a Data Migration License Key in the CLI . . . . . . . . . . . . . . .
Applying an Array-based License to a Specific Array . . . . . . . . . . . . . . . . .
Applying an Array-based License to a Specific Array in the GUI . . . .
Applying an Array-based License to a Specific Array in the CLI . . . . .
Viewing Data Migration License Usage . . . . . . . . . . . . . . . . . . . . . . . . . . . .
Viewing Data Migration License Usage in the GUI . . . . . . . . . . . . . . .
Viewing Data Migration License Usage in the CLI . . . . . . . . . . . . . . .
5
3-32
3-33
3-34
3-36
3-36
4-1
4-1
4-1
4-2
4-2
4-4
4-5
4-5
4-7
4-8
4-8
4-9
Command Line Interface
User Accounts . . . . . . . . . . . . . . . . . . . . . . . . . . . . . . . . . . . . . . . . . . . . . . .
User Sessions . . . . . . . . . . . . . . . . . . . . . . . . . . . . . . . . . . . . . . . . . . . . . . .
Admin Session. . . . . . . . . . . . . . . . . . . . . . . . . . . . . . . . . . . . . . . . . . .
Miguser Session . . . . . . . . . . . . . . . . . . . . . . . . . . . . . . . . . . . . . . . . .
Commands . . . . . . . . . . . . . . . . . . . . . . . . . . . . . . . . . . . . . . . . . . . . . . . . . .
set system . . . . . . . . . . . . . . . . . . . . . . . . . . . . . . . . . . . . . . . . . . . . . .
set features . . . . . . . . . . . . . . . . . . . . . . . . . . . . . . . . . . . . . . . . . . . . .
set fc . . . . . . . . . . . . . . . . . . . . . . . . . . . . . . . . . . . . . . . . . . . . . . . . . .
set array. . . . . . . . . . . . . . . . . . . . . . . . . . . . . . . . . . . . . . . . . . . . . . . .
set VPGroups . . . . . . . . . . . . . . . . . . . . . . . . . . . . . . . . . . . . . . . . . . .
migration_group add . . . . . . . . . . . . . . . . . . . . . . . . . . . . . . . . . . . . . .
migration_group remove . . . . . . . . . . . . . . . . . . . . . . . . . . . . . . . . . . .
migration_group edit . . . . . . . . . . . . . . . . . . . . . . . . . . . . . . . . . . . . . .
migration add. . . . . . . . . . . . . . . . . . . . . . . . . . . . . . . . . . . . . . . . . . . .
migration rm. . . . . . . . . . . . . . . . . . . . . . . . . . . . . . . . . . . . . . . . . . . . .
migration stop . . . . . . . . . . . . . . . . . . . . . . . . . . . . . . . . . . . . . . . . . . .
migration start . . . . . . . . . . . . . . . . . . . . . . . . . . . . . . . . . . . . . . . . . . .
migration pause . . . . . . . . . . . . . . . . . . . . . . . . . . . . . . . . . . . . . . . . . .
migration resume. . . . . . . . . . . . . . . . . . . . . . . . . . . . . . . . . . . . . . . . .
ISR654606-00 A
5-1
5-1
5-1
5-2
5-2
5-5
5-6
5-7
5-8
5-9
5-10
5-11
5-12
5-13
5-16
5-17
5-18
5-19
5-20
v
Data Migration Service for HP StorageWorks MPX200
User’s Guide
migration acknowledge . . . . . . . . . . . . . . . . . . . . . . . . . . . . . . . . . . . .
start_serial_jobs . . . . . . . . . . . . . . . . . . . . . . . . . . . . . . . . . . . . . . . . .
compare_luns add . . . . . . . . . . . . . . . . . . . . . . . . . . . . . . . . . . . . . . . .
compare_luns rm. . . . . . . . . . . . . . . . . . . . . . . . . . . . . . . . . . . . . . . . .
compare_luns stop . . . . . . . . . . . . . . . . . . . . . . . . . . . . . . . . . . . . . . .
compare_luns start . . . . . . . . . . . . . . . . . . . . . . . . . . . . . . . . . . . . . . .
compare_luns pause . . . . . . . . . . . . . . . . . . . . . . . . . . . . . . . . . . . . . .
compare_luns resume . . . . . . . . . . . . . . . . . . . . . . . . . . . . . . . . . . . . .
compare_luns acknowledge . . . . . . . . . . . . . . . . . . . . . . . . . . . . . . . .
show fc . . . . . . . . . . . . . . . . . . . . . . . . . . . . . . . . . . . . . . . . . . . . . . . .
show migration . . . . . . . . . . . . . . . . . . . . . . . . . . . . . . . . . . . . . . . . . .
show array . . . . . . . . . . . . . . . . . . . . . . . . . . . . . . . . . . . . . . . . . . . . . .
show luninfo. . . . . . . . . . . . . . . . . . . . . . . . . . . . . . . . . . . . . . . . . . . . .
show migration_luninfo . . . . . . . . . . . . . . . . . . . . . . . . . . . . . . . . . . . .
show migration_params . . . . . . . . . . . . . . . . . . . . . . . . . . . . . . . . . . .
show mgmt . . . . . . . . . . . . . . . . . . . . . . . . . . . . . . . . . . . . . . . . . . . . .
show memory . . . . . . . . . . . . . . . . . . . . . . . . . . . . . . . . . . . . . . . . . . .
show properties . . . . . . . . . . . . . . . . . . . . . . . . . . . . . . . . . . . . . . . . . .
show migration_usage. . . . . . . . . . . . . . . . . . . . . . . . . . . . . . . . . . . . .
show perf . . . . . . . . . . . . . . . . . . . . . . . . . . . . . . . . . . . . . . . . . . . . . . .
show perf byte . . . . . . . . . . . . . . . . . . . . . . . . . . . . . . . . . . . . . . . . . . .
show features . . . . . . . . . . . . . . . . . . . . . . . . . . . . . . . . . . . . . . . . . . .
show migration_logs . . . . . . . . . . . . . . . . . . . . . . . . . . . . . . . . . . . . . .
show logs. . . . . . . . . . . . . . . . . . . . . . . . . . . . . . . . . . . . . . . . . . . . . . .
show luns. . . . . . . . . . . . . . . . . . . . . . . . . . . . . . . . . . . . . . . . . . . . . . .
show targets . . . . . . . . . . . . . . . . . . . . . . . . . . . . . . . . . . . . . . . . . . . .
show vpgroups . . . . . . . . . . . . . . . . . . . . . . . . . . . . . . . . . . . . . . . . . .
target rescan . . . . . . . . . . . . . . . . . . . . . . . . . . . . . . . . . . . . . . . . . . . .
save capture . . . . . . . . . . . . . . . . . . . . . . . . . . . . . . . . . . . . . . . . . . . .
array rm . . . . . . . . . . . . . . . . . . . . . . . . . . . . . . . . . . . . . . . . . . . . . . . .
array_licensed_port rm . . . . . . . . . . . . . . . . . . . . . . . . . . . . . . . . . . . .
readjust_priority . . . . . . . . . . . . . . . . . . . . . . . . . . . . . . . . . . . . . . . . . .
show compare_luns. . . . . . . . . . . . . . . . . . . . . . . . . . . . . . . . . . . . . . .
6
Performance
Performance Factors . . . . . . . . . . . . . . . . . . . . . . . . . . . . . . . . . . . . . . . . . .
Maximizing Performance . . . . . . . . . . . . . . . . . . . . . . . . . . . . . . . . . . . . . . .
Optimal Configuration and Zoning . . . . . . . . . . . . . . . . . . . . . . . . . . . . . . . .
vi
5-21
5-22
5-23
5-26
5-27
5-28
5-29
5-30
5-31
5-32
5-34
5-36
5-38
5-40
5-42
5-43
5-44
5-45
5-46
5-47
5-48
5-49
5-50
5-51
5-52
5-54
5-55
5-56
5-57
5-58
5-59
5-60
5-61
6-1
6-1
6-2
ISR654606-00 A
Data Migration Service for HP StorageWorks MPX200
User’s Guide
7
Using the HP MSA2012fc Storage Array
MSA2012fc Array Behavior . . . . . . . . . . . . . . . . . . . . . . . . . . . . . . . . . . . . .
Using Array-based Licenses for MSA2012fc Array . . . . . . . . . . . . . . . . . . .
Workaround for Using a Single Array License for MSA2012fc. . . . . . . . . . .
8
Restrictions
Reconfiguring LUNs on a Storage Array . . . . . . . . . . . . . . . . . . . . . . . . . . .
Removing an Array After Completing Data Migration Jobs . . . . . . . . . . . . .
A
7-1
7-1
7-2
8-1
8-1
Troubleshooting
Glossary
Index
List of Figures
Figure
Page
2-1
Single and Dual Blade Configuration . . . . . . . . . . . . . . . . . . . . . . . . . . . . . . . . . . . .
2-1
2-2
Single and Dual Blade High Availability Setup. . . . . . . . . . . . . . . . . . . . . . . . . . . . .
2-2
2-3
Migration Between Dissimilar Vendor SANs . . . . . . . . . . . . . . . . . . . . . . . . . . . . . .
2-3
3-1
Setting Array Properties: Target Type . . . . . . . . . . . . . . . . . . . . . . . . . . . . . . . . . . .
3-3
3-2
Setting Array Bandwidth. . . . . . . . . . . . . . . . . . . . . . . . . . . . . . . . . . . . . . . . . . . . . .
3-4
3-3
Migration Schedule Options: Individual Job . . . . . . . . . . . . . . . . . . . . . . . . . . . . . . .
3-8
3-4
Create Data Migration Job: Individual Job . . . . . . . . . . . . . . . . . . . . . . . . . . . . . . . .
3-9
3-5
Data Migration Jobs Options: Individual. . . . . . . . . . . . . . . . . . . . . . . . . . . . . . . . . . 3-11
3-6
Migration Schedule Options: Batch Mode . . . . . . . . . . . . . . . . . . . . . . . . . . . . . . . . 3-15
3-7
Create Data Migration Job: Batch . . . . . . . . . . . . . . . . . . . . . . . . . . . . . . . . . . . . . . 3-16
3-8
Data Migration Jobs Options: Batch. . . . . . . . . . . . . . . . . . . . . . . . . . . . . . . . . . . . . 3-18
3-9
Serial Data Migration Jobs Options . . . . . . . . . . . . . . . . . . . . . . . . . . . . . . . . . . . . . 3-19
3-10 Active Data Migration Jobs . . . . . . . . . . . . . . . . . . . . . . . . . . . . . . . . . . . . . . . . . . . 3-20
3-11 Viewing Migration Job Details . . . . . . . . . . . . . . . . . . . . . . . . . . . . . . . . . . . . . . . . . 3-24
3-12 mpx Log: System Log . . . . . . . . . . . . . . . . . . . . . . . . . . . . . . . . . . . . . . . . . . . . . . . 3-28
3-13 mpx Log: Migration Log . . . . . . . . . . . . . . . . . . . . . . . . . . . . . . . . . . . . . . . . . . . . . . 3-29
3-14 Verify Migration Job Wizard . . . . . . . . . . . . . . . . . . . . . . . . . . . . . . . . . . . . . . . . . . . 3-34
3-15 Verifying Jobs Options Dialog Box. . . . . . . . . . . . . . . . . . . . . . . . . . . . . . . . . . . . . . 3-35
4-1
Features Page: License Information . . . . . . . . . . . . . . . . . . . . . . . . . . . . . . . . . . . .
4-3
4-2
New License Key Dialog Box . . . . . . . . . . . . . . . . . . . . . . . . . . . . . . . . . . . . . . . . . .
4-3
4-3
Add License Dialog Box . . . . . . . . . . . . . . . . . . . . . . . . . . . . . . . . . . . . . . . . . . . . . .
4-4
4-4
License Array Dialog Box. . . . . . . . . . . . . . . . . . . . . . . . . . . . . . . . . . . . . . . . . . . . .
4-6
4-5
Information Page Showing Array is Licensed . . . . . . . . . . . . . . . . . . . . . . . . . . . . .
4-7
4-6
Data Migration Info. . . . . . . . . . . . . . . . . . . . . . . . . . . . . . . . . . . . . . . . . . . . . . . . . .
4-9
6-1
Topology Example . . . . . . . . . . . . . . . . . . . . . . . . . . . . . . . . . . . . . . . . . . . . . . . . . .
6-2
ISR654606-00 A
vii
Data Migration Service for HP StorageWorks MPX200
User’s Guide
List of Tables
Table
1-1
2-1
2-2
2-3
5-1
A-1
viii
Data Migration Job States . . . . . . . . . . . . . . . . . . . . . . . . . . . . . . . . . . . . . . . . . . . .
Migration Rates for Single and Dual Blade Configurations . . . . . . . . . . . . . . . . . . .
Migration Rates for Single Configuration . . . . . . . . . . . . . . . . . . . . . . . . . . . . . . . . .
Supported Storage Arrays . . . . . . . . . . . . . . . . . . . . . . . . . . . . . . . . . . . . . . . . . . . .
CLI Commands . . . . . . . . . . . . . . . . . . . . . . . . . . . . . . . . . . . . . . . . . . . . . . . . . . . .
Troubleshooting . . . . . . . . . . . . . . . . . . . . . . . . . . . . . . . . . . . . . . . . . . . . . . . . . . . .
Page
1-7
2-2
2-3
2-4
5-2
A-1
ISR654606-00 A
Preface
Data Migration Service (DMS) is a new block level, offline data migration service
introduced in the HP StorageWorks MPX200 Multifunction Router (MPX200) data
transport device. The HP StorageWorks mpx Manager software is designed to
simplify data migration jobs for minimum downtime, while providing protection
against common user errors.
Intended Audience
This guide is intended for end users responsible for administration of data
migration services using the HP StorageWorks MPX200 Multifunction Router.
What’s in This Guide
This preface provides a general overview of DMS and the HP StorageWorks mpx
Manager software, and covers the intended audience, related materials,
document conventions, and contact information for technical support.
The remainder of this guide is organized into the following chapters and
appendices:
1 Introduction lists the DMS and HP StorageWorks mpx Manager features at
both a high level and in detail.
2 Getting Started describes the direct attached and fabric configurations,
and lists the supported fabric and array types; provides recommendations
for high availability and redundant configurations, guidelines for choosing
DMS options, and a few general precautions for DMS usage; describes
hardware and software setup; and shows how to switch to switch to DMS
mode in both the GUI and CLI.
3 Using DMS provides detailed procedures for using DMS in both the HP
StorageWorks mpx Manager graphical user interface (GUI) mode and the
command line interface (CLI) mode.
4 Data Migration Licenses describes the two types of migration licenses and
provides instructions for license key installation.
5 Command Line Interface provides information on using the command line
interface (CLI) for data migration services. It defines the guest account and
the user sessions: admin and miguser. In addition, for each command, it
provides a description, the required session type, and an example.
ISR654606-00 A
ix
Preface
Related Materials
6 Performance describes the factors affecting DMS performance and offers
suggestions for obtaining maximum performance.
7 Using the HP MSA2012fc Storage Array offers several considerations for
using the HP Modular Storage Array 2012fc (MSA2012fc), including array
behavior and licensing concerns.
8 Restrictions details the restrictions that apply to the DMS when
reconfiguring logical unit numbers (LUNs) on a storage array and removing
an array after completing data migration jobs.
Appendix A Troubleshooting lists some problems that may occur with DMS
and offers a possible reason or solution for each.
Following the appendix are a glossary of terms and acronyms used, and an index
that will help you quickly find the information you need.
Related Materials
For additional information, refer to these related documents from QLogic:
Data Migration Service for HP StorageWorks MX200 Planning Guide
iSR6140 Quick Start Guide
iSR6140 Router Manager User’s Guide
iSR6140 Command Line Interface (CLI) User’s Guide
Documentation Conventions
This guide uses the following documentation conventions:
NOTE: provides additional information.
Text in blue font indicates a hyperlink (jump) to a figure, table, or section in
this guide, and links to Web sites are shown in underlined blue. For
example:
x
Table 1-1 lists the possible data migration job states.
For details, see “Starting Serial Scheduled Jobs” on page 4-23.
For more information, visit www.qlogic.com.
Text in bold font indicates user interface elements such as a menu items,
buttons, check boxes, or column headings. For example:
On the Wizards menu, click License an Array.
In the Migration Schedule Options dialog box, click Schedule
individual job, and then click OK.
Under Scheduling Type, select Serial Schedule Jobs.
ISR654606-00 A
Preface
License Agreements
Text in Courier font indicates a file name, directory path, or command line
text; and text in Courier Bold font indicates user input. For example:
Please select a Migration Job Id from the list above:
0
miguser start -p migration
Key names and key strokes are indicated with UPPERCASE:
Press CTRL+P.
Press the UP ARROW key.
Text in italics indicates terms, emphasis, variables, or document titles. For
example:
For a complete listing of license agreements, refer to the QLogic
Software End User License Agreement.
A job group allows better management of data migration jobs.
In the left pane, click mpx MPX200:<IP address>.
License Agreements
Refer to the QLogic Software End User License Agreement for a complete listing
of all license agreements affecting this product.
Technical Support
Customers should contact their authorized maintenance provider for technical
support of their QLogic switch products. QLogic-direct customers may contact
QLogic Technical Support; others will be redirected to their authorized
maintenance provider.
Visit the QLogic support Web site listed in Contact Information for the latest
firmware and software updates.
Availability
QLogic Technical Support for products under warranty is available during local
standard working hours excluding QLogic Observed Holidays.
Training
QLogic offers training for technical professionals for all iSCSI, InfiniBand, and
Fibre Channel products. From the main QLogic Web page at www.qlogic.com,
click the Education and Resources tab at the top, and then click the Education
& Training tab on the left. The QLogic Global Training Portal offers online
courses, certification exams, and scheduling of in-person training.
ISR654606-00 A
xi
Preface
Technical Support
Technical Certification courses include installation, maintenance and
troubleshooting QLogic SAN products. Upon demonstrating knowledge using live
equipment, QLogic awards a certificate identifying the student as a Certified
Professional. The training professionals at QLogic may be reached by e-mail at
[email protected].
Contact Information
Please feel free to contact your QLogic approved reseller or QLogic Technical
Support at any phase of integration for assistance. QLogic Technical Support can
be reached by the following methods:
Web
http://support.qlogic.com
E-mail
[email protected]
Knowledge Database
The QLogic knowledge database is an extensive collection of QLogic product
information that you can search for specific solutions. We are constantly adding to
the collection of information in our database to provide answers to your most
urgent questions. Access the database from the QLogic Support Center:
http://support.qlogic.com.
xii
ISR654606-00 A
1
Introduction
Data Migration Service (DMS) is a new block level, offline data migration service
introduced in the HP StorageWorks MPX200 Multifunction Router (MPX200) data
transport device. The HP StorageWorks mpx Manager software is designed to
simplify data migration jobs for minimum downtime, while providing protection
against common user errors.
This chapter provides a high-level Features Overview, and also details of each of
the following features:
“Job Scheduling” on page 1-3
“Data Migration Job Groups” on page 1-4
“Array Properties” on page 1-4
“Protection” on page 1-6
“Data Migration Jobs” on page 1-6
“Logs” on page 1-8
“Users” on page 1-8
Features Overview
The Data Migration Service technology deployed on the MPX200 with the HP
StorageWorks MPX200 Multifunction Router software has following features:
Fibre Channel SAN vendor independent: The MPX200 supports
Brocade®/McDATA®, Cisco®, and QLogic Fibre Channel fabrics. HP
StorageWorks mpx Manager allows data migration across multi-vendor
fabrics.
Heterogeneous array support: HP StorageWorks mpx Manager supports
data migration across heterogeneous arrays (arrays manufactured by
different vendors). For a list of the storage array types for which DMS
currently provides support, see “Supported Storage Arrays” on page 2-4.
Ease of use: HP StorageWorks mpx Manager is designed to be extremely
simple to use. The graphical user interface (GUI) and command line
interface (CLI) provide many wizard-based operations and user-level
protection.
ISR654606-00 A
1-1
1–Introduction
Feature Details
Data security and sanity: HP StorageWorks mpx Manager provides
features to classify a storage array as “source only,” making it impossible to
write data to that array and thus minimizing the chances of data corruption. It
also provides a Verify Migration Job wizard to compare data on the source
LUN with that on the destination LUN to indicate that the data copy occurred
without any data loss or corruption.
Migration job scheduling: Data migration may be disruptive to
business-critical applications; therefore, minimizing application downtime is
very important. DMS provides several job scheduling options, including the
Configure Only option, which allows you to complete the time-consuming
task of configuring data migration jobs without requiring any downtime. The
different I/O size capabilities for migration jobs enables you to tune the
storage array’s performance during sequential read/write operations. The
Load Balancing option is also very useful when dealing with
older-generation, lower-speed arrays (such as 2Gb and 4Gb Fibre Channel)
being migrated to higher speed (4Gb and 8Gb Fibre Channel) arrays using
higher-speed (4Gb and 8Gb) Fibre Channel switches.
Data migration service logs: DMS logs are maintained separately from the
system logs. DMS logs are designed to help the service professional
maintain a full, detailed history of each job performed, and can be submitted
as a part of the migration report to the customer.
Logging and troubleshooting: System logs are designed to store a
significant number of details that can be used for debugging and
troubleshooting. The save capture command (see “save capture” on
page 5-57) helps to capture the configuration details, system logs, and
MPX200 state at any time, and can be used for troubleshooting if the need
arises.
Licensing: DMS licenses provide capacity- (per TB) and array-based
licenses. For more information, see 4 Data Migration Licenses.
Feature Details
This section describes the features of the Data Migration Service. Because the
current DMS is an offline-only service, it is assumed that when a data migration
job for the specified LUN starts, applications (Microsoft® Exchange, Oracle®
Applications, and other applications that are using the source LUNs for data
storage) and server access to the LUN is blocked. You do not need to bring down
these applications during the initial setup and configuration of DMS. DMS
minimizes the downtime by allowing the complete setup and configuration of data
migration jobs (except for immediate scheduling of the jobs) without bringing down
the other applications. The application and server must be offline only during the
actual data migration.
1-2
ISR654606-00 A
1–Introduction
Feature Details
Job Scheduling
HP StorageWorks mpx Manager provides multiple data migration job scheduling
options to optimize bandwidth and provide maximum usage of SAN resources. It
provides a priority-based serial scheduling feature that enables you to line up
migration jobs and execute them in serial or parallel fashion, based on available
resources.
You can schedule data migration jobs for execution in the following three ways:
Immediate Schedule (start now)
Delayed Schedule (start at a later time within the next 30 days)
Serial Schedule (priority-based scheduling)
Immediate Schedule
Use the Immediate Schedule option to schedule a data migration job to instantly
start data migration. You must ensure that both the source and destination LUNs
are not being accessed by any application when this option is selected.
Delayed Schedule
Use the Delayed Schedule option to schedule a data migration job to start at a
later time. When you select this option during configuration of a migration job, you
are requested to enter the start time. This allows you to configure a migration job
during normal business hours and perform actual data migration during off peak
hours, so that the application remains down only for a short period of time and
during the off peak hours.
Configure Only
The Configure Only option enables you to configure migrations jobs without a
specified start time. With this option, you must start the migration jobs when
system downtime begins. This option is very useful when the exact downtime of
the application is not known. Use this option when you need to configure all
migration jobs without requiring any application downtime.
Serial Schedule
The Serial Schedule option is designed to provide maximum flexibility for data
migration. Even though DMS supports 256 simultaneous migration jobs, typical
array performance can be maximized by having only 4 to 8 LUNs under migration.
Serial scheduling of the job allows configuration of all 256 jobs at the same time,
while having fewer active jobs at a time.
ISR654606-00 A
1-3
1–Introduction
Feature Details
Serial scheduling allows you to configure migration jobs that can have the same or
different priority. If you need to configure a large number of jobs (256, for
example), you can configure them in batches such that the first four to eight jobs
are scheduled at priority 1, the next four to eight jobs at priority 2, and so on. This
scheduling arrangement ensures that when the serial schedule starts, no more
than four to eight jobs are running simultaneously, and DMS can provide better
performance.
In order to achieve this, serial scheduling requires a job priority for each data
migration job. Multiple data migration jobs can have the same priority. Migration
jobs with the same priority are run together. Job priority 1 is highest and job
priority 255 is lowest. After all the jobs are configured for serial execution, you
must schedule this batch of serially-scheduled jobs. The batch can be started
immediately or at a later time. The Serial Data Migration Jobs Options dialog box
provides an easy way to start or schedule the batch.
After the serial batch starts to run, all jobs having the highest priority are
completed before the jobs scheduled at the next priority level start to execute.
Only one serial schedule can be active at any time.
Data Migration Job Groups
The mpx Manager uses the concept of job groups to associate data migration jobs
with user-defined groups. A job group allows better management of data migration
jobs. You can create a maximum of eight job groups. The mpx Manager also has
commands to remove and edit job groups.
The groups can be classified for data migration jobs related to application type or
server class. For example, a data migration job related to the Microsoft Exchange
application could be part of group named “Exchange,” and a data migration job
related to a payroll application could be part of group named “Payroll.” The data
migration jobs are tracked separately within each group. You can schedule the
data migration of all LUNs related to one application, followed by other
applications.
If no group is defined, all jobs are assigned to the default group, Group 0. You
cannot delete Group 0.
Array Properties
DMS discovers the Fibre Channel target ports and forms an array when at least
one data LUN is presented to the DMS running in the MPX200 from that array. If
no data LUN is presented to the MPX200, all array ports are shown in the mpx
Manager GUI and CLI as target ports. After the LUNs are presented to the
MPX200, a target rescan is required to form an array (see “target rescan” on
page 5-56).
1-4
ISR654606-00 A
1–Introduction
Feature Details
DMS classifies the discovered storage array controllers into two categories:
targets and arrays. All array controller ports are initially identified as targets by the
MPX200. After a single data LUN is detected on the target, DMS forms an entity
called an array. A specific LUN seen through multiple Fibre Channel target ports
are grouped under a single array.
Configure the array entity created by the DMS for the following attributes:
Symbolic name: Upon forming an array, the HP StorageWorks MPX200
Multifunction Router automatically assigns a symbolic name to an array.
QLogic highly recommends that the you assign a more meaningful name to
an array because the migration logs identify the source and destination
LUNs with the symbolic names of the source and destination arrays.
Array type: DMS requires the classification of each array as either Source,
Destination, or Source+Destination. During the creation of migration jobs,
the Data Migration wizard restricts the assignment of a source LUN only
from arrays that have an attribute Source and assignment of a destination
LUN only from the arrays with attribute Destination. Use the array attribute
Source+Destination only when you need to create copies of a LUN on the
same array.
Select the array type attribute None to exclude the storage array from
participating in data migration. The MPX200 simultaneously supports both
iSCSI connectivity and data migration service. Typically, you would use the
“None” attribute when the MPX200 is used to provide only iSCSI
connectivity for that storage array.
Array bandwidth: This feature is applied only to a source array. This value
indicates the maximum bandwidth available from the array for a data
migration task. The bandwidth is computed over all paths. The MPX200
uses only the user-assigned array bandwidth to migrate the data. This
allows other applications and servers using the same source array to
continue to perform at an acceptable performance level.
Load Balancing: The MPX200 detects all available multiple active and
passive paths to the LUN. Load balancing balances the load for migration
jobs over multiple active paths, thus improving the migration rate. Load
balancing should be disabled only in case of trouble performing data
migration.
ISR654606-00 A
1-5
1–Introduction
Feature Details
Protection
DMS provides data protection against some of the common user errors by
enforcing the following restrictions:
An array must have an attribute of either Source, Destination, or
Source+Destination to participate in the migration. When you configure a
data migration job, Source LUNs can be assigned only from an array with
the attribute Source (or (Source+Destination), and Destination LUNs can be
assigned only from an array with the attribute Destination (or
Source+Destination). Use these attributes properly to avoid errors.
A user acknowledgement is required for a data migration job after the job is
completed. This feature provides better accounting and record-keeping for
the job. The data migration log indicates when the job was completed and
when you acknowledge the completion status of the job.
After a LUN is configured as a Destination LUN for a specific data migration
job, the LUN cannot be configured for a different job until the current job is
completed and you acknowledge or remove the job.
DMS detects the normal configuration of partitions on the data LUN. Before
fully configuring a data migration job, DMS provides a warning if it detects
valid partition tables on the destination LUN.
Data Migration Jobs
DMS manages the data migration processes in terms of data migration jobs. A
maximum of 256 jobs can be scheduled to run at any time.
Data Migration Job Attributes
Configure a data migration job for the following attributes:
1-6
Source and Destination LUN: You can configure a single source LUN to
migrate to one or multiple destination LUNs. Any specified destination LUN
can be part of a single data migration job.
Job groups: For better manageability, you can configure data migration
jobs to belong to a specific, user-defined job group. By default, a job is
assigned to a default group, Group 0.
Scheduling: You can configure data migration jobs to start immediately, to
start at a specified time, to have no start time (configure only), or to use a
priority-based serial scheduling. For details, see the “Scheduling...” sections
under “Using the Data Migration Wizard” on page 3-7.
I/O size: You can configure each data migration job to migrate data using a
specified I/O size. Different types of arrays and LUNs may provide optimum
performance based on the I/O size. The default size is 64K.
ISR654606-00 A
1–Introduction
Feature Details
The Data Migration wizard enables you to configure multiple jobs in a batch mode.
The jobs configured in batch mode have the same common attributes. For more
details, see “Using the Data Migration Wizard” on page 3-7.
Data Migration Job States
Table 1-1 lists the possible data migration job states.
Table 1-1. Data Migration Job States
Job State
Description
Running
Job is currently running. You can pause or stop a running job.
Scheduled
Job is waiting to be run.
Completed
Job is complete. You must acknowledge a completed job.
Paused
A running job has been interrupted.
Stopped
A running, scheduled, failed, or pending job has been halted. You can
restart or remove a job in the Stopped state.
Failed
The MPX200 lost access to the LUN during a data migration job, causing it to fail.
Pending
A job configured for a delayed start (either due to Delayed Scheduling
or Serial Scheduling) cannot start at the specified time because the
source or destination LUN is offline. When the LUN becomes online,
the job will go into the Running state. If you determine that the specified
LUN will never come back online, you can remove the pending job.
Data Migration Job CLI Commands
DMS provides CLI commands (migration stop/start/pause/resume) to
alter the state of the migration job. The migration stop/start command
causes a job to be stopped and then restarted from the beginning. The
migration stop command rewinds the job to the beginning.
You can use the migration pause/resume commands only on running jobs.
The migration pause command causes the job to halt temporarily. The
migration resume command causes the job to resume from the point where it
was paused; it will not start from the beginning of the LUN. Pause a migration job
if it is taking a lot of array bandwidth and causing other processes on the array to
slow down. You can later resume the job when the I/O activity on the array is
reduced.
ISR654606-00 A
1-7
1–Introduction
Feature Details
Logs
DMS manages the following two log types:
Migration logs: Migration logs provide a detailed history of each data
migration job. The job history contains information such as the start and end
time of the job, source and destination LUNs and arrays, size of the job, total
time consumed for the job, and so on. Using the HP StorageWorks mpx
Manager GUI, you can export the migration logs out of the MPX200. You
can open this file with a spreadsheet application such as Microsoft Excel
and use it as a data migration task report. QLogic highly recommends that
you save migration logs after the data migration job is completed and
cleared from the MPX200. This provides a record of every data migration job
and makes it easier to differentiate between them.
System logs: System logs primarily record events, errors, and configuration
changes, and can be used for troubleshooting.
Users
The MPX200 supports two types of users:
1-8
Administrative user: For managing the MPX200, you must be in an
administrative session. The default password for the administrator is config.
Data migration user (“miguser”): This user session is required to
configure migration-related activities. The default password is migration. For
all DSM functions, you must run a miguser session.
ISR654606-00 A
2
Getting Started
This chapter helps you get started using Data Migration Service with the MPX200
and HP StorageWorks mpx Manager by describing the supported configurations,
some “best practices” recommendations, and hardware and software setup.
Supported Configurations
This section describes and illustrates the supported topologies (direct attach and
fabric), and lists the supported fabric and array types.
Supported Topologies
Supported topologies include direct attach configuration and fabric configuration,
described in this section.
Direct Attach Configuration
Figure 2-1 shows a direct attach configuration with a single blade or dual blade
MPX200.
Single
Blade
Dual
Blade
Figure 2-1 Single and Dual Blade Configuration
Table 2-1 shows the migration rates that can be achieved for single and dual
blades, depending on the bandwidth capability of the storage array.
ISR654606-00 A
2-1
2–Getting Started
Supported Configurations
Table 2-1. Migration Rates for Single and Dual Blade Configurations
Array Type
Single Blade
Dual Blade
2Gb Fibre Channel
700 GB/hour
1 TB/hour
4Gb Fibre Channel
1.25 TB/hour
2.5 TB/hour
8Gb Fibre Channel
2 TB/hour
4 TB/hour
Fabric Configuration
Figure 2-2 shows typical setup for data migration with a dual fabric high
availability (HA) configuration with both array controller ports and one port from
each MPX200 blade connected to each fabric. This configuration enables the
MPX200 to perform load balancing.
Single
Blade
Dual
Blade
Figure 2-2 Single and Dual Blade High Availability Setup
Table 2-1 shows the migration rates that can be achieved for a single blade,
depending on the bandwidth capability of the storage array.
2-2
ISR654606-00 A
2–Getting Started
Supported Configurations
Table 2-2. Migration Rates for Single Configuration
One Port per Array
Two Ports per
Controller
Array Controller
Connected to Each Connected to Each
Fabric
Fabric
Source or
Destination Array
Fibre
Channel
Fabric
2Gb Fibre Channel
4Gb
1.25 TB/hour
2.5 TB/hour
4Gb Fibre Channel
8Gb
2.5 TB/hour
4 TB/hour
8Gb Fibre Channel
8Gb
4 TB/hour
4 TB/hour
Figure 2-3 shows the configuration used when you are:
Migrating from one vendor SAN to another vendor SAN.
Installing a new fabric and do not have enough ports available in the new
fabric.
This configuration provides data migration rates similar to the direct attach
configuration (see page 2-1).
Figure 2-3 Migration Between Dissimilar Vendor SANs
Supported Fibre Channel Fabrics
DMS is currently supported with Brocade/McDATA, Cisco, and QLogic 2Gb, 4Gb,
and 8Gb Fibre Channel fabrics.
Supported Storage Arrays
Table 2-3 lists the storage array types for which DMS currently provides support.
ISR654606-00 A
2-3
2–Getting Started
Best Practices
Table 2-3. Supported Storage Arrays
Vendor
EMC®
Storage Array
CLARiiON® CX family
CLARiiON® AX family
Symmetrix® DMX family
Hitachi Data Systems
(HDS)
Thunder 95xx V series
Lightning 99xx V series
Attachable Modular Storage (AMS) family
Workgroup Modular Storage (WMS) family
Universal Storage Platform (USP) family
Hewlett-Packard® (HP)
HP StorageWorks Modular Storage Array (MSA) family
HP StorageWorks Enterprise Virtual Array (EVA) family
HP StorageWorks XP Disk Arrays family
IBM®
System Storage DS3000 family
System Storage DS4000 family
System Storage DS5000 family
System Storage DS6000 family
System Storage DS8000 family
NEC
Xiotech®
D-Series SAN Storage arrays
Emprise™ Storage family
Magnitude 3D® 4000 family
Best Practices
This sections provides some “best practices” recommendations for DMS usage.
High Availability and Redundant Configurations
The following recommendations pertain to high availability (HA) and redundant
configurations:
2-4
The MPX200 is capable of detecting and performing load balancing over
multiple paths. To achieve the highest data migration rates, zone multiple
ports from each array controller with each port of the MPX200.
ISR654606-00 A
2–Getting Started
Best Practices
To maximize performance, zone each MPX200 Fibre Channel port with one
or two ports from one of the array controllers.
To optimize performance, QLogic recommends that LUNs under migration
are balanced across two controllers of a storage array.
Choosing the Right DMS Options
Follow these guidelines when choosing DMS options:
Use the Configure Only option to configure migration jobs while applications
are still online. Then, start the migration jobs as soon as the server offline
notification is received from the system administrator.
To get optimum MPX200 performance, schedule a maximum of eight jobs to
run simultaneously.
To sequentially run migration jobs, use the Serial Scheduling feature, which
allows the migration jobs to start automatically after the jobs with previous
priority values are completed; no user intervention is required. Serial
scheduling helps ensure optimum bandwidth usage without filling up array
I/O queues, which may occur if jobs run simultaneously.
Use the array bandwidth feature when applications are still using different
LUNs of the array while DMS is migrating the data. This ensures that the
MPX200 uses limited array bandwidth for the data migration and does not
impact application performance during data migration.
General Precautions
Note the following general precautions:
Make sure that hosts connected to source and destination LUNs are either
zoned out completely, or that LUN masking is changed appropriately such
that the LUNs being migrated are not touched by any host other than the
MPX200 until the migration is complete.
In high availability (HA) configurations where the LUNs are visible from both
MPX200 ports, make sure that both ports from each MPX200 blade are
configured under a single host or host group entity in the array management
software. This configuration ensures that all MPX200 ports from the same
virtual port group (VP group) see the same set of LUNs as having the same
LUN ID. Failing to follow this configuration can lead to unpredictable or
erroneous behavior.
For a dual blade configuration for the MPX200, add the same VP group
WWPNs from both blades as one host entry. If you need to migrate more
than 255 LUNs, you may create additional host entries in the array using
WWPNs from additional VP groups in the MPX200.
ISR654606-00 A
2-5
2–Getting Started
Hardware and Software Setup
Migration logs require the following handling:
Always clear migration logs at the start of the project.
Export migration logs onto your system after the project completes.
Migration logs wrap after 1,024 migration log entries.
If the source array controllers are configured in redundant fabrics, configure
one MPX200 port into Fabric A and the second port into Fabric B.
When using the serial scheduling feature, configure similar size jobs with the
same priority.
Array reconfiguration precautions include the following:
If the LUN presentation from the array to the MPX200 is changed, click
the Refresh button two or three times to see the changes.
Wait for a few seconds between retries because the MPX200 will be
running the discovery process.
Remove unused arrays for the following reasons:
The maximum number of arrays configured at any time is 7.
Arrays stored in persistence consume resources even if the array is
offline and no longer needed.
After the migration is complete, QLogic recommends that you remove
the arrays.
If the array-based license was used and the array will not be used in
the next project, remove the license for this array.
Array-based license use requires the following precautions:
If you reconfigure a removed array, it may require a new array-based
license.
You can use a maximum of 32 array-based licenses at any time.
Use an array-based license if you require an ongoing replications of
LUNs for the array.
Hardware and Software Setup
Follow the procedures and guidelines in this section for setting up your hardware
and software.
Hardware Setup
For information on installing your HP StorageWorks MPX200 Multifunction
Router, refer to the MPX200 Hardware Installation Guide.
2-6
ISR654606-00 A
2–Getting Started
Hardware and Software Setup
To set up the hardware for DMS:
1.
To manage the MPX200, install the HP StorageWorks mpx Manager
software on any computer running Windows 2003, Windows 2008, or
Windows XP. The MPX200 must be accessible over the network connection
from the machine on which HP StorageWorks mpx Manager is installed.
2.
Set up the MPX200 management port IP address. For details, refer to the
HP StorageWorks MPX200 Multifunction Router Quick Start Guide.
3.
Connect the storage array (source and destination) controller ports to an
Fibre Channel switch. For a high availability (HA) topology, connect the two
ports of each array on two different switches.
4.
Ensure that the controller ports are seen as online on the Fibre Channel
switches.
5.
Connect the Fibre Channel ports of the MPX200 to the Fibre Channel
switches where the array controller ports are connected. For an HA
topology, connect each Fibre Channel port of the MPX200 to a different
Fibre Channel switch.
6.
Ensure that the MPX200 Fibre Channel ports are seen as online on the
Fibre Channel switches.
Software Setup
Software setup for DMS includes configuring switch zoning and LUN presentation.
Zoning: Perform zoning on the Fibre Channel switches such that array
controller ports are visible to the MPX200, and the array is able to see
MPX200 Fibre Channel ports and can present LUNs to the MPX200.
LUN Presentation: Ensure the appropriate data LUNs are presented from
the storage arrays to the MPX200.
NOTE:
For HA configurations where the source or destination LUNs are visible from
both MPX200 ports, make sure that both MPX200 ports are configured
under a single host or host group entity in the array management software.
This ensures that both MPX200 ports see the same set of LUNs as having
the same LUN ID. Failure to do so can lead to unpredictable and erroneous
behavior.
ISR654606-00 A
2-7
2–Getting Started
Hardware and Software Setup
Notes
2-8
ISR654606-00 A
3
Using DMS
This chapter provides the following procedures for using DMS:
General Steps for Data Migration
“Setting Array Properties” on page 3-2
“Creating a Data Migration Job Group” on page 3-6
“Using the Data Migration Wizard” on page 3-7
“Starting Serial Scheduled Jobs” on page 3-18
“Viewing the Status of Data Migration Jobs” on page 3-19
“Rescanning Targets” on page 3-22
“Viewing Job Details and Controlling Job Actions” on page 3-23
“Viewing System and Data Migration Job Logs” on page 3-27
“Using the Verify Migration Job Wizard” on page 3-32
“Acknowledging a Data Migration Job” on page 3-36
“Removing an Offline Array” on page 3-36
General Steps for Data Migration
To perform data migration, follow these general steps:
1.
Plan for data migration. For project guidelines, refer to the Data Migration
Service for HP StorageWorks MX200 Planning Guide.
2.
Zone the Fibre Channel ports from the HP StorageWorks MPX200
Multifunction Router with the Fibre Channel ports of the storage array.
3.
Present the source LUNs and destination LUNs to the MPX200 using the
array vendor’s configuration tools; for example, use Command View for HP
Enterprise Storage Array (EVA) or Navisphere® for EMC CLARiiON.
4.
Before beginning data migration, clear the migration logs (see “Viewing
System and Data Migration Job Logs” on page 3-27).
5.
If the router fails to discover arrays, use the target rescan option (see
“Rescanning Targets” on page 3-22).
ISR654606-00 A
3-1
3–Using DMS
Setting Array Properties
6.
If you are using an array-based license, follow the License Array wizard to
apply the license.
7.
Set the array properties: symbolic name (optional) and target type (Source
or Destination) (see “Setting Array Properties” on page 3-2).
8.
Create the user-defined job groups (see “Creating a Data Migration Job
Group” on page 3-6).
9.
Configure data migration jobs (see “Using the Data Migration Wizard” on
page 3-7).
10.
Monitor your data migration jobs (see “Viewing the Status of Data Migration
Jobs” on page 3-19).
11.
Acknowledge completed data migration jobs (see “Acknowledging a Data
Migration Job” on page 3-36).
12.
After the data migration project is complete, export the migration logs to your
local workstation (see “Viewing System and Data Migration Job Logs” on
page 3-27).
13.
Make the array offline by zoning out the array ports from the MPX200, and
then remove the array.
Setting Array Properties
The HP StorageWorks mpx Manager provides both GUI and CLI interfaces to
view and edit array properties, including the bandwidth.
Setting Array Properties in the GUI
Follow these steps to set the array properties in the HP StorageWorks mpx
Manager.
To set array properties in the GUI:
1.
In the left pane, click FC Arrays to view all the Fibre Channel storage arrays
detected by the MPX200.
2.
Click the storage array you want to use as the source array.
The Information page in the right pane displays all the properties currently
set for the selected array.
3-2
3.
(Optional) In the Symbolic Name box, type a user-friendly array name.
4.
From the Target Type list, select Source, as shown inFigure 3-1.
ISR654606-00 A
3–Using DMS
Setting Array Properties
Figure 3-1 Setting Array Properties: Target Type
5.
To save your changes, click Save.
6.
In the Security Check dialog box, enter the administrative password. (The
default password is migration.)
The mpx Manager displays an informative message indicating that the array
properties have changed.
7.
Click OK to close the message box.
8.
To apply the changes and update the window before changing other array
properties, click Refresh.
Setting the Array Bandwidth
After you have changed the Target Type to Source, saved your changes, and
refreshed the mpx Manager (see “Setting Array Properties in the GUI” on
page 3-2), the right pane for the array shows an additional property, Array
Bandwidth. Follow the procedure in this section to change the array’s bandwidth
setting for data transfers.
ISR654606-00 A
3-3
3–Using DMS
Setting Array Properties
NOTE:
Array bandwidth is only displayed and editable if the array target type is
Source.
To set the array bandwidth:
1.
On the Information page of the selected array, click Array Bandwidth, and
then click one of the following values:
2.
Slow (50 MB/s)
Medium (200 MB/s)
Fast (1600 MB/s)
Throttle
If you select Throttle, type a value between 1 and 400 in the User Defined
Bandwidth (MB/s) box. (Figure 3-2 shows an example.) By default, the
MPX200 uses all available bandwidth.
Figure 3-2 Setting Array Bandwidth
3.
3-4
To save your changes, click Save.
ISR654606-00 A
3–Using DMS
Setting Array Properties
4.
In the Security Check dialog box, enter the administrative password. (The
default password is migration.)
The mpx Manager displays an informative message indicating that the array
properties have changed.
5.
Click OK to close the message box.
6.
To apply the changes and update the window, click Refresh.
Setting Array Properties in the CLI
Follow these steps to change the array properties using the CLI. Note that all data
migration operations are authorized only to the migration administrator session,
miguser. For more information, see “Miguser Session” on page 5-2.
To set array properties in the CLI:
1.
Log in to the MPX200 as guest and enter the password.
2.
Open a miguser session using the following command:
miguser start -p migration
(The default password for miguser is migration.)
3.
To access the array properties, enter the following command:
set array
4.
Select a target ID by entering its index number.
5.
At the prompts, modify the symbolic name, target type, or array bandwidth
for the source and destination arrays.
NOTE:
The DM CLI allows you to change the Bandwidth for Migration
setting only if the Target Type is either Source or Src+Dest
Target.
6.
At the Do you want to apply array license (yes/no) prompt,
enter Yes (the default is No) to apply your changes.
The following shows an example of how to change the array properties in the CLI.
MPX200 (miguser) #> set array
ISR654606-00 A
3-5
3–Using DMS
Creating a Data Migration Job Group
A list of attributes with formatting and current values will follow.
Enter a new value or simply press the ENTER key to accept the current value.
If you wish to terminate this process before reaching the end of the list
press 'q' or 'Q' and the ENTER key to do so.
Index
WWPN, PortId
Symbolic Name
Target Type
0
20:78:00:c0:ff:d5:9a:05, 00-00-00
HP MSA2012fc-0
Src+Dest
1
50:00:1f:e1:50:0a:e1:49, 82-07-00
HP HSV200-1
Src+Dest
2
50:06:01:60:4b:a0:35:de, 82-03-00
DGC RAID-2
Src+Dest
3
50:00:1f:e1:50:0a:37:18, 00-00-00
HP HSV210-3
Src+Dest
Please select a Target Id from the list above ('q' to quit):
Symbolic Name (Max = 128 characters)
0
[HP MSA2012fc-0]
Target Type (1=SrcTarget, 2=DstTarget, 3=Src+Dest 4=None Target)
[3
]
Bandwidth for Migration (0=Array Bandwidth, 50-1600 MBps )
[0
]
Enable Load Balancing (0=Enable, 1=Disable)
[Enabled
]
Array based licensed applied.
All attribute values for that have been changed will now be saved.
Creating a Data Migration Job Group
The HP StorageWorks mpx Manager provides both GUI and CLI interfaces to
create data migration job groups.
Creating a Data Migration Job Group in the GUI
Follow these steps to create a data migration job group in the HP StorageWorks
mpx Manager.
To create a data migration job group in the GUI:
1.
In the left pane, click the Services tab to open the Services page.
By default, the MPX200 shows Group 0 created under the Data Migration
Jobs item.
3-6
2.
Right-click Data Migration Jobs, and then on the shortcut menu, click Add
Group.
3.
In the Input dialog box, type a group name that you want to assign to
administer a set of data migration jobs, and then click OK.
4.
In the Security Check dialog box, type the data migration user password
(default is migration), and then click OK.
ISR654606-00 A
3–Using DMS
Using the Data Migration Wizard
Creating a Data Migration Job Group in the CLI
The data migration group name must be a minimum of 4 and a maximum of 128
alphanumeric characters. You can create a maximum of eight job groups in
addition to the default job group.
To create a data migration job group in the CLI:
1.
Log in to the MPX200 as guest and enter the password.
2.
Open a miguser session using the following command:
miguser start -p migration
(The default password for misguser is migration.)
3.
Create a migration group using the following command:
migration_group add
4.
At the prompt, enter a name for the new group.
The following shows an example of how to add a migration group in the CLI.
MPX200 (miguser) #> migration_group add
Please Enter Group Name that you want to create (Min = 4 Max = 128
characters) MS_Exchg_2
Sucessfully created Group
MS_Exchg_2
Using the Data Migration Wizard
The Data Migration wizard helps simplify the configuration and scheduling of both
individual and batches of data migration jobs. This section contains the following
information for the wizard:
“Starting the Data Migration Wizard” on page 3-7
“Scheduling an Individual Data Migration Job in the GUI” on page 3-8
“Scheduling an Individual Data Migration Job in the CLI” on page 3-11
“Scheduling Data Migration Jobs in Batch Mode” on page 3-15
Starting the Data Migration Wizard
Follow these steps to start the data migration wizard.
ISR654606-00 A
3-7
3–Using DMS
Using the Data Migration Wizard
To start the Data Migration wizard:
1.
Start HP StorageWorks mpx Manager and connect to the MPX200 by
providing the IP address of the MPX200.
2.
Start the Data Migration wizard using one of these methods:
3.
On the Wizards menu, click Start Data Migration.
In the left pane, open the Services page, and then right-click Data
Migration Jobs.
Select the scheduling mode as follows:
a.
In the top section of the Data Migration wizard, click Options.
b.
In the Migration Schedule Options dialog box, select either Schedule
in batch mode or Schedule individual job, as shown in Figure 3-3.
c.
Click OK.
Figure 3-3 Migration Schedule Options: Individual Job
4.
Depending on your selection in the preceding step, continue with either
“Scheduling an Individual Data Migration Job in the GUI” on page 3-8 or
“Scheduling Data Migration Jobs in Batch Mode” on page 3-15.
Scheduling an Individual Data Migration Job in the GUI
Follow these steps to schedule an individual data migration job in HP
StorageWorks mpx Manager. (To perform this operation in the CLI instead, see
“Scheduling an Individual Data Migration Job in the CLI” on page 3-11.)
To schedule an individual data migration job in the GUI:
3-8
1.
Start the Data Migration wizard by following the steps specified in “Starting
the Data Migration Wizard” on page 3-7.
2.
In the Migration Schedule Options dialog box, click Schedule individual
job, and then click OK.
ISR654606-00 A
3–Using DMS
Using the Data Migration Wizard
The right pane of the Create Data Migration Job dialog box shows the type
of array (Source, Destination, or Src+Dest) for each of the arrays available
for configuring the data migration job.
3.
Choose the appropriate Source and Destination LUN for the data migration
job by dragging and dropping the LUNs from the right pane onto the Source
LUN or Destination LUN for the data migration job in the left pane.
Figure 3-4 shows an example.
Figure 3-4 Create Data Migration Job: Individual Job
4.
ISR654606-00 A
To save your migration job and assign job attributes, click Schedule. Or, to
abandon your changes, click Close.
3-9
3–Using DMS
Using the Data Migration Wizard
NOTE:
The mpx Manager does not allow you to drag a LUN from an array
of Source type in the right pane and drop it onto the Destination
LUN in the left pane. However, if the array type is Src+Dest, you
can drop the LUN from that array onto either a Source LUN or
Destination LUN in the left pane.
If you attempt to drop a Source LUN from the right pane onto a
Destination LUN of a smaller size in the left pane, an error
message appears.
5.
In the Data Migration Jobs Options dialog box (see Figure 3-5), specify the
job attributes as follows:
a.
3-10
Under Scheduling Type, select one of the following:
Click Start Now to start the job immediately.
Click Schedule for Later, and then enter a Start Time and Start
Date.
Click Serial Schedule Jobs, and then assign a priority (1–256)
in the Job Priority box, where a lower value indicates that the
job is scheduled earlier than jobs configured with higher values.
For details on Serial Schedule Jobs, see “Starting Serial
Scheduled Jobs” on page 3-18.
Click Configure Only to configure the migration job without any
start time or priority. You may start this job at a later time. (To
start the job, select it, and then click Start. Or, from the active job
pane, right-click the job, and then click Start.)
b.
In the Job Description box, enter a user-defined name to describe
this data migration job.
c.
In the Group Name box, select a job group name from the list. The
group name makes it easier to view the job status on a group basis.
d.
In the IO Size box, either select one of the default I/O sizes, or enter a
custom value.
ISR654606-00 A
3–Using DMS
Using the Data Migration Wizard
Figure 3-5 Data Migration Jobs Options: Individual
6.
To save the data migration job options, click Apply. Or to abandon changes
to this data migration job, click Cancel.
Scheduling an Individual Data Migration Job in the CLI
Follow these steps to schedule an individual data migration job in the CLI. (To
perform this operation in the mpx Manager instead, see “Scheduling an Individual
Data Migration Job in the GUI” on page 3-8.)
To schedule an individual data migration job in the CLI:
1.
Log in to the MPX200 as guest and enter the password.
2.
Open a miguser session using the following command:
miguser start -p migration
(The default password for misguser is migration.)
3.
To create a migration job, enter the following command:
migration add
4.
Every migration job is defined by a Source LUN and a Destination LUN. The
CLI lists the source arrays that you have previously defined and prompts you
to select one.
5.
From the selected source array, the CLI lists the LUNs that have been
exposed to the MPX200 for migration, and prompts you to select one LUN.
ISR654606-00 A
3-11
3–Using DMS
Using the Data Migration Wizard
6.
The CLI lists the destination arrays that you have previously defined, and
prompts you to select one.
7.
From the selected destination array, the CLI lists the LUNs that have been
exposed to the MPX200 for migration, and prompts you to select one LUN.
The destination LUN you select should not be a part of any other job, and its
size should be equal to or greater than the source LUN.
The MPX200 warns you if it detects any valid metadata on the destination
LUN. However, you can continue and use the LUN for migration if you are
aware of the consequences and want to continue with the job scheduling.
8.
At the prompts, specify the I/O size, job name, migration group, and
scheduling type.
a.
Enter an I/O size between 32K and 1 MB to optimize migration
performance based on the storage array under consideration.
b.
(Optional) Enter a job name (maximum of 64 characters) to identify the
job.
c.
Select one of the listed available migration groups.
d.
Select a Migration Start Time: 1=Now, 2=Delayed, or
3=JobSerialScheduling.
If you choose Delayed, the CLI prompts you to input the date
and time to begin job execution.
If you choose JobSerialScheduling, the CLI prompts you to
to assign a priority level at which the job should be started when
all the serial scheduled jobs start execution. The priority can
range between 1 and 256. The jobs with priority 1 are executed
before the scheduler executes jobs with priority 2.
The CLI informs you if the migration job is created successfully, and saves
any changes you have made.
The MPX200 then schedules a migration job based on your inputs.
3-12
ISR654606-00 A
3–Using DMS
Using the Data Migration Wizard
The following shows an example of scheduling an individual data migration job in
the CLI:
MPX200 <1> (admin) (miguser) #> migration add
A list of attributes with formatting and current values will follow.
Enter a new value or simply press the ENTER key to accept the current value.
If you wish to terminate this process before reaching the end of the list
press 'q' or 'Q' and the ENTER key to do so.
Index
WWPN, PortId
Symbolic Name
Target Type
-----
---------------------------------
--------------------
------------
0
20:78:00:c0:ff:d5:9a:05, 00-00-00
HP MSA2012fc-0
Src+Dest
1
50:00:1f:e1:50:0a:e1:49, 82-07-00
HP HSV200-1
Src+Dest
2
50:06:01:60:4b:a0:35:de, 82-03-00
DGC RAID-2
Src+Dest
3
50:00:1f:e1:50:0a:37:18, 00-00-00
HP HSV210-3
Src+Dest
Please select a Source Target from the list above ('q' to quit):
Index
(VpGroup Name)
-----
--------------
1
VPGROUP_1
2
VPGROUP_2
3
VPGROUP_3
4
VPGROUP_4
Please select a VPGroup for Source Lun ('q' to quit):
LUN
Vendor
LUN Size( GB)
---
------
-------------- ----------
0
DGC
5.00
1
DGC
5.00
2
DGC
5.00
3
DGC
5.00
4
DGC
5.00
4
Attributes
Please select a LUN as a Source Lun ('q' to quit):
Index
2
WWPN, PortId
1
Symbolic Name
Target Type
-----
---------------------------------
--------------------
------------
0
20:78:00:c0:ff:d5:9a:05, 00-00-00
HP MSA2012fc-0
Src+Dest
1
50:00:1f:e1:50:0a:e1:49, 82-07-00
HP HSV200-1
Src+Dest
2
50:06:01:60:4b:a0:35:de, 82-03-00
DGC RAID-2
Src+Dest
ISR654606-00 A
3-13
3–Using DMS
Using the Data Migration Wizard
3
50:00:1f:e1:50:0a:37:18, 00-00-00
HP HSV210-3
Src+Dest
Please select a Destination Target from the list above ('q' to quit):
Index
(VpGroup Name)
-----
--------------
1
VPGROUP_1
2
VPGROUP_2
3
VPGROUP_3
4
VPGROUP_4
Please select a VPGroup for Destination Lun ('q' to quit):
LUN
Vendor
LUN Size( GB)
---
------
-------------- ----------
1
HP
10.00
2
HP
10.00
3
HP
20.00
4
HP
20.00
5
HP
10.00
6
HP
5.00
7
HP
5.00
8
HP
5.00
3
1
Attributes
Please select a LUN as a Destination Lun('q' to quit):
1
I/O Size (0=32KB, 1=64KB, 2=128KB, 3=512KB, 4=1MB) [64KB
]
Please Enter a Job Description (Max = 64 characters)
default name [ DGC RAID-2:VPG4:001 to HP HSV210-3:VPG1:001 ]
Index
Group Owner
Group Name
-----
-----------
----------
0
1
Group 0
1
1
DM_Testing
Please select a Group that this Job should belong to
[0]
Start Time (1=Now, 2=Delayed, 3=JobSerialScheduling, 4=ConfigureOnly) [Now
]
Successfully created Job
All attribute values for that have been changed will now be saved.
3-14
ISR654606-00 A
3–Using DMS
Using the Data Migration Wizard
Scheduling Data Migration Jobs in Batch Mode
Batch mode for data migration jobs is an HP StorageWorks mpx Manager
GUI-only feature used to schedule multiple jobs having the same priority, I/O size,
and group options.
This option is particularly useful for migration jobs specified as Schedule for later
and Serial Schedule Jobs on the Data Migration Jobs Options dialog box, where
the jobs need to be classified under a specific group for better management.
DMS allows a maximum of eight jobs to run simultaneously at any specific time
per source array. To optimize MPX200 performance, QLogic recommends that
you run simultaneously no more than four jobs on any specified source or
destination array.
Consider a data center having multiple applications running on multiple storage
arrays that need to be consolidated, and data migration needs to be done on
associated LUNs. The data migration administrator must plan the data migration
operation to minimize the application downtime. In order to achieve this, the HP
StorageWorks mpx Manager provides an option to create data migration job
groups, as described in “Creating a Data Migration Job Group” on page 3-6.
You can combine all the source LUNs associated with a specific application into a
single job group and schedule it for migration using the Schedule in batch mode
option. That way all the jobs can start at a predefined time, which can be off-peak
hours when the administrator can afford a small application downtime.
Follow these steps to schedule a batch of data migration jobs.
To schedule data migration jobs in batch mode:
1.
Start the Data Migration wizard by following the steps specified in “Starting
the Data Migration Wizard” on page 3-7.
2.
In the Migration Schedule Options dialog box, click Schedule in batch
mode, and then click OK. (See Figure 3-6.)
Figure 3-6 Migration Schedule Options: Batch Mode
ISR654606-00 A
3-15
3–Using DMS
Using the Data Migration Wizard
The left pane of the Create Data Migration Job dialog box shows a
DataMigration Job (New) option with icons for Source LUNs and
Destination LUNs.
The right pane of the Create Data Migration Job dialog box shows the type
of array (Source, Destination, or Src+Dest) for each of the arrays available
for configuring the data migration job.
3.
Choose the appropriate source and destination LUN for the migration job by
dragging and dropping the LUNs from the right pane onto the Source LUN
or Destination LUN under DataMigration Job (New) in the left pane.
The HP StorageWorks mpx Manager populates the Source LUN and
Destination LUN attributes and creates a new DataMigration Job n (New)
object below the first one. The default job name is created by using the
source and destination array names.
4.
Repeat the preceding steps to create migration jobs for all source LUNs to
be migrated in a batch, as shown in Figure 3-7.
Figure 3-7 Create Data Migration Job: Batch
3-16
ISR654606-00 A
3–Using DMS
Using the Data Migration Wizard
5.
To save your migration job and assign job attributes, click Schedule. Or, to
abandon your changes, click Close.
6.
In the Data Migration Jobs Options dialog box (see Figure 3-8), specify the
job attributes as follows:
a.
ISR654606-00 A
Under Scheduling Type, select one of the following:
Click Start Now to start the job immediately.
Click Schedule for Later, and then enter a Start Time and Start
Date.
Click Serial Schedule Jobs, and then assign a priority (1–256)
in the Job Priority box, where a lower value indicates that the
job is scheduled earlier than jobs configured with higher values.
For details on Serial Schedule Jobs, see “Starting Serial
Scheduled Jobs” on page 3-18.
Click Configure Only to configure the migration job without any
start time or priority. You may start this job at a later time. (To
start the job, select it and then click Start, or from the active job
pane, right-click the job and then click Start.)
b.
In the Job Description box, enter a user-defined name to describe
this data migration job.
c.
In the Group Name box, select a job group name from the list. The
group name makes it easier to view the job status on a group basis.
d.
In the IO Size box, either select one of the default I/O sizes, or enter a
custom value.
3-17
3–Using DMS
Starting Serial Scheduled Jobs
Figure 3-8 Data Migration Jobs Options: Batch
7.
To save the data migration job options, click Apply. Or, to abandon changes
to this data migration job, click Cancel.
Starting Serial Scheduled Jobs
If the individual or batch data migration job you created was configured as a
Serial Schedule Jobs scheduling type on the Data Migration Jobs Options dialog
box(Figure 3-5 on page 3-11 or Figure 3-8 on page 3-18), the job is listed on the
Active Data Migration Jobs page. The Status column shows the job as Serial
Scheduled.
To start a serial scheduled job:
1.
Open the Serial Data Migration Jobs Options dialog box using one of these
options:
On the Wizards menu, click Serial Schedule Job(s).
Right-click a serial scheduled job, and then click Start the Serial
Schedule. This option immediately starts the selected job, unless
there are other jobs configured with a lower priority that must complete
migration first.
The Serial Data Migration Jobs Options dialog box opens, as shown in
Figure 3-9.
3-18
ISR654606-00 A
3–Using DMS
Viewing the Status of Data Migration Jobs
Figure 3-9 Serial Data Migration Jobs Options
2.
Under Scheduling Type, click either Start Now or Schedule for later.
3.
If you choose Schedule for later, enter the Start Time and Start Date.
4.
To save your settings, click Apply.
5.
When prompted for a security password, enter migration.
The serial scheduled jobs will start as you have scheduled.
Viewing the Status of Data Migration Jobs
You can use either the HP StorageWorks mpx Manager GUI or the CLI to view the
status of data migration jobs.
Viewing Data Job Migration Jobs Status in the GUI
The right pane of the HP StorageWorks mpx Manager displays the job status for
all active and completed data migration jobs that you have configured.
To view the status of data migration jobs in the GUI:
1.
In the left pane, click the Services tab.
2.
In the right pane, click the Active Data Migration Jobs tab.
The Active Data Migration Jobs page in the right pane shows a summarized
view of all active jobs, as shown in Figure 3-10.
ISR654606-00 A
3-19
3–Using DMS
Viewing the Status of Data Migration Jobs
Figure 3-10 Active Data Migration Jobs
3.
To see a summarized view of all completed jobs, click the Completed Data
Migration Jobs tab in the right pane.
4.
To view a list of all jobs, click Data Migration Jobs in the left pane.
5.
To view a list of all jobs belonging to a specific migration group, click the
migration group name in the left pane.
Viewing Data Job Migration Jobs Status in the CLI
To view the status of data migration jobs in the CLI, use the show migration
command.
To view the status of data job migration jobs in the CLI:
1.
Open a miguser session using the following command:
miguser start -p migration
2.
To view the status of migration jobs, enter the following command:
show migration
3-20
ISR654606-00 A
3–Using DMS
Viewing the Status of Data Migration Jobs
3.
Enter the appropriate option to see only jobs in a specific state (Running,
Failed, or Completed) or all jobs.
4.
To see the configuration details for a specific job, enter the appropriate job
ID.
The following shows an example of using the CLI to view the status of data
migration jobs:
MPX200 <1> (admin) (miguser) #> show migration
Migration State Type ( 1=Running
Job
2=Failed
3=Completed
Owner
Type
Status
---
-----
----
------------------------
0
1
Offline
Running
4=All ) : 4
Job Description
ID
( 96%)
-----------------------------HP HSV210-3:VPG1:001 to HP MS..
Please select a Migration Job Id from the list above ('q' to quit):
0
Migration Information
--------------------Job Id
0
Job Owner
b1
Job Description
HP HSV210-3:VPG1:001 to HP MSA2012fc-0:VPG1:001
Group Name
Group 0
Migration Type
Offline
Priority
Not Applicable
Migration Status
Running
I/O Size
64 KB
Migration State
96% Complete
Migration Performance
86 MBps
Start Time
Fri Oct
End Time
---
Delta Time
---
Source Array
HP HSV210-3
Source Lun VPG:ID
1:1
Source Lun WWULN
60:05:08:b4:00:05:4d:94:00:00:f0:00:35:a1:00:00
Source Lun Size
10.00 GB
Destination Array
HP MSA2012fc-0
Destination Lun VPG:ID
1:1
Destination Lun WWULN
60:0c:0f:f0:00:d5:9a:cb:4d:00:25:4a:01:00:00:00
ISR654606-00 A
9 10:56:56 2009
3-21
3–Using DMS
Rescanning Targets
Destination Lun Size
10.24 GB
Number of DRL Blocks
0
Rescanning Targets
To see if one or more data LUNs are exposed to the router ports from the target,
you can rescan the target ports. A rescan causes the router to create an array
entity for the target ports through which the router is able to see data LUNs.
To rescan targets in the GUI:
1.
In the mpx Manager left pane, right-click the FC Discovered Targets node.
2.
From the shortcut menu, click Rescan.
In the left pane under the FC Arrays node, the GUI shows the
newly-generated array entity.
Alternately, you can click Refresh two or three to rescan the targets and
generate the array entity for targets that are exposing LUNs to the router.
To rescan targets in the CLI:
1.
Open a miguser session using the following command:
miguser start -p config
2.
To rescan for target ports, enter the following command:
target rescan
For example:
MPX200 (admin) #> target rescan
Scanning Target
WWPN
00:00:02:00:00:00:00:00
Target Rescan done
Scanning Target
WWPN
00:00:01:00:00:00:00:00
Target Rescan done
Scanning Target
WWPN
00:00:03:00:00:00:00:00
Target Rescan done
Scanning Target
WWPN
50:08:05:f3:00:1a:15:11
Target Rescan done
Scanning Target
WWPN
50:08:05:f3:00:1a:15:19
Target Rescan done
Target Re-Scan completed
3-22
ISR654606-00 A
3–Using DMS
Viewing Job Details and Controlling Job Actions
Viewing Job Details and Controlling Job Actions
DMS allows you to view the details of a configured data migration job and control
the job actions from either the mpx Manager GUI or the CLI.
Viewing Job Details and Controlling Job Actions in the GUI
The HP StorageWorks mpx Manager provides a view of the details of data
migration jobs. From the detailed view, you can also control job actions, including
pausing, stopping, deleting, resuming, and restarting the job.
To view data migration job details in the GUI:
1.
In the mpx Manager left pane, click a migration group to view the status for
all jobs belonging to that specific group.
2.
In the left pane, click the job by JobID.
Details for the specified job are listed in the right pane, as shown in
Figure 3-11.
ISR654606-00 A
3-23
3–Using DMS
Viewing Job Details and Controlling Job Actions
Figure 3-11 Viewing Migration Job Details
3.
(Optional) From the migration job details pane, perform any of the following
job control actions as needed:
3-24
Click Pause to interrupt a running migration job.
Click Stop to halt a running migration job.
Click Remove to delete a migration job.
Click Resume to continue a previously paused migration job.
Click Start to restart a previously stopped migration job.
ISR654606-00 A
3–Using DMS
Viewing Job Details and Controlling Job Actions
You can also perform the preceding job control actions from the summary
view. To do so, right-click a specific job, and then click the appropriate action
on the shortcut menu.
Viewing Job Details and Controlling Job Actions in the CLI
The CLI also provides a view of the details of data migration jobs and allows you
to control job actions, including pausing, stopping, deleting, resuming, and
restarting the job.
To view data migration job details in the CLI:
1.
Open a miguser session using the following command:
miguser start -p migration
2.
3.
To pause, resume, stop, restart, or delete a migration job, enter the following
commands:
To pause a running migration job, enter migration pause (see
“migration pause” on page 5-19).
To resume migration job operation from the state at which it was
paused, enter migration resume (see “migration resume” on
page 5-20).
To halt a running job, enter migration stop (see “migration stop” on
page 5-17). Use this operation if you want to later restart the migration
process without changing the configuration information associated with
the job. You may need to also reschedule jobs that have been
configured in Serial Scheduled or Delayed Scheduled mode and are
not yet started.
To restart a stopped migration job from beginning, enter migration
start (see “migration start” on page 5-18). The data blocks
transmitted before the stop operations are re-migrated. If a job has not
yet started, you can optionally change the scheduled time.
To remove a configured job in any state from the system persistence,
enter migration rm (see “migration rm” on page 5-16). Generally,
you would use migration rm for completed jobs as an
acknowledgement from the administrator. This frees the destination
LUN for use by other migration operations. It can also be used to clean
up failed jobs that require reconfiguration.
The CLI prompts you to select the appropriate job ID to perform the
operation on the selected job.
The following shows examples of the migration job action commands:
ISR654606-00 A
3-25
3–Using DMS
Viewing Job Details and Controlling Job Actions
MPX200 (miguser) #> migration stop
Job Id
Type
------
----
Status
0
Offline
Scheduled
1
Offline
Running
----------------(
LUN ID
LUN Size(MB)
Src Symbolic Name
------
------------
-----------------
4%)
7
10000
HP MSA-1
8
10000
HP MSA-1
Please select a Migration Job Id from the list above ('q' to quit):
1
All attribute values for that have been changed will now be saved.
MPX200 (miguser) #> migration start
Job Id
Type
Status
------
----
-----------------
1
Offline
Stopped
LUN ID
LUN Size(MB)
Src Symbolic Name
------
------------
-----------------
8
10000
HP MSA-1
Please select a Migration Job Id from the list above ('q' to quit):
1
Migration Start Time for JobId 1:(1=Now, 2=Delayed, 3=JobSerialScheduling)
[Now
] 2
Please specify a Date & Time (in <MMddhhmmCCYY> format)
when the migration should start.
This should be
within the next 30 days.
[
] 100815002009
All attribute values for that have been changed will now be saved.
MPX200 (miguser) #> migration pause
Job Id
Type
------
----
0
Offline
Status
LUN ID
-----------------Running
------
( 16%)
7
LUN Size(MB)
-----------10000
Src Symbolic Name
--------------HP MSA-1
Please select a Migration Job Id from the list above ('q' to quit):
0
All attribute values for that have been changed will now be saved.
MPX200 (miguser) #> migration resume
Job Id
Type
------
----
-----------------
0
Offline
Paused
3-26
Status
LUN ID
LUN Size(MB)
Src Symbolic Name
------
------------
-----------------
( 18%)
7
10000
HP MSA-1
ISR654606-00 A
3–Using DMS
Viewing System and Data Migration Job Logs
Please select a Migration Job Id from the list above ('q' to quit):
0
All attribute values for that have been changed will now be saved.
Viewing System and Data Migration Job Logs
HP StorageWorks mpx Manager provides two types of logs: system and data
migration job. You can view system and data migration job logs from both the GUI
and the CLI.
Viewing Logs in the GUI
This section provides procedures for viewing the system log and the data
migration job log in the HP StorageWorks mpx Manager.
To view the system log in the GUI:
1.
On the HP StorageWorks mpx Manager main window, click the View Logs
button.
2.
In the Log Type dialog box, click System Logs.
Figure 3-12 shows an example of the mpx Log: System Log dialog box.
ISR654606-00 A
3-27
3–Using DMS
Viewing System and Data Migration Job Logs
Figure 3-12 mpx Log: System Log
Data in the system log includes the date and time, application type, and
description. Informational entries are shown with a white background, and
error entries are shown with a red background.
Buttons on the bottom of the mpx Log: System Log dialog box provide the
following actions:
Click OK to close the log window after you have finished viewing it.
Click Clear to delete the contents of the log.
Click Export to download the logs in CSV file format that can be
viewed in any spreadsheet application, such as Microsoft Excel.
Click Print to send the contents of the log to a printer.
To view the data migration job log in the GUI:
1.
On the HP StorageWorks mpx Manager main window, click the View Logs
button.
2.
In the Log Type dialog box, click Data Migration Logs.
Figure 3-13 shows an example of the mpx Log: Migration Log dialog box.
3-28
ISR654606-00 A
3–Using DMS
Viewing System and Data Migration Job Logs
Figure 3-13 mpx Log: Migration Log
The migration job log contains the following columns of information:
ISR654606-00 A
SeqID is the sequential ID of log entries.
Time Stamp is the log entry time, based on router system time.
Group Name is the user-defined job group or Group 0.
Job Name is the user-defined name for the job.
Job ID is a numeric ID.
Job Type is the migration job type (COMPARE or MIGRATION).
Operation is the task or action (ADDED, STARTED, COMPLETED, or
ACK).
Source Array LUN is the migration source LUN.
Dest Array LUN is the migration destination LUN.
3-29
3–Using DMS
Viewing System and Data Migration Job Logs
Source Array WWULN is the world wide unique LUN name for the
source array.
Dest Array WWULN: is the world wide unique LUN name for the
destination array.
Migr Size is the size of the migration job (source LUN).
Buttons on the bottom of the mpx Log: Migration Log dialog box provide the
following actions:
Click OK to close the log window after you have finished viewing it.
Click Clear to delete the contents of the log.
Click Export to download the logs in CSV format that can be viewed in
a spreadsheet application, such as Microsoft Excel®.
Viewing Logs in the CLI
This section provides procedures for viewing the system log and the data
migration job log in the CLI.
To view the system log in the CLI:
1.
Open a miguser session using the following command:
miguser start -p migration
2.
To view all logs related to all migration jobs, enter the following command:
show logs (see “show logs” on page 5-51)
3.
To view only a limited number of log entries, specify a value; for example,
show logs 10.
The following example shows how to view the system log in the CLI:
3-30
ISR654606-00 A
3–Using DMS
Viewing System and Data Migration Job Logs
MPX200 <1> (admin) (miguser) #> show logs 10
10/09/2009 11:11:04 BridgeApp
3 QLFC_Login: Port Name 500601604ba035de
10/09/2009 11:15:29 QLFC
rscnInfo:0x2080000 VpIndex:0x0
3 #0: QLIsrEventHandler: RSCN update (8015)
10/09/2009 11:15:29 QLFC
rscnInfo:0x2080000 VpIndex:0x1
3 #0: QLIsrEventHandler: RSCN update (8015)
10/09/2009 11:15:29 QLFC
rscnInfo:0x2080000 VpIndex:0x2
3 #0: QLIsrEventHandler: RSCN update (8015)
10/09/2009 11:15:29 QLFC
rscnInfo:0x2080000 VpIndex:0x3
3 #0: QLIsrEventHandler: RSCN update (8015)
10/09/2009 11:15:29 QLFC
rscnInfo:0x2080000 VpIndex:0x0
3 #1: QLIsrEventHandler: RSCN update (8015)
10/09/2009 11:15:29 QLFC
rscnInfo:0x2080000 VpIndex:0x1
3 #1: QLIsrEventHandler: RSCN update (8015)
10/09/2009 11:15:29 QLFC
rscnInfo:0x2080000 VpIndex:0x2
3 #1: QLIsrEventHandler: RSCN update (8015)
10/09/2009 11:15:29 QLFC
rscnInfo:0x2080000 VpIndex:0x3
3 #1: QLIsrEventHandler: RSCN update (8015)
10/09/2009 11:18:41 UserApp
time 2
3 ValidateSerialSchedule: Previous time 0 New
To view the data migration job log in the CLI:
1.
Open a miguser session using the following command:
miguser start -p migration
2.
To view all logs related to all migration jobs, enter the following command:
show migration_logs (see “show migration_logs” on page 5-50)
3.
To view only a limited number of log entries, specify a value; for example,
show migration_logs 5.
The following example shows how to view the data migration log in the CLI:
MPX200 (miguser) #> show migration_logs 5
Thu Sep 10 13:15:49 2009
Seq id: 645 : Job Type: Migration : miguser :COMPLETED : JobId 0(Offline) of
group Group 0 with priority 0 from Target HP HSV200-0 Lun
60:05:08:b4:00:07:59:a4:00:02:a0:00:00:7e:00:00(6) to Target HP HSV200-0 Lun
60:05:08:b4:00:07:59:a4:00:02:a0:00:00:83:00:00(7) with migration size 5.00 GB
ISR654606-00 A
3-31
3–Using DMS
Using the Verify Migration Job Wizard
Thu Sep 10 13:33:16 2009
Seq id: 646 : Job Type: Migration : miguser :ACKNOWLEDGED : JobId 0(Offline)
of group Group 0 with priority 0 from Target HP HSV200-0 Lun
60:05:08:b4:00:07:59:a4:00:02:a0:00:00:7e:00:00(6) to Target HP HSV200-0 Lun
60:05:08:b4:00:07:59:a4:00:02:a0:00:00:83:00:00(7) with migration size 5.00 GB
Thu Sep 10 13:38:37 2009
Seq id: 647 : Job Type: Migration : miguser :ADDED : JobId 0(Offline) of group
Group 0 with priority 0 from Target HP HSV200-0 Lun Invalid Wwuln(6) to Target
HP HSV200-0 Lun Invalid Wwuln(7) with migration size 5.00 GB
Thu Sep 10 13:38:37 2009
Seq id: 648 : Job Type: Migration : miguser :STARTING MIGRATION : JobId
0(Offline) of group Group 0 with priority 0 from Target HP HSV200-0 Lun Invalid
Wwuln(6) to Target HP HSV200-0 Lun Invalid Wwuln(7) with migration size 5.00 GB
Thu Sep 10 13:39:45 2009
Seq id: 649 : Job Type: Migration : miguser :COMPLETED : JobId 0(Offline) of
group Group 0 with priority 0 from Target HP HSV200-0 Lun Invalid Wwuln(6) to
Target HP HSV200-0 Lun Invalid Wwuln(7) with migration size 5.00 GB
MPX200 (miguser) #>
Using the Verify Migration Job Wizard
The Verify Migration Job wizard helps you configure verification jobs to compare
data residing on two LUNs. This ensures the data integrity of the migration
process by performing a bit-by-bit comparison of the data on the source LUN with
the corresponding data on the destination LUN. Job verification helps ensure that
the source data migrated successfully without any data loss or corruption.
You can configure a verification job on a pair of source and destination LUNs only
after the migration job configured on that pair has been completed and
acknowledged. The Verify Migration Job wizard is generally the same as the Data
Migration wizard (see “Using the Data Migration Wizard” on page 3-7). All
scheduling options and job state changes (start, stop, pause, and so on) apply in
the same way to both verification and migration jobs.
This section contains the following information for the Verify Migration Job wizard:
3-32
“Starting the Verify Migration Job Wizard” on page 3-33
“Scheduling Verification of Job Options” on page 3-34
ISR654606-00 A
3–Using DMS
Using the Verify Migration Job Wizard
Starting the Verify Migration Job Wizard
Follow these steps to start the configure verifying jobs wizard.
To start the Verify Migration Job wizard:
1.
Start the HP StorageWorks mpx Manager and connect to the MPX200 by
providing the IP address of the MPX200.
2.
Start the Verify Migration Job wizard using one of these methods:
3.
ISR654606-00 A
From the Wizards menu, click Configure Verifying Jobs.
In the left pane, open the Services page, and then right-click
Configure Verifying Job.
In the Data Migration Security Check dialog box, enter your miguser
password (the default is migration), and then click OK.
3-33
3–Using DMS
Using the Verify Migration Job Wizard
Scheduling Verification of Job Options
Follow these steps to schedule the verification of job options.
To schedule job option verification:
1.
In the Verify Migration Jobs wizard (Figure 3-14), click Options.
Figure 3-14 Verify Migration Job Wizard
2.
In the Verify Schedule Options dialog box, select the Scheduling Mode:
either batch mode or individual job, and then click OK.
3.
Click Schedule.
4.
In the Verifying Jobs Options dialog box (Figure 3-15), specify the job
attributes as follows:
a.
Under Scheduling Type, select one of the following:
3-34
Click Start Now to start the job immediately.
ISR654606-00 A
3–Using DMS
Using the Verify Migration Job Wizard
Click Schedule for Later, and then enter a Start Time and Start
Date.
Click Serial Schedule Jobs, and then assign a priority (1–256)
in the Job Priority box, where a lower value indicates that the
job is scheduled earlier than jobs configured with higher values.
For details on Serial Schedule Jobs, see “Starting Serial
Scheduled Jobs” on page 3-18.
Click Configure Only to configure the migration job without any
start time or priority. You may start this job at a later time. (To
start the job, select it and then click Start, or from the active job
pane, right-click the job and then click Start.)
b.
In the Group Name box, select a job group name from the list. The
group name makes it easier to view the job status on a group basis.
c.
In the IO Size box, either select one of the default I/O sizes, or enter a
custom value.
Figure 3-15 Verifying Jobs Options Dialog Box
d.
5.
ISR654606-00 A
To save the verifying jobs options, click Apply. Or, to abandon
changes to this job verification, click Cancel.
Add the source and destination LUN. For details, see “Using the Data
Migration Wizard” on page 3-7.
3-35
3–Using DMS
Acknowledging a Data Migration Job
Acknowledging a Data Migration Job
HP StorageWorks mpx Manager keeps a track of all the data migration jobs until
you either delete them from the system or acknowledge them after job completion.
You must acknowledge jobs to free up the destination LUN so that it can become
part of another job, if required.
To acknowledge a completed data migration job:
1.
In the left pane of the HP StorageWorks mpx Manager, click the Services
tab, and then click Data Migration Jobs.
2.
In the right pane, click the Completed Data Migration Jobs tab to bring that
page to the front.
3.
On the Completed Data Migration Jobs page, scroll over a job that is
specified as 100% in the % Completed column.
4.
On the shortcut menu, click Acknowledge Completed Data Migration.
Removing an Offline Array
You should remove arrays used in data migration because they are kept in
persistent storage. If you used an array-based license for the data migration job
and you plan to use this array again for migration, you may keep the license when
removing the array.
To remove an offline array:
3-36
1.
In the left pane of the HP StorageWorks mpx Manager, click the Services
tab.
1.
Under FC Arrays, right-click the name of the offline array you want to
remove.
2.
From the shortcut menu, click Remove Offline Array.
ISR654606-00 A
4
Data Migration Licenses
This chapter provides information on data migration licenses, including:
Types of Data Migration Licenses
“Installing a Data Migration License Key” on page 4-2
“Applying an Array-based License to a Specific Array” on page 4-5
“Viewing Data Migration License Usage” on page 4-8
Types of Data Migration Licenses
The two types of data migration licenses include:
Capacity-based licenses
Array-based licenses
Capacity-based Licenses
Capacity-based licenses allow you to migrate data up to a specific limit designated
by the applied license key. This type of license is available in variants of 2TB, 5TB,
and 10TB capacities, which can be consumed by one or more migration jobs that
you specify. Every time you configure a data migration job, the available capacity
is reduced by an amount equivalent to the size of the source LUN being migrated.
The MPX200 does not allow you to add migration jobs when the job size exceeds
available migration licenses. In addition, custom size license keys are available. A
custom size license key allows you to purchase a single license key based on
your requirements.
Array-based Licenses
Array-based licenses allow you to migrate unlimited amounts of data to and from
the specific array that is licensed. These licenses are available in variants of
SINGLE-ARRAY and 3-ARRAY capacity. The licensed array may be used as
either a source or destination array while configuring jobs for data migration.
ISR654606-00 A
4-1
4–Data Migration Licenses
Installing a Data Migration License Key
Installing a Data Migration License Key
You can install a data migration license key from either the HP StorageWorks mpx
Manager GUI or the CLI. This section provides both methods.
Installing a Data Migration License Key in the GUI
Follow this procedure to install a data migration license key in the HP
StorageWorks mpx Manager GUI.
To install a data migration license key in the GUI:
4-2
1.
In the HP StorageWorks mpx Manager, click the mpx Manager tab in the
left pane.
2.
In the left pane, click mpx HP StorageWorks MPX200:<IP address>.
3.
In the right pane, click the Features tab.
4.
On the Features page under License Information, click Add, as shown in
Figure 4-1.
ISR654606-00 A
4–Data Migration Licenses
Installing a Data Migration License Key
Figure 4-1 Features Page: License Information
The New License Key dialog box opens, as shown in Figure 4-2.
Figure 4-2 New License Key Dialog Box
5.
Type a valid DM license key, and then click OK.
The Add License dialog box (Figure 4-3) indicates the success of the license
add operation.
ISR654606-00 A
4-3
4–Data Migration Licenses
Installing a Data Migration License Key
Figure 4-3 Add License Dialog Box
6.
Click OK to close the verification dialog box.
7.
Verify that the newly-added key appears in the list of keys on the Features
page, as shown in Figure 4-1 on page 4-3.
Installing a Data Migration License Key in the CLI
Follow this procedure to install a data migration license key in the CLI.
To install a data migration license key in the CLI:
1.
Open a miguser session using the following command:
miguser start -p migration
2.
To add the license key, enter the following command:
set features (see “set features” on page 5-6)
3.
To view a list of installed data migration licenses, enter the following
command:
show features (see “show features” on page 5-49)
The following example shows the set features and show features
commands.
MPX200 <1> (admin) set features
A list of attributes with formatting and current values will follow.
Enter a new value or simply press the ENTER key to accept the current value.
If you wish to terminate this process before reaching the end of the list
press 'q' or 'Q' and the ENTER key to do so.
Enter feature key to be saved/activated: 2000800-LCWL13GAUWO5K-8-ARR-LIC
4-4
ISR654606-00 A
4–Data Migration Licenses
Applying an Array-based License to a Specific Array
All attribute values that have been changed will now be saved
MPX200 (miguser) #> show features
Feature Key Information
------------------------Key
100000-LCMDSNDCESR3X-B751BF30-DM-2TB
Date Applied
Fri Aug 22 21:59:58 2009
Key
200000-LCKROB9C6AKYA-B751BE8E-DM-5TB
Date Applied
Wed Sep 17 10:05:09 2009
Key
100000-LCIGAALUMFE2S-B751BF0B-DM-2TB
Date Applied
Wed Oct
8 09:54:28 2009
MPX200 (miguser) #>
Applying an Array-based License to a Specific
Array
You can apply an array-based license to a specified storage array using either the
HP StorageWorks mpx Manager GUI or the CLI. This section provides
instructions for both methods.
Applying an Array-based License to a Specific Array in the
GUI
If you have purchased array-based licenses and installed the licenses in the
MPX200, follow these steps to license a specific array for data migration. For
every array that is licensed, one license is consumed.
To apply an array-based license to a specific array in the GUI:
1.
In the left pane of the HP StorageWorks mpx Manager main window, click
the mpx Manager tab.
2.
On the Wizards menu, click License an Array.
3.
In the left pane under FC Arrays, click the name of the array for which you
want to apply the license.
4.
In the License Array dialog box (Figure 4-4), select the array for which you
want to apply the license, and then click OK.
ISR654606-00 A
4-5
4–Data Migration Licenses
Applying an Array-based License to a Specific Array
Figure 4-4 License Array Dialog Box
The Information page for the selected array now shows the Array License
as Licensed, as shown in Figure 4-5.
4-6
ISR654606-00 A
4–Data Migration Licenses
Applying an Array-based License to a Specific Array
Figure 4-5 Information Page Showing Array is Licensed
Applying an Array-based License to a Specific Array in the
CLI
To apply an array-based license to a specific array in the CLI:
If you have purchased array-based licenses and installed the licenses in the
MPX200, follow these steps to license a specific array for data migration. For
every array that is licensed, one license is consumed.
1.
Open a miguser session using the following command:
miguser start -p migration
2.
To apply a license, enter the following command:
set array (see “set array” on page 5-8)
3.
ISR654606-00 A
At the prompt, Do you want to apply array license (yes/no),
enter yes.
4-7
4–Data Migration Licenses
Viewing Data Migration License Usage
The following example shows the set array command.
MPX200 (miguser) #> set array
A list of attributes with formatting and current values will follow.
Enter a new value or simply press the ENTER key to accept the current value.
If you wish to terminate this process before reaching the end of the list
press 'q' or 'Q' and the ENTER key to do so.
Index
Symbolic Name
Target Type
-----
---------------------------------
WWPN, PortId
---------------
-----------
0
50:00:1f:e1:50:0a:e1:4c, 01-2b-00
HP HSV200-0
Unknown
1
50:00:1f:e1:50:0a:37:18, 01-24-00
HP HSV210-1
Unknown
2
50:06:01:69:41:e0:18:94, 01-2d-00
DGC RAID-2
Unknown
3
20:70:00:c0:ff:d5:9a:05, 01-0f-ef
HP MSA2012fc-3
Unknown
Please select a Target Id from the list above ('q' to quit):
1
Symbolic Name (Max = 128 characters)
[HP HSV210-1]
Target Type (1=SrcTarget, 2=DstTarget, 3=Src+Dest Target)
[3
]
Bandwidth for Migration (0=Array Bandwidth, 1-400 MBps )
[0
]
Do you want to apply array license (yes/no)
[No
]yes
1
All attribute values for that have been changed will now be saved.
Viewing Data Migration License Usage
You can view the usage for the data migration licenses from either the HP
StorageWorks mpx Manager GUI or the CLI. This section provides both methods.
Viewing Data Migration License Usage in the GUI
Follow this procedure to view the usage of data migration licenses in the GUI.
To view data migration license usage in the GUI:
1.
In the left pane of the HP StorageWorks mpx Manager, click the Services
tab.
2.
In the left pane, click mpx MPX200:<IP address>.
License usage appears on the Data Migration Info page, as shown in
Figure 4-6.
4-8
ISR654606-00 A
4–Data Migration Licenses
Viewing Data Migration License Usage
Figure 4-6 Data Migration Info
Viewing Data Migration License Usage in the CLI
Follow this procedure to view the usage of data migration licenses in the CLI.
To view data migration license usage in the CLI:
1.
Open a miguser session using the following command:
miguser start -p migration
2.
To view the status of migration license consumed and available on the
current system, enter the following command:
show migration_usage (see “show migration_usage” on page 5-46)
ISR654606-00 A
4-9
4–Data Migration Licenses
Viewing Data Migration License Usage
The following example shows the show migration_usage command.
MPX200 (miguser) #> show migration_usage
Migration License Usage
----------------------Total capacity licensed
10240.00
Migration license consumed
1.00
License consumed by active jobs
10.00
Total capacity available
10229.00
GB
GB
GB
GB
Array Based Licenses
--------------------
4-10
Array based licences issued
3
Array based licences used
0
Available array based licenses
3
ISR654606-00 A
5
Command Line Interface
This chapter provides information on using the command line interface (CLI) for
data migration services. It defines the guest MPX200 account and the user
sessions, admin and miguser. For each command, it provides a description, the
required session type, and an example.
User Accounts
User accounts include the guest account. The guest account is the default user
account used to log into the MPX200 Telnet session. The guest session has a
view-only type of access. The default password for this account is password.
User Sessions
User sessions include the admin session and miguser session, as described in
the following.
Admin Session
The admin is the system administrator session that provides access to CLI
commands that manage the system resources. The default password for starting
the admin session is config. You can start and stop an admin session using the
following commands:
admin [start/begin]
admin [end/cancel/stop]
For example:
MPX200 #> admin start
Password
:
******
MPX200 (admin) #>
MPX200 (admin) #> admin cancel
MPX200 #>
ISR654606-00 A
5-1
5–Command Line Interface
Commands
Miguser Session
The miguser is the migration administrator session that has privileges to run CLI
commands related to the migration operations. The default password for starting
the miguser session is migration. You can start and stop a miguser session using
the following commands:
miguser [start/begin]
miguser [end/cancel/stop]
For example:
MPX200 #> miguser begin
Password
:
*********
MPX200 (miguser) #>
MPX200 (miguser) #> miguser stop
MPX200 #>
Commands
Table 5-1 lists by type the DMS commands used in the CLI, and provides a
cross-reference to the details for each one.
Table 5-1. CLI Commands
Command Type
set commands
Commands
“set system” on page 5-5
“set features” on page 5-6
“set fc” on page 5-7
“set array” on page 5-8
“set VPGroups” on page 5-9
migration commands
“migration_group add” on page 5-10
“migration_group remove” on page 5-11
“migration_group edit” on page 5-12
“migration add” on page 5-13
“migration rm” on page 5-16
“migration stop” on page 5-17
“migration start” on page 5-18
“migration pause” on page 5-19
“migration resume” on page 5-20
“migration acknowledge” on page 5-21
5-2
ISR654606-00 A
5–Command Line Interface
Commands
Table 5-1. CLI Commands (Continued)
Command Type
Commands
start commands
“start_serial_jobs” on page 5-22
compare_luns commands
“compare_luns add” on page 5-23
“compare_luns rm” on page 5-26
“compare_luns stop” on page 5-27
“compare_luns start” on page 5-28
“compare_luns pause” on page 5-29
“compare_luns resume” on page 5-30
“compare_luns acknowledge” on page 5-31
show commands
“show fc” on page 5-32
“show migration” on page 5-34
“show array” on page 5-36
“show luninfo” on page 5-38
“show migration_luninfo” on page 5-40
“show migration_params” on page 5-42
“show mgmt” on page 5-43
“show memory” on page 5-44
“show properties” on page 5-45
“show migration_usage” on page 5-46
“show perf” on page 5-47
“show perf byte” on page 5-48
“show features” on page 5-49
“show migration_logs” on page 5-50
“show logs” on page 5-51
“show luns” on page 5-52
“show targets” on page 5-54
“show vpgroups” on page 5-55
“show compare_luns” on page 5-61
array commands
“show array” on page 5-36
“set array” on page 5-8
“array rm” on page 5-58
“array_licensed_port rm” on page 5-59
target commands
“show targets” on page 5-54
“target rescan” on page 5-56
ISR654606-00 A
5-3
5–Command Line Interface
Commands
Table 5-1. CLI Commands (Continued)
Command Type
Miscellaneous commands
Commands
“save capture” on page 5-57
“readjust_priority” on page 5-60
5-4
ISR654606-00 A
5–Command Line Interface
set system
set system
Changes the operational mode of the MPX200 to Data Migration from the default
mode of iSCSI Server Connectivity. All the data migration CLI and GUI features
are activated only in the Data Migration mode. This command removes all
existing mapping-related settings and causes the MPX200 to reboot.
Session
admin
Example
The following example shows the set system command:
MPX200 <1> (admin) #> set system
A list of attributes with formatting and current values will follow.
Enter a new value or simply press the ENTER key to accept the current value.
If you wish to terminate this process before reaching the end of the list
press 'q' or 'Q' and the ENTER key to do so.
A list of attributes with formatting and current values will follow.
Enter a new value or simply press the ENTER key to accept the current value.
If you wish to terminate this process before reaching the end of the list
press 'q' or 'Q' and the ENTER key to do so.
System Symbolic Name (Max = 64 characters)
[Blade-1
]
Target Presentation Mode (0=Auto, 1=Manual)
[Auto
]
Controller Lun AutoMap
[Disabled
]
[Enabled
]
Telnet (0=Enable, 1=Disable)
[Enabled
]
SSH (0=Enable, 1=Disable)
[Enabled
]
System Log Level (Default,Min=0, Max=2)
[0
]
Target Access Control
(0=Enable, 1=Disable)
(0=Enable, 1=Disable)
All attribute values that have been changed will now be saved.
ISR654606-00 A
5-5
5–Command Line Interface
set features
set features
Saves and activates the array’s data migration license key.
Session
admin
Example
The following example shows the set features command:
MPX200 <1> (admin) #> set features
A list of attributes with formatting and current values will follow.
Enter a new value or simply press the ENTER key to accept the current value.
If you wish to terminate this process before reaching the end of the list
press 'q' or 'Q' and the ENTER key to do so.
Enter feature key to be saved/activated: 2000800-LCWL13GAUWO5K-8-ARR-LIC
All attribute values that have been changed will now be saved.
5-6
ISR654606-00 A
5–Command Line Interface
set fc
set fc
Sets the port status and programmed connection status.
Session
admin
Example
The following example shows the set fc command:
MPX200 (admin) #> set fc
A list of attributes with formatting and current values will follow.
Enter a new value or simply press the ENTER key to accept the current value.
If you wish to terminate this process before reaching the end of the list
press 'q' or 'Q' and the ENTER key to do so.
WARNING:
The following command might cause a loss of connections to both ports.
Configuring FC Port: 1
------------------------Port Status (0=Enable, 1=Disable)
[Enabled
]
Link Rate (0=Auto, 1=1Gb, 2=2Gb, 4=4Gb, 8=8GB)
[Auto
]
Frame Size
[2048
]
[256
]
(0=512B, 1=1024B, 2=2048B)
Execution Throttle (Min=16, Max=65535)
All attribute values for Port 1 that have been changed will now be saved.
Configuring FC Port: 2
------------------------Port Status (0=Enable, 1=Disable)
[Enabled
]
Link Rate (0=Auto, 1=1Gb, 2=2Gb, 4=4Gb, 8=8GB)
[Auto
]
Frame Size
[2048
]
[256
]
(0=512B, 1=1024B, 2=2048B)
Execution Throttle (Min=16, Max=65535)
All attribute values for Port 2 that have been changed will now be saved.
ISR654606-00 A
5-7
5–Command Line Interface
set array
set array
Sets the target type of an array to make it behave as either a source, a
destination, or both.
Session
miguser
Example
The following example shows the set array command:
MPX200 <1> (admin)(miguser) #> set array
A list of attributes with formatting and current values will follow.
Enter a new value or simply press the ENTER key to accept the current value.
If you wish to terminate this process before reaching the end of the list
press 'q' or 'Q' and the ENTER key to do so.
Index
-----
WWPN, PortId
Symbolic Name
---------------------------------
Target Type
---------------
-----------
0
20:78:00:c0:ff:d5:9a:05, 00-00-00
HP MSA2012fc-0
Src+Dest
1
50:00:1f:e1:50:0a:e1:49, 82-07-00
HP HSV200-1
Src+Dest
2
50:06:01:60:4b:a0:35:de, 82-03-00
DGC RAID-2
Src+Dest
3
50:00:1f:e1:50:0a:37:18, 00-00-00
HP HSV210-3
Src+Dest
Please select a Target Id from the list above ('q' to quit):
Symbolic Name (Max = 128 characters)
0
[HP MSA2012fc-0]
Target Type (1=SrcTarget, 2=DstTarget, 3=Src+Dest 4=None Target)
[3
]
Bandwidth for Migration (0=Array Bandwidth, 50-1600 MBps )
[0
]
Enable Load Balancing (0=Enable, 1=Disable)
[Enabled
]
Array based licensed applied.
All attribute values for that have been changed will now be saved.
5-8
ISR654606-00 A
5–Command Line Interface
set VPGroups
set VPGroups
Enables or disables the virtual port groups (VP groups), and specifies names to
each VP group. VpGroup 1 cannot be disabled; however, you can change its
name.
Session
admin
Example
The following shows an example of the set vpgroups command.
MPX200 <1> (admin) (miguser) #> set vpgroups
The following wizard will query for attributes before persisting
and activating the updated mapping in the system configuration.
If you wish to terminate this wizard before reaching the end of the list
press 'q' or 'Q' and the ENTER key to do so.
Configuring VpGroup: 1
------------------------Status (0=Enable, 1=Disable)
[Enabled
]
VpGroup Name (Max = 64 characters)
[VPGROUP_1
] VPGroup 1
All attribute values for VpGroup 1 that have been changed will now be saved.
Configuring VpGroup: 2
------------------------Status (0=Enable, 1=Disable)
[Enabled
]
VpGroup Name (Max = 64 characters)
[VPGROUP_2
] VPGroup 2
All attribute values for VpGroup 2 that have been changed will now be saved.
Configuring VpGroup: 3
------------------------Status (0=Enable, 1=Disable)
[Enabled
]
VpGroup Name (Max = 64 characters)
[VPGROUP_3
] VPGroup 3
All attribute values for VpGroup 3 that have been changed will now be saved.
Configuring VpGroup: 4
------------------------Status (0=Enable, 1=Disable)
[Enabled
]
VpGroup Name (Max = 64 characters)
[VPGROUP_4
] VPGroup 4
All attribute values for VpGroup 4 that have been changed will now be saved.
ISR654606-00 A
5-9
5–Command Line Interface
migration_group add
migration_group add
Creates a data migration job group that you can use to combine migration jobs to
simplify scheduling and monitoring data migration processes.
Session
miguser
Example
The following example shows the migration_group add command:
MPX200 (miguser) #> migration_group add
Please Enter Group Name that you want to create (Min = 4 Max = 64 chars) DM_1
Successfully created Group DM_1
5-10
ISR654606-00 A
5–Command Line Interface
migration_group remove
migration_group remove
Deletes or removes an existing data migration group that will not be used in any of
the new data migration jobs that need to be scheduled. You may need to delete
groups because there is limit of eight groups into which the MPX200 can classify
data migration jobs.
Session
miguser
Example
The following example shows the migration_group rm command:
MPX200 (miguser) #> migration_group remove
Index Group Name
----- ---------1
DM_1
2
DM_2
Please select a Group to be removed
('q' to quit):
1
Sucessfully removed Group DM_1
ISR654606-00 A
5-11
5–Command Line Interface
migration_group edit
migration_group edit
Renames an already existing data migration job group. Use this command to
correct spelling mistakes that might have occurred when you typed the name
while creating the data migration job group.
Session
miguser
Example
The following example shows the migration_group edit command:
MPX200 (miguser) #> migration_group edit
Index Group Name
----- ---------0
Group 0
1
DM_1
2
DM_2
Please select a Group to be updated
('q' to quit):
0
Please Enter New Group Name (Min = 4 Max = 64 characters) [ Group 0
Successfully updated Group name
5-12
]: DM_3
to DM_3
ISR654606-00 A
5–Command Line Interface
migration add
migration add
Schedules a data migration job. You can enter a name for the data migration job
and associate it with a job group. Scheduling options include: immediately, at a
pre-defined later time, or by serial scheduling. Serial scheduling requires that you
assign a priority to the job that is used to schedule it prior to (lower priority value)
or after (higher priority value) a specific job in the serial schedule queue of data
migration jobs.
Session
miguser
Example
The following example shows the migration add command:
MPX200 <1> (admin) (miguser) #> migration add
A list of attributes with formatting and current values will follow.
Enter a new value or simply press the ENTER key to accept the current value.
If you wish to terminate this process before reaching the end of the list
press 'q' or 'Q' and the ENTER key to do so.
Index
WWPN, PortId
Symbolic Name
Target Type
-----
---------------------------------
--------------------
------------
0
20:78:00:c0:ff:d5:9a:05, 00-00-00
HP MSA2012fc-0
Src+Dest
1
50:00:1f:e1:50:0a:e1:49, 82-07-00
HP HSV200-1
Src+Dest
2
50:06:01:60:4b:a0:35:de, 82-03-00
DGC RAID-2
Src+Dest
3
50:00:1f:e1:50:0a:37:18, 00-00-00
HP HSV210-3
Src+Dest
Please select a Source Target from the list above ('q' to quit):
Index
(VpGroup Name)
-----
--------------
1
VPGROUP_1
2
VPGROUP_2
3
VPGROUP_3
4
VPGROUP_4
Please select a VPGroup for Source Lun ('q' to quit):
LUN
Vendor
LUN Size( GB)
---
------
-------------- ----------
0
DGC
5.00
1
DGC
5.00
2
DGC
5.00
3
DGC
5.00
ISR654606-00 A
2
4
Attributes
5-13
5–Command Line Interface
migration add
4
DGC
5.00
Please select a LUN as a Source Lun ('q' to quit):
Index
WWPN, PortId
1
Symbolic Name
Target Type
-----
---------------------------------
--------------------
------------
0
20:78:00:c0:ff:d5:9a:05, 00-00-00
HP MSA2012fc-0
Src+Dest
1
50:00:1f:e1:50:0a:e1:49, 82-07-00
HP HSV200-1
Src+Dest
2
50:06:01:60:4b:a0:35:de, 82-03-00
DGC RAID-2
Src+Dest
3
50:00:1f:e1:50:0a:37:18, 00-00-00
HP HSV210-3
Src+Dest
Please select a Destination Target from the list above ('q' to quit):
Index
(VpGroup Name)
-----
--------------
1
VPGROUP_1
2
VPGROUP_2
3
VPGROUP_3
4
VPGROUP_4
Please select a VPGroup for Destination Lun ('q' to quit):
LUN
Vendor
LUN Size( GB)
---
------
-------------- ----------
1
HP
10.00
2
HP
10.00
3
HP
20.00
4
HP
20.00
5
HP
10.00
6
HP
5.00
7
HP
5.00
8
HP
5.00
3
1
Attributes
Please select a LUN as a Destination Lun('q' to quit):
1
I/O Size (0=32KB, 1=64KB, 2=128KB, 3=512KB, 4=1MB) [64KB
]
Please Enter a Job Description (Max = 64 characters)
default name [ DGC RAID-2:VPG4:001 to HP HSV210-3:VPG1:001 ]
Index
Group Owner
Group Name
-----
-----------
----------
0
1
Group 0
5-14
ISR654606-00 A
5–Command Line Interface
migration add
1
1
DM_Testing
Please select a Group that this Job should belong to
[0]
Start Time (1=Now, 2=Delayed, 3=JobSerialScheduling, 4=ConfigureOnly) [Now
]
Successfully created Job
All attribute values for that have been changed will now be saved.
ISR654606-00 A
5-15
5–Command Line Interface
migration rm
migration rm
Deletes a data migration job.
Session
miguser
Example
The following example shows the migration rm command:
MPX200 <1> (admin)(miguser) #> migration rm
Job
Type
Status
Job Description
---
----
-----------------------
------------------------------------
0
Offline
Running (
DGC RAID-2:VPG4:001 to HP HSV210-3
ID
5%)
Please select a Job Id from the list above ('q' to quit):
0
Do you wish to continue with the operation(yes/no)? [No] yes
All attribute values for that have been changed will now be saved.
5-16
ISR654606-00 A
5–Command Line Interface
migration stop
migration stop
Stops running the data migration job. Use this command if you want to later restart
the migration process due to some technical or business need. You can also use
it on already scheduled jobs to change the scheduling time.
Session
miguser
Example
The following example shows the migration stop command:
MPX200 <1> (admin)(miguser) #> migration stop
Job
Type
Status
Job Description
---
----
-----------------------
------------------------------------
0
Offline
Running
HP HSV200-0:LUN1 to DGC RAID-1:LUN0
ID
( 61%)
Please select a Job Id from the list above ('q' to quit):
0
All attribute values for that have been changed will now be saved.
ISR654606-00 A
5-17
5–Command Line Interface
migration start
migration start
Restarts a previously stopped migration job. The migration process starts over
from the first block.
Session
miguser
Example
The following example shows the migration start command:
MPX200 <1> (admin)(miguser) #> migration start
Job
Type
Status
Job Description
ID
---
----
------------------------
------------------------------------
0
Offline
Stopped
HP HSV200-0:LUN1 to DGC RAID-1:LUN0
Please select a Job Id from the list above ('q' to quit):
0
Start Time for JobId 0:(1=Now, 2=Delayed, 3=JobSerialScheduling) [Now
] 2
Please specify a Date & Time (in <MMddhhmmCCYY> format)
when the scheduled job should start.
within the next 30 days.
This should be
[
] 121215002009
All attribute values for that have been changed will now be saved.
5-18
ISR654606-00 A
5–Command Line Interface
migration pause
migration pause
Pauses a running migration job. This command freezes the migration process.
You can later resume the job from the block where the migration was paused.
Session
miguser
Example
The following example shows the migration pause command:
MPX200 <1> (admin)(miguser) #> migration pause
Job
Type
Status
Job Description
ID
---
----
------------------------
------------------------------------
0
Offline
Running
HP HSV200-0:LUN1 to DGC RAID-1:LUN0
( 67%)
Please select a Job Id from the list above ('q' to quit):
0
All attribute values for that have been changed will now be saved.
ISR654606-00 A
5-19
5–Command Line Interface
migration resume
migration resume
Resumes a paused data migration job. The job is resumed from the block where
the data migration was paused.
Session
miguser
Example
The following example shows the migration resume command:
MPX200 <1> (admin)(miguser) #> migration resume
Job
Type
Status
Job Description
ID
---
----
------------------------
------------------------------------
0
Offline
Paused
HP HSV200-0:LUN1 to DGC RAID-1:LUN0
( 80%)
Please select a Job Id from the list above ('q' to quit):
0
All attribute values for that have been changed will now be saved..
5-20
ISR654606-00 A
5–Command Line Interface
migration acknowledge
migration acknowledge
Acknowledges a completed data migration job. After running this command, the
migration job is permanently deleted from the database.
Session
miguser
Example
The following example shows the migration acknowledge command:
MPX200 (miguser) #> migration acknowledge
Job
Type
Status
Job Description
ID
---
----
------------------------
------------------------------------
0
Offline
Completed
HP HSV200-0:LUN1 to DGC RAID-1:LUN0
(100%)
Please select a Job Id from the list above ('q' to quit):
0
All attribute values for that have been changed will now be saved.
ISR654606-00 A
5-21
5–Command Line Interface
start_serial_jobs
start_serial_jobs
Starts one or more serial scheduled jobs that have been configured but not yet
started.
Session
miguser
Example
The following example shows the start_serial jobs command:
MPX200 (miguser) #> start_serial_jobs
] 2
Serial Job Start Time (1=Now, 2=Delayed) [Now
Please specify a Date & Time (in <MMddhhmmCCYY> format)
when the serial schduled jobs should start.
within the next 30 days.
This should be
[
] 121215002009
Started serial scheduled [migration | compare ] jobs
All attribute values for that have been changed will now be saved.
5-22
ISR654606-00 A
5–Command Line Interface
compare_luns add
compare_luns add
Schedules a standalone LUN compare job. You can name the job and associate it
with a job group. Scheduling options include: immediately, at a pre-defined later
time, or by serial scheduling. Serial scheduling requires that you assign a priority
to the job, which will be used to schedule it prior to (lower priority value) or after
(higher priority value) a specific job in the serial schedule queue of jobs.
Session
miguser
Example
The following example shows the compare_luns add command:
MPX200 (miguser) #> compare_luns add
A list of attributes with formatting and current values will follow.
Enter a new value or simply press the ENTER key to accept the current value.
If you wish to terminate this process before reaching the end of the list
press 'q' or 'Q' and the ENTER key to do so.
MPX200 <2> (admin) (miguser) #> compare_luns add
A list of attributes with formatting and current values will follow.
Enter a new value or simply press the ENTER key to accept the current value.
If you wish to terminate this process before reaching the end of the list
press 'q' or 'Q' and the ENTER key to do so.
Index
WWPN, PortId
Symbolic Name
Target Type
-----
---------------------------------
--------------------
------------
0
20:78:00:c0:ff:d5:9a:05, 8c-01-ef
HP MSA2012fc-0
Src+Dest
1
50:00:1f:e1:50:0a:37:18, 82-01-00
HP HSV210-3
Src+Dest
Please select a Source Target from the list above ('q' to quit):
Index
(VpGroup Name)
-----
--------------
1
VPGROUP_1
2
VPGROUP_2
3
VPGROUP_3
4
VPGROUP_4
Please select a VPGroup for Source Lun ('q' to quit):
LUN
Vendor
LUN Size( GB)
---
------
-------------- ----------
1
HP
10.00
ISR654606-00 A
1
1
Attributes
SRC LUN
5-23
5–Command Line Interface
compare_luns add
2
HP
10.00
3
HP
20.00
4
HP
20.00
5
HP
10.00
6
HP
5.00
7
HP
5.00
8
HP
5.00
Please select a LUN as a Source Lun ('q' to quit):
Index
WWPN, PortId
1
Symbolic Name
Target Type
-----
---------------------------------
--------------------
------------
0
20:78:00:c0:ff:d5:9a:05, 8c-01-ef
HP MSA2012fc-0
Src+Dest
1
50:00:1f:e1:50:0a:37:18, 82-01-00
HP HSV210-3
Src+Dest
Please select a Destination Target from the list above ('q' to quit):
Index
(VpGroup Name)
-----
--------------
1
VPGROUP_1
2
VPGROUP_2
3
VPGROUP_3
4
VPGROUP_4
Please select a VPGroup for Destination Lun ('q' to quit):
LUN
Vendor
LUN Size( GB)
---
------
-------------- ----------
1
HP
10.00
2
HP
10.00
3
HP
20.00
4
HP
20.00
5
HP
10.00
6
HP
5.00
7
HP
5.00
8
HP
5.00
1
1
Attributes
SRC LUN
Please select a LUN as a Destination Lun('q' to quit):
2
I/O Size (0=32KB, 1=64KB, 2=128KB, 3=512KB, 4=1MB) [64KB
]
Please Enter a Job Description (Max = 64 characters)
default name [ HP HSV210-3:VPG1:001 to HP HSV210-3:VPG1:002 ]
5-24
ISR654606-00 A
5–Command Line Interface
compare_luns add
Index
Group Owner
Group Name
-----
-----------
----------
0
2
Group 0
Please select a Group that this Job should belong to
[0]
Start Time (1=Now, 2=Delayed, 3=JobSerialScheduling, 4=ConfigureOnly) [Now
]
Successfully created Job
All attribute values for that have been changed will now be saved.
ISR654606-00 A
5-25
5–Command Line Interface
compare_luns rm
compare_luns rm
Deletes a LUN compare job.
Session
miguser
Example
The following example shows the compare_luns rm command:
MPX200 (miguser) #> compare_luns rm
Job
Type
Status
Job Description
ID
---
----
0
Offline
-----------------------Verify Running
------------------------------------HP HSV200-0:0001 to DGC RAID-1:0000
Please select a Job Id from the list above ('q' to quit):
0
Do you wish to continue with the operation(yes/no)? [No] yes
All attribute values for that have been changed will now be saved.
5-26
ISR654606-00 A
5–Command Line Interface
compare_luns stop
compare_luns stop
Stops running a LUN compare job. Use this command if you need to restart the
compare process due to some technical or business needs. Use this command
also on already configured scheduled jobs to change the scheduling time.
Session
miguser
Example
The following example shows the compare_luns stop command:
MPX200 (miguser) #> compare_luns stop
Job
Type
Status
Job Description
ID
---
----
0
Offline
-----------------------Verify Running
------------------------------------HP HSV200-0:0001 to DGC RAID-1:0000
Please select a Job Id from the list above ('q' to quit):
0
All attribute values for that have been changed will now be saved.
ISR654606-00 A
5-27
5–Command Line Interface
compare_luns start
compare_luns start
Restarts a stopped LUN compare jobs. The compare process restarts from the
first block.
Session
miguser
Example
The following example shows the compare_luns start command:
MPX200 (miguser) #> compare_luns start
Job
Type
Status
Job Description
ID
---
----
------------------------
------------------------------------
0
Offline
Stopped
HP HSV200-0:0001 to DGC RAID-1:0000
Please select a Job Id from the list above ('q' to quit):
0
Start Time for JobId 0:(1=Now, 2=Delayed, 3=JobSerialScheduling) [Now
] 2
Please specify a Date & Time (in <MMddhhmmCCYY> format)
when the should start.
This should be
within the next 30 days.
[
] 121610002009
All attribute values for that have been changed will now be saved.
5-28
ISR654606-00 A
5–Command Line Interface
compare_luns pause
compare_luns pause
Interrupts a LUN compare job. This command freezes the compare process. You
can later resume the job from the block where the compare was paused.
Session
miguser
Example
The following example shows the compare_luns pause command:
MPX200 (miguser) #> compare_luns pause
Job
Type
Status
Job Description
ID
---
----
------------------------
------------------------------------
0
Offline
Verify Running
HP HSV200-0:0001 to DGC RAID-1:0000
Please select a Job Id from the list above ('q' to quit):
0
All attribute values for that have been changed will now be saved.
ISR654606-00 A
5-29
5–Command Line Interface
compare_luns resume
compare_luns resume
Resumes a paused LUN compare job. The job resumes from the block where the
compare was paused.
Session
miguser
Example
The following example shows the compare_luns resume command:
MPX200 (miguser) #> compare_luns resume
Job
Type
Status
Job Description
ID
---
----
------------------------
------------------------------------
0
Offline
Verify Paused
HP HSV200-0:0001 to DGC RAID-1:0000
Please select a Job Id from the list above ('q' to quit):
0
All attribute values for that have been changed will now be saved.
5-30
ISR654606-00 A
5–Command Line Interface
compare_luns acknowledge
compare_luns acknowledge
Acknowledges a LUN compare job. After you run this command, the LUN
compare job is permanently deleted from the database.
Session
miguser
Example
The following example shows the compare_luns acknowledge command:
MPX200 (miguser) #> compare_luns acknowledge
Job
Type
Status
Job Description
ID
---
----
------------------------
------------------------------------
0
Offline
Completed
HP HSV200-0:0001 to DGC RAID-1:0000
Please select a Job Id from the list above ('q' to quit):
0
All attribute values for that have been changed will now be saved.
ISR654606-00 A
5-31
5–Command Line Interface
show fc
show fc
Displays the port status and link status of each Fibre Channel port, along with the
port name and node name.
Session
admin
Example
The following example shows the show fc command:
MPX200 <1> (admin) #> show fc
FC Port Information
--------------------FC Port
FC1
Port Status
Enabled
Port Mode
FCP
Link Status
Up
Current Link Rate
8Gb
Programmed Link Rate
Auto
WWNN
20:00:00:c0:dd:13:2c:60 (VPGROUP_1)
WWPN
21:00:00:c0:dd:13:2c:60 (VPGROUP_1)
Port ID
8c-0a-00 (VPGROUP_1)
WWNN
20:01:00:c0:dd:13:2c:60 (VPGROUP_2)
WWPN
21:01:00:c0:dd:13:2c:60 (VPGROUP_2)
Port ID
8c-0a-01 (VPGROUP_2)
WWNN
20:02:00:c0:dd:13:2c:60 (VPGROUP_3)
WWPN
21:02:00:c0:dd:13:2c:60 (VPGROUP_3)
Port ID
8c-0a-02 (VPGROUP_3)
WWNN
20:03:00:c0:dd:13:2c:60 (VPGROUP_4)
WWPN
21:03:00:c0:dd:13:2c:60 (VPGROUP_4)
Port ID
8c-0a-04 (VPGROUP_4)
Firmware Revision No.
5.01.03
Frame Size
2048
Execution Throttle
256
Connection Mode
Point-to-Point
SFP Type
8Gb
FC Port
FC2
Port Status
Enabled
Port Mode
FCP
Link Status
Up
Current Link Rate
8Gb
Programmed Link Rate
Auto
5-32
ISR654606-00 A
5–Command Line Interface
show fc
WWNN
20:00:00:c0:dd:13:2c:61 (VPGROUP_1)
WWPN
21:00:00:c0:dd:13:2c:61 (VPGROUP_1)
Port ID
8c-0d-00 (VPGROUP_1)
WWNN
20:01:00:c0:dd:13:2c:61 (VPGROUP_2)
WWPN
21:01:00:c0:dd:13:2c:61 (VPGROUP_2)
Port ID
8c-0d-01 (VPGROUP_2)
WWNN
20:02:00:c0:dd:13:2c:61 (VPGROUP_3)
WWPN
21:02:00:c0:dd:13:2c:61 (VPGROUP_3)
Port ID
8c-0d-02 (VPGROUP_3)
WWNN
20:03:00:c0:dd:13:2c:61 (VPGROUP_4)
WWPN
21:03:00:c0:dd:13:2c:61 (VPGROUP_4)
Port ID
8c-0d-04 (VPGROUP_4)
Firmware Revision No.
5.01.03
Frame Size
2048
Execution Throttle
256
Connection Mode
Point-to-Point
SFP Type
8Gb
ISR654606-00 A
5-33
5–Command Line Interface
show migration
show migration
Displays a summarized status of either all migration jobs or those having a
specific state. It also lists the configuration details of the selected job.
Session
miguser
Example
The following example shows the show migration command:
MPX200 <1> (admin) (miguser) #> show migration
Migration State Type ( 1=Running
Job
2=Failed
3=Completed
Owner
Type
Status
---
-----
----
------------------------
0
1
Offline
Running
4=All ) : 4
Job Description
ID
( 96%)
-----------------------------HP HSV210-3:VPG1:001 to HP MS..
Please select a Migration Job Id from the list above ('q' to quit):
0
Migration Information
--------------------Job Id
0
Job Owner
b1
Job Description
HP HSV210-3:VPG1:001 to HP MSA2012fc-0:VPG1:001
Group Name
Group 0
Migration Type
Offline
Priority
Not Applicable
Migration Status
Running
I/O Size
64 KB
Migration State
96% Complete
Migration Performance
86 MBps
Start Time
Fri Oct
End Time
---
Delta Time
---
Source Array
HP HSV210-3
Source Lun VPG:ID
1:1
Source Lun WWULN
60:05:08:b4:00:05:4d:94:00:00:f0:00:35:a1:00:00
Source Lun Size
10.00 GB
Destination Array
HP MSA2012fc-0
Destination Lun VPG:ID
1:1
Destination Lun WWULN
60:0c:0f:f0:00:d5:9a:cb:4d:00:25:4a:01:00:00:00
5-34
9 10:56:56 2009
ISR654606-00 A
5–Command Line Interface
show migration
Destination Lun Size
10.24 GB
Number of DRL Blocks
0
ISR654606-00 A
5-35
5–Command Line Interface
show array
show array
Displays the status of array objects identified by the DMS.
Session
miguser
Example
The following example shows the show array command:
MPX200 (miguser) #> show array
Array Information
-----------------
5-36
Symbolic Name
HP HSV200-0
State
Online
Vendor ID
HP
Product ID
HSV200
Target Type
Src+Dest
WWPN
50:00:1f:e1:50:0a:e1:4c
Port ID
01-2b-00
State
Online
WWPN
50:00:1f:e1:50:0a:e1:48
Port ID
01-29-00
State
Online
Array Bandwidth
Available Bandwidth
Load Balancing
Enabled
Array License
Applied
Symbolic Name
DGC RAID-1
State
Online
Vendor ID
DGC
Product ID
RAID 0
Target Type
Src+Dest
WWPN
50:06:01:69:41:e0:18:94
Port ID
01-2d-00
State
Online
Array Bandwidth
Available Bandwidth
Load Balancing
Enabled
Array License
Not Applied
Symbolic Name
HP HSV210-2
State
Online
Vendor ID
HP
Product ID
HSV210
ISR654606-00 A
5–Command Line Interface
show array
ISR654606-00 A
Target Type
Src+Dest
WWPN
50:00:1f:e1:50:0a:37:1c
Port ID
01-20-00
State
Online
WWPN
50:00:1f:e1:50:0a:37:18
Port ID
01-24-00
State
Offline
Array Bandwidth
Available Bandwidth
Load Balancing
Enabled
Array License
Not Applied
Symbolic Name
HP MSA2012fc-3
State
Online
Vendor ID
HP
Product ID
MSA2012fc
Target Type
Src+Dest
WWPN
20:70:00:c0:ff:d5:9a:05
Port ID
01-0f-ef
State
Online
Array Bandwidth
Available Bandwidth
Load Balancing
Enabled
Array License
Not Applied
5-37
5–Command Line Interface
show luninfo
show luninfo
Displays the status of LUN objects identified by the DMS.
Session
miguser
Notes
The show luninfo command displays all the LUNs that are seen by the
MPX200 and their size and path information. To view a list of just all LUNs without
the details, run the show luns command instead.
Example
The following example shows the show luninfo command:
MPX200 (miguser) #> show luninfo
MPX200 <1> (admin) #> show luninfo
Index
(WWNN,WWPN/iSCSI Name)
-----
----------------------
0
20:78:00:c0:ff:d5:9a:05,20:78:00:c0:ff:d5:9a:05
1
20:78:00:c0:ff:d5:9a:05,21:78:00:c0:ff:d5:9a:05
2
50:06:01:60:cb:a0:35:de,50:06:01:60:4b:a0:35:de
3
50:00:1f:e1:50:0a:e1:40,50:00:1f:e1:50:0a:e1:49
4
50:00:1f:e1:50:0a:37:10,50:00:1f:e1:50:0a:37:18
5
50:00:1f:e1:50:0a:37:10,50:00:1f:e1:50:0a:37:1b
Please select a Target from the list above ('q' to quit):
Index
(LUN/VpGroup)
-----
-------------
0
0/VPGROUP_1
1
1/VPGROUP_1
2
2/VPGROUP_1
3
3/VPGROUP_1
4
4/VPGROUP_1
5
5/VPGROUP_1
6
6/VPGROUP_1
7
7/VPGROUP_1
8
8/VPGROUP_1
Please select a LUN from the list above ('q' to quit):
5
1
LUN Information
----------------WWULN
5-38
60:05:08:b4:00:05:4d:94:00:00:f0:00:35:a1:00:00
ISR654606-00 A
5–Command Line Interface
show luninfo
LUN Number
1
VendorId
HP
ProductId
HSV210
ProdRevLevel
5000
Portal
0
Lun Size
10240 MB
Lun State
Online
LUN Path Information
-------------------Controller Id
WWPN, PortId
Path Status
-------------
---------------------------------
-----------
1
50:00:1f:e1:50:0a:37:1b, 8c-0c-00
Active Optimized
1
50:00:1f:e1:50:0a:37:18, 82-01-00
Current Optimized
ISR654606-00 A
5-39
5–Command Line Interface
show migration_luninfo
show migration_luninfo
Provides the current status and path information for any array LUN. Use this
command to check the usability of a path in failover scenarios. The paths
specified as passive are not used by data migration jobs if the current path fails.
The passive path is only capable of reading the LUN size, vendor, and product
information, but cannot perform any I/O operation.
Session
miguser
Example
The following example shows the show migration_luninfo command.
MPX200 <1> (miguser) #> show migration_luninfo
Index
WWPN, PortId
Symbolic Name
Target Type
-----
---------------------------------
--------------------
-------------
0
50:06:01:68:41:e0:18:94, 60-02-00
CX-320-B
Src+Dest
1
50:06:01:68:41:e0:49:2e, 02-06-00
CX-340
Src+Dest
2
50:06:01:60:41:e0:18:94, 02-02-00
CX-320-A
Source
3
20:78:00:c0:ff:d5:92:e5, 02-04-00
MSA-2012
Destination
Please select a Target from the list above ('q' to quit):
Index
(LUN/VpGroup)
-----
-------------
0
0/VPGROUP_1
1
1/VPGROUP_1
2
2/VPGROUP_1
3
3/VPGROUP_1
4
4/VPGROUP_1
5
0/VPGROUP_2
6
1/VPGROUP_2
7
2/VPGROUP_2
8
3/VPGROUP_2
9
4/VPGROUP_2
10
0/VPGROUP_3
11
1/VPGROUP_3
12
2/VPGROUP_3
13
3/VPGROUP_3
14
4/VPGROUP_3
15
0/VPGROUP_4
16
1/VPGROUP_4
17
2/VPGROUP_4
5-40
3
ISR654606-00 A
5–Command Line Interface
show migration_luninfo
18
3/VPGROUP_4
19
4/VPGROUP_4
Please select a LUN from the list above ('q' to quit):
0
LUN Information
----------------WWULN
60:0c:0f:f0:00:d5:9c:a4:31:d4:a9:4a:01:00:00:00
LUN Number
0
VendorId
HP
ProductId
MSA2012fc
ProdRevLevel
J200
Portal
0
Lun Size
10240 MB
Lun State
Online
LUN Path Information
-------------------Controller Id
WWPN, PortId
Path Status
-------------
---------------------------------
-----------
0
20:78:00:c0:ff:d5:92:e5, 02-04-00
Current Optimized
ISR654606-00 A
5-41
5–Command Line Interface
show migration_params
show migration_params
Displays the current time and start time of a serial scheduled job.
Session
miguser
Example
The following example shows the show migration_params command:
MPX200 (miguser) #> show migration_params
Current Time : Mon Dec 15 08:36:12 2009
Serial Scheduled Start Time : Mon Dec 15 08:37:00 2009
5-42
ISR654606-00 A
5–Command Line Interface
show mgmt
show mgmt
Displays management port information, including the IP address, subnet mask,
and gateway.
Session
miguser
Example
The following example shows the show mgmt command:
MPX200 (miguser) #> show mgmt
Management Port Information
-----------------------------
ISR654606-00 A
IPv4 Interface
Enabled
IPv4 Mode
Static
IPv4 IP Address
172.35.14.53
IPv4 Subnet Mask
255.255.254.0
IPv4 Gateway
172.35.14.1
IPv6 Interface
Disabled
Link Status
Up
MAC Address
00-c0-dd-0d-a9-c1
5-43
5–Command Line Interface
show memory
show memory
Displays the free and total memory.
Session
miguser
Example
The following example shows the show memory command:
MPX200 (miguser) #> show memory
Memory Units
Free/Total
--------------
----------
Physical
309MB/1002MB
Buffer Pool
9433/10496
Nic Buffer Pool
40960/40960
Process Blocks
14336/14336
Request Blocks
14336/14336
Event Blocks
8182/8192
Control Blocks
2048/2048
Client Req Blocks
14336/14336
FCIP Buffer Pool
0/0
FCIP Request Blocks
0/0
FCIP NIC Buffer Pool 0/0
Sessions
4096/4096
Connections:
5-44
GE1
256/256
GE2
256/256
ISR654606-00 A
5–Command Line Interface
show properties
show properties
Displays the CLI properties.
Session
miguser
Example
The following example shows the show properties command:
MPX200 (miguser) #> show properties
CLI Properties
----------------
ISR654606-00 A
Inactivty Timer
15 minutes
Prompt String
MPX200
5-45
5–Command Line Interface
show migration_usage
show migration_usage
Displays licenses usage, information about array-based licenses, and details of
the array that is licensed.
Session
miguser
Example
The following example shows the show migration_usage command:
MPX200 (miguser) #> show migration_usage
Migration License Usage
----------------------Total capacity licensed
10240.00
Migration license consumed
1.00
License consumed by active jobs
10.00
Total capacity available
10229.00
GB
GB
GB
GB
Array Based Licenses
--------------------
5-46
Array based licences issued
3
Array based licences used
0
Available array based licenses
3
ISR654606-00 A
5–Command Line Interface
show perf
show perf
Displays the performance (in bytes) of the active job.
Session
miguser
Example
The following example shows the show perf command:
MPX200 (miguser) #> show perf
WARNING: Valid data is only displayed for port(s) that are not
associated with any configured FCIP routes.
ISR654606-00 A
Port
Bytes/s
Bytes/s
Bytes/s
Bytes/s
Bytes/s
Number
(init_r)
(init_w)
(tgt_r)
(tgt_w)
(total)
------
--------
--------
--------
--------
--------
GE1
0
0
0
0
0
GE2
0
0
0
0
0
FC1
23M
0
0
0
23M
FC2
0
23M
0
0
23M
5-47
5–Command Line Interface
show perf byte
show perf byte
Displays the active job performance in bytes.
Session
miguser
Example
The following example shows the show perf byte command:
MPX200 (miguser) #> show perf byte
WARNING: Valid data is only displayed for port(s) that are not
associated with any configured FCIP routes.
Displaying bytes/sec (total)...
GE1
GE2
FC1
(Press any key to stop display)
FC2
--------------------------------
5-48
0
0
189M
189M
0
0
188M
188M
0
0
182M
182M
0
0
187M
187M
0
0
188M
188M
0
0
186M
186M
0
0
187M
187M
0
0
186M
186M
0
0
170M
170M
0
0
189M
189M
ISR654606-00 A
5–Command Line Interface
show features
show features
Displays the feature key information.
Session
miguser
Example
The following example shows the show features command:
MPX200 <1> (admin) (miguser) #> show features
License Information
------------------FCIP 1Gig
Not Licensed
DM Capacity
Licensed
DM Array
Licensed
Feature Key Information
------------------------Key
100TB)
806400-LCPJRHKUYZ9NS-DM-100TB (DATA-MIGRATION CAPACITY
Chassis Licensed
0851E00035
Date Applied
Tue Jan
6 01:28:57 2009
Key
0-LCSM8RY4C4BPX-B69D4ABE-1E1F1C1D1A1B18191617-4FC1534B-5FD1535B-444D415A-444D4
3415CD2540B
Chassis Licensed
0851E00035
Date Applied
Tue Jan
6 01:47:12 2009
Key
0-LCR89I44H4LME-B69D4555-1E1F1C1D1A1B18191617-4FC1534B-5FD1535B-444D415A-444D4
3415CD2540B
Chassis Licensed
0851E00035
Date Applied
Tue Jan
ISR654606-00 A
6 02:06:52 2009
5-49
5–Command Line Interface
show migration_logs
show migration_logs
Displays the data migration logs and the operation performed on it.
Session
miguser
Example
The following example shows the show migration_logs command:
MPX200 (admin) (miguser) #> show migration_logs 6
Tue Sep
8 15:28:00 2009
Seq id: 640 : Job Type: Migration : miguser :COMPLETED : JobId 1(Offline) of
group Group 0 with priority 0 from Target HP HSV200-0 Lun
60:05:08:b4:00:07:59:a4:00:02:a0:00:03:ba:00:00(9) to Target HP HSV200-0 Lun
60:05:08:b4:00:07:59:a4:00:02:a0:00:00:83:00:00(7) with migration size 1.00 GB
Thu Sep 10 13:09:16 2009
Seq id: 641 : Job Type: Migration : miguser :ACKNOWLEDGED : JobId 0(Offline)
of group Group 0 with priority 0 from Target HP HSV200-0 Lun
60:05:08:b4:00:07:59:a4:00:02:a0:00:03:b5:00:00(8) to Target HP HSV200-0 Lun
60:05:08:b4:00:07:59:a4:00:02:a0:00:00:7e:00:00(6) with migration size 1.00 GB
Thu Sep 10 13:09:18 2009
Seq id: 642 : Job Type: Migration : miguser :ACKNOWLEDGED : JobId 1(Offline)
of group Group 0 with priority 0 from Target HP HSV200-0 Lun
60:05:08:b4:00:07:59:a4:00:02:a0:00:03:ba:00:00(9) to Target HP HSV200-0 Lun
60:05:08:b4:00:07:59:a4:00:02:a0:00:00:83:00:00(7) with migration size 1.00 GB
Thu Sep 10 13:14:43 2009
Seq id: 643 : Job Type: Migration : miguser :ADDED : JobId 0(Offline) of group
Group 0 with priority 0 from Target HP HSV200-0 Lun
60:05:08:b4:00:07:59:a4:00:02:a0:00:00:7e:00:00(6) to Target HP HSV200-0 Lun
60:05:08:b4:00:07:59:a4:00:02:a0:00:00:83:00:00(7) with migration size 5.00 GB
Thu Sep 10 13:14:43 2009
Seq id: 644 : Job Type: Migration : miguser :STARTING MIGRATION : JobId
0(Offline) of group Group 0 with priority 0 from Target HP HSV200-0 Lun
60:05:08:b4:00:07:59:a4:00:02:a0:00:00:7e:00:00(6) to Target HP HSV200-0 Lun
60:05:08:b4:00:07:59:a4:00:02:a0:00:00:83:00:00(7) with migration size 5.00 GB
Thu Sep 10 13:15:49 2009
Seq id: 645 : Job Type: Migration : miguser :COMPLETED : JobId 0(Offline) of
group Group 0 with priority 0 from Target HP HSV200-0 Lun
60:05:08:b4:00:07:59:a4:00:02:a0:00:00:7e:00:00(6) to Target HP HSV200-0 Lun
60:05:08:b4:00:07:59:a4:00:02:a0:00:00:83:00:00(7) with migration size 5.00 GB
5-50
ISR654606-00 A
5–Command Line Interface
show logs
show logs
Displays log BridgeApp event information.
Session
miguser
Example
The following example shows the show logs command:
MPX200 <1> (admin) (miguser) #> show logs 10
10/09/2009 11:11:04 BridgeApp
3 QLFC_Login: Port Name 500601604ba035de
10/09/2009 11:15:29 QLFC
rscnInfo:0x2080000 VpIndex:0x0
3 #0: QLIsrEventHandler: RSCN update (8015)
10/09/2009 11:15:29 QLFC
rscnInfo:0x2080000 VpIndex:0x1
3 #0: QLIsrEventHandler: RSCN update (8015)
10/09/2009 11:15:29 QLFC
rscnInfo:0x2080000 VpIndex:0x2
3 #0: QLIsrEventHandler: RSCN update (8015)
10/09/2009 11:15:29 QLFC
rscnInfo:0x2080000 VpIndex:0x3
3 #0: QLIsrEventHandler: RSCN update (8015)
10/09/2009 11:15:29 QLFC
rscnInfo:0x2080000 VpIndex:0x0
3 #1: QLIsrEventHandler: RSCN update (8015)
10/09/2009 11:15:29 QLFC
rscnInfo:0x2080000 VpIndex:0x1
3 #1: QLIsrEventHandler: RSCN update (8015)
10/09/2009 11:15:29 QLFC
rscnInfo:0x2080000 VpIndex:0x2
3 #1: QLIsrEventHandler: RSCN update (8015)
10/09/2009 11:15:29 QLFC
rscnInfo:0x2080000 VpIndex:0x3
3 #1: QLIsrEventHandler: RSCN update (8015)
10/09/2009 11:18:41 UserApp
time 2
ISR654606-00 A
3 ValidateSerialSchedule: Previous time 0 New
5-51
5–Command Line Interface
show luns
show luns
Displays all the LUNs and their detailed information.
Session
miguser
Example
The following example shows the show luns command:
MPX200 <1> (admin) (miguser) #> show luns
Target(WWPN)
VpGroup
LUN
============
=======
===
20:78:00:c0:ff:d5:9a:05
VPGROUP_1
0
VPGROUP_1
1
VPGROUP_1
2
VPGROUP_1
3
VPGROUP_1
4
VPGROUP_1
5
VPGROUP_1
6
VPGROUP_1
7
VPGROUP_1
8
VPGROUP_1
9
VPGROUP_1
10
VPGROUP_1
11
VPGROUP_1
12
VPGROUP_1
13
VPGROUP_1
14
VPGROUP_1
0
VPGROUP_1
1
VPGROUP_1
2
VPGROUP_1
3
VPGROUP_1
4
VPGROUP_1
5
VPGROUP_1
6
VPGROUP_1
7
VPGROUP_1
8
VPGROUP_1
9
VPGROUP_1
10
VPGROUP_1
11
VPGROUP_1
12
VPGROUP_1
13
VPGROUP_1
14
21:78:00:c0:ff:d5:9a:05
5-52
ISR654606-00 A
5–Command Line Interface
show luns
50:06:01:60:4b:a0:35:de
50:00:1f:e1:50:0a:e1:49
50:00:1f:e1:50:0a:37:18
50:00:1f:e1:50:0a:37:1b
ISR654606-00 A
VPGROUP_4
0
VPGROUP_4
1
VPGROUP_4
2
VPGROUP_4
3
VPGROUP_4
4
VPGROUP_1
0
VPGROUP_1
1
VPGROUP_1
2
VPGROUP_1
3
VPGROUP_1
4
VPGROUP_1
5
VPGROUP_1
6
VPGROUP_1
7
VPGROUP_1
8
VPGROUP_1
9
VPGROUP_1
0
VPGROUP_1
1
VPGROUP_1
2
VPGROUP_1
3
VPGROUP_1
4
VPGROUP_1
5
VPGROUP_1
6
VPGROUP_1
7
VPGROUP_1
8
VPGROUP_1
0
VPGROUP_1
1
VPGROUP_1
2
VPGROUP_1
3
VPGROUP_1
4
VPGROUP_1
5
VPGROUP_1
6
VPGROUP_1
7
VPGROUP_1
8
5-53
5–Command Line Interface
show targets
show targets
Displays the WWPN and WWNN for all targets that are zoned in with the router
ports. If one or more data LUNs are exposed to the router ports from the target, no
information is shown.
Session
miguser
Example
The following example shows the show targets command:
MPX200 (miguser) #> show targets
Target Information
--------------------
5-54
WWNN
50:08:05:f3:00:1a:15:10
WWPN
50:08:05:f3:00:1a:15:11
Port ID
02-03-00
State
Online
WWNN
50:08:05:f3:00:1a:15:10
WWPN
50:08:05:f3:00:1a:15:19
Port ID
02-07-00
State
Online
ISR654606-00 A
5–Command Line Interface
show vpgroups
show vpgroups
Lists the status and WWPN for each virtual port group (VP group).
The router’s Fibre Channel ports can present four virtual ports (if enabled) to zone
with Fibre Channel targets and allow the target to expose more LUNs to the
router. The router provides the VP group by combining virtual port entities from
each Fibre Channel port. Every VP group consists of one virtual port from each
Fibre Channel port. Because there are four virtual ports per Fibre Channel port,
there are four VP groups.
Session
miguser
Example
The following example shows the show vpgroups command.
MPX200 <1> (miguser) #> show vpgroups
VpGroup Information
--------------------Index
1
VpGroup Name
VPGROUP_1
Status
Enabled
WWPNs
21:00:00:c0:dd:12:f4:f2
21:00:00:c0:dd:12:f4:f3
Index
2
VpGroup Name
VPGROUP_2
Status
Enabled
WWPNs
21:01:00:c0:dd:12:f4:f2
21:01:00:c0:dd:12:f4:f3
Index
VPGROUP_3
Status
Enabled
WWPNs
21:02:00:c0:dd:12:f4:f2
21:02:00:c0:dd:12:f4:f3
Index
4
VpGroup Name
VPGROUP_4
Status
Enabled
WWPNs
21:03:00:c0:dd:12:f4:f2
21:03:00:c0:dd:12:f4:f3
ISR654606-00 A
5-55
5–Command Line Interface
target rescan
target rescan
Scans the target ports to see if one or more data LUNs are exposed to the router
ports from the target. This command causes the router to create an array entity for
the target ports through which the router is able to see data LUNs. The router
deletes those ports from show targets output (see “show targets” on
page 5-54).
Session
admin
Example
The following example shows the target rescan command:
MPX200 (admin) #> target rescan
Scanning Target
WWPN
00:00:02:00:00:00:00:00
Target Rescan done
Scanning Target
WWPN
00:00:01:00:00:00:00:00
Target Rescan done
Scanning Target
WWPN
00:00:03:00:00:00:00:00
Target Rescan done
Scanning Target
WWPN
50:08:05:f3:00:1a:15:11
Target Rescan done
Scanning Target
WWPN
50:08:05:f3:00:1a:15:19
Target Rescan done
Target Re-Scan completed
5-56
ISR654606-00 A
5–Command Line Interface
save capture
save capture
Captures the system log that you can use to detect and troubleshoot problems
when the MPX200 is exhibiting erroneous behavior. This command generates a
System_Capture.tar.gz file that provides a detailed analysis.
Session
admin
Example
The following example shows the save capture command:
MPX200 (admin) #> save capture
Debug capture completed.
Package is System_Capture.tar.gz
Please use FTP to extract the file out from the System.
ISR654606-00 A
5-57
5–Command Line Interface
array rm
array rm
Removes details associated with an offline array from persistence, and removes
the license information associated with the array.
Session
miguser
Example
The following example shows the array rm command:
MPX200 (miguser) #> array rm
A list of attributes with formatting and current values will follow.
Enter a new value or simply press the ENTER key to accept the current value.
If you wish to terminate this process before reaching the end of the list
press 'q' or 'Q' and the ENTER key to do so.
Index
WWPN, PortId
Symbolic Name
Target Type
-----
---------------------------------
---------------
-----------
0
50:00:1f:e1:50:0a:e1:4c, 01-0c-00
HP HSV200-0
Src+Dest
1
50:00:1f:e1:50:0a:37:1b, 02-04-00
HP HSV210-1
Src+Dest
2
20:70:00:c0:ff:d5:9a:05, 02-0f-ef
HP MSA2012fc-2
Src+Dest
Please select a Target Id to remove from the list above ('q' to quit):
0
Array is Licensed
WARNING
Removing Array License, Will not allow you to reuse the license in the
future for the same array.
Do you want to remove array license [No] yes
All attribute values for that have been changed will now be saved.
5-58
ISR654606-00 A
5–Command Line Interface
array_licensed_port rm
array_licensed_port rm
Removes licensed offline array ports. Use this command to remove the ports
(shown by the show migration_usage command) for which you have removed an
array without also removing the array’s license.
Session
miguser
Example
The following example shows the array_licensed_port rm command:
MPX200 (admin) (miguser) #> array_licensed_port rm
01. Symbolic name
= DGC RAID-1
No of ports registered = 2
WWNN, WWPN
50:06:01:60:cb:a0:35:de, 50:06:01:60:4b:a0:35:de
WWNN, WWPN
50:06:01:60:cb:a0:35:de, 50:06:01:68:4b:a0:35:de
02. Symbolic name
= DGC RAID-1
No of ports registered = 2
WWNN, WWPN
50:06:01:60:cb:a0:35:de, 50:06:01:60:4b:a0:35:de
WWNN, WWPN
50:06:01:60:cb:a0:35:de, 50:06:01:68:4b:a0:35:de
01
Please select a Id to remove from the list above ('q' to quit):
All attribute values that have been changed will now be saved.
ISR654606-00 A
5-59
5–Command Line Interface
readjust_priority
readjust_priority
Modifies the priority of serial scheduled jobs. Use this feature if you have more
than 256 jobs that must be executed sequentially. This operation is allowed only if
the high priority jobs are completed, and there is room for shifting the priority
values on already configured jobs. This reduces the priority value of the last job
from 256 by the value of the priority of the currently running serial job, and makes
room to configure more serial jobs.
Session
miguser
Example
The following shows an example of the readjust priority command.
MPX200 <1> (miguser) #> readjust_priority
Are you sure you want to adjust the priorities of serially
scheduled jobs that haven't started (y/n): y
Priorities have been successfully re-adjusted.
5-60
ISR654606-00 A
5–Command Line Interface
show compare_luns
show compare_luns
Summarizes the status of verify jobs either with a specific state or all jobs. It also
lists the configuration details of the selected job.
Session
miguser
Example
The following shows an example of the show compare_luns command.
MPX200 <1> (miguser) #> show compare_luns
Compare State Type ( 1=Running
Job
2=Failed
3=Completed
4=All ) : 4
Owner
Type
Status
Job Description
---
-----
----
----------------
----------------------
0
1
Offline
Serial Scheduled
CX-320-A:VPG1:000 to MSA-2012..
ID
Please select a Compare Job Id from the list above ('q' to quit):
0
Compare Information
------------------Job Id
0
Job Owner
b1
Job Description
CX-320-A:VPG1:000 to MSA-2012:VPG1:000
Group Name
Group 0
Compare Type
Offline
Priority
1
Compare Status
Serial Scheduled
I/O Size
64 KB
Compare State
0% Complete
Compare Performance
0 MBps
Start Time
---
End Time
---
Delta Time
---
Source Array
CX-320-A
Source Lun VPG:ID
1:0
Source Lun WWULN
60:06:01:60:96:02:1a:00:84:f3:f5:81:89:9e:de:11
Source Lun Size
10.00 GB
Destination Array
MSA-2012
Destination Lun VPG:ID
1:0
Destination Lun WWULN
60:0c:0f:f0:00:d5:9c:a4:31:d4:a9:4a:01:00:00:00
ISR654606-00 A
5-61
5–Command Line Interface
show compare_luns
Destination Lun Size
10.00 GB
Number of DRL Blocks
0
5-62
ISR654606-00 A
6
Performance
This chapter discusses the factors affecting DMS performance and offers
suggestions for obtaining maximum performance.
Performance Factors
DMS provides maximum throughput of 1TB (one terabyte) per hour. The migration
performance depends upon several factors, including:
Number of concurrent migration jobs running on the MPX200
I/O size used for data transfer
I/O traffic serviced by the array from other applications active during data
migration
Fibre Channel link speed
RAID configuration of LUNs
Maximizing Performance
Suggestions for maximizing performance include the following:
Use the Array Bandwidth feature (see “Setting Array Properties” on
page 3-2) to make sure that the MPX200 is not using all available
bandwidth, because bandwidth is needed for other LUNs still servicing
applications.
Use Serial Scheduling of migration jobs (see “Using the Data Migration
Wizard” on page 3-7) instead of simultaneously starting all jobs.
The MPX200 is capable of simultaneously configuring a maximum of 256
jobs. However, QLogic recommends that you simultaneously run only four
and eights jobs. The remaining jobs can be scheduled using Serial
Scheduling or Delayed Scheduling.
LUNs belonging to different RAID groups (set of physical drives) or on a
different array controller on the storage array should be scheduled to run
simultaneously.
ISR654606-00 A
6-1
6–Performance
Optimal Configuration and Zoning
Optimal Configuration and Zoning
In order to get the best performance from the router, configure your system as
follows:
In the physical topology, configure a single switch with two ports each from
the router, source array, and destination array.
Set the zoning such that each router port sees both controller ports from the
source array and the destination array.
Balance the LUNs on the source and destination arrays between the two
controller ports.
NOTE:
QLogic recommends that you do not simultaneously run more than four data
migration jobs.
Figure 6-1 shows a topology that provides maximum performance.
HP StorageWorks
MPX200
Fibre Channel Switch
Source LUN
Destination LUN
Figure 6-1 Topology Example
6-2
ISR654606-00 A
7
Using the HP MSA2012fc
Storage Array
This chapter discusses the following considerations for using the HP Modular
Storage Array 2012fc (MSA2012fc):
“MSA2012fc Array Behavior” on page 7-1
“Using Array-based Licenses for MSA2012fc Array” on page 7-1
“Workaround for Using a Single Array License for MSA2012fc” on page 7-2
MSA2012fc Array Behavior
The controllers A and B of the MSA2012fc expose a completely independent set
of LUNs that cannot be accessed through other controllers. ControllerA-port0 and
ControllerA-port1 form one array, and ControllerB-port0 and ControllerB-port1
form another array. The MSA2012fc array appears as two independent arrays on
the MPX200.
Zoning. After data LUNs are assigned to the MPX200 ports, zone MPX200
ports (FC1 and FC2) with MSA2012fc (ControllerA-port0 and ControllerA-port1).
This zoning creates an array entity that allows you to migrate data to and from
LUNs owned by ControllerA. You must zone in ControllerB-port0 and
ControllerB-port1 to be able to migrate data to and from LUNs owned by
ControllerB. By doing so, you create a separate array entity for the ports
belonging to ControllerB. To understand the physical connections required, refer
to the MSA documentation on Fibre Channel port interconnect mode settings.
Using Array-based Licenses for MSA2012fc
Array
As indicated in the preceding, each controller of the MSA2012fc array presents
different LUNs to the MPX200 ports and hence appears as two separate arrays.
Using array-based licenses to migrate LUNs owned by both controllers requires
two array licenses. If, however, all LUNs requiring migration are owned by a single
controller, one array license should suffice.
ISR654606-00 A
7-1
7–Using the HP MSA2012fc Storage Array
Workaround for Using a Single Array License for MSA2012fc
MSA2012fc allows a maximum of 128 volumes (LUNs) to be accessed through
one controller from any host. If you need to migrate data to and from more than
128 LUNs, you must present LUNs in batches with a maximum of 128 LUNs at a
time.
To unpresent old LUNs and present new LUNs to the MPX200 ports, follow the
steps in “Reconfiguring LUNs on a Storage Array” on page 8-1.
Workaround for Using a Single Array License for
MSA2012fc
In order to use a single license for an MSA2012fc array where data needs to be
migrated to and from LUNs owned by both ControllerA and ControllerB, use the
following workaround.
To use a single array license for MSA2012fc:
7-2
1.
Add array-based licenses (a Single Array or Three Array License) as
required.
2.
Present LUNs that need to be used by data migration jobs from the storage
array to the MPX200 ports.
3.
Make sure that the LUNs are presented with the same LUN ID for both
MPX200 ports.
4.
Zone in only ControllerA ports with the MPX200. The MPX200 will create
one array entity for the zoned in ports, because they belong to the same
controller.
5.
Apply array-based licenses to the array entity using the set array CLI
command, or in the License Array dialog box.
6.
Configure data migration jobs as described in “Scheduling an Individual
Data Migration Job in the GUI” on page 3-8 or “Scheduling Data Migration
Jobs in Batch Mode” on page 3-15.
7.
After the data migration jobs for all the LUNs belonging to ControllerA are
completed and acknowledged, perform a reconfiguration.
8.
Zone out the MSA2012fc ports and the MPX200 ports.
9.
Unpresent the LUNs presented in Step 2.
10.
Change the ownership of LUNs from ControllerB to ControllerA for all the
LUNs that belong to Controller B and need to be used in data migration jobs.
11.
Present LUNs from Step 10 from the storage array to the MPX200 ports.
12.
Make sure that the LUNs are presented with the same LUN ID for both
MPX200 ports.
ISR654606-00 A
7–Using the HP MSA2012fc Storage Array
Workaround for Using a Single Array License for MSA2012fc
13.
Rezone the MSA2012fc ports and the MPX200 ports that were zoned out in
Step 8.
14.
Reboot the MPX200.
The MPX200 can now “see” the new set of LUNs under the array entity that
was licensed in Step 5.
15.
ISR654606-00 A
Configure data migration jobs as described in “Scheduling an Individual
Data Migration Job in the GUI” on page 3-8 or “Scheduling Data Migration
Jobs in Batch Mode” on page 3-15.
7-3
7–Using the HP MSA2012fc Storage Array
Workaround for Using a Single Array License for MSA2012fc
Notes
7-4
ISR654606-00 A
8
Restrictions
This chapter details the restrictions that apply to DMS for reconfiguring LUNs on a
storage array and provides the steps for removing an array after completing data
migration jobs.
Reconfiguring LUNs on a Storage Array
Carefully handle reconfiguration of a LUN ID following these guidelines:
Do not change the LUN ID for any LUN that is currently assigned to a data
migration Job.
If a data migration job is completed or stopped on a specified LUN, you must
acknowledge or remove the migration job before reassigning the LUN ID.
After changing the LUN presentation from the array to the MPX200, where a
different LUN is presented to the same LUN ID, click Refresh three times in
the HP StorageWorks mpx Manager GUI and verify that the state of the LUN
is online. Also, make sure that the correct LUN world wide unique LUN
name (WWULN) and path information are shown.
Removing an Array After Completing Data
Migration Jobs
After you complete all data migration jobs, remove the storage array following
these steps.
To remove an array after completing data migration jobs:
1.
Acknowledge or remove all data migration jobs associated with the array
being removed.
2.
Remove the configured zones containing MPX200 Fibre Channel ports and
controller ports of the array.
3.
Wait for up to 30 seconds to see the array in the offline state in the show
array output (see “show array” on page 5-36).
ISR654606-00 A
8-1
8–Restrictions
Removing an Array After Completing Data Migration Jobs
8-2
4.
Remove the array from persistence using the array rm command (see
“array rm” on page 5-58)
5.
To completely remove the target entity, reboot the MPX200.
ISR654606-00 A
A
Troubleshooting
Table A-1 lists some problems that may occur with the data migration service and
provides a possible reason or solution for each.
Table A-1. Troubleshooting
Problem
The show array command does not show
any array entities.
Reason and Solution
Ensure that the zoning is correctly set up on the
switches.
Ensure that the show targets command is not
showing any entry for the array. If show targets is
showing an entry for the target array, it means that the
MPX200 is zoned correctly, but no data LUNs are
mapped to the MPX200 ports. Add masking for the
required data LUNs so that they are seen by the
MPX200, and then run the target rescan command. (For more information, see “show targets” on
page 5-54 and “target rescan” on page 5-56.)
The migration add command does not
show any source or destination array.
By default, the target type attribute for an array is
Unknown. Use the set array command to set it
appropriately.
The migration add command fails to start a
job.
Verify that the arrays are still visible and online.
Setting the array bandwidth does not cause
any change in the data transfer rate in show
perf output.
Array bandwidth is a “source-only” feature. Make sure
that the bandwidth setting has been configured on the
array that contains the source LUN. If the setting is
configured on the array holding the destination LUN,
no effect is seen.
Migration failover to active path does not
occur.
Ensure that both the MPX200 ports are correctly
masked for the LUN under consideration, and that both
controllers are correctly zoned with both the MPX200
Fibre Channel ports.
ISR654606-00 A
A-1
A–Troubleshooting
Table A-1. Troubleshooting (Continued)
Problem
Reason and Solution
A migration job goes into running state, halts at
the Running (0% complete) state for awhile,
and then fails.
Make sure that the controller ports zoned for the
accessing source and destination array LUNs also own
the respective LUNs. In other words, if the source LUN
is being accessed by the MPX200 through a controller
port belonging to Controller A while the LUN is actually
owned by Controller B, the MPX200 will allow you to
configure a migration job but will not be able to do any
data access operations for that LUN.
The MPX200 displays the following messages:
The MPX200 sees the same LUN ID being presented
for two different LUNs. This can happen if you try to
change the set of LUNs exposed to the MPX200 without removing associated migration jobs and zoning out
the original set of LUNs.
Array reconfiguration detected.
Refer to user manual for trouble
shooting.
WWULN:
60:05:08:b4:00:05:4d:94:00:00:c0:0
0:00:2c:00:00 and WWULN:
60:05:08:b4:00:05:4d:94:00:00:c0:0
0:00:2d:00:00 mapped on same LUN
ID: 8.
Marking LUN offline: LUN ID: 8
WWULN:
60:05:08:b4:00:05:4d:94:00:00:c0:0
0:00:2d:00:00
The MPX200 displays the following messages:
Array reconfiguration detected.
Refer to user manual for trouble
shooting.
WWULN:
60:05:08:b4:00:05:4d:94:00:00:c0:0
0:00:2d:00:00 mapped on different
LUN IDs: 8 and 9.
In order to keep the LUN object database maintained
by the MPX200 in a sane state, ensure that you explicitly acknowledge or remove all migration jobs associated with a set of LUNs that need to be removed. Only
after that should you assign the new set of LUNs to the
MPX200 host group. You must refresh the GUI three
times to rediscover the new set of LUNs.
The MPX200 sees the same WWULN through different
LUN IDs from the same array. This can happen if the
two MPX200 ports are placed in different host groups
and you inadvertently assign different LUN IDs while
presenting a specific LUN to the two host groups. To
avoid this situation, put both MPX200 ports under the
same host group.
Marking LUN offline: LUN ID: 8,
WWULN:
60:05:08:b4:00:05:4d:94:00:00:c0:0
0:00:2d:00:00. LUN with ID: 8 is
not presented
A-2
ISR654606-00 A
A–Troubleshooting
Table A-1. Troubleshooting (Continued)
Problem
Reason and Solution
The MPX200 does not show masked LUNs,
and instead shows LUN 0 only with offline status for an EMC CX array.
Verify that the MPX200 port is registered with the storage system through the same storage controller port
through which it is trying to access the LUNs. If the
MPX200 ports are registered with SPA-0 port, and
SPA-1 port is zoned with the MPX200 ports on the
switch, the MPX200 will not see any of the assigned
LUNs.
On presenting a data LUN for the first time, the router
considers it to be an array reconfiguration scenario,
where the data LUN replaces the controller LUN. To
see the correct LUN details, perform either of these
options:
In the CLI, issue the show luninfo command two
or three times.
In the HP StorageWorks mpx Manager GUI, click
Refresh two or three times.
The MPX200 tries to start a scheduled job and
shows a job in Pending state instead of Running state.
ISR654606-00 A
Make sure that the LUN state is online for both the
source and destination LUNs. Check if the zoning configuration is valid and that the arrays are shown in an
online state. If the array state is online and the LUN
state is offline, make sure that the LUN presented to
the MPX200 at the time of configuring the job has not
been replaced by another LUN at the time of starting
the job. This is a case of reconfiguration and the associated job will have to be deleted. For more information, see “Reconfiguring LUNs on a Storage Array” on
page 8-1.
A-3
A–Troubleshooting
Notes
A-4
ISR654606-00 A
Glossary
array
A type of storage array, such as a disk
array or tape array.
bandwidth
A measure of the volume of data that can
be transmitted at a specified transmission
rate. A 1-Gbps/2-Gbps Fibre Channel port
can transmit or receive at nominal rates of
1- or 2-Gbps, depending on the device to
which it is connected. This corresponds to
actual bandwidth values of 106 MB and
212 MB, respectively.
CLI
Command line interface. A program interface driven by entering commands and
parameters.
comma separate values file
See CSV file.
command line interface
See CLI.
CSV file
Comma separated values file. A data file
used for storage of data structured in a
table form. Each line in the file corresponds to a row in the table. Within a line,
fields are separated by commas, each field
belonging to one table column.
ISR654606-00 A
data migration
The process of transferring data between
storage types, formats, or computer
systems. Data migration is usually
performed programmatically to achieve an
automated migration, freeing up human
resources from tedious tasks. Migration is
a necessary action for retaining the integrity of the data and for allowing users to
search, retrieve, and make use of data in
the face of constantly changing
technology.
Data Migration Service
See DMS.
DMS
Data Migration Service. A technology that
simplifies data migration jobs with
minimum downtime while providing protection against common user errors.
fabric
A fabric consists of cross-connected Fibre
Channel devices and switches.
FC
See Fibre Channel.
Fibre Channel
High-speed serial interface technology
that supports other higher layer protocols
such as SCSI and IP, and is primarily used
in SANs. Standardized under ANSI in
1994.
Glossary-1
Data Migration Service for HP StorageWorks MPX200
User’s Guide
field replaceable unit
See FRU.
FRU
Field replaceable unit. Component that
can be replaced in the field upon failure.
graphical user interface.
See GUI.
GUI
Graphical user interface. A user interface
that is based upon icons and visual
relationships rather than text.
HA
High availability. A system or device that
operates continuously for a long length of
time.
high availability
See HA.
I/O
Input/output. Collection of interfaces that
different functional units of a system use to
communicate with each other.
input/output
See I/O.
iSCSI
Internet small computer system interface.
Transmits native SCSI over the TCP/IP
stack. In a system supporting iSCSI, a
user or software application issues a
command to store or retrieve data on a
SCSI storage device. The request is
processed by the operating system and is
converted to one or more SCSI commands
that are then passed to software or to a
card. The command and data are encapsulated by representing them as a serial
string of bytes proceeded by iSCSI
headers. The encapsulated data is then
Glossary-2
passed to a TCP/IP layer that breaks it into
packets suitable for transfer over the
network. If required, the encapsulated data
can also be encrypted for transfer over an
insecure network.
logical unit number
See LUN.
LUN
Logical unit number. Representation of a
logical address on a peripheral device or
array of devices.
mpx200
The MPX200 offers simultaneous iSCSI
and Fibre Channel support with 10GbE,
1GbE, and 8Gb/s Fibre Channel
technology, providing modular
multi-protocol SAN designs with increased
scalability, stability, ROI and simpler to
manage, secure storage solution for virtualized server environments.
MPX 200’s enterprise-class high-availability design provides dual hot-plug power
supplies and router blades for no single
point of failure. MPX200 integrated in
same rack allows customers to connect up
to 4 EVA to a single MPX200 reducing the
complexity and cost of iSCSI connectivity
to EVA storage arrays
multipath routing
The routing technique of leveraging
multiple alternative paths through a
network, which can yield a variety of
benefits such as fault tolerance, increased
bandwidth, or improved security.
ISR654606-00 A
Data Migration Service for HP StorageWorks MPX200
User’s Guide
path
A path to a device is a combination of an
adapter port instance and a target port as
distinct from internal paths in the fabric
network. A fabric network appears to the
operating system as an opaque network
between the adapter (initiator) and the
target.
Because a path is a combination of an
adapter and a target port, it is distinct from
another path if it is accessed through a
different adapter or it is accessing a
different target port. Consequently, when
switching from one path to another, the
driver might be selecting a different
adapter (initiator), a different target port, or
both.
This is important to the driver when
selecting the proper method of failover
notification. It can make a difference to the
target device, which might have to take
different actions when receiving retries of
the request from another initiator or on a
different port.
RAID
Redundant array of independent/inexpensive disks. RAID technology groups
separate disks into one logical storage unit
(LUN) to improve reliability and/or performance.
redundant array of
independent/inexpensive disks
See RAID.
SAN
Storage area network. Multiple storage
units (disk drives) and servers connected
by networking topology.
ISR654606-00 A
SCSI
Small computer system interface. A
high-speed interface used to connect
devices, such as hard drives, CD drives,
printers, and scanners, to a computer. The
SCSI can connect many devices using a
single controller. Each device is accessed
by an individual identification number on
the SCSI controller bus.
Secure shell
See SSH.
small computer system interface
See SCSI.
SSH
Secure shell. Protocol that secures
connections to the switch for the command
line interface.
storage area network
See SAN.
target
The storage-device endpoint of a SCSI
session. Initiators request data from
targets (usually disk-drives, tape-drives, or
other media devices). Typically, a SCSI
peripheral device is the target but an
adapter may, in some cases, be a target. A
target can contain many LUNs.
A target is a device that responds to a
requested by an initiator (the host system).
Peripherals are targets, but for some
commands (for example, a SCSI COPY
command), the peripheral may act as an
initiator.
Glossary-3
Data Migration Service for HP StorageWorks MPX200
User’s Guide
Telnet
Refers to software that implements the
client part of the protocol. Telnet clients are
available for nearly all computer platforms.
Because of security issues with Telnet, its
use has declined in favor of SSH for
remote access.
world wide node name
See WWNN.
world wide port name
See WWPN.
world wide unique LUN name
See WWULN.
WWNN
World wide node name. Unique 64-bit
address assigned to a device.
WWPN
World wide port name. Unique 64-bit
address assigned to each port on a
device. One WWNN may contain multiple
WWPN addresses.
WWULN
World wide unique LUN name. WWULN
identifiers for SCSI devices are read from
page 83 and page 80 of your SCSI block
device as based on the SCSI standard.
SANsurfer® looks for identifiers in the order
of: page 83 type 3, page 83 type 2, page
83 type 1, page 80, and lastly page 83
type 0.
zoning
Configuring a set of Fibre Channel device
ports to communicate across the fabric.
Through switches, traffic within a zone can
be physically isolated from traffic outside
the zone.
Glossary-4
ISR654606-00 A
Index
A
acknowledging
data migration job in CLI 5-21
data migration job in GUI 3-36
LUN compare job in CLI 5-31
acronyms and terms Glossary-1
activating license key in CLI 5-6
Active Data Migration Jobs page 3-18, 3-19
Add License dialog box 4-3
adding
data migration job group in CLI 5-10
data migration job to schedule in CLI 5-13
admin session in CLI 5-1
administrative user session in GUI 1-8
agreements, license xi
array rm command 5-58
array_licensed_port rm command 5-59
array-based license
applying to specific array in CLI 4-7
applying to specific array in GUI 4-5
best practices 2-6
described 4-1
using for HP MSA2012fc 7-1
arrays
attribute types for data migration 1-6
attributes 1-4
bandwidth feature 1-5
bandwidth, setting 3-3
best practices 2-6
data migration license, applying to specific in
CLI 4-7
definition of Glossary-1
details, removing from persistence 5-58
information, viewing 5-36
license, applying to specific in GUI 4-5
ISR654606-00 A
arrays (continued)
license, removing information from offline
5-58
licensed ports, removing 5-59
LUN information, showing 5-40
properties, feature details 1-4
properties, setting in CLI 3-5
properties, setting in GUI 3-2
reconfiguring LUNs on 8-1
removing after completing data migration job
8-1
removing details for offline from persistence
5-58
removing license information 5-58
removing offline 3-36
source-only 1-2
supported storage 2-3
symbolic name 1-5
symbolic name, setting 3-2
target type, setting in CLI 5-8
types of 1-5
attributes
arrays 1-4
data migration job 1-6
audience for this guide ix
B
bandwidth
array, setting 1-5, 3-3
definition of Glossary-1
batch mode
scheduling data migration jobs in 3-15
scheduling option setting 3-8
“best practices” 2-4
BridgeApp event information, viewing 5-51
Index-1
Data Migration Service for HP StorageWorks MPX200
User’s Guide
C
capacity-based license, described 4-1
capturing system logs 5-57
changes in this guide -ii
clearing
data migration log contents 3-30
system log contents 3-28
CLI
commands, list of 5-2
definition of Glossary-1
properties, viewing 5-45
comma separated values file, See CSV file
command line interface, See CLI
commands 5-2
array rm 5-58
compare_luns acknowledge 5-31
compare_luns add 5-23
compare_luns pause 5-29
compare_luns resume 5-30
compare_luns rm 5-26
compare_luns start 5-28
compare_luns stop 5-27
migration acknowledge 5-21
migration add 5-13
migration pause 3-25, 5-19
migration resume 3-25, 5-20
migration rm 3-25, 5-16
migration start 3-25, 5-18
migration stop 3-25, 5-17
migration_group add 5-10
migration_group edit 5-12
migration_group remove 5-11
readjust priority 5-60
save capture 5-57
set array 5-8
set fc 5-7
set features 5-6
set system 5-5
show array 5-36
show compare_luns 5-61
show fc 5-32
show features 5-49
show logs 5-51
Index-2
commands (continued)
show luninfo 5-38
show luns 5-52
show memory 5-44
show mgmt 5-43
show migration 3-20, 5-34
show migration_logs 5-50
show migration_luninfo 5-40
show migration_params 5-42
show migration_usage 5-46
show perf 5-47
show perf byte 5-48
show properties 5-45
show targets 5-54
show vpgroups 5-55
start_serial_jobs 5-22
target rescan 5-56
compare_luns acknowledge command 5-31
compare_luns add command 5-23
compare_luns pause command 5-29
compare_luns resume command 5-30
compare_luns rm command 5-26
compare_luns start command 5-28
compare_luns stop command 5-27
Completed Data Migration Jobs page 3-36
configurations
arrays, best practices 2-6
direct attach 2-1
fabric 2-2
supported 2-1
configure only option 1-3
configure-only job option 3-10, 3-17
contact information xii
controlling
data migration job actions in CLI 3-25
data migration job actions in GUI 3-23
conventions, documentation x
Create Data Migration Job dialog box 3-16
creating data migration job group in CLI 5-10
CSV file
definition of Glossary-1
exporting data migration log to 3-30
exporting system log to 3-28
customer support xi
ISR654606-00 A
Data Migration Service for HP StorageWorks MPX200
User’s Guide
D
data migration
definition of Glossary-1
overview 1-1
data migration job groups
creating in CLI 3-7, 5-10
creating in GUI 3-6
editing name in CLI 5-12
feature details 1-4
name, selecting in CLI 3-12
name, selecting in GUI 3-10
removing in CLI 5-11
data migration jobs
acknowledging in CLI 5-21
acknowledging in GUI 3-36
actions, controlling in CLI 3-25
actions, controlling in GUI 3-23
attributes 1-6
batch mode, scheduling in 3-15
CLI commands 1-7
compare LUN, pausing in CLI 5-29
compare LUN, restarting in CLI 5-28
compare LUN, resuming in CLI 5-30
configuration details, viewing in CLI 5-34
configure only 1-3
delayed schedule 1-3
deleting 3-24, 3-25
deleting in CLI 5-16
details, viewing in CLI 3-25
details, viewing in GUI 3-23
feature described 1-6
immediate schedule 1-3
pausing in CLI 5-19
pausing/resuming 3-24, 3-25
performance in bytes, viewing 5-47, 5-48
removing array after completing 8-1
removing in CLI 5-16
restarting in CLI 5-18
resuming in CLI 5-20
scheduling 1-3
scheduling in CLI 5-13
serial scheduled 1-3
serial scheduled, start time, viewing 5-42
ISR654606-00 A
data migration jobs (continued)
serial scheduled, starting in CLI 5-22
states 1-7
status, viewing in CLI 3-20, 5-34
status, viewing in GUI 3-19
stopping in CLI 5-17
stopping/starting 3-24, 3-25
verifying job options 3-34
Data Migration Jobs Options dialog box 3-10,
3-15, 3-17
data migration licenses 4-1
array-based, applying to specific array in CLI
4-7
array-based, applying to specific array in
GUI 4-5
array-based, described 4-1
capacity-based, described 4-1
key, activating in CLI 5-6
key, installing in CLI 4-4
key, installing in GUI 4-2
offline array, removing information 5-58
types of 4-1
usage, viewing in CLI 4-9, 5-46
usage, viewing in GUI 4-8
data migration log
best practices 2-6
clearing contents of 3-30
exporting to CSV file 3-30
viewing in CLI 3-31, 5-50
viewing in GUI 3-28, 3-29
data migration mode
setting in CLI 5-5
Data Migration Security Check dialog box
3-33
Data Migration Service, See DMS
data migration user session in GUI 1-8
Data Migration wizard 1-7, 3-7
scheduling data migration jobs in batch
mode 3-15
scheduling individual data migration job 3-8
scheduling mode, setting 3-8
starting 3-7
data security 1-2
delayed schedule 1-3
Index-3
Data Migration Service for HP StorageWorks MPX200
User’s Guide
deleting
array licensed ports, offline 5-59
data migration job groups in CLI 5-11
data migration job in CLI 3-25, 5-16
data migration job in GUI 3-24
data migration log contents 3-30
LUN compare job in CLI 5-26
system log contents 3-28
destination arrays 1-5, 1-6
destination LUNs 1-3, 1-5, 1-6
direct attach configuration 2-1
DMS
definition of Glossary-1
feature details 1-2
introduction to ix, 1-1
options, guidelines for choosing 2-5
documentation
conventions x
related x
revision history -ii
E
end user license agreements xi
exporting
data migration log to CSV file 3-30
system log to CSV file 3-28
feature details (continued)
logs 1-8
protection 1-6
user session types 1-8
feature key information, viewing in CLI 5-49
features
details of 1-2
overview 1-1
Features page 4-2
Fibre Channel
definition of Glossary-1
fabric types supported 2-3
port information, viewing in CLI 5-32
field replaceable unit, See FRU
free memory, viewing in CLI 5-44
FRU, definition of Glossary-2
G
gateway, port, viewing in CLI 5-43
getting started 2-1
glossary of terms Glossary-1
graphical user interface, definition of
Glossary-2
group name, See job group name
GUI, definition of Glossary-2
H
F
fabric
configuration 2-2
definition of Glossary-1
supported types 2-3
factors affecting performance 6-1
FAQs A-1
FC, See Fibre Channel
feature details
array properties 1-4
data migration job groups 1-4
data migration jobs 1-6
job scheduling 1-3
Index-4
HA
best practices 2-4
configurations 2-7
definition of Glossary-2
fabric configuration 2-2
hardware setup 2-6
help, troubleshooting A-1
high availability, See HA
history, revision -ii
HP MSA2012fc storage array 7-1
array-based licenses, using 7-1
behavior of controllers 7-1
workaround for using single 7-2
ISR654606-00 A
Data Migration Service for HP StorageWorks MPX200
User’s Guide
I
I/O
definition of Glossary-2
size for migration job, setting in CLI 3-12
size for migration job, setting in GUI 3-10
immediate schedule 1-3
individual migration job
scheduling in CLI 3-11
scheduling in GUI 3-8
scheduling mode, setting 3-8
Information page 4-6
Input dialog box 3-6
input/output, See I/O
installing
data migration license key in CLI 4-4
data migration license key in GUI 4-2
intended audience ix
Internet small computer system interface, See
iSCSI
interrupting
data migration job in CLI 3-25, 5-19
data migration job in GUI 3-24
introduction, DMS overview 1-1
IP address, port, viewing in CLI 5-43
iSCSI
definition of Glossary-2
server connectivity mode, changing from in
CLI 5-5
J
job groups, See data migration job groups
jobs, See data migration jobs
L
license agreements xi
License Array dialog box 4-5, 7-2
license keys, viewing information 5-49
licensed offline array ports, removing 5-59
licenses, See data migration licenses
link status, viewing in CLI 5-32
Log Type dialog box 3-27, 3-28
logical unit number, See LUN
logs 3-27
BridgeApp event information, viewing 5-51
data migration, viewing in CLI 3-31, 5-50
data migration, viewing in GUI 3-28
feature details 1-8
system, viewing in CLI 3-30
system, viewing in GUI 3-27
LUN compare jobs
acknowledging in CLI 5-31
pausing in CLI 5-29
removing in CLI 5-26
restarting in CLI 5-28
resuming in CLI 5-30
scheduling in CLI 5-23
stopping in CLI 5-27
LUNs
data, exposed to router ports 5-56
definition of Glossary-2
detailed information, viewing 5-52
ID, restriction on changing 8-1
information, showing 5-40
objects, viewing status of 5-38
source and destination 1-6
M
K
key, data migration license
activating in CLI 5-6
installing in CLI 4-4
installing in GUI 4-2
knowledge database, searching xii
ISR654606-00 A
management port information, viewing in CLI
5-43
materials, related x
maximizing performance 6-1
memory, viewing free and total in CLI 5-44
migration acknowledge command 5-21
migration add command 3-11, 5-13
Index-5
Data Migration Service for HP StorageWorks MPX200
User’s Guide
migration jobs, See data migration jobs
migration licenses, See data migration
licenses
Migration Log dialog box 3-28, 3-30
migration pause command 3-25, 5-19
migration resume command 3-25, 5-20
migration rm command 3-25, 5-16
Migration Schedule Options dialog box 3-8,
3-15
migration start command 3-25, 5-18
migration stop command 3-25, 5-17
migration_group add command 3-7, 5-10
migration_group edit command 5-12
migration_group remove command 5-11
miguser session
array properties, setting 3-5
feature details 1-8
in CLI 5-2
modes
data migration, setting in CLI 5-5
mpx Log
Migration Log dialog box 3-28, 3-30
System Log dialog box 3-27, 3-28
mpx200, definition of Glossary-2
multipath fabric configuration 2-2
multipath routing, definition of Glossary-2
N
New License Key dialog box 4-3
P
path
definition of Glossary-3
information for LUN, viewing 5-38
pausing
compare LUN job in CLI 5-29
data migration job in CLI 3-25, 5-19
data migration job in GUI 3-24
performance 6-1
active job, viewing 5-47, 5-48
factors affecting 6-1
maximizing 6-1
port information, viewing in CLI 5-32, 5-43
port status
setting in CLI 5-7
viewing in CLI 5-32
ports
array licensed offline, removing 5-59
ports, scanning target 5-56
practices, best 2-4
preface ix
printing system log contents 3-28
priority, serial scheduled jobs, modifying 5-60
problems and solutions A-1
programmed connection status, setting in CLI
5-7
properties
array (feature details) 1-4
arrays, setting in CLI 3-5
arrays, setting in GUI 3-2
protection, feature details 1-6
O
offline array ports, removing licensed 5-59
offline array, removing 3-36
overview
DMS 1-1
features 1-1
user guide ix
Q
QLogic technical support xii
R
RAID
definition of Glossary-3
LUN configuration performance factors 6-1
readjust priority command 5-60
Index-6
ISR654606-00 A
Data Migration Service for HP StorageWorks MPX200
User’s Guide
recommendations, “best practices” 2-4
reconfiguring LUNs on storage array 8-1
redundant array of independent/inexpensive
disks, See RAID
redundant configurations, best practices 2-4
refreshing the GUI 3-3, 3-5
related materials x
removing
array after completing data migration job
8-1
array details for offline 5-58
array licensed ports, offline 5-59
array, offline 3-36
arrays, best practices 2-6
data migration job groups in CLI 5-11
data migration job in CLI 3-25, 5-16
data migration job in GUI 3-24
LUN compare job in CLI 5-26
renaming data migration job group in CLI
5-12
rescanning target ports 3-22, 5-56
restarting
compare LUN job in CLI 5-28
data migration job in CLI 3-25, 5-18
data migration job in GUI 3-24
restrictions 8-1
resuming
compare LUN job in CLI 5-30
data migration job in CLI 3-25, 5-20
data migration job in GUI 3-24
revision history, of this guide -ii
router ports, data LUNs exposed to 5-56
routers (multiple), topology example 2-3
S
SAN
definition of Glossary-3
resources, maximizing with job scheduling
1-3
vendor independent feature 1-1
save capture command 5-57
ISR654606-00 A
saving
data migration license key in CLI 5-6
system log to file 5-57
scanning target ports 5-56
scheduling
data migration jobs (overview) 1-3
data migration jobs in batch mode 3-15
individual migration job in CLI 3-11, 5-13
individual migration job in GUI 3-8
LUN compare job in CLI 5-23
serial jobs, modifying priorities of 5-60
verification of job options 3-34
scheduling mode, setting in GUI 3-8
scheduling type
batch job, setting for 3-17
individual job, setting for 3-10
serial data migration jobs, setting for 3-19
SCSI, definition of Glossary-3
Secure shell, See SSH
Security Check dialog box 3-3, 3-5, 3-6
Serial Data Migration Jobs Options dialog box
1-4, 3-18
serial scheduled jobs 1-3
priority, modifying 5-60
start time, viewing 5-42
starting in CLI 5-22
set array command 5-8
set fc command 5-7
set features command 5-6
set system command 5-5
setup
hardware 2-6
software 2-7
show array command 5-36
show compare_luns command 5-61
show fc command 5-32
show features command 5-49
show logs command 5-51
show luninfo command 5-38
show luns command 5-52
show memory command 5-44
show mgmt command 5-43
show migration command 3-20, 5-34
show migration_logs command 5-50
Index-7
Data Migration Service for HP StorageWorks MPX200
User’s Guide
show migration_luninfo command 5-40
show migration_params command 5-42
show migration_usage command 5-46
show perf byte command 5-48
show perf command 5-47
show properties command 5-45
show targets command 5-54
show vpgroups command 5-55
showing
LUN information 5-40
virtual port group information 5-55
single array license workaround for HP
MSA2012fc storage array 7-2
small computer system interface, See SCSI
software end user license agreements xi
software setup 2-7
solutions to problems A-1
source arrays 1-5, 1-6
source LUNs 1-3, 1-5, 1-6
source target type, setting 3-2
source+destination arrays 1-5, 1-6
source-only arrays 1-2
SSH, definition of Glossary-3
start time, serial scheduled job, viewing 5-42
start_serial_jobs command 5-22
starting
Data Migration wizard 3-7
serial scheduled data migration job in CLI
5-22
Verify Migration Job wizard 3-33
states, data migration job 1-7
status
data migration jobs, viewing in CLI 3-20
data migration jobs, viewing in GUI 3-19
port and programmed connection, setting in
CLI 5-7
stopping
data migration job in CLI 3-25, 5-17
data migration job in GUI 3-24
LUN compare job in CLI 5-27
storage area network, See SAN
storage arrays, See arrays
subnet mask, port, viewing in CLI 5-43
Index-8
support, technical xi
contact information xii
supported
configurations 2-1
storage array types 2-3
supported topologies 2-1
symbolic name, assigning to array 1-5, 3-2
system log
capturing 5-57
clearing contents of 3-28
exporting to CSV file 3-28
printing contents of 3-28
viewing in CLI 3-30
viewing in GUI 3-27
System Log dialog box 3-27, 3-28
system_capture.tar.gz file 5-57
T
target
definition of Glossary-3
ports, scanning 5-56
showing all zoned 5-54
target rescan command 5-56
target type
array, setting in CLI 5-8
source, setting in GUI 3-2
targets
rescanning ports 3-22
technical support xi
contacting xii
knowledge database xii
Telnet
definition of Glossary-4
guest account login 5-1
terms, glossary of Glossary-1
throttle, user-defined bandwidth, setting 3-4
topologies supported 2-1
total memory, viewing in CLI 5-44
troubleshooting
problems and solutions A-1
QLogic knowledge database xii
ISR654606-00 A
Data Migration Service for HP StorageWorks MPX200
User’s Guide
U
usage, data migration license
viewing in CLI 4-9
viewing in GUI 4-8
user sessions (CLI) 5-1
admin 5-1
miguser 5-2
user sessions (GUI), types of 1-8
V
verify jobs, status of, viewing 5-61
Verify Migration Job wizard 3-32
scheduling verification 3-34
starting 3-33
Verifying Jobs Options dialog box 3-34, 3-35
viewing
active job performance 5-47, 5-48
array information in CLI 5-36
BridgeApp event information 5-51
CLI properties 5-45
data migration job details in CLI 3-25, 5-34
data migration job details in GUI 3-23
data migration job log in GUI 3-28
data migration job status in CLI 5-34
data migration license usage in CLI 4-9,
5-46
data migration license usage in GUI 4-8
data migration log in CLI 5-50
Fibre Channel port information 5-32
link status in CLI 5-32
LUN information, detailed 5-52
LUN status 5-38
management port information in CLI 5-43
memory, free and total in CLI 5-44
port status in CLI 5-32
serial scheduled job start time 5-42
virtual port group information, showing 5-55
VP groups
information, showing 5-55
precautions, general 2-5
ISR654606-00 A
W
what’s in this guide ix
wizards
Data Migration 3-7
Verify Migration Job 3-32
world wide node name, See WWNN
world wide port name, See WWPN
world wide unique LUN name, See WWULN
WWNN
definition of Glossary-4
viewing for array 5-46
viewing for FC port 5-32
viewing for targets 5-54
WWPN
definition of Glossary-4
viewing for array 5-46
viewing for FC port 5-32
viewing for targets 5-54
WWULN
definition of Glossary-4
viewing for array 3-30
viewing for LUNs 3-21, 5-34, 5-38, 5-52
Z
zoning
definition of Glossary-4
FC switches, performing on 2-7
HP MSA2012fc storage array 7-1
troubleshooting A-1, A-3
Index-9
Corporate Headquarters QLogic Corporation 26650 Aliso Viejo Parkway
Aliso Viejo, CA 92656 949.389.6000
Europe Headquarters QLogic (UK) LTD. Quatro House Lyon Way, Frimley Camberley Surrey, GU16 7ER UK
www.qlogic.com
+44 (0) 1276 804 670
© 2009 QLogic Corporation. Specifications are subject to change without notice. All rights reserved worldwide. QLogic and the QLogic logo are
registered trademarks of QLogic Corporation. Brocade is a registered trademark of Brocade Communications Systems, Inc. Cisco is a registered
trademark of Cisco Systems, Inc. EMC, CLARiiON, Navisphere, and Symmetrix are registered trademarks of EMC Corporation. HP is a registered
trademark of Hewlett-Packard Company. IBM is a registered trademark of International Business Machines Corporation. McDATA is a registered
trademark of McDATA Corporation. Microsoft and Excel are registered trademarks of Microsoft Corporation. NEC is a registered trademark of NEC
Corporation. Oracle is a registered trademark of Oracle Corporation. Xiotech and Magnitude 3D are registered trademarks and Emprise is a trademark
of Xiotech Corporation. All other brand and product names are trademarks or registered trademarks of their respective owners. Information supplied
by QLogic Corporation is believed to be accurate and reliable. QLogic Corporation assumes no responsibility for any errors in this manual. QLogic
Corporation reserves the right, without notice, to make changes in product design or specifications.