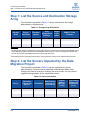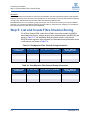
1
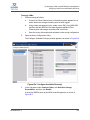
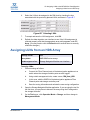
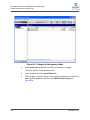
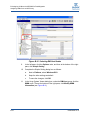
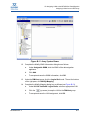
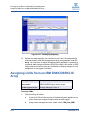
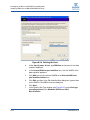
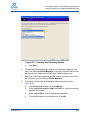
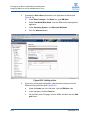
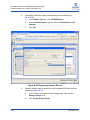
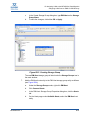
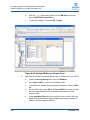
Data Migration Service for HP
StorageWorks MPX200
Planning Guide
ISR654605-00 A
Data Migration Service for HP StorageWorks MPX200
Planning Guide
Information furnished in this manual is believed to be accurate and reliable. However, QLogic Corporation assumes no
responsibility for its use, nor for any infringements of patents or other rights of third parties which may result from its
use. QLogic Corporation reserves the right to change product specifications at any time without notice. Applications
described in this document for any of these products are for illustrative purposes only. QLogic Corporation makes no
representation nor warranty that such applications are suitable for the specified use without further testing or
modification. QLogic Corporation assumes no responsibility for any errors that may appear in this document.
Document Revision History
Revision A, November 13, 2009
Changes
Initial release of new guide.
ii
Sections Affected
All
ISR654605-00 A
Table of Contents
Preface
Intended Audience . . . . . . . . . . . . . . . . . . . . . . . . . . . . . . . . . . . . . . . . . . . .
Related Materials . . . . . . . . . . . . . . . . . . . . . . . . . . . . . . . . . . . . . . . . . . . . .
What’s in This Guide . . . . . . . . . . . . . . . . . . . . . . . . . . . . . . . . . . . . . . . . . .
Documentation Conventions . . . . . . . . . . . . . . . . . . . . . . . . . . . . . . . . . . . .
HP Technical Support. . . . . . . . . . . . . . . . . . . . . . . . . . . . . . . . . . . . . . . . . .
HP Websites. . . . . . . . . . . . . . . . . . . . . . . . . . . . . . . . . . . . . . . . . . . . . . . . .
1
Getting Started
Terminology . . . . . . . . . . . . . . . . . . . . . . . . . . . . . . . . . . . . . . . . . . . . . . . . .
Relationship Between Application Data and Physical Storage. . . . . . . . . . .
LUN Access to a Server . . . . . . . . . . . . . . . . . . . . . . . . . . . . . . . . . . . . . . . .
General Steps for Data Migration . . . . . . . . . . . . . . . . . . . . . . . . . . . . . . . . .
2
vii
vii
vii
viii
ix
ix
1-1
1-2
1-2
1-3
Inventory Checklists
Step 1: List the Source and Destination Storage Array . . . . . . . . . . . . . . . .
2-2
Step 2: List the Servers Impacted by the Data Migration Project . . . . . . . . .
2-2
Step 3: List the Applications, Mount Points, and Paths to the Physical Devices 2-3
Step 4: List and Create LUN ID Mappings . . . . . . . . . . . . . . . . . . . . . . . . . .
2-3
Step 5: List and Create Fibre Channel Zoning . . . . . . . . . . . . . . . . . . . . . . .
2-4
3
Performance and Downtime
Optimizing Performance During Data Migration. . . . . . . . . . . . . . . . . . . . . .
Minimizing Downtime . . . . . . . . . . . . . . . . . . . . . . . . . . . . . . . . . . . . . . . . . .
Before Application Downtime . . . . . . . . . . . . . . . . . . . . . . . . . . . . . . .
During Application Downtime . . . . . . . . . . . . . . . . . . . . . . . . . . . . . . .
Validating Integrity of the Data. . . . . . . . . . . . . . . . . . . . . . . . . . . . . . .
4
3-1
3-1
3-2
3-2
3-3
Operating Systems Dependencies
Windows OS. . . . . . . . . . . . . . . . . . . . . . . . . . . . . . . . . . . . . . . . . . . . . . . . .
UNIX OS (HP_UX, Linux, AIX, Solaris) . . . . . . . . . . . . . . . . . . . . . . . . . . . .
ISR654605-00 A
4-1
4-2
iii
Data Migration Service for HP StorageWorks MPX200
Planning Guide
A
Checklist Examples
Step 1: List the Source and Destination Storage Array . . . . . . . . . . . . . . . .
Step 2: List the Servers Impacted by the Data Migration Project . . . . . . . . .
Step 3: List Applications, Mount Points, and Paths to the Physical Device .
Step 4: List and Create LUN ID Mappings . . . . . . . . . . . . . . . . . . . . . . . . . .
Step 5: List and Create Fibre Channel Zoning . . . . . . . . . . . . . . . . . . . . . . .
B
A-1
A-2
A-2
A-3
A-3
Assigning LUNs to the MPX200 for Data Migration
Assigning LUNs from an MSA2012fc Array . . . . . . . . . . . . . . . . . . . . . . . . .
Assigning LUNs from an MSA1000/1500 Array . . . . . . . . . . . . . . . . . . . . . .
Assigning LUNs from an HDS Array . . . . . . . . . . . . . . . . . . . . . . . . . . . . . .
Assigning LUNs from an IBM DS4K/DS5K/LSI Array . . . . . . . . . . . . . . . . .
Assigning LUNs from an EVA 4/6/8000 Series Array. . . . . . . . . . . . . . . . . .
Assigning LUNs from an EMC CLARiiON Array . . . . . . . . . . . . . . . . . . . . .
B-1
B-4
B-7
B-12
B-16
B-20
List of Figures
i
B-1
B-2
B-3
B-4
B-5
B-6
B-7
B-8
B-9
B-10
B-11
B-12
B-13
B-14
B-15
B-16
B-17
B-18
B-19
B-20
B-21
B-22
B-23
B-24
B-25
iv
Jagged Edged Screen Shot Depicting Partial Interface . . . . . . . . . . . . . . . . . . . . . .
Viewing the Storage Management Utility . . . . . . . . . . . . . . . . . . . . . . . . . . . . . . . . .
Viewing WWPNs in Storage Management Utility . . . . . . . . . . . . . . . . . . . . . . . . . . .
Selecting LUNs in Storage Management Utility . . . . . . . . . . . . . . . . . . . . . . . . . . . .
Configure Available Device(s) . . . . . . . . . . . . . . . . . . . . . . . . . . . . . . . . . . . . . . . . .
Entering a Connection Name . . . . . . . . . . . . . . . . . . . . . . . . . . . . . . . . . . . . . . . . . .
Selecting the Host Mode . . . . . . . . . . . . . . . . . . . . . . . . . . . . . . . . . . . . . . . . . . . . .
Selecting LUNs . . . . . . . . . . . . . . . . . . . . . . . . . . . . . . . . . . . . . . . . . . . . . . . . . . . .
Changing to Management Mode . . . . . . . . . . . . . . . . . . . . . . . . . . . . . . . . . . . . . . .
Selecting a Port for New Host Group . . . . . . . . . . . . . . . . . . . . . . . . . . . . . . . . . . . .
Selecting DM-Host Nodes . . . . . . . . . . . . . . . . . . . . . . . . . . . . . . . . . . . . . . . . . . . .
Array System Viewer . . . . . . . . . . . . . . . . . . . . . . . . . . . . . . . . . . . . . . . . . . . . . . . .
Modifying Mapping . . . . . . . . . . . . . . . . . . . . . . . . . . . . . . . . . . . . . . . . . . . . . . . . . .
Selecting Host to Define. . . . . . . . . . . . . . . . . . . . . . . . . . . . . . . . . . . . . . . . . . . . . .
Defining the Host . . . . . . . . . . . . . . . . . . . . . . . . . . . . . . . . . . . . . . . . . . . . . . . . . . .
Selecting Host Operating System . . . . . . . . . . . . . . . . . . . . . . . . . . . . . . . . . . . . . .
Defining Additional Mapping . . . . . . . . . . . . . . . . . . . . . . . . . . . . . . . . . . . . . . . . . .
Opening Command View EVA . . . . . . . . . . . . . . . . . . . . . . . . . . . . . . . . . . . . . . . . .
Adding a Host. . . . . . . . . . . . . . . . . . . . . . . . . . . . . . . . . . . . . . . . . . . . . . . . . . . . . .
Adding a Second Host Port . . . . . . . . . . . . . . . . . . . . . . . . . . . . . . . . . . . . . . . . . . .
Presenting Vdisks . . . . . . . . . . . . . . . . . . . . . . . . . . . . . . . . . . . . . . . . . . . . . . . . . .
Viewing Enterprise Storage . . . . . . . . . . . . . . . . . . . . . . . . . . . . . . . . . . . . . . . . . . .
Registering Initiator Record . . . . . . . . . . . . . . . . . . . . . . . . . . . . . . . . . . . . . . . . . . .
Creating Storage Group . . . . . . . . . . . . . . . . . . . . . . . . . . . . . . . . . . . . . . . . . . . . . .
Adding DM-Host to Storage Group . . . . . . . . . . . . . . . . . . . . . . . . . . . . . . . . . . . . .
Adding LUNs to DM-Host. . . . . . . . . . . . . . . . . . . . . . . . . . . . . . . . . . . . . . . . . . . . .
ix
B-2
B-3
B-4
B-5
B-6
B-6
B-7
B-8
B-9
B-10
B-11
B-12
B-13
B-14
B-15
B-16
B-17
B-18
B-19
B-20
B-21
B-22
B-23
B-24
B-25
ISR654605-00 A
Data Migration Service for HP StorageWorks MPX200
Planning Guide
List of Tables
Table
2-1
2-2
2-3
2-4
2-5
2-6
A-1
A-2
A-3
A-4
A-5
A-6
A-7
Storage Array Information . . . . . . . . . . . . . . . . . . . . . . . . . . . . . . . . . . . . . . . . . . . .
Server Information . . . . . . . . . . . . . . . . . . . . . . . . . . . . . . . . . . . . . . . . . . . . . . . . . .
Physical Device Information. . . . . . . . . . . . . . . . . . . . . . . . . . . . . . . . . . . . . . . . . . .
LUN ID Mappings. . . . . . . . . . . . . . . . . . . . . . . . . . . . . . . . . . . . . . . . . . . . . . . . . . .
Pre-Migration Fibre Channel Zoning Information . . . . . . . . . . . . . . . . . . . . . . . . . . .
Post-Migration Fibre Channel Zoning Information . . . . . . . . . . . . . . . . . . . . . . . . . .
Example: Storage Array Information . . . . . . . . . . . . . . . . . . . . . . . . . . . . . . . . . . . .
Example: Server Information . . . . . . . . . . . . . . . . . . . . . . . . . . . . . . . . . . . . . . . . . .
Example: Physical Device Information. . . . . . . . . . . . . . . . . . . . . . . . . . . . . . . . . . .
Example: LUN ID Mappings. . . . . . . . . . . . . . . . . . . . . . . . . . . . . . . . . . . . . . . . . . .
Example A: Pre-Migration Fibre Channel Zoning Information . . . . . . . . . . . . . . . . .
Example B: Pre-Migration Fibre Channel Zoning Information . . . . . . . . . . . . . . . . .
Example: Post-Migration Fibre Channel Zoning Information . . . . . . . . . . . . . . . . . .
ISR654605-00 A
Page
2-2
2-2
2-3
2-3
2-4
2-4
A-1
A-2
A-2
A-3
A-4
A-4
A-5
v
Data Migration Service for HP StorageWorks MPX200
Planning Guide
Notes
vi
ISR654605-00 A
Preface
The Data Migration Service for HP StorageWorks MPX200 Planning Guide
provides end-to-end “best practices” for using HP StorageWorks MPX200 data
migration service. MPX200-based data migration service migrates the data at
block level. Successful data migration means the application is able to access the
same data after the data is migrated to a new logical unit number (LUN). Proper
planning for data migration reduces downtime and creates first-pass success.
Intended Audience
This guide is intended for administrators planing to implement data migration
projects. The administrator should be familiar with SAN and storage management.
Related Materials
For more information, refer to the Data Migration Service for HP StorageWorks
MPX200 User’s Guide.
What’s in This Guide
This preface provides a general overview of data migration service and covers the
intended audience, related materials, document conventions, and contact
information for technical support.
The remainder of this guide is organized into the following chapters and
appendices:
Chapter 1 Getting Started defines some data migration terms, provides
basic understanding of the planning process, and helps you to associate the
new data LUN (destination LUN) back to the application.
Chapter 2 Inventory Checklists outlines the details you must incorporate for
data migration planning.
Chapter 3 Performance and Downtime describes methods for optimizing
data migration performance and minimizing downtime using the MPX200.
Chapter 4 Operating Systems Dependencies provides some specific
information on operating system dependencies.
ISR654605-00 A
vii
Preface
Documentation Conventions
Appendix A Checklist Examples provides some examples of completed data
migration checklists.
Appendix B Assigning LUNs to the MPX200 for Data Migration provides
specific steps for data migration using various storage array management
tools.
In addition, following the appendices is an index to help you quickly locate the
information you need.
Documentation Conventions
This guide uses the following documentation conventions:
NOTE: provides additional information.
CAUTION! indicates the presence of a hazard that has the potential of
causing damage to data or equipment.
Text in blue font indicates a hyperlink (jump) to a figure, table, or section in
this guide. Links to Web sites are shown in underlined blue. For example:
viii
Table 9-2 lists problems related to the user interface and remote
agent.
See “Installation Checklist” on page 3-6.
For more information, visit www.qlogic.com.
Text in bold font indicates user interface elements such as a menu items,
buttons, check boxes, or column headings. For example:
Click the Start button, point to Programs, point to Accessories, and
then click Command Prompt.
Under Notification Options, select the Warning Alarms check box.
Text in Courier font indicates a file name, directory path, or command line
text. For example:
To return to the root directory from anywhere in the file structure:
Type cd /root, and then press ENTER.
Enter the following command: sh ./install.bin
Key names and key strokes are indicated with UPPERCASE:
Press CTRL+P.
Press the UP ARROW key.
ISR654605-00 A
Preface
HP Technical Support
Text in italics indicates terms, emphasis, variables, or document titles. For
example:
For a complete listing of license agreements, refer to the QLogic
Software End User License Agreement.
What are shortcut keys?
To enter the date type mm/dd/yyyy (where mm is the month, dd is the
day, and yyyy is the year).
Titles between quotation marks identify related sections within this guide.
Screen shots that depict only the portion of the interface currently under
discussion are shown with jagged edges. For example:
Figure i Jagged Edged Screen Shot Depicting Partial Interface
HP Technical Support
Telephone numbers for worldwide technical support are listed on the HP support
website:
http://www.hp.com/support/
Collect the following information before calling:
Technical support registration number (if applicable)
Product serial numbers
Product model names and numbers
Error messages
Operating system type and revision level
Detailed questions
For continuous quality improvement, calls may be recorded or monitored.
HP Websites
For additional information, see the following HP websites:
ISR654605-00 A
http://www.hp.com
http://www.hp.com/go/storage
ix
Preface
HP Websites
x
http://www.hp.com/support
http://www.docs.hp.com
http://www.hp.com/go/mpx200
ISR654605-00 A
1
Getting Started
In a typical storage area network (SAN), the storage array serves one or more
servers. When data is migrated from a source LUN to a destination LUN on a
different storage array or the same storage array, it is important to understand:
Which applications and servers (or cluster) are affected?
How is application data related to a physical storage?
How does the server access old and new physical storage?
A single blade of the MPX200 can deliver up to 4TB/hr. migration rate. Following
the suggestions outlined in this guide may allow you to perform most migration
jobs using simple offline migration, while meeting application downtime
requirements. Thus, it removes the complexity of performing online data migration
using other data migration tools.
Terminology
This guide uses the following terms:
Mount point: A node or a directory where application data is stored.
Volume: A single, logical presentation of one or more physical disks.
Physical disk. The raw disk device discovered and configured in the
operating system. The object represented in the operating system is usually
associated to a LUN on a storage array.
Multi-pathing software. The LUN may be accessed through multiple ports
on a storage array. Each port of a storage array may be accessed through
multiple ports (adapters) in the server. Multi-pathing software in the host
manages the multiple paths to a LUN.
ISR654605-00 A
1-1
1–Getting Started
Relationship Between Application Data and Physical Storage
Relationship Between Application Data and
Physical Storage
Successful data migration requires that you understand the relationship between
the application data and the physical device (LUN).
NOTE:
UNIX operating system in this discussion refers to HP-UX, Linux, Solaris,
and AIX.
Typically, the application accesses the data using a mount point. For example:
The Windows SharePoint application accesses its data through a mount
point F:\Sharepoint.
The Oracle application running on a HP-UX (UNIX) host accesses its data
through a mount point /home/oracle.
The Apache Web Server application on a Linux (UNIX) host access its data
through a mount point /data/webinfo.
Typically, you create a mount point on a volume. On Windows, volume refers to a
drive letter (for example, D:\ or F:\). On UNIX operating systems, a mount point
may be on a volume managed by a logical volume manager (Veritas or native), or
a mount point may be directly on raw device (/dev/rdsk/c0t1d4).
You can create a volume either on a single physical disk or on multiple physical
disks. For example, in Windows, drive letter F:\ may span multiple physical disks
(Disk2, Disk3, and so on). On UNIX, a Veritas Volume Manager may have a
volume /dev/vg-1/vol1 created on three physical disks:
/dev/rdsk/c0t1d2, /dev/rdsk/c0t1d3, and /dev/rdsk/c0t1d4.
The physical disk or a raw device is associated with a LUN. For example, in
Windows, Disk2 is LUN 5 on a storage array and Disk3 is LUN 6 on a storage
array. In UNIX, /dev/rdsk/c0t1d2 is LUN 2 on a storage array and
/dev/rdsk/c0t1d3 is LUN 3 on a storage array.
LUN Access to a Server
Multi-pathing software installed on the server typically manages multi-paths to a
LUN. In a typical SAN:
1-2
A single storage array serves multiple servers and provides controlled
access to the LUN, often referred as LUN presentation.
Multiple servers and storage arrays are present. Server access to a storage
array is often controlled by name server zoning.
ISR654605-00 A
1–Getting Started
General Steps for Data Migration
General Steps for Data Migration
To perform a successful data migration, follow these recommended steps:
1.
Create a data migration checklist. Chapter 2 Inventory Checklists provides
an explanation of each of the checklists, and Appendix A Checklist
Examples shows examples of completed checklists for a specific data
migration scenario.
To obtain the template for the checklists, go to QLogic’s HP OEM Solutions
Web page:
http://qlogic.com/OEMSolutions/Pages/OEMHP.aspx
2.
Configure the MPX200 for migration. For detailed instructions, see the Data
Migration forHP StorageWorks MPX200 User’s Guide, “Using DMS”
chapter, and the recommendations in the “Performance” chapter.
3.
Migrate the data.
4.
Adjust the Fibre Channel zoning in the Fibre Channel switches, and then
update the LUN presentation from the destination storage array to the
server.
5.
After data is migrated from one storage to another storage, do the following:
6.
ISR654605-00 A
Update the multi-pathing software on the server, if necessary.
Adjust the mount point for the volume, if necessary. In most cases,
volumes are automatically discovered under Windows and UNIX
(HP-UX, Linux, Solaris) systems configured with logical volume
managers. For details, see Appendix B Assigning LUNs to the
MPX200 for Data Migration
For record keeping, save the migration logs.
1-3
1–Getting Started
General Steps for Data Migration
Notes
1-4
ISR654605-00 A
2
Inventory Checklists
Data migration checklists help you take inventory of all items affected by a data
migration project. This chapter provides a list of servers and applications, and
defines relationships of application data to LUNs and how LUNs are accessed
through the server. The migration checklists will also help you identify the changes
you may need to make to the server after migration.
The tables in this chapter are designed to take proper inventory used for planning
data migration, including:
Step 1: List the Source and Destination Storage Array
Step 2: List the Servers Impacted by the Data Migration Project
Step 3: List the Applications, Mount Points, and Paths to the Physical
Devices
Step 4: List and Create LUN ID Mappings
Step 5: List and Create Fibre Channel Zoning
ISR654605-00 A
2-1
2–Inventory Checklists
Step 1: List the Source and Destination Storage Array
Step 1: List the Source and Destination Storage
Array
The information requested in Table 2-1 can be retrieved from the storage
administrator in the data center.
Table 2-1. Storage Array Information
Storage
Array
Source/
Destination
Firmware
Version
Array
Number
Management of Controllers
Software a
WWPN b (Fibre
Channel)
Table Notes
a
The storage array specific software that is used in data migration to present the source LUNs to the MPX200, and to
create destination LUNs to be presented to the MPX200 and to the server. The array management software also
provides the controller and WWPN information for the storage array ports.
b
World wide port name of the Fibre Channel array; used in performing zoning in Fibre Channel switch firmware.
Step 2: List the Servers Impacted by the Data
Migration Project
The information requested in Table 2-2 can be retrieved by the server
administrator(s). You may need to install new multi-pathing software when
changing the class of an array or changing the array vendor. You may need to
upgrade existing software for the same class of array.
Table 2-2. Server Information
Server
2-2
Operating
System and
Version
IP Address
Multi-Pathing
Software for
Source Array
Logical
Volume
Manager
(if any)
Multi-Pathing
Software for
Destination
Array
ISR654605-00 A
2–Inventory Checklists
Step 3: List the Applications, Mount Points, and Paths to the Physical Devices
Step 3: List the Applications, Mount Points, and
Paths to the Physical Devices
The applications, mount points, and paths to the physical device requested in
Table 2-3 can be retrieved by the server administrator. For Windows OS or any
UNIX OS with a logical volume manager (LVM), the LUN ID association with the
server or application and volume is the most important because, in most cases,
the OS will automatically discover the relationship between the volume and the
migrated LUN(s) on a destination storage array.
Table 2-3. Physical Device Information
Server
Application
Mount Point
(if any)
Volume
Physical Disk or
Raw Device
Node
LUN ID
Step 4: List and Create LUN ID Mappings
Create a list of LUNs containing the size and mapping information that shows how
the LUNs are seen by the server and the MPX200, as shown in Table 2-4.
Although a specific LUN may be presented at a different LUN ID to a server other
than to MPX200, it is recommended that you use the same LUN ID, if possible.
This will be very helpful while creating new LUNs on a destination array, and while
presenting source and destination LUNs to MPX200 data migration service. For
operating systems other than Windows, it is highly recommended that source and
destination LUNs are the same size.
Table 2-4. LUN ID Mappings
Server
Source
LUN Seen
by the
Server as
LUN ID
ISR654605-00 A
Volume
ID,
Source
Array
Capacity
Source LUN
Presented to
MPX200 as LUN
ID and MPX200
VP Group
Destination LUN
Presented to
MPX200 as LUN
ID and MPX200
VP Group
VP
Group
VP
Group
LUN ID
Destination
LUN
Presented
to Server
as LUN ID
Capacity
LUN ID
2-3
2–Inventory Checklists
Step 5: List and Create Fibre Channel Zoning
Table Notes
You should complete the information for the source and destination LUN during the planning phase of data migration.
Determine the unique volume ID for the source storage array to make it easier to refer to the LUN, because sometimes
on large arrays, different LUNs with the same LUN ID are presented to different hosts.
Each MPX200 has up to four virtual port groups (VP Groups), each of which can be seen by an array as a different
host entity. You can expose the different LUNs as the same LUN ID on each VP Group, enabling you to maintain the
same LUN ID exposure to both the host and the MPX200.
Step 5: List and Create Fibre Channel Zoning
For a Fibre Channel SAN, create a list of fabric zones that contain the WWPN
associated with servers, storage arrays (source and destination) and MPX200, as
shown in Table 2-5. The destination array should be zoned in only with the
MPX200 before migration. After migration, the destination arrays should be zoned
in with servers, as shown in Table 2-6.
Table 2-5. Pre-Migration Fibre Channel Zoning Information
FC Switch and
IP Address
FC Zone Name
Zone Members (WWPNs)
Server, MPX200,
Storage Name
Table 2-6. Post-Migration Fibre Channel Zoning Information
FC Switch and
IP Address
2-4
FC Zone Name
Zone Members (WWPNs)
Server, MPX200,
Storage Name
ISR654605-00 A
3
Performance and Downtime
This chapter provides recommendations designed to improve performance and
minimize downtime during data migration.
Optimizing Performance During Data Migration
The MPX200 detects the multiple paths of a specified LUN and performs load
balancing using active optimized paths. To get the best performance, QLogic
highly recommends that LUNs for the source array and destination array are
balanced across both controllers. One set of LUNs shows active optimized paths
on one controller, while another set of LUNs shows active optimized paths on a
different controller.
Where high availability (HA) configuration as redundant SAN is deployed, QLogic
highly recommends the following:
Connect one Fibre Channel port from the MPX200 blade to one SAN, and
connect the other port to the redundant SAN.
Connect Fibre Channel ports from the destination array to both SANs.
Maximize array performance by simultaneously running 4 to 8 active jobs on
a single array. The MPX200 can perform up to 32 active migrations jobs
(255 configured) per array.
Balance across two controllers the LUNs used in migration jobs that run
simultaneously.
Minimizing Downtime
The MPX200's ability to deliver a migration rate of 4TB/hr. per blade—combined
with seamless integration of the MPX200 in the SAN and data protection features
such as array attributes (source/destination)—make it likely that the downtime
objective will be met by offline data migration. The following recommendations will
simplify the data migration project:
Configure all migration jobs in the MPX200 before application downtime
begins.
Deploy dual blade configuration in the MPX200 to achieve up to 8TB/hr. (for
storage arrays that are capable of delivering such performance).
ISR654605-00 A
3-1
3–Performance and Downtime
Minimizing Downtime
Before Application Downtime
Before application downtime, follow these steps:
1.
Plan the data migration project:
a.
Create the migration checklist.
b.
Determine if a change in multi-pathing software is required.
c.
Build the LUN ID table for both the source and destination array to
establish the LUN ID relationship between the server and the MPX200.
d.
Plan to migrate together the LUNs from the same server/cluster.
2.
Configure the MPX200 in the SAN: Perform proper zoning such that the
MPX200 can see ports from both the source and destination arrays.
3.
Create the LUNs on the destination array:
For the UNIX operating system, use the same size LUNs.
For Windows operating systems, you may create a larger LUN.
Do not present LUNs from the destination array to the server until migration
is complete.
4.
Based on the order in which LUNs should be migrated, balance the LUNs
across multiple controllers of the same array.
5.
Present the source LUNs and destination LUNs to the MPX200.
6.
Using the MPX200 user interface, assign appropriate (source/destination)
attributes to the storage array.
7.
Using the MPX200, create user-defined groups to assign the migration jobs
related to the same server in a single group.
8.
Using the user interface wizard, configure migration jobs.
During Application Downtime
During application downtime, follow these steps:
3-2
1.
Confirm with the storage administrator that the application and server are
down, and that the server no longer has access to the storage under
migration.
2.
Remove the server access to the source storage array.by changing the Fibre
Channel zoning such that server adapter ports can no longer see the source
or destination array ports.
3.
Start the previously configured migration jobs.
4.
If required, install the new multi-pathing software on the server.
ISR654605-00 A
3–Performance and Downtime
Minimizing Downtime
5.
After the data is migrated for the specified server or cluster, present the
destination LUNs to the server or cluster by changing the fabric zoning and
LUN presentation from the array.
6.
Reboot the server, and then validate that the new LUNs are seen by the
system and that the volumes are mounted on the destination LUNs.
Validating Integrity of the Data
If there is a file system on the LUN, perform a quick file system check by bringing
up the application and confirming access to the data.
ISR654605-00 A
3-3
3–Performance and Downtime
Minimizing Downtime
Notes
3-4
ISR654605-00 A
4
Operating Systems
Dependencies
If the source array type is different from the destination array type, you may need
to install the new multi-pathing software associated with the destination array.
CAUTION!
Do not expose the destination LUNs to a server until the data migration is
complete and server access to the source LUN is removed.
Windows OS
Migrating data for Windows servers is not difficult. Windows offers two types of
disks: basic disks and dynamic disks. In most cases, Windows will discover the
migrated volumes whenever migrated LUNs are seen by the server.
Take the following precautions:
Do not create new drive letters while data migration is in process.
Ensure that the destination LUN size is equal or greater than the source
LUN size.
NOTE:
A dynamic disk may appear in an offline state.after migration and even after
presenting the new LUN to the server. To bring the disk to an online state:
1. In the Device Manager, right-click the disk.
2. Depending on the Windows OS version, click either Import Foreign Disk or Reactivate Disk.
When all dynamic disks are brought back online, the volume will be mounted
for application access.
ISR654605-00 A
4-1
4–Operating Systems Dependencies
UNIX OS (HP_UX, Linux, AIX, Solaris)
UNIX OS (HP_UX, Linux, AIX, Solaris)
On UNIX operating systems—HP_UX, Linux, AIX, and Solaris—If volumes are
managed through logical volume managers, follow these general guidelines:
Export the volume before migration begins.
Import the volume after migration is complete and destination LUNs are
presented to the server.
If volumes are not managed through a logical volume manager in the system, it is
very important to follow the pre-migration checklists to identify the physical device
node(s) (/dev/rdsk/c0t1d1) on which the volume is mounted. After data
migration, the physical device node may change. Change the volume mount such
that it now it points to the new physical device (dev/rdsk/c0t2d5).
To discover current active mount points, issue the mount command on the
system console.
Some applications, such as the Oracle Cluster File system (OCFS) may directly
use the raw devices. Consult the system administrator. OCFS may automatically
discover the migrated devices. Follow the procedure listed in OCFS manual.
In addition, QLogic recommends that the destination LUN size is equal to the
source LUN size. Expand the destination LUN after the migration is complete and
the migrated volume is remounted.
If you are running Veritas Volume Manager on any of the UNIX operating
systems, the destination LUN size must be greater than the source LUN size.
4-2
ISR654605-00 A
A
Checklist Examples
This appendix provides examples of completed data migration checklists. These
examples depict a scenario where a customer is upgrading from an old EMC
CX3-20 storage array to a new HP EVA 4400 storage array. Three applications
and servers are using the CX3-20 array. Each of these three servers has a
different operating system. The information shown with bold text in these tables
represents changes from the existing configuration.
Step 1: List the Source and Destination Storage
Array
Table A-1. Example: Storage Array Information
Storage
Array
Source or
Destination
EMC CX3-20
Source
Firmware
Version
03.24.040.5.0
06
Array
Number
Management of Controllers
Softwarea
Navisphere
2
WWPNb (Fibre
Channel)
50-06-01-60-41-e0-18-94
50-06-01-61-41-e0-18-94
50-06-01-62-41-e0-18-94
50-06-01-63-41-e0-18-94
HP EVA
4400
Destination
CR0D63xc3
p-6000
Command
View
2
50-00-1F-E1-50-06-22-A1
50-00-1F-E1-50-06-22-A2
50-00-1F-E1-50-06-22-A2
50-00-1F-E1-50-06-22-A3
50-00-1F-E1-50-06-22-A4
Table Notes
a
The storage array specific software that will be used in data migration to present the source LUNs to the MPX200, and
to create destination LUNs to be presented to the MPX200 and to the server. The array management software will
also provide the controller and WWPN information for the storage array ports.
b
World wide port name of the Fibre Channel array; used in performing zoning in Fibre Channel switch firmware.
ISR654605-00 A
A-1
A–Checklist Examples
Step 2: List the Servers Impacted by the Data Migration Project
Step 2: List the Servers Impacted by the Data
Migration Project
Table A-2 shows an example of the server information that can be retrieved by
server administrator(s)
Table A-2. Example: Server Information
Server
Operating
System and
Version
IP Address
Multi-Pathing
Software for
Source Array
Logical
Volume
Manager
(if any)
Multi-Pathing
Software for
Destination
Array
HR-Dept
Windows SP2
10.3.3.1
EMC PowerPath for
Windows
N/A
MPIO DSM for
EVA
iPortal
SUSE 10
10.4.3.2
EMC PowerPath for Linux
None
Device
Mapper
Sales
HP-UX 11.3
10.4.3.3
EMC PowerPath for HP-UX
Veritas
Secure Path
for HP-UX
Step 3: List Applications, Mount Points, and
Paths to the Physical Device
Table A-3 shows an example of the applications, mount points, and path to the
physical device, which can be retrieved from the server administrator.
Table A-3. Example: Physical Device Information
Server
Application
Mount Point
(if any)
Volume
Physical Disk or
Raw Device
Node
LUN ID
HR-Dept
Sharepoint
F:\Sharepoint
F:\
Disk2, Disk3
(Dynamic Disks)
2, 3
iPortal
Apache Web
Server
/data/webinfo
/dev/sdb
/dev/sdb
2
Sales
Oracle
/home/oracle
/dev/vg-2/
vol2
/dev/rdsk/
c0t1d5
5, 6, 7
/dev/rdsk/
c0t1d6
/dev/rdsk/
c0t1d7
A-2
ISR654605-00 A
A–Checklist Examples
Step 4: List and Create LUN ID Mappings
Step 4: List and Create LUN ID Mappings
Table A-4 shows that a different LUN from a storage array is presented as the
same LUN ID (2) on two different servers (HR-Dept, iPortal).
Table A-4. Example: LUN ID Mappings
Server
HR-Dept
Source
LUN Seen
by the
Server as
LUN ID
Volume
ID,
Source
Array
Capacity
Source LUN
Presented to
MPX200 as LUN
ID and MPX200
VP Group
Destination LUN
Presented to
MPX200 as LUN
ID and MPX200
VP Group
VP
Group
LUN ID
VP
Group
LUN ID
Destination
LUN
Presented
to Server
as LUN ID
Capacity
2
1
100GB
0
2
0
2
2
200GB
3
2
250GB
0
3
0
3
3
500GB
iPortal
2
3
250GB
1
2
1
2
2
250GB
Sales
5
4
300GB
0
5
0
5
5
300GB
6
5
300GB
0
6
0
6
6
300GB
7
6
300GB
0
7
0
7
7
300Gb
Step 5: List and Create Fibre Channel Zoning
In Table A-5, we assume that it is a redundant configuration, meaning there are:
ISR654605-00 A
Two Fibre Channel switches
Multiple servers, each with two adapter ports
One storage array with two controllers
Four ports per controller.
A-3
A–Checklist Examples
Step 5: List and Create Fibre Channel Zoning
Table A-5. Example A: Pre-Migration Fibre Channel Zoning Information
FC Switch and
IP Address
FC-SW-1
FC Zone Name
Zone-A
10.5.3.1
FC-SW-2
Zone-B
10.5.3.2
Zone Members (WWPNs)
Server, MPX200,
Storage Name
21-00-00-C0-DD-C0-8A-D7
HR-Dept: P1
21-00-00-C0-DD-C0-55-57
iPortal: P1
21-00-00-C0-DD-C0-60-66
Sales: P1
50-06-01-60-41-E0-18-94
SRC-Array-ABC: P1
50-06-01-62-41-E0-18-94
SRC-Array-ABC: P3
21-00-00-C0-DD-C0-8A-D8
HR-Dept: P2
21-00-00-C0-DD-C0-55-58
iPortal: P2
21-00-00-C0-DD-C0-60-67
Sales: P2
50-06-01-61-41-E0-18-94
SRC-Array-ABC: P2
50-06-01-63-41-E0-18-94
SRC-Array-ABC: P4
Table A-6 shows new Fibre Channel zones information to configure MPX200 for
data migration and to migrate the data. The MPX200 Fibre Channel ports are
configured with source and destination arrays.
Table A-6. Example B: Pre-Migration Fibre Channel Zoning Information
FC Switch and
IP Address
FC-SW-1
FC Zone Name
Zone-A-DM
10.5.3.1
FC-SW-1
10.5.3.2
A-4
Zone-B-DM
Zone Members (WWPNs)
Server, MPX200,
Storage Name
21-00-00-C0-DD-C0-88-81
MPX200, FC1
50-06-01-60-41-E0-18-94
SRC-Array-ABC: P1
50-06-01-62-41-E0-18-94
SRC-Array-ABC: P3
50-00-1F-E1-50-06-22-A1
DEST-Array-XYZ: P1
50-00-1F-E1-50-06-22-A2
DEST-Array-XYZ: P3
21-00-00-C0-DD-C0-88-82
MPX200: FC2
50-06-01-61-41-E0-18-94
SRC-Array-ABC: P2
50-06-01-63-41-E0-18-94
SRC-Array-ABC: P4
50-00-1F-E1-50-06-22-A8
DEST-Array-XYZ: P2
50-00-1F-E1-50-06-22-A9
DEST-Array-XYZ: P4
ISR654605-00 A
A–Checklist Examples
Step 5: List and Create Fibre Channel Zoning
Table A-7 shows an example of post-migration Fibre Channel zoning information:
Table A-7. Example: Post-Migration Fibre Channel Zoning Information
FC Switch and
IP Address
FC-SW-1/10.5.3.1
FC-SW-2/10.5.3.2
ISR654605-00 A
FC Zone Name
Zone-A
Zone-B
Zone Members (WWPNs)
Server, MPX200,
Storage Name
21-00-00-C0-DD-C0-8A-D7
HR-Dept: P1
21-00-00-C0-DD-C0-55-57
iPortal: P1
21-00-00-C0-DD-C0-60-66
Sales: P1
50-00-1F-E1-50-06-22-A1
DEST-Array-XYZ: P1
50-00-1F-E1-50-06-22-A2
DEST-Array-XYZ: P3
21-00-00-C0-DD-C0-8A-D8
HR-Dept: P2
21-00-00-C0-DD-C0-55-58
iPortal: P2
21-00-00-C0-DD-C0-60-67
Sales: P2
50-00-1F-E1-50-06-22-A8
DEST-Array-XYZ: P2
50-00-1F-E1-50-06-22-A9
DEST-Array-XYZ: P4
A-5
A–Checklist Examples
Step 5: List and Create Fibre Channel Zoning
Notes
A-6
ISR654605-00 A
B
Assigning LUNs to the
MPX200 for Data Migration
For successful completion of data migration, you must assign source and
destination LUNs to the MPX200 using storage array management tools. The
MPX200 appears as a host to the array controller. This appendix provides
procedures for using some of the array management tools to assign LUNs,
including:
Assigning LUNs from an MSA2012fc Array
“Assigning LUNs from an MSA1000/1500 Array” on page B-4
“Assigning LUNs from an HDS Array” on page B-7
“Assigning LUNs from an IBM DS4K/DS5K/LSI Array” on page B-12
“Assigning LUNs from an EVA 4/6/8000 Series Array” on page B-16
“Assigning LUNs from an EMC CLARiiON Array” on page B-20
Assigning LUNs from an MSA2012fc Array
Storage Vendor
HP
Array Model
MSA2012fc arrays
LUN Assignment Tool
Storage Management Utility user interface
To assign LUNs:
1.
ISR654605-00 A
Perform zoning as follows:
a.
Connect the Fibre Channel ports of the data migration appliance to a
switch where the storage controller ports are also logged.
b.
Using switch management tools, create a zone DM_Host_MSA2012,
and then add the WWPN of the data migration appliance Fibre
Channel ports and storage controller ports in this zone.
c.
Save the zoning information and activate the new zoning configuration.
B-1
B–Assigning LUNs to the MPX200 for Data Migration
Assigning LUNs from an MSA2012fc Array
2.
In Internet Explorer, open the Storage Management Utility using the IP
assigned to the storage controller.
3.
In the left pane, click Manage to open the management menu (see
Figure B-1).
Figure B-1 Viewing the Storage Management Utility
4.
In the left pane, click VOLUME MANAGEMENT, click volume mapping,
and then click manage host list.
Figure B-2 shows the WWPN of the data migration appliance in the right
pane.
B-2
ISR654605-00 A
B–Assigning LUNs to the MPX200 for Data Migration
Assigning LUNs from an MSA2012fc Array
Figure B-2 Viewing WWPNs in Storage Management Utility
5.
In the Manufacturer Nickname box, type DM-Host.
6.
To accept and save the changes, click Update.
7.
In the left pane, click VOLUME MANAGEMENT, click volume mapping,
and then click map hosts to volume.
8.
In the right pane, click the LUN to be assigned to the data migration
appliance (see Figure B-3).
ISR654605-00 A
B-3
B–Assigning LUNs to the MPX200 for Data Migration
Assigning LUNs from an MSA1000/1500 Array
Figure B-3 Selecting LUNs in Storage Management Utility
9.
In the Assign Host Access Privileges table, select the DM-Host in the
Host WWN - Name list, and then enter the appropriate, planned LUN ID.
10.
To accept and save the LUN assignment, click Map it.
11.
Refresh the data migration user interface to see if the LUN assignment is
reflected properly, and that the appropriate array entity appears under FC
Array. (You may need to click the Refresh button several times to correctly
reflect the changes.)
Assigning LUNs from an MSA1000/1500 Array
B-4
Storage Vendor
HP
Array Model
MSA 1000/1500 arrays
LUN Assignment Tool
Storage Navigator Modular user interface
ISR654605-00 A
B–Assigning LUNs to the MPX200 for Data Migration
Assigning LUNs from an MSA1000/1500 Array
To assign LUNs:
1.
2.
Perform zoning as follows:
a.
Connect the Fibre Channel ports of the data migration appliance to a
switch where the storage controller ports are also logged.
b.
Using switch management tools, create a zone DM_Host_MSA1000,
and then add the WWPN of the data migration appliance Fibre
Channel ports and storage controller ports in this zone.
c.
Save the zoning information and activate the new zoning configuration.
Open the Array Configuration Utility.
The Configure Available Device(s) window appears, as shown in Figure B-4.
Figure B-4 Configure Available Device(s)
3.
In the right pane under Common Tasks, click Selective Storage
Presentation, and then click Enable.
A list of the WWPNs seen by the MSA controller appears, as shown in
Figure B-5.
ISR654605-00 A
B-5
B–Assigning LUNs to the MPX200 for Data Migration
Assigning LUNs from an MSA1000/1500 Array
Figure B-5 Entering a Connection Name
4.
Enter DM-Host as the connection name for the data migration appliance
WWPN.
5.
From the list box, select Windows as the host mode value, as shown in
Figure B-6.
Figure B-6 Selecting the Host Mode
B-6
ISR654605-00 A
B–Assigning LUNs to the MPX200 for Data Migration
Assigning LUNs from an HDS Array
6.
Select the LUNs to be assigned to the DM-Host by checking the box
associated with the previously planned LUNs, as shown in Figure B-7.
Figure B-7 Selecting LUNs
7.
To accept and save the LUN assignment, click OK.
8.
Refresh the data migration user interface to see if the LUN assignment is
reflected properly, and that the appropriate array entity appears under FC
Array. (You may need to click the Refresh button several times to correctly
reflect the changes.)
Assigning LUNs from an HDS Array
Storage Vendor
HDS
Array Model
AMS/WMS series arrays
LUN Assignment Tool
Storage Navigator Modular user interface
To assign LUNs:
1.
Perform zoning as follows:
a.
Connect the Fibre Channel ports of the data migration appliance to a
switch where the storage controller ports are also logged.
b.
Using switch management tools, create a zone, DM_Host_HDS.
c.
In this zone, add the WWPN of the data migration appliance Fibre
Channel ports and storage controller ports.
d.
Save the zoning information and activate the new zoning configuration.
2.
Open the Storage Navigator Modular application. If you are using the tool for
the first time, you may have to discover the array using the IP assigned to
the storage controller.
3.
On the Tool menu, click Operation Mode > Change, and then change to
Management Mode.
ISR654605-00 A
B-7
B–Assigning LUNs to the MPX200 for Data Migration
Assigning LUNs from an HDS Array
Figure B-8 Changing to Management Mode
4.
Under Array Unit, double-click the name of the array to manage.
The Array System Viewer window opens.
B-8
5.
In the left pane, click the Logical Status tab.
6.
In the left pane, right-click the port of the array that has been zoned with the
data migration appliance, and then click Add New Host Group (see
Figure B-9).
ISR654605-00 A
B–Assigning LUNs to the MPX200 for Data Migration
Assigning LUNs from an HDS Array
Figure B-9 Selecting a Port for New Host Group
7.
In the Host Group dialog box, type DM-Host in the Name box, and then click
OK.
8.
In the Array System Viewer left pane under Host Groups, click the + sign
next to the port to expand the newly-created DM-Host group entity.
Three nodes are listed: Options, Logical Unit, and WWN, as shown in
Figure B-10.
ISR654605-00 A
B-9
B–Assigning LUNs to the MPX200 for Data Migration
Assigning LUNs from an HDS Array
Figure B-10 Selecting DM-Host Nodes
9.
In the left pane, click the Options node, and then at the bottom of the right
pane, click Simple Setting.
10.
Complete the Simple Setting dialog box as follows:
11.
B-10
a.
Next to Platform, select Windows2003.
b.
Keep the other settings as default.
c.
To save the changes, click OK.
In the Array System Viewer dialog box, under the DM-Host group, click the
WWN node. Then at the bottom of the right pane, click Modify WWN
Information (see Figure B-11).
ISR654605-00 A
B–Assigning LUNs to the MPX200 for Data Migration
Assigning LUNs from an HDS Array
Figure B-11 Array System Viewer
12.
Complete the Modify WWN Information dialog box as follows:
a.
Under Assignable WWN, click the WWN of the data migration
appliance.
b.
Click Add.
c.
To accept and save the WWN information, click OK.
13.
Under the DM-Host group, click the Logical Unit node. Then at the bottom
of the right pane, click Modify Mapping.
14.
Complete the Modify Mapping dialog box as follows (see Figure B-13):
ISR654605-00 A
a.
Under H-LUN / Available Logical Units, select an appropriate LUN.
b.
Click the
c.
To accept and save the LUN assignment, click OK.
(up arrow) to map the LUN to the DM-Host group.
B-11
B–Assigning LUNs to the MPX200 for Data Migration
Assigning LUNs from an IBM DS4K/DS5K/LSI Array
Figure B-12 Modifying Mapping
15.
Refresh the data migration user interface to see if the LUN assignment is
reflected properly, and that the appropriate array entity appears under FC
Array. You may have to reboot the data migration appliance or generate a
registered state change notification (RSCN) to initiate a full rescan on HDS
array, because it does not send any notification indicating changes in LUN
assignment to the logged in initiators.
Assigning LUNs from an IBM DS4K/DS5K/LSI
Array
Storage Vendor
IBM
Array Model
IBM DS4000/Engineo series arrays
LUN Assignment Tool
Storage Manager Client 1e
To assign LUNs:
1.
B-12
Perform zoning as follows:
a.
Connect the Fibre Channel ports of the data migration appliance to a
switch where the storage controller ports are also logged.
b.
Using switch management tools, create a zone, DM_Host_IBM.
ISR654605-00 A
B–Assigning LUNs to the MPX200 for Data Migration
Assigning LUNs from an IBM DS4K/DS5K/LSI Array
c.
In this zone, add the WWPN of the data migration appliance Fibre
Channel ports and storage controller ports.
d.
Save the zoning information and activate the new zoning configuration.
2.
Open the Storage Manager Client configuration utility, and then select the
array to manage.
3.
On the Subsystem Management window, in the left pane, click the
Mappings View tab.
4.
In the left pane, right-click Default Group, point to Define, and then click
Host. (see Figure B-13).
Figure B-13 Selecting Host to Define
5.
ISR654605-00 A
Complete the Define Host wizard as follows (see Figure B-14):
B-13
B–Assigning LUNs to the MPX200 for Data Migration
Assigning LUNs from an IBM DS4K/DS5K/LSI Array
Figure B-14 Defining the Host
B-14
a.
Under Specify name of host, type DM-Host as the name for the data
migration appliance.
b.
In the Known HBA host port identifiers box, click the WWPN of the
data migration appliance.
c.
Click Add to move the selected WWPN to the Selected HBA host
port identifiers/aliases box.
d.
Click Edit, and then in the Edit Identifier/Alias dialog box, type an alias
for the WWPN. Click OK to close the dialog box.
e.
Click Next.
f.
In the Specify Host Type window (see Figure B-15) under Host type
(operating system), click Windows 2000/Server 2003
Non-Clustered.
ISR654605-00 A
B–Assigning LUNs to the MPX200 for Data Migration
Assigning LUNs from an IBM DS4K/DS5K/LSI Array
Figure B-15 Selecting Host Operating System
g.
Click Next.
6.
On the Subsystem Management window, in the left pane’s Mapping View
page, click either Undefined Mappings or the host group/host that currently
has access to the LUNs that need to be part of data migration jobs.
7.
Select the LUNs to be assigned to the DM-Host by right-clicking the LUN in
the right pane, and then clicking Change Mappings.
8.
Complete the Define Additional Mapping dialog box as follows (see
Figure B-16):
ISR654605-00 A
a.
In the Host group or host box, click DM-Host.
b.
In the Logical unit number (LUN) (0 to 255) box, click the previously
planned LUN number.
c.
Under Logical Drive, click the appropriate logical drive.
d.
To accept and save the LUN assignment, click Add.
B-15
B–Assigning LUNs to the MPX200 for Data Migration
Assigning LUNs from an EVA 4/6/8000 Series Array
Figure B-16 Defining Additional Mapping
9.
Refresh the data migration user interface to see if the LUN assignment is
reflected properly, and that the appropriate array entity appears under FC
Array. (You may need to click the Refresh button several times to correctly
reflect the changes.)
Assigning LUNs from an EVA 4/6/8000 Series
Array
B-16
Storage Vendor
HP
Array Model
EVA 4/6/8000 series arrays
LUN Assignment Tool
Command View user interface
ISR654605-00 A
B–Assigning LUNs to the MPX200 for Data Migration
Assigning LUNs from an EVA 4/6/8000 Series Array
To assign LUNs:
1.
2.
Perform zoning as follows:
a.
Connect the Fibre Channel ports of the data migration appliance to a
switch where the storage controller ports are also logged.
b.
Using switch management tools, create a zone, DM_Host_EVA.
c.
In this zone, add the WWPN of the data migration appliance Fibre
Channel ports and storage controller ports.
d.
Save the zoning information and activate the new zoning configuration.
Open the Command View EVA application, as shown in Figure B-17.
Figure B-17 Opening Command View EVA
3.
In the left pane, double-click the array that you want to manage. This
expands the nodes under the selected array.
4.
In the left pane, click the Hosts node.
ISR654605-00 A
B-17
B–Assigning LUNs to the MPX200 for Data Migration
Assigning LUNs from an EVA 4/6/8000 Series Array
5.
Complete the Add a Host information in the right pane as follows (see
Figure B-18):
a.
Under Basic Settings in the Name box, type DM-Host.
b.
Under Port World Wide Name, click the WWN of the data migration
appliance.
c.
Under Operating System, click Microsoft Windows.
d.
Click the Add host button.
Figure B-18 Adding a Host
6.
B-18
If you have a multi-path configuration, add the second router port to the
DM-Host entity as follows (see Figure B-19):
a.
Under the Hosts tree in the left pane, click the DM-Host node.
b.
In the right pane, click the Ports tab.
c.
On the Add a Host Port page, select a WWN, and then click the Add
port button.
ISR654605-00 A
B–Assigning LUNs to the MPX200 for Data Migration
Assigning LUNs from an EVA 4/6/8000 Series Array
Figure B-19 Adding a Second Host Port
7.
ISR654605-00 A
Present virtual disks as follows (see Figure B-20):
a.
In the left pane, double-click the Virtual Disks node.
b.
Click the LUN that needs to be presented to the data migration
appliance for data migration.
c.
In the right pane, click the Presentation tab, and then click the
DM-Host.
d.
To accept and save the LUN assignment, click Present Vdisk.
B-19
B–Assigning LUNs to the MPX200 for Data Migration
Assigning LUNs from an EMC CLARiiON Array
Figure B-20 Presenting Vdisks
8.
Refresh the data migration user interface to see if the LUN assignment is
reflected properly, and that the appropriate array entity appears under FC
Array. (You may need to click the Refresh button several times to correctly
reflect the changes.)
Assigning LUNs from an EMC CLARiiON Array
Storage Vendor
EMC
Array Model
CLARiiON CX/AX series arrays
LUN Assignment Tool
Navisphere
To assign LUNs:
1.
B-20
Perform zoning as follows:
a.
Connect the Fibre Channel ports of the data migration appliance to a
switch where the storage controller ports are also logged.
b.
Using switch management tools, create a zone, DM_Host_EMC.
ISR654605-00 A
B–Assigning LUNs to the MPX200 for Data Migration
Assigning LUNs from an EMC CLARiiON Array
2.
c.
Add the WWPN of the data migration appliance Fibre Channel ports
and storage controller ports in this zone.
d.
Save the zoning information and activate the new zoning configuration.
Using Internet Explorer, open the Navisphere utility using the IP assigned to
the storage controller.
The Enterprise Storage dialog box opens, as shown in Figure B-21.
Figure B-21 Viewing Enterprise Storage
3.
Select the appropriate storage array, right-click the array name, and then
click Connectivity Status.
4.
Select the WWPN associated with the data migration appliance, and then
click Register.
ISR654605-00 A
B-21
B–Assigning LUNs to the MPX200 for Data Migration
Assigning LUNs from an EMC CLARiiON Array
5.
Complete the Register Initiator Record dialog box as follows (see
Figure B-22):
a.
In the Initiator Type box, click CLARIION Open.
b.
Under Host Information, type the values for Host Name and IP
Address.
c.
Click OK.
Figure B-22 Registering Initiator Record
6.
B-22
Create a storage group to add to the newly-registered DM-Host entity as
follows (see Figure B-23):
a.
In the Enterprise Storage window, Storage page, right-click the
Storage Groups node.
b.
Click Create Storage Group.
ISR654605-00 A
B–Assigning LUNs to the MPX200 for Data Migration
Assigning LUNs from an EMC CLARiiON Array
c.
In the Create Storage Group dialog box, type DM-Host as the Storage
Group Name.
d.
To save the changes, click either OK or Apply.
Figure B-23 Creating Storage Group
The new DM-Host storage group is listed under the Storage Groups tree in
the main window.
7.
ISR654605-00 A
Add the DM-Host host entity to the DM-Host storage group entity as follows
(see Figure B-24):
a.
Under the Storage Groups node, right-click DM-Host.
b.
Click Connect Hosts.
c.
In the DM-Host: Storage Group Properties dialog box, click the Hosts
tab.
d.
On the Hosts page under Available Hosts, select the DM-Host host
entity.
B-23
B–Assigning LUNs to the MPX200 for Data Migration
Assigning LUNs from an EMC CLARiiON Array
e.
Click the
(right arrow) button to move DM-Host to the right
pane’s Host to be Connected box.
f.
To save the changes, click either OK or Apply.
Figure B-24 Adding DM-Host to Storage Group
8.
B-24
Add LUNs to the DM-Host storage group entity as follows (see Figure B-25):
a.
Under the Storage Groups tree, right-click DM-Host.
b.
Click Select LUNs to view a list of available LUNs.
c.
In the DM-Host: Storage Group Properties dialog box, click the LUNs
tab.
d.
On the LUNs page, select All on the Show LUNs list to view all LUNs
that have been assigned to the host and will be part of the data
migration jobs.
e.
Under Available LUNs, select the check box next to each LUN to be
assigned for data migration jobs (as determined during the planning
phase of the data migration activity).
ISR654605-00 A
B–Assigning LUNs to the MPX200 for Data Migration
Assigning LUNs from an EMC CLARiiON Array
Figure B-25 Adding LUNs to DM-Host
9.
ISR654605-00 A
Refresh the data migration user interface to see if the LUN assignment is
reflected properly, and that the appropriate array entity appears under FC
Array. (You may need to click the Refresh button several times to correctly
reflect the changes.)
B-25
B–Assigning LUNs to the MPX200 for Data Migration
Assigning LUNs from an EMC CLARiiON Array
Notes
B-26
ISR654605-00 A
Index
A
access, LUN to server 1-2
active optimized paths, load balancing with
3-1
applications
downtime, minimizing 3-1
server, listing 2-3
arrays
assigning LUNs for data migration B-1
listing storage 2-2
management tools, assigning LUNs B-1
multi-pathing software for 2-2
assigning LUNs for data migration B-1
from EMC CLARiiON array B-20
from EVA 4/6/8000 series array B-16
from HDS array B-7
from IBM DS4K array B-12
from IBM DS5KL array B-12
from IBM LSI array B-12
from MSA2012fc array B-1
audience vii
creating
Fibre Channel zoning 2-4
LUN ID mappings 2-3
D
data migration
checklists, examples of A-1
checklists, inventory 2-1
general steps for 1-3
LUNs, assigning B-1
performance, improving 3-1
planning 2-1
data, validating integrity of 3-3
definitions of terms 1-1
dependencies, operating systems 4-1
destination arrays
listing 2-2
multi-pathing software for 2-2
destination LUNs, assigning B-1
downtime, minimizing 3-1
dual blade configuration, minimizing downtime
with 3-1
B
before you begin 1-1
C
checklists
examples of A-1
inventory 2-1
confirming access to data 3-3
controllers, balancing LUNs across 3-1
conventions viii
ISR654605-00 A
E
EMC CLARiiON array, assigning LUNs from
B-20
EVA 4/6/8000 series array, assigning LUNs
from B-16
examples of completed checklists A-1
Index-1
Data Migration Service for HP StorageWorks MPX200
Planning Guide
F
fabric zones, listing 2-4
Fibre Channel switches, listing 2-4
Fibre Channel zoning, listing 2-4
file system check, validating data 3-3
G
getting started 1-1
H
HDS array, assigning LUNs from B-7
HP technical support ix
HP websites ix
I
IBM DS4K array, assigning LUNs from B-12
IBM DS5K array
assigning LUNs from B-12
IBM LSI array, assigning LUNs from B-12
inventory checklists 2-1
LUN IDs
mappings, listing 2-3
server, listing for 2-3
LUNs
access to server 1-2
assigning for data migration B-1
controllers, balancing across 3-1
size recommendations 4-2
M
mappings
assigning using storage array management
tools B-1
LUN ID, listing and creating 2-3
migration logs, saving 1-3
minimizing downtime 3-1
mount points
creating 1-2
server, listing 2-3
MSA2012fc array, assigning LUNs from B-1
multi-pathing software
LUNs, managing paths to 1-2
OS dependencies 4-1
O
L
listing
destination storage array 2-2
Fibre Channel zoning 2-4
items affected by data migration 2-1
LUN ID mappings 2-3
physical device info for server 2-3
source storage array 2-2
load balancing for optimal performance 3-1
logical volume manager, listing for server 2-2
logical volume managers, OS dependencies
4-2
logs, migration, saving 1-3
Index-2
offline data migration, minimizing downtime
with 3-1
operating systems
dependencies with 4-1
server, listing 2-2
optimizing performance during data migration
3-1
Oracle Cluster File System, OS dependencies
4-2
P
performance (data migration), improving 3-1
physical devices, listing 2-3
physical disks (server), listing 2-3
ISR654605-00 A
Data Migration Service for HP StorageWorks MPX200
Planning Guide
planning data migration 2-1
post-migration Fibre Channel zoning 2-4
pre-migration Fibre Channel zoning 2-4
R
raw device node (server), listing 2-3
related materials vii
relationship between data and storage 1-2
S
saving data migration logs 1-3
servers
impacted by data migration, listing 2-2
LUN access to 1-2
physical device information, listing 2-3
source arrays
listing 2-2
multi-pathing software for 2-2
source LUNs, assigning B-1
storage arrays, See arrays
support, technical ix
U
UNIX OS dependencies 4-2
V
validating data integrity 3-3
Veritas Volume Manager, OS dependencies
4-2
volume (server), listing 2-3
W
websites, HP ix
Windows OS, dependencies with 4-1
WWPNs
listing for FC array 2-2
listing for zone members 2-4
Z
zone members, WWPNs for 2-4
zoning, Fibre Channel, listing and creating 2-4
T
technical support, contacting HP ix
terminology 1-1
ISR654605-00 A
Index-3
Corporate Headquarters QLogic Corporation 26650 Aliso Viejo Parkway
Aliso Viejo, CA 92656 949.389.6000
Europe Headquarters QLogic (UK) LTD. Quatro House Lyon Way, Frimley Camberley Surrey, GU16 7ER UK
www.qlogic.com
+44 (0) 1276 804 670
© 2009 QLogic Corporation. Specifications are subject to change without notice. All rights reserved worldwide. QLogic and the QLogic logo are
registered trademarks of QLogic Corporation. Apache is a trademark of The Apache Software Foundation. AIX is a registered trademark of International
Business Machines Corporation. EMC, CLARiiON, and PowerPath are registered trademarks of EMC Corporation. HP is a registered trademark of
Hewlett-Packard Company. Linux is a registered trademark of Linus Torvalds. Oracle is a registered trademark of Oracle Corporation. Solaris is a
registered trademark of Sun Microsystems, Inc. UNIX is a registered trademark of The Open Group. Veritas is a trademark of Symantec Corporation.
Windows and SharePoint are registered trademarks of Microsoft Corporation. All other brand and product names are trademarks or registered
trademarks of their respective owners. Information supplied by QLogic Corporation is believed to be accurate and reliable. QLogic Corporation
assumes no responsibility for any errors in this brochure. QLogic Corporation reserves the right, without notice, to make changes in product design
or specifications.