1
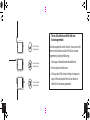
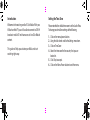
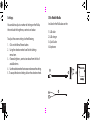
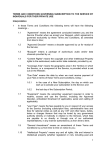
fold
™
HANDHELD TV
Quick Guide v1.2
fold
CONTENTS
2
Introduction
4
DStv Mobile Walka
5
Step 1: Familiarise yourself with the hardware
6
Step 2 : Charging your Walka
10
Step 3 : Activate your Walka
11
Step 4 : Basic operation
13
Step 5 : Advanced operation
14
Channel Scan
16
Resetting your Walka
17
Updating the firmware
19
Setting the Time Zone
21
?
About DVB-H
DVB-H is a technology that delivers video to mobile
devices at a resolution of 320 by 240 pixels. It uses a
terrestrial broadcast similar to radio, unlike the satellite
technology used for your DStv Service at home. This
means that you can enjoy Mobile TV on the move,
when in a DVB-H Broadcast coverage area.
23
fold
!
Terms & Conditions and the End user
licence agreement
Must be accepted to use this device. You can view the
Terms and Conditions and/or the End User Licence
Agreement by doing the following;
Correct antenna
reception angle
1. Go to apps.dstvmobile.com/decoder/terms
Incorrect antenna
reception angle
2. Email [email protected]
3. Visit your local DStv Service Centre and request a
copy of the subscription Terms & Conditions or
Walka End User licence agreement.
Incorrect antenna
reception angle
13
22
3
fold
Introduction
Setting the Time Zone
Welcome to the exciting world of DStv Mobile. With your
Walka handheld TV you will be able to connect to DVB-H
broadcast mobile TV and have access to live DStv Mobile
content.
Please note that the default time zone in set for South Africa.
To change your time Zone settings do the following;
This guide will help you activate your Walka and start
watching right away.
4
1.!
2.
3.
4.
Click on the menu/power button.
Using the click wheel scroll to the Settings menu item.
Click on Time Zone
Select the time zone for the country that you are
located in.
5. Click Okay to accept.
6. Click on the Menu Power button to exit the menu.
21
fold
Settings
DStv Mobile Walka
You are able to adjust a number of settings on the Walka,
these include the brightness, contrast and colour.
Included in the Walka box are the:
To adjust the screen settings do the following;
1. Click on the Menu/Power button.
2. Using the selection wheel scroll to the Settings
menu item.
3. Choose brightness, contrast or colour from the list of
available items.
4. Use the selection wheel to increase or decrease the setting.
5. To accept the desired setting click on the selection wheel.
1. USB cable
2. USB charger
3. Quick Guide
4. Earphones
2
™
HANDHELD TV
User Guide v1.0
4
20
5
fold
Step 1: Familiarise yourself with the hardware
Front
2
1. Viewing screen
2. Speaker
6
Updating the firmware
1. Go to dstvmobile.com, select the country you are
located in from the available map or drop down menu.
2. Click on the Get DStv Mobile Tab, then click on Phones
and devices.
3. Locate the Walka on the list of devices and then click on
Read more.
4. Scroll to the bottom of the page and click on
Download firmware.
5. Save the firmware to your computer.
6. Turn on the Walka.
7. Short click on the Menu/Power button to access the
settings menu, then click on Settings.
8. Scroll down and select the Firmware upgrade option.
9. Follow the on-screen instructions.
10. Once the firmware upgrade is complete the Walka
will restart.
19
fold
Factory reset (Hard reset)
Back
In the event that the soft reset does not work, then it might
be necessary to perform a factory reset. To do this, hold
down the menu/power button for 5 seconds while
inserting a paper clip into the reset hole on the left of the
device. Then release the power button and remove the
paper clip from the reset hole. The device will power up and
you will see the hello screen. Accept the terms and
conditions and the device will perform a channel scan.
+
18
P
3. Retractable antenna for receiving the DVB-H signal
Important: Extend and position vertically to improve
signal reception.
4. Device serial Number.
5. A CAS number is used in conjunction with the
serial number when activating the device.
7
fold
Resetting the Walka (Soft reset)
Top
If you experience an error with your Walka, you can reset it.
To do this, you will need to locate the reset point on the left
side of the device. Insert a paper clip into the hole. Once the
device screen goes to black, remove the paperclip and the
device will restart.
Left
9
Right
11
10
8
12
16
14
13
15
17
fold
Channel Scan
In the event you lose DVB-H reception while in a coverage
area, you will be able to re-acquire the signal by
rescanning for channels by doing the following.
1.
2.
3.
4.
5.
6.
7.
8.
16
Extend the antenna.
Click on the Power/menu button.
Click the scroll wheel to select the Channel scan option.
Click on Channel Scan.
You will be prompted to confirm your selection.
Click OK.
Channel Scan will begin, and once complete will
connect to the last channel viewed.
Do not turn off the device while the channel scan is
in progress.
6.
7.
8.
9.
10.
11.
12.
13.
14.
15.
16.
Headphone port.
Power/menu button. Pressing and holding the
power/menu button will turn the device on or off.
A short press of the Menu/Power button once will
bring up or remove the menu on the device screen.
Reset button.
Lanyard loop.
USB port for charging the device or upgrading firmware.
Charge status LED, if the LED is green then the device
is charged. If the LED is red the device is charging.
Volume Down button.
Volume Up button.
Previous channel.
Next channel.
Selection Wheel, pushing the selection wheel will
select the on-screen menu item.
9
fold
Step 2 : Charging your Walka
Information Plate (iPlate)
The Walka comes partially charged. There are 2 ways to
charge the Walka. Please note: charging via a power point
is faster than charging via the USB port on your computer.
The iPlate will provide you with the channel title, start and
end time and short synopsis of the programme you are
currently watching. It also allows you to change channels.
1. Use the provided USB cable and charger.
2. Use the provided USB cable and plug the device into an
available USB Port on your computer.
To access the iPlate
1. Click in on the selection wheel.
2. You will now be presented with the iPlate at the
bottom of the screen.
3. Scrolling up or down with the selection wheel whilst
viewing the iPlate will allow you to see the synopsis
for programs on other channels, currently playing.
4. To select a channel press the selection wheel in.
5. To exit the iPlate click on the Menu/Power button.
Plug the USB cable into the USB port
10
15
fold
Step 5 : Advanced Operation
Step 3 : Activate your Walka
TV Guide
You can use the TV guide to view the list of programmes
on a specific channel for the next 24 hours. Access the TV
Guide by doing the following;
You can activate your Walka using one of the two options
listed below.
1. Short click on the Power/Menu button. A menu will
2.
3.
4.
5.
6.
7.
14
appear on the screen.
Use the selection wheel to select TV Guide.
You will be presented with a list of programs that are
currently available on the various channels.
Use the selection wheel to scroll and select a desired
channel.
You will be presented with a list of programs on that
channel for the next 24 hours.
Click on a program to reveal the synopsis.
To exit the TV Guide, click on the Menu/Power button.
Option 1:
Go to dstvmobile.mobi on your mobile phone, or
http://www.dstvmobile.com for a list of activation options.
Option 2:
Activate your Walka by calling MultiChoice customer care
(see customer care numbers on the next page) and
provide the customer service representative with the CA
number and the device serial number, found on the back
of the Walka.
11
fold
MultiChoice customer care
South Africa:
+27 11 289 2222
Ghana :
+233 302 740 540
Kenya :
+254 20 444 9000
Namibia :
+264 61 270 5222
Nigeria :
+234 1 270 3232
Step 4 : Basic operation
1. To power the device, press and hold Power button (7)
until the LCD is turned on and you see the DStv Mobile
hello screen.
2. The splash screen will be displayed, and the device will
then connect to the DVB-H network and begin playing.
3. To change channels on the device, use the channel up
(15) or channel down (14) selection wheel to navigate
the EPG. Pushing the selection wheel (16) will select
the highlighted channel and the device will then
connect to the channel.
4. To lower the volume use the volume down button (12).
To raise the volume press and hold the volume up
button (13) until desired level is reached.
5. To power off the device, press the Menu/Power button
for five seconds, until the LCD is turned off.
12
13