1
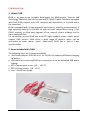
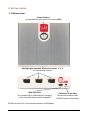
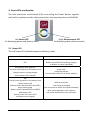
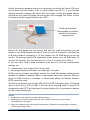
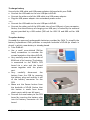
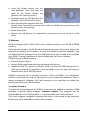
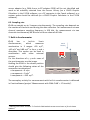
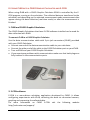
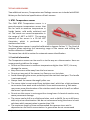
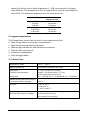
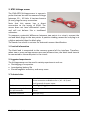
CLAB DATA‐LOGGER 003 USER’S GUIDE CENTRE FOR MICROCOMPUTER APPLICATIONS http://www.cma-science.nl CLAB User’s Guide ver. 2.0, April 2014 Author: Ewa Kedzierska © CMA, Amsterdam, 2015 CMA, A.J. Ernststraat 169, 1083 GT Amsterdam, Netherlands [email protected] www.cma-science.nl CASIO and ClassPad are trademarks or registered trademarks of Casio Computer Co., Ltd. 2 | CLAB User’s Guide TABLE OF CONTENTS I. INTRODUCTION 5 1. About CLAB 5 2. Items included with CLAB 5 3. How to use this guidebook 6 II. GETTING STARTED 7 1. CLAB overview 7 2. Power Button 8 3. Status LEDs and Speaker 3.1. Power LED 3.2. Measurement LED 3.3. Speaker 9 9 10 10 4. Powering CLAB 10 5. Memory 13 6. Sensor inputs 6.1. BT analog sensor plug 6.2. Automatic sensor detection 6.3. Sampling rate 14 14 14 15 7. Built‐in Accelerometer 15 8. The ways of using CLAB 8.2. CLAB with a CASIO Graphic Calculator 8.1. CLAB with a PC computer 8.3. CLAB standalone 15 16 16 16 III. USING CLAB WITH A CASIO GRAPHIC CALCULATOR AND E‐CON 17 1. CLAB and CASIO Graphic Calculators 17 2. E‐CON software 17 IV. USING CLAB WITH A COMPUTER AND COACH 18 1. Coach programs 1.1 Coach 1.2 Coach Lite 18 18 18 2. Installing the CLAB driver 19 3. Typical measurement procedure in Coach 19 CLAB User’s Guide | 3 V. USING CLAB STANDALONE 3. Typical measurement procedure with CLAB standalone VI. INCLUDED SENSORS 20 21 1. BT01 Temperature sensor 1. Practical information 2. Suggested experiments 3. Technical data 22 22 23 23 2. BT02 Voltage sensor 1. Practical information 2. Suggested experiments 3. Technical data 23 24 24 24 VII. TECHNICAL SPECIFICATIONS 25 1. Key features 25 2. Working conditions and maintenance 25 3. Software for CLAB 26 4. Warranty 26 5. Battery precautions 26 6. Safety Information 26 4 | CLAB User’s Guide 20 I. INTRODUCTION 1. About CLAB CLAB is an easy‐to‐use portable data‐logger for Mathematics, Science and Technology Education that can be used with a CASIO Graphic Calculator equipped with the E‐CON program, with a PC computer and standalone, in the field and in the classroom. CLAB is equipped with its own processor and memory, enabling measurements at high sampling rates up to 100 000 Hz with accurate independent timing. It has FLASH memory to allow easy upgrade of the internal system software and to store measured data. For connecting sensors CLAB has three BT (right‐handed) sensor inputs, which support CMA sensors. CMA offers a wide range of sensors, which can be connected to these sensor inputs. Additionally CLAB has a built‐in 3‐axis accelerometer. 2. Items included with CLAB The following items are included with CLAB: USB Power Adapter (100‐240 V AC, DC 5V/1A) for powering CLAB and charging its battery USB cable for connecting CLAB to the computer or to the delivered USB power adapter BT01 Temperature sensor (‐40 .. 140 °C) BT02 Voltage sensor (‐10 .. 10 V) User’s Quick Start Guide. CLAB User’s Guide | 5 3. How to use this guidebook This guidebook is intended to provide instructions for the basic operations of the CLAB data‐logger. The chapters in this guidebook include: II. Getting started – provides start‐up information for the learning of data‐logger, and offers and overview of basic operations of CLAB. III. Using CLAB with a CASIO Graphic Calculator and E‐CON software – explains how to use CLAB with a CASIO Graphic Calculator. IV. Using CLAB with a computer and Coach software – explains how to use CLAB with a PC computer and Coach software. V. Using CLAB standalone ‐ explains how to use CLAB standalone. VI. Included sensors – provides technical specifications of included in the CLAB package sensors. VII. Technical specifications – provides technical specifications, working conditions and maintenance. This User’s Guide and more on CLAB is also available on‐line as a free download at CMA website www.cma‐science.nl. 6 | CLAB User’s Guide II. GETTING STARTED 1. CLAB overview Power Button surrounded by two semicircle status LEDs Analog (right‐handed) BT Sensors Inputs 1, 2, 3, for connecting sensors Mini USB Port for connecting a USB cable for charging or for communication with computer Calculator 3‐pin Port for communication with CASIO Graphic Calculators CLAB has built‐in a 3‐axis Accelerometer and Speaker. CLAB User’s Guide | 7 2. Power Button The Power Button of CLAB is used to: Turning the device on and off. Rebooting the device. Use this feature when CLAB “locks up” and does not respond to commands. Data and measurement settings may be lost. Handling data collection process. The detailed operations of the Power Button: CLAB Status POWER BUTTON ACTION OFF Press Turns CLAB on The left LED blinks red and turns green when the device is ready ON Press and hold for 2 sec and release Turns CLAB off Press until the left LED becomes red then release, the device turns off. Resets CLAB ON Press and hold for 6 sec and release ON CLAB waiting for triggering ON CLAB is sampling Press Press ON CLAB ready for data collection 8 | CLAB User’s Guide Press (use only when the device does not respond) Press and hold, after 2 sec the left LED becomes red, after 6 sec the LED starts to blink, then release, the rebooting starts. Manually triggers the data collection Press the button when the right LED is blinking blue. Stops data collection Press the button when the right LED is blinking green. Starts data collection or Collects a single measurement (Only available when the device works standalone) Press the button when the right LED is blue. 3. Status LEDs and Speaker The two semicircles multicolored LEDs surrounding the Power Button together with built‐in speaker provide information about the operating status of the CLAB. Left Power LED for displaying power and battery status Right Measurement LED for displaying data collection status 3.1. Power LED The left Power LED indicates power and battery status. POWER LED OFF ON, together with right LED The LEDs color depend on the battery level Orange: battery is being charged Green: battery fully charged CLAB STATE CLAB is turned Off and not being charged, or CLAB is in Power Save Mode CLAB is Off and being charged (connected to USB or to its power adapter) ON The LED color depends on the battery level Green: battery full (battery level is between 80% and 100%) Blue: battery good (battery level is between 20% and 80%) Red: battery low (battery level is less than 20 % and needs to be charged) CLAB is turned On and not being charged (not connected to USB or to its power adapter) Note: powering CLAB in this situation may cause faulty battery level indication CLAB User’s Guide | 9 3.2. Measurement LED The right Measurement LED indicates the data‐collection status. MEASUREMENT LED CLAB STATE OFF No data collection ON Blue Ready for data collection ON Blinking Blue Waiting for trigger conditions Data collection starts automatically after the trigger conditions are met. To start the data collection manually, press the Power Button. ON Blinking Green Sampling data ON Green Measurement data present in CLAB’s memory ON Red Error 3.3. Speaker Speaker generates different sounds and indicates events. SPEAKER CLAB STATE Sound 1 Power On Sound 2 Data collection starts Sound 3 Data collection ends Sound 4 Count down ‐ sound n times (= number of countdown) 4. Powering CLAB An internal rechargeable battery (Lithium‐Ion battery, 3.7 V, 1200 mAh) located in the internal compartment, powers CLAB. CLAB is delivered with its battery partially charged. The device will work as long as the battery provides power or it is powered via the power adapter. The Power LED indicates the actual battery level when CLAB is turned on (see “3. Status LEDs and Speaker”). Note: In case CLAB is connected to USB or to the USB Power Adapter the Power LED will show nearly always Green. 10 | CLAB User’s Guide Before the battery becomes too low for operating the device the Power LED turns red to warn that the battery level is critical (lower than 20 %). If you continue working without charging, the device will shut down. A fully discharged battery requires up to 4 hours of charge time to become fully charged. But within 3 hours the battery will be charged at least up to 90 %. CLAB backside with rechargeable the battery placed in the battery compartment Battery life will depend on the sensors and features used but typically you can expect to use CLAB between at least 4 hours (in case of 3 sensors connected) up to 8 hours without recharging it. To save power turn off CLAB when you do not need it. To prolong battery life, automatic power down turns off CLAB after 10 minutes of inactivity. The next time you turn it on, it is exactly as you left it. In the case that CLAB is used standalone (see also 8.3) and the measurement settings are: measurement time longer than 2 hours, and sampling frequency less than one sample per 2 minutes, CLAB is set into a Power‐save Mode and will turn itself off between collecting data samples. It awakes 2 seconds before a new sample has to be collected. Data are saved in CLAB memory in between. In Power‐save Mode the Motion detector BT55i cannot be used. The life of the battery is more than 300 full (0 to 100%) charging cycles. If charging cycle is not full e.g. 30% to 60% it will last more charging cycles. Exposure to temperature over 35oC will significantly reduce battery life. A replacement battery can be ordered separately. Notes: CLAB can be used while the battery is being charged. CLAB typically consumes about 150 mA. If you connect many sensors then power consumption can be higher. When the USB port does not provide enough power, CLAB will not be charged or charging will be significantly slower. CLAB User’s Guide | 11 To charge battery Use only the USB cable and USB power adapter delivered with your CLAB. Connect the USB cable to the mini USB port of CLAB. Connect the other end of the USB cable to a USB power adapter. Plug the USB power adapter into a standard power outlet. ‐ or ‐ Connect the USB cable to the mini USB port of CLAB. Connect the other end of the USB cable into a free USB port of your computer. Notice, that the efficiency of charging via a USB port, is limited by the maximal current provided by a USB socket (500 mA for USB 2.0 and 800 mA for USB 3.0). To replace battery Use only the approved rechargeable batteries provided by CMA. To simplify the battery replacement CMA provides a complete backside of CLAB (as shown in photo) in which a new battery is already placed. Turn CLAB off. Use a small cross‐slotted (Philips head) screwdriver to unscrew the screws located on the sides of CLAB. Very carefully move the back side of CLAB out of its housing. The battery is connected to the CLAB’s PCB board via a wire and the board moves together with the plastic part. Very carefully disconnect the battery from the PCB by pressing the battery plug and moving it out of the battery connector on the PCB. Move out the Power button from the backside of CLAB. Notice that this button is made from three plastic parts, which can fall apart. Connect the new battery to the PCB board by inserting the battery plug into the battery connector on the board. 12 | CLAB User’s Guide Insert the Power button into the new backside. Take care that the parts of the Power button are placed in the correct position. Carefully insert the PCB board to the backside. The PCB should fit firmly. Keep the backside together with the board, insert the board into small rails inside the CLAB housing and move the board to close the housing. Screw the screws. Return your old battery for responsible recycling and do not throw it in the trash. 5. Memory CLAB is equipped with 2 MB of Flash (non‐volatile) memory, and 128 KB of FRAM memory. Flash memory contains the CLAB internal operating system (firmware) and can be rewritten to update the firmware. As new functionality becomes available, you can download the firmware from the CMA website to your computer and update your CLAB. Firmware updates are also included with the Coach software. FRAM memory of CLAB contains: the local sensor library, current CLAB experiment settings and sensor definitions, measured data file ‐ which can consist of up to a total of 60,000 data points. In the Coach software it is possible to use the buffer in a cyclic way, resulting in a measurement up to 500,000 points. If CLAB is switched off, all memory contents ‐ Flash and FRAM ‐ are maintained. FRAM is maintained as long as the battery is not completely depleted; Flash is always maintained. However, the Flash memory can be rewritten to update the local sensor library and the firmware. To update firmware To make use of new features for CLAB it is necessary to update its firmware. CMA provides a special utility program Firmware Update. This program can be downloaded from the CMA website or is provided with the Coach software. The Coach program recognizes automatically when a connected to the computer CLAB needs to be updated and offers direct update. CLAB User’s Guide | 13 6. Sensor inputs For connecting sensors CLAB has three BT (right‐handed) sensor inputs 1, 2, and 3 with input voltage ranges 0 .. 5 V and ‐10 .. 10 V. These inputs support all analog CMA sensors and automatically identify these sensors. Especially for CLAB a new CMA Ultrasonic Motion Detector BT55i, which can be connected to analog BT inputs of CLAB, is available. CMA offers a wide range of sensors, for a complete list of available CMA sensors consult the CMA website. CLAB also supports Vernier sensors. 6.1. BT analog sensor plug Sensors with BT (right‐handed) plug can be connected to input channels of CLAB. The BT plug has 6 pins with the following connections: Pin 1 2 3 4 5 6 Connections Vin Ground Vres1/I2C3 data Auto‐ID2/I2C3 clock 5 V DC Vin‐low 1 6 1 Vres - Output reference voltage (pull-up resistor 15 k) for resistance measurements. Auto ID (pull-up resistor 10 k) - Auto ID sensor detection input. The BT inputs have the possibility for automatic sensor recognition. 3 For (I2C) communication between CLAB and intelligent sensors. 2 Inputs Input range Resolution (12 bit) Input impedance Vin 1, 2, 3 ‐10 .. 10 V 4.9 mV 100 k Vin‐low 1, 2, 3 0 .. 5 V 1.2 mV 100 k In the Coach software all CLAB inputs can be (simultaneously) used as counter inputs. Sensors such as the CMA Photogate or CMA Radiation sensor are by default defined as counters. Other analog sensors can be used as counters (e.g. using a Heart‐rate sensor as a counter) after defining the counter conversion settings. 6.2. Automatic sensor detection CLAB automatically detects sensors when they are connected to the sensor inputs and tries to identify the connected sensors. Most CMA sensors will be automatically identified. Some older CMA sensors or sensors connected via the 14 | CLAB User’s Guide sensor adapter (e.g. CMA 4‐mm to BT adapter 0519) will be not identified and need to be manually selected from the Sensor Library (on a CASIO Graphic Calculator in the E‐CON software, on a PC computer in the Coach software) or a custom probe should be defined (on a CASIO Graphic Calculator in the E‐CON software). 6.3. Sampling rate CLAB can sample up to 3 sensors simultaneously. The sampling rate depends on the number of channels used during the data collection. For measurement via one channel maximum sampling frequency is 100 kHz, for measurement via two channels simultaneously 60 kHz and via three channels 40 kHz. 7. Built‐in Accelerometer CLAB has a built‐in 3‐axis Earth Accelerometer, which measures Gravity 2 acceleration in 3 ranges: 20 m/s , 40 m/s2 and 80 m/s2 in the x, y and z z directions. This sensor can be used in x combination with other external sensors. y For the directions of x, y and z axes of the accelerometer see the image. Holding the CLAB in the shown position should give the following values of the component accelerations: x‐component ≈ 0 m/s2 y‐component ≈ 0 m/s2 z‐component ≈ ‐9.81 m/s2. The exemplary activity for measurements with built‐in accelerometer is delivered in Coach software (project ‘Measurement with CMA CLAB’ > 1.Tutorials)*. * Starting from Coach version 6.7. Check the CMA website www.cma‐science.nl for the latest updates. CLAB User’s Guide | 15 8. The ways of using CLAB CLAB can be used: ‐ as an interface connected to a CASIO Graphic Calculator with display of measured data on the calculator screen, ‐ as an interface connected to a PC computer with display of measured data on the computer screen, ‐ as a stand‐alone data‐logger. 8.2. CLAB with a CASIO Graphic Calculator CLAB can be used with CASIO Graphic Calculators on which the E‐CON software is installed, such as CASIO fx‐CG Series, fx‐9860GII Series or ClassPad II (fx‐CP400). When connected to a calculator CLAB is controlled by the E‐CON software running on the calculator. The collected data are transferred to the calculator and the measurement can be followed and analyzed on the calculator. To connect CLAB to a CASIO Graphic Calculator you need a data communication cable with 3‐pin jack connectors (SB‐62). This cable is provided with your CASIO Graphic Calculator. 8.1. CLAB with a PC computer Via the provided USB cable CLAB can be connected to a USB port of a PC computer and work as a lab interface. The Coach 6 program running on the PC controls CLAB. The collected data are transferred to the computer and the measurement can be followed and analyzed on the computer screen. The USB cable is provided with your CLAB data‐logger. 8.3. CLAB standalone When using CLAB as a standalone device, CLAB controls the data collection process; it collects and stores the measurement data. This is very useful for remote data collection e.g. outside the school. The experimental setup is prepared using the E‐CON application on a CASIO Graphic Calculator or the Coach software on a computer and uploaded to CLAB. The measured data are stored in the CLAB memory and can be downloaded into a calculator or a computer after the measurement is finished. 16 | CLAB User’s Guide III. USING CLAB WITH A CASIO GRAPHIC CALCULATOR AND E‐CON When using CLAB with a CASIO Graphic Calculator CLAB is controlled by the E‐ CON program running on the calculator. The collected data are transferred to the calculator and depending on the selected measurement mode measurement data appear during the data collection (real‐time mode) or after the measurement is finished. 1. CLAB and CASIO Graphic Calculators The CASIO Graphic Calculators that have E‐CON software installed can be used for data collection with CLAB. To connect CLAB to a CASIO Graphic Calculator Use the data communication cable with 3‐pin jack connectors (SB‐62) provided with your CASIO Calculator. Connect one end of the data communication cable to your calculator. Connect the other end of the cable to the CASIO Calculator port on your CLAB. Turn on CLAB and your CASIO Graphic Calculator. If you experience problems with communication make sure that both plugs are fully inserted in the communication ports. 2. E‐CON software E‐CON is a menu‐driven calculator application developed by CASIO. It allows configuring experiments with CLAB, collecting the data via connected sensors, graphing and processing the collected data. For more information on CASIO E‐CON visit the following website http://edu.casio.com/support/. CLAB User’s Guide | 17 IV. USING CLAB WITH A COMPUTER AND COACH When using CLAB as a lab interface connected to a PC computer CLAB stays connected to the PC via a USB port (on‐line mode) and is controlled by the Coach program running on the PC. The collected data are transferred in real‐time to the computer and the course of the measurement can be followed directly in the program. The recorded data are not stored in CLAB’s memory and should be saved on the PC in the Coach 6 program. 1. Coach programs The Coach and Coach Lite programs (version 6.6 or newer) support measurements with CLAB. Before you start to use CLAB with the computer we recommend to first install the Coach or Coach Lite program (version 6.6 or newer) on your PC. 1.1 Coach1 Coach is a multimedia learning and authoring software environment for Science, Technology and Mathematics Education that offers tools to: collect data via interfaces and sensors control systems measure on digital videos and images model dynamical systems and processes process and analyze data. As an authoring system Coach allows to create multimedia activities for CLAB. Exemplary Coach Activities for CLAB, prepared for use by students, are available in the Coach program. Detailed information about the use and features of Coach 6 are described in the Guide to Coach 6 which can be found on the CMA website (www.cma‐science.nl). 1.2 Coach Lite2 Coach Lite is a limited version of Coach, which supports measurement and control with CMA's interfaces, among others also CLAB. The data collected in measurements can be further processed; the program offers a number of data processing and data analysis tools. Exemplary Activities for CLAB, prepared for use by students, are available in Coach Lite. These Activities cannot be modified; the result of student work can be saved in Result files. Detailed information about the use and features of Coach 6 Lite are described in the Guide to Coach 6 Lite, which can be found on the CMA website. 1 Has to be purchased separate (license code needed for installation). Free, has to be downloaded from the CMA website www.cma‐science.nl. 18 | CLAB User’s Guide 2 2. Installing the CLAB driver CLAB is equipped with HID3 USB for which a standard driver is available in Windows. The driver installation is automatically executed the first time CLAB is connected to the computer4. 3. Typical on‐line measurement procedure in Coach To collect data with CLAB connected to the computer 5: Connect CLAB to the computer via the provided USB cable. Turn on CLAB. Start Coach 6 Lite or Coach 6 and open an Activity for CLAB. Connect sensor(s) to the sensor input(s) on CLAB. CLAB automatically detects the connected sensor(s) and displays the sensor icons of the identified sensors on the CLAB screen panel. Sensors, which are not automatically identified, have to be selected manually from the Coach Sensor Library. The measurement in Coach is executed according to the given measurement settings. Click Measurement Settings to check these settings: measurement type, measuring time, sampling frequency and number of collected samples. Adjust these settings if needed. Follow the instructions given in the Coach Activity or directly start the measurement by clicking the green Start button. In most cases, Coach automatically starts the measurement. o If triggering is enabled then the measurement is started automatically when the trigger conditions are met. o When the type of measurement is set to Manual then the green Manual Start button appears in the Toolbar. Click this button to collect a single measurement. When keyboard input(s) is specified then the value of one or more quantities have to be typed in. The measurement is stopped when the specified measurement time (time‐ based) or specified number of samples (manual) has been reached. If you want to interrupt the measurements process, click the red Stop button or press <Esc>. Save your result to file via the File menu options Save or Save As…. 3 Human Interface Device. No administrator rights are needed to install this driver under all Windows versions. 5 This procedure does not describe the Event‐based type of measurement. CLAB User’s Guide | 19 4 V. USING CLAB STANDALONE When using CLAB as a standalone device, CLAB controls the data collection process ‐ it collects and stores the measurement data. This is very useful for remote data collection e.g. outside the school. The experimental setup is prepared using the E‐CON application on a CASIO Graphic Calculator or the Coach software on a computer and uploaded to CLAB. CLAB can be then disconnected from the calculator or computer. The Power button of CLAB is used to start and stop the pre‐defined experiment and LEDs and a speaker give feedback about the status of the data collection. The measured data are stored in the CLAB memory and can be downloaded into a calculator or a computer after the measurement is finished. Using E‐CON or Coach the collected data can be further analyzed and processed. 1. Typical measurement procedure with CLAB standalone Prepare the experiment setting by using a CASIO Graphical Calculator with the E‐CON program or a computer with the Coach program. Send the experiment settings to CLAB. The right Measurement LED of CLAB becomes blue when CLAB is ready. Now you can disconnect CLAB from your calculator or computer. If you wish (long time between preparation of the measurement and the start of the measurement) you can now turn your CLAB off. Settings are stored in permanent memory. After you turn CLAB on again the right measurement LED will show CLAB is ready for measurement. Start the measurement by pressing the Power Button. o If Triggering is enabled (the right Measurement LED is blinking blue) then the measurement is started automatically when the trigger conditions are met. To force triggering manually, press the Power Button. o When the type of measurement is set to Manual then press the Power Button to collect a single measurement. The right Measurement LED blinks green when CLAB is collecting data. If you want to stop the measurement, click the Power Button. For long‐time measurements: o with time measurements longer than 2 hours, and o with sampling frequency of one sample per 2 minutes (or lower), and o without use of Motion detectors BT55i, CLAB is set into a Power‐save Mode and will turn itself off between collecting single data samples. It awakes 2 seconds before a new sample has to be collected. Data are saved in CLAB memory in between. During the measurement a short press of the Power Button will wake CLAB up. It will stay awake until the next sample is taken and then go back to sleep again. 20 | CLAB User’s Guide The data collection stops after the specified measurement time (time‐based mode) or specified number of samples (manual mode) has been reached. The Measurement LED remains green to show that measured data are stored in the CLAB’s permanent memory. These data will stay in this memory also when you turn CLAB off. Only new measurement settings will cause the data to disappear. Re‐connect CLAB to your Graphical Calculator or computer and retrieve the collected data into the ECON or Coach software. In a very rare situation it can happen that after the off‐line measurement is performed CLAB does not start anymore. This can be caused by a problem with reading the stored data from the CLAB’s memory. To force CLAB to start without reading the stored data press and hold the Power Button (3‐4 sec) until the left Power LED becomes green then release the button. 2. Using Coach with CLAB for the standalone mode A Coach Activity suitable for the CLAB standalone mode (off‐line measurement)6 has in its toolbar, next to the green Start button, two additional buttons, the Send Settings and Get Data buttons7. Such activity can be used as well as for on‐ line measurements (CLAB connected to the computer during the measurement, see Chapter IV) as for off‐line measurements to set up CLAB for remote data collection and to retrieve the collected data from its memory. By clicking the green Start button the on‐line measurement is started. By clicking the Send Settings button the Experiment settings (measurement settings and sensor information) are uploaded to CLAB. Then CLAB can be disconnected from the computer and remote measurements can be performed. After the measurement is finished, CLAB is reconnected to the computer. By clicking the Get Data button, the contact between CLAB and the computer is re‐established and the measurement results will be downloaded to Coach. Please notice that you need to be in the same Coach Activity. In the case there is no communication between Coach and CLAB right click the CLAB screen image and select Reset Hardware. 6 For off‐line measurements CLAB does not have to be connected to the computer during the measurement. The collected data are stored in the CLAB’s memory and have to be transferred to Coach afterwards. 7 To enrich a Coach Activity with the off‐line measurement mode, go to the menu option Options > Activity options and check the Off‐line checkbox. CLAB User’s Guide | 21 VI. INCLUDED SENSORS Two additional sensors, Temperature and Voltage sensors are included with CLAB. Below you find technical specifications of both sensors. 1. BT01 Temperature sensor The CMA BT01 Temperature sensor is a general‐purpose temperature sensor that can be used to measure temperature in liquids (water, mild acidic solutions) and air. The sensor can record temperature in the range of ‐40°C to 140°C. The sensing element of the sensor is a 20 k NTC thermistor, which is positioned in a stainless steel tube. The Temperature sensor is supplied calibrated in degrees Celsius °C. The Coach 6 program allows selecting the measuring range of the sensor and shifting the sensor calibration if needed. The sensor has a built‐in resistor for automatic sensor identification. 1. Practical information The Temperature sensor can be used in a similar way as a thermometer. Here are some general guidelines for usage: Do not use the sensor to measure temperatures higher than 150°C, this may damage the sensor. Keep the sensor cable away from the heat source. Do not put any part of the sensor in a flame or on a hot plate. Avoid submerging the sensor probe beyond the stainless steel part. The handle is not waterproof. Always clean the sensor thoroughly after use. The sensor tube is constructed from stainless steel, which has a high resistance to corrosion from weak acids and alkalis. Some environments e.g. salt water may cause some discoloration of the stainless steel tube but this will not affect the sensor’s performance. Do not use this sensor in a strong acid or strong base. A chemical reaction may cause permanent damage. The sensor can be left in an alkaline solution, such as NaOH, for up to 48 hours, with only minor discoloration. We do not recommend using the sensor in basic solutions which concentration is greater than 3 M. The maximum length of time recommended for exposure to an acid is dependent on the acid’s concentration. In general we do not recommend 22 | CLAB User’s Guide sensors be left to soak in acids of between 1 ‐ 3 M concentration for longer than 48 hours. The exceptions to this are Hydrochloric acid HCL and Sulphuric acid H2SO4. The maximum exposure time for these acids are: Acid 1 M HCL 2 M HCL 3 M HCL 1 M H2SO4 2 M H2SO4 3 M H2SO4 Maximum Exposure Time 20 minutes 10 minutes 5 minutes 48 hours 20 minutes 10 minutes 2. Suggested experiments The Temperature sensor can be used in many experiments like: Monitoring indoor and outdoor temperatures. Monitoring freezing and boiling water. Monitoring endothermic and exothermic reactions. Specific heat experiments. Insulation investigations. Solar energy studies. 3. Technical data Temperature range ‐40 C .. 140 C Measuring element 20 k NTC Thermistor; non‐linear Calibration (Steinhart‐Hart equation) Coefficients T = [K0 + K1*ln(R) + K2* (ln(R))3]‐1 Where T the temperature in C, and R the measured resistance in K0 = 1.02119E‐03; K1 = 2.22468E‐04; K2 = 1.33342E‐07 Maximum temperature that sensor can tolerate without damage 150 C Accuracy 2C at ‐40 C 0.6 at 30 C 1.8C at 140 C Response time (time for 90% change in reading) 10 seconds (in water with stirring) 270 seconds (in still air) 80 seconds (in moving air) CLAB User’s Guide | 23 2. BT02 Voltage sensor The CMA BT02 Voltage sensor is a generic probe that can be used to measure voltage between ‐10 .. 10 Volts. It has two banana (4‐mm) plugs for easy connection. Note that this sensor has a direct connection to the inputs of CLAB. The sensor does not have differential inputs, and will not behave like a traditional voltmeter. To measure a potential difference between two points in a circuit, connect the red and black plugs to the two points. A positive reading means the red plug is at a higher potential than the black plug. The sensor has a built‐in resistor for automatic sensor identification. 1. Practical information The black lead is connected to the common ground of the interface. Therefore, when two or more voltage sensors are used at same time, the black leads have to be connected to the same point in the circuit. 2. Suggested experiments The Voltage sensor can be used in variety experiments such as: Discharging of a capacitor Investigating battery life Electromagnetic induction, and many more. 3. Technical data Voltage range ‐10 .. 10 V Direct connection to CLAB via Pin 1 (‐10 .. 10 V) and Pin 2 (ground) of sensor inputs. Calibration None Vin (V) = Vout (V) Resolution using 12 bit 5 V A/D converter 4.9 mV Chemical tolerance None (air only) 24 | CLAB User’s Guide VII. TECHNICAL SPECIFICATIONS 1. Key features PROCESSORS PIC32MZ (512 kB SRAM) MEMORY 2 MB Flash POWER Rechargeable battery Li‐ion 3.7 V, 1200 mAh USB Power Adapter (100‐240 V AC, DC 5V/1A) STATUS INFORMATION Two color LEDs (left Power and right Measurement status) One speaker ADC RESOLUTION 12 bits SAMPLING FREQUENCY Max 100 000 Hz, via one channel Max 60 000 Hz, via two channels simultaneously Max 40 000 Hz, via three channels simultaneously SENSOR INPUTS Three sensor inputs, analog BT (right‐handed) inputs BUILT‐IN SENSOR 3‐axis Accelerometer (20 m/s2, 40 m/s2 and 80 m/s2), max. frequency 400 Hz CALCULATOR CONNECTION 3‐pin port for communication to CASIO Graphic Calculators COMPUTER CONNECTION Mini USB port also used for powering CALCULATOR SOFTWARE CASIO E‐CON software COMPUTER SOFTWARE Coach 6 Lite (free) or Coach 6 (license required) SENSORS INCLUDED Temperature sensor and Voltage sensor 2. Working conditions and maintenance For your safety and that of your equipment, follow these rules for handling, for cleaning CLAB, and for working more comfortably. Your CLAB is designed to be operated on a desk or hand‐held. Your CLAB is not waterproof. Precautions must be taken to ensure that liquid cannot enter the unit. Do not expose CLAB to extreme heat or cold sources and to direct sunlight for extended periods of time. Operating CLAB outside the following ranges may affect performance: o Temperature: 5° to 40° C. o Relative humidity: 0 % to 90 % (noncondensing) Never force a connector into a port. When connecting a sensor, make sure that the sensor cable connector matches the sensor input, and that you have positioned the connector correctly. When cleaning CLAB, first turn it off and unplug the connected sensors and USB cable. Then clean with a soft, lint‐free cloth. Avoid getting moisture in any openings. Do not spray liquid directly on CLAB. When charging the battery always use the provided USB power adapter. CLAB User’s Guide | 25 When replacing the battery, only use a CLAB replacement battery pack supplied by CMA. Make sure to handle it gently. Rough handling may cause the battery damage. Do not pull on wires. Pull only from the connectors at the ends of the wires. Dispose your old battery appropriately. 3. Software for CLAB CASIO E‐CON – Data collection software installed on CASIO Graphic Calculators. CMA Coach Lite* for PC – PC program to control CLAB with computer (free). CMA Coach* for PC – PC program to control CLAB with computer (license needed), Author version which allows to create Activities for CLAB and additionally offers Data‐Video, Modeling and Animations tools. 4. Warranty The CLAB data‐logger is warranted to be free from defects in materials and workmanship for a period of 24 months from the date of purchase provided that it has been used under normal laboratory conditions. This warranty does not apply if CLAB has been damaged by accident or misuse. The CLAB battery is a consumable and is warranted to be free from defects in materials and workmanship for a period of 12 months from the date of purchase. 5. Battery precautions Do not place the battery in or near fire, on stoves or other high temperature locations such as direct sunlight. Doing so may cause the battery to generate heat, explode or ignite, or generate a toxic gas if placed in contact with fire. In the event the battery leaks and the fluid gets into one's eye, do not rub the eye. Rinse well with water and immediately seek medical care. If left untreated, the battery fluid could cause damage to the eye. Discard batteries according to local regulations. 6. Safety Information CLAB is developed and produced in conformity with CE and FCC regulations. Any changes made by the purchaser or user without first contacting the manufacturer will be subject to penalty under FCC regulations. This product shall be handed over to your local community waste collection point for recycle of the products. * Version 6.6 or newer 26 | CLAB User’s Guide CLAB User’s Guide | 27 This product is to be used for educational purposes only. It is not appropriate for industrial, medical, research, or commercial applications. 28 | CLAB User’s Guide