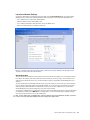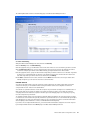
1
MN-700 Base Station
Configuration Guide
Contents
Open the Base Station Management Tool .....................................................................................................................3
Log Off the Base Station Management Tool ..................................................................................................................3
Navigate the Base Station Management Tool ...............................................................................................................4
Current Base Station Settings ........................................................................................................................................5
Wide Area Network ......................................................................................................................................................6
Local Area Network......................................................................................................................................................7
DHCP Client List ...........................................................................................................................................................7
Base Station Information ............................................................................................................................................7
Management Settings.....................................................................................................................................................8
Reset the Base Station................................................................................................................................................8
Restore Factory Default Settings ................................................................................................................................8
Back Up Base Station Settings ...................................................................................................................................9
Restore Base Station Settings from a Backup ...........................................................................................................9
Set Base Station Time Zone......................................................................................................................................10
Synchronize Time to Internet Time Server................................................................................................................10
Change the Base Station Password..........................................................................................................................10
Local Area Network Settings.........................................................................................................................................11
Base Station Name....................................................................................................................................................11
Base Station IP Address ............................................................................................................................................12
DHCP Server and IP Address Range .........................................................................................................................12
Wide Area Network Settings .........................................................................................................................................13
Dynamic Internet Connection....................................................................................................................................14
Static Internet Connection.........................................................................................................................................14
PPPoE Internet Connection .......................................................................................................................................15
Disabled Connection..................................................................................................................................................15
Wireless Settings...........................................................................................................................................................16
Wireless Network Name (SSID).................................................................................................................................16
Wireless Mode ...........................................................................................................................................................17
Wireless Channel .......................................................................................................................................................17
Security Settings ...........................................................................................................................................................17
Wireless Security........................................................................................................................................................18
Base Station Mode ....................................................................................................................................................20
Firewall .......................................................................................................................................................................21
Port Forwarding..........................................................................................................................................................21
Virtual DMZ (demilitarized zone)...............................................................................................................................24
MAC Filtering..............................................................................................................................................................25
Client Filtering ............................................................................................................................................................26
Parental Controls .......................................................................................................................................................27
Base Station Log........................................................................................................................................................29
Index ..............................................................................................................................................................................30
Thank you for purchasing the Microsoft® Broadband Networking Wireless Base Station (MN-700). This guide
describes the various functions of your base station and how you can customize the base station by using the Base
Station Management Tool.
The base station plays an important role in your network. It enables you to share your Internet connection with all
the computers and devices on your network. In addition, your base station:
O
Directs or “routes” data from your networked devices (collectively referred to as a local area network, or LAN) to
the Internet (also known as a wide area network, or WAN), and from the Internet to your networked devices. This
is why the base station is sometimes referred to as a “router.”
O
Connects the devices on your network. This enables you to share files and folders between networked
computers.
O
Helps to protect the devices on your network from hostile attacks coming from the Internet by providing a firewall
and network address translation (NAT).
To enable the base station to perform these activities, all you need to do is configure the base station with the
Internet settings provided by your Internet service provider (ISP) so that your networked computers can connect to
the Internet. You can establish these settings by running the Setup Wizard on the setup CD.
If you need to change a base station setting or if you would like to customize your base station to accommodate
special network requirements, you can use the Base Station Management Tool to do so. The Base Station
Management Tool is a Web-based utility that you can use to view current base station settings and to configure the
base station.
You can use the Base Station Management Tool to:
O
Set up wireless security and media access control (MAC) filtering to restrict unauthorized devices from
connecting to your network wirelessly.
O
Set up client filtering and parental controls to restrict your networked computers from accessing particular
applications and specific Web sites or content.
O
Configure port forwarding so that you can run programs with special network requirements or host a server on
your network.
O
Establish a virtual DMZ (demilitarized zone) to enable unrestricted traffic from the Internet to one of your
networked devices.
O
Set the base station to access point mode so that it no longer provides a routing or NAT service. The base station
should be set to access point mode only to extend the range of a wireless network or to connect an existing
wired network to a wireless network.
O
Enable wireless connectivity by establishing the wireless network name (also known as Service Set Identifier, or
SSID), wireless channel, and data mode for your network.
O
Perform a variety of base station management tasks, including setting or changing the base station password
and creating a backup file of the base station settings.
The following sections describe how to open and navigate the Base Station Management Tool so that you can
customize the base station for your network needs.
Note If you update your base station firmware after purchasing the base station, you should consult the Base Station
Management Tool Help for the latest information on new or improved features of the base station.
MN-700 Base Station Configuration Guide
2
Open the Base Station Management Tool
You can open the Base Station Management Tool from the Microsoft Broadband Network Utility or open it directly
from a Web browser, such as Microsoft Internet Explorer 5 or later, or Netscape Navigator 6.0 or later.
To open the Base Station Management Tool
1. In the Broadband Network Utility, on the Tools menu, click Base Station Management Tool.
-orOpen your Web browser, and then type the Internet protocol (IP) address of the base station in the address field.
By default, this address is http://192.168.2.1. However, you can change this address in the Base Station
Management Tool.
2. To log on, type the base station password that you created when you ran the Setup Wizard. If you did not run the
Setup Wizard, use the default base station password, admin. The base station password is case sensitive.
If you do not remember your base station password, you must restore the factory default settings to the base
station and use the default base station password, admin, to access the Base Station Management Tool. You can
restore the base station to its factory default settings by using the Restore button on the base station.
To restore factory default settings to the base station
Use a pointed object to press and release the Restore button on the back of the base station. The Power light
turns solid orange. When it turns solid green, the restoration is complete. This process takes about a minute. Do
not unplug the base station during this process.
O
After you restore factory default settings to the base station, you must reestablish the base station’s connection to
the Internet. For more information, see “Wide Area Network Settings.”
Log Off the Base Station Management Tool
It is important to log off the Base Station Management Tool after you have finished using it. Logging off protects the
configuration of your base station so that unauthorized users cannot access and change your settings.
In addition, the Base Station Management Tool cannot be opened simultaneously on two different networked
computers. If you log on to the Base Station Management Tool when there is an active session on another
computer, the other session will automatically end.
To log off the Base Station Management Tool
O On any page of the Base Station Management Tool, click Log Off.
You can establish a time interval for logging out inactive users. After the specified time interval elapses without
user activity, the session automatically ends and the user is logged out.
To change the log out time interval
1. Open the Base Station Management Tool, and then click Management.
2. On the Management menu, click Change Password.
3. In the Log out inactive user in box, type a time interval.
4. To save the new time interval, click Apply.
MN-700 Base Station Configuration Guide
3
Navigate the Base Station Management Tool
When you log on to the Base Station Management Tool, the Home page opens. You can use the menu in the left
pane to navigate to the other pages of the Base Station Management Tool.
The following table lists the menu items in the Base Station Management Tool and describes the tasks that you can
perform from the pages that those menu items open.
Menu Item
Tasks
Home
View current network settings and activity.
Management
Reset or restore the base station, back up the current base station settings, establish time settings, and
change the base station password. For more information, see “Management Settings.”
Local Area Network
Enable the Dynamic Host Configuration Protocol (DHCP) server on your base station and set the IP
address range and lease time. For more information, see “Local Area Network Settings.”
Wide Area Network
Specify and configure the type of Internet connection that your base station uses or disable the Internet
connection. For more information, see “Wide Area Network Settings.”
Wireless
Set up or modify the connection between your base station and the wireless computers on your network.
You can also disable the wireless radio from this page. For more information, see “Wireless Settings.”
Security
Configure a variety of specialized security functions, including:
O Firewall
O Wireless security (Wired Equivalent Protection [WEP] or Wi-Fi Protected Access™ [WPA])
O Port forwarding
O Client filtering
O Parental controls
O MAC filtering
You can also view the base station log from the Security section. For more information, see “Security Settings.”
When you need more information about how to perform activities from a specific page of the Base Station
Management Tool, click the Help button available on that page.
MN-700 Base Station Configuration Guide
4
Current Base Station Settings
You can view current base station and Internet connection settings from the Home page of the Base Station
Management Tool, shown in the following illustration. The following sections describe these settings.
MN-700 Base Station Configuration Guide
5
Wide Area Network
The wide area network (WAN) settings provide a summary of the Internet settings provided by your ISP. The settings
that appear will vary depending on whether your ISP account provides a connection that uses a static (fixed) IP
address, a dynamic Internet connection, or a Point-to-Point Protocol over Ethernet (PPPoE) connection. If your
Internet connection is disabled, the WAN settings will be unavailable.
Note When your base station is set to access point mode, the wide area network settings are not displayed on the
Home page.
The following table describes the WAN settings and how to modify them.
Setting
Description
Notes
Broadband
Connection
Appears as
Connecting,
Connected,
Disconnecting, or
Disconnected.
If your broadband connection is disconnected when you expect it to be connected,
try clicking Release and then Renew to change the base station IP address. If you
have a PPPoE connection, try clicking Disconnect and then Connect. You can
also try resetting the base station and your broadband modem. If you complete
these steps and the Broadband Connection is still disconnected, contact your ISP
for assistance.
WAN IP address
Shows the IP
address provided
by your ISP.
This is the external (public) IP address that connects your network to the Internet.
If your ISP provides you with an IP address dynamically (by using a DHCP server),
this address may change periodically. You can click the Release button and then
the Renew button to get a new IP address. Releasing your IP address is a good
idea if you are having trouble accessing the Internet and you have determined that
the computer is not the source of the problem. If renewing the IP address does not
resolve the problem, contact your ISP for assistance.
Subnet mask
Your ISP
establishes the
WAN subnet mask.
If you are using a static Internet connection, you can change the subnet mask for
your wide area network, but you should use the subnet mask provided by your ISP.
The subnet mask does not appear when you are using a PPPoE Internet connection.
Default gateway
The IP address that
the base station
uses to send data
from your network
to the Internet.
The gateway setting is automatically generated when you have a dynamic or
PPPoE connection. If you have a static (fixed) IP address, your ISP should provide
the gateway setting, and you can enter the setting on the Wide Area Network page
of the Base Station Management Tool. If you have a dynamic connection and your
Gateway setting is blank, you should click Release and then Renew.
Primary Domain
Name System (DNS)
and Secondary DNS
Your ISP provides
the DNS addresses.
In some cases, these settings may be automatically filled in. Otherwise, you
can enter them on the Wide Area Network page of the Base Station
Management Tool.
MN-700 Base Station Configuration Guide
6
Local Area Network
The Local Area Network (LAN) settings relate to your local network—that is, how the base station is configured in
relation to the devices on your network. In contrast, the Wide Area Network (WAN) settings determine how your
base station is configured in relation to the Internet. In some cases, your base station will have two different values
for the same type of setting, such as IP address. This is because one value is the WAN IP address and one value is
the LAN IP address. Typically, you can modify the base station LAN settings, but you cannot modify most WAN
settings, because they are provided by your ISP.
The following table describes the LAN settings and how to modify them.
Setting
Description
Notes
Local IP address
The default IP address of your
base station is 192.168.2.1.
You can change the local IP address on the Local Area Network page of
the Base Station Management Tool, but this is not recommended,
unless you are setting the base station to access point mode.
Subnet mask
The subnet mask for your local
network is 255.255.255.0.
You cannot change the subnet mask of your LAN.
DHCP server
Appears as Enabled or Disabled.
You can change this setting on the Local Area Network page of the
Base Station Management Tool.
DHCP Client List
When the DHCP server is enabled on your base station, each device on your network leases an IP address for a
specified period of time. The DHCP client list shows all the devices that have an active lease on an IP address,
including the IP address and MAC address of each device. If you reset the base station, only those devices that
request or renew an IP address after the reset will appear in this list.
You can specify the IP address lease time from the Local Area Network page of the Base Station Management
Tool. For more information, see “Local Area Network Settings.”
The DHCP client list is relevant to your network only if you have the DHCP server enabled on the base station. For
more information, see “DHCP Server and IP Address Range.”
Base Station Information
You can view current information about your base station under Base Station Information. The following table
describes the base station information.
Setting
Description
Notes
Runtime code version
and Boot code version
These settings show the version
numbers of your firmware.
When you check for firmware upgrades, you should download the
version on the Web only if it is later than the version shown here.
LAN MAC address
This is the MAC address of the
base station.
For more information, see “MAC Addresses.”
MAC address
This is the MAC address that
your ISP sees.
For more information, see “MAC Addresses.”
Serial number
This is the serial number of your
base station.
If you need to call Product Support Services for assistance, you
might need to provide the serial number.
MN-700 Base Station Configuration Guide
7
Management Settings
When you want to change the settings related to the management of your base station (for example, resetting the
base station, backing up or restoring settings, establishing time settings, or changing the password), use the
Management menu in the Base Station Management Tool. The following sections describe how to perform
management-related tasks.
Reset the Base Station
You can reset the base station from the Base Station Management Tool or by unplugging the device and then
plugging it back in again. When you reset the base station, you are forcing it to reinitialize and restart all of its
functions. The base station settings will not change when you reset the base station.
You can reset the base station whenever it is not performing as expected. For example, you may want to reset the
base station:
O
When you have DHCP enabled on the base station, but the base station is not assigning IP addresses.
O
When the computers on the network are no longer able to connect to the Internet.
To reset the base station
1. Open the Base Station Management Tool, and then click Management.
2. On the Management menu, click Reset Base Station.
3. On the Reset Base Station page, click Reset. While the reset is in progress, the Power light on the base station
turns orange. When the light is solid green, the reset is complete.
If you want to open the Base Station Management Tool after the reset is complete, type your base station password
on the Logon page. Do not attempt to log on until the reset is complete and the Power light on the base station is
solid green.
Restore Factory Default Settings
When you restore factory default settings to the base station, you clear your Internet connection settings and any
special base station configurations that you have established. After the restore is complete, you will need to
reconfigure your base station settings or restore these settings from a backup file.
You should restore the original factory default settings only under the following circumstances:
O
You are experiencing serious problems with your base station, and resetting the base station does not fix
the problem.
O
You cannot remember your base station password. In this situation, you must restore the factory default settings
by using the Restore button on the base station, and then use the default password admin to log on to the Base
Station Management Tool.
To restore factory default settings
1. Open the Base Station Management Tool, and then click Management.
2. On the Management menu, click Back Up and Restore Settings.
3. Under Restore factory default settings, click Restore Factory Default Settings. While the original factory
default settings are being restored to the base station, the Power light on the base station turns orange. When
the light is solid green, the settings have been restored.
If you want to open the Base Station Management Tool after the settings have been restored, type admin as the
password on the Logon page. Do not attempt to log on to the base station until the settings are restored and the
Power light on the base station is solid green.
After you restore the factory default settings to the base station, you should navigate to each page of the Base
Station Management Tool and reestablish the network settings you want, or restore the base station settings by
using a backup file. For information about creating a backup file of your settings, see the following section.
Be sure to establish your unique base station password as soon as possible after restoring the factory default
settings to prevent unauthorized users from logging on. For more information, see “Change the Base Station
Password.”
MN-700 Base Station Configuration Guide
8
Back Up Base Station Settings
You can create a backup file of all your base station settings from the Base Station Management Tool. The backup
file includes any settings that you established when you completed the Setup Wizard and any settings that you
modified from the Base Station Management Tool.
It is a good idea to create a backup file after you have the base station set up and operating normally. If the base
station malfunctions, you can restore the factory default settings to the base station, and then use the backup file
to reconfigure your base station and resume normal operations.
It is recommended that you create a new backup file whenever you change settings, such as your base station
password.
To back up base station settings
1. Open the Base Station Management Tool, and then click Management.
2. On the Management menu, click Back Up and Restore Settings.
3. Under Back up base station settings, click Back Up Settings.
4. If you receive a message asking you whether to open or save the file, click Save.
5. Type a name for the file that contains your base station settings (or use the default name Settings.dat), browse
to the folder or disk where you want to save the file, and then click Save.
Restore Base Station Settings from a Backup
If you have created a backup file of your base station settings, you can restore settings from the backup file at any
time. This capability is particularly useful if the base station malfunctions and you must restore factory default
settings to the base station. Instead of manually reconfiguring each of your network settings from the Base Station
Management Tool, you can restore all of your saved settings from the backup file.
To restore base station settings from a backup file
1. On the computer where you saved the backup file of your base station settings, open the Base Station
Management Tool.
2. Type the current base station password. If you have just restored the factory default settings to the base station,
the password will be admin.
3. On the Management menu, click Back Up and Restore Settings.
4. Under Restore base station settings from a backup, type the path and name of the backup settings file, or click
Browse to search for the file that contains your network settings.
5. Click Restore Settings. While the settings are being restored, the Power light on the base station turns orange.
When the light is solid green, the settings have been restored.
If you want to open the Base Station Management Tool after the settings have been restored, type your base
station password on the Logon page. Do not attempt to log on until the settings are restored and the Power light on
the base station is solid green.
MN-700 Base Station Configuration Guide
9
Set Base Station Time Zone
The base station uses the date and time for client filtering and to timestamp entries to the base station log.
The base station system clock is set to the Pacific time zone by default. You can change the base station time zone
from the Base Station Management Tool.
To set base station time zone
1. Open the Base Station Management Tool, and then click Management.
2. On the Management menu, click Set Time.
3. Under Base Station Time Zone, in the Set time zone drop-down list box, select the time zone you want.
4. Select the Adjust for daylight saving time check box to advance the clock one hour for daylight saving time. Be
sure to clear this check box when daylight saving time has ended.
5. Click Apply to ensure that the changes that you made are saved.
Synchronize Time to Internet Time Server
The base station automatically attempts to synchronize with a Simple Network Time Protocol (SNTP) server when it
is connected to the Internet. If you want to synchronize the base station to a specific SNTP server, you can do so
from the Base Station Management Tool.
To synchronize the base station with an SNTP server
1. Open the Base Station Management Tool, and then click Management.
2. On the Management menu, click Set Time.
3. Under Synchronize Time to Internet Time Server, type the name of the specific SNTP server that you want to
use, and then click Apply.
Change the Base Station Password
Access to the Base Station Management Tool is password protected to help ensure that only users who know the
base station password can change your network configuration. If you ran the Setup Wizard, you were prompted to
establish a password. This is your base station password. If you did not run the Setup Wizard, your default
password is admin. You can change the base station password from the Base Station Management Tool.
It is a good idea to change your password every six to eight weeks, or more frequently if you are concerned that an
unauthorized person has administrative access to the base station.
If you restore the factory default settings to the base station, the default password admin is also restored. You can
use this password to access the base station, and then create a new password at the earliest opportunity.
When you change your base station password, be sure to update your backup file.
To change the base station password
1. Open the Base Station Management Tool, and then click Management.
2. On the Management menu, click Change Password.
3. In the Current password box, type your current password.
4. In the New password box, type in a new password. Use a minimum of 6 characters, but no more than 16
characters. The base station password is case sensitive.
5. In the Confirm new password box, retype the new password.
6. To save the new password, click Apply.
Be sure to store your password in a safe place. If you forget or misplace your password and cannot log on to the
Base Station Management Tool, you must restore factory default settings to the base station by using the Restore
button on the base station, and then use the default password admin to open the Base Station Management Tool.
MN-700 Base Station Configuration Guide
10
Local Area Network Settings
You can view and change your local area network settings on the Local Area Network page of the Base Station
Management Tool, shown in the following illustration. From this page, you can perform the following actions:
O
Set or change the base station name and IP address.
O
Enable or disable the base station DHCP server.
O
Set or change the IP address range and lease time for the DHCP server.
O
Enter the local domain name if your ISP provided one.
Before you configure your local area network settings, learn about the options available. The following sections
describe each of the local area network settings.
Base Station Name
The base station name identifies the base station on your local network and enables you to communicate with the
base station. For example, if the base station name is HomeNetwork, you can type http://homenetwork into the
address field of a Web browser from one of your networked computers, and the Base Station Management Tool
will open.
The base station name is particularly useful when you set the base station to access point mode. In this situation,
the base station obtains an IP address automatically by DHCP, so you can no longer communicate with the base
station by using its default IP address of 192.168.2.1. You must use the base station name to open the Base
Station Management Tool and to identify the access point on your network.
You may have established a base station name when you ran the Setup Wizard. If you did not run the Setup Wizard,
the default base station name is MN-700. For security purposes, it is recommended that you establish a unique
name for your base station. Do not use the default name.
Note The base station name is a NetBIOS name. If the base station is connected to a Macintosh computer, you will not
be able to access the Base Station Management Tool by using the base station name.
MN-700 Base Station Configuration Guide
11
Base Station IP Address
The default IP address of your base station is 192.168.2.1. This address is reserved for private local networks; it is
not visible to the Internet. You can use the base station IP address to open the Base Station Management Tool from
a Web browser, unless you have set the base station to access point mode.
You do not need to change the base station IP address unless you have a specific reason to do so—for example, if
your modem IP address replicates the base station IP address. If you do change the IP address of your base station,
be sure to change it to another non-routable (private) IP address.
To change the base station name or IP address
1. Open the Base Station Management Tool, and then click Local Area Network.
2. Type a new base station name in the Base station name textbox.
3. Type a new IP address for the base station in the IP address fields.
4. To save the changes, click Apply.
DHCP Server and IP Address Range
Your base station includes a Dynamic Host Configuration Protocol (DHCP) server. The base station DHCP server
allocates IP addresses to the computers on your local network from a specific range of IP addresses. Each time a
computer on your network requests an IP address, it receives one within the specified IP address range. Typically,
the DHCP server will assign the same IP address to a client computer each time the client connects to the network.
The IP address range is derived from the base station IP address. The fourth number in the IP address can
be between 2 and 254, depending on the range you set. For example, when your base station IP address is set
to 192.168.2.1, the IP addresses included in the DHCP address range can be between 192.168.2.2 and
192.168.2.254.
The base station provides a default IP address range for the DHCP server to use. If you want, you can change the IP
address range.
Following are some tips for setting the DHCP address range:
O
Do not include the base station IP address in the IP address range.
O
Be sure to include enough addresses in the address range to provide IP addresses for all the devices on
your network.
O
Do not include any IP address in the address range that you want to use as a static IP address on your network.
For example, if you set up a virtual DMZ (demilitarized zone) on one computer in your network, you should assign
a static IP address to that machine and exclude the address from your IP address range.
To set the IP address range
1. Open the Base Station Management Tool, and then click Local Area Network.
2. If it is not already selected, select the Enable DHCP server checkbox to enable the DHCP server on the
base station.
3. If you do not want to use the IP address range specified by the DHCP server, type a starting IP address and an
ending IP address for the range. The DHCP address range must include a minimum of 50 addresses. Do not
include the base station IP address in the IP address range. For example, if you are using the default base
station IP address (192.168.2.1), the address range must be between 192.168.2.2 and 192.168.2.254.
4. Select a lease time for the assigned IP addresses. The default time is two hours.
5. To save your changes, click Apply.
MN-700 Base Station Configuration Guide
12
Wide Area Network Settings
Your Internet Service Provider (ISP) provides the settings that enable you to establish an Internet connection on
your network. These are your wide area network (WAN) settings. These settings vary, depending on whether your
ISP account provides a static IP address, a dynamic Internet connection, or a Point-to-Point Protocol over Ethernet
(PPPoE) connection.
If you did not run the Setup Wizard to configure your base station, you can establish your Internet connection by
entering the settings provided by your ISP on the Wide Area Network page of the Base Station Management Tool,
shown in the following illustration. You can also update these settings, if, for example, you change ISPs or settings
for your current account change.
If you need assistance identifying your Internet connection settings, see Broadband Network Utility Help.
You also have the option to disable your network Internet connection from the Wide Area Network page,
if necessary.
The following sections describe each type of Internet connection and how to configure your base station for
that option.
MN-700 Base Station Configuration Guide
13
Dynamic Internet Connection
A dynamic Internet connection enables your base station to obtain an IP address from your Internet service provider
(ISP) automatically by Dynamic Host Configuration Protocol (DHCP).
Note The base station WAN IP address is the IP address visible to the Internet. Do not confuse this address with the
base station LAN IP address (192.168.2.1). The LAN IP address is visible only to your local network devices.
To establish a dynamic Internet connection
1. Open the Base Station Management Tool, and then click Wide Area Network.
2. Under Internet Connection Type, click Dynamic.
3. Specify a host name if your ISP requires one. The host name identifies the computer connected to your modem
when you established your Internet connection. If you do not know the name of that computer, contact your ISP.
4. Specify a MAC address, or click Clone MAC Address, if necessary. You should only complete this step if your ISP
recorded the MAC address of one of the devices on your local network when you established your Internet
connection. For more information, see “MAC Addresses.”
5. If your ISP requires a DNS primary and secondary address, make sure that Automatically is selected in the
Obtain DNS Address drop-down list, unless you want to enter the addresses manually. In this case, select
Manually in the Obtain DNS Address drop-down list, and then type the DNS addresses in the appropriate fields.
6. To save the WAN settings, click Apply.
MAC Addresses
A media access control (MAC) address is a unique alphanumeric identifier for a hardware device, such as a base
station or adapter. You can find the MAC address for your Microsoft base station and any Microsoft network
adapters you are using printed on the label of each device.
Some ISPs record the MAC address of the adapter that you use when you first establish your Internet connection.
Depending on your ISP account, you might experience problems if the ISP later detects that the MAC address of
your base station is different from the MAC address originally recorded.
One way to avoid this problem is to provide the MAC address recorded by your ISP along with your other WAN
settings or to clone the MAC address of the adapter installed in the computer connected to your base station. When
you clone the modem or adapter MAC address, it replaces the base station MAC address, so that each device on
your network, including the base station, appears to have that MAC address.
To clone a MAC address
1. Open the Base Station Management Tool, and then click Wide Area Network.
2. In the MAC address box, type the MAC address recorded by your ISP.
-orClick Clone MAC address to clone the MAC address of the adapter used by the computer connected to your
base station.
3. To save the MAC address settings, click Apply.
It is a good idea to record the MAC address of the adapter that you clone, so that if you lose your settings or no
longer have the adapter, you do not lose your ability to connect to the Internet.
Static Internet Connection
If your ISP account provides a static (fixed) IP address for your base station, you should configure the WAN settings
on your base station for a static Internet connection.
You should request a static IP address from your ISP in the following situations:
O
You want to host a Web or FTP server on your network.
O
You want to register a domain name for a personal Web site hosted on your network.
O
You want to use remote desktop to connect to your network from an external network.
MN-700 Base Station Configuration Guide
14
To establish a static Internet connection
1. Open the Base Station Management Tool, and then click Wide Area Network.
2. Under Internet Connection Type, click Static.
3. Under Static Connection, type the static IP address provided by your ISP in the IP address fields.
4. Type the subnet mask, default gateway IP address, and DNS addresses (if provided) in the appropriate fields.
5. To save the WAN settings, click Apply.
PPPoE Internet Connection
If your ISP uses a PPPoE connection, you should configure the WAN settings on your base station for a PPPoE
connection.
A PPPoE Internet connection functions like a dial-up connection in that your user name and password are passed to
the ISP for authentication to establish an Internet connection. This interaction happens automatically when the
base station is turned on.
Unlike a dial-up connection, a PPPoE Internet connection is persistent unless any of the following events occur:
O
You disable the connection;
O
The base station is turned off or loses power;
O
You specify a maximum idle time, and this time elapses.
To establish a PPPoE Internet connection
1. Open the Base Station Management Tool, and then click Wide Area Network.
2. Under Internet Connection Type, click PPPoE.
3. Under Point-to-Point Protocol over Ethernet (PPPoE), type your user name and password.
4. Type a service name if your ISP supplied it.
5. Type a maximum idle time, if your ISP instructs you to. You will be disconnected from the Internet if the time that
you specify elapses without activity.
6. Select the Auto-reconnect checkbox if you want the base station to reconnect to the service automatically after
being disconnected.
7. If your ISP requires a DNS primary and secondary address, make sure that Automatically is selected in the
Obtain DNS Address drop-down list, unless you want to enter the addresses manually. In this case, select
Manually in the Obtain DNS Address drop-down list, and then type the DNS addresses in the appropriate fields.
8. To save the WAN settings, click Apply.
Disabled Connection
You can disable your Internet connection at any time. You might want to disable your Internet connection in the
following situations:
O
When you suspect that an unauthorized individual is accessing your network.
O
When you want to limit your children’s access to the Internet.
O
When you want to limit the exposure of the devices on your network to the Internet.
Disabling your Internet connection does not affect your Internet connection settings in any way. When you
reestablish your connection, your original settings are intact.
To disable the Internet connection
1. Open the Base Station Management Tool, and then click Wide Area Network.
2. Under Internet Connection Type, click Disabled.
3. To disable your Internet connection, click Apply.
MN-700 Base Station Configuration Guide
15
Wireless Settings
Wireless settings enable the devices on your network to connect to and communicate with the base station
wirelessly. You can establish or change the following wireless settings from the Wireless page of the Base Station
Management Tool, shown in the following illustration:
O
Wireless network name (SSID)
O
Wireless mode
O
Wireless channel number
For more information about each of these settings, see the following sections.
Wireless Network Name (SSID)
The wireless network name, also known as the Service Set Identifier (SSID), identifies your wireless network. For
security purposes, it is recommended that you establish a unique SSID for your base station. Do not use the
default name.
The purpose of the SSID is to help wireless clients locate and join a wireless network. A base station broadcasts its
SSID, so that any wireless client within range of the device can detect its presence. If the client sends a response
back to the base station containing the same SSID and the necessary wireless security settings, it can join
the network.
All the devices on your network must use the same network name as your base station. Therefore, if you change
the network name set on the base station, you must also change the name on all the devices that connect
wirelessly to your network. You can change the network name for devices that use a Microsoft wireless adapter
from the Broadband Network Utility. For more information, see Broadband Network Utility Help.
Because the wireless network name is broadcast by your base station or adapter, any user of a wireless device that
supports the Institute of Electrical and Electronics Engineers (IEEE) 802.11b or 802.11g standard can attempt to
join your wireless network when that user’s wireless device is within range of it. To help prevent users of
unauthorized wireless clients from joining your wireless network, it is recommended that you enable wireless
security. For more information, see “Wireless Security.”
Broadcast of Wireless Network Name
The base station is set to broadcast the wireless network name (Service Set Identifier, or SSID) by default, so that
wireless clients can detect and join your network. If you do not want wireless devices to detect your wireless
network, you can disable the base station broadcast of the SSID.
MN-700 Base Station Configuration Guide
16
Disabling the broadcast of the wireless network name is not recommended, however, because it is more difficult to
join a network with the broadcast disabled. If, for example, you use a laptop running Microsoft Windows® XP
operating system, Windows XP automatically detects and connects to your wireless network when you are within
range of it. When the broadcast is disabled, you might have to manually reconnect to your wireless network after
joining a different network.
If you are concerned about security and want to take measures to prevent unauthorized users from joining your
network, you should enable wireless security. For more information, see “Wireless Security.”
Wireless Mode
The wireless mode determines whether devices on your network can connect to the base station wirelessly and, if
so, the rate at which wireless data can be transmitted between the base station and the network devices.
The data rate varies depending on a number of factors, including the IEEE 802.11 standard to which the devices on
your network conform. Data can be transmitted at speeds up to 54 megabytes per second (Mbps) if all the devices
on your network conform to the 802.11g standard.
There are three wireless mode options available:
O
g performance (fastest). Choose this option only if all the devices on your network use network adapters
that conform to the 802.11g standard. Your base station will transmit data at the highest rate possible, up to
54 Mbps.
O
mixed b compatible (fast). Choose this option if your network includes devices that use network adapters that
conform to the 802.11b standard. Your base station will use the fastest connection speed available, so when it
connects to an 802.11b-compatible device, it will transmit data at up to 11 Mbps. When it connects to an
802.11g compatible device, it will transmit data at up to 54 Mbps.
O
Disabled. Choose this option when you do not want any devices to connect to your base station wirelessly. This
disables the wireless radio on your base station. You may want to disable the radio as a security measure when
you cannot monitor network activity for a period of time, for example, when you are away on vacation.
Wireless Channel
The wireless channel is a path through which signals flow to and from your network. The wireless channel for all
Microsoft wireless network products is set to channel 6 by default.
When you experience difficulty sending or receiving information from a wireless device, you may want to change the
wireless channel your network uses. Generally, the best wireless reception is available on channels 1, 6, and 11.
All the devices on your network must use the same wireless channel to communicate. The one exception to that
rule occurs when you want to set the base station to access point mode. In this case, the base station set to access
point mode should be set to a channel at least five channel numbers away from the base station, router, or
gateway that you are using on your network.
If you are having difficulty sending or receiving information on a wireless client, try changing the wireless channel.
Channels 1, 6, and 11 are recommended for best reception.
To establish wireless settings
1. Open the Base Station Management Tool, and then click Wireless.
2. Type a network name in the Wireless network name (SSID) box. The network name is case sensitive and cannot
exceed 32 characters.
3. In the Wireless mode drop-down list, click the wireless mode you want. Select Disabled if you do not want
devices to connect to your base station wirelessly.
4. To change the wireless channel, click a number in the Wireless channel number drop-down list box.
5. If you do not want the base station to broadcast the wireless network name (SSID), clear the Broadcast wireless
network name (SSID) check box. This option is not recommended.
6. To save these settings, click Apply.
Security Settings
The Broadband Networking Wireless Base Station is configured to protect your network from the most common
hacker attacks and other security risks. If necessary, you can change the default base station security settings or
establish special services from the Security section of the Base Station Management Tool.
MN-700 Base Station Configuration Guide
17
The following sections describe the base station security features and how to customize them.
Be aware that changing security settings might affect whether the computers on your network are able to connect
to the base station and the Internet. You should not change the default security settings unless you are absolutely
clear about your objective in doing so.
Wireless Security
Wireless security helps to protect your network from unauthorized access. Because wireless networks use radio
signals, it is possible for wireless network devices outside your immediate area to pick up the signals broadcast by
your base station and either connect to your network and access your network resources or capture data as it is
being transmitted wirelessly. The Microsoft Broadband Networking Wireless Base Station uses Wired Equivalent
Privacy (WEP) and Wi-Fi Protected Access (WPA) to help prevent unauthorized users from joining your network or
accessing data that is being transmitted wirelessly.
Both WEP and WPA use data encryption to help protect your network data. When data is encrypted, it is rendered
unreadable by a network key before being transmitted between wireless nodes. The data is readable only by
computers that have the key to decrypt the data. This prevents eavesdroppers from capturing your network data as
it is being transmitted.
In addition, WEP and WPA enforce one type of authentication for devices on your network. Before a device can join
your network, it must provide the WEP network key or WPA passphrase you establish. This prevents unauthorized
users from using your Internet connection or accessing shared network resources.
You can establish the wireless security settings for your base station from the Wireless Security page of the Base
Station Management Tool, shown in the following illustration. The following sections describe WEP and WPA in
more detail.
Note You cannot enable both WEP and WPA on your network. You must select either WEP or WPA. If you want to
enable WPA, make sure that all the computers on your network meet the system requirements necessary to use WPA.
MN-700 Base Station Configuration Guide
18
Wired Equivalent Privacy (WEP)
When you enable WEP, you must choose between 64-bit or 128-bit WEP encryption. The number defines the
strength of the data encryption. The higher the number, the more difficult the data is to decrypt.
After you select the wireless encryption strength, you must enter a WEP key. For 64-bit encryption, your WEP key
must consist of ten hexadecimal digits. For 128-bit encryption, your WEP key must consist of 26 hexadecimal digits.
A hexadecimal digit is a number or letter in the range 0–9 or A–F.
You must store the WEP key that you establish on the base station on each of your networked computers. This key
enables each computer to communicate with the base station. If you are enabling WEP for the first time or
changing your network key, be sure to update the wireless security settings for each of your wireless network
devices.
You can update the WEP settings for a Microsoft wireless adapter from the Broadband Network Utility. If you are
using a non-Microsoft adapter, use the software installed with that adapter to update these settings.
To enable WEP wireless security
1. Open the Base Station Management Tool, and then click Security.
2. On the Security menu, click Wireless Security.
3. Under Wireless encryption, select 128-bit WEP (strong), or leave the default setting of 64-bit WEP (standard).
4. Type a WEP key in the WEP Key box. For 64-bit encryption, the WEP key must be 10 characters in length. For
128-bit encryption, the WEP key must be 26 characters in length. WEP keys can contain numbers and the letters
A through F.
5. To save the wireless security (WEP) settings, click Apply.
Wi-Fi Protected Access (WPA)
WPA provides 256-bit data encryption to help protect your network data. This is the strongest data encryption
available.
Although WPA is a stronger form of wireless security than WEP, you can enable it only on computers running
Windows XP operating system with Service Pack 1 and the WPA Support Patch installed. You can download
the Windows XP Support Patch for WPA at www.support.microsoft.com.
Warning Do not enable WPA on the base station unless all the devices on your network meet the specified system
requirements.
When you enable WPA, you establish a passphrase. This passphrase generates a network key dynamically.
You must store the WPA passphrase that you establish on the base station on each of your networked computers.
This passphrase enables each computer to communicate with the base station. If you are enabling WPA for the first
time or changing your passphrase, be sure to update the passphrase on each of your wireless network devices.
To enable wireless security (WPA)
1. Open the Base Station Management Tool, and then click Security.
2. On the Security menu, click Wireless Security.
3. On the Wireless Security page of the Base Station Management Tool, under Wireless Encryption, select 256-bit
WPA-PSK (strongest).
4. In the Passphrase box, type a WPA passphrase. Your passphrase can be between 8 and 63 characters.
5. To save your wireless security settings, click Apply.
MN-700 Base Station Configuration Guide
19
Base Station Mode
The Microsoft base station is a router with an integrated access point.
As a router, the base station provides a network address translation (NAT) service, which enables you to use the
single IP address supplied by your ISP to connect multiple computers to the Internet. The NAT also manages
network traffic by directing data to the appropriate destination and by restricting access to your network.
You have the option to turn off the routing capabilities of your base station by setting it to access point mode. This
option is not recommended unless you have another base station, gateway, or router connected to your network,
and you want to use the MN-700 only to extend the range of a wireless network or to add wireless connectivity to a
wired network. In these situations, you can use the base station as an access point to move data only within your
local network.
The following illustration shows the Base Station Mode page of the Base Station Management Tool.
Access point mode does limit the functionality of the base station. It disables the base station NAT and DHCP server
and many base station security features, including the firewall, client filtering, port forwarding, the virtual DMZ
(demilitarized zone), and the base station log.
Important If you want to set your base station to access point mode, be sure to assign a name to the base station.
When you set the base station to access point mode, it becomes a client on your network and obtains its IP address
automatically by DHCP. You must, therefore, type the base station name in the address field of your Web browser to
open the Base Station Management Tool.
MN-700 Base Station Configuration Guide
20
The following procedure describes how to change the base station to access point mode after you have already set
up your network. If you are adding the base station to an existing network, and you want to set it to access point
mode, see Chapter 3, “Custom Setup” of the printed User’s Guide for detailed instructions.
To change the base station to access point mode
1. Open the Base Station Management Tool, and click Security.
2. From the Security menu, click Base Station Mode.
3. On the Base Station Mode page, click the Access Point radio button.
4. If you have not already established a name for your base station, type a name in the Base station name text
box. Do not use the default name of MN-700.
5. Click Apply. When you switch the base station from router mode to access point mode, the base station resets.
While the reset is in progress, the Power light on the base station turns orange. When the light is solid green, the
reset is complete.
Firewall
The Broadband Networking Wireless Base Station provides a firewall to protect your network against malicious
transmissions. Just as the name implies, a firewall acts as a barrier or buffer zone between your local network and
the Internet. It checks data packets that are being transmitted to your network and discards any suspicious data.
The firewall is enabled by default, but you can choose to disable the firewall rule that blocks ping and other Internet
Control Message Protocol (ICMP) commands.
Block Ping Commands
The base station firewall is configured to discard network ping commands. A ping command is like a short
conversation between a device on the WAN and your base station. When a device on the WAN sends a ping
command, the base station responds.
When ping commands are blocked, the base station does not respond to a ping initiated from the WAN. This
security mechanism hides your network from hackers who might be pinging random IP addresses to see where they
get a response. A response verifies your network location, and a hacker can then use this information to send
malicious communications to your network.
In general, it is a good idea to discard ping commands sent from the WAN. You should only disable this firewall rule
under the following circumstances:
O
When your ISP needs to ping your network to ensure that the connection is still valid.
O
When you or another person needs to check your Internet connection from an external network. For example,
you might want to do this to make sure that you can access your Web server.
O
When you are playing games on the Internet, and other players need to verify your network location and
connection speed.
To disable block ICMP commands rule
1. Open the Base Station Management Tool, and then click Security.
2. On the Security menu, click Firewall.
3. Clear the Block ICMP Commands check box.
4. To disable the rule, click Apply.
Port Forwarding
You can configure the data ports on your base station to run programs that have special network requirements or to
host a server on your network. This configuration process is called port forwarding.
Port forwarding involves the configuration of data ports, which are logical programmatic elements. Do not confuse
data ports with the physical ports on your base station.
To run a program that sends and receives data on different ports, you must configure application-triggered port
forwarding. To host a server, you must configure persistent port forwarding.
For more information about ports and their role in data transmission, read the following section, “About Ports.”
MN-700 Base Station Configuration Guide
21
About Ports
Data ports play an important role in data transmission.
Many different types of data are transmitted across a network, and certain types of data must pass out of certain
ports. The data type is identified by the protocol, or rules, that it follows. Typically, the data protocol determines the
ports to which the data is passed. For example, when you download files by using the File Transfer Protocol (FTP),
the request goes to outbound port 21, and the response returns to inbound port 20.
As a security feature, the Microsoft base station only opens inbound ports when data is transmitted from one of the
computers or other devices on your local network to the corresponding outbound port.
By keeping the inbound ports closed, the base station protects your networked computers from unsolicited traffic
from the Internet. A computer on the wide area network cannot initiate communication with your computers.
In certain situations, however, you may need to change the port configuration of the base station.
To run a program that uses a different port for inbound traffic than for outbound traffic, you may need to configure
application-triggered port forwarding.
To host a server on your network that receives unsolicited data requests from the Internet, you must configure
persistent port forwarding.
Application-Triggered Port Forwarding
Some applications, such as Internet games and videoconferencing, require multiple ports for data transmission.
For example, when you download files by using the File Transfer Protocol (FTP), the data requests go out through
port 21, and responses return through port 20.
These multiple port transmissions might cause problems when NAT is enabled on your base station, because the
NAT service anticipates that data sent to one port will return to the same port.
To run a program that uses a different port for inbound traffic than for outbound traffic, you may need to configure
application-triggered port forwarding.
The following illustration shows the Application-Triggered Port Forwarding page of the Base Station
Management Tool.
MN-700 Base Station Configuration Guide
22
The Broadband Networking Wireless Base Station has been configured to accommodate some common
application protocols that require multiple ports, including FTP, Simple Mail Transfer Protocol (SMTP), and Post
Office Protocol 3 (POP3).
To configure application-triggered port forwarding for other applications that require multiple ports, you must
specify the following information:
O
The outbound port from which data following a particular protocol will be sent.
O
The inbound port or ports to which related data will return.
O
The protocol, or “trigger type” used when data is sent from the outbound port.
O
The protocol, or “public type,” used when data is returned to the inbound port.
Essentially, you are telling the base station how to direct traffic across the networks. The inbound ports that you
specify will open only when data is sent to the corresponding outbound port. These ports will close again after a
certain amount of time has elapsed with no data sent to the inbound port.
You can set ranges of ports, multiple ports, and combinations of single and multiple ports for the inbound ports.
To identify the protocol that an application uses and the ports to which the data should be sent, consult the
documentation for that application.
To establish application-triggered port forwarding
1. Open the Base Station Management Tool, and then click Security.
2. On the Security menu, click Port Forwarding, and then click Set up application-triggered port forwarding.
3. In the Description box, type a description of the application that you want to enable.
4. In the Outbound port box, type the number of the outbound port. The outbound port should be a number from 0
through 65535. To determine which port the application uses, consult the documentation for the application.
5. In the Trigger type drop-down list box, click the protocol that the outbound data uses. This protocol should be
specified in the documentation for the application.
6. In the Inbound port(s) box, type the inbound port. The inbound port can be a single port or a comma-separated list of
ports or port ranges. For example, you could type 4-25, or 243, or 10, 24-50, 74. You are limited to 256 characters.
7. In the Public type drop-down list box, click the protocol that the inbound data uses. The protocol should be
specified in the documentation for the application.
8. To add this application to your list of applications, click Add. You can now enable, disable, edit, or delete the
application triggered port forwarding you have set up.
If an application does not function correctly after you enable multiple ports, check the documentation for the
application to verify that you are specifying the correct ports. If you have set the correct ports and the application
still does not function properly, you might need to establish a virtual DMZ on one of the client computers on your
network to run the application. For more information, see “Virtual DMZ (demilitarized zone)”
Persistent Port Forwarding
When you host a server on your network—for example, a Web or FTP server—you must configure the base station to
perform persistent port forwarding.
Persistent port forwarding is similar to application-triggered port forwarding in that you are opening inbound ports to
allow particular types of data or data requests to be sent from the Internet to one of the networked computers. The
difference is that you are opening these inbound ports permanently, rather than configuring them to open only
when there is data sent to an outbound port. In addition, you are directing all data sent to that port to a particular
computer on your local network.
For example, if you set up a Web server on one of the computers on your network, you must direct unsolicited
requests sent to Transmission Control Protocol (TCP) Port 80, which handles Hypertext Transfer Protocol (HTTP) or
Web data, to that computer. An unsolicited request is any data communication that is not initiated by a computer
on your local network.
Although not required, it is recommended that you assign a static (fixed) IP address to the computer that will host the
server on your network. For more information about assigning a static IP address, see Broadband Network Utility Help.
MN-700 Base Station Configuration Guide
23
To establish persistent port forwarding, you need the following information:
O
The IP address of the computer that you want to use as a server on your local network. If you have not assigned
a static IP address to this computer, you can determine its IP address by checking the DHCP client list on the
Home page of the Base Station Management Tool.
O
The inbound and private port numbers and protocol that correspond to the type of data that your server handles.
To configure persistent port forwarding
1. Open the Base Station Management Tool, and then click Security.
2. On the Security menu, click Port Forwarding, and then click Set up persistent port forwarding.
3. In the Description box, type a description of the server field. (This step is optional.)
4. In the Inbound port box, type the inbound port to which data packets sent from the Internet to the server will be
passed. The inbound port can be a single port or a range of ports. The port range cannot exceed 100 ports.
5. In the Type box, select the protocol (UDP or TCP) for the port.
6. In the Private IP address box, type the private IP address of the client computer that is hosting the server.
7. In the Private port boxes, type the private port or port range. The private port range must include the same
number of ports as the inbound port range.
8. To add this server to your list of servers, click Add. You can now enable, disable, edit, or delete the persistent
port forwarding that you have set up for this server.
Virtual DMZ (demilitarized zone)
In certain situations, you might want to set up a virtual DMZ (demilitarized zone) on one of the clients on your
network. When you establish a DMZ, you essentially open all inbound ports and direct the base station to forward
certain inbound data packets (those that are not in response to a transmission initiated by a LAN client and not
handled through application-triggered or persistent port forwarding) to a particular computer on your LAN. This
computer becomes the DMZ host.
A DMZ host is useful for experimenting with new games on the Internet or for setting up a server on your network
before you know which ports to open for that server.
However, you should use a DMZ only in very specific situations. The computer that hosts the DMZ is fully exposed to
the Internet, and is thus susceptible to malicious attacks and unauthorized access.
Unlike a real DMZ, the virtual DMZ is a client on your network and therefore has access to the other computers
on your LAN. If a hacker were to upload a virus to the virtual DMZ, the virus could spread to all the computers on
your network.
You should assign a static IP address to the computer that you will use as your virtual DMZ. For information about
how to assign a static IP address to a computer on your network, see Broadband Network Utility Help.
To establish a virtual DMZ
1. Open the Base Station Management Tool, and then click Security.
2. On the Security menu, click Virtual DMZ (Demilitarized Zone).
3. Select the Enable Virtual DMZ check box.
4. In the text box, type the IP address assigned to the computer that will host the virtual DMZ.
5. To save your changes, click Apply.
MN-700 Base Station Configuration Guide
24
MAC Filtering
You can increase the security on your network by using MAC filtering. MAC filtering enables you to control wireless
access to network resources, including your Internet connection and shared files and printers. You can configure
the base station to permit or deny a wireless client access to network resources based on the MAC address of the
adapter that the client uses. MAC filtering can only prevent computers from making a wireless connection to your
network; it does not affect computers with an Ethernet connection to your network.
Note A MAC address is a unique alphanumeric identifier for a hardware device, such as a base station or adapter. You
can find the MAC address for your Microsoft base station and any Microsoft network adapters you are using printed on
the label of each device.
You have two options for implementing MAC filtering. You can:
O
Allow unspecified MAC addresses. This is a good option when you know the MAC addresses of the computers
or other devices that you do not want to access your network. Any device whose MAC address you do not specify
will be able to connect to your network with the appropriate wireless settings.
O
Deny unspecified MAC addresses. This is a good option if you want to enforce the highest security level on your
network, because it helps to prevent unknown wireless clients from being able to join your network. Only the
clients to which you specifically grant permission can connect to the base station and use your network
resources.
The following illustration shows that MAC Filtering page of the Base Station Management Tool.
MN-700 Base Station Configuration Guide
25
To allow unspecified MAC addresses
1. On the MAC Filtering page of the Base Station Management Tool, select the Enable MAC filtering check box.
2. From the drop-down list, select Allow, and then click Apply. In this case, any client whose MAC address is not
listed in the MAC address table will be able to access your network.
3. Under Specify MAC address, type the adapter MAC address of the computer or device to which you want to deny
access, and then click Apply. Repeat this step for any additional clients to which you want to deny connection
permission.
4. In the MAC address table, clear the Allow check box next to the MAC address of each device you want to deny
access your network.
To deny unspecified MAC addresses
1. On the MAC Filtering page of the Base Station Management Tool, select the Enable MAC Filtering check box.
2. In the drop-down list, select Disallow, and then click Apply. Any client whose MAC address is not listed in the
MAC address table will not be able to access your network.
3. Under Specify MAC address, type the MAC address of the client to which you want to grant access, and then
click Apply. Repeat this step for any additional clients to which you want to grant connection permission.
Note Be sure to type the MAC address of each of your network adapters so that each of your networked devices can
access the network.
4. In the MAC address table, select the Allow check box next to the MAC address of each device to which you want
to grant wireless access to your network.
Client Filtering
You can use client filtering to control the Internet access of each client on your network. This feature is particularly
useful when you want to prevent your children from playing specific Internet games, or you want to restrict the time
that people connected to your network spend surfing the Web.
To configure client filtering, you must have the following information:
O
The ports and protocols for the type of application data to which you want to control access.
O
The IP address assigned to the client computer.
For optimal performance of client filtering, it is recommended that you assign static IP addresses to each of the
client devices whose access to the Internet you want to control. For information about assigning static IP addresses
to a computer, see the Broadband Network Utility Help.
If you choose not to assign a static IP address, you can determine the IP address assigned to the client computer by
checking the DHCP client list on the Home page of the Base Station Management Tool.
MN-700 Base Station Configuration Guide
26
The following illustration shows the Client Filtering page of the Base Station Management Tool.
To enable client filtering
1. Open the Base Station Management Tool, and then click Security.
2. On the Security menu, click Client Filtering.
3. In the appropriate box, type the IP address of the client device whose access to the Internet you want to control.
4. In the Outbound port(s) boxes, type the outbound port(s) and select the protocol for the data that you want to
control. For example, if you want to control Web browsing, specify Port 80 and select Protocol TCP.
5. In the appropriate boxes, specify the date and time range when you want to block access to this data. If you want
to filter access on a particular day, for example, every Sunday, enter the same time and the same date for the
start and end period. If you want to block access all the time, click Always.
6. Click Add to add this filter to the table, and then select the Block check box next to the entry to enable client
filtering. At any time, you can clear the check box to turn off the filter.
Parental Controls
You can use parental controls to prevent computers on your network from accessing specific Web sites or Web
content. For example, you can establish a filter so that your children cannot access any Web site from their
computer with the term “x-rated” in the domain name.
You can also use parental controls to ensure that computers on your network can only access certain Web sites or
Web content. This may be useful, for example, if you want your employees only to access Web sites related to
company business from their work computers. The filters you create will apply only to the computers you specify,
not to all computers on your network.
To configure parental controls, you must know the private IP address assigned to the computer(s) where you want
to control access to the Internet. For optimal performance of parental controls, it is recommended that you assign a
static IP addresses to each of the client devices whose access to the Internet you want to control. For information
about assigning a static IP address to a client, see Broadband Network Utility Help.
If you choose not to assign static IP addresses, you can determine the IP address assigned to the client computer
by checking the DHCP client list on the Home page of the Base Station Management Tool.
MN-700 Base Station Configuration Guide
27
The following illustration shows the Parental Controls page of the Base Station Management Tool.
To enable parental controls
1. Open the Base Station Management Tool, and click Security.
2. From the Security menu of the Base Station Management Tool, click Parental Controls.
3. Under Computer IP address, in the IP Address box, type the IP address of the computer for which you would like
to control access to Web content, and then click Add.
Note If you have not assigned a static IP address to this computer and you do not know its IP address, consult the
DHCP client list on the Home page of the Base Station Management Tool.
4. To enable parental controls on the computer you have just added, select the Parental Control check box next to
that computer’s IP address.
MN-700 Base Station Configuration Guide
28
5. If you want to permit access to any Web site whose domain name you have not identified in the Web filters
table, under Configure parental controls, select the Permit radio button, and then click Apply.
-orIf you want to block access to any Web site whose domain name you have not identified in the Web filters table,
under Configure parental controls, select the Block radio button, and then click Apply.
6. In the Domain name, Web address, or key word box, type the domain name or Web address of the Web site for
which you would like to create a filter, and then click Add.
7. In the Web filters table, select Permit to allow access to the domain name, Web address, or key word you have
identified. Select Block to prevent access to the domain name, Web address, or key word you have identified.
Base Station Log
You can access the base station log for your network from the Security section of the Base Station Management
Tool. The base station log records base station events, including communication between the base station and
servers on the Internet, and between the base station and clients on your local area network (LAN). It also includes
events in which the base station enforces firewall, filtering, and port forwarding rules. Typically, the log reports
status events that require no action on your part.
Each log message begins by specifying the date and time of the event. It also includes a brief description of the
event. If you have any concerns about unusual activity on your network, review the base station log.
To view the base station log
1. Open the Base Station Management Tool, and then click Security.
2. On the Security menu, click Base Station Log.
The base station log maintains a finite amount of data. When the base station log reaches maximum capacity, the
base station deletes the oldest log entries. If you want to retain data from the base station log, consider saving it to
a file.
To save the base station log
1. From the Home page of the Base Station Management Tool, click Security.
2. On the Security menu, click Base Station Log.
3. Click Save a Copy of Log File. The file will be exported to Notepad.
4. From the File menu, click Save, and then type a name for your log file.
5. Browse to the location where you want to save the log file, and then click Save.
MN-700 Base Station Configuration Guide
29
Index
access point mode, 20
application-triggered port forwarding, 22
back up settings
restoring, 9
storing, 9
base station
backing up settings, 9
log, 29
modes, 20
name, 11
password, 3, 10
resetting, 8
restoring back up settings, 9
restoring factory default settings, 8
serial number, 7
SNTP server synchronization, 10
time zone settings, 10
Base Station Management Tool
about, 2
access point mode, 20
backing up settings, 9
DMZ hosts, 24
firewall settings, 21
help, 4
Home page, 5
LAN settings, 7, 11
log, 29
logging off, 3
MAC addresses, 14
menus, 4
network status, 7
opening, 3
password, changing, 10
port forwarding, 21
resetting base station, 8
restoring back up settings, 9
restoring factory default settings, 8
security settings, 17
SNTP server synchronization, 10
time zone settings, 10
WAN settings, 6
wireless access settings, 16
blocking ping commands, 21
browsers supported, 3
channel, wireless, 17
child Internet access, restricting, 27
client filtering, 26
clock settings, 10
cloning MAC addresses, 14
daylight savings time, 10
default settings, restoring, 8
demilitarized zone (DMZ), 24
DHCP
IP address range, 12
disabling Internet connection, 15
DMZ (virtual demilitarized zone), 24
DNS, 6
dynamic Internet connections, 14
Explorer, versions supported, 3
factory default settings, restoring, 8
File Transfer Protocol (FTP), 22, 23
filtering
client, 26
MAC addresses, 25
firewalls, 21
firmware, version number, 7
FTP (File Transfer Protocol), 22, 23
games
DMZ (demilitarized zone), 24
ping commands, 21
port forwarding, 22
gateway, 6
help, Base Station Management Tool, 4
Home page, Base Station Management Tool, 5
hosting servers, 23, 24
Internet connection
disabling, 15
filtering, 26, 27
PPPoE, 15
Internet Explorer, versions supported, 3
IP addresses
changing, 12
DHCP server range, 12
dynamic, 14
LAN, 7
persistent port forwarding, 23
static, 14
WAN, 6
LAN (local area network) settings, 7, 11
local area network (LAN) settings, 7, 11
log, base station, 29
logging off Base Station Management Tool, 3
MAC addresses
cloning, 14
filtering, 25
settings, 7
modes
base station, 20
wireless, 17
name, base station, 11
NAT (Network Address Translation), 20, 22
Netscape Navigator, versions supported, 3
Network Address Translation (NAT), 20, 22
parental controls, 27
password
changing, 10
restoring default, 3, 8
persistent port forwarding, 23
ping commands, blocking, 21
POP3 protocol, 23
port forwarding
about, 21
application-triggered, 22
persistent, 23
PPPoE Internet connection, 15
resetting base station, 8
MN-700 Base Station Configuration Guide
30
restoring settings
back ups, 9
factory defaults, 8
router, 20
security
base station log, 29
blocking ping commands, 21
DMZ hosts, 24
firewalls, 21
logging off Base Station Management Tool, 3
MAC address filtering, 25
settings, changing, 17
SSID (wireless network name), 16
virus prevention, 24
WEP, 18, 19
WPA, 18, 19
serial number, base station, 7
servers, hosting, 23, 24
Service Set Identifier (SSID), 16
settings
backing up, 9
Base Station Management Tool, 2
firewalls, 21
IP address, 12
LAN, 7, 11
MAC addresses, 14
password, 10
restoring back ups, 9
restoring factory defaults, 8
security, 17
time zone, 10
WAN, 6
wireless access, 16, 17
SMTP protocol, 23
SNTP server synchronization, 10
SSID (wireless network name), 16
static IP addresses, 14
status, network, 7
subnet mask
LAN, 7
WAN, 6
synchronization, SNTP server, 10
TCP (Transmission Control Protocol) ports, 23
time zone settings, 10
Transmission Control Protocol (TCP) ports, 23
virtual demilitarized zone (DMZ), 24
virtual servers, 21
viruses, preventing, 24
WAN (wide area network)
blocking ping commands, 21
MAC address, 14
settings, 6, 13
Web access, restricting, 26, 27
Web server, hosting, 23
WEP (Wireless Equivalent Privacy), 18, 19
wide area network (WAN)
blocking ping commands, 21
MAC address, 14
settings, 6, 13
Wi-Fi Protected Access (WPA), 18, 19
wireless access settings, 16, 17
Wireless Equivalent Privacy (WEP), 18, 19
wireless network name (SSID), 16
WPA (Wi-Fi Protected Access), 18, 19
MN-700 Base Station Configuration Guide
31