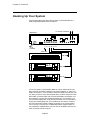
1
MIDI PRODUCTION CENTER
Software version 3.0
WARNING
To prevent fire or shock hazard, do not
expose this appliance to rain or moisture.
Operator's Manual
MIDI PRODUCTION CENTER
MIDI Production Center
Software version 3.0
Operator’s Manual
By Roger Linn
Copyright 1987-1994
Akai Electric Co., LTD.
Document Revision date: May 1994
WARNING!!
To prevent fire or shock hazard, do not expose this appliance to rain or moisture.
1-En
CAUTION
RISK OF ELECTRIC SHOCK
DO NOT OPEN
CAUTION: TO REDUCE THE RISK OF ELECTRIC SHOCK
DO NOT REMOVE COVER (OR BACK).
NO USER-SERVICEABLE PARTS INSIDE.
REFER SERVICING TO QUALIFIED SERVICE PERSONNEL.
THE SYMBOLS ARE RULED BY UL STANDARDS (U.S.A).
The lightning flash with the arrowhead symbol superimposed across a graphical
representation of a person, within an equilateral triangle, is intended to alert the user
to the presence of uninsulated “dangerous voltage” within the product’s enclosure;
that may be of sufficient magnitude to constitute a risk of electric shock.
The exclamation point within an equilateral triangle is intented to alert the user
to the presence of important operating and maintenance (servicing) instructions
in the literature accompanying the appliance.
5A-En
ii
WARNING
The MPC3000 is designed to be used in a standard household environment.
Power requirements for electrical equipment vary from area to area. Please ensure
that your MPC3000 meets the power requirements in your area. If in doubt, consult
a qualified electrician or Akai Professional dealer.
120V
220V – 230/240V
240V
@60Hz for USA and Canada
@50Hz for Europe
@50Hz for Australia
PROTECTING YOURSELF AND THE MPC3000
• Never touch the AC plug with wet hands.
• Always disconnect the MPC3000 from the power supply by pulling on the plug, not
the cord.
• Allow only an “Akai Professional” dealer or qualified professional engineer to
repair or reassemble the MPC3000. Apart from voiding the warranty, unauthorized engineers might touch live internal parts and receive a serious electric
shock.
• Do not put, or allow anyone to put any object, especially metal objects, into the
MPC3000.
• Use only a household AC power source. Never use a DC power source.
• If water or any other liquid is spilled into or onto the MPC3000, disconnect the
power, and call your dealer.
• Make sure that the MPC3000 is well-ventilated, and away from direct sunlight.
• To avoid damage to internal circuitry, as well as the external finish, keep the
MPC3000 away from sources of direct heat (stoves, radiators, etc.).
• Avoid using aerosol insecticides, etc. near the MPC3000. They may damage the
surface, and may ignite.
• Do not use denaturated alcohol, thinner or similar chemicals to clean the
MPC3000. They will damage the finish.
• Place the MPC3000 on a flat and solid surface.
iii
WARNING
THIS APPARATUS MUST BE EARTHED
IMPORTANT
This equipment is fitted with an approved non-rewireable UK mains plug.
To change the fuse in this type of plug proceed as follows:
1) Remove the fuse cover and old fuse.
2) Fit a new fuse which should be a BS1362 5 Amp A.S.T.A or BSI approved type.
3) Refit the fuse cover.
If the AC mains plug fitted to the lead supplied with this equipment is not suitable for your type of
AC outlet sockets, it should be changed to an AC mains lead, complete with moulded plug, to the
appropriate type. If this is not possible, the plug should be cut off and a correct one fitted to suit
the AC outlet. This should be fused at 5 Amps.
If a plug without a fuse is used, the fuse at the distribution board should NOT BE GREATER than 5 Amp.
PLEASE NOTE: THE SEVERED PLUG MUST BE DESTROYED TO AVOID A POSSIBLE
SHOCK HAZARD SHOULD IT BE INSERTED INTO A 13 AMP SOCKET
ELSEWHERE.
The wires in this mains lead are coloured in accordance with the following code:
GREEN and YELLOW —EARTH
BLUE
—NEUTRAL
BROWN
—LIVE
As the colours of the wires in the mains lead of this apparatus may not correspond with the
coloured markings identifying the terminals in your plug, please proceed as follows:
The wire which is coloured GREEN and YELLOW must be connected to the terminal which is
marked with the letter E or with the safety earth symbol or coloured GREEN or coloured
GREEN and YELLOW.
The wire which is coloured BLUE must be connected to the terminal which is marked with the
letter N or coloured BLACK.
The wire which is coloured BROWN must be connected to the terminal which is marked with
the letter L or coloured RED.
THIS APPARATUS MUST BE EARTHED
Ensure that all the terminals are securely tightened and no loose strands of wire exist.
Before replacing the plug cover, make certain the cord grip is clamped over the outer sheath of
the lead and not simply over the wires.
6D-En
This equipment conforms to No. 82/499/EEC, 87/308/EEC standard
3A-En
CONFORME AL D.M. 13 APRILE 1989 DIRETTIVA CEE/87/308
3B-It
iv
LITHIUM BATTERY
This product uses aLithium Battery for memory back-up. The lithium battery should only be
replaced by qualified service personnel. improper handling may cause risk of explosion.
24A-En
FCC warning
This equipment has been tested and found to comply with the limits for a Class A digital
device, pursuant to Part 15 of the FCC Rules. These limits are designed to provide
reasonable protection against harmful interference when the equipment is operated in
a commercial environment. This equipment generates, uses, and can radiate radio
frequency energy and, if not installed and used in accordance with the instruction
manual, may cause harmful interference to radio communications. Operation of this
equipment in a residential area is likely to cause harmful interference in which case the
user will be required to correct the interference at his own expense.
21A-En
AVIS POUR LES ACHETEURS CANADIENS DU MPC3000
Le présent appareil numérique n’ément pas des bruits radioélectriques dépassant les
limites applicables aux appareils numériques de la Class A prescrites dans le Règlement
sur le brouillage radioélectrique édicté par le ministère des Communications du Canada.
27-F
This digital apparatus does not exceed the Class A limits for radio noise emissions
from digital apparatus set out in the Radio Interference Regulations of the Canadian
Department of Communications.
27-En
FÜR KUNDEN IN DER BUNDESREPUBLIK DEUTSCHLAND
Bescheinigung von AKAI
Hiermit wird bescheinigt, daß das Gerät AKAI
MPC3000
in Übereinstimmung mit den Bestimmungen der
Amtsblattverfügung 1046/1984
funkentstört ist.
Der Deutschen Bundespostwurde das Inverkehrbringen dieses Gerätes angezeigt und
die Berichtigung zur Überprüfung der Serie auf Einhaltung der Bestimmungen eingeräumt.
AKAI ELECTRIC CO., LTD.
17B-G
COPYRIGHT NOTICE
The AKAI MPC3000 is a computer-based instrument, and as such contains and uses
software in ROMs and disks. This software, and all related documentation, including this
Operator’s Manual, contain proprietary information which is protected by copyright laws. All
rights are reserved. No part of the software or its documentation may be copied, transferred
or modified. You may copy the operating software and any samples, programs, etc.
contained on disks for your own personal use. All other copies of the software are in violation
of copyright laws. You may not distribute copies of the software to others, or transfer the
software to another computer by electronic means. You may not modify, adapt, translate,
lease, distribute, resell for profit or create derivative works based on the software and its
related documentation or any part there of without prior written consent from AKAI Electric
Co., Ltd, Yokohama, Japan.
v
FRONT PANEL
INTEGRATED RHYTHM MACHINE
16BIT DRUM SAMPLER/MIDI SEQUENCER
STEREO VOLUME
MPC3000
MIDI PRODUCTION CENTER
DATE ENTRY
7
COMMANDS
8
9
RECORD LEVEL
4
5
6
b
MIDI
1
SOFT KEY 2
SOFT KEY 3
2
3
OTHER
e
SEQ EDIT
g
SOFT KEY 4
c
SONG
d
SOFT KEY 1
MIXER/
EFECTS
PROGRAM/
SOUNDS
DISK
a
f
STEP EDIT EDIT LOOP
h
i
DISPLAY
CONTRAST
0
•
ENTER
TEMPO/SYNC TRANSPOSE SIMUL SEQ
j
SOFT KEY 1
SOFT KEY 2
SOFT KEY 3
k
l
SOFT KEY 4
AUTO PUNCH COUNT IN WAIT FOR KEY
m
–
A
C
n
o
+
DRUMS
B
D
CURSOR
PAD BANK
CRASH
13
CRASH2
14
RIDE CYMBAL 1 5
RIDE BELL
16
MID TOM
10
LOW TOM
FLOOR TOM
12
p
DATA ENTRY
FULL LEVEL
q
16 LEVELS
HIGH TOM
9
11
NOTE VARIATION
REAL TIME
r
s
t
ASSIGN
TIMING
CORRECT
ERASE
ALT SNARE
5
SNARE
6
HIHAT OPEN
7
HIHAT PEDAL
TAP
TEMPO
MAIN
SCREEN
HELP
8
AFTER
PLAY / REC
u
v
w
x
y
LOCATE
10
10
SIDE STICK
1
BASS
2
HIHAT CLOSED
3
HIHAT LOOSE
4
Z
#
REC
0
&
OVER DUB
space
STOP
A/a
PLAY
START
PLAY
0
REAR PANEL
AKAI ELECTRIC CO.,LTD.
SCSI
MODEL NUMBER MPC3000
MADE IN JAPAN
RECORD IN
FOOT SW
1
LEVEL
2
GAIN
OUT
LOW MID
MIDI IN
1
POWER
ON
STEREO OUT
DIGITAL
SYNC
IN
LEFT
RIGHT
LEFT
RIGHT
PHONS
HI
MIDI OUT
2
A
B
C
D
1
OFF
vi
2
3
INDIVIDUAL MIX OUTPUTS
4
5
6
7
8
Table of Contents
Chapter 1: Introduction ......................................................................................................... 1
Welcome! ......................................................................................................................... 2
Features .......................................................................................................................... 3
What’s Different From the MPC60? .............................................................................. 6
If You Already Know the MPC60 ...................................................................... 8
Chapter 2: The Basics ........................................................................................................... 13
Hooking Up Your System ............................................................................................. 14
Getting Around on the MPC3000 ................................................................................ 15
The Cursor, Cursor Keys, Data Fields, and Command Keys ........................ 15
The Numeric Keypad, Data Entry Control, and [+] & [–] Keys .................... 16
The Soft Keys ................................................................................................... 17
The HELP key .................................................................................................. 18
Definitions: Sequence, Track, Song, Sound, Pad, Note Number, and Program ....... 19
Loading and Playing Sounds and Programs ............................................................... 22
Playing the Pads, the PAD BANK, & FULL LEVEL Keys ........................... 22
Selecting Programs .......................................................................................... 23
The Note Variation Slider, ASSIGN and AFTER keys .................................. 24
The 16 LEVELS key ......................................................................................... 26
Chapter 3: Recording Sequences ....................................................................................... 29
How Sequences are Organized .................................................................................... 30
The MAIN SCREEN Key & Play/Record Screen ........................................................ 32
The Play/Record Keys .................................................................................................. 39
Sequence Recording Example 1: A Looped Drum Pattern ......................................... 42
Sequence Recording Example 2: A Multitrack Sequence ........................................... 44
The TIMING CORRECT Key: Correcting Timing Errors, Swing Timing ................ 49
The Note Repeat Feature ................................................................................ 52
Tempo and the TEMPO/SYNC Key ............................................................................. 53
Mid-Sequence Tempo Changes ........................................................................ 56
The TAP TEMPO Key ...................................................................................... 58
The WAIT FOR and COUNT IN Keys ........................................................................ 59
The AUTO PUNCH Key .............................................................................................. 60
The SIMUL SEQUENCE Key ..................................................................................... 62
The OTHER Key ........................................................................................................... 63
Metronome, Foot Switches, and Free Sequence Memory .............................. 63
Initializing System Parameters ...................................................................... 66
The Record 16 Channels Function: Multichannel Recording ........................ 67
Recording MIDI System-Exclusive Data .................................................................... 70
Chapter 4: Editing Sequences ............................................................................................ 71
The ERASE Key ........................................................................................................... 72
Erasing Notes in Real Time While in Overdub Mode .................................... 72
Erasing Notes or Other Events While Stopped .............................................. 72
Initializing a Sequence .................................................................................... 75
The SEQ EDIT Key ...................................................................................................... 77
Viewing and Changing Time Signature .......................................................... 77
Rearranging the Track Order .......................................................................... 78
Inserting Blank Bars Into a Sequence ............................................................ 79
Deleting Bars From a Sequence ...................................................................... 80
Copying Bars (All Tracks) ............................................................................... 81
vii
Copying Events ................................................................................................ 82
Copying an Entire Sequence to Another ......................................................... 84
Shifting the Timing of Many Notes ................................................................. 85
Global Editing of Note Event Data ................................................................. 86
Editing Note Velocity or Duration Data ............................................. 87
Editing Note Number Assignment of Drum Note Events ................. 89
Editing Note Variation Data of Drum Note Events ........................... 90
The STEP EDIT Key .................................................................................................... 92
Using Step Edit ................................................................................................ 93
Step Edit Event Types ..................................................................................... 95
Step Edit Options ............................................................................................. 99
Step Recording ............................................................................................... 102
The EDIT LOOP Key ................................................................................................. 103
Using Edit Loop as an Undo Function .......................................................... 104
The TRANSPOSE Key ............................................................................................... 105
Transposing in Real Time While Playing ..................................................... 106
Chapter 5: Song Mode ........................................................................................................ 107
Overview ..................................................................................................................... 108
The SONG Key and Song Mode Screen .................................................................... 109
An Example of Creating and Playing a Song ............................................................ 112
Converting a Song Into a Long Sequence ................................................................. 114
Chapter 6: Creating and Editing Programs .................................................................. 115
What Are Programs? .................................................................................................. 116
Selecting the Active Program, Assigning Sounds ..................................................... 119
Envelope, Velocity Modulation, Tuning, Poly Mode ................................................. 125
The Dynamic Filter .................................................................................................... 128
Copying and Initializing Programs ........................................................................... 130
Chapter 7: The MIXER/EFFECTS Key ........................................................................... 133
The Stereo Output Mixer ........................................................................................... 134
The Individual Outputs/Effects Mixer ...................................................................... 136
Viewing the Mix Data in Text Form ......................................................................... 139
Mixer Source Select, Automated Mix ........................................................................ 142
Effects Generator ....................................................................................................... 145
Chapter 8: Creating and Editing Sounds ...................................................................... 147
Sampling a New Sound .............................................................................................. 148
Editing a sound........................................................................................................... 154
Renaming, Copying, and Deleting a Sound .............................................................. 158
Triggering a Sound from an External Signal—the Audio Trigger .......................... 161
Chapter 9: Saving to and Loading from Disk ............................................................... 163
Overview ..................................................................................................................... 164
Saving Files ................................................................................................................ 166
Saving a SEQ File (Single Sequence) ............................................................ 166
Saving an ALL File (All Sequences and Songs) ........................................... 167
Saving a SND File (Single Sound) ................................................................ 168
Saving a PGM File (Single Program & Sounds) ........................................... 169
Saving an APS File (All Programs and Sounds) .......................................... 170
Saving a PAR File (System Parameters) ...................................................... 172
viii
Loading, Erasing, or Renaming Files ........................................................................ 173
Loading a SEQ File (Single Sequence) ......................................................... 175
Loading an ALL File (All Sequences and Songs) ......................................... 177
Loading a SND File (Single Sound) .............................................................. 177
Loading a PGM File (Single Program and Sounds) ..................................... 178
Loading an APS File (All Programs and Sounds) ........................................ 178
Loading an MPC60 Version 1 or 2 SET or ST1 File ..................................... 179
Loading a PAR File (System Parameters) .................................................... 182
Files That Automatically Load on Power-Up ............................................... 182
Loading Sample Files From Akai S1000/S3000 Disks ............................................. 184
Formatting a Floppy Disk .......................................................................................... 186
Using a SCSI Hard Disk ............................................................................................ 187
Copying an Entire Floppy Disk ................................................................................. 191
Chapter 10: Syncing to Tape and Other Devices ......................................................... 193
The SYNC Screen ....................................................................................................... 194
Syncing to Tape and Other Devices: Examples ........................................................ 201
Syncing to MIDI Clock ................................................................................... 201
Syncing to SMPTE ......................................................................................... 201
Syncing to MIDI Time Code .......................................................................... 204
Syncing to FSK24 ........................................................................................... 204
Syncing to 1/4-note Clicks .............................................................................. 206
Chapter 11: MIDI Functions ............................................................................................. 207
Assigning Pads to Note Numbers .............................................................................. 208
MIDI Receive Channel, Local Mode, Soft Thru, Note Variation Controller
Assign and Sustain Pedal Processing ................................................................. 210
MIDI Input Filter ....................................................................................................... 213
Turning All Notes Off ................................................................................................. 216
The MIDI Implementation Charts ............................................................................ 217
Appendix ............................................................................................................................... 219
Technical Specifications ............................................................................................. 220
Answers to Frequent Questions ................................................................................ 222
Contents of Disk Files ................................................................................................ 225
MPC3000 Options ...................................................................................................... 229
The SMPTE Option ........................................................................................ 229
Expanding the Sound Memory ...................................................................... 229
The Video Output Option .............................................................................. 230
Index ...................................................................................................................................... 231
ix
Chapter 1: Introduction
Chapter 1:
Introduction
Page 1
Chapter 1: Introduction
Welcome!
Since its release in 1988, the MPC60 MIDI Production Center has
earned a reputation not only as the world’s greatest drum machine
but also as a powerful sequencer for those who desire an alternative
to the complexity and confusion of computer sequencers.
But over the years users asked for more: 16-bit stereo sampling,
more sample memory, enhanced sound design features, faster
sequence processing, enhanced sequence recording and editing
features, SCSI, and much more. The MPC3000 fulfills the majority
of the requests we received. And in keeping with the MPC60’s
tradition of ease of use, we have tried our best to implement these
new features in the most intuitive way possible.
Since the advent of sequencers I have tracked their evolution with
great interest and in my view, sequencers have evolved to a point
where they are now a legitimate instrument on their own. Many of
today’s musicians could be better described as sequencer players
than as keyboardists or guitarists. Album credits often read “programming by...” to denote a musician who has used a sequencer to
create the backing track for a recording. These new musicians think
and compose in terms of total arrangement as opposed to single
instruments. In many ways, the sequencer’s panel and display
screens are their strings and keys, allowing them to reach heights of
creativity never before possible.
In this light, I like to think of the MPC3000 as the piano or violin of
our time, and of you as an MPC3000ist. In the same way a violinist’s
style is identified by his or her vibrato and phrasing, your MPC3000
virtuosity may be identified by your particular swing settings, your
creative use of Note Repeat, or your real-time use of the Note
Variation feature. As an MPC3000ist, if you find the instrument
useful in your creative process, please let the world know. Next time
you perform on a recording, ask to be credited not with, “Keyboards
played by...” or “Programming by...” but rather with, “MPC3000
played by....”
Thanks for buying the MPC3000. I hope you enjoy using it as much
as we have enjoyed creating it.
Page 2
Chapter 1: Introduction
Features
The following is a summary of some of the advanced features of the
MPC3000.
General
• Large 320-character LCD display (8 lines by 40 characters) with
graphics.
• Built-in 1.44 megabyte disk drive for storing both sequence and
sound data.
• Built-in SCSI interface for storing data to external hard disk.
• Interactive Help function provides a full screen of explanation for
every data field of every function screen.
• Four soft keys provide one-button execution of many functions.
• The contents of many data fields and other settings are retained
while the power is turned off.
• Fast internal 16MHz V53 16-bit microprocessor (equivalent to an
80286) provides accurate timing in complex sequences and fast
response to MIDI.
Sound Generator
• 16-bit, 44.1kHz stereo sampling.
• High capacity sound memory: 2 megabytes standard (21.9 seconds
mono or 10.9 seconds stereo), expandable to 16 megabytes (188.3
seconds mono or 94.1 seconds stereo).
• Digital sampling input for direct recording from digital sources.
• 128 sounds (samples) may be held in memory at one time.
• 32 simultaneous playback voices.
• Dynamic lowpass filter with envelope generator (and resonance!)
for each voice.
• Built-in effects generator for versatile delay effects.
• 10 polyphonic audio outputs, including stereo mix out and 8
individual outputs.
• 24 programs (sets of sound assignments) exist, each having 64
unique sound assignments from a common bank of 128 sounds, and
unique sound modifying parameters for each assignment. Switching
programs instantly changes all sound assignments and sound
parameters.
• Multiple iterations of a single sound may be assigned to use
multiple voices (polyphonic) or the same voice (monophonic), and
may either respond to Note Off messages or not. Also, any sound
may be set to terminate the playing of any two other sounds.
• Extensive sample editing allows any portion of a sound to be
copied or removed and inserted into another sound at any location.
Any portion may also be silenced or reversed.
Page 3
Chapter 1: Introduction
• The Best Start feature automatically finds the point within a
sound at which the drum strike begins, bypassing any dead space at
the beginning of the sound which could cause playback delays.
• Up to three sounds can be assigned to a MIDI note number or pad.
The sounds can either play simultaneously, switch depending on
note velocity, or switch depending on envelope decay (to simulate
the MPC60’s hi-hat decay slider function).
• The stereo and individual output mixers are automated. Any
changes made while recording will be automatically repeated on
playback.
Sequencer
• Both linear and pattern-style (looped) recording are supported.
• Both drum machine and sequencer-oriented features are integrated into one easy-to-use operating system.
• 75,000 note sequencer capacity.
• 99 sequences may be held in memory at once. Each sequence
contains 99 individual tracks, each of which can be output to any
one or two MIDI channels.
• 4 independent MIDI output ports permit 64 simultaneous MIDI
output channels.
• 2 mergeable MIDI inputs.
• The MPC3000 may be slaved to five sync sources: MIDI Clock,
MIDI Time Code, FSK24, sync to any sound playing 1/4-notes, and
SMPTE (optional).
• 2 sequence record modes: Record (erasing existing notes while
recording) and Overdub (merge with existing notes). You can switch
between modes at any time.
• Step Edit feature allows fast viewing, recording, editing, or
deletion of any event within a sequence.
• The Simul Sequence feature allows two sequences, or one sequence and one song, to play simultaneously. For example, you could
play a short, looped drum sequence while simultaneously recording
your multitrack keyboard sequence.
• Versatile editing system allows erasing, time shifting, copying,
merging, inserting, and deleting of any sequence data.
• Individual parameters within note events may be changed for
multiple notes globally.
• Each track has an adjustable output level, allowing output velocities to be scaled in real time while playing.
• All 16 MIDI channels can be recorded simultaneously, allowing
sequences to be transferred to the MPC3000 from an external
sequencer in one pass.
• The Edit Loop feature allows a portion of a sequence to be looped
while overdubbing, and allows changes to be undone.
• Sequences may be transposed, either in real time while playing or
by altering note data.
• The Tap Tempo feature allows the playback tempo to be set by
tapping a key in the time of 1/4-notes.
Page 4
Chapter 1: Introduction
• Programmable tempo changes in mid-sequence or mid-song are
supported.
• Mid-sequence time signature changes are supported.
• Auto Punch feature allows automated punch-in and/or punch-out
at preset times within the sequence.
• Two foot switch inputs allow functions such as Play/Stop and
Punch In/Out to be remotely controlled.
• Swing feature provides a useful method of adjusting the rhythmic
feel of your tracks.
• 16 velocity- and pressure-sensitive front panel drum pads and 4
pad banks provide a total of 64 pad/bank combinations.
• Note Variation feature allows a unique value of tuning, decay,
attack or filter frequency to be recorded with each drum note.
• MIDI sustain pedal messages can be specially processed so that
multiple overdubs on the same track of a sequence can use the
sustain pedal independently, without interaction.
Page 5
Chapter 1: Introduction
What’s Different From the MPC60?
The MPC3000 contains many changes and improvements over the
MPC60. The major changes are listed below.
Sound Generator Changes
• Sampling resolution is increased from 12-bit non-linear to 16-bit
linear.
• Sampling rate is increased from 40 kHz to 44.1 kHz.
• Stereo sampling is supported.
• A digital sampling input is included for direct recording from
digital sources.
• Sound memory is increased: 2 megabytes standard (21.9 seconds
mono or 10.9 seconds stereo), expandable to 16 megabytes (188.3
seconds mono or 94.1 seconds stereo). The maximum sampling time
per sound is no longer limited to 5 seconds, but rather only by
available sound memory. Also, sampling no longer requires erasing
sequence memory.
• Total sound capacity is increased from 34 to 128 sounds.
• Number of playback voices is increased from 16 to 32.
• A dynamic lowpass filter with envelope generator (and resonance)
exists for each playback voice.
• A built-in effects generator permits versatile delay effects.
• The new programs system of sound assignment allows all sound
assignments to be instantly changed merely by changing the active
program number, instead of by loading a new SET file as in the
MPC60. There are 24 programs, each with a unique set of sound
assignments from a common bank of 128 sounds. Unlike Set files,
saving a program to disk only saves assignment and parameter
information; the sounds used by the program are saved as individual sound files. This allows multiple programs to be saved to the
same disk without redundantly saving sound data as with SET files.
• Sounds are now assigned to MIDI note numbers instead of to pad
names. This permits simpler operation of the MPC3000 as a MIDI
sound module, eliminating the need to translate MIDI note numbers
into pad names as in the MPC60.
• New Mono Mode parameter causes a voice to restart, terminating
earlier plays. Also, any sound can be set to terminate any two other
sounds.
• Sample files from Akai S1000 & S3000 floppy disks may be loaded.
• Sample editing is enhanced. Now, any portion of a sound may be
copied or removed and then inserted into another sound at any
location. Also, any portion may be silenced or reversed.
• The Echo Mixer has been removed. It is replaced by the Individual
Outputs/Effects Mixer. This new mixer allows any sound to be
routed to any one of the individual outputs or the internal effects
generator, and the volume level of this assignment is adjustable
independently of the stereo volume.
Page 6
Chapter 1: Introduction
This allows independent send-level mixing to the internal effects
generator, or for any one of the individual outputs to be used as a
full external echo send mixer.
• The Double Play feature has been removed. Instead, up to three
sounds can be assigned to play from an incoming MIDI note number
or pad. The sounds can either play simultaneously, switch depending on note velocity, or switch depending on envelope decay (to
simulate the MPC60’s hi-hat decay slider function).
• The Best Start feature automatically finds the point within a
sound at which the drum strike begins, bypassing any dead space at
the beginning of the sound which could cause playback delays.
• The envelope decay parameter is now switchable between two
modes: END (same as the MPC60’s Fadeout parameter) and START
(decay begins immediately following attack).
Sequencer Changes
• Sequence memory capacity is expanded by 30% to 75,000 notes.
• In Step Edit , the REWIND [<] and FAST FORWARD [>] keys
may now be used to search to the previous or next event within a
track.
• In Step Edit, events may be cut and pasted by changing the
function of soft keys 1 and 2 from <Insert> and <Delete> to <Paste>
and <Cut>.
• The number of pad banks has been increased from 2 to 4 for a
total of 64 pad/bank combinations. The active pad bank is indicated
by the LEDs above the PAD BANK key.
• In drum tracks, drum notes are now assigned to MIDI note
numbers instead of to pads. This provides easier compatibility with
external MIDI devices and allows pad assignments to be rearranged
without affecting sequence or program data. MPC60 version 2
sequences are automatically converted from pad assignment to note
number assignment when loaded.
• The MPC60’s fixed four-letter drum names are no longer used.
Instead, notes in drum tracks are visually identified in editing
screens by pad number, MIDI note number and currently assigned
sound name.
• The new Note Variation Slider replaces the MPC60’s Hi-hat Decay
Slider, expanding its capabilities to provide a unique value of either
decay, tuning, attack, or filter frequency for every note.
• The 16 Levels function can now provide 16 levels of velocity,
tuning, attack, decay or filter frequency for every note.
• The Copy/Merge a Track feature has been renamed to Copy
Events and now permits specific drum notes to be copied.
• The Change Velocity/Duration feature now allows specific drum
notes to be edited.
• The new Shift Timing feature shifts track timing independently of
timing correction.
Page 7
Chapter 1: Introduction
• The new Edit Note Number Assignment feature permits
reassigning specific drum notes from one note number
(instrument) to another.
• The Count In feature may now be set to activate only before
recording.
• The Punch In feature may now be set to punch-in only or
punch-out only.
• New MIDI Local Mode internally disconnects the pads from the
sound generator. This is useful when using the pads and sound
generator with external sequencers.
General Changes
• Floppy disk capacity is expanded to 1.44 megabytes.
• Built-in SCSI interface allows data to be saved to and loaded from
external hard disk.
• Faster internal computer (16MHz V53—equivalent to a 80286) for
improved timing accuracy in complex sequences and enhanced
timing response to MIDI input.
• Many screens are changed and some functions moved in order to
make operation simpler and more intuitive.
If You Already Know the MPC60
Most of the operational differences between the MPC60 and
MPC3000 should be relatively simple to understand for MPC60
users, but some changes are more complex than others. Here is
additional information about the more complex changes to the
MPC3000.
The new Programs system
The MPC3000 uses a new system of sound assignments called
programs. A program is a set of 64 sound assignments and
sound modifying parameters. There are 24 different programs,
each with a unique set of sound assignments to a common
bank of up to 128 sounds in memory. Only one program may
be active at a time. As result of this new system, changing a
pad’s assignment from one sound to another is done merely by
changing the contents of a data field. Changing from one
entire set of sound assignments to another is done by changing
the active program number. In addition to the sound
assignments, each program contains a unique set of sound
modifying parameters for each sound assignment. These
parameters include envelope, tuning, velocity modulation,
Page 8
Chapter 1: Introduction
dynamic filter and other data. This is explained further in Chapter
6: “Creating and Editing Programs”.
MPC60 SET files are replaced by the new Program files.
In the MPC60, all sounds and sound assignments are saved in
one large SET file. In order to change all pad assignments, it
is necessary to load a new SET file. Because of the MPC3000’s
new Program system of sound assignments, SET files have
been replaced by PGM (program) files. A PGM file contains
all assignment information but no sound data. Instead, when
a PGM file is saved, all sounds used by the program are also
saved as individual sound files. This new method allows
different PGM files on the same disk to use the same sound
files, eliminating the problem of saving sound data redundantly
in multiple SET files. However, SET files may be loaded—the
assignments are loaded into a program and the sounds are added
to sound memory.
There is another new save operation called Save All Programs and
All Sounds. This saves a file with the extension APS containing the
data of all 24 programs, followed by a sound file for every sound
currently in memory.
Saving of PGM and APS files is explained further in chapter 9:
“Saving To and Loading From Disk”.
Sounds and sequenced drum notes are now assigned to note
numbers instead of to pad names.
In the MPC60, sounds and sequenced drum notes are assigned to
one of a number of fixed drum pad names (HIHT, SNR1, DR01 etc.)
In the MPC3000, sounds in programs and drum notes in sequences
are assigned instead to one of 64 MIDI note numbers (35-98), as are
each of the 64 pad/bank combinations (A01-D16). The fixed 4
character drum names are no longer used. This new note number
assignment method provides the following advantages over the
MPC60’s pad-assign method:
1. Because pads are assigned to MIDI note numbers independently of sound assignments in programs or note
assignments in drum tracks, the pad assignments may be
freely rearranged to personal preference without affecting
sequences or sound assignments.
2. When using the MPC3000 as a sound generator, it is no
longer necessary to use the MPC60’s “Assign incoming
notes to pads” conversion table, which has been removed.
Instead, simply assign the received MIDI note number
directly to a sound.
Page 9
Chapter 1: Introduction
3. Notes may be recorded from MIDI directly into drum
tracks without the need for the MPC60’s “Assign incoming notes to pads” conversion table, which has been
removed. Now, when viewing a drum note in Step Edit,
the actual MIDI note number received is displayed, as
well as the currently assigned pad number (A01-D16) and
sound name.
4. Drum notes are sent out over MIDI without the need for
the MPC60’s “Assign pads to outgoing note numbers”
conversions, a function which has been removed. When
viewing a drum note in Step Edit, the actual MIDI note
number displayed is sent out.
When MPC60 SEQ or ALL files are loaded, a screen is presented
explaining that the pad assignments of drum notes will be converted
to note number assignments and offering conversion options.
For a more detailed explanation of how the MPC3000 uses note
numbers, please refer to the beginning of chapters 6 and 11: “Creating and Editing Programs” and “MIDI Functions”.
Assigning tracks as either Drum or MIDI
In the MPC60, a track is assigned to drums by assigning its output
MIDI channel to the Drums Channel, which is the input MIDI
channel of the internal sound generator. In the MPC3000, assigning
a track to drums is simpler: a new data field in the Play/Record
screen permits each track to be assigned as either DRUM or MIDI.
MIDI tracks contain normal MIDI data recorded from the MIDI
input and played out through the MIDI outputs. Drum tracks are
the same as MIDI tracks except for the following:
1. The output of the track plays to the internal drum sound
generator.
2. You can record drum notes into the track using the front
panel pads.
3. In sequence editing screens, note events in Drum tracks
are visually identified and selected not by note number
only as in MIDI tracks, but also by the pad number and
sound name currently assigned to the displayed note
number.
4. Drum tracks are not affected by the Transpose function.
Independently, each track (DRUM or MIDI) may be assigned to any
MIDI channel and MIDI output port. As a result of this change, the
MPC60’s Drums Channel and Drum Data Sent Out fields have been
removed.
Page 10
Chapter 1: Introduction
New Note Variation system and revised 16 Levels function
In the MPC60, the Hi-hat Decay Slider controlled decay time and
sound selection for the hi-hat pad only. In the MPC3000, the new
Note Variation Slider provides all functions of the hi-hat decay
slider, but may be assigned to any pad and may alternately control
either tuning, attack or filter frequency. As with the Hi-hat Decay
Slider, this information is recorded into each drum note.
The 16 Levels function does everything it did in the MPC60. In
addition, it can produce 16 levels of either attack, decay or filter
frequency by working in conjunction with the Note Variation system.
Delete Bars and Copy Bars: Last bar field has different function that MPC60’s To bar field
In the Delete Bars function, the Last Bar field now contains the
actual last bar of the region to be deleted. This is different from the
MPC60’s To Bar field that contained the first bar after the region to
be deleted.
In the Copy Bars function, the Last Bar field now contains the
actual last bar of the region to be copied. This is different from the
MPC60’s To Bar field that contained the first bar after the region to
be copied.
Page 11
Chapter 2: The Basics
Chapter 2:
The Basics
Page 13
Chapter 2: The Basics
Hooking Up Your System
The following diagram shows how to hook up the MPC3000 to a
MIDI keyboard and two sound modules.
TO AUDIO CONSOLE
MPC3000
SCSI
1
FOOT SW
2
LEVEL
SYNC
IN
OUT
DIGITAL
RECORD IN
GAIN
MONO
RIGHT
LEFT
STEREO OUT
RIGHT
PHONES
LOW MID HIGH
MIDI IN
1
MIDI OUT
2
A
B
C
D
POWER
OFF
TO
POWER
INDIVIDUAL MIX OUTPUTS
1
2
3
4
5
6
7
8
ON
MIDI IN MIDI OUT
1—2 A---B---C---D
MIDI OUT
MIDI IN
MULTI TIMBRAL MIDI KEYBOARD
MIDI IN
MULTI TIMBRAL MIDI SOUND MODULE
MIDI IN
MULTI TIMBRAL MIDI SOUND MODULE
If you only want to use the MPC3000 as a drum machine for now,
don’t connect the MIDI keyboard, the sound modules, or make any
MIDI connections. If you choose to make the MIDI connections, you
can daisy chain all of the sound generators to MIDI Output A of the
MPC3000. (Connect MIDI Out A of the MPC3000 to the MIDI in of
the keyboard; connect the keyboard’s MIDI thru to the MIDI in of
the first sound generator; and connect its MIDI thru to the MIDI in
of the next sound generator.) This method of connection, however,
will limit the total number of MIDI channels on all sound generators to 16. By using the four independent MIDI outputs shown in
the connection method above, you can use all 16 MIDI channels on
each of the four MIDI Outputs.
Page 14
Chapter 2: The Basics
Getting Around on the MPC3000
Before you can use the MPC3000, you must learn how to use the
cursor keys, data fields, command keys, the data entry keys and
data entry control, the soft keys and the HELP key.
While no disk is in the drive, turn the power on. After a few seconds,
the LCD screen will display the following text:
============== Play/Record =============
Seq: 1-(unused)
BPM:120.0 (SEQ)
Sig: 4/ 4
Bars:
0
Loop:TO BAR
1
============== Track Data ==============
Trk: 1-(unused)
Type:DRUM On:YES
Chn:OFF-(off)
& OFF
Vel%:100 Pgm:OFF
===== Now:001.01.00 (00:00:00:00) ======
<Tk on/off> <Solo=OFF> <Track-> <Track+>
This is known as the Play/Record screen, as indicated by the title at
the top of the screen. It’s also known as the Main Screen.
It is the main operating state of the MPC3000 and most playing and
recording of sequences is done when this screen is in view. It will be
discussed further in the chapter entitled “Recording Sequences.” If
at any time while operating the MPC3000 you are confused and
want to return to this screen, press the MAIN SCREEN key.
COMMENT: If you can’t clearly see the text on the screen, try
adjusting the LCD CONTRAST control.
The Cursor, Cursor Keys, Data Fields, and Command Keys
Make sure that the Play/Record screen is showing. If not, press
MAIN SCREEN.
Notice that a small rectangular block is blinking somewhere on the
screen. This is called the cursor. It is possible to move the cursor
around the screen using the four gray direction keys located in the
Cursor section of the panel. These four keys are referred to as the
CURSOR LEFT, CURSOR RIGHT, CURSOR UP and CURSOR
DOWN keys. Try moving the cursor around the LCD, then move it
to the upper left corner.
Notice that the cursor does not move from letter to letter, but rather
jumps across many letters at a time, landing only in certain locations, usually to the right of a colon (:). These areas are called data
fields and each one controls a specific parameter. For example, the
upper left-most data field is called Seq, an abbreviation for
Page 15
Chapter 2: The Basics
sequence. To the right of this field is another field containing the
name for the selected sequence.
The Play/Record screen is one of many display screens available on
the MPC3000. Most of the panel keys present a unique screen, and
each screen has its own unique data fields. Try pressing a few of the
different keys in the Commands section of the panel, such as DISK
or TEMPO/SYNC.
The Numeric Keypad, Data Entry Control, and [+] & [–] Keys
Make sure that the Play/Record screen is showing. If not, press
MAIN SCREEN.
To change the data in a data field, move the cursor to the field and
type in the new number using the numeric keypad, followed by
ENTER. For example, to change to sequence number 2:
1. Move the cursor to the Seq field in the upper left corner;
2. Type 2, followed by the ENTER key.
Notice that the sequence name (located immediately to the right of
the sequence number) now changes automatically, because it must
now display the name of sequence 2.
Another use of the numeric keypad is to select from a list of menu
options presented on the screen. For example, pressing the PROGRAM/SOUNDS key causes the following menu to be displayed:
===== Programs =====
1.Sel pgm, asn snds
2.Envel,veloc,tune..
3.Dynamic filter
4.Copy, initialize
===== Sounds =====
5.Sample new sound
6.Edit sound
7.Renam,cpy,delete
8.Audio trigger
====================
==================
Select option:
When a screen like this is displayed, you are expected to select one
of the options by pressing a single number—it is not necessary to
press ENTER afterwards. Press MAIN SCREEN to return to the
Play/Record screen.
Another way of changing on-screen data is to use the data entry
control. While the cursor is in a data field, if the data entry control
is rotated one step to the right, the on-screen number will
increment. If the data entry control is rotated one step to the left,
Page 16
Chapter 2: The Basics
the on-screen number will decrement. Continuously turning the
data entry control will repeatedly increment or decrement the onscreen value. It is not necessary to press ENTER after turning the
data entry control.
There is a special type of data field called a choice field. Fields of
this type do not contain numeric data, but rather a specific number
of preset text selections, though only one can be active at a time. In
this case, the data entry control is used to select from the available
options. For example, press the OTHER key and move the cursor to
the Rate field, which is a choice field. Now turn the data entry
control and notice that with each step of the control, a different
preset option appears in the data field. When finished, set this field
back to 1/4 NOTE.
Pressing the [+] key has the same effect as turning the data entry
control one step to the right. It either increments a number in a
numeric field or chooses the next option in a choice field.
Pressing the [-] key has the same effect as turning the data entry
control one step to the left. It either decrements a number in a
numeric field or chooses the previous option in a choice field.
The Soft Keys
Make sure that the Play/Record screen is showing. If not, press
MAIN SCREEN.
Immediately below the LCD screen are four keys labeled SOFT
KEY 1, SOFT KEY 2, SOFT KEY 3, and SOFT KEY 4. The
functions of these keys change from one screen to another; these
functions are always displayed on the lowest line of the screen. For
example, while the Play/Record screen is showing, the lowest line
appears as:
<Tk on/off> <Solo=OFF> <Track-> <Track+>
The bottom line shows four titles enclosed in angle brackets. The
titles are <Tk On/Off >, <Solo=OFF>, <Track-> and
<Track+>. These four titles indicate the functions of the four soft
keys, but only while this screen is showing. Most of the screen
displays in the MPC3000 have soft key functions, and the lowest
line of each of these screens indicates the function of the four soft
keys while that screen is showing. You can see this by pressing the
ERASE key, then the TIMING CORRECT key, then MAIN SCREEN
to return to the Play/Record screen. Some screens have fewer than
four active soft keys and some have none.
Page 17
Chapter 2: The Basics
The HELP key
Whenever this key is pressed and held down, the contents of the
screen will be temporarily replaced by text explaining the function
of the data field where the cursor is currently located. To return to
the previous screen, release the HELP key. There is a different help
screen for every data field of every screen in the MPC3000.
Page 18
Chapter 2: The Basics
Definitions: Sequence, Track, Song, Sound, Pad,
Note Number, and Program
Here are some definitions of terms used in the MPC3000 that you
should know:
Sequence
A sequence can be thought of as a segment of multitrack tape of
variable length. Depending on the sequence contents, it could be a
two-bar repeating drum pattern, an eight-bar verse, or an entire
200-bar multitrack composition with time signature and tempo
changes. The MPC3000 holds 99 sequences in memory at one time.
Normally, only one sequence can play at one time, unless the Simul
Sequence feature is on, which allows two sequences or one sequence
and one song to play simultaneously.
Track
Within each of the 99 sequences are 99 tracks that contain the
actual MIDI events. These can be thought of as the tracks on a
multitrack tape recorder—they each contain a specific instrument or
piece of the total arrangement, but they all play simultaneously. For
example, track 1 could be drums, track 2 percussion, track 3 bass,
track 4 piano, track 5 horns, track 6 more horns, etc. Each track can
be assigned as a Drum track or a MIDI track, but not both. MIDI
tracks contain normal MIDI data recorded from the MIDI input and
played out through the MIDI output. Drum tracks are the same as
MIDI tracks except for the following:
1. The output of the track plays to the internal drum sound
generator.
2. You can record drum notes into the track using the front
panel pads.
3. In sequence editing screens, note events in drum tracks
are visually identified and selected not by note number
only as in MIDI tracks, but also by the pad number and
sound name currently assigned to the displayed note
number.
4. Drum tracks are not affected by the Transpose function.
Song
A song is a list of sequences that play consecutively, with each
sequence representing a section of a composition. In the MPC3000
there are 20 songs, each having up to 250 steps. Each step holds
one sequence and can repeat a specified number of times before the
song moves to the next step.
Page 19
Chapter 2: The Basics
Sound
Each individual sampled recording in the MPC3000 is called a
sound. A sound could be a recording of a single strike of a snare
drum or cymbal, a sound effect, or a 30 second stereo recording of
backing vocals. Sounds are sampled in 16-bit linear format at a
sampling rate of 44.1kHz in either mono or stereo and can be any
length up to the limit of sound memory. A maximum of 128 sounds
can reside in sound memory.
Pad
When sounds are loaded into the MPC3000, each pad plays a
particular sound. Though there are only 16 pads, the MPC3000 can
hold many more than 16 sounds, To access more than 16 sounds
from the pads, the MPC3000 provides four banks of pad assignments permitting up to 64 sounds to be played from the 16 pads.
Only one bank can be active at a time. The four banks are named A,
B, C, and D, and the pads are numbered 1 through 16. The 64 bank/
pad combinations are named by combining the bank letter (A-D)
with the pad number:
Pads in bank A: A01 through A16
Pads in bank B: B01 through B16
Pads in bank C: C01 through C16
Pads in bank D: D01 through D16
Each of these 64 bank/pad combinations (A01-D16) is referred to as
a pad.
Notice that sounds are not assigned directly to pads, but rather to
MIDI Note Numbers. In order for a pad to play a sound, it is first
assigned to a MIDI note number, then that note number is assigned
to a sound. This is described further in the “MIDI Functions” and
“Creating and Editing Programs” chapters of this manual.
Note Number
In MIDI terminology, note number refers to the element in a MIDI
Note On event that supplies the pitch of the note. The note number
range is from 0 to 127. For example, if Middle C is played on a MIDI
keyboard, a Note On event is sent out over MIDI containing note
number 60; the receiving sound generator interprets this as Middle
C and plays the appropriate pitch. If the sound generator is playing
drum sounds, the note number is not used for pitch, but rather to
Page 20
Chapter 2: The Basics
select which drum will play—one key for bass drum, one for snare,
one for high tom, etc.
This system of using MIDI note numbers to select drums is used in
the MPC3000’s sound assignment system. In programs (described
below), sounds are assigned directly to one of 64 MIDI note numbers
(35-98). In sequences, drum notes are also assigned to one of 64 note
numbers (35-98) to indicate which sound to play. Because of this
assignment method, there are many data fields in the MPC3000
called Note, in which you enter either the note number you wish to
assign in a program, or the note number you wish to edit in a
sequence’s drum track. (For easy visual identification in these
Note fields, the note number is accompanied by both the currently
assigned pad number and sound name. )
Program
Once a sound is loaded into memory, it cannot be played by pads or
from MIDI until it is assigned within a program. A program is a
collection of 64 sound assignments and can be thought of as a drum
set. In a program, each of 64 MIDI note numbers (35-98) is assigned
to one of the 128 possible sounds currently residing in memory. Once
assigned to a note number, a sound can be played in one of three
ways:
1. By receiving a Note On message from the MIDI input;
2. By playing a front panel drum pad (each pad is also assigned to
one of the 64 MIDI note numbers 35-98);
3. By playing drum tracks in sequences (each note event in a drum
track is assigned to one of the 64 MIDI note numbers 35-98).
In addition to the 64 sound assignments, each program also contains a number of sound modifying parameters for each of the 64
sound assignments, including envelope, tuning, filter, mixer, and
velocity response data. Each program also contains some parameters, such as the settings of the effects generator, that collectively
affect all sounds.
The MPC3000 has 24 different programs (one of which can be active
at a time) each with its own unique set of 64 assignments. Simply by
changing the active program number (1-24), all 64 sound assignments and their sound modifying settings will instantly change.
Page 21
Chapter 2: The Basics
Loading and Playing Sounds and Programs
All sounds and programs are held in RAM memory and are therefore lost whenever the power is turned off. In order to play any
sounds after turning the power on, you must load them in from disk.
The procedure for loading files from disk is described in the “Saving
To and Loading From Disk” chapter of this manual, but to get you
started quickly, you’ll learn how to load a disk automatically when
the power is turned on. Follow these steps:
1. Of the 4 sound disks that are included with the MPC3000, select
one and place it in the disk drive. Each disk contains a variety of
drum sounds and programs.
2. Turn the power on and wait for the MPC3000 to load the sounds
and sequences into memory. While loading, the LCD screen will
display the following message:
============= Akai MPC3000 =============
Copyright
1987 - 1994
AKAI ELECTRIC CO., LTD.
Version 3.00
========================================
Loading files...
When the disk has finished loading, the Play/Record screen (the
Main Screen) will be displayed. All sounds and programs from the
disk are now loaded into the MPC3000’s memory.
Playing the Pads, the PAD BANK, & FULL LEVEL Keys
Each sampled recording in the MPC3000 is called a sound. To hear
some of the drum sounds you have just loaded, play the 16 dynamic
pads on the front panel. To hear other sounds, press the PAD
BANK key once so that the [B] light above the key is lit, then play
the pads again. The MPC3000 has four pad banks (A, B, C and D).
To hear the sounds assigned to pad bank C, press PAD BANK again
and play the pads, and do the same to hear bank D. Each time you
press the PAD BANK key you change to the next pad bank, and
with each bank the 16 pads play different sounds.
The 64 bank/pad combinations are named by combining the bank
letter (A-D) with the pad number:
Page 22
Chapter 2: The Basics
Pads in bank A: A01 through A16
Pads in bank B: B01 through B16
Pads in bank C: C01 through C16
Pads in bank D: D01 through D16
Each of these 64 bank/pad combinations (A01-D16) is referred to as
a pad.
The 16 pads are dynamic—the harder you play them, the louder the
sound will play. If desired, however, this touch sensitivity can be
defeated. Press the FULL LEVEL key (the light goes on), and no
matter how hard you play the pads, the sound will play at its
maximum dynamic level. Press FULL LEVEL again to return to
normal dynamic operation.
Selecting Programs
The 64 sound assignments you have just heard (four pad banks of 16
sounds each) comprise a program. The MPC3000 can hold up to 24
programs. Each program has a unique set of 64 sound assignments,
so you can think of programs as drum sets. If you change from one
program to another, playing the four banks of pads will produce
entirely different sounds.
When you just played the pads and heard the sounds, you were
hearing the sounds assigned in Program 1. To change to Program 2:
1. Press the PROGRAM/SOUNDS key and select 1, “Select program,
assign sounds”, from the menu. The following screen will appear:
============ Select Program ============
Active program: 1-PROGRAM NAME
========== Assign Note:35/A01 ==========
Sound:BIG BAD DRUM
(ST)
Mode:DCY SW
General MIDI name for note:LO FLOR TOM
========================================
<Play>
2. Move the cursor to the Active Program field. It should
display 1. Select program 2 using the data entry control.
3. Play the sounds in program 2: Select Pad Bank A and play the
sounds, then select Pad Bank B and play the sounds, then play
bank C, then bank D.
Page 23
Chapter 2: The Basics
4. Repeat step 3, except select program 3 and play the sounds.
Repeat this procedure to hear the other programs.
5. To return to the Play/Record screen, press MAIN SCREEN.
The Note Variation Slider, ASSIGN and AFTER keys
The Note Variation slider can be used in real time to change the
tuning, attack, decay, or filter frequency for a sound played from a
single pad. Once the slider is assigned to single pad and parameter,
moving the slider while playing the pad will cause the sound’s
tuning, attack, decay, or filter frequency to be determined by the
current slider position.
Here are some examples of uses of Note Variation:
1. The slider can control decay for a hi-hat sound. This would
simulate the action of a drummer’s hi-hat pedal, allowing a
unique hi-hat decay time each time the pad is played.
2. The slider can be assigned to tuning for a tom tom sound. By
moving the slider while playing the tom pad, a wide range of tom
tunings is possible.
3. The slider can control filter frequency for a sound containing a
resonant filter setting. This would allow each note played to have
a different resonant filter frequency, simulating old analog
synthesizer sample and hold filter effects.
The ASSIGN Key
To assign the Note Variation Slider to a pad and parameter, press
the ASSIGN key. The following screen will appear:
==== Assign Note Var Slider (Pgm:24) ===
Note:64/A01-Sound_name
Param:TUNING
Low range:
0
High range:5000
========================================
To assign the slider to a pad and parameter:
1. Press the desired pad (the note number, pad number and sound
name of the pad you pressed will appear in the Note field).
2. Move the cursor to the Param field and select the desired parameter (TUNING, ATTACK, DECAY or FILTER).
Page 24
Chapter 2: The Basics
3. Press MAIN SCREEN to return to the Play/Record screen.
4. Play the selected pad while moving the Note Variation slider.
Each time the pad is played, the selected parameter (tuning,
attack, decay or filter) will change according to the slider position.
Here is additional information about the four fields:
• The Note field:
This field contains the note number to which the slider is assigned
(35-98). To change the assignment, press a pad. The note number to
which the pad is assigned will instantly appear in the Note field,
along with the pad number of the pad you pressed and the name of
the sound currently assigned to the note number. Alternately, you
can enter the desired note number by direct cursor editing.
• The Param (parameter) field:
This field determines which of the four possible parameters the
slider will control. The four choices are:
1. TUNING:
If selected, the slider alters tuning. This data is added to
the tuning settings used in the program and sound.
2. DECAY:
If selected, the slider alters envelope decay time. This
data overrides the program’s envelope decay setting.
3. ATTACK:
If selected, the slider alters envelope attack time. This
data overrides the program’s envelope attack setting.
4. FILTER:
If selected, the slider alters filter frequency. This data is
added to the program’s filter frequency setting.
• The Low range and High range fields:
These two fields control the range of the slider. The Low range
field determines the parameter value that will be produced when
the pad is hit while the slider is at the bottom of its travel; the
High range field determines the parameter value that will be
produced when the pad is hit while the slider is at the top of its
travel. Any position in between produces a proportionate value
between these two values. The type of data shown in these fields is
determined by the parameter selected in the Param field. If
TUNING is selected, these fields contain a signed tuning number
(e.g., -120 to +120); if ATTACK or DECAY is selected, they contain
a millisecond value (0-5000); if FILTER is selected, these fields
contain a number representing the range of filter frequencies
(-50~50).
Page 25
Chapter 2: The Basics
The AFTER key
Note Variation information may be recorded into sequences. Each
drum note in a sequence contains two pieces of data related to Note
Variation:
1. The Note Variation Parameter: This identifies which
parameter the Note Variation Data will affect (tuning,
decay, attack or filter frequency).
2. The Note Variation Data: This is the actual tuning,
attack, decay or filter frequency information, representing the position of the slider when the note was recorded.
Normally, the slider only affects new notes—it has no effect on notes
played back from sequences. However, if the AFTER key is pressed
(and the associated light goes on), the slider also overrides the Note
Variation data of any drum notes playing back from sequences, but
only drum notes that are assigned to the same note number (drum
pad) and parameter currently selected in the ASSIGN key’s screen.
Further, if in Overdub mode while the AFTER key light is on, these
changes are recorded into the active track.
To return to normal operation, press AFTER again and the light will
go off.
The 16 LEVELS key
When the 16 Levels function is on, a single sound will play from all
16 pads but each pad will produce a different value of either velocity,
tuning, attack, decay, or filter frequency.
To set the parameters and turn 16 Levels mode on, press the 16
LEVELS key. The following screen will appear:
========== Assign '16 Levels' ==========
Note:64/A06-Sound_name
Param:NOTE VAR (TUNING)
Center pad:13
========================================
<Turn on, exit>
The fields and soft keys are:
Page 26
Chapter 2: The Basics
• The Note field:
This field is used to assign the 16 Levels function to one of the 64
possible note numbers (35-98). When 16 Levels mode is on, all 16
pads will play one sound but at 16 evenly spaced levels of either
velocity, tuning, decay, attack, or filter frequency. Select a sound by
pressing a pad. This will automatically select the note number that
is currently assigned to the selected pad. For convenience, the sound
name currently assigned to the selected note number in the active
program is displayed.
• The Param field:
This is a choice field with two choices:
1. VELOCITY:
If this option is selected, and 16 LEVELS mode is on,
then the selected note number and sound will play from
all 16 pads, but at 16 fixed velocity levels with the softest
level on the lower leftmost pad and the loudest level on
the upper rightmost pad.
2. NOTE VAR:
If this option is selected, and 16 LEVELS mode is on,
then the selected note number and sound will play from
all 16 pads, but at 16 fixed levels of tuning, decay, attack,
or filter frequency using the Note Variation data stored
with each drum note in the sequence.
• The Note Variation Parameter field (NOTE VAR (TUNING) in the
screen example above):
This field has no label and appears only if NOTE VAR is selected
in the Param field. It is a choice field and is used to determine
which of the four Note Variation parameters is active. The four
choices are:
1. (TUNING):
If selected, the 16 pads play a single sound but at 16
chromatic tunings. The tuning range is controlled by the
Center pad field to the right.
2. (DECAY):
If selected, the 16 pads play a single sound but at 16
evenly spaced levels of envelope decay. The range of decay
values is set in the Assign Note Variation screen.
3. (ATTACK):
If selected, the 16 pads play a single sound but at 16
evenly spaced levels of envelope attack. The range of
attack values is set in the Assign Note Variation screen.
4. (FILTER):
If selected, the 16 pads play a single sound but at 16
evenly spaced levels of filter frequency. The range of filter
frequency values is set in the Assign Note Variation
screen.
• The Center pad field:
This field only appears if the Param field is set to NOTE VAR
and the Note Variation Parameter field is set to (TUNING). It is
used to set the tuning range of the 16 pads by selecting which of
Page 27
Chapter 2: The Basics
the 16 pads will play the sound at no tuning change. Regardless
of this center pad, higher numbered pads play higher chromatic
tunings and lower numbered pads play lower chromatic tunings.
In order to limit the entire tuning range of the 16 pads to within
+/- one octave, only pads 4 through 13 can be selected. For
example, if pad 4 is selected, the tuning range is from -30 (-3
semitones at pad 1) through 0 (no tuning change at pad 4) to
+120 (+12 semitones at pad 16).
To turn the 16 Levels function on:
1. Press the 16 LEVELS key. The 16 Levels screen will
appear.
2. Press the pad of the drum you want to use. The Note
field will immediately show the note number assigned to
that pad along with the pad number pressed and the
currently assigned sound name.
3. Set the Param field to the desired parameter, and, if
NOTE VAR is selected, also set the Note Variation Parameter field to the right.
4. Press the <Turn on, exit> soft key. This will turn the
light above the 16 LEVELS key on and cause the Play/
Record screen to be displayed. Now the sound you selected will play from all 16 pads, but at 16 fixed levels of
the parameter you selected.
To turn the 16 Levels function off:
Press the 16 LEVELS key again. The light will go out, indicating
that normal pad function has returned.
Page 28
Chapter 3:
Recording
Sequences
Chapter 3: Recording Sequences
How Sequences are Organized
A sequence can be thought of as a segment of multitrack tape of
variable length. Depending on the sequence contents, it could be a
two-bar repeating drum pattern, an eight-bar verse, or an entire
200-bar multitrack composition with time signature and tempo
changes. The MPC3000 holds 99 sequences in memory at one time.
Normally, only one sequence can play at one time, unless the Simul
Sequence feature is on, which allows two sequences, or one sequence
and one song, to play simultaneously.
Within each of the 99 sequences are 99 tracks that contain the
actual MIDI events. These can be thought of as the tracks on a
multitrack tape recorder—they each contain a specific instrument or
piece of the total arrangement, but they all play simultaneously. For
example, track 1 could be drums, track 2 percussion, track 3 bass
guitar, track 4 piano, track 5 horns, track 6 more horns, etc. Each
track can be assigned as a Drum track or a MIDI track, but not
both. MIDI tracks contain normal MIDI data recorded from the
MIDI input and played out through the MIDI output. Drum tracks
are the same as MIDI tracks except for the following:
1. The output of the track plays to the internal drum sound
generator.
2. You can record drum notes into the track using the front
panel pads.
3. In sequence editing screens, note events in drum tracks
are visually identified and selected not by note number
only as in MIDI tracks, but also by the pad number and
sound name currently assigned to the displayed note
number.
4. Drum tracks are not affected by the Transpose function.
In order for the sequencer to play external synthesizers, it must
send its notes out through MIDI on one of the 64 output MIDI
channels (16 channels for each of the 4 MIDI output jacks). On the
MPC3000, each track can be independently assigned to output its
notes through any one or two of these 64 output MIDI channels.
Ticks and Bar.Beat.Tick fields
The timing resolution of the sequencer is 96 divisions per quarter
note (96 ppq). Each one of these divisions is called a tick.
In many of the sequence editing screens it is necessary to enter the
start and end of the region to be edited. This is done using a threepart field, called a bar.beat.tick field, containing a bar number,
Page 30
Chapter 3: Recording Sequences
beat number, and tick number. (A beat is the timing value of the
lower half of the time signature. For example, in 4/4 time, a beat is
one quarter note.) In bar.beat.tick fields, you enter the three parts
separated by decimal points (.), followed by ENTER. For example, to
enter bar 1, beat 3 and tick 24, type 1, decimal point, 3, decimal
point, 24, ENTER. If you only want to enter the bar number, type it
followed by ENTER—The beat and tick portions will be reset to the
start of the bar.
Page 31
Chapter 3: Recording Sequences
The MAIN SCREEN Key & Play/Record Screen
When the MPC3000 is first powered on, the LCD screen shows the
following contents:
============== Play/Record =============
Seq: 1-(unused)
BPM:120.0 (SEQ)
Sig: 4/ 4
Bars:
0
Loop:TO BAR
1
============== Track Data ==============
Trk: 1-(unused)
Type:DRUM On:YES
Chn:OFF-(off)
& OFF
Vel%:100 Pgm:OFF
===== Now:001.01.00 (00:00:00:00) ======
<Tk on/off> <Solo=OFF> <Track-> <Track+>
This is called the Play/Record screen. It is the main operating
screen of the MPC3000 and most playing and recording of sequences
is done while this screen is showing. To return to this screen at any
time, press the MAIN SCREEN key. The following is an explanation
of each of the data fields and soft keys contained in this screen:
• The title line (===== Play/Record =====) :
The title line not only displays the title of this screen but also
indicates whether Record Ready status is enabled or disabled by
appearing in one of two views:
1. Record disabled:
========== Play/Record ============
This is the normal mode for sequence playing. In this mode,
it is impossible to “punch in” to Record or Overdub mode
while playing the sequence. However, in this mode it is
possible to change sequences while playing. To do this,
simply select a new sequence while playing using the
numeric keypad. When the previously selected sequence
finishes, the newly selected one begins playing. This feature
is very useful for creating the structure of a song in real
time while the MPC3000 is playing.
COMMENT: If you use the data entry control to select
a new sequence while playing, only the next highernumbered or next lower-numbered sequence can be
selected. If you want to select a sequence whose
number is greater than one higher or lower, you must
use the numeric keypad (remember to press ENTER
after you have entered the new sequence number).
Page 32
Chapter 3: Recording Sequences
2. Record ready:
==== Play/Record (Record ready) ===
In this mode, it is possible to “punch in” to Record or
Overdub mode while playing the sequence. To punch
in: while playing a sequence, hold both PLAY and either
RECORD or OVERDUB simultaneously—the MPC3000 will
immediately enter either Record or Overdub mode. In this
mode it is impossible to change sequences while playing.
• The Sequence Number field (Seq: 1-(unused) in the example
screen):
This field displays the active sequence number, from 1 to 99. This is
the sequence that will play when either PLAY START or PLAY is
pressed. If you change the sequence number while a sequence is
playing, the new sequence will start playing when the current
sequence finishes playing.
COMMENT: If you select a new sequence number while
playing by using the data entry control, only the next higher
or next lower sequence can be selected. To select other sequences while playing, use the numeric keypad.
• The Sequence Name field (Seq: 1-(unused) in the example
screen):
This is the 16-character name for the active sequence. To change the
sequence name, move the cursor to this field and turn the data
entry control one step in either direction. This will cause the keys
that have alphabet letters printed above them to function as alphabet entry keys. To indicate that alphabet mode is active, the cursor
changes from the normal blinking block to a blinking underline.
Now change the name by typing the letters printed above the keys.
The CURSOR LEFT and CURSOR RIGHT keys do not type letters,
but allow you to move the cursor left or right within the name. For
punctuation, use the data entry control. When finished, press
ENTER and the cursor will return to a blinking block at the beginning of the field, indicating that the alpha keys have returned to
their normal functions. To discard any changes and return to the old
name before ENTER is pressed, press and release HELP.
• The Tempo Display Mode field (BPM
BPM:120.0 (SEQ) in the
example screen):
This is a choice field with two options:
1. BPM: The tempo is displayed in Beats Per Minute with
one digit to the right of the decimal point.
2. FPB: The tempo is displayed in Frames Per Beat with one
digit to the right of the decimal point indicating 1/8s of a
frame. If this option is selected, the Frames field (in the
Tempo/Sync screen)
Page 33
Chapter 3: Recording Sequences
should be set to the desired frame rate.
120.0 (SEQ) in the above ex• The Active Tempo field (BPM:120.0
ample):
This is the active playing tempo. If the sequence contains tempo
changes, this shows the active tempo at the current sequence
position displayed in the Now field.
• The Tempo Source field (BPM:120.0 (SEQ) in the above
example):
This is a choice field with two options:
1. SEQ (sequence): Within each sequence is a unique tempo
setting. If this option is selected, the sequence’s unique
tempo is used in the Active Tempo field. In this case,
whenever the active sequence number is changed, the
newly selected sequence’s tempo immediately appears in
the Active Tempo field. When playing sequences, this is
useful if you want each newly selected sequence to play
at its own preset tempo. The sequence’s tempo is saved to
disk when a sequence is saved.
2. MAS (master): The master tempo is a single tempo setting
that applies to all sequences and songs. When playing
sequences this is useful if you always want each newly
selected sequence to play at the same tempo. This tempo
setting is not saved in the sequence file.
• The Time Signature field (Sig: 4/ 4 in the above example):
This field shows the time signature of the current bar (displayed in
the Now field) of the active sequence. It is for display only and
cannot be changed. For information on how to change the time
signature of a bar or to insert time signature changes, see the
“Editing Sequences” chapter of this manual.
• The Bars field:
This shows the total number of bars in the active sequence. It is for
display only and cannot be changed.
• The Loop field:
This is a choice field with two options:
1. OFF:
If this option is selected, the sequence stops playing when
it reaches its end. However, if in Record mode, recording
continues past the end, adding one measure (at the time
signature of the last bar) onto the end of the sequence as
each new bar is entered, until the sequence is stopped.
2. TO BAR 1:
If this option is selected, when the sequence plays to the
end, it immediately loops back to the bar number
Page 34
Chapter 3: Recording Sequences
displayed to the right of the word BAR. To set the
number of the bar to which the sequence loops back,
move the cursor to the field to the right of the word
BAR and enter the new number.
COMMENT: If the bar to loop to is bar number 1 and
the sequence is in Record mode, the MPC3000 will
automatically switch from Record to Overdub mode at
the moment the sequence loops back—this will prevent
accidental erasure of any notes just recorded. In the
event that the bar to loop to is bar number 2 or higher
and the sequence is in Record or Overdub mode the
MPC3000 will automatically switch to Play mode at
the moment the sequence loops back to the specified
bar.
The Track Data area (lines 4-6):
• The Active Track field (Trk: 1-(unused) in the example
screen):
This field displays the active track number within the sequence. The
active track is the track that, when Record or Overdub mode is
entered, will be recorded into from the MIDI keyboard or pads. Also,
if the Soft thru field is on (described in the “MIDI Functions”
chapter of this manual) and the pads or MIDI keyboard is played,
the played notes will be sent out over MIDI in real time using the
active track’s MIDI channel and port assignments. Only one track
can be active at a time.
(unused) in the example
• The Track Name field (Trk: 1-(unused)
screen)
This field has no on-screen title, but is the 16-character name of the
active track, and is located directly to the right of the active track
number. It is changed in the same manner as the sequence name,
detailed above.
• The Type field:
This is a choice field with two options—MIDI and DRUM:
1. MIDI: Select this option if you want to record normal
non-drum MIDI data from an external MIDI keyboard
into the selected track. MIDI tracks do not use the
internal sound generator or pads.
2. DRUM: Select this option if you want to record drum data
into the selected track. Drum tracks are the same as
MIDI tracks except for the following:
A. The output of the track plays to the internal
drum sound generator.
B. You can record drum notes into the track using
the front panel pads.
C. In sequence editing screens, note events in
drum tracks are visually identified and
Page 35
Chapter 3: Recording Sequences
selected not by note number only as in MIDI
tracks, but also by the pad number and sound
name currently assigned to the displayed note
number.
D. Drum tracks are not affected by the Transpose
function.
YES in the example screen):
• The Track On/Off field (On:YES
This choice field turns the output of the active track on (YES) or off
(NO). Pressing SOFT KEY 1 toggles the field’s state between YES
and NO.
OFF
• The MIDI Channel/Port fields (Chn:OFF
OFF-(off) in the example
screen):
There are actually two fields here, which together are used to
determine which MIDI channel and MIDI output port the active
track will output its data to. The to fields are:
1. The MIDI Channel field (Chn: 1A-(off)):
This field determines which of the 16 MIDI channels the
active track will play through. If you don’t want the track
to play through any MIDI channels, select 0 and the word
OFF will appear.
A-(off)):
2. The MIDI Port field (Chn: 1A
This choice field determines which of the four MIDI
output ports (A, B, C, or D) the active track will play
through. (If OFF is selected in the MIDI channel field to
the left, this field can’t be seen.)
COMMENT: If OFF is displayed in this field (no MIDI
output assignment) and you want to select a MIDI channel or
port, first move the cursor to the letter “O” of OFF and turn
the data entry control one step to the right.
(off) in the
• The MIDI Channel/Port Name field (Chn:OFF-(off)
example screen):
This is the eight-character name for the currently selected MIDI
output channel/port combination. This would commonly contain the
name of the synthesizer that is being played from the displayed
MIDI channel/port combination. There are 64 names—one for each
of the 64 output MIDI channel/port combinations. The name is
changed in exactly the same way as the sequence name field.
COMMENT: These 64 names are intended to be used to
identify the MIDI devices that are externally connected—not
the data contained in the track. For this reason, they are not
saved within sequence files or ALL files. They are, however,
retained in memory after power is removed and are also
saved within Parameter files.
• The Auxiliary MIDI Channel/Port fields (& OFF in the example
screen):
These two fields have exactly the same function and operation as
the MIDI Channel/Port fields shown to the left. These two
Page 36
Chapter 3: Recording Sequences
fields allow the active track to play simultaneously through an
additional channel/port combination. If no additional output channel/port is desired, select OFF here.
100 in the example screen):
• The Velocity% field (Vel%:100
This is an overall output volume control for active track. However,
unlike a normal volume control, this function actually scales the
velocities of all notes that play from the track in real time, acting as
a real-time dynamics control. The range is from 0 to 200%. Values
from 0 to 99 reduce velocities; values from 101 to 200 increase them.
Select 100 for no effect.
• The Program Number field (Pgm:OFF ):
This field permits a MIDI program number (1-128) to be assigned to
the active track. To select no program assignment for the active
track, enter a 0 in this field and OFF will be displayed. Whenever a
new sequence is selected, if any of the sequence’s tracks contain
program number assignments, those program numbers will be
immediately sent out over the track’s assigned MIDI channel/port
(not the auxiliary MIDI channel/port) to the external synthesizer,
causing it to change to the assigned program number. This way, all
external synthesizers are immediately changed to the correct
program numbers by merely selecting the sequence. If a track’s
Type field is set to DRUM, the assigned program number will
change the internal sound generator’s active program number.
COMMENT: It is also possible to record MIDI program
change events at any location within a track, either in real
time or in Step Edit mode. (See the “Step Edit” section in
the “Editing Sequences” chapter of this manual for more
details about this.) It is important to note that if one of these
program change events is inserted mid-sequence and the
portion of the sequence containing the change is played
(causing the external synthesizer to change to the new program), the original program number (as set up in the Program Number field) will not be re-sent over MIDI until the
sequence is reselected in the Sequence Number field. Simply
restarting the sequence will not implement the program
change. If the MPC3000 did send out all assigned program
numbers whenever PLAY START were pressed, this problem
would be corrected, but there would also be a brief delay at
the start of the sequence because the external synthesizers
must take time to change their program data. If you do want
a program change to be sent out whenever PLAY START is
pressed, it is better to insert a MIDI Program Change event
at the start of the track, using Step Edit.
001.01.00 (00:00:00:00
00:00:00:00
• The Now field (Now:001.01.00
00:00:00:00) in the
example screen):
This field displays the current position within the sequence. The left
side of this field shows the current position in musical terms—as a
three-part number separated by decimal points.
Page 37
Chapter 3: Recording Sequences
The first part is the bar number; the second is the beat number
within the bar (the beat is equal to the denominator of the time
signature); and the third is the tick number within the beat (there
are 96 ticks to a quarter note). Bars and beats start at 1; ticks start
at 0.
To the right of the above-described bar.beat.tick number is another
four-part number, displayed in parentheses. This field shows the
current position of the sequence as a function of elapsed time from
the beginning of the sequence, in hours, minutes, seconds, and
frames. However, the number displayed when the sequence is set to
the start is not necessarily 00:00:00:00, but rather is equal to the
SMPTE start time. SMPTE operation is described in the chapter 10:
“Syncing to Tape and Other Devices”.
This field is for display only and cannot be edited directly with the
cursor. It is normally changed by using the REWIND, FAST FORWARD and LOCATE keys, described in the “Play/Record Keys”
section of this chapter. These fields change in real time while the
sequence plays. However, the right-most part of each field—the ticks
and frames parts—are replaced with two dashes (—) while playing
because they would otherwise change too quickly to be useful.
The four soft keys are:
• The <Tk on/off> soft key:
Pressing this soft key toggles the Track On/Off field between YES
and NO.
• The <Solo=OFF> soft key:
Pressing this soft key turns solo mode ON or OFF. If set to ON, only
the active track is heard and all other tracks are temporarily muted.
The text of the soft key indicates whether solo mode is ON or OFF.
• The <Track-> soft key:
Pressing this soft key decrements the active track number by one.
• The <Track+> soft key:
Pressing this soft key increments the active track number by one.
Page 38
Chapter 3: Recording Sequences
The Play/Record Keys
These ten keys operate similarly to the transport keys on a tape
recorder, with some very useful additions:
• The PLAY START key:
This key causes the active sequence to begin playing from the start
of bar 1.
• The PLAY key:
This key causes the sequence to begin playing from the current
position displayed in the Now field in the Play/Record screen.
• The STOP key:
This key causes the sequence to stop playing.
• The OVERDUB key:
This key, when held down while PLAY is pressed, causes Overdub
mode to be entered, in which new notes can be recorded into the
active track without erasing existing notes. While Overdub mode is
active, the light above the OVERDUB key is on.
It is also possible to punch-in to Overdub mode while playing. To do
this:
1. The MPC3000 must be in Record Ready mode. (The top
line of the Play/Record screen must display the words
Play/Record (Record ready).) If not, simply
press and release the RECORD or OVERDUB key once
while the sequence is stopped.
2. While the sequence is playing, simultaneously press the
OVERDUB and PLAY keys. Overdub mode is now active,
indicated by the light above the OVERDUB key.
To punch-out of Overdub mode, simply press the OVERDUB key
once, and the light above the OVERDUB key will turn off.
COMMENT: If Overdub mode is entered while the sequence
is set to loop to a higher-numbered bar than bar number1,
Overdub mode will automatically be turned off at the moment the sequence reaches the end and starts to loop.
• The RECORD key:
This key, when held down while PLAY is pressed, causes Record
mode to be entered, in which new notes can be recorded into the
active track while existing notes are erased, just as with a tape
recorder. While Record mode is active, the light above the RECORD
key is on.
Page 39
Chapter 3: Recording Sequences
It is also possible to punch-in to Record mode while playing. To do
this:
1. The MPC3000 must be in Record Ready mode. (The top
line of the Play/Record screen must display the words
Play/Record (Record ready).) If not, simply
press and release the RECORD or OVERDUB key once
while the sequence is stopped.
2. While the sequence is playing, simultaneously press the
RECORD and PLAY keys. Record mode is now active, as
indicated by the light above the RECORD key.
To punch-out of Record mode, simply press the RECORD key once,
and the light above the RECORD key will turn off.
COMMENT: If Record mode is entered while the sequence is
set to loop to bar number1 (or a portion of the sequence is
looped with the Edit Loop function), Record mode automatically switches to Overdub mode at the moment the sequence
reaches the end and starts to loop. This prevents accidental
erasure of any data that were recorded on the previous pass
through the loop. If, however, Record mode is entered while
the sequence is set to loop to a higher-numbered bar than bar
1, Record mode will automatically be turned off at the
moment the sequence reaches the end and starts to loop.
COMMENT: If an empty sequence is selected (the sequence
name field shows “unused”), and either RECORD or OVERDUB is pressed, the sequence will instantly be initialized
using the settings in the Initialize Sequence screen. This
function is normally accessed by pressing the ERASE key
and selecting SOFT KEY 2.
• The REWIND [<<] and FAST FORWARD [>>] keys:
Use these two keys to change the current position within the sequence to either the previous or next bar boundary. The actions of
these keys repeat when they are held.
• The REWIND [<] and FAST FORWARD [>] keys:
Use these two keys to move the current position within the sequence
to either the previous or next note boundary, as determined by the
value in the Note Value field of the Timing Correct screen
(normally set to 1/16 NOTE). To change the amount of movement,
simply change the setting in this data field. The actions of these
keys repeat when they are held.
While the Step Edit function is active, it is possible to set these keys
to an alternate function—to search to the previous or next event of a
specific type within the track. To learn how to do this, see the “Step
Page 40
Chapter 3: Recording Sequences
Edit Options” section in the “Editing Sequences” chapter of this
manual.
• The LOCATE key:
This key is used to instantly move to a specific position within the
active sequence. When pressed, the following screen is displayed:
================ Locate ================
Hit softkeys or LOCATE to go to markers:
Marker A: 001.01.00
Marker B: 001.01.00
Marker C: 001.01.00
===== Now:001.01.00 (00:00:00:00) ======
<Goto A>
<Goto B>
<Goto C> <Load'Now'>
There are three sequence position markers, labeled A, B, and C.
Pressing SOFT KEY 1, 2 ,or 3 causes the MPC3000 to move immediately to the location shown in either marker A, B, or C, respectively,
and the Play/Record screen to be redisplayed. Pressing SOFT KEY
4, <Load'Now'>, causes the contents of the Now field to be loaded
into the marker field that currently contains the cursor. To load any
of the three markers, move the cursor to it and enter the desired bar
numbers in the format bar.beat.tick (separated by decimal points),
using the numeric keypad. If you only want to enter the bar number,
type it, followed by ENTER, and the beat and tick numbers will be
automatically reset to 01.00.
There is a faster way to use locate. While the Locate screen is
showing, press the LOCATE key again, and the MPC3000 will
immediately move to the sequence location of the marker (A, B, or
C) where the cursor is currently positioned, exactly as if the SOFT
KEY for that marker (SOFT KEY 1, 2, or 3) had been pressed.
Therefore, from the Play/Record screen, “double-clicking” LOCATE
will instantly move to location A, B, or C, depending on where the
cursor was last positioned in the Locate screen.
Page 41
Chapter 3: Recording Sequences
Sequence Recording Example 1: A Looped
Drum Pattern
The MPC3000 is both a linear-type sequencer and a pattern-oriented sequencer. The following examples use short, looped sequences and are therefore examples of pattern-oriented recording.
To record linearly, simply set the Loop field (in the Play/Record
screen) to OFF. Then, the sequence length will automatically increase as you record past the existing end. See the description of the
Loop field to learn more about this.
The following is a step-by-step example of how to record a repeating
two-bar drum sequence:
1. Load some sounds into sound memory by loading a program file
from one of the sound disks included with your MPC3000. If you
don’t know how to do this, see the chapter “Saving To and Loading From Disk”.
2. Press MAIN SCREEN to view the Play/Record screen.
3. Move the cursor to the Seq field and select 1 (ENTER) or any
other empty sequence.
4. The upper line of the screen should display:
====== Play/Record (Record ready) ======
If not, press either the RECORD or OVERDUB keys once. This will
make the current sequence ready for recording.
5. Set the Trk field to 1 and the Type field to DRUM.
6. While holding RECORD, press PLAY START. The RECORD and
PLAY lights should go on, and the metronome should be heard
through the stereo outputs. The metronome will play on 1/4notes, with a louder click at the start of each bar. Also, the Now
display will be constantly changing to reflect the current position
within the sequence. If you want to adjust the tempo, move the
cursor to the Active Tempo field (to the right of the word BPM in
the upper left corner) and enter the desired tempo.
7. Start recording your drum pattern by playing the drum pads in
time to the metronome. Since no specific format of time signature
or number of bars has been entered, the sequence format defaults
to two bars of 4/4 time signature. When the two-bar pattern loops
back to the start, Record mode switches automatically to
Page 42
Chapter 3: Recording Sequences
Overdub mode to avoid erasing your new notes. The notes you
played will be heard at the position they were recorded, except
that the Timing Correct function has automatically moved all of
your notes to the nearest 1/16-note. (This can be defeated, as
explained in “The TIMING CORRECT Key” section, later in this
chapter.)
8. Press STOP.
COMMENT: To initialize a sequence to a different time
signature or number of bars, press ERASE and select
<Initialize>.
If you don’t think your pattern sounds as good as you intended, you
may need some practice in following the metronome. If you want to
erase what you’ve just recorded and start again, simply repeat steps
6 through 8 above.
To erase a particular drum from your new sequence
1. Press the ERASE key. The following screen will appear:
================= Erase ================
Seqnc: 1-SEQ01
Track: 1-TRK01
(0 = all)
Ticks:001.01.00-003.01.00
Erase:ALL EVENTS
Notes:ALL
(Hit pads)
========================================
<Do it> <Initialize><Delete><Delete All>
2. To select a particular drum to erase, press the drum pad that was
used to record its notes. Immediately, the Notes field will
display the note number (35-98), pad number, and currently
assigned sound for the selected pad. To erase additional notes,
continue pressing pads. The Notes field will always display the
last pad pressed, and the total number of pads selected is displayed on the right side of the same line.
3. Press Soft key 1: <Do it>. When you press this soft key, all
notes assigned to the note number(s) you selected will be erased
throughout the track, after which the Play/Record screen will be
displayed.
4. Now, enter Overdub mode by holding OVERDUB and PLAY
START simultaneously and re-record that pad into your track.
(Unlike Record mode which erases existing notes as you record
new notes, Overdub mode merges the new notes into the existing
notes.)
To hear your new drum pattern, press STOP then PLAY START.
Page 43
Chapter 3: Recording Sequences
Sequence Recording Example 2: A Multitrack
Sequence
The following is a step-by-step example of recording a multitrack
sequence with a format of 4 bars of 4/4 time, containing the following tracks:
Track 1: Drums
Track 2: Percussion
Track 3: Bass
Track 4: Piano
First, set up the instruments:
1. Using the connection diagram in the “Hooking Up Your System”
section (in the “Basics” chapter) as a guideline, connect the MIDI
Out connector of a MIDI keyboard to MIDI Input 1 of the
MPC3000 and connect MIDI Output A of the MPC3000 to a
multitimbral synthesizer that is set to play both bass and piano
sounds simultaneously. (Alternately, you could connect two
synthesizers in a daisy chain, with the MIDI thru connector of
the first synthesizer connecting to the MIDI input of the second.)
2. Set up the synthesizer(s) so that a bass sound plays from MIDI
channel 1A and a piano sound plays from MIDI channel 2A. If
you are using a single integrated keyboard, set Local Control on
your keyboard to OFF during this tutorial.
3. If no sounds are loaded into sound memory, load a program file
from one of the sound disks included with your MPC3000. If you
don’t know how to do this, see the chapter “Saving To and Loading From Disk”.
4. The Play/Record screen should be showing. If not, press MAIN
SCREEN.
5. The upper line of the screen should display Play/Record
(Record ready). If not, press either the RECORD or OVERDUB key once. This will make the current sequence ready for
recording.
Next, initialize the sequence to 4 bars of 4/4 time:
1. Move the cursor to the Seq field and select 2 (ENTER) or any
other sequence that is currently empty.
Page 44
Chapter 3: Recording Sequences
2. Press the ERASE key, then select SOFT KEY 2
(<Initialize>). The following screen will appear:
========== Initialize Sequence =========
Select sequence: 2-(unused)
===== General =====
==== Track: 1 ====
Bars:
2
Sig: 4/ 4
Status:UNUSED
BPM:120.0 (SEQ)
Type:DRUM
Pgm:OFF
Loop:TO BAR
1
Chn:OFF
& OFF
========================================
<Do it>
<Track->
<Track+>
4. Enter 4 in the Bars field then press <Do it>. The Play/Record
screen will reappear, showing that the sequence has been initialized to 4 bars of 4/4.
COMMENT: Whenever you select an empty sequence followed
by pressing either RECORD or OVERDUB, the sequence will
be initialized using the settings in this screen. Now that you
have changed these settings to 4 bars of 4/4, looped, whenever you now select an empty sequence in the Play/Record
screen and press either RECORD or OVERDUB, the sequence will be initialized instantly to 4 bars of 4/4, looped,
instead of the factory default of 2 bars of 4/4, looped. These
settings, as well as the contents of many other data fields in
the MPC3000, are remembered when the power is turned off,
so this new default will remain in effect until changed.
Now, record the drums on track 1:
1. Move the cursor to the Trk field and select 1 (Enter) to make
track number 1 active.
2. Set the Type field to DRUM.
3. While holding RECORD, press PLAY START. The RECORD and
PLAY keys’ lights should go on, and the metronome should be
heard through the stereo outputs. The metronome will play on 1/
4-notes, with a louder sound at the start of each bar. Also, the
Now field will be changing constantly to reflect the current
position within the sequence.
4. Record the bass drum and snare drum parts by playing the pads
labeled with those names. Notice that when the sequence loops
back to bar 1, Record mode automatically changes to Overdub
mode so that the new part won’t get erased. Notice also that
every time the four-bar pattern loops back to the start, any
drums recorded on the last pass will be heard at the position they
were recorded, except that your notes will have been moved to
Page 45
Chapter 3: Recording Sequences
the nearest value specified in the Timing Correct screen (in this
case, 1/16-note).
5. Without stopping the sequence, record a 1/16-note hi-hat part by
simultaneously holding the TIMING CORRECT key and the
HIHAT CLOSED pad, varying the pressure on the pad as the
sequence plays. After four bars, release both the key and the pad.
Notice that closed hi-hats have now been recorded on all 1/16notes. This feature is called note repeat and is described further
in the “Timing Correct” section, later in this chapter. If at any
time you want to erase what you’ve recorded and start over, go
back to step 3.
If you accidentally played one or two wrong notes, you can erase
them without affecting any other notes by following these steps:
A) While still in Overdub mode, hold down the ERASE key.
B) Just before the wrong notes are about to play, hold that
drum’s pad down, then quickly release it as soon as the
wrong notes have passed.
C) Release the ERASE key. The wrong notes have now been
permanently erased from the sequence.
6. Press STOP.
Next, overdub the percussion part on track 2:
1. With the Play/Record screen showing, move the cursor to the Trk
field and select 2.
2. Set the Type field to DRUM.
3. Enter Record mode again by holding RECORD and pressing
PLAY START. You will hear the drum part you just recorded on
track 1. Don’t worry about erasing it: since track 2 is now the
active track, all recording and erasing occurs only on track 2.
4. Record the percussion part by playing pads assigned to percussion
instruments. (Try Pad Bank B.) Keep adding drums until your
percussion part is complete.
5. If any mistakes were made, use either of the two erase methods
described above.
Next, overdub the bass part on track 3:
1. With the Play/Record screen showing, move the cursor to the Trk
field and select 3 to make track 3 active.
Page 46
Chapter 3: Recording Sequences
2. Set the Type field to MIDI, indicating that this track will not
play the internal drum sounds.
3. Set the Chn field to 1A, indicating that track 3 will play through
MIDI channel 1 and MIDI output port A. The Chn field is actually two fields—move the cursor to the position indicated by the
underline below and select 1:
Chn:OFF becomes—> Chn: 1A
4. If you play the MIDI keyboard now, the synthesizer that is set to
receive on MIDI channel 1 should play a bass sound. If not, check
the previous steps and your MIDI hookup.
5. Press the COUNT IN key—the light will go on. This will cause
the metronome to play one bar before the sequence plays to cue
you to start playing. By default, the count in will only play before
you start recording or overdubbing but not before playing. This
can be changed by pressing the OTHER key and changing the
setting of the Count in field in the screen that appears.
6. Enter RECORD MODE by holding RECORD and pressing PLAY
START.
7. Once the COUNT IN bar has passed, record your bass part in
time to the drums and percussion parts.
8. Press the COUNT IN key again to turn it off.
9. If you make a mistake while recording, you can correct it by
punching in the new note:
A) Press the REWIND keys [<] or [<<] until the Now field
shows a location about one bar before the mistake.
B) Press PLAY (not PLAY START). The sequence will start
playing from the position shown in the Now field.
C) Just before the wrong note plays, press RECORD and
PLAY simultaneously to enter Record mode (in which
existing notes are erased while new notes are recorded)
then play the correct note. You can now either punch out
by pressing RECORD again or continue recording from
that point. Don’t worry: when the sequence loops back to
bar 1, it will automatically switch from Record to Overdub mode so that those notes in the earlier part of the
sequence won’t be erased.
Now, overdub the piano part on track 4:
1. Move the cursor to the Trk field and select 4 to make track 4
active.
Page 47
Chapter 3: Recording Sequences
2. Set the Type field to MIDI, indicating that this track will not
play the internal drum sounds.
3. Set the Chn field to 2A, indicating that track 4 will play through
MIDI channel 2 and MIDI output port A.
4. If you play the MIDI keyboard now, the synthesizer that is set to
receive on MIDI channel 2 and port A should play a piano sound.
If not, check the previous steps and your MIDI hookup.
5. Enter Record mode by holding RECORD and pressing PLAY
START.
6. Record your piano part in time to the drums, percussion and bass
parts.
7. Press STOP.
Page 48
Chapter 3: Recording Sequences
The TIMING CORRECT Key: Correcting Timing
Errors, Swing Timing
The MPC3000 corrects timing errors made as you are recording by
moving notes to the nearest perfect timing location. For example, if
the timing correct function is set to 1/16-notes, then all notes are
moved to the nearest perfect 1/16-note. The result is that all recorded notes play back as perfectly even 1/16-notes. It is also possible to correct the timing of notes after they have been recorded.
To inspect or change the timing correction settings, press TIMING
CORRECT while the MPC3000 is not playing. The following screen
will appear:
====== Timing Correct / Step Size ======
Note value:1/16 NOTE
Swing%:50
Shift timing:LATER
Shift amount: 0
========= Move Existing Notes ==========
Track: 1-(unused)
Ticks:001.01.00-001.01.00
Notes:ALL
(Hit pads)
<Move existing>
This screen presents various parameters relevant to the timing
correct function. A description of each of the fields follows:
• The Note value field:
Timing correction works by moving your recorded notes to a preset
note timing value. This field is used to select that note value. The
options are:
1.1/8 NOTE: All notes are moved to the nearest 1/8-note
2.1/8 TRPLT: All notes are moved to the nearest 1/8-note
triplet
3.1/16 NOTE: All notes are moved to the nearest 1/16-note
4.1/16 TRPLT: All notes are moved to the nearest 1/16note triplet
5.1/32 NOTE: All notes are moved to the nearest 1/32-note
6. 1/32 TRPLT: All notes are moved to the nearest 1/32note triplet
7. OFF(1/384): No timing correction—in this setting, the
highest resolution of the MPC3000 is used—96 divisions
per 1/4-note.
This value also affects two other functions in the MPC3000:
1. It sets the Note Repeat timing value, described later in
this chapter.
Page 49
Chapter 3: Recording Sequences
2. It sets the amount by which the current sequence position
will change when either the REWIND [<] or FAST
FORWARD [>] key is pressed.
• The Swing% field:
This field only appears if the Note Value field is set to either 1/16- or
1/8-notes. The swing feature is a variation of timing correction.
Whereas normal timing correction moves your notes to perfect 1/16or 1/8-note intervals, the swing feature moves your notes to swingtiming intervals. The amount of swing is measured as a percentage
of time given to the first note in each pair of 1/16- or 1/8-notes. The
range of values is from 50% to 75%. For example:
• A swing setting of 50% gives perfectly even timing with no
swing effect; the first and second notes of each pair of 1/16or 1/8-notes have equal (50%) timing.
• A swing setting of 66% indicates a technically perfect
swing; the first note of each pair of 1/8 or 1/16 notes has a
timing value of twice that of the second note, giving the
effect of 1/16- or 1/8-note triplets where the middle note of
each triplet is silent.
• A swing setting of 75% is the highest swing setting; the
first note of each pair of 1/8 or 1/16 notes has a timing value
of three times that of the second note. This creates a very
exaggerated swing timing.
A very important use of the swing feature is to add a human rhythm
feel to the timing of your music. Here are a couple of useful settings
to experiment with:
• Note Value = 1/16, Swing = 54%, Tempo = 100 BPM:
While not enough swing for a true swing feel, this small
amount of swing timing removes the stiffness from perfect 1/
16-note timing and is especially useful on drum sequences
using 1/16-note hi-hats.
• Note Value = 1/16, Swing = 62%, Tempo = 100 BPM:
This creates an 1/16-note swing feel that could be described
as more relaxed than a perfect triplet swing (66%).
As with timing correction, swing moves your notes in real time as
they are recorded into the sequence, so your notes are instantly
played back with the specified shift. Also, as with timing correction,
this effect can be used on existing sequence data by using SOFT
KEY 1 (<Move existing>).
• The Shift timing and Shift amount fields:
These two fields work in conjunction with the Note value and
Swing% fields to move your notes to shifted timing locations. The
Shift timing field sets the direction of shift (EARLIER or
LATER) and the Shift amount field sets the amount of timing
shift in ticks (1/96 of a 1/4-note). For example, in order to compensate for the slow attack time of a particular synthesizer, you might
Page 50
Chapter 3: Recording Sequences
set these two fields to EARLY, 1 tick. This would cause all new notes
to be recorded onto 1/16-notes but at 1 tick earlier than normal.
COMMENT: It is not possible for this function to shift the
timing of notes without also correcting their timing. This also
means that the range of shift depends on the current Note
value field’s setting. For example, if the Note value
field is set to 1/16-notes, the maximum shift amount is 11
ticks, or slightly less than 1/2 of one 1/16-note; if the Note
value field is set to 1/32 notes, the maximum shift amount
is 5 ticks, or slightly less than 1/2 of one 1/32 note; and if
the Note Value field is set to OFF(1/384), the Shift
amount is fixed at 0, meaning that no shift is possible since
timing correction is not being used. If you wish to shift the
timing of a track independently of the timing correction
function, use the Shift Timing function, accessed by pressing
the SEQ EDIT key.
COMMENT: If the Shift Timing function is set to shift
notes early and one or more notes exist at the start of the
sequence, these starting notes will be deleted when the
<Move existing> operation is performed, because
there is no space before the start of the sequence for them
to be moved to. To avoid this problem, insert a blank bar
before bar 1 of the sequence before performing the shift
operation, then be sure to include this extra bar within the
range of bars to be shifted. This way, the notes that would
have been lost will now be moved onto this newly inserted
bar.
• The Ticks fields:
These two fields are used to specify the region of the sequence that
will be altered when the <Move existing> soft key is pressed.
These are bar.beat.tick fields—the region starts at the location
entered in the leftmost field and ends one tick before the location
entered in the rightmost field.
• The Track field:
This field is only used in conjunction with the <Move existing>
soft key. It is used to specify the track number that is to be altered.
Entering a 0 indicates all tracks will be altered.
• The <Move existing> soft key:
Normally, the timing correct function operates in real time, correcting notes before they are recorded into the sequence. It is also
possible to correct the timing (or add swing or shift the timing) of an
existing sequence. Pressing this soft key will cause the region of the
active sequence specified by the Ticks and Track fields to be
corrected according to the settings of the Note value, Swing%,
Shift timing and Shift amount fields.
Page 51
Chapter 3: Recording Sequences
The Note Repeat Feature
Another very useful feature of the TIMING CORRECT key is the
ability to automatically repeat either drum or keyboard notes at a
preset timing interval. This is useful in creating:
• Drum rolls
• Repeating-note drum patterns, such as 1/16-note hi-hat patterns
• Repeating keyboard notes, such as a repeated 1/16-note bass part
The Note Repeat feature is used in real time while recording or
playing. To use this feature, press and hold TIMING CORRECT
while in Play, Overdub, or Record mode. The top line of the Play/
Record screen will change to:
==== (Hold pads or keys to repeat) =====
If any drum pads (when the active track is a drum track) or keys
(when the active track is a MIDI track) are held while TIMING
CORRECT is being held, they will automatically be repeated at the
timing interval selected in the Note value field of the Timing
Correct screen. Furthermore, the velocity level of each repeating
note is set by the current pressure applied to the drum pad or key
being played (if your MIDI keyboard has channel pressure capability). To demonstrate this effect:
1. Set up a sequence for recording, select a drum track to record,
and initiate recording.
2. While holding TIMING CORRECT, also hold the drum pad
assigned to the closed hi-hat, varying the pressure as you hold it.
You should hear repeating 1/16-note hi-hats.
3. Press STOP to stop playing.
4. Press TIMING CORRECT and select 1/32 TRPLT in the Note
field.
5. Press MAIN SCREEN to return to the Play/Record screen.
6. Enter Overdub mode.
7. While holding TIMING CORRECT, also hold the pad assigned to
snare drum, varying the pressure as you hold it. You should hear
a snare drum roll with varying dynamics.
This same procedure can be used in exactly the same way when
recording keyboard sequences. In this case, hold TIMING CORRECT while holding one or more keys on the MIDI keyboard. In
order to use the varying pressure technique, you will need to use a
keyboard that sends channel pressure messages.
Page 52
Chapter 3: Recording Sequences
Tempo and the TEMPO/SYNC Key
Many of the functions in the MPC3000 are associated with controlling the playing tempo. First, there is the Tempo field in the Play/
Record screen (shown below in bold):
============== Play/Record =============
120.0 (SEQ)
Seq: 1-(unused)
BPM:120.0
Sig: 4/ 4
Bars:
0
Loop:TO BAR
1
============== Track Data ==============
Trk: 1-(unused)
Type:DRUM On:YES
Chn:OFF-(off)
& OFF
Vel%:100 Pgm:OFF
===== Now:001.01.00 (00:00:00:00) ======
<Tk on/off> <Solo=OFF> <Track-> <Track+>
To change the tempo at any time while playing or recording sequences, move the cursor to the Tempo field and change it with the
data knob or the numeric keypad.
The Tempo screen
To display the Tempo screen, press the TEMPO/SYNC key:
================ Tempo =================
Tempo:120.0
Tempo source:SEQUENCE
============= Display mode =============
BPM/FPB:BPM
Frames:30 DROP
============== Tap Tempo ===============
Tap averaging:3
========================================
<SyncScreen ><TempoChanges>
This screen presents most of the parameters that are associated
with tempo. A detailed description of the individual screen fields and
soft keys follows:
• The Tempo field:
This is the active playing tempo. It is either the sequence’s assigned
tempo or the master tempo, depending on the setting of the Tempo
source field. This has the same function as the Active Tempo field
in the Play/Record screen except that this field doesn’t display
tempo changes.
• The Tempo source field:
This field has the same function as the Tempo Source field in the
Play/Record screen: It determines whether the sequence’s
Page 53
Chapter 3: Recording Sequences
tempo or the master tempo is currently active. It is a choice field
with two options:
1. SEQUENCE: Within each sequence is a unique tempo
setting. If this option is selected, this unique sequence
tempo is used. In this case, whenever the active sequence
number is changed, the newly selected sequence’s tempo
immediately becomes active. When playing sequences,
this is useful if you want each newly selected sequence to
play at its own preset tempo. Only the sequence’s tempo
is saved to disk when a sequence is saved.
2. MASTER: The master tempo is a single tempo setting that
applies to all sequences and songs. When playing sequences this is useful if you want each newly selected
sequence to always play at the same tempo.
BPM):
• Tempo Display Mode field (BPM/FPB:BPM
This field has the same function as the Tempo Display Mode field in
the Play/Record screen: it determines whether the active tempo is
displayed as Beats Per Minute or Frames Per Beat. It is a choice
field with two options:
1. BPM: The tempo is displayed in Beats Per Minute, with
the digit to the right of the decimal point indicating
tenths of a beat. This is the most common format used to
specify a tempo setting. In this mode, the range of tempo
settings in the MPC3000 is from 30 BPM to 300 BPM.
Beats Per Minute is also sometimes referred to as metronome marking, or MM.
2. FPB: This is another way of specifying tempo settings and
is often used in the making of music for film or video
soundtracks, because the tempo is referenced to the
number of film or video frames that pass for every beat of
music. Frames Per Beat is also sometimes referred to as
click. If the FPB setting is in use, the digit to the right of
the decimal point in any of the numeric tempo settings
indicates eighths (1/8 of a frame). The range is from 0 to
7. There are four different types of FPB tempo, described
in the Frames field below.
• The Frames field:
This field selects one of four Frames Per Second standards, used to
calculate the current FPB (frames per beat) setting. It also sets the
frame rate (and therefore affects the tempo) for received SMPTE
sync or MIDI Time Code. The four options are:
30 (30 frames per second, non-drop):
This is the most common frame rate for music production in
the United States. It was also the standard for black and
white television in the U.S. Using this mode, the tempo
range of the MPC3000 is from 60.0 to 6.0 FPB.
Page 54
Chapter 3: Recording Sequences
29.97 DROP (29.97 frames per second, drop frame):
This is the standard for NTSC color television in the United
States. Using this mode, the tempo range of the MPC3000 is
from 59.7 to 6.0 FPB.
COMMENT: In the MPC60 version 2 software, this
selection was erroneously called 30DROP, although it
was actually 29.97 frames per second drop frame
time code. Sorry.
25 (25 frames per second):
This is the standard for European television (PAL /SECAM
standard). Using this mode, the tempo range of the
MPC3000 is from 50.0 to 5.0 FPB.
24 (24 frames per second):
This is the standard for film. However, since film is usually
transferred to video for scoring, the composer still works
with the video standard frame rates. Using this mode, the
tempo range of the MPC3000 is from 48.0 to 5.0 FPB.
• The Tap averaging field
This parameter is used in conjunction with the TAP TEMPO key.
The TAP TEMPO key is used for quick setting of the playing tempo
by repeatedly tapping 1/4-notes on the key at the desired tempo.
(This is described further in the section “The Tap Tempo key.”)
Repeated taps are averaged to help reduce timing errors; this field
sets the number of taps that must be played successively before the
tempo is recalculated. The options are:
2 taps:
The tempo is recalculated after only two taps. This should
be used only if your timing is very good, or if you want to set
the new tempo roughly.
3 taps:
Initially, the tempo is recalculated after the first two taps. If
you continue to tap successive 1/4-notes, the tempo is
continuously recalculated by averaging the last three
successive tap intervals. This is a good average setting.
4 taps:
Initially, the tempo is recalculated after the first two taps. If
you tap a third time, the tempo will be recalculated using an
average of the three taps. If you continue to tap successive 1/
4-notes, the tempo is continuously recalculated on each
successive tap by averaging the last four successive tap
intervals. This is very useful if your timing is not very
accurate, because it smoothes out your timing errors.
Page 55
Chapter 3: Recording Sequences
• The <SyncScreen> soft key :
This screen is described in the chapter entitled “Syncing to Tape and
Other Devices.”
• The <TempoChanges> soft key:
The function of this soft key is described in the following section.
Mid-Sequence Tempo Changes
This feature allows the tempo to change automatically at preset
locations within a sequence. To insert tempo changes into the active
sequence or to view existing tempo changes, press the TEMPO/
SYNC key, then press the <TempoChanges> soft key. The following screen will appear:
====== Mid-sequence tempo changes ======
Tempo changes:ON
Location for inserted change:001.01.00
Change#: Bar#:
%Change: =Tempo:
2
002.03.00
150.00
180.0 BPM
========================================
<Insert new> <Delete> <Previous> <Next>
In the center of the screen is a group of fields, labeled Change#,
Bar#, %Change and =Tempo. In this case, the labels are located
directly above the actual data fields. These four fields work together
to allow you to view or edit any tempo changes that exist in the
sequence.
There can be many tempo changes in the sequence. These four fields
show one of these changes at a time. The Change# field shows the
number of the currently displayed tempo change within the list of
changes; the other fields show the contents of that tempo change.
For example, the above screen example shows that tempo change
number 2 will occur at bar 2, beat 3, and will change the tempo by
150% to 180 beats per minute.
The following is a description of each of these four fields:
• The Change# field:
This field displays the number of the tempo change currently displayed. There can be many tempo changes within
the sequence, but only one can be viewed at a time. By
changing this number, each of the existing tempo changes
can be viewed. The <Previous> and <Next> soft keys
can also be used to decrement or increment this field.
Page 56
Chapter 3: Recording Sequences
• The Bar# field:
This field shows the location within the sequence where the
currently displayed tempo change will occur. This is a
bar.beat.tick field.
• The %Change field:
This field shows, as a percentage of the main starting tempo
(either MASTER or SEQUENCE), the amount of tempo
change that the currently displayed tempo will produce.
Tempo changes are always specified as a percentage of the
main starting tempo setting (not the previous tempo
change), regardless of whether the SEQUENCE or MASTER
tempo setting is currently active. This way, all tempo
changes are automatically re-scaled when the main tempo
setting (either SEQUENCE or MASTER) is changed.
• The =Tempo field:
This field displays the actual tempo number that will play
once the tempo change is active. This number is automatically computed from the displayed percentage of change
multiplied by the main playing tempo (either MASTER or
SEQUENCE).
To view the entire list of tempo changes, simply modify the
Change# field and notice the different settings of the other three
fields as you change it. Even if no changes have been entered, every
sequence has one change—to 100% at bar 1. This is because the
current tempo setting is always returned to when the sequence
plays bar 1, whether it does so by playing from the start or by
looping back to the start.
To insert a new tempo change, enter the location within the sequence where you want the change to occur into the Location
for inserted change field, which is a bar.beat.tick field.
Then press the <Insert new> soft key. Immediately, a new
tempo change will be inserted into the list, displayed on the screen
with a default value in the %Change field of 100%. You must now
enter a percentage of the main starting tempo. As you enter the
percentage, the =Tempo field will show the actual tempo. For
example, to insert a tempo change to 60 BPM at bar 5 from a main
starting tempo of 120 BPM, you must insert a tempo change with a
value of 50% at bar 5 (120 BPM X 50% = 60 BPM).
To delete the currently displayed tempo change, press the
<Delete> soft key.
The field at the top of the screen, Tempo changes, is a choice
field with two options: ON and OFF. If set to ON, tempo changes are
used; if set to OFF, all tempo changes within the sequence are
ignored.
Page 57
Chapter 3: Recording Sequences
The TAP TEMPO Key
The TAP TEMPO key allows the tempo to be set quickly by tapping
two beats (1/4-notes) on the TAP TEMPO key. After two taps, the
MPC3000 automatically assumes the two taps to be 1/4-notes and
recalculates a new tempo to match those 1/4-notes.
For example, to quickly change to a tempo of 80 BPM, tap two 1/4notes at a tempo of approximately 80 BPM on the TAP TEMPO key.
After the second tap, the new tempo will appear in the Active Tempo
field of the Play/Record screen. This can also be done while the
sequence is playing.
Normally, only two taps are required before the MPC3000 recalculates the new tempo. However, it is possible to set this feature so
that it recalculates the tempo by averaging the last three (or four)
successive tap intervals. This is set in the Tap averaging field,
located in the Tempo screen. More information about using the TAP
TEMPO key is contained in the “Tempo and the TEMPO/SYNC Key”
section of the manual, earlier in this chapter.
Page 58
Chapter 3: Recording Sequences
The WAIT FOR and COUNT IN Keys
These two keys make the process of real-time sequence recording
easier.
The WAIT FOR KEY key
This function is useful in the recording of keyboard sequences when
your keyboard is not located close to the MPC3000. If Play, Record
or Overdub mode is entered while the Wait For Key function is on,
the sequence will not begin to play until a key is played on the MIDI
keyboard. This acts as a remote switch to start the sequence playing. Note that the first key that is played to start the sequence is
NOT recorded into the sequence—it only starts the sequence. All
keys played after recording has been initiated are recorded into the
sequence.
To turn Wait For Key mode on, press the WAIT FOR KEY key once;
the light goes on to indicate it has been activated. To turn the mode
off, press the WAIT FOR KEY key again and the light will go off. If
set to ON, it will automatically go OFF after it has been used once
(for playback, recording, or overdubbing a sequence). You must turn
it on again each time you want to use it.
The COUNT IN key
If the Count In function is on, one bar of metronome clicks will
precede the playing of the sequence or song whenever you initiate
playback of a sequence or song. The clicks provide a tempo guide to
prepare you to record or play along with the sequence.
Press COUNT IN to turn the function on and again to turn it off.
While on, the light above the key is lit.
It is possible to select a mode in which the count in only occurs
before recording and not before playing. To select this mode and to
adjust other metronome parameters, press the OTHER key. These
features are explained in the “OTHER Key” section, later in this
chapter.
COMMENT: While the Count In bar is playing, keys played
on the MIDI keyboard will not be output through MIDI (via
the MPC3000 ‘s Soft Thru function) until the Count In bar
has finished. For example, if you were to play a chord during
the count in bar, the chord would not sound until bar 1
started playing. This is normal operation and serves as a
reminder that no notes can be recorded during the count in
bar, and that any notes played during that time will be held
and recorded at the start of the sequence.
Page 59
Chapter 3: Recording Sequences
The AUTO PUNCH Key
The Auto Punch function allows Overdub or Record modes to be
entered and exited automatically at preset times while playing. This
can be very useful when you want to execute a very tight punch-in
and there isn’t enough time to get from the console keys to the MIDI
keyboard to play the new notes after the punch-in. The Auto Punch
function punches in for you, allowing you to concentrate on playing
the new part.
Press AUTO PUNCH to display the following screen:
============== Auto Punch ==============
Mode:IN+OUT
Auto Punch: In=001.01.000 Out=003.01.000
Last Punch: In=001.01.000 Out=003.01.000
========================================
<Turn on ><Use 'Last'>
The following is a detailed description of the fields and soft keys:
• The Mode field:
This field is used to select one of three Auto Punch modes:
1. IN+OUT:
Both the punch-in and the punch-out is automated.
2. PUNCH IN ONLY:
Only the punch-in is automated. Once Record or Overdub
mode is automatically entered by the Auto Punch function, it will not punch out—you must manually exit
Record or Overdub mode.
3. PUNCH OUT ONLY:
Only the punch-out is automated. You must enter Record
or Overdub mode manually, after which Auto Punch will
automatically exit Record or Overdub mode at the preset
punch-out time.
• The Auto Punch In= and Out= fields:
These two fields are used to specify the locations within the sequence at which the punch-in and punch-out will occur. To enter a
number into either of these two fields, type the bar number, a
decimal point, the beat number, a decimal point, and the tick
number, followed by ENTER. If the number you wish to enter is at
the start of a bar, simply enter the bar number followed by ENTER,
and the beat and tick numbers will automatically be reset.
Page 60
Chapter 3: Recording Sequences
• The Last Punch In= and Out= fields:
These two fields are indicators only—they cannot be manually
changed. They are used to indicate the exact locations of the
punch-in and punch-out that was last performed manually.
• The <Turn on > soft key:
Pressing this turns on the Auto Punch function, as indicated by
the status light above the key. If Auto Punch is already on, the
soft key text shows <Turn off> and pressing it turns both
Auto Punch and the light off.
• The <Use 'Last'> soft key:
Pressing this soft key causes the contents of the Last Punch
In= and Out= fields to be copied into the Auto Punch In=
and Out= fields. This is useful when you want Auto Punch to
automatically repeat the last manual punch.
To perform the AUTO PUNCH:
Once you have entered the punch-in and punch-out locations and
you have turned Auto Punch mode on by pressing SOFT KEY 1,
locate to a position within the sequence that is a few bars before
the punch-in point. Then enter Record mode as usual by pressing
PLAY and RECORD simultaneously. Since the Auto Punch
function is on, however, Record mode is not yet entered. Instead,
the RECORD light blinks until the punch-in point is reached.
When it is reached, Record mode is automatically entered and
the RECORD light stops blinking and stays on continuously.
When the punch-out point is reached, Record mode is automatically exited and the RECORD light goes off, but play continues.
It is also possible to use Auto Punch to enter and exit Overdub
mode automatically. To do this, follow the example given above,
but instead of pressing RECORD, press OVERDUB. The mode
that is entered is determined by which key is pressed, RECORD
or OVERDUB.
Page 61
Chapter 3: Recording Sequences
The SIMUL SEQUENCE Key
This function allows the MPC3000 to play two sequences simultaneously. For example, you could use the active sequence to linearly
record all of your keyboard tracks while simultaneously using the
Simul Sequence to play a looped drum sequence. The Simul Sequence can also play simultaneously with the active song, if song
mode is active.
To use this feature, press the SIMUL SEQ key, and the following
screen will appear:
============ Simul Sequence ============
On/off:ON
Sequence:23-A_funny_sequence
(This sequence will play simultaneously
with the active sequence or song.)
========================================
To turn the Simul Sequence on, first enter the number of the sequence that you would like to play simultaneously with the active
sequence in the Sequence field. The name of the selected sequence is displayed to the right of the number for convenience.
Next, move the cursor to the On/off field and select ON. The light
above the key will turn on as an indicator. Now, when you play the
active sequence or song, the sequence you selected in the Simul
Sequence screen will also play. To turn the feature off, return to the
Simul Sequence screen and select OFF in the On/off field.
Page 62
Chapter 3: Recording Sequences
The OTHER Key
The OTHER key gives you access to a number of additional features,
many of which are related to sequence recording:
• Metronome controls: Provides adjustments for the recording
metronome and Count In function.
• Foot Switches: Allows the two foot switch inputs to be assigned.
• Free sequence memory display: Shows the current percentage of
sequence memory available for recording.
• Initialize system parameters: Provides access to the Initialize PAR
File Data screen, which allows the initialization of all general
parameters in the MPC3000. This function is further described in
the “Initializing System Parameters” section later in this chapter.
• Record 16 channels simultaneously: Provides access to the Record
16 Channels function, which allows all 16 incoming MIDI channels
to be recorded simultaneously, useful when transferring sequences
from another sequencer to the MPC300. This function is detailed in
the “Record 16 Channels Function: Multichannel Recording” section
later in this chapter.
Metronome, Foot Switches, and Free Sequence Memory
When the OTHER key is pressed, the following screen appears:
============== Metronome ===============
Volume:100
In play:YES
Output:STEREO
Count IN:REC ONLY
Rate:1/4 NOTE
====== Foot Switches / Free Memory =====
Foot1:PLAY-STRT/STP Foot2:RECORD IN/OUT
Free seq mem:100%
========================================
<Init PAR><Rec 16 Chs>
The fields and soft keys are:
The Metronome section:
• The Volume field:
This field controls the volume of the metronome, from 0 to 100.
• The In play field:
This is a choice field that has two options:
Page 63
Chapter 3: Recording Sequences
1. NO: The metronome is only heard during Record or
Overdub modes, but not while in Play mode.
2. YES: The metronome is heard in Play, as well as in
Record and Overdub modes.
• The Output field:
This choice field determines which audio output the metronome will
play through. The options are STEREO and INDIV 1 (individual
out 1) through INDIV 8 (individual out 8.)
• The Count IN field:
This is a choice field with two options:
1. REC+PLAY: If the Count In light is on, the count in will
be heard before recording, overdubbing, or playing.
2. REC ONLY: If the Count In light is on, the count in will
be heard before recording only.
• The Rate field:
This choice field controls the note value of the metronome. Normally, the metronome plays 1/4-notes. In this field it is possible to
change that value to one of eight options:
1/4 NOTE
1/4 TRIPLET
1/8 NOTE
1/8 TRIPLET
1/16 NOTE
1/16 TRIPLET
1/32 NOTE
1/32 TRIPLET
The Foot Switches /Free Memory section:
• The Foot1 and Foot2 fields:
These two fields determine the function of foot switches connected to
the rear panel FOOT SW 1 and 2 inputs. These are choice fields,
each of which can be set independently to one of the following
options:
PLAY/STOP:
Press once for PLAY, press again for STOP.
PLAY-STRT/STP (Play start /stop):
Press once for PLAY START, press again for STOP.
ERASE:
Press to duplicate the function of pressing ERASE. This is
very useful for hands-free use of the real-time erase
function.
Page 64
Chapter 3: Recording Sequences
TIMING CORECT (Timing correct):
Press to duplicate the function of pressing TIMING CORRECT. This is very useful for hands-free use of the Note
Repeat function.
‘+’:
Press to duplicate the function of turning the data entry
control one step to the right.
‘-’:
Press to duplicate the function of turning the data entry
control one step to the left.
RECORD IN/OUT:
Press once to duplicate the function of punching in to Record
mode while playing; press again to duplicate the function of
punching out of Record mode and back into Play mode.
OVRDUB IN/OUT (Overdub in/out):
Press once to duplicate the function of punching in to
Overdub mode while playing; press again to duplicate the
function of punching out of Overdub mode and back into
Play mode.
‘<’:
Press to duplicate the function of pressing the REWIND [<]
key. This is very useful for stepping backward through the
sequence while Step Edit is on.
‘>’:
Press to duplicate the function of pressing the FAST FORWARD [>] key. This is very useful for stepping forward
through the sequence while Step Edit is on.
TAP TEMPO:
Press to duplicate the function of pressing the TAP TEMPO
key.
• The Free seq mem field:
This field shows the total amount of sequence memory currently
available for recording. It is for display only and cannot be edited.
The soft keys:
• The <Init PAR> soft key:
Pressing this soft key presents a screen used for initializing all
general system parameters, which are stored in PAR files. This
function is described in the following section of this chapter.
Page 65
Chapter 3: Recording Sequences
• The <Rec 16 chs> soft key:
Pressing this soft key presents a screen used for setting up multichannel recording. This is described in the section “The Record 16
Channels Function: Multichannel Recording”, later in this chapter.
Initializing System Parameters
There are a number of parameters in the MPC3000 that are not
saved in SEQ, ALL, SND, PGM, or APS disk files. These settings,
called system parameters, are retained in a special memory that
doesn’t lose its contents when the power is turned off. These settings
include:
• Names for all 64 MIDI channels
• Master tempo
• BPM/FPB select and frames per second select
• MIDI Input Filter settings
• Default settings for initializing sequences
. . .and many more (see the Appendix for a complete list).
To initialize these system parameters to their factory preset state,
press the OTHER key, then select the <Init PAR> soft key. The
following screen will appear:
==== Initialize Parameter File Data ====
Initialize:ALL PAR FILE DATA
========================================
<Do it>
The fields and soft keys are:
• The Initialize field:
This choice field is used to select whether all or only some of the
system parameters will be initialized. The options are:
ALL PAR FILE DATA
PAD TO NOTE ASSIGNMENTS
MIDI INPUT FILTER
MIDI CHANNEL NAMES
MISC. SINGLE DATA FIELDS
• The <Do it> soft key:
Pressing this soft key initializes the selected data.
Page 66
Chapter 3: Recording Sequences
The Record 16 Channels Function: Multichannel Recording
In its normal operating mode the MPC3000 can only record one
track at a time. There is, however, a special mode of recording that
allows you to record on all 16 MIDI channels at once. This is very
useful when transferring sequences to the MPC300 from other
sequencers. This feature works by recording the 16 incoming MIDI
channels into the first 16 tracks of a newly-created empty sequence,
with each track assigned to the like-numbered MIDI channel. For
example, track 1 records MIDI channel 1, track 2 records MIDI
channel 2, and so on up to track 16, which records MIDI channel 16.
Track assignments are done automatically.
To use the Record 16 Channels function to transfer a sequence from
an external sequencer to the MPC3000, you must first synchronize
the MPC3000 to the other sequencer using MIDI Clock. To do this:
1. Set the sending sequencer to generate MIDI clock and song
position pointer data.
2. Set the MPC3000 to synchronize to incoming MIDI clock and song
position pointer data. (See the “Syncing to tape and Other Device” chapter of this manual for details.)
Press the OTHER key, then press SOFT KEY 2, <Rec 16 Chs>,
to view the first Record 16 Channels screen:
======== Record All 16 channels ========
Seq: 1-SEQ01
Sig: 4/ 4
Drums on ch:10
========================================
Tracks 1-16 recv from chans 1-16. Timing
corr = off. Enter data, then <Proceed>.
========================================
<Proceed>
In this screen, you must select a sequence for recording, a time
signature for the new sequence, and select which channel will
receive drum data, if any. The fields and soft key of this screen are:
• The Seq field:
This is the sequence to be recorded into. When <Proceed> is
pressed, the contents of this sequence will be completely erased so
that it can be used for recording.
SEQ01 in the above example
• The Sequence Name field (Seq: 1-SEQ01
screen):
This field shows the name of the current sequence. Once you have
selected the sequence number to be used, you can enter the new
sequence name here. It can be changed in the same manner as the
Sequence Name field in the Play/Record screen.
Page 67
Chapter 3: Recording Sequences
• The Sig field (time signature):
This is actually two fields—the upper and lower half of the time
signature to be used for recording. When <Proceed> is pressed,
the selected sequence will be initialized to one bar of the time
signature entered in these two fields.
• The Drums on ch field (drums on channel):
If one of the incoming MIDI channels will contain drum data and
you would like the corresponding MPC3000 track to be a DRUM
track, specify that MIDI channel here. When <Proceed> is
pressed, this track number will have its Type field set to DRUM.
• The <Proceed> soft key:
When all of the above fields have been entered, press this soft key to
initialize the selected sequence and move on to the second Record 16
Channels screen:
======== Record all 16 channels ========
Seq: 1-Sequence_name
BPM:120.0 (SEQ)
Sig: 4/ 4
Bars:
1
Loop:OFF
========================================
While holding RECORD, play ext sequencer
with MIDI clock.
===== Bar:001.01.00 (00:00:00.00) ======
<Done>
This is the screen in which the actual recording will take place. The
selected sequence has now been initialized to contain one bar of the
time signature entered in the previous screen. The first 16 tracks
have been assigned to MIDI channels 1 through 16, as described
above. All tracks have their Type assigned to MIDI except for the
track number specified in the Drums on ch field in the previous
screen, which has been initialized to DRUM.
The fields and soft key are:
• The Seq field:
This field shows the sequence number that was entered in the
previous screen. In this screen it is for display only and cannot be
changed.
SEQ01 in the above example
• The Sequence Name field (Seq: 1-SEQ01
screen):
This is the selected sequence’s name. It can be changed in the same
manner as the Sequence Name field in the Play/Record screen.
• The Tempo Display Mode, Active Tempo, and Tempo Source fields:
These three fields operate exactly as their counterparts in the Play/
Record screen do.
Page 68
Chapter 3: Recording Sequences
• The Sig field (time signature):
This field shows the time signature entered in the previous screen.
It is for display only and cannot be changed.
• The Bars field
This shows the total number of bars in the newly initialized sequence, which is always initialized to 1 bar. When recording begins,
additional bars will be added to the end of the sequence as needed,
as is normal when the Loop field is set to OFF in the Play/Record
screen.
• The Loop field:
This is for display only and cannot be changed. It indicates that the
sequence’s Loop field is forced to OFF because loop recording is not
permitted during 16 channel recording.
• The <Done> soft key:
When finished recording, press this soft key to exit to the Play/
Record screen with your new sequence intact.
To record the incoming sequence:
While holding the RECORD key on the MPC3000, start the external sequencer playing from the beginning of its sequence. As soon as
the MPC3000 receives the sync signals, it will enter Record mode
and begin recording the data from the other sequencer in real time.
(Note: The OVERDUB key is disabled during 16 channel recording.)
Once the transfer is finished, stop the external sequencer (the
MPC3000 will stop automatically) or manually stop the MPC3000.
The MPC3000 now contains the transferred sequence, which can be
played using the PLAY, PLAY START, REWIND, FAST FORWARD
and LOCATE keys. Play the sequence; if the transfer was successful, press <Done> to return to the Play/Record screen. If the
transfer didn’t come out as intended, try again by holding RECORD
and starting the other sequencer.
COMMENT: If the incoming multitrack sequence contains a
large amount of data or is playing at a very fast tempo, it is
possible for the MPC3000 to become overloaded, causing
delays in the timing of the recorded sequence. If this occurs,
reduce the tempo of the sending sequencer. This will lower the
MPC3000’s processing requirement, and should eliminate
any overload errors.
Page 69
Chapter 3: Recording Sequences
Recording MIDI System-Exclusive Data
The MPC3000 can record patch data or any other MIDI systemexclusive messages from external synthesizers directly into tracks.
To do this, simply send the system-exclusive message to the
MPC3000 while in Record, Overdub, or Step Edit mode, and it will
be recorded into the active track, just the same as any other MIDI
data. The only limitation is that the message must be smaller than
1000 bytes. If an attempt is made to record a message that is larger
than that, the entire message will be rejected. 1000 bytes is enough
to accommodate a single voice patch data dump from virtually any
synthesizer, but it is not large enough for many voice bank data
dumps (large files containing an entire bank of synthesizer patches).
One way of using this feature is to insert a blank bar at the beginning of your sequence and record the voice data dumps for each
track into that first bar. When the sequence is played from the start,
each external synthesizer will immediately receive the voice data in
the first bar, so it will be ready to play the note data starting in the
second bar with the proper sound.
There is one problem with playing system-exclusive messages from
sequences: there is no standard method for identifying the MIDI
channel number within the message, and therefore the MPC3000
cannot assign the output MIDI channel over which the message will
be sent. This means, for example, that a system-exclusive message
received over MIDI channel 3 while recording into the MPC3000
will always be played out of the MPC3000 on MIDI channel 3,
regardless of the track’s output MIDI channel. To overcome this
problem, you must send the system-exclusive message on the
desired MIDI channel while recording it into the MPC3000. Most
synthesizers allow you to select the transmit channel. Note, however, that some older synthesizers, such as the original Yamaha DX7, always transmit on MIDI channel 1.
However, there is a way to change the MIDI channel of a systemexclusive message while it is in the MPC3000—by using Step Edit.
The MIDI channel is assigned to a single byte within the message
and the Step Edit function allows you to change the contents of any
byte within the message. If you know which byte a particular
manufacturer uses for the channel number, you can change the
contents of that byte to the desired MIDI channel number. For
example, the Yamaha DX-7 system-exclusive messages contain the
MIDI channel in byte number 3, so whatever number you put into
byte number 3 of the message will be the new output MIDI channel
number. To learn more about editing in Step Edit mode, read “The
STEP EDIT Key” section in the “Editing Sequences” chapter of this
manual.
Page 70
Chapter 4: Editing Sequence
Chapter 4:
Editing Sequences
Page 71
Chapter 4: Editing Sequence
The ERASE Key
The ERASE key provides three main functions:
• Erasing notes in real time while in Overdub mode
• Erasing notes or other events while stopped
• Initializing or deleting sequences
Erasing Notes in Real Time While in Overdub Mode
If the ERASE key is pressed and held while in Overdub mode, the
top line of the Play/Record screen changes to the following for as
long as ERASE is held:
==== (Hold pads or notes to erase) =====
If during this time you hold a drum pad (if the active track is a
Drum track) or hold a key on the MIDI keyboard (if the active track
is a MIDI track), any notes assigned to that pad or key in the
selected track will be erased.
Erasing Notes or Other Events While Stopped
While not playing, the MPC3000 allows the erasure of specific
events from any region within a sequence, on one or all tracks. This
is done using the ERASE key.
If the ERASE key is pressed while the MPC3000 is not playing, the
Erase screen appears:
================= Erase ================
Seqnc: 1-SEQ01
Track: 1-TRK01
(0 = all)
Ticks:001.01.00-003.01.00
Erase:ALL EVENTS
Notes:
0(C.-2)-127(G.8 )
(Press keys)
========================================
<Do it> <Initialize><Delete><Delete All>
To erase the notes, enter the appropriate data into each of the data
fields, then press the <Do it> soft key. Each of the screen fields
and soft keys is described below:
Page 72
Chapter 4: Editing Sequence
• The Seqnc (sequence) field:
In this field, enter the sequence number from which the data will be
erased. The sequence name is shown to the right for convenience.
• The Track field:
This field specifies the track from which the data will be erased. The
active track is automatically inserted here. To erase all tracks at
once, enter a 0 here. In that case, the Notes field will be forced to
ALL because it is not possible to select specific notes for erasure
when erasing all tracks.
• The Ticks fields:
These two fields are used to set the region to be erased, starting
with the location specified in the leftmost field, through one clock
before the location specified in the rightmost field. They are both
bar.beat.tick fields, allowing you to set the region to be erased in
increments as small as one tick.
• The Erase field:
This field allows you to select which types of events will be erased. It
is a choice field with three options:
1. ALL EVENTS: If this option is selected, all possible MIDI
event types will be erased.
2. ONLY ERASE: If this option is selected, only one event
type will be erased, and the type of event to be erased will
appear in a choice field directly to the right on the same
line. In this rightmost field, all event types are listed,
including all 128 MIDI controllers.
3. ALL EXCEPT: If this option is selected, all MIDI event
types EXCEPT one specific type will be erased; the event
type that will NOT be erased will appear in a choice field
directly to the right on the same line. In this rightmost
field, all event types are listed, including all 128 MIDI
controllers.
• The Notes field:
This field determines which notes will be erased. It appears in one
of two ways depending on whether the selected track is a Drum
track or a MIDI track:
1. If the source track is a MIDI track, two numeric fields—
used to set the lowest and highest notes to erase within
the MIDI keyboard’s range—will appear as above. Each
of these numeric fields is editable and has a range of 0 to
127; the equivalent note name (C-2 to G8) is shown to the
right of each field. Alternately, these fields can be set by
pressing two notes on the MIDI input device’s keyboard.
The fields will automatically be set to the lowest and
highest keys pressed.
2. If the source track is a Drum track, this field is used to
select specific MIDI note numbers for erasure, but
cannot be accessed by the cursor—it can only be
changed by pressing pads or by receiving external
MIDI notes. When the screen is first displayed, it
contains the word ALL (erase all notes) and the text
Page 73
Chapter 4: Editing Sequence
(Hit pads) to the right. When a pad is pressed, its
currently assigned note number will appear in the field,
followed by the pad number and currently assigned sound
name. On the right side of the line is the text (1 pad)
indicating that 1 pad is selected for erasure:
Notes:36/A02-SNARE_DRUM (1 pad)
If another pad is then pressed, its note number, pad
number, and assigned sound are displayed instead, and
the text to the right displays (2 pads). This continues
until the user has selected all of the pads he or she
intends to erase.
• The <Do it> soft key:
Pressing this soft key performs the erasure specified by the data in
the screen fields. After the erasure has been performed, the Play/
Record screen is redisplayed.
• The <Initialize> soft key:
This soft key is used to erase and initialize the entire sequence to
specific values. Please see the following section, “Initializing a
Sequence,” for an explanation of this feature.
• The <Delete> soft key:
This soft key is used to delete the entire sequence, which erases all
data and sets the sequence to the same unused state as when power
is first turned on. When a sequence is deleted, it uses the least
amount of memory, less than if it is initialized. When SOFT KEY 3
(<Delete>) is pressed, the following screen appears:
============ Delete Sequence ==========
Sequence: 23-Sequence_name
(This will set sequence to unused state
with no contents.)
========================================
<Do it>
To delete the sequence, enter the desired sequence number and
press <Do it>.
• The <Delete all> soft key:
This soft key is used to delete all 99 sequences, setting them to the
same state as when power is first turned on (maximum available
sequence memory). When <Delete all> is pressed, the
following screen appears:
Page 74
Chapter 4: Editing Sequence
========= Delete All Sequences =========
Pressing <Do it> will erase all
sequences and set them to unused state
as when power is turned on!!!!
========================================
<Do it>
To delete all sequences, press <Do it>.
Initializing a Sequence
To erase a sequence and initialize it to preset values, press the
ERASE key, followed by SOFT KEY 2 (<Initialize>). The
following screen will appear:
========== Initialize Sequence =========
Select sequence: 1-(unused)
===== General =====
==== Track: 1 ====
Bars:
2
Sig: 4/ 4
Status:UNUSED
BPM:120.0
Type:DRUM
Pgm:OFF
Loop:TO BAR
1
Chn:OFF
& OFF
========================================
<Do it>
<Track->
<Track+>
The fields and soft keys are:
• The Select sequence field:
This field is used to enter the number of the sequence that is to be
initialized. The selected sequence’s name is shown for convenience.
The “General” section:
• The Bars field:
In this field enter the number of bars for the initialized sequence.
• The Sig (time signature) field:
In this field enter the time signature for the initialized sequence. It
is actually two fields, one for the upper and one for the lower parts
of the time signature.
• The BPM field:
In this field enter the tempo to which you want the sequence to be
initialized. To view the tempo in frames per beat, move the cursor to
the word BPM and use the data entry control to change it to FPB,
just as in the Play/Record screen.
Page 75
Chapter 4: Editing Sequence
• The Loop field:
In this field enter the loop status (OFF or TO BAR) and the loop bar
number, if TO BAR is selected, for the initialized sequence.
The “Track” section
• The Track field:
Any or all of the sequence’s tracks can be initialized. To enter the
settings for each track, first select the track number in this field,
then enter the initialization data for that track in the fields below.
The contents of the five fields in this section apply only to the track
(1 of 99) that is selected in this field.
• The Status field:
This is a choice field with two options:
1. UNUSED: The track number displayed in the Track field
will not be initialized. Instead, it will be set to an unused
state (as when power is turned on), which requires the
least amount of memory. However, if this track is later
recorded into, it will immediately be initialized to default
values.
2. IN USE: The track number displayed in the Track field
will be initialized to the values entered in the Type, Pgm
and Chn fields.
• The Type field:
The Type field for the selected track will be initialized to the option
selected in this field (DRUM or MIDI).
• The Pgm field:
The Pgm field for the selected track will be initialized to the option
selected in this field (1-128 or OFF).
• The Chn field:
In this field enter the output MIDI channel (1-16 or OFF) and port
(A-D) to which the selected track will be initialized, using the same
data entry method as in the Chn field in the Play/Record screen. To
the right of this field is another field for the auxiliary MIDI output
channel assignment.
• The <Do it> soft key:
After values for all the fields have been entered, press this soft key
to initialize the sequence.
Page 76
Chapter 4: Editing Sequence
The SEQ EDIT Key
The SEQ EDIT key provides access to many features related to
sequence editing. Pressing it will display the following menu screen:
============= Edit Sequence ============
1)View/chng T sig
6)Copy events
2)Chng track order
7)Copy a sequence
3)Insert blank bars 8)Shift timing
4)Delete bars
9)Edit note data
5)Copy bars
========================================
Select option:
Pressing a single number key causes the screen for the selected
function to appear. These functions are described below:
Viewing and Changing Time Signature
This feature displays the time signature and number of bars in the
active sequence as well as any time signature changes. Press 1
(View/chng T sig) from the SEQ EDIT key menu and the
following screen will be displayed:
========== View Time Signature =========
Bar
1 2: 4/ 4
========================================
<Page -> <Page +> <Change TSig>
This screen displays all time signature changes within the active
sequence, and the number of bars associated with each change. If no
time signature changes exist, the existing single time signature and
the total number of bars in the sequence will be displayed. Space is
given for ten time signature changes, with two changes per line. If
more exist, the <Page +> soft key is used to view more pages of
changes, and the <Page -> soft key is used to display earlier
pages.
Page 77
Chapter 4: Editing Sequence
Changing the time signature of a single bar
To change the time signature of a specific bar, press <Change
Tsig>. The following screen will appear:
======== Change Time Signature =========
Change the time signature of bar:
1
from
4/ 4 to
4/ 4.
(If the new time sig is shorter, the end
of the bar is truncated; if longer,
blank space is added to the end.)
========================================
<Do it>
This function allows you to change the length of a particular bar
within a sequence by changing its time signature. It works like this:
if the time signature you change to is shorter than the existing one,
the unused end of the bar is truncated. For example, if you need to
remove one 1/8-note from the end of a 4/4 bar, you would change its
time signature to 7/8. If the new time signature is longer than the
existing one, a small amount of blank space will be added onto the
end of the bar.
To change the time signature of a bar, first select the bar number to
be changed in the top line. The existing time signature for that bar
will be displayed in the from field in the second line. Next, enter
the time signature you wish to change to in the to fields (2 parts) in
the second line. To perform the change, press the <Do it> soft key.
Rearranging the Track Order
This feature rearranges the track order by removing one track and
inserting it before another, causing all tracks in between to be renumbered. Multiple operations may be required to put the tracks in
the desired order. Select 2 (Chng track order) from the SEQ
EDIT key menu and the following screen will appear:
========== Change Track Order ==========
Sequence: 1-Seqnc_name
Place
track: 1-Track_name
Before track: 2-Track_name
(Tracks in between will be renumbered.)
========================================
<Do it>
Page 78
Chapter 4: Editing Sequence
To rearrange tracks, first enter the desired sequence number. Then
enter the track number to be moved in the Place track field. In
the Before track field, enter the number of the track that the
moved track will be inserted before. Press <Do it> to execute the
move.
Inserting Blank Bars Into a Sequence
This feature inserts a specified number of blank bars into the
current sequence. Select option 3 (Insert blank bars) from
the SEQ EDIT key menu, and the following screen will appear:
========== Insert Blank Bars ===========
Sequence:12-Sequence_name
Number of bars:
4
Time signature: 4/ 4
Insert before bar:
4
========================================
<Do it>
The fields and soft key are:
• The Sequence field:
This is the sequence into which the bars will be inserted. The
sequence’s name is shown to the right.
• The Number of bars field:
This is the number of blank bars to be inserted.
• The Time signature field:
This is the time signature of the bars to be inserted. This is actually
two fields—one for each part of the time signature. The range of the
first part is from 1 to 31; the second part is a choice field with four
selections: 4, 8, 16, and 32.
• The Insert before bar field:
This field specifies the bar number before which the new bars will
be inserted. To insert bars after the end of the sequence, enter a
number one higher than that of the last bar in the sequence.
• The <Do it> soft key:
Pressing this soft key performs the insertion according to the abovedisplayed parameters.
COMMENT: If the sequence is set to loop to an earlier bar (in
the time signature/ending status screen) and the new bars
are inserted before the loop bar, the bar number specified in
Page 79
Chapter 4: Editing Sequence
the Loop field will automatically be increased to compensate
for the insertion.
Deleting Bars From a Sequence
This function allows you to delete a specified number of bars from
the active sequence. To use this function, select option 4 (Delete
bars) from the SEQ EDIT key menu. The following screen will be
displayed:
=========== Delete Bars ============
Sequence:12-Sequence_name___
First bar:
1
Last bar:
2
========================================
<Do it>
The on-screen fields and soft keys are:
• The Sequence field:
This is the sequence from which the bars will be deleted. The
sequence’s name is shown to the right.
• The First bar field:
This is the first bar to be deleted.
• The Last bar field:
This is the last bar to be deleted.
COMMENT: For those of you familiar with the MPC60
version 2 operating software, this field has a different function than the To bar field in the MPC60’s Delete Bars
function. This field contains the last bar of the range of bars
to be deleted, whereas the MPC60’s To Bar field contained
the first bar number after the region to be deleted.
• The <Do it> soft key:
Pressing this soft key performs the specified deletion.
COMMENT: If the sequence is set to loop to an earlier bar (in
the Play/Record screen) and the deleted bars are before the
loop point, the bar number specified in the Loop field will
automatically be decreased to compensate for the deletion.
Page 80
Chapter 4: Editing Sequence
Copying Bars (All Tracks)
This function allows you to copy a specified range of bars (across all
tracks) from one sequence and insert the copied data at any point
within the same sequence or any other sequence. In this mode of
copying, the overall length of the destination sequence will always
be increased. To use this function, select option 5 (Copy bars)
from the SEQ EDIT key menu. The following screen will appear:
============ Copy Bars From ============
Seq:12-Sequence_name
First bar:
1
Last bar:
2
============= Copy Bars To =============
Seq:12-Sequence_name
Before bar:
1
Copies: 1
========================================
<Do it>
The fields and soft key are described below:
• The Seq field (in the Copy Bars From section):
This field is used to specify the sequence number to be copied from.
• The First bar and Last bar fields:
These fields set the range of bars to be copied. First bar sets the
first bar in the range that is to be copied, and Last bar sets the
last bar to be copied.
COMMENT: For those of you familiar with the MPC60
version 2 operating software, this field has a different function than the To bar field in the MPC60’s Copy Bars
function. This field contains the last bar of the range of bars
to be copied, whereas the MPC60’s To Bar field contained
the first bar number after the region to be copied.
• The Seq field (in the Copy Bars To section):
This field is used to specify the sequence number to be copied to.
• The Before bar field:
This field specifies the bar number before which the copied data will
be inserted. To insert the bars at the end of the sequence, enter a
number one higher than that of the last bar in the sequence.
• The Copies field:
This field specifies how many repetitions of the source data will be
inserted into the destination sequence.
• The <Do it> soft key:
Pressing this soft key executes the copy according to the entered
parameters.
Page 81
Chapter 4: Editing Sequence
COMMENT: If the sequence is set to loop to an earlier bar (in
the Play/Record screen) and the copied bars are inserted
before the loop bar, the bar number specified in the Loop
field will automatically be increased to compensate for the
insertion.
COMMENT : When copying from one sequence to another, be
careful to copy MIDI track data only to MIDI tracks and
Drum track data only to Drum tracks. Otherwise, keyboard
notes can cause drum sounds to play or vice versa.
Copying Events
This function permits the copying of all events within a specified
region of a single track to a different point in the same or another
track in the same or another sequence. In this function, only the
events from the source track are copied—no time signature or tempo
data are copied. Unlike the Copy Bars function, which inserts the
copied data into the sequence, thus increasing its overall length,
this copy function either replaces the existing events or merges the
copied data with existing events, without adding additional bars.
Therefore, in this function, the track’s overall length is unchanged
after the copy has been executed.
To use this function, select option 6 (Copy events) from the SEQ
EDIT key menu. The following screen will be displayed:
=========== Copy Events From ===========
Sequence: 1
Track: 1-Track_name
Ticks:001.01.00-001.01.00
Notes:ALL
(Hit pads)
============ Copy Events To ============
Sequence: 1
Track: 1-Track_name
Mode:REPLACE
Copies:
3 Start:001.01.00
<Do it>
A description of the fields and soft key follows:
• The Sequence field (in the Copy Events From section):
This is the sequence from which the data will be copied.
• The Track field (in the Copy Events From section):
This is the track from which the data will be copied. Enter a 0 here
to copy all tracks at once. If you do this, the lower Track field (in
the Copy Events To section) will be forced to 0 also, because the
destination must also be all tracks.
• The Ticks fields:
These two fields are used to set the region of the track that will be
copied from, starting at the tick specified in the leftmost field and
including all data up to (but not including) the tick specified in the
Page 82
Chapter 4: Editing Sequence
rightmost field. These are bar.beat.tick fields, enabling you to
specify the region in units as small as one tick.
• The Notes field:
This field determines which notes will be copied. It appears in one of
two ways depending on whether the selected track is a Drum track
or a MIDI track:
1. If the source track is a Drum track, this field is used to
select the specific drum notes, represented as MIDI note
numbers, that are to be copied. It cannot be accessed with
the cursor; notes can only be entered by pressing pads or
via the reception of external MIDI notes. When the
screen is first displayed, it contains the word ALL (copy
all notes) and the text (Hit pads) to the right. When
a pad is pressed, the pad’s currently assigned note
number appears in the field, followed by the pad number
and currently assigned sound name. On the right side of
the line is the text ( 1 pad ) indicating that 1 pad is
selected for copying:
Notes:36/A02-SNARE_DRUM
( 1 pad )
If another pad is pressed, its note number, pad number,
and assigned sound are displayed instead, and the text to
the right displays ( 2 pads). This continues until the
user has selected all of the pads he or she intends to copy.
2. If the source track is a MIDI track, two numeric fields—
used to set the lowest and highest notes of the note range
that is to be erased—will appear. Each of these numeric
fields is editable via the cursor and has a range of 0 to
127; the equivalent note name (C-2 to G8) is shown to the
right of each field. Alternately, these fields can be set by
pressing two notes on the MIDI input device’s keyboard.
The fields will automatically be set to the lowest and
highest keys pressed.
• The Sequence field (in the Copy Events To section):
This is the sequence into which the data will be copied.
• The Track field (in the Copy Events To section):
This is the track to be copied to. If this field can’t be changed from
0—(all tracks), then the upper Track field (in the Copy
Events From section) must have been set to 0, indicating that all
tracks will be copied.
• The Mode field:
This is a choice field with two options:
1. REPLACE:
In this mode, all existing events in the destination track
are overwritten by the newly copied data.
Page 83
Chapter 4: Editing Sequence
2. MERGE:
In this mode, the copied data are merged, or added, to the
existing events.
• The Copies field:
This field specifies the number of repetitions of the copied data that
will be added to the new sequence.
• The Start field:
The copied data can be added into the destination sequence and
track starting at any location. This field specifies the start location
where the copied data will be placed. This is a bar.beat.tick field,
allowing the copied data to be placed starting at any location, in
increments as small as one tick.
• The <Do it> soft key:
Pressing this soft key performs the copy as specified in the above
fields.
COMMENT : Be careful to copy MIDI track data only to
MIDI tracks and Drum track data only to Drum tracks.
Otherwise, keyboard notes can cause drum sounds to play or
vice versa.
Copying an Entire Sequence to Another
This function is useful if you want to make a perfect copy of a
sequence, including all parameters, to another sequence number,
replacing all data and parameters previously contained in the
destination sequence. To use this function, select option 7 (Copy a
sequence) from the SEQ EDIT key menu. The following screen
will appear:
===== Copy One Sequence To Another =====
Copy contents of seq: 1-Sequence_name
Over contents of seq: 2-Sequence_name
========================================
<Do it>
A description of the screen fields and soft keys follows:
• The Copy contents of seq field:
This specifies the sequence to be copied from.
Page 84
Chapter 4: Editing Sequence
• The Over contents of seq field:
This specifies the sequence whose contents will be replaced by the
contents of the above specified sequence number. The lowestnumbered empty sequence is automatically inserted here when this
screen is entered.
• The <Do it> soft key:
Pressing this soft key performs the above specified copy.
Shifting the Timing of Many Notes
This feature shifts a group of notes within a single track forward or
backward in time. To use this feature, select 8 (Shift timing)
from the SEQ EDIT key menu. The following screen will appear:
============= Shift Timing
Seqnc: 1-Sequence_name
Track: 1-Track_name
Ticks:001.01.00-001.01.00
Notes:
0(C.-2)-127(G.8 )
=============
Dir:EARLIER
Amount:
0
(Press keys)
========================================
<Do it>
The fields and soft keys are:
• The Seqnc field:
This specifies the sequence to be shifted.
• The Track field:
This specifies the track to be shifted. Only one track can be shifted
at a time.
• The Ticks fields:
These two bar.beat.tick fields are used to determine the region
within the track that will be shifted. The leftmost field sets the start
point of the region and the rightmost field holds the location that is
one tick after the region to be shifted.
• The Notes field:
This field determines which notes will be shifted. It appears in one
of two ways depending on whether the selected track is a drum or
MIDI track:
1. If the source track is a MIDI track, two numeric fields—
used to set the lowest and highest notes of the note range
that is to be shifted—appear as above. Each of these
numeric fields is editable via the cursor, and has a range
Page 85
Chapter 4: Editing Sequence
of 0 to 127; the equivalent note name (C-2 to G8) is shown
to the right of each field. Alternately, these fields can be
set by pressing two notes on the MIDI input device’s
keyboard. The fields will automatically be set to the
lowest and highest keys pressed.
2. If the source track is a Drum track, this field is used to
select specific drum notes, represented as MIDI note
numbers, that are to be copied. It cannot be accessed with
the cursor; notes can only be entered by pressing pads or
via the reception of external MIDI notes. When the
screen is first displayed, it contains the word ALL (shift
all notes) and the text (Hit pads) to the right. When
a pad is pressed, the pad’s currently assigned note
number appears in the field, followed by the pad number
and currently assigned sound name. On the right side of
the line is the text ( 1 pad ) indicating that one pad
is selected for shifting:
Notes:36/A02-SNARE_DRUM
( 1 pad )
If another pad is then pressed, its note number, pad
number, and assigned sound are displayed instead, and
the text to the right displays ( 2 pads). This continues until the user has selected all of the pads he or she
intends to shift.
• The Dir (direction) field:
This choice field is used to determine the direction of shift and has
two options: EARLIER and LATER.
• The Amount field:
This field is used to determine the amount of shift in ticks.
• The <Do it> soft key:
Pressing this soft key performs the shift specified in the above
fields.
Global Editing of Note Event Data
If option 9 (Edit note data) is selected from the SEQ EDIT key
menu, the following menu, which contains three choices for editing
note data, appears:
Page 86
Chapter 4: Editing Sequence
============ Edit Note Data ============
1.Edit velocity/duration
2.Edit note number assignment
3.Edit note variation data
========================================
Select option:
These options are described in the three sections below.
Editing Note Velocity or Duration Data
To edit the velocity or duration data of a group of notes in one
operation, select 1 from the Edit Note Data menu. The following
screen will appear:
======== Edit Velocity/Duration ========
Seqnc: 1-Seqnc_name
Edit:VELOCITY
Track: 1-Track_name
Do:ADD VALUE
Ticks:001.01.00-001.01.00
Value:120
Notes:
0(C.-2)-127(G.8 )
(Press keys)
========================================
<Do it>
The fields and soft keys are:
• The Seqnc field:
This specifies the sequence to be edited.
• The Track field:
This specifies the track to be edited. Only one track can be edited at
a time.
• The Ticks fields:
These two bar.beat.tick fields are used to determine the region
within the track that will be edited. The leftmost field sets the start
of the region and the rightmost field holds a location one tick after
the region to be edited.
• The Notes field:
This field determines which notes will be edited. As shown above, it
appears in one of two ways depending on whether the selected track
is a Drum or MIDI track:
1. If the source track is a MIDI track, two numeric fields—
used to set the lowest and highest notes of the note range
that is selected for editing—appear as above. Each of
these numeric fields is editable via the cursor, and has a
Page 87
Chapter 4: Editing Sequence
range of 0 to 127; the equivalent note name (C-2 to G8) is
shown to the right of each field. Alternately, these fields
can be set by pressing two notes on the MIDI input
device’s keyboard. The fields will automatically be set to
the lowest and highest keys pressed.
2. If the source track is a Drum track, this field is used to
select specific drum notes, represented by MIDI note
numbers, that are to be edited. This field cannot be
accessed by the cursor—it can only be changed by pressing pads or receiving external MIDI notes. When the
screen is first displayed, it contains the word ALL (edit
all notes) and the text (Hit pads) to the right. When
a pad is pressed, the pad’s currently assigned note
number appears in the field, followed by the pad number
and currently-assigned sound name. On the right side of
the line is the text ( 1 pad ) indicating that one pad
is selected for editing:
Notes:36/A02-SNARE_DRUM
( 1 pad )
If another pad is then pressed, its note number, pad
number, and assigned sound are displayed instead, and
the text to the right displays ( 2 pads). This continues until the user has selected all of the pads he or she
intends to edit.
• The Edit field:
This is a choice field with two options: VELOCITY and DURATION.
It is used to select which of these two parameters will be affected.
• The Do field:
This is a choice field with four options:
1. ADD VALUE: This selection adds the number in the
Value field to the velocity or duration of each note that
has been selected for editing.
2. SUB VALUE: This selection subtracts the number in the
Value field from the velocity or duration of each note
that has been selected for editing.
3. MULT VAL %: This selection multiplies the velocity or
duration of each note that has been selected for editing by
the number in the Value field. A value of 100% = no
change; values of 101 to 200% proportionally increase
each note’s velocity or duration value; values of 0 to 99%
proportionally decrease each note’s velocity or duration
value.
4. SET TO VAL: This selection changes the velocity or
duration of each note that has been selected for editing to
the number in the Value field.
Page 88
Chapter 4: Editing Sequence
• The Value field:
This field works in conjunction with the Do field and sets the
number that will be used to change the velocities or durations.
• The <Do it> soft key:
Pressing this soft key performs the edit specified in the above fields.
Editing Note Number Assignment of Drum Note Events
This feature affects Drum tracks only. It is used to change all notes
of one drum to that of another drum. It does this by searching for all
drum notes of the specified note number and changing them to
another note number assignment. To change the note number
assignment of a group of notes, select 2 (Edit note number
assignment) from the Edit Note Data menu; the following screen
will appear:
===== Edit Note Number Assignment ======
Seqnc: 1-Seqnc_name
Track: 1-Track_name
Ticks:001.01.00-001.01.00
Change notes:64/A01-Sound_name
To notes:65/A07-Sound_name
========================================
<Do it>
The fields and soft keys are:
• The Seqnc field:
This specifies the sequence to be edited.
• The Track field:
This specifies the track to be edited. Only one track can be edited at
a time. Since this function only works on Drum tracks, if a MIDI
track is selected the message “You must select a drums track” will
appear.
• The Ticks fields:
These two bar.beat.tick fields are used to determine the region
within the track that will be edited. The leftmost field sets the start
of the region and the rightmost field holds a location that is one tick
after the region to be edited.
• The Change notes field:
This field is used to determine which drum notes will be affected.
While the cursor is in this field, press the pad of the drum notes to
be changed—its currently assigned note number and sound will
appear in the field. (You can also send a Note On message to the
MIDI input or enter the note number directly.) Only drum notes
assigned to this note number will be changed.
Page 89
Chapter 4: Editing Sequence
• The To notes field:
This field determines the note number to which the selected drum
notes will be reassigned. While the cursor is in this field, press the
pad of the drum note to be changed to—its currently assigned note
number and sound will appear in the field. (You can also send a
Note On message to the MIDI input or enter the note number
directly.)
• The <Do it> soft key:
Pressing this soft key performs the edit as specified in the above
fields.
Editing Note Variation Data of Drum Note Events
This feature affects Drum tracks only and is used to edit the Note
Variation data of many drum notes in one operation. Select 3 (Edit
note variation data) from the Edit Note Data menu. The
following screen will appear:
======= Edit Note Variation Data =======
Seqnc: 1-Seqnc_name
Track: 1-Track_name
Ticks:001.01.00-003.01.00
Notes:ALL
(Hit pads)
Set notes to param:TUNING & Value:
0
========================================
<Do it>
The fields and soft keys are:
• The Seqnc field:
This specifies the sequence to be edited.
• The Track field:
This specifies the track to be edited. Only one track can be edited at
a time. Since this function works only on Drum tracks, if a MIDI
track is selected the message “You must select a drums track” will
appear.
• The Ticks fields:
These two bar.beat.tick fields are used to determine the region
within the track that will be edited. The leftmost field sets the start
of the region and the rightmost field holds a location that is one tick
after the region to be edited.
Page 90
Chapter 4: Editing Sequence
• The Notes field:
This field determines which notes will be affected. It cannot be
accessed by the cursor. It can only be changed by pressing pads or
receiving external MIDI notes. When the screen is first displayed, it
appears as shown above with the word ALL (affect all notes) and the
text (Hit pads) to the right. When a pad is pressed, the pad’s
currently assigned note number appears in the field, followed by the
pad number and currently assigned sound name. On the right side
of the line is the text ( 1 pad ) indicating that one pad is selected for editing:
Notes:36/A02-SNARE_DRUM
( 1 pad )
If another pad is then pressed, its note number, pad number, and
assigned sound are displayed instead, and the text to the right
displays ( 2 pads). This continues until the user has selected all
of the pads he or she intends to edit.
• The Set notes to param field:
This choice field determines to which parameter (TUNING, ATTACK, DECAY, or FILTER) the selected notes’ Note Variation
parameter will be set.
• The Value field:
This field selects what value of tuning, attack, decay, or filter the
selected notes’ Note Variation data will be set to.
• The <Do it> soft key:
Pressing this key performs the edit as specified in the above fields.
Page 91
Chapter 4: Editing Sequence
The STEP EDIT Key
The Step Edit function allows the contents of the active track to be
edited in precise detail. When the Step Edit key is pressed, any
notes or events that exist in the active track at the current sequence
position are displayed on the screen as a series of data fields, which
can then be edited. Also, any notes played at this time are recorded
into the active track at the current sequence position.
To enter step edit mode, press the STEP EDIT key. The following
screen will appear, displaying any notes or events that exist in the
active track at the current sequence position:
============== Step Edit ===============
>N:64/A01-Sound_na V:127 Tun:-120 D:
96
Program_change
Val:127
Pitch_bend
Val:+
0
Channel_pressure
Val:127
Control:C1-MODULATION_WHEEL
Val:127
===== Now:001.01.00 (00:00:00:00) ======
<Insert> <Delete> <PlayEvent> <Options>
A description of the fields and soft keys follows:
• The event display area (lines 2 through 6 of the LCD
screen).
This area of the screen displays up to five events, one per line, that
exist in the active track at the sequence location displayed in the
Now field. These events are most commonly notes (either drum or
keyboard notes, depending on whether the active track is a Drum
track or a MIDI track), but they can also be one of a number of
special MIDI message types. The format of each of the various event
types is described in detail later in this chapter, in the “Step Edit
Event Types” section. The event positioned at the uppermost line
(preceded by the >) is called the active event. It is the only event
whose fields can be edited by the cursor.
• The Now field:
The field shows the current position within the sequence. As in the
Play/Record screen, this value is changed by using the REWIND,
FAST FORWARD, and LOCATE keys. As this value changes, the
event display area is continually updated to display the events
contained at the newly-displayed location.
Page 92
Chapter 4: Editing Sequence
• SOFT KEY 1 (<Insert> or <Paste>):
This soft key has one of two functions, depending on the current
setting of the Function of soft key 1&2 field in the Step
Edit Options screen (described below):
1. <Insert>: When pressed, a new event is inserted at the
current sequence position. The type of event inserted is
determined by the Event to insert field in the Step
Edit Options screen.
2. <Paste>: Pressing this key inserts a copy of the event
last removed from the track by using the <Cut> soft key.
If the <Cut> soft key has not been used since turning
the power on, nothing will be inserted.
• SOFT KEY 2 (<Delete> or <Cut>):
This soft key has one of two functions, depending on the current
setting of the Function of soft key 1&2 field in the Step
Edit Options screen:
1. <Delete>: When pressed, the active event is deleted
from the screen. The active event is the event at the
uppermost line of the screen (preceded by the >).
2. <Cut>: When pressed, the active event is deleted from
the screen and saved internally. If the <Paste> soft key
is then pressed, a copy of that stored event will be inserted into the screen.
• SOFT KEY 3 (<PlayEvent>):
Pressing this soft key causes the active event to be played. The
active event is the event at the uppermost line of the screen (preceded by the >).
• SOFT KEY 4 (<Options>):
Pressing this soft key causes the Step Edit Options screen, described later in this chapter, to appear.
Using Step Edit
To use Step Edit to edit recorded events:
1. Press STEP EDIT. The Now field will change to the
nearest step. A step is defined as a specific note timing
value, 1/8 notes through 1/32 triplets, set in the Note
value field in the Timing Correct screen. Any notes or
other MIDI events existing in the active track at that
location will be displayed on the screen.
2. Use the REWIND, FAST FORWARD, or LOCATE keys to
find the desired location within the sequence. As in the
Play/Record screen, the [<<] and [>>] keys move to the
previous or next bar boundary and the [<] and [>] keys
Page 93
Chapter 4: Editing Sequence
move to the previous or next step within the active track.
(It is also possible to change the function of the [<] and
[>] keys to search forward or backward to the next event
within the track. This option is selected in the Step Edit
Options screen.)
3. You can now edit any of the data fields for any of the
displayed events by moving the cursor to the desired field
and editing it. Also, any notes played from the pads or
external MIDI keyboard at this time will be recorded into
this location and immediately displayed on the screen.
4. To view other locations within the sequence, use the
REWIND, FAST FORWARD, and LOCATE keys.
5. Once you’re finished editing, press MAIN SCREEN to
return to the Play/Record screen.
Of the five on-screen events, only the uppermost line can be edited.
It is edited by moving the cursor to the desired field within the line
and editing the field contents. This uppermost line is called the
active event, and is preceded by a >. To edit an event, it must be
moved up to the active event line using the CURSOR UP and
CURSOR DOWN keys.
Use the [<] or [>] key to move to the previous or next step within the
active track, and the [<<] or [>>] key to move to the previous or next
bar boundary.
As you move through the sequence, any events in the active track at
that position will be displayed on the screen, and any events (on all
tracks) at the current position will be played (output through MIDI),
just as if the sequence had been played at that position only. If you
don’t want to hear a particular track, turn that track OFF in the
Play/Record screen; if you want to hear only the active track, turn
solo mode to ON in the Play/Record screen. To edit any of the fields
in the active event (uppermost line), move the cursor left or right to
the desired field and change the contents as desired. If there are
multiple events at that step, they will be displayed on the other onscreen event lines. Use the CURSOR UP or CURSOR DOWN keys
to access different events by scrolling the screen’s five-line window
UP or DOWN, thereby moving higher- or lower-numbered events to
the active event line.
COMMENT: All mid-sequence control messages, including
the 128 Controllers, Pitch Bend, Program Change, Mixer
Volume, Mixer Pan, and Individual Out/Effects Level, only
take effect after being played in a sequence. This means that
if you play a section of a sequence that contains a specific
controller event, the last played value of that controller will
remain active until another occurrence of the same controller
is played—even if you stop the sequence and start playing it
from another location. Because of this, whenever you use one
of these events within a sequence, it is important to insert
Page 94
Chapter 4: Editing Sequence
another event of the same type at the beginning of the sequence to set the controller to an initial value.
Step Edit Event Types
The Step Edit screen can display up to five events, one on each line,
that exist in the active track at the current Now field position. The
format of the event line is different for each type of event. The
following is a description of each event type:
• The Drum Note event
>N:64/A01-My_Sound V:127 Tun:-120 D:
96
The fields are:
64
1. The Note Number field (N:64
64/A01-My_Sound):
This is the note number assignment (35-98) of the drum
note event.
A01
2. The Pad Number field (N:64/A01
A01-My_Sound):
This is the pad number (A01-D16) that is currently
assigned to the note number displayed to the left. This
field is for display only and cannot be edited.
My_Sound):
3. The Sound Name field (N:64/A01-My_Sound
This field shows the first eight characters of the sound
name currently assigned (in the active program) to the
note number selected to the left. This field is for display
only and cannot be edited.
127):
4. The Velocity field (V:127
This is the velocity of the drum note.
5. The Note Variation Parameter field (Tun
Tun:-120):
Each drum note contains Note Variation data, a unique
value of either tuning, attack, decay, or filter frequency,
for that note only. This field determines which of those
four parameters is contained in this note, and therefore
which of those four sound parameters will be affected
when this note plays. There are four options: TUN (tuning), DCY (decay), ATK (attack) or FLT (filter frequency).
-120):
6. The Note Variation Data field (Tun:-120
This field works in conjunction with the Note Variation
Parameter field to the left. It contains the data for the
parameter selected in that field. If the parameter is set to
TUN, the range is -120 to 120 tenths of a semitone. When
set to either ATK or DCY, the range is from 0 to 5000
milliseconds. When set to FLT, the range is 0 to 100.
Page 95
Chapter 4: Editing Sequence
7. The Duration field (D: 96):
This field shows the note duration in ticks (96 ticks = one
quarter note). The range is 1-9999 ticks.
• The MIDI Note event
>Note: 60(C.3 )
V:127 ^V: 64
D:
96
The fields are:
1. The Note Number field (Note: 60
60(C.3 ):
This is the MIDI note number (0-127) of the note, indicating the pitch.
C.3 )):
2. The Note Name field (Note: 60(C.3
This field shows the note name (C-2 to G8) for the note
number shown to the left.
127):
3. The Velocity field (V:127
This is the Note On velocity of the note.
4. The Release Velocity field (^V: 64):
This is the release velocity of the note.
5. The Duration field (D: 96):
This field shows the note duration in ticks (96 ticks = one
quarter note). The range is 1-9999 ticks.
• The Program Change event
>Program_change
Val:
1
The single field, Val, with a range of 1-128, is used to select the
MIDI program number.
• The Pitch Bend event
>Pitch_bend
Val:+
0
The single field, Val, contains the actual numeric value of the pitch
bend event. It is a signed field, with a range from -8192 to 8191.
• The Channel Pressure event
>Channel_pressure
The single field, Val, has a range of 0-127.
Page 96
Val:127
Chapter 4: Editing Sequence
• The Poly Pressure event
>Poly_pressure
Note: 60(C.3 ) Val:127
There are three fields:
1. The Note Number field (Note: 60
60(C.3 )):
This is the note to which the pressure message applies.
C.3 )):
2. The Note Name field (Note: 60<C.3
This is the note name for the note number selected at the
left. This is for display only and cannot be edited.
127):
3. The Value field (Val:127
This is the pressure value for the selected note number (0
to 127).
• The System-Exclusive event
>System_exc Size:
1 Byte:
1 Val:
0
There are three fields:
1. The Size field:
This displays the total number of data bytes. The maximum size of a system-exclusive event in the MPC3000 is
999 bytes.
2. The Byte field:
The number of the byte whose contents are currently
displayed in the Val field.
3. The Val field:
The current value of the byte number displayed in the
Byte field.
• The Stereo Volume event
>Stereo_volume
Pad:A01
Val:100
This message is exclusive to the MPC3000 and is used to change the
Stereo Mixer Volume setting of a particular sound in mid-sequence.
When the Record Live Changes feature is used (accessed by pressing
MIXER/EFFECTS, then 4), many of these events are recorded into
the active track to simulate a smooth and continuous mixer volume
change. There are two fields:
1. The Pad field:
This field determines which of the 64 pad numbers/mixer
sliders (A01-D16) this message will affect.
2. The Val field:
This field contains the actual mixer slider value (0-100).
Page 97
Chapter 4: Editing Sequence
• The Stereo Pan event
>Stereo_pan
Pad:A01
Val:C
This message is exclusive to the MPC3000 and is used to change the
stereo mixer pan setting of a particular sound in mid-sequence.
When the Record Live Changes feature is used (accessed by pressing
MIXER/EFFECTS, then 4), many of these events are recorded into
the active track to simulate a smooth and continuous mixer pan
change. There are two fields:
1. The Pad field:
This field determines which of the 64 pad numbers/pan
pots (A01-D16) this message will affect.
2. The Val field:
This field contains the actual pan pot value (50L - C 50R).
• The Output/Effect Volume event
>Output/effect_volume Pad:A01
Val:127
This message is exclusive to the MPC3000 and is used to change the
individual output/effects mixer volume setting of a particular sound
in mid-sequence. When the Record Live Changes feature is used
(accessed by pressing MIXER/EFFECTS, then 4), many of these
events are recorded into the active track to simulate a smooth and
continuous individual output/effects mixer volume change. There
are two fields:
1. The Pad field:
This field determines which of the 64 pad numbers/mixer
sliders (A01-D16) this message affects.
2. The Val field:
This field contains the actual mixer slider value (0-100).
• The Control Change event
>Control:C1-MODULATION WHEEL
Val:127
There are two fields:
C1-MODULATION
1. The Control field (Control:C1-MODULATION
WHEEL):
There are 128 MIDI continuous controllers (0-127), each
with an assigned control function. The control function,
as defined in the MIDI 1.0 Detailed Specification, is
displayed to the right of the selected controller number.
Page 98
Chapter 4: Editing Sequence
127):
2. The Val field (Val:127
This field contains the data value of the displayed controller event.
• The Tune Request event
>Tune request
This event type has no data fields.
Step Edit Options
Pressing the <Options> soft key in the Step Edit screen displays
the following screen:
=========== Step Edit Options ==========
Event to insert:NOTES
Auto step increment on key release:NO
Duration of recorded notes:AS PLAYED
Function of soft key 1&2:PASTE/CUT
Function of '<' and '>' keys:NEXT EVENT
======= Step Edit Display Filter =======
View:ALL EVENTS
This screen presents a number of options related to use of the Step
Edit function:
• The Event to insert field:
This parameter selects which type of MIDI event will be inserted
when the <Insert> soft key from the Step Edit screen is pressed.
The options include all the available MIDI event types and 128
MIDI controllers. If one of these controllers is selected, the name
assigned to that controller number is also displayed.
• The Auto step increment on key release field:
If set to YES, the Step Edit screen’s Now field will automatically
move forward one step (as defined by the timing value set in the
Note Value field of the Timing Correct screen) after each key
from the MIDI keyboard is released or, if a chord was played, after
the last key from the chord is released. (If the active track is a Drum
track, the Now field will increment after a pad is released.) This
allows, for example, the recording of a series of notes or chords, one
on each step, without having to advance manually to the next step
after playing each key. If this field is set to NO, this function is
defeated.
Page 99
Chapter 4: Editing Sequence
• The Duration of recorded notes field:
This field is used while in Step Edit mode to determine the method
by which durations are assigned to notes recorded from a MIDI
keyboard or the MPC3000 pads. This is a choice field and has two
options: SAME AS STEP and AS PLAYED:
1. If set to SAME AS STEP, durations are always four ticks
less than the current step size (the current Note
Value field setting in the Timing Correct screen).
2. If set to AS PLAYED, the actual time the note is held
(relative to the current tempo) is used for the duration
value, even though the sequence is not playing. To guide
your timing, if a key is held down longer than one 1/4note, a metronome click plays exactly one 1/4-note after
the key is depressed, and sounds again for each additional 1/4-note the key is held down. For example, if you
wanted to record a note with a duration of one 1/2-note,
you would play the key and release it after two metronome clicks were heard.
• The Function of soft key 1&2 field:
This choice field is used to determine the functions of soft keys 1
and 2. It has two options:
1. INSERT/DELETE:
The functions of soft keys 1 and 2 are <Insert> and
<Delete>. <Insert> causes an event to be inserted
onto the screen. The type of event is determined by the
setting of the Event to insert field above. <Delete> removes the active event from the screen.
2. PASTE/CUT.
The functions of soft keys 1 and 2 are <Paste> and
<Cut>. <Cut> deletes the active event from the screen
and saves a copy of it internally. <Paste> inserts onto
the screen a copy of the event most recently cut.
• The Function of '<' And '>' keys field:
This choice field is used to determine the function of the REWIND
[<] and FAST FORWARD [>] keys. It has two options:
1. NEXT STEP:
This is the default setting. Pressing the REWIND [<] key
moves to the previous step within the sequence. Pressing
the FAST FORWARD [>] key moves to the next step
within the sequence. (The timing value of a step is set in
the Timing Correct screen’s Note Value field.)
COMMENT: If the current setting of the Swing%
field is set to a value other than 50%, pressing the
REWIND [<] and FAST FORARD [>] keys will
move forward or backward to locations that fall
on swing timing intervals. If you are editing a
sequence that contains 1/16-notes recorded at a
swing setting of 50%, the even-numbered
Page 100
Chapter 4: Editing Sequence
1/16-notes will NOT be heard as you step through
the sequence, because only notes existing in swung
1/16-note locations will be viewed. This same rule
applies to the Shift Timing function: if the Shift
Amount field is set to 0 and you are editing a
sequence that was recorded while it was set to any
amount other than 0, none of the notes will be seen
as you step through the sequence, because these
notes fall on shifted locations, and you are currently viewing only those notes that fall on nonshifted locations.
2. NEXT EVENT:
Pressing the REWIND [<] key searches to the previous
event within the track. Pressing the FAST FORWARD [>]
key searches to the next event within the track. To search
for specific event types, set the Step Edit Display Filter to
the desired event type; pressing these keys will then
cause the MPC3000 to locate to the next or previous
event of the specified type, ignoring event types not
included in the display filter settings.
• The Step Edit Display Filter section.
This is similar to the erase filter or the MIDI input filter, except this
one controls which types of MIDI events are displayed in the Step
Edit screen. For example, if the only events you want to edit are
pitch bend messages, it is bothersome to view all the other events.
Another use is to filter out continuous controller data to make it
easier to view only the note events.
To use the display filter, move the cursor to the View field. This is a
choice field with three options:
1. ALL EVENTS: If this option is selected, all possible event
types will be displayed.
2. ONLY VIEW: If this option is selected, only one event
type can be displayed, and the type of event to be displayed is selected in a new field appearing directly to the
right on the same line. In this rightmost field all event
types are listed, including all 128 MIDI controllers, each
one individually named as listed in the MIDI 1.0 Detailed
Specification.
3. ALL EXCEPT: This option is similar to ONLY VIEW,
detailed above, except that all event types except the
event displayed to the right of the words ALL EXCEPT
are displayed.
Page 101
Chapter 4: Editing Sequence
Step Recording
Step Edit also makes it possible to record new notes from a MIDI
keyboard while the sequence is not playing. To record a note while
in Step Edit mode, move to the desired position within the sequence,
then play and release the desired note on the MIDI keyboard. This
note will then appear as the new active event, with its pitch, velocity, release velocity, and duration displayed numerically. The duration of the note is taken from the actual duration played, relative to
the current tempo. However, if the Duration of recorded
notes field in the Step Edit Options screen is set to SAME AS
STEP, The duration always defaults to the current step value.
If the Auto step increment on key release field in the
Step Edit Options screen is set to YES, the current position within
the sequence will automatically advance one step forward when the
newly recorded note (or chord) is released. This allow you to, for
example, record a series of notes (or chords) one at a time while
stopped, and automatically play them back with evenly spaced
timing. To do this:
1. Set up your sequence and track for recording from your
MIDI keyboard as you would to record in real time.
2. In the Timing Correct screen, set the Note value field
to the desired step value.
3. Rewind to the start of the sequence.
4. Press STEP EDIT.
5. Press SOFT KEY 4, <Options>.
6. Set the Auto step increment on key release
field to YES.
7. Press STEP EDIT again.
8. Play a series of notes (or chords), one at a time.
9. Press PLAY START. The notes you have just entered will
play back with evenly spaced timing.
Page 102
Chapter 4: Editing Sequence
The EDIT LOOP Key
This function allows a specified number of bars within a sequence to
repeat in a loop while playing or overdubbing. This allows for quick
recording or editing of the looped section. Press EDIT LOOP and the
following screen will be displayed:
============== Edit Loop ===============
Number of Bars:2
1st bar:54
========================================
<Turn On>
The screen fields and soft keys are:
• The Number of bars field:
This field specifies the number of bars that will be looped when the
edit loop is turned on.
• The 1st bar field:
This field specifies the starting bar of the edit loop. The current bar
number is automatically inserted here.
• The <Turn on> soft key:
Pressing this soft key turns the edit loop on. It also causes the Play/
Record screen to be displayed and the Edit Loop light to go on,
indicating that an edit loop is active.
If EDIT LOOP is again pressed while an edit loop is active, the
same screen will appear, but with two changes:
1. The first two fields are displayed, but all changes are locked out.
2. The bottom line changes to:
<Turn Off> <Undo & off>
If SOFT KEY 1, <Turn off>, is pressed at this time, the edit loop
will be turned off, returning the sequence to its normal operation.
However, if SOFT KEY 2, <Undo & off>, is pressed, the loop is
turned off, but all changes made while the loop was on are not used
and the sequence returns to its status before the loop was turned on.
In either case, the Edit Loop light is turned off and the display
returns to the Play/Record screen.
Page 103
Chapter 4: Editing Sequence
Using Edit Loop as an Undo Function
Because the Edit Loop function allows you the option of ignoring all
recording and editing that was done while Edit Loop was on, it
serves very well as an undo function.
For example, if you want to record a drum fill on bar 4 of a 4-bar
sequence, but you aren’t sure if you want to keep it, following these
steps will allow you to try the fill, then restore the sequence to its
original state if you don’t like it:
1. Fast forward to bar 4.
2. Press EDIT LOOP.
3. Set the Number of bars field to 1.
4. Press SOFT KEY 1, <Turn on>, which will turn the
Edit Loop on. Bar 4 will now repeatedly play in a loop.
5. Overdub your drum fill.
6. Press EDIT LOOP again.
7. If you didn’t like how the fill sounded, press SOFT KEY 2,
<Undo & off>, and the sequence will return to its
original state. If you want to keep the fill, press SOFT
KEY 1 (<Turn off>) and the sequence will now
contain the new drum fill.
Page 104
Chapter 4: Editing Sequence
The TRANSPOSE Key
This function allows you to transpose a track up or down by a
specified amount in real time. This function is only a temporary
change—the sequence data are not altered unless SOFT KEY 1,
<Transpose Permanent>, is pressed. Also, the MPC3000 does
not transpose Drum tracks—only MIDI tracks can be transposed.
(Though if you do want to transpose a Drum track, temporarily
changing its type to MIDI on the Play/Record screen will allow you
to transpose it. Make sure to change it back to DRUM when you’re
done.) Pressing TRANSPOSE causes the following screen to appear:
============== Transpose ===============
Track: 0-(all tracks)
Amount:
0
(Play synth key to set amount)
========== Transpose Permanent =========
Ticks:001.01.00-003.01.00
========================================
<Transpose Permanent>
The following is a description of each of the screen fields and soft
keys:
• The Track field:
The field specifies the track that will be transposed. Enter a 0 here
if you want all tracks (except Drum tracks) to be transposed simultaneously.
• The Amount field:
This field sets the amount and direction of transposition in semitones. For example, to transpose up a fifth, enter a 7. To transpose
down a fourth, turn the data entry control to the left until -5
appears. A much faster way to set this field is to simply press a key
on the MIDI keyboard—the amount will be automatically set by the
location of the key in relation to Middle C. For example, pressing a
key one octave below Middle C would set the Amount field to -12.
If the Amount field is set to any value other than 0, the transpose
light will go on, indicating that the transpose function is active. It
will turn off when this field is returned to 0, or if <Transpose
Permanent> is selected.
• The Ticks fields:
These two bar.beat.tick fields specify the region to be permanently
transposed when the <Transpose Permanent> soft key is
pressed. The first field (before the dash) sets the start of the region
Page 105
Chapter 4: Editing Sequence
and the second field sets a location one tick after the last tick of the
region to be transposed.
• The <Transpose Permanent> soft key:
Pressing this soft key causes the above-specified transposition to be
made permanent by actually changing each of the note events
within the specified region of the sequence. After this operation, the
Amount field is reset to 0 and the transpose light goes off.
Transposing in Real Time While Playing
To transpose a sequence in real time while playing, follow these
steps:
1. Play the sequence.
2. Press the TRANSPOSE key.
3. Locate Middle C on the keyboard. Pressing any key above Middle
C will instantly transpose the sequence up by an amount equal to
the interval between the new key and Middle C. Pressing any key
below Middle C will instantly transpose the sequence down by an
amount equal to the interval between the new key and Middle C.
When you press the transposition key, it will only be used to set
the transposition interval—the note itself will not sound. Be sure
to press the key immediately before the instant that you want
the transposition to occur. To remind you that your sequence is
being transposed, the light above the TRANSPOSE key will go on
if any Amount value other than 0 has been selected.
4. To return to the original key signature, press Middle C or set the
Amount field to 0.
Page 106
Chapter 5: Song Mode
Chapter 5:
Song Mode
Page 107
Chapter 5: Song Mode
Overview
One way to create a song in the MPC3000 is to record all of the
parts in one long sequence, either playing the entire song manually
or using the copy functions to duplicate repeating sections. Another
way is use Song mode. In Song mode, several sequences are
entered into a list, with each sequence being a different section of
the whole song. Once the entire list is entered, Song mode automatically plays the list of sequences in the order they were entered. This
is especially useful in creating arrangements that have many
repeating sections, such as drum parts. Song mode has the following
advantages over using a long sequence to record a song:
• The song structure can be created very quickly.
• The content of the sections of the song can be changed very
quickly.
A song in the MPC3000 consists of up to 250 steps, each of which
contains the number of the sequence that will play at the step and
the number of times the step will repeat before going on to the next
step in the song. After the last step, the song can either stop playing
or loop back to an earlier step. The MPC3000 can hold up to 20
songs in memory at one time. Recording is not permitted in Song
mode. Rather, the individual sequences must be recorded or edited
while in Play/Record mode.
Page 108
Chapter 5: Song Mode
The SONG Key and Song Mode Screen
To enter Song mode, press the SONG key. The Song Mode screen
will appear:
=============== Song mode ==============
Song: 1-(unused)
Loop:TO STEP
1
Song starts at SMPTE#:00:00:00:00.00
========= Contents of step:
1 =========
Sqnc: 1-(unused)
Reps(0=end): 1
Bars: 0
Tempo:120.0 BPM
===== Now:001.01.00 (00:00:00:00) ======
<Ins/Del> <Conv2Seq>
<Step-1> <Step+1>
While this screen is showing, the MPC3000 is in Song mode, meaning that if play is entered, the active song will play instead of the
active sequence.
All of the Play/Record keys except RECORD and OVERDUB operate
on the active song. PLAY START plays the active song from the
start; PLAY plays the active song from the current location in the
Now field; the REWIND, FAST FORWARD, and LOCATE keys
change the position within the song.
A detailed description of each of the on-screen fields and soft keys is
given below:
• The Song field:
This field selects the current song number (1-20). There are 20
songs, each containing its own list of 250 steps.
(unused)):
• The Song Name field (Song: 1-(unused)
This field has no title but exists directly to the right of the song
number. It is the 16-character name of the active song. Changing
the song name is done in the same manner as changing the sequence name in the Play/Record screen.
• The Loop field:
This field indicates what will occur when the current song plays all
the way to its end. There are two options:
1. OFF: The song stops playing.
2. TO STEP 1: The song loops back to the step number
shown directly to the right of the word STEP. This step
number can be changed by moving the cursor to it and
changing it.
Page 109
Chapter 5: Song Mode
• The SMPTE start field:
This five-part field sets the SMPTE number associated with the
exact beginning of the song. Also called SMPTE offset, this is the
SMPTE number which, when the MPC3000 is syncing to SMPTE,
denotes the beginning of the song. Normally, this is set to all zeroes
(00:00:00:00.00). The five parts are Hours:Minutes:Seconds:
Frames.HundrethFrames.
• The Contents of step field:
This shows the current step number (1-250) within the active song.
The data displayed below this field are the data contained within
this step.
• The Sqnc field:
This field indicates the sequence number contained in the current
step. The selected sequence’s name is displayed to the right.
• The Reps(0=end) field:
This field indicates the number of repetitions that the sequence in
the current step will play before moving on to the next step. For
example, if you want the sequence to play only once in the current
step, a 1 should be entered here. If a 0 is entered here, the MPC3000
will treat this step as the end of the song, and either stop playing or
loop to a previous step number, depending on the setting of the
Loop field.
• The Bars field:
This field shows the total number of bars in the selected sequence. It
is for display only and can’t be edited.
• The Tempo field:
This field shows the sequence tempo (the tempo value stored within
the sequence—not the master tempo) of the selected sequence.
• The Now field:
This has nearly the same function as in the Play/Record screen,
except that in Song mode this number refers to the current position
within the song, not within the sequence.
• The <Ins/Del> soft key:
This key is used for inserting a new step into a song, deleting a step,
or deleting an entire song. Pressing it causes the following screen to
appear:
Page 110
Chapter 5: Song Mode
=== Insert Step ===
Ins before step:
1
(This and all higher
steps will be moved
up and a new step
will be inserted.)
===================
<Insert>
=== Delete Step ===
Delete step:
1
(This step will be
deleted and all
higher steps will
be moved down.
===================
<Delete><Del song!>
To insert a new step into the song, enter the step number before
which the new step will be inserted in the Ins before step
field, then press <Insert>. The Song screen will be redisplayed
and a new step inserted, with all higher-numbered steps moved up
by one position.
To delete a step, select the step number to be deleted in the Delete
step field and press <Delete>. The Song screen will be
redisplayed and the specified step deleted, with all higher-numbered
steps moved down by one position.
To delete all steps in the song or to delete all songs, press <Del
song!> and follow the instructions on the screens that appear.
Other soft keys on the Song screen:
• The <Conv2Seq> soft key:
This key accesses a feature that converts the individual steps in a
song into one long sequence. It does this by copying each event in all
of the sequences within the song to a new sequence that has the
same total number of bars as the song. This function is described in
detail later in this chapter.
• The <Step-1> soft key:
Pressing this soft key decrements the Contents of step field.
• The <Step+1> soft key:
Pressing this soft key increments the Contents of step field.
Page 111
Chapter 5: Song Mode
An Example of Creating and Playing a Song
The following demonstrates how to use Song mode to create a song
on the MPC3000:
1. Record some drum or MIDI data into sequences 1, 2, and 3.
2. Enter Song mode by pressing the SONG key.
3. In the Song field, select an unused song number. An unused song
is indicated as (unused) in the Song Name field.
4. Set the Contents of step field to 1, which sets the active
step to step number1.
5. Select 1 in the Sqnc field, indicating that you want sequence
number 1 to play at the start of the song.
6. Select 2 in the Reps field, indicating that you want sequence
number 1 to repeat two times before completing step 1.
7. Press <Step+1> to move on to step 2.
8. Select 2 in the Sqnc field and 1 in the Reps field, indicating that
you want sequence 2 to play only once for step 2.
9. Press <Step+1> to move on to step 3.
10. Select 3 in the Sqnc field and 2 in the Reps field, indicating
that you want sequence 3 to play twice for step 3.
11. Press <Step+1> to move on to step 4.
12. Select 0 in the Reps field, indicating that this is the end of your
song. If a 0 already exists here, there is no need to enter it again.
13. Select the TO STEP option in the Loop field and enter a 2 to
the right of the word STEP, indicating that you want the song to
loop back to step 2 once it reaches its end.
14. Press PLAY START. The song will play back as follows:
First, it will play two repetitions of sequence 1;
next, it will play one repetition of sequence 2;
next, it will play two repetitions of sequence 3;
after that, it will repeat steps 2 and 3 indefinitely.
Notice that the Now field always indicates the position within the
song, not the position within each sequence.
Page 112
Chapter 5: Song Mode
COMMENT: Occasionally you may see the message Analyzing sequence. Please wait... on the lowest
line of the screen, asking that you wait briefly while the
MPC3000 does some thinking. This occurs after you make
changes in the song, but only if the song contains a large
number of different sequences. Once this process is done, all
subsequent fast-forward, rewind, and locate operations will
be immediate.
COMMENT: If you notice a timing irregularity in your song
at the point of transition from one sequence to another, the
problem may be due to the assignments of the Pgm field (in
the Play/Record screen) for the sequence that plays immediately after the timing irregularity. If a sequence containing
these program assignments is played in Song mode (or if the
sequence is selected manually while the MPC3000 is playing), the sequence’s program assignments are sent out at the
moment that the sequence starts to play in the song. This can
present a problem, because most synthesizers require time to
change programs, which can cause any notes existing at the
start of the new sequence to be delayed. This delay is brief in
most synthesizers, but is usually enough to cause a timing
irregularity when it occurs at the start of a sequence. To
avoid this problem, don’t assign program changes to sequences that you are using in Song mode. If you need to use
program changes within the song, make sure that no notes
exist at the start of the sequences that contain the program
changes. Another alternative is to insert MIDI Program
Change commands within the sequences in the song at
locations where no notes exist.
Page 113
Chapter 5: Song Mode
Converting a Song Into a Long Sequence
Song mode is useful for quickly creating the format of a song.
However, it is cumbersome compared to Sequence mode when finetuning the details of a complex song. It is therefore useful to create
a song initially using Song mode, then convert that song into a long
sequence. This allows you to use the more versatile sequence editing
features to complete the song. The Convert Song to Sequence
function does this conversion. All sequences in the song, including
their designated repetitions, are copied end-to-end into the specified
sequence. Note that track names, track status (Drum or MIDI),
MIDI output channel assignments, MIDI program change assignments, stereo mixer settings, effects mixer settings, tuning settings,
and tempo settings for the newly created sequence are taken from
the first sequence in the song, and that the song’s loop status is
used for the new sequence’s loop status. To use this function, select
the <Conv2Seq>) soft key from the Song screen. The following
screen will appear:
======= Convert Song To Sequence =======
Convert from song: 1-Song_name
To sequence: 1-Sequence_name
(The existing contents of the
destination sequence will be erased!)
========================================
<Do it>
The fields are:
• The Convert from song field:
This is the number of the song that will be converted into a sequence. The song’s name is shown to the right.
• The To sequence field:
This is the number of the sequence that will contain the converted
song. The sequence’s name is shown to the right. Any data in this
sequence will be replaced.
• The <Do it> soft key:
Pressing this soft key performs the copy as specified.
COMMENT: Be sure that the drum or MIDI status of likenumbered tracks of the sequences in a song match. If not,
drum track data can be appended onto the end of a MIDI
track or vice versa. This would cause keyboard notes to play
drum sounds , or drum notes (in which the note number
indicates drum selection) to play various keyboard pitches.
Page 114
Chapter 6: Creating and Editing Programs
Chapter 6:
Creating and
Editing Programs
Page 115
Chapter 6: Creating and Editing Programs
What Are Programs?
A program can be thought of as a drum set. It is a collection of up
to 64 sound assignments with accompanying sound modifying
parameters. When a sound is loaded into the MPC3000’s sound
memory, it cannot be played by pads or from MIDI until it is assigned within a program. In a program, each of 64 legal MIDI note
numbers (35-98) is assigned to one of the 128 possible sounds
currently residing in memory. Once assigned to a note number, a
sound can be played in one of three ways:
1. By receiving a Note On message from the MIDI input. (The note
number within the message is used to select which sound to
play.)
2. By playing a front panel drum pad. (Each pad is separately
assigned to one of 64 MIDI note numbers, 35-98, in the MIDI
key’s option 1 screen.)
3. By playing drum tracks in sequences. (The sound played by a
sequenced drum note event is determined by its note number
assignment, 35-98.)
In addition to the 64 sound assignments, each program also contains a number of sound modifying parameters for each of the 64
sound assignments, such as envelope, tuning, filter, mixer, and
velocity response data. Each program also contains some parameters, such as the settings of the effects generator, that collectively
affect all sounds.
The MPC3000 has 24 different programs (of which only one can be
active at a time), each with its own unique set of 64 assignments.
Simply by changing the active program number (1-24), all 64 sound
assignments and their sound modifying settings will instantly
change. Each program contains the following data:
• Program name
• For each of 64 pad numbers (A01-D16):
The note number generated when the pad is played
• For each of 64 note numbers (35-98):
Sound assignment
Sound assignment mode and related parameters
Envelope attack, decay and decay mode
Velocity modulation of volume, attack and start address
Tuning, poly assignment and cutoff assignments
Filter settings
Stereo mix volume and pan
Individual out/effects mix level
“Indiv out/effects level follows stereo volume” (yes/no)
• Note Variation Slider assignment and parameter range limits
• Effects settings
Page 116
Chapter 6: Creating and Editing Programs
The following is a graphical representation of how data is organized
within programs:
Program 24: Acoustic drum set
128 Sounds (for all programs)
Data for each note number:
Program 3: Jazz drum set
Program 2: Brushes drum set
Program 1: Rock drum set
Pad:
A01
A02
A03
A04
A05
Note#:
35
36
37
38
39
D16
98
Data for each note number:
Attack: . . . Mix vol Sound used:
20
. . . 100
HAT_OPN
0
. . . 98
HI_SNARE
311
. . . 45
HI_SNARE
23
. . . 91
AMB_KICK
0
. . . 76
22"_RIDE
.
.
.
20
. . . 34
BIG_TOM
Used by all 64 note numbers:
Effects data, Note Variation slider assignment
Sounds params
Tune: . . . Soft end:
Name:
SNARE15
+32
. . . 002.017.42
BIG_TOM
0
. . . 001.429.03
22"_RIDE
-11
. . . 003.239.42
AMB_KICK -103 . . . 000.872.09
HAT_OPN +3
. . . 001.290.31
.
.
.
.
.
.
.
.
.
.
.
.
HI_SNARE 120
-11 001.02.12
Note that sound assignments and sound modifying parameters are
not assigned to pad numbers but rather to one of 64 MIDI note
numbers (35-98). Separately, each of the 64 pad numbers (A01-D16)
is assigned to a specific MIDI note number. When a pad is played,
the pad number is translated into a note number (35-98) using the
assignments in the MIDI key, option 1 screen. The resulting note
number is then used by the program to determine which sound to
play. This way, sounds can either be played by the pads or by incoming MIDI Note On messages: both use note numbers to specify
which sound to play. Another graphic explanation of this connection
can be found at the beginning of the “MIDI Functions” chapter.
Program data are edited primarily in the screens accessed by
pressing the PROGRAM/SOUNDS key. These screens are described
in this chapter. Editing other program data is described in the
following chapters:
• The pad to note number assignments:
Accessed by pressing the MIDI key and selecting option 1. This is
described in the “MIDI Functions” chapter of the manual.
• The stereo mix, individual output/effects mix, and effects:
Accessed by pressing the MIXER/EFFECTS key. This is described the “MIXER/EFFECTS Key” chapter of the manual.
• The Note Variation Slider assignment and slider range limits:
Page 117
Chapter 6: Creating and Editing Programs
Accessed by pressing the Note Variation ASSIGN key. This is
described in the “Basics” chapter of the manual.
How to create a program
To create a program, either copy an existing program and modify it,
or start a new one:
1. Load in from disk the sounds you intend to use in the program.
2. If you want to change the note number assignments for any of the
pads, press the MIDI key and select option 1.
3. For each pad you want to assign to a sound, select that pad’s note
number in the “Select Programs, Assign Sounds” screen and
assign it to the desired sound and sound assignment mode. This
screen is accessed by pressing the PROGRAM/SOUNDS key and
selecting option 1.
4. If desired, modify the default settings for envelope, velocity
modulation, tuning, poly mode, cutoff assignments, or filter
settings. These are accessed by selecting options 2 or 3 from the
PROGRAM/SOUNDS key menu.
5. If desired, adjust the stereo or individual output/effect mixes or
add effects by pressing the MIXER/EFFECTS key and selecting
the appropriate option.
Page 118
Chapter 6: Creating and Editing Programs
Selecting the Active Program, Assigning Sounds
A single screen allows the selection of the current program, as well
as the creation of a program’s sound assignments. To access this
screen, press the PROGRAM/SOUNDS key. The following menu
screen will appear:
===== Programs =====
1.Sel pgm, asn snds
2.Envel,veloc,tune..
3.Dynamic filter
4.Copy, initialize
===== Sounds =====
5.Sample new sound
6.Edit sound
7.Renam,cpy,delete
8.Audio trigger
==================== ==================
Select option:
Options 1 through 4 relate to creating and editing programs. Press 1
to go to the Select Program, Assign Sounds screen:
============ Select Program ============
Active program: 1-BIG DRUM SET
========== Assign Note:37/A01 ==========
Sound:BIG BAD DRUM
(ST) Mode:DCY SW
General MIDI name for note:SIDE STICK
========================================
<Play>
A description of screen fields and soft keys follows:
The Select Program section of the screen:
• The Active program field:
The active program is the program that is currently in use. Only one
program can be active at a time. This field is used to select which of
the 24 programs is currently active. All data displayed below and in
the other program screens apply only to the active program selected
here. Range: 1-24.
BIG DRUM SET in above example):
• The Program Name field (1-BIG
This field is located to the right of the Active program field. It
contains the currently assigned 16-character name for the selected
program number. This name is edited in the same way as the
Sequence Name field in the Play/Record screen.
Page 119
Chapter 6: Creating and Editing Programs
The Edit Sound Assignments section of the screen:
• The Assign note field:
The Assign note and Sound field work together to assign
sounds to MIDI note numbers. To assign a sound, first select the
note number to be assigned (35-98) in the Assign note field.
Then select the desired sound for that note number in the Sound
field. You can also select a note number by pressing one of the drum
pads—the note number currently assigned to that pad will be
selected automatically. (To change the MIDI note number assignments for each pad, press the MIDI key and select option 1.)
For convenience, the pad number currently assigned to the
selected note number is displayed to its right. (If no pad is currently
assigned to the note number, then [- -] is displayed.)
• The Sound field:
This field contains the sound assignment for the note number
selected above. This is a choice field containing an alphabetical list
of all sounds currently in memory, or OFF. If a stereo sound is
selected, (ST) will appear to the right of the sound name.
• The Mode field:
This is a choice field with four options:
1. NORMAL:
Only the sound in the Sound field plays when the
selected MIDI note number is received. The screen
appears as below:
============ Select Program ============
Active program:24-PROGRAM NAME
========== Assign Note:37/A01 ==========
Sound:Tiny tom
(ST)
Mode:NORMAL
General MIDI name for note:SIDE STICK
========================================
<Play>
If this option is selected, the fifth line will contain the
field General MIDI name for note. This noneditable field shows the instrument name in the General
MIDI standard for the selected MIDI note number. If you
want your custom programs to be compatible with the
General MIDI standard, then select sound assignments
that are of the same instrument type as shown in this
field.
2. SIMULT (Simultaneous):
This option allows up to two additional sounds to play
automatically whenever the note number specified in the
Note field is received—useful for creating layered
Page 120
Chapter 6: Creating and Editing Programs
sounds. If this option is selected, the fifth and sixth lines
appear as follows:
============ Select Program ============
Active program:24-PROGRAM NAME
========== Assign Note:37/A01 ==========
Sound:Tiny tom
(ST)
Mode:SIMULT
Also play note:38/A06-Big snare drum
Also play note:39/B16-Doomsday tom
========================================
<Play>
In the above example, whenever note number 35 is
played, note numbers 36 and 37 will also play—Tiny tom
will be layered with Big snare drum and Doomsday tom.
Select the simultaneous note numbers in the two Also
play note fields. Each field is a numeric field allowing
the selection of one of the 64 available note numbers (3598). As in the Note field, the pad number currently
assigned to the selected note number is displayed to its
right for convenience. If only one additional sound is
desired, select a number below 35 in either of the fields
and [- -] will appear in place of the number, indicating
no note number assignment.
COMMENT: When the three sounds play simultaneously, it is as though three pads were manually
played from the front panel at the same velocity—
each sound uses all of its individual program
parameter data including tuning, envelope, and
mixer data.
3. VEL SW (velocity switch):
This option permits one of three sounds, either the main
assigned sound or two others, to play depending on the
velocity level of the note played. If selected, the screen
appears as follows:
============ Select Program ============
Active program:24-PROGRAM NAME
========== Assign Note:37/A01 ==========
Sound:Soft snare
(ST)
Mode:VEL SW
If over: 64 ,use:38/A06-Smack snare
If over:110 ,use:39/B16-Goliath snare
========================================
<Play>
The fifth and sixth lines now contain four additional
fields—two velocity thresholds and two new note number
Page 121
Chapter 6: Creating and Editing Programs
assignments. These fields are used to play one of three
sounds depending on the velocity of the note received:
1. If the received note’s velocity is less than or equal
to the value in the first If over field, then only
the sound selected in the Sound field plays.
2. If the received note’s velocity is greater than the
value in the first If over field but less than or
equal to the value in the second If over field,
then only the note number selected in the first
use field plays.
3. If the received note’s velocity is greater than the
value in the second If over field, then only the
sound assigned to the note number selected in the
second use field plays.
(The second If over field is limited to values at
least one higher than the first If over field.)
In the above example, if you hit pad A01 softly you’ll hear
the Soft snare sound. Hit it harder and you’ll hear the
Smack snare. Hit even harder and you’ll hear the Goliath
snare.
COMMENT: If you only want to switch between 2
sounds, then select the same note number in both
use fields and use the first If over field to set the
threshold.
COMMENT: Regardless of which pad plays, the
individual program parameter data (tuning, envelope, velocity data, etc.) for each of the three note
numbers are used but only the main note number’s
mixer data (mix volume and pan, output assignment,
and output/effects mix level) are used. The advantage of this is that it is only necessary to adjust the
volume and pan, for example, of the main sound in
the mix instead of all three sounds.
4. DCY SW (decay switch):
This option permits one of three sounds to play depending on the value of the Decay field in the “Envelope,
Velocity, Tune...” screen. However, if any drum notes
contain Note Variation decay data, it will override the
Decay field’s for that note only. (The Envelope, Velocity,
Tune... screen is accessed by pressing the PROGRAM/
SOUNDS key and selecting option 2.)
If selected, the screen appears the same as if the VEL
SW option above were selected, except that in this case
one of three sounds will play depending on the current
envelope decay setting instead of the note’s velocity
setting:
Page 122
Chapter 6: Creating and Editing Programs
============ Select Program ============
Active program:24-PROGRAM NAME
========== Assign Note:37/A01 ==========
Sound:Sound_name
(ST) Mode:DCY SW
If over:1013,use:38/A06-Good snare drum
If over:5000,use:39/B16-Some other drum
========================================
<Play>
The fifth and sixth lines now contain four additional
fields—two decay thresholds and two new note number
assignments. These fields are used to play one of three
sounds depending on the envelope decay setting:
1. If the received note’s envelope decay is less than
or equal to the value in the first If over field,
then only the sound selected in the Sound field
plays.
2. If the received note’s envelope decay is greater
than the value in the first If over field but
less than or equal to the value in the second If
over field, then only the note number selected in
the first use field plays.
3. If the received note’s envelope decay is greater
than the value in the second If over field, then
only the sound assigned to the note number
selected in the second use field plays.
(The second If over field is limited to values at
least one higher than the first If over field.)
COMMENT: This feature is provided primarily to emulate
the MPC60’s Hi-hat Decay Slider. Whenever the Hi-hat
pad on an MPC60 is played, one of three different sounds
(closed, loose or open hi-hat) plays depending on the slider
position. Also, the slider varies the envelope decay time of
the selected sound. On the MPC3000, this same function
can be achieved by selecting DCY SW in the Mode field.
Because Note Variation decay data in sequenced drum
notes overrides the program’s envelope decay setting, it
will also determine which of 3 sounds (e.g., closed, medium and open hi-hats) will play while simultaneously
varying envelope decay of the selected sound. If an MPC60
SET file is loaded from disk, these parameters are automatically set to emulate the MPC60 Hi-hat Decay Slider
as part of the conversion to an MPC3000 program.
COMMENT: Regardless of which pad plays, the individual program parameter data (tuning, envelope, velocity
data, etc.) for each of the three note numbers are used but
only the main note number’s mixer data (mix volume and
pan, output assignment, and output/effects mix level) are
Page 123
Chapter 6: Creating and Editing Programs
used. The advantage of this is that it is only necessary to
adjust the volume and pan, for example, of the main
sound in the mix instead of all three sounds.
Soft keys:
• The <Play> soft key:
Pressing this key has the same effect as playing the selected note
number at full velocity.
Page 124
Chapter 6: Creating and Editing Programs
Envelope, Velocity Modulation, Tuning,
Poly Mode
To edit these program parameters, press the PROGRAM/SOUNDS
key, then select option 2 and the following screen will appear:
=== Env,Veloc.. (Pgm:24 Note:37/A01) ===
---Envel----Vel Mod---Tune/Poly-Attack:
0
Attack: 0
Tune:
0
Decay :
0
Sft st: 0
Poly:POLY
Dcy md:END
Volume:100
Cutoff:64/B01
Cutoff:64/B02
========================================
<Play>
Each of the screen’s data fields and the soft key are explained below:
The Title line:
• The Pgm field:
This is the active program number (1-24). All data shown in the
fields below apply only to this program.
• The Note field:
All data values in the lower portion of the screen apply only to the
note number (35-98) selected in this field. For convenience, the pad
number currently assigned to the selected note number is displayed
to the right. The note number in this field can be changed either by
cursor editing or by pressing one of the front panel drum pads—the
note number currently assigned to that pad will be selected automatically.
The Envel (Envelope) section:
• The Attack field:
This is the volume envelope’s attack time. There are 101 values,
exponentially spaced from 0 to 5000 milliseconds.
• The Decay field:
This is the volume envelope’s decay time. There are 101 values,
exponentially spaced from 0 to 5000 milliseconds.
• The Dcy md (decay mode) field:
This is a choice field with two options:
1. START: The decay phase of the envelope begins immedi-
Page 125
Chapter 6: Creating and Editing Programs
ately following the attack phase. This is similar to the
“envelope initial decay” parameter on most synthesizers.
2. END: The decay phase of the envelope always ends exactly
at the end of the sound playback. The point at which the
decay starts is determined by the decay parameter. This
was called fadeout on the MPC60 and is very useful for
creating a smooth fade down just before the end of a
sampled sound.
The Vel Mod (Velocity Modulation) section:
• The Attack field:
This field sets the amount of effect that note velocity has on attack
time (0-100%). If set to 0, note velocity has no effect on attack; if set
to higher values, attack time will increase as you play lower velocities. That is, hitting a pad hard will produce a faster attack than
hitting it softly.
• The Sft st (soft start) field:
This field controls the amount of time (0-5000 ms) that will be added
to the sound’s Soft Start location when notes with low velocities are
received. (The Soft Start field is located in the screen accessed by
pressing the PROGRAM/SOUNDS key and selecting option 6 from
the menu.) This provides a good simulation of the way a real drum
sounds differently when hit softly. If you set this field above 0,
hitting a pad more softly will start playback later in the sample,
causing fewer attack transients to be heard. Notes with velocity = 1
will add the full amount of time entered here to the Soft Start
location; notes with velocity = 127 will add nothing; notes with
velocities in between will add time proportionately. If this field is set
to 0, note velocity will have no effect on the Soft Start location.
• The Volume field:
This field sets the amount of effect that note velocity has on volume
(0-100%). If set to 0, note velocity has no effect on volume; if set to
higher values, the volume will decrease as you play lower velocities.
The Tune/Poly section:
• The Tune field:
This sets the tuning. The range is from -240 (-24 semitones) to 240
(+24 semitones) in increments of 0.1 semitone.
• The Poly field:
This is a choice field with three options:
1.POLY: Multiple plays of the sound are assigned to additional voices, allowing polyphonic overlap. This is useful
for sounds like ride cymbals, for which you don’t want
new notes to cut off old ones.
Page 126
Chapter 6: Creating and Editing Programs
2. MONO: Multiple plays of the sound use the same voice,
terminating and restarting playback of the sound (no
polyphonic overlap). This is useful for producing stuttering effects.
3. NOTE OFF: When the pad is released (or a MIDI Note
Off message is received), the sound is terminated. This is
useful for controlling long samples.
• The two Cutoff fields:
Each of these two fields allows a note number to be entered. Whenever the note selected in the top line’s Note field is played, then
any currently playing sounds assigned to either of the note numbers
in these two fields are immediately terminated.
This is useful when it is desirable for one sound to cause
another to stop playing, such as a closed hi-hat stopping an open hihat, or a muted triangle stopping an open triangle.
Each of these two fields allows a note number to be entered
(35-98). In each case, the pad currently assigned to that note number is displayed to its right. To disable this feature in either or both
fields, enter a note lower than 35 and “--/OFF” will appear in the
field indicating that no note is selected to be cut off.
The soft key:
• The <Play > soft key:
Pressing this key has the same effect as playing the selected note
number at full velocity.
Page 127
Chapter 6: Creating and Editing Programs
The Dynamic Filter
Each of the 32 voices in the MPC3000 has a 12 dB per octave
dynamic resonant lowpass filter and a second envelope generator
dedicated to modulating the filter frequency. All controls related to
this filter and envelope generator are accessed by selecting option 3
from the initial PROGRAM/SOUNDS key menu, which presents the
following screen:
====== Filter (Pgm:24 Note:37/A01) =====
Freq:100
Vel>Freq: 0
Reson: 0
----------- Filter Envelope -----------Attack:
0
Decay:
0
Amount: 0
========================================
<Play>
Each of the screen’s data fields and the soft key are explained below:
The title line:
• The Pgm (program number) field:
This is the active program number (1-24). All data shown in the
fields below apply only to this program.
• The Note field:
All data values in the lower portion of the screen apply only to the
note number (35-98) selected in this field. For convenience, the pad
number currently assigned to the selected note number is displayed
to the right. The note number in this field can be changed either by
cursor editing or by pressing one of the front panel pads—the note
number currently assigned to that pad will be selected automatically.
The upper section:
• The Freq (frequency) field:
This is the cutoff frequency of the lowpass filter specified as an
arbitrary value from 0 (about 70 Hz) to 100 (filter completely out).
• The Vel>Freq (velocity modulation of frequency) field:
This is the amount of effect velocity has on the filter frequency (0100%). If set above 0, increasing note velocity will increase the
cutoff frequency (i.e., open the filter).
Page 128
Chapter 6: Creating and Editing Programs
• The Reson (resonance) field:
This is the resonance of the filter at the cutoff frequency. The range
is from 0 (no resonance) to 15 (highest resonance). Raising this
value accentuates changes in the filter frequency.
The Filter Envelope section:
• The Attack field:
This is the filter envelope attack time. There are 101 values, exponentially spaced from 0 to 5000 milliseconds.
• The Decay field:
This is the filter envelope decay time. There are 101 values, exponentially spaced from 0 to 5000 milliseconds.
• The Amount field:
This is the amount of effect the envelope has on the cutoff frequency
(0-100%).
The soft key:
• The <Play> soft key:
Pressing this key has the same effect as playing the selected note
number at full velocity.
Page 129
Chapter 6: Creating and Editing Programs
Copying and Initializing Programs
Selecting option 4 from the initial PROGRAM/SOUNDS key menu
presents the following menu screen, allowing programs to be copied
or initialized:
======= Copy, Initialize Program =======
1.Copy program Data of 1 Note
2.Copy 1 program over another
3.Initialize 1 program
4.Initialize all programs
========================================
Select option:
If 1 is selected from the Copy, Initialize Program menu:
====== Copy Program Data of 1 Note =====
Copy from note:64/A01-Sound_name
Of program:24-Program_name
Copy to note:64/A01-Sound_name
Of program:24-Program_name
========================================
<Do it>
This command copies the program data (envelope, tuning, sound
assignments, filter, etc.) for one note number to a different note
number. To perform the copy:
1. Enter the source note number in the Copy from note field.
The pad number and sound name currently assigned to that note
number are displayed to its right for convenience.
2. Enter the source program number in the upper Of program
field. The program name is displayed to the right for convenience.
3. Enter the destination note number in the Copy to note field.
The pad number and sound name currently assigned to that note
number are displayed to its right for convenience.
4. Enter the destination program number in the lower Of program field. The program name is displayed to its right for convenience.
Page 130
Chapter 6: Creating and Editing Programs
5. Press the <Do it> soft key to perform the copy.
If 2 is selected from the Copy, Initialize Program menu:
===== Copy 1 Program over Another ======
Copy from program:24-Program_name____
Copy to program:24-Program_name____
========================================
<Do it>
This command copies all data from one program to a different
program number. To perform the copy:
1. Enter the source program number in the Copy from program field. The program name is displayed to the right for convenience.
2. Enter the destination program number in the Copy to program field. The program name is displayed to the right for convenience.
3. Press the <Do it> soft key to perform the copy.
If 3 is selected from the Copy, Initialize Program menu:
========== Initialize Program ==========
Initialize program:24-Program_name____
========================================
<Do it>
This command initializes a program to default values with no
sounds assigned. When <Do it> is pressed, the selected program
is initialized.
Page 131
Chapter 6: Creating and Editing Programs
If 4 is selected from the Copy, Initialize Program menu:
======= Initialize All Programs ========
Press <Do it> to initialize all
programs!!
========================================
<Do it>
This feature initializes all programs to default values with no
sounds assigned. When <Do it> is pressed, all programs are
initialized.
Page 132
Chapter 7: The MIXER/EFFECTS Key
Chapter 7:
The
MIXER/EFFECTS
Key
Page 133
Chapter 7: The MIXER/EFFECTS Key
The Stereo Output Mixer
The MPC3000 has a 64 channel stereo mixer, providing a unique
volume and pan value for each of the 64 note number assignments
(35-98) in the active program.
To adjust the stereo mixer, press the MIXER/EFFECTS key, then
select option 1. The following screen will appear:
This is a graphic simulation of a multi-channel stereo mixer, showing a simulated volume slider and pan knob for each of the 16 pads
in pad bank A (A01-A16).
To show the settings for the other 3 pad banks, press the PAD
BANK key until the desired bank (A-D) is active.
To adjust the volume of a particular sound:
1. Press the pad for the sound that you want to adjust; the small
triangle on the screen will move directly above the number of the
selected pad.
2. Rotate the data entry control. As you turn it, the graphic volume
slider will move up or down, indicating that the volume of the
selected sound is being changed.
To adjust the pan position of a particular sound:
1. Press the pad that you want to adjust; the small triangle on the
screen will move directly above the number of the selected pad.
2. Press the CURSOR UP key. The small triangle will now point
upwards, toward the graphic pan knob.
3. Rotate the data entry control. As you turn it, the graphic pan
knob will move between one of 15 pan positions, indicating that
the pan setting of the selected pad is being changed.
Notice that the screen displays pad numbers, yet the mixer contains
volume and pan data for each of the 64 note number assignments
(35-98) in the active program. For each pad number on the screen,
the volume and pan data shown is from the note number (35-98)
within the active program to which the pad number is currently
assigned (in the MIDI key, option 1 screen). If you want to be able
to adjust mix data by selecting a specific note number regardless of
Page 134
Chapter 7: The MIXER/EFFECTS Key
its pad assignment, use the All Mix Data (Text) function, accessed
by selecting option 3 from the initial MIXER/EFFECTS key menu.
COMMENT: The data values used for the volume and pan
displays are normally taken from the active program. Because of this, whenever the active program is changed, the
newly selected program’s stereo mix settings will immediately
become active. However, it is also possible to use mix data
from the active sequence so that each newly selected sequence
will have its own custom mix, or to use a single master set of
mix data so that the stereo mix never changes when either the
program or sequence is changed. This choice may be made in
the Mixer Source Select fields, accessed by pressing option 4
from the MIXER/EFFECTS key menu.
• SOFT KEY 1:
Even though no soft key functions are displayed on the screen, there
is one active soft key: pressing SOFT KEY 1 will change the mixer
to a mode in which all pads are edited simultaneously, indicated by
16 cursor triangles across the screen. Thus, you can fade or pan all
pads in a bank at the same time. You can toggle between volume
and pan control with the UP and DOWN cursor keys. To return to
normal operation, press SOFT KEY 1 again.
Page 135
Chapter 7: The MIXER/EFFECTS Key
The Individual Outputs/Effects Mixer
In addition to the stereo outputs, the MPC3000 provides eight
individual mix outputs and an internal effects generator. The mixer
described in this chapter allows each of the sounds to be assigned to
one of the eight assignable mix outputs or to the internal effects
generator. The level of this assignment is controllable independently
of the stereo mix level.
To access the Individual Outputs/Effects Mixer screen, press the
MIXER/EFFECTS key, then select option 2. The following screen
will appear:
Similar to the Stereo Mix screen, this screen presents a graphic
simulation of a multi-channel mixer, showing a simulated volume
slider and an output assignment for each of the 16 pads in pad bank
A (A01-A16). To view other pad banks, press the PAD BANK key.
To adjust the volume level of the individual outputs or effects for a
particular sound:
1. Press the pad for the sound that you want to adjust; the small
triangle on the screen will move directly above the number of the
selected pad.
2. Rotate the data entry control. As you turn it, the graphic volume
slider will move up or down, indicating that the volume of the
selected sound at the individual outputs (or at the effects generator input) is being changed. The graphic volume slider can be
thought of as an auxiliary or effects send on a hardware mixing
board.
To change the assignment to the individual outputs or effects for a
particular sound:
1. Press the pad for the sound that you want to adjust; the small
triangle on the screen will move directly above the number of the
selected pad;
2. Press the CURSOR UP key. The small triangle will now point
upwards, toward the number (or E for effects) indicating the
current output assignment.
Page 136
Chapter 7: The MIXER/EFFECTS Key
3. Rotate the data entry control. Turning it will rotate through ten
selections:
The pad’s sound has no output assignment
[-]
1
The pad’s sound is sent to individual output 1
2
The pad’s sound is sent to individual output 2
3
The pad’s sound is sent to individual output 3
4
The pad’s sound is sent to individual output 4
5
The pad’s sound is sent to individual output 5
6
The pad’s sound is sent to individual output 6
7
The pad’s sound is sent to individual output 7
8
The pad’s sound is sent to individual output 8
E
The pad’s sound is sent to the internal effects
generator
If the sound being adjusted is a stereo sound, then the available
selections are different:
[-]
The pad’s sound has no output assignment
[ ]
The left side of the sound is sent to individual output
1 and the right side is sent to individual output 2
[ ]
The left side of the sound is sent to individual output
3 and the right side is sent to individual output 4
[ ]
The left side of the sound is sent to individual output
5 and the right side is sent to individual output 6
[ ]
The left side of the sound is sent to individual output
7 and the right side is sent to individual output 8
[E]
Both sides of the sound are sent to the internal
effects generator
Notice that the screen displays pad numbers, yet the mixer contains
data for each of the 64 note number assignments (35-98) in the
active program. For each pad number on the screen, the data shown
is from the note number (35-98) within the active program to which
the pad number is currently assigned (in the MIDI key, option 1
screen). If you want to be able to adjust mix data by selecting a
specific note number regardless of its pad assignment, use the All
Mix Data (Text) function, accessed by selecting option 3 from the
initial MIXER/EFFECTS key menu.
COMMENT: The data values used for this mixer are normally taken from the active program. Because of this, whenever the active program is changed, the newly selected
program’s individual output assign and mix settings will
immediately become active. However, it is also possible to use
settings from the active sequence so that each newly selected
sequence will have its own custom settings, or to use a single
master set of individual out assignments and mix data so
that the settings never change when either the program or
sequence is changed. This choice may be made in the Mixer
Source Select fields, accessed by pressing option 4 from the
MIXER/EFFECTS key menu.
Page 137
Chapter 7: The MIXER/EFFECTS Key
• SOFT KEY 1:
Even though no soft key functions are displayed on the screen, there
is one active soft key: If SOFT KEY 1 is pressed while the triangular
cursor is pointing downward???, the mixer changes to a mode in
which all sliders or output assignments are moved simultaneously,
indicated by 16 cursor triangles across the screen. To return to
normal operation, press SOFT KEY 1 again.
Page 138
Chapter 7: The MIXER/EFFECTS Key
Viewing the Mix Data in Text Form
The graphic screens for the stereo mixer and individual outputs/
effects mixer (menu options 1 and 2) are normally used for the
adjusting the stereo mix and individual outputs/effects mix. However, an additional screen containing the same data in text form is
also provided. You can access it by pressing the MIXER/EFFECTS
key and selecting option 3. The following screen will appear:
================ Mixer =================
Note:64/A01-Sound_name
(ST)
--- Stereo Out ------ Indiv Out ---Volume:100
Volume:100
Pan:50L
Output select:EFCT
Follow ster vol:YES
========================================
<Set all notes>
This alternate view is useful when adjusting mix data for note
numbers within the active program that are not currently assigned
to a pad. This would be the case when you’re playing sounds from
the MIDI input only. Also, one mix parameter, Follow ster
vol(Follow stereo volume), only appears in this screen.
The fields and soft keys are:
• The Note field:
A unique set of mix data values exists for each of the 64 MIDI note
numbers (35-98) in the active program. The mix values shown in the
center area of the screen apply only to the MIDI note number
selected in this field. For convenience, the pad number and sound
currently assigned to the selected note number are shown to its
right. A new note number may be entered either (1) by cursor
editing, (2) by pressing a front panel pad (the note number assigned
to that pad will be selected automatically), or (3) by sending a note
to the MIDI input (the received note number will be selected automatically).
The Stereo Out section:
• The Volume field:
This is the volume for the selected sound at the stereo outputs. The
range is from 0 to 100. This is the same parameter set by the
graphic volume slider in the Stereo Mix screen.
Page 139
Chapter 7: The MIXER/EFFECTS Key
• The Pan field.
This is the current pan position for the selected sound within the
stereo mix. The range is 50L to C to 50R. This is the same parameter set by the graphic pan control in the Stereo Mix screen.
The Indiv Out section:
• The Volume field:
This is the volume for the selected sound at the individual outputs
or at the effects generator input. This is the same parameter set by
the graphic volume slider in the Individual Outputs/Effects Mixer
screen.
• The Output select field:
This is the selected sound’s assignment to the individual outputs or
the effects generator. This is the same parameter set by the output
assignment in the Individual Outputs/Effects Mixer screen. It is a
choice field with 10 selections:
OFF
The sound has no output assignment.
OUT1 The sound is sent to individual output 1.
OUT2 The sound is sent to individual output 2.
OUT3 The sound is sent to individual output 3.
OUT4 The sound is sent to individual output 4.
OUT5 The sound is sent to individual output 5.
OUT6 The sound is sent to individual output 6.
OUT7 The sound is sent to individual output 7.
OUT8 The sound is sent to individual output 8.
EFCT The sound is sent to the internal effects
generator.
If the sound being adjusted is a stereo sound, then the available
selections are different:
OFF The sound has no output assignment.
1+2 The left side of the sound is sent to individual output
1 and the right side is sent to individual output 2.
3+4 The left side of the sound is sent to individual output
3 and the right side is sent to individual output 4.
5+6 The left side of the sound is sent to individual output
5 and the right side is sent to individual output 6.
7+8 The left side of the sound is sent to individual output
7 and the right side is sent to individual output 8.
EFCT Both sides of the sound are sent to the internal
effects generator.
• The Follow ster vol(Follow stereo volume) field:
This is a choice field with two options:
1. YES:
The level of the Individual Outputs/Effects send is made
proportional to the stereo volume. Therefore, all changes
to the stereo mix volume for the selected sound will also
change the level sent to the individual outputs or effects.
This is similar to the Post Fader Echo Send function on
Page 140
Chapter 7: The MIXER/EFFECTS Key
hardware mixing consoles. It provides the advantage of
automatically changing the level to the individual outputs or effects whenever the stereo volume is changed.
2. NO:
The level of the Individual Outputs/Effects send is made
completely independent of the stereo volume. Changing
the stereo volume will have no effect on the Individual
Outputs/Effects volume for the same sound. This is
similar to the Pre Fader Echo Send function on hardware
mixing consoles.
The Soft Key:
• The <Set all notes> soft key:
Pressing this soft key displays the following screen, which allows
the mix data for all 64 note numbers to be set in one step:
====== Set Mix Data For All Notes ======
Parameter:INDIV OUT FOLLOW STER VOL
Set all 64 notes to:YES
========================================
<Do it>
To set a single mix parameter for all 64 note numbers:
1. Set the Parameter field to the desired mix parameter. The
options are:
STEREO VOLUME
STEREO PAN
INDIV OUT VOLUME
INDIV OUT ASSIGN
INDIV OUT FOLLOW STER VOL
2. Enter the value that you want all 64 note numbers to be set to in
the Set All 64 Notes To field.
3. Press <Do it>.
Page 141
Chapter 7: The MIXER/EFFECTS Key
Mixer Source Select, Automated Mix
Selecting option 4 from the MIXER/EFFECTS menu presents a
screen containing four fields that alter the performance of the
mixer:
========= Mixer Source Select ==========
Stereo mix:PROGRAM
Indiv out / effect mix:PROGRAM
Effects:PROGRAM
=========== Automated Mixer ============
Record live mix changes:YES
========================================
The fields are:
The Mixer Source Select section:
• The Stereo mix field:
This choice field allows you to choose one of three sources for the
data displayed on the Stereo Mixer screen and the Stereo Mix
section of the All Mix Data (Text) screen:
1. PROGRAM:
There is a set of stereo mix settings (volume and pan)
that is stored within each program. If PROGRAM is
selected in this field, these settings are used in the Stereo
Mixer screen. In this mode, whenever the active program
is changed, the stereo mix immediately changes to the
newly selected program’s stereo mixer settings. This
option is useful if you want each newly selected program
to have a custom stereo mix. This is the default setting.
2. SEQUENCE:
There is a set of stereo mix settings (volume and pan)
that is stored within each sequence. If SEQUENCE is
selected in this field, these settings are used in the Stereo
Mixer screen. In this mode, whenever the active sequence
is changed, the stereo mix immediately changes to the
newly selected sequence’s stereo mix settings. This option
is useful if you want each newly selected sequence to
have a custom stereo mix.
Page 142
Chapter 7: The MIXER/EFFECTS Key
3. MASTER:
There is a set of stereo mix settings (volume and pan)
that is stored within each APG (all programs) file and
that applies globally to all sequences and programs. If
MASTER is selected in this field, this set of global data is
used in the mixer screen. In this mode, the stereo mixer
settings never change unless you change them, even if
the active sequence or program is changed. This option is
useful for people who always want the mix settings to
stay where they last put them. Note that these settings
must be saved to the APS file before power is removed, or
any changes mix changes will be lost.
• The Individual outs / effect mix field:
This field works the same way as the Stereo mix field above
except that the selection applies to the source of the Individual
Outputs/Effects Volume, Outputs/Effects Assignment, and Follows
Stereo Volume data instead of the stereo volume and pan.
• The Effects field:
This field works the same way as the Stereo mix field above
except that the selection applies to the source of the data for the
Effects screen instead of the Stereo Volume and Pan screen.
COMMENT: Whenever you change effect settings, any effect
signals that are still sounding (such as a long delay signal
that has not yet finished) will immediately be cut off. This
can cause a problem if SEQUENCE is selected while playing
a song in song mode because the effect settings will change at
each sequence boundary in the song, causing termination of
any decaying delay signals at the sequence transition. A
similar problem occurs if PROGRAM is controlling the effects
generator and you change programs while a sequence is
playing. Keep these issues in mind when creating effects
changes in mid-sequence or mid-song.
The contents of these 3 fields are saved in APS files.
The Automated mixer section:
• The Record live mix changes field:
This is a choice field and has two options:
1. YES:
If you’re recording on a drum track, all real-time changes
made to the volume or pan in the Stereo Mix screen (or to
the volume in the Individual Outputs/Effects Mixer
screen) are recorded, just as with an automated mixer.
When played back, the mixer settings will change exactly
as they did while recording, both audibly and visually on
the graphic screens. These movements are stored like
Page 143
Chapter 7: The MIXER/EFFECTS Key
MIDI continuous controllers, as a series of many discrete
events (in this case, STEREO VOLUME, STEREO PAN,
or OUTPUT/EFFECT VOLUME system exclusive
events). These discrete events can be edited in detail in
Step Edit mode.
2. NO:
Real time mixer changes are not recorded. If prerecorded
real time mix changes already exist in drum tracks, they
are ignored.
COMMENT: The changes to the stereo mix volume and pan
will only be recorded or played back if the Stereo Mix
field in the Mixer Source Select section of the screen is set to
SEQUENCE. Likewise, the volume slider movements in the
Individual Outputs/Effects Mixer will only be recorded or
played back if the Indiv Out/Effects Mix field in the Mixer
Source Select section of the screen is set to SEQUENCE.
COMMENT: If you use overdub mode to add mix changes to
a region of the track where previous mix changes exist, the
old changes are not erased, but rather the new changes will
be added in between the old ones, producing unpredictable
results. For this reason, it is a good idea to record your
automated mix data on its own separate drum track, then
always use record mode (not overdub mode) to punch-in any
mix changes. This will automatically erase the old changes
throughout the punch-in region, but since the mix changes
are on a separate track, any drum notes will not be erased.
COMMENT: A large number of these mix change events can
cause minor slowing of playback due to the large processing
requirement. To reduce the number of these events, increase
the Minimum Change field’s setting for these event types
(in the MIDI Input Filter screen) to as high a number as
acceptable before recording mix changes. This will thin out
the mix data during recording, lessening the processing
requirement in playback.
COMMENT: As with any other mid-sequence control
changes, these mix changes only take effect when played in a
sequence. This means that if you play a section of a sequence
containing a specific controller event, the last played value of
that controller will remain until another occurrence of the
same controller is played, even if you stop the sequence and
start playing it from another location. Because of this,
whenever you use one of these events within a sequence, it is
important to insert another event of the same type at the
beginning of the sequence to set the volume, pan or mixer/
effects setting to an initial value.
Page 144
Chapter 7: The MIXER/EFFECTS Key
Effects Generator
The MPC3000 contains an internal effects generator capable of a
number of delay effects. To access the settings of the effects generator, select option 5 from the MIXER/EFFECTS menu screen. The
following screen will appear:
============ Effects (Delay) ===========
Vol:
Pan:
Time:
Fdbk:
Delay 1= 100
50L
1486
100
Delay 2=
0
C
1486
100
Delay 3=
0
C
1486
100
========================================
(FX=ON )
There are three separate delays. Each has the following fields:
• The Vol (Volume) field:
This field sets the volume level to the stereo mix, simulating the
effects return level on a hardware mixing console.
• The Pan field:
This field sets the pan position within the stereo mix.
• The Time field:
This field sets the delay time, from 1 to 1486 milliseconds.
• The Fdbk (feedback) field:
This sets the amount of delayed signal fed back into the delay input.
The range is from 0 to 100%.
COMMENT: The feedback level of each delay is independent
of the volume level. This means that if at least one Volume
field is set above 0, then all of the Feedback fields will
produce feedback if set above 0.
COMMENT: Since all three delays use the same delay
memory, the feedback of one delay will include the feedback
of the others and will therefore add together. For this reason,
be sure that the sum of the three Feedback fields does not
exceed 100% or infinite feedback will occur.
COMMENT: The values used in this screen are normally
taken from the active program. Because of this, whenever the
active program is changed, the newly selected program’s
effects settings will immediately become active. However, it is
also possible to use effects data from the active sequence so
that each newly selected sequence will have its own custom
Page 145
Chapter 7: The MIXER/EFFECTS Key
effects data, or to use a single master set of effects data so
that the selected effect never changes. This choice may be
made in the Mixer Source Select fields, accessed by pressing
option 4 from the MIXER/EFFECTS menu.
Page 146
Chapter 8: Creating and Editing Sounds
Chapter 8:
Creating and
Editing Sounds
Page 147
Chapter 8: Creating and Editing Sounds
Sampling a New Sound
This function is used to record new sounds into your MPC3000. All
sampling is done in 16-bit linear format at the full 44.1kHz sampling rate, as with compact discs.
COMMENT: As with all samplers, all sounds are lost when
the power is removed. This means that you must load in
sounds from a sounds disk every time the MPC3000 is turned
on, and you must save any edited or newly sampled sounds
to disk, or the changes will be lost!
To sample new sounds, press the PROGRAM/SOUNDS key to view
the menu screen, then press 5 to select the Sample New Sound
option. This will cause the Sample New Sound screen to appear:
=========== Sample New Sound ===========
Input:ANALOG
Mode:MONO-LFT Monitor:ON
Length: 1.0
Thres: 1
Pre-rec: 1
================ Meter =================
Left :PT
========================================
<Rec ready> <Reset P>
All sampling is done while this screen is showing. A description of
screen fields and soft keys follows:
• The Input field:
This choice field has two options:
1. ANALOG: The recording source is the rear panel analog
Record In jacks.
2. DIGITAL: The recording source is the rear panel digital
input. This input can be connected to any 44.1kHz digital
SP/DIF source such as a CD or DAT tapes recorded at
44.1kHz, but 48 kHz sources are not supported.
• The Mode field:
This choice field has three options:
1. MONO-LFT: Sampling is done in mono, using only the left
record input (or the left part of the signal arriving at the
digital input). The mono signal is monitored at both the
left and right sides of the stereo outputs.
2. MONO-RGT: Sampling is done in mono, using only the
right record input (or the right part of the signal arriving
at the digital input). The mono signal is monitored at
both the left and right sides of the stereo outputs.
Page 148
Chapter 8: Creating and Editing Sounds
3. STEREO: Sampling is done in stereo, using both the left
and right sampling inputs (or both parts of the signal
arriving at the digital input).
• The Monitor field:
This choice field has two options: ON and OFF. If ON, the signal from
the sampling input is heard in the stereo mix outputs. If OFF, it is
not. If you are sampling with a microphone in the same room as the
speakers, select OFF to avoid audio feedback. Otherwise, select ON
to hear the incoming signal in the stereo mix.
• The Length field:
This field is used to specify the total recording time to be allocated
to the new sample, in seconds (and 0.1 seconds). Any number can be
entered here up to the maximum available sampling time. In a nonexpanded MPC3000, the maximum sampling time is 21.9 seconds
mono or 10.9 seconds stereo. In a fully expanded MPC3000 (total 16
megabytes) the maximum sampling time is 188.3 seconds mono or
94.1 seconds stereo.
COMMENT: If you frequently find that you need more
memory even when all sounds are deleted, you may want to
add more memory to the MPC3000. See the section “Expanding the Sound Memory” in the Appendix for information
about how to do this.
COMMENT: Although the maximum sampling time is
limited only by available sound memory, the maximum
sound file size that can fit on a floppy disk is 16.4 seconds
mono or 8.2 seconds stereo. If a sound is larger than this, it
won’t fit on a single floppy and the MPC3000 cannot split
single sound files over two or more floppies. If you need to
create longer sounds and save them to disk, you must use an
external hard disk connected to the SCSI port.
• The Thres (Threshold) field:
This sets the threshold above which recording will begin once <Rec
ready> has been pressed. The range is 0-100% of full scale. A good
setting to start with is 1%. Setting Thres to 0 will cause recording
to begin as soon as <Rec ready> is pressed.
• The Pre-Rec (Pre-Record) field:
When sampling, a small amount of time before the level threshold is
exceeded is also recorded, insuring that even the low level start of
the sound is retained. This field is used to set that amount of prerecord time, in milliseconds. For example, to record 10 milliseconds
before the audio threshold is exceeded, enter 10 here. The default
value here is 1 millisecond, which is adequate for most sharp attack
sounds like drums.
COMMENT: When played back, the sound starts playing
from the point at which the threshold was exceeded
Page 149
Chapter 8: Creating and Editing Sounds
because the Soft Start parameter (in the Edit a Sound screen)
is automatically set to the first sample which exceeded the
threshold. To hear the pre-record portion of the sound, you
must set the Soft Start field to an earlier position within the
sound.
COMMENT: The number entered here is actually the minimum pre-record time. Because of the method the MPC3000
uses internally for sampling, pre-record time may be up to 20
milliseconds more than the number entered in this field, but
never less.
• The Meter section of the screen:
This is a simulation of an analog record level meter. While this
screen is present, the meter will constantly display the level of the
signal at the input. If stereo sampling is active, then the screen
changes to display two meters—one each for the left and right
inputs. In either case, the threshold setting is graphically represented by a T within the meter’s range. If the range is exceeded, ! is
displayed to the right of the meter’s range to indicate clipping. In
addition, a P shows the highest peak level received since the last
time the <Reset peak> soft key was pressed.
• The <Rec ready> soft key:
Pressing this soft key commands the MPC3000 to enter Record
Ready mode and the bottom line of the screen changes to:
Waiting for input signal...
<Cancel>
During this time the MPC3000 stands ready to record, waiting for
the incoming audio to exceed the record threshold. If the <Cancel> soft key is pressed, the Record Ready status is canceled and
the previous screen status is re-displayed. When the incoming audio
signal exceeds the record threshold, the bottom line changes to:
Recording...
<Cancel>
When the entire sample has been recorded, the screen changes to:
=========== Sample New Sound ===========
Done. Press <Playback> to hear it, then
<Keep & name> or <Discard> to try again.
================= Meter ================
Left :
P
Right:
P
========================================
<Play/stop><Keep&name><Discard>
Page 150
Chapter 8: Creating and Editing Sounds
As the screen explains, sampling is finished. The Meter section of
the screen shows the highest peak levels received during recording.
You can now hear the new sound by pressing <Play/stop>. If
you don’t like it and want to sample again, press <Discard>. If
you want to keep it and give it a name, press <Keep&name>, and
the following screen will appear:
============ Name New Sound ============
Name for new sound:Sound_001_______
(Turn data knob to enter LETTER mode,
type name with letter keys & press ENTER
when done. To assign sound to a program,
press PROGRAM/SOUNDS key, option 1.)
========================================
<Done>
Naming the sound is done in the same way as renaming a sequence
in the Play/Record screen. When finished naming the sound, press
<Done>.
• The <Reset P> (Reset Peak) soft key:
The level meter displays a moving letter P. This shows the highest
peak audio level that has been received. To reset this peak level,
press this soft key. When <Rec ready> is pressed, the peak level
is automatically reset.
COMMENT: The audio input jacks on the rear panel are
balanced inputs having a high, low and ground connection
using a standard stereo phone jack:
Ground Low High
However, standard mono phone plugs will work fine—the low
connection will simply connect to ground.
Page 151
Chapter 8: Creating and Editing Sounds
An example of sampling a new sound:
The following is a step-by-step example of how to record a mono
sound from the analog input:
1. Connect a mono audio signal source to the LEFT RECORD IN
jack.
2. Press the PROGRAM/SOUNDS key, then select 5 from the menu
screen. The Sample New Sound screen will appear.
3. Set the fields to the following values:
Set Input to ANALOG
Set Mode to MONO-LFT
Set Monitor to ON
Set Length to 1 (1 second)
Set Thres to 1
Set Pre-rec to 1
4. While playing the source signal and watching the screen meter,
adjust the rear panel GAIN switch and front panel RECORD
LEVEL knob so that the screen meter goes as far to the right as
possible when the sound plays, but not into the clipping region
(clipping is indicated by ! to the right of the meter). The highest
peak received is indicated by a P within the meter range. To reset
the peak level, press <Reset P>.
5. To begin sampling, press <Rec ready>. The bottom line of the
screen will display Waiting for input signal.
6. Play the sound into the audio input. Sampling starts once the
record threshold is exceeded at the audio input, indicated by the
bottom line changing to Recording.
7. When recording finishes, the screen changes to:
=========== Sample New Sound ===========
Done. Press <Playback> to hear it, then
<Keep & name> or <Discard> to try again.
================= Meter ================
Left :
P
Right:
P
========================================
<Play/stop><Keep&name><Discard>
As the screen explains, sampling is finished. The Meter section of
the screen shows the highest peak levels received during recording.
To hear the newly sampled sound, press the <Play/stop> soft
key. Pressing the key a second time will stop playback immediately.
If you don’t like how it turned out, press <Discard> to return to
the Sample New Sound screen.
Page 152
Chapter 8: Creating and Editing Sounds
If you liked it, press <Keep&name> to keep it and go on to a screen
that allows you to name the new sound.
8. The sound must be assigned to a note number within a program
before it can be played by pads, sequences or the MIDI input. To do
this, press the PROGRAM/SOUNDS key and select option 1. Follow
the instructions in the “Creating and Editing Programs” chapter of
this manual.
9. It is a good idea to save your sound to disk now. IF YOU DON’T,
THE SOUND WILL BE LOST WHEN YOU TURN THE POWER
OFF! To save your sample to disk, follow the instructions in the
“Saving to and Loading from Disk” chapter of this manual for saving
a single sound to disk.
Page 153
Chapter 8: Creating and Editing Sounds
Editing a sound
This function is used to edit a sound in your MPC3000. The available editing features are:
• Edit the sound’s parameter data, including:
• Initial volume
• Initial tuning
• Soft start address
• Soft end address
• Automatically find the best soft start address
• Edit the sound’s sample data, including:
• Copy a portion of the sound and insert the copy at any
other point within the same sound or a different sound.
• Delete, reverse, or silence any portion of the sound.
To edit a sound, press the PROGRAM/SOUNDS key, then type 6.
The following screen will appear:
=== Edit Sound:Sound_name
(ST) ===
--- Sound Params ---- Edit Samples -Soft st :000.000.00 Zone st :000.000.00
Soft end:000.000.00 Zone end:000.000.00
Length:000.000.00 Play X:AFTR SFT END
Vol%:100 Tune:+ 0 Do:COPY ZONE->TEMP
=================== ==================
<Ply/Stp> <Best st> <Play X>
<Do>
There are two parts to this screen—Sound Params and Edit
Samples. Sound Params permits the editing of certain parameters
stored with the sound file that affect its playback. Edit Samples
permits actual editing of the sound’s sample data.
The Sound Parameters section of the screen (left side)
The fields and soft keys are:
• The Edit Sound field (title line of screen):
This field is used to select the sound to be edited. It can be selected
in one of two ways:
1. Press one of the front panel pads. The sound currently
assigned to that pad will be selected.
2. Use the data entry control. Each click of the control will
select the next sound in an alphabetized list of all available sounds in memory.
Page 154
Chapter 8: Creating and Editing Sounds
If the sound is stereo, (ST) will appear to the right of the sound
name. Also, once a sound is selected, the Soft St, Soft end,
Vol%, and Tune fields will immediately be updated to show the
newly selected sound’s settings.
• The Soft St (soft start) field:
When a sound is played, play actually starts not at the absolute
beginning of the sound but rather at the position within the sound
specified in this field. It is actually three interrelated fields:
1. Seconds (0-999),
2. Milliseconds (0-999), and
3. Samples (0-43; at the 44.1kHz sample rate, there are
approximately 44 samples to a millisecond.)
Increasing this value above 000.000.00 will cause the sound to start
playback from a location later than the actual start, but will retain
the unused beginning portion of the sound. It is possible to delete
this unused portion by using the <Do> soft key, described below. To
find the best soft start address for the sound automatically, use the
<Best st> soft key, described below.
• The Soft end field:
When a sound is played, play actually stops not at the absolute end
of the sound but rather at the position within the sound specified in
this field. It is a seconds.milliseconds.samples-format field as used
in the Soft st field above. Decreasing this value below the
address in the Length field will cause the sample to stop playing
sooner than the actual end, but will not delete the unused end of the
sound from memory. However, the end can be deleted from memory
by using the <Do> soft key, described below.
• The Length field:
This field shows the total size of the sound, in
seconds.milliseconds.samples format. This field is for indication
only—it cannot be edited directly.
• The Vol% (volume percentage) field:
This is an initial volume control for the sound, and affects all
outputs. The range is 1 to 200% and is initially set to 100%. The
intended purpose of this parameter is to adjust the sound’s volume
to be roughly equal to the levels of other sounds.
• The Tune field:
This is an initial tuning setting for the sound. This tuning value
adds to the other tuning values found in the program and to each
note’s Note Variation tuning data. The range is from -120 to +120 in
increments of 0.1 semitone. The intended purpose of this parameter
is to adjust the sound’s tuning to be at the apparent center of its
range.
Page 155
Chapter 8: Creating and Editing Sounds
• The <Play> soft key:
Pressing this soft key plays the selected sound, from soft start
address to soft end address, at full velocity level through the stereo
mix outputs, panned center.
• The <Best st> (best start) soft key:
This function automatically finds the point within a sound at which
the drum strike begins, bypassing any dead space at the beginning
of the sound which could cause play delays. Pressing this soft key
causes the following screen to appear:
========= Find Best Soft Start =========
Start threshold%: 5
Press <Do it> to change SOFT START
address to earliest sample that exceeds
threshold.
========================================
<Do it>
It works by searching through the sound for the earliest sample that
exceeds the threshold entered into the Start threshold field.
To find the best start, enter a number into the field (5% is a good
starting point) and press <Do it>. At that time, the Edit Sound
screen reappears with the Soft st field set to the optimum
starting value. Experiment with the threshold value. A value too low
will start the sound too early, causing a slight playback delay; a
value too high will start too far into the sound, cutting off too much
of the beginning.
The Edit Samples section of the screen (right side)
This section allows the editing of the sound’s actual sample data.
The following is a description of the fields and soft keys.
• The Zone st (zone start) and Zone end fields:
These two fields are used to edit the actual sample data. They
define the start and end of a zone to be altered with the Do field and
<Do> soft key. The contents of the zone can be copied, deleted,
silenced, or reversed. Both fields are of the
seconds.milliseconds.samples format as described in the Soft st
section above.
• The Play X field:
This field works in conjunction with the <Play X> soft key to
audition any portion of the sound before editing. When the <Play
X> key is pressed, it plays the portion of the sound that is currently
selected in the PLAY X field, a choice field. The options are:
Page 156
Chapter 8: Creating and Editing Sounds
ALL (the entire sound)
ZONE (from the start to the end of the zone)
TEMP (the current contents of the temporary storage area)
BEFORE ZONE (the portion of the sound before the zone
start)
AFTER ZONE (the portion of the sound after the zone end)
BEFR SOFT ST (the portion of the sound before the soft
start)
AFTR SFT END (the portion of the sound after the soft
end)
COMMENT: Because of the way the MPC3000 internally
plays sounds, up to approximately 20 milliseconds (randomly) of the end of a sound is not heard. Take this into
account when playing a portion of a sound. For example,
when playing a region from 001.000.00 to 002.000.00, you
may only hear all but the last 20 milliseconds of this region.
• The Do field:
This field works in conjunction with the <Do> soft key. It is a choice
field, used to select one of a number of editing operations that will
be performed when the <Do> soft key is pressed. The options are:
COPY ZONE->TEMP (copy the contents of the zone to the
temporary storage area)
INS TMP->ZON ST (copy the contents of the temporary
storage area and insert them at the address shown in the
Zone st field)
INS TMP->ZN END (copy the contents of the temporary
storage area and insert them at the address shown in the
Zone end field)
DELETE ZONE (delete the contents of the zone and close
the gap)
SILENCE ZONE (silence the contents of the zone)
REVERSE ZONE (reverse the contents of the zone)
COMMENT: The contents of the temporary storage area are
lost whenever the Edit Sound screen is exited.
• The <Play X> soft key:
This soft key works in conjunction with the Play X field. When
pressed, it plays the portion of the sound that is currently displayed
in the Play X field.
• The <Do> soft key:
This soft key works in conjunction with the Do field. When pressed,
it performs the action currently selected in the Do field.
Page 157
Chapter 8: Creating and Editing Sounds
Renaming, Copying, and Deleting a Sound
To rename, copy, or delete a sound, convert a stereo sound to mono,
or delete all sounds, select option 7 from the PROGRAM/SOUNDS
menu. The following screen will appear:
====== Rename, Copy, Delete Sound ======
Select sound:Sound_name
========================================
<Play>
<Rename>
<Copy>
<Delete>
The fields and soft keys are:
• The Select sound field:
This field is used to select the sound to be renamed, copied, or
deleted. It is a choice field containing an alphabetic list of all sounds
in memory. Pressing a pad will select the sound currently assigned
to that pad in the current program. If a stereo sound is selected,
(ST) is displayed to the right of the sound name.
• The <Play> soft key:
Pressing this soft key plays the selected sound at full velocity level
through the stereo outputs.
• The <Rename> soft key:
Pressing this soft key causes a new field, New name, to appear
below the Select sound field:
============= Rename Sound =============
Select sound:Sound_name
New name:Sound_name
========================================
<Do it>
Enter the new name in the New name field, using the same
method as editing the Sequence Name field in the Play/Record
screen. Once the new name is entered, press <Do it>.
Page 158
Chapter 8: Creating and Editing Sounds
• The <Copy> soft key:
Pressing this soft key causes a new field, Name for copy, to
appear below the Select sound field:
============== Copy Sound ==============
Select sound:Sound_name
Name for copy:Sound_name
========================================
<Do it>
Enter the name for the copy in the Name for copy field, using
the same method as editing the Sequence Name field in the Play/
Record screen. Once the new name is entered, press <Do it>.
• The <Delete> soft key:
Pressing this soft key causes either a new field or additional text to
be added to the screen, depending on whether the selected sound is
mono or stereo:
(If the sound is mono)
============= Delete Sound =============
Select sound:Sound_name
Mode:DELETE SOUND
========================================
<Do it> <Del ALL SNDS!>
Press <Do it> to delete it.
(If the sound is stereo)
============= Delete Sound =============
Select sound:Sound_name
(ST)
Mode:DELETE LEFT SIDE (CONVERT MONO)
========================================
<Do it> <Del ALL SNDS!>
If the sound is stereo, then an additional field appears—Mode. This
choice field has three options:
Page 159
Chapter 8: Creating and Editing Sounds
1. DELETE SOUND:
The entire stereo sound will be deleted.
2. DELETE LEFT SIDE (CONVERT MONO):
The stereo sound will be converted to mono by deleting
only the left side.
3. DELETE RIGHT SIDE (CONVERT MONO):
The stereo sound will be converted to mono by deleting
only the right side.
Pressing <Do it> performs the selected function on the sound.
Pressing <Del ALL SNDS!>, on either the mono or the stereo
screen, causes the screen to change to the following:
==== DELETE ALL SOUNDS FROM MEMORY =====
ARE YOU SURE YOU WANT TO DELETE ALL
SOUNDS FROM MEMORY?
========================================
<DELETE ALL!>
Pressing <DELETE ALL!> will delete all sounds fromb memory.
Page 160
Chapter 8: Creating and Editing Sounds
Triggering a Sound from an External Signal—
the Audio Trigger
This feature of the MPC3000 allows one of its internal sounds to be
triggered by an external transient audio signal. The triggering is
non-dynamic. If dynamic triggering or triggering of more than one
sound is needed you must use an analog trigger-to-MIDI converter,
available from various manufacturers.
To select this feature, choose option 8, Audio Trigger, from the
PROGRAM/SOUNDS screen. The following screen will appear:
==== Audio Trigger (Use Sync Input) ====
Plays note:64/A01-Sound_name
(Triggering is only active while this
screen is displayed.)
========================================
To use this feature, connect the triggering signal to the SYNC IN
jack on the rear panel of the MPC3000. The triggering signal can be
any percussive sound, but best results will be achieved by using a
signal of consistent dynamics and little background noise. The
SYNC LEVEL control on the rear panel should be used to set the
triggering threshold.
The only field on this screen is the Plays note field. This is used
to select which of the 64 note numbers (35-98) in the current program will play when the signal is received. Since the triggering is
non-dynamic, the sound will always play at full velocity.
COMMENT: Triggering can only be done while this screen is
showing, and therefore sequences cannot be played while
triggering is being done.
Page 161
Chapter 9: Saving to and Loading from Disk
Chapter 9:
Saving to and
Loading from Disk
Page 163
Chapter 9: Saving to and Loading from Disk
Overview
The MPC3000 has a built-in 3-1/2" disk drive for storing data. This
chapter describes the procedures for saving and loading the various
types of files. Since the MPC3000 loses all sequence and sound data
when the power is removed, it is important always to save any
changes to disk before turning the power off.
The five different file types:
All data are stored to disk as files. All disk files used on the
MPC3000 use a 16-character file name, which you assign to the file
when it is saved to disk. In addition, there is a three-letter file
extension, which is used to differentiate the file types. The five
types of files (and file name extensions) are:
1. FILENAME.SEQ: This file contains a single sequence.
2. FILENAME.ALL: This file contains all 99 sequences and all 20
songs.
3. FILENAME.SND: This file contains a single drum sound.
4. FILENAME.PGM: This file holds the contents of a single program
and the names of all sounds used by that program, but it does not
contain the actual sounds.
5. FILENAME.APS: This file holds the contents of all 24 programs
and the names of all sounds used in those programs, but it does not
contain the actual sounds.
6. FILENAME.PAR: This file contains all settings that are normally
retained in the MPC3000, even when power is removed. These
parameters are not saved within any other file type.
Before proceeding, be aware of these important points:
• When new disks are purchased, they are not formatted. Before
using the disks, you MUST format each one using the Format Disk
option from the DISK menu. Pre-formatted MS-DOS disks will
work, but they will save and load faster if you format them again on
the MPC3000.
• The 3-1/2" disks used in the MPC3000 should be high density
(HD) disks. It is also possible to use double-sided, double-density
disks (2DD) for compatibility with the MPC60, but these hold only
793K, whereas the HD disks hold 1.44MB.
• NEVER REMOVE A DISK FROM THE DISK DRIVE WHILE
THE LIGHT ON THE FRONT OF THE DISK DRIVE IS ON!
Page 164
Chapter 9: Saving to and Loading from Disk
To access the disk functions, press the DISK key. The following
screen will appear:
== Save to Disk ==
=== Load, Other ===
1)A sequence
7)Load,erase,rename
2)All seqs & songs
8)Load S3000 disk
3)A sound
9)Copy, format disk
4)A program
0)Select disk
5)All programs
6)System parameters
Select option:
This screen displays a list of disk options. To select one, type the
number of the desired option. Each of the options is described in
detail in the following sections.
Page 165
Chapter 9: Saving to and Loading from Disk
Saving Files
There are six options in the DISK key menu for saving files:
1. Save a sequence
2. Save all sequences and songs
3. Save a sound
4. Save a program
5. Save all programs and sounds
6. Save system parameters
The screens for all of these save operations are very similar. All are
discussed in the following sections.
Saving a SEQ File (Single Sequence)
To save a single sequence, select 1 (A sequence) from the DISK
key menu screen. The following screen will appear:
============ Save a Sequence ===========
Seq:23-Sequence_name
Size:
0K
Disk:HARD DISK PART A
Free:
793K
========================================
<Do it>
<Select disk>
The fields and soft keys are:
• The Seq field (sequence number):
In this field, select the sequence number to be saved. The sequence
name is shown to the right. The file name will be created from the
sequence’s name and the file extension will be SEQ.
• The Disk field:
This field only appears if a hard disk is connected to the SCSI port.
It shows the active disk device: the floppy drive or one of the hard
disk partitions. It is for display only and cannot be edited. To change
from floppy drive to hard disk or vice versa, you must press
<Select disk>.
• The Size field:
This field shows the size of the selected sequence in kilobytes. In
order for a sequence to be saved, this value must be less than the
free space on disk shown in the Free field .
Page 166
Chapter 9: Saving to and Loading from Disk
• The Free field:
This shows the amount of free space on disk.
• The <Do it> soft key:
Pressing this soft key saves the selected sequence to disk.
• The <Select disk> soft key:
This soft key only appears if a hard disk is connected to the SCSI
port. It is used to change the active disk device from the floppy drive
to one of the hard disk partitions or vice versa. Pressing <Select
disk> causes this screen to appear:
============== Select Disk =============
Select disk, then press <Select it> to
return to previous screen.
Disk:HARD DISK PART A
========================================
<Select it>
To select a different disk device, select it in the Disk field, then
press <Select it>. The options are:
FLOPPY DISK
HARD DISK PART A
HARD DISK PART B
HARD DISK PART C
(and other hard disk partitions if they exist)
When <Select it> is pressed, the previous screen will be
redisplayed and the selected disk drive will be active.
Saving an ALL File (All Sequences and Songs)
To save a single file that contains all 99 sequences and 20 songs,
select 2 (All seqs & songs) from the DISK key menu. The
following screen will appear:
========= Save All Seqs & Songs ========
File name:All_file_name
Size:
0K
Disk:HARD DISK PART A
Free:27793K
========================================
<Do it>
<Select disk>
Page 167
Chapter 9: Saving to and Loading from Disk
The fields and soft keys are:
• The File name field:
Enter the file name in this field. The name can be changed in the
same manner as the Sequence Name field in the Play/Record screen.
The file’s extension will be ALL.
• The Disk, Size, and Free fields:
These fields have the same functions as in the Save Sequence screen
described above.
• The <Do it> soft key:
Press this key to save the file to disk.
• The <Select disk> soft key:
This soft key has the same function as in the Save Sequence screen
described above.
Saving a SND File (Single Sound)
To save a single sound to disk, select 3 (A sound) from the DISK
key menu. The following screen will appear:
============= Save a Sound =============
Sound:Sound_name
Size:
0K
Disk:HARD DISK PART A
Free:
793K
========================================
<Do it>
<Select disk>
The fields and soft keys are:
• The Sound field:
In this field, select the sound to be saved. The sound’s name will be
used for the file name and the file extension will be SND.
• The Disk, Size, and Free fields:
These fields have the same functions as in the Save Sequence screen
described above.
• The <Do it> soft key:
Press this key to save the file to disk.
Page 168
Chapter 9: Saving to and Loading from Disk
• The <Select disk> soft key:
This soft key has the same function as in the Save Sequence screen
described above.
Saving a PGM File (Single Program & Sounds)
To save a single program and all sounds used by that program,
select 4 (A program) from the DISK key menu. The following
screen will appear:
========= Save a Program (PGM) =========
Program:19-Program name
Size:
0K
Disk:HARD DISK PART A
Free:
793K
========================================
<Do it>
<Select disk>
Saving a program involves two steps, which occur automatically
when <Do it> is pressed:
1. The Program file that contains all program data, including the
names of all sounds used by the program (but not the sound data
itself), is saved.
2. Each sound used by the program is individually saved as a sound
file. If a sound file on the disk has the same name as the sound
being saved, the new sound won’t be saved.
The fields and soft keys are:
• The Program field:
In this field, enter the program number to be saved (1-24). The
program’s name is shown to the right. The program file name will be
created from the program name, and the file’s extension will be
PGM.
• The Disk field:
This field has the same function as in the Save Sequence screen
described above.
• The Size field:
This field shows the combined size of the program file and all sound
files to be saved. (Program files only require 4K each.) Since sound
files with the same name as those already on disk
won’t be saved, it is possible that not as much free space will be
needed as indicated in this field .
Page 169
Chapter 9: Saving to and Loading from Disk
• The Free field:
This shows the amount of free space on the selected disk.
COMMENT: The MPC3000 will allow large programs to be
saved onto multiple disks. If the total size of the PGM file
and its sound files exceeds the free space on the inserted
floppy disk, a warning will appear on the screen, informing
you how many disks will be needed. The MPC3000 will save
the PGM file and as many sound files as will fit onto the first
disk. Then, it will present a screen asking you to insert
another disk and will save as many sound files as will fit
onto that disk. This process will continue until all files have
been saved. To load this program file later, simply load the
PGM file—it will load along with the sound files from the
first disk, then a screen will appear asking you to insert the
other disks, one by one, in order to load the remaining sound
files.
• The <Do it> soft key:
Press this key to save to disk the program file and each individual
sound file used in the program.
• The <Select disk> soft key:
This soft key has the same function as in the Save Sequence screen
described above.
Saving an APS File (All Programs and Sounds)
To save all programs and all sounds in memory, select 5 (All
programs) from the DISK key menu. The following screen will
appear:
========== Save All Programs
==========
File name:File_name
Size:
0K
Disk:HARD DISK PART A
Free:30793K
========================================
<Do it>
<Select disk>
Two steps occur automatically when <Do it> is pressed:
Page 170
Chapter 9: Saving to and Loading from Disk
1. The All Programs and Sounds file (APS), which contains the data
for all 24 programs and the names of all sounds in memory (but
not the sound data itself), is saved.
2. Each sound in memory (even sounds not currently assigned to a
program) is individually saved as a sound file. If a sound file on
the disk has the same name as the sound being saved, the new
sound won’t be saved.
The fields and soft keys are:
• The File name field:
Enter the name for the file in this field. The name can be changed in
the same way as the Sequence Name field in the Play/Record screen.
The file’s extension will be APS.
• The Disk field:
This field has the same function as in the Save Sequence screen
described above.
• The Size field:
This field shows the combined size of the APS file and all individual
sound files to be saved. (APS files require 48K.) Since sound files
with the same name as those already on disk won’t be saved, it is
possible that not as much free space will be needed as is indicated in
this field.
• The Free field:
This shows the amount of free space on the selected disk.
COMMENT: The MPC3000 will allow large APS files to be
saved onto multiple disks. If the total size of the APS file and
its sound files exceeds the free space on the inserted floppy
disk, a warning will appear on the screen, informing you
how many disks will be needed. The MPC3000 will save the
APS file and as many sound files as will fit onto the first
disk. Then, it will present a screen asking you to insert
another disk and will save as many sound files as will fit
onto that disk. This process will continue until all files have
been saved. To load this APS file later, simply load the APS
file from the first disk—it will load along with the sound files
from the first disk, then a screen will appear asking you to
insert the other disks, one by one, in order to load the remaining sound files.
• The <Do it> soft key:
Press this key to save to disk the APS file and each individual sound
file currently in memory.
Page 171
Chapter 9: Saving to and Loading from Disk
• The <Select disk> soft key:
This soft key has the same function as in the Save Sequence screen
described above.
Saving a PAR File (System Parameters)
A number of parameters in the MPC3000 are not saved in SEQ,
ALL, SND, PGM, or APS files. These settings, called system parameters, are retained in a special memory that doesn’t lose its
contents when the power is turned off. These settings include:
• Names for all 64 MIDI channels
• Master tempo
• BPM/FPB select and frames per second select
• MIDI Input Filter settings
• Default settings for initializing sequences
. . .and many more (see the Appendix for a complete list).
These settings can be saved to disk in a file called a parameter file,
which has the file extension PAR. To save a parameter file, select 6
(System parameters) from the DISK key menu. The following
screen will appear:
======== Save System Parameters ========
File name:File_name
Size:
2K
Disk:HARD DISK PART A
Free:
793K
========================================
<Do it>
<Select disk>
The fields and soft keys are:
• The File name field:
Enter the name for the file in this field. The name can be changed in
the same way as the Sequence Name field in the Play/Record screen.
The file’s extension will be PAR.
• The Disk, Size, and Free fields:
These fields have the same functions as in the Save Sequence screen
described above.
• The <Do it> soft key:
Press this key to save the file to disk.
• The <Select disk> soft key:
This soft key has the same function as in the Save Sequence screen
described above.
Page 172
Chapter 9: Saving to and Loading from Disk
Loading, Erasing, or Renaming Files
This function is used to either load, erase, or rename files on the
current disk. In the case of a load, the screens will guide you to load
the file into the proper place, according to the file extension (the
three letters after the period in a file name, e.g., PGM).
To load, erase, or rename a file on disk, select 7 (Load,erase,
rename) from the DISK key menu. The following screen will
appear:
======== Load/Erase/Rename File ========
File:File_name.ALL
Size:
0K
Disk:HARD DISK PART A
Free(seq):
793K
========================================
<Load>
<Erase>
<Rename><Select disk>
The fields and soft keys are:
• The File field:
This field is used to select the disk file to be loaded, erased, or
renamed. Use the data entry control to select from an alphabetical
list of the files on the current disk. File names can be up to 16
characters, and are followed by a period and a three-character
extension, which identifies the type of file:
SEQ: a single sequence
ALL: all sequences and songs
SND: a single sound
PGM: a single program
APS: all programs and sounds
PAR: system parameters
• The Size field:
This field shows the size (in kilobytes) of the selected file. It is for
display only and cannot be edited.
• The Free(seq) field:
If a SEQ, ALL, or PAR file is selected in the File field, this field
shows the amount of available sequence memory. If a SND, PGM, or
APS file is selected, this field appears as Free(snd) and shows
the amount of available sound memory. By comparing the file size to
the available memory, you will be able to see if there is enough space
available to load the selected file. This field is for display only and
cannot be edited.
Page 173
Chapter 9: Saving to and Loading from Disk
• The Disk field:
This field only appears if a hard disk is connected to the SCSI port.
It shows the active disk device, either the floppy drive or one of the
hard disk partitions. It is for display only and cannot be edited. To
change from floppy disk to hard disk or vice versa, you must press
<Select disk>.
• The <Load> soft key:
Pressing this soft key loads the selected file. Instructions for loading
various file types are given in the following sections.
• The <Erase> soft key:
Press this soft key to erase the selected file from the disk. An
additional screen will appear asking you to confirm the erasure.
• The <Rename> soft key:
To rename the selected file, press this soft key. The following screen
will appear:
============ Rename a File =============
Rename the file: FILENAME.PGM
To the new name: FILENAME
========================================
<Rename it>
To rename the file, enter the new name in the lower field in the
same manner as you would change the Sequence Name field in the
Play/Record screen, then press the <Rename it>soft key.
• The <Select disk> soft key:
This soft key only appears if a hard disk is connected to the SCSI
port. It is used to change the active disk device from the floppy drive
to one of the hard disk partitions or vice versa. If <Select
disk> is pressed, the following screen appears:
============== Select Disk =============
Select disk, then press <Select it> to
return to previous screen.
Disk:HARD DISK PART A
========================================
<Select it>
Page 174
Chapter 9: Saving to and Loading from Disk
To select a different disk device, choose it in the Disk field, then
press the <Select it>soft key. The options are:
FLOPPY DISK
HARD DISK PART A
HARD DISK PART B
HARD DISK PART C
(and other hard disk partitions if they exist)
When <Select it> is pressed, the previous screen will be
redisplayed and the selected disk device will be active.
Loading a SEQ File (Single Sequence)
If a SEQ file is selected and <Load it> is pressed, you’ll see the
following screen, in which you are asked which sequence number to
load the sequence into:
===== Load a Sequence file (.SEQ) ======
Load into sequence:02-Sequence_name___
========================================
<Load it>
Select the sequence number to load the file into, then press
<Load it>.
If the file is an MPC60 version 1 or 2 SEQ file
If the SEQ file is a MPC60 version 2 file, additional screens are
presented:
=========== Load V2 SEQ File ===========
Each drum noteÕs pad assignment must be
converted to a MIDI note number using
the editable table in the next screen.
To standardize note-to-instrument
assignments, use general MIDI numbers.
========================================
<Next screen>
After pressing <Next screen>:
Page 175
Chapter 9: Saving to and Loading from Disk
=========== Load V2 SEQ File ===========
Use the same assigments for loading SET
or ST1 files. If confused, just load it.
-------- Conversion Table ---------MPC60 pad:HIHT (A01)
Becomes note:56 (Gen MIDI:COWBELL
)
========================================
<Load it>
In MPC60 version 1 or 2 SEQ files, notes in drum tracks were
assigned to one of 32 pad names (HIHT-DR16). In MPC3000 sequences, notes in drum tracks are assigned not to pad numbers, but
rather to one of 64 MIDI note numbers (35-98). Therefore, all drum
notes in MPC60 version 1 or 2 SEQ files must be converted from pad
assignments to note number assignments. This is done using the
conversion table in the screen above. The conversion table consists
of two fields:
• The MPC60 pad field:
Select an MPC60 pad name in this field (HIHT, SNR1,
SNR2, etc.) For convenience, the pad number is shown to
the right .
• The Becomes note field:
This field shows the note number currently assigned to the
MPC60 pad name shown in the field above. There is a
unique note number assigned to each of the 32 MPC60 pad
names. To change the note number assignment, edit the
contents of this field. For help in deciding which note number to use, the General MIDI instrument assignment for the
displayed note number is shown to the right.
It is not necessary to edit the table. Your MPC60 sequence will load
and play just fine if you press <Load it> without editing the
table. The only reason to edit the table is if you want the note
number assignments of the notes in the sequence’s drum tracks to
correspond to specific instruments. By default, MPC60 pad names
will be translated to General MIDI note numbers having the same
instrument name. For example, all notes assigned to the MPC60
pad BASS will be translated by default to note number 36, which
has a General MIDI assignment of Bass drum 1. It is desirable to
use General MIDI note number assignments because this is the
standard for instrument note number assignments played over
MIDI.
This conversion table is also used to convert MPC60 SET or ST1
files, in which case the sound assignments are converted from pad
numbers to note numbers. If you modify the conversion table, make
Page 176
Chapter 9: Saving to and Loading from Disk
sure that the same settings are used when loading any MPC60 SET
or ST1 files that you plan to use with the converted SEQ files.
If you modify the conversion table from the factory-preset defaults,
your changes will be retained in memory even after power is turned
off, so that the next time you load an MPC60 sequence, it will be
converted using your edited conversion assignments.
Loading an ALL File (All Sequences and Songs)
If an ALL file is selected and <Load it> is pressed, an additional
screen will appear warning you that all sequences and songs currently in memory will be erased:
==== Load All Seqs and Songs (.ALL) ====
This will erase all sequences and songs
currently in memory!
========================================
<Load it>
Press <Load it> to load the ALL file.
If the file is an MPC60 version 1 or 2 ALL file
If the ALL file is a MPC60 version 1 or 2 file, additional screens are
presented, just as when an MPC60 version SEQ file is loaded. (See
the section above entitled, “Loading an MPC60 version 1 or 2 SEQ
file.”) The only difference is that in this case, each sequence within
the ALL file will be converted using the pad-to-note conversion
table.
Loading a SND File (Single Sound)
If a SND file is selected and <Load it> is pressed, the sound
loads immediately. No other screens are presented. If an MPC60
SND file is loaded, it is automatically converted into a 16-bit file
and the MPC3000 sound format.
Page 177
Chapter 9: Saving to and Loading from Disk
Loading a PGM File (Single Program and Sounds)
If a PGM file is selected for load, an additional screen is presented,
in which you are asked which program number (1-24) to load the
program into:
============= Load Program =============
Program to load into: 1-PROGRAM_01
(Sound files with same name as a sound
already in memory won't be loaded.)
========================================
<Load it>
Select a program number, then press <Load it>. When <Load
it> is pressed, the program file will be loaded, followed by each
sound file used in the program. (Program files contain a list of the
sound names used by the program but not the sound data itself.) If
one of the sound files to be loaded already exists in memory, that file
won’t be loaded from disk.
COMMENT: If the selected program’s sound files span
multiple disks, the MPC3000 will first load the PGM file,
then all of its sound files from the first disk. Then, a message
will appear on the screen asking you to insert the disk
containing a specific sound file (this is the second disk you
saved to when saving the large program). The MPC3000 will
then load all needed sound files from the second disk. If the
program used more than two disks, this process will repeat
until all of the needed sound files are loaded.
Loading an APS File (All Programs and Sounds)
If an APS file is selected for load, an additional screen is presented,
warning you that all programs and sounds currently in memory will
be erased when the APS file is loaded:
====== Load All Programs & Sounds ======
Press <Load it> to load 'APS' file (all
programs and all sounds). THIS WILLL
ERASE ALL PROGRAMS & SOUNDS IN MEMORY!
========================================
<Load it>
Page 178
Chapter 9: Saving to and Loading from Disk
Press <Load it> to load the APS file. The APS file will be loaded,
followed by each sound file used in the APS file. (APS files contain a
list of sound names but not sound data itself.) If one of the sound
files to be loaded already exists in memory, that file won’t be loaded
from disk.
COMMENT: If the selected APS file’s sound files span
multiple disks, the MPC3000 will first load the APS file,
then all of its sound files from the first disk. Then, a message
will appear on the screen asking you to insert the disk
containing a specific sound file (this is the second disk you
saved to when saving the large APS file). The MPC3000 will
then load all needed sound files from the second disk. If the
sound files spanned more than two disks, this process will
repeat until all of the needed sound files are loaded.
Loading an MPC60 Version 1 or 2 SET or ST1 File
The MPC60 version 2 operating system used SET or ST1 files to
hold an entire set of sounds and their assignments to the pads. In
the MPC3000, SET or ST1 files are no longer used. Instead, programs are used to hold sound assignments. However, the MPC3000
allows SET or ST1 files to be loaded, automatically converting pad
assignments to note number assignments and loading them into a
program, and adding all sounds from the file into sound memory.
If a SET or ST1 file is selected in the Load File screen and <Load
it> is pressed, the following screen will be displayed, in which you
are asked if you want to load the entire file or only a single sound
within the file:
====== Load MPC60 SET or ST1 file ======
1.Load entire file (add sounds to memory
and load assignments into a program)
2.Load one sound from the SET file
========================================
Select option:
To load the entire SET or ST1 file
If 1 is selected, the SET file’s assignments will be loaded into a
program. A screen will appear asking you which program to load the
assignments into:
Page 179
Chapter 9: Saving to and Loading from Disk
====== Load MPC60 SET or ST1 file ======
Load the file's assignments into
Program:24-Program_name
(Sounds will be added to memory.)
========================================
<Proceed>
As the screen shows, all sounds contained in the SET file will be
separated into individual sounds and added to the sound memory.
When <Proceed> is pressed, two additional screens are presented:
========= Load V2 SET/ST1 File =========
Each soundÕs pad assignment must be
converted to a MIDI note number using
the editable table in the next screen.
To standardize note-to-instrument
assignments, use general MIDI numbers.
========================================
<Next screen>
After pressing <Next screen>:
========= Load V2 SET/ST1 File =========
Use the same assignments for loading SEQ
or ALL files. If confused, just load it.
-------- Conversion Table ---------MPC60 Pad:HIHT-CLSD (A01)
Becomes note:56 (Gen MIDI:COWBELL
)
========================================
<Load file>
In MPC60 version 2 SET or ST1 files, sounds were assigned to one
of 32 pad names (HIHT-CLSD, HIHT-MEDM, HIHT-OPEN, SNR1,
SNR2 ... DR15, and DR16.) In the MPC3000, SET and ST1 files are
not used. Instead, programs are used to hold sound assignments.
But in programs, sounds are assigned to one of 64 note numbers (3598) instead of to pad names. Therefore, in order to load the SET or
ST1 file, these pad assignments must be converted to note number
assignments. This is done automatically when <Load file> is
pressed in the screen above. Assignments are made according to the
conversion table displayed in the lower part of the screen. The
conversion table consists of two fields:
• The MPC60 pad field:
Select one of the 32 MPC60 pad names in this field. For
convenience, the pad number is shown to the right.
Page 180
Chapter 9: Saving to and Loading from Disk
• The Becomes note field:
This field shows the note number to which the displayed pad
name assignment will be converted. There is a unique note
number assignment for each of the 32 MPC60 pad names. To
change the note number assignment, edit the contents of
this field. For convenience in deciding which note number to
use, the General MIDI instrument assignment for the
displayed note number is shown to the right.
It is not necessary to edit the table. Your MPC60 SET or ST1 file
will load and play just fine if you press <Load it> without editing
the table. The only reason to edit the table is if you want the resulting program’s note number-to-sound assignments to correspond to
specific instruments. By default, MPC60 pad names will be translated to General MIDI note numbers having the same instrument
name. For example, a sound assigned to MPC60 pad BASS will be
translated by default to note number 36, which has a General MIDI
assignment of Bass drum 1. It is desirable to use General MIDI
note number assignments because this is the standard for instrument note number assignments played over MIDI.
This conversion table is also used to convert MPC60 SEQ or ALL
files, in which case the sound assignments are converted from pad
numbers to note numbers. If you modify the conversion table, make
sure that the same settings are used when loading any MPC60 SEQ
or ALL files that you plan to use with the converted SET or ST1
files.
If you modify the conversion table from the factory-preset defaults,
your changes will be retained in memory even after power is turned
off, so that the next time you load an MPC60 sequence, it will be
converted using your edited conversion assignments.
COMMENT: In the MPC60, an ST1 file is a SET file that is
too large to fit on a single disk, so it is saved in two parts:
FILENAME.ST1 (the first disk) and FILENAME.ST2 (the
second disk). After you load an ST1 file, a message will
appear on the screen asking you to insert the disk containing
the ST2 file associated with the ST1 just loaded. Other than
this additional message screen, loading ST1 files is identical
to loading SET files.
To load only one sound from the SET or ST1 file
If 2 (Load one sound from the SET file) is selected
from the Load SET or ST1 File menu screen, the following screen
will appear:
Page 181
Chapter 9: Saving to and Loading from Disk
=== Load One Sound From SET/ST1 File ===
Sound:BIG_SOUND
Size:
0K
Free(snd):
793K
========================================
<Load it>
The fields and soft keys are:
• The Sound field:
This field contains an alphabetical list of the sounds in the file. Use
the data entry control to select one of the sounds.
• The Size field:
This shows the amount of memory in kilobytes that will be required
in order to load the selected sound.
• The Free(snd) field:
This shows the number of free kilobytes in sound memory.
• The <Load it> soft key:
Pressing this soft key loads the sound from the file.
COMMENT: If a single sound is being loaded from an ST1
file and the actual sound to be loaded exists on the corresponding ST2 disk, a screen will appear asking you to insert
the ST2 disk.
Loading a PAR File (System Parameters)
If a PAR file is selected for loading in the Load File screen and
<Load it> is pressed, a screen will appear warning you that all
existing system parameters in memory will be erased. To load the
file, press <Load it> in that screen.
Files That Automatically Load on Power-Up
If a disk is in the drive when power is turned on, the MPC3000 will
load from the disk the first APS (all programs and sounds) file that
it finds, including all sound files used by the APS file. If more than
one APS file exists on the disk, the first one found will be loaded. If
no APS files exist on the disk, up to 24 PGM (program) files will
then be loaded into consecutive program numbers (including all
Page 182
Chapter 9: Saving to and Loading from Disk
sound files used by the PGM files). Next, the first ALL file (all
sequences and songs) that is found will be loaded.
To cause specific programs, sounds, sequences, and songs to load
automatically when power is turned on, save a single APS file to a
disk that contains the desired programs and sounds, then save an
ALL file that contains the appropriate sequences and songs to the
same disk. Insert this disk in the drive and turn the power on—the
APS and ALL files will load automatically.
If you have a SCSI hard disk connected
If you have a SCSI hard disk connected and no floppy disk is in the
drive when power is turned on, the MPC3000 will load the following
files from partition A of the hard disk automatically: STARTUP.APS
(and all sound files used by that file) and STARTUP.ALL.
Page 183
Chapter 9: Saving to and Loading from Disk
Loading Sample Files From Akai S1000/S3000
Disks
This function allows the loading of sample files from disks formatted
and saved on Akai S1000- or S3000-series samplers. Only sample
files may be loaded—no program files or other file types may be
loaded. Saving to S1000/S3000 disks is not supported.
To load a sample file from a S1000/S3000 disk, insert the disk in the
drive and select option 8 from the DISK key menu. The following
screen will appear:
===== Load S1000/3000 Sample Files =====
File:Ambient_snar
Size:
44K
Free(snd): 1916K
(Only sample files are shown.)
========================================
<Load>
The operation of this screen is similar to the main
Load,erase,rename screen, except that only S1000/S3000
disks may be loaded. Either mono or stereo samples may be loaded.
To load stereo samples, see the following section, “Loading stereo
S1000/S3000 samples.” The fields and soft key are:
• The File field:
This field is used to select the disk file to be loaded, erased, or
renamed. Use the Data Entry Control to select from an alphabetical
list of the files on the current disk. Only sample files may be selected in this field—no other files on the disk can be selected in this
field. S1000/S3000 file names are up to 12 characters long.
• The Size field:
This field shows the size (in kilobytes) of the selected file. It is for
display only and cannot be edited.
• The Free(snd) field:
This field shows the amount of available sound memory. By comparing the file size to the available memory, you will be able to see if
there is enough space available to load the selected file. This field is
for display only and cannot be edited.
• The <Load> soft key:
Pressing this soft key loads the selected file and converts it to an
MPC3000 sound.
Page 184
Chapter 9: Saving to and Loading from Disk
Loading stereo S1000/S3000 samples
In the S1000 and S3000, stereo samples are stored on disk as two
different mono sample files having the same name followed by -L
(left side) or -R (right side). If a pair of these mono samples comprising a stereo sample exists on the disk and one of them is selected, the screen appearance changes:
===== Load S1000/3000 Sample Files =====
File:SNAREDRUM-L
Size:
56K
Free(snd): 1916K
Also load SNAREDRUM-R to make a stereo
sound?
========================================
<Yes,stereo> <No,mono>
As the message states, you now have two choices—to load both sides
of the stereo sound or to load only the selected side as a mono sound.
The soft keys are:
• The <Yes,stereo> soft key:
Pressing this soft key loads both the selected sample and the sample
containing the opposite stereo side into a single MPC3000 stereo
sound. The new stereo sound will have the same name as the
selected sample name except the -L or -R will be removed. If this
soft key is pressed, the amount of free sound memory must be at
least twice the amount shown in the Size field because only the
size of one of the stereo sides is shown.
• The <No,mono> soft key:
Pressing this soft key loads the selected mono sample only, ignoring
the opposite stereo side.
Page 185
Chapter 9: Saving to and Loading from Disk
Formatting a Floppy Disk
This function is used to format a new disk or to completely erase an
already-formatted disk. ALL DISKS MUST BE FORMATTED
BEFORE THEY CAN BE USED IN THE MPC3000! Disks that are
pre-formatted for MS-DOS computers will work, but they will save
and load faster if you reformat them on the MPC3000.
To format a disk, select option 9 (Copy, format disk) from the
DISK key menu, followed by option 2 from the subsequent menu.
The following screen will appear:
=========== Format a Floppy ============
High density disks (HD) format as 1.44
megabytes; old style double density
disks will format as 793K bytes (MPC60
compatible). Press <Format it> to begin.
WARNING: THIS WILL ERASE THE WHOLE DISK!
========================================
<Format it>
As the screen shows, high-density (HD) disks will format to hold
1.44MB of data and old-style double-sided, double-density disks will
format to hold 793K, which is MPC60 compatible.
To format the disk, press <Format it>.
Page 186
Chapter 9: Saving to and Loading from Disk
Using a SCSI Hard Disk
The MPC3000’s SCSI port permits an external SCSI hard drive to
be used for all disk save and load operations. A 25-pin D-type SCSI
connector is used, which is compatible with hard drives used with
the Apple Macintosh. All that is required for interfacing with hard
drives that use 50-pin connectors is the appropriate SCSI adapter
cable. At time of printing of this manual, however, only the following
have been tested with the MPC3000:
• Syquest 44, 88 and 200 megabyte 5.25 inch removable drives
• Syquest 105 and 270 megabyte 3.5 inch removable drives
If you are unsure whether a specific hard drive will work with the
MPC3000, call your Akai distributor.
Changing the power-on delay:
When the MPC3000’s power is turned on, the bottom line of the
screen shows the following message:
Searching SCSI for hard disk... <Cancel>
This informs you that the MPC3000 is scanning the SCSI port to
determine if a hard disk is connected.
If a hard disk is connected to the SCSI port and the power for both
the hard disk and the MPC3000 is turned on simultaneously, this
message will persist until the hard disk apine up to the proper
operating speed, then the MPC3000’s MAIN SCREEN will appear,
indicating that the MPC3000 is ready for use with the hard disk.
If no hard disk is connected to the SCSI port, this message will
appear for 30 seconds. This is because the MPC3000 can’t tell the
difference between no hard disk and a hard disk spinning up to
speed, which can take up to 30 seconds for some hard disks.
If no hard disk is connected and you want to cancel this delay, press
SOFT KEY 4 while the message appears on the screen.
If no hard disk is connected and you want to automatically eliminate this delay every time you turn the power on, press the DISK
key, then 9, then 4. The following screen will appear:
Page 187
Chapter 9: Saving to and Loading from Disk
== Change Power-On SCSI Search Delay ===
Power-on SCSI search delay (secs):30
(If no hard disk attached, enter 0 to
bypass delay at power-on.)
========================================
The single data field sets the amount of time that the SCSI port is
scanned when the power is turned on. By default, it is set to 30
seconds. To eliminate the power-on delay, change the field’s contents
to 0.
If you are using a hard disk and it is not being recognized by the
MPC3000 when the power for both devices is turned on simultaneously, then your hard disk may require more than 30 seconds to
spin up to operating speed. If so, try changing the value in this
screen to 45 seconds or longer.
Formatting a SCSI hard disk for the MCP3000
To format the external SCSI hard disk, turn power off for both the
hard drive and the MPC3000 and connect the hard drive to the
MPC3000’s SCSI port. (Warning: Never connect or disconnect
any SCSI device while power is on. This could seriously
damage both the device itself and the MPC3000.) Then turn
the power on to both the SCSI drive and the MPC3000. Next, press
the DISK key and select option 9 (Copy, format disk) from
the menu screen followed by option 3 from the subsequent menu.
The following screen will appear:
=========== Format Hard Disk ===========
Select hard disk type:SYQUEST
Formatting will erase all existing data
and divide the disk into 'partitions' of
less than 30 megabytes each.
========================================
<Next screen>
The field has two options: STANDARD and SYQUEST. If your drive
is a Syquest removable, select that option; if not, select STANDARD.
The screen warns that the hard disk’s storage space must be divided
into up to 26 partitions of no more than 30 megabytes each. These
partitions are called partition A, partition B, and so on. In each of
the save and load operations, you will be allowed to select which
partition to save to or load from.
Page 188
Chapter 9: Saving to and Loading from Disk
Now press <Next screen>. The display will change to the
following:
=========== Format Hard Disk ===========
Enter number of partitions: 4 (A-D)
Each partition will be 27 mbytes, for
a total of 110 mbytes.
========================================
<Next screen>
At this point you must enter the number of partitions to divide your
hard disk into. A higher number of partitions will reduce the size of
each partition; a lower number of partitions will maximize the size
of each partition. If you’re unsure, a safe bet is to select the fewest
partitions, allowing each partition to have the maximum size. When
you’ve decided, press <Next screen> and the following screen
will appear:
=========== Format Hard Disk ===========
Press <Format now> to start formatting.
THIS WILL ERASE ALL DATA ON THE DISK!
========================================
<Format now>
To begin formatting, press <Format now>. The disk formatting
process may take ten minutes or more, depending on the size of the
hard disk.
Using the hard disk
To use your formatted SCSI hard disk, make sure it is connected to
the MPC3000’s SCSI port when power for both devices is turned on.
The MPC3000 automatically recognizes that the hard disk is connected and ready to be saved to and loaded from. At this time, all
save and load screens inform you of whether the floppy drive or one
of the hard disk partitions is active. You can easily change from one
to another.
The method of displaying and changing the active disk device is
described in the sections of this chapter outlining disk save and load
operations. In addition to being able to change the active disk device
from each of the save and load screens, it is also possible to select
drives from the initial DISK key menu.
Page 189
Chapter 9: Saving to and Loading from Disk
To do this, select option 0 (Select disk) from the initial DISK
key menu. The following screen will appear:
============== Select Disk =============
Select disk, then press <Select it> to
return to previous screen.
Disk:HARD DISK PART A
========================================
<Select it>
To select a different disk device, choose it in the Disk field, then
press <Select it>. The options are:
FLOPPY DISK
HARD DISK PART A
HARD DISK PART B
HARD DISK PART C
(and other hard disk partitions if they exist)
When <Select it> is pressed, the previous screen will be
redisplayed and the selected disk device will be active.
Page 190
Chapter 9: Saving to and Loading from Disk
Copying an Entire Floppy Disk
This feature permits an entire 1.4MB MPC3000 disk to be copied to
another 1.4MB MPC3000 disk. This provides an easy way to back
up your data disks. 793K disks, however, cannot be copied. To copy a
disk, have both your original disk and a blank formatted disk
available. Select option 9 (Copy, format disk) from the DISK
key menu, followed by option 1 from the subsequent menu, and the
following screen will appear:
============== Copy a disk =============
THIS WILL ERASE ALL SEQUENCES IN MEMORY!
Are you sure you want to copy a disk?
========================================
<Yes, proceed>
The disk copy function requires the use of the sequence memory and
therefore will erase all existing sequences before making the copy.
Be sure to back up your sequences to disk before executing the Copy
Disk utility. Once your data have been safely backed up, press
<Yes, proceed> to proceed with the copy function. The following screen will appear:
============== Copy a disk =============
Insert disk to be copied FROM, then
press <Proceed>.
========================================
<Proceed>
When you see this screen, insert the source disk into the disk drive
and press <Proceed>. The bottom line then shows Copying
source disk. Please wait. When as much information as
can fit into memory has been copied, the display reads:
Page 191
Chapter 9: Saving to and Loading from Disk
============== Copy a disk =============
Insert disk to be copied TO, then
press <Proceed>.
========================================
<Proceed>
Remove the original disk and insert the blank formatted disk, then
press <Proceed>. The bottom line will change to Writing to
destination disk. Please wait. If all the disk data have
not been copied, the cycle of inserting the source disk, followed by
the destination disk, will be repeated until all data have been
copied.
Page 192
Chapter 10: Syncing to Tape and Other Devices
Chapter 10:
Syncing to Tape
and Other Devices
Page 193
Chapter 10: Syncing to Tape and Other Devices
The SYNC Screen
To access the sync input and output settings, press the TEMPO/
SYNC key, followed by the <SyncScreen> soft key. The following
screen will be displayed:
===== Sync In ======
Mode:MIDI CLOCK
Shift early (ms):20
MIDI Input:2
Song pointer:ON
==== Sync Out ====
MIDI sync:OUT A
====================
<SyncIn=OFF>
==================
<GenSMPTE>
This screen has two sections, Sync In and Sync Out.
The Sync In section
The left side of the Sync screen shows all settings related to slaving
the MPC3000 to an external source. There are five possible sync
input signals:
1. MIDI CLOCK:
This is the standard method of syncing two MIDI devices together. Since the sync signal is only sent over MIDI, this method
cannot be used with tape. When the MPC3000 is slaved to MIDI
clock, the internal tempo settings are not used, because MIDI
clock provides the tempo information.
2. SMPTE:
SMPTE timecode is a standard sync code used in video, film, and
music. SMPTE code contains information about absolute elapsed
time, but no tempo information. So when syncing to SMPTE, the
MPC3000’s internal tempo settings are used. When syncing to
SMPTE, always use the same tempo setting each time you play
the sequence or song. Tip: using the SEQ (sequence) tempo mode
(set in the Tempo Source field of the Play/Record screen) will
ensure that your sequences will play at the desired tempo,
because that tempo is stored with the sequence disk file.
COMMENT: The SMPTE selection is only available if the I0055 SMPTE option is installed. See “The SMPTE Option”
in the Appendix of this manual for information.
Page 194
Chapter 10: Syncing to Tape and Other Devices
3. MIDI TIME CODE:
MIDI Time Code is similar to SMPTE timecode except that the
timing information is converted into a signal that is sent over
MIDI. As such, it cannot be recorded on tape.
4. FSK24:
This is the general-purpose tape sync code commonly used by
inexpensive drum machines and sequencers. FSK24 stands for
Frequency Shift Keying at 24 2400Hz/1200Hz transitions per 1/4note. This code contains no location information, so when syncing
to it, you must start both devices from the beginning of the song
in order for them to play in sync. Because of this, the MPC3000
always plays from bar 1 when FSK24 sync is received. This code
does contain tempo information, so the MPC3000’s tempo settings are not used when syncing to FSK. Also, FSK24 signal is
always generated from the SYNC OUT jack when the MPC3000
plays.
5. 1/4 NOTE CLICKS:
In the event that no sync signal exists on tape, this feature
allows the MPC3000 to sync to any percussive sound playing 1/4notes.
The Mode field in the upper left corner allows the selection of one of
these five sync input sources. The fields in the Sync In section vary
according to the sync mode selected.
If MIDI CLOCK is selected in the Mode field, the following screen
is displayed:
===== Sync In ======
Mode:MIDI CLOCK
Shift early (ms):20
MIDI Input:2
Song pointer:ON
==== Sync Out ====
MIDI sync:OUT A
====================
<SyncIn=OFF>
==================
<GenSMPTE>
In this case, the fields are:
• The Shift early field:
This field is used to compensate for any sync delays or
delays that are produced by slow synthesizer attacks. It
does this by shifting the MPC3000’s playback earlier in
relation to the sync signal by up to 20 milliseconds. If the
sync playback appears to be late, adjust this field until
playback is exactly on time.
• The MIDI Input field:
This field is used to select which of the two MIDI inputs,
input 1 or input 2, will be used to receive the MIDI sync
signal. It is often desirable to devote one MIDI input to
Page 195
Chapter 10: Syncing to Tape and Other Devices
sync and the other to other real-time MIDI messages,
thus reducing the amount of data that has to flow on one
MIDI cable.
• The Song pointer field:
When set to ON, MIDI Song Position Pointer messages
are recognized. This allows the external device to change
the MPC3000’s current bar position within the sequence
or song. If this field is set to OFF, incoming Song Position
Pointer messages will be ignored.
If the SMPTE option is installed and SMPTE is selected in the
Mode field, the following screen is displayed:
===== Sync In ======
Mode:SMPTE
Start:00:00:00:00.00
Frames:30
==== Sync Out ====
MIDI sync:OUT A
====================
<SyncIn=ON >
==================
<GenSMPTE>
In this case, the fields are:
• The Start field:
Also called SMPTE offset, this field is used to set the
incoming SMPTE time number that must be received in
order for bar 1 of the sequence to start playing. Once the
MPC3000 knows which incoming SMPTE number plays
bar 1, it will automatically calculate the proper point
within the sequence to start playing when higher SMPTE
numbers are received. It will also know that it should not
play if a SMPTE number is received whose value is
before or after those values that fall within the sequence’s
boundaries. This field has five parts—hours, minutes,
seconds, frames and 1/100 frames. separated by colons (:).
The SMPTE start number applies to the active sequence
only and is stored with the sequence when saved to disk.
If syncing to SMPTE while in Song mode, a different
SMPTE start number field appears in the Song screen
and the number in this field is ignored.
• The Frames field:
This field is used to select one of four types of SMPTE
time code. It should be set to the same type as the incoming SMPTE signal. The four types are:
Page 196
Chapter 10: Syncing to Tape and Other Devices
1. 30 (30 frames per second, non-drop):
This is the old NTSC standard for black and
white television, and is the most popular standard for SMPTE-based music production in the
U.S. and Japan. To assure widest compatibility
for your recordings, use this standard if you are
working in this field.
2. 29.97 DROP (29.97 frames per second, drop
frame):
This is the NTSC standard for color television. In
the MPC60 version 2 software and earlier, this
mode was erroneously called 30 DROP; we
apologize for this mistake. To be clear, this signal
runs at a rate of 29.97 frames per second and
frames are occasionally omitted, in accordance
with the SMPTE drop frame standard.
3. 24 (24 frames per second):
This is the standard for film. However, since film
is usually transferred to video for scoring, composers generally still work with video rates of 30
or 29.97 drop.
4. 25 (25 frames per second, non-drop):
This is the standard for European television (PAL
/SECAM standard).
If MIDI TIME CODE is selected in the Mode field, the following
screen is displayed:
===== Sync In ======
Mode:MIDI TIME CODE
Start:00:00:00:00.00
Frames:30
MIDI in:2
==== Sync Out ====
MIDI sync:OUT A
====================
<SyncIn=ON >
==================
<GenSMPTE>
In this case, the fields are:
• The Start field:
This has the same function as the field of the same name
that appears when SMPTE is selected in the Mode field,
as described above.
• The Frames field:
This has the same function as the field of the same name
that appears when SMPTE is selected in the Mode field.
Page 197
Chapter 10: Syncing to Tape and Other Devices
• The MIDI in field:
This field is used to select which of the two MIDI inputs,
input 1 or input 2, will be used to receive the MIDI sync
signal.
If FSK24 is selected in the Mode field, the following screen will be
displayed:
===== Sync In ======
Mode:FSK24
Shift early (ms):20
==== Sync Out ====
MIDI sync:OUT A
====================
<SyncIn=ON >
==================
<GenSMPTE>
In this case, the field is:
• The Shift early field:
This has the same function as the field of the same name
that appears when MIDI CLOCK is selected in the
Mode field, as described above.
If 1/4 NOTE CLICKS is selected in the Mode field, the following
screen will be displayed:
===== Sync In ======
Mode:1/4 NOTE CLICKS
Shift early (ms):20
Starts at:THIS BAR
==== Sync Out ====
MIDI sync:OUT A
====================
<SyncIn=ON >
==================
<GenSMPTE>
In this case, the fields are:
• The Shift early field:
This has the same function as the field of the same name
that appears when MIDI CLOCK is selected in the
Mode field, as described above.
• The Starts at field:
If set to BAR 1, the first click received will always start
the sequence at bar 1. If set to THIS BAR , the first click
received will start the sequence playing from the current
bar position within the sequence or song.
Page 198
Chapter 10: Syncing to Tape and Other Devices
Regardless of which sync mode is selected, there is one soft key in
the Sync In section:
• The <SyncIn=ON > soft key:
Pressing this soft key turns the sync input on or off. The soft key
text shows the current state. If ON, the MPC3000 always stands
ready to sync to the incoming sync signal. If OFF, incoming sync
signals are ignored.
The Sync Out section
The right side of the Sync screen contains all settings related to
using the MPC3000 as the source of sync signals. The MPC3000 can
send three types of sync signals:
• FSK24, output from the Sync Out jack whenever a sequence or
song plays
• MIDI clock, output from any one of the four MIDI output ports
• SMPTE, output from the Sync Out jack only while no sequence or
song is playing and only while the SMPTE Generation screen is
showing
There is one field and one soft key on this side of the screen:
• The MIDI sync field:
This choice field determines which of the four MIDI output ports (or
none) will send MIDI clock and Song Position Pointer signals. The
options are OFF, OUT A, OUT B, OUT C or OUT D.
• The <GenSMPTE> soft key:
Pressing this soft key displays the screen that’s used to generate
SMPTE time code:
============ Generate SMPTE ============
Start=00:00:00:00
Frames/Sec:30
========================================
<Start>
<Stop>
This screen permits SMPTE time code to be generated from
the SYNC OUT jack. It can only be generated while this
screen is showing. It is not generated while the MPC3000 is
playing. The fields and soft keys are:
Page 199
Chapter 10: Syncing to Tape and Other Devices
• The Start= field:
This is the SMPTE timecode number at which the generated
time code will start. The four parts of the field are hours,
minutes, seconds and frames. Normally, this should be set to
00:00:00:00. While the SMPTE code is being generated
(when <Start> is pressed), this field will continuously
update to show the current timecode number being output.
When <Stop> is pressed, the starting value will be
redisplayed.
• The Frames/sec field:
This field has the same function as the similarly-labeled
fields in the Tempo screen and the Sync Input section of the
Sync screen. Use it to select which of the four SMPTE modes
(30, 29.97 drop, 24 or 25) you wish to generate. Be sure to
set the proper SMPTE mode in this field before recording
the SMPTE signal to tape.
• The <Start> soft key:
Pressing this soft key starts SMPTE generation.
• The <Stop> soft key:
Pressing this soft key stops SMPTE generation.
Page 200
Chapter 10: Syncing to Tape and Other Devices
Syncing to Tape and Other Devices: Examples
This section provides step-by-step examples of how to sync to each of
the five sync signals.
Syncing to MIDI Clock
To generate MIDI clock with Song Position Pointer:
1. In the Sync screen, set the MIDI sync field (in the Sync Out
section) to the MIDI port that you want the sync signal to be sent
from (OUT A, OUT B, OUT C or OUT D.)
2. Play a sequence (or, if in Song mode, play a song). While playing,
the MIDI clock signal will be sent out over MIDI at the current
tempo.
To slave the MPC3000 to MIDI clock signal received from an
external device:
1. Connect a MIDI cable from the MIDI output of the device sending
MIDI clock to one of the MPC3000’s MIDI inputs.
2. In the Sync screen, set the Mode field (in the Sync In section) to
MIDI CLOCK and set the MIDI input field to the number of
the MIDI input to which you have connected the cable.
3. In the Sync screen, SOFT KEY 1 should show the text
<SyncIn=ON>. If it shows <SyncIn=OFF>, press it once.
4. Set up your MPC3000 sequence or song to play as normal.
5. Start the external device sending MIDI clock. The MPC3000 will
automatically play in sync.
Syncing to SMPTE
To record a SMPTE track:
SMPTE timecode can only be generated by the MPC3000 when it is
not playing. Before recording any music to tape, record (“stripe”)
SMPTE timecode onto one track of your multitrack tape.
Page 201
Chapter 10: Syncing to Tape and Other Devices
1. Connect the SYNC OUT jack of the MPC3000 to the input of one
track of your multitrack tape recorder.
2. Access the Generate SMPTE screen by pressing TEMPO/SYNC,
then the <SyncScreen> soft key, followed by the
<GenSMPTE> soft key.
3. Set the Start field to 00:00:00:00 or the desired start time.
4. Set the Frames/sec field to the desired SMPTE mode. In the
U.S., the standard for music production using SMPTE is 30.
5. To set the proper recording level, press <Start>; this will start
the SMPTE generation. Then set the recording level of the tape
recorder to about -3dB. Press <Stop> to stop generating.
6. Start the tape recorder recording.
7. Press <Start> to start generating SMPTE time code.
8. Wait until enough time has passed to allow for the total duration
of your song (plus a litte extra time to allow for changes in the
arrangement). Press <Stop> to stop SMPTE generation, and
then stop the tape recorder. Your tape now contains the SMPTE
code.
To play back a sequence in sync to SMPTE:
COMMENT: The I-0055 SMPTE option is required; see the
Appendix for more information
1. Connect the output of the tape track that contains the SMPTE
signal to the SYNC IN jack of the MPC3000. Set the SYNC IN
LEVEL knob to about 1/2.
2. From the Play/Record screen, select the sequence that you intend
to record to tape.
3. Press the TEMPO/SYNC key and set the Tempo Source field
to SEQUENCE. This causes the MPC3000 to use the tempo
setting that’s stored within the sequence, so that it will always be
remembered. (This is true even when the sequence is saved to
disk and later recalled, as master tempo settings are only saved
in PAR files, not in ALL files.) It is important for the MPC3000 to
remember the tempo setting because SMPTE time code does not
provide any tempo information.
4. Set the Frames field to the SMPTE frame rate that matches the
SMPTE timecode that will be received. If this field is set to a
different frame rate than that of the incoming timecode, the
playback tempo will be inaccurate.
5. Set the Mode field in the Sync screen to SMPTE and press SOFT
KEY 1 until it shows <SyncIn=ON>.
6. While in the Sync screen, set the Start field to the SMPTE
location you want your sequence to start at. If you don’t know,
use 00:00:10:00.00. This will cause your sequence to start at a
location 10 seconds after the start of the SMPTE code you recorded in this example. This will allow you to add some new parts
in that first 10 seconds if you should later decide to do so. This
setting only applies to the active sequence, so be sure that the
Page 202
Chapter 10: Syncing to Tape and Other Devices
sequence you intend to use is selected before setting this parameter.
7. Press the MAIN SCREEN key to return to the Play/Record
screen.
8. Play the tape from a point just before the beginning of the
SMPTE timecode. Once the code reaches the start time you have
entered into the Start field, the MPC3000 will automatically
start playing from the beginning of the sequence, and will not
stop until the sequence comes to its end (or the tape recorder is
stopped). To stop playback early, press the STOP key on the
MPC3000 or stop the tape recorder. To play in sync from a
location in the middle of your sequence, fast-forward the tape
recorder to any point within the duration of the sequence and
start playback of the tape. The MPC3000 will start playing from
the correct location within the sequence.
COMMENT: If the MPC3000 doesn’t respond properly to the
sync signal, try adjusting the SYNC IN LEVEL control on
the rear panel. Find the lowest setting to which the MPC3000
responds, then increase the level by about 1/4 turn.
COMMENT: When playing a sequence from bar 1 in response
to incoming SMPTE, the timing of the first note in bar 1 will
be slightly late. To get around this problem, insert a blank
bar at the start of the sequence (or song). This will cause the
late timing to occur within the initial blank bar, so that the
timing is stable well before the notes (starting in the second
bar) start playing.
To play back a song (in Song mode) in sync to the SMPTE time
code on tape:
1. Connect the output of the tape track that contains the SMPTE
signal to the SYNC INPUT of the MPC3000. Set the SYNC IN
LEVEL knob to about 1/2.
2. In the Tempo/Sync screen, set the Tempo source field to
SEQUENCE. This causes the MPC3000 to use the tempo setting
that’s stored within the sequence, so that it will always be
remembered. (This is true even when the sequence is saved to
disk and later recalled, as master tempo settings are only saved
in PAR files, not in ALL files.) Then, set each sequence in your
song to the desired tempo setting. It is important for the
MPC3000 to remember the tempo setting because SMPTE
timecode does not provide any tempo information.
3. In the Sync screen, set the Mode field to SMPTE. Press SOFT
KEY 1 until it shows <SyncIn=ON>, and set the Frames field
to the same SMPTE frame rate as that of the incoming SMPTE
signal. Ignore the Start field because this start time applies
only to active sequences, not to songs.
4. Press the SONG key and set up your song to play as you want it
to. In the Song screen, set the SMPTE Start field to the
Page 203
Chapter 10: Syncing to Tape and Other Devices
SMPTE location where you want your song to start. If you don’t
know, use 00:00:10:00.00. This will cause your song to start at a
location 10 seconds after the start of the SMPTE code you recorded in the example above. This will allow you to add some new
parts in those first 10 seconds if you should later decide to do so.
This setting only applies to the active song, so be sure that the
song you intend to use is selected before setting this parameter.
5. Play the tape from a point just before the beginning of the
SMPTE timecode. Once the code reaches the start time you have
entered in the SMPTE Start field, the MPC3000 will automatically start playing from the beginning of the song and will not
stop until the song has completed (or the tape recorder is
stopped). To stop playback early, press the STOP key on the
MPC3000 or stop the tape recorder. To play in sync from a
location in the middle of your song, fast-forward the tape recorder to any point within the duration of the song and start
playback of the tape. The MPC3000 will start playing from the
correct location within the song.
Syncing to MIDI Time Code
MIDI Time Code is SMPTE timecode encoded over MIDI. Since it is
a MIDI signal, it cannot be recorded on tape. Rather, it is used to
sync to devices such as drum machines and sequencers. The
MPC3000 does not generate MIDI Time Code, but does sync to it
when received from an external source.
To play back a sequence or song in sync to MIDI Time Code:
Use the same instructions as if playing a sequence or a song in sync
to SMPTE (earlier in this chapter), except that in the Sync screen
select MIDI TIME CODE in the Mode field and set the MIDI in
field to the number of the MIDI input where the MIDI time code
signal is connected.
Syncing to FSK24
Of the five possible sync modes in the MPC3000, only three can be
used to sync to tape: FSK24, 1/4 NOTE CLICKS, and SMPTE (an
option on the MPC3000). SMPTE is preferable for many reasons,
and is the standard for professional use. 1/4 NOTE CLICKS can be
used with tape, but since it provides low timing resolution it is not a
good first choice for syncing to tape. FSK24 was the tape sync
method in general use for musical applications prior to the
Page 204
Chapter 10: Syncing to Tape and Other Devices
acceptance of SMPTE, and is still used by many drum machines and
sequencers. If you don’t have the SMPTE option, FSK24 provides a
very good alternative.
FSK24 sync code is generated in real time as the MPC3000 plays.
Remember that FSK24 sync code contains tempo information, so it
is important that the tempo is properly set before the FSK sync tone
is recorded to tape.
To record the sync tone to tape:
1. Connect the SYNC OUT jack of the MPC3000 to the input of a
track on your multitrack tape recorder.
2. Set the recording level of the sync tone’s track to -3 dB. (The
FSK24 sync tone is always emitted from the SYNC OUT jack,
even when the MPC3000 is stopped.)
3. Create your sequence or song on the MPC3000, making sure that
all tempo settings and tempo changes have been finalized. It is
important that the tempo be exactly as you want it throughout
the sequence or song because the FSK24 sync tone contains all
tempo information and cannot be changed after recording.
4. Put the tape recorder into record mode and start recording.
5. Play the sequence or song on the MPC3000. Let it play until the
its end, then stop both the MPC3000 and the tape recorder.
To play back the MPC3000 in sync to the tape:
1. Connect the output of the tape track that contains the FSK24
signal to the SYNC IN jack of the MPC3000.
2. Set the SYNC IN LEVEL control on the rear panel to about 1/2.
3. In the Sync screen, set the Mode field (Sync Input section) to
FSK24 and press SOFT KEY 1 until it reads <SyncIn=ON>.
4. Set up the MPC3000 to play your sequence or song.
5. Rewind the tape to just before the point at which you started
recording the sync tone.
6. Play the tape. Once the tape reaches the point where the sync
tone starts, the MPC3000 will begin playing its parts in perfect
sync. Note that the current tempo setting is not used; tempo is
provided from the sync tone on tape. To use FSK24, you must
always start the tape from the beginning of the recording, as in
this example.
COMMENT: If the MPC3000 doesn’t respond to the sync
signal, try adjusting the SYNC IN LEVEL control on the
rear panel. Find the lowest setting at which the MPC3000
responds, then increase the level by about 1/4 turn.
Page 205
Chapter 10: Syncing to Tape and Other Devices
Syncing to 1/4-note Clicks
This method of syncing uses any cleanly recorded, percussive sound
playing on 1/4-notes as a sync source. This allows you to add
sequenced parts to a recording that contains no sync track. For
example, the sync track could consist of a drummer recording a
track of 1/4-note drumstick clicks throughout the song. Using this
method of sync, the playback tempo is derived from the external
1/4-note clicks.
To play the MPC3000 in sync to 1/4-note clicks:
1. Connect the output of the tape track that contains the 1/4-note
click signal (or other percussive audio source) into the MPC3000’s
SYNC IN jack, and set the SYNC IN LEVEL to about 1/2.
3. In the Sync screen, set the Mode field (Sync input section) to 1/4
NOTE CLICKS.
4. Set up the MPC3000 to play your sequence or song. Set the
playback tempo as close as possible to the intended tempo. The
internal tempo will be used for the time between the first and
second clicks received.
5. Rewind the tape to just before the point at which the 1/4-note
clicks begin.
6. Play the tape. Once the tape reaches the first click, the MPC3000
will begin playing. It will start at the current internal tempo,
then it will gradually use the timing of the clicks for its tempo. To
use 1/4 NOTE CLICK sync, you must always start the tape from
the beginning of the clicks, as in this example.
COMMENT: To smooth out any variations in tempo, the
playback tempo is averaged over time. It is possible for the
MPC3000 to follow slight tempo changes, but larger changes
will cause it to temporarily lag behind or lead. It is possible
to use almost any clean signal rather than metronome clicks,
but the signal used must be very distinct and short, such as a
cowbell or closed hi-hat, and there must be a minimum of
background noise. Adjusting the sync input level control will
help to minimize triggering from background noise.
Page 206
Chapter 11: MIDI Function
Chapter 11:
MIDI Functions
Page 207
Chapter 11: MIDI Function
Assigning Pads to Note Numbers
In the MPC3000, sounds in programs and drum notes in sequences
are assigned not to pad numbers but to MIDI note numbers in the
range 35-98. Each of the 64 pad/bank combinations (A01-D16) is
assigned to a unique MIDI note number (35-98) and it is the pad’s
assigned note number that is sent to the sound generator, sequencer, and/or MIDI output when the pad is played. In other
words, the MIDI note number is the basic unit of communication
between the different sections of the MPC3000 and the outside
world. This communication is shown graphically in the following
diagram.
Pad
MPC3000
Sequencer
section
MIDI in
Pad number to
MIDI note number
assignment*
MIDI note
number
*MIDI key, option 1
MPC3000
Sound Generator
section
MIDI out
As you can see from the diagram, hitting a pad will generate a pad
number, which is then converted into a MIDI note number. This
note number can then trigger a sound in the Sound Generator
section, be recorded by the Sequencer section, and/or go out the
MIDI output. Similarly, note numbers coming in from the MIDI
input can trigger a sound and/or be recorded into the sequencer. And
note numbers played back by the sequencer can trigger internal
sounds and/or go out the MIDI output.
Page 208
Chapter 11: MIDI Function
Assigning pads to note numbers is done in the following screen,
accessed by pressing the MIDI key then selecting option 1 from the
menu:
====== Assign Pads to Note Numbers =====
Mode:PROGRAM
Pad:A01 = Note:37 (Gen MIDI:SIDE STICK )
========================================
The fields are:
• The Mode field:
This choice field allows you to choose one of two sets of pad-to-notenumber assignments:
1. PROGRAM:
The active program’s pad-to-note assignments will be
used. These 64 assignments are stored within each
program (and saved in the PGM file). When the active
program is changed, the newly selected program’s assignments will be used. This choice is useful if you want each
program to use a unique set of pad-to-note assignments.
2. MASTER:
A single master set of pad-to-note assignments will be
used. These assignments will apply to all programs and
will not change unless manually changed. These settings
are stored in the PAR file. This choice is useful if you like
the pad-to-note assignments to always stay where you
last put them.
• The Pad and Note fields:
Together, these two fields comprise the table of 64 pad-to-note
assignments. To view or edit the note assignment for a particular
pad, select the pad number (A01-D16) in the Pad field either
manually or by pressing a front panel pad. The pad’s currently
assigned note number will appear immediately in the Note field. To
change the pad’s note number assignment, edit the Note field. For
convenience, the General MIDI instrument assignment for the
displayed note number is shown to its right.
Page 209
Chapter 11: MIDI Function
MIDI Receive Channel, Local Mode, Soft Thru,
Note Variation Controller Assign and Sustain
Pedal Processing
Selecting option 2 from the MIDI key menu will display a screen
that provides access to a variety of MIDI-related parameters:
============= MIDI Routing =============
Active track receive channel:ALL
Local mode:ON
Soft thru:ON
Assign Note Var slider to controller: 20
Convert sustain pedal to duration:ON
========================================
<Play snds from MIDI><Send MIDI frm pds>
The fields and soft keys are:
• The Active track receive channel field:
This choice field determines on which MIDI channel the active track
receives its data from the MIDI inputs. The choices are 1-16 or ALL
(all channels).
COMMENT: If using the MPC3000 as a sound generator
played from the MIDI input, set this field to the MIDI channel you wish the sound generator to receive on. Also, select a
DRUM track in the Play/Record screen. This will cause all
incoming MIDI note events on the selected receive channel to
be routed to the internal sound generator.
• The Local mode field:
This is a choice field with two options: ON or OFF. If ON, playing the
pads causes the internal sounds to play as normal. If OFF, then
playing the front panel pads does not send notes internally to the
sound generator but does send notes to the MIDI output (if the
active track is a drums track and the Play/Record screen’s Chn field
is set to a MIDI channel). In the OFF mode, the internal sound
generator receives notes from MIDI but not from the pads.
Setting this field to OFF is useful if you want to use the MPC3000’s
pads and sound generator with an external sequencer. This allows
the pads to send notes out over MIDI without playing the internal
sounds directly, and allows the external sequencer to play the
sounds from the MIDI inputs.
• The Soft thru field:
If set to ON, any incoming MIDI data are routed in real time to the
active track’s assigned output MIDI channel. If set to OFF,
Page 210
Chapter 11: MIDI Function
they aren’t. If you are using a single keyboard synthesizer (the
keyboard and sound generator are together in one unit), this field
should be set to OFF (or set the keyboard’s Local Control to OFF). In
this case, there is no need for incoming MIDI notes to be immediately sent out to the synthesizer’s sound generator because it is
already receiving notes directly from its keyboard. If you are using a
MIDI master keyboard and separate synthesizer modules, set this
field to ON. This way, the notes played on the keyboard will play the
synthesizer modules in real time.
COMMENT: When the MIDI thru field is set to ON, be
careful to avoid a MIDI feedback loop in your external MIDI
cables and devices. A MIDI feedback loop occurs when an
output MIDI message, because of some incorrect external
MIDI connection, is immediately sent back to the input, then
it is immediately sent back out (because the MIDI thru
field is ON), then back in, then back out, etc. If this occurs,
the MPC3000 could stop operating until one of the MIDI
cables is disconnected. To avoid this, be very careful in
connecting your external MIDI cables and devices to prevent
a direct signal path from the MPC3000’s MIDI output to its
MIDI input.
• The Assign Note Var slider to controller field:
The function of the Note Variation Slider can be remotely duplicated
by any external MIDI device sending MIDI control change messages. Set this field to the number (0-127) of the incoming controller
that you want to affect the current slider value. For example, to use
a MIDI keyboard’s modulation wheel to duplicate the function of the
Note Variation Slider, connect the keyboard’s MIDI output to the
MPC3000’s MIDI input and set this field to 1, which is the MIDI
controller number for the keyboard’s modulation wheel.
• The Convert sustain pedal to duration field:
In all other sequencers, sustain pedal messages (MIDI controller 64)
are recorded as received into the sequence along with the notes.
This presents the following problems:
1. If you delete or erase a section of the sequence that
contained a Sustain Off message, all notes after that
location will be sustained until the next Sustain On
message.
2. If you play two or more tracks into the same MIDI output
channel and only one track has sustain pedal information, the notes on the other tracks will also be sustained.
3. If you merge a track with sustain pedal information into a
track without sustain pedal information, notes on the
resultant track will be sustained.
4. If you overdub notes into a track containing sustain pedal
information, the new notes will be sustained.
Page 211
Chapter 11: MIDI Function
The MPC3000 eliminates these problems by specially processing
sustain pedal messages. If the Convert sustain pedal to
duration field is set to ON, when the MPC3000 receives a Sustain
On message during record, it will NOT record it. Instead, any notes
that are currently pressed will be internally held on, even after they
are released, until a Sustain Off message is received. The result is
that the individual durations of notes are lengthened, so unwanted
transfer of sustain information to other notes on the same MIDI
channel is impossible. This has the added advantage of allowing you
to adjust durations of sustained notes individually in Step Edit
mode.
There are some situations in which converting sustain pedal to
duration is undesirable:
1. On some synthesizers, this special sustain method will
cause the synthesizer to ignore any new notes played
after all available voices are used, because the synthesizer thinks the keys are still held.
2. Some synthesizers have the ability to use MIDI controller
64 for other purposes than sustain, so it is desirable to
record it into the sequence.
For these reasons, the MPC3000’s special sustain processing can be
defeated. To defeat this special feature and record MIDI sustain
messages (controller 64) into sequences, set this field to OFF.
• SOFT KEYS 1 and 2—<Play snds from MIDI>:
Pressing either of these soft keys presents a screen that explains
how to play the MPC3000’s internal sounds from its MIDI input.
These soft keys are only used to display information—they don’t
affect any data in the MPC3000.
• SOFT KEYS 3 and 4 —<Send MIDI frm pds>:
Pressing either of these soft keys presents a screen that explains
how to send note events out over MIDI when the MPC3000’s pads
are played. These soft keys are only used to display information—
they don’t affect any data in the MPC3000.
Page 212
Chapter 11: MIDI Function
MIDI Input Filter
Selecting option 3 from the MIDI key menu presents the MIDI
Input Filter screen, which allows specific types of MIDI events to be
either received or ignored by the MPC3000:
===== Sound Generator Input Filter =====
MIDI volume:RECEIVE
MIDI vol now:127
Prog change:IGNORE
======= Sequencer Input Filter =========
Event:NOTES
Pass event?:YES
Min change:5
Velocity mode:NORMAL
Fixed veloc: 64
========================================
There are two sections, the Sound Generator Input Filter and the
Sequencer Input Filter. The fields are:
The Sound Generator Input Filter section:
• The MIDI volume field:
This choice field has two options: RECEIVE and IGNORE. If set to
RECEIVE, incoming MIDI volume messages (controller 7) will
affect the sound generator’s overall output volume on all outputs. If
set to IGNORE, incoming MIDI volume messages will be ignored.
• The MIDI vol now field:
This field shows the last value of MIDI volume (controller 7)
received. A value of 127 is normal (no attenuation). Any value less
than 127 causes the volume of all outputs to be attenuated from
normal. A VALUE OF ZERO WILL SILENCE ALL AUDIO
OUTPUTS EVEN IF ALL OTHER PARAMETERS ARE SET
CORRECTLY!
• The Prog change field:
This choice field has two options: RECEIVE and IGNORE. If set to
RECEIVE, incoming Program Change messages will automatically
select the active program. (Incoming Program Change messages
above program 24 will select program 24.) If set to IGNORE, incoming Program Change messages will be ignored.
The Sequencer Input Filter section:
• The Event and Pass event? fields:
The Event field is a choice field and can be set to any one of the
following event types:
Page 213
Chapter 11: MIDI Function
NOTES
PROGRAM CHANGE
PITCH BEND
CHANNEL PRESSURE
POLY PRESSURE
SYSTEM EXCLUSIVE
MIXER VOLUME
MIXER PAN
OUTPUT/EFFECT LEVEL
C0-BANK SELECT MSB
C1-MODULATION WHEEL
C2-BREATH CONT
.
.
.
C127-POLY MODE ON
TUNE REQUEST
While one of these event types is selected, the Pass event? field
displays either YES, indicating that the event will be recorded into
sequences, or NO, indicating that the event type will be removed
from the MIDI input data stream when encountered. To change the
status of a particular event, first select the event in the Event
field, then set the Pass event? field to the desired status—YES
or NO.
COMMENT: An example of a good use of this function is to
prevent channel pressure data from being recorded into your
tracks. If you are using a keyboard that produces channel
pressure messages, all of these continuous messages will
normally be recorded into the track, whether your synthesizer
uses them or not. This will cause a lot of extra sequence
memory to be used and will cause the sequencer to work
much harder to play all of these messages, possibly causing
note delays. To avoid this, turn off the recording of continuous controller messages unless your synthesizer is using
them. To do this, select CHANNEL PRESSURE in the
Event field, then select NO in the Pass event? field.
• The Min change field:
This field only appears if the Event field is set to PITCH,
CHANNEL PRESSURE, MIXER VOLUME, MIXER PAN,
OUTPUT/EFFECT LEVEL, or controllers 0 through 31. These are
all continuous controller event types, meaning that large numbers of
these individual events are used to simulate a gradual change in the
specified parameter. For example, when you move a pitch bend
wheel on a keyboard, a large number of pitch bend events are
output from the keyboard, and all of them are recorded into the
active track. The problem with recording all of these events is that
they use a large amount of memory and they cause the internal
computer to work very hard, causing possible timing delays if large
amounts of these events exist in a sequence. In many cases,
however, many more of these events are output from the keyboard
than are necessary to produce the desired effect.
Page 214
Chapter 11: MIDI Function
The Min change field is used to thin out the event data for the
above specified event types, thereby reducing the total number of
events that will be recorded into tracks. It works by only recording
events that have changed more than a specified amount since the
last received event of the same type. This amount is set in the Min
change field. As with the Pass event? field, the Min change
field shows the value associated with the event type shown in the
Event field. For example, to thin out incoming channel pressure
events:
1. Set the Event field to CHANNEL PRESSURE.
2. Set the Pass event? field to YES.
3. Set the Min change field to 5.
This means that an incoming channel pressure message will be
recorded only if its value has changed by more than 5 increments
from the last value received. The range of this field is 0-127, with
127 being the full range of the controller. (Pitch bend is an exception—even though the pitch bend messages actually have a range of
± 8191, 0-127 represents the full range here. For example, to specify
that only a change of 10% or more in the total range of the bend
wheel may be recorded, enter a 12 here, because 12 is approximately
10% of 127, which here represents the full range of the bend wheel.)
If the Min change value is set too high, a stepping effect will be
heard as the continuous controller is moved. Try to pick a value that
is low enough so that the stepping is not noticeable.
• The Velocity mode and Fixed veloc fields:
Incoming MIDI note events are normally recorded into the sequence
with their velocity values intact, permitting the recording of dynamics. These two fields permit the incoming velocity data to be ignored,
if desired, and a fixed value substituted for each incoming note. The
Velocity mode field has two options: NORMAL and FIXED. If
set to FIXED, all incoming velocity values are replaced by the value
specified in the Fixed veloc field (1-127).
Page 215
Chapter 11: MIDI Function
Turning All Notes Off
Occasionally, a note from an externally-connected synthesizer may
stick on. This may be due to sending the synthesizer too much data,
or switching an external MIDI switching box at the wrong time, or
many other reasons. Regardless of the reason, to turn all notes off
on all MIDI channels and ports, press the MIDI key and select
option 4, All notes off. The MPC3000 will send MIDI Note
Off messages for every note (0-127) on every channel.
Page 216
Chapter 11: MIDI Function
The MIDI Implementation Charts
This section contains the MIDI implementation charts for the
MPC3000. There are two charts—one for the sequencer section, and
one for the pad and sound generator section. These charts are useful
to determine if any incompatibilities exist between the MPC3000
and your other MIDI instruments.
Model: MPC3000 (sound generator section)
Function
Basic
Channel
Mode
Note
Number
Velocity
Default
Channel
Default
Messages
Altered
True Voice
Note ON
Note OFF
Key’s
Ch’s
After
Touch
Pitch Bender
Control
Change
Prog
Change
True#
System Exclusive
System
:Song Pos
:Song Sel
Common
:Tune
System
:Clock
Real Time
:Commands
Aux
:Local ON/OFF
Mes:All Notes Off
sages
:Active Sense
:Reset
Mode 1: OMNI ON, POLY
Mode 3: OMNI OFF, POLY
MIDI Implementation Chart
Transmitted
Recognized
16
1-16
3
✕
✕
35-98
35-98
❍
❍ (Always = 64)
✕
✕
✕
✕
16
1-16
3
✕
✕
35-98
35-98
❍
✕
✕
❍
✕
❍
✕
✕
❍
✕
✕
✕
✕
✕
✕
✕
✕
✕
0-127
0-23
❍
✕
✕
✕
✕
✕
✕
❍
✕
✕
Mode 2: OMNI ON, MONO
Mode 4: OMNI OFF, MONO
Version: 3.0
Remarks
Used in Note
Repeat feature
Can be assigned to
Note Variation Slider
See note below
❍ : Yes
✕ : No
Note : The MPC3000 numbers its 24 programs as 1-24. Incoming Program Change numbers
over 23 (i.e., 24 in MPC3000) will select program 24.
Page 217
Chapter 11: MIDI Function
Model: MPC3000 (sequencer section)
Function
MIDI Implementation Chart
Transmitted
Recognized
Basic
Channel
Default
Channel
1-16
1-16
1-16
1-16
Mode
Default
Messages
Altered
3
✕
✕
1
✕
✕
True Voice
0-127
0-127
0-127
0-127
Velocity
Note ON
Note OFF
❍
❍
❍
❍
After
Touch
Key’s
Ch’s
❍
❍
❍
❍
❍
❍
0-127
❍
❍
True#
❍
0-127
❍
0-127
System Exclusive
❍
❍
System
Common
:Song Pos
:Song Sel
:Tune
❍
✕
✕
❍
❍
✕
System
Real Time
:Clock
:Commands
❍
❍
❍
❍
Aux
Messages
:Local ON/OFF
:All Notes Off
:Active Sense
:Reset
✕
❍
✕
✕
✕
✕
✕
✕
Note
Number
Pitch Bender
Control
Change
Prog
Change
Mode 1: OMNI ON, POLY
Mode 3: OMNI OFF, POLY
Mode 2: OMNI ON, MONO
Mode 4: OMNI OFF, MONO
Version: 3.0
Remarks
See note below
❍ : Yes
✕ : No
Note: If the Convert Sustain Pedal To Duration field (accessed by pressing the MIDI key
and selecting option 2) is set to ON, then incoming controller 64 messages (sustain pedal)
will not be recorded into sequences. Instead, any notes that are currently pressed when a
Sustain On message is received are internally held on, even after they are released, until a
Sustain Off message is received. The result is that the individual durations of notes are
lengthened. This is explained further in the “MIDI Receive Channel, Local Mode, Soft Thru,
Note Variation Controller Assign and Sustain Pedal Processing” section of the manual,
earlier in this chapter.
Page 218
Appendix
Appendix
Page 219
Appendix
Technical Specifications
General
• Display: 320 character (240 x 64 dot graphic) LCD
• Disk drive: 3.5 inch HD (1.44MB formatted)
• CPU: V53 @ 16MHz
• Dimensions: 440(W) x 121(H) x 405(D) mm
• Weight: 9 kg
• Power requirements: 120 VAC 60Hz 40W
220-240 VAC 50Hz
Sound Generator
• Sampling rate: 44.1kHz (frequency response: 20Hz-20kHz)
• Sampling capacity: 2MB standard (21.9 seconds mono or 10.9
seconds stereo), expandable to 16MB (188.3 seconds mono or 94.1
seconds stereo).
• Data format: 16-bit linear
• Dynamic filtering: 12 dB/Octave dynamic resonant lowpass filter
per voice
• Maximum sounds in memory: 128
• Number of sound programs: 24
• Sound assignments per program: 64
• Simultaneous voices: 32
Sequencer
• Maximum notes: 75,000
• Resolution: 96 parts per 1/4-note (ppq)
• Sequences: 99
• Tracks per sequence: 99
• MIDI output channels: 64 (16 channels x 4 output ports)
• Song mode: 20 songs, 250 steps per song
• Drum pads: 16 (velocity and pressure sensitive)
• Drum pad banks: 4
• Sync modes: MIDI Time Code, MIDI clock, FSK 24, 1/4-note clicks
and SMPTE (optional). SMPTE frame rates supported are 24, 25,
29.97 drop and 30.
Rear Panel Inputs/Outputs
• Record input sensitivity (both L and R): (HI gain) -58dBm, 45kΩ;
(MID gain) -38dBm, 45kΩ; (LO gain) -18dBm, 45kΩ
• Digital sampling input: S/PDIF
• Stereo output level: 6dBm, 600Ω
Page 220
Appendix
• Level of 8 individual outputs: 6dBm, 600Ω
• Sync/Trigger input level: 0.5V p-p level (with input control at
maximum)
• Sync output level: 2.5V p-p, impedance 600Ω
• MIDI inputs: 2 (mergeable)
• MIDI outputs: 4 (independent)
• SCSI port: 1 (Apple 25-pin D-type SCSI connector)
• Headphone output: 1
• Foot Switch inputs: 2 (independently assignable)
Page 221
Appendix
Answers to Frequent Questions
If you discover a problem in your MPC3000, we would appreciate it
if you would please read the relevant section of the manual to make
sure you correctly understand the operation before you before call
your Akai representative. Here are some answers to commonly
asked questions and problems:
When I play a particular sequence or song, the timing is irregular.
What’s wrong?
If you notice a timing irregularity in song mode at the point of
transition from one sequence into another, the problem may be
caused by assignments of the Program field (in the Play/Record
screen) for the new playing sequence. When a new sequence is
encountered in a song, any program assignments for the tracks in
the newly selected sequence are sent out at the moment that the
sequence starts to play. This can present a problem because most
synthesizers require time to change programs, which can cause any
notes existing at the start of the new sequence to be delayed. This
delay is brief in most synthesizers, but is usually enough to cause a
timing irregularity at the start of the sequence. To avoid this problem, remove any assignments of the Program field for all sequences
except the first sequence in the song. If you are encountering the
same problem when changing sequences while playing (in which
case the new sequence begins immediately following the current
repetition of the current sequence), then use the same solution:
remove all program assignments for the newly selected sequence.
If the timing irregularity does not exist at the beginning of a sequence, it may be due to the sequence containing a large system
exclusive message at that location, in which case the MPC3000
must finish processing the system exclusive message before playing
any other notes at that location. If this is the case, erase or move the
system exclusive event that is causing the problem.
If the timing irregularity does not exist at the beginning of a sequence and is not due to a system exclusive event, it may be due to
having too many notes (more than approximately 10 or 12) at one
tick in the sequence. If so, this could cause the last notes occurring
at this location to be delayed. This problem is aggravated at faster
tempos. This problem exists to some degree in all sequencers, and is
due to the fact that there is a finite number of notes that the internal computer can process at one time. However, this will NOT cause
the sequence to slip out of sync when syncing to an external sync
source. To reduce the processing requirement in your sequence, try
the following:
Page 222
Appendix
1. Erase any unnecessary events from the sequence. For example,
erase any channel pressure, poly pressure and system exclusive
events if you are not using them. Many keyboards send out large
amounts of channel pressure messages while playing, which are
recorded into your tracks. If you are not using these messages,
removing them from the tracks will improve the playback timing.
To block these messages from being recorded into new sequences,
use the MIDI Input Filter.
2. Erase any tracks that are turned off but still exist in the sequence. Turning a track off (the On field in the Play/Record
screen) eases the processing requirement for playing the track,
but doesn’t eliminate it.
3. If you only need to improve the timing while recording your
sequence to tape and are using a sync tone, then record the
sequence to tape a few tracks at a time, and turn off or erase the
tracks you are not using on each pass. By eliminating the need
for the MPC3000 to process the tracks that aren’t being heard,
the timing of the remaining tracks will be improved.
4. In the Play/Record screen, disable Record Ready by selecting a
different sequence, then the original one. This slightly lessens
the processing requirement.
5. If the delay is due to many notes existing at one tick, then either
delete some of the notes or spread them around to neighboring
ticks.
How can I reduce the time required for the “Analyzing sequence.
Please wait...” message?
This message is most noticeable during song mode. It appears once
after the song is edited and when the song screen is entered while a
long song is selected. The reason for this delay is that the MPC3000
must scan through the entire song to learn where the start of each
bar is. Once this is done, any rewind, fast forward or locate operation will be very fast. Also, response to incoming SMPTE will be
nearly immediate. Unfortunately, there is no way to reduce the time
required for this message other than reducing the complexity of the
song.
I want to use the MPC3000 only as a sound generator receiving
notes from another sequencer. How can I get it to play from only
one MIDI channel?
1. Press the MIDI key and select option 2. In the screen that appears, set the Active track receive channel field to
the channel you want the MPC3000 to receive on.
2. In the Play/Record screen, set the Type field to DRUM or select a
track that has a Type of DRUM.
3. Load in the desired program.
Page 223
Appendix
If you ever forget these instructions, just press the <Play snds
from MIDI> soft key. It’s in the screen accessed by pressing the
MIDI key and selecting option 2.
I want to use the MPC3000’s pads to program drum parts on an
external sequencer, but I can’t get any of the MIDI outputs to send
note-on messages when I play the pads. How do I do it?
1. In the Play/Record screen, set the Type field to DRUM or select a
track that has a Type of DRUM. Then, set the track’s Chn field to
the desired output MIDI channel and port.
2. In the MIDI key, option 1 screen, you can change the note numbers assigned to each pad if desired.
3. If you are simultaneously using the pads to program the external
sequencer and using the MPC3000’s sound generator to receive
from the external sequencer, then set both the Soft thru and
Local mode fields to OFF. These fields are in the screen
accessed by pressing the MIDI key and selecting option 2.
When I play a key on my keyboard synthesizer while connected to
the MPC3000, two voices play in my keyboard for every one key
pressed. Why?
When you play a key on the syntheizer keyboard, it plays the note
internally and also sends a note over MIDI to the MPC3000.
Because the MPC3000’s Soft thru feature is normally set to ON,
that note is immediately sent back out to the keyboard, causing it to
play the same note again. To solve this problem, turn Soft thru
off (press the MIDI key, then select option 2) or disable Local Control on your keyboard synthesizer.
Page 224
Appendix
Contents of Disk Files
The following is a list of the contents of each of the six file types.
The SEQ (sequence) file
Sequence name (file name is used)
Loop status (END or TO BAR) and TO BAR bar number
Sequence tempo
SMPTE offset
List of tempo changes
Active track number
For each track:
• Track name
• Track on/off
• Primary output MIDI channel & port
• Secondary output MIDI channel & port
• Track type assignment (drum or MIDI)
• Track volume
• Track program assignment
Sequence mixer data (for each of the 64 note numbers 35-98):
• Stereo mixer volume
• Stereo mixer pan
• Individual out/effects mix assignment
• Individual out/effects mix volume
• Indiv Out/Effects Mix Volume Follows Stereo (yes/no)
Sequence effects settings
List of events in sequence (actual sequence event data)
The ALL (all sequences and songs) file
Data for all 99 sequences (see SEQ file above)
Data for each of 20 songs:
• Song name
• Loop status (END or TO STEP) and TO STEP step
number
• SMPTE offset
• Contents of each step in song
The SND (single sound) file
Sound name (file name is used)
Sample data for sound
Stereo/mono status
Tuning
Volume
Soft start and Soft end
Page 225
Appendix
The PGM (single program) file
Program name (file name is used)
For each of the 64 pads (A01-D16):
• Note number assignment
For each of the 64 note numbers 35-98:
• Sound name (name only—program contains no sound
data)
• Sound assignment mode (normal, simultaneous, velocity
switch or decay switch)
• Alternate note number assignments (2)
• Velocity or decay switch thresholds (2)
• Envelope attack, decay and decay mode
• Velocity modulation of attack, start address and volume
• Tuning
• Poly mode (poly, mono or note off)
• Cutoff assignments (2)
• Filter frequency
• Velocity modulation of filter frequency
• Filter resonance
• Filter envelope attack, decay and amount
Note variation data:
• Note number assignment for slider
• Low and high range limits for each of the four parameter
types (tuning, attack, decay, or filter frequency)
• For each of the 64 note numbers (35-98):
• Note variation parameter select
Program mixer data (for each of the 64 note numbers 35-98):
• Stereo mixer volume and pan
• Individual out/effects mix assignment
• Individual out/effects mix volume
• Indiv Out/Effects Mix Volume Follows Stereo (yes/no)
Program effects settings
The APS (all programs and sounds) file
Program data for each of the 24 programs (see above)
Active program number
Source of mixer data (program, sequence or master):
• For stereo mix
• For individual output/effects mix
• For effects
Record live mix changes setting (on/off)
Audio trigger note number assignment
Master mixer data (for each of the 64 note numbers 35-98):
• Stereo mixer volume and pan
• Individual out/effects mix assignment
• Individual out/effects mix volume
• Indiv Out/Effects Mix Volume Follows Stereo (yes/no)
Master effects settings
Page 226
Appendix
The PAR (system parameters) file
(Play/Record screen)
For each of the 64 MIDI output channel/port combinations:
• MIDI channel name
(16 Levels screen)
Parameter select for 16 levels (velocity or note variation)
(Tempo screen)
Master tempo
Tempo display mode (BPM or FPB)
Frames per second (24, 25, 29.97 drop or 30)
Tempo source (master or sequence)
Tap averaging count (2, 3 or 4 taps)
(Sync screen)
Sync input source (MIDI clock, MTC, SMPTE, FSK or 1/4 notes)
MIDI input used for receiving sync
MIDI clock sync: song pointer enable/disable
Shift Sync Early field (number of milliseconds)
1/4-note sync start (Bar 1 or This Bar)
Sync input enable/disable
MIDI clock output assignment
(Timing Correct screen)
Timing correct note value, swing, shift direction and amount
(Step Edit Options screen)
Event to insert
Auto Step Increment On Key Release setting (on/off)
Duration of recorded notes (as played, same as step)
Function of soft keys 1 and 2 (insert/delete or paste/cut)
Function of rewind & fast forward keys (next event or next step)
Step Edit Display Filter settings
(MIDI Routing screen)
Active track receive channel
Local Mode setting (on/off)
Soft Thru setting (on/off)
Controller assignment for Note Variation Slider
Convert Sustain Pedal To Duration setting (on/off)
(MIDI Input Filter screen)
Sound Generator Input Filter settings
Sequencer Input Filter settings
(OTHER screen)
Metronome volume, output select and rate
Metronome In Play setting (on/off)
Count In mode (record only, normal)
Foot Switch assignments (2)
Page 227
Appendix
(Auto Punch screen)
all settings
(Initialize Sequence screen)
all settings
(Erase screen)
all settings
(Sample New Sound screen)
Input (analog or digital)
Mode (stereo, mono-left or mono-right)
Monitor setting (on/off)
Record length
Record threshold
Pre-record time
(Copy Events screen)
Mode select (merge or replace)
(Edit Velocity/Duration screen)
Edit Velocity Or Duration select
Edit Action select (add, subtract, multiply or replace)
Value
(Simul Sequence screen)
Sequence number
(Hard Disk Format screen)
Disk Type select (normal or Syquest)
(Load MPC60 SEQ, ALL, SET or ST1 screens)
Conversion table (converts “drum” assignments to note numbers)
(All screens with two or more editable fields)
Cursor position (field number) within screen
Page 228
Appendix
MPC3000 Options
This section describes the various options available for the
MPC3000. To purchase any of these items, contact your Akai retailer. These options should be installed only by an authorized Akai
retailer or service center.
The SMPTE Option
The I-0055 SMPTE option gives your MPC3000 the ability to play
in sync to externally received SMPTE sync signals in one of four
frame formats: 24, 25, 29.97 drop, and 30. This option is not needed
to generate SMPTE code.
To Service Technicians
Installation of the I-0055 SMPTE/EBU IC chip
1. Open the operation panel of the MPC3000; Detach the CPU jack
daughter board (L4012B509B) on the CPU main board
(L4012A5010) by removing the 3 screws.
2. Attach the I-0055 IC chip to the IC26 socket on the CPU main
board (L4012A5010). Make sure that the No. 1 pin of the I-0055
chip is correctly placed as guided by the mark.
3. Replace the CPU jack daughter board (L4012B509B) on the CPU
main board (L4012A5010).
Expanding the Sound Memory
The MPC3000 includes 2 megabytes of sound memory but is expandable using common SIMM 1 megabyte or 4 megabyte memory
modules and an 8 megabyte memory board from Akai, the
EXM3008. Internally, there are two SIMM sockets and one connector for an Akai memory board. When the MPC3000 is shipped from
the factory, its SIMM sockets are empty and the Akai connector
contains an Akai 2 megabyte memory board. You can expand the
memory in either or both of two ways:
1. In the SIMM sockets, install either a pair of 1 megabyte SIMMs
(adding 2 megabytes) or a pair of 4 megabyte SIMMs (adding 8
megabytes). You must fill both sockets and the 2 SIMMs installed
must be identical. The SIMM modules must have a speed of 150
nanoseconds (ns) or faster.
2. Remove the standard 2 megabyte Akai memory board from its
socket and replace it with an Akai 8 megabyte memory board, the
EXM3008.
Page 229
Appendix
There are four possible combinations:
• Akai standard 2MB board + a pair of 1MB SIMMs: 4MB total
• Akai standard 2MB board + a pair of 4MB SIMMs: 10MB total
• Akai EXM3008 8MB board + a pair of 1MB SIMMs: 10MB total
• Akai EXM3008 8MB board + a pair of 4MB SIMMs: 16MB total
Akai’s EXM3008 board can be purchased and installed at your Akai
retailer.
The Video Output Option
The IB-CRT video option allows a video monitor to be connected to
the MPC3000, displaying the exact contents of the LCD screen at all
times. This provides an easy way to view SMPTE and bar.beat
location from across a room. The option adds a standard VGA video
output connector to the rear panel of the MPC3000 to which a
standard VGA monitor can be connected.
Page 230
Index
Index
Page 231
Index
+ and – keys 17
16 LEVELS key 26
Active Track, defined 35
All Notes Off 216
Analyzing Sequence message 223
Answers to frequent questions 222
Appendix 219
Audio Trigger 161
AUTO PUNCH key 60
Example 61
Bar.beat.tick fields 30
Basic Operations 13
Choice Fields 17
Command keys 16
Copying a sequence 84
Copying Bars 81
Copying Events 82
COUNT IN key 59
Cursor, cursor keys 15
Cutoff (cutting off one sound when another plays) 127
Data entry
+ and – keys 17
Choice fields 17
Command keys 16
Cursor 15
Data entry control 16
Data fields 15
Numeric keypad 16
Data Entry Control 16
Data fields 15
Deleting Bars 80
Digital sampling input 148
Disk
Auto loading sounds and sequences 22
Automatically loading files on power-up 182
Contents of file types 225
Copying a floppy 191
Disk Files, overview 164
DISK key 163
Erasing files 173
Formatting a floppy disk 186
Formatting and Using a SCSI hard disk 188
Loading a PAR file (system parameters) 182
Loading a program file (and its sounds) 178
Loading a sequence file 175
Loading a sound file 177
Loading ALL files (all sequences and songs) 177
Loading an APS file (all programs and sounds) 178
Loading an MPC60 version 1 or 2 SET or ST1 file 179
Loading files 173
Loading MPC60 version 1 or 2 ALL files 177
Loading MPC60 version 1 or 2 sequence files 175
Page 232
Index
Partitions of hard disk 188
Renaming files 173
S1000/S3000 files, loading 184
S1000/S3000 stereo files, loading 185
Saving a PAR file (system parameters) 172
Saving a sequence 166
Saving a single program (and its sounds) 169
Saving a single sound 168
Saving an ALL file (all sequences and songs) 167
Saving an APS file (all programs and sounds) 170
Saving files 166
Drum Tracks 30, 35
EDIT LOOP key 103
Edit Loop, using as an undo function 104
Edit Note Data (global editing of note events) 86
Effects 145
Envelope (volume) 125
ERASE key 72
Erasing notes in real time 72
Erasing notes while stopped 72
FAST FORWARD keys 40
Filter Envelope 129
Filter, dynamic 128
Foot Switches 64
Free Sequence Memory 64
FULL LEVEL key 23
Gain Switch (rear panel) 152
Getting around on the MPC3000 15
HELP key 18
Hooking up your system 14
Individual out/effects mixer 136
Inserting Blank Bars 79
Irregular timing 222
Local Mode 210
LOCATE key 41
Looping, sequence 34
MAIN SCREEN key 32
Metronome settings 63
MIDI
All notes off 216
Assigning Pads to Note Numbers 208
Feedback loop 211
Implementation Charts 217
Input Filter 213
Local Mode 210
MIDI key 207
MIDI Routing 210
Output Channel Assignment for tracks 36
Receive Channel 210
Soft Thru 210
MIDI Channels 30
MIDI System-Exclusive Data, recording 70
Page 233
Index
MIDI Tracks 30, 35
Mix Data, setting all channels at once 141
Mix, automated 143
Mixer source select 142
MIXER/EFFECTS Key 133
Mixers, text view 139
Multichannel Sequence Recording 67
Note Number Assignment, globally editing 89
Note Number, defined 20
Note Repeat 52
Note Variation
16 LEVELS key 26
AFTER key 26
ASSIGN key 24
Controlling from external MIDI controller 211
Defined 24
Globally editing 90
Slider 24
Now field (current location counter) 37
Numeric Keypad 16
Options for MPC3000 229
OTHER key 63
OVERDUB key 39
Overdub Mode, defined 39
PAD BANK key 22
Pad, defined 20
PLAY key 39
PLAY START key 39
PLAY/RECORD keys 39
Play/Record screen 32
Poly Mode (poly, mono or note off) 126
Programs
Active Program, defined 119
Copying and Initializing 130
Cutoff (cutting off one sound when another plays) 127
Defined 21, 116
Effects 145
Filter envelope 129
Filter, dynamic 128
Graphic representation of 117
How to create 118
Individual out/effects mixer 136
Mix data, text view 139
Note Numbers 116
Pad Banks 22
Pad, defined 20
Playing Simultaneous Sounds 120
Poly mode (poly, mono or note off) 126
PROGRAM/SOUNDS key 115
Selecting 23
Selecting the active program and assigning sounds 119
Sound Assignment mode 120
Page 234
Index
Stereo Mixer 134
Switching sounds depending on Envelope Decay 122
The MIXER/EFFECTS Key 133
Tuning 126
Velocity modulation of attack, start address & volume 126
Velocity Switching between sounds. 121
Volume Envelope 125
Punching in and out 33, 39, 40
Record 16 Channels 67
RECORD key 39
Record Level Control 152
Record Ready mode 32
Reversing sample data 156
REWIND keys 40
Sample data, editing 156
Sampling a new sound 148
Sampling, an example 152
Sampling, balanced inputs 151
Sampling, stereo 148
SEQ EDIT key 77
Sequence, defined 19
Sequencer, using the MPC3000’s sounds and pads with another 224
Sequences
Active Track, defined 35
Bar.beat.tick fields 30
Changing while playing 32
Copying 84
Copying bars 81
Copying events 82
Data Organization 30
Defined 19
Deleting 74
Deleting all 74
Deleting bars 80
Drum Tracks 35
Editing 71
Editing note data (global editing of note events) 86
Erasing 72
Erasing notes in real time 72
Erasing notes while stopped 72
Globally editing drum note number assignment 89
Globally editing velocity or duration data 87
Initializing 75
Inserting blank bars 79
Looping 34
MIDI Channels 30
MIDI Tracks 30, 35
Note Variation Data, globally editing 90
Play/Record screen 32
Program Number Assignment for tracks 37
Punching in and out 33, 40
Record all 16 MIDI channels 67
Page 235
Index
Record Ready mode 32
Recording 29, 39
Recording with multiple tracks, example 44
Recording, example 42
SEQ EDIT key 77
Shift Timing 85
Step Editing (visual editing) 92
Step Recording 102
Ticks 30
Track, defined 19
Transposing 105
Shift Timing 85
Shift Timing (in Timing Correct) 50
SIMUL SEQ key 62
Soft Keys 17
Soft Thru, MIDI 210
Songs
An example of creating 112
Converting a song into a long sequence 114
Defined 19
Overview 108
SONG key 109
Song Mode screen 109
Sound Module, using the MPC3000 as a 223
Sounds
Defined 20
Deleting all 160
Digital sampling input 148
Finding the Best Soft Start 156
Gain Switch (rear panel) 152
PROGRAM/SOUNDS key 147
Record Level Control 152
Renaming, copying and deleting 158
Reversing sample data 156
Sample data, editing 156
Sampling a new sound 148
Sampling, balanced inputs 151
Sampling, stereo 148
Soft end 154
Soft start 154
Sound memory expansion option 229
Trigger from audio source 161
Tuning 154
Volume 154
STEP EDIT key 92
Step Edit Options 99
Step Edit, event types 95
Step Edit, using 93
Step Recording 102
Stereo Mixer 134
STOP key 39
Sustain Pedal, converting to note durations 211
Page 236
Index
Swing 50
Sync
1/4 note clicks 198
1/4 note clicks, syncing to 206
1/4-note clicks 195
FSK24 195, 198
FSK24, syncing to 204
MIDI clock 194, 195
MIDI clock, generating 199
MIDI clock, syncing to 201
MIDI time code 194, 197
MIDI time code, syncing to 204
Outputting sync 199
SMPTE 194, 196
SMPTE option 229
SMPTE, generating 199
SMPTE, syncing to 201
Sync screen 194
Turning sync input on and off 199
System Parameters, initializing 66
System-Exclusive Data, recording 70
Tap Averaging 55
TAP TEMPO key 58
Technical specifications 220
Tempo
Adjusting 34, 53
BPM/FPB 54
BPM/FPB select 33
Frames/second 54
Source select (master or sequence) 34, 53
Sync, external 193
TAP TEMPO key 58
Tap Tempo, Tap Averaging 55
Tempo Changes, mid-sequence 56
Tempo screen 53
TEMPO/SYNC key, sync functions 193
Ticks 30
Time Signature
Viewing 34
Viewing and changing 77
Timing Correct
Note Repeat 52
TIMING CORRECT key 49
Timing delays 222
Track, defined 19, 30
Tracks, muting 38
Tracks, rearranging order of 78
Tracks, soloing 38
TRANSPOSE key 105
Transposing in real time while playing 106
Troubleshooting 222
Tuning (program data) 126
Page 237
Index
Undo, using Edit Loop key 104
Velocity modulation of attack, start address & volume 126
Velocity or duration data, globally editing 87
Video output option 230
WAIT FOR KEY key 59
[<<] and [>>] keys 40
[<] and [>] keys 40
Page 238
SOFTWARE UPDATE
MIDI PRODUCTION CENTER
Software version 3.1
WARNING
To prevent fire or shock hazard, do not
expose this appliance to rain or moisture.
Operator's Manual
New Features of Version 3.1
Saving and Loading Standard MIDI Files .................................................... 1
Loading Sample Files From Akai S1000/S3000
CD-ROMs or Hard Disks .............................................................................. 5
Connecting Multiple SCSI Devices, Making a SCSI
Device Active Without Recycling Power ................................................. 7
MIDI Machine Control ..................................................................................... 10
Sending MIDI Time Code In Real Time While Playing ............................ 12
MIDI Sample Dump .......................................................................................... 13
Saving Program or APS Files Without Sounds,
Optional Overwriting of Sounds During Program
Save or Load ................................................................................................. 17
New Sound Edit Options— Delete Before Soft Start and
Delete After Soft End ................................................................................. 21
Improved Speed of Saving to Hard Disk ..................................................... 22
MPC3000 Software Update Version 3.1 Operator’s Manual
Saving and Loading Standard MIDI Files
MPC3000 sequences may be saved to floppies as Standard MIDI Files, and
Standard MIDI Files may be loaded from floppies into MPC3000 sequences.
This permits the transfer of sequences between the MPC3000 and any MSDOS/Windows or Macintosh sequencer.
A Standard MIDI File is an industry-standard file format for the exchange of
MIDI sequences between sequencers. There are three types of MIDI files:
Type 0:
In this type of MIDI file, all events are contained in a single track,
each event having a unique MIDI channel assignment. This format
is commonly used in simple MIDI file players.
Type 1:
In this type of MIDI file, events are organized into separate tracks,
similar to the MPC3000’s sequence structure. This format is best for
exchanging sequences between multi-track sequencers because the
track separation is maintained.
Type 2:
This format is not supported by the MPC3000.
When the MPC3000 saves a MIDI file to a floppy, it may be loaded directly
into any MS-DOS/Windows computer sequencer. This is because the MPC3000
1.44 MB floppy disk format is the same as that used in MS-DOS/Windows
computers. Conversely, if you save a MIDI file to a floppy from a sequencer
running on a MS-DOS/Windows computer, that floppy may be directly read
by the MPC3000. To exchange MIDI files between the MPC3000 and a
Macintosh sequencer, you must either use Apple’s System 7.5, which is able to
directly save to and read MS-DOS/Windows floppies, or use the Apple File
Exchange utility to translate the MIDI file between MS-DOS/Windows and
Macintosh file formats.
When a MIDI file is saved from the MPC3000, it has an eight character
filename (taken from the first eight characters of the sequence name) and a
three letter extension of “MID”. The MPC3000 will read any MIDI file with an
extension of “MID”, “SMF” or “MFF”.
Page 1
MPC3000 Software Update Version 3.1 Operator’s Manual
Saving a Standard MIDI File
To save a standard MIDI file, go to the “Save a Sequence” screen by pressing
DISK, then 1:
============ Save a Sequence
Seq:23-Sequence_name
Disk:SCSI DISK PART A
Save as:MIDI FILE TYPE 1
===========
Size:
0K
Free:
793K
Drum ch:10A
========================================
<Do it>
<Select disk>
Two new fields exist, Save as and Drum ch:
• The Save as field:
This field allows you to select which type of file to save— either a normal
MPC3000 sequence file or a Standard MIDI File. This field is a choice field
with three options:
1. MPC SEQ FILE:
Select this if you want to save your sequence in the normal MPC3000
sequence file format.
2. MIDI FILE TYPE 0:
Select this to save your file as a type 0 MIDI file. All tracks will be
merged together into the MIDI file’s single track, with each event
retaining the MIDI channel assignment of the track it previously
existed within. Select this format if you want your MIDI file to be
played in a simple MIDI file player.
3. MIDI FILE TYPE 1:
Select this to save your file as a type 1 MIDI file. Each track will be
saved in its own separate track within the MIDI file, and each event
is given the MIDI channel assignment of its original track. Select
this format if you want to maintain track separation when transferring your sequence to another sequencer.
COMMENT: If you save your sequence as a MIDI file, the contents of
the following fields in the Play/Record screen will not be saved to the
file: Loop, Type, On, the auxiliary MIDI channel/port field, and
Vel%. This is because the MIDI file format does not support these
data items.
Once saved, the new MIDI file’s name is created from the first eight characters of the sequence name and has an extension of “MID”.
Page 2
MPC3000 Software Update Version 3.1 Operator’s Manual
Loading a Standard MIDI File
In order to load a MIDI file, it must exist on a MS-DOS/Windows floppy disk
formatted to either 1.44 MB or 720 KB. (The MPC3000’s 1.44 MB floppy disk
format is the same as MS-DOS/Windows 1.44 MB floppy disks.) It must have
a standard eight character MS-DOS/Windows filename with a three letter
extension of either MID, SMF or MFF. MIDI files on Macintosh disks may not
be loaded directly. They must first be copied to MS-DOS/Windows 1.44 MB
disks using Apple File Exchange or System 7.5.
To load a MIDI file of this type, insert the disk and go to the “Load, erase,
rename” screen by pressing DISK, then 7. Select the MIDI file in the File
field, then press <Load>. The following screen will appear:
============ Load MIDI File ============
Load into sequence:02-(unused)
DRUM tracks from MIDI channel:10
Arrange tracks:AS IN FILE (NORMAL)
========================================
<Do it>
The fields are:
• The Load into sequence field:
Enter the sequence number in memory to load into.
• The DRUM tracks from MIDI channel field:
Tracks in MIDI files do not have a Type assignment (DRUM or MIDI) so when
loading a MIDI file, the MPC3000 doesn’t know whether to assign any of the
newly created tracks to DRUM in the Type field. If you know which MIDI
channel is used in the MIDI file for drum notes, enter that number in this
field. When loaded, any tracks created from events assigned to this channel
number will be given a Type assignment of DRUM. Normally, MIDI files
use channel 10 for drum notes, so it is usually best to enter 10 here. If you
don’t want any tracks to be assigned to DRUM, enter NONE here.
• The Arrange tracks field:
This field only appears if a type 1 MIDI file has been selected for loading. It
has two options:
1. AS IN FILE (NORMAL):
If this option is selected, the newly created sequence will have the
same track numbering arrangement as in the file. Track 1 will map
to track 1, track 2 to track 2, 3 to 3, etc. This is the normal setting.
Page 3
MPC3000 Software Update Version 3.1 Operator’s Manual
2. ONE PER MIDI OUTPUT:
In this option is selected, one track is created for each channel/port
assignment in use within the MIDI file, and all events are mapped to
tracks with the same channel/port assignment, regardless of their
original track numbers. For example, if a MIDI file to be loaded contains events assigned to channel/port 1A, 6D, 7B and 2C, then the
resulting sequence would contain four tracks assigned to these channel/ports, and containing the events that had the same channel/port
assignments in the MIDI file. This option will cause different tracks
containing the same channel/port assignments to be merged together,
but allows MIDI files with more than 99 tracks to be loaded.
COMMENT: If a type 0 file is selected for loading, the message “(Format 0 file, will auto-map tracks)” appears in place of this field. This
indicates that, as with the ONE PER MIDI OUTPUT selection, one
track will be created for each channel/port assignment that exists in
the file’s single track.
To load the MIDI file, set the fields as desired then press <Do it>.
Page 4
MPC3000 Software Update Version 3.1 Operator’s Manual
Loading Sample Files From Akai S1000/S3000
CD-ROMs or Hard Disks
Earlier versions of the MPC3000 system software supported the loading of
sample files from S1000 or S3000 formatted floppy disks. Now, sample files
may also be read from S1000/S3000 hard disks or CD-ROMs.
To load a sample file from an S1000/S3000 hard disk or CD-ROM, first you
must connect the hard disk or CD-ROM drive to the SCSI port and make it
active (recognized by the MPC3000 as ready for use). To do this, read the
section of this manual entitled “Connecting multiple SCSI devices, making a
SCSI device active without recycling power”. The instructions for making an
MPC3000 hard disk, an S1000/S3000 hard disk, or a CD-ROM drive containing an S1000/S3000 CD-ROM are the same.
Once you have made the S1000/S3000 hard disk or CD-ROM active, the
remaining instructions are nearly the same for reading S1000/S3000 floppies,
hard disks or CD-ROMs.
Once the S1000/S3000 hard disk or CD-ROM is active, go to the “Load S1000/
S3000 sample files” screen by pressing DISK, then 8:
===== Load S1000/3000 Sample Files =====
File:Ambient_snar
Size:
44K
Disk:FLOPPY DISK
Free(snd): 1916K
Volume:KICKS+SNARES
========================================
<Load>
<Sel Vol> <Sel Dsk>
Two new fields and two new soft keys exist:
• The Disk field:
As in any of the save and load screens, this field shows the active disk device,
either the floppy or one of the SCSI disk partitions. S1000/S3000 hard disks
and CD-ROMs have partitions just like MPC3000 hard disks. This field is for
display only and cannot be edited— you must use the <Sel Dsk> soft key
to change the active disk device or partition.
• The <Sel Dsk> soft key:
As in any of the save and load screens, pressing this soft key presents a screen
allowing you to change the active disk device or partition.
Page 5
MPC3000 Software Update Version 3.1 Operator’s Manual
• The Volume field:
On S1000 or S3000 hard disks or CD-ROMs, each partition may contain up to
100 volumes, in which the actual files are contained. Volumes act as directories— files are contained within volumes, and volumes are contained within
partitions. This field displays the active volume and only appears if a SCSI
disk partition, not the floppy, is selected in the Disk field. It is for display
only and cannot be edited. To change the active volume, you must press <Sel
Vol>.
• The <Sel Vol> soft key:
Pressing this soft key presents a screen that allows you to change the active
volume of the S1000/S3000 hard disk or CD-ROM. This field appears only if a
S1000 or S3000 hard disk or CD-ROM is active and one of the disk partitions
is currently selected in the Disk field above.
Other than the above changes, this screen operates as in previous system
software versions.
Page 6
MPC3000 Software Update Version 3.1 Operator’s Manual
Connecting Multiple SCSI Devices, Making a
SCSI Device Active Without Recycling Power
In previous versions of the system software, the only way to make a SCSI
hard disk active (recognized as ready for use by the MPC3000) was to turn the
MPC3000’s power on while the SCSI disk was connected and turned on. Also,
it was impossible to connect two or more SCSI devices to the MPC3000 and
switch between them while working.
Now, up to seven SCSI devices may be connected simultaneously, and you
may make any one of the connected devices active at any time without recycling power.
To make a SCSI device active, or to make a different SCSI device active when
two or more are connected, go to the “SCSI status, make SCSI device active”
screen by pressing DISK, then 9, then 4:
============= SCSI Status ==============
Status:NO SCSI DEVICE IN USE
======= Make SCSI Device Active ========
SCSI device address to make active:AUTO
Timeout for SCSI scan:30
========================================
<Make active>
The fields and soft key in this new screen are:
• The Status field:
This field shows whether a SCSI device is currently in use and if so, tells the
SCSI address of that device. There are eight possible SCSI addresses, 0 - 7.
Your external SCSI hard disk has a switch to select one of these addresses. If
a SCSI device is currently active, this field will display the address of that
device. It is a display field and cannot be directly edited by the cursor. The 8
possible status messages are:
NO SCSI DEVICE IN USE
SCSI ID 0 IN USE
SCSI ID 1 IN USE
SCSI ID 2 IN USE
SCSI ID 3 IN USE
SCSI ID 4 IN USE
SCSI ID 5 IN USE
SCSI ID 6 IN USE
Page 7
MPC3000 Software Update Version 3.1 Operator’s Manual
Only addresses 0 - 6 may be used for external SCSI devices. Address 7 cannot
be used because it is the address of the MPC3000.
• The SCSI device address to make active field:
This field determines which SCSI address will be made active when the power
is turned on or when <Make active> is pressed. It is a choice field with
the following options:
AUTO
(scan for lowest addressed SCSI device)
0
1
(scan for SCSI device address 0)
(scan for SCSI device address 1)
2
3
(scan for SCSI device address 2)
(scan for SCSI device address 3)
4
5
(scan for SCSI device address 4)
(scan for SCSI device address 5)
6
(scan for SCSI device address 6)
If only one SCSI device is connected to the SCSI port, select AUTO. Then,
when <Make active> is pressed or when power is turned on, the single
device will be made active regardless of its address setting, 0 - 6. (If two or
more devices are connected when the “AUTO” scan is done, only the device
with the lowest address will be made active.) In operating system 3.08 or
earlier, the MPC3000 always performed an “AUTO” scan at power-on.
It is only necessary to enter a specific SCSI address (0 - 6) in this field if more
than one SCSI device is connected to the SCSI port. In this case, enter the
specific address of the device you want to make active (0 - 6). Then, when
<Make active> is pressed or when power is turned on, the SCSI port
will be scanned and only the device with the specified address will be made
active.
• The Timeout for SCSI scan field:
This field has the same function as the Power-on SCSI search
delay field, used in operating system version 3.08 or earlier. When <Make
active> is pressed or when power is turned on, the MPC3000 continuously scans the SCSI port for a device to make active. If it doesn’t find a device, it continues its scan for the number of seconds entered in this field, then
displays an error message. Since the scan is usually done at power-on when
both the MPC3000 and the hard disk are turned on simultaneously, it is important to give enough waiting time for the hard disk to spin up to operating
speed. Most hard disks come up to operating speed within about 20 seconds,
so the default setting here is 30 seconds. If the MPC3000 is not recognizing
your hard disk when both devices are powered on simultaneously, try a longer
scan time in this field.
COMMENT: If you aren’t using a hard disk and you’d like to eliminate this power-on scan time, select 0 in this field.
Page 8
MPC3000 Software Update Version 3.1 Operator’s Manual
• The <Make active> soft key:
Press this soft key to make the connected SCSI hard disk active. Whenever
the MPC3000 is turned on, it automatically performs the same function as
pressing this soft key. In either case, the Status field will subsequently
show that the hard disk is active.
Hard Disk Format now allows selection of SCSI address
When formatting a SCSI hard disk, it is now possible to specify the SCSI
address of the hard disk to be formatted. Press DISK, 9, then 3 to go to the
Format Hard Disk screen:
=========== Format Hard Disk ===========
SCSI address:AUTO
Formatting will erase all existing data
and divide the disk into 'partitions' of
less than 30 megabytes each.
========================================
<Next screen>
The new field, SCSI
address, has the same function as the SCSI
device to make active field described above— it contains the
address (0 - 6) of the external SCSI hard disk to be formatted. If the only SCSI
device connected is the hard disk to be formatted, enter AUTO here and the
MPC3000 will automatically determine its SCSI address. (It is strongly recommended to have no other SCSI devices connected during a hard disk format.) If more than one SCSI device is connected, enter here the SCSI address
of the hard disk drive to be formatted (0 - 6).
Page 9
MPC3000 Software Update Version 3.1 Operator’s Manual
MIDI Machine Control
MIDI Machine Control (abbreviated “MMC”) is a standard system of communication over MIDI that allows the MPC3000 to remotely control the transport of an MMC-compatible audio or video recorder. By using MIDI Machine
Control, the MPC3000 can remotely play, record, stop or reposition an external recorder.
To use MIDI Machine Control, press MIDI, then 4, and the MIDI Machine
Control screen will appear:
========= MIDI Machine Control =========
Send MMC:OFF
MIDI out:A
(Shortcut to toggle MMC on or off from
Play/Record or Song screens: hold STOP
& press PLAY.)
========================================
To turn MMC on:
1. Connect a MIDI cable from one of the MPC3000’s MIDI outputs to
the external recorder’s MIDI input.
2. Set the MMC field in the above screen to ON.
3. Set the MIDI out field in the above screen to the same MIDI
output port to which you connected the external recorder.
4. Set the external recorder to respond to MMC commands. (The external recorder must be MMC-compatible.)
While MMC is on, the keys in the Play/Record section of the front panel have
different functions:
PLAY: This does not play the MPC3000 sequencer. Instead, it sends
an MMC “deferred play” command to the external recorder, causing
it to play.
STOP: This does not stop the MPC3000 sequencer. Instead, it sends
an MMC “stop” command to the external recorder.
PLAY START: This does not play the MPC3000 sequencer. Instead,
it sends an MMC “Locate (to start)” command, followed by a “deferred play” command, causing it to play from the start of the recording.
Page 10
MPC3000 Software Update Version 3.1 Operator’s Manual
“<<”, “<”, LOCATE, “>”, and “>>”: In addition to their normal
MPC3000 functions, these keys cause MMC “Locate” commands to
be sent out, repositioning the external recorder.
RECORD + PLAY pressed together: This does not enter record
mode on the MPC3000’s sequencer. Instead, it sends an MMC “Record
strobe” command to the external recorder, causing it to enter record
mode.
Whenever an MMC command is sent, the bottom line of the screen briefly
displays a message indicating that the command was sent.
MMC is most useful if the MPC3000 is also set to respond to SMPTE or MIDI
Time Code from the external recorder. This allows the MPC3000 not only to
remotely control the external recorder’s transport functions, but also for both
devices to play in sync. (To learn how to set the MPC3000 to receive incoming
SMPTE or MIDI Time Code sync, read the chapter of the operator’s manual:
“Syncing to tape and other devices”.)
If both MMC is on and the MPC3000 is receiving SMPTE or MTC sync from
the external recorder, the PLAY, STOP and PLAY START keys act as follows:
PLAY: When pressed, the external recorder starts playing, causing
its sync signal to be sent. When the MPC3000 receives the sync signal, it starts playing in sync.
STOP: When pressed, the external recorder stops playing, causing
its outgoing sync signal to stop. When the MPC3000 stops receiving
sync, it stops playing.
PLAY START: When pressed, the external recorder repositions to
the start of the song and starts playing, causing its sync signal to be
sent. When the MPC3000 receives the sync signal, it starts playing
in sync.
When using MMC, it is useful to quickly turn MMC on or off. For example,
you may want to quickly turn MMC off in order to hear the MPC3000 play
alone, then turn it back on in order to play both devices together. As the MMC
screen shows, a shortcut has been provided for this purpose: from the Play/
Record or Song screens, hold the STOP key and press PLAY.
Page 11
MPC3000 Software Update Version 3.1 Operator’s Manual
Sending MIDI Time Code In Real Time While Playing
The MPC3000 may now send MIDI Time Code out over MIDI in real time as
a sequence or song plays. MIDI Time Code is an industry-standard for sending SMPTE time code data over MIDI.
To send MIDI Time Code in real time as a sequence or song plays, go to the
Sync screen by pressing TEMPO/SYNC, then <Sync>:
===== Sync In ======
Mode:MIDI CLOCK
Shift early (ms):20
MIDI Input:2
Song pointer:ON
==== Sync Out ====
MIDI clock:OUT A
MIDI tm code:OUT A
====================
<SyncIn=OFF>
==================
<GenSMPTE>
Notice the new MIDI tm code field on the right side of the screen. It is a
choice field with five options:
OFF: No MIDI Time Code is sent.
OUT A: MIDI Time Code is sent out over MIDI output A.
OUT B: MIDI Time Code is sent out over MIDI output B.
OUT C: MIDI Time Code is sent out over MIDI output C.
OUT D: MIDI Time Code is sent out over MIDI output D.
Page 12
MPC3000 Software Update Version 3.1 Operator’s Manual
MIDI Sample Dump
MIDI Sample Dump is an industry-standard format for transferring sample
data between sampling devices over MIDI. To use this feature, you must first
connect the MPC3000 to the external sampler using either one or two MIDI
cables:
1.
Using one MIDI cable:
This is called “open loop” mode and although simpler is also less reliable
and often slower than closed loop mode. If sending data from the MPC3000
to the external sampler, connect a MIDI cable from one of the MPC3000’s
MIDI outputs to the MIDI input of the external sampler. If sending data
from the external sampler to the MPC3000, connect a MIDI cable from
the external sampler’s MIDI output to one of the MPC3000’s MIDI inputs.
2.
Using two MIDI cables:
This is called “closed loop” mode and is more reliable and often faster
than open loop mode. Regardless of the direction of data transfer, connect
one MIDI cable from one of the MPC3000’s MIDI outputs to the MIDI
input of the external sampler and another MIDI cable from the external
sampler’s MIDI output to one of the MPC3000’s MIDI inputs.
To send or receive a MIDI Sample Dump, press the PROGRAM/SOUNDS key,
then type 9, and the following screen will appear:
====== MIDI Sample Dump (Receive) ======
MIDI input:2
MIDI output:B
MIDI channel: 1
Free samples: 981K
(Send from ext device or hit <Send req>)
===== Select sound for <Send req> ======
Requested sound:
1
========================================
<Send req><Send/recv>
This is the MIDI Sample Dump screen. There are actually two screens— one
for receiving and one for sending. To toggle between the send and receive
screens, press the <Send/recv> soft key.
Receiving and sending MIDI sample dumps are individually described in the
following two sections.
Page 13
MPC3000 Software Update Version 3.1 Operator’s Manual
Receiving a MIDI sample dump from an external sampler
To receive a MIDI Sample Dump, make sure that the receive screen is showing. If not, press <Send/recv>. The screen fields and soft keys are described below:
• The MIDI input field:
This is the MIDI input jack number (1 or 2) through which the sound data will
be received. Set this field to the number of the MIDI input jack you used to
connect to the external sampler.
• The MIDI output field:
This is the MIDI output jack (A, B, C or D) through which the sound data will
be sent. Set this field to the MIDI output jack you used to connect to the
external sampler.
• The MIDI channel field:
Enter here the same MIDI channel that the external sampler is set to transfer on.
• The Free samples field:
This field is not changeable— it displays the amount of memory, in kilosamples,
that is currently available to load new sounds into. This number should be
exactly double the number of free kilobytes, shown in the “Load, erase, rename file” screen.
• The Requested sound field:
This field is used only if you are using “closed loop” mode (two MIDI cables).
Enter the number of the sound (of the sounds currently loaded in the external
sampler) that you want to receive.
• The <Send req> soft key:
This soft key is used only if you are using “closed loop” mode (two MIDI cables).
When pressed, the MPC3000 sends out a “dump request” message to the external sampler, tell it to start sending the sound number entered in the Requested sound field.
• The <Send/recv> soft key:
Pressing this soft key toggles between the send and receive screens.
You may start the sample dump in one of two ways:
1.
At the external sampler.
While the MPC3000’s receive screen is showing, it stands ready to receive a sample dump. Initiate the transfer at the external sampler.
2.
Send a “dump request” to the external sampler.
This method may only be used if the two devices are connected using
“closed loop” mode (two MIDI cables). First, set the Requested sound
Page 14
MPC3000 Software Update Version 3.1 Operator’s Manual
field to the sound number (in the external sampler) that you want transferred. Then, press <Send req>. Immediately, the MPC3000 sends
out a “dump request” message to the external sampler, telling it to start
sending the specified sound number.
Regarding of which of the above two methods you use to initiate the sample
dump, once the transfer begins the RECORD light will begin blinking and the
bottom line of the screen will display the following message:
Receiving sample dump...
<Cancel>
Pressing <Cancel> at any time during the transfer will abort the transfer.
Once the transfer is complete, the following screen will appear:
=========== MIDI Sample Dump ===========
Sound is received. Press <Play> to hear
it. To rename it, enter LETTER mode by
turning the data knob, typing letters
and pressing ENTER, then press <Done>.
New sound name:SOUND001
========================================
<Play>
<Done>
Follow the on-screen instructions to play or rename the new sound, then press
<Done>. The sound now exists in memory and you may assign it to a program.
Sending a MIDI sample dump to an external sampler
To send a MIDI Sample Dump, make sure that the send screen is showing. If
not, press <Send/recv>. The screen will appear as follows:
======== MIDI Sample Dump (Send) =======
MIDI input:2
MIDI output:B
MIDI channel: 1
(Select sound then press <Send>)
======== Select sound to <Send> ========
Sound:SOUND_NAME
(
0) L/R:LEFT
========================================
<Send>
<Send/recv>
<Play>
The screen fields and soft keys are described below:
Page 15
MPC3000 Software Update Version 3.1 Operator’s Manual
• The MIDI input, MIDI output, and MIDI channel fields,
and the <Send/recv> soft key:
These fields and soft key operate exactly as in the receive screen described in
the previous section.
• The Sound field:
In this choice field, select the sound to be sent from an alphabetical list of
sounds in memory. To the right of this field is the selected sound’s number
within the list of sounds.
If the selected sound is stereo, an additional field, L/R, will appear further
to the right. Because MIDI Sample Dump may only transfer mono sounds,
you must select in this field to send either the LEFT or RIGHT side of the
stereo sound.
• The <Send> soft key:
Pressing this soft key will cause the MPC3000 to start sending the sound
selected in the Sound field.
• The <Play> soft key:
Press this soft key to hear the sound selected in the Sound field.
You may start the sample dump in one of two ways:
1.
Set the Sound field to the sound you want to transfer, then press
<Send>. Immediately, the MPC3000 starts sending the sample data.
2.
Send a “dump request” from the external sampler.
This method is possible only if “closed loop” mode (two MIDI cables) is in
use. When the MPC3000’s send screen is showing, it stands ready to send
sample data in response to receiving a “dump request” message. Do the
required procedure in order to send the dump request message from the
external sampler.
Regarding of which of the above two methods you use to initiate the sample
dump, once the transfer begins the PLAY light will start blinking and the
bottom line of the screen will display the following message:
Sending sample dump...
<Cancel>
Pressing <Cancel> at any time during the transfer will abort the transfer.
Once the transfer is complete, the bottom line of the screen will return to
normal.
Page 16
MPC3000 Software Update Version 3.1 Operator’s Manual
Saving Program or APS Files Without Sounds,
Optional Overwriting of Sounds During Program
Save or Load
In previous system software versions, three conditions existed that are now
enhanced:
When a program was saved to disk, all sounds used by the program were
automatically saved to disk at the same time. Also, when saving an APS file,
all sounds in memory were automatically saved to disk at the same time.
Now, when saving a program or APS file, you may opt to save only the PGM or
APS file without the accompanying sounds.
If when saving a program and its sounds, a sound file existed on the destination disk having the same name as a sound to be saved with the program, that
sound would not be saved. (The sound file on disk would not be overwritten.)
Now, when saving a program you may choose to either overwrite or not overwrite sound files on disk having the same names as sounds to be saved.
If when loading a program, a sound existed in memory having the same name
as a sound file to be loaded with the program, that sound would not be loaded.
(The sound file in memory would not be overwritten.) Now, when loading a
program you may choose to either overwrite or not overwrite sounds in memory
having the same name as sounds to be loaded.
The enhancements are described in the following three sections.
Enhancements to the “Save a program” screen
In order to add the enhancements, the “Save a Program” screen has been
enhanced. This screen is accessed by pressing DISK, then 4:
========= Save a Program (PGM) =========
Program:19-Program name
Size:
0K
Disk:SCSI DISK PART A
Free:
793K
Save:PROGRAM+SOUNDS (NORMAL)
Replace same sounds on disk:NO (FASTER)
========================================
<Do it>
<Select disk>
Page 17
MPC3000 Software Update Version 3.1 Operator’s Manual
Two new fields exist:
• The Save field:
Program files contain no sound data so when saving a program, the sounds
used by the program are normally also saved at the same time. This choice
field permits the option of saving the program file by itself without the accompanying sound files. The two options are:
1. PROGRAM+SOUNDS (NORMAL):
This is the normal setting, saving first the program file then each
sound file used within the program.
2. PROGRAM ONLY (NO SOUNDS):
This option allows only the program file to be saved without any
sounds.
• The Replace same sounds on disk field:
This field appears only if PROGRAM+SOUNDS (NORMAL) is selected in
the field above. It has two options:
1. NO (FASTER):
When saving a program (and its sounds), if a sound file exists on disk
with the same name as one of the sounds to be saved, the file is not
overwritten by the sound in memory. If when saving a program you
know that the sounds have not changed, this option will permit a
faster save.
2. YES:
When saving a program (and its sounds), if a sound file exists on disk
with the same name as one of the sounds to be saved, the disk file is
overwritten by the sound in memory. If when saving a program you
know that the sounds have changed, you should select this option.
Enhancements to the “Save all programs and sounds”
screen
In order to add the enhancements, the “Save All Programs” screen has been
enhanced. It is accessed by pressing DISK, then 5:
========== Save All Programs
==========
File name:File_name
Size:
0K
Disk:SCSI DISK PART A
Free:30793K
Save:APS FILE + SOUNDS (NORMAL)
Replace same sounds on disk:NO (FASTER)
========================================
<Do it>
<Select disk>
Page 18
MPC3000 Software Update Version 3.1 Operator’s Manual
Two new fields exist:
• The Save field:
Program files contain no sound data, so when saving a program the sounds
used by the program are normally also saved at the same time. This choice
field permits the option of saving the program file by itself without the accompanying sound files. The two options are:
1. APS FILE + SOUNDS (NORMAL):
This is the normal setting, saving first the APS file then each sound
file currently in memory.
2. APS FILE ONLY (NO SOUNDS):
This option allows only the APS file to be saved without any sounds.
• The Replace same sounds on disk field:
This field appears only if APS FILE +
selected in the field above. It has two options:
SOUNDS
(NORMAL) is
1. NO (FASTER):
When saving an APS file and sounds, if a sound file exists on disk
with the same name as one of the sounds to be saved, the file is not
overwritten by the sound in memory. If when doing an APS save you
know that the sounds have not changed, this option will permit a
faster save.
2. YES:
When saving an APS file and sounds, if a sound file exists on disk
with the same name as one of the sounds to be saved, the file is overwritten by the sound in memory. If when doing an APS save you know
that the sounds have changed, you should select this option.
Enhancements to the “Load a program” screen
In order to add the enhancements, the “Load a program” screen has been
enhanced. This screen is accessed by pressing DISK, then 7, then selecting a
PGM file in the File field and pressing <Load>:
============= Load Program =============
Program to load into: 1-PROGRAM_01
Replace same sounds in memory:NO(FASTER)
========================================
<Do it>
Page 19
MPC3000 Software Update Version 3.1 Operator’s Manual
A new field exists:
• The Replace same sounds in memory field:
This choice field has two options:
1. NO(FASTER):
When loading a program (and its sounds), if a sound file exists in
memory with the same name as one of the sounds to be loaded, the
sound is not overwritten by the sound on disk, and the program will
use the sound of the same name already in memory. If you don’t usually use different sound files with the same name in your sound library, choose this option because it will enable faster loading.
2. YES:
When loading a program (and its sounds), if a sound file exists in
memory with the same name as one of the sounds to be loaded, the
sound is overwritten by the sound on disk. If you often use different
sound files with the same name in your sound library, choose this
option to insure that the correct sound is always loaded with the
program.
COMMENT: If you select YES and you overwrite a sound in memory,
this may alter the sound of another program in memory that uses the
same sound. To avoid confusion, always try to avoid different sound
files in your library with the same name.
Page 20
MPC3000 Software Update Version 3.1 Operator’s Manual
New Sound Edit Options— Delete Before Soft
Start and Delete After Soft End
In previous system software versions, the Edit a Sound screen enabled the
deletion of any portion of a sound by setting the beginning and end of a “zone”,
then deleting it. However, this was cumbersome for performing the most common deletion: removing the unused portion of a sound before the soft start
and after the soft end.
Now, the Do field in the Edit a Sound screen contains two new editing options:
DEL BEFR SOFT ST (delete the area before the soft start)
DEL AFTR SFT END (delete the area after the soft end)
Page 21
MPC3000 Software Update Version 3.1 Operator’s Manual
Improved Speed of Saving to Hard Disk
In previous system software versions, saving to hard disk was slow. In this
version, the speed of saving to hard disk has been greatly improved.
Page 22
AKAI ELECTRIC CO., LTD.
Electronic Musical Instrument Div.
940912 Imprimé au Japan