1
USERS MANUAL
AX-100
AX-100 SB
Version 1.0-9/97
BLUE CHIP
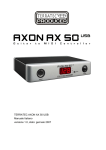
AXON AX-100 GUITAR TO MIDI CONVERTER
Table of Contents
Accessories AX-100 / AX-100SB ....................................................................................................... 7
AXON Setup ....................................................................................................................................... 8
Front Panel AX-100 ........................................................................................................................... 9
Rear Panel AX-100 .......................................................................................................................... 10
About the AXON AX 100 (-SB) ...................................................................................................... 11
Quickstart ......................................................................................................................................... 12
Basic Settings ................................................................................................................................... 12
Changing a preset sound ................................................................................................................. 14
About the User Interface of your AXON ....................................................................................... 16
The Four AXON Modes of operation ............................................................................................ 17
GLOBAL MODE ..................................................................................................................... 17
PRESET MODE....................................................................................................................... 17
UTILITY MODE ..................................................................................................................... 17
CHAIN MODE ........................................................................................................................ 17
GLOBAL MODE ............................................................................................................................. 18
Global Parameters .................................................................................................................... 18
BASIC CHANNEL .................................................................................................................. 18
HOLD CHANNEL .................................................................................................................. 18
SEQ CHANNEL ...................................................................................................................... 19
PBEND RANGE ...................................................................................................................... 19
SND PBENDRG ...................................................................................................................... 19
LOCAL MODE ........................................................................................................................ 20
TUNE BASE ............................................................................................................................ 20
GUITAR NO… ........................................................................................................................ 21
TYP ................................................................................................................................. 21
PICKUP .......................................................................................................................... 21
NOTE OFF LIM ............................................................................................................. 22
TRIG. LEVEL ................................................................................................................ 22
SENSE ............................................................................................................................ 22
PAN ENABLE ......................................................................................................................... 23
REV ENABLE ......................................................................................................................... 23
CHOR ENABLE ...................................................................................................................... 23
VAR ENABLE ......................................................................................................................... 23
CC DEFAULTS… .................................................................................................................... 24
PRESET MODE .............................................................................................................................. 25
Preset Parameters ..................................................................................................................... 25
Recalling Presets ...................................................................................................................... 25
Guitar Tuner ............................................................................................................................. 25
PRESET PROGRAMMING .................................................................................................... 26
String Split ............................................................................................................................... 26
Fret Split ................................................................................................................................... 26
Pick Split .................................................................................................................................. 26
Split Combinations ................................................................................................................... 26
Selecting Split Zones ............................................................................................................... 27
Changing the Split Parameters ................................................................................................. 27
2
User manual AXON AX-100 / AX-100 SB
AXON AX-100 GUITAR TO MIDI CONVERTER
BLUE CHIP
Choose Instrument .......................................................................................................... 28
BANK MSB / BANK LSB ................................................................................... 28
VOLUME ....................................................................................................................... 28
TRANSPOSE ................................................................................................................. 28
QUANTIZE .................................................................................................................... 28
PAN POS ........................................................................................................................ 29
PAN SPREAD ................................................................................................................ 30
REVERB ........................................................................................................................ 30
CHORUS ........................................................................................................................ 30
VARIATION ................................................................................................................... 30
VEL SENSE ................................................................................................................... 30
VEL OFFSET ................................................................................................................. 31
PICK CONTROL… ....................................................................................................... 31
PICK VAL1..................................................................................................................... 31
PICK VAL2..................................................................................................................... 31
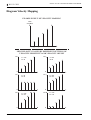
Diagram Velocity Mapping ............................................................................................................. 32
Changing split-common Parameters ........................................................................................ 33
Preset Name .................................................................................................................... 33
STRING MODE ............................................................................................................. 34
HOLDMD ....................................................................................................................... 34
COMMON ...................................................................................................................... 34
SEP… ............................................................................................................................. 34
HOLD PRESET .................................................................................................... 35
VOLUME: ............................................................................................................. 35
SEQ PATTERN ..................................................................................................... 35
SEQ TRACK ......................................................................................................... 35
SEQ TEMPO ......................................................................................................... 36
LAYER… ....................................................................................................................... 36
LAYER PRESET .................................................................................................. 36
SEQ PATTERN ..................................................................................................... 36
SEQ TRACK ......................................................................................................... 36
SEQ TEMPO ......................................................................................................... 37
ARPEG… ....................................................................................................................... 37
ARPEG PRESET .................................................................................................. 37
TEMPO ................................................................................................................. 37
LENGTH ............................................................................................................... 38
SCAN .................................................................................................................... 38
PATTERN .............................................................................................................. 38
SYNC .................................................................................................................... 40
OCTAVES ............................................................................................................. 40
REPEATS .............................................................................................................. 40
VELOCITY ........................................................................................................... 41
SEQ PATTERN ..................................................................................................... 41
SEQ TRACK ......................................................................................................... 41
Editing HOLD Presets .................................................................................................... 42
CNTRL… ....................................................................................................................... 42
HOLD CONTROLLER ........................................................................................ 42
SEQ PATTERN ..................................................................................................... 42
User manual AXON AX-100 / AX-100 SB
3
BLUE CHIP
AXON AX-100 GUITAR TO MIDI CONVERTER
SEQ TRACK ......................................................................................................... 43
SEQ TEMPO ......................................................................................................... 43
STACK... ............................................................................................................... 43
WHEELCNTL… ............................................................................................................ 43
NRPN/RPN… ................................................................................................................. 44
FINGER PICK ................................................................................................................ 45
STRING SPLIT .............................................................................................................. 45
FRET SPLIT ................................................................................................................... 45
PICK SPLIT 1 and 2 ....................................................................................................... 46
REV ................................................................................................................................ 46
CHOR ............................................................................................................................. 46
VAR ................................................................................................................................ 46
Chain Mode ...................................................................................................................................... 47
Creating Chain Presets ............................................................................................................. 47
CHAIN PRESET NAME ......................................................................................................... 47
PROGRAM .............................................................................................................................. 47
STEP ........................................................................................................................................ 48
Saving Chain Presets ................................................................................................................ 48
UTILITY MODE ............................................................................................................................. 49
Utility Parameters .................................................................................................................... 49
DISPLAY ................................................................................................................................. 49
PRESET NAMES .................................................................................................................... 50
DCLIC RESPNS ................................................................................................... 50
XMIT SYSEX… ...................................................................................................................... 51
RECEIVE SYSEX ................................................................................................................... 52
EDIT SEQUENCE… ............................................................................................................... 52
TEMPO ........................................................................................................................... 52
VOLUME ....................................................................................................................... 52
REVERB SEND ............................................................................................................. 53
CHORUS SEND ............................................................................................................. 53
VARIAT SEND ............................................................................................................... 53
MODE ............................................................................................................................ 53
PATTERN… ................................................................................................................... 53
TRACK… ....................................................................................................................... 54
EDIT QS300… ......................................................................................................................... 55
QS300 Voice ................................................................................................................... 55
ELEMENT ...................................................................................................................... 56
VOICE LEVEL .............................................................................................................. 56
EDIT ELMNT… ............................................................................................................ 56
WAVEFORM .................................................................................................................. 56
ELEMENT LEV ............................................................................................................. 56
VEL CURVE .................................................................................................................. 56
PANORAMA .................................................................................................................. 57
AMPLITUDE EG… ....................................................................................................... 57
ATTACK RATE .................................................................................................... 57
DECAY1 RATE .................................................................................................... 57
DECAY2 RATE .................................................................................................... 57
RELEASE RATE .................................................................................................. 57
DEC1 LEVEL ....................................................................................................... 57
DEC2 LEVEL ....................................................................................................... 57
4
User manual AXON AX-100 / AX-100 SB
AXON AX-100 GUITAR TO MIDI CONVERTER
BLUE CHIP
LFO… ............................................................................................................................. 58
LFO WAVE ........................................................................................................... 58
LFO INIT .............................................................................................................. 58
LFO SPEED .......................................................................................................... 58
LFO DELAY ......................................................................................................... 58
LFO FADETIME .................................................................................................. 58
LFO PMD .............................................................................................................. 58
LFO CMD ............................................................................................................. 59
LFO AMD ............................................................................................................. 59
TUNING… ..................................................................................................................... 59
NOTE SHIFT ........................................................................................................ 59
DETUNE ............................................................................................................... 59
PITCH SCALE ...................................................................................................... 59
PITCH CENTR ..................................................................................................... 60
RESONANCE ................................................................................................................ 60
VELO SENSE ................................................................................................................ 60
CUTOFF FREQ .............................................................................................................. 60
VEL FEG LEV ............................................................................................................... 60
VEL FEG RATE ............................................................................................................. 60
FILTER EG… ................................................................................................................. 61
ATTACK RATE .................................................................................................... 61
DECAY1 RATE .................................................................................................... 61
DECAY2 RATE .................................................................................................... 61
REL RATE ............................................................................................................ 61
INIT.LEVEL ......................................................................................................... 61
ATTCK LEVEL .................................................................................................... 61
DEC1 LEVEL ....................................................................................................... 61
DEC2 LEVEL ....................................................................................................... 62
REL LEVEL .......................................................................................................... 62
PTCH DPT ..................................................................................................................... 62
VEL PEG LEV ............................................................................................................... 62
VEL PEG RATE ............................................................................................................. 62
PITCH EG… .................................................................................................................. 62
ATTACK RATE .................................................................................................... 63
DECAY1 RATE .................................................................................................... 63
DECAY2 RATE .................................................................................................... 63
REL RATE ............................................................................................................ 63
INIT.LEVEL ......................................................................................................... 63
ATTCK LEVEL .................................................................................................... 63
DEC1 LEVEL ....................................................................................................... 63
DEC2 LEVEL ....................................................................................................... 63
REL LEVEL .......................................................................................................... 64
COPY ELEMENTS… .................................................................................................... 64
EDIT REVERB… .................................................................................................................... 65
REVERB TYPES ........................................................................................................... 65
Reverb Parameters .......................................................................................................... 66
GLOBAL REVERB PARAMETERS ............................................................................ 66
EDIT CHORUS… ................................................................................................................... 67
CHORUS TYPES ........................................................................................................... 67
User manual AXON AX-100 / AX-100 SB
5
BLUE CHIP
AXON AX-100 GUITAR TO MIDI CONVERTER
Chorus parameters .......................................................................................................... 68
GLOBAL CHORUS PARAMETERS ............................................................................ 68
EDIT VARIAT ... ...................................................................................................................... 69
VARIATIONS EFFECT TYPES .................................................................................... 69
Variations Effect Parameters........................................................................................... 72
GLOBALE VARIATIONSPARAMETER ..................................................................... 77
ADC MONITOR ...................................................................................................................... 78
Appendix .......................................................................................................................................... 79
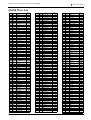
Factory Presets ......................................................................................................................... 79
Problem Solving ....................................................................................................................... 87
External MIDI instrument doesn’t play .......................................................................... 87
String bending does not function properly...................................................................... 87
Sometimes wrong notes .................................................................................................. 87
Varying string volume levels .......................................................................................... 88
Dynamic difference between notes is too great .............................................................. 88
Wrong sounds ................................................................................................................. 88
SYSTEM EXCLUSIVE IMPLEMENTATION ....................................................................... 89
QS300 Wave List .............................................................................................................................. 91
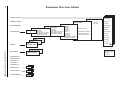
Parameter Overview Global ........................................................................................................... 92
Parameter Overview Global ........................................................................................................... 93
Parameter Overview Chain ............................................................................................................ 93
Parameter Overview Utility ............................................................................................................ 94
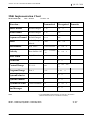
Midi Implementation Chart ........................................................................................................... 95
6
User manual AXON AX-100 / AX-100 SB
AXON AX-100 GUITAR TO MIDI CONVERTER
BLUE CHIP
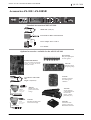
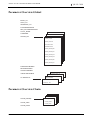
Accessories AX-100 / AX-100SB
Standard Accessories AXON AX-100
1,5 m
MIDI cable
MIDI cable 1,5 m ( 5')
1,5 m
FOOTSWITCH
Footswitch for Hold / Chain function
Adapter
AC 12 Volt
1500 mA
Power adapter 115 V or 230 V
User manual
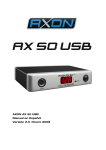
Optional accessories available for the AXON AX-100
Piezo Pickup
Hex piezo pickup for
acoustic guitars
Sound card SB-676
GM / XG sound card with 480
sounds, 11 reverbs, 41 effects,
and synth sounds.
13-conductor cable
7m
13-conductor cable AXK100
length 7 m (23 foot)
13 pin connector
AIX-101
Interface for 6
string guitar
AIX-101
Interface for any
guitar with 6 steel
strings.
PICKUP FOR GUITAR
13 pin connector
AIX-102
Interface for Bass
with 4 strings
AIX-102
Interface for Bass guitar
with 4 steel strings.
PICKUP FOR BASS
User manual AXON AX-100 / AX-100 SB
AIX-110
Interface board
for piezo pickup
AIX-210
Interface board for
the Godin guitar
"Multiac"
AFS-100
Swell pedal for
control function of
the AX-100.
(filter, volume,
panorama, etc. )
AFT-100
Footswitch with
closing contact for
Hold/Chain function.
7
AXON AX-100 GUITAR TO MIDI CONVERTER
BLUE CHIP
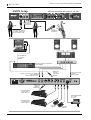
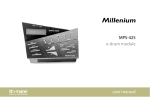
AXON Setup
AXON connections and setup for AX-100
Mono input
for guitar or
microphone
From Interface
AIX-101 / 102 / AIX110
to AXON 13 pin input
via 13-conductor cable.
For all
monophonic
instruments
MIDI
RECORDING
From MIDI thru
to computer
MIDI in
MIXER
Output (stereo/mono) sound module
to mixer/amplifier
Output (stereo/mono) AX-100 SB to
mixer/amplifier
Only AX-100 SB version !
MIDI OUT
to synth/
GM-module
MIDI IN
Output guitar audio
signal to
mixer/amplifier
SB
707 100 001
MIDI IN for
sound card
SB-676 or
MIDI Dump
Exp. Pedal -EXP 1
control pedal for
volume, filter, etc.
POWER ADAPTER
AC - output
12V/1,5 A
FO
Exp. Pedal -EXP 2
control pedal for
volume, filter, etc.
OTS
W
ITCH
FO
OTS
W
ITCH
Footswitch
CHAIN
8
Footswitch
HOLD
User manual AXON AX-100 / AX-100 SB
AXON AX-100 GUITAR TO MIDI CONVERTER
BLUE CHIP
Front Panel AX-100
f h j ln
p
e g i km
o
Front Panel AX-100-SB
a bc
a
b
c
d
e
d
q
Guitar Interface Jack. Connect your guitar interface to this jack using the 13-conductor cable provided.
MONO IN Input Jack. Use this jack to input any analog signal to your AXON. The AXON will then convert it to MIDI
information.
LEVEL MONO. Sensitivity pot for the MONO IN jack.
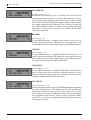
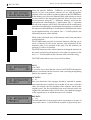
The high-contrast LCD display shows preset names as well as various parameters, some of which are shown graphically.
Using the PRESET button, you can change from GLOBAL, UTILITY and CHAIN modes directly to PRESET mode. The
LED just to the left of the PRESET button shows you the status. In PRESET mode, the presently selected preset is shown
in the display. You also have the option of seeing the built in instrument tuner in the bottom half of the display. Use the
+/- Value buttons to cycle through and select presets. In the Text-Editor, using the PRESET button gives you a space.
f
Using the GLOBAL button, you have access to general system settings such as MIDI channel, guitar settings, as well as
the default values of all MIDI controllers. In addition you can prohibit output of Panorama, Reverb, Chorus and Variation
controllers separately. In the Text-Editor, using the PRESET button (A…Z) changes the presently selected character to a
capital or if no character is selected, gives you a capital ”A”.
g
The STORE button allows you to save preset data, arpeggiator patterns, drum sequences and chains to the permanent
battery-backed-up RAM of your AXON. In the Text-Editor, using the STORE button inserts a character at the present
cursor position, shifting all following characters one character to the right.
h
i
In UTILITY mode there are various special functions available:
output of sysex (system exclusive) data for archival purposes
access to the pattern-oriented drum sequencer built in to the AXON AX 100 SB
synthesizer with 32 user-programmable sounds (2 oscillators with over 200 waveforms, envelope generation,
LFO’s, Filters, etc.)
flexible effect editor for all available effects including reverb, delay, modulation, equalization, etc.
In the Text-Editor, using the UTILITY button (a…z) removes the presently selected character to small case, or if no
character is selected, inserts a small case ”a”.
Using the EDIT button in PRESET mode allows you access to the various preset parameters. In CHAIN mode you can
select various series of presets that can be toggled using a foot pedal. In the Text-Editor, using the EDIT button (delete)
removes the presently selected character and moves all the following characters one character to the left.
j
Use the CHAIN button to get to CHAIN mode, where you can use a foot pedal to cycle through preprogrammed preset
series. In the Text-Editor, using the CHAIN button (!…@) inserts a punctuation or special character.
km
The +/- Value buttons increase or decrease the presently selected value of a parameter in the display. You can also use
the UP/DOWN buttons on your guitar interface.
ln
The +/- Parameter buttons allow you to cycle through the various parameters in a parameter list in the display. In PRESET
mode these buttons have no function.
o
Use the EXIT button to leave the present sub menu. Pressing it several times brings you to the root level of PRESET
mode. Use the EXIT button to cancel a save function as well.
p
The ENTER button serves as a confirmation of saves and copies as well as opening a sub menu. The presence of a sub
menu is shown as ”…” in the display. You can leave any sub menu using the EXIT button.
q
POWER ON/OFF. Here is where you turn your AXON on and off. When you turn it on, the display shows your last used
preset in PRESET mode and is in LOCAL ON mode.
User manual AXON AX-100 / AX-100 SB
9
BLUE CHIP
AXON AX-100 GUITAR TO MIDI CONVERTER
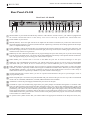
Rear Panel AX-100
Rear Panel AX-100-SB
a b
c d e f g h i jk l m
n
number of your AXON from the factory. If there is ”SB” after the ”AXON AX 100”, your AXON is equipped with
a Model
the internal sound board built in at the factory. You can of course opt to purchase the sound board later.
b Serial Number of your AXON.
(MONO): This is the right side line level output from the internal sound board, if you have the AXON AX 100
c RIGHT
SB. If this output jack alone is connected (without the left output being connected) the resulting signal from this output
jack is a composite MONO signal.
(STEREO): This is the left side line level output from the internal sound board, if you have the AXON AX 100
d LEFT
SB. If this output jack alone is connected (without the right jack being connected) the resulting signal from this jack is
still the left side of the stereo signal alone.
IN jack: Your AXON AX 100 (SB) receives program change and sysex data on this port. If you also use the setting
e MIDI
LOCAL OFF in GLOBAL mode, you can have all incoming MIDI data sent directly to the optional internal sound board.
This is the typical setting if you are using your AXON with a sequencer.
f MIDI THRU jack: All data that is received on the MIDI IN jack will be echoed unchanged to this port.
OUT jack: All MIDI data generated by your AXON will be sent to this port. If you are using an external MIDI
g MIDI
instrument with your AXON, be sure to connect this port with the MIDI IN port on your external instrument.
EXP2 jacks for foot swell pedals: You can connect to separate swell pedals to these jacks to control any MIDI
hi EXP1,
controller you choose. Especially valuable when assigned to modulation and filter effects. Because your AXON supports
the NRPN/RPN controllers, you can assign controllers #6 and #38 to these pedals and have access to a wide variety of
usable functions that are not presently available in any other machine of this category.
footpedal jack: In chain mode, you can use a pedal switch attached to this port to cycle through a series of
j CHAIN
preprogrammed presets.
footpedal jack: connect the foot pedal included with your AXON to this port to access any of the various HOLD
k HOLD
modes such as COMMON, SEPARATE, LAYER, ARPEGGIATOR and CONTROL.
l ADAPTER: Connect the powersupply included with your AXON to this jack.
OUT jack: The normal analog signal from your guitar pickups is transmitted through the 13-conductor cable
m GUITAR
from your guitar interface along with all the other information sent to your AXON. This unchanged analog signal is fed
through your AXON to this port so that you can, for example, combine your natural guitar sound with the MIDI sounds
generated by your AXON. In order to eliminate possible hum from the guitar analog signal, always use this port and the
signal coming through the 13-conductor cable for the source of your analog guitar sound if you are going to be combining
it with MIDI sounds. Your guitar interface AX101/102 has a mini phone jack for this purpose. You can connect it directly
to the included 13-conductor cable.
n CE symbol: This symbol certifies that your AXON follows the appropriate standards of the European Union (EU).
10
User manual AXON AX-100 / AX-100 SB
AXON AX-100 GUITAR TO MIDI CONVERTER
BLUE CHIP
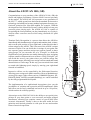
About the AXON AX 100 (-SB)
Congratulations on your purchase of the AXON AX 100 (-SB), the
fastest and highest performance Guitar to Midi Converter presently
on the market. The AXON AX 100 represents a new generation of
the NGC 77, which up until now has been the standard for innovative
technology and which has become standard equipment for many professional guitarists like John McLaughlin for example. With the
development of the Neural Net System, with its ability to learn your
personal guitar playing style, the AXON AX 100 is capable of
recognizing the exact pitch that you play immediately as you play it,
whereas other converters need several string vibrations for pitch
analysis.
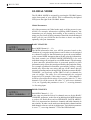
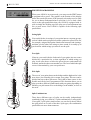
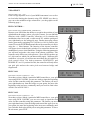
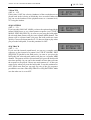
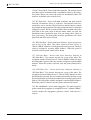
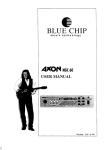
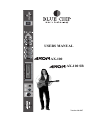
PICK
Lower
Midle
Upper
Pick Split 1
Pick Split 2
Zone
{
{
Fret Lower Zone
Fert Split
String Split
{
{
{
Fret Upper Zone
{
The implimentation of a sophisticated Arpeggiator gives you the
possibilities of variation and expression and accompaniment. Splits
and effects can be freely combined and saved in up to 128 presets,
which can then be called up quickly.
{
Impressive effects can be controlled by the Pickcontrol function,
allowing you to assign such Midi controller effects as Modulation to
various pick ranges. Other effects such as COMMON (Bypass), SEPARATE (Hold), LAYER (ensemble/doubling), etc. can be controlled
by the fully programmable hold pedal.
String
String
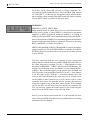
Transient Early Recognition is a process that allows the AXON to
immediately and simultaneously recognize and translate pitch, volume,
and even the pick position of your right hand, a characteristic that is
to date unique to the AXON. This is because of the AXON’s unique
structure of Splits. You can divide the six strings of your guitar into
two separate groups and then assign two separate sounds to those
string groups. Or you can make use of a ”Fretsplit”, to divide the
fingerboard of your guitar into two totally distinct play areas, assigning
separate sounds or characteristics to each area. Using ”Picksplit” you
can divide the area of your guitar where you pick the strings into
three separate ranges, allowing you to assign various sounds and sound
characteristics to each range. In this way you can switch from sound
to sound with lightning speed, simply by moving your right hand
forward or backward.
Also unique to the AXON AX 100 is the ability to use special piezo
pickups in your bass guitar or even accoustic and nylon stringed
instruments, allowing you complete control of your AXON from
accoustic instruments. Finally a door to the midi world for bass
guitarists and classical guitarists is wide open for new and modern
forms of musical expression.
User manual AXON AX-100 / AX-100 SB
11
AXON AX-100 GUITAR TO MIDI CONVERTER
BLUE CHIP
The internal sound board built into the AXON AX 100-SB makes
your AXON a professional guitar synthesizer with 480 excellent and
well-thought-out sounds, as well as 11 drum kits. Aside from the fact
that the soundboard totally adhers to XG-MIDI-MODE, the newest
standard in General-MIDI, there are numerous digital effects. All the
reverb, chorus and variation effects (11 reverb, 11 chorus, 42 variation)
can be freely combined and simultaneously implimented. In addition
the AXON AX 100-SB is a freely editable drum sequencer as well as
a programmable synthesizer section with 32 freely programmable
user voices. And because the AXON AX 100 is structured modularly,
you can choose at any time to add the optional sound board, upgrading
to the SB version.
Quickstart
It’s certainly understandable that you are not in the mood right now
to learn all about the theory and structure of your AXON. You can do
that later in the pages of this manual. Now it’s time to dabble a little:
Basic Settings
Before you start, it’s important to tell the AXON a few things about
the instrument you’ll be playing. The more exact you are about these
basic settings, the more exact your AXON’s neural net will be able to
interpret your playing style and adjust to how you play. The default
parameters are so thought-out so that you will probably only have to
change a few of them. Then later, when you get to know your AXON
a bit better, you will be able to fine-tune these settings (Global Parameters).
1. Using the 13 pin jack on the front side of the AXON, connect your
guitar interface to it using the 13 connector cable provided. If you
will be using an external MIDI instrument, connect it using the MIDIout port on the AXON and the MIDI-in port on the synth using normal MIDI cables
2. Turn the AXON on. Wait for a moment until the AXON has
completed its initialisation process and the display is still.
3. Press the GLOBAL button. In the display you now see ”BASIC
CHANNEL.” If you see a ”1” after the colon, leave it. If not, use the
+/- Value buttons to set this value to 1.
12
User manual AXON AX-100 / AX-100 SB
AXON AX-100 GUITAR TO MIDI CONVERTER
BLUE CHIP
4. Press the + Parameter button, to get to the next Global parameter.
Check to make sure that the parameter ”HOLD CHANNEL” is set to
”7.” If your AXON does not have the optional internal sound board
built in, you should skip to step 5. Otherwise press the + Parameter
button again and set the value for ”SEQ CHANNEL” to ”16” (+/Value buttons) if the value is different than 16.
5. Press the + Parameter button to set the values for ”PBEND RANGE.” This value sets the maximum number of halfsteps that are
allowed when Pitchbend information is analysed. What you set this
value for will be determined by the MIDI instrument you will be
using. If in doubt, read the user’s manual of your MIDI instrument. If
your instrument allows, use the +/- Value buttons to set this value to
12 (one octave).
6. Press the + Parameter button to get to ”SND PBENDRG.” If your
MIDI instrument supports setting separate pitchbend parameters for
each sound preset, set this value to ”ON” (+/- Value buttons). If in
doubt, read the user’s manual of your MIDI instrument. If you are
using the internal sound card of the AXON AX 100-SB, set this value
to ”OFF.”
7. Press the + Parameter button repeatedly until you see ”GUITAR
NO” in the display. Now press the ENTER button to get to the
submenu. At the prompt ”TYP:” use the +/- Value buttons to set the
instrument you will be playing into your AXON: ”BASS”,
”GUITAR”, „VIOLINE“ OR „CELLO“ (+/- Value buttons).
8. Press the + Parameter button to tell the AXON about the type of
pickup you are using on your instrument. If you are using an accoustic
guitar or bass with a piezo pickup, choose ”PIEZO” (+/- Value
buttons). Otherwise leave the default setting at ”AIX101.”
You have now completed the basic settings and your AXON is ready
to be played. The changes you made have been automatically saved
in static RAM so that they will still be available after you restart your
AXON. Press the ”EXIT” button twice to get back to normal play
mode.
User manual AXON AX-100 / AX-100 SB
13
AXON AX-100 GUITAR TO MIDI CONVERTER
BLUE CHIP
Changing a preset sound
Make sure your AXON is in PRESET MODE (PRESET LED on the
front panel is on). This is the mode that your AXON is in when you
first turn it on or if you have not pressed any of the other mode buttons
(GLOBAL, UTIL, CHAIN).The top half of the display contains the
name of the active preset. To the right, the preset number. You can
change the preset by pressing the +/- Value buttons or by using the
UP/DOWN buttons on your guitar interface, stepping you through
256 presets. Presets 1-128 can be freely manipulated and edited by
the user. 129-256 contain factory presets that are undeditable. We
have copied the factory presets to positions 1-128 for you so that
there will be playable sounds already available in those slots. Perhaps
you’d like to play with a few of these factory presets. If you see an
abbreviation in the Preset name, for example ”SS”, the present preset
contains a split, in this case a String split. Other split abbreviations
are:
FS:
PS:
MS:
HL:
HS:
HA:
HC:
PC:
WH:
Fret split
Pick split
Multi split
Hold mode layer (activated using the hold pedal)
Hold Mode Stack (simultaneously without Hold pedal)
Hold mode arpeggio (activated using the hold pedal)
Hold mode control (activated using the hold pedal)
Pick control (control using your pick position)
Wheel control (control using the wheel)
Now that you have sufficiently looked at and tried the factory presets,
let’s edit one of them:
1. Using the +/- Value buttons, find Preset number 2 ”EPno2+HdPad”
(the same as factory preset 130). You can also use the UP/DOWN
buttons on your guitar interface to manouver to Preset no. 2. Now
press the EDIT button.
2. Press the ENTER button to get to the split zone area of your AXON.
Press the ENTER button to accept the selected split zone.
3. If your AXON is equipped with the internal sound module, press
the – Parameter button and use the +/- Value buttons to select any of
the instrument groups. With the + Parameter button, you can now
move to the area where you can select a particular instrument for that
group. (+/- Value buttons).
14
User manual AXON AX-100 / AX-100 SB
AXON AX-100 GUITAR TO MIDI CONVERTER
BLUE CHIP
If you don’t own the internal sound board, choose a GM (General
MIDI) instrument that you like and set the following parameters
”BANK MSB” und ”BANK LSB” (using the + Parameter button) to
the value of ”0” (+/- Value buttons). If the instrument shown in the
display is different than the sound you hear, you may have to set your
external MIDI instrument to GM (General MIDI) mode. If this isn’t
possible, maybe because your instrument is older and does not conform
to the General MIDI standard, you can still use the somewhat less
user-friendly method of setting Bank and program numbers. See the
chapter ”UTILITY MODE” for a description. We won’t however go
into that at this time.
4. Press the + Parameter button. Set the value for ”VOLUME” to
your desired level using the +/- Value buttons. If you like, you can
also change the next parameter ”TRANSPOSE”, which is valuable,
for example, for bass players. This parameter changes the pitch value
of your MIDI instrument in halfstep increments (like moving your
fingers up or down on the fingerboard.) To do this, press the + Parameter button again and set it’s value using the +/- Value buttons. (”+12”
or ”-12” for up an octave or down and octave respectively.)
5. Press the EXIT button twice to get back to the top of the Preset
area. We now want to give our new (changed) preset a new name.
Press the ENTER button. The editor cursor is now over the ”E” of the
old name ”EPno2+HdPad.” With the +/- Value buttons you can change
the letter where the cursor is. Think of a new name and change the
first letter accordingly. With the +/- Parameter buttons you can move
the editor cursor one character to the right or to the left respectively.
Repeat this process until your new name is complete in the display. If
your new name is shorter than the old one, you can simply change the
left over letters to spaces.
6. Press the EXIT button twice to end your Preset text editing session.
The upper half of the display is blinking. This signals that you have
changed some parameters that have not yet been saved. Press the
STORE button. Now you can determine at which slot you want to
save your new Preset. You can either overwrite the Preset you have
been editing or save it at another location within the user-definable
area (1-128). Choose, for example, Preset No. 128 (+/- Value buttons).
Now when you press the ENTER button, your preset will be copied
to slot 128 and saved there. This also now becomes the active preset.
User manual AXON AX-100 / AX-100 SB
15
BLUE CHIP
AXON AX-100 GUITAR TO MIDI CONVERTER
About the User Interface of your AXON
The flexibility of of your AXON with all of its sophistication also
requires that many parameters to be set in order to achieve all the
possibilities. Here is a short description of the structure of the user
interface, in order to give you an overview of how the AXON works.
In order to keep the user interface as simple and as transparent as
possible, the structure of functions has been divided into four modes
or sections of operation that can all be accessed directly from the
front panel. Each of these Modes (GLOBAL, PRESET, UTILITY,
CHAIN) contain a series of related parameters that are accessed by
pressing the +/- Parameter buttons. The + Parameter button takes you
to the next parameter in the series, the - Parameter button to the
previous.
The values of each individual parameter can then be changed by using
the +/- Value buttons. The + Value button increases the value to the
next highest and the - Value button to the next lowest. By holding the
value buttons down, you can cycle through the available values step
by step. And so that you don’t fall asleep waiting for the appropriate
value in a long list, you can, after pressing the desired +/- Value buttons
and are holding it down, also pressing the other one (+ or -) and holding
both down. This will speed the scrolling of values considerably. You
can also change values in parameters by using the UP/DOWN buttons
on your guitar interface, although these are primarily designed to
change presets.
Some of the parameters have submenus with further parameters. You
can tell if this is the case by the ”…” at the end of the Parameter
name. Use the ENTER button to get to these submenus. You can then
navigate the submenus using the +/- Parameter buttons. The EXIT
button takes you back to the next level up in the submenu hierarchy;
to the parameter (…) before you pressed the ENTER button. Also
use the EXIT button to get back to the PRESET mode, the standard
mode of your AXON.
16
User manual AXON AX-100 / AX-100 SB
AXON AX-100 GUITAR TO MIDI CONVERTER
BLUE CHIP
The Four AXON Modes of operation
GLOBAL MODE
All of the parameters in Global mode apply to all the presets in your
AXON, for example information regarding MIDI channels, the
instrument you are playing, basic tuning, or the sensitivity of each
string you play. Some of these parameters should be checked/changed
before you use your AXON for the first time so that it can operate
optimally with your instrument.
PRESET MODE
This is where you find all the parameters that relate to the
administration of individual presets. The Preset mode along with the
Utility mode is most sophisticated of the modes and contains numerous
split and effect settings. If you are not in any of the other modes,
Preset mode is always active.
UTILITY MODE
Owners of the AXON AX 100-SB will find here numerous settings
for drum sequences, programmable digital effects and the QS300
sythesizer section. Here are also functions for loading and saving
SYSEX data using MIDI, so that you can, for example, back up all
your AXON settings to a floppy or hard disk drive on your computer,
providing you have the appropriate software.
CHAIN MODE
You can define chains of presets for use in live performance that are
then easily accessible.
User manual AXON AX-100 / AX-100 SB
17
AXON AX-100 GUITAR TO MIDI CONVERTER
BLUE CHIP
GLOBAL MODE
The GLOBAL MODE is activated by pressing the GLOBAL button
on the front panel of your AXON. This is confirmed by the lighted
LED just to the right of the GLOBAL button.
Global Parameters
All of the parameters in Global mode apply to all the presets in your
AXON, for example information regarding MIDI channels, the
instrument you are playing, basic tuning, or the sensitivity of each
string you play. Some of these parameters should be checked/changed
before you use your AXON for the first time so that it can operate
optimally with your instrument.
BASIC CHANNEL
Basic MIDI Channel (1…11)
The MIDI information that your AXON generates based on the
vibrations of your guitar strings that are sent to it have to be assigned
to a channel in order for that information to get to the sound module
or the external MIDI instrument that will then play the information.
The ideal scenario (see STRING MODE SEPARATE) is for each
individual string to be assigned its own MIDI channel. The advantage
is that controller information that is generated parallel to pitch
information only effects the sound generated by that particular string.
For example pitchbend information generatedby pulling a string
should only affect that one string and not all the others that are
presently sounding and not being pulled. With the parameter BASIC
CHANNEL, you need only set the FIRST of the six channels for
your six strings. The other five will automatically be assigned
respectively. For example, if this value is set to ”1”, then channels 16 will be reserved for the six strings. If you set this value for ”5”, then
channels 5-10 will be reserved, the value ”11” will reserve channels
11-16, etc. Typically this parameter is set to ”1”, reserving channels
1-6 for string input.
HOLD CHANNEL
Hold MIDI Channel (1…11)
In the same way that the first of six channels was set for the BASIC
CHANNEL parameter, so the first of an additional six MIDI channels
is set here for Hold effects such as SEPARATE, LAYER, ARPEGGIO. It is important here that basic channels and hold channels do
not coincide. In other words, make sure that the basic channel and the
hold channel values are at least six digits apart. Typically this parameter
is set to ”7”, reserving channels 7-12 for the hold functions.
18
User manual AXON AX-100 / AX-100 SB
AXON AX-100 GUITAR TO MIDI CONVERTER
BLUE CHIP
SEQ CHANNEL
MIDI channel for internal soundboard drum sequences (1…16)
The output from the drum sequencer that is built into the internal
soundboard will have its own separate MIDI channel. It is important
here that the SEQ CHANNEL not coincide with any of the BASIC
CHANNEL or HOLD CHANNEL reserved MIDI channels. Make
sure you choose a free channel and reserve it for drum sequences
using this parameter. Typically this value is set for ”16.” This parameter
is only available to those who have the internal sound board installed.
PBEND RANGE
Pitchbend limit values (OFF, 1…24)
Techniques often used by guitarists are string bends, pulloffs,
hammerons, slides. In order to effectively interpret these techniques
that are fairly unique to guitar, your AXON uses the MIDI controller
Pitchebend. In much the same way that a keyboard player hits a key
and then uses his pitchwheel to modify the pitch, your AXON can
generate pitchbend information for picked notes. In order for the built
in sound module or the external MIDI instrument to correctly play
this pitchbend information, the limit values for pitchbending need to
be set. The value you choose relates to the number of halfsteps that
the pitch will be allowed to be bent. Make sure that your MIDI
instrument can interpret the values you program for this parameter. If
possible set this value to 12 (one octave). For bass guitar, we
recommend a setting of 24. The value OFF sends no pitchbend
information, so that when you bend strings or slide, the resulting pitch
will change in halfstep increments.
SND PBENDRG
Send Pitchbend Range (ON/OFF)
If your MIDI instrument allows pitchbend parameter settings for every
Preset (sound), set this parameter to ON. In this case your AXON
sends the pitchbend range event directly after every program change
event. If your MIDI instrument saves pitchbend information in its
global area, set this value to OFF.
User manual AXON AX-100 / AX-100 SB
19
AXON AX-100 GUITAR TO MIDI CONVERTER
BLUE CHIP
LOCAL MODE
Local operation mode (ON/OFF)
ON: This is the internal operating mode of your AXON. The internal
sound module will be directly triggered. Received program change
events (via MIDI IN) will affect the program selected in your AXON.
These events are then sent on to the MIDI OUT port. In this way,
other connected MIDI instruments can be controlled. This value should
be set if you are not using an external sequencer to drive your AXON
or other synths. This would probably be the case most often in live
situations.
OFF: If you want to control your AXON from a hardware or software
sequencer in cooperation with other connected MIDI instruments,
you can deactivate local control. Your internal sound module will
now act like a normal expander. You can no longer change the Presets
of your internal sound module thtrough the MIDI IN port. Of course
you can still select presets using the front panel buttons. All the MIDI
data that your AXON generates will now be exclusively sent to the
MIDI OUT port. Make sure you have the sequencer connected to the
MIDI OUT port of the AXON and that the MIDI OUT port on the
sequencer is connected to MIDI IN on your AXON. Switch the echo
function in your sequencer on, so that the incoming signal from your
AXON will be echoed to the OUT port and back to the AXON and to
it’s internal sound module.
After turning off your AXON, the LOCAL MODE parameter is
automatically reset to ON. If you set this parameter to OFF, it will
only remain off as long as your AXON is poweredup.
TUNE BASE
Basic Tuning (-99…+99)
All the MIDI notes generated by your AXON are compared to the
reference tuning of 40 Hz plus or minus the value you set with this
parameter. If you are playing with other musicians using instruments
that are difficult to tune (piano for example), it is much easier to tune
your AXON to their instrument. Here’s how to do that: carefully tune
the A string of your guitar to the other instrument, to which you want
to tune (piano). Press the ENTER button. In the display you see ”PICK
THE OPEN A STRING”. When you play the A string, your AXON
analyses the pitch and adjusts its tune base to the correct value. You
can also set the value manually using the +/- Value buttons, if you
know the value. After this step, you can now tune the other strings of
your guitar using the AXON’s built in tuning function. When you
play alone (solo), you should set the tune base value to ”0”.
20
User manual AXON AX-100 / AX-100 SB
AXON AX-100 GUITAR TO MIDI CONVERTER
BLUE CHIP
GUITAR NO…
Guitar number and guitar-specific settings (1…4)
In order for your AXON to optimally translate the information coming
from your guitar into MIDI information, there are a few basic
parameters that need to be set in terms of sensitivity, etc. These settings
are dependant upon the structure of your guitar, and are very specific.
They can be totally different for different guitars. If, in the middle of
a live performance, you decide you want to play another guitar with
your AXON, you can quickly call up settings for that particular
instrument.. It is simply a matter of selecting the appropriate guitar
number. You can program basic settings for four totally distinct
instruments into your AXON. When you press the ENTER button,
you toggle through the various settings. Use the +/- Parameter buttons
to select the individual functions. The values can then be changed
using the +/- Value buttons. Within these basic settings, the first line
in your display shows a VU meter. The position of the small dashes
correspond to the strings of your guitar. When you play a string, you
will see that the associated dash fills in more and more until playing
loudly fills out the entire character space.
TYP
Type of instrument (GUITAR, BASS, VIO:LINE, CELLO)
You decide here what type of instrument you will be using. This is
particularly important for the assigning of string and hold channels.
PICKUP
The type of pickup in your instrument (AIX101, PIEZO)
Choose the type of pickup you will be using to drive your AXON.
AIX101 is the normal setting if, for example, you are using the Guitar
Interface AIX-101. The setting PIEZO allows for the use of polyphonic
Piezo-Pickups (optional). The signal from piezo pickups is very true
to the original accoustic sound of the instrument and have been
developed especially for accoustic guitars. The advantages of these
pickups for accoustic guitarists are that the pickup is totally invisible
(installed under the bridge) and that you can use nylong stringed
instruments (classical guitars) to drive your AXON.
User manual AXON AX-100 / AX-100 SB
21
AXON AX-100 GUITAR TO MIDI CONVERTER
BLUE CHIP
NOTE OFF LIM
Note off Limiter (10…30)
Unlike a keyboard, where a key is pressed and the note ends when
you release the key, a guitar string sounds until its vibrations decay
totally or until it is dampened. The decay time is most definitely
dependant upon the quality and structure of the guitar and the strings.
Some guitars sound more percussive; others have a longer sustain.
Synthesizers recreate these characteristics using a so-called ”envelope
curve,” to graphically reproduce an instrument’s characteristic of
decaying amplitude (volume) as it diminishes to zero. Be setting a
limit point within the envelope, we can determine at what point in
time a note’s ”release” comes; the point at which it ceases to sound.
The higher this value, the earlier a MIDI NOTE OFF event will be
sent to the MIDI instruments. Smaller values will allow the note to be
held longer. In this way you can adjust this value to match your
instrument optimally.
TRIG. LEVEL
Trigger Level (0…9)
Using this parameter you can set the volume level at which your
AXON reacts to a signal from your instrument (at which volume level
a MIDI NOTE ON event is sent). The smaller the value, the more
sensitively your AXON reacts even to very softly played notes. Higher
values mean that you have to play loudly in order for the AXON to
send a NOTE ON event. You should experiment with this parameter
in order to find a setting that feels good to you and your playing style.
SENSE
Guitar/Bass input sensitivity: E6…E1 or B6…C1 (16…64)
Using the +/- Parameter buttons you can toggle through all the strings
of your instrument and set each one’s input sensitivity separately.
Higher values mean a higher level of sensitivity. Your AXON, like
many electronic devices that translate analog audio into a digital signal,
is very sensitive and can easily be overdriven. But the other extreme
is equally as true: you shouldn’t drive your AXON with too low of an
input signal level either.You will probably have to increase the
sensitivity of the thin strings to obtain a balance between the strings
and to reproduce a natural sound. When setting up a bass guitar, for
reasons of compatibility, your AXON takes for granted that you are
playing a six-string bass. If you are playing an instrument with less
than six strings, simply bypass the strings that don’t apply.
22
User manual AXON AX-100 / AX-100 SB
AXON AX-100 GUITAR TO MIDI CONVERTER
BLUE CHIP
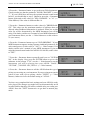
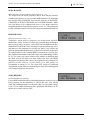
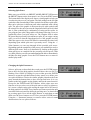
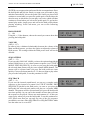
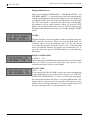
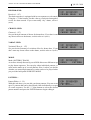
PAN ENABLE
Panorama Controller (ON/OFF)
Within a given preset of your AXON, it is possible to set distinct
stereo panorama placement for each individual split. Panorama is
MIDI Controller #10 which is sent to your MIDI instruments. If you
don’t want to send Controller #10 events, perhaps because you would
rather use the panorama settings within a connected keyboard, for
example, or because a given MIDI instrument is older and doesn’t
support Controller 10 information, set this value to OFF. If this
parameter is set to ON, the values will be sent that were set in the
Play Area parameters (see PRESET MODE). As will all other
controller information, you AXON will only send Controller 10 if
the panorama settings have changed from what was previously sent,
so as not send redundant information.
GLOBALS
PAN ENABLE:
ON
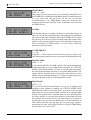
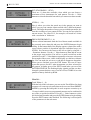
GLOBALS
REV ENABLE:
ON
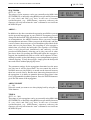
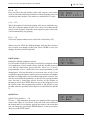
GLOBALS
CHOR ENABLE:
ON
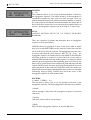
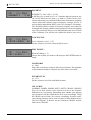
GLOBALS
VAR ENABLE:
ON
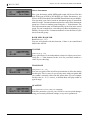
REV ENABLE
Reverb Controller (ON/OFF)
For the same reasons (see PAN ENABLE), you may not want MIDI
Controller #91 information (Reverb) for a preset split sent to your
MIDI instruments. Set this value to OFF. If your AXON is equipped
with the internal soundboard, a third parameter, NO EFFECT, is also
listed as a choice. If this is selected, the programmed reverb function
of the preset will be ignored by the soundboard.
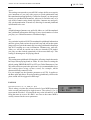
CHOR ENABLE
Chorus Controller (ON/OFF)
Here you determine whether MIDI Controller #93 (Chorus) will be
sent to your MIDI instruments or not. (see PAN ENABLE) f your
AXON is equipped with the internal soundboard, a third parameter,
NO EFFECT, is also listed as a choice. If this is selected, the
programmed chorus function of the preset will be ignored by the
soundboard.
VAR ENABLE
Variation Controller (ON/OFF)
ere you determine whether MIDI Controller #94 (Variation) will be
sent to your MIDI instruments or not. (see PAN ENABLE) f your
AXON is equipped with the internal soundboard, a third parameter,
NO EFFECT, is also listed as a choice. If this is selected, the
programmed variation function of the preset will be ignored by the
soundboard.
User manual AXON AX-100 / AX-100 SB
23
AXON AX-100 GUITAR TO MIDI CONVERTER
BLUE CHIP
CC DEFAULTS…
Controller defaults…
In using the various possibilities of control you have using modulation
wheels or, in our case, pick control functionality, it is necessary for
the controller value to be reset to its default value (usually zero) after
a preset change for example. But there are exceptions. The optional
soundboard excpects a standard value of 64 for Controllers 71-74
because these controllers are used as offsets. Because there are
numerous non-standard Controllers available in the MIDI Protocol,
that manufacturers can use at will, your AXON is equipped with the
ability to determine and set the default value for all these controllers.
Press the ENTER button to get to the submenu. In the first line of the
display shows the name and number of the presently selected controller
and in the second line, its default value in hexadecimal format. The
cursor is in the first line and by using the +/- Value buttons, you can
select the controller you want to work with. The + Parameter button
moves the cursor to the second line, and then the default value can be
changed using the +/- Value buttons. The value you enter here will be
saved in a battery-backed-up memory area of your AXON. The table
contains the factory default values. All standardized MIDI controllers
have a default value of zero. Refer to the user manual of MIDI
instrument or module you are using for the default values of any
controller used by the manufacturer and set it here. Use the EXIT
button to leave the Submenu.
MIDI MAPPING:
GLOBALS
MIDI MAPPING:...
Program change commands that are received on the selected active
BASIC CHANNEL can be assigned to any AXON presets using this
mapping table. Press the ENTER button.
The first line of the display shows the program number that your
AXON receives; the second line of the display shows the Preset to
which the change will be made. The default setting is the program
change will be sent to the AXON preset with the same program
number. If you want to change this setting, use the +/- VALUE buttons
to change to the appropriate value. Your entry will be immediately
saved in the AXON’s internal battery-backed-up memory, and does
not have to be saved. Use the EXIT button to leave the submenu.
24
User manual AXON AX-100 / AX-100 SB
AXON AX-100 GUITAR TO MIDI CONVERTER
BLUE CHIP
PRESET MODE
Preset Mode is always active unless you activate another mode. When
you leave one of the other modes, you will always be sent back to
Preset Mode. Preset Mode is signaled by a lit LED just to the right of
the PRESET button on the front panel.
Preset Parameters
These parameters contain all the settings that relate to individual
presets. A preset is a playing environment that you determine, saved
and easily retrievable, with the flexibility and complexity to give you
total control over playing and sound characteristics. You can program, save and recall up to 128 complex presets. How complex a
preset is, is something you determine. For example you have the
capability of dividing the strings of your guitar into a total of 12 totally
separate and individual splits and then to freely combine them. Each
of these presets can have its own set of effects, selected from a copious
list, as well as its own set of playing parameters.
Recalling Presets
Use the +/- Value buttons to cycle through your presets. You can also
use the UP/DOWN buttons on your guitar interface.
Guitar Tuner
In the default setting (see UTILITY MODE, DISPLAY) the bottom
half of the display shows a tuner that monitors your instrument as
you play to insure correct tuning. It is important that your instrument
is tuned within a certain tolerance so that your AXON will send the
proper MIDI pitch information to your MIDI instruments. Tune every
string so that the meter pointer is directly over the arrow in the middle
of the scale. As long as the Tune Base Parameter is set to “0”, the
arrow in the middle of the scale represents a standard tuning of 440
Hz. There may be reasons for changing this basic tuning standard, for
example if you want to play with an acoustic piano that is somewhat
under the pitch. (see Global Parameters, TUNE BASE) In this case
you can tell the AXON to orient itself to the tuning of your guitar,
giving you a new standard. In this case the arrow in the middle of the
tuning scale represents the new tuning standard.
User manual AXON AX-100 / AX-100 SB
25
AXON AX-100 GUITAR TO MIDI CONVERTER
BLUE CHIP
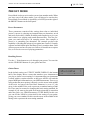
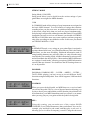
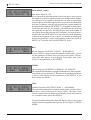
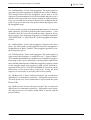
String Split
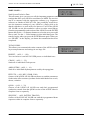
PRESET PROGRAMMING
When your AXON is in preset mode, you can press the EDIT button
to program/edit a preset. The graphic at the bottom of the display
shows the actual split zones of the presently selected preset. In order
for you to better understand what a split zone is, let us look a little
closer at the split possibilities that your AXON is equipped with. A
split is simply the dividing up of the play area of an instrument into
two or more zones. Your AXON is capable of the following split
possibilities:
String Split
Fret Split
You can divide the six strings of your guitar into two separate groups,
each of which can be assigned a separate synthesizer sound. You can,
for example, assign a Bass guitar sound to the bottom E and A strings,
and then give the other four strings a piano sound. It is totally up to
you between which strings you want to set the split.
Fret Split
String Lower Zone
String Upper Zone
Pick Split
Likewise you can divide the fretboard of your guitar into two zones
divided by a particular fret, so that regardless of which string you
play, in one zone above or below the given fret one synth sound will
be heard, and in the other zone another one. The fret at which the split
occurs is determined by your own preference.
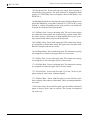
PICK
Lower
Midle
Upper
Pick Split 2
Zone
{
Pick Split 1
Fret Lower Zone
Fert Split
String Split
{
{
Fret Upper Zone
{
{
26
{
{
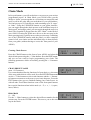
Pick Split
The area of your guitar between the bridge and the highest fret is the
area where you normally pick or strum your guitar. This area can be
divided into up to three split zones. The width of these zones is also
flexible and can be freely programmed. This function allows you to
play up to three different synth sounds with your guitar depending on
whether you pick/strum close to the bridge, in the middle, or close to
the neck.
Split Combinations
These three different types of splits can be totally independently
combined giving you a total of 12 split combinations (2 string splits,
2 fret splits, 3 pick splits). And because you can freely choose where
the split points are in each of the three split types, the combination
possibilities are more than numerous.
User manual AXON AX-100 / AX-100 SB
AXON AX-100 GUITAR TO MIDI CONVERTER
BLUE CHIP
Selecting Split Zones
Make sure your AXON is in PRESET MODE (PRESET LED next to
the PRESET button on the front panel is on.) Press the EDIT button.
The bottom half of the display now shows a small graphic to help you
visualize the play area of your guitar. The little triangle at the far right
symbolizes the nut and at the left the symbols for the three pick splits,
that can be split into six different parts when combined with a string
split. The part of the graphic in between the pick split symbols and
the triangle for the nut represent the fingerboard and can be divided
into 4 parts symbolizing a combination of string and fret splits. As
you program your splits, this graphic will change allowing you to see
graphically where your split zones are. The simplest form is when
the preset that is presently selected has no splits. If you assign a string
split, you will see that the fingerboard area of the graphic now has
either the upper or the lower half filled in contrasting the other half,
depending upon which split zone is presently active. Using the +/Value buttons you can step through all the possible split zones.
Depending upon the complexity of the preset, you can half up to twelve
different split zones. Now try to determine by looking at the graphic
what split types are combined in the presently selected preset. With
very little practice you will soon understand and be able to immediately
decipher the help graphic. Press the EXIT button once to return to
normal play mode.
Changing the Split Parameters
Select a split zone as described above and press the ENTER button.
Just to the left of the help graphic described above the text SLCT is
flashing. Your AXON is waiting for you to either press the ENTER
button to accept the split definitions as they stand, or to define your
own split definitions. Notice the similar graphic painted on the front
panel around the buttons that we have used up until now. It is very
similar to the help graphic on the display and has the same function.
Except for the ENTER and EXIT buttons, all the other ones now
function to let you select one of the split zones to edit. For right now,
let’s create a simple string split causing the upper half of fret area in
the help graphic to be filled. Every button represents a particular split
zone that can be activated for editing by pressing once, or deactivated
by pressing again. Press all the upper buttons to turn them on and
make sure the lower buttons are off. Now press the ENTER button.
Using the +/- Parameter buttons we can now edit a series of sound
characteristics for our split as follows:
User manual AXON AX-100 / AX-100 SB
27
AXON AX-100 GUITAR TO MIDI CONVERTER
BLUE CHIP
Choose Instrument
Here your determine which MIDI patch/sound will be used for this
split. With your AXON in XG MODE (see Utility Parameters), you
will see all XG (Extended General MIDI) Sound names in your display.
You can make your choice based on instrument group or instrument
name. Press the – Parameter button to place the cursor in the instrument
group box. Choose a random group using the +/- Value buttons. The
selected instrument name will automatically be the first in the sound
group. For our example here, select the group Bass instruments (e.g.:
AkBas). Now press the + Parameter button to select the Bass of your
choice from the group.
BANK MSB / BANK LSB
Bank Select (0...127)
You can select banks with this function, if there is no sound board
build in the AX100.
VOLUME
Volume level (0…127)
Every split allows for an independent volume level that you set here.
Using the +/- Value buttons set the level for your Bass sound to a
value of your choosing.
TRANSPOSE
Transposition (-36…+36)
You can set a pitch offset in half step increments to affect the tuning
for this split. This is a way for you to play notes with your guitar that
you couldn’t normally reach with the guitar alone. For our example
set this value to –12 (–1 octave), so that the Bass will play within its
typical range.
QUANTIZE
Pitch Quantization (AUTO, OFF, ON, TRIGGER)
With this parameter you tell your AXON to execute pitch changes
using your normal pitchbend settings or step-wise (quantized):
28
User manual AXON AX-100 / AX-100 SB
AXON AX-100 GUITAR TO MIDI CONVERTER
BLUE CHIP
AUTO:
This setting corresponds to your AXON’s unique ability to recognize
your intentions as you play with respect to pitch quantization and
then translate them appropriately. Chords for example, are interpreted
exactly (no pitchbend information), whereas for melodic notes of a
solo which contain string bends and slides, hammer-ons and pulloffs, pitch quantization is turned off, allowing for normal pitchbend
information to be sent.
OFF:
All pitch changes (hammer-ons, pull-offs, slides, etc.) will be translated
into pitchbend information allowing for true representation of what
you play. (see Global Parameters: Pitchbend range).
ON:
Any variation in pitch will NOT be translated in pitchbend information
until the given pitch reaches the next half step and will at that point
jump to the new pitch chromatically, but using pitchbend information
and NOT sending new note information. Hammer-ons, pull-offs,
slides, etc. will not be carried out as they are intended. The pitches
you play are then locked (quantized) to the nearest half step. This
setting is advantageous for playing chords.
TRIGGER:
This setting turns pitchbend off altogether, affecting simple chromatic
half steps when playing bends or slides. It is the same as setting the
global setting PBEND RANGE to OFF (see Global Parameters), but
only affects this one particular split zone. It is recommendable to use
this setting when using a piano sound, for example, which
characteristically cannot be bent.
For our example set the Quantize parameter to AUTO. It applies to
the Bass split and allows for string bending (pitchbend), whereas the
piano sound will be triggered in half steps.
PAN POS
Panorama Position (L15…L1, MID, R1…R15)
This is where you place the selected sound of your MIDI instrument
in the overall panorama left to right in stereo. The values L15 to L1
represent the left side, L15 being all the way to the left and R15 to R1
being the same in reverse. R1 and L1 are close to the center. MID is
exactly centered in the stereo panorama.
User manual AXON AX-100 / AX-100 SB
29
AXON AX-100 GUITAR TO MIDI CONVERTER
BLUE CHIP
PAN SPREAD
Panorama spread (–15…+15)
So that not all sounds (up to six 6 per Split) aren’t all in the same
panorama position (see above), you can use this parameter to separate each of the sounds within the general panorama set above in PAN
POS. Set the PAN POS to MID, for example, and then while you play
your guitar, adjust the PAN SPREAD value, keeping in mind that
your MIDI instrument must be capable of interpreting Panorama
information. If you need to, read your user’s manual for the MIDI
instrument in question.
REVERB
Reverb mix (0…127)
If your MIDI instrument is equipped with built-in reverb, you can
control it with this parameter. The higher the value, the more reverb
will be added to the mix in the output signal of your MIDI instrument.
CHORUS
Chorus Effect (0…127)
If your MIDI instrument is equipped with built-in Chorus, you can
control it with this parameter. The higher the value, the more chorus
will be added to the mix in the output signal of your MIDI instrument.
The optional sound board has this feature built in.
VARIATION
Variation Effect (0…127)
If your MIDI instrument is equipped with built-in variation effects
(such as Auto-wah), you can control it with this parameter. The optional sound board contains numerous variation effects that can be
randomly combined with Reverb and Chorus.
VEL SENSE
Velocity Sensitivity (0…127)
You can limit the dynamic range of your MIDI instrument by adjusting
the value of this parameter. The smaller the value, the less dynamic
range there will be between note events. In the extreme case, a value
of zero plays all notes on your MIDI instrument at the same dynamic
level, regardless of how loud or softly you play your guitar. With a
value of 127, you achieve the highest sensitivity and dynamic range
for the notes you play.
30
User manual AXON AX-100 / AX-100 SB
AXON AX-100 GUITAR TO MIDI CONVERTER
BLUE CHIP
VEL OFFSET
Velocity Offset (–64…+64)
If the average dynamic level of your MIDI instrument is too soft or
too loud after limiting the dynamic using VEL SENSE (see above),
you can set the middle/average volume here. (see the graphic on the
following page.)
PICK CONTROL…
Because your AXON has the ability to recognize the position of your
right hand on the strings (where you pick or strum), you can link this
function with a MIDI Controller, allowing you to simulate the
modulation wheel on a synth, or after touch, etc. with the position of
your right hand over the string pick area. Further interesting effects
can be generated by assigning Ctrl 74 (Filter) or Ctrl 10 (Pan) to pick
control. Press the ENTER button and choose the controller you desire
using the +/- Value buttons. The function of the chosen controller
will appear in text in the display window. For controllers that are not
standardized, you see a horizontal line. Using the following parameters
you will now assign the value areas of the chosen controllers. This
controller only affects one pick split zone. (Your AXON can have up
to 3 pick zones to which you can theoretically apply 3 different pick
controllers.) As a rule, you will not use more than one pick split for a
pick control effect. Set both parameters PICKSPLIT1 and
PICKSPLIT2 to 0. If you don’t do this, the controller will only affect
one pick split and not the entire pick area between bridge and
fingerboard.
Pick Control
Pick Controller (NO CONTROLLER, CONTRLxxx)
PICK VAL1
Pick Value 1 for Pick Controller (0…127)
Now that you have linked a particular MIDI controller to your split
zone using PICK CONTRL, you are now ready to input the beginning
value for that controller using this parameter. The further you move
your right hand away from the bridge on your guitar, the more this
beginning value increases continually until you reach its final value
which is set in PICK VAL2.
PICK VAL2
Pick Value 2 for Pick Controller (0…127
Now that you have linked a particular MIDI controller to your split
zone using PICK CONTRL, you are now ready to input the final
value for that controller using this parameter. The further you move
your right hand away from the bridge and toward the upper frets on
your guitar, the more the beginning value increases continually until
you reach this final value which you set using this parameter. To leave
the sub menu, press EXIT.
User manual AXON AX-100 / AX-100 SB
31
AXON AX-100 GUITAR TO MIDI CONVERTER
BLUE CHIP
Diagram Velocity Mapping
EXAMPLE INPUT OF VELOCITY MAPPING
Pick
Loudness
pp
p
mf
f
ff
MIDI VELOCITY VALUES BY DIFFERENT SETTINGS OF
VELOCITY SENSITIVITY AND VELOCITY OFFSET
127
S = 127
O= 0
0
127
0
32
S = 64
O= 0
0
S=0
O= 0
0
127
127
127
S = 64
O= 32
0
S = 127
O= 32
127
S = 127
O= -32
0
User manual AXON AX-100 / AX-100 SB
AXON AX-100 GUITAR TO MIDI CONVERTER
BLUE CHIP
Changing split-common Parameters
Up until now the preset parameters that we have worked with have
been specific to the individual split zones. There is however one preset
that contains parameters that are common to all split zones and control
characteristics of the entire preset. This is also where you will set the
points at which the split types change. In PRESET MODE (Preset
LED is on), press the EDIT button. (If you are presently still in the
split zone level of the menu hierarchy, press the EXIT button.) Using
the +/- Parameter buttons you can choose the following parameters,
and then change their values using the +/- Value buttons.
Preset Name
In order to identify your preset easily, you should name it carefully
with a description of its function. The name can be up to 12 characters
in length. Press the ENTER button to begin editing the preset name.
The cursor jumps to the first letter which can now be changed using
the +/- Value buttons. You can use both small case or capital letters as
well as special characters. To move the cursor to the right or back to
the left by one character, use the +/- Parameter buttons. While in this
edit mode some of the buttons on the front panel have special
functions:
The GLOBAL button changes to capital letters, jumping directly to
capital ‘A’.
The UTIL button changes to small case letters, jumping directly to
small case ‘a’.
The CHAIN button changes to special characters, jumping directly
to ‘!’.
The PRESET button changes the presently selected character to a
space.
The STORE button provides for an insert function, allowing you to
insert a character at the cursor position, and displacing all the
characters after it one position to the right. The last character (at
position 12) will be overwritten.
The EDIT button provides a delete function, deleting the character at
the cursor and moving all characters to its right one position to the
left. A space is then inserted at the end of the string.
The EXIT button allows you to leave the Text Editor.
User manual AXON AX-100 / AX-100 SB
33
AXON AX-100 GUITAR TO MIDI CONVERTER
BLUE CHIP
STRING MODE
String Mode (COM, SEP)
String mode allows you to decide how the various strings of your
guitar/Bass are assigned to MIDI channels:
COM
In COMMON mode all the strings of your instrument are assigned to
the basic MIDI channel. To avoid conflict of strings that continue
sounding when you play new ones, no pitchbend information is sent
in this mode, when more than one note are played simultaneously.
Solo playing is still possible, although somewhat limited. If your MIDI
instrument can only receive on one channel, you should set STRING
MODE to COM. In the same way, some sequencer software programs
only allow recording on one channel at a time. In this case you should
set STRING MODE to COM.
SEP
In SEPARATE mode, every string on your guitar/Bass is assigned a
separate channel all its own. (see Global Parameters) This is the setting
that allows you the most flexibility. Pitchbend information such as
string-bending, hammer-ons, pull-offs, slides, etc. only effect the string
on which they are actually played. All this information is string specific
and will maintain the desired effect.. Most modern MIDI instruments
are equipped “multi-mode” allowing reception of MIDI information
on more than one channel. You should use the SEP setting whenever
it’s at all possible.
HOLDMD
Hold Mode (COMMON, SEP…, LAYER…, ARPEG…, CNTRL…,
TACK) While playing, you have access to several different “hold”
functions using the hold pedals. Your AXON supports 5 different hold
functions:
COMMON
When you press the hold pedal, no MIDI data can e received until
you release the pedal. This is a sort of bypass function allowing you
to play a chord, press and hold the pedal so that the played chord will
be sustained on your MIDI instrument until you release it, no matter
what you may play on your guitar while the pedal is being held.
SEP…
Using this setting, you can make use of the various HOLD
CHANNELS (see Global Parameters) that you defined. You can, for
example, play and hold a pad sound, and then play a solo over it,
allowing you to in effect accompany yourself. Using the sub menu
34
User manual AXON AX-100 / AX-100 SB
AXON AX-100 GUITAR TO MIDI CONVERTER
BLUE CHIP
(ENTER), set an appropriate pad sound for the accompaniment. Press
the hold pedal and play the chord you want your pad sound to play
and then immediately release the pedal. The chord you played will
continue to sound until you press the pedal again, which causes the
chord to stop, at which time you can play a new one, which will then
continue to sound when you release the pedal again. To get back to
normal play mode, simply press and release the hold pedal without
playing anything. In the sub menu, you can set the following
parameters:
HOLD PRESET
(1…128)
Using the +/- Value buttons, choose the sound you want to hear after
pressing the hold pedal.
VOLUME:
(OFF,0...127)
In order to have a balanced relationship between the volume of the
Main and Hold presets, you have the option to adjust the volume of
Hold presets. The settings within the Hold preset itself will not be
affected.
ED: HOLD-SEP
VOLUME:
OFF
SEQ PATTERN
(OFF, 1…32)
If you own the AXON AX 100SB, you have the option alongside the
normal Hold Preset, to set a drum pattern sequence )see UTILITY
MODE, EDIT SEQUENCE). As soon as you press the hold pedal,
the selected drum pattern will play on a separate MIDI channel. The
pattern will be repeated until you press the hold pedal two times
quickly. Choose one drum pattern of 1-32, that you want to play when
you press the hold pedal, or set this parameter to OFF.
SEQ TRACK
(OFF, 1…8)
If you own the internal sound board, you can set a complex track
sequence to play instead of a pattern (see UTILITY MODE, EDIT
SEQUENCE) parallel to the hold preset. As soon as you press the
hold pedal, the selected track pattern will play on a separate MIDI
channel. The pattern will be repeated until you press the hold pedal
two times quickly. Or you can set the number of times that you want
the sequence to be played. Choose one track pattern of 1-8, that you
want to play when you press the hold pedal, or set this parameter to
OFF. Please note that you can only use one of the two sequence
possibilities at a time: either SEQ TRACK or SEQ PATTERN. Make
sure the other one is set to OFF.
User manual AXON AX-100 / AX-100 SB
35
AXON AX-100 GUITAR TO MIDI CONVERTER
BLUE CHIP
SEQ TEMPO
(EXT., 41…240)
The tempo of your sequence can be set externally using Midi clock
(EXT/MIDI IN) or internally using BPM (beats per minute) between
41 (very slow) and 240 (very fast). In the case of external
synchronization, (e.g.. MIDI-Drums, sequencer software) the
sequence will only start when the “start” command is received from
the MIDI IN port.
LAYER…
This function allows you to play 2 sounds over each other (layer). In
this way you can play particularly full, rich sounds by layering them
one on top of the other. Using the sub menu (ENTER) select a sound
for layering. Now when you press the hold pedal, this sound will be
added to your present sound as long as the hold pedal is depressed.
After pressing the ENTER button, you can set the following
parameters in the sub menu:
LAYER PRESET
(1…128)
Using the +/- Value buttons select the sound you want to layer with
your normal play sound as long as you have the hold pedal depressed.
SEQ PATTERN
(OFF, 1…32)
If you own the AXON AX 100SB, you have the option alongside the
normal Hold Preset, to set a drum pattern sequence )see UTILITY
MODE, EDIT SEQUENCE). As soon as you press the hold pedal,
the selected drum pattern will play on a separate MIDI channel. The
pattern will be repeated until you press the hold pedal two times
quickly. Choose one drum pattern of 1-32, that you want to play when
you press the hold pedal, or set this parameter to OFF.
SEQ TRACK
(OFF, 1…8)
If you own the internal sound board, you can set a complex track
sequence to play instead of a pattern (see UTILITY MODE, EDIT
SEQUENCE) parallel to the hold preset. As soon as you press the
hold pedal, the selected track pattern will play on a separate MIDI
channel. The pattern will be repeated until you press the hold pedal
two times quickly. Or you can set the number of times that you want
the sequence to be played. Choose one track pattern of 1-8, that you
want to play when you press the hold pedal, or set this parameter to
OFF. Please note that you can only use one of the two sequence
possibilities at a time: either SEQ TRACK or SEQ PATTERN. Make
sure the other one is set to OFF.
36
User manual AXON AX-100 / AX-100 SB
AXON AX-100 GUITAR TO MIDI CONVERTER
BLUE CHIP
SEQ TEMPO
(EXT., 41…240)
The tempo of your sequence can be set externally using Midi clock
(EXT/MIDI IN) or internally using BPM (beats per minute) between
41 (very slow) and 240 (very fast). In the case of external
synchronization, (e.g.. MIDI-Drums, sequencer software) the
sequence will only start when the “start” command is received from
the MIDI IN port.
ARPEG…
In addition to the above mentioned sequencing possibilities you can
use the powerful arpeggiator in your AXON to accompany yourself.
Along side the function SEP, which allows you to hold a single chord
as accompaniment, the ARPEG function allows you more complex
accompaniment structures. When you press the hold pedal, and play
a series of notes, these notes are received and then played back in the
same order as you played them. The recording of your arpeggio is
ended when you release the hold pedal. The sequence of recording
notes is now played back immediately and endlessly (on the
preselected Hold channel), allowing you to play your solo or other
part above them. By pressing the hold pedal again, the arpeggio is
stopped, but simultaneously able to record a new sequence of notes,
making it possible to play and change your accompaniment sequence
without stopping. To stop the arpeggio, simply press the hold pedal
once and release without playing any notes.
The parameter settings for the arpeggiator determine how the notes
you play into it will be played back. You can control the order in
which the notes are played back, or stretch out the intervals between
them into several octaves. But the most interesting characteristic of
the arpeggiator is its ability to quantize the notes played into it into
freely programmable rhythmic patterns. Press the ENTER button to
get to the Sub menu of the arpeggiator:
ARPEG PRESET
(1…128)
Select the sound you want to use when playing back by using the +/Value buttons.
TEMPO
(EXT., 41…240)
The tempo of your arpeggiator can be set externally using Midi clock
(EXT/MIDI IN) or internally using BPM (beats per minute) between
41 (very slow) and 240 (very fast). In the case of external
synchronization, (e.g.. MIDI-Drums, sequencer software) the
sequence will only start when the “start” command is received from
the MIDI IN port.
User manual AXON AX-100 / AX-100 SB
37
BLUE CHIP
AXON AX-100 GUITAR TO MIDI CONVERTER
LENGTH
(1…32)
This parameter allows you to set the maximum number of notes for
the arpeggiator sequence. The buffer memory of the arpeggiator is
expanded to include one more note every time you play a new one
with the hold pedal depressed, until this maximum number is reached.
If you play more notes than this maximum number, the oldest note in
the series will be replaced for every note played beyond the limit you
set here. An arpeggiator sequence can be as long as 32 notes long.
SCAN
(ASSIGN, REVERS, RECYCLE, UP, DOWN, UP/DOWN,
RANDOM)
There are a number of options that determine how an arpeggiator
sequence will be played back:
ASSIGN allows for playback of notes in the same order in which
they were recorded.REVERS acts like a stack of notes where the last
one recorded is the first one replayed. The arpeggiator plays the notes
in reverse order than they were entered. RECYCLE plays the
arpeggiator sequence in normal order as with ASSIGN, but when the
end of the sequence is reached, it is played back in reverse order as
with REVERS until the first note in the sequence is reached, at which
point the process begins from the beginning again. In UP mode, the
notes will be sorted from lowest to highest in pitch and played in that
order.In DOWN mode, the notes are sorted from highest to lowest in
pitch and played in that order.In UP/DOWN mode, the pitches are
played from lowest to highest and then back down to lowest, somewhat
simulating finger picking. RAND plays back the notes of the
arpeggiator sequence in total random order.
PATTERN
(1/16thSt…USER#1…16)
This parameter allows you to set the quantize function of the
arpeggiator sequence. The following quantize functions are available:
1/16thSt:
Classic Arpeggio. Plays back the arpeggiator sequence in staccato
16th notes.
1/16thLg:
16th notes same as above except legato.
1/8thSt:
Plays back the arpeggiator sequence in staccato 8th notes.
38
User manual AXON AX-100 / AX-100 SB
AXON AX-100 GUITAR TO MIDI CONVERTER
BLUE CHIP
1/8thLg:
8th notes same as above except legato.
1/4thSt:
Plays back the arpeggiator sequence in staccato quarter notes.
1/4thLg:
Quarter notes same as above except legato.
1/2th:
Plays back the arpeggiator sequence in quarter note values with quarter
rests.
1/8Trpl:
Plays back the arpeggiator sequence in 8th note triplets.
The following patterns represent rhythmical styles (grooves) and have
been preprogrammed for you:
BLUES 1:
Blues rhythm. Especially effective for Bass guitar riffs.
BLUES 2:
A variation on BLUES 1.
BOOGI 1:
Boogie rhythm. Especially effective for Bass guitar riffs.
BOOGI 2:
A variation of BOOGI 1.
DISCO 1:
Disco groove. Especially effective for Bass guitar riffs.
DISCO 2:
A variation of DISCO 1.
ROCK:
Rock groove for Bass guitar riffs.
HOUSE:
House rhythm. Effective for Organ riffs.
User manual AXON AX-100 / AX-100 SB
39
AXON AX-100 GUITAR TO MIDI CONVERTER
BLUE CHIP
32th triplet 32th note
16th triplet 16th note
4th triplet
Dotted 4th
4th note
32th trplt rest
32th rest
16th trplt rest
16th rest
8th note
Dotted 8th
Dotted 16th rest
8th trplt rest8th rest
Dotted 8th rest
4th trplt rest4th rest
Dotted 4th rest
2th rest
Dotted 16th 8th triplet
Using the patterns USER#1…USER#16, you can program up to
sixteen of your own quantize patterns for use with arpeggiator
playback. Select one of the user patterns and press the ENTER button.
In the display you will see the Pattern Editor, with which you can set
the note values for the arpeggiator playback. Move the cursor to the
desired position using the +/- Parameter buttons, and select the
appropriate note value using the +/- Value buttons. The “<” represents
the end of the sequence (the LOOP). The pattern will be continuously
repeated from beginning to end using the notes that are recorded into
the sequence as described above. A maximum of 8 different note values
can be implemented for every pattern. The “<” LOOP symbol is not
affected by the note values entered.
While in this edit mode some of the buttons on the front panel have
special functions:
The STORE button provides for an insert function, allowing you to
insert a character at the cursor position, and displacing all the
characters after it one position to the right. The last character (at
position 12) will be overwritten.
The EDIT button provides a delete function, deleting the character at
the cursor and moving all characters to its right one position to the
left. A “<” LOOP symbol is then inserted at the end of the string.
Repeat
The EXIT button allows you to leave the Text Editor.
SYNC
(ON, OFF)
If you enter fewer notes than the value set in LENGTH, the quantize
pattern is continued with the next note value, but using the beginning
pitch in the sequence again.
OCTAVES
(1…4)
Here you determine if the arpeggio should be repeated in another
octave than the one in which it was recorded. If you enter a 2 for this
value, for example, the first playback of the sequence will be in the
original octave, the first repetitions in the octave directly above the
original. The maximum value is 4. The value 1 plays back the arpeggio
in the original octave in which the notes were recorded.
REPEATS
(1…16)
The individual notes in an arpeggio can be repeated up to 16 times. If
you set this value to 1, each note in the sequence is played only once.
40
User manual AXON AX-100 / AX-100 SB
AXON AX-100 GUITAR TO MIDI CONVERTER
BLUE CHIP
VELOCITY
(OFF, 0…127)
If this value is OFF, the velocity (loudness) of the recorded notes are
played back in the velocity at which they were recorded. Otherwise
you can set the loudness of the playback notes to a constant level,
127 being the loudest.
SEQ PATTERN
(OFF, 1…32)
If you own the AXON AX 100SB, you have the option alongside the
normal Hold Preset, to set a drum pattern sequence )see UTILITY
MODE, EDIT SEQUENCE). As soon as you press the hold pedal,
the selected drum pattern will play on a separate MIDI channel. The
pattern will be repeated until you press the hold pedal two times
quickly. Choose one drum pattern of 1-32, that you want to play when
you press the hold pedal, or set this parameter to OFF.
SEQ TRACK
(OFF, 1…8)
If you own the internal sound board, you can set a complex track
sequence to play instead of a pattern (see UTILITY MODE, EDIT
SEQUENCE) parallel to the hold preset. As soon as you press the
hold pedal, the selected track pattern will play on a separate MIDI
channel. The pattern will be repeated until you press the hold pedal
two times quickly. Or you can set the number of times that you want
the sequence to be played. Choose one track pattern of 1-8, that you
want to play when you press the hold pedal, or set this parameter to
OFF. Please note that you can only use one of the two sequence
possibilities at a time: either SEQ TRACK or SEQ PATTERN. Make
sure the other one is set to OFF.
User manual AXON AX-100 / AX-100 SB
41
AXON AX-100 GUITAR TO MIDI CONVERTER
BLUE CHIP
Editing HOLD Presets
While you are editing HOLDMD: SEP…, HOLDMD: LAYER… and
HOLDMD: ARPEG…, it is possible to move directly to the parameter
settings for the Hold Presets when the Hold preset is in the display by
pressing the EDIT button. The first line of the display now shows the
text: ED: <Presetname>. Except for the Effect types (only the SB),
all parameters can be edited normally. When you press the EXIT
button, you are taken back to where you were last. The display of the
Hold preset name blinks until you save your changes using the STORE
button.
CNTRL…
With this function, you have the ability to link your Hold pedal to any
MIDI controller you desire. When you press the hold pedal, the
controller value is set to its maximum value 127 (7Fh). As soon as
you release the pedal, the controller value 0 is sent. Controllers that
work well with this function are Sustain (64), Portamento (65). To
get to the sub menu, press the ENTER button to set the following
parameters:
HOLD CONTROLLER
(CNTRL 0…119)
Choose the appropriate MIDI controller that will be set to its maximum
value (127) when you press the hold pedal. The function of the
controller will appear in text in your display.
SEQ PATTERN
(OFF, 1…32)
If you own the AXON AX 100SB, you have the option alongside the
normal Hold Preset, to set a drum pattern sequence )see UTILITY
MODE, EDIT SEQUENCE). As soon as you press the hold pedal,
the selected drum pattern will play on a separate MIDI channel. The
pattern will be repeated until you press the hold pedal two times
quickly. Choose one drum pattern of 1-32, that you want to play when
you press the hold pedal, or set this parameter to OFF.
42
User manual AXON AX-100 / AX-100 SB
AXON AX-100 GUITAR TO MIDI CONVERTER
BLUE CHIP
SEQ TRACK
(OFF, 1…8)
If you own the internal sound board, you can set a complex track
sequence to play instead of a pattern (see UTILITY MODE, EDIT
SEQUENCE) parallel to the hold preset. As soon as you press the
hold pedal, the selected track pattern will play on a separate MIDI
channel. The pattern will be repeated until you press the hold pedal
two times quickly. Or you can set the number of times that you want
the sequence to be played. Choose one track pattern of 1-8, that you
want to play when you press the hold pedal, or set this parameter to
OFF. Please note that you can only use one of the two sequence
possibilities at a time: either SEQ TRACK or SEQ PATTERN. Make
sure the other one is set to OFF.
SEQ TEMPO
(EXT., 41…240)
The tempo of your sequence can be set externally using Midi clock
(EXT/MIDI IN) or internally using BPM (beats per minute) between
41 (very slow) and 240 (very fast). In the case of external
synchronization, (e.g.. MIDI-Drums, sequencer software) the
sequence will only start when the “start” command is received from
the MIDI IN port.
STACK...
The effect is the same as in Hold Mode LAYER. The difference is
that in this mode the Hold pedal must not be explicitly pressed. The
Layer effect is always available. Otherwise all parameters of LAYER
mode are available. (see LAYER.)
WHEELCNTL…
WHEEL CONTROLLER (AIX, EXP1, EXP2)
Your AXON offers you the option of using up to three different wheel
controllers simultaneously: AIX is the wheel on the guitar interface
AX101/102, EXP1 and EXP2 are swell pedals, which can be plugged
into the back of the AXON. Choose the desired wheel using the +/Value buttons, that you want to link a controller to, and press ENTER.
The first line of the display shows the wheel that you just choose; the
second line shows the controller that is assigned to the selected wheel.
Use the +/- Value buttons to select the desired controller. The function
of the selected controller appears in simple text in the display. The
nonstandardized MIDI controllers have the “————” description.
The setting “NO CONTROLLER” means that no MIDI controller at
all is assigned to the selected wheel. One practical use for this setting
is for example, when you want to affect an arpeggio but not the main
sound (preset) using the wheel on the guitar interface.
User manual AXON AX-100 / AX-100 SB
43
AXON AX-100 GUITAR TO MIDI CONVERTER
BLUE CHIP
To do this, set the wheel AIX 101/102 to a Filter Controller (74).
Your main preset should then be set to “NO CONTROLLER” instead
of “VOLUME 7”, so that only the arpeggiator will be affected by the
wheel and the volume setting of the main sound will remain constant.
Use the EXIT button to get back to the main menu.
NRPN/RPN…
NRPN/RPN (NONE, NRPN, RPN)
Many manufacturers of synths allow you to set sound characteristics
of their presets using so called NRPN’s (nonregistered parameter
numbers) or RPN’s (registered parameter numbers). According to
MIDI specifications RPN’s have standardized functions and NRPN’s
do not. The functions of NRPN’s are dependent upon the manufacturer
and are found in the individual user’s manuals. The process for using
RPN’s and NRPN’s is identical as follows:
NRPN-LSB and MSB or RPN-LSB and MSB set system parameters
using Controller #6 (DATA ENTRY MSB) or Controller #38 (DATA
ENTRY LSB) to access them. Here is how you access these settings
in your AXON:
You have extracted from the user’s manual of your synth/sound
module that the manufacturer uses NRPN: MSB=01h and LSB=21h
for a filter function for example. Use the +/- Value buttons to select
the setting “NRPN/RPN:…NRPN” and press the ENTER button. The
first line of your display shows you whether you are editing NRPN’s
or RPN’s. The second line shows you the present value for MSB and
LSB. The cursor is in the MSB field at first. Use the +/- Value buttons
to set this value to 01h. With the +/- Parameter buttons move the
cursor to the filed LSB and set the value here to 21h. You have now
set the NRPN so that Controller #6 (or #38) can be used as a filter
controller. As a source for controller #6/#38, you have the option of
using Pick control or any of the three wheel options. If for example
you set the AIX 101/102 wheel on your interface to controller #6/
#38, you can now control the actual sound of your synth using the
wheel. Press the EXIT button to leave the sub menu.
Note: If you are not an experienced user, it is advised that you steer
clear of using the RPN controllers because pitchbend and even tuning
information can be changed.
44
User manual AXON AX-100 / AX-100 SB
AXON AX-100 GUITAR TO MIDI CONVERTER
BLUE CHIP
Another note for “Insiders”: Normally after using a DATA ENTRY
controller for NRPN or RPN Data, these values are reset to “NULL”
(7fh), so that the DATA ENTRY controller has no more influence.
Your AXON does NOT do this, because this would drastically increase
the amount of MIDI data processed and sent. However, when you
change a Preset, or when you edit an NRPN/RPN, these controllers
ARE set to NULL.
FINGER PICK
Finger picking (OFF, ON)
This parameter allows you to turn on a series of detailed settings that
are particularly valuable for finger picking techniques. In this case
however, you will not have access to the Pick split and Pick control
functions. Make sure that the selected preset does not use Pick split
and that the Pick controller is set to “NO CONTROLLER”.
STRING SPLIT
String Split (1…5)
To implement a string split, enter the first string of the bottom split.
The values are assigned to the strings, 1 being the high E-string. The
value of 4 here means that the two Bass strings (5, 6) are set for the
upper split and the 4 high strings for the lower string split zone.
FRET SPLIT
Fret Split (0 ... 23)
If you are using a fret split in your preset, this parameter defines the
first fret of the left segment (the left split on the front panel graphic).
The frets are numbered starting with the lowest fret (furthest from the
bridge) being fret number 1. Open strings are assigned the value of 0.
The value of 4 means that frets 1 through 3 (including of course open
strings) are assigned to the right split and frets 4 to the highest fret to
the left split zone.
User manual AXON AX-100 / AX-100 SB
45
AXON AX-100 GUITAR TO MIDI CONVERTER
BLUE CHIP
PICK SPLIT 1 and 2
Pick Split 1 and 2 (0…99)
If you use the Pick split option with your Preset, this is where you set
the width of each Pick segment between the bridge and the highest
fret. This area of your guitar is divided into 100 units: 0 is the bridge
and 99 is the top end of the fingerboard. If you want to divide the pick
area into 2 segments, enter the split point for the segment furthest to
the right into the parameter PICK SPLIT 1 (see graphic on front panel).
If you enter the value 50, for example, you divide the pick area into
two segments of equal size, dividing the pick area in the middle. If
you want to divide the pick area into 3 segments, you need to enter a
second value into PICK SPLIT 2 for the split point at the beginning
of the left most segment. If, for example, you want to divide the pick
area of your guitar into 3 equal-sized segments, set the value for PICK
SPLIT 1 to 33 and the value for PICK SPLIT 2 for 66.
REV
Reverb Program (NO EFFECT, HALL1…BASEMENT)
If your AXON is equipped with the optional sound module, you can
use this parameter to choose one of several reverb options. The program name then appears in your display. If you don’t want to use
reverb, set this parameter to NO EFFECT.
CHOR
Chorus Program (NO EFFECT, CHORUS1…FLANGER3)
The optional sound module is equipped with numerous chorus options,
from which you can choose here. The name of the program you choose
is shown in the display. Set this parameter to NO EFFECT if you
don’t want to use chorus.
VAR
Variation Program (NO EFFECT, HALL1…AUTOWAH)
The optional sound module is equipped with further variation effects
that can be mixed with reverb or chorus effects. The name of the
chosen variation effect is shown in your display. If you don’t want to
use a variation effect, select NO EFFECT.
For more detailed information about the digital effects in the sound
module and their programmable options, see the chapter UTILITY
MODE.
46
User manual AXON AX-100 / AX-100 SB
AXON AX-100 GUITAR TO MIDI CONVERTER
BLUE CHIP
Chain Mode
In live performance, you will need to have easy access to your various
programmed presets. In Chain Mode, your AXON offers you the
ability to “chain” presets together in a series that you can quickly and
easily recall in the order that you need them for your performance.
You can have up to 32 Chain Presets, each containing up to 32 “steps”
or “links”. Using the UP/DOWN buttons on your guitar interface,
you can toggle through the chain presets or the individual steps in a
chain preset, and using a pedal, you can toggle through the steps in a
chain. The footpedal is plugged into the jack “Chain” on the back of
your AXON. Pressing the pedal once moves to the next step in the
chain, pressing it twice quickly moves to the previous step. Combining
use of the UP/DOWN buttons with the pedal, you have complete
control of all your chains and the individual steps in them directly
from your guitar (without having to access the front panel of your
AXON).
Creating Chain Presets
Press the CHAIN button on the front of your AXON, and select the
desired chain preset using the +/- Value buttons. Press the EDIT button,
and you are now ready to begin programming your chain. The
following parameters can be accessed by pressing the +/- Parameter
buttons:
CHAIN PRESET NAME
(max. 12 Characters)
Use a name that describes the function of of your chain, e.g. the name
of the song with which it will be used. Press the RETURN button and
use the +/- Value buttons to select each character and the +/- Parameter buttons to maneuver to the next (or previous) character.. Press the
EXIT button when you are finished naming your Chain Preset. As
with all other Text-Editor functions some of the front panel buttons
have special functions when in this mode (A…Z, a…z, !…9, space,
insert, delete).
PROGRAM
(1…128)
Use the +/- Value buttons to select the desired Preset number for the
present step. Press the ENTER button. This moves you to the next
step in the chain.
User manual AXON AX-100 / AX-100 SB
47
AXON AX-100 GUITAR TO MIDI CONVERTER
BLUE CHIP
STEP
(1…32)
Using the +/- Value buttons, select the step in the chain you want to
edit. In the display you see the program number of the presently
selected preset for that step.
If you want to add a step in the middle of a chain, simply press the
STORE button on the front panel. A new step is inserted directly after
the selected step and all the following steps are moved one step down
in the chain. When you create a new step, the default settings for the
new step are the same as the step from which you inserted the new
one.
In the same way you can delete a step in the chain by selecting the
one you want to delete and pressing the EDIT button. The step is
deleted and the following steps are moved one up in the chain to fill
the empty spot.
Saving Chain Presets
Press the EXIT button to leave CHAIN MODE. If you have made
changes, the display will flash to remind you that you have not yet
saved the changes. Press the STORE button and your AXON asks
you where (at which chain preset position: 1…32) to store your preset.
Pressing the ENTER button saves your changes. If you don’t change
the preset number, your changes will be written over the preset that
you just edited. You can, of course, save your changes to a different
preset if you may want to save the previous version of the preset for
later use. If you don’t want to save your changes at all, simply press
the EXIT button again.
48
User manual AXON AX-100 / AX-100 SB
AXON AX-100 GUITAR TO MIDI CONVERTER
BLUE CHIP
UTILITY MODE
To activate UTILITY MODE, press the UTIL button on the front of
your AXON. The LED next to the UTIL button will be lit.
Utility Parameters
Utility Mode controls the appearance of information in your display.
This mode also controls the load and save functions via MIDI
(SYSEX), so that you can save all of your valuable presets and
parameters to a floppy disk using the appropriate communications
software. Owners of the AXON AX 100-SB will find here numerous
settings for drum sequences, programmable digital effects and the
QS300 synthesizer section.
DISPLAY
Control instrument and the LCD display (TUNING, LEVEL)
Here you decide which instrument in PRESET MODE you want be
shown in the bottom half of the display:
TUNING
With this setting selected, the bottom half of your AXON’s LCD
display shows a guitar tuner, that can be used during play to check
and correct the tuning of your input instrument. Tune each string so
that the arrow points to the middle of the scale. If the Tune Base
Parameter is set to 0 (zero), the middle point on the tuning scale in
the display represents the standard tuning calibration of 440 Hertz.
LEVEL
With this selection, instead of a tuner, you see a VU (LEVEL) meter
in the bottom half of the display. The small vertical bars represent the
present levels of each of the six strings of your guitar. The higher the
bar, the louder the string.
User manual AXON AX-100 / AX-100 SB
49
AXON AX-100 GUITAR TO MIDI CONVERTER
BLUE CHIP
PRESET NAMES
Display of sound presets (patches) (NUM, GM, XG)
Your AXON has the ability to display selected presets in various forms:
NUM
All sound presets (patches) will be displayed in their numeric form in
their given MIDI bank. A MIDI bank contains 128 preset numbers. It
is possible to split MIDI banks using MSB (most significant byte)
and LSB (least significant byte) information, so that you can actually
have as many as 128 x 128 MIDI banks. Use this option if your sound
module/synth is not GM (General MIDI) capable.
GM
The sound presets or patches follow the GM (General MIDI) standard.
The names of patches appear in text form in the display. The General
MIDI standard dictates 128 sounds, and some manufacturers of GM
capable sound modules have implemented kits that allow for choosing
various MIDI sound banks. Your AXON divides it’s MIDI bank into
an MSB (most significant byte) and an LSB (least significant byte)
data group, which allows 128 x 128 GM kits. Use this option if your
sound module/synth is not GM (General MIDI) capable.
XG
The sound presets or patches follow the XG (Extended General MIDI)
standard. The names of patches appear in text form in the display.
Information about MIDI bank numbers is not included. If your MIDI
instrument is XG capable, you should certainly make use of it. It is a
very easy way to maintain an overview of the numerous normal
patches available. The built-in sound module of the AXON AX 100SB is XG compatible and offers you all of the XG sounds in superior
quality.
DCLIC RESPNS
Double-click response (1...20)
Here you set the amount of time in which a double click (double
press) of the two foot switches should take place in order to be
recognized as a double click. Remember that you can double click
the chain foot switch in order to jump one step back in your chain.
Double clicking the Hold pedal allows you to stop the presently
running drum sequence (AX100SB only).
50
User manual AXON AX-100 / AX-100 SB
AXON AX-100 GUITAR TO MIDI CONVERTER
BLUE CHIP
XMIT SYSEX…
Send System Exclusive Data
This sub menu gives you access to all the important parameters and
settings that allow your AXON to send data over MIDI. The receiver
can be a computer with the appropriate software (e.g. Sequencer
software) or another AXON AX 100. One possibility would be to
save the numerous settings of your AXON to a floppy disk to be
shared with others, or as an archive for later use. Users of the AXON
AX 100-SB can use this method to collect an entire sound library
from the programmable synth section of the AXON. Press the ENTER
button and use the +/- Parameter buttons to select the area you would
like to send. Use the +/- Value buttons to select individual parts. The
transfer begins when you press the ENTER button again. When you
see “READY” in the display, you know the transmission has been
completed.
TOTAL DUMP…
This allows you to transmit the entire contents of the AXON with all
its present parameters and settings in one large file.
PRESET… (ALL, 1…128)
You can choose to send all 128 USER presets or individual ones.
CHAIN… (ALL, 1…32)
Sends all or individual Chain presets.
ARP-PATTRN…(ALL, 1…16)
Send all or individual rhythm patterns used by the arpeggiator.
EFFECTS…(ALL, REV, CHOR, VAR)
Owners of the AXON AX 100-SB can choose to send the parameters
for the entire effect section or just those for the individual areas: reverb,
chorus, variation.
QS300… (ALL, 1…32)
Owners of the AXON AX 100-SB can send their programmed
synthesizer sounds from the QS300 section of the AXON either in
complete form or separately.
SEQUENC… (ALL, PATTRN, TRACKS)
Owners of the AXON AX 100-SB can send their programmed drum
sequences either in complete form or separately.
User manual AXON AX-100 / AX-100 SB
51
AXON AX-100 GUITAR TO MIDI CONVERTER
BLUE CHIP
RECEIVE SYSEX
Receive System Exclusive Data
In the same way as the AXON sends sysex data to another AXON or
computer via MIDI, it can also receive sysex data with the help of
this sub menu. The data blocks that are received by the AXON will
overwrite the same parameters in the AXON.
EDIT SEQUENCE…
Drum Sequence Editing
Owners of the AXON AX 100-SB have the option of programming
drum sequences that can be accessed in PRESET MODE using the
hold pedal. It is necessary to differentiate between pattern sequences
and track sequences.
A pattern is made up of 16 steps that are divided into equal time units
over the entire pattern. You have the option of choosing up to 4 drum
sounds from any drum kit to be played within each step. This can be
given 3 different dynamic levels. Up to 32 patterns can be created in
the Pattern Editor. These patterns can then be integrated into a track
sequence, that controls the playing of the pattern according to your
wish. 32 program steps are possible that can be combined in any order
or repetition. Press the ENTER button to get to the Drum sequencer
menu.
TEMPO
Tempo (EXT, 41…240)
The tempo of the drum sequencer can be set externally using Midi
clock (EXT/MIDI IN) or internally using BPM (beats per minute)
between 41 (very slow) and 240 (very fast). In the case of external
synchronization, (e.g.. MIDI-Drums, sequencer software) the
sequence will only start when the “start” command is received from
the MIDI IN port.
VOLUME
Volume Level (0…127)
The drum sequencer is equipped with its own separate volume control.
Set the level here to create a good mix with the other sounds.
52
User manual AXON AX-100 / AX-100 SB
AXON AX-100 GUITAR TO MIDI CONVERTER
BLUE CHIP
REVERB SEND
Reverb (0…127)
The drum sequencer is equipped with its own separate reverb control.
Using the +/- Value buttons, set this value to your desired strength of
reverb for drum sounds. If you want totally “dry” drums, select 0
(zero).
CHORUS SEND
Chorus (0…127)
Set your desired amount of chorus for drums here. If you don’t want
any chorus effect on the drums, set this value to 0 (zero).
VARIAT SEND
Variation Effect (0…127)
Set your desired amount of variation effect for drums here. If you
don’t want any chorus effect on the drums, set this value to 0 (zero).
MODE
Mode (PATTERN, TRACK)
As we have already discussed, your AXON allows two different ways
to play drum sequences. You can play either individual patterns, or
entire tracks made up of several patterns. Here is where you decide
whether you want simple patterns or entire tracks to be played when
you press the hold pedal in PRESET MODE.
PATTERN…
Pattern Editor (1…32)
With this sub menu, you can edit your drum patterns. You can create
up to 32 patterns that can be played back either individually or as part
of a track sequence. Use the +/- Value buttons to select the desired
pattern number and press the ENTER button to begin editing it.
User manual AXON AX-100 / AX-100 SB
53
AXON AX-100 GUITAR TO MIDI CONVERTER
BLUE CHIP
KIT (STANDARD1…SFX2)
There are 11 drum kits available, from which you can choose a
maximum of four instruments for each pattern. Use the +/- Value
buttons to select the drum kit from which you want to use drum sounds.
STEPS (1…16)
Here is where you select the actual step in the pattern you want to
edit. Every step can contain 4 drum sounds with 3 different dynamic
levels. The larger the number of steps you set with this parameter, the
finer the resolution of your pattern will be. You can also set values for
uneven meters. The value of 12, for example, will result in 3/4 time
with a resolution of 16th notes.
DRUM INSTRUMENT (1…4)
Choose a drum instrument from the list of drum sounds available in
the presently active drum kit and press the ENTER button to begin
editing. In the bottom half of the display appears a dotted line with a
cursor whose position is dependent upon the individual steps (see
STEPS). You can move the cursor to the left or right by using the +/
- Parameter buttons. Use the +/- Value buttons to then add an accent
at the proper step position. You will see a small vertical bar at that
position. Press the +/- Value buttons repeatedly to increase or decrease
the strength of the accent, visible in the display as a thicker or thinner
bar. You can make the accent so weak that it disappears altogether.
When you are finished, press the EXIT button. You can of course
repeat this process for the 3 other instruments you have selected for
the pattern. A further press of the EXIT button takes you out of the
PATTERN EDITOR. The flashing display signals you that you have
changed a pattern but have not yet saved it. Press STORE to save the
pattern to battery-backed-up RAM.
TRACK…
Track Editor (1…8)
With the help of this sub menu, you can use the Track Editor for drum
sequences to create up to 8 tracks that can be accessed from PRESET
MODE by pressing the hold pedal. A track sequence contains up to
32 steps in which your own programmed patterns can be combined in
any order or repeated as desired. Use the +/- Value buttons to select
the desired track number and press the ENTER button to begin editing.
Press the EXIT button when finished. The following is a description
of the parameters in the sub menu:
54
User manual AXON AX-100 / AX-100 SB
AXON AX-100 GUITAR TO MIDI CONVERTER
BLUE CHIP
ST: (0…31)
Here you select the step number of the track sequence you want to
work on. The individual steps will then be chained together step-wise
according to their number. You can have a maximum of 32 steps.
C: (0…127)
This is the number of repeats the pattern will execute within the step.
The value 1 plays the patter one time. The value 0 (zero) indicates the
end of a track sequence. When the drum sequencer gets to this point,
it will automatically stop playing.
PT: (1…32)
Choose the pattern number to be used in the selected step (ST).
When you press EXIT, the flashing display indicates that you have
not yet saved your changes to the track. Press STORE to save your
changes in battery-backed-up RAM.
EDIT QS300…
Editing the QS300 synthesizer section
If you own the AXON AX 100-SB, your AXON is equipped with its
own synthesizer, whose sounds can be used like normal presets in
your AXON (Instrument group QS300). There are 32 freely
programmable voices, which have been preprogrammed by the
manufacturer. You can edit them, or create new ones at will. If you
would like to keep the factory sounds, you can save them to a computer
hard drive or floppy disk via sysex and the appropriate software. You
can also write down the parameters so that you can reprogram them
later, but this is somewhat tedious because of the number of
parameters. Press the ENTER button to get to the program level of
the QS300. Note that programming sounds in the QS300 is only
possible when the presently selected preset a sound from the QS300
is.
QS300 Voice
QS300 Voice number (1…32)
Use the +/- Value buttons to select the voice number of the sound you
want to edit. There are 32 of them. To the left of the voice number in
the bottom half of your display appears the name of the sound that
you can change by pressing the ENTER button. To leave text-editor
mode, press the EXIT button.
User manual AXON AX-100 / AX-100 SB
55
AXON AX-100 GUITAR TO MIDI CONVERTER
BLUE CHIP
ELEMENT
ELEMENT (1 ON, 2 ON, 1+2 ON)
A QS300 voice is made up of 1 or 2 elements that are based on any
one of 205 different wave form (e.g. Piano or Violin). In the voice
element sub menus you can build on these basic elements by assigning
various pitch shift options, trigger sensitivity, envelope curves, as
well as totally independent filters, pitch- EGs, tunings, LFO settings.
This flexibility allows creation of extremely complex voices that can
be structured to change with the various dynamic levels of your playing
style. This parameter allows you to independently turn on or off each
of the 2 elements. You will use one element for most of your voices.
VOICE LEVEL
Voice Volume Level (0…127)
Set the volume level of the selected QS300 voice.
EDIT ELMNT…
Element Editing (1, 2)
Choose the element you want to edit and press the ENTER button to
begin:
WAVEFORM
(0…204)
Select the waveform to assign to the selected element. The appendix
of this manual contains a complete list of the basic waveforms.
ELEMENT LEV
(0…127)
Set the volume level of the individual element
VEL CURVE
(NORMAL, HARD1, HARD2, SOFT1, SOFT2, CROSS1, CROSS2)
You can set how sensitive the element will be to the dynamic
differences in your playing. Depending upon whether your playing
style is hard or soft, the sound can be set to react accordingly. Using
the CROSS curves allows for velocity crossfading. In other words,
your playing dynamic can be used to control volume shifts between
your two elements. To do this, set one element to CROSS1 and the
other one to CROSS2.
56
User manual AXON AX-100 / AX-100 SB
AXON AX-100 GUITAR TO MIDI CONVERTER
BLUE CHIP
PANORAMA
(L7…L1, C, R1…R7, SCALE)
Set the panorama position in stereo for each of the elements in your
voice. Use the setting SCALE to allow for stereo panorama separation
according to the actual pitches of the notes played.
AMPLITUDE EG…
Press the ENTER button to get to the parameters for the amplitude
envelope curve. In the upper half of the display appears a graphic to
help you orient yourself within the envelope. Press the EXIT button
to leave this sub menu. The following is a description of the amplitude
envelope parameters:
ATTACK RATE
(0…63)
The attack rate determines how much time is allowed from the
beginning of a played note until its volume level reaches the maximum.
DECAY1 RATE
(0…63)
This is the time it takes for the volume level to reach the value in
DEC1 LEVEL.
DECAY2 RATE
(0…63)
This is the time it takes for the volume level to reach the value in
DEC2 LEVEL.
RELEASE RATE
(0…63)
This is the time after a MIDI Note Off event is received before the
volume level of the voice falls all the way to zero.
DEC1 LEVEL
(0…127)
Here you set the first decay level which will be reached after the
amount of time set in DECAY1 RATE has passed.
DEC2 LEVEL
(0…127)
Here you set the second decay level which will be reached after the
amount of time set in DECAY2 RATE has passed.
User manual AXON AX-100 / AX-100 SB
57
AXON AX-100 GUITAR TO MIDI CONVERTER
BLUE CHIP
LFO…
Press the ENTER button to edit the individual parameters for the
LFO (Low Frequency Oscillator). The LFO produces low frequency
waveforms that are used to modulate volume, pitch and timbre. Press
the EXIT button to leave this sub menu.
LFO WAVE
(SAW, TRI, S&H)
Select the waveform for the LFO. The kind of modulation applied to
your voice depends on this waveform. Sample & Hold (S&H) creates
a random modulation.
LFO INIT
(OFF, ON)
Setting this parameter to ON resets the LFO at the beginning of every
played note so that each note will have identical modulation. OFF
allows the LFO to modulate freely in an asynchronous manner.
LFO SPEED
(0…63)
Set the speed at which the LFO modulates. Higher values cause the
LFO to modulate faster.
LFO DELAY
(0…127)
This is the delay time after a MIDI Note On event before the LFO is
activated. (This applies only to pitch modulation).
LFO FADETIME
(0…127)
You can program the LFO to begin abruptly or to fade in slowly. The
higher the value here, the more slowly the LFO fades in.
LFO PMD
(0…63)
Pitch Modulation Depth is the value for the amount of pitch
differentiation in the modulation. The higher the value, the wider the
pitches of the modulation swing are apart.
58
User manual AXON AX-100 / AX-100 SB
AXON AX-100 GUITAR TO MIDI CONVERTER
BLUE CHIP
LFO CMD
(0…15)
The Cutoff Modulation Depth determines how strongly the filter is
modulated by the LFO. The higher the value, the stronger the filter
modulation.
LFO AMD
(0…31)
Amplitude Modulation Depth determines how strongly the volume
(amplitude) is modulated by the LFO. The higher the value, the
stronger the amplitude modulation.
TUNING…
Press the ENTER button to edit the tuning of the selected element.
Press the EXIT button to leave the sub menu. The following is a
description of the various parameters in this section:
NOTE SHIFT
(-32…+32)
These values represent half step increments (intervals). Finer
adjustments than half steps can be set using DETUNE.
DETUNE
(-50…+50)
These values represent Cents (1 Cent = 1/100 of a half step).
PITCH SCALE
(0%, 5%, 10%, 20%, 50%, 100%)
This parameter allows you full control of the tonal environment in
which you want to work. Under normal western musical
circumstances, each fret on your guitar raises the pitch of the string
by one half step. Some eastern and middle eastern cultures, however,
use tonal systems based on quarter tone units or other units. If you set
the value of this parameter to 0% the resulting divisions within an
octave will be 12 half steps and thereby our standard western chromatic
system. If this value is set for 100%, every note you play in a scale
will have the same pitch. The value of 5% results in an octave divided
into 24 equal parts or quarter tones. The higher the value for this
parameter, the smaller the interval unit played when you play adjacent
frets on your guitar.
User manual AXON AX-100 / AX-100 SB
59
BLUE CHIP
AXON AX-100 GUITAR TO MIDI CONVERTER
PITCH CENTR
(C-2…G8)
Here you set the pitch that will be your pitch center in your pitch
scale (see above). This is the note that will be played true to its pitch,
from which all the other intervals up and down will be computed.
RESONANCE
(0…63)
Set the strength of filter resonance, the emphasis of the filter cutoff
frequency. Higher values give more emphasis to filter cutoff frequency,
giving a higher point of resonance.
VELO SENSE
(0…7)
Setting this parameter determines how much touch sensitivity (your
playing dynamic) affects resonance.
CUTOFF FREQ
(0…127)
Setting this parameter determines the frequency at which the filter no
longer allows sound. Lower values produce warmer, duller sounds;
higher values produce brighter, crisper sounds.
VEL FEG LEV
(-7…+7)
Setting this parameter determines the velocity sensitivity level… how
much influence touch sensitivity (the various dynamic levels of your
playing) has on the filter envelope. With a value of 0 (zero), velocity
has no effect on the filter envelope. Positive values have increasing
effect on the filter’s effect according to your play velocity. Negative
values cause more filter effect the softer (smaller velocities) you play.
VEL FEG RATE
(-7…+7)
Setting this parameter determines how the speed of the filter is affected
by the various dynamic levels (velocities) you play. Positive values
change the filter faster the louder (harder) you play. Negative values
cause the filter to change faster the softer you play.
60
User manual AXON AX-100 / AX-100 SB
AXON AX-100 GUITAR TO MIDI CONVERTER
BLUE CHIP
FILTER EG…
Press the ENTER button to edit the parameters for the Envelope curve
controlling the filter. This is where the highs of your voice are
controlled on a time curve. The upper half of the display shows a help
graphic to help you orient yourself to the various points in the envelope
curve. Press the EXIT button to leave this sub menu. The following is
a description of the various parameters in this sub menu:
ATTACK RATE
(0…63)
This value determines how long after a string is played on your guitar
the filter is totally open.
DECAY1 RATE
(0…63)
This is the time it takes for the level to reach the value in DEC1
LEVEL.
DECAY2 RATE
(0…63)
This is the time it takes for the level to reach the value in DEC2
LEVEL.
REL RATE
Release Rate (0…63)
This is the time after a MIDI Note Off event is received before the
filter level falls all the way to zero.
INIT.LEVEL
(-64…+64)
Set the beginning level for the filter’s effect at the beginning of the
note.
ATTCK LEVEL
(-64…+64)
Set the maximum filter level to be reached after the attack time is
reached.
DEC1 LEVEL
(0…127)
Here you set the first decay level which will be reached after the
amount of time set in DECAY1 RATE has passed.
User manual AXON AX-100 / AX-100 SB
61
AXON AX-100 GUITAR TO MIDI CONVERTER
BLUE CHIP
DEC2 LEVEL
(0…127)
Here you set the second decay level which will be reached after the
amount of time set in DECAY2 RATE has passed.
REL LEVEL
Release Level (-64…+64)
Set the final value of the filter’s level at a MIDI Note Off event.
PTCH DPT
(1/2OCT, 1OCT, 2OCT, 4OCT)
Here you determine the effective working values in octaves for the
pitch envelope generator.
VEL PEG LEV
(-7…+7)
Setting this parameter determines the pitch sensitivity level… how
much influence touch sensitivity (the various dynamic levels of your
playing) has on the pitch filter envelope. With a value of 0 (zero),
velocity has no effect on the pitch envelope. Positive values have
increasing effect on the pitch envelope’s effect according to your play
velocity. Negative values cause more pitch envelope’s effect the softer
(smaller velocities) you play.
VEL PEG RATE
(-7…+7)
Setting this parameter determines how the speed of the pitch envelope
is affected by the various dynamic levels (velocities) you play. Positive values change the pitch envelope faster the louder (harder) you
play. Negative values cause the pitch envelope to change faster the
softer you play.
PITCH EG…
Press the ENTER button to edit the parameters for the Envelope curve
controlling the pitch envelope. This is where the pitches of your voice
are controlled on a time curve. The upper half of the display shows a
help graphic to help you orient yourself to the various points in the
envelope curve. Press the EXIT button to leave this sub menu. The
following is a description of the various parameters in this sub menu:
62
User manual AXON AX-100 / AX-100 SB
AXON AX-100 GUITAR TO MIDI CONVERTER
BLUE CHIP
ATTACK RATE
(0…63)
This value determines how long after a string is played on your guitar
the pitch envelope reaches its maximum value.
DECAY1 RATE
(0…63)
This is the time it takes for the pitch to reach the value in DEC1
LEVEL.
DECAY2 RATE
(0…63)
This is the time it takes for the pitch to reach the value in DEC2
LEVEL.
REL RATE
Release Rate (0…63)
This is the time after a MIDI Note Off event is received before the
pitch envelope level effect all the way to zero.
INIT.LEVEL
(-64…+64)
Set the beginning pitch for the pitch envelope’s effect at the beginning
of the note.
ATTCK LEVEL
(-64…+64)
Set the maximum pitch envelope effect to be reached after the attack
time is reached.
DEC1 LEVEL
(0…127)
Here you set the first decay effect level which will be reached after
the amount of time set in DECAY1 RATE has passed.
DEC2 LEVEL
(0…127)
Here you set the second decay effect level which will be reached
after the amount of time set in DECAY2 RATE has passed.
User manual AXON AX-100 / AX-100 SB
63
AXON AX-100 GUITAR TO MIDI CONVERTER
BLUE CHIP
REL LEVEL
Release Level (-64…+64)
Set the final pitch value of the pitch envelope at a MIDI Note Off
event.
COPY ELEMENTS…
COPY (ELM1->2, ELM2->1)
You can copy all of the parameters of one element of your voice to
the other and thereby save you a lot of duplicate programming. You
can then modify individual parameters in one element or the other to
fit your needs. Select the element that you want to receive the
parameters from the other one, and press the ENTER button. (In order
to then use both elements simultaneously in your voice, you need to
set the parameter ELEMENT to 1+2 ON.
64
User manual AXON AX-100 / AX-100 SB
AXON AX-100 GUITAR TO MIDI CONVERTER
BLUE CHIP
EDIT REVERB…
Owners of the AXON AX 100-SB can customize the built-in reverb
effect in the sound board. You need to first select on of the 11 types of
reverb effects available in your AXON. Depending upon the type of
reverb you’ve selected, there are different parameters available for
customizing.
REVERB TYPES
NO EFFECT:
Turns the reverb off.
HALL1:
Simulates the reverb found in a concert hall.
HALL2:
A variation of HALL1.
ROOM1:
Simulates the reverb found in a normal room.
ROOM2:
A variation of ROOM1.
ROOM3:
A variation of ROOM1.
STAGE1:
For use with a solo instrument’s reverb program.
STAGE2:
A variation of STAGE1.
PLATE:
Simulates the reverb effect generated by metal plate reverb units found
in recording studios.
WHITE ROOM:
A short reverb program followed by a fast delay.
TUNNEL:
Simulates a tunnel that becomes increasingly wider.
BASEMENT:
A short delay followed by massive reverb.
User manual AXON AX-100 / AX-100 SB
65
AXON AX-100 GUITAR TO MIDI CONVERTER
BLUE CHIP
Reverb Parameters
It would be impossible for us to describe in detail the various effects
and parameters available for various reverb possibilities and it’s not
our purpose to do that here. The following is general description.
There is specific literature available if you want more information
than you find here.
PROGRAMS: HALL1,2, ROOM1,2,3, STAGE1,2, PLATE:
RevTime (0.3s ... 30.0s) / Reverb length
Diffusion (0 ... 10) / Diffusion of reverb reflections
PreDelay (0.1ms ... 99.3ms) / Delay before reverb
HPF Cut (20Hz ... 8.0kHz) / High Pass Filtercutoff
LPF Cut (1.0kHz ... 20.0kHz) / Low Pass Filtercutoff
Dry/wet (1 ... 127) / Amount of effect
RevDelay (0.1ms ... 99.3ms) / Amount of reverb delay
Density (0 ... 3) / Reverb Intensity
Er/rev Bal (1 ... 127) / Balance
Fdbck Level (-63 ... +63) / Level of Feedback
PROGRAMS: WHITE ROOM, TUNNEL, BASEMENT:
RevTime (0.3s ... 30.0s) / Reverb length
Diffusion (0 ... 10) / Diffusion of Reverb Reflections
PreDelay (0.1ms ... 99.3ms) / Delay before Reverb
HPF Cut (20Hz ... 8.0kHz) / High Pass Filtercutoff
LPF Cut (1.0kHz ... 20.0kHz) / Low Pass Filtercutoff
Width (0.5 ... 10.2) / Room width in Meter
Height (0.5 ... 20.2) / Room height in Meter
Depth (0.5 ... 30.2) / Room length in Meter
Wall vary (0 ... 30) / Simulation of the Walls
Dry/wet (1 ... 127) / Amount of effect
RevDelay (0.1ms ... 99.3ms) / Reverb Delay
Density (0 ... 3) / Reverb Intensity
Er/rev Bal (1 ... 127) / Balance
Fdbck Level (-63 ... +63) / Feedback level
GLOBAL REVERB PARAMETERS
Reverb Ret (-64 ... +63) / Amount of Reverb Return Signal
Reverb Pan (L63 ... R63) / Reverb Panorama
66
User manual AXON AX-100 / AX-100 SB
AXON AX-100 GUITAR TO MIDI CONVERTER
BLUE CHIP
EDIT CHORUS…
Owners of the AXON AX 100-SB can customize the built-in chorus
effect in the sound board. You need to first select on of the 11 types of
chorus effects available in your AXON. Depending upon the type of
chorus you’ve selected, there are different parameters available for
customizing.
CHORUS TYPES
NO EFFECT:
Turns Chorus off.
CHORUS1:
Conventional chorus effect for a full sound.
CHORUS2:
Variation of CHORUS1-Effect.
CHORUS3:
Variation of CHORUS1-Effect.
CHORUS4:
Variation of CHORUS1-Effect with Stereo-Input.
CELESTE1:
LFO modulated in 3 Phases.
CELESTE2:
Variation of CELESTE1-Effect.
CELESTE3:
Variation of CELESTE1-Effect.
CELESTE4:
LFO modulated in 3 Phases.
FLANGER1:
Chorus with Phase-shifting (Jet-Effect)
FLANGER2:
Variation of FLANGER1-Effect.
FLANGER3:
Variation of FLANGER1-Effect.
User manual AXON AX-100 / AX-100 SB
67
AXON AX-100 GUITAR TO MIDI CONVERTER
BLUE CHIP
Chorus parameters
It would be impossible for us to describe in detail the various effects
and parameters available for various reverb possibilities and it’s not
our purpose to do that here. The following is general description.
There is specific literature available if you want more information
than you find here.
PROGRAMS: CHORUS1,2,3,4, CELESTE1,2,3,4:
LFO Freq (0.00Hz ... 39.70Hz) / Frequency of the Low Freq. Osc.
LFO PM Depth (0 ... 127) / Depth of Pitch-Modulation
Fdbck Level (-63 ... +63) / Feedback level
Delay Offs (0.0 ... 50.0) / Delay offset for Modulation
EQ Low (50Hz ... 2.0kHz) / Equalization for low Freq.
EQ LowGain (-12dB ... +12dB) / EQ-level for lower frequencies
EQ Hi (500Hz ... 16.0kHz) / Equalization for high Freq.
EQ HiGain (-12dB ... +12dB) / EQ-level for high er frequencies
Dry/wet (1 ... 127) / Amount of effect
Input (MONO, STEREO) / Input signal MONO or STEREO
PROGRAMS: FLANGER1,2,3:
LFO Freq (0.00Hz ... 39.70Hz) / Frequency of the Low Freq. Osc.
LFO Depth (0 ... 127) / Modulation depth
Fdbck Level (-63 ... +63) / Feedback level
Delay Offs (0.0 ... 50.0) / Delay offset for Modulation
EQ Low (50Hz ... 2.0kHz) / Equalization for low Freq.
EQ LowGain (-12dB ... +12dB) / EQ-level for low frequencies
EQ Hi (500Hz ... 16.0kHz) / Equalization for high Freq.
EQ HiGain (-12dB ... +12dB) / EQ-level for high frequencies
Dry/wet (1 ... 127) / Amount of effect
LFO Phase (-180° ... +180°) / LFO phase control
GLOBAL CHORUS PARAMETERS
Chorus Ret (-64 ... +63)
Chorus return signal.
Chorus Pan (L63 ... R63)
Panorama of the chorus signal.
Chor -> Rev (0 ... 127)
Mixes the chorus effect .with Reverb. The higher the value, the more
chorus in the mix.
68
User manual AXON AX-100 / AX-100 SB
AXON AX-100 GUITAR TO MIDI CONVERTER
BLUE CHIP
EDIT VARIAT ...
Owners of the AXON AX 100-SB can customize the built-in variation
effect in the sound board. You need to first select on of the 42 types of
variation effects available in your AXON. Depending upon the type
of variation you’ve selected, there are different parameters available
for customizing.
VARIATIONS EFFECT TYPES
NO EFFECT:
Turns variation effects off.
HALL1:
Simulates reverb in a concert hall.
HALL2:
Variation of HALL1 Effect.
ROOM1:
Simulates reverb in a normal room.
ROOM2:
Variation of ROOM1 Effect.
ROOM3:
Variation of ROOM1 Effect.
STAGE1:
For use with a solo instruments reverb program.
STAGE2:
Variation of STAGE1 Effect.
PLATE:
Simulates the metal plate reverb system found in recording studios.
DELAY L;C;R:
Delay effect(Panoramaposition Left, Right, Center).
DELAY L;R:
Delay effekt (Panoramaposition Links und Rechts).
ECHO:
Echoeffect with independent feedback control for left and right.
User manual AXON AX-100 / AX-100 SB
69
BLUE CHIP
AXON AX-100 GUITAR TO MIDI CONVERTER
CROSSDLY:
Delay effect with changing Panorama-Feedback-Loops.
EARLYREF1:
Only generates the first reverb reflection.
EARLYREF2:
Variation of EARLY REF1-Effect.
GATED REV:
Gated Reverb Effect. (made popular by Phil Collins)
REV GATE:
Reverse Gated Reverb Effekt.
KARAOKE 1:
A Karaoke-typical reverb effect.
KARAOKE 2:
Variation of KARAOKE 1-Effect.
KARAOKE 3:
Variation of KARAOKE 1-Effect.
CHORUS1:
Conventional chorus effect for a full sound.
CHORUS2:
Variation of CHORUS1-Effect.
CHORUS3:
Variation of CHORUS1-Effect.
CHORUS4:
Variation of CHORUS1-Effect with Stereo-Input.
CELESTE1:
LFO with 3 Phase Modulation.
CELESTE2:
Variation of CELESTE1-Effect.
CELESTE3:
Variation of CELESTE1-Effect.
70
User manual AXON AX-100 / AX-100 SB
AXON AX-100 GUITAR TO MIDI CONVERTER
BLUE CHIP
CELESTE4:
LFO with 3 Phase Modulation.
FLANGER1:
Chorus with Phaseshifting (Jet-Effect
FLANGER2:
Variation of FLANGER1-Effect.
FLANGER3:
Variation of FLANGER1-Effect.
SYMPHONIC:
Multi-Phase-variant of CELESTE1-Effect.
ROTARY:
Simulation of a Leslie cabinet.
TREMOLO:
Effect based on amplitude variation.
AUTO PAN:
Effect based on panorama variation.
PHASER1:
Effect based on phase shifting.
PHASER2:
Variatiion of PHASER1-Effect with Stereo-Input.
DISTORTION:
Distortion simulator.
OVERDRIVE:
Simulation of overdriving a tube guitar amplifier.
GUITARAMP:
Simulation a tube guitar amplifier.
3BANDEQU:
A MONO-Equalizer with controls for Lows, Mids, Highs..
2BANDEQU:
A STEREO-Equalizer with controls for Lows, Mids, Highs.
User manual AXON AX-100 / AX-100 SB
71
BLUE CHIP
AXON AX-100 GUITAR TO MIDI CONVERTER
AUTOWAH:
Automatic Wah-Wah Effect.
Variations Effect Parameters
It would be impossible for us to describe in detail the various effects
and parameters available for various reverb possibilities and it’s not
our purpose to do that here. The following is general description.
There is specific literature available if you want more information
than you find here.
PROGRAMS HALL1 ... PLATE:
(see. Reverb parameters)
PROGRAMS DELAY L,C,R:
Lch Dly (0.1ms ... 715.0ms) / Delay left channel
Rch Dly (0.1ms ... 715.0ms) / Delay right channel
Cch Dly (0.1ms ... 715.0ms) / Delay Center
Fdb Dly (0.1ms ... 715.0ms) / Feedback Delay
Fdbck Level (-63 ... +63) / Feedback level
Cch Level (0 ... 127) / Center level
High Damp (1 ... 10) / Highs roll-off
Dry/wet (1 ... 127) / Amount of effect signal
EQ Low (50Hz ... 2.0kHz) / Equalization for low freq.
EQ LowGain (-12dB ... +12dB) / EQ-Level for low freq.
EQ Hi (500Hz ... 16.0kHz) / Equalization for high Freq.
EQ HiGain (-12dB ... +12dB) / EQ-Level for high frequencies
PROGRAM DELAY L,R:
Lch Dly (0.1ms ... 715.0ms) / Delay right channel
Rch Dly (0.1ms ... 715.0ms) / Delay left channel
Fdb1 Dly (0.1ms ... 715.0ms) / Feedback 1 Delay
Fdb2 Dly (0.1ms ... 715.0ms) / Feedback 2 Delay
Fdbck Level (-63 ... +63) / Feedback level
High Damp (1 ... 10) / Highs roll-off
Dry/wet (1 ... 127) / Amount of effect signal
EQ Low (50Hz ... 2.0kHz) / Equalization for low Freq.
EQ LowGain (-12dB ... +12dB) / EQ-Level for low Freq.
EQ Hi (500Hz ... 16.0kHz) / Equalization for high Freq.
EQ HiGain (-12dB ... +12dB) / EQ-Level for high frequencies
72
User manual AXON AX-100 / AX-100 SB
AXON AX-100 GUITAR TO MIDI CONVERTER
BLUE CHIP
PROGRAM ECHO:
Lch Dly1 (0.1ms ... 355.0ms) / Left Channel Delay 1
Lch Fdbck (-63 ... +63) / Left Channel Feedback
Rch Dly1 (0.1ms ... 355.0ms) / Right Channel Delay 1
Rch Fdbck (-63 ... +63) / Right Channel Feedback
High Damp (1 ... 10) / Highs roll-off
Lch Dly2 (0.1ms ... 355.0ms) / Left Channel Delay 2
Rch Dly2 (0.1ms ... 355.0ms) / Right Channel Delay 2
Delay2 Lev (0 ... 127) / Delay 2 Level
Dry/wet (1 ... 127) / Amount of echo
EQ Low (50Hz ... 2.0kHz) / Equalization for low Freq.
EQ LowGain (-12dB ... +12dB) / EQ-Level for low freq.
EQ Hi (500Hz ... 16.0kHz) / Equalization for high Freq.
EQ HiGain (-12dB ... +12dB) / EQ-Level for high frequencies
PROGRAM CROSSDLY:
L ->R Dly (0.1ms ... 355.0ms) / Crossdelay Left/Right
R ->L Dly (0.1ms ... 355.0ms) / Crossdelay Right/Left
Fdbck Level (-63 ... +63) / Feedback level
Inp Select (L, R, L&R) / Input selection for L, R, or both
High Damp (1 ... 10) / Highs roll-off
Dry/wet (1 ... 127) / Amount of effect signal
EQ Low (50Hz ... 2.0kHz) / Equalization for low Freq.
EQ LowGain (-12dB ... +12dB) / EQ-Level for low frequencies
EQ Hi (500Hz ... 16.0kHz) / Equalization for high Freq.
EQ HiGain (-12dB ... +12dB) / EQ-level for high frequencies
PROGRAM EARLYREF1,2:
Type (SHORT, LARGE, RANDOM, REVERS, PLATE, SPRING) /
Reverb-Typ
Room size (0.1m ... 7.0m) / Size of room
Diffusion (0 ... 10) / Diffusion reverb reflections
PreDelay (0.1ms ...99.3ms) / Delay before reverb
Fdbck Level (-63 ... +63) / Feedback level
HPF Cut (20Hz ... 8.0kHz) / Low frequency Cutoff
LPF Cut (1.0kHz ... 20.0kHz) / High frequency Cutoff
Dry/wet (1 ... 127) / Amount of effect signal
Liveness (0 ... 10) / Liveness
Density (0 .. 3) / Intensity
High Damp (1 ... 10) / Highs roll-off
User manual AXON AX-100 / AX-100 SB
73
AXON AX-100 GUITAR TO MIDI CONVERTER
BLUE CHIP
PROGRAMS GATED REV, REV GATE:
Type (TYPE A, TYPE B, L<->RB, L->RB, L<-RB, LTURNB) /
Reverb-Typ
Room size (0.1m ... 7.0m) / Size of room
Diffusion (0 ... 10) / Diffusion of reverb reflections
PreDelay (0.1ms ...99.3ms) / Delay before reverb
Fdbck Level (-63 ... +63) / Feedback level
HPF Cut (20Hz ... 8.0kHz) / Low frequency Cutoff
LPF Cut (1.0kHz ... 20.0kHz) / High frequency Cutoff
Dry/wet (1 ... 127) / Amount of effect signal
Liveness (0 ... 10) / Liveness
Density (0 .. 3) / Intensity
High Damp (1 ... 10) / Highs roll-off
PROGRAMS KARAOKE1,2,3:
DlyTime (0.1ms ... 200.0ms) / Delay-Time
Fdbck Level (-63 ... +63) / Feedback level
HPF Cut (20Hz ... 8.0kHz) / Low frequency Cutoff
LPF Cut (1.0kHz ... 20.0kHz) / High frequency Cutoff
Dry/wet (1 ... 127) / Amount of effect signal
PROGRAMS CHORUS1 ... FLANGER3:
(see Chorus Parameter)
PROGRAM SYMPHONIC:
LFO Freq (0.00Hz ... 39.70Hz) / Frequency of the Low Frequency
Oscillators
LFO Depth (0 ... 127) / Modulation depth
Delay Offs (0.0 ... 50.0) / Delay offset for the Modulation
EQ Low (50Hz ... 2.0kHz) / Equalization for low Freq.
EQ LowGain (-12dB ... +12dB) / EQ-Level for low frequencies
EQ Hi (500Hz ... 16.0kHz) / Equalization for high Freq.
EQ HiGain (-12dB ... +12dB) / EQ-level for high frequencies
Dry/wet (1 ... 127) / Amount of effect signal
74
User manual AXON AX-100 / AX-100 SB
AXON AX-100 GUITAR TO MIDI CONVERTER
BLUE CHIP
PARAMETERS THE LESLIE PROGRAM:
LFO Freq (0.00Hz ... 39.70Hz) / Frequency of Low Frequency
Oscillator
LFO Depth (0 ... 127) / Modulation depth
EQ Low (50Hz ... 2.0kHz) / Equalization for low Freq.
EQ LowGain (-12dB ... +12dB) / EQ-Level for low frequencies
EQ Hi (500Hz ... 16.0kHz) / Equalization for high Freq.
EQ HiGain (-12dB ... +12dB) / EQ-level for high frequencies
Dry/wet (1 ... 127) / Amount of effect signal
PROGRAM TREMOLO:
LFO Freq (0.00Hz ... 39.70Hz) / FrequenofLow Frequency Oscillators
AM Depth (0 ... 127) / Depth of amplitude modulation
PM Depth (0 ... 127) / Depth of pitch modulation
EQ Low (50Hz ... 2.0kHz) / Equalization for low Freq.
EQ LowGain (-12dB ... +12dB) / EQ-Level for low frequencies
EQ Hi (500Hz ... 16.0kHz) / Equalization for high Freq.
EQ HiGain (-12dB ... +12dB) / EQ-level for high frequencies
LFO Phase (-180° ... +180°) / LFO Phase difference
Input (MONO, STEREO) / Input MONO or STEREO
PROGRAM AUTOPAN:
LFO Freq (0.00Hz ... 39.70Hz) / Frequenz of the Low Frequency
Oscillator
L/R Depth (0 ... 127) / Depth left and right
PM Depth (0 ... 127) / Depth front and back
Pan Direc (L<->R, L->R, L<-R, LTURN, RTURN, L/R) / Direction
of Panorama shifting
EQ Low (50Hz ... 2.0kHz) / Equalization for low Freq.
EQ LowGain (-12dB ... +12dB) / EQ-Level for low frequencies
EQ Hi (500Hz ... 16.0kHz) / Equalization for high Freq.
EQ HiGain (-12dB ... +12dB) / EQ-level for high frequencies
User manual AXON AX-100 / AX-100 SB
75
BLUE CHIP
AXON AX-100 GUITAR TO MIDI CONVERTER
PROGRAMS PHASER1,2:
LFO Freq (0.00Hz ... 39.70Hz) / Frequenz of the Low Frequency
Oscillator
LFO Depth (0 ... 127) / Modulation depth
Phase Offset (0 ... 127) / Phaseshift Offset
Fdbck Level (-63 ... +63) / Feedback level
EQ Low (50Hz ... 2.0kHz) / Equalization for low Freq.
EQ LowGain (-12dB ... +12dB) / EQ-Level for low frequencies
EQ Hi (500Hz ... 16.0kHz) / Equalization for high Freq.
EQ HiGain (-12dB ... +12dB) / EQ-level for high frequencies
Dry/wet (1 ... 127) / Amount of effect signal
Stage (PHASER1: 6 ... 10, PHASER2: 3 ... 5) / Phaser-Step
Diffusion (MONO, STEREO) / Mono- or Stereo
LFO Phase (-180° ... +180°) / LFO Phase control
PROGRAMS DISTORTION, OVERDRIVE:
Drive (0 ... 127) / Amount of overdrive
EQ Low (50Hz ... 2.0kHz) / Equalization for low Freq.
EQ LowGain (-12dB ... +12dB) / EQ-level for low Frequencies
LPF Cut (1.0kHz ... 20.0kHz) / Cutoff of upper frequencies
Output Level (0 ... 127) / Output level
EQ Mid (500Hz ... 10.0kHz) / Equalization for midrange Freq.
EQ Mid Gain (-12dB ... +12dB) / EQ-Level for midrange frequencies
EQ Mid Width (10 ... 120) / Equalization for Midrange
Dry/wet (1 ... 127) / Amount of effect signal
Edge (0 ... 127) / Clipping-Curve
PROGRAM GUITARAMP:
Drive (0 ... 127) / Overdrive
AMP type (OFF, STACK, COMBO, TUBE) / Amplifier type
LPF Cut (1.0kHz ... 20.0kHz) / Cutoff of highrange frequencies
Output Level (0 ... 127) / Output levle
Dry/wet (1 ... 127) / Amount of effect signal
Edge (0 ... 127) / Clipping-Curve
76
User manual AXON AX-100 / AX-100 SB
AXON AX-100 GUITAR TO MIDI CONVERTER
BLUE CHIP
PROGRAM 3BANDEQU:
EQ LowGain (-12dB ... +12dB) / EQ-Level for lowrange frequencies
EQ Mid (500Hz ... 10.0kHz) / Equalizer for midrange Freq.
EQ Mid Gain (-12dB ... +12dB) / EQ-Level for midrange frequencies
EQ Mid Width (10 ... 120) / Equalizer for midrange Freq.
EQ HiGain (-12dB ... +12dB) / EQ-Level for highrange freqencies
EQ Low (50Hz ... 2.0kHz) / Equalizer for lowrange Freq.
EQ Hi (500Hz ... 16.0kHz) / Equalizer for highrange frequencies
PROGRAM 2BANDEQU:
EQ Low (50Hz ... 2.0kHz) / Equalization for low Freq.
EQ LowGain (-12dB ... +12dB) / EQ-Level for low frequencies
EQ Hi (500Hz ... 16.0kHz) / Equalization for high Freq.
EQ HiGain (-12dB ... +12dB) / EQ-level for high frequencies
PROGRAM AUTOWAH:
LFO Freq (0.00Hz ... 39.70Hz) / Frequency of the Low Frequency
Oscillator
LFO Depth (0 ... 127) / Modulation depth
Cutoff Offs (0 ... 127) / Cutoff Frequency Offset
Resonance (10 ... 120) / Resonance
EQ Low (50Hz ... 2.0kHz) / Equalization for low Freq.
EQ LowGain (-12dB ... +12dB) / EQ-Level for low frequencies
EQ Hi (500Hz ... 16.0kHz) / Equalization for high Freq.
EQ HiGain (-12dB ... +12dB) / EQ-level for high frequencies
Dry/wet (1 ... 127) / Amount of effect signal
GLOBALE VARIATIONSPARAMETER
Var Ret (-64 ... +63)
Amount of variation effect signal
Var Pan (L63 ... R63)
Panorama placement of variation effect.
Var -> Rev (-64 ... +63)
Mixes variation effect signal with reverb signal. The higher the value,
the more variation in the mix.
User manual AXON AX-100 / AX-100 SB
77
AXON AX-100 GUITAR TO MIDI CONVERTER
BLUE CHIP
Var -> Chor -(-64 ... +63)
Var Connect (INS, SYS)
In SYS, the normal setting, variation effects are sent to all 16 MIDI
channels. If this value is INS, variation effect will only be sent to the
MIDI channel set in VarPart (see below).
Var Part (OFF, 1... 16)
If you want to send variation effect to only one MIDI channel, you
can set this value to the channel of your choice. You must, however,
also have set VarConnect (see above) to INS.
ADC MONITOR
This option allows you a small window into the actual ANALOG/
DIGITAL CONVERTER of your AXON. When you press the ENTER
button, you can see the actual (digital) HEX data that have been
converted by your AXON from the analog string information sent
from your guitar. This feature is primarily for diagnostic purposes
like detecting which conductor of the cable between guitar interface
and AXON may be bad, for example.
78
User manual AXON AX-100 / AX-100 SB
AXON AX-100 GUITAR TO MIDI CONVERTER
BLUE CHIP
Appendix
FACTORY RESET
Press the PRESET and EXIT buttons together to initialize the AX100
and reset it to the factory settings. This applies to all presets as well,
so be sure to save your work to a sequencer or computer beforehand.
Factory Presets
Presets starting at number 129 have been preprogrammed in ROM at
the factory. We have created these to demonstrate the flexibility and
complexity that your AXON has to offer. You can play with them and
experiment with them at will, and if you want to save any of your
changes to the factory presets, you can do that within the USER area:
1…128. Here is a short description of each of the factory presets:
129. GPno1+HdPad : Simple preset with no split function. Uses a
basic piano sound. Pitchbend has been turned off. For notes played
and bent or slid on your guitar that bend the pitch more than one half
step, a new MIDI Note On event is sent. You can use a hold pedal to
play a pad sound in the background.
130. EPno2+HdPad : Simple preset with no split function. Uses an
electric piano sound. Pitchbend has been turned on, but with pitch
quantize. That meants that for notes played and bent or slid on your
guitar that bend the pitch more than one half step, the pitch jumps in
half step increments. You can use a hold pedal to play a pad sound in
the background.
131. Flute+HdPad : Simple preset with no split function. Uses a basic
flute sound. Pitch quantize is ON and makes realistic trills possible
using string vibrato for example, especially in the higher range. You
can use a hold pedal to play a pad sound in the background.
132. Marmb+HdPad : Simple preset with no split function. Uses a
basic percussion sound. You can use a hold pedal to play a pad sound
in the background.
133.Orgn1+HdPad : Simple preset with no split function. Uses a basic
organ sound. Especially noteworthy here is the parameter “Velocity
Sensitivity” which has been set to 0 (zero) and the Offset belonging
to it to 63. In this case all notes sound with the same velocity (level).
You can use a hold pedal to play a pad sound in the background.
User manual AXON AX-100 / AX-100 SB
79
BLUE CHIP
AXON AX-100 GUITAR TO MIDI CONVERTER
134. JzGt1+HdPad : Simple preset with no split function. Uses a basic
Electric guitar sound. Of course now we want to pay attention to
stringbends, etc. so that each string will react the way live guitar would
be played. You can use a hold pedal to play a pad sound in the
background.
135. RkGt1+HdPad : Simple preset with no split function. Uses a
distorted guitar sound. You can use a hold pedal to play a pad sound
in the background.
136. Bass1+HdPad : Simple preset with no split function. Uses a
fretless bass guitar sound. Note: “Transpose” has been set to -12 so
that the bass guitar sound played on your guitar will be in the correct
octave. You can use a hold pedal to play a pad sound in the background.
137. Bass2+HdPad : Simple preset with no split function. Uses a
synthesizer bass guitar sound. Note: “Transpose” has been set to -12
so that the bass guitar sound played on your guitar will be in the
correct octave. You can use a hold pedal to play a pad sound in the
background.
138. Strg1+HdPad : Simple preset with no split function. Uses a basic
string sound. You can use a hold pedal to play a pad sound in the
background.
139. Trmp1+HdPad : Simple preset with no split function. Uses a
basic Trumpet sound. Pitch Quantize has been turned ON to make
realistic trills possible from your guitar using String vibrato. You can
use a hold pedal to play a pad sound in the background.
140. Sax1+HdPad : Simple preset with no split function. Uses a basic
Saxophone sound. Pitch Quantize is ON. You can use a hold pedal to
play a pad sound in the background.
141. Lead1+HdPad : Simple preset with no split function. Uses a
basic synthesizer sound. You can use a hold pedal to play a pad sound
in the background.
142. Pad1+HdPad : Simple preset with no split function. Uses a basic
synthesizer sound. You can use a hold pedal to play a pad sound in
the background.
80
User manual AXON AX-100 / AX-100 SB
AXON AX-100 GUITAR TO MIDI CONVERTER
BLUE CHIP
143. ADrm1+HdPad : Simple preset with no split function. Uses a
basic analog drum kit. “Transpose” has been set to -10 to allow you
to play a bass drum using the open low E-string. You can use a hold
pedal to play a pad sound in the background.
144. Synt1+HdPad :
145. Synt2+HdPad :
146. Synt3+HdPad :
147. Synt4+HdPad : Simple presets with no split function. Use a
programmable synth sound from the internal sound board. You can
use a hold pedal to play a pad sound in the background.
148. PC:Organ+Mod : Preset with Pick Control. Uses an organ sound
with Modulation. The intensity of the modulation is controlled by
where you pick your guitar.
149. PC:Sax+Revrb : Preset with Pick Control. Uses a saxophone
sound. The intensity of the reverb is controlled by where you pick
your guitar.
150. PC:Synth+Pan : Preset with Pick Control. Uses a synthesizer
sound. The panorama placement is controlled by where you pick your
guitar.
151. PC:Bass+Filt : Preset with Pick Control. Uses a synthesizer bass
sound. A filter is controlled by where you pick your guitar.
152. WH:Organ+Mod : Preset with Wheel control. Basically the same
as “PC:Organ+Mod”, the difference being that now the intensity of
the modulation is controlled using the wheel on the guitar interface
instead of pick control.
153. WH:Bass+Filt : Preset with Wheel control. Same as
“PC:Bass+Filt” only the filter is controlled by the wheel on the guitar
interface instead of pick control. Note: if you want to use this preset
as an arpeggiator preset, you can control the filter with the wheel
while the arpeggiator is playing its sequences. In this way you can
create typical techno grooves. In this case it would be advantageous
to have a swell foot pedal (connected to EXP1 or EXP2), in order to
use the swell pedal to control the filter, leaving the wheel free to
control the volume.
User manual AXON AX-100 / AX-100 SB
81
BLUE CHIP
AXON AX-100 GUITAR TO MIDI CONVERTER
154. HC:Trmp+Mod : Preset with hold controller. The trumpet sound
used here can be modulated with a modulation effect by pressing a
foot pedal. When you release the pedal, the modulation value will
return to its default value (usually zero).
155. HC:Synt+Port : Preset with hold controller and pick controll
function. Portamento effect is used here. Portamento needs two
controllers: one to turn the effect off and on, and the other to control
the portamento time parameter. Here the portamento time is controlled
using pick control. We have set the default values for both ends of the
pick splits to the same value so that no matter where you pick, the
portamento time remains the same. You can change these values to
suite your needs. The hold pedal switches portamento ON when
depressed and OFF when released.
156. HL:Pian+Bass : Preset with layer function. Layers two presets
one on top of the other. The piano sound will have Preset 9,
“Bass2+HdPad” added to it when the hold pedal is pressed. The bass
sound is assigned a separate MIDI channel.. When the pedal is
released, only the piano sound will be heard.
157. HL:Sax+Bass : Preset with layer function. Similar to
“HL:Pian+Bass”. Two presets layered one on top of the other. The
saxophone sound will have Preset 9, “Bass2+HdPad” added to it when
the hold pedal is pressed. The bass sound is assigned a separate MIDI
channel.. When the pedal is released, only the piano sound will be
heard.
158. HL:EPno+Five : Preset with layer function. Similar to
“HL:Pian+Bass”. Two presets layered one on top of the other. The
saxophone sound will have Preset 9, “EPiano Fifth” added to it when
the hold pedal is pressed. The two sounds are basically identical except
for the fact that the layered piano sound has been transposed a perfect
fifth up. The fifth piano sound is assigned a separate MIDI channel..
When the pedal is released, only the piano sound will be heard.
159. HA:16thMarmb : Preset with arpeggiator. The main sound is a
piano sound; the arpeggiator is assigned Preset 4, “Marmb+HdPad”.
In this example the arpeggiator generates classic 16th notes in 3
octaves.
82
User manual AXON AX-100 / AX-100 SB
AXON AX-100 GUITAR TO MIDI CONVERTER
BLUE CHIP
160. HA:BluesBass : Preset with arpeggiator. The main sound is a
jazz guitar sound; the arpeggiator is assigned Preset 8 “Bass1+HdPad”.
This example shows how the arpeggiator can be used as a bass
sequencer. Recommendation: Press the hold pedal and play a low A
and then release the pedal. You can now improvise with your guitar.
Later you can add several notes to the bass line, holding down the
pedal. If you press and release the pedal without playing any notes,
the arpeggiator stops.
It’s also possible to play a preprogrammed drum pattern. To stop the
drum sequencer, you need to press the pedal 2 times quickly… a sort
of double-click. We have not activated the drum sequencer for our
factory presets. You can do that at any time by setting the parameters
“SEQ PATTERN” or “SEQ TRACK” in the Arpeggiator Parameter
section.
161. HA:RockBass : Preset with arpeggiator. Similar to the above
preset. The main sound is a distorted guitar sound; the arpeggiator is
assigned Preset 8 “Bass1+HdPad”. The arpeggiator generates a simple driving bass groove.
162. HA:HouseStuf : Preset with arpeggiator. The main sound is a
synth sound; the arpeggiaor is assigned Preset 5 “Orgn1+HdPad”.
This example demonstrates once again the use of rhythmic arpeggios.
Interesting results can be obtained by entering simple random bass
notes with the pedal depressed. While the arpeggiator is playing, switch
to the arpeggio menu and experiment with various parameters,
especially SCAN, SYNC, OCTAVES and REPEAT. Or activate a drum
pattern that can be started with a pedal press. To stop the drum
sequencer it is necessary to press the pedal 2 times quickly.
163. HS Bass+Pno 5: Preset with layered sound. The second preset
(Hold Preset) is immediately turned on... Hold pedal not necessary.
The main preset uses a bass sound which is layered with the preset
EPiano Fifth.
164. HS Brass+Sect: Preset with layered sound. The second preset
(Hold Preset) is immediately turned on... Hold pedal not necessary.
The main preset uses an Altosax sound which is layered with the
preset Trumpet.
User manual AXON AX-100 / AX-100 SB
83
BLUE CHIP
AXON AX-100 GUITAR TO MIDI CONVERTER
165 HS Morph Vol: Preset with layered sound. Here layering is
controlled by pick position. The pick controller is identical for both
presets (CC:VOLUME) only reversing the values for PICKVAL1 and
PICKVAL2.
166 HS:MorphAtck: Preset with layered sound. Similar to the previous
preset:HS:MorphVol except that Controller #73 (ATTACK) is used
instead ov volume. Depending on the pick position, one sound will
be heard first with the other layered later.
167. SS:Bass+Guit : Preset with string split. The two lowest strings
are assigned to a bass sound, the 4 upper strings, a guitar sound. Like
the above presets, a hold preset is implemented here to give you a
layered pad sound when you press the hold pedal.
168. SS:Bass+Slap : Preset with string split. The bottom four strings
are assigned to a fretless bass sound, the upper two a slap bass soud.
Both are transposed down one octave.
169. SS:Drum+Bass : Preset with string split. The bottom two strings
are assigned to a drum kit; the upper four to a bass sound.
170. SS:Sitr+Flut : Preset with string split. The bottom two strings
are assigned to a sitar; the upper four to a flute sound.
171. SS:Tuba+Brss : Preset with string split. The bottom two strings
are assigned to a tuba; the upper four to a brass sound.
172. FS:Guit+Dist : Preset with fret split. Up to the 7th fret a jazz
guitar is played. Above that, a distorted guitar.
173. FS:Bass+Bass : Preset with fret split. Up to the 9th fret a pick
bass is played. Above that, a fretless bass. These are transposed down
an octave.
174. FS:Guit+Ocar : Preset with fret split. Up to the 9th fret a distorted
guitar is played. Above that, an ocarina. The ocarina is transposed
one octave up.
84
User manual AXON AX-100 / AX-100 SB
AXON AX-100 GUITAR TO MIDI CONVERTER
BLUE CHIP
175. FS:Clari+Sax : Preset with fret split. Up to the 9th fret a clarinet
is played. Above that, a saxophone. Pitchbend is quantized to afford
trills using string vibrato.
176. PS:Orgn+Orgn : Preset with 1 pick split. 2 different organ sounds
that can be switched between depending on your pick position. The
split point is approximately in the middle of the pick area.
177. PS:Bass+Bass : Preset with 1 pick split. 2 different bass sounds
that can be switched between depending on your pick position. The
split point is approximately in the middle of the pick area.
178. PS:2xAc.Bass : Preset with 1 pick split. 2 different bass sounds
that can be switched between depending on your pick position. The
split point is approximately in the middle of the pick area.
179. PS:BassVar : Preset with 2 pick splits. 3 different bass sounds
that can be switched between depending on your pick position. The
split points are divided approximately in thirds of the pick area. All
three bass sounds are transposed down one octave.
180. PS:2xGuitar : Preset with 1 pick split. 2 different guitar sounds
that can be switched between depending on your pick position. The
split point is approximately in the middle of the pick area.
181. PS:GuitVar : Preset with 2 pick splits. 3 different guitar sounds
that can be switched between depending on your pick position. The
split points are divided approximately in thirds of the pick area.
182. MS:Strg+Fret : Preset with multi splits. Combination of a string
split and a fret split. The result is four play zones. The three lower
strings play bass sounds; in the lower zone below the 7th fret,an
acoustic bass, in the upper frets above the 7th fret a fretless. The three
higher strings in the lower frets a slap bass, in the higher frets a synth
bass.
183. MS:Strg+Pick : Preset with multi splits. Combination of a string
split and a pick split. The result is four play zones. The three lower
strings near the bridge, a marimba, near the fingerboard, a pad sound.
The three higher strings near the bridge a flute, near the fingerboard
an organ.
184. MS:Fret+Pick : Preset with multi split. Combination of a fret
split and a pick split. The result is four play zones. Near the fingerboard
and in the lower frets a synth sound, above the 7th fret an oboe. Near
the bridge and in the lower frets an acoustic guitar, above the 7th fret
an organ.
User manual AXON AX-100 / AX-100 SB
85
BLUE CHIP
AXON AX-100 GUITAR TO MIDI CONVERTER
185. MS:StrFrtPck : Preset with multi split. Combination of all split
options. The result is 12 different play zones. This example is not
very practical but is here to show the flexibility of the AXON.
Remember that you you can use multi splits like this one not only to
access various sounds, but more practically to access various
characteristics such as TRANSPOSE, QUANTIZE, VOLUME,
REVERB, PICK CONTROL, thereby maintaining the same sound
for all split zones.
86
User manual AXON AX-100 / AX-100 SB
AXON AX-100 GUITAR TO MIDI CONVERTER
BLUE CHIP
Problem Solving
External MIDI instrument doesn’t play
Description:: When I play the guitar, the AXON reacts properly on
the meters in the display but my external MIDI instrument does not
play.
Possible problem: Set up… cable connections
Solution:
• Make sure the MIDI cables are connected properly. From the
AXON’s MIDI OUT jack to the instrument’s MIDI IN jack.
• The MIDI channels of both instruments need to be correctly set.
• The MIDI instrument should be in multi timbral mode.
• Make sure the audio cable between your MIDI instrument and the
amplifier is correctly connected.
• Check the volume control on your guitar interface.
• The select button on your guitar interface could be set to “GUITAR”.
(This would cause no signal to the AXON.)
String bending does not function properly.
Description: When I play a string, I hear the right note, but hammerons, pull-offs, slides, and string bending do not function like I expect.
Possible problem: The Pitchbend settings on your AXON do not match
the settings in your MIDI instrument; or Pitch Quantize is turned on.
Solution:
• Make sure that the pitchbend range settings in your MIDI instrument
correspond to the same settings in your AXON (GLOBAL MODE).
• Make sure the QUANTIZE value in the preset split (PRESET
MODE) is set to AUTO or OFF.
Sometimes wrong notes
Description: When I play the guitar, the notes I hear are all or partly
wrong notes.
Possible problem: Discrepancy in tuning.
Solution:
• Tune your guitar using the AXON’s tuning aids.
• If you want to tune your AXON to your guitar, use the Tune-Base
function in GLOBAL MODE.
• It’s possible that the transpose function in the preset split is ON.
Turn TRANSPOSE OFF in PRESET MODE.
• Your MIDI instrument may be set to another tuning or have its
transpose function turned ON. Check to see if these parameters are
set to the correct values.
User manual AXON AX-100 / AX-100 SB
87
BLUE CHIP
AXON AX-100 GUITAR TO MIDI CONVERTER
Varying string volume levels
Description: One or more strings are not loud enough in comparison
to the others.
Possible problem: The string sensitivity of the individual strings is
not set well.
Solution: In GLOBAL MODE, try resetting the sensitivity of the
problematic strings.
Dynamic difference between notes is too great
Description: With some sounds the drastic dynamic differences
between notes is irritating.
Possible problem: Setting problems in the touch sensitivity parameters.
Solution: The touch sensitivity settings in your AXON should
correspond to the sound in your MIDI instrument that you are using.
Try reducing the value in the touch sensitivity parameter of the preset
split (PRESET MODE) and then try adding some value to the Velocity
Offset parameter.
Wrong sounds
Description: The sounds that appear in the AXON’s display do not
correspond with the sounds I hear from my MIDI instrument.
Possible problem: Your external MIDI instrument is not set to XG/
General MIDI mode or does not support this standard.
Solution:
• Set your MIDI instrument to GM mode. Set the AXON’s parameter
for preset names to “GM” (see UTILITY MODE).
• If your MIDI instrument doesn’t support these standards, set your
AXON’s preset names parameter to “NUM”. You can now access the
desired sound using the corresponding MIDI bank and program
number.
88
User manual AXON AX-100 / AX-100 SB
AXON AX-100 GUITAR TO MIDI CONVERTER
BLUE CHIP
SYSTEM EXCLUSIVE IMPLEMENTATION
F0H
00H
20H
2DH
20H
00H
ah
am
al
ch
cm
cl
dh
dl
...
...
dh
dl
cc
F7H
- Exclusive status
- European ID's
- European ID's
- BCM ID
- Model ID AX100
- Device ID
- Address high
- Address mid
- Address low
- Byte Count high
- Byte Count mid
- Byte Count low
- Data #0 high 7 bits
- Data #0 low 7 bits
- Data ...
- Data ...
- Data #n high 7 bits
- Data #n low 7 bits
- Checksum
- End of exclusive
The following dumps are presently supported:
Total dump
Presetdump (All, 1...128)
Chaindump (All, 1...32)
Patterndump for Arpeggiator (All, 1...16)
Total Effectdump (Rev setup, all revs, chor setup, all chors, var setup, all vars)
Reverbdump (Rev setup, all reverb programs)
Chorusdump (Chor setup, all chorus programs)
Variationdump (Var setup, all variation programs)
QS300dump (All, 1...32)
Total Sequencerdump (Seq setup, pattern 1...32, tracks 1...8)
Patterndump for Sequencer (All)
Trackdump for Sequencer (All)
User manual AXON AX-100 / AX-100 SB
89
AXON AX-100 GUITAR TO MIDI CONVERTER
BLUE CHIP
Byte Count corresponds to „Size“ in the following table. The value for Checksum is chosen so
that the sum of Address, Byte Counte, Data and Checksums is zero.
Addr
Addr
Addr
Size␣
Description
System
High
00
Mid
00
Low
00
F842h
dump all Data
not implem.
Presets
00
00
00
00
7F
01
—B800h
Reset all Parameters
Dump all presets
00
00
00
00
02
03
B00h
200h
Dump all chain presets
Dump all arpeggio pattern
00
00
00
00
04
05
B60h
164h
Dump all effects
Dump all reverb effects
00
00
00
00
06
07
166h
896h
Dump all chorus effects
Dump all variation effects
00
00
00
00
08
09
1B80h
A08h
Dump all QS300 voices
Dump all sequence (tracks/pattern)
00
00
00
00
0A
0B
600h
400h
Dump all sequence pattern
Dump all sequence tracks
00
00
01
02
#n (00h..7Fh)
#n (00h..1Fh)
170h
58h
Dump preset 1..128
Dump chain preset 1..32
not implem.
00
00
03
05
#n (00h..0Fh)
#n (00h..0Ah)
20h
20h
Dump arpeggio pattern 1..16
Dump reverb effect 1..11
not implem.
not implem.
00
00
06
07
#n (00h..0Ah)
#n (00h..29h)
20h
34h
Dump chorus effect 1..11
Dump variation effect 1..42
not implem.
00
00
08
0A
#n (00h..1Fh)
#n (00h..1Fh)
DCh
30h
Dump QS300 voices 1..32
Dump sequence pattern 1..32
not implem.
00
0B
#n (00h..07h)
80h
Dump sequence track 1..8
Single Preset
90
User manual AXON AX-100 / AX-100 SB
AXON AX-100 GUITAR TO MIDI CONVERTER
BLUE CHIP
QS300 Wave List
No.
0
1
2
3
4
5
6
7
8
9
10
11
12
13
14
15
16
17
18
19
20
21
22
23
24
25
26
27
28
29
30
31
32
33
34
35
36
37
38
39
40
41
42
43
44
45
46
47
48
49
50
51
52
53
54
55
56
57
58
59
60
61
62
63
64
65
66
67
Grp
Ap
Ap
Ap
Ep
Ep
Ep
Mk
Mk
Mk
Mk
Mk
Cp
Cp
Cp
Cp
Cp
Cp
Cp
Cp
Ao
Ao
Eo
Eo
Eo
Eo
Eo
Ag
Ag
Ag
Eg
Eg
Eg
Eg
Eg
Eg
Eg
Eg
Ab
Eb
Eb
Eb
Eb
Eb
Eb
Mb
Mb
Bw
Bw
Bw
Bw
Oe
Oe
Oe
Oe
Ch
Ch
Ar
Ar
Ar
Ar
Ar
Ar
Sr
Rd
Rd
Rd
Rd
Rd
Name
Grand
Brite
Honky
Roads
CP80
DX7
Accordion
Bandoneon
Celesta
Clavi.
Harpsichrd
Glocken
Marimba
SteelDrum
Timpani
TinkleBell
TabularBell
Vibes
Xylophone
Pipe
Reed
Drawbar 1
Drawbar 2
Percussive
Rock 1
Rock 2
Nylon
Steel
12GtrUpper
Jazz Gtr
Clean
Muted
Overdrive
OverdriveLp
Distortion
Harmonics1
Harmonics2
Upright
Finger
Fretless
Picked
Slap 1
Slap 2
Thump
Bass 1
Bass 2
Violin
Viola
Cello
ContraBass
SectionEns
Pizzicato
StrngEnsLp
Ensemble
Aah
Ooh
Trumpet
MutedTrp
Trombone
Tuba
FrenchHorn
TrumpetEns
Brass
Bassoon
Clarinet
EnglshHorn
Oboe
SopranoSax
MIDI
Wave No.
37
38
39
56
172
55
79
241
80
81
82
105
106
107
108
109
110
111
112
86
87
83
240
84
85
237
71
72
190
73
74
75
76
183
77
78
242
46
40
41
42
43
44
45
97
98
88
89
90
91
92
93
180
231
53
54
47
48
49
50
51
52
99
113
114
115
117
120
User manual AXON AX-100 / AX-100 SB
No.
68
69
70
71
72
73
74
75
76
77
78
79
80
81
82
83
84
85
86
87
88
89
90
91
92
93
94
95
96
97
98
99
100
101
102
103
104
105
106
107
108
109
110
111
112
113
114
115
116
117
118
119
120
121
122
123
124
125
126
127
128
129
130
131
132
133
134
135
Grp
Rd
Rd
Rd
Rd
Rd
Rd
Rd
Rd
Pi
Pi
Et
Et
Et
Et
Et
Et
Et
Et
Et
Et
Et
Et
Et
Et
Pc
Pc
Pc
Pc
Pc
Pc
Pc
Pc
Pc
Pc
Pc
Pc
Pc
Pc
Pc
Pc
Pc
Pc
Pc
Pc
Pc
Pc
Pc
Pc
Pc
Pc
Pc
Pc
Pc
Pc
Me
Me
Me
Me
Me
Me
Me
Me
Me
Me
Ne
Ne
Ne
Ne
Name
SprSaxAtk
AltoSax
AltoSaxAtk
TenorSax
BaritonSax
BariSaxAtk
BariSaxLp
Flute
Piccolo
SprRecordr
Banjo
BagPipe
Dulcimer
Harmonica
Harp
Kalimba
Koto
Ocarina
Shakuhachi
Shamisen
Sho
Sitar
Shanai
PanFlute
SideStick
Snare 1
Snare 2
Snare 3
Snare 4
Snare 5
Snare 6
SnareBrush
Tom 1
Tom 2
Tom 3
Tom 4
Tom 5
Tom 6
Kick 1
Kick 2
Kick 3
Kick 4
GranCassa
Stick
Cymbal 1
Cymbal 2
Cymbal 3
Cymbal 4
LoopCymbal
Agogo
Castanet
WoodBlock
Taiko
Triangle
BassSlap
GtrStroke
GtrFretNz
KeyPad
Metronome
OrchHit
WindChime
TublrBell.p
XylophonLp
Scratch
Applause
Bird 1
Bird 2
Breath
MIDI
WaveNo.
176
121
177
184
123
179
182
116
118
119
57
58
59
60
61
62
63
64
66
67
69
70
188
243
4
5
6
7
8
9
10
11
12
13
14
15
16
17
18
19
20
21
22
23
24
25
26
27
29
32
33
34
35
36
128
138
139
143
146
148
163
189
191
245
124
125
126
127
No.
136
137
138
139
140
141
142
142
144
145
146
147
148
149
150
151
152
153
154
155
156
157
158
159
160
161
162
163
164
165
166
167
168
169
170
171
172
173
174
175
176
177
178
179
180
181
182
183
184
185
186
187
188
189
190
191
192
193
194
195
196
197
198
199
200
201
202
203
204
Grp
Ne
Ne
Ne
Ne
Ne
Ne
Ne
Ne
Ne
Ne
Ne
Ne
Ne
Ne
Ne
Ne
Ne
Ne
Ne
Ne
Ne
Ne
Ne
Ne
Ne
Ne
Ow
Ow
Ow
Ow
Ow
Ow
Ow
Ow
Ow
Ow
Ow
Ow
Ow
Ow
Ow
Ow
Ow
Ow
Ow
Ow
Ow
Ow
Ow
Ow
Ow
Ow
Ow
Ow
Ow
Ow
Ow
Ow
Ow
Ow
Ow
Ow
Lw
Lw
Lw
Lw
Mw
Mw
Dr
Name
Bubble
CarPass
CarCrash
CarStart
Dog
DoorSlam
DoorSqueak
FootStep
Gallop
Gun
Helicopter
HeartBeat
Laughing
MachineGun
Punch
Rain
Scream
Stream
Surf
TelDial
TelRing 1
TelRing 2
Thunder
TireSkid
Train
Wind
Square
Saw
Sine
Digi 1
Digi 2
Digi 3
Digi 4
Digi 5
Digi 6
Digi 7
Digi 8
Digi 9
Digi 10
Digi 11
Digi 12
Digi 13
Digi 14
Digi 15
Digi 16
Digi 17
Digi 19
Digi 20
Digi 21
Digi 22
Digi 23
Digi 24
Digi 25
Digi 26
Digi 27
Digi 28
Digi 29
Digi 30
Digi 31
Digi 32
Pulse 10
Pulse 25
Pad 1
Pad 2
Pad 3
Itopia
Mallet
Noise
Stndrd Kit
MIDI
WaveNo.
129
130
131
132
133
134
135
136
137
140
141
142
144
145
149
150
151
152
153
154
155
162
156
157
158
159
94
95
195
196
197
198
199
200
201
202
203
204
205
206
207
208
209
210
211
212
213
214
215
216
217
218
219
220
221
222
223
224
225
226
228
229
102
227
230
236
104
147
1
91
92
PROGRAM
SELECT ZONE
HOLDSTACK
HOLDCONTROL
HOLD-ARPEGGIO
STRINGMODE
HOLDLAYER
HOLDSEPARATE
HOLDCOMMON
PRESET
VOLUME
SEQUENCE PATTERN
SEQUENCE TRACK
SEQUENCE TEMPO
EXP2
CONTROLLER #n
EXP1
CONTROLLER #n
WHEEL
AIX
CONTROLLER #n
NRPN
MSB mmh LSB llh
FINGERPICK
STRINGSPLIT
FRETSPLIT
PICKSPLIT 1
PICKSPLIT 2
REVERBTYP
11
CHORUSTYP
11
VARIATIONTYP
42
PRESET
VOLUME
SEQUENCE PATTERN
SEQUENCE TRACK
SEQUENCE TEMPO
PRESET
TEMPO
LENGHT
SCAN
PATTERN
SYNC
OCTAVES
REPEATS
VELOCITY
SEQUENCE PATTERN
SEQUENCE TRACK
PRESET
VOLUME
VOLUME
TRANSPOSE
QUANTIZE
CONTROLLER #
SEQUENCE PATTERN
SEQUENCE TRACK
SEQUENCE TEMPO
PANPOS
PANSPREAD
REVERB
CHORUS
VARIATION
VELSENS
VELOFFS
PICKCNTRL
CONTROLLER #
PICKVAL1
PICKVAL2
AXON AX-100 GUITAR TO MIDI CONVERTER
User manual AXON AX-100 / AX-100 SB
RPN
MSB mmh LSB llh
NRPN/RPN
BANK_MSB
BANK_LSB
PRESET NAME
HOLDMODE
BLUE CHIP
Parameter Overview Global
AXON AX-100 GUITAR TO MIDI CONVERTER
BLUE CHIP
Parameter Overview Global
BASIC_CH
HOLD_CH
SEQUENCE_CH
PITCHBENDRANGE
RES_PITCHBENDRANGE
LOCAL_MODE
TUNEBASE
GUITAR_NR
GUITAR_TYPE
GUITAR_PICKUP
NOTE OFF LIMIT
TRIGGER LEVEL
GUITAR_SENSE_E6
GUITAR_SENSE_A5
GUITAR_SENSE_D4
GUITAR_SENSE_G3
GUITAR_SENSE_B2
GUITAR_SENSE_E1
PANORAMA ENABLE
REVERB ENABLE
CHORUS ENABLE
VARIATION ENABLE
CONTROLLER 119
...
CC DEFAULTS
DEFAULT ; 00h
MODULATION
DEFAULT ; 00h
BANKDEFAULT
SELECT ;MSB
00h
DEFAULT ; 00h
Parameter Overview Chain
CHAIN_PRESET
CHAIN_STEP
CHAIN_NAME
CHAIN_PROG
CHAIN_STEP
CHAIN_PROG
User manual AXON AX-100 / AX-100 SB
93
94
VARIATION EDITOR
CHORUS EDITOR
REVERB EDITOR
QS300 SYNTHESIZER
SEQUENCER
32
PATTERN NR
PEG
VELO_PEG_RATE
VELO_PEG_LEV
Parameter 16
FEG
VEL_FEG_RATE
VEL_FEG_LEVEL
RELEASE LEVEL
DECAY 2 LEVEL
DECAY 1 LEVEL
ATTACK LEVEL
INITIAL LEVEL
RELEASE RATE
DECAY 2 RATE
DECAY 1 RATE
ATTACK RATE
PITCH CENTER
VELO_SENSE
CUTOFF_FREQ
PITCH SCALE
DETUNE
NOTE SHIFT
DECAY 2 LEVEL
DECAY 1 LEVEL
RELEASE RATE
DECAY 2 RATE
DECAY 1 RATE
RESONANCE
TUNING
LFO
AEG
PANORAMA
VELO_CURVE
ELEMENT_LEVEL
ATTACK RATE
REPEATS
TRACK
WAVE #
STEP NR
PATTERN
INSTRM NR4
INSTRM NR3
INSTRM NR2
INSTRM NR1
STEPS
DRUMKIT #
PLAYMODE
VARIATION SEND
CHORUS SEND
REVERB SEND
VOLUME
PITCH_DEPTH
ELEMENT COPY
EDIT ELEMENT
VOICE_LEVEL
ELEMENT SWITCH
NAME
TRACK
PATTERN
TEMPO
...
Parameter 1
Parameter 16
...
Parameter 1
Parameter 16
...
Parameter 1
SEQUENCER
SYSEX RECEIVE
EFFECTS
QS300
VARIATION
ARP PATTERN
DOUBLE CLIC RESPONSE
SYSEX SEND
CHORUS
CHAIN
PRESET NAMES
REVERB
PRESET
DISPLAY
TOTAL DUMP
Parameter Overview Utility
AMD
CMD
PMD
FADETIME
DELAY
SPEED
INIT
WAVE
PATTERN EDITOR
BLUE CHIP
AXON AX-100 GUITAR TO MIDI CONVERTER
User manual AXON AX-100 / AX-100 SB
AXON AX-100 GUITAR TO MIDI CONVERTER
BLUE CHIP
Midi Implementation Chart
Model AX100 (SB)
Date : 16.07.97
Version : 1.0
.Function...
Transmitted
Recognized Remarks
BasicChannel
DefaultChanged
11..10
1X
HoldChannel
DefaultChanged
71..10
XX
161..16
XX
SequencerChannel DefaultChanged
*1
Mode
DefaultChangedAltered
3,4XX
XX
NoteNumber
True Voice
0..127xxxxxxxxxx
X
*1X
*1
Velocity
Note OnNote Off 09n v = 1..12708n v
X
*1X
*1
AfterTouch
Key'sChannels
XX
X
*1X
*1
O
X
*1
= 10
PitchBend
*1X
ControlChange
012..119
OOO
O *1O
*1
ProgramChange
True #
0..127
0..127
SystemExclusive
O
O
*1
SystemCommon
X
X
*1
OO
O
*1O
X
X
*1
SystemReal Time
ClockCommands
AuxMessages
Notes
Bank Select
MSBBank Select
LSB
*1
*1
*1 extended MIDI implementation for AX100 - SB models
(detailed information for soundboard available)
Mode 1 : Omni On, Poly Mode 2 : Omni On, Mono
Mode 3 : Omni Off, PolyMode 4 : Omni Off, Mono
User manual AXON AX-100 / AX-100 SB
*1X
O : Yes
X : No
95
BLUE CHIP MUSIC GmbH
Industriestrasse 1
56283 HALSENBACH
GERMANY
Phone: +49 (0) 6747 - 8900
Fax: +49 (0) 6747 - 8914
CompuServe: 10 03 47, 12 05
Email: [email protected]