1
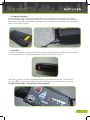
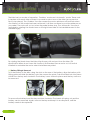
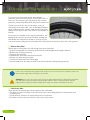
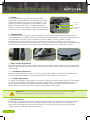
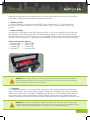
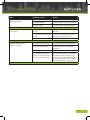
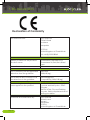
IBEX Range
OWNERS MANUAL
2015
IBEX
Product Code: BYO-2014IBX
IBEX PLUS
Product Code: BYO-2014IBX+
Introduction
Thank You For Choosing A Byocycle Electric Bike.
Welcome to the new world of Electric Bicycles. They are fast, quiet, environmentally friendly
and fun. To ensure your safety when riding, please read this manual carefully
before you make your first journey.
The dealer you have purchased your ByoCycle from will have performed a pre delivery
inspection (PDI), so if you notice the tyres look used it is just a sign that the bike has been
thoroughly safety checked.
Before riding your ByoCycle, it is advisable to check your tyres are the right pressure and
your brakes are in good working order. Both of these will affect the quality of your ride.
Also be aware that in adverse weather conditions the braking and tyre performance will
decline, so please take extra care.
When riding your ByoCycle please observe the highway code, this is not only for your
safety but also the safety of other road users.
When cycling we recommend wearing a helmet, high visibility clothing and using lights at
all times, anything that will ensure you are seen by other road users will only be of benefit.
By following the steps laid out in the manual, you will prolong the usage of your Byocycle as
well as increasing your overall enjoyment.
We wish you many happy miles of cycling.
Regards
The ByoCycles Team
Page 2
Owners Manual Contents
1. Package Contents
2. Quick Start
2.1 Charging
2.2 Operation
2.3 Battery Fitting & Removal
2.4 Parts Identification
3
5-8
3. Looking After Your Byocycle 9-12
3.1 Before The 1St Ride
3.2 Pre Ride Checks
3.3 Post Ride Checks
3.4 Weekly Checks
3.5 Monthly Checks
3.6 Lubrication
3.7 Water Resistance
3.8 Mechanical Maintenance
3.9 Tyre Maintenance
4. Controls And Equipment
13-14
4.1 Led Display/LCD Display
4.2 Throttle Control
4.3 Pedelec Control
4.4 Lights
4.5 Gears
4.6 Brakes
4.7 Manifold Wire
4.8 Ride Position Adjustment
4.8.1 Handlebars
4.8.2 Seatpost
4.9 Wheel Removal
5. Battery
15-16
5.1 On/Off
5.2 Display
5.3 Charging
5.4 Cleaning
5.5 Storage/Transport
5.6 Maintenance
5.7 Disposal
5.8 Copacity/Range/Usage
6. Trouble Shooting
17
7. EG Declaration
18
8. Legal Regulations
19
8.1 Public Road Use
8.2 Other Legal Regulations
9. Warranty
9.1 Liability
9.2 Exclusions
9.3 Claims
20
10. Technical Specification
21
11. Pre Delivery Inspection
22
12. Service Schedule
23
1. Package Contents
When purchasing your ByoCycle, you should have received the following items
•
1 x ByoCycle Bike
•
1 x Battery Charger
•
1 x Multi-tool (Allen Keys, Spanner Tool, Screwdriver Etc..)
•
1 x King-Meter SW-LCD User Guide (IBEX PLUS ONLY)
Page 3
Page 4
2. Quick Start
2.1 Charging The Battery
Before using your ByoCycle, we advise that you charge the battery fully. This is done
by firstly connecting the supplied charger to the battery then connecting the charger to
the mains socket. By connecting the charger in this sequence it minimizes the chance of
short circuiting the system.
2.2 Operation
To start the system you need to have the battery already fitted to the bike. Press the REP
switch to position (1) - (this will make the system ‘live’ but not active).
Press the ‘ ’ button on the handlebar display to activate the system. Once active
you can use the handle bar display to select the amount of assistance you require.
For IBEX PLUS models - Please refer to the user guide.
Page 5
2. Quick Start Cont.
The bike has two modes of operation, ‘Pedelec’ mode and ‘Automatic’ mode. These work
in tandem with each other so there is no need to select one or the other (as on previous
ByoCycle systems). The ‘Pedelec’ function means the motor assistance will activate when
one rotation of the cranks has been achieved, it will then continue to provide assistance as
you pedal. The motor will cut out when the pedal strokes stop. The ‘Automatic’ function is
operated by rotating the thumb lever on the right-hand side of the handlebars next to the
handlebar grip.
By rotating the thumb lever the bike will pull away with no input from the rider, (EU
specification bikes do not have this function). Both brakes have a motor cut-out switch
installed to neutralise the motor when the brakes are pulled.
2.3 Battery Fitting & Removal
To fit the battery to the bike, using the slots on the rear of the battery, align the battery with
fitting guide and slide the battery onto the connection plate. Push the barrel lock into place
& then turn the key anti-clockwise. The battery is now locked in place and the key can now
be removed.
To remove the battery insert the key and turn clockwise. The barrel will spring out and the
battery can be removed. Again, remove the key and keep it in a safe place, until the
battery needs to be replaced.
Page 6
2. Quick Start Cont.
2.4 Parts Identification
Your ByoCycle comprises of various components you should take note of. These vary
from items that affect safety to the bike’s operational features. The images below lists the
equipment for the various styles of ‘LED and the LCD’ Specification’ bikes.
IBEX MODEL
Brake Lever
LED Display - Assistance Level
& Light Control
Bell
Height Adjustment
Stem Clamp
Brake Lever
Gear Shifter
Throttle Control
IBEX PLUS MODEL
Brake Lever
Brake Lever
Throttle Control
Power/Light
Unit
LCD Display Unit
(IBEX PLUS Only)
Gear Shifter
Page 7
2. Quick Start Cont.
Handle Bar
Adjustment System
Quick Release Seat
Clamp Lever
LED Display IBEX (Left
Hand Side Of
Handlebars)
Battery
Saddle
Throttle Control
LCD Display
IBEX PLUS ONLY
Pannier Rack
Stem Height
Adjusting System
Seatpost
Rear Light
Front Light
Gear Cable
Motor
(Rear Wheel Only)
Chain
Pedal
Reflector
Inner Tube Valve
Fork
Derailleur
Inner Tube Valve
Chainwheel
Reflector
Disk Brake
Page 8
3. Looking After Your Byocycle
3.1 Before The 1St Ride
Before you embark on your 1st journey aboard your ByoCycle, we strongly recommend
you familiarise yourself with the bike and its controls. Ensure your bicycle is ready to use
and adjusted to fit your body.
That Means:
• Setting the position of the saddle and handlebars to suit your body size.
• Checking the assembly and position of the brakes.
• Securing the wheels onto the frame and forks.
• Checking the tyre pressures.
• Checking the battery to make sure it is properly secured.
• Setting the adjustable suspension setting to suit your riding style.
To ensure you enjoy a safe and comfortable riding position, please allow your authorised
ByoCycle specialist to adjust the handlebars and stem.
i
Allow your authorised ByoCycle specialist to adjust your brakes, so that they are within easy
reach at all times. Ensure you know which brake lever operates which brake (left/right).
WARNING! Modern braking systems might be more powerful or have a different functionality or
feel to what you have previously experienced. It is advised to take an initial test ride in a safe
and open space to familiarise yourself before setting off on your first ride. Also remember the
effectiveness of the brakes will be different in wet conditions, we advise allowing extra braking
distances in adverse/wet conditions.
WARNING! Always apply the bicycle’s brakes before stepping onto the pedal. Both brakes have
a motor cut-out switch which will ensure the bicycle stays stationary while you familiarise yourself.
The initial force of power will give a different riding experience to a non-electric powered bike.
In some instances this can lead to falls and/or dangerous incidents, which can lead to injury.
To assess your bike for rattles and unfamiliar noises, lift the bike slightly off the ground (5cm) and
drop it (making sure at the same time it does not fall over completely). If you hear any rattles,
please seek the advise of you ByoCycle specialist.
Page 9
3. Looking After Your Byocycle Cont.
To ensure your tyres are at the appropriate
pressure, seek the information on the side walls of
the tyre. This will give you a guide for the correct
pressure, personal preference will play its part here.
Check your tyres for any wear marks, such as
cracking in the side walls, cuts, embedded debris
such as glass and/or stones, and also the general
shape of the tyre to see if it is free of any bumps of
bends.
To ensure your brakes work, apply pressure to the
brake levers and try to move the bike, pulling the
rear brake will cause the wheel to lock up as you
move forward, pulling the front brake will cause the rear wheel to raise from the ground.
3.2 Before Each Ride
Before each ride ensure the following items are checked:
• Tyres are pumped up correctly and are free of damage and foreign objects.
• Brakes are working correctly.
• Gears work correctly
• Handlebars and stem are fitted correctly
• Wheels run true and smoothly.
• Frame and fork are free of damage
• All nuts and bolts are tight as well as all quick release clamps being secure.
i
In the event of the bike being dropped or it falls over or it is involved in an accident, perform all
these checks again before setting off on the bike.
WARNING! If you are unsure about any part of the bike being below the appropriate standards,
stop riding and consult your ByoCycle specialist. Failure to do so could result in the bicycle
failing without warning, possibly causing serious injury to the rider and fellow road users.
3.3 After Each Ride
After each ride ensure the following items are checked:
• The bike is clean and free of any dirt that can cause degradation to the frame and
components.
• The battery is stored in a warm place free of moisture.
• The bike is secure and not likely to fall over or be stolen.
Page 10
3. Looking After Your Byocycle Cont.
3.4 Weekly Checks
Each week your bicycle should be inspected. This will ensure that you achieve the safest
riding experience possible. In the event you find the bicycle to be in need of a service
please seek the advice from your ByoCycle specialist.
Please Ensure The Following Items Are Done:
• Clean the bike thoroughly; including chainrings, chain and gears.
• Lubricate the chain and gear components with the appropriate lubricant (WD40 or
GT85 are not lubricants) if unsure of what to use seek advice from your ByoCycle Specialist.
• Check the brakes are adjusted correctly.
• Check the gears are indexed correctly.
• Check the tyres are pumped up with the appropriate level of air pressure.
3.5 Monthly Checks
In addition to the weekly checks, extended checks should be carried out monthly, or after
every 20 hours of riding.
Please Ensure The Following Items Are Inspected And Adjusted:
• Apply pressure to the brakes and rock the bike forward and backward to check for
any play in the headset. If it seems loose ask your ByoCycle specialist to inspect it and
adjust if needed.
• Lift the front wheel off the ground and turn the handlebars, if any resistance is felt, this
may require lubricant.
• Check the bottom bracket for play by pulling the pedal arm away from the bike. If it
seems loose ask your ByoCycle specialist to inspect it and adjust if needed.
• Check your wheels are true and running smoothly. If either of these appears to be less
than perfect, consult your ByoCycle specialist.
3.6 Lubrication
There are a few points of a bicycle that require regular lubrication, these are:
• Chain
• Dérailleur pivot points & pulley wheels
• Brake arm & lever pivot points
• Gear cables
i
There are specific lubricants for all of these items, consult your ByoCycle specialist for more
information. By keeping these items lubricated it will extend the life of the parts.
Other Areas That Require Attention On A Less Regular Basis, But Should Be Serviced By
Your Byocycle Specialist, Are The:
• The headset
• Wheel bearings
Page 11
3. Looking After Your Byocycle Cont.
3.7 Water Resistance
Your ByoCycle is designed to be ridden in all weather conditions, this includes wet
weather. The bicycle and it’s electrical components are splash resistant. However leaving
your bicycle to endure the elements, without appropriate cover or protection, will cause
corrosion, especially in coastal areas where salt and grit is most common. Negligence is
not covered under the warranty.
WARNING! Do not submerge your motor, controller, throttle, LED display, battery or wiring loom
in water.
3.8 Mechanical Maintenance
All bicycles require maintenance to their mechanical parts, there is no set time to do this
as riding style and conditions will effect the wear life of the bicycle components.
Components that will require regular maintenance and possible replacement are:
• Gear cable
• Brake cables
• Sprockets
• Spokes
• Nuts and bolts
• Brake pads
If there is any doubt about the condition of these items, please seek help from you
ByoCycle specialist.
3.9 Tyre Maintenance
Tyres take a lot of punishment and should be inspected regularly. When inspecting your
tyres you should look out for the following:
• Any cuts in the tyre from sharp objects.
• Any debris embedded into the tyre.
• Any cracking in the tyre walls.
• Any bulges or parts of the tyre that are misshaped.
WARNING! Failure to properly look after your tyres could result in the tyre failing without warning,
in the worst cases, this can cause the rider to have an accident, resulting in serious injury to the
rider and other fellow road users.
i
Page 12
Tyres will also wear through use, this will result in a ‘flat top’ to the tyre, in the event of this
happening the tyre is beyond its useful life and needs replacing.
4. Controls & Equipment
4.1 IBEX LED Display
The LED display fitted to your ByoCycle is fitted to the lefthand side of the handlebars and
serves multiple functions. The display will allow you to operate the front light as well as the
power input from the motor. Using the ‘MODE’ button you can scroll through the amount of
assistance you wish to receive from the motor. This is indicated by the 5 LED Lights.
4.1A IBEX PLUS LCD Display
The LCD display on the IBEX PLUS model replaces the LED display on the IBEX.
A FULL USER GUIDE IS INCLUDED IN THE PACKAGE CONTENTS WHICH EXPLAINS ALL OF THE
FUNCTIONS.
4.2 Throttle Control
The throttle fitted to your ByoCycle is located next to the right hand handlebar grip. It is
operated by pressing the ‘ ’ button on the LED display, then using your thumb, push down
on the throttle. This will cause the motor to engage and provide forward momentum. The
throttle is progressive so the further it is pushed the more power it will give. You can also
control the amount of power given using the ‘MODE’ button on the LED/LCD display.
4.3 Pedelec Control
Your ByoCycle also has a ‘pedelec’ control, this means the motor will provide assistance
whilst you pedal. To operate the pedelec function, press the ‘ ’ button on the LED display
and start pedalling. Control the assistance level using the ‘MODE’ button on the LED display.
FOR IBEX PLUS FUNCTION PLEASE REFER TO THE USER GUIDE
4.4 Lights
Your ByoCycle is fitted with front and rear lights. The front light is powered by the main
Lithium-Ion battery pack, and the rear light is powered by standard AA batteries. To
operate the front light, press the ‘Light’ button on the LED display. To operate the rear
light, press the ‘Light Switch’ on the underside of the light unit itself.
FOR IBEX PLUS FUNCTION PLEASE REFER TO THE USER GUIDE
4.5 Gears
Your ByoCycle uses a cable Shimano SIS 6-speed gear system, this gives you a range of
gears to get you up hills as well as down them. The gears are operated by the indexed
shifter on the handlebars, by pushing the shifter arm, you can scroll ‘Down’ the gears. This
will make pedalling easier as speeds become slower (such as going up-hill). By pressing
the shifter button, you can scroll back ‘Up’ the gears, this will make pedalling harder and
tends to be used as you go faster.
i
To improve your riding experience, always ensure you are in the optimum gear for when you
are going up-hill or when you have come to a stop at a junction. Being in the correct gear will
make getting going again easier. Dérailleur gears are not designed to be changed when the
bicycle is stood still.
Page 13
4. Controls & Equipment cont.
4.6 Brakes
The brakes fitted to your ByoCycle are cable
operated V-style brakes or disc brakes. The brake
levers are fitted with motor cut-out switches. The
moment pressure is applied to the brakes, even
lightly, the motor will cut-out. Small adjustments
can be made to the brakes, as the pads will wear
over time, by unscrewing the cable guide ferrules.
Motor cut
out cable
Cable guide
Ferrules
4.7 Manifold Wire
The manifold wire is a great way to simplify the service and replacement of electronic
components on your ByoCycle. All the electrical components on the handlebars filter into
one wire and run back to the control box. Each cable is colour coded to each
component so there can be no mix up when connecting the cables. In the event your
bicycles electronics do not appear to be working correctly, we strongly recommend seeking
advice from your ByoCycle specialist before attempting to work on the bike yourself.
4.8 Rider Position Adjustment
The rider’s position is crucial to their well being and safety when riding. You can adjust the
height of the handlebars and saddle on your ByoCycle, as well as the moving the saddle
fore and aft.
4.8.1 Handlebar Adjustment
We recommend that you refer to your Byocycles Specialist to adjust the handlebars for
comfort and safety before leaving the premises if an ajustment is required.
4.8.2 Saddle Adjustments
To adjust the height of the saddle, release the seat post quick-release lever, lift the saddle
to the correct height and tighten the quick-release lever. To move the saddle fore and
aft, loosen the clamp bolts underneath the saddle, move the saddle either fore/aft
depending on your position, then tighten the saddle clamp bolts.
WARNING! Do not extend the seat post beyond its maximum height, this can cause failure
without warning, resulting in serious injury to the rider and fellow road users.
4.9 Wheel Removal
In the event you need to remove either or both wheels, you will need to undo the wheel
nuts using a spanner/socket. If your bike is fitted with V-Style brakes, you will need to
disconnect the brakes to remove the wheel, this can be done by undoing the brake
cable clamp on the right hand brake arm.
Page 14
5. Battery
When removing the motor wheel ensure you disconnect the motor wire at the junction
point half way between the wheel and the control box.
5.1 Battery On/Off
To turn the battery on, simply press the REP switch to position (1). This will make the
bycycle’s electrical system live. To turn the battery ‘OFF’, press the switch to the (O)
position.
5.2 Battery Display
On the top of the battery is an LED indicator, this is so you can check how much power
the battery has remaining. The LEDs will either light up green or red. If they light up red,
connect the battery to a charger as soon as possible. To test the power level simply switch
the REP switch to position (1) and press the small black button below the indicator lights.
Power Levels Are As Follows:
• 3 green lights = 75% to 100%
• 2 green lights = 50% to 75%
• 1 green light = 25% to 50%
• 1 red light = less than 25%
WARNING! If the battery is left for an extended period of time with the display having the red
indicator light lit, damage can be caused to the battery. The consequences of this will mean
that the usable life of the battery will decrease.
5.3 Charging
To charge your battery, 1st connect the charger to the battery and then connect the
plug to the mains outlet. Initially the charger will display a red light, this will turn to green
when the battery is fully charged. Charging can take up to 5 hours depending how low
the power level is. When the battery is fully charged, disconnect the charger from the
mains outlet then disconnect from the battery, this minimises the chance of a short-circuit.
WARNING! If you are not planning on using your battery for an extended period of time, fully
charge the battery before putting it into storage, we recommend you give the battery a top up
charge every 4 weeks during this time to prevent any of the cells breaking down.
Page 15
5. Battery Cont.
5.4 Cleaning
When cleaning your battery, do not use any corrosive solvents or cleaners.
Ensure that the connections are free from water at all times.
5.5 Storage & Transport
When storing your battery, whether it is for the short term or the long term, store in a dry &
warm environment. The batteries’ capacity will be adversely affected and possibly cause
the battery cells to break down if the battery is left in cold temperature environments. This will
cause the battery to give a lower than stated range.
5.6 Maintenance
Your battery requires very little maintenance. The lithium-Ion technology has no memory of
it’s usage so the battery can be charged at any point in its cycle, whether nearly full or nearly
empty. If you are not going to use the battery for an extended period of time, It is advisable
to fully charge the battery and then give it a top up charge once every 4 weeks.
5.7 Disposal
Your battery must be disposed of by the proper method. It is best to contact your local
council to see how they wish to dispose of such an item, some will collect and some will direct
you to a disposal point.
5.8 Battery Capacity/Range/Usage
It is important to note that there are many factors that will affect the performance/range of
your battery (distance between charges). This can be anything from the settings the rider
uses. This can include; the amount of pedalling the rider does, the amount of weight loaded
on to the bicycle to the areas the bike is being ridden in and even the weather conditions.
For example if the bike is being ridden on a low level pedelec assistance setting, with equal
rider input, with no additional loading, on flat terrain, in calm warm weather the battery will
perform beyond the quoted mileage. However, if you are riding with a high level of throttle
assistance, no rider input, pannier bags attached, on hilly terrain, in windy cold weather the
range will be considerably less.
To maximise the range of your battery, it is advisable to pedal away from a standing start
as this is where the most power is used. You can do this by minimising the use of the throttle,
which can lower the level of assistance. Most people will find the low level of assistance to be
more than enough power.
Under high loads the handlebar display will dip occasionally. This is nothing to be worried
about, as when the loading on the battery decreases, it will naturally recover a small portion
of it’s voltage.
Both the LED and LCD display on the handlebars and the display on the battery will indicate
the capacity the battery has remaining. The four LEDs indicate 25% capacity, however due to
the variations when using the battery we recommend, if the situation allows, recharging the
battery when it drops below 50%.
WARNING! When using your ByoCycle in very cold weather, your battery range will decrease as
the cold temperatures reduce the batteries capacity and efficiency. So plan ahead and make
sure you have enough charge to complete your journey.
Page 16
6. Troubleshooting
Fault
Possible cause
Action
Bike seems
underpowered
• Battery charge is low
Recharge Battery
• Display Issue
Contact ByoCycle Specialist
• Motor Issue
Contact ByoCycle specialist
• Motor connection
loose
Check motor connection is
secure
• Manifold connection
loose
Check all connections are
secure on manifold wire
Motor failure
Contact ByoCycle specialist
• Battery damaged
Contact ByoCycle specialist
• Tyre pressures low
Re-inflate tyres to a higher
pressure
• Charger issue
Contact ByoCycle specialist
• Frequent riding up
hills, stop/start, strong
winds or overloading
Use the throttle less, change
the pedal assist setting to a
lower level and pedal away
from a stand still (this is where
the most power is used)
Power on but no drive from
the motor
Short range after full
battery charge
Page 17
7. EG Declaration
Declaration of Conformity
The Manufacturer:
ByoCycles Ltd
53 Kent Road
Southsea
Hampshire
PO5 3HU
United Kingdom of Great Britain
Tel: +44 (0) 2392 88362
Hereby confirms for the products:
Product name:
Chameleon/Chameleon LS/
Chameleon XL/Zest/Zest+/Ibex/
Ibex+
Year of construction:
2014
The Conformity with all applicable
directives from the guideline:
Machines
(2006/42/eg).
The machine also conforms to all
the directives in the guideline:
Electromagnetic
Compatibility (2004/108/eg)
The following harmonising norms
were applied to the product:
DIN EN 15194: Bicycles – electrically power assisted cycles – EPAC
bicycles.
DIN EN 14764: City and Trekking
bicycles. Safety requirements and
testing procedure
Technical documentation by:
ByoCycles ltd
36 New Lane
Havant
Hampshire
PO9 2JL
United Kingdom of Great Britain
Page 18
8. Legal Regulations
8.1 Use On Public Roads
Before riding your ByoCycle, ensure you are familiar with the road laws of your specific
country, observing the highway code at all times.
Pedelecs fall under the jurisdiction of the same EU laws as bicycles. Pedelecs are also
subject to the same laws as bicycles when using cycle paths.
8.2 Other Regulations
• The motor on your electric bike must be restricted to 250w, the motor must also stop
providing assistance when the bike reaches 15.5mph.
• In the UK the minimum age to ride an electric bike is 14 years of age.
• In the UK and Europe the rider is not obliged to wear a helmet, hold a drivers licence or
have insurance.
Making helmets compulsory is currently being discussed, please make yourself aware of
any other applicable regulations before using your bicycle. We strongly recommend using
a suitable bicycle helmet when riding you bike.
Page 19
9. Warranty
9.1 Liability
ByoCycle provide a limited warranty on all the components on the bicycle that are non
‘wear & tear’ items. The liability for completion of the warranty work is assumed by the
ByoCycle specialist the bicycle was purchased from.
The precondition for the seller to assume this liability is that the products use a method
of maintenance that is in line with all the conditions stipulated in the pages of this
instruction manual.
The Warranty Lengths Are As Follows;
• Frame/Fork • Electronic components • Battery (Capacity loss of more than 35% and/or leaking)
• Other components not listed that are non wear & Tear items
- 2 Years
- 2 Years
- 2 Years
- 2 Years
9.2 Exclusions
Please note that the parts of an electric bicycle are subject to higher levels of wear than
a bicycle without an additional integrated motor. This is due to the increased weight
and higher average speed produced by the motor. The increased wear is not a material
defect and is not covered by the warranty.
Typically This Affects The Following Parts:
• Tyres
• Brake pads
• Chain, cassette and chainrings
• Spokes
• The Battery is subject to ageing and is therefore a wearable part. Please note – the
battery gradually loses it’s capacity based on it’s age and operating life. Take this into
account when planning your journeys. New batteries can be purchased at any time.
9.3 Claims
In the event a warranty claim needing to be made, please contact the ByoCycle
specialist you originally purchased the bike from.
ByoCycles do not contribute to the collection and delivery charges incurred during a
warranty claim. These must be covered by the claimant. All decisions on warranty claims
are made solely by ByoCycles Ltd.
Page 20
10. Technical Specification
IBEX
Frame
Fork
Mud Guards
Wheel Set
Tyre
Handle Bar
Stem
Front Brake
Rear Brake
Saddle
Seat Post
Chain
Gear Lever
Dérailleur
Chainset
Pedal
Stand
Nuts & Bolts
Motor
Controller
Battery
Charger
Display
Throttle
Brake Levers
Weight
Byocycles
Sr Suntour
Henli
Kenda
Tubro
Zoom
Avid
Winzip
Jst
Thl
Kmc
Shimano
Shimano
Tl
Yh
Tubro
Yh
Mxus
Lishui
Yoku/Samsung
Sans
Kingmeter
Wuxing
Wuxing
Aluminium
Xct 40Mm Suspension
None
26” Double Wall Rim, Stainless Steel Spokes
Mtb 26” X 1.95
Aluminium Flat 600Mm Wide
Aluminium 110Mm Adjustable
BB5 Cable Disc Brake
V-Style Brake
Rubber With Suspension Ball
27.2 X 300Mm Aluminium
Z51
Tourney Tz Series 7-Speed
Tx35 7-Speed
44T X 170Mm With Aluminium Guard
Aluminium
Aluminium With Adjustment
214 Stainless Steel
250W 36V Brushless Geared Motor, Rear Wheel
36V 15A
10Ah 36V/13Ah 36V Lithium-ion
AC 100V-240V
790
Thumb Throttle
Aluminium inc Motor Cut Out
23kg
IBEX
Product Code: BYO-2014IBX
Frame
Aluminium
Wheel
26”
Colour
White & Green
Gears
7 Speed
Battery
10ah/13ah 36v
Display
LED 3 Modes Of Assistance
Motor
250w Brushless Geared Motor
Charging Time
4-5 Hours
Rang
Up to 35/50 Miles
Working Style:
Pedelec & Throttle Control
IBEX PLUS
Frame
Byocycles
Aluminium
Fork
Sr Suntour
Xct-Mlo 60Mm With Preload & Lockout
Mud Guards
None
Wheel Set
Henli
26” Double Wall Rim, Stainless Steel Spokes
Tyre
Kenda
Mtb 26” X 1.95
Handle Bar
Tubro
Aluminium Flat 600Mm Wide
Stem
Zoom
Aluminium 110Mm Adjustable
Front Brake
Avid
BB7 Cable Disc Brake
Rear Brake
Avid
V-Brake
Saddle
Velo
Rubber With Suspension Ball
Seat Post
Tubro
27.2 X 300Mm Aluminium
Chain
Kmc
Z51np
Gear Lever
Sram
Altus M310 Rapid Fire 7-Speed Shifter
Dérailleur
Sram
X3
Chainset
Tl
44T X 170Mm With Aluminium Guard
Pedal
Yh
Aluminium
Stand
Tubro
Aluminium With Adjustment
Nuts & Bolts
Yh
214 Stainless Steel
Motor
Mxus
250W 36V Brushless Geared Motor, Rear Wheel
Controller
Lishui
36V 15A
Battery
Yoku/Samsung
10Ah 36V/13Ah 36V Lithium-ion
Charger
Sans
AC 100V-240V
Display
Kingmeter
Sw-Lcd
Throttle
Wuxing
Thumb Throttle
Brake Levers
Tektro
El-555Rt With Integrated Bell
Weight
23kg
IBEX PLUS
Product Code: BYO-2014IBX+
Frame
Aluminium
Wheel
26”
Colour
Green & Black
Gears
7 Speed
Battery
10ah/13ah 36v
Display
3” LCD Display With 5 Modes Of Assistance
Motor
250w Brushless Geared Motor
Charging Time
4-5 Hours
Range
Up to 35/50 Miles
Working Style
Pedelec & Throttle Control
Page 21
11. Pre Delivery Inspection
• Battery
• Charger
• Handle bars secure
• Brakes set up
• Gears set up
• Tyre pressure
• Throttle active
• Pedal assist active
• Wheel alignment
• Wheel nuts secure
• Frame condition
• Frame Number
• Battery Number
q
Dealer Stamp
q
q
q
q
q
q
q
q
q
q
q
q
Checked by:
Position:
Signed:
After sales service is dealt with by your ByoCycle specialist. However if you are unable to
contact your ByoCycle specialist or wish to receive further advice about your bicycle,
please contact the:
BYOCYCLE LTD TEAM
Address:ByoCycles Ltd
36 New Lane
Havant
Hampshire
PO9 2JL
England
Telephone:
Fax:
+44 (0) 2392 488362
+44 (0) 2392 476319
Email: [email protected]
technical@byocyles.
com
Website:
www.byocycles.com
Page 22
12. Service Schedule
Service To Be Completed Annually Or Every 1,000 Miles Which Ever Is Achieved Earliest:
Initial inspection
1st Service
2nd Service
(After approx 100 miles)
Work Completed:
(After approx 1,000 miles)
Work Completed:
(After approx 2,000 miles)
Work Completed
Parts Used:
Parts Used:
Parts Used:
Date:
Date:
Date:
Signature:
Signature:
Signature:
Dealer Stamp
Dealer Stamp
Dealer Stamp
3rd Service
4th Service
5th Service
(After approx 3,000 miles)
Work Completed:
(After approx 4,000 miles)
Work Completed:
(After approx 5,000 miles)
Work Completed
Parts Used:
Parts Used:
Parts Used:
Date:
Date:
Date:
Signature:
Signature:
Signature:
Dealer Stamp
Dealer Stamp
Dealer Stamp
Page 23
What’s in
your ebike?
Find us on
http://www.facebook.com/Byocycles
Follow Us On
http://twitter.com/byocycles
For Further Details Please Contact Us On
02392 488362
Email: [email protected] Website: www.byocycles.com