1
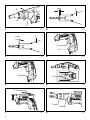
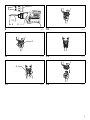
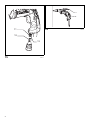
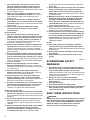
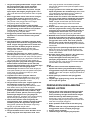
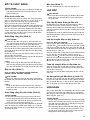
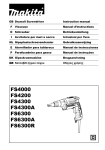
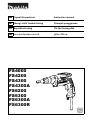
GB Drywall Screwdriver
Instruction manual
ID Obeng Listrik Tembok Kering
Petunjuk penggunaan
VI Máy b t vít t
Tài li u h
ng
TH
FS4000
FS4200
FS4300
FS4300A
FS6200
FS6300
FS6300A
FS6300R
ng d n
1mm
A
2
B
1
1
009960
1mm
2
004149
2
3
4
3
004154
4
A
5
5
009961
6
009967
B
6
009962
7
1
8
7
2
009963
8
009964
2
10
8
9
9
010095
10
004178
004179
12
004180
004181
14
004182
4
11
4
13
3
16
11
12
13
15
4
009971
009966
ENGLISH
Explanation of general view
1.
2.
3.
4.
5.
Lock ring
Locator
Switch trigger
Lock button
Lamp
6.
7.
8.
9.
10.
Reversing switch lever
Hook
Gear housing
Bit
Magnetic bit holder
11. Swells
12. Trapezoidal holes
13. Locator holder
SPECIFICATIONS
Model
FS4000
FS4200
FS4300/FS4300A
FS6200
FS6300/FS6300A
Self drilling screw
6 mm
6 mm
6 mm
-
-
-
Drywall screw
5 mm
5 mm
5 mm
4 mm
4 mm
4 mm
No load speed (min-1)
0 - 4,000
0 - 4,000
0 - 4,000
0 - 6,000
0 - 6,000
0 - 6,000
Overall length
269 mm
269 mm
279 mm
269 mm
279 mm
279 mm
Net weight
1.3 kg
1.4 kg
1.4 kg
1.4 kg
1.4 kg
1.4 kg
Capacities
Safety class
FS6300R
/II
• Due to our continuing programme of research and development, the specifications herein are subject to change without
notice.
• Specifications may differ from country to country.
• Weight according to EPTA-Procedure 01/2003
END201-5
Symbols
The following show the symbols used for the equipment.
Be sure that you understand their meaning before use.
.... Read instruction manual.
.............. DOUBLE INSULATION
ENE033-1
Intended use
The tool is intended for screw driving in wood, metal and
plastic.
ENF002-1
Power supply
The tool should be connected only to a power supply of
the same voltage as indicated on the nameplate, and can
only be operated on single-phase AC supply. They are
double-insulated in accordance with European Standard
and can, therefore, also be used from sockets without
earth wire.
General Power Tool Safety
Warnings
GEA005-3
WARNING! Read all safety warnings and all
instructions. Failure to follow the warnings and
instructions may result in electric shock, fire and/or
serious injury.
Save all warnings and
instructions for future reference.
The term “power tool” in the warnings refers to your
mains-operated (corded) power tool or battery-operated
(cordless) power tool.
Work area safety
1. Keep work area clean and well lit. Cluttered or dark
areas invite accidents.
2. Do not operate power tools in explosive
atmospheres, such as in the presence of
flammable liquids, gases or dust. Power tools
create sparks which may ignite the dust or fumes.
3. Keep children and bystanders away while
operating a power tool. Distractions can cause you
to lose control.
Electrical safety
4. Power tool plugs must match the outlet. Never
modify the plug in any way. Do not use any
adapter plugs with earthed (grounded) power
tools. Unmodified plugs and matching outlets will
reduce risk of electric shock.
5. Avoid body contact with earthed or grounded
surfaces such as pipes, radiators, ranges and
refrigerators. There is an increased risk of electric
shock if your body is earthed or grounded.
6. Do not expose power tools to rain or wet
conditions. Water entering a power tool will increase
the risk of electric shock.
5
7. Do not abuse the cord. Never use the cord for
carrying, pulling or unplugging the power tool.
Keep cord away from heat, oil, sharp edges or
moving parts. Damaged or entangled cords increase
the risk of electric shock.
8. When operating a power tool outdoors, use an
extension cord suitable for outdoor use. Use of a
cord suitable for outdoor use reduces the risk of
electric shock.
9. If operating a power tool in a damp location is
unavoidable, use a residual current device (RCD)
protected supply. Use of an RCD reduces the risk of
electric shock.
10. Use of power supply via a RCD with a rated
residual current of 30 mA or less is always
recommended.
Personal safety
11. Stay alert, watch what you are doing and use
common sense when operating a power tool. Do
not use a power tool while you are tired or under
the influence of drugs, alcohol or medication. A
moment of inattention while operating power tools
may result in serious personal injury.
12. Use personal protective equipment. Always wear
eye protection. Protective equipment such as dust
mask, non-skid safety shoes, hard hat, or hearing
protection used for appropriate conditions will reduce
personal injuries.
13. Prevent unintentional starting. Ensure the switch
is in the off-position before connecting to power
source and/or battery pack, picking up or carrying
the tool. Carrying power tools with your finger on the
switch or energising power tools that have the switch
on invites accidents.
14. Remove any adjusting key or wrench before
turning the power tool on. A wrench or a key left
attached to a rotating part of the power tool may result
in personal injury.
15. Do not overreach. Keep proper footing and
balance at all times. This enables better control of
the power tool in unexpected situations.
16. Dress properly. Do not wear loose clothing or
jewellery. Keep your hair, clothing, and gloves
away from moving parts. Loose clothes, jewellery or
long hair can be caught in moving parts.
17. If devices are provided for the connection of dust
extraction and collection facilities, ensure these
are connected and properly used. Use of dust
collection can reduce dust-related hazards.
Power tool use and care
18. Do not force the power tool. Use the correct power
tool for your application. The correct power tool will
do the job better and safer at the rate for which it was
designed.
19. Do not use the power tool if the switch does not
turn it on and off. Any power tool that cannot be
controlled with the switch is dangerous and must be
repaired.
20. Disconnect the plug from the power source and/or
the battery pack from the power tool before
making any adjustments, changing accessories,
or storing power tools. Such preventive safety
6
measures reduce the risk of starting the power tool
accidentally.
21. Store idle power tools out of the reach of children
and do not allow persons unfamiliar with the
power tool or these instructions to operate the
power tool. Power tools are dangerous in the hands
of untrained users.
22. Maintain power tools. Check for misalignment or
binding of moving parts, breakage of parts and
any other condition that may affect the power
tool’s operation. If damaged, have the power tool
repaired before use. Many accidents are caused by
poorly maintained power tools.
23. Keep cutting tools sharp and clean. Properly
maintained cutting tools with sharp cutting edges are
less likely to bind and are easier to control.
24. Use the power tool, accessories and tool bits etc.
in accordance with these instructions, taking into
account the working conditions and the work to
be performed. Use of the power tool for operations
different from those intended could result in a
hazardous situation.
Service
25. Have your power tool serviced by a qualified
repair person using only identical replacement
parts. This will ensure that the safety of the power tool
is maintained.
26. Follow instruction for lubricating and changing
accessories.
27. Keep handles dry, clean and free from oil and
grease.
SCREWDRIVER SAFETY
WARNINGS
GEB017-4
1. Hold power tool by insulated gripping surfaces,
when performing an operation where the fastener
may contact hidden wiring or its own cord.
Fasteners contacting a “live” wire may make exposed
metal parts of the power tool “live” and could give the
operator an electric shock.
2. Always be sure you have a firm footing.
Be sure no one is below when using the tool in
high locations.
3. Hold the tool firmly.
4. Keep hands away from rotating parts.
5. Do not touch the bit or the workpiece immediately
after operation; they may be extremely hot and
could burn your skin.
SAVE THESE INSTRUCTIONS.
WARNING:
DO NOT let comfort or familiarity with product (gained
from repeated use) replace strict adherence to safety
rules for the subject product. MISUSE or failure to
follow the safety rules stated in this instruction
manual may cause serious personal injury.
FUNCTIONAL DESCRIPTION
Hook (Fig. 7)
CAUTION:
• Always be sure that the tool is switched off and
unplugged before adjusting or checking function on the
tool.
ASSEMBLY
Depth adjustment
The depth can be adjusted by turning the lock ring. Turn it
in "B" direction for less depth and in "A" direction for more
depth. One full turn of the lock ring equals 1.5 mm change
in depth. (Fig. 1)
Adjust the lock ring so that the distance between the tip of
the locator and the screw head is approximately 1 mm as
shown in the figures. Drive a trial screw into your material
or a piece of duplicate material. If the depth is still not
suitable for the screw, continue adjusting until you obtain
the proper depth setting. (Fig. 2 & Fig. 3)
The hook is convenient for temporarily hanging the tool.
CAUTION:
• Always be sure that the tool is switched off and
unplugged before carrying out any work on the tool.
Installing or removing the bit
To remove the bit, first remove the locator by pulling the
lock ring away from the gear housing. (Fig. 8)
Grasp the bit with a pair of pliers and pull the bit out of the
magnetic bit holder. Sometimes, it helps to wiggle the bit
with the pliers as you pull.
To install the bit, push it firmly into the magnetic bit holder.
Then install the locator by pushing it firmly back onto the
gear housing. (Fig. 9)
Switch action (Fig. 4)
Installing removable cord adapter
CAUTION:
• Before plugging in the tool, always check to see that
the switch trigger actuates properly and returns to the
"OFF" position when released.
To start the tool, simply pull the switch trigger. Tool speed
is increased by increasing pressure on the switch trigger.
Release the switch trigger to stop.
For continuous operation, pull the switch trigger and then
push in the lock button.
To stop the tool from the locked position, pull the switch
trigger fully, then release it.
For Model FS6300R
Insert the removable cord adapter as far as it goes so that
the marking
on an end of the removable cord adapter
on the side of connecting to power supply cord is aligned
to the marking
on the other end of the removable cord
adapter on the side of connecting to the tool. (Fig. 10)
Turn the removable cord adapter clockwise until it is
locked with a lock button. (Fig. 11)
And at this time the marking
on an end of the
removable cord adapter on the side of power supply cord
is aligned to the marking on the other end of the
removable cord adapter on the side of connecting to the
tool. (Fig. 12)
NOTE:
• Even with the switch on and motor running, the bit will
not rotate until you fit the point of the bit in the screw
head and apply forward pressure to engage the clutch.
Lighting up the lamps (Fig. 5)
For Model FS4200, FS4300, FS4300A, FS6200,
FS6300, FS6300A, FS6300R
CAUTION:
• Do not look in the light or see the source of light
directly.
To turn on the lamp, pull the trigger. Release the trigger to
turn it off.
NOTE:
• Use a dry cloth to wipe the dirt off the lens of lamp. Be
careful not to scratch the lens of lamp, or it may lower
the illumination.
Reversing switch action (Fig. 6)
CAUTION:
• Always check the direction of rotation before operation.
• Use the reversing switch only after the tool comes to a
complete stop. Changing the direction of rotation
before the tool stops may damage the tool.
This tool has a reversing switch to change the direction of
rotation. Move the reversing switch lever to the position
(A side) for clockwise rotation or the position (B side)
for counterclockwise rotation.
Removing removable cord adapter
Rotate the removable cord adapter counterclockwise until
it stops while pressing the lower part of the lock button.
(Fig. 13)
Then pull the removable cord adapter in that position.
(Fig. 14)
Use of locator holder (Fig. 15)
The locator can be temporarily held on the locator holder
during replacing bit or using without locator. To hold the
locator, position the trapezoidal holes of the locator on the
swells of the locator holder and push it in.
OPERATION
Fit the screw on the point of the bit and place the point of
the screw on the surface of the workpiece to be fastened.
Apply pressure to the tool and start it. Withdraw the tool
as soon as the clutch cuts in. Then release the switch
trigger. (Fig. 16)
CAUTION:
• When fitting the screw onto the point of the bit, be
careful not to push in on the screw. If the screw is
pushed in, the clutch will engage and the screw will
rotate suddenly. This could damage a workpiece or
cause an injury.
• Make sure that the bit is inserted straight in the screw
head, or the screw and/or bit may be damaged.
7
• Hold the tool only by the handle when performing an
operation. Do not touch the metal part.
MAINTENANCE
CAUTION:
• Always be sure that the tool is switched off and
unplugged before attempting to perform inspection or
maintenance.
• Never use gasoline, benzine, thinner, alcohol or the
like. Discoloration, deformation or cracks may result.
To maintain product SAFETY and RELIABILITY, repairs,
carbon brush inspection and replacement, any other
maintenance or adjustment should be performed by
Makita Authorized Service Centers, always using Makita
replacement parts.
OPTIONAL ACCESSORIES
CAUTION:
• These accessories or attachments are recommended
for use with your Makita tool specified in this manual.
The use of any other accessories or attachments might
present a risk of injury to persons. Only use accessory
or attachment for its stated purpose.
If you need any assistance for more details regarding
these accessories, ask your local Makita Service Center.
• Phillips Insert bits
• Magnetic bit holder
• Locator
• Plastic carrying case
NOTE:
• Some items in the list may be included in the tool
package as standard accessories. They may differ from
country to country.
8
BAHASA INDONESIA
Penjelasan tampilan keseluruhan
1.
2.
3.
4.
5.
Cincin pengunci
Penepat
Picu saklar
Tombol kunci
Lampu
6.
7.
8.
9.
10.
Tuas saklar pembalik arah
Kait
Rumahan gir
Mata mesin
Penahan mata mesin magnetik
11. Tonjolan
12. Lubang trapesium
13. Gantungan penepat
SPESIFIKASI
Model
FS4000
FS4200
FS4300/FS4300A
FS6200
FS6300/FS6300A
Sekrup menakik
6 mm
6 mm
6 mm
-
-
-
Sekrup papan
5 mm
5 mm
5 mm
4 mm
4 mm
4 mm
Kecepatan tanpa beban (min-1)
0 - 4.000
0 - 4.000
0 - 4.000
0 - 6.000
0 - 6.000
0 - 6.000
Panjang keseluruhan
269 mm
269 mm
279 mm
269 mm
279 mm
279 mm
Berat bersih
1,3 kg
1,4 kg
1,4 kg
1,4 kg
1,4 kg
1,4 kg
Kapasitas
Kelas keamanan
FS6300R
/II
• Karena kesinambungan program penelitian dan pengembangan kami, spesifikasi yang disebutkan di sini dapat
berubah tanpa
• Spesifikasi dapat berbeda dari satu negara ke negara lainnya.
• Berat menurut Prosedur EPTA 01/2003
END201-5
Simbol
Berikut ini adalah simbol-simbol yang digunakan pada
peralatan ini.
Pastikan Anda mengerti makna masing-masing simbol
sebelum menggunakan alat.
..... Baca petunjuk penggunaan.
.............. ISOLASI GANDA
ENE033-1
Penggunaan
Mesin ini digunakan untuk memasang sekrup pada kayu,
logam dan plastik.
ENF002-1
Pasokan daya
Mesin harus terhubung dengan pasokan daya listrik yang
bervoltase sama dengan yang tertera pada pelat nama,
dan hanya dapat dijalankan dengan listrik AC fase
tunggal. Mesin diisolasi ganda sesuai Standard Eropa dan
oleh sebab itu dapat dihubungkan dengan soket tanpa
arde.
GEA005-3
Peringatan Keselamatan Umum
Mesin Listrik
PERINGATAN! Bacalah semua peringatan
keselamatan dan semua petunjuk. Kelalaian mematuhi
peringatan dan petunjuk dapat menyebabkan sengatan
listrik, kebakaran dan/atau cedera serius.
Simpanlah semua peringatan dan
petunjuk untuk acuan di masa
depan.
Istilah “mesin listrik” dalam semua peringatan mengacu
pada mesin listrik yang dijalankan dengan sumber listrik
jala-jala (berkabel) atau baterai (tanpa kabel).
Keselamatan tempat kerja
1. Jaga tempat kerja selalu bersih dan
berpenerangan cukup. Tempat kerja yang
berantakan dan gelap mengundang kecelakaan.
2. Jangan gunakan mesin listrik dalam lingkungan
yang mudah meledak, misalnya jika ada cairan,
gas, atau debu yang mudah menyala. Mesin listrik
menimbulkan bunga api yang dapat menyalakan debu
atau uap tersebut.
3. Jauhkan anak-anak dan orang lain saat
menggunakan mesin listrik. Bila perhatian terpecah,
anda dapat kehilangan kendali.
Keamanan kelistrikan
4. Steker mesin listrik harus cocok dengan
stopkontak. Jangan sekali-kali mengubah steker
dengan cara apa pun. Jangan menggunakan
steker adaptor dengan mesin listrik berarde
(dibumikan). Steker yang tidak diubah dan
stopkontak yang cocok akan mengurangi risiko
sengatan listrik.
5. Hindari sentuhan tubuh dengan permukaan
berarde atau yang dibumikan seperti pipa,
radiator, kompor, dan kulkas. Risiko sengatan listrik
bertambah jika tubuh Anda terbumikan atau terarde.
6. Jangan membiarkan mesin listrik kehujanan atau
kebasahan. Air yang masuk ke dalam mesin listrik
akan meningkatkan risiko sengatan listrik.
9
7. Jangan menyalahgunakan kabel. Jangan sekalikali menggunakan kabel untuk membawa,
menarik, atau mencabut mesin listrik dari
stopkontak. Jauhkan kabel dari panas, minyak,
tepian tajam, atau bagian yang bergerak. Kabel
yang rusak atau kusut memperbesar risiko sengatan
listrik.
8. Bila menggunakan mesin listrik di luar ruangan,
gunakan kabel ekstensi yang sesuai untuk
penggunaan di luar ruangan. Penggunaan kabel
yang sesuai untuk penggunaan luar ruangan
mengurangi risiko sengatan listrik.
9. Jika mengoperasikan mesin listrik di lokasi
lembap tidak terhindarkan, gunakan pasokan daya
yang dilindungi peranti imbasan arus (residual
current device - RCD). Penggunaan RCD
mengurangi risiko sengatan listrik.
10. Penggunaan pasokan daya melalui RCD dengan
kapasitas arus sisa 30 mA atau kurang selalu
dianjurkan.
Keselamatan diri
11. Jaga kewaspadaan, perhatikan pekerjaan Anda
dan gunakan akal sehat bila menggunakan mesin
listrik. Jangan menggunakan mesin listrik saat
Anda lelah atau di bawah pengaruh obat bius,
alkohol, atau obat. Sekejap saja lalai saat
menggunakan mesin listrik dapat menyebabkan
cedera diri yang serius.
12. Gunakan alat pelindung diri. Selalu gunakan
pelindung mata. Peralatan pelindung seperti masker
debu, sepatu pengaman anti-selip, helm pengaman,
atau pelindung telinga yang digunakan untuk kondisi
yang sesuai akan mengurangi risiko cedera diri.
13. Cegah penyalaan yang tidak disengaja. Pastikan
bahwa sakelar berada dalam posisi mati (off)
sebelum menghubungkan mesin ke sumber daya
dan/atau baterai, atau mengangkat atau
membawanya. Membawa mesin listrik dengan jari
Anda pada sakelarnya atau mengalirkan listrik pada
mesin listrik yang sakelarnya hidup (on) akan
mengundang kecelakaan.
14. Lepaskan kunci-kunci penyetel sebelum
menghidupkan mesin listrik. Kunci-kunci yang
masih terpasang pada bagian mesin listrik yang
berputar dapat menyebabkan cedera.
15. Jangan meraih terlalu jauh. Jagalah pijakan dan
keseimbangan sepanjang waktu. Hal ini
memungkinkan kendali yang lebih baik atas mesin
listrik dalam situasi yang tidak diharapkan.
16. Kenakan pakaian dengan baik. Jangan memakai
pakaian yang kedodoran atau perhiasan. Jaga
jarak antara rambut, pakaian, dan sarung tangan
Anda dengan bagian mesin yang bergerak.
Pakaian kedodoran, perhiasan, atau rambut panjang
dapat tersangkut pada bagian yang bergerak.
17. Jika tersedia fasilitas untuk menghisap dan
mengumpulkan debu, pastikan fasilitas tersebut
terhubung listrik dan digunakan dengan baik.
Penggunaan pembersih debu dapat mengurangi
bahaya yang terkait dengan debu.
Penggunaan dan pemeliharaan mesin listrik
18. Jangan memaksa mesin listrik. Gunakan mesin
listrik yang tepat untuk keperluan Anda. Mesin
10
listrik yang tepat akan menuntaskan pekerjaan
dengan lebih baik dan aman pada kecepatan sesuai
rancangannya.
19. Jangan gunakan mesin listrik jika sakelar tidak
dapat menyalakan dan mematikannya. Mesin listrik
yang tidak dapat dikendalikan dengan sakelarnya
adalah berbahaya dan harus diperbaiki.
20. Cabut steker dari sumber listrik dan/atau baterai
dari mesin listrik sebelum melakukan penyetelan,
penggantian aksesori, atau menyimpan mesin
listrik. Langkah keselamatan preventif tersebut
mengurangi risiko hidupnya mesin secara tak
sengaja.
21. Simpan mesin listrik jauh dari jangkauan anakanak dan jangan biarkan orang yang tidak paham
mengenai mesin listrik tersebut atau petunjuk ini
menggunakan mesin listrik. Mesin listrik sangat
berbahaya di tangan pengguna yang tak terlatih.
22. Rawatlah mesin listrik. Periksa apakah ada bagian
bergerak yang tidak lurus atau macet, bagian yang
pecah dan kondisi lain yang dapat mempengaruhi
penggunaan mesin listrik. Jika rusak, perbaiki
dahulu mesin listrik sebelum digunakan. Banyak
kecelakaan disebabkan oleh kurangnya pemeliharaan
mesin listrik.
23. Jaga agar mesin pemotong tetap tajam dan bersih.
Mesin pemotong yang terawat baik dengan mata
pemotong yang tajam tidak mudah macet dan lebih
mudah dikendalikan.
24. Gunakan mesin listrik, aksesori, dan mata mesin,
dll. sesuai dengan petunjuk ini, dengan
memperhitungkan kondisi kerja dan jenis
pekerjaan yang dilakukan. Penggunaan mesin listrik
untuk penggunaan yang lain dari peruntukan dapat
menimbulkan situasi berbahaya.
Servis
25. Berikan mesin listrik untuk diperbaiki hanya
kepada oleh teknisi yang berkualifikasi dengan
menggunakan hanya suku cadang pengganti yang
serupa. Hal ini akan menjamin terjaganya keamanan
mesin listrik.
26. Patuhi petunjuk pelumasan dan penggantian
aksesori.
27. Jagalah agar gagang kering, bersih, dan bebas
dari minyak dan gemuk.
GEB017-4
PERINGATAN KESELAMATAN
OBENG LISTRIK
1. Pegang mesin listrik pada permukaan genggam
yang terisolasi saat melakukan pekerjaan bila
mesin pemotong mungkin bersentuhan dengan
kawat tersembunyi atau kabelnya sendiri.
Pengencang yang menyentuh kawat “hidup” dapat
menyebabkan bagian logam pada mesin teraliri arus
listrik dan menyengat pengguna.
2. Selalu pastikan Anda berada di atas alas yang
kuat.
Pastikan tidak ada orang di bawahnya bila Anda
menggunakan mesin di tempat yang tinggi.
3. Pegang mesin kuat-kuat.
4. Jauhkan tangan dari bagian yang berputar.
5. Jangan menyentuh mata mesin atau benda kerja
segera setelah pengoperasian; suhunya mungkin
masih sangat panas dan dapat membakar kulit
Anda.
SIMPAN PETUNJUK INI.
PERINGATAN:
JANGAN biarkan kenyamanan atau terbiasanya Anda
dengan produk (karena penggunaan berulang)
menggantikan kepatuhan yang ketat terhadap aturan
keselamatan untuk produk yang terkait.
PENYALAHGUNAAN atau kelalaian mematuhi kaidah
keselamatan yang tertera dalam petunjuk ini dapat
menyebabkan cedera badan serius.
DESKRIPSI FUNGSI
PERHATIAN:
• Pastikan bahwa mesin dalam keadaan mati dan steker
tercabut sebelum menyetel atau memeriksa kerja
mesin.
Penyetelan kedalaman
Kedalaman bisa disetel dengan memutar cincin pengunci.
Putar ke arah "B" untuk mengurangi kedalaman dan ke
arah "A" untuk menambah kedalaman. Satu putaran
penuh cincin pengunci sama dengan mengubah
kedalaman sebesar 1,5 mm. (Gb. 1)
Setel cincin pengunci sehingga jarak antara ujung
penepat dan kepala sekrup kira-kira 1 mm seperti
ditunjukkan dalam gambar. Pasang sekrup percobaan
pada bahan atau potongan bahan lain. Jika
kedalamannya masih tidak sesuai dengan sekrup,
lanjutkan penyetelan sampai setelan kedalaman yang
tepat. (Gb. 2 & Gb. 3)
Kerja saklar (Gb. 4)
PERHATIAN:
• Sebelum memasukkan steker, pastikan picu saklar
berfungsi dengan baik dan kembali ke posisi "OFF"
saat dilepas.
Untuk menjalankan mesin, cukup tarik picu saklarnya.
Kecepatan mesin akan meningkat dengan menambah
tekanan pada picu saklar. Lepaskan picu saklar untuk
berhenti.
Untuk penggunaan terus-menerus, tarik picu saklar dan
kemudian tekan tombol kunci.
Untuk membebaskan posisi terkunci, tarik picu saklar
sampai penuh, lalu lepaskan.
CATATAN:
• Walaupun kondisinya menyala dan motor dalam
keadaan hidup, mata mesin tidak akan berputar
sampai Anda menempatkan ujung mata mesin pada
kepala sekrup dan menekan maju mesin untuk
menjalankan kopeling.
Menyalakan lampu (Gb. 5)
Untuk Model FS4200, FS4300, FS4300A, FS6200,
FS6300, FS6300A, FS6300R
PERHATIAN:
• Jangan melihat lampu atau sumber cahaya secara
langsung.
Untuk menyalakan lampu, tarik picu saklar. Lepaskan picu
untuk mematikan.
CATATAN:
• Gunakan kain kering untuk mengelap kotoran dari
lensa lampu. Hati-hati jangan sampai menggores lensa
lampu, atau hal tersebut dapat menurunkan tingkat
penerangannya.
Kerja saklar pembalik arah (Gb. 6)
PERHATIAN:
• Selalu periksa arah putaran sebelum penggunaan.
• Gunakan saklar pembalik arah hanya setelah mesin
berhenti penuh. Mengubah arah putaran sebelum
mesin berhenti dapat merusak mesin.
Mesin ini memiliki saklar pembalik arah untuk mengubah
arah putaran. Gerakkan tuas saklar pembalik arah ke
posisi (sisi A) untuk putaran searah jarum jam atau
posisi (sisi B) untuk putaran berlawanan arah jarum
jam.
Kait (Gb. 7)
Kait bisa digunakan untuk menggantung mesin
sementara.
PERAKITAN
PERHATIAN:
• Pastikan bahwa mesin dalam keadaan mati dan steker
tercabut sebelum melakukan pekerjaan apapun pada
mesin.
Memasang atau melepas mata mesin
Untuk melepas mata mesin, pertama-tama lepas penepat
dengan menarik cincin pengunci keluar dari rumahan gir.
(Gb. 8)
Jepit mata mesin dengan tang dan tarik mata mesin
keluar dari penahan mata mesin magnetik. Terkadang
perlu sedikit mengoyang-goyangkan mata mesin dengan
tang ketika Anda menariknya.
Untuk memasang mata mesin, dorong kuat-kuat ke dalam
penahan mata mesin magnetik. Kemudian pasang
penepat dengan mendorongnya kuat-kuat pada rumahan
gir. (Gb. 9)
Memasang adaptor kabel bisa-lepas
Untuk Model FS6300R
Masukkan adaptor kabel bisa-lepas sejauh mungkin
sehingga tanda
pada ujung adaptor kabel bisa-lepas di
sisi yang terhubung ke kabel pasokan daya sejajar
dengan tanda
pada ujung adaptor kabel bisa-lepas
yang satunya di sisi yang terhubung ke mesin. (Gb. 10)
Putar adaptor kabel bisa-lepas searah jarum jam sampai
terkunci oleh tombol kunci. (Gb. 11)
Pada kondisi ini, tanda
pada ujung adaptor kabel bisalepas di sisi yang terhubung ke kabel pasokan daya
sejajar dengan tanda pada ujung adaptor kabel bisa11
lepas yang satunya di sisi yang terhubung ke mesin. (Gb.
12)
Melepas adaptor kabel bisa-lepas
Putar adaptor kabel bisa-lepas berlawanan arah jarum
jam sampai berhenti sambil menekan bagian bawah
tombol kunci. (Gb. 13)
Kemudian tarik adaptor kabel bisa-lepas pada posisi
tersebut. (Gb. 14)
Penggunaan gantungan penepat (Gb. 15)
Penepat bisa digantung sementara pada gantungan
penepat selama mengganti mata mesin atau
menggunakan mesin tanpa penepat. Untuk menggantung
penepat, posisikan lubang trapesium penepat pada
tonjolan gantungan penepat lalu dorong sampai masuk.
PENGGUNAAN
Pasang sekrup pada ujung mata mesin dan posisikan
ujung sekrup pada permukaan benda kerja yang akan
dikencangkan. Beri tekanan pada mesin lalu nyalakan.
Tarik mesin segera setelah kopeling memotong.
Kemudian lepas picu saklar. (Gb. 16)
PERHATIAN:
• Ketika memasang sekrup pada ujung mata mesin, hatihati jangan sampai mendorong sekrup ke dalam. Jika
sekrup terdorong ke dalam, kopeling akan bekerja dan
sekrup akan berputar secara tiba-tiba. Hal ini bisa
merusak benda kerja atau menyebabkan luka.
• Pastikan bahwa mata mesin dimasukkan lurus
terhadap kepala sekrup, atau sekrup dan/atau mata
mesin bisa rusak.
• Pegang mesin hanya pada pegangannya saat
melakukan pekerjaan. Jangan menyentuh bagian
logamnya.
PERAWATAN
PERHATIAN:
• Selalu pastikan bahwa mesin dimatikan dan steker
dicabut sebelum melakukan pemeriksaan atau
perawatan.
• Jangan sekali-kali menggunakan bensin, tiner, alkohol,
atau bahan sejenisnya. Penggunaan bahan demikian
dapat menyebabkan perubahan warna, perubahan
bentuk atau timbulnya retakan.
Untuk menjaga KEAMANAN dan KEANDALAN mesin,
perbaikan, pemeriksaan dan penggantian sikat karbon,
serta perawatan atau penyetelan lain harus dilakukan
oleh Pusat Layanan Resmi Makita, selalu gunakan suku
cadang pengganti buatan Makita.
PILIHAN AKSESORI
PERHATIAN:
• Dianjurkan untuk menggunakan aksesori atau
perangkat tambahan ini dengan mesin Makita Anda
yang ditentukan dalam petunjuk ini. Penggunaan
aksesori atau perangkat tambahan lain bisa
menyebabkan risiko cedera pada manusia. Hanya
gunakan aksesori atau perangkat tambahan sesuai
dengan peruntukkannya.
12
Jika Anda memerlukan bantuan lebih rinci berkenaan
dengan aksesori ini, tanyakan pada Pusat Layanan
Makita terdekat.
• Mata mesin benam Phillips
• Penahan mata mesin magnetik
• Penepat
• Tas jinjing plastik
CATATAN:
• Beberapa item dalam daftar tersebut mungkin sudah
termasuk dalam paket mesin sebagai aksesori standar.
Hal tersebut dapat berbeda dari satu negara ke negara
lainnya.
TI NG VI T
Explanation of general view
1.
2.
3.
4.
5.
Vòng khóa
u nh v
C n công t c kh i
Nút khóa
èn
THÔNG S
6. C n công t c o chi u
7. Móc treo
8. V H p s
9.
um i
10.
u gi m i t tính
ng
K THU T
Ki u
Vít t khoan
Công su t
Vít khoan t
ng
không t i (phút-1)
T c
Chi u dài t ng th
Tr ng l
C p
11. G nhô
12. L hình thang
13. Ph n gi
u nh v
ng t nh
FS4000
FS4200
FS4300/FS4300A
FS6200
FS6300/FS6300A
6 mm
6 mm
6 mm
-
-
-
5 mm
5 mm
5 mm
4 mm
4 mm
4 mm
0 - 4.000
0 - 4.000
0 - 4.000
0 - 6.000
0 - 6.000
0 - 6.000
269 mm
269 mm
279 mm
269 mm
279 mm
279 mm
1,3 kg
1,4 kg
1,4 kg
1,4 kg
1,4 kg
1,4 kg
an toàn
FS6300R
/II
• Do ch ng trình nghiên c u và phát tri n liên t c c a chúng tôi nên các thông s k thu t trong ây có th thay
không c n thông.
• Các thông s k thu t có th thay i tùy theo t ng qu c gia.
• Tr ng l ng tùy theo Quy trình EPTA tháng 01/2003
END201-5
Ký hi u
Ph n d i ây cho bi t các ký hi u
c dùng cho thi t b .
m b o r ng b n hi u rõ ý ngh a c a các ký hi u này
tr c khi s d ng.
.....
c tài li u h
ng d n.
.............. CÁCH I N KÉP
ENE033-1
M c ích s d ng
D ng c này dùng
b t vít vào g , kim lo i và nh a.
ENF002-1
Ngu n c p i n
D ng c này ch
c n i v i ngu n c p i n có i n áp
gi ng nh
ã ch ra trên bi n tên và ch có th
cv n
hành trên ngu n i n AC mt pha. Chúng
c cách i n
hai l p theo Tiêu chu n Châu Âu và do ó c ng có th
c s d ng t các c m i n không có dây ti p t.
GEA005-3
C nh báo An toàn Chung dành
cho D ng c Máy
h
h
th
C NH BÁO!
c t t c các c nh báo an toàn và
ng d n. Vi c không tuân theo các c nh báo và
ng d n có th d n n i n gi t, ho ho n và/ho c
ng tích nghiêm tr ng.
L u gi t t c c nh báo và h
d n
tham kh o sau này.
ng
Thu t ng “d ng c máy” trong các c nh báo
c p n
d ng c máy (có dây)
c v n hành b ng ngu n i n
chính ho c d ng c máy (không dây)
b ng pin c a b n.
i mà
c v n hành
An toàn t i n i làm vi c
1. Gi n i làm vi c s ch s và có
ánh sáng. N i
làm vi c b a b n ho c t i th ng d gây ra tai n n.
2. Không v n hành d ng c máy trong môi tr ng
cháy n , ví d nh môi tr ng có s hi n di n
c a các ch t l ng, khí ho c b i d cháy. Các d ng
c máy t o tia l a i n có th làm b i ho c khí b c
cháy.
3. Gi tr em và ng i ngoài tránh xa n i làm vi c
khi ang v n hành d ng c máy. S xao lãng có th
khi n b n m t kh n ng ki m soát.
An toàn v i n
4. Phích c m c a d ng c máy ph i kh p v i c m.
Không bao gi
c s a i phích c m theo b t
k cách nào. Không s d ng b t k phích chuy n
i nào v i các d ng c máy
c n i t (ti p
t). Các phích c m còn nguyên v n và c m phù
h p s gi m nguy c i n gi t.
5. Tránh
c th ti p xúc v i các b m t n i t
ho c ti p t nh
ng ng, b t n nhi t, b p ga
và t l nh. Nguy c b i n gi t s t ng lên n u c
th b n
c n i t ho c ti p t.
6. Không
d ng c máy ti p xúc v i m a ho c
trong i u ki n m
t. N c l t vào d ng c máy
s làm t ng nguy c i n gi t.
7. Không l m d ng dây. Không bao gi s d ng dây
mang, kéo ho c tháo phích c m d ng c máy.
Gi dây tránh xa ngu n nhi t, d u, các mép s c
ho c các b ph n chuy n
ng. Dây b h ng ho c
b r i s làm t ng nguy c i n gi t.
8. Khi v n hành d ng c máy ngoài tr i, hãy s
d ng dây kéo dài phù h p cho vi c s d ng ngoài
tr i. Vi c dùng dây phù h p cho vi c s d ng ngoài
tr i s gi m nguy c i n gi t.
13
9. N u b t bu c ph i v n hành d ng c máy n i
m
t, hãy s d ng ngu n c p i n
cb ov
b ng thi t b ng t dòng i n rò (RCD). Vi c s
d ng RCD s gi m nguy c i n gi t.
10. Chúng tôi luôn khuyên b n s d ng ngu n c p
i n qua thi t b RCD có th ng t dòng i n d
nh m c 30 mA ho c th p h n.
An toàn cá nhân
11. Luôn t nh táo, quan sát nh ng vi c b n ang làm
và s d ng nh ng phán oán theo kinh nghi m
khi v n hành d ng c máy. Không s d ng d ng
c máy khi b n ang m t m i ho c ch u nh
h ng c a ma tuý, r u hay thu c. Ch m t
kho nh kh c không t p trung khi ang v n hành d ng
c máy c ng có th d n n th ng tích cá nhân
nghiêm tr ng.
12. S d ng thi t b b o h cá nhân. Luôn eo thi t b
b o v m t. Các thi t b b o h nh m t n ch ng
b i, giày an toàn ch ng tr t, m b o h hay thi t b
b o v thính giác
c s d ng trong các i u ki n
thích h p s giúp gi m th ng tích cá nhân.
mb o
13. Tránh vô tình kh i ng d ng c máy.
công t c v trí off (t t) tr c khi n i ngu n i n
và/ho c b pin, c m ho c mang d ng c máy. Vi c
mang d ng c máy khi ang t ngón tay v trí công
t c ho c c p i n cho d ng c máy ang b t th ng
d gây ra tai n n.
14. Tháo m i khoá ho c chìa v n i u ch nh tr c khi
b t d ng c máy. Vi c chìa v n ho c khoá v n còn
g n vào b ph n quay c a d ng c máy có th d n
n th ng tích cá nhân.
15. Không v i quá cao. Luôn gi th ng b ng t t và có
ch
chân phù h p. i u này cho phép i u khi n
d ng c máy t t h n trong nh ng tình hu ng b t ng .
16. n m c phù h p. Không m c qu n áo r ng hay
eo
trang s c. Gi tóc, qu n áo và g ng tay
tránh xa các b ph n chuy n ng. Qu n áo r ng,
trang s c hay tóc dài có th m c vào các b ph n
chuy n ng.
17. N u các thi t b
c cung c p
k t n i các thi t
b thu gom và hút b i, hãy m b o chúng
c
k t n i và s d ng h p lý. Vi c s d ng thi t b thu
gom b i có th làm gi m nh ng m i nguy hi m liên
quan n b i.
S d ng và b o qu n d ng c máy
18. Không dùng l c i v i d ng c máy. S d ng
úng d ng c máy cho công vi c c a b n. S
d ng úng d ng c máy s giúp th c hi n công vi c
t t h n và an toàn h n theo giá tr nh m c
c
thi t k c a d ng c máy ó.
19. Không s d ng d ng c máy n u công t c không
b t và t t
c d ng c máy ó. M i d ng c máy
c b ng công t c u r t
không th i u khi n
nguy hi m và c n
c s a ch a.
20. Rút phích c m ra kh i ngu n i n và/ho c ng t
k t n i b pin kh i d ng c máy tr c khi th c
hi n b t k công vi c i u ch nh, thay
i ph
tùng hay c t gi d ng c máy nào. Nh ng bi n
pháp an toàn phòng ng a này s gi m nguy c vô
tình kh i ng vô tình d ng c máy.
21. C t gi các d ng c máy không s d ng ngoài
t m v i c a tr em và không cho b t k ng i nào
không có hi u bi t v d ng c máy ho c các
14
h ng d n này v n hành d ng c máy. D ng c
máy s r t nguy hi m n u
c s d ng b i nh ng
ng i dùng ch a qua ào t o.
22. B o qu n d ng c máy. Ki m tra tình tr ng l ch
tr c ho c bó k p c a các b ph n chuy n
ng,
hi n t ng n t v c a các b ph n và m i tình
tr ng khác mà có th nh h ng n ho t ng
c a d ng c máy. N u có h ng hóc, hãy s a ch a
d ng c máy tr c khi s d ng. Nhi u tai n n x y
ra là do không b o qu n t t d ng c máy.
c s c bén và s ch
23. Luôn gi cho d ng c c t
s . Nh ng d ng c c t
c b o qu n t t có mép c t
s c s ít b k t h n và d i u khi n h n.
24. S d ng d ng c máy, ph tùng và u d ng c
c t, v.v... theo các h ng d n này, có tính n i u
ki n làm vi c và công vi c
c th c hi n. Vi c s
d ng d ng c máy cho các công vi c khác v i công
vi c d
nh có th gây nguy hi m.
B o d ng
25.
nhân viên s a ch a
trình
b o d ng
d ng c máy c a b n và ch s d ng các b ph n
thay th
ng nh t. Vi c này s
m b o duy trì
c
an toàn c a d ng c máy.
26. Tuân theo h ng d n dành cho vi c bôi tr n và
thay ph tùng.
27. Gi tay c m khô, s ch, không dính d u và m .
C NH BÁO AN TOÀN
SÚNG B N VÍT
GEB017-4
IV I
1. C m d ng c máy b ng b m t k p cách i n khi
th c hi n m t thao tác trong ó b ph n xoay v n
có th ti p xúc v i dây d n kín ho c dây c a chính
nó. B ph n k p ti p xúc v i dây d n “có i n” có th
khi n các b ph n kim lo i b h c a d ng c máy “có
i n” và làm cho ng i v n hành b i n gi t.
2. Luôn ch c ch n r ng b n có ch t a chân v ng
ch c.
m b o r ng không có ai d i khi dùng d ng
c
nh ng v trí trên cao.
3. C m ch c d ng c .
4. Gi tay tránh xa các b ph n quay.
5. Không ch m vào m i khoan hay v t gia công ngay
sau khi v n hành; chúng có th r t nóng và có th
gây b ng da.
L U GI
CÁC H
NG D N NÀY.
C NH BÁO:
KHÔNG
c
s tho i mái hay quen thu c v i s n
ph m (có
c do s d ng nhi u l n) thay th vi c
tuân th nghiêm ng t các quy nh v an toàn dành
cho s n ph m này. VI C DÙNG SAI ho c không tuân
theo các quy nh v an toàn
c nêu trong tài li u
h ng d n này có th d n n th ng tích cá nhân
nghiêm tr ng.
MÔ T
CH C N NG
C N TR NG:
• Ph i luôn m b o r ng d ng c ã
c t t i n và
ng t k t n i tr c khi ch nh s a ho c ki m tra ch c
n ng c a d ng c .
i u ch nh chi u sâu
Có th i u ch nh chi u sâu b ng cách xoay vòng khóa.
Xoay nó vào h ng "B"
nông h n và v h ng "A"
sâu h n. Xoay tr n m t vòng cho vòng khóa t ng
ng v i thay i 1,5 mm chi u sâu. (Hình 1)
i u ch nh vòng khóa sao cho kho ng cách gi a nh c a
u nh v và u vít vào kho ng 1 mm nh th hi n trên
hình v . Khoan th m t vít vào v t li u ho c m t mi ng
v t li u m u. N u chi u sâu khoan v n ch a phù h p v i
vít, ti p t c khoan cho n hi b n có
c cài t chi u
sâu phù h p. (Hình 2 & Hình 3)
Ho t
ng công t c (Hình 4)
C N TR NG:
• Tr c khi c m i n vào d ng c , luôn luôn ki m tra
xem c n kh i ng công t c có ho t ng bình th ng
hay không và tr v v trí “OFF” (T T) khi nh ra.
kh i ng d ng c , ch c n kéo c n kh i ng công
t c. T c
d ng c
c gi m xu ng b ng cách t ng l c
ép lên c n kh i ng công t c. Nh c n kh i ng công
t c ra
d ng.
ti p t c v n hành, hãy kéo c n kh i ng công t c và
sau ó nh n vào nút khóa.
d ng d ng c t v trí ã khóa, hãy kéo c n kh i ng
công t c h t m c, sau ó nh ra.
L U Ý:
• Ngay c khi công t c ang b t và motor ang ch y,
u m i c ng s không quay cho n khi nào b n kh p
gài ly h p.
nh u m i vào u vít và nh n t i nh
B t các èn (Hình 5)
Dành cho Ki u máy FS4200, FS4300, FS4300A,
FS6200, FS6300, FS6300A, FS6300R
C N TR NG:
ng nhìn th ng tr c ti p vào èn ho c ngu n sáng.
t t èn, hãy kéo c n kh i ng. Nh c n kh i ng
t t èn.
•
L U Ý:
• Dùng v i khô
lau b i b n trên kính èn. C n th n
không
c làm x c kính èn, n u không èn có th
b gi m
sáng.
Ho t
ng công t c
o chi u (Hình 6)
C N TR NG:
• Luôn luôn ki m tra h ng xoay tr c khi v n hành.
• Ch s d ng công t c o chi u sau khi d ng c ã
d ng hoàn toàn. Vi c thay i h ng xoay tr c khi
d ng c d ng có th làm h ng d ng c .
D ng c này có m t công t c o chi u
thay i chi u
xoay. Di chuy n c n g t o chi u sang v trí (m t A)
(m t B)
xoay ng c
xoay theo chi u kim ng h
chi u kim ng h .
Móc treo (Hình 7)
Móc treo r t thu n ti n cho vi c treo t m d ng c .
L P RÁP
C N TR NG:
• Luôn luôn m b o r ng d ng c ã
c t t và tháo
phích c m tr c khi dùng d ng c th c hi n b t c
công vi c nào.
Vi c l p
t ho c tháo g
um i
tháo u m i ra, u tiên hãy tháo b
nh v b ng
cách kéo vòng khóa ra kh i v h p s . (Hình 8)
N m l y u m i b ng kìm và kéo u m i ra kh i u gi
m i t tính. ôi lúc c n l c nh
u m i b ng kìm khi b n
ang kéo ra.
l p u m i, nh n nó th t ch t vào u gi m i t tính.
Sau ó l p u nh v b ng cách nh n ch t nó tr l i v
h p s . (Hình 9)
L p b chuy n i n có dây tháo r i
Dành cho Ki u máy FS6300R
L p b chuy n i n có dây tháo r i
nó i xu ng h t
m c nd u
trên m t u c a b chuy n i n có dây
tháo r i phía bên dây i n
c c n ch nh n d u
u kia c a b chuy n i n có dây tháo r i phía bên
k t n i d ng c . (Hình 10)
Xoay b chuy n i n có dây tháo r i theo chi u kim ng
h cho n khi nào b khóa b i nút khóa. (Hình 11)
Vào lúc này d u
trên u cu i c a b chuy n i n có
dây tháo r i phía bên dây i n
c c n ch nh theo d u
trên u kia c a b chuy n i n có dây tháo r i phía
bên k t n i v i d ng c . (Hình 12)
Tháo b chuy n i n có dây tháo r i
Xoay b chuy n i n có dây tháo r i ng c chi u kim
ng h cho n khi ng ng l i trong lúc b m ph n d i
c a nút khóa. (Hình 13)
Sau ó kéo b chuy n i n có dây tháo r i vào v trí ó.
(Hình 14)
S d ng ph n gi
u nh v có th t
trong lúc thay th
nh v .
gi
u
nh v vào ph n g
u
nh v (Hình 15)
m th i g n trên ph n gi
u nh v
u m i ho c s d ng không c n u
nh v , t các l hình thang trên u
nhô c a u nh v và n vào.
V N HÀNH
G n vít trên i m u m i và t i m u vít lên b m t
gia công c n
c g n ch t. Nh n d ng c và b t u.
Rút d ng c ra khi v a ng t ly h p. Sau ó nh c n kh i
ng công t c. (Hình 16)
C N TR NG:
• Khi g n kh p vít lên nh u m i, c n th n không y
vào vít. N u vít b
y vào, kh p ly h p s gài và vít s
quay b t thình lình. i u này có th gây h h ng v t
gia công ho c gây th ng tích.
•
m b o r ng u m i
c l p th ng
ng vào u
vít, n u không vít và/ho c m i v n có th b h h ng.
• Ch gi d ng c b ng tay c m khi th c hi n thao tác.
Không
c ch m vào ph n kim lo i.
15
B O TRÌ
C N TR NG:
• Hãy luôn ch c ch n r ng d ng c ã
c t t và ng t
k t n i tr c khi c g ng th c hi n vi c ki m tra hay
b o d ng.
• Không bao gi dùng x ng, ét x ng, dung môi, c n
ho c hóa ch t t ng t . Có th x y ra hi n t ng m t
màu, bi n d ng ho c n t v .
m b o AN TOÀN và TIN C Y c a s n ph m, vi c
s a ch a ho c b t c thao tác b o trì, i u ch nh nào u
ph i
c th c hi n b i các Trung tâm D ch v
c y
quy n c a Makita (Makita Authorized Service Center),
luôn s d ng các ph tùng thi t b thay th c a Makita.
PH
KI N TÙY CH N
C N TR NG:
• Các ph ki n ho c ph tùng g n thêm này
c
khuy n cáo s d ng v i d ng c Makita c a b n theo
nh quy nh trong h ng d n này. Vi c s d ng b t
c ph ki n ho c ph tùng g n thêm nào khác u có
th gây ra r i ro th ng tích cho ng i. Ch s d ng
ph ki n ho c ph tùng g n thêm cho m c ích ã quy
nh s n c a chúng.
N u b n c n h tr
bi t thêm chi ti t v nh ng ph
ki n này, hãy liên h v i Trung tâm D ch v c a Makita t i
a ph ng c a b n.
•
u m i chèn Phillips
•
u gi m i t tính
•
u nh v
• H p nh a ch a d ng c
L U Ý:
• M t vài m c trong danh sách có th
c bao g m
trong gói d ng c làm ph ki n tiêu chu n. Các thông
s k thu t có th thay i tùy theo t ng qu c gia.
16
6.
7.
8.
9.
10.
1.
2.
3.
4.
5.
(
•
•
•
)
FS4000
6 .
5 .
0 - 4,000
269 .
1.3 .
11.
12.
13.
FS4200
6 .
5 .
0 - 4,000
269 .
1.4 .
FS4300/FS4300A
6 .
5 .
0 - 4,000
279 .
1.4 .
FS6200
4 .
0 - 6,000
269 .
1.4 .
/II
FS6300/FS6300A
4 .
0 - 6,000
279 .
1.4 .
FS6300R
4 .
0 - 6,000
279 .
1.4 .
EPTA 01/2003
END201-5
“
”
(
(
.....
)
)
1.
..................
ENE033-1
2.
ENF002-1
3.
European Standard
4.
GEA005-3
5.
!
/
6.
7.
17
21.
8.
22.
9.
(RCD)
10.
RCD
RCD
30 mA
23.
11.
24.
12.
25.
13.
/
26.
27.
GEB017-4
14.
1.
“
15.
”
“
”
2.
16.
3.
4.
5.
17.
18.
:
(
)
19.
20.
18
/
:
:
•
•
“B”
“A”
1.5
(
(
8)
.
1)
1
.
(
2
(
9)
3)
(
FS6300R
4)
:
•
“OFF”
(
:
(
11)
(
12)
10)
•
(
(
5)
FS4200, FS4300, FS4300A, FS6200, FS6300,
FS6300A, FS6300R
(
13)
14)
(
:
15)
•
:
•
(
6)
(
:
•
•
16)
:
•
(
(
(
7)
B)
A)
•
/
•
19
:
•
•
Makita
Makita
:
•
Makita
Makita
Phillips
•
•
•
•
:
•
20
21
22
23
Makita Corporation
Anjo, Aichi, Japan
884894-376
TRD
www.makita.com