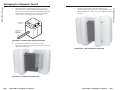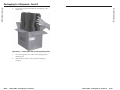
1
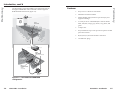
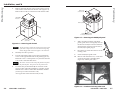
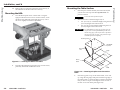
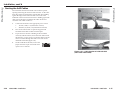
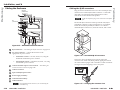
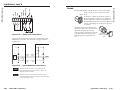
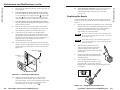
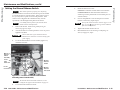
i.
Remove the four flathead screws that secure the top
plate to the surface block. Retain the surface block if
another HSA is to be installed in the table.
j.
Using the four 1/4" nuts that you removed in step 2h,
secure the secure the top plate to the lifting plate
(figure B-6).
l.
Disconnect the IEC power cord (international
versions only), the RJ-45 connectors, and the control
and status connector (figure 3-1 on page 3-2, items
7 , 8 , and 9 ) from the connectors on the underside
of the HSA.
m.
On the underside of the table, support the HSA while
you remove the eight screws that secure the
enclosure to the table (figure B-7). Lift the enclosure
away from the table.
CAUTION
The surfaces of the HSA enclosure have screws and
other protruding hardware that could damage fine
furniture. Do not rest the enclosure on unprotected
furniture.
Figure B-6 — Securing the top plate to the lifting
plate
k.
Replace the AAP/RJ-45 panels in the surface mount
enclosure and secure them in place with the screws
removed in step 2c. If you lose an AAP/RJ-45 panel
screw, four spare screws are stored in the underside
of the enclosure (figure 3-1 on page 3-2, item 6 ).
Figure B-7 — Removing the HSA from the table
B-6
HSA 822MS • Packaging for Shipment
HSA 822MS • Packaging for Shipment
B-7
Preliminary
Preliminary
Packaging for Shipment, Cont’d