1
❑
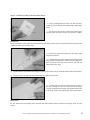
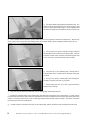
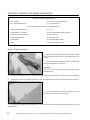
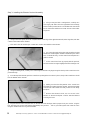
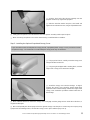
After the epoxy has cured, set the belly pan onto the wing and push it down firmly into place.
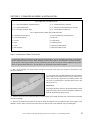
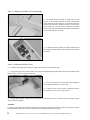
❑ Check the fit of the belly pan. To do this, align both the
front and back of the belly pan with the sides and bottom of
the fuselage. The sides and bottom of the fuselage and belly
pan should be even with each other and there should be few
or no gaps between the wing and the belly pan.
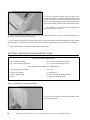
☞ There should be about a 1/16" gap between the belly
pan and the front and back of the fuselage. See the important
notice below.
IMPORTANT
The belly pan is slightly oversize so you will need to sand the front and back of it a bit, using 220 grit sandpaper with a
sanding block, to achieve a perfect fit. Remove small amounts of material at a time, checking the fit often. Also, if there are
any gaps between the belly pan and wing, carefully sand down the high spots on the belly pan until you are satisfied with
the fit.
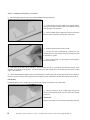
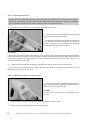
❑ When satisfied with the fit, glue the belly pan into place using a generous amount of 5 minute epoxy, making sure to
apply epoxy to the edges of the front and back plywood plates and to the sides of the balsa support rails. Remove any
excess epoxy using a paper towel and rubbing alcohol, and hold the belly pan firmly in place and aligned using pieces of
masking tape until the epoxy fully cures.
WARNING
Be careful not get any epoxy between the wing and/or belly pan and the fuselage.
❑ After the epoxy has cured, remove the masking tape and check that the belly pan is glued firmly into place. This is
important as the belly pan secures the flight battery in place, and, if you're hand-launching the airplane, you'll be holding
the belly pan to launch the airplane.
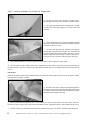
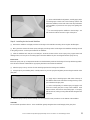
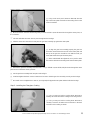
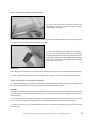
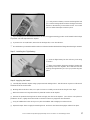
❑ Using a rotary tool with a cutting wheel, carefully make
several 1-1/4" long by 1/8" wide air-intake slots in the front of
the belly pan.
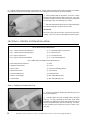
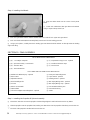
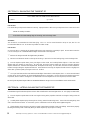
❑ Using a rotary tool with a sanding drum, carefully cut a
5/8" diameter hole in the back of the belly pan over the
wing hold-down bolt. This hole will give you access to the
wing screw and also serve as an air-exit hole for cooling
the flight battery.
❑
16
Remove the wing from the fuselage and set them both aside for now.
Need help or have any questions? Call us at 1-714-963-0329 or send us an email to [email protected]