1
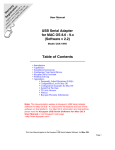
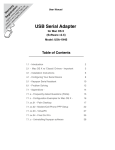
Grappler SCSI Notes
Quick
Installation
and Reference
Guide
From time to time Orange Micro will offer firmware and Software upgrades. If you are experiencing difficulties check our web site periodically at:
http://www.orangemicro.com/updatescsi.html
Register Online:
INTRODUCTION
This Quick Reference Guide was designed specifically to provide you with an easy
reference for installing the Grappler+ SCSI+Serial PCI Board.
http://www.orangemicro.com/register.html
LIMITED WARRANTY
Every Orange Micro product is fully tested and checked for quality prior to shipment. It is warranted to be free from defects in
materials and workmanship for a period of one (1) year from date of purchase. During that time period, Orange Micro Inc. will,
at no charge to the purchaser of record, repair or replace the defective unit returned to the Customer Service Department in
accordance with the following instructions:
NOTE: DO NOT return the Orange Micro card to Orange Micro Inc. until you have received a Return Material
Authorization (RMA) Number. Customers outside the United States should contact the Orange Micro distributor in that
country and request service.
1) Phone the Orange Micro Customer Service Department between 8AM and 4PM PST to obtain a Return Material
Authorization (RMA) number. Customer Service lines are closed from 12PM to 1PM PST for lunch.
2) Provide Orange Micro, Inc. with: Model, Serial Number, Proof of Purchase, Return Address, and preferred return shipping
method. Enclose a clear description of the problem experienced and any sample printouts showing the problem, if possible.
3) Ship in the original carton or securely packed in a cardboard carton with at least two inches of cushioned packing material
on all sides. Mark the package "FRAGILE" and ship via UPS, Parcel Post, or Air Freight, insured and prepaid.
NOTE:DO NOT SEND COLLECT - collect shipments will be refused and returned to sender.
Orange Micro, Inc. disclaims any liability to users of the Orange Micro product for consequential damages of any kind arising
from or connected with the use of the Orange Micro product. This warranty is void in cases of misuse, abuse, abnormal conditions of operations or attempts to alter or modify the function of a part or assembly. This limited warranty is in lieu of all other
warranties expressed or implied, and no representative or other person is authorized to represent or assume for Orange Micro,
Inc. any warranty liability beyond that set forth herein. This warranty gives you specific legal rights, and you may also have
additional rights, which vary, from state to state. The warranty expressed herein applies to the Orange Micro product sold and
used in the United States of America.
FCC Class B Information
This equipment has been tested and found to comply with the limits of a Class B digital device, pursuant to Part 15 of the FCC
Rules. These limits are designed to provide reasonable protection against harmful interference in a residential installation. This
equipment generates, uses and can radiate radio frequency energy and, if not installed and used in accordance with the instructions, may cause harmful interference to radio or television reception, which can be determined by turning the equipment off
and on, the user is encouraged to try to correct the interference by one or more of the following measures:
• Reorient or relocate the receiving antenna.
• Increase the separation between the equipment and receiver.
• Connect the equipment into an outlet on a circuit different from that to which the receiver is connected
• Consult the dealer or an experienced radio/TV technician for help.
Any changes or modifications not expressly approved by the manufacturer could void the user’s authority to operate the equipment.
The user may find the following booklet prepared by the Federal Communications Commission helpful: "How to Identify and
Resolve Radio/TV Interference Problems". This booklet is available from the US Government Printing Office, Washington, DC
20402. Stock No. 004-000-00345-4.
“ 20 Years of Innovation and Excellence”
1400 N. Lakeview Ave., Anaheim, CA 92807
(714)779-2772 • www.orangemicro.com
© Orange Micro, Inc. 2000
75MAN00049
OPERATING SYSTEM REQUIREMENTS
On a PowerMac or G3, use an operating system that is Mac OS 7.5 or higher.
CONNECTION NOTE
There are four connectors on the Grappler+
SCSI+Serial board:
1) One internal 50-pin SCSI connector
2) One external DB 25-pin SCSI connector
3) Two mini-din 8 Macintosh compatible serial
ports.
HOST ADAPTER LAYOUT
GRAPPLER+ SCSI+SERIAL
50-Pin Internal
SCSI
LED
Connector
INSTALLING THE GRAPPLER+
SCSI+SERIAL BOARD
25-Pin
The following are steps for installing the
SCSI
Grappler+ Board:
1) Turn computer power OFF.
2) Remove the Mac chassis cover to access the
Grappler
expansion slot and expansion slot covers.
Port 1
Grappler Port 2
Consult the chapter on "Installing PCI Cards,
(Serial)
(Serial)
Memory, and Internal Storage Devices" in the
Setup Manual that came with your Mac.
3) Identify an unused PCI expansion slot.
4) Remove the cover from the selected expansion slot.
5) Align bus connector on the bottom of the host adapter with the available slot. Carefully insert the
card into the slot. Attach the Grappler+ SCSI bracket to the chassis with the expansion slot cover
screw. (Some older Mac models may not have a hole for screw mounting).
CONNECTING INTERNAL SCSI DEVICES
Follow the steps listed below to connect SCSI devices mounted inside your Mac. Do NOT install
differential devices, which can burn up the power supply. Install only single-ended devices. Use
the internal SCSI cable included with the Grappler SCSI to connect your SCSI devices, or use an
internal cable that supports the number of devices you wish to connect. If the cable does not have
a built-in terminator, make sure you terminate the last internal device on the cable.
1) Follow the instructions with your SCSI devices and disable termination on all internal SCSI
devices except the last one.
2) Plug the 50-pin female on the end of your internal cable into the Grappler SCSI’s internal SCSI
connector. (Make sure the end of the cable is not terminated.) When installing, make sure to
match up pin 1 on the connector and on the ribbon cable.
3) Plug the female end of the cable into the connector of the closest internal SCSI device. Maintain
Pin 1 orientation.
4) Add new devices individually and check to make sure each runs properly before adding the next
one.
ASSIGNMENT OF SCSI IDS
Any SCSI device you are connecting such as hard disk drives, CD-ROMs or other SCSI devices
require a unique SCSI ID. The host adapter has a default of ID 7.
REASSEMBLING AND STARTING THE MAC
To reassemble and start up your Mac, follow the steps below.
1) Following the instructions in your Mac documentation, replace the chassis cover.
2) Make sure all power switches are powered OFF. Then reconnect the power cables to your Mac.
3) Turn the power ON for the Mac and peripherals.
CONNECTING EXTERNAL SCSI DEVICES
Note: Properly shut down your system and power OFF your computer before adding any external
device. Please use the following steps when connecting external SCSI devices to your host adapter.
1) Use DB 25 pin Macintosh standard external SCSI cable.
2) Plug the second end of the cable into one of the SCSI connectors at the back of the external device
you wish to connect.
3) If you wish to add more external devices, repeat step 2 for each subsequent device you are connecting.
4) Insert an active standard or active pass through terminator plug into the SCSI connector on the
last external SCSI device. See instructions in device documentation if necessary.
INSTALLING THE GRAPPLER SOFTWARE
The Grappler+ Installer will install the Grappler Serial software in your Mac System folder. It will
also create a Grappler+ Folder on your hard disk that includes a Grappler Flash Utility. You can use
this to check the version of the firmware on the Grappler+ board.
1) Insert the Grappler+ SCSI+Serial Installation CD.
2) Double-click on the Grappler Installer icon.
3) Follow the onscreen instructions.
4) Restart your computer
CONNECTING AND CONFIGURING YOUR SERIAL DEVICES
Prior to using your serial device (modem, printer, PDA, camera, etc.) with the Grappler+ SCSI
Serial board, you must:
1) Connect your serial device (hardware) to one of your Grappler+ serial ports.
2) Configure your serial device's software.
3) Properly configure the Grappler Serial Control Panel
CONNECTING YOUR SERIAL DEVICE (HARDWARE)
1) Connect your serial device to the Grappler+ SCSI Serial board.
2) Determine which Grappler+ Serial port your serial device is connected to.
You must now tell your serial device software that your serial device (hardware) is now connected
to your new Grappler+ serial port.
CONFIGURING YOUR SERIAL DEVICE'S SOFTWARE
The following configuration instructions provide a basic overview of how to configure your software to use your Grappler+ serial port(s). For specific instructions on how to operate your serial
device, refer to that device's user's manual for detailed instructions.
1) Determine where to select/configure the Grappler+ serial port(s)
Most serial devices have software that will allow you to select which serial port the device is connected to. Depending on your serial device and its software, you may have to configure: a Control
Panel (modems), an icon in the Chooser (printers), an application, or some combination of these.
Please refer to your serial device's documentation to determine which method your serial device
uses and how to access that software serial port "configuration" screen.
2) Determine which serial port to select in your serial device's software
When you've found the port selection screen in your serial device's software, you may be presented
with:
* A list of serial port names
* A list of serial port icons
* A list of serial port icons with names
If you see the name or icon of the Grappler+ serial ports in the list of available serial ports as in figure 1, your serial device's software is CommToolBox compliant. This also means that your serial
device's software is able to see any serial port in your computer including the Grappler+ serial ports.
If you see Grappler+ serial ports listed, simply select the Grappler+ serial port icon or port name
that your serial device is connected to.
If you only see the generic Modem and Printer Port icons and/or names in the list of available serial ports as in figure 2 or 3, this means that your serial device's software is non-CommToolBox compliant. In other words, non-CommToolBox compliant software cannot see the Grappler+ serial
ports. However, you can still use this software with your Grappler+ serial ports since Grappler serial port 1 can emulate the Apple Printer port by properly configuring the Grappler Serial Control
Panel.
figure 1
figure 2
figure 3
figure 4
CONFIGURING THE GRAPPLER SERIAL CONTROL PANEL
The following Grappler Serial options allow the Grappler Serial software to emulate special characteristics of the traditional Apple built-in Printer Port.
Important: Any changes to the Grappler Serial Control Panel requires a Macintosh system restart,
for changes to take effect.
1) Port 1 emulates Printer Port
This option allows Grappler Serial Port 1 to emulate the traditional Apple built-in Printer Port. This
is required for non-CommToolBox compliant serial device software as in the Chooser window in
figure 2 or 3. Once the Port 1 emulates Printer Port option is selected, the above Chooser window
in figure 3 will look like figure 4.
2) Epson Printer Support
Many Epson and some 3rd party printer drivers may make low level hardware requests to Apple
built-in ports. This option may be required to allow these printers to work. When Epson Printer
Support is turned on, the built-in Apple modem is disabled.
Note: The Grappler+ Serial Port 1 can only emulate the built-in Printer Port on Macs that do not
already have a built-in Printer Port (i.e. Blue and White G3s, G4, etc). The Grappler Serial Control
Panel will only be installed on systems with Mac OS 8.6 or newer, since it is not necessary on older
systems.