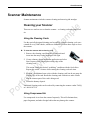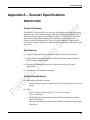
1
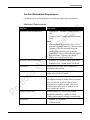
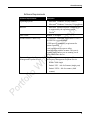
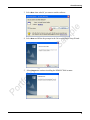
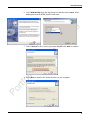
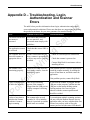
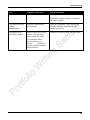
Property Management Payment Service Check Scanning User Guide This manual contains proprietary and confidential information. This user guide may not be reproduced or disclosed to others in whole or in part without the written permission. Permitted reproductions shall bear this notice a copyright notice. The user of this user guide agrees to maintain this user guide and its contents in confidence. ©2009 Contents Contents Overview ............................................................................................................................. 1 Benefits ................................................................................................................... 1 Features ................................................................................................................. 1 How Check Scanning Works ........................................................................................ 2 High Level Workflow ............................................................................................... 2 Check 21 ................................................................................................................ 3 OCR ........................................................................................................................ 3 Before you Begin........................................................................................................... 3 Confirm Workstation Requirements ....................................................................... 4 Installation .......................................................................................................................... 6 Scanners Supported by Property Management Payment Service ............................... 6 Installing the Scanner and Drivers ................................................................................ 6 RDM EC7000i Installation ...................................................................................... 7 Panini VX1 and VX50 Installation ......................................................................... 12 Scanning Checks ............................................................................................................. 17 Scans Tab Check List........................................................................................... 20 Reviewing and Editing Check Details ......................................................................... 20 Send to Batch.............................................................................................................. 24 Exceptions ................................................................................................................... 24 What is the MICR? ............................................................................................... 24 Repairing the MICR .............................................................................................. 25 Submitting the Batch ................................................................................................... 26 Searching Batches ...................................................................................................... 27 Scanner Maintenance ...................................................................................................... 29 Cleaning your Scanner ............................................................................................... 29 Using the Cleaning Cards .................................................................................... 29 Using Compressed Air.......................................................................................... 29 Removing Ink Smudges ....................................................................................... 30 Additional Information ................................................................................................. 30 Appendix A – Scanner Specifications ........................................................................... 31 RDM EC7000i ............................................................................................................. 31 Product Overview ................................................................................................. 31 Key Features ........................................................................................................ 31 Product Specifications .......................................................................................... 31 iii Title Panini VX .................................................................................................................... 33 Product Overview ................................................................................................. 33 Key Features ........................................................................................................ 33 Product Specifications .......................................................................................... 34 Appendix B – Online Customer Adjustments............................................................... 36 Appendix C – Icons ......................................................................................................... 39 Appendix D – Troubleshooting, Login, Authentication and Scanner Errors ............ 40 iv Check Scanning Overview The scanning feature in Property Management Payment Service Community portal converts paper checks into electronic transactions, with support for Check 21 items. Every payment made is fully integrated with your existing accounting system for reconciliation and reporting. Also, all transactions are fully compliant with state and federal laws. By scanning a check, you are capturing bank account information and an electronic image of the check. The system will take information captured from the check and process it as an electronic payment. Funds will be electronically withdrawn from the resident’s bank account on the following business day and deposited. The scanning feature supports ACH and Check 21 transactions. ACH regulations only allow you to scan and process consumer checks. Other types of paper checks (business checks, third-party checks, money orders, etc.) may be scanned and processed as Check 21 transactions. Benefits ▀ Provides a simple, efficient way to handle paper checks. ▀ Eliminates trips to the financial institution to deposit checks. ▀ Offers a single, integrated view of all payments across the portfolio. ▀ Verifies that all payments are fully compliant. ▀ Improves cash management with next day funding. Features ▀ Simple, easy to use user interface ▀ Supports single check handling or bulk processing of items Supports multiple scanners with same interface Designed specifically for the multifamily industry Residents are “remembered” if they’ve already had a check scanned Integrated offering Resident drop down list for quick processing Enforces Do Not Accept functionality (when passed by client) Displays outstanding balance (when passed by client) Checks integrated with all other payment types 1 Check Scanning ▀ All transactions are processed as Check 21 All transactions are the same price Eliminates the need to handle resident “opt-outs” Single deposit to bank account for all items in a batch ▀ View payment status for all transactions via a single interface (approved, refunded, returned) ▀ Support for all major scanners including RDM 7000, Panini MVX and SB1000 How Check Scanning Works The check scanning feature allows you to convert paper checks into electronic transactions. A scanner, supplied by a third-party vendor, is used to capture the MICR line and CAR/LAR, and create an image of each check. The check information is stored and then sent electronically for processing. High Level Workflow 1. Resident pays with a paper check. 2. Community manager launches the Property Management Payment Service Community portal. 3. Community manager feeds the resident’s check into a scanner, capturing the Image, Amount (CAR/LAR) and MICR information from the bottom of the check. 4. If the Property Management Payment Service system recognizes the checking account, it will populate the screen with the previously provided customer information. 5. Community manager verifies the dollar amount and processes the payment. 6. Funds are electronically withdrawn from the Resident’s bank account. 7. Funds are deposited into the property’s bank account. 2 Check Scanning Check 21 The Check Clearing for the 21st Century Act (or Check 21 Act) is a United States federal law enacted into law October 28, 2003. Check 21 allows a company to replace an original check with a paper reproduction (front and back). This reproduction, called a substitute check, is created from a digital image of the original, contains the same information, and becomes the legal equivalent of the original check. Check 21 allows a company to use digital image files of the original paper checks to settle check payments electronically, thereby reducing reliance on physical transportation. The digital images can be converted to substitute checks, if a substitute check is needed for any reason. With this legislation, any type of paper check can be converted into a digital image, including corporate checks, consumer checks, cashiers checks, third-party checks and money orders. Once converted to a digital image, checks are then processed as an ACH or Check 21 transaction. OCR Optical character recognition (OCR) is a type of computer software designed to translate images of handwritten or type written text (usually captured by a scanner) into a machine-editable text. The scanning feature leverages OCR to read the MICR (Bank account and routing number) and CAR/LAR (handwritten amount). Before you Begin In order to use the scanning functionality, Property Management Payment Service requires scanner drivers to be loaded onto a user’s workstation. If the workstation does not meet the minimum system requirements, it may impact the overall performance of the service. To be certain you will be able to use the service when you are ready to implement, please take a minute to read the hardware and software requirements below and confirm your workstations will be compatible. Please contact the Property Management Payment Service support if you have any questions about the listed requirements. 3 Check Scanning Confirm Workstation Requirements Confirm that your workstation meets the minimum application requirements. Hardware Requirements Hardware Requirement Processor: (min/recommended) ▀ ▀ Windows XP®: Pentium 512MHz/Pentium 1 GHz Windows Vista®: Pentium 800MHz/Pentium 1GHz Notes: Memory: (min/recommended) ▀ If the minimum requirement is for a 1 GHz processor, the requirement for a dual-processor system is 1 GHz for each dual processor. ▀ Not all of the operating systems that are certified for a client workstation will support dual processors. Typically, the “Home” editions are single processor only. ▀ Windows XP: 256MB RAM/512MB RAM ▀ Windows Vista: 512MB RAM/1GB RAM Hard Drive 1GB free space on hard drive is required for installation and operation Display Adapter and monitor capable of 1024 x 768 display with at least 256 colors. Network Ethernet 10Mbit connectivity to LAN, preferably with adapter teaming to enable failure protection. Local port 80 will need to be open to allow communication with the scanner. This port is normally open, unless you are running a web server on the same device. Internet Connectivity Internet connectivity with TCP/IP enabled. Broadband connectivity capable of at least 512Kbit upload speed is strongly recommended. Peripherals ▀ Standard 101-keyboard ▀ 2-button mouse 4 Check Scanning Software Requirements Software Requirements Description Operating System ▀ Microsoft® Windows XP (any edition) ▀ Microsoft® Windows Vista (any 32-bit edition) Browser ▀ ▀ Microsoft® Internet Explorer version 6.0 or 7, as supported by the operating system. Firefox® PDF viewer Acrobat® 9 or higher Scanner/Printer Connectivity 1 x USB port - Minimum requirement is USB 1.1, but USB 2.0 is recommended. A USB port is a mandatory requirement for scanner operation. Local port 80 must be open to allow communication with the scanner. This port is normally open, unless you are running a web server on the same device. Scanners Support by Property Management Payment Service The following scanners are supported for use with the Property Management Payment Service ▀ RDM® 7000i single ▀ Panini® VX1 + ink Jet Scanner (single pass) ▀ Panini® VX50 + Ink Jet scanner (bulk scanner) 5 Check Scanning Installation Obtain a scanner that is supported by Property Management Payment Service or verify that your scanner is supported. Scanners Supported by Property Management Payment Service The following scanners are supported in the Property Management Payment Service product and are offered for purchase, rent, or lease. ▀ RDM® EC7000i scanner (single pass) ▀ Panini® VX1+ Ink Jet scanner (single pass) ▀ Panini® VX50 + Ink Jet scanner (bulk scanner) Note. All scanners must be purchased with printing capability. If your model does not support printing, a firmware upgrade will be required. Example of a Panini scanner: Refer to “Appendix A – Scanner Specifications” for key features and detailed product specifications. Installing the Scanner and Drivers The following section provides instructions for setting up and installing the RDM and Panini scanners. Note. You need to have local administrator rights on your machine to install the scanners. Before performing the installation: 6 Check Scanning ▀ Disconnect the scanner and USB cable from the computer. ▀ Make sure you are logged into the workstation and that you have administrator privileges. ▀ Close all open applications, including Property Management Payment Service. RDM EC7000i Installation Follow these instructions to install and setup the RDM EC7000i scanner. For more detailed instructions on unpacking your scanner and initial setup, please refer to the user guide included in the box. Unpacking the Scanner ▀ Unpack your new RDM EC7000i scanner, USB cable and document/CD package. ▀ DO NOT CONNECT THE SCANNER to your computer yet. ▀ Exit all programs you are running on your computer. Download and Install the Scanner Driver – Part 1 The scanner requires the download and installation of a driver on your local PC. ► To install the scanner driver: 1. Open a web browser and go to https://www.checkscanning.exe. 2. Select Run when asked if you want to run or save this file. 7 Check Scanning 3. Select Run when asked if you want to run this software. 4. Select Next and follow the prompts in the Universal Installer Setup Wizard. 5. Select Proceed to continue installing the RDM EC7000i scanner. 8 Check Scanning 6. Select RDM EC7000i from the drop down list, and then select Install. Select Next again when the RDM install wizard starts. 7. Select I Accept for the License Agreement and then click Next to continue. 8. Select Next to install to the default location on your computer. 9 Check Scanning 9. Select Next to install the default components. 10. Click Next to install to the default program group. 11. Click Next to start installation. 10 Check Scanning 12. Click Finish to complete installation. Download and Install the RDM EC7000i ActiveX Driver – Part 2 The scanner also requires you to download and install an ActiveX driver in order to communicate with the web browser. This is a one-time install. ► To install the ActiveX driver: 1. Log on to the Property Management Payment Service Community portal and click Scan Checks from the left menu. 2. Select Install ActivX Control when asked (this may be flashing at the top of your browser window). 3. Select Install when prompted to install the RDM 7000 File. 4. Connect scanner and begin scanning. 11 Check Scanning Note. The RDM EC7000i scanner is now installed and ready to be used. Please keep the original box and packaging as you may need to return your scanner for service. Panini VX1 and VX50 Installation Follow these instructions to install and setup the Panini VX1 and VX50 check scanners. Installing the Scanner The Panini VisionX scanner hardware should be set up according the instructions in the manual included with the scanner. It is not necessary to install the inkjet cartridge in a test environment. Downloading and Installing the Scanner Driver – Part 1 The scanner requires the download and installation of a driver on your local PC. ► To download and install the driver: 1. Open your web browser and go to https://www.checkscanning.exe. 12 Check Scanning 2. Select Run when asked if you want to run or save this file. 3. Select Run when asked if you want to run this software. 4. Select Next and follow the prompts in the Universal Installer Setup Wizard. 13 Check Scanning 5. Select Proceed to continue installing the Panini Scanner. 6. Select Panini MyVision from the drop down list, then select Install. Select Next again when the MyVision install wizard starts. 7. Be sure the Panini scanner is NOT plugged into your computer. 14 Check Scanning 8. Select Next to install to the default location on your computer. 9. Select Next to install to choose the default features. 10. Click Finish to complete installation. 15 Check Scanning Note. Setup will also install the Panini “MyDemo for MyVisionX” program that you can use to test the scanner. Click Start > All Programs > Panini to run this program. Download and Install the Panini MVX30 ActiveX Driver – Part 2 The scanner also requires you to download and install an ActiveX driver in order to communicate with the web browser. This is a one-time install. ► To download and install the ActiveX driver: 1. Log into the Property Management Payment Service Community portal and click Scan Checks from the left menu. 2. Select Install when asked if you want to install the Panini Object. Note. The Panini scanner is now installed and ready to be used. Please keep the original box and packaging as you may need to return your scanner for service. 16 Check Scanning Scanning Checks Follow these instructions to scan paper checks. ► To scan a check: 1. Gather all checks and money orders. 2. Compute the expected total amount of your deposit, this amount is the declared amount. 3. Perform a quality check of all deposit items. Make sure that the bottom and leading edges of the deposit slip (if applicable) and deposit items are aligned and are facing the same direction. Remove all staples and paper clips and straighten any bent corners before loading into the scanner. 4. Make sure your scanner is connected to your computer. 5. Log on to Property Management Payment Service 6. From the left menu, click Scan Checks. The scan checks home page appears. 7. Click Open Scanner. The scanner control window opens. 17 Check Scanning 8. Select the type of check(s) you are scanning: ▀ Personal or Corporate Checks ▀ Money Order or Cashier’s Checks 9. Slide the item(s) up to the line on the body of the scanner. DO NOT push or insert items past the line. Note. Depending on your scanner model, you may have either a single feed scanner or a bulk-feed scanner. 10. Click the Scan Checks button. The scanning status is displayed next to Operation: ▀ Scanning Check ▀ Processing Check 18 Check Scanning 11. While the checks are scanned, the scanner prints a horizontal “spray” line on the back of each check and the application overlays a virtual endorsment on the check image which will be used in clearing the items. The scanner must be equipped with an ink cartridge that will “spray” or print information on the back of each item. The information “sprayed” on the item includes the following: ▀ Sequential number in which the item was scanned ▀ Deposit number ▀ Location ▀ Customer number Check images a. The check image will appear in the scanner control window if you are using the SB1000 scanner. Other scanners will not show an image in the control window, rather the check will go straight to the list. b. Within a few seconds, you will see the check appear in the list of scanned checks at the bottom of the page. 12. Click Close Scanner when you are finished scanning. Note. Check images are available online for six (6) months. After the point, you can request a copy of an image. 19 Check Scanning Scans Tab Check List The checks you scanned appear in the list, in the order in which you scanned them. Consider this your “Inbox” of checks waiting to be reviewed, edited and batched for processing. The far left icon shows a status of the check. If you mouse over the icon, you will see the status details. Statuses include: ▀ Green circle: Successful (you should still review the transaction detail for scanning accuracy). ▀ Red circle with exclamation point: ▀ Yellow triangle with exclamation point: Error Attention Required (MICR Repair, $0 Amount, etc.). Edit ( Delete ) - The middle icon opens the Edit pane. ( ) - The far right icon allows you to delete a check from the list. Reviewing and Editing Check Details Before you can process a check, you must verify and possibly edit certain information, including: ▀ Payment Description ▀ Payment Amount ▀ Resident Unit and Name ▀ Payer Name (defaults to Resident Name, but can be overridden) ▀ ▀ Check Type (Personal Check, Money Order, Cashier’s Check, Corporate Check) Check Number 20 Check Scanning ► To review / edit the check details: 1. Click the edit button ( appears. Note. ) for the check you would like to edit. The edit pane Fields marked with a red asterisk (*) are required. 2. Select the payment description from the drop-down list to indicate for what the check is being used to pay: ▀ Outstanding Balance (rent) ▀ Security Deposit ▀ Application Fee 3. Verify the payment amount. The amount of the check is read using Optical Character Recognition (OCR). 21 Check Scanning OCR works well but is not perfect. You should verify the amount as the transaction will be processed for the amount entered in this field. If you have an integrated solution with a backend property management system, you may see the Outstanding Balance for each resident displayed next to the amount for reference. 4. Select a resident name from the drop-down list or click in the field and typing the first few characters of the unit number or resident name. A filtered dropdown list appears. Select the correct resident from the list. Note. The first time you scan a check for a resident, you will need to “Assign” the resident’s name to the payment. This ties the resident name to the bank account and routing number being used for payment. The next time a check is scanned with the same bank account and routing number, the resident information will be populated for you, including the Resident Name and Payment Description. 5. The payer name defaults to the resident name. You can override this by typing in the payer name if different. 6. If the payment is for a non-resident, select Not a resident at the top of the drop- down list. You will then be able to enter a unit number as well. 7. Select the type of check from the drop-down list: ▀ Personal Check ▀ Cashier’s Check ▀ Corporate Check ▀ Money Order Selecting the check type will impact the payment receipt data. Integrated receipt files are updated to include an indicator for each check type as follows: 22 Check Scanning ▀ Personal Check: PC + Check Number (example – PC1234) ▀ Money Order: MO + Check Number (example – MO2345) ▀ Cashier’s Check: CC + Check Number (example – CC3456) ▀ Corporate Check: CORP + Check Number (example – CORP4566) 8. To complete the review/edit process, you have three options: a. Update and Send to Batch. Saves all edits and adds the check to the open batch tab. b. Update. Saves any changes, leaves the check on the Scans tab and returns you to the list of checks. c. Cancel. Cancels all edits and returns you to the check list. 23 Check Scanning Send to Batch Follow these instructions to send the check(s) to batch. ► To send the check(s) to batch: 1. When you have finished reviewing the check details, click Update and Send to Batch to send the check to the Batch Tab. 2. You can also send a check to the Batch tab by clicking the check list on the Scans Tab. icon from the IMPORTANT: Always verify the details of the transaction prior to submitting the item to the batch to prevent adjustments or returned items. The check will move from the Scans tab, and is added it to the Batch tab. Exceptions Exceptions are caused when the MICR line is misread. In this case, you will have to repair the MICR and submit the item for approval. What is the MICR? Magnetic Ink Character Recognition (MICR) is the series of printed, machinereadable characters at the bottom of a check including: check number, bank routing number, checking account number and in some cases the amount of the check. 24 Check Scanning Repairing the MICR After you scan a check, if the MICR line is not readable, you will see a yellow error icon in the scanned checks list, located under the Scans tab. Follow the process below to repair the MICR and to submit the item to Property Management Payment Service Support for approval. Your items that are awaiting approval will appear under the Exceptions tab. ► To repair a MICR: 1. In the Scans tab, place your cursor over the yellow error icon and you will see the following error message: “MICR line cannot be read – Please enter the Routing Number, Account Number and Check Number below.” 2. In order to repair the MICR, click the edit icon , and manually enter the Routing Number, Account Number and Check Number in the text boxes that appear on the screen. IMPORTANT: Review the information you have entered to verify accuracy which will speed up the approval process. Note. If you are uncertain which numbers are the account and routing number, click on the Help link. Hint: Routing numbers are always 9 digits. Account numbers can be up to 17 characters and can be separated in the MICR line. Do not include the check number which matches the check number in the upper right hand corner. 3. Once you have entered the MICR, click Request Approval to submit the item to Property Management Payment Service Support for approval. Your items that are awaiting approval will appear under the Exceptions tab. Approval Decision Process Once your submitted items move to the Exceptions tab, it goes through the following approval process: 1. Upon receipt, Property Management Payment Service Support will also enter the same MICR line information from the image. The item is either approved or rejected: ▀ If both submissions match, the item is approved and returned to your Scans tab. ▀ If the submissions DO NOT match, the item is rejected and appears back on your scans tab to be entered again. 25 Check Scanning 2. Users are notified of Approval or Rejection by email. 3. Once an item is approved, it will appear under the Scans tab, in the scanned checks list. You may then send the item to the Batch for processing. Submitting the Batch The Batch tab contains a summary of the items that have been reviewed and are ready to be submitted (number of items and total dollar amount). You have the following options on the Batch tab: ▀ To delete items from the batch, click on the Note. icon. You will need to rescan the item if you want to submit it again. ▀ To print a report or list of the items in the batch, click on the Printer icon in your web browser. ▀ To export the batch list to Excel, click Export to Excel. This allows further filtering and analysis as well as the ability to print. ▀ To submit the batch for processing, click Submit batch. Checks will be removed from the batch tab after submission. Note. The cutoff time for submitted batches is 6 PM ET. The daily limit for the total batch amount is $100,000.00. You will receive a message if you exceed the limit for the day. IMPORTANT: Do not take checks to the bank after submitting them through Property Management Payment Service. 26 Check Scanning Searching Batches You can search for past batches from the Batch History tab and export a report of all searched batches to an Excel spreadsheet. ► To search for batches: 1. Click the Batch History tab. The search page appears. 2. Enter the start and end dates or click the calendar icon next to each field to select a date from the pop-up calendar. 3. Select a check status from the drop-down list: ▀ All ▀ Approved ▀ Error ▀ Pending ▀ Returned ▀ Rejected 4. Click Search. A list of all batches matching your search criteria appears. 27 Check Scanning 5. To view the scanned check, click the icon. 6. To export the list to Excel, click Export to Excel. When the File Download dialog box appears, click either Open or Save. 28 Check Scanning Scanner Maintenance Scanner maintenance includes scanner cleaning and removing ink smudges. Cleaning your Scanner There are two tools to use to clean the scanner – a cleaning card and compressed air. Using the Cleaning Cards Use the specially-designed cleaning card to perform a simple cleaning cycle once a month or every 5000 checks, whichever comes first. Follow these steps to clean the scanner. ► To clean the scanner with a cleaning card: 1. Remove the cleaning cared from the sealed pouch and insert into the entry feeder as shown to the right. 2. Create a dummy deposit within the application and select Start Capture while grasping the trailing edge of the cleaning card. This action creates the desired “scrubbing” condition with the feed rollers. Repeat this action 3-4 times while rotating the cleaning card each time. 3. Perform 3-4 additional scan cycles with the cleaning card, but do not grasp the trailing edge of the card. Rotate the cleaning card each time to make certain that the cleanest part of the card is being used. 4. Delete the dummy deposit. Additional cleaning cards can be ordered by contacting the scanner vendor TASQ at 1-866-410-7216 Using Compressed Air Use compressed air to clean the scanner frequently. This will eliminate dust, paper fragments, and other foreign bodies that may damage the scanner. 29 Check Scanning Removing Ink Smudges Follow these steps to remove ink smudges. ► To remove ink smudges: 1. Check the ink-jet cartridge for leaks. If it has leaked, remove the cartridge and clean it off, then insert it back in the scanner. 2. Replace the ink jet cartridge. 3. Periodically check the condition of the ink jet cartridge and replace it when the ink begins to fade in density on the printed items. Additional Information For additional information on operating your Panini scanner, refer to the Panini Operator Training at http://www.paninina.com/operatortraining/flash.php. 30 Check Scanning Appendix A – Scanner Specifications RDM EC7000i Product Overview The RDM EC7000i provides a low cost, two-sided imaging solution for property managers who want to take advantage of the opportunities presented by Check 21, including scanning paper checks and money orders. The EC7000i is one of the most versatile and reliable scanners in the marketplace. Utilizing RDM’s Progressive MICR Method, the EC7000i delivers the industry’s highest MICR read accuracy which results in lower administrative returns due to MICR misreads and rejects. Key Features ▀ ▀ Captures a high-quality two-sided binary image of the check in seconds. Utilizes RDM’s patented Progressive MICR Method delivering the highest MICR read rate in the industry. ▀ Standard USB connectivity provides flexible connection to PC-based applications. ▀ Standard 2-year manufacturer warranty. Product Specifications ▀ Internal Image Storage (memory) Standard memory capacity approximately 225 images (Based on 11kb size image) ▀ Image CCITT Group 4 compression (ITU T.6) of bi-level image TIFF 6.0 file format MICR line with transaction information included in header description tags of check image OCR line with transaction information included in header description tags of bill stub 31 Check Scanning Image size varies according to document, typically 11kb or less High quality binary (b&w) 200 dpi nominal ▀ Document Minimum: 2.17” W x 4.4” L (5.5 cm x 11.2 cm) Maximum: 4” W x 9” L (11.16 cm x 22.86 cm) Paper weight: 8lb to 100lb (thermal paper to business card stock) ▀ Microprocessor Renesas (Hitachi) SH-3 32-bit RISC 133 Mhz ▀ Communication Ports ▀ Power: Mini-Din 3-pin USB: Type-A connector (V1.1) AUX: Mini-DIN 8-pin COM: Mini-DIN 9-pin TEL/Ethernet: RJ11 for optional modem; RJ45 for optional Ethernet Magnetic Read E13B MICR character set. Uses RDM’s Progressive MICR Method for optimum MICR read accuracy ▀ Physical Dimensions 10.2" L x 6.2" W x 4.8" H ▀ Power Power Consumption: 12 W (normal operation) Input: 100-240V AC, 50-60Hz 1.2A Output: 24V DC, 1.5A 32 Check Scanning Panini VX Product Overview The Panini Vision X 3-mode feeder allows for: single document feeding, up to 30 items batch single hand insertion (document automatic detection – no start buttons), up to 100 items batch insertion by manually moving the pressure plate. A double document infrared detector and special auto-adjust separator rollers allow for the ability to process a range of documents with different thickness and prevent double feeds. Vision X is available in three processing speed versions: 30 dpm, 60 dpm or 90 dpm when high speed scanning is required. The Panini Vision X connects to computers via USB2 interface, guaranteeing the fastest communication at no additional cost. Key Features ▀ Easy-to-use, ergonomic device frees the teller from paper handling and let the operator focus on customer service. ▀ 3 models with different speed available (30/60/90 dpm) for fast transactions and elimination of teller waiting queues. ▀ Unique 3-mode feeder to process a single check or batches of checks. ▀ Double document detector and auto-adjust separator rollers for mixed items to minimize operator intervention. ▀ Superior MICR reading rate with Panini MICR PlusTM, for reliable check conversion and electronic transactions. ▀ Easy computer connection via USB2 interface for fastest communication at no additional cost. ▀ Large single pocket, adjustable to receive documents of different length, to keep the deposit integrity. ▀ High quality rear ink jet endorser printing audit trail alphanumeric characters or logos. ▀ Superior imaging quality for safe replacement of the physical check by its image throughout the process and for effective implementation of recognition engines. 33 Check Scanning Product Specifications ▀ Performance V X-30: Up to 30 DPM V X-60: Up to 60 DPM VX-90: Up to 90 DPM ▀ Document Feeder (3 mode feeder): Single document automatic insertion Holding up to 30 documents for automatic batch one hand insertion Holding up to 100 documents, with pressure plate ▀ Document Specifications Height: Min: 54 mm ( 2.12’’) - Max: 106 mm (4.17’’) Length: Min: 80 mm ( 3.14’’) - Max: 235 mm ( 9.25’’) Weight: Min: 60 gr/m2 (16 #) - Max: 120 gr/m2 (32 #) ▀ Interface: USB2.0 port/ Backward compatible with USB 1.1 ▀ Magnetic Reader: E13B / CMC7/Automatic ▀ Image Capture Scanning: Contact Image sensors (CIS) technology (front and rear) Image format: Bitmap in B/W, 256 shades of gray. TIFF, JPEG and Group IV compression Image resolution: 100 or 200 dpi Advanced dynamic thresholding Dual Image: 4 images in one document pass ▀ Ink-Jet Printer: Rear ink jet printer Printing capability: Single line, Alphanumeric characters, all MS Windows fonts Printed information captured by the image. ▀ Input Voltage: Autosensing from 100 to 240 Vac, 50 to 60 Hz. ▀ Dimensions and Weight Height: 175 mm (6.88”) Width: 138 mm (5.43”) Length: 264 mm (10.39”) Weight: 2.5 Kg (5.51#) 34 Check Scanning ▀ System Requirements My V X-30, X-60: Intel Pentium III, 500 MHz, 128 Megabytes Ram My V X-90: Intel Pentium III, 1.2 Ghz, 256 Megabytes Ram Windows 2000 S.P 3, XP S.P 1, with USB2.0 or USB 1.1 Windows NT 4.0 S.P 6 with USB 1.1 35 Check Scanning Appendix B – Online Customer Adjustments When a check scan deposit is being processed, a number of verifications take place including: ▀ Confirming the declared amount of each item ▀ Confirming each item is negotiable for deposit ▀ Assessing that the quality of each image is acceptable ▀ Confirming that the deposit is in balance When an issue is discovered for a particular item or for the deposit as a whole, the item or deposit will be adjusted as appropriate. The matrix below details the Online customer adjustments that can be created, whether they would result in a debit or credit to a customer’s account, a description of why the adjustment was created, and what the customer needs to do, if anything, to resolve the issue. 36 Check Scanning Adjustment Reason Adjustment Reason Code Debit or Credit to Customer’s Account? Description of Why Adjustment Was Received What Action Does the Customer Need to Take to Resolve? Debits Do Not Equal Credits 001 Customer could either receive a debit or a credit depending on the error If an error does not fall into one of the following categories, this adjustment will be created. No action required to resolve the deposit adjustment. You will be notified by email and reports of the credit/debit adjustment. You will need to manually adjust any back end accounting system. Check Declared for Wrong Amount 002 Customer could either receive a debit or a credit depending on the error During processing, if an item is determined to have an amount that does match the declared amount of the item, an adjustment will be created for the difference of the two amounts. No action required to resolve the deposit adjustment. You will be notified by email and reports of the credit/debit adjustment. You will need to manually adjust any back end accounting system. NonNegotiable Item in Deposit 005 Customer would be debited for the declared amount of this item If an item is found during processing that is not considered negotiable via Remote Deposit Service Online, an adjustment will be created for the declared amount of the item. If the item is negotiable, it should be re-deposited through a channel other than Remote Deposit Service Online. Examples include: savings bond, items without account numbers, cash, store coupons Foreign Item 011 Customer would be debited for the declared amount of this item Foreign items are not considered negotiable via Remote Deposit Service Online. If one is found during processing, an adjustment will be created for the declared amount of the item. The item should be re-deposited through a channel other than Remote Deposit Service Online. Piggyback 017 Customer would be debited for the declared amount of this item A piggyback occurs when two items go through the scanner at the same time and Both items involved in the piggyback should be redeposited. 37 Check Scanning Adjustment Reason Adjustment Reason Code Debit or Credit to Customer’s Account? Description of Why Adjustment Was Received What Action Does the Customer Need to Take to Resolve? there is only one image associated with them. An adjustment will be created for the declared amount of the image. IQA – Bad Quality Image 018 Customer would be debited for the declared amount of this item Images that are of bad quality cannot be processed. These items will have an adjustment created for the declared amount of the image. The item should be re-deposited through a channel other than Remote Deposit Service Online. Image capture error 019 Debit Image missing, Image not legible, image capture error Locate the items from the referenced deposit. Retrieve the deposit list for the affected deposit and compare the items for which you received credit to the physical items. If there are any physical items for which you did not receive credit, those item(s) will need to be deposited again. You may either deposit these items at a banking center or through Remote Deposit 38 Check Scanning Appendix C – Icons Property Management Payment Services uses icons to communicate messages and information to users. Icon Action Purpose Delete Deletes the associated item. View Lets you view an item’s details. Edit Lets you edit an item’s details. Selection Alerts you to selectable items. Filter Lets you create filters. Alert Draws attention to specified areas or items that required user action. Success Error The items loaded successfully. The items processed need attention. 39 Check Scanning Appendix D – Troubleshooting, Login, Authentication and Scanner Errors The table below provides information about login, authentication and scanner errors and potential resolutions. Please note that these are suggestions for making the product work better for you, not a guarantee for seamless service. Error Probable Cause of Error You entered an invalid user name or password. User names and passwords are case sensitive, and passwords must comply with guidelines. The application cannot be accessed. Check that the correct URL is used. The computer does not detect the scanner or appropriate driver. Scanner connections may be loose, scanner is powered off, or driver may not be correctly installed. The scanner is not functioning properly. Check to see if any items are stuck in the scanner, clear the path and try again. Potential Resolution Check all USB and power connections. Check that scanner is powered on. Contact Help Desk for assistance with reinstalling drivers. If the problem persists, close the application, restart the scanner manually by turning the power off and then on, and then restart the application. If the problem persists, contact Help Desk. Laptop computer fails to detect the scanner. This error occasionally appears if the scanner is plugged into the USB port on a laptop computer’s docking station. Be sure that the scanner is plugged into the USB port on the computer, and not into the USB port on the laptop docking station. Docking stations can cause irregular behavior with the scanner operation and should be avoided. It takes a long time to initialize the scanner each time I want to begin scanning. The scanner takes several seconds (10-15) to initialize when it is powered up and the initial items are scanned. If you anticipate multiple scanning sessions, you may close the Remote Deposit Service application after you have completed the first session, but you may wish to leave the scanner powered on (the status LED should 40 Check Scanning Error Probable Cause of Error Potential Resolution remain green). Subsequent scanning session will initialize much more quickly. Two items have been scanned simultaneously. Items have inadvertently stuck together. Delete the ‘piggyback’ items, remove any substance that may cause them to stick together and rescan. Item appears to be stuck in the scanner. Remove center cover from scanner, clear any stuck items, replace the center cover and then follow scanner jam recovery process. If problem persists, clean the scanner’s document track. If unable to re-process item, call Help Desk. 41