
1
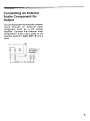
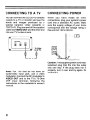
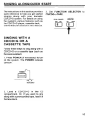
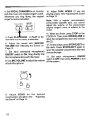
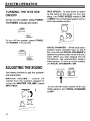
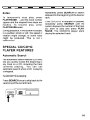
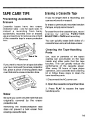
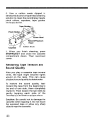
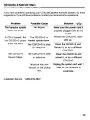
@
MODEL:
MKS 3001
BEFORE OPERATING THIS PRODUCT
PLEASE READ THESE INSTRUCTION COMPLETELY
This CD player is made and tested to
meet exacting
safety standards.
It
meets FCC requirements and complies
with safety performance
standards of
the U. S. Department of Health and
Human Services.
Warnings:
This CD player employs a laser light
beam. Only a qualified service person
should remove the cover or attempt to
service this device, due to possible eye
injury.
The use of controls, adjustments,
or
procedures other than those specified
herein
might
result
in hazardous
radiation exposure.
Note: Most material on compact discs
and prerecorded tapes is copyrighted.
Unauthorized duplication ofcopyrighted
material is a violation of U. S. Copyright
laws for a consumer to use an audio
recording device to duplicate musical
recordings
for
noncommercial
(personal) use.
2
FEATURES
Your Memorex CD-G Cassette Karaoke
System is one of the most versatile
karaoke systems available. It lets you be
the "star" as you sing along with your
favorite recordings on a CD, a COG (a
compact disc with a graphic track), a
cassette tape, and hear your voice with
the music through the powerful built-in
speaker.
The karaoke system's COG capability is
the latest advancement
in karaoke
technology.
It lets you connect the
karaoke system to a TV or monitor and
read the lyrics of your favorite tunes as
they scroll by in front of a still video
graphic, such as a picture or drawing
related to the music.
You can sing along without video graphics
using special karaoke audio cassette
tapes that let you balance the volume of
the original singer's voice and the music
tracks. Or, you can sing along with a
regular prerecorded cassette tape or CD
(not Supplied).
Plus, your karaoke system can be used as
a small PA system for speaking at parties
or other gatherings -just
plug in the
microphone and turn on the power!
3
Your karaoke system's features include:
CD/CD+G Player -lets you play regular or
karaoke CDs, or special CD+Gs so you
can experience digital images the latest in
karaoke fun! Plus, the player's 16 bit D/A
converter and 8 times oversampling
produce high quality sound.
Analog Echo Control -lets you add an
echo to the sound for a concert hall effect.
Vocal Changer -lets you replace the
prerecorded original singer's voice with
your voice when you use a karaoke tape
or CD-G, so you can sing solo.
Cassette
Deck -lets
you play the
Karaoke cassette tapes, or record from CD
to tape.
Auto-Stop -automatically
stops a tape
when it finishes playing or recording, to
protect the tape and tape-handling parts.
20- Track Programmable
Memory -lets
you pace your own performance
by
programming up to 20 to tracks in the
order you want to hearthem.
Auxiliary
Output Jacks -for connecting
to another audio component,
such as an
booster ora PAsystem.
Automatic
Search -lets
you quickly
locate and play any track on the loaded
CD/CD+G.
Supplied Karaoke CD+G -lets you sing
along with the music and adjust the
volume of the prerecorded voice and
music.
Dual Microphone
Jacks -let you use the
supplied
microphone
simultaneously
to
sing duets or for lead and background
vocals.
Recording -lets you record your voice
as you sing along with a tape or
CD/CD+G
Tape Speed Control -lets
the tape speed to match
pitch.
you adjust
your voice
4
Vocal Changer -lets
you replace the
prerecorded original singer's voice with
your voice when you use a karaoke tape
or CD-G, so you can sing solo.
Cassette
Deck -lets
you play the
Karaoke cassette tapes, or record from CD
to tape.
Auto-Stop -automatically
stops a tape
when it finishes playing or recording, to
protect the tape and tape-handling parts.
20- Track Programmable
Memory -lets
you pace your own performance by.programming
up to 20 to tracks in the
order you want to hear them.
Auxiliary
Output Jacks -for connecting
to another audio component,
such as an
booster or a PA system.
Automatic
Search -lets
you quickly
locate and play any track on the loaded
CD/CD+G.
Supplied Karaoke CD+G -lets you sing
along with the music and adjust the
volume of the prerecorded voice and
music.
Dual Microphone Jacks -let you use the
supplied microphone simultaneously to
sing duets or for lead and background
vocals.
Recording
-lets you record your voice
as you sing along with a tape or
CD/CD+G
Tape Speed Control -lets
the tape speed to match
pitch.
you adjust
your voice
4
CONTENTS
Connections
Connecting Microphones
Connecting an External Audio Component for Output
Connecting to a TV..
Connecting Power
Singing Along/Quick
Start
Singing with a CD/CD+G ora Cassette Tape
Through Another Audio Component
10
10
12
System
Operation
Tuning the System On/Off
Adjusting
the Sound
Echo Control
CD/CD+G
Playing
Player
a
13
...13
13
14
Operation
15
.CD/CD+G
Special
Programmed
Programming
Automatic CD/CD+G
,
Search
Play aridPlayer Playing
7
7
8
9
9
Features a
Sequence
of
Tracks..
.15
.16
,.16
,.17
..17
Reviewing/Replacing
CD/CD+G
Erasing
Care
a Programmed
Tips
a
Programmed
Sequence..
Sequence
..18
.18
.19
Cassette Deck Operation
Loading a Tape
Playing a Tape
Normal Play
TapeCareTips
Preventing Accidental Erasure
Erasing a Cassette Tape
Cleaning the Tape-Handling Parts
Restoring Tape Tension and Sound Quality
5
20
20
20
20
22
22
22
22
23
Using Optional Components
Listening Through AnotherAudio
Component
24
24
Recording A Cassette Tape
Recording YourVoicewith
Music
25
25
Troubleshooting
26
Care and Maintenance
The FCC Wants You to Know
27
28
Specifications
29
,
6
CONNECTIONS
Caution: To avoid electrical shock, do
not connect the system to AC power until
all other connections are complete.
CONNECTING
MICROPHONES
The system has two microphone jacks
so you can use the supplied microphone
to sing along to your favorite recordings,
and connect an additional microphone
(not supplied) for duets or lead and
background vocals.
For the best performance, the additional
microphone should be a unidirectional
GOO-ohm dynamic microphone with a
1/4inch (G.35-mm) plug and an ON/OFF
switch.
Before you connect a
alwaysturnVOLUMEtoMIN
microphone
on MIC.
MIC VOLUME
~
MIC1
0
7
MIC2
0::::::::>
If you are connecting
only one
microphone, plug it into MIC 1. If you are
adding a second microphone, plug it into
MIC2.
Connecting an External
Audio Component for
Output
You can broadcast the karaoke system's
sound
through
an external
audio
component
such as a PA system
amplifier. Connect the external audio
component's
audio input jacks to the
karaoke system's AUX OUT Rand
L
jacks.
8
CONNECTING
TO A TV
You can connect the CD/CD+G karaoke
system to a TV or monitor and see the
words and images produced
by a
special
karaoke
video cassette
or
CD/CD+G. Plug one end of the supplied
cable into VIDEO OUT and the other end
intoyourTV'svideo
in jack.
Note: For TVs that do not have an
audio/video
input jack, use a video
modulator. Connect the RF modulator to
VIDEO OUT and to the TV's 75-0hm
VHF input terminal,
following
the
instructions in the modulator's owner's
manual.
9
CONNECTING
POWER
When
you have
made
all other
connections, plug your system's power
cord into a standard AC outlet. Make
sure the supply voltage of your home
corresponds with the voltage rating of
this unit (AC 120 V / 60 Hz).
Caution: The supplied power cord has a
polarized plug that fits into the outlet
only one way. If the plug does not fit
properly, turn it over and try again. Do
not force it.
SINGING ALONG/QUICK
START
The instructions in this section provide a
quick reference to help you get started
singing
along
with your
karaoke
CD/CD+G system. For details on using
the system's various features such as
the CD/CD+G player, cassette deck,
see the feature's section in this Manual.
3. Set FUNCTION
CD/CDGorTAPE.
SELECTOR
to
SINGING WITH A
CD/CD+G OR A
CASSETTE TAPE
Follow these steps to sing along with a
CD/CD+G or a cassette tape (such as
the ones supplied).
1. Press POWER (if necessary) to turn
on the system. The POWER indicator
turnson.
,f -0
POWER"
B
Power
Indicator
2. Load a CD/CD+G
in the CD
compartment.
Or, if you want to sing
along with a prerecorded tape, load it in
the tape deck.
10
4. Set VOCAL CHANGER to on, to enjoy
both the music and original singer's voice.
Whenever you sing along, the original
singer's voice is cancelled.
10. Adjust TAPE SPEED (if you are
playing a tape). See "Adjusting the Sound
on Page 13.
Note: With a regular (non-karaoke)
prerecorded cassette tape, you cannot
adjust the volume of the prerecorded
original singer's voice in relation to the
music.
11. When you finish, press STOP on the
CD/CD+G. Then press OPEN/CLOSE to
open the compartment door and remove
the CD.
6. Adjust the sound with MASTER
VOLUME See "Adjusting the Sound" on
Page13.
7. Set each connected microphone's
ON/OFF switch to ON. Sing directly into
the microphone along with the music.
8. Use MIC VOLUME to adjust the volume
of both Microphone.
MIC
VOLUME
Q~
MIC1
0
~
MIC2
0
9. Adjust
ECHO
for the desired
reverberation and pitch. See
"Adjusting
the Sound" on Page 14.
11
12. To stop a tape, press STOP/EJECT on
the deck. Press STOP/EJECT again to
open the cassette compartment door and
remove the tape.
13. Set each microphone's
ON/OFF
switch to OFF, then press POWER to turn
off the system.
THROUGH ANOTHER
AUDIO COMPONENT
If you connected
another
audio
component, so you can hear your voice
through another component,
Turn on
the audio component, and be sure to
turn off the component when you finish.
12
-L
SYSTEM OPERATION
TURNING THE SYSTEM
ON/OFF
To turn on the system, press POWER
The POWER indicatorturns light.
TAPE SPEED -To slow down or speed
up the pace of the music as you sing
along, turn TAPE SPEED toward LOW
or HIGH. For normal tape speed, leave it
settothe middle position.
POWER;
B
--t-
Power
Indicator
To turn off the system, press POWER
The POWER indicatoroff.
POWER-
S
Power
Indicator
ADJUSTING
VOCAL CHANGER -While your playa
karaoke audio cassette tape or CD-G
disc, you can use VOCAL CHANGER to
replace the prerecorded voice with your
voice. When you stop singing into the
microphone,
the prerecorded singer's
voice returns. To turn on voice control,
turn VOCAL CHANGER to ON.
THE SOUND
Use these controls
sound just right.
to get the system's
J
MASTER
VOLUME
-Control
the
volume from the system's speaker by
truing the MASTER VOLUME toward
MINorMAX.
MASnR
VOLUME
To turn off the voice control when you
finish using it, turn VOCAL CHANGER
to OFF.
13
ECHO -You can adjust ECHO to add an
echo effect to your voice while you sing.
Turn ECHO toward MIN or MAX for the
desired effect.
14
PLAYING
A CD/CD+G
1. Press POWER to turn on the system.
The POWER indicator turns on.
2. Set FUNCTION
CD/CDG.
SELECTOR
5. Press OPEN/CLOSE again to close the
CD/CD+G's total number of tracks and
total playing time.
to
6. Press PLAY/PAUSE. The CD/CD+G
begins to play from Track 1 and the
track's elapsed play time appears.
3. Press OPEN/CLOSE
CD/CD+G compartment.
to open
the
7. Adjust the sound with the controls
explained in "Adjusting the Sound" on
Page 13.
Note: To sing along see
Along/Quick Start" on Page 10.
4. Place a CD/CD+G in the compartment
tray overthe center hub, label side up.
15
8. The system automatically
the end of the CD/CD+G's
stop it sooner
press
CD/CD+G's total number
playing time appear.
"Singing
stops play at
last track. To
STOP.
The
of tracks and
Notes:
To temporarily
stop play,
press
PLAY/PAUSE.
,and the track number
appear and the elapsed time stops and
flashes.
To resume
play,
press
PLAY/PAUSE again.
During playback, if the system is subject
to a sudden shock or jolt, the speed of
rotation might change, or some noise
might be produced.
This is not a
malfunction.
SPECIAL
Repeatedly press SEARCH to search
backward to the beginning of the desired
track.
If the CD/CD+G is stopped or paused,
repeatedly
press SEARCH until the
system displays the number of the track
you want to play and press PLAY/
PAUSE. The CD/CD+G player starts
playing the selected track.
CD/CD+G
PLAYER FEATURES
Automatic
Search
The automatic search feature (CD only)
lets you quickly locate the beginning of
any track on a CD, including the track
currently
playing,.
You can use
automatic search when a CD is playing
or stopped.
If a CD/CD+G is playing:
Press SEARCH once to skip back to the
beginning of the currenttrack.
16
PROGRAMMED
PLAY
You can program the CD/CD+G player
during normal or karaoke mode to play
up to 20 tracks in any order you choose,
and you can program the same track to
play more than once.
Programming and Playing a
Sequence of Tracks.
1. Repeatedly
press STOP until the
system displays the total number of
tracks and the total playing time.
2. Press PROGRAM.
MEMORY appear at the top of the
display along with the track number also
appears.
~
,
,
17
-
,-,
1-
Note: MEMORY remains on the top left
corner of the display until you erase the
programmed sequence.
3. Press SEARCH (~
the desired track.
) or ( "") to select
4. Press PROGRAM to store the selected
track.
~
Erasing a Programmed
Sequence
You can do any of the following to erase a
programmed sequence:
Press OPEN/CLOSE
programmed play.
5. Repeat Steps 3 and 4 to program up to
20 tracks.
before
or
after
Press POWER. The POWER indicator off.
Note: You cannot store more than 20.
tracks. If you try to program a 21 st track,
the system does not store it.
6. Press PLAY/PAUSE
to play the
programmed
tracks.
The first track
number appears on the display with the
elapsed time of the track in play.
7. Programmed play automatically stops
at the end of the last programmed track.
To stop the CD/CD+G's total number of
tracks and playing time appear.
Reviewing/Replacing
a
Programmed Sequence
While play is stopped, repeatedly press
PROGRAM to review the programmed
sequence.
To replace a programmed track, press
PROGRAM until the position number of
the track you want to replace appears.
Then repeat Steps 3 and 4 to select and
store the new track.
18
CD/CD+G
CARE
TIPS
Although a CD/CD+G is very durable,
you should handle it with care. We
recommend the following precautions:
.
Keep the CD/CD+G
in its
protective case or sleeve when
you are not playing it.
Keep the CD/CD+G clean. Your
local store sells a suitable CD
cleaner kit.
Do not write on either side of the
CD/CD+G, particularly the nonlabel side.
Do not store CD/CD+Gs in hightemperature,
high-humidity
locations. They might warp.
Keep CD/CD+Gs dry. A water
drop can act as a lens and affect
the laser beam's focus.
Always handle a CD/CD+G by
the edges to avoid fingerprints.
Fingerprints and scratches on
the CD/CD+G's
scratches
on
the CD/CD+G's
surface can
prevent the laser beam from
correctly
reading
the digital
information.
If a CD/CD+G skips during play,
it might be scratched. Your local
store sells a Scratch'n Fix kit
that might stop the skip. Also,
see "Troubleshooting"
on Page
26.
19
~
CASSETTE DECK OPERATION
You can playa cassette tape in cassette
deck, and you can record CD to TAPE.
edge facing down, the side you want to
play or record on facing out, and the full
reel to the left.
LOADING A TAPE
1. Take up any slack in the tape by turning
the cassette's hub with a pencil or your
finger. If you do not remove excess slack,
the tape might become tangled in the
record/playback
mechanism.
Avoid
touching the tape.
~. \
I RECORD
PLAY REWUO~~
~
PAUSE
4. Close the compartment door.
PLAYING A TAPE
Warning: To protect your hearing, set
MASTER VOLUME to MIN before you
playa cassette tape.
Normal Play
2. Press STOP/EJECT
cassette compartment.
to
open
the
Follow these steps to playa cassette tape
1. Load a cassette tape in tape deck.
2. Press POWER (if necessary) to turn on
the system. The POWER indicator turns
on.
3. Load the cassette tape with its open
20
!
3. Set FUNCTION SELECTOR
to TAPE.
backward, press FAST -F or REWIND.
Press STOP/EJECT
when you reach
the desired section.
:C;i~~;[""
--,..,40
==
4. Press PLAYonthedeck
L
r
v
~
5. Adjust the sound with the controls
explained in "Adjusting the Sound" on
Page13.
6. Press STOP/EJECT to stop the tape.
Press STOP/EJECT
again to open the
cassette compartment, then remove the
cassette tape.
Turn the tape over and press PLAY
play the other side.
to
Notes:
To temporarily stop play, press PAUSE.
Press PAUSE again to resume play.
To rapidly
21
wind
the tape
I
forward
or
~=
TAPE CARE TIPS
Erasing
Preventing Accidental
If you no longer want a recording,
can record over it or erase it.
Erasure
Cassette
tapes
have two eraseprotection tabs -one for each side. To
protect
a recording
from
being
accidentally
recorded over or erased,
use a screwdriver to remove one or both
of the cassette tape's erase-protection
Tabs.
\I
a Cassette
Tape
To erase a previously recorded
of a tape, simply record over it.
you
section
To erase the entire cassette tape. record
silence
by setting
FUNCTION
SELECTOR to TAPE and recording.
You can quickly erase both sides of a
cassette tape using a bulk tape eraser.
00
-$;~~~
~~\~::~~~~~~
Cleaning the Tape-Handling
Parts
ATab
Tab
If you want to record on a tape side after
you have removed the erase protection
tab, place a piece of strong plastic tape
over that side's erase protection hole.
Dirt, dust or particles of the tape's
coating can accumulate
on the tape
heads and other parts that the tape
touches. This can greatly reduce the
performance
of the cassette player.
After every 20 hours of tape player
operation, use a cassette deck cleaning
kit or follow these steps to clean the
tape-handling parts.
1 .Disconnect
the AC power cord
2. Open the cassette compartment door.
3. Press PLAY to expose
handling parts.
the
tape-
Notes:
Be sure you cover only the hole that was
originally
covered
by the eraseprotection tab.
Removing
the erase-protection
does not prevent a bulk eraser
erasing a cassette tape.
tabs
from
22
4. Use a cotton
swab dipped
in
denatured alcohol ortape head cleaning
solution to clean the record/play heads,
pinch rollers, capstans,
tape guides,
and erase heads.
se"'Head
layback
Capstan
5. When you finish cleaning,
press
STOP/EJECT
and close the cassette
compartment
doors. Then reconnect
power.
Restoring Tape Tension and
Sound Quality
After you playa cassette tape several
times, the tape might become tightly
wound on the reels. This can cause
playback sound quality to deteriorate.
To restore the sound quality, fast..
forward the tape from the beginning to
the end of one side, them completely
rewind it. Then loosen the tpe reels by
gently
tapping
each side
of the
cassette's outer shell on a flat surface.
Caution: Be careful not to damage thE~
cassette when tapping it. Do not touch
the exposed tape or allow any sharp
objects nearthe cassette.
23
, ~
t--=
USING OPTIONAL
COMPONIENTS
Warning: To protect your hearing and
prevent damage to the karaoke system,
an audio source and/or and audio
component,
always set their volume
controls to the lowest settings before
turning them on.
6. To turn off the system, press POWER
The POWER indicator lights turn off
Then turn off the audio component.
LISTENING THROUGH
ANOTHER AUDIO
COMPONENT
If you connected an audio component
(such as PA system) follow these steps
to listen to the karaoke system's sound
through that component.
1. Set FUNCTION
TAPE.
SELECTOR
to CD I
.~--~.
OFF'
.ON
CD
2. Press POWER to turn on the system
The POWERindicatorturns
on.
3. Turn on the audio component,
4. Playa cassette,
karaoke system.
CD, or CD+G in the
5. Adjust the sound with the controls
explained in "Adjusting the Sound" on
Page13.
24
RECORDING
A CASSETTE
TAPE
You can become a recording star! The
system lets you record your voice on a
blank or reusable tape as record from
the CD.
RECORDING YOUR VOICE
WITH MUSIC
Recording
1. Load a blank tape, or one that you
want to record over, into tape deck, with
the side you want to record on facing out,
and the full reelto the left.
Tips:
Tape quality greatly affects the quality of
the recording.
We recommend
Extended Range or Low-Noise Type 1
tape. We do not recommend long-play
cassette
tapes,
such as C-120s,
because they are thin and can easily
tangle in the cassette mechanism. For
low-noise, wide-range recordings, use
normal-bias tape.
Follow these steps to record your voice
along with music from a CD/CD+G.
2. Follow Steps 1-10 in "Singing with a
CD/CD+G or Cassette Tape" on Page
10-11.
3. Press RECORD to begin recording.
RECORD and PLAY both lock down.
Before recording, be sure the tape you
are using has its erase-proection tabs in
place.
See "Preventing
Accidental
Erasure" on Page 22.
Recording automatically stops when the
tape reaches the end. To record on the
otherside, turn overthe tape.
Note: Press PAUSE to temporarily stop
recording.
Press PAUSE again to
resume recording.
4. Press
recording.
release.
25
STOP/EJECT
RECORD
to
and
stop
PLAY
TROUBLESHOOTING
If you have problems operating your CD/DualCassette
Karaoke System, try these
suggestions. If you still have problems, contact your local store for assistance.
Possible Cause
.Problem
The karaoke syst~rh
No Power
"
S I ti
..~,
'
0 U on !,":~;;~~,..
Make sure the power card is
properly
does not work.
plugged into an AC
outlet.
A CD is~ loaded,
-~--
But
--
The CD/CD+G
the CD/CD+G
player
does not start.
is
loaded upside-down.
The CD/CD+G
is dirty
Or defective.
Reload the CD/CD+G,
side up. '
Clean the CD/CD+G
label
and
Reload it, or try a different
CD/CD+G.
-The
-CD/CD+G
Sound Skips.
The CD/CD+G
is dirty
or defective
Clean the CD/CD+G
and
reload it, or try a different
CD/CD+G.
Moisture
has con-
densed on the pickup
lens.
Customer
Service
Unplug the system and wait 1
hour for the moisture
to
evaporate.
1-800-919-3647
26
CARE AND MAINTENANCE
You CD/Dual Cassette Karaoke System is an example of superior design and
craftsmanship. The following suggestions will help you care for your karaoke system
so you can enjoy it for years.
Keep the karaoke system dry. If it gets wet, wipe it dry immediately.
Liquids might contain minerals that can corrode the electronic
circuits.
Use and store the karaoke system only in normal temperature
environments.
Temperature
extremes
can shorten the life of
electronic devices, and distort or melt plastic parts.
Keep the karaoke system away from dust and dirt, which can cause
premature wearof parts.
Handle the karaoke system gently and carefully. Dropping it can
damage circuit boards and cases and can cause the karaoke
system's to work improperly.
Wipe the karaoke system with a damp cloth occasionally to keep it
ooking new. Do not use harsh chemicals, cleaning solvents, or
strong detergents to clean the karaoke system.
Modifying
or tampering
with the karaoke system's
malfunction
and might invalidate
its warranty.
27
internal
components
can cause
a
THE FCC WANTS YOU
TO KNOW
This music system complies with the
limits for a Class B digital device as
specified in Part 15 of FCC Rules. These
limits provide reasonable
protection
against radio and TV interference in a
residential area. However, your system
might cause TV or radio interference
even when it is operating properly. To
eliminate interference, you can try one
or more of the following
corrective
measures:
reorient
or relocate
receiving antenna
.
the
increase the distance between
the system and the radio orTV
Use outlets
on different
electrical circuits for the system
and the radio orTV
Consult your local store if the problem
still exists.
You must use shielded interface cables
with this system.
28
SPECIFICATIONS
Power Output (at 10% THO)
2 Watts per channel
Track System
4 Track, Two Channel
Stereo
1.875 ips
Tape Speed
Record System
DC Bias
Erasing System
Magnet
Wow and Flutter
Record/Play
+/- 3 dB)
(WRMS)
Frequency
Response
Less Than 0.35%
125-8000 Hz
(at
Signal To Noise
Dynamic
40-60 dB
More Than 80 dB
Range
4-lnch mono speaker
(4 Ohms)
Speaker
Microphone
(Monaural)
Power Source
Dimensions
(HWD)
600 Ohm
Impedance
AC 120 V, 60 Hz, 20 W
10 5/8, 9 3/8, 18 1/2 Inches
(270 x 240 x 465 mm)
20.5 Ibs
Weight
(9.5 Kg)
Included Accessories
Microphone,
RCA Plug Cable,
CD+G Karaoke Disc
Specifications are typical; individual units might vary. Specifications
change and improvement without notice.
29
are subject to
MEMCORP Inc.
7145 West 20th AVenUE! Hialeah,
FL 33014 U.S.A.
@ 1999. Memorex is a trademark of ~emorex Telex. N. V.
Printed irl Hong Kong
Visit
our website
at www.memorex.com


![TSP091 MCL PCI Card User Manual V1[1].](http://vs1.manualzilla.com/store/data/005724184_1-fb2316c3e25785c5ec1a95e56a29cba9-150x150.png)