1
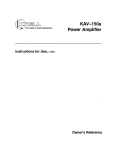
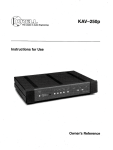
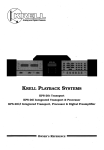
KPS 25s
TheLeaderin
Engineering
Krell PlaybackSystem
TM
Instructions for Use
Owner’s Reference
KPS 25s
TM
Krell PlaybackSystem
CONTENTS
Page
INTRODUCTION
3
UNPACKING
3
PLACEMENT
4
ACPowerGuidelines
4
Krell®lndustries,
Inc.
INSTALLING THE ACRYLIC COVER4
45 Connair Road
CONNECTING
THE KPS 25s
TO YOUR SYSTEM
Orange, CT 06477-3650 USA
Additional Connections
TEL 203-799-9954
8
11
REMOTECONTROLOPERATION
11
FAX203-799-9796
Howto Write a Program
[email protected]
Battery Installation andRemoval 14
www.krellonline.com
12
MENUFUNCTIONS
15
WARRANTY
17
RETURNAUTHORIZATION
PROCEDURE
18
SPECIFICATIONS
20
INSTALLINGTHE ACRYLICCOVER
ONTOTHE KPS 25s BACKPANEL 5-7
THE KPS 25s BACKPANEL
8
THE KPS 25s FRONTPANEL
9
THE KPS 25s TABLETOPREMOTE
CONTROLLER
10
THE KPS 25s HANDHELDREMOTE
CONTROLLER
11
®Industries,
©1998
byKRELL
Inc. All rightsreserved
P/N1960101900100
CE Marking
Unpacking
This product complies with the EMCdirec- 1. Openthe shipping box and removethe
tire (89/336/EEC)andthe low-voltage top layer of foam. Youwill see these items:
directive (73/23/EEC).
KPS25s chassis
Introduction
Thankyou for your purchaseof the Krell
KPS25s Krell Playback SystemTM. The
KPS25sis an integrateddesignincorporating a compactdisc player, a preamplifier,
and a digital-to-analog converter in one
chassis.
Acrylic Coverin velvet pouch
KPS25s HandheldRemote
Controller
KPS25s Tabletop Remote
Controller
packageof ~ batteries
Disc Clamp
ACpower cord
12 Vo=tremotecable
T-10 Torx wrench
cleaningkit for the Acrylic Cover
packetcontainingan introductory
letter from DanD’Agostino,
C.E.O., the Owner’sReference,
andthe WarrantyRegistration Card
To obtain the best performancefrom your
KPS25s, paycareful attention to its placement,installation, andoperation. A thoroughunderstandingof these details will
help insure satisfactory operationandlong
life for the KPS25s and related system
NOTE:
If anyof theseitemsare not includcomponents,
ed in the box, please contact your authorized Kre//edea/eror distributor for assisTHERE ARE NO USER-SERVICEABLE
PARTSINSIDE ANY KRELL® PRODUCT.tance.
2. Carefully removethe unit and accesPleasecontact your authorizeddealer,
sories from the box. Remove
the prodistributor, or Krell®, if youhaveany
tective plastic wrapfromthe unit.
questionsnot addressedin this referNOTE:Saveall packingmaterials, ff you
ence manual.
ship your KPS25sin the future, repackthe
unit in its original packaging
to preventtransit damage.
® KPS 25s
KRELL
English Page 3 of 20
Placement
WARNINGS
TM must not be
The Krell PlaybackSystem
locatedwhereit could be exposedto drippingor splashingfluids.
accessories maycauseproblemswith the
transport mechanism,
resulting in erratic
playbackand/or poor sound.
ACPowerGuidelines
WARNING
Before you install the KPS25s into your Donot removeor bypassthe groundpin on
system,review the following guidelines to the endof the ACcord. This maycauseRFI
choosethe location for the KPS25s. This (radio frequencyinterference)to be induced
will facilitate a clean,trouble-free
installation. into your playbacksystem.
TheKPS25sdoesnot require a special rack
The KPS25s has superb regulation and
or cabinetfor installation. Forthedimensionsdoes not require a dedicatedACcircuit.
of the KPS25s see Specifications on page
Avoid connectionsthroughextensioncords
20.
or multiple ACadapters.Highquality 15 amp
1. Place the KPS25s on a firm level sur- groundedACstdps are acceptable. High
face, awayfrom excessiveheat, humi- quality ACline conditionersor filters canbe
dity or moisture.
used if they are grounded and meet or
exceedthe unit’s powersupplyrating of 100
2. The KPS25s incorporates an advan- VA.
ced suspension system and does not
require additional masscouplingor isolation. Youmayexperimentwith feet Installing the Acrylic
or conesas long as they are not perma- Cover
nently affixed to the chassis.Anyunauthorizedmodificationsto the electronics Install the Acrylic Coverontothe top of the
or chassiswill void the warranty.
KPS25s, before connectingthe KPS25s to
your
system.Followthe easysteps outlined
IMPORTANT:Please do not attach
on pages5, 6, and7.
enhancement
accessories such as rings,
mats, or dampers
to individual CDs.These
Page4 of 20 English
® KPS 25s
KRELL
NOTE:
Attachthe AcrylicCoverbeforeconnecting
theflex-foil cable.
Carefullyremove
the AcrylicCoverfrom
the velvetpouch
andplaceit ona soft
surface.
TheAc~licCover
2. Pull thepush-pull
pins(A) until theyare
fully extended.
PUSH-PULL
PIN
-~ A
A
PUSH-PULL
PIN
FLEX-FOIL
RECEPTACLE
IN OPEN
POSITION
A
B
C
D
E
PUSH-PULL
PiN
PIN IN ACRYLICCOVER
NOTCHIN TOP COVER
FLEX-FOILCABLE
FLEX-FOIL RECEPTACLE
The"lopof theKPS
25s
KRELL® KPS 25s
English Page 5 of 20
INSTALLINGTHE ACRYLICCOVERONTOTHE KPS25s, continued
ACRYLIC
COVER
3. Withthe AcrylicCoverperpendicularto the KPS25s, line up
the pinsin theAcrylicCover
(B)
with the notchesin the top of
the KPS25s(C).
Acrylic
Cover,
Right
View,
Perpendicular
to theKPS
25s
=
A
B
C
D
E
Gentlylowerthe AcrylicCover
into the notches.
PUSH-PULL
PIN
PIN IN ACRYUC
COVER
NOTCHIN TOP COVER
FLEX-FOILCABLE
FLEX-FOIL RECEPTACLE
Acrylic
Cover
withRex-Foil
Cable
in Flex-Foil
Receptacle
Page 6 of 20 Engllsh
KRELL® KPS 25s
INSTALLINGTHEA(;RYLIC COVERONTOTHE KPS 25s continued
PUBH-PULL
P’N
~
(
)
A
B
C
D
E
PUSH-PULL
PIN
PIN IN ACRYLICCOVER
NOTCHIN TOP COVER
FLEX-FOILCABLE
FLEX-FOIL RECEPTACLE
The"lopo] theKPS
25swithAcrylicCover
andFlex-Foil
Cable
in Piece
5. Pushthe push-pull pins (A) into the
closedposition.
6. Makesure the flex-foil receptacleis in
the openposition. Feedthe flex-foil
cable (D) attachedto the Acrylic Cover
backtowardthe flex-foil receptacle(E)
on the top of the KPS25s. Carefully
align theflex-foil cablesothe tip of ~the
flex-foil cableis parallel to the flex-foil
receptacle.
7. Insertthe flex-foil cableinto theflex-foil
receptacle(E). Closethe flex-foil receptacle by sliding the flex-foil receptacle
sleeve towardthe transport. Therewill
be an audible"click" whenthe flex-foil
cableis lockedin position.
® KPS25s
KRELL
English Page7 of 20
Connectingthe KPS25s
to Your System
WARNING
Whenmakingconnections to this component or any other, makesure the power
amplifier is Off. Makesureall cableterminationsare of the highestquality, free from
frayedends,shorts,or cold solderjoints.
1. Connect the outputs of associated
sourceequipmentto the inputs of the
KPS25s.
2. Connect
the left andright outputsof the
KPS25s to the appropriate associated
equipment.
3. Whenconnecting the KPS25s to AC
power,first connectthe EICStandard
15 amp AC power cord between
the KPS-25sand the wall socket. Then
switch the power on from the Rear
Panel PowerSwitch. The word KRELL
will momentarily appear in the Menu
Display Windowlocated on the dght
front panel of the KPS25s. This indicates that the KPS25s has initialized
andis readyfor operation.Theunit is in
Stand-by mode.
THE KPS 25s BACKPANEL
1
2
3
4
5
6
7
Left and right balanced Inputs
Inputs from tape deck
Outputs to tape deck
Single-ended input 1
SinglHnded Input 2
Single-ended input 3
Acrylic Cover damperadjustmentcorrtrol
8 Rxed level balanced outputs
9 Variable level balanced
outputs
10 Fixedlevel single-ended
outputs
1
3 7
2
1 4
5
6
Page 8 of 20 English
11 Variable level single-ended
outputs
TM outputs (vari12 KrelP CAST
able level outputsfor usewith
TM equipped
other KrelP CAST
components)
13 BAJfiber optic digital outputs
TM connectors)
(via TosLink
14 SPDIFco-axial digital outputs
(via RCAconnectors)
digital output (via an
15 AES/EBU
XLRconnector)
16 BAJfiber optic digital inputs
TM connectors)
(via TosLink
17 SPDIFco-axial digital Inputs
(via RCAconnectors)
18 AES/EBU
digital input (via an
XLRconnector)
19 Main on/off powerswitch
20 Fuse holder
21 IEC Standard 15 ampAC
powercord receptacle
22 KrelP RemoteLinkTM communications output data pert
23 KrelP RemotaLlnkTM communicatlons input data port
24 RC-5 basebandInput
25 12 Volt trigger output
8
10 11
® KPS25s
KRELL
TheKPS25s is equippedwith the following
analoganddigital inputs:
TheKPS25sis equippedwith the following analoganddigital outputs:
1 set of balancedanaloginputs (via
an XLRconnector)
3 sets of single-endedanaloginputs
(via RCAconnectors)
1 set of tape monitoranaloginputs
2 EIAJfiber optic digital inputs(via
TM connectors)
TosLink
co-axialdigital inputsIvia
2 SPDIF
RCAconnectors)
1 AES/EBU
digital input (via an XLR
connector)
CompactDisc Transport
Display Window
2 Transport Pausebutton
3 Transport Play button
4 Transport Stop button
Indicator light
5 TransportHDCD’
~ Indicator light
6 TransportSYNC
7 Transport Search Back button
8 Transport Search Forward
button
9 Transport Track Back button
10 Transport Track Forward
button
11 Transport Drive On/Off button
2 1 3
4
5
1 set of fixed balancedoutputs(via
an XLRconnector)
1 set of variable balancedoutputs(via
an XLRconnector)
1 set of fixed single-endedoutputs
(via an RCAconnector)
1 set of variable single-endedoutputs
(via an RCAconnector)
TM outputs (via
set
of KrelPCAST
1
4-pin bayonetconnector)
2 EIAJfiber optic digital inputs(via
TM connectors)
TosLink
21 Balancedinput selector button
12 Main powerbutton
13 OperatingIndicator light
22 Single-endedinput selector
button
14 Compact
disc player Input
23
Single-endedInput selector
selector button
button
15 AES/EBU
Input selector button
24 Tapedeck Input selector
16 EIAJfiber optic digital input
button
selector button
25
Level
control knob
17 SPDIFco-axial input selector
26 Menudisplay window
button
18 SPDIFco-axial input selector
27 Fixed output muteselector
button
button
19 EIAJfiber optic digital input " 28 Variable output muteselector
selector button
button
20 Single-endedinput selector
29 Menucontrol button
button
=
30 AbsolutephaseIndicator light
6
14
20
15 1
16
19
13
23
26 27
28
KPS
25s
7
8
9
10 11 12
24
25
29 30
e is the registeredtrademark
HDCD
of Pacific Microsonics,
Inc.
Indicatesthat thedigital dateis functioning
properly.
Illuminateswhen
the absolutepolarity of Ihemainoutputis invarted180",
® KPS 25s
KRELL
English Page 9 of 20
SECTION1
SECTION
2
SECTION
3
SECTION4
KPS 25s
DIRECT
AGCESS
CONTROLLER
SECTION7
SECTION6
SECTION5
2 SPDIFco-axial digital outputs(via
The XLR pin configuration is described
below:
RCAconnectors)
1 AES/EBU
digital output (via an XLR
Pin 1
Ground
connector)
°)
Non-inverting(0
Pin 2
KrelP recommends
the use of balanced
Pin 3
Inverting(180")
interconnects.Balancedinterconnectsnot
The left and right channel RCAand balonly havethe ability to minimizesonic loss anced outputs are labeled on the back
but also haveimmunityto inducednoise,
panel.Pleasemaintainthe correct left/right
especiallyfor installations usinglongcable orientation.
lengths. Balancedconnectionshave6dB
moregain than single-endedconnections. NOTE:Both ba/anced and single-ended
outputscan be usedto simultaneouslyfeed
When
level matching
is critical, keepthis
different systems.
specificationin mind.
When
the KPS25s is connecteddirectly to
a stereopoweramplifier or a pair of monaural poweramplifiers, usethe variableoutput
terminals to insure proper level control.
Page10 of 20 Engllsh
® KPS 25a
KRELL
Usingthe fixed outputsin this configuration RemoteControl Operation
may cause damageto associated power
amplifier andloudspeakers.
The KPS25s is equippedwith two remote
controllers. The KPS25s HandheldRemote
Additional Connections
Controller providesthe basic functions of
RC-5
Power,Play, .Pause,Stop,Track,andLevel.
TheRC-5input makescustominstallation
The KPS25s Tabletop RemoteController,
easy and secure by accepting baseband namedthe Direct AccessController, proRC-5 input commandsfrom hardwired
vides completeCDtransport functions as
remotecontrollers.
well as KrelPpreamplifierandpoweramplifier remotecontrol functions.A description
12 VDC OUT
Theremotepoweroutput transmits 12 Volt of the buttonsandtheir functionsfollows.
poweron/off signals to other KrelPcompo- NOTE:The Tabletop RemoteController
nents, as well as to other components
that ®
also includes functions usedwith Krell
accept 12 Volt poweron/off trigger com- amplifiers.
mands.
NOTE:Consult the owner’s reference of Section1
the components
usedin a custominstallation to take full advantageof the remote Direct NumberAccessKeypad
capability of the KPS25s.
The Direct NumberAccessKeypadmakes
track selection quick andeasy. When
using
THE KPS 25s HANDHELDREMOTE the direct track accessfunction,the selected
CONTROLLER
track will begin play immediatelyafter a
track is selected.If the track youwantto
play is numbered
1-9, pressthe button that
corresponds
to the track. Usethe +10button to accesstracks numbered
10 or higher.
V LEVEL /~
The+10b~Jtton selects a track in incrementsof 10.
PAUSE
PLAY
I~ TRACK
bl
STOP
POWER
EXAMPLE:
To access Track 8, press the
number8 button once. To accessTrack 10,
pressthe + 10 button onceandthe 0 button
once. To access Track 24, press the +10
button twice andpressthe 4 button once.
Tracks consisting of two digits must be
keyedwithin eight secondsof eachother.
Clear
Deletesthe last entry selected in a programmedsequence.
KRELL® KPS 25s
English Page 11 of 20
II
Section 2
Special Play Functions
Prog
Press once to accessthe track programming mode.
Repeat
Howto Write a Program
Pressonceto repeatthe entire disc or track
programcontinuously.Presstwice to repeat 1. Press Programon the KPS25s remote
control. PROGRAM
will appear in the
the currenttrack continuously.Pressa third
time to cancelthis function. When
selecting
Compact Disc Transport Display
the desired Repeatfunction, press the
Window.
Repeat button once and REPEATwill
using
appear in the CompactDisc Transport 2. Keyin the desiredtrack sequence
the numerickeypad.Tracksconsisting
Display Window.Press the Repeatbutton
of two digits must be keyed within
twice and REPEAT
and SINGLE
will appear
eight secondsof each other. Thenumin the CompactDisc Transport Display
ber of tracks andtotal playing time of
Window.
the programmed
sequencewill appear
AJB
in the Compact
Disc TransportDisplay
Createsa loop betweentwo pre-determined
Window.Track numberswill appearin
points within a single track or sequential
the CompactDisc Transport Display
tracks. Tocreatean A/Bloop, start the play
Windowin the order in whichthey are
of a track. When
youhear the part that you
stored within a programmed
sequence.
wantas the beginningof the loop, pressA/B
PressPlay to begin playbackof a proto insert the start position. PressNBagain 3.
grammedsequence.
to insert the finish position. A/Bwill automatically beginandcontinueindefinitely.
4. Pressthe Stopbutton twice to erase a
PressStop or A/B again to delete the A/B
programmedsequence.
program.
Section 3
Access
Digital Inputs
When
anexactstart positionsis critical, use
the Accessbutton to numerically select a The KPS25s has six digital inputs: CD,
positionwithin a specific track program:
AES, OPTICS1, OPTICS2, COAX1, and
COAX
2. Press the appropriate button to
Track Programming
select the input that supportsyoursource.
Track programming
gives youthe ability to
select the tracks youwantto hear, in the Section4
order in whichyouwantto hearthem. This Track Functions
methodof programming
is short term and
will be cleared whenyou press the Stop Pause
playing
button twice. A maximum
of twenty tracks Pressonceto temporarily suspends
the current track. Pressthe Pauseor Play
maybe stored in a programsequence.
button to resumeplaying the track at the
NOTE:Track Forward,Track Back, Repeat, point Pausewasengaged.
andPausefunction normally within a programmedsequence.
Page12 of 20 English
® KPS25s
KRELL
Play
To activate playbackfrom the beginningof
the CD,pressthe Playbuttonafter inserting
the CDonto the transport. Clampthe CD
down,andclose the Acrylic Cover.Playback
will beginfromthe first track. If the CDis
loaded and the disc contents have been
scanned,press Play on the front panel or
remotecontrol. Thedisc will start playing
from Track 1 or the beginning of a programmed track sequence. When an
~
HDCI~encodedCDis played, the HDCD
~
led illuminates, indicating that HDCD
decoding
is functioning.
<<: SearchBack
Performa sustainedpressof the button to
scroll backward
throughthe current track.
Stop
TerminatesCDplayback.
BalanceLeft andRight
Pressto balancespeakers.
I< I<: IndexBack
Pressonceto select the index number
prior
to the current index numberwithin a specific track, if the CDhasbeenrecordedwith
separateindexing.
Menu
Press to accessmenufunctions. Seealso
MenuFunctions page15.
>>: SearchForward
Performa sustainedpressof the button to
scroll forwardthroughthe currenttrack.
Section 5
VolumeAdjustment and Menu
Functions
Level U p and Down
Press to adjust the volumeand to scroll
throughmenufunctions.
Fixed Mute
Pressto activate. Thereis no signal on the
fixed outputwhenthe led on the front panel
of the KPS25sis on.
>1 >1: IndexForward
Pressonceto select the index numberfollowing the current index numberwithin a
specific track, if the CDhasbeenrecorded Variable Mute
Pressto activate. There is no signal on the
with separateindexing.
variable output whenthe led on the front
NOTE:Somediscs do not haveindex num- panelof the’ KPS25sis on.
bers programmed
within tracks. Whenthe
Variable Phase
Indexbuttonsare pressed,the display will
Pressto invert the absolutepolarity of the
default to the currenttrack number.
mainoutput 180 degrees. Whenthe polarI<: TrackBack
ity is reversed,the led on the front panelof
Pressonceto select andbeginplaying the the KPS25s is on.
track that precedes
the currenttrack.
Section6
>1: TrackForward
Pressonceto select andbeginplaying the AnalogInputs
track that followsthe currenttrack.
TheKPS25s has five analoginputs. Press
the buttonto select the input that supports
your source.B-l, S-1, S-2, S-3, TAPE.
1HDCD~
is theregistered
trademark
of PacificMicrosonics,
Inc.
® KPS25s
KRELL
English Page 13 of 20
Section7
Amplifier andDisplayI/Vindow
Functions
Drive Off
Turnsthe CDtransport On/off.
Power
Themain powerswitch that turns the KPS
NOTE: Use the Amplifier Power and
Amplifier Displaybuttonsto accessa Krell ® 25s On/off.
amplifier connectedto your system. TheseBattery Installation andRemoval
buttonsdo not activate the KPS25s.
NOTE:Batteries should be replaced when
Display Mode
Cyclesthe Compact
Disc TransportDisplay
Window
throughthree options: the elapsed
time of the track currentlyplaying,the time
remaining
in the current track, andthe total
remaining time of the disc or program.
Press the CDbutton and then press the
Mode
button. Theoptionswill appearin the
CompactDisc Transport Display Window
as they are selected.
functionsactivatedby the remotecontroller
become
intermittent. TheKPS25s Tabletop
RemoteController uses four AAAsize 1.5
Volt batteries. The KPS25s Handheld
RemoteController uses two AAAsize 1.5
Volt batteries.
1. Removethe backplate to expose the
batteries.
2. Remove
the old batteries.
Display Dim
3. Install the newbatteries, following the
Turns the Compact
Disc Transport Display
battery position diagramon the plastic
battery receptacle.
WindowOn/off.
Amplifier Power
Turnsa KrelP remotecontrolled amplifier
On/off.
4. Re-install the backplate.
5. Checkto makesure the remotecontrol
is functioningproperly.
Amplifier Display
Operatesthe display of a KrelPremotecontrolled amplifier.
Page14 of 20 English
® KPS25s
KRELL
MenuFunctions
4. Turn the Level Control Knobto select
the input to whichyou wantto assigna
custom name.
All initial set u p andsubsequent
system
configuration adjustmentsmaybe madeusing 5. Press the Menu bUtton. The word
either the TabletopRemote
Controller,or the
PHONO
will appear.
front panelcontrols. Severalmenu
features
that customizethe KPS25s are described 6. Turn the Level Control Knobto select
the desired name.
below.
To adjust the brightness of the Menu 7. Press the Menubutton to lock the
selectedname
to the selectedinput.
Display Window:
1. Press the Menu button. The word 8. To exit the Menumodecompletely,
press the menubutton again.
MENU
will appearin the MenuDisplay
Window.
NOTE:
Theinput for CDcannotbe renamed.
2. Turn the Level Control Knobuntil the To select an input for Theater
word BRIGHTappears.
Throughput~:
3. Press the Menubutton again. The cur- 1. Press the Menu button. The word
rent brightnesslevel will appearin the
MENU
will appear.
MenuDisplay Window.
2. Turn the Level Control Knobuntil the
4. Turnthe LevelControlKnobto the left or
word THEATER
appears.
right to viewbrightnesslevels. Thedisplay maybe set to mutethe brightness 3. Press the Menubutton again. Theword
CDwill appear.
completely.When
the brightnesslevel is
set to the desiredlevel, pressthe Menu 4. Turn the Level Control Knobto select
buttononemoretime to lock the setting
TM.
the input for TheaterThroughput
in place.
5. Pressthe Menubutton againto display
5. To exit the Menumodecompletely,
the current theater modesetting.
pressthe Menubutton again.
Whenthe display reads YES,Theater
TM is active. When
Throughput
the disTo assign customnamesto any of the
TM is
play readsNO,TheaterThroughput
digital or the analoginputs of the KPS
inactive.
25s:
1. Press the Menu button. The word 6. Turn the Level Control Knobto select
the desiredtheater mode
setting.
MENU
will appear.
2. Turn the Level Control Knobuntil the 7. Pressthe Menubutton to lock the setting in place.
word NAME
appears.
3. Press the Menubutton again. The word 8. To exit the Menumodecompletely,
pressthe Menubutton again.
AESEBU
will appear.
® KPS 25s
KRELL
English Page 15 of 20
To changethe shutter operationmode:
1. Press the Menu button.
MENU
will appear.
The word
2. Turn the Level Control Knobuntil the
word SHUTTER
appears.
4. Turn the Level Control Knobto select
. the input for volume
trim.
5. Pressthe Menubutton again. Thecurrent volumetdmwill appear.
6. Turn the Level Control Knobto select
the desiredvolumetrim.
Press the Menubutton again. Thecurrent shutter operationmode
will appear. 7. Pressthe Menu
buttonto Iockthesetting.
4. Turn the Level Control Knobto select
the desiredshutter operationalmode.
8. To exit the Menumodecompletely,
press the Menubutton again.
5. Pressthe Menu
buttonto lock the setting.
To changethe volumecontrol
sensitivity:
6. To exit the Menumodecompletely,
press the Menubutton again.
To changethe coveroperational modes:
1. Press the Menu button.
MENU
will appear.
The word
2. Turn the Level Control Knobuntil the
word COVER
appears.
3. Press the Menubutton again. The current coveroperationalmode
will appear.
4. Turn the Level Control Knobto select
the desired coveroperational mode.
5. Pressthe Menu
buttonto lock the setting.
1. Press Menubutton. The word MENU
will appear.
2. Turn the Level Control Knobuntil the
words VOLSPEEDappear.
3. Press the Menubutton again. The current volumespeedwill appear.
4. Turn the Level Control Knobto select
the desired volumespeed.
5. Pressthe Menu
buttonto lock the setting.
6. To exit the Menumodecompletely,
press the Menubutton again.
To return all settingsto factory default
6. To exit the Menu modecompletely, values:
press the Menubutton again.
1. Press the Menu button. The word
To changean input’s volumetrim:
MENU
will appear.
1. Press the Menu button. The word
2. Turn the Level Control Knobuntil the
MENU
will appear.
words ALLCLEAR
appear.
2. Turn the Level Control Knobuntil the
words VOLTRIMappear.
3. Press the Menubutton again. Theword
WAITwill appear.
3. Press the Menubutton again. Theword
4. To exit the Menumodecompletely,
CDwill appear.
,press the Menubutton again,
Page16 of 20 English
® KPS 25s
KRELL
U.S.A.-basedfreight forwarder of your
choice. Freight andother chargesto ship
THERE ARE NO USER-SERVICEABLE the unit fromthe freight forwarderto youare
PARTSINSIDE ANYKRELLPRODUCT. alsoyourresponsibility.
The KPS25s KrelP PlaybackSystemhas a Theoperatingvoltageof this unit is determined by the factory and can only be
limited andtransferable warrantyof five
by an authorizedKrelPdistributor
yearsfor parts andlabor andthree yearson changed
or
at
the
factory. Thevoltage for the KPS
transport related parts. Thewarrantyperiod
beginson the date of retail purchase,as 25s Krell PlaybackSystemin the U.S.A.
notedon the retail salesslip providedby an can not be changeduntil six monthsfrom
authorized
Krell® dealeror distributor, or on the original purchasedate. Any unauthothe warrantyregistration cardsent to KrelP. rized voltage conversion, disassembly,
In the event adequateproof of purchase componentreplacement, perforation of
chassis, updates, or modifications perdateis unavailable,the warrantyperiodwill
formedto the unit wil!void the warranty.
begin on the date the unit wasoriginally
shippedfromthe factory. Theoriginal ship Krell ® is not responsible for any damage
date can be determinedby KrelP from the incurredin transit. KrelPwill file claimsfor
serial number.
damagesas necessary for units damaged
Thewarrantyfor KrelPproductsis valid only in transit to the factory. Youare responsible
during
in the countryto whichthey wereoriginally to file claims for shippingdamages
the
return
shipment.
shipped,throughthe authorizedKrelP distributor for that country,andat the factory. Theuseof any packingmaterial other than
Theremaybe restrictions on, or changes
to original is not recommended.
KrelP may,at
Krell’s warranty becauseof regulations it’s discretion, packa unit in newpacking
within a specific country.Pleasecheckwith for the return shipmentand bill you for
your distributor for a completeunderstand- suchpackingif the unit waspackedin noning of the warrantyin yourcountry.
standardpackingor the original packaging
as to be unusable. Should
Freightto the factoryis yourresponsibility. is so damaged
you
need
to
purchase
additional packagSecond
dayreturn freight within the United
authorized KrelP
States(U.S.A.)is includedin the warranty. ing please contact your ®
dealer,
distributor
or
Krell
for assistance.
If you havepurchasedyour KrelP product
outsidethe U.S.A.andwish to haveit ser- All operational features, functions, and
viced at the factory, all freight andassoci- specifications andpolicies are subject to
ated chargesto the factory are your respon- change
withoutnotification.
sibility. KrelPwill payreturnfreight to the
Warranty
® KPS 25s
KRELL
English Page17 of 20
ReturnAuthorization
Procedure
dealer,distributor,or the KrelPService
Department
for assistance.
Krell ® is not responsible for any damage
IMPORTAN~
Ifyou believe there is a prob- incurredin transit. KrelPwill file claimsfor
iemwith yourunit, pleasecontactyour dea/- damagesas necessaryfor products damer, distributor, or the Kreli~ factoryimmedi- agedin transit to the factory. Theowneris
ate/y. Donot return anyunit to Kre//®for responsibleforfilingclaimsforshippingdamrepair without first discussingthe problem agesthat occurduringthe return shipment.
and obtaining a Return Authorization
Replacement
parts and/or productswill be
Number.
furnished on an exchangebasis only; any
parts and/orproductsreturnedto Krell® for
To return a product,the owner
exchangebecome
the property of KrelP.
is requiredto:
[] Obtain a Return Authorization Number Noexpressedor implied warrantyis made
by accident,
(R/A number) and shipping address for any KrelPproductdamaged
abuse,misuse,natural or personaldisaster,
from the KrelP Service Department.
or unauthorized
modification.
[] Insureandacceptall liability for loss or
damage
to the product during shipment In the eventthat KrelPreceivesa product
to the KrelPfactory andprepayall ship- for warrantyservice whichhas beenmodiping charges.The product mayalso be fied in anywaywithoutKrell® authorization,
handdelivered if arrangements
with the all warrantieson that productwill be void.
Theproductwill be returnedto original facService Departmenthave beenmadein
advance.Proof of purchasemaybe re- tory layout specifications at the owner’s
quiredfor warrantyvalidationat the time expensebeforeit is repaired. All repairs
requiredafter the producthasbeenreturned
of handdelivery.
to original factory specification will be
to insure the chargedto the customer,at current parts
[] Usethe original packaging
safetransit of the producttothe factory, andlabor rates.
dealer, or distributor. Theuse of any
packaging
materialotherthanthe original
"
"~- * ~:’’°
--;"
_ I
packagingmaterials is not recommend- - ~’ ~"
ed. KrelPmay,at its discretion, return a
TEL 203-799-9954
product in newpackagingand bill the
Monday-Friday
9:00 AMto 5:00 PMEST
ownerfor suchpackagingif the product
®
received by Krell wasboxedin nonFAX 203-799-9796
standard packagingor if the original
[email protected]
packagingwasso damaged
that it was
unusable.If KrelP determinesthat new KPS25s
SERIAL NUMBER
packaging
is required, the ownerwill be PRODUCT
notified beforethe productis returned
Toregisteryourproductfor warrantybenefits,
To purchase additional packaging,
please contact your authorized KrelP
Page18 of 20 English
complete
andreturn the WarrantyRegistration
Card enclosedin the shipping box within 15
daysof purchase.
® KPS25s
KRELL
KrelPIndustries,Inc.
45 Connair Road
Orange, CT 06477-3650 USA
KPS 25s
TM
Krell
PlaybackSystem
TEL 203-799-9954, FAX 203-799-9796
[email protected]
www.krellonline.com
Specifications
FREQUENCYRESPONSE
0.1 Hz-1 MHz0,-3 dB
REMOTE CONTROL
1 handheldwireless infrared
1 tabletopmulti-functionwireless
infrared
TRANSPORT
JVC EXU-901A
ANALOGINPUTS
1 Pair balanced(via an XLR
connector)
4 Pair single-ended(via RCA
connectors)
ANALOGOUTPUTS
2 Pair balanced(via XLR
connectors)
DISTORTION
1KHzless than 0.005%THD
(balanced)
20KHzless than 0.008%THD
(balanced)
INPUT IMPEDANCE
98k Ohms
OUTPUT IMPEDANCE
17 Ohms
OUTPUT VOLTAGE
13 volts R.M.S.(balanced)
DIGITAL INPUTS/OUTPUTS
2 TM
EIAJoptical (via TosLink
connectors)
2 SPDIFcoaxial (via RCA
connectors)
1 AES/EBU
balanced(via an XLR
connector)
3 Pair single-ended
(via RCA
DIMENSIONS
connectors)
19wx 5.25hx 15.38din.
-rM (via a 4-pin bayonet
Pair CAS’I
48.3wx 13.3h x 39.1d cm
connector)
WEIGHT
GAIN
6 dB (single-ended) 12
(balanced)
Shipping55 Ibs.,
Unit only45Ibs.,
25kg
20.5kg
SIGNALTO NOISE RATIO
97dB(balanced)"A" weighted
All operationalfeatures,functions,specifications,and
policiesaresubjectto change
withoutnotification.