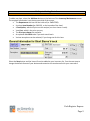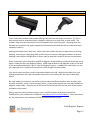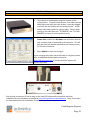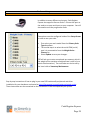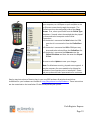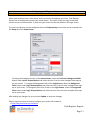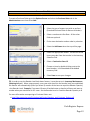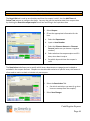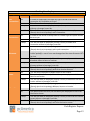
1
Table of Contents CONFIGURING CASH REGISTER EXPRESS 1 REGISTERING CASH REGISTER EXPRESS 1 10 STEPS TO GETTING STARTED 2 STEP 1 - PLUG IN THE EQUIPMENT STEP 2 - INSTALL AND START CASH REGISTER EXPRESS STEP 3 - ADD YOUR EMPLOYEES INTO THE SYSTEM STEP 4 - CONFIGURE A FEW SETUP OPTIONS STEP 5 - CREATE YOUR INVENTORY ITEMS STEP 6 – CONFIGURE YOUR INVENTORY AND FUNCTION BUTTONS STEP 7 - LOGIN TO THE SYSTEM STEP 8 - RING IN SOME ITEMS STEP 9 – A FEW BASIC EVERY DAY FUNCTIONS STEP 10 - CASH – OR CREDIT – OUT THE TRANSACTION 2 3 6 7 8 10 11 12 14 15 COMPUTER ESSENTIALS 16 OVERVIEW AND SYSTEM SECURITY BACKING UP YOUR DATABASE 16 17 HARDWARE SETUP 18 CONFIGURING A RECEIPT PRINTER INSTALLING A BAR CODE PRINTER POLE DISPLAY CREDIT CARD READER & BAR CODE SCANNER CONFIGURING A CASH DRAWER 18 19 20 21 22 INSTALLING THE TOUCH SCREEN SCANNER SCALES PINPADS WEIGHT AND DELI SCALES 23 24 25 26 CONFIGURING CASH REGISTER EXPRESS 27 CHANGING THE ADMINISTRATOR PASSWORD & ADMINISTRATOR SWIPE CARD TAX RATES CONFIGURE YOUR RECEIPT PERSONALIZE YOUR RECEIPT PERSONALIZE COLORS AND PICTURES CREDIT CARD PROCESSING ENCRYPTION KEY SETUP CHECK PROCESSING CONFIGURING MULTIPLE STATIONS PRINTING BAR CODES QUICKBOOKS SPEED TIPS FOR RETAIL STORES 27 28 29 30 31 32 33 35 37 39 40 41 COMMON RETAIL FUNCTIONS 42 SELECT A CUSTOMER DELETE, DISCOUNT, QUAN CHANGE AND PRICE CHANGE PURCHASE ORDERS CREATING A PURCHASE ORDER RECEIVING PURCHASE ORDERS BACK ORDERS VOID AN INVOICE/PULLBACK AN INVOICE SELL AND REDEEM GIFT CARDS AND STORED VALUE CARDS CLOCKING OUT AND CLOSING OUT A DAY 42 43 44 45 46 47 48 49 50 TRACKING YOUR CUSTOMERS 51 CUSTOMER MAINTENANCE SCREEN ADDING AND MODIFYING CUSTOMERS ACCOUNTS RECEIVABLE AND CUSTOMER LOYALTY 51 52 53 CUSTOMER LOYALTY 54 YOUR INVENTORY 59 INVENTORY MAINTENANCE – ADDING AND MODIFYING ITEMS SALE AND SPECIAL PRICING CATEGORIES AND DEPARTMENTS INVENTORY TRACK EXPRESS MASS TRANSFER & RETURNED ITEMS CHOICE ITEMS COUPON ITEMS SETTING UP THE RECIPE FEATURE SETTING UP RETAIL ITEMS WITH AND WITHOUT BARCODES KIT ITEMS STYLES MATRIX 59 60 61 62 63 64 65 68 72 73 76 TRACKING YOUR EMPLOYEES 79 EMPLOYEE MAINTENANCE – ADDING & MODIFYING EMPLOYEES EMPLOYEE SECURITY AND EXCEPTIONS TRACKING TOP FIVE EMPLOYEE PERMISSIONS AND USES JOB CODES, TIME CLOCK, HOURS & WAGES 79 80 81 82 REPORTING 84 HOW TO USE THE REPORTING SCREEN LISTING OF THE MOST USEFUL REPORTS 84 85 HELP AND TECHNICAL SUPPORT 86 TRAINING SESSIONS AND CONTACTING TECHNICAL SUPPORT 86 Configuring Cash Register Express Registering Cash Register Express Your copy of Cash Register Express (CRE) must be registered before use. To register your software, choose Register from the File menu at the Login Screen. Cash Register Express will prompt you for your activation number; enter the serial number located on the side of your CRE box. After entering your activation number, Cash Register Express will access the pcAmerica registration server over the internet to register your software. NOTE: The registration process requires an active internet connection. If you do not have an internet connection, please contact pcAmerica’s customer service department to manually register your software. For more information see Step 2 of the 10 Steps to Getting Started section of the manual. Cash Register Express Page 1 10 Steps to Getting Started Step 1 - Plug in the Equipment The first step of setting up your point of sale system is plugging in the equipment. Some of the devices require hardware drivers which is what your computer uses to talk to each piece of equipment. Step by step instructions on how to plug in your new POS hardware, peripherals and install drivers are located at: http://faq.pcAmerica.com/hardware or are contained on the installation CD that accompanied your system. Pole Display Cash Drawer Barcode Scanner Receipt Printer Your Pole Display allows customers to quickly and easily view their transaction as it is being entered into the system. Store cash for the day in one safe and convenient place. CRE features an antitheft setting to only allow employees to ring in a transaction with the cash drawer closed. Scan items effortlessly and fast with a bar code scanner. Receipt printers allow your customers to have an itemized breakdown of their transaction. CRE will also enable you to place your company logo and bounce back coupon on the receipt. For more detailed information about hardware and hardware configurations please see the Hardware Setup section of the manual. Note: These are common connection arrangements. Depending on the equipment you purchased, your connection arrangements will vary. Cash Register Express Page 2 10 Steps to Getting Started Step 2 - Install and Start Cash Register Express Below are instructions on installing Cash Register Express and starting it for the first time. You must be logged onto your computer as an Administrator with full access rights in order to properly install Cash Register Express. If you have multiple stations within your store, it is very important that you install the server first! We also recommend you read the Configure Multiple Stations section later in this manual. If you have multiple stores communicating to a corporate office, it is recommended you sign up for a pcAmerica training session to ensure you fully understand the process. 1. Insert the Cash Register Express CD into the CD-ROM drive. Before installing CRE the installer will scan for any prerequisites. Whatever is listed on this screen MUST be installed prior to the CRE install. If nothing on this screen is installed you will get prompted to select ok to install everything. 2. After all prerequisites have been installed the CRE installer should automatically launch and bring you to the next step. After the install has completed select Finish to exit the wizard. 3. 4. Select Next to begin the configuration process. You will be asked a series of questions that will determine how your system is installed. Cash Register Express Page 3 10 Steps to Getting Started Step 2 – Install and Start Cash Register Express 5. Cash Register Express will prompt you to select your industry type, select A Retail Store. Otherwise, choose A Corporate Office for a Chain of Stores or Restaurants ONLY IF this computer is an office computer in your corporate office (not an office computer in a retail store). 6. The next screen in the wizard will be the Database Selection tab. Select Configure This Computer to start a NEW database. To connect to your server please see the Configure Multiple Stations section later in this manual for more information. 7. You will need to answer a series of questions to help configure your system properly. 8. If you are connecting more than one computer in your store to a server you must select the right server that station will be connecting to. Cash Register Express Page 4 10 Steps to Getting Started Step 2 – Install and Start Cash Register Express 8. To setup a Store Server you will need to choose the appropriate Store ID by highlighting it. In addition, you need to select a Station. For connecting a Station to a Store Server please see the Configure Multiple Stations section later in this manual. Note: Every station must have a unique number. 9. After you have configured your system select either Begin or Exit and restart the program. 10. In order to gain access to your new software you must now register it. Select the Register Now tab and scan or enter the registration number that came with your software. You must have an internet connection to register your software or call your customer service representative (1-800-722-6374 x278) to guide you through the manual registration process. 11. If you are not connecting to a corporate office, Cash Register Express will proceed to the Login Screen after a brief loading process. If you are connecting to a corporate office, you will be prompted for the corporate office information before progressing to the Login Screen. Cash Register Express Page 5 10 Steps to Getting Started Step 3 - Add Your Employees into the System Employees are configured within the Employee Maintenance screen of Cash Register Express. Cashiers and servers must be added into the system before they can log in and ring up sales. Other types of employees can be added and their hours tracked within CRE, even if their jobs don’t require them to use the POS. The steps below describe how to add your initial cashier into CRE; the Employee Maintenance section later in this manual will describe additional employee options, job codes and how to record employee hours. 1. Select the Manager or Options button. 2. Enter the administrator password (default: admin) where applicable. Select Administrative then, Employee Maintenance. Only the administrator can access this screen. 3. 4. Select the Add Employee button to create a new employee record. Assign a unique Employee ID (which could be their initials or some other unique identifier), password and a Display Name that prints on the receipt. If you would like to assign a secure login card to this employee, swipe the card in the Card Swipe ID box. 5. Assign security permissions by selecting the dropdown list and selecting Yes (the employee can do this), No (they cannot), Prompt (they can with manager’s permission) or Override (they can and are a manager for this function). For more information see the Top Five Employee Permissions and Uses section of the manual. 6. Select the Save button. Your employee has been added! Add any additional employees you wish to configure and then select the Exit button to go back to the Login Screen. Cash Register Express Page 6 10 Steps to Getting Started Step 4 - Configure a Few Setup Options Cash Register Express has hundreds of built-in features that can be turned on or off. The Setup Screen includes many of these options, organizing them into multiple tabs. You can access the Setup Screen from the Login Screen by selecting the File menu and Setup Screen – you must use the administrator password to enter this screen (default: admin). Global settings only need to be configured once for all stations while settings that are not global need to be configured once at each station. Below is a chart of recommended feature settings per vertical: Feature Tab Retail Clothing Store X Grocery Store Prompt Cashier ID, requires a cashier to login for every check. Change the Receipt Size to Short Receipt to print only the most important information. Enter the company information that prints on the receipt. Enter necessary credit card information if you are processing credit cards through Cash Register Express. Allow credit card swipes on invoice screen will allow credit cards to be swiped on the invoice screen. Create text that will print on the bottom of a receipt as a coupon. Quick Tender will show the amount of change on the invoice screen, eliminating a touch from every transaction. Reason Codes allow you to choose a reason why you are accepting a return. Combine lines items scanned multiple times will appear on the same line item. Invoice Settings Receipt X X Company Info X X Payment Processing X X Station Specifics X X Couponing X Quick Invoicing & Alerts X X Invoice Settings X X Invoice Settings X X Global X X You can read about the other settings and options in the Setup Screen in our F1 Help Section built into Cash Register Express. Cash Register Express Page 7 10 Steps to Getting Started Step 5 - Create Your Inventory Items Your goods are separated into separate groups called Departments. A few examples of departments are Sweaters, Pants, and Fruits. Departments are used to organize your inventory items on screen as well as on reports. After your departments are created, you create items inside of each of your departments. To begin creating your inventory items, select the Manager Button on the top right of the Login Screen and enter a username and password (default username: 01, password: admin). Navigate to the Inventory Maintenance screen inside of the Administrative tab. To add a new department, select the blue Department for this Item link in the top left of the screen. This will bring you to the Department Maintenance screen. Select the Add Department button, type in a department ID (ex: SWTRS) and description (ex: SWEATERS) and select Save. After adding the department, select Exit to return to the Inventory Maintenance screen. Cash Register Express Page 8 10 Steps to Getting Started Step 5 – Create Your Inventory Items To add a new item, select the Add Item button on the bottom of the Inventory Maintenance screen. The required information is on the top one-third of the screen: The Department this item will be inside of (ex: SWEATERS). A unique Item Number (ex: SW1001, or the barcode of the item). A Description, which will print on the receipts (ex: short sleeve v-neck). Your Cost, which is the price you pay. The Price you charge the customer. An optional # In Stock value if you track stock levels. Various tax options can be selected, if you charge tax for this item. Select the Save button and the item will now be added to your inventory list. See the next step to change the default format of your button and customize the touchscreen with your own colors. Cash Register Express Page 9 10 Steps to Getting Started Step 6 – Configure Your Inventory and Function Buttons The invoice screen, where sales are ring up is a highly customizable screen. By default, inventory items are displayed in the order you add them. The buttons are added to the screen using a default color. To change the look of your invoice screen, and configure function buttons and best sellers, select the Manager Button on the top right of the Login Screen and enter a username and password (default username: 01, password: admin). Navigate to the Touch Screen Configuration screen inside of the Setup tab and go to the Items & Departments tab. The functions in the Items & Departments tab are used to change the order, color, caption and picture of your menu buttons. You can also choose to make certain items or departments invisible. To change the color of a department or menu item button, select the department (in the left list) or menu item (in the right list) and select the Select Color button. Change the order of your departments or menu items by selecting them from the list and using the Up or Down buttons. When you are finished making changes, select the Save & Exit button. Your saved changes will display the next time you log into the invoice screen. TIP: Changes made to the inventory screen on one terminal automatically update ALL terminals in real time. You do have the ability to design different screens for specific terminals in your store without affecting the other terminals. To do this, select the Configure This Station Individually option from the Options menu on the top of the screen. If this is checked, any layout changes made within Touch Screen Configuration will not affect other terminals. Cash Register Express Page 10 10 Steps to Getting Started Step 7 - Login to the System Cashiers must login to Cash Register Express before they can ring up customers or enter orders. The Login Screen prompts cashiers for a user name and password, or alternatively the cashier can swipe their card to gain access. 1. To log into CRE, simply enter your ID and password (the default is “01” and “admin”), enter the employees id or swipe the secure login card you previously configured in the Employee Maintenance screen from Step 3. 2. Once you have logged in, the CRE invoice screen will appear. Once your system is setup, most of your pos experience will take place in the invoice screen. From this screen you can easily access many of the setup options and do all of your establishments invoicing. A secure login card helps prevent one cashier from logging in as a different cashier (which is a hole for theft). Without a secure login card, cashiers must type in a user name and password, which is visible to others close by. The only way to log in with the card is to swipe the card, protecting the cashier’s cash bank from others trying to steal money. You can purchase these cards from pcAmerica directly. Cash Register Express Page 11 10 Steps to Getting Started Step 8 - Ring in Some Items Ringing up an item is easy. Simply select the TS Lookup button then select the department the item is in (examples: sweaters, T-shirt, cigars, equipment, etc). While viewing the inventory for a specific department you can then select the items you would like to add to the invoice. You can also scan the barcode of the item with the barcode scanner (if one has been purchased), the item will then be added to the invoice grid automatically. Cash Register Express Page 12 10 Steps to Getting Started Step 8 – Ring in Some Items If the item is not listed on the touchscreen and it does not have a barcode to scan, select the Search button. This option lets you search the entire inventory for the item. At the search screen find the item in your inventory using the many features of filtering inventory described below: On the right of the screen you can select the item type to filter the displayed inventory by. On the bottom of the grid you can use the dropdowns to filter out the inventory based on the Category, Department, or Vendor that the Item is part of. At the bottom you can search for the item based on text entered and by how to search through the inventory. After finding the item you would like to add to the invoice, highlight it, click the Select button, and the item will then be placed on the current invoice. Cash Register Express Page 13 10 Steps to Getting Started Step 9 – A Few Basic Every Day Functions You can access additional functions by selecting the tabs on the bottom of the invoice screen. Below is an explanation of each of these buttons. Note: These buttons can be hidden from the touchscreen by selecting Display Setup from the Setup section of the Manager/Options screen. The Toolbar option is checked it will be displayed. F1 – Help a shortcut to the Help section. F2 – Inventory a shortcut to the Inventory Maintenance screen. F3 – Clock In/Out a shortcut to the Time clock screen. F4 – Customers a shortcut to the Customer Maintenance screen. F5 – Price Check this is where you can check the price and stock level of an item. F6 – Cash Sale this will ring up the current invoice as a cash sale. Item Options Delete -- This will delete the currently highlighted item on the invoice grid. Discount -- This will discount the highlighted item on the grid, not the entire invoice. Down -- Will scroll down to the next item on the invoice grid. Up -- Will scroll up to the next item on the invoice grid. Quan Change -- Will allow you to change the quantity of an item on the invoice grid. Price Change -- Will allow you to change the price of an item on the invoice grid. F7 – Check Sale this will ring up the current invoice as a check sale. F8 – CC Sale this will ring up the current invoice as a credit card sale. F9 – On Account this will ring up the current invoice on account. F10 – Cashier Fxns a shortcut that will take you to the Cashier Functions screen. F11 – Invoice Info a shortcut that will take you to the Invoice Properties screen. F12 – Item Options this button controls whether or not the item options are visible. Void Invoice – This will void the entire invoice. Hold Invoice – This will allow you to pull up an invoice that has been placed on hold. TS Lookup – This will bring up an on screen layout of your items and departments. Options – This will bring you to the View Options screen. Cash Register Express Page 14 10 Steps to Getting Started Step 10 - Cash – or Credit – Out the Transaction Step 10 is the most important part of the transaction – accepting payment (money) for the goods/services that your establishment offers. The three most common forms of payment in most retail stores are cash, credit/debit cards and gift cards. To pay for a transaction, select the appropriate button (PAY). This will bring open the amounttendered screen. You can also select one of the Quick Tender buttons which will bring you to an appropriate screen based on the tender type selected. CRE also gives the ability to quickly ring in items and put them on a customer’s account. Cash Register Express’s amount tendered screen is built for speed and flexibility. The default amount is always the exact amount remaining for the invoice. To enter a payment, enter in the amount and select the payment method. If paying by gift card, credit\debit card or check, CRE will ask you for more information. You can also enable one-touch quick payment buttons (in the Quick Invoicing & Alerts tab of the Setup Screen) for the most common tender amounts. CRE supports split tendering, meaning you can pay with more than one tender type. SPEED TIP - Pay by credit card without touching a button; our unique swipe-and-go feature allows you to pay by credit card or gift card without touching a button. All you need to do is swipe the credit card on the invoice screen and it will process the card. This is the fastest way to pay. This option can be configured on the Station Specifics tab of the Setup Screen. Congratulations! You’ve rung up your first sale inside of Cash Register Express. You’ve covered the basics and can now use your new point of sale system. The remainder of this manual includes some useful information for configuring and using your Cash Register Express point of sale system. Cash Register Express Page 15 Computer Essentials Overview and System Security On the surface, Cash Register Express is a very simple to use point of sale system. Cashiers can ring up customers quickly and accurately. Behind the scenes, however, your Cash Register Express retail point of sale system consists of multiple components, functioning together, all running on the Microsoft Windows operating system. In most cases your computers are connected to the Internet for e-mail, credit card processing and a variety of other uses. In today’s world of computers a variety of risks (both internal and external) exist that you should protect against. Viruses, Spyware and Worms are malicious programs written by outsiders that can cause serious damage to your data or even your computer. Unknown to you, these can be downloaded and installed on your computer by visiting an infected web page, downloading and running malicious programs or by an outside intruder accessing your computer from a different continent via the Internet. To protect yourself you should do the following: Install a router, which is an Internet buffer between you and the outside world. Routers help control who can access your computer and will help keep unwanted intruders out. Popular brands of routers include Linksys and DLink, however you should do your homework and choose the router you feel most comfortable with. Install and activate a firewall which is an additional layer of protection against outside intruders. Anti-virus and anti-worm software runs on your computers and, if configured properly, can actively watch each of your actions and put on the brakes if you are about to download or use an infected file. It’s important to scan your hard drive regularly for viruses and also keep current with the latest virus updates (which can change very frequently). Popular brands of anti-virus software include Symantec (Norton Anti-Virus) and McAfee, however you should do your homework and choose the anti-virus software you feel most comfortable with. Spyware is another malicious form of software that can sneak onto your computers. The effects of spyware vary from slowing down your computer to revealing your personal information with a wide array in between. Many anti-virus packages also protect you against spyware, however you can also download additional packages that can scan for spyware, eliminate it and protect against future infections. Hardware and database failure, while extremely uncommon, is a reality of life that you should protect against. Lightning may strike – literally – and fry a hard drive or files on your computer. The two best ways to protect against this are fairly simple. The first is to have a surge protector unit with a battery backup; common brands are APC and SmartPower, however you should do your homework and pick the one you are most comfortable with. The second way to protect yourself is to perform daily backups of your data that you keep off-site. Cash Register Express Page 16 Computer Essentials Backing Up Your Database Your inventory, customer records and entire sales history is stored inside of your database. It is highly recommended you backup your data on a daily basis in order to avoid minimal loss of data due to unforeseen circumstances. It is uncommon to lose data, however the loss of a establishments database can be catastrophic for the business. It is YOUR RESPONSIBILITY to backup your database on a daily basis. In CRE, backing up your database can be done easily through the Database Maintenance section of the File Menu on the Login Screen. 1. From the Login Screen, select File, then Database Maintenance, and finally Backup Database. 2. Enter your Administrator’s Password and select OK. 3. Choose a backup folder and type a filename for the data backup file. We recommend using today’s date as the file name, and keeping a week’s worth of backups at a time. You can never be too careful when it comes to your store’s database backup. The only way to recover from a catastrophic occurrence, such as a fire at your store, is to have an off-site backup copy of your database. We recommend using high capacity backup drives or any removable mass storage device as part of your backup system. A removable mass storage device usually plugs into your computer through a USB port and will be recognized by your computer as another disk drive. Your computer will assign a drive letter and will be available through the windows explorer. You should remove this device from your business each and every day to ensure that you can be up and running quickly in case a catastrophic event actually takes place. Cash Register Express Page 17 Hardware Setup Configuring a Receipt Printer It is necessary to add and configure the receipt printers you are using inside of Cash Register Express. CRE has a function for you to install and configure your printer easily. Step by step instructions of how to plug in your new POS hardware & peripherals and driver installation for your hardware are located at: http://faq.pcAmerica.com/hardware These instructions are also contained on the installation CD that accompanied your system. Fundamentally, configuring most of your printers inside of Cash Register Express is done in a similar manner as in Windows. Therefore, please follow the below directions to configure and assign your receipt printers, barcode printers, back office printer and any additional printers. 1. You must first install the printer drivers for each printer and test them to make sure they are printing correctly in Windows at each station. If you are not able to print a test page at each station in Windows then you will not be able to print in CRE. 2. Select the Friendly Printer Setup in the Setup tab of the Options screen (4-L). 3. Select the Friendly Printer on the left and match it to the corresponding printer driver in the right side window. 4. Select the appropriate Printer Type on the bottom of the screen. 5. Select Save & Exit to update your settings. * In order for your station to print correctly, you must assign and configure your printer at each individual station. Cash Register Express Page 18 Hardware Setup Installing a Bar Code Printer It is necessary to add and configure the Bar Code printer you are using inside of Cash Register Express. 1. Some of the supported label printers only require that a Generic / Text only driver is installed, which is a standard Windows driver. NOTE: Not all label printers are installed like this. Depending on which label printer you have purchased your installation process may differ. 2. Go to the Options Screen then, (4) Setup – (L) Friendly Printer Setup. 3. Set the Label printer as the Generic / Text Only driver (or the driver that has been installed). 4. Select Save & Exit. For more information on how to print labels using Restaurant Pro Express please see the Printing Bar Codes Section of this manual. Step by step instructions of how to plug in your new POS hardware & peripherals and driver installation for your hardware are located at: http://faq.pcAmerica.com/hardware. These instructions are also contained on the installation CD that accompanied your system. Cash Register Express Page 19 Hardware Setup Pole Display Pole displays face the customer and display the items you are selling as you add them to the invoice. Other information such as amount tendered, change, the current date and time as well as discounts will appear on the pole display at the proper time. 1. Select the Manager or Options button. 2. Enter the administrator password (default: admin) where applicable. 3. Inside of the Hardware Tab, select the USB (or the appropriate port) option under the Pole Display Port selection. 4. Under Pole Display Type select the type of pole display that is connected. 5. Select the Update button at the bottom of the screen to save your changes. Step by step instructions of how to plug in your new POS hardware & peripherals and driver installation for your hardware are located at: http://faq.pcAmerica.com/hardware. These instructions are also contained on the installation CD that accompanied your system. Cash Register Express Page 20 Hardware Setup Credit Card Reader & Bar Code Scanner Credit card readers and bar code readers differ greatly but have two things in common. The first is they are both used to read data (either a magnetic card such as a credit card, or a bar code). The second is they enter the information into the computer like a really fast typist – meaning when the barcodes are scanned or the card is swiped the information associated with them is entered into the computer instantly! Hooking up both devices is fairly easy. Most credit card readers and the bar code scanners are plugand-play, meaning you simply plug them in and they work without installing any software or drivers. Although, some require configuration or drivers may be required in order for them to work properly. Credit card readers (also referred to as MSRs or Magnetic Stripe Readers) are devices that allow you to swipe a credit card into Cash Register Express. MSRs read the data on the magnetic stripe on the back of the card and automatically “type it” into Cash Register Express. In addition to credit cards, you can also swipe gift cards, loyalty cards and security cards through the same reader. Your touch screen may have a credit card reader bolted to the side. While this provides for a nicer looking presentation, the credit card reader may have its own cable and is the same as described above. Bar code readers (or scanners) are used to scan bar codes on different products such as sodas, juice and milk containers, candy, t-shirts and other items. Loyalty cards can also use a bar code instead of a magnetic stripe reader. A simple scan of the item will read the bar code into the point of sale system and add it to the invoice. Step by step instructions of how to plug in your new POS hardware & peripherals and driver installation for your hardware are located at: http://faq.pcAmerica.com/hardware. These instructions are also contained on the installation CD that accompanied your system. Cash Register Express Page 21 Hardware Setup Configuring a Cash Drawer 1. The majority of cash drawers plug into the back of the receipt printer. To install a Cash Drawer, first make sure the cable that comes with your cash drawer is securely plugged in to both the cash drawer and the receipt printer. A cash drawer cable looks similar to a phone cable. There is often writing on the cable that says “TO PRINTER” and “TO CASH DRAWER” to ensure it is connected correctly. 2. Inside of the Setup Screen, drop down the Default Cash Drawer Port inside of the Hardware tab and select however your receipt printer is connected to the computer. This will pop open the cash drawer attached to your receipt printer for all cash transactions. 3. Select Update to save your changes. If you are using more than one cash drawer at a register, please refer to additional documentation located at http://faq.pcamerica.com or contact technical support for further assistance. Step by step instructions of how to plug in your new POS hardware & peripherals and driver installation for your hardware are located at: http://faq.pcAmerica.com/hardware. These instructions are also contained on the installation CD that accompanied your system. Cash Register Express Page 22 Hardware Setup Installing the Touch Screen Most touch screen monitors have three plugs: The first is a standard power cable. The second cable is a USB cable which must be plugged into one of the USB ports on the back of your computer. The third cable will plug either into the VGA port or the DVI port depending on your computer. After connecting the touch screen, insert the CD that came with the Touch Screen monitor which will start the Setup Wizard, or navigate to: http://faq.pcamerica.com for certified drivers for CRE/RPE. Note: Depending on which touch screen monitor you have will determine the cable arrangement. Note: The touch screen may have another USB cable for the MSR (magnetic swipe reader) which must be plugged into one of the USB ports on the back of your computer. Step by step instructions of how to plug in your new POS hardware & peripherals and driver installation for your hardware are located at: http://faq.pcAmerica.com/hardware. These instructions are also contained on the installation CD that accompanied your system. Cash Register Express Page 23 Hardware Setup Scanner Scales In addition to many different scale types, Cash Register Express also supports Scanner Scales. Connect the port on the scale to an open serial port on your computer. You will also need to scan the program bar code. Two options must be configured inside of the Setup Screen in order to use your scale. First select your scale model from the Primary Scale Type dropdown. The second step is to select the serial COM (serial) port it is connected to from the Weight Scale – Primary list. Select Update to save your changes. CRE will ask you to enter an optional tare amount, which is the weight of the container a weighed item is sold in (ex: a plastic salad container). The tare value can also be set by the item inside of Inventory Maintenance. Step by step instructions of how to plug in your new POS hardware & peripherals and driver installation for your hardware are located at: http://faq.pcamerica.com/hardware/weight-scales. These instructions are also contained on the installation CD that accompanied your system. Cash Register Express Page 24 Hardware Setup PinPads PinPads can be connected to a COM (serial) port on your computer, to a USB port on your computer or via an Ethernet connection through the network. The PinPad must then be configured inside of the Setup Screen. First, select your model from the PinPad Type dropdown. Second, select the method that the pinpad is connected to the computer under PinPad Connection: If the device is connected via Serial select the COM port that it is connected to from the PinPad Port list. If the device is connected via USB a COM port may also need to be selected from the PinPad Port list. If the device is connected via Ethernet enter the PinPad IP Address and then also enter the Pinpad IP Port. Be sure to select Update to save your changes. Note: For Maximum security, pinpads are encrypted. It may be necessary for some models to be shipped to pcAmerica for encryption prior to installation. Please ask your pcAmerica sales representative for assistance. Step by step instructions of how to plug in your new POS hardware & peripherals and driver installation for your hardware are located at: http://faq.pcAmerica.com/hardware. These instructions are also contained on the installation CD that accompanied your system. Cash Register Express Page 25 Hardware Setup Weight and Deli Scales Cash Register Express supports specific scales that are directly connected to the computer (where items are weighed at the register) and can also work with deli scales, where the items are weighed at the deli or other food preparation station, and a bar code label is printed and affixed to the item. Two options must be configured inside of the Setup Screen in order to use your scale. First select your scale model from the Primary Scale Type dropdown. The second step is to select the serial COM port it is connected to from the Weight Scale – Primary list. Be sure to select Update to save your changes. CRE will ask you to enter an optional tare amount which is the weight of the container a weighed item is sold in (ex: a plastic salad container). The tare value can also be set by the item inside of Inventory Maintenance. NOTE: Checking the Auto-Weigh property of an item (found in Inventory Maintenance) will automatically query the scale for a weight whenever you sell it. Cash Register Express can scan and properly interpret the standard UPC random weight bar codes printed by many deli scales. This scale does not interface with the computer. For assistance in setting up your random weight bar code printing scale, consult the manual that comes with the scale or contact the manufacturer. Step by step instructions of how to plug in your new POS hardware & peripherals and driver installation for your hardware are located at: http://faq.pcAmerica.com/hardware. These instructions are also contained on the installation CD that accompanied your system. Cash Register Express Page 26 Configuring Cash Register Express Changing the Administrator Password & Administrator Swipe Card There are two types of passwords inside of Cash Register Express. Employee passwords are passwords that are assigned to an individual employee. A description of the use and configuration of the employee password is discussed in the Tracking your Employees section. The administrator password is the “super password” of the system which can be used to access any function inside of the software. This password should only be known to the owner and the administrator of the system. Standard employees and managers should not receive this password. By default, the password is “admin” – you should change this Day 1 of using the system to enhance your security. To change your password, choose the Change Password link under the File menu in the Login Screen. Be sure to select Update to save your changes. Change Password Screen You can also create an administrator swipe card using the Change Password screen. Swiping an administrator card takes the place of typing in the password, providing for faster and more secure overrides. Step by step instructions of how to configure your system are located at: http://faq.pcAmerica.com/software Cash Register Express Page 27 Configuring Cash Register Express Tax Rates The Set Tax Rate screen is accessed from the Setup tab in the Options Screen. Cash Register Express has three tax rates. Most stores will only use the first tax rate, however some stores may charge different tax rates for different items. Change the percentage of the tax1 rate to match your local tax rate. Be sure to select Update to save your changes. Some stores that deliver or ship items are required to charge the tax rate of the county or region where the goods are being sent. Cash Register Express allows you to configure different tax rates in different regions inside of the Area Tax Rates tab. In order to apply an area tax rate to an order, the tax rate must be applied to the customer through Customer Maintenance and the customer must be selected for the invoice being processed. Step by step instructions of how to configure your system are located at: http://faq.pcAmerica.com/software Cash Register Express Page 28 Configuring Cash Register Express Configure Your Receipt The receipt you give to your customers can be more than a simple listing of items; it can be an advertising piece that will encourage your customers to come back to your store. Receipts are configured in the Receipt and Company Info tabs of the Setup Screen. Below are some of the most commonly used receipt options. Option Receipt Size Print Invoices Suppress Extra Signature Copy Combine Lines on Short Receipt Company Name Description The Short Receipt selection prints a more compact, nicer looking receipt and is recommended for stores. Set this to Yes to print a receipt for every check, No to never print receipts or Prompt to ask you every sale if you’d like a receipt. If you do not desire a signed copy of the receipt. Turn on this option to suppress the signature copy. If the same item is ordered more than once on the same check, this option will combine their quantities on one line on the receipt. Configured on the Company Info tab, prints on the top of the receipt. After making any changes, be sure to select Update to save your changes. Step by step instructions of how to configure your system are located at: http://faq.pcAmerica.com/software Cash Register Express Page 29 Configuring Restaurant Pro Express Personalize Your Receipt Printing Logos on the top of your receipt can help to ensure brand recognition for your company. To enable your receipt printer to print your logo at the top, please follow these steps: 1. Select the Manager or Options button. 2. Enter the administrator password (default: admin) where applicable. 3. Select Setup then, Friendly Printer Setup. Check Print Logo on receipts at this station. 4. 5. 6. Select the Click to select the logo file which will prompt you select an image file to use. Select Save & Exit to save your changes. The next receipt that is printed should have your logo at the top. Step by step instructions of how to configure your system are located at: http://faq.pcAmerica.com/software Cash Register Express Page 30 Configuring Cash Register Express Personalize Colors and Pictures Many retail locations have a color theme that is consistent throughout your store. Cash Register Express can be configured to match your stores theme. The colors of both the login screen and invoice screen are customizable. A picture of your choice can also be placed on the login screen. The colors and pictures can be configured within the Display Setup screen that can be accessed from the Setup tab of the Setup Screen. To change the background color of the Invoice Screen, select the Set Form’s Background Color button under Invoice Screen Options and select the color from the color template that pops up on your screen. To change the background color of the Login Screen, select the Background Color button under Login Screen Options and select the color from the color template that pops up on your screen. To change the text color of text on the Login Screen, select the Foreground Color button under Login Screen Options and select the color from the color template that pops up on your screen. After making any changes, be sure to select Update to save your changes. Step by step instructions of how to configure your system are located at: http://faq.pcAmerica.com/software Cash Register Express Page 31 Configuring Cash Register Express Credit Card Processing 1. Select the Manager or Options button. Enter the administrator password (default: admin) where applicable. Go to Setup then Setup Screen. 2. Inside of the Payment Processing tab, (with Credit highlighted) select an option under the Payment processor selection. Some of the choices may require a merchant number as well as a username, password and gateway URL. 3. Select the Update button to save your changes. Cash Register Express integrates directly with several credit card processors. If the processor you have chosen to use is not in the list (Payment Processing tab of the Setup Screen), CRE also integrates with a third party software package that links to most other processors. If you have questions about using one of our integrated processors, OR questions configuring one not in that list, please contact your sales representative. For Help setting up Credit Card Processing Please reference our website: http://faq.pcamerica.com/paymentprocessing For suggestions on how to achieve PCI Compliance for your store please refer to the PA-DSS implementation guide which is available as a .pdf at: http://faq.pcamerica.com/pci-compliance Note: Manual and Express Manual processor choices are used when processing credit cards on an external terminal. The aforementioned processors will not charge customers cards when processing invoices. Cash Register Express Page 32 Configuring Cash Register Express Encryption Key Setup Cash Register Express requires a unique encryption key to be setup for each computer. This key is used to store sensitive credit card information safely. Because of security compliance regulations, an encryption key must be unique per store. When you start the program without a key you will see the following prompt: ***Important*** - All customers not using “Express Manual” processing will be required to setup a key. The user must type in a password that will be used to generate a new encryption key. This same password must be entered into the program on every computer in the store. If you type in a password that doesn’t match the password you used on your other computers, the program will let you know it’s wrong and prompt for the password again. Cash Register Express Page 33 Configuring Cash Register Express Encryption Key Setup 1. When you select Yes to the above prompt, you must enter the administrator password for the store. 2. You must then enter a password. The password should be secure, unique, and stored in a safe place. 3. If the user ever wants to change the encryption key, then they can do so via the File menu on the login screen. The user may not change the encryption key when there are credit cards in the database. This means they should make sure they have settled their current batch, and have performed the end of day function. NOTE: Performing the end of day clears out ALL encrypted credit card numbers. Cash Register Express Page 34 Configuring Cash Register Express Check Processing Many retail locations now accept checks as a form of payment. Cash Register Express has a convenient feature that enables your store to process checks. 1. From the Login Screen, select the File Menu, then Setup Screen and type in the Administrator password. 2. Inside of the Payment Processing tab, (with Check highlighted) select an option under the Payment processor selection. Some of the choices may require a merchant number as well as a username, password and, gateway URL. 3. Select the Update button to save your changes. 4. After selecting the check processor and filling in the information that is required, select which (if any) verification items that are to be required for the checks to be processed. Cash Register Express Page 35 Configuring Cash Register Express Check Processing If a customer is paying with a check, select the check button from the invoice screen or the amount tendered screen. The Process Check screen will appear and ask the cashier to enter the check number as it appears on the check. Select Enter. (Depending on which verification items you chose earlier CRE will prompt you for other information.) Note: It is important to accurately record the check number for reporting purposes. For Help setting up Check Processing Please reference our website: http://faq.pcamerica.com/paymentprocessing Tip: A Payment Type Breakdown report can display all your check transactions between a specified date range. Cash Register Express Page 36 Configuring Cash Register Express Configuring Multiple Stations It is fairly easy to configure multiple stations in Cash Register Express. Before configuring CRE, ensure your Windows computer network is properly installed. If you need over-the-phone help to assess and configure a computer network, please contact your sales representative. If your network is properly configured, please follow the steps below. Cash Register Express is a multi-user software package working off one database which resides on the server. A change made on one station will be seen at all stations at the same time. As the database is only located at the server it must always be running – if the server goes down, the individual stations will not be able to continue to function independently, thus stressing the importance of doing regular backups and taking them off the server either on a CD or a flash drive. Database redundancy can be achieved via SQL Replication for more information please see: http://faq.pcamerica.com/advanced/sql-server-replication-configuration-in-cre-rpe It is very important to install and configure your CRE Server prior to installing/configuring additional workstations. 1. 2. 3. The installation of CRE is documented in Step 2 of the 10 Steps to Getting Started in the beginning of this manual. Start by first installing the application on the server and select configure this computer, set this computer up as a single station in a store that does not connect to a corporate server. Install Cash Register Express on the second station. When starting Cash Register Express, in the Database Selection during the startup wizard, select the Use Advanced Configuration button and select Next. Cash Register Express Page 37 Configuring Cash Register Express Configuring Multiple Stations 4. 5. Select Standalone or Corporate Office Computer under This computer is a….. Under Local Database select Change Local Database Info. 6. The information here will be copied directly from the server (i.e. the Server Name will be set as the name of the server computer holding the database). To get this information off the server at the login screen go to File – Database Maintenance and finally View Database Settings. 7. 8. Select Test My Login Info if Connection Successful appears select Ok. Select Done. 9. Select Next. 10. You will be presented with the window pictured right. On the left pane select the correct Store ID (i.e. 1001) and select Create New Station. 11. Enter a new station number (i.e. 02), set the Station Role to Standard and select Done. There will be a brief wait while Cash Register Express communicates with the server, and starts for the first time on this station. This may take a number of minutes; however it is a fully automatic process. 12. Select Begin. Cash Register Express Page 38 Configuring Cash Register Express Printing Bar Codes Cash Register Express has the capabilities to print bar code labels. You must be registered to use this feature, for more information please contact your pcAmerica sales representative. You must also have your inventory added and a Bar Code printer installed. From the Administrative section of the Manager/Options screen select Barcode Express Note: You can also access the Print Barcodes screen through the Inventory Maintenance screen. Depending on which label printer in the Friendly printer setup is selected will determine which labels will be available to print. After a label printer has been chosen the Print Barcodes screen should appear with a list of your inventory items. Select a Type of Label specific to your printer and choose which item you would like to print. Note: You must add a number for the item you would like to print in the # Labels column. Anything with a zero will not print. Cash Register Express Page 39 Configuring Cash Register Express QuickBooks 1. 2. Select the QuickBooks Sales Pass option from the View Options screen. Make sure QuickBooks is running and minimized when setting up the interface. 3. Select the Configuration button in the General Sales tab. 4. In the Company File field select Load and search for your company file you created with QuickBooks. Under Transactions enter the information according to how you want everything to be exported into QuickBooks. Make sure to do this for, Sales, Tax, PO, TimeSheet, AR, Misc, and ExportDates. Select Save and Exit when you are finished. 5. 6. * These instructions assume you have setup a Chart of Accounts in QuickBooks and that correspond to the data you want to export. 7. 8. Enter dates in the Export Dates tab. Select (in each tab) which fields you want exported by checking the boxes. 9. Select the Export Now button. 10. Your POS data should now pass to QuickBooks. Note: Cash Register Express exports to the Pro, Premiere and Enterprise versions of QuickBooks 2007 and up. For More information on exporting to QuickBooks please see: http://faq.pcamerica.com/software/accounting Cash Register Express Page 40 Configuring Cash Register Express Speed Tips for Retail Stores Retail Stores increase throughput, customer satisfaction and overall profits by streamlining their operations to be as efficient as possible. Reducing transaction time by a few seconds can have substantial results. Cash Register Express is designed to provide the fastest checkout possible. Below are a few tips on how to speed up the check out and payment of every customer. Swipe-and-go credit card processing. In order to pay by credit card, most point of sale systems require selecting a PAY or TENDER button and then the selection of the CREDIT CARD tender type. CRE is easier and fast; simply swipe the credit card on the menu screen. As soon as the card is swiped CRE will process the card. Eliminating these two button presses shaves a few valuable seconds off every credit card sale. Quick Tender button (configured in the Quick Invoicing and Alerts tab of the Setup Screen) turn on quick pay buttons for cash; this will turn on $1, $5, $10, $20, $50 and the next even dollar amount as fast payment buttons for speedy cash payment. Customizing buttons on the invoice screen can be used to dramatically increase the speed of checking out a customer. The buttons should be color coded so your staff can associate a certain color with a certain product. Therefore, eliminating the need to search for an item every time. For example, in a grocery store you may want the color of your produce button to be green. Secure Login Cards are a fast and secure way to log servers into the system. Typing an ID and password (or a PIN code) takes a couple of seconds longer than swiping a card. Cash Register Express Page 41 Common Retail Functions Select a Customer Selecting a Customer for the Invoice Customer tracking is a very valuable function of Cash Register Express. The Tracking Your Customers section of this manual (and the built-in F1 Help Section) describes how to add and modify customers and loyalty plans. To select the customer for an invoice, follow these steps: Select the Find button on the invoice screen to bring up the Select Customer screen. The Quick Search button triggers a quick search by scanning, typing or a swipe of the customer card. The Select Customer screen is an easy screen that allows you to search by first name, last name, customer number, phone number and company name. You don’t have to select which criteria you are searching on – you can simply type the information and it will search all fields. After you find the customer, highlight the specific customer and select the Enter button to select them for the invoice. The selected customer’s name and bonus activity will appear under Customer Info. Select the Customer Info area to see a Bill To, Ship To address and Picture. You can configure all customer information under the F4-Customers Tab at the bottom of the Invoice Screen. The fastest way to select a customer is to swipe their loyalty card at any time in the invoice screen. In addition to fast customer selection, loyalty cards are a physical reminder of your business. Please contact the pcAmerica Sales Department to purchase customized loyalty cards with your logo. All items sold to the selected customer will appear in that customer’s sales history in the reporting screen and the Customer Sales History in Customer Maintenance. Cash Register Express Page 42 Common Retail Functions Delete, Discount, Quan Change and Price Change Retail stores often need to modify an order for a variety of different reasons. CRE provides delete, quantity change, price change and discount functions that are logged upon their use. In addition, the Up and Down arrow keys allow for easy access to any item on the invoice. An item delete, price change, and discount are all permission based functions that can be set to be accessible for managers only. These permissions are configured in the Employee Maintenance screen (Please see the Tracking Your Employees section for further details). A cashier can use the Quan Change button when there is more than 1 of the same item. They can scan or enter the item again or select the item on the invoice grid by scrolling to it with the Up and Down arrows and select the Quan Change button. CRE will then ask to enter the quantity. A cashier can also select the Quantity box at the top of the invoice screen and enter the correct amount, before scanning the items bar code. Cashiers can delete items if they made a mistake ringing in the wrong item or if the customer does not want it anymore. Select the item on the invoice grid and select the Delete button. Note: When you delete an item with quantity changes, all of the items will be deleted. Select the Discount button to discount individual line items on the invoice grid. Select the specific item on the invoice grid and choose the Discount button. Next the user will be prompted for a discount percentage. You can also discount the entire invoice by going to Options - [2] Invoice Properties – [A] Discount. Cashiers can also have the ability to change the price of an item. If a sale item was not discounted properly at the register a cashier can choose the item on the invoice grid, select the Price Change button and enter the correct price. Discounts will show next to the item on the invoice grid. To remove a discount you must delete the item and ring the item in again. Cash Register Express Page 43 Common Retail Functions Purchase Orders The Purchase Order screen allows you to create and update purchase orders. To access this screen, select Purchase Orders from the Administrative menu in the Options Screen. Note: When you login to the Purchase Order screen your open Purchase Orders will be displayed The main screen, displays all open purchase orders: Feature PO # Date Ref # Vendor # Due Date Status Total Cost Order by Destination Store ID Description This is the purchase order number. It is assigned by CRE and cannot be modified. This is automatically set to the current date. It cannot be modified. This is an optional field and is assigned by the user. After you have entered the vendor through the Vendor Maintenance screen select the vendor you are purchasing the order from. You must enter a due date for each purchase order. This is the date by which the order should get received. This is the current status of the purchase order: O-open, C-closed, V-voided. This is the Total Cost of the order. It is automatically calculated by CRE and cannot be modified. Select Individual to order by individual item or select Case to order the item by the case. Select the store ID to which this order should be shipped from the pull down menu. Cash Register Express Page 44 Common Retail Functions Creating a Purchase Order To create a Purchase Order go to the Options Screen and select the Purchase Order tab in the Administrative menu then select Add. 1. Select the type of request you wish to perform (Standard Purchase Order or Return to Vendor). 2. Select a vendor and a Due Date. All the other fields are optional. 3. Pick a store destination and an order by selection. 4. Select the Add Items tab at the top of the page. 5. Select the appropriate vendor. You will see all the items you order from that vendor in the Inventory Selection Grid. 6. Select a Destination Store ID. 7. Choose an item by double clicking next to the Item Number. It will be added to the Added Inventory Grid. 8. Select Save to save your changes. TIP: In order to use the Reorder Low Stock Items feature, it must be set up in Inventory Maintenance (Ordering Info tab). When setup properly, once your stock level hits the reorder level you established, this feature will automatically (when you select it) reorder all the items to equal the Reorder Quantity + the Reorder Level. Example: If you want 10 cases of bottled water on hand at all times and want to reorder when your stock level is at 2 cases. Set the Reorder Level to 2 and the Reorder Quantity to 8. For more information on exporting to Purchase Orders see: http://faq.pcamerica.com/file-lockers/pdf-locker/Vendors_and_Purchase_Orders.pdf Cash Register Express Page 45 Common Retail Functions Receiving Purchase Orders To receive a purchase order, enter the Purchase Order screen through the Administrative menu in the Options Screen. 1. Select the Purchase Order you would like to receive by double clicking to the left of the PO #. 2. The General Info screen will appear, displaying the PO # in black bold letters. 3. On the bottom of the screen are some receiving options tabs, along with a Receiving Screen button on the right hand side. 4. Select Receive All to receive all the items on the Purchase order. 5. To receive one item on the PO, select Receive Item. You will be prompted to enter the Line number. Note: The Print tab will print the current PO and the Print History will print out a detailed record of all the items received against the current PO. Cash Register Express Page 46 Common Retail Functions Back Orders This screen displays either the items that are currently on backorder for a selected customer or the customers for whom a particular item is on backorder. The grid will display the date the backorder was placed, customer number, item number, item name, the quantity placed on backorder for the customer, the current quantity in stock, amount paid, whether or not the backorder was prepaid, and the invoice number. To view items on back order for a customer To view which customer has placed a certain item on back order Type the desired customer number in the For Customer # field. Only backorders for the entered customer will be displayed. Type the desired item number in the For Item # field. Only backorders for the entered item will be displayed. There are three options for displaying backorders. Select All Open Backorders to display all backorders that have not yet been filled. Select Backorders Covered by Stock to only display backorders for items that are currently in stock. Select Backorders Not Covered by Stock to only display backorders for items that are not in stock. To fill a backorder, double click on the desired backorder or highlight the desired backorder then select Fill Backorder. The item will be added to the current invoice. Cash Register Express Page 47 Common Retail Functions Void an Invoice/Pullback an Invoice Checks can be voided before they are paid for and closed out. They can also be voided AFTER being paid for as long as it is within the same day by pulling back the check. To void a check before it has been paid simply select the Void Invoice selection in the Invoice Menu. This permission based function will save the invoice as a voided invoice with the next invoice number in sequence. The voided invoice totals will not be included in the sales totals. You can also use the Void Invoice button on the Invoice Screen or press Ctrl + V on your keyboard to perform the same function. A check may be re-opened after it is closed out as long as the day hasn’t been completed (by running an End-of-Day). After the check is re-opened you can either void the check (by using the Void Invoice selection as described above) or you may modify it and re-close it to another form of tender. To re-open a check, use the Pullback Invoice button inside of the Options Screen ([1] Cashier – [O] Pullback Invoice). CRE will ask you which employee committed the invoice you would like to pullback followed by a listing of invoice numbers closed out by the selected employee. After the invoice is reopened it is as if it was never closed out. For more information on invoice edits in CRE please see: http://faq.pcamerica.com/file-lockers/pdf-locker/Invoice_Edits_CRE.pdf TIP: A few of the reports inside of the Reporting Screen can be generated for voided invoices. It is good practice to run these reports on a regular basis as post voiding of checks opens up opportunity for theft. There are valid uses of the void function; an audit trail is kept to protect against theft in such a fashion. For more information on printing reports please see: http://faq.pcamerica.com/software/screen-explanations/reporting-screen Cash Register Express Page 48 Common Retail Functions Sell and Redeem Gift Cards and Stored Value Cards Gift cards and stored value cards are tracked inside of Cash Register Express with no transaction fees. They can be sold for any value. In order to sell a gift card select the Sell Gift Card feature in the Invoice menu. Swipe the new card and enter the dollar amount you wish to sell the gift card for. A gift card does not become active until the transaction is fully paid for and completed. To pay by gift card, simply choose the Gift Card button from the Payment Screen. You do not need to enter the amount tendered, as Cash Register Express will automatically calculate the most desirable amount. A box will pop up asking you to swipe the gift card; swipe the card and CRE will deduct the proper amount from the gift card. If the gift card balance is more than the total amount due then CRE will deduct the amount from the gift card. If the balance is less, CRE will exhaust the balance on the gift card and display the new amount remaining to be paid by another form of tender. NOTE TO FRANCHISEES: The internal gift card system is ideal for single unit stores. For multiple store locations the use of gift cards across all of your stores require the use of a third party gift card processor. Please contact the pcAmerica sales department at 1-800-722-6374 for more information. Cash Register Express Page 49 Common Retail Functions Clocking Out and Closing Out a Day There are two steps to closing out a day in at a store. First, every employee should Clock Out of Cash Register Express. Employees can clock out by selecting the clock out button on the Login Screen. A Shift Report will print out for the cashier providing it is setup in the Job Code Setup screen. After each employee is clocked out, the manager of the store should run the End of Day function within Cash Register Express. The End of Day will scan all the checks for the day and ensure that they are all closed out, and that all of your employees are clocked out of the system. Cash Register Express will prompt the manager for the amount of cash at the end of the day. This cash figure is a total for all cashiers for that shift. The store over/short amount will be printed in the Daily Close report as well as other vital information detailing the activities at the store for that day. This report can be re-printed in the future from within the Reporting Screen. The End of Day function is subject to the Perform End of Day permission in the Reporting tab of the Employee Maintenance screen. Please see the Tracking Your Employees section for an explanation of how to configure permissions. NOTE: If using a credit card processor that requires the batch to be performed manually it is recommended that this is done prior to the End of Day being performed. NOTE: It is possible to automatically settle when running the End-of-Day by using the Perform Batch Settlement On EndofDay option on the Other Options tab of the Payment Processing section of the Setup Screen. Cash Register Express Page 50 Tracking Your Customers Customer Maintenance Screen The Customer Maintenance screen is used to add and update your customers. One customer is displayed at a time. Detailed information is stored in the tabs across the top of the screen. This screen is fully touch screen compatible, meaning you can double select any field (or select the field and then the keyboard button) to bring up an on screen keyboard. Each customer within Cash Register Express must have a unique customer number. It is easy to use the phone number as the customer number, as this provides a fast and easy way to look up a customer if they forget their membership card. Loyalty and membership cards are easy to assign to a customer. Below the Card Swipe Ids label, select the Add button and swipe or scan the loyalty card. The General Info tab stores basic information such as name and address. Extended Info has less commonly used information. Information regarding accounts receivable is stored in the Account Info tab. Optional Ship To and Bill To addresses are stored in the Shipping\Billing tab, followed by the History tab which stores a detailed purchase history for the current customer. The Notes tab has an open notes section. Track Your Customers Remember, your customers are a very important part of your business. You purchased a point of sale system that provides several great tools to track your customers and get them back into your store. You have the tools – now use them! Enter their name, address, phone number, e-mail address and other information. Run reports to see whom your best customers are; perhaps once a year you should have a special free product coupon for your best customers where you spoil them with something free and extra service. Configure customer loyalty plans to reward your loyal customers. Send mass e-mails with news and specials about your business. Remember your customers and they will remember you. Cash Register Express Page 51 Tracking Your Customers Adding and Modifying Customers Adding customers in Cash Register Express is easy. Use the Customer Maintenance screen to add your customers; this screen can be accessed in the Administrative tab of the Options Screen. 1. Inside of the Customer Maintenance screen, select the Add button on the bottom of the screen. This will set the screen to add mode, during which CRE is waiting for you to enter the information for the new customer. 2. Fill in the information on the top; a unique customer # as well as the customer’s first and last name is required. An e-mail address is highly recommended. 3. Optionally, fill in other pieces of information such as the phone number, name, company, etc. 4. To assign a loyalty card to a customer, select the Add button under Card Swipe IDs and swipe the loyalty card through your magnetic stripe reader. Loyalty cards are a great way to increase repeat business. You can order customized loyalty cards with your logo from pcAmerica. 5. Select the Save button to save the new customer in the database. Modifying customers is just as easy. First search for the customer you want to modify (using the Look Up button on the bottom left corner of the screen). Make your changes to the customer record and select Update at the bottom to save the updated information. Cash Register Express Page 52 Tracking Your Customers Accounts Receivable and Customer Loyalty Accounts Receivable Cash Register Express gives you the ability to open accounts for your customer, charge on account and send statements out at a later point in time. These features, as well as the ability to make payments and credit balance are part of the built-in Accounts Receivable system. To open an account for a customer, find the customer inside of Customer Maintenance and select the O button in the Account Info tab (and save the changes). Select the Detailed Account Info button next to it to access the payment and credit screen, where you can apply payments to open balance and print customer statements. Customer Loyalty Offering incentives and bonuses to your customers is a great way to earn their loyalty and bring them back to your store many times in the future. Some great examples are a floral shop that offers a free bouquet on your birthday and may also mail coupons with discounts based on how many times you visit – people continue to shop there to earn their points. The coffee shop downstairs from the pcAmerica office earns the majority of the coffee business in the building by offering a buy 9 get the th 10 free coffee special. Many stores offer $ 2 off a purchase if you come back within a week of your last visit. These, and more, can be achieved through the use of the loyalty features built into Cash Register Express. Most stores that offer loyalty plans will give out a loyalty card that the customer carries as a physical reminder of the store. They swipe their card at the time of sale in order to earn their loyalty points for the order. Customized loyalty cards are available from pcAmerica and may be assigned to customers inside of Cash Register Express. It’s easy to set up customer loyalty inside of Cash Register Express. In the Options Screen, select the Customer Loyalty function. You must create both Loyalty Incentives and Loyalty Plans. Incentives are the actual rewards you give to your customers, such as a free meal or $ 2 off the next purchase. Plans consist of one or more incentives. After you have created a loyalty plan, you can assign it to a customer by selecting the Loyalty Plan button in the customer’s record in Customer Maintenance. The F1 Help Section includes a full description and tutorial for configuring loyalty incentives, plans and assigning them to customers. Using the Customer loyalty feature across multiple stores requires a third party processor. For help acquiring a third party processor please call your sales representative for assistance. Sales: 1-800-722-6374 Cash Register Express Page 53 Tracking Your Customers Customer Loyalty Customer Loyalty is great way to get repeat customers and increase sales. By offering your customer incentives to shop in your store, they will have a more enjoyable and rewarding shopping experience. This guide will focus on setting up a loyalty plan that will give a free gift card after 10 points. Customer Loyalty in CRE is used in conjunction with the Customer Maintenance screen and Bonus Points. In order to set up a loyalty plan you need to first set up a customer in Customer Maintenance, (see the Adding and Modifying Customers section of this manual) then create a loyalty incentive (the bonus you give the customer when they achieve a certain goal), add the incentive to a plan (similar to adding modifiers to a modifier group), then finally adding the loyalty plan to the customer it will apply to (adding the modifier group to the standard item). Setting the Bonus Points for Certain Inventory Items Each item in inventory needs to be assigned a certain number of bonus points. For example, an apple pie may get 3 bonus points, whereas a steak dinner gets 7 points. 1. Select the Manager or Options button. 2. Enter the administrator password (default: admin) where applicable. Select Administrative and then Inventory Maintenance. 3. 4. After selecting an inventory item, set the Bonus Points section to the amount of bonus points you want to give for this item. Cash Register Express Page 54 Tracking Your Customers Configuring Loyalty Incentives 1. Select the Manager or Options button. 2. 3. Enter the administrator password (default: admin) where applicable. Select Setup then Customer Loyalty. 4. Select Loyalty Incentive. 5. Select Add in the bottom left of the screen. 6. Enter a Description. 7. Select the type of Incentive (we will focus on Points Rewarded which means after a certain amount of points are achieved, the bonus will be rewarded). 8. Set 10 for Give Rewards after how many points. 9. Select Free Gift Card. 10. Enter 5 for Gift Card Value. 11. Select Save. Cash Register Express Page 55 Tracking Your Customers Configuring Loyalty Plans 1. Select the Manager or Options button. 2. 3. Enter the administrator password (default: admin) where applicable. Select Setup then Customer Loyalty. 4. Select Loyalty Plans. 5. 6. 7. Select Add. Enter a Description for the plan. Check Accumulate Points (This will mean that bonus points will add up over time instead of being reset after each sale). 8. Select Add Incentive. 9. Select the inventive you want to add to this plan. (Whatever you named the incentive from the previous step.) 10. Select Save. Cash Register Express Page 56 Tracking Your Customers Adding the Loyalty Plan to a Customer 1. Select the Manager or Options button. 2. Enter the administrator password (default: admin) where applicable. Select Administrative then Customer Maintenance. 3. 4. 5. 6. 7. Select the customer you want to add this plan to. Select the big blue Loyalty Plan: None Box. Select the appropriate loyalty plan from the list. Select Update in Customer Maintenance to save changes to the customer. Cash Register Express Page 57 Tracking Your Customers Triggering the Bonus Plan 1. 2. 3. 4. 5. Ring up a sale as normal. Before paying out the sale, make sure to select the customer (or swipe their card) so they get the appropriate bonus points for their plan. The bonus points earned and bonus point balance will print on the receipt. The bonus point balance will also appear in the customer section of the invoice screen. You will see that when the customer has reached the bonus point level they will NOT get their incentive. The customer will not receive the incentive until the next transaction. Cash Register Express Page 58 Your Inventory Inventory Maintenance – Adding and Modifying Items Cash Register Express allows you to create inventory items, create linked inventory, create sale pricing, track inventory and configure retail and other inventory items. Creation and modification of these inventory items, as well as coupons, is done through the Inventory Maintenance screen which can be accessed from the Administrative section of the Options Screen. A full tutorial of this screen is in the built-in F1 help section; below are some basic pointers to get you started. You can add standard items from the Inventory Maintenance screen. Adding them through the Inventory Maintenance screen gives you more options and flexibility. Select on the Add button to add a new item. You’ll have a choice of four different types of items: Standard Item encompasses all inventory and SKU based retail items. A Choice Item is not a real item, but rather it is a fake item that when “sold,” gives you a choice of which item to sell. For example, you can create a Corkscrew choice item whose choices would be Waiter Corkscrew, Metal Corkscrew and Fancy Corkscrew. The advantage is one inventory button that drills down into choices, as opposed to an overwhelming number of on screen inventory buttons. The Modifier Group is used to group modifiers together. For example, if you have modifier items Small Vase, Large Vase and Bouquet Wrap, for your flower bouquet you can group them into one modifier group called Flower Presentation. Using modifier groups simplifies creation of menu items; instead of adding four modifiers to many flower bouquets, you can add the group once to each item. Note: This feature is mostly used for restaurants. Coupon items are created to give the customer a discount. They can be configured to give a flat amount or percentage off an entire check or only specific items. Coupons automatically calculate the discount amount based on price paid, date and time and other options. (For more information see the Coupon section.) Kit Items are created in order to group items together to sell them at a discounted rate. Fill in the data for the item and select Save. The most important fields for a standard item are the item number (must be unique), description, cost, price and tax rates. Modifying an item is just as easy. Select the Lookup button on the bottom left, find the item in the list and select it, modify the item and select Save Changes to update the item. Cash Register Express Page 59 Your Inventory Sale and Special Pricing Special pricing is an extremely powerful feature of Cash Register Express. A variety of sale and promotional pricing can be configured at any time; these prices will automatically be used when the cashier rings in the items. For example, sale pricing on specific items can be pre-configured; during the allotted times the special/sale price will automatically be used without the cashiers having to apply a discount. There are three main types of special pricing: Sale Pricing: This function allows you to place an item on sale between certain dates. To create sale pricing for an item, select the Add button in the Special Pricing tab under the Inventory Maintenance screen. Enter the percent of the sale mark down and select the start and end dates for the promotion. To remove a sale price for an item, select the desired sale price then select Remove. To place an item on sale for only one day, select the same day for both starting and ending date. Example: All Juicy Couture Sweatpants 10% off next week. Bulk Pricing is used to sell items at a reduced price when your customers buy more than one of an item. To set up a bulk price for an item, select Add, enter the quantity needed to be purchased for bulk pricing, and then enter the new price. To remove a bulk price for an item, select the desired bulk price then select Remove. Note: Bulk Pricing requires that the option Combine Lines is enabled, on the Invoice Settings tab of the Setup Screen. Example: Two Magazines for the price of one. Time-Based Pricing allows you to offer alternate prices on certain days within certain time ranges and is most commonly used for Black Friday (the day after Thanksgiving) or certain days that have designated sales. Retail stores often use time based pricing to attract customers during their non-busy hours. To enter time-based price for an item, select Add, select the day on which you want to offer the sale price, and then enter the start and end times. To remove a time-based price for an item, select the desired price then select Remove. Example: A store may offer a sale on shirts during Fridays from 2PM to 5PM for a sale price of $8.00 while the normal price is $12.00. TIP: If Black Friday is 7 AM to 4 PM, start your time-based price at 6:50 AM and end it at 4:10 PM. You may sell a few extra discounted items, but you will also avoid annoying a customer who is on line at 4:02 PM and wants the discount. Note: The special pricing can only be used for a sale price or discounted price. You cannot increase the cost of an item in special or sale pricing. Cash Register Express Page 60 Your Inventory Categories and Departments Retail stores can carry anywhere from a few dozen items to hundreds of items and more. Regardless of how many inventory items your business sells, it is useful to break your items down into smaller groups of items to perform a certain task or search. In Cash Register Express, items can be grouped into Departments. Departments can be further grouped into Categories. A few examples of departments are Jeans, Fruits and Wines. Common choices for categories are Produce and Clothes. The category breakdowns are easy to see which area of store is bringing in the most profit. Please note that Cash Register Express comes with a default department of NONE. This department cannot be deleted. The Department Maintenance screen can also be used to set up employee departments, which allows you to group your employees in different ways for functions such as labor scheduling. See the Department Type description detailed in the F1 help section for more details. You can access Department Maintenance from the Administrative tab of the Options Screen. To add a department: 1. 2. 3. 4. 5. 6. Enter the Department Maintenance screen. Select the Add button. Type in a Department ID in the corresponding box (ex: Magazines). Type in a Department Description box in the corresponding box (ex: US Weekly). Select a category and department type (or leave these as is). Select the Save button. Optionally, you can check the Bar Tax Inclusive check box which will enable bar tax for all the items in that department. This only works when the certain items are ordered and immediately paid for at a bar station or any other station. This provides for a fast cash transaction where the tax is built into the price for an even round number. Categories are configured in the Category Maintenance screen, which is accessible through the Department Maintenance screen. Adding a category is nearly identical to adding a department. Cash Register Express Page 61 Your Inventory Inventory Track Express Every store must take physical inventory periodically, even when using a point of sale system. It is important to compare how much of each item you really have as opposed to what the computer tells you. By doing physical inventory, you will find where inventory shrinkage occurs. You may also find areas of your store that are more prone to theft. Tracking your inventory closely will actually save lots of money as a result. Inventory Track Express is a tool that has been incorporated into Cash Register Express that acts like a physical inventory control panel. You can do a physical count by selecting the Print Worksheet button, which will print a list of all inventory with the stock level in CRE, and a place to enter the actual count. You may use portable data terminals (Handheld units), for fast and easy inventory counting. pcAmerica has created a program called Pocket Inventory for these handheld units. Pocket Inventory has 3 main functions: Count Inventory A quick, point and scan, inventory counter. Just point the Handheld’s bar code scanner to the bar code and scan it. Pocket Inventory will then prompt for the number of this item is in your inventory. Edit Inventory You can download your inventory from CRE to Pocket Inventory. This feature will allow you to be out in your store, bring an item onto the portable unit's screen and edit the description, cost, price, tax status, and quantity. You can download the open Purchase Orders from CRE to Pocket Inventory. You can also create new Purchase Orders as well as DSDs (Direct Store Delivery). Once the PO shipment arrives, you may use Pocket Inventory to bring up the purchase order information, scan the items on the shipment to mark down what was received. Purchase Orders Cash Register Express Page 62 Your Inventory Mass Transfer & Returned Items If you are a retailer that has multiple stores, CRE has the capabilities to transfer inventory from one store to another. The Inventory that is depleted or added will automatically be reduced or added to that store’s inventory. To access the Transfer inventory feature select the Transfer button inside the Inventory Maintenance screen. The Mass Transfer screen will allow you to scan or manually enter the item(s) you wish to transfer Select a Quantity. Select a Source Store ID and Destination Store ID. Select Transfer. Note: You can either transfer out from the host store or accept a transfer into the host store from a different location. Returned Items Cash Register Express has a simple solution for returns. When an item comes back, enter a negative number in the Quantity field and scan or enter the item. Close out the transaction like a normal sale (cash/credit/debit etc). You’ll see the price in parentheses ( ) indicating a negative sale and a red bar in the invoice grid. Cash Register Express Page 63 Your Inventory Choice Items A Choice Item is a not a “real” item, but rather provides a way to have the user choose from a list of actual items in your inventory. For example, if have a liquor store that sells a METAL CORKSCREW and a WAITERS CORKSCREW, you can create a choice item called Corkscrew. When you sell this choice item, you will be prompted to choose which of the two corkscrews is being sold. This simplifies your on screen inventory – you can replace two buttons for Corkscrew on the screen with one button that drills down into a choice of Corkscrews. Choice items are primarily used to limit the number of items on the main invoice screen and provide drill downs for quicker, easier selection. In the example above, the choice item is the “fake” item called Corkscrew. The items included inside of the choice item are the “real” items, the choices that are displayed when you “sell” the choice item. In this example, the “real” items would be; METAL CORKSCREW and WAITERS CORKSCREW. Some retail stores may use this for a clothing menu. The person configuring the inventory would create all their clothes as standard inventory items, and create an “H Clothes” Choice, with all clothes that start with the letter H inside of it. Instead of scrolling through searching for Hanes, the cashier can select H and see a drill-down with Hanes amongst a few other clothes that begin with the letter H. When setting up a Choice Item you can include a Prompt which is the question that is asked to the server when provided with the individual choices. For the above example, a suitable question would be “What Style Corkscrew?” Cash Register Express Page 64 Your Inventory Coupon Items Coupons are commonly used in retail stores. A couple of examples are buying one greeting card getting one free on Thursday and 10% off all Magazines 3 – 5 PM daily. In order to account for the wide variety of types and restrictions of coupons in the retail business, the Cash Register Express inventory screen includes an item type just for coupons. Coupons may be configured to give either a percent or a flat dollar amount off the Grand Total. Redemptions of a coupon appear as a sale of an item for a negative dollar amount. It is a good idea to put all of your coupons in one department for easier reporting. Creating a coupon is easy, by following these simple steps you’ll be able to discount items with your newly created coupons. 1. Select the Manager or Options button. 2. Enter the administrator password (default: admin) where applicable. 3. Select Inventory Maintenance in the Administrative Tab. This will give you access to the inventory maintenance screen. Cash Register Express Page 65 Your Inventory Coupon Items The Days Valid tab is used to set what days and time the coupon is valid. Use the Add Time and Delete Time buttons to configure the times. You may also set the expiration date for a coupon date by checking the Does this coupon expire? check box and filling in the expiration date. 1. Select Add Item. 2. Select Coupon. 3. Fill out the appropriate information for the item. a. Select the Department. b. Input an Item Number. c. Select the Discount Amount or Discount Percent (make sure you choose a negative number). d. Select whether the coupon expires and if it does, when does it expire. e. Set which days and times the coupon is valid. The Restrictions tab allows you to specify which items, departments or categories are included or excluded in the coupon discount. Coupons can also be made exclusive of specific items; this feature is often used to restrict a check to include only one coupon. 4. Select the Restrictions Tab. a. 5. Set which restrictions you want (e.g. what items are exempt from the coupon). Select Save Changes. Cash Register Express Page 66 Your Inventory Coupon Items In the Restrictions Tab there are a number of options, including a minimum dollar amount, number of days between use and other restrictions to make your coupons more customizable. Listed below are the restrictions and their most common uses; Include: Will include these category/department/items for the coupon. Exclude: Will NOT include these category/department/items for the coupon. Exclusive: When adding this coupon to the exclusive list will mean it can only be used once on the invoice. Minimum Amount: The minimum dollar amount the invoice has to be to trigger the coupon. # Days Between Use: Days allowed between coupon use. Include all items besides above exceptions: Can be used to save time instead of including and excluding, just check this and exclude what you don’t want. Apply only to parent items: Not valid on modifiers. Apply to items using special pricing: This will allow the coupons to be applied to items where special pricing has been enabled. Only allow through bonus plan: Only applicable if triggered through a loyalty plan. Suppress Bonus Points of Affected Items: If coupon is used, you do not get loyalty plan points on this invoice. Allow on Deposit Invoices: Here you can specify whether or not coupons can be applied to items on a deposit invoice (layaway invoices for example). Apply to already discounted items: Whether or not it can be applied to invoices with previous line discounts, etc. Require Permissions: Whether the employee needs permission to ring up the coupon. Using the coupon 1. Ring up an invoice as normal. 2. Select the Inventory item for the coupon. (You will notice an invoice item show up within parenthesis denoting a negative priced item.) 3. Notice the grand total is now discounted the amount of the coupon. Getting Deeper Take some time to experiment with the different options within Inventory Maintenance for coupons. You can limit the items the coupon is valid for (by department, individual item, or category) the times the coupon is valid (down to the minute), and everything in between. Cash Register Express Page 67 Your Inventory Setting up The Recipe Feature Retail Stores need to keep track of unit sales that make up a carton or case of the same item so that they will be "broken open" when necessary. Common examples include packs of cigarettes or cans of beer or soda. Cash Register Express includes a Recipe feature that simplifies this task. This section describes how to add individual packs and cartons of cigarettes to your inventory, but the same procedure can be applied to any item you sell as singles or in bulk of any quantity. The basic steps are: Add a Carton of Cigarettes to Your Inventory. Add an Individual Pack of Cigarettes to Your Inventory. Define the Recipe for a Carton of Cigarettes. Cash Register Express Page 68 Your Inventory Setting Up The Recipe Feature The first step is to add a carton of cigarettes as a separate item in your inventory. From the Inventory Maintenance Screen: 1. Select [5] Administrative. 2. Select [A] Inventory Maintenance. 3. Select Add Item. 4. Select Standard Item. 5. Choose a Department from the drop-down list (“Cigarettes” in our example). 6. Enter an Item Number. 7. Enter the Item Description (“Brand X – Carton” in our example). 8. Enter the Item Cost (optional). 9. Enter the Item Price (required; $50.00 in our example). Next, you’ll enter the In Stock information for cartons of cigarettes: 1. Enter the number of “cartons” in stock in the # In Stock field. We’ll use 4 for our example (4 cartons constitutes 40 packs as there are 10 packs per carton). 2. Select Save Changes. Cash Register Express Page 69 Your Inventory Setting Up The Recipe Feature The next step is to add an individual pack of cigarettes to your inventory. From the Manager Options window: 1. Select [5] Administrative. 2. Select [A] Inventory Maintenance. 3. Select Add Item. 4. Select Standard Item. 5. Choose a Department from the drop-down list (“Cigarettes” in our example). 6. Enter an Item Number. 7. Enter the Item Description (“Brand X – Pack” in our example). 8. Enter the Item Cost (optional). 9. Enter the Item Price (required; $5.00 in our example). Next, you’ll enter the In Stock information for individual packs of cigarettes: 3. Enter the number of “loose packs” in stock in the # In Stock field. We’ll use 40 for our example. (40 packs constitutes 4 cartons as there are 10 packs per carton.) 4. Select Save Changes. Cash Register Express Page 70 Your Inventory Setting Up The Recipe Feature The final procedure is to create a recipe for a carton of cigarettes so the program will know when a new carton should be opened or “broken into”: From the Inventory Maintenance screen, with the pack of cigarettes item still displayed: 1. Select the Recipe tab. 2. Select Add Ingredient. 3. Locate the carton item you created (“Brand X – Carton” in our example). 4. Double-click on it in the list or select the Select button. 5. Enter .10 when prompted for the Quantity (since there are 10 packs in a carton, the th software calculates it as 1/10 of the carton) and select OK. 6. Enter 0 when prompted for the Yield amount (since there is no “wasted” quantity in this recipe) and select OK. 7. Select Save Changes. In the Restaurant tab of the Reporting Screen, run the Ingredients – Theoretical Usage report to view a list of all ingredients that should have been used based on the sales recorded within the selected date range. You can compare this list to your actual ingredients to determine if anything has been stolen. Tip: Use the Ingredients – Theoretical Usage report for last weekend to see what items you need to have in stock this weekend. If you only sold 10 packs during Sunday, this report will help save you from purchasing more than one extra carton for this Sunday. Cash Register Express Page 71 Your Inventory Setting Up Retail Items with and Without Barcodes Cash Register Express allows you to configure, ring up and track the sales of SKU based items with bar codes. You can also track retail items that do not have bar codes. To do this, add a standard item to your inventory. Scan (or type) the bar code or unique item number into the Item Number field. The main fields on the top third of the screen should be filled in for every retail item you carry in your store. It is easy to ring up a SKU based item inside of Cash Register Express – simply scan the item at any time during the transaction using a bar code scanner. The quantity sold will deduct from the in stock value in the Inventory Maintenance screen. There are a variety of useful inventory reports in the Reporting Screen to help you track your retail items. The simple numerical and alphabetical listings will show you what is currently in stock. More advanced reports, such as the Item Activity Report will show you what was sold and received of each item between date ranges. For instructions on creating new inventory items please see below: http://faq.pcamerica.com/software/inventory/creating-new-inventory-items For a screen breakdown of the inventory maintenance screen please see below: http://faq.pcamerica.com/file-lockers/pdf-locker/Inventory_Maintenance_Screen.pdf Cash Register Express also has a built in Purchase Orders screen (accessible from the Administrative tab of the Setup Screen). This screen can be used to place orders for items, print purchase orders and at a later time receive the items when they arrive at your store. You can learn how to use the Purchase Orders feature by reading F1 Help Section or by viewing the link below: http://faq.pcamerica.com/file-lockers/pdf-locker/Vendors_and_Purchase_Orders.pdf Cash Register Express Page 72 Your Inventory Kit Items Efficiency is an important part of a point of sale system with fast and easy checkout and inventory tracking. With Kits, you can speed up the process of selling multiple items as a package deal. At the same time, each item within the package gets accounted for in your inventory. A kit is similar to an inventory item, where you can assign a bar code (item number) for easy addition to the invoice. It will automatically add all items within that kit to the invoice as well. This feature works well with gift baskets from a department store, flower arrangements from a florist, or even a stereo system with components. The Inventory Maintenance screen is an easy way to configure kits. Accessing Inventory Maintenance 1. Select the Manager or Options button. 2. Enter the administrator password (default: admin) where applicable. Select Administrative then, Inventory Maintenance. 3. To setup a kit, a department and inventory items (the items to be a part of the kit) must already be created. Cash Register Express Page 73 Your Inventory Kit Maintenance 1. Select Add and then select the department which the items are located in the Department for this Item field (i.e. Combo Meals). 2. 5. Give the kit an Item Number and Description and (if applicable) an Override Price. Select a tax to be applied (if applicable) and if the kit requires the customers ID to be checked. Select Add Item and select the items that are to be a part of the kit (i.e. Diet Coke and French Fries). Select Save and then Exit. 6. Under Combo Pricing select how to charge for the Kit: 3. 4. Use Calculated Price: This option will total the prices for the inventory added to the kit/combo. After adding the prices together of each item that is part of the kit/combo it will then check the tax settings for each item. Use Override Price: This option will disregard all price and tax settings for the items in Inventory Maintenance. CRE/RPE only looks at the Override Price that the user sets for the Kit/combo. Use Grid Pricing: This option will look at the specific settings of each item in the Grid. The grid by default will use the normal price set in inventory maintenance, but you can edit that price in the grid. Cash Register Express Page 74 Your Inventory Kit Maintenance When the kit is scanned or selected for the invoice the items that make up the kit are automatically added to the invoice and the number in stock for each is deducted by how many are sold. To automatically have the items added to an invoice, (that are part of a kit) charge for the kit price the option Auto-Kit / Auto-Combo must be checked on Invoice Settings tab of the Setup Screen. Cash Register Express Page 75 Your Inventory Styles Matrix A matrix is a way to classify an item that has different styles. Styles Matrix allows you to create a matrix for inventory items. For example, you may have a company shirt that comes in four colors (white, blue, black, and green) and three sizes (Small, Medium, and Large). In order to keep track of how many of each color and size you have, you need to use a style, such as Company Shirt. Each size in each color can have its own item number, and you can keep track of how many company shirts you have on hand. NOTE: In order for Styles matrix to be setup a department must first be created in the Department maintenance (i.e. Clothes) as well as a vendor in Vendor Maintenance (e.g. Company Shirt Maker). Accessing Styles Matrix 1. Select the Manager or Options button. 2. Enter the administrator password (default: admin) where applicable. 3. Select Administrative then, Styles Matrix. 4. 5. Select Add Style. Enter a Style Name (e.g. Company Shirts). Whatever is entered here will be set as both the item number as well as the description. 6. Select a Department for the items. 7. Select a Vendor for the items. 8. Enter a Cost and the Price you Charge for these items. 9. Select the tax you would like applied to these items. Cash Register Express Page 76 Your Inventory Styles Matrix 10. Select Auto-Generate Item Numbers to have the software generate item numbers based on this format “Item Number – Size –Color” (e.g. Company Shirts Large White). 11. Go to the In Stock Matrix tab and select Add Size and enter a size for your matrix (e.g. Small, Med, Large). 12. Select Add Color and enter the colors for your matrix (white, blue, black, and green). Note: these steps must be done for each size and color in the matrix. Select Save Changes. 13. Select a cell (a color and size) then select Instant PO and enter a number in stock (e.g. 20.). 14. Select Ok. 15. Select Save Changes. Note: The Instant PO process will need to be done on each cell you would like to add inventory to. Cash Register Express Page 77 Your Inventory Styles Matrix 16. Open Inventory Maintenance go to lookup and sort the list to only display the (Clothes) Department. You will see that the items that were created in the matrix are now present in your inventory. Cash Register Express Page 78 Tracking Your Employees Employee Maintenance – Adding & Modifying Employees It’s important to track your employees and configure functions they have access to within your point of sale system. Employees and security, as well as job codes and other employee settings, are configured in the Employee Maintenance screen, which can be accessed from the File Menu of the Login Screen. A full tutorial of this screen is in the built-in F1 help section; below are some basic pointers to get you started. The basic steps of how to add an employee are introduced in step three in the 10 Steps to Getting Started. Modifying an employee is just as simple; navigate to the employee you would like to modify using the buttons in the bottom left corner of the screen, make edits to the specific employee and select the Save Changes button to update the employee. Swipe Cards and Security The fastest and most secure way to log an employee into the system is to use a POS Access Card. Alternatively an employee can use a pin number or their username and password, which is not as secure because another employee may watch the login number typed in over their shoulder. When an employee needs to log in or clock in\out of the system or a manager needs to provide override permission, they can simply swipe their card which is faster, easier and more secure than a pin code or user name. POS Access cards can be purchased directly from pcAmerica. To assign a card, swipe the card into the Card Swipe ID field using the MSR. NOTE: The Display Name for an employee will print on an invoice when they are the cashiers. If you desire, fill this field in to make a more personalized receipt. Cash Register Express Page 79 Tracking Your Employees Employee Security and Exceptions Tracking Cash Register Express can be configured in a flexible fashion, allowing you to define which employees can access which functions inside of the system. It is important to understand and properly configure the permissions to ensure employees only have access to the appropriate functionality. Security is a priority within Cash Register Express. The Employee Maintenance screen has dozens of permissions which can be set individually for each employee. Permissions can determine what that employee is allowed to do or what they are restricted from doing. Most of the permissions have four settings: Yes allows the use of a function. No restricts the selected function. Prompt asks for manager’s permission to use the selected function. Override makes the selected employee a manager for the selected function, meaning they can access the function and also give an employee with the Prompt setting permission to use this function. The Exceptions Tracking features of CRE provide a great way to identify and track suspect activity. If you log a certain activity as an exception (ex: Cashier 01 ringing in a discount or Cashier 03 opening the cash drawer for change), CRE will record these instances in Exceptions Logs for later viewing. Even though many of these functions are already recorded for all employees, this will provide you with a list of functions and employees you would like to specifically watch. Exceptions Tracking is a great analytical tool that will provide you with specific lists of activity you define as suspect without having to wade through pages of information. You can view the results in the Operational Exceptions and Invoice Exceptions reports, viewable in the Sales tab of the Reporting Screen. Configuring Exceptions Tracking is easy; simply check the Log as Exception check box for each permission and employee combination that you wish to watch. This setting is configured individually for each employee and permission to provide maximum flexibility. Cash Register Express Page 80 Tracking Your Employees Top Five Employee Permissions and Uses Permission End Transactions Set as Yes No Prompt Override End Cash Transactions Yes No Prompt Override Invoice Discounts Yes No Prompt Override Delete Items Yes No Prompt Override Allow Exit Yes No Prompt Override Reason In order for employees to accept any type of tender and end the transaction this should be set to yes. This will not allow the employee to end any transactions. This will not allow an employee (usually a server) to end a transaction without a (manager) override. This will allow an employee (manager) to allow another employee (Server) who is set to prompt, end a transaction. In order for the server to accept cash as a tender type this option should be set to yes. This will not allow the employee to end any cash transactions. This will not allow an employee (usually a server) to end a cash transaction without a (manager) override. This will allow an employee (manager) to allow another employee (Server) who is set to prompt, end a cash transaction. Employees might have to be able to discount an item or the whole invoice perhaps, a can of corn was damaged and the store discounts 10% for that. This option (when set to no) will not allow your employees to do discounts either to items or invoices. This will not allow an employee (usually a server) to do an invoice discount without a (manager) override. This will allow an employee (manager) to allow another employee (Server) who is set to prompt, perform an invoice discount. This will allow Employees to delete items off the invoice. This option (when set to no) will not allow your employees to delete items on an invoice. This will not allow an employee (usually a server) to delete an item off an invoice without a (manager) override. This will allow an employee (manager) to allow another employee (Server) who is set to prompt, delete an item on an invoice. This will allow servers to exit from the invoice screen. This option (when set to no) will not allow your employees to exit from the invoice screen. This will not allow an employee (usually a server) to exit from the invoice screen without a (manager) override. This will allow an employee (manager) to allow another employee (Server) who is set to prompt, exit from the invoice screen Cash Register Express Page 81 Tracking Your Employees Job Codes, Time Clock, Hours & Wages Job codes and the employee time clock are valuable features that are easy to configure and will help you control your business. Simply put, Job Codes are the different jobs that your employees work inside of your business. A few examples are cashier, janitor, manager and crew member. Job codes can be configured inside of the Employee Maintenance screen (by selecting the Job Code Setup button). You can configure an employee working a certain job code to have access to the POS, if they handle cash and how many shift reports to print at the end of their shift. You can read more about these options in the built-in F1 Help Section. After creating job codes, they can be assigned to an employee using the Add button in the Job Codes & Wages tab in Employee Maintenance. Hourly wages and overtime wages are configured in the same tab. An employee can have more than one job code each with a different wage; when they clock in, they will be asked which job code they are working this shift. Enforcing employees to use either employee maintenance permissions or job code permissions is set in the Setup Screen, under System Access. Use Employee Permissions Will use the permissions set in the employee maintenance screen. Use Permissions of Current Job Code Will use the permissions of the job code that the employee clocks in with. Use Permissions of all Job Codes Assigned to Employee Will use the permissions of all the job codes which are assigned to that employee. Cash Register Express Page 82 Tracking Your Employees Job Codes, Time Clock, Hours & Wages To track the hours worked by your employees, have them clock in by selecting the clock icon on the Login Screen. Staff members use the same icon to end their shift and clock out. In the occasional situation an employee forgets to clock in or clock out, the Time Clock Management screen can be used to modify times. If you want to enforce that your employees clock-in before starting their shift, select the Require Clock-In Before Login option on the Employee Maintenance screen. Typical steps for an employee: 1. Employees and servers clock in when they come in for the day. 2. They take orders and close out checks throughout the day. 3. At the end of the shift, the employee clocks out. 4. A shift report is printed upon clock-out which includes a cash count that shows how much money was taken in and removed. At the bottom is an over\short amount that helps ensure that your servers are properly reporting and turning in the money they collected throughout the day. Cash Register Express Page 83 Reporting How to Use the Reporting Screen Cash Register Express has dozens of built-in reports that help you view and analyze sales figures, inventory and ingredients, efficiency, employee activity, customer history and a substantial amount of additional statistics and data regarding your store operations. These reports are generated from the reporting screen, which can be accessed from the Administrative tab of the Options Screen. There are six categories of reports you can choose from, listed down the left side. To run a report, first select the report you’d like to run by selecting its name in the Report list box. Each report can be customized on the fly by selecting one or more pieces of criteria such as a date range, one or more cashier IDs, one or more registers, etc. For example you can run the Receipt st Listing report to see a detailed sales transaction listing for cashier 01 from April 1 , 2006 through April th 5 , 2006. The built-in reports will satisfy all or most of your reporting needs. Cash Register Express includes a built-in report writer which can be accessed by selecting the Advanced Reporting button. The report writer is for more computer savvy users that are familiar with report builders. Training Sessions on how to use the Advanced Reporting section can be purchased from pcAmerica. Cash Register Express Page 84 Reporting Listing of the Most Useful Reports Most store operators use less than tenth of the built-in reports. It is a good idea to select each report and read the description of what information the report includes. Many users miss out on valuable information simply because they haven’t taken the time to learn the figures that each report generates and how it will benefit their business. Listed below are a few of the most useful reports. Report Name Invoice Totals Report Invoice Totals - Daily Summary Category Sales Sales Grand Totals by Payment Method Sales Detailed Daily Report Detailed Department Sales General Hourly Report Grand Totals by Date Receipt Listing Shift Summary Financial Summary Sales Sales Sales Sales Sales Sales Sales Detailed report with payment breakdowns (receipt printer). Breakdown of items sold by department. Breakdown of income by hour within a day. Quick figure of how much was sold in a date range. Detailed summary of each check within a date range. Summary of each employee’s shift. Detailed “picture” of your business within a date range, gathering all of your key figures in one compact report. Invoice and Operational Exceptions List Alphabetical Reorder Report Top Sellers Discrepancy Report Sales Top 10 Sellers Pending Orders \ Details A/R Summary Purchasers of Item Inventory Inventory Customer Customer Sales History Hours and Wages Employee Listing Commissions Customer Employee Employee Employee List of functions that you have identified as suspicious with employee ID and manager ID. Useful to prevent theft. Summary of your in stock inventory and value. Breakdown of items sold. See your best selling items. Identify what is in stock versus what should be in stock, use this to identify theft, waste and other loss factors. Another report to identify the best sellers in your inventory. Used for catering businesses to view future orders. View a list of all outstanding accounts. View all customers who purchased a specific inventory items so you may market to them for similar new items. Detailed list of which customers ordered which inventory items. List the hours and wages of your employees. Generate a report listing the ID and personal info of each employee. View the commissions you rewarded to your employees for recommending and selling certain items. Late Rentals Rentals Inventory Inventory Inventory Inventory Description Summary of each invoice processed within a date range. Summary by day with totals, # of tickets and average dollar amount per ticket. Total dollar amount collected by each payment method with the option to break down by cashier. A list of all rentals that are currently out of the store and beyond the due date. Cash Register Express Page 85 Help and Technical Support Training Sessions and Contacting Technical Support Got a question? We’re here to help. pcAmerica offers a variety of technical services to help ease your transition, make you comfortable with your new point of sale system and help you with any problems you may have. Contact our sales department to purchase any of our service offerings. Our Hourly Training service is a great way to learn your new point of sale system. A trained engineer will spend a full hour with you on the phone (or over the internet) to walk you through some of our features step by step. They can recommend which features you should use for YOUR business or you can tell them what you’d like to learn. Many business owners also purchase this service after owning the system for many months or years in order to learn new features that they haven’t used yet. A bundled technical support and upgrades package is a must-have for your business, 24-7 - 365 support gives you the highest level of comfort that everything is 100% at your store. This service is purchased on an annual basis and includes not only your technical support but also all the new versions of Cash Register Express released in that year. Are you too busy to input your inventory? Our engineers can do it for you with our Inventory Programming Service. Send us a copy of your inventory and one of our engineers will input the entire inventory into the system for you. Department Sales Department Technical Support Contact Info 1-800-PC-AMERICA (722-6374) Or 845-920-0800 [email protected] 1-800-342-5729 845-920-0888 [email protected] Most questions are already answered at our FAQ website located at http://faq.pcamerica.com. Thank you for choosing pcAmerica! Cash Register Express Page 86 SOFTWARE LICENSE AGREEMENT OF PC AMERICA PC AMERICA ("LICENSOR") IS WILLING TO LICENSE THE ENCLOSED SOFTWARE TO YOU ONLY IF YOU ACCEPT ALL OF THE TERMS IN THIS LICENSE AGREEMENT. PLEASE READ THE TERMS CAREFULLY BEFORE YOU OPEN THIS PACKAGE, BECAUSE BY OPENING THIS SEALED DISK PACKAGE YOU ARE AGREEING TO BE BOUND BY THE TERMS OF THIS AGREEMENT. IF YOU DO NOT AGREE TO THESE TERMS, LICENSOR WILL NOT LICENSE THIS SOFTWARE TO YOU, AND IN THAT CASE YOU SHOULD RETURN THIS PRODUCT PROMPTLY, INCLUDING THE PACKAGING, THIS UNOPENED DISK PACKAGE, AND ALL WRITTEN MATERIALS, TO THE PLACE OF PURCHASE PROMPTLY FOR A FULL REFUND. Ownership of the Software 1. The enclosed Licensor software program ("Software") and the accompanying written materials are owned by Licensor [or its suppliers] and are protected by United States copyright laws, by laws of other nations, and by international treaties. Grant Of License 2. Licensor grants to you the right to use one copy of the Software on a single computer. You may load one copy into permanent memory of one computer and may use that copy, or the enclosed diskettes, only on that same computer. You may install the Software on a single network server, provided that you have a License for Network Station from Licensor for each station of the network at which the Software is used. 3. This license is valid only for use within the United States of America and its territories. Restrictions on Use and Transfer 4. If this Software package contains both 3½" and 5¼" disks, CD-ROM or DVD or any other media, then you may use only the size disks appropriate for your computer. You may not use the other size disks on another computer or loan, rent, transfer, or assign them to another user except as part of the permanent transfer of the Software and all written materials (as provided for below). 5. You may not copy the Software, except that (1) you may make one copy of the Software solely for backup or archival purposes, and (2) you may transfer the Software to a single hard disk provided you keep the original solely for backup or archival purposes. You may not copy the written materials. 6. You may permanently transfer the Software and accompanying written materials (including the most recent update and all prior versions) if you retain no copies and the transferee agrees to be bound by the terms of this Agreement. Such a transfer terminates your license. You may not rent or lease the Software or otherwise transfer or assign the right to use the Software, except as stated in this paragraph. 7. You may not reverse engineer, decompile, or disassemble the Software. Limited Warranty 8. Licensor warrants that the Software will perform substantially in accordance with the accompanying written materials for a period of 90 days from the date of your receipt of the Software. Any implied warranties on the Software are limited to 90 days. Some states do not allow limitations on duration of an implied warranty, so the above limitation may not apply to you. 9. LICENSOR DISCLAIMS ALL OTHER WARRANTIES, EITHER EXPRESS OR IMPLIED, INCLUDING BUT NOT LIMITED TO IMPLIED WARRANTIES OF MERCHANTABILITY, FITNESS FOR A PARTICULAR PURPOSE, AND NON-INFRINGEMENT, WITH RESPECT TO THE SOFTWARE AND THE ACCOMPANYING WRITTEN MATERIALS. This limited warranty gives you specific legal rights. You may have others, which vary from state to state. 10. LICENSOR'S ENTIRE LIABILITY AND YOUR EXCLUSIVE REMEDY SHALL BE, AT LICENSOR'S CHOICE, EITHER (A) RETURN OF THE PRICE PAID OR (B) REPLACEMENT OF THE SOFTWARE THAT DOES NOT MEET LICENSOR'S LIMITED WARRANTY AND WHICH IS RETURNED TO LICENSOR WITH A COPY OF YOUR RECEIPT. Any replacement Software will be warranted for the remainder of the original warranty period or 30 days, whichever is longer. These remedies are not available outside the United States of America. 11. This Limited Warranty is void if failure of the Software has resulted from modification, accident, abuse, or misapplication. 12. IN NO EVENT WILL LICENSOR BE LIABLE TO YOU FOR DAMAGES, INCLUDING ANY LOSS OF PROFITS, LOST SAVINGS, OR OTHER INCIDENTAL OR CONSEQUENTIAL DAMAGES ARISING OUT OF YOUR USE OR INABILITY TO USE THE SOFTWARE. Because some states do not allow the exclusion or limitation of liability for consequential or incidental damages, the above limitation may not apply to you. 13. Governing Law/Forum Selection. This Agreement shall be governed by and construed in accordance with the laws of the State of New York, notwithstanding principles of conflicts of laws, and the parties submit to the exclusive jurisdiction and venue of the Supreme Court of the State of New York for the County of Rockland and/or the United States District Court for the Southern District of New York in the County of Westchester; and the parties agree not to raise and waive any objection to or defense based on the venue of any such court or based upon forum non conveniens. 14. If you have any questions concerning this Agreement or wish to contact Licensor for any reason, please write: PC America One Blue Hill Plaza Second Floor, PO Box 1546 Pearl River, NY 10965 or call 845-920-0800. 15. U.S. Government Restricted Rights. The Software and documentation are provided with Restricted Rights. Use, duplication, or disclosure by the Government is subject to restrictions set forth in subparagraph (c)(1) of The Rights in Technical Data and Computer Software clause at DFARS 252.227-7013 or subparagraphs (c)(1)(ii) and (2) of Commercial Computer Software - Restricted Rights at 48 CFR 52.227-19, as applicable. Supplier is: PC America One Blue Hill Plaza Second Floor, PO Box 1546 Pearl River, NY 10965 or call 845-920-0800. Cash Register Express Page 87