1
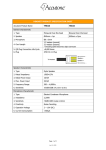
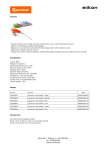
www.accutone.com
AU400 Telephone Headset USB Adaptor
installation guide & user manual
© 2011 Accutone Technologies Limited. All rights reserved.
Accutone and the logo device are trademarks of Accutone Technologies Ltd.
[ inspiring people, inspiring change ]
Introduction.
Interface & Specifications.
®
Thank you for purchasing the Accutone AU400 USB Headset Converter. This
powerful device is designed to convert any ordinary Accutone® telephone headset
into a USB headset instantly. With the now well-developed market of VoIP
communication, many users are forced to have two headsets on their desktop.
Instead, this product fully utilizes professional level telephone headsets in internet
communication as well, by using only the highest level of USB digital sound
technology.
Now please spend a few moments to read through this user manual before
connecting the USB device to your headset and your computer. After familiarizing
with the features and functions, you will surely appreciate the top audio
performance this unique device offers you.
Any PC or
Macintosh**
Any Accutone
telephone headset
MAIN SWITCHES AND INTERFACE
1. USB plug (to computer)
3. Multi-directional control button
SPECIFICATIONS
AU400 USB Converter
Frequency range
Data resolution
Sampling rate
20 - 20,000 Hz (headphone)
100 - 10,000 Hz (microphone)
16 bit
48 kHz Stereo
Operating Characteristics Rx
Receiver gain
Output power
THD +Noise
S/N @ THD <0.4%
Master volume control range
14dB Max.
35mW Max.
<0.4% @ P0=30mW 20~20,000 Hz
86dB
0~46.5dB attenuation
Operating Characteristics Tx
Microphone gain
Volume control range
Power supply
Dimensions
AU400
USB Converter
Operating environment
* The AU400 USB Converter may be sold separately or bundled with a telephone headset.
** AU400 is compatible to both desktop and notebook computers with an USB jack. Only the operating
systems listed under "Operating Environment" in the section of Specifications on page 2 are applicable.
*** Outside the operating environments mentioned on page 2, AU400 is not guaranteed to operate with all
computers. The converter is not guaranteed to operate with home built computers, operating systems
that are personally up-graded or multiple operating systems. The converter is also not guaranteed to
operate with functions under system suspend, sleep and hibernation modes.
1
AU400 - Installation Guide & User Manual
2. Status LED (flashes different colors)
4. Quick Disconnector (to headset)
_
turns your telephone headset into VoIP instantly!
+
AU400 TELEPHONE HEADSET USB ADAPTOR
20dB Max.
+12dB ~ -34.5dB, 1.5dB step
USB bus power compliant (5V, 100mA)
(excluding projections)
approx. 28x65x18mm (w/d/h)
compliant operating systems:
Windows 98 SE/Windows 2000/Windows Me/Windows XP
Apple Macintosh OSX
CPU: Pentium II 266 MHz or better
AU400 - Installation Guide & User Manual
connecting the computer
adjusting the headset
multi-status LED indications
installing driver & software
operation, verification& trademarks
Installing your headset.
[ inspiring people, inspiring change ]
Installation.
LED - Indication.
3. multi-status LED indications
1. connecting the computer
The LED-indicator on the controller will light up to indicate the various status of the
device. The definitions are listed as below:
®
Connect any Accutone telephone headset (monaural
or binaural) to the AU400 via the standardize QD
(quick disconnector). Most Accutone ® telephone
headset comes with the QD connected, so simply unplug the bottom half of your QD cable (with the RJ
modular jack).
Steady WHITE light
Online & Standby
_
+
quick disconnector
Flashing WHITE light
Data Being Received
Steady RED light
Speaker Muted
Steady BLUE light
Microphone Muted
Note that there can be combined-indications as well:
2. adjusting the headset
Connect the USB plug extended from the AU400
to the USB port of your notebook or desktop
computer. The LED indicator will light up indicating
correct connection to the computer.
Make sure you plug in the headset BEFORE you
insert the Installation CD. For more, refer to
section 4.
LED indication:
steady WHITE
flashing WHITE
RED with steady WHITE
BLUE with steady WHITE
RED w/ flashing WHITE
BLUE w/ flashing WHITE
BLUE, RED & WHITE together
Meaning
device in standby mode ready to receive or transmit voice data.
device is operating, voice data is currently being received.
speakers of the headset are muted, while no voice data is currently being received.
microphone is muted, while no voice data is currently being received.
voice data is being received, users cannot hear anything because speakers are muted.
users should be able to hear voice data coming in, but microphone is muted.
both microphone and speakers are muted, meanwhile no voice data is being received.
4. installing driver and software
To begin, you should restart your computer, and when your operating system finishes
loading, close all applications and connect the USB400 headset to any USB port in your
computer.
_
+
This manual will use Windows XP as demonstration but the steps should be identical for Win98SE, ME or 2000 versions.
to USB port
AU400 - Installation Guide & User Manual
Please note that after you plug in the USB400 headset, your operating system
may automatically launch the Hardware Installation Wizard. You should abort
such installation by pressing cancel, instead download the Driver Software at
http://www.accutone.com/frmst_downloads.html for proper performance.
* Apple Macintosh OS X automatically detects the USB device and loads up the driver instantly, no software or
driver installation is required.
AU400 - Installation Guide & User Manual
Installing your headset.
connecting the computer
adjusting the headset
multi-status LED indications
installing driver & software
operation, verification& trademarks
[ inspiring people, inspiring change ]
Driver Installation.
Driver Installation.
4. installing driver and software
Go to the root directory of the downloaded folder, and double-click the setup.exe file to
start installation. The following welcome screen will be shown, simply follow the Install
Shield Wizard according to the following guide:
Please note that in some Windows XP system, you may be prompt at this point
asking you about Windows Logo testing issues, simply ignore this message and
click Continue Anyway to continue installation.
the setup program should begin to copy
files into your system,
after copying all the files, the program will
automatically install the required drivers
into your system, please be patient as this
may take a little while.
click Next
after successful installation of the drivers,
you will have to reboot your system, and
when you do, you should be able to see
the accutone orange logo displayed on the
bottom right corner icon tray.
you have the option to install
only the USB driver or with the
3D Audio Demo program, we
recommend you check both and
click Next
the setup program will install the
AU400 USB software to a default
path and folder
click Next
AU400 - Installation Guide & User Manual
The AU400 driver will only operate when connected to the USB port which you
have installed with. If your computer has more than one USB port, you can
determine if the port is the correct one by checking whether the orange
Accutone icon is in the icon tray as shown above.
AU400 - Installation Guide & User Manual
Operating your headset.
connecting the computer
adjusting the headset
multi-status LED indications
installing driver & software
operation, verification& trademarks
[ inspiring people, inspiring change ]
Software Operation.
Software Operation.
5. operating the sound configuration software
The AU400 USB adaptor is equipped with a Sound Configuation software for sound
adjustments. You can open the program by simply double clicking on the orange
Accutone icon in the icon tray, as shown in section 4 of this manual.
In Main Setting tab, you can choose
your output device from headset to
desktop speakers.
AU400 is also equipped to be used
for digital entertainment programs
like surround sound movie viewing
and gaming.
When connected to a desktop
speaker, AU400 can simulate 7.1
surround sound using Xear 3D
technology.
Simply select your application here.
When selected Xear 3D as your
DSP mode, you can experience the
7.1 3D-surround effect even with
your headset. Choose headset as
your Output Device, turn on Xear
3D, and click the rotating icon
under the 7.1 Virtual Speaker
Shifter during your favorite audio
applications.
6. operating the Sound Configuration Software
In Mixer tab, the top panel is the
Playback Volume Control, and the
bottom panel is the Recording
Volume Control.
In Playback Volume Control, you
can adjust the main volume and
balance by adjusting the knob.
Other volume controls includes
Wave, SW Synth., CD Player and
Microphone realtime playback.
Microphone realtime playback adjusts the feedback volume of the microphone to
yourself. The small hammer icon next to the microphone volume control opens up the
microphone advanced adjustments. You can choose to turn on the microphone
playback mute or microphone boost function.
Please note that in muting function inside the Playback Volume Control advanced microphone adjustments ONLY mute the volume of the microphone
going to the speaker of the headset, the user on the other end can still hear you.
You can also choose to use S/PDIF output
when connected to other digital audio devices.
AU400 - Installation Guide & User Manual
In Recording Volume Control, you can choose the Stereo Mix volume
control and the Microphone transmit/record volume control. In this
microphone control, you are adjusting the actual outgoing volume. Again,
the hammer icon opens up the advanced setting which include mute and
microphone boost.
AU400 - Installation Guide & User Manual
Operating your headset.
connecting the computer
adjusting the headset
multi-status LED indications
installing driver & software
operation, verification& trademarks
[ inspiring people, inspiring change ]
Software Operation.
Verification & Trademarks.
6. operating the Sound Configuration Software
7. verifying successful installation of the driver
The Effect tab controls the various sound effect you can use with your USB400 headset.
There are three panels here: Environment Type, Environment Size and Equalizer.
For all Windows operating systems mentioned earlier, to verify that the installation of the USB driver is
successful, you check within the Device Manager:
> click on Start, Settings, and Control Panel.
> in control panel, click on the System icon
> open up the System Properties page
> click on the Device Manager tab
(or Hardware tab and then Device Manager button for Windows XP)
> in the Device Manager page, make sure that the View Device by Type is selected.
(*An alternative way to check whether the USB converter is properly installed, make sure the
LED indicator is lit, and press mute, if the light flashes, then the device is properly installed, if not
you should check the details settings as suggested below.)
There are 4 standard environment
types: bathroom, opera house,
underwater and music lounge.
Aside from these four, you can
choose from a drop-down menu
under More Option for 27 other
environment types. Under
environment size, there are 3
selection: small, medium & large.
In the equalizer panel you can
adjust loudness of various
frequencies and save such settings.
You can also choose from the 16
preset options for different types of
music.
Checking the drivers within the Device Manager
>
>
>
>
>
>
scroll down and find the Universal Serial Bus Controllers category
open it up and see if you can find the USB Composite Device
if yes close it and look for the Sound Video and Game Controllers category
open it up and find the USB Sound Device (or Accutone Audio adaptor)
if you see both these drivers installed, then the installation is successful
if you cannot locate them, then try to unplug the USB converter, re-boot the machine, and try the
installation again or check the troubleshooting section in this manual.
8. trademark and ownership
Under Karaoke tab, you can adjust
the microphone effect by selecting
the ON button, and checking the
Microphone Echo option.
D Accutone and the logo design combined are trademarks or registered trademarks of Accutone
Technologies Limited.
D Microsoft and Windows are registered trademarks or trademarks of Microsoft Corporation in the
United States and or other countries.
D IBM and PC/AT are registered trademarks of International Business Machines Corporation.
D Pentium is a trademark or registered trademark of Intel Corporation.
D Apple Computer Inc. has intellectual property rights over "Apple", "Macintosh" and "OSX".
D In this manual, Microsoft® Windows® XP Home Edition and Microsoft® Windows® XP Professional
®
Edition are referred to as Windows XP, whereas Microsoft 2000 Professional Edition is referred to
®
®
as Windows 2000, Microsoft Millennium Edition is referred to as Windows Me, and Microsoft
®
Windows 98 Second Edition is referred to as Windows 98 SE.
D All other names of systems and products mentioned are trademarks or registered trademarks of
®
their respective owners. ™ marks and marks are omitted for convenience purposes.
Various Karaoke functions can be set
in this section, from adjusting echo
loudness to shifting key. You can
even remove the vocal sound from
a n y s o n g u s i n g t h e Vo c a l
Cancellation option, so you can have
a music-only track.
These functions are applicable to all
audio programs.
For setup instructions and troubleshooting of AU400 with Apple Macintosh OSX, please refer to our website at
http://www.accutone.com
AU400 - Installation Guide & User Manual
AU400 - Installation Guide & User Manual